Doro PhoneEasy - low Vision Shop · Doro PhoneEasy 312cs can be used as a desktop or wall-mounted...
88
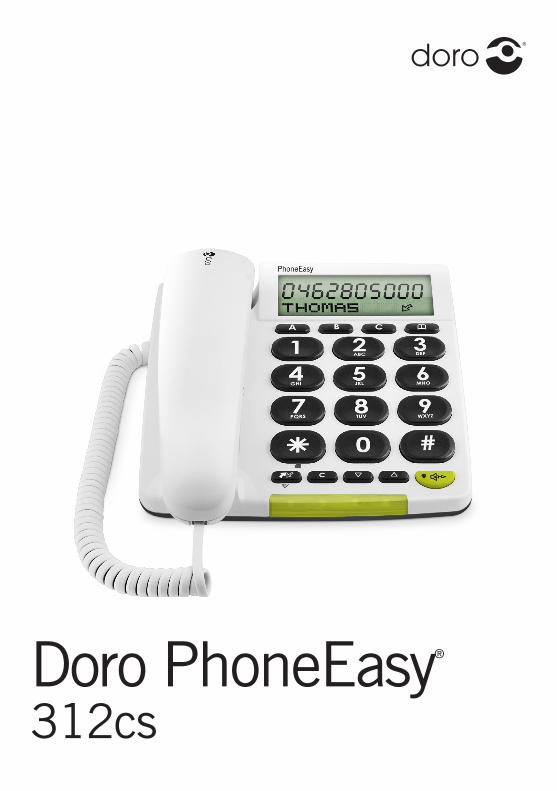
Doro PhoneEasy ® 312cs
Transcript of Doro PhoneEasy - low Vision Shop · Doro PhoneEasy 312cs can be used as a desktop or wall-mounted...
Doro PhoneEasy®
312cs
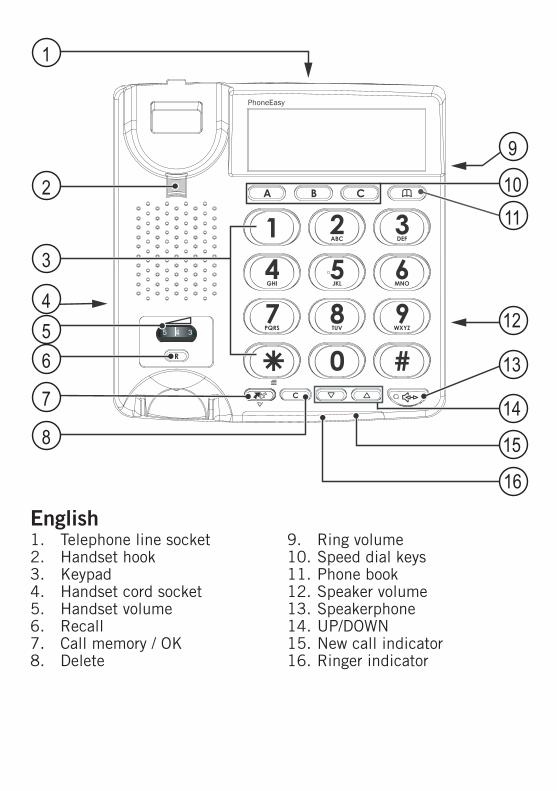
1. Telephone line socket2. Handset hook3. Keypad4. Handset cord socket5. Handset volume6. Recall7. Call memory / OK8. Delete
9. Ring volume10. Speed dial keys11. Phone book12. Speaker volume13. Speakerphone14. UP/DOWN15. New call indicator16. Ringer indicator
English
1
2
3
456
7
8
16
15
14
13
12
9
1011

1. Prise de ligne téléphonique2. Languette de support du
combiné3. Clavier4. Prise du cordon du combiné5. Volume du combiné6. Touche R7. Journal des appels / OK
8. Effacer9. Volume de la sonnerie10. Touches mémoires directes11. Répertoire12. Volume du haut-parleur13. Haut-parleur14. HAUT/BAS15. Témoin de nouvel appel16. Témoin de la sonnerie
Français
1. Toma de la línea telefónica2. Gancho del auricular3. Teclado4. Toma del cable del auricular5. Volumen del auricular6. Tecla de retirada de línea7. Memoria de llamadas / Aceptar8. Borrar
9. Volumen de la señal10. Teclas de marcación rápida11. Guía12. Volumen del altavoz13. Altavoz14. ARRIBA / ABAJO15. Indicador de llamada nueva16. Indicador de señal
Español
1. Telefoonlijnaansluiting2. Haak handset3. Toetsenblok4. Aansluiting handsetsnoer5. Volume handset6. Opnieuw bellen7. Oproepgeheugen / OK8. Verwijderen
9. Belvolume10. Sneltoetsen11. Telefoonboek12. Luidsprekervolume13. Luidspreker14. OMHOOG/OMLAAG15. Indicator nieuwe oproep16. Belindicator
Nederlands
1. Anschluss für das Telefonkabel2. Höreraufhängung3. Tastatur4. Anschluss für Hörerkabel5. Hörerlautstärke6. R-Taste7. Anrufliste / OK8. Löschen
9. Klingellautstärke10. Schnellwahltasten11. Telefonbuch12. Lautsprecherlautstärke13. Lautsprecherfunktion14. NACH OBEN/NACH UNTEN15. Anzeige neue Anrufe16. Klingeltonanzeige
Deutsch

1
English
Description
Doro PhoneEasy 312csDoro PhoneEasy 312cs can be used as a desktop or wall-mounted telephone. Enhanced ring volume and visual call indication make this telephone well suited for people with hearing difficulties.
The extra-large keypad and easy to read display with large characters make the telephone easy to use even with impaired eyesight.
The built-in phonebook can store up to 30 names and numbers. Three one touch memory keys can be programmed for frequently used numbers or emergency numbers. A call memory logs the 15 most recently incoming and outgoing calls.
A speakerphone function allows you to talk hands-free with the simple press of a button.
This device is intended for the analogue telephone network lines in AT, BE, BG, CH, CY, CZ, DE, DK, EE, ES, FI, FR, GB, GR, HU, IE, IS, IT, LV, LT, LU, MT, NL, NO, PL, PT, RO, SI, SK, SE.

2
English
Installation
Connection1. Connect the curly cord to the handset and to socket marked
y on the telephone.
2. Connect the telephone line cord to a network wall socket and to the K socket on the back of the telephone.
3. Lift the handset and listen for the dial tone.
BatteriesThis telephone is powered from the telephone line.
If the power from the line is insufficient, you can install four AA alkaline batteries as backup for the Caller ID and speakerphone.
Use only AA alkaline batteries of good quality.
Note!Before installing or changing the batteries, make sure that the telephone is not connected to the telephone network.
1. Disconnect the telephone line cord.
2. Remove the battery cover.
3. Insert the batteries ensuring correct battery polarity is observed.
4. Replace the battery cover and reconnect the telephone line cord.
Basic setupBefore using the telephone the first time, the following basic settings should be made.
After confirming a setting, the next setting is automatically displayed. The setup mode will automatically time out after 30 seconds of inactivity. You can exit setup mode anytime by pressing .

3
English
Time and dateIf the phone has not been setup, the display clock will show 00:00 when the batteries are installed.
1. Press and hold * for about 5 seconds until the hour flashes.
2. Use v / V to change the value and confirm with .
3. Repeat steps 1–2 to set the minutes, day and month.
Display languageWhen the date has been set, ENGLISH is displayed. You can now choose between 8 display languages:
English - Français - Español - Italiano Deutsch - Nederlands - Polski - Svenska
Use v / V to select the desired language, and confirm with .
Display contrast-2- CONTRAST is displayed.
Use v / V to select a suitable display contrast setting (1–4), and confirm with .
Flash time-100- FLASH is displayed.
Use v / V to set the flash key time (100/300/600 ms), and confirm with .
100 is the standard setting for most countries. 300 for France/Portugal.
Call indicatorLED OFF is displayed.
4
English
Use v / V to enable/disable the LED indicator for new calls, and confirm with .
Tone/pulseTONE is displayed.
Use v / V to select either tone or pulse dialling mode, and confirm with .
Note!If you are unsure of which dialling mode to use, select TONE as this works in most locations.
Basic setup of the telephone is now completed.
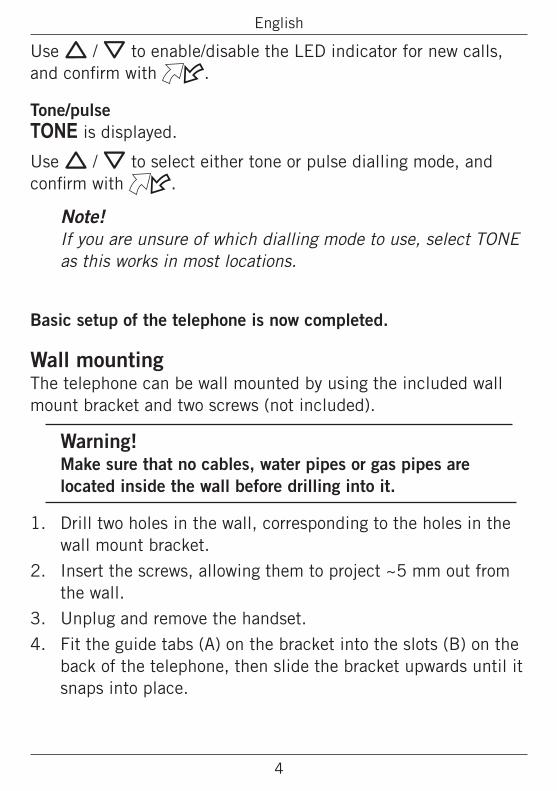
Wall mountingThe telephone can be wall mounted by using the included wall mount bracket and two screws (not included).
Warning!Make sure that no cables, water pipes or gas pipes are located inside the wall before drilling into it.
1. Drill two holes in the wall, corresponding to the holes in the wall mount bracket.
2. Insert the screws, allowing them to project ~5 mm out from the wall.
3. Unplug and remove the handset.
4. Fit the guide tabs (A) on the bracket into the slots (B) on the back of the telephone, then slide the bracket upwards until it snaps into place.

5
English
B
A
5. Position the telephone so that the screws on the wall fit into the slots in the bracket, then slide the telephone downwards until it is hanging on the screws.
6. Remove the handset hook (C) by pushing it upwards, and insert it in the reversed position so that the small tab (D) protrudes. The hook will now keep the handset in the cradle when the phone is wall mounted.
C
D
C
7. Reconnect the handset and place it in the cradle.
Note!If the phone is to be used as a desktop phone again, remember to reverse the position of the handset hook.

6
English
Operation
Making a callNormal dialling1. Lift the handset.
2. Dial the desired telephone number using the keypad. Hang up the handset to terminate the call.
SpeakerphoneThe speakerphone function allows you to make a call without using the handset.
1. Press s to activate the speakerphone. The LED next to the key will light up.
2. Dial the desired telephone number using the keypad. Press s again to terminate the call.
Lift the handset to switch from speaker to handset during a call.
Pre-diallingThe pre-dialling function allows you to enter and change a number before it is dialled.
1. Enter the desired telephone number using the keypad. Press to delete the last entered digit.
2. Lift the handset or press s to dial the number.
3. Hang up the handset or press s to terminate the call.
7
English
Quick redial1. Lift the handset or press s.
2. Press to redial the last dialled number.
Dialling numbers in the call memory1. Press to display the most recent call.
2. Use v / V to scroll through the last 15 incoming and outgoing calls.
= Incoming call = Outgoing call
3. Lift the handset or press s to dial the displayed number.
Speed dial (one-touch dialling)1. Press one of the speed dialling keys A–C. The stored
telephone number is displayed.
2. Lift the handset or press s to dial the number.
3. Hang up the handset or press s to terminate the call.
Dialling numbers in the phone book1. Press b to open the phone book.
2. Use v / V to browse through the phone book, or enter the first character in the name to quickly find an entry.
3. Lift the handset or press s to dial the number.
AnsweringLift the handset to answer an incoming call, or press s to answer using the speakerphone.

8
English
Additional functions
Call timerThe display shows the current time when in standby mode. During a call the display will show a call timer instead, indicating the duration of the call. The call duration is displayed for 5 seconds after the call is terminated.
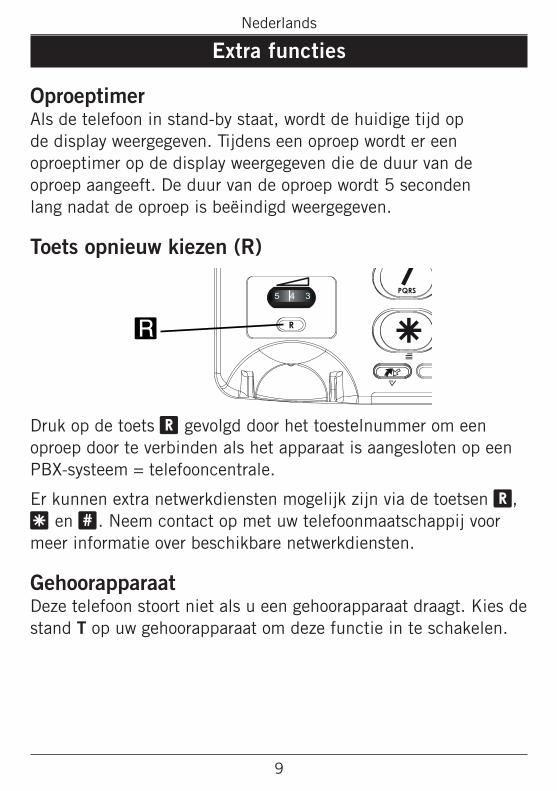
Recall key (R)
R
Press the R key followed by the extension number to transfer a call when connected to a PBX system.
Additional network services may be accessible by using the R, * and # keys. Please contact your network operator for more information about the available network services.
Hearing aidThis telephone is hearing aid compatible. Select the T mode on your hearing aid to enable this feature.

9
English
Phone bookThe built-in phone book can store up to 30 entries. When the phone book memory is full, ----100% is displayed
Storing numbers in the phone book
1. Press and hold b until a flashing cursor is shown.
2. Enter a telephone number (up to 22 digits) using the keypad. Use v/V to move the cursor and to erase if needed. Use # to insert a pause in the number.
3. Press to confirm. A flashing cursor will be shown on the second line on the display.
4. Use the keypad to enter a name (up to 9 characters) for the number to be stored. Press repeatedly to select from the characters for each key:
5. Press to confirm. OK is displayed.
6. Repeat steps 1–5 to store another number, or press and hold to exit from the phone book.

10
English
Deleting numbers from the phone book1. Press b to open the phone book.
2. Use v/V to browse through the phone book, or enter the first character to quickly find an entry.
3. Press and hold to delete the selected entry.
Editing numbers in the phone book1. Press b to open the phone book.
2. Use v/V to browse through the phone book, or enter the first character to quickly find an entry.
3. Press and hold b until the flashing cursor appears in the selected number.
4. Use v/V to move the cursor, and use and the keypad to erase and enter new data.
5. Press to confirm. The cursor will move to the second line on the display.
6. Repeat step 4 to edit the name/description for the selected number.
7. Press to confirm. OK is displayed.
Dialling from the phone book1. Press b to open the phone book.
2. Use v / V to browse through the phone book, or enter the first character in the name to quickly find an entry.
3. Lift the handset or press s to dial the number.

11
English
Speed dial (one-touch dialling)The telephone has 3 speed dialling keys that can be used for numbers that are called frequently, or for emergency numbers.
Storing speed dial numbers1. Press and hold one of the speed dialling keys A–C until a
flashing cursor is shown on the first line on the display.
2. Enter a telephone number (up to 22 digits) using the keypad. Use v/V to move the cursor and to erase if needed. Use # to insert a pause in the number.
3. Press to confirm. A flashing cursor will be shown on the second line on the display.
4. Enter a name or description for the number to be stored (up to 9 characters). Press repeatedly to scroll through the characters for each keypad key (see figure on facing page).
5. Press to confirm. OK is displayed.
6. Repeat steps 1–5 to store numbers for the other speed dialling keys.
Deleting speed dial numbersSpeed dial numbers can not be deleted, they can only be replaced by storing a new number.
Dialling speed dial numbers1. Press one of the speed dialling keys A–C. The stored
telephone number is displayed.
2. Lift the handset or press s to dial the number.
3. Hang up the handset or press s to terminate the call.

12
English
Caller ID and call memoryCaller ID allows you to see who is calling before you answer and to see who has called in your absence.
Note!The Caller ID function must be subscribed. Please contact your network operator for more information.
The call memory will store the last 15 incoming and 15 outgoing calls. On the display, incoming (answered and unanswered) calls are indicated with and outgoing calls with .
If the Call Indicator function is active, a blinking light indicates that an unanswered call has been received since the call memory was last checked.
Browsing the call memory1. Press then v / V to scroll through the call memory.
The number and time of each call will be displayed. For calls older than 24 hours, the date of the call is displayed instead of the time.
2. Press to exit the call memory.
Calling numbers in the call memory1. Press then v / V to scroll through the call memory.
2. Lift the handset or press s to dial the displayed number
Deleting numbers from the call memory1. Press then v / V to scroll through the call memory.
2. Press and hold to delete the selected entry.

13
English
Copying call memory entries to the phone book1. Press then v / V to scroll through the call memory.
2. Press and hold *. Press to confirm. A flashing cursor will be shown on the second line on the display.
3. Use the keypad to enter a name (up to 9 characters) for the number to be stored. Press repeatedly to select from the characters for each key.
4. Press to confirm. OK is displayed.
14
English
Settings
See also Installation / Basic setup.
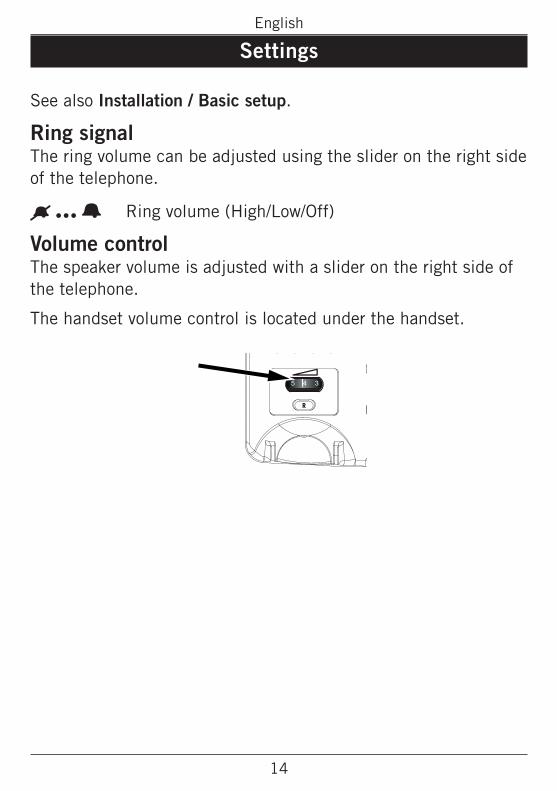
Ring signalThe ring volume can be adjusted using the slider on the right side of the telephone.
e Ring volume (High/Low/Off)
Volume controlThe speaker volume is adjusted with a slider on the right side of the telephone.
The handset volume control is located under the handset.

15
English
Care and maintenanceYour unit is a technically advanced product and should be treated with the greatest care. Negligence may void the warranty.
• Protect the unit from moisture. Rain/snowfall, moisture and all types of liquid can contain substances that corrode the electronic circuits. If the unit gets wet, you should remove the battery and allow the unit to dry completely before you replace it.
• Do not use or keep the unit in dusty, dirty environments. The unit’s moving parts and electronic components can be damaged.
• Do not keep the unit in warm places. High temperatures can reduce the lifespan for electronic equipment, damage batteries and distort or melt certain plastics.
• Do not keep the unit in cold places. When the unit warms up to normal temperature, condensation can form on the inside which can damage the electronic circuits.
• Do not try to open the unit in any other way than that which is indicated here.
• Do not drop the unit. Do not knock or shake it either. If it is treated roughly the circuits and precision mechanics can be broken.
• Do not use strong chemicals to clean the unit.
The advice above applies to the unit, battery and other accessories. If the telephone is not working as it should, please contact the place of purchase for service. Don’t forget the receipt or a copy of the invoice.
16
English
Warranty and technical dataThis product is guaranteed for a period of 12 months from the date of purchase. In the unlikely event of a fault occurring during this period, please contact the place of purchase. Proof of purchase is required for any service or support needed during the guarantee period.
This guarantee will not apply to a fault caused by an accident or a similar incident or damage, liquid ingress, negligence, abnormal usage, non-maintenance or any other circumstances on the user’s part. Furthermore, this guarantee will not apply to any fault caused by a thunderstorm or any other voltage fluctuations. As a matter of precaution, we recommend disconnecting the device during a thunderstorm.Batteries are consumables and are not included in any guarantee.Use only AA Alkaline batteries of good quality.
SpecificationsSize: 175 mm x 175 mm x 60 mmWeight: 750 g (including batteries)Battery: 4 x 1.5 V AA Alkaline batteries
Declaration of ConformityDoro hereby declares that Doro PhoneEasy 312cs conforms to the essen-tial requirements and other relevant regulations contained in the Direc-tives 1999/5/EC (R&TTE) and 2002/95/EC (RoHS).
A copy of the Declaration of Conformity is available at www.doro.com/dofc

1
Français
Description
Doro PhoneEasy 312csDoro PhoneEasy 312cs peut être utilisé comme téléphone de bureau ou mural. L’augmentation du volume de sonnerie et le témoin d’appel visuel rendent ce téléphone particulièrement adapté aux personnes présentant une déficience auditive.
Le téléphone équipé d’un clavier extralarge et d’un afficheur à grands caractères facile à lire est simple d’utilisation, même par les personnes malvoyantes.
Le répertoire intégré peut mémoriser jusqu’à 30 noms et numéros. Trois touches de mémoire directe peuvent être programmées pour les numéros fréquemment utilisés ou les numéros d’urgence. Un journal des appels enregistre les 15 derniers appels entrants et sortants.
Une fonction haut-parleur vous permet de téléphoner en mains libres en appuyant simplement sur un bouton.
Cet équipement est conçu pour être utilisé sur le réseau téléphonique analogique AT, BE, BG, CH, CY, CZ, DE, DK, EE, ES, FI, FR, GB, GR, HU, IE, IS, IT, LV, LT, LU, MT, NL, NO, PL, PT, RO, SI, SK, SE.

2
Français
Installation
Raccordement1. Reliez le cordon spiralé au combiné et à la prise marquée
y du téléphone.
2. Reliez le cordon de ligne téléphonique à une prise de courant du réseau et à la prise K située à l’arrière du téléphone.
3. Décrochez le combiné et vérifiez que vous avez la tonalité.
PilesCe téléphone est alimenté par la ligne téléphonique.
Si la puissance de la ligne est insuffisante, vous pouvez installer quatre piles alcalines AA pour la sauvegarde du journal des appelants et le haut-parleur.
N’utilisez que des piles alcalines AA de bonne qualité.
Remarque :Avant d’installer ou de remplacer les piles, assurez-vous que le téléphone n’est pas branché sur le réseau téléphonique.
1. Débranchez le cordon de ligne téléphonique.
2. Retirez la trappe des piles.
3. Placez les piles en veillant bien à respecter les polarités.
4. Remettez la trappe en place et rebranchez le cordon de ligne téléphonique.

3
Français
Réglages de baseAvant d’utiliser le téléphone pour la première fois, vous devez procéder aux réglages de base ci-dessous.
Une fois un réglage confirmé, le réglage suivant s’affiche automatiquement. Le mode de réglage s’éteindra automatiquement après 30 secondes d’inactivité. Vous pouvez quitter le mode de réglage à tout moment en appuyant sur la touche .
Heure et dateSi les réglages du téléphone n’ont pas été effectués, l’affichage de l’horloge indiquera 00:00 lorsque les piles sont installées.
1. Maintenez la touche * enfoncée pendant environ 5 secondes jusqu’à ce que l’heure clignote.
2. Utilisez les touches v / V pour modifier la valeur et confirmez à l’aide de la touche .
3. Répétez les étapes 1–2 pour régler les minutes, le jour et le mois.
Langue d’affichageUne fois la date réglée, ENGLISH s’affiche. Vous pouvez maintenant choisir entre 8 langues :
English - Français - Español - Italiano Deutsch - Nederlands - Polski - Svenska
Utilisez les touches v / V pour sélectionner la langue souhaitée et confirmez à l’aide de la touche .
Contraste de l’afficheur-2- CONTRASTE s’affiche.
Utilisez les touches v / V pour sélectionner un réglage de contraste de l’afficheur adapté (1–4) et confirmez à l’aide de la touche .

4
Français
Durée de touche R-100- FLASH s’affiche.
Utilisez les touches v / V pour régler la durée de touche R (100/300/600 ms) et confirmez à l’aide de la touche .
100 est le réglage standard pour la plupart des pays. 300 est le réglage pour la France / le Portugal.
Témoin d’appelLED OFF s’affiche.
Utilisez les touches v / V pour activer/désactiver le témoin LED des nouveaux appels et confirmez à l’aide de la touche .
Tonalité/impulsionFV s’affiche.
Utilisez les touches v / V pour sélectionner le mode de numérotation par tonalité ou par impulsion et confirmez à l’aide de la touche .
Remarque :Si vous n’êtes pas certain du mode de numérotation à utiliser, sélectionnez TONE car il fonctionne dans la plupart des endroits.
Les réglages de base du téléphone sont maintenant terminés.

5
Français
Fixation au murLe téléphone peut être fixé au mur à l’aide du support de fixation mural fourni et de deux vis (non incluses).
Avertissement !Assurez-vous qu’aucun câble, qu’aucune conduite d’eau ou de gaz n’est situé(e) dans le mur avant de per forer.
1. Perforez deux trous dans le mur, en les faisant correspondre aux trous du support de fixation mural.
2. Insérez les vis, en laissant une saillie de ~5 mm à partir du mur.
3. Débranchez et retirez le combiné.
4. Placez les onglets de guidage (A) du support dans les fentes (B) situées à l’arrière du téléphone, puis faites glisser le support vers le haut jusqu’à ce qu’il se mette en place.
B
A

6
Français
5. Placez le téléphone de sorte que les vis du mur correspondent aux fentes du support, puis glissez le téléphone vers le bas jusqu’à ce qu’il s’accroche aux vis.
6. Retirez la languette de support du combiné (C) en le poussant vers le haut et introduisez-le dans la position inverse de manière à ce que le petit onglet (D) fasse saillie. La languette sera désormais maintenue dans le support lorsque le téléphone est fixé au mur.
7. Rebranchez le combiné et placez-le dans le support.
Remarque :Si le téléphone doit être à nouveau utilisé comme téléphone de bureau, rappelez-vous d’inverser la position de la languette de support du combiné.
C
D
C

7
Français
Utilisation
Passer un appelNumérotation normale1. Décrochez le combiné.
2. Composez le numéro de téléphone souhaité à l’aide du clavier. Raccrochez le combiné pour mettre fin à l’appel.
Haut-parleurLa fonction haut-parleur vous permet de passer un appel sans utiliser le combiné.
1. Appuyez sur la touche s pour activer le haut-parleur. La LED situé e à côté de la touche s’allume.
2. Composez le numéro de téléphone souhaité à l’aide du clavier. Appuyez une nouvelle fois sur la touche s pour mettre fin à l’appel.
Décrochez le combiné pour passer du haut-parleur au combiné pendant un appel.
Pré-numérotationLa fonction de pré-numérotation vous permet de saisir et de modifier un numéro avant de le composer.
1. Saisissez le numéro de téléphone souhaité à l’aide du clavier. Appuyez sur la touche pour supprimer le dernier chiffre saisi.
2. Décrochez le combiné ou appuyez sur la touche s pour composer le numéro.
3. Raccrochez le combiné ou appuyez sur la touche s pour mettre fin à l’appel.

8
Français
Composition rapide du numéro1. Décrochez le combiné ou appuyez sur la touche s.
2. Appuyez sur la touche pour composer à nouveau le dernier numéro composé.
Composition des numéros enregistrés dans la mémoire des appels1. Appuyez sur la touche pour afficher l’appel le plus récent.
2. Utilisez les touches v / V pour faire défiler les 15 derniers appels entrants et sortants.
= Appel entrant = Appel sortant
3. Décrochez le combiné ou appuyez sur la touche s pour composer le numéro affiché.
Mémoires directes (numérotation directe)1. Appuyez sur l’une des touches de s mémoires directes A, B
ou C. Le numéro de téléphone mémorisé s’affiche.
2. Décrochez le combiné ou appuyez sur la touche s pour composer le numéro.
3. Raccrochez le combiné ou appuyez sur la touche s pour mettre fin à l’appel.
Composition des numéros mémorisés dans le répertoire1. Appuyez sur la touche b pour ouvrir le répertoire.
2. Utilisez les touches v / V pour parcourir le répertoire ou saisissez le premier caractère du nom pour trouver rapidement une entrée.
3. Décrochez le combiné ou appuyez sur la touche s pour composer le numéro.
RépondreDécrochez le combiné pour répondre à un appel entrant ou appuyez sur la touche s pour répondre à l’aide du haut-parleur.

9
Français
Fonctions supplémentaires
Temps d’appelL’afficheur indique l’heure actuelle en mode de veille. Pendant un appel, l’afficheur indiquera à la place une minuterie de temps d’appel, laquelle indique la durée de l’appel. La durée de l’appel reste affichée pendant 5 secondes après la fin de l’appel.
Touche (R)
Appuyez sur la touche R suivie du numéro d’extension pour transférer un appel en cas de connexion à un système PABX.
D’autres services réseau peuvent être accessibles à l’aide des touches R, * et #. Veuillez contacter votre opérateur pour obtenir plus d’informations sur les services réseau disponibles.
Prothèse auditiveCe téléphone est compatible avec une prothèse auditive. Sélectionnez le mode T sur votre prothèse auditive pour activer cette fonction.
R

10
Français
RépertoireLe répertoire intégré peut mémoriser jusqu’à 30 entrées. Lorsque la mémoire du répertoire est pleine, ----100% s’affiche
Mémorisation des numéros dans le répertoire
1. Maintenez la touche b enfoncée jusqu’à ce qu’un curseur clignotant s’affiche.
2. Saisissez un numéro de téléphone (jusqu’à 22 chiffres) à l’aide du clavier. Utilisez les touches v/V pour déplacer le curseur et la touche pour effacer si nécessaire. Utilisez la touche # pour insérer une pause dans le numéro.
3. Appuyez sur la touche pour confirmer. Un curseur clignotant s’affichera sur la deuxième ligne de l’afficheur.
4. Utilisez le clavier pour saisir un nom (jusqu’à 9 caractères) correspondant au numéro à mémoriser. Appuyez plusieurs fois pour sélectionner les caractères pour chaque touche :
5. Appuyez sur la touche pour confirmer. OK s’affiche.
6. Répétez les étapes 1 à 5 pour mémoriser un autre numéro ou maintenez la touche enfoncée pour quitter le répertoire.

11
Français
Suppression des numéros mémorisés dans le répertoire1. Appuyez sur la touche b pour ouvrir le répertoire.
2. Utilisez les touches v/V pour parcourir le répertoire ou saisissez le premier caractère pour trouver rapidement une entrée.
3. Maintenez la touche enfoncée pour supprimer l’entrée sélectionnée.
Modification des numéros mémorisés dans le répertoire1. Appuyez sur la touche b pour ouvrir le répertoire.
2. Utilisez les touches v/V pour parcourir le répertoire ou saisissez le premier caractère pour trouver rapidement une entrée.
3. Maintenez la touche b enfoncée jusqu’à ce que le curseur clignotant s’affiche dans le numéro sélectionné.
4. Utilisez les touches v/V pour déplacer le curseur et utilisez la touche et le clavier pour effacer et saisir les nouvelles données.
5. Appuyez sur la touche pour confirmer. Le curseur passera à la deuxième ligne de l’afficheur.
6. Répétez l’étape 4 pour modifier le nom/la description du numéro sélectionné.
7. Appuyez sur la touche pour confirmer. OK s’affiche.
Composition à partir du répertoire1. Appuyez sur la touche b pour ouvrir le répertoire.
2. Utilisez les touches v / V pour parcourir le répertoire ou saisissez le premier caractère du nom pour trouver rapidement une entrée.
3. Décrochez le combiné ou appuyez sur la touche s pour composer le numéro.

12
Français
Mémoires directes (numérotation directe)Le téléphone possède 3 touches de mémoires directes qui peuvent être utilisées pour les numéros qui sont composés fréquemment et pour les numéros d’urgence.
Mémorisation des numéros abrégés1. Maintenez une des touches de numéro abrégé A, B ou C
enfoncée jusqu’à ce qu’un curseur clignotant s’affiche sur la première ligne de l’afficheur.
2. Saisissez un numéro de téléphone (jusqu’à 22 chiffres) à l’aide du clavier. Utilisez les touches v/V pour déplacer le curseur et la touche pour effacer si nécessaire. Utilisez la touche # pour insérer une pause dans le numéro.
3. Appuyez sur la touche pour confirmer. Un curseur clignotant s’affichera sur la deuxième ligne de l’afficheur.
4. Saisissez un nom ou une description pour le numéro à mémoriser (jusqu’à 9 caractères). Appuyez plusieurs fois pour faire défiler les caractères de chaque touche du clavier (voir illustration de la page 10).
5. Appuyez sur pour confirmer. OK s’affiche.6. Répétez les étapes 1 à 5 pour mémoriser les numéros des
autres touches de mémoires directes.
Suppression des mémoires directesLes mémoires directes ne peuvent pas être supprimées, elles peuvent uniquement être remplacées en mémorisant un nouveau numéro.
Composition des mémoires directes1. Appuyez sur l’une des touches de s mémoires directes A, B ou C.
Le numéro de téléphone mémorisé s’affiche.
2. Décrochez le combiné ou appuyez sur la touche s pour composer le numéro.
3. Raccrochez le combiné ou appuyez sur la touche s pour mettre fin à l’appel.

13
Français
Présentation du numéro/nom et du journal des appelsLa présentation du numéro/nom vous permet de voir qui vous appelle avant de répondre et qui a appelé en votre absence.
Remarque :La fonction de présentation du numéro/nom doit être activée par abonnement. Veuillez contacter votre opérateur pour de plus amples informations.
La mémoire des appels enregistrera les 15 derniers appels entrants et les 15 derniers appels sortants. Sur l’afficheur, les appels entrants (auxquels vous avez ou non répondu) sont indiqués par le symbole et les appels sortants par le symbole . Si la fonction de Témoin d’appel est activée, un signal clignotant indique qu’un appel sans réponse a été reçu depuis la dernière vérification de la mémoire des appels.
Parcourir la mémoire des appels1. Appuyez sur la touche , puis sur les touches v / V
pour faire défiler la mémoire des appels. Le numéro et l’heure de chaque appel s’afficheront. Pour les appels passés et reçus il y a plus de 24 heures, la date de l’appel s’affiche à la place de l’heure.
2. Appuyez sur la touche pour quitter la mémoire des appels.

14
Français
Appel des numéros enregistrés dans la mémoire des appels1. Appuyez sur la touche , puis sur les touches v / V
pour faire défiler la mémoire des appels. 2. Décrochez le combiné ou appuyez sur la touche s pour
composer le numéro affiché.
Suppression des numéros enregistrés dans le journal des appels1. Appuyez sur la touche , puis sur les touches v / V
pour faire défiler la mémoire des appels. 2. Maintenez la touche enfoncée pour supprimer l’entrée
sélectionnée.
Copie des entrées de la mémoire des appels dans le répertoire1. Appuyez sur la touche , puis sur les touches v / V
pour faire défiler le journal des appels.2. Maintenez la touche * enfoncée. Appuyez sur la touche
pour confirmer. Un curseur clignotant s’affichera sur la deuxième ligne de l’afficheur.
3. Utilisez le clavier pour saisir un nom (jusqu’à 9 caractères) correspondant au numéro à mémoriser. Appuyez plusieurs fois pour sélectionner les caractères pour chaque touche.
4. Appuyez sur la touche pour confirmer. OK s’affiche.

15
Français
Réglages
Voir aussi Installation / Réglages de base.
Réglage volume de la sonnerieLe volume de la sonnerie peut être réglé à l’aide du curseur situé sur le côté droit du téléphone.
e Volume de la sonnerie (sourdine/bas/haut)
Réglage du volumeLe volume du haut-parleur est réglé à l’aide d’un curseur situé sur le côté droit du téléphone.
Le réglage du volume du combiné se trouve sous le combiné.

16
Français
Précautions et entretienVotre téléphone est un produit de haute technologie et il doit être mani-pulé avec le plus grand soin. Une négligence peut annuler la garantie.
• Maintenez l’appareil au sec. L’eau de pluie ou la neige, l’humidité et les liquides contiennent des minéraux susceptibles d’oxyder et de détério-rer les composants électroniques. Si votre appareil est humide, retirez la batterie et laissez l’appareil sécher complètement avant de la rem-ettre en place.
• N’utilisez pas et ne rangez pas votre appareil dans un endroit sale ou poussiéreux. Les parties mobiles et les composants électroniques de l’appareil pourraient être endommagés.
• Ne rangez pas l’appareil dans des zones de température élevée. Des températures élevées peuvent réduire la durée de vie des appareils électroniques, endommager les batteries et faire fondre certains compo-sants en plastique.
• Ne rangez pas l’appareil dans des zones de basse température. Lorsqu’il repasse à température normale, de la condensation peut se former à l’intérieur de l’appareil et endommager les circuits électroniques.
• N’essayez pas d’ouvrir l’appareil autrement que selon les instructions de ce manuel.
• Ne faites pas tomber l’appareil. Ne le heurtez pas et ne le secouez pas. Une manipulation brutale risquerait de détruire les circuits internes et les pièces mécaniques.
• N’utilisez pas de produits chimiques puissants pour nettoyer votre appareil.
Les recommandations ci-dessus s’appliquent à votre appareil ainsi qu’à la batterie et à tout autre accessoire. Si le téléphone ne fonctionne pas correctement, rapportez-le au S.A.V. de votre revendeur. N’oubliez pas de vous munir du ticket de caisse ou d’une copie de la facture.
17
Français
Garantie et données techniques
Garantie et S.A.V.Pour la France Cet appareil est garanti deux ans à partir de sa date d’achat, la facture faisant foi. En cas de panne, contactez votre revendeur. La réparation dans le cadre de cette garantie sera effectuée gratuitement.
La garantie ne s’appliquera pas si l’appareil a été endommagé à la suite d’un choc ou d’une chute, d’une fausse manœuvre, d’un branchement non con-forme aux instructions mentionnées dans la notice, d’une protection insuf-fisante contre l’humidité, la chaleur ou le gel. Par ailleurs, la garantie ne s’appliquera pas si l’appareil a été endommagé à la suite d’un choc ou d’une chute, d’une fausse manœuvre, d’un branchement non-conforme aux instruc-tions mentionnées dans la notice, de l’effet de la foudre, de surtensions élec-triques ou électrostatiques, d’une protection insuffisante contre l’humidité, la chaleur ou le gel. En tout état de cause, la garantie légale pour vices cachés s’appliquera conformément aux articles 1641 et suivants du Code Civil. Il est recommandé de débrancher le téléphone en cas d’orage.
Les batteries sont des articles consommables et ne sont couvertes par aucune garantie.
N’utilisez que des piles alcalines AA de bonne qualité.
SpécificationsDimensions : 175 mm x 175 mm x 60 mmPoids : 750 g (avec piles)Piles : 4 x 1,5 V piles alcalines AA
Déclaration de conformitéDoro certifie que cet appareil Doro PhoneEasy 312cs est compatible avec l’essentiel des spécifications requises et autres points des directives 1999/5/CE (R&TTE) et 2002/95/CE (RoHS).
Une copie de la déclaration de conformité peut être consultée sur www.doro.com/dofc

1
Deutsch
Beschreibung
Doro PhoneEasy 312csDas Doro PhoneEasy 312cs kann als Tischtelefon verwendet oder an die Wand montiert werden. Durch eine verbesserte Klingellautstärke und die optische Anzeige von Anrufen eignet sich diese Telefon optimal für Menschen mit Hörproblemen.
Durch das extra große Tastenfeld und das leicht lesbare Display mit großen Zeichen kann das Telefon auch von Menschen mit eingeschränkter Sicht verwendet werden.
Im integrierten Telefonbuch können bis zu 30 Namen und Rufnummern gespeichert werden. Für häufig verwendete Nummern oder Notrufnummern können drei Zielwahlspeichertasten programmiert werden. Die 15 letzten ein- und ausgehenden Anrufe werden in einer Anrufliste gespeichert.
Mit der Lautsprecherfunktion haben Sie mit einem Tastendruck die Hände beim Telefonieren frei.
Dieses Gerät ist für den Betrieb an einem analogen Telefonanschluss (PSTN) in den folgenden Ländern geeignet:
AT, BE, BG, CH, CY, CZ, DE, DK, EE, ES, FI, FR, GB, GR, HU, IE, IS, IT, LV, LT, LU, MT, NL, NO, PL, PT, RO, SI, SK, SE.

2
Deutsch
Installation
Anschluss1. Schließen Sie das Hörerkabel an den Telefonhörer und den
mit y gekennzeichneten Anschluss am Telefon an.
2. Schließen Sie das Telefonkabel an eine Wandsteckdose und den mit K gekennzeichneten Anschluss auf der Geräterückseite an.
3. Nehmen Sie den Hörer ab, und prüfen Sie, ob der Wählton erklingt.
BatteriebetriebDieses Telefon wird über die Telefonleitung mit Strom versorgt.
Falls die Leistung aus der Telefonleitung nicht ausreicht, können Sie vier Batterien vom Typ AA (Mignon) einsetzen.
Damit sind dann alle Funktionen sichergestellt.
Verwenden Sie nur alkaline Batterien guter Qualität (keine Akkus).
Hinweis!Stellen Sie vor dem Einsetzen oder Wechseln der Batterien sicher, dass das Telefon nicht an das Telefonnetz angeschlossen ist.
1. Ziehen Sie das Telefonkabel.
2. Entfernen Sie die Abdeckung des Batteriefachs.
3. Setzen Sie die Batterien ein, und achten Sie dabei auf die korrekte Polung.
4. Setzen Sie die Abdeckung des Batteriefachs wieder auf, und schließen Sie die Telefonleitung wieder an.

3
Deutsch
Grundlegende EinrichtungBevor Sie das Telefon zum ersten Mal verwenden, sollten die folgenden grundlegenden Einstellungen vorgenommen werden.
Wenn Sie eine Einstellung bestätigt haben, wird automatisch die nächste Einstellung angezeigt. Der Setup-Modus wird nach einer Inaktivität von 30 Sekunden automatisch beendet. Sie können den Setup-Modus jederzeit beenden, indem Sie drücken.
Uhrzeit und DatumWenn das Telefon nicht eingerichtet wurde, wird auf der Uhr im Display 00:00 angezeigt, nachdem Sie die Batterien eingesetzt haben.
Halten Sie die *-Taste etwa fünf Sekunden lang gedrückt, bis die Stundenanzeige anfängt zu blinken.
1. Wählen Sie v / V, um den Wert zu ändern, und bestätigen Sie mit .
2. Wiederholen Sie die Schritte 1-2, um die Minuten, den Tag und den Monat festzulegen.
AnzeigespracheWenn das Datum festgelegt wurde, wird ENGLISH angezeigt. Sie können jetzt zwischen acht Anzeigesprachen wählen:
English - Français - Español - Italiano Deutsch - Nederlands - Polski - Svenska
Wählen Sie v / V, um die gewünschte Sprache auszuwählen, und bestätigen Sie mit .

4
Deutsch
Display-Kontrast-2- KONTRAST wird angezeigt.
Wählen Sie v / V, um eine geeignete Einstellung für den Display-Kontrast (1-4) auszuwählen, und bestätigen Sie mit .
R-Tastenzeit-100- FLASH wird angezeigt.
Wählen Sie v / V, um die R-Tastenzeit (100/300/600 ms) auszuwählen, und bestätigen Sie mit .
100 ist die Standardeinstellung für die meisten Länder. 300 ist die Standardeinstellung für Frankreich und Portugal.
AnrufanzeigeLED AUS wird angezeigt.
Wählen Sie v / V, um die LED-Anzeige für neue Anrufe zu aktivieren/deaktivieren, und bestätigen Sie mit .
Ton/ImpulsTON wird angezeigt.
Wählen Sie v / V, um das Ton- oder Impulswahlverfahren auszuwählen, und bestätigen Sie mit .
Hinweis!Wenn Sie sich nicht sicher sind, welches Wahlverfahren Sie verwenden sollen, wählen Sie TON. Dies funktioniert an den meisten Standorten.
Die grundlegende Einrichtung des Telefons ist jetzt abgeschlossen.

5
Deutsch
WandmontageMit der im Lieferumfang enthaltenen Halterung für die Wandmontage und zwei Schrauben (nicht im Lieferumfang enthalten) kann das Telefon an der Wand befestigt werden.
Warnung!Stellen Sie vor dem Bohren sicher, dass in der Wand keine Kabel, Wasserrohre oder Gasleitungen verlaufen.
1. Bohren Sie zwei Löcher in die Wand, die den Öffnungen in der Halterung für die Wandmontage entsprechen.
2. Drehen Sie die Schrauben ein, und lassen Sie sie etwa 5 mm aus der Wand herausstehen.
3. Ziehen Sie das Hörerkabel, und entfernen Sie den Hörer.
4. Setzen Sie die Führungsspitzen (A) der Halterung in die Schlitze (B) auf der Rückseite des Telefons ein, und schieben Sie die Halterung dann nach oben, bis sie einrastet.
B
A

6
Deutsch
5. Positionieren Sie das Telefon so, dass die Schrauben an der Wand in die Schlitze in der Halterung passen, und schieben Sie dann das Telefon nach unten, bis es auf den Schrauben aufliegt.
6. Entfernen Sie die Höreraufhängung (C), indem Sie sie nach oben ziehen, und setzen Sie sie umgekehrt wieder ein, sodass der kleine Vorsprung (D) herausragt. Die Aufhängung sorgt nun dafür, dass der Hörer auf der Gabel liegen bleibt, wenn das Telefon an der Wand befestigt wird.
C
D
C
7. Schließen Sie den Hörer wieder an, und legen Sie ihn auf die Gabel.
Hinweis!Wenn das Telefon wieder als Tischtelefon verwendet werden soll, müssen Sie die Position der Höreraufhängung wieder umkehren.

7
Deutsch
Betrieb
AnrufenNormaler Wählvorgang1. Nehmen Sie den Hörer ab.
2. Wählen Sie die gewünschte Rufnummer auf der Tastatur. Hängen Sie den Hörer ein, um den Anruf zu beenden.
LautsprecherfunktionMit der Lautsprecherfunktion können Sie telefonieren, ohne den Hörer zu verwenden.
1. Drücken Sie s, um die Lautsprecherfunktion zu aktivieren. Die LED neben der Taste leuchtet auf.
2. Wählen Sie die gewünschte Rufnummer auf der Tastatur. Drücken Sie erneut s, um den Anruf zu beenden.
Heben Sie den Hörer ab, um während eines Gesprächs von der Lautsprecherfunktion zur Hörerverwendung zu wechseln.
Nummer vorwählenMit dieser Funktion können Sie eine Rufnummer eingeben und ändern, bevor sie gewählt wird.
1. Geben Sie die gewünschte Rufnummer auf der Tastatur ein. Drücken Sie , um die zuletzt eingegebene Ziffer zu löschen.
2. Nehmen Sie den Hörer ab, oder drücken Sie s, um die Nummer zu wählen.
3. Hängen Sie den Hörer ein, oder drücken Sie s, um den Anruf zu beenden.
Wahlwiederholung1. Nehmen Sie den Hörer ab, oder drücken Sie s.
2. Drücken Sie , um die zuletzt gewählte Nummer erneut zu wählen.

8
Deutsch
Wählen von Nummern aus der Anrufliste1. Drücken Sie , um den letzten Anruf anzuzeigen.
2. Wählen Sie v / V, um durch die letzten 15 ein- und ausgehenden Anrufe zu blättern.
= eingehender Anruf = ausgehender Anruf
3. Nehmen Sie den Hörer ab, oder drücken Sie s, um die angezeigte Nummer zu wählen.
Schnellwahl (Zielwahl)1. Drücken Sie eine der Schnellwahltasten A-C. Die
gespeicherte Telefonnummer wird angezeigt.
2. Nehmen Sie den Hörer ab, oder drücken Sie s, um die Nummer zu wählen.
3. Hängen Sie den Hörer ein, oder drücken Sie s, um den Anruf zu beenden.
Wählen von Nummern aus dem Telefonbuch1. Drücken Sie b, um das Telefonbuch aufzurufen.
2. Wählen Sie v / V, um durch das Telefonbuch zu blättern, oder geben Sie das erste Zeichen des Namens ein, um einen Eintrag schnell zu finden.
3. Nehmen Sie den Hörer ab, oder drücken Sie s, um die Nummer zu wählen.
Annehmen von AnrufenNehmen Sie den Hörer ab, um einen eingehenden Anruf anzunehmen, oder drücken Sie s, um den Anruf mit dem Lautsprecher anzunehmen.

9
Deutsch
Weitere Funktionen
AnrufdauerIm Standby-Modus wird auf dem Display die aktuelle Uhrzeit angezeigt. Während eines Anrufs wird stattdessen die Anrufdauer angezeigt. Die Anrufdauer wird nach Beenden des Gesprächs für weitere 5 Sekunden angezeigt.
R-Taste (R)
R
Drücken Sie die Taste R, gefolgt von der Durchwahl, wenn Sie an ein öffentliches Telefonsystem angeschlossen sind.
Zusätzliche Netzdienste sind unter Umständen über die Tasten R, * und # verfügbar. Weitere Informationen über die verfügbaren Netzdienste erhalten Sie bei Ihrem Netzbetreiber.
HörgeräteDieses Telefon ist kompatibel mit Hörgeräten. Wählen Sie den T-Modus an Ihrem Hörgerät, um diese Funktion zu aktivieren.

10
Deutsch
TelefonbuchIm integrierten Telefonbuch können bis zu 30 Einträge gespeichert werden. Wenn der Telefonbuchspeicher voll ist, wird ----100% angezeigt
Speichern von Nummern im Telefonbuch
1. Halten Sie b gedrückt, bis ein blinkender Cursor angezeigt wird.
2. Geben Sie eine Telefonnummer (bis zu 22 Ziffern) mit der Tastatur ein. Wählen Sie v/V, um den Cursor zu verschieben, und , um bei Bedarf Ziffern zu löschen. Wählen Sie #, um eine Pause in die Nummer einzufügen.
3. Drücken Sie zur Bestätigung . In der zweiten Displayzeile wird ein blinkender Cursor angezeigt.
4. Verwenden Sie das Tastenfeld, um einen Namen (bis zu neun Zeichen) für die zu speichernde Nummer einzugeben. Drücken Sie eine Taste mehrmals, um aus den Zeichen für diese Taste zu wählen:
5. Drücken Sie zur Bestätigung . OK wird angezeigt.
6. Wiederholen Sie die Schritte 1–5, um eine weitere Nummer zu speichern, oder halten Sie gedrückt, um das Telefonbuch zu schließen.
11
Deutsch
Löschen von Nummern aus dem Telefonbuch1. Drücken Sie b, um das Telefonbuch aufzurufen.
2. Wählen Sie v / V, um durch das Telefonbuch zu blättern, oder geben Sie das erste Zeichen ein, um einen Eintrag schnell zu finden.
3. Drücken Sie , um den ausgewählten Eintrag zu löschen.
Bearbeiten von Nummern im Telefonbuch1. Drücken Sie b, um das Telefonbuch aufzurufen.
2. Wählen Sie v / V, um durch das Telefonbuch zu blättern, oder geben Sie das erste Zeichen ein, um einen Eintrag schnell zu finden.
3. Halten Sie b gedrückt, bis der blinkende Cursor in der ausgewählten Nummer angezeigt wird.
4. Wählen Sie v/V, um den Cursor zu verschieben, und wählen Sie und das Tastenfeld, um den Eintrag zu löschen und neue Daten einzugeben.
5. Drücken Sie zur Bestätigung . Der Cursor wird in die zweite Displayzeile verschoben.
6. Wiederholen Sie Schritt 4, um den Namen/die Beschreibung für die ausgewählte Nummer zu ändern.
7. Drücken Sie zur Bestätigung . OK wird angezeigt.
Wählen von Nummern aus dem Telefonbuch1. Drücken Sie b, um das Telefonbuch aufzurufen.
2. Wählen Sie v / V, um durch das Telefonbuch zu blättern, oder geben Sie das erste Zeichen des Namens ein, um einen Eintrag schnell zu finden.
3. Nehmen Sie den Hörer ab, oder drücken Sie s, um die Nummer zu wählen.

12
Deutsch
Schnellwahl (Zielwahl)Das Telefon verfügt über drei Schnellwahltasten, die für häufig angerufene Nummern oder für Notrufnummern verwendet werden können.
Speichern von Schnellwahlnummern1. Halten Sie eine der Schnellwahltasten A-C gedrückt, bis in
der ersten Displayzeile ein blinkender Cursor angezeigt wird.
2. Geben Sie eine Telefonnummer (bis zu 22 Ziffern) mit der Tastatur ein. Wählen Sie v/V, um den Cursor zu verschieben, und , um bei Bedarf Ziffern zu löschen. Wählen Sie #, um eine Pause in die Nummer einzufügen.
3. Drücken Sie zur Bestätigung . In der zweiten Displayzeile wird ein blinkender Cursor angezeigt.
4. Geben Sie einen Namen oder eine Beschreibung für die zu speichernde Nummer ein (bis zu 9 Zeichen). Drücken Sie wiederholt, um durch die Zeichen für jede Taste zu blättern (siehe Abbildung auf der gegenüberliegenden Seite).
5. Drücken Sie zur Bestätigung . OK wird angezeigt.
6. Wiederholen Sie die Schritte 1-5, um Nummern für die anderen Schnellwahltasten zu speichern.
Löschen von SchnellwahlnummernSchnellwahlnummern können nicht gelöscht werden, sie können lediglich durch das Speichern einer neuen Nummer ersetzt werden.
Wählen von Schnellwahlnummern1. Drücken Sie eine der Schnellwahltasten A-C. Die
gespeicherte Telefonnummer wird angezeigt.
2. Nehmen Sie den Hörer ab, oder drücken Sie s, um die Nummer zu wählen.
3. Hängen Sie den Hörer ein, oder drücken Sie s, um den Anruf zu beenden.

13
Deutsch
Anruferkennung und AnruflisteMit der Anruferkennung können Sie vor dem Abnehmen des Hörers sehen, wer Sie anruft. Die Anrufliste enthält die während Ihrer Abwesenheit eingegangenen Anrufe.
Hinweis!Die Funktion Anruferkennung muss abonniert werden. Weitere Informationen erhalten Sie bei Ihrem Netzbetreiber.
Die 15 letzten ein- und ausgehenden Anrufe werden in der Anrufliste gespeichert. Auf dem Display sind eingehende (sowohl beantwortete als auch nicht beantwortete) Anrufe durch und ausgehende Anrufe durch gekennzeichnet.
Wenn die Funktion zum Anzeigen von Anrufen aktiv ist, wird durch ein blinkendes Licht angezeigt, dass seit dem letzten Überprüfen der Anrufliste ein unbeantworteter Anruf eingegangen ist.
Durchsuchen der Anrufliste1. Drücken Sie und dann v / V, um durch die
Anrufliste zu blättern. Die Nummer sowie Uhrzeit jedes Anrufs werden angezeigt. Bei Anrufen, die bereits mehr als 24 Stunden zurückliegen, wird anstelle der Uhrzeit das Datum des Anrufs angezeigt.
2. Drücken Sie , um die Anrufliste zu schließen.
Anrufen von Nummern aus der Anrufliste1. Drücken Sie und dann v / V, um durch die
Anrufliste zu blättern.
2. Nehmen Sie den Hörer ab, oder drücken Sie s, um die angezeigte Nummer zu wählen.

14
Deutsch
Löschen von Nummern aus der Anrufliste1. Drücken Sie und dann v / V, um durch die
Anrufliste zu blättern.
2. Drücken Sie , um den ausgewählten Eintrag zu löschen.
Kopieren von Einträgen aus der Anrufliste in das Telefonbuch1. Drücken Sie und dann v / V, um durch die
Anrufliste zu blättern.
2. Halten Sie * gedrückt. Drücken Sie zur Bestätigung . In der zweiten Displayzeile wird ein blinkender Cursor angezeigt.
3. Verwenden Sie das Tastenfeld, um einen Namen (bis zu neun Zeichen) für die zu speichernde Nummer einzugeben. Drücken Sie eine Taste mehrmals, um aus den Zeichen für diese Taste zu wählen.
4. Drücken Sie zur Bestätigung . OK wird angezeigt.

15
Deutsch
Einstellungen
Siehe auch Installation / Grundlegende Einrichtung.
KlingeltonKlingellautstärke können mit den Schieberegler auf der rechten Seite des Telefons eingestellt werden.
e Klingellautstärke (Hoch/Niedrig/Aus)
LautstärkeregelungDie Lautsprecherlautstärke wird mit einem Schieberegler auf der rechten Seite des Telefons eingestellt.
Die Hörerlautstärkeregelung befindet sich unter dem Hörer.

16
Deutsch
Pflege und WartungIhr Telefon ist ein technisch fortschrittliches Produkt und ist mit größter Sorgfalt zu behandeln. Nachlässigkeit kann dazu führen, dass die Gewähr-leistung erlischt.
• Schützen Sie das Gerät vor Nässe. Regen/Schnee, Nässe und alle Arten von Flüssigkeiten können Stoffe enthalten, die zu Korrosion der Elek-tronik führen. Wird das Gerät nass, entfernen Sie den Akku und lassen Sie das Gerät vollständig trocknen; legen Sie den Akku erst dann wieder ein.
• Bewahren Sie das Gerät nicht in staubigen, schmutzigen Umgebungen auf. Die beweglichen Geräteteile und die Elektronik könnten beschädigt werden.
• Schützen Sie das Gerät vor Hitze. Hohe Temperaturen können die Lebensdauer der Elektronik verringern, den Akku beschädigen und Kunststoffteile verformen oder gar schmelzen.
• Schützen Sie das Gerät vor Kälte. Beim Aufwärmen auf normale Tempe-raturen kann sich im Inneren Kondenswasser bilden, das die Elektronik schädigt.
• Versuchen Sie nicht, das Gerät anders als hier beschrieben zu öffnen.
• Lassen Sie das Gerät nicht fallen. Schützen Sie es vor Stößen oder Schütteln. Bei grobem Umgang können Leiter und feinmechanische Teile zerstört werden.
• Reinigen Sie das Gerät nicht mit scharfen Mitteln.
Diese Hinweise gelten für das Gerät, für Akku und anderes Zubehör. Funk-tioniert das Telefon nicht ordnungsgemäß, wenden Sie sich bitte an Ihren Händler. Bringen Sie Ihren Kaufbeleg oder eine Kopie der Rechnung mit.

17
Deutsch
Gewährleistung und technische DatenFür dieses Produkt gilt eine Gewährleistungszeit von 24 Monaten ab dem Zeitpunkt des Kaufs. Sollte während dieser Zeit ein Fehler auftre-ten, wenden Sie sich bitte an Ihren Händler. Leistungen im Rahmen der Gewährleistung sind nur möglich bei Vorlage einer gültigen Quittung/Rechnungskopie.
Diese Gewährleistung gilt nicht, wenn der Fehler durch einen Unfall oder ein vergleichbares Ereignis eingetreten ist. Weiterhin gilt die Gewährlei-stung nicht bei Eindringen von Flüssigkeiten, Gewaltanwendung, nicht erfolgter Wartung, falscher Bedienung oder anderen durch den Käufer zu verantwortenden Fehlern. Sie gilt ferner nicht bei Fehlern, die durch Gewitter oder andere Spannungsschwankungen verursacht werden. Zur Vorsicht empfehlen wir, das Gerät während eines Gewitters abzuschalten.
Die Akkus sind Verbrauchsstoffe und in der Gewährleistung nicht enthal-ten.
Verwenden Sie nur hochwertige AA-Alkali-Batterien.
Technische DatenAbmessungen: 175 mm x 175 mm x 60 mm
Gewicht: 750 g (inkl. Batterien)
Akku: 4 x 1,5 V AA-Alkali-Batterien
KonformitätserklärungDoro erklärt hiermit, dass das Doro PhoneEasy 312cs die wesentlichen Anforderungen und die sonstigen relevanten Bestimmungen der Richtli-nien 1999/5/EU (R&TTE) und 2002/95/EU (ROHS) erfüllt.
Eine Kopie der Konformitätserklärung finden Sie unter www.doro.com/dofc

1
Español
Descripción
Doro PhoneEasy 312csDoro PhoneEasy 312cs puede utilizarse como teléfono de sobremesa o montado en la pared. El volumen de señal mejorado y la indicación visual de llamada hacen que este teléfono sea apto para personas con dificultades auditivas.
El teclado extragrande y fácil de leer y la pantalla con grandes caracteres, facilitan el uso del teléfono incluso si se sufren problemas de visión.
La guía integrada puede almacenar hasta 30 nombres y números. Pueden programarse tres teclas de memoria de marcación directa para los números de emergencia o los números que se usan con más frecuencia. La memoria de llamadas almacena las 15 llamadas entrantes y salientes más recientes.
La función de altavoz le permite hablar en modo de manos libres con solo pulsar una tecla.
Este equipo está diseñado para uso únicamente en las redes telefónicas analógicas de AT, BE, BG, CH, CY, CZ, DE, DK, EE, ES, FI, FR, GB, GR, HU, IE, IS, IT, LV, LT, LU, MT, NL, NO, PL, PT, RO, SI, SK, SE.

2
Español
Instalación
Conexión1. Conecte el cable ondulado al auricular y a la toma con la
imagen y en el teléfono.
2. Conecte el cable de la línea telefónica a una toma de red de pared y a la toma K de la parte posterior del teléfono.
3. Descuelgue el auricular y compruebe si hay tono de marcación.
PilasEste teléfono está conectado a la línea telefónica.
Si la potencia de la línea es insuficiente, puede instalar cuatro baterías alcalinas AA como copia de seguridad para la memoria de llamadas y el altavoz.
Utilice solo pilas alcalinas AA de alta calidad.
NotaAntes de introducir o cambiar las pilas, asegúrese de que el teléfono no está conectado a la línea telefónica.
1. Desconecte el cable de la línea telefónica.
2. Retire la tapa del compartimento de las pilas.
3. Inserte las pilas asegurándose de que se sigue la polaridad correcta.
4. Vuelva a colocar la tapa y conecte de nuevo el cable de la línea telefónica.

3
Español
Configuración básicaAntes de utilizar el teléfono por primera vez, deberá efectuar los siguientes ajustes básicos.
Después de confirmar un ajuste, aparecerá automáticamente el siguiente ajuste. Saldrá automáticamente del modo de configuración después de 30 segundos de inactividad. Puede salir del modo de configuración cuando lo desee pulsando .
Hora y fechaSi todavía no ha configurado el teléfono, el reloj mostrará 00:00 al insertar las pilas.
1. Mantenga pulsado * durante unos 5 segundos hasta que la hora parpadee.
2. Utilice v / V para cambiar el valor. Confírmelo pulsando .
3. Repita los pasos 1 y 2 para configurar los minutos, el día y el mes.
Idioma de visualizaciónUna vez configurada la fecha, aparecerá ENGLISH (inglés) en pantalla. Puede elegir entre 8 idiomas de visualización:
English - Français - Español - Italiano Deutsch - Nederlands - Polski - Svenska
Utilice v / V para seleccionar el idioma deseado. Confírmelo pulsando .
4
Español
Contraste de pantalla-2- CONTRAST (contraste)
Utilice v / V para seleccionar el contraste deseado para la pantalla (1-4). Confírmelo pulsando .
Tiempo de retirada de línea
«-100- FLASH (retirada de línea)
Utilice v / V para seleccionar el tiempo de la tecla de retirada de línea (100 / 300 / 600 ms). Confírmelo pulsando .
«100» es el ajuste habitual en la mayoría de países. «300» es el ajuste habitual en Francia y Portugal.
Indicador de llamadaLED DES (LED desactivado)
Utilice v / V para activar / desactivar el indicador LED para las llamadas nuevas. Confírmelo pulsando .
Tonos / PulsosTONOUtilice v / V para seleccionar el modo de marcación por tonos o por pulsos. Confírmelo pulsando .
NotaSi no está seguro de qué modo de marcación usar, seleccione TONO ya que dicha opción funcionará en la mayoría de ubicaciones.
Ya ha finalizado la configuración básica del teléfono.

5
Español
Montaje en paredPuede montar el teléfono en la pared utilizando el soporte de pared incluido y dos tornillos (no incluidos).
AdvertenciaAsegúrese de que no hay ningún cable, tubería de agua o tubería de gas en la pared cuando vaya a taladrarla.
1. Haga dos orificios en la pared que se correspondan con los orificios del soporte de pared.
2. Introduzca los tornillos y deje que sobresalgan 5 mm de la pared.
3. Desatornille y retire el auricular.
4. Introduzca las lengüetas guía (A) del soporte en las ranuras (B) de la parte posterior del teléfono y, a continuación, deslice el soporte hacia arriba hasta que encaje en su sitio.
B
A

6
Español
5. Coloque el teléfono de manera que los tornillos de la pared encajen en las ranuras del soporte. Posteriormente, deslice el teléfono hacia abajo hasta que cuelgue de los tornillos.
6. Retire el gancho del auricular (C) empujando hacia arriba y vuelva a colocarlo pero en la posición invertida, de manera que sobresalga a lengüeta pequeña (D). Ahora el gancho mantendrá el auricular en su base aunque el teléfono esté montado en la pared.
C
D
C
7. Conecte de nuevo el auricular y colóquelo en la base.
NotaSi desea volver a utilizar el teléfono como teléfono de sobremesa, recuerde invertir la posición del gancho del auricular.

7
Español
Funcionamiento
Realización de una llamadaMarcación normal1. Descuelgue el auricular.
2. Marque el número de teléfono deseado utilizando el teclado. Cuelgue el auricular para finalizar la llamada.
AltavozLa función de altavoz le permite efectuar una llamada sin utilizar el auricular.
1. Pulse s para activar el altavoz. Se encenderá el LED que se encuentra junto a la tecla.
2. Marque el número de teléfono deseado utilizando el teclado. Pulse s de nuevo para finalizar la llamada.
Descuelgue el auricular para dejar de utilizar el altavoz durante una llamada.
PremarcaciónLa función de premarcación le permite introducir y cambiar un número antes de marcarlo.
1. Introduzca el número de teléfono deseado utilizando el teclado. Pulse para borrar el último dígito introducido.
2. Descuelgue el auricular o pulse s para marcar el número.
3. Cuelgue el auricular o pulse s para finalizar la llamada.
8
Español
Rellamada rápida1. Descuelgue el auricular o pulse s.
2. Pulse para llamar al último número marcado.
Marcación de números de la memoria de llamadas1. Pulse para visualizar la llamada más reciente.
2. Utilice v / V para desplazarse por las 15 últimas llamadas entrantes y salientes.
= Llamada entrante = Llamada saliente
3. Descuelgue el auricular o pulse s para marcar el número visualizado.
Marcación rápida (marcación directa)1. Pulse una de las teclas de marcación rápida (A-C).
Se visualizará el número de teléfono almacenado.
2. Descuelgue el auricular o pulse s para marcar el número.
3. Cuelgue el auricular o pulse s para finalizar la llamada.
Marcación de números de la guía1. Pulse b para abrir la guía.
2. Utilice v / V para desplazarse por la guía o introduzca la primera letra del nombre para encontrar rápidamente una entrada.
3. Descuelgue el auricular o pulse s para marcar el número.
RespuestaDescuelgue el auricular para responder una llamada entrante o pulse s para responder utilizando el altavoz.

9
Español
Funciones adicionales
Cronómetro de llamadaLa pantalla muestra la hora actual cuando está en modo de espera. En cambio, durante una llamada, la pantalla mostrará la duración de la llamada con el cronómetro. La duración de la llamada se mostrará durante 5 segundos una vez finalizada la llamada.
Tecla de retirada de línea (R)
R
Pulse la tecla R seguida del número de extensión para transferir una llamada si está conectado a un sistema PBX.
Puede acceder a servicios de red adicionales pulsando las teclas R, * y #. Póngase en contacto con su operador de red si desea obtener más información sobre los servicios de red disponibles.
AudífonosEste teléfono es compatible con audífonos. Seleccione el modo T en su audífono para habilitar esta función.

10
Español
GuíaLa guía integrada puede almacenar hasta 30 entradas. Cuando la guía esté llena, aparecerá en pantalla «----100%».
Almacenamiento de números de la guía
1. Mantenga pulsado b hasta que aparezca un cursor parpadeante.
2. Introduzca un número de teléfono (de hasta 22 dígitos) utilizando el teclado. Utilice v/V para mover el cursor y
para borrar, si es necesario. Utilice # para introducir una pausa en el número.
3. Pulse para confirmar. Aparecerá un cursor parpadeante en la segunda línea de la pantalla.
4. Utilice el teclado para introducir un nombre (de hasta 9 caracteres) para el número que está guardando. Pulse cada tecla varias veces para seleccionar e introducir el carácter deseado:
5. Pulse para confirmar. Aparecerá en pantalla «OK» (terminado).
6. Repita los pasos 1-5 para guardar otro número o mantenga pulsado para salir de la guía.

11
Español
Eliminación de números de la guía1. Pulse b para abrir la guía.
2. Utilice v / V para desplazarse por la guía o introduzca la primera letra para encontrar rápidamente una entrada.
3. Mantenga pulsada la tecla para eliminar la entrada seleccionada.
Edición de números de la guía1. Pulse b para abrir la guía.
2. Utilice v / V para desplazarse por la guía o introduzca la primera letra para encontrar rápidamente una entrada.
3. Mantenga pulsado b hasta que aparezca un cursor parpadeante en el número seleccionado.
4. Utilice v/V para mover el cursor y utilice y el teclado para borrar e introducir datos nuevos.
5. Pulse para confirmar. El cursor pasará a la segunda línea de la pantalla.
6. Repita el paso 4 para editar el nombre o la descripción del número seleccionado.
7. Pulse para confirmar. Aparecerá en pantalla «OK» (terminado).
Marcación desde la guía1. Pulse b para abrir la guía.
2. Utilice v / V para desplazarse por la guía o introduzca la primera letra del nombre para encontrar rápidamente una entrada.
3. Descuelgue el auricular o pulse s para marcar el número.

12
Español
Marcación rápida (marcación directa)El teléfono tiene 3 teclas de marcación rápida que pueden utilizarse para los números a los que se llama con más frecuencia o para los números de emergencia.
Almacenamiento de números de marcación rápida1. Mantenga pulsada una de las teclas de marcación rápida
(A-C) hasta que aparezca un cursor parpadeante en la primera línea de la pantalla.
2. Introduzca un número de teléfono (de hasta 22 dígitos) utilizando el teclado. Utilice v/V para mover el cursor y
para borrar, si es necesario. Utilice # para introducir una pausa en el número.
3. Pulse para confirmar. Aparecerá un cursor parpadeante en la segunda línea de la pantalla.
4. Introduzca un nombre o descripción (de hasta 9 caracteres) para el número que está guardando. Pulse cada tecla varias veces para seleccionar e introducir el carácter deseado (consulte la imagen en la página opuesta).
5. Pulse para confirmar. Aparecerá en pantalla «OK» (terminado).
6. Repita los pasos 1-5 para guardar otros números en las demás teclas de marcación rápida.
Eliminación de números de marcación rápidaLos números de marcación rápida no se pueden eliminar, sino que deben sustituirse por otro número.
Llamada a números de marcación rápida1. Pulse una de las teclas de marcación rápida (A-C). Se
visualizará el número de teléfono almacenado.
2. Descuelgue el auricular o pulse s para marcar el número.
3. Cuelgue el auricular o pulse s para finalizar la llamada.

13
Español
Identificación y memoria de llamadasLa identificación de llamadas le permite ver quién está llamando antes de responder y saber quién ha llamado en su ausencia.
NotaDebe estar abonado a la función de identificación de llamadas para que sea operativa. Póngase en contacto con su operador de red para obtener más información.
La memoria de llamadas almacena las 15 últimas llamadas entrantes y las 15 últimas llamadas salientes. En la pantalla, las llamadas entrantes (contestadas / sin contestar) se indican con
y las salientes con . La memoria de llamadas almacena las 15 últimas llamadas entrantes y las 15 últimas llamadas salientes. En la pantalla, las llamadas entrantes (contestadas / sin contestar) se indican con
y las salientes con .
Exploración de la memoria de llamadas
1. Pulse y, a continuación, v / V para desplazarse por la memoria de llamadas. El número y la hora de cada llamada se mostrarán en pantalla. Para llamadas anteriores a las últimas 24 h, se mostrará la fecha de la llamada en lugar de la hora.
2. Pulse para salir de la memoria de llamadas.
14
Español
Llamada a números de la memoria de llamadas1. Pulse y, a continuación, v / V para desplazarse por
la memoria de llamadas.
2. Descuelgue el auricular o pulse s para marcar el número visualizado.
Eliminación de números de la memoria de llamadas1. Pulse y, a continuación, v / V para desplazarse por
la memoria de llamadas.
2. Mantenga pulsada la tecla para eliminar la entrada seleccionada.
Copia de entradas de la memoria de llamadas en la guía1. Pulse y, a continuación, v / V para desplazarse por
la memoria de llamadas.
2. Mantenga pulsado *. Pulse para confirmar. Aparecerá un cursor parpadeante en la segunda línea de la pantalla.
3. Utilice el teclado para introducir un nombre (de hasta 9 caracteres) para el número que está guardando. Pulse cada tecla varias veces para seleccionar e introducir el carácter deseado.
4. Pulse para confirmar. Aparecerá en pantalla «OK» (terminado).

15
Español
Configuración
Consulte también Instalación / Configuración básica.
Señal de llamadaEl volumen de la señal pueden ajustarse a través de los controle deslizantes situados en el lado derecho del teléfono.
e Volumen de la señal (alto / bajo / desactivado)
Control de volumenEl volumen del altavoz se regula con uno de los controles deslizantes situados en el lado derecho del teléfono.
El control del volumen del auricular se encuentra bajo el auricular.

16
Español
Cuidado y mantenimientoSu unidad es un producto técnicamente avanzado y deberá tratarla con el mayor cuidado. Cualquier negligencia invalidará la garantía.
• Proteja la unidad de la humedad. La lluvia, la nieve, la humedad y otros tipos de líquidos pueden contener sustancias que corroen los circuitos electrónicos. Si la unidad se moja, deberá extraer la batería y dejar que el aparato se seque totalmente antes de volver a colocarla.
• No utilice ni deje la unidad en entornos con polvo o suciedad. Las partes móviles y los componentes electrónicos de la unidad podrían resultar dañados.
• No deje la unidad en lugares demasiado cálidos. Las altas temperatu-ras podrían reducir la vida operativa de los componentes electrónicos, dañar la batería y deformar o fundir las partes de plástico.
• No deje la unidad en lugares demasiado fríos. Al calentarse la unidad hasta la temperatura ambiente, podría formarse condensación en el interior y dañar los circuitos electrónicos.
• No intente abrir la unidad de ningún otro modo que no sea el indicado en estas instrucciones.
• No deje caer al suelo la unidad. Tampoco la golpee ni la zarandee. Si se trata con brusquedad, los circuitos y los mecanismos de precisión podrían romperse.
• No emplee productos químicos fuertes para limpiar la unidad.
Las recomendaciones anteriores se aplican a la unidad, la batería y cual-quier otro accesorio. Si el teléfono no funciona como debiera, póngase en contacto con el establecimiento en el que lo compró para solicitar asisten-cia técnica. No olvide el recibo o una copia de la factura.
17
Español
Garantía y datos técnicosEl certificado de garantía de este producto tiene una duración de 24 meses a partir de la fecha de compra. En el improbable caso de que se produzca un fallo durante dicho período, póngase en contacto con el establecimiento en el que realizó la compra. Para cualquier mantenimiento o asistencia nec-esarios durante el período de validez de la garantía, se exigirá una prueba de compra.
La garantía no se aplicará en caso de daños provocados por un accidente, la penetración de líquido, una negligencia, el uso anormal, la falta de manten-imiento o cualquier otra circunstancia que dependa del usuario. Asimismo, esta garantía no se aplicará en caso de daños causados por rayos o cualquier otra fluctuación de tensión. Como medida de precaución, recomendamos desconectar el dispositivo en caso de tormenta eléctrica.
Las pilas son bienes fungibles y no se incluyen en ninguna garantía.
Utilice solo pilas alcalinas AA de alta calidad.
Especificaciones técnicasTamaño: 175 mm × 175 mm × 60 mm
Peso: 750 g (incluidas las pilas)
Pilas: 4 pilas alcalinas AA de 1,5 V
Declaración de conformidadDoro declara que el producto Doro PhoneEasy 312cs cumple los requisi-tos esenciales y otras normativas relevantes contenidas en las directivas 1999/5/CE sobre equipos radioeléctricos y equipos terminales de telecomu-nicación y 2002/95/CE sobre la restricción de ciertas sustancias peligrosas en aparatos eléctricos y electrónicos.
Una copia de la Declaración de conformidad está disponible en www.doro.com/dofc.

1
Nederlands
Beschrijving
Doro PhoneEasy 312csDe Doro PhoneEasy 312cs kan als tafelmodel en als wandmodel worden gebruikt. Het hogere belvolume en de visuele indicatie voor oproepen maken dat deze telefoon zeer geschikt is voor mensen met hoorproblemen.
Deze telefoon is ook gemakkelijk te gebruiken door slechtziende mensen, dankzij het extra grote toetsenblok en de eenvoudig af te lezen display met grote tekens.
Er kunnen maximaal 30 namen en nummers in het ingebouwde telefoonboek worden opgeslagen. Voor de drie 'one touch' geheugentoetsen kunnen vaak gebruikte nummers of noodnummers worden geprogrammeerd. Het oproepgeheugen slaat de 15 meest recente inkomende en uitgaande oproepen op.
Dankzij de luidsprekerfunctie kunt u met één druk op de knop handsfree bellen.
Dit product is geschikt voor analoge telefoon aansluitingen in AT, BE, BG, CH, CY, CZ, DE, DK, EE, ES, FI, FR, GB, GR, HU, IE, IS, IT, LV, LT, LU, MT, NL, NO, PL, PT, RO, SI, SK, SE.
2
Nederlands
Installatie
Verbinding1. Sluit het krulsnoer aan op de handset en op de aansluiting
die met y op de telefoon is gemarkeerd.
2. Sluit het telefoonsnoer aan op een telefooncontactdoos in de muur en op de aansluiting K op de achterzijde van de telefoon.
3. Pak de handset op en luister of u een kiestoon hoort.
BatterijenDeze telefoon wordt gevoed door de telefoonlijn.
Als de stroom van de telefoonlijn onvoldoende is, kunt u vier AA Alkaline batterijen gebruiken voor de ondersteuning van nummerweergave en handenvrij functie.
Gebruik uitsluitend AA Alkaline batterijen.
Opmerking!Zorg dat de telefoon niet op de contactdoos is aangesloten als u batterijen plaatst of vervangt .
1. Koppel het telefoonsnoer los.
2. Verwijder het batterijdeksel.
3. Plaats de batterijen en let daarbij op de polariteit van de batterijen.
4. Plaats het batterijdeksel terug en sluit het telefoonsnoer weer aan.

3
Nederlands
BasisinstellingenEr moeten enkele basisinstellingen worden ingesteld voordat de telefoon voor het eerst kan worden gebruikt.
Als een instelling is bevestigd, wordt automatisch de volgende instelling weergegeven. De instelmodus wordt automatisch uitgeschakeld als u 30 seconden niets invoert. U kunt de instelmodus altijd afsluiten door op te drukken.
Tijd en datumAls de instellingen nog niet zijn uitgevoerd, geeft de klok op de display 00:00 als de batterijen zijn geplaatst.
1. Houd * ongeveer 5 seconden ingedrukt totdat het uur knippert.
2. Gebruik v/V om de waarde aan te passen en bevestig met .
3. Herhaal stappen 1–2 om de minuten, de dag en de maand in te stellen.
DisplaytaalAls de datum is ingesteld, wordt ENGLISH weergegeven. U kunt nu uit 8 displaytalen kiezen:
English - Français - Español - Italiano Deutsch - Nederlands - Polski - Svenska
Gebruik v/V om de gewenste taal te selecteren en bevestig met .

4
Nederlands
Displaycontrast-2- CONTRAST wordt weergegeven.
Gebruik v/V om een gewenste instelling voor het displaycontrast (1–4) te selecteren en bevestig met .
Flashtijd-100- FLASH wordt weergegeven.
Gebruik v/V om de flashtoetstijd (100/300/600 ms) in te stellen en bevestig met .
100 is de standaardinstelling voor de meeste landen. 300 voor Frankrijk/Portugal.
OproepindicatorLED UIT wordt weergegeven.
Gebruik v/V om het LED-lampje voor nieuwe oproepen in of uit te schakelen en bevestig met .
Toon/pulsTOON wordt weergegeven.
Gebruik v/V om de kiesmodus toon of puls in te stellen en bevestig met .
Opmerking!Als u niet zeker weet welke kiesmodus u moet gebruiken, kies dan TOON omdat dit in de meeste landen werkt.
De basisinstellingen van de telefoon zijn nu klaar.

5
Nederlands
WandmontageDe telefoon kan aan de muur worden gemonteerd met de bijgeleverde wandsteun en twee schroeven (niet meegeleverd).
Waarschuwing!Zorg dat er geen kabels, waterleidingen of gasleidingen in de muur liggen voordat u begint met boren.
1. Boor twee gaten in de muur die overeenkomen met de gaten in de wandsteun.
2. Plaats de schroeven en laat ze ongeveer 5 mm uit de muur steken.
3. Maak de stekker van de handset los en verwijder de handset.
4. Plaats de geleidingslipjes (A) op de steun in de sleuven (B) op de achterkant van de telefoon en schuif de steun omhoog totdat deze op zijn plaats klikt.
B
A

6
Nederlands
5. Plaats de telefoon zodanig dat de schroeven op de muur precies in de sleuven in de steun passen en schuif de telefoon daarna omlaag totdat deze aan de schroeven hangt.
6. Verwijder de handsethaak (C) door deze omhoog te duwen en steek deze in de omgekeerde positie zodat het kleine lipje (D) uitsteekt. De haak zorgt nu dat de handset in de houder blijft als de telefoon aan de muur is gemonteerd.
C
D
C
7. Sluit de handset opnieuw aan en plaats de handset in de houder.
Opmerking!Als de telefoon weer als tafelmodel moet worden gebruikt, vergeet dan niet de positie van de handsethaak om te keren.

7
Nederlands
Bediening
Een oproep doenNormaal kiezen1. Pak de handset op.
2. Kies het gewenste telefoonnummer met behulp van het toetsenbord. Plaats de handset terug in de houder om de oproep te beëindigen.
LuidsprekerMet de luidsprekerfunctie kunt u een oproep maken zonder de handset te gebruiken.
1. Druk op s om de luidspreker in te schakelen. De LED naast de toets gaat branden.
2. Kies het gewenste telefoonnummer met behulp van het toetsenbord. Druk nog een keer op s om de oproep te beëindigen.
Pak de handset op om tijdens een oproep over te schakelen van de luidspreker naar de handset.
VoorkiesfunctieMet de voorkiesfunctie kunt u een nummer invoeren en wijzigen voordat het wordt gekozen.
1. Voer het gewenste telefoonnummer in met behulp van het toetsenbord. Druk op om het laatst ingevoerde cijfer te wissen.
2. Pak de handset op of druk op s om het nummer te kiezen.
3. Plaats de handset terug in de houder of druk op s om de oproep te beëindigen.

8
Nederlands
Snel opnieuw kiezen1. Pak de handset op of druk op s.
2. Druk op om het laatst gekozen nummer opnieuw te kiezen.
Nummers uit het oproepgeheugen kiezen1. Druk op om de meest recente oproep te zien.
2. Gebruik v/V om door de laatste 15 inkomende en uitgaande oproepen te bladeren.
= inkomende oproep = uitgaande oproep
3. Pak de handset op of druk op s om het weergegeven nummer te kiezen.
Snelkiezen ('one touch' kiezen)1. Druk op één van de sneltoetsen A–C. Het opgeslagen
telefoonnummer wordt weergegeven.
2. Pak de handset op of druk op s om het nummer te kiezen.
3. Plaats de handset terug in de houder of druk op s om de oproep te beëindigen.
Nummers uit het telefoonboek kiezen1. Druk op b om het telefoonboek te openen.
2. Gebruik v/V om door het telefoonboek te bladeren of voer de eerste letter van de naam in om een invoer snel te vinden.
3. Pak de handset op of druk op s om het nummer te kiezen.
BeantwoordenPak de handset op om een inkomende oproep te beantwoorden of druk op s om de oproep met de luidspreker te beantwoorden.
9
Nederlands
Extra functies
OproeptimerAls de telefoon in stand-by staat, wordt de huidige tijd op de display weergegeven. Tijdens een oproep wordt er een oproeptimer op de display weergegeven die de duur van de oproep aangeeft. De duur van de oproep wordt 5 seconden lang nadat de oproep is beëindigd weergegeven.
Toets opnieuw kiezen (R)
R
Druk op de toets R gevolgd door het toestelnummer om een oproep door te verbinden als het apparaat is aangesloten op een PBX-systeem = telefooncentrale.
Er kunnen extra netwerkdiensten mogelijk zijn via de toetsen R, * en #. Neem contact op met uw telefoonmaatschappij voor meer informatie over beschikbare netwerkdiensten.
GehoorapparaatDeze telefoon stoort niet als u een gehoorapparaat draagt. Kies de stand T op uw gehoorapparaat om deze functie in te schakelen.

10
Nederlands
TelefoonboekIn het ingebouwde telefoonboek kunnen maximaal 30 nummers worden opgeslagen. Als het geheugen van het telefoonboek vol is, wordt ----100% weergegeven.
Nummers in het telefoonboek opslaan
1. Houd b ingedrukt totdat u een knipperende cursor ziet.
2. Voer een telefoonnummer (van maximaal 22 cijfers) met het toetsenbord in. Gebruik v/V om de cursor te verplaatsen en om een verkeerde invoer te wissen. Gebruik # om een onderbreking in het nummer in te voegen.
3. Druk op om te bevestigen. Er wordt een knipperende cursor op de tweede regel van de display weergegeven.
4. Gebruik het toetsenbord om een naam (maximaal 9 tekens) in te voeren voor het nummer dat u wilt opslaan. Druk herhaaldelijk op de toets om de tekens voor elke toets te selecteren:
5. Druk op om te bevestigen. OK wordt weergegeven.
6. Herhaal stappen 1–5 om een ander nummer op te slaan of houd ingedrukt om het telefoonboek af te sluiten.
11
Nederlands
Nummers uit het telefoonboek verwijderen1. Druk op b om het telefoonboek te openen.
2. Gebruik v/V om door het telefoonboek te bladeren of voer de eerste letter in om een invoer snel te vinden.
3. Houd ingedrukt om de geselecteerde invoer te wissen.
Nummers in het telefoonboek bewerken1. Druk op b om het telefoonboek te openen.
2. Gebruik v/V om door het telefoonboek te bladeren of voer de eerste letter in om een invoer snel te vinden.
3. Houd b ingedrukt totdat u de knipperende cursor in het geselecteerde nummer ziet.
4. Gebruik v/V om de cursor te verplaatsen en gebruik en het toetsenblok om invoeren te wissen en nieuwe gegevens in te voeren.
5. Druk op om te bevestigen. De cursor gaat naar de tweede regel op de display.
6. Herhaal stap 4 om de naam/beschrijving voor het geselecteerde nummer te bewerken.
7. Druk op om te bevestigen. OK wordt weergegeven.
Kiezen vanuit het telefoonboek1. Druk op b om het telefoonboek te openen.
2. Gebruik v/V om door het telefoonboek te bladeren of voer de eerste letter van de naam in om een invoer snel te vinden.
3. Pak de handset op of druk op s om het nummer te kiezen.

12
Nederlands
Snelkiezen ('one touch' kiezen)De telefoon heeft 3 sneltoetsen die kunnen worden gebruikt voor vaak gekozen nummers of voor noodnummers.
Nummers voor de sneltoetsen opslaan1. Houd één van de sneltoetsen A-C ingedrukt totdat u een
knipperende cursor op de eerste regel van de display ziet.
2. Voer een telefoonnummer (van maximaal 22 cijfers) met het toetsenbord in. Gebruik v/V om de cursor te verplaatsen en om invoeren eventueel te wissen. Gebruik # om een onderbreking in het nummer in te voegen.
3. Druk op om te bevestigen. Er wordt een knipperende cursor op de tweede regel van de display weergegeven.
4. Voer een naam of beschrijving voor het nummer dat u wilt opslaan in (maximaal 9 tekens). Druk herhaaldelijk op de toets om door de tekens van elke toets op het toetsenbord te bladeren (zie de afbeelding op de andere pagina).
5. Druk op om te bevestigen. OK wordt weergegeven.
6. Herhaal stappen 1-5 om nummers voor de andere sneltoetsen op te slaan.
Nummers voor de sneltoetsen verwijderenNummers voor sneltoetsen kunnen niet worden verwijderd, ze kunnen alleen worden vervangen door een ander nummer.
Nummers voor de sneltoetsen kiezen1. Druk op één van de sneltoetsen A–C. Het opgeslagen
telefoonnummer wordt weergegeven.
2. Pak de handset op of druk op s om het nummer te kiezen.
3. Plaats de handset terug in de houder of druk op s om de oproep te beëindigen.

13
Nederlands
Nummerweergave en oproepgeheugenMet nummerweergave kunt u zien wie er belt voordat u de telefoon aanneemt en kunt u zien wie er heeft gebeld toen u er niet was.
Opmerking!Voor de functie Nummerweergave moet u een abonnement hebben. Neem contact op met uw telefoonmaatschappij voor meer informatie.
In het oproepgeheugen worden de laatste 15 inkomende en 15 uitgaande oproepen opgeslagen. Op de display worden inkomende (beantwoorde) oproepen aangegeven met en uitgaande oproepen met .
Als de functie Oproepindicator actief is, geeft een knipperend lampje aan dat u een onbeantwoorde oproep hebt ontvangen sinds de laatste keer dat u het oproepgeheugen hebt gecontroleerd.
Door het oproepgeheugen bladeren1. Druk op en daarna op v/V om door het
oproepgeheugen te bladeren. Het nummer en de tijd van elke oproep worden weergegeven. Bij gesprekken die langer dan 24 uur geleden zijn gemaakt, wordt de datum van de oproep weergegeven, niet de tijd.
2. Druk op om het oproepgeheugen af te sluiten.

14
Nederlands
Nummers uit het oproepgeheugen oproepen1. Druk op en daarna op v/V om door het
oproepgeheugen te bladeren.
2. Pak de handset op of druk op s om het weergegeven nummer te kiezen.
Nummers uit het oproepgeheugen verwijderen1. Druk op en daarna op v/V om door het
oproepgeheugen te bladeren.
2. Houd ingedrukt om de geselecteerde invoer te wissen.
Invoeren uit het oproepgeheugen naar het telefoonboek kopiëren1. Druk op en daarna op v/V om door het
oproepgeheugen te bladeren.
2. Houd * ingedrukt. Druk op om te bevestigen. Er wordt een knipperende cursor op de tweede regel van de display weergegeven.
3. Gebruik het toetsenbord om een naam (maximaal 9 tekens) in te voeren voor het nummer dat u wilt opslaan. Druk herhaaldelijk op de toets om de tekens voor elke toets te selecteren.
4. Druk op om te bevestigen. OK wordt weergegeven.

15
Nederlands
Instellingen
Zie ook Installation / Basic setup (installatie/basisinstellingen).
BelsignaalHet volume van het belsignaal kan met de schuifschakelaar aan de rechterzijde van de telefoon op hard, zacht en uit worden ingesteld.
e Belvolume (hoog/laag/Uit)
VolumeregelingU kunt het luidsprekervolume aanpassen met een schuifregelaar rechts van de telefoon.
De volumeregeling van de handset bevindt zich onder de handset.

16
Nederlands
Verzorging en onderhoudDit technisch geavanceerde product moet zeer zorgvuldig worden behan-deld. De garantie kan door nalatigheid komen te vervallen.
• Bescherm het product tegen vocht. Regen/sneeuw, vocht en alle andere vloeistoffen kunnen stoffen bevatten waardoor elektronische circuits corroderen. Als het product nat wordt, moet u de batterij verwijderen en het product volledig laten drogen voordat u de batterij weer aanbrengt.
• Gebruik en bewaar het product niet in een stoffige, vuile omgeving. Hierdoor kunnen de bewegende en elektronische onderdelen van het product worden beschadigd.
• Bewaar het product niet op een warme plek. Door hoge temperaturen kan de levensduur van elektronische apparatuur worden bekort, kunnen batterijen beschadigd raken en kunnen bepaalde kunststoffen worden vervormd of smelten.
• Bewaar het product niet op een koude plek. Wanneer het product ver-volgens weer op temperatuur komt, kan zich inwendig condensvorming voordoen, waardoor de elektronische circuits kunnen worden beschad-igd.
• Probeer het product niet te openen op een andere wijze dan deze ver-meld in de gebruiksaanwijzing.
• Laat het product niet vallen. Ook niet mee stoten of schudden. Door een ruwe behandeling kunnen de circuits en precisiemechanismen defect raken.
• Gebruik geen sterke chemicaliën om het product te reinigen.
Het bovenstaande advies geldt voor het product, de batterij en eventuele accessoires. Als de telefoon niet naar behoren werkt, neemt u contact op met de plaats van aanschaf voor reparatie. Vergeet niet de bon of een kopie van de factuur mee te nemen.

17
Nederlands
Garantie en technische gegevensVoor dit product geldt een garantietermijn van 24 maanden vanaf de aankoopdatum. Het valt niet te verwachten, maar als zich gedurende deze termijn toch een storing voordoet, wendt u zich tot de plaats van aan-schaf. Een aankoopbewijs is vereist als u tijdens de garantietermijn repa-ratie of bijstand nodig hebt.Deze garantie geldt niet voor defecten die zijn veroorzaakt door een ongeval of een soortgelijk incident of schade, binnendringen van vloe-istoffen, onvoorzichtigheid, abnormaal gebruik, gebrek aan onderhoud of andere door de gebruiker veroorzaakte omstandigheden. Bovendien is deze garantie niet van toepassing op defecten veroorzaakt door onweer of andere spanningsschommelingen. Wij adviseren het apparaat tijdens onweer uit voorzorg los te koppelen van het elektriciteitsnet.Batterijen zijn verbruiksartikelen waarop de garantie niet van toepassing is.Gebruik uitsluitend AA-alkalinebatterijen van goede kwaliteit.
SpecificatiesAfmetingen: 175 mm x 175 mm x 60 mmGewicht: 750 g (inclusief batterij)Batterij: 4 x 1,5 V AA-alkalinebatterijen
Verklaring van overeenstemmingDoro verklaart hierbij dat het product Doro PhoneEasy 312cs voldoet aan de essentiële eisen en andere relevante voorschriften van de richtlijnen 1999/5/EG (R&TTE) en 2002/95/EG (RoHS).
Een afschrift van de verklaring van overeenstemming vindt u op www.doro.com/dofc

EnglishFrenchGermanSpanishDutch
Version 1.0