Door Prep for Small Rosettes
5
PK.1036 Rev 01(4/17) ©2017 Spectrum Brands, Inc. Door Prep for Small Rosettes ese instructions MUST be used for all rosettes with diameters less than 2.5˝ and doors thicker than 1-3/4˝. Optional for door thickness of 1-3/8˝ to 1-3/4˝ with a 5/8˝ face bore.
Transcript of Door Prep for Small Rosettes

PK.1036 Rev 01(4/17)©2017 Spectrum Brands, Inc.
Door Prep for Small Rosettes
These instructions MUST be used for all rosettes with diameters less than 2.5˝ and doors thicker than 1-3/4˝.
Optional for door thickness of 1-3/8˝ to 1-3/4˝ with a 5/8˝ face bore.
PK.1036 Rev 01(4/17)©2017 Spectrum Brands, Inc.
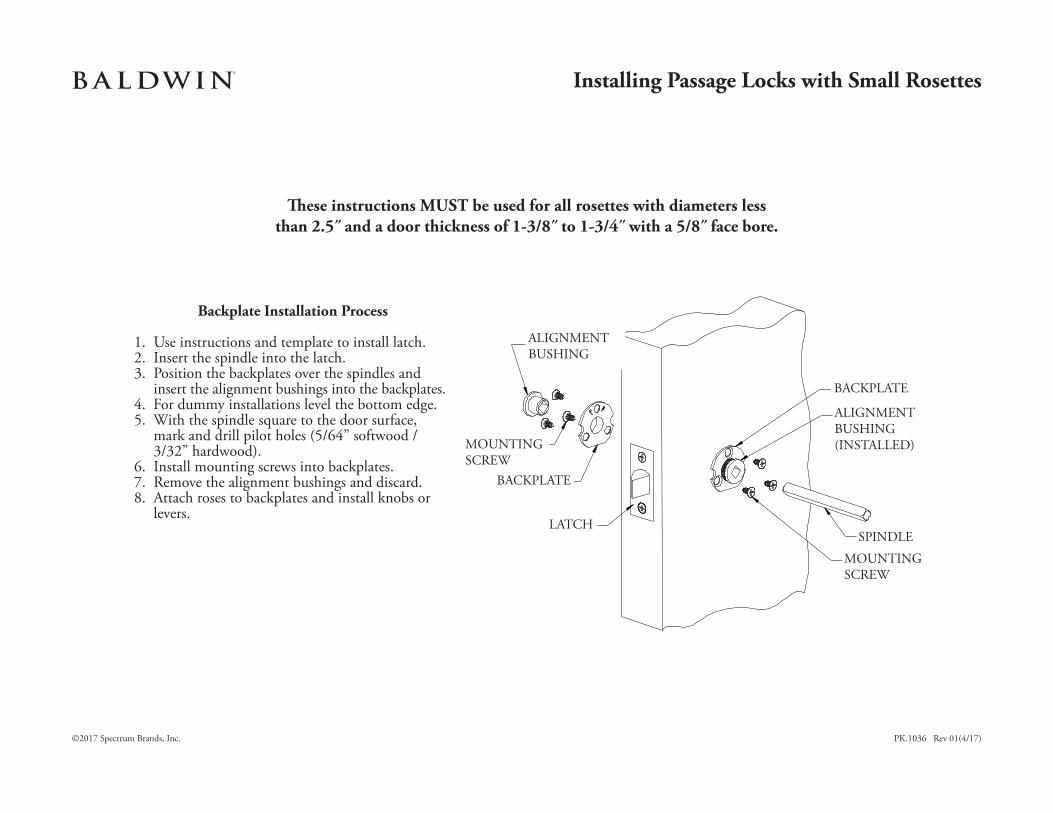
Backplate Installation Process
1. Use instructions and template to install latch.2. Insert the spindle into the latch.3. Position the backplates over the spindles and insert the alignment bushings into the backplates.4. For dummy installations level the bottom edge.5. With the spindle square to the door surface, mark and drill pilot holes (5/64” softwood / 3/32” hardwood).6. Install mounting screws into backplates.7. Remove the alignment bushings and discard.8. Attach roses to backplates and install knobs or levers.
ALIGNMENT BUSHING
LATCH
ALIGNMENTBUSHING(INSTALLED)
SPINDLE
BACKPLATE
MOUNTINGSCREW
BACKPLATE
MOUNTINGSCREW
These instructions MUST be used for all rosettes with diameters less than 2.5˝ and a door thickness of 1-3/8˝ to 1-3/4˝ with a 5/8˝ face bore.
Installing Passage Locks with Small Rosettes
PK.1036 Rev 01(4/17)©2017 Spectrum Brands, Inc.
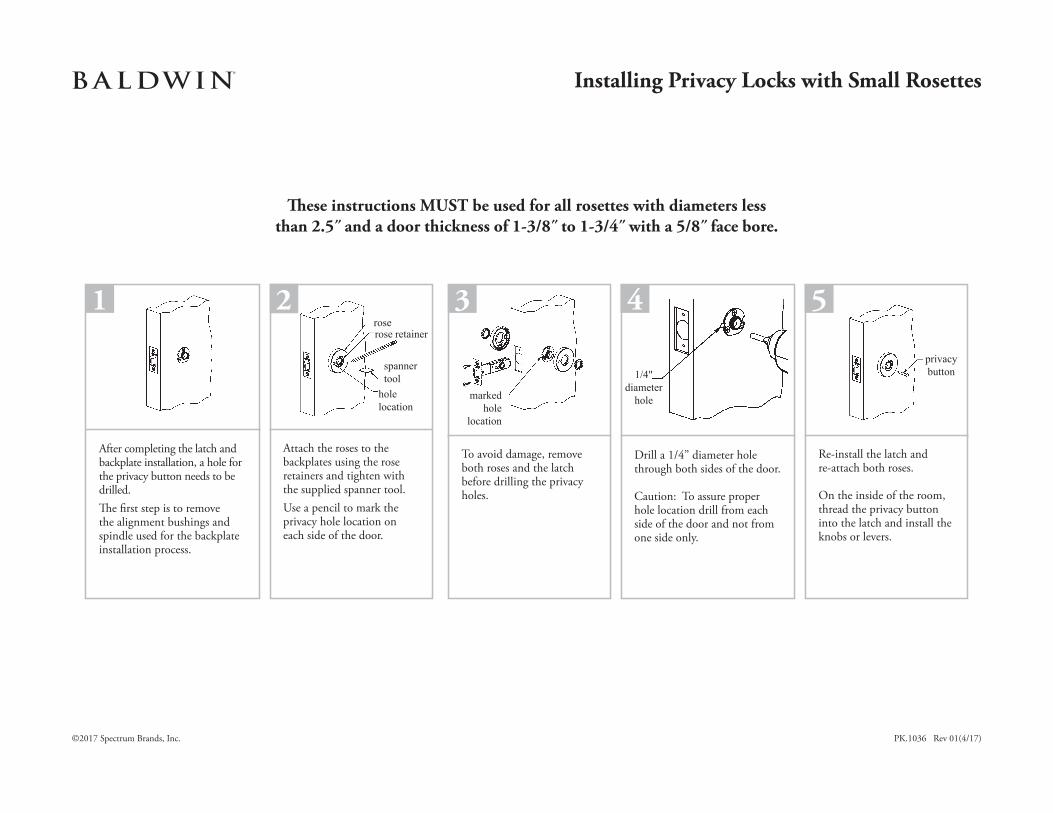
Installing Privacy Locks with Small Rosettes
These instructions MUST be used for all rosettes with diameters less than 2.5˝ and a door thickness of 1-3/8˝ to 1-3/4˝ with a 5/8˝ face bore.
After completing the latch and backplate installation, a hole for the privacy button needs to be drilled.The first step is to remove the alignment bushings and spindle used for the backplate installation process.
1
Attach the roses to the backplates using the rose retainers and tighten with the supplied spanner tool.Use a pencil to mark the privacy hole location on each side of the door.
2roserose retainer
spanner tool
hole location
To avoid damage, remove both roses and the latch before drilling the privacy holes.
3
marked hole
location
4
Drill a 1/4” diameter hole through both sides of the door.
Caution: To assure proper hole location drill from each side of the door and not from one side only.
1/4"diameter
hole
5
Re-install the latch and re-attach both roses.
On the inside of the room, thread the privacy button into the latch and install the knobs or levers.
privacybutton

PK.1036 Rev 01(4/17)©2017 Spectrum Brands, Inc.
Door Prep for Large Rosettes
These instructions may be used for rosettes with diameters greater than 2.5˝ and a door thickness of 1-3/8˝ to 1-3/4˝ with a 2-1/8˝ face bore.

PK.1036 Rev 01(4/17)©2017 Spectrum Brands, Inc.
Adapter Installation Process
1. Use instructions and template to install latch.2. Position the adapters so the #10 machine screws are inserted from the inside face of the door.3. Loosely thread the #10 machine screws through the inside adapter into the outside adapter.4. Insert the spindle into the latch.5. Insert the alignment bushings into both adapters.6. Fully tighten the #10 machine screws.7. Remove the alignment bushings and discard.8. Attach roses to adapters and install knobs or levers.
ALIGNMENT BUSHING
LATCH
OUTSIDEADAPTER
INSIDEADAPTER
ALIGNMENTBUSHING(INSTALLED)
SPINDLE
#10 MACHINE SCREWS
These instructions may be used for rosettes with diameters greater than 2.5˝ and a door thickness of 1-3/8˝ to 1-3/4˝ with a 2-1/8˝ face bore.
Installing Passage or Privacy Locks with Large Rosettes


![FLAT TRACK SLIDING BARN DOOR HARDWARE Face Mount ... Door hardware... · 4 Prep Door for Hangers & Floor Guide Drill Holes in door for hanger bolt by using a 19/32” bit. 19/32 [15.1]](https://static.fdocuments.net/doc/165x107/5ee4235aad6a402d666d7977/flat-track-sliding-barn-door-hardware-face-mount-door-hardware-4-prep-door.jpg)