Domestically Sustainable Agriculture Constructio
25
http://www.instructables.com/id/Domestically-Sustainable-Agriculture-Constructio/ Domestically Sustainabl e Agriculture - Construction, Planting, and Harvesting by Brennn10 on March 5, 2009 Table of Contents Author: Brennn10 . . . . . . . . . . . . . . . . . . . . . . . . . . . . . . . . . . . . . . . . . . . . . . . . . . . . . . . . . . . . . . . . . . . . . . . . . . . . . . . . . . . . . . . . . . . . . . . . . . . . . . . . . . . . 2 License: Attribution Non-comme rcial Share Alike (by-nc -sa) . . . . . . . . . . . . . . . . . . . . . . . . . . . . . . . . . . . . . . . . . . . . . . . . . . . . . . . . . . . . . . . . . . . . . . . . . . . . . 2 Intro: Domestically Sus tainable Agriculture - Construct ion, Planting, and H arvesting . . . . . . . . . . . . . . . . . . . . . . . . . . . . . . . . . . . . . . . . . . . . . . . . . . . . . . . . . . . 2 step 1: Find your plot . . . . . . . . . . . . . . . . . . . . . . . . . . . . . . . . . . . . . . . . . . . . . . . . . . . . . . . . . . . . . . . . . . . . . . . . . . . . . . . . . . . . . . . . . . . . . . . . . . . . . . . . . . 2 step 2: Raised Bed Overview . . . . . . . . . . . . . . . . . . . . . . . . . . . . . . . . . . . . . . . . . . . . . . . . . . . . . . . . . . . . . . . . . . . . . . . . . . . . . . . . . . . . . . . . . . . . . . . . . . . . 3 step 3: Building Your Raised Bed Boxes . . . . . . . . . . . . . . . . . . . . . . . . . . . . . . . . . . . . . . . . . . . . . . . . . . . . . . . . . . . . . . . . . . . . . . . . . . . . . . . . . . . . . . . . . . . . 3 step 4: Garden Layout . . . . . . . . . . . . . . . . . . . . . . . . . . . . . . . . . . . . . . . . . . . . . . . . . . . . . . . . . . . . . . . . . . . . . . . . . . . . . . . . . . . . . . . . . . . . . . . . . . . . . . . . . 5 step 5: Prepping the soil . . . . . . . . . . . . . . . . . . . . . . . . . . . . . . . . . . . . . . . . . . . . . . . . . . . . . . . . . . . . . . . . . . . . . . . . . . . . . . . . . . . . . . . . . . . . . . . . . . . . . . . . 6 step 6: Building Your Enclosure . . . . . . . . . . . . . . . . . . . . . . . . . . . . . . . . . . . . . . . . . . . . . . . . . . . . . . . . . . . . . . . . . . . . . . . . . . . . . . . . . . . . . . . . . . . . . . . . . . 7 step 7: Installing the w ire fenc ing . . . . . . . . . . . . . . . . . . . . . . . . . . . . . . . . . . . . . . . . . . . . . . . . . . . . . . . . . . . . . . . . . . . . . . . . . . . . . . . . . . . . . . . . . . . . . . . . . 9 step 8: Installing your gates . . . . . . . . . . . . . . . . . . . . . . . . . . . . . . . . . . . . . . . . . . . . . . . . . . . . . . . . . . . . . . . . . . . . . . . . . . . . . . . . . . . . . . . . . . . . . . . . . . . . . 10 step 9: Deer Protection . . . . . . . . . . . . . . . . . . . . . . . . . . . . . . . . . . . . . . . . . . . . . . . . . . . . . . . . . . . . . . . . . . . . . . . . . . . . . . . . . . . . . . . . . . . . . . . . . . . . . . . . 12 step 10: Getting your topsoil . . . . . . . . . . . . . . . . . . . . . . . . . . . . . . . . . . . . . . . . . . . . . . . . . . . . . . . . . . . . . . . . . . . . . . . . . . . . . . . . . . . . . . . . . . . . . . . . . . . . . 13 step 11 : Put t he Boxes Back I n . . . . . . . . . . . . . . . . . . . . . . . . . . . . . . . . . . . . . . . . . . . . . . . . . . . . . . . . . . . . . . . . . . . . . . . . . . . . . . . . . . . . . . . . . . . . . . . . . . 14 step 12: Plant your seeds . . . . . . . . . . . . . . . . . . . . . . . . . . . . . . . . . . . . . . . . . . . . . . . . . . . . . . . . . . . . . . . . . . . . . . . . . . . . . . . . . . . . . . . . . . . . . . . . . . . . . . . 14 step 13: After 3 Weeks . . . . . . . . . . . . . . . . . . . . . . . . . . . . . . . . . . . . . . . . . . . . . . . . . . . . . . . . . . . . . . . . . . . . . . . . . . . . . . . . . . . . . . . . . . . . . . . . . . . . . . . . . 15 step 14: Our First Harvest! . . . . . . . . . . . . . . . . . . . . . . . . . . . . . . . . . . . . . . . . . . . . . . . . . . . . . . . . . . . . . . . . . . . . . . . . . . . . . . . . . . . . . . . . . . . . . . . . . . . . . . 17 step 15: Growth! . . . . . . . . . . . . . . . . . . . . . . . . . . . . . . . . . . . . . . . . . . . . . . . . . . . . . . . . . . . . . . . . . . . . . . . . . . . . . . . . . . . . . . . . . . . . . . . . . . . . . . . . . . . . . 18 step 16: Our first casualty . . . . . . . . . . . . . . . . . . . . . . . . . . . . . . . . . . . . . . . . . . . . . . . . . . . . . . . . . . . . . . . . . . . . . . . . . . . . . . . . . . . . . . . . . . . . . . . . . . . . . . 20 step 17 : Chard and Baby Lettuce . . . . . . . . . . . . . . . . . . . . . . . . . . . . . . . . . . . . . . . . . . . . . . . . . . . . . . . . . . . . . . . . . . . . . . . . . . . . . . . . . . . . . . . . . . . . . . . . . 20 step 18: Zucchini Tips . . . . . . . . . . . . . . . . . . . . . . . . . . . . . . . . . . . . . . . . . . . . . . . . . . . . . . . . . . . . . . . . . . . . . . . . . . . . . . . . . . . . . . . . . . . . . . . . . . . . . . . . . 22 step 19: Our Tomatoes . . . . . . . . . . . . . . . . . . . . . . . . . . . . . . . . . . . . . . . . . . . . . . . . . . . . . . . . . . . . . . . . . . . . . . . . . . . . . . . . . . . . . . . . . . . . . . . . . . . . . . . . 23 step 20: Cucumbers . . . . . . . . . . . . . . . . . . . . . . . . . . . . . . . . . . . . . . . . . . . . . . . . . . . . . . . . . . . . . . . . . . . . . . . . . . . . . . . . . . . . . . . . . . . . . . . . . . . . . . . . . . . 24 step 21: Conclusion . . . . . . . . . . . . . . . . . . . . . . . . . . . . . . . . . . . . . . . . . . . . . . . . . . . . . . . . . . . . . . . . . . . . . . . . . . . . . . . . . . . . . . . . . . . . . . . . . . . . . . . . . . . 24 Advertisements . . . . . . . . . . . . . . . . . . . . . . . . . . . . . . . . . . . . . . . . . . . . . . . . . . . . . . . . . . . . . . . . . . . . . . . . . . . . . . . . . . . . . . . . . . . . . . . . . . . . . . . . . . . . . . . 25
-
Upload
miruna-gabriela -
Category
Documents
-
view
221 -
download
0
Transcript of Domestically Sustainable Agriculture Constructio

8/10/2019 Domestically Sustainable Agriculture Constructio
http://slidepdf.com/reader/full/domestically-sustainable-agriculture-constructio 1/25
http://www.instructables.com/id/Domestically-Sustainable-Agriculture-Constructio/
Domestically Sustainable Agriculture - Construction, Planting, and
Harvestingby Brennn10 on March 5, 2009
Table of Contents
Author: Brennn10 ............................................................................................................
License: Attribution Non-commercial Share Alike (by-nc-sa) .............................................................................
Intro: Domestically Sustainable Agriculture - Construction, Planting, and Harvesting ...........................................................
step 1: Find your plot ..........................................................................................................
step 2: Raised Bed Overview ....................................................................................................
step 3: Building Your Raised Bed Boxes ............................................................................................
step 4: Garden Layout .........................................................................................................
step 5: Prepping the soil ........................................................................................................
step 6: Building Your Enclosure ..................................................................................................
step 7: Installing the wire fencing .................................................................................................
step 8: Installing your gates ..................................................................................................... 1
step 9: Deer Protection ........................................................................................................ 1
step 10: Getting your topsoil ..................................................................................................... 1
step 11: Put the Boxes Back In .................................................................................................. 1
step 12: Plant your seeds ....................................................................................................... 1
step 13: After 3 Weeks ......................................................................................................... 1
step 14: Our First Harvest! ...................................................................................................... 1
step 15: Growth! ............................................................................................................. 1
step 16: Our first casualty ...................................................................................................... 2
step 17: Chard and Baby Lettuce ................................................................................................. 2
step 18: Zucchini Tips ......................................................................................................... 2
step 19: Our Tomatoes ........................................................................................................ 2
step 20: Cucumbers ........................................................................................................... 2
step 21: Conclusion ........................................................................................................... 2
Advertisements ............................................................................................................... 2

8/10/2019 Domestically Sustainable Agriculture Constructio
http://slidepdf.com/reader/full/domestically-sustainable-agriculture-constructio 2/25
http://www.instructables.com/id/Domestically-Sustainable-Agriculture-Constructio/
t r : r e 1 0
Author: Brennn10
Brennn10 will begin the study of Electrical Engineering at college this fall.
License: Attribution Non-commercial Share Alike (by-nc-sa)
Intro: Domestically Sustainable Agriculture - Construction, Planting, and HarvestingIn an effort to reduce future food costs, and create a lasting source of mainly vegetables and some fruits, we decided to invest some time and money into creating asustainable garden. We all know the taste and experience of a home grown fruit or vegetable, and the satisfaction of enjoying a domestic masterpiece. It is not shippefrom a far off land or an agricultural company, but rather it comes straight from the soil in your back yard.
I wanted to show you how we were able to experience this satisfaction, and I hope you can improvise some of my tips and adapt them to your own garden.
I wanted to publish this Instructable in time for the gardening contest, so I will be adding more pictures and information about the remaining crops that I will harvest!
Image Notes1. These are our own vegetables. They look delicious!
step 1: Find your plotPlanning is key, because you must know where you are planting, the dimensions of the plot, and plot characteristics to produce the best possible yield.
When choosing your plot, look for:
Self accessibility (is it easy to get to?)Sunlight (at least 5 hours)Water accessibilityLand qualityThreats (animals, bugs, etc..)Ways to reduce costs (along an existing fence will reduce one side of your costs, or along the side of a barn or wall will reduce one side)
Update: April 9th: We will actually be extending our plot to include a larger area, enclosing some raspberry bushes, and an Asian pear tree. This will increase our pricefencing a little bit more, but it will be worth it.
Image Notes1. This is the plot that we chose. The ground is level, the area is close toresources, and it can easily be customized.
Image Notes1. Our water supply. A rain barrel can also be installed.

8/10/2019 Domestically Sustainable Agriculture Constructio
http://slidepdf.com/reader/full/domestically-sustainable-agriculture-constructio 3/25
http://www.instructables.com/id/Domestically-Sustainable-Agriculture-Constructio/
step 2: Raised Bed OverviewThe type of garden we will be building is known as a raised bed garden. Raised bed gardens offer:
Excellent drainage of waterThe soil warms up more quickly in a raised bed than a bed in the ground.Maintenance is easy and very customizableThe garden can be made more easily accessible.
- We plan on building boxes to grow in, which will help to make access to the gardens much easier.
The one major disadvantage of building a raised bed garden is that fact that more labor will have to be put in to building it. Depending on the quality of the build,maintenance can be either easy or hard. So, it will be best to make the most sturdy, and supported bed in order to avoid labor as the season moves on. The raised be
can also dry out a little easier, which is why we will instal a green system of a rain barrel to make use of the rain water instead of continual use of well water.
Image Notes1. Generic picture of a jolly raised bed garden. (That is not my mother)
step 3: Building Your Raised Bed BoxesMaterials to build one box:
12 ft. rough cut Cyprus (2 pieces)4 ft. rough cut Cyprus (2 pieces)2 in. by 2 in. by 3 ft. pine (Cut in half at a 45 degree angle to get 4 pieces)2 in. stainless steel screws (16 for each box)
Once you have cut your pine stakes into four pieces with a 45 degree angle, now move on to building the rest of the box.
Starting with the 4 ft. end pieces, mark a line 1 inch. in. and then trace the other line with the stake. Now drill two holes from the outside, near the top and bottom of thipiece. These will be the holes for your screws when you connect this piece of wood to the stake. Do the same to the other side.
Now take your stake and insert the screws into the stake. It should look like Image 9. Now do the same to the other end piece, and your two end pieces will be comple
Now find your 12 ft. Cyprus pieces. As shown in Image 10, this piece will be placed on the outside of the stake, but on the inside of the end piece. Take two more screand connect this piece to the plank. Make sure your screws are in a different spot than the screws on the end piece, because you do not want them to collide.
For however many boxes you wish to produce, repeat the process. For our garden, we will be making four of these boxes.
Image Notes

8/10/2019 Domestically Sustainable Agriculture Constructio
http://slidepdf.com/reader/full/domestically-sustainable-agriculture-constructio 4/25
http://www.instructables.com/id/Domestically-Sustainable-Agriculture-Constructio/
1. This is the 4ft. Cyprus2. 12 ft. Cyprus3. This is the pine stake that goes into the ground.4. The box is currently upside down. The stakes will go into the dirt.
Image Notes1. Do this one more time to get 4 stakes.
Image Notes1. Measure 1 inch in on the first piece of 4 ft. Cyprus.
Image Notes1. Mark it.
Image Notes1. Drill a hole approximately in the center. This does not have to be completelyaccurate, but it should be close.

8/10/2019 Domestically Sustainable Agriculture Constructio
http://slidepdf.com/reader/full/domestically-sustainable-agriculture-constructio 5/25
http://www.instructables.com/id/Domestically-Sustainable-Agriculture-Constructio/
Image Notes1. This is one completed end piece. The two 12 ft. Cyprus pieces will be screwedin on the outside of the stake.2. Image 9
Image Notes1. This is what you should do to each corner of your box.2. There will two screws inserted in from the outside of the wood into thestake.3. There will be two screws inserted from the outside of the wood into theplank.4. Image 10
step 4: Garden LayoutIt is time to begin laying out your garden. Keep in mind walking space in between your boxes, and accessibility from all areas.
Lay your boxes out on your plot, and choose the measurements by which you want to separate each box. We chose to separate each box by 4ft., and we also chose thave the boxes 4 ft. away from the fence.
Once your boxes are in their places, take flags or any indicator, which outlines the plot for each box.
Image Notes1. Relaxation at its finest.

8/10/2019 Domestically Sustainable Agriculture Constructio
http://slidepdf.com/reader/full/domestically-sustainable-agriculture-constructio 6/25
http://www.instructables.com/id/Domestically-Sustainable-Agriculture-Constructio/
step 5: Prepping the soilFor our first soil preparations, we decided to cut out the grass in our outlined plots, and then just turn them over to give a good beginning layer of soil. When the grassdies, hopefully there will be some good nutrients in our soil, and that way grass won't be poking through when we begin planting.
So begin by taking an edger, and make an edge around the plot, and then edge sections of the plot. This allows the shovel to go in easier and separate the dirt andeverything. Just take your shovel, shove it into the edges, and lift up. You will now be able to just grab the soil and lift it up. Now just place it back into the same positioas it was; except this time the grass will be facing down with the dirt facing up.

8/10/2019 Domestically Sustainable Agriculture Constructio
http://slidepdf.com/reader/full/domestically-sustainable-agriculture-constructio 7/25
http://www.instructables.com/id/Domestically-Sustainable-Agriculture-Constructio/
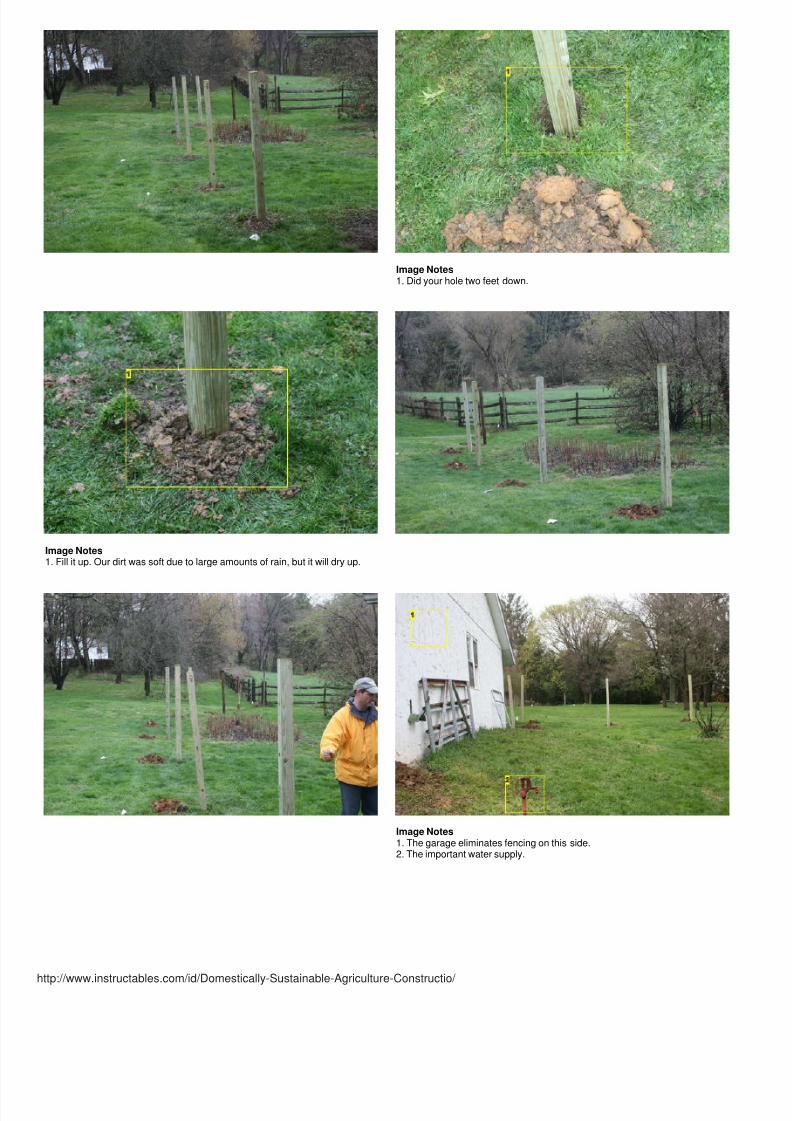
step 6: Building Your EnclosureSince we decided to expand our enclosure to include a small plot of raspberry bushes, we are going to need to buy some more 6 foot posts. We chose to have posts twere 6 feet above the ground, because we know that deer can jump over 4 foot fencing, and some may be able to jump over 5 foot fencing, so we decided to be safe purchase 8 foot fencing and place it two feet into the ground.
We bought 8 foot treated pine posts with a 4 by 4 square base. Where you put your posts is your preference, but try to maximize your area without raising costs toomuch. You can use differential optimization calculus, or you can just try your best in your head. We used the back of our garage to eliminate about 1 full side of posts. also have two other sides of existing 4 foot fencing (which we will heighten later), so we did not need very many 8 foot posts.
When you are plotting your posts, be sure to make room for gates. We used 2 Galvanized Mesh Gate which was 4 ft. We also had an extra gate which was much longso that we can bring a small tractor in. When you are putting your fencing in, just measure the distance of the fence between two of your posts, and then put up somehinges. Step 9 shows you some pictures of the process.
8/10/2019 Domestically Sustainable Agriculture Constructio
http://slidepdf.com/reader/full/domestically-sustainable-agriculture-constructio 8/25
http://www.instructables.com/id/Domestically-Sustainable-Agriculture-Constructio/
Image Notes1. Did your hole two feet down.
Image Notes1. Fill it up. Our dirt was soft due to large amounts of rain, but it will dry up.
Image Notes1. The garage eliminates fencing on this side.2. The important water supply.

8/10/2019 Domestically Sustainable Agriculture Constructio
http://slidepdf.com/reader/full/domestically-sustainable-agriculture-constructio 9/25
http://www.instructables.com/id/Domestically-Sustainable-Agriculture-Constructio/
step 7: Installing the wire fencingWe went to a Tractor Supply store and purchase 6 foot wire fencing. The brand is pictured in the photo below.
You will be rolling it out and nailing it to your posts. Try to give your posts about a day to become sturdy in their dirt. This will make it easier to nail the wire to the postsTake the U nails and connect them with as much tension as possible. Try your best not to have waves in your fencing.
As you can see in the first picture below, we have wooden planks to keep the posts up. Our enclosure is a little bit hilly, so we just wanted to be safe when we werenailing. As the dirt dries up, we will take these off.
Once you finish one section, just snip it with wire cutters and take the remaining fencing to your next spot.
Image Notes1. On a hill, it is tricky to get the wire fencing to be completely straight. But do yourbest.2. This is our raspberry plot that we cut down for the winter.
Image Notes1. Take those "u" nails and do this up and down each post.

8/10/2019 Domestically Sustainable Agriculture Constructio
http://slidepdf.com/reader/full/domestically-sustainable-agriculture-constructio 10/25
http://www.instructables.com/id/Domestically-Sustainable-Agriculture-Constructio/
step 8: Installing your gatesAs I was beginning to describe in step 7, we used 2 Galvanized Mesh Gate which were 4 ft. long. We also had an extra gate which was much longer, so that we can b
a small tractor in. When you are putting your fencing in, just measure the distance of the fence between two of your posts, and then put up some hinges in the post.
Be sure to scrape away some of the grass that may hinder the gate from smoothly opening and closing. Try to build some sort of stopper for the gate as well. Rocks aperfect candidates.

8/10/2019 Domestically Sustainable Agriculture Constructio
http://slidepdf.com/reader/full/domestically-sustainable-agriculture-constructio 11/25
8/10/2019 Domestically Sustainable Agriculture Constructio
http://slidepdf.com/reader/full/domestically-sustainable-agriculture-constructio 12/25
http://www.instructables.com/id/Domestically-Sustainable-Agriculture-Constructio/
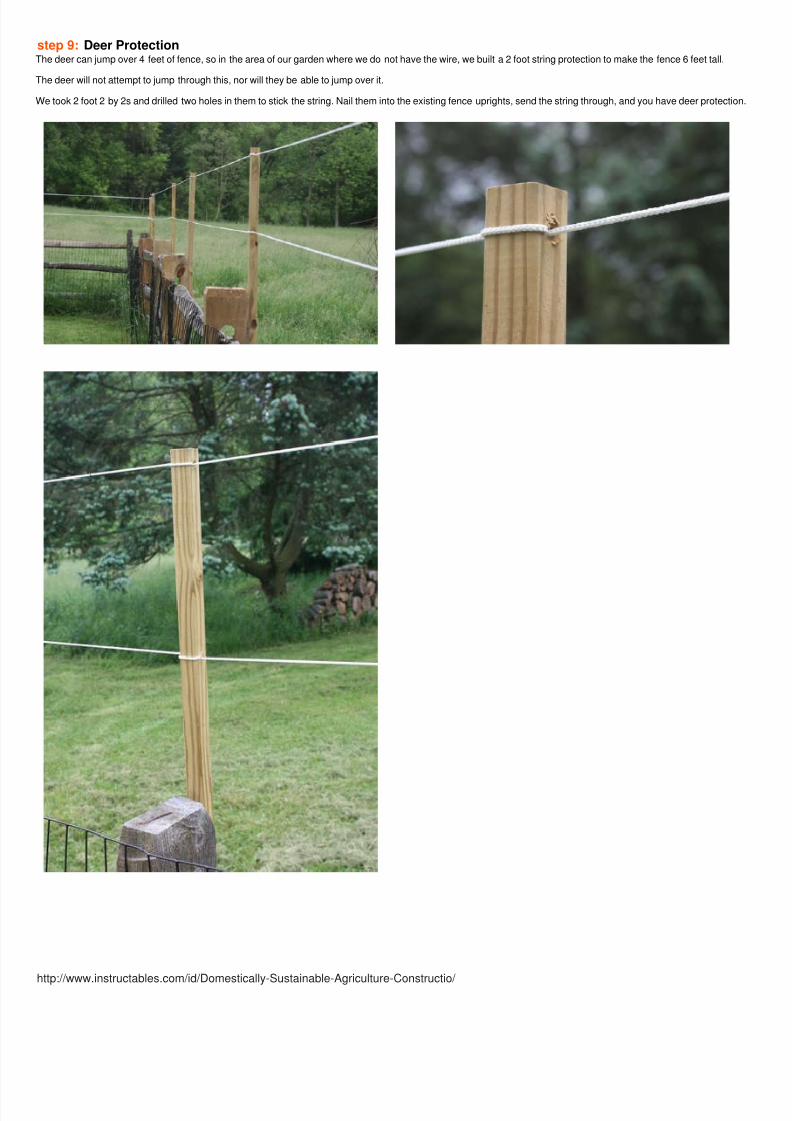
step 9: Deer ProtectionThe deer can jump over 4 feet of fence, so in the area of our garden where we do not have the wire, we built a 2 foot string protection to make the fence 6 feet tall.
The deer will not attempt to jump through this, nor will they be able to jump over it.
We took 2 foot 2 by 2s and drilled two holes in them to stick the string. Nail them into the existing fence uprights, send the string through, and you have deer protection

8/10/2019 Domestically Sustainable Agriculture Constructio
http://slidepdf.com/reader/full/domestically-sustainable-agriculture-constructio 13/25
http://www.instructables.com/id/Domestically-Sustainable-Agriculture-Constructio/
step 10: Getting your topsoilThe topsoil that we used was screened topsoil, which got rid of any roots, or extra junk that may grow in the topsoil. We found that it was cheaper to buy it in bulk, raththan buying it by the bag.
Take a tractor, or a wheel barrow, and just spread a good amount of topsoil over each one of your plots. You can put your boxes in now, or later, but you should have good outline of where your dirt should go, as a result of turning the grass over.
Put a good amount on each plot, and then place your boxes into their positions. This way you can judge how much more you will need.

8/10/2019 Domestically Sustainable Agriculture Constructio
http://slidepdf.com/reader/full/domestically-sustainable-agriculture-constructio 14/25
http://www.instructables.com/id/Domestically-Sustainable-Agriculture-Constructio/
step 11: Put the Boxes Back InNow take your boxes and dig them back into their respective plots. It is okay if they are not completely straight, lord knows that ours were not.
Once the boxes are in, spread the topsoil and add more to each box as needed. Fill them up a little more than 3/4 the way up. I would say about 85% filled up. The topwill settle a little bit, but this may be your preference.
step 12: Plant your seedsNow select the seeds you wish to plant.
We planted lettuce, herbs, peppers, green beans, carrots, potatoes, beets, tomatoes (plant), and some others I think. Read the back of each seed label for the directioon seed depth and distance from each other. Each vegetable is a little different, so it is important to pay attention to where and how you plant the seeds.
Be sure to water them to allow them to germinate, and as the soil dries up, water some more. Pretty straight forward.
I found a great guide for you all to use and it has tons of information for a huge variety of vegetables.Fedco Seeds Vegetable Chart
July 6th Update: If you do not want a ton of zucchini, you will only need to plant one or two plants. We planted 4 or 5 and have gotten waay more than weneeded!
Image Notes1. Seedlings are popping up after one week of watering each day when there was
lots of sunlight.

8/10/2019 Domestically Sustainable Agriculture Constructio
http://slidepdf.com/reader/full/domestically-sustainable-agriculture-constructio 15/25
http://www.instructables.com/id/Domestically-Sustainable-Agriculture-Constructio/
Image Notes1. Marigolds, look great with the herbs.
2. Basil3. Tomato, I believe.
step 13: After 3 WeeksAfter about 3 weeks, our plants are definitely sprouting. We have them nicely spaced, and they all look healthy. With the onset of summer, it is very important to keep
soil saturated once it looks dry. Keep an eye on the weather report so nature can water your seedlings for you.
As I walked out today, a rabbit ran out of our raspberry bushes. We will have to go purchase some liquid fence, and other repellents to keep them away. The deer havbeen taken care of, it is time for us to repel wretched Benjamin Rabbit.
We also experienced another issue. Grass chutes are starting to grow in varying spots in the beds. This is a result of mowing around the beds and the seeds are jumpinto the beds and growing. We will deal with this by just removing them as they come up, but you can improvise possibly by adding an artificial walkway area betweenbeds so you won't have to mow.

8/10/2019 Domestically Sustainable Agriculture Constructio
http://slidepdf.com/reader/full/domestically-sustainable-agriculture-constructio 16/25
http://www.instructables.com/id/Domestically-Sustainable-Agriculture-Constructio/

8/10/2019 Domestically Sustainable Agriculture Constructio
http://slidepdf.com/reader/full/domestically-sustainable-agriculture-constructio 17/25
http://www.instructables.com/id/Domestically-Sustainable-Agriculture-Constructio/
step 14: Our First Harvest!We have received our first harvest. Our strawberries are beginning to show some great signs! Today we only harvested one strawberry, but there are definitely more
coming!
We used it in a great antioxidant smoothie made of mango, blueberries, yogurt, orange juice, milk, and the lone strawberry! Delicious!
The last picture also shows great signs of what I think are our carrots. Everything works great so far, and there are no signs of animals; so we are looking good!

8/10/2019 Domestically Sustainable Agriculture Constructio
http://slidepdf.com/reader/full/domestically-sustainable-agriculture-constructio 18/25
http://www.instructables.com/id/Domestically-Sustainable-Agriculture-Constructio/
Image Notes1. Nothing beats cleaning a fresh home grown strawberry of its dirt. You just get asense of accomplishment!
Image Notes1. Here are our carrots. They look great!
step 15: Growth!Our plants have really been growing vertically and definitely horizontally! The strawberries are the only plants that have produced as of June 15th, but the other ones asoon on their way!
I am just making sure that each plant receives enough water because it is in the direct summer sunlight.
I am excited about the progress!
Image Notes1. Raspberries

8/10/2019 Domestically Sustainable Agriculture Constructio
http://slidepdf.com/reader/full/domestically-sustainable-agriculture-constructio 19/25
http://www.instructables.com/id/Domestically-Sustainable-Agriculture-Constructio/
Image Notes1. Carrots
Image Notes1. Eggplant - sadly the bugs have gotten to this one.
Image Notes1. Lettuce!
Image Notes1. Green beans

8/10/2019 Domestically Sustainable Agriculture Constructio
http://slidepdf.com/reader/full/domestically-sustainable-agriculture-constructio 20/25
http://www.instructables.com/id/Domestically-Sustainable-Agriculture-Constructio/
step 16: Our first casualtyUnfortunately, this morning when I walked out to water the plants, I found a rabbit just sitting in the broccoli, with the broccoli plants completely eaten.
The rabbit and his/her family must have been there last evening and decided to chow down.
Fortunately, that was the only casualty, so today I will purchase some rabbit repellent. Next year we plan on adding some rabbit cages around the plot for extra protecagainst these critters.
I have researched some options of rabbit repellents, and I have found many results.Natural
MarigoldMothballsHuman HairKitty litterGarlicLavender
Please give some more! Add comments!!There are also the dry and spray repellents which can be used around the bed. Companies make tons of different types; many quite similar. Some are urine based,others are blood based, and some are smell based. There is "Liquid Fence" which I have heard positive results about, and also "Cridder Ridder." If anyone has any otsuggestions, please comment!
We bought a blood based product, which we just spread around the raised beds, but not on the plants. The instructions told us not to. The bottle tells us that it has apotent smell when animals smell it, and also a toxic taste. So, if we continue to see evidence of Peter Rabbit, we will probably try a new product, or one of the naturalmethods.
UPDATE 6/24 We sprayed some liquid fence on our veggies, and so far we have not seen any traces of rabbits. Keep in mind that your repellent should tell you whethor not you can use it on edible plants.
Image Notes1. All gone :(
step 17: Chard and Baby LettuceToday we harvested some swiss chard and some baby lettuce which we planned on using for the night's dinner.
Much to our satisfaction, we had two colors of swiss chard; yellow and red. We harvested a little bit today by cutting at the base of the leave, with the stem and all. It isgreat when you saute it. First you should rinse it off, just like anything you harvest. Chop up the leaves and if you like; the stem as well. The stem can be added to a sato add a unique flavor. Once you chop the chard up, pour some olive oil in a pan, and add the chard. It will be slightly sweet, and you can add some salt to taste. it shoresemble spinach somewhat.
Our lettuce was not completely grown, but we decided to harvest a little bit of the young lettuce to mix in with some more mature lettuce that we purchased at a farmermarket.

8/10/2019 Domestically Sustainable Agriculture Constructio
http://slidepdf.com/reader/full/domestically-sustainable-agriculture-constructio 21/25
http://www.instructables.com/id/Domestically-Sustainable-Agriculture-Constructio/
Image Notes1. Ranch dressing anyone?

8/10/2019 Domestically Sustainable Agriculture Constructio
http://slidepdf.com/reader/full/domestically-sustainable-agriculture-constructio 22/25
http://www.instructables.com/id/Domestically-Sustainable-Agriculture-Constructio/
step 18: Zucchini TipsI suggest that if you don't want to be eating pounds upon pounds of zucchini every week, then plant only one or two zucchini plants.
We have harvested too much zucchini for one family to consume in a week. My mom is now planning dinners around zucchini!
When it is the size of a cucumber, or a little bigger, it is time to pick. It should be a darker green color, and nothing like the mutant, giant zucchini that is pictured belowWe like to soak cut up zucchini in soy sauce, and then sear it in a pan on low heat. We also stuffed it with sausage and other meats. It was delicious. Of course, webegan to get tired of all of the zucchini, and began to wish for our other veggies to begin growing.
Run a Google search to find some zucchini recipes. There are zucchini breads, cookies (mmm?) and probably some delicious ideas. You can always give it away to yfriends or sell it on the side of the road.
Here are a whole bunch of zucchini recipes!
Image Notes1. Zucchini bake stuffed with sausage topped with melted cheese. Eat it with yourhands, or take a fork and knife to it!
Image Notes1. What do we do with all of this zucchini?!?!

8/10/2019 Domestically Sustainable Agriculture Constructio
http://slidepdf.com/reader/full/domestically-sustainable-agriculture-constructio 23/25
http://www.instructables.com/id/Domestically-Sustainable-Agriculture-Constructio/
Image Notes1. This is the mutant zucchini. We forgot to pick it.2. Normal size, maybe even picked a little early.
step 19: Our TomatoesWe have a wide variety of tomatoes growing... Roma, grape, and beef steak. They are all looking very healthy and it looks like we will have a great crop this year.
Make sure you use tomato cages, because they will help keep your plant upright as it starts to get bigger. Keep them well watered, and your crop will be great.
Of course there are thousands of recipes using tomatoes, but my favorite is tomatoes and basil. We cut the fresh ripe tomatoes and top them with basil and freshmozzarella topped with some olive oil. It is very delicious and a healthy addition to any dinner!
Image Notes

8/10/2019 Domestically Sustainable Agriculture Constructio
http://slidepdf.com/reader/full/domestically-sustainable-agriculture-constructio 24/25
http://www.instructables.com/id/Domestically-Sustainable-Agriculture-Constructio/
1. Beef steak
step 20: CucumbersWe also harvested some great cucumbers as well! You can harvest the cucumbers when they a nice green color, and have some nice looking "warts."
Throw them on your salad, mix them with soy sauce and serve, and do what you like with them!
We are just glad to see that we have something other than zucchini this year!
step 21: ConclusionThis whole gardening experience has been a learning year, so here are some tips that we are going to be implementing next year to ensure the best crop.
Get some rabbit barriers to put up around each raised bed. I saw a groundhog this morning (7/8) in our garden, and also some rabbits! I don't trust the sprayrepellents. It is better to install some physical barriers so that you are positive that nothing will hinder your crop.If you don't want to be eating zucchini all summer, just plant one or two crops. Believe me, we planted four or five (we actually pulled some in the beginning of season) and we have been eating more zucchini than we can handle!Put some bird nets over your raspberries. Once the birds were done with our cherry tree, they went straight to the raspberries. Not next year.Separate the big plants from the small ones. Put the zucchini and potatoes in different plots than the small plants like the carrots and the strawberries. They justake over. We actually had to trim down our zucchini to give our strawberries some light!At the beginning of the season, keep in mind what you will want a lot of. We had more zucchini than we wanted, and less strawberries than we wanted. So we probably plant more strawberries next year.Don't use store brand soil; try compost! You will see a much bigger yield!HAVE FUN!
Image Notes1. Think of the potential!

8/10/2019 Domestically Sustainable Agriculture Constructio
http://slidepdf.com/reader/full/domestically-sustainable-agriculture-constructio 25/25
Advertisements