Document Object Model (DOM): Objects and Collections
25
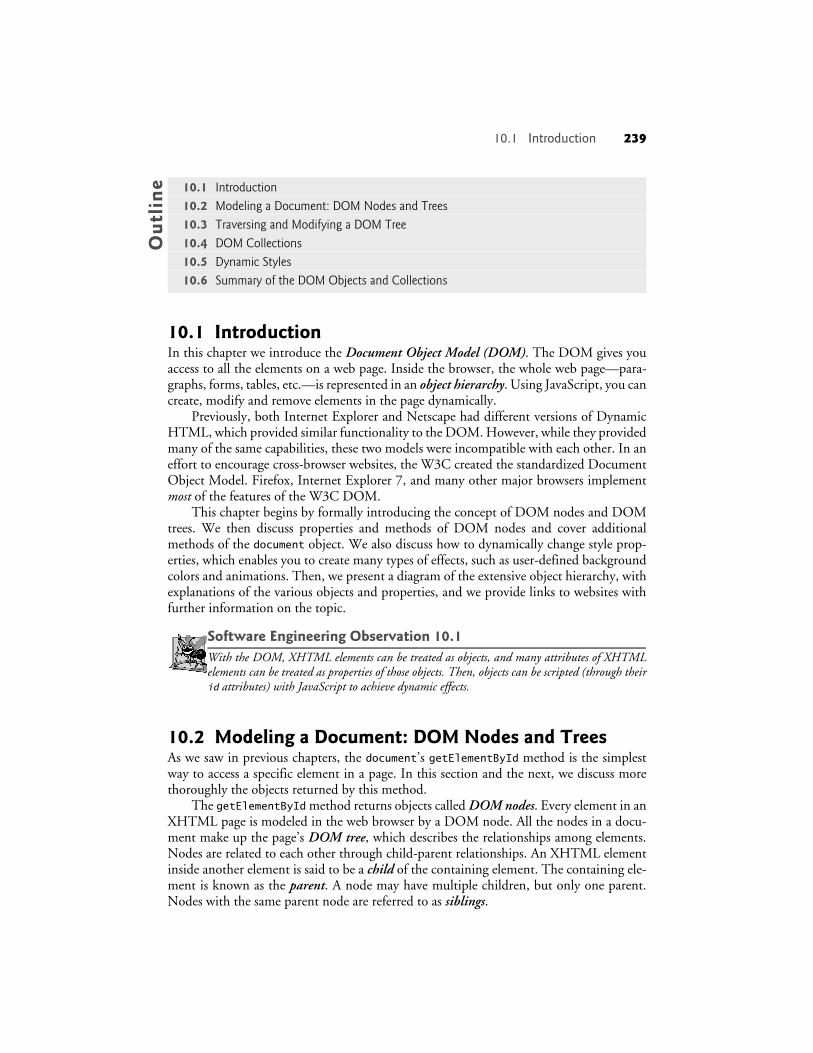
10 Document Object Model (DOM): Objects and Collections OBJECTIVES In this chapter you’ll learn: ■ To use JavaScript and the W3C Document Object Model to create dynamic web pages. ■ The concepts of DOM nodes and DOM trees. ■ To traverse, edit and modify elements in an XHTML document. ■ To change CSS styles dynamically. ■ To create JavaScript animations. Our children may learn about heroes of the past. Our task is to make ourselves architects of the future. —Jomo Mzee Kenyatta Though leaves are many, the root is one. —William Butler Yeats The thing that impresses me most about America is the way parents obey their children. —Duke of Windsor Most of us become parents long before we have stopped being children. —Mignon McLaughlin To write it, it took three months; to conceive it three minutes; to collect the data in it—all my life. —F. Scott Fitzgerald Sibling rivalry is inevitable. The only sure way to avoid it is to have one child. —Nancy Samalin
Transcript of Document Object Model (DOM): Objects and Collections
10Document Object Model (DOM): Objects and Collections
O B J E C T I V E SIn this chapter you’ll learn:
■ To use JavaScript and the W3C Document Object Model to create dynamic web pages.
■ The concepts of DOM nodes and DOM trees.
■ To traverse, edit and modify elements in an XHTML document.
■ To change CSS styles dynamically.
■ To create JavaScript animations.
Our children may learn about heroes of the past. Our task is to make ourselves architects of the future.—Jomo Mzee Kenyatta
Though leaves are many, the root is one.—William Butler Yeats
The thing that impresses me most about America is the way parents obey their children.—Duke of Windsor
Most of us become parents long before we have stopped being children.—Mignon McLaughlin
To write it, it took three months; to conceive it three minutes; to collect the data in it—all my life.—F. Scott Fitzgerald
Sibling rivalry is inevitable. The only sure way to avoid it is to have one child.—Nancy Samalin
10.1 Introduction 239O
utl
ine
10.1 IntroductionIn this chapter we introduce the Document Object Model (DOM). The DOM gives youaccess to all the elements on a web page. Inside the browser, the whole web page—para-graphs, forms, tables, etc.—is represented in an object hierarchy. Using JavaScript, you cancreate, modify and remove elements in the page dynamically.
Previously, both Internet Explorer and Netscape had different versions of DynamicHTML, which provided similar functionality to the DOM. However, while they providedmany of the same capabilities, these two models were incompatible with each other. In aneffort to encourage cross-browser websites, the W3C created the standardized DocumentObject Model. Firefox, Internet Explorer 7, and many other major browsers implementmost of the features of the W3C DOM.
This chapter begins by formally introducing the concept of DOM nodes and DOMtrees. We then discuss properties and methods of DOM nodes and cover additionalmethods of the document object. We also discuss how to dynamically change style prop-erties, which enables you to create many types of effects, such as user-defined backgroundcolors and animations. Then, we present a diagram of the extensive object hierarchy, withexplanations of the various objects and properties, and we provide links to websites withfurther information on the topic.
Software Engineering Observation 10.1With the DOM, XHTML elements can be treated as objects, and many attributes of XHTMLelements can be treated as properties of those objects. Then, objects can be scripted (through theirid attributes) with JavaScript to achieve dynamic effects. 10.1
10.2 Modeling a Document: DOM Nodes and TreesAs we saw in previous chapters, the document’s getElementById method is the simplestway to access a specific element in a page. In this section and the next, we discuss morethoroughly the objects returned by this method.
The getElementById method returns objects called DOM nodes. Every element in anXHTML page is modeled in the web browser by a DOM node. All the nodes in a docu-ment make up the page’s DOM tree, which describes the relationships among elements.Nodes are related to each other through child-parent relationships. An XHTML elementinside another element is said to be a child of the containing element. The containing ele-ment is known as the parent. A node may have multiple children, but only one parent.Nodes with the same parent node are referred to as siblings.
10.1 Introduction 10.2 Modeling a Document: DOM Nodes and Trees 10.3 Traversing and Modifying a DOM Tree 10.4 DOM Collections 10.5 Dynamic Styles 10.6 Summary of the DOM Objects and Collections
240 Chapter 10 Document Object Model (DOM): Objects and Collections
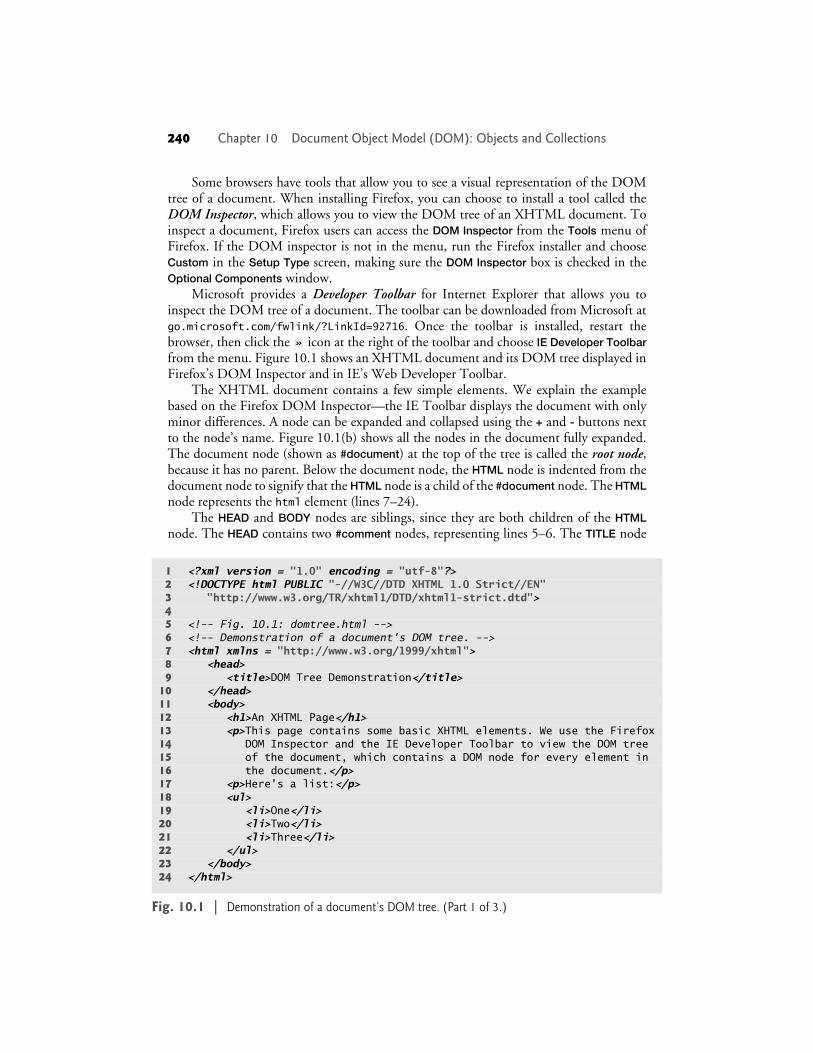
Some browsers have tools that allow you to see a visual representation of the DOMtree of a document. When installing Firefox, you can choose to install a tool called theDOM Inspector, which allows you to view the DOM tree of an XHTML document. Toinspect a document, Firefox users can access the DOM Inspector from the Tools menu ofFirefox. If the DOM inspector is not in the menu, run the Firefox installer and chooseCustom in the Setup Type screen, making sure the DOM Inspector box is checked in theOptional Components window.
Microsoft provides a Developer Toolbar for Internet Explorer that allows you toinspect the DOM tree of a document. The toolbar can be downloaded from Microsoft atgo.microsoft.com/fwlink/?LinkId=92716. Once the toolbar is installed, restart thebrowser, then click the icon at the right of the toolbar and choose IE Developer Toolbarfrom the menu. Figure 10.1 shows an XHTML document and its DOM tree displayed inFirefox’s DOM Inspector and in IE’s Web Developer Toolbar.
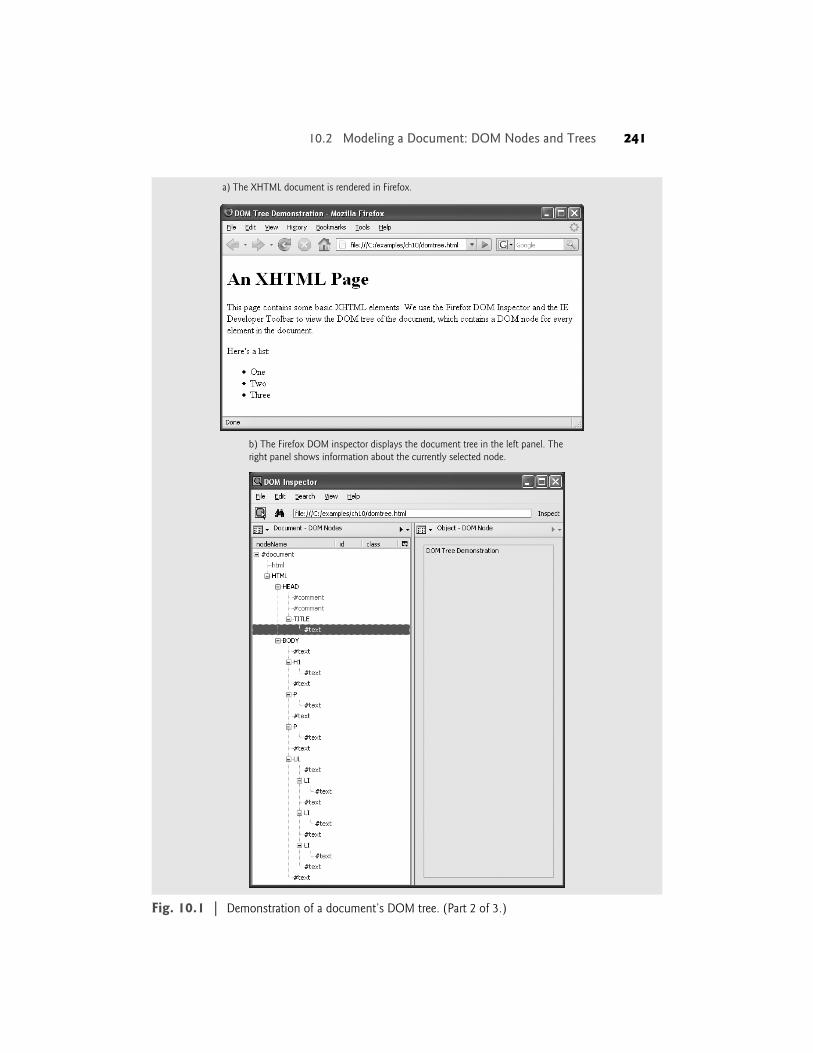
The XHTML document contains a few simple elements. We explain the examplebased on the Firefox DOM Inspector—the IE Toolbar displays the document with onlyminor differences. A node can be expanded and collapsed using the + and - buttons nextto the node’s name. Figure 10.1(b) shows all the nodes in the document fully expanded.The document node (shown as #document) at the top of the tree is called the root node,because it has no parent. Below the document node, the HTML node is indented from thedocument node to signify that the HTML node is a child of the #document node. The HTMLnode represents the html element (lines 7–24).
The HEAD and BODY nodes are siblings, since they are both children of the HTMLnode. The HEAD contains two #comment nodes, representing lines 5–6. The TITLE node
1 <?xml version = "1.0" encoding = "utf-8"?>2 <!DOCTYPE html PUBLIC "-//W3C//DTD XHTML 1.0 Strict//EN"3 "http://www.w3.org/TR/xhtml1/DTD/xhtml1-strict.dtd">45 <!-- Fig. 10.1: domtree.html -->6 <!-- Demonstration of a document's DOM tree. -->7 <html xmlns = "http://www.w3.org/1999/xhtml">8 <head>9 <title>DOM Tree Demonstration</title>
10 </head>11 <body>12 <h1>An XHTML Page</h1>13 <p>This page contains some basic XHTML elements. We use the Firefox 14 DOM Inspector and the IE Developer Toolbar to view the DOM tree 15 of the document, which contains a DOM node for every element in16 the document.</p>17 <p>Here's a list:</p>18 <ul>19 <li>One</li>20 <li>Two</li>21 <li>Three</li>22 </ul>23 </body>24 </html>
Fig. 10.1 | Demonstration of a document’s DOM tree. (Part 1 of 3.)
10.2 Modeling a Document: DOM Nodes and Trees 241
Fig. 10.1 | Demonstration of a document’s DOM tree. (Part 2 of 3.)
a) The XHTML document is rendered in Firefox.
b) The Firefox DOM inspector displays the document tree in the left panel. The right panel shows information about the currently selected node.
242 Chapter 10 Document Object Model (DOM): Objects and Collections
has a child text node (#text) containing the text DOM Tree Demonstration, visible in theright pane of the DOM inspector when the text node is selected. The BODY node containsnodes representing each of the elements in the page. Note that the LI nodes are childrenof the UL node, since they are nested inside it.
Also, notice that, in addition to the text nodes representing the text inside the body,paragraphs and list elements, a number of other text nodes appear in the document. Thesetext nodes contain nothing but white space. When Firefox parses an XHTML documentinto a DOM tree, the white space between sibling elements is interpreted as text andplaced inside text nodes. Internet Explorer ignores white space and does not convert it intoempty text nodes. If you run this example on your own computer, you will notice that theBODY node has a #comment child node not present above in both the Firefox and InternetExplorer DOM trees. This is a result of the copyright line at the end of the example filethat you downloaded.
This section introduced the concept of DOM nodes and DOM trees. The next sec-tion considers DOM nodes in more detail, discussing methods and properties of DOMnodes that allow you to modify the DOM tree of a document using JavaScript.
10.3 Traversing and Modifying a DOM TreeThe DOM gives you access to the elements of a document, allowing you to modify thecontents of a page dynamically using event-driven JavaScript. This section introduces
Fig. 10.1 | Demonstration of a document’s DOM tree. (Part 3 of 3.)
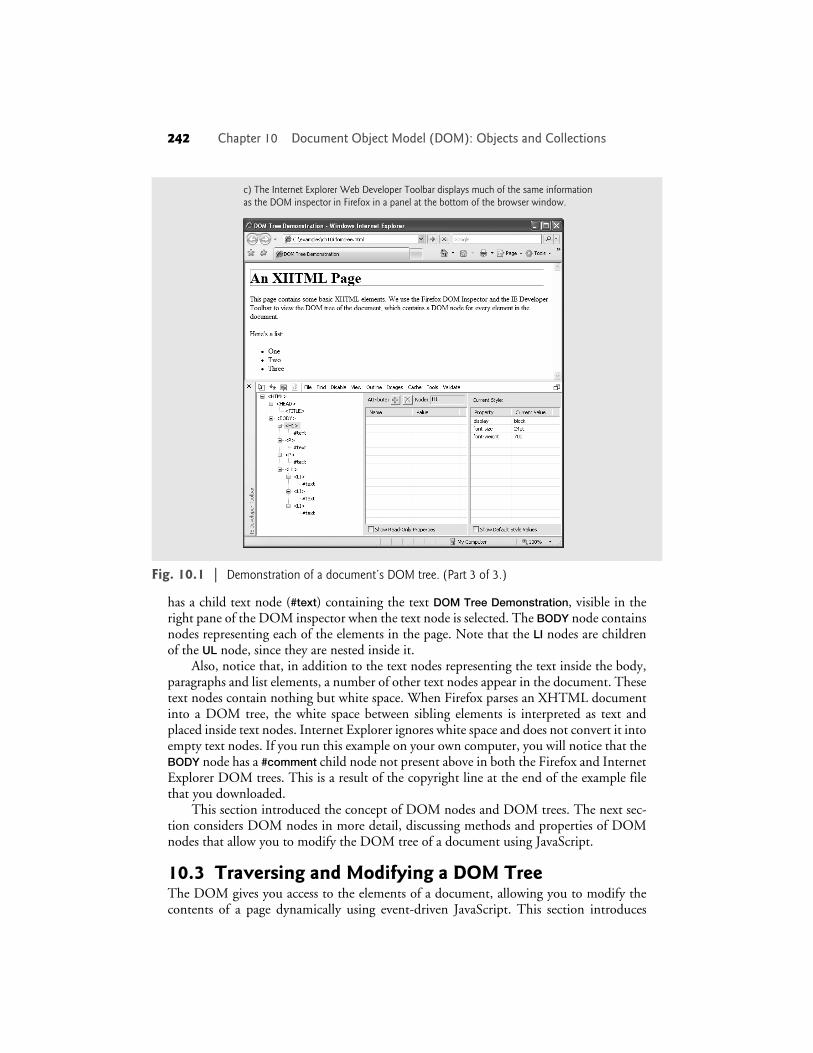
c) The Internet Explorer Web Developer Toolbar displays much of the same information as the DOM inspector in Firefox in a panel at the bottom of the browser window.
10.3 Traversing and Modifying a DOM Tree 243
properties and methods of all DOM nodes that enable you to traverse the DOM tree,modify nodes and create or delete content dynamically.
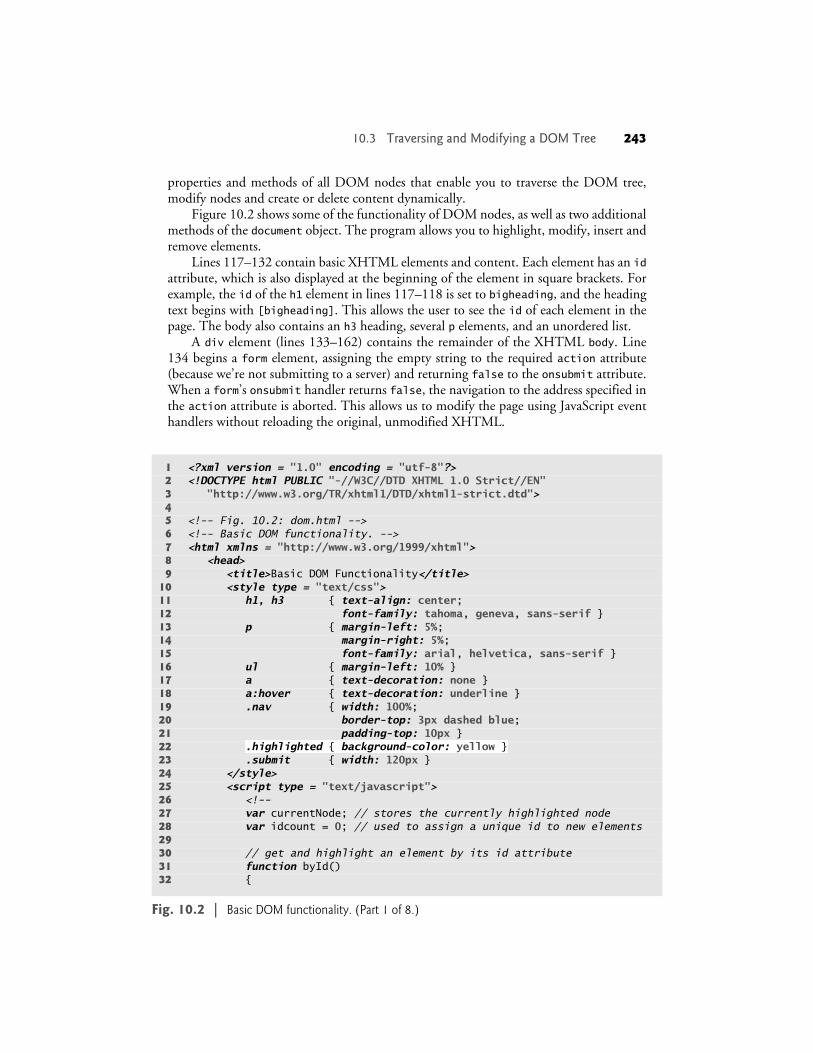
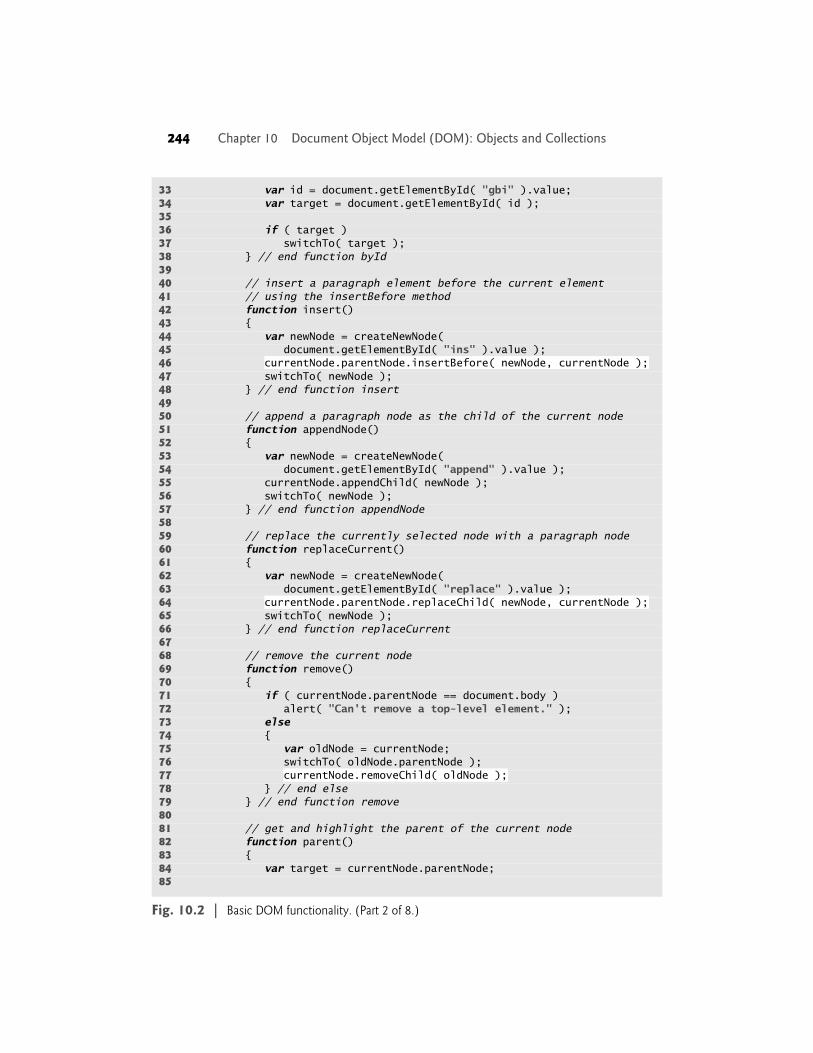
Figure 10.2 shows some of the functionality of DOM nodes, as well as two additionalmethods of the document object. The program allows you to highlight, modify, insert andremove elements.
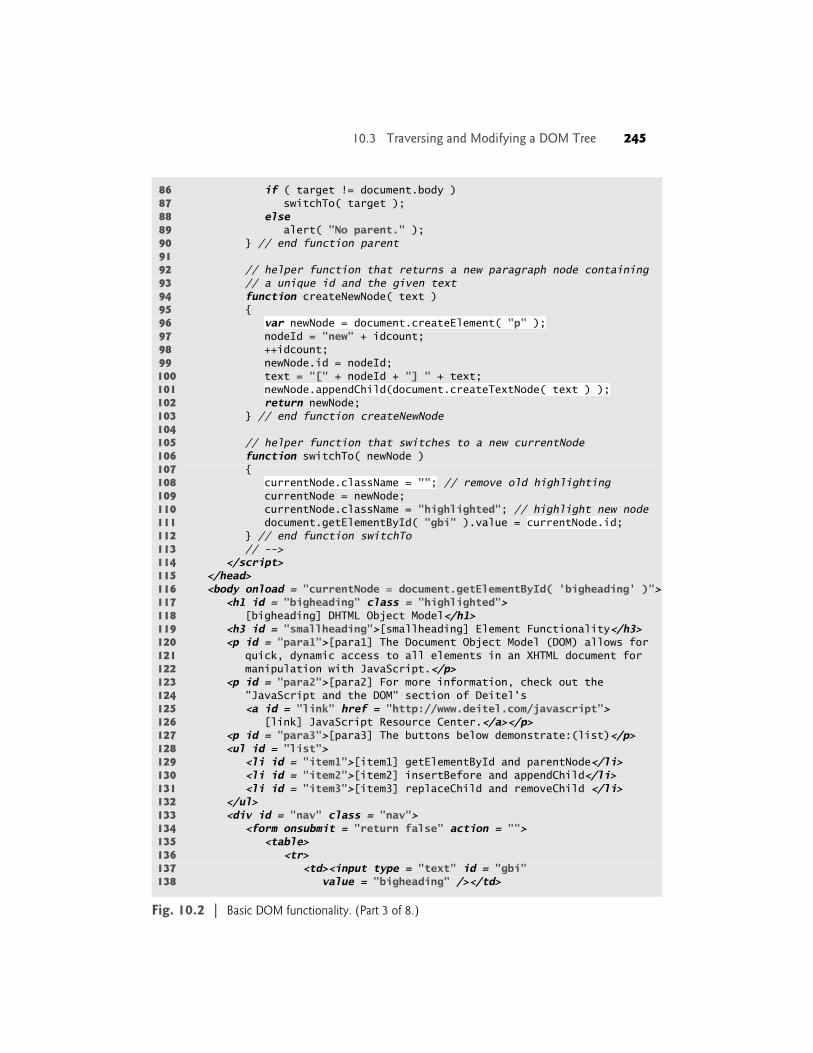
Lines 117–132 contain basic XHTML elements and content. Each element has an idattribute, which is also displayed at the beginning of the element in square brackets. Forexample, the id of the h1 element in lines 117–118 is set to bigheading, and the headingtext begins with [bigheading]. This allows the user to see the id of each element in thepage. The body also contains an h3 heading, several p elements, and an unordered list.
A div element (lines 133–162) contains the remainder of the XHTML body. Line134 begins a form element, assigning the empty string to the required action attribute(because we’re not submitting to a server) and returning false to the onsubmit attribute.When a form’s onsubmit handler returns false, the navigation to the address specified inthe action attribute is aborted. This allows us to modify the page using JavaScript eventhandlers without reloading the original, unmodified XHTML.
1 <?xml version = "1.0" encoding = "utf-8"?>2 <!DOCTYPE html PUBLIC "-//W3C//DTD XHTML 1.0 Strict//EN"3 "http://www.w3.org/TR/xhtml1/DTD/xhtml1-strict.dtd">45 <!-- Fig. 10.2: dom.html -->6 <!-- Basic DOM functionality. -->7 <html xmlns = "http://www.w3.org/1999/xhtml">8 <head>9 <title>Basic DOM Functionality</title>
10 <style type = "text/css">11 h1, h3 { text-align: center;12 font-family: tahoma, geneva, sans-serif }13 p { margin-left: 5%;14 margin-right: 5%;15 font-family: arial, helvetica, sans-serif }16 ul { margin-left: 10% }17 a { text-decoration: none }18 a:hover { text-decoration: underline }19 .nav { width: 100%;20 border-top: 3px dashed blue;21 padding-top: 10px }22 23 .submit { width: 120px }24 </style>25 <script type = "text/javascript">26 <!--27 var currentNode; // stores the currently highlighted node28 var idcount = 0; // used to assign a unique id to new elements2930 // get and highlight an element by its id attribute31 function byId()32 {
Fig. 10.2 | Basic DOM functionality. (Part 1 of 8.)
.highlighted { background-color: yellow }
244 Chapter 10 Document Object Model (DOM): Objects and Collections
33 var id = document.getElementById( "gbi" ).value;34 var target = document.getElementById( id );3536 if ( target )37 switchTo( target );38 } // end function byId3940 // insert a paragraph element before the current element41 // using the insertBefore method42 function insert()43 {44 var newNode = createNewNode(45 document.getElementById( "ins" ).value );46 47 switchTo( newNode );48 } // end function insert4950 // append a paragraph node as the child of the current node51 function appendNode()52 {53 var newNode = createNewNode(54 document.getElementById( "append" ).value );55 currentNode.appendChild( newNode );56 switchTo( newNode );57 } // end function appendNode5859 // replace the currently selected node with a paragraph node60 function replaceCurrent()61 {62 var newNode = createNewNode(63 document.getElementById( "replace" ).value );64 65 switchTo( newNode );66 } // end function replaceCurrent6768 // remove the current node69 function remove()70 {71 if ( currentNode.parentNode == document.body )72 alert( "Can't remove a top-level element." );73 else74 {75 var oldNode = currentNode;76 switchTo( oldNode.parentNode );77 78 } // end else79 } // end function remove8081 // get and highlight the parent of the current node82 function parent()83 {84 var target = currentNode.parentNode;85
Fig. 10.2 | Basic DOM functionality. (Part 2 of 8.)
currentNode.parentNode.insertBefore( newNode, currentNode );
currentNode.parentNode.replaceChild( newNode, currentNode );
currentNode.removeChild( oldNode );
10.3 Traversing and Modifying a DOM Tree 245
86 if ( target != document.body )87 switchTo( target );88 else89 alert( "No parent." );90 } // end function parent9192 // helper function that returns a new paragraph node containing93 // a unique id and the given text94 function createNewNode( text )95 {96 97 nodeId = "new" + idcount;98 ++idcount;99 newNode.id = nodeId;100 text = "[" + nodeId + "] " + text;101 102 return newNode;103 } // end function createNewNode104105 // helper function that switches to a new currentNode106 function switchTo( newNode )107 {108 // remove old highlighting109 currentNode = newNode;110 currentNode.className = "highlighted"; // highlight new node111 document.getElementById( "gbi" ).value = ;112 } // end function switchTo113 // -->114 </script>115 </head>116 <body onload = "currentNode = document.getElementById( 'bigheading' )">117 <h1 id = "bigheading" class = "highlighted">118 [bigheading] DHTML Object Model</h1>119 <h3 id = "smallheading">[smallheading] Element Functionality</h3>120 <p id = "para1">[para1] The Document Object Model (DOM) allows for121 quick, dynamic access to all elements in an XHTML document for122 manipulation with JavaScript.</p>123 <p id = "para2">[para2] For more information, check out the124 "JavaScript and the DOM" section of Deitel's125 <a id = "link" href = "http://www.deitel.com/javascript">126 [link] JavaScript Resource Center.</a></p>127 <p id = "para3">[para3] The buttons below demonstrate:(list)</p>128 <ul id = "list">129 <li id = "item1">[item1] getElementById and parentNode</li>130 <li id = "item2">[item2] insertBefore and appendChild</li>131 <li id = "item3">[item3] replaceChild and removeChild </li>132 </ul>133 <div id = "nav" class = "nav">134 <form onsubmit = "return false" action = "">135 <table>136 <tr>137 <td><input type = "text" id = "gbi"138 value = "bigheading" /></td>
Fig. 10.2 | Basic DOM functionality. (Part 3 of 8.)
var newNode = document.createElement( "p" );
newNode.appendChild(document.createTextNode( text ) );
currentNode.className = "";
currentNode.id
246 Chapter 10 Document Object Model (DOM): Objects and Collections
139 <td><input type = "submit" value = "Get By id"140 onclick = "byId()" class = "submit" /></td>141 </tr><tr>142 <td><input type = "text" id = "ins" /></td>143 <td><input type = "submit" value = "Insert Before"144 onclick = "insert()" class = "submit" /></td>145 </tr><tr>146 <td><input type = "text" id = "append" /></td>147 <td><input type = "submit" value = "Append Child"148 onclick = "appendNode()" class = "submit" /></td>149 </tr><tr>150 <td><input type = "text" id = "replace" /></td>151 <td><input type = "submit" value = "Replace Current"152 onclick = "replaceCurrent()" class = "submit" /></td>153 </tr><tr><td />154 <td><input type = "submit" value = "Remove Current"155 onclick = "remove()" class = "submit" /></td>156 </tr><tr><td />157 <td><input type = "submit" value = "Get Parent"158 onclick = "parent()" class = "submit" /></td>159 </tr>160 </table>161 </form>162 </div>163 </body>164 </html>
Fig. 10.2 | Basic DOM functionality. (Part 4 of 8.)
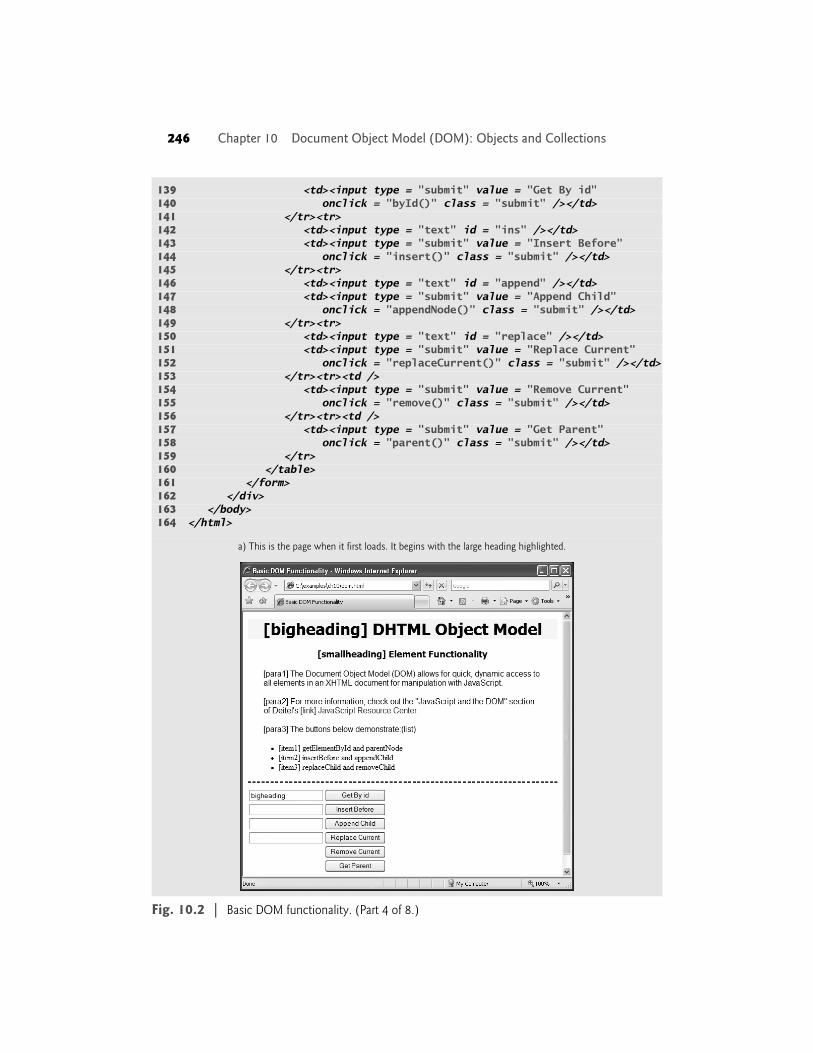
a) This is the page when it first loads. It begins with the large heading highlighted.
10.3 Traversing and Modifying a DOM Tree 247
Fig. 10.2 | Basic DOM functionality. (Part 5 of 8.)
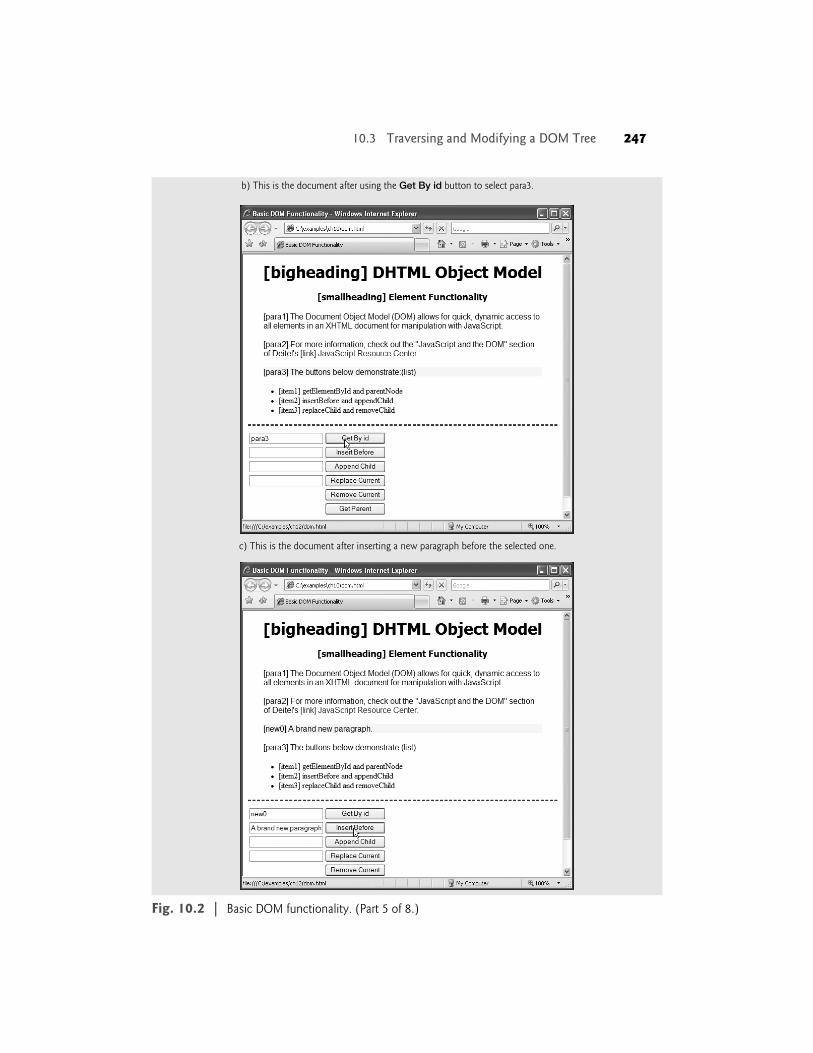
b) This is the document after using the Get By id button to select para3.
c) This is the document after inserting a new paragraph before the selected one.
248 Chapter 10 Document Object Model (DOM): Objects and Collections
Fig. 10.2 | Basic DOM functionality. (Part 6 of 8.)
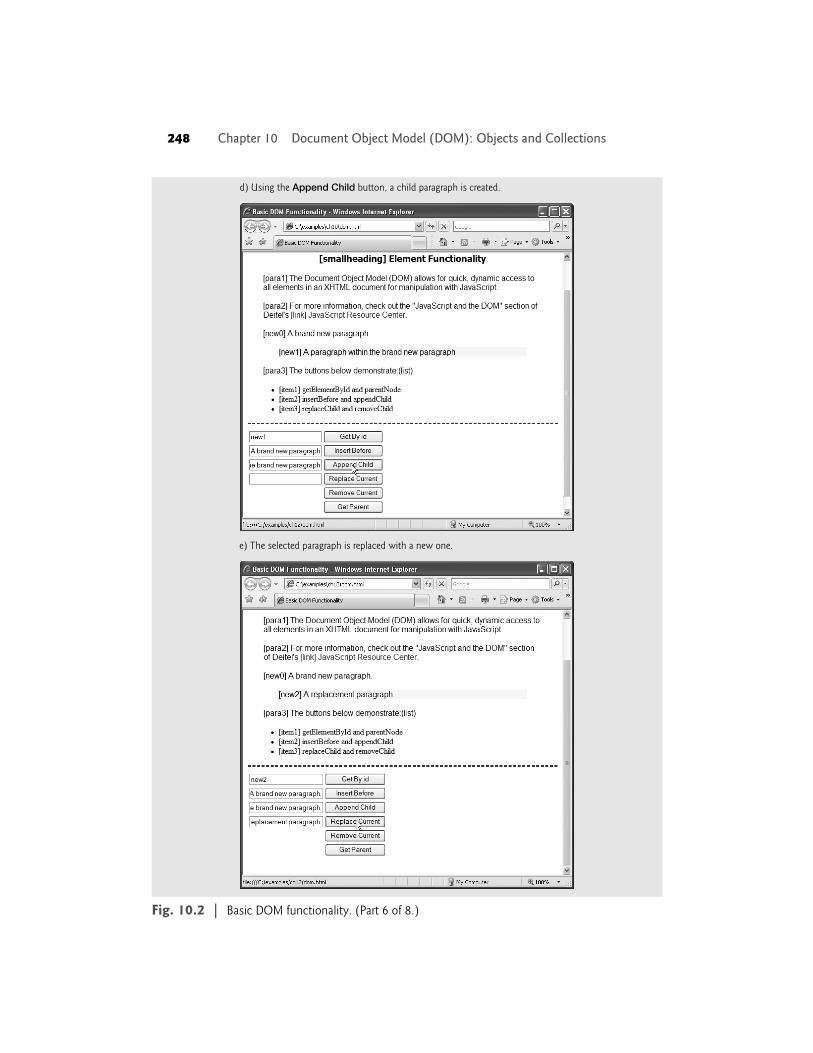
d) Using the Append Child button, a child paragraph is created.
e) The selected paragraph is replaced with a new one.
10.3 Traversing and Modifying a DOM Tree 249
Fig. 10.2 | Basic DOM functionality. (Part 7 of 8.)
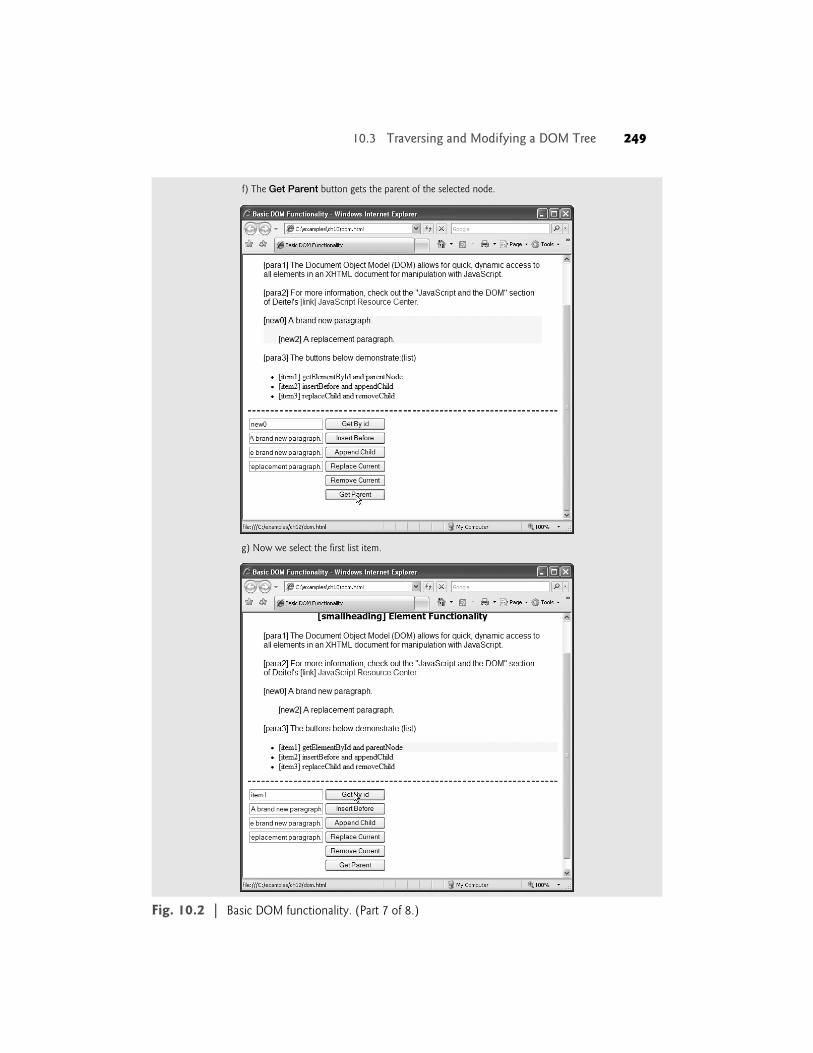
f) The Get Parent button gets the parent of the selected node.
g) Now we select the first list item.
250 Chapter 10 Document Object Model (DOM): Objects and Collections
A table (lines 135–160) contains the controls for modifying and manipulating theelements on the page. Each of the six buttons calls its own event-handling function to per-form the action described by its value.
The JavaScript code begins by declaring two variables. The variable currentNode (line27) keeps track of the currently highlighted node, because the functionality of the buttonsdepends on which node is currently selected. The body’s onload attribute (line 116) ini-tializes currentNode to the h1 element with id bigheading. Variable idcount (line 28) isused to assign a unique id to any new elements that are created. The remainder of the Java-Script code contains event handling functions for the XHTML buttons and two helperfunctions that are called by the event handlers. We now discuss each button and its corre-sponding event handler in detail.
Finding and Highlighting an Element Using getElementById and classNameThe first row of the table (lines 136-141) allows the user to enter the id of an element intothe text field (lines 137–138) and click the Get By Id button (lines 139–140) to find andhighlight the element, as shown in Fig. 10.2(b) and (g). The onclick attribute sets thebutton’s event handler to function byId.
The byId function is defined in lines 31–38. Line 33 uses getElementById to assignthe contents of the text field to variable id. Line 34 uses getElementById again to find theelement whose id attribute matches the contents of variable id, and assign it to variabletarget. If an element is found with the given id, getElementById returns an object rep-
Fig. 10.2 | Basic DOM functionality. (Part 8 of 8.)
h) The Remove Current button removes the current node and selects its parent.
10.3 Traversing and Modifying a DOM Tree 251
resenting that element. If no element is found, getElementById returns null. Line 36checks whether target is an object—recall that any object used as a boolean expression istrue, while null is false. If target evaluates to true, line 37 calls the switchTo functionwith target as its argument.
The switchTo function, defined in lines 106–112, is used throughout the programto highlight a new element in the page. The current element is given a yellow backgroundusing the style class highlighted, defined in line 22. Line 108 sets the current node’sclassName property to the empty string. The className property allows you to changean XHTML element’s class attribute. In this case, we clear the class attribute in orderto remove the highlighted class from the currentNode before we highlight the new one.
Line 109 assigns the newNode object (passed into the function as a parameter) to vari-able currentNode. Line 110 adds the highlighted style class to the new currentNodeusing the className property.
Finally, line 111 uses the id property to assign the current node’s id to the inputfield’s value property. Just as className allows access to an element’s class attribute, theid property controls an element’s id attribute. While this isn’t necessary when switchTois called by byId, we will see shortly that other functions call switchTo. This line makessure that the text field’s value is consistent with the currently selected node’s id. Havingfound the new element, removed the highlighting from the old element, updated the cur-rentNode variable and highlighted the new element, the program has finished selecting anew node by a user-entered id.
Creating and Inserting Elements Using insertBefore and appendChildThe next two table rows allow the user to create a new element and insert it before thecurrent node or as a child of the current node. The second row (lines 141–145) allows theuser to enter text into the text field and click the Insert Before button. The text is placedin a new paragraph element, which is then inserted into the document before the currentlyselected element, as in Fig. 10.2(c). The button in lines 143–144 calls the insert func-tion, defined in lines 42–48.
Lines 44–45 call the function createNewNode, passing it the value of the input field(whose id is ins) as an argument. Function createNewNode, defined in lines 94–103, cre-ates a paragraph node containing the text passed to it. Line 96 creates a p element usingthe document object’s createElement method. The createElement method creates a newDOM node, taking the tag name as an argument. Note that while createElement createsan element, it does not insert the element on the page.
Line 97 creates a unique id for the new element by concatenating "new" and the valueof idcount before incrementing idcount in line 98. Line 99 assigns the id to the new ele-ment. Line 100 concatenates the element’s id in square brackets to the beginning of text(the parameter containing the paragraph’s text).
Line 101 introduces two new methods. The document’s createTextNode method cre-ates a node that can contain only text. Given a string argument, createTextNode insertsthe string into the text node. In line 101, we create a new text node containing the contentsof variable text. This new node is then used (still in line 101) as the argument to theappendChild method, which is called on the paragraph node. Method appendChild iscalled on a parent node to insert a child node (passed as an argument) after any existingchildren.
252 Chapter 10 Document Object Model (DOM): Objects and Collections
After the p element is created, line 102 returns the node to the calling functioninsert, where it is assigned to variable newNode in lines 44–45. Line 46 inserts the newlycreated node before the currently selected node. The parentNode property of any DOMnode contains the node’s parent. In line 46, we use the parentNode property of current-Node to get its parent.
We call the insertBefore method (line 46) on the parent with newNode and cur-rentNode as its arguments to insert newNode as a child of the parent directly before cur-rentNode. The general syntax of the insertBefore method is
parent.insertBefore( newChild, existingChild );
The method is called on a parent with the new child and an existing child as arguments.The node newChild is inserted as a child of parent directly before existingChild. Line 47uses the switchTo function (discussed earlier in this section) to update the currentNodeto the newly inserted node and highlight it in the XHTML page.
The third table row (lines 145–149) allows the user to append a new paragraph nodeas a child of the current element, demonstrated in Fig. 10.2(d). This feature uses a similarprocedure to the insertBefore functionality. Lines 53–54 in function appendNode createa new node, line 55 inserts it as a child of the current node, and line 56 uses switchTo toupdate currentNode and highlight the new node.
Replacing and Removing Elements Using replaceChild and removeChildThe next two table rows (lines 149–156) allow the user to replace the current element witha new p element or simply remove the current element. Lines 150–152 contain a text fieldand a button that replaces the currently highlighted element with a new paragraph nodecontaining the text in the text field. This feature is demonstrated in Fig. 10.2(e).
The button in lines 151–152 calls function replaceCurrent, defined in lines 60–66.Lines 62–63 call createNewNode, in the same way as in insert and appendNode, gettingthe text from the correct input field. Line 64 gets the parent of currentNode, then callsthe replaceChild method on the parent. The replaceChild method works as follows:
parent.replaceChild( newChild, oldChild );
The parent’s replaceChild method inserts newChild into its list of children in place of old-Child.
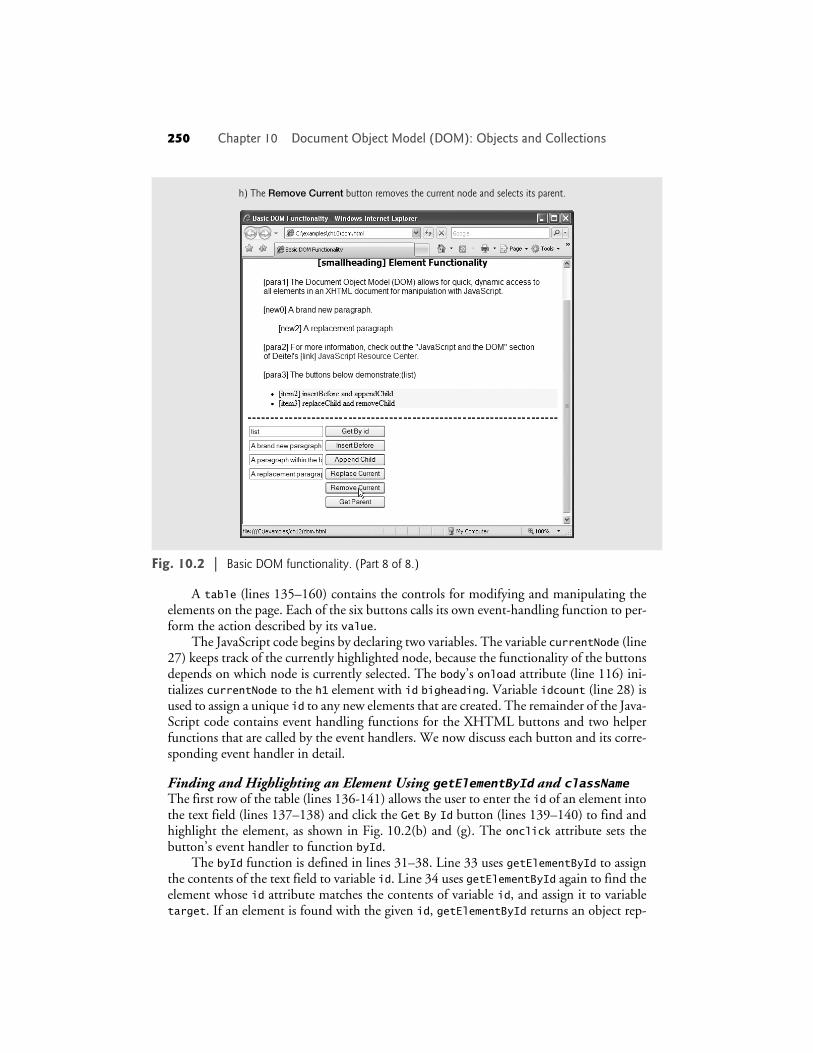
The Remove Current feature, shown in Fig. 10.2(h), removes the current elemententirely and highlights the parent. No text field is required because a new element is notbeing created. The button in lines 154-155 calls the remove function, defined in lines 69–79. If the node’s parent is the body element, line 72 alerts an error—the program does notallow the entire body element to be selected. Otherwise, lines 75–77 remove the currentelement. Line 75 stores the old currentNode in variable oldNode. We do this to maintaina reference to the node to be removed after we’ve changed the value of currentNode. Line76 calls switchTo to highlight the parent node.
Line 77 uses the removeChild method to remove the oldNode (a child of the newcurrentNode) from its place in the XHTML document. In general,
parent.removeChild( child );
looks in parent’s list of children for child and removes it.
10.4 DOM Collections 253
The final button (lines 157–158) selects and highlights the parent element of the cur-rently highlighted element by calling the parent function, defined in lines 82–90. Func-tion parent simply gets the parent node (line 84), makes sure it is not the body element,(line 86) and calls switchTo to highlight it (line 87). Line 89 alerts an error if the parentnode is the body element. This feature is shown in Fig. 10.2(f).
This section introduced the basics of DOM tree traversal and manipulation. Next, weintroduce the concept of collections, which give you access to multiple elements in a page.
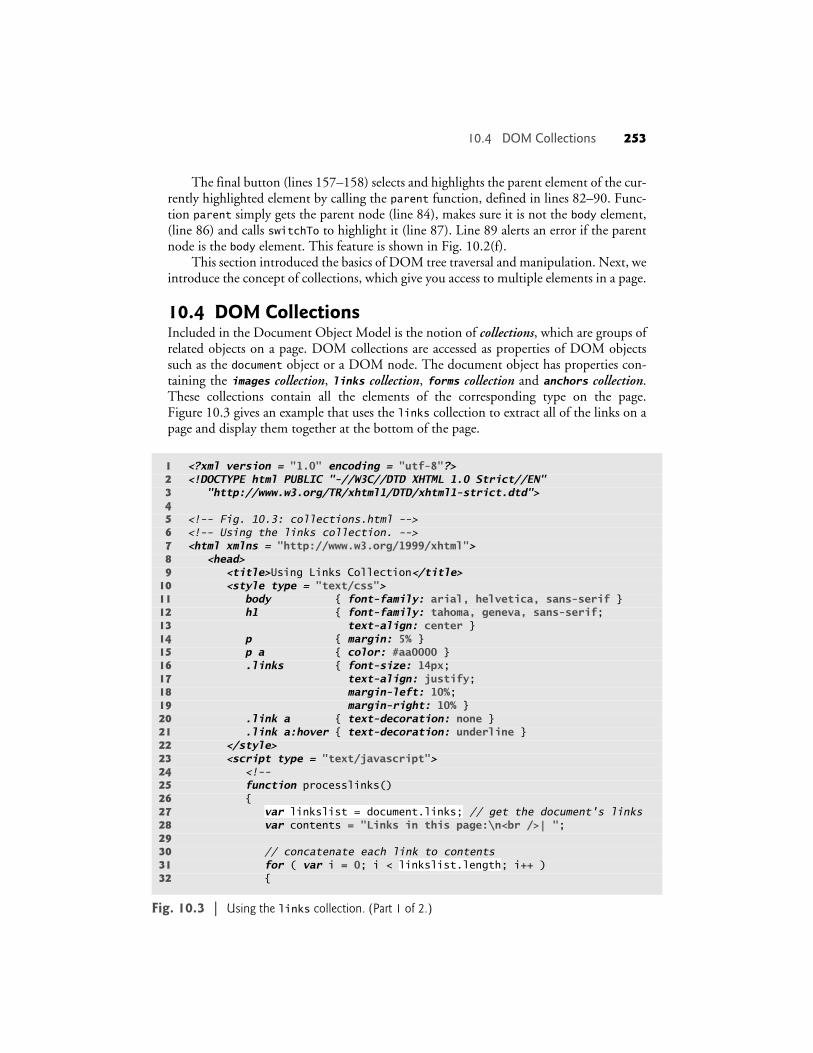
10.4 DOM CollectionsIncluded in the Document Object Model is the notion of collections, which are groups ofrelated objects on a page. DOM collections are accessed as properties of DOM objectssuch as the document object or a DOM node. The document object has properties con-taining the images collection, links collection, forms collection and anchors collection.These collections contain all the elements of the corresponding type on the page.Figure 10.3 gives an example that uses the links collection to extract all of the links on apage and display them together at the bottom of the page.
1 <?xml version = "1.0" encoding = "utf-8"?>2 <!DOCTYPE html PUBLIC "-//W3C//DTD XHTML 1.0 Strict//EN"3 "http://www.w3.org/TR/xhtml1/DTD/xhtml1-strict.dtd">45 <!-- Fig. 10.3: collections.html -->6 <!-- Using the links collection. -->7 <html xmlns = "http://www.w3.org/1999/xhtml">8 <head>9 <title>Using Links Collection</title>
10 <style type = "text/css">11 body { font-family: arial, helvetica, sans-serif }12 h1 { font-family: tahoma, geneva, sans-serif;13 text-align: center }14 p { margin: 5% }15 p a { color: #aa0000 }16 .links { font-size: 14px;17 text-align: justify;18 margin-left: 10%;19 margin-right: 10% }20 .link a { text-decoration: none }21 .link a:hover { text-decoration: underline }22 </style>23 <script type = "text/javascript">24 <!--25 function processlinks()26 {27 // get the document's links28 var contents = "Links in this page:\n<br />| ";2930 // concatenate each link to contents31 for ( var i = 0; i < ; i++ )32 {
Fig. 10.3 | Using the links collection. (Part 1 of 2.)
var linkslist = document.links;
linkslist.length

254 Chapter 10 Document Object Model (DOM): Objects and Collections
33 34 contents += "<span class = 'link'>" + 35 36 "</span> | ";37 } // end for3839 document.getElementById( "links" ).innerHTML = contents;40 } // end function processlinks41 // -->42 </script>43 </head>44 <body onload = "processlinks()">45 <h1>Deitel Resource Centers</h1>46 <p><a href = "http://www.deitel.com/">Deitel's website</a> contains47 a rapidly growing48 <a href = "http://www.deitel.com/ResourceCenters.html">list of49 Resource Centers</a> on a wide range of topics. Many Resource50 centers related to topics covered in this book, 51 <a href = "http://www.deitel.com/iw3htp4">Internet and World Wide52 Web How to Program, 4th Edition</a>. We have Resouce Centers on53 <a href = "http://www.deitel.com/Web2.0">Web 2.0</a>,54 <a href = "http://www.deitel.com/Firefox">Firefox</a> and55 <a href = "http://www.deitel.com/IE7">Internet Explorer 7</a>,56 <a href = "http://www.deitel.com/XHTML">XHTML</a>, and57 <a href = "http://www.deitel.com/JavaScript">JavaScript</a>.58 Watch the list of Deitel Resource Centers for related new59 Resource Centers.</p>60 <div id = "links" class = "links"></div>61 </body>62 </html>
Fig. 10.3 | Using the links collection. (Part 2 of 2.)
var currentLink = linkslist[ i ];
currentLink.innerHTML.link( currentLink.href ) +
10.5 Dynamic Styles 255
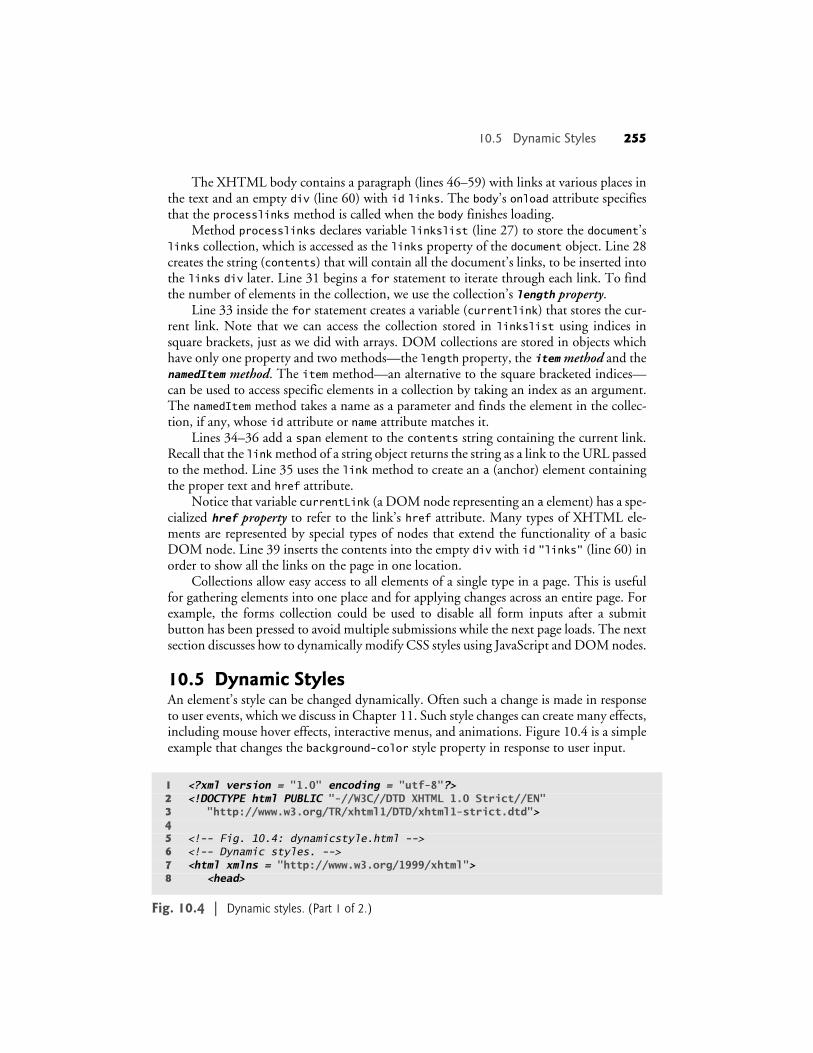
The XHTML body contains a paragraph (lines 46–59) with links at various places inthe text and an empty div (line 60) with id links. The body’s onload attribute specifiesthat the processlinks method is called when the body finishes loading.
Method processlinks declares variable linkslist (line 27) to store the document’slinks collection, which is accessed as the links property of the document object. Line 28creates the string (contents) that will contain all the document’s links, to be inserted intothe links div later. Line 31 begins a for statement to iterate through each link. To findthe number of elements in the collection, we use the collection’s length property.
Line 33 inside the for statement creates a variable (currentlink) that stores the cur-rent link. Note that we can access the collection stored in linkslist using indices insquare brackets, just as we did with arrays. DOM collections are stored in objects whichhave only one property and two methods—the length property, the item method and thenamedItem method. The item method—an alternative to the square bracketed indices—can be used to access specific elements in a collection by taking an index as an argument.The namedItem method takes a name as a parameter and finds the element in the collec-tion, if any, whose id attribute or name attribute matches it.
Lines 34–36 add a span element to the contents string containing the current link.Recall that the link method of a string object returns the string as a link to the URL passedto the method. Line 35 uses the link method to create an a (anchor) element containingthe proper text and href attribute.
Notice that variable currentLink (a DOM node representing an a element) has a spe-cialized href property to refer to the link’s href attribute. Many types of XHTML ele-ments are represented by special types of nodes that extend the functionality of a basicDOM node. Line 39 inserts the contents into the empty div with id "links" (line 60) inorder to show all the links on the page in one location.
Collections allow easy access to all elements of a single type in a page. This is usefulfor gathering elements into one place and for applying changes across an entire page. Forexample, the forms collection could be used to disable all form inputs after a submitbutton has been pressed to avoid multiple submissions while the next page loads. The nextsection discusses how to dynamically modify CSS styles using JavaScript and DOM nodes.
10.5 Dynamic StylesAn element’s style can be changed dynamically. Often such a change is made in responseto user events, which we discuss in Chapter 11. Such style changes can create many effects,including mouse hover effects, interactive menus, and animations. Figure 10.4 is a simpleexample that changes the background-color style property in response to user input.
1 <?xml version = "1.0" encoding = "utf-8"?>2 <!DOCTYPE html PUBLIC "-//W3C//DTD XHTML 1.0 Strict//EN"3 "http://www.w3.org/TR/xhtml1/DTD/xhtml1-strict.dtd">45 <!-- Fig. 10.4: dynamicstyle.html -->6 <!-- Dynamic styles. -->7 <html xmlns = "http://www.w3.org/1999/xhtml">8 <head>
Fig. 10.4 | Dynamic styles. (Part 1 of 2.)
256 Chapter 10 Document Object Model (DOM): Objects and Collections
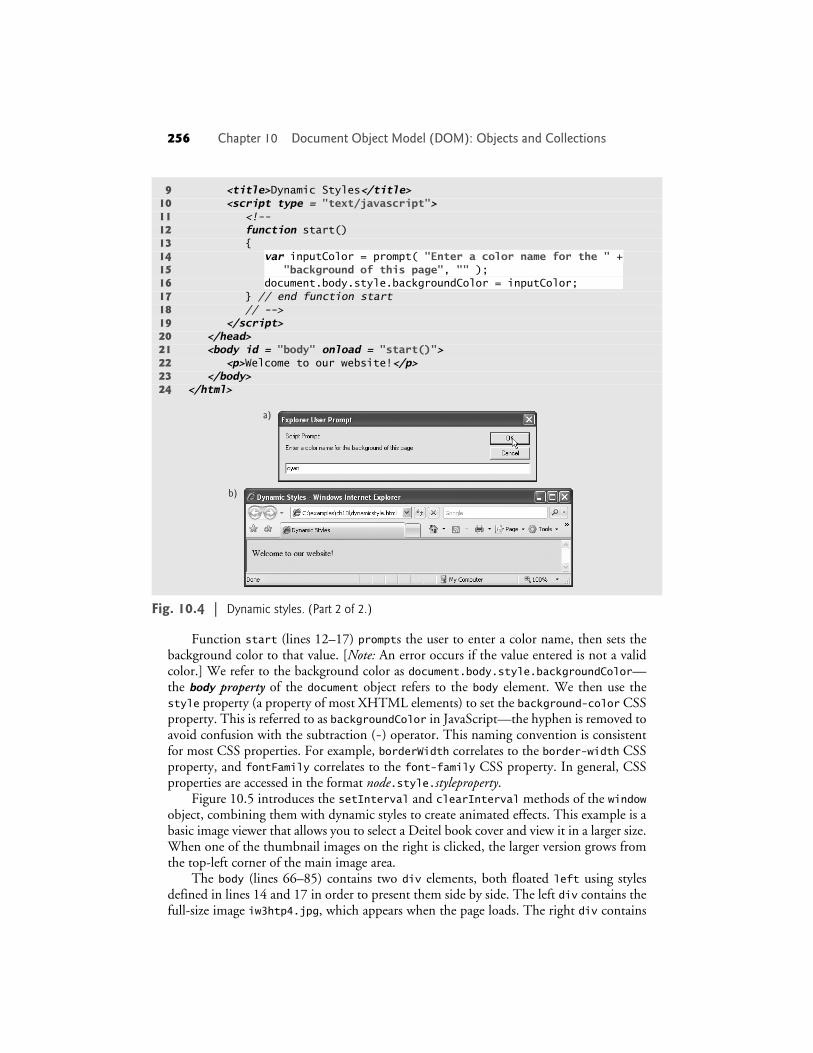
Function start (lines 12–17) prompts the user to enter a color name, then sets thebackground color to that value. [Note: An error occurs if the value entered is not a validcolor.] We refer to the background color as document.body.style.backgroundColor—the body property of the document object refers to the body element. We then use thestyle property (a property of most XHTML elements) to set the background-color CSSproperty. This is referred to as backgroundColor in JavaScript—the hyphen is removed toavoid confusion with the subtraction (-) operator. This naming convention is consistentfor most CSS properties. For example, borderWidth correlates to the border-width CSSproperty, and fontFamily correlates to the font-family CSS property. In general, CSSproperties are accessed in the format node.style.styleproperty.
Figure 10.5 introduces the setInterval and clearInterval methods of the windowobject, combining them with dynamic styles to create animated effects. This example is abasic image viewer that allows you to select a Deitel book cover and view it in a larger size.When one of the thumbnail images on the right is clicked, the larger version grows fromthe top-left corner of the main image area.
The body (lines 66–85) contains two div elements, both floated left using stylesdefined in lines 14 and 17 in order to present them side by side. The left div contains thefull-size image iw3htp4.jpg, which appears when the page loads. The right div contains
9 <title>Dynamic Styles</title>10 <script type = "text/javascript">11 <!--12 function start()13 {14 15 16 17 } // end function start18 // -->19 </script>20 </head>21 <body id = "body" onload = "start()">22 <p>Welcome to our website!</p>23 </body>24 </html>
Fig. 10.4 | Dynamic styles. (Part 2 of 2.)
var inputColor = prompt( "Enter a color name for the " + "background of this page", "" ); document.body.style.backgroundColor = inputColor;
a)
b)
10.5 Dynamic Styles 257
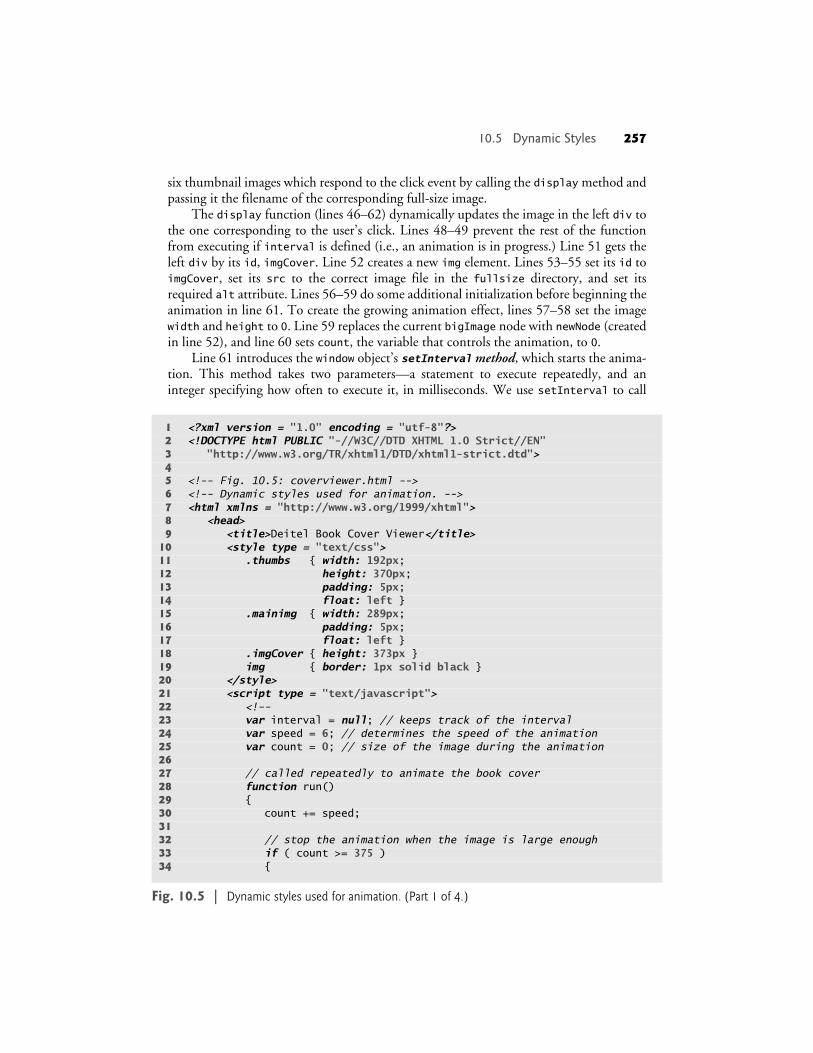
six thumbnail images which respond to the click event by calling the display method andpassing it the filename of the corresponding full-size image.
The display function (lines 46–62) dynamically updates the image in the left div tothe one corresponding to the user’s click. Lines 48–49 prevent the rest of the functionfrom executing if interval is defined (i.e., an animation is in progress.) Line 51 gets theleft div by its id, imgCover. Line 52 creates a new img element. Lines 53–55 set its id toimgCover, set its src to the correct image file in the fullsize directory, and set itsrequired alt attribute. Lines 56–59 do some additional initialization before beginning theanimation in line 61. To create the growing animation effect, lines 57–58 set the imagewidth and height to 0. Line 59 replaces the current bigImage node with newNode (createdin line 52), and line 60 sets count, the variable that controls the animation, to 0.
Line 61 introduces the window object’s setInterval method, which starts the anima-tion. This method takes two parameters—a statement to execute repeatedly, and aninteger specifying how often to execute it, in milliseconds. We use setInterval to call
1 <?xml version = "1.0" encoding = "utf-8"?>2 <!DOCTYPE html PUBLIC "-//W3C//DTD XHTML 1.0 Strict//EN"3 "http://www.w3.org/TR/xhtml1/DTD/xhtml1-strict.dtd">45 <!-- Fig. 10.5: coverviewer.html -->6 <!-- Dynamic styles used for animation. -->7 <html xmlns = "http://www.w3.org/1999/xhtml">8 <head>9 <title>Deitel Book Cover Viewer</title>
10 <style type = "text/css">11 .thumbs { width: 192px;12 height: 370px;13 padding: 5px;14 float: left }15 .mainimg { width: 289px;16 padding: 5px;17 float: left }18 .imgCover { height: 373px }19 img { border: 1px solid black }20 </style>21 <script type = "text/javascript">22 <!--23 var interval = null; // keeps track of the interval24 var speed = 6; // determines the speed of the animation25 var count = 0; // size of the image during the animation2627 // called repeatedly to animate the book cover28 function run()29 {30 count += speed;3132 // stop the animation when the image is large enough33 if ( count >= 375 ) 34 {
Fig. 10.5 | Dynamic styles used for animation. (Part 1 of 4.)
258 Chapter 10 Document Object Model (DOM): Objects and Collections
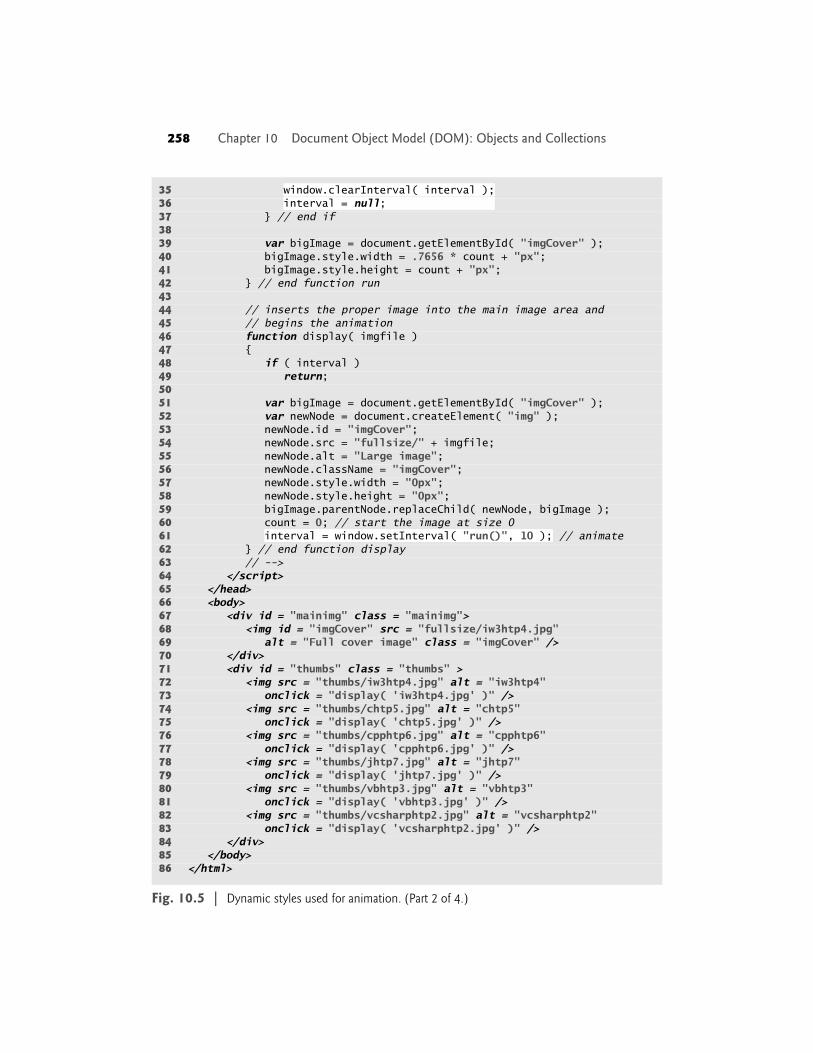
35 36 37 } // end if3839 var bigImage = document.getElementById( "imgCover" );40 bigImage.style.width = .7656 * count + "px";41 bigImage.style.height = count + "px";42 } // end function run4344 // inserts the proper image into the main image area and45 // begins the animation46 function display( imgfile )47 {48 if ( interval )49 return;5051 var bigImage = document.getElementById( "imgCover" );52 var newNode = document.createElement( "img" );53 newNode.id = "imgCover";54 newNode.src = "fullsize/" + imgfile;55 newNode.alt = "Large image";56 newNode.className = "imgCover";57 newNode.style.width = "0px";58 newNode.style.height = "0px";59 bigImage.parentNode.replaceChild( newNode, bigImage );60 count = 0; // start the image at size 061 // animate62 } // end function display63 // -->64 </script>65 </head>66 <body>67 <div id = "mainimg" class = "mainimg">68 <img id = "imgCover" src = "fullsize/iw3htp4.jpg" 69 alt = "Full cover image" class = "imgCover" />70 </div>71 <div id = "thumbs" class = "thumbs" >72 <img src = "thumbs/iw3htp4.jpg" alt = "iw3htp4"73 onclick = "display( 'iw3htp4.jpg' )" />74 <img src = "thumbs/chtp5.jpg" alt = "chtp5"75 onclick = "display( 'chtp5.jpg' )" />76 <img src = "thumbs/cpphtp6.jpg" alt = "cpphtp6"77 onclick = "display( 'cpphtp6.jpg' )" />78 <img src = "thumbs/jhtp7.jpg" alt = "jhtp7"79 onclick = "display( 'jhtp7.jpg' )" />80 <img src = "thumbs/vbhtp3.jpg" alt = "vbhtp3"81 onclick = "display( 'vbhtp3.jpg' )" />82 <img src = "thumbs/vcsharphtp2.jpg" alt = "vcsharphtp2"83 onclick = "display( 'vcsharphtp2.jpg' )" />84 </div>85 </body>86 </html>
Fig. 10.5 | Dynamic styles used for animation. (Part 2 of 4.)
window.clearInterval( interval );interval = null;
interval = window.setInterval( "run()", 10 );
10.5 Dynamic Styles 259
Fig. 10.5 | Dynamic styles used for animation. (Part 3 of 4.)
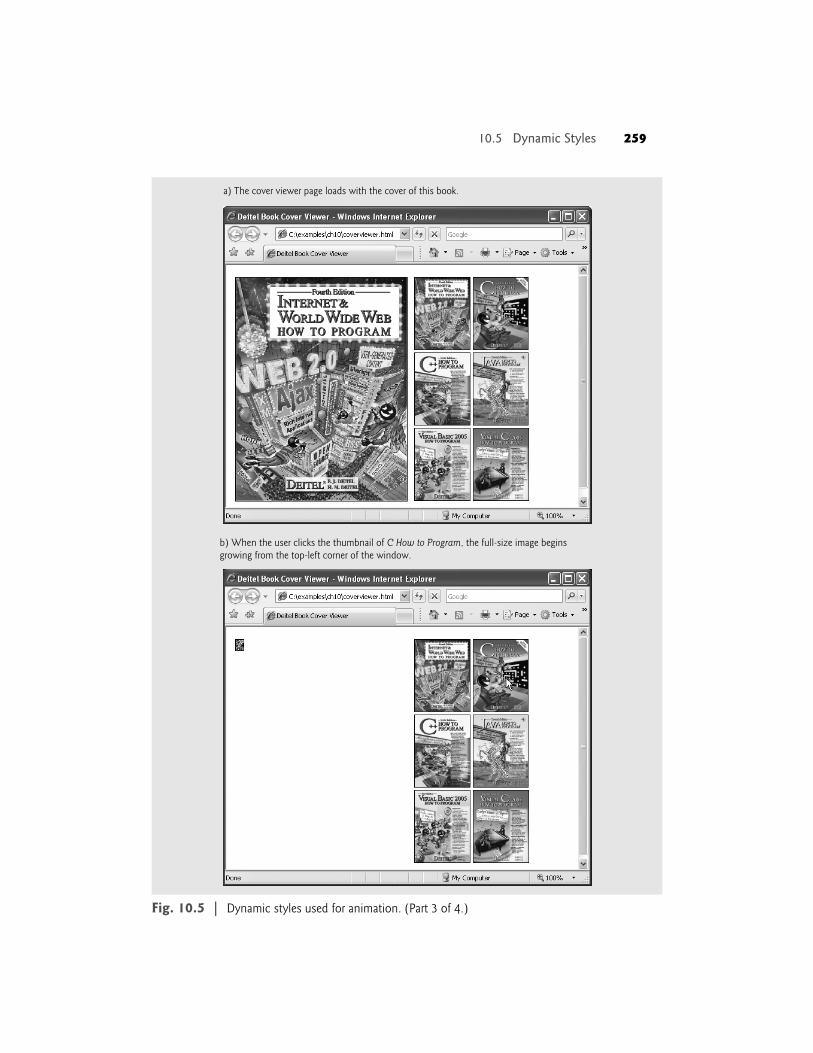
a) The cover viewer page loads with the cover of this book.
b) When the user clicks the thumbnail of C How to Program, the full-size image begins growing from the top-left corner of the window.
260 Chapter 10 Document Object Model (DOM): Objects and Collections
Fig. 10.5 | Dynamic styles used for animation. (Part 4 of 4.)
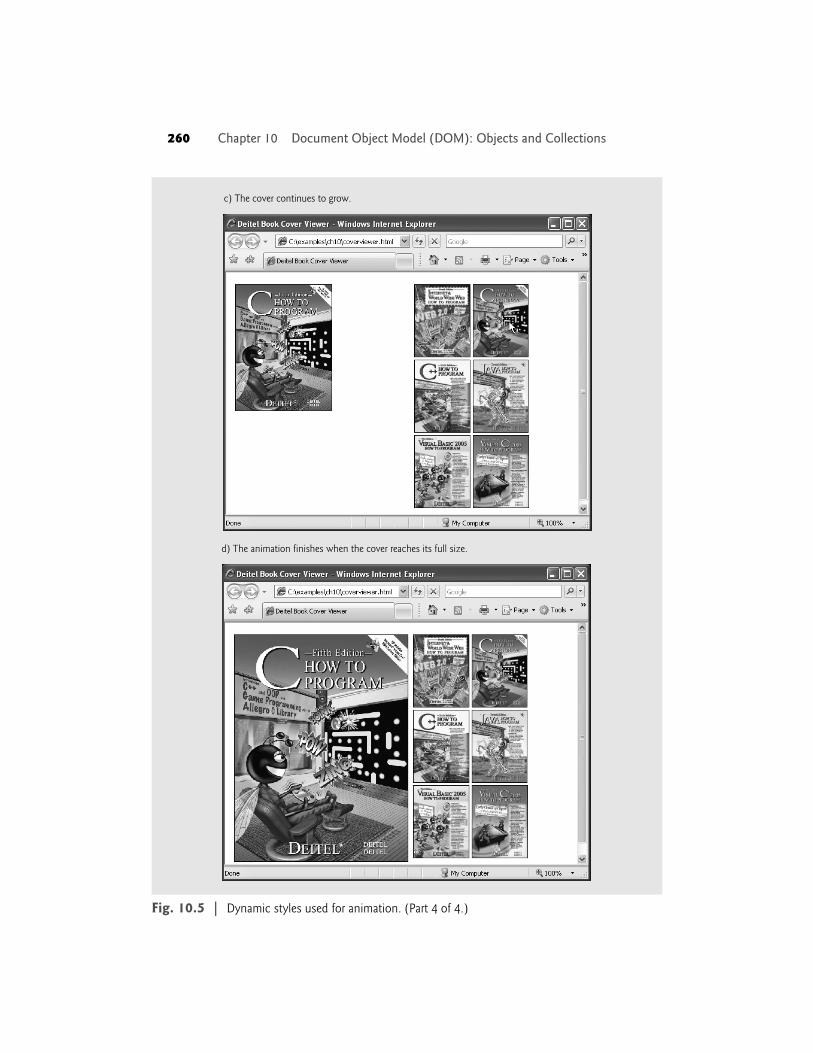
c) The cover continues to grow.
d) The animation finishes when the cover reaches its full size.
10.6 Summary of the DOM Objects and Collections 261
function run every 10 milliseconds. The setInterval method returns a unique identifierto keep track of that particular interval—we assign this identifier to the variable interval.We use this identifier to stop the animation when the image has finished growing.
The run function, defined in lines 28–42, increases the height of the image by thevalue of speed and updates its width accordingly to keep the aspect ratio consistent.Because the run function is called every 10 milliseconds, this increase happens repeatedlyto create an animated growing effect. Line 30 adds the value of speed (declared and ini-tialized to 6 in line 24) to count, which keeps track of the animation’s progress and dictatesthe current size of the image. If the image has grown to its full height (375), line 35 usesthe window’s clearInterval method to stop the repetitive calls of the run method. Wepass to clearInterval the interval identifier (stored in interval) that setInterval cre-ated in line 61. Although it seems unnecessary in this script, this identifier allows the scriptto keep track of multiple intervals running at the same time and to choose which intervalto stop when calling clearInterval.
Line 39 gets the image and lines 40–41 set its width and height CSS properties. Notethat line 40 multiplies count by a scaling factor of .7656 in order to keep the ratio of theimage’s dimensions consistent with the actual dimensions of the image. Run the codeexample and click on a thumbnail image to see the full animation effect.
This section demonstrated the concept of dynamically changing CSS styles usingJavaScript and the DOM. We also discussed the basics of how to create scripted anima-tions using setInterval and clearInterval.
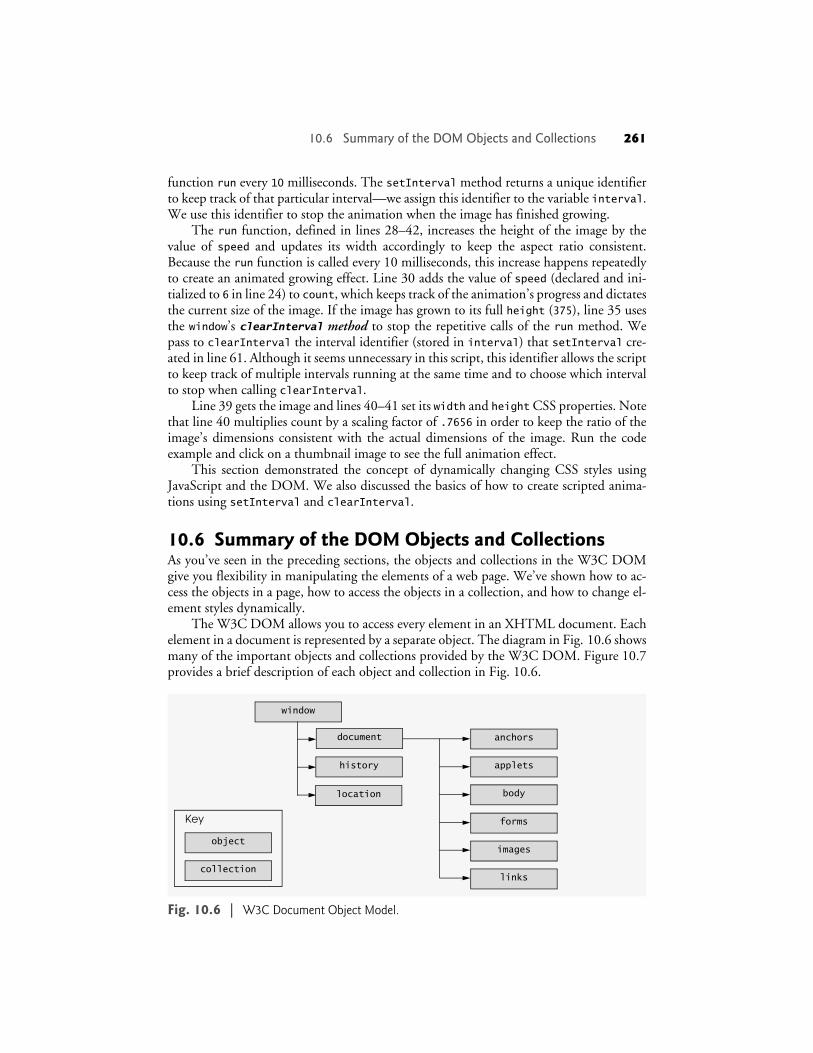
10.6 Summary of the DOM Objects and CollectionsAs you’ve seen in the preceding sections, the objects and collections in the W3C DOMgive you flexibility in manipulating the elements of a web page. We’ve shown how to ac-cess the objects in a page, how to access the objects in a collection, and how to change el-ement styles dynamically.
The W3C DOM allows you to access every element in an XHTML document. Eachelement in a document is represented by a separate object. The diagram in Fig. 10.6 showsmany of the important objects and collections provided by the W3C DOM. Figure 10.7provides a brief description of each object and collection in Fig. 10.6.
Fig. 10.6 | W3C Document Object Model.
applets
anchors
forms
images
linkscollection
body
document
history
location
object
window
Key
262 Chapter 10 Document Object Model (DOM): Objects and Collections
For a complete reference on the W3C Document Object Model, see the DOM Level3 recommendation from the W3C at http://www.w3.org/TR/DOM-Level-3-Core/. TheDOM Level 2 HTML Specification (the most recent HTML DOM standard), availableat http://www.w3.org/TR/DOM-Level-2-HTML/, describes additional DOM functionalityspecific to HTML, such as objects for various types of XHTML elements. Keep in mindthat not all web browsers implement all features included in the specification.
Object or collection Description
Objectswindow Represents the browser window and provides access to the window’s
document object. Also contains history and location objects.document Represents the XHTML document rendered in a window. Provides
access to every element in the document and allows dynamic modifica-tion of it. Contains collections for accessing all elements of a given type.
body Provides access to the body element of an XHTML document.history Keeps track of the sites visited by the browser user. The object provides
a script programmer with the ability to move forward and backward through the visited sites.
location Contains the URL of the rendered document. When this object is set to a new URL, the browser immediately navigates to the new location.
Collectionsanchors Collection contains all the anchor elements (a) that have a name or id
attribute. The elements appear in the collection in the order in which they were defined in the XHTML document.
forms Contains all the form elements in the XHTML document. The ele-ments appear in the collection in the order in which they were defined in the XHTML document.
images Contains all the img elements in the XHTML document. The ele-ments appear in the collection in the order in which they were defined in the XHTML document.
links Contains all the anchor elements (a) with an href property. The ele-ments appear in the collection in the order in which they were defined in the XHTML document.
Fig. 10.7 | Objects and collections in the W3C Document Object Model.