DO NOT H80 Tuna Flora - Amazon S3Tuna+Flora... · Make sure the unit is connected to the power...
1
To next light Input from Controller Intensity Tuning Dial Unit Link Cable Spectrum Tuning Dial INSTALLATION GUIDE PARTS DIAGRAM TROUBLESHOOTING GUIDE Problem Light doesn’t turn ON Unit is flickering Solution Make sure the unit is connected to the power supply and the power supply is connected to an outlet with the correct specifications. Make sure you are using a power supply with the correct specifications. Make sure to operate the unit in a room at 104°F / 40°C or lower to prevent overheating. Make sure electrical power is available to the AC outlet being used. Make sure the power supply has the right specifications. Make sure the device is operating within the specified operating temperature range (below 104°F or 40°C). If the unit overheats, it will automatically shut down. H80 Tuna Flora PRODUCT SPECIFICATIONS Illuminator Listed Power Supply Power Consumption 15W maximum 24VDC Input Voltage Input Output 100-240VAC, 50-60Hz 24VDC, maximum 1A Controllability Multiple Kessil lights with 0-10V ports can be controlled either manually or by an external 0-10V controller. SAFETY INSTRUCTIONS 1. DO NOT use a power supply that does not meet the specifications. This is a fire hazard and may lead to unit failure. 2. DO NOT use outdoors. This unit is intended for indoor use only. 3. DO NOT expose unit to an extremely humid environment or submerge in water. This may lead to unit failure. 4. DO NOT place unit in close contact with any other objects while powered on because unit may overheat. 5. KEEP Lens (E) away from sharp objects. This may break the lens and lead to unit failure. 6. DO NOT cover or place objects on the DC Power Supply (G). It should not be contained in an airtight space. MAINTENANCE 1. Keep the unit clear of dust. To clean, unplug the unit and use a clean, dry cloth to remove accumulated dust from between each Heat Sink Fin (D). 2. Keep the Lens (E) clean. If the lens becomes contaminated with water, dust, or other particles, unplug the unit and clean the lens with isopropyl alcohol. Wet a cotton swab or a napkin in isopropyl alcohol, gently wipe the surface of the lens and let dry. CABLES Available cables: • Control Cable (Please consult kessil.com for list of available cables and compatible controllers). • Unit Link Cable (male/male with 3.5 mm stereo jack). • Control Extension Cable (6' male/female with 3.5 mm stereo jack). STARTING A CHAIN Connect two or more lights with the Unit Link Cable, as shown above. CONTROL METHODS There are two ways to control a chain of lights: 1. With an external controller. 2. Without external controller (Tuning Dials on the first light control all other lights in chain). Each light has its own independent power supply. Any number of lights can be daisy chained together without degradation of signal. However, in longer chains a slight delay in response may occur. Manual tuning is disabled when input cable is plugged in. INSTRUCTIONS DE SECURITE 1. N'UTILISEZ PAS d'adaptateur d'alimentation qui ne satisfait pas aux exigences. Il y aurait un risque d’incendie et de dommages de l’unité. 2. NE PAS UTILISER à l’extérieur. Cette unité est prévue pour une utilisation en intérieur. 3. N’EXPOSEZ PAS l’unité à un environnement extrêmement humide ou ne submergez pas l’unité dans l’eau. Cela pourrait endommager l’unité. 4. NE PLACEZ PAS l'illuminateur dans Contact étroit avec tout autreObjets pendant qu'ils sont allumés parce que l'unité peut surchauffer. 5. GARDEZ la Lentille (E) à l‘écart des objets pointus. Les objets pointus pourraient casser la lentille et endommager l’unité. 6. NE RECOUVRE PAS, ou ne placez pas d’objet sur DC l'adaptateur d'alimentation (G). Il ne doit pas se trouver dans un espace fermé. 1. Remove contents from package. 2. Hang the H80 at least 4 inches above the plants/tank. 3. Connect Power Cord (A) to the specified DC Power Supply (G). 4. Plug the power supply into an outlet with the correct specifications (see product specifications for more information). 5. Using the H80's Intensity Tuning Dial (F) and Spectrum Tuning Dial (B), set the light to the desired setting. H80 has four specifically designed spectrums (BLUE, GROW, BLOOM, RED)(see kessil.com for detailed spectrum information and application). 6. The ports between the dials can be connected to an external 0~10V controller. Please consult your controller's owner's manual for more information. A B F D A. Power Cord B. Spectrum Tuning Dial C. 0-10V Controller Ports D. Heat Sink Fin E. Lens F. Intensity Tuning Dial G. DC Power Supply C G Optional Accessories For other accessories, please visit www.kessil.com. Remove the two screws on the back of H80, and use them to secure Top Mounting Adapter (H) to H80, then use two wood screws (I) to mount them. Top Mounting Adapter OWNER’S MANUAL LED ILLUMINATOR Mini A-Series Gooseneck (Gooseneck Length = 10 inches) E A DiCon Brand ver. A1 H I
Transcript of DO NOT H80 Tuna Flora - Amazon S3Tuna+Flora... · Make sure the unit is connected to the power...
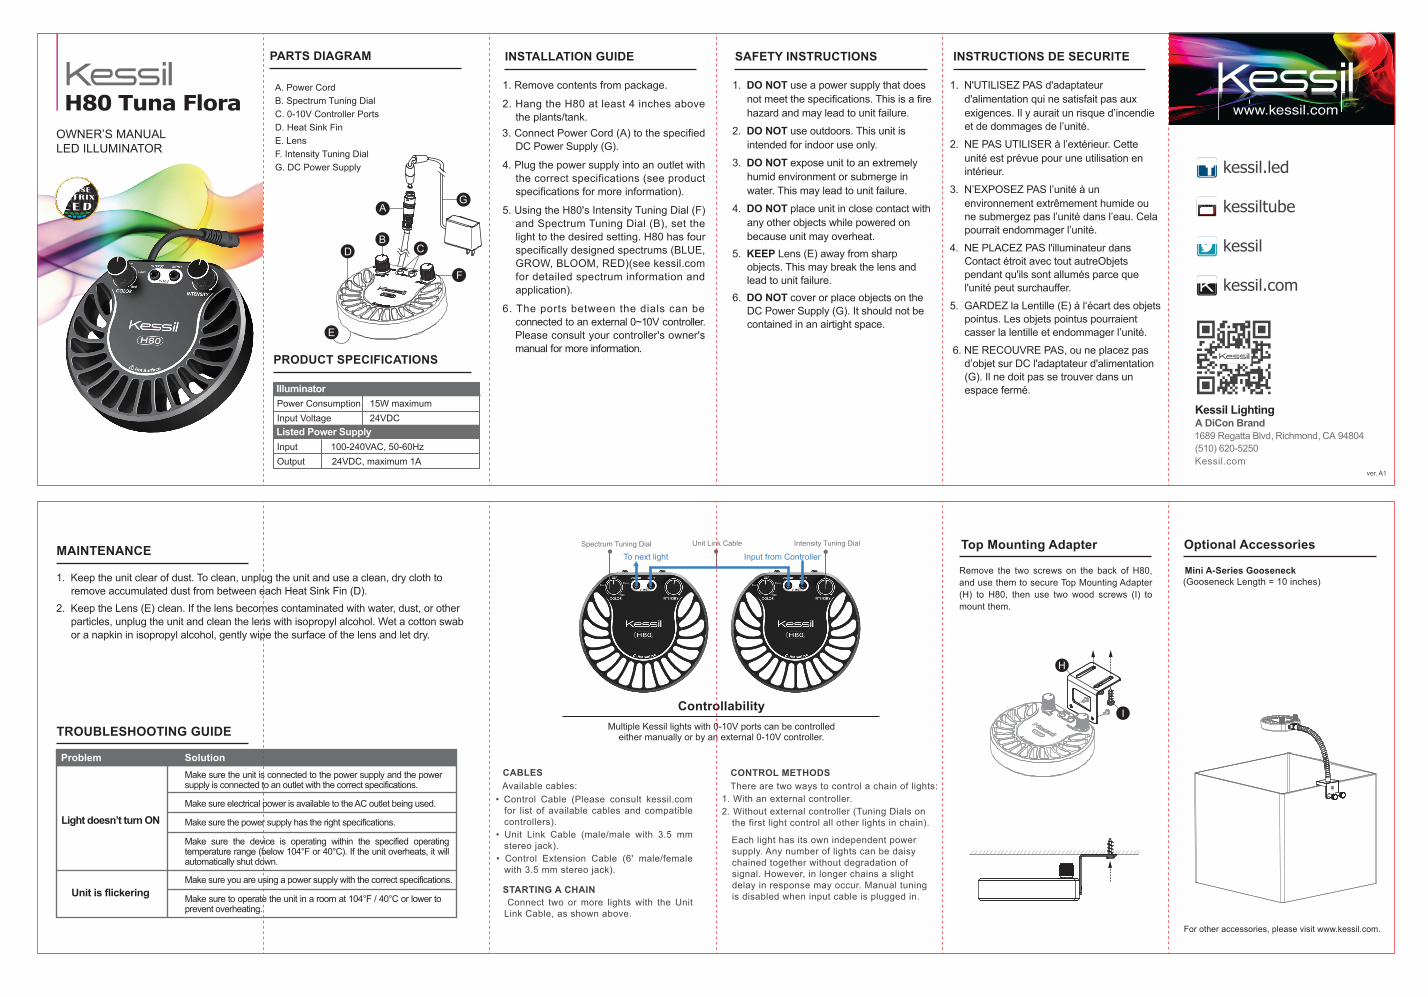
To next light Input from ControllerIntensity Tuning DialUnit Link CableSpectrum Tuning Dial
INSTALLATION GUIDEPARTS DIAGRAM
TROUBLESHOOTING GUIDE
Problem
Light doesn’t turn ON
Unit is flickering
SolutionMake sure the unit is connected to the power supply and the power supply is connected to an outlet with the correct specifications.
Make sure you are using a power supply with the correct specifications.
Make sure to operate the unit in a room at 104°F / 40°C or lower to prevent overheating.
Make sure electrical power is available to the AC outlet being used.
Make sure the power supply has the right specifications.
Make sure the device is operating within the specified operating temperature range (below 104°F or 40°C). If the unit overheats, it will automatically shut down.
H80 Tuna Flora
PRODUCT SPECIFICATIONS
Illuminator
Listed Power Supply
Power Consumption 15W maximum24VDCInput Voltage
InputOutput
100-240VAC, 50-60Hz24VDC, maximum 1A
ControllabilityMultiple Kessil lights with 0-10V ports can be controlled
either manually or by an external 0-10V controller.
SAFETY INSTRUCTIONS
1. DO NOT use a power supply that does not meet the specifications. This is a fire hazard and may lead to unit failure.
2. DO NOT use outdoors. This unit is intended for indoor use only.
3. DO NOT expose unit to an extremely humid environment or submerge in water. This may lead to unit failure.
4. DO NOT place unit in close contact with any other objects while powered on because unit may overheat.
5. KEEP Lens (E) away from sharp objects. This may break the lens and lead to unit failure.
6. DO NOT cover or place objects on the DC Power Supply (G). It should not be contained in an airtight space.
MAINTENANCE
1. Keep the unit clear of dust. To clean, unplug the unit and use a clean, dry cloth to remove accumulated dust from between each Heat Sink Fin (D).
2. Keep the Lens (E) clean. If the lens becomes contaminated with water, dust, or other particles, unplug the unit and clean the lens with isopropyl alcohol. Wet a cotton swab or a napkin in isopropyl alcohol, gently wipe the surface of the lens and let dry.
CABLES Available cables: • Control Cable (Please consult kessil.com
for list of available cables and compatible controllers).
• Unit Link Cable (male/male with 3.5 mm stereo jack).
• Control Extension Cable (6' male/female with 3.5 mm stereo jack).
STARTING A CHAIN Connect two or more lights with the Unit
Link Cable, as shown above.
CONTROL METHODS There are two ways to control a chain of lights:
1. With an external controller. 2. Without external controller (Tuning Dials on
the first light control all other lights in chain).
Each light has its own independent power supply. Any number of lights can be daisy chained together without degradation of signal. However, in longer chains a slight delay in response may occur. Manual tuning is disabled when input cable is plugged in.
INSTRUCTIONS DE SECURITE
1. N'UTILISEZ PAS d'adaptateur d'alimentation qui ne satisfait pas aux exigences. Il y aurait un risque d’incendie et de dommages de l’unité.
2. NE PAS UTILISER à l’extérieur. Cette unité est prévue pour une utilisation en intérieur.
3. N’EXPOSEZ PAS l’unité à un environnement extrêmement humide ou ne submergez pas l’unité dans l’eau. Cela pourrait endommager l’unité.
4. NE PLACEZ PAS l'illuminateur dans Contact étroit avec tout autreObjets pendant qu'ils sont allumés parce que l'unité peut surchauffer.
5. GARDEZ la Lentille (E) à l‘écart des objets pointus. Les objets pointus pourraient casser la lentille et endommager l’unité.
6. NE RECOUVRE PAS, ou ne placez pas d’objet sur DC l'adaptateur d'alimentation (G). Il ne doit pas se trouver dans un espace fermé.
1. Remove contents from package.
2. Hang the H80 at least 4 inches above the plants/tank.
3. Connect Power Cord (A) to the specified DC Power Supply (G).
4. Plug the power supply into an outlet with the correct specifications (see product specifications for more information).
5. Using the H80's Intensity Tuning Dial (F) and Spectrum Tuning Dial (B), set the light to the desired setting. H80 has four specifically designed spectrums (BLUE, GROW, BLOOM, RED)(see kessil.com for detailed spectrum information and application).
6. The ports between the dials can be connected to an external 0~10V controller. Please consult your controller's owner's manual for more information.
A
B
F
D
A. Power CordB. Spectrum Tuning DialC. 0-10V Controller PortsD. Heat Sink FinE. LensF. Intensity Tuning DialG. DC Power Supply
C
G
Optional Accessories
For other accessories, please visit www.kessil.com.
Remove the two screws on the back of H80, and use them to secure Top Mounting Adapter (H) to H80, then use two wood screws (I) to mount them.
Top Mounting Adapter
OWNER’S MANUALLED ILLUMINATOR
Mini A-Series Gooseneck(Gooseneck Length = 10 inches)
E
A DiCon Brand
ver. A1
H
I