DMK 11A & 11A GPS Owners Manual · DMK 11A & 11A GPS Owners Manual . ... Throughout this manual,...
16
DMK 11A & 11A GPS Owners Manual
Transcript of DMK 11A & 11A GPS Owners Manual · DMK 11A & 11A GPS Owners Manual . ... Throughout this manual,...

DMK 11A & 11A GPS
Owners Manual

Table of Contents
Section I Description of DMK 11A & 11A-GPS
1.1 Introduction
1.2 Background
1.3 Infrastructure Connection
1.4 Components
1.5 Input Protocols
1.6 Configuration Memory
1.7 Power Supply
1.8 Wiring Connections
1.9 LEDs
1.10 Transmitting Data
Section II Installing the DMK Box
2.1 Location
2.2 Antenna Mounting
2.3 Electrical Power to the DMK Box
2.4 Instrument Connections
Section III Connecting your iOS Device to the DMK 11A &
Configuring the WiFi Settings
3.1 First Time Connection
3.2 Adjust the IP Settings
3.3 Changing the Wireless Setting of the DMK Box
3.4 Changing the Network Name (SSID)
3.5 Changing the Network Password (WEP Code)
3.6 Changing the Number of Attached Devices
3.7 Changing the Baud Rate of the NMEA 0183 Ports
3.8 Third Party Software Configuration
Section IV Troubleshooting and Maintenance
4.1 Troubleshooting our iOS Installation
4.2 Manual Reboot to Factory Settings
4.3 DMK Support
Appendix A Wiring Installation Examples
Wiring a Standard Horizon Matrix AIS Radio
Wiring a Raymarine E85001 PC/NMEA Interface
Box
Wiring a NMEA 2000 Drop Cable
Wiring Directly to a Seatalk Backbone
1
2
2
2
2
3
3
3
3
4
4
5
5
5
5
6
7
8
8
8
8
9
9
10
11
11
12
13
14
15

1
SECTION I DESCRIPTION of DMK 11A & 11A-GPS
DMK-11A Hardware
1.1 Introduction. Congratulations on your purchase of a DMK 11A or DMK 11A-GPS (GPS enabled) wireless device. The DMK-11A is a wireless gateway that transmits marine electronics data from a variety of marine instruments via Wi-Fi (802.11b) to devices, including laptop and desktop personal computers and a range of compact portable devices including Apple iOS devices. (iPhone/iPad/iPodTouch) The DMK-11A is capable of connecting and transmitting to as many as three wireless devices simultaneously. However the box is originally configured to stream to a single device. More technical information can be found online at:
http://dmkyacht.com/reference
Throughout this manual, when reference is made to the DMK 11A, unless otherwise noted, descriptions are equally applicable to the DMK 11A-GPS. Where differences apply, it will be described. 1.2 Background. The DMK 11A was created with the realization that these devices make ideal platforms for displaying marine data. These devices have the added function that software apps can easily be upgraded to incorporate new features unlike fixed function marine displays which can be upgraded only through a complicated firmware download if at all. Because they are portable, the devices support a number of wireless connections-Bluetooth and Wi-Fi being the most common. Wi-Fi was chosen as the wireless connection for the DMK 11A because it is available across the widest variety of portable and fixed platforms. 1.3 Infrastructure Connection, Using Wi-Fi also allows the DMK 11A to connect to the Internet through Wi-Fi Access Points available at many marinas. This means that it is possible to monitor your boat from a remote location with the DMK 11A. 1.4 Components. The DMK 11A consists of a small waterproof, impact resistant polycarbonate box with a single 10 pin flat ribbon cable and one or two (GPS option) antenna connectors. Figure I shows the DMK 11A-GPS box. Inside the box are:
- A high performance low power embedded processor - An NMEA2000 interface chip set - Two NMEA 0183 interfaces - A Seatalk interface - An integrated Wi-Fi module with external antenna connector - 6 LEDs that provide status information

2
- Optional GPS module with external antenna connector (-GPS option only)
- A 16megabyte EEPROM for storing data packets for later transfer over Wi-Fi
Figure 1-1 The DMK 11A-GPS 1.5 Input Protocols, The three protocols of the DMK 11A (NMEA2000, NMEA0183,and Sea Talk) support virtually all existing marine electronics instrumentation. The DMK 11A has been designed to support data transfer on all three protocols simultaneously so that it is possible to serve multiple instrument types with a single DMK 11A. 1.6 Configuration Memory, The DMK 11A runs firmware programmed into the Flash Memory of its embedded processor. This flash memory is preserved even when power is removed from the unit. Configuration information written into the unit is also preserved when power is removed. 1.7 Power Supply. The DMK boxes are designed to be powered by a negative ground DC electrical power source (your boat’s battery) ranging between 6 and 35 volts DC. Power can be provided through the NMEA2000 interface or the SeaTalk interface or can be provided through a separate power circuit. The DMK 11A consumes about 80 milliamps at 12VDC and less than 50ma at 24VDC. The two Ground wires are connected in parallel and either or both can be used as a Ground Return (using both is recommended). Please see SECTION II for installation instructions. 1.8 Wiring Connections. Table 1-1 lists the color coding of the flat ribbon cable that is attached to the I/O connector and brought out of the box through the environmentally sealed cable gland. Please note that while all DMK boxes have the same cable, the blue wire (GPS output) is attached only for the DMK 11A-GPS.

3
Table 1-1 Connector Ribbon Color Key 1.9 LEDs. Table 1-2 lists the six Light Emitting Diodes (LEDs) are visible through the transparent box cover and indicate the following functions:
LED Color Function
LED0 Green Status of Wi-Fi and Data Connections to DMK-11A
LED1 Yellow SeaTalk Activity
LED2 Yellow NMEA2000 Activity
LED3 Yellow NMEA0183 Port A Activity
LED4 Yellow NMEA0183 Port B Activity
LED5 Yellow On Board GPS Activity
Table 1-2-LEDs
LED 0 (the green one) is closest to the ribbon end of the box. Each time electrical power is applied to the DMK 11A, for example, when the battery switch is turned on, all the LEDs flash on for ½ second and then off. 1.10 Transmitting Data. The DMK boxes operate in transmit mode only, sending information to your wireless device. Boxes with DMK Rev 7 Firmware cannot receive information transmitted back from the device. (This is to avoid receiving signals from other vessels in close proximity.) However, this may change with later updates to the DMK Firmware, which will be available online.
Wire Color Function
1 Brown DC In (6-24VDC)
2 Red Seatalk Receive/Transmit
3 Orange NMEA 0183 In (Port A)
4 Yellow NMEA 0183 Out (Port A)
5 Green NMEA 0183 In (Port B)
6 Blue OnBrdGPSOut (4800 baud) (DMK 11A-GPS only)
7 Purple NMEA2000 H
8 Gray NMEA 2000 L
9 White Ground
10 Black Ground

4
SECTION II
Installing the DMK Box
2.1 Location. Mount the DMK box near your vessel’s instruments and a source of DC electrical power. It should be in an interior (dry) location away from extreme temperatures and vibration. The DMK box should NOT be located in an
engine room or other location enclosed in metal. The DMK box should be located at least eight inches away from places people sit or sleep. 2.2 Antenna. Mount the DMK box with the antenna pointing up (near vertical). It has been found that the 2 dB gain Wi-Fi antenna provided has a range of at least 150 feet in most mounting situations. Other higher gain antennas are readily available and it is possible to mount the antenna in a different location from the DMK 11A by using low loss SMA type coaxial cable to remote the antenna. A higher gain antenna can be mounted by unscrewing and removing the factory antenna and attaching the new antenna’s SMA coaxial connection in its place. 2.3 Electrical Power. Connect the brown wire of the connector wire ribbon to a 6 – 35 Volt DC power source. Power can normally be supplied from the NMEA2000 interface or the SeaTalk interface or can be provided through a separate power circuit. Connect BOTH the White AND the Black wires of the
ribbon to your instrument’s signal ground or to the boats negative electrical ground. If connecting to Seatalk you must connect to the Seatalk ground to receive all the data from your SeaTalk instruments. With other instruments, connecting to the NMEA 0183 negative ground may be required to receive a proper signal. But most times the vessel’s DC negative will work. Always connect both the Black and White wires to the same place. If the LED lights in the DMK box are not active after you connect the power, use a circuit tester to determine why power is not provided to the box. Most likely moving the ground wires will correct the issue. On some boat’s electrical systems, it may be necessary to jumper the SeaTalk and/or NEMA ground and the boats electrical ground system and then connect the white and black DMK box ground wires. 2.4 Instrument Connections. Connect the other wires of the ribbon to the corresponding connections on your SeaTalk and/or NMEA instrument outputs. Diagram examples of recommended wiring are included in Apendix A – Wiring Installation Examples. 2.5 Unused wires, for example SeaTalk red wire if your vessel does not have SeaTalk, may remain unconnected. Bare wire should not be allowed to come into contact with other electrical devices or the vessel’s electrical ground.

5
Section III
Connecting Your iOS Wireless Device to the DMK 11A & Configuring the WiFi Settings
3.1 First Time Connection The first time you connect your mobile device to a DMK Box you must perform the following configuration in order for your mobile device to connect automatically each time you return onboard and power on your instruments. Open “Settings” on your device.
Locate available WI-FI Networks. Choose “dmkyacht”.
Enter the password “0123456789”
6
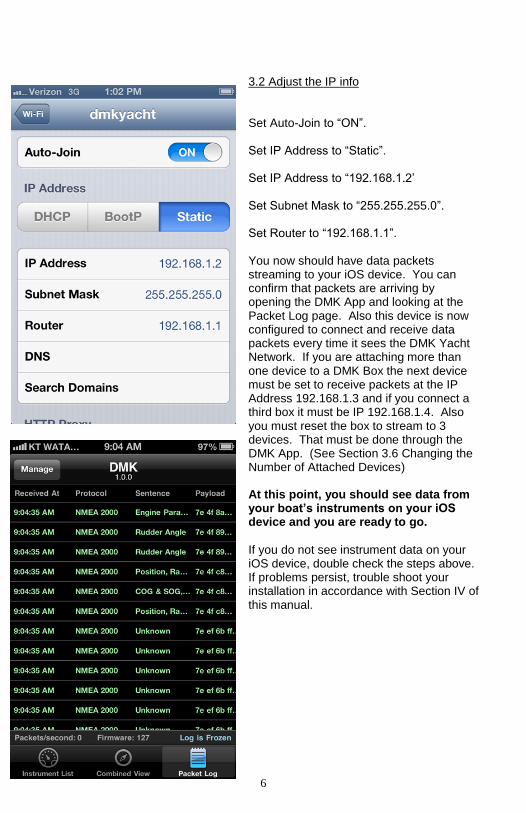
3.2 Adjust the IP info
Set Auto-Join to “ON”. Set IP Address to “Static”. Set IP Address to “192.168.1.2’ Set Subnet Mask to “255.255.255.0”. Set Router to “192.168.1.1”. You now should have data packets streaming to your iOS device. You can confirm that packets are arriving by opening the DMK App and looking at the Packet Log page. Also this device is now configured to connect and receive data packets every time it sees the DMK Yacht Network. If you are attaching more than one device to a DMK Box the next device must be set to receive packets at the IP Address 192.168.1.3 and if you connect a third box it must be IP 192.168.1.4. Also you must reset the box to stream to 3 devices. That must be done through the DMK App. (See Section 3.6 Changing the Number of Attached Devices) At this point, you should see data from your boat’s instruments on your iOS device and you are ready to go.
If you do not see instrument data on your iOS device, double check the steps above. If problems persist, trouble shoot your installation in accordance with Section IV of this manual.

7
3.3 Changing the WiFi Settings of the DMK Box
The DMK 11A can be reprogrammed using the DMK App to change the Wi-Fi settings (e.g. Network Name, password, number of attached devices) The configuration settings menu is found in the DMK App by going to the Instrument List page and tapping the Settings button. Any changes to the DMK Box’s
wireless settings will require you reconnect the mobile device using the new wireless settings. 3.4 Changing the Network Name (SSID)
You can change the name of your wireless network from dmkyacht by going into the Settings and under DMK Box Settings; tap the right arrow at SSID. Enter the new SSID (Network Name) and tap Tell the DMK Box to use this SSID. You will be asked once more to Update DMK Box. Tap the button and the box will
reprogram itself. You can tell the box received the command because all the LED’s will blink 8 times then the box will go through its startup sequence. At this point you will lose connection with the box and will need to reconnect to the network using the new SSID. If the LED’s do not flash after you send the command, power cycle the DMK Box and look for the new network name in your iOS settings. 3.5 Changing the Network Password (WEP Code)
You can change the password required to connect to the DMK Box from its default 0123456789 by going to the Settings and under DMK Box Settings, tap the right arrow at WEP Code. In the Enter the new WEP code here screen write a new password then tap Tell the DMK Box to use this Code. You will be asked once more to Update DMK Box. Tap the button and the
box will reprogram itself. You can tell the box received the command because it all the LED’s will blink 8 times then the box will go through its startup sequence. At this point you will lose connection with the box and will need to reconnect to the network using the new SSID. If the LED’s do not flash after you send the command, power cycle the DMK Box and look for the new network name in your iOS settings. 3.6 Changing the number of Attached Devices
You can stream data to more than one IP Address by changing the Attached Device Count setting. Under DMK Box Settings, tap the right arrow at Attached Device Count. You will have the option of selecting 1,2,or 3 devices. Select from

8
the menu of 1, 2, or 3 then tap Update DMK Box. The second device needs to attach at IP 192.168.1.3 and the third device needs to attach at IP 192.168.1.4. 3.7 Changing the Baud Rate of the NMEA 0183 Ports
The DMK Box is originally configured with the Primary 0183 Port set to 38400 Baud and the Secondary 0183 Port Set to 4800 Baud. If your data sources to not output at those baud rates then it will be necessary to reconfigure the DMK Box. To do so tap the right arrow at Primary or Secondary 0183 Baud, then select the baud rate you want. Tap again when you are prompted Update DMK Box. If the baud rate does not reset, power cycle the box before trying to reset it again with the app. The baud rate most likely will change after the power cycle. If not power cycle the box to have it take effect. 3.8 Third Party Software Configuration.
Most times after downloading a new app, some software configuration is required to let the software know where it must source its data. The configuration interface of every app is a little different and you may be asked to enter one or more of the following:
- IP Address/ Server. Set to the IP address the device connects to
the DMK Box with. If the box is in default mode and you are connecting one device this is 192.168.1.2
- TCP/UDP. Set to UDP - Port Number. Set to 1703

9
SECTION IV
TROUBLESHOOTING AND MAINTENANCE
4.1 Troubleshooting your iOS installation.
4.1.1 Most installations are trouble free. However sometimes settings must be changed on the box or wiring must be scrutinized for the box to function fully and correctly. Table 3-1 below show some common problems people have after installing a DMK Box.
Problem Check Solution
Cannot Connect to DMK Box.
LED’s. If none are blinking the box does not have power. If LED 0 is blinking rapidly then the DMK Box is still searching for a network. If LED 0 is blinking once per second then the box has automatically connected to another device.
-Check if there is power to the DMK Box (See 3.1.2)
-Wait to see if the box finds a network and the LED Blinks then pauses, then blinks again.
-Check that the DMK Box has not connected with other mobile devices on the vessel
Connected but cannot see all the data streaming to the box
LED’s in box to make sure data is getting to the DMK Box. (See Table 1-2)
If LED is not blinking for connected port, this is a wiring or baud rate issue. Check wiring and source baud rate and match against the DMK Box settings.
Connected to the box but do not receive any streaming data
The App settings that they match the IP and Port of the DMK Box. Especially if once app is getting data and another is not.
-Change App Settings
-Make sure another app is not running in the background
-Make sure another device onboard is not connected to the same IP Address.
-May be an issue with the WEP Code (See 3.1.3)
Table 3-01
Troubleshooting Matrix

10
4.1.2 If the LED lights in the DMK box are not active after you connect the electrical power, use a circuit tester to determine why power is not provided to the box. 4.1.3 If you see no packets in the DMK App’s packet log, yet the DMK Box appears to be connected to your iOS device,(you see WI-FI bars on the iOS status bar) there may be a problem with the WEP code password. The solution for this is to use the “Forget this Network button in the iOS WI-FI settings, then follow the instructions in paragraphs 3.1 and 3.2 to reconnect. 4.2 Manual Reboot to Factory Default Settings
4.2.1 Sometimes it is more convenient to reset the DMK Box back to its factory defaults if the password has been forgotten or if other hardware has been reconfigured. To set the Box back into the factory default mode follow the steps below. - Turn off the electrical power to the DMK 11A Box. - Connect through a jumper or just by touching, the Seatalk wire to the two ground wires. - Turn the electrical power back on to the DMK 11A. - You should see all the LEDs blink several times shortly after powering on. - After the LEDs are done blinking, remove the connection between the Seatalk and the Ground. 4.2.2 Once the box is in Factory Default it will be streaming to the default IP Address and Port using the SSID “dmkyacht”. The WEP code will be 0123456789. Follow the instructions in paragraphs 3.1 and 3.2 to reconnect your device. 4.3 DMK Support
If all else fails you can always contact DMK Directly for support. (206) 971-6975

11
Appendix A
Wiring installation examples
Wiring a Standard Horizon 2150 AIS Radio
The blue wire from the DMK Box connects with the blue wire of the Standard Horizon Matrix 2150 radio. The AIS output from the radio connects the Orange wire of the DMK Box. Power and grounding wires are connected to the vessels electronics circuit.

12
Wiring a DMK Box to a Raymarine E85001 PC/NMEA
Interface Box to a DMK 11A or 11A-GPS
- Connect the DMK brown (+) wire to the positive wire
powering the electrical circuit. - Connect the DMK Ground wires to the NMEA Ground inside
the E85001. - Connect the DMK Secondary 0183 Port to the NMEA out
inside the E85001

13
Wiring a NMEA 2000 Drop Cable
- Connect a new T connector and drop cable from the NMEA 2000 Backbone to the DMK Box. Cut and strip back wires in order to make the following field connections. - DC Power can be taken from the NMEA 2000 Bus by connecting the DMK brown to the drop cable Red and tying the screen and black from the drop cable to the DMK’s black and white wires. - Next connect the DMK grey wire (CAN L) to the drop cable blue wire - Connect the DMK violet wire (CAN H) to the drop cable white wire.

14
Wiring a DMK Box Directly to a Seatalk Backbone
- Connect the DMK Brown to the Seatalk Red - Connect the DMK white and black wires to the Seatalk Screen - Connect the DMK Red wire to the Seatalk Yellow - If there is a device outputting NMEA GPS data then it should be connected to the DMK green wire.