DIY Hollowing amera Set - Silicon Valley Woodturners · Hollowing amera 1,4 ... Experienced turners...
22
hp://www.svwoodturners.org/ July 2016 In This Issue Page Hollowing Camera 1,4 John’s Message 2 Calendar of Events 3 Meeng Minutes 5 President’s Challenge 6-8 Show & Tell 9-11 SCHS Donaons 11 Next Level Slim Line Pen 12-14 Refrigerator Magnets 15-17 Selected Symposia 17 Sponsors 18 Club Notes 19 Ironman 20 For Sale 22 The July Program will be: Brian Havens The Joy of Therming! Bob Gerenser demonstrated a high tech soluon to aid in the hollowing process. Experienced turners like Mahoney or Jackoffsky, who have 1,000’s of hours hol- lowing experience, have developed a sense of where the hollowing cuer is within the turning. Trent Bosh developed and sells a system he calls the Visualizer, which uses a video camera in place of a laser on a capve hollowing system, and lets the turner, regardless of his hollowing experience, “visualize” where the cuer is within the piece being turned, much as very experi- enced turners have developed this ability. Trent Bosh’s Visualizer sells for $650, and is a great idea. hp://trentbosch.com/introducing-the- trent-bosch-visualizer/. Bob put together his system for about $25-$30 but was reluctant to publicize it, and cut into Trent’s intellectual prop- erty markeng, unl an arcle (“Frugal Camera Hollowing Rig” by Tom Schneider) in the online e-zine More Woodturning, August 2015, let the cat out of the bag. Why a hollowing aid valuable? Well, if it is not obvious, while hollow- ing you most oſten can’t even see the cuer. Bending over and trying to peek inside is uncomfortable, leads to poor ergonomics, and is fu- le, regardless of the natural temptaon to do this. It also gives lile or no clue to wall thickness. Doesn’t a laser do the same thing? The use of a laser is a great help to knowing where the cuer is within the piece be- ing hollowed. The limitaon to a laser is that it is a point of light, that is adjusted to only one point on the cuer head, or the desired wall thickness away from a point on the cuer. As the hollowing moves from the neck, to the side and to the boom, the posion of the laser needs to be readjusted to maintain the desired reference to the contact point on the cuer. DIY Hollowing Camera Set-up
Transcript of DIY Hollowing amera Set - Silicon Valley Woodturners · Hollowing amera 1,4 ... Experienced turners...

http://www.svwoodturners.org/
July 2016
In This Issue Page
Hollowing Camera 1,4
John’s Message 2
Calendar of Events 3
Meeting Minutes 5
President’s Challenge 6-8
Show & Tell 9-11
SCHS Donations 11
Next Level Slim Line Pen 12-14
Refrigerator Magnets 15-17
Selected Symposia 17
Sponsors 18
Club Notes 19
Ironman 20
For Sale 22
The July Program
will be:
Brian Havens
The Joy of
Therming!
Bob Gerenser demonstrated a high tech solution to aid in the hollowing process. Experienced turners like Mahoney or Jackoffsky, who have 1,000’s of hours hol-lowing experience, have developed a sense of where the hollowing cutter is within the turning. Trent Bosh developed and sells a system he calls the Visualizer, which uses a video camera in place of a laser on a captive hollowing system, and
lets the turner, regardless of his hollowing experience, “visualize” where the cutter is within the piece being turned, much as very experi-enced turners have developed this ability. Trent Bosh’s Visualizer sells for $650, and is a great idea. http://trentbosch.com/introducing-the-trent-bosch-visualizer/. Bob put together his system for about $25-$30 but was reluctant to publicize it, and cut into Trent’s intellectual prop-erty marketing, until an article (“Frugal Camera Hollowing Rig” by Tom Schneider) in the online e-zine More Woodturning, August 2015, let the cat out of the bag. Why a hollowing aid valuable? Well, if it is not obvious, while hollow-
ing you most often can’t even see the cutter. Bending over and trying
to peek inside is uncomfortable, leads to poor ergonomics, and is fu-
tile, regardless of the natural temptation to do this. It also gives little
or no clue to wall thickness.
Doesn’t a laser do the same thing? The
use of a laser is a great help to knowing
where the cutter is within the piece be-
ing hollowed. The limitation to a laser is
that it is a point of light, that is adjusted
to only one point on the cutter head, or
the desired wall thickness away from a
point on the cutter. As the hollowing
moves from the neck, to the side and to the bottom, the position of
the laser needs to be readjusted to maintain the desired reference to
the contact point on the cutter.
DIY Hollowing Camera Set-up

http://www.svwoodturners.org/ Page 2
The Board of Directors has determined that since the club’s Jet mini-lathe is no longer
being used, the mini-lathe, including a mobile base, will be raffled off. Tickets will go
on sale starting with the March meeting and the raffle will be held at the Annual Club
Picnic on September 17Th. Tickets will be $5.00 each or 5 for $20.00. Paul Rygard is
the Ticketmaster for this.
This past month we had a demo by Bob Gerenser on hollowing with the Monster
capture system. We are very fortunate to have members like Bob who are so will-
ing to share their expertise with us. A BIG Thank you Bob.
On July 30th there will be demo by Sharon Doughtie. So far we have 4 people
signed up from our club on our files section. We passed out a signup sheet at the
meeting. You still need to sign up at our site to express your preference for lunch.
Please do so NOW. The demo by Sharon runs from 9:00 AM to 4 PM at the Bridg-
es church in Los Altos at 625 Magdalena. Hope to see all of you there.
Our Membership Chairman, Paul Rygard, will be calling some of you to run for our elected offices of Presi-
dent, Vice President, Secretary and Treasure. Please consider running for one of these positions.
On September 17th SVW will be hosting our annual picnic at the Edith Morley Park in Campbell. There will be
a signup sheet for this event for the potluck part and to gauge how many will be coming. Remember there
will be a President’s Challenge voted on by the public worth $100.00. The challenge this year is to turn some-
thing out of the redwood (old growth) that I have supplied. It is not too late to receive wood from me for this
interesting challenge. Also at the picnic we will have the winner selected for the Jet mini late on stand select-
ed. Need not be present to will this or other items.
Keep turning,
John Whittier
http://www.svwoodturners.org/ Page 4
DIY Hollowing Camera, continued
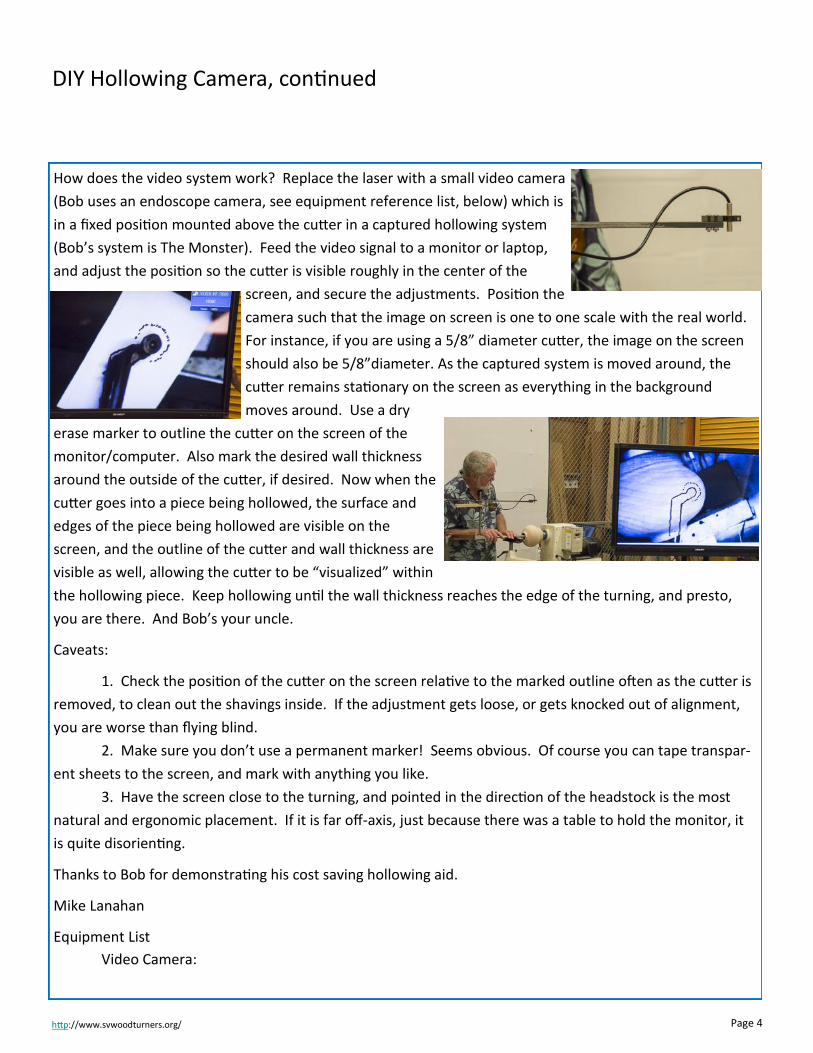
How does the video system work? Replace the laser with a small video camera
(Bob uses an endoscope camera, see equipment reference list, below) which is
in a fixed position mounted above the cutter in a captured hollowing system
(Bob’s system is The Monster). Feed the video signal to a monitor or laptop,
and adjust the position so the cutter is visible roughly in the center of the
screen, and secure the adjustments. Position the
camera such that the image on screen is one to one scale with the real world.
For instance, if you are using a 5/8” diameter cutter, the image on the screen
should also be 5/8”diameter. As the captured system is moved around, the
cutter remains stationary on the screen as everything in the background
moves around. Use a dry
erase marker to outline the cutter on the screen of the
monitor/computer. Also mark the desired wall thickness
around the outside of the cutter, if desired. Now when the
cutter goes into a piece being hollowed, the surface and
edges of the piece being hollowed are visible on the
screen, and the outline of the cutter and wall thickness are
visible as well, allowing the cutter to be “visualized” within
the hollowing piece. Keep hollowing until the wall thickness reaches the edge of the turning, and presto,
you are there. And Bob’s your uncle.
Caveats:
1. Check the position of the cutter on the screen relative to the marked outline often as the cutter is
removed, to clean out the shavings inside. If the adjustment gets loose, or gets knocked out of alignment,
you are worse than flying blind.
2. Make sure you don’t use a permanent marker! Seems obvious. Of course you can tape transpar-
ent sheets to the screen, and mark with anything you like.
3. Have the screen close to the turning, and pointed in the direction of the headstock is the most
natural and ergonomic placement. If it is far off-axis, just because there was a table to hold the monitor, it
is quite disorienting.
Thanks to Bob for demonstrating his cost saving hollowing aid.
Mike Lanahan
Equipment List
Video Camera:

http://www.svwoodturners.org/ Page 5 Page 5
Meeting was called to order at 7:00 P.M. by our President John Whittier
Visitors/New Members: Visitor, Maarten Meerman, returning from Vancouver with an amazingly small turning to
Show & Tell.
Greg Peck
— Staff Updates: Vice President (Mike Lanahan) Librarian (Gordon Patnude)
Library - USE THE LIBRARY. There are lots of good titles with good presentations
Pens for Patriots - Pens are coming in droves. Gordon still has 33 for turning. We will be able to present ~200 pens to the Troops if the 33 are used.
Paul Rygaard
Notified the club members that this Fall will be time for nominations of members to the Club Board positions for next term.
President (John Whittier )
Christmas Party—Party to be at Mama Mia’s in Campbell. Dennis Lillis
Reminded about the Sharon Doughtie hands-on Demo July 31 at West Bay, Bridges Church
7:25 P.M. June’s President’s Challenge, makeups — A Platter
See the Member and their work in the Presidents Challenge photo section of this Newsletter.
7:40 P.M. June’s President’s Challenge raffle — Thirteen items raffled
7:45 P.M. Show and Tell —
See the Member and their work in the Show & Tell photo section of this Newsletter.
8:10 P.M. Break
8:20 P.M. Demonstration - Bob Gerenser’ presentation, “Where You Are Hollowing”, showed a technique using a laser beam and camera setup such that one can determine quite accurately where the cutting edge is located when it is inside a hollow form during turning .
9:20 P.M. Meeting adjourned.

http://www.svwoodturners.org/ Page 6 Page 6
Oscar Wittrock —
Maple plate w poly
thinned 50%
John Whittier —
Walnut w 4 coats of
Wipe-On Poly
Jerry Galli —
Ash end grain
platter
June makeup—
spinning top
Mike Lanahan —
Walnut plate w mineral
oil and beeswax finish
June Makeup - Maple
burl natural edge bowl
w Wipe-On Poly
Johnny Alias —
Unknown wood platter
w turquoise inlay,
w Wipe-On Poly

http://www.svwoodturners.org/ Page 7
Milton West
—
A Bubinga and
a Cherry plate
w shellwax
finish
Tom Schmida —
June makeup — toy
car
Bob Gerenser —
Walnut 9 petal plate
w shellac finish
Jim Gott—
Walnut salad plate
w mineral oil and
beeswax finish
Dennis Lillis —
Spalted Silver Maple platters
April makeup — Stemmed Apricot
champagne flutes

http://www.svwoodturners.org/ Page 8 Page 8
Marcus Moody—
Mostly Mango, some Mahogany
w 50/50 lacquer
Paul Rygaard —
Walnut plate
Brian Havens —
Sho Sugi rimmed plates
Dennis Lillis —
June makeup — Blackwood Top

http://www.svwoodturners.org/ Page 9
Mike Lanahan —
Maple lidded con-
tainer w Wipe-On
Poly finish
Oscar Wittrock—
Osage Orange small
dish w 2 coats of
Wipe-On Poly finish
Tom Schmida —
Walnut bowl w salad
bowl finish
Jim Gott —
Ash bowl w mineral
oil and beeswax
finish
Michael Wiley—
1. Redwood double Celtic knot experiment w shellac &
lacquer finish
2. Black Walnut & Maple colorwood light-pull w CA finish

http://www.svwoodturners.org/ Page 10
Bob Gerenser —
African Mahogany & Cherry
Ocean Wave segmented
closed form, w Wipe-On
Poly
Jerry Galli—
1. Cypress and Ash bowls w Doctor’s Products oil finish.
2. Pens for the Troops — Maple, Cedar, Brazilian Koa, Jarrah,
Cypress, Ash
Larry Thomas —
Pen press assembly
w Morris taper
Gordon Patnude—
More pens for the
Troops! Pens have
wooden bands
Scott Landon —
Bowls, carved
The “Don’t Give Up Series”

http://www.svwoodturners.org/ Page 11
Dennis Lillis —
Blackwood Top
Martin —
Micro turning. Scale is 1/72 and 1/144. Smallest feature is
20 micron, less than 0.001”!
Donations to Santa
Clara High School
John Whittier-
Walnut Plate
http://www.svwoodturners.org/ Page 12
TAKE YOUR SLIM PEN KIT
TO THE NEXT LEVEL WITH UNIQUE CUSTOM CENTER BANDS
Okay, so you’ve been making the standard slim pens for a while, but are finding the results to be a little bor-ing. Here are some tips to help you break out of that rut and create a pen with the heart of the slim pen, but the soul of a free spirit.
Custom center bands allow you to express your creativity. You can enhance the appearance and appeal of an otherwise hum-drum, simple pen.
Here are some things that you need to know:
The standard pen mandrel is 0.243” diameter. If you are making pen kits with a 7mm brass tube, center band material with a 1/4” hole will slide nicely onto the mandrel without a brass tube. If you are making larger diameter pens, you may have to consider other options, which will not be elaborated here.
Choice of material
Materials that complement or are in contrast to the pen blank selected are good choices. Lighter or darker woods, dyed and stabilized woods, and acrylics make excellent center bands.
Center Band Styles
You can choose between two styles of center band – “loose” or “captive”. Let’s take a closer look at each of these:
Loose bands
A loose center band is just that; it is free to move around or along the axis of the the pen mecha-nism, just like the standard band that is included with the pen kit.
A loose band can be made either with or without a tube. If you choose to use a tube, I recommend that you drill a blank of your choice and glue the tube into the blank before cutting individual bands.
Captive bands
A captive center band is fused to either the cap/clip body, or to the nib body of the pen. Since it will be a permanent part of the pen, it will always be in the same position on the finished work.
The center band can be made a part of the original pen blank before drilling the blank for the tube. You can decide if you want a longer tube to be through the center band, or just use the tube provid-ed and have the blank with band just a bit longer than the tube. It can also be made as a separate part and fused to the body prior to turning.

http://www.svwoodturners.org/ Page 13
The single disadvantage to fusing the band to the lower body [nib end] is that you cannot see the markings on the transmission mechanism, while pressing it into the nib body. This is easily alleviat-ed by making an assembly jig to the precise length of the assembled body, which will allow you to repetitively press the parts together without repeatedly checking the pen tip exposure length.
Getting started Prepare the chosen material by cutting it into pen-blank size pieces. I like to prepare multiples of different materials so that they will be on hand when I am ready to make pens.
Next, drill a 1/4” hole through the center of the pen blank as if it were going to be a pen. Use a 7mm pen mill to face each end of the blank. Cutting individual center bands Now, carefully cut the blank into slices from 3/8” up to about 3/4” long. This extra length is necessary so that once the center band is attached to the upper body piece, the remaining end-face can be milled to be square with the tube already in the pen body and excess material can be milled away to achieve the de-sired final width of the band. There are several ways to cut the pieces.
And remember, ALWAYS - - SAFETY FIRST!! The band saw with a sled is probably the easiest and quickest means to cut your material. A fine-toothed blade is recommended. With a good blade and your saw tuned properly, you will get a 90° square and smooth cut. Another method you might use is a mini-sized miter box to hold the blank while cutting the desired lengths. This is a little slower. Another way is to mount the blank on the mandrel with oversize bushings and rough-turning the blank un-til it is cylindrical. Then, using a thin parting tool, score the blank to the desired length, but don’t cut them loose. Take care to make each cut exactly perpendicular to the mandrel. Finish the cuts off the lathe, using an X-Acto™ or other ultra-fine-toothed saw. At this point, you could mount a dozen or so of these drilled slices on the pen mandrel and rough-turn them to about 5/8” diameter – larger if you like, but 5/8” will result in a comfortable diameter midpoint for a nicely balanced pen.
For a “loose” center-band:
Carefully mill both ends of the selected center band, ensuring that the length of the band is as you want it. While this is a simple statement to make, ensuring that both ends of the center band are par-allel and at 90° to the centerline is not simple.
For a “captive” center-band:
Place the upper bushing and the upper blank [cap and clip end] on the mandrel, with the center to-ward the tailstock. Carefully mill one end of the selected center band material and apply CA glue on the milled end. Slide it onto the mandrel followed by block of wood with a 1/4” hole. Snug up the tailstock with just enough pressure to clamp the parts together and wait for the CA to cure.

http://www.svwoodturners.org/ Page 14
After a few minutes, the CA should be set and you can back off the tailstock and remove the glued-up cap piece with the center band attached. Mill the exposed end of the center-band and proceed to “Turning the Pen” [below].
What next, you say??
With your pen blanks drilled, glued and milled we are now ready to make a pen with a custom center band.
First, wipe some paste wax on the mandrel. This will help prevent any CA or finish products from adhering to the mandrel in the following steps.
Don’t blow your fuse, now …
If you are making a captive center band, now is the time to fuse it to either the upper or lower body. I gen-erally put it on the cap end.
Lately [May 2016] I have been using DAP RapidFuse CA for this step. You may use medium CA or even 5-minute epoxy if you prefer.
Slide one bushing onto the mandrel and put the cap blank in place. Apply the adhesive to the desired cen-ter-band piece and slide it onto the mandrel followed by another bushing, and bring up the tailstock. I am using the PSI Mandrel-Saver, but you could use a pen blank with a 1/4” hole drilled through as a means of putting clamping pressure on the center-band to hold it while the your adhesive cures. I leave this set up for at least 5 minutes, and I will often leave it overnight. There’s always something to do while you are waiting.
Turning the Pen
With either the captive or loose center-band now prepared, put the pieces onto the mandrel with bushings only on the cap-end and the nib-end. NO CENTER BUSHING. The new center-band is placed between the upper [cap] blank and lower [nib] blank.
Proceed to turn the pen and finish it as you would normally. The beauty here is that the pen body is turned as a single continuous line, with no intervening bushings. You are in control of the diameter and how the pen contours and details are done. Take care not to make the diameter too large, or the clip will not fit properly.
Sand and finish the pen as you wish, using your preferred finish. Assemble the completed pen and VOILA!! Repeat as needed.
Gordon Patnude

http://www.svwoodturners.org/ Page 15
This information is provided by More Woodturning Magazine. Please visit their web site: www.morewoodturningmagazine.com
Make Refrigerator Magnets by John Wolf
You probably have a collection of small pieces of beautiful wood. Pieces that are big enough to be used as a color accent or to make that one knob. I used to be overrun with wood that was too good to throw away butnot large enough to make useful projects. Not any more! Why? Refrigerator magnets! This quick project makes a useful item that everyone seems to need. I begin by purchasing rare earth mag-nets. The most useful size is just under1/2 inch diameter (12 mm) and 1/8 inch thick. These can be ordered from most supply catalogs, but I get mine from my local craft supply store. They are about 1/2 the price as the mail order sources, and the magnet is the major cost in making this project. Samples of stock to be used.
Select the blank of wood. I usually start with stock that is at least ¾inch square but larger or slightly smaller will work. Cut the wood to lengths anywhere from ¾ to 3 inches. If your saw doesn’t leave a beautiful fin-ish, you should true the end on a sander. Drill the approximate center of the finished end with a brad point or Forstner drill that leaves a hole just large enough for your magnet. I use a 15/32 brad point drill for the 12 mm magnet. I use a drill press vise and drill press to do this most of the time, but it can be done with a hand drill. What you must do is secure the wood blank using something other than your fingers! Drill this hole to a depth that equals about 3/4 the thickness of your magnet.
The drill will leave a center mark.At this center point drill a 5/32 hole with a standard twist drill to a depth of3/4 inch. Make a screw center for your lathe that is appropriately sized for this project. I take a scrap of wood that fits into my chuck and true its face. I then drill clear through the piece at its center with a 5/32 drill. Remove this blank from the chuck and counter sink the backside of the hole so that a #12flat head screw will seat firmly. I typically use a 1" by #12. You may need to deepen the countersink so that ½ to 5/8 of an inch of the screw protrudes through the front of the blank. I then put epoxy on the head to hold the screw in place.

http://www.svwoodturners.org/ Page 16
Homemade screw chuck to hold the blank for turning.
Once the epoxy has cured, the small size screw chuck is ready to use. Remount it into your chuck. Screw on your wood blank and turn to a shape of your choosing using gouge, skew and or scrapers
Turning the wood to shape, in this case a neat knob.
Sand the turning and apply the finish of your choice. I often use either a friction polish or lacquer depending upon the wood, my mood and the ambient temperature. Remove the piece from the screw chuck. Clean the magnet with solventto remove any oils from manufactur-ing or handling. Apply a small amount of epoxy or super glue to the magnet recess andthen press in the clean magnet. The project is complete when the glue has cured.
This information is provided by More Woodturning Magazine. Please visit their web site: www.morewoodturningmagazine.com

http://www.svwoodturners.org/ Page 17
The finished refrigerator magnet
Note: Larger more powerful magnets are desirable when the turning is more than 3 inches long and is going to be used as a “hook” for aprons or potholders. Otherwise, these powerful magnets may break the glue bond with the wood before they pull off the frig.
This information is provided by More Woodturning Magazine. Please visit their web site: www.morewoodturningmagazine.com

http://www.svwoodturners.org/ Page 18
17252 Big Rd, Bloxom VA 23308
Toll Free 1 (800) 995-9328
15% off online orders! use WOODTURNERS coupon code at checkout.
Chocolates Worth Their Calories TM
1492 Soquel Ave
Santa Cruz, CA 95062
831-425-1492
Shavings & Sawdust Join this Group for Home & Garden or
Sawdust Session information.
Here are the details on Shavings:
Group home page: http://groups.yahoo.com/group/Shavings
Group email address: [email protected]

http://www.svwoodturners.org/
2016 Silicon Valley Woodturners Officers, Staff, Volunteers, and Contacts
President John Whittier (408) 379-3722 [email protected]
V.P./Programs Mike Lanahan (408) 926-9330 [email protected]
Treasurer Tom Schmida (831) 688-3866 [email protected]
Secretary Greg Peck (408) 281-9156 [email protected]
Newsletter Editor Bob Gerenser (408) 262-5411 [email protected]
Greg Peck (408) 623-9156 [email protected]
Hospitality Barbara Jones (408) 257-9385 [email protected]
Membership Chair. Paul Rygard (408) 866-0390 [email protected]
Photographer Jim Gott (408) 265-9501 [email protected]
Property Mgmt. Gary Keogh (408) 281-9054 [email protected]
Librarian Gordon Patnude (408) 267-6789 [email protected]
Webmaster Pete Zavela (405) 849-2858 [email protected]
Site Prep Johnny Alias (408) 227-2423 [email protected]
Milton West (408) 729-6334 [email protected]
Audio/Visual Richard Scott (408) 799-0005 [email protected]
Greg Peck (408) 281-9156 [email protected]
Yahoo Groups Howard Cohen (408)378-9456 [email protected]
Page 19
It takes more than the officers and pro-gram chairs to make our club function at its best. If your name’s not in the column at right, we still need your help in other ways to manage some of the club’s activities. This is a HELP WANTED ad, and we need you to respond. There are al-ways things that need doing. In particular, we need: • Volunteers for shop tours • Volunteers to present/demonstrate at meetings • Members to write up their profiles for the newsletter • Short articles or Tips & Tricks for the Chips & Chatter newsletter Please contact Mike Lanahan to volunteer
MEMBERS: Please contribute your expertise to our newsletter. The editor will help you get your article ready if need be. Deadline is one week after our club meeting. OTHER WOODTURNING CLUBS: You may use materials in this newsletter for the benefit of other turners. Please credit Silicon Valley Woodturners and the news-letter month and year for any material you use, and mention our web site: www.svwoodturners.org. Note that if we’ve flagged an article as having been reprinted from another source with permission, you must secure that same per-mission in order to use that material. Volunteer Instructors / Mentors The turners below have graciously offered to open their shops to help members who want to learn to sharpen, try something new, or master a technique that just doesn’t seem to be working. We all love to share. You just have to ask. Willing to help? Contact Mike Lanahan to join this list.
Jim Gott, [email protected] , (408) 265-9501 sharpening, design, natural edge
bowls, boxes, goblets, tool control, you name it. Anything but segmenting.
Mike Lanahan, [email protected] , (408) 926-9330 Pepper Mills,
Segmented, and Shaving or Makeup Brushes.
Dennis Lillis, [email protected] , (408) 353-3821 Hollowing, sharpening,
and coring
SVW NEEDS
YOU!

http://www.svwoodturners.org/
IRONMAN Rules
There are twelve challenges listed for the year and in order to qualify for Ironman you must show, by the
end of the year, that you have completed all twelve challenges.
Challenge entries should be shown at the meeting corresponding to the challenge schedule.
Ironmen are those who
successfully complete
all 12 President’s Chal-
lenge projects for the
year. Those who meet
the challenge are
awarded coveted and
distinctive IRONMAN
name badges. A blue
bar in the accompany-
ing chart means that
person has completed
the project for the
month indicated. You
needn’t be a great
turner, you just need to
participate. Make
something in our Chal-
lenge theme and bring it
to the next meeting.
Editor’s Note
If I’ve somehow
overlooked your
President’s Challenge
entry, send me an
e-mail at
bob.gerenser@
sbcglobal.net
Page 20
For a more detailed description of the 2014 President’s Challenges, go to:
http://groups.yahoo.com/group/SVWoodturners/files/Forms/

http://www.svwoodturners.org/
Want to join a great group of turning enthusiasts in an atmosphere of sharing and camaraderie? Become a member of Sili-con Valley Woodturners. We meet on the First Wednesday of each month. See page 2 for details. Drop in at any meeting and check things out. To join, contact John Whittier (see contact list), or just complete the application form below and mail
with check to Grant. Learn more about our club on the web at www.svwoodturners.org.
Silicon Valley Woodturners Membership Application
Please print and mail with a check payable to SVW for $35* individual ($45* family) to: Paul Rygard, 255 Prince St. Los Gatos,CA 95032
Name __________________________________________________________________
Address ________________________________________________________________
City _________________________________________ State _____ Zip ___________ Phone(s): home:___________________________mobile:__________________________
Email ______________________________ Website _______________________________________________ Lathe(s): ________________________________________________________________
Current Member of AAW? Yes ___ No ___
Member-ship*
Renewal 2nd Quarter
April - June 3rd Quarter July - Sept.
4th Quarter Oct. - Dec.
Individual $35 $25 $20 $10
Family $45 $35 $30 $15
Page 21
Join us Wednesday, August
@7:00PM
Santa Clara High School Woodshop
3000 Benton St, Santa Clara, CA
It is right across the street from the
Baptist Church sign, and just past
(coming from Kiely) a No Entrance
sign.
August Program: Brian Havens
“Therming”
August Challenge: Hollow Form
http://www.svwoodturners.org/
Page 22
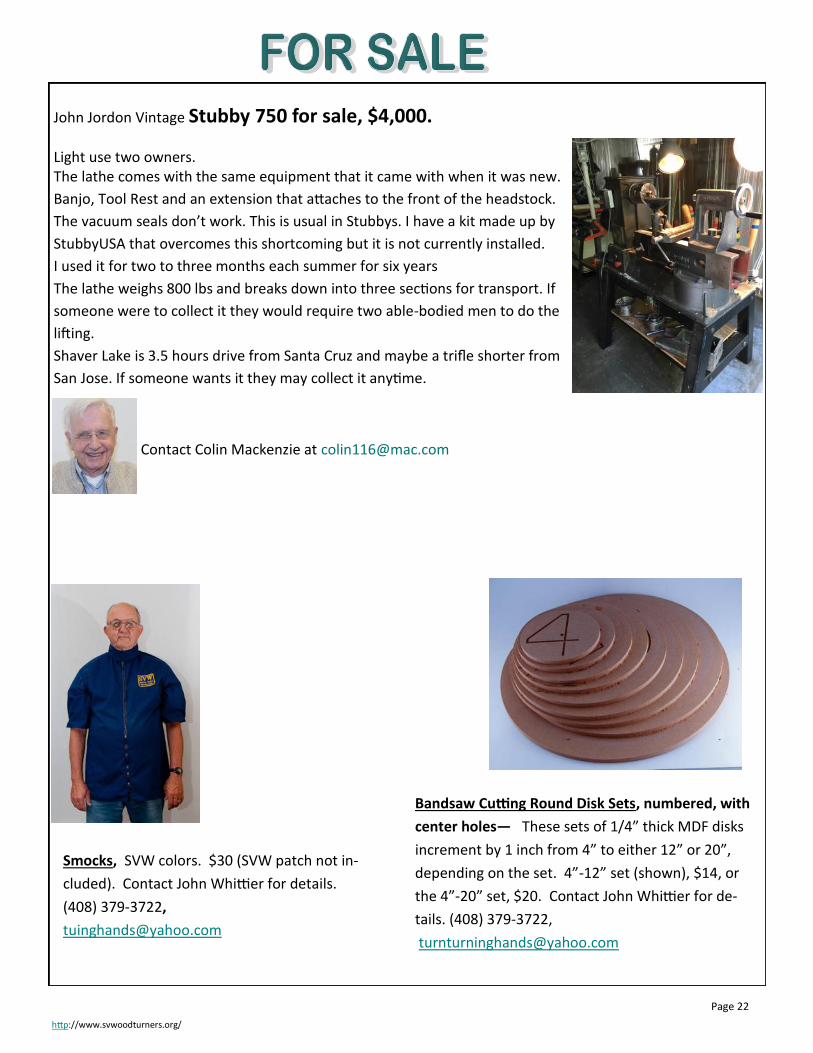
John Jordon Vintage Stubby 750 for sale, $4,000.
Light use two owners. The lathe comes with the same equipment that it came with when it was new.
Banjo, Tool Rest and an extension that attaches to the front of the headstock.
The vacuum seals don’t work. This is usual in Stubbys. I have a kit made up by
StubbyUSA that overcomes this shortcoming but it is not currently installed.
I used it for two to three months each summer for six years
The lathe weighs 800 lbs and breaks down into three sections for transport. If
someone were to collect it they would require two able-bodied men to do the
lifting.
Shaver Lake is 3.5 hours drive from Santa Cruz and maybe a trifle shorter from
San Jose. If someone wants it they may collect it anytime.
Contact Colin Mackenzie at [email protected]
Bandsaw Cutting Round Disk Sets, numbered, with
center holes— These sets of 1/4” thick MDF disks
increment by 1 inch from 4” to either 12” or 20”,
depending on the set. 4”-12” set (shown), $14, or
the 4”-20” set, $20. Contact John Whittier for de-
tails. (408) 379-3722,
Smocks, SVW colors. $30 (SVW patch not in-
cluded). Contact John Whittier for details.
(408) 379-3722,