D.I.Y. e-Caller took two pieces of speaker wire and stripped the ends. On one end I twisted ... o...
9
D.I.Y. e-Caller Page 1 of 9 D.I.Y. e-Caller The Project Being new to the predator hunting hobby and not trusting my ability to call with a reed or diaphragm, I wanted an electronic caller. But a commercial unit wasn’t/isn’t in the budget. I got to thinking about the components and after scrounging in the garage through leftovers from previous projects I found I had what I needed to make one myself. The following is the result. And it works! Figure 1: Finished e-Caller, Side View Here is the finished e-Caller shown with the mp3 player cable coming out the side of the enclosure. Figure 2: Finished e-Caller, Front View L = 9, W = 7, H = 9 (Box is 9 x 7 x 4) Assembly On the next few pages I’ll step through the assembly of the component parts. For each I’ll provide a brief narrative on the part, what I’m trying to accomplish, as-well-as any snags I ran into or any tips I may have. (The complete parts list is provided further below.)
Transcript of D.I.Y. e-Caller took two pieces of speaker wire and stripped the ends. On one end I twisted ... o...

D.I.Y. e-Caller Page 1 of 9
D.I.Y. e-Caller
The Project
Being new to the predator hunting hobby and not trusting my ability to call with a reed or diaphragm, I wanted an
electronic caller. But a commercial unit wasn’t/isn’t in the budget. I got to thinking about the components and after
scrounging in the garage through leftovers from previous projects I found I had what I needed to make one myself. The
following is the result. And it works!
Figure 1: Finished e-Caller, Side View
Here is the finished e-Caller shown with the mp3 player
cable coming out the side of the enclosure.
Figure 2: Finished e-Caller, Front View
L = 9, W = 7, H = 9 (Box is 9 x 7 x 4)
Assembly
On the next few pages I’ll step through the assembly of the component parts. For each I’ll provide a brief narrative on
the part, what I’m trying to accomplish, as-well-as any snags I ran into or any tips I may have. (The complete parts list is
provided further below.)

D.I.Y. e-Caller Page 2 of 9
Car Charger
As this project uses a 12 Volt battery I thought ‘why not build in a charger for the MP3 player, a phone, or a GPS’. So I
simply split open a car charger that had a USB port for charging a mobile phone. Figure 3 shows the charger split open.
At the top of Figure 3 you can see the charger with the power wires soldered on, prior to applying the heat shrink
tubing. Figure 4 shows the charger after heat shrink was applied. While Figure 5 shows the entire power wire assembly,
including the charger before the heat shrink was applied.
Figure 3: Car Charger Disassembled
I clipped off the curved negative terminals (see Figure
5). One I cut quite short. The other I left a little longer,
so I could solder the power wire to it. I clipped off the
fuse/spring assembly on the positive terminal and
soldered the power wire directly to the wire that led to
the fuse.
Figure 4: Car Charger with Heat Shrink
Before applying the heat shrink, I used electrical tape to
secure the power wire to the circuit board as a stress
relief, in case anyone (me) ever pulls on the wires.
Figure 5: Power Wire Assembly
Here is the final power cord assembly. I took two pieces of speaker wire and stripped the ends. On one end I twisted
the negative (red/black) wires together and soldered them to a battery clip. I did the same for the two positive wires. A
little heat shrink and you see the created “Y” assembly below. To one end of the remaining loose ends I soldered the
USB charger, making sure I soldered the positive lead to what was the center post. To the other I soldered a Size K
power plug, making sure the center (small post) received the positive lead. (That may differ depending on your amp.)

D.I.Y. e-Caller Page 3 of 9
The Amplifier
I used an inexpensive Lapai T-Class Amplifier. The LP-808 outputs 20 watts per channel, of which I only use one. (Of
course there is no reason you can’t add another speaker to the assembly for more volume. Maybe I will later.) The T-
Class amplifiers are very flexible. They will take an input voltage from typically anywhere between 9 and 15 volts.
However, the volume is greatly reduced as you approach 9 volts. Another nice thing about them is that (typically) they
produce very, very, little to absolutely no sound (hum) when cranked full volume and no input. This means I can control
the volume of the caller from my MP3 player and not need to fool with the volume control on the amp. I just leave the
amp’s volume all the way up. This particular amp has both RCA jack and 3.5mm phono plug inputs. Lastly, the amp will
tolerate speakers anywhere from 2 to 8 ohms. Meaning you can plug in virtually any common speaker.
Figure 6: Amp Stand
I cut an old office name plaque holder to the width of
the amp and used it to mount the amp at an angle so I
could easily access the controls when it’s in the box.
Figure 7: Amp Front
Figure 8: Amp Top
Figure 9: Amp Rear
D.I.Y. e-Caller Page 4 of 9
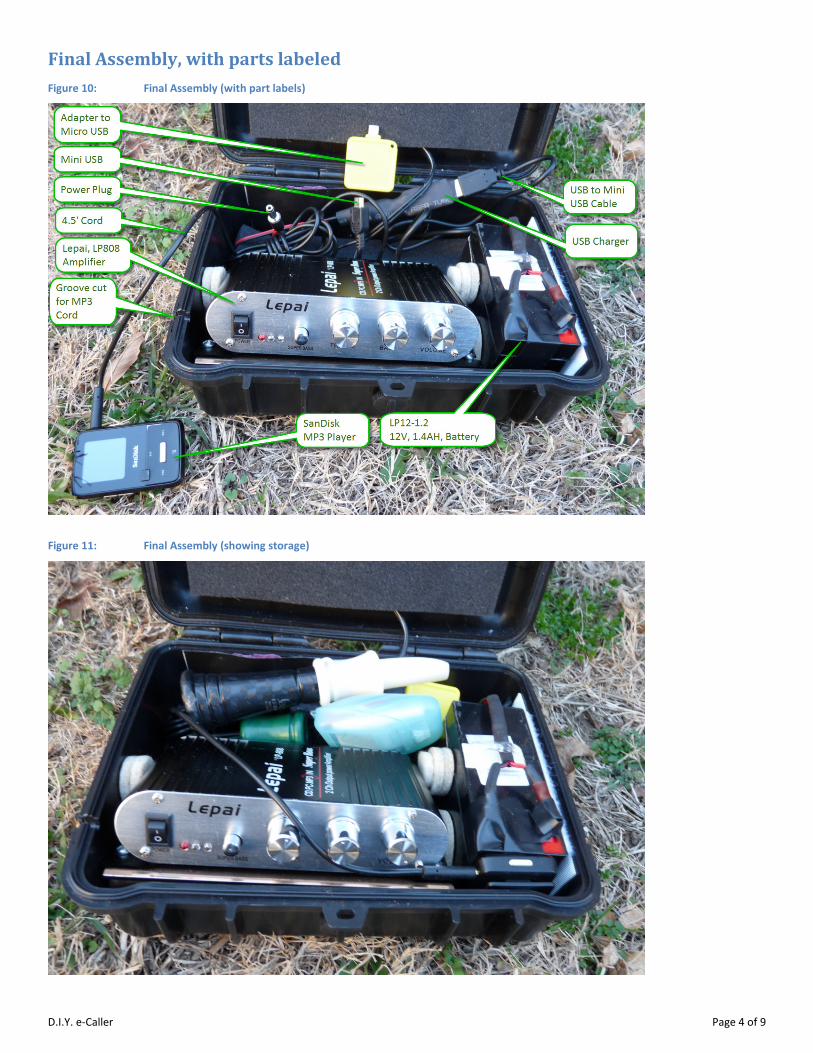
Final Assembly, with parts labeled
Figure 10: Final Assembly (with part labels)
Figure 11: Final Assembly (showing storage)

D.I.Y. e-Caller Page 5 of 9
Parts List
You can see from the assembly that nothing special is going on here. Most anything listed below can be substituted with
something similar. It’s a pretty much goof-free project, as long as you don’t mind something that definitely looks DIY.
• Speaker
o I used the “4x6" 50-Watt Indoor/Outdoor Powerhorn” from Radio Shack, Model: 40-1440,
Catalog #: 40-1440. It normally runs about $30.
• Project Box
o Some box I had in the garage that was left over from a previous project.
• Amplifier
o Lepai, LP-808, T-Class Amplifier. You can find them on eBay and Amazon for around $10.
• Battery
o LP12 – 1.2, 12 Volt, 1.4 Amp Hour Battery or near equivalent. Price is about $20.
o Size 3-3/4 L x 1-5/8 W x 2” H
• Battery Charger
o You’ll need one. I just use the one from my spot light charger.
• Battery Clips (Female, Crimp-On, Quick Disconnects)
o Pick what you need for the battery you select.
o Radio Shack 10 Pack, Part 6403039, contains 2 each of 5 different sizes
• Power Cord(s)
o I just used old and thin speaker wire.
• Power Plug (going into the amp from the battery)
o Size K Coaxial DC Power Plug
o The one I used was from a 2 piece set, Part 274-1567 from Radio Shack.
• Amp Stand
o An old office desktop name holder cut to width of amp.
• Car Charger
o An old Jabra cigarette lighter USB charger. I would suggest using a brand name charger. Some phones,
such as the Motorola brand smart phones, are quite finicky on the input voltage and they won’t accept a
charge from cheap chargers.
• USB to Mini USB Cable
o Pretty much any old cable will do, but I would suggest one that is shielded so that it won’t cause any
interference (hum) to the amp. Shielded cables are most often round in shape and are supplied for also
transferring data to a computer. A flat, two wire, charging only cable will not be shielded.
• Mini USB to Micro USB Adapter
o Many, if not most, phones these days use a Micro USB plug, so you will need an adapter to go from the
Mini plug on the cable to a Micro plug. You could use a cable with a Micro plug, but then if you want to
charge a GPS or a buddy’s phone that uses a Mini plug you are out of luck. Of course, if you use an
iPhone then you will want to have an extra USB charge cable tucked in with the caller.
• Miscellaneous Parts
o Electrical Tape
o Heat Shrink
o Solder
o Silicone Sealer

D.I.Y. e-Caller Page 6 of 9
• Miscellaneous Parts, continued…
o Velcro
� Used to hold the battery in place.
o Nuts and Bolts
� Whatever you find you need to hold the amp and speaker in place.
o Foam Pads
� Used to keep things from rattling in the case and for appearance.
� I just used the top and bottom foam pads that came with the case.
o Furniture Gliders/Pads
� Used to pad the amp and help hold it in place.
� I used the self-stick pads made to put on table and chair legs so they slide easily over the floor.
o Monster Tape
� It holds the foam and the amp in place.
o Speaker Wire
� I just used some old thin wire I had laying around. The distances are so short there is no need
for a heavier wire.
o MP3 Player
� I use my little Sansa. I’ve tried using my smart phone, but on occasion it has caused a hum.
o Phono Cable
� Any old shielded phono cable will do that has either a 3.5 mm plug or pair of RCA plugs that will
attach to the amp and then whatever you need on the other end to attach to your MP3 player.
o Paint
� I just used a black matte paint over a dark green gloss.
• LED Light Assembly and switch
o Not shown in the pictures. I added it after taking pictures. (As I’ll likely be constantly tweaking this
project, I’ll never get this document posted if I have to take pictures over every time I make a change.)
o Radio Shack Part 276-0270, 12 Volt, LED Red. Cost was about $2.50.
o Small slider switch I had in the garage. I don’t have the part number.
o The light assembly consists of a small red LED that casts enough light to let someone see items within
the caller case and immediately around it
• Quick Connect Power Cord
o Another enhancement not shown in the
final assembly picture, as it is not yet
installed. I purchased an 8’ quick connect
power cord from our local battery store for
$8. It’s the same connector used by my
spotlight assembly. I believe I’ll remake my
power cord assembly using the quick
connect cord. Doing so means I won’t have
to borrow the adapter from my spotlight in
order to charge the caller battery. I’ll be
able to directly connect the battery to the
charger.
I’m thinking I’ll cut off about 4 to 6” of the
cable for charging. The remaining 7.5’ or so
I may wire up to the battery as well, but for
the purpose of powering my spotlight if my
main battery runs out. (It never hurts to
have a Plan-B.)
Figure 12: Final Assembly (showing storage)

D.I.Y. e-Caller Page 7 of 9
Assembly Notes
[Purposefully provided on this separate page, so Figures on separate pages may be referenced.]
• First I mounted the speaker on the box. I simply found where I wanted to place it, drilled a small hole through
which I could pass the speaker wire, and bolted it into place. I used some silicone sealant to seal the wire and
bolt holes from moisture.
o A consideration would be to paint the speaker before mounting, but I found it easier to paint afterwards
because it was mounted on a stable platform.
o At some point I’ll try a smaller speaker. Maybe a compression driver. I need to look into this more.
There is no reason why the unit can’t be much smaller.
• Then I built the power harness. I’ve already described the process above.
o With the next harness I make, I’ll use some heavier wire (perhaps lamp cord). The distances are so short
that I don’t believe it will make any difference with the power transfer. The thicker wire will simply be
more robust.
• Next I just assembled and mounted the equipment as I discussed above.
• Originally I used rubber cement to hold the battery in place. That was a mistake, as I wanted to borrow the
battery temporarily for another use.
• TIP: Make everything removable without needing to disassemble everything but the part you want to remove.
This makes enhancing the unit much easier.
• You’ll note that I taped the battery terminals in the picture above. Don’t bother. Remember, make everything
removable. If you want to protect the terminals from accidental shorting then get a piece of rubber or
something you can just tape on the battery as a flap to cover the terminals.
• TIP: Disconnect power when the hunt is over and recharge your battery. I’ve found that both the amp and the
charger will draw a small amount of current. This will drain your battery over the course of a day or two.
Sound Notes
Volume Control
• Turn the amp all the way up and use your MP3 player to control the volume.
o If you are getting a hum from the amp then look for some sort of interference source. Hopefully it won’t
be your MP3 player. For example, when nothing is connected to the amp it is silent (even with the
volume turned up all the way). But if I work under my high intensity shop light then I’ll get a little hum
(which working under a bright light is not a big concern while hunting). Also, I’ll get a slight hum when I
go to use my mobile phone for playing the calls. I haven’t tried to see if I can correct the problem
because my little Sansa works perfectly. – And no hum.
o I leave the bass and treble at the middle (neutral) setting. I leave the ‘Super Bass’ off.
MP3 Files
• I’m still cultivating a list of good call files.
Playlists
• I use the computer to merge different calls into 30 minute playlists. They have 10 minutes of silence and the
start calling. Each playlist is around 30 minutes in length.
• MediaCope is the application I use to edit and convert the sound files. This is the tool I used to create different
lengths of ‘silent’ sound files. http://www.mediacope.com/media-cope-download.html
• Audacity is another application for manipulating files. It is an excellent tool, but one I just haven’t needed.
http://audacity.sourceforge.net/download/

D.I.Y. e-Caller Page 8 of 9
Finished Product
More Information
Please feel free to visit my personal Fishing, Hunting, Shooting, and Reloading web site FSHRmen.net.
Regards,
Andrew Lindsay
D.I.Y. e-Caller Page 9 of 9
Disclaimer
No claims of suitability or guarantees of any manner are made with this document.
Always remember, safety is your responsibility. This material provided above is for informational purposes; for
the added enjoyment of the fishing, shooting, hunting, and reloading hobbies. But the enjoyment ends quickly
if someone gets hurt. These hobbies can be dangerous. Always follow proper safety rules and
practices. Always follow all appropriate laws. Seek proper training.
The author takes no responsibility for any harm that may result from the direct or indirect use of any
information in this document. Content is not guaranteed to be correct or complete. The author is not responsible
for the content of any material referenced.
If sections or individual terms of this disclaimer are not legal or correct, the content or validity of the other parts
remain uninfluenced by this fact.
Table of Contents D.I.Y. e-Caller .............................................................................................................................................................................................. 1
The Project............................................................................................................................................................................................. 1
Assembly................................................................................................................................................................................................ 1
Car Charger........................................................................................................................................................................................ 2
The Amplifier ..................................................................................................................................................................................... 3
Final Assembly, with parts labeled ........................................................................................................................................................ 4
Parts List ................................................................................................................................................................................................ 5
Assembly Notes ..................................................................................................................................................................................... 7
Sound Notes .......................................................................................................................................................................................... 7
Volume Control ................................................................................................................................................................................. 7
MP3 Files ........................................................................................................................................................................................... 7
Finished Product .................................................................................................................................................................................... 8
More Information .................................................................................................................................................................................. 8
Disclaimer .............................................................................................................................................................................................. 9
Table of Figures ..................................................................................................................................................................................... 9
Table of Figures
Figure 1: Finished e-Caller, Side View ................................................................................................................................ 1
Figure 2: Finished e-Caller, Front View .............................................................................................................................. 1
Figure 3: Car Charger Disassembled .................................................................................................................................. 2
Figure 4: Car Charger with Heat Shrink .............................................................................................................................. 2
Figure 5: Power Wire Assembly ......................................................................................................................................... 2
Figure 6: Amp Stand ........................................................................................................................................................... 3
Figure 7: Amp Front ........................................................................................................................................................... 3
Figure 8: Amp Top .............................................................................................................................................................. 3
Figure 9: Amp Rear ............................................................................................................................................................. 3
Figure 10: Final Assembly (with part labels) .................................................................................................................... 4
Figure 11: Final Assembly (showing storage) ................................................................................................................... 4
Figure 12: Final Assembly (showing storage) ................................................................................................................... 6