Distributed Programming with Ice - Michi Henning
2083
Distributed Programming with Ice Michi Henning Mark Spruiell With contributions by Dwayne Boone, Brent Eagles, Benoit Foucher, Marc Laukien, Matthew Newhook, Bernard Normier
Transcript of Distributed Programming with Ice - Michi Henning

Distributed Programming with Ice
Michi HenningMark Spruiell
With contributions by
Dwayne Boone, Brent Eagles, Benoit Foucher,Marc Laukien, Matthew Newhook, Bernard Normier

Many of the designations used by manufacturers and sellers to distinguish their products are claimed as trademarks. Where those designations appear in this book and ZeroC was aware of the trademark claim, the designations have been printed in initial caps or all caps. The authors and publisher have taken care in the preparation of this book, but make no expressed or implied warranty of any kind and assume no responsibility for errors or omissions. No liability is assumed for incidental or consequential damages in connection with or arising out of the use of the information or programs contained herein.
This manual is provided under one of two licenses, whichever you prefer:
• the Creative Commons Attribution-No Derivative Works 3.0 Unported License (http://creativecommons.org/licenses/by-nd/3.0/). This license does not permit you make modifications.
• the Creative Commons Attribution-Noncommercial-Share Alike 3.0 Unported License (http://creativecommons.org/licenses/by-nc-sa/3.0/). This license permits you to make modifications. If you distribute this manual under this license, you must prominently include the following text:
This document is derived from “Distributed Computing with Ice”, Copyright © ZeroC, Inc. 2003-2010. You can find the latest version of “Distributed Computing with Ice” athttp://www.zeroc.com/Ice-Manual.pdf.
Copyright © 2003-2010 by ZeroC, Inc.mailto:[email protected]://www.zeroc.com
Revision 3.4, June 2010
This revision of the documentation describes Ice version 3.4.1.
The Ice source distribution makes use of a number of third-party products:
• Berkeley DB, developed by Oracle (http://www.oracle.com)
• bzip2/libbzip2, developed by Julian R. Seward (http://sources.redhat.com/bzip2)
• The OpenSSL Toolkit, developed by the OpenSSL Project (http://www.openssl.org)
• SSLeay, developed by Eric Young (mailto:[email protected])
• Expat, developed by James Clark (http://www.libexpat.org)
• STLport, developed by the STLport Standard Library Project (http://www.stlport.org)
• mcpp, developed by Kiyoshi Matsui (http://mcpp.sourceforge.net)
• QT, developed by Nokia (http://qt.nokia.com)
See the Ice source distribution for the license agreements for each of these products.

iii
Contents
Chapter 1 Introduction 11.1 The Internet Communications Engine (Ice) 11.2 Organization 21.3 Typographical Conventions 31.4 Source Code Examples 41.5 Contacting the Authors 41.6 Ice Support 4
Part I Ice Overview 5
Chapter 2 Ice Overview 72.1 Chapter Overview 72.2 The Ice Architecture 72.3 Ice Services 232.4 Architectural Benefits of Ice 26
Chapter 3 A Hello World Application 293.1 Chapter Overview 293.2 Writing a Slice Definition 303.3 Writing an Ice Application with C++ 303.4 Writing an Ice Application with Java 393.5 Writing an Ice Application with C# 463.6 Writing an Ice Application with Visual Basic 533.7 Writing an Ice Application with Objective-C 613.8 Writing an Ice Application with Python 703.9 Writing an Ice Application with Ruby 753.10 Writing an Ice Application with PHP 783.11 Summary 81

iv
Part II Slice 83
Chapter 4 The Slice Language 854.1 Chapter Overview 854.2 Introduction 854.3 Compilation 864.4 Source Files 894.5 Lexical Rules 914.6 Modules 944.7 The Ice Module 954.8 Basic Slice Types 964.9 User-Defined Types 984.10 Interfaces, Operations, and Exceptions 1054.11 Classes 1314.12 Forward Declarations 1484.13 Type IDs 1494.14 Operations on Object 1504.15 Local Types 1514.16 Names and Scoping 1534.17 Metadata 1594.18 Serializable Objects 1604.19 Deprecating Slice Definitions 1624.20 Using the Slice Compilers 1634.21 Slice Checksums 1644.22 Generating Slice Documentation 1654.23 Summary 171
Chapter 5 Slice for a Simple File System 1735.1 Chapter Overview 1735.2 The File System Application 1735.3 Slice Definitions for the File System 1745.4 The Complete Definition 176

v
Part III C++ Mapping 179
Chapter 6 Client-Side Slice-to-C++ Mapping 1816.1 Chapter Overview 1816.2 Introduction 1816.3 Mapping for Identifiers 1826.4 Mapping for Modules 1836.5 The Ice Namespace 1846.6 Mapping for Simple Built-In Types 1846.7 Mapping for User-Defined Types 1866.8 Mapping for Constants 1966.9 Mapping for Exceptions 1976.10 Mapping for Run-Time Exceptions 2016.11 Mapping for Interfaces 2026.12 Mapping for Operations 2126.13 Exception Handling 2186.14 Mapping for Classes 2206.15 Asynchronous Method Invocation (AMI) 2446.16 slice2cpp Command-Line Options 2606.17 Using Slice Checksums 266
Chapter 7 Developing a File System Client in C++ 2677.1 Chapter Overview 2677.2 The C++ Client 2677.3 Summary 272
Chapter 8 Server-Side Slice-to-C++ Mapping 2738.1 Chapter Overview 2738.2 Introduction 2738.3 The Server-Side main Function 2748.4 Mapping for Interfaces 2908.5 Parameter Passing 2938.6 Raising Exceptions 2948.7 Object Incarnation 2958.8 Asynchronous Method Dispatch (AMD) 3008.9 Summary 306
Chapter 9 Developing a File System Server in C++ 3079.1 Chapter Overview 3079.2 Implementing a File System Server 3079.3 Summary 324

vi
Part IV Java Mapping 327
Chapter 10 Client-Side Slice-to-Java Mapping 32910.1 Chapter Overview 32910.2 Introduction 32910.3 Mapping for Identifiers 33010.4 Mapping for Modules 33110.5 The Ice Package 33210.6 Mapping for Simple Built-in Types 33210.7 Mapping for User-Defined Types 33210.8 Mapping for Constants 33610.9 Mapping for Exceptions 33710.10 Mapping for Run-Time Exceptions 34010.11 Mapping for Interfaces 34110.12 Mapping for Operations 35110.13 Exception Handling 35610.14 Mapping for Classes 35810.15 Serializable Objects 36710.16 Customizing the Java Mapping 36810.17 Asynchronous Method Invocation (AMI) 37910.18 Slice Compiler 39210.19 Using Slice Checksums 397
Chapter 11 Developing a File System Client in Java 39911.1 Chapter Overview 39911.2 The Java Client 39911.3 Summary 403
Chapter 12 Server-Side Slice-to-Java Mapping 40512.1 Chapter Overview 40512.2 Introduction 40512.3 The Server-Side main Method 40612.4 Mapping for Interfaces 41312.5 Parameter Passing 41612.6 Raising Exceptions 41712.7 Tie Classes 41812.8 Object Incarnation 42212.9 Asynchronous Method Dispatch (AMD) 42612.10 Summary 431

vii
Chapter 13 Developing a File System Server in Java 43313.1 Chapter Overview 43313.2 Implementing a File System Server 43313.3 Summary 442
Part V C# Mapping 443
Chapter 14 Client-Side Slice-to-C# Mapping 44514.1 Chapter Overview 44514.2 Introduction 44514.3 Mapping for Identifiers 44614.4 Mapping for Modules 44714.5 The Ice Namespace 44814.6 Mapping for Simple Built-in Types 44814.7 Mapping for User-Defined Types 44914.8 Mapping for Constants 46714.9 Mapping for Exceptions 46914.10 Mapping for Interfaces 47214.11 Mapping for Operations 48014.12 Exception Handling 48414.13 Mapping for Classes 48614.14 Serializable Objects 49714.15 C#-Specific Metadata Directives 49814.16 Asynchronous Method Invocation (AMI) 49814.17 slice2cs Command-Line Options 51314.18 Using Slice Checksums 513
Chapter 15 Developing a File System Client in C# 51715.1 Chapter Overview 51715.2 The C# Client 51715.3 Summary 521

viii
Chapter 16 Server-Side Slice-to-C# Mapping 52316.1 Chapter Overview 52316.2 Introduction 52316.3 The Server-Side Main Method 52416.4 Mapping for Interfaces 53016.5 Parameter Passing 53316.6 Raising Exceptions 53416.7 Tie Classes 53616.8 Object Incarnation 53916.9 Asynchronous Method Dispatch (AMD) 54316.10 Summary 548
Chapter 17 Developing a File System Server in C# 54917.1 Chapter Overview 54917.2 Implementing a File System Server 54917.3 Summary 558
Part VI Objective-C Mapping 559
Chapter 18 Client-Side Slice-to-Objective-C Mapping 56118.1 Chapter Overview 56118.2 Introduction 56118.3 Mapping for Modules 56218.4 The ICE Prefix 56418.5 Mapping for Identifiers 56418.6 Internal Identifiers 56518.7 Mapping for Built-In Types 56618.8 Mapping for User-Defined Types 56718.9 Mapping for Constants 57518.10 Mapping for Exceptions 57618.11 Mapping for Interfaces 58318.12 Mapping for Operations 58918.13 Exception Handling 59718.14 Mapping for Local Interfaces 59918.15 Mapping for Classes 60018.16 Interfaces by Value 61118.17 Asynchronous Method Invocation (AMI) 61218.18 slice2objc Command-Line Options 619

ix
Chapter 19 Developing a File System Client in Objective-C 62119.1 Chapter Overview 62119.2 The Objective-C Client 62119.3 Summary 626
Chapter 20 Server-Side Slice-to-Objective-C Mapping 62720.1 Chapter Overview 62720.2 Introduction 62720.3 The Server-Side main Function 62820.4 Mapping for Interfaces 63120.5 Parameter Passing 63520.6 Raising Exceptions 63720.7 Object Incarnation 63820.8 Summary 642
Chapter 21 Developing a File System Server in Objective-C 64321.1 Chapter Overview 64321.2 Implementing a File System Server 64321.3 Summary 655
Part VII Python Mapping 657
Chapter 22 Client-Side Slice-to-Python Mapping 65922.1 Chapter Overview 65922.2 Introduction 65922.3 Mapping for Identifiers 66022.4 Mapping for Modules 66122.5 The Ice Module 66122.6 Mapping for Simple Built-In Types 66122.7 Mapping for User-Defined Types 66322.8 Mapping for Constants 66822.9 Mapping for Exceptions 66922.10 Mapping for Run-Time Exceptions 67122.11 Mapping for Interfaces 67222.12 Mapping for Operations 67822.13 Exception Handling 68322.14 Mapping for Classes 68422.15 Asynchronous Method Invocation (AMI) 69122.16 Code Generation 70122.17 Using Slice Checksums 711

x
Chapter 23 Developing a File System Client in Python 71323.1 Chapter Overview 71323.2 The Python Client 71323.3 Summary 717
Chapter 24 Server-Side Slice-to-Python Mapping 71924.1 Chapter Overview 71924.2 Introduction 71924.3 The Server-Side Main Program 72024.4 Mapping for Interfaces 72624.5 Parameter Passing 72924.6 Raising Exceptions 73024.7 Object Incarnation 73124.8 Asynchronous Method Dispatch (AMD) 73524.9 Summary 740
Chapter 25 Developing a File System Server in Python 74125.1 Chapter Overview 74125.2 Implementing a File System Server 74125.3 Thread Safety 74825.4 Summary 749
Part VIII Ruby Mapping 751
Chapter 26 Client-Side Slice-to-Ruby Mapping 75326.1 Chapter Overview 75326.2 Introduction 75326.3 Mapping for Identifiers 75426.4 Mapping for Modules 75526.5 The Ice Module 75526.6 Mapping for Simple Built-In Types 75526.7 Mapping for User-Defined Types 75626.8 Mapping for Constants 76126.9 Mapping for Exceptions 76226.10 Mapping for Run-Time Exceptions 76426.11 Mapping for Interfaces 76426.12 Mapping for Operations 77126.13 Exception Handling 77526.14 Mapping for Classes 77726.15 Code Generation 78626.16 The main Program 79126.17 Using Slice Checksums 797
xi
Chapter 27 Developing a File System Client in Ruby 79927.1 Chapter Overview 79927.2 The Ruby Client 79927.3 Summary 803
Part IX PHP Mapping 805
Chapter 28 Client-Side Slice-to-PHP Mapping 80728.1 Chapter Overview 80728.2 Introduction 80728.3 Mapping for Identifiers 80828.4 Mapping for Modules 80828.5 The Ice Module 80928.6 Mapping for Simple Built-In Types 81028.7 Mapping for User-Defined Types 81128.8 Mapping for Constants 81428.9 Mapping for Exceptions 81528.10 Mapping for Run-Time Exceptions 81628.11 Mapping for Interfaces 81728.12 Mapping for Operations 82528.13 Exception Handling 82828.14 Mapping for Classes 82928.15 slice2php Command-Line Options 83728.16 Application Notes 83828.17 Using Slice Checksums 846
Chapter 29 Developing a File System Client in PHP 84929.1 Chapter Overview 84929.2 The PHP Client 84929.3 Summary 853

xii
Part X Advanced Ice 855
Chapter 30 Ice Properties and Configuration 85730.1 Chapter Overview 85730.2 Properties 85730.3 Configuration Files 85930.4 Setting Properties on the Command Line 86230.5 Using Configuration Files 86230.6 Alternate Property Stores 86530.7 Command-Line Parsing and Initialization 86630.8 The Ice.ProgramName property 86930.9 Using Properties Programmatically 86930.10 Unused Properties 87930.11 Summary 879
Chapter 31 Threads and Concurrency with C++ 88131.1 Chapter Overview 88131.2 Introduction 88131.3 Library Overview 88231.4 Mutexes 88231.5 Recursive Mutexes 88931.6 Monitors 89231.7 Condition Variables 90131.8 Threads 90531.9 Priority Inversion 91531.10 Portable Signal Handling 91631.11 Summary 917

xiii
Chapter 32 The Ice Run Time in Detail 91932.1 Introduction 91932.2 Communicators 92032.3 Communicator Initialization 92532.4 Object Adapters 92732.5 Object Identity 94132.6 The Ice::Current Object 94532.7 Servant Locators 94632.8 Default Servants 96332.9 Server Implementation Techniques 96932.10 The Ice Threading Model 100332.11 Proxies 102832.12 The Ice::Context Parameter 104232.13 Connection Timeouts 105132.14 Oneway Invocations 105332.15 Datagram Invocations 105832.16 Batched Invocations 106032.17 Location Services 106332.18 Administrative Facility 107232.19 The Ice::Logger Interface 108132.20 The Ice::Stats Interface 109032.21 Location Transparency 109232.22 Automatic Retries 109432.23 Dispatch Interceptors 110032.24 C++ Strings and Character Encoding 110532.25 Developing a Plug-In 111332.26 Custom Class Loaders 111932.27 Summary 1120
Chapter 33 Facets and Versioning 112133.1 Introduction 112133.2 Concept and APIs 112133.3 The Versioning Problem 112833.4 Versioning with Facets 113433.5 Facet Selection 113433.6 Behavioral Versioning 113633.7 Design Considerations 113833.8 Summary 1140

xiv
Chapter 34 Object Life Cycle 114134.1 Chapter Overview 114134.2 Introduction 114234.3 Object Existence and Non-Existence 114334.4 Life Cycle of Proxies, Servants, and Ice Objects 114834.5 Object Creation 115034.6 Object Destruction 115434.7 Removing Cyclic Dependencies 117134.8 Object Identity and Uniqueness 117834.9 Object Life Cycle for the File System Application 118034.10 Avoiding Server-Side Garbage 119834.11 Summary 1208
Chapter 35 Dynamic Ice 120935.1 Chapter Overview 120935.2 Streaming Interface 120935.3 Dynamic Invocation and Dispatch 124935.4 Asynchronous Dynamic Invocation and Dispatch 126635.5 Summary 1273
Chapter 36 Connection Management 127536.1 Chapter Overview 127536.2 Introduction 127536.3 Connection Establishment 127636.4 Active Connection Management 128136.5 Obtaining a Connection 128236.6 Connection Closure 129036.7 Bidirectional Connections 129136.8 Summary 1296
Chapter 37 The Ice Protocol 129737.1 Chapter Overview 129737.2 Data Encoding 129737.3 Protocol Messages 132237.4 Compression 133237.5 Protocol and Encoding Versions 1334

xv
Part XI Ice Services 1339
Chapter 38 IceGrid 134138.1 Chapter Overview 134138.2 Introduction 134238.3 IceGrid Architecture 134438.4 Getting Started 134838.5 Using Deployment 135338.6 Well-known Objects 136238.7 Templates 137138.8 IceBox Integration 137738.9 Object Adapter Replication 138038.10 Load Balancing 138338.11 Sessions 138738.12 Registry Replication 139438.13 Application Distribution 139938.14 Administrative Sessions 140738.15 Glacier2 Integration 141438.16 Using an SQL Database 141838.17 XML Reference 141938.18 Variable and Parameter Semantics 144938.19 Property Set Semantics 145538.20 XML Features 146038.21 Server Reference 146338.22 Administrative Facility Integration 147238.23 Securing IceGrid 148138.24 Administrative Utilities 148638.25 Server Activation 149438.26 Solving Problems 149838.27 Summary 1501
Chapter 39 Freeze 150339.1 Chapter Overview 150339.2 Introduction 150439.3 Freeze Evictors 150439.4 Using the Freeze Evictor in a File System Server 152139.5 The Freeze Map 154139.6 Using a Freeze Map in the File System Server 157639.7 The Freeze Catalog 160239.8 Backups 160339.9 Summary 1604

xvi
Chapter 40 FreezeScript 160540.1 Chapter Overview 160540.2 Introduction 160540.3 Database Migration 160640.4 Transformation Descriptors 161240.5 Using transformdb 162640.6 Database Inspection 163440.7 Using dumpdb 164540.8 Descriptor Expression Language 165040.9 Summary 1653
Chapter 41 IceSSL 165541.1 Chapter Overview 165541.2 Introduction 165541.3 Using IceSSL 165841.4 Configuring IceSSL 166141.5 Programming with IceSSL 167541.6 Advanced Topics 169041.7 Setting up a Certificate Authority 169841.8 Summary 1704
Chapter 42 Glacier2 170542.1 Chapter Overview 170542.2 Introduction 170542.3 Using Glacier2 171042.4 Callbacks 171742.5 Helper Classes 172042.6 Router Security 172942.7 Session Management 173842.8 Dynamic Filtering 174242.9 Request Buffering 174442.10 Request Contexts 174542.11 Firewalls 174742.12 Advanced Client Configurations 174842.13 IceGrid Integration 175042.14 Summary 1751

xvii
Chapter 43 IceBox 175343.1 Chapter Overview 175343.2 Introduction 175343.3 Developing a Service 175443.4 Starting IceBox 176343.5 IceBox Administration 176443.6 Summary 1769
Chapter 44 IceStorm 177144.1 Chapter Overview 177144.2 Introduction 177144.3 Concepts 177344.4 IceStorm Interface Overview 177644.5 Using IceStorm 177844.6 Publishing to a Specific Subscriber 178944.7 Highly Available IceStorm 179144.8 IceStorm Administration 179644.9 Topic Federation 179844.10 Quality of Service 180244.11 Delivery Mode 180444.12 Configuring IceStorm 180644.13 Summary 1812
Chapter 45 IcePatch2 181345.1 Chapter Overview 181345.2 Introduction 181345.3 Using icepatch2calc 181445.4 Running the Server 181745.5 Running the Client 181845.6 Object Identities 182145.7 The IcePatch2 Client Utility Library 182145.8 Summary 1826
Appendixes 1827
Appendix A Slice Keywords 1829

xviii
Appendix B Slice Metadata Directives 1831B.1 General Metadata Directives 1831B.2 Metadata Directives for C++ 1832B.3 Metadata Directives for Java 1835B.4 Metadata Directives for C# 1836B.5 Metadata Directives for .NET and Mono 1836B.6 Metadata Directives for Objective-C 1837B.7 Metadata Directives for Python 1837B.8 Metadata Directives for Freeze 1838
Appendix C Slice API Reference 1839
Appendix D Properties 1841D.1 Ice Configuration Property 1841D.2 Ice Trace Properties 1842D.3 Ice Warning Properties 1845D.4 Ice Object Adapter Properties 1848D.5 Ice Administrative Properties 1853D.6 Ice Plug-In Properties 1855D.7 Ice Thread Pool Properties 1858D.8 Ice Default and Override Properties 1861D.9 Ice Proxy Properties 1866D.10 Ice Transport Properties 1869D.11 Ice Miscellaneous Properties 1871D.12 IceSSL Properties 1881D.13 IceBox Properties 1898D.14 IceBoxAdmin Properties 1902D.15 IceGrid Properties 1902D.16 IceGrid Administrative Client Properties 1923D.17 IceStorm Properties 1925D.18 Glacier2 Properties 1935D.19 Freeze Properties 1950D.20 IcePatch2 Properties 1958
Appendix E Proxies and Endpoints 1961E.1 Proxies 1961E.2 Endpoints 1963

xix
Appendix F The C++ Utility Library 1973F.1 Introduction 1973F.2 AbstractMutex 1973F.3 Cache 1976F.4 CtrlCHandler 1979F.5 Exception 1980F.6 generateUUID 1980F.7 Handle Template 1981F.8 Handle Template Adaptors 1984F.9 ScopedArray 1989F.10 Shared and SimpleShared 1990F.11 Threads and Synchronization Primitives 1991F.12 Time 1991F.13 Timer and TimerTask 1995F.14 Unicode and UTF-8 Conversion Functions 1998F.15 Version Information 1999
Appendix G The Java Utility Library 2001G.1 Introduction 2001G.2 The IceUtil Package 2001G.3 The Ice.Util Class 2004
Appendix H Windows Services 2007H.1 Introduction 2007H.2 Installing a Windows Service 2008H.3 The Ice Service Installer 2008H.4 Manual Installation 2014H.5 Troubleshooting 2022
Appendix I The .NET Utility Library 2025I.1 Introduction 2025I.2 Communicator Initialization Methods 2025I.3 Identity Conversion 2025I.4 Property Creation Methods 2026I.5 Proxy Comparison Methods 2026I.6 Stream Creation 2026I.7 UUID Generation 2026I.8 Version Information 2026
Appendix J Binary Distributions 2029J.1 Introduction 2029J.2 Developer Kits 2029J.3 Guidelines 2030

xx
Appendix K Deprecated AMI Mapping 2035K.1 Chapter Overview 2035K.2 Introduction 2035K.3 Using AMI 2038K.4 Language Mappings 2042K.5 Summary 2058
Bibliography 2059

1
Chapter 1Introduction
1.1 The Internet Communications Engine (Ice)
The rise of object-oriented middleware in the mid-nineties was an important step forward toward making distributed computing available to application developers. For the first time, it was possibe to build distributed applications without having to be a networking guru: the middleware platform took care of the majority of networking chores, such as marshaling and unmarshaling (encoding and decoding data for transmission), mapping logical object addresses to physical transport endpoints, changing the representation of data according to the native machine architecture of client and server, and automatically starting servers on demand.
Despite these advances, the leading object-oriented middleware platforms suffered from a number of serious practical limitations that prompted ZeroC to develop the Internet Communications Engine, or Ice for short.1 The main design goals of Ice are:
• Provide an object-oriented middleware platform suitable for use in heteroge-neous environments.
• Provide a full set of features that support development of realistic distributed applications for a wide variety of domains.
1. The acronym “Ice” is pronounced as a single syllable, like the word for frozen water.

2 Introduction
• Avoid unnecessary complexity, making the platform easy to learn and to use.
• Provide an implementation that is efficient in network bandwidth, memory use, and CPU overhead.
• Provide an implementation that has built-in security, making it suitable for use over insecure public networks.
To be more simplistic, the Ice design goals could be stated as “Let’s build a more powerful middleware platform that makes the developer’s life easier and avoids the mistakes of its predecessors.”
1.2 Organization
This book is divided into four parts and a number of appendixes:
• Part I: Ice Overview provides an overview of the features offered by Ice and explains the Ice object model. After reading this part, you will understand the major features and architecture of the Ice platform, its object model and request dispatch model, and know the basic steps required to build a simple application in C++, Java, C#, Visual Basic, Objective-C, Python, and Ruby.
• Part II: Slice explains the Slice definition language. After reading this part, you will have detailed knowledge of how to specify interfaces and types for a distributed application.
• Part III through Part IX cover language mappings. Each section shows how to implement an application in your language of choice.
• Part X: Advanced Ice presents many Ice features in detail and covers advanced aspects of server development, such as properties, threading, object life cycle, object location, persistence, and asynchronous as well as dynamic method invocation and dispatch. After reading this part, you will understand the advanced features of Ice and how to effectively use them to find the correct trade-off between performance and resource consumption as appropriate for your application requirements.
• Part XI: Ice Services covers the services provided with Ice, such as IceGrid (a sophisticated deployment tool), Glacier2 (the Ice firewall solution), IceStorm (the Ice messaging service), and IcePatch2 (a software patching service).2
• Appendixes contain Ice reference material and explain the feature differences between Ice and Ice-E (the version of Ice for embedded systems).

1.3 Typographical Conventions 3
NOTE: This entire manual is also available online as a set of HTML pages at http://www.zeroc.com/doc/Ice-3.4.1/manual.You can always find the latest version of the manual at http://www.zeroc.com/Ice-Manual.html.In addition, you can find an online reference of all the Slice APIs that are used by Ice and its services at http://www.zeroc.com/doc/Ice-3.4.1/reference.You can always find the latest version of this reference at http://www.zeroc.com/Slice-Reference.html.
1.3 Typographical Conventions
This book uses the following typographical conventions:
• Slice source code appears in monospace.
• Programming-language source code appears in monospace.
• File names appear in monospace.
• Commands appear in monospace bold.
Occasionally, we present copy of an interactive session at a terminal. In such cases, we assume a Bourne shell (or one of its derivatives, such as ksh or bash). Output presented by the system is shown in monospace, and input is presented in monospace bold, for example:
$ echo hellohello
Slice and the various programming languages often use the same identifiers. When we talk about an identifier in its generic, language-independent sense, we use monospace. When we talk about an identifier in its language-specific (for example, C++ or Java) sense, we use monospace.
2. If you notice a certain commonality in the theme of naming Ice features, it just goes to show that software developers are still inveterate punsters.

4 Introduction
1.4 Source Code Examples
Throughout the book, we use a case study to illustrate various aspects of Ice. The case study implements a simple distributed hierarchical file system, which we progressively improve to take advantage of more sophisticated features as the book progresses. The source code for the case study in its various stages is provided with the distribution of this book. We encourage you to experiment with these code examples (as well as the many demonstration programs that ship with Ice).
1.5 Contacting the Authors
We would very much like to hear from you in case you find any bugs (however minor) in this book. We also would like to hear your opinion on the contents, and any suggestions as to how it might be improved. You can contact us via e-mail at mailto:[email protected].
1.6 Ice Support
If you have a question and you cannot find an answer in this manual, you can visit our developer forums at http://www.zeroc.com/forums to see if another developer has encountered the same issue. If you still need help, feel free to post your ques-tion on the forum, which ZeroC's developers monitor regularly. Note, however, that we can provide only limited free support in our forums. For guaranteed response and problem resolution times, we highly recommend purchasing commercial support.

Part I
Ice Overview


7
Chapter 2Ice Overview
2.1 Chapter Overview
In this chapter, we present a high-level overview of the Ice architecture. Section 2.2 introduces fundamental concepts and terminology, and outlines how Slice definitions, language mappings, and the Ice run time and protocol work in concert to create clients and servers. Section 2.3 briefly presents the object services provided by Ice, and Section 2.4 outlines the benefits that result from the Ice architecture.
2.2 The Ice Architecture
2.2.1 Introduction
Ice is an object-oriented middleware platform. Fundamentally, this means that Ice provides tools, APIs, and library support for building object-oriented client–server applications. Ice applications are suitable for use in heterogeneous environments: client and server can be written in different programming languages, can run on different operating systems and machine architectures, and can communicate using a variety of networking technologies. The source code for these applications is portable regardless of the deployment environment.

8 Ice Overview
2.2.2 Terminology
Every computing technology creates its own vocabulary as it evolves. Ice is no exception. However, the amount of new jargon used by Ice is minimal. Rather than inventing new terms, we have used existing terminology as much as possible. If you have used another middleware technology in the past, you will be familiar with much of what follows. (However, we suggest you at least skim the material because a few terms used by Ice do differ from the corresponding terms used by other middleware.)
Clients and Servers
The terms client and server are not firm designations for particular parts of an application; rather, they denote roles that are taken by parts of an application for the duration of a request:
• Clients are active entities. They issue requests for service to servers.
• Servers are passive entities. They provide services in response to client requests.
Frequently, servers are not “pure” servers, in the sense that they never issue requests and only respond to requests. Instead, servers often act as a server on behalf of some client but, in turn, act as a client to another server in order to satisfy their client’s request.
Similarly, clients often are not “pure” clients, in the sense that they only request service from an object. Instead, clients are frequently client–server hybrids. For example, a client might start a long-running operation on a server; as part of starting the operation, the client can provide a callback object to the server that is used by the server to notify the client when the operation is complete. In that case, the client acts as a client when it starts the operation, and as a server when it is notified that the operation is complete.
Such role reversal is common in many systems, so, frequently, client–server systems could be more accurately described as peer-to-peer systems.
Ice Objects
An Ice object is a conceptual entity, or abstraction. An Ice object can be character-ized by the following points:
• An Ice object is an entity in the local or a remote address space that can respond to client requests.

2.2 The Ice Architecture 9
• A single Ice object can be instantiated in a single server or, redundantly, in multiple servers. If an object has multiple simultaneous instantiations, it is still a single Ice object.
• Each Ice object has one or more interfaces. An interface is a collection of named operations that are supported by an object. Clients issue requests by invoking operations.
• An operation has zero or more parameters as well as a return value. Parame-ters and return values have a specific type. Parameters are named and have a direction: in-parameters are initialized by the client and passed to the server; out-parameters are initialized by the server and passed to the client. (The return value is simply a special out-parameter.)
• An Ice object has a distinguished interface, known as its main interface. In addition, an Ice object can provide zero or more alternate interfaces, known as facets. Clients can select among the facets of an object to choose the interface they want to work with.
• Each Ice object has a unique object identity. An object’s identity is an identi-fying value that distinguishes the object from all other objects. The Ice object model assumes that object identities are globally unique, that is, no two objects within an Ice communication domain can have the same object iden-tity.
In practice, you need not use object identities that are globally unique, such as UUIDs [14], only identities that do not clash with any other identity within your domain of interest. However, there are architectural advantages to using globally unique identifiers, which we explore in Chapter 34.
Proxies
For a client to be able to contact an Ice object, the client must hold a proxy for the Ice object. A proxy is an artifact that is local to the client’s address space; it repre-sents the (possibly remote) Ice object for the client. A proxy acts as the local ambassador for an Ice object: when the client invokes an operation on the proxy, the Ice run time:
1. Locates the Ice object
2. Activates the Ice object’s server if it is not running
3. Activates the Ice object within the server
4. Transmits any in-parameters to the Ice object
5. Waits for the operation to complete

10 Ice Overview
6. Returns any out-parameters and the return value to the client (or throws an exception in case of an error)
A proxy encapsulates all the necessary information for this sequence of steps to take place. In particular, a proxy contains:
• Addressing information that allows the client-side run time to contact the correct server
• An object identity that identifies which particular object in the server is the target of a request
• An optional facet identifier that determines which particular facet of an object the proxy refers to
Section 32.11 provides more information about proxies.
Stringified Proxies
The information in a proxy can be expressed as a string. For example, the string
SimplePrinter:default -p 10000
is a human-readable representation of a proxy. The Ice run time provides API calls that allow you to convert a proxy to its stringified form and vice versa. This is useful, for example, to store proxies in database tables or text files.
Provided that a client knows the identity of an Ice object and its addressing information, it can create a proxy “out of thin air” by supplying that information. In other words, no part of the information inside a proxy is considered opaque; a client needs to know only an object’s identity, addressing information, and (to be able to invoke an operation) the object’s type in order to contact the object.
Direct Proxies
A direct proxy is a proxy that embeds an object’s identity, together with the address at which its server runs. The address is completely specified by:
• a protocol identifier (such TCP/IP or UDP)
• a protocol-specific address (such as a host name and port number)
To contact the object denoted by a direct proxy, the Ice run time uses the addressing information in the proxy to contact the server; the identity of the object is sent to the server with each request made by the client.

2.2 The Ice Architecture 11
Indirect Proxies
An indirect proxy has two forms. It may provide only an object’s identity, or it may specify an identity together with an object adapter identifier. An object that is accessible using only its identity is called a well-known object. For example, the string
SimplePrinter
is a valid proxy for a well-known object with the identity SimplePrinter.An indirect proxy that includes an object adapter identifier has the stringified
form
SimplePrinter@PrinterAdapter
Any object of the object adapter can be accessed using such a proxy, regardless of whether that object is also a well-known object.
Notice that an indirect proxy contains no addressing information. To deter-mine the correct server, the client-side run time passes the proxy information to a location service (see Section 32.17). In turn, the location service uses the object identity or the object adapter identifier as the key in a lookup table that contains the address of the server and returns the current server address to the client. The client-side run time now knows how to contact the server and dispatches the client request as usual.
The entire process is similar to the mapping from Internet domain names to IP address by the Domain Name Service (DNS): when we use a domain name, such as www.zeroc.com, to look up a web page, the host name is first resolved to an IP address behind the scenes and, once the correct IP address is known, the IP address is used to connect to the server. With Ice, the mapping is from an object identity or object adapter identifier to a protocol–address pair, but otherwise very similar. The client-side run time knows how to contact the location service via configuration (just as web browsers know which DNS to use via configuration).
Direct Versus Indirect Binding
The process of resolving the information in a proxy to protocol–address pair is known as binding. Not surprisingly, direct binding is used for direct proxies, and indirect binding is used for indirect proxies.
The main advantage of indirect binding is that it allows us to move servers around (that is, change their address) without invalidating existing proxies that are held by clients. In other words, direct proxies avoid the extra lookup to locate the server but no longer work if a server is moved to a different machine. On the other hand, indirect proxies continue to work even if we move (or migrate) a server.

12 Ice Overview
Fixed Proxies
A fixed proxy is a proxy that is bound to a particular connection: instead of containing addressing information or an adapter name, the proxy contains a connection handle. The connection handle stays valid only for as long as the connection stays open so, once the connection is closed, the proxy no longer works (and will never work again). Fixed proxies cannot be marshaled, that is, they cannot be passed as parameters on operation invocations. Fixed proxies are used to allow bidirectional communication, so a server can make callbacks to a client without having to open a new connection (see Section 36.7).
Routed Proxies
A routed proxy is a proxy that forwards all invocations to a specific target object, instead of sending invocations directly to the actual target. Routed proxies are useful to implement services such as Glacier2, which enables clients to communi-cate with servers that are behind a firewall (see Chapter 42).
Replication
In Ice, replication involves making object adapters (and their objects) available at multiple addresses. The goal of replication is usually to provide redundancy by running the same server on several computers. If one of the computers should happen to fail, a server still remains available on the others.
The use of replication implies that applications are designed for it. In partic-ular, it means a client can access an object via one address and obtain the same result as from any other address. Either these objects are stateless, or their imple-mentations are designed to synchronize with a database (or each other) in order to maintain a consistent view of each object’s state.
Ice supports a limited form of replication when a proxy specifies multiple addresses for an object. The Ice run time selects one of the addresses at random for its initial connection attempt (see Section 32.11) and tries all of them in the case of a failure. For example, consider this proxy:
SimplePrinter:tcp -h server1 -p 10001:tcp -h server2 -p 10002
The proxy states that the object with identity SimplePrinter is available using TCP at two addresses, one on the host server1 and another on the host server2. The burden falls to users or system administrators to ensure that the servers are actually running on these computers at the specified ports.

2.2 The Ice Architecture 13
Replica Groups
In addition to the proxy-based replication described above, Ice supports a more useful form of replication known as replica groups that requires the use of a loca-tion service (see Section 32.17).
A replica group has a unique identifier and consists of any number of object adapters. An object adapter may be a member of at most one replica group; such an adapter is considered to be a replicated object adapter.
After a replica group has been established, its identifier can be used in an indi-rect proxy in place of an adapter identifier. For example, a replica group identified as PrinterAdapters can be used in a proxy as shown below:
SimplePrinter@PrinterAdapters
The replica group is treated by the location service as a “virtual object adapter.” The behavior of the location service when resolving an indirect proxy containing a replica group id is an implementation detail. For example, the location service could decide to return the addresses of all object adapters in the group, in which case the client’s Ice run time would select one of the addresses at random using the limited form of replication discussed earlier. Another possibility is for the location service to return only one address, which it decided upon using some heuristic.
Regardless of the way in which a location service resolves a replica group, the key benefit is indirection: the location service as a middleman can add more intel-ligence to the binding process.
Servants
As we mentioned on page 8, an Ice object is a conceptual entity that has a type, identity, and addressing information. However, client requests ultimately must end up with a concrete server-side processing entity that can provide the behavior for an operation invocation. To put this differently, a client request must ultimately end up executing code inside the server, with that code written in a specific programming language and executing on a specific processor.
The server-side artifact that provides behavior for operation invocations is known as a servant. A servant provides substance for (or incarnates) one or more Ice objects. In practice, a servant is simply an instance of a class that is written by the server developer and that is registered with the server-side run time as the servant for one or more Ice objects. Methods on the class correspond to the opera-tions on the Ice object’s interface and provide the behavior for the operations.

14 Ice Overview
A single servant can incarnate a single Ice object at a time or several Ice objects simultaneously. If the former, the identity of the Ice object incarnated by the servant is implicit in the servant. If the latter, the servant is provided the iden-tity of the Ice object with each request, so it can decide which object to incarnate for the duration of the request.
Conversely, a single Ice object can have multiple servants. For example, we might choose to create a proxy for an Ice object with two different addresses for different machines. In that case, we will have two servers, with each server containing a servant for the same Ice object. When a client invokes an operation on such an Ice object, the client-side run time sends the request to exactly one server. In other words, multiple servants for a single Ice object allow you to build redundant systems: the client-side run time attempts to send the request to one server and, if that attempt fails, sends the request to the second server. An error is reported back to the client-side application code only if that second attempt fails as well.
At-Most-Once Semantics
Ice requests have at-most-once semantics: the Ice run time does its best to deliver a request to the correct destination and, depending on the exact circumstances, may retry a failed request. Ice guarantees that it will either deliver the request, or, if it cannot deliver the request, inform the client with an appropriate exception; under no circumstances is a request delivered twice, that is, retries are attempted only if it is known that a previous attempt definitely failed.1
At-most-once semantics are important because they guarantee that operations that are not idempotent can be used safely. An idempotent operation is an opera-tion that, if executed twice, has the same effect as if executed once. For example, x = 1; is an idempotent operation: if we execute the operation twice, the end result is the same as if we had executed it once. On the other hand, x++; is not idempotent: if we execute the operation twice, the end result is not the same as if we had executed it once.
Without at-most-once semantics, we can build distributed systems that are more robust in the presence of network failures. However, realistic systems require non-idempotent operations, so at-most-once semantics are a necessity, even though they make the system less robust in the presence of network failures.
1. One exception to this rule are datagram invocations over UDP transports. For these, duplicated UDP packets can lead to a violation of at-most-once semantics.

2.2 The Ice Architecture 15
Ice permits you to mark individual operations as idempotent. For such operations, the Ice run time uses a more aggressive error recovery mechanism than for non-idempotent operations.
Synchronous Method Invocation
By default, the request dispatch model used by Ice is a synchronous remote proce-dure call: an operation invocation behaves like a local procedure call, that is, the client thread is suspended for the duration of the call and resumes when the call completes (and all its results are available).
Asynchronous Method Invocation
Ice also supports asynchronous method invocation (AMI): clients can invoke oper-ations asynchronously, that is, the client uses a proxy as usual to invoke an opera-tion but, in addition to passing the normal parameters, also passes a callback object and the client invocation returns immediately. Once the operation completes, the client-side run time invokes a method on the callback object passed initially, passing the results of the operation to the callback object (or, in case of failure, passing exception information).
The server cannot distinguish an asynchronous invocation from a synchronous one—either way, the server simply sees that a client has invoked an operation on an object.
Asynchronous Method Dispatch
Asynchronous method dispatch (AMD) is the server-side equivalent of AMI. For synchronous dispatch (the default), the server-side run time up-calls into the appli-cation code in the server in response to an operation invocation. While the opera-tion is executing (or sleeping, for example, because it is waiting for data), a thread of execution is tied up in the server; that thread is released only when the opera-tion completes.
With asynchronous method dispatch, the server-side application code is informed of the arrival of an operation invocation. However, instead of being forced to process the request immediately, the server-side application can choose to delay processing of the request and, in doing so, releases the execution thread for the request. The server-side application code is now free to do whatever it likes. Eventually, once the results of the operation are available, the server-side application code makes an API call to inform the server-side Ice run time that a request that was dispatched previously is now complete; at that point, the results of the operation are returned to the client.

16 Ice Overview
Asynchronous method dispatch is useful if, for example, a server offers opera-tions that block clients for an extended period of time. For example, the server may have an object with a get operation that returns data from an external, asyn-chronous data source and that blocks clients until the data becomes available. With synchronous dispatch, each client waiting for data to arrive ties up an execu-tion thread in the server. Clearly, this approach does not scale beyond a few dozen clients. With asynchronous dispatch, hundreds or thousands of clients can be blocked in the same operation invocation without tying up any threads in the server.
Another way to use asynchronous method dispatch is to complete an opera-tion, so the results of the operation are returned to the client, but to keep the execu-tion thread of the operation beyond the duration of the operation invocation. This allows you to continue processing after results have been returned to the client, for example, to perform cleanup or write updates to persistent storage.
Synchronous and asynchronous method dispatch are transparent to the client, that is, the client cannot tell whether a server chose to process a request synchro-nously or asynchronously.
Oneway Method Invocation
Clients can invoke an operation as a oneway operation. A oneway invocation has “best effort” semantics. For a oneway invocation, the client-side run time hands the invocation to the local transport, and the invocation completes on the client side as soon as the local transport has buffered the invocation. The actual invoca-tion is then sent asynchronously by the operating system. The server does not reply to oneway invocations, that is, traffic flows only from client to server, but not vice versa.
Oneway invocations are unreliable. For example, the target object may not exist, in which case the invocation is simply lost. Similarly, the operation may be dispatched to a servant in the server, but the operation may fail (for example, because parameter values are invalid); if so, the client receives no notification that something has gone wrong.
Oneway invocations are possible only on operations that do not have a return value, do not have out-parameters, and do not throw user exceptions (see Chapter 4).
To the application code on the server-side, oneway invocations are transparent, that is, there is no way to distinguish a twoway invocation from a oneway invoca-tion.

2.2 The Ice Architecture 17
Oneway invocations are available only if the target object offers a stream-oriented transport, such as TCP/IP or SSL.
Note that, even though oneway operations are sent over a stream-oriented transport, they may be processed out of order in the server. This can happen because each invocation may be dispatched in its own thread: even though the invocations are initiated in the order in which the invocations arrive at the server, this does not mean that they will be processed in that order—the vagaries of thread scheduling can result in a oneway invocation to complete before other oneway invocations that were received earlier.
Batched Oneway Method Invocation
Each oneway invocation sends a separate message to the server. For a series of short messages, the overhead of doing so is considerable: the client- and server-side run time each must switch between user mode and kernel mode for each message and, at the networking level, each message incurs the overheads of flow-control and acknowledgement.
Batched oneway invocations allow you to send a series of oneway invocations as a single message: every time you invoke a batched oneway operation, the invo-cation is buffered in the client-side run time. Once you have accumulated all the oneway invocations you want to send, you make a separate API call to send all the invocations at once. The client-side run time then sends all of the buffered invoca-tions in a single message, and the server receives all of the invocations in a single message. This avoids the overhead of repeatedly trapping into the kernel for both client and server, and is much easier on the network between them because one large message can be transmitted more efficiently than many small ones.
The individual invocations in a batched oneway message are dispatched by a single thread in the order in which they were placed into the batch. This guaran-tees that the individual operations in a batched oneway message are processed in order in the server.
Batched oneway invocations are particularly useful for messaging services, such as IceStorm (see Chapter 44), and for fine-grained interfaces that offer set operations for small attributes.
Datagram Invocations
Datagram invocations have similar “best effort” semantics to oneway invocations. However, datagram invocations require the object to offer UDP as a transport (whereas oneway invocations require TCP/IP).
18 Ice Overview
Like a oneway invocation, a datagram invocation can be made only if the oper-ation does not have a return value, out-parameters, or user exceptions. A datagram invocation uses UDP to invoke the operation. The operation returns as soon as the local UDP stack has accepted the message; the actual operation invocation is sent asynchronously by the network stack behind the scenes.
Datagrams, like oneway invocations, are unreliable: the target object may not exist in the server, the server may not be running, or the operation may be invoked in the server but fail due to invalid parameters sent by the client. As for oneway invocations, the client receives no notification of such errors.
However, unlike oneway invocations, datagram invocations have a number of additional error scenarios:
• Individual invocations may simply be lost in the network.
This is due to the unreliable delivery of UDP packets. For example, if you invoke three operations in sequence, the middle invocation may be lost. (The same thing cannot happen for oneway invocations—because they are deliv-ered over a connection-oriented transport, individual invocations cannot be lost.)
• Individual invocations may arrive out of order.
Again, this is due to the nature of UDP datagrams. Because each invocation is sent as a separate datagram, and individual datagrams can take different paths through the network, it can happen that invocations arrive in an order that differs from the order in which they were sent.
Datagram invocations are well suited for small messages on LANs, where the likelihood of loss is small. They are also suited to situations in which low latency is more important than reliability, such as for fast, interactive internet applications. Finally, datagram invocations can be used to multicast messages to multiple servers simultaneously.
Batched Datagram Invocations
As for batched oneway invocations, batched datagram invocations allow you to accumulate a number of invocations in a buffer and then send the entire buffer as a single datagram by making an API call to flush the buffer. Batched datagrams reduce the overhead of repeated system calls and allow the underlying network to operate more efficiently. However, batched datagram invocations are useful only for batched messages whose total size does not substantially exceed the PDU limit of the network: if the size of a batched datagram gets too large, UDP fragmenta-tion makes it more likely that one or more fragments are lost, which results in the

2.2 The Ice Architecture 19
loss of the entire batched message. However, you are guaranteed that either all invocations in a batch will be delivered, or none will be delivered. It is impossible for individual invocations within a batch to be lost.
Batched datagrams use a single thread in the server to dispatch the individual invocations in a batch. This guarantees that the invocations are made in the order in which they were queued—invocations cannot appear to be reordered in the server.
Run-Time Exceptions
Any operation invocation can raise a run-time exception. Run-time exceptions are pre-defined by the Ice run time and cover common error conditions, such as connection failure, connection timeout, or resource allocation failure. Run-time exceptions are presented to the application as native exceptions and so integrate neatly with the native exception handling capabilities of languages that support exception handling.
User Exceptions
User exceptions are used to indicate application-specific error conditions to clients. User exceptions can carry an arbitrary amount of complex data and can be arranged into inheritance hierarchies, which makes it easy for clients to handle categories of errors generically, by catching an exception that is further up the inheritance hierarchy. Like run-time exceptions, user exceptions map to native exceptions.
Properties
Much of the Ice run time is configurable via properties. Properties are name–value pairs, such as Ice.Default.Protocol=tcp. Properties are typically stored in text files and parsed by the Ice run time to configure various options, such as the thread pool size, the level of tracing, and various other configuration parameters.
2.2.3 Slice (Specification Language for Ice)
As mentioned on page 9, each Ice object has an interface with a number of opera-tions. Interfaces, operations, and the types of data that are exchanged between client and server are defined using the Slice language. Slice allows you to define the client-server contract in a way that is independent of a specific programming language, such as C++, Java, or C#. The Slice definitions are compiled by a compiler into an API for a specific programming language, that is, the part of the

20 Ice Overview
API that is specific to the interfaces and types you have defined consists of gener-ated code.
2.2.4 Language MappingsThe rules that govern how each Slice construct is translated into a specific programming language are known as language mappings. For example, for the C++ mapping (see Chapter 6), a Slice sequence appears as an STL vector, whereas, for the Java mapping (see Chapter 10), a Slice sequence appears as a Java array. In order to determine what the API for a specific Slice construct looks like, you only need the Slice definition and knowledge of the language mapping rules. The rules are simple and regular enough to make it unnecessary to read the generated code to work out how to use the generated API.
Of course, you are free to peruse the generated code. However, as a rule, that is inefficient because the generated code is not necessarily suitable for human consumption. We recommend that you familiarize yourself with the language mapping rules; that way, you can mostly ignore the generated code and need to refer to it only when you are interested in some specific detail.
Currently, Ice provides language mappings for C++, Java, C#, Python, Objec-tive-C, and, for the client side, PHP and Ruby.

2.2 The Ice Architecture 21
2.2.5 Client and Server StructureIce clients and servers have the logical internal structure shown in Figure 2.1
Figure 2.1. Ice Client and Server Structure
Both client and server consist of a mixture of application code, library code, and code generated from Slice definitions:
• The Ice core contains the client- and server-side run-time support for remote communication. Much of this code is concerned with the details of networking, threading, byte ordering, and many other networking-related issues that we want to keep away from application code. The Ice core is provided as a number of libraries that client and server use.
• The generic part of the Ice core (that is, the part that is independent of the specific types you have defined in Slice) is accessed through the Ice API. You use the Ice API to take care of administrative chores, such as initializing and finalizing the Ice run time. The Ice API is identical for clients and servers (although servers use a larger part of the API than clients).
• The proxy code is generated from your Slice definitions and, therefore, specific to the types of objects and data you have defined in Slice. The proxy code has two major functions:
• It provides a down-call interface for the client. Calling a function in the generated proxy API ultimately ends up sending an RPC message to the server that invokes a corresponding function on the target object.
Server Ice CoreClient Ice Core
Client Application Server Application
ObjectAdapter
ProxyCode
Ice API Ice API Skeleton
Ice API
Network
Generated Code

22 Ice Overview
• It provides marshaling and unmarshaling code.
Marshaling is the process of serializing a complex data structure, such as a sequence or a dictionary, for transmission on the wire. The marshaling code converts data into a form that is standardized for transmission and indepen-dent of the endian-ness and padding rules of the local machine.
Unmarshaling is the reverse of marshaling, that is, deserializing data that arrives over the network and reconstructing a local representation of the data in types that are appropriate for the programming language in use.
• The skeleton code is also generated from your Slice definition and, therefore, specific to the types of objects and data you have defined in Slice. The skel-eton code is the server-side equivalent of the client-side proxy code: it provides an up-call interface that permits the Ice run time to transfer the thread of control to the application code you write. The skeleton also contains marshaling and unmarshaling code, so the server can receive parameters sent by the client, and return parameters and exceptions to the client.
• The object adapter is a part of the Ice API that is specific to the server side: only servers use object adapters. An object adapter has several functions:
• The object adapter maps incoming requests from clients to specific methods on programming-language objects. In other words, the object adapter tracks which servants with what object identity are in memory.
• The object adapter is associated with one or more transport endpoints. If more than one transport endpoint is associated with an adapter, the servants incarnating objects within the adapter can be reached via multiple trans-ports. For example, you can associate both a TCP/IP and a UDP endpoint with an adapter, to provide alternate quality-of-service and performance characteristics.
• The object adapter is responsible for the creation of proxies that can be passed to clients. The object adapter knows about the type, identity, and transport details of each of its objects and embeds the correct details when the server-side application code requests the creation of a proxy.
Note that, as far as the process view is concerned, there are only two processes involved: the client and the server. All the run time support for distributed commu-nication is provided by the Ice libraries and the code that is generated from Slice definitions. (For indirect proxies, a third process, IceGrid, is required to resolve proxies to transport endpoints.)

2.3 Ice Services 23
2.2.6 The Ice Protocol
Ice provides an RPC protocol that can use either TCP/IP or UDP as an underlying transport. In addition, Ice also allows you to use SSL as a transport, so all commu-nication between client and server is encrypted.
The Ice protocol defines:
• a number of message types, such as request and reply message types,
• a protocol state machine that determines in what sequence different message types are exchanged by client and server, together with the associated connec-tion establishment and tear-down semantics for TCP/IP,
• encoding rules that determine how each type of data is represented on the wire,
• a header for each message type that contains details such as the message type, the message size, and the protocol and encoding version in use.
Ice also supports compression on the wire: by setting a configuration parameter, you can arrange for all network traffic to be compressed to conserve bandwidth. This is useful if your application exchanges large amounts of data between client and server.
The Ice protocol is suitable for building highly-efficient event forwarding mechanisms because it permits forwarding of a message without knowledge of the details of the information inside a message. This means that messaging switches need not do any unmarshaling and remarshaling of messages—they can forward a message by simply treating it as an opaque buffer of bytes.
The Ice protocol also supports bidirectional operation: if a server wants to send a message to a callback object provided by the client, the callback can be made over the connection that was originally created by the client. This feature is especially important when the client is behind a firewall that permits outgoing connections, but not incoming connections.
2.3 Ice Services
The Ice core provides a sophisticated client–server platform for distributed appli-cation development. However, realistic applications usually require more than just a remoting capability: typically, you also need a way to start servers on demand, distribute proxies to clients, distribute asynchronous events, configure your appli-cation, distribute patches for an application, and so on.
24 Ice Overview
Ice ships with a number of services that provide these and other features. The services are implemented as Ice servers to which your application acts as a client. None of the services use Ice-internal features that are hidden from application developers so, in theory, you could develop equivalent services yourself. However, having these services available as part of the platform allows you to focus on application development instead of having to build a lot of infrastructure first. Moreover, building such services is not a trivial effort, so it pays to know what is available and use it instead of reinventing your own wheel.
2.3.1 Freeze and FreezeScript
Ice has a built-in object persistence service, known as Freeze. Freeze makes it easy to store object state in a database: you define the state stored by your objects in Slice, and the Freeze compiler generates code that stores and retrieves object state to and from a database. Freeze uses Berkeley DB [18] as its database. We discuss Freeze in detail in Chapter 39.
Ice also offers a tool called FreezeScript that makes it easier to maintain data-bases and to migrate the contents of existing databases to a new schema if the type definitions of objects change. We discuss FreezeScript in Chapter 40.
2.3.2 IceGrid
IceGrid is an implementation of an Ice location service that resolves the symbolic information in an indirect proxy to a protocol–address pair for indirect binding. A location service is only the beginning of IceGrid’s capabilities:
• IceGrid allows you to register servers for automatic start-up: instead of requiring a server to be running at the time a client issues a request, IceGrid starts servers on demand, when the first client request arrives.
• IceGrid provides tools that make it easy to configure complex applications containing several servers.
• IceGrid supports replication and load-balancing.
• IceGrid automates the distribution and patching of server executables and dependent files.
• IceGrid provides a simple query service that allows clients to obtain proxies for objects they are interested in.

2.3 Ice Services 25
2.3.3 IceBox
IceBox is a simple application server that can orchestrate the starting and stopping of a number of application components. Application components can be deployed as a dynamic library instead of as a process. This reduces overall system load, for example, by allowing you to run several application components in a single Java virtual machine instead of having multiple processes, each with its own virtual machine.
2.3.4 IceStorm
IceStorm is a publish–subscribe service that decouples clients and servers. Funda-mentally, IceStorm acts as a distribution switch for events. Publishers send events to the service, which, in turn, passes the events to subscribers. In this way, a single event published by a publisher can be sent to multiple subscribers. Events are categorized by topic, and subscribers specify the topics they are interested in. Only events that match a subscriber’s topic are sent to that subscriber. The service permits selection of a number of quality-of-service criteria to allow applications to choose the appropriate trade-off between reliability and performance.
IceStorm is particularly useful if you have a need to distribute information to large numbers of application components. (A typical example is a stock ticker application with a large number of subscribers.) IceStorm decouples the publishers of information from subscribers and takes care of the redistribution of the published events. In addition, IceStorm can be run as a federated service, that is, multiple instances of the service can be run on different machines to spread the processing load over a number of CPUs.
2.3.5 IcePatch2
IcePatch22 is a software patching service. It allows you to easily distribute soft-ware updates to clients. Clients simply connect to the IcePatch2 server and request updates for a particular application. The service automatically checks the version of the client’s software and downloads any updated application components in a compressed format to conserve bandwidth. Software patches can be secured using the Glacier2 service, so only authorized clients can download software updates.
2. IcePatch2 supersedes IcePatch, which was a previous version of this service.

26 Ice Overview
2.3.6 Glacier2
Glacier23 is the Ice firewall traversal service: it allows clients and servers to securely communicate through a firewall without compromising security. Client-server traffic is SSL-encrypted using public key certificates and is bidirectional. Glacier2 offers support for mutual authentication as well as secure session management.
2.4 Architectural Benefits of Ice
The Ice architecture provides a number of benefits to application developers:
• Object-oriented semantics
Ice fully preserves the object-oriented paradigm “across the wire.” All opera-tion invocations use late binding, so the implementation of an operation is chosen depending on the actual run-time (not static) type of an object.
• Support for synchronous and asynchronous messaging
Ice provides both synchronous and asynchronous operation invocation and dispatch, as well as publish–subscribe messaging via IceStorm. This allows you to choose a communication model according to the needs of your applica-tion instead of having to shoe-horn the application to fit a single model.
• Support for multiple interfaces
With facets, objects can provide multiple, unrelated interfaces while retaining a single object identity across these interfaces. This provides great flexibility, particularly as an application evolves but needs to remain compatible with older, already deployed clients.
• Machine independence
Clients and servers are shielded form idiosyncrasies of the underlying machine architecture. Issues such as byte ordering and padding are hidden from application code.
• Language independence
Client and server can be developed independently and in different program-ming languages. The Slice definition used by both client and server estab-
3. Glacier2 supersedes Glacier, which was a previous version of this service.

2.4 Architectural Benefits of Ice 27
lishes the interface contract between them and is the only thing they need to agree on.
• Implementation independence
Clients are unaware of how servers implement their objects. This means that the implementation of a server can be changed after clients are deployed, for example, to use a different persistence mechanism or even a different programming language.
• Operating system independence
The Ice APIs are fully portable, so the same source code compiles and runs under both Windows and Unix.
• Threading support
The Ice run time is fully threaded and APIs are thread-safe. No effort (beyond synchronizing access to shared data) is required on part of the application developer to develop threaded, high-performance clients and servers.
• Transport independence
Ice currently offers both TCP/IP and UDP as transport protocols. Neither client nor server code are aware of the underlying transport. (The desired transport can be chosen by a configuration parameter.)
• Location and server transparency
The Ice run time takes care of locating objects and managing the underlying transport mechanism, such as opening and closing connections. Interactions between client and server appear connection-less. Via IceGrid, you can arrange for servers to be started on demand if they are not running at the time a client invokes an operation. Servers can be migrated to different physical addresses without breaking proxies held by clients, and clients are completely unaware how object implementations are distributed over server processes.
• Security
Communications between client and server can be fully secured with strong encryption over SSL, so applications can use unsecured public networks to communicate securely. Via Glacier2, you can implement secure forwarding of requests through a firewall, with full support for callbacks.
• Built-in persistence
With Freeze, creating persistent object implementations becomes trivial. Ice comes with built-in support for Berkeley DB [18], which is a high-perfor-mance database.

28 Ice Overview
• Source code availability
The source code for Ice is available. While it is not necessary to have access to the source code to use the platform, it allows you to see how things are imple-mented or port the code to a new operating system.
Overall, Ice provides a state-of-the art development and deployment environment for distributed computing that is more complete than any other platform we are aware of.

29
Chapter 3A Hello World Application
3.1 Chapter Overview
In this chapter, we will see how to create a very simple client–server application in C++ (Section 3.3), Java (Section 3.4), C# (Section 3.5), Visual Basic (Section 3.6), Objective-C (Section 3.7), Python (Section 3.8), Ruby (Section 3.9), and PHP (Section 3.10). Rather than reading the entire chapter, we suggest that you read Section 3.2 and then skip to the section that deals with the programming language of your choice.
The application enables remote printing: a client sends the text to be printed to a server, which in turn sends that text to a printer. For simplicity (and because we do not want to concern ourselves with the idiosyncrasies of print spoolers for various platforms), our printer will simply print to a terminal instead of a real printer. This is no great loss: the purpose of the exercise is to show how a client can communicate with a server; once the thread of control has reached the server application code, that code can of course do anything it likes (including sending the text to a real printer). How to do this is independent of Ice and therefore not relevant here.
Note that much of the detail of the source code will remain unexplained for now. The intent is to show you how to get started and give you a feel for what the development environment looks like; we will provide all the detail throughout the remainder of this book.

30 A Hello World Application
3.2 Writing a Slice Definition
The first step in writing any Ice application is to write a Slice definition containing the interfaces that are used by the application. For our minimal printing applica-tion, we write the following Slice definition:
module Demo { interface Printer { void printString(string s); };};
We save this text in a file called Printer.ice.Our Slice definitions consist of the module Demo containing a single interface
called Printer. For now, the interface is very simple and provides only a single operation, called printString. The printString operation accepts a string as its sole input parameter; the text of that string is what appears on the (possibly remote) printer.
3.3 Writing an Ice Application with C++
This section shows how to create an Ice application with C++.
Compiling a Slice Definition for C++
The first step in creating our C++ application is to compile our Slice definition to generate C++ proxies and skeletons. Under Unix, you can compile the definition as follows:
$ slice2cpp Printer.ice
The slice2cpp compiler produces two C++ source files from this definition, Printer.h and Printer.cpp.
• Printer.h
The Printer.h header file contains C++ type definitions that correspond to the Slice definitions for our Printer interface. This header file must be included in both the client and the server source code.
• Printer.cpp
The Printer.cpp file contains the source code for our Printer interface. The generated source contains type-specific run-time support for both clients
3.3 Writing an Ice Application with C++ 31
and servers. For example, it contains code that marshals parameter data (the string passed to the printString operation) on the client side and unmarshals that data on the server side.
The Printer.cpp file must be compiled and linked into both client and server.
Writing and Compiling a Server
The source code for the server takes only a few lines and is shown in full here:
#include <Ice/Ice.h>#include <Printer.h>using namespace std;using namespace Demo;class PrinterI : public Printer {public: virtual void printString(const string& s, const Ice::Current&);};void PrinterI::printString(const string& s, const Ice::Current&){ cout << s << endl;}intmain(int argc, char* argv[]){ int status = 0; Ice::CommunicatorPtr ic; try { ic = Ice::initialize(argc, argv); Ice::ObjectAdapterPtr adapter = ic->createObjectAdapterWithEndpoints( "SimplePrinterAdapter", "default -p 10000"); Ice::ObjectPtr object = new PrinterI; adapter->add(object, ic->stringToIdentity("SimplePrinter")); adapter->activate(); ic->waitForShutdown(); } catch (const Ice::Exception& e) {

32 A Hello World Application
cerr << e << endl; status = 1; } catch (const char* msg) { cerr << msg << endl; status = 1; } if (ic) { try { ic->destroy(); } catch (const Ice::Exception& e) { cerr << e << endl; status = 1; } } return status;}
There appears to be a lot of code here for something as simple as a server that just prints a string. Do not be concerned by this: most of the preceding code is boiler plate that never changes. For this very simple server, the code is dominated by this boiler plate.
Every Ice source file starts with an include directive for Ice.h, which contains the definitions for the Ice run time. We also include Printer.h, which was generated by the Slice compiler and contains the C++ definitions for our printer interface, and we import the contents of the std and Demo namespaces for brevity in the code that follows:
#include <Ice/Ice.h>#include <Printer.h>using namespace std;using namespace Demo;
Our server implements a single printer servant, of type PrinterI. Looking at the generated code in Printer.h, we find the following (tidied up a little to get rid of irrelevant detail):
namespace Demo { class Printer : virtual public Ice::Object { public: virtual void printString(const std::string&, const Ice::Current&

3.3 Writing an Ice Application with C++ 33
= Ice::Current() ) = 0; };};
The Printer skeleton class definition is generated by the Slice compiler. (Note that the printString method is pure virtual so the skeleton class cannot be instantiated.) Our servant class inherits from the skeleton class to provide an implementation of the pure virtual printString method. (By convention, we use an I-suffix to indicate that the class implements an interface.)
class PrinterI : public Printer {public: virtual void printString(const string& s, const Ice::Current&);};
The implementation of the printString method is trivial: it simply writes its string argument to stdout:
void PrinterI::printString(const string& s, const Ice::Current&){ cout << s << endl;}
Note that printString has a second parameter of type Ice::Current. As you can see from the definition of Printer::printString, the Slice compiler generates a default argument for this parameter, so we can leave it unused in our implementation. (We will examine the purpose of the Ice::Current parameter in Section 32.6.)
What follows is the server main program. Note the general structure of the code:
intmain(int argc, char* argv[]){ int status = 0; Ice::CommunicatorPtr ic; try { // Server implementation here... } catch (const Ice::Exception& e) { cerr << e << endl;

34 A Hello World Application
status = 1; } catch (const char* msg) { cerr << msg << endl; status = 1; } if (ic) { try { ic->destroy(); } catch (const Ice::Exception& e) { cerr << e << endl; status = 1; } } return status;}
The body of main contains the declaration of two variables, status and ic. The status variable contains the exit status of the program and the ic variable, of type Ice::CommunicatorPtr, contains the main handle to the Ice run time.
Following these declarations is a try block in which we place all the server code, followed by two catch handlers. The first handler catches all exceptions that may be thrown by the Ice run time; the intent is that, if the code encounters an unexpected Ice run-time exception anywhere, the stack is unwound all the way back to main, which prints the exception and then returns failure to the operating system. The second handler catches string constants; the intent is that, if we encounter a fatal error condition somewhere in our code, we can simply throw a string literal with an error message. Again, this unwinds the stack all the way back to main, which prints the error message and then returns failure to the operating system.
Following the try block, we see a bit of cleanup code that calls the destroy method on the communicator (provided that the communicator was initialized). The cleanup call is outside the first try block for a reason: we must ensure that the Ice run time is finalized whether the code terminates normally or terminates due to an exception.1
The body of the first try block contains the actual server code:
1. Failure to call destroy on the communicator before the program exits results in undefined behavior.

3.3 Writing an Ice Application with C++ 35
ic = Ice::initialize(argc, argv); Ice::ObjectAdapterPtr adapter = ic->createObjectAdapterWithEndpoints( "SimplePrinterAdapter", "default -p 10000"); Ice::ObjectPtr object = new PrinterI; adapter->add(object, ic->stringToIdentity("SimplePrinter")); adapter->activate(); ic->waitForShutdown();
The code goes through the following steps:
1. We initialize the Ice run time by calling Ice::initialize. (We pass argc and argv to this call because the server may have command-line argu-ments that are of interest to the run time; for this example, the server does not require any command-line arguments.) The call to initialize returns a smart pointer to an Ice::Communicator object, which is the main handle to the Ice run time.
2. We create an object adapter by calling createObjectAdapterWith-Endpoints on the Communicator instance. The arguments we pass are "SimplePrinterAdapter" (which is the name of the adapter) and "default -p 10000", which instructs the adapter to listen for incoming requests using the default protocol (TCP/IP) at port number 10000.
3. At this point, the server-side run time is initialized and we create a servant for our Printer interface by instantiating a PrinterI object.
4. We inform the object adapter of the presence of a new servant by calling add on the adapter; the arguments to add are the servant we have just instantiated, plus an identifier. In this case, the string "SimplePrinter" is the name of the servant. (If we had multiple printers, each would have a different name or, more correctly, a different object identity.)
5. Next, we activate the adapter by calling its activate method. (The adapter is initially created in a holding state; this is useful if we have many servants that share the same adapter and do not want requests to be processed until after all the servants have been instantiated.) The server starts to process incoming requests from clients as soon as the adapter is activated.
6. Finally, we call waitForShutdown. This call suspends the calling thread until the server implementation terminates, either by making a call to shut down the run time, or in response to a signal. (For now, we will simply inter-rupt the server on the command line when we no longer need it.)

36 A Hello World Application
Note that, even though there is quite a bit of code here, that code is essentially the same for all servers. You can put that code into a helper class and, thereafter, will not have to bother with it again. (Ice ships with such a helper class, called Ice::Application—see Section 8.3.1.) As far as actual application code is concerned, the server contains only a few lines: six lines for the definition of the PrinterI class, plus three2 lines to instantiate a PrinterI object and register it with the object adapter.
Assuming that we have the server code in a file called Server.cpp, we can compile it as follows:
$ c++ -I. -I$ICE_HOME/include -c Printer.cpp Server.cpp
This compiles both our application code and the code that was generated by the Slice compiler. We assume that the ICE_HOME environment variable is set to the top-level directory containing the Ice run time. (For example, if you have installed Ice in /opt/Ice, set ICE_HOME to that path.) Depending on your platform, you may have to add additional include directives or other options to the compiler (such as an include directive for the STLport headers, or to control template instantiation); please see the demo programs that ship with Ice for the details.
Finally, we need to link the server into an executable:
$ c++ -o server Printer.o Server.o \-L$ICE_HOME/lib -lIce -lIceUtil
Again, depending on the platform, the actual list of libraries you need to link against may be longer. The demo programs that ship with Ice contain all the detail. The important point to note here is that the Ice run time is shipped in two libraries, libIce and libIceUtil.
Writing and Compiling a Client
The client code looks very similar to the server. Here it is in full:
#include <Ice/Ice.h>#include <Printer.h>using namespace std;using namespace Demo;int
2. Well, two lines, really: printing space limitations force us to break source lines more often than you would in your actual source files.

3.3 Writing an Ice Application with C++ 37
main(int argc, char* argv[]){ int status = 0; Ice::CommunicatorPtr ic; try { ic = Ice::initialize(argc, argv); Ice::ObjectPrx base = ic->stringToProxy( "SimplePrinter:default -p 10000"); PrinterPrx printer = PrinterPrx::checkedCast(base); if (!printer) throw "Invalid proxy"; printer->printString("Hello World!"); } catch (const Ice::Exception& ex) { cerr << ex << endl; status = 1; } catch (const char* msg) { cerr << msg << endl; status = 1; } if (ic) ic->destroy(); return status;}
Note that the overall code layout is the same as for the server: we include the headers for the Ice run time and the header generated by the Slice compiler, and we use the same try block and catch handlers to deal with errors.
The code in the try block does the following:
1. As for the server, we initialize the Ice run time by calling Ice::initialize.
2. The next step is to obtain a proxy for the remote printer. We create a proxy by calling stringToProxy on the communicator, with the string "SimplePrinter:default -p 10000". Note that the string contains the object identity and the port number that were used by the server. (Obvi-ously, hard-coding object identities and port numbers into our applications is a bad idea, but it will do for now; we will see more architecturally sound ways of doing this in Chapter 38.)
3. The proxy returned by stringToProxy is of type Ice::ObjectPrx, which is at the root of the inheritance tree for interfaces and classes. But to actually talk to our printer, we need a proxy for a Printer interface, not an Object interface. To do this, we need to do a down-cast by calling Print-

38 A Hello World Application
erPrx::checkedCast. A checked cast sends a message to the server, effectively asking “is this a proxy for a Printer interface?” If so, the call returns a proxy to a Printer; otherwise, if the proxy denotes an interface of some other type, the call returns a null proxy.
4. We test that the down-cast succeeded and, if not, throw an error message that terminates the client.
5. We now have a live proxy in our address space and can call the print-String method, passing it the time-honored "Hello World!" string. The server prints that string on its terminal.
Compiling and linking the client looks much the same as for the server:
$ c++ -I. -I$ICE_HOME/include -c Printer.cpp Client.cpp$ c++ -o client Printer.o Client.o -L$ICE_HOME/lib -lIce -lIceUtil
Running Client and Server
To run client and server, we first start the server in a separate window:
$ ./server
At this point, we won’t see anything because the server simply waits for a client to connect to it. We run the client in a different window:
$ ./client$
The client runs and exits without producing any output; however, in the server window, we see the "Hello World!" that is produced by the printer. To get rid of the server, we interrupt it on the command line for now. (We will see cleaner ways to terminate a server in Section 8.3.1.)
If anything goes wrong, the client will print an error message. For example, if we run the client without having first started the server, we get:
Network.cpp:471: Ice::ConnectFailedException:connect failed: Connection refused
Note that, to successfully run client and server, you will have to set some plat-form-dependent environment variables. For example, under Linux, you need to add the Ice library directory to your LD_LIBRARY_PATH. Please have a look at the demo applications that ship with Ice for the details for your platform.

3.4 Writing an Ice Application with Java 39
3.4 Writing an Ice Application with Java
This section shows how to create an Ice application with Java.
Compiling a Slice Definition for Java
The first step in creating our Java application is to compile our Slice definition to generate Java proxies and skeletons. Under Unix, you can compile the definition as follows:3
$ mkdir generated$ slice2java --output-dir generated Printer.ice
The --output-dir option instructs the compiler to place the generated files into the generated directory. This avoids cluttering the working directory with the generated files. The slice2java compiler produces a number of Java source files from this definition. The exact contents of these files do not concern us for now—they contain the generated code that corresponds to the Printer interface we defined in Printer.ice.
Writing and Compiling a Server
To implement our Printer interface, we must create a servant class. By conven-tion, servant classes use the name of their interface with an I-suffix, so our servant class is called PrinterI and placed into a source file PrinterI.java:
public class PrinterI extends Demo._PrinterDisp { public void printString(String s, Ice.Current current) { System.out.println(s); }}
The PrinterI class inherits from a base class called _PrinterDisp, which is generated by the slice2java compiler. The base class is abstract and contains a printString method that accepts a string for the printer to print and a parameter of type Ice.Current. (For now we will ignore the Ice.Current parameter. We will see its purpose in detail in Section 32.6.) Our
3. Whenever we show Unix commands in this book, we assume a Bourne or Bash shell. The commands for Windows are essentially identical and therefore not shown.

40 A Hello World Application
implementation of the printString method simply writes its argument to the terminal.
The remainder of the server code is in a source file called Server.java, shown in full here:
public class Server { public static void main(String[] args) { int status = 0; Ice.Communicator ic = null; try { ic = Ice.Util.initialize(args); Ice.ObjectAdapter adapter = ic.createObjectAdapterWithEndpoints( "SimplePrinterAdapter", "default -p 10000"); Ice.Object object = new PrinterI(); adapter.add( object, ic.stringToIdentity("SimplePrinter")); adapter.activate(); ic.waitForShutdown(); } catch (Ice.LocalException e) { e.printStackTrace(); status = 1; } catch (Exception e) { System.err.println(e.getMessage()); status = 1; } if (ic != null) { // Clean up // try { ic.destroy(); } catch (Exception e) { System.err.println(e.getMessage()); status = 1; } } System.exit(status); }}
Note the general structure of the code:

3.4 Writing an Ice Application with Java 41
public class Server { public static void main(String[] args) { int status = 0; Ice.Communicator ic = null; try { ic = Ice.Util.initialize(args); Ice.ObjectAdapter adapter = ic.createObjectAdapterWithEndpoints( "SimplePrinterAdapter", "default -p 10000"); Ice.Object object = new PrinterI(); adapter.add( object, ic.stringToIdentity("SimplePrinter")); adapter.activate(); ic.waitForShutdown(); } catch (Ice.LocalException e) { e.printStackTrace(); status = 1; } catch (Exception e) { System.err.println(e.getMessage()); status = 1; } if (ic != null) { // Clean up // try { ic.destroy(); } catch (Exception e) { System.err.println(e.getMessage()); status = 1; } } System.exit(status); }}
The body of main contains a try block in which we place all the server code, followed by two catch blocks. The first block catches all exceptions that may be thrown by the Ice run time; the intent is that, if the code encounters an unexpected Ice run-time exception anywhere, the stack is unwound all the way back to main, which prints the exception and then returns failure to the operating system. The second block catches Exception exceptions; the intent is that, if we encounter a fatal error condition somewhere in our code, we can simply throw an exception

42 A Hello World Application
with an error message. Again, this unwinds the stack all the way back to main, which prints the error message and then returns failure to the operating system.
Before the code exits, it destroys the communicator (if one was created successfully). Doing this is essential in order to correctly finalize the Ice run time: the program must call destroy on any communicator it has created; otherwise, undefined behavior results.
The body of our try block contains the actual server code:
ic = Ice.Util.initialize(args); Ice.ObjectAdapter adapter = ic.createObjectAdapterWithEndpoints( "SimplePrinterAdapter", "default -p 10000"); Ice.Object object = new PrinterI(); adapter.add( object, ic.stringToIdentity("SimplePrinter")); adapter.activate(); ic.waitForShutdown();
The code goes through the following steps:
1. We initialize the Ice run time by calling Ice.Util.initialize. (We pass args to this call because the server may have command-line arguments that are of interest to the run time; for this example, the server does not require any command-line arguments.) The call to initialize returns an Ice::Communicator reference, which is the main handle to the Ice run time.
2. We create an object adapter by calling createObjectAdapterWith-Endpoints on the Communicator instance. The arguments we pass are "SimplePrinterAdapter" (which is the name of the adapter) and "default -p 10000", which instructs the adapter to listen for incoming requests using the default protocol (TCP/IP) at port number 10000.
3. At this point, the server-side run time is initialized and we create a servant for our Printer interface by instantiating a PrinterI object.
4. We inform the object adapter of the presence of a new servant by calling add on the adapter; the arguments to add are the servant we have just instantiated, plus an identifier. In this case, the string "SimplePrinter" is the name of the servant. (If we had multiple printers, each would have a different name or, more correctly, a different object identity.)
5. Next, we activate the adapter by calling its activate method. (The adapter is initially created in a holding state; this is useful if we have many servants

3.4 Writing an Ice Application with Java 43
that share the same adapter and do not want requests to be processed until after all the servants have been instantiated.)
6. Finally, we call waitForShutdown. This call suspends the calling thread until the server implementation terminates, either by making a call to shut down the run time, or in response to a signal. (For now, we will simply inter-rupt the server on the command line when we no longer need it.)
Note that, even though there is quite a bit of code here, that code is essentially the same for all servers. You can put that code into a helper class and, thereafter, will not have to bother with it again. (Ice ships with such a helper class, called Ice.Application—see Section 12.3.1.) As far as actual application code is concerned, the server contains only a few lines: seven lines for the definition of the PrinterI class, plus four4 lines to instantiate a PrinterI object and register it with the object adapter.
We can compile the server code as follows:
$ mkdir classes$ javac -d classes -classpath classes:$ICEJ_HOME/lib/Ice.jar\-source 1.4 Server.java PrinterI.java generated/Demo/*.java
This compiles both our application code and the code that was generated by the Slice compiler. We assume that the ICEJ_HOME environment variable is set to the top-level directory containing the Ice run time. (For example, if you have installed Ice in /opt/Icej, set ICEJ_HOME to that path.) Note that Ice for Java uses the ant build environment to control building of source code. (ant is similar to make, but more flexible for Java applications.) You can have a look at the demo code that ships with Ice to see how to use this tool.
Writing and Compiling a Client
The client code, in Client.java, looks very similar to the server. Here it is in full:
public class Client { public static void main(String[] args) { int status = 0; Ice.Communicator ic = null;
4. Well, two lines, really: printing space limitations force us to break source lines more often than you would in your actual source files.

44 A Hello World Application
try { ic = Ice.Util.initialize(args); Ice.ObjectPrx base = ic.stringToProxy( "SimplePrinter:default -p 10000"); Demo.PrinterPrx printer = Demo.PrinterPrxHelper.checkedCast(base); if (printer == null) throw new Error("Invalid proxy"); printer.printString("Hello World!"); } catch (Ice.LocalException e) { e.printStackTrace(); status = 1; } catch (Exception e) { System.err.println(e.getMessage()); status = 1; } if (ic != null) { // Clean up // try { ic.destroy(); } catch (Exception e) { System.err.println(e.getMessage()); status = 1; } } System.exit(status); }}
Note that the overall code layout is the same as for the server: we use the same try and catch blocks to deal with errors. The code in the try block does the following:
1. As for the server, we initialize the Ice run time by calling Ice.Util.initialize.
2. The next step is to obtain a proxy for the remote printer. We create a proxy by calling stringToProxy on the communicator, with the string "SimplePrinter:default -p 10000". Note that the string contains the object identity and the port number that were used by the server. (Obvi-ously, hard-coding object identities and port numbers into our applications is a bad idea, but it will do for now; we will see more architecturally sound ways of doing this in Chapter 38.)

3.4 Writing an Ice Application with Java 45
3. The proxy returned by stringToProxy is of type Ice::ObjectPrx, which is at the root of the inheritance tree for interfaces and classes. But to actually talk to our printer, we need a proxy for a Printer interface, not an Object inter-face. To do this, we need to do a down-cast by calling PrinterPrx-Helper.checkedCast. A checked cast sends a message to the server, effectively asking “is this a proxy for a Printer interface?” If so, the call returns a proxy of type Demo::Printer; otherwise, if the proxy denotes an interface of some other type, the call returns null.
4. We test that the down-cast succeeded and, if not, throw an error message that terminates the client.
5. We now have a live proxy in our address space and can call the print-String method, passing it the time-honored "Hello World!" string. The server prints that string on its terminal.
Compiling the client looks much the same as for the server:
$ javac -d classes -classpath classes:$ICEJ_HOME/lib/Ice.jar\-source 1.4 Client.java PrinterI.java generated/Demo/*.java
Running Client and Server
To run client and server, we first start the server in a separate window:
$ java Server
At this point, we won’t see anything because the server simply waits for a client to connect to it. We run the client in a different window:
$ java Client$
The client runs and exits without producing any output; however, in the server window, we see the "Hello World!" that is produced by the printer. To get rid of the server, we interrupt it on the command line for now. (We will see cleaner ways to terminate a server in Chapter 12.)
If anything goes wrong, the client will print an error message. For example, if we run the client without having first started the server, we get something like the following:
Ice.ConnectFailedException at IceInternal.Network.doConnect(Network.java:201) at IceInternal.TcpConnector.connect(TcpConnector.java:26) atIceInternal.OutgoingConnectionFactory.create(OutgoingConnectionFactory.java:80)

46 A Hello World Application
at Ice._ObjectDelM.setup(_ObjectDelM.java:251) at Ice.ObjectPrxHelper.__getDelegate(ObjectPrxHelper.java:642) at Ice.ObjectPrxHelper.ice_isA(ObjectPrxHelper.java:41) at Ice.ObjectPrxHelper.ice_isA(ObjectPrxHelper.java:30) at Demo.PrinterPrxHelper.checkedCast(Unknown Source) at Client.main(Unknown Source)Caused by: java.net.ConnectException: Connection refused at sun.nio.ch.SocketChannelImpl.checkConnect(Native Method) atsun.nio.ch.SocketChannelImpl.finishConnect(SocketChannelImpl.java:518) at IceInternal.Network.doConnect(Network.java:173) ... 8 more
Note that, to successfully run client and server, your CLASSPATH must include the Ice library and the classes directory, for example:
$ export CLASSPATH=$CLASSPATH:./classes:$ICEJ_HOME/lib/Ice.jar
Please have a look at the demo applications that ship with Ice for the details for your platform.
3.5 Writing an Ice Application with C#
This section shows how to create an Ice application with C#.
Compiling a Slice Definition for C#
The first step in creating our C# application is to compile our Slice definition to generate C# proxies and skeletons. You can compile the definition as follows:
$ mkdir generated$ slice2cs --output-dir generated Printer.ice
The --output-dir option instructs the compiler to place the generated files into the generated directory. This avoids cluttering the working directory with the generated files. The slice2cs compiler produces a single source file, Printer.cs, from this definition. The exact contents of this file do not concern us for now—it contains the generated code that corresponds to the Printer inter-face we defined in Printer.ice.

3.5 Writing an Ice Application with C# 47
Writing and Compiling a Server
To implement our Printer interface, we must create a servant class. By conven-tion, servant classes use the name of their interface with an I-suffix, so our servant class is called PrinterI and placed into a source file Server.cs:
using System;public class PrinterI : Demo.PrinterDisp_{ public override void printString(string s, Ice.Current current) { Console.WriteLine(s); }}
The PrinterI class inherits from a base class called _PrinterDisp, which is generated by the slice2cs compiler. The base class is abstract and contains a printString method that accepts a string for the printer to print and a param-eter of type Ice.Current. (For now we will ignore the Ice.Current param-eter. We will see its purpose in detail in Section 32.6.) Our implementation of the printString method simply writes its argument to the terminal.
The remainder of the server code follows in Server.cs and is shown in full here:
public class Server{ public static void Main(string[] args) { int status = 0; Ice.Communicator ic = null; try { ic = Ice.Util.initialize(ref args); Ice.ObjectAdapter adapter = ic.createObjectAdapterWithEndpoints( "SimplePrinterAdapter", "default -p 10000"); Ice.Object obj = new PrinterI(); adapter.add( obj, ic.stringToIdentity("SimplePrinter")); adapter.activate(); ic.waitForShutdown(); } catch (Exception e) { Console.Error.WriteLine(e); status = 1; }

48 A Hello World Application
if (ic != null) { // Clean up // try { ic.destroy(); } catch (Exception e) { Console.Error.WriteLine(e); status = 1; } } Environment.Exit(status); }}
Note the general structure of the code:
public class Server{ public static void Main(string[] args) { int status = 0; Ice.Communicator ic = null; try { // Server implementation here... } catch (Exception e) { Console.Error.WriteLine(e); status = 1; } if (ic != null) { // Clean up // try { ic.destroy(); } catch (Exception e) { Console.Error.WriteLine(e); status = 1; } } Environment.Exit(status); }}
The body of Main contains a try block in which we place all the server code, followed by a catch block. The catch block catches all exceptions that may be

3.5 Writing an Ice Application with C# 49
thrown by the code; the intent is that, if the code encounters an unexpected run-time exception anywhere, the stack is unwound all the way back to Main, which prints the exception and then returns failure to the operating system.
Before the code exits, it destroys the communicator (if one was created successfully). Doing this is essential in order to correctly finalize the Ice run time: the program must call destroy on any communicator it has created; otherwise, undefined behavior results.
The body of our try block contains the actual server code:
ic = Ice.Util.initialize(ref args); Ice.ObjectAdapter adapter = ic.createObjectAdapterWithEndpoints( "SimplePrinterAdapter", "default -p 10000"); Ice.Object obj = new PrinterI(); adapter.add( obj, ic.stringToIdentity("SimplePrinter")); adapter.activate(); ic.waitForShutdown();
The code goes through the following steps:
1. We initialize the Ice run time by calling Ice.Util.initialize. (We pass args to this call because the server may have command-line arguments that are of interest to the run time; for this example, the server does not require any command-line arguments.) The call to initialize returns an Ice::Communicator reference, which is the main handle to the Ice run time.
2. We create an object adapter by calling createObjectAdapterWith-Endpoints on the Communicator instance. The arguments we pass are "SimplePrinterAdapter" (which is the name of the adapter) and "default -p 10000", which instructs the adapter to listen for incoming requests using the default protocol (TCP/IP) at port number 10000.
3. At this point, the server-side run time is initialized and we create a servant for our Printer interface by instantiating a PrinterI object.
4. We inform the object adapter of the presence of a new servant by calling add on the adapter; the arguments to add are the servant we have just instantiated, plus an identifier. In this case, the string "SimplePrinter" is the name of the servant. (If we had multiple printers, each would have a different name or, more correctly, a different object identity.)
5. Next, we activate the adapter by calling its activate method. (The adapter is initially created in a holding state; this is useful if we have many servants

50 A Hello World Application
that share the same adapter and do not want requests to be processed until after all the servants have been instantiated.)
6. Finally, we call waitForShutdown. This call suspends the calling thread until the server implementation terminates, either by making a call to shut down the run time, or in response to a signal. (For now, we will simply inter-rupt the server on the command line when we no longer need it.)
Note that, even though there is quite a bit of code here, that code is essentially the same for all servers. You can put that code into a helper class and, thereafter, will not have to bother with it again. (Ice ships with such a helper class, called Ice.Application—see Section 16.3.1.) As far as actual application code is concerned, the server contains only a few lines: seven lines for the definition of the PrinterI class, plus four5 lines to instantiate a PrinterI object and register it with the object adapter.
We can compile the server code as follows:
$ csc /reference:Ice.dll /lib:%ICE_HOME%\bin Server.cs \generated\Printer.cs
This compiles both our application code and the code that was generated by the Slice compiler. We assume that the ICE_HOME environment variable is set to the top-level directory containing the Ice run time. (For example, if you have installed Ice in C:\opt\Ice, set ICE_HOME to that path.)
Writing and Compiling a Client
The client code, in Client.cs, looks very similar to the server. Here it is in full:
using System;using Demo;public class Client{ public static void Main(string[] args) { int status = 0; Ice.Communicator ic = null; try { ic = Ice.Util.initialize(ref args); Ice.ObjectPrx obj = ic.stringToProxy(
5. Well, two lines, really: printing space limitations force us to break source lines more often than you would in your actual source files.

3.5 Writing an Ice Application with C# 51
"SimplePrinter:default -p 10000"); PrinterPrx printer = PrinterPrxHelper.checkedCast(obj); if (printer == null) throw new ApplicationException("Invalid proxy"); printer.printString("Hello World!"); } catch (Exception e) { Console.Error.WriteLine(e); status = 1; } if (ic != null) { // Clean up // try { ic.destroy(); } catch (Exception e) { Console.Error.WriteLine(e); status = 1; } } Environment.Exit(status); }}
Note that the overall code layout is the same as for the server: we use the same try and catch blocks to deal with errors. The code in the try block does the following:
1. As for the server, we initialize the Ice run time by calling Ice.Util.initialize.
2. The next step is to obtain a proxy for the remote printer. We create a proxy by calling stringToProxy on the communicator, with the string "SimplePrinter:default -p 10000". Note that the string contains the object identity and the port number that were used by the server. (Obvi-ously, hard-coding object identities and port numbers into our applications is a bad idea, but it will do for now; we will see more architecturally sound ways of doing this in Chapter 38.)
3. The proxy returned by stringToProxy is of type Ice::ObjectPrx, which is at the root of the inheritance tree for interfaces and classes. But to actually talk to our printer, we need a proxy for a Printer interface, not an Object inter-face. To do this, we need to do a down-cast by calling PrinterPrx-Helper.checkedCast. A checked cast sends a message to the server,

52 A Hello World Application
effectively asking “is this a proxy for a Printer interface?” If so, the call returns a proxy of type Demo::Printer; otherwise, if the proxy denotes an interface of some other type, the call returns null.
4. We test that the down-cast succeeded and, if not, throw an error message that terminates the client.
5. We now have a live proxy in our address space and can call the print-String method, passing it the time-honored "Hello World!" string. The server prints that string on its terminal.
Compiling the client looks much the same as for the server:
$ csc /reference:Ice.dll /lib:%ICE_HOME%\bin Client.cs \generated\Printer.cs
Running Client and Server
To run client and server, we first start the server in a separate window:
$ server.exe
At this point, we won’t see anything because the server simply waits for a client to connect to it. We run the client in a different window:
$ client.exe$
The client runs and exits without producing any output; however, in the server window, we see the "Hello World!" that is produced by the printer. To get rid of the server, we interrupt it on the command line for now. (We will see cleaner ways to terminate a server in Chapter 16.)
If anything goes wrong, the client will print an error message. For example, if we run the client without having first started the server, we get something like the following:
Ice.ConnectionRefusedException error = 0 at IceInternal.ProxyFactory.checkRetryAfterException(LocalException ex, Reference ref, Int32 cnt) in c:\cygwin\home\michi\src\ice\cs\src\Ice\ProxyFactory.cs:line 167 at Ice.ObjectPrxHelperBase.handleException__(ObjectDel_ delegate, LocalException ex, Int32 cnt) in c:\cygwin\home\michi\src\ice\cs\src\Ice\Proxy.cs:line 970 at Ice.ObjectPrxHelperBase.ice_isA(String id__, Dictionary`2 context__, Boolean explicitContext__) in c:\cygwin\home\michi\src\ice\cs\src\Ice\Proxy.cs:line 201 at Ice.ObjectPrxHelperBase.ice_isA(String id__) in c:\cygwin\ho

3.6 Writing an Ice Application with Visual Basic 53
me\michi\src\ice\cs\src\Ice\Proxy.cs:line 170 at Demo.PrinterPrxHelper.checkedCast(ObjectPrx b) in C:\cygwin\home\michi\src\ice\cs\demo\book\printer\generated\Printer.cs:line 140 at Client.Main(String[] args) in C:\cygwin\home\michi\src\ice\cs\demo\book\printer\Client.cs:line 23Caused by: System.ComponentModel.Win32Exception: No connection could be made because the target machine actively refused it
Note that, to successfully run client and server, the C# run time must be able to locate the Ice.dll library. (Under Windows, one way to ensure this is to copy the library into the current directory. Please consult the documentation for your C# run time to see how it locates libraries.)
3.6 Writing an Ice Application with Visual Basic
This section shows how to create an Ice application with Visual Basic.
Overview
As of version 3.3, Ice no longer includes a separate compiler to create Visual Basic source code from Slice definitions. Instead, you need to use the Slice-to-C# compiler slice2cs to create C# source code and compile the generated C# source code with a C# compiler into a DLL that contains the compiled generated code for your Slice definitions. Your Visual Basic application then links with this DLL and the Ice-for-.NET DLL (Ice.dll).6
6. This approach works not only with Visual Basic, but with any language that targets the .NET run time. However, ZeroC does not provide support for languages other than C# and Visual Basic.

54 A Hello World Application
Figure 3.1 illustrates this development process.
Figure 3.1. Developing a Visual Basic application with Ice.
Compiling a Slice Definition for Visual Basic
The first step in creating our VB application is to compile our Slice definition to generate proxies and skeletons. You can compile the definition as follows:
$ mkdir generated$ slice2cs --output-dir generated Printer.ice
The --output-dir option instructs the compiler to place the generated files into the generated directory. This avoids cluttering the working directory with the generated files. The slice2cs compiler produces a single source file, Printer.cs, from this definition. The exact contents of this file do not concern us for now—it contains the generated code that corresponds to the Printer inter-face we defined in Printer.ice.
We now need to compile this generated code into a DLL:
$ csc /reference:Ice.dll /lib:%ICE_HOME%\bin /t:library /out:Printer.dll generated\Printer.cs
This creates a DLL called Printer.dll that contains the code we generated from the Slice definitions.
ServerDeveloper
ClientDeveloper
ServerExecutable
.NET IceRun-Time
DLL
ClientExecutable
SliceDeveloper
Slice-to-C#Compiler
Server.vb
Client.vb
Printer.ice Printer.cs
Stub &Skeleton
DLL
C#Compiler
Visual BasicCompiler
Visual BasicCompiler
RPC

3.6 Writing an Ice Application with Visual Basic 55
Writing and Compiling a Server
To implement our Printer interface, we must create a servant class. By conven-tion, servant classes use the name of their interface with an I-suffix, so our servant class is called PrinterI and placed into a source file Server.vb:
Imports SystemImports DemoPublic Class PrinterI Inherits PrinterDisp_ Public Overloads Overrides Sub printString( _ ByVal s As String, _ ByVal current As Ice.Current) Console.WriteLine(s) End SubEnd Class
The PrinterI class inherits from a base class called _PrinterDisp, which is generated by the slice2cs compiler. The base class is abstract and contains a printString method that accepts a string for the printer to print and a param-eter of type Ice.Current. (For now we will ignore the Ice.Current param-eter. We will see its purpose in detail in Section 32.6.) Our implementation of the printString method simply writes its argument to the terminal.
The remainder of the server code follows in Server.vb and is shown in full here:
Module Server Public Sub Main(ByVal args() As String) Dim status As Integer = 0 Dim ic As Ice.Communicator = Nothing Try ic = Ice.Util.initialize(args) Dim adapter As Ice.ObjectAdapter = _ ic.createObjectAdapterWithEndpoints( _ "SimplePrinterAdapter", "default -p 10000") Dim obj As Ice.Object = New PrinterI adapter.add(obj, ic.stringToIdentity( _ "SimplePrinter")) adapter.activate() ic.waitForShutdown()

56 A Hello World Application
Catch e As Exception Console.Error.WriteLine(e) status = 1 End Try If Not ic Is Nothing Then ' Clean up ' Try ic.destroy() Catch e As Exception Console.Error.WriteLine(e) status = 1 End Try End If Environment.Exit(status) End SubEnd module
Note the general structure of the code:
Module Server Public Sub Main(ByVal args() As String) Dim status As Integer = 0 Dim ic As Ice.Communicator = Nothing Try ' Server implementation here... Catch e As Exception Console.Error.WriteLine(e) status = 1 End Try If Not ic Is Nothing Then ' Clean up ' Try ic.destroy() Catch e As Exception Console.Error.WriteLine(e) status = 1 End Try End If

3.6 Writing an Ice Application with Visual Basic 57
Environment.Exit(status) End SubEnd module
The body of Main contains a Try block in which we place all the server code, followed by a Catch block. The catch block catches all exceptions that may be thrown by the code; the intent is that, if the code encounters an unexpected run-time exception anywhere, the stack is unwound all the way back to Main, which prints the exception and then returns failure to the operating system.
Before the code exits, it destroys the communicator (if one was created successfully). Doing this is essential in order to correctly finalize the Ice run time: the program must call destroy on any communicator it has created; otherwise, undefined behavior results.
The body of our Try block contains the actual server code:
ic = Ice.Util.initialize(args) Dim adapter As Ice.ObjectAdapter = _ ic.createObjectAdapterWithEndpoints( _ "SimplePrinterAdapter", "default -p 10000") Dim obj As Ice.Object = New PrinterI adapter.add(obj, ic.stringToIdentity( _ "SimplePrinter")) adapter.activate() ic.waitForShutdown()
The code goes through the following steps:
1. We initialize the Ice run time by calling Ice.Util.initialize. (We pass args to this call because the server may have command-line arguments that are of interest to the run time; for this example, the server does not require any command-line arguments.) The call to initialize returns an Ice::Communicator reference, which is the main handle to the Ice run time.
2. We create an object adapter by calling createObjectAdapterWith-Endpoints on the Communicator instance. The arguments we pass are "SimplePrinterAdapter" (which is the name of the adapter) and "default -p 10000", which instructs the adapter to listen for incoming requests using the default protocol (TCP/IP) at port number 10000.
3. At this point, the server-side run time is initialized and we create a servant for our Printer interface by instantiating a PrinterI object.
4. We inform the object adapter of the presence of a new servant by calling add on the adapter; the arguments to add are the servant we have just instantiated,

58 A Hello World Application
plus an identifier. In this case, the string "SimplePrinter" is the name of the servant. (If we had multiple printers, each would have a different name or, more correctly, a different object identity.)
5. Next, we activate the adapter by calling its activate method. (The adapter is initially created in a holding state; this is useful if we have many servants that share the same adapter and do not want requests to be processed until after all the servants have been instantiated.)
6. Finally, we call waitForShutdown. This call suspends the calling thread until the server implementation terminates, either by making a call to shut down the run time, or in response to a signal. (For now, we will simply inter-rupt the server on the command line when we no longer need it.)
Note that, even though there is quite a bit of code here, that code is essentially the same for all servers. You can put that code into a helper class and, thereafter, will not have to bother with it again. (Ice ships with such a helper class, called Ice.Application—see Section 16.3.1.) As far as actual application code is concerned, the server contains only a few lines: ten lines for the definition of the PrinterI class, plus three7 lines to instantiate a PrinterI object and register it with the object adapter.
We can compile the server code as follows:
$ vbc /reference:Ice.dll /libpath:%ICE_HOME%\bin /reference:Printer.dll /out:server.exe Server.vb
This compiles our application code and links it with the Ice-for-.NET run time and the DLL we generated earlier. We assume that the ICE_HOME environment vari-able is set to the top-level directory containing the Ice run time. (For example, if you have installed Ice in C:\opt\Ice, set ICE_HOME to that path.)
Writing and Compiling a Client
The client code, in Client.vb, looks very similar to the server. Here it is in full:
Imports SystemImports DemoModule Client
7. Well, two lines, really: printing space limitations force us to break source lines more often than you would in your actual source files.
3.6 Writing an Ice Application with Visual Basic 59
Public Sub Main(ByVal args() As String) Dim status As Integer = 0 Dim ic As Ice.Communicator = Nothing Try ic = Ice.Util.initialize(args) Dim obj As Ice.ObjectPrx = ic.stringToProxy( _ "SimplePrinter:default -p 10000") Dim printer As PrinterPrx = _ PrinterPrxHelper.checkedCast(obj) If printer Is Nothing Then Throw New ApplicationException("Invalid proxy") End If printer.printString("Hello World!") Catch e As Exception Console.Error.WriteLine(e) status = 1 End Try If Not ic Is Nothing Then ' Clean up ' Try ic.destroy() Catch e As Exception Console.Error.WriteLine(e) status = 1 End Try End If Environment.Exit(status) End SubEnd Module
Note that the overall code layout is the same as for the server: we use the same Try and Catch blocks to deal with errors. The code in the Try block does the following:
1. As for the server, we initialize the Ice run time by calling Ice.Util.initialize.
2. The next step is to obtain a proxy for the remote printer. We create a proxy by calling stringToProxy on the communicator, with the string "SimplePrinter:default -p 10000". Note that the string contains the object identity and the port number that were used by the server. (Obvi-ously, hard-coding object identities and port numbers into our applications is a

60 A Hello World Application
bad idea, but it will do for now; we will see more architecturally sound ways of doing this in Chapter 38.)
3. The proxy returned by stringToProxy is of type Ice::ObjectPrx, which is at the root of the inheritance tree for interfaces and classes. But to actually talk to our printer, we need a proxy for a Printer interface, not an Object inter-face. To do this, we need to do a down-cast by calling PrinterPrx-Helper.checkedCast. A checked cast sends a message to the server, effectively asking “is this a proxy for a Printer interface?” If so, the call returns a proxy of type Demo::Printer; otherwise, if the proxy denotes an interface of some other type, the call returns null.
4. We test that the down-cast succeeded and, if not, throw an error message that terminates the client.
5. We now have a live proxy in our address space and can call the print-String method, passing it the time-honored "Hello World!" string. The server prints that string on its terminal.
Compiling the client looks much the same as for the server:
$ vbc /reference:Ice.dll /libpath:%ICE_HOME%\bin /reference:Printer.dll /out:client.exe Client.vb
Running Client and Server
To run client and server, we first start the server in a separate window:
$ server.exe
At this point, we won’t see anything because the server simply waits for a client to connect to it. We run the client in a different window:
$ client.exe$
The client runs and exits without producing any output; however, in the server window, we see the "Hello World!" that is produced by the printer. To get rid of the server, we interrupt it on the command line for now. (We will see cleaner ways to terminate a server in Chapter 16.)
If anything goes wrong, the client will print an error message. For example, if we run the client without having first started the server, we get something like the following:

3.7 Writing an Ice Application with Objective-C 61
Ice.ConnectionRefusedException error = 0 at IceInternal.ProxyFactory.checkRetryAfterException(LocalException ex, Reference ref, Int32 cnt) in c:\cygwin\home\michi\src\ice\cs\src\Ice\ProxyFactory.cs:line 167 at Ice.ObjectPrxHelperBase.handleException__(ObjectDel_ delegate, LocalException ex, Int32 cnt) in c:\cygwin\home\michi\src\ice\cs\src\Ice\Proxy.cs:line 970 at Ice.ObjectPrxHelperBase.ice_isA(String id__, Dictionary`2 context__, Boolean explicitContext__) in c:\cygwin\home\michi\src\ice\cs\src\Ice\Proxy.cs:line 201 at Ice.ObjectPrxHelperBase.ice_isA(String id__) in c:\cygwin\home\michi\src\ice\cs\src\Ice\Proxy.cs:line 170 at Demo.PrinterPrxHelper.checkedCast(ObjectPrx b) in C:\cygwin\home\michi\src\ice\cs\demo\book\printer\generated\Printer.cs:line 140 at Client.Main(String[] args) in C:\cygwin\home\michi\src\ice\cs\demo\book\printer\Client.cs:line 23Caused by: System.ComponentModel.Win32Exception: No connection could be made because the target machine actively refused it
Note that, to successfully run client and server, the VB run time must be able to locate the Ice.dll library. (Under Windows, one way to ensure this is to copy the library into the current directory. Please consult the documentation for your VB run time to see how it locates libraries.)
3.7 Writing an Ice Application with Objective-C
This section shows how to create an Ice application with Objective-C.
Compiling a Slice Definition for Objective-C
The first step in creating our Objective-C application is to compile our Slice defi-nition to generate Objective-C proxies and skeletons. Under Unix, you can compile the definition as follows:
$ slice2objc Printer.ice
The slice2objc compiler produces two Objective-C source files from this definition, Printer.h and Printer.m.

62 A Hello World Application
• Printer.h
The Printer.h header file contains Objective-C type definitions that corre-spond to the Slice definitions for our Printer interface. This header file must be included in both the client and the server source code.
• Printer.m
The Printer.m file contains the source code for our Printer interface. The generated source contains type-specific run-time support for both clients and servers. For example, it contains code that marshals parameter data (the string passed to the printString operation) on the client side and unmarshals that data on the server side.
The Printer.m file must be compiled and linked into both client and server.
Writing and Compiling a Server
The source code for the server takes only a few lines and is shown in full here:
#import <Ice/Ice.h>#import <Printer.h>#import <Foundation/NSAutoreleasePool.h>#import <stdio.h>@interface PrinterI : DemoPrinter <DemoPrinter>@end@implementation PrinterI-(void) printString:(NSMutableString *)s current:(ICECurrent *)current{ printf("%s\n", [s UTF8String]);}@endintmain(int argc, char* argv[]){ NSAutoreleasePool * pool = [[NSAutoreleasePool alloc] init]; int status = 1; id<ICECommunicator> communicator = nil; @try { communicator = [ICEUtil createCommunicator:&argc argv:argv];

3.7 Writing an Ice Application with Objective-C 63
id<ICEObjectAdapter> adapter = [communicator createObjectAdapterWithEndpoints: @"SimplePrinterAdapter" endpoints:@"default -p 10000"]; ICEObject *object = [[[PrinterI alloc] init] autorelease]; [adapter add:object identity:[communicator stringToIdentity:@"SimplePrinter"]]; [adapter activate]; [communicator waitForShutdown]; status = 0; } @catch (NSException* ex) { NSLog(@"%@", ex); } @try { [communicator destroy]; } @catch (NSException* ex) { NSLog(@"%@", ex); } [pool release]; return status;}
There appears to be a lot of code here for something as simple as a server that just prints a string. Do not be concerned by this: most of the preceding code is boiler plate that never changes. For this very simple server, the code is dominated by this boiler plate.
Every Ice source file starts with an include directive for Ice.h, which contains the definitions for the Ice run time. We also include Printer.h, which was generated by the Slice compiler and contains the Objective-C definitions for our printer interface. We also import headers to allow us to use an autorelease pool and to produce output:
#import <Ice/Ice.h>#import <Printer.h>#import <Foundation/NSAutoreleasePool.h>#import <stdio.h>

64 A Hello World Application
Our server implements a single printer servant, of type PrinterI. Looking at the generated code in Printer.h, we find the following (tidied up a little to get rid of irrelevant detail):
@protocol DemoPrinter <ICEObject>-(void) printString:(NSMutableString *)s current:(ICECurrent *)current;@end@interface DemoPrinter : ICEObject// ...@end
The DemoPrinter protocol and class definitions are generated by the Slice compiler. The protocol defines the printString method, which we must implement in our servant. The DemoPrinter class contains methods that are internal to the mapping, so we are not concerned with these. However, our servant must derive from this skeleton class:
@interface PrinterI : DemoPrinter <DemoPrinter>@end@implementation PrinterI-(void) printString:(NSMutableString *)s current:(ICECurrent *)current{ printf("%s\n", [s UTF8String]);}@end
As you can see, the implementation of the printString method is trivial: it simply writes its string argument to stdout.
Note that printString has a second parameter of type ICECurrent. The Ice run time passes additional information about an incoming request to the servant in this parameter. For now, we will ignore it. (See Section 32.6 for more information about this parameter.)
What follows is the server main program. Note the general structure of the code:
intmain(int argc, char* argv[]){ NSAutoreleasePool * pool = [[NSAutoreleasePool alloc] init]; int status = 1;

3.7 Writing an Ice Application with Objective-C 65
id<ICECommunicator> communicator = nil; @try { communicator = [ICEUtil createCommunicator:&argc argv:argv]; // Server implementation here... status = 0; } @catch (NSException* ex) { NSLog(@"%@", ex); } @try { [communicator destroy]; } @catch (NSException* ex) { NSLog(@"%@", ex); } [pool release]; return status;}
The body of main instantiates an autorelease pool, which it releases before returning to ensure that the program does not leak memory. main contains the declaration of two variables, status and communicator. The status vari-able contains the exit status of the program and the communicator variable, of type id<ICECommunicator>, contains the main handle to the Ice run time.
Following these declarations is a try block in which we place all the server code, followed by a catch handler that logs any unhandled exceptions.
Before returning, main executes a bit of cleanup code that calls the destroy method on the communicator. The cleanup call is outside the first try block for a reason: we must ensure that the Ice run time is finalized whether the code termi-nates normally or terminates due to an exception.8
The body of the first try block contains the actual server code:
communicator = [ICEUtil createCommunicator:&argc argv:argv]; id<ICEObjectAdapter> adapter =
8. Failure to call destroy on the communicator before the program exits results in undefined behavior.

66 A Hello World Application
[communicator createObjectAdapterWithEndpoints: @"SimplePrinterAdapter" endpoints:@"default -p 10000"]; ICEObject *object = [[[PrinterI alloc] init] autorelease]; [adapter add:object identity:[communicator stringToIdentity:@"SimplePrinter"]]; [adapter activate]; [communicator waitForShutdown];
The code goes through the following steps:
1. We initialize the Ice run time by calling createCommunicator. (We pass argc and argv to this call because the server may have command-line argu-ments that are of interest to the run time; for this example, the server does not require any command-line arguments.) The call to createCommunicator returns a pointer to an Ice::Communicator object, which is the main handle to the Ice run time.
2. We create an object adapter by calling createObjectAdapterWith-Endpoints on the Communicator instance. The arguments we pass are "SimplePrinterAdapter" (which is the name of the adapter) and "default -p 10000", which instructs the adapter to listen for incoming requests using the default protocol (TCP/IP) at port number 10000.
3. At this point, the server-side run time is initialized and we create a servant for our Printer interface by instantiating a PrinterI object.
4. We inform the object adapter of the presence of a new servant by calling add on the adapter; the arguments to add are the servant we have just instantiated, plus an identifier. In this case, the string "SimplePrinter" is the name of the servant. (If we had multiple printers, each would have a different name or, more correctly, a different object identity.)
5. Next, we activate the adapter by calling its activate method. (The adapter is initially created in a holding state; this is useful if we have many servants that share the same adapter and do not want requests to be processed until after all the servants have been instantiated.) The server starts to process incoming requests from clients as soon as the adapter is activated.
6. Finally, we call waitForShutdown. This call suspends the calling thread until the server implementation terminates, either by making a call to shut down the run time, or in response to a signal. (For now, we will simply inter-rupt the server on the command line when we no longer need it.)

3.7 Writing an Ice Application with Objective-C 67
Note that, even though there is quite a bit of code here, that code is essentially the same for all servers. You can put that code into a helper class and, thereafter, will not have to bother with it again. As far as actual application code is concerned, the server contains only a few lines: nine lines for the definition of the PrinterI class, plus three9 lines to instantiate a PrinterI object and register it with the object adapter.
Assuming that we have the server code in a file called Server.m, we can compile it as follows:
$ cc -c -I. -I$ICE_HOME/include Printer.m Server.m
This compiles both our application code and the code that was generated by the Slice compiler. We assume that the ICE_HOME environment variable is set to the top-level directory containing the Ice run time. (For example, if you have installed Ice in /opt/Ice, set ICE_HOME to that path.) Depending on your platform, you may have to add additional include directives or other options to the compiler; please see the demo programs that ship with Ice for the details.
Finally, we need to link the server into an executable:
$ c++ Printer.o Server.o -o server \-L$ICE_HOME/lib -lIceObjC -framework Foundation
Again, depending on the platform, the actual list of libraries you need to link against may be longer. The demo programs that ship with Ice contain all the detail.
Writing and Compiling a Client
The client code looks very similar to the server. Here it is in full:
#import <Ice/Ice.h>#import <Printer.h>#import <Foundation/NSAutoreleasePool.h>#import <stdio.h>intmain(int argc, char* argv[]){ NSAutoreleasePool * pool = [[NSAutoreleasePool alloc] init];
9. Well, fewer lines, really: printing space limitations force us to break source lines more often than you would in your actual source files.
68 A Hello World Application
int status = 1; id<ICECommunicator> communicator = nil; @try { communicator = [ICEUtil createCommunicator:&argc argv:argv]; id<ICEObjectPrx> base = [communicator stringToProxy:@"SimplePrinter:default -p 10000"]; id<DemoPrinterPrx> printer = [DemoPrinterPrx checkedCast:base]; if(!printer) [NSException raise:@"Invalid proxy" format:nil]; [printer printString:@"Hello World!"]; status = 0; } @catch (NSException* ex) { NSLog(@"%@", ex); } @try { [communicator destroy]; } @catch (NSException* ex) { NSLog(@"%@", ex); } [pool release]; return status;}
Note that the overall code layout is the same as for the server: we include the headers for the Ice run time and the header generated by the Slice compiler, and we use the same try block and catch handlers to deal with errors.
The code in the try block does the following:
1. As for the server, we initialize the Ice run time by calling createCommuni-cator.
2. The next step is to obtain a proxy for the remote printer. We create a proxy by calling stringToProxy on the communicator, with the string "SimplePrinter:default -p 10000". Note that the string contains the object identity and the port number that were used by the server. (Obvi-ously, hard-coding object identities and port numbers into our applications is a bad idea, but it will do for now; we will see more architecturally sound ways of doing this in Chapter 38.)

3.7 Writing an Ice Application with Objective-C 69
3. The proxy returned by stringToProxy is of type id<ICEObjectPrx>, which is at the root of the inheritance tree for interfaces and classes. But to actually talk to our printer, we need a proxy for a Printer interface, not an Object interface. To do this, we need to do a down-cast by calling the checkedCast class method on the DemoPrinterPrx class. A checked cast sends a message to the server, effectively asking “is this a proxy for a Printer interface?” If so, the call returns a proxy to a Printer; otherwise, if the proxy denotes an interface of some other type, the call returns a null proxy.
4. We test that the down-cast succeeded and, if not, throw an error message that terminates the client.
5. We now have a live proxy in our address space and can call the print-String method, passing it the time-honored "Hello World!" string. The server prints that string on its terminal.
Compiling and linking the client looks much the same as for the server:
$ cc -c -I. -I$ICE_HOME/include Printer.m Client.m
$ c++ Printer.o Client.o -o client \-L$ICE_HOME/lib -lIceObjC -framework Foundation
Running Client and Server
To run client and server, we first start the server in a separate window:
$ ./server
At this point, we won’t see anything because the server simply waits for a client to connect to it. We run the client in a different window:
$ ./client$
The client runs and exits without producing any output; however, in the server window, we see the "Hello World!" that is produced by the printer. To get rid of the server, we interrupt it on the command line for now.
If anything goes wrong, the client will print an error message. For example, if we run the client without having first started the server, we get:
Network.cpp:1218: Ice::ConnectionRefusedException:connection refused: Connection refused
Note that, to successfully run client and server, you may have to set DYLD_LIBRARY_PATH to include the Ice library directory. Please see the instal-lation instructions and the demo applications that ship with Ice Touch for details.

70 A Hello World Application
3.8 Writing an Ice Application with Python
This section shows how to create an Ice application with Python.
Compiling a Slice Definition for Python
The first step in creating our Python application is to compile our Slice definition to generate Python proxies and skeletons. You can compile the definition as follows:10
$ slice2py Printer.ice
The slice2py compiler produces a single source file, Printer_ice.py, from this definition. The compiler also creates a Python package for the Demo module, resulting in a subdirectory named Demo. The exact contents of the source file do not concern us for now—it contains the generated code that corresponds to the Printer interface we defined in Printer.ice.
Writing a Server
To implement our Printer interface, we must create a servant class. By conven-tion, servant classes use the name of their interface with an I-suffix, so our servant class is called PrinterI:
class PrinterI(Demo.Printer): def printString(self, s, current=None): print s
The PrinterI class inherits from a base class called Demo.Printer, which is generated by the slice2py compiler. The base class is abstract and contains a printString method that accepts a string for the printer to print and a param-eter of type Ice.Current. (For now we will ignore the Ice.Current param-eter. We will see its purpose in detail in Section 32.6.) Our implementation of the printString method simply writes its argument to the terminal.
The remainder of the server code, in Server.py, follows our servant class and is shown in full here:
10.Whenever we show Unix commands in this book, we assume a Bourne or Bash shell. The commands for Windows are essentially identical and therefore not shown.

3.8 Writing an Ice Application with Python 71
import sys, traceback, Iceimport Democlass PrinterI(Demo.Printer): def printString(self, s, current=None): print sstatus = 0ic = Nonetry: ic = Ice.initialize(sys.argv) adapter = ic.createObjectAdapterWithEndpoints( "SimplePrinterAdapter", "default -p 10000") object = PrinterI() adapter.add(object, ic.stringToIdentity("SimplePrinter")) adapter.activate() ic.waitForShutdown()except: traceback.print_exc() status = 1if ic: # Clean up try: ic.destroy() except: traceback.print_exc() status = 1sys.exit(status)
Note the general structure of the code:
status = 0ic = Nonetry: # Server implementation here...except: traceback.print_exc() status = 1if ic: # Clean up try:

72 A Hello World Application
ic.destroy() except: traceback.print_exc() status = 1sys.exit(status)
The body of the main program contains a try block in which we place all the server code, followed by an except block. The except block catches all exceptions that may be thrown by the code; the intent is that, if the code encoun-ters an unexpected run-time exception anywhere, the stack is unwound all the way back to the main program, which prints the exception and then returns failure to the operating system.
Before the code exits, it destroys the communicator (if one was created successfully). Doing this is essential in order to correctly finalize the Ice run time: the program must call destroy on any communicator it has created; otherwise, undefined behavior results.
The body of our try block contains the actual server code:
ic = Ice.initialize(sys.argv)adapter = ic.createObjectAdapterWithEndpoints( "SimplePrinterAdapter", "default -p 10000")object = PrinterI()adapter.add(object, ic.stringToIdentity("SimplePrinter"))adapter.activate()ic.waitForShutdown()
The code goes through the following steps:
1. We initialize the Ice run time by calling Ice.initialize. (We pass sys.argv to this call because the server may have command-line arguments that are of interest to the run time; for this example, the server does not require any command-line arguments.) The call to initialize returns an Ice::Communicator reference, which is the main handle to the Ice run time.
2. We create an object adapter by calling createObjectAdapterWith-Endpoints on the Communicator instance. The arguments we pass are "SimplePrinterAdapter" (which is the name of the adapter) and "default -p 10000", which instructs the adapter to listen for incoming requests using the default protocol (TCP/IP) at port number 10000.
3. At this point, the server-side run time is initialized and we create a servant for our Printer interface by instantiating a PrinterI object.

3.8 Writing an Ice Application with Python 73
4. We inform the object adapter of the presence of a new servant by calling add on the adapter; the arguments to add are the servant we have just instantiated, plus an identifier. In this case, the string "SimplePrinter" is the name of the servant. (If we had multiple printers, each would have a different name or, more correctly, a different object identity.)
5. Next, we activate the adapter by calling its activate method. (The adapter is initially created in a holding state; this is useful if we have many servants that share the same adapter and do not want requests to be processed until after all the servants have been instantiated.)
6. Finally, we call waitForShutdown. This call suspends the calling thread until the server implementation terminates, either by making a call to shut down the run time, or in response to a signal. (For now, we will simply inter-rupt the server on the command line when we no longer need it.)
Note that, even though there is quite a bit of code here, that code is essentially the same for all servers. You can put that code into a helper class and, thereafter, will not have to bother with it again. (Ice ships with such a helper class, called Ice.Application—see Section 24.3.1.) As far as actual application code is concerned, the server contains only a few lines: three lines for the definition of the PrinterI class, plus two lines to instantiate a PrinterI object and register it with the object adapter.
Writing a Client
The client code, in Client.py, looks very similar to the server. Here it is in full:
import sys, traceback, Iceimport Demostatus = 0ic = Nonetry: ic = Ice.initialize(sys.argv) base = ic.stringToProxy("SimplePrinter:default -p 10000") printer = Demo.PrinterPrx.checkedCast(base) if not printer: raise RuntimeError("Invalid proxy") printer.printString("Hello World!")except: traceback.print_exc() status = 1

74 A Hello World Application
if ic: # Clean up try: ic.destroy() except: traceback.print_exc() status = 1sys.exit(status)
Note that the overall code layout is the same as for the server: we use the same try and except blocks to deal with errors. The code in the try block does the following:
1. As for the server, we initialize the Ice run time by calling Ice.initialize.
2. The next step is to obtain a proxy for the remote printer. We create a proxy by calling stringToProxy on the communicator, with the string "SimplePrinter:default -p 10000". Note that the string contains the object identity and the port number that were used by the server. (Obvi-ously, hard-coding object identities and port numbers into our applications is a bad idea, but it will do for now; we will see more architecturally sound ways of doing this in Chapter 38.)
3. The proxy returned by stringToProxy is of type Ice::ObjectPrx, which is at the root of the inheritance tree for interfaces and classes. But to actually talk to our printer, we need a proxy for a Demo::Printer interface, not an Object interface. To do this, we need to do a down-cast by calling Demo.Print-erPrx.checkedCast. A checked cast sends a message to the server, effec-tively asking “is this a proxy for a Demo::Printer interface?” If so, the call returns a proxy of type Demo.PrinterPrx; otherwise, if the proxy denotes an interface of some other type, the call returns None.
4. We test that the down-cast succeeded and, if not, throw an error message that terminates the client.
5. We now have a live proxy in our address space and can call the print-String method, passing it the time-honored "Hello World!" string. The server prints that string on its terminal.
Running Client and Server
To run client and server, we first start the server in a separate window:
$ python Server.py
3.9 Writing an Ice Application with Ruby 75
At this point, we won’t see anything because the server simply waits for a client to connect to it. We run the client in a different window:
$ python Client.py$
The client runs and exits without producing any output; however, in the server window, we see the "Hello World!" that is produced by the printer. To get rid of the server, we interrupt it on the command line for now. (We will see cleaner ways to terminate a server in Chapter 24.)
If anything goes wrong, the client will print an error message. For example, if we run the client without having first started the server, we get something like the following:
Traceback (most recent call last): File "Client.py", line 10, in ? printer = Demo.PrinterPrx.checkedCast(base) File "Printer_ice.py", line 43, in checkedCast return Demo.PrinterPrx.ice_checkedCast(proxy, '::Demo::Printer', facet)ConnectionRefusedException: Ice.ConnectionRefusedException:Connection refused
Note that, to successfully run the client and server, the Python interpreter must be able to locate the Ice extension for Python. See the Ice for Python installation instructions for more information.
3.9 Writing an Ice Application with Ruby
This section shows how to create an Ice client application with Ruby.
Compiling a Slice Definition for Ruby
The first step in creating our Ruby application is to compile our Slice definition to generate Ruby proxies. You can compile the definition as follows:11
$ slice2rb Printer.ice
11.Whenever we show Unix commands in this book, we assume a Bourne or Bash shell. The commands for Windows are essentially identical and therefore not shown.

76 A Hello World Application
The slice2rb compiler produces a single source file, Printer.rb, from this definition. The exact contents of the source file do not concern us for now—it contains the generated code that corresponds to the Printer interface we defined in Printer.ice.
Writing a Client
The client code, in Client.rb, is shown below in full:
require 'Printer.rb'status = 0ic = nilbegin ic = Ice::initialize(ARGV) base = ic.stringToProxy("SimplePrinter:default -p 10000") printer = Demo::PrinterPrx::checkedCast(base) if not printer raise "Invalid proxy" end printer.printString("Hello World!")rescue puts $! puts $!.backtrace.join("\n") status = 1endif ic # Clean up begin ic.destroy() rescue puts $! puts $!.backtrace.join("\n") status = 1 endendexit(status)
The program begins with a require statement, which loads the Ruby code we generated from our Slice definition in the previous section. It is not necessary for the client to explicitly load the Ice module because Printer.rb already does that.

3.9 Writing an Ice Application with Ruby 77
The body of the main program contains a begin block in which we place all the client code, followed by a rescue block. The rescue block catches all exceptions that may be thrown by the code; the intent is that, if the code encoun-ters an unexpected run-time exception anywhere, the stack is unwound all the way back to the main program, which prints the exception and then returns failure to the operating system.
The body of our begin block goes through the following steps:
1. We initialize the Ice run time by calling Ice::initialize. (We pass ARGV to this call because the client may have command-line arguments that are of interest to the run time; for this example, the client does not require any command-line arguments.) The call to initialize returns an Ice::Commu-nicator reference, which is the main handle to the Ice run time.
2. The next step is to obtain a proxy for the remote printer. We create a proxy by calling stringToProxy on the communicator, with the string "SimplePrinter:default -p 10000". Note that the string contains the object identity and the port number that were used by the server. (Obvi-ously, hard-coding object identities and port numbers into our applications is a bad idea, but it will do for now; we will see more architecturally sound ways of doing this in Chapter 38.)
3. The proxy returned by stringToProxy is of type Ice::ObjectPrx, which is at the root of the inheritance tree for interfaces and classes. But to actually talk to our printer, we need a proxy for a Demo::Printer interface, not an Object interface. To do this, we need to do a down-cast by calling Demo::Print-erPrx::checkedCast. A checked cast sends a message to the server, effectively asking “is this a proxy for a Demo::Printer interface?” If so, the call returns a proxy of type Demo::PrinterPrx; otherwise, if the proxy denotes an interface of some other type, the call returns nil.
4. We test that the down-cast succeeded and, if not, throw an error message that terminates the client.
5. We now have a live proxy in our address space and can call the print-String method, passing it the time-honored "Hello World!" string. The server prints that string on its terminal.
Before the code exits, it destroys the communicator (if one was created success-fully). Doing this is essential in order to correctly finalize the Ice run time: the program must call destroy on any communicator it has created; otherwise, undefined behavior results.

78 A Hello World Application
Running the Client
The server must be started before the client. Since Ice for Ruby does not support server-side behavior, we need to use a server from another language mapping. In this case, we will use the C++ server (see Chapter 9):
$ server
At this point, we won’t see anything because the server simply waits for a client to connect to it. We run the client in a different window:
$ ruby Client.rb$
The client runs and exits without producing any output; however, in the server window, we see the "Hello World!" that is produced by the printer. To get rid of the server, we interrupt it on the command line for now. (We will see cleaner ways to terminate a server in Chapter 24.)
If anything goes wrong, the client will print an error message. For example, if we run the client without having first started the server, we get something like the following:
exception ::Ice::ConnectionRefusedException{ error = 111}
Note that, to successfully run the client, the Ruby interpreter must be able to locate the Ice extension for Ruby. See the Ice for Ruby installation instructions for more information.
3.10 Writing an Ice Application with PHP
This section shows how to create an Ice client application with PHP.
Compiling a Slice Definition for PHP
The first step in creating our PHP application is to compile our Slice definition to generate PHP code. You can compile the definition as follows:12
12.Whenever we show Unix commands in this book, we assume a Bourne or Bash shell. The commands for Windows are essentially identical and therefore not shown.

3.10 Writing an Ice Application with PHP 79
$ slice2php Printer.ice
The slice2php compiler produces a single source file, Printer.php, from this definition. The exact contents of the source file do not concern us for now—it contains the generated code that corresponds to the Printer interface we defined in Printer.ice.
Writing a Client
The client code, in Client.php, is shown below in full:
<?phprequire 'Ice.php';require 'Printer.php';$ic = null;try{ $ic = Ice_initialize(); $base = $ic->stringToProxy("SimplePrinter:default -p 10000"); $printer = Demo_PrinterPrxHelper::checkedCast($base); if(!$printer) throw new RuntimeException("Invalid proxy"); $printer->printString("Hello World!");}catch(Exception $ex){ echo $ex;}if($ic){ // Clean up try { $ic->destroy(); } catch(Exception $ex) { echo $ex; }}?>

80 A Hello World Application
The program begins with require statements to load the Ice run-time defini-tions (Ice.php) and the code we generated from our Slice definition in the previous section (Printer.php).
The body of the main program contains a try block in which we place all the client code, followed by a catch block. The catch block catches all exceptions that may be thrown by the code; the intent is that, if the code encounters an unex-pected run-time exception anywhere, the stack is unwound all the way back to the main program, which prints the exception and then returns failure to the operating system.
The body of our try block goes through the following steps:
1. We initialize the Ice run time by calling Ice_initialize. The call to initialize returns an Ice::Communicator reference, which is the main handle to the Ice run time.
2. The next step is to obtain a proxy for the remote printer. We create a proxy by calling stringToProxy on the communicator, with the string "SimplePrinter:default -p 10000". Note that the string contains the object identity and the port number that were used by the server. (Obvi-ously, hard-coding object identities and port numbers into our applications is a bad idea, but it will do for now; we will see more architecturally sound ways of doing this in Chapter 38.)
3. The proxy returned by stringToProxy is of type Ice::ObjectPrx, which is at the root of the inheritance tree for interfaces and classes. But to actually talk to our printer, we need a proxy for a Demo::Printer interface, not an Object interface. To do this, we need to do a down-cast by calling Demo_PrinterPrxHelper::checkedCast. A checked cast sends a message to the server, effectively asking “is this a proxy for a Demo::Printer interface?” If so, the call returns a proxy narrowed to the Printer interface; otherwise, if the proxy denotes an interface of some other type, the call returns null.
4. We test that the down-cast succeeded and, if not, throw an exception that terminates the client.
5. We now have a live proxy in our address space and can call the print-String method, passing it the time-honored "Hello World!" string. The server prints that string on its terminal.
Before the code exits, it destroys the communicator (if one was created success-fully). Doing this is essential in order to correctly finalize the Ice run time. If a script neglects to destroy the communicator, Ice destroys it automatically.

3.11 Summary 81
Running the Client
The server must be started before the client. Since Ice for PHP does not support server-side behavior, we need to use a server from another language mapping. In this case, we will use the C++ server (see Chapter 9):
$ server
At this point, we won’t see anything because the server simply waits for a client to connect to it. We run the client in a different window using PHP’s command-line interpreter:
$ php -f Client.php$
The client runs and exits without producing any output; however, in the server window, we see the "Hello World!" that is produced by the printer. To get rid of the server, we interrupt it on the command line for now. (We will see cleaner ways to terminate a server in Chapter 24.)
If anything goes wrong, the client will print an error message. For example, if we run the client without having first started the server, we get something like the following:
exception ::Ice::ConnectionRefusedException{ error = 111}
Note that, to successfully run the client, the PHP interpreter must be able to locate the Ice extension for PHP. See the Ice for PHP installation instructions for more information.
3.11 Summary
This chapter presented a very simple (but complete) client and server. As we saw, writing an Ice application involves the following steps:
1. Write a Slice definition and compile it.
2. Write a server and compile it.
3. Write a client and compile it.
If someone else has written the server already and you are only writing a client, you do not need to write the Slice definition, only compile it (and, obviously, you do not need to write the server in that case).

82 A Hello World Application
Do not be concerned if, at this point, much appears unclear. The intent of this chapter is to give you an idea of the development process, not to explain the Ice APIs in intricate detail. We will cover all the detail throughout the remainder of this book.

Part II
Slice


85
Chapter 4The Slice Language
4.1 Chapter Overview
In this chapter we present the Slice language. We start by discussing the role and purpose of Slice, explaining how language-independent specifications are compiled for particular implementation languages to create actual implementa-tions. Sections 4.10 and 4.11 cover the core Slice concepts of interfaces, opera-tions, exceptions, and inheritance. These concepts have profound influence on the behavior of a distributed system and should be read in detail.
This chapter also presents slice2docbook, which you can use to automate generation of documentation for Slice definitions.
4.2 Introduction
Slice1 (Specification Language for Ice) is the fundamental abstraction mechanism for separating object interfaces from their implementations. Slice establishes a contract between client and server that describes the types and object interfaces used by an application. This description is independent of the implementation
1. Even though Slice is an acronym, it is pronounced as single syllable, like a slice of bread.

86 The Slice Language
language, so it does not matter whether the client is written in the same language as the server.
Slice definitions are compiled for a particular implementation language by a compiler. The compiler translates the language-independent definitions into language-specific type definitions and APIs. These types and APIs are used by the developer to provide application functionality and to interact with Ice. The trans-lation algorithms for various implementation languages are known as language mappings. Currently, Ice defines language mappings for C++, Java, C#, Python, Objective-C, Ruby, and PHP.
Because Slice describes interfaces and types (but not implementations), it is a purely declarative language; there is no way to write executable statements in Slice.
Slice definitions focus on object interfaces, the operations supported by those interfaces, and exceptions that may be raised by operations. In addition, Slice offers features for object persistence (see Chapter 39). This requires quite a bit of supporting machinery; in particular, quite a bit of Slice is concerned with the defi-nition of data types. This is because data can be exchanged between client and server only if their types are defined in Slice. You cannot exchange arbitrary C++ data between client and server because it would destroy the language indepen-dence of Ice. However, you can always create a Slice type definition that corre-sponds to the C++ data you want to send, and then you can transmit the Slice type.
We present the full syntax and semantics of Slice here. Because much of Slice is based on C++ and Java, we focus on those areas where Slice differs from C++ or Java or constrains the equivalent C++ or Java feature in some way. Slice features that are identical to C++ and Java are mentioned mostly by example.
4.3 Compilation
A Slice compiler produces source files that must be combined with application code to produce client and server executables.
The outcome of the development process is a client executable and a server executable. These executables can be deployed anywhere, whether the target envi-ronments use the same or different operating systems and whether the executables are implemented using the same or different languages. The only constraint is that the host machines must provide the necessary run-time environment, such as any required dynamic libraries, and that connectivity can be established between them.

4.3 Compilation 87
4.3.1 Single Development Environment for Client and Server
Figure 4.1 shows the situation when both client and server are developed in C++. The Slice compiler generates two files from a Slice definition in a source file Printer.ice: a header file (Printer.h) and a source file (Printer.cpp).
Figure 4.1. Development process if client and server share the same development environment.
• The Printer.h header file contains definitions that correspond to the types used in the Slice definition. It is included in the source code of both client and server to ensure that client and server agree about the types and interfaces used by the application.
• The Printer.cpp source file provides an API to the client for sending messages to remote objects. The client source code (Client.cpp, written by the client developer) contains the client-side application logic. The gener-ated source code and the client code are compiled and linked into the client executable.
The Printer.cpp source file also contains source code that provides an up-call interface from the Ice run time into the server code written by the devel-oper and provides the connection between the networking layer of Ice and the
ServerDeveloper
ClientDeveloper
ServerExecutable
C++ IceRun-Time
Library
ClientExecutable
RPC
SliceDeveloper
Slice-to-C++Compiler
Printer.h Printer.cpp Server.cpp
Client.cpp
Printer.ice
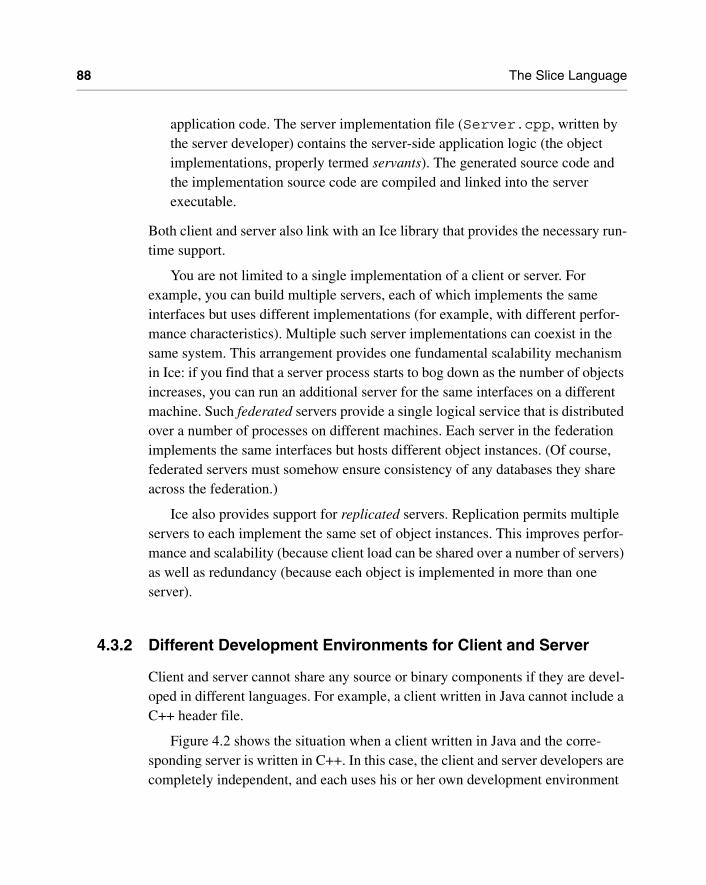
88 The Slice Language
application code. The server implementation file (Server.cpp, written by the server developer) contains the server-side application logic (the object implementations, properly termed servants). The generated source code and the implementation source code are compiled and linked into the server executable.
Both client and server also link with an Ice library that provides the necessary run-time support.
You are not limited to a single implementation of a client or server. For example, you can build multiple servers, each of which implements the same interfaces but uses different implementations (for example, with different perfor-mance characteristics). Multiple such server implementations can coexist in the same system. This arrangement provides one fundamental scalability mechanism in Ice: if you find that a server process starts to bog down as the number of objects increases, you can run an additional server for the same interfaces on a different machine. Such federated servers provide a single logical service that is distributed over a number of processes on different machines. Each server in the federation implements the same interfaces but hosts different object instances. (Of course, federated servers must somehow ensure consistency of any databases they share across the federation.)
Ice also provides support for replicated servers. Replication permits multiple servers to each implement the same set of object instances. This improves perfor-mance and scalability (because client load can be shared over a number of servers) as well as redundancy (because each object is implemented in more than one server).
4.3.2 Different Development Environments for Client and Server
Client and server cannot share any source or binary components if they are devel-oped in different languages. For example, a client written in Java cannot include a C++ header file.
Figure 4.2 shows the situation when a client written in Java and the corre-sponding server is written in C++. In this case, the client and server developers are completely independent, and each uses his or her own development environment

4.4 Source Files 89
and language mapping. The only link between client and server developers is the Slice definition each one uses.
Figure 4.2. Development process for different development environments.
For Java, the slice compiler creates a number of files whose names depend on the names of various Slice constructs. (These files are collectively referred to as *.java in Figure 4.2.)
4.4 Source Files
Slice defines a number of rules for the naming and contents of Slice source files.
Slice-to-JavaCompiler
ClientDeveloper
C++ IceRun-Time
Library
Java IceRun-Time
Library
C++Java
ServerExecutable
ClientExecutable
Client.java
RPC
*.java
SliceDeveloper
Slice-to-C++Compiler
Printer.h Printer.cpp Server.cpp
ServerDeveloper
Printer.ice

90 The Slice Language
4.4.1 File Naming
Files containing Slice definitions must end in a .ice file extension, for example, Clock.ice is a valid file name. Other file extensions are rejected by the compilers.
For case-insensitive file systems (such as DOS), the file extension may be written as uppercase or lowercase, so Clock.ICE is legal. For case-sensitive file systems (such as Unix), Clock.ICE is illegal. (The extension must be in lower-case.)
4.4.2 File Format
Slice is a free-form language so you can use spaces, horizontal and vertical tab stops, form feeds, and newline characters to lay out your code in any way you wish. (White space characters are token separators). Slice does not attach seman-tics to the layout of a definition. You may wish to follow the style we have used for the Slice examples throughout this book.
Slice files can be ASCII text files or use the UTF-8 character encoding with a byte order marker (BOM) at the beginning of each file. However, Slice identifiers are limited to ASCII letters and digits; non-ASCII letters can appear only in comments.
4.4.3 Preprocessing
Slice is preprocessed by the C++ preprocessor, so you can use the usual prepro-cessor directives, such as #include and macro definitions. However, Slice permits #include directives only at the beginning of a file, before any Slice definitions.
If you use #include directives, it is a good idea to protect them with guards to prevent double inclusion of a file:
// File Clock.ice#ifndef _CLOCK_ICE#define _CLOCK_ICE// #include directives here...// Definitions here...#endif _CLOCK_ICE
#include directives permit a Slice definition to use types defined in a different source file. The Slice compilers parse all of the code in a source file, including the

4.5 Lexical Rules 91
code in #included files. However, the compilers generate code only for the top-level file(s) nominated on the command line. You must separately compile #included files to obtain generated code for all the files that make up your Slice definition.
Note that you should avoid #include with double quotes:
#include "Clock.ice" // Not recommended!
While double quotes will work, the directory in which the preprocessor tries to locate the file can vary depending on the operating system, so the included file may not always be found where you expect it. Instead, use angle brackets (<>); you can control which directories are searched for the file with the -I option of the Slice compiler (see page 169).
Also note that, if you include a path separator in a #include directive, you must use a forward slash:
#include <SliceDefs/Clock.ice> // OK
You cannot use a backslash in #include directives:
#include <SliceDefs\Clock.ice> // Illegal
4.4.4 Definition Order
Slice constructs, such as modules, interfaces, or type definitions, can appear in any order you prefer. However, identifiers must be declared before they can be used.
4.5 Lexical Rules
Slice’s lexical rules are very similar to those of C++ and Java, except for some differences for identifiers.
4.5.1 Comments
Slice definitions permit both the C and the C++ style of writing comments:
/* * C-style comment. */// C++-style comment extending to the end of this line.

92 The Slice Language
4.5.2 Keywords
Slice uses a number of keywords, which must be spelled in lowercase. For example, class and dictionary are keywords and must be spelled as shown. There are two exceptions to this lowercase rule: Object and LocalObject are keywords and must be capitalized as shown. You can find a full list of Slice keywords in Appendix A.
4.5.3 Identifiers
Identifiers begin with an alphabetic character followed by any number of alpha-betic characters or digits. Underscores are also permitted in identifiers with the following limitations:
• an identifier cannot begin or end with an underscore
• an identifier cannot contain multiple consecutive underscores
Given these rules, the identifier get_account_name is legal but not _account, account_, or get__account.
Slice identifiers are restricted to the ASCII range of alphabetic characters and cannot contain non-English letters, such as Å. (Supporting non-ASCII identifiers would make it very difficult to map Slice to target languages that lack support for this feature.)
Case Sensitivity
Identifiers are case-insensitive but must be capitalized consistently. For example, TimeOfDay and TIMEOFDAY are considered the same identifier within a naming scope. However, Slice enforces consistent capitalization. After you have intro-duced an identifier, you must capitalize it consistently throughout; otherwise, the compiler will reject it as illegal. This rule exists to permit mappings of Slice to languages that ignore case in identifiers as well as to languages that treat differ-ently capitalized identifiers as distinct.
Identifiers That Are Keywords
You can define Slice identifiers that are keywords in one or more implementation languages. For example, switch is a perfectly good Slice identifier but is a C++ and Java keyword. Each language mapping defines rules for dealing with such identifiers. The solution typically involves using a prefix to map away from the keyword. For example, the Slice identifier switch is mapped to _cpp_switch in C++ and _switch in Java.

4.5 Lexical Rules 93
The rules for dealing with keywords can result in hard-to-read source code. Identifiers such as native, throw, or export will clash with C++ or Java keywords (or both). To make life easier for yourself and others, try to avoid Slice identifiers that are implementation language keywords. Keep in mind that mappings for new languages may be added to Ice in the future. While it is not reasonable to expect you to compile a list of all keywords in all popular program-ming languages, you should make an attempt to avoid at least common keywords. Slice identifiers such as self, import, and while are definitely not a good idea.
Escaped Identifiers
It is possible to use a Slice keyword as an identifier by prefixing the keyword with a backslash, for example:
struct dictionary { // Error! // ...};struct \dictionary { // OK // ...};struct \foo { // Legal, same as "struct foo" // ...};
The backslash escapes the usual meaning of a keyword; in the preceding example, \dictionary is treated as the identifier dictionary. The escape mechanism exists to permit keywords to be added to the Slice language over time with minimal disruption to existing specifications: if a pre-existing specification happens to use a newly-introduced keyword, that specification can be fixed by simply prepending a backslash to the new keyword. Note that, as a matter of style, you should avoid using Slice keywords as identifiers (even though the backslash escapes allow you to do this).
It is legal (though redundant) to precede an identifier that is not a keyword with a backslash—the backslash is ignored in that case.
Reserved Identifiers
Slice reserves the identifier Ice and all identifiers beginning with Ice (in any capitalization) for the Ice implementation. For example, if you try to define a type named Icecream, the Slice compiler will issue an error message.2

94 The Slice Language
Slice identifiers ending in any of the suffixes Helper, Holder, Prx, and Ptr are also reserved. These endings are used by the various language mappings and are reserved to prevent name clashes in the generated code.
4.6 Modules
A common problem in large systems is pollution of the global namespace: over time, as isolated systems are integrated, name clashes become quite likely. Slice provides the module construct to alleviate this problem:
module ZeroC { module Client { // Definitions here... }; module Server { // Definitions here... };};
A module can contain any legal Slice construct, including other module defini-tions. Using modules to group related definitions together avoids polluting the global namespace and makes accidental name clashes quite unlikely. (You can use a well-known name, such as a company or product name, as the name of the outer-most module.)
Slice requires all definitions to be nested inside a module, that is, you cannot define anything other than a module at global scope. For example, the following is illegal:
interface I { // Error: only modules can appear at global scope // ...};
Definitions at global scope are prohibited because they cause problems with some implementation languages (such as Python, which does not have a true global scope).
2. You can suppress this behavior by using the --ice compiler option, which enables definition of identifiers beginning with Ice. However, do not use this option unless you are compiling the Slice definitions for the Ice run time itself.

4.7 The Ice Module 95
NOTE: Throughout the remainder of this book, you will occasionally see Slice definitions that are not nested inside a module. This is to keep the examples short and free of clutter. Whenever you see such a definition, assume that it is nested in a module.
Modules can be reopened:
module ZeroC { // Definitions here...};// Possibly in a different source file:module ZeroC { // OK, reopened module // More definitions here...};
Reopened modules are useful for larger projects: they allow you to split the contents of a module over several different source files. The advantage of doing this is that, when a developer makes a change to one part of the module, only files dependent on the changed part need be recompiled (instead of having to recompile all files that use the module).
Modules map to a corresponding scoping construct in each programming language. (For example, for C++ and C#, Slice modules map to namespaces whereas, for Java, they map to packages.) This allows you to use an appropriate C++ using or Java import declaration to avoid excessively long identifiers in the source code.
4.7 The Ice Module
APIs for the Ice run time, apart from a small number of language-specific calls that cannot be expressed in Ice, are defined in the Ice module. In other words, most of the Ice API is actually expressed as Slice definitions. The advantage of doing this is that a single Slice definition is sufficient to define the API for the Ice run time for all supported languages. The respective language mapping rules then determine the exact shape of each Ice API for each implementation language.
We will incrementally explore the contents of the Ice module throughout the remainder of this book.

96 The Slice Language
4.8 Basic Slice Types
Slice provides a number of built-in basic types, shown in Table 4.1.
All the basic types (except byte) are subject to changes in representation as they are transmitted between clients and servers. For example, a long value is byte-swapped when sent from a little-endian to a big-endian machine. Similarly, strings undergo translation in representation if they are sent, for example, from an EBCDIC to an ASCII implementation, and the characters of a string may also change in size. (Not all architectures use 8-bit characters). However, these changes are transparent to the programmer and do exactly what is required.
4.8.1 Integer Types
Slice provides integer types short, int, and long, with 16-bit, 32-bit, and 64-bit ranges, respectively. Note that, on some architectures, any of these types may be mapped to a native type that is wider. Also note that no unsigned types are provided. (This choice was made because unsigned types are difficult to map into languages without native unsigned types, such as Java. In addition, the unsigned integers add little value to a language. See [9] for a good treatment of the topic.)
Table 4.1. Slice basic types.
Type Range of Mapped Type Size of Mapped Type
bool false or true bit
byte or a
a. The range depends on whether byte maps to a signed or an unsigned type.
bits
short to bits
int to bits
long to bits
float IEEE single-precision bits
double IEEE double-precision bits
string All Unicode characters, excludingthe character with all bits zero.
Variable-length

4.8 Basic Slice Types 97
4.8.2 Floating-Point Types
These types follow the IEEE specification for single- and double-precision floating-point representation [6]. If an implementation cannot support IEEE format floating-point values, the Ice run time converts values into the native floating-point representation (possibly at a loss of precision or even magnitude, depending on the capabilities of the native floating-point format).
4.8.3 Strings
Slice strings use the Unicode character set. The only character that cannot appear inside a string is the zero character.3
The Slice data model does not have the concept of a null string (in the sense of a C++ null pointer). This decision was made because null strings are difficult to map to languages without direct support for this concept (such as Python). Do not design interfaces that depend on a null string to indicate “not there” semantics. If you need the notion of an optional string, use a class (see Section 4.11), a sequence of strings (see Section 4.9.3), or use an empty string to represent the idea of a null string. (Of course, the latter assumes that the empty string is not other-wise used as a legitimate string value by your application.)
4.8.4 Booleans
Boolean values can have only the values false and true. Language mappings use the corresponding native boolean type if one is available.
4.8.5 Bytes
The Slice type byte is an (at least) 8-bit type that is guaranteed not to undergo any changes in representation as it is transmitted between address spaces. This guar-antee permits exchange of binary data such that it is not tampered with in transit. All other Slice types are subject to changes in representation during transmission.
3. This decision was made as a concession to C++, with which it becomes impossibly difficult to manipulate strings with embedded zero characters using standard library routines, such as strlen or strcat.

98 The Slice Language
4.9 User-Defined Types
In addition to providing the built-in basic types, Slice allows you to define complex types: enumerations, structures, sequences, and dictionaries.
4.9.1 EnumerationsA Slice enumerated type definition looks like the C++ version:
enum Fruit { Apple, Pear, Orange };
This definition introduces a type named Fruit that becomes a new type in its own right. Slice does not define how ordinal values are assigned to enumerators. For example, you cannot assume that the enumerator Orange will have the value 2 in different implementation languages. Slice guarantees only that the ordinal values of enumerators increase from left to right, so Apple compares less than Pear in all implementation languages.
Unlike C++, Slice does not permit you to control the ordinal values of enumerators (because many implementation languages do not support such a feature):
enum Fruit { Apple = 0, Pear = 7, Orange = 2 }; // Syntax error
In practice, you do not care about the values used for enumerators as long as you do not transmit the ordinal value of an enumerator between address spaces. For example, sending the value 0 to a server to mean Apple can cause problems because the server may not use 0 to represent Apple. Instead, simply send the value Apple itself. If Apple is represented by a different ordinal value in the receiving address space, that value will be appropriately translated by the Ice run time.
As with C++, Slice enumerators enter the enclosing namespace, so the following is illegal:
enum Fruit { Apple, Pear, Orange };enum ComputerBrands { Apple, IBM, Sun, HP }; // Apple redefined
Slice does not permit empty enumerations.
4.9.2 StructuresSlice supports structures containing one or more named members of arbitrary type, including user-defined complex types. For example:

4.9 User-Defined Types 99
struct TimeOfDay { short hour; // 0 - 23 short minute; // 0 - 59 short second; // 0 - 59};
As in C++, this definition introduces a new type called TimeOfDay. Structure defi-nitions form a namespace, so the names of the structure members need to be unique only within their enclosing structure.
Data member definitions using a named type are the only construct that can appear inside a structure. It is impossible to, for example, define a structure inside a structure:
struct TwoPoints { struct Point { // Illegal! short x; short y; }; Point coord1; Point coord2;};
This rule applies to Slice in general: type definitions cannot be nested (except for modules, which do support nesting—see Section 4.6). The reason for this rule is that nested type definitions can be difficult to implement for some target languages and, even if implementable, greatly complicate the scope resolution rules. For a specification language, such as Slice, nested type definitions are unnecessary—you can always write the above definitions as follows (which is stylistically cleaner as well):
struct Point { short x; short y;};struct TwoPoints { // Legal (and cleaner!) Point coord1; Point coord2;};
You can specify a default value for a data member that has one of the following types:
• An integral type (bool, byte, short, int, long, or an enumerated type)
• float or double

100 The Slice Language
• string
For example:
struct Location { string name; Point pt; bool display = true; string source = "GPS";};
The legal syntax for literal values is the same as for Slice constants (see Section 4.9.5). The language mapping guarantees that data members are initial-ized to their declared default values using a language-specific mechanism.
4.9.3 SequencesSequences are variable-length collections of elements:
sequence<Fruit> FruitPlatter;
A sequence can be empty — that is, it can contain no elements, or it can hold any number of elements up to the memory limits of your platform.
Sequences can contain elements that are themselves sequences. This arrange-ment allows you to create lists of lists:
sequence<FruitPlatter> FruitBanquet;
Sequences are used to model a variety of collections, such as vectors, lists, queues, sets, bags, or trees. (It is up to the application to decide whether or not order is important; by discarding order, a sequence serves as a set or bag.)
One particular use of sequences has become idiomatic, namely, the use of a sequence to indicate an optional value. For example, we might have a Part struc-ture that records the details of the parts that go into a car. The structure could record things such as the name of the part, a description, weight, price, and other details. Spare parts commonly have a serial number, which we can model as a long value. However, some parts, such as simple screws, often do not have a serial number, so what are we supposed to put into the serial number field of a screw? There are a number of options for dealing with this situation:
• Use a sentinel value, such as zero, to indicate the “no serial number” condi-tion.
This approach is workable, provided that a sentinel value is actually available. While it may seem unlikely that anyone would use a serial number of zero for

4.9 User-Defined Types 101
a part, it is not impossible. And, for other values, such as a temperature value, all values in the range of their type can be legal, so no sentinel value is avail-able.
• Change the type of the serial number from long to string.
Strings come with their own built-in sentinel value, namely, the empty string so we can use an empty string to indicate the “no serial number” case. This is workable, but leaves a bad taste in most people’s mouth: we should not have to change the natural data type of something to string just so we get a sentinel value.
• Add an indicator as to whether the contents of the serial number are valid:
struct Part { string name; string description; // ... bool serialIsValid; // true if part has serial number long serialNumber;};
This is distasteful to most people and guaranteed to get you into trouble even-tually: sooner or later, some programmer will forget to check whether the serial number is valid before using it and create havoc.
• Use a sequence to model the optional field.
This technique uses the following convention:
sequence<long> SerialOpt;struct Part { string name; string description; // ... SerialOpt serialNumber; // optional: zero or one element};
By convention, the Opt suffix is used to indicate that the sequence is used to model an optional value. If the sequence is empty, the value is obviously not there; if it contains a single element, that element is the value. The obvious drawback of this scheme is that someone could put more than one element into the sequence. This could be rectified by adding a special-purpose Slice construct for optional values. However, optional values are not used frequently enough to justify the complexity of adding a dedicated language

102 The Slice Language
feature. (As we will see in Section 4.11, you can also use class hierarchies to model optional fields.)
4.9.4 Dictionaries
A dictionary is a mapping from a key type to a value type. For example:
struct Employee { long number; string firstName; string lastName;};dictionary<long, Employee> EmployeeMap;
This definition creates a dictionary named EmployeeMap that maps from an employee number to a structure containing the details for an employee. Whether or not the key type (the employee number, of type long in this example) is also part of the value type (the Employee structure in this example) is up to you—as far as Slice is concerned, there is no need to include the key as part of the value.
Dictionaries can be used to implement sparse arrays, or any lookup data struc-ture with non-integral key type. Even though a sequence of structures containing key–value pairs could be used to model the same thing, a dictionary is more appropriate:
• A dictionary clearly signals the intent of the designer, namely, to provide a mapping from a domain of values to a range of values. (A sequence of struc-tures of key–value pairs does not signal that same intent as clearly.)
• At the programming language level, sequences are implemented as vectors (or possibly lists), that is, they are not well suited to model sparsely populated domains and require a linear search to locate an element with a particular value. On the other hand, dictionaries are implemented as a data structure (typically a hash table or red-black tree) that supports efficient searching in O(log n) average time or better.
The key type of a dictionary need not be an integral type. For example, we could use the following definition to translate the names of the days of the week:
dictionary<string, string> WeekdaysEnglishToGerman;
The server implementation would take care of initializing this map with the key–value pairs Monday–Montag, Tuesday–Dienstag, and so on.

4.9 User-Defined Types 103
The value type of a dictionary can be any user-defined type. However, the key type of a dictionary is limited to one of the following types:
• Integral types (byte, short, int, long, bool, and enumerated types)
• string
• structures containing only data members of integral type or string
Complex nested types, such as nested structures, sequences, or dictionaries, and floating-point types (float and double) cannot be used as the key type. Complex nested types are disallowed because they complicate the language mappings for dictionaries, and floating-point types are disallowed because representational changes of values as they cross machine boundaries can lead to ill-defined seman-tics for equality.
4.9.5 Constant Definitions and Literals
Slice allows you to define constants. Constant definitions must be of one of the following types:
• An integral type (bool, byte, short, int, long, or an enumerated type)
• float or double
• string
Here are a few examples:
const bool AppendByDefault = true;const byte LowerNibble = 0x0f;const string Advice = "Don't Panic!";const short TheAnswer = 42;const double PI = 3.1416;enum Fruit { Apple, Pear, Orange };const Fruit FavoriteFruit = Pear;
The syntax for literals is the same as for C++ and Java (with a few minor excep-tions):
• Boolean constants can only be initialized with the keywords false and true. (You cannot use 0 and 1 to represent false and true.)
• As for C++, integer literals can be specified in decimal, octal, or hexadecimal notation. For example:

104 The Slice Language
const byte TheAnswer = 42;const byte TheAnswerInOctal = 052;const byte TheAnswerInHex = 0x2A; // or 0x2a
Be aware that, if you interpret byte as a number instead of a bit pattern, you may get different results in different languages. For example, for C++, byte maps to unsigned char whereas, for Java, byte maps to byte, which is a signed type.
Note that suffixes to indicate long and unsigned constants (l, L, u, U, used by C++) are illegal:
const long Wrong = 0u; // Syntax errorconst long WrongToo = 1000000L; // Syntax error
The value of an integer literal must be within the range of its constant type, as shown in Table 4.1 on page 96; otherwise the compiler will issue a diagnostic.
• Floating-point literals use C++ syntax, except that you cannot use an l or L suffix to indicate an extended floating-point constant; however, f and F are legal (but are ignored). Here are a few examples:
const float P1 = -3.14f; // Integer & fraction, with suffixconst float P2 = +3.1e-3; // Integer, fraction, and exponentconst float P3 = .1; // Fraction part onlyconst float P4 = 1.; // Integer part onlyconst float P5 = .9E5; // Fraction part and exponentconst float P6 = 5e2; // Integer part and exponent
Floating-point literals must be within the range of the constant type (float or double); otherwise, the compiler will issue a diagnostic.
• String literals support the same escape sequences as C++. Here are some examples:
const string AnOrdinaryString = "Hello World!";const string DoubleQuote = "\"";const string TwoSingleQuotes = "'\'"; // ' and \' are OKconst string Newline = "\n";const string CarriageReturn = "\r";const string HorizontalTab = "\t";const string VerticalTab = "\v";const string FormFeed = "\f";const string Alert = "\a";const string Backspace = "\b";const string QuestionMark = "\?";

4.10 Interfaces, Operations, and Exceptions 105
const string Backslash = "\\";const string OctalEscape = "\007"; // Same as \aconst string HexEscape = "\x07"; // Dittoconst string UniversalCharName = "\u03A9"; // Greek Omega
As for C++, adjacent string literals are concatenated:
const string MSG1 = "Hello World!";const string MSG2 = "Hello" " " "World!"; // Same message/* * Escape sequences are processed before concatenation, * so the string below contains two characters, * '\xa' and 'c'. */const string S = "\xa" "c";
Note that Slice has no concept of a null string:
const string nullString = 0; // Illegal!
Null strings simply do not exist in Slice and, therefore, do not exist as a legal value for a string anywhere in the Ice platform. The reason for this decision is that null strings do not exist in many programming languages.4
4.10 Interfaces, Operations, and Exceptions
The central focus of Slice is on defining interfaces, for example:
struct TimeOfDay { short hour; // 0 - 23 short minute; // 0 - 59 short second; // 0 - 59};
4. Many languages other than C and C++ use a byte array as the internal string representation. Null strings do not exist (and would be very difficult to map) in such languages.

106 The Slice Language
interface Clock { TimeOfDay getTime(); void setTime(TimeOfDay time);};
This definition defines an interface type called Clock. The interface supports two operations: getTime and setTime. Clients access an object supporting the Clock interface by invoking an operation on the proxy for the object: to read the current time, the client invokes the getTime operation; to set the current time, the client invokes the setTime operation, passing an argument of type TimeOfDay.
Invoking an operation on a proxy instructs the Ice run time to send a message to the target object. The target object can be in another address space or can be collocated (in the same process) as the caller—the location of the target object is transparent to the client. If the target object is in another (possibly remote) address space, the Ice run time invokes the operation via a remote procedure call; if the target is collocated with the client, the Ice run time uses an ordinary function call instead, to avoid the overhead of marshaling.
You can think of an interface definition as the equivalent of the public part of a C++ class definition or as the equivalent of a Java interface, and of operation defi-nitions as (virtual) member functions. Note that nothing but operation definitions are allowed to appear inside an interface definition. In particular, you cannot define a type, an exception, or a data member inside an interface. This does not mean that your object implementation cannot contain state—it can, but how that state is implemented (in the form of data members or otherwise) is hidden from the client and, therefore, need not appear in the object’s interface definition.
An Ice object has exactly one (most derived) Slice interface type (or class type—see Section 4.11). Of course, you can create multiple Ice objects that have the same type; to draw the analogy with C++, a Slice interface corresponds to a C++ class definition, whereas an Ice object corresponds to a C++ class instance (but Ice objects can be implemented in multiple different address spaces).
Ice also provides multiple interfaces via a feature called facets. We discuss facets in detail in Chapter 33.
A Slice interface defines the smallest grain of distribution in Ice: each Ice object has a unique identity (encapsulated in its proxy) that distinguishes it from all other Ice objects; for communication to take place, you must invoke operations on an object’s proxy. There is no other notion of an addressable entity in Ice. You cannot, for example, instantiate a Slice structure and have clients manipulate that structure remotely. To make the structure accessible, you must create an interface that allows clients to access the structure.

4.10 Interfaces, Operations, and Exceptions 107
The partition of an application into interfaces therefore has profound influence on the overall architecture. Distribution boundaries must follow interface (or class) boundaries; you can spread the implementation of interfaces over multiple address spaces (and you can implement multiple interfaces in the same address space), but you cannot implement parts of interfaces in different address spaces.
4.10.1 Parameters and Return Values
An operation definition must contain a return type and zero or more parameter definitions. For example, the getTime operation on page 105 has a return type of TimeOfDay and the setTime operation has a return type of void. You must use void to indicate that an operation returns no value—there is no default return type for Slice operations.
An operation can have one or more input parameters. For example, setTime accepts a single input parameter of type TimeOfDay called time. Of course, you can use multiple input parameters, for example:
interface CircadianRhythm { void setSleepPeriod(TimeOfDay startTime, TimeOfDay stopTime); // ...};
Note that the parameter name (as for Java) is mandatory. You cannot omit the parameter name, so the following is in error:
interface CircadianRhythm { void setSleepPeriod(TimeOfDay, TimeOfDay); // Error! // ...};
By default, parameters are sent from the client to the server, that is, they are input parameters. To pass a value from the server to the client, you can use an output parameter, indicated by the out keyword. For example, an alternative way to define the getTime operation on page 105 would be:
void getTime(out TimeOfDay time);
This achieves the same thing but uses an output parameter instead of the return value. As with input parameters, you can use multiple output parameters:

108 The Slice Language
interface CircadianRhythm { void setSleepPeriod(TimeOfDay startTime, TimeOfDay stopTime); void getSleepPeriod(out TimeOfDay startTime, out TimeOfDay stopTime); // ...};
If you have both input and output parameters for an operation, the output parame-ters must follow the input parameters:
void changeSleepPeriod( TimeOfDay startTime, // OK TimeOfDay stopTime, out TimeOfDay prevStartTime, out TimeOfDay prevStopTime);void changeSleepPeriod(out TimeOfDay prevStartTime, out TimeOfDay prevStopTime, TimeOfDay startTime, // Error TimeOfDay stopTime);
Slice does not support parameters that are both input and output parameters (call by reference). The reason is that, for remote calls, reference parameters do not result in the same savings that one can obtain for call by reference in program-ming languages. (Data still needs to be copied in both directions and any gains in marshaling efficiency are negligible.) Also, reference (or input–output) parame-ters result in more complex language mappings, with concomitant increases in code size.
Style of Operation Definition
As you would expect, language mappings follow the style of operation definition you use in Slice: Slice return types map to programming language return types, and Slice parameters map to programming language parameters.
For operations that return only a single value, it is common to return the value from the operation instead of using an out-parameter. This style maps naturally into all programming languages. Note that, if you use an out-parameter instead, you impose a different API style on the client: most programming languages permit the return value of a function to be ignored whereas it is typically not possible to ignore an output parameter.
For operations that return multiple values, it is common to return all values as out-parameters and to use a return type of void. However, the rule is not all that clear-cut because operations with multiple output values can have one particular value that is considered more “important” than the remainder. A common example of this is an iterator operation that returns items from a collection one-by-one:

4.10 Interfaces, Operations, and Exceptions 109
bool next(out RecordType r);
The next operation returns two values: the record that was retrieved and a Boolean to indicate the end-of-collection condition. (If the return value is false, the end of the collection has been reached and the parameter r has an undefined value.) This style of definition can be useful because it naturally fits into the way programmers write control structures. For example:
while (next(record)) // Process record...if (next(record)) // Got a valid record...
Overloading
Slice does not support any form of overloading of operations. For example:
interface CircadianRhythm { void modify(TimeOfDay startTime, TimeOfDay endTime); void modify( TimeOfDay startTime, // Error TimeOfDay endTime, out timeOfDay prevStartTime, out TimeOfDay prevEndTime);};
Operations in the same interface must have different names, regardless of what type and number of parameters they have. This restriction exists because over-loaded functions cannot sensibly be mapped to languages without built-in support for overloading.5
Idempotent Operations
Some operations, such as getTime on page 105, do not modify the state of the object they operate on. They are the conceptual equivalent of C++ const member functions. Similary, setTime does modify the state of the object, but is idempotent. You can indicate this in Slice as follows:
5. Name mangling is not an option in this case: while it works fine for compilers, it is unacceptable to humans.

110 The Slice Language
interface Clock { idempotent TimeOfDay getTime(); idempotent void setTime(TimeOfDay time);};
This marks the getTime and setTime operations as idempotent. An operation is idempotent if two successive invocations of the operation have the same effect as a single invocation. For example, x = 1; is an idempotent operation because it does not matter whether it is executed once or twice—either way, x ends up with the value . On the other hand, x += 1; is not an idempotent operation because executing it twice results in a different value for x than executing it once. Obvi-ously, any read-only operation is idempotent.
The idempotent keyword is useful because it allows the Ice run time to attempt more aggressive error recovery. Specifically, Ice guarantees at-most-once semantics for operation invocations:
• For normal (not idempotent) operations, the Ice run time has to be conserva-tive about how it deals with errors. For example, if a client sends an operation invocation to a server and then loses connectivity, there is no way for the client-side run time to find out whether the request it sent actually made it to the server. This means that the run time cannot attempt to recover from the error by re-establishing a connection and sending the request a second time because that could cause the operation to be invoked a second time and violate at-most-once semantics; the run time has no option but to report the error to the application.
• For idempotent operations, on the other hand, the client-side run time can attempt to re-establish a connection to the server and safely send the failed request a second time. If the server can be reached on the second attempt, everything is fine and the application never notices the (temporary) failure. Only if the second attempt fails need the run time report the error back to the application. (The number of retries can be increased with an Ice configuration parameter.)
4.10.2 User Exceptions
Looking at the setTime operation on page 105, we find a potential problem: given that the TimeOfDay structure uses short as the type of each field, what will happen if a client invokes the setTime operation and passes a TimeOfDay value with meaningless field values, such as -199 for the minute field, or 42 for the hour? Obviously, it would be nice to provide some indication to the caller that this

4.10 Interfaces, Operations, and Exceptions 111
is meaningless. Slice allows you to define user exceptions to indicate error condi-tions to the client. For example:
exception Error {}; // Empty exceptions are legalexception RangeError { TimeOfDay errorTime; TimeOfDay minTime; TimeOfDay maxTime;};
A user exception is much like a structure in that it contains a number of data members. However, unlike structures, exceptions can have zero data members, that is, be empty.
You can specify a default value for an exception data member that has one of the following types:
• An integral type (bool, byte, short, int, long, or an enumerated type)
• float or double
• string
For example:
exception RangeError { TimeOfDay errorTime; TimeOfDay minTime; TimeOfDay maxTime; string reason = "out of range";};
The legal syntax for literal values is the same as for Slice constants (see Section 4.9.5). The language mapping guarantees that data members are initial-ized to their declared default values using a language-specific mechanism.
Exceptions allow you to return an arbitrary amount of error information to the client if an error condition arises in the implementation of an operation. Opera-tions use an exception specification to indicate the exceptions that may be returned to the client:
interface Clock { idempotent TimeOfDay getTime(); idempotent void setTime(TimeOfDay time) throws RangeError, Error;};

112 The Slice Language
This definition indicates that the setTime operation may throw either a Rang-eError or an Error user exception (and no other type of exception). If the client receives a RangeError exception, the exception contains the TimeOfDay value that was passed to setTime and caused the error (in the errorTime member), as well as the minimum and maximum time values that can be used (in the minTime and maxTime members). If setTime failed because of an error not caused by an illegal parameter value, it throws Error. Obviously, because Error does not have data members, the client will have no idea what exactly it was that went wrong—it simply knows that the operation did not work.
An operation can throw only those user exceptions that are listed in its excep-tion specification. If, at run time, the implementation of an operation throws an exception that is not listed in its exception specification, the client receives a run-time exception (see Section 4.10.4) to indicate that the operation did something illegal. To indicate that an operation does not throw any user exception, simply omit the exception specification. (There is no empty exception specification in Slice.)
Exceptions are not first-class data types and first-class data types are not exceptions:
• You cannot pass an exception as a parameter value.
• You cannot use an exception as the type of a data member.
• You cannot use an exception as the element type of a sequence.
• You cannot use an exception as the key or value type of a dictionary.
• You cannot throw a value of non-exception type (such as a value of type int or string).
The reason for these restrictions is that some implementation languages use a specific and separate type for exceptions (in the same way as Slice does). For such languages, it would be difficult to map exceptions if they could be used as an ordi-nary data type. (C++ is somewhat unusual among programming languages by allowing arbitrary types to be used as exceptions.)
4.10.3 Exception Inheritance
Exceptions support inheritance. For example:
exception ErrorBase { string reason;};

4.10 Interfaces, Operations, and Exceptions 113
enum RTError { DivideByZero, NegativeRoot, IllegalNull /* ... */};exception RuntimeError extends ErrorBase { RTError err;};enum LError { ValueOutOfRange, ValuesInconsistent, /* ... */ };exception LogicError extends ErrorBase { LError err;};exception RangeError extends LogicError { TimeOfDay errorTime; TimeOfDay minTime; TimeOfDay maxTime;};
These definitions set up a simple exception hierarchy:
• ErrorBase is at the root of the tree and contains a string explaining the cause of the error.
• Derived from ErrorBase are RuntimeError and LogicError. Each of these exceptions contains an enumerated value that further categorizes the error.
• Finally, RangeError is derived from LogicError and reports the details of the specific error.
Setting up exception hierarchies such as this not only helps to create a more read-able specification because errors are categorized, but also can be used at the language level to good advantage. For example, the Slice C++ mapping preserves the exception hierarchy so you can catch exceptions generically as a base excep-tion, or set up exception handlers to deal with specific exceptions.
Looking at the exception hierarchy on page 112, it is not clear whether, at run time, the application will only throw most derived exceptions, such as Rang-eError, or if it will also throw base exceptions, such as LogicError, Runti-meError, and ErrorBase. If you want to indicate that a base exception, interface, or class is abstract (will not be instantiated), you can add a comment to that effect.
Note that, if the exception specification of an operation indicates a specific exception type, at run time, the implementation of the operation may also throw more derived exceptions. For example:

114 The Slice Language
exception Base { // ...};exception Derived extends Base { // ...};interface Example { void op() throws Base; // May throw Base or Derived};
In this example, op may throw a Base or a Derived exception, that is, any excep-tion that is compatible with the exception types listed in the exception specifica-tion can be thrown at run time.
As a system evolves, it is quite common for new, derived exceptions to be added to an existing hierarchy. Assume that we initially construct clients and server with the following definitions:
exception Error { // ...};interface Application { void doSomething() throws Error;};
Also assume that a large number of clients are deployed in field, that is, when you upgrade the system, you cannot easily upgrade all the clients. As the application evolves, a new exception is added to the system and the server is redeployed with the new definition:
exception Error { // ...};exception FatalApplicationError extends Error { // ...};interface Application { void doSomething() throws Error;};

4.10 Interfaces, Operations, and Exceptions 115
This raises the question of what should happen if the server throws a FatalAppli-cationError from doSomething. The answer depends whether the client was built using the old or the updated definition:
• If the client was built using the same definition as the server, it simply receives a FatalApplicationError.
• If the client was built with the original definition, that client has no knowledge that FatalApplicationError even exists. In this case, the Ice run time auto-matically slices the exception to the most-derived type that is understood by the receiver (Error, in this case) and discards the information that is specific to the derived part of the exception. (This is exactly analogous to catching C++ exceptions by value—the exception is sliced to the type used in the catch-clause.)
Exceptions support single inheritance only. (Multiple inheritance would be diffi-cult to map into many programming languages.)
4.10.4 Ice Run-Time ExceptionsAs mentioned in Section 2.2.2, in addition to any user exceptions that are listed in an operation’s exception specification, an operation can also throw Ice run-time exceptions. Run-time exceptions are predefined exceptions that indicate platform-related run-time errors. For example, if a networking error interrupts communica-tion between client and server, the client is informed of this by a run-time excep-tion, such as ConnectTimeoutException or SocketException.
The exception specification of an operation must not list any run-time excep-tions. (It is understood that all operations can raise run-time exceptions and you are not allowed to restate that.)

116 The Slice Language
Inheritance Hierarchy for Exceptions
All the Ice run-time and user exceptions are arranged in an inheritance hierarchy, as shown in Figure 4.3.
Figure 4.3. Inheritance structure for exceptions.
Ice::Exception is at the root of the inheritance hierarchy. Derived from that are the (abstract) types Ice::LocalException and Ice::UserException. In turn, all run-time exceptions are derived from Ice::LocalException, and all user excep-tions are derived from Ice::UserException.
LocalException UserException
Exception
Specific Run-Time Exceptions... Specific User Exceptions...

4.10 Interfaces, Operations, and Exceptions 117
Figure 4.4 shows the complete hierarchy of the Ice run-time exceptions.6
Figure 4.4. Ice run-time exception hierarchy. (Shaded exceptions can be sent by the server.)
6. We use the Unified Modeling Language (UML) for the object model diagrams in this book (see [1] and [13] for details).
ConnectFailedExceptionConnectionLostException
ObjectNotExistExceptionOperationNotExistExceptionFacetNotExistException
LocalException
UnknownLocalExceptionUnknownUserException
InitializationExceptionIllegalIdentityExceptionIdentityParseExceptionPluginInitializationExceptionDNSExceptionProxyParseExceptionNoEndpointExceptionObjectAdapterDeactivatedExceptionObjectAdapterNameInUseExceptionObjectAdapterIdInUseExceptionVersionMismatchExceptionCommunicatorDestroyedExceptionEndpointParseExceptionEndpointSelectionTypeParseExceptionLocationForwardIdentityExceptionPluginInitializationExceptionCollocationOptimizationExceptionAlreadyRegisteredExceptionNotRegisteredExceptionTwowayOnlyExceptionCloneNotImplementedExceptionSecurityExceptionFixedProxyExceptionFeatureNotSupportedException
SocketException
UserException
TimeoutException
ConnectTimeoutExceptionConnectionTimeoutExceptionCloseTimeoutException
ProtocolException
BadMagicExceptionUnsupportedProtocolExceptionUnsupportedEncodingExceptionUnknownMessageExceptionConnectionNotValidatedExceptionUnknownRequestIdExceptionUnknownReplyStatusExceptionCloseConnectionExceptionForcedCloseConnectionExceptionAbortBatchRequestExceptionIllegalMessageSizeExceptionCompressionExceptionDatagramLimitException
ProxyUnmarshalExceptionUnmarshalOutOfBoundsExceptionIllegalIndirectionExceptionMemoryLimitExceptionEncapsulationExceptionNoObjectFactoryExceptionUnexpectedObjectExceptionEncapsulationExceptionStringConversionException
MarshalException
UnknownException
SyscallException RequestFailedException
Exception
ConnectionRefusedException
FileException

118 The Slice Language
Note that Figure 4.4 groups several exceptions into a single box to save space (which, strictly, is incorrect UML syntax). Also note that some run-time excep-tions have data members, which, for brevity, we have omitted in Figure 4.4. These data members provide additional information about the precise cause of an error.
Many of the run-time exceptions have self-explanatory names, such as Memor-yLimitException. Others indicate problems in the Ice run time, such as Encap-sulationException. Still others can arise only through application programming errors, such as TwowayOnlyException. In practice, you will likely never see most of these exceptions. However, there are a few run-time exceptions you will encounter and whose meaning you should know.
Local Versus Remote Exceptions
Most error conditions are detected on the client side. For example, if an attempt to contact a server fails, the client-side run time raises a ConnectTimeoutExcep-tion. However, there are three specific error conditions (shaded in Figure 4.4) that are detected by the server and made known explicitly to the client-side run time via the Ice protocol:
• ObjectNotExistException
This exception indicates that a request was delivered to the server but the server could not locate a servant with the identity that is embedded in the proxy. In other words, the server could not find an object to dispatch the request to.
An ObjectNotExistException is a death certificate: it indicates that the target object in the server does not exist.7 Most likely, this is the case because the object existed some time in the past and has since been destroyed, but the same exception is also raised if a client uses a proxy with the identity of an object that has never been created. If you receive this exception, you are expected to clean up whatever resources you might have allocated that relate to the specific object for which you receive this exception.
• FacetNotExistException
The client attempted to contact a non-existent facet of an object, that is, the server has at least one servant with the given identity, but no servant with a matching facet name. (See Chapter 33 for a discussion of facets.)
7. The Ice run time raises ObjectNotExistException only if there are no facets in existence with a matching identity; otherwise, it raises FacetNotExistException (see Chapter 33).

4.10 Interfaces, Operations, and Exceptions 119
• OperationNotExistException
This exception is raised if the server could locate an object with the correct identity but, on attempting to dispatch the client’s operation invocation, the server found that the target object does not have such an operation. You will see this exception in only two cases:
• You have used an unchecked down-cast on a proxy of the incorrect type. (See page 208 and page 345 for unchecked down-casts.)
• Client and server have been built with Slice definitions for an interface that disagree with each other, that is, the client was built with an interface defini-tion for the object that indicates that an operation exists, but the server was built with a different version of the interface definition in which the opera-tion is absent.
Any error condition on the server side that is not described by one of the three preceding exceptions is made known to the client as one of three generic excep-tions (shaded in Figure 4.4):
• UnknownUserException
This exception indicates that an operation implementation has thrown a Slice exception that is not declared in the operation’s exception specification (and is not derived from one of the exceptions in the operation’s exception specifica-tion).
• UnknownLocalException
If an operation implementation raises a run-time exception other than Object-NotExistException, FacetNotExistException, or OperationNotExistEx-ception (such as a NotRegisteredException), the client receives an UnknownLocalException. In other words, the Ice protocol does not transmit the exact exception that was encountered in the server, but simply returns a bit to the client in the reply to indicate that the server encountered a run-time exception.
A common cause for a client receiving an UnknownLocalException is failure to catch and handle all exceptions in the server. For example, if the implemen-tation of an operation encounters an exception it does not handle, the excep-tion propagates all the way up the call stack until the stack is unwound to the point where the Ice run time invoked the operation. The Ice run time catches all Ice exceptions that “escape” from an operation invocation and returns them to the client as an UnknownLocalException.

120 The Slice Language
• UnknownException
An operation has thrown a non-Ice exception. For example, if the operation in the server throws a C++ exception, such as a char *, or a Java exception, such as a ClassCastException, the client receives an UnknownExcep-tion.
All other run-time exceptions (not shaded in Figure 4.4) are detected by the client-side run time and are raised locally.
It is possible for the implementation of an operation to throw Ice run-time exceptions (as well as user exceptions). For example, if a client holds a proxy to an object that no longer exists in the server, your server application code is required to throw an ObjectNotExistException. If you do throw run-time excep-tions from your application code, you should take care to throw a run-time excep-tion only if appropriate, that is, do not use run-time exceptions to indicate something that really should be a user exception. Doing so can be very confusing to the client: if the application “hijacks” some run-time exceptions for its own purposes, the client can no longer decide whether the exception was thrown by the Ice run time or by the server application code. This can make debugging very difficult.
4.10.5 Interface Semantics and ProxiesBuilding on the Clock example, we can create definitions for a world-time server:
exception GenericError { string reason;};struct TimeOfDay { short hour; // 0 - 23 short minute; // 0 - 59 short second; // 0 - 59};exception BadTimeVal extends GenericError {};interface Clock { idempotent TimeOfDay getTime(); idempotent void setTime(TimeOfDay time) throws BadTimeVal;};dictionary<string, Clock*> TimeMap; // Time zone name to clock map

4.10 Interfaces, Operations, and Exceptions 121
exception BadZoneName extends GenericError {};interface WorldTime { idempotent void addZone(string zoneName, Clock* zoneClock); void removeZone(string zoneName) throws BadZoneName; idempotent Clock* findZone(string zoneName) throws BadZoneName; idempotent TimeMap listZones(); idempotent void setZones(TimeMap zones);};
The WorldTime interface acts as a collection manager for clocks, one for each time zone. In other words, the WorldTime interface manages a collection of pairs. The first member of each pair is a time zone name; the second member of the pair is the clock that provides the time for that zone. The interface contains operations that permit you to add or remove a clock from the map (addZone and remove-Zone), to search for a particular time zone by name (findZone), and to read or write the entire map (listZones and setZones).
The WorldTime example illustrates an important Slice concept: note that addZone accepts a parameter of type Clock* and findZone returns a parameter of type Clock*. In other words, interfaces are types in their own right and can be passed as parameters. The * operator is known as the proxy operator. Its left-hand argument must be an interface (or class—see Section 4.11) and its return type is a proxy. A proxy is like a pointer that can denote an object. The semantics of proxies are very much like those of C++ class instance pointers:
• A proxy can be null (see page 126).
• A proxy can dangle (point at an object that is no longer there)
• Operations dispatched via a proxy use late binding: if the actual run-time type of the object denoted by the proxy is more derived than the proxy’s type, the implementation of the most-derived interface will be invoked.
When a client passes a Clock proxy to the addZone operation, the proxy denotes an actual Clock object in a server. The Clock Ice object denoted by that proxy may be implemented in the same server process as the WorldTime interface, or in a different server process. Where the Clock object is physically implemented matters neither to the client nor to the server implementing the WorldTime inter-face; if either invokes an operation on a particular clock, such as getTime, an RPC call is sent to whatever server implements that particular clock. In other words, a proxy acts as a local “ambassador” for the remote object; invoking an operation on the proxy forwards the invocation to the actual object implementation. If the

122 The Slice Language
object implementation is in a different address space, this results in a remote procedure call; if the object implementation is collocated in the same address space, the Ice run time uses an ordinary local function call from the proxy to the object implementation.
Note that proxies also act very much like pointers in their sharing semantics: if two clients have a proxy to the same object, a state change made by one client (such as setting the time) will be visible to the other client.
Proxies are strongly typed (at least for statically typed languages, such as C++ and Java). This means that you cannot pass something other than a Clock proxy to the addZone operation; attempts to do so are rejected at compile time.
4.10.6 Interface Inheritance
Interfaces support inheritance. For example, we could extend our world-time server to support the concept of an alarm clock:
interface AlarmClock extends Clock { idempotent TimeOfDay getAlarmTime(); idempotent void setAlarmTime(TimeOfDay alarmTime) throws BadTimeVal;};
The semantics of this are the same as for C++ or Java: AlarmClock is a subtype of Clock and an AlarmClock proxy can be substituted wherever a Clock proxy is expected. Obviously, an AlarmClock supports the same getTime and setTime operations as a Clock but also supports the getAlarmTime and setAlarmTime operations.
Multiple interface inheritance is also possible. For example, we can construct a radio alarm clock as follows:
interface Radio { void setFrequency(long hertz) throws GenericError; void setVolume(long dB) throws GenericError;};enum AlarmMode { RadioAlarm, BeepAlarm };interface RadioClock extends Radio, AlarmClock { void setMode(AlarmMode mode); AlarmMode getMode();};

4.10 Interfaces, Operations, and Exceptions 123
RadioClock extends both Radio and AlarmClock and can therefore be passed where a Radio, an AlarmClock, or a Clock is expected. The inheritance diagram for this definition looks as follows:
Figure 4.5. Inheritance diagram for RadioClock.
Interfaces that inherit from more than one base interface may share a common base interface. For example, the following definition is legal:
interface B { /* ... */ };interface I1 extends B { /* ... */ };interface I2 extends B { /* ... */ };interface D extends I1, I2 { /* ... */ };
This definition results in the familiar diamond shape:
Figure 4.6. Diamond-shaped inheritance.
Radio«interface»
RadioClock«interface»
AlarmClock«interface»
Clock«interface»
D«interface»
I1«interface»
I2«interface»
B«interface»

124 The Slice Language
Interface Inheritance Limitations
If an interface uses multiple inheritance, it must not inherit the same operation name from more than one base interface. For example, the following definition is illegal:
interface Clock { void set(TimeOfDay time); // set time};interface Radio { void set(long hertz); // set frequency};interface RadioClock extends Radio, Clock { // Illegal! // ...};
This definition is illegal because RadioClock inherits two set operations, Radio::set and Clock::set. The Slice compiler makes this illegal because (unlike C++) many programming languages do not have a built-in facility for disambiguating the different operations. In Slice, the simple rule is that all inher-ited operations must have unique names. (In practice, this is rarely a problem because inheritance is rarely added to an interface hierarchy “after the fact”. To avoid accidental clashes, we suggest that you use descriptive operation names, such as setTime and setFrequency. This makes accidental name clashes less likely.)

4.10 Interfaces, Operations, and Exceptions 125
Implicit Inheritance from Object
All Slice interfaces are ultimately derived from Object. For example, the inheri-tance hierarchy from Figure 4.5 would be shown more correctly as in Figure 4.7.
Figure 4.7. Implicit inheritance from Object.
Because all interfaces have a common base interface, we can pass any type of interface as that type. For example:
interface ProxyStore { idempotent void putProxy(string name, Object* o); idempotent Object* getProxy(string name);};
Object is a Slice keyword (note the capitalization) that denotes the root type of the inheritance hierarchy. The ProxyStore interface is a generic proxy storage facility: the client can call putProxy to add a proxy of any type under a given name and later retrieve that proxy again by calling getProxy and supplying that name. The ability to generically store proxies in this fashion allows us to build general-purpose facilities, such as a naming service that can store proxies and deliver them to clients. Such a service, in turn, allows us to avoid hard-coding proxy details into clients and servers (see Chapter 38).
Inheritance from type Object is always implicit. For example, the following Slice definition is illegal:
interface MyInterface extends Object { /* ... */ }; // Error!
RadioClock«interface»
Radio«interface»
AlarmClock«interface»
Object«interface»
Clock«interface»

126 The Slice Language
It is understood that all interfaces inherit from type Object; you are not allowed to restate that.
Type Object is mapped to an abstract type by the various language mappings, so you cannot instantiate an Ice object of that type.
Null Proxies
Looking at the ProxyStore interface once more, we notice that getProxy does not have an exception specification. The question then is what should happen if a client calls getProxy with a name under which no proxy is stored? Obviously, we could add an exception to indicate this condition to getProxy. However, another option is to return a null proxy. Ice has the built-in notion of a null proxy, which is a proxy that “points nowhere”. When such a proxy is returned to the client, the client can test the value of the returned proxy to check whether it is null or denotes a valid object.
A more interesting question is: “which approach is more appropriate, throwing an exception or returning a null proxy?” The answer depends on the expected usage pattern of an interface. For example, if, in normal operation, you do not expect clients to call getProxy with a non-existent name, it is better to throw an exception. (This is probably the case for our ProxyStore interface: the fact that there is no list operation makes it clear that clients are expected to know which names are in use.)
On the other hand, if you expect that clients will occasionally try to look up something that is not there, it is better to return a null proxy. The reason is that throwing an exception breaks the normal flow of control in the client and requires special handling code. This means that you should throw exceptions only in exceptional circumstances. For example, throwing an exception if a database lookup returns an empty result set is wrong; it is expected and normal that a result set is occasionally empty.
It is worth paying attention to such design issues: well-designed interfaces that get these details right are easier to use and easier to understand. Not only do such interfaces make life easier for client developers, they also make it less likely that latent bugs cause problems later.
Self-Referential Interfaces
Proxies have pointer semantics, so we can define self-referential interfaces. For example:

4.10 Interfaces, Operations, and Exceptions 127
interface Link { idempotent SomeType getValue(); idempotent Link* next();};
The Link interface contains a next operation that returns a proxy to a Link inter-face. Obviously, this can be used to create a chain of interfaces; the final link in the chain returns a null proxy from its next operation.
Empty Interfaces
The following Slice definition is legal:
interface Empty {};
The Slice compiler will compile this definition without complaint. An interesting question is: “why would I need an empty interface?” In most cases, empty inter-faces are an indication of design errors. Here is one example:
interface ThingBase {};interface Thing1 extends ThingBase { // Operations here...};interface Thing2 extends ThingBase { // Operations here...};
Looking at this definition, we can make two observations:
• Thing1 and Thing2 have a common base and are therefore related.
• Whatever is common to Thing1 and Thing2 can be found in interface Thing-Base.
Of course, looking at ThingBase, we find that Thing1 and Thing2 do not share any operations at all because ThingBase is empty. Given that we are using an object-oriented paradigm, this is definitely strange: in the object-oriented model, the only way to communicate with an object is to send a message to the object. But, to send a message, we need an operation. Given that ThingBase has no oper-ations, we cannot send a message to it, and it follows that Thing1 and Thing2 are not related because they have no common operations. But of course, seeing that Thing1 and Thing2 have a common base, we conclude that they are related, other-wise the common base would not exist. At this point, most programmers begin to scratch their head and wonder what is going on here.

128 The Slice Language
One common use of the above design is a desire to treat Thing1 and Thing2 polymorphically. For example, we might continue the previous definition as follows:
interface ThingUser { void putThing(ThingBase* thing);};
Now the purpose of having the common base becomes clear: we want to be able to pass both Thing1 and Thing2 proxies to putThing. Does this justify the empty base interface? To answer this question, we need to think about what happens in the implementation of putThing. Obviously, putThing cannot possibly invoke an operation on a ThingBase because there are no operations. This means that putThing can do one of two things:
1. putThing can simply remember the value of thing.
2. putThing can try to down-cast to either Thing1 or Thing2 and then invoke an operation. The pseudo-code for the implementation of putThing would look something like this:
void putThing(ThingBase thing){ if (is_a(Thing1, thing)) { // Do something with Thing1... } else if (is_a(Thing2, thing)) { // Do something with Thing2... } else { // Might be a ThingBase? // ... }}
The implementation tries to down-cast its argument to each possible type in turn until it has found the actual run-time type of the argument. Of course, any object-oriented text book worth its price will tell you that this is an abuse of inheritance and leads to maintenance problems.
If you find yourself writing operations such as putThing that rely on artificial base interfaces, ask yourself whether you really need to do things this way. For example, a more appropriate design might be:
interface Thing1 { // Operations here...};

4.10 Interfaces, Operations, and Exceptions 129
interface Thing2 { // Operations here...};interface ThingUser { void putThing1(Thing1* thing); void putThing2(Thing2* thing);};
With this design, Thing1 and Thing2 are not related, and ThingUser offers a sepa-rate operation for each type of proxy. The implementation of these operations does not need to use any down-casts, and all is well in our object-oriented world.
Another common use of empty base interfaces is the following:
interface PersistentObject {};interface Thing1 extends PersistentObject { // Operations here...};interface Thing2 extends PersistentObject { // Operations here...};
Clearly, the intent of this design is to place persistence functionality into the PersistentObject base implementation and require objects that want to have persistent state to inherit from PersistentObject. On the face of things, this is reasonable: after all, using inheritance in this way is a well-established design pattern, so what can possibly be wrong with it? As it turns out, there are a number of things that are wrong with this design:
• The above inheritance hierarchy is used to add behavior to Thing1 and Thing2. However, in a strict OO model, behavior can be invoked only by sending messages. But, because PersistentObject has no operations, no messages can be sent.
This raises the question of how the implementation of PersistentObject actually goes about doing its job; presumably, it knows something about the implementation (that is, the internal state) of Thing1 and Thing2, so it can write that state into a database. But, if so, PersistentObject, Thing1, and Thing2 can no longer be implemented in different address spaces because, in

130 The Slice Language
that case, PersistentObject can no longer get at the state of Thing1 and Thing2.
Alternatively, Thing1 and Thing2 use some functionality provided by PersistentObject in order to make their internal state persistent. But PersistentObject does not have any operations, so how would Thing1 and Thing2 actually go about achieving this? Again, the only way that can work is if PersistentObject, Thing1, and Thing2 are implemented in a single address space and share implementation state behind the scenes, meaning that they cannot be implemented in different address spaces.
• The above inheritance hierarchy splits the world into two halves, one containing persistent objects and one containing non-persistent ones. This has far-reaching ramifications:
• Suppose you have an existing application with already implemented, non-persistent objects. Requirements change over time and you find that you now would like to make some of your objects persistent. With the above design, you cannot do this unless you change the type of your objects because they now must inherit from PersistentObject. Of course, this is extremely bad news: not only do you have to change the implementation of your objects in the server, you also need to locate and update all the clients that are currently using your objects because they suddenly have a completely new type. What is worse, there is no way to keep things back-ward compatible: either all clients change with the server, or none of them do. It is impossible for some clients to remain “unupgraded”.
• The design does not scale to multiple features. Imagine that we have a number of additional behaviors that objects can inherit, such as serializa-tion, fault-tolerance, persistence, and the ability to be searched by a search engine. We quickly end up in a mess of multiple inheritance. What is worse, each possible combination of features creates a completely separate type hierarchy. This means that you can no longer write operations that generi-cally operate on a number of object types. For example, you cannot pass a persistent object to something that expects a non-persistent object, even if the receiver of the object does not care about the persistence aspects of the object. This quickly leads to fragmented and hard-to-maintain type systems. Before long, you will either find yourself rewriting your application or end up with something that is both difficult to use and difficult to maintain.
The foregoing discussion will hopefully serve as a warning: Slice is an interface definition language that has nothing to do with implementation (but empty inter-

4.11 Classes 131
faces almost always indicate that implementation state is shared via mechanisms other than defined interfaces). If you find yourself writing an empty interface defi-nition, at least step back and think about the problem at hand; there may be a more appropriate design that expresses your intent more cleanly. If you do decide to go ahead with an empty interface regardless, be aware that, almost certainly, you will lose the ability to later change the distribution of the object model over physical server processes because you cannot place an address space boundary between interfaces that share hidden state.
Interface Versus Implementation Inheritance
Keep in mind that Slice interface inheritance applies only to interfaces. In partic-ular, if two interfaces are in an inheritance relationship, this in no way implies that the implementations of those interfaces must also inherit from each other. You can choose to use implementation inheritance when you implement your interfaces, but you can also make the implementations independent of each other. (To C++ programmers, this often comes as a surprise because C++ uses implementation inheritance by default, and interface inheritance requires extra effort to imple-ment.)
In summary, Slice inheritance simply establishes type compatibility. It says nothing about how interfaces are implemented and, therefore, keeps implementa-tion choices open to whatever is most appropriate for your application.
4.11 Classes
In addition to interfaces, Slice permits the definition of classes. Classes are like interfaces in that they can have operations and are like structures in that they can have data members. This leads to hybrid objects that can be treated as interfaces and passed by reference, or can be treated as values and passed by value. Classes provide much architectural flexibility. For example, classes allow behavior to be implemented on the client side, whereas interfaces allow behavior to be imple-mented only on the server side.
Classes support inheritance and are therefore polymorphic: at run time, you can pass a class instance to an operation as long as the actual class type is derived from the formal parameter type in the operation’s signature. This also permits classes to be used as type-safe unions, similarly to Pascal’s discriminated variant records.

132 The Slice Language
4.11.1 Simple Classes
A Slice class definition is similar to a structure definition, but uses the class keyword. For example:
class TimeOfDay { short hour; // 0 - 23 short minute; // 0 - 59 short second; // 0 - 59};
Apart from the keyword class, this definition is identical to the structure defini-tion we saw on page 99. You can use a Slice class wherever you can use a Slice structure (but, as we will see shortly, for performance reasons, you should not use a class where a structure is sufficient). Unlike structures, classes can be empty:
class EmptyClass {}; // OKstruct EmptyStruct {}; // Error
Much the same design considerations as for empty interfaces (see page 127) apply to empty classes: you should at least stop and rethink your approach before committing yourself to an empty class.
You can specify a default value for a class data member that has one of the following types:
• An integral type (bool, byte, short, int, long, or an enumerated type)
• float or double• string
For example:
class Location { string name; Point pt; bool display = true; string source = "GPS";};
The legal syntax for literal values is the same as for Slice constants (see Section 4.9.5). The language mapping guarantees that data members are initial-ized to their declared default values using a language-specific mechanism.
4.11.2 Class Inheritance
Unlike structures, classes support inheritance. For example:

4.11 Classes 133
class TimeOfDay { short hour; // 0 - 23 short minute; // 0 - 59 short second; // 0 - 59};class DateTime extends TimeOfDay { short day; // 1 - 31 short month; // 1 - 12 short year; // 1753 onwards};
This example illustrates one major reason for using a class: a class can be extended by inheritance, whereas a structure is not extensible. The previous example defines DateTime to extend the TimeOfDay class with a date.8
Classes only support single inheritance. The following is illegal:
class TimeOfDay { short hour; // 0 - 23 short minute; // 0 - 59 short second; // 0 - 59};class Date { short day; short month; short year;};class DateTime extends TimeOfDay, Date { // Error! // ...};
A derived class also cannot redefine a data member of its base class:
8. If you are puzzled by the comment about the year 1753, search the Web for “1752 date change”. The intricacies of calendars for various countries prior to that year can keep you occupied for months…

134 The Slice Language
class Base { int integer;};class Derived extends Base { int integer; // Error, integer redefined};
4.11.3 Class Inheritance Semantics
Classes use the same pass-by-value semantics as structures. If you pass a class instance to an operation, the class and all its members are passed. The usual type compatibility rules apply: you can pass a derived instance where a base instance is expected. If the receiver has static type knowledge of the actual derived run-time type, it receives the derived instance; otherwise, if the receiver does not have static type knowledge of the derived type, the instance is sliced to the base type. For an example, suppose we have the following definitions:
// In file Clock.ice:class TimeOfDay { short hour; // 0 - 23 short minute; // 0 - 59 short second; // 0 - 59};interface Clock { TimeOfDay getTime(); void setTime(TimeOfDay time);};// In file DateTime.ice:#include <Clock.ice>class DateTime extends TimeOfDay { short day; // 1 - 31 short month; // 1 - 12 short year; // 1753 onwards};
Because DateTime is a sub-class of TimeOfDay, the server can return a DateTime instance from getTime, and the client can pass a DateTime instance to setTime.

4.11 Classes 135
In this case, if both client and server are linked to include the code generated for both Clock.ice and DateTime.ice, they each receive the actual derived DateTime instance, that is, the actual run-time type of the instance is preserved.
Contrast this with the case where the server is linked to include the code generated for both Clock.ice and DateTime.ice, but the client is linked only with the code generated for Clock.ice. In other words, the server under-stands the type DateTime and can return a DateTime instance from getTime, but the client only understands TimeOfDay. In this case, the derived DateTime instance returned by the server is sliced to its TimeOfDay base type in the client. (The infor-mation in the derived part of the instance is simply lost to the client.)
Class hierarchies are useful if you need polymorphic values (instead of poly-morphic interfaces). For example:
class Shape { // Definitions for shapes, such as size, center, etc.};class Circle extends Shape { // Definitions for circles, such as radius...};class Rectangle extends Shape { // Definitions for rectangles, such as width and length...};sequence<Shape> ShapeSeq;interface ShapeProcessor { void processShapes(ShapeSeq ss);};
Note the definition of ShapeSeq and its use as a parameter to the processShapes operation: the class hierarchy allows us to pass a polymorphic sequence of shapes (instead of having to define a separate operation for each type of shape).
The receiver of a ShapeSeq can iterate over the elements of the sequence and down-cast each element to its actual run-time type. (The receiver can also ask each element for its type ID to determine its type—see Section 6.14.1 and Section 10.11.2.)

136 The Slice Language
4.11.4 Classes as Unions
Slice does not offer a dedicated union construct because it is redundant. By deriving classes from a common base class, you can create the same effect as with a union:
interface ShapeShifter { Shape translate(Shape s, long xDistance, long yDistance);};
The parameter s of the translate operation can be viewed as a union of two members: a Circle and a Rectangle. The receiver of a Shape instance can use the type ID (see Section 4.13) of the instance to decide whether it received a Circle or a Rectangle. Alternatively, if you want something more along the lines of a conventional discriminated union, you can use the following approach:
class UnionDiscriminator { int d;};class Member1 extends UnionDiscriminator { // d == 1 string s; float f;};class Member2 extends UnionDiscriminator { // d == 2 byte b; int i;};
With this approach, the UnionDiscriminator class provides a discriminator value. The “members” of the union are the classes that are derived from Union-Discriminator. For each derived class, the discriminator takes on a distinct value. The receiver of such a union uses the discriminator value in a switch statement to select the active union member.
4.11.5 Self-Referential Classes
Classes can be self-referential. For example:

4.11 Classes 137
class Link { SomeType value; Link next;};
This looks very similar to the self-referential interface example on page 127, but the semantics are very different. Note that value and next are data members, not operations, and that the type of next is Link (not Link*). As you would expect, this forms the same linked list arrangement as the Link interface on page 127: each instance of a Link class contains a next member that points at the next link in the chain; the final link’s next member contains a null value. So, what looks like a class including itself really expresses pointer semantics: the next data member contains a pointer to the next link in the chain.
You may be wondering at this point what the difference is then between the Link interface on page 127 and the Link class on page 136. The difference is that classes have value semantics, whereas proxies have reference semantics. To illus-trate this, consider the Link interface from page 127 once more:
interface Link { idempotent SomeType getValue(); idempotent Link* next();};
Here, getValue and next are both operations and the return value of next is Link*, that is, next returns a proxy. A proxy has reference semantics, that is, it denotes an object somewhere. If you invoke the getValue operation on a Link proxy, a message is sent to the (possibly remote) servant for that proxy. In other words, for proxies, the object stays put in its server process and we access the state of the object via remote procedure calls. Compare this with the definition of our Link class:
class Link { SomeType value; Link next;};
Here, value and next are data members and the type of next is Link, which has value semantics. In particular, while next looks and feels like a pointer, it cannot denote an instance in a different address space. This means that if we have a chain of Link instances, all of the instances are in our local address space and, when we read or write a value data member, we are performing local address space opera-tions. This means that an operation that returns a Link instance, such as getHead,

138 The Slice Language
does not just return the head of the chain, but the entire chain, as shown in Figure 4.8.
Figure 4.8. Class version of Link before and after calling getHead.
On the other hand, for the interface version of Link, we do not know where all the links are physically implemented. For example, a chain of four links could have each object instance in its own physical server process; those server processes could be each in a different continent. If you have a proxy to the head of this four-link chain and traverse the chain by invoking the next operation on each link, you will be sending four remote procedure calls, one to each object
Self-referential classes are particularly useful to model graphs. For example, we can create a simple expression tree along the following lines:
enum UnaryOp { UnaryPlus, UnaryMinus, Not };enum BinaryOp { Plus, Minus, Multiply, Divide, And, Or };class Node {};class UnaryOperator extends Node { UnaryOp operator; Node operand;};class BinaryOperator extends Node { BinaryOp op; Node operand1; Node operand2;};class Operand extends Node { long val;};
Client Client ServerServer
getHead

4.11 Classes 139
The expression tree consists of leaf nodes of type Operand, and interior nodes of type UnaryOperator and BinaryOperator, with one or two descendants, respec-tively. All three of these classes are derived from a common base class Node. Note that Node is an empty class. This is one of the few cases where an empty base class is justified. (See the discussion on page 127; once we add operations to this class hierarchy (see Section 4.11.7), the base class is no longer empty.)
If we write an operation that, for example, accepts a Node parameter, passing that parameter results in transmission of the entire tree to the server:
interface Evaluator { long eval(Node expression); // Send entire tree for evaluation};
Self-referential classes are not limited to acyclic graphs; the Ice run time permits loops: it ensures that no resources are leaked and that infinite loops are avoided during marshaling.
4.11.6 Classes Versus Structures
One obvious question to ask is: why does Ice provide structures as well as classes, when classes obviously can be used to model structures? The answer has to do with the cost of implementation: classes provide a number of features that are absent for structures:
• Classes support inheritance.
• Classes can be self-referential.
• Classes can have operations (see Section 4.11.7).
• Classes can implement interfaces (see Section 4.11.9).
Obviously, an implementation cost is associated with the additional features of classes, both in terms of the size of the generated code and the amount of memory and CPU cycles consumed at run time. On the other hand, structures are simple collections of values (“plain old structs”) and are implemented using very efficient mechanisms. This means that, if you use structures, you can expect better perfor-mance and smaller memory footprint than if you would use classes (especially for languages with direct support for “plain old structures”, such as C++ and C#). Use a class only if you need at least one of its more powerful features.

140 The Slice Language
4.11.7 Classes with Operations
Classes, in addition to data members, can have operations. The syntax for opera-tion definitions in classes is identical to the syntax for operations in interfaces. For example, we can modify the expression tree from Section 4.11.5 as follows:
enum UnaryOp { UnaryPlus, UnaryMinus, Not };enum BinaryOp { Plus, Minus, Multiply, Divide, And, Or };class Node { idempotent long eval();};class UnaryOperator extends Node { UnaryOp operator; Node operand;};class BinaryOperator extends Node { BinaryOp op; Node operand1; Node operand2;};class Operand { long val;};
The only change compared to the version in Section 4.11.5 is that the Node class now has an eval operation. The semantics of this are as for a virtual member function in C++: each derived class inherits the operation from its base class and can choose to override the operation’s definition. For our expression tree, the Operand class provides an implementation that simply returns the value of its val member, and the UnaryOperator and BinaryOperator classes provide imple-mentations that compute the value of their respective subtrees. If we call eval on the root node of an expression tree, it returns the value of that tree, regardless of whether we have a complex expression or a tree that consists of only a single Operand node.
Operations on classes are normally executed in the caller’s address space, that is, operations on classes are local operations that do not result in a remote proce-dure call.9 Of course, this immediately raises an interesting question: what happens if a client receives a class instance with operations from a server, but client and server are implemented in different languages? Classes with operations

4.11 Classes 141
require the receiver to supply a factory for instances of the class. The Ice run time only marshals the data members of the class. If a class has operations, the receiver of the class must provide a class factory that can instantiate the class in the receiver’s address space, and the receiver is responsible for providing an imple-mentation of the class’s operations.
Therefore, if you use classes with operations, it is understood that client and server each have access to an implementation of the class’s operations. No code is shipped over the wire (which, in an environment of heterogeneous nodes using different operating systems and languages is infeasible).
4.11.8 Architectural Implications of Classes
Classes have a number of architectural implications that are worth exploring in some detail.
Classes without Operations
Classes that do not use inheritance and only have data members (whether self-referential or not) pose no architectural problems: they simply are values that are marshaled like any other value, such as a sequence, structure, or dictionary. Classes using derivation also pose no problems: if the receiver of a derived instance has knowledge of the derived type, it simply receives the derived type; otherwise, the instance is sliced to the most-derived type that is understood by the receiver. This makes class inheritance useful as a system is extended over time: you can create derived class without having to upgrade all parts of the system at once.
Classes with Operations
Classes with operations require additional thought. Here is an example: suppose that you are creating an Ice application. Also assume that the Slice definitions use quite a few classes with operations. You sell your clients and servers (both written in Java) and end up with thousands of deployed systems.
As time passes and requirements change, you notice a demand for clients written in C++. For commercial reasons, you would like to leave the development
9. It is possible to invoke an operation on a remote class instance—see the relevant language mapping chapter for details.

142 The Slice Language
of C++ clients to customers or a third party but, at this point, you discover a glitch: your application has lots of classes with operations along the following lines:
class ComplexThingForExpertsOnly { // Lots of arcane data members here... MysteriousThing mysteriousOperation(/* parameters */); ArcaneThing arcaneOperation(/* parameters */); ComplexThing complexOperation(/* parameters */); // etc...};
It does not matter what exactly these operations do. (Presumably, you decided to off-load some of the processing for your application onto the client side for performance reasons.) Now that you would like other developers to write C++ clients, it turns out that your application will work only if these developers provide implementations of all the client-side operations and, moreover, if the semantics of these operations exactly match the semantics of your Java implemen-tations. Depending on what these operations do, providing exact semantic equiva-lents in a different language may not be trivial, so you decide to supply the C++ implementations yourself. But now, you discover another problem: the C++ clients need to be supported for a variety of operating systems that use a variety of different C++ compilers. Suddenly, your task has become quite daunting: you really need to supply implementations for all the combinations of operating systems and compiler versions that are used by clients. Given the different state of compliance with the ISO C++ standard of the various compilers, and the idiosyn-crasies of different operating systems, you may find yourself facing a develop-ment task that is much larger than anticipated. And, of course, the same scenario will arise again should you need client implementations in yet another language.
The moral of this story is not that classes with operations should be avoided; they can provide significant performance gains and are not necessarily bad. But, keep in mind that, once you use classes with operations, you are, in effect, using client-side native code and, therefore, you can no longer enjoy the implementation transparencies that are provided by interfaces. This means that classes with opera-tions should be used only if you can tightly control the deployment environment of clients. If not, you are better off using interfaces and classes without operations. That way, all the processing stays on the server and the contract between client and server is provided solely by the Slice definitions, not by the semantics of the additional client-side code that is required for classes with operations.

4.11 Classes 143
Classes for Persistence
Ice also provides a built-in persistence mechanism that allows you to store the state of a class in a database with very little implementation effort. To get access to these persistence features, you must define a Slice class whose members store the state of the class. We discuss the persistence features of Slice in detail in Chapter 39.
4.11.9 Classes Implementing Interfaces
A Slice class can also be used as a servant in a server, that is, an instance of a class can be used to provide the behavior for an interface, for example:
interface Time { idempotent TimeOfDay getTime(); idempotent void setTime(TimeOfDay time);};class Clock implements Time { TimeOfDay time;};
The implements keyword indicates that the class Clock provides an implementa-tion of the Time interface. The class can provide data members and operations of its own; in the preceding example, the Clock class stores the current time that is accessed via the Time interface. A class can implement several interfaces, for example:
interface Time { idempotent TimeOfDay getTime(); idempotent void setTime(TimeOfDay time);};interface Radio { idempotent void setFrequency(long hertz); idempotent void setVolume(long dB);};class RadioClock implements Time, Radio { TimeOfDay time; long hertz;};
The class RadioClock implements both Time and Radio interfaces.

144 The Slice Language
A class, in addition to implementing an interface, can also extend another class:
interface Time { idempotent TimeOfDay getTime(); idempotent void setTime(TimeOfDay time);};class Clock implements Time { TimeOfDay time;};interface AlarmClock extends Time { idempotent TimeOfDay getAlarmTime(); idempotent void setAlarmTime(TimeOfDay alarmTime);};interface Radio { idempotent void setFrequency(long hertz); idempotent void setVolume(long dB);};class RadioAlarmClock extends Clock implements AlarmClock, Radio { TimeOfDay alarmTime; long hertz;};
These definitions result in the inheritance graph shown in Figure 4.9:
Figure 4.9. A Class using implementation and interface inheritance.
Radio«interface»
AlarmClock«interface»
Time«interface»
Clock
RadioAlarmClock

4.11 Classes 145
For this definition, Radio and AlarmClock are abstract interfaces, and Clock and RadioAlarmClock are concrete classes. As for Java, a class can implement multiple interfaces, but can extend at most one class.
4.11.10 Class Inheritance Limitations
As for interface inheritance, a class cannot redefine an operation or data member that it inherits from a base interface or class. For example:
interface BaseInterface { void op();};class BaseClass { int member;};class DerivedClass extends BaseClass implements BaseInterface { void someOperation(); // OK int op(); // Error! int someMember; // OK long member; // Error!};
4.11.11 Pass-by-Value Versus Pass-by-Reference
As we saw in Section 4.11.5, classes naturally support pass-by-value semantics: passing a class transmits the data members of the class to the receiver. Any changes made to these data members by the receiver affect only the receiver’s copy of the class; the data members of the sender’s class are not affected by the changes made by the receiver.
In addition to passing a class by value, you can pass a class by reference. For example:
class TimeOfDay { short hour; short minute; short second; string format();};

146 The Slice Language
interface Example { TimeOfDay* get(); // Note: returns a proxy!};
Note that the get operation returns a proxy to a TimeOfDay class and not a TimeOfDay instance itself. The semantics of this are as follows:
• When the client receives a TimeOfDay proxy from the get call, it holds a proxy that differs in no way from an ordinary proxy for an interface.
• The client can invoke operations via the proxy, but cannot access the data members. This is because proxies do not have the concept of data members, but represent interfaces: even though the TimeOfDay class has data members, only its operations can be accessed via a the proxy.
The net effect is that, in the preceding example, the server holds an instance of the TimeOfDay class. A proxy for that instance was passed to the client. The only thing the client can do with this proxy is to invoke the format operation. The implementation of that operation is provided by the server and, when the client invokes format, it sends an RPC message to the server just as it does when it invokes an operation on an interface. The implementation of the format operation is entirely up to the server. (Presumably, the server will use the data members of the TimeOfDay instance it holds to return a string containing the time to the client.)
The preceding example looks somewhat contrived for classes only. However, it makes perfect sense if classes implement interfaces: parts of your application can exchange class instances (and, therefore, state) by value, whereas other parts of the system can treat these instances as remote interfaces. For example:
interface Time { string format(); // ...};class TimeOfDay implements Time { short hour; short minute; short second;};interface I1 { TimeOfDay get(); // Pass by value void put(TimeOfDay time); // Pass by value};

4.11 Classes 147
interface I2 { Time* get(); // Pass by reference};
In this example, clients dealing with interface I1 are aware of the TimeOfDay class and pass it by value whereas clients dealing with interface I2 deal only with the Time interface. However, the actual implementation of the Time interface in the server uses TimeOfDay instances.
Be careful when designing systems that use such mixed pass-by-value and pass-by-reference semantics. Unless you are clear about what parts of the system deal with the interface (pass by reference) aspects and the class (pass by value) aspects, you can end up with something that is more confusing than helpful.
A good example of putting this feature to use can be found in Freeze (see Chapter 39), which allows you to add classes to an existing interface to implement persistence.
4.11.12 Passing Interfaces by Value
Consider the following definitions:
interface Time { idempotent TimeOfDay getTime(); // ...};interface Record { void addTimeStamp(Time t); // Note: Time t, not Time* t // ...};
Note that addTimeStamp accepts a parameter of type Time, not of type Time*. The question is, what does it mean to pass an interface by value? Obviously, at run time, we cannot pass an an actual interface to this operation because interfaces are abstract and cannot be instantiated. Neither can we pass a proxy to a Time object to addTimeStamp because a proxy cannot be passed where an interface is expected.
However, what we can pass to addTimeStamp is something that is not abstract and derives from the Time interface. For example, at run time, we could pass an instance of our TimeOfDay class from the previous section. Because the TimeOfDay class derives from the Time interface, the class type is compatible with

148 The Slice Language
the formal parameter type Time and, at run time, what is sent over the wire to the server is the TimeOfDay class instance.
4.12 Forward Declarations
Both interfaces and classes can be forward declared. Forward declarations permit the creation of mutually dependent objects, for example:
module Family { interface Child; // Forward declaration sequence<Child*> Children; // OK interface Parent { Children getChildren(); // OK }; interface Child { // Definition Parent* getMother(); Parent* getFather(); };};
Without the forward declaration of Child, the definition obviously could not compile because Child and Parent are mutually dependent interfaces. You can use forward-declared interfaces and classes to define types (such as the Children sequence in the previous example). Forward-declared interfaces and classes are also legal as the type of a structure, exception, or class member, as the value type of a dictionary, and as the parameter and return type of an operation. However, you cannot inherit from a forward-declared interface or class until after its defini-tion has been seen by the compiler:
interface Base; // Forward declarationinterface Derived1 extends Base {}; // Error!interface Base {}; // Definitioninterface Derived2 extends Base {}; // OK, definition was seen

4.13 Type IDs 149
Not inheriting from a forward-declared base interface or class until its definition is seen is necessary because, otherwise, the compiler could not enforce that derived interfaces must not redefine operations that appear in base interfaces.10
4.13 Type IDs
Each user-defined Slice type has an internal type identifier, known as its type ID. The type ID is simply the fully-qualified name of each type. For example, the type ID of the Child interface in the preceding example is ::Family::Chil-dren::Child. All type IDs for user-defined types start with a leading ::, so the type ID of the Family module is ::Family (not Family). In general, a type ID is formed by starting with the global scope (::) and forming the fully-qualified name of a type by appending each module name in which the type is nested, and ending with the name of the type itself; the components of the type ID are sepa-rated by ::.
The type ID of a proxy is formed by appending a * to the type ID of an inter-face or class. For example, the type ID of a Child proxy is ::Family::Chil-dren::Child*.
The type ID of the Slice Object type is ::Ice::Object and the type ID of an Object proxy is ::Ice::Object*.
The type IDs for the remaining built-in types, such as int, bool, and so on, are the same as the corresponding keyword. For example, the type ID of int is int, and the type ID of string is string.
Type IDs are used internally by the Ice run time as a unique identifier for each type. For example, when an exception is raised, the marshaled form of the excep-tion that is returned to the client is preceded by its Type ID on the wire. The client-side run time first reads the Type ID and, based on that, unmarshals the remainder of the data as appropriate for the type of the exception.
Type IDs are also used by the ice_isA operation (see page 150).
10.A multi-pass compiler could be used, but the added complexity is not worth it.

150 The Slice Language
4.14 Operations on Object
The Object interface has a number of operations. We cannot define type Object in Slice because Object is a keyword; regardless, here is what (part of) the defini-tion of Object would look like if it were legal:
sequence<string> StrSeq;interface Object { // "Pseudo" Slice! idempotent void ice_ping(); idempotent bool ice_isA(string typeID); idempotent string ice_id(); idempotent StrSeq ice_ids(); // ...};
Note that, apart from the illegal use of the keyword Object as the interface name, the operation names all contain the ice_ prefix. This prefix is reserved for use by Ice and cannot clash with a user-defined operation. This means that all Slice inter-faces can inherit from Object without name clashes. There are three built-in oper-ations that are commonly used:
• ice_ping
All interfaces support the ice_ping operation. That operation is useful for debugging because it provides a basic reachability test for an object: if the object exists and a message can successfully be dispatched to the object, ice_ping simply returns without error. If the object cannot be reached or does not exist, ice_ping throws a run-time exception that provides the reason for the failure.
• ice_isA
The ice_isA operation accepts a type identifier (such as the identifier returned by ice_id) and tests whether the target object supports the specified type, returning true if it does. You can use this operation to check whether a target object supports a particular type. For example, referring to Figure 4.7 once more, assume that you are holding a proxy to a target object of type Alarm-Clock. Table 4.2 illustrates the result of calling ice_isA on that proxy with

4.15 Local Types 151
various arguments. (We assume that all type in Figure 4.7 are defined in a module Times):
As expected, ice_isA returns true for ::Times::Clock and ::Times::AlarmClock and also returns true for ::Ice::Object (because all interfaces support that type). Obviously, an AlarmClock supports neither the Radio nor the RadioClock interfaces, so ice_isA returns false for these types.
• ice_id
The ice_id operation returns the type ID (see Section 4.13) of the most-derived type of an interface.
• ice_ids
The ice_ids operation returns a sequence of type IDs that contains all of the type IDs supported by an interface. For example, for the RadioClock interface in Figure 4.7, ice_ids returns a sequence containing the type IDs ::Ice::Object, ::Times::Clock, ::Times::AlarmClock, ::Times::Radio, and ::Times::RadioClock.
4.15 Local Types
In order to access certain features of the Ice run time, you must use APIs that are provided by libraries. However, instead of defining an API that is specific to each implementation language, Ice defines its APIs in Slice using the local keyword. The advantage of defining APIs in Slice is that a single definition suffices to
Table 4.2. Calling ice_isA on a proxy denoting an object of type AlarmClock.
Argument Result
::Ice::Object true
::Times::Clock true
::Times::AlarmClock true
::Times::Radio false
::Times::RadioClock false

152 The Slice Language
define the API for all possible implementation languages. The actual language-specific API is then generated by the Slice compiler for each implementation language. Types that are provided by Ice libraries are defined using the Slice local keyword. For example:
module Ice { local interface ObjectAdapter { // ... };};
Any Slice definition (not just interfaces) can have a local modifier. If the local modifier is present, the Slice compiler does not generate marshaling code for the corresponding type. This means that a local type can never be accessed remotely because it cannot be transmitted between client and server. (The Slice compiler prevents use of local types in non-local contexts.)
In addition, local interfaces and local classes do not inherit from Ice::Object. Instead, local interfaces and classes have their own, completely separate inheritance hierarchy. At the root of this hierarchy is the type Ice::LocalObject, as shown in Figure 4.10.
Figure 4.10. Inheritance from LocalObject
Because local interfaces form a completely separate inheritance hierarchy, you cannot pass a local interface where a non-local interface is expected and vice-versa.
You rarely need to define local types for your own applications—the local keyword exists mainly to allow definition of APIs for the Ice run time. (Because local objects cannot be invoked remotely, there is little point for an application to define local objects; it might as well define ordinary programming-language objects instead.) However, there is one exception to this rule: servant locators must be implemented as local objects (see Section 32.7).
LocalObject«interface»
Other local interfaces...
ObjectAdapter«interface»

4.16 Names and Scoping 153
4.16 Names and Scoping
Slice has a number of rules regarding identifiers. You will typically not have to concern yourself with these. However, occasionally, it is good to know how Slice uses naming scopes and resolves identifiers.
4.16.1 Naming Scopes
The following Slice constructs establish a naming scope:
• the global (file) scope
• modules
• interfaces
• classes
• structures
• exceptions
• parameter lists
Within a naming scope, identifiers must be unique, that is, you cannot use the same identifier for different purposes. For example:
interface Bad { void op(int p, string p); // Error!};
Because a parameter list forms a naming scope, it is illegal to use the same identifier p for different parameters. Similarly, data members, operation names, interface and class names, etc. must be unique within their enclosing scope.
4.16.2 Case Sensitivity
Identifiers that differ only in case are considered identical, so you must use identi-fiers that differ not only in capitalization within a naming scope. For example:
struct Bad { int m; string M; // Error!};

154 The Slice Language
The Slice compiler also enforces consistent capitalization for identifiers. Once you have defined an identifier, you must use the same capitalization for that iden-tifier thereafter. For example, the following is in error:
sequence<string> StringSeq;interface Bad { stringSeq op(); // Error!};
Note that identifiers must not differ from a Slice keyword in case only. For example, the following is in error:
interface Module { // Error, "module" is a keyword // ...};
4.16.3 Qualified Names
The scope-qualification operator :: allows you to refer to a type in a non-local scope. For example:
module Types { sequence<long> LongSeq;};module MyApp { sequence<Types::LongSeq> NumberTree;};
Here, the qualified name Types::LongSeq refers to LongSeq defined in module Types. The global scope is denoted by a leading ::, so we could also refer to LongSeq as ::Types::LongSeq.
The scope-qualification operator also allows you to create mutually dependent interfaces that are defined in different modules. The obvious attempt to do this fails:
module Parents { interface Children::Child; // Syntax error! interface Mother { Children::Child* getChild(); }; interface Father { Children::Child* getChild(); };
4.16 Names and Scoping 155
};module Children { interface Child { Parents::Mother* getMother(); Parents::Father* getFather(); };};
This fails because it is syntactically illegal to forward-declare an interface in a different module. To make it work, we must use a reopened module:
module Children { interface Child; // Forward declaration};module Parents { interface Mother { Children::Child* getChild(); // OK }; interface Father { Children::Child* getChild(); // OK };};module Children { // Reopen module interface Child { // Define Child Parents::Mother* getMother(); Parents::Father* getFather(); };};
While this technique works, it is probably of dubious value: mutually dependent interfaces are, by definition, tightly coupled. On the other hand, modules are meant to be used to place related definitions into the same module, and unrelated definitions into different modules. Of course, this begs the question: if the inter-faces are so closely related that they depend on each other, why are they defined in different modules? In the interest of clarity, you probably should avoid this construct, even though it is legal.
4.16.4 Names in Nested Scopes
Names defined in an enclosing scope can be redefined in an inner scope. For example, the following is legal:

156 The Slice Language
module Outer { sequence<string> Seq; module Inner { sequence<short> Seq; };};
Within module Inner, the name Seq refers to a sequence of short values and hides the definition of Outer::Seq. You can still refer to the other definition by using explicit scope qualification, for example:
module Outer { sequence<string> Seq; module Inner { sequence<short> Seq; struct Confusing { Seq a; // Sequence of short ::Outer::Seq b; // Sequence of string }; };};
Needless to say, you should try to avoid such redefinitions—they make it harder for the reader to follow the meaning of a specification.
Same-named constructs cannot be nested inside each other. For example, a module named M cannot (recursively) contain any construct also named M. The same is true for interfaces, classes, structures, exceptions, and operations. For example, the following examples are all in error:
module M { interface M { /* ... */ }; // Error! interface I { void I(); // Error! void op(string op); // Error! }; struct S { long s; // Error, even if case differs! };};

4.16 Names and Scoping 157
module Outer { module Inner { interface Outer { // Error! // ... }; };};
The reason for this restriction is that nested types that have the same name are difficult to map into some languages. For example, C++ and Java reserve the name of a class as the name of the constructor, so an interface I could not contain an operation named I without artificial rules to avoid the name clash.
Similarly, some languages (such as C# prior to version 2.0) do not permit a qualified name to be anchored at the global scope. If a nested module or type is permitted to have the same name as the name of an enclosing module, it can become impossible to generate legal code in some cases.
In the interest of simplicity, Slice simply prohibits the name of a nested module or type to be the same as the name of one of its enclosing modules.
4.16.5 Introduced Identifiers
Within a naming scope, an identifier is introduced at the point of first use; there-after, within that naming scope, the identifier cannot change meaning. For example:
module M { sequence<string> Seq; interface Bad { Seq op1(); // Seq and op1 introduced here int Seq(); // Error, Seq has changed meaning };};
The declaration of op1 uses Seq as its return type, thereby introducing Seq into the scope of interface Bad. Thereafter, Seq can only be used as a type name that denotes a sequence of strings, so the compiler flags the declaration of the second operation as an error.
Note that fully-qualified identifiers are not introduced into the current scope:

158 The Slice Language
module M { sequence<string> Seq; interface Bad { ::M::Seq op1(); // Only op1 introduced here int Seq(); // OK };};
In general, a fully-qualified name (one that is anchored at the global scope and, therefore, begins with a :: scope resolution operator) does not introduce any name into the current scope. On the other hand, a qualified name that is not anchored at the global scope introduces only the first component of the name:
module M { sequence<string> Seq; interface Bad { M::Seq op1(); // M and op1 introduced here, but not Seq int Seq(); // OK };};
4.16.6 Name Lookup RulesWhen searching for the definition of a name that is not anchored at the global scope, the compiler first searches backward in the current scope of a definition of the name. If it can find the name in the current scope, it uses that definition. Other-wise, the compiler successively searches enclosing scopes for the name until it reaches the global scope. Here is an example to illustrate this:
module M1 { sequence<double> Seq; module M2 { sequence<string> Seq; // OK, hides ::M1::Seq interface Base { Seq op1(); // Returns sequence of string }; }; module M3 { interface Derived extends M2::Base { Seq op2(); // Returns sequence of double

4.17 Metadata 159
}; sequence<bool> Seq; // OK, hides ::M1::Seq interface I { Seq op(); // Returns sequence of bool }; }; interface I { Seq op(); // Returns sequence of double };};
Note that M2::Derived::op2 returns a sequence of double, even though M1::Base::op1 returns a sequence of string. That is, the meaning of a type in a base interface is irrelevant to determining its meaning in a derived interface—the compiler always searches for a definition only in the current scope and enclosing scopes, and never takes the meaning of a name from a base interface or class.
4.17 Metadata
Slice has the concept of a metadata directive. For example:
["java:type:java.util.LinkedList"] sequence<int> IntSeq;
A metadata directive can appear as a prefix to any Slice definition. Metadata directives appear in a pair of square brackets and contain one or more string literals separated by commas. For example, the following is a syntactically valid metadata directives containing two strings:
["a", "b"] interface Example {};
Metadata directives are not part of the Slice language per se: the presence of a metadata directive has no effect on the client–server contract, that is, metadata directives do not change the Slice type system in any way. Instead, metadata direc-tives are targeted at specific back-ends, such as the code generator for a particular language mapping. In the preceding example, the java: prefix indicates that the directive is targeted at the Java code generator.
Metadata directives permit you to provide supplementary information that does not change the Slice types being defined, but somehow influences how the compiler will generate code for these definitions. For example, a metadata direc-

160 The Slice Language
tive java:type:java.util.LinkedList instructs the Java code generator to map a sequence to a linked list instead of an array (which is the default).
Metadata directives are also used to create proxies and skeletons that support Asynchronous Method Invocation (AMI) and Asynchronous Method Dispatch (AMD).
Apart from metadata directives that are attached to a specific definition, there are also global metadata directives. For example:
[["java:package:com.acme"]]
Note that a global metadata directive is enclosed by double square brackets, whereas a local metadata directive (one that is attached to a specific definition) is enclosed by single square brackets. Global metadata directives are used to pass instructions that affect the entire compilation unit. For example, the preceding metadata directive instructs the Java code generator to generate the contents of the source file into the Java package com.acme. Global metadata directives must precede any definitions in a file (but can appear following any #include direc-tives).
We discuss specific metadata directives in the relevant chapters to which they apply.
You can find a summary of all metadata directives in Appendix B.
4.18 Serializable Objects
Ice for Java and Ice for .NET allow you to send native Java and CLR objects as operation parameters. The Ice run time automatically serializes and deserializes the objects as part of an invocation. This mechanism allows you to transmit Java and CLR objects that do not have a corresponding Slice definition.
4.18.1 The serializable Metadata DirectiveTo enable serialization, the parameter type must be a byte sequence with appro-priate metadata. For example:
["java:serializable:SomePackage.JavaClass"]sequence<byte> JavaObj;interface JavaExample { void sendJavaObj(JavaObj o);};

4.18 Serializable Objects 161
["clr:serializable:SomeNamespace.CLRClass"]sequence<byte> CLRObj;interface CLRExample { void sendCLRObj(CLRObj o);};
The java:serializable metadata indicates that the corresponding byte sequence holds a Java serializable type named SomePackage.JavaClass. Your program must provide an implementation of this class; the class must be derived from java.io.Serializable. (See Section 10.15 for details of the language mapping.)
Similarly, the clr:serializable metadata indicates that the corresponding byte sequences holds a CLR serializable type named Some-Namespace.CLRClass. Your program must provide an implementation of this class; the class must be marked with the Serializable attribute. (See Section 14.14 for the details of the language mapping.)
4.18.2 Architectural Implications
The serializable metadata directive permits you to transmit arbitrary Java and CLR objects across the network without the need to define corresponding Slice classes or structures. This is mainly a convenience feature: you could achieve the same thing by using ordinary Slice byte sequences and explicitly serializing your Java or CLR objects into byte sequences at the sending end, and deserializing them at the receiving end. The serializable metadata conveniently takes care of these chores for you and so is simpler to use.
Despite its convenience, you should use this feature with caution because it destroys language transparency. For example, a serialized Java object is useless to a C++ server. All the C++ server can do with such an object is to pass it on to some other process as a byte sequence. (Of course, if that receiving process is a Java process, it can deserialize the byte sequence.)
Further, similar to Slice classes with methods (see Section 4.11.8), a serialized object can be deserialized only if client and server agree on the definition of the serialized class. In Java, this is enforced by the serialVersionUID field of each instance; in the CLR, client and server must reference identical assembly versions. This creates much tighter coupling of client and server than exchanging Slice-defined types.

162 The Slice Language
And, of course, if you build a system that relies on, for example, the exchange of serialized Java objects and you later find that you need to add C++ or C# components to the system, these components cannot do anything with the serial-ized Java objects other than pass them around as a blob of bytes.
So, if you do use these features, be clear that this implies tighter coupling between client and server, and that it creates additional library versioning and distribution issues because all parts of the system must agree on the implementa-tion of the serialized objects.
4.19 Deprecating Slice Definitions
All Slice compilers support a metadata directive that allows you to deprecate a Slice definition. For example:
interface Example { ["deprecated:someOperation() has been deprecated, \ use alternativeOperation() instead."] void someOperation(); void alternativeOperation();};
The [“deprecated”] metadata directive causes the compiler to emit code that generates a warning if you compile application code that uses a deprecated feature. This is useful if you want to remove a feature from a Slice definition but do not want to cause a hard error.
The message that follows the colon is optional; if you omit the message and use [“deprecated”], the Slice compilers insert a default message into the gener-ated code.
You can apply the [“deprecated”] metadata directive to Slice constructs other than operations (for example, a structure or sequence definition).

4.20 Using the Slice Compilers 163
4.20 Using the Slice Compilers
Ice provides a separate Slice compiler for each language mapping, as shown in Table 4.3.
The compilers share a similar command-line syntax:
<compiler-name> [options] file…
Regardless of which compiler you use, a number of command-line options are common to the compilers for any language mapping. (See the appropriate language mapping chapter for options that are specific to a particular language mapping.) The common command-line options are:
• -h, --help
Displays a help message.
• -v, --version
Displays the compiler version.
• -DNAME
Defines the preprocessor symbol NAME.
• -DNAME=DEF
Defines the preprocessor symbol NAME with the value DEF.
Table 4.3. The Slice compilers.
Language Compiler
C++ slice2cpp
Java slice2java
C# slice2cs
Python slice2py
Ruby slice2rb
Objective-C slice2objc

164 The Slice Language
• -UNAME
Undefines the preprocessor symbol NAME.
• -IDIR
Add the directory DIR to the search path for #include directives.
• -E
Print the preprocessor output on stdout.
• --output-dir DIR
Place the generated files into directory DIR.
• -d, --debug
Print debug information showing the operation of the Slice parser.
• --ice
Permit use of the normally reserved prefix Ice for identifiers. Use this option only when compiling the source code for the Ice run time.
• --underscore
Permit use of underscores in Slice identifiers.
The Slice compilers permit you to compile more than a single source file, so you can compile several Slice definitions at once, for example:
slice2cpp -I. file1.ice file2.ice file3.ice
4.21 Slice Checksums
As distributed applications evolve, developers and system administrators must be careful to ensure that deployed components are using the same client–server contract. Unfortunately, mistakes do happen, and it is not always readily apparent when they do.
To minimize the chances of this situation, the Slice compilers support an option that generates checksums for Slice definitions, thereby enabling two peers to verify that they share an identical client–server contract. The checksum for a Slice definition includes details such as parameter and member names and the order in which operations are defined, but ignores information that is not relevant to the client–server contract, such as metadata, comments, and formatting.
This option causes the Slice compiler to construct a dictionary that maps Slice type identifiers to checksums. A server typically supplies an operation that returns

4.22 Generating Slice Documentation 165
its checksum dictionary for the client to compare with its local version, at which point the client can take action if it discovers a mismatch.
The dictionary type is defined in the file Ice/SliceChecksumDict.ice as follows:
module Ice { dictionary<string, string> SliceChecksumDict;};
This type can be incorporated into an application’s Slice definitions like this:
#include <Ice/SliceChecksumDict.ice>interface MyServer { idempotent Ice::SliceChecksumDict getSliceChecksums(); // ...};
The key of each element in the dictionary is a Slice type ID (see Section 4.13), and the value is the checksum of that type.
For more information on generating and using Slice checksums, see the appro-priate language mapping chapter.
4.22 Generating Slice Documentation
If you look at the online Slice reference, you will find reference documentation for all the Slice definitions used by Ice and its services. In the binary distributions of Ice, you will also find HTML documentation that contains the same information. Both the PDF and the HTML documentation are generated from special comments in the Slice definitions by slice2html, a tool that scans Slice defini-tions for special comments and generates HTML pages for those comments.
As an example of documentation comments, here is the definition of Ice::Current:
/** * * Information about the current method invocation for servers. * Each operation on the server has a [Current] as its implicit * final parameter. [Current] is mostly used for Ice services. * Most applications ignore this parameter. * **/

166 The Slice Language
local struct Current { /** * The object adapter. **/ ObjectAdapter adapter; /** * Information about the connection over which the current * method invocation was received. If the invocation is direct * due to collocation optimization, this value is set to null. **/ Connection con; /** * The Ice object identity. **/ Identity id; /** * The facet. ***/ string facet; /** * The operation name. **/ string operation; /** * The mode of the operation. **/ OperationMode mode; /** * The request context, as received from the client. **/ Context ctx; /** * The request id unless oneway (0) or collocated (-1). **/ int requestId;};

4.22 Generating Slice Documentation 167
If you look at the comments, you will see these reflected in the documentation for Ice::Current in the online Slice API Reference.
4.22.1 Documentation Comments
Any comment that starts with /** and ends with **/ is a documentation comment. Such a comment can precede any Slice construct, such as a module, interface, structure, operation, and so on. Within a documentation comment, you can either start each line with a *, or you can leave the beginning of the line blank—slice2html can handle either convention:
/** * * This is a documentation comment for which every line * starts with a '*' character. **//** This is a documentation comment without a leading '*' for each line. Either style of comment is fine. **/
The first sentence of the documentation comment for a Slice construct should be a summary sentence. slice2html generates an index of all Slice constructs; the first sentence of the comments for each Slice construct is ued as a summary in that index.
Hyperlinks
Any Slice identifier enclosed in square brackets is presented as a hyperlink in code font. For example:
/** * An empty [name] denotes a null object. **/
This generates a hyperlink for the name markup that points at the definition of the corresponding Slice symbol. (The symbol can denote any Slice construct, such as a type, interface, parameter, or structure member.)

168 The Slice Language
Explicit Cross-References
The directive @see is recognized by slice2html. Where it appears, the gener-ated HTML contains a separate section titled “See Also”, followed by a list of Slice identifiers. For example:
/** * The object adapter, which is responsible for receiving requests * from endpoints, and for mapping between servants, identities, * and proxies. * * @see Communicator * @see ServantLocator **/
The Slice identifiers are listed in the corresponding “See Also” section as hyper-links in code font.
Markup for Operations
There are three directives specifically to document Slice operations: @param, @return, and @throws. For example:
/** * Look for an item with the specified * primary and secondary key. * * @param p The primary search key. * * @param s The secondary search key. * * @return The item that matches the specified keys. * * @throws NotFound Raised if no item matches the specified keys. **/Item findItem(Key p, Key s) throws NotFound;
slice2html generates separate “Parameters”, “Return Value”, and “Excep-tions” sections for these directives. Parameters are listed in the same order as they appear in the comments. (For clarity, that order should match the order of declara-tion of parameters for the corresponding operation.)

4.22 Generating Slice Documentation 169
General HTML Markup
A documentation comment can contain any markup that is permitted by HTML in that place. For example, you can create separate paragraphs with <P> and </P> elements:
/** * This is a comment for some Slice construct.</p> * * <p>This comment appears in a separate paragraph. **/
Note that you must neither begin a documentation comment with a <p> element nor end it with a </p> element because, in the generated HTML, documentation comments are already surrounded by <p> and </p> elements.
There are various other ways to create markup—for example, you can use <table> or <ul> elements. Please see the HTML specification [25] for details.
4.22.2 Using slice2html
slice2html uses the following syntax:
slice2html [options] slice_file…
If you have cross-references that span Slice files, you must compile all of the Slice files with a single invocation of slice2html.
The command supports the following options:
• -h, --help
Displays a help message.
• -v, --version
Displays the compiler version.
• -DNAME
Defines the preprocessor symbol NAME.
• -DNAME=DEF
Defines the preprocessor symbol NAME with the value DEF.
• -UNAME
Undefines the preprocessor symbol NAME.
• -IDIR
Add the directory DIR to the search path for #include directives.

170 The Slice Language
• -E
Print the preprocessor output on stdout.
• --output-dir DIR
Place the generated files into the directory DIR. (The default setting is the current directory.)
• --hdr FILE
Prepend FILE to each generated HTML file (except for _sindex.html). This allows you to replace the HTML header and other preamble information with a custom version, so you can connect style sheets to the generated pages. The specified file must include the <body> tag (but need not end with a <body> tag).
FILE is expected to contain the string TITLE on a line by itself, starting in column one. slice2html replaces the TITLE string with the fully-scoped name of the Slice symbol that is documented on the corresponding page.
• --ftr FILE
Append FILE to each generated HTML file (except for _sindex.html). This allows you to add, for example, a custom footer to each generated page.
FILE is must end with a </body> tag.
• --indexhdr FILE
slice2html generates a file _sindex.html that contains a table of contents of all Slice symbols that hyperlink to the corresponding page. This option allows you to replace the standard header with a custom header, for example, to attach a JavaScript. The specified file must include the <body> tag (but need not end with a <body> tag).
The default value is the setting of --hdr (if any).
• --indexftr FILE
Append FILE to the generated_sindex.html page. This allows you to add, for example, a custom footer to the table of contents, or to invoke a JavaScript.
FILE is must end with a </body> tag.
The default value is the setting of --ftr (if any).
• --image-dir DIR
With this option, slice2html looks in the specified directory for images to use for the generated navigation hyperlinks. (Without this option, text links

4.23 Summary 171
are used instead.) Please see the generated HTML for the names of the various image files. (They can easily be found by looking for img elements.)
• --logo-url URL
Use the specified URL as a hyperlink for the company logo that is added to each page (if --image-dir is specified). The company logo is expected to be in <image-dir>/logo.gif.
• --search ACTION
If this option is specified, the generated pages contain a search box that allows you to connect the generated pages to a search engine. On pressing the “Search” button, the specified ACTION is carrid out.
• --index NUM
slice2html generates sub-indexes for various Slice symbols. This option controls how many entries must be present before a sub-index is generated. For example, if NUM is set to 3, a sub-index will be generated only if there are three or more symbols that appear in that index. The default settings is 1, meaning that a sub-index is always generated. To disable sub-indexes entirely, set NUM to 0.
• --summary NUM
If this option is set, summary sentences that exceed NUM characters generate a warning.
• -d, --debug
Print debug information showing the operation of the Slice parser.
• --ice
Permit use of the normally reserved prefix Ice for identifiers. Use this option if your Slice definitions include Slice files for Ice or its services.
4.23 Summary
Slice is the fundamental mechanism for defining the client–server contract. By defining data types and interfaces in Slice, you create a language-independent API definition that are translated by a compiler into an API specific for a particular programming language.
Slice provides the usual built-in types and allows you to create user-defined types of arbitrary complexity, such as sequences, enumerations, structures,

172 The Slice Language
dictionaries, and classes. Polymorphism is catered for via inheritance of inter-faces, classes, and exceptions. In turn, exceptions provide you with facilities that permit sophisticated error reporting and handling. Modules permit you to group related parts of a specification and prevent pollution of the global namespace, and metadata can be used to augment Slice definitions with directives for specific compiler backends.
slice2html permits you to integrate Slice documentation with existing documentation tools.

173
Chapter 5Slice for a Simple File System
5.1 Chapter Overview
The remainder of this book uses a file system application to illustrate various aspects of Ice. Throughout the book, we progressively improve and modify the application such that it evolves into an application that is realistic and illustrates the architectural and coding aspects of Ice. This allows us to explore the capabili-ties of the platform to a realistic degree of complexity without overwhelming you with an inordinate amount of detail early on. Section 5.2 outlines the file system functionality, Section 5.3 develops the data types and interfaces that are required for the file system, and Section 5.4 presents the complete Slice definition for the application.
5.2 The File System Application
Our file system application implements a simple hierarchical file system, similar to the file systems we find in Windows or Unix. To keep code examples to manageable size, we ignore many aspects of a real file system, such as ownership, permissions, symbolic links, and a number of other features. However, we build enough functionality to illustrate how you could implement a fully-featured file system, and we pay attention to things such as performance and scalability. In this

174 Slice for a Simple File System
way, we can create an application that presents us with real-world complexity without getting buried in large amounts of code.
Our file system consists of directories and files. Directories are containers that can contain either directories or files, meaning that the file system is hierarchical. A dedicated directory is at the root of the file system. Each directory and file has a name. Files and directories with a common parent directory must have different names (but files and directories with different parent directories can have the same name). In other words, directories form a naming scope, and entries with a single directory must have unique names. Directories allow you to list their contents.
For now, we do not have a concept of pathnames, or the creation and destruc-tion of files and directories. Instead, the server provides a fixed number of directo-ries and files. (We will address the creation and destruction of files and directories in Chapter 34.)
Files can be read and written but, for now, reading and writing always replace the entire contents of a file; it is impossible to read or write only parts of a file.
5.3 Slice Definitions for the File System
Given the very simple requirements we just outlined, we can start designing inter-faces for the system. Files and directories have something in common: they have a name and both files and directories can be contained in directories. This suggests a design that uses a base type that provides the common functionality, and derived types that provide the functionality specific to directories and files, as shown in Figure 5.1.
Figure 5.1. Inheritance Diagram of the File System.
The Slice definitions for this look as follows:
File«interface»
Directory«interface»
Node«interface»

5.3 Slice Definitions for the File System 175
interface Node { // ...}; interface File extends Node { // ...}; interface Directory extends Node { // ...};
Next, we need to think about what operations should be provided by each inter-face. Seeing that directories and files have names, we can add an operation to obtain the name of a directory or file to the Node base interface:
interface Node { idempotent string name();};
The File interface provides operations to read and write a file. For simplicity, we limit ourselves to text files and we assume that read operations never fail and that only write operations can encounter error conditions. This leads to the following definitions:
exception GenericError { string reason;};sequence<string> Lines;interface File extends Node { idempotent Lines read(); idempotent void write (Lines text) throws GenericError;};
Note that read and write are marked idempotent because either operation can safely be invoked with the same parameter value twice in a row: the net result of doing so is the same has having (successfully) called the operation only once.
The write operation can raise an exception of type GenericError. The excep-tion contains a single reason data member, of type string. If a write operation fails for some reason (such as running out of file system space), the operation throws a GenericError exception, with an explanation of the cause of the failure provided in the reason data member.

176 Slice for a Simple File System
Directories provide an operation to list their contents. Because directories can contain both directories and files, we take advantage of the polymorphism provided by the Node base interface:
sequence<Node*> NodeSeq; interface Directory extends Node { idempotent NodeSeq list(); };
The NodeSeq sequence contains elements of type Node*. Because Node is a base interface of both Directory and File, the NodeSeq sequence can contain proxies of either type. (Obviously, the receiver of a NodeSeq must down-cast each element to either File or Directory in order to get at the operations provided by the derived interfaces; only the name operation in the Node base interface can be invoked directly, without doing a down-cast first. Note that, because the elements of NodeSeq are of type Node* (not Node), we are using pass-by-reference seman-tics: the values returned by the list operation are proxies that each point to a remote node on the server.
These definitions are sufficient to build a simple (but functional) file system. Obviously, there are still some unanswered questions, such as how a client obtains the proxy for the root directory. We will address these questions in the relevant implementation chapter.
5.4 The Complete Definition
We wrap our definitions in a module, resulting in the final definition as follows:
module Filesystem { interface Node { idempotent string name(); }; exception GenericError { string reason; }; sequence<string> Lines; interface File extends Node { idempotent Lines read(); idempotent void write(Lines text) throws GenericError;

5.4 The Complete Definition 177
}; sequence<Node*> NodeSeq; interface Directory extends Node { idempotent NodeSeq list(); }; };


Part III
C++ Mapping


181
Chapter 6Client-Side Slice-to-C++ Mapping
6.1 Chapter Overview
In this chapter, we present the client-side Slice-to-C++ mapping (see Chapter 8 for the server-side mapping). One part of the client-side C++ mapping concerns itself with rules for representing each Slice data type as a corresponding C++ type; we cover these rules in Section 6.3 to Section 6.10. Another part of the mapping deals with how clients can invoke operations, pass and receive parame-ters, and handle exceptions. These topics are covered in Section 6.11 to Section 6.13. Slice classes have the characteristics of both data types and inter-faces and are covered in Section 6.14. Section 6.15 presents asynchronous method invocations and, finally, Sections 6.16 and 6.17 show you how to use the Slice compiler and Slice checksums.
6.2 Introduction
The client-side Slice-to-C++ mapping defines how Slice data types are translated to C++ types, and how clients invoke operations, pass parameters, and handle errors. Much of the C++ mapping is intuitive. For example, Slice sequences map to STL vectors, so there is essentially nothing new you have to learn in order to use Slice sequences in C++.

182 Client-Side Slice-to-C++ Mapping
The rules that make up the C++ mapping are simple and regular. In particular, the mapping is free from the potential pitfalls of memory management: all types are self-managed and automatically clean up when instances go out of scope. This means that you cannot accidentally introduce a memory leak by, for example, ignoring the return value of an operation invocation or forgetting to deallocate memory that was allocated by a called operation.
The C++ mapping is fully thread-safe. For example, the reference counting mechanism for classes (see Section 6.14.6) is interlocked against parallel access, so reference counts cannot be corrupted if a class instance is shared among a number of threads. Obviously, you must still synchronize access to data from different threads. For example, if you have two threads sharing a sequence, you cannot safely have one thread insert into the sequence while another thread is iter-ating over the sequence. However, you only need to concern yourself with concur-rent access to your own data—the Ice run time itself is fully thread safe, and none of the Ice API calls require you to acquire or release a lock before you safely can make the call.
Much of what appears in this chapter is reference material. We suggest that you skim the material on the initial reading and refer back to specific sections as needed. However, we recommend that you read at least Section 6.9 to Section 6.13 in detail because these sections cover how to call operations from a client, pass parameters, and handle exceptions.
A word of advice before you start: in order to use the C++ mapping, you should need no more than the Slice definition of your application and knowledge of the C++ mapping rules. In particular, looking through the generated header files in order to discern how to use the C++ mapping is likely to be confusing because the header files are not necessarily meant for human consumption and, occasion-ally, contain various cryptic constructs to deal with operating system and compiler idiosyncrasies. Of course, occasionally, you may want to refer to a header file to confirm a detail of the mapping, but we recommend that you otherwise use the material presented here to see how to write your client-side code.
6.3 Mapping for Identifiers
Slice identifiers map to an identical C++ identifier. For example, the Slice identi-fier Clock becomes the C++ identifier Clock. There is one exception to this rule: if a Slice identifier is the same as a C++ keyword, the corresponding C++ identi-

6.4 Mapping for Modules 183
fier is prefixed with _cpp_. For example, the Slice identifier while is mapped as _cpp_while.1
A single Slice identifier often results in several C++ identifiers. For example, for a Slice interface named Foo, the generated C++ code uses the identifiers Foo and FooPrx (among others). If the interface has the name while, the generated identifiers are _cpp_while and whilePrx (not _cpp_whilePrx), that is, the prefix is applied only to those generated identifiers that actually require it.
6.4 Mapping for Modules
Slice modules map to C++ namespaces. The mapping preserves the nesting of the Slice definitions. For example:
module M1 { module M2 { // ... }; // ...};// ...module M1 { // Reopen M1 // ...};
This definition maps to the corresponding C++ definition:
namespace M1 { namespace M2 { // ... } // ...}// ...
1. As suggested in Section 4.5.3 on page 92, you should try to avoid such identifiers as much as possible.

184 Client-Side Slice-to-C++ Mapping
namespace M1 { // Reopen M1 // ...}
If a Slice module is reopened, the corresponding C++ namespace is reopened as well.
6.5 The Ice Namespace
All of the APIs for the Ice run time are nested in the Ice namespace, to avoid clashes with definitions for other libraries or applications. Some of the contents of the Ice namespace are generated from Slice definitions; other parts of the Ice namespace provide special-purpose definitions that do not have a corresponding Slice definition. We will incrementally cover the contents of the Ice namespace throughout the remainder of the book.
6.6 Mapping for Simple Built-In Types
The Slice built-in types are mapped to C++ types as shown in Table 6.1.
Table 6.1. Mapping of Slice built-in types to C++.
Slice C++
bool bool
byte Ice::Byte
short Ice::Short
int Ice::Int
long Ice::Long
float Ice::Float
double Ice::Double

6.6 Mapping for Simple Built-In Types 185
Slice bool and string map to C++ bool and std::string. The remaining built-in Slice types map to C++ type definitions instead of C++ native types. This allows the Ice run time to provide a definition as appropriate for each target archi-tecture. (For example, Ice::Int might be defined as long on one architecture and as int on another.)
Note that Ice::Byte is a typedef for unsigned char. This guarantees that byte values are always in the range .
All the basic types are guaranteed to be distinct C++ types, that is, you can safely overload functions that differ in only the types in Table 6.1.
6.6.1 Alternate String Mapping
You can use a metadata directive, ["cpp:type:wstring"], to map strings to C++ std::wstring. This is useful for applications that use languages with alpha-bets that cannot be represented in 8-bit characters. The metadata directive can be applied to any Slice construct. For containers (such as modules, interfaces, or structures), the metadata directive applies to all strings within the container. A corresponding metadata directive, ["cpp:type:string"] can be used to selec-tively override the mapping defined by the enclosing container. For example:
["cpp:type:wstring"]struct S1 { string x; // Maps to std::wstring ["cpp:type:wstring"] string y; // Maps to std::wstring ["cpp:type:string"] string z; // Maps to std::string};struct S2 { string x; // Maps to std::string ["cpp:type:string"]
string std::string
Table 6.1. Mapping of Slice built-in types to C++.
Slice C++

186 Client-Side Slice-to-C++ Mapping
string y; // Maps to std::string ["cpp:type:wstring"] string z; // Maps to std::wstring};
With these metadata directives, the strings are mapped as indicated by the comments. By default, narrow strings are encoded as UTF-8, and wide strings use Unicode in an encoding that is appropriate for the platform on which the applica-tion executes. You can override the encoding for narrow and wide strings by regis-tering a string converter with the Ice run time. (See Section 32.24 for details.)
6.7 Mapping for User-Defined Types
Slice supports user-defined types: enumerations, structures, sequences, and dictionaries.
6.7.1 Mapping for Enumerations
Enumerations map to the corresponding enumeration in C++. For example:
enum Fruit { Apple, Pear, Orange };
Not surprisingly, the generated C++ definition is identical:
enum Fruit { Apple, Pear, Orange };
6.7.2 Mapping for Structures
The mapping for structures maps Slice structures to C++ structures by default. In addition, you can use a metadata directive to map structures to classes (see page 189).
Default Mapping for Structures
Slice structures map to C++ structures with the same name. For each Slice data member, the C++ structure contains a public data member. For example, here is our Employee structure from Section 4.9.4 once more:

6.7 Mapping for User-Defined Types 187
struct Employee { long number; string firstName; string lastName;};
The Slice-to-C++ compiler generates the following definition for this structure:
struct Employee { Ice::Long number; std::string firstName; std::string lastName; bool operator==(const Employee&) const; bool operator!=(const Employee&) const; bool operator<(const Employee&) const; bool operator<=(const Employee&) const; bool operator>(const Employee&) const; bool operator>=(const Employee&) const;};
For each data member in the Slice definition, the C++ structure contains a corre-sponding public data member of the same name. Constructors are intentionally omitted so that the C++ structure qualifies as a plain old datatype (POD).
Note that the structure also contains comparison operators. These operators have the following behavior:
• operator==
Two structures are equal if (recursively), all its members are equal.
• operator!=
Two structures are not equal if (recursively), one or more of its members are not equal.
• operator<operator<=operator>operator>=
The comparison operators treat the members of a structure as sort order criteria: the first member is considered the first criterion, the second member the second criterion, and so on. Assuming that we have two Employee struc-tures, s1 and s2, this means that the generated code uses the following algo-rithm to compare s1 and s2:
bool Employee::operator<(const Employee& rhs) const{

188 Client-Side Slice-to-C++ Mapping
if (this == &rhs) // Short-cut self-comparison return false; // Compare first members // if (number < rhs.number) return true; else if (rhs.number < number) return false; // First members are equal, compare second members // if (firstName < rhs.firstName) return true; else if (rhs.firstName < firstName) return false; // Second members are equal, compare third members // if (lastName < rhs.lastName) return true; else if (rhs.lastName < lastName) return false; // All members are equal, so return false return false;}
The comparison operators are provided to allow the use of structures as the key type of Slice dictionaries, which are mapped to std::map in C++ (see Section 6.7.5).
Note that copy construction and assignment always have deep-copy semantics. You can freely assign structures or structure members to each other without having to worry about memory management. The following code fragment illus-trates both comparison and deep-copy semantics:
Employee e1, e2;e1.firstName = "Bjarne";e1.lastName = "Stroustrup";e2 = e1; // Deep copyassert(e1 == e2);e2.firstName = "Andrew"; // Deep copye2.lastName = "Koenig"; // Deep copyassert(e2 < e1);

6.7 Mapping for User-Defined Types 189
Because strings are mapped to std::string, there are no memory manage-ment issues in this code and structure assignment and copying work as expected. (The default member-wise copy constructor and assignment operator generated by the C++ compiler do the right thing.)
Class Mapping for Structures
Occasionally, the mapping of Slice structures to C++ structures can be inefficient. For example, you may need to pass structures around in your application, but want to avoid having to make expensive copies of the structures. (This overhead becomes noticeable for structures with many complex data members, such as sequences or strings.) Of course, you could pass the structures by const reference, but that can create its own share of problems, such as tracking the life time of the structures to avoid ending up with dangling references.
For this reason, you can enable an alternate mapping that maps Slice struc-tures to C++ classes. Classes (as opposed to structures) are reference-counted. Because the Ice C++ mapping provides smart pointers for classes (see Section 6.14.6), you can keep references to a class instance in many places in the code without having to worry about either expensive copying or life time issues.
The alternate mapping is enabled by a metadata directive, ["cpp:class"]. Here is our Employee structure once again, but this time with the additional meta-data directive:
["cpp:class"] struct Employee { long number; string firstName; string lastName;};
Here is the generated class:
class Employee : public IceUtil::Shared {public: Employee() {} Employee(::Ice::Long, const ::std::string&, const ::std::string&); ::Ice::Long number; ::std::string firstName; ::std::string lastName; bool operator==(const Employee&) const; bool operator!=(const Employee&) const; bool operator<(const Employee&) const;

190 Client-Side Slice-to-C++ Mapping
bool operator<=(const Employee&) const; bool operator>(const Employee&) const; bool operator>=(const Employee&) const;};
Note that the generated class, apart from a default constructor, has a constructor that accepts one argument for each member of the structure. This allows you to instantiate and initialize the class in a single statement (instead of having to first instantiate the class and then assign to its members).
As for the default structure mapping, the class contains one public data member for each data member of the corresponding Slice structure.
The comparison operators behave as for the default structure mapping.
For details on how to instantiate classes, and how to access them via smart pointers, please Section 6.14—the class mapping described there applies equally to Slice structures that are mapped to classes.
Constructors
Structures have an implicit default constructor that default-constructs each data member. Members having a complex type, such as strings, sequences, and diction-aries, are initialized by their own default constructor. However, the default constructor performs no initialization for members having one of the simple built-in types boolean, integer, floating point, or enumeration. For such a member, it is not safe to assume that the member has a reasonable default value. This is especially true for enumerated types as the member’s default value may be outside the legal range for the enumeration, in which case an exception will occur during marshaling unless the member is explicitly set to a legal value.
If you wish to ensure that data members of primitive types are initialized to reasonable values, you can declare default values in your Slice definition (see Section 4.9.2). The default constructor initializes each of these data members to its declared value.
The Slice compiler also generates a second constructor for structures that use the class mapping, and for structures having at least one member with a default value. This one-shot constructor has one parameter for each data member, allowing you to construct and initialize an instance in a single statement (instead of first having to construct the instance and then assigning to its members).

6.7 Mapping for User-Defined Types 191
6.7.3 Mapping for Sequences
Here is the definition of our FruitPlatter sequence from Section 4.9.3 once more:
sequence<Fruit> FruitPlatter;
The Slice compiler generates the following C++ definition for the FruitPlatter sequence:
typedef std::vector<Fruit> FruitPlatter;
As you can see, the sequence simply maps to an STL vector. As a result, you can use the sequence like any other STL vector, for example:
// Make a small platter with one Apple and one Orange//FruitPlatter p;p.push_back(Apple);p.push_back(Orange);
As you would expect, you can use all the usual STL iterators and algorithms with this vector.
6.7.4 Custom Sequence Mapping
In addition to the default mapping of sequences to vectors, Ice supports three addi-tional custom mappings for sequences.
STL Container Mapping for Sequences
You can override the default mapping of Slice sequences to C++ vectors with a metadata directive, for example:
[["cpp:include:list"]]module Food { enum Fruit { Apple, Pear, Orange }; ["cpp:type:std::list< ::Food::Fruit>"] sequence<Fruit> FruitPlatter;};
With this metadata directive, the sequence now maps to a C++ std::list:

192 Client-Side Slice-to-C++ Mapping
#include <list>namespace Food { typedef std::list< Food::Fruit> FruitPlatter; // ...}
The cpp:type metadata directive must be applied to a sequence definition; anything following the cpp:type: prefix is taken to be the name of the type. For example, we could use ["cpp:type:::std::list< ::Food::Fruit>"]. In that case, the compiler would use a fully-qualified name to define the type:
typedef ::std::list< ::Food::Fruit> FruitPlatter;
Note that the code generator inserts whatever string you specify following the cpp:type: prefix literally into the generated code. This means that, to avoid C++ compilation failures due to unknown symbols, you should use a qualified name for the type.
Also note that, to avoid compilation errors in the generated code, you must instruct the compiler to generate an appropriate include directive with the cpp:include global metadata directive. This causes the compiler to add the line
#include <list>
to the generated header file.
Instead of std::list, you can specify a type of your own as the sequence type, for example:
[["cpp:include:FruitBowl.h"]]module Food { enum Fruit { Apple, Pear, Orange }; ["cpp:type:FruitBowl"] sequence<Fruit> FruitPlatter;};
With these metadata directives, the compiler will use a C++ type FruitBowl as the sequence type, and add an include directive for the header file FruitBowl.h to the generated code.

6.7 Mapping for User-Defined Types 193
You can use any class of your choice as a sequence type, but the class must meet certain requirements. (vector, list, and deque happen to meet these requirements.)
• The class must have a default constructor and a single-argument constructor that takes the size of the sequence as an argument of unsigned integral type.
• The class must have a copy constructor.
• The class must provide a member function size that returns the number elements in the sequence as an unsigned integral type.
• The class must provide a member function swap that swaps the contents of the sequence with another sequence of the same type.
• The class must define iterator and const_iterator types and must provide begin and end member functions with the usual semantics; the iter-ators must be comparable for equality and inequality.
Less formally, this means that if the class looks like a vector, list, or deque with respect to these points, you can use it as a custom sequence implementation.
In addition to modifying the type of a sequence itself, you can also modify the mapping for particular return values or parameters (see Section 6.12). For example:
[["cpp:include:list"]][["cpp:include:deque"]]module Food { enum Fruit { Apple, Pear, Orange }; sequence<Fruit> FruitPlatter; interface Market { ["cpp:type:list< ::Food::Fruit>"] FruitPlatter barter( ["cpp:type:deque< ::Food::Fruit>"] FruitPlatter offer ); };};
With this definition, the default mapping of FruitPlatter to a C++ vector still applies but the return value of barter is mapped as a list, and the offer param-eter is mapped as a deque.

194 Client-Side Slice-to-C++ Mapping
Array Mapping for Sequences
The array mapping for sequences applies to input parameters (see Section 6.12) and to out parameters of AMI (see Section 6.15) and AMD (see Section 8.8) oper-ations . For example:
interface File { void write(["cpp:array"] Ice::ByteSeq contents);};
The cpp:array metadata directive instructs the compiler to map the contents parameter to a pair of pointers. With this directive, the write method on the proxy has the following signature:
void write(const std::pair<const Ice::Byte*, const Ice::Byte*>& contents);
To pass a byte sequence to the server, you pass a pair of pointers; the first pointer points at the beginning of the sequence, and the second point points one element past the end of the sequence.
Similarly, for the server side, the write method on the skeleton has the following signature:
virtual void write(const ::std::pair<const ::Ice::Byte*, const ::Ice::Byte*>&, const ::Ice::Current& = ::Ice::Current()) = 0;
The passed pointers denote the beginning and end of the sequence as a range [first, last) (that is, they use the usual STL semantics for iterators).
The array mapping is useful to achieve zero-copy passing of sequences. The pointers point directly into the server-side transport buffer; this allows the server-side run time to avoid creating a vector to pass to the operation implementation, thereby avoiding both allocating memory for the sequence and copying its contents into that memory.
Note that you can use the array mapping for any sequence type. However, it provides a performance advantage only for byte sequences (on all platforms) and for sequences of integral or floating point types (x86 platforms only).
Also note that the called operation in the server must not store a pointer into the passed sequence because the transport buffer into which the pointer points is deallocated as soon as the operation completes.
Range Mapping for Sequences
The range mapping for sequences is similar to the array mapping and exists for the same purpose, namely, to enable zero-copy of sequence parameters:
6.7 Mapping for User-Defined Types 195
interface File { void write(["cpp:range"] Ice::ByteSeq contents);};
The cpp:range metadata directive instructs the compiler to map the contents parameter to a pair of const_iterator. With this directive, the write method on the proxy has the following signature:
void write(const std::pair<Ice::ByteSeq::const_iterator, Ice::ByteSeq::const_iterator>& contents);
Similarly, for the server side, the write method on the skeleton has the following signature:
virtual void write(const ::std::pair< ::Ice::ByteSeq::const_iterator, ::Ice::ByteSeq::const_iterator>&, const ::Ice::Current& = ::Ice::Current()) = 0;
The passed iterators denote the beginning and end of the sequence as a range [first, last) (that is, they use the usual STL semantics for iterators).
The motivation for the range mapping is the same as for the array mapping: the passed iterators point directly into the server-side transport buffer and so avoid the need to create a temporary vector to pass to the operation.
As for the array mapping, the range mapping can be used with any sequence type, but offers a performance advantage only for byte sequences (on all plat-forms) and for sequences of integral type (x86 platforms only).
The operation must not store an iterator into the passed sequence because the transport buffer into which the iterator points is deallocated as soon as the opera-tion completes.
You can optionally add a type name to the cpp:range metadata directive, for example:
interface File { void write( ["cpp:range:std::deque<Ice::Byte>"] Ice::ByteSeq contents);};
This instructs the compiler to generate a pair of const_iterator for the spec-ified type:

196 Client-Side Slice-to-C++ Mapping
virtual void write(const ::std::pair< std::deque<Ice::Byte>::const_iterator, std::deque<Ice::Byte>::const_iterator>&, const ::Ice::Current& = ::Ice::Current()) = 0;
This is useful if you want to combine the range mapping with a custom sequence type that behaves like an STL container.
6.7.5 Mapping for Dictionaries
Here is the definition of our EmployeeMap from Section 4.9.4 once more:
dictionary<long, Employee> EmployeeMap;
The following code is generated for this definition:
typedef std::map<Ice::Long, Employee> EmployeeMap;
Again, there are no surprises here: a Slice dictionary simply maps to an STL map. As a result, you can use the dictionary like any other STL map, for example:
EmployeeMap em;Employee e;e.number = 42;e.firstName = "Stan";e.lastName = "Lippman";em[e.number] = e;e.number = 77;e.firstName = "Herb";e.lastName = "Sutter";em[e.number] = e;
Obviously, all the usual STL iterators and algorithms work with this map just as well as with any other STL container.
6.8 Mapping for Constants
Slice constant definitions map to corresponding C++ constant definitions. Here are the constant definitions we saw in Section 4.9.5 on page 103 once more:

6.9 Mapping for Exceptions 197
const bool AppendByDefault = true;const byte LowerNibble = 0x0f;const string Advice = "Don't Panic!";const short TheAnswer = 42;const double PI = 3.1416;enum Fruit { Apple, Pear, Orange };const Fruit FavoriteFruit = Pear;
Here are the generated definitions for these constants:
const bool AppendByDefault = true;const Ice::Byte LowerNibble = 15;const std::string Advice = "Don't Panic!";const Ice::Short TheAnswer = 42;const Ice::Double PI = 3.1416;enum Fruit { Apple, Pear, Orange };const Fruit FavoriteFruit = Pear;
All constants are initialized directly in the header file, so they are compile-time constants and can be used in contexts where a compile-time constant expression is required, such as to dimension an array or as the case label of a switch state-ment.
6.9 Mapping for Exceptions
Here is a fragment of the Slice definition for our world time server from Section 4.10.5 on page 120 once more:
exception GenericError { string reason;};exception BadTimeVal extends GenericError {};exception BadZoneName extends GenericError {};
These exception definitions map as follows:
class GenericError: public Ice::UserException {public: std::string reason; GenericError() {} explicit GenericError(const string&);

198 Client-Side Slice-to-C++ Mapping
virtual const std::string& ice_name() const; virtual Ice::Exception* ice_clone() const; virtual void ice_throw() const; // Other member functions here...};class BadTimeVal: public GenericError {public: BadTimeVal() {} explicit BadTimeVal(const string&); virtual const std::string& ice_name() const; virtual Ice::Exception* ice_clone() const; virtual void ice_throw() const; // Other member functions here...};class BadZoneName: public GenericError {public: BadZoneName() {} explicit BadZoneName(const string&); virtual const std::string& ice_name() const; virtual Ice::Exception* ice_clone() const; virtual void ice_throw() const;};
Each Slice exception is mapped to a C++ class with the same name. For each exception member, the corresponding class contains a public data member. (Obvi-ously, because BadTimeVal and BadZoneName do not have members, the generated classes for these exceptions also do not have members.)
The inheritance structure of the Slice exceptions is preserved for the generated classes, so BadTimeVal and BadZoneName inherit from GenericError.
Each exception has three additional member functions:
• ice_name
As the name suggests, this member function returns the name of the exception. For example, if you call the ice_name member function of a BadZone-Name exception, it (not surprisingly) returns the string "BadZoneName". The ice_name member function is useful if you catch exceptions generi-cally and want to produce a more meaningful diagnostic, for example:
try { // ...} catch (const Ice::GenericError& e) {

6.9 Mapping for Exceptions 199
cerr << "Caught an exception: " << e.ice_name() << endl;}
If an exception is raised, this code prints the name of the actual exception (BadTimeVal or BadZoneName) because the exception is being caught by reference (to avoid slicing).
• ice_clone
This member function allows you to polymorphically clone an exception. For example:
try { // ...} catch (const Ice::UserException& e) { Ice::UserException* copy = e.clone();}
ice_clone is useful if you need to make a copy of an exception without knowing its precise run-time type. This allows you to remember the exception and throw it later by calling ice_throw.
• ice_throw
ice_throw allows you to throw an exception without knowing its precise run-time type. It is implemented as:
voidGenericError::ice_throw() const{ throw *this;}
You can call ice_throw to throw an exception that you previously cloned with ice_clone.
Each exception has a default constructor. This constructor performs memberwise initialization; for simple built-in types, such as integers, the constructor performs no initialization, whereas complex types, such as strings, sequences, and diction-aries are initialized by their respective default constructors.
An exception also has a second constructor that accepts one argument for each exception member. This constructor allows you to instantiate and initialize an exception in a single statement, instead of having to first instantiate the exception and then assign to its members. For derived exceptions, the constructor accepts one argument for each base exception member, plus one argument for each derived exception member, in base-to-derived order.

200 Client-Side Slice-to-C++ Mapping
Note that the generated exception classes contain other member functions that are not shown on page 197. However, those member functions are internal to the C++ mapping and are not meant to be called by application code.
All user exceptions ultimately inherit from Ice::UserException. In turn, Ice::UserException inherits from Ice::Exception (which is an alias for IceUtil::Exception):
namespace IceUtil { class Exception { virtual const std::string& ice_name() const; Exception* ice_clone() const; void ice_throw() const; virtual void ice_print(std::ostream&) const; // ... }; std::ostream& operator<<(std::ostream&, const Exception&); // ...}namespace Ice { typedef IceUtil::Exception Exception; class UserException: public Exception { public: virtual const std::string& ice_name() const = 0; // ... };}
Ice::Exception forms the root of the exception inheritance tree. Apart from the usual ice_name, ice_clone, and ice_throw member functions, it contains the ice_print member functions. ice_print prints the name of the exception. For example, calling ice_print on a BadTimeVal exception prints:
BadTimeVal
To make printing more convenient, operator<< is overloaded for Ice::Exception, so you can also write:
try { // ...} catch (const Ice::Exception& e) { cerr << e << endl;}

6.10 Mapping for Run-Time Exceptions 201
This produces the same output because operator<< calls ice_print inter-nally.
For Ice run time exceptions, ice_print also shows the file name and line number at which the exception was thrown.
Constructors
Exceptions have a default constructor that default-constructs each data member. Members having a complex type, such as strings, sequences, and dictionaries, are initialized by their own default constructor. However, the default constructor performs no initialization for members having one of the simple built-in types boolean, integer, floating point, or enumeration. For such a member, it is not safe to assume that the member has a reasonable default value. This is especially true for enumerated types as the member’s default value may be outside the legal range for the enumeration, in which case an exception will occur during marshaling unless the member is explicitly set to a legal value.
If you wish to ensure that data members of primitive types are initialized to reasonable values, you can declare default values in your Slice definition (see Section 4.10.2). The default constructor initializes each of these data members to its declared value.
Exceptions also have a second constructor that has one parameter for each data member. This allows you to construct and initialize a class instance in a single statement (instead of first having to construct the instance and then assigning to its members). For derived exceptions, this constructor has one param-eter for each of the base class’s data members, plus one parameter for each of the derived class’s data members, in base-to-derived order.
6.10 Mapping for Run-Time Exceptions
The Ice run time throws run-time exceptions for a number of pre-defined error conditions. All run-time exceptions directly or indirectly derive from Ice::LocalException (which, in turn, derives from Ice::Exception). Ice::LocalException has the usual member functions (ice_name, ice_clone, ice_throw, and (inherited from Ice::Exception), ice_print, ice_file, and ice_line).
An inheritance diagram for user and run-time exceptions appears in Figure 4.4 on page 117. By catching exceptions at the appropriate point in the hierarchy, you can handle exceptions according to the category of error they indicate:

202 Client-Side Slice-to-C++ Mapping
• Ice::Exception
This is the root of the complete inheritance tree. Catching Ice::Excep-tion catches both user and run-time exceptions.
• Ice::UserException
This is the root exception for all user exceptions. Catching Ice::UserEx-ception catches all user exceptions (but not run-time exceptions).
• Ice::LocalException
This is the root exception for all run-time exceptions. Catching Ice::LocalException catches all run-time exceptions (but not user exceptions).
• Ice::TimeoutException
This is the base exception for both operation-invocation and connection-estab-lishment timeouts.
• Ice::ConnectTimeoutException
This exception is raised when the initial attempt to establish a connection to a server times out.
For example, a ConnectTimeoutException can be handled as Connect-TimeoutException, TimeoutException, LocalException, or Exception.
You will probably have little need to catch run-time exceptions as their most-derived type and instead catch them as LocalException; the fine-grained error handling offered by the remainder of the hierarchy is of interest mainly in the implementation of the Ice run time. An exception to this rule are FacetNo-tExistException (see Chapter 33) and ObjectNotExistException (see Chapter 34), which you may want to catch explicitly.
6.11 Mapping for Interfaces
The mapping of Slice interfaces revolves around the idea that, to invoke a remote operation, you call a member function on a local class instance that represents the remote object. This makes the mapping easy and intuitive to use because, for all intents and purposes (apart from error semantics), making a remote procedure call is no different from making a local procedure call.

6.11 Mapping for Interfaces 203
6.11.1 Proxy Classes and Proxy Handles
On the client side, interfaces map to classes with member functions that corre-spond to the operations on those interfaces. Consider the following simple inter-face:
module M { interface Simple { void op(); };};
The Slice compiler generates the following definitions for use by the client:
namespace IceProxy { namespace M { class Simple; }}namespace M { class Simple; typedef IceInternal::ProxyHandle< ::IceProxy::M::Simple> SimplePrx; typedef IceInternal::Handle< ::M::Simple> SimplePtr;}namespace IceProxy { namespace M { class Simple : public virtual IceProxy::Ice::Object { public: typedef ::M::SimplePrx ProxyType; typedef ::M::SimplePtr PointerType; void op(); void op(const Ice::Context&); // ... }; };}
As you can see, the compiler generates a proxy class Simple in the IceProxy::M namespace, as well as a proxy handle M::SimplePrx. In general, for a module M, the generated names are ::IceProxy::M::<inter-face-name> and ::M::<interface-name>Prx.

204 Client-Side Slice-to-C++ Mapping
In the client’s address space, an instance of IceProxy::M::Simple is the local ambassador for a remote instance of the Simple interface in a server and is known as a proxy class instance. All the details about the server-side object, such as its address, what protocol to use, and its object identity are encapsulated in that instance.
Note that Simple inherits from IceProxy::Ice::Object. This reflects the fact that all Ice interfaces implicitly inherit from Ice::Object. For each oper-ation in the interface, the proxy class has two overloaded member functions of the same name. For the preceding example, we find that the operation op has been mapped to two member functions op.
One of the overloaded member functions has a trailing parameter of type Ice::Context. This parameter is for use by the Ice run time to store informa-tion about how to deliver a request; normally, you do not need to supply a value here and can pretend that the trailing parameter does not exist. (We examine the Ice::Context parameter in detail in Chapter 32. The parameter is also used by IceStorm—see Chapter 44.)
Client-side application code never manipulates proxy class instances directly. In fact, you are not allowed to instantiate a proxy class directly. The following code will not compile because Ice::Object is an abstract base class with a protected constructor and destructor:
IceProxy::M::Simple s; // Compile-time error!
Proxy instances are always instantiated on behalf of the client by the Ice run time, so client code never has any need to instantiate a proxy directly. When the client receives a proxy from the run time, it is given a proxy handle to the proxy, of type <interface-name>Prx (SimplePrx for the preceding example). The client accesses the proxy via its proxy handle; the handle takes care of forwarding operation invocations to its underlying proxy, as well as reference-counting the proxy. This means that no memory-management issues can arise: deallocation of a proxy is automatic and happens once the last handle to the proxy disappears (goes out of scope).
Because the application code always uses proxy handles and never touches the proxy class directly, we usually use the term proxy to denote both proxy handle and proxy class. This reflects the fact that, in actual use, the proxy handle looks and feels like the underlying proxy class instance. If the distinction is important, we use the terms proxy class, proxy class instance, and proxy handle.
Also note that the generated proxy class contains type definitions for Proxy-Type and PointerType. These are provided so you can refer to the proxy type

6.11 Mapping for Interfaces 205
and smart pointer type (see Section 6.14.6) in template definitions without having to resort to preprocessor trickery, for example:
template<typename T>class ProxyWrapper {public: T::ProxyType proxy() const; // ...};
6.11.2 Methods on Proxy Handles
As we saw for the preceding example, the handle is actually a template of type IceInternal::ProxyHandle that takes the proxy class as the template parameter. This template has the usual constructor, copy constructor, and assign-ment operator:
• Default constructor
You can default-construct a proxy handle. The default constructor creates a proxy that points nowhere (that is, points at no object at all.) If you invoke an operation on such a null proxy, you get anIceUtil::NullHandleException:
try { SimplePrx s; // Default-constructed proxy s->op(); // Call via nil proxy assert(0); // Can't get here} catch (const IceUtil::NullHandleException&) { cout << "As expected, got a NullHandleException" << endl;}
• Copy constructor
The copy constructor ensures that you can construct a proxy handle from another proxy handle. Internally, this increments a reference count on the proxy; the destructor decrements the reference count again and, once the count drops to zero, deallocates the underlying proxy class instance. That way, memory leaks are avoided:
{ // Enter new scope SimplePrx s1 = ...; // Get a proxy from somewhere SimplePrx s2(s1); // Copy-construct s2 assert(s1 == s2); // Assertion passes} // Leave scope; s1, s2, and the // underlying proxy instance

206 Client-Side Slice-to-C++ Mapping
// are deallocated
Note the assertion in this example: proxy handles support comparison (see Section 6.11.4).
• Assignment operator
You can freely assign proxy handles to each other. The handle implementation ensures that the appropriate memory-management activities take place. Self-assignment is safe and you do not have to guard against it:
SimplePrx s1 = ...; // Get a proxy from somewhereSimplePrx s2; // s2 is nils2 = s1; // both point at the same objects1 = 0; // s1 is nils2 = 0; // s2 is nil
Widening assignments work implicitly. For example, if we have two inter-faces, Base and Derived, we can widen a DerivedPrx to a BasePrx implicitly:
BasePrx base;DerivedPrx derived;base = derived; // Fine, no problemderived = base; // Compile-time error
Implicit narrowing conversions result in a compile error, so the usual C++ semantics are preserved: you can always assign a derived type to a base type, but not vice versa.
• Checked cast
Proxy handles provide a checkedCast method:
namespace IceInternal { template<typename T> class ProxyHandle : public IceUtil::HandleBase<T> { public: template<class Y> static ProxyHandle checkedCast(const ProxyHandle<Y>& r); template<class Y> static ProxyHandle checkedCast(const ProxyHandle<Y>& r, const ::Ice::Context& c); // ... };

6.11 Mapping for Interfaces 207
}
A checked cast has the same function for proxies as a C++ dynamic_cast has for pointers: it allows you to assign a base proxy to a derived proxy. If the base proxy’s actual run-time type is compatible with the derived proxy’s static type, the assignment succeeds and, after the assignment, the derived proxy denotes the same object as the base proxy. Otherwise, if the base proxy’s run-time type is incompatible with the derived proxy’s static type, the derived proxy is set to null. Here is an example to illustrate this:
BasePrx base = ...; // Initialize base proxyDerivedPrx derived;derived = DerivedPrx::checkedCast(base);if (derived) { // Base has run-time type Derived, // use derived...} else { // Base has some other, unrelated type}
The expression DerivedPrx::checkedCast(base) tests whether base points at an object of type Derived (or an object with a type that is derived from Derived). If so, the cast succeeds and derived is set to point at the same object as base. Otherwise, the cast fails and derived is set to the null proxy.
Note that checkedCast is a static member function so, to do a down-cast, you always use the syntax <interface-name>Prx::checkedCast.
Also note that you can use proxies in boolean contexts. For example, if (proxy) returns true if the proxy is not null (see Section 6.11.4).
A checkedCast typically results in a remote message to the server.2 The message effectively asks the server “is the object denoted by this reference of type Derived?” The reply from the server is communicated to the application code in form of a successful (non-null) or unsuccessful (null) result. Sending a remote message is necessary because, as a rule, there is no way for the client to find out what the actual run-time type of a proxy is without confirmation from the server. (For example, the server may replace the implementation of
2. In some cases, the Ice run time can optimize the cast and avoid sending a message. However, the optimization applies only in narrowly-defined circumstances, so you cannot rely on a checkedCast not sending a message.

208 Client-Side Slice-to-C++ Mapping
the object for an existing proxy with a more derived one.) This means that you have to be prepared for a checkedCast to fail. For example, if the server is not running, you will receive a ConnectFailedException; if the server is running, but the object denoted by the proxy no longer exists, you will receive an ObjectNotExistException.
• Unchecked cast
In some cases, it is known that an object supports a more derived interface than the static type of its proxy. For such cases, you can use an unchecked down-cast:
namespace IceInternal { template<typename T> class ProxyHandle : public IceUtil::HandleBase<T> { public: template<class Y> static ProxyHandle uncheckedCast(const ProxyHandle<Y>& r); // ... };}
An uncheckedCast provides a down-cast without consulting the server as to the actual run-time type of the object, for example:
BasePrx base = ...; // Initialize to point at a DerivedDerivedPrx derived;derived = DerivedPrx::uncheckedCast(base);// Use derived...
You should use an uncheckedCast only if you are certain that the proxy indeed supports the more derived type: an uncheckedCast, as the name implies, is not checked in any way; it does not contact the object in the server and, if it fails, it does not return null. (An unchecked cast is implemented internally like a C++ static_cast, no checks of any kind are made). If you use the proxy resulting from an incorrect uncheckedCast to invoke an operation, the behavior is undefined. Most likely, you will receive an Opera-tionNotExistException, but, depending on the circumstances, the Ice run time may also report an exception indicating that unmarshaling has failed, or even silently return garbage results.
Despite its dangers, uncheckedCast is still useful because it avoids the cost of sending a message to the server. And, particularly during initialization (see Chapter 7), it is common to receive a proxy of static type
6.11 Mapping for Interfaces 209
Ice::Object, but with a known run-time type. In such cases, an uncheckedCast saves the overhead of sending a remote message.
• Stream insertion and stringification
For convenience, proxy handles also support insertion of a proxy into a stream, for example:
Ice::ObjectPrx p = ...;cout << p << endl;
This code is equivalent to writing:
Ice::ObjectPrx p = ...;cout << p->ice_toString() << endl;
Either code prints the stringified proxy (see Appendix E). You could also achieve the same thing by writing:
Ice::ObjectPrx p = ...;cout << communicator->proxyToString(p) << endl;
The advantage of using the ice_toString member function instead of proxyToString is that you do not need to have the communicator avail-able at the point of call.
6.11.3 Using Proxy Methods
The base proxy class ObjectPrx supports a variety of methods for customizing a proxy (see Section 32.11). Since proxies are immutable, each of these “factory methods” returns a copy of the original proxy that contains the desired modifica-tion. For example, you can obtain a proxy configured with a ten second timeout as shown below:
Ice::ObjectPrx proxy = communicator->stringToProxy(...);proxy = proxy->ice_timeout(10000);
A factory method returns a new proxy object if the requested modification differs from the current proxy, otherwise it returns the current proxy. With few excep-tions, factory methods return a proxy of the same type as the current proxy, there-fore it is generally not necessary to repeat a down-cast after using a factory method. The example below demonstrates these semantics:
Ice::ObjectPrx base = communicator->stringToProxy(...);HelloPrx hello = HelloPrx::checkedCast(base);hello = hello->ice_timeout(10000); # Type is preservedhello->sayHello();

210 Client-Side Slice-to-C++ Mapping
The only exceptions are the factory methods ice_facet and ice_identity. Calls to either of these methods may produce a proxy for an object of an unrelated type, therefore they return a base proxy that you must subsequently down-cast to an appropriate type.
6.11.4 Object Identity and Proxy Comparison
Apart from the methods discussed in Section 6.11.2, proxy handles also support comparison. Specifically, the following operators are supported:
• operator==operator!=
These operators permit you to compare proxies for equality and inequality. To test whether a proxy is null, use a comparison with the literal 0, for example:
if (proxy == 0) // It's a nil proxyelse // It's a non-nil proxy
• operator<operator<=operator>operator>=
Proxies support comparison. This allows you to place proxies into STL containers such as maps or sorted lists.
• Boolean comparison
Proxies have a conversion operator to bool. The operator returns true if a proxy is not null, and false otherwise. This allows you to write:
BasePrx base = ...;if (base) // It's a non-nil proxyelse // It's a nil proxy
Note that proxy comparison uses all of the information in a proxy for the compar-ison. This means that not only the object identity must match for a comparison to succeed, but other details inside the proxy, such as the protocol and endpoint information, must be the same. In other words, comparison with == and != tests for proxy identity, not object identity. A common mistake is to write code along the following lines:

6.11 Mapping for Interfaces 211
Ice::ObjectPrx p1 = ...; // Get a proxy...Ice::ObjectPrx p2 = ...; // Get another proxy...if (p1 != p2) { // p1 and p2 denote different objects // WRONG!} else { // p1 and p2 denote the same object // Correct}
Even though p1 and p2 differ, they may denote the same Ice object. This can happen because, for example, both p1 and p2 embed the same object identity, but each use a different protocol to contact the target object. Similarly, the protocols may be the same, but denote different endpoints (because a single Ice object can be contacted via several different transport endpoints). In other words, if two proxies compare equal with ==, we know that the two proxies denote the same object (because they are identical in all respects); however, if two proxies compare unequal with ==, we know absolutely nothing: the proxies may or may not denote the same object.
To compare the object identities of two proxies, you can use helper functions in the Ice namespace:
namespace Ice { bool proxyIdentityLess(const ObjectPrx&, const ObjectPrx&); bool proxyIdentityEqual(const ObjectPrx&, const ObjectPrx&); bool proxyIdentityAndFacetLess(const ObjectPrx&, const ObjectPrx&); bool proxyIdentityAndFacetEqual(const ObjectPrx&, const ObjectPrx&);}
The proxyIdentityEqual function returns true if the object identities embedded in two proxies are the same and ignores other information in the proxies, such as facet and transport information. To include the facet name (see Chapter 33) in the comparison, use proxyIdentityAndFacetEqual instead.
The proxyIdentityLess function establishes a total ordering on proxies. It is provided mainly so you can use object identity comparison with STL sorted containers. (The function uses name as the major ordering criterion, and cate-gory as the minor ordering criterion.) The proxyIdentityAndFacetLess

212 Client-Side Slice-to-C++ Mapping
function behaves similarly to proxyIdentityLess, except that it also compares the facet names of the proxies when their identities are equal.
proxyIdentityEqual and proxyIdentityAndFacetLess allow you to correctly compare proxies for object identity. The example below demon-strates how to use proxyIdentityEqual:
Ice::ObjectPrx p1 = ...; // Get a proxy...Ice::ObjectPrx p2 = ...; // Get another proxy...if (!Ice::proxyIdentityEqual(p1, p2) { // p1 and p2 denote different objects // Correct} else { // p1 and p2 denote the same object // Correct}
6.12 Mapping for Operations
As we saw in Section 6.11, for each operation on an interface, the proxy class contains a corresponding member function with the same name. To invoke an operation, you call it via the proxy handle. For example, here is part of the defini-tions for our file system from Section 5.4:
module Filesystem { interface Node { idempotent string name(); }; // ...};
The proxy class for the Node interface, tidied up to remove irrelevant detail, is as follows:
namespace IceProxy { namespace Filesystem { class Node : virtual public IceProxy::Ice::Object { public: std::string name(); // ... }; typedef IceInternal::ProxyHandle<Node> NodePrx;

6.12 Mapping for Operations 213
// ... } // ...}
The name operation returns a value of type string. Given a proxy to an object of type Node, the client can invoke the operation as follows:
NodePrx node = ...; // Initialize proxystring name = node->name(); // Get name via RPC
The proxy handle overloads operator-> to forward method calls to the under-lying proxy class instance which, in turn, sends the operation invocation to the server, waits until the operation is complete, and then unmarshals the return value and returns it to the caller.
Because the return value is of type string, it is safe to ignore the return value. For example, the following code contains no memory leak:
NodePrx node = ...; // Initialize proxynode->name(); // Useless, but no leak
This is true for all mapped Slice types: you can safely ignore the return value of an operation, no matter what its type—return values are always returned by value. If you ignore the return value, no memory leak occurs because the destructor of the returned value takes care of deallocating memory as needed.
6.12.1 Normal and idempotent Operations
You can add an idempotent qualifier to a Slice operation. As far as the signature for the corresponding proxy methods is concerned, idempotent has no effect. For example, consider the following interface:
interface Example { string op1(); idempotent string op2(); idempotent void op3(string s);};
The proxy class for this interface looks like this:
namespace IceProxy { class Example : virtual public IceProxy::Ice::Object { public: std::string op1(); std::string op2(); // idempotent

214 Client-Side Slice-to-C++ Mapping
void op3(const std::string&); // idempotent // ... };}
Because idempotent affects an aspect of call dispatch, not interface, it makes sense for the mapping to be unaffected by the idempotent keyword.
6.12.2 Passing Parameters
In-Parameters
The parameter passing rules for the C++ mapping are very simple: parameters are passed either by value (for small values) or by const reference (for values that are larger than a machine word). Semantically, the two ways of passing parame-ters are identical: it is guaranteed that the value of a parameter will not be changed by the invocation (with some caveats—see page 217 and page 1093).
Here is an interface with operations that pass parameters of various types from client to server:
struct NumberAndString { int x; string str;};sequence<string> StringSeq;dictionary<long, StringSeq> StringTable;interface ClientToServer { void op1(int i, float f, bool b, string s); void op2(NumberAndString ns, StringSeq ss, StringTable st); void op3(ClientToServer* proxy);};
The Slice compiler generates the following code for this definition:
struct NumberAndString { Ice::Int x; std::string str; // ...};typedef std::vector<std::string> StringSeq;

6.12 Mapping for Operations 215
typedef std::map<Ice::Long, StringSeq> StringTable;namespace IceProxy { class ClientToServer : virtual public IceProxy::Ice::Object { public: void op1(Ice::Int, Ice::Float, bool, const std::string&); void op2(const NumberAndString&, const StringSeq&, const StringTable&); void op3(const ClientToServerPrx&); // ... };}
Given a proxy to a ClientToServer interface, the client code can pass parameters as in the following example:
ClientToServerPrx p = ...; // Get proxy...p->op1(42, 3.14, true, "Hello world!"); // Pass simple literalsint i = 42;float f = 3.14;bool b = true;string s = "Hello world!";p->op1(i, f, b, s); // Pass simple variablesNumberAndString ns = { 42, "The Answer" };StringSeq ss;ss.push_back("Hello world!");StringTable st;st[0] = ss;p->op2(ns, ss, st); // Pass complex variablesp->op3(p); // Pass proxy
You can pass either literals or variables to the various operations. Because every-thing is passed by value or const reference, there are no memory-management issues to consider.
Out-Parameters
The C++ mapping passes out-parameters by reference. Here is the Slice definition from page 214 once more, modified to pass all parameters in the out direction:

216 Client-Side Slice-to-C++ Mapping
struct NumberAndString { int x; string str;};sequence<string> StringSeq;dictionary<long, StringSeq> StringTable;interface ServerToClient { void op1(out int i, out float f, out bool b, out string s); void op2(out NumberAndString ns, out StringSeq ss, out StringTable st); void op3(out ServerToClient* proxy);};
The Slice compiler generates the following code for this definition:
namespace IceProxy { class ServerToClient : virtual public IceProxy::Ice::Object { public: void op1(Ice::Int&, Ice::Float&, bool&, std::string&); void op2(NumberAndString&, StringSeq&, StringTable&); void op3(ServerToClientPrx&); // ... };}
Given a proxy to a ServerToClient interface, the client code can pass parameters as in the following example:
ServerToClientPrx p = ...; // Get proxy...int i;float f;bool b;string s;p->op1(i, f, b, s);// i, f, b, and s contain updated values nowNumberAndString ns;StringSeq ss;StringTable st;p->op2(ns, ss, st);
6.12 Mapping for Operations 217
// ns, ss, and st contain updated values nowp->op3(p);// p has changed now!
Again, there are no surprises in this code: the caller simply passes variables to an operation; once the operation completes, the values of those variables will be set by the server.
It is worth having another look at the final call:
p->op3(p); // Weird, but well-defined
Here, p is the proxy that is used to dispatch the call. That same variable p is also passed as an out-parameter to the call, meaning that the server will set its value. In general, passing the same parameter as both an input and output parameter is safe: the Ice run time will correctly handle all locking and memory-management activi-ties.
Another, somewhat pathological example is the following:
sequence<int> Row;sequence<Row> Matrix;interface MatrixArithmetic { void multiply(Matrix m1, Matrix m2, out Matrix result);};
Given a proxy to a MatrixArithmetic interface, the client code could do the following:
MatrixArithmeticPrx ma = ...; // Get proxy...Matrix m1 = ...; // Initialize one matrixMatrix m2 = ...; // Initialize second matrixma->squareAndCubeRoot(m1, m2, m1); // !!!
This code is technically legal, in the sense that no memory corruption or locking issues will arise, but it has surprising behavior: because the same variable m1 is passed as an input parameter as well as an output parameter, the final value of m1 is indeterminate—in particular, if client and server are collocated in the same address space, the implementation of the operation will overwrite parts of the input matrix m1 in the process of computing the result because the result is written to the same physical memory location as one of the inputs. In general, you should take care when passing the same variable as both an input and output parameter and only do so if the called operation guarantees to be well-behaved in this case.

218 Client-Side Slice-to-C++ Mapping
Chained Invocations
Consider the following simple interface containing two operations, one to set a value and one to get it:
interface Name { string getName(); void setName(string name);};
Suppose we have two proxies to interfaces of type Name, p1 and p2, and chain invocations as follows:
p2->setName(p1->getName());
This works exactly as intended: the value returned by p1 is transferred to p2. There are no memory-management or exception safety issues with this code.
6.13 Exception Handling
Any operation invocation may throw a run-time exception (see Section 6.10 on page 201) and, if the operation has an exception specification, may also throw user exceptions (see Section 6.9 on page 197). Suppose we have the following simple interface:
exception Tantrum { string reason;};interface Child { void askToCleanUp() throws Tantrum;};
Slice exceptions are thrown as C++ exceptions, so you can simply enclose one or more operation invocations in a try–catch block:
ChildPrx child = ...; // Get proxy...try { child->askToCleanUp(); // Give it a try...} catch (const Tantrum& t) { cout << "The child says: " << t.reason << endl;}

6.13 Exception Handling 219
Typically, you will catch only a few exceptions of specific interest around an oper-ation invocation; other exceptions, such as unexpected run-time errors, will typi-cally be dealt with by exception handlers higher in the hierarchy. For example:
void run(){ ChildPrx child = ...; // Get proxy... try { child->askToCleanUp(); // Give it a try... } catch (const Tantrum& t) { cout << "The child says: " << t.reason << endl; child->scold(); // Recover from error... } child->praise(); // Give positive feedback...}intmain(int argc, char* argv[]){ int status = 1; try { // ... run(); // ... status = 0; } catch (const Ice::Exception& e) { cerr << "Unexpected run-time error: " << e << endl; } // ... return status;}
This code handles a specific exception of local interest at the point of call and deals with other exceptions generically. (This is also the strategy we used for our first simple application in Chapter 3.)
For efficiency reasons, you should always catch exceptions by const refer-ence. This permits the compiler to avoid calling the exception’s copy constructor (and, of course, prevents the exception from being sliced to a base type).
Exceptions and Out-Parameters
The Ice run time makes no guarantees about the state of out-parameters when an operation throws an exception: the parameter may have still have its original value or may have been changed by the operation’s implementation in the target object.

220 Client-Side Slice-to-C++ Mapping
In other words, for out-parameters, Ice provides the weak exception guarantee [21] but does not provide the strong exception guarantee.3
Exceptions and Return Values
For return values, C++ provides the guarantee that a variable receiving the return value of an operation will not be overwritten if an exception is thrown. (Of course, this guarantee holds only if you do not use the same variable as both an out-parameter and to receive the return value of an invocation (see page 217).)
6.14 Mapping for Classes
Slice classes are mapped to C++ classes with the same name. The generated class contains a public data member for each Slice data member, and a virtual member function for each operation. Consider the following class definition:
class TimeOfDay { short hour; // 0 - 23 short minute; // 0 - 59 short second; // 0 - 59 string format(); // Return time as hh:mm:ss};
The Slice compiler generates the following code for this definition:4
class TimeOfDay;typedef IceInternal::ProxyHandle<IceProxy::TimeOfDay> TimeOfDayPrx;typedef IceInternal::Handle<TimeOfDay> TimeOfDayPtr;class TimeOfDay : virtual public Ice::Object {public: Ice::Short hour; Ice::Short minute; Ice::Short second;
3. This is done for reasons of efficiency: providing the strong exception guarantee would require more overhead than can be justified.
4. The ProxyType and PointerType definitions are for template programming (see page 204).

6.14 Mapping for Classes 221
virtual std::string format() = 0; TimeOfDay() {}; TimeOfDay(Ice::Short, Ice::Short, Ice::Short); virtual bool ice_isA(const std::string&); virtual const std::string& ice_id(); static const std::string& ice_staticId(); typedef TimeOfDayPrx ProxyType; typedef TimeOfDayPtr PointerType; // ...};
There are a number of things to note about the generated code:
1. The generated class TimeOfDay inherits from Ice::Object. This means that all classes implicitly inherit from Ice::Object, which is the ultimate ancestor of all classes. Note that Ice::Object is not the same as IceProxy::Ice::Object. In other words, you cannot pass a class where a proxy is expected and vice versa. (However, you can pass a proxy for the class—see Section 6.14.6.)
2. The generated class contains a public member for each Slice data member.
3. The generated class has a constructor that takes one argument for each data member, as well as a default constructor.
4. The generated class contains a pure virtual member function for each Slice operation.
5. The generated class contains additional member functions: ice_isA, ice_id, ice_staticId, and ice_factory.
6. The compiler generates a type definition TimeOfDayPtr. This type imple-ments a smart pointer that wraps dynamically-allocated instances of the class. In general, the name of this type is <class-name>Ptr. Do not confuse this with <class-name>Prx—that type exists as well, but is the proxy handle for the class, not a smart pointer.
There is quite a bit to discuss here, so we will look at each item in turn.

222 Client-Side Slice-to-C++ Mapping
6.14.1 Inheritance from Ice::Object
Like interfaces, classes implicitly inherit from a common base class, Ice::Object. However, as shown in Figure 6.1, classes inherit from Ice::Object instead of Ice::ObjectPrx (which is at the base of the inher-itance hierarchy for proxies). As a result, you cannot pass a class where a proxy is expected (and vice versa) because the base types for classes and proxies are not compatible.
Figure 6.1. Inheritance from Ice::ObjectPrx and Ice::Object.
Ice::Object contains a number of member functions:
namespace Ice { class Object : public virtual IceInternal::GCShared { public: virtual bool ice_isA(const std::string&, const Current& = Current()) const; virtual void ice_ping(const Current& = Current()) const; virtual std::vector<std::string> ice_ids( const Current& = Current()) const; virtual const std::string& ice_id( const Current& = Current()) const; static const std::string& ice_staticId(); virtual Ice::Int ice_getHash() const; virtual ObjectPtr ice_clone() const; virtual void ice_preMarshal(); virtual void ice_postUnmarshal(); virtual DispatchStatus ice_dispatch( Ice::Request&, const DispatchInterceptorAsyncCallbackPtr& = 0); virtual bool operator==(const Object&) const; virtual bool operator!=(const Object&) const;
Ice::ObjectPrx
Proxies... Classes...
Ice::Object

6.14 Mapping for Classes 223
virtual bool operator<(const Object&) const; virtual bool operator<=(const Object&) const; virtual bool operator>(const Object&) const; virtual bool operator>=(const Object&) const; };}
The member functions of Ice::Object behave as follows:
• ice_isA
This function returns true if the object supports the given type ID, and false otherwise.
• ice_ping
As for interfaces, ice_ping provides a basic reachability test for the class.
• ice_ids
This function returns a string sequence representing all of the type IDs supported by this object, including ::Ice::Object.
• ice_id
This function returns the actual run-time type ID for a class. If you call ice_id through a smart pointer to a base instance, the returned type id is the actual (possibly more derived) type ID of the instance.
• ice_staticId
This function returns the static type ID of a class.
• ice_getHash
This method returns a hash value for the class, allowing you to easily place classes into hash tables.
• ice_clone
This function makes a polymorphic shallow copy of a class (see page 236).
• ice_preMarshal
The Ice run time invokes this function prior to marshaling the object’s state, providing the opportunity for a subclass to validate its declared data members.
• ice_postUnmarshal
The Ice run time invokes this function after unmarshaling an object’s state. A subclass typically overrides this function when it needs to perform additional initialization using the values of its declared data members.

224 Client-Side Slice-to-C++ Mapping
• ice_dispatch
This function dispatches an incoming request to a servant. It is used in the implementation of dispatch interceptors (see Section 32.23).
• operator==operator!=operator<operator<=operator>operator>=
The comparison operators permit you to use classes as elements of STL sorted containers. Note that sort order, unlike for structures (see Section 6.12), is based on the memory address of the class, not on the contents of its data members of the class.
6.14.2 Data Members of Classes
By default, data members of classes are mapped exactly as for structures and exceptions: for each data member in the Slice definition, the generated class contains a corresponding public data member.
If you wish to restrict access to a data member, you can modify its visibility using the protected metadata directive. The presence of this directive causes the Slice compiler to generate the data member with protected visibility. As a result, the member can be accessed only by the class itself or by one of its subclasses. For example, the TimeOfDay class shown below has the protected metadata directive applied to each of its data members:
class TimeOfDay { ["protected"] short hour; // 0 - 23 ["protected"] short minute; // 0 - 59 ["protected"] short second; // 0 - 59 string format(); // Return time as hh:mm:ss};
The Slice compiler produces the following generated code for this definition:
class TimeOfDay : virtual public Ice::Object {public: virtual std::string format() = 0; // ...

6.14 Mapping for Classes 225
protected: Ice::Short hour; Ice::Short minute; Ice::Short second;};
For a class in which all of the data members are protected, the metadata directive can be applied to the class itself rather than to each member individually. For example, we can rewrite the TimeOfDay class as follows:
["protected"] class TimeOfDay { short hour; // 0 - 23 short minute; // 0 - 59 short second; // 0 - 59 string format(); // Return time as hh:mm:ss};
6.14.3 Class Constructors
Classes have a default constructor that default-constructs each data member. Members having a complex type, such as strings, sequences, and dictionaries, are initialized by their own default constructor. However, the default constructor performs no initialization for members having one of the simple built-in types boolean, integer, floating point, or enumeration. For such a member, it is not safe to assume that the member has a reasonable default value. This is especially true for enumerated types as the member’s default value may be outside the legal range for the enumeration, in which case an exception will occur during marshaling unless the member is explicitly set to a legal value.
If you wish to ensure that data members of primitive types are initialized to reasonable values, you can declare default values in your Slice definition (see Section 4.11.1). The default constructor initializes each of these data members to its declared value.
Classes also have a second constructor that has one parameter for each data member. This allows you to construct and initialize a class instance in a single statement (instead of first having to construct the instance and then assigning to its members).
For derived classes, the constructor has one parameter for each of the base class’s data members, plus one parameter for each of the derived class’s data members, in base-to-derived order. For example:

226 Client-Side Slice-to-C++ Mapping
class Base { int i;};class Derived extends Base { string s;};
This generates:
class Base : virtual public ::Ice::Object{public: ::Ice::Int i; Base() {}; explicit Base(::Ice::Int); // ...};class Derived : public Base{public: ::std::string s; Derived() {}; Derived(::Ice::Int, const ::std::string&); // ...};
Note that single-parameter constructors are defined as explicit, to prevent implicit argument conversions.
By default, derived classes derive non-virtually from their base class. If you need virtual inheritance, you can enable it using the ["cpp:virtual"] metadata directive (see Appendix B).
6.14.4 Operations of Classes
Operations of classes are mapped to pure virtual member functions in the gener-ated class. This means that, if a class contains operations (such as the format operation of our TimeOfDay class), you must provide an implementation of the operation in a class that is derived from the generated class. For example:5

6.14 Mapping for Classes 227
class TimeOfDayI : virtual public TimeOfDay {public: virtual std::string format() { std::ostringstream s; s << setw(2) << setfill('0') << hour << ":"; s << setw(2) << setfill('0') << minute << ":"; s << setw(2) << setfill('0') << second; return s.c_str(); }protected: virtual ~TimeOfDayI() {} // Optional};
6.14.5 Class Factories
Having created a class such as TimeOfDayI, we have an implementation and we can instantiate the TimeOfDayI class, but we cannot receive it as the return value or as an out-parameter from an operation invocation. To see why, consider the following simple interface:
interface Time { TimeOfDay get();};
When a client invokes the get operation, the Ice run time must instantiate and return an instance of the TimeOfDay class. However, TimeOfDay is an abstract class that cannot be instantiated. Unless we tell it, the Ice run time cannot magi-cally know that we have created a TimeOfDayI class that implements the abstract format operation of the TimeOfDay abstract class. In other words, we must provide the Ice run time with a factory that knows that the TimeOfDay abstract class has a TimeOfDayI concrete implementation. The Ice::Communi-cator interface provides us with the necessary operations:
module Ice { local interface ObjectFactory { Object create(string type); void destroy(); };
5. We discuss the motivation for the protected destructor on page 238.

228 Client-Side Slice-to-C++ Mapping
local interface Communicator { void addObjectFactory(ObjectFactory factory, string id); ObjectFactory findObjectFactory(string id); // ... };};
To supply the Ice run time with a factory for our TimeOfDayI class, we must implement the ObjectFactory interface:
module Ice { local interface ObjectFactory { Object create(string type); void destroy(); };};
The object factory’s create operation is called by the Ice run time when it needs to instantiate a TimeOfDay class. The factory’s destroy operation is called by the Ice run time when its communicator is destroyed. A possible implementation of our object factory is:
class ObjectFactory : public Ice::ObjectFactory {public: virtual Ice::ObjectPtr create(const std::string& type) { assert(type == M::TimeOfDay::ice_staticId()); return new TimeOfDayI; } virtual void destroy() {}};
The create method is passed the type ID (see Section 4.13) of the class to instantiate. For our TimeOfDay class, the type ID is "::M::TimeOfDay". Our implementation of create checks the type ID: if it matches, the method instanti-ates and returns a TimeOfDayI object. For other type IDs, the method asserts because it does not know how to instantiate other types of objects.
Note that we used the ice_staticId method to obtain the type ID rather than embedding a literal string. Using a literal type ID string in your code is discouraged because it can lead to errors that are only detected at run time. For example, if a Slice class or one of its enclosing modules is renamed and the literal string is not changed accordingly, a receiver will fail to unmarshal the object and the Ice run time will raise NoObjectFactoryException. By using ice_staticId instead, we avoid any risk of a misspelled or obsolete type ID, and we can discover at compile time if a Slice class or module has been renamed.

6.14 Mapping for Classes 229
Given a factory implementation, such as our ObjectFactory, we must inform the Ice run time of the existence of the factory:
Ice::CommunicatorPtr ic = ...;ic->addObjectFactory(new ObjectFactory, M::TimeOfDay::ice_staticId());
Now, whenever the Ice run time needs to instantiate a class with the type ID "::M::TimeOfDay", it calls the create method of the registered ObjectFac-tory instance.
The destroy operation of the object factory is invoked by the Ice run time when the communicator is destroyed. This gives you a chance to clean up any resources that may be used by your factory. Do not call destroy on the factory while it is registered with the communicator—if you do, the Ice run time has no idea that this has happened and, depending on what your destroy implementation is doing, may cause undefined behavior when the Ice run time tries to next use the factory.
The run time guarantees that destroy will be the last call made on the factory, that is, create will not be called concurrently with destroy, and create will not be called once destroy has been called. However, calls to create can be made concurrently.
Note that you cannot register a factory for the same type ID twice: if you call addObjectFactory with a type ID for which a factory is registered, the Ice run time throws an AlreadyRegisteredException.
Finally, keep in mind that if a class has only data members, but no operations, you need not create and register an object factory to transmit instances of such a class. Only if a class has operations do you have to define and register an object factory.
6.14.6 Smart Pointers for Classes
A recurring theme for C++ programmers is the need to deal with memory alloca-tions and deallocations in their programs. The difficulty of doing so is well known: in the face of exceptions, multiple return paths from functions, and callee-allocated memory that must be deallocated by the caller, it can be extremely diffi-cult to ensure that a program does not leak resources. This is particularly impor-tant in multi-threaded programs: if you do not rigorously track ownership of dynamic memory, a thread may delete memory that is still used by another thread, usually with disastrous consequences.

230 Client-Side Slice-to-C++ Mapping
To alleviate this problem, Ice provides smart pointers for classes. These smart pointers use reference counting to keep track of each class instance and, when the last reference to a class instance disappears, automatically delete the instance.6 Smart pointers are generated by the Slice compiler for each class type. For a Slice class <class-name>, the compiler generates a C++ smart pointer called <class-name>Ptr. Rather than showing all the details of the generated class, here is the basic usage pattern: whenever you allocate a class instance on the heap, you simply assign the pointer returned from new to a smart pointer for the class. Thereafter, memory management is automatic and the class instance is deleted once the last smart pointer for it goes out of scope:
{ // Open scope TimeOfDayPtr tod = new TimeOfDayI; // Allocate instance // Initialize... tod->hour = 18; tod->minute = 11; tod->second = 15; // ...} // No memory leak here!
As you can see, you use operator-> to access the members of the class via its smart pointer. When the tod smart pointer goes out of scope, its destructor runs and, in turn, the destructor takes care of calling delete on the underlying class instance, so no memory is leaked.
The smart pointers perform reference counting of their underlying class instance:
• The constructor of a class sets its reference count to zero.
• Initializing a smart pointer with a dynamically-allocated class instance causes the smart pointer to increment the reference count for the class by one.
• Copy constructing a smart pointer increments the reference count for the class by one.
• Assigning one smart pointer to another increments the target’s reference count and decrements the source’s reference count. (Self-assignment is safe.)
• The destructor of a smart pointer decrements the reference count by one and calls delete on its class instance if the reference count drops to zero.
6. Smart pointer classes are an example of the RAII (Resource Acquisition Is Initialization) idiom [20].
6.14 Mapping for Classes 231
Figure 6.2 shows the situation after default-constructing a smart pointer as follows:
TimeOfDayPtr tod;
This creates a smart pointer with an internal null pointer.
Figure 6.2. Newly initialized smart pointer.
Constructing a class instance creates that instance with a reference count of zero; the assignment to the class pointer causes the smart pointer to increment the class’s reference count:
tod = new TimeOfDayI; // Refcount == 1
The resulting situation is shown in Figure 6.3.
Figure 6.3. Initialized smart pointer.
Assigning or copy-constructing a smart pointer assigns and copy-constructs the smart pointer (not the underlying instance) and increments the reference count of the instance:
TimeOfDayPtr tod2(tod); // Copy-construct tod2TimeOfDayPtr tod3;tod3 = tod; // Assign to tod3
tod
tod1

232 Client-Side Slice-to-C++ Mapping
The situation after executing these statements is shown in Figure 6.4:
Figure 6.4. Three smart pointers pointing at the same class instance.
Continuing the example, we can construct a second class instance and assign it to one of the original smart pointers, tod2:
tod2 = new TimeOfDayI;
This decrements the reference count of the class originally denoted by tod2 and increments the reference count of the class that is assigned to tod2. The resulting situation is shown in Figure 6.5.
Figure 6.5. Three smart pointers and two instances.
You can clear a smart pointer by assigning zero to it:
tod = 0; // Clear handle
tod3
tod2
tod3
tod2
tod2
tod3
1

6.14 Mapping for Classes 233
As you would expect, this decrements the reference count of the instance, as shown in Figure 6.6.
Figure 6.6. Decremented reference count after clearing a smart pointer.
If a smart pointer goes out of scope, is cleared, or has a new instance assigned to it, the smart pointer decrements the reference count of its instance; if the reference count drops to zero, the smart pointer calls delete to deallocate the instance. The following code snippet deallocates the instance on the right by assigning tod2 to tod3:
tod3 = tod2;
This results in the situation shown in Figure 6.7.
Figure 6.7. Deallocation of an instance with a reference count of zero.
Copying and Assignment of Classes
Classes have a default memberwise copy constructor and assignment operator, so you can copy and assign class instances:
TimeOfDayPtr tod = new TimeOfDayI(2, 3, 4); // Create instanceTimeOfDayPtr tod2 = new TimeOfDayI(*tod); // Copy instanceTimeOfDayPtr tod3 = new TimeOfDayI;*tod3 = *tod; // Assign instance
tod1
tod2
tod3
1
tod0
tod2
tod3
2

234 Client-Side Slice-to-C++ Mapping
Copying and assignment in this manner performs a memberwise shallow copy or assignment, that is, the source members are copied into the target members; if a class contains class members (which are mapped as smart pointers), what is copied or assigned is the smart pointer, not the target of the smart pointer.
To illustrate this, consider the following Slice definitions:
class Node { int i; Node next;};
Assume that we initialize two instances of type Node as follows:
NodePtr p1 = new Node(99, new Node(48, 0));NodePtr p2 = new Node(23, 0);// ...*p2 = *p1; // Assignment
After executing the first two statements, we have the situation shown in Figure 6.8.
Figure 6.8. Class instances prior to assignment.
p11 1
i: 48next:
i: 99next:
p21
i: 23next:

6.14 Mapping for Classes 235
After executing the assignment statement, we end up with the result shown in Figure 6.9.
Figure 6.9. Class instances after assignment.
Note that copying and assignment also works for the implementation of abstract classes, such as our TimeOfDayI class, for example:
class TimeOfDayI;typedef IceUtil::Handle<TimeOfDayI> TimeOfDayIPtr;class TimeOfDayI : virtual public TimeOfDay { // As before...};
The default copy constructor and assignment operator will perform a memberwise copy or assignment of your implementation class:
TimeOfDayIPtr tod1 = new TimeOfDayI;TimeOfDayIPtr tod2 = new TimeOfDayI(*tod1); // Make copy
Of course, if your implementation class contains raw pointers (for which a memberwise copy would almost certainly be inappropriate), you must implement your own copy constructor and assignment operator that take the appropriate action (and probably call the base copy constructor or assignment operator to take care of the base part).
Note that the preceding code uses TimeOfDayIPtr as a typedef for IceUtil::Handle<TimeOfDayI>. This class is a template that contains the smart pointer implementation. If you want smart pointers for the implementation of an abstract class, you must define a smart pointer type as illustrated by this type definition.
p11 2
i: 48next:
i: 99next:
p21
i: 99next:

236 Client-Side Slice-to-C++ Mapping
Copying and assignment of classes also works correctly for derived classes: you can assign a derived class to a base class, but not vice-versa; during such an assignment, the derived part of the source class is sliced, as per the usual C++ assignment semantics.
Polymorphic Copying of Classes
As shown in Section 6.14.1 on page 222, the C++ mapping generates an ice_clone member function for every class:
class TimeOfDay : virtual public Ice::Object {public: // ... virtual Ice::ObjectPtr ice_clone() const;};
This member function makes a polymorphic shallow copy of a class: members that are not class members are deep copied; all members that are class members are shallow copied. To illustrate, consider the following class definition:
class Node { Node n1; Node n2;};
Assume that we have an instance of this class, with the n1 and n2 members initialized to point at separate instances, as shown in Figure 6.10.
Figure 6.10. A class instance pointing at two other instances.
n1
n2p1

6.14 Mapping for Classes 237
If we call ice_clone on the instance on the left, we end up with the situation shown in Figure 6.11.
Figure 6.11. Resulting graph after calling ice_clone on the left-most instance of Figure 6.10.
As you can see, class members are shallow copied, that is, ice_clone makes a copy of the class instance on which it is invoked, but does not copy any class instances that are pointed at by the copied instance.
Note that ice_clone returns a value of type Ice::ObjectPtr, to avoid problems with compilers that do not support covariant return types. The generated Ptr classes contain a dynamicCast member that allows you to safely down-cast the return value of ice_clone. For example, the code to achieve the situa-tion shown in Figure 6.11 looks as follows:
NodePtr p1 = new Node(new Node, new Node);NodePtr p2 = NodePtr::dynamicCast(p1->ice_clone());
ice_clone is generated by the Slice compiler for concrete classes (that is, classes that do not have operations). However, because classes with operations are abstract, for abstract classes, the generated ice_clone cannot know how to instantiate an instance of the derived concrete class (because the name of the derived class is not known). This means that, for abstract classes, the generated ice_clone throws a CloneNotImplementedException.
If you want to clone the implementation of an abstract class, you must over-ride the virtual ice_clone member in your concrete implementation class. For example:
class TimeOfDayI : public TimeOfDay {public: virtual Ice::ObjectPtr ice_clone() const { return new TimeOfDayI(*this); }};
n1
n2
n1
n2
p1
p2

238 Client-Side Slice-to-C++ Mapping
Null Smart Pointers
A null smart pointer contains a null C++ pointer to its underlying instance. This means that if you attempt to dereference a null smart pointer, you get an IceUtil::NullHandleException:
TimeOfDayPtr tod; // Construct null handletry { tod->minute = 0; // Dereference null handle assert(false); // Cannot get here} catch (const IceUtil::NullHandleException&) { ; // OK, expected} catch (...) { assert(false); // Must get NullHandleException}
Preventing Stack-Allocation of Class Instances
The Ice C++ mapping expects class instances to be allocated on the heap. Allo-cating class instances on the stack or in static variables is pragmatically useless because all the Ice APIs expect parameters that are smart pointers, not class instances. This means that, to do anything with a stack-allocated class instance, you must initialize a smart pointer for the instance. However, doing so does not work because it inevitably leads to a crash:
{ // Enter scope TimeOfDayI t; // Stack-allocated class instance TimeOfDayPtr todp; // Handle for a TimeOfDay instance todp = &t; // Legal, but dangerous // ...} // Leave scope, looming crash!
This goes badly wrong because, when todp goes out of scope, it decrements the reference count of the class to zero, which then calls delete on itself. However, the instance is stack-allocated and cannot be deleted, and we end up with unde-fined behavior (typically, a core dump).
The following attempt to fix this is also doomed to failure:
{ // Enter scope TimeOfDayI t; // Stack-allocated class instance TimeOfDayPtr todp; // Handle for a TimeOfDay instance

6.14 Mapping for Classes 239
todp = &t; // Legal, but dangerous // ... todp = 0; // Crash imminent!}
This code attempts to circumvent the problem by clearing the smart pointer explicitly. However, doing so also causes the smart pointer to drop the reference count on the class to zero, so this code ends up with the same call to delete on the stack-allocated instance as the previous example.
The upshot of all this is: never allocate a class instance on the stack or in a static variable. The C++ mapping assumes that all class instances are allocated on the heap and no amount of coding trickery will change this.7
You can prevent allocation of class instances on the stack or in static variables by adding a protected destructor to your implementation of the class: if a class has a protected destructor, allocation must be made with new, and static or stack allo-cation causes a compile time error. In addition, explicit calls to delete on a heap-allocated instance also are flagged at compile time. You may want to habitu-ally add a protected destructor to your implementation of abstract Slice classes to protect yourself from accidental heap allocation, as shown on page 226. (For Slice classes that do not have operations, the Slice compiler automatically adds a protected destructor.)
Smart Pointers and Constructors
Slice classes inherit their reference-counting behavior from the IceUtil::Shared class (see Appendix F), which ensures that reference counts are managed in a thread-safe manner. When a stack-allocated smart pointer goes out of scope, the smart pointer invokes the __decRef function on the refer-ence-counted object. Ignoring thread-safety issues, __decRef is implemented like this:
voidIceUtil::Shared::__decRef(){ if (--_ref == 0 && !_noDelete) delete this;}
7. You could abuse the __setNoDelete member to disable deallocation, but we strongly discourage you from doing this.

240 Client-Side Slice-to-C++ Mapping
In other words, when the smart pointer calls __decRef on the pointed-at instance and the reference count reaches zero (which happens when the last smart pointer for a class instance goes out of scope), the instance self-destructs by calling delete this.
However, as you can see, the instance self-destructs only if _noDelete is false (which it is by default, because the constructor initializes it to false). You can call __setNoDelete(true) to prevent this self-destruction and, later, call __setNoDelete(false) to enable it again. This is necessary if, for example, a class in its constructor needs to pass this to another function:
void someFunction(const TimeOfDayPtr& t){ // ...}TimeOfDayI::TimeOfDayI(){ someFunction(this); // Trouble looming here!}
At first glance, this code looks innocuous enough. While TimeOfDayI is being constructed, it passes this to someFunction, which expects a smart pointer. The compiler constructs a temporary smart pointer at the point of call (because the smart pointer template has a single-argument constructor that accepts a pointer to a heap-allocated instance, so the constructor acts a conversion function). However, this code fails badly. The TimeOfDayI instance is constructed with a statement such as:
TimeOfDayPtr tod = new TimeOfDayI;
The constructor of TimeOfDayI is called by operator new and, when the constructor starts executing, the reference count of the instance is zero (because that is what the reference count is initialized to by the Shared base class of TimeOfDayI). When the constructor calls someFunction, the compiler creates a temporary smart pointer, which increments the reference count of the instance and, once someFunction completes, the compiler dutifully destroys that temporary smart pointer again. But, of course, that drops the reference count back to zero and causes the TimeOfDayI instance to self-destruct by calling delete this. The net effect is that the call to new TimeOfDayI returns a pointer to an already deleted object, which is likely to cause the program to crash.
To get around the problem, you can call __setNoDelete:

6.14 Mapping for Classes 241
TimeOfDayI::TimeOfDayI(){ __setNoDelete(true); someFunction(this); __setNoDelete(false);}
The code disables self-destruction while someFunction uses its temporary smart pointer by calling __setNoDelete(true). By doing this, the reference count of the instance is incremented before someFunction is called and decre-mented back to zero when someFunction completes without causing the object to self-destruct. The constructor then re-enables self-destruction by calling __setNoDelete(false) before returning, so the statement
TimeOfDayPtr tod = new TimeOfDayI;
does the usual thing, namely to increment the reference count of the object to 1, despite the fact that a temporary smart pointer existed while the constructor ran.
In general, whenever a class constructor passes this to a function or another class that accepts a smart pointer, you must temporarily disable self-destruction.
Smart Pointers and Exception Safety
Smart pointers are exception safe: if an exception causes the thread of execution to leave a scope containing a stack-allocated smart pointer, the C++ run time ensures that the smart pointer’s destructor is called, so no resource leaks can occur:
{ // Enter scope... TimeOfDayPtr tod = new TimeOfDayI; // Allocate instance someFuncThatMightThrow(); // Might throw... // ...} // No leak here, even if an exception is thrown
If an exception is thrown, the destructor of tod runs and ensures that it deallo-cates the underlying class instance.
There is one potential pitfall you must be aware of though: if a constructor of a base class throws an exception, and another class instance holds a smart pointer to the instance being constructed, you can end up with a double deallocation. You can use the __setNoDelete mechanism to temporarily disable self-destruction in this case, as described in the previous section.

242 Client-Side Slice-to-C++ Mapping
Smart Pointers and Cycles
One thing you need to be aware of is the inability of reference counting to deal with cyclic dependencies. For example, consider the following simple self-refer-ential class:
class Node { int val; Node next;};
Intuitively, this class implements a linked list of nodes. As long as there are no cycles in the list of nodes, everything is fine, and our smart pointers will correctly deallocate the class instances. However, if we introduce a cycle, we have a problem:
{ // Open scope... NodePtr n1 = new Node; // N1 refcount == 1 NodePtr n2 = new Node; // N2 refcount == 1 n1->next = n2; // N2 refcount == 2 n2->next = n1; // N1 refcount == 2} // Destructors run: // N2 refcount == 1, // N1 refcount == 1, memory leak!
The nodes pointed to by n1 and n2 do not have names but, for the sake of illustra-tion, let us assume that n1’s node is called N1, and n2’s node is called N2. When we allocate the N1 instance and assign it to n1, the smart pointer n1 increments N1’s reference count to 1. Similarly, N2’s reference count is 1 after allocating the node and assigning it to n2. The next two statements set up a cyclic dependency between n1 and n2 by making their next pointers point at each other. This sets the reference count of both N1 and N2 to 2. When the enclosing scope closes, the destructor of n2 is called first and decrements N2’s reference count to 1, followed by the destructor of n1, which decrements N1’s reference count to 1. The net effect is that neither reference count ever drops to zero, so both N1 and N2 are leaked.
Garbage Collection of Class Instances
The previous example illustrates a problem that is generic to using reference counts for deallocation: if a cyclic dependency exists anywhere in a graph (possibly via many intermediate nodes), all nodes in the cycle are leaked.

6.14 Mapping for Classes 243
To avoid memory leaks due to such cycles, Ice for C++ contains a garbage collector. The collector identifies class instances that are part of one or more cycles but are no longer reachable from the program and deletes such instances:
• By default, garbage is collected whenever you destroy a communicator. This means that no memory is leaked when your program exits. (Of course, this assumes that you correctly destroy your communicators as described in Section 8.3.)
• You can also explicitly call the garbage collector by calling Ice::collectGarbage. For example, the leak caused by the preceding example can be avoided as follows:
{ // Open scope... NodePtr n1 = new Node; // N1 refcount == 1 NodePtr n2 = new Node; // N2 refcount == 1 n1->next = n2; // N1 refcount == 2 n2->next = n1; // N2 refcount == 2} // Destructors run: // N2 refcount == 1, // N1 refcount == 1Ice::collectGarbage(); // Deletes N1 and N2
The call to Ice::collectGarbage deletes the no longer reachable instances N1 and N2 (as well as any other non-reachable instances that may have accumulated earlier).
• Deleting leaked memory with explicit calls to the garbage collector can be inconvenient because it requires polluting the code with calls to the collector. You can ask the Ice run time to run a garbage collection thread that periodi-cally cleans up leaked memory by setting the property Ice.GC.Interval to a non-zero value.8 For example, setting Ice.GC.Interval to 5 causes the collector thread to run the garbage collector once every five seconds. You can trace the execution of the collector by setting Ice.Trace.GC to a non-zero value (Appendix D).
Note that the garbage collector is useful only if your program actually creates cyclic class graphs. There is no point in running the garbage collector in programs that do not create such cycles. (For this reason, the collector thread is disabled by
8. See Chapter 30 for how to set properties.

244 Client-Side Slice-to-C++ Mapping
default and runs only if you explicitly set Ice.GC.Interval to a non-zero value.)
Smart Pointer Comparison
As for proxy handles (see Section 6.11.4 on page 210), class handles support the comparison operators ==, !=, and <. This allows you to use class handles in STL sorted containers. Be aware that, for smart pointers, object identity is not used for the comparison, because class instances do not have identity. Instead, these opera-tors simply compare the memory address of the classes they point to. This means that operator== returns true only if two smart pointers point at the same phys-ical class instance:
// Create a class instance and initialize//TimeOfDayIPtr p1 = new TimeOfDayI;p1->hour = 23;p1->minute = 10;p1->second = 18;// Create another class instance with// the same member values//TimeOfDayIPtr p2 = new TimeOfDayI;p2->hour = 23;p2->minute = 10;p2->second = 18;assert(p1 != p2); // The two do not compare equalTimeOfDayIPtr p3 = p1; // Point at first class againassert(p1 == p3); // Now they compare equal
6.15 Asynchronous Method Invocation (AMI)
NOTE: As of version 3.4, Ice provides a new API for asynchronous method invocation. This section describes this API. You can find documentation for the previous API in Appendix K. Note that the old API is deprecated and will be removed in a future release.

6.15 Asynchronous Method Invocation (AMI) 245
Asynchronous Method Invocation (AMI) is the term used to describe the client-side support for the asynchronous programming model. AMI supports both oneway and twoway requests, but unlike their synchronous counterparts, AMI requests never block the calling thread. When a client issues an AMI request, the Ice run time hands the message off to the local transport buffer or, if the buffer is currently full, queues the request for later delivery. The application can then continue its activities and poll or wait for completion of the invocation, or receive a callback when the invocation completes.
AMI is transparent to the server: there is no way for the server to tell whether a client sent a request synchronously or asynchronously.
6.15.1 Basic Asynchronous API
Consider the following simple Slice definition:
module Demo { interface Employees { string getName(int number); };};
Proxy Methods
Besides the synchronous proxy methods, slice2cpp generates the following asynchronous proxy methods:9
Ice::AsyncResultPtr begin_getName(Ice::Int number);Ice::AsyncResultPtr begin_getName(Ice::Int number, const Ice::Context& __ctx)std::string end_getName(const Ice::AsyncResultPtr&);
As you can see, the single getName operation results in begin_getName and end_getName methods. (The begin_ method is overloaded so you can pass a per-invocation context—see Section 32.12.)
• The begin_getName method sends (or queues) an invocation of getName. This method does not block the calling thread.
9. There are four additional overloads of begin_getName that we discuss in Sections 6.15.4 and 6.15.5.

246 Client-Side Slice-to-C++ Mapping
• The end_getName method collects the result of the asynchronous invoca-tion. If, at the time the calling thread calls end_getName, the result is not yet available, the calling thread blocks until the invocation completes. Other-wise, if the invocation completed some time before the call to end_getName, the method returns immediately with the result.
A client could call these methods as follows:
EmployeesPrx e = ...;Ice::AsyncResultPtr r = e->begin_getName(99);// Continue to do other things here...string name = e->end_getName(r);
Because begin_getName does not block, the calling thread can do other things while the operation is in progress.
Note that begin_getName returns a value of type AsyncResultPtr. The AsyncResult associated with this smart pointer contains the state that the Ice run time requires to keep track of the asynchronous invocation. You must pass the AsyncResultPtr that is returned by the begin_ method to the corre-sponding end_ method.
The begin_ method has one parameter for each in-parameter of the corre-sponding Slice operation. Similarly, the end_ method has one out-parameter for each out-parameter of the corresponding Slice operation (plus the AsyncRe-sultPtr parameter). For example, consider the following operation:
double op(int inp1, string inp2, out bool outp1, out long outp2);
The begin_op and end_op methods have the following signature:
Ice::AsyncResultPtr begin_op(Ice::Int inp1, const ::std::string& inp2)Ice::Double end_op(bool& outp1, Ice::Long& outp2, const Ice::AsyncResultPtr&);
Exception Handling
If an invocation raises an exception, the exception is thrown by the end_ method, even if the actual error condition for the exception was encountered during the begin_ method (“on the way out”). The advantage of this behavior is that all exception handling is located with the code that calls the end_ method (instead of being present twice, once where the begin_ method is called, and again where the end_ method is called).

6.15 Asynchronous Method Invocation (AMI) 247
There is one exception to the above rule: if you destroy the communicator and then make an asynchronous invocation, the begin_ method throws Communi-catorDestroyedException. This is necessary because, once the run time is finalized, it can no longer throw an exception from the end_ method.
The only other exception that is thrown by the begin_ and end_ methods is IceUtil::IllegalArgumentException. This exception indicates that you have used the API incorrectly. For example, the begin_ method throws this exception if you call an operation that has a return value or out-parameters on a oneway proxy. Similarly, the end_ method throws this exception if you use a different proxy to call the end_ method than the proxy you used to call the begin_ method, or if the AsyncResult you pass to the end_ method was obtained by calling the begin_ method for a different operation.
6.15.2 The AsyncResult Class
The AsyncResult that is returned by the begin_ method encapsulates the state of the asynchronous invocation:
class AsyncResult : virtual public IceUtil::Shared, private IceUtil::noncopyable {public: virtual bool operator==(const AsyncResult&) const; virtual bool operator<(const AsyncResult&) const; virtual Int getHash() const; virtual CommunicatorPtr getCommunicator() const; virtual ConnectionPtr getConnection() const; virtual ObjectPrx getProxy() const; const string& getOperation() const; LocalObjectPtr getCookie() const; bool isCompleted() const; void waitForCompleted(); bool isSent() const; void waitForSent(); bool sentSynchronously() const;};

248 Client-Side Slice-to-C++ Mapping
The methods have the following semantics:
• bool operator==(const AsyncResult&) constbool operator<(const AsyncResult&) constInt getHash() const
These methods allow you to create ordered or hashed collections of pending asynchronous invocations. This is useful, for example, if you can have a number of outstanding requests, and need to pass state between the begin_ and the end_ methods. In this case, you can use the returned AsyncRe-sults as the key into a map that stores the state for each call.
• CommunicatorPtr getCommunicator() const
This method returns the communicator that sent the invocation.
• virtual ConnectionPtr getConnection() const
This method returns the connection that was used for the invocation.
• virtual ObjectPrx getProxy() const
This method returns the proxy that was used to call the begin_ method.
• const string& getOperation() const
This method returns the name of the operation.
• LocalObjectPtr getCookie() const
This method returns the cookie that was passed to the begin_ method (see Section 6.15.4). If you did not pass a cookie to the begin_ method, the return value is null.
• bool isCompleted() const
This method returns true if, at the time it is called, the result of an invocation is available, indicating that a call to the end_ method will not block the caller. Otherwise, if the result is not yet available, the method returns false.
• void waitForCompleted()
This method blocks the caller until the result of an invocation becomes avail-able.
• bool isSent() const
When you call the begin_ method, the Ice run time attempts to write the corresponding request to the client-side transport. If the transport cannot accept the request, the Ice run time queues the request for later transmission. isSent returns true if, at the time it is called, the request has been written to
6.15 Asynchronous Method Invocation (AMI) 249
the local transport (whether it was initially queued or not). Otherwise, if the request is still queued, isSent returns false.
• void waitForSent()
This method blocks the calling thread until a request has been written to the client-side transport.
• bool sentSynchronously() const
This method returns true if a request was written to the client-side transport without first being queued. If the request was initially queued, sentSyn-chronously returns false (independent of whether the request is still in the queue or has since been written to the client-side transport).
6.15.3 Polling for CompletionThe AsyncResult methods allow you to poll for call completion. Polling is useful in a variety of cases. As an example, consider the following simple inter-face to transfer files from client to server:
interface FileTransfer{ void send(int offset, ByteSeq bytes);};
The client repeatedly calls send to send a chunk of the file, indicating at which offset in the file the chunk belongs. A naïve way to transmit a file would be along the following lines:
FileHandle file = open(...);FileTransferPrx ft = ...;const int chunkSize = ...;Ice::Int offset = 0;while (!file.eof()) { ByteSeq bs; bs = file.read(chunkSize); // Read a chunk ft->send(offset, bs); // Send the chunk offset += bs.size();}
This works, but not very well: because the client makes synchronous calls, it writes each chunk on the wire and then waits for the server to receive the data, process it, and return a reply before writing the next chunk. This means that both client and server spend much of their time doing nothing—the client does nothing

250 Client-Side Slice-to-C++ Mapping
while the server processes the data, and the server does nothing while it waits for the client to send the next chunk.
Using asynchronous calls, we can improve on this considerably:
FileHandle file = open(...);FileTransferPrx ft = ...;const int chunkSize = ...;Ice::Int offset = 0;list<Ice::AsyncResultPtr> results;const int numRequests = 5;while (!file.eof()) { ByteSeq bs; bs = file.read(chunkSize); // Send up to numRequests + 1 chunks asynchronously. Ice::AsyncResultPtr r = ft->begin_send(offset, bs); offset += bs.size(); // Wait until this request has been passed to the transport. r->waitForSent(); results.push_back(r); // Once there are more than numRequests, wait for the least // recent one to complete. while (results.size() > numRequests) { Ice::AsyncResultPtr r = results.front(); results.pop_front(); r->waitForCompleted(); }}// Wait for any remaining requests to complete.while (!results.empty()) { Ice::AsyncResultPtr r = results.front(); results.pop_front(); r->waitForCompleted();}
With this code, the client sends up to numRequests + 1 chunks before it waits for the least recent one of these requests to complete. In other words, the client sends the next request without waiting for the preceding request to complete, up to the limit set by numRequests. In effect, this allows the client to “keep the pipe

6.15 Asynchronous Method Invocation (AMI) 251
to the server full of data”: the client keeps sending data, so both client and server continuously do work.
Obviously, the correct chunk size and value of numRequests depend on the bandwidth of the network as well as the amount of time taken by the server to process each request. However, with a little testing, you can quickly zoom in on the point where making the requests larger or queuing more requests no longer improves performance. With this technique, you can realize the full bandwidth of the link to within a percent or two of the theoretical bandwidth limit of a native socket connection.
6.15.4 Generic Completion Callbacks
The begin_ method is overloaded to allow you to provide completion callbacks. Here are the corresponding methods for the getName operation:
Ice::AsyncResultPtr begin_getName( Ice::Int number, const Ice::CallbackPtr& __del, const Ice::LocalObjectPtr& __cookie = 0);Ice::AsyncResultPtr begin_getName( Ice::Int number, const Ice::Context& __ctx, const Ice::CallbackPtr& __del, const Ice::LocalObjectPtr& __cookie = 0);
The second version of begin_getName lets you override the default context. (We discuss the purpose of the cookie parameter in the next section.) Following the in-parameters, the begin_ method accepts a parameter of type Ice::CallbackPtr. This is a smart pointer to a callback class that is provided by the Ice run time. This class stores an instance of a callback class that you implement. The Ice run time invokes a method on your callback instance when an asynchronous operation completes. Your callback class must provide a method that returns void and accepts a single parameter of type const AsyncResultPtr&, for example:
class MyCallback : public IceUtil::Shared {public: void finished(const Ice::AsyncResultPtr& r) { EmployeesPrx e = EmployeesPrx::uncheckedCast(r->getProxy()); try { string name = e->end_getName(r);
252 Client-Side Slice-to-C++ Mapping
cout << "Name is: " << name << endl; } catch (const Ice::Exception& ex) { cerr << "Exception is: " << ex << endl; } }};typedef IceUtil::Handle<MyCallback> MyCallbackPtr;
Note that your callback class must derive from IceUtil::Shared. The call-back method can have any name you prefer but its signature must match the preceding example.
The implementation of your callback method must call the end_ method. The proxy for the call is available via the getProxy method on the AsyncResult that is passed by the Ice run time. The return type of getProxy is Ice::ObjectPrx, so you must down-cast the proxy to its correct type. (You should always use an uncheckedCast to do this, otherwise you send an addi-tional message to the server to verify the proxy type.)
Your callback method should catch and handle any exceptions that may be thrown by the end_ method. If you allow an exception to escape from the call-back method, the Ice run time produces a log entry by default and ignores the exception. (You can disable the log message by setting the property Ice.Warn.AMICallback to zero.)
To inform the Ice run time that you want to receive a callback for the comple-tion of the asynchronous call, you pass the callback instance to the begin_ method:
EmployeesPrx e = ...;MyCallbackPtr cb = new MyCallback;Ice::CallbackPtr d = Ice::newCallback(cb, &MyCallback::finished);e->begin_getName(99, d);
Note the call to Ice::newCallback in this example. This helper function expects a smart pointer to your callback instance and a member function pointer that specifies your callback method.
Using Cookies
It is common for the end_ method to require access to some state that is estab-lished by the code that calls the begin_ method. As an example, consider an application that asynchronously starts a number of operations and, as each opera-tion completes, needs to update different user interface elements with the results.

6.15 Asynchronous Method Invocation (AMI) 253
In this case, the begin_ method knows which user interface element should receive the update, and the end_ method needs access to that element.
The API allows you to pass such state by providing a cookie. A cookie is an instance of a class that you write; the class can contain whatever data you want to pass, as well as any methods you may want to add to manipulate that data.
The only requirement on the cookie class is that it must derive from Ice::LocalObject. Here is an example implementation that stores a WidgetHandle. (We assume that this class provides whatever methods are needed by the end_ method to update the display.)
class Cookie : public Ice::LocalObject{public: Cookie(WidgetHandle h) : _h(h) {} WidgetHandle getWidget() { return _h; }private: WidgetHandle _h;};typedef IceUtil::Handle<Cookie> CookiePtr;
When you call the begin_ method, you pass the appropriate cookie instance to inform the end_ method how to update the display:
// Make cookie for call to getName(99).CookiePtr cookie1 = new Cookie(widgetHandle1);// Make cookie for call to getName(42);CookiePtr cookie2 = new Cookie(widgetHandle2);// Invoke the getName operation with different cookies.e->begin_getName(99, getNameCB, cookie1);e->begin_getName(24, getNameCB, cookie2);
The end_ method can retrieve the cookie from the AsyncResult by calling getCookie. For this example, we assume that widgets have a writeString method that updates the relevant UI element:
voidMyCallback::getName(const Ice::AsyncResultPtr& r){ EmployeesPrx e = EmployeesPrx::uncheckedCast(r->getProxy()); CookiePtr cookie = CookiePtr::dynamicCast(r->getCookie()); try { string name = e->end_getName(r); cookie->getWidget()->writeString(name);

254 Client-Side Slice-to-C++ Mapping
} catch (const Ice::Exception& ex) { handleException(ex); }}
The cookie provides a simple and effective way for you to pass state between the point where an operation is invoked and the point where its results are processed. Moreover, if you have a number of operations that share common state, you can pass the same cookie instance to multiple invocations.
6.15.5 Type-Safe Completion Callbacks
The generic callback API we saw in Section 6.15.4 is not entirely type-safe:
• You must down-cast the return value of getProxy to the correct proxy type before you can call the end_ method.
• You must call the correct end_ method to match the operation called by the begin_ method.
• If you use a cookie, you must down-cast the cookie to the correct type before you can access the data inside the cookie.
• You must remember to catch exceptions when you call the end_ method; if you forget to do this, you will not know that the operation failed.
slice2cpp generates an additional type-safe API that takes care of these chores for you. The type-safe API is provided as a template that works much like the Ice::Callback class of the generic API, but requires strongly-typed method signatures.
To use type-safe callbacks, you must implement a callback class that provides two callback methods:
• a success callback that is called if the operation succeeds
• a failure callback that is called if the operation raises an exception
As for the generic API, your callback class must derive from IceUtil::Shared. Here is a callback class for an invocation of the getName operation:
class MyCallback : public IceUtil::Shared{public: void getNameCB(const string& name) { cout << "Name is: " << name << endl; }

6.15 Asynchronous Method Invocation (AMI) 255
void failureCB(const Ice::Exception& ex) { cerr << "Exception is: << ex << endl; }};
The callback methods can have any name you prefer and must have void return type. The failure callback always has a single parameter of type const Ice::Exception&. The success callback parameters depend on the operation signature. If the operation has non-void return type, the first parameter of the success callback is the return value. The return value (if any) is followed by a parameter for each out-parameter of the corresponding Slice operation, in the order of declaration.
To receive these callbacks, you instantiate your callback instance and specify the methods you have defined before passing a smart pointer to a callback wrapper instance to the begin_ method:
MyCallbackPtr cb = new MyCallback;Callback_Employees_getNamePtr getNameCB = newCallback_Employees_getName( cb, &MyCallback::getNameCB, &MyCallback::failureCB);Callback_Employees_getNumberPtr getNumberCB = newCallback_Employees_getNumber( cb, &MyCallback::getNumberCB, &MyCallback::failureCB);e->begin_getName(99, getNameCB);e->begin_getNumber("Fred", getNumberCB);
Note how this code creates instances of two smart pointer types generated by slice2cpp named Callback_Employees_getNamePtr and Callback_Employees_getNumberPtr. Each smart pointer points to a template instance that encapsulates your callback instance and two member func-tion pointers for the callback methods. The name of this smart pointer type is<module>::Callback_<interface>_<operation>Ptr.
Also note that the code uses helper functions to initialize the smart pointers. The first argument to the helper function is your callback instance, and the two following arguments are the success and failure member function pointers, respec-tively. The name of this helper function is <module>::newCallback_<interface>_<operation>.
It is legal to pass a null pointer as the success or failure callback. For the success callback, this is legal only for operations that have void return type and no

256 Client-Side Slice-to-C++ Mapping
out-parameters. This is useful if you do not care when the operation completes but want to know if the call failed. If you pass a null exception callback, the Ice run time will ignore any exception that is raised by the invocation.
The type of the success and exception member function pointers is provided as Response and Exception typedefs by the callback template. For example, you can ignore exceptions for an invocation of getName as follows:
Callback_Employees_op::Exception nullException = 0;MyCallbackPtr cb = new MyCallback;Callback_Employees_getNamePtr getNameCB = newCallback_Employees_getName( cb, &MyCallback::getNameCB, nullException);e->begin_getName(99, getNameCB); // Ignores exceptions
Using Cookies
The begin_ method optionally accepts a cookie as a trailing parameter. As for the generic API, you can use the cookie to share state between the begin_ and end_ methods. However, with the type-safe API, there is no need to down-cast the cookie. Instead, the cookie parameter that is passed to the end_ method is strongly typed. Assuming that you have defined a Cookie class and Cook-iePtr smart pointer, you can pass a cookie to the begin_ method as follows:
MyCallbackPtr cb = new MyCallback;Callback_Employees_getNamePtr getNameCB = newCallback_Employees_getName( cb, &MyCallback::getNameCB, &MyCallback::failureCB);CookiePtr cookie = new Cookie(widgetHandle);e->begin_getName(99, getNameCB, cookie);
The callback methods of your callback class simply add the cookie parameter:
class MyCallback : public IceUtil::Shared{public: void getNameCB(const string& name, const CookiePtr& cookie) { cookie->getWidget()->writeString(name); } void failureCB(const Ice::Exception& ex,

6.15 Asynchronous Method Invocation (AMI) 257
const CookiePtr& cookie) { cookie->getWidget()->writeError(ex.what()); }};
6.15.6 Oneway InvocationsYou can invoke operations via oneway proxies asynchronously, provided the oper-ation has void return type, does not have any out-parameters, and does not raise user exceptions. If you call the begin_ method on a oneway proxy for an opera-tion that returns values or raises a user exception, the begin_ method throws an IceUtil::IllegalArgumentException.
For the generic API, the callback method looks exactly as for a twoway invo-cation. However, for oneway invocations, the Ice run time does not call the call-back method unless the invocation raised an exception during the begin_ method (“on the way out”).
For the type-safe API, the newCallback helper for void operations is over-loaded so you can omit the success callback. For example, here is how you could call ice_ping asynchronously:
MyCallbackPtr cb = new MyCallback;Ice::Callback_Object_ice_pingPtr callback = Ice::newCallback_Object_ice_ping(cb, &MyCallback::failureCB);p->begin_opVoid(callback);
6.15.7 Flow ControlAsynchronous method invocations never block the thread that calls the begin_ method: the Ice run time checks to see whether it can write the request to the local transport. If it can, it does so immediately in the caller’s thread. (In that case, AsyncResult::sentSynchronously returns true.) Alternatively, if the local transport does not have sufficient buffer space to accept the request, the Ice run time queues the request internally for later transmission in the background. (In that case, AsyncResult::sentSynchronously returns false.)
This creates a potential problem: if a client sends many asynchronous requests at the time the server is too busy to keep up with them, the requests pile up in the client-side run time until, eventually, the client runs out of memory.
The API provides a way for you to implement flow control by counting the number of requests that are queued so, if that number exceeds some threshold, the

258 Client-Side Slice-to-C++ Mapping
client stops invoking more operations until some of the queued operations have drained out of the local transport.
For the generic API, you can create an additional callback method:
class MyCallback : public IceUtil::Shared {public: void finished(const Ice::AsyncResultPtr&); void sent(const Ice::AsyncResultPtr&);};typedef IceUtil::Handle<MyCallback> MyCallbackPtr;
As with any other callback method, you are free to choose any name you like. For this example, the name of the callback method is sent. You inform the Ice run time that you want to be informed when a call has been passed to the local trans-port by specifying the sent method as an additional parameter when you create the Ice::Callback:
EmployeesPrx e = ...;MyCallbackPtr cb = new MyCallback;Ice::CallbackPtr d = Ice::newCallback(cb, &MyCallback::finished, &MyCallback::sent);e->begin_getName(99, d);
If the Ice run time can immediately pass the request to the local transport, it does so and invokes the sent method from the thread that calls the begin_ method. On the other hand, if the run time has to queue the request, it calls the sent method from a different thread once it has written the request to the local trans-port. In addition, you can find out from the AsyncResult that is returned by the begin_ method whether the request was sent synchronously or was queued, by calling sentSynchronously.
For the generic API, the sent method has the following signature:
void sent(const Ice::AsyncResult&);
For the type-safe API, there are two versions, one without and one with a cookie:
void sent(bool sentSynchronously);void sent(bool sentSynchronously, const <CookiePtr>& cookie);
For the version with a cookie, <CookiePtr> is replaced with the actual type of the cookie smart pointer you passed to the begin_ method.

6.15 Asynchronous Method Invocation (AMI) 259
The sent methods allow you to limit the number of queued requests by counting the number of requests that are queued and decrementing the count when the Ice run time passes a request to the local transport.
6.15.8 Batch Requests
Applications that send batched requests (see Section 32.16) can either flush a batch explicitly or allow the Ice run time to flush automatically. The proxy method ice_flushBatchRequests performs an immediate flush using the synchro-nous invocation model and may block the calling thread until the entire message can be sent. Ice also provides asynchronous versions of this method so you can flush batch requests asynchronously.
begin_ice_flushBatchRequests and end_ice_flushBatchRequests are proxy methods that flush any batch requests queued by that proxy.
In addition, similar methods are available on the communicator and the Connection object that is returned by AsyncResult::getConnection. These methods flush batch requests sent via the same communicator and via the same connection, respectively.
6.15.9 Concurrency
The Ice run time always invokes your callback methods from a separate thread. This means that you can safely use a non-recursive mutex without risking dead-lock. There is one exception to this rule: the run time calls the sent callback from the thread calling the begin_ method if the request could be sent synchro-nously. In the sent callback, you know which thread is calling the callback by looking at the sentSynchronously member or parameter, so you can take appropriate action to avoid a self-deadlock.
6.15.10 Limitations
AMI invocations cannot be sent using collocated optimization. If you attempt to invoke an AMI operation using a proxy that is configured to use collocation opti-mization, the Ice run time raises CollocationOptimizationException if the servant happens to be collocated; the request is sent normally if the servant is not collocated. Section 32.21 provides more information about this optimization and describes how to disable it when necessary.

260 Client-Side Slice-to-C++ Mapping
6.16 slice2cpp Command-Line Options
The Slice-to-C++ compiler, slice2cpp, offers the following command-line options in addition to the standard options described in Section 4.20:
• --header-ext EXT
Changes the file extension for the generated header files from the default h to the extension specified by EXT.
You can also change the header file extension with a global metadata direc-tive:
[["cpp:header-ext:hpp"]]// ...
Only one such directive can appear in each source file. If you specify a header extension on both the command line and with a metadata directive, the meta-data directive takes precedence. This ensures that included Slice files that were compiled separately get the correct header extension (provided that the included Slice files contain a corresponding metadata directive). For example:
// File example.ice#include <Ice/BuiltinSequences.ice>// ...
Compiling this file with
$ slice2cpp --header-ext=hpp -I/opt/Ice/include \ example.ice
generates example.hpp, but the #include directive in that file is for Ice/BuiltinSequences.h (not Ice/BuiltinSequences.hpp) because BuiltinSequences.ice contains a metadata directive [[”cpp:header-ext:h”]].
You normally will not need to use this metadata directive. The directive is necessary only if:
• You #include a Slice file in one of your own Slice files.
• The included Slice file is part of a library you link against.
• The library ships with the included Slice file’s header.

6.16 slice2cpp Command-Line Options 261
• The library header uses a different header extension than your own code.
For example, if the library uses .hpp as the header extension, but your own code uses .h, the library’s Slice file should contain a [[”cpp:header-ext:hpp”]] directive. (If the directive is missing, you can add it to the library’s Slice file.)
• --source-ext EXT
Changes the file extension for the generated source files from the default cpp to the extension specified by EXT.
• --add-header HDR[,GUARD]
This option adds an include directive for the specified header at the beginning of the generated source file (preceding any other include directives). If GUARD is specified, the include directive is protected by the specified guard. For example, --add-header precompiled.h,__PRECOMPILED_H__ results in the following directives at the beginning of the generated source file:
#ifndef __PRECOMPILED_H__#define __PRECOMPILED_H__#include <precompiled.h>#endif
The option can be repeated to create include directives for several files.
As suggested by the preceding example, this option is useful mainly to inte-grate the generated code with a compiler’s precompiled header mechanism.
• --include-dir DIR
Modifies #include directives in source files to prepend the path name of each header file with the directory DIR. See Section 6.16.1 for more informa-tion.
• --impl
Generate sample implementation files. This option will not overwrite an existing file.
• --depend
Prints makefile dependency information to standard output. No code is gener-ated when this option is specified. The output generally needs to be filtered before it can be included in a makefile; the Ice build system uses the script config/makedepend.py for this purpose.

262 Client-Side Slice-to-C++ Mapping
• --dll-export SYMBOL
Use SYMBOL to control DLL exports or imports. This option allows you to selectively export or import global symbols in the generated code. As an example, compiling a Slice definition with
$ slice2cpp --dll-export ENABLE_DLL x.ice
results in the following additional code being generated into x.h:
#ifndef ENABLE_DLL# ifdef ENABLE_DLL_EXPORTS# define ENABLE_DLL ICE_DECLSPEC_EXPORT# else# define ENABLE_DLL ICE_DECLSPEC_IMPORT# endif#endif
ICE_DECLSPEC_EXPORT and ICE_DECLSPEC_IMPORT are platform-specific macros. For example, for Windows, they are defined as __declspec(dllexport) and __declspec(dllimport), respec-tively; for Solaris using CC version 5.5 or later, ICE_DECLSPEC_EXPORT is defined as __global, and ICE_DECLSPEC_IMPORT is empty.10
The symbol name you specify on the command line (ENABLE_DLL in this example) is used by the generated code to export or import any symbols that must be visible to code outside the generated compilation unit. The net effect is that, if you want to create a DLL that includes x.cpp, but also want to use the generated types in compilation units outside the DLL, you can arrange for the relevant symbols to be exported by compiling x.cpp with -DENABLE_DLL_EXPORTS.
• --checksum
Generate checksums for Slice definitions.
• --stream
Generate streaming helper functions for Slice types (see Section 35.2).
10.Similar definitions exist for other platforms. For platforms that do not have any concept of explicit export or import of shared library symbols, both macros are empty.

6.16 slice2cpp Command-Line Options 263
6.16.1 Include DirectivesThe #include directives generated by the Slice-to-C++ compiler can be a source of confusion if the semantics governing their generation are not well-understood. The generation of #include directives is influenced by the command-line options -I and --include-dir; these options are discussed in more detail below. The --output-dir option directs the translator to place all generated files in a particular directory, but has no impact on the contents of the generated code.
Given that the #include directives in header files and source files are gener-ated using different semantics, we describe them in separate sections.
Header Files
In most cases, the compiler generates the appropriate #include directives by default. As an example, suppose file A.ice includes B.ice using the following statement:
// A.ice#include <B.ice>
Assuming both files are in the current working directory, we run the compiler as shown below:
$ slice2cpp -I. A.ice
The generated file A.h contains this #include directive:
// A.h#include <B.h>
If the proper include paths are specified to the C++ compiler, everything should compile correctly.
Similarly, consider the common case where A.ice includes B.ice from a subdirectory:
// A.ice#include <inc/B.ice>
Assuming both files are in the inc subdirectory, we run the compiler as shown below:
$ slice2cpp -I. inc/A.ice
The default output of the compiler produces this #include directive in A.h:
// A.h#include <inc/B.h>

264 Client-Side Slice-to-C++ Mapping
Again, it is the user’s responsibility to ensure that the C++ compiler is configured to find inc/B.h during compilation.
Now let us consider a more complex example, in which we do not want the #include directive in the header file to match that of the Slice file. This can be necessary when the organizational structure of the Slice files does not match the application’s C++ code. In such a case, the user may need to relocate the gener-ated files from the directory in which they were created, and the #include directives must be aligned with the new structure.
For example, let us assume that B.ice is located in the subdirectory slice/inc:
// A.ice#include <slice/inc/B.ice>
However, we do not want the slice subdirectory to appear in the #include directive generated in the header file, therefore we specify the additional compiler option -Islice:
$ slice2cpp -I. -Islice slice/inc/A.ice
The generated code demonstrates the impact of this extra option:
// A.h#include <inc/B.h>
As you can see, the #include directives generated in header files are affected by the include paths that you specify when running the compiler. Specifically, the include paths are used to abbreviate the path name in generated #include direc-tives.
When translating an #include directive from a Slice file to a header file, the compiler compares each of the include paths against the path of the included file. If an include path matches the leading portion of the included file, the compiler removes that leading portion when generating the #include directive in the header file. If more than one include path matches, the compiler selects the one that results in the shortest path for the included file.
For example, suppose we had used the following options when compiling A.ice:
$ slice2cpp -I. -Islice -Islice/inc slice/inc/A.ice
In this case, the compiler compares all of the include paths against the included file slice/inc/B.ice and generates the following directive:
// A.h#include <B.h>

6.16 slice2cpp Command-Line Options 265
The option -Islice/inc produces the shortest result, therefore the default path for the included file (slice/inc/B.h) is replaced with B.h.
In general, the -I option plays two roles: it enables the preprocessor to locate included Slice files, and it provides you with a certain amount of control over the generated #include directives. In the last example above, the preprocessor locates slice/inc/B.ice using the include path specified by the -I. option. The remaining -I options do not help the preprocessor locate included files; they are simply hints to the compiler.
Finally, we recommend using caution when specifying include paths. If the preprocessor is able to locate an included file via multiple include paths, it always uses the first include path that successfully locates the file. If you intend to modify the generated #include directives by specifying extra -I options, you must ensure that your include path hints match the include path selected by the prepro-cessor to locate the included file. As a general rule, you should avoid specifying include paths that enable the preprocessor to locate a file in multiple ways.
Source Files
By default, the compiler generates #include directives in source files using only the base name of the included file. This behavior is usually appropriate when the source file and header file reside in the same directory.
For example, suppose A.ice includes B.ice from a subdirectory, as shown in the following snippet of A.ice:
// A.ice#include <inc/B.ice>
We generate the source file using this command:
$ slice2cpp -I. inc/A.ice
Upon examination, we see that the source file contains the following #include directive:
// A.cpp#include <B.h>
However, suppose that we wish to enforce a particular standard for generated #include directives so that they are compatible with our C++ compiler’s existing include path settings. In this case, we use the --include-dir option to modify the generated code. For example, consider the compiler command shown below:
$ slice2cpp --include-dir src -I. inc/A.ice

266 Client-Side Slice-to-C++ Mapping
The source file now contains the following #include directive:
// A.cpp#include <src/B.h>
Any leading path in the included file is discarded as usual, and the value of the --include-dir option is prepended.
6.17 Using Slice Checksums
As described in Section 4.21, the Slice compilers can optionally generate check-sums of Slice definitions. For slice2cpp, the --checksum option causes the compiler to generate code in each C++ source file that accumulates checksums in a global map. A copy of this map can be obtained by calling a function defined in the header file Ice/SliceChecksums.h:
namespace Ice { Ice::SliceChecksumDict sliceChecksums();}
In order to verify a server’s checksums, a client could simply compare the diction-aries using the equality operator. However, this is not feasible if it is possible that the server might be linked with more Slice definitions than the client. A more general solution is to iterate over the local checksums as demonstrated below:
Ice::SliceChecksumDict serverChecksums = ...Ice::SliceChecksumDict localChecksums = Ice::sliceChecksums();for (Ice::SliceChecksumDict::const_iterator p = localChecksums.begin(); p != localChecksums.end(); ++p) { Ice::SliceChecksumDict::const_iterator q = serverChecksums.find(p->first); if (q == serverChecksums.end()) { // No match found for type id! } else if (p->second != q->second) { // Checksum mismatch! }}
In this example, the client first verifies that the server’s dictionary contains an entry for each Slice type ID, and then it proceeds to compare the checksums.

267
Chapter 7Developing a File System Client in C++
7.1 Chapter Overview
In this chapter, we present the source code for a C++ client that accesses the file system we developed in Chapter 5 (see Chapter 9 for the corresponding server).
7.2 The C++ Client
We now have seen enough of the client-side C++ mapping to develop a complete client to access our remote file system. For reference, here is the Slice definition once more:
module Filesystem { interface Node { idempotent string name(); }; exception GenericError { string reason; }; sequence<string> Lines; interface File extends Node {

268 Developing a File System Client in C++
idempotent Lines read(); idempotent void write(Lines text) throws GenericError; }; sequence<Node*> NodeSeq; interface Directory extends Node { idempotent NodeSeq list(); }; };
To exercise the file system, the client does a recursive listing of the file system, starting at the root directory. For each node in the file system, the client shows the name of the node and whether that node is a file or directory. If the node is a file, the client retrieves the contents of the file and prints them.
The body of the client code looks as follows:
#include <Ice/Ice.h>#include <Filesystem.h>#include <iostream>#include <iterator>using namespace std;using namespace Filesystem;static voidlistRecursive(const DirectoryPrx& dir, int depth = 0){ // ...}intmain(int argc, char* argv[]){ int status = 0; Ice::CommunicatorPtr ic; try { // Create a communicator // ic = Ice::initialize(argc, argv); // Create a proxy for the root directory // Ice::ObjectPrx base = ic->stringToProxy("RootDir:default -p 10000");

7.2 The C++ Client 269
if (!base) throw "Could not create proxy"; // Down-cast the proxy to a Directory proxy // DirectoryPrx rootDir = DirectoryPrx::checkedCast(base); if (!rootDir) throw "Invalid proxy"; // Recursively list the contents of the root directory // cout << "Contents of root directory:" << endl; listRecursive(rootDir); } catch (const Ice::Exception& ex) { cerr << ex << endl; status = 1; } catch (const char* msg) { cerr << msg << endl; status = 1; } // Clean up // if (ic) ic->destroy(); return status;}
1. The code includes a few header files:
1.Ice/Ice.h
This file is always included in both client and server source files. It provides definitions that are necessary for accessing the Ice run time.
2.Filesystem.h
This is the header that is generated by the Slice compiler from the Slice defi-nitions in Filesystem.ice.
3.iostream
The client uses the iostream library to produce its output.
4.iterator
The implementation of listRecursive uses an STL iterator.

270 Developing a File System Client in C++
2. The code adds using declarations for the std and Filesystem namespaces.
3. The structure of the code in main follows what we saw in Chapter 3. After initializing the run time, the client creates a proxy to the root directory of the file system. For this example, we assume that the server runs on the local host and listens using the default protocol (TCP/IP) at port 10000. The object iden-tity of the root directory is known to be RootDir.
4. The client down-casts the proxy to DirectoryPrx and passes that proxy to listRecursive, which prints the contents of the file system.
Most of the work happens in listRecursive:
// Recursively print the contents of directory "dir" in// tree fashion. For files, show the contents of each file.// The "depth" parameter is the current nesting level// (for indentation).static voidlistRecursive(const DirectoryPrx& dir, int depth = 0){ string indent(++depth, '\t'); NodeSeq contents = dir->list(); for (NodeSeq::const_iterator i = contents.begin(); i != contents.end(); ++i) { DirectoryPrx dir = DirectoryPrx::checkedCast(*i); FilePrx file = FilePrx::uncheckedCast(*i); cout << indent << (*i)->name() << (dir ? " (directory):" : " (file):") << endl; if (dir) { listRecursive(dir, depth); } else { Lines text = file->read(); for (Lines::const_iterator j = text.begin(); j != text.end(); ++j) { cout << indent << "\t" << *j << endl; } } }}

7.2 The C++ Client 271
The function is passed a proxy to a directory to list, and an indent level. (The indent level increments with each recursive call and allows the code to print the name of each node at an indent level that corresponds to the depth of the tree at that node.) listRecursive calls the list operation on the directory and iter-ates over the returned sequence of nodes:
1. The code does a checkedCast to narrow the Node proxy to a Directory proxy, as well as an uncheckedCast to narrow the Node proxy to a File proxy. Exactly one of those casts will succeed, so there is no need to call checkedCast twice: if the Node is-a Directory, the code uses the Direc-toryPrx returned by the checkedCast; if the checkedCast fails, we know that the Node is-a File and, therefore, an uncheckedCast is sufficient to get a FilePrx.
In general, if you know that a down-cast to a specific type will succeed, it is preferable to use an uncheckedCast instead of a checkedCast because an uncheckedCast does not incur any network traffic.
2. The code prints the name of the file or directory and then, depending on which cast succeeded, prints "(directory)" or "(file)" following the name.
3. The code checks the type of the node:
• If it is a directory, the code recurses, incrementing the indent level.
• If it is a file, the code calls the read operation on the file to retrieve the file contents and then iterates over the returned sequence of lines, printing each line.
Assume that we have a small file system consisting of two files and a directory as follows:
Figure 7.1. A small file system.
The output produced by the client for this file system is:
RootDir
Coleridge README
Kubla_Khan
= Directory
= File

272 Developing a File System Client in C++
Contents of root directory: README (file): This file system contains a collection of poetry. Coleridge (directory): Kubla_Khan (file): In Xanadu did Kubla Khan A stately pleasure-dome decree: Where Alph, the sacred river, ran Through caverns measureless to man Down to a sunless sea.
Note that, so far, our client (and server) are not very sophisticated:
• The protocol and address information are hard-wired into the code.
• The client makes more remote procedure calls than strictly necessary; with minor redesign of the Slice definitions, many of these calls can be avoided.
We will see how to address these shortcomings in Chapter 38 and Chapter 34.
7.3 Summary
This chapter presented a very simple client to access a server that implements the file system we developed in Chapter 5. As you can see, the C++ code hardly differs from the code you would write for an ordinary C++ program. This is one of the biggest advantages of using Ice: accessing a remote object is as easy as accessing an ordinary, local C++ object. This allows you to put your effort where you should, namely, into developing your application logic instead of having to struggle with arcane networking APIs. As we will see in Chapter 9, this is true for the server side as well, meaning that you can develop distributed applications easily and efficiently.

273
Chapter 8Server-Side Slice-to-C++ Mapping
8.1 Chapter Overview
In this chapter, we present the server-side Slice-to-C++ mapping (see Chapter 6 for the client-side mapping). Section 8.3 discusses how to initialize and finalize the server-side run time, sections 8.4 to 8.6 show how to implement interfaces and operations, and Section 8.7 discusses how to register objects with the server-side Ice run time. Finally, Section 8.8 shows how to implement operations asynchro-nously.
8.2 Introduction
The mapping for Slice data types to C++ is identical on the client side and server side. This means that everything in Chapter 6 also applies to the server side. However, for the server side, there are a few additional things you need to know, specifically:
• how to initialize and finalize the server-side run time
• how to implement servants
• how to pass parameters and throw exceptions
• how to create servants and register them with the Ice run time.

274 Server-Side Slice-to-C++ Mapping
We discuss these topics in the remainder of this chapter.
8.3 The Server-Side main Function
The main entry point to the Ice run time is represented by the local interface Ice::Communicator. As for the client side, you must initialize the Ice run time by calling Ice::initialize before you can do anything else in your server. Ice::initialize returns a smart pointer to an instance of an Ice::Communi-cator:
intmain(int argc, char* argv[]){ Ice::CommunicatorPtr ic = Ice::initialize(argc, argv); // ...}
Ice::initialize accepts a C++ reference to argc and argv. The function scans the argument vector for any command-line options that are relevant to the Ice run time; any such options are removed from the argument vector so, when Ice::initialize returns, the only options and arguments remaining are those that concern your application. If anything goes wrong during initialization, initialize throws an exception.1
Before leaving your main function, you must call Communicator::destroy. The destroy operation is responsible for finalizing the Ice run time. In particular, destroy waits for any operation implementations that are still executing in the server to complete. In addition, destroy ensures that any outstanding threads are joined with and reclaims a number of operating system resources, such as file descriptors and memory. Never allow your main function to terminate without calling destroy first; doing so has undefined behavior.
The general shape of our server-side main function is therefore as follows:
#include <Ice/Ice.h>intmain(int argc, char* argv[])
1. Ice::initialize has additional overloads to permit other information to be passed to the Ice run time (see Section 32.3).

8.3 The Server-Side main Function 275
{ int status = 0; Ice::CommunicatorPtr ic; try { ic = Ice::initialize(argc, argv); // Server code here... } catch (const Ice::Exception& e) { cerr << e << endl; status = 1; } catch (const std::string& msg) { cerr << msg << endl; status = 1; } catch (const char* msg) { cerr << msg << endl; status = 1; } if (ic) { try { ic->destroy(); } catch (const std::string& msg) { cerr << msg << endl; status = 1; } } return status;}
Note that the code places the call to Ice::initialize in to a try block and takes care to return the correct exit status to the operating system. Also note that an attempt to destroy the communicator is made only if the initialization succeeded.
The catch handlers for const std::string & and const char * are in place as a convenience feature: if we encounter a fatal error condition anywhere in the server code, we can simply throw a string or a string literal containing an error message; this causes the stack to be unwound back to main, at which point the error message is printed and, after destroying the communicator, main terminates with non-zero exit status.

276 Server-Side Slice-to-C++ Mapping
8.3.1 The Ice::Application Class
The preceding structure for the main function is so common that Ice offers a class, Ice::Application, that encapsulates all the correct initialization and finalization activities. The definition of the class is as follows (with some detail omitted for now):
namespace Ice { enum SignalPolicy { HandleSignals, NoSignalHandling }; class Application /* ... */ { public: Application(SignalPolicy = HandleSignals); virtual ~Application(); int main(int argc, char*[] argv); int main(int argc, char*[] argv, const char* config); int main(int argc, char*[] argv, const Ice::InitializationData& id); int main(int argc, char* const [] argv); int main(int argc, char* const [] argv, const char* config); int main(int argc, char* const [] argv, const Ice::InitializationData& id); int main(const Ice::StringSeq&); int main(const Ice::StringSeq&, const char* config); int main(const Ice::StringSeq&, const Ice::InitializationData& id);#ifdef _WIN32 int main(int argc, wchar_t*[] argv); int main(int argc, wchar_t*[] argv, const char* config); int main(int argc, wchar_t*[] argv, const Ice::InitializationData& id);#endif virtual int run(int, char*[]) = 0; static const char* appName(); static CommunicatorPtr communicator(); // ... };}
The intent of this class is that you specialize Ice::Application and imple-ment the pure virtual run method in your derived class. Whatever code you

8.3 The Server-Side main Function 277
would normally place in main goes into the run method instead. Using Ice::Application, our program looks as follows:
#include <Ice/Ice.h>class MyApplication : virtual public Ice::Application {public: virtual int run(int, char*[]) { // Server code here... return 0; }};intmain(int argc, char* argv[]){ MyApplication app; return app.main(argc, argv);}
Note that Application::main is overloaded: you can pass a string sequence instead of an argc/argv pair. This is useful if you need to parse application-specific property settings on the command line (see Section 30.9.3). You also can call main with an optional file name or an InitializationData structure (see Section 32.3 and Section 30.9).
If you pass a configuration file name to main, the settings in this file are over-ridden by settings in a file identified by the ICE_CONFIG environment variable (if defined). Property settings supplied on the command line take precedence over all other settings.
The Application::main function does the following:
1. It installs an exception handler for Ice::Exception. If your code fails to handle an Ice exception, Application::main prints the exception details on stderr before returning with a non-zero return value.
2. It installs exception handlers for const std::string & and const char *. This allows you to terminate your server in response to a fatal error condition by throwing a std::string or a string literal. Application::main prints the string on stderr before returning a non-zero return value.
3. It initializes (by calling Ice::initialize) and finalizes (by calling Communicator::destroy) a communicator. You can get access to the

278 Server-Side Slice-to-C++ Mapping
communicator for your server by calling the static communicator() member.
4. It scans the argument vector for options that are relevant to the Ice run time and removes any such options. The argument vector that is passed to your run method therefore is free of Ice-related options and only contains options and arguments that are specific to your application.
5. It provides the name of your application via the static appName member function. The return value from this call is argv[0], so you can get at argv[0] from anywhere in your code by calling Ice::Applica-tion::appName (which is usually required for error messages).
6. It creates an IceUtil::CtrlCHandler that properly destroys the communicator.
7. It installs a per-process logger (see Section 32.19.5) if the application has not already configured one. The per-process logger uses the value of the Ice.ProgramName property (see Section 30.8) as a prefix for its messages and sends its output to the standard error channel. An application can specify an alternate logger as described in Section 32.19.
Using Ice::Application ensures that your program properly finalizes the Ice run time, whether your server terminates normally or in response to an excep-tion or signal. We recommend that all your programs use this class; doing so makes your life easier. In addition, Ice::Application also provides features for signal handling and configuration that you do not have to implement yourself when you use this class.
Using Ice::Application on the Client Side
You can use Ice::Application for your clients as well: simply implement a class that derives from Ice::Application and place the client code into its run method. The advantage of this approach is the same as for the server side: Ice::Application ensures that the communicator is destroyed correctly even in the presence of exceptions.
Catching Signals
The simple server we developed in Chapter 3 had no way to shut down cleanly: we simply interrupted the server from the command line to force it to exit. Termi-nating a server in this fashion is unacceptable for many real-life server applica-tions: typically, the server has to perform some cleanup work before terminating, such as flushing database buffers or closing network connections. This is particu-

8.3 The Server-Side main Function 279
larly important on receipt of a signal or keyboard interrupt to prevent possible corruption of database files or other persistent data.
To make it easier to deal with signals, Ice::Application encapsulates the platform-independent signal handling capabilities provided by the class IceUtil::CtrlCHandler (see Section 31.10). This allows you to cleanly shut down on receipt of a signal and to use the same source code regardless of the underlying operating system and threading package:
namespace Ice { class Application : /* ... */ { public: // ... static void destroyOnInterrupt(); static void shutdownOnInterrupt(); static void ignoreInterrupt(); static void callbackOnInterrupt(); static void holdInterrupt(); static void releaseInterrupt(); static bool interrupted(); virtual void interruptCallback(int); };}
You can use Ice::Application under both Windows and Unix: for Unix, the member functions control the behavior of your application for SIGINT, SIGHUP, and SIGTERM; for Windows, the member functions control the behavior of your application for CTRL_C_EVENT, CTRL_BREAK_EVENT, CTRL_CLOSE_EVENT, CTRL_LOGOFF_EVENT, and CTRL_SHUTDOWN_EVENT.
The functions behave as follows:
• destroyOnInterrupt
This function creates an IceUtil::CtrlCHandler that destroys the communicator when one of the monitored signals is raised. This is the default behavior.
• shutdownOnInterrupt
This function creates an IceUtil::CtrlCHandler that shuts down the communicator when one of the monitored signals is raised.
• ignoreInterrupt
This function causes signals to be ignored.
280 Server-Side Slice-to-C++ Mapping
• callbackOnInterrupt
This function configures Ice::Application to invoke interrupt-Callback when a signal occurs, thereby giving the subclass responsibility for handling the signal. Note that if the signal handler needs to terminate the program, you must call _exit (instead of exit). This prevents global destructors from running which, depending on the activities of other threads in the program, could cause deadlock or assertion failures.
• holdInterrupt
This function causes signals to be held.
• releaseInterrupt
This function restores signal delivery to the previous disposition. Any signal that arrives after holdInterrupt was called is delivered when you call releaseInterrupt.
• interrupted
This function returns true if a signal caused the communicator to shut down, false otherwise. This allows us to distinguish intentional shutdown from a forced shutdown that was caused by a signal. This is useful, for example, for logging purposes.
• interruptCallback
A subclass overrides this function to respond to signals. The Ice run time may call this function concurrently with any other thread. If the function raises an exception, the Ice run time prints a warning on cerr and ignores the excep-tion.
By default, Ice::Application behaves as if destroyOnInterrupt was invoked, therefore our server main function requires no change to ensure that the program terminates cleanly on receipt of a signal. (You can disable the signal-handling functionality of Ice::Application by passing the enumerator NoSignalHandling to the constructor. In that case, signals retain their default behavior, that is, terminate the process.) However, we add a diagnostic to report the occurrence of a signal, so our main function now looks like:
#include <Ice/Ice.h>class MyApplication : virtual public Ice::Application {public: virtual int run(int, char*[]) { // Server code here...

8.3 The Server-Side main Function 281
if (interrupted()) cerr << appName() << ": terminating" << endl; return 0; }};intmain(int argc, char* argv[]){ MyApplication app; return app.main(argc, argv);}
Note that, if your server is interrupted by a signal, the Ice run time waits for all currently executing operations to finish. This means that an operation that updates persistent state cannot be interrupted in the middle of what it was doing and cause partial update problems.
Under Unix, if you handle signals with your own handler (by deriving a subclass from Ice::Application and calling callbackOnInterrupt), the handler is invoked synchronously from a separate thread. This means that the handler can safely call into the Ice run time or make system calls that are not async-signal-safe without fear of deadlock or data corruption. Note that Ice::Application blocks delivery of SIGINT, SIGHUP, and SIGTERM. If your application calls exec, this means that the child process will also ignore these signals; if you need the default behavior of these signals in the exec’d process, you must explicitly reset them to SIG_DFL before calling exec.
Ice::Application and Properties
Apart from the functionality shown in this section, Ice::Application also takes care of initializing the Ice run time with property values. Properties allow you to configure the run time in various ways. For example, you can use proper-ties to control things such as the thread pool size or port number for a server. We discuss Ice properties in more detail in Chapter 30.
Limitations of Ice::Application
Ice::Application is a singleton class that creates a single communicator. If you are using multiple communicators, you cannot use Ice::Application. Instead, you must structure your code as we saw in Chapter 3 (taking care to always destroy the communicators).

282 Server-Side Slice-to-C++ Mapping
8.3.2 The Ice::Service Class
The Ice::Application class described in Section 8.3.1 is very convenient for general use by Ice client and server applications. In some cases, however, an application may need to run at the system level as a Unix daemon or Windows service. For these situations, Ice includes Ice::Service, a singleton class that is comparable to Ice::Application but also encapsulates the low-level, plat-form-specific initialization and shutdown procedures common to system services. The Ice::Service class is defined as follows:
namespace Ice { class Service { public: Service(); virtual bool shutdown(); virtual void interrupt(); int main(int& argc, char* argv[], const Ice::InitializationData& = Ice::InitializationData()); int main(Ice::StringSeq& args, const Ice::InitializationData& = Ice::InitializationData()); Ice::CommunicatorPtr communicator() const; static Service* instance(); bool service() const; std::string name() const; bool checkSystem() const; int run(int& argc, char* argv[], const Ice::InitializationData&);#ifdef _WIN32 int main(int& argc, wchar_t* argv[], const InitializationData& = InitializationData()); void configureService(const std::string& name);#else void configureDaemon(bool changeDir, bool closeFiles,

8.3 The Server-Side main Function 283
const std::string& pidFile);#endif virtual void handleInterrupt(int); protected: virtual bool start(int argc, char* argv[], int& status) = 0; virtual void waitForShutdown(); virtual bool stop(); virtual Ice::CommunicatorPtr initializeCommunicator( int& argc, char* argv[], const Ice::InitializationData&); virtual void syserror(const std::string& msg); virtual void error(const std::string& msg); virtual void warning(const std::string& msg); virtual void trace(const std::string& msg); virtual void print(const std::string& msg); void enableInterrupt(); void disableInterrupt(); // ... };}
At a minimum, an Ice application that uses the Ice::Service class must define a subclass and override the start member function, which is where the service must perform its startup activities, such as processing command-line argu-ments, creating an object adapter, and registering servants. The application’s main function must instantiate the subclass and typically invokes its main member function, passing the program’s argument vector as parameters. The example below illustrates a minimal Ice::Service subclass:
#include <Ice/Service.h>class MyService : public Ice::Service {protected: virtual bool start(int, char*[]);private: Ice::ObjectAdapterPtr _adapter;};bool

284 Server-Side Slice-to-C++ Mapping
MyService::start(int argc, char* argv[], int& status){ _adapter = communicator()->createObjectAdapter("MyAdapter"); _adapter->addWithUUID(new MyServantI); _adapter->activate(); status = EXIT_SUCCESS; return true;}intmain(int argc, char* argv[]){ MyService svc; return svc.main(argc, argv);}
The Service::main member function performs the following sequence of tasks:
1. Scans the argument vector for reserved options that indicate whether the program should run as a system service and removes these options from the argument vector (argc is adjusted accordingly). Additional reserved options are supported for administrative tasks.
2. Configures the program for running as a system service (if necessary) by invoking configureService or configureDaemon, as appropriate for the platform.
3. Invokes the run member function and returns its result.
Note that, as for Application::main, Service::main is overloaded to accept a string sequence instead of an argc/argv pair. This is useful if you need to parse application-specific property settings on the command line (see Section 30.9.3).
The Service::run member function executes the service in the steps shown below:
1. Installs an IceUtil::CtrlCHandler (see Section 31.10) for proper signal handling.
2. Invokes the initializeCommunicator member function to obtain a communicator. The communicator instance can be accessed using the communicator member function.
3. Invokes the start member function. If start returns false to indicate failure, run destroys the communicator and returns immediately using the exit status provided in status.

8.3 The Server-Side main Function 285
4. Invokes the waitForShutdown member function, which should block until shutdown is invoked.
5. Invokes the stop member function. If stop returns true, run considers the application to have terminated successfully.
6. Destroys the communicator.
7. Gracefully terminates the system service (if necessary).
If an unhandled exception is caught by Service::run, a descriptive message is logged, the communicator is destroyed and the service is terminated.
Ice::Service Member Functions
The virtual member functions in Ice::Service represent the points at which a subclass can intercept the service activities. All of the virtual member functions (except start) have default implementations.
• void handleInterrupt(int sig)
Invoked by the CtrlCHandler when a signal occurs. The default imple-mentation ignores the signal if it represents a logoff event and the Ice.Nohup property is set to a value larger than zero, otherwise it invokes the interrupt member function.
• Ice::CommunicatorPtrinitializeCommunicator(int & argc, char * argv[], const Ice::InitializationData & data)
Initializes a communicator. The default implementation invokes Ice::initialize and passes the given arguments.
• void interrupt()
Invoked by the signal handler to indicate a signal was received. The default implementation invokes the shutdown member function.
• bool shutdown()
Causes the service to begin the shutdown process. The default implementation invokes shutdown on the communicator. The subclass must return true if shutdown was started successfully, and false otherwise.
• bool start(int argc, char * argv[], int & status)
Allows the subclass to perform its startup activities, such as scanning the provided argument vector for recognized command-line options, creating an object adapter, and registering servants. The subclass must return true if

286 Server-Side Slice-to-C++ Mapping
startup was successful, and false otherwise. The subclass can set an exit status via the status parameter. This status is returned by main.
• bool stop()
Allows the subclass to clean up prior to termination. The default implementa-tion does nothing but return true. The subclass must return true if the service has stopped successfully, and false otherwise.
• void syserror(const std::string & msg)
• void error(const std::string & msg)
• void warning(const std::string & msg)
• void trace(const std::string & msg)
• void print(const std::string & msg)
Convenience functions for logging messages to the communicator’s logger. The syserror member function includes a description of the system’s current error code.
• void waitForShutdown()
Waits indefinitely for the service to shut down. The default implementation invokes waitForShutdown on the communicator.
The non-virtual member functions shown in the class definition are described below:
• bool checkSystem() const
Returns true if the operating system supports Windows services or Unix daemons. This function returns false on Windows 95/98/ME.
• Ice::CommunicatorPtr communicator() const
Returns the communicator used by the service, as created by initial-izeCommunicator.
• void configureDaemon(bool chdir, bool close, const std::string & pidFile)
Configures the program to run as a Unix daemon. The chdir parameter determines whether the daemon changes its working directory to the root directory. The close parameter determines whether the daemon closes unnecessary file descriptors (i.e., stdin, stdout, etc.). If a non-empty string is provided in the pidFile parameter, the daemon writes its process ID to the given file.

8.3 The Server-Side main Function 287
• void configureService(const std::string & name)
Configures the program to run as a Windows service with the given name.
• void disableInterrupt()
Disables the signal handling behavior in Ice::Service. When disabled, signals are ignored.
• void enableInterrupt()
Enables the signal handling behavior in Ice::Service. When enabled, the occurrence of a signal causes the handleInterrupt member function to be invoked.
• static Service * instance()
Returns the singleton Ice::Service instance.
• int main(int & argc, char * argv[], const Ice::InitializationData & data = Ice::InitializationData())int main(Ice::StringSeq& args, const Ice::InitializationData& = Ice::InitializationData());int main(int & argc, wchar_t * argv[], const Ice::InitializationData & data = Ice::InitializationData())
The primary entry point of the Ice::Service class. The tasks performed by this function are described earlier in this section. The function returns EXIT_SUCCESS for success, EXIT_FAILURE for failure. For Windows, this function is overloaded to allow you to pass a wchar_t argument vector.
• std::string name() const
Returns the name of the service. If the program is running as a Windows service, the return value is the Windows service name, otherwise it returns the value of argv[0].
• int run(int & argc, char * argv[], const Ice::InitializationData & data)
Alternative entry point for applications that prefer a different style of service configuration. The program must invoke configureService (Windows) or configureDaemon (Unix) in order to run as a service. The tasks performed by this function are described earlier in this section. The function normally returns EXIT_SUCCESS or EXIT_FAILURE, but the start method can also supply a different value via its status argument.

288 Server-Side Slice-to-C++ Mapping
• bool service() const
Returns true if the program is running as a Windows service or Unix daemon, or false otherwise.
Unix Daemons
On Unix platforms, Ice::Service recognizes the following command-line options:
• --daemon
Indicates that the program should run as a daemon. This involves the creation of a background child process in which Service::main performs its tasks. The parent process does not terminate until the child process has successfully invoked the start member function2. Unless instructed otherwise, Ice::Service changes the current working directory of the child process to the root directory, and closes all unnecessary file descriptors. Note that the file descriptors are not closed until after the communicator is initialized, meaning standard input, standard output, and standard error are available for use during this time. For example, the IceSSL plug-in may need to prompt for a passphrase on standard input, or Ice may print the child’s process id on stan-dard output if the property Ice.PrintProcessId is set.
• --pidfile FILE
This option writes the process ID of the service into the specified file. (This option requires --daemon.)
• --noclose
Prevents Ice::Service from closing unnecessary file descriptors. This can be useful during debugging and diagnosis because it provides access to the output from the daemon’s standard output and standard error.
• --nochdir
Prevents Ice::Service from changing the current working directory.
The --noclose and --nochdir options can only be specified in conjunction with --daemon. These options are removed from the argument vector that is passed to the start member function.
2. This behavior avoids the uncertainty often associated with starting a daemon from a shell script, because it ensures that the command invocation does not complete until the daemon is ready to receive requests.

8.3 The Server-Side main Function 289
Windows Services
On Windows, Ice::Service recognizes the following command-line options:
• --service NAME
Run as a Windows service named NAME, which must already be installed. This option is removed from the argument vector that is passed to the start member function.
Installing and configuring a Windows service is outside the scope of the Ice::Service class. Ice includes a utility for installing its services (see Appendix H) which you can use as a model for your own applications.
The Ice::Service class supports the Windows service control codes SERVICE_CONTROL_INTERROGATE and SERVICE_CONTROL_STOP. Upon receipt of SERVICE_CONTROL_STOP, Ice::Service invokes the shut-down member function.
Logging Considerations
A service that uses a custom logger has several ways of configuring it:
• as a process-wide logger (see Section 32.19.5),
• in the InitializationData argument that is passed to main,
• by overriding the initializeCommunicator member function.
On Windows, Ice::Service installs its own logger that uses the Windows Application event log if no custom logger is defined. The source name for the event log is the service’s name unless a different value is specified using the prop-erty Ice.EventLog.Source (see Appendix D).
On Unix, the default Ice logger (which logs to the standard error output) is used when no other logger is configured. For daemons, this is not appropriate because the output will be lost. To change this, you can either implement a custom logger or set the Ice.UseSyslog property, which selects a logger implementa-tion that logs to the syslog facility. Alternatively, you can set the Ice.LogFile property to write log messages to a file.
Note that Ice::Service may encounter errors before the communicator is initialized. In this situation, Ice::Service uses its default logger unless a process-wide logger is configured. Therefore, even if a failing service is config-ured to use a different logger implementation, you may find useful diagnostic information in the Application event log (on Windows) or sent to standard error (on Unix).

290 Server-Side Slice-to-C++ Mapping
8.4 Mapping for Interfaces
The server-side mapping for interfaces provides an up-call API for the Ice run time: by implementing virtual functions in a servant class, you provide the hook that gets the thread of control from the Ice server-side run time into your applica-tion code.
8.4.1 Skeleton Classes
On the client side, interfaces map to proxy classes (see Section 6.11). On the server side, interfaces map to skeleton classes. A skeleton is a class that has a pure virtual member function for each operation on the corresponding interface. For example, consider the Slice definition for the Node interface we defined in Chapter 5 once more:
module Filesystem { interface Node { idempotent string name(); }; // ...};
The Slice compiler generates the following definition for this interface:
namespace Filesystem { class Node : virtual public Ice::Object { public: virtual std::string name(const Ice::Current& = Ice::Current()) = 0; // ... }; // ...}
For the moment, we will ignore a number of other member functions of this class. The important points to note are:
• As for the client side, Slice modules are mapped to C++ namespaces with the same name, so the skeleton class definition is nested in the namespace File-system.
• The name of the skeleton class is the same as the name of the Slice interface (Node).

8.4 Mapping for Interfaces 291
• The skeleton class contains a pure virtual member function for each operation in the Slice interface.
• The skeleton class is an abstract base class because its member functions are pure virtual.
• The skeleton class inherits from Ice::Object (which forms the root of the Ice object hierarchy).
8.4.2 Servant ClassesIn order to provide an implementation for an Ice object, you must create a servant class that inherits from the corresponding skeleton class. For example, to create a servant for the Node interface, you could write:
#include <Filesystem.h> // Slice-generated headerclass NodeI : public virtual Filesystem::Node {public: NodeI(const std::string&); virtual std::string name(const Ice::Current&);private: std::string _name;};
By convention, servant classes have the name of their interface with an I-suffix, so the servant class for the Node interface is called NodeI. (This is a convention only: as far as the Ice run time is concerned, you can chose any name you prefer for your servant classes.)
Note that NodeI inherits from Filesystem::Node, that is, it derives from its skeleton class. It is a good idea to always use virtual inheritance when defining servant classes. Strictly speaking, virtual inheritance is necessary only for servants that implement interfaces that use multiple inheritance; however, the virtual keyword does no harm and, if you add multiple inheritance to an interface hier-archy half-way through development, you do not have to go back and add a virtual keyword to all your servant classes.
As far as Ice is concerned, the NodeI class must implement only a single member function: the pure virtual name function that it inherits from its skeleton. This makes the servant class a concrete class that can be instantiated. You can add other member functions and data members as you see fit to support your imple-mentation. For example, in the preceding definition, we added a _name member and a constructor. Obviously, the constructor initializes the _name member and the name function returns its value:

292 Server-Side Slice-to-C++ Mapping
NodeI::NodeI(const std::string& name) : _name(name){}std::stringNodeI::name(const Ice::Current&) const{ return _name;}
Normal and idempotent Operations
The name member function of the NodeI skeleton on page 291 is not a const member function. However, given that the operation does not modify the state of its object, it really should be a const member function. We can achieve this by adding the [“cpp:const”] metadata directive. For example:
interface Example { void normalOp(); idempotent void idempotentOp(); ["cpp:const"] idempotent void readonlyOp();};
The skeleton class for this interface looks like this:
class Example : virtual public Ice::Object {public: virtual void normalOp(const Ice::Current& = Ice::Current()) = 0; virtual void idempotentOp(const Ice::Current& = Ice::Current()) = 0; virtual void readonlyOp(const Ice::Current& = Ice::Current()) const = 0; // ...};
Note that readonlyOp is mapped as a const member function due to the ["cpp:const"] metadata directive; normal and idempotent operations (without the metadata directive) are mapped as ordinary, non-const member functions.

8.5 Parameter Passing 293
8.5 Parameter Passing
For each parameter of a Slice operation, the C++ mapping generates a corre-sponding parameter for the virtual member function in the skeleton. In addition, every operation has an additional, trailing parameter of type Ice::Current. For example, the name operation of the Node interface has no parameters, but the name member function of the Node skeleton class has a single parameter of type Ice::Current. We explain the purpose of this parameter in Section 32.6 and will ignore it for now.
Parameter passing on the server side follows the rules for the client side:
• in-parameters are passed by value or const reference.
• out-parameters are passed by reference.
• return values are passed by value
To illustrate the rules, consider the following interface that passes string parame-ters in all possible directions:
module M { interface Example { string op(string sin, out string sout); };};
The generated skeleton class for this interface looks as follows:
namespace M { class Example : virtual public ::Ice::Object { public: virtual std::string op(const std::string&, std::string&, const Ice::Current& = Ice::Current()) = 0; // ... };}
As you can see, there are no surprises here. For example, we could implement op as follows:
std::stringExampleI::op(const std::string& sin, std::string& sout, const Ice::Current&){

294 Server-Side Slice-to-C++ Mapping
cout << sin << endl; // In parameters are initialized sout = "Hello World!"; // Assign out parameter return "Done"; // Return a string}
This code is in no way different from what you would normally write if you were to pass strings to and from a function; the fact that remote procedure calls are involved does not impact on your code in any way. The same is true for parame-ters of other types, such as proxies, classes, or dictionaries: the parameter passing conventions follow normal C++ rules and do not require special-purpose API calls or memory management.
8.6 Raising Exceptions
To throw an exception from an operation implementation, you simply instantiate the exception, initialize it, and throw it. For example:
voidFilesystem::FileI::write(const Filesystem::Lines& text, const Ice::Current&){ // Try to write the file contents here... // Assume we are out of space... if (error) { Filesystem::GenericError e; e.reason = "file too large"; throw e; }};
No memory management issues arise in the presence of exceptions.
Note that the Slice compiler never generates exception specifications for oper-ations, regardless of whether the corresponding Slice operation definition has an exception specification or not. This is deliberate: C++ exception specifications do not add any value and are therefore not used by the Ice C++ mapping. (See [22] for an excellent treatment of the problems associated with C++ exception specifi-cations.)
If you throw an arbitrary C++ exception (such as an int or other unexpected type), the Ice run time catches the exception and then returns an UnknownExcep-tion to the client. Similarly, if you throw an “impossible” user exception (a user

8.7 Object Incarnation 295
exception that is not listed in the exception specification of the operation), the client receives an UnknownUserException.
If you throw a run-time exception, such as MemoryLimitException, the client receives an UnknownLocalException.3 For that reason, you should never throw system exceptions from operation implementations. If you do, all the client will see is an UnknownLocalException, which does not tell the client anything useful.
8.7 Object Incarnation
Having created a servant class such as the rudimentary NodeI class in Section 8.4.2, you can instantiate the class to create a concrete servant that can receive invocations from a client. However, merely instantiating a servant class is insufficient to incarnate an object. Specifically, to provide an implementation of an Ice object, you must follow the following steps:
1. Instantiate a servant class.
2. Create an identity for the Ice object incarnated by the servant.
3. Inform the Ice run time of the existence of the servant.
4. Pass a proxy for the object to a client so the client can reach it.
8.7.1 Instantiating a ServantInstantiating a servant means to allocate an instance on the heap:
NodePtr servant = new NodeI("Fred");
This code creates a new NodeI instance on the heap and assigns its address to a smart pointer of type NodePtr (see also page 238). This works because NodeI is derived from Node, so a smart pointer of type NodePtr can also look after an instance of type NodeI. However, if we want to invoke a member function of the derived NodeI class at this point, we have a problem: we cannot access member functions of the derived NodeI class through a NodePtr smart pointer, only member functions of Node base class. (The C++ type rules prevent us from
3. There are three system exceptions that are not changed to UnknownLocalException when returned to the client: ObjectNotExistException, OperationNotExistException, and FacetNotExistException. We discuss these exceptions in more detail in Section 4.10.4 and Chapter 33.

296 Server-Side Slice-to-C++ Mapping
accessing a member of a derived class through a pointer to a base class.) To get around this, we can modify the code as follows:
typedef IceUtil::Handle<NodeI> NodeIPtr;NodeIPtr servant = new NodeI("Fred");
This code makes use of the smart pointer template we presented in Section 6.14.6 by defining NodeIPtr as a smart pointer to NodeI instances. Whether you use a smart pointer of type NodePtr or NodeIPtr depends solely on whether you want to invoke a member function of the NodeI derived class; if you only want to invoke member functions that are defined in the Node skeleton base class, it is sufficient to use a NodePtr and you need not define the NodeIPtr type.
Whether you use NodePtr or NodeIPtr, the advantages of using a smart pointer class should be obvious from the discussion in Section 6.14.6: they make it impossible to accidentally leak memory.
8.7.2 Creating an IdentityEach Ice object requires an identity. That identity must be unique for all servants using the same object adapter.4 An Ice object identity is a structure with the following Slice definition:
module Ice { struct Identity { string name; string category; }; // ...};
The full identity of an object is the combination of both the name and category fields of the Identity structure. For now, we will leave the category field as the empty string and simply use the name field. (See Section 32.7 for a discussion of the category field.)
To create an identity, we simply assign a key that identifies the servant to the name field of the Identity structure:
Ice::Identity id;id.name = "Fred"; // Not unique, but good enough for now
4. The Ice object model assumes that all objects (regardless of their adapter) have a globally unique identity. See Chapter 34 for further discussion.

8.7 Object Incarnation 297
8.7.3 Activating a ServantMerely creating a servant instance does nothing: the Ice run time becomes aware of the existence of a servant only once you explicitly tell the object adapter about the servant. To activate a servant, you invoke the add operation on the object adapter. Assuming that we have access to the object adapter in the _adapter variable, we can write:
_adapter->add(servant, id);
Note the two arguments to add: the smart pointer to the servant and the object identity. Calling add on the object adapter adds the servant pointer and the servant’s identity to the adapter’s servant map and links the proxy for an Ice object to the correct servant instance in the server’s memory as follows:
1. The proxy for an Ice object, apart from addressing information, contains the identity of the Ice object. When a client invokes an operation, the object iden-tity is sent with the request to the server.
2. The object adapter receives the request, retrieves the identity, and uses the identity as an index into the servant map.
3. If a servant with that identity is active, the object adapter retrieves the servant pointer from the servant map and dispatches the incoming request into the correct member function on the servant.
Assuming that the object adapter is in the active state (see Section 32.4.5), client requests are dispatched to the servant as soon as you call add.
Servant Life Time and Reference Counts
Putting the preceding points together, we can write a simple function that instanti-ates and activates one of our NodeI servants. For this example, we use a simple helper function called activateServant that creates and activates a servant with a given identity:
voidactivateServant(const string& name){ NodePtr servant = new NodeI(name); // Refcount == 1 Ice::Identity id; id.name = name; _adapter->add(servant, id); // Refcount == 2} // Refcount == 1
Note that we create the servant on the heap and that, once activateServant returns, we lose the last remaining handle to the servant (because the servant

298 Server-Side Slice-to-C++ Mapping
variable goes out of scope). The question is, what happens to the heap-allocated servant instance? The answer lies in the smart pointer semantics:
• When the new servant is instantiated, its reference count is initialized to 0.
• Assigning the servant’s address to the servant smart pointer increments the servant’s reference count to 1.
• Calling add passes the servant smart pointer to the object adapter which keeps a copy of the handle internally. This increments the reference count of the servant to 2.
• When activateServant returns, the destructor of the servant variable decrements the reference count of the servant to 1.
The net effect is that the servant is retained on the heap with a reference count of 1 for as long as the servant is in the servant map of its object adapter. (If we deacti-vate the servant, that is, remove it from the servant map, the reference count drops to zero and the memory occupied by the servant is reclaimed; we discuss these life cycle issues in Chapter 34.)
8.7.4 UUIDs as Identities
The Ice object model assumes that object identities are globally unique. One way of ensuring that uniqueness is to use UUIDs (Universally Unique Identifiers) [14] as identities. The IceUtil namespace contains a helper function to create such identities:
#include <IceUtil/UUID.h>#include <iostream>using namespace std;intmain(){ cout << IceUtil::generateUUID() << endl;}
When executed, this program prints a unique string such as 5029a22c-e333-4f87-86b1-cd5e0fcce509. Each call to genera-teUUID creates a string that differs from all previous ones.5 You can use a UUID such as this to create object identities. For convenience, the object adapter has an operation addWithUUID that generates a UUID and adds a servant to the servant

8.7 Object Incarnation 299
map in a single step. Using this operation, we can rewrite the code on page 297 like this:
voidactivateServant(const string& name){ NodePtr servant = new NodeI(name); _adapter->addWithUUID(servant);}
8.7.5 Creating Proxies
Once we have activated a servant for an Ice object, the server can process incoming client requests for that object. However, clients can only access the object once they hold a proxy for the object. If a client knows the server’s address details and the object identity, it can create a proxy from a string, as we saw in our first example in Chapter 3. However, creation of proxies by the client in this manner is usually only done to allow the client access to initial objects for boot-strapping. Once the client has an initial proxy, it typically obtains further proxies by invoking operations.
The object adapter contains all the details that make up the information in a proxy: the addressing and protocol information, and the object identity. The Ice run time offers a number of ways to create proxies. Once created, you can pass a proxy to the client as the return value or as an out-parameter of an operation invo-cation.
Proxies and Servant Activation
The add and addWithUUID servant activation operations on the object adapter return a proxy for the corresponding Ice object. This means we can write:
typedef IceUtil::Handle<NodeI> NodeIPtr;NodeIPtr servant = new NodeI(name);NodePrx proxy = NodePrx::uncheckedCast( _adapter->addWithUUID(servant));// Pass proxy to client...
5. Well, almost: eventually, the UUID algorithm wraps around and produces strings that repeat themselves, but this will not happen until approximately the year 3400.

300 Server-Side Slice-to-C++ Mapping
Here, addWithUUID both activates the servant and returns a proxy for the Ice object incarnated by that servant in a single step.
Note that we need to use an uncheckedCast here because addWithUUID returns a proxy of type Ice::ObjectPrx.
Direct Proxy Creation
The object adapter offers an operation to create a proxy for a given identity:
module Ice { local interface ObjectAdapter { Object* createProxy(Identity id); // ... };};
Note that createProxy creates a proxy for a given identity whether a servant is activated with that identity or not. In other words, proxies have a life cycle that is quite independent from the life cycle of servants:
Ice::Identity id;id.name = IceUtil::generateUUID();ObjectPrx o = _adapter->createProxy(id);
This creates a proxy for an Ice object with the identity returned by genera-teUUID. Obviously, no servant yet exists for that object so, if we return the proxy to a client and the client invokes an operation on the proxy, the client will receive an ObjectNotExistException. (We examine these life cycle issues in more detail in Chapter 34.)
8.8 Asynchronous Method Dispatch (AMD)
The number of simultaneous synchronous requests a server is capable of supporting is determined by the number of threads in the server’s thread pool (see Section 32.10). If all of the threads are busy dispatching long-running operations, then no threads are available to process new requests and therefore clients may experience an unacceptable lack of responsiveness.
Asynchronous Method Dispatch (AMD), the server-side equivalent of AMI (see Section 6.15), addresses this scalability issue. Using AMD, a server can receive a request but then suspend its processing in order to release the dispatch thread as soon as possible. When processing resumes and the results are available,

8.8 Asynchronous Method Dispatch (AMD) 301
the server sends a response explicitly using a callback object provided by the Ice run time.
AMD is transparent to the client, that is, there is no way for a client to distin-guish a request that, in the server, is processed synchronously from a request that is processed asynchronously.
In practical terms, an AMD operation typically queues the request data (i.e., the callback object and operation arguments) for later processing by an applica-tion thread (or thread pool). In this way, the server minimizes the use of dispatch threads and becomes capable of efficiently supporting thousands of simultaneous clients.
An alternate use case for AMD is an operation that requires further processing after completing the client’s request. In order to minimize the client’s delay, the operation returns the results while still in the dispatch thread, and then continues using the dispatch thread for additional work.
8.8.1 Enabling AMD with MetadataTo enable asynchronous dispatch, you must add an ["amd"] metadata directive to your Slice definitions. The directive applies at the interface and the operation level. If you specify ["amd"] at the interface level, all operations in that interface use asynchronous dispatch; if you specify ["amd"] for an individual operation, only that operation uses asynchronous dispatch. In either case, the metadata direc-tive replaces synchronous dispatch, that is, a particular operation implementation must use synchronous or asynchronous dispatch and cannot use both.
Consider the following Slice definitions:
["amd"] interface I { bool isValid(); float computeRate();};interface J { ["amd"] void startProcess(); int endProcess();};
In this example, both operations of interface I use asynchronous dispatch, whereas, for interface J, startProcess uses asynchronous dispatch and endPro-cess uses synchronous dispatch.
Specifying metadata at the operation level (rather than at the interface or class level) minimizes the amount of generated code and, more importantly, minimizes

302 Server-Side Slice-to-C++ Mapping
complexity: although the asynchronous model is more flexible, it is also more complicated to use. It is therefore in your best interest to limit the use of the asyn-chronous model to those operations that need it, while using the simpler synchro-nous model for the rest.
8.8.2 AMD Mapping
The C++ mapping emits the following code for each AMD operation:
1. A callback class used by the implementation to notify the Ice run time about the completion of an operation. The name of this class is formed using the pattern AMD_class_op. For example, an operation named foo defined in interface I results in a class named AMD_I_foo. The class is generated in the same scope as the interface or class containing the operation. Several methods are provided:
void ice_response(<params>);
The ice_response method allows the server to report the successful completion of the operation. If the operation has a non-void return type, the first parameter to ice_response is the return value. Parameters corre-sponding to the operation’s out parameters follow the return value, in the order of declaration.
void ice_exception(const std::exception &);
This version of ice_exception allows the server to raise any standard exception, Ice run-time exception, or Ice user exception.
void ice_exception()
This version of ice_exception allows the server to report an UnknownEx-ception.
Neither ice_response nor ice_exception throw any exceptions to the caller.
2. The dispatch method, whose name has the suffix _async. This method has a void return type. The first parameter is a smart pointer to an instance of the callback class described above. The remaining parameters comprise the in-parameters of the operation, in the order of declaration.
For example, suppose we have defined the following operation:

8.8 Asynchronous Method Dispatch (AMD) 303
interface I { ["amd"] int foo(short s, out long l);};
The callback class generated for operation foo is shown below:
class AMD_I_foo : public ... {public: void ice_response(Ice::Int, Ice::Long); void ice_exception(const std::exception&); void ice_exception();};
The dispatch method for asynchronous invocation of operation foo is generated as follows:
void foo_async(const AMD_I_fooPtr&, Ice::Short);
8.8.3 Exceptions
There are two processing contexts in which the logical implementation of an AMD operation may need to report an exception: the dispatch thread (the thread that receives the invocation), and the response thread (the thread that sends the response).6 Although we recommend that the callback object be used to report all exceptions to the client, it is legal for the implementation to raise an exception instead, but only from the dispatch thread.
As you would expect, an exception raised from a response thread cannot be caught by the Ice run time; the application’s run-time environment determines how such an exception is handled. Therefore, a response thread must ensure that it traps all exceptions and sends the appropriate response using the callback object. Otherwise, if a response thread is terminated by an uncaught exception, the request may never be completed and the client might wait indefinitely for a response.
Whether raised in a dispatch thread or reported via the callback object, user exceptions are validated as described in Section 4.10.2, and local exceptions may undergo the translation described in Section 4.10.4.
6. These are not necessarily two different threads: it is legal to send the response from the dispatch thread.

304 Server-Side Slice-to-C++ Mapping
8.8.4 Example
To demonstrate the use of AMD in Ice, let us define the Slice interface for a simple computational engine:
module Demo { sequence<float> Row; sequence<Row> Grid; exception RangeError {}; interface Model { ["amd"] Grid interpolate(Grid data, float factor) throws RangeError; };};
Given a two-dimensional grid of floating point values and a factor, the interpo-late operation returns a new grid of the same size with the values interpolated in some interesting (but unspecified) way.
Our servant class derives from Demo::Model and supplies a definition for the interpolate_async method:
class ModelI : virtual public Demo::Model, virtual public IceUtil::Mutex {public: virtual void interpolate_async( const Demo::AMD_Model_interpolatePtr&, const Demo::Grid&, Ice::Float, const Ice::Current&);private: std::list<JobPtr> _jobs;};
The implementation of interpolate_async uses synchronization to safely record the callback object and arguments in a Job that is added to a queue:
void ModelI::interpolate_async( const Demo::AMD_Model_interpolatePtr& cb, const Demo::Grid& data, Ice::Float factor, const Ice::Current& current){

8.8 Asynchronous Method Dispatch (AMD) 305
IceUtil::Mutex::Lock sync(*this); JobPtr job = new Job(cb, data, factor); _jobs.push_back(job);}
After queuing the information, the operation returns control to the Ice run time, making the dispatch thread available to process another request. An application thread removes the next Job from the queue and invokes execute to perform the interpolation. Job is defined as follows:
class Job : public IceUtil::Shared {public: Job( const Demo::AMD_Model_interpolatePtr&, const Demo::Grid&, Ice::Float); void execute();private: bool interpolateGrid(); Demo::AMD_Model_interpolatePtr _cb; Demo::Grid _grid; Ice::Float _factor;};typedef IceUtil::Handle<Job> JobPtr;
The implementation of execute uses interpolateGrid (not shown) to perform the computational work:
Job::Job( const Demo::AMD_Model_interpolatePtr& cb, const Demo::Grid& grid, Ice::Float factor) : _cb(cb), _grid(grid), _factor(factor){}void Job::execute(){ if (!interpolateGrid()) { _cb->ice_exception(Demo::RangeError()); return; } _cb->ice_response(_grid);}

306 Server-Side Slice-to-C++ Mapping
If interpolateGrid returns false, then ice_exception is invoked to indicate that a range error has occurred. The return statement following the call to ice_exception is necessary because ice_exception does not throw an exception; it only marshals the exception argument and sends it to the client.
If interpolation was successful, ice_response is called to send the modi-fied grid back to the client.
8.9 Summary
This chapter presented the server-side C++ mapping. Because the mapping for Slice data types is identical for clients and servers, the server-side mapping only adds a few additional mechanism to the client side: a small API to initialize and finalize the run time, plus a few rules for how to derive servant classes from skele-tons and how to register servants with the server-side run time.
Even though the examples in this chapter are very simple, they accurately reflect the basics of writing an Ice server. Of course, for more sophisticated servers (which we discuss in Chapter 32), you will be using additional APIs, for example, to improve performance or scalability. However, these APIs are all described in Slice, so, to use these APIs, you need not learn any C++ mapping rules beyond those we described here.

307
Chapter 9Developing a File System Server in C++
9.1 Chapter Overview
In this chapter, we present the source code for a C++ server that implements the file system we developed in Chapter 5 (see Chapter 7 for the corresponding client). The code we present here is fully functional, apart from the required inter-locking for threads. (We examine threading issues in detail in Chapter 31.)
9.2 Implementing a File System Server
We have now seen enough of the server-side C++ mapping to implement a server for the file system we developed in Chapter 5. (You may find it useful to review the Slice definition for our file system in Section 5 before studying the source code.)
Our server is composed of two source files:
• Server.cpp
This file contains the server main program.
• FilesystemI.cpp
This file contains the implementation for the file system servants.

308 Developing a File System Server in C++
9.2.1 The Server main ProgramOur server main program, in the file Server.cpp, uses theIce::Application class we discussed in Section 8.3.1. The run method installs a signal handler, creates an object adapter, instantiates a few servants for the directories and files in the file system, and then activates the adapter. This leads to a main program as follows:
#include <Ice/Ice.h>#include <FilesystemI.h>using namespace std;using namespace Filesystem;class FilesystemApp : virtual public Ice::Application {public: virtual int run(int, char*[]) { // Terminate cleanly on receipt of a signal // shutdownOnInterrupt(); // Create an object adapter. // Ice::ObjectAdapterPtr adapter = communicator()->createObjectAdapterWithEndpoints( "SimpleFilesystem", "default -p 10000"); // Create the root directory (with name "/" and no parent) // DirectoryIPtr root = new DirectoryI(communicator(), "/", 0); root->activate(adapter); // Create a file called "README" in the root directory // FileIPtr file = new FileI(communicator(), "README", root); Lines text; text.push_back("This file system contains " "a collection of poetry."); file->write(text); file->activate(adapter); // Create a directory called "Coleridge" // in the root directory // DirectoryIPtr coleridge =

9.2 Implementing a File System Server 309
new DirectoryI(communicator(), "Coleridge", root); coleridge->activate(adapter); // Create a file called "Kubla_Khan" // in the Coleridge directory // file = new FileI(communicator(), "Kubla_Khan", coleridge); text.erase(text.begin(), text.end()); text.push_back("In Xanadu did Kubla Khan"); text.push_back("A stately pleasure-dome decree:"); text.push_back("Where Alph, the sacred river, ran"); text.push_back("Through caverns measureless to man"); text.push_back("Down to a sunless sea."); file->write(text); file->activate(adapter); // All objects are created, allow client requests now // adapter->activate(); // Wait until we are done // communicator()->waitForShutdown(); if (interrupted()) { cerr << appName() << ": received signal, shutting down" << endl; } return 0; };};intmain(int argc, char* argv[]){ FilesystemApp app; return app.main(argc, argv);}
There is quite a bit of code here, so let us examine each section in detail:
#include <FilesystemI.h>#include <Ice/Application.h>using namespace std;using namespace Filesystem;

310 Developing a File System Server in C++
The code includes the header file FilesystemI.h (see page 319). That file includes Ice/Ice.h as well as the header file that is generated by the Slice compiler, Filesystem.h. Because we are using Ice::Application, we need to include Ice/Application.h as well.
Two using declarations, for the namespaces std and Filesystem, permit us to be a little less verbose in the source code.
The next part of the source code is the definition of FilesystemApp, which derives from Ice::Application and contains the main application logic in its run method:
class FilesystemApp : virtual public Ice::Application {public: virtual int run(int, char*[]) { // Terminate cleanly on receipt of a signal // shutdownOnInterrupt(); // Create an object adapter. // Ice::ObjectAdapterPtr adapter = communicator()->createObjectAdapterWithEndpoints( "SimpleFilesystem", "default -p 10000"); // Create the root directory (with name "/" and no parent) // DirectoryIPtr root = new DirectoryI(communicator(), "/", 0); root->activate(adapter); // Create a file called "README" in the root directory // FileIPtr file = new FileI(communicator(), "README", root); Lines text; text.push_back("This file system contains " "a collection of poetry."); file->write(text); file->activate(adapter); // Create a directory called "Coleridge" // in the root directory // DirectoryIPtr coleridge = new DirectoryI(communicator(), "Coleridge", root); coleridge->activate(adapter);

9.2 Implementing a File System Server 311
// Create a file called "Kubla_Khan" // in the Coleridge directory // file = new FileI(communicator(), "Kubla_Khan", coleridge); text.erase(text.begin(), text.end()); text.push_back("In Xanadu did Kubla Khan"); text.push_back("A stately pleasure-dome decree:"); text.push_back("Where Alph, the sacred river, ran"); text.push_back("Through caverns measureless to man"); text.push_back("Down to a sunless sea."); file->write(text); file->activate(adapter); // All objects are created, allow client requests now // adapter->activate(); // Wait until we are done // communicator()->waitForShutdown(); if (interrupted()) { cerr << appName() << ": received signal, shutting down" << endl; } return 0; };};
Much of this code is boiler plate that we saw previously: we create an object adapter, and, towards the end, activate the object adapter and call waitFor-Shutdown.
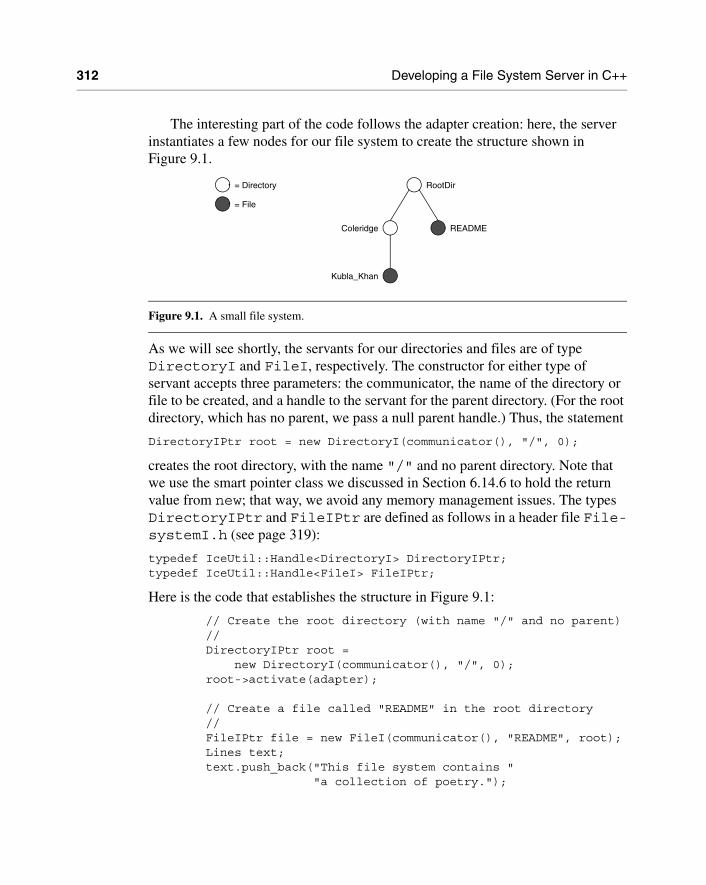
312 Developing a File System Server in C++
The interesting part of the code follows the adapter creation: here, the server instantiates a few nodes for our file system to create the structure shown in Figure 9.1.
Figure 9.1. A small file system.
As we will see shortly, the servants for our directories and files are of type DirectoryI and FileI, respectively. The constructor for either type of servant accepts three parameters: the communicator, the name of the directory or file to be created, and a handle to the servant for the parent directory. (For the root directory, which has no parent, we pass a null parent handle.) Thus, the statement
DirectoryIPtr root = new DirectoryI(communicator(), "/", 0);
creates the root directory, with the name "/" and no parent directory. Note that we use the smart pointer class we discussed in Section 6.14.6 to hold the return value from new; that way, we avoid any memory management issues. The types DirectoryIPtr and FileIPtr are defined as follows in a header file File-systemI.h (see page 319):
typedef IceUtil::Handle<DirectoryI> DirectoryIPtr;typedef IceUtil::Handle<FileI> FileIPtr;
Here is the code that establishes the structure in Figure 9.1:
// Create the root directory (with name "/" and no parent) // DirectoryIPtr root = new DirectoryI(communicator(), "/", 0); root->activate(adapter); // Create a file called "README" in the root directory // FileIPtr file = new FileI(communicator(), "README", root); Lines text; text.push_back("This file system contains " "a collection of poetry.");
RootDir
Coleridge README
Kubla_Khan
= Directory
= File

9.2 Implementing a File System Server 313
file->write(text); file->activate(adapter); // Create a directory called "Coleridge" // in the root directory // DirectoryIPtr coleridge = new DirectoryI(communicator(), "Coleridge", root); coleridge->activate(adapter); // Create a file called "Kubla_Khan" // in the Coleridge directory // file = new FileI(communicator(), "Kubla_Khan", coleridge); text.erase(text.begin(), text.end()); text.push_back("In Xanadu did Kubla Khan"); text.push_back("A stately pleasure-dome decree:"); text.push_back("Where Alph, the sacred river, ran"); text.push_back("Through caverns measureless to man"); text.push_back("Down to a sunless sea."); file->write(text); file->activate(adapter);
We first create the root directory and a file README within the root directory. (Note that we pass the handle to the root directory as the parent pointer when we create the new node of type FileI.)
After creating each servant, the code calls activate on the servant. (We will see the definition of this member function shortly.) The activate member function adds the servant to the ASM.
The next step is to fill the file with text:
FileIPtr file = new FileI(communicator(), "README", root); Lines text; text.push_back("This file system contains " "a collection of poetry."); file->write(text); file->activate(adapter);
Recall from Section 6.7.3 that Slice sequences map to STL vectors. The Slice type Lines is a sequence of strings, so the C++ type Lines is a vector of strings; we add a line of text to our README file by calling push_back on that vector.
Finally, we call the Slice write operation on our FileI servant by simply writing:
file->write(text);

314 Developing a File System Server in C++
This statement is interesting: the server code invokes an operation on one of its own servants. Because the call happens via a smart class pointer (of type FilePtr) and not via a proxy (of type FilePrx), the Ice run time does not know that this call is even taking place—such a direct call into a servant is not mediated by the Ice run time in any way and is dispatched as an ordinary C++ function call.
In similar fashion, the remainder of the code creates a subdirectory called Coleridge and, within that directory, a file called Kubla_Khan to complete the structure in Figure 9.1.
9.2.2 The Servant Class Definitions
We must provide servants for the concrete interfaces in our Slice specification, that is, we must provide servants for the File and Directory interfaces in the C++ classes FileI and DirectoryI. This means that our servant classes might look as follows:
namespace Filesystem { class FileI : virtual public File { // ... }; class DirectoryI : virtual public Directory { // ... };}
This leads to the C++ class structure as shown in Figure 9.2.
Figure 9.2. File system servants using interface inheritance.
Node
File
Object
Directory
FileI DirectoryI

9.2 Implementing a File System Server 315
The shaded classes in Figure 9.2 are skeleton classes and the unshaded classes are our servant implementations. If we implement our servants like this, FileI must implement the pure virtual operations it inherits from the File skeleton (read and write), as well as the operation it inherits from the Node skeleton (name). Similarly, DirectoryI must implement the pure virtual function it inherits from the Directory skeleton (list), as well as the operation it inherits from the Node skeleton (name). Implementing the servants in this way uses interface inheritance from Node because no implementation code is inherited from that class.
Alternatively, we can implement our servants using the following definitions:
namespace Filesystem { class NodeI : virtual public Node { // ... }; class FileI : virtual public File, virtual public NodeI { // ... }; class DirectoryI : virtual public Directory, virtual public NodeI { // ... };}

316 Developing a File System Server in C++
This leads to the C++ class structure shown in Figure 9.3.
Figure 9.3. File system servants using implementation inheritance.
In this implementation, NodeI is a concrete base class that implements the name operation it inherits from the Node skeleton. FileI and DirectoryI use multiple inheritance from NodeI and their respective skeletons, that is, FileI and DirectoryI use implementation inheritance from their NodeI base class.
Either implementation approach is equally valid. Which one to choose simply depends on whether we want to re-use common code provided by NodeI. For the implementation that follows, we have chosen the second approach, using imple-mentation inheritance.
Given the structure in Figure 9.3 and the operations we have defined in the Slice definition for our file system, we can add these operations to the class defini-tion for our servants:
namespace Filesystem { class NodeI : virtual public Node { public: virtual std::string name(const Ice::Current&); }; class FileI : virtual public File, virtual public NodeI { public: virtual Lines read(const Ice::Current&); virtual void write(const Lines&, const Ice::Current&);
Node
NodeI
Object
DirectoryFile
DirectoryIFileI

9.2 Implementing a File System Server 317
}; class DirectoryI : virtual public Directory, virtual public NodeI { public: virtual NodeSeq list(const Ice::Current&); };}
This simply adds signatures for the operation implementations to each class. Note that the signatures must exactly match the operation signatures in the generated skeleton classes—if they do not match exactly, you end up overloading the pure virtual function in the base class instead of overriding it, meaning that the servant class cannot be instantiated because it will still be abstract. To avoid signature mismatches, you can copy the signatures from the generated header file (File-system.h), or you can use the --impl option with slice2cpp to generate header and implementation files that you can add your application code to (see Section 6.16).
Now that we have the basic structure in place, we need to think about other methods and data members we need to support our servant implementation. Typi-cally, each servant class hides the copy constructor and assignment operator, and has a constructor to provide initial state for its data members. Given that all nodes in our file system have both a name and a parent directory, this suggests that the NodeI class should implement the functionality relating to tracking the name of each node, as well as the parent–child relationships:
namespace Filesystem { class DirectoryI; typedef IceUtil::Handle<DirectoryI> DirectoryIPtr; class NodeI : virtual public Node { public: virtual std::string name(const Ice::Current&); NodeI(const Ice::CommunicatorPtr&, const std::string&, const DirectoryIPtr&); void activate(const Ice::ObjectAdapterPtr&); private: std::string _name; Ice::Identity _id; DirectoryIPtr _parent;

318 Developing a File System Server in C++
NodeI(const NodeI&); // Copy forbidden void operator=(const NodeI&); // Assignment forbidden };}
The NodeI class has a private data member to store its name (of type std::string) and its parent directory (of type DirectoryIPtr). The constructor accepts parameters that set the value of these data members. For the root directory, by convention, we pass a null handle to the constructor to indicate that the root directory has no parent. The constructor also requires the communi-cator to be passed to it. This is necessary because the constructor creates the iden-tity for the servant, which requires access to the communicator. The activate member function adds the servant to the ASM (which requires access to the object adapter) and connects the child to its parent.
The FileI servant class must store the contents of its file, so it requires a data member for this. We can conveniently use the generated Lines type (which is a std::vector<std::string>) to hold the file contents, one string for each line. Because FileI inherits from NodeI, it also requires a constructor that accepts the communicator, file name, and parent directory, leading to the following class definition:
namespace Filesystem { class FileI : virtual public File, virtual public NodeI { public: virtual Lines read(const Ice::Current&); virtual void write(const Lines&, const Ice::Current&); FileI(const Ice::CommunicatorPtr&, const std::string&, const DirectoryIPtr&); private: Lines _lines; };}
For directories, each directory must store its list of child notes. We can conve-niently use the generated NodeSeq type (which is a vector<NodePrx>) to do this. Because DirectoryI inherits from NodeI, we need to add a constructor to initialize the directory name and its parent directory. As we will see shortly, we also need a private helper function, addChild, to make it easier to connect a newly created directory to its parent. This leads to the following class definition:

9.2 Implementing a File System Server 319
namespace Filesystem { class DirectoryI : virtual public Directory, virtual public NodeI { public: virtual NodeSeq list(const Ice::Current&) const; DirectoryI(const Ice::CommunicatorPtr&, const std::string&, const DirectoryIPtr&); void addChild(NodePrx child); private: NodeSeq _contents; };}
Putting all this together, we end up with a servant header file, FilesystemI.h, as follows:
#include <Ice/Ice.h>#include <Filesystem.h>namespace Filesystem { class DirectoryI; typedef IceUtil::Handle<DirectoryI> DirectoryIPtr; class NodeI : virtual public Node { public: virtual std::string name(const Ice::Current&); NodeI(const Ice::CommunicatorPtr&, const std::string&, const DirectoryIPtr&); void activate(const Ice::ObjectAdapterPtr&); private: std::string _name; Ice::Identity _id; DirectoryIPtr _parent; NodeI(const NodeI&); // Copy forbidden void operator=(const NodeI&); // Assignment forbidden }; typedef IceUtil::Handle<NodeI> NodeIPtr; class FileI : virtual public File, virtual public NodeI { public: virtual Lines read(const Ice::Current&); virtual void write(const Lines&,

320 Developing a File System Server in C++
const Ice::Current& = Ice::Current()); FileI(const Ice::CommunicatorPtr&, const std::string&, const DirectoryIPtr&); private: Lines _lines; }; typedef IceUtil::Handle<FileI> FileIPtr; class DirectoryI : virtual public Directory, virtual public NodeI { public: virtual NodeSeq list(const Ice::Current&); DirectoryI(const Ice::CommunicatorPtr&, const std::string&, const DirectoryIPtr&); void addChild(const Filesystem::NodePrx&); private: Filesystem::NodeSeq _contents; };}
9.2.3 The Servant Implementation
The implementation of our servants is mostly trivial, following from the class definitions in our FilesystemI.h header file.
Implementing FileI
The implementation of the read and write operations for files is trivial: we simply store the passed file contents in the _lines data member. The constructor is equally trivial, simply passing its arguments through to the NodeI base class constructor:
Filesystem::LinesFilesystem::FileI::read(const Ice::Current&){ return _lines;}voidFilesystem::FileI::write(const Filesystem::Lines& text, const Ice::Current&){

9.2 Implementing a File System Server 321
_lines = text;}Filesystem::FileI::FileI(const Ice::CommunicatorPtr& communicator, const string& name, const DirectoryIPtr& parent ) : NodeI(communicator, name, parent){}
Implementing DirectoryI
The implementation of DirectoryI is equally trivial: the list operation simply returns the _contents data member and the constructor passes its argu-ments through to the NodeI base class constructor:
Filesystem::NodeSeqFilesystem::DirectoryI::list(const Ice::Current&){ return _contents;}Filesystem::DirectoryI::DirectoryI( const Ice::CommunicatorPtr& communicator, const string& name, const DirectoryIPtr& parent ) : NodeI(name, parent){}voidFilesystem::DirectoryI::addChild(const NodePrx child){ _contents.push_back(child);}
The only noteworthy thing is the implementation of addChild: when a new directory or file is created, the constructor of the NodeI base class calls addChild on its own parent, passing it the proxy to the newly-created child. The implementation of addChild appends the passed reference to the contents list of the directory it is invoked on (which is the parent directory).
Implementing NodeI
The name operation of our NodeI class is again trivial: it simply returns the _name data member:

322 Developing a File System Server in C++
std::stringFilesystem::NodeI::name(const Ice::Current&){ return _name;}
The NodeI constructor creates an identity for the servant:
Filesystem::NodeI::NodeI(const Ice::CommunicatorPtr& communicator, const string& name, const DirectoryIPtr& parent) : _name(name), _parent(parent){ _id.name = parent ? IceUtil::generateUUID() : "RootDir";}
For the root directory, we use the fixed identity "RootDir". This allows the client to create a proxy for the root directory (see Section 7.2). For directories other than the root directory, we use a UUID as the identity (see page 298).
Finally, NodeI provides the activate member function that adds the servant to the ASM and connects the child node to its parent directory:
voidFilesystem::NodeI::activate(const Ice::ObjectAdapterPtr& a){ NodePrx thisNode = NodePrx::uncheckedCast(a->add(this, _id)); if(_parent) { _parent->addChild(thisNode); }}
This completes our servant implementation. The complete source code is shown here once more:
#include <IceUtil/IceUtil.h>#include <FilesystemI.h>using namespace std;// Slice Node::name() operationstd::stringFilesystem::NodeI::name(const Ice::Current&){ return _name;}

9.2 Implementing a File System Server 323
// NodeI constructorFilesystem::NodeI::NodeI(const Ice::CommunicatorPtr& communicator, const string& name, const DirectoryIPtr& parent) : _name(name), _parent(parent){ // Create an identity. The root directory has the fixed identity "RootDir" // _id.name = parent ? IceUtil::generateUUID() : "RootDir";}// NodeI activate() member functionvoidFilesystem::NodeI::activate(const Ice::ObjectAdapterPtr& a){ NodePrx thisNode = NodePrx::uncheckedCast(a->add(this, _id)); if(_parent) { _parent->addChild(thisNode); }}// Slice File::read() operationFilesystem::LinesFilesystem::FileI::read(const Ice::Current&){ return _lines;}// Slice File::write() operationvoidFilesystem::FileI::write(const Filesystem::Lines& text, const Ice::Current&){ _lines = text;}// FileI constructorFilesystem::FileI::FileI(const Ice::CommunicatorPtr& communicator,

324 Developing a File System Server in C++
const string& name, const DirectoryIPtr& parent) : NodeI(communicator, name, parent){}// Slice Directory::list() operationFilesystem::NodeSeqFilesystem::DirectoryI::list(const Ice::Current& c){ return _contents;}// DirectoryI constructorFilesystem::DirectoryI::DirectoryI( const Ice::CommunicatorPtr& communicator, const string& name, const DirectoryIPtr& parent) : NodeI(communicator, name, parent){}// addChild is called by the child in order to add// itself to the _contents member of the parentvoidFilesystem::DirectoryI::addChild(const NodePrx& child){ _contents.push_back(child);}
9.3 Summary
This chapter showed how to implement a complete server for the file system we defined in Chapter 5. Note that the server is remarkably free of code that relates to distribution: most of the server code is simply application logic that would be present just the same for a non-distributed version. Again, this is one of the major advantages of Ice: distribution concerns are kept away from application code so that you can concentrate on developing application logic instead of networking infrastructure.

9.3 Summary 325
Note that the server code we presented here is not quite correct as it stands: if two clients access the same file in parallel, each via a different thread, one thread may read the _lines data member while another thread updates it. Obviously, if that happens, we may write or return garbage or, worse, crash the server. However, it is trivial to make the read and write operations thread-safe: a single data member and two lines of source code are sufficient to achieve this. We discuss how to write thread-safe servant implementations in Chapter 31.


Part IV
Java Mapping


329
Chapter 10Client-Side Slice-to-Java Mapping
10.1 Chapter Overview
In this chapter, we present the client-side Slice-to-Java mapping (see Chapter 12 for the server-side mapping). One part of the client-side Java mapping concerns itself with rules for representing each Slice data type as a corresponding Java type; we cover these rules in Section 10.3 to Section 10.10. Another part of the mapping deals with how clients can invoke operations, pass and receive parameters, and handle exceptions. These topics are covered in Section 10.11 to Section 10.13. Slice classes have the characteristics of both data types and interfaces and are covered in Section 10.14. In Section 10.16, we show how you can customize the Slice-to-Java mapping using metadata. Section 10.17 describes asynchronous method invocation. Section 10.18 lists the command-line options for the Slice-to-Java compiler and describes how to use the Slice compiler in ant projects. Finally, Section 10.19 covers the use of Slice checksums in the Java mapping.
10.2 Introduction
The client-side Slice-to-Java mapping defines how Slice data types are translated to Java types, and how clients invoke operations, pass parameters, and handle errors. Much of the Java mapping is intuitive. For example, Slice sequences map

330 Client-Side Slice-to-Java Mapping
to Java arrays, so there is essentially nothing new you have to learn in order to use Slice sequences in Java.
The Java API to the Ice run time is fully thread-safe. Obviously, you must still synchronize access to data from different threads. For example, if you have two threads sharing a sequence, you cannot safely have one thread insert into the sequence while another thread is iterating over the sequence. However, you only need to concern yourself with concurrent access to your own data—the Ice run time itself is fully thread safe, and none of the Ice API calls require you to acquire or release a lock before you safely can make the call.
Much of what appears in this chapter is reference material. We suggest that you skim the material on the initial reading and refer back to specific sections as needed. However, we recommend that you read at least Section 10.9 to Section 10.13 in detail because these sections cover how to call operations from a client, pass parameters, and handle exceptions.
A word of advice before you start: in order to use the Java mapping, you should need no more than the Slice definition of your application and knowledge of the Java mapping rules. In particular, looking through the generated code in order to discern how to use the Java mapping is likely to be inefficient, due to the amount of detail. Of course, occasionally, you may want to refer to the generated code to confirm a detail of the mapping, but we recommend that you otherwise use the material presented here to see how to write your client-side code.
10.3 Mapping for Identifiers
Slice identifiers map to an identical Java identifier. For example, the Slice identi-fier Clock becomes the Java identifier Clock. There is one exception to this rule: if a Slice identifier is the same as a Java keyword or is an identifier reserved by the Ice run time (such as checkedCast), the corresponding Java identifier is prefixed with an underscore. For example, the Slice identifier while is mapped as _while.1
A single Slice identifier often results in several Java identifiers. For example, for a Slice interface named Foo, the generated Java code uses the identifiers Foo and FooPrx (among others). If the interface has the name while, the generated
1. As suggested in Section 4.5.3 on page 92, you should try to avoid such identifiers as much as possible.

10.4 Mapping for Modules 331
identifiers are _while and whilePrx (not _whilePrx), that is, the under-score prefix is applied only to those generated identifiers that actually require it.
10.4 Mapping for Modules
Slice modules map to Java packages with the same name as the Slice module. The mapping preserves the nesting of the Slice definitions. For example:
// Definitions at global scope here...module M1 { // Definitions for M1 here... module M2 { // Definitions for M2 here... };};// ...module M1 { // Reopen M1 // More definitions for M1 here...};
This definition maps to the corresponding Java definitions:
package M1;// Definitions for M1 here...package M1.M2;// Definitions for M2 here...package M1;// Definitions for M1 here...
Note that these definitions appear in the appropriate source files; source files for definitions in module M1 are generated in directory M1 underneath the top-level directory, and source files for definitions for module M2 are generated in directory M1/M2 underneath the top-level directory. You can set the top-level output directory using the --output-dir option with slice2java (see Section 4.20).

332 Client-Side Slice-to-Java Mapping
10.5 The Ice Package
All of the APIs for the Ice run time are nested in the Ice package, to avoid clashes with definitions for other libraries or applications. Some of the contents of the Ice package are generated from Slice definitions; other parts of the Ice package provide special-purpose definitions that do not have a corresponding Slice definition. We will incrementally cover the contents of the Ice package throughout the remainder of the book.
10.6 Mapping for Simple Built-in Types
The Slice built-in types are mapped to Java types as shown in Table 10.1.
10.7 Mapping for User-Defined Types
Slice supports user-defined types: enumerations, structures, sequences, and dictionaries.
Table 10.1. Mapping of Slice built-in types to Java.
Slice Java
bool boolean
byte byte
short short
int int
long long
float float
double double
string String

10.7 Mapping for User-Defined Types 333
10.7.1 Mapping for Enumerations
A Slice enum type maps to the Java enum type. Consider the following example:
enum Fruit { Apple, Pear, Orange };
The Java mapping for Fruit is shown below:
public enum Fruit implements java.io.Serializable { Apple, Pear, Orange; // ...}
Given the above definitions, we can use enumerated values as follows:
Fruit favoriteFruit = Fruit.Apple;Fruit otherFavoriteFruit = Fruit.Orange;if (favoriteFruit == Fruit.Apple) // Compare with constant // ...if (f1 == f2) // Compare two enums // ...switch (f2) { // Switch on enumcase Fruit.Apple: // ... break;case Fruit.Pear // ... break;case Fruit.Orange // ... break;}
Note that the generated class contains a number of other members, which we have not shown. These members are internal to the Ice run time and you must not use them in your application code (because they may change from release to release).

334 Client-Side Slice-to-Java Mapping
10.7.2 Mapping for Structures
Slice structures map to Java classes with the same name. For each Slice data member, the Java class contains a corresponding public data member. For example, here is our Employee structure from Section 4.9.4 once more:
struct Employee { long number; string firstName; string lastName;};
The Slice-to-Java compiler generates the following definition for this structure:
public final class Employee implements java.lang.Cloneable, java.io.Serializable { public long number; public String firstName; public String lastName; public Employee {} public Employee(long number, String firstName, String lastName) { this.number = number; this.firstName = firstName; this.lastName = lastName; } public boolean equals(java.lang.Object rhs) { // ... } public int hashCode() { // ... } public java.lang.Object clone() java.lang.Object o; try { o = super.clone(); } catch(java.lang.CloneNotSupportedException ex) { assert false; // impossible

10.7 Mapping for User-Defined Types 335
} return o; }}
For each data member in the Slice definition, the Java class contains a corre-sponding public data member of the same name. Refer to Section 10.16.3 for additional information on data members.
The equals member function compares two structures for equality. Note that the generated class also provides the usual hashCode and clone methods. (clone has the default behavior of making a shallow copy.)
Constructors
Structures have a default constructor that default-constructs each data member. This means members of primitive type are initialized to the equivalent of zero, and members of reference type are initialized to null. Note that applications must always explicitly initialize members of structure and enumerated types because the Ice run time does not accept null as a legal value for these types.
If you wish to ensure that data members of primitive and enumerated types are initialized to specific values, you can declare default values in your Slice defini-tion (see Section 4.9.2). The default constructor initializes each of these data members to its declared value.
Structures also have a second constructor that has one parameter for each data member. This allows you to construct and initialize a class instance in a single statement (instead of first having to construct the instance and then assigning to its members).
10.7.3 Mapping for Sequences
Slice sequences map to Java arrays. This means that the Slice-to-Java compiler does not generate a separate named type for a Slice sequence. For example:
sequence<Fruit> FruitPlatter;
This definition simply corresponds to the Java type Fruit[]. Naturally, because Slice sequences are mapped to Java arrays, you can take advantage of all the array functionality provided by Java, such as initialization, assignment, cloning, and the length member. For example:
Fruit[] platter = { Fruit.Apple, Fruit.Pear };assert(platter.length == 2);

336 Client-Side Slice-to-Java Mapping
See Section 10.16 for information on alternate mappings for sequence types.
10.7.4 Mapping for DictionariesHere is the definition of our EmployeeMap from Section 4.9.4 once more:
dictionary<long, Employee> EmployeeMap;
As for sequences, the Java mapping does not create a separate named type for this definition. Instead, the dictionary is simply an instance of the generic type java.util.Map<K, V>, where K is the mapping of the key type and V is the mapping of the value type. In the example above, EmployeeMap is mapped to the Java type java.util.Map<Long, Employee>. The following code demon-strates how to allocate and use an instance of EmployeeMap:
java.util.Map<Long, Employee> em = new java.util.HashMap<Long, Employee>();Employee e = new Employee();e.number = 31;e.firstName = "James";e.lastName = "Gosling";em.put(e.number, e);
The typesafe nature of the mapping makes iterating over the dictionary quite convenient:
for (java.util.Map.Entry<Long, Employee> i : em.entrySet()) { long num = i.getKey(); Employee emp = i.getValue(); System.out.println(emp.firstName + " was employee #" + num);}
See Section 10.16 for information on alternate mappings for dictionary types.
10.8 Mapping for Constants
Here are the constant definitions we saw in Section 4.9.5 on page 103 once more:
const bool AppendByDefault = true;const byte LowerNibble = 0x0f;const string Advice = "Don't Panic!";const short TheAnswer = 42;

10.9 Mapping for Exceptions 337
const double PI = 3.1416;enum Fruit { Apple, Pear, Orange };const Fruit FavoriteFruit = Pear;
Here are the generated definitions for these constants:
public interface AppendByDefault { boolean value = true;}public interface LowerNibble { byte value = 15;}public interface Advice { String value = "Don't Panic!";}public interface TheAnswer { short value = 42;}public interface PI { double value = 3.1416;}public interface FavoriteFruit { Fruit value = Fruit.Pear;}
As you can see, each Slice constant is mapped to a Java interface with the same name as the constant. The interface contains a member named value that holds the value of the constant.
10.9 Mapping for Exceptions
Here is a fragment of the Slice definition for our world time server from Section 4.10.5 on page 120 once more:

338 Client-Side Slice-to-Java Mapping
exception GenericError { string reason;};exception BadTimeVal extends GenericError {};exception BadZoneName extends GenericError {};
These exception definitions map as follows:
public class GenericError extends Ice.UserException { public String reason; public GenericError() {} public GenericError(String reason) { this.reason = reason; } public String ice_name() { return "GenericError"; }}public class BadTimeVal extends GenericError { public BadTimeVal() {} public BadTimeVal(String reason) { super(reason); } public String ice_name() { return "BadTimeVal"; }}public class BadZoneName extends GenericError { public BadZoneName() {} public BadZoneName(String reason) { super(reason); }

10.9 Mapping for Exceptions 339
public String ice_name() { return "BadZoneName"; }}
Each Slice exception is mapped to a Java class with the same name. For each data member, the corresponding class contains a public data member. (Obviously, because BadTimeVal and BadZoneName do not have members, the generated classes for these exceptions also do not have members.) Refer to Section 10.16.3 for additional information on data members.
The inheritance structure of the Slice exceptions is preserved for the generated classes, so BadTimeVal and BadZoneName inherit from GenericError.
Each exception also defines the ice_name member function, which returns the name of the exception.
All user exceptions are derived from the base class Ice.UserException. This allows you to catch all user exceptions generically by installing a handler for Ice.UserException. Ice.UserException, in turn, derives from java.lang.Exception.
Ice.UserException implements a clone method that is inherited by its derived exceptions, so you can make memberwise shallow copies of exceptions.
Note that the generated exception classes contain other member functions that are not shown. However, those member functions are internal to the Java mapping and are not meant to be called by application code.
Constructors
Exceptions have a default constructor that default-constructs each data member. This means members of primitive type are initialized to the equivalent of zero, and members of reference type are initialized to null. Note that applications must always explicitly initialize members of structure and enumerated types because the Ice run time does not accept null as a legal value for these types.
If you wish to ensure that data members of primitive and enumerated types are initialized to specific values, you can declare default values in your Slice defini-tion (see Section 4.10.2). The default constructor initializes each of these data members to its declared value.
Exceptions also have a second constructor that has one parameter for each data member. This allows you to construct and initialize a class instance in a single statement (instead of first having to construct the instance and then assigning to its members). For derived exceptions, this constructor accepts one

340 Client-Side Slice-to-Java Mapping
argument for each base exception member, plus one argument for each derived exception member, in base-to-derived order.
10.10 Mapping for Run-Time Exceptions
The Ice run time throws run-time exceptions for a number of pre-defined error conditions. All run-time exceptions directly or indirectly derive from Ice.LocalException (which, in turn, derives from java.lang.Runti-meException).
Ice.LocalExceptions implements a clone method that is inherited by its derived exceptions, so you can make memberwise shallow copies of excep-tions.
An inheritance diagram for user and run-time exceptions appears in Figure 4.4 on page 117. By catching exceptions at the appropriate point in the hierarchy, you can handle exceptions according to the category of error they indicate:
• Ice.LocalException
This is the root of the inheritance tree for run-time exceptions.
• Ice.UserException
This is the root of the inheritance tree for user exceptions.
• Ice.TimeoutException
This is the base exception for both operation-invocation and connection-estab-lishment timeouts.
• Ice.ConnectTimeoutException
This exception is raised when the initial attempt to establish a connection to a server times out.
You will probably have little need to catch the remaining run-time exceptions; the fine-grained error handling offered by the remainder of the hierarchy is of interest mainly in the implementation of the Ice run time. However, there is one exception you will probably be interested in specifically: Ice.ObjectNotExistEx-ception. This exception is raised if a client invokes an operation on an Ice object that no longer exists. In other words, the client holds a dangling reference to an object that probably existed some time in the past but has since been perma-nently destroyed.

10.11 Mapping for Interfaces 341
10.11 Mapping for Interfaces
Slice interfaces map to proxies on the client side. A proxy is simply a Java inter-face with operations that correspond to the operations defined in the Slice inter-face.
The compiler generates quite few source files for each Slice interface. In general, for an interface <interface-name>, the following source files are created by the compiler:
• <interface-name>.java
This source file declares the <interface-name> Java interface.
• <interface-name>Holder.java
This source file defines a holder type for the interface (see page 353).
• <interface-name>Prx.java
This source file defines the <interface-name>Prx interface (see page 342).
• <interface-name>PrxHelper.java
This source file defines the helper type for the interface’s proxy (see page 345).
• <interface-name>PrxHolder.java
This source file defines the holder type for the interface’s proxy (see page 353).
• _<interface-name>Operations.java_<interface-name>OperationsNC.java
These source files each define an interface that contains the operations corre-sponding to the Slice interface.
These are the files that contain code that is relevant to the client side. The compiler also generates a file that is specific to the server side, plus three addi-tional files:
• _<interface-name>Disp.java
This file contains the definition of the server-side skeleton class.
• _<interface-name>Del.java
• _<interface-name>DelD.java

342 Client-Side Slice-to-Java Mapping
• _<interface-name>DelM.java
These files contain code that is internal to the Java mapping; they do not contain any functions of relevance to application programmers.
10.11.1 Proxy Interfaces
On the client side, Slice interfaces map to Java interfaces with member functions that correspond to the operations on those interfaces. Consider the following simple interface:
interface Simple { void op();};
The Slice compiler generates the following definition for use by the client:
public interface SimplePrx extends Ice.ObjectPrx { public void op(); public void op(java.util.Map<String, String> __context);}
As you can see, the compiler generates a proxy interface SimplePrx. In general, the generated name is <interface-name>Prx. If an interface is nested in a module M, the generated class is part of package M, so the fully-qualified name is M.<interface-name>Prx.
In the client’s address space, an instance of SimplePrx is the local ambas-sador for a remote instance of the Simple interface in a server and is known as a proxy instance. All the details about the server-side object, such as its address, what protocol to use, and its object identity are encapsulated in that instance.
Note that SimplePrx inherits from Ice.ObjectPrx. This reflects the fact that all Ice interfaces implicitly inherit from Ice::Object.
For each operation in the interface, the proxy class has a member function of the same name. For the preceding example, we find that the operation op has been mapped to the member function op. Also note that op is overloaded: the second version of op has a parameter __context of type java.util.Map<String, String>. This parameter is for use by the Ice run time to store information about how to deliver a request. You normally do not need to use it. (We examine the __context parameter in detail in Chapter 32. The parameter is also used by IceStorm—see Chapter 44.)
Because all the <interface-name>Prx types are interfaces, you cannot instantiate an object of such a type. Instead, proxy instances are always instanti-

10.11 Mapping for Interfaces 343
ated on behalf of the client by the Ice run time, so client code never has any need to instantiate a proxy directly.The proxy references handed out by the Ice run time are always of type <interface-name>Prx; the concrete implementation of the interface is part of the Ice run time and does not concern application code.
A value of null denotes the null proxy. The null proxy is a dedicated value that indicates that a proxy points “nowhere” (denotes no object).
10.11.2 The Ice.ObjectPrx Interface
All Ice objects have Object as the ultimate ancestor type, so all proxies inherit from Ice.ObjectPrx. ObjectPrx provides a number of methods:
package Ice;public interface ObjectPrx { boolean equals(java.lang.Object r); Identity ice_getIdentity(); boolean ice_isA(String __id); boolean ice_isA(String __id, java.util.Map<String, String> ctx); String[] ice_ids(); String[] ice_ids(java.util.Map<String, String> ctx); String ice_id(); String ice_id(java.util.Map<String, String> ctx); void ice_ping(); void ice_ping(java.util.Map<String, String> ctx); // ...}
The methods behave as follows:
• equals
This operation compares two proxies for equality. Note that all aspects of proxies are compared by this operation, such as the communication endpoints for the proxy. This means that, in general, if two proxies compare unequal, that does not imply that they denote different objects. For example, if two proxies denote the same Ice object via different transport endpoints, equals returns false even though the proxies denote the same object.
• ice_getIdentity
This method returns the identity of the object denoted by the proxy. The iden-tity of an Ice object has the following Slice type:

344 Client-Side Slice-to-Java Mapping
module Ice { struct Identity { string name; string category; };};
To see whether two proxies denote the same object, first obtain the identity for each object and then compare the identities:
Ice.ObjectPrx o1 = ...;Ice.ObjectPrx o2 = ...;Ice.Identity i1 = o1.ice_getIdentity();Ice.Identity i2 = o2.ice_getIdentity();if (i1.equals(i2)) // o1 and o2 denote the same objectelse // o1 and o2 denote different objects
• ice_isA
This method determines whether the object denoted by the proxy supports a specific interface. The argument to ice_isA is a type ID (see Section 4.13). For example, to see whether a proxy of type ObjectPrx denotes a Printer object, we can write:
Ice.ObjectPrx o = ...;if (o != null && o.ice_isA("::Printer")) // o denotes a Printer objectelse // o denotes some other type of object
Note that we are testing whether the proxy is null before attempting to invoke the ice_isA method. This avoids getting a NullPointerException if the proxy is null.
• ice_ids
This method returns an array of strings representing all of the type IDs that the object denoted by the proxy supports.
• ice_id
This method returns the type ID of the object denoted by the proxy. Note that the type returned is the type of the actual object, which may be more derived than the static type of the proxy. For example, if we have a proxy of type

10.11 Mapping for Interfaces 345
BasePrx, with a static type ID of ::Base, the return value of ice_id might be ::Base, or it might something more derived, such as ::Derived.
• ice_ping
This method provides a basic reachability test for the object. If the object can physically be contacted (that is, the object exists and its server is running and reachable), the call completes normally; otherwise, it throws an exception that indicates why the object could not be reached, such as ObjectNotExist-Exception or ConnectTimeoutException.
The ice_isA, ice_ids, ice_id, and ice_ping methods are remote opera-tions and therefore support an additional overloading that accepts a request context. Also note that there are other methods in ObjectPrx (not shown here) that provide different ways to dispatch a call. We discuss these topics in Chapter 32.
10.11.3 Proxy HelpersFor each Slice interface, apart from the proxy interface, the Slice-to-Java compiler creates a helper class: for an interface Simple, the name of the generated helper class is SimplePrxHelper. The helper classes contains two methods that support down-casting:
public final class SimplePrxHelper extends Ice.ObjectPrxHelper implements SimplePrx { public static SimplePrx checkedCast(Ice.ObjectPrx b) { // ... } public static SimplePrx checkedCast(Ice.ObjectPrx b, Ice.Context ctx) { // ... } public static SimplePrx uncheckedCast(Ice.ObjectPrx b) { // ... } // ...}
Both the checkedCast and uncheckedCast methods implement a down-cast: if the passed proxy is a proxy for an object of type Simple, or a proxy for an object with a type derived from Simple, the cast returns a non-null reference to a

346 Client-Side Slice-to-Java Mapping
proxy of type SimplePrx; otherwise, if the passed proxy denotes an object of a different type (or if the passed proxy is null), the cast returns a null reference.
Given a proxy of any type, you can use a checkedCast to determine whether the corresponding object supports a given type, for example:
Ice.ObjectPrx obj = ...; // Get a proxy from somewhere...SimplePrx simple = SimplePrxHelper.checkedCast(obj);if (simple != null) // Object supports the Simple interface...else // Object is not of type Simple...
Note that a checkedCast contacts the server. This is necessary because only the implementation of a proxy in the server has definite knowledge of the type of an object. As a result, a checkedCast may throw a ConnectTimeoutEx-ception or an ObjectNotExistException. (This also explains the need for the helper class: the Ice run time must contact the server, so we cannot use a Java down-cast.)
In contrast, an uncheckedCast does not contact the server and uncondi-tionally returns a proxy of the requested type. However, if you do use an uncheckedCast, you must be certain that the proxy really does support the type you are casting to; otherwise, if you get it wrong, you will most likely get a run-time exception when you invoke an operation on the proxy. The most likely error for such a type mismatch is OperationNotExistException. However, other exceptions, such as a marshaling exception are possible as well. And, if the object happens to have an operation with the correct name, but different parameter types, no exception may be reported at all and you simply end up sending the invocation to an object of the wrong type; that object may do rather non-sensical things. To illustrate this, consider the following two interfaces:
interface Process { void launch(int stackSize, int dataSize);};// ...interface Rocket { void launch(float xCoord, float yCoord);};
Suppose you expect to receive a proxy for a Process object and use an uncheckedCast to down-cast the proxy:

10.11 Mapping for Interfaces 347
Ice.ObjectPrx obj = ...; // Get proxy...ProcessPrx process = ProcessPrxHelper.uncheckedCast(obj); // No worries...process.launch(40, 60); // Oops...
If the proxy you received actually denotes a Rocket object, the error will go unde-tected by the Ice run time: because int and float have the same size and because the Ice protocol does not tag data with its type on the wire, the implementation of Rocket::launch will simply misinterpret the passed integers as floating-point numbers.
In fairness, this example is somewhat contrived. For such a mistake to go unnoticed at run time, both objects must have an operation with the same name and, in addition, the run-time arguments passed to the operation must have a total marshaled size that matches the number of bytes that are expected by the unmar-shaling code on the server side. In practice, this is extremely rare and an incorrect uncheckedCast typically results in a run-time exception.
A final warning about down-casts: you must use either a checkedCast or an uncheckedCast to down-cast a proxy. If you use a Java cast, the behavior is undefined.
10.11.4 Using Proxy Methods
The base proxy class ObjectPrx supports a variety of methods for customizing a proxy (see Section 32.11). Since proxies are immutable, each of these “factory methods” returns a copy of the original proxy that contains the desired modifica-tion. For example, you can obtain a proxy configured with a ten second timeout as shown below:
Ice.ObjectPrx proxy = communicator.stringToProxy(...);proxy = proxy.ice_timeout(10000);
A factory method returns a new proxy object if the requested modification differs from the current proxy, otherwise it returns the current proxy. With few excep-tions, factory methods return a proxy of the same type as the current proxy, there-fore it is generally not necessary to repeat a checkedCast or uncheckedCast after using a factory method. However, a regular cast is still required, as shown in the example below:
Ice.ObjectPrx base = communicator.stringToProxy(...);HelloPrx hello = HelloPrxHelper.checkedCast(base);hello = (HelloPrx)hello.ice_timeout(10000); # Type is preservedhello.sayHello();

348 Client-Side Slice-to-Java Mapping
The only exceptions are the factory methods ice_facet and ice_identity. Calls to either of these methods may produce a proxy for an object of an unrelated type, therefore they return a base proxy that you must subsequently down-cast to an appropriate type.
10.11.5 Object Identity and Proxy Comparison
Proxies provide an equals method that compares proxies:
interface ObjectPrx { boolean equals(java.lang.Object r);}
Note that proxy comparison with equals uses all of the information in a proxy for the comparison. This means that not only the object identity must match for a comparison to succeed, but other details inside the proxy, such as the protocol and endpoint information, must be the same. In other words, comparison with equals tests for proxy identity, not object identity. A common mistake is to write code along the following lines:
Ice.ObjectPrx p1 = ...; // Get a proxy...Ice.ObjectPrx p2 = ...; // Get another proxy...if (p1.equals(p2)) { // p1 and p2 denote different objects // WRONG!} else { // p1 and p2 denote the same object // Correct}
Even though p1 and p2 differ, they may denote the same Ice object. This can happen because, for example, both p1 and p2 embed the same object identity, but each use a different protocol to contact the target object. Similarly, the protocols may be the same, but denote different endpoints (because a single Ice object can be contacted via several different transport endpoints). In other words, if two proxies compare equal with equals, we know that the two proxies denote the same object (because they are identical in all respects); however, if two proxies compare unequal with equals, we know absolutely nothing: the proxies may or may not denote the same object.
To compare the object identities of two proxies, you can use a helper function in the Ice.Util class:

10.11 Mapping for Interfaces 349
package Ice;public final class Util { public static int proxyIdentityCompare(ObjectPrx lhs, ObjectPrx rhs); public static int proxyIdentityAndFacetCompare(ObjectPrx lhs, ObjectPrx rhs); // ...}
proxyIdentityCompare allows you to correctly compare proxies for iden-tity:
Ice.ObjectPrx p1 = ...; // Get a proxy...Ice.ObjectPrx p2 = ...; // Get another proxy...if (Ice.Util.proxyIdentityCompare(p1, p2) != 0) { // p1 and p2 denote different objects // Correct} else { // p1 and p2 denote the same object // Correct}
The function returns 0 if the identities are equal, 1 if p1 is less than p2, and 1 if p1 is greater than p2. (The comparison uses name as the major and category as the minor sort key.)
The proxyIdentityAndFacetCompare function behaves similarly, but compares both the identity and the facet name (see Chapter 33).
In addition, the Java mapping provides two wrapper classes that allow you to wrap a proxy for use as the key of a hashed collection:
package Ice;public class ProxyIdentityKey { public ProxyIdentityKey(Ice.ObjectPrx proxy); public int hashCode(); public boolean equals(java.lang.Object obj); public Ice.ObjectPrx getProxy();}public class ProxyIdentityFacetKey { public ProxyIdentityFacetKey(Ice.ObjectPrx proxy); public int hashCode(); public boolean equals(java.lang.Object obj); public Ice.ObjectPrx getProxy();}

350 Client-Side Slice-to-Java Mapping
The constructor caches the identity and the hash code of the passed proxy, so calls to hashCode and equals can be evaluated efficiently. The getProxy method returns the proxy that was passed to the constructor.
As for the comparison functions, ProxyIdentityKey only uses the proxy’s identity, whereas ProxyIdentityFacetKey also includes the facet name.
10.11.6 Deserializing Proxies
Proxy objects implement the java.io.Serializable interface that enables serialization of proxies to and from a byte stream. You can use the standard class java.io.ObjectInputStream to deserialize all Slice types except proxies; proxies are a special case because they must be created by a communicator.
To supply a communicator for use in deserializing proxies, an application must use the class Ice.ObjectInputStream:
package Ice;public class ObjectInputStream extends java.io.ObjectInputStream{ public ObjectInputStream(Communicator communicator, java.io.InputStream stream) throws java.io.IOException; public Communicator getCommunicator();}
The code shown below demonstrates how to use this class:
Ice.Communicator communicator = ...byte[] bytes = ... // data to be deserializedjava.io.ByteArrayInputStream byteStream = new java.io.ByteArrayInputStream(bytes);Ice.ObjectInputStream in = new Ice.ObjectInputStream(communicator, byteStream);Ice.ObjectPrx proxy = (Ice.ObjectPrx)in.readObject();
Ice raises java.io.IOException if an application attempts to deserialize a proxy without supplying a communicator.

10.12 Mapping for Operations 351
10.12 Mapping for Operations
As we saw in Section 10.11, for each operation on an interface, the proxy class contains a corresponding member function with the same name. To invoke an operation, you call it via the proxy. For example, here is part of the definitions for our file system from Section 5.4:
module Filesystem { interface Node { idempotent string name(); }; // ...};
The name operation returns a value of type string. Given a proxy to an object of type Node, the client can invoke the operation as follows:
NodePrx node = ...; // Initialize proxyString name = node.name(); // Get name via RPC
This illustrates the typical pattern for receiving return values: return values are returned by reference for complex types, and by value for simple types (such as int or double).
10.12.1 Normal and idempotent Operations
You can add an idempotent qualifier to a Slice operation. As far as the signature for the corresponding proxy method is concerned, idempotent has no effect. For example, consider the following interface:
interface Example { string op1(); idempotent string op2();};
The proxy interface for this is:
public interface ExamplePrx extends Ice.ObjectPrx { public String op1(); public String op2();}
Because idempotent affects an aspect of call dispatch, not interface, it makes sense for the two methods to be mapped the same.

352 Client-Side Slice-to-Java Mapping
10.12.2 Passing Parameters
In-Parameters
The parameter passing rules for the Java mapping are very simple: parameters are passed either by value (for simple types) or by reference (for complex types and type String). Semantically, the two ways of passing parameters are identical: it is guaranteed that the value of a parameter will not be changed by the invocation (with some caveats—see page 1093).
Here is an interface with operations that pass parameters of various types from client to server:
struct NumberAndString { int x; string str;};sequence<string> StringSeq;dictionary<long, StringSeq> StringTable;interface ClientToServer { void op1(int i, float f, bool b, string s); void op2(NumberAndString ns, StringSeq ss, StringTable st); void op3(ClientToServer* proxy);};
The Slice compiler generates the following proxy for this definition:
public interface ClientToServerPrx extends Ice.ObjectPrx { public void op1(int i, float f, boolean b, String s); public void op2(NumberAndString ns, String[] ss, java.util.Map st); public void op3(ClientToServerPrx proxy);}
Given a proxy to a ClientToServer interface, the client code can pass parameters as in the following example:
ClientToServerPrx p = ...; // Get proxy...p.op1(42, 3.14f, true, "Hello world!"); // Pass simple literalsint i = 42;float f = 3.14f;

10.12 Mapping for Operations 353
boolean b = true;String s = "Hello world!";p.op1(i, f, b, s); // Pass simple variablesNumberAndString ns = new NumberAndString();ns.x = 42;ns.str = "The Answer";String[] ss = { "Hello world!" };java.util.HashMap st = new java.util.HashMap();st.put(new Long(0), ns);p.op2(ns, ss, st); // Pass complex variablesp.op3(p); // Pass proxy
Out-Parameters
Java does not have pass-by-reference: parameters are always passed by value. For a function to modify one of its arguments, we must pass a reference (by value) to an object; the called function can then modify the object’s contents via the passed reference.
To permit the called function to modify a parameter, the Java mapping uses so-called holder classes. For example, for each of the built-in Slice types, such as int and string, the Ice package contains a corresponding holder class. Here are the definitions for the holder classes Ice.IntHolder and Ice.StringHolder:
package Ice;public final class IntHolder { public IntHolder() {} public IntHolder(int value) this.value = value; } public int value;}public final class StringHolder { public StringHolder() {} public StringHolder(String value) { this.value = value; } public String value;}

354 Client-Side Slice-to-Java Mapping
A holder class has a public value member that stores the value of the parameter; the called function can modify the value by assigning to that member. The class also has a default constructor and a constructor that accepts an initial value.
For user-defined types, such as structures, the Slice-to-Java compiler generates a corresponding holder type. For example, here is the generated holder type for the NumberAndString structure we defined on page 352:
public final class NumberAndStringHolder { public NumberAndStringHolder() {} public NumberAndStringHolder(NumberAndString value) { this.value = value; } public NumberAndString value;}
This looks exactly like the holder classes for the built-in types: we get a default constructor, a constructor that accepts an initial value, and the public value member.
Note that holder classes are generated for every Slice type you define. For example, for sequences, such as the FruitPlatter sequence we saw on page 335, the compiler does not generate a special Java FruitPlatter type because sequences map to Java arrays. However, the compiler does generate a Fruit-PlatterHolder class, so we can pass a FruitPlatter array as an out-parameter.
To pass an out-parameter to an operation, we simply pass an instance of a holder class and examine the value member of each out-parameter when the call completes. Here is the same Slice definition we saw on page 352 once more, but this time with all parameters being passed in the out direction:
struct NumberAndString { int x; string str;};sequence<string> StringSeq;dictionary<long, StringSeq> StringTable;interface ServerToClient { void op1(out int i, out float f, out bool b, out string s); void op2(out NumberAndString ns,

10.12 Mapping for Operations 355
out StringSeq ss, out StringTable st); void op3(out ServerToClient* proxy);};
The Slice compiler generates the following code for this definition:
public interface ClientToServerPrx extends Ice.ObjectPrx { public void op1(Ice.IntHolder i, Ice.FloatHolder f, Ice.BooleanHolder b, Ice.StringHolder s); public void op2(NumberAndStringHolder ns, StringSeqHolder ss, StringTableHolder st); public void op3(ClientToServerPrxHolder proxy);}
Given a proxy to a ServerToClient interface, the client code can pass parameters as in the following example:
ClientToServerPrx p = ...; // Get proxy...Ice.IntHolder ih = new Ice.IntHolder();Ice.FloatHolder fh = new Ice.FloatHolder();Ice.BooleanHolder bh = new Ice.BooleanHolder();Ice.StringHolder sh = new Ice.StringHolder();p.op1(ih, fh, bh, sh);NumberAndStringHolder nsh = new NumberAndString();StringSeqHolder ssh = new StringSeqHolder();StringTableHolder sth = new StringTableHolder();p.op2(nsh, ssh, sth);ServerToClientPrxHolder stcph = new ServerToClientPrxHolder();p.op3(stch);System.out.writeln(ih.value); // Show one of the values
Again, there are no surprises in this code: the various holder instances contain values once the operation invocation completes and the value member of each instance provides access to those values.
Null Parameters
Some Slice types naturally have “empty” or “not there” semantics. Specifically, sequences, dictionaries, and strings all can be null, but the corresponding Slice types do not have the concept of a null value. To make life with these types easier, whenever you pass null as a parameter or return value of type sequence,

356 Client-Side Slice-to-Java Mapping
dictionary, or string, the Ice run time automatically sends an empty sequence, dictionary, or string to the receiver.
This behavior is useful as a convenience feature: especially for deeply-nested data types, members that are sequences, dictionaries, or strings automatically arrive as an empty value at the receiving end. This saves you having to explicitly initialize, for example, every string element in a large sequence before sending the sequence in order to avoid NullPointerExceptions. Note that using null parameters in this way does not create null semantics for Slice sequences, diction-aries, or strings. As far as the object model is concerned, these do not exist (only empty sequences, dictionaries, and strings do). For example, whether you send a string as null or as an empty string makes no difference to the receiver: either way, the receiver sees an empty string.
10.13 Exception Handling
Any operation invocation may throw a run-time exception (see Section 10.10 on page 340) and, if the operation has an exception specification, may also throw user exceptions (see Section 10.9 on page 337). Suppose we have the following simple interface:
exception Tantrum { string reason;};interface Child { void askToCleanUp() throws Tantrum;};
Slice exceptions are thrown as Java exceptions, so you can simply enclose one or more operation invocations in a try–catch block:
ChildPrx child = ...; // Get child proxy...try { child.askToCleanUp();} catch (Tantrum t) { System.out.write("The child says: "); System.out.writeln(t.reason);}

10.13 Exception Handling 357
Typically, you will catch only a few exceptions of specific interest around an oper-ation invocation; other exceptions, such as unexpected run-time errors, will typi-cally be handled by exception handlers higher in the hierarchy. For example:
public class Client { static void run() { ChildPrx child = ...; // Get child proxy... try { child.askToCleanUp(); } catch (Tantrum t) { System.out.print("The child says: "); System.out.println(t.reason); child.scold(); // Recover from error... } child.praise(); // Give positive feedback... } public static void main(String[] args) { try { // ... run(); // ... } catch (Ice.LocalException e) { e.printStackTrace(); } catch (Ice.UserException e) { System.err.println(e.getMessage()); } }}
This code handles a specific exception of local interest at the point of call and deals with other exceptions generically. (This is also the strategy we used for our first simple application in Chapter 3.)
Exceptions and Out-Parameters
The Ice run time makes no guarantees about the state of out-parameters when an operation throws an exception: the parameter may still have its original value or may have been changed by the operation’s implementation in the target object. In other words, for out-parameters, Ice provides the weak exception guarantee [21] but does not provide the strong exception guarantee.2

358 Client-Side Slice-to-Java Mapping
10.14 Mapping for Classes
Slice classes are mapped to Java classes with the same name. The generated class contains a public data member for each Slice data member (just as for structures and exceptions), and a member function for each operation. Consider the following class definition:
class TimeOfDay { short hour; // 0 - 23 short minute; // 0 - 59 short second; // 0 - 59 string format(); // Return time as hh:mm:ss};
The Slice compiler generates the following code for this definition:
public interface _TimeOfDayOperations { String format(Ice.Current current);}public interface _TimeOfDayOperationsNC { String format();}public abstract class TimeOfDay extends Ice.ObjectImpl implements _TimeOfDayOperations, _TimeOfDayOperationsNC { public short hour; public short minute; public short second; public TimeOfDay(); public TimeOfDay(short hour, short minute, short second); // ...}
There are a number of things to note about the generated code:
2. This is done for reasons of efficiency: providing the strong exception guarantee would require more overhead than can be justified.

10.14 Mapping for Classes 359
1. The compiler generates “operations interfaces” called _TimeOfDayOperations and _TimeOfDayOperationsNC. These interfaces contain a method for each Slice operation of the class.
2. The generated class TimeOfDay inherits (indirectly) from Ice.Object. This means that all classes implicitly inherit from Ice.Object, which is the ultimate ancestor of all classes. Note that Ice.Object is not the same as Ice.ObjectPrx. In other words, you cannot pass a class where a proxy is expected and vice versa.
If a class has only data members, but no operations, the compiler generates a non-abstract class.
3. The generated class contains a public member for each Slice data member.
4. The generated class inherits member functions for each Slice operation from the operations interfaces.
5. The generated class contains two constructors.
There is quite a bit to discuss here, so we will look at each item in turn.
10.14.1 Operations Interfaces
The methods in the _<interface-name>Operations interface have an additional trailing parameter of type Ice.Current, whereas the methods in the _<interface-name>OperationsNC interface lack this additional trailing parameter. The methods without the Current parameter simply forward to the methods with a Current parameter, supplying a default Current. For now, you can ignore this parameter and pretend it does not exist. (We look at it in more detail in Section 32.6.)
If a class has only data members, but no operations, the compiler omits gener-ating the _<interface-name>Operations and _<inter-face-name>OperationsNC interfaces.
10.14.2 Inheritance from Ice.Object
Like interfaces, classes implicitly inherit from a common base class, Ice.Object. However, as shown in Figure 10.1, classes inherit from Ice.Object instead of Ice.ObjectPrx (which is at the base of the inheri-tance hierarchy for proxies). As a result, you cannot pass a class where a proxy is
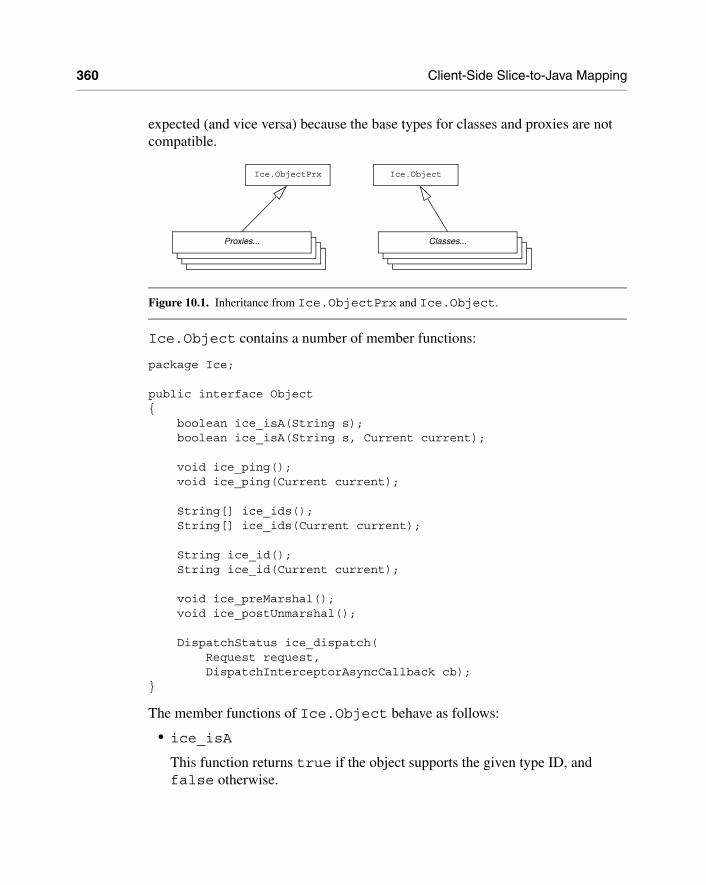
360 Client-Side Slice-to-Java Mapping
expected (and vice versa) because the base types for classes and proxies are not compatible.
Figure 10.1. Inheritance from Ice.ObjectPrx and Ice.Object.
Ice.Object contains a number of member functions:
package Ice;public interface Object{ boolean ice_isA(String s); boolean ice_isA(String s, Current current); void ice_ping(); void ice_ping(Current current); String[] ice_ids(); String[] ice_ids(Current current); String ice_id(); String ice_id(Current current); void ice_preMarshal(); void ice_postUnmarshal(); DispatchStatus ice_dispatch( Request request, DispatchInterceptorAsyncCallback cb);}
The member functions of Ice.Object behave as follows:
• ice_isA
This function returns true if the object supports the given type ID, and false otherwise.
Ice.ObjectPrx
Proxies... Classes...
Ice.Object

10.14 Mapping for Classes 361
• ice_ping
As for interfaces, ice_ping provides a basic reachability test for the class.
• ice_ids
This function returns a string sequence representing all of the type IDs supported by this object, including ::Ice::Object.
• ice_id
This function returns the actual run-time type ID for a class. If you call ice_id through a reference to a base instance, the returned type id is the actual (possibly more derived) type ID of the instance.
• ice_preMarshal
The Ice run time invokes this function prior to marshaling the object’s state, providing the opportunity for a subclass to validate its declared data members.
• ice_postUnmarshal
The Ice run time invokes this function after unmarshaling an object’s state. A subclass typically overrides this function when it needs to perform additional initialization using the values of its declared data members.
• ice_dispatch
This function dispatches an incoming request to a servant. It is used in the implementation of dispatch interceptors (see Section 32.23).
Note that the generated class does not override hashCode and equals. This means that classes are compared using shallow reference equality, not value equality (as is used for structures).
All Slice classes derive from Ice.Object via the Ice.ObjectImpl abstract base class. ObjectImpl implements the java.io.Serializable interface to support Java’s serialization facility (see Section 10.15). Object-Impl also supplies an implementation of clone that returns a shallow member-wise copy.
10.14.3 Data Members of ClassesBy default, data members of classes are mapped exactly as for structures and exceptions: for each data member in the Slice definition, the generated class contains a corresponding public data member.
If you wish to restrict access to a data member, you can modify its visibility using the protected metadata directive. The presence of this directive causes the Slice compiler to generate the data member with protected visibility. As a result,

362 Client-Side Slice-to-Java Mapping
the member can be accessed only by the class itself or by one of its subclasses. For example, the TimeOfDay class shown below has the protected metadata directive applied to each of its data members:
class TimeOfDay { ["protected"] short hour; // 0 - 23 ["protected"] short minute; // 0 - 59 ["protected"] short second; // 0 - 59 string format(); // Return time as hh:mm:ss};
The Slice compiler produces the following generated code for this definition:
public abstract class TimeOfDay extends Ice.ObjectImpl implements _TimeOfDayOperations, _TimeOfDayOperationsNC { protected short hour; protected short minute; protected short second; public TimeOfDay(); public TimeOfDay(short hour, short minute, short second); // ...}
For a class in which all of the data members are protected, the metadata directive can be applied to the class itself rather than to each member individually. For example, we can rewrite the TimeOfDay class as follows:
["protected"] class TimeOfDay { short hour; // 0 - 23 short minute; // 0 - 59 short second; // 0 - 59 string format(); // Return time as hh:mm:ss};
Refer to Section 10.16.3 for additional information on data members.
10.14.4 Operations of Classes
Operations of classes are mapped to abstract member functions in the generated class. This means that, if a class contains operations (such as the format operation of our TimeOfDay class), you must provide an implementation of the operation in a class that is derived from the generated class. For example:

10.14 Mapping for Classes 363
public class TimeOfDayI extends TimeOfDay { public String format(Ice.Current current) { DecimalFormat df = (DecimalFormat)DecimalFormat.getInstance(); df.setMinimumIntegerDigits(2); return new String(df.format(hour) + ":" + df.format(minute) + ":" + df.format(second)); }}
Class Factories
Having created a class such as TimeOfDayI, we have an implementation and we can instantiate the TimeOfDayI class, but we cannot receive it as the return value or as an out-parameter from an operation invocation. To see why, consider the following simple interface:
interface Time { TimeOfDay get();};
When a client invokes the get operation, the Ice run time must instantiate and return an instance of the TimeOfDay class. However, TimeOfDay is an abstract class that cannot be instantiated. Unless we tell it, the Ice run time cannot magi-cally know that we have created a TimeOfDayI class that implements the abstract format operation of the TimeOfDay abstract class. In other words, we must provide the Ice run time with a factory that knows that the TimeOfDay abstract class has a TimeOfDayI concrete implementation. The Ice::Communi-cator interface provides us with the necessary operations:
module Ice { local interface ObjectFactory { Object create(string type); void destroy(); }; local interface Communicator { void addObjectFactory(ObjectFactory factory, string id); ObjectFactory findObjectFactory(string id); // ... };};

364 Client-Side Slice-to-Java Mapping
To supply the Ice run time with a factory for our TimeOfDayI class, we must implement the ObjectFactory interface:
class ObjectFactory implements Ice.ObjectFactory { public Ice.Object create(String type) { if (type.equals(M.TimeOfDay.ice_staticId())) { return new TimeOfDayI(); } assert(false); return null; } public void destroy() { // Nothing to do }}
The object factory’s create method is called by the Ice run time when it needs to instantiate a TimeOfDay class. The factory’s destroy method is called by the Ice run time when its communicator is destroyed.
The create method is passed the type ID (see Section 4.13) of the class to instantiate. For our TimeOfDay class, the type ID is "::M::TimeOfDay". Our implementation of create checks the type ID: if it matches, the method instanti-ates and returns a TimeOfDayI object. For other type IDs, the method asserts because it does not know how to instantiate other types of objects.
Note that we used the ice_staticId method to obtain the type ID rather than embedding a literal string. Using a literal type ID string in your code is discouraged because it can lead to errors that are only detected at run time. For example, if a Slice class or one of its enclosing modules is renamed and the literal string is not changed accordingly, a receiver will fail to unmarshal the object and the Ice run time will raise NoObjectFactoryException. By using ice_staticId instead, we avoid any risk of a misspelled or obsolete type ID, and we can discover at compile time if a Slice class or module has been renamed.
Given a factory implementation, such as our ObjectFactory, we must inform the Ice run time of the existence of the factory:
Ice.Communicator ic = ...;ic.addObjectFactory(new ObjectFactory(), M.TimeOfDay.ice_staticId());
Now, whenever the Ice run time needs to instantiate a class with the type ID "::M::TimeOfDay", it calls the create method of the registered ObjectFac-tory instance.

10.14 Mapping for Classes 365
The destroy operation of the object factory is invoked by the Ice run time when the communicator is destroyed. This gives you a chance to clean up any resources that may be used by your factory. Do not call destroy on the factory while it is registered with the communicator—if you do, the Ice run time has no idea that this has happened and, depending on what your destroy implementation is doing, may cause undefined behavior when the Ice run time tries to next use the factory.
The run time guarantees that destroy will be the last call made on the factory, that is, create will not be called concurrently with destroy, and create will not be called once destroy has been called. However, calls to create can be made concurrently.
Note that you cannot register a factory for the same type ID twice: if you call addObjectFactory with a type ID for which a factory is registered, the Ice run time throws an AlreadyRegisteredException.
Finally, keep in mind that if a class has only data members, but no operations, you need not create and register an object factory to transmit instances of such a class. Only if a class has operations do you have to define and register an object factory.
10.14.5 Class Constructors
Classes have a default constructor that default-constructs each data member. This means members of primitive type are initialized to the equivalent of zero, and members of reference type are initialized to null. Note that applications must always explicitly initialize members of structure and enumerated types because the Ice run time does not accept null as a legal value for these types.
If you wish to ensure that data members of primitive and enumerated types are initialized to specific values, you can declare default values in your Slice defini-tion (see Section 4.11.1). The default constructor initializes each of these data members to its declared value.
The generated class also contains a second constructor that accepts one argu-ment for each member of the class. This allows you to create and initialize a class in a single statement, for example:
TimeOfDayI tod = new TimeOfDayI(14, 45, 00); // 14:45pm
For derived classes, the constructor requires an argument for every member of the class, including inherited members. For example, consider the the definition from Section 4.11.2 once more:

366 Client-Side Slice-to-Java Mapping
class TimeOfDay { short hour; // 0 - 23 short minute; // 0 - 59 short second; // 0 - 59};class DateTime extends TimeOfDay { short day; // 1 - 31 short month; // 1 - 12 short year; // 1753 onwards};
The constructors for the generated classes are as follows:
public class TimeOfDay extends Ice.ObjectImpl { public TimeOfDay() {} public TimeOfDay(short hour, short minute, short second) { this.hour = hour; this.minute = minute; this.second = second; } // ...}public class DateTime extends TimeOfDay{ public DateTime() { super(); } public DateTime(short hour, short minute, short second, short day, short month, short year) { super(hour, minute, second); this.day = day; this.month = month; this.year = year; } // ...}

10.15 Serializable Objects 367
If you want to instantiate and initialize a DateTime instance, you must either use the default constructor or provide values for all of the data members of the instance, including data members of any base classes.
10.15 Serializable Objects
In Java terminology, a serializable object typically refers to an object that imple-ments the java.io.Serializable interface and therefore supports serial-ization to and from a byte stream. All Java classes generated from Slice definitions implement the java.io.Serializable interface.
In addition to serializing Slice types, applications may also need to incorpo-rate foreign types into their Slice definitions. As discussed in Section 4.18, you can pass Java serializable objects directly as operation parameters or as fields of another data type. For example:
["java:serializable:SomePackage.JavaClass"]sequence<byte> JavaObj;struct MyStruct { int i; JavaObj o;};interface Example { void op(JavaObj inObj, MyStruct s, out JavaObj outObj);};
The generated code for MyStruct contains a member i of type int and a member o of type SomePackage.JavaClass:
public final class MyStruct implements java.lang.Cloneable { public int i; public SomePackage.JavaClass o; // ...}
Similarly, the signature for op has parameters of type JavaClass and MyStruct for the in-parameters, and Ice.Holder<SomePackage.Java-Class> for the out-parameter. (Out-parameters are always passed as Ice.Holder<class>.)

368 Client-Side Slice-to-Java Mapping
void op(SomePackage.JavaClass inObj, MyStruct s, Ice.Holder<SomePackage.JavaClass> outObj);
Of course, your client and server code must have an implementation of Java-Class that derives from java.io.Serializable:
package SomePackage;public class JavaClass implements java.io.Serializable { // ...}
You can implement this class in any way you see fit—the Ice run time does not place any other requirements on the implementation.
10.16 Customizing the Java Mapping
You can customize the code that the Slice-to-Java compiler produces by anno-tating your Slice definitions with metadata (see Section 4.17). This section describes how metadata influences several aspects of the generated Java code.
10.16.1 Packages
By default, the scope of a Slice definition determines the package of its mapped Java construct. A Slice type defined in a module hierarchy is mapped to a type residing in the equivalent Java package (see Section 10.4 for more information on the module mapping).
There are times when applications require greater control over the packaging of generated Java classes. For instance, a company may have software develop-ment guidelines that require all Java classes to reside in a designated package. One way to satisfy this requirement is to modify the Slice module hierarchy so that the generated code uses the required package by default. In the example below, we have enclosed the original definition of Workflow::Document in the modules com::acme so that the compiler will create the class in the com.acme package:
module com { module acme { module Workflow { class Document { // ...

10.16 Customizing the Java Mapping 369
}; }; };};
There are two problems with this workaround:
1. It incorporates the requirements of an implementation language into the appli-cation’s interface specification.
2. Developers using other languages, such as C++, are also affected.
The Slice-to-Java compiler provides a better way to control the packages of gener-ated code through the use of global metadata (see Section 4.17). The example above can be converted as follows:
[["java:package:com.acme"]]module Workflow { class Document { // ... };};
The global metadata directive java:package:com.acme instructs the compiler to generate all of the classes resulting from definitions in this Slice file into the Java package com.acme. The net effect is the same: the class for Docu-ment is generated in the package com.acme.Workflow. However, we have addressed the two shortcomings of the first solution by reducing our impact on the interface specification: the Slice-to-Java compiler recognizes the package meta-data directive and modifies its actions accordingly, whereas the compilers for other language mappings simply ignore it.
Package Configuration Properties
Using global metadata to alter the default package of generated classes has ramifi-cations for the Ice run time when unmarshaling exceptions and concrete class types. The Ice run time dynamically loads generated classes by translating their Slice type ids into Java class names. For example, the Ice run time translates the Slice type id ::Workflow::Document into the class name Work-flow.Document.
However, when the generated classes are placed in a user-specified package, the Ice run time can no longer rely on the direct translation of a Slice type id into a Java class name, and therefore must be configured in order to successfully locate the generated classes. Two configuration properties are supported:

370 Client-Side Slice-to-Java Mapping
• Ice.Package.Module=package
Associates a top-level3 Slice module with the package in which it was gener-ated.
• Ice.Default.Package=package
Specifies a default package to use if other attempts to load a class have failed.
The behavior of the Ice run time when unmarshaling an exception or concrete class is described below:
1. Translate the Slice type id into a Java class name and attempt to load the class.
2. If that fails, extract the top-level module from the type id and check for an Ice.Package property with a matching module name. If found, prepend the specified package to the class name and try to load the class again.
3. If that fails, check for the presence of Ice.Default.Package. If found, prepend the specified package to the class name and try to load the class again.
4. If the class still cannot be loaded, the instance may be sliced according to the rules described in Section 37.2.11.
Continuing our example from the previous section, we can define the following property:
Ice.Package.Workflow=com.acme
Alternatively, we could achieve the same result with this property:
Ice.Default.Package=com.acme
10.16.2 Custom Types
One of the more powerful applications of metadata is the ability to tailor the Java mapping for sequence and dictionary types to match the needs of your application.
Metadata
The metadata for specifying a custom type has the following format:
java:type:instance-type[:formal-type]
3. Only top-level module names are allowed; the semantics of global metadata prevent a nested module from being generated into a different package than its enclosing module.

10.16 Customizing the Java Mapping 371
The formal type is optional; the compiler uses a default value if one is not defined. The instance type must satisfy an is-A relationship with the formal type: either the same class is specified for both types, or the instance type must be derived from the formal type.
The Slice-to-Java compiler generates code that uses the formal type for all occurrences of the modified Slice definition except when the generated code must instantiate the type, in which case the compiler uses the instance type instead.
The compiler performs no validation on your custom types. Misspellings and other errors will not be apparent until you compile the generated code.
Defining a Custom Sequence Type
Although the default mapping of a sequence type to a native Java array is efficient and typesafe, it is not always the most convenient representation of your data. To use a different representation, specify the type information in a metadata directive, as shown in the following example:
["java:type:java.util.LinkedList<String>"]sequence<string> StringList;
It is your responsibility to use a type parameter for the Java class (String in the example above) that is the correct mapping for the sequence’s element type.
The compiler requires the formal type to implement java.util.List<E>, where E is the Java mapping of the element type. If you do not specify a formal type, the compiler uses java.util.List<E> by default.
Note that extra care must be taken when defining custom types that contain nested generic types, such as a custom sequence whose element type is also a custom sequence. The Java compiler strictly enforces type safety, therefore any compatibility issues in the custom type metadata will be apparent when the gener-ated code is compiled.
Defining a Custom Dictionary Type
The default instance type for a dictionary is java.util.HashMap<K, V>, where K is the Java mapping of the key type and V is the Java mapping of the value type. If the semantics of a HashMap are not suitable for your application, you can specify an alternate type using metadata as shown in the example below:
["java:type:java.util.TreeMap<String, String>"]dictionary<string, string> StringMap;

372 Client-Side Slice-to-Java Mapping
It is your responsibility to use type parameters for the Java class (String in the example above) that are the correct mappings for the dictionary’s key and value types.
The compiler requires the formal type to implement java.util.Map<K, V>. If you do not specify a formal type, the compiler uses this type by default.
Note that extra care must be taken when defining dictionary types that contain nested generic types, such as a dictionary whose element type is a custom sequence. The Java compiler strictly enforces type safety, therefore any compati-bility issues in the custom type metadata will be apparent when the generated code is compiled.
Usage
You can define custom type metadata in a variety of situations. The simplest scenario is specifying the metadata at the point of definition:
["java:type:java.util.LinkedList<String>"]sequence<string> StringList;
Defined in this manner, the Slice-to-Java compiler uses java.util.List<String> (the default formal type) for all occurrences of StringList, and java.util.LinkedList<String> when it needs to instantiate StringList.
You may also specify a custom type more selectively by defining metadata for a data member, parameter or return value. For instance, the mapping for the orig-inal Slice definition might be sufficient in most situations, but a different mapping is more convenient in particular cases. The example below demonstrates how to override the sequence mapping for the data member of a structure as well as for several operations:
sequence<string> StringSeq;struct S { ["java:type:java.util.LinkedList<String>"] StringSeq seq;};interface I { ["java:type:java.util.ArrayList<String>"] StringSeq modifiedReturnValue(); void modifiedInParam( ["java:type:java.util.ArrayList<String>"] StringSeq seq);

10.16 Customizing the Java Mapping 373
void modifiedOutParam( out ["java:type:java.util.ArrayList<String>"] StringSeq seq);};
As you might expect, modifying the mapping for an operation’s parameters or return value may require the application to manually convert values from the orig-inal mapping to the modified mapping. For example, suppose we want to invoke the modifiedInParam operation. The signature of its proxy operation is shown below:
void modifiedInParam(java.util.List<String> seq, Ice.Current curr)
The metadata changes the mapping of the seq parameter to java.util.List, which is the default formal type. If a caller has a StringSeq value in the original mapping, it must convert the array as shown in the following example:
String[] seq = new String[2];seq[0] = "hi";seq[1] = "there";IPrx proxy = ...;proxy.modifiedInParam(java.util.Arrays.asList(seq));
Although we specified the instance type java.util.ArrayList<String> for the parameter, we are still able to pass the result of asList because its return type (java.util.List<String>) is compatible with the parameter’s formal type declared by the proxy method. In the case of an operation parameter, the instance type is only relevant to a servant implementation, which may need to make assumptions about the actual type of the parameter.
Mapping for Modified Out Parameters
The mapping for an out parameter uses a generated “holder” class to convey the parameter value (see Section 10.12.2). If you modify the mapping of an out parameter, as discussed in the previous section, it is possible that the holder class for the parameter’s unmodified type is no longer compatible with the custom type you have specified. The holder class generated for StringSeq is shown below:
public final class StringSeqHolder{ public StringSeqHolder() { }

374 Client-Side Slice-to-Java Mapping
public StringSeqHolder(String[] value) { this.value = value; } public String[] value;}
An out parameter of type StringSeq would normally map to a proxy method that used StringSeqHolder to hold the parameter value. When the parameter is modified, as is the case with the modifiedOutParam operation, the Slice-to-Java compiler cannot use StringSeqHolder to hold an instance of java.util.List<String>, because StringSeqHolder is only appro-priate for the default mapping to a native array.
As a result, the compiler handles these situations using instances of the generic class Ice.Holder<T>, where T is the parameter’s formal type. Consider the following example:
sequence<string> StringSeq;interface I { void modifiedOutParam( out ["java:type:java.util.ArrayList<String>"] StringSeq seq);};
The compiler generates the following mapping for the modifiedOutParam proxy method:
void modifiedOutParam( Ice.Holder<java.util.List<java.lang.String> > seq, Ice.Current curr)
The formal type of the parameter is java.util.List<String>, therefore the holder class becomes Ice.Holder<java.util.List<String>>.
10.16.3 JavaBean Mapping
The Java mapping optionally generates JavaBean-style methods for the data members of class, structure and exception types.

10.16 Customizing the Java Mapping 375
Generated Methods
For each data member val of type T, the mapping generates the following methods:
public T getVal();public void setVal(T v);
The mapping generates an additional method if T is the bool type:
public boolean isVal();
Finally, if T is a sequence type with an element type E, two methods are generated to provide direct access to elements:
public E getVal(int index);public void setVal(int index, E v);
Note that these element methods are only generated for sequence types that use the default mapping.
The Slice-to-Java compiler considers it a fatal error for a JavaBean method of a class data member to conflict with a declared operation of the class. In this situ-ation, you must rename the operation or the data member, or disable the genera-tion of JavaBean methods for the data member in question.
Metadata
The JavaBean methods are generated for a data member when the member or its enclosing type is annotated with the java:getset metadata. The following example demonstrates both styles of usage:
sequence<int> IntSeq;class C { ["java:getset"] int i; double d;};["java:getset"]struct S { bool b; string str;};["java:getset"]exception E { IntSeq seq;};

376 Client-Side Slice-to-Java Mapping
JavaBean methods are generated for all members of struct S and exception E, but for only one member of class C. Relevant portions of the generated code are shown below:
public class C extends Ice.ObjectImpl{ ... public int i; public int getI() { return i; } public void setI(int _i) { i = _i; } public double d;}public final class S implements java.lang.Cloneable{ public boolean b; public boolean getB() { return b; } public void setB(boolean _b) { b = _b; } public boolean isB() { return b; }

10.16 Customizing the Java Mapping 377
public String str; public String getStr() { return str; } public void setStr(String _str) { str = _str; } ...}public class E extends Ice.UserException{ ... public int[] seq; public int[] getSeq() { return seq; } public void setSeq(int[] _seq) { seq = _seq; } public int getSeq(int _index) { return seq[_index]; } public void setSeq(int _index, int _val) { seq[_index] = _val;

378 Client-Side Slice-to-Java Mapping
} ...}

10.17 Asynchronous Method Invocation (AMI) 379
10.17 Asynchronous Method Invocation (AMI)
NOTE: As of version 3.4, Ice provides a new API for asynchronous method invocation. This section describes this API. You can find documentation for the previous API in Appendix K. Note that the old API is deprecated and will be removed in a future release.
Asynchronous Method Invocation (AMI) is the term used to describe the client-side support for the asynchronous programming model. AMI supports both oneway and twoway requests, but unlike their synchronous counterparts, AMI requests never block the calling thread. When a client issues an AMI request, the Ice run time hands the message off to the local transport buffer or, if the buffer is currently full, queues the request for later delivery. The application can then continue its activities and poll or wait for completion of the invocation, or receive a callback when the invocation completes.
AMI is transparent to the server: there is no way for the server to tell whether a client sent a request synchronously or asynchronously.
10.17.1 Basic Asynchronous API
Consider the following simple Slice definition:
module Demo { interface Employees { string getName(int number); };};
Proxy Methods
Besides the synchronous proxy methods, slice2java generates the following asynchronous proxy methods:4
4. There are four additional overloads of begin_getName that we discuss in Sections 10.17.4 and 10.17.6.

380 Client-Side Slice-to-Java Mapping
public interface EmployeesPrx extends Ice.ObjectPrx{ // ... public Ice.AsyncResult begin_getName(int number); public Ice.AsyncResult begin_getName( int number, java.util.Map<String, String> __ctx); public String end_getName(Ice.AsyncResult __result);}
As you can see, the single getName operation results in begin_getName and end_getName methods. (The begin_ method is overloaded so you can pass a per-invocation context—see Section 32.12).
• The begin_getName method sends (or queues) an invocation of getName. This method does not block the calling thread.
• The end_getName method collects the result of the asynchronous invoca-tion. If, at the time the calling thread calls end_getName, the result is not yet available, the calling thread blocks until the invocation completes. Other-wise, if the invocation completed some time before the call to end_getName, the method returns immediately with the result.
A client could call these methods as follows:
EmployeesPrx e = ...;Ice.AsyncResult r = e.begin_getName(99);// Continue to do other things here...String name = e.end_getName(r);
Because begin_getName does not block, the calling thread can do other things while the operation is in progress.
Note that begin_getName returns a value of type AsyncResult. This value contains the state that the Ice run time requires to keep track of the asyn-chronous invocation. You must pass the AsyncResult that is returned by the begin_ method to the corresponding end_ method.
The begin_ method has one parameter for each in-parameter of the corre-sponding Slice operation. Similarly, the end_ method has one out-parameter for each out-parameter of the corresponding Slice operation (plus the AsyncRe-sult parameter). For example, consider the following operation:
double op(int inp1, string inp2, out bool outp1, out long outp2);

10.17 Asynchronous Method Invocation (AMI) 381
The begin_op and end_op methods have the following signature:
Ice.AsyncResult begin_op(int inp1, String inp2);Ice.AsyncResult begin_op(int inp1, String inp2, java.util.Map<String, String> __ctx);double end_op(Ice.BooleanHolder outp1, Ice.LongHolder outp2, Ice.AsyncResult r);
Exception Handling
If an invocation raises an exception, the exception is thrown by the end_ method, even if the actual error condition for the exception was encountered during the begin_ method (“on the way out”). The advantage of this behavior is that all exception handling is located with the code that calls the end_ method (instead of being present twice, once where the begin_ method is called, and again where the end_ method is called).
There is one exception to the above rule: if you destroy the communicator and then make an asynchronous invocation, the begin_ method throws Communi-catorDestroyedException. This is necessary because, once the run time is finalized, it can no longer throw an exception from the end_ method.
The only other exception that is thrown by the begin_ and end_ methods is java.lang.IllegalArgumentException. This exception indicates that you have used the API incorrectly. For example, the begin_ method throws this exception if you call an operation that has a return value or out-parameters on a oneway proxy. Similarly, the end_ method throws this exception if you use a different proxy to call the end_ method than the proxy you used to call the begin_ method, or if the AsyncResult you pass to the end_ method was obtained by calling the begin_ method for a different operation.
10.17.2 The AsyncResult ClassThe AsyncResult that is returned by the begin_ method encapsulates the state of the asynchronous invocation:
public class AsyncResult { public Communicator getCommunicator(); public Connection getConnection(); public ObjectPrx getProxy(); public String getOperation(); public boolean isCompleted(); public void waitForCompleted();
382 Client-Side Slice-to-Java Mapping
public boolean isSent(); public void waitForSent(); public boolean sentSynchronously();}
The methods have the following semantics:
• Communicator getCommunicator()
This method returns the communicator that sent the invocation.
• Connection getConnection()
This method returns the connection that was used for the invocation.
• ObjectPrx getProxy()
This method returns the proxy that was used to call the begin_ method.
• String getOperation()
This method returns the name of the operation.
• boolean isCompleted()
This method returns true if, at the time it is called, the result of an invocation is available, indicating that a call to the end_ method will not block the caller. Otherwise, if the result is not yet available, the method returns false.
• void waitForCompleted()
This method blocks the caller until the result of an invocation becomes avail-able.
• boolean isSent()
When you call the begin_ method, the Ice run time attempts to write the corresponding request to the client-side transport. If the transport cannot accept the request, the Ice run time queues the request for later transmission. isSent returns true if, at the time it is called, the request has been written to the local transport (whether it was initially queued or not). Otherwise, if the request is still queued, isSent returns false.
• void waitForSent()
This method blocks the calling thread until a request has been written to the client-side transport.
• boolean sentSynchronously()
This method returns true if a request was written to the client-side transport without first being queued. If the request was initially queued, sentSyn-

10.17 Asynchronous Method Invocation (AMI) 383
chronously returns false (independent of whether the request is still in the queue or has since been written to the client-side transport).
10.17.3 Polling for CompletionThe AsyncResult methods allow you to poll for call completion. Polling is useful in a variety of cases. As an example, consider the following simple inter-face to transfer files from client to server:
interface FileTransfer{ void send(int offset, ByteSeq bytes);};
The client repeatedly calls send to send a chunk of the file, indicating at which offset in the file the chunk belongs. A naïve way to transmit a file would be along the following lines:
FileHandle file = open(...);FileTransferPrx ft = ...;int chunkSize = ...;int offset = 0;while (!file.eof()) { byte[] bs; bs = file.read(chunkSize); // Read a chunk ft.send(offset, bs); // Send the chunk offset += bs.length;}
This works, but not very well: because the client makes synchronous calls, it writes each chunk on the wire and then waits for the server to receive the data, process it, and return a reply before writing the next chunk. This means that both client and server spend much of their time doing nothing—the client does nothing while the server processes the data, and the server does nothing while it waits for the client to send the next chunk.
Using asynchronous calls, we can improve on this considerably:
FileHandle file = open(...);FileTransferPrx ft = ...;int chunkSize = ...;int offset = 0;LinkedList<Ice.AsyncResult> results = new LinkedList<Ice.AsyncResult>();int numRequests = 5;

384 Client-Side Slice-to-Java Mapping
while (!file.eof()) { byte[] bs; bs = file.read(chunkSize); // Send up to numRequests + 1 chunks asynchronously. Ice.AsyncResult r = ft.begin_send(offset, bs); offset += bs.length; // Wait until this request has been passed to the transport. r.waitForSent(); results.add(r); // Once there are more than numRequests, wait for the least // recent one to complete. while (results.size() > numRequests) { Ice.AsyncResult r = results.getFirst(); results.removeFirst(); r.waitForCompleted(); }}// Wait for any remaining requests to complete.while (results.size() > 0) { Ice.AsyncResult r = results.getFirst(); results.removeFirst(); r.waitForCompleted();}
With this code, the client sends up to numRequests + 1 chunks before it waits for the least recent one of these requests to complete. In other words, the client sends the next request without waiting for the preceding request to complete, up to the limit set by numRequests. In effect, this allows the client to “keep the pipe to the server full of data”: the client keeps sending data, so both client and server continuously do work.
Obviously, the correct chunk size and value of numRequests depend on the bandwidth of the network as well as the amount of time taken by the server to process each request. However, with a little testing, you can quickly zoom in on the point where making the requests larger or queuing more requests no longer improves performance. With this technique, you can realize the full bandwidth of the link to within a percent or two of the theoretical bandwidth limit of a native socket connection.

10.17 Asynchronous Method Invocation (AMI) 385
10.17.4 Generic Completion Callbacks
The begin_ method is overloaded to allow you to provide completion callbacks. Here are the corresponding methods for the getName operation:
Ice.AsyncResult begin_getName(int number, Ice.Callback __cb);Ice.AsyncResult begin_getName(int number, java.util.Map<String, String> __ctx, Ice.Callback __cb);
The second version of begin_getName lets you override the default context. Following the in-parameters, the begin_ method accepts a parameter of type Ice.Callback, which is a callback class with a completed method that you must provide. The Ice run time invokes the completed method when an asyn-chronous operation completes. For example:
public class MyCallback extends Ice.Callback{ public void completed(Ice.AsyncResult r) { EmployeesPrx e = (EmployeesPrx)r.getProxy(); try { String name = e.end_getName(r); System.out.println("Name is: " + name); } catch (Ice.LocalException ex) { System.err.println("Exception is: " + ex); } }}
Note that your callback class must derive from Ice.Callback. The implemen-tation of your callback method must call the end_ method. The proxy for the call is available via the getProxy method on the AsyncResult that is passed by the Ice run time. The return type of getProxy is Ice.ObjectPrx, so you must down-cast the proxy to its correct type.
Your callback method should catch and handle any exceptions that may be thrown by the end_ method. If an operation can throw user exceptions, this means that you need an additional catch handler for Ice.UserException (or catch all possible user exceptions explicitly). If you allow an exception to escape from the callback method, the Ice run time produces a log entry by default and ignores the exception. (You can disable the log message by setting the property Ice.Warn.AMICallback to zero.)

386 Client-Side Slice-to-Java Mapping
To inform the Ice run time that you want to receive a callback for the comple-tion of the asynchronous call, you pass the callback instance to the begin_ method:
EmployeesPrx e = ...;MyCallback cb = new MyCallback();e.begin_getName(99, cb);
A more terse way to make an invocation is to use an anonymous class:
EmployeesPrx e = ...;e.begin_getName( 99, new Ice.AsyncCallback() { public void completed(Ice.AsyncResult r) { EmployeesPrx p = (EmployeesPrx)r.getProxy(); try { String name = p.end_getName(r); System.out.println("Name is: " + name); } catch (Ice.LocalException ex) { System.err.println("Exception: " + ex); } } });
This style is useful particularly for callbacks that do only a small amount of work because the code that starts the call and the code that processes the results are physically close together.
10.17.5 Sharing State Between the begin_ and end_ Method
It is common for the end_ method to require access to some state that is estab-lished by the code that calls the begin_ method. As an example, consider an application that asynchronously starts a number of operations and, as each opera-tion completes, needs to update different user interface elements with the results. In this case, the begin_ method knows which user interface element should receive the update, and the end_ method needs access to that element.
Assuming that we have a Widget class that designates a particular user inter-face element, you could pass different widgets by storing the widget to be used as a member of your callback class:

10.17 Asynchronous Method Invocation (AMI) 387
public class MyCallback extends Ice.AsyncCallback{ public MyCallback(Widget w) { _w = w; } private Widget _w; public void completed(Ice.AsyncResult r) { EmployeesPrx e = (EmployeesPrx)r.getProxy(); try { String name = e.end_getName(r); _w.writeString(name); } catch (Ice.LocalException ex) { System.err.println("Exception is: " + ex); } }}
For this example, we assume that widgets have a writeString method that updates the relevant UI element.
When you call the begin_ method, you pass the appropriate callback instance to inform the end_ method how to update the display:
EmployeesPrx e = ...;Widget widget1 = ...;Widget widget2 = ...;// Invoke the getName operation with different widget callbacks.e.begin_getName(99, new MyCallback(widget1));e.begin_getName(24, new MyCallback(widget2));
The callback class provides a simple and effective way for you to pass state between the point where an operation is invoked and the point where its results are processed. Moreover, if you have a number of operations that share common state, you can pass the same callback instance to multiple invocations. (If you do this, your callback methods may need to use synchronization.)
10.17.6 Type-Safe Completion Callbacks
The generic callback API we saw in Section 10.17.4 is not entirely type-safe:

388 Client-Side Slice-to-Java Mapping
• You must down-cast the return value of getProxy to the correct proxy type before you can call the end_ method.
• You must call the correct end_ method to match the operation called by the begin_ method.
• You must remember to catch exceptions when you call the end_ method; if you forget to do this, you will not know that the operation failed.
slice2java generates an additional type-safe API that takes care of these chores for you. To use type-safe callbacks, you must implement a callback class that provides two callback methods:
• a response method that is called if the operation succeeds
• an exception method that is called if the operation raises an exception
Your callback class must derive from the base class that is generated by slice2java. The name of this base class is <module>.Callback_<interface>_<operation>. Here is a callback class for an invocation of the getName operation:
public class MyCallback extends Demo.Callback_Employees_getName{ public void response(String name) { System.out.println("Name is: " + name); } public void exception(Ice.LocalException ex) { System.err.println("Exception is: " + ex); }}
The response callback parameters depend on the operation signature. If the operation has non-void return type, the first parameter of the response call-back is the return value. The return value (if any) is followed by a parameter for each out-parameter of the corresponding Slice operation, in the order of declara-tion.
The exception callback is invoked if the invocation fails because of an Ice run time exception. If the Slice operation can also raise user exceptions, your call-back class must supply an additional overloading of exception that accepts an argument of type Ice.UserException.
The proxy methods are overloaded to accept this callback instance:

10.17 Asynchronous Method Invocation (AMI) 389
Ice.AsyncResult begin_getName(int number, Callback_Employees_getName __cb);Ice.AsyncResult begin_getName(int number, java.util.Map<String, String> __ctx, Callback_Employees_getName __cb);
You pass the callback to an invocation as you would with the generic API:
EmployeesPrx e = ...;MyCallback cb = new MyCallback();e.begin_getName(99, cb);
10.17.7 Oneway Invocations
You can invoke operations via oneway proxies asynchronously, provided the oper-ation has void return type, does not have any out-parameters, and does not raise user exceptions. If you call the begin_ method on a oneway proxy for an opera-tion that returns values or raises a user exception, the begin_ method throws an IllegalArgumentException.
The callback methods looks exactly as for a twoway invocation. For the generic API, the Ice run time does not call the completed callback method unless the invocation raised an exception during the begin_ method (“on the way out”). For the type-safe API, the response method is never called.
10.17.8 Flow Control
Asynchronous method invocations never block the thread that calls the begin_ method: the Ice run time checks to see whether it can write the request to the local transport. If it can, it does so immediately in the caller’s thread. (In that case, AsyncResult.sentSynchronously returns true.) Alternatively, if the local transport does not have sufficient buffer space to accept the request, the Ice run time queues the request internally for later transmission in the background. (In that case, AsyncResult.sentSynchronously returns false.)
This creates a potential problem: if a client sends many asynchronous requests at the time the server is too busy to keep up with them, the requests pile up in the client-side run time until, eventually, the client runs out of memory.
The API provides a way for you to implement flow control by counting the number of requests that are queued so, if that number exceeds some threshold, the

390 Client-Side Slice-to-Java Mapping
client stops invoking more operations until some of the queued operations have drained out of the local transport.
For the generic API, you can override the sent method:
public class MyCallback extends Ice.AsyncCallback{ public void completed(Ice.AsyncResult r) { // ... } public void sent(Ice.AsyncResult r) { // ... }}
You inform the Ice run time that you want to be informed when a call has been passed to the local transport as usual:
e.begin_getName(99, new MyCallback());
If the Ice run time can immediately pass the request to the local transport, it does so and invokes the sent method from the thread that calls the begin_ method. On the other hand, if the run time has to queue the request, it calls the sent method from a different thread once it has written the request to the local trans-port. In addition, you can find out from the AsyncResult that is returned by the begin_ method whether the request was sent synchronously or was queued, by calling sentSynchronously.
For the generic API, the sent method has the following signature:
void sent(Ice.AsyncResult r);
For the type-safe API, the signature is:
void sent(boolean sentSynchronously);
For the generic API, you can find out whether the request was sent synchronously by calling sentSynchronously on the AsyncResult. For the type-safe API, the boolean sentSynchronously parameter provides the same informa-tion.
The sent methods allow you to limit the number of queued requests by counting the number of requests that are queued and decrementing the count when the Ice run time passes a request to the local transport.

10.17 Asynchronous Method Invocation (AMI) 391
10.17.9 Batch RequestsApplications that send batched requests (see Section 32.16) can either flush a batch explicitly or allow the Ice run time to flush automatically. The proxy method ice_flushBatchRequests performs an immediate flush using the synchro-nous invocation model and may block the calling thread until the entire message can be sent. Ice also provides asynchronous versions of this method so you can flush batch requests asynchronously.
begin_ice_flushBatchRequests and end_ice_flushBatchRequests are proxy methods that flush any batch requests queued by that proxy.
In addition, similar methods are available on the communicator and the Connection object that is returned by AsyncResult.getConnection. These methods flush batch requests sent via the same communicator and via the same connection, respectively.
10.17.10 ConcurrencyThe Ice run time always invokes your callback methods from a separate thread, with one exception: it calls the sent callback from the thread calling the begin_ method if the request could be sent synchronously. In the sent call-back, you know which thread is calling the callback by looking at the sentSyn-chronously member or parameter.
10.17.11 LimitationsAMI invocations cannot be sent using collocated optimization. If you attempt to invoke an AMI operation using a proxy that is configured to use collocation opti-mization, the Ice run time raises CollocationOptimizationException if the servant happens to be collocated; the request is sent normally if the servant is not collocated. Section 32.21 provides more information about this optimization and describes how to disable it when necessary.

392 Client-Side Slice-to-Java Mapping
10.18 Slice Compiler
10.18.1 slice2java Command-Line Options
The Slice-to-Java compiler, slice2java, offers the following command-line options in addition to the standard options described in Section 4.20:
• --tie
Generate tie classes (see Section 12.7).
• --impl
Generate sample implementation files. This option will not overwrite an existing file.
• --impl-tie
Generate sample implementation files using ties (see Section 12.7). This option will not overwrite an existing file.
• --checksum CLASS
Generate checksums for Slice definitions into the class CLASS. The given class name may optionally contain a package specifier. The generated class contains checksums for all of the Slice files being translated by this invocation of the compiler. For example, the command below causes slice2java to generate the file Checksums.java containing the checksums for the Slice definitions in File1.ice and File2.ice:
slice2java --checksum Checksums File1.ice File2.ice
• --stream
Generate streaming helper functions for Slice types (see Section 35.2).
• --meta META
Define the global metadata directive META. Using this option is equivalent to defining the global metadata META in each named Slice file, as well as in any file included by a named Slice file.
Global metadata specified with --meta overrides any corresponding global metadata directive in the files being compiled.

10.18 Slice Compiler 393
10.18.2 Ant Task
The Ice for Java build system makes extensive use of an ant task named Slice2JavaTask that automates the Slice-to-Java compiler and may also be useful for Ice developers. The task and its supporting classes reside in the JAR file named ant-ice.jar, which normally can be found in the lib subdirectory of your Ice installation.
Execution Environment
The Slice2JavaTask must be able to locate and spawn the slice2java executable. You can specify the directory of your Ice installation by defining the ice.home ant property or the ICE_HOME environment variable, in which case the task assumes that the Slice compiler’s executable is located in the bin subdi-rectory of the specified installation directory. For example, if ICE_HOME is set to /opt/Ice on Linux, the task assumes that the executable path name is /opt/Ice/bin/slice2java. Furthermore, the task also configures its shared library search path (if necessary for your platform) to ensure the executable can resolve its library dependencies.
If both ice.home and ICE_HOME are defined, ice.home takes prece-dence. If neither are defined, the task assumes that the executable can already be found in your PATH and that your shared library search path is configured correctly.
Finally, you can use a task parameter to specify the full path name of the Slice compiler. Again, the task assumes that your shared library search path is config-ured correctly.
Dependencies
The task minimizes recompilation by maintaining dependencies between Slice files. The task stores this information in a file named .depend in the output directory and updates the dependencies after each invocation. (You can specify a different name for this file using a task parameter.)
Note that the task does not maintain dependencies between a Slice file and its generated Java source files. Consequently, removing the generated Java source files does not cause the task to recompile a Slice file. In fact, the task only compiles a Slice file when any of the following conditions are true:
• no dependency file exists
• no dependency information is found for the Slice file
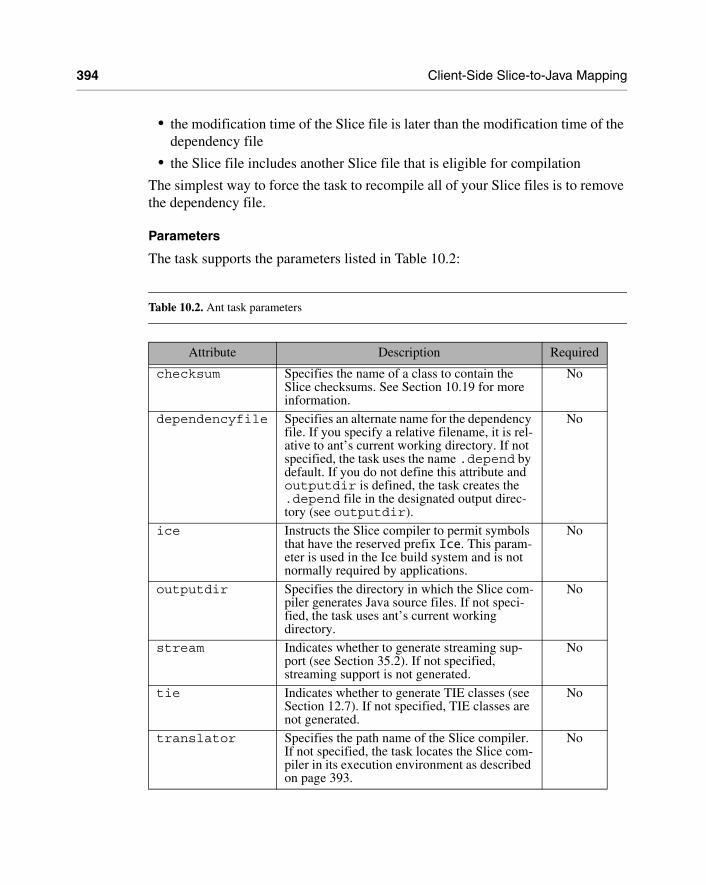
394 Client-Side Slice-to-Java Mapping
• the modification time of the Slice file is later than the modification time of the dependency file
• the Slice file includes another Slice file that is eligible for compilation
The simplest way to force the task to recompile all of your Slice files is to remove the dependency file.
Parameters
The task supports the parameters listed in Table 10.2:
Table 10.2. Ant task parameters
Attribute Description Required
checksum Specifies the name of a class to contain the Slice checksums. See Section 10.19 for more information.
No
dependencyfile Specifies an alternate name for the dependency file. If you specify a relative filename, it is rel-ative to ant’s current working directory. If not specified, the task uses the name .depend by default. If you do not define this attribute and outputdir is defined, the task creates the .depend file in the designated output direc-tory (see outputdir).
No
ice Instructs the Slice compiler to permit symbols that have the reserved prefix Ice. This param-eter is used in the Ice build system and is not normally required by applications.
No
outputdir Specifies the directory in which the Slice com-piler generates Java source files. If not speci-fied, the task uses ant’s current working directory.
No
stream Indicates whether to generate streaming sup-port (see Section 35.2). If not specified, streaming support is not generated.
No
tie Indicates whether to generate TIE classes (see Section 12.7). If not specified, TIE classes are not generated.
No
translator Specifies the path name of the Slice compiler. If not specified, the task locates the Slice com-piler in its execution environment as described on page 393.
No

10.18 Slice Compiler 395
For the flag parameters (ice, stream, and tie), legal positive values are on, true, or yes; negative values are off, false, or no.
Nested Elements
Several Slice compiler options must be defined as nested elements of the task:
• define
Defines a preprocessor macro. The element supports the attributes name and (optionally) value, as shown below:
<define name="FOO"><define name="BAR" value="5">
These definitions are equivalent to the command-line options -DFOO and-DBAR=5, respectively.
• fileset
Specifies the set of Slice files to be compiled. Refer to the ant documentation of its FileSet type for more information.
• includepath
Specifies the include file search path for Slice files. In ant terminology, includepath is a path-like structure. Refer to the ant documentation of its Path type for more information.
• meta
Defines a global metadata directive in each Slice file as well as in each included Slice file. The element supports name and value attributes.
Using the Task
Define the following taskdef element in your project’s build file to enable the task:
<taskdef name="slice2java" classname="Slice2JavaTask"/>
This configuration assumes that ant-ice.jar is already present in ant’s class path. Alternatively, you can specify the JAR explicitly as follows:
<taskdef name="slice2java" classpath="/opt/Ice/lib/ant-ice.jar" classname="Slice2JavaTask"/>
Once activated, you can invoke the task to translate your Slice files. The example shown below is a simplified version of the ant project for the hello demo:

396 Client-Side Slice-to-Java Mapping
<target name="generate" depends="init"> <mkdir dir="generated"/> <slice2java outputdir="generated"> <fileset dir="." includes="Hello.ice"/> </slice2java></target><target name="compile" depends="generate"> <mkdir dir="classes"/> <javac srcdir=".:generated" destdir="classes"> <exclude name="generated/**"/> ... </javac></target><target name="all" depends="compile"/><target name="clean"> <delete dir="generated"/> <delete dir="classes"/></target>
This project demonstrates some practices that we encourage you to adopt in your own projects. First, it is helpful to keep the source files generated by the Slice compiler separate from your application’s source files by dedicating an output directory for the exclusive use of the Slice compiler. Doing so helps to minimize confusion and makes it easier to configure a source-code management system to ignore generated files.
Next, we also recommend that you include a clean target in your ant project that removes this output directory. Assuming that the dependency file (.depend) is also stored in this directory, removing the output directory is an efficient way to clean up your project’s source tree and guarantees that all of your Slice files are recompiled in the next build.
Finally, after seeing the exclude element in the invocation of javac you might infer that the generated code was not being compiled, but the presence of the output directory in the srcdir attribute ensures that the generated code is included in the build. The purpose of the exclude element is to prevent ant from including the generated files twice in its target list.

10.19 Using Slice Checksums 397
10.19 Using Slice Checksums
As described in Section 4.21, the Slice compilers can optionally generate check-sums of Slice definitions. For slice2java, the --checksum option causes the compiler to generate a new Java class that adds checksums to a static map member. Assuming we supplied the option --checksum Checksums to slice2java, the generated class Checksums.java looks like this:
public class Checksums { public static java.util.Map checksums;}
The read-only map checksums is initialized automatically prior to first use; no action is required by the application.
In order to verify a server’s checksums, a client could simply compare the dictionaries using the equals method. However, this is not feasible if it is possible that the server might return a superset of the client’s checksums. A more general solution is to iterate over the local checksums as demonstrated below:
java.util.Map serverChecksums = ...java.util.Iterator i = Checksums.checksums.entrySet().iterator();while(i.hasNext()) { java.util.Map.Entry e = (java.util.Map.Entry)i.next(); String id = (String)e.getKey(); String checksum = (String)e.getValue(); String serverChecksum = (String)serverChecksums.get(id); if (serverChecksum == null) { // No match found for type id! } else if (!checksum.equals(serverChecksum)) { // Checksum mismatch! }}
In this example, the client first verifies that the server’s dictionary contains an entry for each Slice type ID, and then it proceeds to compare the checksums.


399
Chapter 11Developing a File System Client in Java
11.1 Chapter Overview
In this chapter, we present the source code for a Java client that accesses the file system we developed in Chapter 5 (see Chapter 13 for the corresponding server).
11.2 The Java Client
We now have seen enough of the client-side Java mapping to develop a complete client to access our remote file system. For reference, here is the Slice definition once more:
module Filesystem { interface Node { idempotent string name(); }; exception GenericError { string reason; }; sequence<string> Lines; interface File extends Node {

400 Developing a File System Client in Java
idempotent Lines read(); idempotent void write(Lines text) throws GenericError; }; sequence<Node*> NodeSeq; interface Directory extends Node { idempotent NodeSeq list(); }; };
To exercise the file system, the client does a recursive listing of the file system, starting at the root directory. For each node in the file system, the client shows the name of the node and whether that node is a file or directory. If the node is a file, the client retrieves the contents of the file and prints them.
The body of the client code looks as follows:
import Filesystem.*;public class Client { // Recursively print the contents of directory "dir" in // tree fashion. For files, show the contents of each file. // The "depth" parameter is the current nesting level // (for indentation). static void listRecursive(DirectoryPrx dir, int depth) { char[] indentCh = new char[++depth]; java.util.Arrays.fill(indentCh, '\t'); String indent = new String(indentCh); NodePrx[] contents = dir.list(); for (int i = 0; i < contents.length; ++i) { DirectoryPrx subdir = DirectoryPrxHelper.checkedCast(contents[i]); FilePrx file = FilePrxHelper.uncheckedCast(contents[i]); System.out.println(indent + contents[i].name() + (subdir != null ? " (directory):" : " (file):")); if (subdir != null) { listRecursive(subdir, depth); } else {
11.2 The Java Client 401
String[] text = file.read(); for (int j = 0; j < text.length; ++j) System.out.println(indent + "\t" + text[j]); } } } public static void main(String[] args) { int status = 0; Ice.Communicator ic = null; try { // Create a communicator // ic = Ice.Util.initialize(args); // Create a proxy for the root directory // Ice.ObjectPrx base = ic.stringToProxy("RootDir:default -p 10000"); if (base == null) throw new RuntimeException("Cannot create proxy"); // Down-cast the proxy to a Directory proxy // DirectoryPrx rootDir = DirectoryPrxHelper.checkedCast(base); if (rootDir == null) throw new RuntimeException("Invalid proxy"); // Recursively list the contents of the root directory // System.out.println("Contents of root directory:"); listRecursive(rootDir, 0); } catch (Ice.LocalException e) { e.printStackTrace(); status = 1; } catch (Exception e) { System.err.println(e.getMessage()); status = 1; } if (ic != null) { // Clean up // try {

402 Developing a File System Client in Java
ic.destroy(); } catch (Exception e) { System.err.println(e.getMessage()); status = 1; } } System.exit(status); }}
After importing the Filesystem package, the Client class defines two methods: listRecursive, which is a helper function to print the contents of the file system, and main, which is the main program. Let us look at main first:
1. The structure of the code in main follows what we saw in Chapter 3. After initializing the run time, the client creates a proxy to the root directory of the file system. For this example, we assume that the server runs on the local host and listens using the default protocol (TCP/IP) at port 10000. The object iden-tity of the root directory is known to be RootDir.
2. The client down-casts the proxy to DirectoryPrx and passes that proxy to listRecursive, which prints the contents of the file system.
Most of the work happens in listRecursive. The function is passed a proxy to a directory to list, and an indent level. (The indent level increments with each recursive call and allows the code to print the name of each node at an indent level that corresponds to the depth of the tree at that node.) listRecursive calls the list operation on the directory and iterates over the returned sequence of nodes:
1. The code does a checkedCast to narrow the Node proxy to a Directory proxy, as well as an uncheckedCast to narrow the Node proxy to a File proxy. Exactly one of those casts will succeed, so there is no need to call checkedCast twice: if the Node is-a Directory, the code uses the Direc-toryPrx returned by the checkedCast; if the checkedCast fails, we know that the Node is-a File and, therefore, an uncheckedCast is sufficient to get a FilePrx.
In general, if you know that a down-cast to a specific type will succeed, it is preferable to use an uncheckedCast instead of a checkedCast because an uncheckedCast does not incur any network traffic.
2. The code prints the name of the file or directory and then, depending on which cast succeeded, prints "(directory)" or "(file)" following the name.
3. The code checks the type of the node:
• If it is a directory, the code recurses, incrementing the indent level.

11.3 Summary 403
• If it is a file, the code calls the read operation on the file to retrieve the file contents and then iterates over the returned sequence of lines, printing each line.
Assume that we have a small file system consisting of two files and a directory as follows:
Figure 11.1. A small file system.
The output produced by the client for this file system is:
Contents of root directory: README (file): This file system contains a collection of poetry. Coleridge (directory): Kubla_Khan (file): In Xanadu did Kubla Khan A stately pleasure-dome decree: Where Alph, the sacred river, ran Through caverns measureless to man Down to a sunless sea.
Note that, so far, our client (and server) are not very sophisticated:
• The protocol and address information are hard-wired into the code.
• The client makes more remote procedure calls than strictly necessary; with minor redesign of the Slice definitions, many of these calls can be avoided.
We will see how to address these shortcomings in Chapter 38 and Chapter 34.
11.3 Summary
This chapter presented a very simple client to access a server that implements the file system we developed in Chapter 5. As you can see, the Java code hardly differs from the code you would write for an ordinary Java program. This is one of
RootDir
Coleridge README
Kubla_Khan
= Directory
= File

404 Developing a File System Client in Java
the biggest advantages of using Ice: accessing a remote object is as easy as accessing an ordinary, local Java object. This allows you to put your effort where you should, namely, into developing your application logic instead of having to struggle with arcane networking APIs. As we will see in Chapter 13, this is true for the server side as well, meaning that you can develop distributed applications easily and efficiently.

405
Chapter 12Server-Side Slice-to-Java Mapping
12.1 Chapter Overview
In this chapter, we present the server-side Slice-to-Java mapping (see Chapter 10 for the client-side mapping). Section 12.3 discusses how to initialize and finalize the server-side run time, sections 12.4 to 12.7 show how to implement interfaces and operations, and Section 12.8 discusses how to register objects with the server-side Ice run time. Finally, Section 12.9 shows how to implement operations asyn-chronously.
12.2 Introduction
The mapping for Slice data types to Java is identical on the client side and server side. This means that everything in Chapter 10 also applies to the server side. However, for the server side, there are a few additional things you need to know, specifically:
• how to initialize and finalize the server-side run time
• how to implement servants
• how to pass parameters and throw exceptions
• how to create servants and register them with the Ice run time.

406 Server-Side Slice-to-Java Mapping
We discuss these topics in the remainder of this chapter.
12.3 The Server-Side main Method
The main entry point to the Ice run time is represented by the local interface Ice::Communicator. As for the client side, you must initialize the Ice run time by calling Ice.Util.initialize before you can do anything else in your server. Ice.Util.initialize returns a reference to an instance of an Ice.Communicator:
public class Server { public static void main(String[] args) { int status = 0; Ice.Communicator ic = null; try { ic = Ice.Util.initialize(args); // ... } catch (Exception e) { e.printStackTrace(); status = 1; } // ... }}
Ice.Util.initialize accepts the argument vector that is passed to main by the operating system. The function scans the argument vector for any command-line options that are relevant to the Ice run time, but does not remove those options.1 If anything goes wrong during initialization, initialize throws an exception.
Before leaving your main function, you must call Communicator::destroy. The destroy operation is responsible for finalizing the Ice run time. In particular, destroy waits for any operation implementations that are still executing in the server to complete. In addition, destroy ensures that any outstanding threads
1. The semantics of Java arrays prevents Ice.Util.initialize from modifying the size of the argument vector. However, another overloading of Ice.Util.initialize is provided that allows the application to obtain a new argument vector with the Ice options removed.

12.3 The Server-Side main Method 407
are joined with and reclaims a number of operating system resources, such as file descriptors and memory. Never allow your main function to terminate without calling destroy first; doing so has undefined behavior.
The general shape of our server-side main function is therefore as follows:
public class Server { public static void main(String[] args) { int status = 0; Ice.Communicator ic = null; try { ic = Ice.Util.initialize(args); // ... } catch (Exception e) { e.printStackTrace(); status = 1; } if (ic != null) { try { ic.destroy(); } catch (Exception e) { e.printStackTrace(); status = 1; } } System.exit(status); }}
Note that the code places the call to Ice::initialize into a try block and takes care to return the correct exit status to the operating system. Also note that an attempt to destroy the communicator is made only if the initialization succeeded.
12.3.1 The Ice.Application Class
The preceding structure for the main function is so common that Ice offers a class, Ice.Application, that encapsulates all the correct initialization and finalization activities. The synopsis of the class is as follows (with some detail omitted for now):

408 Server-Side Slice-to-Java Mapping
package Ice;public enum SignalPolicy { HandleSignals, NoSignalHandling }public abstract class Application { public Application() public Application(SignalPolicy signalPolicy) public final int main(String appName, String[] args) public final int main(String appName, String[] args, String configFile) public final int main(String appName, String[] args, InitializationData initData) public abstract int run(String[] args); public static String appName() public static Communicator communicator() // ...}
The intent of this class is that you specialize Ice.Application and imple-ment the abstract run method in your derived class. Whatever code you would normally place in main goes into the run method instead. Using Ice.Appli-cation, our program looks as follows:
public class Server extends Ice.Application { public int run(String[] args) { // Server code here... return 0; } public static void main(String[] args) { Server app = new Server();

12.3 The Server-Side main Method 409
int status = app.main("Server", args); System.exit(status); }}
Note that Application.main is overloaded: you can pass an optional file name or an InitializationData structure (see Section 32.3 and Section 30.9).
If you pass a configuration file name to main, the settings in this file are over-ridden by settings in a file identified by the ICE_CONFIG environment variable (if defined). Property settings supplied on the command line take precedence over all other settings.
The Application.main function does the following:
1. It installs an exception handler for java.lang.Exception. If your code fails to handle an exception, Application.main prints the name of an exception and a stack trace on System.err before returning with a non-zero return value.
2. It initializes (by calling Ice.Util.initialize) and finalizes (by calling Communicator.destroy) a communicator. You can get access to the communicator for your server by calling the static communicator accessor.
3. It scans the argument vector for options that are relevant to the Ice run time and removes any such options. The argument vector that is passed to your run method therefore is free of Ice-related options and only contains options and arguments that are specific to your application.
4. It provides the name of your application via the static appName member function. The return value from this call is the first argument in the call to Application.main, so you can get at this name from anywhere in your code by calling Ice.Application.appName (which is usually required for error messages). In the example above, the return value from appName would be Server.
5. It installs a shutdown hook that properly shuts down the communicator.
6. It installs a per-process logger (see Section 32.19.5) if the application has not already configured one. The per-process logger uses the value of the Ice.ProgramName property (see Section 30.8) as a prefix for its messages and sends its output to the standard error channel. An application can specify an alternate logger as described in Section 32.19.
Using Ice.Application ensures that your program properly finalizes the Ice run time, whether your server terminates normally or in response to an exception.

410 Server-Side Slice-to-Java Mapping
We recommend that all your programs use this class; doing so makes your life easier. In addition Ice.Application also provides features for signal handling and configuration that you do not have to implement yourself when you use this class.
Using Ice.Application on the Client Side
You can use Ice.Application for your clients as well: simply implement a class that derives from Ice.Application and place the client code into its run method. The advantage of this approach is the same as for the server side: Ice.Application ensures that the communicator is destroyed correctly even in the presence of exceptions.
Catching Signals
The simple server we developed in Chapter 3 had no way to shut down cleanly: we simply interrupted the server from the command line to force it to exit. Termi-nating a server in this fashion is unacceptable for many real-life server applica-tions: typically, the server has to perform some cleanup work before terminating, such as flushing database buffers or closing network connections. This is particu-larly important on receipt of a signal or keyboard interrupt to prevent possible corruption of database files or other persistent data.
Java does not provide direct support for signals, but it does allow an applica-tion to register a shutdown hook that is invoked when the JVM is shutting down. There are several events that trigger JVM shutdown, such as a call to System.exit or an interrupt signal from the operating system, but the shut-down hook is not provided with the reason for the shut down.
Ice.Application registers a shutdown hook by default, allowing you to cleanly terminate your application prior to JVM shutdown.
package Ice;public abstract class Application { // ... synchronized public static void destroyOnInterrupt() synchronized public static void shutdownOnInterrupt() synchronized public static void setInterruptHook(Thread t) synchronized public static void defaultInterrupt() synchronized public static boolean interrupted()}
The functions behave as follows:

12.3 The Server-Side main Method 411
• destroyOnInterrupt
This function installs a shutdown hook that calls destroy on the communi-cator. This is the default behavior.
• shutdownOnInterrupt
This function installs a shutdown hook that calls shutdown on the communi-cator.
• setInterruptHook
This function installs a custom shutdown hook that takes responsibility for performing whatever action is necessary to terminate the application. Refer to the Java documentation for Runtime.addShutdownHook for more infor-mation on the semantics of shutdown hooks.
• defaultInterrupt
This function removes the shutdown hook.
• interrupted
This function returns true if the shutdown hook caused the communicator to shut down, false otherwise. This allows us to distinguish intentional shutdown from a forced shutdown that was caused by the JVM. This is useful, for example, for logging purposes.
By default, Ice.Application behaves as if destroyOnInterrupt was invoked, therefore our server main function requires no change to ensure that the program terminates cleanly on JVM shutdown. (You can disable this default shut-down hook by passing the enumerator NoSignalHandling to the constructor. In that case, shutdown is not intercepted and terminates the VM.) However, we add a diagnostic to report the occurrence, so our main function now looks like:
public class Server extends Ice.Application { public int run(String[] args) { // Server code here... if (interrupted()) System.err.println(appName() + ": terminating"); return 0; } public static void main(String[] args)

412 Server-Side Slice-to-Java Mapping
{ Server app = new Server(); int status = app.main("Server", args); System.exit(status); }}
During the course of normal execution, the JVM does not terminate until all non-daemon threads have completed. If an interrupt occurs, the JVM ignores the status of active threads and terminates as soon as it has finished invoking all of the installed shutdown hooks.
In a subclass of Ice.Application, the default shutdown hook (as installed by destroyOnInterrupt) blocks until the application’s main thread completes. As a result, an interrupted application may not terminate successfully if the main thread is blocked. For example, this can occur in an interactive applica-tion when the main thread is waiting for console input. To remedy this situation, the application can install an alternate shutdown hook that does not wait for the main thread to finish:
public class Server extends Ice.Application { class ShutdownHook extends Thread { public void run() { try { communicator().destroy(); } catch(Ice.LocalException ex) { ex.printStackTrace(); } } } public int run(String[] args) { setInterruptHook(new ShutdownHook()); // ... }}

12.4 Mapping for Interfaces 413
After replacing the default shutdown hook using setInterruptHook, the JVM will terminate as soon as the communicator is destroyed.
Ice.Application and Properties
Apart from the functionality shown in this section, Ice.Application also takes care of initializing the Ice run time with property values. Properties allow you to configure the run time in various ways. For example, you can use proper-ties to control things such as the thread pool size or port number for a server. The main function of Ice.Application is overloaded; the second version allows you to specify the name of a configuration file that will be processed during initialization. We discuss Ice properties in more detail in Chapter 30.
Limitations of Ice.Application
Ice.Application is a singleton class that creates a single communicator. If you are using multiple communicators, you cannot use Ice.Application. Instead, you must structure your code as we saw in Chapter 3 (taking care to always destroy the communicator).
12.4 Mapping for Interfaces
The server-side mapping for interfaces provides an up-call API for the Ice run time: by implementing member functions in a servant class, you provide the hook that gets the thread of control from the Ice server-side run time into your applica-tion code.
12.4.1 Skeleton Classes
On the client side, interfaces map to proxy classes (see Section 5.12). On the server side, interfaces map to skeleton classes. A skeleton is a class that has a pure virtual member function for each operation on the corresponding interface. For example, consider the Slice definition for the Node interface we defined in Chapter 5 once more:

414 Server-Side Slice-to-Java Mapping
module Filesystem { interface Node { idempotent string name(); }; // ...};
The Slice compiler generates the following definition for this interface:
package Filesystem;public interface _NodeOperations{ String name(Ice.Current current);}public interface _NodeOperationsNC{ String name();}public interface Node extends Ice.Object, _NodeOperations, _NodeOperationsNC {}public abstract class _NodeDisp extends Ice.ObjectImpl implements Node{ // Mapping-internal code here...}
The important points to note here are:
• As for the client side, Slice modules are mapped to Java packages with the same name, so the skeleton class definitions are part of the Filesystem package.
• For each Slice interface <interface-name>, the compiler generates Java interfaces _<interface-name>Operations and_<interface-name>OperationsNC (_NodeOperations and _NodeOperationsNC in this example). These interfaces contains a member function for each operation in the Slice interface. (You can ignore the Ice.Current parameter for the time being—we discuss it in detail in Section 32.6.)

12.4 Mapping for Interfaces 415
• For each Slice interface <interface-name>, the compiler generates a Java interface <interface-name> (Node in this example). That interface extends Ice.Object and the two operations interfaces.
• For each Slice interface <interface-name>, the compiler generates an abstract class _<interface-name>Disp (_NodeDisp in this example). This abstract class is the actual skeleton class; it is the base class from which you derive your servant class.
12.4.2 Servant Classes
In order to provide an implementation for an Ice object, you must create a servant class that inherits from the corresponding skeleton class. For example, to create a servant for the Node interface, you could write:
package Filesystem;public final class NodeI extends _NodeDisp { public NodeI(String name) { _name = name; } public String name(Ice.Current current) { return _name; } private String _name;}
By convention, servant classes have the name of their interface with an I-suffix, so the servant class for the Node interface is called NodeI. (This is a convention only: as far as the Ice run time is concerned, you can choose any name you prefer for your servant classes.) Note that NodeI extends _NodeDisp, that is, it derives from its skeleton class.
As far as Ice is concerned, the NodeI class must implement only a single method: the name method that it inherits from its skeleton. This makes the servant class a concrete class that can be instantiated. You can add other member func-tions and data members as you see fit to support your implementation. For example, in the preceding definition, we added a _name member and a

416 Server-Side Slice-to-Java Mapping
constructor. (Obviously, the constructor initializes the _name member and the name function returns its value.)
Normal and idempotent Operations
Whether an operation is an ordinary operation or an idempotent operation has no influence on the way the operation is mapped. To illustrate this, consider the following interface:
interface Example { void normalOp(); idempotent void idempotentOp(); idempotent string readonlyOp();};
The operations class for this interface looks like this:
public interface _ExampleOperations{ void normalOp(Ice.Current current); void idempotentOp(Ice.Current current); String readonlyOp(Ice.Current current);}
Note that the signatures of the member functions are unaffected by the idempo-tent qualifier.
12.5 Parameter Passing
For each parameter of a Slice operation, the Java mapping generates a corre-sponding parameter for the corresponding method in the_<interface-name>Operations interface. In addition, every operation has an additional, trailing parameter of type Ice.Current. For example, the name operation of the Node interface has no parameters, but the name member function of the _NodeOperations interface has a single parameter of type Ice.Current. We explain the purpose of this parameter in Section 32.6 and will ignore it for now.
To illustrate the rules, consider the following interface that passes string parameters in all possible directions:

12.6 Raising Exceptions 417
module M { interface Example { string op(string sin, out string sout); };};
The generated skeleton class for this interface looks as follows:
public interface _ExampleOperations{ String op(String sin, Ice.StringHolder sout, Ice.Current current);}
As you can see, there are no surprises here. For example, we could implement op as follows:
public final class ExampleI extends M._ExampleDisp { public String op(String sin, Ice.StringHolder sout, Ice.Current current) { System.out.println(sin); // In params are initialized sout.value = "Hello World!"; // Assign out param return "Done"; }}
This code is in no way different from what you would normally write if you were to pass strings to and from a function; the fact that remote procedure calls are involved does not impact on your code in any way. The same is true for parame-ters of other types, such as proxies, classes, or dictionaries: the parameter passing conventions follow normal Java rules and do not require special-purpose API calls.
12.6 Raising Exceptions
To throw an exception from an operation implementation, you simply instantiate the exception, initialize it, and throw it. For example:
// ...public voidwrite(String[] text, Ice.Current current)

418 Server-Side Slice-to-Java Mapping
throws GenericError{ // Try to write file contents here... // Assume we are out of space... if (error) { GenericError e = new GenericError(); e.reason = "file too large"; throw e; }}
If you throw an arbitrary Java run-time exception (such as a ClassCastEx-ception), the Ice run time catches the exception and then returns an Unknown-Exception to the client. Similarly, if you throw an “impossible” user exception (a user exception that is not listed in the exception specification of the operation), the client receives an UnknownUserException.
If you throw an Ice run-time exception, such as MemoryLimitException, the client receives an UnknownLocalException.2 For that reason, you should never throw system exceptions from operation implementations. If you do, all the client will see is an UnknownLocalException, which does not tell the client anything useful.
12.7 Tie Classes
The mapping to skeleton classes we saw in Section 12.4 requires the servant class to inherit from its skeleton class. Occasionally, this creates a problem: some class libraries require you to inherit from a base class in order to access functionality provided by the library; because Java does not support multiple inheritance, this means that you cannot use such a class library to implement your servants because your servants cannot inherit from both the library class and the skeleton class simultaneously.
To allow you to still use such class libraries, Ice provides a way to write servants that replaces inheritance with delegation. This approach is supported by tie classes. The idea is that, instead of inheriting from the skeleton class, you
2. There are three run-time exceptions that are not changed to UnknownLocalException when returned to the client: ObjectNotExistException, OperationNotExistException, and FacetNotExistException. We discuss these exceptions in more detail in Chapter 33.

12.7 Tie Classes 419
simply create a class (known as an implementation class or delegate class) that contains methods corresponding to the operations of an interface. You use the --tie option with the slice2java compiler to create a tie class. For example, for the Node interface we saw in Section 12.4.1, the --tie option causes the compiler to create exactly the same code as we saw previously, but to also emit an additional tie class. For an interface <interface-name>, the generated tie class has the name _<interface-name>Tie:
package Filesystem;public class _NodeTie extends _NodeDisp implements Ice.TieBase { public _NodeTie() {} public _NodeTie(_NodeOperations delegate) { _ice_delegate = delegate; } public java.lang.Object ice_delegate() { return _ice_delegate; } public void ice_delegate(java.lang.Object delegate) { _ice_delegate = (_NodeOperations)delegate; } public boolean equals(java.lang.Object rhs) { if (this == rhs) { return true; } if (!(rhs instanceof _NodeTie)) { return false; } return _ice_delegate.equals(((_NodeTie)rhs)._ice_delegate)

420 Server-Side Slice-to-Java Mapping
; } public int hashCode() { return _ice_delegate.hashCode(); } public String name(Ice.Current current) { return _ice_delegate.name(current); } private _NodeOperations _ice_delegate;}
This looks a lot worse than it is: in essence, the generated tie class is simply a servant class (it extends _NodeDisp) that delegates each invocation of a method that corresponds to a Slice operation to your implementation class (see Figure 12.1).
Figure 12.1. A skeleton class, tie class, and implementation class.
The generated tie class also implements the Ice.TieBase interface, which defines methods for obtaining and changing the delegate object:
package Ice;public interface TieBase { java.lang.Object ice_delegate(); void ice_delegate(java.lang.Object delegate);}
The delegate has type java.lang.Object in these methods in order to allow a tie object’s delegate to be manipulated without knowing its actual type. However,
_NodeTie
_NodeDisp«interface»
NodeI
Skeleton Class
Tie Class
ImplementationClass
_NodeOperations«interface»
12.7 Tie Classes 421
the ice_delegate modifier raises ClassCastException if the given dele-gate object is not of the correct type.
Given this machinery, we can create an implementation class for our Node interface as follows:
package Filesystem;public final class NodeI implements _NodeOperations {{ public NodeI(String name) { _name = name; } public String name(Ice.Current current) { return _name; } private String _name;}
Note that this class is identical to our previous implementation, except that it implements the _NodeOperations interface and does not extend _NodeDisp (which means that you are now free to extend any other class to support your implementation).
To create a servant, you instantiate your implementation class and the tie class, passing a reference to the implementation instance to the tie constructor:
NodeI fred = new NodeI("Fred"); // Create implementation_NodeTie servant = new _NodeTie(fred); // Create tie
Alternatively, you can also default-construct the tie class and later set its delegate instance by calling ice_delegate:
_NodeTie servant = new _NodeTie(); // Create tie// ...NodeI fred = new NodeI("Fred"); // Create implementation// ...servant.ice_delegate(fred); // Set delegate
When using tie classes, it is important to remember that the tie instance is the servant, not your delegate. Furthermore, you must not use a tie instance to incar-nate (see Section 12.8) an Ice object until the tie has a delegate. Once you have set

422 Server-Side Slice-to-Java Mapping
the delegate, you must not change it for the lifetime of the tie; otherwise, unde-fined behavior results.
You should use the tie approach only if you need to, that is, if you need to extend some base class in order to implement your servants: using the tie approach is more costly in terms of memory because each Ice object is incarnated by two Java objects instead of one, the tie and the delegate. In addition, call dispatch for ties is marginally slower than for ordinary servants because the tie forwards each operation to the delegate, that is, each operation invocation requires two function calls instead of one.
Also note that, unless you arrange for it, there is no way to get from the dele-gate back to the tie. If you need to navigate back to the tie from the delegate, you can store a reference to the tie in a member of the delegate. (The reference can, for example, be initialized by the constructor of the delegate.)
12.8 Object Incarnation
Having created a servant class such as the rudimentary NodeI class in Section 12.4.2, you can instantiate the class to create a concrete servant that can receive invocations from a client. However, merely instantiating a servant class is insufficient to incarnate an object. Specifically, to provide an implementation of an Ice object, you must take the following steps:
1. Instantiate a servant class.
2. Create an identity for the Ice object incarnated by the servant.
3. Inform the Ice run time of the existence of the servant.
4. Pass a proxy for the object to a client so the client can reach it.
12.8.1 Instantiating a Servant
Instantiating a servant means to allocate an instance:
Node servant = new NodeI("Fred");
This code creates a new NodeI instance and assigns its address to a reference of type Node. This works because NodeI is derived from Node, so a Node refer-ence can refer to an instance of type NodeI. However, if we want to invoke a member function of the NodeI class at this point, we must use a NodeI refer-ence:

12.8 Object Incarnation 423
NodeI servant = new NodeI("Fred");
Whether you use a Node or a NodeI reference depends purely on whether you want to invoke a member function of the NodeI class: if not, a Node reference works just as well as a NodeI reference.
12.8.2 Creating an IdentityEach Ice object requires an identity. That identity must be unique for all servants using the same object adapter.3 An Ice object identity is a structure with the following Slice definition:
module Ice { struct Identity { string name; string category; }; // ...};
The full identity of an object is the combination of both the name and category fields of the Identity structure. For now, we will leave the category field as the empty string and simply use the name field. (See Section 32.6 for a discussion of the category field.)
To create an identity, we simply assign a key that identifies the servant to the name field of the Identity structure:
Ice.Identity id = new Ice.Identity();id.name = "Fred"; // Not unique, but good enough for now
12.8.3 Activating a ServantMerely creating a servant instance does nothing: the Ice run time becomes aware of the existence of a servant only once you explicitly tell the object adapter about the servant. To activate a servant, you invoke the add operation on the object adapter. Assuming that we have access to the object adapter in the _adapter variable, we can write:
_adapter.add(servant, id);
3. The Ice object model assumes that all objects (regardless of their adapter) have a globally unique identity. See Chapter 34 for further discussion.

424 Server-Side Slice-to-Java Mapping
Note the two arguments to add: the servant and the object identity. Calling add on the object adapter adds the servant and the servant’s identity to the adapter’s servant map and links the proxy for an Ice object to the correct servant instance in the server’s memory as follows:
1. The proxy for an Ice object, apart from addressing information, contains the identity of the Ice object. When a client invokes an operation, the object iden-tity is sent with the request to the server.
2. The object adapter receives the request, retrieves the identity, and uses the identity as an index into the servant map.
3. If a servant with that identity is active, the object adapter retrieves the servant from the servant map and dispatches the incoming request into the correct member function on the servant.
Assuming that the object adapter is in the active state (see Section 32.4), client requests are dispatched to the servant as soon as you call add.
12.8.4 UUIDs as Identities
The Ice object model assumes that object identities are globally unique. One way of ensuring that uniqueness is to use UUIDs (Universally Unique Identifiers) [14] as identities. The Ice.Util package contains a helper function to create such identities:
public class Example { public static void main(String[] args) { System.out.println(Ice.Util.generateUUID()); }}
When executed, this program prints a unique string such as 5029a22c-e333-4f87-86b1-cd5e0fcce509. Each call to genera-teUUID creates a string that differs from all previous ones.4 You can use a UUID such as this to create object identities. For convenience, the object adapter has an operation addWithUUID that generates a UUID and adds a servant to the servant
4. Well, almost: eventually, the UUID algorithm wraps around and produces strings that repeat themselves, but this will not happen until approximately the year 3400.
12.8 Object Incarnation 425
map in a single step. Using this operation, we can create an identity and register a servant with that identity in a single step as follows:
_adapter.addWithUUID(new NodeI("Fred"));
12.8.5 Creating ProxiesOnce we have activated a servant for an Ice object, the server can process incoming client requests for that object. However, clients can only access the object once they hold a proxy for the object. If a client knows the server’s address details and the object identity, it can create a proxy from a string, as we saw in our first example in Chapter 3. However, creation of proxies by the client in this manner is usually only done to allow the client access to initial objects for boot-strapping. Once the client has an initial proxy, it typically obtains further proxies by invoking operations.
The object adapter contains all the details that make up the information in a proxy: the addressing and protocol information, and the object identity. The Ice run time offers a number of ways to create proxies. Once created, you can pass a proxy to the client as the return value or as an out-parameter of an operation invo-cation.
Proxies and Servant Activation
The add and addWithUUID servant activation operations on the object adapter return a proxy for the corresponding Ice object. This means we can write:
NodePrx proxy = NodePrxHelper.uncheckedCast( _adapter.addWithUUID(new NodeI("Fred")));
Here, addWithUUID both activates the servant and returns a proxy for the Ice object incarnated by that servant in a single step.
Note that we need to use an uncheckedCast here because addWithUUID returns a proxy of type Ice.ObjectPrx.
Direct Proxy Creation
The object adapter offers an operation to create a proxy for a given identity:
module Ice { local interface ObjectAdapter { Object* createProxy(Identity id); // ... };};

426 Server-Side Slice-to-Java Mapping
Note that createProxy creates a proxy for a given identity whether a servant is activated with that identity or not. In other words, proxies have a life cycle that is quite independent from the life cycle of servants:
Ice.Identity id = new Ice.Identity();id.name = Ice.Util.generateUUID();Ice.ObjectPrx o = _adapter.createProxy(id);
This creates a proxy for an Ice object with the identity returned by genera-teUUID. Obviously, no servant yet exists for that object so, if we return the proxy to a client and the client invokes an operation on the proxy, the client will receive an ObjectNotExistException. (We examine these life cycle issues in more detail in Chapter 34.)
12.9 Asynchronous Method Dispatch (AMD)
The number of simultaneous synchronous requests a server is capable of supporting is determined by the number of threads in the server’s thread pool (see Section 32.10). If all of the threads are busy dispatching long-running operations, then no threads are available to process new requests and therefore clients may experience an unacceptable lack of responsiveness.
Asynchronous Method Dispatch (AMD), the server-side equivalent of AMI (see Section 10.17), addresses this scalability issue. Using AMD, a server can receive a request but then suspend its processing in order to release the dispatch thread as soon as possible. When processing resumes and the results are available, the server sends a response explicitly using a callback object provided by the Ice run time.
AMD is transparent to the client, that is, there is no way for a client to distin-guish a request that, in the server, is processed synchronously from a request that is processed asynchronously.
In practical terms, an AMD operation typically queues the request data (i.e., the callback object and operation arguments) for later processing by an applica-tion thread (or thread pool). In this way, the server minimizes the use of dispatch threads and becomes capable of efficiently supporting thousands of simultaneous clients.
An alternate use case for AMD is an operation that requires further processing after completing the client’s request. In order to minimize the client’s delay, the operation returns the results while still in the dispatch thread, and then continues using the dispatch thread for additional work.

12.9 Asynchronous Method Dispatch (AMD) 427
12.9.1 Enabling AMD with Metadata
To enable asynchronous dispatch, you must add an ["amd"] metadata directive to your Slice definitions. The directive applies at the interface and the operation level. If you specify ["amd"] at the interface level, all operations in that interface use asynchronous dispatch; if you specify ["amd"] for an individual operation, only that operation uses asynchronous dispatch. In either case, the metadata direc-tive replaces synchronous dispatch, that is, a particular operation implementation must use synchronous or asynchronous dispatch and cannot use both.
Consider the following Slice definitions:
["amd"] interface I { bool isValid(); float computeRate();};interface J { ["amd"] void startProcess(); int endProcess();};
In this example, both operations of interface I use asynchronous dispatch, whereas, for interface J, startProcess uses asynchronous dispatch and endPro-cess uses synchronous dispatch.
Specifying metadata at the operation level (rather than at the interface or class level) minimizes the amount of generated code and, more importantly, minimizes complexity: although the asynchronous model is more flexible, it is also more complicated to use. It is therefore in your best interest to limit the use of the asyn-chronous model to those operations that need it, while using the simpler synchro-nous model for the rest.
12.9.2 AMD Mapping
The Java mapping emits the following code for each AMD operation:
1. A callback interface used by the implementation to notify the Ice run time about the completion of an operation. The name of this interface is formed using the pattern AMD_class_op. For example, an operation named foo defined in interface I results in an interface named AMD_I_foo. The inter-face is generated in the same scope as the interface or class containing the operation. Two methods are provided:

428 Server-Side Slice-to-Java Mapping
public void ice_response(<params>);
The ice_response method allows the server to report the successful completion of the operation. If the operation has a non-void return type, the first parameter to ice_response is the return value. Parameters corre-sponding to the operation’s out parameters follow the return value, in the order of declaration.
public void ice_exception(java.lang.Exception ex);
The ice_exception method allows the server to raise an exception. With respect to exceptions, there is less compile-time type safety in an AMD imple-mentation because there is no throws clause on the dispatch method and any exception type could conceivably be passed to ice_exception. However, the Ice run time validates the exception value using the same semantics as for synchronous dispatch (see Section 4.10.4).
Neither ice_response nor ice_exception throw any exceptions to the caller.
2. The dispatch method, whose name has the suffix _async. This method has a void return type. The first parameter is a reference to an instance of the call-back interface described above. The remaining parameters comprise the in parameters of the operation, in the order of declaration.
For example, suppose we have defined the following operation:
interface I { ["amd"] int foo(short s, out long l);};
The callback interface generated for operation foo is shown below:
public interface AMD_I_foo { void ice_response(int __ret, long l); void ice_exception(java.lang.Exception ex);}
The dispatch method for asynchronous invocation of operation foo is generated as follows:
void foo_async(AMD_I_foo __cb, short s);
12.9.3 ExceptionsThere are two processing contexts in which the logical implementation of an AMD operation may need to report an exception: the dispatch thread (the thread

12.9 Asynchronous Method Dispatch (AMD) 429
that receives the invocation), and the response thread (the thread that sends the response).5 Although we recommend that the callback object be used to report all exceptions to the client, it is legal for the implementation to raise an exception instead, but only from the dispatch thread.
As you would expect, an exception raised from a response thread cannot be caught by the Ice run time; the application’s run time environment determines how such an exception is handled. Therefore, a response thread must ensure that it traps all exceptions and sends the appropriate response using the callback object. Otherwise, if a response thread is terminated by an uncaught exception, the request may never be completed and the client might wait indefinitely for a response.
Whether raised in a dispatch thread or reported via the callback object, user exceptions are validated as described in Section 4.10.2, and local exceptions may undergo the translation described in Section 4.10.4.
12.9.4 Example
To demonstrate the use of AMD in Ice, let us define the Slice interface for a simple computational engine:
module Demo { sequence<float> Row; sequence<Row> Grid; exception RangeError {}; interface Model { ["amd"] Grid interpolate(Grid data, float factor) throws RangeError; };};
Given a two-dimensional grid of floating point values and a factor, the interpo-late operation returns a new grid of the same size with the values interpolated in some interesting (but unspecified) way.
Our servant class derives from Demo._ModelDisp and supplies a definition for the interpolate_async method that creates a Job to hold the callback
5. These are not necessarily two different threads: it is legal to send the response from the dispatch thread.

430 Server-Side Slice-to-Java Mapping
object and arguments, and adds the Job to a queue. The method is synchronized to guard access to the queue:
public final class ModelI extends Demo._ModelDisp { synchronized public void interpolate_async( Demo.AMD_Model_interpolate cb, float[][] data, float factor, Ice.Current current) throws RangeError { _jobs.add(new Job(cb, data, factor)); } java.util.LinkedList _jobs = new java.util.LinkedList();}
After queuing the information, the operation returns control to the Ice run time, making the dispatch thread available to process another request. An application thread removes the next Job from the queue and invokes execute, which uses interpolateGrid (not shown) to perform the computational work:
class Job { Job(Demo.AMD_Model_interpolate cb, float[][] grid, float factor) { _cb = cb; _grid = grid; _factor = factor; } void execute() { if (!interpolateGrid()) { _cb.ice_exception(new Demo.RangeError()); return; } _cb.ice_response(_grid); } private boolean interpolateGrid() { // ... }

12.10 Summary 431
private Demo.AMD_Model_interpolate _cb; private float[][] _grid; private float _factor;}
If interpolateGrid returns false, then ice_exception is invoked to indicate that a range error has occurred. The return statement following the call to ice_exception is necessary because ice_exception does not throw an exception; it only marshals the exception argument and sends it to the client.
If interpolation was successful, ice_response is called to send the modi-fied grid back to the client.
12.10 Summary
This chapter presented the server-side Java mapping. Because the mapping for Slice data types is identical for clients and servers, the server-side mapping only adds a few additional mechanism to the client side: a small API to initialize and finalize the run time, plus a few rules for how to derive servant classes from skele-tons and how to register servants with the server-side run time.
Even though the examples in this chapter are very simple, they accurately reflect the basics of writing an Ice server. Of course, for more sophisticated servers (which we discuss in Chapter 32), you will be using additional APIs, for example, to improve performance or scalability. However, these APIs are all described in Slice, so, to use these APIs, you need not learn any Java mapping rules beyond those we described here.


433
Chapter 13Developing a File System Server in Java
13.1 Chapter Overview
In this chapter, we present the source code for a Java server that implements the file system we developed in Chapter 5 (see Chapter 11 for the corresponding client). The code we present here is fully functional, apart from the required inter-locking for threads. (We examine threading issues in detail in Section 32.10.)
13.2 Implementing a File System Server
We have now seen enough of the server-side Java mapping to implement a server for the file system we developed in Chapter 5. (You may find it useful to review the Slice definition for our file system in Section 5.4 before studying the source code.)
Our server is composed of three source files:
• Server.java
This file contains the server main program.
• Filesystem/DirectoryI.java
This file contains the implementation for the Directory servants.

434 Developing a File System Server in Java
• Filesystem/FileI.java
This file contains the implementation for the File servants.
13.2.1 The Server main Program
Our server main program, in the file Server.java, uses theIce.Application class we discussed in Section 12.3.1. The run method installs a shutdown hook, creates an object adapter, instantiates a few servants for the directories and files in the file system, and then activates the adapter. This leads to a main program as follows:
import Filesystem.*;public class Server extends Ice.Application { public int run(String[] args) { // Create an object adapter (stored in the _adapter // static members) // Ice.ObjectAdapter adapter = communicator().createObjectAdapterWithEndpoints( "SimpleFilesystem", "default -p 10000"); DirectoryI._adapter = adapter; FileI._adapter = adapter; // Create the root directory (with name "/" and no parent) // DirectoryI root = new DirectoryI("/", null); // Create a file "README" in the root directory // File file = new FileI("README", root); String[] text; text = new String[] { "This file system contains a collection of poetry." }; try { file.write(text, null); } catch (GenericError e) { System.err.println(e.reason); } // Create a directory "Coleridge" in the root directory

13.2 Implementing a File System Server 435
// DirectoryI coleridge = new DirectoryI("Coleridge", root); // Create a file "Kubla_Khan" in the Coleridge directory // file = new FileI("Kubla_Khan", coleridge); text = new String[]{ "In Xanadu did Kubla Khan", "A stately pleasure-dome decree:", "Where Alph, the sacred river, ran", "Through caverns measureless to man", "Down to a sunless sea." }; try { file.write(text, null); } catch (GenericError e) { System.err.println(e.reason); } // All objects are created, allow client requests now // adapter.activate(); // Wait until we are done // communicator().waitForShutdown(); return 0; } public static void main(String[] args) { Server app = new Server(); System.exit(app.main("Server", args)); }}
The code imports the contents of the Filesystem package. This avoids having to continuously use fully-qualified identifiers with a Filesystem. prefix.
The next part of the source code is the definition of the Server class, which derives from Ice.Application and contains the main application logic in its run method. Much of this code is boiler plate that we saw previously: we create an object adapter, and, towards the end, activate the object adapter and call wait-ForShutdown.

436 Developing a File System Server in Java
The interesting part of the code follows the adapter creation: here, the server instantiates a few nodes for our file system to create the structure shown in Figure 13.1.
Figure 13.1. A small file system.
As we will see shortly, the servants for our directories and files are of type DirectoryI and FileI, respectively. The constructor for either type of servant accepts two parameters, the name of the directory or file to be created and a reference to the servant for the parent directory. (For the root directory, which has no parent, we pass a null parent.) Thus, the statement
DirectoryI root = new DirectoryI("/", null);
creates the root directory, with the name "/" and no parent directory.Here is the code that establishes the structure in Figure 13.1:
// Create the root directory (with name "/" and no parent) // DirectoryI root = new DirectoryI("/", null); // Create a file "README" in the root directory // File file = new FileI("README", root); String[] text; text = new String[] { "This file system contains a collection of poetry." }; try { file.write(text, null); } catch (GenericError e) { System.err.println(e.reason); } // Create a directory "Coleridge" in the root directory // DirectoryI coleridge
RootDir
Coleridge README
Kubla_Khan
= Directory
= File
13.2 Implementing a File System Server 437
= new DirectoryI("Coleridge", root); // Create a file "Kubla_Khan" in the Coleridge directory // file = new FileI("Kubla_Khan", coleridge); text = new String[]{ "In Xanadu did Kubla Khan", "A stately pleasure-dome decree:", "Where Alph, the sacred river, ran", "Through caverns measureless to man", "Down to a sunless sea." }; try { file.write(text, null); } catch (GenericError e) { System.err.println(e.reason); }
We first create the root directory and a file README within the root directory. (Note that we pass a reference to the root directory as the parent when we create the new node of type FileI.)
The next step is to fill the file with text:
String[] text; text = new String[] { "This file system contains a collection of poetry." }; try { file.write(text, null); } catch (GenericError e) { System.err.println(e.reason); }
Recall from Section 10.7.3 that Slice sequences by default map to Java arrays. The Slice type Lines is simply an array of strings; we add a line of text to our README file by initializing the text array to contain one element.
Finally, we call the Slice write operation on our FileI servant by simply writing:
file.write(text, null);
This statement is interesting: the server code invokes an operation on one of its own servants. Because the call happens via a reference to the servant (of type FileI) and not via a proxy (of type FilePrx), the Ice run time does not know that this call is even taking place—such a direct call into a servant is not mediated by the Ice run time in any way and is dispatched as an ordinary Java function call.

438 Developing a File System Server in Java
In similar fashion, the remainder of the code creates a subdirectory called Coleridge and, within that directory, a file called Kubla_Khan to complete the structure in Figure 13.1.
13.2.2 The FileI Servant Class
Our FileI servant class has the following basic structure:
public class FileI extends _FileDisp{ // Constructor and operations here... public static Ice.ObjectAdapter _adapter; private String _name; private DirectoryI _parent; private String[] _lines;}
The class has a number of data members:
• _adapter
This static member stores a reference to the single object adapter we use in our server.
• _name
This member stores the name of the file incarnated by the servant.
• _parent
This member stores the reference to the servant for the file’s parent directory.
• _lines
This member holds the contents of the file.
The _name and _parent data members are initialized by the constructor:
publicFileI(String name, DirectoryI parent){ _name = name; _parent = parent; assert(_parent != null); // Create an identity // Ice.Identity myID = new Ice.Identity();

13.2 Implementing a File System Server 439
myID.name = Ice.Util.generateUUID(); // Add the identity to the object adapter // _adapter.add(this, myID); // Create a proxy for the new node and // add it as a child to the parent // NodePrx thisNode = NodePrxHelper.uncheckedCast(_adapter.createProxy(myID)); _parent.addChild(thisNode);}
After initializing the _name and _parent members, the code verifies that the reference to the parent is not null because every file must have a parent directory. The constructor then generates an identity for the file by calling Ice.Util.generateUUID and adds itself to the servant map by calling ObjectAdapter.add. Finally, the constructor creates a proxy for this file and calls the addChild method on its parent directory. addChild is a helper func-tion that a child directory or file calls to add itself to the list of descendant nodes of its parent directory. We will see the implementation of this function on page 441.
The remaining methods of the FileI class implement the Slice operations we defined in the Node and File Slice interfaces:
// Slice Node::name() operationpublic Stringname(Ice.Current current){ return _name;}// Slice File::read() operationpublic String[]read(Ice.Current current){ return _lines;}// Slice File::write() operationpublic void

440 Developing a File System Server in Java
write(String[] text, Ice.Current current) throws GenericError{ _lines = text;}
The name method is inherited from the generated Node interface (which is a base interface of the _FileDisp class from which FileI is derived). It simply returns the value of the _name member.
The read and write methods are inherited from the generated File inter-face (which is a base interface of the _FileDisp class from which FileI is derived) and simply return and set the _lines member.
13.2.3 The DirectoryI Servant ClassThe DirectoryI class has the following basic structure:
package Filesystem;public final class DirectoryI extends _DirectoryDisp{ // Constructor and operations here... public static Ice.ObjectAdapter _adapter; private String _name; private DirectoryI _parent; private java.util.ArrayList _contents = new java.util.ArrayList();}
As for the FileI class, we have data members to store the object adapter, the name, and the parent directory. (For the root directory, the _parent member holds a null reference.) In addition, we have a _contents data member that stores the list of child directories. These data members are initialized by the constructor:
publicDirectoryI(String name, DirectoryI parent){ _name = name; _parent = parent; // Create an identity. The parent has the // fixed identity "RootDir" //

13.2 Implementing a File System Server 441
Ice.Identity myID = new Ice.Identity(); myID.name = _parent != null ? Ice.Util.generateUUID() : "RootDir"; // Add the identity to the object adapter // _adapter.add(this, myID); // Create a proxy for the new node and add it as a // child to the parent // NodePrx thisNode = NodePrxHelper.uncheckedCast(_adapter.createProxy(myID)); if (_parent != null) _parent.addChild(thisNode);}
The constructor creates an identity for the new directory by calling Ice.Util.generateUUID. (For the root directory, we use the fixed identity "RootDir".) The servant adds itself to the servant map by calling ObjectA-dapter.add and then creates a reference to itself and passes it to the addChild helper function.
addChild simply adds the passed reference to the _contents list:
voidaddChild(NodePrx child){ _contents.add(child);}
The remainder of the operations, name and list, are trivial:
public Stringname(Ice.Current current){ return _name;}// Slice Directory::list() operationpublic NodePrx[]list(Ice.Current current){

442 Developing a File System Server in Java
NodePrx[] result = new NodePrx[_contents.size()]; _contents.toArray(result); return result;}
Note that the _contents member is of type java.util.ArrayList, which is convenient for the implementation of the addChild method. However, this requires us to convert the list into a Java array in order to return it from the list operation.
13.3 Summary
This chapter showed how to implement a complete server for the file system we defined in Chapter 5. Note that the server is remarkably free of code that relates to distribution: most of the server code is simply application logic that would be present just the same for a non-distributed version. Again, this is one of the major advantages of Ice: distribution concerns are kept away from application code so that you can concentrate on developing application logic instead of networking infrastructure.
Note that the server code we presented here is not quite correct as it stands: if two clients access the same file in parallel, each via a different thread, one thread may read the _lines data member while another thread updates it. Obviously, if that happens, we may write or return garbage or, worse, crash the server. However, it is trivial to make the read and write operations thread-safe. We discuss thread safety in Section 32.10.

443
Part V
C# Mapping


445
Chapter 14Client-Side Slice-to-C# Mapping
14.1 Chapter Overview
In this chapter, we present the client-side Slice-to-C# mapping (see Chapter 16 for the server-side mapping). One part of the client-side C# mapping concerns itself with rules for representing each Slice data type as a corresponding C# type; we cover these rules in Section 14.3 to Section 14.9. Another part of the mapping deals with how clients can invoke operations, pass and receive parameters, and handle exceptions. These topics are covered in Section 14.10 to Section 14.12. Slice classes have the characteristics of both data types and interfaces and are covered in Section 14.13. Sections 14.14 and 14.15 cover serializable objects and metadata directives, and Section 14.16 discusses asynchronous invocations. Finally, Sections 14.17 and 14.18 explain how to use the Slice compiler and Slice checksums.
14.2 Introduction
The client-side Slice-to-C# mapping defines how Slice data types are translated to C# types, and how clients invoke operations, pass parameters, and handle errors. Much of the C# mapping is intuitive. For example, by default, Slice sequences

446 Client-Side Slice-to-C# Mapping
map to C# arrays, so there is little you have learn in order to use Slice dictionaries in C#.
The C# API to the Ice run time is fully thread-safe. Obviously, you must still synchronize access to data from different threads. For example, if you have two threads sharing a sequence, you cannot safely have one thread insert into the sequence while another thread is iterating over the sequence. However, you only need to concern yourself with concurrent access to your own data—the Ice run time itself is fully thread safe, and none of the Ice API calls require you to acquire or release a lock before you safely can make the call.
Much of what appears in this chapter is reference material. We suggest that you skim the material on the initial reading and refer back to specific sections as needed. However, we recommend that you read at least Section 14.9 to Section 14.12 in detail because these sections cover how to call operations from a client, pass parameters, and handle exceptions.
A word of advice before you start: in order to use the C# mapping, you should need no more than the Slice definition of your application and knowledge of the C# mapping rules. In particular, looking through the generated code in order to discern how to use the C# mapping is likely to be inefficient, due to the amount of detail. Of course, occasionally, you may want to refer to the generated code to confirm a detail of the mapping, but we recommend that you otherwise use the material presented here to see how to write your client-side code.
14.3 Mapping for Identifiers
Slice identifiers map to an identical C# identifier. For example, the Slice identifier Clock becomes the C# identifier Clock. If a Slice identifier is the same as a C# keyword, the corresponding C# identifier is a verbatim identifier (an identifier prefixed with @). For example, the Slice identifier while is mapped as @while.1
The Slice-to-C# compiler generates classes that inherit from interfaces or base classes in the .NET framework. These interfaces and classes introduce a number of methods into derived classes. To avoid name clashes between Slice identifiers that happen to be the same as an inherited method, such identifiers are prefixed with ice_ and suffixed with _ in the generated code. For example, the Slice iden-
1. As suggested in Section 4.5.3 on page 92, you should try to avoid such Slice identifiers as much as possible.

14.4 Mapping for Modules 447
tifier Clone maps to the C# identifier ice_Clone_ if it would clash with an inherited Clone. The complete list of identifiers that are so changed is:
Note that Slice identifiers in this list are translated to the corresponding C# identi-fier only where necessary. For example, structures do not derive from IClone-able, so if a Slice structure contains a member named Clone, the corresponding C# structure’s member is named Clone as well. On the other hand, classes do derive from ICloneable, so, if a Slice class contains a member named Clone, the corresponding C# class’s member is named ice_Clone_.
Also note that, for the purpose of prefixing, Slice identifiers are case-insensi-tive, that is, both Clone and clone are escaped and map to ice_Clone_ and ice_clone_, respectively.
14.4 Mapping for Modules
Slice modules map to C# namespaces with the same name as the Slice module. The mapping preserves the nesting of the Slice definitions. For example:
module M1 { // Definitions for M1 here... module M2 { // Definitions for M2 here... };};// ...module M1 { // Reopen M1 // More definitions for M1 here...};
This definition maps to the corresponding C# definitions:
namespace M1{ namespace M2 { // ...
Clone Equals FinalizeGetBaseException GetHashCode GetObjectDataGetType MemberwiseClone ReferenceEqualsToString checkedCast uncheckedCast

448 Client-Side Slice-to-C# Mapping
} // ...}// ...namespace M1 // Reopen M1{ // ...}
If a Slice module is reopened, the corresponding C# namespace is reopened as well.
14.5 The Ice Namespace
All of the APIs for the Ice run time are nested in the Ice namespace, to avoid clashes with definitions for other libraries or applications. Some of the contents of the Ice namespace are generated from Slice definitions; other parts of the Ice namespace provide special-purpose definitions that do not have a corresponding Slice definition. We will incrementally cover the contents of the Ice namespace throughout the remainder of the book.
14.6 Mapping for Simple Built-in Types
The Slice built-in types are mapped to C# types as shown in Table 14.1.
Table 14.1. Mapping of Slice built-in types to C#.
Slice C#
bool bool
byte byte
short short
int int

14.7 Mapping for User-Defined Types 449
14.7 Mapping for User-Defined Types
Slice supports user-defined types: enumerations, structures, sequences, and dictionaries.
14.7.1 Mapping for Enumerations
Enumerations map to the corresponding enumeration in C#. For example:
enum Fruit { Apple, Pear, Orange };
Not surprisingly, the generated C# definition is identical:
enum Fruit { Apple, Pear, Orange };
14.7.2 Mapping for Structures
Ice for .NET supports two different mappings for structures. By default, Slice structures map to C# structures if they (recursively) contain only value types. If a Slice structure (recursively) contains a string, proxy, class, sequence, or dictionary member, it maps to a C# class. A metadata directive (see Section 4.17) allows you to force the mapping to a C# class for Slice structures that contain only value types.
In addition, for either mapping, you can control whether Slice data members are mapped to fields or to properties (see page 453).
long long
float float
double double
string string
Table 14.1. Mapping of Slice built-in types to C#.
Slice C#

450 Client-Side Slice-to-C# Mapping
Structure Mapping for Structures
Consider the following structure:
struct Point { double x; double y;};
This structure consist of only value types and so, by default, maps to a C# partial structure:
public partial struct Point{ public double x; public double y; public Point(double x, double y); public override int GetHashCode(); public override bool Equals(object other); public static bool operator==(Point lhs, Point rhs); public static bool operator!=(Point lhs, Point rhs);}
For each data member in the Slice definition, the C# structure contains a corre-sponding public data member of the same name.
The generated constructor accepts one argument for each structure member, in the order in which they are defined in the Slice definition. This allows you to construct and initialize a structure in a single statement:
Point p = new Point(5.1, 7.8);
Note that C# does not allow a value type to declare a default constructor or to assign default values to data members.
The structure overrides the GetHashCode and Equals methods to allow you to use it as the key type of a dictionary. (Note that the static two-argument version of Equals is inherited from System.Object.) Two structures are equal if (recursively) all their data members are equal. Otherwise, they are not equal. For structures that contain reference types, Equals performs a deep comparison; that is, reference types are compared for value equality, not reference equality.

14.7 Mapping for User-Defined Types 451
Class Mapping for Structures
The mapping for Slice structures to C# structures provides value semantics. Usually, this is appropriate, but there are situations where you may want to change this:
• If you use structures as members of a collection, each access to an element of the collection incurs the cost of boxing or unboxing. Depending on your situa-tion, the performance penalty may be noticeable.
• On occasion, it is useful to be able to assign null to a structure, for example, to support “not there” semantics (such as when implementing parameters that are conceptually optional).
To allow you to choose the correct performance and functionality trade-off, the Slice-to-C# compiler provides an alternative mapping of structures to classes, for example:
["clr:class"] struct Point { double x; double y;};
The "clr:class" metadata directive instructs the Slice-to-C# compiler to generate a mapping to a C# partial class for this structure. The generated code is almost identical, except that the keyword struct is replaced by the keyword class2 and that the class has a default constructor and inherits from IClone-able:
public partial class Point : _System.ICloneable{ public double x; public double y; public Point(); public Point(double x, double y); public object Clone(); public override int GetHashCode(); public override bool Equals(object other);
2. Some of the generated marshaling code differs for the class mapping of structures, but this is irrelevant to application code.

452 Client-Side Slice-to-C# Mapping
public static bool operator==(Point lhs, Point rhs); public static bool operator!=(Point lhs, Point rhs);}
The class has a default constructor that default-constructs each data member. This means members of primitive type are initialized to the equivalent of zero, and members of reference type are initialized to null. Note that applications must always explicitly initialize a member whose type is a class-mapped structure because the Ice run time does not accept null as a legal value for these types.
If you wish to ensure that data members of primitive and enumerated types are initialized to specific values, you can declare default values in your Slice defini-tion (see Section 4.9.2). The default constructor initializes each of these data members to its declared value.
The class also provides a second constructor that has one parameter for each data member. This allows you to construct and initialize a class instance in a single statement:
Point p = new Point(5.1, 7.8);
The Clone method performs a shallow memberwise copy, and the comparison methods have the usual semantics (they perform value comparison).
Note that you can influence the mapping for structures only at the point of definition of a structure, that is, for a particular structure type, you must decide whether you want to use the structure or the class mapping. (You cannot override the structure mapping elsewhere, for example, for individual structure members or operation parameters.)
As we mentioned previously, if a Slice structure (recursively) contains a member of reference type, it is automatically mapped to a C# class. (The compiler behaves as if you had explicitly specified the “clr:class” metadata directive for the structure.)
Here is our Employee structure from Section 4.9.4 once more:
struct Employee { long number; string firstName; string lastName;};
The structure contains two strings, which are reference types, so the Slice-to-C# compiler generates a C# class for this structure:

14.7 Mapping for User-Defined Types 453
public partial class Employee : _System.ICloneable{ public long number; public string firstName; public string lastName; public Employee(); public Employee(long number, string firstName, string lastName); public object Clone(); public override int GetHashCode(); public override bool Equals(object other); public static bool operator==(Employee lhs, Employee rhs); public static bool operator!=(Employee lhs, Employee rhs);}
Property Mapping for Structures
You can instruct the compiler to emit property definitions instead of public data members. For example:
["clr:property"] struct Point { double x; double y;};
The “clr:property” metadata directive causes the compiler to generate a prop-erty for each Slice data member:
public partial struct Point{ private double x_prop; public double x { get { return x_prop; } set { x_prop = value; } } private double y_prop; public double y {

454 Client-Side Slice-to-C# Mapping
get { return y_prop; } set { y_prop = value; } } // Other methods here...}
Note that the properties are non-virtual because C# structures cannot have virtual properties. However, if you apply the “clr:property” directive to a structure that contains a member of reference type, or if you combine the “clr:property” and “clr:class” directives, the generated properties are virtual. For example:
["clr:property", "clr:class"]struct Point { double x; double y;};
This generates the following code:
public partial class Point : System.ICloneable{ private double x_prop; public virtual double x { get { return x_prop; } set { x_prop = value; } } private double y_prop; public virtual double y { get { return y_prop; } set { y_prop = value; }

14.7 Mapping for User-Defined Types 455
} // Other methods here...}
14.7.3 Mapping for Sequences
Ice for .NET supports several different mappings for sequences. By default, sequences are mapped to arrays. You can use metadata directives (see Section 4.17) to map sequences to a number of alternative types:
• System.Collections.Generic.List
• System.Collections.Generic.LinkedList
• System.Collections.Generic.Queue
• System.Collections.Generic.Stack
• Types derived from Ice.CollectionBase (which is a drop-in replace-ment for System.Collections.CollectionBase)3
• User-defined custom types that derive from System.Collec-tions.Generic.IEnumerable<T>.
The different mappings allow you to map sequences to a container type that provides the correct performance trade-off for your application.
Array Mapping for Sequences
By default, the Slice-to-C# compiler maps sequences to arrays. Interestingly, no code is generated in this case; you simply define an array of elements to model the Slice sequence. For example:
sequence<Fruit> FruitPlatter;
Given this definition, to create a sequence containing an apple and an orange, you could write:
Fruit[] fp = { Fruit.Apple, Fruit.Orange };
Or, alternatively:
3. This mapping is provided mainly for compatibility with Ice versions prior to 3.3.
456 Client-Side Slice-to-C# Mapping
Fruit fp[] = new Fruit[2];fp[0] = Fruit.Apple;fp[1] = Fruit.Orange;
The array mapping for sequences is both simple and efficient, especially for sequences that do not need to provide insertion or deletion other than at the end of the sequence.
Mapping to Predefined Generic Containers for Sequences
With metadata directives, you can change the default mapping for sequences to use generic containers provided by .NET. For example:
["clr:generic:List"] sequence<string> StringSeq;["clr:generic:LinkedList"] sequence<Fruit> FruitSeq;["clr:generic:Queue"] sequence<int> IntQueue;["clr:generic:Stack"] sequence<double> DoubleStack;
The "clr:generic:<type>" metadata directive causes the slice2cs compiler to the map the corresponding sequence to one of the containers in the System.Collections.Generic namespace. For example, the Queue sequence maps to System.Collections.Generic.Queue<int> due to its metadata directive.
The predefined containers allow you to select an appropriate space–perfor-mance trade-off, depending on how your application uses a sequence. In addition, if a sequence contains value types, such as int, the generic containers do not incur the cost of boxing and unboxing and so are quite efficient. (For example, System.Collections.Generic.List<int> performs within a few percentage points of an integer array for insertion and deletion at the end of the sequence, but has the advantage of providing a richer set of operations.)
Generic containers can be used for sequences of any element type except objects. For sequences of objects, only List is supported because it provides the functionality required for efficient unmarshaling. Metadata that specifies any other generic type is ignored with a warning:
class MyClass { // ...};["clr:generic:List"]sequence<MyClass> MyClassList; // OK["clr:generic:LinkedList"]sequence<MyClass> MyClassLinkedList; // Ignored

14.7 Mapping for User-Defined Types 457
In this example, sequence type MyClassList maps to the generic container System.Collections.Generic.List<MyClass>, but sequence type MyClassLinkedList uses the default array mapping.
Mapping to Custom Types for Sequences
If the array mapping and the predefined containers are unsuitable for your applica-tion (for example, because may need a priority queue, which does not come with .NET), you can implement your own custom containers and direct slice2cs to map sequences to these custom containers. For example:
["clr:generic:MyTypes.PriorityQueue"] sequence<int> Queue;
This metadata directive causes the Slice Queue sequence to be mapped to the type MyTypes.PriorityQueue. You must specify the fully-qualified name of your custom type following the clr:generic: prefix. This is because the gener-ated code prepends a global:: qualifier to the type name you provide; for the preceding example, the generated code refers to your custom type as global::MyTypes.PriorityQueue<int>.
Your custom type can have whatever interface you deem appropriate, but it must meet the following requirements:
• The custom type must derive from System.Collec-tions.Generic.IEnumerable<T>.
• The custom type must provide a readable Count property that returns the number of elements in the collection.
• The custom type must provide an Add method that appends an element to the end of the collection.
• If (and only if) the Slice sequence contains elements that are Slice classes, the custom type must provide an indexer that sets the value of an element at a specific index. (Indexes, as usual, start at zero.)
As an example, here is a minimal class (omitting implementation) that meets these criteria:
public class PriorityQueue<T> : IEnumerable<T>{ public IEnumerator<T> GetEnumerator(); public int Count get; public void Add(T elmt);
458 Client-Side Slice-to-C# Mapping
public T this[int index] // Needed for class elements only. set; // Other methods and data members here...}
CollectionBase Mapping for Sequences
The CollectionBase mapping is provided mainly for compatibility with Ice versions prior to 3.3. Internally, CollectionBase is implemented using System.Collections.Generic.List<T>, so it offers the same perfor-mance trade-offs as List<T>. (For value types, Ice.CollectionBase is considerably faster than System.Collections.CollectionBase, however.)
Ice.CollectionBase is not as type-safe as List<T> because, in order to remain source code compatible with System.Collections.Collec-tionBase, it provides methods that accept elements of type object. This means that, if you pass an element of the wrong type, the problem will be diag-nosed only at run time, instead of at compile time. For this reason, we suggest that you do not use the CollectionBase mapping for new code.
To enable the CollectionBase mapping, you must use the "clr:collec-tion" metadata directive:
["clr:collection"] sequence<Fruit> FruitPlatter;
With this directive, slice2cs generates a type that derives from Ice.CollectionBase:
public class FruitPlatter : Ice.CollectionBase<M.Fruit>, System.ICloneable{ public FruitPlatter(); public FruitPlatter(int capacity); public FruitPlatter(Fruit[] a); public FruitPlatter( System.Collections.Generic.IEnumerable<Fruit> l); public static implicit operator _System.Collections.Generic.List<Fruit>(FruitPlatter s); public virtual FruitPlatter GetRange(int index, int count);

14.7 Mapping for User-Defined Types 459
public static FruitPlatter Repeat(Fruit value, int count); public object Clone();}
The generated FruitPlatter class provides the following methods:
• FruitPlatter();FruitPlatter(int capacity);FruitPlatter(Fruit[] a);FruitPlatter(IEnumerable<Fruit> l);
Apart from calling the default constructor, you can also specify an initial capacity for the sequence or, using the array constructor, initialize a sequence from an array. In addition, you can initialize the class to contain the same elements as any enumerable collection with the same element type.
• FruitPlatter GetRange(int index, int count);
This method returns a new sequence with count elements that are copied from the source sequence beginning at index.
• FruitPlatter Repeat(Fruit value, int count);
This method returns a sequence with count elements that are initialized to value.
• object Clone()
The Clone method returns a shallow copy of the source sequence.
• static implicit operator List<Fruit> (FruitPlatter s);
This operator performs an implicit conversion of a FruitPlatter instance to a List<Fruit>, so you can pass a FruitPlatter sequence where a List<Fruit>, IEnumerable<Fruit>, or System.Collec-tions.IEnumerable is expected.
The remaining methods are provided by the generic Ice.CollectionBase base class. This class provides the following methods:
• CollectionBase();CollectionBase(int capacity);CollectionBase(T[] a);CollectionBase(IEnumerable<T> l);
The constructors initialize the sequence as for the concrete derived class.
• int Count { get; }

460 Client-Side Slice-to-C# Mapping
This property returns the number of elements of the sequence.
• int Capacity { get; set; }
This property controls the capacity of the sequence. Its semantics are as for the corresponding property of List<T>.
• virtual void TrimToSize();
This method sets the capacity of the sequence to the actual number of elements.
• int Add(object o);int Add(T value);
These methods append value at the end of the sequence. They return the index at which the element is inserted (which always is the value of Count prior the call to Add.)
• void Insert(int index, object o);void insert(int index, T value);
These methods insert an element at the specified index.
• virtual void InsertRange(int index, CollectionBase<T> c);virtual void InsertRange(int index, T[] c);
These methods insert a range of values into the sequence starting at the given index.
• virtual void SetRange(int index, CollectionBase<T> c);virtual void SetRange(int index, T[] c);
These methods copy the provided sequence over a range of elements in the target sequence, starting at the provided index, with semantics as for System.Collections.ArrayList
• void RemoveAt(int index);
This method deletes the element at the specified index.
• void Remove(object o);void Remove(T value);
These methods search for the specified element and, if present, delete that element. If the element is not in the sequence, the methods do nothing.
• virtual void RemoveRange(int index, int count);
This method removes count elements, starting at the given index.

14.7 Mapping for User-Defined Types 461
• void Clear();
This method deletes all elements of the sequence.
• bool Contains(object o);bool Contains(T value);
These methods return true if the sequence contains value; otherwise, they return false.
• int IndexOf(object o);int IndexOf(T value);
These methods return the index of the specified element. If the element is not in the sequence, the return value is -1.
• virtual int LastIndexOf(T value);virtual int LastIndexOf(T value, int startIndex);virtual int LastIndexOf(T value, int startIndex, int count);
These methods search for the provided element and return its last occurrence in the sequence, as forSystem.Collections.ArrayList.LastIndexOf.
• object this[int index] { get; set; }T this[int index] { get; set; }
The indexers allow you to read and write elements using array subscript nota-tion.
• IEnumerator<T> GetEnumerator();
This method returns an enumerator that you can use to iterate over the collec-tion.
• static implicit operator List<T> (CollectionBase<T> s);
As for the derived class, this operator permits implicit conversion to a List<T>.
• void CopyTo(T[] a);void CopyTo(T[] a, int i);void CopyTo(int i, T[] a, int ai, int c);void CopyTo(System.Array a, int i);
These methods copy the contents of a sequence into an array. The semantics are the same as for the corresponding methods of List<T>.

462 Client-Side Slice-to-C# Mapping
• T[] ToArray();
The ToArray method returns the contents of the sequence as an array.
• void AddRange(CollectionBase<T> s);void AddRange(T[] a);
The AddRange methods append the contents of a sequence or an array to the current sequence, respectively.
• virtual void Sort();virtual void Sort(System.Collections.IComparer comparer);virtual void Sort(int index, int count, System.Collections.IComparer comparer);
These methods sort the sequence.
• virtual void Reverse();virtual void Reverse(int index, int count);
These methods reverse the order of elements of the sequence.
• virtual int BinarySearch(T value);virtual int BinarySearch(T value, System.Collections.IComparer comparer);virtual int BinarySearch(int index, int count, T value, System.Collections.IComparer comparer);
The methods perform a binary search on the sequence, with semantics as for System.Collections.ArrayList.
• static FruitPlatter Repeat(Fruit value, int count);
This method returns a sequence with count elements that are initialized to value.
Note that for all methods that return sequences, these methods perform a shallow copy, that is, if you have a sequence whose elements have reference type, what is copied are the references, not the objects denoted by those references.
Ice.CollectionBase also provides the usual GetHashCode and Equals methods, as well as the comparison operators for equality and inequality. (Two sequences are equal if they have the same number of elements and all elements in corresponding positions are equal, as determined by the Equals method of the elements.)

14.7 Mapping for User-Defined Types 463
Ice.CollectionBase also implements the inherited IsFixedSize, IsReadOnly, and IsSynchronized properties (which return false), and the inherited SyncRoot property (which returns this).
Creating a sequence containing an apple and an orange is simply a matter of writing:
FruitPlatter fp = new FruitPlatter();fp.Add(Fruit.Apple);fp.Add(Fruit.Orange);
Multi-Dimensional Sequences
Slice permits you to define sequences of sequences, for example:
enum Fruit { Apple, Orange, Pear };["clr:generic:List"] sequence<Fruit> FruitPlatter;["clr:generic:LinkedList"] sequence<FruitPlatter> Cornucopia;
If we use these definitions as shown, the type of FruitPlatter in the generated code is:
System.Collections.Generic.LinkedList< System.Collections.Generic.List<Fruit>>
As you can see, the outer sequence contains elements of type List<Fruit>, as you would expect.
Now let us modify the definition to change the mapping of FruitPlatter to an array:
enum Fruit { Apple, Orange, Pear };sequence<Fruit> FruitPlatter;["clr:LinkedList"] sequence<FruitPlatter> Cornucopia;
With this definition, the type of Cornucopia becomes:
System.Collections.Generic.LinkedList<Fruit[]>
As you can see, the generated code now no longer mentions the type Fruit-Platter anywhere and deals with the outer sequence elements as an array of Fruit instead.
14.7.4 Mapping for DictionariesIce for .NET supports three different mappings for dictionaries. By default, dictionaries are mapped to System.Collec-

464 Client-Side Slice-to-C# Mapping
tions.Generic.Dictionary<T>. You can use metadata directives (see Section 4.17) to map dictionaries to two other types:
• System.Collections.Generic.SortedDictionary
• Types derived from Ice.DictionaryBase (which is a drop-in replace-ment for System.Collections.DictionaryBase)4
Mapping to Predefined Containers for Dictionaries
Here is the definition of our EmployeeMap from Section 4.9.4 once more:
dictionary<long, Employee> EmployeeMap;
By default, he Slice-to-C# compiler maps the dictionary to the following type:
System.Collections.Generic.Dictionary<Employee>
You can use the "clr:generic:SortedDictionary" metadata directive to change the mapping to a sorted dictionary:
["clr:generic:SortedDictionary"]dictionary<long, Employee> EmployeeMap;
With this definition, the type of the dictionary becomes:
System.Collections.Generic.SortedDictionary<Employee>
DictionaryBase mapping for Dictionaries
The DictionaryBase mapping is provided mainly for compatibility with Ice versions prior to 3.3. Internally, DictionaryBase is implemented using System.Collections.Generic.Dictionary<T>, so it offers the same performance trade-offs as Dictionary<T>. (For value types, Ice.DictionaryBase is considerably faster than System.Collec-tions.DictionaryBase, however.)
Ice.DictionaryBase is not as type-safe as Dictionary<T> because, in order to remain source code compatible with System.Collec-tions.DictionaryBase, it provides methods that accept elements of type object. This means that, if you pass an element of the wrong type, the problem will be diagnosed only at run time, instead of at compile time. For this reason, we suggest that you do not use the DictionaryBase mapping for new code.
4. This mapping is provided mainly for compatibility with Ice versions prior to 3.3.

14.7 Mapping for User-Defined Types 465
To enable the DictionaryBase mapping, you must use the "clr:collec-tion" metadata directive:
["clr:collection"] dictionary<long, Employee> EmployeeMap;
With this directive, slice2cs generates a type that derives from Ice.CollectionBase:
public class EmployeeMap : Ice.DictionaryBase<long, Employee>, System.ICloneable{ public void AddRange(EmployeeMap m); public object Clone();}
Note that the generated EmployeeMap class derives from Ice.Dictionary-Base, which provides a super-set of the interface of the .NET System.Collections.DictionaryBase class. Apart from methods inherited from DictionaryBase, the class provides a Clone method and an AddRange method that allows you to append the contents of one dictionary to another. If the target dictionary contains a key that is also in the source dictionary, the target dictionary’s value is preserved. For example:
Employee e1 = new Employee();e1.number = 42;e1.firstName = "Herb";e1.lastName = "Sutter";EmployeeMap em1 = new EmployeeMap();em[42] = e;Employee e2 = new Employee();e2.number = 42;e2.firstName = "Stan";e2.lastName = "Lipmann";EmployeeMap em2 = new EmployeeMap();em[42] = e2;// Add contents of em2 to em1//em1.AddRange(em2);// Equal keys preserve the original value//Debug.Assert(em1[42].firstName.Equals("Herb"));

466 Client-Side Slice-to-C# Mapping
The DictionaryBase class provides the following methods:
public abstract class DictionaryBase<KT, VT> : System.Collections.IDictionary{ public DictionaryBase(); public int Count { get; } public void Add(KT key, VT value); public void Add(object key, object value); public void CopyTo(System.Array a, int index); public void Remove(KT key); public void Remove(object key); public void Clear(); public System.Collections.ICollection Keys { get; } public System.Collections.ICollection Values { get; } public VT this[KT key] { get; set; } public object this[object key] { get; set; } public bool Contains(KT key); public bool Contains(object key); public override int GetHashCode(); public override bool Equals(object other); public static bool operator==(DictionaryBase<KT, VT> lhs, DictionaryBase<KT, VT> rhs); public static bool operator!=(DictionaryBase<KT, VT> lhs, DictionaryBase<KT, VT> rhs); public System.Collections.IEnumerator GetEnumerator(); public bool IsFixedSize { get; } public bool IsReadOnly { get; } public bool IsSynchronized { get; } public object SyncRoot { get; }}
The methods have the same semantics as the corresponding methods in the .NET Framework. The Equals method returns true if two dictionaries contain the

14.8 Mapping for Constants 467
same number of entries and, for each entry, the key and value are the same (as determined by their Equals methods).
The Clone method performs a shallow copy.
The class also implements the inherited IsFixedSize, IsReadOnly, and IsSynchronized properties (which return false), and the SyncRoot property (which returns this).
14.7.5 Collection Comparison
A utility class, Ice.CollectionComparer allows you to compare collec-tions for equality:
public class CollectionComparer { public static bool Equals(System.Collections.IDictionary d1, System.Collections.IDictionary d2); public static bool Equals(System.Collections.ICollection c1, System.Collections.ICollection c2); public static bool Equals(System.Collections.IEnumerable c1, System.Collections.IEnumerable c2);}
Equality of the elements in a collection is determined by calling the elements’ Equals method.
Two dictionaries are equal if they contain the same number of entries with identical keys and values.
Two collections that derive from ICollection or IEnumerable are equal if they contain the same number of entries and entries compare equal. Note that order is significant, so corresponding entries must not only be equal but must also appear in the same position.
14.8 Mapping for Constants
Here are the constant definitions we saw in Section 4.9.5 on page 103 once more:

468 Client-Side Slice-to-C# Mapping
const bool AppendByDefault = true;const byte LowerNibble = 0x0f;const string Advice = "Don't Panic!";const short TheAnswer = 42;const double PI = 3.1416;enum Fruit { Apple, Pear, Orange };const Fruit FavoriteFruit = Pear;
Here are the generated definitions for these constants:
public abstract class AppendByDefault{ public const bool value = true;}public abstract class LowerNibble{ public const byte value = 15;}public abstract class Advice{ public const string value = "Don't Panic!";}public abstract class TheAnswer{ public const short value = 42;}public abstract class PI{ public const double value = 3.1416;}public enum Fruit { Apple, Pear, Orange }public abstract class FavoriteFruit{ public const Fruit value = Fruit.Pear;}
As you can see, each Slice constant is mapped to a class with the same name as the constant. The class contains a member named value that holds the value of the constant.5

14.9 Mapping for Exceptions 469
14.9 Mapping for Exceptions
The mapping for exceptions is based on the inheritance hierarchy shown in Figure 14.1
Figure 14.1. Inheritance structure for exceptions.
The ancestor of all exceptions is System.Exception. Derived from that is Ice.Exception, which provides the definitions of a number of constructors. Ice.LocalException and Ice.UserException are derived from Ice.Exception and form the base of all run-time and user exceptions, respec-tively.
The constructors defined in Ice.Exception have the following signatures:
public abstract class Exception : System.Exception{ public Exception(); public Exception(System.Exception ex);}
5. The mapping to classes instead of to plain constants is necessary because C# does not permit constant definitions at namespace scope.
Ice.LocalException Ice.UserException
Ice.Exception
Specific Run-Time Exceptions... Specific User Exceptions...
System.Exception

470 Client-Side Slice-to-C# Mapping
Each concrete derived exception class implements these constructors. The second constructor initializes the InnerException property of System.Excep-tion. (Both constructors set the Message property to the empty string.)
Here is a fragment of the Slice definition for our world time server from Section 4.10.5 on page 120 once more:
exception GenericError { string reason;};exception BadTimeVal extends GenericError {};exception BadZoneName extends GenericError {};
These exception definitions map as follows:
public partial class GenericError : Ice.UserException{ public string reason; public GenericError(); public GenericError(System.Exception ex__); public GenericError(string reason); public GenericError(string reason, System.Exception ex__); // GetHashCode and comparison methods defined here, // as well as mapping-internal methods.}public partial class BadTimeVal : M.GenericError{ public BadTimeVal(); public BadTimeVal(System.Exception ex__); public BadTimeVal(string reason); public BadTimeVal(string reason, System.Exception ex__); // GetHashCode and comparison methods defined here, // as well as mapping-internal methods.}public partial class BadZoneName : M.GenericError{ public BadZoneName(); public BadZoneName(System.Exception ex__); public BadZoneName(string reason); public BadZoneName(string reason, System.Exception ex__);

14.9 Mapping for Exceptions 471
// GetHashCode and comparison methods defined here, // as well as mapping-internal methods.}
Each Slice exception is mapped to a C# partial class with the same name. For each exception member, the corresponding class contains a public data member. (Obvi-ously, because BadTimeVal and BadZoneName do not have members, the generated classes for these exceptions also do not have members.)
The inheritance structure of the Slice exceptions is preserved for the generated classes, so BadTimeVal and BadZoneName inherit from GenericError.
All user exceptions are derived from the base class Ice.UserException. This allows you to catch all user exceptions generically by installing a handler for Ice.UserException. Similarly, you can catch all Ice run-time exceptions with a handler for Ice.LocalException, and you can catch all Ice excep-tions with a handler for Ice.Exception.
If an exception (or one of its base exceptions) contains data members, the mapping generates two additional constructors. These constructors allow you to instantiate and initialize an exception in a single statement, instead of having to first instantiate the exception and then assign to its members. For derived excep-tions, the constructors accept one argument for each base exception member, plus one argument for each derived exception member, in base-to-derived order. The second of these constructors has a trailing parameter of type System.Excep-tion which initializes the InnerException property of the System.Exception base exception.
All exceptions also provide the usual GetHashCode and Equals methods, as well as the == and != comparison operators.
The generated exception classes also contain other member functions that are not shown here; these member functions are internal to the C# mapping and are not meant to be called by application code.
Constructors
Exceptions have a default constructor that default-constructs each data member. This means members of primitive type are initialized to the equivalent of zero, and members of reference type are initialized to null. Note that applications must always explicitly initialize a member whose type is a class-mapped structure because the Ice run time does not accept null as a legal value for these types.
If you wish to ensure that data members of primitive and enumerated types are initialized to specific values, you can declare default values in your Slice defini-

472 Client-Side Slice-to-C# Mapping
tion (see Section 4.10.2). The default constructor initializes each of these data members to its declared value.
Exceptions also provide constructors that accept one parameter for each data member. This allows you to construct and initialize a class instance in a single statement (instead of first having to construct the instance and then assigning to its members). For derived exceptions, these constructors accept one argument for each base exception member, plus one argument for each derived exception member, in base-to-derived order.
14.10 Mapping for Interfaces
On the client side, Slice interfaces map to C# interfaces with member functions that correspond to the operations on those interfaces. Consider the following simple interface:
interface Simple { void op();};
The Slice compiler generates the following definition for use by the client:
public interface SimplePrx : Ice.ObjectPrx{ void op(); void op(System.Collections.Generic.Dictionary<string, string> __context);}
As you can see, the compiler generates a proxy interface SimplePrx. In general, the generated name is <interface-name>Prx. If an interface is nested in a module M, the generated interface is part of namespace M, so the fully-qualified name is M.<interface-name>Prx.
In the client’s address space, an instance of SimplePrx is the local ambas-sador for a remote instance of the Simple interface in a server and is known as a proxy instance. All the details about the server-side object, such as its address, what protocol to use, and its object identity are encapsulated in that instance.
Note that SimplePrx inherits from Ice.ObjectPrx. This reflects the fact that all Ice interfaces implicitly inherit from Ice::Object.
For each operation in the interface, the proxy class has a member function of the same name. For the preceding example, we find that the operation op has been

14.10 Mapping for Interfaces 473
mapped to the method op. Also note that op is overloaded: the second version of op has a parameter __context, which is a dictionary of string pairs. This parameter is for use by the Ice run time to store information about how to deliver a request. You normally do not need to use it. (We examine the __context parameter in detail in Chapter 32. The parameter is also used by IceStorm—see Chapter 44.)
Because all the <interface-name>Prx types are interfaces, you cannot instantiate an object of such a type. Instead, proxy instances are always instanti-ated on behalf of the client by the Ice run time, so client code never has any need to instantiate a proxy directly.The proxy references handed out by the Ice run time are always of type <interface-name>Prx; the concrete implementation of the interface is part of the Ice run time and does not concern application code.
A value of null denotes the null proxy. The null proxy is a dedicated value that indicates that a proxy points “nowhere” (denotes no object).
14.10.1 The Ice.ObjectPrx Interface
All Ice objects have Object as the ultimate ancestor type, so all proxies inherit from Ice.ObjectPrx. ObjectPrx provides a number of methods:
namespace Ice{ public interface ObjectPrx { Identity ice_getIdentity(); bool ice_isA(string id); string ice_id(); void ice_ping(); int GetHashCode(); bool Equals(object r); // Defined in a helper class: // public static bool Equals(Ice.ObjectPrx lhs, Ice.ObjectPrx rhs); public static bool operator==(ObjectPrx lhs, ObjectPrx rhs); public static bool operator!=(ObjectPrx lhs, ObjectPrx rhs);

474 Client-Side Slice-to-C# Mapping
// ... }}
Note that the static methods are not actually defined Ice.ObjectPrx, but in a helper class that becomes a base class of an instantiated proxy. However, this is simply an internal detail of the C# mapping—conceptually, these methods belong with Ice.ObjectPrx, so we discuss them here.
The methods behave as follows:
• ice_getIdentity
This method returns the identity of the object denoted by the proxy. The iden-tity of an Ice object has the following Slice type:
module Ice { struct Identity { string name; string category; };};
To see whether two proxies denote the same object, first obtain the identity for each object and then compare the identities:
Ice.ObjectPrx o1 = ...;Ice.ObjectPrx o2 = ...;Ice.Identity i1 = o1.ice_getIdentity();Ice.Identity i2 = o2.ice_getIdentity();if (i1.Equals(i2)) // o1 and o2 denote the same objectelse // o1 and o2 denote different objects
• ice_isA
This method determines whether the object denoted by the proxy supports a specific interface. The argument to ice_isA is a type ID (see Section 4.13). For example, to see whether a proxy of type ObjectPrx denotes a Printer object, we can write:
Ice.ObjectPrx o = ...;if (o != null && o.ice_isA("::Printer")) // o denotes a Printer objectelse
14.10 Mapping for Interfaces 475
// o denotes some other type of object
Note that we are testing whether the proxy is null before attempting to invoke the ice_isA method. This avoids getting a NullReferenceException if the proxy is null.
• ice_id
This method returns the type ID of the object denoted by the proxy. Note that the type returned is the type of the actual object, which may be more derived than the static type of the proxy. For example, if we have a proxy of type BasePrx, with a static type ID of ::Base, the return value of ice_id might be ::Base, or it might something more derived, such as ::Derived.
• ice_ping
This method provides a basic reachability test for the object. If the object can physically be contacted (that is, the object exists and its server is running and reachable), the call completes normally; otherwise, it throws an exception that indicates why the object could not be reached, such as ObjectNotExist-Exception or ConnectTimeoutException.
• Equals
This operation compares two proxies for equality. Note that all aspects of proxies are compared by this operation, such as the communication endpoints for the proxy. This means that, in general, if two proxies compare unequal, that does not imply that they denote different objects. For example, if two proxies denote the same Ice object via different transport endpoints, equals returns false even though the proxies denote the same object.
Note that there are other methods in ObjectPrx, not shown here. These methods provide different ways to dispatch a call and also provide access to an object’s facets; we discuss these methods in Chapter 32 and Chapter 33.
14.10.2 Proxy Helpers
For each Slice interface, apart from the proxy interface, the Slice-to-C# compiler creates a helper class: for an interface Simple, the name of the generated helper class is SimplePrxHelper.6 The helper class contains two methods of interest:
6. You can ignore the ObjectPrxHelperBase base class—it exists for mapping-internal purposes.

476 Client-Side Slice-to-C# Mapping
public class SimplePrxHelper : Ice.ObjectPrxHelperBase, SimplePrx{ public static SimplePrx checkedCast(Ice.ObjectPrx b); public static SimplePrx checkedCast(Ice.ObjectPrx b, System.Collections.Generic.Dictionary <string, string> ctx); public static SimplePrx uncheckedCast(Ice.ObjectPrx b) // ...}
Both the checkedCast and uncheckedCast methods implement a down-cast: if the passed proxy is a proxy for an object of type Simple, or a proxy for an object with a type derived from Simple, the cast returns a non-null reference to a proxy of type SimplePrx; otherwise, if the passed proxy denotes an object of a different type (or if the passed proxy is null), the cast returns a null reference.
Given a proxy of any type, you can use a checkedCast to determine whether the corresponding object supports a given type, for example:
Ice.ObjectPrx obj = ...; // Get a proxy from somewhere...SimplePrx simple = SimplePrxHelper.checkedCast(obj);if (simple != null) // Object supports the Simple interface...else // Object is not of type Simple...
Note that a checkedCast contacts the server. This is necessary because only the implementation of an object in the server has definite knowledge of the type of an object. As a result, a checkedCast may throw a ConnectTimeoutEx-ception or an ObjectNotExistException. (This also explains the need for the helper class: the Ice run time must contact the server, so we cannot use a C# down-cast.)
In contrast, an uncheckedCast does not contact the server and uncondi-tionally returns a proxy of the requested type. However, if you do use an uncheckedCast, you must be certain that the proxy really does support the type you are casting to; otherwise, if you get it wrong, you will most likely get a run-time exception when you invoke an operation on the proxy. The most likely error for such a type mismatch is OperationNotExistException. However, other exceptions, such as a marshaling exception are possible as well. And, if the object happens to have an operation with the correct name, but different parameter types, no exception may be reported at all and you simply end

14.10 Mapping for Interfaces 477
up sending the invocation to an object of the wrong type; that object may do rather non-sensical things. To illustrate this, consider the following two interfaces:
interface Process { void launch(int stackSize, int dataSize);};// ...interface Rocket { void launch(float xCoord, float yCoord);};
Suppose you expect to receive a proxy for a Process object and use an uncheckedCast to down-cast the proxy:
Ice.ObjectPrx obj = ...; // Get proxy...ProcessPrx process = ProcessPrxHelper.uncheckedCast(obj); // No worries...process.launch(40, 60); // Oops...
If the proxy you received actually denotes a Rocket object, the error will go unde-tected by the Ice run time: because int and float have the same size and because the Ice protocol does not tag data with its type on the wire, the implementation of Rocket::launch will simply misinterpret the passed integers as floating-point numbers.
In fairness, this example is somewhat contrived. For such a mistake to go unnoticed at run time, both objects must have an operation with the same name and, in addition, the run-time arguments passed to the operation must have a total marshaled size that matches the number of bytes that are expected by the unmar-shaling code on the server side. In practice, this is extremely rare and an incorrect uncheckedCast typically results in a run-time exception.
A final warning about down-casts: you must use either a checkedCast or an uncheckedCast to down-cast a proxy. If you use a C# cast, the behavior is undefined.
14.10.3 Using Proxy MethodsThe base proxy class ObjectPrx supports a variety of methods for customizing a proxy (see Section 32.11). Since proxies are immutable, each of these “factory methods” returns a copy of the original proxy that contains the desired modifica-tion. For example, you can obtain a proxy configured with a ten second timeout as shown below:

478 Client-Side Slice-to-C# Mapping
Ice.ObjectPrx proxy = communicator.stringToProxy(...);proxy = proxy.ice_timeout(10000);
A factory method returns a new proxy object if the requested modification differs from the current proxy, otherwise it returns the current proxy. With few excep-tions, factory methods return a proxy of the same type as the current proxy, there-fore it is generally not necessary to repeat a checkedCast or uncheckedCast after using a factory method. However, a regular cast is still required, as shown in the example below:
Ice.ObjectPrx base = communicator.stringToProxy(...);HelloPrx hello = HelloPrxHelper.checkedCast(base);hello = (HelloPrx)hello.ice_timeout(10000); # Type is preservedhello.sayHello();
The only exceptions are the factory methods ice_facet and ice_identity. Calls to either of these methods may produce a proxy for an object of an unrelated type, therefore they return a base proxy that you must subsequently down-cast to an appropriate type.
14.10.4 Object Identity and Proxy Comparison
As mentioned on page 475, proxies provide an Equals operation. Proxy compar-ison with Equals uses all of the information in a proxy for the comparison. This means that not only the object identity must match for a comparison to succeed, but other details inside the proxy, such as the protocol and endpoint information, must be the same. In other words, comparison with Equals (or == and !=) tests for proxy identity, not object identity. A common mistake is to write code along the following lines:
Ice.ObjectPrx p1 = ...; // Get a proxy...Ice.ObjectPrx p2 = ...; // Get another proxy...if (p1.Equals(p2)) { // p1 and p2 denote different objects // WRONG!} else { // p1 and p2 denote the same object // Correct}
Even though p1 and p2 differ, they may denote the same Ice object. This can happen because, for example, both p1 and p2 embed the same object identity, but each use a different protocol to contact the target object. Similarly, the protocols may be the same, but denote different endpoints (because a single Ice object can
14.10 Mapping for Interfaces 479
be contacted via several different transport endpoints). In other words, if two proxies compare equal with Equals, we know that the two proxies denote the same object (because they are identical in all respects); however, if two proxies compare unequal with Equals, we know absolutely nothing: the proxies may or may not denote the same object.
To compare the object identities of two proxies, you must use a helper func-tion in the Ice.Util class:
public sealed class Util { public static int proxyIdentityCompare(ObjectPrx lhs, ObjectPrx rhs); public static int proxyIdentityAndFacetCompare(ObjectPrx lhs, ObjectPrx rhs);// ...
proxyIdentityCompare allows you to correctly compare proxies for iden-tity:
Ice.ObjectPrx p1 = ...; // Get a proxy...Ice.ObjectPrx p2 = ...; // Get another proxy...if (Ice.Util.proxyIdentityCompare(p1, p2) != 0) { // p1 and p2 denote different objects // Correct} else { // p1 and p2 denote the same object // Correct}
The function returns 0 if the identities are equal, 1 if p1 is less than p2, and 1 if p1 is greater than p2. (The comparison uses name as the major and category as the minor sort key.)
The proxyIdentityAndFacetCompare function behaves similarly, but compares both the identity and the facet name (see Chapter 33).
The C# mapping also provides two helper classes in the Ice namespace that allow you to insert proxies into hashtables or ordered collections, based on the identity, or the identity plus the facet name:
public class ProxyIdentityKey : System.Collections.IHashCodeProvider, System.Collections.IComparer { public int GetHashCode(object obj); public int Compare(object obj1, object obj2);}public class ProxyIdentityFacetKey

480 Client-Side Slice-to-C# Mapping
: System.Collections.IHashCodeProvider, System.Collections.IComparer { public int GetHashCode(object obj); public int Compare(object obj1, object obj2);}
Note these classes derive from IHashCodeProvider and IComparer, so they can be used for both hash tables and ordered collections.
14.11 Mapping for Operations
As we saw in Section 14.10, for each operation on an interface, the proxy class contains a corresponding member function with the same name. To invoke an operation, you call it via the proxy. For example, here is part of the definitions for our file system from Section 5.4:
module Filesystem { interface Node { idempotent string name(); }; // ...};
The name operation returns a value of type string. Given a proxy to an object of type Node, the client can invoke the operation as follows:
NodePrx node = ...; // Initialize proxystring name = node.name(); // Get name via RPC
This illustrates the typical pattern for receiving return values: return values are returned by reference for complex types, and by value for simple types (such as int or double).
14.11.1 Normal and idempotent Operations
You can add an idempotent qualifier to a Slice operation. As far as the signature for the corresponding proxy method is concerned idempotent has no effect. For example, consider the following interface:

14.11 Mapping for Operations 481
interface Example { string op1(); idempotent string op2();};
The proxy interface for this is:
public interface ExamplePrx : Ice.ObjectPrx{ string op1(); string op2();}
Because idempotent affects an aspect of call dispatch, not interface, it makes sense for the two methods to be mapped the same.
14.11.2 Passing Parameters
In-Parameters
The parameter passing rules for the C# mapping are very simple: parameters are passed either by value (for value types) or by reference (for reference types). Semantically, the two ways of passing parameters are identical: it is guaranteed that the value of a parameter will not be changed by the invocation (with some caveats—see page 1093).
Here is an interface with operations that pass parameters of various types from client to server:
struct NumberAndString { int x; string str;};sequence<string> StringSeq;dictionary<long, StringSeq> StringTable;interface ClientToServer { void op1(int i, float f, bool b, string s); void op2(NumberAndString ns, StringSeq ss, StringTable st); void op3(ClientToServer* proxy);};
The Slice compiler generates the following proxy for this definition:

482 Client-Side Slice-to-C# Mapping
public interface ClientToServerPrx : Ice.ObjectPrx{ void op1(int i, float f, bool b, string s); void op2(NumberAndString ns, string[] ss, Dictionary<long, string[]> st); void op3(ClientToServerPrx proxy);}
Given a proxy to a ClientToServer interface, the client code can pass parameters as in the following example:
ClientToServerPrx p = ...; // Get proxy...p.op1(42, 3.14f, true, "Hello world!"); // Pass simple literalsint i = 42;float f = 3.14f;bool b = true;string s = "Hello world!";p.op1(i, f, b, s); // Pass simple variablesNumberAndString ns = new NumberAndString();ns.x = 42;ns.str = "The Answer";string[] ss = new string[1];ss[0] = "Hello world!";Dictionary<long, string[]> st = new Dictionary<long, string[]>();st[0] = ss;p.op2(ns, ss, st); // Pass complex variablesp.op3(p); // Pass proxy
Out-Parameters
Slice out parameters simply map to C# out parameters.Here is the same Slice definition we saw on page 481 once more, but this time
with all parameters being passed in the out direction:
struct NumberAndString { int x; string str;};sequence<string> StringSeq;dictionary<long, StringSeq> StringTable;

14.11 Mapping for Operations 483
interface ServerToClient { void op1(out int i, out float f, out bool b, out string s); void op2(out NumberAndString ns, out StringSeq ss, out StringTable st); void op3(out ServerToClient* proxy);};
The Slice compiler generates the following code for this definition:
public interface ServerToClientPrx : Ice.ObjectPrx{ void op1(out int i, out float f, out bool b, out string s); void op2(out NumberAndString ns, out string[] ss, out Dictionary<long, string[]> st); void op3(out ServerToClientPrx proxy);}
Given a proxy to a ServerToClient interface, the client code can pass parameters as in the following example:
ClientToServerPrx p = ...; // Get proxy...int i;float f;bool b;string s;p.op1(out i, out f, out b, out s);NumberAndString ns;string[] ss;Dictionary<long, string[]> st;p.op2(out ns, out ss, out st);ServerToClientPrx stc;p.op3(out stc);System.Console.WriteLine(i); // Show one of the values
Null Parameters
Some Slice types naturally have “empty” or “not there” semantics. Specifically, C# sequences (if mapped to CollectionBase), dictionaries, strings, and struc-tures (if mapped to classes) all can be null, but the corresponding Slice types do not have the concept of a null value.

484 Client-Side Slice-to-C# Mapping
• Slice sequences, dictionaries, and strings cannot be null, but can be empty. To make life with these types easier, whenever you pass a C# null reference as a parameter or return value of type sequence, dictionary, or string, the Ice run time automatically sends an empty sequence, dictionary, or string to the receiver.
• If you pass a C# null reference to a Slice structure that is mapped to a C# class as a parameter or return value, the Ice run time automatically sends a structure whose elements are default-initialized. This means that all proxy members are initialized to null, sequence and dictionary members are initialized to empty collections, strings are initialized to the empty string, and members that have a value type are initialized to their default values.
This behavior is useful as a convenience feature: especially for deeply-nested data types, members that are structures, sequences, dictionaries, or strings automati-cally arrive as an empty value at the receiving end. This saves you having to explicitly initialize, for example, every string element in a large sequence before sending the sequence in order to avoid NullReferenceExceptions. Note that using null parameters in this way does not create null semantics for Slice sequences, dictionaries, or strings. As far as the object model is concerned, these do not exist (only empty sequences, dictionaries, and strings do). For example, whether you send a string as null or as an empty string makes no difference to the receiver: either way, the receiver sees an empty string.
14.12 Exception Handling
Any operation invocation may throw a run-time exception (see Section 14.9 on page 469) and, if the operation has an exception specification, may also throw user exceptions (see Section 14.9 on page 469). Suppose we have the following simple interface:
exception Tantrum { string reason;};interface Child { void askToCleanUp() throws Tantrum;};
Slice exceptions are thrown as C# exceptions, so you can simply enclose one or more operation invocations in a try–catch block:

14.12 Exception Handling 485
ChildPrx child = ...; // Get child proxy...try{ child.askToCleanUp();}catch (Tantrum t){ System.Console.Write("The child says: "); System.Console.WriteLine(t.reason);}
Typically, you will catch only a few exceptions of specific interest around an oper-ation invocation; other exceptions, such as unexpected run-time errors, will typi-cally be handled by exception handlers higher in the hierarchy. For example:
public class Client{ private static void run() { ChildPrx child = ...; // Get child proxy... try { child.askToCleanUp(); } catch (Tantrum t) { System.Console.Write("The child says: "); System.Console.WriteLine(t.reason); child.scold(); // Recover from error... } child.praise(); // Give positive feedback... } static void Main(string[] args) { try { // ... run(); // ... } catch (Ice.Exception e) {

486 Client-Side Slice-to-C# Mapping
System.Console.WriteLine(e); } }}
This code handles a specific exception of local interest at the point of call and deals with other exceptions generically. (This is also the strategy we used for our first simple application in Chapter 15.)
Note that the ToString method of exceptions prints the name of the excep-tion, any inner exceptions, and the stack trace. Of course, you can be more selec-tive in the way exceptions are displayed. For example, e.GetType().Name returns the (unscoped) name of an exception.
Exceptions and Out-Parameters
The Ice run time makes no guarantees about the state of out-parameters when an operation throws an exception: the parameter may still have its original value or may have been changed by the operation’s implementation in the target object. In other words, for out-parameters, Ice provides the weak exception guarantee [21] but does not provide the strong exception guarantee.7
14.13 Mapping for Classes
Slice classes are mapped to C# classes with the same name. By default, the gener-ated class contains a public data member for each Slice data member (just as for structures and exceptions), and a member function for each operation.
Note that classes also support the "clr:property" metadata directive, so you can generate classes with virtual properties instead of data members. (See page 453 for details on “clr:property”.)
Consider the following class definition:
class TimeOfDay { short hour; // 0 - 23 short minute; // 0 - 59 short second; // 0 - 59 string format(); // Return time as hh:mm:ss};
7. This is done for reasons of efficiency: providing the strong exception guarantee would require more overhead than can be justified.

14.13 Mapping for Classes 487
The Slice compiler generates the following code for this definition:
public interface TimeOfDayOperations_{ string format(Ice.Current __current);}public interface TimeOfDayOperationsNC_{ string format();}public abstract partial class TimeOfDay : Ice.ObjectImpl, TimeOfDayOperations_, TimeOfDayOperationsNC_{ public short hour; public short minute; public short second; public TimeOfDay() { } public TimeOfDay(short hour, short minute, short second) { this.hour = hour; this.minute = minute; this.second = second; } public string format() { return format(new Ice.Current()); } public abstract string format(Ice.Current __current);}
There are a number of things to note about the generated code:
1. The compiler generates “operations interfaces” called TimeOfDayOperations_ and TimeOfDayOperationsNC_. These interfaces contain a method for each Slice operation of the class.
488 Client-Side Slice-to-C# Mapping
2. The generated class TimeOfDay inherits (indirectly) from Ice.Object. This means that all classes implicitly inherit from Ice.Object, which is the ultimate ancestor of all classes. Note that Ice.Object is not the same as Ice.ObjectPrx. In other words, you cannot pass a class where a proxy is expected and vice versa.
If a class has only data members, but no operations, the compiler generates a non-abstract class.
3. The generated class contains a public member for each Slice data member.
4. The generated class inherits member functions for each Slice operation from the operations interfaces.
5. The generated class contains two constructors.
There is quite a bit to discuss here, so we will look at each item in turn.
14.13.1 Operations Interfaces
The methods in the <interface-name>Operations_ interface have an additional trailing parameter of type Ice.Current, whereas the methods in the <interface-name>OperationsNC_ interface lack this additional trailing parameter. The methods without the Current parameter simply forward to the methods with a Current parameter, supplying a default Current. For now, you can ignore this parameter and pretend it does not exist. (We look at it in more detail in Section 32.6.)
If a class has only data members, but no operations, the compiler omits gener-ating the <interface-name>Operations_ and <inter-face-name>OperationsNC_ interfaces.
14.13.2 Inheritance from Ice.Object
Like interfaces, classes implicitly inherit from a common base class, Ice.Object. However, as shown in Figure 14.2, classes inherit from Ice.Object instead of Ice.ObjectPrx (which is at the base of the inheri-tance hierarchy for proxies). As a result, you cannot pass a class where a proxy is

14.13 Mapping for Classes 489
expected (and vice versa) because the base types for classes and proxies are not compatible.
Figure 14.2. Inheritance from Ice.ObjectPrx and Ice.Object.
Ice.Object contains a number of member functions:
namespace Ice{ public interface Object : System.ICloneable { bool ice_isA(string s); bool ice_isA(string s, Current current); void ice_ping(); void ice_ping(Current current); string[] ice_ids(); string[] ice_ids(Current current); string ice_id(); string ice_id(Current current); void ice_preMarshal(); void ice_postUnmarshal(); DispatchStatus ice_dispatch( Request request, DispatchInterceptorAsyncCallback cb); }}
The member functions of Ice.Object behave as follows:
• ice_isA
This function returns true if the object supports the given type ID, and false otherwise.
Ice.ObjectPrx
Proxies... Classes...
Ice.Object

490 Client-Side Slice-to-C# Mapping
• ice_ping
As for interfaces, ice_ping provides a basic reachability test for the class.
• ice_ids
This function returns a string sequence representing all of the type IDs supported by this object, including ::Ice::Object.
• ice_id
This function returns the actual run-time type ID for a class. If you call ice_id through a reference to a base instance, the returned type id is the actual (possibly more derived) type ID of the instance.
• ice_preMarshal
The Ice run time invokes this function prior to marshaling the object’s state, providing the opportunity for a subclass to validate its declared data members.
• ice_postUnmarshal
The Ice run time invokes this function after unmarshaling an object’s state. A subclass typically overrides this function when it needs to perform additional initialization using the values of its declared data members.
• ice_dispatch
This function dispatches an incoming request to a servant. It is used in the implementation of dispatch interceptors (see Section 32.23).
Note that the generated class does not override GetHashCode and Equals. This means that classes are compared using shallow reference equality, not value equality (as is used for structures).
The class also provides a Clone method (whose implementation is inherited from Ice.ObjectImpl); the Clone method returns a shallow memberwise copy.
14.13.3 Data Members of Classes
By default, data members of classes are mapped exactly as for structures and exceptions: for each data member in the Slice definition, the generated class contains a corresponding public data member.
If you wish to restrict access to a data member, you can modify its visibility using the protected metadata directive. The presence of this directive causes the Slice compiler to generate the data member with protected visibility. As a result, the member can be accessed only by the class itself or by one of its subclasses. For

14.13 Mapping for Classes 491
example, the TimeOfDay class shown below has the protected metadata directive applied to each of its data members:
class TimeOfDay { ["protected"] short hour; // 0 - 23 ["protected"] short minute; // 0 - 59 ["protected"] short second; // 0 - 59 string format(); // Return time as hh:mm:ss};
The Slice compiler produces the following generated code for this definition:
public abstract partial class TimeOfDay : Ice.ObjectImpl, TimeOfDayOperations_, TimeOfDayOperationsNC_{ protected short hour; protected short minute; protected short second; public TimeOfDay() { } public TimeOfDay(short hour, short minute, short second) { this.hour = hour; this.minute = minute; this.second = second; } // ...}
For a class in which all of the data members are protected, the metadata directive can be applied to the class itself rather than to each member individually. For example, we can rewrite the TimeOfDay class as follows:
["protected"] class TimeOfDay { short hour; // 0 - 23 short minute; // 0 - 59 short second; // 0 - 59 string format(); // Return time as hh:mm:ss};

492 Client-Side Slice-to-C# Mapping
If a protected data member also has the clr:property directive, the generated property has protected visibility. Consider the TimeOfDay class once again:
["protected", "clr:property"] class TimeOfDay { short hour; // 0 - 23 short minute; // 0 - 59 short second; // 0 - 59 string format(); // Return time as hh:mm:ss};
The effects of combining these two metadata directives are shown in the generated code below:
public abstract partial class TimeOfDay : Ice.ObjectImpl, TimeOfDayOperations_, TimeOfDayOperationsNC_{ private short hour_prop; protected short hour { get { return hour_prop; } set { hour_prop = value; } } // ...}
See page 453 for more information on the property mapping for data members.
14.13.4 Operations of Classes
Operations of classes are mapped to abstract member functions in the generated class. This means that, if a class contains operations (such as the format operation of our TimeOfDay class), you must provide an implementation of the operation in a class that is derived from the generated class. For example:
public class TimeOfDayI : TimeOfDay{ public string format(Ice.Current current) { return hour.ToString("D2") + ":"

14.13 Mapping for Classes 493
+ minute.ToString("D2") + ":" + second.ToString("D2"); }}
Class Factories
Having created a class such as TimeOfDayI, we have an implementation and we can instantiate the TimeOfDayI class, but we cannot receive it as the return value or as an out-parameter from an operation invocation. To see why, consider the following simple interface:
interface Time { TimeOfDay get();};
When a client invokes the get operation, the Ice run time must instantiate and return an instance of the TimeOfDay class. However, TimeOfDay is an abstract class that cannot be instantiated. Unless we tell it, the Ice run time cannot magi-cally know that we have created a TimeOfDayI class that implements the abstract format operation of the TimeOfDay abstract class. In other words, we must provide the Ice run time with a factory that knows that the TimeOfDay abstract class has a TimeOfDayI concrete implementation. The Ice::Communi-cator interface provides us with the necessary operations:
module Ice { local interface ObjectFactory { Object create(string type); void destroy(); }; local interface Communicator { void addObjectFactory(ObjectFactory factory, string id); ObjectFactory findObjectFactory(string id); // ... };};
To supply the Ice run time with a factory for our TimeOfDayI class, we must implement the ObjectFactory interface:
class ObjectFactory : Ice.ObjectFactory{ public Ice.Object create(string type) {

494 Client-Side Slice-to-C# Mapping
if (type.Equals(M.TimeOfDay.ice_staticId())) return new TimeOfDayI(); System.Diagnostics.Debug.Assert(false); return null; } public void destroy() { // Nothing to do }}
The object factory’s create method is called by the Ice run time when it needs to instantiate a TimeOfDay class. The factory’s destroy method is called by the Ice run time when its communicator is destroyed.
The create method is passed the type ID (see Section 4.13) of the class to instantiate. For our TimeOfDay class, the type ID is "::M::TimeOfDay". Our implementation of create checks the type ID: if it matches, the method instanti-ates and returns a TimeOfDayI object. For other type IDs, the method asserts because it does not know how to instantiate other types of objects.
Note that we used the ice_staticId method to obtain the type ID rather than embedding a literal string. Using a literal type ID string in your code is discouraged because it can lead to errors that are only detected at run time. For example, if a Slice class or one of its enclosing modules is renamed and the literal string is not changed accordingly, a receiver will fail to unmarshal the object and the Ice run time will raise NoObjectFactoryException. By using ice_staticId instead, we avoid any risk of a misspelled or obsolete type ID, and we can discover at compile time if a Slice class or module has been renamed.
Given a factory implementation, such as our ObjectFactory, we must inform the Ice run time of the existence of the factory:
Ice.Communicator ic = ...;ic.addObjectFactory(new ObjectFactory(), M.TimeOfDay.ice_staticId());
Now, whenever the Ice run time needs to instantiate a class with the type ID "::M::TimeOfDay", it calls the create method of the registered ObjectFac-tory instance, which returns a TimeOfDayI instance to the Ice run time.
The destroy operation of the object factory is invoked by the Ice run time when the communicator is destroyed. This gives you a chance to clean up any resources that may be used by your factory. Do not call destroy on the factory while it is registered with the communicator—if you do, the Ice run time has no

14.13 Mapping for Classes 495
idea that this has happened and, depending on what your destroy implementation is doing, may cause undefined behavior when the Ice run time tries to next use the factory.
The run time guarantees that destroy will be the last call made on the factory, that is, create will not be called concurrently with destroy, and create will not be called once destroy has been called. However, calls to create can be made concurrently.
Note that you cannot register a factory for the same type ID twice: if you call addObjectFactory with a type ID for which a factory is registered, the Ice run time throws an AlreadyRegisteredException.
Finally, keep in mind that if a class has only data members, but no operations, you need not create and register an object factory to transmit instances of such a class. Only if a class has operations do you have to define and register an object factory.
14.13.5 Class Constructors
Classes have a default constructor that default-constructs each data member. This means members of primitive type are initialized to the equivalent of zero, and members of reference type are initialized to null. Note that applications must always explicitly initialize a member whose type is a class-mapped structure because the Ice run time does not accept null as a legal value for these types.
If you wish to ensure that data members of primitive and enumerated types are initialized to specific values, you can declare default values in your Slice defini-tion (see Section 4.11.1). The default constructor initializes each of these data members to its declared value.
Classes also provide a constructor that accepts one argument for each member of the class. This allows you to create and initialize a class in a single statement, for example:
TimeOfDayI tod = new TimeOfDayI(14, 45, 00); // 2:45pm
For derived classes, the constructor requires one argument of all of the members of the class, including inherited members. For example, consider the the definition from Section 4.11.2 once more:
class TimeOfDay { short hour; // 0 - 23 short minute; // 0 - 59 short second; // 0 - 59};

496 Client-Side Slice-to-C# Mapping
class DateTime extends TimeOfDay { short day; // 1 - 31 short month; // 1 - 12 short year; // 1753 onwards};
The constructors for the generated classes are as follows:
public partial class TimeOfDay : Ice.ObjectImpl{ public TimeOfDay() {} public TimeOfDay(short hour, short minute, short second) { this.hour = hour; this.minute = minute; this.second = second; } // ...}public partial class DateTime : TimeOfDay{ public DateTime() : base() {} public DateTime(short hour, short minute, short second, short day, short month, short year) : base(hour, minute, second) { this.day = day; this.month = month; this.year = year; } // ...}
If you want to instantiate and initialize a DateTime instance, you must either use the default constructor or provide values for all of the data members of the instance, including data members of any base classes.

14.14 Serializable Objects 497
14.14 Serializable Objects
As discussed in Section 4.18, you can pass CLR serializable objects directly as operation parameters or as fields of another data type. For example:
["clr:serializable:SomeNamespace.CLRClass"]sequence<byte> CLRObj;struct MyStruct { int i; CLRObj o;};interface Example { void op(CLRObj o, MyStruct s);};
The generated code for MyStruct contains member i of type int and a member o of type SomeNamespace.CLRClass:
public partial class MyStruct : _System.ICloneable { public int i; SomeNamespace.CLRClass o; // ...}
Similarly, the signature for op has parameters of type CLRClass and MyStruct:
void op(SomeNamespace.CLRClass o, MyStruct s);
Of course, your client and server code must have an implementation of CLRClass that sets the Serializable attribute:
namespace SomeNamespace { [Serializable] public class CLRClass { // ... }}
You can implement this class in any way you see fit—the Ice run time does not place any other requirements on the implementation. However, note that the CLR requires the class to reside in the same assembly for client and server.

498 Client-Side Slice-to-C# Mapping
14.15 C#-Specific Metadata Directives
The slice2cs compiler supports metadata directives that allow you inject C# attribute specifications into the generated code. The metadata directive is cs:attribute:. For example:
["cs:attribute:System.Serializable"]struct Point { double x; double y;};
This results in the following code being generated for S:
[System.Serializable]public partial struct Point{ public double x; public double y; // ...}
You can apply this metadata directive to any slice construct, such as structure, operation, or parameter definitions.
You can use this directive also at global level. For example:
[["cs:attribute:assembly: AssemblyDescription(\"My assembly\")"]]
This results in the following code being inserted following any using directives and preceding any definitions:
[assembly: AssemblyDescription("My assembly")]
14.16 Asynchronous Method Invocation (AMI)
NOTE: As of version 3.4, Ice provides a new API for asynchronous method invocation. This section describes this API. You can find documentation for the previous API in Appendix K. Note that the old API is deprecated and will be removed in a future release.
Asynchronous Method Invocation (AMI) is the term used to describe the client-side support for the asynchronous programming model. AMI supports both

14.16 Asynchronous Method Invocation (AMI) 499
oneway and twoway requests, but unlike their synchronous counterparts, AMI requests never block the calling thread. When a client issues an AMI request, the Ice run time hands the message off to the local transport buffer or, if the buffer is currently full, queues the request for later delivery. The application can then continue its activities and poll or wait for completion of the invocation, or receive a callback when the invocation completes.
AMI is transparent to the server: there is no way for the server to tell whether a client sent a request synchronously or asynchronously.
14.16.1 Basic Asynchronous API
Consider the following simple Slice definition:
module Demo { interface Employees { string getName(int number); };};
Proxy Methods
Besides the synchronous proxy methods, slice2cs generates the following asynchronous proxy methods:8
public interface EmployeesPrx : Ice.ObjectPrx { Ice.AsyncResult<Demo.Callback_Employees_getName> begin_getName(int number); Ice.AsyncResult<Demo.Callback_Employees_getName> begin_getName( int number, _System.Collections.Generic.Dictionary <string, string> ctx__); string end_getName(Ice.AsyncResult r__);}
As you can see, the single getName operation results in begin_getName and end_getName methods. (The begin_ method is overloaded so you can pass a per-invocation context—see Section 32.12).
8. There are two additional overloads of begin_getName that we discuss in Section 14.16.4.

500 Client-Side Slice-to-C# Mapping
• The begin_getName method sends (or queues) an invocation of getName. This method does not block the calling thread.
• The end_getName method collects the result of the asynchronous invoca-tion. If, at the time the calling thread calls end_getName, the result is not yet available, the calling thread blocks until the invocation completes. Other-wise, if the invocation completed some time before the call to end_getName, the method returns immediately with the result.
A client could call these methods as follows:
EmployeesPrx e = ...;Ice.AsyncResult r = e.begin_getName(99);// Continue to do other things here...string name = e.end_getName(r);
Because begin_getName does not block, the calling thread can do other things while the operation is in progress.
Note that begin_getName returns a value of type Ice.AsyncResult. (The class derives from System.IAsyncResult.) This value contains the state that the Ice run time requires to keep track of the asynchronous invocation. You must pass the AsyncResult that is returned by the begin_ method to the corresponding end_ method.
The begin_ method has one parameter for each in-parameter of the corre-sponding Slice operation. Similarly, the end_ method has one out-parameter for each out-parameter of the corresponding Slice operation (plus the AsyncRe-sult parameter). For example, consider the following operation:
double op(int inp1, string inp2, out bool outp1, out long outp2);
The begin_op and end_op methods have the following signature:
Ice.AsyncResult<Demo.Callback_Employees_op> begin_op(int inp1, string inp2);double end_op(out bool outp1, out long outp2, Ice.AsyncResult r__);
Exception Handling
If an invocation raises an exception, the exception is thrown by the end_ method, even if the actual error condition for the exception was encountered during the begin_ method (“on the way out”). The advantage of this behavior is that all

14.16 Asynchronous Method Invocation (AMI) 501
exception handling is located with the code that calls the end_ method (instead of being present twice, once where the begin_ method is called, and again where the end_ method is called).
There is one exception to the above rule: if you destroy the communicator and then make an asynchronous invocation, the begin_ method throws Communi-catorDestroyedException. This is necessary because, once the run time is finalized, it can no longer throw an exception from the end_ method.
The only other exception that is thrown by the begin_ and end_ methods is System.ArgumentException. This exception indicates that you have used the API incorrectly. For example, the begin_ method throws this exception if you call an operation that has a return value or out-parameters on a oneway proxy. Similarly, the end_ method throws this exception if you use a different proxy to call the end_ method than the proxy you used to call the begin_ method, or if the AsyncResult you pass to the end_ method was obtained by calling the begin_ method for a different operation.
14.16.2 The AsyncResult Class
The AsyncResult that is returned by the begin_ method encapsulates the state of the asynchronous invocation:
public interface AsyncResult : System.IAsyncResult{ Ice.Communicator getCommunicator(); Ice.Connection getConnection(); ObjectPrx getProxy(); string getOperation(); object AsyncState { get; } bool IsCompleted { get; } void waitForCompleted(); bool isSent(); void waitForSent(); bool sentSynchronously(); AsyncResult whenSent(Ice.AsyncCallback cb); AsyncResult whenSent(Ice.SentCallback cb); AsyncResult whenCompleted(Ice.ExceptionCallback ex);}

502 Client-Side Slice-to-C# Mapping
public interface AsyncResult<T> : AsyncResult{ AsyncResult<T> whenCompleted(T cb, Ice.ExceptionCallback excb); new AsyncResult<T> whenCompleted(Ice.ExceptionCallback excb); new AsyncResult<T> whenSent(Ice.SentCallback cb);}
The methods and properties have the following semantics:
• Communicator getCommunicator()
This method returns the communicator that sent the invocation.
• Connection getConnection()
This method returns the connection that was used for the invocation.
• ObjectPrx getProxy()
This method returns the proxy that was used to call the begin_ method.
• string getOperation()
This method returns the name of the operation.
• object AsyncState { get; }
This property stores an object that you can use to pass shared state from the begin_ to the end_ method.
• bool IsCompleted { get; }
This property is true if, at the time it is called, the result of an invocation is available, indicating that a call to the end_ method will not block the caller. Otherwise, if the result is not yet available, the method returns false.
• void waitForCompleted()
This method blocks the caller until the result of an invocation becomes avail-able.
• bool isSent()
When you call the begin_ method, the Ice run time attempts to write the corresponding request to the client-side transport. If the transport cannot accept the request, the Ice run time queues the request for later transmission. isSent returns true if, at the time it is called, the request has been written to the local transport (whether it was initially queued or not). Otherwise, if the request is still in its queue, isSent returns false.

14.16 Asynchronous Method Invocation (AMI) 503
• void waitForSent()
This method blocks the calling thread until a request has been written to the client-side transport.
• bool sentSynchronously()
This method returns true if a request was written to the client-side transport without first being queued. If the request was initially queued, sentSyn-chronously returns false (independent of whether the request is still in the queue or has since been written to the client-side transport).
• AsyncResult whenSent(Ice.AsyncCallback cb)AsyncResult whenSent(Ice.SentCallback cb)AsyncResult<T> whenSent(Ice.SentCallback cb)AsyncResult whenCompleted(Ice.ExceptionCallback ex)AsyncResult<T> whenCompleted( T cb, Ice.ExceptionCallback excb)AsyncResult<T> whenCompleted( Ice.ExceptionCallback excb)
These methods allow you to specify callback methods that are called by the Ice run time. The whenSent methods set a callback that triggers when an asynchronous invocation is written to the client-side transport. The when-Completed methods set a callback that triggers when an asynchronous invo-cation completes (see Section 14.16.4).
14.16.3 Polling for Completion
The AsyncResult methods allow you to poll for call completion. Polling is useful in a variety of cases. As an example, consider the following simple inter-face to transfer files from client to server:
interface FileTransfer{ void send(int offset, ByteSeq bytes);};
The client repeatedly calls send to send a chunk of the file, indicating at which offset in the file the chunk belongs. A naïve way to transmit a file would be along the following lines:

504 Client-Side Slice-to-C# Mapping
FileHandle file = open(...);FileTransferPrx ft = ...;const int chunkSize = ...;int offset = 0;while (!file.eof()) { byte[] bs; bs = file.read(chunkSize); // Read a chunk ft.send(offset, bs); // Send the chunk offset += bs.Length;}
This works, but not very well: because the client makes synchronous calls, it writes each chunk on the wire and then waits for the server to receive the data, process it, and return a reply before writing the next chunk. This means that both client and server spend much of their time doing nothing—the client does nothing while the server processes the data, and the server does nothing while it waits for the client to send the next chunk.
Using asynchronous calls, we can improve on this considerably:
FileHandle file = open(...);FileTransferPrx ft = ...;const int chunkSize = ...;int offset = 0;LinkedList<Ice.AsyncResult> results = new LinkedList<Ice.AsyncResult>();const int numRequests = 5;while (!file.eof()) { byte[] bs; bs = file.read(chunkSize); // Send up to numRequests + 1 chunks asynchronously. Ice.AsyncResult r = ft.begin_send(offset, bs); offset += bs.Length; // Wait until this request has been passed to the transport. r.waitForSent(); results.AddLast(r); // Once there are more than numRequests, wait for the least // recent one to complete. while (results.Count > numRequests) { Ice.AsyncResult r = results.First; results.RemoveFirst();

14.16 Asynchronous Method Invocation (AMI) 505
r.waitForCompleted(); }}// Wait for any remaining requests to complete.while (results.Count > 0) { Ice.AsyncResult r = results.First; results.RemoveFirst(); r.waitForCompleted();}
With this code, the client sends up to numRequests + 1 chunks before it waits for the least recent one of these requests to complete. In other words, the client sends the next request without waiting for the preceding request to complete, up to the limit set by numRequests. In effect, this allows the client to “keep the pipe to the server full of data”: the client keeps sending data, so both client and server continuously do work.
Obviously, the correct chunk size and value of numRequests depend on the bandwidth of the network as well as the amount of time taken by the server to process each request. However, with a little testing, you can quickly zoom in on the point where making the requests larger or queuing more requests no longer improves performance. With this technique, you can realize the full bandwidth of the link to within a percent or two of the theoretical bandwidth limit of a native socket connection.
14.16.4 Generic Completion Callbacks
The begin_ method is overloaded to allow you to provide completion callbacks. Here are the corresponding methods for the getName operation:
Ice.AsyncResult begin_getName( int number, Ice.AsyncCallback cb__, object cookie__);Ice.AsyncResult begin_getName( int number, _System.Collections.Generic.Dictionary <string, string> ctx__, Ice.AsyncCallback cb__, object cookie__);

506 Client-Side Slice-to-C# Mapping
The second version of begin_getName lets you override the default context. (We discuss the purpose of the cookie parameter in the next section.) Following the in-parameters, the begin_ method accepts a parameter of type Ice.AsyncCallback, which is a delegate for a callback method. The Ice run time invokes the callback method when an asynchronous operation completes. Your callback method must have void return type and accept a single parameter of type AsyncResult, for example:
private class MyCallback{ public void finished(Ice.AsyncResult r) { EmployeesPrx e = (EmployeesPrx)r.getProxy(); try { string name = e.end_getName(r); System.Console.WriteLine("Name is: " + name); } catch (Ice.Exception ex) { System.Console.Err.WriteLine("Exception is: " + ex); } }}
The implementation of your callback method must call the end_ method. The proxy for the call is available via the getProxy method on the AsyncResult that is passed by the Ice run time. The return type of getProxy is Ice.ObjectPrx, so you must down-cast the proxy to its correct type.
Your callback method should catch and handle any exceptions that may be thrown by the end_ method. If you allow an exception to escape from the call-back method, the Ice run time produces a log entry by default and ignores the exception. (You can disable the log message by setting the property Ice.Warn.AMICallback to zero.)
To inform the Ice run time that you want to receive a callback for the comple-tion of the asynchronous call, you pass a delegate for your callback method to the begin_ method:
EmployeesPrx e = ...;MyCallback cb = new MyCallback();Ice.AsyncCallback del = new Ice.AsyncCallback(cb.finished);e.begin_getName(99, del, null);
The trailing null argument specifies a cookie, which we will discuss shortly.You can avoid explicit instantiation of the delegate and, more tersely, write:
14.16 Asynchronous Method Invocation (AMI) 507
EmployeesPrx e = ...;MyCallback cb = new MyCallback();e.begin_getName(99, cb.finished, null);
Using Cookies
It is common for the end_ method to require access to some state that is estab-lished by the code that calls the begin_ method. As an example, consider an application that asynchronously starts a number of operations and, as each opera-tion completes, needs to update different user interface elements with the results. In this case, the begin_ method knows which user interface element should receive the update, and the end_ method needs access to that element.
The API allows you to pass such state by providing a cookie. A cookie is any class instance; the class can contain whatever data you want to pass, as well as any methods you may want to add to manipulate that data.
Here is an example implementation that stores a Widget. (We assume that this class provides whatever methods are needed by the end_ method to update the display.) When you call the begin_ method, you pass the appropriate cookie instance to inform the end_ method how to update the display:
// Invoke the getName operation with different widget cookies.e.begin_getName(99, getNameCB, widget1);e.begin_getName(24, getNameCB, widget2);
The end_ method can retrieve the cookie from the AsyncResult by reading the AsyncState property. For this example, we assume that widgets have a writeString method that updates the relevant UI element:
public void getNameCB(Ice.AsyncResult r){ EmployeesPrx e = (EmployeesPrx)r.getProxy(); Widget widget = (Widget)r.AsyncState; try { string name = e.end_getName(r); widget.writeString(name); } catch (Ice.Exception ex) { handleException(ex); }}
The cookie provides a simple and effective way for you to pass state between the point where an operation is invoked and the point where its results are processed.
508 Client-Side Slice-to-C# Mapping
Moreover, if you have a number of operations that share common state, you can pass the same cookie instance to multiple invocations.
14.16.5 Type-Safe Completion Callbacks
The generic callback API we saw in Section 14.16.4 is not entirely type-safe:
• You must down-cast the return value of getProxy to the correct proxy type before you can call the end_ method.
• You must call the correct end_ method to match the operation called by the begin_ method.
• You must remember to catch exceptions when you call the end_ method; if you forget to do this, you will not know that the operation failed.
slice2cs generates an additional type-safe API that takes care of these chores for you. To use type-safe callbacks, you must implement a callback class that provides two callback methods:
• a success callback that is called if the operation succeeds
• a failure callback that is called if the operation raises an exception
Here is a callback class for an invocation of the getName operation:
public class MyCallback{ public void getNameCB(string name) { System.Console.WriteLine("Name is: " + name); } public void failureCB(Ice.Exception ex) { System.Console.Err.WriteLine("Exception is: " + ex); }}
The callback methods can have any name you prefer and must have void return type. The failure callback always has a single parameter of type Ice.Excep-tion. The success callback parameters depend on the operation signature. If the operation has non-void return type, the first parameter of the success callback is the return value. The return value (if any) is followed by a parameter for each out-parameter of the corresponding Slice operation, in the order of declaration.
At the calling end, you call the begin_ method as follows:

14.16 Asynchronous Method Invocation (AMI) 509
MyCallback cb = new MyCallback();e.begin_getName(99).whenCompleted(cb.getNameCB, cb.failureCB);
Note the whenCompleted method on the AsyncResult that is returned by the begin_ method. This method establishes the link between the begin_ method and the callbacks that are called by the Ice run time by setting the dele-gates for the success and failure methods.
It is legal to pass a null delegate for the success or failure methods. For the success callback, this is legal only for operations that have void return type and no out-parameters. This is useful if you do not care when the operation completes but want to know if the call failed. If you pass a null exception delegate, the Ice run time will ignore any exception that is raised by the invocation.
Using Cookies
The type-safe API does not support cookies. If you want to pass state from the begin_ method to the end_ method, you must use the generic API or, alterna-tively, place the state into the callback class containing the callback methods. Here is a simple implementation of a callback class that stores a widget that can be retrieved by the end_ method:
public class MyCallback{ public MyCallback(Widget w) { _w = w; } private Widget _w; public void getNameCB(string name) { _w.writeString(name); } public void failureCB(Ice.Exception ex) { _w.writeError(ex); }}
When you call the begin_ method, you pass the appropriate callback instance to inform the end_ method how to update the display:

510 Client-Side Slice-to-C# Mapping
EmployeesPrx e = ...;Widget widget1 = ...;Widget widget2 = ...;// Invoke the getName operation with different widget callbacks.e.begin_getName(99, new MyCallback(widget1)). whenCompleted(getNameCB, failureCB);e.begin_getName(24, new MyCallback(widget2)). whenCompleted(getNameCB, failureCB);
14.16.6 Oneway Invocations
You can invoke operations via oneway proxies asynchronously, provided the oper-ation has void return type, does not have any out-parameters, and does not raise user exceptions. If you call the begin_ method on a oneway proxy for an opera-tion that returns values or raises a user exception, the begin_ method throws a System.ArgumentException.
For the generic API, the callback method looks exactly as for a twoway invo-cation. However, for oneway invocations, the Ice run time does not call the call-back method unless the invocation raised an exception during the begin_ method (“on the way out”).
For the type-safe API, you only specify a delegate for the failure method. For example, here is how you could call ice_ping asynchronously:
ObjectPrx p = ...;MyCallback cb = new MyCallback();p.begin_ice_ping().whenCompleted(cb.failureCB);
14.16.7 Flow Control
Asynchronous method invocations never block the thread that calls the begin_ method: the Ice run time checks to see whether it can write the request to the local transport. If it can, it does so immediately in the caller’s thread. (In that case, AsyncResult.sentSynchronously returns true.) Alternatively, if the local transport does not have sufficient buffer space to accept the request, the Ice run time queues the request internally for later transmission in the background. (In that case, AsyncResult.sentSynchronously returns false.)
14.16 Asynchronous Method Invocation (AMI) 511
This creates a potential problem: if a client sends many asynchronous requests at the time the server is too busy to keep up with them, the requests pile up in the client-side run time until, eventually, the client runs out of memory.
The API provides a way for you to implement flow control by counting the number of requests that are queued so, if that number exceeds some threshold, the client stops invoking more operations until some of the queued operations have drained out of the local transport.
For the generic API, you can create an additional callback method:
public class MyCallback{ public void finished(Ice.AsyncResult r) { // ... } public void sent(Ice.AsyncResult r) { // ... }}
As with any other callback method, you are free to choose any name you like. For this example, the name of the callback method is sent. You inform the Ice run time that you want to be informed when a call has been passed to the local trans-port by calling whenSent:
MyCallback cb = new MyCallback();e.begin_getName(99).whenCompleted(cb.getNameCB, cb.failureCB).whenSent(cb.sent);
If the Ice run time can immediately pass the request to the local transport, it does so and invokes the sent method from the thread that calls the begin_ method. On the other hand, if the run time has to queue the request, it calls the sent method from a different thread once it has written the request to the local trans-port. In addition, you can find out from the AsyncResult that is returned by the begin_ method whether the request was sent synchronously or was queued, by calling sentSynchronously.
For the generic API, the sent method has the following signature:
void sent(Ice.AsyncResult r);
For the type-safe API, the signature is:

512 Client-Side Slice-to-C# Mapping
void sent(bool sentSynchronously);
For the generic API, you can find out whether the request was sent synchronously by calling sentSynchronously on the AsyncResult. For the type-safe API, the boolean sentSynchronously parameter provides the same informa-tion.
The sent methods allow you to limit the number of queued requests by counting the number of requests that are queued and decrementing the count when the Ice run time passes a request to the local transport.
14.16.8 Batch Requests
Applications that send batched requests (see Section 32.16) can either flush a batch explicitly or allow the Ice run time to flush automatically. The proxy method ice_flushBatchRequests performs an immediate flush using the synchro-nous invocation model and may block the calling thread until the entire message can be sent. Ice also provides asynchronous versions of this method so you can flush batch requests asynchronously.
begin_ice_flushBatchRequests and end_ice_flushBatchRequests are proxy methods that flush any batch requests sent queued by that proxy.
In addition, similar methods are available on the communicator and the Connection object that is returned by AsyncResult.getConnection. These methods flush batch requests sent via the same communicator and via the same connection, respectively.
14.16.9 Concurrency
The Ice run time always invokes your callback methods from a separate thread, with one exception: it calls the sent callback from the thread calling the begin_ method if the request could be sent synchronously. In the sent call-back, you know which thread is calling the callback by looking at the sentSyn-chronously member or parameter.
14.16.10 Limitations
AMI invocations cannot be sent using collocated optimization. If you attempt to invoke an AMI operation using a proxy that is configured to use collocation opti-mization, the Ice run time raises CollocationOptimizationException if the

14.17 slice2cs Command-Line Options 513
servant happens to be collocated; the request is sent normally if the servant is not collocated. Section 32.21 provides more information about this optimization and describes how to disable it when necessary.
14.17 slice2cs Command-Line Options
The Slice-to-C# compiler, slice2cs, offers the following command-line options in addition to the standard options described in Section 4.20:
• --tie
Generate tie classes (see Section 16.7).
• --impl
Generate sample implementation files. This option will not overwrite an existing file.
• --impl-tie
Generate sample implementation files using ties (see Section 16.7). This option will not overwrite an existing file.
• --checksum
Generate checksums for Slice definitions.
• --stream
Generate streaming helper functions for Slice types (see Section 35.2).
14.18 Using Slice Checksums
As described in Section 4.21, the Slice compilers can optionally generate check-sums of Slice definitions. For slice2cs, the --checksum option causes the compiler to generate checksums in each C# source file that are added to a member of the Ice.SliceChecksums class:
namespace Ice { public sealed class SliceChecksums { public readonly static SliceChecksumDict checksums; };}
The checksums map is initialized automatically prior to first use; no action is required by the application.

514 Client-Side Slice-to-C# Mapping
In order to verify a server’s checksums, a client could simply compare the dictionaries using the Equals function. However, this is not feasible if it is possible that the server might be linked with more Slice definitions than the client. A more general solution is to iterate over the local checksums as demonstrated below:
Ice.SliceChecksumDict serverChecksums = ...foreach(System.Collections.DictionaryEntry e in Ice.SliceChecksums.checksums) { string checksum = serverChecksums[e.Key]; if (checksum == null) { // No match found for type id! } else if (!checksum.Equals(e.Value)) { // Checksum mismatch! }}
In this example, the client first verifies that the server’s dictionary contains an entry for each Slice type ID, and then it proceeds to compare the checksums.

14.18 Using Slice Checksums 515


517
Chapter 15Developing a File System Client in C#
15.1 Chapter Overview
In this chapter, we present the source code for a C# client that accesses the file system we developed in Chapter 5 (see Chapter 17 for the corresponding server).
15.2 The C# Client
We now have seen enough of the client-side C# mapping to develop a complete client to access our remote file system. For reference, here is the Slice definition once more:
module Filesystem { interface Node { idempotent string name(); }; exception GenericError { string reason; }; sequence<string> Lines; interface File extends Node {
518 Developing a File System Client in C#
idempotent Lines read(); idempotent void write(Lines text) throws GenericError; }; sequence<Node*> NodeSeq; interface Directory extends Node { idempotent NodeSeq list(); }; };
To exercise the file system, the client does a recursive listing of the file system, starting at the root directory. For each node in the file system, the client shows the name of the node and whether that node is a file or directory. If the node is a file, the client retrieves the contents of the file and prints them.
The body of the client code looks as follows:
using System;using Filesystem;public class Client{ // Recursively print the contents of directory "dir" // in tree fashion. For files, show the contents of // each file. The "depth" parameter is the current // nesting level (for indentation). static void listRecursive(DirectoryPrx dir, int depth) { string indent = new string('\t', ++depth); NodePrx[] contents = dir.list(); foreach (NodePrx node in contents) DirectoryPrx subdir = DirectoryPrxHelper.checkedCast(node); FilePrx file = FilePrxHelper.uncheckedCast(node); Console.WriteLine(indent + node.name() + (subdir != null ? " (directory):" : " (file):")); if (subdir != null) { listRecursive(subdir, depth); } else { string[] text = file.read(); for (int j = 0; j < text.Length; ++j) Console.WriteLine(indent + "\t" + text[j]);

15.2 The C# Client 519
} } } public static void Main(string[] args) { int status = 0; Ice.Communicator ic = null; try { // Create a communicator // ic = Ice.Util.initialize(ref args); // Create a proxy for the root directory // Ice.ObjectPrx obj = ic.stringToProxy("RootDir:default -p 10000"); // Down-cast the proxy to a Directory proxy // DirectoryPrx rootDir = DirectoryPrxHelper.checkedCast(obj); // Recursively list the contents of the root directory // Console.WriteLine("Contents of root directory:"); listRecursive(rootDir, 0); } catch (Exception e) { Console.Error.WriteLine(e); status = 1; } if (ic != null) { // Clean up // try { ic.destroy(); } catch (Exception e) { Console.Error.WriteLine(e); status = 1; } } Environment.Exit(status); }}

520 Developing a File System Client in C#
The Client class defines two methods: listRecursive, which is a helper function to print the contents of the file system, and Main, which is the main program. Let us look at Main first:
1. The structure of the code in Main follows what we saw in Chapter 3. After initializing the run time, the client creates a proxy to the root directory of the file system. For this example, we assume that the server runs on the local host and listens using the default protocol (TCP/IP) at port 10000. The object iden-tity of the root directory is known to be RootDir.
2. The client down-casts the proxy to DirectoryPrx and passes that proxy to listRecursive, which prints the contents of the file system.
Most of the work happens in listRecursive. The function is passed a proxy to a directory to list, and an indent level. (The indent level increments with each recursive call and allows the code to print the name of each node at an indent level that corresponds to the depth of the tree at that node.) listRecursive calls the list operation on the directory and iterates over the returned sequence of nodes:
1. The code does a checkedCast to narrow the Node proxy to a Directory proxy, as well as an uncheckedCast to narrow the Node proxy to a File proxy. Exactly one of those casts will succeed, so there is no need to call checkedCast twice: if the Node is-a Directory, the code uses the Direc-toryPrx returned by the checkedCast; if the checkedCast fails, we know that the Node is-a File and, therefore, an uncheckedCast is sufficient to get a FilePrx.
In general, if you know that a down-cast to a specific type will succeed, it is preferable to use an uncheckedCast instead of a checkedCast because an uncheckedCast does not incur any network traffic.
2. The code prints the name of the file or directory and then, depending on which cast succeeded, prints "(directory)" or "(file)" following the name.
3. The code checks the type of the node:
• If it is a directory, the code recurses, incrementing the indent level.
• If it is a file, the code calls the read operation on the file to retrieve the file contents and then iterates over the returned sequence of lines, printing each line.

15.3 Summary 521
Assume that we have a small file system consisting of two files and a directory as follows:
Figure 15.1. A small file system.
The output produced by the client for this file system is:
Contents of root directory: README (file): This file system contains a collection of poetry. Coleridge (directory): Kubla_Khan (file): In Xanadu did Kubla Khan A stately pleasure-dome decree: Where Alph, the sacred river, ran Through caverns measureless to man Down to a sunless sea.
Note that, so far, our client (and server) are not very sophisticated:
• The protocol and address information are hard-wired into the code.
• The client makes more remote procedure calls than strictly necessary; with minor redesign of the Slice definitions, many of these calls can be avoided.
We will see how to address these shortcomings in Chapter 38 and Chapter 34.
15.3 Summary
This chapter presented a very simple client to access a server that implements the file system we developed in Chapter 5. As you can see, the C# code hardly differs from the code you would write for an ordinary C# program. This is one of the biggest advantages of using Ice: accessing a remote object is as easy as accessing an ordinary, local C# object. This allows you to put your effort where you should, namely, into developing your application logic instead of having to struggle with
RootDir
Coleridge README
Kubla_Khan
= Directory
= File

522 Developing a File System Client in C#
arcane networking APIs. As we will see in Chapter 17, this is true for the server side as well, meaning that you can develop distributed applications easily and effi-ciently.

523
Chapter 16Server-Side Slice-to-C# Mapping
16.1 Chapter Overview
In this chapter, we present the server-side Slice-to-C# mapping (see Chapter 14 for the client-side mapping). Section 16.3 discusses how to initialize and finalize the server-side run time, sections 16.4 to 16.7 show how to implement interfaces and operations, and Section 16.8 discusses how to register objects with the server-side Ice run time. Finally, Section 16.9 shows how to implement operations asyn-chronously.
16.2 Introduction
The mapping for Slice data types to C# is identical on the client side and server side. This means that everything in Chapter 14 also applies to the server side. However, for the server side, there are a few additional things you need to know, specifically:
• how to initialize and finalize the server-side run time
• how to implement servants
• how to pass parameters and throw exceptions
• how to create servants and register them with the Ice run time.

524 Server-Side Slice-to-C# Mapping
We discuss these topics in the remainder of this chapter.
16.3 The Server-Side Main Method
The main entry point to the Ice run time is represented by the local interface Ice::Communicator. As for the client side, you must initialize the Ice run time by calling Ice.Util.initialize before you can do anything else in your server. Ice.Util.initialize returns a reference to an instance of an Ice.Communicator:
using System;public class Server{ public static void Main(string[] args) { int status = 0; Ice.Communicator communicator = null; try { communicator = Ice.Util.initialize(ref args); // ... } catch (Exception ex) { Console.Error.WriteLine(ex); status = 1; } // ... }}
Ice.Util.initialize accepts the argument vector that is passed to Main by the operating system. The method scans the argument vector for any command-line options that are relevant to the Ice run time; any such options are removed from the argument vector so, when Ice.Util.initialize returns, the only options and arguments remaining are those that concern your application. If anything goes wrong during initialization, initialize throws an exception.
Before leaving your Main method, you must call Communicator::destroy. The destroy operation is responsible for finalizing the Ice run time. In particular, destroy waits for any operation implementations that are still executing in the server to complete. In addition, destroy ensures that any outstanding threads are joined with and reclaims a number of operating system resources, such as file

16.3 The Server-Side Main Method 525
descriptors and memory. Never allow your Main method to terminate without calling destroy first; doing so has undefined behavior.
The general shape of our server-side Main method is therefore as follows:
using System;public class Server{ public static void Main(string[] args) { int status = 0; Ice.Communicator communicator = null; try { communicator = Ice.Util.initialize(ref args); // ... } catch (Exception ex) { Console.Error.WriteLine(ex); status = 1; } if (communicator != null) { try { communicator.destroy(); } catch (Exception ex) { Console.Error.WriteLine(ex); status = 1; } } Environment.Exit(status); }}
Note that the code places the call to Ice.Util.initialize into a try block and takes care to return the correct exit status to the operating system. Also note that an attempt to destroy the communicator is made only if the initialization succeeded.
16.3.1 The Ice.Application Class
The preceding structure for the Main method is so common that Ice offers a class, Ice.Application, that encapsulates all the correct initialization and finaliza-tion activities. The synopsis of the class is as follows (with some detail omitted for now):

526 Server-Side Slice-to-C# Mapping
namespace Ice{ public abstract class Application { public abstract int run(string[] args); public Application(); public Application(SignalPolicy signalPolicy); public int main(string[] args); public int main(string[] args, string configFile); public int main(string[] args, InitializationData init); public static string appName(); public static Communicator communicator(); }}
The intent of this class is that you specialize Ice.Application and imple-ment the abstract run method in your derived class. Whatever code you would normally place in Main goes into the run method instead. Using Ice.Appli-cation, our program looks as follows:
using System;public class Server{ class App : Ice.Application { public override int run(string[] args) { // Server code here... return 0; } } public static void Main(string[] args) { App app = new App(); Environment.Exit(app.main(args)); }}

16.3 The Server-Side Main Method 527
Note that Application.main is overloaded: you can pass an optional file name or an InitializationData structure (see Section 32.3 and Section 30.9).
If you pass a configuration file name to main, the settings in this file are over-ridden by settings in a file identified by the ICE_CONFIG environment variable (if defined). Property settings supplied on the command line take precedence over all other settings.
The Application.main method does the following:
1. It installs an exception handler for System.Exception. If your code fails to handle an exception, Application.main prints the name of the excep-tion and a stack trace on Console.Error before returning with a non-zero return value.
2. It initializes (by calling Ice.Util.initialize) and finalizes (by calling Communicator.destroy) a communicator. You can get access to the communicator for your server by calling he static communicator accessor.
3. It scans the argument vector for options that are relevant to the Ice run time and removes any such options. The argument vector that is passed to your run method therefore is free of Ice-related options and only contains options and arguments that are specific to your application.
4. It provides the name of your application via the static appName method. You can get at the application name from anywhere in your code by calling Ice.Application.appName (which is usually required for error messages).
5. It installs a signal handler that properly destroys the communicator.
6. It installs a per-process logger (see Section 32.19.5) if the application has not already configured one. The per-process logger uses the value of the Ice.ProgramName property (see Section 30.8) as a prefix for its messages and sends its output to the standard error channel. An application can specify an alternate logger as described in Section 32.19.
Using Ice.Application ensures that your program properly finalizes the Ice run time, whether your server terminates normally or in response to an exception. We recommend that all your programs use this class; doing so makes your life easier. In addition Ice.Application also provides features for signal handling and configuration that you do not have to implement yourself when you use this class.

528 Server-Side Slice-to-C# Mapping
Using Ice.Application on the Client Side
You can use Ice.Application for your clients as well: simply implement a class that derives from Ice.Application and place the client code into its run method. The advantage of this approach is the same as for the server side: Ice.Application ensures that the communicator is destroyed correctly even in the presence of exceptions.
Catching Signals
The simple server we developed in Chapter 3 had no way to shut down cleanly: we simply interrupted the server from the command line to force it to exit. Termi-nating a server in this fashion is unacceptable for many real-life server applica-tions: typically, the server has to perform some cleanup work before terminating, such as flushing database buffers or closing network connections. This is particu-larly important on receipt of a signal or keyboard interrupt to prevent possible corruption of database files or other persistent data.
To make it easier to deal with signals, Ice.Application encapsulates the low-level signal handling tasks, allowing you to cleanly shut down on receipt of a signal.
namespace Ice{ public abstract class Application { // ... public static void destroyOnInterrupt(); public static void shutdownOnInterrupt(); public static void ignoreInterrupt(); public static void callbackOnInterrupt(); public static void holdInterrupt(); public static void releaseInterrupt(); public static bool interrupted(); public virtual void interruptCallback(int sig); }}
The methods behave as follows:
• destroyOnInterrupt
This method installs a handler that destroys the communicator if it is inter-rupted. This is the default behavior.

16.3 The Server-Side Main Method 529
• shutdownOnInterrupt
This method installs a handler that shuts down the communicator if it is inter-rupted.
• ignoreInterrupt
This method causes signals to be ignored.
• callbackOnInterrupt
This method configures Ice.Application to invoke interruptCall-back when a signal occurs, thereby giving the subclass responsibility for handling the signal.
• holdInterrupt
This method temporarily blocks signal delivery.
• releaseInterrupt
This method restores signal delivery to the previous disposition. Any signal that arrives after holdInterrupt was called is delivered when you call releaseInterrupt.
• interrupted
This method returns true if a signal caused the communicator to shut down, false otherwise. This allows us to distinguish intentional shutdown from a forced shutdown that was caused by a signal. This is useful, for example, for logging purposes.
• interruptCallback
A subclass overrides this method to respond to signals. The method may be called concurrently with any other thread and must not raise exceptions.
By default, Ice.Application behaves as if destroyOnInterrupt was invoked, therefore our server Main method requires no change to ensure that the program terminates cleanly on receipt of a signal. (You can disable the signal-handling functionality of Ice.Application by passing the enumerator NoSignalHandling to the constructor. In that case, signals retain their default behavior, that is, terminate the process.) However, we add a diagnostic to report the occurrence, so our run method now looks like:
using System;public class Server{ class App : Ice.Application {

530 Server-Side Slice-to-C# Mapping
public override int run(string[] args) { // Server code here... if (interrupted()) Console.Error.WriteLine( appName() + ": terminating"); return 0; } } public static void Main(string[] args) { App app = new App(); Environment.Exit(app.main(args)); }}
Ice.Application and Properties
Apart from the functionality shown in this section, Ice.Application also takes care of initializing the Ice run time with property values. Properties allow you to configure the run time in various ways. For example, you can use proper-ties to control things such as the thread pool size or port number for a server. The main method of Ice.Application is overloaded; the second version allows you to specify the name of a configuration file that will be processed during initialization. We discuss Ice properties in more detail in Chapter 30.
Limitations of Ice.Application
Ice.Application is a singleton class that creates a single communicator. If you are using multiple communicators, you cannot use Ice.Application. Instead, you must structure your code as we saw in Chapter 3 (taking care to always destroy the communicator).
16.4 Mapping for Interfaces
The server-side mapping for interfaces provides an up-call API for the Ice run time: by implementing methods in a servant class, you provide the hook that gets the thread of control from the Ice server-side run time into your application code.

16.4 Mapping for Interfaces 531
16.4.1 Skeleton Classes
On the client side, interfaces map to proxy classes (see Section 5.12). On the server side, interfaces map to skeleton classes. A skeleton is a class that has an abstract method for each operation on the corresponding interface. For example, consider the Slice definition for the Node interface we defined in Chapter 5 once more:
module Filesystem { interface Node { idempotent string name(); }; // ...};
The Slice compiler generates the following definition for this interface:
namespace Filesystem{ public interface NodeOperations_ { string name(Ice.Current __current); } public interface NodeOperationsNC_ { string name(); } public interface Node : Ice.Object, NodeOperations_, NodeOperationsNC_ { } public abstract class NodeDisp_ : Ice.ObjectImpl, Node { public string name() { return name(new Ice.Current()); } public abstract string name(Ice.Current __current); // Mapping-internal code here... }}

532 Server-Side Slice-to-C# Mapping
The important points to note here are:
• As for the client side, Slice modules are mapped to C# namespaces with the same name, so the skeleton class definitions are part of the Filesystem namespace.
• For each Slice interface <interface-name>, the compiler generates C# inter-faces <interface-name>Operations_ and<interface-name>OperationsNC_ (NodeOperations_ and NodeOperationsNC_ in this example). These interfaces contain a method for each operation in the Slice interface. (You can ignore the Ice.Current parameter for the time being—we discuss it in detail in Section 32.6.)
• For each Slice interface <interface-name>, the compiler generates a C# interface <interface-name> (Node in this example). That interface extends Ice.Object and the two operations interfaces.
• For each Slice interface <interface-name>, the compiler generates an abstract class <interface-name>Disp_ (NodeDisp_ in this example). This abstract class is the actual skeleton class; it is the base class from which you derive your servant class.
16.4.2 Servant Classes
In order to provide an implementation for an Ice object, you must create a servant class that inherits from the corresponding skeleton class. For example, to create a servant for the Node interface, you could write:
public class NodeI : NodeDisp_{ public NodeI(string name) { _name = name; } public override string name(Ice.Current current) { return _name; } private string _name;}
By convention, servant classes have the name of their interface with an I-suffix, so the servant class for the Node interface is called NodeI. (This is a convention

16.5 Parameter Passing 533
only: as far as the Ice run time is concerned, you can chose any name you prefer for your servant classes.) Note that NodeI extends NodeDisp_, that is, it derives from its skeleton class.
As far as Ice is concerned, the NodeI class must implement only a single method: the abstract name method that it inherits from its skeleton. This makes the servant class a concrete class that can be instantiated. You can add other methods and data members as you see fit to support your implementation. For example, in the preceding definition, we added a _name member and a constructor. (Obviously, the constructor initializes the _name member and the name method returns its value.)
Normal and idempotent Operations
Whether an operation is an ordinary operation or an idempotent operation has no influence on the way the operation is mapped. To illustrate this, consider the following interface:
interface Example { void normalOp(); idempotent void idempotentOp();};
The operations class for this interface looks like this:
public interface ExampleOperations_{ void normalOp(Ice.Current __current); void idempotentOp(Ice.Current __current);}
Note that the signatures of the methods are unaffected by the idempotent quali-fier.
16.5 Parameter Passing
For each parameter of a Slice operation, the C# mapping generates a corre-sponding parameter for the corresponding method in the<interface-name>Operations_ interface. In addition, every operation has an additional, trailing parameter of type Ice.Current. For example, the name operation of the Node interface has no parameters, but the name method of the NodeOperations_ interface has a single parameter of type

534 Server-Side Slice-to-C# Mapping
Ice.Current. We explain the purpose of this parameter in Section 32.6 and will ignore it for now.
To illustrate the rules, consider the following interface that passes string parameters in all possible directions:
module M { interface Example { string op(string sin, out string sout); };};
The generated method for op looks as follows:
public interface ExampleOperations_{ string op(string sin, out string sout, Ice.Current __current);}
As you can see, there are no surprises here. For example, we could implement op as follows:
using System;public class ExampleI : ExampleDisp_{ public override string op(string sin, out string sout, Ice.Current current) { Console.WriteLine(sin); // In params are initialized sout = "Hello World!"; // Assign out param return "Done"; }}
This code is in no way different from what you would normally write if you were to pass strings to and from a method; the fact that remote procedure calls are involved does not affect your code in any way. The same is true for parameters of other types, such as proxies, classes, or dictionaries: the parameter passing conventions follow normal C# rules and do not require special-purpose API calls.
16.6 Raising Exceptions
To throw an exception from an operation implementation, you simply instantiate the exception, initialize it, and throw it. For example:

16.6 Raising Exceptions 535
// ...public override void write(string[] text, Ice.Current current){ try { // Try to write file contents here... } catch(System.Exception ex) { GenericError e = new GenericError("cannot write file", ex); e.reason = "Exception during write operation"; throw e; }}
Note that, for this example, we have supplied the optional second parameter to the GenericError constructor (see Section 14.9). This parameter sets the InnerException member of System.Exception and preserves the orig-inal cause of the error for later diagnosis.
// ...public voidwrite(String[] text, Ice.Current current) throws GenericError{ // Try to write file contents here... // Assume we are out of space... if (error) { GenericError e = new GenericError(); e.reason = "file too large"; throw e; }}
If you throw an arbitrary C# run-time exception (such as an InvalidCastEx-ception), the Ice run time catches the exception and then returns an Unknown-Exception to the client. Similarly, if you throw an “impossible” user exception (a user exception that is not listed in the exception specification of the operation), the client receives an UnknownUserException.
If you throw an Ice run-time exception, such MemoryLimitException, the client receives an UnknownLocalException.1 For that reason, you should never throw system exceptions from operation implementations. If you do, all the client

536 Server-Side Slice-to-C# Mapping
will see is an UnknownLocalException, which does not tell the client anything useful.
16.7 Tie Classes
The mapping to skeleton classes we saw in Section 16.4 requires the servant class to inherit from its skeleton class. Occasionally, this creates a problem: some class libraries require you to inherit from a base class in order to access functionality provided by the library; because C# does not support multiple implementation inheritance, this means that you cannot use such a class library to implement your servants because your servants cannot inherit from both the library class and the skeleton class simultaneously.
To allow you to still use such class libraries, Ice provides a way to write servants that replaces inheritance with delegation. This approach is supported by tie classes. The idea is that, instead of inheriting from the skeleton class, you simply create a class (known as an implementation class or delegate class) that contains methods corresponding to the operations of an interface. You use the --tie option with the slice2cs compiler to create a tie class. For example, for the Node interface we saw in Section 16.4.1, the --tie option causes the compiler to create exactly the same code as we saw previously, but to also emit an additional tie class. For an interface <interface-name>, the generated tie class has the name <interface-name>Tie_:
public class NodeTie_ : NodeDisp_, Ice.TieBase{ public NodeTie_() { } public NodeTie_(NodeOperations_ del) { _ice_delegate = del; } public object ice_delegate()
1. There are three run-time exceptions that are not changed to UnknownLocalException when returned to the client: ObjectNotExistException, OperationNotExistException, and FacetNotExistException. We discuss these exceptions in more detail in Chapter 33.

16.7 Tie Classes 537
{ return _ice_delegate; } public void ice_delegate(object del) { _ice_delegate = (NodeOperations_)del; } public override int GetHashCode() { return _ice_delegate == null ? 0 : _ice_delegate.GetHashCode(); } public override bool Equals(object rhs) { if (object.ReferenceEquals(this, rhs)) { return true; } if (!(rhs is NodeTie_)) { return false; } if (_ice_delegate == null) { return ((NodeTie_)rhs)._ice_delegate == null; } return _ice_delegate.Equals(((NodeTie_)rhs)._ice_delegate); } public override string name(Ice.Current __current) { return _ice_delegate.name(__current); } private NodeOperations_ _ice_delegate;}
This looks a lot worse than it is: in essence, the generated tie class is simply a servant class (it extends NodeDisp_) that delegates each invocation of a method

538 Server-Side Slice-to-C# Mapping
that corresponds to a Slice operation to your implementation class (see Figure 16.1).
Figure 16.1. A skeleton class, tie class, and implementation class.
The Ice.TieBase interface defines the ice_delegate methods that allow you to get and set the delegate.
Given this machinery, we can create an implementation class for our Node interface as follows:
public class NodeI : NodeOperations_{ public NodeI(string name) { _name = name; } public override string name(Ice.Current current) { return _name; } private string _name;}
Note that this class is identical to our previous implementation, except that it implements the NodeOperations_ interface and does not extend NodeDisp_ (which means that you are now free to extend any other class to support your implementation).
To create a servant, you instantiate your implementation class and the tie class, passing a reference to the implementation instance to the tie constructor:
NodeI fred = new NodeI("Fred"); // Create implementationNodeTie_ servant = new NodeTie_(fred); // Create tie
Alternatively, you can also default-construct the tie class and later set its delegate instance by calling ice_delegate:
NodeTie_
NodeDisp_«interface»
NodeI
Skeleton Class
Tie Class
ImplementationClass
NodeOperations_«interface»

16.8 Object Incarnation 539
NodeTie_ servant = new NodeTie_(); // Create tie// ...NodeI fred = new NodeI("Fred"); // Create implementation// ...servant.ice_delegate(fred); // Set delegate
When using tie classes, it is important to remember that the tie instance is the servant, not your delegate. Furthermore, you must not use a tie instance to incar-nate (see Section 16.8) an Ice object until the tie has a delegate. Once you have set the delegate, you must not change it for the lifetime of the tie; otherwise, unde-fined behavior results.
You should use the tie approach only if you need to, that is, if you need to extend some base class in order to implement your servants: using the tie approach is more costly in terms of memory because each Ice object is incarnated by two C# objects instead of one, the tie and the delegate. In addition, call dispatch for ties is marginally slower than for ordinary servants because the tie forwards each operation to the delegate, that is, each operation invocation requires two function calls instead of one.
Also note that, unless you arrange for it, there is no way to get from the dele-gate back to the tie. If you need to navigate back to the tie from the delegate, you can store a reference to the tie in a member of the delegate. (The reference can, for example, be initialized by the constructor of the delegate.)
16.8 Object Incarnation
Having created a servant class such as the rudimentary NodeI class in Section 16.4.2, you can instantiate the class to create a concrete servant that can receive invocations from a client. However, merely instantiating a servant class is insufficient to incarnate an object. Specifically, to provide an implementation of an Ice object, you must take the following steps:
1. Instantiate a servant class.
2. Create an identity for the Ice object incarnated by the servant.
3. Inform the Ice run time of the existence of the servant.
4. Pass a proxy for the object to a client so the client can reach it.
16.8.1 Instantiating a ServantInstantiating a servant means to allocate an instance:

540 Server-Side Slice-to-C# Mapping
Node servant = new NodeI("Fred");
This code creates a new NodeI instance and assigns its address to a reference of type Node. This works because NodeI is derived from Node, so a Node refer-ence can refer to an instance of type NodeI. However, if we want to invoke a method of the NodeI class at this point, we must use a NodeI reference:
NodeI servant = new NodeI("Fred");
Whether you use a Node or a NodeI reference depends purely on whether you want to invoke a method of the NodeI class: if not, a Node reference works just as well as a NodeI reference.
16.8.2 Creating an Identity
Each Ice object requires an identity. That identity must be unique for all servants using the same object adapter.2 An Ice object identity is a structure with the following Slice definition:
module Ice { struct Identity { string name; string category; }; // ...};
The full identity of an object is the combination of both the name and category fields of the Identity structure. For now, we will leave the category field as the empty string and simply use the name field. (See Section 32.6 for a discussion of the category field.)
To create an identity, we simply assign a key that identifies the servant to the name field of the Identity structure:
Ice.Identity id = new Ice.Identity();id.name = "Fred"; // Not unique, but good enough for now
2. The Ice object model assumes that all objects (regardless of their adapter) have a globally unique identity. See Chapter 34 for further discussion.

16.8 Object Incarnation 541
16.8.3 Activating a ServantMerely creating a servant instance does nothing: the Ice run time becomes aware of the existence of a servant only once you explicitly tell the object adapter about the servant. To activate a servant, you invoke the add operation on the object adapter. Assuming that we have access to the object adapter in the _adapter variable, we can write:
_adapter.add(servant, id);
Note the two arguments to add: the servant and the object identity. Calling add on the object adapter adds the servant and the servant’s identity to the adapter’s servant map and links the proxy for an Ice object to the correct servant instance in the server’s memory as follows:
1. The proxy for an Ice object, apart from addressing information, contains the identity of the Ice object. When a client invokes an operation, the object iden-tity is sent with the request to the server.
2. The object adapter receives the request, retrieves the identity, and uses the identity as an index into the servant map.
3. If a servant with that identity is active, the object adapter retrieves the servant from the servant map and dispatches the incoming request into the correct method on the servant.
Assuming that the object adapter is in the active state (see Section 32.4), client requests are dispatched to the servant as soon as you call add.
16.8.4 UUIDs as IdentitiesThe Ice object model assumes that object identities are globally unique. One way of ensuring that uniqueness is to use UUIDs (Universally Unique Identifiers) [14] as identities. The Ice.Util package contains a helper function to create such identities:
public class Example{ public static void Main(string[] args) { System.Console.WriteLine(Ice.Util.generateUUID()); }}
When executed, this program prints a unique string such as 5029a22c-e333-4f87-86b1-cd5e0fcce509. Each call to genera-

542 Server-Side Slice-to-C# Mapping
teUUID creates a string that differs from all previous ones.3 You can use a UUID such as this to create object identities. For convenience, the object adapter has an operation addWithUUID that generates a UUID and adds a servant to the servant map in a single step. Using this operation, we can create an identity and register a servant with that identity in a single step as follows:
_adapter.addWithUUID(new NodeI("Fred"));
16.8.5 Creating Proxies
Once we have activated a servant for an Ice object, the server can process incoming client requests for that object. However, clients can only access the object once they hold a proxy for the object. If a client knows the server’s address details and the object identity, it can create a proxy from a string, as we saw in our first example in Chapter 3. However, creation of proxies by the client in this manner is usually only done to allow the client access to initial objects for boot-strapping. Once the client has an initial proxy, it typically obtains further proxies by invoking operations.
The object adapter contains all the details that make up the information in a proxy: the addressing and protocol information, and the object identity. The Ice run time offers a number of ways to create proxies. Once created, you can pass a proxy to the client as the return value or as an out-parameter of an operation invo-cation.
Proxies and Servant Activation
The add and addWithUUID servant activation operations on the object adapter return a proxy for the corresponding Ice object. This means we can write:
NodePrx proxy = NodePrxHelper.uncheckedCast( _adapter.addWithUUID(new NodeI("Fred")));
Here, addWithUUID both activates the servant and returns a proxy for the Ice object incarnated by that servant in a single step.
Note that we need to use an uncheckedCast here because addWithUUID returns a proxy of type Ice.ObjectPrx.
3. Well, almost: eventually, the UUID algorithm wraps around and produces strings that repeat themselves, but this will not happen until approximately the year 3400.

16.9 Asynchronous Method Dispatch (AMD) 543
Direct Proxy Creation
The object adapter offers an operation to create a proxy for a given identity:
module Ice { local interface ObjectAdapter { Object* createProxy(Identity id); // ... };};
Note that createProxy creates a proxy for a given identity whether a servant is activated with that identity or not. In other words, proxies have a life cycle that is quite independent from the life cycle of servants:
Ice.Identity id = new Ice.Identity();id.name = Ice.Util.generateUUID();Ice.ObjectPrx o = _adapter.createProxy(id);
This creates a proxy for an Ice object with the identity returned by genera-teUUID. Obviously, no servant yet exists for that object so, if we return the proxy to a client and the client invokes an operation on the proxy, the client will receive an ObjectNotExistException. (We examine these life cycle issues in more detail in Chapter 34.)
16.9 Asynchronous Method Dispatch (AMD)
The number of simultaneous synchronous requests a server is capable of supporting is determined by the number of threads in the server’s thread pool (see Section 32.10). If all of the threads are busy dispatching long-running operations, then no threads are available to process new requests and therefore clients may experience an unacceptable lack of responsiveness.
Asynchronous Method Dispatch (AMD), the server-side equivalent of AMI (see Section 14.16), addresses this scalability issue. Using AMD, a server can receive a request but then suspend its processing in order to release the dispatch thread as soon as possible. When processing resumes and the results are available, the server sends a response explicitly using a callback object provided by the Ice run time.
AMD is transparent to the client, that is, there is no way for a client to distin-guish a request that, in the server, is processed synchronously from a request that is processed asynchronously.

544 Server-Side Slice-to-C# Mapping
In practical terms, an AMD operation typically queues the request data (i.e., the callback object and operation arguments) for later processing by an applica-tion thread (or thread pool). In this way, the server minimizes the use of dispatch threads and becomes capable of efficiently supporting thousands of simultaneous clients.
An alternate use case for AMD is an operation that requires further processing after completing the client’s request. In order to minimize the client’s delay, the operation returns the results while still in the dispatch thread, and then continues using the dispatch thread for additional work.
16.9.1 Enabling AMD with Metadata
To enable asynchronous dispatch, you must add an ["amd"] metadata directive to your Slice definitions. The directive applies at the interface and the operation level. If you specify ["amd"] at the interface level, all operations in that interface use asynchronous dispatch; if you specify ["amd"] for an individual operation, only that operation uses asynchronous dispatch. In either case, the metadata direc-tive replaces synchronous dispatch, that is, a particular operation implementation must use synchronous or asynchronous dispatch and cannot use both.
Consider the following Slice definitions:
["amd"] interface I { bool isValid(); float computeRate();};interface J { ["amd"] void startProcess(); int endProcess();};
In this example, both operations of interface I use asynchronous dispatch, whereas, for interface J, startProcess uses asynchronous dispatch and endPro-cess uses synchronous dispatch.
Specifying metadata at the operation level (rather than at the interface or class level) minimizes the amount of generated code and, more importantly, minimizes complexity: although the asynchronous model is more flexible, it is also more complicated to use. It is therefore in your best interest to limit the use of the asyn-chronous model to those operations that need it, while using the simpler synchro-nous model for the rest.

16.9 Asynchronous Method Dispatch (AMD) 545
16.9.2 AMD Mapping
The C# mapping emits the following code for each AMD operation:
1. A callback interface used by the implementation to notify the Ice run time about the completion of an operation. The name of this interface is formed using the pattern AMD_class_op. For example, an operation named foo defined in interface I results in an interface named AMD_I_foo. The inter-face is generated in the same scope as the interface or class containing the operation. Two methods are provided:
public void ice_response(<params>);
The ice_response method allows the server to report the successful completion of the operation. If the operation has a non-void return type, the first parameter to ice_response is the return value. Parameters corre-sponding to the operation’s out parameters follow the return value, in the order of declaration.
public void ice_exception(System.Exception ex);
The ice_exception method allows the server to raise an exception.
Neither ice_response nor ice_exception throw any exceptions to the caller.
2. The dispatch method, whose name has the suffix _async. This method has a void return type. The first parameter is a reference to an instance of the call-back interface described above. The remaining parameters comprise the in parameters of the operation, in the order of declaration.
For example, suppose we have defined the following operation:
interface I { ["amd"] int foo(short s, out long l);};
The callback interface generated for operation foo is shown below:
public interface AMD_I_foo{ void ice_response(int __ret, long l); void ice_exception(System.Exception ex);}
The dispatch method for asynchronous invocation of operation foo is generated as follows:

546 Server-Side Slice-to-C# Mapping
public abstract void foo_async(AMD_I_foo __cb, short s, Ice.Current __current);
16.9.3 Exceptions
There are two processing contexts in which the logical implementation of an AMD operation may need to report an exception: the dispatch thread (the thread that receives the invocation), and the response thread (the thread that sends the response).4 Although we recommend that the callback object be used to report all exceptions to the client, it is legal for the implementation to raise an exception instead, but only from the dispatch thread.
As you would expect, an exception raised from a response thread cannot be caught by the Ice run time; the application’s run time environment determines how such an exception is handled. Therefore, a response thread must ensure that it traps all exceptions and sends the appropriate response using the callback object. Otherwise, if a response thread is terminated by an uncaught exception, the request may never be completed and the client might wait indefinitely for a response.
Whether raised in a dispatch thread or reported via the callback object, user exceptions are validated as described in Section 4.10.2, and local exceptions may undergo the translation described in Section 4.10.4.
16.9.4 Example
To demonstrate the use of AMD in Ice, let us define the Slice interface for a simple computational engine:
module Demo { sequence<float> Row; sequence<Row> Grid; exception RangeError {}; interface Model {
4. These are not necessarily two different threads: it is legal to send the response from the dispatch thread.

16.9 Asynchronous Method Dispatch (AMD) 547
["amd"] Grid interpolate(Grid data, float factor) throws RangeError; };};
Given a two-dimensional grid of floating point values and a factor, the interpo-late operation returns a new grid of the same size with the values interpolated in some interesting (but unspecified) way.
Our servant class derives from Demo._ModelDisp and supplies a definition for the interpolate_async method that creates a Job to hold the callback object and arguments, and adds the Job to a queue. The method uses a lock statement to guard access to the queue:
public class ModelI : Demo.ModelDisp_{ public override void interpolate_async( Demo.AMD_Model_interpolate cb, float[][] data, float factor, Ice.Current current) { lock(this) { _jobs.Add(new Job(cb, data, factor)); } } private System.Collections.ArrayList _jobs = new System.Collections.ArrayList();}
After queuing the information, the operation returns control to the Ice run time, making the dispatch thread available to process another request. An application thread removes the next Job from the queue and invokes execute, which uses interpolateGrid (not shown) to perform the computational work:
public class Job { public Job(Demo.AMD_Model_interpolate cb, float[][] grid, float factor) { _cb = cb; _grid = grid; _factor = factor; }

548 Server-Side Slice-to-C# Mapping
public void execute() { if (!interpolateGrid()) { _cb.ice_exception(new Demo.RangeError()); return; } _cb.ice_response(_grid); } private boolean interpolateGrid() { // ... } private Demo.AMD_Model_interpolate _cb; private float[][] _grid; private float _factor;}
If interpolateGrid returns false, then ice_exception is invoked to indicate that a range error has occurred. The return statement following the call to ice_exception is necessary because ice_exception does not throw an exception; it only marshals the exception argument and sends it to the client.
If interpolation was successful, ice_response is called to send the modi-fied grid back to the client.
16.10 Summary
This chapter presented the server-side C# mapping. Because the mapping for Slice data types is identical for clients and servers, the server-side mapping only adds a few additional mechanisms to the client side: a small API to initialize and finalize the run time, plus a few rules for how to derive servant classes from skeletons and how to register servants with the server-side run time.
Even though the examples in this chapter are very simple, they accurately reflect the basics of writing an Ice server. Of course, for more sophisticated servers (which we discuss in Chapter 32), you will be using additional APIs, for example, to improve performance or scalability. However, these APIs are all described in Slice, so, to use these APIs, you need not learn any C# mapping rules beyond those we described here.

549
Chapter 17Developing a File System Server in C#
17.1 Chapter Overview
In this chapter, we present the source code for a C# server that implements the file system we developed in Chapter 5 (see Chapter 15 for the corresponding client). The code we present here is fully functional, apart from the required interlocking for threads. (We examine threading issues in detail in Section 32.10.)
17.2 Implementing a File System Server
We have now seen enough of the server-side C# mapping to implement a server for the file system we developed in Chapter 5. (You may find it useful to review the Slice definition for our file system in Section 5.4 before studying the source code.)
Our server is composed of three source files:
• Server.cs
This file contains the server main program.
• DirectoryI.cs
This file contains the implementation for the Directory servants.

550 Developing a File System Server in C#
• FileI.cs
This file contains the implementation for the File servants.
17.2.1 The Server Main Program
Our server main program, in the file Server.cs, uses the Ice.Applica-tion class we discussed in Section 16.3.1. The run method installs a signal handler, creates an object adapter, instantiates a few servants for the directories and files in the file system, and then activates the adapter. This leads to a Main method as follows:
using Filesystem;using System;public class Server{ class App : Ice.Application { public override int run(string[] args) { // Terminate cleanly on receipt of a signal // shutdownOnInterrupt(); // Create an object adapter (stored in the _adapter // static members) // Ice.ObjectAdapter adapter = communicator().createObjectAdapterWithEndpoints( "SimpleFilesystem", "default -p 10000"); DirectoryI._adapter = adapter; FileI._adapter = adapter; // Create the root directory (with name "/" and no // parent) // DirectoryI root = new DirectoryI("/", null); // Create a file called "README" in the root directory // File file = new FileI("README", root); string[] text; text = new string[]{ "This file system contains " + "a collection of poetry." };

17.2 Implementing a File System Server 551
try { file.write(text); } catch (GenericError e) { Console.Error.WriteLine(e.reason); } // Create a directory called "Coleridge" // in the root directory // DirectoryI coleridge = new DirectoryI("Coleridge", root); // Create a file called "Kubla_Khan" // in the Coleridge directory // file = new FileI("Kubla_Khan", coleridge); text = new string[]{ "In Xanadu did Kubla Khan", "A stately pleasure-dome decree:", "Where Alph, the sacred river, ran", "Through caverns measureless to man", "Down to a sunless sea." }; try { file.write(text); } catch (GenericError e) { Console.Error.WriteLine(e.reason); } // All objects are created, allow client requests now // adapter.activate(); // Wait until we are done // communicator().waitForShutdown(); if (interrupted()) Console.Error.WriteLine( appName() + ": terminating"); return 0; } } public static void Main(string[] args) {

552 Developing a File System Server in C#
App app = new App(); Environment.Exit(app.main(args)); }}
The code uses a using directive for the Filesystem namespace. This avoids having to continuously use fully-qualified identifiers with a Filesystem. prefix.
The next part of the source code is the definition of the Server class, which includes a nested class that derives from Ice.Application and contains the main application logic in its run method. Much of this code is boiler plate that we saw previously: we create an object adapter, and, towards the end, activate the object adapter and call waitForShutdown.
The interesting part of the code follows the adapter creation: here, the server instantiates a few nodes for our file system to create the structure shown in Figure 17.1.
Figure 17.1. A small file system.
As we will see shortly, the servants for our directories and files are of type DirectoryI and FileI, respectively. The constructor for either type of servant accepts two parameters, the name of the directory or file to be created and a reference to the servant for the parent directory. (For the root directory, which has no parent, we pass a null parent.) Thus, the statement
DirectoryI root = new DirectoryI("/", null);
creates the root directory, with the name "/" and no parent directory.Here is the code that establishes the structure in Figure 17.1:
// Create the root directory (with name "/" and no parent) // DirectoryI root = new DirectoryI("/", null); // Create a file called "README" in the root directory //
RootDir
Coleridge README
Kubla_Khan
= Directory
= File

17.2 Implementing a File System Server 553
File file = new FileI("README", root); string[] text; text = new string[]{ "This file system contains " + "a collection of poetry." }; try { file.write(text); } catch (GenericError e) { Console.Error.WriteLine(e.reason); } // Create a directory called "Coleridge" // in the root directory // DirectoryI coleridge = new DirectoryI("Coleridge", root); // Create a file called "Kubla_Khan" // in the Coleridge directory // file = new FileI("Kubla_Khan", coleridge); text = new string[]{ "In Xanadu did Kubla Khan", "A stately pleasure-dome decree:", "Where Alph, the sacred river, ran", "Through caverns measureless to man", "Down to a sunless sea." }; try { file.write(text); } catch (GenericError e) { Console.Error.WriteLine(e.reason); }
We first create the root directory and a file README within the root directory. (Note that we pass a reference to the root directory as the parent when we create the new node of type FileI.)
The next step is to fill the file with text:
string[] text; text = new string[]{ "This file system contains " + "a collection of poetry." }; try { file.write(text); } catch (GenericError e) { Console.Error.WriteLine(e.reason); }
554 Developing a File System Server in C#
Recall from Section 14.7.3 that Slice sequences by default map to C# arrays. The Slice type Lines is simply an array of strings; we add a line of text to our README file by initializing the text array to contain one element.
Finally, we call the Slice write operation on our FileI servant by simply writing:
file.write(text);
This statement is interesting: the server code invokes an operation on one of its own servants. Because the call happens via a reference to the servant (of type FileI) and not via a proxy (of type FilePrx), the Ice run time does not know that this call is even taking place—such a direct call into a servant is not mediated by the Ice run time in any way and is dispatched as an ordinary C# method call.
In similar fashion, the remainder of the code creates a subdirectory called Coleridge and, within that directory, a file called Kubla_Khan to complete the structure in Figure 17.1.
17.2.2 The FileI Servant Class
Our FileI servant class has the following basic structure:
using Filesystem;using System;public class FileI : FileDisp_{ // Constructor and operations here... public static Ice.ObjectAdapter _adapter; private string _name; private DirectoryI _parent; private string[] _lines;}
The class has a number of data members:
• _adapter
This static member stores a reference to the single object adapter we use in our server.
• _name
This member stores the name of the file incarnated by the servant.

17.2 Implementing a File System Server 555
• _parent
This member stores the reference to the servant for the file’s parent directory.
• _lines
This member holds the contents of the file.
The _name and _parent data members are initialized by the constructor:
public FileI(string name, DirectoryI parent) { _name = name; _parent = parent; Debug.Assert(_parent != null); // Create an identity // Ice.Identity myID = new Ice.Identity(); myId.name = Ice.Util.generateUUID(); // Add the identity to the object adapter // _adapter.add(this, myID); // Create a proxy for the new node and // add it as a child to the parent // NodePrx thisNode = NodePrxHelper.uncheckedCast( _adapter.createProxy(myID)); _parent.addChild(thisNode); }
After initializing the _name and _parent members, the code verifies that the reference to the parent is not null because every file must have a parent directory. The constructor then generates an identity for the file by calling Ice.Util.generateUUID and adds itself to the servant map by calling ObjectAdapter.add. Finally, the constructor creates a proxy for this file and calls the addChild method on its parent directory. addChild is a helper func-tion that a child directory or file calls to add itself to the list of descendant nodes of its parent directory. We will see the implementation of this function on page 557.
The remaining methods of the FileI class implement the Slice operations we defined in the Node and File Slice interfaces:

556 Developing a File System Server in C#
// Slice Node::name() operation public override string name(Ice.Current current) { return _name; } // Slice File::read() operation public override string[] read(Ice.Current current) { return _lines; } // Slice File::write() operation public override void write(string[] text, Ice.Current current) { _lines = text; }
The name method is inherited from the generated Node interface (which is a base interface of the _FileDisp class from which FileI is derived). It simply returns the value of the _name member.
The read and write methods are inherited from the generated File inter-face (which is a base interface of the _FileDisp class from which FileI is derived) and simply return and set the _lines member.
17.2.3 The DirectoryI Servant ClassThe DirectoryI class has the following basic structure:
using Filesystem;using System;using System.Collections;public class DirectoryI : DirectoryDisp_{ // Constructor and operations here... public static Ice.ObjectAdapter _adapter; private string _name; private DirectoryI _parent; private ArrayList _contents = new ArrayList();}

17.2 Implementing a File System Server 557
As for the FileI class, we have data members to store the object adapter, the name, and the parent directory. (For the root directory, the _parent member holds a null reference.) In addition, we have a _contents data member that stores the list of child directories. These data members are initialized by the constructor:
public DirectoryI(string name, DirectoryI parent) { _name = name; _parent = parent; // Create an identity. The // parent has the fixed identity "RootDir" // Ice.Identity myID = new Ice.Identity(); myID.name = _parent != null ? Ice.Util.generateUUID() : "RootDir"; // Add the identity to the object adapter // _adapter.add(this, myID); // Create a proxy for the new node and // add it as a child to the parent // NodePrx thisNode = NodePrxHelper.uncheckedCast( _adapter.createProxy(myID)); if (_parent != null) _parent.addChild(thisNode); }
The constructor creates an identity for the new directory by calling Ice.Util.generateUUID. (For the root directory, we use the fixed identity "RootDir".) The servant adds itself to the servant map by calling ObjectA-dapter.add and then creates a proxy to itself and passes it to the addChild helper function.
addChild simply adds the passed reference to the _contents list:
public void addChild(NodePrx child) { _contents.Add(child); }
The remainder of the operations, name and list, are trivial:

558 Developing a File System Server in C#
public override string name(Ice.Current current) { return _name; } public override NodePrx[] list(Ice.Current current) { return (NodePrx[])_contents.ToArray(typeof(NodePrx)); }
Note that the _contents member is of type System.Collec-tions.ArrayList, which is convenient for the implementation of the addChild method. However, this requires us to convert the list into a C# array in order to return it from the list operation.
17.3 Summary
This chapter showed how to implement a complete server for the file system we defined in Chapter 5. Note that the server is remarkably free of code that relates to distribution: most of the server code is simply application logic that would be present just the same for a non-distributed version. Again, this is one of the major advantages of Ice: distribution concerns are kept away from application code so that you can concentrate on developing application logic instead of networking infrastructure.
Note that the server code we presented here is not quite correct as it stands: if two clients access the same file in parallel, each via a different thread, one thread may read the _lines data member while another thread updates it. Obviously, if that happens, we may write or return garbage or, worse, crash the server. However, it is trivial to make the read and write operations thread-safe. We discuss thread safety in Section 32.10.

Part VI
Objective-C Mapping


561
Chapter 18Client-Side Slice-to-Objective-C Mapping
18.1 Chapter Overview
In this chapter, we present the client-side Slice-to-Objective-C mapping (see Chapter 20 for the server-side mapping). One part of the client-side Objective-C mapping concerns itself with rules for representing each Slice data type as a corre-sponding Objective-C type; we cover these rules in Sections 18.3 to 18.11. Another part of the mapping deals with how clients can invoke operations, pass and receive parameters, and handle exceptions. These topics are covered in Sections 18.12 to 18.14. Slice classes have the characteristics of both data types and interfaces and are covered in Sections 18.15 and 18.16. Section 18.17 presents asynchronous invocations, and Section 18.18 discusses how to use the slice2objc compiler.
18.2 Introduction
The client-side Slice-to-Objective-C mapping defines how Slice data types are translated to Objective-C types, and how clients invoke operations, pass parame-ters, and handle errors. Much of the Objective-C mapping is intuitive. For example, Slice dictionaries map to Cocoa framework dictionaries, so there is little new you have to learn in order to use Slice dictionaries in Objective-C.

562 Client-Side Slice-to-Objective-C Mapping
The Objective-C mapping is thread-safe. For example, you can concurrently invoke operations on an object from different threads without the risk of race conditions or corrupting data structures in the Ice run time, but you must still synchronize access to application data from different threads. For example, if you have two threads sharing a sequence, you cannot safely have one thread insert into the sequence while another thread is iterating over the sequence. However, you only need to concern yourself with concurrent access to your own data—the Ice run time itself is fully thread safe, and none of the Ice API calls require you to acquire or release a lock before you safely can make the call.
Much of what appears in this chapter is reference material. We suggest that you skim the material on the initial reading and refer back to specific sections as needed. However, we recommend that you read at least Sections 18.11 to 18.13 in detail because these sections cover how to call operations from a client, pass parameters, and handle exceptions.
A word of advice before you start: in order to use the Objective-C mapping, you should need no more than the Slice definition of your application and knowl-edge of the Objective-C mapping rules. In particular, looking through the gener-ated code in order to discern how to use the Objective-C mapping is likely to be confusing because the generated code is not necessarily meant for human consumption and, occasionally, contains various cryptic constructs to deal with mapping internals. Of course, occasionally, you may want to refer to the generated code to confirm a detail of the mapping, but we recommend that you otherwise use the material presented here to see how to write your client-side code.
18.3 Mapping for Modules
Because Objective-C does not support namespaces, a Slice module maps to a prefix for the identifiers defined inside the modules. By default, the prefix is the same as the name of the module:
module example{ enum Color { Red, Green, Blue };};
With this definition, the Slice Color identifier is mapped to the Objective-C iden-tifier exampleColor.
For nested modules, by default, the module identifiers are concatenated. For example, consider the following Slice definition:

18.3 Mapping for Modules 563
module outer { module inner { enum Color { Red, Green, Blue }; };};
With this definition, the Slice identifier Color becomes outerinnerColor in Objective-C.
You can use a metadata directive to change the default mapping to a different prefix. For example:
["objc:prefix:OUT"]module outer { enum Vehicle { Car, Truck, Bicycle }; module inner { enum Color { Red, Green, Blue }; };};
With this definition, Vehicle maps to OUTVehicle. However, Color still maps to outerinnerColor, that is, the metadata directive applies only to types defined in the outer module, but not to types that are defined in nested modules. If you want to assign a prefix for types in the nested module, you must use a sepa-rate metadata directive, for example:
["objc:prefix:OUT"]module outer { enum Vehicle { Car, Truck, Bicycle }; ["objc:prefix:IN"] module inner { enum Color { Red, Green, Blue }; };};
With this definition, Vehicle maps to OUTVehicle, and Color maps to INColor.
For the remainder of the examples in this chapter, we assume that Slice defini-tions are enclosed by a module Example with a ["objc:prefix:EX"] metadata directive.

564 Client-Side Slice-to-Objective-C Mapping
18.4 The ICE Prefix
All of the APIs for the Ice run time are prefixed by ICE, to avoid clashes with definitions for other libraries or applications. Parts of the Ice API are generated from Slice definitions; other parts provide special-purpose definitions that do not have a corresponding Slice definition. Regardless of they way they are defined, the ICE prefix universally applies to all entry points in the Ice run time. We will incrementally cover the contents of the Ice API throughout the remainder of the book.
18.5 Mapping for Identifiers
Objective-C identifiers are derived from Slice identifiers. The exact Objective-C identifier that is generated depends on the context. For types that are nested in modules (and hence have global visibility in Objective-C), the generated Objec-tive-C identifiers are prefixed with their module prefix, as discussed in Section 18.3. Slice identifiers that do not have global visibility (such as operation names and structure members) do not use the module prefix and are preserved without change. For example, consider the following Slice definition:
["objc:prefix:EX"]module Example { struct Point { double x; double y; };};
This maps to the following Objective-C definition:
@interface EXPoint : NSObject <NSCopying>{ @private ICEDouble x; ICEDouble y;}@property(nonatomic, assign) ICEDouble x;

18.6 Internal Identifiers 565
@property(nonatomic, assign) ICEDouble y;// More definitions here...@end
If a Slice identifier is the same as an Objective-C keyword, the corresponding Objective-C identifier has an underscore suffix. For example, Slice while maps to Objective-C while_.
In some cases, the Objective-C mapping generates more than one identifier for a given Slice construct. For example, an interface Intf generates the identifiers EXIntf and EXIntfPrx. If a Slice identifier happens to be an Objective-C keyword, the underscore suffix applies only where necessary, so an interface while generates EXWhile and EXWhilePrx.
Note that Slice operation and member names can clash with the name of an inherited method, property, or instance variable. For example:
exception Failed { string reason; // Clashes with NSException};
This is a legal Slice definition. However, the generated exception class derives from NSException, which defines a reason method. To avoid hiding the method in the base class, the generated exception class maps the Slice reason member to the Objective-C property reason_, just as it would for a keyword.
This escape mechanism applies to all generated classes that directly or indi-rectly derive from NSObject or NSException.
18.6 Internal Identifiers
Any methods that contain two or more adjacent underscores (such as read__ and op____) are internal to the Objective-C mapping implementation and are not for use by application code.

566 Client-Side Slice-to-Objective-C Mapping
18.7 Mapping for Built-In Types
The Slice built-in types are mapped to Objective-C types as shown in Table 18.1.
Slice bool maps to Objective-C BOOL. The remaining integral and floating-point types map to Objective-C type definitions instead of native types. This allows the Ice run time to provide a definition as appropriate for each target architecture. (For example, ICELong might be defined as long on one architecture and as long long on another.)
Note that ICEByte is a typedef for unsigned char. This guarantees that byte values are always in the range , and it ensures that right-shifting an ICEByte does not cause sign-extension.
Whether a Slice string maps to NSString or NSMutableString depends on the context. NSMutableString is used in some cases for operation parame-ters; otherwise, if a string is a data member of a Slice structure, class, or excep-tion, it maps to NSString. (We will discuss these differences in more detail as we cover the mapping of the relevant Slice language features.)
Table 18.1. Mapping of Slice built-in types to Objective-C.
Slice Objective-C
bool BOOL
byte ICEByte
short ICEShort
int ICEInt
long ICELong
float ICEFloat
double ICEDouble
string NSString or NSMutableString

18.8 Mapping for User-Defined Types 567
18.8 Mapping for User-Defined Types
Slice supports user-defined types: enumerations, structures, sequences, and dictionaries.
18.8.1 Mapping for Enumerations
Enumerations map to the corresponding enumeration in Objective-C. For example:
["objc:prefix:EX"]module Example { enum Fruit { Apple, Pear, Orange };};
The generated Objective-C definition is:
typedef enum { EXApple, EXPear, EXOrange} EXFruit;
18.8.2 Mapping for Structures
The mapping for structures maps Slice structures to Objective-C classes. For each Slice data member, the Objective-C class has a corresponding property. For example, here is our Employee structure from Section 4.9.4 once more:
struct Employee { long number; string firstName; string lastName;};
The Slice-to-Objective-C compiler generates the following definition for this structure:
@interface EXEmployee : NSObject <NSCopying>{ @private ICELong number; NSString *firstName; NSString *lastName;}

568 Client-Side Slice-to-Objective-C Mapping
@property(nonatomic, assign) ICELong number;@property(nonatomic, retain) NSString *firstName;@property(nonatomic, retain) NSString *lastName;-(id) init:(ICELong)number firstName:(NSString *)firstName lastName:(NSString *)lastName;+(id) employee:(ICELong)number firstName:(NSString *)firstName lastName:(NSString *)lastName;+(id) employee;// This class also overrides copyWithZone,// hash, isequal, and dealloc.@end
Mapping for Data Members
For each data member in the Slice definition, the Objective-C class contains a corresponding private instance variable of the same name, as well as a property definition that allows you to set and get the value of the corresponding instance variable. For example, given an instance of EXEmployee, you can write the following:
ICELong number;EXemployee *e = ...;[e setNumber:99];number = [e number];// Or, more concisely with dot notation:e.number = 99;number = e.number;
Properties that represent data members always use the nonatomic property attribute. This avoids the overhead of locking each data member during access. The second property attribute is assign for integral and floating-point types and retain for all other types (such as strings, structures, and so on.)
Creating and Initializing Structures
Structures provide the usual (inherited) init method:
EXEmployee *e = [[EXEmployee alloc] init];// ...[e release];
As usual, init initializes the instance variables of the structure with zero-filled memory.

18.8 Mapping for User-Defined Types 569
In addition, a structure provides a second init method that accepts one parameter for each data member of the structure:
-(id) init:(ICELong)number firstName:(NSString *)firstName lastName:(NSString *)lastName;
Note that the first parameter is always unlabeled; the second and subsequent parameters have a label that is the same as the name of the corresponding Slice data member. The additional init method allows you to instantiate a structure and initialize its data members in a single statement:
EXEmployee *e = [[EXEmployee alloc] init:99 firstName:@"Brad" lastName:@"Cox"];// ...[e release];
init applies the memory management policy of the corresponding properties, that is, it calls retain on the firstName and lastName arguments.
Each structure also provides two convenience constructors that mirror the init methods: a parameter-less convenience constructor and one that has a parameter for each Slice data member:
+(id) employee;+(id) employee:(ICELong)number firstName:(NSString *)firstName lastName:(NSString *)lastName;
The convenience constructors have the same name as the mapped Slice structure (without the module prefix). As usual, they allocate an instance, perform the same initialization actions as the corresponding init methods, and call autore-lease on the return value:
EXEmployee *e = [EXEmployee employee:99 firstName:@"Brad" lastName:@"Cox"];// No need to call [e release] here.
Copying Structures
Structures implement the NSCopying protocol. Structures are copied by assigning instance variables of value type and calling retain on each instance variable of non-value type. In other words, the copy is shallow:

570 Client-Side Slice-to-Objective-C Mapping
EXEmployee *e = [EXEmployee employee:99 firstName:@"Brad" lastName:@"Cox"];EXEmployee *e2 = [e copy];NSAssert(e.number == e2.number);NSAssert([e.firstName == e2.firstName]); // Same instance// ...[e2 release];
Note that, if you assign an NSMutableString to a structure member and use the structure as a dictionary key, you must not modify the string inside the struc-ture without copying it because doing so will corrupt the dictionary.
Deallocating Structures
Each structure implements a dealloc method that calls release on each instance variable with a retain property attribute. This means that structures take care of the memory management of their contents: releasing a structure auto-matically releases all its instance variables.
Structure Comparison and Hashing
Structures implement isEqual, so you can compare them for equality. Two structures are equal if all their instance variables are equal. For value types, equality is determined by the == operator; for non-value types other than classes, equality is determined by the corresponding instance variable’s isEqual method. Classes (see Section 18.15) are compared by comparing their identity: two class members are equal if they both point at the same instance.
The hash method returns a hash value is that is computed from the hash value of all of the structure’s instance variables.
18.8.3 Mapping for SequencesThe Objective-C mapping uses different mappings for sequence of value types (such as sequence<byte>) and non-value types (such as sequence<string>).
Mapping for Sequences of Value Types
The following Slice types are value types:
• Integral types (bool, byte, short, int, long)
• Floating point types (float, double)
• Enumerated types
Sequences of these types map to a type definition. For example:

18.8 Mapping for User-Defined Types 571
enum Fruit { Apple, Pear, Orange };sequence<byte> ByteSeq;sequence<int> IntSeq;sequence<Fruit> FruitSeq;
The three Slice sequences result in the following Objective-C definitions:
typedef enum { EXApple, EXPear, EXOrange} EXFruit;typedef NSData EXByteSeq;typedef NSMutableData EXMutableByteSeq;typedef NSData EXIntSeq;typedef NSMutableData EXMutableIntSeq;typedef NSData EXFruitSeq;typedef NSMutableData EXMutableFruitSeq;
As you can see, each sequence definition creates a pair of type definitions, an immutable version named <module-prefix><Slice-name>, and a mutable version named <module-prefix>Mutable<Slice-name>. This constitutes the entire public API for sequence of value types, that is, sequences of value types simply map to NSData or NSMutableData. The NS(Mutable)Data sequences contain an array of the corresponding element type in their internal byte array.1
For example, here is how you could initialize a byte sequence of 1024 elements with values that are the modulo 128 of the element index in reverse order:
int limit = 1024;EXMutableByteSeq *bs = [NSMutableData dataWithLength:limit];ICEByte *p = (ICEByte *)[bs bytes];while (--limit > 0) { *p++ = limit % 0x80;}
1. We chose to map sequences of value types to NSData instead of NSArray because of the large overhead of placing each sequence element into an NSNumber container instance.

572 Client-Side Slice-to-Objective-C Mapping
Naturally, you do not need to initialize the sequence using a loop. For example, if the data is available in a buffer, you could use the dataWithBytes:length or dataWithBytesNoCopy:length methods of NSData instead.
Here is one way to retrieve the bytes of the sequence:
const ICEByte* p = (const ICEByte *)[bs bytes];const ICEByte* limitp = p + [bs length];while (p < limitp) { printf("%d\n", *p++);}
For sequences of types other than byte or bool, you must keep in mind that the length of the NSData array is not the same as the number of elements. The following example initializes an integer sequence with the first few primes and prints out the contents of the sequence:
const int primes[] = { 1, 2, 3, 5, 7, 9, 11, 13, 17, 19, 23 };EXMutableIntSeq *is = [NSMutableData dataWithBytes:primes length:sizeof(primes)];const ICEInt *p = (const ICEInt *)[is bytes];int limit = [is length] / sizeof(*p);int i;for(i = 0; i < limit; ++i) { printf("%d\n", p[i]);}
The code to manipulate a sequence of enumerators is very similar. For portability, you should not assume a particular size for enumerators. That is, instead of relying on all enumerators having the size of, for example, an int, it is better to use sizeof(EXFruit) to ensure that you are not overstepping the bounds of the sequence.
Mapping of Sequences of Non-Value Types
Sequences of non-value types, such as sequences of string, structures, classes, and so on, map to mutable and immutable type definitions of NSArray. For example:
sequence<string> Page;sequence<Page> Book;
This maps to:

18.8 Mapping for User-Defined Types 573
typedef NSArray EXPage;typedef NSMutableArray EXMutablePage;typedef NSArray EXBook;typedef NSMutableArray EXMutableBook;
You use such sequences as you would use any other NSArray in your code. For example:
EXMutablePage *page1 = [NSArray arrayWithObjects: @"First line of page one", @"Second line of page one", nil];EXMutablePage *page2 = [NSArray arrayWithObjects: @"First line of page two", @"Second line of page two", nil];EXMutableBook *book = [NSMutableArray array];[book addObject:page1];[book addObject:page2];[book addObject:[NSArray array]]; // Empty page
This creates a book with three pages; the first two pages contain two lines each, and the third page is empty. You can print the contents of the book as follows:
int pageNum = 0;for (EXPage *page in book) { ++pageNum; int lineNum = 0; if ([page count] == 0) { printf("page %d: <empty>\n", pageNum); } else { for (NSString *line in page) { ++lineNum; printf("page %d, line %d: %s\n", pageNum, lineNum, [line UTF8String]); } }}
This prints:

574 Client-Side Slice-to-Objective-C Mapping
page 1, line 1: First line of page onepage 1, line 2: Second line of page onepage 2, line 1: First line of page twopage 2, line 2: Second line of page twopage 3: <empty>
If you have a sequence of proxies or a sequence of classes, to transmit a null proxy or class inside a sequence, you must insert an NSNull value into the NSArray. In addition, the mapping also allows you to use NSNull as the element value of an NSArray for elements of type string, structure, sequence, or dictionary. For example, instead of inserting an empty NSArray into the book sequence in the preceding example, we could also have inserted NSNull:
EXMutableBook *book = [NSMutableArray array];[book addObject:page1];[book addObject:page2];[book addObject:[NSNull null]]; // Empty page
18.8.4 Mapping for Dictionaries
Here is the definition of our EmployeeMap from Section 4.9.4 once more:
dictionary<long, Employee> EmployeeMap;
The following code is generated for this definition:
typedef NSDictionary EXEmployeeMap;typedef NSMutableDictionary EXMutableEmployeeMap;
Similar to sequences, Slice dictionaries map to type definitions for NSDic-tionary and NSMutableDictionary, with the names <module-prefix><Slice-name> and <module-prefix>Mutable<Slice-name>.
As a result, you can use the dictionary like any other NSDictionary, for example:
EXMutableEmployeeMap *em = [EXMutableEmployeeMap dictionary];EXEmployee *e = [EXEmployee employee];e.number = 42;e.firstName = @"Stan";e.lastName = @"Lippman";[em setObject:e forKey:[NSNumber numberWithLong:e.number]];e = [EXEmployee employee];

18.9 Mapping for Constants 575
e.number = 77;e.firstName = @"Herb";e.lastName = @"Sutter";[em setObject:e forKey:[NSNumber numberWithLong:e.number]];
To put a value type into a dictionary (either as the key or the value), you must use NSNumber as the object to hold the value. If you have a dictionary that uses a Slice enumeration as the key or the value, you must insert the enumerator as an NSNumber that holds an int.
To insert a null proxy or null class instance into a dictionary as a value, you must insert NSNull.
As a convenience feature, the Objective-C mapping also allows you to insert NSNull as the value of a dictionary if the value type of the dictionary is a string, structure, sequence, or dictionary. If you send such a dictionary to a receiver, the Ice run time marshals an empty string, default-initialized structure, empty sequence, or empty dictionary as the corresponding value to the receiver, respec-tively.
18.9 Mapping for Constants
Slice constant definitions map to corresponding Objective-C constant definitions. Here are the constant definitions we saw in Section 4.9.5 on page 103 once more:
const bool AppendByDefault = true;const byte LowerNibble = 0x0f;const string Advice = "Don't Panic!";const short TheAnswer = 42;const double PI = 3.1416;enum Fruit { Apple, Pear, Orange };const Fruit FavoriteFruit = Pear;
Here are the generated definitions for these constants:
static const BOOL EXAppendByDefault = YES;static const ICEByte EXLowerNibble = 15;static NSString * const EXAdvice = @"Don't Panic!";static const ICEShort EXTheAnswer = 42;static const ICEDouble EXPI = 3.1416;

576 Client-Side Slice-to-Objective-C Mapping
typedef enum { EXApple, EXPear, EXOrange} EXFruit;static const EXFruit EXFavoriteFruit = EXPear;
All constants are initialized in the generated header file, so they are compile-time constants and can be used in contexts where a compile-time constant expression is required, such as to dimension an array or as the case label of a switch state-ment.
18.10 Mapping for Exceptions
Here is a fragment of the Slice definition for our world time server from Section 4.10.5 on page 120 once more:
exception GenericError { string reason;};exception BadTimeVal extends GenericError {};exception BadZoneName extends GenericError {};
18.10.1 Inheritance Hierarchy
These exception definitions map as follows:
@interface EXGenericError : ICEUserException{@private NSString *reason_;}@property(nonatomic, retain) NSString *reason_;// ...@end@interface EXBadTimeVal : EXGenericError// ...@end@interface EXBadZoneName : EXGenericError// ...@end

18.10 Mapping for Exceptions 577
Each Slice exception is mapped to an Objective-C class. For each exception member, the corresponding class contains a private instance variable and a prop-erty. (Obviously, because BadTimeVal and BadZoneName do not have members, the generated classes for these exceptions also do not have members.)
The inheritance structure of the Slice exceptions is preserved for the generated classes, so EXBadTimeVal and EXBadZoneName inherit from EXGe-nericError.
In turn, EXGenericError derives from ICEUserException:
@interface ICEException : NSException-(NSString* *)ice_name;@end@interface ICEUserException : ICEException// ...@end@interface ICELocalException : ICEException// ...@end
Note that ICEUserException itself derives from ICEException, which derives from NSException. Similarly, run-time exceptions derive from a

578 Client-Side Slice-to-Objective-C Mapping
common base class ICELocalException that derives from ICEException, so we have the inheritance structure shown in Figure 18.1:
Figure 18.1. Inheritance structure for exceptions.
ICEException provides a single method, ice_name, that returns the Slice type ID of the exception with the leading :: omitted. For example, the return value of ice_name for our Slice GenericError is Example::Gener-icError.
18.10.2 Mapping for Data MembersAs we mentioned on page 577, each data member of a Slice exception generates a corresponding Objective-C property. Here is an example that extends our Gener-icError with yet another exception:
exception GenericError { string reason;};exception FileError extends GenericError { string name; int errorCode;};
The generated properties for these exceptions are as follows:
ICELocalException
ICEException
Specific Run-Time Exceptions... Specific User Exceptions...
NSException
ICEUserException

18.10 Mapping for Exceptions 579
@interface EXGenericError : ICEUserException{@private NSString *reason_;}@property(nonatomic, retain) NSString *reason_;// ...@end@interface EXFileError : EXGenericError{@private NSString *name_; ICEInt errorCode;}@property(nonatomic, retain) NSString *name_;@property(nonatomic, assign) ICEInt errorCode;// ...@end
This is exactly the same mapping as for structure members (see page 567), with one difference: the name and reason members map to name_ and reason_ properties, whereas—as for structures—errorCode maps to errorCode. The trailing underscore for reason_ and name_ prevents a name collision with the name and reason methods that are defined by NSException: if you call the name method, you receive the name that is stored by NSException; if you call the name_ method, you receive the value of the name_ instance variable of EXFileError:
@try { // Do something that can throw ExFileError...}@catch(EXFileError *ex){ // Print the value of the Slice reason, name, // and errorCode members. printf("reason: %s, name: %s, errorCode: %d\n", [ex.reason_ UTF8String], [ex.name_ UTF8String], ex.errorCode);

580 Client-Side Slice-to-Objective-C Mapping
// Print the NSException name. printf("NSException name: %s\n", [[ex name] UTF8String]);}
The same escape mechanism applies if you define exception data members named callStackReturnAddresses, raise, or userInfo.
18.10.3 Mapping for User Exceptions
Creating and Initializing User Exceptions
Initialization of exceptions follows the same pattern as for structures (see page 568): each exception (apart from the inherited no-argument init method) provides an init method that accepts one argument for each data member of the exception, and two convenience constructors. For example, the generated methods for our EXGenericError exception look as follows:
@interface EXGenericError : ICEUserException// ...-(id) init:(NSString *)reason;+(id) genericError;+(id) genericError:(NSString *)reason;@endif
If a user exception has no data members (and its base exceptions do not have data members either), only the inherited init method and the no-argument conve-nience constructor are generated.
If an exception has a base exception with data members, its init method and convenience constructor accept one argument for each Slice data member, in base-to-derived order. For example, here are the methods for the FileError exception we defined on page 578):
@interface EXFileError : EXGenericError// ...-(id) init:(NSString *)reason name_:(NSString *)name errorCode:(ICEInt)errorCode;+(id) fileError;+(id) fileError:(NSString *)reason name_:(NSString *)name errorCode:(ICEInt)errorCode;@end

18.10 Mapping for Exceptions 581
Note that init and the second convenience constructor accept three arguments; the first initializes the EXGenericError base, and the remaining two initialize the instance variables of EXFileError.
18.10.4 Mapping for Run-Time Exceptions
The Ice run time throws run-time exceptions for a number of pre-defined error conditions. All run-time exceptions directly or indirectly derive from ICELo-calException which, in turn, derives from ICEException. (See Figure 4.4 for an inheritance diagram.)
By catching exceptions at the appropriate point in the hierarchy, you can handle exceptions according to the category of error they indicate:
• NSException
This is the root of the complete inheritance tree. Catching NSException catches all exceptions, whether they relate to Ice or the Cocoa framework.
• ICEException
Catching ICEException catches both user and run-time exceptions.
• ICEUserException
This is the root exception for all user exceptions. Catching ICEUserExcep-tion catches all user exceptions (but not run-time exceptions).
• ICELocalException
This is the root exception for all run-time exceptions. Catching ICELo-calException catches all run-time exceptions (but not user exceptions).
• ICETimeoutException
This is the base exception for both operation-invocation and connection-estab-lishment timeouts.
• ICEConnectTimeoutException
This exception is raised when the initial attempt to establish a connection to a server times out.
For example, an ICEConnectTimeoutException can be handled as ICEConnectTimeoutException, ICETimeoutException, ICELo-calException, ICEException, or NSException.
You will probably have little need to catch run-time exceptions as their most-derived type and instead catch them as ICELocalException; the fine-grained error handling offered by the remainder of the hierarchy is of interest mainly in

582 Client-Side Slice-to-Objective-C Mapping
the implementation of the Ice run time. Exceptions to this rule are ICEFacetNotExistException (see Chapter 33) and ICEObjectNotEx-istException (see Chapter 34), which you may want to catch explicitly.
Creating and Initializing Run-Time Exceptions
ICELocalException provides two properties that return the file name and line number at which an exception was raised:
@interface ICELocalException : ICEException{// ...@property(nonatomic, readonly) NSString* file;@property(nonatomic, readonly) int line;-(id)init:(const char*)file line:(int)line;+(id)localException:(const char*)file line:(int)line;@end
The init method and the convenience constructor accept the file name and line number as arguments.
Concrete run-time exceptions that derived from ICEException provide a corresponding init method and convenience constructor. For example, here is the Slice definition of ObjectNotExistException:
local exception RequestFailedException { Identity id; string facet; string operation;};local exception ObjectNotExistException extends RequestFailedException {};
The Objective-C mapping for ObjectNotExistException is:
@interface ICEObjectNotExistException : ICERequestFailedException// ...-(id) init:(const char*)file__p line:(int)line__p;-(id) init:(const char*)file__p line:(int)line__p id_:(ICEIdentity *)id_ facet:(NSString *)facet operation:(NSString *)operation;+(id) objectNotExistException:(const char*)file__p

18.11 Mapping for Interfaces 583
line:(int)line__p;+(id) objectNotExistException:(const char*)file__p line:(int)line__p id_:(ICEIdentity *)id_ facet:(NSString *)facet operation:(NSString *)operation;@end
In other words, as for user exceptions, run-time exceptions provide init methods and convenience constructors that accept arguments in base-to-derived order. This means that all run-time exceptions require a file name and line number when they are instantiated. For example, you can throw an ICEObjectNotExistEx-ception as follows:
@throw [ICEObjectNotExistException objectNotExistException:__FILE__ line:__LINE__];
If you throw this exception in the context of an executing operation on the server side, the id_, facet, and operation instance variables are automatically initialized by the Ice run time.
When you instantiate a run-time exception, the base NSException is initial-ized such that its name method returns the same string as ice_name; the reason and userInfo methods return nil.
18.10.5 Copying and Deallocation
User exceptions and run-time exceptions implement the NSCopying protocol, so you can copy them. The semantics are the same as for structures (see page 569).
Similarly, like structures, exceptions implement a dealloc method that takes care of deallocating the instance variables when an exception is released.
18.10.6 Comparison and Hashing
Exceptions do not override isEqual or hash, so these methods have the behavior inherited from NSObject.
18.11 Mapping for Interfaces
The mapping of Slice interfaces revolves around the idea that, to invoke a remote operation, you call a member function on a local class instance that represents the

584 Client-Side Slice-to-Objective-C Mapping
remote object. This makes the mapping easy and intuitive to use because, for all intents and purposes (apart from error semantics), making a remote procedure call is no different from making a local procedure call.
18.11.1 Proxy Classes and Proxy Protocols
On the client side, interfaces map to a protocol with member functions that corre-spond to the operations on those interfaces. Consider the following simple inter-face:
["objc:prefix:EX"]module Example { interface Simple { void op(); }};
The Slice compiler generates the following definitions for use by the client:
@interface EXSimplePrx : ICEObjectPrx// Mapping-internal methods here...@end@protocol EXSimplePrx <ICEObjectPrx>-(void) op;-(void) op:(ICEContext *)context;@end;
As you can see, the compiler generates a proxy protocol EXSimplePrx and a proxy class EXSimplePrx. In general, the generated name for both protocol and class is <module-prefix><interface-name>Prx.
In the client’s address space, an instance of EXSimplePrx is the local ambassador for a remote instance of the Simple interface in a server and is known as a proxy class instance. All the details about the server-side object, such as its address, what protocol to use, and its object identity are encapsulated in that instance.
Note that EXSimplePrx derives from ICEObjectPrx, and that EXSim-plePrx adopts the ICEObjectPrx protocol. This reflects the fact that all Slice interfaces implicitly derive from Ice::Object. For each operation in the inter-face, the proxy protocol has two methods whose name is derived from the opera-tion. For the preceding example, we find that the operation op is mapped to two methods, op and op:.

18.11 Mapping for Interfaces 585
The second method has a trailing parameter of type ICEContext. This parameter is for use by the Ice run time to store information about how to deliver a request; normally, you do not need to supply a value here and can pretend that the trailing parameter does not exist. (We examine the ICEContext parameter in detail in Chapter 32. The parameter is also used by IceStorm—see Chapter 44.)
18.11.2 Instantiation and Casting
Client-side application code never manipulates proxy class instances directly. In fact, you are not allowed to instantiate a proxy class directly. Instead, proxy instances are always instantiated on behalf of the client by the Ice run time, so client code never has any need to instantiate a proxy directly.
Proxies are immutable: once the run time has instantiated a proxy, that proxy continues to denote the same remote object and cannot be changed. This means that, if you want to keep a copy of a proxy, it is sufficient to call retain on the proxy. (You can also call copy on a proxy because ICEObjectPrx implements NSCopying. However, calling copy has the same effect as calling retain.)
Proxies are always passed and returned as type id<<module-prefix><interface-name>Prx>. For example, for the preceding Simple interface, the proxy type is id<EXSimplePrx>.
The ICEObjectPrx base class provides two class methods that allow you cast a proxy from one type to another.
• +(id) checkedCast:(id<ICEObjectPrx>)proxy;
A checkedCast tests whether the object denoted by a proxy implements the specified interface. If so, the cast returns a proxy to the specified interface; otherwise, if the object denoted by the proxy does not implement the specified interface, the cast returns nil. Checked casts are typically used to safely down-cast a proxy to a more derived interface. For example, assuming we have Slice interfaces Base and Derived, you can write the following:
id<EXBasePrx> base = ...; // Initialize base proxyid<EXDerivedPrx> derived = [EXDerivedPrx checkedCast:base];if(derived != nil){ // base implements run-time type Derived // use derived...} else { // Base has some other, unrelated type

586 Client-Side Slice-to-Objective-C Mapping
}
The expression [EXDerivedPrx checkedCast:base] tests whether base points at an object of type Derived (or an object with a type that is derived from Derived). If so, the cast succeeds and derived is set to point at the same object as base. Otherwise, the cast fails and derived is set to nil. (Proxies that “point nowhere” are represented by nil.)
A checkedCast typically results in a remote message to the server.2 The message effectively asks the server “is the object denoted by this proxy of type Derived?” The reply from the server is communicated to the application code in form of a successful (non-nil) or unsuccessful (nil) result. Sending a remote message is necessary because, as a rule, there is no way for the client to find out what the actual run-time type of a proxy is without confirmation from the server. (For example, the server may replace the implementation of the object for an existing proxy with a more derived one.) This means that you have to be prepared for a checkedCast to fail. For example, if the server is not running, you will receive an ICEConnectionRefusedException; if the server is running, but the object denoted by the proxy no longer exists, you will receive an ICEObjectNotExistException.
• +(id) uncheckedCast:(id<ICEObjectPrx>)proxy;
In some cases, it is known that an object supports a more derived interface than the static type of its proxy. For such cases, you can use an unchecked down-cast:
id<EXBasePrx> base;base = ...; // Initialize base to point at a Derivedid<EXDerivedPrx> derived = [EXDerivedPrx uncheckedCast:base];// Use derived...
An uncheckedCast provides a down-cast without consulting the server as to the actual run-time type of the object. You should use an unchecked-Cast only if you are certain that the proxy indeed supports the more derived type: an uncheckedCast, as the name implies, is not checked in any way; it does not contact the object in the server and, if the proxy does not support the specified interface, the cast does not return null. If you use the proxy
2. In some cases, the Ice run time can optimize the cast and avoid sending a message. However, the optimization applies only in narrowly-defined circumstances, so you cannot rely on a checkedCast not sending a message.

18.11 Mapping for Interfaces 587
resulting from an incorrect uncheckedCast to invoke an operation, the behavior is undefined. Most likely, you will receive an ICEOperationNo-tExistException, but, depending on the circumstances, the Ice run time may also report an exception indicating that unmarshaling has failed, or even silently return garbage results.
Despite its dangers, uncheckedCast is still useful because it avoids the cost of sending a message to the server. And, particularly during initialization (see page 641), it is common to receive a proxy of type id<ICEOb-jectPrx>, but with a known run-time type. In such cases, an unchecked-Cast saves the overhead of sending a remote message.
Note that an uncheckedCast is not the same as an ordinary cast. The following is incorrect and has undefined behavior:
id<EXDerivedPrx> derived = (id<EXDerivedPrx>)base; // Wrong!
Both checkedCast and uncheckedCast call autorelease on the proxy they return so, if you want to prevent the proxy from being deallocated once the enclosing autorelease pool is drained, you must call retain on the returned proxy.
18.11.3 Using Proxy MethodsThe ICEObjectPrx provides a variety of methods for customizing a proxy (see Section 32.11). Since proxies are immutable, each of these “factory methods” returns a copy of the original proxy that contains the desired modification. For example, you can obtain a proxy configured with a ten-second timeout as shown below:
id<ICEObjectPrx> proxy = [communicator stringToProxy:...];proxy = [proxy ice_timeout:10000];
A factory method returns a new (autoreleased) proxy object if the requested modi-fication differs from the current proxy, otherwise it returns the original proxy. The returned proxy is always of the same type as the source proxy.
18.11.4 Object Identity and Proxy ComparisonApart from the methods discussed in Section 18.11.2, proxy handles also support comparison with isEqual. Note that isEqual uses all of the information in a proxy for the comparison. This means that not only the object identity must match for a comparison to succeed, but other details inside the proxy, such as the

588 Client-Side Slice-to-Objective-C Mapping
protocol and endpoint information, must be the same as well. In other words, comparison with isEqual tests for proxy identity, not object identity. A common mistake is to write code along the following lines:
id<ICEObjectPrx> p1 = ...; // Get a proxy...id<ICEObjectPrx> p2 = ...; // Get another proxy...if (![p1 isEqual:p2]) { // p1 and p2 denote different objects // WRONG!} else { // p1 and p2 denote the same object // Correct}
Even though p1 and p2 differ, they may denote the same Ice object. This can happen if, for example, p1 and p2 embed the same object identity, but use a different protocol to contact the target object. Similarly, the protocols might be the same, but could denote different endpoints (because a single Ice object can be contacted via several different transport endpoints). In other words, if two proxies compare equal with isEqual, we know that the two proxies denote the same object (because they are identical in all respects); however, if two proxies compare unequal with isEqual, we know absolutely nothing: the proxies may or may not denote the same object.
To compare the object identities of two proxies, you can use additional methods provided by proxies:
@protocol ICEObjectPrx <NSObject, NSCopying>// ...-(NSComparisonResult) compareIdentity:(id<ICEObjectPrx>)p;-(NSComparisonResult) compareIdentityAndFacet:(id<ICEObjectPrx>)p;@end
The compareIdentity method compares the object identities embedded in two proxies while ignoring other information, such as facet and transport informa-tion. To include the facet name (see Chapter 33) in the comparison, use compa-reIdentityAndFacet instead.
compareIdentity and compareIdentityAndFacet allow you to correctly compare proxies for object identity. The example below demonstrates how to use compareIdentity:
id<ICEObjectPrx> p1 = ...; // Get a proxy...id<ICEObjectPrx> p2 = ...; // Get another proxy...if ([p1 compareIdentity:p2] != NSOrderedSame) {

18.12 Mapping for Operations 589
// p1 and p2 denote different objects // Correct} else { // p1 and p2 denote the same object // Correct}
18.12 Mapping for Operations
As we saw in Section 18.11, for each operation on an interface, the proxy protocol contains two corresponding methods with the same name as the operation. To invoke an operation, you call it via the proxy handle. For example, here is part of the definitions for our file system from Section 5.4:
["objc:prefix:FS"]module Filesystem { interface Node { idempotent string name(); }; // ...};
The proxy protocol for the Node interface looks as follows:
@protocol FSNodePrx <ICEObjectPrx>-(NSMutableString *) name;-(NSMutableString *) name:(ICEContext *)context;@end;
The name method returns a value of type NSMutableString. Given a proxy to an object of type Node, the client can invoke the operation as follows:
id<EXNodePrx> node = ...; // Initialize proxyNSString *name = [node name]; // Get name via RPC
The name method sends the operation invocation to the server, waits until the operation is complete, and then unmarshals the return value and returns it to the caller.
Because the name method autoreleases the return value, it is safe to ignore the return value. For example, the following code contains no memory leak:
id<EXNodePrx> node = ...; // Initialize proxy[node name]; // Useless, but no leak
If you ignore the return value, no memory leak occurs because the next time the enclosing autorelease pool is drained, the memory will be reclaimed.

590 Client-Side Slice-to-Objective-C Mapping
18.12.1 Normal and idempotent Operations
You can add an idempotent qualifier to a Slice operation. As far as the corre-sponding proxy protocol methods are concerned, idempotent has no effect. For example, consider the following interface:
interface Example { string op1(); idempotent string op2(); idempotent void op3(string s);};
The proxy protocol for this interface looks like this:3
@protocol EXOpsPrx <ICEObjectPrx>-(NSMutableString *) op1;-(NSMutableString *) op1:(ICEContext *)context;-(NSMutableString *) op2;-(NSMutableString *) op2:(ICEContext *)context;-(void) op3:(NSString *)s;-(void) op3:(NSString *)s context:(ICEContext *)context;@end;
Because idempotent affects an aspect of call dispatch, not interface, it makes sense for the mapping to be unaffected by the idempotent keyword.
18.12.2 Passing Parameters
In-Parameters
The parameter passing rules for the Objective-C mapping are very simple: value type parameters are passed by value and non-value type parameters are passed by pointer. Semantically, the two ways of passing parameters are identical: the Ice run time guarantees not to change the value of an in-parameter.
Here is an interface with operations that pass parameters of various types from client to server:
3. For brevity, we will not show the methods with the additional trailing context parameter for the remainder of this chapter. Of course, the compiler generates the additional methods regard-less. See Section 32.12 for more information on contexts.

18.12 Mapping for Operations 591
struct NumberAndString { int x; string str;};sequence<string> StringSeq;dictionary<long, StringSeq> StringTable;interface ClientToServer { void op1(int i, float f, bool b, string s); void op2(NumberAndString ns, StringSeq ss, StringTable st); void op3(ClientToServer* proxy);};
The Slice compiler generates the following code for this definition:
@interface EXNumberAndString : NSObject <NSCopying>// ...@property(nonatomic, assign) ICEInt x;@property(nonatomic, retain) NSString *str;// ...@endtypedef NSArray EXStringSeq;typedef NSMutableArray EXMutableStringSeq;typedef NSDictionary EXStringTable;typedef NSMutableDictionary EXMutableStringTable;@protocol EXClientToServerPrx <ICEObjectPrx>-(void) op1:(ICEInt)i f:(ICEFloat)f b:(BOOL)b s:(NSString *)s;-(void) op2:(EXNumberAndString *)ns ss:(EXStringSeq *)ss st:(NSDictionary *)st;-(void) op3:(id<EXClientToServerPrx>)proxy;@end;
Given a proxy to a ClientToServer interface, the client code can pass parameters as in the following example:
id<EXClientToServerPrx> p = ...; // Get proxy...[p op1:42 f:3.14 b:YES s:@"Hello world!"]; // Pass literalsICEInt i = 42;ICEFloat f = 3.14;BOOL b = YES;

592 Client-Side Slice-to-Objective-C Mapping
NSString *s = @"Hello world!";[p op1:i f:f b:b s:s]; // Pass simple varsEXNumberAndString *ns = [EXNumberAndString numberAndString:42 str:@"The Answer"];EXMutableStringSeq *ss = [ExMutableStringSeq array];[ss addObject:@"Hello world!"];EXStringTable *st = [EXMutableStringTable dictionary];[ss setObject:ss forKey:[NSNumber numberWithInt:0]];[p op2:ns ss:ss st:st]; // Pass complex vars[p op3:p]; // Pass proxy
You can pass either literals or variables to the various operations. The Ice run time simply marshals the value of the parameters to the server and leaves parameters otherwise untouched, so there are no memory-management issues to consider.
Note that the invocation of op3 is somewhat unusual: the caller passes the proxy it uses to invoke the operation to the operation as a parameter. While unusual, this is legal (and no memory management issues arise from doing this.)
Passing nil and NSNull
The Slice language supports the concept of null (“points nowhere”) for only two of its types: proxies and classes. For either type, nil represents a null proxy or class. For other Slice types, such as strings, the concept of a null string simply does not apply. (There is no such thing as a null string, only the empty string.) However, strings, structures, sequences, and dictionaries are all passed by pointer, which raises the question of how the Objective-C mapping deals with nil values.
As a convenience feature, the Objective-C mapping permits passing of nil as a parameter for the following types:
• Proxies (nil sends a null proxy.)
• Classes (nil sends a null class instance.)
• Strings (nil sends an empty string.)
• Structures (nil sends a default-initialized structure.)
• Sequences (nil sends an empty sequence.)
• Dictionaries (nil sends an empty dictionary.)
It is impossible to add nil to an NSArray or NSDictionary, so the mapping follows the usual convention that an NSArray element or NSDictionary

18.12 Mapping for Operations 593
value that is conceptually nil is represented by NSNull. For example, to send a sequence of proxies, some of which are null proxies, you must insert NSNull values into the sequence.
As a convenience feature, if you have a sequence with elements of type string, structure, sequence, or dictionary, you can use NSNull as the element value. For elements that are NSNull, the Ice run time marshals an empty string, default-initialized structure, empty sequence, or empty dictionary to the receiver.
Similarly, for dictionaries with value type string, structure, sequence, or dictionary, you can use NSNull as the value to send the corresponding empty value (or default-initialized value, in the case of structures).
Out-Parameters
The Objective-C mapping passes out-parameters by pointer (for value types) and by pointer-to-pointer (for non-value types). Here is the Slice definition from page 590 once more, modified to pass all parameters in the out direction:
struct NumberAndString { int x; string str;};sequence<string> StringSeq;dictionary<long, StringSeq> StringTable;interface ServerToClient { void op1(out int i, out float f, out bool b, out string s); void op2(out NumberAndString ns, out StringSeq ss, out StringTable st); void op3(out ClientToServer* proxy);};
The Slice compiler generates the following code for this definition:
@protocol EXServerToClientPrx <ICEObjectPrx>-(void) op1:(ICEInt *)i f:(ICEFloat *)f b:(BOOL *)b s:(NSMutableString **)s;-(void) op2:(EXNumberAndString **)ns ss:(EXMutableStringSeq **)ss st:(EXMutableStringTable **)st;-(void) op3:(id<EXClientToServerPrx> *)proxy;@end

594 Client-Side Slice-to-Objective-C Mapping
Note that, for types that come in immutable and mutable variants (strings, sequences, and dictionaries), the corresponding out-parameter uses the mutable variant.
Given a proxy to a ServerToClient interface, the client code can pass param-eters as in the following example:
id<EXServerToClientPrx> p = ...; // Get proxy...ICEInt i;ICEFloat f;BOOL b;NSMutableString *s;[p op1:&i f:&f b:&b s:&s];// i, f, b, and s contain updated values nowEXNumberAndString *ns;EXStringSeq *ss;EXStringTable *st;[p op2:&ns ss:&ss st:&st];// ns, ss, and st contain updated values now[p op3:&p];// p has changed now!
Again, there are no surprises in this code: the caller simply passes pointers to pointer variables to a method; once the operation completes, the values of those variables will have been set by the server.
Memory Management for Out-Parameters
When the Ice run time returns an out-parameter to the caller, it does not make any assumptions about the previous value of that parameter (if any). In other words, if you pass an initialized string as an out-parameter, the value you pass is simply discarded and the corresponding variable is assigned a new instance. As an example, consider the following operation:
void getString(out string s);
You could call this as follows:
NSMutableString *s = @"Hello";[p getString:&s];// s now points at the returned string.

18.12 Mapping for Operations 595
All out-parameters are autoreleased by the Ice run time before they are returned. This is convenient because it does just the right thing with respect to memory management. For example, the following code does not leak memory:
NSMutableString *s = @"Hello";[p getString:&s];[p getString:&s]; // No leak here.
However, because the pointer value of out-parameters is simply assigned by the proxy method, you must be careful not to pass a variable as an out-parameter if that variable was not released or autoreleased:
NSMutableString *s = [[NSMutableString alloc] initWithString: @"Hello"];[p getString:&s]; // Bad news!
This code leaks the initial string because the proxy method assigns the passed pointer without calling release on it first. (In practice, this is rarely a problem because there is no need to initialize out-parameters and, if an out-parameter was initialized by being passed as an out-parameter to an operation earlier, its value will have been autoreleased by the proxy method already.)
It is worth having another look at the final call of the code example on page 594:
[p op3:&p];
Here, p is the proxy that is used to dispatch the call. That same variable p is also passed as an out-parameter to the call, meaning that the server will set its value. In general, passing the same parameter as both an input and output parameter is safe (with the caveat we just discussed).
Receiving Return Values
The Objective-C mapping returns return values in much the same way as out-parameters: value types are returned by value, and non-value types are returned by pointer. As an example, consider the following operations:
struct NumberAndString { int x; string str;};interface Ops {

596 Client-Side Slice-to-Objective-C Mapping
int getInt(); string getString(); NumberAndString getNumberAndString();};
The proxy protocol looks as follows:
@protocol EXOpsPrx <ICEObjectPrx>-(ICEInt) getInt;-(NSMutableString *) getString;-(EXNumberAndString *) getNumberAndString;@end
Note that, for types with mutable and immutable variants (strings, sequences, and dictionaries), the formal return type is the mutable variant. As for out-parameters, anything returned by pointer is autoreleased by the Ice run time. This means that the following code works fine and does not contain memory management errors:
EXNumberAndString *ns = [NSNumberAndString numberAndString];ns.x = [p getInt];ns.str = [p getString]; // Autoreleased by getString, // retained by ns.str.[p getNumberAndString]; // No leak here.
The return value of getString is autoreleased by the proxy method but, during the assignment to the property str, the generated code calls retain, so the structure keeps the returned string alive in memory, as it should. Similarly, ignoring the return value from an invocation is safe because the returned value is autoreleased and will be reclaimed when the enclosing autorelease pool is drained.
Chained Invocations
Consider the following simple interface containing two operations, one to set a value and one to get it:
interface Name { string getName(); void setName(string name);};
Suppose we have two proxies to interfaces of type Name, p1 and p2, and chain invocations as follows:
[p2 setName:[p1 getName]]; // No leak here.

18.13 Exception Handling 597
This works exactly as intended: the value returned by p1 is transferred to p2. There are no memory-management or exception safety issues with this code.
nil Out-Parameters and Return Values
If an out-parameter or return value is a proxy or class, and the operation returns a null proxy or class, the proxy method returns nil. If a proxy or class is returned as part of a sequence or dictionary, the corresponding entry is NSNull.
For strings, structures, sequences, and dictionaries, the Ice run-time never returns nil or NSNull (even if the server passed nil or NSNull as the value). Instead, the unmarshaling code always instantiates an empty string, empty sequence, or empty dictionary, and it always initializes structure members during unmarshaling, so structures that are returned from an operation invocation never contain a nil instance variable (except for proxy and class instance variables).
18.13 Exception Handling
Any operation invocation may throw a run-time exception (see Section 18.10.4 on page 581) and, if the operation has an exception specification, may also throw user exceptions (see Section 18.10 on page 576). Suppose we have the following simple interface:
exception Tantrum { string reason;};interface Child { void askToCleanUp() throws Tantrum;};
Slice exceptions are thrown as Objective-C exceptions, so you can simply enclose one or more operation invocations in a try–catch block:
id<EXChildPrx> child = ...; // Get proxy...@try { [child askToCleanUp]; // Give it a try...} @catch (EXTantrum *t) { printf("The child says: %s\n", t.reason_);}

598 Client-Side Slice-to-Objective-C Mapping
Typically, you will catch only a few exceptions of specific interest around an oper-ation invocation; other exceptions, such as unexpected run-time errors, will typi-cally be dealt with by exception handlers higher in the hierarchy. For example:
void run(){ id<EXChildPrx> child = ...; // Get proxy... @try { [child askToCleanUp]; // Give it a try... } @catch (EXTantrum *t) { printf("The child says: %s\n", t.reason); [child scold]; // Recover from error... } [child praise]; // Give positive feedback...}intmain(int argc, char* argv[]){ int status = 1; @try { // ... run(); // ... status = 0; } @catch (ICEException *e) { printf("Unexpected run-time error: %s\n", [e ice_name]); } // ... return status;}
This code handles a specific exception of local interest at the point of call and deals with other exceptions generically. (This is also the strategy we used for our first simple application in Chapter 3.)
Exceptions and Out-Parameters
If an operation throws an exception, the Ice run time makes no guarantee for the value of out-parameters. Individual out-parameters may have the old value, the new value, or a value that is indeterminate, such that parts of the out-parameter have been assigned and others have not. However, no matter what their state, the values will be “safe” for memory-management purposes, that is, any out-parame-ters that were successfully unmarshaled are autoreleased.

18.14 Mapping for Local Interfaces 599
Exceptions and Return Values
For return values, the Objective-C mapping provides the guarantee that a variable receiving the return value of an operation will not be overwritten if an exception is thrown.
18.14 Mapping for Local Interfaces
The Ice run time defines APIs using Slice (see Section 4.7). These APIs are provided as part of the Ice run time library and cannot be invoked remotely. (Doing so would not make any sense.) Therefore, the Slice interfaces for the Ice run time are defined as local interfaces (see Section 4.15). The Objective-C mapping for local interfaces differs from the default mapping in two ways:
• Local interfaces do not adopt an <interface-name>Prx protocol. (Doing so would be misleading because proxies imply that the target object can be remote.) Instead, the protocol for local interfaces has the same name as the interface. For example, the Ice::Communicator interfaces is defined as:
["objc:prefix:ICE"]module Ice { local interface Communicator { // ... }};
Because Communicator is a local interface, objects of type ICECommuni-cator are passed as id<ICECommunicator> (not ICECommunicator * or id<ICEComunicatorPrx>).
• Types that come in mutable and immutable variants (strings, sequences, and dictionaries) are always passed as the immutable variant. For example, the getName operation on the ObjectAdapter interface is defined as:
["objc:prefix:ICE"]module Ice { local interface ObjectAdapter { string getName(); };};
Because ObjectAdapter is a local interface, the getName operation maps to:

600 Client-Side Slice-to-Objective-C Mapping
-(NSString *) getName;
Note that the returned string is of type NSString instead of NSMut-ableString (as would be the case for an operation on a non-local inter-face).
For local interfaces, parameters are passed as the immutable version because their values are not meant to be modified by application code. In addition, passing the immutable version avoids an unnecessary data copy.
18.15 Mapping for Classes
Slice classes are mapped similar to structures and exceptions. The generated class contains an instance variable and a property for each Slice data member. Consider the following class definition:
class TimeOfDay { short hour; // 0 - 23 short minute; // 0 - 59 short second; // 0 - 59 string format(); // Return time as hh:mm:ss};
The Slice compiler generates the following code for this definition:
@interface EXTimeOfDay : ICEObject{ ICEShort hour; ICEShort minute; ICEShort second;}@property(nonatomic, assign) ICEShort hour;@property(nonatomic, assign) ICEShort minute;@property(nonatomic, assign) ICEShort second;-(id) init:(ICEShort)hour minute:(ICEShort)minute second:(ICEShort)second;+(id) timeOfDay;+(id) timeOfDay:(ICEShort)hour minute:(ICEShort)minute second:(ICEShort)second;@end
There are a number of things to note about the generated code:

18.15 Mapping for Classes 601
1. The generated class EXTimeOfDay derives from ICEObject, which is the parent of all classes. Note that ICEObject is not the same as ICEOb-jectPrx. In other words, you cannot pass a class where a proxy is expected and vice versa.
2. The generated class contains a property for each Slice data member.
3. The generated class provides an init method that accepts one argument for each data member, and it provides the same two convenience constructors as structures and exceptions.
18.15.1 Derivation from ICEObjectAll classes ultimately derive from a common base class, ICEObject. Note that this is not the same as implementing the ICEObjectPrx protocol (which is implemented by proxies). As a result, you cannot pass a class where a proxy is expected (and vice versa) because the base types for classes and proxies are not compatible.
ICEObject defines a number of methods:
@protocol ICEObject <NSObject>-(BOOL) ice_isA:(NSString*)typeId current:(ICECurrent*)current;-(void) ice_ping:(ICECurrent*)current;-(NSString*) ice_id:(ICECurrent*)current;-(NSArray*) ice_ids:(ICECurrent*)current;@end@interface ICEObject NSObject <ICEObject, NSCopying>-(BOOL) ice_isA:(NSString*)typeId;-(void) ice_ping;-(NSString*) ice_id;-(NSArray*) ice_ids;+(NSString*) ice_staticId;-(void) ice_preMarshal;-(void) ice_postUnmarshal;-(BOOL) ice_dispatch:(id<ICERequest>)request;-(id) initWithDelegate:(id)delegate;+(id) objectWithDelegate:(id)delegate;@end
The methods of ICEObject behave as follows:4
• ice_isA
This function returns YES if the object supports the given type ID, and NO otherwise.

602 Client-Side Slice-to-Objective-C Mapping
• ice_ping
ice_ping provides a basic reachability test for the class. If it completes without raising an exception, the class exists and is reachable.5
• ice_ids
This function returns a string sequence representing all of the type IDs supported by this object, including ::Ice::Object.
• ice_id
This function returns the actual run-time type ID for a class. If you call ice_id via a pointer to a base instance, the returned type ID is the actual (possibly more derived) type ID of the instance.
• ice_staticId
This function returns the static type ID of a class.
• ice_preMarshal
The Ice run time invokes this function prior to marshaling the object’s state, providing the opportunity for a subclass to validate its declared data members.
• ice_postUnmarshal
The Ice run time invokes this function after unmarshaling an object’s state. A subclass typically overrides this function when it needs to perform additional initialization using the values of its declared data members.
• ice_dispatch
This function dispatches an incoming request to a servant. It is used in the implementation of dispatch interceptors (see Section 32.23).
• initWithDelegateobjectWithDelegate
These constructors enable the implementation of servants with a delegate (see page 634).
4. The methods are split between the ICEObject protocol and class because classes can be servants.
5. ice_ping is normally only invoked on the proxy for a class that might be remote because a class instance that is local (in the caller’s address space) can always be reached.

18.15 Mapping for Classes 603
18.15.2 Data Members of Classes
By default, data members of classes are mapped exactly as for structures and exceptions: for each data member in the Slice definition, the generated class contains a corresponding property.
18.15.3 Class Constructors
Classes provide the usual init method and a parameter-less convenience constructor that perform default initialization of the class’s instance variables. In addition, if a class has data members, it provides an init method and a conve-nience constructor that accept one argument for each data member. This allows you to allocate and initialize a class instance in a single statement (instead of first having to allocate and default-initialize the instance and then assigning to its prop-erties).
For derived classes, the init method and the convenience constructor have one parameter for each of the base class’s data members, plus one parameter for each of the derived class’s data members, in base-to-derived order. For example:
class Base { int i;};class Derived extends Base { string s;};
This generates:
@interface EXBase : ICEObject// ...@property(nonatomic, assign) ICEInt i;-(id) init:(ICEInt)i;+(id) base;+(id) base:(ICEInt)i;@end@interface EXDerived : EXBase// ...@property(nonatomic, retain) NSString *s;

604 Client-Side Slice-to-Objective-C Mapping
-(id) init:(ICEInt)i s:(NSString *)s;+(id) derived;+(id) derived:(ICEInt)i s:(NSString *)s;@end
18.15.4 Derived Classes
Note that, in the preceding example, the derivation of the Slice definitions is preserved for the generated classes: EXBase derives from ICEObject, and EXDerived derives from EXBase. This allows you to treat and pass classes polymorphically: you can always pass an EXDerived instance where an EXBase instance is expected.
18.15.5 Passing Classes as Parameters
Classes are passed by pointer, like any other Objective-C object. For example, here is an operation that accepts a Base as an in-parameter and returns a Derived:
Derived getDerived(Base d);
The corresponding proxy method looks as follows:
-(EXDerived *) getDerived:(EXBase *)d;
To pass a null instance, you simply pass nil.
18.15.6 Operations of Classes
If you look back at the code that is generated for the EXTimeOfDay class (see page 600), you will notice that there is no indication at all that the class has a format operation. As opposed to proxies, classes do not implement any protocol that would define which operations are available. This means that you can partially implement the operations of a class. For example, you might have a Slice class with five operations that is returned from a server to a client. If the client uses only one of the five operations, the client-side code needs to implement only that one operation and can leave the remaining four operations without implemen-tation. (If the class were to implement a mandatory protocol, the client-side code would have to implement all operations in order to avoid a compiler warning.)
Of course, you must implement those operations that you actually intend to call. The mapping of operations for classes follows the server-side mapping for operations on interfaces: parameter types and labels are exactly the same. (See

18.15 Mapping for Classes 605
Section 20.5 for details.) In a nutshell, the server-side mapping is the same as the client-side mapping except that, for types that have mutable and immutable vari-ants, they map to the immutable variant where the client-side mapping uses the mutable variant, and vice versa.
For example, here is how we could implement the format operation of our TimeOfDay class:
@interface TimeOfDayI : EXTimeOfDay@end@implementation TimeOfDayI-(NSString *) format{ return [NSString stringWithFormat:@"%.2d:%.2d:%.2d", self.hour, self.minute, self.second];}@end
By convention, the implementation of classes with operations has the same name as the Slice class with an I-suffix. Doing this is not mandatory—you can call your implementation class anything you like. However, if you do not want to use the I-suffix naming, we recommend that you adopt another naming convention and follow it consistently.
Note that TimeOfDayI derives from EXTimeOfDay. This is because, as we will see in a moment, the Ice run time will instantiate a TimeOfDayI instance whenever it receives a TimeOfDay instance over the wire and expects that instance to provide the properties of EXTimeOfDay.
18.15.7 Class FactoriesHaving created a class such as TimeOfDayI, we have an implementation and we can instantiate the TimeOfDayI class, but we cannot receive it as the return value or as an out-parameter from an operation invocation. To see why, consider the following simple interface:
interface Time { TimeOfDay get();};
When a client invokes the get operation, the Ice run time must instantiate and return an instance of the TimeOfDayI class. However, unless we tell it, the Ice run time cannot magically know that we have created a TimeOfDayI class that implements a format method. To allow the Ice run time to instantiate the correct

606 Client-Side Slice-to-Objective-C Mapping
object, we must provide a factory that knows that the Slice TimeOfDay class is implemented by our TimeOfDayI class. The Ice::Communicator interface provides us with the necessary operations:
["objc:prefix:ICE"]module Ice { local interface ObjectFactory { Object create(string type); void destroy(); }; local interface Communicator { void addObjectFactory(ObjectFactory factory, string id); ObjectFactory findObjectFactory(string id); // ... };};
To supply the Ice run time with a factory for our TimeOfDayI class, we must implement the ObjectFactory interface:
module Ice { local interface ObjectFactory { Object create(string type); void destroy(); };};
The object factory’s create operation is called by the Ice run time when it needs to instantiate a TimeOfDay class. The factory’s destroy operation is called by the Ice run time when its communicator is destroyed. A possible implementation of our object factory is:
@interface ObjectFactory<ICEObjectFactory>@end@implementation ObjectFactory-(ICEObject*) create:(NSString *)type{ NSAssert([type isEqualToString:@"::Example::TimeOfDay"]); return [[TimeOfDayI alloc] init];}@end
The create method is passed the type ID (see Section 4.13) of the class to instantiate. For our TimeOfDay class, the type ID is "::Example::TimeOfDay".

18.15 Mapping for Classes 607
Our implementation of create checks the type ID: if it is "::Example::TimeOfDay", it instantiates and returns a TimeOfDayI object. For other type IDs, it asserts because it does not know how to instantiate other types of objects.
Note that your factory must not autorelease the returned instance. The Ice run time takes care of the necessary memory management activities on your behalf.
Given a factory implementation, such as our ObjectFactory, we must inform the Ice run time of the existence of the factory:
id<ICECommunicator> ice = ...;ObjectFactory *factory = [[[ObjectFactory alloc] init] autorelease];[ic addObjectFactory:factory sliceId:@"::Example::TimeOfDay"];
Now, whenever the Ice run time needs to instantiate a class with the type ID "::Example::TimeOfDay", it calls the create method of the registered ObjectFactory instance.
The destroy operation of the object factory is invoked by the Ice run time when the communicator is destroyed. This gives you a chance to clean up any resources that may be used by your factory. Do not call destroy on the factory while it is registered with the communicator—if you do, the Ice run time has no idea that this has happened and, depending on what your destroy implementa-tion is doing, may cause undefined behavior when the Ice run time tries to next use the factory.
The run time guarantees that destroy will be the last call made on the factory, that is, create will not be called concurrently with destroy, and create will not be called once destroy has been called. However, the Ice run time may make concurrent calls to create.
Note that you cannot register a factory for the same type ID twice: if you call addObjectFactory with a type ID for which a factory is registered, the Ice run time throws an AlreadyRegisteredException.
Finally, keep in mind that if a class has only data members, but no operations, you need not (but can) create and register an object factory to transmit instances of such a class. Only if a class has operations do you have to define and register an object factory.
Using a Category to Implement Operations
An alternative to registering a class factory is to use an Objective-C category to implement operations. For example, we could have implemented our format method using a category instead:
608 Client-Side Slice-to-Objective-C Mapping
@interface EXTimeOfDay (TimeOfDayI)@end@implementation EXTimeOfDay (TimeOfDayI)-(NSString *) format{ return [NSString stringWithFormat:@"%.2d:%.2d:%.2d", self.hour, self.minute, self.second];}@end
In this case, there is no need to derive from the generated EXTimeOfDay class because we provide the format implementation as a category. There is also no need to register a class factory: the Ice run time instantiates an EXTimeOfDay instance when a TimeOfDay instance arrives over the wire, and the format method is found at run time when it is actually called.
This is a viable alternative approach to implement class operations. However, keep in mind that, if the operation implementation requires use of instance vari-ables that are not defined as part of the Slice definitions of a class, you cannot use this approach because Objective-C categories do not permit you to add instance variables to a class.
18.15.8 Copying of Classes
Classes implement NSCopying. The behavior is the same as for structures: instance variables of value type are copied by assignment, instance variables of pointer type are copied by calling retain, that is, the copy is shallow. To illustrate this, consider the following class definition:
class Node { int i; string s; Node next;};
We can initialize two instances of type EXNode as follows:
NSString lastString = [NSString stringWithString:@"last"];EXNode *last = [EXNode node:99 s:lastString next:nil];NSString firstString = [NSString stringWithString:@"first"];EXNode *first = [EXNode node:1 s:firstString next:last];

18.15 Mapping for Classes 609
This creates the situation shown in Figure 18.2.
Figure 18.2. Two instances of type EXNode.
Now we create a copy of the first node by calling copy:
EXNode *copy = [[first copy] autorelease];
This creates the situation shown in Figure 18.3.
Figure 18.3. EXNode instances after calling copy on first.
firsti: 1s:next:
lasti: 99s:next:nil
first
last
EXNode
EXNode
NSString
NSString
firsti: 1s:next:
lasti: 99s:next:nil
first
last
EXNode
EXNode
NSString
NSString
copyi: 1s:next:
EXNode

610 Client-Side Slice-to-Objective-C Mapping
As you can see, the first node is copied, but the last node (pointed at by the next instance variable of the first node) is not copied; instead, first and copy now both have their next instance variable point at the same last node, and both point at the same string.
Cyclic References
One thing to be aware about are cyclic references among classes. As an example, we can easily create a cycle by executing the following statements:
EXNode *first = [EXNode node];ExNode *last = [EXNode node];first.next = last;last.next = first;
This makes the next instance variable of the two classes point at each other, creating the cycle shown in Figure 18.4.
Figure 18.4. Two nodes with cyclic references.
There is no problem with sending this class graph as a parameter. For example, you could pass either first or last as a parameter to an operation and, in the server, the Ice run time will faithfully rebuild the corresponding graph, preserving the cycle. However, if a server returns such a graph from an operation invocation as the return value or as an out-parameter, all class instances that are part of a cycle are leaked. The same is true on the client side: if you receive such a graph from an operation invocation and do not explicitly break the cycle, you will leak all instances that form part of the cycle.
first
i: 0s: nilnext:
EXNode
EXNode
i: 0s: nilnext:
last

18.16 Interfaces by Value 611
Because it is difficult to break cycles manually (and, on the server side, for return values and out-parameters, it is impossible to break them), we recommend that you avoid cyclic references among classes.6
18.16 Interfaces by Value
Slice permits you to pass an interface by value:
interface ClassBase { void someOp(); // ...};interface Processor { ClassBase process(ClassBase b);};class SomeClass implements ClassBase { // ...};
Note that process accepts and returns a value of type ClassBase. This is not the same as passing a ClassBase*, which is a proxy to an object of type ClassBase that is possibly remote. Instead, what is passed here is an interface, and the inter-face is passed by value.
The immediate question is “what does this mean?” After all, interfaces are abstract and, therefore, it is impossible to pass an interface by value. The answer is that, while an interface cannot be passed, what can be passed is a class that imple-ments the interface. That class is type compatible with the formal parameter type and, therefore, can be passed by value. In the preceding example, SomeClass implements ClassBase and, hence, can be passed to and returned from the process operation.
The Objective-C mapping maps interface-by-value parameters to ICEOb-ject*, regardless of the type of the interface. For example, the proxy protocol for the process operation is:
-(ICEObject *) process:(ICEObject *)b;
6. A future version of the Objective-C run time may provide a garbage collector similar to the one used by Ice for C++.

612 Client-Side Slice-to-Objective-C Mapping
This means that you can pass a class of any type to the operation, even if it is not type-compatible with the formal parameter type, because all classes derive from ICEObject. However, an invocation of process is still type-safe at run time: the Ice run time verifies that the class instance that is passed implements the spec-ified interface; if not, the invocation throws an ICEMarshalException.
Passing interfaces by value as ICEObject* is a consequence of the decision to not generate a formal protocol for classes. (If such a protocol would exist, the formal parameter type could be id<ProtocolName>. However, as we mentioned on page 604, a protocol would require the implementation of a class to implement all of its operations, which can be inconvenient. Because it is rare to pass interfaces by value (more often, the formal parameter type will be a base class instead of a base interface), the minor loss of static type safety is an accept-able trade-off.
18.17 Asynchronous Method Invocation (AMI)
Asynchronous Method Invocation (AMI) is the term used to describe the client-side support for the asynchronous programming model. AMI supports both oneway and twoway requests, but unlike their synchronous counterparts, AMI requests never block the calling thread. When a client issues an AMI request, the Ice run time hands the message off to the local transport buffer or, if the buffer is currently full, queues the request for later delivery. The application can then continue its activities and poll or wait for completion of the invocation, or receive a callback when the invocation completes.
AMI is transparent to the server: there is no way for the server to tell whether a client sent a request synchronously or asynchronously.
To use AMI with Objective-C, you must annotate your Slice definitions with an ["objc:ami"] metadata directive. This directive instructs slice2objc to generate AMI support in addition to synchronous API (which is always gener-ated).
The metadata directive applies interfaces or operations, for example:
["objc:ami"] interface I { bool isValid(); float computeRate();};

18.17 Asynchronous Method Invocation (AMI) 613
interface J { void startProcess(); ["objc:ami"] int endProcess();};
In this example, all proxy methods of interface I are generated with support for synchronous and asynchronous invocations. In interface J, the startProcess operation uses asynchronous dispatch, and the endProcess operation supports asynchronous invocation and dispatch.
Specifying metadata at the operation level, rather than at the interface or class level, not only minimizes the amount of generated code, but more importantly, it minimizes complexity. Although the asynchronous model is more flexible, it is also more complicated to use. It is therefore in your best interest to limit the use of the asynchronous model to those operations for which it provides a particular advantage, while using the simpler synchronous model for the rest.
Proxy Methods
Besides the synchronous proxy methods, slice2objc generates an additional proxy method with the name <operation>_async. For example, consider the following definition:
["ami"] interface Intf { string op(int i, string s, out double d, out bool b);};
The corresponding asynchronous proxy method is:7
-(BOOL) op_async:(id)target_ response:(SEL)response_ exception:(SEL)exception_ i:(ICEInt)i s:(NSString *)s;
The return value and the parameters work as follows:
• An asynchronous invocation returns YES if it was written to the local trans-port and NO if it was queued for later delivery.
• The first parameter (target) of an asynchronous operation is the callback object that is notified once the invocation completes.
7. Each asynchronous operation actually results in four methods. We will return to these once we have covered the basics.

614 Client-Side Slice-to-Objective-C Mapping
• The second parameter (response) is the selector of a method of the target callback object. This method is called by the Ice run time once the operation invocation completes successfully. In other words, this selector is used if the operation did not raise an exception.
• The third parameter (exception) is the selector of a method of the target callback object. This method is called by the Ice run time once the operation invocation completes unsuccessfully. In other words, this selector is used if the operation did raise an exception.
• The remaining parameters are the in-parameters for the operation, in the order in which they are defined in Slice. (Out-parameters are not visible on the invoking end of the API.)
Given a proxy to an object of type Intf, you can invoke op assynchronously as follows:
id<EXIntfPrx> proxy = ...; // Get proxy...@try { [proxy op_async:cb response:@selector(opResponse:d:b:) exception:@selector(opException:) i:99 s:@"Hello"]) {} @catch (ICECommunicatorDestroyedException *ex) // Communicator no longer exists.}
Note that the in-parameters passed to the operation are 99 and "Hello". (We will return to the callback parameters shortly.)
In your code, you are unlikely to catch ICECommunicatorDestroyed-Exception for every asynchronous invocation. Instead, it usually is easier to catch this exception higher up in the call hierarchy and deal with it there. (After all, this indication most likely indicates that you have initiated program termina-tion.) We have included the catch handler here for illustration purposes only.
Once the Ice run time has successfully initiated an asynchronous invocation, control returns to the caller. The actual invocation is processed in the background (if it could not be written to the network immediately). Eventually, the operation will complete, either successfully or with an exception.
If the operation raised an exception, the Ice run time delivers the exception to the selector that you passed to the invocation. The exception callback method accepts a single argument of type ICEException that informs it of the cause of the failure. The exception callback must have void return type.

18.17 Asynchronous Method Invocation (AMI) 615
If the operation completed successfully, the Ice run time calls the response callback method whose selector you passed to the invocation (opRe-sponse:d:b: for the preceding example). The response callback must have void return type. The rules for how the parameter list of the response callback is formed are as follows:
• If an operation has void return type and does not use out-parameters, the response callback has no arguments.
• If an operation has non-void return type, the first parameter of the response callback is the return value of the operation.
• If an operation has out-parameters, each out-parameters becomes an argument for the response callback, in the same order as the order of out-parameters in the corresponding Slice definition. The arguments for out-parameters follow the argument for the return value (if any).
For our op_async invocation, here is how we could write our callback object to process the results:
@interface Callback// ...@end@implementation Callback-(void) opResponse:(NSString *)ret d:(ICEDouble) b:(BOOL)b{ // Process results...}-(void) opException:(ICEException *)ex{ // Handle exception...}@end
Of course, you are free to add constructors and other methods to your callback object. For example, it is common for the callback object to store a reference to an object that can further process the results (such as display them to the user). Typi-cally, the constructor stores that reference in an instance variable.
On page 613, we mentioned that each Slice operation generates four _async methods. Here is one of these for our example operation op:

616 Client-Side Slice-to-Objective-C Mapping
-(BOOL) op_async:(id)target_ response:(SEL)response_ exception:(SEL)exception_ i:(ICEInt)i s:(NSString *)s context:(ICEContext *)context;
This is exactly the same as the version we have already seen, except for the trailing context parameter. This parameter allows you to pass a context with asynchronous operations. (See Section 32.12 for details on contexts.)
The remaining two variants also come in “without context” and “with context” versions, but also have a sent parameter:
-(BOOL) op_async:(id)target_ response:(SEL)response_ exception:(SEL)exception_ sent:(SEL)sent_ i:(ICEInt)i s:(NSString *)s;-(BOOL) op_async:(id)target_ response:(SEL)response_ exception:(SEL)exception_ sent:(SEL)sent_ i:(ICEInt)i s:(NSString *)s context:(ICEContext *)context;
When you invoke an operation asynchronously, the Ice run time attempts to write the invocation to the local network buffers immediately. However, if doing so would block, the invocation is instead queued for later processing in the back-ground. In other words, once control returns to you after making an asynchronous invocation, you do not know whether the invocation was written to the local trans-port or whether it will be sent some time later.
The purpose of the sent parameter (which always follows the exception parameter and precedes the in-parameters) is to notify you if an asynchronous invocation could not be written immediately. If the invocation was queued because it could not be written to the local transport, the Ice run time calls the sent call-back. The sent callback has void return type and accepts no parameters:
@implementation Callback// ...-(void) sent

18.17 Asynchronous Method Invocation (AMI) 617
{ // Invocation was queued for later delivery.}@end
The reason for providing this callback is that, without it, a client could flood the Ice run time with asynchronous requests and run out of memory. For example, the client might asynchronously invoke operations in a loop. If the network is tempo-rarily congested, or the client loses connectivity, all the client’s invocations will end up being queued in the Ice run time (at least until they time out, if the client has configured a timeout). Of course, there is only a limited amount of buffer space available and, unless the client realizes that all its invocations are piling up in memory, it will die an untimely death.
The sent callback allows you to implement flow-control for asynchronous invocations. If an asynchronous invocation returns NO, you know that the invoca-tion has not been written to the local transport yet. In that case, you can increment a counter to keep track of the number of queued invocations. In the sent call-back, you can decrement that counter again. This mechanism allows you to limit the number of queued invocations and avoid running out of memory.
18.17.1 Concurrency Issues
Support for asynchronous invocations in Ice is enabled by the client thread pool (see Section 32.10), whose threads are primarily responsible for processing reply messages. It is important to understand the concurrency issues associated with asynchronous invocations:
• A callback object must not be used for multiple simultaneous invocations. An application that needs to aggregate information from multiple replies can create a separate object to which the callback objects delegate.
• Calls to the callback object are always made by threads from an Ice thread pool, therefore synchronization may be necessary if the application might interact with the callback object at the same time as the reply arrives. Further-more, since the Ice run time never invokes callback methods from the client’s calling thread, the client can safely make AMI invocations while holding a lock without risk of a deadlock.
• The number of threads in the client thread pool determines the maximum number of simultaneous callbacks possible for asynchronous invocations. The default size of the client thread pool is one, meaning invocations on callback objects are serialized. If the size of the thread pool is increased, the application

618 Client-Side Slice-to-Objective-C Mapping
may require synchronization, and replies can be dispatched out of order. The client thread pool can also be configured to serialize messages received over a connection so that AMI replies from a connection are dispatched in the order they are received (see Section 32.10.4).
• AMI invocations do not use collocation optimization (see Section 32.20). As a result, AMI invocations are always sent “over the wire” and thus are dispatched by the server thread pool.
18.17.2 Flushing Batch Requests
Applications that send batched requests (see Section 32.16) can either flush a batch explicitly or allow the Ice run time to flush automatically. The proxy method ice_flushBatchRequests performs an immediate flush using the synchro-nous invocation model and may block the calling thread until the entire message can be sent. Ice also provides an asynchronous version of this method for applica-tions that wish to flush batch requests without the risk of blocking.
The proxy method ice_flushBatchRequests_async initiates an asynchronous flush. Its only argument is a callback object; this object must define an ice_exception method for receiving a notification if an error occurs before the message is sent.
If the application is interested in flow control (see page 616), the return value of ice_flushBatchRequests_async is a boolean indicating whether the message was sent synchronously. Furthermore, the callback object can define an ice_sent method that is invoked when an asynchronous flush completes.
18.17.3 Limitations
AMI invocations cannot be sent using collocated optimization. If you attempt to invoke an AMI operation using a proxy that is configured to use collocation opti-mization, the Ice run time raises CollocationOptimizationException if the servant happens to be collocated; the request is sent normally if the servant is not collocated. Section 32.21 provides more information about this optimization and describes how to disable it when necessary.

18.18 slice2objc Command-Line Options 619
18.18 slice2objc Command-Line Options
The Slice-to-Objective-C compiler, slice2objc, offers the following command-line options in addition to the standard options described in Section 4.20:
• --include-dir DIR
Modifies #import directives in source files to prepend the path name of each header file with the directory DIR.
• --output-dir DIR
Places the generated source files into the specified output directory DIR.
• --depend
Prints makefile dependency information to standard output. No code is gener-ated when this option is specified. The output generally needs to be filtered before it can be included in a makefile; the Ice build system uses the script config/makedepend.py for this purpose.
• --depend-xml
Prints dependency information to standard output in XML format. No code is generated when this option is specified. This option is intended for use with Apple’s Xcode development environment.


621
Chapter 19Developing a File System Client in Objective-C
19.1 Chapter Overview
In this chapter, we present the source code for an Objective-C client that accesses the file system we developed in Chapter 5 (see Chapter 21 for the corresponding server).
19.2 The Objective-C Client
We now have seen enough of the client-side Objective-C mapping to develop a complete client to access our remote file system. For reference, here is the Slice definition once more:
["objc:prefix:FS"]module Filesystem { exception GenericError { string reason; }; interface Node { idempotent string name(); }; sequence<string> Lines;

622 Developing a File System Client in Objective-C
interface File extends Node { idempotent Lines read(); idempotent void write(Lines text) throws GenericError; }; sequence<Node*> NodeSeq; interface Directory extends Node { idempotent NodeSeq list(); };};
To exercise the file system, the client does a recursive listing of the file system, starting at the root directory. For each node in the file system, the client shows the name of the node and whether that node is a file or directory. If the node is a file, the client retrieves the contents of the file and prints them.
The body of the client code looks as follows:
#import <Ice/Ice.h>#import <Filesystem.h>#import <Foundation/NSAutoreleasePool.h>#import <stdio.h>static voidlistRecursive(id<FSDirectoryPrx> dir, int depth){ // ...}intmain(int argc, char* argv[]){ NSAutoreleasePool * pool = [[NSAutoreleasePool alloc] init]; int status = 1; id<ICECommunicator> communicator; @try { communicator = [ICEUtil createCommunicator:&argc argv:argv]; // Create a proxy for the root directory // id<FSDirectoryPrx> rootDir = [FSDirectoryPrx checkedCast:

19.2 The Objective-C Client 623
[communicator stringToProxy: @"RootDir:default -p 10000"]]; if (!rootDir) [NSException raise:@"invalid proxy" format:@"nil"]; // Recursively list the contents of the root directory // printf("Contents of root directory:\n"); listRecursive(rootDir, 0); status = 0; } @catch (NSException *ex) { NSLog(@"%@\n", [ex name]); } @try { [communicator destroy]; } @catch (NSException* ex) { NSLog(@"%@\n", [ex name]); } [pool release]; return status;}
1. The code imports a few header files:
1.Ice/Ice.h
This file is always included in both client and server source files. It provides definitions that are necessary for accessing the Ice run time.
2.Filesystem.h
This is the header that is generated by the Slice compiler from the Slice defi-nitions in Filesystem.ice.
3.NSAutoreleasePool.h
The client uses an autorelease pool to reclaim memory before it exits.
4.stdio.h
The implementation of listRecursive prints to stdout.
2. The structure of the code in main follows what we saw in Chapter 3. After initializing the run time, the client creates a proxy to the root directory of the file system. For this example, we assume that the server runs on the local host and listens using the default protocol (TCP/IP) at port 10000. The object iden-tity of the root directory is known to be RootDir.

624 Developing a File System Client in Objective-C
3. The client down-casts the proxy to DirectoryPrx and passes that proxy to listRecursive, which prints the contents of the file system.
Most of the work happens in listRecursive:
// Print the specified number of tabs.static voidprintIndent(int depth){ while (depth-- > 0) putchar('\t');}// Recursively print the contents of directory "dir" in tree// fashion. For files, show the contents of each file.// The "depth" parameter is the current nesting level// (for indentation).static voidlistRecursive(id<FSDirectoryPrx> dir, int depth){ ++depth; FSNodeSeq *contents = [dir list]; for (id<FSNodePrx> node in contents) { id<FSDirectoryPrx> dir = [FSDirectoryPrx checkedCast:node]; id<FSFilePrx> file = [FSFilePrx uncheckedCast:node]; printIndent(depth); printf("%s%s\n", [[node name] UTF8String], (dir ? " (directory):" : " (file):")); if (dir) { listRecursive(dir, depth); } else { FSLines *text = [file read]; for (NSString *line in text) { printIndent(depth); printf("\t%s\n", [line UTF8String]); } } }}
The function is passed a proxy to a directory to list, and an indent level. (The indent level increments with each recursive call and allows the code to print the

19.2 The Objective-C Client 625
name of each node at an indent level that corresponds to the depth of the tree at that node.) listRecursive calls the list operation on the directory and iter-ates over the returned sequence of nodes:
1. The code does a checkedCast to narrow the Node proxy to a Directory proxy, as well as an uncheckedCast to narrow the Node proxy to a File proxy. Exactly one of those casts will succeed, so there is no need to call checkedCast twice: if the Node is-a Directory, the code uses the id<FSDirectoryPrx> returned by the checkedCast; if the checkedCast fails, we know that the Node is-a File and, therefore, an uncheckedCast is sufficient to get an id<FSFilePrx>.
In general, if you know that a down-cast to a specific type will succeed, it is preferable to use an uncheckedCast instead of a checkedCast because an uncheckedCast does not incur any network traffic.
2. The code prints the name of the file or directory and then, depending on which cast succeeded, prints "(directory)" or "(file)" following the name.
3. The code checks the type of the node:
• If it is a directory, the code recurses, incrementing the indent level.
• If it is a file, the code calls the read operation on the file to retrieve the file contents and then iterates over the returned sequence of lines, printing each line.
Assume that we have a small file system consisting of two files and a directory as follows:
Figure 19.1. A small file system.
The output produced by the client for this file system is:
Contents of root directory: README (file): This file system contains a collection of poetry. Coleridge (directory):
RootDir
Coleridge README
Kubla_Khan
= Directory
= File

626 Developing a File System Client in Objective-C
Kubla_Khan (file): In Xanadu did Kubla Khan A stately pleasure-dome decree: Where Alph, the sacred river, ran Through caverns measureless to man Down to a sunless sea.
Note that, so far, our client (and server) are not very sophisticated:
• The protocol and address information are hard-wired into the code.
• The client makes more remote procedure calls than strictly necessary; with minor redesign of the Slice definitions, many of these calls can be avoided.
We will see how to address these shortcomings in Chapter 38 and Chapter 34.
19.3 Summary
This chapter presented a very simple client to access a server that implements the file system we developed in Chapter 5. As you can see, the Objective-C code hardly differs from the code you would write for an ordinary Objective-C program. This is one of the biggest advantages of using Ice: accessing a remote object is as easy as accessing an ordinary, local Objective-C object. This allows you to put your effort where you should, namely, into developing your application logic instead of having to struggle with arcane networking APIs. As we will see in Chapter 20, this is true for the server side as well, meaning that you can develop distributed applications easily and efficiently.
627
Chapter 20Server-Side Slice-to-Objective-C Mapping
20.1 Chapter Overview
In this chapter, we present the server-side Slice-to-Objective-C mapping (see Chapter 18 for the client-side mapping). Section 20.3 discusses how to initialize and finalize the server-side run time, sections 20.4 to 20.6 show how to implement interfaces and operations, and Section 20.7 discusses how to register objects with the server-side Ice run time.
20.2 Introduction
The mapping for Slice data types to Objective-C is identical on the client side and server side, except for operation parameters, which map slightly differently for types that have mutable and immutable variants (strings, sequence, and diction-aries). This means that the mappings in Chapter 18 also apply to the server side. However, for the server side, there are a few additional things you need to know, specifically:
• how to initialize and finalize the server-side run time
• how to implement servants
• how to pass parameters and throw exceptions

628 Server-Side Slice-to-Objective-C Mapping
• how to create servants and register them with the Ice run time.
We discuss these topics in the remainder of this chapter.
20.3 The Server-Side main Function
The main entry point to the Ice run time is represented by the local interface ICECommunicator. As for the client side, you must initialize the Ice run time by calling createCommunicator (a class method of the ICEUtil class) before you can do anything else in your server. createCommunicator returns an instance of type id<ICECommunicator>:
intmain(int argc, char* argv[]){ // ... id<ICECommunicator> communicator = [ICEUtil createCommunicator:&argc argv:argv]; // ...}
createCommunicator accepts a pointer to argc as well as argv. The class method scans the argument vector for any command-line options that are relevant to the Ice run time; any such options are removed from the argument vector so, when createCommunicator returns, the only options and arguments remaining are those that concern your application. If anything goes wrong during initialization, createCommunicator throws an exception.
Before leaving your main function, you must call Communicator::destroy. The destroy operation is responsible for finalizing the Ice run time. In particular, destroy waits for any operation implementations that are still executing in the server to complete. In addition, destroy ensures that any outstanding threads are joined with and reclaims a number of operating system resources, such as file descriptors and memory. Never allow your main function to terminate without calling destroy first; doing so has undefined behavior.
The general shape of our server-side main function is therefore as follows:
#import <Ice/Ice.h>intmain(int argc, char* argv[]){ NSAutoreleasePool * pool = [[NSAutoreleasePool alloc] init];

20.3 The Server-Side main Function 629
int status = 1; id<ICECommunicator> communicator = nil; @try { communicator = [ICEUtil createCommunicator:&argc argv:argv]; // Server code here... status = 0; } @catch (NSException* ex) { NSLog(@"%@", ex); } @try { [communicator destroy]; } @catch (NSException* ex) { NSLog(@"%@", ex); } [pool release]; return status;}
Note that the code places the call to createCommunicator into a try block and takes care to return the correct exit status to the operating system. Also note that the code creates and releases an autorelease pool. This ensures that memory will be released before the program terminates.
The catch handler for NSException ensures that the communicator is destroyed regardless of whether the program terminates normally or due to an exception.
You must not release the communicator that is returned by createCommu-nicator. As for any operation that returns a pointer, the Ice run time calls autorelease on the returned instance, so you do not have to release it your-self.1
1. This is also the reason why createCommunicator is not called initialize (as it is for other language mappings)—initialize would suggest that the return value must be released because the method name begins with init.

630 Server-Side Slice-to-Objective-C Mapping
Alternative Ways to Create a Communicator
createCommunicator is provided in several versions that accept different arguments. Here is the complete list:
• (id<ICECommunicator>) createCommunicator: (int*)argc argv:(char*[])argv initData:(ICEInitializationData*)initData;
This is the designated initializer—the remaining versions of createCommu-nicator are implemented in terms of this initializer.
As for the version we saw in the preceding section, this version accepts a pointer to argc as well as argv and removes Ice-related command-line options from the argument vector.
The initData argument allows you to pass additional initialization infor-mation to the Ice run time (see below).
• +(id<ICECommunicator>) createCommunicator;
This is equivalent to calling
[ICEUtil createCommunicator:nil argv:nil initData:nil];
• +(id<ICECommunicator>) createCommunicator: (int*)argc argv:(char*[])argv;
This is equivalent to calling
[ICEUtil createCommunicator:&argc argv:argv initData:nil];
• +(id<ICECommunicator>) createCommunicator: (ICEInitializationData*)initData
This is equivalent to calling
[ICEUtil createCommunicator:nil argv:nil initData:initData];
The initData argument is of type ICEInitializationData. Even though it has no Slice definition, this class behaves as if it were a Slice structure with the following definition:
#include <Properties.ice>#include <Logger.ice>["objc:prefix:ICE"]module Ice { dictionary<string, string> PrefixDict; local struct InitializationData {

20.4 Mapping for Interfaces 631
Ice::Properties properties; Ice::Logger logger; };};
The properties member allows you to explicitly set property values for the communicator to be created. This is useful, for example, if you want to ensure that a particular property setting is always used by the communicator. (See Chapter 30 for more information.)
The logger member sets the logger that the Ice run time uses to log messages. If you do not set a logger (leaving the logger member as nil), the run time installs a default logger that calls NSLog to log messages. (See Section 32.19 for more information on loggers.)
20.4 Mapping for Interfaces
The server-side mapping for interfaces provides an up-call API for the Ice run time: by implementing methods in a servant class, you provide the hook that gets the thread of control from the Ice server-side run time into your application code.
20.4.1 Skeleton Classes
On the client side, interfaces map to proxy protocols and classes (see Section 18.11). On the server side, interfaces map to skeleton protocols and classes. A skeleton is a class that has a method for each operation on the corre-sponding interface. For example, consider the Slice definition for the Node inter-face we defined in Chapter 5 once more:
["objc:prefix:FS"]module Filesystem { interface Node { idempotent string name(); };// ...};
The Slice compiler generates the following definition for this interface:

632 Server-Side Slice-to-Objective-C Mapping
@protocol FSNode <ICEObject>-(NSString *) name:(ICECurrent *)current;@end@interface FSNode : ICEObject// ...@end
As you can see, the server-side API consists of a protocol and a class, known as the skeleton protocol and skeleton class. The methods of the skeleton class are internal to the mapping, so they do not concern us here. The skeleton protocol defines one method for each Slice operation. As for the client-side mapping, the method name is the same as the name of the corresponding Slice operation. If the Slice operation has parameters or a return value, these are reflected in the gener-ated method, just as they are for the client-side mapping. In addition, each method has an additional trailing parameter of type ICECurrent. This parameter provides additional information about an invocation to your server-side code (see Section 32.6).
As for the client-side mapping, the generated code reflects the fact that all Slice interfaces and classes ultimately derive from Ice::Object. As you can see, the generated protocol incorporates the ICEObject protocol, and the generated class derives from the ICEObject class.
20.4.2 Servant Classes
The Objective-C mapping supports two different ways to implement servants. You can implement a servant by deriving from the skeleton class and implementing the methods for the Slice operations in your derived class. Alternatively, you can use a delegate servant, which need not derive from the skeleton class.
Derived Servants
To provide an implementation for an Ice object, you can create a servant class that derives from the corresponding skeleton class. For example, to create a servant for the Node interface, you could write:
@interface NodeI : FSNode <FSNode>{ @private NSString *myName;

20.4 Mapping for Interfaces 633
}+(id) nodei:(NSString *)name;@end
By convention, servant classes have the name of their interface with an I-suffix, so the servant class for the Node interface is called NodeI. (This is a convention only: as far as the Ice run time is concerned, you can chose any name you prefer for your servant classes.)
Note that NodeI derives from FSNode, that is, it derives from its skeleton class. In addition, it adopts the FSNode protocol. Adopting the protocol is not strictly necessary; however, if you do write your servants this way, the compiler emits a warning if you forget to implement one or more Slice operations for the corresponding interface, so we suggest that you make it a habit to always have your servant class adopt its skeleton protocol.
As far as Ice is concerned, the NodeI class must implement the single name method that is defined by its skeleton protocol. That way, the Ice run time gets a servant that can respond to the operation that is defined by its Slice interface. You can add other methods and instance variables as you see fit to support your imple-mentation. For example, in the preceding definition, we added a myName instance variable and property, a convenience constructor, and dealloc. Not surprisingly, the convenience constructor initializes the myName instance variable, the name method returns the value of that variable, and dealloc releases it:
@implementation NodeI+(id) nodei:(NSString *)name{ NodeI *instance = [[[NodeI alloc] init] autorelease]; instance.myName = [[name copy] retain]; return instance;}-(NSString *) name:(ICECurrent *)current{ return myName;}-(void) dealloc{

634 Server-Side Slice-to-Objective-C Mapping
[myName release]; [super dealloc];}@end
Delegate Servants
An alternate way to implement a servant is to use a delegate. ICEObject provides two constructors to do this:
@interface ICEObject NSObject <ICEObject, NSCopying>// ...-(id) initWithDelegate:(id)delegate;+(id) objectWithDelegate:(id)delegate;@end
The delegate parameter specifies an object to which the servant will delegate operation invocations. That object need not derive from the skeleton class; the only requirement on the delegate is that it must have an implementation of the methods corresponding to the Slice operations that are called by clients. As for derived servants, we suggest that the delegate adopt the skeleton protocol, so the compiler will emit a warning if you forget to implement one or more Slice opera-tions in the delegate.
The implementation of the Slice operations in a delegate servant is exactly the same as for a derived servant.
Delegate servants are useful if you need to derive your servant implementation from a base class in order to access some functionality. In that case, you cannot also derive the servant from the generated skeleton class. A delegate servant gets around Objective-C’s single inheritance limitation and saves you having to write a servant class that forwards each operation invocation to the delegate.
Another use case are different interfaces that share their implementation. As an example, consider the following Slice definitions:
interface Intf1 { void op1();};interface Intf2 { void op2();};
If op1 and op2 are substantially similar in their implementation and share common state, it can be convenient to implement the servants for Intf1 and Intf2 using a common delegate class:

20.5 Parameter Passing 635
@interface Intf1AndIntf2 : NSObject<EXIntf1, EXIntf2> +(id) intf1AndIntf2;@end@implementation Intf1AndIntf2 +(id) intf1AndIntf2 { /*...*/ } -(void) op1:(ICECurrent*)current { /*...*/ } -(void) op2:(ICECurrent*)current { /*...*/ }@end
See page 638 for an example of how to instantiate delegate servants.Delegate servants do not permit you to override operations that are inherited
from ICEObject (such as ice_ping). Therefore, if you want to override ice_ping, for example, to implement a default servant (see page 968), you must use a derived servant.
20.5 Parameter Passing
For each parameter of a Slice operation, the Objective-C mapping generates a corresponding parameter for the method in the skeleton. In addition, every method has an additional, trailing parameter of type ICECurrent. For example, the name operation of the Node interface has no parameters, but the name method of the Node skeleton protocol has a single parameter of type ICECurrent. We explain the purpose of this parameter in Section 32.6 and will ignore it for now.
Parameter passing on the server side follows the rules for the client side (with one exception):
• In-parameters and the return value are passed by value or by pointer, depending on the parameter type.
• Out-parameters are passed by pointer-to-pointer.
The exception to the client-side rules concerns types that come in mutable and immutable variants (strings, sequences, and dictionaries). For these, the server-side mapping passes the mutable variant where the client-side passes the immu-table variant, and vice versa.
To illustrate the rules, consider the following interface that passes string parameters in all possible directions:
interface Intf { string op(string sin, out string sout);};

636 Server-Side Slice-to-Objective-C Mapping
The generated skeleton protocol for this interface looks as follows:
@protocol EXIntf <ICEObject>-(NSString *) op:(NSMutableString *)sin sout:(NSString **)sout current:(ICECurrent *)current;@end
As you can see, the in-parameter sin is of type NSMutableString, and out parameter and return value are passed as NSString (the opposite of the client-side mapping). This means that in-parameters are passed to the servant as their mutable variant, and it is safe for you to modify such in-parameters. This is useful, for example, if a client passes a sequence to the operation, and the operation returns the sequence with a few minor changes. In that case, there is no need for the operation implementation to copy the sequence. Instead, you can simply modify the passed sequence as necessary and return the modified sequence to the client.
Here is an example implementation of the operation:
-(NSString *) op:(NSMutableString *)sin sout:(NSString **)sout current:(ICECurrent *)current{ printf("%s\n", [sin UTF8String]); // In-params are initialized *sout = [sin appendString:@"appended"]; // Assign out-param return @"Done"; // Return a string}
Memory Management for Operations
To avoid leaking memory, you must be aware of how the Ice run time manages memory for operation implementations:
• In-parameters are passed to the servant already autoreleased.
• Out-parameters and return values must be returned by the servant as autore-leased values.
This follows the usual Objective-C convention: the allocator of a value is respon-sible for releasing it. This is what the Ice run time does for in-parameters, and what you are expected to do for out-parameters and return values. These rules also mean that it is OK to return an in-parameter as an out-parameter or return value. For example:

20.6 Raising Exceptions 637
-(NSString *) op:(NSMutableString *)sin sout:(NSString **)sout current:(ICECurrent *)current{ *sout = sin; // Works fine. return sin; // Works fine.}
The Ice run time creates and releases a separate autorelease pool for each invoca-tion. This means that the memory for parameters is reclaimed as soon as the run time has marshaled the operation results back to the client.
20.6 Raising Exceptions
To throw an exception from an operation implementation, you simply allocate the exception, initialize it, and throw it. For example:
-(void) write:(NSMutableArray *)text current:(ICECurrent *)current{ // Try to write the file contents here... // Assume we are out of space... if (error) @throw [FSGenericError genericError:@"file too large"];}
As for out-parameters and return values, you must take care to throw an autore-leased exception.
If you throw an “impossible” user exception (a user exception that is not listed in the exception specification of the operation), the client receives an Unknow-nUserException.
If you throw a run-time exception, such as MemoryLimitException, the client receives an UnknownLocalException.2 For that reason, you should never throw system exceptions from operation implementations. If you do, all the client will see is an UnknownLocalException, which does not tell the client anything useful.
2. There are three system exceptions that are not changed to UnknownLocalException when returned to the client: ObjectNotExistException, OperationNotExistException, and FacetNotExistException. We discuss these exceptions in more detail in Section 4.10.4 and Chapter 33.

638 Server-Side Slice-to-Objective-C Mapping
If you throw an arbitrary Objective-C exception that does not derive from ICEException, the client receives an UnknownException.
20.7 Object Incarnation
Having created a servant class such as the rudimentary NodeI class in Section 20.4.2, you can instantiate the class to create a concrete servant that can receive invocations from a client. However, merely instantiating a servant class is insufficient to incarnate an object. Specifically, to provide an implementation of an Ice object, you must follow these steps:
1. Instantiate a servant class.
2. Create an identity for the Ice object incarnated by the servant.
3. Inform the Ice run time of the existence of the servant.
4. Pass a proxy for the object to a client so the client can reach it.
20.7.1 Instantiating a Servant
Instantiating a servant means to allocate an instance on the heap:
NodeI *servant = [NodeI nodei:@"Fred"];
This code creates a new NodeI instance. For this example, we used the conve-nience constructor we saw on page 633. Of course, you are not obliged to define such a constructor but, if you do not, you must explicitly call release or autorelease on the servant.
For the delegate servants we saw on page 634, instantiation would look as follows:
Intf1AndIntf2 *delegate = [Intf1AndIntf2 intf1AndIntf2];ICEObject *servant = [ICEObject objectWithDelegate:delegate];
20.7.2 Creating an Identity
Each Ice object requires an identity. That identity must be unique for all servants using the same object adapter.3 An Ice object identity is a structure with the following Slice definition:

20.7 Object Incarnation 639
["objc:prefix:ICE"]module Ice { struct Identity { string name; string category; }; // ...};
The full identity of an object is the combination of both the name and category fields of the Identity structure. For now, we will leave the category field as the empty string and simply use the name field. (See Section 32.7 for a discussion of the category field.)
To create an identity, we simply assign a key that identifies the servant to the name field of the Identity structure:
ICEIdentity ident = [ICEIdentity identity:"Fred" category:nil];
20.7.3 Activating a Servant
Merely creating a servant instance does nothing: the Ice run time becomes aware of the existence of a servant only once you explicitly tell the object adapter about the servant. To activate a servant, you invoke the add operation on the object adapter. Assuming that we have access to the object adapter in the adapter vari-able, we can write:
[adapter add:servant identity:ident];
Note the two arguments to add: the servant and the object identity. Calling add on the object adapter adds the servant and the servant’s identity to the adapter’s servant map and links the proxy for an Ice object to the correct servant instance in the server’s memory as follows:
1. The proxy for an Ice object, apart from addressing information, contains the identity of the Ice object. When a client invokes an operation, the object iden-tity is sent with the request to the server.
2. The object adapter receives the request, retrieves the identity, and uses the identity as an index into the servant map.
3. The Ice object model assumes that all objects (regardless of their adapter) have a globally unique identity. See Chapter 34 for further discussion.

640 Server-Side Slice-to-Objective-C Mapping
3. If a servant with that identity is active, the object adapter retrieves the servant pointer from the servant map and dispatches the incoming request into the correct method on the servant.
Assuming that the object adapter is in the active state (see Section 32.4.5), client requests are dispatched to the servant as soon as you call add.
Putting the preceding points together, we can write a simple method that instantiates and activates one of our NodeI servants. For this example, we use a simple method on our servant called activate that activates a servant in an object adapter with the passed identity:
-(void) activate:(id<ICEObjectAdapter>)a name:(NSString *)name{ ICEIdentity ident = [ICEIdentity identity:name category:nil]; [a add:self identity:ident];}
20.7.4 UUIDs as Identities
The Ice object model assumes that object identities are globally unique. One way of ensuring that uniqueness is to use UUIDs (Universally Unique Identifiers) [14] as identities. The ICEUtil class contains a helper function to create such identi-ties:
@interface ICEUtil : NSObject+(id) generateUUID;// ...@end
When executed, this method returns a unique string such as 5029a22c-e333-4f87-86b1-cd5e0fcce509. Each call to genera-teUUID creates a string that differs from all previous ones. You can use a UUID such as this to create object identities. For convenience, the object adapter has an operation addWithUUID that generates a UUID and adds a servant to the servant map in a single step:
-(id<ICEObjectPrx>) addWithUUID:(ICEObject*)servant
Note that the operation returns the proxy for the servant just activated.

20.7 Object Incarnation 641
20.7.5 Creating Proxies
Once we have activated a servant for an Ice object, the server can process incoming client requests for that object. However, clients can only access the object once they hold a proxy for the object. If a client knows the server’s address details and the object identity, it can create a proxy from a string, as we saw in our first example in page 68. However, creation of proxies by the client in this manner is usually only done to allow the client access to initial objects for bootstrapping. Once the client has an initial proxy, it typically obtains further proxies by invoking operations.
The object adapter contains all the details that make up the information in a proxy: the addressing and protocol information, and the object identity. The Ice run time offers a number of ways to create proxies. Once created, you can pass a proxy to the client as the return value or as an out-parameter of an operation invo-cation.
Proxies and Servant Activation
The add and addWithUUID servant activation operations on the object adapter return a proxy for the corresponding Ice object, as we saw earlier. This means we can write:
NodeI *servant = [NodeI nodei:name];id<FSNodePrx> proxy = [FSNodePrx uncheckedCast: [adapter addWithUUID:servant]];// Pass proxy to client...
Here, addWithUUID both activates the servant and returns a proxy for the Ice object incarnated by that servant in a single step.
Note that we need to use an uncheckedCast here because addWithUUID returns a proxy of type id<ICEObjectPrx>.
Direct Proxy Creation
The object adapter offers an operation to create a proxy for a given identity:
["objc:prefix:ICE"]module Ice { local interface ObjectAdapter { Object* createProxy(Identity id); // ... };};

642 Server-Side Slice-to-Objective-C Mapping
Note that createProxy creates a proxy for a given identity whether a servant is activated with that identity or not. In other words, proxies have a life cycle that is quite independent from the life cycle of servants:
ICEIdentity *ident = [ICEIdentity identity];ident.name = [ICEUtil generateUUID];id<ICEObjectPrx> o = [adapter createProxy:ident];
This creates a proxy for an Ice object with the identity returned by genera-teUUID. Obviously, no servant yet exists for that object so, if we return the proxy to a client and the client invokes an operation on the proxy, the client will receive an ObjectNotExistException. (We examine these life cycle issues in more detail in Chapter 34.)
20.8 Summary
This chapter presented the server-side Objective-C mapping. Because the mapping for Slice data types is almost identical for clients and servers, the server-side mapping only adds a few additional mechanisms to the client side: a small API to initialize and finalize the run time, plus a few rules for how to derive servant classes from skeletons and how to register servants with the server-side run time.
Even though the examples in this chapter are very simple, they accurately reflect the basics of writing an Ice server. Of course, for more sophisticated servers (which we discuss in Chapter 32), you will be using additional APIs, for example, to improve performance or scalability. However, these APIs are all described in Slice, so, to use these APIs, you need not learn any Objective-C mapping rules beyond those we described here.

643
Chapter 21Developing a File System Server in Objective-C
21.1 Chapter Overview
In this chapter, we present the source code for an Objective-C server that imple-ments the file system we developed in Chapter 5 (see Chapter 19 for the corre-sponding client). The code we present here is fully functional, apart from the required interlocking for threads. (We examine threading issues in detail in Chapter 31.)
21.2 Implementing a File System Server
We have now seen enough of the server-side Objective-C mapping to implement a server for the file system we developed in Chapter 5. (You may find it useful to review the Slice definition for our file system in Section 5.4 before studying the source code.)
Our server is composed of three source files:
• Server.m
This file contains the server main program.
• FileI.m
This file contains the implementation for the File servants.

644 Developing a File System Server in Objective-C
• DirectoryI.m
This file contains the implementation for the Directory servants.
21.2.1 The Server main ProgramOur server main program, in the file Server.m, uses the structure we saw in Section 20.3:
#import <Ice/Ice.h>#import <FileI.h>#import <DirectoryI.h>#import <Foundation/NSAutoreleasePool.h>intmain(int argc, char* argv[]){ NSAutoreleasePool * pool = [[NSAutoreleasePool alloc] init]; int status = 1; id<ICECommunicator> communicator = nil; @try { communicator = [ICEUtil createCommunicator:&argc argv:argv]; id<ICEObjectAdapter> adapter = [communicator createObjectAdapterWithEndpoints: @"SimpleFilesystem" endpoints:@"default -p 10000"]; // Create the root directory (with name "/" and no parent) // DirectoryI *root = [DirectoryI directoryi:@"/" parent:nil]; [root activate:adapter]; // Create a file called "README" in the root directory // FileI *file = [FileI filei:@"README" parent:root]; NSMutableArray *text = [NSMutableArray arrayWithObject: @"This file system contains a collection of poetry."]; [file write:text current:nil]; [file activate:adapter]; // Create a directory called "Coleridge" in the root dir
21.2 Implementing a File System Server 645
// DirectoryI *coleridge = [DirectoryI directoryi:@"Coleridge" parent:root]; [coleridge activate:adapter]; // Create a file called "Kubla_Khan" // in the Coleridge directory // file = [FileI filei:@"Kubla_Khan" parent:coleridge]; text = [NSMutableArray arrayWithObjects: @"In Xanadu did Kubla Khan", @"A stately pleasure-dome decree:", @"Where Alph, the sacred river, ran", @"Through caverns measureless to man", @"Down to a sunless sea.", nil]; [file write:text current:nil]; [file activate:adapter]; // All objects are created, allow client requests now // [adapter activate]; // Wait until we are done // [communicator waitForShutdown]; status = 0; } @catch (NSException* ex) { NSLog(@"%@", ex); } @try { [communicator destroy]; } @catch (NSException* ex) { NSLog(@"%@", ex); } [pool release]; return status;}
There is quite a bit of code here, so let us examine each section in detail:

646 Developing a File System Server in Objective-C
#import <Ice/Ice.h>#import <FileI.h>#import <DirectoryI.h>#import <Foundation/NSAutoreleasePool.h>
The code includes the header Ice/Ice.h, which contains the definitions for the Ice run time, and the files FileI.h and DirectoryI.h, which contain the definitions of our servant implementations. Because we use an autorelease pool, we need to include Foundation/NSAutoreleasePool.h as well.
The next part of the source code is mostly boiler plate that we saw previously: we create an object adapter, and, towards the end, activate the object adapter and call waitForShutdown, which blocks the calling thread until you call shut-down or destroy on the communicator. (Ice does not make any demands on the main thread, so waitForShutdown simply blocks the calling thread; if you want to use the main thread for other purposes, you are free to do so.)
intmain(int argc, char* argv[]){ NSAutoreleasePool * pool = [[NSAutoreleasePool alloc] init]; int status = 1; id<ICECommunicator> communicator = nil; @try { communicator = [ICEUtil createCommunicator:&argc argv:argv]; id<ICEObjectAdapter> adapter = [communicator createObjectAdapterWithEndpoints: @"SimpleFilesystem" endpoints:@"default -p 10000"]; // ... // All objects are created, allow client requests now // [adapter activate]; // Wait until we are done // [communicator waitForShutdown]; status = 0; } @catch (NSException* ex) {
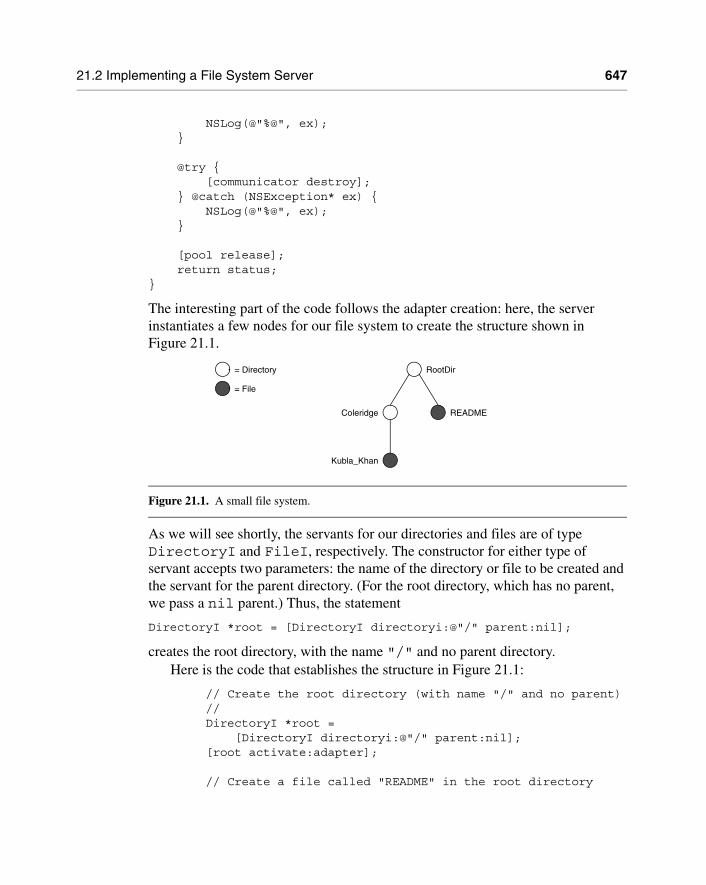
21.2 Implementing a File System Server 647
NSLog(@"%@", ex); } @try { [communicator destroy]; } @catch (NSException* ex) { NSLog(@"%@", ex); } [pool release]; return status;}
The interesting part of the code follows the adapter creation: here, the server instantiates a few nodes for our file system to create the structure shown in Figure 21.1.
Figure 21.1. A small file system.
As we will see shortly, the servants for our directories and files are of type DirectoryI and FileI, respectively. The constructor for either type of servant accepts two parameters: the name of the directory or file to be created and the servant for the parent directory. (For the root directory, which has no parent, we pass a nil parent.) Thus, the statement
DirectoryI *root = [DirectoryI directoryi:@"/" parent:nil];
creates the root directory, with the name "/" and no parent directory.Here is the code that establishes the structure in Figure 21.1:
// Create the root directory (with name "/" and no parent) // DirectoryI *root = [DirectoryI directoryi:@"/" parent:nil]; [root activate:adapter]; // Create a file called "README" in the root directory
RootDir
Coleridge README
Kubla_Khan
= Directory
= File
648 Developing a File System Server in Objective-C
// FileI *file = [FileI filei:@"README" parent:root]; NSMutableArray *text = [NSMutableArray arrayWithObject: @"This file system contains a collection of poetry."]; [file write:text current:nil]; [file activate:adapter]; // Create a directory called "Coleridge" in the root dir // DirectoryI *coleridge = [DirectoryI directoryi:@"Coleridge" parent:root]; [coleridge activate:adapter]; // Create a file called "Kubla_Khan" // in the Coleridge directory // file = [FileI filei:@"Kubla_Khan" parent:coleridge]; text = [NSMutableArray arrayWithObjects: @"In Xanadu did Kubla Khan", @"A stately pleasure-dome decree:", @"Where Alph, the sacred river, ran", @"Through caverns measureless to man", @"Down to a sunless sea.", nil]; [file write:text current:nil]; [file activate:adapter];
We first create the root directory and a file README within the root directory. (Note that we pass the servant for the root directory as the parent pointer when we create the new node of type FileI.)
After creating each servant, the code calls activate on the servant. (We will see the definition of this member function shortly.) The activate member function adds the servant to the ASM.
The next step is to fill the file with text:
// Create the root directory (with name "/" and no parent) // DirectoryI *root = [DirectoryI directoryi:@"/" parent:nil]; [root activate:adapter]; // Create a file called "README" in the root directory // FileI *file = [FileI filei:@"README" parent:root]; NSMutableArray *text = [NSMutableArray arrayWithObject:

21.2 Implementing a File System Server 649
@"This file system contains a collection of poetry."]; [file write:text current:nil]; [file activate:adapter]; // Create a directory called "Coleridge" in the root dir // DirectoryI *coleridge = [DirectoryI directoryi:@"Coleridge" parent:root]; [coleridge activate:adapter]; // Create a file called "Kubla_Khan" // in the Coleridge directory // file = [FileI filei:@"Kubla_Khan" parent:coleridge]; text = [NSMutableArray arrayWithObjects: @"In Xanadu did Kubla Khan", @"A stately pleasure-dome decree:", @"Where Alph, the sacred river, ran", @"Through caverns measureless to man", @"Down to a sunless sea.", nil]; [file write:text current:nil]; [file activate:adapter];
Recall from Section 18.8.3 that Slice string sequences map to NSArray or NSMutableArray, depending on the parameter direction. Here, we instantiate that array and add a line of text to it.
Finally, we call the Slice write operation on our FileI servant by simply writing:
[file write:text current:nil];
This code is interesting: the server code invokes an operation on one of its own servants. Because the call happens via the pointer to the servant (of type FileI) and not via a proxy (of type id<FilePrx>), the Ice run time does not know that this call is even taking place—such a direct call into a servant is not mediated by the Ice run time in any way and is dispatched as an ordinary Objective-C function call. The operation implementation in the servant expects a current object. In this case, we pass nil (which is fine because the operation implementation does not use it anyway).
In similar fashion, the remainder of the code creates a subdirectory called Coleridge and, within that directory, a file called Kubla_Khan to complete the structure in Figure 21.1.

650 Developing a File System Server in Objective-C
21.2.2 The Servant Class Definitions
We must provide servants for the concrete interfaces in our Slice specification, that is, we must provide servants for the File and Directory interfaces in the Objective-C classes FileI and DirectoryI. This means that our servant classes look as follows:
#import <Filesystem.h>@interface FileI : FSFile <FSFile>// ...@end@interface DirectoryI : FSDirectory <FSDirectory>// ...@end
Each servant class derives from its skeleton class and adopts its skeleton protocol.We now can think about how to implement our servants. One thing that is
common to all nodes is that they have a name and a parent directory. As we saw earlier, we pass these details to a convenience constructor, which also takes care of calling autorelease on the new servant.
In addition, we will use UUIDs as the object identities for files and directories. This relieves us of the need to otherwise come up with a unique identity for each servant (such as path names, which would only complicate our implementation). Because the list operation returns proxies to nodes, and because each proxy carries the identity of the servant it denotes, this means that our servants must store their own identity, so we can create proxies to them when clients ask for them.
For File servants, we also need to store the contents of the file, leading to the following definition for the FileI class:
#import <Filesystem.h>@class DirectoryI;@interface FileI : FSFile <FSFile>{ @private NSString *myName; DirectoryI *parent; ICEIdentity *ident; NSArray *lines;}

21.2 Implementing a File System Server 651
@property(nonatomic, retain) NSString *myName;@property(nonatomic, retain) DirectoryI *parent;@property(nonatomic, retain) ICEIdentity *ident;@property(nonatomic, retain) NSArray *lines;+(id) filei:(NSString *)name parent:(DirectoryI *)parent;-(void) write:(NSMutableArray *)text current:(ICECurrent *)current;-(void) activate:(id<ICEObjectAdapter>)a;@end
The instance variables store the name, parent node, identity, and the contents of the file. The filei convenience constructor instantiates the servant, remembers the name and parent directory, assigns a new identity, and calls autorelease.
Note that the only Slice operation we have defined here is the write method. This is necessary because, as we saw previously, the code in Server.m calls this method to initialize the files it creates.
For directories, the requirements are similar. They also need to store a name, parent directory, and object identity. Directories are also responsible for keeping track of the child nodes. We can store these nodes in an array of proxies. This leads to the following definition:
#import <Filesystem.h>@interface DirectoryI : FSDirectory <FSDirectory>{ @private NSString *myName; DirectoryI *parent; ICEIdentity *ident; NSMutableArray *contents;}@property(nonatomic, retain) NSString *myName;@property(nonatomic, retain) DirectoryI *parent;@property(nonatomic, retain) ICEIdentity *ident;@property(nonatomic, retain) NSMutableArray *contents; +(id) directoryi:(NSString *)name parent:(DirectoryI *)parent;-(void) addChild:(id<FSNodePrx>)child;-(void) activate:(id<ICEObjectAdapter>)a;@end
Because the code in Server.m does not call any Slice operations on directory servants, we have not declared any of the corresponding methods. (We will see the

652 Developing a File System Server in Objective-C
purpose of the addChild method shortly.) As for files, the convenience constructor creates the servant, remembers the name and parent, and assigns an object identity, as well as calling autorelease.
21.2.3 The Servant Implementation
Let us now turn to how to implement each of the methods for our servants.
Implementing FileI
The implementation of the name, read, and write operations for files is trivial, returning or updating the corresponding instance variable:
-(NSString *) name:(ICECurrent *)current{ return myName;}-(NSArray *) read:(ICECurrent *)current{ return lines;}-(void) write:(NSMutableArray *)text current:(ICECurrent *)current{ self.lines = text;}
Note that this constitutes the complete implementation of the Slice operations for files.
Here is the convenience constructor:
+(id) filei:(NSString *)name parent:(DirectoryI *)parent{ FileI *instance = [[[FileI alloc] init] autorelease]; if(instance == nil) { return nil; } instance.myName = name; instance.parent = parent; instance.ident = [ICEIdentity identity:[ICEUtil generateUUID] category:nil]; return instance;}

21.2 Implementing a File System Server 653
After allocating and autoreleasing the instance, the constructor initializes the instance variables. The only interesting part of this code is how we create the iden-tity for the servant. generateUUID is a class method of the ICEUtil class that returns a UUID. We assign this UUID to the name member of the identity. (The category is unused—see Section 32.5 for more information.)
We saw earlier that the server calls activate after it creates each servant. Here is the implementation of this method:
-(void) activate:(id<ICEObjectAdapter>)a{ id<FSNodePrx> thisNode = [FSNodePrx uncheckedCast:[a add:self identity:ident]]; [parent addChild:thisNode];}
This is how our code informs the Ice run time of the existence of a new servant. The call to add on the object adapter adds the servant and object identity to the adapter’s servant map. In other words, this step creates the link between the object identity (which is embedded in proxies), and the actual Objective-C class instance that provides the behavior for the Slice operations.
add returns a proxy to the servant, of type id<ICEObjectPrx>. Because the contents instance variable of directory servants stores proxies of type id<FSNodePrx> (and addChild expects a proxy of that type), we down-cast the returned proxy to id<FSNodePrx>. In this case, because we know that the servant we just added to the adapter is indeed a servant that implements the opera-tions on the Slice Node interface, we can use an uncheckedCast.
The call to addChild connects the new file to its parent directory.Finally, we need a dealloc function so we do not leak the memory for the
servant’s instance variables:
-(void) dealloc{ [myName release]; [parent release]; [ident release]; [lines release]; [super dealloc];}
Implementing DirectoryI
The implementation of the Slice operations for directories is just as simple as for files:

654 Developing a File System Server in Objective-C
-(NSString *) name:(ICECurrent *)current{ return myName;}-(NSArray *) list:(ICECurrent *)current{ return contents;}
Because the contents instance variable stores the proxies for child nodes of the directory, the list operation simply returns that variable.
The convenience constructor looks much like the one for file servants:
+(id) directoryi:(NSString *)name parent:(DirectoryI *)parent{ DirectoryI *instance = [[[DirectoryI alloc] init] autorelease]; if(instance == nil) { return nil; } instance.myName = name; instance.parent = parent; instance.ident = [ICEIdentity identity:(parent ? [ICEUtil generateUUID] : @"RootDir") category:nil]; instance.contents = [[NSMutableArray alloc] init]; return instance;}
The only noteworthy differences are that, for the root directory (which has no parent), the code uses "RootDir" as the identity. (As we saw on page 623, the client knows that this is the identity of the root directory and uses it to create its proxy.)
The addChild method connects our nodes into a hierarchy by updating the contents instance variable. That way, each directory knows which nodes are contained in it:
-(void) addChild:(id<FSNodePrx>)child{ [contents addObject:child];}
Finally, the activate and dealloc methods are very much like the corre-sponding methods for files:

21.3 Summary 655
-(void) activate:(id<ICEObjectAdapter>)a{ id<FSNodePrx> thisNode = [FSNodePrx uncheckedCast:[a add:self identity:ident]]; [parent addChild:thisNode];}-(void) dealloc{ [myName release]; [parent release]; [ident release]; [contents release]; [super dealloc];}
21.3 Summary
This chapter showed how to implement a complete server for the file system we defined in Chapter 5. Note that the server is remarkably free of code that relates to distribution: most of the server code is simply application logic that would be present just the same for a non-distributed version. Again, this is one of the major advantages of Ice: distribution concerns are kept away from application code so that you can concentrate on developing application logic instead of networking infrastructure.
Note that the server code we presented here is not quite correct as it stands: if two clients access the same file in parallel, each via a different thread, one thread may read the lines instance variable while another thread updates it. Obviously, if that happens, we may write or return garbage or, worse, crash the server. However, it is trivial to make the read and write operations thread-safe with a few lines of code. We discuss how to write thread-safe servant implementations in Chapter 31.


Part VII
Python Mapping


659
Chapter 22Client-Side Slice-to-Python Mapping
22.1 Chapter Overview
In this chapter, we present the client-side Slice-to-Python mapping (see Chapter 24 for the server-side mapping). One part of the client-side Python mapping concerns itself with rules for representing each Slice data type as a corre-sponding Python type; we cover these rules in Section 22.3 to Section 22.10. Another part of the mapping deals with how clients can invoke operations, pass and receive parameters, and handle exceptions. These topics are covered in Section 22.11 to Section 22.13. Slice classes have the characteristics of both data types and interfaces and are covered in Section 22.14. Section 22.15 discusses asynchronous invocations. Code generation issues are discussed in Section 22.16, while Section 22.17 addresses the use of Slice checksums.
22.2 Introduction
The client-side Slice-to-Python mapping defines how Slice data types are trans-lated to Python types, and how clients invoke operations, pass parameters, and handle errors. Much of the Python mapping is intuitive. For example, Slice sequences map to Python lists, so there is essentially nothing new you have to learn in order to use Slice sequences in Python.

660 Client-Side Slice-to-Python Mapping
The Python API to the Ice run time is fully thread-safe. Obviously, you must still synchronize access to data from different threads. For example, if you have two threads sharing a sequence, you cannot safely have one thread insert into the sequence while another thread is iterating over the sequence. However, you only need to concern yourself with concurrent access to your own data—the Ice run time itself is fully thread safe, and none of the Ice API calls require you to acquire or release a lock before you safely can make the call.
Much of what appears in this chapter is reference material. We suggest that you skim the material on the initial reading and refer back to specific sections as needed. However, we recommend that you read at least Section 22.11 to Section 22.13 in detail because these sections cover how to call operations from a client, pass parameters, and handle exceptions.
A word of advice before you start: in order to use the Python mapping, you should need no more than the Slice definition of your application and knowledge of the Python mapping rules. In particular, looking through the generated code in order to discern how to use the Python mapping is likely to be inefficient, due to the amount of detail. Of course, occasionally, you may want to refer to the gener-ated code to confirm a detail of the mapping, but we recommend that you other-wise use the material presented here to see how to write your client-side code.
22.3 Mapping for Identifiers
Slice identifiers map to an identical Python identifier. For example, the Slice iden-tifier Clock becomes the Python identifier Clock. There is one exception to this rule: if a Slice identifier is the same as a Python keyword or is an identifier reserved by the Ice run time (such as checkedCast), the corresponding Python identifier is prefixed with an underscore. For example, the Slice identifier while is mapped as _while.1
The mapping does not modify a Slice identifier that matches the name of a Python built-in function because it can always be accessed by its fully-qualified name. For example, the built-in function hash can also be accessed as __builtin__.hash.
1. As suggested in Section 4.5.3 on page 92, you should try to avoid such identifiers as much as possible.

22.4 Mapping for Modules 661
22.4 Mapping for Modules
Slice modules map to Python modules with the same name as the Slice module. The mapping preserves the nesting of the Slice definitions. See Section 22.16.2 for information about the mapping’s use of Python packages.
22.5 The Ice Module
All of the APIs for the Ice run time are nested in the Ice module, to avoid clashes with definitions for other libraries or applications. Some of the contents of the Ice module are generated from Slice definitions; other parts of the Ice module provide special-purpose definitions that do not have a corresponding Slice defini-tion. We will incrementally cover the contents of the Ice module throughout the remainder of the book.
A Python application can load the Ice run time using the import statement:
import Ice
If the statement executes without error, the Ice run time is loaded and available for use. You can determine the version of the Ice run time you have just loaded by calling the stringVersion function:
icever = Ice.stringVersion()
22.6 Mapping for Simple Built-In Types
The Slice built-in types are mapped to Python types as shown in Table 22.1.
Table 22.1. Mapping of Slice built-in types to Python.
Slice Python
bool bool
byte int
short int

662 Client-Side Slice-to-Python Mapping
Although Python supports arbitrary precision in its integer types, the Ice run time validates integer values to ensure they have valid ranges for their declared Slice types.
22.6.1 String Mapping
String values returned as the result of a Slice operation (including return values, out parameters, and data members) are always represented as instances of Python’s 8-bit string type. These string values contain UTF-8 encoded strings unless the program has installed a string converter, in which case string values use the converter’s native encoding instead. See Section 32.24 for more information on string converters.
Legal string input values for a remote Slice operation are shown below:
• None
Ice marshals an empty string whenever None is encountered.
• 8-bit string objects
Ice assumes that all 8-bit string objects contain valid UTF-8 encoded strings unless the program has installed a string converter, in which case Ice assumes that 8-bit string objects use the native encoding expected by the converter.
• Unicode objects
Ice converts a Unicode object into UTF-8 and marshals it directly. If a string converter is installed, it is not invoked for Unicode objects.
int int
long long
float double
double double
string string
Table 22.1. Mapping of Slice built-in types to Python.
Slice Python

22.7 Mapping for User-Defined Types 663
22.7 Mapping for User-Defined Types
Slice supports user-defined types: enumerations, structures, sequences, and dictionaries.
22.7.1 Mapping for Enumerations
Python does not have an enumerated type, so the Slice enumerations are emulated using a Python class: the name of the Slice enumeration becomes the name of the Python class; for each enumerator, the class contains an attribute with the same name as the enumerator. For example:
enum Fruit { Apple, Pear, Orange };
The generated Python class looks as follows:
class Fruit(object): def __init__(self, val): assert(val >= 0 and val < 3) self.value = val # ...Fruit.Apple = Fruit(0)Fruit.Pear = Fruit(1)Fruit.Orange = Fruit(2)
Each instance of the class has a value attribute providing the integer value of the enumerator. Note that the generated class also defines a number of Python special methods, such as __str__ and __cmp__, which we have not shown.
Given the above definitions, we can use enumerated values as follows:
f1 = Fruit.Applef2 = Fruit.Orangeif f1 == Fruit.Apple: # Compare with constant # ...if f1 == f2: # Compare two enums # ...if f2.value == Fruit.Apple.value: # Use integer values # ...
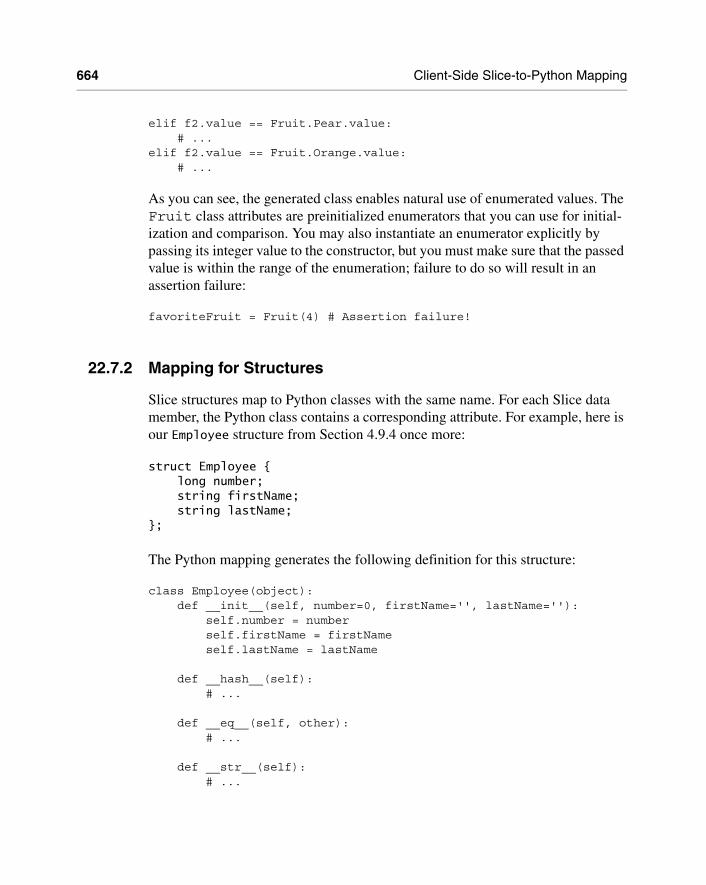
664 Client-Side Slice-to-Python Mapping
elif f2.value == Fruit.Pear.value: # ...elif f2.value == Fruit.Orange.value: # ...
As you can see, the generated class enables natural use of enumerated values. The Fruit class attributes are preinitialized enumerators that you can use for initial-ization and comparison. You may also instantiate an enumerator explicitly by passing its integer value to the constructor, but you must make sure that the passed value is within the range of the enumeration; failure to do so will result in an assertion failure:
favoriteFruit = Fruit(4) # Assertion failure!
22.7.2 Mapping for Structures
Slice structures map to Python classes with the same name. For each Slice data member, the Python class contains a corresponding attribute. For example, here is our Employee structure from Section 4.9.4 once more:
struct Employee { long number; string firstName; string lastName;};
The Python mapping generates the following definition for this structure:
class Employee(object): def __init__(self, number=0, firstName='', lastName=''): self.number = number self.firstName = firstName self.lastName = lastName def __hash__(self): # ... def __eq__(self, other): # ... def __str__(self): # ...

22.7 Mapping for User-Defined Types 665
The constructor initializes each of the attributes to a default value appropriate for its type. You can also declare different default values for members of primitive and enumerated types, as discussed in Section 4.9.2.
The __hash__ method returns a hash value for the structure based on the value of all its data members.
The __eq__ method returns true if all members of two structures are (recur-sively) equal.
The __str__ method returns a string representation of the structure.
22.7.3 Mapping for Sequences
Slice sequences map by default to Python lists; the only exception is a sequence of bytes, which maps by default to a string in order to lower memory utilization and improve throughput. This use of native types means that the Python mapping does not generate a separate named type for a Slice sequence. It also means that you can take advantage of all the inherent functionality offered by Python’s native types. For example:
sequence<Fruit> FruitPlatter;
We can use the FruitPlatter sequence as shown below:
platter = [ Fruit.Apple, Fruit.Pear ]assert(len(platter) == 2)platter.append(Fruit.Orange)
The Ice run time validates the elements of a tuple or list to ensure that they are compatible with the declared type; a ValueError exception is raised if an incompatible type is encountered.
Allowable Sequence Values
Although each sequence type has a default mapping, the Ice run time allows a sender to use other types as well. Specifically, a tuple is also accepted for a sequence type that maps to a list, and in the case of a byte sequence, the sender is allowed to supply a tuple or list of integers as an alternative to a string2.
2. Using a string for a byte sequence bypasses the validation step and avoids an extra copy, resulting in much greater throughput than a tuple or list. For larger byte sequences, the use of a string is strongly recommended.

666 Client-Side Slice-to-Python Mapping
Furthermore, the Ice run time accepts objects that implement Python’s buffer protocol as legal values for sequences of all primitive types except strings. For example, you can use the array module to create a buffer that is transferred much more efficiently than a tuple or list. Consider the two sequence values in the sample code below:
import array...seq1 = array.array("i", [1, 2, 3, 4, 5])seq2 = [1, 2, 3, 4, 5]
The values have the same on-the-wire representation, but they differ greatly in marshaling overhead because the buffer can be traversed more quickly and requires no validation.
Note that the Ice run time has no way of knowing what type of elements a buffer contains, therefore it is the application’s responsibility to ensure that a buffer is compatible with the declared sequence type.
Customizing the Sequence Mapping
The previous section described the allowable types that an application may use when sending a sequence. That kind of flexibility is not possible when receiving a sequence, because in this case it is the Ice run time’s responsibility to create the container that holds the sequence.
As stated earlier, the default mapping for most sequence types is a list, and for byte sequences the default mapping is a string. Unless otherwise indicated, an application always receives sequences as the container type specified by the default mapping. If it would be more convenient to receive a sequence as a different type, you can customize the mapping by annotating your Slice defini-tions with metadata. Table 22.2 describes the metadata directives supported by the Python mapping.
Table 22.2. Custom metadata directives for the sequence mapping.
Directive Description
python:seq:default Use the default mapping.
python:seq:list Map to a Python list.

22.7 Mapping for User-Defined Types 667
A metadata directive may be specified when defining a sequence, or when a sequence is used as a parameter, return value or data member. If specified at the point of definition, the directive affects all occurrences of that sequence type unless overridden by another directive at a point of use. The following Slice defi-nitions illustrate these points:
sequence<int> IntList; // Uses list by default["python:seq:tuple"] sequence<int> IntTuple; // Defaults to tuplesequence<byte> ByteString; // Uses string by default["python:seq:list"] sequence<byte> ByteList; // Defaults to liststruct S { IntList i1; // list IntTuple i2; // tuple ["python:seq:tuple"] IntList i3; // tuple ["python:seq:list"] IntTuple i4; // list ["python:seq:default"] IntTuple i5; // list ByteString b1; // string ByteList b2; // list ["python:seq:list"] ByteString b3; // list ["python:seq:tuple"] ByteString b4; // tuple ["python:seq:default"] ByteList b5; // string};interface I { IntList op1(ByteString s1, out ByteList s2); ["python:seq:tuple"] IntList op2(["python:seq:list"] ByteString s1, ["python:seq:tuple"] out ByteList s2);};
The operation op2 and the data members of structure S demonstrate how to over-ride the mapping for a sequence at the point of use.
python:seq:tuple Map to a Python tuple.
Table 22.2. Custom metadata directives for the sequence mapping.
Directive Description

668 Client-Side Slice-to-Python Mapping
It is important to remember that these metadata directives only affect the receiver of the sequence. For example, the data members of structure S are popu-lated with the specified sequence types only when the Ice run time unmarshals an instance of S. In the case of an operation, custom metadata affects the client when specified for the operation’s return type and output parameters, whereas metadata affects the server for input parameters.
22.7.4 Mapping for Dictionaries
Here is the definition of our EmployeeMap from Section 4.9.4 once more:
dictionary<long, Employee> EmployeeMap;
As for sequences, the Python mapping does not create a separate named type for this definition. Instead, all dictionaries are simply instances of Python’s dictionary type. For example:
em = {}e = Employee()e.number = 31e.firstName = "James"e.lastName = "Gosling"em[e.number] = e
The Ice run time validates the elements of a dictionary to ensure that they are compatible with the declared type; a ValueError exception is raised if an incompatible type is encountered.
22.8 Mapping for Constants
Here are the constant definitions we saw in Section 4.9.5 on page 103 once more:
const bool AppendByDefault = true;const byte LowerNibble = 0x0f;const string Advice = "Don't Panic!";const short TheAnswer = 42;const double PI = 3.1416;enum Fruit { Apple, Pear, Orange };const Fruit FavoriteFruit = Pear;

22.9 Mapping for Exceptions 669
The generated definitions for these constants are shown below:
AppendByDefault = TrueLowerNibble = 15Advice = "Don't Panic!"TheAnswer = 42PI = 3.1416FavoriteFruit = Fruit.Pear
As you can see, each Slice constant is mapped to a Python attribute with the same name as the constant.
22.9 Mapping for Exceptions
The mapping for exceptions is based on the inheritance hierarchy shown in Figure 22.1
Figure 22.1. Inheritance structure for Ice exceptions.
The ancestor of all exceptions is exceptions.Exception, from which Ice.Exception is derived. Ice.LocalException and Ice.UserEx-ception are derived from Ice.Exception and form the base for all run-time and user exceptions.
Here is a fragment of the Slice definition for our world time server from Section 4.10.5 on page 120 once more:
Ice.LocalException Ice.UserException
Ice.Exception
Specific Run-Time Exceptions... Specific User Exceptions...
exceptions.Exception

670 Client-Side Slice-to-Python Mapping
exception GenericError { string reason;};exception BadTimeVal extends GenericError {};exception BadZoneName extends GenericError {};
These exception definitions map as follows:
class GenericError(Ice.UserException): def __init__(self, reason=''): self.reason = reason def ice_name(self): # ... def __str__(self): # ...class BadTimeVal(GenericError): def __init__(self, reason=''): GenericError.__init__(self, reason) def ice_name(self): # ... def __str__(self): # ...class BadZoneName(GenericError): def __init__(self, reason=''): GenericError.__init__(self, reason) def ice_name(self): # ... def __str__(self): # ...
Each Slice exception is mapped to a Python class with the same name. The inheri-tance structure of the Slice exceptions is preserved for the generated classes, so BadTimeVal and BadZoneName inherit from GenericError.
Each exception member corresponds to an attribute of the instance, which the constructor initializes to a default value appropriate for its type. You can also declare different default values for members of primitive and enumerated types, as discussed in Section 4.10.2. Although BadTimeVal and BadZoneName do not

22.10 Mapping for Run-Time Exceptions 671
declare data members, their constructors still accept a value for the inherited data member reason in order to pass it to the constructor of the base exception Gener-icError.
Each exception also defines the ice_name method to return the name of the exception, and the special method __str__ to return a stringified representation of the exception and its members.
All user exceptions are derived from the base class Ice.UserException. This allows you to catch all user exceptions generically by installing a handler for Ice.UserException. Similarly, you can catch all Ice run-time exceptions with a handler for Ice.LocalException, and you can catch all Ice excep-tions with a handler for Ice.Exception.
22.10 Mapping for Run-Time Exceptions
The Ice run time throws run-time exceptions for a number of pre-defined error conditions. All run-time exceptions directly or indirectly derive from Ice.LocalException (which, in turn, derives from Ice.Exception).
An inheritance diagram for user and run-time exceptions appears in Figure 4.4 on page 117. By catching exceptions at the appropriate point in the hierarchy, you can handle exceptions according to the category of error they indicate:
• Ice.LocalException
This is the root of the inheritance tree for run-time exceptions.
• Ice.UserException
This is the root of the inheritance tree for user exceptions.
• Ice.TimeoutException
This is the base exception for both operation-invocation and connection-estab-lishment timeouts.
• Ice.ConnectTimeoutException
This exception is raised when the initial attempt to establish a connection to a server times out.
You will probably have little need to catch the remaining run-time exceptions; the fine-grained error handling offered by the remainder of the hierarchy is of interest mainly in the implementation of the Ice run time. However, there is one exception you will probably be interested in specifically: Ice.ObjectNotExistEx-ception. This exception is raised if a client invokes an operation on an Ice

672 Client-Side Slice-to-Python Mapping
object that no longer exists. In other words, the client holds a dangling reference to an object that probably existed some time in the past but has since been perma-nently destroyed.
22.11 Mapping for Interfaces
The mapping of Slice interfaces revolves around the idea that, to invoke a remote operation, you call a method on a local class instance that represents the remote object. This makes the mapping easy and intuitive to use because, for all intents and purposes (apart from error semantics), making a remote procedure call is no different from making a local procedure call.
22.11.1 Proxy Classes
On the client side, Slice interfaces map to Python classes with methods that corre-spond to the operations on those interfaces. Consider the following simple inter-face:
interface Simple { void op();};
The Python mapping generates the following definition for use by the client:
class SimplePrx(Ice.ObjectPrx): def op(self, _ctx=None): # ... # ...
In the client’s address space, an instance of SimplePrx is the local ambassador for a remote instance of the Simple interface in a server and is known as a proxy instance. All the details about the server-side object, such as its address, what protocol to use, and its object identity are encapsulated in that instance.
Note that SimplePrx inherits from Ice.ObjectPrx. This reflects the fact that all Ice interfaces implicitly inherit from Ice::Object.
For each operation in the interface, the proxy class has a method of the same name. In the preceding example, we find that the operation op has been mapped to the method op. Note that op accepts an optional trailing parameter _ctx repre-senting the operation context. This parameter is a Python dictionary for use by the

22.11 Mapping for Interfaces 673
Ice run time to store information about how to deliver a request. You normally do not need to use it. (We examine the context parameter in detail in Chapter 32. The parameter is also used by IceStorm—see Chapter 44.)
Proxy instances are always created on behalf of the client by the Ice run time, so client code never has any need to instantiate a proxy directly.
A value of None denotes the null proxy. The null proxy is a dedicated value that indicates that a proxy points “nowhere” (denotes no object).
22.11.2 The Ice.ObjectPrx ClassAll Ice objects have Object as the ultimate ancestor type, so all proxies inherit from Ice.ObjectPrx. ObjectPrx provides a number of methods:
class ObjectPrx(object): def equals(self, other): def ice_getIdentity(self): def ice_isA(self, id): def ice_id(self): def ice_ping(self): # ...
The methods behave as follows:
• equals
This operation compares two proxies for equality. Note that all aspects of proxies are compared by this operation, such as the communication endpoints for the proxy. This means that, in general, if two proxies compare unequal, that does not imply that they denote different objects. For example, if two proxies denote the same Ice object via different transport endpoints, equals returns false even though the proxies denote the same object.
• ice_getIdentity
This method returns the identity of the object denoted by the proxy. The iden-tity of an Ice object has the following Slice type:
module Ice { struct Identity { string name; string category; };};
To see whether two proxies denote the same object, first obtain the identity for each object and then compare the identities:

674 Client-Side Slice-to-Python Mapping
proxy1 = ...proxy2 = ...id1 = proxy1.ice_getIdentity()id2 = proxy2.ice_getIdentity()if id1 == id2: # proxy1 and proxy2 denote the same objectelse: # proxy1 and proxy2 denote different objects
• ice_isA
This method determines whether the object denoted by the proxy supports a specific interface. The argument to ice_isA is a type ID (see Section 4.13). For example, to see whether a proxy of type ObjectPrx denotes a Printer object, we can write:
proxy = ...if proxy != None and proxy.ice_isA("::Printer"): # proxy denotes a Printer objectelse: # proxy denotes some other type of object
Note that we are testing whether the proxy is None before attempting to invoke the ice_isA method. This avoids getting a run-time error if the proxy is None.
• ice_id
This method returns the type ID of the object denoted by the proxy. Note that the type returned is the type of the actual object, which may be more derived than the static type of the proxy. For example, if we have a proxy of type BasePrx, with a static type ID of ::Base, the return value of ice_id might be "::Base", or it might be something more derived, such as "::Derived".
• ice_ping
This method provides a basic reachability test for the object. If the object can physically be contacted (that is, the object exists and its server is running and reachable), the call completes normally; otherwise, it throws an exception that indicates why the object could not be reached, such as ObjectNotExist-Exception or ConnectTimeoutException.
Note that there are other methods in ObjectPrx, not shown here. These methods provide different ways to dispatch a call. (We discuss these methods in Chapter 32.)

22.11 Mapping for Interfaces 675
22.11.3 Casting Proxies
The Python mapping for a proxy also generates two static methods:
class SimplePrx(Ice.ObjectPrx): # ... def checkedCast(proxy, facet=''): # ... checkedCast = staticmethod(checkedCast) def uncheckedCast(proxy, facet=''): # ... uncheckedCast = staticmethod(uncheckedCast)
Both the checkedCast and uncheckedCast methods implement a down-cast: if the passed proxy is a proxy for an object of type Simple, or a proxy for an object with a type derived from Simple, the cast returns a reference to a proxy of type SimplePrx; otherwise, if the passed proxy denotes an object of a different type (or if the passed proxy is None), the cast returns None.
The method names checkedCast and uncheckedCast are reserved for use in proxies. If a Slice interface defines an operation with either of those names, the mapping escapes the name in the generated proxy by prepending an under-score. For example, an interface that defines an operation named checkedCast is mapped to a proxy with a method named _checkedCast.
Given a proxy of any type, you can use a checkedCast to determine whether the corresponding object supports a given type, for example:
obj = ... # Get a proxy from somewhere...simple = SimplePrx.checkedCast(obj)if simple != None: # Object supports the Simple interface...else: # Object is not of type Simple...
Note that a checkedCast contacts the server. This is necessary because only the implementation of a proxy in the server has definite knowledge of the type of an object. As a result, a checkedCast may throw a ConnectTimeoutEx-ception or an ObjectNotExistException.
In contrast, an uncheckedCast does not contact the server and uncondi-tionally returns a proxy of the requested type. However, if you do use an uncheckedCast, you must be certain that the proxy really does support the type you are casting to; otherwise, if you get it wrong, you will most likely get a

676 Client-Side Slice-to-Python Mapping
run-time exception when you invoke an operation on the proxy. The most likely error for such a type mismatch is OperationNotExistException. However, other exceptions, such as a marshaling exception are possible as well. And, if the object happens to have an operation with the correct name, but different parameter types, no exception may be reported at all and you simply end up sending the invocation to an object of the wrong type; that object may do rather non-sensical things. To illustrate this, consider the following two interfaces:
interface Process { void launch(int stackSize, int dataSize);};// ...interface Rocket { void launch(float xCoord, float yCoord);};
Suppose you expect to receive a proxy for a Process object and use an uncheckedCast to down-cast the proxy:
obj = ... # Get proxy...process = ProcessPrx.uncheckedCast(obj) # No worries...process.launch(40, 60) # Oops...
If the proxy you received actually denotes a Rocket object, the error will go unde-tected by the Ice run time: because int and float have the same size and because the Ice protocol does not tag data with its type on the wire, the implementation of Rocket::launch will simply misinterpret the passed integers as floating-point numbers.
In fairness, this example is somewhat contrived. For such a mistake to go unnoticed at run time, both objects must have an operation with the same name and, in addition, the run-time arguments passed to the operation must have a total marshaled size that matches the number of bytes that are expected by the unmar-shaling code on the server side. In practice, this is extremely rare and an incorrect uncheckedCast typically results in a run-time exception.
22.11.4 Using Proxy Methods
The base proxy class ObjectPrx supports a variety of methods for customizing a proxy (see Section 32.11). Since proxies are immutable, each of these “factory methods” returns a copy of the original proxy that contains the desired modifica-

22.11 Mapping for Interfaces 677
tion. For example, you can obtain a proxy configured with a ten second timeout as shown below:
proxy = communicator.stringToProxy(...)proxy = proxy.ice_timeout(10000)
A factory method returns a new proxy object if the requested modification differs from the current proxy, otherwise it returns the current proxy. With few excep-tions, factory methods return a proxy of the same type as the current proxy, there-fore it is generally not necessary to repeat a down-cast after using a factory method. The example below demonstrates these semantics:
base = communicator.stringToProxy(...)hello = Demo.HelloPrx.checkedCast(base)hello = hello.ice_timeout(10000) # Type is preservedhello.sayHello()
The only exceptions are the factory methods ice_facet and ice_identity. Calls to either of these methods may produce a proxy for an object of an unrelated type, therefore they return a base proxy that you must subsequently down-cast to an appropriate type.
22.11.5 Object Identity and Proxy Comparison
Proxy objects support comparison using the built-in relational operators as well as the cmp function. Note that proxy comparison uses all of the information in a proxy for the comparison. This means that not only the object identity must match for a comparison to succeed, but other details inside the proxy, such as the protocol and endpoint information, must be the same. In other words, comparison tests for proxy identity, not object identity. A common mistake is to write code along the following lines:
p1 = ... # Get a proxy...p2 = ... # Get another proxy...if p1 != p2: # p1 and p2 denote different objects # WRONG!else: # p1 and p2 denote the same object # Correct
Even though p1 and p2 differ, they may denote the same Ice object. This can happen because, for example, both p1 and p2 embed the same object identity, but each uses a different protocol to contact the target object. Similarly, the protocols may be the same, but denote different endpoints (because a single Ice object can

678 Client-Side Slice-to-Python Mapping
be contacted via several different transport endpoints). In other words, if two proxies compare equal, we know that the two proxies denote the same object (because they are identical in all respects); however, if two proxies compare unequal, we know absolutely nothing: the proxies may or may not denote the same object.
To compare the object identities of two proxies, you can use a helper function in the Ice module:
def proxyIdentityCompare(lhs, rhs)def proxyIdentityAndFacetCompare(lhs, rhs)
proxyIdentityCompare allows you to correctly compare proxies for iden-tity:
p1 = ... # Get a proxy...p2 = ... # Get another proxy...if Ice.proxyIdentityCompare(p1, p2) != 0: # p1 and p2 denote different objects # Correctelse: # p1 and p2 denote the same object # Correct
The function returns 0 if the identities are equal, 1 if p1 is less than p2, and 1 if p1 is greater than p2. (The comparison uses name as the major sort key and category as the minor sort key.)
The proxyIdentityAndFacetCompare function behaves similarly, but compares both the identity and the facet name (see Chapter 33).
22.12 Mapping for Operations
As we saw in Section 22.11, for each operation on an interface, the proxy class contains a corresponding method with the same name. To invoke an operation, you call it via the proxy. For example, here is part of the definitions for our file system from Section 5.4:
module Filesystem { interface Node { idempotent string name(); }; // ...};

22.12 Mapping for Operations 679
The name operation returns a value of type string. Given a proxy to an object of type Node, the client can invoke the operation as follows:
node = ... # Initialize proxyname = node.name() # Get name via RPC
22.12.1 Normal and idempotent OperationsYou can add an idempotent qualifier to a Slice operation. As far as the signature for the corresponding proxy method is concerned, idempotent has no effect. For example, consider the following interface:
interface Example { string op1(); idempotent string op2();};
The proxy class for this is:
class ExamplePrx(Ice.ObjectPrx): def op1(self, _ctx=None): # ... def op2(self, _ctx=None): # ...
Because idempotent affects an aspect of call dispatch, not interface, it makes sense for the two methods to look the same.
22.12.2 Passing Parameters
In Parameters
All parameters are passed by reference in the Python mapping; it is guaranteed that the value of a parameter will not be changed by the invocation.
Here is an interface with operations that pass parameters of various types from client to server:
struct NumberAndString { int x; string str;};sequence<string> StringSeq;

680 Client-Side Slice-to-Python Mapping
dictionary<long, StringSeq> StringTable;interface ClientToServer { void op1(int i, float f, bool b, string s); void op2(NumberAndString ns, StringSeq ss, StringTable st); void op3(ClientToServer* proxy);};
The Slice compiler generates the following proxy for this definition:
class ClientToServerPrx(Ice.ObjectPrx): def op1(self, i, f, b, s, _ctx=None): # ... def op2(self, ns, ss, st, _ctx=None): # ... def op3(self, proxy, _ctx=None): # ...
Given a proxy to a ClientToServer interface, the client code can pass parameters as in the following example:
p = ... # Get proxy...p.op1(42, 3.14f, True, "Hello world!") # Pass simple literalsi = 42f = 3.14fb = Trues = "Hello world!"p.op1(i, f, b, s) # Pass simple variablesns = NumberAndString()ns.x = 42ns.str = "The Answer"ss = [ "Hello world!" ]st = {}st[0] = nsp.op2(ns, ss, st) # Pass complex variablesp.op3(p) # Pass proxy
Out Parameters
As in Java, Python functions do not support reference arguments. That is, it is not possible to pass an uninitialized variable to a Python function in order to have its

22.12 Mapping for Operations 681
value initialized by the function. The Java mapping (see Section 10.12.2) over-comes this limitation with the use of “holder classes” that represent each out parameter. The Python mapping takes a different approach, one that is more natural for Python users.
The semantics of out parameters in the Python mapping depend on whether the operation returns one value or multiple values. An operation returns multiple values when it has declared multiple out parameters, or when it has declared a non-void return type and at least one out parameter.
If an operation returns multiple values, the client receives them in the form of a result tuple. A non-void return value, if any, is always the first element in the result tuple, followed by the out parameters in the order of declaration.
If an operation returns only one value, the client receives the value itself.
Here is the same Slice definition we saw on page 679 once more, but this time with all parameters being passed in the out direction:
struct NumberAndString { int x; string str;};sequence<string> StringSeq;dictionary<long, StringSeq> StringTable;interface ServerToClient { int op1(out float f, out bool b, out string s); void op2(out NumberAndString ns, out StringSeq ss, out StringTable st); void op3(out ServerToClient* proxy);};
The Python mapping generates the following code for this definition:
class ServerToClientPrx(Ice.ObjectPrx): def op1(self, _ctx=None): # ... def op2(self, _ctx=None): # ... def op3(self, _ctx=None): # ...

682 Client-Side Slice-to-Python Mapping
Given a proxy to a ServerToClient interface, the client code can receive the results as in the following example:
p = ... # Get proxy...i, f, b, s = p.op1()ns, ss, st = p.op2()stcp = p.op3()
The operations have no in parameters, therefore no arguments are passed to the proxy methods. Since op1 and op2 return multiple values, their result tuples are unpacked into separate values, whereas the return value of op3 requires no unpacking.
Parameter Type Mismatches
Although the Python compiler cannot check the types of arguments passed to a function, the Ice run time does perform validation on the arguments to a proxy invocation and reports any type mismatches as a ValueError exception.
Null Parameters
Some Slice types naturally have “empty” or “not there” semantics. Specifically, sequences, dictionaries, and strings all can be None, but the corresponding Slice types do not have the concept of a null value. To make life with these types easier, whenever you pass None as a parameter or return value of type sequence, dictionary, or string, the Ice run time automatically sends an empty sequence, dictionary, or string to the receiver.
This behavior is useful as a convenience feature: especially for deeply-nested data types, members that are sequences, dictionaries, or strings automatically arrive as an empty value at the receiving end. This saves you having to explicitly initialize, for example, every string element in a large sequence before sending the sequence in order to avoid a run-time error. Note that using null parameters in this way does not create null semantics for Slice sequences, dictionaries, or strings. As far as the object model is concerned, these do not exist (only empty sequences, dictionaries, and strings do). For example, it makes no difference to the receiver whether you send a string as None or as an empty string: either way, the receiver sees an empty string.

22.13 Exception Handling 683
22.13 Exception Handling
Any operation invocation may throw a run-time exception (see Section 22.10) and, if the operation has an exception specification, may also throw user excep-tions (see Section 22.9). Suppose we have the following simple interface:
exception Tantrum { string reason;};interface Child { void askToCleanUp() throws Tantrum;};
Slice exceptions are thrown as Python exceptions, so you can simply enclose one or more operation invocations in a try–except block:
child = ... # Get child proxy...try: child.askToCleanUp()except Tantrum, t: print "The child says:", t.reason
Typically, you will catch only a few exceptions of specific interest around an oper-ation invocation; other exceptions, such as unexpected run-time errors, will usually be handled by exception handlers higher in the hierarchy. For example:
import traceback, Icedef run(): child = ... # Get child proxy... try: child.askToCleanUp() except Tantrum, t: print "The child says:", t.reason child.scold() # Recover from error... child.praise() # Give positive feedback...try: # ... run() # ...except Ice.Exception: traceback.print_exc()

684 Client-Side Slice-to-Python Mapping
This code handles a specific exception of local interest at the point of call and deals with other exceptions generically. (This is also the strategy we used for our first simple application in Chapter 3.)
22.14 Mapping for Classes
Slice classes are mapped to Python classes with the same name. The generated class contains an attribute for each Slice data member (just as for structures and exceptions). Consider the following class definition:
class TimeOfDay { short hour; // 0 - 23 short minute; // 0 - 59 short second; // 0 - 59 string format(); // Return time as hh:mm:ss};
The Python mapping generates the following code for this definition:
class TimeOfDay(Ice.Object): def __init__(self, hour=0, minute=0, second=0): # ... self.hour = hour self.minute = minute self.second = second def ice_staticId(): return '::M::TimeOfDay' ice_staticId = staticmethod(ice_staticId) # ... # # Operation signatures. # # def format(self, current=None):
There are a number of things to note about the generated code:
1. The generated class TimeOfDay inherits from Ice.Object. This means that all classes implicitly inherit from Ice.Object, which is the ultimate ancestor of all classes. Note that Ice.Object is not the same as Ice.ObjectPrx. In other words, you cannot pass a class where a proxy is expected and vice versa.
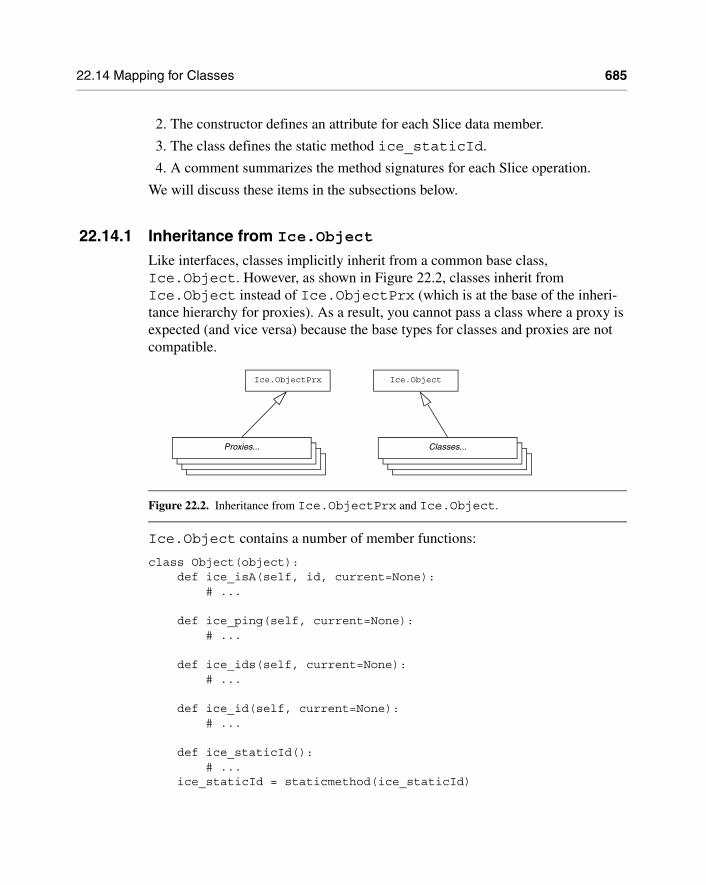
22.14 Mapping for Classes 685
2. The constructor defines an attribute for each Slice data member.
3. The class defines the static method ice_staticId.
4. A comment summarizes the method signatures for each Slice operation.
We will discuss these items in the subsections below.
22.14.1 Inheritance from Ice.ObjectLike interfaces, classes implicitly inherit from a common base class, Ice.Object. However, as shown in Figure 22.2, classes inherit from Ice.Object instead of Ice.ObjectPrx (which is at the base of the inheri-tance hierarchy for proxies). As a result, you cannot pass a class where a proxy is expected (and vice versa) because the base types for classes and proxies are not compatible.
Figure 22.2. Inheritance from Ice.ObjectPrx and Ice.Object.
Ice.Object contains a number of member functions:
class Object(object): def ice_isA(self, id, current=None): # ... def ice_ping(self, current=None): # ... def ice_ids(self, current=None): # ... def ice_id(self, current=None): # ... def ice_staticId(): # ... ice_staticId = staticmethod(ice_staticId)
Ice.ObjectPrx
Proxies... Classes...
Ice.Object

686 Client-Side Slice-to-Python Mapping
def ice_preMarshal(self): # ... def ice_postUnmarshal(self): # ...
The member functions of Ice.Object behave as follows:
• ice_isA
This method returns true if the object supports the given type ID, and false otherwise.
• ice_ping
As for interfaces, ice_ping provides a basic reachability test for the class.
• ice_ids
This method returns a string sequence representing all of the type IDs supported by this object, including ::Ice::Object.
• ice_id
This method returns the actual run-time type ID of the object. If you call ice_id through a reference to a base instance, the returned type id is the actual (possibly more derived) type ID of the instance.
• ice_staticId
This method is generated in each class and returns the static type ID of the class.
• ice_preMarshal
The Ice run time invokes this method prior to marshaling the object’s state, providing the opportunity for a subclass to validate its declared data members.
• ice_postUnmarshal
The Ice run time invokes this method after unmarshaling an object’s state. A subclass typically overrides this function when it needs to perform additional initialization using the values of its declared data members.
Note that neither Ice.Object nor the generated class override __hash__ and __eq__, so the default implementations apply.

22.14 Mapping for Classes 687
22.14.2 Data Members of Classes
By default, data members of classes are mapped exactly as for structures and exceptions: for each data member in the Slice definition, the generated class contains a corresponding attribute.
Although Python provides no standard mechanism for restricting access to an object’s attributes, by convention an attribute whose name begins with an under-score signals the author’s intent that the attribute should only be accessed by the class itself or by one of its subclasses. You can employ this convention in your Slice classes using the protected metadata directive. The presence of this direc-tive causes the Slice compiler to prepend an underscore to the mapped name of the data member. For example, the TimeOfDay class shown below has the protected metadata directive applied to each of its data members:
class TimeOfDay { ["protected"] short hour; // 0 - 23 ["protected"] short minute; // 0 - 59 ["protected"] short second; // 0 - 59 string format(); // Return time as hh:mm:ss};
The Slice compiler produces the following generated code for this definition:
class TimeOfDay(Ice.Object): def __init__(self, hour=0, minute=0, second=0): # ... self._hour = hour self._minute = minute self._second = second # ... # # Operation signatures. # # def format(self, current=None):
For a class in which all of the data members are protected, the metadata directive can be applied to the class itself rather than to each member individually. For example, we can rewrite the TimeOfDay class as follows:

688 Client-Side Slice-to-Python Mapping
["protected"] class TimeOfDay { short hour; // 0 - 23 short minute; // 0 - 59 short second; // 0 - 59 string format(); // Return time as hh:mm:ss};
22.14.3 Class Constructors
Classes have a constructor that assigns to each data member a default value appro-priate for its type. You can also declare different default values for data members of primitive and enumerated types, as discussed in Section 4.11.1.
For derived classes, the constructor has one parameter for each of the base class’s data members, plus one parameter for each of the derived class’s data members, in base-to-derived order.
22.14.4 Operations of Classes
Operations of classes are mapped to methods in the generated class. This means that, if a class contains operations (such as the format operation of our TimeOfDay class), you must provide an implementation of the operation in a class that is derived from the generated class. For example:
class TimeOfDayI(TimeOfDay): def __init__(self, hour=0, minute=0, second=0): TimeOfDay.__init__(self, hour, minute, second) def format(self, current=None): return "%02d:%02d:%02d" %\ (self.hour, self.minute, self.second)
A Slice class such as TimeOfDay that declares or inherits an operation is inherently abstract. Python does not support the notion of abstract classes or abstract methods, therefore the mapping merely summarizes the required method signa-tures in a comment for your convenience. Furthermore, the mapping generates code in the constructor of an abstract class to prevent it from being instantiated directly; any attempt to do so raises a RuntimeError exception.
You may notice that the mapping for an operation adds an optional trailing parameter named current. For now, you can ignore this parameter and pretend it does not exist. (We look at it in more detail in Section 32.6.)

22.14 Mapping for Classes 689
22.14.5 Class Factories
Having created a class such as this, we have an implementation and we can instan-tiate the TimeOfDayI class, but we cannot receive it as the return value or as an out-parameter from an operation invocation. To see why, consider the following simple interface:
interface Time { TimeOfDay get();};
When a client invokes the get operation, the Ice run time must instantiate and return an instance of the TimeOfDay class. However, TimeOfDay is an abstract class that cannot be instantiated. Unless we tell it, the Ice run time cannot magi-cally know that we have created a TimeOfDayI class that implements the abstract format operation of the TimeOfDay abstract class. In other words, we must provide the Ice run time with a factory that knows that the TimeOfDay abstract class has a TimeOfDayI concrete implementation. The Ice::Communi-cator interface provides us with the necessary operations:
module Ice { local interface ObjectFactory { Object create(string type); void destroy(); }; local interface Communicator { void addObjectFactory(ObjectFactory factory, string id); ObjectFactory findObjectFactory(string id); // ... };};
To supply the Ice run time with a factory for our TimeOfDayI class, we must implement the ObjectFactory interface:
class ObjectFactory(Ice.ObjectFactory): def create(self, type): if type == M.TimeOfDay.ice_staticId(): return TimeOfDayI() assert(False) return None

690 Client-Side Slice-to-Python Mapping
def destroy(self): # Nothing to do pass
The object factory’s create method is called by the Ice run time when it needs to instantiate a TimeOfDay class. The factory’s destroy method is called by the Ice run time when its communicator is destroyed.
The create method is passed the type ID (see Section 4.13) of the class to instantiate. For our TimeOfDay class, the type ID is "::M::TimeOfDay". Our implementation of create checks the type ID: if it matches, the method instanti-ates and returns a TimeOfDayI object. For other type IDs, the method asserts because it does not know how to instantiate other types of objects.
Note that we used the ice_staticId method to obtain the type ID rather than embedding a literal string. Using a literal type ID string in your code is discouraged because it can lead to errors that are only detected at run time. For example, if a Slice class or one of its enclosing modules is renamed and the literal string is not changed accordingly, a receiver will fail to unmarshal the object and the Ice run time will raise NoObjectFactoryException. By using ice_staticId instead, we avoid any risk of a misspelled or obsolete type ID, and we can discover at compile time if a Slice class or module has been renamed.
Given a factory implementation, such as our ObjectFactory, we must inform the Ice run time of the existence of the factory:
ic = ... # Get Communicator...ic.addObjectFactory(ObjectFactory(), M.TimeOfDay.ice_staticId())
Now, whenever the Ice run time needs to instantiate a class with the type ID "::M::TimeOfDay", it calls the create method of the registered ObjectFac-tory instance.
The destroy operation of the object factory is invoked by the Ice run time when the communicator is destroyed. This gives you a chance to clean up any resources that may be used by your factory. Do not call destroy on the factory while it is registered with the communicator—if you do, the Ice run time has no idea that this has happened and, depending on what your destroy implementation is doing, may cause undefined behavior when the Ice run time tries to next use the factory.
The run time guarantees that destroy will be the last call made on the factory, that is, create will not be called concurrently with destroy, and create will not

22.15 Asynchronous Method Invocation (AMI) 691
be called once destroy has been called. However, calls to create can be made concurrently.
Note that you cannot register a factory for the same type ID twice: if you call addObjectFactory with a type ID for which a factory is registered, the Ice run time throws an AlreadyRegisteredException.
Finally, keep in mind that if a class has only data members, but no operations, you need not create and register an object factory to transmit instances of such a class. Only if a class has operations do you have to define and register an object factory.
22.15 Asynchronous Method Invocation (AMI)
NOTE: As of version 3.4, Ice provides a new API for asynchronous method invocation. This section describes this API. You can find documentation for the previous API in Appendix K. Note that the old API is deprecated and will be removed in a future release.
Asynchronous Method Invocation (AMI) is the term used to describe the client-side support for the asynchronous programming model. AMI supports both oneway and twoway requests, but unlike their synchronous counterparts, AMI requests never block the calling thread. When a client issues an AMI request, the Ice run time hands the message off to the local transport buffer or, if the buffer is currently full, queues the request for later delivery. The application can then continue its activities and poll or wait for completion of the invocation, or receive a callback when the invocation completes.
AMI is transparent to the server: there is no way for the server to tell whether a client sent a request synchronously or asynchronously.
22.15.1 Basic Asynchronous API
Consider the following simple Slice definition:
module Demo { interface Employees { string getName(int number); };};

692 Client-Side Slice-to-Python Mapping
Proxy Methods
Besides the synchronous proxy methods, the Python mapping generates the following asynchronous proxy methods:
def begin_getName(self, number, _response=None, _ex=None, _sent=None, _ctx=None)def end_getName(self, result)
As you can see, the single getName operation results in begin_getName and end_getName methods. The begin_ method optionally accepts a per-invoca-tion context (see Section 32.12) and callbacks (see Section 22.15.4).
• The begin_getName method sends (or queues) an invocation of getName. This method does not block the calling thread.
• The end_getName method collects the result of the asynchronous invoca-tion. If, at the time the calling thread calls end_getName, the result is not yet available, the calling thread blocks until the invocation completes. Other-wise, if the invocation completed some time before the call to end_getName, the method returns immediately with the result.
A client could call these methods as follows:
e = EmployeePrx.checkedCast(...)r = e.begin_getName(99)# Continue to do other things here...name = e.end_getName(r)
Because begin_getName does not block, the calling thread can do other things while the operation is in progress.
Note that begin_getName returns a value of type AsyncResult. This value contains the state that the Ice run time requires to keep track of the asyn-chronous invocation. You must pass the AsyncResult that is returned by the begin_ method to the corresponding end_ method.
The begin_ method has one parameter for each in-parameter of the corre-sponding Slice operation. The end_ method accepts the AsyncResult object as its only argument and returns the out-parameters using the same semantics as for regular synchronous invocations (see page 680). For example, consider the following operation:
double op(int inp1, string inp2, out bool outp1, out long outp2);
The begin_op and end_op methods have the following signature:

22.15 Asynchronous Method Invocation (AMI) 693
def begin_op(self, inp1, inp2, ...)def end_op(self, result)
The call to end_op returns the following tuple:
doubleValue, outp1, outp2 = p.end_op(result)
Exception Handling
If an invocation raises an exception, the exception is thrown by the end_ method, even if the actual error condition for the exception was encountered during the begin_ method (“on the way out”). The advantage of this behavior is that all exception handling is located with the code that calls the end_ method (instead of being present twice, once where the begin_ method is called, and again where the end_ method is called).
There is one exception to the above rule: if you destroy the communicator and then make an asynchronous invocation, the begin_ method throws Communi-catorDestroyedException. This is necessary because, once the run time is finalized, it can no longer throw an exception from the end_ method.
The only other exception that is thrown by the begin_ and end_ methods is RuntimeError. This exception indicates that you have used the API incor-rectly. For example, the begin_ method throws this exception if you call an operation that has a return value or out-parameters on a oneway proxy. Similarly, the end_ method throws this exception if you use a different proxy to call the end_ method than the proxy you used to call the begin_ method, or if the AsyncResult you pass to the end_ method was obtained by calling the begin_ method for a different operation.
22.15.2 The AsyncResult Class
The AsyncResult that is returned by the begin_ method encapsulates the state of the asynchronous invocation:
class AsyncResult: def getCommunicator() def getConnection() def getProxy() def getOperation() def isCompleted() def waitForCompleted()

694 Client-Side Slice-to-Python Mapping
def isSent() def waitForSent() def sentSynchronously()
The methods have the following semantics:
• getCommunicator()
This method returns the communicator that sent the invocation.
• getConnection()
This method returns the connection that was used for the invocation.
• getProxy()
This method returns the proxy that was used to call the begin_ method.
• getOperation()
This method returns the name of the operation.
• isCompleted()
This method returns true if, at the time it is called, the result of an invocation is available, indicating that a call to the end_ method will not block the caller. Otherwise, if the result is not yet available, the method returns false.
• waitForCompleted()
This method blocks the caller until the result of an invocation becomes avail-able.
• isSent()
When you call the begin_ method, the Ice run time attempts to write the corresponding request to the client-side transport. If the transport cannot accept the request, the Ice run time queues the request for later transmission. isSent returns true if, at the time it is called, the request has been written to the local transport (whether it was initially queued or not). Otherwise, if the request is still queued, isSent returns false.
• waitForSent()
This method blocks the calling thread until a request has been written to the client-side transport.
• sentSynchronously()
This method returns true if a request was written to the client-side transport without first being queued. If the request was initially queued, sentSyn-

22.15 Asynchronous Method Invocation (AMI) 695
chronously returns false (independent of whether the request is still in the queue or has since been written to the client-side transport).
22.15.3 Polling for CompletionThe AsyncResult methods allow you to poll for call completion. Polling is useful in a variety of cases. As an example, consider the following simple inter-face to transfer files from client to server:
interface FileTransfer{ void send(int offset, ByteSeq bytes);};
The client repeatedly calls send to send a chunk of the file, indicating at which offset in the file the chunk belongs. A naïve way to transmit a file would be along the following lines:
file = open(...)ft = FileTransferPrx.checkedCast(...)chunkSize = ...offset = 0while not file.eof(): bytes = file.read(chunkSize) # Read a chunk ft.send(offset, bytes) # Send the chunk offset += len(bytes.length)
This works, but not very well: because the client makes synchronous calls, it writes each chunk on the wire and then waits for the server to receive the data, process it, and return a reply before writing the next chunk. This means that both client and server spend much of their time doing nothing—the client does nothing while the server processes the data, and the server does nothing while it waits for the client to send the next chunk.
Using asynchronous calls, we can improve on this considerably:
file = open(...)ft = FileTransferPrx.checkedCast(...)chunkSize = ...offset = 0results = []numRequests = 5while not file.eof(): bytes = file.read(chunkSize) # Read a chunk

696 Client-Side Slice-to-Python Mapping
# Send up to numRequests + 1 chunks asynchronously. r = ft.begin_send(offset, bytes) offset += len(bytes) # Wait until this request has been passed to the transport. r.waitForSent() results.append(r) # Once there are more than numRequests, wait for the least # recent one to complete. while len(results) > numRequests: r = results[0] del results[0] r.waitForCompleted()# Wait for any remaining requests to complete.while len(results) > 0: r = results[0] del results[0] r.waitForCompleted()
With this code, the client sends up to numRequests + 1 chunks before it waits for the least recent one of these requests to complete. In other words, the client sends the next request without waiting for the preceding request to complete, up to the limit set by numRequests. In effect, this allows the client to “keep the pipe to the server full of data”: the client keeps sending data, so both client and server continuously do work.
Obviously, the correct chunk size and value of numRequests depend on the bandwidth of the network as well as the amount of time taken by the server to process each request. However, with a little testing, you can quickly zoom in on the point where making the requests larger or queuing more requests no longer improves performance. With this technique, you can realize the full bandwidth of the link to within a percent or two of the theoretical bandwidth limit of a native socket connection.
22.15.4 Completion Callbacks
The begin_ method accepts three optional callback arguments that allow you to be notified asynchronously when a request completes. Here is the signature of the begin_getName method from Section 22.15.1 once more:

22.15 Asynchronous Method Invocation (AMI) 697
def begin_getName(self, number, _response=None, _ex=None, _sent=None, _ctx=None)
The value you pass for the response callback (_response), the exception call-back (_ex), or the sent callback (_sent) argument must be a callable object such as a function or method. The response callback is invoked when the request completes successfully, and the exception callback is invoked when the operation raises an exception. (We discuss the sent callback in Section 22.15.7.)
For example, consider the following callbacks for an invocation of the getName operation:
def getNameCB(name): print "Name is: " + namedef failureCB(ex): print "Exception is: " + str(ex)
The response callback parameters depend on the operation signature. If the opera-tion has a non-void return type, the first parameter of the response callback is the return value. The return value (if any) is followed by a parameter for each out-parameter of the corresponding Slice operation, in the order of declaration.
The exception callback is invoked if the invocation fails because of an Ice run time exception, or if the operation raises a user exception.
To inform the Ice run time that you want to receive callbacks for the comple-tion of the asynchronous call, you pass the callbacks to the begin_ method:
e = EmployeesPrx.checkedCast(...)e.begin_getName(99, getNameCB, failureCB)
Although the signature of an asynchronous proxy method implies that all of the callbacks are optional and therefore can be supplied in any combination, Ice enforces the following semantics at run time:
• If you omit all callbacks, you must call the end_ method explicitly as described in Section 22.15.1.
• If you supply either a response callback or a sent callback (or both), you must also supply an exception callback.
• You may omit the response callback for an operation that returns no data (that is, an operation with a void return type and no out-parameters).
698 Client-Side Slice-to-Python Mapping
22.15.5 Sharing State Between the begin_ and end_ Method
It is common for the end_ method to require access to some state that is estab-lished by the code that calls the begin_ method. As an example, consider an application that asynchronously starts a number of operations and, as each opera-tion completes, needs to update different user interface elements with the results. In this case, the begin_ method knows which user interface element should receive the update, and the end_ method needs access to that element.
Assuming that we have a Widget class that designates a particular user inter-face element, you could pass different widgets by storing the widget to be used as a member of a callback class:
class MyCallback(object): def __init__(self, w): self._w = w def getNameCB(self, name): self._w.writeString(name) def failureCB(self, ex): print "Exception is: " + str(ex)
For this example, we assume that widgets have a writeString method that updates the relevant UI element.
When you call the begin_ method, you pass the appropriate callback instance to inform the end_ method how to update the display:
e = EmployeesPrx.checkedCast(...)widget1 = ...widget2 = ...# Invoke the getName operation with different widget callbacks.cb1 = MyCallback(widget1)e.begin_getName(99, cb1.getNameCB, cb1.failureCB)cb2 = MyCallback(widget2)e.begin_getName(24, cb2.getNameCB, cb2.failureCB)
The callback class provides a simple and effective way for you to pass state between the point where an operation is invoked and the point where its results are processed. Moreover, if you have a number of operations that share common state, you can pass the same callback instance to multiple invocations. (If you do this, your callback methods may need to use synchronization.)
For those situations in which a stateless callback is preferred, you can use a lambda function to pass state to a callback. Consider the following example:

22.15 Asynchronous Method Invocation (AMI) 699
def getNameCB(name, w): w.writeString(name)def failureCB(ex): print "Exception is: " + str(ex)e = EmployeesPrx.checkedCast(...)widget1 = ...widget2 = ...# Use lambda functions to pass state.e.begin_getName(99, lambda name: getNameCB(name, widget1), failureCB)e.begin_getName(24, lambda name: getNameCB(name, widget2), failureCB)
This strategy eliminates the need to encapsulate shared state in a callback class. Since lambda functions can refer to variables in the enclosing scope, they provide a convenient way to pass state directly to your callback.
22.15.6 Oneway Invocations
You can invoke operations via oneway proxies asynchronously, provided the oper-ation has void return type, does not have any out-parameters, and does not raise user exceptions. If you call the begin_ method on a oneway proxy for an opera-tion that returns values or raises a user exception, the begin_ method throws a RuntimeError.
The callback signatures look exactly as for a twoway invocation, but the response method is never called and may be omitted.
22.15.7 Flow Control
Asynchronous method invocations never block the thread that calls the begin_ method: the Ice run time checks to see whether it can write the request to the local transport. If it can, it does so immediately in the caller’s thread. (In that case, AsyncResult.sentSynchronously returns true.) Alternatively, if the local transport does not have sufficient buffer space to accept the request, the Ice run time queues the request internally for later transmission in the background. (In that case, AsyncResult.sentSynchronously returns false.)

700 Client-Side Slice-to-Python Mapping
This creates a potential problem: if a client sends many asynchronous requests at the time the server is too busy to keep up with them, the requests pile up in the client-side run time until, eventually, the client runs out of memory.
The API provides a way for you to implement flow control by counting the number of requests that are queued so, if that number exceeds some threshold, the client stops invoking more operations until some of the queued operations have drained out of the local transport.
You can supply a sent callback to be notified when the request was success-fully sent:
def response(name): # ...def exception(ex): # ...def sent(sentSynchronously): # ...
You inform the Ice run time that you want to be informed when a call has been passed to the local transport as usual:
e.begin_getName(99, response, exception, sent)
If the Ice run time can immediately pass the request to the local transport, it does so and invokes the sent callback from the thread that calls the begin_ method. On the other hand, if the run time has to queue the request, it calls the sent call-back from a different thread once it has written the request to the local transport. The boolean sentSynchronously parameter indicates whether the request was sent synchronously or was queued.
The sent callback allows you to limit the number of queued requests by counting the number of requests that are queued and decrementing the count when the Ice run time passes a request to the local transport.
22.15.8 Batch Requests
Applications that send batched requests (see Section 32.16) can either flush a batch explicitly or allow the Ice run time to flush automatically. The proxy method ice_flushBatchRequests performs an immediate flush using the synchro-nous invocation model and may block the calling thread until the entire message can be sent. Ice also provides asynchronous versions of this method so you can flush batch requests asynchronously.

22.16 Code Generation 701
begin_ice_flushBatchRequests and end_ice_flushBatchRequests are proxy methods that flush any batch requests queued by that proxy.
In addition, similar methods are available on the communicator and the Connection object that is returned by AsyncResult.getConnection. These methods flush batch requests sent via the same communicator and via the same connection, respectively.
22.15.9 Concurrency
The Ice run time always invokes your callback methods from a separate thread, with one exception: it calls the sent callback from the thread calling the begin_ method if the request could be sent synchronously. In the sent call-back, you know which thread is calling the callback by looking at the sentSyn-chronously parameter.
22.16 Code Generation
The Python mapping supports two forms of code generation: dynamic and static.
22.16.1 Dynamic Code Generation
Using dynamic code generation, Slice files are “loaded” at run time and dynami-cally translated into Python code, which is immediately compiled and available for use by the application. This is accomplished using the Ice.loadSlice function, as shown in the following example:
Ice.loadSlice("Color.ice")import Mprint "My favorite color is", M.Color.blue
For this example, we assume that Color.ice contains the following definitions:
module M { enum Color { red, green, blue };};
The code imports module M after the Slice file is loaded because module M is not defined until the Slice definitions have been translated into Python.

702 Client-Side Slice-to-Python Mapping
Ice.loadSlice Options
The Ice.loadSlice function behaves like a Slice compiler in that it accepts command-line arguments for specifying preprocessor options and controlling code generation. The arguments must include at least one Slice file.
The function has the following Python definition:
def Ice.loadSlice(cmd, args=[])
The command-line arguments can be specified entirely in the first argument, cmd, which must be a string. The optional second argument can be used to pass addi-tional command-line arguments as a list; this is useful when the caller already has the arguments in list form. The function always returns None.
For example, the following calls to Ice.loadSlice are functionally equiv-alent:
Ice.loadSlice("-I/opt/IcePy/slice Color.ice")Ice.loadSlice("-I/opt/IcePy/slice", ["Color.ice"])Ice.loadSlice("", ["-I/opt/IcePy/slice", "Color.ice"])
In addition to the standard compiler options described in Section 4.20, Ice.loadSlice also supports the following command-line options:
• --all
Generate code for all Slice definitions, including those from included files.
• --checksum
Generate checksums for Slice definitions. See Section 22.17 for more infor-mation.
Locating Slice Files
If your Slice files depend on Ice types, you can avoid hard-coding the path name of your Ice installation directory by calling the Ice.getSliceDir function:
Ice.loadSlice("-I" + Ice.getSliceDir() + " Color.ice")
This function attempts to locate the slice subdirectory of your Ice installation using an algorithm that succeeds for the following scenarios:
• Installation of a binary Ice archive
• Installation of an Ice source distribution using make install
• Installation via a Windows installer
• RPM installation on Linux
• Execution inside a compiled Ice source distribution

22.16 Code Generation 703
If the slice subdirectory can be found, getSliceDir returns its absolute path name, otherwise the function returns None.
Loading Multiple Files
You can specify as many Slice files as necessary in a single invocation of Ice.loadSlice, as shown below:
Ice.loadSlice("Syscall.ice Process.ice")
Alternatively, you can call Ice.loadSlice several times:
Ice.loadSlice("Syscall.ice")Ice.loadSlice("Process.ice")
If a Slice file includes another file, the default behavior of Ice.loadSlice generates Python code only for the named file. For example, suppose Syscall.ice includes Process.ice as follows:
// Syscall.ice#include <Process.ice>...
If you call Ice.loadSlice("-I. Syscall.ice"), Python code is not generated for the Slice definitions in Process.ice or for any definitions that may be included by Process.ice. If you also need code to be generated for included files, one solution is to load them individually in subsequent calls to Ice.loadSlice. However, it is much simpler, not to mention more efficient, to use the --all option instead:
Ice.loadSlice("--all -I. Syscall.ice")
When you specify --all, Ice.loadSlice generates Python code for all Slice definitions included directly or indirectly from the named Slice files.
There is no harm in loading a Slice file multiple times, aside from the addi-tional overhead associated with code generation. For example, this situation could arise when you need to load multiple top-level Slice files that happen to include a common subset of nested files. Suppose that we need to load both Syscall.ice and Kernel.ice, both of which include Process.ice. The simplest way to load both files is with a single call to Ice.loadSlice:
Ice.loadSlice("--all -I. Syscall.ice Kernel.ice")
Although this invocation causes the Ice extension to generate code twice for Process.ice, the generated code is structured so that the interpreter ignores

704 Client-Side Slice-to-Python Mapping
duplicate definitions. We could have avoided generating unnecessary code with the following sequence of steps:
Ice.loadSlice("--all -I. Syscall.ice")Ice.loadSlice("-I. Kernel.ice")
In more complex cases, however, it can be difficult or impossible to completely avoid this situation, and the overhead of code generation is usually not significant enough to justify such an effort.
22.16.2 Static Code Generation
You should be familiar with static code generation if you have used other Slice language mappings, such as C++ or Java. Using static code generation, the Slice compiler slice2py (see Section 22.16.4) generates Python code from your Slice definitions.
Compiler Output
For each Slice file X.ice, slice2py generates Python code into a file named X_ice.py3 in the output directory. The default output directory is the current working directory, but a different directory can be specified using the --output-dir option.
In addition to the generated file, slice2py creates a Python package for each Slice module it encounters. A Python package is nothing more than a subdi-rectory that contains a file with a special name (__init__.py). This file is executed automatically by Python when a program first imports the package. It is created by slice2py and must not be edited manually. Inside the file is Python code to import the generated files that contain definitions in the Slice module of interest.
For example, the Slice files Process.ice and Syscall.ice both define types in the Slice module OS. First we present Process.ice:
module OS { interface Process { void kill(); };};
3. Using the file name X.py would create problems if X.ice defined a module named X, therefore the suffix _ice is appended to the name of the generated file.

22.16 Code Generation 705
And here is Syscall.ice:
#include <Process.ice>module OS { interface Syscall { Process getProcess(int pid); };};
Next, we translate these files using the Slice compiler:
> slice2py -I. Process.ice Syscall.ice
If we list the contents of the output directory, we see the following entries:
OS/Process_ice.pySyscall_ice.py
The subdirectory OS is the Python package that slice2py created for the Slice module OS. Inside this directory is the special file __init__.py that contains the following statements:
import Process_iceimport Syscall_ice
Now when a Python program executes import OS, the two files Process_ice.py and Syscall_ice.py are implicitly imported.
Subsequent invocations of slice2py for Slice files that also contain defini-tions in the OS module result in additional import statements being added to OS/__init__.py. Be aware, however, that import statements may persist in __init__.py files after a Slice file is renamed or becomes obsolete. This situa-tion may manifest itself as a run-time error if the interpreter can no longer locate the generated file while attempting to import the package. It may also cause more subtle problems, if an obsolete generated file is still present and being loaded unintentionally. In general, it is advisable to remove the package directory and regenerate it whenever the set of Slice files changes.
A Python program may also import a generated file explicitly, using a state-ment such as import Process_ice. Typically, however, it is more conve-nient to import the Python module once, rather than importing potentially several individual files that comprise the module, especially when you consider that the program must still import the module explicitly in order to make its definitions available. For example, it is much simpler to state
import OS

706 Client-Side Slice-to-Python Mapping
rather than the following alternative:
import Process_iceimport Syscall_iceimport OS
In situations where a Python package is unnecessary or undesirable, the --no-package option can be specified to prevent the creation of a package. In this case, the application must import the generated file(s) explicitly, as shown above.
Include Files
It is important to understand how slice2py handles include files. In the absence of the --all option, the compiler does not generate Python code for Slice defini-tions in included files. Rather, the compiler translates Slice #include state-ments into Python import statements in the following manner:
1. Determine the full pathname of the include file.
2. Create the shortest possible relative pathname for the include file by iterating over each of the include directories (specified using the -I option) and removing the leading directory from the include file if possible.
For example, if the full pathname of an include file is /opt/App/slice/OS/Process.ice, and we specified the options -I/opt/App and -I/opt/App/slice, then the shortest relative path-name is OS/Process.ice after removing /opt/App/slice.
3. Replace any slashes with underscores, remove the .ice extension, and append _ice. Continuing our example from the previous step, the translated import statement becomes
import OS_Process_ice
There is a potential problem here that must be addressed. The generated import statement shown above expects to find the file OS_Process_ice.py some-where in Python’s search path. However, slice2py uses a different default name, Process_ice.py, when it compiles Process.ice. To resolve this issue, we must use the --prefix option when compiling Process.ice:
> slice2py --prefix OS_ Process.ice
The --prefix option causes the compiler to prepend the specified prefix to the name of each generated file. When executed, the above command creates the desired file name: OS_Process_ice.py.

22.16 Code Generation 707
It should be apparent by now that generating Python code for a complex Ice application requires a bit of planning. In particular, it is imperative that you be consistent in your use of #include statements, include directories, and --prefix options to ensure that the correct file names are used at all times.
Of course, these precautionary steps are only necessary when you are compiling Slice files individually. An alternative is to use the --all option and generate Python code for all of your Slice definitions into one Python source file. If you do not have a suitable Slice file that includes all necessary Slice definitions, you could write a “master” Slice file specifically for this purpose.
22.16.3 Static Versus Dynamic Code Generation
There are several issues to consider when evaluating your requirements for code generation.
Application Considerations
The requirements of your application generally dictate whether you should use dynamic or static code generation. Dynamic code generation is convenient for a number of reasons:
• it avoids the intermediate compilation step required by static code generation
• it makes the application more compact because the application requires only the Slice files, not the assortment of files and directories produced by static code generation
• it reduces complexity, which is especially helpful during testing, or when writing short or transient programs.
Static code generation, on the other hand, is appropriate in many situations:
• when an application uses a large number of Slice definitions and the startup delay must be minimized
• when it is not feasible to deploy Slice files with the application
• when a number of applications share the same Slice files
• when Python code is required in order to utilize third-party Python tools.
Mixing Static and Dynamic Generation
Using a combination of static and dynamic translation in an application can produce unexpected results. For example, consider a situation where a dynami-cally-translated Slice file includes another Slice file that was statically translated:

708 Client-Side Slice-to-Python Mapping
// Slice#include <Glacier2/Session.ice>module App { interface SessionFactory { Glacier2::Session* createSession(); };};
The Slice file Session.ice is statically translated, as are all of the Slice files included with the Ice run time.
Assuming the above definitions are saved in App.ice, let’s execute a simple Python script:
# Pythonimport IceIce.loadSlice("-I/opt/Ice/slice App.ice")import Glacier2class MyVerifier(Glacier2.PermissionsVerifier): # Error def checkPermissions(self, userId, password): return (True, "")
The code looks reasonable, but running it produces the following error:
'module' object has no attribute 'PermissionsVerifier'
Normally, importing the Glacier2 module as we have done here would load all of the Python code generated for the Glacier2 Slice files. However, since App.ice has already included a subset of the Glacier2 definitions, the Python interpreter ignores any subsequent requests to import the entire module, and therefore the PermissionsVerifier type is not present.
One way to address this problem is to import the statically-translated modules first, prior to loading Slice files dynamically:
# Pythonimport Ice, Glacier2 # Import Glacier2 before App.ice is loadedIce.loadSlice("-I/opt/Ice/slice App.ice")class MyVerifier(Glacier2.PermissionsVerifier): # OK def checkPermissions(self, userId, password): return (True, "")
The disadvantage of this approach in a non-trivial application is that it breaks encapsulation, forcing one Python module to know what other modules are doing.

22.16 Code Generation 709
For example, suppose we place our PermissionsVerifier implementation in a module named verifier.py:
# Pythonimport Glacier2class MyVerifier(Glacier2.PermissionsVerifier): def checkPermissions(self, userId, password): return (True, "")
Now that the use of Glacier2 definitions is encapsulated in verifier.py, we would like to remove references to Glacier2 from the main script:
# Pythonimport IceIce.loadSlice("-I/opt/Ice/slice App.ice")...import verifier # Errorv = verifier.MyVerifier()
Unfortunately, executing this script produces the same error as before. To fix it, we have to break the verifier module’s encapsulation and import the Glacier2 module in the main script because we know that the verifier module requires it:
# Pythonimport Ice, Glacier2Ice.loadSlice("-I/opt/Ice/slice App.ice")...import verifier # OKv = verifier.MyVerifier()
Although breaking encapsulation in this way might offend our sense of good design, it is a relatively minor issue.
Another solution is to import the necessary submodules explicitly. We can safely remove the Glacier2 reference from our main script after rewriting veri-fier.py as shown below:
# Pythonimport Glacier2_PermissionsVerifier_iceimport Glacier2class MyVerifier(Glacier2.PermissionsVerifier): def checkPermissions(self, userId, password): return (True, "")
Using the rules defined in Section 22.16.2, we can derive the name of the module containing the code generated for PermissionsVerifier.ice and import it

710 Client-Side Slice-to-Python Mapping
directly. We need a second import statement to make the Glacier2 definitions accessible in this module.
22.16.4 slice2py Command-Line OptionsThe Slice-to-Python compiler, slice2py, offers the following command-line options in addition to the standard options described in Section 4.20:
• --all
Generate code for all Slice definitions, including those from included files.
• --checksum
Generate checksums for Slice definitions.
• --prefix PREFIX
Use PREFIX as the prefix for generated file names. See Section 22.16.2 for more information.
22.16.5 PackagesBy default, the scope of a Slice definition determines the module of its mapped Python construct (see Section 22.4 for more information on the module mapping). There are times, however, when applications require greater control over the pack-aging of generated Python code. For example, consider the following Slice defini-tions:
module sys { interface Process { // ... };};
Other language mappings can use these Slice definitions as shown, but they present a problem for the Python mapping: the top-level Slice module sys conflicts with Python’s predefined module sys. A Python application executing the statement import sys would import whichever module the interpreter happens to locate first in its search path.
A workaround for this problem is to modify the Slice definitions so that the top-level module no longer conflicts with a predefined Python module, but that may not be feasible in certain situations. For example, the application may already be deployed using other language mappings, in which case the impact of modi-fying the Slice definitions could represent an unacceptable expense.

22.17 Using Slice Checksums 711
The Python mapping could have addressed this issue by considering the names of predefined modules to be reserved, in which case the Slice module sys would be mapped to the Python module _sys. However, the likelihood of a name conflict is relatively low to justify such a solution, therefore the mapping supports a different approach: global metadata (see Section 4.17) can be used to enclose generated code in a Python package. Our modified Slice definitions demonstrate this feature:
[["python:package:zeroc"]]module sys { interface Process { // ... };};
The global metadata directive python:package:zeroc causes the mapping to generate all of the code resulting from definitions in this Slice file into the Python package zeroc. The net effect is the same as if we had enclosed our Slice definitions in the module zeroc: the Slice module sys is mapped to the Python module zeroc.sys. However, by using metadata we have not affected the semantics of the Slice definitions, nor have we affected other language mappings.
22.17 Using Slice Checksums
As described in Section 4.21, the Slice compilers can optionally generate check-sums of Slice definitions. For slice2py, the --checksum option causes the compiler to generate code that adds checksums to the dictionary Ice.slice-Checksums. The checksums are installed automatically when the Python code is first imported; no action is required by the application.
In order to verify a server’s checksums, a client could simply compare the dictionaries using the comparison operator. However, this is not feasible if it is possible that the server might return a superset of the client’s checksums. A more general solution is to iterate over the local checksums as demonstrated below:
serverChecksums = ...for i in Ice.sliceChecksums: if not serverChecksums.has_key(i): # No match found for type id! elif Ice.sliceChecksums[i] != serverChecksums[i]: # Checksum mismatch!

712 Client-Side Slice-to-Python Mapping
In this example, the client first verifies that the server’s dictionary contains an entry for each Slice type ID, and then it proceeds to compare the checksums.

713
Chapter 23Developing a File System Client in Python
23.1 Chapter Overview
In this chapter, we present the source code for a Python client that accesses the file system we developed in Chapter 5 (see Chapter 25 for the corresponding server).
23.2 The Python Client
We now have seen enough of the client-side Python mapping to develop a complete client to access our remote file system. For reference, here is the Slice definition once more:
module Filesystem { interface Node { idempotent string name(); }; exception GenericError { string reason; }; sequence<string> Lines; interface File extends Node {

714 Developing a File System Client in Python
idempotent Lines read(); idempotent void write(Lines text) throws GenericError; }; sequence<Node*> NodeSeq; interface Directory extends Node { idempotent NodeSeq list(); }; };
To exercise the file system, the client does a recursive listing of the file system, starting at the root directory. For each node in the file system, the client shows the name of the node and whether that node is a file or directory. If the node is a file, the client retrieves the contents of the file and prints them.
The body of the client code looks as follows:
import sys, traceback, Ice, Filesystem# Recursively print the contents of directory "dir"# in tree fashion. For files, show the contents of# each file. The "depth" parameter is the current# nesting level (for indentation).def listRecursive(dir, depth): indent = '' depth = depth + 1 for i in range(depth): indent = indent + '\t' contents = dir.list() for node in contents: subdir = Filesystem.DirectoryPrx.checkedCast(node) file = Filesystem.FilePrx.uncheckedCast(node) print indent + node.name(), if subdir: print "(directory):" listRecursive(subdir, depth) else: print "(file):" text = file.read() for line in text: print indent + "\t" + line

23.2 The Python Client 715
status = 0ic = Nonetry: # Create a communicator # ic = Ice.initialize(sys.argv) # Create a proxy for the root directory # obj = ic.stringToProxy("RootDir:default -p 10000") # Down-cast the proxy to a Directory proxy # rootDir = Filesystem.DirectoryPrx.checkedCast(obj) # Recursively list the contents of the root directory # print "Contents of root directory:" listRecursive(rootDir, 0)except: traceback.print_exc() status = 1if ic: # Clean up # try: ic.destroy() except: traceback.print_exc() status = 1sys.exit(status)
The program first defines the listRecursive function, which is a helper func-tion to print the contents of the file system, and the main program follows. Let us look at the main program first:
1. The structure of the code follows what we saw in Chapter 34. After initializing the run time, the client creates a proxy to the root directory of the file system. For this example, we assume that the server runs on the local host and listens using the default protocol (TCP/IP) at port 10000. The object identity of the root directory is known to be RootDir.
2. The client down-casts the proxy to DirectoryPrx and passes that proxy to listRecursive, which prints the contents of the file system.

716 Developing a File System Client in Python
Most of the work happens in listRecursive. The function is passed a proxy to a directory to list, and an indent level. (The indent level increments with each recursive call and allows the code to print the name of each node at an indent level that corresponds to the depth of the tree at that node.) listRecursive calls the list operation on the directory and iterates over the returned sequence of nodes:
1. The code does a checkedCast to narrow the Node proxy to a Directory proxy, as well as an uncheckedCast to narrow the Node proxy to a File proxy. Exactly one of those casts will succeed, so there is no need to call checkedCast twice: if the Node is-a Directory, the code uses the Direc-toryPrx returned by the checkedCast; if the checkedCast fails, we know that the Node is-a File and, therefore, an uncheckedCast is sufficient to get a FilePrx.
In general, if you know that a down-cast to a specific type will succeed, it is preferable to use an uncheckedCast instead of a checkedCast because an uncheckedCast does not incur any network traffic.
2. The code prints the name of the file or directory and then, depending on which cast succeeded, prints "(directory)" or "(file)" following the name.
3. The code checks the type of the node:
• If it is a directory, the code recurses, incrementing the indent level.
• If it is a file, the code calls the read operation on the file to retrieve the file contents and then iterates over the returned sequence of lines, printing each line.
Assume that we have a small file system consisting of a two files and a a directory as follows:
Figure 23.1. A small file system.
The output produced by the client for this file system is:
RootDir
Coleridge README
Kubla_Khan
= Directory
= File

23.3 Summary 717
Contents of root directory: README (file): This file system contains a collection of poetry. Coleridge (directory): Kubla_Khan (file): In Xanadu did Kubla Khan A stately pleasure-dome decree: Where Alph, the sacred river, ran Through caverns measureless to man Down to a sunless sea.
Note that, so far, our client (and server) are not very sophisticated:
• The protocol and address information are hard-wired into the code.
• The client makes more remote procedure calls than strictly necessary; with minor redesign of the Slice definitions, many of these calls can be avoided.
We will see how to address these shortcomings in Chapter 38 and Chapter 34.
23.3 Summary
This chapter presented a very simple client to access a server that implements the file system we developed in Chapter 5. As you can see, the Python code hardly differs from the code you would write for an ordinary Python program. This is one of the biggest advantages of using Ice: accessing a remote object is as easy as accessing an ordinary, local Python object. This allows you to put your effort where you should, namely, into developing your application logic instead of having to struggle with arcane networking APIs. As we will see in Chapter 25, this is true for the server side as well, meaning that you can develop distributed applications easily and efficiently.


719
Chapter 24Server-Side Slice-to-Python Mapping
24.1 Chapter Overview
In this chapter, we present the server-side Slice-to-Python mapping (see Chapter 22 for the client-side mapping). Section 24.3 discusses how to initialize and finalize the server-side run time, sections 24.4 to 24.6 show how to implement interfaces and operations, and Section 24.7 discusses how to register objects with the server-side Ice run time. Finally, Section 24.8 shows how to implement opera-tions asynchronously.
24.2 Introduction
The mapping for Slice data types to Python is identical on the client side and server side. This means that everything in Chapter 22 also applies to the server side. However, for the server side, there are a few additional things you need to know, specifically:
• how to initialize and finalize the server-side run time
• how to implement servants
• how to pass parameters and throw exceptions
• how to create servants and register them with the Ice run time.

720 Server-Side Slice-to-Python Mapping
We discuss these topics in the remainder of this chapter.
24.3 The Server-Side Main Program
The main entry point to the Ice run time is represented by the local interface Ice::Communicator. As for the client side, you must initialize the Ice run time by calling Ice.initialize before you can do anything else in your server. Ice.initialize returns a reference to an instance of an Ice.Communicator:
import sys, traceback, Icestatus = 0ic = Nonetry: ic = Ice.initialize(sys.argv) # ...except: traceback.print_exc() status = 1# ...
Ice.initialize accepts the argument list that is passed to the program by the operating system. The function scans the argument list for any command-line options that are relevant to the Ice run time; any such options are removed from the argument list so, when Ice.initialize returns, the only options and arguments remaining are those that concern your application. If anything goes wrong during initialization, initialize throws an exception.
You can pass a second argument of type InitializationData to Ice.initialize. InitializationData is defined as follows:
class InitializationData(object): def __init__(self): self.properties = None self.logger = None self.threadHook = None
You can pass in an instance of this class to set properties for the communicator (see Chapter 30), establish a logger (see Section 32.19), and to establish a thread notification hook (see page 1016).
Before leaving your program, you must call Communicator::destroy. The destroy operation is responsible for finalizing the Ice run time. In particular,

24.3 The Server-Side Main Program 721
destroy waits for any operation implementations that are still executing in the server to complete. In addition, destroy ensures that any outstanding threads are joined with and reclaims a number of operating system resources, such as file descriptors and memory. Never allow your program to terminate without calling destroy first; doing so has undefined behavior.
The general shape of our server-side program is therefore as follows:
import sys, traceback, Icestatus = 0ic = Nonetry: ic = Ice.initialize(sys.argv) # ...except: traceback.print_exc() status = 1if ic: try: ic.destroy() except: traceback.print_exc() status = 1sys.exit(status)
Note that the code places the call to Ice.initialize into a try block and takes care to return the correct exit status to the operating system. Also note that an attempt to destroy the communicator is made only if the initialization succeeded.
24.3.1 The Ice.Application Class
The preceding program structure is so common that Ice offers a class, Ice.Application, that encapsulates all the correct initialization and finaliza-tion activities. The synopsis of the class is as follows (with some detail omitted for now):
class Application(object): def __init__(self, signalPolicy=0): def main(self, args, configFile=None, initData=None):

722 Server-Side Slice-to-Python Mapping
def run(self, args): def appName(): # ... appName = staticmethod(appName) def communicator(): # ... communicator = staticmethod(communicator)
The intent of this class is that you specialize Ice.Application and imple-ment the abstract run method in your derived class. Whatever code you would normally place in your main program goes into run instead. Using Ice.Application, our program looks as follows:
import sys, Iceclass Server(Ice.Application): def run(self, args): # Server code here... return 0app = Server()status = app.main(sys.argv)sys.exit(status)
You also can call main with an optional file name or an Initialization-Data structure (see Section 32.3 and Section 30.9). If you pass a configuration file name to main, the settings in this file are overridden by settings in a file iden-tified by the ICE_CONFIG environment variable (if defined). Property settings supplied on the command line take precedence over all other settings.
The Application.main function does the following:
1. It installs an exception handler. If your code fails to handle an exception, Application.main prints the exception information before returning with a non-zero return value.
2. It initializes (by calling Ice.initialize) and finalizes (by calling Communicator.destroy) a communicator. You can get access to the communicator for your server by calling the static communicator accessor.
3. It scans the argument list for options that are relevant to the Ice run time and removes any such options. The argument list that is passed to your run method therefore is free of Ice-related options and only contains options and arguments that are specific to your application.

24.3 The Server-Side Main Program 723
4. It provides the name of your application via the static appName member function. The return value from this call is the first element of the argument vector passed to Application.main, so you can get at this name from anywhere in your code by calling Ice.Application.appName (which is usually required for error messages).
5. It installs a signal handler that properly shuts down the communicator.
6. It installs a per-process logger (see Section 32.19.5) if the application has not already configured one. The per-process logger uses the value of the Ice.ProgramName property (see Section 30.8) as a prefix for its messages and sends its output to the standard error channel. An application can specify an alternate logger as described in Section 32.19.
Using Ice.Application ensures that your program properly finalizes the Ice run time, whether your server terminates normally or in response to an exception or signal. We recommend that all your programs use this class; doing so makes your life easier. In addition Ice.Application also provides features for signal handling and configuration that you do not have to implement yourself when you use this class.
Using Ice.Application on the Client Side
You can use Ice.Application for your clients as well: simply implement a class that derives from Ice.Application and place the client code into its run method. The advantage of this approach is the same as for the server side: Ice.Application ensures that the communicator is destroyed correctly even in the presence of exceptions or signals.
Catching Signals
The simple server we developed in Chapter 3 had no way to shut down cleanly: we simply interrupted the server from the command line to force it to exit. Termi-nating a server in this fashion is unacceptable for many real-life server applica-tions: typically, the server has to perform some cleanup work before terminating, such as flushing database buffers or closing network connections. This is particu-larly important on receipt of a signal or keyboard interrupt to prevent possible corruption of database files or other persistent data.
To make it easier to deal with signals, Ice.Application encapsulates Python’s signal handling capabilities, allowing you to cleanly shut down on receipt of a signal:

724 Server-Side Slice-to-Python Mapping
class Application(object): # ... def destroyOnInterrupt(): # ... destroyOnInterrupt = classmethod(destroyOnInterrupt) def shutdownOnInterrupt(): # ... shutdownOnInterrupt = classmethod(shutdownOnInterrupt) def ignoreInterrupt(): # ... ignoreInterrupt = classmethod(ignoreInterrupt) def callbackOnInterrupt(): # ... callbackOnInterrupt = classmethod(callbackOnInterrupt) def holdInterrupt(): # ... holdInterrupt = classmethod(holdInterrupt) def releaseInterrupt(): # ... releaseInterrupt = classmethod(releaseInterrupt) def interrupted(): # ... interrupted = classmethod(interrupted) def interruptCallback(self, sig): # Default implementation does nothing. pass
The methods behave as follows:
• destroyOnInterrupt
This method installs a signal handler that destroys the communicator if it is interrupted. This is the default behavior.
• shutdownOnInterrupt
This method installs a signal handler that shuts down the communicator if it is interrupted.
• ignoreInterrupt
This method causes signals to be ignored.

24.3 The Server-Side Main Program 725
• callbackOnInterrupt
This function configures Ice.Application to invoke interrupt-Callback when a signal occurs, thereby giving the subclass responsibility for handling the signal.
• holdInterrupt
This method temporarily blocks signal delivery.
• releaseInterrupt
This method restores signal delivery to the previous disposition. Any signal that arrives after holdInterrupt was called is delivered when you call releaseInterrupt.
• interrupted
This method returns True if a signal caused the communicator to shut down, False otherwise. This allows us to distinguish intentional shutdown from a forced shutdown that was caused by a signal. This is useful, for example, for logging purposes.
• interruptCallback
A subclass overrides this function to respond to signals. The function may be called concurrently with any other thread and must not raise exceptions.
By default, Ice.Application behaves as if destroyOnInterrupt was invoked, therefore our server program requires no change to ensure that the program terminates cleanly on receipt of a signal. (You can disable the signal-handling functionality of Ice.Application by passing 1 to the constructor. In that case, signals retain their default behavior, that is, terminate the process.) However, we add a diagnostic to report the occurrence of a signal, so our program now looks like:
import sys, Iceclass MyApplication(Ice.Application): def run(self, args): # Server code here... if self.interrupted(): print self.appName() + ": terminating" return 0

726 Server-Side Slice-to-Python Mapping
app = MyApplication()status = app.main(sys.argv)sys.exit(status)
Note that, if your server is interrupted by a signal, the Ice run time waits for all cur-rently executing operations to finish. This means that an operation that updates per-sistent state cannot be interrupted in the middle of what it was doing and cause partial update problems.
Ice.Application and Properties
Apart from the functionality shown in this section, Ice.Application also takes care of initializing the Ice run time with property values. Properties allow you to configure the run time in various ways. For example, you can use proper-ties to control things such as the thread pool size or port number for a server. The main method of Ice.Application accepts an optional second parameter allowing you to specify the name of a configuration file that will be processed during initialization. We discuss Ice properties in more detail in Chapter 30.
Limitations of Ice.Application
Ice.Application is a singleton class that creates a single communicator. If you are using multiple communicators, you cannot use Ice.Application. Instead, you must structure your code as we saw in Chapter 3 (taking care to always destroy the communicator).
24.4 Mapping for Interfaces
The server-side mapping for interfaces provides an up-call API for the Ice run time: by implementing methods in a servant class, you provide the hook that gets the thread of control from the Ice server-side run time into your application code.
24.4.1 Skeleton Classes
On the client side, interfaces map to proxy classes (see Section 5.12). On the server side, interfaces map to skeleton classes. A skeleton is an abstract base class from which you derive your servant class and define a method for each operation on the corresponding interface. For example, consider the Slice definition for the Node interface we defined in Chapter 5 once more:

24.4 Mapping for Interfaces 727
module Filesystem { interface Node { idempotent string name(); }; // ...};
The Python mapping generates the following definition for this interface:
class Node(Ice.Object): def __init__(self): # ... # # Operation signatures. # # def name(self, current=None):
The important points to note here are:
• As for the client side, Slice modules are mapped to Python modules with the same name, so the skeleton class definitions are part of the Filesystem module.
• The name of the skeleton class is the same as the name of the Slice interface (Node).
• The skeleton class contains a comment summarizing the method signature of each operation in the Slice interface.
• The skeleton class is an abstract base class because its constructor prevents direct instantiation of the class.
• The skeleton class inherits from Ice.Object (which forms the root of the Ice object hierarchy).
24.4.2 Servant Classes
In order to provide an implementation for an Ice object, you must create a servant class that inherits from the corresponding skeleton class. For example, to create a servant for the Node interface, you could write:
import Filesystemclass NodeI(Filesystem.Node): def __init__(self, name):
728 Server-Side Slice-to-Python Mapping
self._name = name def name(self, current=None): return self._name
By convention, servant classes have the name of their interface with an I-suffix, so the servant class for the Node interface is called NodeI. (This is a convention only: as far as the Ice run time is concerned, you can choose any name you prefer for your servant classes.) Note that NodeI extends Filesystem.Node, that is, it derives from its skeleton class.
As far as Ice is concerned, the NodeI class must implement only a single method: the name method that is defined in the Node interface. This makes the servant class a concrete class that can be instantiated. You can add other member functions and data members as you see fit to support your implementation. For example, in the preceding definition, we added a _name member and a constructor. (Obviously, the constructor initializes the _name member and the name function returns its value.)
Normal and idempotent Operations
Whether an operation is an ordinary operation or an idempotent operation has no influence on the way the operation is mapped. To illustrate this, consider the following interface:
interface Example { void normalOp(); idempotent void idempotentOp();};
The mapping for this interface is shown below:
class Example(Ice.Object): # ... # # Operation signatures. # # def normalOp(self, current=None): # def idempotentOp(self, current=None):
Note that the signatures of the methods are unaffected by the idempotent quali-fier.

24.5 Parameter Passing 729
24.5 Parameter Passing
For each in parameter of a Slice operation, the Python mapping generates a corre-sponding parameter for the corresponding method. In addition, every operation has an additional, trailing parameter of type Ice.Current. For example, the name operation of the Node interface has no parameters, but the name method in a Python servant has a current parameter. We explain the purpose of this param-eter in Section 32.6 and will ignore it for now.
An operation returning multiple values1 returns them in a tuple consisting of a non-void return value, if any, followed by the out parameters in the order of declaration. An operation returning only one value simply returns the value itself.
To illustrate these rules, consider the following interface that passes string parameters in all possible directions:
interface Example { string op1(string sin); void op2(string sin, out string sout); string op3(string sin, out string sout);};
The generated skeleton class for this interface looks as follows:
class Example(Ice.Object): def __init__(self): # ... # # Operation signatures. # # def op1(self, sin, current=None): # def op2(self, sin, current=None): # def op3(self, sin, current=None):
The signatures of the Python methods are identical because they all accept a single in parameter, but their implementations differ in the way they return values. For example, we could implement the operations as follows:
1. An operation returns multiple values when it declares multiple out parameters, or when it declares a non-void return type and at least one out parameter.

730 Server-Side Slice-to-Python Mapping
class ExampleI(Example): def op1(self, sin, current=None): print sin # In params are initialized return "Done" # Return value def op2(self, sin, current=None): print sin # In params are initialized return "Hello World!" # Out parameter def op3(self, sin, current=None): print sin # In params are initialized return ("Done", "Hello World!")
Notice that op1 and op2 return their string values directly, whereas op3 returns a tuple consisting of the return value followed by the out parameter.
This code is in no way different from what you would normally write if you were to pass strings to and from a function; the fact that remote procedure calls are involved does not impact on your code in any way. The same is true for parame-ters of other types, such as proxies, classes, or dictionaries: the parameter passing conventions follow normal Python rules and do not require special-purpose API calls.
24.6 Raising Exceptions
To throw an exception from an operation implementation, you simply instantiate the exception, initialize it, and throw it. For example:
class FileI(Filesystem.File): # ... def write(self, text, current=None): # Try to write the file contents here... # Assume we are out of space... if error: e = Filesystem.GenericError() e.reason = "file too large" raise e
The mapping for exceptions (see Section 22.9) generates a constructor that accepts values for data members, so we can simplify this example by changing our raise statement to the following:

24.7 Object Incarnation 731
class FileI(Filesystem.File): # ... def write(self, text, current=None): # Try to write the file contents here... # Assume we are out of space... if error: raise Filesystem.GenericError("file too large")
If you throw an arbitrary Python run-time exception, the Ice run time catches the exception and then returns an UnknownException to the client. Similarly, if you throw an “impossible” user exception (a user exception that is not listed in the exception specification of the operation), the client receives an UnknownUserEx-ception.
If you throw an Ice run-time exception, such MemoryLimitException, the client receives an UnknownLocalException.2 For that reason, you should never throw system exceptions from operation implementations. If you do, all the client will see is an UnknownLocalException, which does not tell the client anything useful.
24.7 Object Incarnation
Having created a servant class such as the rudimentary NodeI class in Section 24.4.2, you can instantiate the class to create a concrete servant that can receive invocations from a client. However, merely instantiating a servant class is insufficient to incarnate an object. Specifically, to provide an implementation of an Ice object, you must take the following steps:
1. Instantiate a servant class.
2. Create an identity for the Ice object incarnated by the servant.
3. Inform the Ice run time of the existence of the servant.
4. Pass a proxy for the object to a client so the client can reach it.
2. There are three run-time exceptions that are not changed to UnknownLocalException when returned to the client: ObjectNotExistException, OperationNotExistException, and FacetNotExistException. We discuss these exceptions in more detail in Chapter 33.

732 Server-Side Slice-to-Python Mapping
24.7.1 Instantiating a Servant
Instantiating a servant means to allocate an instance:
servant = NodeI("Fred")
This statement creates a new NodeI instance and assigns its reference to the vari-able servant.
24.7.2 Creating an Identity
Each Ice object requires an identity. That identity must be unique for all servants using the same object adapter.3 An Ice object identity is a structure with the following Slice definition:
module Ice { struct Identity { string name; string category; }; // ...};
The full identity of an object is the combination of both the name and category fields of the Identity structure. For now, we will leave the category field as the empty string and simply use the name field. (See Section 32.6 for a discussion of the category field.)
To create an identity, we simply assign a key that identifies the servant to the name field of the Identity structure:
id = Ice.Identity()id.name = "Fred" # Not unique, but good enough for now
Note that the mapping for structures (see Section 22.7.2) allows us to write the following equivalent code:
id = Ice.Identity("Fred") # Not unique, but good enough for now
3. The Ice object model assumes that all objects (regardless of their adapter) have a globally unique identity. See Chapter 34 for further discussion.
24.7 Object Incarnation 733
24.7.3 Activating a ServantMerely creating a servant instance does nothing: the Ice run time becomes aware of the existence of a servant only once you explicitly tell the object adapter about the servant. To activate a servant, you invoke the add operation on the object adapter. Assuming that we have access to the object adapter in the adapter vari-able, we can write:
adapter.add(servant, id)
Note the two arguments to add: the servant and the object identity. Calling add on the object adapter adds the servant and the servant’s identity to the adapter’s servant map and links the proxy for an Ice object to the correct servant instance in the server’s memory as follows:
1. The proxy for an Ice object, apart from addressing information, contains the identity of the Ice object. When a client invokes an operation, the object iden-tity is sent with the request to the server.
2. The object adapter receives the request, retrieves the identity, and uses the identity as an index into the servant map.
3. If a servant with that identity is active, the object adapter retrieves the servant from the servant map and dispatches the incoming request into the correct member function on the servant.
Assuming that the object adapter is in the active state (see Section 32.4), client requests are dispatched to the servant as soon as you call add.
24.7.4 UUIDs as IdentitiesThe Ice object model assumes that object identities are globally unique. One way of ensuring that uniqueness is to use UUIDs (Universally Unique Identifiers) [14] as identities. The Ice.generateUUID function creates such identities:
import Iceprint Ice.generateUUID()
When executed, this program prints a unique string such as 5029a22c-e333-4f87-86b1-cd5e0fcce509. Each call to genera-teUUID creates a string that differs from all previous ones.4 You can use a UUID
4. Well, almost: eventually, the UUID algorithm wraps around and produces strings that repeat themselves, but this will not happen until approximately the year 3400.
734 Server-Side Slice-to-Python Mapping
such as this to create object identities. For convenience, the object adapter has an operation addWithUUID that generates a UUID and adds a servant to the servant map in a single step. Using this operation, we can create an identity and register a servant with that identity in a single step as follows:
adapter.addWithUUID(NodeI("Fred"))
24.7.5 Creating Proxies
Once we have activated a servant for an Ice object, the server can process incoming client requests for that object. However, clients can only access the object once they hold a proxy for the object. If a client knows the server’s address details and the object identity, it can create a proxy from a string, as we saw in our first example in Chapter 3. However, creation of proxies by the client in this manner is usually only done to allow the client access to initial objects for boot-strapping. Once the client has an initial proxy, it typically obtains further proxies by invoking operations.
The object adapter contains all the details that make up the information in a proxy: the addressing and protocol information, and the object identity. The Ice run time offers a number of ways to create proxies. Once created, you can pass a proxy to the client as the return value or as an out-parameter of an operation invo-cation.
Proxies and Servant Activation
The add and addWithUUID servant activation operations on the object adapter return a proxy for the corresponding Ice object. This means we can write:
proxy = adapter.addWithUUID(NodeI("Fred"))nodeProxy = Filesystem.NodePrx.uncheckedCast(proxy)# Pass nodeProxy to client...
Here, addWithUUID both activates the servant and returns a proxy for the Ice object incarnated by that servant in a single step.
Note that we need to use an uncheckedCast here because addWithUUID returns a proxy of type Ice.ObjectPrx.
Direct Proxy Creation
The object adapter offers an operation to create a proxy for a given identity:

24.8 Asynchronous Method Dispatch (AMD) 735
module Ice { local interface ObjectAdapter { Object* createProxy(Identity id); // ... };};
Note that createProxy creates a proxy for a given identity whether a servant is activated with that identity or not. In other words, proxies have a life cycle that is quite independent from the life cycle of servants:
id = Ice.Identity()id.name = Ice.generateUUID()proxy = adapter.createProxy(id)
This creates a proxy for an Ice object with the identity returned by genera-teUUID. Obviously, no servant yet exists for that object so, if we return the proxy to a client and the client invokes an operation on the proxy, the client will receive an ObjectNotExistException. (We examine these life cycle issues in more detail in Chapter 34.)
24.8 Asynchronous Method Dispatch (AMD)
The number of simultaneous synchronous requests a server is capable of supporting is determined by the number of threads in the server’s thread pool (see Section 32.10). If all of the threads are busy dispatching long-running operations, then no threads are available to process new requests and therefore clients may experience an unacceptable lack of responsiveness.
Asynchronous Method Dispatch (AMD), the server-side equivalent of AMI, addresses this scalability issue. Using AMD, a server can receive a request but then suspend its processing in order to release the dispatch thread as soon as possible. When processing resumes and the results are available, the server sends a response explicitly using a callback object provided by the Ice run time.
AMD is transparent to the client, that is, there is no way for a client to distin-guish a request that, in the server, is processed synchronously from a request that is processed asynchronously.
In practical terms, an AMD operation typically queues the request data (i.e., the callback object and operation arguments) for later processing by an applica-tion thread (or thread pool). In this way, the server minimizes the use of dispatch

736 Server-Side Slice-to-Python Mapping
threads and becomes capable of efficiently supporting thousands of simultaneous clients.
An alternate use case for AMD is an operation that requires further processing after completing the client’s request. In order to minimize the client’s delay, the operation returns the results while still in the dispatch thread, and then continues using the dispatch thread for additional work.
24.8.1 Enabling AMD with Metadata
To enable asynchronous dispatch, you must add an ["amd"] metadata directive to your Slice definitions. The directive applies at the interface and the operation level. If you specify ["amd"] at the interface level, all operations in that interface use asynchronous dispatch; if you specify ["amd"] for an individual operation, only that operation uses asynchronous dispatch. In either case, the metadata direc-tive replaces synchronous dispatch, that is, a particular operation implementation must use synchronous or asynchronous dispatch and cannot use both.
Consider the following Slice definitions:
["amd"] interface I { bool isValid(); float computeRate();};interface J { ["amd"] void startProcess(); int endProcess();};
In this example, both operations of interface I use asynchronous dispatch, whereas, for interface J, startProcess uses asynchronous dispatch and endPro-cess uses synchronous dispatch.
Specifying metadata at the operation level (rather than at the interface or class level) minimizes the amount of generated code and, more importantly, minimizes complexity: although the asynchronous model is more flexible, it is also more complicated to use. It is therefore in your best interest to limit the use of the asyn-chronous model to those operations that need it, while using the simpler synchro-nous model for the rest.

24.8 Asynchronous Method Dispatch (AMD) 737
24.8.2 AMD Mapping
For each AMD operation, the Python mapping emits a dispatch method with the same name as the operation and the suffix _async. This method returns None. The first parameter is a reference to a callback object, as described below. The remaining parameters comprise the in parameters of the operation, in the order of declaration.
The callback object defines two methods:
• def ice_response(self, <params>)
The ice_response method allows the server to report the successful completion of the operation. If the operation has a non-void return type, the first parameter to ice_response is the return value. Parameters corre-sponding to the operation’s out parameters follow the return value, in the order of declaration.
• def ice_exception(self, ex)
The ice_exception method allows the server to report an exception.
Neither ice_response nor ice_exception throw any exceptions to the caller.
Suppose we have defined the following operation:
interface I { ["amd"] int foo(short s, out long l);};
The callback interface generated for operation foo is shown below:
class ... # # Operation signatures. # # def ice_response(self, _result, l) # def ice_exception(self, ex)
The dispatch method for asynchronous invocation of operation foo is generated as follows:
def foo_async(self, __cb, s)
24.8.3 ExceptionsThere are two processing contexts in which the logical implementation of an AMD operation may need to report an exception: the dispatch thread (the thread

738 Server-Side Slice-to-Python Mapping
that receives the invocation), and the response thread (the thread that sends the response).5 Although we recommend that the callback object be used to report all exceptions to the client, it is legal for the implementation to raise an exception instead, but only from the dispatch thread.
As you would expect, an exception raised from a response thread cannot be caught by the Ice run time; the application’s run time environment determines how such an exception is handled. Therefore, a response thread must ensure that it traps all exceptions and sends the appropriate response using the callback object. Otherwise, if a response thread is terminated by an uncaught exception, the request may never be completed and the client might wait indefinitely for a response.
Whether raised in a dispatch thread or reported via the callback object, user exceptions are validated as described in Section 4.10.2, and local exceptions may undergo the translation described in Section 4.10.4.
24.8.4 Example
To demonstrate the use of AMD in Ice, let us define the Slice interface for a simple computational engine:
module Demo { sequence<float> Row; sequence<Row> Grid; exception RangeError {}; interface Model { ["amd"] Grid interpolate(Grid data, float factor) throws RangeError; };};
Given a two-dimensional grid of floating point values and a factor, the interpo-late operation returns a new grid of the same size with the values interpolated in some interesting (but unspecified) way.
Our servant class derives from Demo.Model and supplies a definition for the interpolate_async method that creates a Job to hold the callback object
5. These are not necessarily two different threads: it is legal to send the response from the dispatch thread.

24.8 Asynchronous Method Dispatch (AMD) 739
and arguments, and adds the Job to a queue. The method uses a lock to guard access to the queue:
class ModelI(Demo.Model): def __init__(self): self._mutex = threading.Lock() self._jobs = [] def interpolate_async(self, cb, data, factor, current=None): self._mutex.acquire() try: self._jobs.append(Job(cb, data, factor)) finally: self._mutex.release()
After queuing the information, the operation returns control to the Ice run time, making the dispatch thread available to process another request. An application thread removes the next Job from the queue and invokes execute, which uses interpolateGrid (not shown) to perform the computational work:
class Job(object): def __init__(self, cb, grid, factor): self._cb = cb self._grid = grid self._factor = factor def execute(self): if not self.interpolateGrid(): self._cb.ice_exception(Demo.RangeError()) return self._cb.ice_response(self._grid) def interpolateGrid(self): # ...
If interpolateGrid returns False, then ice_exception is invoked to indicate that a range error has occurred. The return statement following the call to ice_exception is necessary because ice_exception does not throw an exception; it only marshals the exception argument and sends it to the client.
If interpolation was successful, ice_response is called to send the modi-fied grid back to the client.
740 Server-Side Slice-to-Python Mapping
24.9 Summary
This chapter presented the server-side Python mapping. Because the mapping for Slice data types is identical for clients and servers, the server-side mapping only adds a few additional mechanism to the client side: a small API to initialize and finalize the run time, plus a few rules for how to derive servant classes from skele-tons and how to register servants with the server-side run time.
Even though the examples in this chapter are very simple, they accurately reflect the basics of writing an Ice server. Of course, for more sophisticated servers (which we discuss in Chapter 32), you will be using additional APIs, for example, to improve performance or scalability. However, these APIs are all described in Slice, so, to use these APIs, you need not learn any Python mapping rules beyond those we described here.
741
Chapter 25Developing a File System Server in Python
25.1 Chapter Overview
In this chapter, we present the source code for a fully-functional Python server that implements the file system we developed in Chapter 5 (see Chapter 23 for the corresponding client).
25.2 Implementing a File System Server
We have now seen enough of the server-side Python mapping to implement a server for the file system we developed in Chapter 5. (You may find it useful to review the Slice definition for our file system in Section 5.4 before studying the source code.)
Our server is implemented in a single source file, Server.py, containing our server’s main program as well as the definitions of our Directory and File servant subclasses.
25.2.1 The Server Main Program
Our server main program uses the Ice.Application class we discussed in Section 24.3.1. The run method installs a signal handler, creates an object

742 Developing a File System Server in Python
adapter, instantiates a few servants for the directories and files in the file system, and then activates the adapter. This leads to a main program as follows:
import sys, threading, Ice, Filesystem# DirectoryI servant class ...# FileI servant class ...class Server(Ice.Application): def run(self, args): # Terminate cleanly on receipt of a signal # self.shutdownOnInterrupt() # Create an object adapter (stored in the _adapter # static members) # adapter = self.communicator().\ createObjectAdapterWithEndpoints( "SimpleFilesystem", "default -p 10000") DirectoryI._adapter = adapter FileI._adapter = adapter # Create the root directory (with name "/" and no parent) # root = DirectoryI("/", None) # Create a file called "README" in the root directory # file = FileI("README", root) text = [ "This file system contains a collection of " + "poetry." ] try: file.write(text) except Filesystem.GenericError, e: print e.reason # Create a directory called "Coleridge" # in the root directory # coleridge = DirectoryI("Coleridge", root) # Create a file called "Kubla_Khan" # in the Coleridge directory # file = FileI("Kubla_Khan", coleridge)

25.2 Implementing a File System Server 743
text = [ "In Xanadu did Kubla Khan", "A stately pleasure-dome decree:", "Where Alph, the sacred river, ran", "Through caverns measureless to man", "Down to a sunless sea." ] try: file.write(text) except Filesystem.GenericError, e: print e.reason # All objects are created, allow client requests now # adapter.activate() # Wait until we are done # self.communicator().waitForShutdown() if self.interrupted(): print self.appName() + ": terminating" return 0app = Server()sys.exit(app.main(sys.argv))
The code defines the Server class, which derives from Ice.Application and contains the main application logic in its run method. Much of this code is boiler plate that we saw previously: we create an object adapter, and, towards the end, activate the object adapter and call waitForShutdown.
The interesting part of the code follows the adapter creation: here, the server instantiates a few nodes for our file system to create the structure shown in Figure 25.1.
Figure 25.1. A small file system.
RootDir
Coleridge README
Kubla_Khan
= Directory
= File

744 Developing a File System Server in Python
As we will see shortly, the servants for our directories and files are of type DirectoryI and FileI, respectively. The constructor for either type of servant accepts two parameters, the name of the directory or file to be created and a reference to the servant for the parent directory. (For the root directory, which has no parent, we pass None.) Thus, the statement
root = DirectoryI("/", None)
creates the root directory, with the name "/" and no parent directory.
Here is the code that establishes the structure in Figure 25.1:
# Create the root directory (with name "/" and no parent) # root = DirectoryI("/", None) # Create a file called "README" in the root directory # file = FileI("README", root) text = [ "This file system contains a collection of " + "poetry." ] try: file.write(text) except Filesystem.GenericError, e: print e.reason # Create a directory called "Coleridge" # in the root directory # coleridge = DirectoryI("Coleridge", root) # Create a file called "Kubla_Khan" # in the Coleridge directory # file = FileI("Kubla_Khan", coleridge) text = [ "In Xanadu did Kubla Khan", "A stately pleasure-dome decree:", "Where Alph, the sacred river, ran", "Through caverns measureless to man", "Down to a sunless sea." ] try: file.write(text) except Filesystem.GenericError, e: print e.reason

25.2 Implementing a File System Server 745
We first create the root directory and a file README within the root directory. (Note that we pass a reference to the root directory as the parent when we create the new node of type FileI.)
The next step is to fill the file with text:
text = [ "This file system contains a collection of " + "poetry." ] try: file.write(text) except Filesystem.GenericError, e: print e.reason
Recall from Section 14.7.3 that Slice sequences map to Python lists. The Slice type Lines is simply a list of strings; we add a line of text to our README file by initializing the text list to contain one element.
Finally, we call the Slice write operation on our FileI servant by simply writing:
file.write(text)
This statement is interesting: the server code invokes an operation on one of its own servants. Because the call happens via a reference to the servant (of type FileI) and not via a proxy (of type FilePrx), the Ice run time does not know that this call is even taking place—such a direct call into a servant is not mediated by the Ice run time in any way and is dispatched as an ordinary Python method call.
In similar fashion, the remainder of the code creates a subdirectory called Coleridge and, within that directory, a file called Kubla_Khan to complete the structure in Figure 25.1.
25.2.2 The FileI Servant Class
Our FileI servant class has the following basic structure:
class FileI(Filesystem.File): # Constructor and operations here... _adapter = None
The class has a number of data members:
• _adapter
This class member stores a reference to the single object adapter we use in our server.

746 Developing a File System Server in Python
• _name
This instance member stores the name of the file incarnated by the servant.
• _parent
This instance member stores the reference to the servant for the file’s parent directory.
• _lines
This instance member holds the contents of the file.
The _name, _parent, and _lines data members are initialized by the constructor:
def __init__(self, name, parent): self._name = name self._parent = parent self._lines = [] assert(self._parent != None) # Create an identity # myID = Ice.Identity() myID.name = Ice.generateUUID() # Add the identity to the object adapter # self._adapter.add(self, myID) # Create a proxy for the new node and # add it as a child to the parent # thisNode = Filesystem.NodePrx.uncheckedCast( self._adapter.createProxy(myID)) self._parent.addChild(thisNode)
After initializing the instance members, the code verifies that the reference to the parent is not None because every file must have a parent directory. The constructor then generates an identity for the file by calling Ice.genera-teUUID and adds itself to the servant map by calling ObjectAdapter.add. Finally, the constructor creates a proxy for this file and calls the addChild method on its parent directory. addChild is a helper function that a child direc-tory or file calls to add itself to the list of descendant nodes of its parent directory. We will see the implementation of this function on page 748.
25.2 Implementing a File System Server 747
The remaining methods of the FileI class implement the Slice operations we defined in the Node and File Slice interfaces:
# Slice Node::name() operation def name(self, current=None): return self._name # Slice File::read() operation def read(self, current=None): return self._lines # Slice File::write() operation def write(self, text, current=None): self._lines = text
The name method is inherited from the generated Node class. It simply returns the value of the _name instance member.
The read and write methods are inherited from the generated File class and simply return and set the _lines instance member.
25.2.3 The DirectoryI Servant ClassThe DirectoryI class has the following basic structure:
class DirectoryI(Filesystem.Directory): # Constructor and operations here... _adapter = None
As for the FileI class, we have data members to store the object adapter, the name, and the parent directory. (For the root directory, the _parent member holds None.) In addition, we have a _contents data member that stores the list of child directories. These data members are initialized by the constructor:
def __init__(self, name, parent): self._name = name self._parent = parent self._contents = [] # Create an identity. The # parent has the fixed identity "RootDir" # myID = Ice.Identity()

748 Developing a File System Server in Python
if(self._parent): myID.name = Ice.generateUUID() else: myID.name = "RootDir" # Add the identity to the object adapter # self._adapter.add(self, myID) # Create a proxy for the new node and # add it as a child to the parent # thisNode = Filesystem.NodePrx.uncheckedCast( self._adapter.createProxy(myID)) if self._parent: self._parent.addChild(thisNode)
The constructor creates an identity for the new directory by calling Ice.gener-ateUUID. (For the root directory, we use the fixed identity "RootDir".) The servant adds itself to the servant map by calling ObjectAdapter.add and then creates a proxy to itself and passes it to the addChild helper function.
addChild simply adds the passed reference to the _contents list:
def addChild(self, child): self._contents.append(child)
The remainder of the operations, name and list, are trivial:
def name(self, current=None): return self._name def list(self, current=None): return self._contents
25.3 Thread Safety
The server code we developed in Section 25.2 is not quite correct as it stands: if two clients access the same file in parallel, each via a different thread, one thread may read the _lines data member while another thread updates it. Obviously, if that happens, we may write or return garbage or, worse, crash the server. However, we can make the read and write operations thread-safe with a few trivial changes to the FileI class:

25.4 Summary 749
def __init__(self, name, parent): self._name = name self._parent = parent self._lines = [] self._mutex = threading.Lock() # ... def name(self, current=None): return self._name def read(self, current=None): self._mutex.acquire() lines = self._lines[:] # Copy the list self._mutex.release() return lines def write(self, text, current=None): self._mutex.acquire() self._lines = text self._mutex.release()
We modified the constructor to add the instance member _mutex, and then enclosed our read and write implementations in a critical section. (The name method does not require a critical section because the file’s name is immutable.)
No changes for thread safety are necessary in the DirectoryI class because the Directory interface, in its current form, defines no operations that modify the object.
25.4 Summary
This chapter showed how to implement a complete server for the file system we defined in Chapter 5. Note that the server is remarkably free of code that relates to distribution: most of the server code is simply application logic that would be present just the same as a non-distributed version. Again, this is one of the major advantages of Ice: distribution concerns are kept away from application code so that you can concentrate on developing application logic instead of networking infrastructure.


Part VIII
Ruby Mapping


753
Chapter 26Client-Side Slice-to-Ruby Mapping
26.1 Chapter Overview
In this chapter, we present the client-side Slice-to-Ruby mapping. One part of the client-side Ruby mapping concerns itself with rules for representing each Slice data type as a corresponding Ruby type; we cover these rules in Section 26.3 to Section 26.10. Another part of the mapping deals with how clients can invoke operations, pass and receive parameters, and handle exceptions. These topics are covered in Section 26.11 to Section 26.13. Slice classes have the characteristics of both data types and interfaces and are covered in Section 26.14. Code generation issues are discussed in Section 26.15, while Section 26.17 addresses the use of Slice checksums.
26.2 Introduction
The client-side Slice-to-Ruby mapping defines how Slice data types are translated to Ruby types, and how clients invoke operations, pass parameters, and handle errors. Much of the Ruby mapping is intuitive. For example, Slice sequences map to Ruby arrays, so there is essentially nothing new you have to learn in order to use Slice sequences in Ruby.

754 Client-Side Slice-to-Ruby Mapping
The Ruby API to the Ice run time is fully thread-safe. Obviously, you must still synchronize access to data from different threads. For example, if you have two threads sharing a sequence, you cannot safely have one thread insert into the sequence while another thread is iterating over the sequence. However, you only need to concern yourself with concurrent access to your own data—the Ice run time itself is fully thread safe, and none of the Ice API calls require you to acquire or release a lock before you safely can make the call.
Much of what appears in this chapter is reference material. We suggest that you skim the material on the initial reading and refer back to specific sections as needed. However, we recommend that you read at least Section 26.11 to Section 26.13 in detail because these sections cover how to call operations from a client, pass parameters, and handle exceptions.
A word of advice before you start: in order to use the Ruby mapping, you should need no more than the Slice definition of your application and knowledge of the Ruby mapping rules. In particular, looking through the generated code in order to discern how to use the Ruby mapping is likely to be inefficient, due to the amount of detail. Of course, occasionally, you may want to refer to the generated code to confirm a detail of the mapping, but we recommend that you otherwise use the material presented here to see how to write your client-side code.
26.3 Mapping for Identifiers
Slice identifiers map to an identical Ruby identifier. For example, the Slice identi-fier Clock becomes the Ruby identifier Clock. There are two exceptions to this rule:
1. If a Slice identifier maps to the name of a Ruby class, module, or constant, and the Slice identifier does not begin with an upper case letter, the mapping replaces the leading character with its upper case equivalent.1 For example, the Slice identifier bankAccount is mapped as BankAccount.
2. If a Slice identifier is the same as a Ruby keyword, the corresponding Ruby identifier is prefixed with an underscore. For example, the Slice identifier while is mapped as _while.2
1. Ruby requires the names of classes, modules, and constants to begin with an upper case letter.
2. As suggested in Section 4.5.3 on page 92, you should try to avoid such identifiers as much as possible.
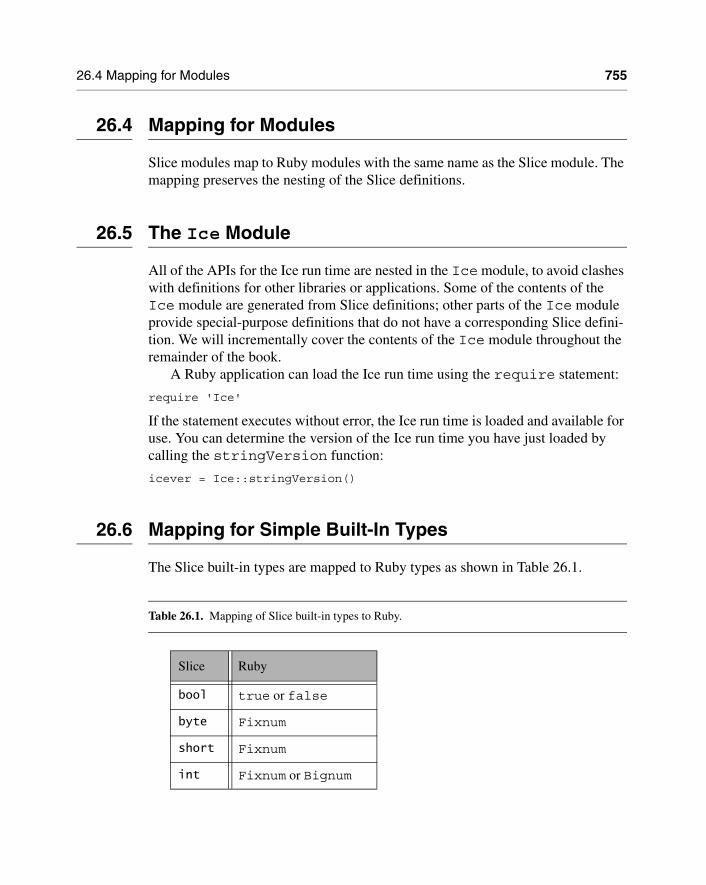
26.4 Mapping for Modules 755
26.4 Mapping for Modules
Slice modules map to Ruby modules with the same name as the Slice module. The mapping preserves the nesting of the Slice definitions.
26.5 The Ice Module
All of the APIs for the Ice run time are nested in the Ice module, to avoid clashes with definitions for other libraries or applications. Some of the contents of the Ice module are generated from Slice definitions; other parts of the Ice module provide special-purpose definitions that do not have a corresponding Slice defini-tion. We will incrementally cover the contents of the Ice module throughout the remainder of the book.
A Ruby application can load the Ice run time using the require statement:
require 'Ice'
If the statement executes without error, the Ice run time is loaded and available for use. You can determine the version of the Ice run time you have just loaded by calling the stringVersion function:
icever = Ice::stringVersion()
26.6 Mapping for Simple Built-In Types
The Slice built-in types are mapped to Ruby types as shown in Table 26.1.
Table 26.1. Mapping of Slice built-in types to Ruby.
Slice Ruby
bool true or false
byte Fixnum
short Fixnum
int Fixnum or Bignum

756 Client-Side Slice-to-Ruby Mapping
Although Ruby supports arbitrary precision in its integer types, the Ice run time validates integer values to ensure they have valid ranges for their declared Slice types.
26.6.1 String MappingString values returned as the result of a Slice operation (including return values, out parameters, and data members) contain UTF-8 encoded strings unless the program has installed a string converter, in which case string values use the converter’s native encoding instead. See Section 32.24 for more information on string converters.
As string input values for a remote Slice operation, Ice accepts nil in addi-tion to String objects; each occurrence of nil is marshaled as an empty string. Ice assumes that all String objects contain valid UTF-8 encoded strings unless the program has installed a string converter, in which case Ice assumes that String objects use the native encoding expected by the converter.
26.7 Mapping for User-Defined Types
Slice supports user-defined types: enumerations, structures, sequences, and dictionaries.
long Fixnum or Bignum
float Float
double Float
string String
Table 26.1. Mapping of Slice built-in types to Ruby.
Slice Ruby

26.7 Mapping for User-Defined Types 757
26.7.1 Mapping for EnumerationsRuby does not have an enumerated type, so the Slice enumerations are emulated using a Ruby class: the name of the Slice enumeration becomes the name of the Ruby class; for each enumerator, the class contains a constant with the same name as the enumerator (see Section 26.3 for more information on identifiers). For example:
enum Fruit { Apple, Pear, Orange };
The generated Ruby class looks as follows:
class Fruit include Comparable Apple = # ... Pear = # ... Orange = # ... def Fruit.from_int(val) def to_i def to_s def <=>(other) def hash # ...end
The compiler generates a class constant for each enumerator that holds a corre-sponding instance of Fruit. The from_int class method returns an instance given its integer value, while to_i returns the integer value of an enumerator and to_s returns its Slice identifier. The comparison operators are available as a result of including Comparable, which means a program can compare enumer-ators according to their integer values.
Given the above definitions, we can use enumerated values as follows:
f1 = Fruit::Applef2 = Fruit::Orangeif f1 == Fruit::Apple # Compare for equality # ...

758 Client-Side Slice-to-Ruby Mapping
if f1 < f2 # Compare two enums # ...case f2when Fruit::Orange puts "found Orange"else puts "found #{f2.to_s}"end
As you can see, the generated class enables natural use of enumerated values.
26.7.2 Mapping for Structures
Slice structures map to Ruby classes with the same name. For each Slice data member, the Ruby class contains a corresponding instance variable as well as accessors to read and write its value. For example, here is our Employee structure from Section 4.9.4 once more:
struct Employee { long number; string firstName; string lastName;};
The Ruby mapping generates the following definition for this structure:
class Employee def initialize(number=0, firstName='', lastName='') @number = number @firstName = firstName @lastName = lastName end def hash # ... end def == # ... end def inspect # ...

26.7 Mapping for User-Defined Types 759
end attr_accessor :number, :firstName, :lastNameend
The constructor initializes each of the instance variables to a default value appro-priate for its type. You can also declare different default values for members of primitive and enumerated types, as discussed in Section 4.9.2.
The compiler generates a definition for the hash method, which allows instances to be used as keys in a hash collection. The hash method returns a hash value for the structure based on the value of its data members.
The == method returns true if all members of two structures are (recursively) equal.
The inspect method returns a string representation of the structure.
26.7.3 Mapping for Sequences
Slice sequences map to Ruby arrays; the only exception is a sequence of bytes, which maps to a string (see below). The use of a Ruby array means that the mapping does not generate a separate named type for a Slice sequence. It also means that you can take advantage of all the array functionality provided by Ruby. For example:
sequence<Fruit> FruitPlatter;
We can use the FruitPlatter sequence as shown below:
platter = [ Fruit::Apple, Fruit::Pear ]platter.push(Fruit::Orange)
The Ice run time validates the elements of a sequence to ensure that they are compatible with the declared type; a TypeError exception is raised if an incom-patible type is encountered.
Mapping for Byte Sequences
A Ruby string can contain arbitrary 8-bit binary data, therefore it is a more effi-cient representation of a byte sequence than a Ruby array in both memory utiliza-tion and throughput performance.
When receiving a byte sequence (as the result of an operation, as an out parameter, or as a member of a data structure), the value is always represented as a string. When sending a byte sequence as an operation parameter or data member,

760 Client-Side Slice-to-Ruby Mapping
the Ice run time accepts both a string and an array of integers as legal values. For example, consider the following Slice definitions:
// Slicesequence<byte> Data;interface I { void sendData(Data d); Data getData();};
The interpreter session below uses these Slice definitions to demonstrate the mapping for a sequence of bytes:
> proxy = ...> proxy.sendData("\0\1\2\3") # Send as a string> proxy.sendData([0, 1, 2, 3]) # Send as an array> d = proxy.getData()> d.class=> String> d=> "\000\001\002\003"
The two invocations of sendData are equivalent; however, the second invocation incurs additional overhead as the Ice run time validates the type and range of each array element.
26.7.4 Mapping for Dictionaries
Here is the definition of our EmployeeMap from Section 4.9.4 once more:
dictionary<long, Employee> EmployeeMap;
As for sequences, the Ruby mapping does not create a separate named type for this definition. Instead, all dictionaries are simply instances of Ruby’s hash collec-tion type. For example:
em = {}e = Employee.newe.number = 31e.firstName = "James"e.lastName = "Gosling"em[e.number] = e

26.8 Mapping for Constants 761
The Ice run time validates the elements of a dictionary to ensure that they are compatible with the declared type; a TypeError exception is raised if an incom-patible type is encountered.
26.8 Mapping for Constants
Here are the constant definitions we saw in Section 4.9.5 on page 103 once more:
const bool AppendByDefault = true;const byte LowerNibble = 0x0f;const string Advice = "Don't Panic!";const short TheAnswer = 42;const double PI = 3.1416;enum Fruit { Apple, Pear, Orange };const Fruit FavoriteFruit = Pear;
The generated definitions for these constants are shown below:
AppendByDefault = trueLowerNibble = 15Advice = "Don't Panic!"TheAnswer = 42PI = 3.1416FavoriteFruit = Fruit::Pear
As you can see, each Slice constant is mapped to a Ruby constant with the same name.

762 Client-Side Slice-to-Ruby Mapping
26.9 Mapping for Exceptions
The mapping for exceptions is based on the inheritance hierarchy shown in Figure 26.1
Figure 26.1. Inheritance structure for Ice exceptions.
The ancestor of all exceptions is StandardError, from which Ice::Excep-tion is derived. Ice::LocalException and Ice::UserException are derived from Ice::Exception and form the base for all run-time and user exceptions.
Here is a fragment of the Slice definition for our world time server from Section 4.10.5 on page 120 once more:
exception GenericError { string reason;};exception BadTimeVal extends GenericError {};exception BadZoneName extends GenericError {};
These exception definitions map to the abbreviated Ruby class definitions shown below:
class GenericError < Ice::UserException def initialize(reason='') def to_s
Ice::LocalException Ice::UserException
Ice::Exception
Specific Run-Time Exceptions... Specific User Exceptions...
StandardError

26.9 Mapping for Exceptions 763
def inspect attr_accessor :reasonendclass BadTimeVal < GenericError def initialize(reason='') def to_s def inspectendclass BadZoneName < GenericError def initialize(reason='') def to_s def inspectend
Each Slice exception is mapped to a Ruby class with the same name. The inheri-tance structure of the Slice exceptions is preserved for the generated classes, so BadTimeVal and BadZoneName inherit from GenericError.
Each exception member corresponds to an instance variable of the instance, which the constructor initializes to a default value appropriate for its type. You can also declare different default values for members of primitive and enumerated types, as discussed in Section 4.10.2. Accessors are provided to read and write the data members.
Although BadTimeVal and BadZoneName do not declare data members, their constructors still accept a value for the inherited data member reason in order to pass it to the constructor of the base exception GenericError.
Each exception also defines the standard methods to_s and inspect to return the name of the exception and a stringified representation of the exception and its members, respectively.
All user exceptions are derived from the base class Ice::UserExcep-tion. This allows you to catch all user exceptions generically by installing a handler for Ice::UserException. Similarly, you can catch all Ice run-time exceptions with a handler for Ice::LocalException, and you can catch all Ice exceptions with a handler for Ice::Exception.

764 Client-Side Slice-to-Ruby Mapping
26.10 Mapping for Run-Time Exceptions
The Ice run time throws run-time exceptions for a number of pre-defined error conditions. All run-time exceptions directly or indirectly derive from Ice::LocalException (which, in turn, derives from Ice::Exception).
An inheritance diagram for user and run-time exceptions appears in Figure 4.4 on page 117. By catching exceptions at the appropriate point in the hierarchy, you can handle exceptions according to the category of error they indicate:
• Ice::LocalException
This is the root of the inheritance tree for run-time exceptions.
• Ice::UserException
This is the root of the inheritance tree for user exceptions.
• Ice::TimeoutException
This is the base exception for both operation-invocation and connection-estab-lishment timeouts.
• Ice::ConnectTimeoutException
This exception is raised when the initial attempt to establish a connection to a server times out.
You will probably have little need to catch the remaining run-time exceptions; the fine-grained error handling offered by the remainder of the hierarchy is of interest mainly in the implementation of the Ice run time. However, there is one exception you will probably be interested in specifically: Ice::ObjectNotExistEx-ception. This exception is raised if a client invokes an operation on an Ice object that no longer exists. In other words, the client holds a dangling reference to an object that probably existed some time in the past but has since been perma-nently destroyed.
26.11 Mapping for Interfaces
The mapping of Slice interfaces revolves around the idea that, to invoke a remote operation, you call a method on a local class instance that represents the remote object. This makes the mapping easy and intuitive to use because, for all intents and purposes (apart from error semantics), making a remote procedure call is no different from making a local procedure call.

26.11 Mapping for Interfaces 765
26.11.1 Proxy Classes
On the client side, Slice interfaces map to Ruby classes with methods that corre-spond to the operations on those interfaces. Consider the following simple inter-face:
interface Simple { void op();};
The Ruby mapping generates the following definition for use by the client:
class SimplePrx < Ice::ObjectPrx def op(_ctx=nil) # ... # ...end
In the client’s address space, an instance of SimplePrx is the local ambassador for a remote instance of the Simple interface in a server and is known as a proxy instance. All the details about the server-side object, such as its address, what protocol to use, and its object identity are encapsulated in that instance.
Note that SimplePrx inherits from Ice::ObjectPrx. This reflects the fact that all Ice interfaces implicitly inherit from Ice::Object.
For each operation in the interface, the proxy class has a method of the same name. In the preceding example, we find that the operation op has been mapped to the method op. Note that op accepts an optional trailing parameter _ctx repre-senting the operation context. This parameter is a Ruby hash value for use by the Ice run time to store information about how to deliver a request. You normally do not need to use it. (We examine the context parameter in detail in Chapter 32. The parameter is also used by IceStorm—see Chapter 44.)
Proxy instances are always created on behalf of the client by the Ice run time, so client code never has any need to instantiate a proxy directly.
A value of nil denotes the null proxy. The null proxy is a dedicated value that indicates that a proxy points “nowhere” (denotes no object).
26.11.2 The Ice::ObjectPrx Class
All Ice objects have Object as the ultimate ancestor type, so all proxies inherit from Ice::ObjectPrx. ObjectPrx provides a number of methods:

766 Client-Side Slice-to-Ruby Mapping
class ObjectPrx def eql?(proxy) def ice_getIdentity def ice_isA(id) def ice_id def ice_ping # ...end
The methods behave as follows:
• eql?
The implementation of this standard method compares two proxies for equality. Note that all aspects of proxies are compared by this operation, such as the communication endpoints for the proxy. This means that, in general, if two proxies compare unequal, that does not imply that they denote different objects. For example, if two proxies denote the same Ice object via different transport endpoints, eql? returns false even though the proxies denote the same object.
• ice_getIdentity
This method returns the identity of the object denoted by the proxy. The iden-tity of an Ice object has the following Slice type:
module Ice { struct Identity { string name; string category; };};
To see whether two proxies denote the same object, first obtain the identity for each object and then compare the identities:
proxy1 = ...proxy2 = ...id1 = proxy1.ice_getIdentityid2 = proxy2.ice_getIdentityif id1 == id2 # proxy1 and proxy2 denote the same objectelse # proxy1 and proxy2 denote different objectsend

26.11 Mapping for Interfaces 767
• ice_isA
This method determines whether the object denoted by the proxy supports a specific interface. The argument to ice_isA is a type ID (see Section 4.13). For example, to see whether a proxy of type ObjectPrx denotes a Printer object, we can write:
proxy = ...if proxy && proxy.ice_isA("::Printer") # proxy denotes a Printer objectelse # proxy denotes some other type of objectend
Note that we are testing whether the proxy is nil before attempting to invoke the ice_isA method. This avoids getting a run-time error if the proxy is nil.
• ice_id
This method returns the type ID of the object denoted by the proxy. Note that the type returned is the type of the actual object, which may be more derived than the static type of the proxy. For example, if we have a proxy of type BasePrx, with a static type ID of ::Base, the return value of ice_id might be "::Base", or it might be something more derived, such as "::Derived".
• ice_ping
This method provides a basic reachability test for the object. If the object can physically be contacted (that is, the object exists and its server is running and reachable), the call completes normally; otherwise, it throws an exception that indicates why the object could not be reached, such as ObjectNotExist-Exception or ConnectTimeoutException.
Note that there are other methods in ObjectPrx, not shown here. These methods provide different ways to dispatch a call. (We discuss these methods in Chapter 32.)
26.11.3 Casting Proxies
The Ruby mapping for a proxy also generates two class methods:

768 Client-Side Slice-to-Ruby Mapping
class SimplePrx < Ice::ObjectPrx # ... def SimplePrx.checkedCast(proxy, facet='', ctx={}) def SimplePrx.uncheckedCast(proxy, facet='')end
Both the checkedCast and uncheckedCast methods implement a down-cast: if the passed proxy is a proxy for an object of type Simple, or a proxy for an object with a type derived from Simple, the cast returns a reference to a proxy of type SimplePrx; otherwise, if the passed proxy denotes an object of a different type (or if the passed proxy is nil), the cast returns nil.
The method names checkedCast and uncheckedCast are reserved for use in proxies. If a Slice interface defines an operation with either of those names, the mapping escapes the name in the generated proxy by prepending an under-score. For example, an interface that defines an operation named checkedCast is mapped to a proxy with a method named _checkedCast.
Given a proxy of any type, you can use a checkedCast to determine whether the corresponding object supports a given type, for example:
obj = ... # Get a proxy from somewhere...simple = SimplePrx::checkedCast(obj)if simple # Object supports the Simple interface...else # Object is not of type Simple...end
Note that a checkedCast contacts the server. This is necessary because only the server implementation has definite knowledge of the type of an object. As a result, a checkedCast may throw a ConnectTimeoutException or an ObjectNotExistException.
In contrast, an uncheckedCast does not contact the server and uncondi-tionally returns a proxy of the requested type. However, if you do use an uncheckedCast, you must be certain that the proxy really does support the type you are casting to; otherwise, if you get it wrong, you will most likely get a run-time exception when you invoke an operation on the proxy. The most likely error for such a type mismatch is OperationNotExistException. However, other exceptions, such as a marshaling exception are possible as well. And, if the object happens to have an operation with the correct name, but

26.11 Mapping for Interfaces 769
different parameter types, no exception may be reported at all and you simply end up sending the invocation to an object of the wrong type; that object may do rather non-sensical things. To illustrate this, consider the following two interfaces:
interface Process { void launch(int stackSize, int dataSize);};// ...interface Rocket { void launch(float xCoord, float yCoord);};
Suppose you expect to receive a proxy for a Process object and use an uncheckedCast to down-cast the proxy:
obj = ... # Get proxy...process = ProcessPrx::uncheckedCast(obj) # No worries...process.launch(40, 60) # Oops...
If the proxy you received actually denotes a Rocket object, the error will go unde-tected by the Ice run time: because int and float have the same size and because the Ice protocol does not tag data with its type on the wire, the implementation of Rocket::launch will simply misinterpret the passed integers as floating-point numbers.
In fairness, this example is somewhat contrived. For such a mistake to go unnoticed at run time, both objects must have an operation with the same name and, in addition, the run-time arguments passed to the operation must have a total marshaled size that matches the number of bytes that are expected by the unmar-shaling code on the server side. In practice, this is extremely rare and an incorrect uncheckedCast typically results in a run-time exception.
26.11.4 Using Proxy Methods
The base proxy class ObjectPrx supports a variety of methods for customizing a proxy (see Section 32.11). Since proxies are immutable, each of these “factory methods” returns a copy of the original proxy that contains the desired modifica-tion. For example, you can obtain a proxy configured with a ten second timeout as shown below:
proxy = communicator.stringToProxy(...)proxy = proxy.ice_timeout(10000)

770 Client-Side Slice-to-Ruby Mapping
A factory method returns a new proxy object if the requested modification differs from the current proxy, otherwise it returns the current proxy. With few excep-tions, factory methods return a proxy of the same type as the current proxy, there-fore it is generally not necessary to repeat a down-cast after using a factory method. The example below demonstrates these semantics:
base = communicator.stringToProxy(...)hello = Demo::HelloPrx::checkedCast(base)hello = hello.ice_timeout(10000) # Type is not discardedhello.sayHello()
The only exceptions are the factory methods ice_facet and ice_identity. Calls to either of these methods may produce a proxy for an object of an unrelated type, therefore they return a base proxy that you must subsequently down-cast to an appropriate type.
26.11.5 Object Identity and Proxy Comparison
Proxy objects support comparison using the comparison operators ==, !=, and <=>, as well as the eql? method. Note that proxy comparison uses all of the information in a proxy for the comparison. This means that not only the object identity must match for a comparison to succeed, but other details inside the proxy, such as the protocol and endpoint information, must be the same. In other words, comparison tests for proxy identity, not object identity. A common mistake is to write code along the following lines:
p1 = ... # Get a proxy...p2 = ... # Get another proxy...if p1 != p2 # p1 and p2 denote different objects # WRONG!else # p1 and p2 denote the same object # Correctend
Even though p1 and p2 differ, they may denote the same Ice object. This can happen because, for example, both p1 and p2 embed the same object identity, but each uses a different protocol to contact the target object. Similarly, the protocols may be the same, but denote different endpoints (because a single Ice object can be contacted via several different transport endpoints). In other words, if two proxies compare equal, we know that the two proxies denote the same object (because they are identical in all respects); however, if two proxies compare

26.12 Mapping for Operations 771
unequal, we know absolutely nothing: the proxies may or may not denote the same object.
To compare the object identities of two proxies, you can use a helper function in the Ice module:
def proxyIdentityCompare(lhs, rhs)def proxyIdentityAndFacetCompare(lhs, rhs)
proxyIdentityCompare allows you to correctly compare proxies for iden-tity:
p1 = ... # Get a proxy...p2 = ... # Get another proxy...if Ice.proxyIdentityCompare(p1, p2) != 0 # p1 and p2 denote different objects # Correctelse # p1 and p2 denote the same object # Correctend
The function returns 0 if the identities are equal, 1 if p1 is less than p2, and 1 if p1 is greater than p2. (The comparison uses name as the major sort key and category as the minor sort key.)
The proxyIdentityAndFacetCompare function behaves similarly, but compares both the identity and the facet name (see Chapter 33).
26.12 Mapping for Operations
As we saw in Section 26.11, for each operation on an interface, the proxy class contains a corresponding method with the same name. To invoke an operation, you call it via the proxy. For example, here is part of the definitions for our file system from Section 5.4:
module Filesystem { interface Node { idempotent string name(); }; // ...};
The name operation returns a value of type string. Given a proxy to an object of type Node, the client can invoke the operation as follows:

772 Client-Side Slice-to-Ruby Mapping
node = ... # Initialize proxyname = node.name() # Get name via RPC
26.12.1 Normal and idempotent Operations
You can add an idempotent qualifier to a Slice operation. As far as the signature for the corresponding proxy method is concerned, idempotent has no effect. For example, consider the following interface:
interface Example { string op1(); idempotent string op2();};
The proxy class for this is:
class ExamplePrx < Ice::ObjectPrx def op1(_ctx=nil) def op2(_ctx=nil)end
Because idempotent affects an aspect of call dispatch, not interface, it makes sense for the two methods to look the same.
26.12.2 Passing Parameters
In Parameters
All parameters are passed by reference in the Ruby mapping; it is guaranteed that the value of a parameter will not be changed by the invocation.
Here is an interface with operations that pass parameters of various types from client to server:
struct NumberAndString { int x; string str;};sequence<string> StringSeq;dictionary<long, StringSeq> StringTable;interface ClientToServer {

26.12 Mapping for Operations 773
void op1(int i, float f, bool b, string s); void op2(NumberAndString ns, StringSeq ss, StringTable st); void op3(ClientToServer* proxy);};
The Slice compiler generates the following proxy for this definition:
class ClientToServerPrx < Ice::ObjectPrx def op1(i, f, b, s, _ctx=nil) def op2(ns, ss, st, _ctx=nil) def op3(proxy, _ctx=nil)end
Given a proxy to a ClientToServer interface, the client code can pass parameters as in the following example:
p = ... # Get proxy...p.op1(42, 3.14, true, "Hello world!") # Pass simple literalsi = 42f = 3.14b = trues = "Hello world!"p.op1(i, f, b, s) # Pass simple variablesns = NumberAndString.new()ns.x = 42ns.str = "The Answer"ss = [ "Hello world!" ]st = {}st[0] = nsp.op2(ns, ss, st) # Pass complex variablesp.op3(p) # Pass proxy
Out Parameters
As in Java, Ruby functions do not support reference arguments. That is, it is not possible to pass an uninitialized variable to a Ruby function in order to have its value initialized by the function. The Java mapping (see Section 10.12.2) over-comes this limitation with the use of “holder classes” that represent each out parameter. The Ruby mapping takes a different approach, one that is more natural for Ruby users.

774 Client-Side Slice-to-Ruby Mapping
The semantics of out parameters in the Ruby mapping depend on whether the operation returns one value or multiple values. An operation returns multiple values when it has declared multiple out parameters, or when it has declared a non-void return type and at least one out parameter.
If an operation returns multiple values, the client receives them in the form of a result array. A non-void return value, if any, is always the first element in the result array, followed by the out parameters in the order of declaration.
If an operation returns only one value, the client receives the value itself.Here is the same Slice definition we saw on page 772 once more, but this time
with all parameters being passed in the out direction:
struct NumberAndString { int x; string str;};sequence<string> StringSeq;dictionary<long, StringSeq> StringTable;interface ServerToClient { int op1(out float f, out bool b, out string s); void op2(out NumberAndString ns, out StringSeq ss, out StringTable st); void op3(out ServerToClient* proxy);};
The Ruby mapping generates the following code for this definition:
class ClientToServerPrx < Ice::ObjectPrx def op1(_ctx=nil) def op2(_ctx=nil) def op3(_ctx=nil)end
Given a proxy to a ServerToClient interface, the client code can receive the results as in the following example:
p = ... # Get proxy...i, f, b, s = p.op1()ns, ss, st = p.op2()stcp = p.op3()

26.13 Exception Handling 775
The operations have no in parameters, therefore no arguments are passed to the proxy methods. Since op1 and op2 return multiple values, their result arrays are unpacked into separate values, whereas the return value of op3 requires no unpacking.
Parameter Type Mismatches
Although the Ruby compiler cannot check the types of arguments passed to a method, the Ice run time does perform validation on the arguments to a proxy invocation and reports any type mismatches as a TypeError exception.
Null Parameters
Some Slice types naturally have “empty” or “not there” semantics. Specifically, sequences, dictionaries, and strings all can be nil, but the corresponding Slice types do not have the of a null value. To make life with these types easier, when-ever you pass nil as a parameter or return value of type sequence, dictionary, or string, the Ice run time automatically sends an empty sequence, dictionary, or string to the receiver.
This behavior is useful as a convenience feature: especially for deeply-nested data types, members that are sequences, dictionaries, or strings automatically arrive as an empty value at the receiving end. This saves you having to explicitly initialize, for example, every string element in a large sequence before sending the sequence in order to avoid a run-time error. Note that using null parameters in this way does not create null semantics for Slice sequences, dictionaries, or strings. As far as the object model is concerned, these do not exist (only empty sequences, dictionaries, and strings do). For example, it makes no difference to the receiver whether you send a string as nil or as an empty string: either way, the receiver sees an empty string.
26.13 Exception Handling
Any operation invocation may throw a run-time exception (see Section 26.10) and, if the operation has an exception specification, may also throw user excep-tions (see Section 26.9). Suppose we have the following simple interface:

776 Client-Side Slice-to-Ruby Mapping
exception Tantrum { string reason;};interface Child { void askToCleanUp() throws Tantrum;};
Slice exceptions are thrown as Ruby exceptions, so you can simply enclose one or more operation invocations in a begin–rescue block:
child = ... # Get child proxy...begin child.askToCleanUp()rescue Tantrum => t puts "The child says: #{t.reason}"end
Typically, you will catch only a few exceptions of specific interest around an oper-ation invocation; other exceptions, such as unexpected run-time errors, will usually be handled by exception handlers higher in the hierarchy. For example:
def run() child = ... # Get child proxy... begin child.askToCleanUp() rescue Tantrum => t puts "The child says: #{t.reason}" child.scold() # Recover from error... end child.praise() # Give positive feedback...endbegin # ... run() # ...rescue Ice::Exception => ex print ex.backtrace.join("\n")end
This code handles a specific exception of local interest at the point of call and deals with other exceptions generically. (This is also the strategy we used for our first simple application in Chapter 3.)

26.14 Mapping for Classes 777
26.14 Mapping for Classes
Slice classes are mapped to Ruby classes with the same name. For each Slice data member, the generated class contains an instance variable and accessors to read and write it, just as for structures and exceptions. Consider the following class definition:
class TimeOfDay { short hour; // 0 - 23 short minute; // 0 - 59 short second; // 0 - 59 string format(); // Return time as hh:mm:ss};
The Ruby mapping generates the following code for this definition:
module TimeOfDay_mixin include ::Ice::Object_mixin # ... def inspect # ... end # # Operation signatures. # # def format() attr_accessor :hours, :minutes, :secondsendclass TimeOfDay include TimeOfDay_mixin def initialize(hour=0, minute=0, second=0) @hour = hour @minute = minute @second = second end def TimeOfDay.ice_staticId() '::M::TimeOfDay'

778 Client-Side Slice-to-Ruby Mapping
end # ...end
There are a number of things to note about the generated code:
1. The generated class TimeOfDay includes the mixin module TimeOfDay_mixin, which in turn includes Ice::Object_mixin. This reflects the semantics of Slice classes in that all classes implicitly inherit from Object, which is the ultimate ancestor of all classes. Note that Object is not the same as Ice::ObjectPrx. In other words, you cannot pass a class where a proxy is expected and vice versa.
2. The constructor defines an instance variable for each Slice data member.
3. The class defines the class method ice_staticId.
4. A comment summarizes the method signatures for each Slice operation.
We will discuss these items in the subsections below.
26.14.1 Inheritance from Object
In other language mappings, the inheritance relationship between Object and a user-defined Slice class is stated explicitly, in that the generated class derives from a language-specific representation of Object. Although its class type allows single inheritance, Ruby’s loosely-typed nature places less emphasis on class hier-archies and relies more on duck typing.3
The Slice mapping for a class follows this convention by placing most of the necessary machinery in a mixin module that the generated class includes into its definition. The Ice run time requires an instance of a Slice class to include the mixin module and define values for the declared data members, but does not require that the object be an instance of the generated class.
3. In Ruby, an object’s type is typically less important than the methods it supports. “If it looks like a duck, and acts like a duck, then it is a duck.”

26.14 Mapping for Classes 779
As shown in Figure 26.2, classes have no relationship to Ice::ObjectPrx (which is at the base of the inheritance hierarchy for proxies), therefore you cannot pass a class where a proxy is expected (and vice versa).
Figure 26.2. Inheritance from Ice::ObjectPrx and Object.
An instance of a Slice class C supports a number of methods:
def ice_isA(id, current=nil)def ice_ping(current=nil)def ice_ids(current=nil)def ice_id(current=nil)def C.ice_staticId()def ice_preMarshal()def ice_postUnmarshal()
The methods behave as follows:
• ice_isA
This method returns true if the object supports the given type ID, and false otherwise.
• ice_ping
As for interfaces, ice_ping provides a basic reachability test for the class.
• ice_ids
This method returns a string sequence representing all of the type IDs supported by this object, including ::Ice::Object.
Ice::ObjectPrx
Proxies... Classes...
Object
780 Client-Side Slice-to-Ruby Mapping
• ice_id
This method returns the actual run-time type ID of the object. If you call ice_id through a reference to a base instance, the returned type id is the actual (possibly more derived) type ID of the instance.
• ice_staticId
This method returns the static type ID of the class.
• ice_preMarshal
If the object supports this method, the Ice run time invokes it just prior to marshaling the object’s state, providing the opportunity for the object to vali-date its declared data members.
• ice_postUnmarshal
If the object supports this method, the Ice run time invokes it after unmar-shaling the object’s state. An object typically defines this method when it needs to perform additional initialization using the values of its declared data members.
The mixin module Ice::Object_mixin supplies default definitions of ice_isA and ice_ping. For each Slice class, the generated mixin module defines ice_ids and ice_id, and the generated class defines the ice_staticId method.
Note that neither Ice::Object nor the generated class override hash and ==, so the default implementations apply.
26.14.2 Data Members of Classes
By default, data members of classes are mapped exactly as for structures and exceptions: for each data member in the Slice definition, the generated class contains a corresponding instance variable and accessor methods.
If you wish to restrict access to a data member, you can modify its visibility using the protected metadata directive. The presence of this directive causes the Slice compiler to generate the data member with protected visibility. As a result, the member can be accessed only by the class itself or by one of its subclasses. For example, the TimeOfDay class shown below has the protected metadata directive applied to each of its data members:

26.14 Mapping for Classes 781
class TimeOfDay { ["protected"] short hour; // 0 - 23 ["protected"] short minute; // 0 - 59 ["protected"] short second; // 0 - 59 string format(); // Return time as hh:mm:ss};
The Slice compiler produces the following generated code for this definition:
module TimeOfDay_mixin include ::Ice::Object_mixin # ... # # Operation signatures. # # def format() attr_accessor :hours, :minutes, :seconds protected :hours, :hours= protected :minutes, :minutes= protected :seconds, :seconds=endclass TimeOfDay include TimeOfDay_mixin def initialize(hour=0, minute=0, second=0) @hour = hour @minute = minute @second = second end # ...end
For a class in which all of the data members are protected, the metadata directive can be applied to the class itself rather than to each member individually. For example, we can rewrite the TimeOfDay class as follows:
["protected"] class TimeOfDay { short hour; // 0 - 23 short minute; // 0 - 59 short second; // 0 - 59 string format(); // Return time as hh:mm:ss};

782 Client-Side Slice-to-Ruby Mapping
26.14.3 Class Constructors
Classes have a constructor that assigns to each data member a default value appro-priate for its type. You can also declare different default values for data members of primitive and enumerated types, as discussed in Section 4.11.1.
For derived classes, the constructor has one parameter for each of the base class’s data members, plus one parameter for each of the derived class’s data members, in base-to-derived order.
26.14.4 Operations of Classes
Operations of classes are mapped to methods in the generated class. This means that, if a class contains operations (such as the format operation of our TimeOfDay class), objects representing instances of TimeOfDay must define equivalent methods. For example:
class TimeOfDayI < TimeOfDay def format(current=nil) sprintf("%02d:%02d:%02d", @hour, @minute, @second) endend
In this case our implementation class TimeOfDayI derives from the generated class TimeOfDay. An alternative is to include the generated mixin module, which makes it possible for the class to derive from a different base class if neces-sary:
class TimeOfDayI < SomeOtherClass include TimeOfDay_mixin def format(current=nil) sprintf("%02d:%02d:%02d", @hour, @minute, @second) endend
As described in Section 26.14.1, an implementation of a Slice class must include the mixin module but is not required to derive from the generated class.
Ruby allows an existing class to be reopened in order to augment or replace its functionality. This feature provides another way for us to implement a Slice class: reopen the generated class and define the necessary methods:

26.14 Mapping for Classes 783
class TimeOfDay def format(current=nil) sprintf("%02d:%02d:%02d", @hour, @minute, @second) endend
As an added benefit, this strategy eliminates the need to define a class factory. The next section describes this subject in more detail.
A Slice class such as TimeOfDay that declares or inherits an operation is inher-ently abstract. Ruby does not support the notion of abstract classes or abstract methods, therefore the mapping merely summarizes the required method signa-tures in a comment for your convenience.
You may notice that the mapping for an operation adds an optional trailing parameter named current. For now, you can ignore this parameter and pretend it does not exist. (We look at it in more detail in Section 32.6.)
26.14.5 Receiving Objects
We have discussed the ways you can implement a Slice class, but we also need to examine the semantics of receiving an object as the return value or as an out-parameter from an operation invocation. Consider the following simple interface:
interface Time { TimeOfDay get();};
When a client invokes the get operation, the Ice run time must instantiate and return an instance of the TimeOfDay class. Unless we tell it otherwise, the Ice run time in Ruby does exactly that: it instantiates the generated class TimeOfDay. Although TimeOfDay is logically an abstract class because its Slice equivalent defined an operation, Ruby has no notion of abstract classes and therefore it is legal to create an instance of this class. Furthermore, there are situa-tions in which this is exactly the behavior you want:
• when you have reopened the generated class to define its operations, or
• when your program uses only the data members of an object and does not invoke any of its operations.
On the other hand, if you have defined a Ruby class that implements the Slice class, you need the Ice run time to return an instance of your class and not an instance of the generated class. The Ice run time cannot magically know about

784 Client-Side Slice-to-Ruby Mapping
your implementation class, therefore you must inform the Ice run time by installing a class factory.
26.14.6 Class Factories
The Ice run time invokes a class factory when it needs to instantiate an object of a particular type. If no factory is found, the Ice run time instantiates the generated class as described in Section 26.14.5. To install a factory, we use operations provided by the Ice::Communicator interface:
module Ice { local interface ObjectFactory { Object create(string type); void destroy(); }; local interface Communicator { void addObjectFactory(ObjectFactory factory, string id); ObjectFactory findObjectFactory(string id); // ... };};
To supply the Ice run time with a factory for our TimeOfDayI class, we must create an object that supports the Ice::ObjectFactory interface:
class ObjectFactory def create(type) fail unless type == M::TimeOfDay::ice_staticId() TimeOfDayI.new end def destroy # Nothing to do endend
The object factory’s create method is called by the Ice run time when it needs to instantiate a TimeOfDay class. The factory’s destroy method is called by the Ice run time when its communicator is destroyed.
The create method is passed the type ID (see Section 4.13) of the class to instantiate. For our TimeOfDay class, the type ID is "::M::TimeOfDay". Our implementation of create checks the type ID: if it matches, the method instanti-

26.14 Mapping for Classes 785
ates and returns a TimeOfDayI object. For other type IDs, the method fails because it does not know how to instantiate other types of objects.
Note that we used the ice_staticId method to obtain the type ID rather than embedding a literal string. Using a literal type ID string in your code is discouraged because it can lead to errors that are only detected at run time. For example, if a Slice class or one of its enclosing modules is renamed and the literal string is not changed accordingly, a receiver will fail to unmarshal the object and the Ice run time will raise NoObjectFactoryException. By using ice_staticId instead, we avoid any risk of a misspelled or obsolete type ID, and we can discover at compile time if a Slice class or module has been renamed.
Given a factory implementation, such as our ObjectFactory, we must inform the Ice run time of the existence of the factory:
ic = ... # Get Communicator...ic.addObjectFactory(ObjectFactory.new, M::TimeOfDay::ice_staticId())
Now, whenever the Ice run time needs to instantiate a class with the type ID "::M::TimeOfDay", it calls the create method of the registered ObjectFac-tory instance.
The destroy operation of the object factory is invoked by the Ice run time when the communicator is destroyed. This gives you a chance to clean up any resources that may be used by your factory. Do not call destroy on the factory while it is registered with the communicator—if you do, the Ice run time has no idea that this has happened and, depending on what your destroy implementation is doing, may cause undefined behavior when the Ice run time tries to next use the factory.
The run time guarantees that destroy will be the last call made on the factory, that is, create will not be called concurrently with destroy, and create will not be called once destroy has been called. However, calls to create can be made concurrently.
Note that you cannot register a factory for the same type ID twice: if you call addObjectFactory with a type ID for which a factory is registered, the Ice run time throws an AlreadyRegisteredException.
Finally, keep in mind that if a class has only data members, but no operations, you need not create and register an object factory to transmit instances of such a class.

786 Client-Side Slice-to-Ruby Mapping
26.15 Code Generation
The Ruby mapping supports two forms of code generation: dynamic and static.
26.15.1 Dynamic Code GenerationUsing dynamic code generation, Slice files are “loaded” at run time and dynami-cally translated into Ruby code, which is immediately compiled and available for use by the application. This is accomplished using the Ice::loadSlice method, as shown in the following example:
Ice::loadSlice("Color.ice")puts "My favorite color is #{M::Color.blue.to_s}"
For this example, we assume that Color.ice contains the following definitions:
module M { enum Color { red, green, blue };};
Ice::loadSlice Options
The Ice::loadSlice method behaves like a Slice compiler in that it accepts command-line arguments for specifying preprocessor options and controlling code generation. The arguments must include at least one Slice file.
The function has the following Ruby definition:
def loadSlice(cmd, args=[])
The command-line arguments can be specified entirely in the first argument, cmd, which must be a string. The optional second argument can be used to pass addi-tional command-line arguments as a list; this is useful when the caller already has the arguments in list form. The function always returns nil.
For example, the following calls to Ice::loadSlice are functionally equivalent:
Ice::loadSlice("-I/opt/IceRuby/slice Color.ice")Ice::loadSlice("-I/opt/IceRuby/slice", ["Color.ice"])Ice::loadSlice("", ["-I/opt/IceRuby/slice", "Color.ice"])
In addition to the standard compiler options described in Section 4.20, Ice::loadSlice also supports the following command-line options:
• --all
Generate code for all Slice definitions, including those from included files.

26.15 Code Generation 787
• --checksum
Generate checksums for Slice definitions. See Section 26.17 for more infor-mation.
Locating Slice Files
If your Slice files depend on Ice types, you can avoid hard-coding the path name of your Ice installation directory by calling the Ice::getSliceDir function:
Ice::loadSlice("-I" + Ice::getSliceDir() + " Color.ice")
This function attempts to locate the slice subdirectory of your Ice installation using an algorithm that succeeds for the following scenarios:
• Installation of a binary Ice archive
• Installation of an Ice source distribution using make install
• Installation via a Windows installer
• RPM installation on Linux
• Execution inside a compiled Ice source distribution
If the slice subdirectory can be found, getSliceDir returns its absolute path name, otherwise the function returns nil.
Loading Multiple Files
You can specify as many Slice files as necessary in a single invocation of Ice::loadSlice, as shown below:
Ice::loadSlice("Syscall.ice Process.ice")
Alternatively, you can call Ice::loadSlice several times:
Ice::loadSlice("Syscall.ice")Ice::loadSlice("Process.ice")
If a Slice file includes another file, the default behavior of Ice::loadSlice generates Ruby code only for the named file. For example, suppose Syscall.ice includes Process.ice as follows:
// Syscall.ice#include <Process.ice>...
If you call Ice::loadSlice("-I. Syscall.ice"), Ruby code is not generated for the Slice definitions in Process.ice or for any definitions that may be included by Process.ice. If you also need code to be generated for

788 Client-Side Slice-to-Ruby Mapping
included files, one solution is to load them individually in subsequent calls to Ice::loadSlice. However, it is much simpler, not to mention more efficient, to use the --all option instead:
Ice::loadSlice("--all -I. Syscall.ice")
When you specify --all, Ice::loadSlice generates Ruby code for all Slice definitions included directly or indirectly from the named Slice files.
There is no harm in loading a Slice file multiple times, aside from the addi-tional overhead associated with code generation. For example, this situation could arise when you need to load multiple top-level Slice files that happen to include a common subset of nested files. Suppose that we need to load both Syscall.ice and Kernel.ice, both of which include Process.ice. The simplest way to load both files is with a single call to Ice::loadSlice:
Ice::loadSlice("--all -I. Syscall.ice Kernel.ice")
Although this invocation causes the Ice extension to generate code twice for Process.ice, the generated code is structured so that the interpreter ignores duplicate definitions. We could have avoided generating unnecessary code with the following sequence of steps:
Ice::loadSlice("--all -I. Syscall.ice")Ice::loadSlice("-I. Kernel.ice")
In more complex cases, however, it can be difficult or impossible to completely avoid this situation, and the overhead of code generation is usually not significant enough to justify such an effort.
Limitations
The Ice::loadSlice method must be called outside of any module scope. For example, the following code is incorrect:
# WRONGmodule M Ice::loadSlice("--all -I. Syscall.ice Kernel.ice") ...end
26.15.2 Static Code Generation
You should be familiar with static code generation if you have used other Slice language mappings, such as C++ or Java. Using static code generation, the Slice

26.15 Code Generation 789
compiler slice2rb (see Section 26.15.4) generates Ruby code from your Slice definitions.
Compiler Output
For each Slice file X.ice, slice2rb generates Ruby code into a file named X.rb in the output directory. The default output directory is the current working directory, but a different directory can be specified using the --output-dir option.
Include Files
It is important to understand how slice2rb handles include files. In the absence of the --all option, the compiler does not generate Ruby code for Slice defini-tions in included files. Rather, the compiler translates Slice #include state-ments into Ruby require statements in the following manner:
1. Determine the full pathname of the included file.
2. Create the shortest possible relative pathname for the included file by iterating over each of the include directories (specified using the -I option) and removing the leading directory from the included file if possible.
For example, if the full pathname of an included file is /opt/App/slice/OS/Process.ice, and we specified the options -I/opt/App and -I/opt/App/slice, then the shortest relative path-name is OS/Process.ice after removing /opt/App/slice.
3. Replace the .ice extension with .rb. Continuing our example from the previous step, the translated require statement becomes
require "OS/Process.rb"
As a result, you can use -I options to tailor the require statements generated by the compiler in order to avoid absolute pathnames and match the organizational structure of your application’s source files.
26.15.3 Static Versus Dynamic Code Generation
There are several issues to consider when evaluating your requirements for code generation.

790 Client-Side Slice-to-Ruby Mapping
Application Considerations
The requirements of your application generally dictate whether you should use dynamic or static code generation. Dynamic code generation is convenient for a number of reasons:
• It avoids the intermediate compilation step required by static code generation.
• It makes the application more compact because the application requires only the Slice files, not the additional files produced by static code generation.
• It reduces complexity, which is especially helpful during testing, or when writing short or transient programs.
Static code generation, on the other hand, is appropriate in many situations:
• when an application uses a large number of Slice definitions and the startup delay must be minimized
• when it is not feasible to deploy Slice files with the application
• when a number of applications share the same Slice files
• when Ruby code is required in order to utilize third-party Ruby tools.
Mixing Static and Dynamic Generation
You can safely use a combination of static and dynamic translation in an applica-tion. For it to work properly, you must correctly manage the include paths for Slice translation and the Ruby interpreter so that the statically-generated code can be imported properly by require.
For example, suppose you want to dynamically load the following Slice defi-nitions:
#include <Glacier2/Session.ice>module MyApp { interface MySession extends Glacier2::Session { // ... };};
Whether the included file Glacier2/Session.ice is loaded dynamically or statically is determined by the presence of the --all option:

26.16 The main Program 791
sliceDir = "-I#{ENV['ICE_HOME']}/slice"# Load Glacier2/Session.ice dynamically:Ice::loadSlice(sliceDir + " --all MySession.ice")# Load Glacier2/Session.ice statically:Ice::loadSlice(sliceDir + " MySession.ice")
In this example, the first invocation of loadSlice uses the --all option so that code is generated dynamically for all included files. The second invocation omits --all, therefore the Ruby interpreter executes the equivalent of the following statement:
require "Glacier2/Session.rb"
As a result, before we can call loadSlice we must first ensure that the inter-preter can locate the statically-generated file Glacier2/Session.rb. We can do this in a number of ways, including
• adding the parent directory (e.g., /opt/IceRuby/ruby) to the RUBYLIB environment variable
• specifying the -I option when starting the interpreter
• modifying the search path at run time, as shown below:
$:.unshift("/opt/IceRuby/ruby")
26.15.4 slice2rb Command-Line Options
The Slice-to-Ruby compiler, slice2rb, offers the following command-line options in addition to the standard options described in Section 4.20:
• --all
Generate code for all Slice definitions, including those from included files.
• --checksum
Generate checksums for Slice definitions.
26.16 The main Program
The main entry point to the Ice run time is represented by the local interface Ice::Communicator. You must initialize the Ice run time by calling Ice::initialize before you can do anything else in your program.

792 Client-Side Slice-to-Ruby Mapping
Ice::initialize returns a reference to an instance of an Ice:::Communi-cator:
require 'Ice'status = 0ic = nilbegin ic = Ice::initialize(ARGV) # ...rescue => ex puts ex status = 1end# ...
Ice::initialize accepts the argument list that is passed to the program by the operating system. The function scans the argument list for any command-line options that are relevant to the Ice run time; any such options are removed from the argument list so, when Ice::initialize returns, the only options and arguments remaining are those that concern your application. If anything goes wrong during initialization, initialize throws an exception.
Before leaving your program, you must call Communicator::destroy. The destroy operation is responsible for finalizing the Ice run time. In particular, destroy ensures that any outstanding threads are joined with and reclaims a number of operating system resources, such as file descriptors and memory. Never allow your program to terminate without calling destroy first; doing so has unde-fined behavior.
The general shape of our program is therefore as follows:
require 'Ice'status = 0ic = nilbegin ic = Ice::initialize(ARGV) # ...rescue => ex puts ex status = 1endif ic

26.16 The main Program 793
begin ic.destroy() rescue => ex puts ex status = 1 endendexit(status)
Note that the code places the call to Ice::initialize into a begin block and takes care to return the correct exit status to the operating system. Also note that an attempt to destroy the communicator is made only if the initialization succeeded.
26.16.1 The Ice::Application ClassThe preceding program structure is so common that Ice offers a class, Ice::Application, that encapsulates all the correct initialization and final-ization activities. The synopsis of the class is as follows (with some detail omitted for now):
module Ice class Application def main(args, configFile=nil, initData=nil) def run(args) def Application.appName() def Application.communicator() endend
The intent of this class is that you specialize Ice::Application and imple-ment the abstract run method in your derived class. Whatever code you would normally place in your main program goes into run instead. Using Ice::Application, our program looks as follows:
require 'Ice'class Client < Ice::Application def run(args) # Client code here... return 0

794 Client-Side Slice-to-Ruby Mapping
endendapp = Client.new()status = app.main(ARGV)exit(status)
If you prefer, you can also reopen Ice::Application and define run directly:
require 'Ice'class Ice::Application def run(args) # Client code here... return 0 endendapp = Ice::Application.new()status = app.main(ARGV)exit(status)
You also can call main with an optional file name or an Initialization-Data structure (see Section 32.3 and Section 30.9). If you pass a configuration file name to main, the settings in this file are overridden by settings in a file iden-tified by the ICE_CONFIG environment variable (if defined). Property settings supplied on the command line take precedence over all other settings.
The Application.main function does the following:
1. It installs an exception handler. If your code fails to handle an exception, Application.main prints the exception information before returning with a non-zero return value.
2. It initializes (by calling Ice::initialize) and finalizes (by calling Communicator.destroy) a communicator. You can get access to the communicator for your program by calling the static communicator accessor.
3. It scans the argument list for options that are relevant to the Ice run time and removes any such options. The argument list that is passed to your run method therefore is free of Ice-related options and only contains options and arguments that are specific to your application.
4. It provides the name of your application via the static appName member function. The return value from this call is the first element of the argument

26.16 The main Program 795
vector passed to Application.main, so you can get at this name from anywhere in your code by calling Ice::Application::appName (which is usually required for error messages).
5. It installs a signal handler that properly shuts down the communicator.
Using Ice::Application ensures that your program properly finalizes the Ice run time, whether your program terminates normally or in response to an exception or signal. We recommend that all your programs use this class; doing so makes your life easier. In addition Ice::Application also provides features for signal handling and configuration that you do not have to implement yourself when you use this class.
Catching Signals
A program typically needs to perform some cleanup work before terminating, such as flushing database buffers or closing network connections. This is particu-larly important on receipt of a signal or keyboard interrupt to prevent possible corruption of database files or other persistent data.
To make it easier to deal with signals, Ice::Application encapsulates Ruby’s signal handling capabilities, allowing you to cleanly shut down on receipt of a signal:
class Application def Application.destroyOnInterrupt() def Application.ignoreInterrupt() def Application.callbackOnInterrupt() def Application.holdInterrupt() def Application.releaseInterrupt() def Application.interrupted() def interruptCallback(sig): # Default implementation does nothing. end # ...end
The methods behave as follows:

796 Client-Side Slice-to-Ruby Mapping
• destroyOnInterrupt
This method installs a signal handler that destroys the communicator if it is interrupted. This is the default behavior.
• ignoreInterrupt
This method causes signals to be ignored.
• callbackOnInterrupt
This function configures Ice::Application to invoke interrupt-Callback when a signal occurs, thereby giving the subclass responsibility for handling the signal.
• holdInterrupt
This method temporarily blocks signal delivery.
• releaseInterrupt
This method restores signal delivery to the previous disposition. Any signal that arrives after holdInterrupt was called is delivered when you call releaseInterrupt.
• interrupted
This method returns True if a signal caused the communicator to shut down, False otherwise. This allows us to distinguish intentional shutdown from a forced shutdown that was caused by a signal. This is useful, for example, for logging purposes.
• interruptCallback
A subclass implements this function to respond to signals. The function may be called concurrently with any other thread and must not raise exceptions.
By default, Ice::Application behaves as if destroyOnInterrupt was invoked, therefore our program requires no change to ensure that the program terminates cleanly on receipt of a signal. (You can disable the signal-handling functionality of Ice::Application by passing the constant NoSignal-Handling to the constructor. In that case, signals retain their default behavior, that is, terminate the process.) However, we add a diagnostic to report the occur-rence of a signal, so our program now looks like:
require 'Ice'class MyApplication < Ice::Application def run(args) # Client code here...

26.17 Using Slice Checksums 797
if Ice::Application::interrupted() print Ice::Application::appName() + ": terminating" end return 0 endendapp = MyApplication.new()status = app.main(ARGV)exit(status)
Ice::Application and Properties
Apart from the functionality shown in this section, Ice::Application also takes care of initializing the Ice run time with property values. Properties allow you to configure the run time in various ways. For example, you can use proper-ties to control things such as the thread pool size or the trace level for diagnostic output. The main method of Ice::Application accepts an optional second parameter allowing you to specify the name of a configuration file that will be processed during initialization. We discuss Ice properties in more detail in Chapter 30.
Limitations of Ice::Application
Ice::Application is a singleton class that creates a single communicator. If you are using multiple communicators, you cannot use Ice::Application. Instead, you must structure your code as we saw in Chapter 3 (taking care to always destroy the communicator).
26.17 Using Slice Checksums
As described in Section 4.21, the Slice compilers can optionally generate check-sums of Slice definitions. For slice2rb, the --checksum option causes the compiler to generate code that adds checksums to the hash collection Ice::SliceChecksums. The checksums are installed automatically when the Ruby code is first parsed; no action is required by the application.
In order to verify a server’s checksums, a client could simply compare the two hash objects using a comparison operator. However, this is not feasible if it is possible that the server might return a superset of the client’s checksums. A more general solution is to iterate over the local checksums as demonstrated below:

798 Client-Side Slice-to-Ruby Mapping
serverChecksums = ...for i in Ice::SliceChecksums.keys if not serverChecksums.has_key?(i) # No match found for type id! elif Ice::SliceChecksums[i] != serverChecksums[i] # Checksum mismatch! endend
In this example, the client first verifies that the server’s dictionary contains an entry for each Slice type ID, and then it proceeds to compare the checksums.

799
Chapter 27Developing a File System Client in Ruby
27.1 Chapter Overview
In this chapter, we present the source code for a Ruby client that accesses the file system we developed in Chapter 5.
27.2 The Ruby Client
We now have seen enough of the client-side Ruby mapping to develop a complete client to access our remote file system. For reference, here is the Slice definition once more:
module Filesystem { interface Node { idempotent string name(); }; exception GenericError { string reason; }; sequence<string> Lines; interface File extends Node {

800 Developing a File System Client in Ruby
idempotent Lines read(); idempotent void write(Lines text) throws GenericError; }; sequence<Node*> NodeSeq; interface Directory extends Node { idempotent NodeSeq list(); }; };
To exercise the file system, the client does a recursive listing of the file system, starting at the root directory. For each node in the file system, the client shows the name of the node and whether that node is a file or directory. If the node is a file, the client retrieves the contents of the file and prints them.
The body of the client code looks as follows:
require 'Filesystem.rb'# Recursively print the contents of directory "dir"# in tree fashion. For files, show the contents of# each file. The "depth" parameter is the current# nesting level (for indentation).def listRecursive(dir, depth) indent = '' depth = depth + 1 for i in (0...depth) indent += "\t" end contents = dir.list() for node in contents subdir = Filesystem::DirectoryPrx::checkedCast(node) file = Filesystem::FilePrx::uncheckedCast(node) print indent + node.name() + " " if subdir puts "(directory):" listRecursive(subdir, depth) else puts "(file):" text = file.read() for line in text puts indent + "\t" + line

27.2 The Ruby Client 801
end end endendstatus = 0ic = nilbegin # Create a communicator # ic = Ice::initialize(ARGV) # Create a proxy for the root directory # obj = ic.stringToProxy("RootDir:default -p 10000") # Down-cast the proxy to a Directory proxy # rootDir = Filesystem::DirectoryPrx::checkedCast(obj) # Recursively list the contents of the root directory # puts "Contents of root directory:" listRecursive(rootDir, 0)rescue => ex puts ex print ex.backtrace.join("\n") status = 1endif ic # Clean up # begin ic.destroy() rescue => ex puts ex print ex.backtrace.join("\n") status = 1 endendexit(status)

802 Developing a File System Client in Ruby
The program first defines the listRecursive function, which is a helper func-tion to print the contents of the file system, and the main program follows. Let us look at the main program first:
1. The structure of the code follows what we saw in Chapter 3. After initializing the run time, the client creates a proxy to the root directory of the file system. For this example, we assume that the server runs on the local host and listens using the default protocol (TCP/IP) at port 10000. The object identity of the root directory is known to be RootDir.
2. The client down-casts the proxy to DirectoryPrx and passes that proxy to listRecursive, which prints the contents of the file system.
Most of the work happens in listRecursive. The function is passed a proxy to a directory to list, and an indent level. (The indent level increments with each recursive call and allows the code to print the name of each node at an indent level that corresponds to the depth of the tree at that node.) listRecursive calls the list operation on the directory and iterates over the returned sequence of nodes:
1. The code does a checkedCast to narrow the Node proxy to a Directory proxy, as well as an uncheckedCast to narrow the Node proxy to a File proxy. Exactly one of those casts will succeed, so there is no need to call checkedCast twice: if the Node is-a Directory, the code uses the Direc-toryPrx returned by the checkedCast; if the checkedCast fails, we know that the Node is-a File and, therefore, an uncheckedCast is sufficient to get a FilePrx.
In general, if you know that a down-cast to a specific type will succeed, it is preferable to use an uncheckedCast instead of a checkedCast because an uncheckedCast does not incur any network traffic.
2. The code prints the name of the file or directory and then, depending on which cast succeeded, prints "(directory)" or "(file)" following the name.
3. The code checks the type of the node:
• If it is a directory, the code recurses, incrementing the indent level.
• If it is a file, the code calls the read operation on the file to retrieve the file contents and then iterates over the returned sequence of lines, printing each line.

27.3 Summary 803
Assume that we have a small file system consisting of a two files and a a directory as follows:
Figure 27.1. A small file system.
The output produced by the client for this file system is:
Contents of root directory: README (file): This file system contains a collection of poetry. Coleridge (directory): Kubla_Khan (file): In Xanadu did Kubla Khan A stately pleasure-dome decree: Where Alph, the sacred river, ran Through caverns measureless to man Down to a sunless sea.
Note that, so far, our client is not very sophisticated:
• The protocol and address information are hard-wired into the code.
• The client makes more remote procedure calls than strictly necessary; with minor redesign of the Slice definitions, many of these calls can be avoided.
We will see how to address these shortcomings in Chapter 38 and Chapter 34.
27.3 Summary
This chapter presented a very simple client to access a server that implements the file system we developed in Chapter 5. As you can see, the Ruby code hardly differs from the code you would write for an ordinary Ruby program. This is one of the biggest advantages of using Ice: accessing a remote object is as easy as accessing an ordinary, local Ruby object. This allows you to put your effort where
RootDir
Coleridge README
Kubla_Khan
= Directory
= File

804 Developing a File System Client in Ruby
you should, namely, into developing your application logic instead of having to struggle with arcane networking APIs.

Part IX
PHP Mapping


807
Chapter 28Client-Side Slice-to-PHP Mapping
28.1 Chapter Overview
In this chapter, we present the client-side Slice-to-PHP mapping. One part of the client-side PHP mapping concerns itself with rules for representing each Slice data type as a corresponding PHP type; we cover these rules in Section 28.3 to Section 28.10. Another part of the mapping deals with how clients can invoke operations, pass and receive parameters, and handle exceptions. These topics are covered in Section 28.11 to Section 28.13. Slice classes have the characteristics of both data types and interfaces and are covered in Section 28.14. Code generation issues are discussed in Section 28.15 and PHP-specific features in Section 28.16. Finally, Section 28.17 addresses the use of Slice checksums.
28.2 Introduction
The client-side Slice-to-PHP mapping defines how Slice data types are translated to PHP types, and how clients invoke operations, pass parameters, and handle errors. Much of the PHP mapping is intuitive. For example, Slice sequences map to PHP arrays, so there is essentially nothing new you have to learn in order to use Slice sequences in PHP.
808 Client-Side Slice-to-PHP Mapping
Much of what appears in this chapter is reference material. We suggest that you skim the material on the initial reading and refer back to specific sections as needed. However, we recommend that you read at least Section 28.11 to Section 28.13 in detail because these sections cover how to call operations from a client, pass parameters, and handle exceptions.
A word of advice before you start: in order to use the PHP mapping, you should need no more than the Slice definition of your application and knowledge of the PHP mapping rules. In particular, looking through the generated code in order to discern how to use the PHP mapping is likely to be inefficient, due to the amount of detail. Of course, occasionally, you may want to refer to the generated code to confirm a detail of the mapping, but we recommend that you otherwise use the material presented here to see how to write your client-side code.
28.3 Mapping for Identifiers
Slice identifiers map to an identical PHP identifier. For example, the Slice identi-fier Clock becomes the PHP identifier Clock. There is one exception to this rule: if a Slice identifier is the same as a PHP keyword or is an identifier reserved by the Ice run time (such as checkedCast), the corresponding PHP identifier is prefixed with an underscore. For example, the Slice identifier while is mapped as _while.1
A single Slice identifier often results in several PHP identifiers. For example, for a Slice interface named Foo, the generated PHP code uses the identifiers Foo and FooPrx (among others). If the interface has the name while, the generated identifiers are _while and whilePrx (not _whilePrx), that is, the under-score prefix is applied only to those generated identifiers that actually require it.
28.4 Mapping for Modules
By default, identifiers defined within a Slice module are mapped to a flattened symbol that uses underscores as module separators. Consider the following Slice definition:
1. As suggested in Section 4.5.3 on page 92, you should try to avoid such identifiers as much as possible.

28.5 The Ice Module 809
module M { module N { enum Color { red, green, blue }; };};
The Slice identifier Color maps to M_N_Color by default because PHP releases prior to version 5.3 lacked language support for namespaces. If you prefer to use namespaces instead, you can enable an alternate mapping in which Slice modules map to PHP namespaces with the same name as the Slice module. This mapping preserves the nesting of the Slice definitions. Using the namespace mapping, the Slice identifier Color maps to \M\N\Color.
Be aware that using underscores in your Slice definitions can lead to name collisions in the flattened mapping. Consider the following example:
module M { module N { enum Color { red, green, blue }; };};module M_N { interface Color { };};
Although these definitions are syntactically correct, they both map to the flattened PHP symbol M_N_Color.
28.5 The Ice Module
All of the APIs for the Ice run time are nested in the Ice module, to avoid clashes with definitions for other libraries or applications. Some of the contents of the Ice module are generated from Slice definitions; other parts of the Ice module provide special-purpose definitions that do not have a corresponding Slice defini-tion. We will incrementally cover the contents of the Ice module throughout the remainder of the book.
A PHP application can load the Ice run time using the require statement:
require 'Ice.php';

810 Client-Side Slice-to-PHP Mapping
If the statement executes without error, the Ice run time is loaded and available for use. You can determine the version of the Ice run time you have just loaded by calling the stringVersion function:
$icever = Ice_stringVersion();
Using the namespace mapping, you can refer to a global Ice function such as stringVersion either by its flattened name (as shown above) or by its namespace equivalent:
$icever = \Ice\stringVersion();
28.6 Mapping for Simple Built-In Types
PHP has a limited set of primitive types: boolean, integer, double, and string. The Slice built-in types are mapped to PHP types as shown in Table 28.1.
PHP’s integer type may not accommodate the range of values supported by Slice’s long type, therefore long values that are outside this range are mapped as
Table 28.1. Mapping of Slice built-in types to PHP.
Slice Ruby
bool true or false
byte integer
short integer
int integer
long integer
float double
double double
string string

28.7 Mapping for User-Defined Types 811
strings. Scripts must be prepared to receive an integer or string from any operation that returns a long value.
28.6.1 String Mapping
String values returned as the result of a Slice operation (including return values, out parameters, and data members) contain UTF-8 encoded strings unless the program has installed a string converter, in which case string values use the converter’s native encoding instead. See Section 32.24 for more information on string converters.
As string input values for a remote Slice operation, Ice accepts null in addi-tion to string objects; each occurrence of null is marshaled as an empty string. Ice assumes that all string objects contain valid UTF-8 encoded strings unless the program has installed a string converter, in which case Ice assumes that string objects use the native encoding expected by the converter.
28.7 Mapping for User-Defined Types
Slice supports user-defined types: enumerations, structures, sequences, and dictionaries.
28.7.1 Mapping for Enumerations
PHP does not have an enumerated type, so Slice enumerations are mapped to constants in a PHP class: the name of the Slice enumeration becomes the name of the PHP class; for each enumerator, the class contains a constant with the same name as the enumerator (see Section 28.3 for more information on identifiers). For example:
enum Fruit { Apple, Pear, Orange };
The generated PHP class looks as follows:
class Fruit{ const Apple = 0; const Pear = 1; const Orange = 2;}

812 Client-Side Slice-to-PHP Mapping
Since enumerated values are mapped to integers, application code is not required to use the generated constants. When an enumerated value enters the Ice run time, Ice validates that the given integer is within the expected range for the enumera-tion. However, to minimize the potential for defects in your code, we recommend using the generated constants instead of literal integers.
28.7.2 Mapping for Structures
A Slice structure maps to a PHP class containing a public variable for each member of the structure. The class also provides a constructor whose arguments correspond to the data members. This allows you to instantiate and initialize the class in a single statement (instead of having to first instantiate the class and then assign to its members). Each argument provides a default value appropriate for the member’s type. You can also declare different default values for members of prim-itive and enumerated types, as discussed in Section 4.9.2. For example, here is our Employee structure from Section 4.9.4 once more:
struct Employee { long number; string firstName; string lastName;};
The PHP mapping generates the following definition for this structure:
class Employee{ public function __construct($number=0, $firstName='', $lastName=''); public function __toString(); public $number; public $firstName; public $lastName;}
The mapping includes a definition for the __toString magic method, which returns a string representation of the structure.

28.7 Mapping for User-Defined Types 813
28.7.3 Mapping for Sequences
Slice sequences are mapped to native PHP indexed arrays. The first element of the Slice sequence is contained at index 0 (zero) of the PHP array, followed by the remaining elements in ascending index order.
Consider this example:
sequence<Fruit> FruitPlatter;
You can create an instance of FruitPlatter as shown below:
// Make a small platter with one Apple and one Orange//$platter = array(Fruit::Apple, Fruit::Orange);
The Ice run time validates the elements of an array to ensure that they are compat-ible with the declared type and raises InvalidArgumentException if an incompatible type is encountered.
28.7.4 Mapping for Dictionaries
Slice dictionaries map to native PHP associative arrays. The PHP mapping does not currently support all Slice dictionary types, however, because native PHP associative arrays support only integer and string key types. A Slice dictionary whose key type is an enumeration or one of the primitive types boolean, byte, short, int, or long is mapped as an associative array with an integer key.2 A Slice dictionary with a string key type is mapped as associative array with a string key. All other key types cause a warning to be generated.
Here is the definition of our EmployeeMap from Section 4.9.4:
dictionary<long, Employee> EmployeeMap;
You can create an instance of this dictionary as shown below:
$e1 = new Employee;$e1->number = 42;$e1->firstName = "Stan";$e1->lastName = "Lipmann";$e2 = new Employee;
2. Boolean values are treated as integers, with false equivalent to 0 (zero) and true equivalent to 1 (one).

814 Client-Side Slice-to-PHP Mapping
$e2->number = 77;$e2->firstName = "Herb";$e2->lastName = "Sutter";$em = array($e1->number => $e1, $e2->number => $e2);
The Ice run time validates the elements of a dictionary to ensure that they are compatible with the declared type; InvalidArgumentException exception is raised if an incompatible type is encountered.
28.8 Mapping for Constants
Slice constants are mapped to PHP constants. Consider the following definitions:
module M { const bool AppendByDefault = true; const byte LowerNibble = 0x0f; const string Advice = "Don't Panic!"; const short TheAnswer = 42; const double PI = 3.1416; enum Fruit { Apple, Pear, Orange }; const Fruit FavoriteFruit = Pear;};
The mapping for these constants is shown below:
define('M_AppendByDefault', true);define('M_LowerNibble', 15);define('M_Advice', "Don't Panic!");define('M_TheAnswer', 42);define('M_PI', 3.1416);define('M_FavoriteFruit', M_Fruit::Pear);
An application refers to a constant using its flattened name:
$ans = M_TheAnswer;
Using the namespace mapping, Slice constants are mapped to PHP constants in the enclosing namespace:
$ans = \M\TheAnswer;

28.9 Mapping for Exceptions 815
28.9 Mapping for Exceptions
The mapping for exceptions is based on the inheritance hierarchy shown in Figure 28.1
Figure 28.1. Inheritance structure for Ice exceptions.
The ancestor of all exceptions is Exception, from which Ice_Exception is derived. Ice_LocalException and Ice_UserException are derived from Ice_Exception and form the base for all run-time and user exceptions.
Consider the following Slice definitions:
exception GenericError { string reason;};exception BadTimeVal extends GenericError {};exception BadZoneName extends GenericError {};
These exception definitions map to the abbreviated PHP class definitions shown below:
class GenericError extends Ice_UserException{ public function __construct($reason=''); public function ice_name(); public function __toString(); public $reason;
Ice_LocalException Ice_UserException
Ice_Exception
Specific Run-Time Exceptions... Specific User Exceptions...
Exception

816 Client-Side Slice-to-PHP Mapping
}class BadTimeVal extends GenericError{ public function __construct($reason=''); public function ice_name(); public function __toString();}class BadZoneName extends GenericError{ public function __construct($reason=''); public function ice_name(); public function __toString();}
Each Slice exception is mapped to a PHP class with the same name. The inheri-tance structure of the Slice exceptions is preserved for the generated classes, so BadTimeVal and BadZoneName inherit from GenericError.
Each exception member corresponds to an instance variable of the instance, which the constructor initializes to a default value appropriate for its type. You can also declare different default values for members of primitive and enumerated types, as discussed in Section 4.10.2.
Although BadTimeVal and BadZoneName do not declare data members, their constructors still accept a value for the inherited data member reason in order to pass it to the constructor of the base exception GenericError.
Each exception also defines the ice_name method to return the exception’s type name, as well as the __toString magic method to return a stringified representation of the exception and its members.
All user exceptions are derived from the base class Ice_UserException. This allows you to catch all user exceptions generically by installing a handler for Ice_UserException. Similarly, you can catch all Ice run-time exceptions with a handler for Ice_LocalException, and you can catch all Ice excep-tions with a handler for Ice_Exception.
28.10 Mapping for Run-Time Exceptions
The Ice run time throws run-time exceptions for a number of pre-defined error conditions. All run-time exceptions directly or indirectly derive from Ice_LocalException (which, in turn, derives from Ice_Exception).

28.11 Mapping for Interfaces 817
An inheritance diagram for user and run-time exceptions appears in Figure 4.4 on page 117. By catching exceptions at the appropriate point in the hierarchy, you can handle exceptions according to the category of error they indicate:
• Ice_LocalException
This is the root of the inheritance tree for run-time exceptions.
• Ice_UserException
This is the root of the inheritance tree for user exceptions.
• Ice_TimeoutException
This is the base exception for both operation-invocation and connection-estab-lishment timeouts.
• Ice_ConnectTimeoutException
This exception is raised when the initial attempt to establish a connection to a server times out.
You will probably have little need to catch the remaining run-time exceptions; the fine-grained error handling offered by the remainder of the hierarchy is of interest mainly in the implementation of the Ice run time. However, there is one exception you will probably be interested in specifically: Ice_ObjectNotExistException. This exception is raised if a client invokes an operation on an Ice object that no longer exists. In other words, the client holds a dangling reference to an object that probably existed some time in the past but has since been permanently destroyed.
28.11 Mapping for Interfaces
The mapping of Slice interfaces revolves around the idea that, to invoke a remote operation, you call a method on a local class instance that represents the remote object. This makes the mapping easy and intuitive to use because, for all intents and purposes (apart from error semantics), making a remote procedure call is no different from making a local procedure call.
28.11.1 Proxy Objects
Slice interfaces are implemented by instances of the Ice_ObjectPrx class. In the client’s address space, an instance of ObjectPrx is the local ambassador for a remote instance of an interface in a server and is known as a proxy instance. All

818 Client-Side Slice-to-PHP Mapping
the details about the server-side object, such as its address, what protocol to use, and its object identity are encapsulated in that instance.
The PHP mapping for proxies differs from that of other Ice language mappings in that the ObjectPrx class is used to implement all Slice interfaces. The primary motivation for this design is minimizing the amount of code that is generated for each interface. As a result, a proxy object returned by the communi-cator operations stringToProxy and propertyToProxy is untyped, meaning it is not associated with a user-defined Slice interface. Once you narrow the proxy to a particular interface, you can use that proxy to invoke your Slice operations.
Proxy instances are always created on behalf of the client by the Ice run time, so client code never has any need to instantiate a proxy directly.
A value of null denotes the null proxy. The null proxy is a dedicated value that indicates that a proxy points “nowhere” (denotes no object).
For each operation in the interface, the proxy object supports a method of the same name. Each operation accepts an optional trailing parameter representing the operation context. This parameter is an associative string array for use by the Ice run time to store information about how to deliver a request. You normally do not need to use it. (We examine the context parameter in detail in Chapter 32. The parameter is also used by IceStorm—see Chapter 44.)
28.11.2 The Ice_ObjectPrx Class
In the PHP language mapping, all proxies are instances of Ice_ObjectPrx. This class provides a number of methods:
class Ice_ObjectPrx{ function ice_getIdentity(); function ice_isA($id); function ice_id(); function ice_ping(); # ...}
The methods behave as follows:
• ice_getIdentity
This method returns the identity of the object denoted by the proxy. The iden-tity of an Ice object has the following Slice type:

28.11 Mapping for Interfaces 819
module Ice { struct Identity { string name; string category; };};
To see whether two proxies denote the same object, first obtain the identity for each object and then compare the identities:
$proxy1 = ...$proxy2 = ...$id1 = $proxy1->ice_getIdentity();$id2 = $proxy2->ice_getIdentity();if($id1 == $id2) // proxy1 and proxy2 denote the same objectelse // proxy1 and proxy2 denote different objects
• ice_isA
This method determines whether the object denoted by the proxy supports a specific interface. The argument to ice_isA is a type ID (see Section 4.13). For example, to see whether a proxy of type ObjectPrx denotes a Printer object, we can write:
$proxy = ...if($proxy != null && $proxy->ice_isA("::Printer")) // proxy denotes a Printer objectelse // proxy denotes some other type of object
Note that we are testing whether the proxy is null before attempting to invoke the ice_isA method. This avoids getting a run-time error if the proxy is null.
• ice_id
This method returns the type ID of the object denoted by the proxy. Note that the type returned is the type of the actual object, which may be more derived than the narrowed type of the proxy. For example, if we have a proxy that has been narrowed to the type ID ::Base, the return value of ice_id might be "::Base", or it might be something more derived, such as "::Derived".

820 Client-Side Slice-to-PHP Mapping
• ice_ping
This method provides a basic reachability test for the object. If the object can physically be contacted (that is, the object exists and its server is running and reachable), the call completes normally; otherwise, it throws an exception that indicates why the object could not be reached, such as ObjectNotExist-Exception or ConnectTimeoutException.
The ObjectPrx class also defines an operator for comparing two proxies for equality. Note that all aspects of proxies are compared by this operation, such as the communication endpoints for the proxy. This means that, in general, if two proxies compare unequal, that does not imply that they denote different objects. For example, if two proxies denote the same Ice object via different transport endpoints, == returns false even though the proxies denote the same object.
There are other methods in ObjectPrx, not shown here. These methods provide different ways to dispatch a call. (We discuss these methods in Chapter 32.)
28.11.3 Casting Proxies
The PHP mapping for a proxy generates a class with two static methods. For example, the following class is generated for the Slice interface named Simple:
class SimplePrxHelper{ public static function checkedCast($proxy, $facetOrCtx=null, $ctx=null); public static function uncheckedCast($proxy, $facet=null);}
Both the checkedCast and uncheckedCast methods implement a down-cast: if the passed proxy is a proxy for an object of type Simple, or a proxy for an object with a type derived from Simple, the cast returns a proxy narrowed to that type; otherwise, if the passed proxy denotes an object of a different type (or if the passed proxy is null), the cast returns null.
The method names checkedCast and uncheckedCast are reserved for use in proxies. If a Slice interface defines an operation with either of those names, the mapping escapes the name in the generated proxy by prepending an under-score. For example, an interface that defines an operation named checkedCast is mapped to a proxy with a method named _checkedCast.

28.11 Mapping for Interfaces 821
The arguments are described below:
• $proxy
The proxy to be narrowed.
• $facetOrCtx
This optional argument can be either a string representing a desired facet (see Chapter 33), or an associative string array representing a context (see Section 32.12).
• $ctx
If $facetOrCtx contains a facet name, use this argument to supply an asso-ciative string array representing a context (see Section 32.12).
• $facet
Specifies the name of the desired facet (see Chapter 33).
Given a proxy of any type, you can use a checkedCast to determine whether the corresponding object supports a given type, for example:
$obj = ... // Get a proxy from somewhere...$simple = SimplePrx::checkedCast($obj);if($simple != null) // Object supports the Simple interface...else // Object is not of type Simple...
Note that a checkedCast contacts the server. This is necessary because only the server implementation has definite knowledge of the type of an object. As a result, a checkedCast may throw a ConnectTimeoutException or an ObjectNotExistException.
In contrast, an uncheckedCast does not contact the server and uncondi-tionally returns a proxy of the requested type. However, if you do use an uncheckedCast, you must be certain that the proxy really does support the type you are casting to; otherwise, if you get it wrong, you will most likely get a run-time exception when you invoke an operation on the proxy. The most likely error for such a type mismatch is OperationNotExistException. However, other exceptions, such as a marshaling exception are possible as well. And, if the object happens to have an operation with the correct name, but different parameter types, no exception may be reported at all and you simply end up sending the invocation to an object of the wrong type; that object may do rather non-sensical things. To illustrate this, consider the following two interfaces:

822 Client-Side Slice-to-PHP Mapping
interface Process { void launch(int stackSize, int dataSize);};// ...interface Rocket { void launch(float xCoord, float yCoord);};
Suppose you expect to receive a proxy for a Process object and use an uncheckedCast to down-cast the proxy:
$obj = ... // Get proxy...$process = ProcessPrx::uncheckedCast($obj); // No worries...$process->launch(40, 60); // Oops...
If the proxy you received actually denotes a Rocket object, the error will go unde-tected by the Ice run time: because int and float have the same size and because the Ice protocol does not tag data with its type on the wire, the implementation of Rocket::launch will simply misinterpret the passed integers as floating-point numbers.
In fairness, this example is somewhat contrived. For such a mistake to go unnoticed at run time, both objects must have an operation with the same name and, in addition, the run-time arguments passed to the operation must have a total marshaled size that matches the number of bytes that are expected by the unmar-shaling code on the server side. In practice, this is extremely rare and an incorrect uncheckedCast typically results in a run-time exception.
Backward Compatibility
Prior releases of the PHP language mapping provided two proxy methods for narrowing a proxy:
class Ice_ObjectPrx{ function ice_checkedCast($type, $facetOrCtx=null, $ctx=null); function ice_uncheckedCast($type, $facet=null); # ...}
For example, a proxy can be narrowed as follows:
$proxy = $proxy->ice_checkedCast("::Demo::Hello");

28.11 Mapping for Interfaces 823
The disadvantage of this API is that embedded type ID strings in an application are a potential source of defects because the strings are not validated until run time. Although these methods are still supported for the sake of backward compat-ibility, we recommend using the static methods that are generated for each inter-face. Not only are these static methods consistent with the APIs of other Ice language mappings, they also avoid the need to hard-code type ID strings in your application.
28.11.4 Using Proxy Methods
The base proxy class ObjectPrx supports a variety of methods for customizing a proxy (see Section 32.11). Since proxies are immutable, each of these “factory methods” returns a copy of the original proxy that contains the desired modifica-tion. For example, you can obtain a proxy configured with a ten second timeout as shown below:
$proxy = $communicator->stringToProxy(...);$proxy = $proxy->ice_timeout(10000);
A factory method returns a new proxy object if the requested modification differs from the current proxy, otherwise it returns the current proxy. With few excep-tions, factory methods return a proxy of the same type as the current proxy, there-fore it is generally not necessary to repeat a down-cast after using a factory method. The example below demonstrates these semantics:
$base = $communicator->stringToProxy(...);$hello = Demo_HelloPrxHelper::checkedCast($base);$hello = $hello->ice_timeout(10000); // Type is not discarded$hello->sayHello();
The only exceptions are the factory methods ice_facet and ice_identity. Calls to either of these methods may produce a proxy for an object of an unrelated type, therefore they return an untyped proxy that you must subsequently down-cast to an appropriate type.
28.11.5 Object Identity and Proxy Comparison
Proxy objects support comparison using the comparison operators == and !=. Note that proxy comparison uses all of the information in a proxy for the compar-ison. This means that not only the object identity must match for a comparison to succeed, but other details inside the proxy, such as the protocol and endpoint

824 Client-Side Slice-to-PHP Mapping
information, must be the same. In other words, comparison tests for proxy identity, not object identity. A common mistake is to write code along the following lines:
$p1 = ... // Get a proxy...$p2 = ... // Get another proxy...if($p1 != $p2) // p1 and p2 denote different objects // WRONG!else // p1 and p2 denote the same object // Correct
Even though p1 and p2 differ, they may denote the same Ice object. This can happen because, for example, both p1 and p2 embed the same object identity, but each uses a different protocol to contact the target object. Similarly, the protocols may be the same, but denote different endpoints (because a single Ice object can be contacted via several different transport endpoints). In other words, if two proxies compare equal, we know that the two proxies denote the same object (because they are identical in all respects); however, if two proxies compare unequal, we know absolutely nothing: the proxies may or may not denote the same object.
To compare the object identities of two proxies, you can use a helper function in the Ice module:
function Ice_proxyIdentityCompare($lhs, $rhs);function Ice_proxyIdentityAndFacetCompare($lhs, $rhs);
proxyIdentityCompare allows you to correctly compare proxies for iden-tity:
$p1 = ... // Get a proxy...$p2 = ... // Get another proxy...if(Ice_proxyIdentityCompare($p1, $p2) != 0) // p1 and p2 denote different objects // Correctelse // p1 and p2 denote the same object // Correct
The function returns 0 if the identities are equal, 1 if p1 is less than p2, and 1 if p1 is greater than p2. (The comparison uses name as the major sort key and category as the minor sort key.)
The proxyIdentityAndFacetCompare function behaves similarly, but compares both the identity and the facet name (see Chapter 33).

28.12 Mapping for Operations 825
28.12 Mapping for Operations
As we learned in Section 28.11, for each operation on an interface, a proxy object narrowed to that type supports a corresponding method with the same name. To invoke an operation, you call it via the proxy. For example, here is part of the defi-nitions for our file system from Section 5.4:
module Filesystem { interface Node { idempotent string name(); }; // ...};
The name operation returns a value of type string. Given a proxy to an object of type Node, the client can invoke the operation as follows:
$node = ... // Initialize proxy$name = $node->name(); // Get name via RPC
28.12.1 Normal and idempotent Operations
You can add an idempotent qualifier to a Slice operation. As far as the signature for the corresponding proxy method is concerned, idempotent has no effect.
28.12.2 Passing Parameters
In Parameters
The PHP mapping for in parameters guarantees that the value of a parameter will not be changed by the invocation.
Here is an interface with operations that pass parameters of various types from client to server:
struct NumberAndString { int x; string str;};sequence<string> StringSeq;dictionary<long, StringSeq> StringTable;

826 Client-Side Slice-to-PHP Mapping
interface ClientToServer { void op1(int i, float f, bool b, string s); void op2(NumberAndString ns, StringSeq ss, StringTable st); void op3(ClientToServer* proxy);};
A proxy object narrowed to the ClientToServer interface supports the following methods:
function op1($i, $f, $b, $s, $_ctx=null);function op2($ns, $ss, $st, $_ctx=null);function op3($proxy, $_ctx=null);
Given a proxy to a ClientToServer interface, the client code can pass parameters as in the following example:
$p = ... // Get proxy...$p->op1(42, 3.14, true, "Hello world!"); // Pass simple literals$i = 42;$f = 3.14;$b = true;$s = "Hello world!";$p->op1($i, $f, $b, $s); // Pass simple variables$ns = new NumberAndString;$ns->x = 42;$ns->str = "The Answer";$ss = array("Hello world!");$st = array();$st[0] = $ns;$p->op2($ns, $ss, $st); // Pass complex variables$p->op3($p); // Pass proxy
Out Parameters
Out parameters are passed by reference. Here is the same Slice definition we saw on page 825 once more, but this time with all parameters being passed in the out direction:
struct NumberAndString { int x; string str;};

28.12 Mapping for Operations 827
sequence<string> StringSeq;dictionary<long, StringSeq> StringTable;interface ServerToClient { int op1(out float f, out bool b, out string s); void op2(out NumberAndString ns, out StringSeq ss, out StringTable st); void op3(out ServerToClient* proxy);};
The PHP mapping looks the same as it did for the in-parameters version:
function op1($i, $f, $b, $s, $_ctx=null);function op2($ns, $ss, $st, $_ctx=null);function op3($proxy, $_ctx=null);
Given a proxy to a ServerToClient interface, the client code can receive the results as in the following example:
$p = ... // Get proxy...$p->op1($i, $f, $b, $s);$p->op2($ns, $ss, $st);$p->op3($stcp);
Note that it is not necessary to use the reference operator (&) before each argu-ment because the Ice run time forces each out parameter to have reference seman-tics.
Parameter Type Mismatches
The Ice run time performs validation on the arguments to a proxy invocation and reports any type mismatches as InvalidArgumentException.
Null Parameters
Some Slice types naturally have “empty” or “not there” semantics. Specifically, sequences, dictionaries, and strings all can be null, but the corresponding Slice types do not have the of a null value. To make life with these types easier, when-ever you pass null as a parameter or return value of type sequence, dictionary, or string, the Ice run time automatically sends an empty sequence, dictionary, or string to the receiver.
This behavior is useful as a convenience feature: especially for deeply-nested data types, members that are sequences, dictionaries, or strings automatically arrive as an empty value at the receiving end. This saves you having to explicitly

828 Client-Side Slice-to-PHP Mapping
initialize, for example, every string element in a large sequence before sending the sequence in order to avoid a run-time error. Note that using null parameters in this way does not create null semantics for Slice sequences, dictionaries, or strings. As far as the object model is concerned, these do not exist (only empty sequences, dictionaries, and strings do). For example, it makes no difference to the receiver whether you send a string as null or as an empty string: either way, the receiver sees an empty string.
28.13 Exception Handling
Any operation invocation may throw a run-time exception (see Section 28.10) and, if the operation has an exception specification, may also throw user excep-tions (see Section 28.9). Suppose we have the following simple interface:
exception Tantrum { string reason;};interface Child { void askToCleanUp() throws Tantrum;};
Slice exceptions are thrown as PHP exceptions, so you can simply enclose one or more operation invocations in a try-catch block:
$child = ... // Get child proxy...try{ $child->askToCleanUp();}catch(Tantrum $t){ echo "The child says: " . $t->reason . "\n";}
Typically, you will catch only a few exceptions of specific interest around an oper-ation invocation; other exceptions, such as unexpected run-time errors, will usually be handled by exception handlers higher in the hierarchy. For example:

28.14 Mapping for Classes 829
function run(){ $child = ... // Get child proxy... try { $child->askToCleanUp(); } catch(Tantrum $t) { echo "The child says: " . $t->reason . "\n"; $child->scold(); // Recover from error... } $child->praise(); // Give positive feedback...}try{ // ... run(); // ...}catch(Ice_Exception $ex){ echo $ex->__toString() . "\n";}
This code handles a specific exception of local interest at the point of call and deals with other exceptions generically. (This is also the strategy we used for our first simple application in Chapter 3.)
28.14 Mapping for Classes
Slice classes are mapped to PHP classes with the same name. For each Slice data member, the generated class contains a member variable, just as for structures and exceptions. Consider the following class definition:
class TimeOfDay { short hour; // 0 - 23 short minute; // 0 - 59 short second; // 0 - 59 string format(); // Return time as hh:mm:ss};

830 Client-Side Slice-to-PHP Mapping
The PHP mapping generates the following code for this definition:
abstract class TimeOfDay extends Ice_ObjectImpl{ public function __construct($hour=0, $minute=0, $second=0) { $this->hour = $hour; $this->minute = $minute; $this->second = $second; } abstract public function format(); public static function ice_staticId() { return '::TimeOfDay'; } public function __toString() { // ... } public $hour; public $minute; public $second;}
There are a number of things to note about the generated code:
1. The generated class TimeOfDay inherits from Ice_ObjectImpl. This reflects the semantics of Slice classes in that all classes implicitly inherit from Object, which is the ultimate ancestor of all classes. Note that Object is not the same as Ice_ObjectPrx. In other words, you cannot pass a class where a proxy is expected and vice versa.
2. The constructor initializes an instance variable for each Slice data member.
3. The class includes an abstract function declaration corresponding to the Slice operation format.
4. The class defines the class method ice_staticId.
We will discuss these items in the subsections below.

28.14 Mapping for Classes 831
28.14.1 Inheritance from Object
Like interfaces, classes implicitly inherit from a common base class, Ice_Object. However, classes inherit from Ice_Object instead of Ice_ObjectPrx, therefore you cannot pass a class where a proxy is expected (and vice versa) because the base types for classes and proxies are not compatible.
Ice_Object contains a number of member functions:
interface Ice_Object{ public function ice_isA($id); public function ice_ping(); public function ice_ids(); public function ice_id(); public function ice_preMarshal(); public function ice_postUnmarshal();}
The member functions of Ice_Object behave as follows:
• ice_isA
This function returns true if the object supports the given type ID, and false otherwise.
• ice_ping
As for interfaces, ice_ping provides a basic reachability test for the class.
• ice_ids
This function returns a string sequence representing all of the type IDs supported by this object, including ::Ice::Object.
• ice_id
This function returns the actual run-time type ID for a class. If you call ice_id through a reference to a base instance, the returned type ID is the actual (possibly more derived) type ID of the instance.
• ice_preMarshal
The Ice run time invokes this function prior to marshaling the object’s state, providing the opportunity for a subclass to validate its declared data members.

832 Client-Side Slice-to-PHP Mapping
• ice_postUnmarshal
The Ice run time invokes this function after unmarshaling an object’s state. A subclass typically overrides this function when it needs to perform additional initialization using the values of its declared data members.
All Slice classes derive from Ice_Object via the Ice_ObjectImpl abstract base class, which provides default implementations of the Ice_Object methods.
28.14.2 Data Members of ClassesBy default, data members of classes are mapped exactly as for structures and exceptions: for each data member in the Slice definition, the generated class contains a corresponding member variable.
If you wish to restrict access to a data member, you can modify its visibility using the protected metadata directive. The presence of this directive causes the Slice compiler to generate the data member with protected visibility. As a result, the member can be accessed only by the class itself or by one of its subclasses. For example, the TimeOfDay class shown below has the protected metadata directive applied to each of its data members:
class TimeOfDay { ["protected"] short hour; // 0 - 23 ["protected"] short minute; // 0 - 59 ["protected"] short second; // 0 - 59 string format(); // Return time as hh:mm:ss};
The Slice compiler produces the following generated code for this definition:
abstract class TimeOfDay extends Ice_ObjectImpl{ public function __construct($hour=0, $minute=0, $second=0) { $this->hour = $hour; $this->minute = $minute; $this->second = $second; } abstract public function format(); public static function ice_staticId() { return '::TimeOfDay';

28.14 Mapping for Classes 833
} public function __toString() { // ... } protected $hour; protected $minute; protected $second;}
For a class in which all of the data members are protected, the metadata directive can be applied to the class itself rather than to each member individually. For example, we can rewrite the TimeOfDay class as follows:
["protected"] class TimeOfDay { short hour; // 0 - 23 short minute; // 0 - 59 short second; // 0 - 59 string format(); // Return time as hh:mm:ss};
28.14.3 Class Constructors
Classes have a constructor that assigns to each data member a default value appro-priate for its type. You can also declare different default values for data members of primitive and enumerated types, as discussed in Section 4.11.1.
For derived classes, the constructor has one parameter for each of the base class’s data members, plus one parameter for each of the derived class’s data members, in base-to-derived order.
28.14.4 Operations of Classes
Operations of classes are mapped to abstract member functions in the generated class. This means that, if a class contains operations (such as the format operation of our TimeOfDay class), you must provide an implementation of the operation in a class that is derived from the generated class. For example:

834 Client-Side Slice-to-PHP Mapping
class TimeOfDayI extends TimeOfDay{ public function format() { return strftime("%X"); }}
Class Factories
Having created a class such as TimeOfDayI, we have an implementation and we can instantiate the TimeOfDayI class, but we cannot receive it as the return value or as an out-parameter from an operation invocation. To see why, consider the following simple interface:
interface Time { TimeOfDay get();};
When a client invokes the get operation, the Ice run time must instantiate and return an instance of the TimeOfDay class. However, TimeOfDay is an abstract class that cannot be instantiated. Unless we tell it, the Ice run time cannot magi-cally know that we have created a TimeOfDayI class that implements the abstract format operation of the TimeOfDay abstract class. In other words, we must provide the Ice run time with a factory that knows that the TimeOfDay abstract class has a TimeOfDayI concrete implementation. The Ice::Communi-cator interface provides us with the necessary operations:
module Ice { local interface ObjectFactory { Object create(string type); void destroy(); }; local interface Communicator { void addObjectFactory(ObjectFactory factory, string id); ObjectFactory findObjectFactory(string id); // ... };};
To supply the Ice run time with a factory for our TimeOfDayI class, we must implement the ObjectFactory interface:

28.14 Mapping for Classes 835
class ObjectFactory implements Ice_ObjectFactory { public function create($type) { if ($type == TimeOfDay::ice_staticId())) { return new TimeOfDayI; } assert(false); return null; } public function destroy() { // Nothing to do }}
The object factory’s create method is called by the Ice run time when it needs to instantiate a TimeOfDay class. The factory’s destroy method is called by the Ice run time when its communicator is destroyed.
The create method is passed the type ID (see Section 4.13) of the class to instantiate. For our TimeOfDay class, the type ID is "::TimeOfDay". Our imple-mentation of create checks the type ID: if it matches, the method instantiates and returns a TimeOfDayI object. For other type IDs, the method asserts because it does not know how to instantiate other types of objects.
Note that we used the ice_staticId method to obtain the type ID rather than embedding a literal string. Using a literal type ID string in your code is discouraged because it can lead to errors that are only detected at run time. For example, if a Slice class or one of its enclosing modules is renamed and the literal string is not changed accordingly, a receiver will fail to unmarshal the object and the Ice run time will raise NoObjectFactoryException. By using ice_staticId instead, we avoid any risk of a misspelled or obsolete type ID, and we can discover at compile time if a Slice class or module has been renamed.
Given a factory implementation, such as our ObjectFactory, we must inform the Ice run time of the existence of the factory:
$communicator = ...;$communicator->addObjectFactory( new ObjectFactory, TimeOfDay::ice_staticId());
Now, whenever the Ice run time needs to instantiate a class with the type ID "::TimeOfDay", it calls the create method of the registered ObjectFactory instance.
The destroy operation of the object factory is invoked by the Ice run time when the communicator is destroyed. This gives you a chance to clean up any resources that may be used by your factory. Do not call destroy on the factory

836 Client-Side Slice-to-PHP Mapping
while it is registered with the communicator—if you do, the Ice run time has no idea that this has happened and, depending on what your destroy implementation is doing, may cause undefined behavior when the Ice run time tries to next use the factory.
The run time guarantees that destroy will be the last call made on the factory, that is, create will not be called concurrently with destroy, and create will not be called once destroy has been called.
Note that you cannot register a factory for the same type ID twice: if you call addObjectFactory with a type ID for which a factory is registered, the Ice run time throws an AlreadyRegisteredException.
Finally, keep in mind that if a class has only data members, but no operations, you need not create and register an object factory to transmit instances of such a class. Only if a class has operations do you have to define and register an object factory.
28.14.5 Class Constructors
The generated class contains a constructor that accepts one argument for each member of the class, with suitable default arguments if you do not wish to supply a value. This allows you to create and initialize a class in a single statement, for example:
$tod = new TimeOfDayI(14, 45, 00); // 14:45pm
For derived classes, the constructor requires one argument of all of the members of the class, including members of the base class(es). For example, consider the the definition from Section 4.11.2 once more:
class TimeOfDay { short hour; // 0 - 23 short minute; // 0 - 59 short second; // 0 - 59};class DateTime extends TimeOfDay { short day; // 1 - 31 short month; // 1 - 12 short year; // 1753 onwards};
The constructors for the generated classes are as follows:

28.15 slice2php Command-Line Options 837
class TimeOfDay extends Ice_ObjectImpl{ public function __construct($hour=0, $minute=0, $second=0) { $this->hour = $hour; $this->minute = $minute; $this->second = $second; } // ...}class DateTime extends TimeOfDay{ public function __construct($hour=0, $minute=0, $second=0, $day=0, $month=0, $year=0) { parent::__construct($hour, $minute, $second); $this->day = $day; $this->month = $month; $this->year = $year; } // ...}
28.15 slice2php Command-Line Options
The Slice-to-PHP compiler, slice2php, offers the following command-line options in addition to the standard options described in Section 4.20:
• --all
Generate code for all Slice definitions, including those included by the main Slice file.
• -n, --namespace
Generate code using PHP namespaces. Note that namespaces are only supported in PHP 5.3 or later. Also note that the Ice extension for PHP must be built with namespace support enabled.
• --checksum
Generate checksums for Slice definitions.

838 Client-Side Slice-to-PHP Mapping
Compiler Output
For each Slice file X.ice, slice2php generates PHP code into a file named X.php in the output directory. The default output directory is the current working directory, but a different directory can be specified using the --output-dir option.
Include Files
It is important to understand how slice2php handles include files. In the absence of the --all option, the compiler does not generate PHP code for Slice definitions in included files. Rather, the compiler translates Slice #include statements into PHP require statements in the following manner:
1. Determine the full pathname of the included file.
2. Create the shortest possible relative pathname for the included file by iterating over each of the include directories (specified using the -I option) and removing the leading directory from the included file if possible.
For example, if the full pathname of an included file is /opt/App/slice/OS/Process.ice, and we specified the options -I/opt/App and -I/opt/App/slice, then the shortest relative path-name is OS/Process.ice after removing /opt/App/slice.
3. Replace the .ice extension with .php. Continuing our example from the previous step, the translated require statement becomes
require "OS/Process.php";
As a result, you can use -I options to tailor the require statements generated by the compiler in order to avoid absolute path names and match the organiza-tional structure of your application’s source files.
28.16 Application Notes
In PHP terminology, a request is the execution of a PHP script on behalf of a Web client. Each request essentially runs in its own instance of the PHP interpreter, isolated from any other requests that may be executing concurrently. Upon the completion of a request, the interpreter reclaims memory and other resources that were acquired during the request, including objects created by the Ice extension.

28.16 Application Notes 839
28.16.1 Using Communicators
A communicator represents an instance of the Ice run time. A PHP script that needs to invoke an operation on a remote Ice object must initialize a communi-cator, obtain and narrow a proxy, and make the invocation. For example, here is a minimal (but complete) Ice script:
<?phprequire 'Ice.php';require 'Hello.php';$communicator = null;try{ $data = new Ice_InitializationData; $data->properties = Ice_createProperties(); $data->properties->load("props.cfg"); $communicator = Ice_initialize($data); $proxy = $communicator->stringToProxy("..."); $hello = Demo_HelloPrxHelper::checkedCast($proxy); $hello->sayHello();}catch(Ice_LocalException $ex){ // Deal with exception...}if($communicator){ try { $communicator->destroy(); } catch(Ice_LocalException $ex) { // Ignore. }}?>
By default, the Ice extension automatically destroys any communicator that was created during a request. This means a script can usually omit the call to destroy unless there is an application-specific reason to destroy the communicator explic-itly. Consequently, we can simplify our script to the following:

840 Client-Side Slice-to-PHP Mapping
<?phprequire 'Ice.php';require 'Hello.php';try{ $data = new Ice_InitializationData; $data->properties = Ice_createProperties(); $data->properties->load("props.cfg"); $communicator = Ice_initialize($data); $proxy = $communicator->stringToProxy("..."); $hello = Demo_HelloPrxHelper::checkedCast($proxy); $hello->sayHello();}catch(Ice_LocalException $ex){ // Deal with exception...}?>
Now we allow the Ice extension to destroy our communicator automatically. (The extension traps and ignores any exception raised by destroy.)
Although the automatic destruction of communicators is convenient, it is important to consider the performance characteristics of this script. Specifically, each execution of the script involves the following activities:
1. Create a property set
2. Load and parse a property file
3. Initialize a communicator with the given configuration properties
4. Obtain a proxy for the remote Ice object
5. Establish a socket connection to the server
6. Send a request message and wait for the reply
7. Destroy the communicator, which closes the socket connection
Of primary concern are the activities that involve system calls, such as opening and reading files, creating and using sockets, and so on. The overhead incurred by these calls may not matter if the script is only executed infrequently, but for an application with high request rates it is necessary to minimize this overhead:
• Using pre-configured property sets eliminates the need to parse a property file in each request (see Section 28.16.2).
• Using timeouts prevents a script from blocking indefinitely in case Ice encounters delays while performing socket operations (see Section 28.16.3).

28.16 Application Notes 841
• Using a registered communicator avoids the need to create and destroy a communicator in every request (see Section 28.16.4).
• Be aware of the number of “round trips” (request-reply pairs) your script makes. For example, the script above uses checkedCast to verify that the remote Ice object supports the desired Slice interface. However, calling checkedCast causes the Ice run time to send a request to the server and await its reply, therefore this script is actually making two remote invocations. It is unnecessary to perform a checked cast if it is safe for the client to assume that the Ice object supports the correct interface, in which case using an uncheckedCast instead avoids the extra round trip.
28.16.2 Configuration
A PHP application can manually construct a property set for configuring its communicator using the API described in Chapter 30. The Ice extension also provides a PHP-specific property set API that helps to minimize the overhead associated with initializing a communicator, allowing you to configure a default property set along with an unlimited number of named property sets (or profiles). You can populate a property set using a configuration file, command-line options, or both. Property sets are initialized using the normal Ice semantics: command-line options override any settings from a configuration file.
The Ice extension creates these property sets during web server startup, which means any subsequent changes you might make to the configuration have no effect until the web server is restarted. Also keep in mind that specifying a relative path name for a configuration file usually means the path name is evaluated rela-tive to the web server’s working directory.
Default Property Set
The INI directives ice.config and ice.options specify the configuration file and the command-line options for the default property set, respectively. These directives must appear in PHP’s configuration file, which is usually named php.ini:
; Snippet from php.ini on Linuxextension=IcePHP.soice.config=/opt/MyApp/default.cfgice.options="--Ice.Override.Timeout=2000"

842 Client-Side Slice-to-PHP Mapping
Profiles
Profiles are useful when several unrelated applications execute in the same web server, or when an application needs to choose among multiple configurations. To configure your profiles, add an ice.profiles directive to PHP’s configuration file. The value of this directive is a file containing profile definitions:
; Snippet from php.ini on Linuxice.profiles=/opt/MyApp/profiles
The profile definition file uses INI syntax:
[Production]config=/opt/MyApp/prod.cfgoptions="..."[Debug]config=/opt/MyApp/debug.cfgoptions="--Ice.Trace.Network=3 ..."
The name of each profile is enclosed in square brackets. The configuration file and command-line options for each profile are defined using the config and options entries, respectively.
Using Property Sets
The Ice_getProperties function allows a script to obtain a copy of a prop-erty set. When called without an argument, or with an empty string, the function returns the default property set. Otherwise, the function expects the name of a configured profile and returns the property set associated with that profile. The return value is an instance of Ice_Properties, or null if no matching profile was found.
Note that the Ice extension always creates the default property set, which is empty if the ice.config and ice.options directives are not defined. Also note that changes a script might make to a property set returned by this function have no effect on other requests because the script is modifying a copy of the orig-inal property set.
Now we can modify our script to use Ice_getProperties and avoid the need to load a configuration file in each request:
<?phprequire 'Ice.php';require 'Hello.php';try
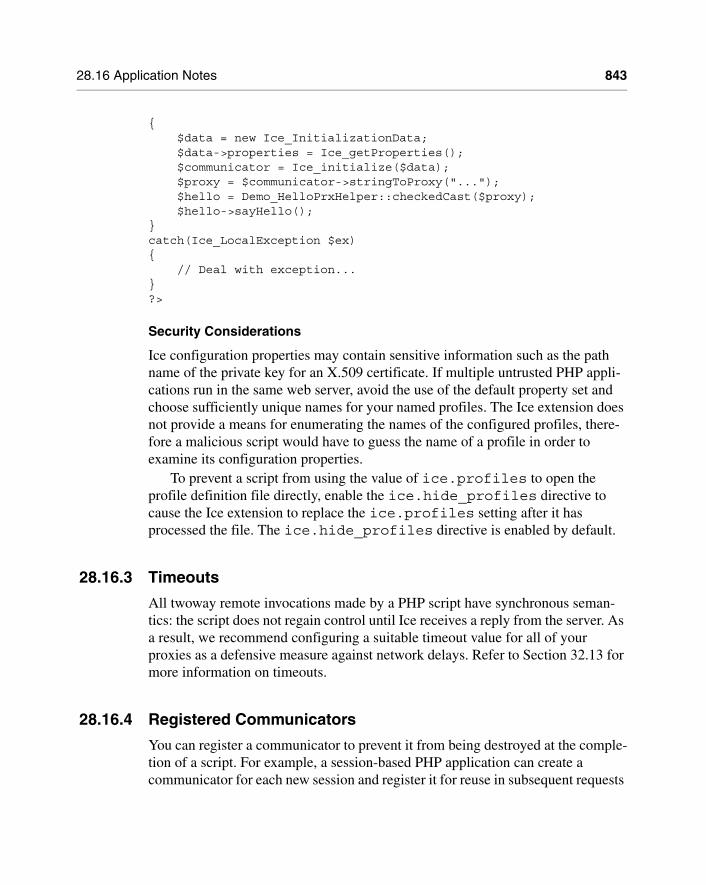
28.16 Application Notes 843
{ $data = new Ice_InitializationData; $data->properties = Ice_getProperties(); $communicator = Ice_initialize($data); $proxy = $communicator->stringToProxy("..."); $hello = Demo_HelloPrxHelper::checkedCast($proxy); $hello->sayHello();}catch(Ice_LocalException $ex){ // Deal with exception...}?>
Security Considerations
Ice configuration properties may contain sensitive information such as the path name of the private key for an X.509 certificate. If multiple untrusted PHP appli-cations run in the same web server, avoid the use of the default property set and choose sufficiently unique names for your named profiles. The Ice extension does not provide a means for enumerating the names of the configured profiles, there-fore a malicious script would have to guess the name of a profile in order to examine its configuration properties.
To prevent a script from using the value of ice.profiles to open the profile definition file directly, enable the ice.hide_profiles directive to cause the Ice extension to replace the ice.profiles setting after it has processed the file. The ice.hide_profiles directive is enabled by default.
28.16.3 Timeouts
All twoway remote invocations made by a PHP script have synchronous seman-tics: the script does not regain control until Ice receives a reply from the server. As a result, we recommend configuring a suitable timeout value for all of your proxies as a defensive measure against network delays. Refer to Section 32.13 for more information on timeouts.
28.16.4 Registered Communicators
You can register a communicator to prevent it from being destroyed at the comple-tion of a script. For example, a session-based PHP application can create a communicator for each new session and register it for reuse in subsequent requests

844 Client-Side Slice-to-PHP Mapping
of the same session. Reusing a communicator in this way avoids the overhead associated with creating and destroying a communicator in each request. Further-more, it allows socket connections established by the Ice run time to remain open and available for use in another request.
Limitations
A communicator object is local to the process that created it, which in the case of PHP is usually a web server process. The usefulness of a registered communicator is therefore limited to situations in which an application can ensure that subse-quent page requests are handled by the same web server process as the one that originally created the registered communicator. For example, registered communi-cators would not be appropriate in a typical CGI configuration because the CGI process terminates at the end of each request. A simple (but often impractical) solution is to configure your web server to use a single persistent process. The topic of configuring a web server to take advantage of registered communicators is outside the scope of this book.
Using Registered Communicators
The API for registered communicators consists of three functions:
• Ice_register($communicator, $name, $expires=0)
Registers a communicator with the given name. On success, the function returns true. If another communicator is already registered with the same name, the function returns false. The expires argument specifies a timeout value in minutes; if expires is greater than zero, the Ice extension automat-ically destroys the communicator if it has not been retrieved (via Ice_find) for the specified number of minutes. The default value (zero) means the communicator never expires, in which case the Ice extension only destroys the communicator when the current process terminates.
It is legal to register a communicator with more than one name. In that case, the most recent value of expires takes precedence.
• Ice_unregister($name)
Removes the registration for a communicator with the given name. Returns true if a match was found or false otherwise. Calling Ice_unregister does not cause the communicator to be destroyed; rather, the communicator is destroyed as soon as all pending requests that are currently using the commu-nicator have completed. Destroying a registered communicator explicitly also removes its registration.
28.16 Application Notes 845
• Ice_find($name)
Retrieves the communicator associated with the given name. Returns null if no match is found.
An application typically uses registered communicators as follows:
<?phprequire 'Ice.php';$communicator = Ice_find('MyCommunicator');$expires = ...;if($communicator == null){ $communicator = Ice_initialize(...); Ice_register($communicator, 'MyCommunicator', $expires);}...?>
Note that communicators consume resources such as threads, sockets, and memory, therefore an application should be designed to minimize the number of communicators it registers. Using a suitable expiration timeout prevents registered communicators from accumulating indefinitely.
A simple application that demonstrates the use of registered communicators can be found in the Glacier2/hello subdirectory of the PHP sample programs.
Security Considerations
There are risks associated with allowing untrusted applications to gain access to a registered communicator. For example, if a malicious script obtains a registered communicator that is configured with SSL credentials, the script could potentially make secure invocations as if it were the trusted script.
Registering a communicator with a sufficiently unique name reduces the chance that a malicious script could guess the communicator’s name. For applica-tions that make use of PHP’s session facility, the session ID is a reasonable choice for a communicator name. The sample application in Glacier2/hello demonstrates this solution.
Object Factories
PHP reclaims all memory at the end of each request, which means any object factories that a script might have installed in a registered communicator are

846 Client-Side Slice-to-PHP Mapping
destroyed when the request completes even if the communicator is not destroyed. As a result, a script must install its object factories in a registered communicator for every request, as shown in the example below:
<?phprequire 'Ice.php';$communicator = Ice_find('MyCommunicator');$expires = ...;if($communicator == null){ $communicator = Ice_initialize(...); Ice_register($communicator, 'MyCommunicator', $expires);}$communicator->addObjectFactory(new MyFactory, MyClass::ice_staticId());...?>
The Ice extension invokes the destroy method of each factory prior to the completion of a request.
28.17 Using Slice Checksums
As described in Section 4.21, the Slice compilers can optionally generate check-sums of Slice definitions. For slice2php, the --checksum option causes the compiler to generate code that adds checksums to the global array Ice_sliceChecksums. The checksums are installed automatically when the PHP code is first parsed; no action is required by the application.
In order to verify a server’s checksums, a client could simply compare the two array objects using a comparison operator. However, this is not feasible if it is possible that the server might return a superset of the client’s checksums. A more general solution is to iterate over the local checksums as demonstrated below:
global $Ice_sliceChecksums;$serverChecksums = ...foreach($Ice_sliceChecksums as $key => $value){ if(!isset($serverChecksums[$key]))

28.17 Using Slice Checksums 847
// No match found for type id! elseif($Ice_sliceChecksums[$key] != $serverChecksums[$key]) // Checksum mismatch!}
In this example, the client first verifies that the server’s dictionary contains an entry for each Slice type ID, and then it proceeds to compare the checksums.

849
Chapter 29Developing a File System Client in PHP
29.1 Chapter Overview
In this chapter, we present the source code for a PHP client that accesses the file system we developed in Chapter 5. This client can interact with a server written in any of the other language mappings.
29.2 The PHP Client
We now have seen enough of the PHP mapping to develop a complete client to access our remote file system. For reference, here is the Slice definition once more:
module Filesystem { interface Node { idempotent string name(); }; exception GenericError { string reason; }; sequence<string> Lines;

850 Developing a File System Client in PHP
interface File extends Node { idempotent Lines read(); idempotent void write(Lines text) throws GenericError; }; sequence<Node*> NodeSeq; interface Directory extends Node { idempotent NodeSeq list(); }; };
To exercise the file system, the client does a recursive listing of the file system, starting at the root directory. For each node in the file system, the client shows the name of the node and whether that node is a file or directory. If the node is a file, the client retrieves the contents of the file and prints them.
The body of the client code looks as follows:
<?phprequire 'Ice.php';require 'Filesystem.php';// Recursively print the contents of directory "dir"// in tree fashion. For files, show the contents of// each file. The "depth" parameter is the current// nesting level (for indentation).function listRecursive($dir, $depth = 0){ $indent = str_repeat("\t", ++$depth); $contents = $dir->_list(); // list is a reserved word in PHP foreach ($contents as $i) { $dir = Filesystem_DirectoryPrxHelper::checkedCast($i); $file = Filesystem_FilePrxHelper::uncheckedCast($i); echo $indent . $i->name() . ($dir ? " (directory):" : " (file):") . "\n"; if ($dir) { listRecursive($dir, $depth); } else { $text = $file->read(); foreach ($text as $j) echo $indent . "\t" . $j . "\n"; }

29.2 The PHP Client 851
}}$ic = null;try{ // Create a communicator // $ic = Ice_initialize(); // Create a proxy for the root directory // $obj = $ic->stringToProxy("RootDir:default -p 10000"); // Down-cast the proxy to a Directory proxy // $rootDir = Filesystem_DirectoryPrxHelper::checkedCast($obj); // Recursively list the contents of the root directory // echo "Contents of root directory:\n"; listRecursive($rootDir);}catch(Ice_LocalException $ex){ print_r($ex);}if($ic){ // Clean up // try { $ic->destroy(); } catch(Exception $ex) { print_r($ex); }}?>

852 Developing a File System Client in PHP
The program first defines the listRecursive function, which is a helper func-tion to print the contents of the file system, and the main program follows. Let us look at the main program first:
1. The client first creates a proxy to the root directory of the file system. For this example, we assume that the server runs on the local host and listens using the default protocol (TCP/IP) at port 10000. The object identity of the root direc-tory is known to be RootDir.
2. The client down-casts the proxy to the Directory interface and passes that proxy to listRecursive, which prints the contents of the file system.
Most of the work happens in listRecursive. The function is passed a proxy to a directory to list, and an indent level. (The indent level increments with each recursive call and allows the code to print the name of each node at an indent level that corresponds to the depth of the tree at that node.) listRecursive calls the list operation on the directory and iterates over the returned sequence of nodes:
1. The code uses checkedCast to narrow the Node proxy to a Directory proxy, and uses uncheckedCast to narrow the Node proxy to a File proxy. Exactly one of those casts will succeed, so there is no need to call checked-Cast twice: if the Node is-a Directory, the code uses the proxy returned by checkedCast; if checkedCast fails, we know that the Node is-a File and, therefore, uncheckedCast is sufficient to get a File proxy.
In general, if you know that a down-cast to a specific type will succeed, it is preferable to use uncheckedCast instead of checkedCast because uncheckedCast does not incur any network traffic.
2. The code prints the name of the file or directory and then, depending on which cast succeeded, prints "(directory)" or "(file)" following the name.
3. The code checks the type of the node:
• If it is a directory, the code recurses, incrementing the indent level.
• If it is a file, the code calls the read operation on the file to retrieve the file contents and then iterates over the returned sequence of lines, printing each line.

29.3 Summary 853
Assume that we have a small file system consisting of a two files and a a directory as follows:
Figure 29.1. A small file system.
The output produced by the client for this file system is:
Contents of root directory: README (file): This file system contains a collection of poetry. Coleridge (directory): Kubla_Khan (file): In Xanadu did Kubla Khan A stately pleasure-dome decree: Where Alph, the sacred river, ran Through caverns measureless to man Down to a sunless sea.
Note that, so far, our client is not very sophisticated:
• The protocol and address information are hard-wired into the code.
• The client makes more remote procedure calls than strictly necessary; with minor redesign of the Slice definitions, many of these calls can be avoided.
We will see how to address these shortcomings in Chapter 38 and Chapter 34.
29.3 Summary
This chapter presented a very simple client to access a server that implements the file system we developed in Chapter 5. As you can see, the PHP code hardly differs from the code you would write for an ordinary PHP program. This is one of the biggest advantages of using Ice: accessing a remote object is as easy as accessing an ordinary, local PHP object. This allows you to put your effort where
RootDir
Coleridge README
Kubla_Khan
= Directory
= File

854 Developing a File System Client in PHP
you should, namely, into developing your application logic instead of having to struggle with arcane networking APIs.

Part X
Advanced Ice


857
Chapter 30Ice Properties and Configuration
30.1 Chapter Overview
Ice uses a configuration mechanism that allows you to control many aspects of the behavior of your Ice applications at run time, such as maximum message size, number of threads, or whether to produce network trace messages. The configura-tion mechanism is not only useful to configure Ice, but you can also use it to provide configuration parameters to your own applications. The configuration mechanism is simple to use with a minimal API, yet flexible enough to cope with the needs of most applications.
Sections 30.2 to 30.8 describe the basics of the configuration mechanism and explain how to configure Ice via configuration files and command line options. Section 30.9 shows how you can create your own application-specific properties and how to access their values from within a program.
30.2 Properties
Ice and its various subsystems are configured by properties. A property is a name–value pair, for example:
Ice.UDP.SndSize=65535

858 Ice Properties and Configuration
In this example, the property name is Ice.UDP.SndSize, and the property value is 65535.
You can find a complete list of the properties used to configure Ice in Appendix D.
Note that Ice reads properties that control the Ice run time and its services (that is, properties that start with one of the reserved prefixes, such as Ice, Glacier2, etc.) only once on start-up, when you create a communicator. This means that you must set Ice-related properties to their correct values before you create a communicator. If you change the value of an Ice-related property after that point, it is likely that the new setting will simply be ignored.
30.2.1 Property Categories
By convention, Ice properties use the following naming scheme:
<application>.<category>[.<sub-category>]
Note that the sub-category is optional and not used by all Ice properties.
This two- or three-part naming scheme is by convention only—if you use properties to configure your own applications, you can use property names with any number of categories.
30.2.2 Reserved Prefixes
Ice reserves properties with the prefixes Ice, IceBox, IceGrid, IcePatch2, IceSSL, IceStorm, Freeze, and Glacier2. You cannot use a property beginning with one of these prefixes to configure your own application.
30.2.3 Property Syntax
A property name consists of any number of characters. For example, the following are valid property names:
fooFoofoo.barfoo bar White space is allowedfoo=bar Special characters are allowed.

30.3 Configuration Files 859
Note that there is no special significance to a period in a property name. (Periods are used to make property names more readable and are not treated specially by the property parser.)
Property names cannot contain leading or trailing white space. (If you create a property name with leading or trailing white space, that white space is silently stripped.)
30.2.4 Value Syntax
A property value consists of any number of characters. The following are exam-ples of property values:
65535yesThis is a = property value.../../config
30.3 Configuration Files
Properties are usually set in a configuration file. A configuration file contains a number of name–value pairs, with each pair on a separate line. Empty lines and lines consisting entirely of white space characters are ignored. The # character introduces a comment that extends to the end of the current line.
Here is a simple configuration file:
# Example config file for IceIce.MessageSizeMax = 2048 # Largest message size is 2MBIce.Trace.Network=3 # Highest level of tracing for networkIce.Trace.Protocol= # Disable protocol tracing
Leading and trailing white space is always ignored for property names (whether the white space is escaped or not), but white space within property values is preserved.
For property values, you can indicate leading and trailing whitespace by escaping the white space with a backslash. For example:

860 Ice Properties and Configuration
# White space exampleMy.Prop = a property # Value is "a property"My.Prop = a property # Value is "a property"My.Prop = \ \ a property\ \ # Value is " a property "My.Prop = \ \ a \ \ property\ \ # Value is " a property "My.Prop = a \\ property # Value is "a \ property"
This example shows that leading and trailing white space for property values is ignored unless escaped with a backslash whereas, white space that is surrounded by non-white space characters is preserved exactly, whether it is escaped or not. As usual, you can insert a literal backslash into a property value by using a double backslash (\\).
If you set the same property more than once, the last setting prevails and over-rides any previous setting. Note that assigning nothing to a property clears that property (that is, sets it to the empty string).
A property that contains the empty string (such as Ice.Trace.Protocol in the preceding example) is indistinguishable from a property that is not mentioned at all. This is because the API to retrieve the property value returns the empty string for non-existent properties (see page 871).
One of the simplest ways of loading a configuration file is to pass the command-line option --Ice.Config to an Ice program, for example:
$ ./server --Ice.Config=/opt/Ice/default_config
This causes the server to read its property settings from the configuration file in /opt/Ice/default_config. Section 30.5 discusses this option in more detail.
Property values can include characters from non-English alphabets. The Ice run time expects the configuration file to use UTF-8 encoding for such characters. (With C++, you can specify a string converter when you read the file. See page 872, Section 32.3, and Section 32.24.)
30.3.1 The ICE_CONFIG Environment Variable
Another way to load a configuration file is to set the ICE_CONFIG environment variable to the relative or absolute path name of the file, for example:
$ export ICE_CONFIG=/opt/Ice/default_config$ ./server

30.3 Configuration Files 861
This causes the server to read its property settings from the configuration file in /opt/Ice/default_config.
Note that, for this to work, the server must call an overload of Ice::initialize (or the equivalent in other languages) that accepts an argu-ment vector. Overloads of initialize that do not accept an argument vector ignore ICE_CONFIG.
NOTE: In Java, the value of ICE_CONFIG can refer to class loader resources as well as regular files.
30.3.2 Special Characters
The characters = and # have special meaning in a configuration file:
• = marks the end of the property name and the beginning of the property value
• # starts a comment that extends to the end of the line
These characters must be escaped when they appear in a property name. Consider the following examples:
foo\=bar=1 Name is “foo=bar”, value is “1”foo\#bar = 2 Name is “foo#bar”, value is “2”foo bar =3 Name is “foo bar”, value is “3”
In a property value, a # character must be escaped to prevent it from starting a comment, but an = character does not require an escape. Consider these examples:
A=1 Name is “A”, value is “1”B= 2 3 4 Name is “B”, value is “2 3 4”C=5=\#6 # 7 Name is “C”, value is “5=#6”
Note that, two successive backslashes in a property value become a single backs-lash. To get two consecutive backslashes, you must escape each one with another backslash:
AServer=\\\\server\dir Value is “\\server\dir”BServer=\\server\\dir Value is “\server\dir”
The preceding example also illustrates that, if a backslash is not followed by \, #, or =, the backslash and the character following it are both preserved.

862 Ice Properties and Configuration
30.4 Setting Properties on the Command Line
In addition to setting properties in a configuration file, you can also set properties on the command line, for example:
$ ./server --Ice.UDP.SndSize=65535 --IceSSL.Trace.Security=2
Any command line option that begins with -- and is followed by one of the reserved prefixes (see page 858) is read and converted to a property setting when you create a communicator. Property settings on the command line override settings in a configuration file. If you set the same property more than once on the same command line, the last setting overrides any previous ones.
For convenience, any property not explicitly set to a value is set to the value 1. For example,
$ ./server --Ice.Trace.Protocol
is equivalent to
$ ./server --Ice.Trace.Protocol=1
Note that this feature only applies to properties that are set on the command line, but not to properties that are set from a configuration file.
You can also clear a property from the command line as follows:
$ ./server --Ice.Trace.Protocol=
As for properties set from a configuration file, assigning nothing to a property clears that property.
30.5 Using Configuration Files
The ability to configure an application’s properties externally provides a great deal of flexibility: you can use any combination of command-line options and configu-ration files to achieve the desired settings, all without having to modify your appli-cation. This section describes two ways of loading property settings from a file.
30.5.1 Prerequisites
The Ice run time automatically loads a configuration file during the creation of a property set, which is an instance of the Ice::Properties interface. Every communicator has its own property set from which it derives its configuration. If

30.5 Using Configuration Files 863
an application does not supply a property set when it calls Ice::initialize (or the equivalent in other language mappings), the Ice run time internally creates a property set for the new communicator.
Note however that Ice loads a configuration file automatically only when the application creates a property set using an argument vector. This occurs when the application passes an argument vector to create a property set explicitly (as discussed in Section 30.9), or when the application passes an argument vector to Ice::initialize.
Both of the mechanisms described below can also retrieve property settings from additional sources. Refer to Section 30.6 for more information.
30.5.2 The ICE_CONFIG Environment Variable
Ice automatically loads the contents of the configuration file named in the ICE_CONFIG environment variable (assuming the prerequisites described in Section 30.5.1 are met). For example:
$ export ICE_CONFIG=/usr/local/filesystem/config$ ./server
This causes the server to read its property settings from the configuration file in /usr/local/filesystem/config.
If you use the ICE_CONFIG environment variable together with command-line options for other properties, the settings on the command line override the settings in the configuration file. For example:
$ export ICE_CONFIG=/usr/local/filesystem/config$ ./server --Ice.MessageSizeMax=4096
This sets the value of the Ice.MessageSizeMax property to 4096 regardless of any setting of this property in /usr/local/filesystem/config.
You can use multiple configuration files by specifying a list of configuration file names, separated by commas. For example:
$ export ICE_CONFIG=/usr/local/filesystem/config,./config$ ./server
This causes property settings to be retrieved from /usr/local/file-system/config, followed by any settings in the file config in the current directory; settings in ./config override settings /usr/local/file-system/config.

864 Ice Properties and Configuration
30.5.3 The Ice.Config Property
The Ice.Config property has special meaning to the Ice run time: it determines the path name of a configuration file from which to read property settings. For example:
$ ./server --Ice.Config=/usr/local/filesystem/config
This causes property settings to be read from the configuration file in /usr/local/filesystem/config.
The --Ice.Config command-line option overrides any setting of the ICE_CONFIG environment variable, that is, if the ICE_CONFIG environment variable is set and you also use the --Ice.Config command-line option, the configuration file specified by the ICE_CONFIG environment variable is ignored.
If you use the --Ice.Config command-line option together with settings for other properties, the settings on the command line override the settings in the configuration file. For example:
$ ./server --Ice.Config=/usr/local/filesystem/config \> --Ice.MessageSizeMax=4096
This sets the value of the Ice.MessageSizeMax property to 4096 regardless of any setting of this property in /usr/local/filesystem/config. The placement of the --Ice.Config option on the command line has no influence on this precedence. For example, the following command is equivalent to the preceding one:
$ ./server --Ice.MessageSizeMax=4096 \> --Ice.Config=/usr/local/filesystem/config
Settings of the Ice.Config property inside a configuration file are ignored, that is, you can set Ice.Config only on the command line.
If you use the --Ice.Config option more than once, only the last setting of the option is used and the preceding ones are ignored. For example:
$ ./server --Ice.Config=file1 --Ice.Config=file2
This is equivalent to using:
$ ./server --Ice.Config=file2
You can use multiple configuration files by specifying a list of configuration file names, separated by commas. For example:
$ ./server --Ice.Config=/usr/local/filesystem/config,./config

30.6 Alternate Property Stores 865
This causes property settings to be retrieved from /usr/local/file-system/config, followed by any settings in the file config in the current directory; settings in ./config override settings /usr/local/file-system/config.
30.6 Alternate Property Stores
In addition to regular files, Ice also supports storing property settings in the Windows registry and Java resources.
30.6.1 Windows Registry
You can use the Windows registry to store property settings. Property settings must be stored with a key underneath HKEY_LOCAL_MACHINE. To inform the Ice run time of this key, you must set the Ice.Config property to the key. For example:
$ client --Ice.Config=HKLM\MyCompany\MyApp
The Ice run time examines the value of Ice.Config; if that value begins with HKLM\, the remainder of the property is taken to be a key to a number of string values. For the preceding example, the Ice run time looks for the key HKEY_LOCAL_MACHINE\MyCompany\MyApp. The string values stored under this key are used to initialize the properties.
The name of each string value is the name of the property (such as Ice.Trace.Network). Note that the value must be a string (even if the prop-erty setting is numeric). For example, to set Ice.Trace.Network to 3, you must store the string “3” as the value, not a binary or DWORD value.
String values in the registry can be regular strings (REG_SZ) or expandable strings (REG_EXPAND_SZ). Expandable strings allow you to include symbolic references to environment variables (such as %ICE_HOME%).
NOTE: Depending on whether you use 32-bit or 64-bit binaries, you must set the registry keys in the corresponding 32-bit or 64-bit registry. See http://support.micro-soft.com/kb/305097 for more information.

866 Ice Properties and Configuration
30.6.2 Java Resources
The Ice run time for Java supports the ability to load a configuration file as a class loader resource, which is especially useful for deploying an Ice application in a self-contained JAR file. For example, suppose we define ICE_CONFIG as shown below:
$ export ICE_CONFIG=app_config
During the creation of a property set (which often occurs implicitly when initial-izing a new communicator), Ice asks the Java run time to search the application’s class path for a file named app_config. This file might reside in the same JAR file as the application’s class files, or in a different JAR file in the class path, or it might be a regular file located in one of the directories in the class path. If Java is unable to locate the configuration file in the class path, Ice attempts to open the file in the local file system.
The class path resource always takes precedence over a regular file. In other words, if a class path resource and a regular file are both present with the same path name, Ice always loads the class path resource in preference to the regular file.
The path name for a class path resource uses a relative Unix-like format such as subdir/myfile. Java searches for the resource relative to each JAR file or subdirectory in an application’s class path.
30.7 Command-Line Parsing and Initialization
When you initialize the Ice run time by calling Ice::initialize (C++/Ruby), Ice.Util.initialize (Java/C#), Ice.initialize (Python), or Ice_initialize (PHP), you can pass an argument vector to the initialization call.1
For C++, Ice::initialize accepts a C++ reference to argc:
namespace Ice { CommunicatorPtr initialize(int& argc, char* argv[]);}
1. See also Section 32.3.

30.7 Command-Line Parsing and Initialization 867
Ice::initialize parses the argument vector and initializes its property settings accordingly. In addition, it removes any arguments from argv that are property settings. For example, assume we invoke a server as:
$ ./server --myoption --Ice.Config=config -x a \--Ice.Trace.Network=3 -y opt file
Initially, argc has the value 9, and argv has ten elements: the first nine elements contain the program name and the arguments, and the final element, argv[argc], contains a null pointer (as required by the ISO C++ standard). When Ice::initialize returns, argc has the value 7 and argv contains the following elements:
./server--myoption-xa-yoptfile0 # Terminating null pointer
This means that you should initialize the Ice run time before you parse the command line for your application-specific arguments. That way, the Ice-related options are stripped from the argument vector for you so you do not need to explicitly skip them. If you use the Ice::Application helper class (see Section 8.3.1), the run member function is passed an argument vector with the Ice-related options already stripped. The same is true for the runWithSession member function called by Glacier2::Application helper class (see Section 42.5).
For Java, Ice.Util.initialize is overloaded. The signatures are:
package Ice;public final class Util { public static Communicator initialize(); public static Communicator initialize(String[] args); public static Communicator initialize(StringSeqHolder args);

868 Ice Properties and Configuration
public static Communicator initialize(InitializationData id); public static Communicator initialize(String[] args, InitializationData id); public static Communicator initialize(StringSeqHolder args, InitializationData id); // ...}
The versions that accept an argument vector of type String[] do not strip Ice-related options for you, so, if you use one of these methods, your code must ignore options that start with one of the reserved prefixes (--Ice, --IceBox, --IceGrid, --IcePatch2, --IceSSL, --IceStorm, --Freeze, and --Glacier2). The versions that accept a StringSeqHolder behave like the C++ version and strip the Ice-related options from the passed argument vector.
In C#, the argument vector is passed by reference to the initialize method, allowing it to strip the Ice-related options:
namespace Ice { public sealed class Util { public static Communicator initialize(); public static Communicator initialize(ref string[] args); public static Communicator initialize(InitializationData id); public static Communicator initialize(ref string[] args, InitializationData id); // ... }}

30.8 The Ice.ProgramName property 869
The Python, Ruby, and PHP implementations of initialize have the same semantics as C++ and .NET; they expect the argument vector to be passed as a list from which all Ice-related options are removed.
If you use the Ice.Application helper class, the run method is passed the cleaned-up argument vector. The Ice.Application class is described in the server-side language mapping chapters.
30.8 The Ice.ProgramName property
For C++, Python, and Ruby, initialize sets the Ice.ProgramName prop-erty to the name of the current program (argv[0]). In C#, initialize sets Ice.ProgramName to the value of System.AppDomain.CurrentDo-main.FriendlyName.
Your application code can read this property and use it for activities such as logging diagnostic or trace messages. (See Section 30.9.1 for how to access the property value in your program.)
Even though Ice.ProgramName is initialized for you, you can still over-ride its value from a configuration file or by setting the property on the command line.
For Java, the program name is not supplied as part of the argument vector—if you want to use the Ice.ProgramName property in your application, you must set it before initializing a communicator.
30.9 Using Properties Programmatically
The Ice property mechanism is useful not only to configure Ice, but you can also use it as the configuration mechanism for your own applications. You can use the same configuration file and command-line mechanism to set application-specific properties. For example, we could introduce a property to control the maximum file size for our file system application:
# Configuration file for file system applicationFilesystem.MaxFileSize=1024 # Max file size in kB
The Ice run time stores the Filesystem.MaxFileSize property like any other property and makes it accessible via the Properties interface.

870 Ice Properties and Configuration
To access property values from within your program, you need to acquire the communicator’s properties by calling getProperties:
module Ice { local interface Properties; // Forward declaration local interface Communicator { Properties getProperties(); // ... };};
The Properties interface provides methods to read and write property settings:
module Ice { local dictionary<string, string> PropertyDict; local interface Properties { string getProperty(string key); string getPropertyWithDefault(string key, string value); int getPropertyAsInt(string key); int getPropertyAsIntWithDefault(string key, int value); PropertyDict getPropertiesForPrefix(string prefix); void setProperty(string key, string value); StringSeq getCommandLineOptions(); StringSeq parseCommandLineOptions(string prefix, StringSeq options); StringSeq parseIceCommandLineOptions(StringSeq options); void load(string file); Properties clone(); };};
30.9.1 Reading Properties
The operations to read property values behave as follows:

30.9 Using Properties Programmatically 871
• getProperty
This operation returns the value of the specified property. If the property is not set, the operation returns the empty string.
• getPropertyWithDefault
This operation returns the value of the specified property. If the property is not set, the operation returns the supplied default value.
• getPropertyAsInt
This operation returns the value of the specified property as an integer. If the property is not set or contains a string that does not parse as an integer, the operation returns zero.
• getPropertyAsIntWithDefault
This operation returns the value of the specified property as an integer. If the property is not set or contains a string that does not parse as an integer, the operation returns the supplied default value.
• getPropertiesForPrefix
This operation returns all properties that begin with the specified prefix as a dictionary of type PropertyDict. This operation is useful if you want to extract the properties for a specific subsystem. For example,
getPropertiesForPrefix("Filesystem")
returns all properties that start with the prefix Filesystem, such as File-system.MaxFileSize. You can then use the usual dictionary lookup operations to extract the properties of interest from the returned dictionary.
With these lookup operations, using application-specific properties now becomes the simple matter of initializing a communicator as usual, getting access to the communicator’s properties, and examining the desired property value. For example (in C++):
// ...Ice::CommunicatorPtr ic;// ...ic = Ice::initialize(argc, argv);// Get the maximum file size.//Ice::PropertiesPtr props = ic->getProperties();Ice::Int maxSize

872 Ice Properties and Configuration
= props->getPropertyAsIntWithDefault("Filesystem.MaxFileSize", 1024);// ...
Assuming that you have created a configuration file that sets the File-system.MaxFileSize property (and set the ICE_CONFIG variable or the --Ice.Config option accordingly), your application will pick up the config-ured value of the property. Refer to Section 30.5 for more information on loading a configuration file using ICE_CONFIG or --Ice.Config.
30.9.2 Setting Properties
The setProperty operation sets a property to the specified value. (You can clear a property by setting it to the empty string.) For properties that control the Ice run time and its services (that is, properties that start with one of the reserved prefixes, such as Ice, Glacier2, etc.), this operation is useful only if you call it before you call initialize. This is because property values are usually read by the Ice run time only once, when you call initialize, so the Ice run time does not pay attention to a property value that is changed after you have initialized a communicator. Of course, this begs the question of how you can set a property value and have it also recognized by a communicator.
To permit you to set properties before initializing a communicator, the Ice run time provides an overloaded helper function called createProperties that creates a property set. In C++, the function is in the Ice namespace:
namespace Ice {PropertiesPtr createProperties(const StringConverterPtr& = 0);PropertiesPtr createProperties(StringSeq&, const PropertiesPtr& = 0, const StringConverterPtr& = 0);PropertiesPtr createProperties(int&, char*[], const PropertiesPtr& = 0, const StringConverterPtr& = 0);}
The StringConverter parameter allows you to parse properties whose values contain non-ASCII characters and to correctly convert these characters into the native codeset. (See Section 32.24 for details.) The converter that is passed to

30.9 Using Properties Programmatically 873
createProperties remains attached to the returned property set for the life time of the property set.
The function is overloaded to accept either an argc/argv pair, or a StringSeq (see Section 30.9.3 for details).
In Java, the functions are static methods of the Util class inside the Ice package:
package Ice;public final class Util{ public static Properties createProperties(); public static Properties createProperties(StringSeqHolder args); public static Properties createProperties(StringSeqHolder args, Properties defaults); public static Properties createProperties(String[] args); public static Properties createProperties(String[] args, Properties defaults); // ...}
In C#, the Util class in the Ice namespace supplies equivalent methods:
namespace Ice { public sealed class Util { public static Properties createProperties(); public static Properties createProperties(ref string[] args); public static Properties createProperties(ref string[] args, Properties defaults); }}
The Python and Ruby methods reside in the Ice module:
def createProperties(args=[], defaults=None)
In PHP, use the Ice_createProperties method:

874 Ice Properties and Configuration
function Ice_createProperties(args=array(), defaults=null)
As for initialize (see Section 32.3), createProperties strips Ice-related command-line options from the passed argument vector. (For Java, only the versions that accept a StringSeqHolder do this.)
The functions behave as follows:
• The parameter-less version of createProperties simply creates an empty property set. It does not check ICE_CONFIG for a configuration file to parse.
• The other overloads of createProperties accept an argument vector and a default property set. The returned property set contains all the property settings that are passed as the default, plus any property settings in the argu-ment vector. If the argument vector sets a property that is also set in the passed default property set, the setting in the argument vector overrides the default.
The overloads that accept an argument vector also look for the --Ice.Config option; if the argument vector specifies a configuration file, the configuration file is parsed. The order of precedence of property settings, from lowest to highest, is:
• Property settings passed in the default parameter
• Property settings set in the configuration file
• Property settings in the argument vector.
The overloads that accept an argument vector also look for the setting of the ICE_CONFIG environment variable and, if that variable specifies a configu-ration file, parse that file. (However, an explicit --Ice.Config option in the argument vector or the defaults parameter overrides any setting of the ICE_CONFIG environment variable.)
createProperties is useful if you want to ensure that a property is set to a particular value, regardless of any setting of that property in a configuration file or in the argument vector. Here is a C++ example:
// Get the initialized property set.//Ice::PropertiesPtr props = Ice::createProperties(argc, argv);// Make sure that network and protocol tracing are off.//props->setProperty("Ice.Trace.Network", "0");props->setProperty("Ice.Trace.Protocol", "0");

30.9 Using Properties Programmatically 875
// Initialize a communicator with these properties.//Ice::InitializationData id;id.properties = props;Ice::CommunicatorPtr ic = Ice::initialize(id);// ...
The equivalent Java code looks as follows:
Ice.StringSeqHolder argsH = new Ice.StringSeqHolder(args);Ice.Properties properties = Ice.Util.createProperties(argsH);properties.setProperty("Ice.Warn.Connections", "0");properties.setProperty("Ice.Trace.Protocol", "0");Ice.InitializationData id = new Ice.InitializationData();id.properties = properties;communicator = Ice.Util.initialize(id);
We first convert the argument array to an initialized StringSeqHolder. This is necessary so createProperties can strip Ice-specific settings. In that way, we first obtain an initialized property set, then override the settings for the two tracing properties, and then set the properties in the InitializationData structure.
The equivalent Python code is shown next:
props = Ice.createProperties(sys.argv)props.setProperty("Ice.Trace.Network", "0")props.setProperty("Ice.Trace.Protocol", "0")id = Ice.InitializationData()id.properties = propsic = Ice.initialize(id)
This is the equivalent code in Ruby:
props = Ice::createProperties(ARGV)props.setProperty("Ice.Trace.Network", "0")props.setProperty("Ice.Trace.Protocol", "0")id = Ice::InitializationData.newid.properties = propsic = Ice::initialize(id)
Finally, we present the code in PHP:

876 Ice Properties and Configuration
$props = Ice_createProperties($args);$props->setProperty("Ice.Trace.Network", "0");$props->setProperty("Ice.Trace.Protocol", "0");$id = new Ice_InitializationData();$id->properties = $props;$ic = Ice_initialize($id);
30.9.3 Parsing Properties
The Properties interface provides three operations to convert and parse properties:
• getCommandLineOptions
This operation converts an initialized set of properties into a sequence of equivalent command-line options. For example, if you have set the File-system.MaxFileSize property to 1024 and call getCommandLineOp-tions, the setting is returned as the string "Filesystem.MaxFileSize=1024". This operation is useful for diag-nostic purposes, for example, to dump the setting of all properties to a logging facility (see Section 32.19), or if you want to fork a new process with the same property settings as the current process.
• parseCommandLineOptions
This operation examines the passed argument vector for command-line options that have the specified prefix. Any options that match the prefix are converted to property settings (that is, they initialize the corresponding prop-erties). The operation returns an argument vector that contains all those options that were not converted (that is, those options that did not match the prefix).
Because parseCommandLineOptions expects a sequence of strings, but C++ programs are used to dealing with argc and argv, Ice provides two utility functions that convert an argc/argv vector into a sequence of strings and vice-versa:
namespace Ice { StringSeq argsToStringSeq(int argc, char* argv[]); void stringSeqToArgs(const StringSeq& args, int& argc, char* argv[]);

30.9 Using Properties Programmatically 877
}
You need to use parseCommandLineOptions (and the utility functions) if you want to permit application-specific properties to be set from the command line. For example, to permit the --Filesystem.MaxFileSize option to be used on the command line, we need to initialize our program as follows:
intmain(int argc, char* argv[]){ // Create an empty property set. // Ice::PropertiesPtr props = Ice::createProperties(); // Convert argc/argv to a string sequence. // Ice::StringSeq args = Ice::argsToStringSeq(argc, argv); // Strip out all options beginning with --Filesystem. // args = props->parseCommandLineOptions("Filesystem", args); // args now contains only those options that were not // stripped. Any options beginning with --Filesystem have // been converted to properties. // Convert remaining arguments back to argc/argv vector. // Ice::stringSeqToArgs(args, argc, argv); // Initialize communicator. // Ice::InitializationData id; id.properties = props; Ice::CommunicatorPtr ic = Ice::initialize(argc, argv, id); // At this point, argc/argv only contain options that // set neither an Ice property nor a Filesystem property, // so we can parse these options as usual. // // ...}
Using this code, any options beginning with --Filesystem are converted to properties and are available via the property lookup operations as usual. The call to initialize then removes any Ice-specific command-line

878 Ice Properties and Configuration
options so, once the communicator is created, argc/argv only contains options and arguments that are not related to setting either a filesystem or an Ice property.
An easier way to achieve the same thing is to use the overload of Ice::initialize that accepts a string sequence, instead of an argc/argv pair:
intmain(int argc, char* argv[]){ // Create an empty property set. // Ice::PropertiesPtr props = Ice::createProperties(); // Convert argc/argv to a string sequence. // Ice::StringSeq args = Ice::argsToStringSeq(argc, argv); // Strip out all options beginning with --Filesystem. // args = props->parseCommandLineOptions("Filesystem", args); // args now contains only those options that were not // stripped. Any options beginning with --Filesystem have // been converted to properties. // Initialize communicator. // Ice::InitializationData id; id.properties = props; Ice::CommunicatorPtr ic = Ice::initialize(args, id); // At this point, args only contains options that // set neither an Ice property nor a Filesystem property, // so we can parse these options as usual. // // ...}
This version of the code avoids having to convert the string sequence back into an argc/argv pair before calling Ice::initialize.
• parseIceCommandLineOptions
This operation behaves like parseCommandLineOptions, but removes the reserved Ice-specific options from the argument vector (see Section 30.2.2). It

30.10 Unused Properties 879
is used internally by the Ice run time to parse Ice-specific options in initialize.
30.9.4 Utility OperationsThe Properties interface provides two utility operations:
• clone
This operation makes a copy of an existing property set. The copy contains exactly the same properties and values as the original.
• load
This operation accepts a path name to a configuration file and initializes the property set from that file. If the specified file cannot be read (for example, because it does not exist or the caller does not have read permission), the oper-ation throws a FileException.
In Java, the given path name can refer to a class loader resource or a regular file (see Section 30.3).
These operations are useful if you need to work with multiple communicators that use different property sets.
30.10 Unused Properties
The property Ice.Warn.UnusedProperties, when set to a non-zero value, causes the Ice run time to emit a warning for properties that were set but not read when you destroy a communicator. Setting this property is useful to detect mis-spelled properties, such as Filesystem.MaxFilSize. By default, the warning is disabled.
30.11 Summary
The Ice property mechanism provides a simple way to configure Ice by setting properties in configuration files or on the command line. This also applies to your own applications: you can easily use the Properties interface to access applica-tion-specific properties that you have created for your own needs. The API to access property values is small and simple, making it easy to retrieve property values at run time, yet is flexible enough to allow you to work with different prop-erty sets and configuration files if the need arises.


881
Chapter 31Threads and Concurrency with C++
31.1 Chapter Overview
This chapter presents the C++ threading and signal handling abstractions that are provided by Ice. (For other language mappings, Ice uses the built-in threading and synchronization facilities.) We briefly describe how to use each of the available synchronization primitives (mutexes and monitors). We then cover how to create, control, and destroy threads. The threading discussion concludes with a brief example that shows how to create a thread-safe producer-consumer application that uses several threads. Finally, we introduce a portable abstraction for handling signals and signal-like events.
31.2 Introduction
Threading and concurrency control vary widely with different operating systems. To make threads programming easier and portable, Ice provides a simple thread abstraction layer that allows you to write portable source code regardless of the underlying platform. In this chapter, we take a closer look at the threading and concurrency control mechanisms in Ice for C++.
Note that we assume that you are familiar with light-weight threads and concurrency control. (See [8] for an excellent treatment of programming with

882 Threads and Concurrency with C++
threads.) Also see Section 32.10, which provides a language-neutral introduction to the Ice threading model.
31.3 Library Overview
The Ice threading library provides the following thread-related abstractions:
• mutexes
• recursive mutexes
• monitors
• a thread abstraction that allows you to create, control, and destroy threads
The synchronization primitives permit you to implement concurrency control at different levels of granularity. In addition, the thread abstraction allows you to, for example, create a separate thread that can respond to GUI or other asynchronous events. All of the threading APIs are part of the IceUtil namespace.
31.4 Mutexes
The class IceUtil::Mutex (defined in IceUtil/Mutex.h) provides a simple non-recursive mutual exclusion mechanism:
namespace IceUtil { enum MutexProtocol { PrioInherit, PrioNone }; class Mutex { public: Mutex(); Mutex(MutexProtocol p); ~Mutex(); void lock() const; bool tryLock() const; void unlock() const; typedef LockT<Mutex> Lock; typedef TryLockT<Mutex> TryLock; };}
The member functions of this class work as follows:

31.4 Mutexes 883
• Mutex()Mutex(MutexProtocol p)
You can optionally specify a mutex protocol when you construct a mutex. The mutex protocol controls how the mutex behaves with respect to thread priori-ties. Default-constructed mutexes use a system-wide default. See Section 31.9 for more detail.
• lock
The lock function attempts to acquire the mutex. If the mutex is already locked, it suspends the calling thread until the mutex becomes available. The call returns once the calling thread has acquired the mutex.
• tryLock
The tryLock function attempts to acquire the mutex. If the mutex is avail-able, the call returns with the mutex locked and returns true. Otherwise, if the mutex is locked by another thread, the call returns false.
• unlock
The unlock function unlocks the mutex.
Note that IceUtil::Mutex is a non-recursive mutex implementation. This means that you must adhere to the following rules:
• Do not call lock on the same mutex more than once from a thread. The mutex is not recursive so, if the owner of a mutex attempts to lock it a second time, the behavior is undefined.
• Do not call unlock on a mutex unless the calling thread holds the lock. Calling unlock on a mutex that is not currently held by any thread, or calling unlock on a mutex that is held by a different thread, results in undefined behavior.
31.4.1 Thread-Safe File Access for the Filesystem ApplicationRecall that the implementation of the read and write operations for our file system server in Section 9.2.3 is not thread safe:
Filesystem::LinesFilesystem::FileI::read(const Ice::Current&) const{ return _lines; // Not thread safe!}void
884 Threads and Concurrency with C++
Filesystem::FileI::write(const Filesystem::Lines& text, const Ice::Current&){ _lines = text; // Not thread safe!}
The problem here is that, if we receive concurrent invocations of read and write, one thread will be assigning to the _lines vector while another thread is reading that same vector. The outcome of such concurrent data access is unde-fined; to avoid the problem, we need to serialize access to the _lines member with a mutex. We can make the mutex a data member of the FileI class and lock and unlock it in the read and write operations:
#include <IceUtil/Mutex.h>// ...namespace Filesystem { // ... class FileI : virtual public File, virtual public Filesystem::NodeI { public: // As before... private: Lines _lines; IceUtil::Mutex _fileMutex; }; // ...}Filesystem::LinesFilesystem::FileI::read(const Ice::Current&) const{ _fileMutex.lock(); Lines l = _lines; _fileMutex.unlock(); return l;}voidFilesystem::FileI::write(const Filesystem::Lines& text, const Ice::Current&){

31.4 Mutexes 885
_fileMutex.lock(); _lines = text; _fileMutex.unlock();}
The FileI class here is identical to the implementation in Section 9.2.2, except that we have added the _fileMutex data member. The read and write oper-ations lock and unlock the mutex to ensure that only one thread can read or write the file at a time. Note that, by using a separate mutex for each FileI instance, it is still possible for multiple threads to concurrently read or write files, as long as they each access a different file. Only concurrent accesses to the same file are seri-alized.
The implementation of read is somewhat awkward here: we must make a local copy of the file contents while we are holding the lock and return that copy. Doing so is necessary because we must unlock the mutex before we can return from the function. However, as we will see in the next section, the copy can be avoided by using a helper class that unlocks the mutex automatically when the function returns.
31.4.2 Guaranteed Unlocking of Mutexes
Using the raw lock and unlock operations on mutexes has an inherent problem: if you forget to unlock a mutex, your program will deadlock. Forgetting to unlock a mutex is easier than you might suspect, for example:
Filesystem::LinesFilesystem::File::read(const Ice::Current&) const{ _fileMutex.lock(); // Lock the mutex Lines l = readFileContents(); // Read from database _fileMutex.unlock(); // Unlock the mutex return l;}
Assume that we are keeping the contents of the file on secondary storage, such as a database, and that the readFileContents function accesses the file. The code is almost identical to the previous example but now contains a latent bug: if readFileContents throws an exception, the read function terminates without ever unlocking the mutex. In other words, this implementation of read is not exception-safe.
The same problem can easily arise if you have a larger function with multiple return paths. For example:

886 Threads and Concurrency with C++
voidSomeClass::someFunction(/* params here... */){ _mutex.lock(); // Lock a mutex // Lots of complex code here... if (someCondition) { // More complex code here... return; // Oops!!! } // More code here... _mutex.unlock(); // Unlock the mutex}
In this example, the early return from the middle of the function leaves the mutex locked. Even though this example makes the problem quite obvious, in large and complex pieces of code, both exceptions and early returns can cause hard-to-track deadlock problems. To avoid this, the Mutex class contains two type definitions for helper classes, called Lock and TryLock:
namespace IceUtil { class Mutex { // ... typedef LockT<Mutex> Lock; typedef TryLockT<Mutex> TryLock; };}
LockT and TryLockT are simple templates that primarily consist of a constructor and a destructor; the LockT constructor calls lock on its argument, the TryLockT constructor calls tryLock on its argument. The destructors call unlock if the mutex is lock when the template goes out of scope. By instanti-ating a local variable of type Lock or TryLock, we can avoid the deadlock problem entirely:1
1. This is an example of the RAII (Resource Acquisition Is Initialization) idiom [20].

31.4 Mutexes 887
voidSomeClass::someFunction(/* params here... */){ IceUtil::Mutex::Lock lock(_mutex); // Lock a mutex // Lots of complex code here... if (someCondition) { // More complex code here... return; // No problem } // More code here...} // Destructor of lock unlocks the mutex
On entry to someFunction, we instantiate a local variable lock, of type IceUtil::Mutex::Lock. The constructor of lock calls lock on the mutex so the remainder of the function is inside a critical region. Eventually, some-Function returns, either via an ordinary return (in the middle of the function or at the end) or because an exception was thrown somewhere in the function body. Regardless of how the function terminates, the C++ run time unwinds the stack and calls the destructor of lock, which unlocks the mutex, so we cannot get trapped by the deadlock problem we had previously.
Both the Lock and TryLock templates have a few member functions:
• void acquire() const;
This function attempts to acquire the lock and blocks the calling thread until the lock becomes available. If the caller calls acquire on a mutex it has locked previously, the function throws ThreadLockedException.
• bool tryAcquire() const;
This function attempts to acquire the mutex. If the mutex can be acquired, it returns true with the mutex locked; if the mutex cannot be acquired, it returns false. If the caller calls tryAcquire on a mutex it has locked previously, the function throws ThreadLockedException.
• void release() const;
This function releases a previously locked mutex. If the caller calls release on a mutex it has unlocked previously, the function throws ThreadLocked-Exception.

888 Threads and Concurrency with C++
• bool acquired() const;
This function returns true if the caller has locked the mutex previously and false, otherwise. If you use the TryLock template, you must call acquired after instantiating the template to test whether the lock actually was acquired.
These functions are useful if you want to use the Lock and TryLock templates for guaranteed unlocking, but need to temporarily release the lock:
{ IceUtil::Mutex::TryLock m(someMutex); if (m.acquired()) { // Got the lock, do processing here... if (release_condition) { m.release(); } // Mutex is now unlocked, someone else can lock it. // ... m.acquire(); // Block until mutex becomes available. // ... if (release_condition) { m.release(); } // Mutex is now unlocked, someone else can lock it. // ... // Spin on the mutex until it becomes available. while (!m.tryLock()) { // Do some other processing here... } // Mutex locked again at this point.

31.5 Recursive Mutexes 889
// ... }} // Close scope, m is unlocked by its destructor.
You should make it a habit to always use the Lock and TryLock helpers instead of calling lock and unlock directly. Doing so results in code that is easier to understand and maintain.
Using the Lock helper, we can rewrite the implementation of our read and write operations as follows:
Filesystem::LinesFilesystem::FileI::read(const Ice::Current&) const{ IceUtil::Mutex::Lock lock(_fileMutex); return _lines;}voidFilesystem::FileI::write(const Filesystem::Lines& text, const Ice::Current&){ IceUtil::Mutex::Lock lock(_fileMutex); _lines = text;}
Note that this also eliminates the need to make a copy of the _lines data member: the return value is initialized under protection of the mutex and cannot be modified by another thread once the destructor of lock unlocks the mutex.
31.5 Recursive Mutexes
As we saw on page 883, a non-recursive mutex cannot be locked more than once, even by the thread that holds the lock. This frequently becomes a problem if a program contains a number of functions, each of which must acquire a mutex, and you want to call one function as part of the implementation of another function:
IceUtil::Mutex _mutex;voidf1(){ IceUtil::Mutex::Lock lock(_mutex);

890 Threads and Concurrency with C++
// ...}voidf2(){ IceUtil::Mutex::Lock lock(_mutex); // Some code here... // Call f1 as a helper function f1(); // Deadlock! // More code here...}
f1 and f2 each correctly lock the mutex before manipulating data but, as part of its implementation, f2 calls f1. At that point, the program deadlocks because f2 already holds the lock that f1 is trying to acquire. For this simple example, the problem is obvious. However, in complex systems with many functions that acquire and release locks, it can get very difficult to track down this kind of situa-tion: the locking conventions are not manifest anywhere but in the source code and each caller must know which locks to acquire (or not to acquire) before calling a function. The resulting complexity can quickly get out of hand.
Ice provides a recursive mutex class RecMutex (defined in IceUtil/RecMutex.h) that avoids this problem:
namespace IceUtil { class RecMutex { public: RecMutex(); RecMutex(MutexProtocol p); ~RecMutex(); void lock() const; bool tryLock() const; void unlock() const; typedef LockT<RecMutex> Lock; typedef TryLockT<RecMutex> TryLock; };}
Note that the signatures of the operations are the same as for IceUtil::Mutex. However, RecMutex implements a recursive mutex:

31.5 Recursive Mutexes 891
• RecMutex()RecMutex(MutexProtocol p)
You can optionally specify a mutex protocol when you construct a mutex. The mutex protocol controls how the mutex behaves with respect to thread priori-ties. Default-constructed mutexes use a system-wide default. See Section 31.9 for more detail.
• lock
The lock function attempts to acquire the mutex. If the mutex is already locked by another thread, it suspends the calling thread until the mutex becomes available. If the mutex is available or is already locked by the calling thread, the call returns immediately with the mutex locked.
• tryLock
The tryLock function works like lock, but, instead of blocking the caller, it returns false if the mutex is locked by another thread. Otherwise, the return value is true.
• unlock
The unlock function unlocks the mutex.
As for non-recursive mutexes, you must adhere to a few simple rules for recur-sive mutexes:
• Do not call unlock on a mutex unless the calling thread holds the lock.
• You must call unlock as many times as you called lock for the mutex to become available to another thread. (Internally, a recursive mutex is imple-mented with a counter that is initialized to zero. Each call to lock increments the counter and each call to unlock decrements the counter; the mutex is made available to another thread when the counter returns to zero.)
Using recursive mutexes, the code fragment on page 889 works correctly:
#include <IceUtil/RecMutex.h>// ...IceUtil::RecMutex _mutex; // Recursive mutexvoidf1(){ IceUtil::RecMutex::Lock lock(_mutex); // ...}

892 Threads and Concurrency with C++
voidf2(){ IceUtil::RecMutex::Lock lock(_mutex); // Some code here... // Call f1 as a helper function f1(); // Fine // More code here...}
Note that the type of the mutex is now RecMutex instead of Mutex, and that we are using the Lock type definition provided by the RecMutex class, not the one provided by the Mutex class.
31.6 Monitors
Mutexes implement a simple mutual exclusion mechanism that allows only a single thread (or, in the case of read-write mutexes, a single writer thread or multiple reader threads) to be active in a critical region at a time. In particular, for another thread to enter the critical region, another thread must leave it. This means that, with mutexes, it is impossible to suspend a thread inside a critical region and have that thread wake up again at a later time, for example, when a condition becomes true.
To address this problem, Ice provides a monitor. Briefly, a monitor is a synchronization mechanism that protects a critical region: as for a mutex, only one thread may be active at a time inside the critical region. However, a monitor allows you to suspend a thread inside the critical region; doing so allows another thread to enter the critical region. The second thread can either leave the monitor (thereby unlocking the monitor), or it can suspend itself inside the monitor; either way, the original thread is woken up and continues execution inside the monitor. This extends to any number of threads, so several threads can be suspended inside a monitor.2
Monitors provide a more flexible mutual exclusion mechanism than mutexes because they allow a thread to check a condition and, if the condition is false, put itself to sleep; the thread is woken up by some other thread that has changed the condition.

31.6 Monitors 893
31.6.1 The Monitor ClassIce provides monitors with the IceUtil::Monitor class (defined in IceUtil/Monitor.h):
namespace IceUtil { template <class T> class Monitor { public: void lock() const; void unlock() const; bool tryLock() const; void wait() const; bool timedWait(const Time&) const; void notify(); void notifyAll(); typedef LockT<Monitor<T> > Lock; typedef TryLockT<Monitor<T> > TryLock; };}
Note that Monitor is a template class that requires either Mutex or RecMutex as its template parameter. (Instantiating a Monitor with a RecMutex makes the monitor recursive.)
The member functions behave as follows:
• lock
This function attempts to lock the monitor. If the monitor is currently locked by another thread, the calling thread is suspended until the monitor becomes available. The call returns with the monitor locked.
• tryLock
This function attempts to lock a monitor. If the monitor is available, the call returns true with the monitor locked. If the monitor is locked by another thread, the call returns false.
2. The monitors provided by Ice have Mesa semantics, so called because they were first imple-mented by the Mesa programming language [12]. Mesa monitors are provided by a number of languages, including Java and Ada. With Mesa semantics, the signalling thread continues to run and another thread gets to run only once the signalling thread suspends itself or leaves the monitor.

894 Threads and Concurrency with C++
• unlock
This function unlocks a monitor. If other threads are waiting to enter the monitor (are blocked inside a call to lock), one of the threads is woken up and locks the monitor.
• wait
This function suspends the calling thread and, at the same time, releases the lock on the monitor. A thread suspended inside a call to wait can be woken up by another thread that calls notify or notifyAll. When the call returns, the suspended thread resumes execution with the monitor locked.
• timedWait
This function suspends the calling thread for up to the specified timeout. If another thread calls notify or notifyAll and wakes up the suspended thread before the timeout expires, the call returns true and the suspended thread resumes execution with the monitor locked. Otherwise, if the timeout expires, the function returns false. (See Appendix F.12 for a description of the Time class.)
• notify
This function wakes up a single thread that is currently suspended in a call to wait or timedWait. If no thread is suspended in a call to wait or timedWait at the time notify is called, the notification is lost (that is, calls to notify are not remembered if there is no thread to be woken up).
Note that notifying does not run another thread immediately. Another thread gets to run only once the notifying thread either calls wait or timedWait or unlocks the monitor (Mesa semantics).
• notifyAll
This function wakes up all threads that are currently suspended in a call to wait or timedWait. As for notify, calls to notifyAll are lost if no threads are suspended at the time.
As for notify, notifyAll causes other threads to run only once the noti-fying thread has either called wait or timedWait or unlocked the monitor (Mesa semantics).
You must adhere to a few rules for monitors to work correctly:
• Do not call unlock unless you hold the lock. If you instantiate a monitor with a recursive mutex, you get recursive semantics, that is, you must call

31.6 Monitors 895
unlock as many times as you have called lock (or tryLock) for the monitor to become available.
• Do not call wait or timedWait unless you hold the lock.
• Do not call notify or notifyAll unless you hold the lock.
• When returning from a wait call, you must re-test the condition before proceeding (see page 897).
31.6.2 Using Monitors
To illustrate how to use a monitor, consider a simple unbounded queue of items. A number of producer threads add items to the queue, and a number of consumer threads remove items from the queue. If the queue becomes empty, consumers must wait until a producer puts a new item on the queue. The queue itself is a crit-ical region, that is, we cannot allow a producer to put an item on the queue while a consumer is removing an item. Here is a very simple implementation of a such a queue:
template<class T> class Queue {public: void put(const T& item) { _q.push_back(item); } T get() { T item = _q.front(); _q.pop_front(); return item; }private: list<T> _q;};
As you can see, producers call the put method to enqueue an item, and consumers call the get method to dequeue an item. Obviously, this implementa-tion of the queue is not thread-safe and there is nothing to stop a consumer from attempting to dequeue an item from an empty queue.
Here is a version of the queue that uses a monitor to suspend a consumer if the queue is empty:

896 Threads and Concurrency with C++
#include <IceUtil/Monitor.h>template<class T> class Queue : public IceUtil::Monitor<IceUtil::Mutex> {public: void put(const T& item) { IceUtil::Monitor<IceUtil::Mutex>::Lock lock(*this); _q.push_back(item); notify(); } T get() { IceUtil::Monitor<IceUtil::Mutex>::Lock lock(*this); while (_q.size() == 0) wait(); T item = _q.front(); _q.pop_front(); return item; }private: list<T> _q;};
Note that the Queue class now inherits from IceUtil::Monitor<IceUtil::Mutex>, that is, Queue is-a monitor.
Both the put and get methods lock the monitor when they are called. As for mutexes, instead of calling lock and unlock directly, we are using the Lock helper which automatically locks the monitor when it is instantiated and unlocks the monitor again when it is destroyed.
The put method first locks the monitor and then, now being in sole posses-sion of the critical region, enqueues an item. Before returning (thereby unlocking the monitor), put calls notify. The call to notify will wake up any consumer thread that may be asleep in a wait call to inform the consumer that an item is available.
The get method also locks the monitor and then, before attempting to dequeue an item, tests whether the queue is empty. If so, the consumer calls wait. This suspends the consumer inside the wait call and unlocks the monitor, so a producer can enter the monitor to enqueue an item. Once that happens, the producer calls notify, which causes the consumer’s wait call to complete, with the monitor again locked for the consumer. The consumer now dequeues an item and returns (thereby unlocking the monitor).

31.6 Monitors 897
For this machinery to work correctly, the implementation of get does two things:
• get tests whether the queue is empty after acquiring the lock.
• get re-tests the condition in a loop around the call to wait; if the queue is still empty after wait returns, the wait call is re-entered.
You must always write your code to follow the same pattern:
• Never test a condition unless you hold the lock.
• Always re-test the condition in a loop around wait. If the test still shows the wrong outcome, call wait again.
Not adhering to these conditions will eventually result in a thread accessing shared data when it is not in its expected state, for the following reasons:
1. If you test a condition without holding the lock, there is nothing to prevent another thread from entering the monitor and changing its state before you can acquire the lock. This means that, by the time you get around to locking the monitor, the state of the monitor may no longer be in agreement with the result of the test.
2. Some thread implementations suffer from a problem known as spurious wake-up: occasionally, more than one thread may wake up in response to a call to notify, or a thread may wake up without any call to notify at all. As a result, each thread that returns from a call to wait must re-test the condition to ensure that the monitor is in its expected state: the fact that wait returns does not indicate that the condition has changed.
31.6.3 Efficient Notification
The previous implementation of our thread-safe queue on page 896 uncondition-ally notifies a waiting reader whenever a writer deposits an item into the queue. If no reader is waiting, the notification is lost and does no harm. However, unless there is only a single reader and writer, many notifications will be sent unneces-sarily, causing unwanted overhead.
Here is one way to fix the problem:
#include <IceUtil/Monitor.h>template<class T> class Queue : public IceUtil::Monitor<IceUtil::Mutex> {public: void put(const T& item) {

898 Threads and Concurrency with C++
IceUtil::Monitor<IceUtil::Mutex>::Lock lock(*this); _q.push_back(item); if (_q.size() == 1) notify(); } T get() { IceUtil::Monitor<IceUtil::Mutex>::Lock lock(*this); while (_q.size() == 0) wait(); T item = _q.front(); _q.pop_front(); return item; }private: list<T> _q;};
The only difference between this code and the implementation on page 896 is that a writer calls notify only if the queue length has just changed from empty to non-empty. That way, unnecessary notify calls are never made. However, this approach works only for a single reader thread. To see why, consider the following scenario:
1. Assume that the queue currently contains a number of items and that we have five reader threads.
2. The five reader threads continue to call get until the queue becomes empty and all five readers are waiting in get.
3. The scheduler schedules a writer thread. The writer finds the queue empty, deposits an item, and wakes up a single reader thread.
4. The awakened reader thread dequeues the single item on the queue.
5. The reader calls get a second time, finds the queue empty, and goes to sleep again.
The net effect of this is that there is a good chance that only one reader thread will ever be active; the other four reader threads end up being permanently asleep inside the get method.
One way around this problem is call notifyAll instead of notify once the queue length exceeds a certain amount, for example:

31.6 Monitors 899
#include <IceUtil/Monitor.h>template<class T> class Queue : public IceUtil::Monitor<IceUtil::Mutex> {public: void put(const T& item) { IceUtil::Monitor<IceUtil::Mutex>::Lock lock(*this); _q.push_back(item); if (_q.size() >= _wakeupThreshold) notifyAll(); } T get() { IceUtil::Monitor<IceUtil::Mutex>::Lock lock(*this); while (_q.size() == 0) wait(); T item = _q.front(); _q.pop_front(); return item; }private: list<T> _q; const int _wakeupThreshold = 100;};
Here, we have added a private data member _wakeupThreshold; a writer wakes up all waiting readers once the queue length exceeds the threshold, in the expectation that all the readers will consume items more quickly than they are produced, thereby reducing the queue length below the threshold again.
This approach works, but has drawbacks as well:
• The appropriate value of _wakeupThreshold is difficult to determine and sensitive to things such as speed and number of processors and I/O bandwidth.
• If multiple readers are asleep, they are all made runnable by the thread sched-uler once a writer calls notifyAll. On a multiprocessor machine, this may result in all readers running at once (one per CPU). However, as soon as the readers are made runnable, each of them attempts to reacquire the mutex that protects the monitor before returning from wait. Of course, only one of the readers actually succeeds and the remaining readers are suspended again, waiting for the mutex to become available. The net result is a large number of thread context switches as well as repeated and unnecessary locking of the system bus.

900 Threads and Concurrency with C++
A better option than calling notifyAll is to wake up waiting readers one at a time. To do this, we keep track of the number of waiting readers and call notify only if a reader needs to be woken up:
#include <IceUtil/Monitor.h>template<class T> class Queue : public IceUtil::Monitor<IceUtil::Mutex> {public: Queue() : _waitingReaders(0) {} void put(const T& item) { IceUtil::Monitor<IceUtil::Mutex>::Lock lock(*this); _q.push_back(item); if (_waitingReaders) notify(); } T get() { IceUtil::Monitor<IceUtil::Mutex>::Lock lock(*this); while (_q.size() == 0) { try { ++_waitingReaders; wait(); --_waitingReaders; } catch (...) { --_waitingReaders; throw; } } T item = _q.front(); _q.pop_front(); return item; }private: list<T> _q; short _waitingReaders;};
This implementation uses a member variable _waitingReaders to keep track of the number of readers that are suspended. The constructor initializes the vari-able to zero and the implementation of get increments and decrements the vari-able around the call to wait. Note that these statements are enclosed in a try–catch block; this ensures that the count of waiting readers remains accurate even

31.7 Condition Variables 901
if wait throws an exception. Finally, put calls notify only if there is a waiting reader.
The advantage of this implementation is that it minimizes contention on the monitor mutex: a writer wakes up only a single reader at a time, so we do not end up with multiple readers simultaneously trying to lock the mutex. Moreover, the monitor notify implementation signals a waiting thread only after it has unlocked the mutex. This means that, when a thread wakes up from its call to wait and tries to reacquire the mutex, the mutex is likely to be unlocked. This results in more efficient operation because acquiring an unlocked mutex is typi-cally very efficient, whereas forcefully putting a thread to sleep on a locked mutex is expensive (because it forces a thread context switch).
31.7 Condition Variables
Condition variables are similar to monitors in that they allow a thread to enter a critical region, test a condition, and sleep inside the critical region while releasing its lock. Another thread then is free to enter the critical region, change the condi-tion, and eventually signal the sleeping thread, which resumes at the point where it went to sleep and with the critical region once again locked.
Note that condition variables provide subset of the functionality of monitors, so a monitor can always be used instead of a condition variable. However, condi-tion variables are smaller, which may be important if you are seriously constrained with respect to memory.
Condition variables are provided by the IceUtil::Cond class. Here is its interface:
class Cond : private noncopyable {public: Cond(); ~Cond(); void signal(); void broadcast(); template<typename Lock> void wait(const Lock& lock) const;
902 Threads and Concurrency with C++
template<typename Lock> bool timedWait(const Lock& lock, const Time& timeout) const;};
Using a condition variable is very similar to using a monitor. The main difference in the Cond interface is that the wait and timedWait member functions are template functions, instead of the entire class being a template. The member func-tions behave as follows:
• wait
This function suspends the calling thread and, at the same time, releases the lock of the condition variable. A thread suspended inside a call to wait can be woken up by another thread that calls signal or broadcast. When wait completes, the suspended thread resumes execution with the lock held.
• timedWait
This function suspends the calling thread for up to the specified timeout. If another thread calls signal or broadcast and wakes up the suspended thread before the timeout expires, the call returns true and the suspended thread resumes execution with the lock held. Otherwise, if the timeout expires, the function returns false.
• signal
This function wakes up a single thread that is currently suspended in a call to wait or timedWait. If no thread is suspended in a call to wait or timedWait at the time signal is called, the signal is lost (that is, calls to signal are not remembered if there is no thread to be woken up).
Note that signalling does not necessarily run another thread immediately; the thread calling signal may continue to run. However, depending on the threads library, signal may also cause an immediate context switch to another thread.
• broadcast
This function wakes up all threads that are currently suspended in a call to wait or timedWait. As for signal, calls to broadcast are lost if no threads are suspended at the time.
You must adhere to a few rules for condition variables to work correctly:
• Do not call wait or timedWait unless you hold the lock.
• When returning from a wait call, you must re-test the condition before proceeding, just as for a monitor (see page 897).

31.7 Condition Variables 903
In contrast to monitors, which require you to call notify and notifyAll with the lock held, condition variables permit you call signal and broadcast without holding the lock. Here is a code example that changes a condition and signals on a condition variable:
Mutex m;Cond c;// ...{ Mutex::Lock sync(m); // Change some condition other threads may be sleeping on... c.signal(); // ...} // m is unlocked here
This code is correct and will work as intended, but it is potentially inefficient. Consider the code executed by the waiting thread:
{ Mutex::Lock sync(m); while(!condition) { c.wait(sync); } // Condition is now true, do // some processing...} // m is unlocked here
Again, this code is correct and will work as intended. However, consider what can happen once the first thread calls signal. It is possible that the call to signal will cause an immediate context switch to the waiting thread. But, even if the thread implementation does not cause such an immediate context switch, it is possible for the signalling thread to be suspended after it has called signal, but before it unlocks the mutex m. If this happens, the following sequence of events occurs:
1. The waiting thread is still suspended inside the implementation of wait and is now woken up by the call to signal.

904 Threads and Concurrency with C++
2. The now awake thread tries to acquire the mutex m but, because the signalling thread has not yet released the mutex, is suspended again waiting for the mutex to be unlocked.
3. The signal thread is scheduled again and leaves the scope enclosing sync, which unlocks the mutex, making the thread waiting for the mutex runnable.
4. The thread waiting for the mutex acquires the mutex and retests its condition.
While the preceding scenario is functionally correct, it is inefficient because it incurs two extra context switches between the signalling thread and the waiting thread. Because context switches are expensive, this can have quite a large impact on run-time performance, especially if the critical region is small and the condi-tion changes frequently.
You can avoid the inefficiency by unlocking the mutex before calling signal:
Mutex m;Cond c;// ...{ Mutex::Lock sync(m); // Change some condition other threads may be sleeping on...} // m is unlocked herec.signal(); // Signal with the lock available
By arranging the code as shown, you avoid the additional context switches because, when the waiting thread is woken up by the call to signal, it succeeds in acquiring the mutex before returning from wait without being suspended and woken up again first.
As for monitors, you should exercise caution in using broadcast, particu-larly if you have many threads waiting on a condition. Condition variables suffer from the same potential problem as monitors with respect to broadcast, namely, that all threads that are currently suspended inside wait can immediately attempt to acquire the mutex, but only one of them can succeed and all other threads are suspended again. If your application is sensitive to this condition, you may want to consider waking threads in a more controlled manner, along the lines shown on page 900

31.8 Threads 905
31.8 Threads
As described in Section 32.10, the server-side Ice run time by default creates a thread pool for you and automatically dispatches each incoming request in its own thread. As a result, you usually only need to worry about synchronization among threads to protect critical regions when you implement a server. However, you may wish to create threads of your own. For example, you might need a dedicated thread that responds to input from a user interface. And, if you have complex and long-running operations that can exploit parallelism, you might wish to use multiple threads for the implementation of that operation.
Ice provides a simple thread abstraction that permits you to write portable source code regardless of the native threading platform. This shields you from the native underlying thread APIs and guarantees uniform semantics regardless of your deployment platform.
31.8.1 The Thread Class
The basic thread abstraction in Ice is provided by two classes, ThreadControl and Thread (defined in IceUtil/Thread.h):
namespace IceUtil { class Time; class ThreadControl { public:#ifdef _WIN32 typedef DWORD ID;#else typedef pthread_t ID;#endif ThreadControl();#ifdef _WIN32 ThreadControl(HANDLE, DWORD);#else ThreadControl(explicit pthread_t);#endif ID id() const; void join(); void detach();

906 Threads and Concurrency with C++
static void sleep(const Time&); static void yield(); bool operator==(const ThreadControl&) const; bool operator!=(const ThreadControl&) const; }; class Thread { public: virtual void run() = 0; ThreadControl start(size_t stBytes = 0); ThreadControl start(size_t stBytes, int priority); ThreadControl getThreadControl() const; bool isAlive() const; bool operator==(const Thread&) const; bool operator!=(const Thread&) const; bool operator<(const Thread&) const; }; typedef Handle<Thread> ThreadPtr;}
The Thread class is an abstract base class with a pure virtual run method. To create a thread, you must specialize the Thread class and implement the run method (which becomes the starting stack frame for the new thread). Note that you must not allow any exceptions to escape from run. The Ice run time installs an exception handler that calls ::std::terminate if run terminates with an exception.
The remaining member functions behave as follows:

31.8 Threads 907
• start(size_t stBytes = 0)start(size_t stBytes, int priority)
This member function starts a newly-created thread (that is, calls the run method).
The stBytes parameter specifies a stack size (in bytes) for the thread. The default value of zero creates the thread with a default stack size that is deter-mined by the operating system.
You can specify a priority for the thread. (If you do not supply a priority, the thread is created with the system default priority.)
The priority value is system-dependent; on POSIX systems, the value must be a legal value for the SCHED_RR real-time scheduling policy. SCHED_RR requires root privileges. On Windows systems, the priority value is passed through to the Windows setThreadPriority function.
Section 31.9 provides information about how you can deal with priority inver-sion.
The return value is a ThreadControl object for the new thread (see Section 31.8.4).
You can start a thread only once; calling start on an already-started thread raises ThreadStartedException.
If the calling thread passes an invalid priority or, on POSIX systems, does not have root priviliges, start raises ThreadSyscallException.
• getThreadControl
This member function returns a thread control object for the thread on which it is invoked (see Section 31.8.4). Calling this method before calling start raises a ThreadNotStartedException.
• id
This method returns the underlying thread ID (DWORD for Windows and pthread_t for POSIX threads). This method is provided mainly for debug-ging purposes.3
3. pthread_t is, strictly-speaking, an opaque type, so you should not make any assumptions about what you can do with a thread ID.

908 Threads and Concurrency with C++
• isAlive
This method returns false before a thread’s start method has been called and after a thread’s run method has completed; otherwise, while the thread is still running, it returns true. isAlive is useful to implement a non-blocking join:
ThreadPtr p = new MyThread();// ...while(p->isAlive()) { // Do something else...}t.join(); // Will not block
• operator==operator!=operator<
These member functions compare the in-memory address of two threads. They are provided so you can use sorted STL containers with Thread objects.
Note that IceUtil also defines the type ThreadPtr. This is the usual refer-ence-counted smart pointer (see Section 6.14.6) to guarantee automatic clean-up: the Thread destructor calls delete this once its reference count drops to zero.
31.8.2 Implementing Threads
To illustrate how to implement threads, consider the following code fragment:
#include <IceUtil/Thread.h>// ...Queue q;class ReaderThread : public IceUtil::Thread { virtual void run() { for (int i = 0; i < 100; ++i) cout << q.get() << endl; }};class WriterThread : public IceUtil::Thread { virtual void run() {

31.8 Threads 909
for (int i = 0; i < 100; ++i) q.put(i); }};
This code fragment defines two classes, ReaderThread and WriterThread, that inherit from IceUtil::Thread. Each class implements the pure virtual run method it inherits from its base class. For this simple example, a writer thread places the numbers from 1 to 100 into an instance of the thread-safe Queue class we defined in Section 31.6, and a reader thread retrieves 100 numbers from the queue and prints them to stdout.
31.8.3 Creating Threads
To create a new thread, we simply instantiate the thread and call its start method:
IceUtil::ThreadPtr t = new ReaderThread;t->start();// ...
Note that we assign the return value from new to a smart pointer of type ThreadPtr. This ensures that we do not suffer a memory leak:4
1. When the thread is created, its reference count is set to zero.
2. Prior to calling run (which is called by the start method), start incre-ments the reference count of the thread to 1.
3. For each ThreadPtr for the thread, the reference count of the thread is incremented by 1, and for each ThreadPtr that is destroyed, the reference count is decremented by 1.
4. When run completes, start decrements the reference count again and then checks its value: if the value is zero at this point, the Thread object deallo-cates itself by calling delete this; if the value is non-zero at this point, there are other smart pointers that reference this Thread object and deletion happens when the last smart pointer goes out of scope.
Note that, for all this to work, you must allocate your Thread objects on the heap—stack-allocated Thread objects will result in deallocation errors:
4. ThreadPtr is another example of an RAII class [20].

910 Threads and Concurrency with C++
ReaderThread thread;IceUtil::ThreadPtr t = &thread; // Bad news!!!
This is wrong because the destructor of t will eventually call delete, which has undefined behavior for a stack-allocated object.
Similarly, you must use a ThreadPtr for an allocated thread. Do not attempt to explicitly delete a a thread:
Thread* t = new ReaderThread();// ...delete t; // Disaster!
This will result in a double deallocation of the thread because the thread’s destructor will call delete this.
It is legal for a thread to call start on itself from within its own constructor. However, if so, the thread must not be (very) short lived:
class ActiveObject : public Thread() {public: ActiveObject() { start(); } void done() { getThreadControl().join(); } virtual void run() { // *Very* short lived... }};typedef Handle<ActiveObject> ActiveObjectPtr;// ...ActiveObjectPtr ao = new ActiveObject;
With this code, it is possible for run to complete before the assignment to the smart pointer ao completes; in that case, start will call delete this; before it returns and ao ends up deleting an already-deleted object. However, note that this problem can arise only if run is indeed very short-lived and moreover, the scheduler allows the newly-created thread to run to completion before the assignment of the return value of operator new to ao takes place. This is

31.8 Threads 911
highly unlikely to happen—if you are concerned about this scenario, do not call start from within a thread’s own constructor. That way, the smart pointer is assigned first, and the thread started second (as in the example on page 909), so the problem cannot arise.
31.8.4 The ThreadControl Class
The start method returns an object of type ThreadControl (see page 905). The member functions of ThreadControl behave as follows:
• ThreadControl
The default constructor returns a ThreadControl object that refers to the calling thread. This allows you to get a handle to the current (calling) thread even if you do not have saved a handle to that thread previously. For example:
IceUtil::ThreadControl self; // Get handle to selfcout << self.id() << endl; // Print thread ID
This example also explains why we have two classes, Thread and Thread-Control: without a separate ThreadControl, it would not be possible to obtain a handle to an arbitrary thread. (Note that this code works even if the calling thread was not created by the Ice run time; for example, you can create a ThreadControl object for a thread that was created by the operating system.)
The (implicit) copy constructor and assignment operator create a Thread-Control object that refers to the same underlying thread as the source ThreadControl object.
Note that the constructor is overloaded. For Windows, the signature is
ThreadControl(HANDLE, DWORD);
For Unix, the signature is
ThreadControl(pthread_t);
These constructors allow you to create a ThreadControl object for the specified thread.
• join
This method suspends the calling thread until the thread on which join is called has terminated. For example:
IceUtil::ThreadPtr t = new ReaderThread; // Create a threadIceUtil::ThreadControl tc = t->start(); // Start it

912 Threads and Concurrency with C++
tc.join(); // Wait for it
If the reader thread has finished by the time the creating thread calls join, the call to join returns immediately; otherwise, the creating thread is suspended until the reader thread terminates.
Note that the join method of a thread must be called from only one other thread, that is, only one thread can wait for another thread to terminate. Calling join on a thread from more than one other thread has undefined behavior.
Calling join on a thread that was previously joined with or calling join on a detached thread has undefined behavior.
You must join with each thread you create; failure to join with a thread has undefined behavior.
• detach
This method detaches a thread. Once a thread is detached, it cannot be joined with.
Calling detach on an already detached thread, or calling detach on a thread that was previously joined with has undefined behavior.
Note that, if you have detached a thread, you must ensure that the detached thread has terminated before your program leaves its main function. This means that, because detached threads cannot be joined with, they must have a life time that is shorter than that of the main thread.
• sleep
This method suspends the calling thread for the amount of time specified by the Time parameter (see Appendix F.12).
• yield
This method causes the calling thread to relinquish the CPU, allowing another thread to run.
• operator==operator!=
These operators compare thread IDs. (Note that operator< is not provided because it cannot be implemented portably.) These operators yield meaningful results only for threads that have not been detached or joined with.
As for all the synchronization primitives, you must adhere to a few rules when using threads to avoid undefined behavior:
• Do not allow run to throw an exception.

31.8 Threads 913
• Do not join with or detach a thread that you have not created yourself.
• For every thread you create, you must either join with that thread exactly once or detach it exactly once; failure to do so may cause resource leaks.
• Do not call join on a thread from more than one other thread.
• Do not leave main until all other threads you have created have terminated.
• Do not leave main until after you have destroyed all Ice::Communi-cator objects you have created (or use the Ice::Application class—see Section 8.3.1 on page 276)).
• A common mistake is to call yield from within a critical region. Doing so is usually pointless because the call to yield will look for another thread that can be run but, when that thread is run, it will most likely try to enter the crit-ical region that is held by the yielding thread and go to sleep again. At best, this achieves nothing and, at worst, it causes many additional context switches for no gain.
If you call yield, do so only in circumstances where there is at least a fair chance that another thread will actually be able to run and do something useful.
31.8.5 A Small Example
Following is a small example that uses the Queue class we defined in Section 31.6. We create five writer and five reader threads. The writer threads each deposit 100 numbers into the queue, and the reader threads each retrieve 100 numbers and print them to stdout:
#include <vector>#include <IceUtil/Thread.h>// ...Queue q;class ReaderThread : public IceUtil::Thread { virtual void run() { for (int i = 0; i < 100; ++i) cout << q.get() << endl; }};class WriterThread : public IceUtil::Thread { virtual void run() {

914 Threads and Concurrency with C++
for (int i = 0; i < 100; ++i) q.put(i); }};intmain(){ vector<IceUtil::ThreadControl> threads; int i; // Create five reader threads and start them // for (i = 0; i < 5; ++i) { IceUtil::ThreadPtr t = new ReaderThread; threads.push_back(t->start()); } // Create five writer threads and start them // for (i = 0; i < 5; ++i) { IceUtil::ThreadPtr t = new WriterThread; threads.push_back(t->start()); } // Wait for all threads to finish // for (vector<IceUtil::ThreadControl>::iterator i = threads.begin(); i != threads.end(); ++i) { i->join(); }}
The code uses the threads variable, of type vector<IceUtil::Thread-Control> to keep track of the created threads. The code creates five reader and five writer threads, storing the ThreadControl object for each thread in the threads vector. Once all the threads are created and running, the code joins with each thread before returning from main.
Note that you must not leave main without first joining with the threads you have created: many threading libraries crash if you return from main with other threads still running. (This is also the reason why you must not terminate a program without first calling Communicator::destroy (see page 274); the destroy implementation joins with all outstanding threads before it returns.)

31.9 Priority Inversion 915
31.9 Priority Inversion
In real-time systems, if you have threads with different priorities, it is possible to encounter a priority inversion. A priority inversion occurs when a low-priority thread prevents a higher-priority thread from running. This situation arises when a low-priority thread acquires a mutex and is pre-empted by one or more medium-priority threads that do not relinquish the CPU. If a high-priority thread then attempts to acquire the mutex locked by the low-priority thread, it will wait (potentially forever) for the medium-priority threads to complete.
One way to deal with this problem is to use a priority inheritance protocol. If thread holds a mutex and a high-priority thread attempts to acquire the mutex, the priority of the thread holding the mutex is temporarily raised to the level of the thread waiting for the mutex. This allows the low-priority thread to keep running until it releases the mutex; as soon as it does, its priority is reduced back to its previous level and the high-priority thread acquires the mutex.
Ice supports the priority inheritance protocol on many POSIX platforms. (Windows does not provide such a protocol.)
For POSIX platforms that support the priority inheritance protocol, mutexes by default do not use it. You can use the getDefaultMutexProtocol func-tion to retrieve the current default for your platform:
namespace IceUtil { enum MutexProtocol { PrioInherit, PrioNone }; MutexProtocol getDefaultMutexProtocol();}
On Posix systems that do not support priority inheritance and on Windows, this function always returns PrioNone.
The return value of getDefaultMutexProtocol determines whether a default-constructed Mutex or RecMutex uses priority inheritance. By default, this function returns PrioNone. You can override this default by explicitly spec-ifying a different protocol when you construct a Mutex or RecMutex (see Sections 31.4 and 31.5). On Windows, if you specify PrioInherit when you construct a mutex, the setting is ignored and the mutex is constructed as if you had specified PrioNone.
To change the value returned by getDefaultMutexProtocol, you can edit IceUtil/Config.h and modify the value of the preprocessor macro

916 Threads and Concurrency with C++
ICE_DEFAULT_MUTEX_PROTOCOL (or set the macro’s value as a compiler option), and then rebuild the IceUtil library.
31.10 Portable Signal Handling
The IceUtil::CtrlCHandler class provides a portable mechanism to handle Ctrl+C and similar signals sent to a C++ process. On Windows, IceUtil::CtrlCHandler is a wrapper for SetConsoleCtrlHandler; on POSIX platforms, it handles SIGHUP, SIGTERM and SIGINT with a dedi-cated thread that waits for these signals using sigwait. Signals are handled by a callback function implemented and registered by the user. The callback is a simple function that takes an int (the signal number) and returns void; it should not throw any exception:
namespace IceUtil { typedef void (*CtrlCHandlerCallback)(int); class CtrlCHandler { public: CtrlCHandler(CtrlCHandlerCallback = 0); ~CtrlCHandler(); void setCallback(CtrlCHandlerCallback); CtrlCHandlerCallback getCallback() const; };}
The member functions of CtrlCHandler behave as follows:
• constructor
Constructs an instance with a callback function. Only one instance of Ctrl-CHandler can exist in a process at a given moment in time. On POSIX plat-forms, the constructor masks SIGHUP, SIGTERM and SIGINT, then starts a thread that waits for these signals using sigwait. For signal masking to work properly, it is imperative that the CtrlCHandler instance be created before starting any thread, and in particular before initializing an Ice commu-nicator.
31.11 Summary 917
• destructor
Destroys the instance, after which the default signal processing behavior is restored on Windows (TerminateProcess). On POSIX platforms, the “sigwait” thread is cancelled and joined, but the signal mask remains unchanged, so subsequent signals are ignored.
• setCallback
Sets a new callback function.
• getCallback
Gets the current callback function.
It is legal specify a value of zero (0) for the callback function, in which case signals are caught and ignored until a non-zero callback function is set.
A typical use for CtrlCHandler is to shutdown a communicator in an Ice server (see Section 8.3.1).
31.11 Summary
This chapter explained the threading abstractions provided by Ice: mutexes, moni-tors, and threads. Using these APIs allows to make your code thread safe and to create threads of your own without having to use non-portable APIs that differ in syntax or semantics across different platforms: Ice not only provides a portable API but also guarantees that the semantics of the various functions are the same across different platforms. This makes it easier to create thread-safe applications and allows you to move your code between platforms with simple recompilation.


919
Chapter 32The Ice Run Time in Detail
32.1 Introduction
Now that we have seen the basics of implementing clients and servers, it is time to look at the Ice run time in more detail. This chapter presents the server-side APIs of the Ice run time for synchronous, oneway, and datagram invocations in detail.
Section 32.2 describes the functionality associated with Ice communicators, which are the main handle to the Ice run time. Sections 32.4 to 32.6 describe object adapters and the role they play for call dispatch, and show the relationship between proxies, Ice objects, servants, and object identities. Sections 32.7 and 32.8 describe servant locators and default servants, which are major mechanisms in Ice for controlling the trade-off between performance and memory consump-tion. Section 32.9 describes the most common implementation techniques that are used by servers. We suggest that you read this section in detail because knowledge of these techniques is crucial to building systems that perform and scale well. Section 32.12 describes implicit transmission of parameters from client to server and Section 32.13 discusses connection timeouts. Sections 32.14 to 32.16 describe oneway, datagram, and batched invocations, and Sections 32.17 to 32.21 deal with location services, administration, logging, statistics collection, and loca-tion transparency. Finally, Sections 32.22 to 32.25 discuss automatic retries, dispatch interceptors, string conversion, and how to write an Ice plug-in.

920 The Ice Run Time in Detail
32.2 Communicators
The main entry point to the Ice run time is represented by the local interface Ice::Communicator. An instance of Ice::Communicator is associated with a number of run-time resources:
• Client-side thread pool
The client-side thread pool (see Section 32.10) is used to process replies to asynchronous method invocations (AMI), to avoid deadlocks in callbacks, and to process incoming requests on bidirectional connections (see Section 36.7).
• Server-side thread pool
Threads in this pool accept incoming connections and handle requests from clients. See Section 32.10 for more information.
• Configuration properties
Various aspects of the Ice run time can be configured via properties. Each communicator has its own set of such configuration properties (see Chapter 30).
• Object factories
In order to instantiate classes that are derived from a known base type, the communicator maintains a set of object factories that can instantiate the class on behalf of the Ice run time (see Section 6.14.5 and Section 10.14.4).
• Logger object
A logger object implements the Ice::Logger interface and determines how log messages that are produced by the Ice run time are handled (see Section 32.19).
• Statistics object
A statistics object implements the Ice::Stats interface and is informed about the amount of traffic (bytes sent and received) that is handled by a communi-cator (see Section 32.20).
• Default router
A router implements the Ice::Router interface. Routers are used by Glacier2 (see Chapter 42) to implement the firewall functionality of Ice.
• Default locator
A locator is an object that resolves an object identity to a proxy. Locator objects are used to build location services, such as IceGrid (see Chapter 38).

32.2 Communicators 921
• Plug-in manager
Plug-ins are objects that add features to a communicator. For example, IceSSL (see Chapter 41) is implemented as a plug-in. Each communicator has a plug-in manager that implements the Ice::PluginManager interface and provides access to the set of plug-ins for a communicator.
• Object adapters
Object adapters dispatch incoming requests and take care of passing each request to the correct servant.
Object adapters and objects that use different communicators are completely inde-pendent from each other. Specifically:
• Each communicator uses its own thread pool. This means that if, for example, one communicator runs out of threads for incoming requests, only objects using that communicator are affected. Objects using other communicators have their own thread pool and are therefore unaffected.
• Collocated invocations across different communicators are not optimized, whereas collocated invocations using the same communicator bypass much of the overhead of call dispatch.
Typically, servers use only a single communicator but, occasionally, multiple communicators can be useful. For example, IceBox (see Chapter 43) uses a sepa-rate communicator for each Ice service it loads to ensure that different services cannot interfere with each other. Multiple communicators are also useful to avoid thread starvation: if one service runs out of threads, this leaves the remaining services unaffected.
The interface of the communicator is defined in Slice. Part of this interfacelooks as follows:
module Ice { local interface Communicator { string proxyToString(Object* obj); Object* stringToProxy(string str); PropertyDict proxyToProperty(Object* proxy, string property); Object* propertyToProxy(string property); Identity stringToIdentity(string str); string identityToString(Identity id); ObjectAdapter createObjectAdapter(string name); ObjectAdapter createObjectAdapterWithEndpoints( string name, string endpoints); ObjectAdapter createObjectAdapterWithRouter(

922 The Ice Run Time in Detail
string name, Router* rtr); void shutdown(); void waitForShutdown(); bool isShutdown(); void destroy(); // ... }; // ...};
The communicator offers a number of operations:
• proxyToStringstringToProxy
These operations allow you to convert a proxy into its stringified representa-tion and vice versa.
Instead of calling proxyToString on the communicator, you can also use the ice_toString operation on a proxy to stringify it (see Section 32.11.2). However, you can only stringify non-null proxies that way—to stringify a null proxy, you must use proxyToString. (The stringified representation of a null proxy is the empty string.)
• proxyToPropertypropertyToProxy
proxyToProperty returns the set of proxy properties for the supplied proxy. The property parameter specifies the base name for the properties in the returned set (see Section 32.11.1).
propertyToProxy retrieves the configuration property with the given name and converts its value into a proxy (see Section 32.11.1). A null proxy is returned if no property is found with the specified name.
• identityToStringstringToIdentity
These operations allow you to convert an identity to a string and vice versa (see Section 32.5).

32.2 Communicators 923
• createObjectAdaptercreateObjectAdapterWithEndpointscreateObjectAdapterWithRouter
These operations create a new object adapter. Each object adapter is associ-ated with zero or more transport endpoints.
Typically, an object adapter has a single transport endpoint. However, an object adapter can also offer multiple endpoints. If so, these endpoints each lead to the same set of objects and represent alternative means of accessing these objects. This is useful, for example, if a server is behind a firewall but must offer access to its objects to both internal and external clients; by binding the adapter to both the internal and external interfaces, the objects imple-mented in the server can be accessed via either interface.
An object adapter also can have no endpoint at all. In that case, the adapter can only be reached via collocated invocations originating from the same commu-nicator as is used by the adapter.
Whereas createObjectAdapter determines its endpoints from configuration information (see Section 32.4.6), createObjectAdapterWithEndpoints allows you to specify the transport endpoints for the new adapter. Typically, you should use createObjectAdapter in preference to createObjectAdapt-erWithEndpoints. Doing so keeps transport-specific information, such as host names and port numbers, out of the source code and allows you to recon-figure the application by changing a property (and so avoid recompilation when a transport endpoint needs to be changed).
createObjectAdapterWithRouter creates a routed object adapter that allows clients to receive callbacks from servers that are behind a router (see Chapter 42).
The newly-created adapter uses its name as a prefix for a collection of config-uration properties that tailor the adapter’s behavior (see Section D.4). By default, the adapter prints a warning if other properties are defined having the same prefix, but you can disable this warning using the property Ice.Warn.UnknownProperties (see Section D.3).
• shutdown
This operation shuts down the server side of the Ice run time:
• Operation invocations that are in progress at the time shutdown is called are allowed to complete normally. shutdown does not wait for these operations to complete; when shutdown returns, you know that no new incoming requests will be dispatched, but operations that were already in progress at

924 The Ice Run Time in Detail
the time you called shutdown may still be running. You can wait for still executing operations to complete by calling waitForShutdown.
• Operation invocations that arrive after the server has called shutdown either fail with a ConnectFailedException or are transparently redirected to a new instance of the server (see Chapter 38).
• Note that shutdown initiates deactivation of all object adapters associated with the communicator, so attempts to use an adapter once shutdown has completed raise an ObjectAdapterDeactivatedException.
• waitForShutdown
On the server side, this operation suspends the calling thread until the commu-nicator has shut down (that is, until no more operations are executing in the server). This allows you to wait until the server is idle before you destroy the communicator.
On the client side, waitForShutdown simply waits until another thread has called shutdown or destroy.
• isShutdown
This operation returns true if shutdown has been invoked on the communi-cator. A return value of true does not necessarily indicate that the shutdown process has completed, only that it has been initiated. An application that needs to know whether shutdown is complete can call waitForShutdown. If the blocking nature of waitForShutdown is undesirable, the application can invoke it from a separate thread.
• destroy
This operation destroys the communicator and all its associated resources, such as threads, communication endpoints, object adapters, and memory resources. Once you have destroyed the communicator (and therefore destroyed the run time for that communicator), you must not call any other Ice operation (other than to create another communicator).
It is imperative that you call destroy before you leave the main function of your program. Failure to do so results in undefined behavior.
Calling destroy before leaving main is necessary because destroy waits for all running threads to terminate before it returns. If you leave main without calling destroy, you will leave main with other threads still running; many threading packages do not allow you to do this and end up crashing your program.

32.3 Communicator Initialization 925
If you call destroy without calling shutdown, the call waits for all executing operation invocations to complete before it returns (that is, the implementation of destroy implicitly calls shutdown followed by waitForShutdown). shutdown (and, therefore, destroy) deactivates all object adapters that are associated with the communicator. Since destroy blocks until all operation invocations complete, a servant will deadlock if it invokes destroy on its own communicator while executing a dispatched operation.
On the client side, calling destroy while operations are still executing causes those operations to terminate with a CommunicatorDestroyedException.
32.3 Communicator Initialization
During the creation of a communicator, the Ice run time initializes a number of features that affect the communicator’s operation. Once set, these features remain in effect for the life time of the communicator, that is, you cannot change these features after you have created a communicator. Therefore, if you want to customize these features, you must do so when you create the communicator.
The following features can be customized at communicator creation time:
• the property set (see Chapter 30)
• the Logger interface (see Section 32.19)
• the Stats interface (see Section 32.20)
• the narrow and wide string converters (C++ only, see page 1105)
• the thread notification hook (see page 1015)
• the dispatcher (see Section 32.10.7)
• the class loader (Java only, see Section 32.26)
To establish these features, you initialize a structure or class of type Initial-izationData with the relevant settings. For C++ the structure is defined as follows:
namespace Ice { struct InitializationData { PropertiesPtr properties; LoggerPtr logger; StatsPtr stats; StringConverterPtr stringConverter; WstringConverterPtr wstringConverter;

926 The Ice Run Time in Detail
ThreadNotificationPtr threadHook; DispatcherPtr dispatcher; };}
For languages other than C++, InitializationData is a class with all data members public. (The data members supported by this class vary with each language mapping.)
For C++, Ice::initialize is overloaded as follows:
namespace Ice { CommunicatorPtr initialize(int&, char*[], const InitializationData& = InitializationData(), Int = ICE_INT_VERSION); CommunicatorPtr initialize(StringSeq&, const InitializationData& = InitializationData(), Int = ICE_INT_VERSION); CommunicatorPtr initialize( const InitializationData& = InitializationData() Int = ICE_INT_VERSION);}
The versions of initialize that accept an argument vector look for Ice-specific command-line options and removes them from the argument vector, as described on page 274. The version without an argc/argv pair is useful if you want to prevent property settings for a program from being changed by command- line arguments (see Section 30.9).
To set a feature, you set the corresponding field in the Initialization-Data structure and pass the structure to initialize. For example, to establish a custom logger of type MyLogger, you can use:
Ice::InitializationData id;id.logger = new MyLoggerI;Ice::CommunicatorPtr ic = Ice::initialize(argc, argv, id);
For Java, C#, and Objective-C, Ice.Util.initialize is overloaded simi-larly1 (as is Ice.initialize for Python, Ice::initialize for Ruby, and Ice_initialize for PHP), so you can pass an InitializationData instance either with or without an argument vector. Note that you must supply an argument vector if you want initialize to look for a configuration file in the ICE_CONFIG environment variable. (See also Section 30.7.)
1. For Objective-C, the method name is createCommunicator (see Section 20.3).

32.4 Object Adapters 927
32.4 Object Adapters
A communicator contains one or more object adapters. An object adapter sits at the boundary between the Ice run time and the server application code and has a number of responsibilities:
• It maps Ice objects to servants for incoming requests and dispatches the requests to the application code in each servant (that is, an object adapter implements an up-call interface that connects the Ice run time and the applica-tion code in the server).
• It assists in life cycle operations so Ice objects and servants can be created and existing destroyed without race conditions.
• It provides one or more transport endpoints. Clients access the Ice objects provided by the adapter via those endpoints. (It is also possible to create an object adapter without endpoints. In this case the adapter is used for bidirec-tional callbacks—see Section 36.7.)
Each object adapter has one or more servants that incarnate Ice objects, as well as one or more transport endpoints. If an object adapter has more than one endpoint, all servants registered with that adapter respond to incoming requests on any of the endpoints. In other words, if an object adapter has multiple transport endpoints, those endpoints represent alternative communication paths to the same set of objects (for example, via different transports).
Each object adapter belongs to exactly one communicator (but a single communicator can have many object adapters). Each object adapter has a name that distinguishes it from all other object adapters in the same communicator.
Each object adapter can optionally have its own thread pool, enabled via the <adapter-name>.ThreadPool.Size property (see Section 32.10.3). If so, client invocations for that adapter are dispatched in a thread taken from the adapter’s thread pool instead of using a thread from the communicator’s server thread pool.
32.4.1 The Active Servant Map
Each object adapter maintains a data structure known as the active servant map. The active servant map (or ASM, for short) is a lookup table that maps object iden-tities to servants: for C++, the lookup value is a smart pointer to the corresponding servant’s location in memory; for Java and C#, the lookup value is a reference to the servant. When a client sends an operation invocation to the server, the request

928 The Ice Run Time in Detail
is targeted at a specific transport endpoint. Implicitly, the transport endpoint iden-tifies the object adapter that is the target of the request (because no two object adapters can be bound to the same endpoint). The proxy via which the client sends its request contains the object identity for the corresponding object, and the client-side run time sends this object identity over the wire with the invocation. In turn, the object adapter uses that object identity to look in its ASM for the correct servant to dispatch the call to, as shown in Figure 32.1.
Figure 32.1. Binding a request to the correct servant.
The process of associating a request via a proxy to the correct servant is known as binding. The scenario depicted in Figure 32.1 shows direct binding, in which the transport endpoint is embedded in the proxy. Ice also supports an indirect binding mode, in which the correct transport endpoints are provided by the IceGrid service (see Chapter 38 for details).
If a client request contains an object identity for which there is no entry in the adapter’s ASM, the adapter returns an ObjectNotExistException to the client (unless you use a servant locator—see Section 32.7).
32.4.2 Servants
As mentioned in Section 2.2.2, servants are the physical manifestation of an Ice object, that is, they are entities that are implemented in a concrete programming language and instantiated in the server’s address space. Servants provide the server-side behavior for operation invocations sent by clients.
The same servant can be registered with one or more object adapters.
Fred
Joe
Carl
ASM
Servants
Object Adapter
Server
Endpoint
Client
ProxyJoe
212.8.7.33
212.8.7.33Joe

32.4 Object Adapters 929
32.4.3 Object Adapter InterfaceObject adapters are local interfaces:
module Ice { local interface ObjectAdapter { string getName(); Communicator getCommunicator(); // ... };};
The operations behave as follows:
• The getName operation returns the name of the adapter as passed to one of the communicator operations createObjectAdapter, createObjectAdapterWithEndpoints, or createObjectAdapterWith-Router.
• The getCommunicator operation returns the communicator that was used to create the adapter.
Note that there are other operations in the ObjectAdapter interface; we will explore these throughout the remainder of this chapter.
32.4.4 Servant Activation and DeactivationThe term servant activation refers to making the presence of a servant for a partic-ular Ice object known to the Ice run time. Activating a servant adds an entry to the active servant map shown in Figure 32.1. Another way of looking at servant acti-vation is to think of it as creating a link between the identity of an Ice object and the corresponding programming-language servant that handles requests for that Ice object. Once the Ice run time has knowledge of this link, it can dispatch incoming requests to the correct servant. Without this link, that is, without a corre-sponding entry in the ASM, an incoming request for the identity results in an ObjectNotExistException. While a servant is activated, it is said to incarnate the corresponding Ice object.
The inverse operation is known as servant deactivation. Deactivating a servant removes an entry for a particular identity from the ASM. Thereafter, incoming requests for that identity are no longer dispatched to the servant and result in an ObjectNotExistException.
The object adapter offers a number of operations to manage servant activation and deactivation:

930 The Ice Run Time in Detail
module Ice { local interface ObjectAdapter { // ... Object* add(Object servant, Identity id); Object* addWithUUID(Object servant); Object remove(Identity id); Object find(Identity id); Object findByProxy(Object* proxy); // ... };};
The operations behave as follows:
• add
The add operation adds a servant with the given identity to the ASM. Requests are dispatched to that servant as soon as add is called. The return value is the proxy for the Ice object incarnated by that servant. The proxy embeds the identity passed to add.
You cannot call add with the same identity more than once: attempts to add an already existing identity to the ASM result in an AlreadyRegisteredExcep-tion. (It does not make sense to add two servants with the same identity because that would make it ambiguous as to which servant should handle incoming requests for that identity.)
Note that it is possible to activate the same servant multiple times with different identities. In that case, the same single servant incarnates multiple Ice objects. We explore the ramifications of this in more detail in Section 32.9.2.
• addWithUUID
The addWithUUID operation behaves the same way as the add operation but does not require you to supply an identity for the servant. Instead, addWith-UUID generates a UUID (see [14]) as the identity for the corresponding Ice object. You can retrieve the generated identity by calling the ice_getIdentity operation on the returned proxy. addWithUUID is useful to create identities for temporary objects, such as short-lived session objects. (You can also use addWithUUID for persistent objects that do not have a natural identity, as we have done for the file system application.)

32.4 Object Adapters 931
• remove
The remove operation breaks the association between an identity and its servant by removing the corresponding entry from the ASM; it returns a smart pointer to the removed servant.
Once the servant is deactivated, new incoming requests for the removed iden-tity result in an ObjectNotExistException. Requests that are executing inside the servant at the time remove is called are allowed to complete normally. Once the last request for the servant is complete, the object adapter drops its reference (or smart pointer, for C++) to the servant. At that point, the servant becomes available for garbage collection (or is destroyed, for C++), provided that you do not hold references or smart pointers to the servant else-where. The net effect is that a deactivated servant is destroyed once it becomes idle.
Deactivating an object adapter (see Section 32.4.5) implicitly calls remove on its active servants.
• find
The find operation performs a lookup in the ASM and returns the servant for the specified object identity. If no servant with that identity is registered, the operation returns null. Note that find does not consult any servant locators.
• findByProxy
The findByProxy operation performs a lookup in the ASM and returns the servant with the object identity and facet that are embedded in the proxy. If no such servant is registered, the operation returns null. Note that findByProxy does not consult any servant locators.
32.4.5 Adapter States
An object adapter has a number of processing states:
• holding
In this state, any incoming requests for the adapter are held, that is, not dispatched to servants.
For TCP/IP (and other stream-oriented protocols), the server-side run time stops reading from the corresponding transport endpoint while the adapter is in the holding state. In addition, it also does not accept incoming connection requests from clients. This means that if a client sends a request to an adapter that is in the holding state, the client eventually receives a TimeoutException

932 The Ice Run Time in Detail
or ConnectTimeoutException (unless the adapter is placed into the active state before the timer expires).
For UDP, client requests that arrive at an adapter that is in the holding state are thrown away.
Immediately after creation of an adapter, the adapter is in the holding state. This means that requests are not dispatched until you place the adapter into the active state.
Note that bidirectional adapters (see Section 36.7) cannot be placed into the holding state. If you call hold on a bidirectional adapter, the call does nothing.
• active
In this state, the adapter accepts incoming requests and dispatches them to servants. A newly-created adapter is initially in the holding state. The adapter begins dispatching requests as soon as you place it into the active state.
You can transition between the active and the holding state as many times as you wish.
Note that bidirectional adapters (see Section 36.7) need not be activated. Further, calls to collocated servants (that is, to servants that are activated in the communicator that created the proxy) succeed even if the adapter is not acti-vated, unless you have disabled collocation optimization (see Section 32.21).
• inactive
In this state, the adapter has conceptually been destroyed (or is in the process of being destroyed). Deactivating an adapter destroys all transport endpoints that are associated with the adapter. Requests that are executing at the time the adapter is placed into the inactive state are allowed to complete, but no new requests are accepted. (New requests are rejected with an exception). Any attempt to use a deactivated object adapter results in an ObjectAdapterDeac-tivatedException.
The ObjectAdapter interface offers operations that allow you to change the adapter state, as well as to wait for a state change to be complete:
module Ice { local interface ObjectAdapter { // ... void activate(); void hold(); void waitForHold(); void deactivate();

32.4 Object Adapters 933
void waitForDeactivate(); void isDeactivated(); void destroy(); // ... };};
The operations behave as follows:
• activate
The activate operation places the adapter into the active state. Activating an adapter that is already active has no effect. The Ice run time starts dispatching requests to servants for the adapter as soon as activate is called.
• hold
The hold operation places the adapter into the holding state. Requests that arrive after calling hold are held as detailed on page 931. Requests that are in progress at the time hold is called are allowed to complete normally. Note that hold returns immediately without waiting for currently executing requests to complete.
• waitForHold
The waitForHold operation suspends the calling thread until the adapter has completed its transition to the holding state, that is, until all currently executing requests have finished. You can call waitForHold from multiple threads, and you can call waitForHold while the adapter is in the active state. If you call waitForHold on an adapter that is already in the holding state, waitForHold returns immediately.
• deactivate
The deactivate operation initiates deactivation of the adapter: requests that arrive after calling deactivate are rejected, but currently executing requests are allowed to complete. Once all requests have completed, the adapter enters the inactivate state. Note that deactivate returns immediately without waiting for the currently executing requests to complete. A deactivated adapter cannot be reactivated; you can create a new adapter with the same name, but only after calling destroy on the existing adapter. Any attempt to use a deactivated object adapter results in an ObjectAdapterDeactivatedEx-ception.

934 The Ice Run Time in Detail
• waitForDeactivate
The waitForDeactivate operation suspends the calling thread until the adapter has completed its transition to the inactive state, that is, until all currently executing requests have completed. You can call waitForDeacti-vate from multiple threads, and you can call waitForDeactivate while the adapter is in the active or holding state. Calling waitForDeactivate on an adapter that is in the inactive state does nothing and returns immediately.
• isDeactivated
The isDeactivated operation returns true if deactivate has been invoked on the adapter. A return value of true does not necessarily indicate that the adapter has fully transitioned to the inactive state, only that it has begun this transition. Applications that need to know when deactivation is completed can use waitForDeactivate.
• destroy
The destroy operation deactivates the adapter and releases all of its resources. Internally, destroy invokes deactivate followed by waitForDe-activate, therefore the operation blocks until all currently executing requests have completed. Furthermore, any servants associated with the adapter are destroyed, all transport endpoints are closed, and the adapter’s name becomes available for reuse.
Destroying a communicator implicitly destroys all of its object adapters. Invoking destroy on an adapter is only necessary when you need to ensure that its resources are released prior to the destruction of its communicator.
Placing an adapter into the holding state is useful, for example, if you need to make state changes in the server that require the server (or a group of servants) to be idle. For example, you could place the implementation of your servants into a dynamic library and upgrade the implementation by loading a newer version of the library at run time without having to shut down the server.
Similarly, waiting for an adapter to complete its transition to the inactive state is useful if your server needs to perform some final clean-up work that cannot be carried out until all executing requests have completed.
Note that you can create an object adapter with the same name as a previous object adapter, but only once destroy on the previous adapter has completed.

32.4 Object Adapters 935
32.4.6 Endpoints
An object adapter maintains two sets of transport endpoints. One set identifies the network interfaces on which the adapter listens for new connections, and the other set is embedded in proxies created by the adapter and used by clients to communi-cate with it. We will refer to these sets of endpoints as the physical endpoints and the published endpoints, respectively. In most cases these sets are identical, but there are situations when they must be configured independently.
Physical Endpoints
An object adapter’s physical endpoints identify the network interfaces on which it receives requests from clients. These endpoints are configured via the name.Endpoints property, or they can be specified explicitly when the adapter is created using the operation createObjectAdapterWithEndpoints (see Section 32.2). The endpoint syntax is described in detail in Appendix E; however, an endpoint generally consists of a transport protocol followed by an optional host name and port.
If a host name is specified, the object adapter listens only on the network inter-face associated with that host name. If no host name is specified but the property Ice.Default.Host is defined, the object adapter uses the property’s value as the host name. Finally, if a host name is not specified, and the property Ice.Default.Host is undefined, the object adapter listens on all available network interfaces, including the loopback interface. You may also force the object adapter to listen on all interfaces by using one of the host names 0.0.0.0 or *. The adapter does not expand the list of interfaces when it is initialized. Instead, if no host is specified, or you use -h * or - 0.0.0.0, the adapter binds to INADDR_ANY to listen for incoming requests.
If you want an adapter to accept requests on certain network interfaces, you must specify a separate endpoint for each interface. For example, the following property configures a single endpoint for the adapter named MyAdapter:
MyAdapter.Endpoints=tcp -h 10.0.1.1 -p 9999
This endpoint causes the adapter to accept requests on the network interface asso-ciated with the IP address 10.0.1.1 at port 9999. Note however that this adapter configuration does not accept requests on the loopback interface (the one associ-ated with address 127.0.0.1). If both addresses must be supported, then both must be specified explicitly, as shown below:
MyAdapter.Endpoints=\ tcp -h 10.0.1.1 -p 9999:tcp -h 127.0.0.1 -p 9999

936 The Ice Run Time in Detail
If these are the only two network interfaces available on the host, then a simpler configuration omits the host name altogether, causing the object adapter to listen on both interfaces automatically:
MyAdapter.Endpoints=tcp -p 9999
If you want to make your configuration more explicit, you can use one of the special host names:
MyAdapter.Endpoints=tcp -h * -p 9999
Another advantage to this configuration is that it ensures the object adapter always listens on all interfaces, even if a definition for Ice.Default.Host is later added to your configuration. Without an explicit host name, the addition of Ice.Default.Host could potentially change the interfaces on which the adapter is listening. For diagnostic purposes, you can determine the set of local addresses that Ice substitutes for the wildcard address by setting the property Ice.Trace.Network=3 and reviewing the log output.
Careful consideration must also be given to the selection of a port for an endpoint. If no port is specified, the adapter uses a port that is selected (essentially at random) by the operating system, meaning the adapter will likely be using a different port each time the server is restarted. Whether that behavior is desirable depends on the application, but in many applications a client has a proxy containing the adapter’s endpoint and expects that proxy to remain valid indefi-nitely. Therefore, an endpoint generally should contain a fixed port to ensure that the adapter is always listening at the same port.
However, there are certain situations where a fixed port is not required. For example, an adapter whose servants are transient does not need a fixed port, because the proxies for those objects are not expected to remain valid past the life-time of the server process. Similarly, a server using indirect binding via IceGrid (see Chapter 38) does not need a fixed port because its port is never published.
Published Endpoints
An object adapter publishes its endpoints in the proxies it creates, but it is not always appropriate to publish the adapter’s physical endpoints in a proxy. For example, suppose a server is running on a host in a private network, protected from the public network by a firewall that can forward network traffic to the server. The adapter’s physical endpoints must use the private network’s address scheme, but a client in the public network would be unable to use those endpoints if they were published in a proxy. In this scenario, the adapter must publish endpoints in its proxies that direct the client to the firewall instead.

32.4 Object Adapters 937
The published endpoints are configured using the adapter property name.PublishedEndpoints. If this property is not defined, the adapter publishes its physical endpoints by default, with one exception: endpoints for the loopback address (127.0.0.1) are not published unless the loopback interface is the only interface, or 127.0.0.1 (or loopback) is explicitly listed as an endpoint with the -h option. Otherwise, to force the inclusion of loopback endpoints when they would normally be excluded, you must define name.PublishedEndpoints explicitly.
As an example, the properties below configure the adapter named MyAdapter with physical and published endpoints:
MyAdapter.Endpoints=tcp -h 10.0.1.1 -p 9999MyAdapter.PublishedEndpoints=tcp -h corpfw -p 25000
This example assumes that clients connecting to host corpfw at port 25000 are forwarded to the adapter’s endpoint in the private network.
Another use case of published endpoints is for replicated servers. Suppose we have two instances of a stateless server running on separate hosts in order to distribute the load between them. We can supply the client with a bootstrap proxy containing the endpoints of both servers, and the Ice run time in the client will select one of the servers at random when a connection is established. However, should the client invoke an operation on a server that returns a proxy for another object, that proxy would normally contain only the endpoint of the server that created it. Invocations on the new proxy are always directed at the same server, reducing the opportunity for load balancing.
We can alleviate this situation by configuring the adapters to publish the endpoints of both servers. For example, here is a configuration for the server on host Sun1:
MyAdapter.Endpoints=tcp -h Sun1 -p 9999MyAdapter.PublishedEndpoints=tcp -h Sun1 -p 9999:tcp -h Sun2 -p 9999
Similarly, the configuration for host Sun2 retains the same published endpoints:
MyAdapter.Endpoints=tcp -h Sun2 -p 9999MyAdapter.PublishedEndpoints=tcp -h Sun1 -p 9999:tcp -h Sun2 -p 9999
For troubleshooting purposes, you can examine the published endpoints for an object adapter by setting the property Ice.Trace.Network=3. Note however that this setting generates significant trace information about the Ice run time’s network activity, therefore you may not want to use this setting by default.
938 The Ice Run Time in Detail
Refreshing Endpoints
The list of interfaces of a host may change over time, for example, if a laptop moves in and out of range of a wireless network. The object adapter provides an operation to refresh its list of interfaces:
local interface ObjectAdapter { void refreshPublishedEndpoints(); // ...};
Calling refreshPublishedEndpoints causes the object adapter to update its internal list of available network interfaces and to use the most recent setting for the name.PublishedEndpoints property. This allows you to react to changing network interfaces while an object adapter is in use, but your application code must determine when it is necessary to call this operation.
Note that refreshPublishedEndpoints takes effect only for object adapters that specify published endpoints without a host or set the published endpoints to -h * or -h 0.0.0.0.
Timeouts
As a defense against hostile clients, we recommend that you specify a timeout for you physical object adapter endpoints. The timeout value you select affects tasks that the Ice run time normally does not expect to block for any significant amount of time, such as writing a reply message to a socket or waiting for SSL negotiation to complete. If you do not specify a timeout, the Ice run time waits indefinitely in these situations. As a result, malicious or misbehaving clients could consume excessive resources such as file descriptors.
Specifying a timeout in an object adapter endpoint is done exactly as in a proxy endpoint using the -t option:
MyAdapter.Endpoints=tcp -p 9999 -t 5000
In this example, we specify a timeout of five seconds.
Routers
If an object adapter is configured with a router, the adapter’s published endpoints are augmented to reflect the router. See Chapter 42 for more information on configuring an adapter with a router.

32.4 Object Adapters 939
Obtaining Endpoint Information
The object adapter provides two operations to retrieve the physical and published endpoints:
module Ice { local interface ObjectAdapter { // ... EndpointSeq getEndpoints(); EndpointSeq getPublishedEndpoints(); // ... };};
The sequences that are returned contain the adapter’s physical and published endpoints, respectively. Section 36.5.2 provides details about the information provided by the sequence elements.
32.4.7 Creating Proxies
Although the servant activation operations described in Section 32.4.4 return proxies, the life cycle of proxies is completely independent from servants (see Chapter 34). The ObjectAdapter interface provides several operations for creating a proxy, regardless of whether a servant is currently activated for the object’s identity:
module Ice { local interface ObjectAdapter { // ... Object* createProxy(Identity id); Object* createDirectProxy(Identity id); Object* createIndirectProxy(Identity id); // ... };};
These operations are described below:• createProxy
The createProxy operation returns a new proxy for the object with the given identity. The adapter’s configuration determines whether the return value is a

940 The Ice Run Time in Detail
direct proxy or an indirect proxy (see Section 2.2.2). If the adapter is config-ured with an adapter id (see Section 32.17.5), the operation returns an indirect proxy that refers to the adapter id. If the adapter is also configured with a replica group id, the operation returns an indirect proxy that refers to the replica group id. Otherwise, if an adapter id is not defined, createProxy returns a direct proxy containing the adapter’s published endpoints (see Section 32.4.6).
• createDirectProxy
The createDirectProxy operation returns a direct proxy containing the adapter’s published endpoints (see Section 32.4.6).
• createIndirectProxy
The createIndirectProxy operation returns an indirect proxy. If the adapter is configured with an adapter id, the returned proxy refers to that adapter id. Otherwise, the proxy refers only to the object’s identity (see page 11).
In contrast to createProxy, createIndirectProxy does not use the replica group id. Therefore, the returned proxy always refers to a specific replica.
Configuring Proxies
After using one of the operations discussed above to create a proxy, you will receive a proxy that is configured by default for twoway invocations. If you require the proxy to have a different configuration, you can use the proxy factory methods described in Section 32.11.2. As an example, the code below demon-strates how to configure the proxy for oneway invocations:
// C++Ice::ObjectAdapterPtr adapter = ...;Ice::Identity id = ...;Ice::ObjectPrx proxy = adapter->createProxy(id)->ice_oneway();
You can also instruct the object adapter to use a different default proxy configura-tion by setting the property name.ProxyOptions. For example, the following property causes the object adapter to return proxies that are configured for oneway invocations by default:
MyAdapter.ProxyOptions=-o
See Appendix D for more information on this property.
32.5 Object Identity 941
32.4.8 Using Multiple Object Adapters
A typical server rarely needs to use more than one object adapter. If you are considering using multiple object adapters, we suggest that you check whether any of the items in the list below apply to your situation:
• You need fine-grained control over which objects are accessible. For example, you could have an object adapter with only secure endpoints to restrict access to some administrative objects, and another object adapter with non-secure endpoints for other objects. Because an object adapter is associated with one or more transport endpoints, you can firewall a particular port, so objects asso-ciated with the corresponding endpoint cannot be reached unless the firewall rules are satisfied.
• You need control over the number of threads in the pools for different sets of objects in your application. For example, you may not need concurrency on the objects connected to a particular object adapter, and multiple object adapters, each with its own thread pool, can be useful to solve deadlocks. See Section 32.10.5 for more information on dealing with deadlocks.
• You want to be able to temporarily disable processing new requests for a set of objects. This can be accomplished by placing an object adapter in the holding state.
• You want to set up different request routing when using an Ice router with Glacier2.
If none of the preceding items apply, chances are that you do not need more than one object adapter.
32.5 Object Identity
Each Ice object has an object identity defined as follows:
module Ice { struct Identity { string name; string category; };};
As you can see, an object identity consists of a pair of strings, a name and a cate-gory. The complete object identity is the combination of name and category, that

942 The Ice Run Time in Detail
is, for two identities to be equal, both name and category must be the same. The category member is usually the empty string, unless you are using servant loca-tors (see Section 32.7).2
If name is an empty string, category must be the empty string as well. (An identity with an empty name and a non-empty category is illegal.) If a proxy contains an identity in which name is empty, Ice interprets that proxy as a null proxy.
Object identities can be represented as strings; the category part appears first and is followed by the name; the two components are separated by a / character, for example:
Factory/File
In this example, Factory is the category, and File is the name. If the name or category member themselves contain a / character, the stringified representation escapes the / character with a \, for example:
Factories\/Factory/Node\/File
In this example, the category member is Factories/Factory and the name member is Node/File.
32.5.1 Syntax for Stringified Identities
You rarely need to write identities as strings because, typically, your code will be using identityToString and stringToIdentity (see Section 32.5.2), or simply deal with proxies instead of identities. However, on occasion, you will need to use stringified identities in configuration files. If the identities happen to contain meta-characters (such as a slash or backslash), or characters outside the printable ASCII range, these characters must be escaped in the stringified representation. Here are rules that the Ice run time applies when parsing a stringified identity:
1. The parser scans the stringified identity for an un-escaped slash character (/). If such a slash character can be found, the substrings to the left and right of the slash are parsed as the category and name members of the identity, respec-tively; if no such slash character can be found, the entire string is parsed as the name member of the identity, and the category member is the empty string.
2. Glacier2 (see Chapter 42) also uses the category member for filtering.

32.5 Object Identity 943
2. Each of the category (if present) and name substrings is parsed according to the following rules:
1.All characters in the string must be in the ASCII range 32 (space) to 126 (~); characters outside this range cause the parse to fail.
2.Any character that is not part of an escape sequence is treated as that char-acter.
3.The parser recognizes the following escape sequences and replaces them with their equivalent character:
\\ (backslash)
\' (single quote)
\" (double quote)
\b (space)
\f (form feed)
\n (new line)
\r (carriage return)
\t (tab)
4.An escape sequence of the form \o, \oo, or \ooo (where o is a digit in the range 0 to 7) is replaced with the ASCII character with the corresponding octal value. Parsing for octal digits allows for at most three consecutive digits, so the string \0763 is interpreted as the character with octal value 76 (>) followed by the character 3. Parsing for octal digits terminates as soon as it encounters a character that is not in the range 0 to 7, so \7x is the character with octal value 7 (bell) followed by the character x. Octal escape sequences must be in the range 0 to 255 (octal 000 to 377); escape sequences outside this range cause a parsing error. For example, \539 is an illegal escape sequence.
5. If a character follows a backslash, but is not part of a recognized escape sequence, the backslash is ignored, so \x is the character x.
32.5.2 Helper Functions
To make conversion of identities to and from strings easier, the Communicator interface provides appropriate conversion functions:

944 The Ice Run Time in Detail
local interface Communicator { string identityToString(Identity id); Identity stringToIdentity(string id);};
For C++, the operations on the communicator are the only way to convert between identities and strings. For other languages, the conversion functions are provided as operations on the communicator as well but, in addition, the language mappings provide static utility functions. (The utility functions have the advantage that you can call them without holding a reference to the communicator.)3
For Java, the utility functions are in the Ice.Util class and are defined as:
package Ice;public final class Util { public static String identityToString(Identity id); public static Identity stringToIdentity(String s);}
For C#, the utility functions are in the Ice.Util class and are defined as:
namespace Ice{ public sealed class Util { public static string identityToString(Identity id); public static Identity stringToIdentity(string s); }}
These functions correctly encode and decode characters that might otherwise cause problems (such as control characters).
As mentioned on page 930, each entry in the ASM for an object adapter must be unique: you cannot add two servants with the same identity to the ASM.
3. For C++, the static utility functions are not provided due to the need to apply string conversions, and the string converters are registered on the communicator (see Section 32.24).

32.6 The Ice::Current Object 945
32.6 The Ice::Current Object
Up to now, we have tacitly ignored the trailing parameter of type Ice::Current that is passed to each skeleton operation on the server side. The Current object is defined as follows:
module Ice { local dictionary<string, string> Context; enum OperationMode { Normal, \Nonmutating, \Idempotent }; local struct Current { ObjectAdapter adapter; Connection con; Identity id; string facet; string operation; OperationMode mode; Context ctx; int requestId; };};
Note that the Current object provides access to information about the currently executing request to the implementation of an operation in the server:
• adapter
The adapter member provides access to the object adapter via which the request is being dispatched. In turn, the adapter provides access to its commu-nicator (via the getCommunicator operation).
• con
The con member provides information about the connection over which this request was received (see Section 36.5.1).
• id
The id member provides the object identity for the current request (see Section 32.5).
• facet
The facet member provides access to the facet for the request (see Chapter 33).

946 The Ice Run Time in Detail
• operation
The operation member contains the name of the operation that is being invoked. Note that the operation name may indicate one of the operations on Ice::Object, such as ice_ping or ice_isA. (ice_isA is invoked if a client performs a checkedCast.)
• mode
The mode member contains the invocation mode for the operation (Normal or Idempotent).
• ctx
The ctx member contains the current context for the invocation (see Section 32.12).
• requestId
The Ice protocol (see Chapter 37) uses request IDs to associate replies with their corresponding requests. The requestId member provides this ID. For oneway requests (which do not have replies), the request ID is 0. For collo-cated requests (which do not use the Ice protocol), the request ID is -1.
If you implement your server such that it uses a separate servant for each Ice object, the contents of the Current object are not particularly interesting. (You would most likely access the Current object to read the adapter member, for example, to activate or deactivate a servant.) However, as we will see in Section 32.7, the Current object is essential for more sophisticated (and more scalable) servant implementations.
32.7 Servant Locators
Using an adapter’s ASM to map Ice objects to servants has a number of design implications:
• Each Ice object is represented by a different servant.4
• All servants for all Ice objects are permanently in memory.
Using a separate servant for each Ice object in this fashion is common to many server implementations: the technique is simple to implement and provides a
4. It is possible to register a single servant with multiple identities. However, there is little point in doing so because a default servant (see Section 32.8) achieves the same thing.

32.7 Servant Locators 947
natural mapping from Ice objects to servants. Typically, on start-up, the server instantiates a separate servant for each Ice object, activates each servant, and then calls activate on the object adapter to start the flow of requests.
There is nothing wrong with the above design, provided that two criteria are met:
1. The server has sufficient memory available to keep a separate servant instanti-ated for each Ice object at all times.
2. The time required to initialize all the servants on start-up is acceptable.
For many servers, neither criterion presents a problem: provided that the number of servants is small enough and that the servants can be initialized quickly, this is a perfectly acceptable design. However, the design does not scale well: the memory requirements of the server grow linearly with the number of Ice objects so, if the number of objects gets too large (or if each servant stores too much state), the server runs out of memory.
Ice offers two APIs that help you scale servers to larger numbers of objects: servant locators and default servants. A default servant is essentially a simplified version of a servant locator that satisfies the majority of use cases, whereas a servant locator provides more flexibility for those applications that require it. Refer to Section 32.8 for more information on default servants.
32.7.1 Overview
In a nutshell, a servant locator is a local object that you implement and attach to an object adapter. Once an adapter has a servant locator, it consults its ASM to locate a servant for an incoming request as usual. If a servant for the request can be found in the ASM, the request is dispatched to that servant. However, if the ASM does not have an entry for the object identity of the request, the object adapter calls back into the servant locator to ask it to provide a servant for the request. The servant locator either
• instantiates a servant and passes it to the Ice run time, in which case the request is dispatched to that newly instantiated servant, or
• the servant locator indicates failure to locate a servant to the Ice run time, in which case the client receives an ObjectNotExistException.
This simple mechanism allows us to scale servers to provide access to an unlim-ited number of Ice objects: instead of instantiating a separate servant for each and every Ice object in existence, the server can instantiate servants for only a subset of Ice objects, namely those that are actually used by clients.

948 The Ice Run Time in Detail
Servant locators are most commonly used by servers that provide access to databases: typically, the number of entries in the database is far larger than what the server can hold in memory. Servant locators allow the server to only instantiate servants for those Ice objects that are actually used by clients.
Another common use for servant locators is in servers that are used for process control or network management: in that case, there is no database but, instead, there is a potentially very large number of devices or network elements that must be controlled via the server. Otherwise, this scenario is the same as for large data-bases: the number of Ice objects exceeds the number of servants that the server can hold in memory and, therefore, requires an approach that allows the number of instantiated servants to be less than the number of Ice objects.
32.7.2 Servant Locator Interface
A servant locator has the following interface:
module Ice { local interface ServantLocator { ["UserException"] Object locate( Current curr, out LocalObject cookie); ["UserException"] void finished( Current curr, Object servant, LocalObject cookie); void deactivate(string category); };};
Note that ServantLocator is a local interface. To create an actual implementation of a servant locator, you must define a class that is derived from Ice::Servant-Locator and provide implementations of the locate, finished, and deactivate operations. The Ice run time invokes the operations on your derived class as follows:
• locate
Whenever a request arrives for which no entry exists in the ASM, the Ice run time calls locate. The implementation of locate (which you provide as part of the derived class) is supposed to return a servant that can process the

32.7 Servant Locators 949
incoming request. Your implementation of locate can behave in three possible ways:
1. Instantiate and return a servant for the current request. In this case, the Ice run time dispatches the request to the newly instantiated servant.
2.Return null. In this case, the Ice run time raises an ObjectNotExistExcep-tion in the client.
3.Throw a run-time exception. In this case, the Ice run time propagates the thrown exception back to the client. Keep in mind that all run-time excep-tions, apart from ObjectNotExistException, OperationNotExistExcep-tion, and FacetNotExistException, are presented as UnknownLocalException to the client.
You can also throw user exceptions from locate. If the user exception is in the corresponding operation’s exception specification, that user exception is returned to the client. User exceptions thrown by locate that are not listed in the exception specification of the corresponding operation are returned to the client as UnknownUserException. Non-Ice exceptions are returned to the client as UnknownException (see page 119).
The cookie out-parameter to locate allows you return a local object to the object adapter. The object adapter does not care about the contents of that object (and it is legal to return a null cookie). Instead, the Ice run time passes whatever cookie you return from locate back to you when it calls finished. This allows you to pass an arbitrary amount of state from locate to the corre-sponding call to finished.
• finished
If a call to locate has returned a servant to the Ice run time, the Ice run time dispatches the incoming request to the servant. Once the request is complete (that is, the operation being invoked has completed), the Ice run time calls finished, passing the servant whose operation has completed, the Current object for the request, and the cookie that was initially created by locate. This means that every call to locate is balanced by a corresponding call to finished (provided that locate actually returned a servant).
If you throw an exception from finished, the Ice run time propagates the thrown exception back to the client. As for locate, you can throw user excep-tions from finished. If a user exception is in the corresponding operation’s exception specification, that user exception is returned to the client. User

950 The Ice Run Time in Detail
exceptions that are not in the corresponding operation’s exception specifica-tion are returned to the client as UnknownUserException.
finished can also throw run-time exceptions. However, only ObjectNotEx-istException, OperationNotExistException, and FacetNotExistExcep-tion are propagated without change to the client; other run-time exceptions are returned to the client as UnknownLocalException.
Non-Ice exceptions thrown from finished are returned to the client as UnknownException (see page 119).
If both the operation implementation and finished throw a user exception, the exception thrown by finished overrides the exception thrown by the operation.
• deactivate
The deactivate operation allows a servant locator to clean up once it is no longer needed. (For example, the locator might close a database connection.) The Ice run time passes the category of the servant locator being deactivated to the deactivate operation.
The run time calls deactivate when the object adapter to which the servant locator is attached is destroyed. More precisely, deactivate is called when you call destroy on the object adapter, or when you call destroy on the communicator (which implicitly calls destroy on the object adapter).
Once the run time has called deactivate, it is guaranteed that no further calls to locate or finished can happen, that is, deactivate is called exactly once, after all operations dispatched via this servant locator have completed.
This also explains why deactivate is not called as part of ObjectA-dapter::deactivate: ObjectAdapter::deactivate initiates deactivation and returns immediately, so it cannot call ServantLocator::deactivate directly, because there might still be outstanding requests dispatched via this servant locator that have to complete first—in turn, this would mean that either ObjectAdapter::deactivate could block (which it must not do) or that a call to ServantLocator::deactivate could be followed by one or more calls to finished (which must not happen either).
It is important to realize that the Ice run time does not “remember” the servant that is returned by a particular call to locate. Instead, the Ice run time simply dispatches an incoming request to the servant returned by locate and, once the request is complete, calls finished. In particular, if two requests for the same servant arrive more or less simultaneously, the Ice run time calls locate and finished once for each request. In other words, locate establishes the associa-

32.7 Servant Locators 951
tion between an object identity and a servant; that association is valid only for a single request and is never used by the Ice run time to dispatch a different request.
32.7.3 Threading Guarantees for Servant Locators
The Ice run time guarantees that every operation invocation that involves a servant locator is bracketed by calls to locate and finished, that is, every call to locate is balanced by a corresponding call to finished (assuming that the call to locate actually returned a servant, of course).
In addition, the Ice run time guarantees that locate, the operation, and finished are called by the same thread. This guarantee is important because it allows you to use locate and finished to implement thread-specific pre- and post-processing around operation invocations. (For example, you can start a trans-action in locate and commit or roll back that transaction in finished, or you can acquire a lock in locate and release the lock in finished.5)
Note that, if you are using asynchronous method dispatch, the thread that starts a call is not necessarily the thread that finishes it. In that case, finished is called by whatever thread executes the operation implementation, which may be a different thread than the one that called locate.
The Ice run time also guarantees that deactivate is called when you deacti-vate the object adapter to which the servant locator is attached. The deactivate call is made only once all operations that involved the servant locator are finished, that is, deactivate is guaranteed not to run concurrently with locate or finished, and is guaranteed to be the last call made to a servant locator.
Beyond this, the Ice run time provides no threading guarantees for servant locators. In particular:
• It is possible for invocations of locate to proceed concurrently (for the same object identity or for different object identities).
• It is possible for invocations of finished to proceed concurrently (for the same object identity or for different object identities).
• It is possible for invocations of locate and finished to proceed concurrently (for the same object identity or for different object identities).
5. Both transactions and locks usually are thread-specific, that is, only the thread that started a trans-action can commit it or roll it back, and only the thread that acquired a lock can release the lock.

952 The Ice Run Time in Detail
These semantics allow you to extract the maximum amount of parallelism from your application code (because the Ice run time does not serialize invocations when serialization may not be necessary). Of course, this means that you must protect access to shared data from locate and finished with mutual exclusion primitives as necessary.
32.7.4 Servant Locator Registration
An object adapter does not automatically know when you create a servant locator. Instead, you must explicitly register servant locators with the object adapter:
module Ice { local interface ObjectAdapter { // ... void addServantLocator(ServantLocator locator, string category); ServantLocator removeServantLocator(string category); ServantLocator findServantLocator(string category); // ... };};
As you can see, the object adapter allows you to add, remove, and find servant locators. Note that, when you register a servant locator, you must provide an argu-ment for the category parameter. The value of the category parameter controls which object identities the servant locator is responsible for: only object identities with a matching category member (see page 941) trigger a corresponding call to locate. An incoming request for which no explicit entry exists in the ASM and with a category for which no servant locator is registered returns an ObjectNo-tExistException to the client.
addServantLocator has the following semantics:
• You can register exactly one servant locator for a specific category. Attempts to call addServantLocator for the same category more than once raise an AlreadyRegisteredException.
• You can register different servant locators for different categories, or you can register the same single servant locator multiple times (each time for a different category). In the former case, the category is implicit in the servant
32.7 Servant Locators 953
locator instance that is called by the Ice run time; in the latter case, the imple-mentation of locate can find out which category the incoming request is for by examining the object identity member of the Current object that is passed to locate.
• It is legal to register a servant locator for the empty category. Such a servant locator is known as a default servant locator: if a request comes in for which no entry exists in the ASM, and whose category does not match the category of any other registered servant locator, the Ice run time calls locate on the default servant locator.
removeServantLocator removes and returns the servant locator for a specific category (including the empty category) with the following semantics:
• If no servant locator is registered for the specified category, the operation raises NotRegisteredException.
• Once a servant locator is successfully removed for the specified category, the Ice run time guarantees that no new incoming requests for that category are dispatched to the servant locator.
• A call to removeServantLocator returns immediately without waiting for the completion of any pending requests on that servant locator; such requests still complete normally by calling finished on the servant locator.
• Removing a servant locator does not cause Ice to invoke deactivate on that servant locator, as deactivate is only called when a registered servant locator’s object adapter is destroyed.
findServantLocator allows you to retrieve the servant locator for a specific cate-gory (including the empty category). If no match is found, the operation returns null.
Call Dispatch Semantics
The preceding rules may seem complicated, so here is a summary of the actions taken by the Ice run time to locate a servant for an incoming request.
Every incoming request implicitly identifies a specific object adapter for the request (because the request arrives at a specific transport endpoint and, therefore, identifies a particular object adapter). The incoming request carries an object iden-tity that must be mapped to a servant. To locate a servant, the Ice run time goes through the following steps, in the order shown:
1. Look for the identity in the ASM. If the ASM contains an entry, dispatch the request to the corresponding servant.

954 The Ice Run Time in Detail
2. If the category of the incoming object identity is non-empty, look for a default servant (see Section 32.8) that is registered for that category. If such a default servant is registered, dispatch the request to that servant.
3. If the category of the incoming object identity is empty, or no default servant could be found for the category in step 2, look for a default servant that is registered for the empty category. If such a default servant is registered, dispatch the request to that servant.
4. If the category of the incoming object identity is non-empty and no servant could be found in the preceding steps, look for a servant locator that is regis-tered for that category. If such a servant locator is registered, call locate on the servant locator and, if locate returns a servant, dispatch the request to that servant, followed by a call to finished; otherwise, if the call to locate returns null, raise ObjectNotExistException or FacetNotExistException in the client.
5. If the category of the incoming object identity is empty, or no servant locator could be found for the category in step 4, look for a default servant locator (that is, a servant locator that is registered for the empty category). If a default servant locator is registered, dispatch the request as for step 2.
6. Raise ObjectNotExistException or FacetNotExistException in the client. (ObjectNotExistException is raised if the ASM does not contain a servant with the given identity at all, FacetNotExistException is raised if the ASM contains a servant with a matching identity, but a non-matching facet.)
It is important to keep these call dispatch semantics in mind because they enable a number of powerful implementation techniques. Each technique allows you to streamline your server implementation and to precisely control the trade-off between performance, memory consumption, and scalability. To illustrate the possibilities, we outline a number of the most common implementation tech-niques in the following section.
32.7.5 Implementing a Simple Servant Locator
To illustrate the concepts outlined in the previous sections, let us examine a (very simple) implementation of a servant locator. Consider that we want to create an electronic phone book for the entire world’s telephone system (which, clearly, involves a very large number of entries, certainly too many to hold the entire phone book in memory). The actual phone book entries are kept in a large data-base. Also assume that we have a search operation that returns the details of a

32.7 Servant Locators 955
phone book entry. The Slice definitions for this application might look something like the following:
struct Details { // Lots of details about the entry here...};interface PhoneEntry { idempotent Details getDetails(); idempotent void updateDetails(Details d); // ...};struct SearchCriteria { // Fields to permit searching...};interface PhoneBook { idempotent PhoneEntry* search(SearchCriteria c); // ...};
The details of the application do not really matter here; the important point to note is that each phone book entry is represented as an interface for which we need to create a servant eventually, but we cannot afford to keep servants for all entries permanently in memory.
Each entry in the phone database has a unique identifier. This identifier might be an internal database identifier, or a combination of field values, depending on exactly how the database is constructed. The important point is that we can use this database identifier to link the proxy for an Ice object to its persistent state: we simply use the database identifier as the object identity. This means that each proxy contains the primary access key that is required to locate the persistent state of each Ice object and, therefore, instantiate a servant for that Ice object.
What follows is an outline implementation in C++. The class definition of our servant locator looks as follows:
class MyServantLocator : public virtual Ice::ServantLocator {public: virtual Ice::ObjectPtr locate(const Ice::Current& c, Ice::LocalObjectPtr& cookie); virtual void finished(const Ice::Current& c, const Ice::ObjectPtr& servant,
956 The Ice Run Time in Detail
const Ice::LocalObjectPtr& cookie); virtual void deactivate(const std::string& category);};
Note that MyServantLocator inherits from Ice::ServantLocator and implements the pure virtual functions that are generated by the slice2cpp compiler for the Ice::ServantLocator interface. Of course, as always, you can add additional member functions, such as a constructor and destructor, and you can add private data members as necessary to support your implementation.
In C++, you can implement the locate member function along the following lines:
Ice::ObjectPtrMyServantLocator::locate(const Ice::Current& c, Ice::LocalObjectPtr& cookie){ // Get the object identity. (We use the name member // as the database key.) // std::string name = c.id.name; // Use the identity to retrieve the state from the database. // ServantDetails d; try { d = DB_lookup(name); } catch (const DB_error&) return 0; } // We have the state, instantiate a servant and return it. // return new PhoneEntryI(d);}
For the time being, the implementations of finished and deactivate are empty and do nothing.
The DB_lookup call in the preceding example is assumed to access the data-base. If the lookup fails (presumably, because no matching record could be found), DB_lookup throws a DB_error exception. The code catches that exception and returns zero instead; this raises ObjectNotExistException in the client to indicate that the client used a proxy to a no-longer existent Ice object.

32.7 Servant Locators 957
Note that locate instantiates the servant on the heap and returns it to the Ice run time. This raises the question of when the servant will be destroyed. The answer is that the Ice run time holds onto the servant for as long as necessary, that is, long enough to invoke the operation on the returned servant and to call finished once the operation has completed. Thereafter, the servant is no longer needed and the Ice run time destroys the smart pointer that was returned by locate. In turn, because no other smart pointers exist for the same servant, this causes the destructor of the PhoneEntryI instance to be called, and the servant to be destroyed.
The upshot of this design is that, for every incoming request, we instantiate a servant and allow the Ice run time to destroy the servant once the request is complete. Depending on your application, this may be exactly what is needed, or it may be prohibitively expensive—we will explore designs that avoid creation and destruction of a servant for every request shortly.
In Java, the implementation of our servant locator looks very similar:6
public class MyServantLocator implements Ice.ServantLocator { public Ice.Object locate(Ice.Current c, Ice.LocalObjectHolder cookie) { // Get the object identity. (We use the name member // as the database key. String name = c.id.name; // Use the identity to retrieve the state // from the database. // ServantDetails d; try { d = DB.lookup(name); } catch (DB.error e) { return null; } // We have the state, instantiate a servant and return it. // return new PhoneEntryI(d);
6. The C# implementation is virtually identical to the Java implementation, so we do not show it here.

958 The Ice Run Time in Detail
} public void finished(Ice.Current c, Ice.Object servant, java.lang.Object cookie) { } public void deactivate(String category) { }}
All implementations of locate follow the pattern illustrated by the previous pseudo-code:
1. Use the id member of the passed Current object to obtain the object identity. Typically, only the name member of the identity is used to retrieve servant state. The category member is normally used to select a servant locator. (We will explore use of the category member shortly.)
2. Retrieve the state of the Ice object from secondary storage (or the network) using the object identity as a key.
• If the lookup succeeds, you have retrieved the state of the Ice object.
• If the lookup fails, return null. In that case, the Ice object for the client’s request truly does not exist, presumably, because that Ice object was deleted earlier, but the client still has a proxy to the now-deleted object.
3. Instantiate a servant and use the state retrieved from the database to initialize the servant. (In this example, we pass the retrieved state to the servant constructor.)
4. Return the servant.
Of course, before we can use our servant locator, we must inform the adapter of its existence prior to activating the adapter, for example (in Java or C#):
MyServantLocator sl = new MyServantLocator();adapter.addServantLocator(sl, "");
Note that, in this example, we have installed the servant locator for the empty category. This means that locate on our servant locator will be called for invo-cations to any of our Ice objects (because the empty category acts as the default). In effect, with this design, we are not using the category member of the object identity. This is fine, as long as all our servants all have the same, single interface.

32.7 Servant Locators 959
However, if we need to support several different interfaces in the same server, this simple strategy is no longer sufficient.
32.7.6 Using the category Member of the Object IdentityThe simple example in the preceding section always instantiates a servant of type PhoneEntryI. In other words, the servant locator implicitly is aware of the type of servant the incoming request is for. This is not a very realistic assumption for most servers because, usually, a server provides access to objects with several different interfaces. This poses a problem for our locate implementation: somehow, we need to decide inside locate what type of servant to instantiate. You have several options for solving this problem:
• Use a separate object adapter for each interface type and use a separate servant locator for each object adapter.
This technique works fine, but has the down-side that each object adapter requires a separate transport endpoint, which is wasteful.
• Mangle a type identifier into the name component of the object identity.
This technique uses part of the object identity to denote what type of object to instantiate. For example, in our file system application, we have directory and file objects. By convention, we could prepend a ‘d’ to the identity of every directory and prepend an ‘f’ to the identity of every file. The servant locator then can use the first letter of the identity to decide what type of servant to instantiate:
Ice::ObjectPtrMyServantLocator::locate(const Ice::Current& c, Ice::LocalObjectPtr& cookie){ // Get the object identity. (We use the name member // as the database key.) // std::string name = c.id.name; std::string realId = c.id.name.substr(1); try { if (name[0] == 'd') { // The request is for a directory. // DirectoryDetails d = DB_lookup(realId); return new DirectoryI(d); } else { // The request is for a file.

960 The Ice Run Time in Detail
// FileDetails d = DB_lookup(realId); return new FileI(d); } } catch (DatabaseNotFoundException&) { return 0; }}
While this works, it is awkward: not only do we need to parse the name member to work out what type of object to instantiate, but we also need to modify the implementation of locate whenever we add a new type to our application.
• Use the category member of the object identity to denote the type of servant to instantiate.
This is the recommended approach: for every interface type, we assign a sepa-rate identifier as the value of the category member of the object identity. (For example, we can use ‘d’ for directories and ‘f’ for files.) Instead of registering a single servant locator, we create two different servant locator implementa-tions, one for directories and one for files, and then register each locator for the appropriate category:
class DirectoryLocator : public virtual Ice::ServantLocator {public: virtual Ice::ObjectPtr locate(const Ice::Current& c, Ice::LocalObjectPtr& cookie) { // Code to locate and instantiate a directory here... } virtual void finished(const Ice::Current& c, const Ice::ObjectPtr& servant, const Ice::LocalObjectPtr& cookie) { } virtual void deactivate(const std::string& category) { }};class FileLocator : public virtual Ice::ServantLocator {
32.7 Servant Locators 961
public: virtual Ice::ObjectPtr locate(const Ice::Current& c, Ice::LocalObjectPtr& cookie) { // Code to locate and instantiate a file here... } virtual void finished(const Ice::Current& c, const Ice::ObjectPtr& servant, const Ice::LocalObjectPtr& cookie) { } virtual void deactivate(const std::string& category) { }};// ...// Register two locators, one for directories and// one for files.//adapter->addServantLocator(new DirectoryLocator(), "d");adapter->addServantLocator(new FileLocator(), "f");
Yet another option is to use the category member of the object identity, but to use a single default servant locator (that is, a locator for the empty category). With this approach, all invocations go to the single default servant locator, and you can switch on the category value inside the implementation of the locate operation to determine which type of servant to instantiate. However, this approach is harder to maintain than the previous one; the category member of the Ice object identity exists specifically to support servant locators, so you might as well use it as intended.
32.7.7 Using Cookies
Occasionally, it can be useful to be able to pass information between locate and finished. For example, the implementation of locate could choose among a number of alternative database backends, depending on load or availability and, to properly finalize state, the implementation of finish might need to know which

962 The Ice Run Time in Detail
database was used by locate. To support such scenarios, you can create a cookie in your locate implementation; the Ice run time passes the value of the cookie to finished after the operation invocation has completed. The cookie must derive from Ice::LocalObject and can contain whatever state and member func-tions are useful to your implementation:
class MyCookie : public virtual Ice::LocalObject {public: // Whatever is useful here...};typedef IceUtil::Handle<MyCookie> MyCookiePtr;class MyServantLocator : public virtual Ice::ServantLocator {public: virtual Ice::ObjectPtr locate(const Ice::Current& c, Ice::LocalObjectPtr& cookie) { // Code as before... // Allocate and initialize a cookie. // cookie = new MyCookie(...); return new PhoneEntryI; } virtual void finished(const Ice::Current& c, const Ice::ObjectPtr& servant, const Ice::LocalObjectPtr& cookie) { // Down-cast cookie to actual type. // MyCookiePtr mc = MyCookiePtr::dynamicCast(cookie); // Use information in cookie to clean up... // // ... } virtual void deactivate(const std::string& category);};

32.8 Default Servants 963
32.8 Default Servants
As explained in Section 32.4.1, the Active Servant Map (ASM) is a simple lookup table that maintains a one-to-one mapping between object identities and servants. Although the ASM is easy to understand and offers efficient indexing, it does not scale well when the number of objects is very large. Scalability is a common problem with object-oriented middleware: servers frequently are used as front ends to large databases that are accessed remotely by clients. The server’s job is to present an object-oriented view to clients of a very large number of records in the database. Typically, the number of records is far too large to instantiate servants for even a fraction of the database records.
A common technique for solving this problem is to use default servants. A default servant is a servant that, for each request, takes on the persona of a different Ice object. In other words, the servant changes its behavior according to the object identity that is accessed by a request, on a per-request basis. In this way, it is possible to allow clients access to an unlimited number of Ice objects with only a single servant in memory. A default servant is essentially a specialized version of a servant locator (see Section 32.7) that satisfies the majority of use cases with a simpler API, whereas a servant locator provides more flexibility for those applications that require it.
Default servant implementations are attractive not only because of the memory savings they offer, but also because of the simplicity of implementation: in essence, a default servant is a facade [2] to the persistent state of an object in the database. This means that the programming required to implement a default servant is typically minimal: it simply consists of the code required to read and write the corresponding database records.
32.8.1 Overview
A default servant is a regular servant that you implement and register with an object adapter. For each incoming request, the object adapter first attempts to locate a servant in its Active Servant Map (ASM). If no servant is found, the object adapter dispatches the request to a default servant. With this design, a default servant is the object adapter’s servant of last resort if no match was found in the ASM.
Implementing a default servant requires a somewhat different mindset than the typical “one servant per Ice object” strategy used in less advanced applications. The most important quality of a default servant is its statelessness: it must be

964 The Ice Run Time in Detail
prepared to dispatch multiple requests simultaneously for different objects. The price we have to pay for the unlimited scalability and reduced memory footprint is performance: default servants typically make a database access for every invoked operation, which is obviously slower than caching state in memory as part of a servant that has been added to the ASM. However, this does not mean that default servants carry an unacceptable performance penalty: databases often provide sophisticated caching, so even though the operation implementations read and write the database, as long as they access cached state, performance may be entirely acceptable.
32.8.2 Default Servant API
The default servant API consists of the following operations in the object adapter interface:
module Ice { local interface ObjectAdapter { void addDefaultServant(Object servant, string category); Object removeDefaultServant(string category); Object findDefaultServant(string category); // ... };};
As you can see, the object adapter allows you to add, remove, and find default servants. Note that, when you register a default servant, you must provide an argu-ment for the category parameter. The value of the category parameter controls which object identities the default servant is responsible for: only object identities with a matching category member trigger a dispatch to this default servant. An incoming request for which no explicit entry exists in the ASM and with a cate-gory for which no default servant is registered returns an ObjectNotExistExcep-tion to the client.
addDefaultServant has the following semantics:
• You can register exactly one default servant for a specific category. Attempts to call addDefaultServant for the same category more than once raise an AlreadyRegisteredException.
• You can register different default servants for different categories, or you can register the same single default servant multiple times (each time for a different category). In the former case, the category is implicit in the default

32.8 Default Servants 965
servant instance that is called by the Ice run time; in the latter case, the servant can find out which category the incoming request is for by examining the object identity member of the Current object that is passed to the dispatched operation.
• It is legal to register a default servant for the empty category. Such a servant is used if a request comes in for which no entry exists in the ASM, and whose category does not match the category of any other registered default servant.
removeDefaultServant removes the default servant for the specified category. Attempts to remove a non-existent default servant raise NotRegisteredExcep-tion. The operation returns the removed default servant. Once a default servant is successfully removed for the specified category, the Ice run time guarantees that no new incoming requests for that category are dispatched to the servant.
The findDefaultServant operation allows you to retrieve the default servant for a specific category (including the empty category). If no default servant is registered for the specified category, findDefaultServant returns null.
32.8.3 Threading Guarantees for Default ServantsThe threading semantics for a default servant are no different than for a servant registered in the ASM: operations may be dispatched on a default servant concur-rently, for the same object identity or for different object identities. If you have configured the communicator with multiple dispatch threads, your default servant must protect access to shared data with appropriate locks.
32.8.4 Call Dispatch SemanticsThis section summarizes the actions taken by the Ice run time to locate a servant for an incoming request.
Every incoming request implicitly identifies a specific object adapter for the request (because the request arrives at a specific transport endpoint and, therefore, identifies a particular object adapter). The incoming request carries an object iden-tity that must be mapped to a servant. To locate a servant, the Ice run time goes through the following steps, in the order shown:
1. Look for the identity in the ASM. If the ASM contains an entry, dispatch the request to the corresponding servant.
2. If the category of the incoming object identity is non-empty, look for a default servant that is registered for that category. If such a default servant is regis-tered, dispatch the request to that servant.

966 The Ice Run Time in Detail
3. If the category of the incoming object identity is empty, or no default servant could be found for the category in step 2, look for a default servant that is registered for the empty category. If such a default servant is registered, dispatch the request to that servant.
4. If the category of the incoming object identity is non-empty and no servant could be found in the preceding steps, look for a servant locator (see Section 32.7) that is registered for that category. If such a servant locator is registered, call locate on the servant locator and, if locate returns a servant, dispatch the request to that servant, followed by a call to finished; otherwise, if the call to locate returns null, raise ObjectNotExistException or FacetNotExistException in the client. (ObjectNotExistException is raised if the ASM does not contain a servant with the given identity at all, FacetNotExistException is raised if the ASM contains a servant with a matching identity, but a non-matching facet.)
5. If the category of the incoming object identity is empty, or no servant locator could be found for the category in step 4, look for a default servant locator (that is, a servant locator that is registered for the empty category). If a default servant locator is registered, dispatch the request as for step 2.
6. Raise ObjectNotExistException or FacetNotExistException in the client. (ObjectNotExistException is raised if the ASM does not contain a servant with the given identity at all, FacetNotExistException is raised if the ASM contains a servant with a matching identity, but a non-matching facet.)
It is important to keep these call dispatch semantics in mind because they enable a number of powerful implementation techniques. Each technique allows you to streamline your server implementation and to precisely control the trade-off between performance, memory consumption, and scalability. We discuss some guidelines for using default servants in the following section.
32.8.5 Guidelines
This section provides some guidelines to assist you in implementing default servants effectively.
Object identity is the Key
When an incoming request is dispatched to the default servant, the target object identity is provided in the Current argument. The name field of the identity typi-cally supplies everything the default servant requires in order to satisfy the

32.8 Default Servants 967
request. For instance, it may serve as the key in a database query, or even hold an encoded structure in some proprietary format that your application uses to convey more than just a string.
Naturally, the client can also pass arguments to the operation that assist the default servant in retrieving whatever state it requires. However, this approach can easily introduce implementation artifacts into your Slice interfaces, and in most cases the client should not need to know that the server is implemented with a default servant. If at all possible, use only the object identity.
Minimize Contention
For better scalability, the default servant’s implementation should strive to elimi-nate contention among the dispatch threads. As an example, when a database holds the default servant’s state, each of the servant’s operations usually begins with a query. Assuming that the database API is thread-safe, the servant needs to perform no explicit locking of its own. With a copy of the state in hand, the imple-mentation can work with function-local data to satisfy the request.
Combine Strategies
The ASM still plays a useful role even in applications that are ideally suited for default servants. For example, there is no need to implement a singleton object as a default servant: if there can only be one instance of the object, implementing it as a default servant does nothing to improve your application’s scalability.
Applications often install a handful of servants in the ASM while servicing the majority of requests in a default servant. For example, a database application might install a singleton query object in the ASM while using a default servant to process all invocations on the database records.
Categories Denote Interfaces
In general, all of the objects serviced by a default servant must have the same interface. If you only need a default servant for one interface, you can register the default servant with an empty category string. However, to implement several interfaces, you will need a default servant implementation for each one. Further-more, you must take steps to ensure that the object adapter dispatches an incoming request to the appropriate default servant. The category field of the object iden-tity is intended to serve this purpose.
For example, a process control system might have interfaces named Sensor and Switch. To direct requests to the proper default servant, the application uses the symbol Sensor or Switch as the category of each object’s identity, and

968 The Ice Run Time in Detail
registers corresponding default servants having those same categories with the object adapter.
Plan for the Future
If you suspect that you might eventually need to implement more than one inter-face with default servants, we recommend using a non-empty category even if you start out having only one default servant. Adding another default servant later becomes much easier if the application is already designed to operate correctly with categories.
Throw exceptions
If a request arrives for an object that no longer exists, it is the default servant’s responsibility to raise ObjectNotExistException.
Handle ice_ping
One issue you need to be aware of with default servants is the need to override ice_ping: the default implementation of ice_ping that the servant inherits from its skeleton class always succeeds. For servants that are registered with the ASM, this is exactly what we want; however, for default servants, ice_ping must fail if a client uses a proxy to a no-longer existent Ice object. To avoid getting successful ice_ping invocations for non-existent Ice objects, you must override ice_ping in the default servant. The implementation must check whether the object identity for the request denotes a still-existing Ice object and, if not, raise ObjectNotExistException.
It is good practice to override ice_ping if you are using default servants. Because you cannot override operations on Ice::Object using a Java or C# tie servant (or an Objective-C delegate servant), you must implement default servants by deriving from the generated skeleton class if you choose to override ice_ping.
Consider Interceptors
Dispatch interceptors are an advanced Ice feature that you can read more about in Section 32.23. A dispatch interceptor is often installed as a default servant.
Use a Blobject Default Servant to Forward Messages
Message forwarding services, such as Glacier2 (see Chapter 42), can be imple-mented simply and efficiently with a Blobject default servant (see

32.9 Server Implementation Techniques 969
Section 35.3.2). Such a servant simply chooses a destination to forward a request to, without decoding any of the parameters.
32.9 Server Implementation Techniques
As we mentioned on page 947, instantiating a servant for each Ice object on server start-up is a viable design, provided that you can afford the amount of memory required by the servants, as well as the delay in start-up of the server. However, Ice supports more flexible mappings between Ice objects and servants; these alternate mappings allow you to precisely control the trade-off between memory consump-tion, scalability, and performance. We outline a few of the more common imple-mentation techniques in this section.
32.9.1 Incremental Initialization
If you use a servant locator, the servant returned by locate is used only for the current request, that is, the Ice run time does not add the servant to the active servant map. Of course, this means that if another request comes in for the same Ice object, locate must again retrieve the object state and instantiate a servant. A common implementation technique is to add each servant to the ASM as part of locate. This means that only the first request for each Ice object triggers a call to locate; thereafter, the servant for the corresponding Ice object can be found in the ASM and the Ice run time can immediately dispatch another incoming request for the same Ice object without having to call the servant locator.
An implementation of locate to do this would look something like the following:
Ice::ObjectPtrMyServantLocator::locate(const Ice::Current& c, Ice::LocalObjectPtr& cookie){ // Get the object identity. (We use the name member // as the database key.) // std::string name = c.id.name; // Use the identity to retrieve the state from the database. // ServantDetails d; try {
970 The Ice Run Time in Detail
d = DB_lookup(name); } catch (const DB_error&) return 0; } // We have the state, instantiate a servant. // Ice::ObjectPtr servant = new PhoneEntryI(d); // Add the servant to the ASM. // c.adapter->add(servant, c.id); // NOTE: Incorrect! return servant;}
This is almost identical to the implementation on page 956—the only difference is that we also add the servant to the ASM by calling ObjectAdapter::add. Unfor-tunately, this implementation is wrong because it suffers from a race condition. Consider the situation where we do not have a servant for a particular Ice object in the ASM, and two clients more or less simultaneously send a request for the same Ice object. It is entirely possible for the thread scheduler to schedule the two incoming requests such that the Ice run time completes the lookup in the ASM for both requests and, for each request, concludes that no servant is in memory. The net effect is that locate will be called twice for the same Ice object, and our servant locator will instantiate two servants instead of a single servant. Because the second call to ObjectAdapter::add will raise an AlreadyRegisteredExcep-tion, only one of the two servants will be added to the ASM.
Of course, this is hardly the behavior we expect. To avoid the race condition, our implementation of locate must check whether a concurrent invocation has already instantiated a servant for the incoming request and, if so, return that servant instead of instantiating a new one. The Ice run time provides the ObjectA-dapter::find operation to allow us to test whether an entry for a specific identity already exists in the ASM:
module Ice { local interface ObjectAdapter { // ... Object find(Identity id);

32.9 Server Implementation Techniques 971
// ... };};
find returns the servant if it exists in the ASM and null, otherwise. Using this lookup function, together with a mutex, allows us to correctly implement locate. The class definition of our servant locator now has a private mutex so we can establish a critical region inside locate:
class MyServantLocator : public virtual Ice::ServantLocator {public: virtual Ice::ObjectPtr locate(const Ice::Current& c, Ice::LocalObjectPtr&); // Declaration of finished() and deactivate() here...private: IceUtil::Mutex _m;};
The locate member function locks the mutex and tests whether a servant is already in the ASM: if so, it returns that servant; otherwise, it instantiates a new servant and adds it to the ASM as before:
Ice::ObjectPtrMyServantLocator::locate(const Ice::Current& c, Ice::LocalObjectPtr&){ IceUtil::Mutex::Lock lock(_m); // Check if we have instantiated a servant already. // Ice::ObjectPtr servant = c.adapter.find(c.id); if (!servant) { // We don't have a servant already // Instantiate a servant. // ServantDetails d; try { d = DB_lookup(c.id.name); } catch (const DB_error&) { return 0; }

972 The Ice Run Time in Detail
servant = new PhoneEntryI(d); // Add the servant to the ASM. // c.adapter->add(servant, c.id); } return servant;}
The Java version of this locator is almost identical, but we use the synchro-nized qualifier instead of a mutex to make locate a critical region:7
synchronized public Ice.Objectlocate(Ice.Current c, Ice.LocalObjectHolder cookie){ // Check if we have instantiated a servant already. // Ice.Object servant = c.adapter.find(c.id); if (servant == null) { // We don't have a servant already // Instantiate a servant // ServantDetails d; try { d = DB.lookup(c.id.name); } catch (DB.error&) { return null; } servant = new PhoneEntryI(d); // Add the servant to the ASM. // c.adapter.add(servant, c.id); } return servant;}
Using a servant locator that adds the servant to the ASM has a number of advan-tages:
7. In C#, you can place the body of locate into a lock(this) statement.

32.9 Server Implementation Techniques 973
• Servants are instantiated on demand, so the cost of initializing the servants is spread out over many invocations instead of being incurred all at once during server start-up.
• The memory requirements for the server are reduced because servants are instantiated only for those Ice objects that are actually accessed by clients. If clients only access a subset of the total number of Ice objects, the memory savings can be substantial.
In general, incremental initialization is beneficial if instantiating servants during start-up is too slow. The memory savings can be worthwhile as well but, as a rule, are realized only for comparatively short-lived servers: for long-running servers, chances are that, sooner or later, every Ice object will be accessed by some client or another; in that case, there are no memory savings because we end up with an instantiated servant for every Ice object regardless.
32.9.2 Default Servants
As explained in Section 32.8, default servants are a very effective tool for conserving memory when a server hosts a large number of Ice objects.
To create a default servant implementation, we need as many default servants as there are non-abstract interfaces in the system. For example, for our file system application, we require two default servants, one for directories and one for files. In addition, the object identities we create use the category member of the object identity to encode the type of interface of the corresponding Ice object. The value of the category field can be anything that identifies the interface, such as the ‘d’ and ‘f’ convention we used on page 960. Alternatively, you could use "Direc-tory" and "File", or use the type ID of the corresponding interface, such as "::Filesystem::Directory" and "::Filesystem::File". The name member of the object identity must be set to whatever identifier we can use to retrieve the persistent state of each directory and file from secondary storage. (For our file system application, we used a UUID as a unique identifier.)
Registration of the default servants is as follows:
adapter->addDefaultServant(new DirectoryI, "d");adapter->addDefaultServant(new FileI, "f");
All the action happens in the implementation of the operations, using the following steps for each operation:
1. Use the passed Current object to get the identity for the current request.

974 The Ice Run Time in Detail
2. Use the name member of the identity to locate the persistent state of the servant on secondary storage. If no record can be found for the identity, throw an ObjectNotExistException.
3. Implement the operation to operate on that retrieved state (returning the state or updating the state as appropriate for the operation).
In pseudo-code, this might look something like the following:
Filesystem::NodeSeqFilesystem::DirectoryI::list(const Ice::Current& c) const{ // Use the identity of the directory to retrieve // its contents. DirectoryContents dc; try { dc = DB_getDirectory(c.id.name); } catch(const DB_error&) { throw Ice::ObjectNotExistException(__FILE__, __LINE__); } // Use the records retrieved from the database to // initialize return value. // FileSystem::NodeSeq ns; // ... return ns;}
Note that the servant implementation is completely stateless: the only state it oper-ates on is the identity of the Ice object for the current request (and that identity is passed as part of the Current parameter).
Overriding ice_ping
Section 32.8.5 recommends that a default servant implementation take steps to preserve the semantics of the ice_ping operation, which is used to test whether an Ice object exists. If a default servant fails to override ice_ping, clients may mistakenly believe that a non-existent Ice object still exists. The code below demonstrates how we can override the operation in our file system application:
voidFilesystem::DirectoryI::ice_ping(const Ice::Current& c) const{ try {

32.9 Server Implementation Techniques 975
d = DB_lookup(c.id.name); } catch (const DB_error&) { throw Ice::ObjectNotExistException(__FILE__, __LINE__); }}
It is good practice to override ice_ping if you are using default servants.
32.9.3 Hybrid Approaches and Caching
Depending on the nature of your application, you may be able to steer a middle path that provides better performance while keeping memory requirements low: if your application has a number of frequently-accessed objects that are perfor-mance-critical, you can add servants for those objects to the ASM. If you store the state of these objects in data members inside the servants, you effectively have a cache of these objects.
The remaining, less-frequently accessed objects can be implemented with a default servant. For example, in our file system implementation, we could choose to instantiate directory servants permanently, but to have file objects implemented with a default servant. This provides efficient navigation through the directory tree and incurs slower performance only for the (presumably less frequent) file accesses.
This technique could be augmented with a cache of recently-accessed files, along similar lines to the buffer pool used by the Unix kernel [10]. The point is that you can combine use of the ASM with servant locators and default servants to precisely control the trade-offs among scalability, memory consumption, and performance to suit the needs of your application.
32.9.4 Servant Evictors
A variation on the previous theme and particularly interesting use of a servant locator is as an evictor [4]. An evictor is a servant locator that maintains a cache of servants:
• Whenever a request arrives (that is, locate is called by the Ice run time), the evictor checks to see whether it can find a servant for the request in its cache. If so, it returns the servant that is already instantiated in the cache; otherwise, it instantiates a servant and adds it to the cache.
• The cache is a queue that is maintained in least-recently used (LRU) order: the least-recently used servant is at the tail of the queue, and the most-recently

976 The Ice Run Time in Detail
used servant is at the head of the queue. Whenever a servant is returned from or added to the cache, it is moved from its current queue position to the head of the queue, that is, the “newest” servant is always at the head, and the “oldest” servant is always at the tail.
• The queue has a configurable length that corresponds to how many servants will be held in the cache; if a request arrives for an Ice object that does not have a servant in memory and the cache is full, the evictor removes the least-recently used servant at the tail of the queue from the cache in order to make room for the servant about to be instantiated at the head of the queue.
Figure 32.2 illustrates an evictor with a cache size of five after five invocations have been made, for object identities 1 to 5, in that order.
Figure 32.2. An evictor after five invocations for object identities 1 to 5.
At this point, the evictor has instantiated five servants, and has placed each servant onto the evictor queue. Because requests were sent by the client for object identi-ties 1 to 5 (in that order), servant 5 ends up at the head of the queue (at the most-recently used position), and servant 1 ends up at the tail of the queue (at the least-recently used position).
Assume that the client now sends a request for servant 3. In this case, the servant is found on the evictor queue and moved to the head position. The resulting ordering is shown in Figure 32.3.
Figure 32.3. The evictor from Figure 32.2 after accessing servant 3.
Evictor5 4 3 2 1
Evictor Queue
Head Tail
5 4 3 2 1
Servants
Evictor3 5 4 2 1
Evictor Queue
Head Tail
5 4 3 2 1
Servants

32.9 Server Implementation Techniques 977
Assume that the next client request is for object identity 6. The evictor queue is fully populated, so the evictor creates a servant for object identity 6, places that servant at the head of the queue, and evicts the servant with identity 1 (the least-recently used servant) at the tail of the queue, as shown in Figure 32.4.
Figure 32.4. The evictor from Figure 32.3 after evicting servant 1.
The evictor pattern combines the advantages of the ASM with the advantages of a default servant: provided that the cache size is sufficient to hold the working set of servants in memory, most requests are served by an already instantiated servant, without incurring the overhead of creating a servant and accessing the database to initialize servant state. By setting the cache size, you can control the trade-off between performance and memory consumption as appropriate for your applica-tion.
The following sections show how to implement an evictor in both C++ and Java. (You can also find the source code for the evictor with the code examples for this book in the Ice distribution.)
Creating an Evictor Implementation in C++
The evictor we show here is designed as an abstract base class: in order to use it, you derive an object from the EvictorBase base class and implement two methods that are called by the evictor when it needs to add or evict a servant. This leads to a class definitions as follows:
class EvictorBase : public Ice::ServantLocator {public: EvictorBase(int size = 1000); virtual Ice::ObjectPtr locate(const Ice::Current& c, Ice::LocalObjectPtr& cookie); virtual void finished(const Ice::Current& c, const Ice::ObjectPtr&, const Ice::LocalObjectPtr& cookie); virtual void deactivate(const std::string&);
Evictor6 3 5 4 2 1
Evictor Queue
Head Tail
6 5 4 3 2 1
Servants

978 The Ice Run Time in Detail
protected: virtual Ice::ObjectPtr add(const Ice::Current&, Ice::LocalObjectPtr&) = 0; virtual void evict(const Ice::ObjectPtr&, const Ice::LocalObjectPtr&) = 0;private: // ...};typedef IceUtil::Handle<EvictorBase> EvictorBasePtr;
Note that the evictor has a constructor that sets the size of the queue, with a default argument to set the size to 1000.
The locate, finished, and deactivate functions are inherited from the ServantLocator base class; these functions implement the logic to main-tain the queue in LRU order and to add and evict servants as needed.
The add and evict functions are called by the evictor when it needs to add a new servant to the queue and when it evicts a servant from the queue. Note that these functions are pure virtual, so they must be implemented in a derived class. The job of add is to instantiate and initialize a servant for use by the evictor. The evict function is called by the evictor when it evicts a servant. This allows evict to perform any cleanup. Note that add can return a cookie that the evictor passes to evict, so you can move context information from add to evict.
Next, we need to consider the data structures that are needed to support our evictor implementation. We require two main data structures:
1. A map that maps object identities to servants, so we can efficiently decide whether we have a servant for an incoming request in memory or not.
2. A list that implements the evictor queue. The list is kept in LRU order at all times.
The evictor map does not only store servants but also keeps track of some admin-istrative information:
1.The map stores the cookie that is returned from add, so we can pass that same cookie to evict.
2.The map stores an iterator into the evictor queue that marks the position of the servant in the queue. Storing the queue position is not strictly neces-sary—we store the position for efficiency reasons because it allows us to locate a servant’s position in the queue in constant time instead of having to search through the queue in order to maintain its LRU property.

32.9 Server Implementation Techniques 979
3.The map stores a use count that is incremented whenever an operation is dispatched into a servant, and decremented whenever an operation completes.
The need for the use count deserves some extra explanation: suppose a client invokes a long-running operation on an Ice object with identity I. In response, the evictor adds a servant for I to the evictor queue. While the original invocation is still executing, other clients invoke operations on various Ice objects, which leads to more servants for other object identities being added to the queue. As a result, the servant for identity I gradually migrates toward the tail of the queue. If enough client requests for other Ice objects arrive while the operation on object I is still executing, the servant for I could be evicted while it is still executing the original request.
By itself, this will not do any harm. However, if the servant is evicted and a client then invokes another request on object I, the evictor would have no idea that a servant for I is still around and would add a second servant for I. However, having two servants for the same Ice object in memory is likely to cause problems, especially if the servant’s operation implementations write to a database.
The use count allows us to avoid this problem: we keep track of how many requests are currently executing inside each servant and, while a servant is busy, avoid evicting that servant. As a result, the queue size is not a hard upper limit: long-running operations can temporarily cause more servants than the limit to appear in the queue. However, as soon as excess servants become idle, they are evicted as usual.
The evictor queue does not store the identity of the servant. Instead, the entries on the queue are iterators into the evictor map. This is useful when the time comes to evict a servant: instead of having to search the map for the identity of the servant to be evicted, we can simply delete the map entry that is pointed at by the iterator at the tail of the queue. We can get away with storing an iterator into the evictor queue as part of the map, and storing an iterator into the evictor map as part of the queue because both std::list and std::map do not invalidate forward iterators when we add or delete entries8 (except for invalidating iterators that point at a deleted entry, of course).
8. Reverse iterators can be invalidated by modification of list entries: if a reverse iterator points at rend and the element at the head of the list is erased, the iterator pointing at rend is invali-dated.

980 The Ice Run Time in Detail
Finally, our locate and finished implementations will need to exchange a cookie that contains a smart pointer to the entry in the evictor map. This is necessary so that finished can decrement the servant’s use count.
This leads to the following definitions in the private section of our evictor:
class EvictorBase : public Ice::ServantLocator { // ...private: struct EvictorEntry; typedef IceUtil::Handle<EvictorEntry> EvictorEntryPtr; typedef std::map<Ice::Identity, EvictorEntryPtr> EvictorMap; typedef std::list<EvictorMap::iterator> EvictorQueue; struct EvictorEntry : public Ice::LocalObject { Ice::ObjectPtr servant; Ice::LocalObjectPtr userCookie; EvictorQueue::iterator queuePos; int useCount; }; EvictorMap _map; EvictorQueue _queue; Ice::Int _size; IceUtil::Mutex _mutex; void evictServants();};
Note that the evictor stores the evictor map, queue, and the queue size in the private data members _map, _queue, and _size. In addition, we use a private _mutex data member so we can correctly serialize access to the evictor’s data structures.
The evictServants member function takes care of evicting servants when the queue length exceeds its limit—we will discuss this function in more detail shortly.
The EvictorEntry structure serves as the cookie that we pass from locate to finished; it stores the servant, the servant’s position in the evictor queue, the servant’s use count, and the cookie that we pass from add to evict.

32.9 Server Implementation Techniques 981
The implementation of the constructor is trivial. The only point of note is that we ignore negative sizes:9
EvictorBase::EvictorBase(Ice::Int size) : _size(size){ if (_size < 0) _size = 1000;}
Almost all the action of the evictor takes place in the implementation of locate:
Ice::ObjectPtrEvictorBase::locate(const Ice::Current& c, Ice::LocalObjectPtr& cookie){ IceUtil::Mutex::Lock lock(_mutex); // // Check if we have a servant in the map already. // EvictorEntryPtr entry; EvictorMap::iterator i = _map.find(c.id); if (i != _map.end()) { // // Got an entry already, dequeue the entry from // its current position. // entry = i->second; _queue.erase(entry->queuePos); } else { // // We do not have an entry. Ask the derived class to // instantiate a servant and add a new entry to the map. // entry = new EvictorEntry; entry->servant = add(c, entry->userCookie); // Down-call if (!entry->servant) { return 0; } entry->useCount = 0; i = _map.insert(std::make_pair(c.id, entry)).first; }
9. We could have stored the size as a size_t instead. However, for consistency with the Java implementation, which cannot use unsigned integers, we use Ice::Int to store the size.

982 The Ice Run Time in Detail
// // Increment the use count of the servant and enqueue // the entry at the front, so we get LRU order. // ++(entry->useCount); entry->queuePos = _queue.insert(_queue.begin(), i); cookie = entry; return entry->servant;}
The first step in locate is to lock the _mutex data member. This protects the evictor’s data structures from concurrent access. The next step is to instantiate a smart pointer to an EvictorEntry. That smart pointer acts as the cookie that is returned from locate and will be passed by the Ice run time to the corre-sponding call to finished. That same smart pointer is also the value type of our map entries, so we do not store two copies of the same information redundantly—instead, smart pointers ensure that a single copy of each EvictorEntry struc-ture is shared by both the cookie and the map.
The next step is to look in the evictor map to see whether we already have an entry for this object identity. If so, we remove the entry from its current queue position.
Otherwise, we do not have an entry for this object identity yet, so we have to create one. The code creates a new evictor entry, and then calls add to get a new servant. This is a down-call to the concrete class that will be derived from Evic-torBase. The implementation of add must attempt to locate the object state for the Ice object with the identity passed inside the Current object and either return a servant as usual, or return null or throw an exception to indicate failure. If add returns null, we return zero to let the Ice run time know that no servant could be found for the current request. If add succeeds, we initialize the entry’s use count to zero and insert the entry into the evictor map.
The last few lines of locate add the entry for the current request to the head of the evictor queue to maintain its LRU property, increment the use count of the entry, set the cookie that is returned from locate to point at the EvictorEntry, and finally return the servant to the Ice run time.
The implementation of finished is comparatively simple. It decrements the use count of the entry and then calls evictServants to get rid of any servants that might need to be evicted:

32.9 Server Implementation Techniques 983
voidEvictorBase::finished(const Ice::Current&, const Ice::ObjectPtr&, const Ice::LocalObjectPtr& cookie){ IceUtil::Mutex::Lock lock(_mutex); EvictorCookiePtr ec = EvictorCookiePtr::dynamicCast(cookie); // Decrement use count and check if // there is something to evict. // --(ec->entry->useCount); evictServants();}
In turn, evictServants examines the evictor queue: if the queue length exceeds the evictor’s size, the excess entries are scanned. Any entries with a zero use count are then evicted:
voidEvictorBase::evictServants(){ // // If the evictor queue has grown larger than the limit, // look at the excess elements to see whether any of them // can be evicted. // EvictorQueue::reverse_iterator p = _queue.rbegin(); int excessEntries = static_cast<int>(_map.size() - _size); for (int i = 0; i < excessEntries; ++i) { EvictorMap::iterator mapPos = *p; if (mapPos->second->useCount == 0) { evict(mapPos->second->servant, mapPos->second->userCookie); p = EvictorQueue::reverse_iterator( _queue.erase(mapPos->second->queuePos)); _map.erase(mapPos); } else ++p; }}
The code scans the excess entries, starting at the tail of the evictor queue. If an entry has a zero use count, it is evicted: after calling the evict member function

984 The Ice Run Time in Detail
in the derived class, the code removes the evicted entry from both the map and the queue.
Finally, the implementation of deactivate sets the evictor size to zero and then calls evictServants. This results in eviction of all servants. The Ice run time guarantees to call deactivate only once no more requests are executing in an object adapter; as a result, it is guaranteed that all entries in the evictor will be idle and therefore will be evicted.
voidEvictorBase::deactivate(const std::string& category){ IceUtil::Mutex::Lock lock(_mutex); _size = 0; evictServants();}
Note that, with this implementation of evictServants, we only scan the tail section of the evictor queue for servants to evict. If we have long-running opera-tions, this allows the number of servants in the queue to remain above the evictor size if the servants in the tail section have a non-zero use count. This means that, even immediately after calling evictServants, the queue length can still exceed the evictor size.
We can adopt a more aggressive strategy for eviction: instead of scanning only the excess entries in the queue, if, after looking in the tail section of the queue, we still have more servants in the queue than the queue size, we keep scanning for servants with a zero use count until the queue size drops below the limit. This alternative version of evictServants looks as follows:
voidEvictorBase::evictServants(){ // // If the evictor queue has grown larger than the limit, // try to evict servants until the length drops // below the limit. // EvictorQueue::reverse_iterator p = _queue.rbegin(); int numEntries = static_cast<int>_map.size(); for (int i = 0; i < numEntries && _map.size() > _size; ++i) { EvictorMap::iterator mapPos = *p; if (mapPos->second->useCount == 0) { evict(mapPos->second->servant,

32.9 Server Implementation Techniques 985
mapPos->second->userCookie); p = EvictorQueue::reverse_iterator( _queue.erase(mapPos->second->queuePos)); _map.erase(mapPos); } else ++p; }}
The only difference in this version is that terminating condition for the for-loop has changed: instead of scanning only the excess entries for servants with a use count, this version keeps scanning until the evictor size drops below the limit.
Which version is more appropriate depends on your application: if locating and evicting servants is expensive, and memory is not at a premium, the first version (which only scans the tail section) is more appropriate; if you want to keep memory consumption to a minimum, the second version in more appropriate. Also keep in mind that the difference between the two versions is significant only if you have long-running operations and many concurrent invocations from clients; otherwise, there is no point in more aggressively scanning for servants to remove because they are going to become idle again very quickly and get evicted as soon as the next request arrives.
Creating an Evictor Implementation in Java
The evictor we show here is designed as an abstract base class: in order to use it, you derive an object from the Evictor.EvictorBase base class and imple-ment two methods that are called by the evictor when it needs to add or evict a servant. This leads to a class definition as follows:
package Evictor;public abstract class EvictorBase implements Ice.ServantLocator{ public EvictorBase() { _size = 1000; } public EvictorBase(int size) { _size = size < 0 ? 1000 : size; }

986 The Ice Run Time in Detail
public abstract Ice.Object add(Ice.Current c, Ice.LocalObjectHolder cookie); public abstract void evict(Ice.Object servant, java.lang.Object cookie); synchronized public final Ice.Object locate(Ice.Current c, Ice.LocalObjectHolder cookie) { // ... } synchronized public final void finished(Ice.Current c, Ice.Object o, java.lang.Object cookie) { // ... } synchronized public final void deactivate(String category) { // ... } // ... private int _size;}
Note that the evictor has constructors to set the size of the queue, with a default size of 1000.
The locate, finished, and deactivate methods are inherited from the ServantLocator base class; these methods implement the logic to maintain the queue in LRU order and to add and evict servants as needed. The methods are synchronized, so the evictor’s internal data structures are protected from concur-rent access.
The add and evict methods are called by the evictor when it needs to add a new servant to the queue and when it evicts a servant from the queue. Note that these functions are abstract, so they must be implemented in a derived class. The job of add is to instantiate and initialize a servant for use by the evictor. The evict function is called by the evictor when it evicts a servant. This allows

32.9 Server Implementation Techniques 987
evict to perform any cleanup. Note that add can return a cookie that the evictor passes to evict, so you can move context information from add to evict.
Next, we need to consider the data structures that are needed to support our evictor implementation. We require two main data structures:
1. A map that maps object identities to servants, so we can efficiently decide whether we have a servant for an incoming request in memory or not.
2. A list that implements the evictor queue. The list is kept in LRU order at all times.
The evictor map does not only store servants but also keeps track of some admin-istrative information:
1.The map stores the cookie that is returned from add, so we can pass that same cookie to evict.
2.The map stores an iterator into the evictor queue that marks the position of the servant in the queue.
3.The map stores a use count that is incremented whenever an operation is dispatched into a servant, and decremented whenever an operation completes.
The last two points deserve some extra explanation.
• The evictor queue must be maintained in least-recently used order, that is, every time an invocation arrives and we find an entry for the identity in the evictor map, we also must locate the servant’s identity on the evictor queue and move it to the front of the queue. However, scanning for that entry is inef-ficient because it requires O(n) time. To get around this, we store an iterator in the evictor map that marks the corresponding entry’s position in the evictor queue. This allows us to dequeue the entry from its current position and enqueue it at the head of the queue in O(1) time.
Unfortunately, the various lists provided by java.util do not allow us to keep an iterator to a list position without invalidating that iterator as the list is updated. To deal with this, we use a special-purpose linked list implementa-tion, Evictor.LinkedList, that does not have this limitation. LinkedList has an interface similar to java.util.LinkedList but does not invalidate iterators other than iterators that point at an element that is removed. For brevity, we do not show the implementation of this list here—you can find the implementation in the code examples for this book in the Ice distribution.

988 The Ice Run Time in Detail
• We maintain a use count as part of the map in order to avoid incorrect eviction of servants. Suppose a client invokes a long-running operation on an Ice object with identity I. In response, the evictor adds a servant for I to the evictor queue. While the original invocation is still executing, other clients invoke operations on various Ice objects, which leads to more servants for other object identities being added to the queue. As a result, the servant for identity I gradually migrates toward the tail of the queue. If enough client requests for other Ice objects arrive while the operation on object I is still executing, the servant for I could be evicted while it is still executing the orig-inal request.
By itself, this will not do any harm. However, if the servant is evicted and a client then invokes another request on object I, the evictor would have no idea that a servant for I is still around and would add a second servant for I. However, having two servants for the same Ice object in memory is likely to cause problems, especially if the servant’s operation implementations write to a database.
The use count allows us to avoid this problem: we keep track of how many requests are currently executing inside each servant and, while a servant is busy, avoid evicting that servant. As a result, the queue size is not a hard upper limit: long-running operations can temporarily cause more servants than the limit to appear in the queue. However, as soon as excess servants become idle, they are evicted as usual.
Finally, our locate and finished implementations will need to exchange a cookie that contains a smart pointer to the entry in the evictor map. This is neces-sary so that finished can decrement the servant’s use count.
This leads to the following definitions in the private section of our evictor:
package Evictor;public abstract class EvictorBase implements Ice.ServantLocator{ // ... private class EvictorEntry { Ice.Object servant; java.lang.Object userCookie; java.util.Iterator<Ice.Identity> queuePos; int useCount; }

32.9 Server Implementation Techniques 989
private void evictServants() { // ... } private java.util.Map<Ice.Identity, EvictorEntry> _map = new java.util.HashMap<Ice.Identity, EvictorEntry>(); private Evictor.LinkedList<Ice.Identity> _queue = new Evictor.LinkedList<Ice.Identity>(); private int _size;}
Note that the evictor stores the evictor map, queue, and the queue size in the private data members _map, _queue, and _size. The map key is the identity of the Ice object, and the lookup value is of type EvictorEntry. The queue simply stores identities, of type Ice::Identity.
The evictServants member function takes care of evicting servants when the queue length exceeds its limit—we will discuss this function in more detail shortly.
Almost all the action of the evictor takes place in the implementation of locate:
synchronized public final Ice.Objectlocate(Ice.Current c, Ice.LocalObjectHolder cookie){ // // Check if we have a servant in the map already. // EvictorEntry entry = _map.get(c.id); if (entry != null) { // // Got an entry already, dequeue the entry from // its current position. // entry.queuePos.remove(); } else { // // We do not have entry. Ask the derived class to // instantiate a servant and add a new entry to the map. // entry = new EvictorEntry(); Ice.LocalObjectHolder cookieHolder = new Ice.LocalObjectHolder(); entry.servant = add(c, cookieHolder); // Down-call if (entry.servant == null) {

990 The Ice Run Time in Detail
return null; } entry.userCookie = cookieHolder.value; entry.useCount = 0; _map.put(c.id, entry); } // // Increment the use count of the servant and enqueue // the entry at the front, so we get LRU order. // ++(entry.useCount); _queue.addFirst(c.id); entry.queuePos = _queue.iterator(); entry.queuePos.next(); // Position iterator on the element. cookie.value = entry; return entry.servant;}
The code uses an EvictorEntry as the cookie that is returned from locate and will be passed by the Ice run time to the corresponding call to finished.
We first look for an existing entry in the evictor map, using the object identity as the key. If we have an entry in the map already, we dequeue the corresponding identity from the evictor queue. (The queuePos member of EvictorEntry is an iterator that marks that entry’s position in the evictor queue.)
Otherwise, we do not have an entry in the map, so we create a new one and call the add method. This is a down-call to the concrete class that will be derived from EvictorBase. The implementation of add must attempt to locate the object state for the Ice object with the identity passed inside the Current object and either return a servant as usual, or return null or throw an exception to indicate failure. If add returns null, we return null to let the Ice run time know that no servant could be found for the current request. If add succeeds, we initialize the entry’s use count to zero and insert the entry into the evictor map.
The final few lines of code increment the entry’s use count, add the entry at the head of the evictor queue, store the entry’s position in the queue, and assign the entry to the cookie that is returned from locate, before returning the servant to the Ice run time.
The implementation of finished is comparatively simple. It decrements the use count of the entry and then calls evictServants to get rid of any servants that might need to be evicted:

32.9 Server Implementation Techniques 991
synchronized public final voidfinished(Ice.Current c, Ice.Object o, java.lang.Object cookie){ EvictorEntry entry = (EvictorEntry)cookie; // Decrement use count and check if // there is something to evict. // --(entry.useCount); evictServants();}
In turn, evictServants examines the evictor queue: if the queue length exceeds the evictor’s size, the excess entries are scanned. Any entries with a zero use count are then evicted:
private void evictServants(){ // // If the evictor queue has grown larger than the limit, // look at the excess elements to see whether any of them // can be evicted. // java.util.Iterator<Ice.Identity> p = _queue.riterator(); int excessEntries = _map.size() - _size; for (int i = 0; i < excessEntries; ++i) { Ice.Identity id = p.next(); EvictorEntry e = _map.get(id); if (e.useCount == 0) { evict(e.servant, e.userCookie); // Down-call e.queuePos.remove(); _map.remove(id); } }}
The code scans the excess entries, starting at the tail of the evictor queue. If an entry has a zero use count, it is evicted: after calling the evict member function in the derived class, the code removes the evicted entry from both the map and the queue.
Finally, the implementation of deactivate sets the evictor size to zero and then calls evictServants. This results in eviction of all servants. The Ice run time guarantees to call deactivate only once no more requests are executing in an object adapter; as a result, it is guaranteed that all entries in the evictor will be idle and therefore will be evicted.

992 The Ice Run Time in Detail
synchronized public final voiddeactivate(String category){ _size = 0; evictServants();}
Note that, with this implementation of evictServants, we only scan the tail section of the evictor queue for servants to evict. If we have long-running opera-tions, this allows the number of servants in the queue to remain above the evictor size if the servants in the tail section have a non-zero use count. This means that, even immediately after calling evictServants, the queue length can still exceed the evictor size.
We can adopt a more aggressive strategy for eviction: instead of scanning only the excess entries in the queue, if, after looking in the tail section of the queue, we still have more servants in the queue than the queue size, we keep scanning for servants with a zero use count until the queue size drops below the limit. This alternative version of evictServants looks as follows:
private void evictServants(){ // // If the evictor queue has grown larger than the limit, // look at the excess elements to see whether any of them // can be evicted. // java.util.Iterator<Ice.Identity> p = _queue.riterator(); int numEntries = _map.size(); for (int i = 0; i < excessEntries && _map.size() > _size; ++i) { Ice.Identity id = p.next(); EvictorEntry e = _map.get(id); if (e.useCount == 0) { evict(e.servant, e.userCookie); // Down-call e.queuePos.remove(); _map.remove(id); } }}
The only difference in this version is that terminating condition for the for-loop has changed: instead of scanning only the excess entries for servants with a use count, this version keeps scanning until the evictor size drops below the limit.

32.9 Server Implementation Techniques 993
Which version is more appropriate depends on your application: if locating and evicting servants is expensive, and memory is not at a premium, the first version (which only scans the tail section) is more appropriate; if you want to keep memory consumption to a minimum, the second version in more appropriate. Also keep in mind that the difference between the two versions is significant only if you have long-running operations and many concurrent invocations from clients; otherwise, there is no point in more aggressively scanning for servants to remove because they are going be become idle again very quickly and get evicted as soon as the next request arrives.
Creating an Evictor Implementation in C#
The System.Collections classes do not provide a container that does not invalidate iterators when we modify the contents of the container but, to efficiently implement an evictor, we need such a container. To deal with this, we use a special-purpose linked list implementation, Evictor.LinkedList, that does not invalidate iterators when we delete or add an element. For brevity, we only show the interface of LinkedList here—you can find the implementation in the code examples for this book in the Ice for .NET distribution.
namespace Evictor{ public class LinkedList<T> : ICollection<T>, ICollection, ICloneable { public LinkedList(); public int Count { get; } public void Add(T value); public void AddFirst(T value); public void Clear(); public bool Contains(T value); public bool Remove(T value); public IEnumerator GetEnumerator(); public class Enumerator : IEnumerator<T>, IEnumerator, IDisposable { public void Reset(); public T Current { get; }

994 The Ice Run Time in Detail
public bool MoveNext(); public bool MovePrev(); public void Remove(); public void Dispose(); } public void CopyTo(T[] array, int index); public void CopyTo(Array array, int index); public object Clone(); public bool IsReadOnly { get; } public bool IsSynchronized { get; } public object SyncRoot { get; } }}
The Add method appends an element to the list, and the AddFirst method prepends an element to the list. GetEnumerator returns an enumerator for the list elements; immediately after calling GetEnumerator, the enumerator does not point at any element until you call either MoveNext or MovePrev, which position the enumerator at the first and last element, respectively. Current returns the element at the enumerator position, and Remove deletes the element at the current position and leaves the enumerator pointing at no element. Calling MoveNext or MovePrev after calling Remove positions the enumerator at the element following or preceding the deleted element, respectively. MoveNext and MovePrev return true if they have positioned the enumerator on an element; otherwise, they return false and leave the enumerator position on the last and first element, respectively.
Given this LinkedList, we can implement the evictor. The evictor we show here is designed as an abstract base class: in order to use it, you derive an object from the Evictor.EvictorBase base class and implement two methods that are called by the evictor when it needs to add or evict a servant. This leads to a class definitions as follows:
namespace Evictor{ public abstract class EvictorBase : Ice.ServantLocator { public EvictorBase() { _size = 1000;

32.9 Server Implementation Techniques 995
} public EvictorBase(int size) { _size = size < 0 ? 1000 : size; } protected abstract Ice.Object add(Ice.Current c, out object cookie); protected abstract void evict(Ice.Object servant, object cookie); public Ice.Object locate(Ice.Current c, out object cookie) { lock(this) { // ... } } public void finished(Ice.Current c, Ice.Object o, object cookie) { lock(this) { // ... } } public void deactivate(string category) { lock(this) { // ... } } private int _size; }}
Note that the evictor has constructors to set the size of the queue, with a default size of 1000.

996 The Ice Run Time in Detail
The locate, finished, and deactivate methods are inherited from the ServantLocator base class; these methods implement the logic to maintain the queue in LRU order and to add and evict servants as needed. The methods use a lock(this) statement for their body, so the evictor’s internal data structures are protected from concurrent access.
The add and evict methods are called by the evictor when it needs to add a new servant to the queue and when it evicts a servant from the queue. Note that these functions are abstract, so they must be implemented in a derived class. The job of add is to instantiate and initialize a servant for use by the evictor. The evict function is called by the evictor when it evicts a servant. This allows evict to perform any cleanup. Note that add can return a cookie that the evictor passes to evict, so you can move context information from add to evict.
Next, we need to consider the data structures that are needed to support our evictor implementation. We require two main data structures:
1. A map that maps object identities to servants, so we can efficiently decide whether we have a servant for an incoming request in memory or not.
2. A list that implements the evictor queue. The list is kept in LRU order at all times.
The evictor map does not only store servants but also keeps track of some admin-istrative information:
1.The map stores the cookie that is returned from add, so we can pass that same cookie to evict.
2.The map stores an iterator into the evictor queue that marks the position of the servant in the queue.
3.The map stores a use count that is incremented whenever an operation is dispatched into a servant, and decremented whenever an operation completes.
The last two points deserve some extra explanation.
• The evictor queue must be maintained in least-recently used order, that is, every time an invocation arrives and we find an entry for the identity in the evictor map, we also must locate the servant’s identity on the evictor queue and move it to the front of the queue. However, scanning for that entry is inef-ficient because it requires O(n) time. To get around this, we store an iterator in the evictor map that marks the corresponding entry’s position in the evictor queue. This allows us to dequeue the entry from its current position and enqueue it at the head of the queue in O(1) time, using the Evictor.LinkedList implementation we saw on page 993.

32.9 Server Implementation Techniques 997
• We maintain a use count as part of the map in order to avoid incorrect eviction of servants. Suppose a client invokes a long-running operation on an Ice object with identity I. In response, the evictor adds a servant for I to the evictor queue. While the original invocation is still executing, other clients invoke operations on various Ice objects, which leads to more servants for other object identities being added to the queue. As a result, the servant for identity I gradually migrates toward the tail of the queue. If enough client requests for other Ice objects arrive while the operation on object I is still executing, the servant for I could be evicted while it is still executing the orig-inal request.
By itself, this will not do any harm. However, if the servant is evicted and a client then invokes another request on object I, the evictor would have no idea that a servant for I is still around and would add a second servant for I. However, having two servants for the same Ice object in memory is likely to cause problems, especially if the servant’s operation implementations write to a database.
The use count allows us to avoid this problem: we keep track of how many requests are currently executing inside each servant and, while a servant is busy, avoid evicting that servant. As a result, the queue size is not a hard upper limit: long-running operations can temporarily cause more servants than the limit to appear in the queue. However, as soon as excess servants become idle, they are evicted as usual.
Finally, our locate and finished implementations will need to exchange a cookie that contains a smart pointer to the entry in the evictor map. This is neces-sary so that finished can decrement the servant’s use count.
This leads to the following definitions in the private section of our evictor:
namespace Evictor{ using System.Collections.Generic; public abstract class EvictorBase : Ice.ServantLocator { // ... private class EvictorEntry { internal Ice.Object servant; internal object userCookie; internal LinkedList<Ice.Identity>.Enumerator queuePos;

998 The Ice Run Time in Detail
internal int useCount; } private void evictServants() { // ... } private Dictionary<Ice.Identity, EvictorEntry> _map = new Dictionary<Ice.Identity, EvictorEntry>(); private LinkedList<Ice.Identity> _queue = new LinkedList<Ice.Identity>(); private int _size; }}
Note that the evictor stores the evictor map, queue, and the queue size in the private data members _map, _queue, and _size. The map key is the identity of the Ice object, and the lookup value is of type EvictorEntry. The queue simply stores identities, of type Ice.Identity.
The evictServants member function takes care of evicting servants when the queue length exceeds its limit—we will discuss this function in more detail shortly.
Almost all the action of the evictor takes place in the implementation of locate:
public Ice.Object locate(Ice.Current c, out object cookie){ lock(this) { // // Check if we a servant in the map already. // EvictorEntry entry = _map[c.id]; if (entry != null) { // // Got an entry already, dequeue the entry from // its current position. // entry.queuePos.Remove(); } else { // // We do not have an entry. Ask the derived class to // instantiate a servant and add an entry to the map.

32.9 Server Implementation Techniques 999
// entry = new EvictorEntry(); entry.servant = add(c, out entry.userCookie); if (entry.servant == null) { cookie = null; return null; } entry.useCount = 0; _map[c.id] = entry; } // // Increment the use count of the servant and enqueue // the entry at the front, so we get LRU order. // ++(entry.useCount); _queue.AddFirst(c.id); entry.queuePos = (LinkedList<Ice.Identity>.Enumerator) _queue.GetEnumerator(); entry.queuePos.MoveNext(); cookie = entry; return entry.servant; }}
The code uses an EvictorEntry as the cookie that is returned from locate and will be passed by the Ice run time to the corresponding call to finished.
We first look for an existing entry in the evictor map, using the object identity as the key. If we have an entry in the map already, we dequeue the corresponding identity from the evictor queue. (The queuePos member of EvictorEntry is an iterator that marks that entry’s position in the evictor queue.)
Otherwise, we do not have an entry in the map, so we create a new one and call the add method. This is a down-call to the concrete class that will be derived from EvictorBase. The implementation of add must attempt to locate the object state for the Ice object with the identity passed inside the Current object and either return a servant as usual, or return null or throw an exception to indicate failure. If add returns null, we return null to let the Ice run time know that no servant could be found for the current request. If add succeeds, we initialize the entry’s use count to zero and insert the entry into the evictor map.
The final few lines of code increment the entry’s use count, add the entry at the head of the evictor queue, store the entry’s position in the queue, and initialize the

1000 The Ice Run Time in Detail
cookie that is returned from locate, before returning the servant to the Ice run time.
The implementation of finished is comparatively simple. It decrements the use count of the entry and then calls evictServants to get rid of any servants that might need to be evicted:
public void finished(Ice.Current c, Ice.Object o, object cookie){ lock(this) { EvictorEntry entry = (EvictorEntry)cookie; // // Decrement use count and check if // there is something to evict. // --(entry.useCount); evictServants(); }}
In turn, evictServants examines the evictor queue: if the queue length exceeds the evictor’s size, the excess entries are scanned. Any entries with a zero use count are then evicted:
private void evictServants(){ // // If the evictor queue has grown larger than the limit, // look at the excess elements to see whether any of them // can be evicted. // LinkedList<Ice.Identity>.Enumerator p = (LinkedList<Ice.Identity>.Enumerator) _queue.GetEnumerator(); int excessEntries = _map.Count - _size; for (int i = 0; i < excessEntries; ++i) { p.MovePrev(); Ice.Identity id = p.Current; EvictorEntry e = _map[id]; if (e.useCount == 0) { evict(e.servant, e.userCookie); // Down-call p.Remove();

32.9 Server Implementation Techniques 1001
_map.Remove(id); } }}
The code scans the excess entries, starting at the tail of the evictor queue. If an entry has a zero use count, it is evicted: after calling the evict member function in the derived class, the code removes the evicted entry from both the map and the queue.
Finally, the implementation of deactivate sets the evictor size to zero and then calls evictServants. This results in eviction of all servants. The Ice run time guarantees to call deactivate only once no more requests are executing in an object adapter; as a result, it is guaranteed that all entries in the evictor will be idle and therefore will be evicted.
public void deactivate(string category){ lock(this) { _size = 0; evictServants(); }}
Note that, with this implementation of evictServants, we only scan the tail section of the evictor queue for servants to evict. If we have long-running opera-tions, this allows the number of servants in the queue to remain above the evictor size if the servants in the tail section have a non-zero use count. This means that, even immediately after calling evictServants, the queue length can still exceed the evictor size.
We can adopt a more aggressive strategy for eviction: instead of scanning only the excess entries in the queue, if, after looking in the tail section of the queue, we still have more servants in the queue than the queue size, we keep scanning for servants with a zero use count until the queue size drops below the limit. This alternative version of evictServants looks as follows:
private void evictServants(){ // // If the evictor queue has grown larger than the limit, // look at the excess elements to see whether any of them // can be evicted. // LinkedList<Ice.Identity>.Enumerator p =

1002 The Ice Run Time in Detail
(LinkedList<Ice.Identity>.Enumerator) _queue.GetEnumerator(); int numEntries = _map.Count; for (int i = 0; i < numEntries && _map.Count > _size; ++i) { p.MovePrev(); Ice.Identity id = p.Current; EvictorEntry e = _map[id]; if (e.useCount == 0) { evict(e.servant, e.userCookie); // Down-call p.Remove(); _map.Remove(id); } }}
The only difference in this version is that terminating condition for the for-loop has changed: instead of scanning only the excess entries for servants with a use count, this version keeps scanning until the evictor size drops below the limit.
Which version is more appropriate depends on your application: if locating and evicting servants is expensive, and memory is not at a premium, the first version (which only scans the tail section) is more appropriate; if you want to keep memory consumption to a minimum, the second version in more appropriate. Also keep in mind that the difference between the two versions is significant only if you have long-running operations and many concurrent invocations from clients; otherwise, there is no point in more aggressively scanning for servants to remove because they are going be become idle again very quickly and get evicted as soon as the next request arrives.
Using Servant Evictors
Using a servant evictor is simply a matter of deriving a class from Evictor-Base and implementing the add and evict methods. You can turn a servant locator into an evictor by simply taking the code that you wrote for locate and placing it into add—EvictorBase then takes care of maintaining the cache in least-recently used order and evicting servants as necessary. Unless you have clean-up requirements for your servants (such as closing network connections or database handles), the implementation of evict can be left empty.
One of the nice aspects of evictors is that you do not need to change anything in your servant implementation: the servants are ignorant of the fact that an evictor is in use. This makes it very easy to add an evictor to an already existing code base with little disturbance of the source code.

32.10 The Ice Threading Model 1003
Evictors can provide substantial performance improvements over default servants: especially if initialization of servants is expensive (for example, because servant state must be initialized by reading from a network), an evictor performs much better than a default servant, while keeping memory requirements low.
32.10 The Ice Threading Model
Ice is inherently a multi-threaded platform. There is no such thing as a single-threaded server in Ice. As a result, you must concern yourself with concurrency issues: if a thread reads a data structure while another thread updates the same data structure, havoc will ensue unless you protect the data structure with appro-priate locks. In order to build Ice applications that behave correctly, it is important that you understand the threading semantics of the Ice run time. This section discusses Ice’s thread pool concurrency model and provides guidelines for writing thread-safe Ice applications.
32.10.1 Introduction to Thread Pools
A thread pool is a collection of threads that the Ice run time draws upon to perform specific tasks. Each communicator creates two thread pools:
• The client thread pool services outgoing connections, which primarily involves handling the replies to outgoing requests and includes notifying AMI callback objects. If a connection is used in bidirectional mode (see Section 36.7), the client thread pool also dispatches incoming callback requests.
• The server thread pool services incoming connections. It dispatches incoming requests and, for bidirectional connections, processes replies to outgoing requests.
By default, these two thread pools are shared by all of the communicator’s object adapters. If necessary, you can configure individual object adapters to use a private thread pool instead.
If a thread pool is exhausted because all threads are currently dispatching a request, additional incoming requests are transparently delayed until a request completes and relinquishes its thread; that thread is then used to dispatch the next pending request. Ice minimizes thread context switches in a thread pool by using a leader-follower implementation (see [17]).

1004 The Ice Run Time in Detail
32.10.2 Configuring Thread Pools
Each thread pool has a unique name that serves as the prefix for its configuration properties:
• name.Size
This property specifies the initial size of the thread pool. If not defined, the default value is one.
• name.SizeMax
This property specifies the maximum size of the thread pool. If not defined, the default value is one. If the value of this property is less than that of name.Size, this property is adjusted to be equal to name.Size.
• name.SizeWarn
This property sets a high water mark; when the number of threads in a pool reaches this value, the Ice run time logs a warning message. If you see this warning message frequently, it could indicate that you need to increase the value of name.SizeMax. The default value is zero, which disables the warning.
• name.StackSize
This property specifies the number of bytes to use as the stack size of threads in the thread pool. The operating system’s default is used if this property is not defined or is set to zero.
• name.Serialize
Setting this property to a value greater than zero forces the thread pool to seri-alize all messages received over a connection. It is unnecessary to enable seri-alization for a thread pool whose maximum size is one because such a thread pool is already limited to processing one message at a time. For thread pools with more than one thread, serialization has a negative impact on latency and throughput. If not defined, the default value is zero.
We discuss this feature in more detail in Section 32.10.4.
• name.ThreadIdleTime
This property specifies the number of seconds that a thread in the thread pool must be idle before it terminates. The default value is 60 seconds if this prop-erty is not defined. Setting it to zero disables the termination of idle threads.
For configuration purposes, the names of the client and server thread pools are Ice.ThreadPool.Client and Ice.ThreadPool.Server, respectively.

32.10 The Ice Threading Model 1005
As an example, the following properties establish the initial and maximum sizes for these thread pools:
Ice.ThreadPool.Client.Size=1Ice.ThreadPool.Client.SizeMax=10Ice.ThreadPool.Server.Size=1Ice.ThreadPool.Server.SizeMax=10
To monitor the thread pool activities of the Ice run time, you can enable the Ice.Trace.ThreadPool property. Setting this property to a non-zero value causes the Ice run time to log a message when it creates a thread pool, as well as each time the size of a thread pool increases or decreases.
Dynamic Thread Pools
A dynamic thread pool can grow and shrink when necessary in response to changes in an application’s work load. All thread pools have at least one thread, but a dynamic thread pool can grow as the demand for threads increases, up to the pool’s maximum size. Threads may also be terminated automatically when they have been idle for some time.
The dynamic nature of a thread pool is determined by the configuration prop-erties name.Size, name.SizeMax, and name.ThreadIdleTime. A thread pool is not dynamic in its default configuration because name.Size and name.SizeMax are both set to one, meaning the pool can never grow to contain more than a single thread. To configure a dynamic thread pool, you must set at least one of name.Size or name.SizeMax to a value greater than one. We can use several configuration scenarios to explore the semantics of dynamic thread pools in greater detail:
• name.SizeMax=5
This thread pool initially contains a single thread because name.Size has a default value of one, and Ice can grow the pool up to the maximum of five threads. During periods of inactivity, idle threads terminate after 60 seconds (the default value for name.ThreadIdleTime) until the pool contains just one thread again.
• name.Size=3name.SizeMax=5
This thread pool starts with three active threads but otherwise behaves the same as in the previous configuration. The pool can still shrink to a size of one as threads become idle.

1006 The Ice Run Time in Detail
• name.Size=3name.ThreadIdleTime=10
This thread pool starts with three active threads and shrinks quickly to one thread during periods of inactivity. As demand increases again, the thread pool can return to its maximum size of three threads (name.SizeMax defaults to the value of name.Size).
• name.SizeMax=5name.ThreadIdleTime=0
This thread pool can grow from its initial size of one thread to contain up to five threads, but it will never shrink because name.ThreadIdleTime is set to zero.
• name.Size=5name.ThreadIdleTime=0
This thread pool starts with five threads and can neither grow nor shrink.
To summarize, the value of name.ThreadIdleTime determines whether (and how quickly) a thread pool can shrink to a size of one. A thread pool that shrinks can also grow to its maximum size. Finally, setting name.SizeMax to a value larger than name.Size allows a thread pool to grow beyond its initial capacity.
32.10.3 Adapter Thread Pools
The default behavior of an object adapter is to share the thread pools of its communicator and, for many applications, this behavior is entirely sufficient. However, the ability to configure an object adapter with its own thread pool is useful in certain situations:
• When the concurrency requirements of an object adapter does not match those of its communicator.
In a server with multiple object adapters, the configuration of the communi-cator’s client and server thread pools may be a good match for some object adapters, but others may have different requirements. For example, the servants hosted by one object adapter may not support concurrent access, in which case limiting that object adapter to a single-threaded pool eliminates the need for synchronization in those servants. On the other hand, another object adapter might need a multi-threaded pool for better performance.
• To ensure that a minimum number of threads is available for dispatching requests to an adapter’s servants. This is especially important for eliminating

32.10 The Ice Threading Model 1007
the possibility of deadlocks when using nested invocations (see Section 32.10.5).
An object adapter’s thread pool supports all of the properties described in Section 32.10.2. For configuration purposes, the name of an adapter’s thread pool is adapter.ThreadPool, where adapter is the name of the adapter.
An adapter creates its own thread pool when at least one of the following prop-erties has a value greater than zero:
• adapter.ThreadPool.Size
• adapter.ThreadPool.SizeMax
These properties have the same semantics as those described earlier except they both have a default value of zero, meaning that an adapter uses the communi-cator’s thread pools by default.
As an example, the properties shown below configure a thread pool for the object adapter named PrinterAdapter:
PrinterAdapter.ThreadPool.Size=3PrinterAdapter.ThreadPool.SizeMax=15PrinterAdapter.ThreadPool.SizeWarn=14
32.10.4 Design ConsiderationsImproper configuration of a thread pool can have a serious impact on the perfor-mance of your application. This section discusses some issues that you should consider when designing and configuring your applications.
Single-Threaded Pool
There are several implications of using a thread pool with a maximum size of one thread:
• Only one message can be dispatched at a time.
This can be convenient because it lets you avoid (or postpone) dealing with thread-safety issues in your application (see Section 32.10.6). However, it also eliminates the possibility of dispatching requests concurrently, which can be a bottleneck for applications running on multi-CPU systems or that perform blocking operations. Another option is to enable serialization in a multi-threaded pool, as discussed on page 1008.
• Only one AMI reply can be processed at a time.
An application must increase the size of the client thread pool in order to process multiple AMI callbacks in parallel.

1008 The Ice Run Time in Detail
• Nested twoway invocations are limited.
At most one level of nested twoway invocations is possible. (See Section 32.10.5.)
It is important to remember that a communicator’s client and server thread pools have a default maximum size of one thread, therefore these limitations also apply to any object adapter that shares the communicator’s thread pools.
Multi-Threaded Pool
Configuring a thread pool to support multiple threads implies that the application is prepared for the Ice run time to dispatch operation invocations or AMI callbacks concurrently. Although greater effort is required to design a thread-safe applica-tion, you are rewarded with the ability to improve the application’s scalability and throughput.
Choosing an appropriate maximum size for a thread pool requires careful analysis of your application. For example, in compute-bound applications it is best to limit the number of threads to the number of physical processors in the host machine; adding any more threads only increases context switches and reduces performance. Increasing the size of the pool beyond the number of processors can improve responsiveness when threads can become blocked while waiting for the operating system to complete a task, such as a network or file operation. On the other hand, a thread pool configured with too many threads can have the opposite effect and negatively impact performance. Testing your application in a realistic environment is the recommended way of determining the optimum size for a thread pool.
If your application uses nested invocations, it is very important that you eval-uate whether it is possible for thread starvation to cause a deadlock. Increasing the size of a thread pool can lessen the chance of a deadlock, but other design solu-tions are usually preferred. Section 32.10.5 discusses nested invocations in more detail.
Serialization
When using a multi-threaded pool, the nondeterministic nature of thread sched-uling means that requests from the same connection may not be dispatched in the order they were received. Some applications cannot tolerate this behavior, such as a transaction processing server that must guarantee that requests are executed in order. There are two ways of satisfying this requirement:
1. Use a single-threaded pool.

32.10 The Ice Threading Model 1009
2. Configure a multi-threaded pool to serialize requests using its Serialize property (see Section 32.10.2).
At first glance these two options may seem equivalent, but there is a significant difference: a single-threaded pool can only dispatch one request at a time and therefore serializes requests from all connections, whereas a multi-threaded pool configured for serialization can dispatch requests from different connections concurrently while serializing requests from the same connection.
You can obtain the same behavior from a multi-threaded pool without enabling serialization, but only if you design the clients so that they do not send requests from multiple threads, do not send requests over more than one connec-tion, and only use synchronous twoway invocations. In general, however, it is better to avoid such tight coupling between the implementations of the client and server.
Enabling serialization can improve responsiveness and performance compared to a single-threaded pool, but there is an associated cost. The extra synchroniza-tion that the pool must perform to serialize requests adds significant overhead and results in higher latency and reduced throughput.
As you can see, thread pool serialization is not a feature that you should enable without analyzing whether the benefits are worthwhile. For example, it might be an inappropriate choice for a server with long-running operations when the client needs the ability to have several operations in progress simultaneously. If serialization was enabled in this situation, the client would be forced to work around it by opening several connections to the server (see Section 36.3), which again tightly couples the client and server implementations. If the server must keep track of the order of client requests, a better solution would be to use serial-ization in conjunction with asynchronous dispatch to queue the incoming requests for execution by other threads.
32.10.5 Nested Invocations
A nested invocation is one that is made within the context of another Ice opera-tion. For instance, the implementation of an operation in a servant might need to make a nested invocation on some other object, or an AMI callback object might invoke an operation in the course of processing a reply to an asynchronous request. It is also possible for one of these invocations to result in a nested call-back to the originating process. The maximum depth of such invocations is deter-mined by the size of the thread pools used by the communicating parties.

1010 The Ice Run Time in Detail
Deadlocks
Applications that use nested invocations must be carefully designed to avoid the potential for deadlock, which can easily occur when invocations take a circular path. For example, Figure 32.5 presents a deadlock scenario when using the default thread pool configuration.
Figure 32.5. Nested invocation deadlock.
In this diagram, the implementation of opA makes a nested twoway invocation of opB, but the implementation of opB causes a deadlock when it tries to make a nested callback. As mentioned in Section 32.10.1, the communicator’s thread pools have a maximum size of one thread unless explicitly configured otherwise. In Server A, the only thread in the server thread pool is busy waiting for its invo-cation of opB to complete, and therefore no threads remain to handle the callback from Server B. The client is now blocked because Server A is blocked, and they remain blocked indefinitely unless timeouts are used.
There are several ways to avoid a deadlock in this scenario:
• Increase the maximum size of the server thread pool in Server A.
Configuring the server thread pool in Server A to support more than one thread allows the nested callback to proceed. This is the simplest solution, but it requires that you know in advance how deeply nested the invocations may occur, or that you set the maximum size to a sufficiently large value that exhausting the pool becomes unlikely. For example, setting the maximum size to two avoids a deadlock when a single client is involved, but a deadlock could easily occur again if multiple clients invoke opA simultaneously. Furthermore, setting the maximum size too large can cause its own set of problems (see Section 32.10.4).
Client Server A Server B
opA
opB
callback

32.10 The Ice Threading Model 1011
• Use a oneway invocation.
If Server A called opB using a oneway invocation, it would no longer need to wait for a response and therefore opA could complete, making a thread avail-able to handle the callback from Server B. However, we have made a signifi-cant change in the semantics of opA because now there is no guarantee that opB has completed before opA returns, and it is still possible for the oneway invocation of opB to block (see Section 32.14).
• Create another object adapter for the callbacks.
No deadlock occurs if the callback from Server B is directed to a different object adapter that is configured with its own thread pool (see Section 32.10.3).
• Implement opA using asynchronous dispatch and invocation.
By declaring opA as an AMD operation and invoking opB using AMI, Server A can avoid blocking the thread pool’s thread while it waits for opB to complete. This technique, known as asynchronous request chaining, is used extensively in Ice services such as IceGrid and Glacier2 to eliminate the possi-bility of deadlocks.
As another example, consider a client that makes a nested invocation from an AMI callback object using the default thread pool configuration. The (one and only) thread in the client thread pool receives the reply to the asynchronous request and invokes its callback object. If the callback object in turn makes a nested twoway invocation, a deadlock occurs because no more threads are available in the client thread pool to process the reply to the nested invocation. The solutions are similar to some of those presented for Figure 32.5: increase the maximum size of the client thread pool, use a oneway invocation, or call the nested invocation using AMI.
Analyzing an Application
A number of factors must be considered when evaluating whether an application is properly designed and configured for nested invocations:
• The thread pool configurations in use by all communicating parties have a significant impact on an application’s ability to use nested invocations. While analyzing the path of circular invocations, you must pay careful attention to the threads involved to determine whether sufficient threads are available to avoid deadlock. This includes not just the threads that dispatch requests, but also the threads that make the requests and process the replies. Enabling the

1012 The Ice Run Time in Detail
Ice.Trace.ThreadPool can give you a better understanding of the thread pool behavior in your application.
• Bidirectional connections are another complication, since you must be aware of which threads are used on either end of the connection.
• Finally, the synchronization activities of the communicating parties must also be scrutinized. For example, a deadlock is much more likely when a lock is held while making an invocation.
As you can imagine, tracing the call flow of a distributed application to ensure there is no possibility of deadlock can quickly become a complex and tedious process. In general, it is best to avoid circular invocations if at all possible.
32.10.6 Thread Safety
The Ice run time itself is fully thread safe, meaning multiple application threads can safely call methods on objects such as communicators, object adapters, and proxies without synchronization problems. As a developer, you must also be concerned with thread safety because the Ice run time can dispatch multiple invo-cations concurrently in a server. In fact, it is possible for multiple requests to proceed in parallel within the same servant and within the same operation on that servant. It follows that, if the operation implementation manipulates non-stack storage (such as member variables of the servant or global or static data), you must interlock access to this data to avoid data corruption.
The need for thread safety in an application depends on its configuration. Using the default thread pool configuration typically makes synchronization unnecessary because at most one operation can be dispatched at a time. Thread safety becomes an issue once you increase the maximum size of a thread pool.
Ice uses the native synchronization and threading primitives of each platform. For C++ users, Ice provides a collection of convenient and portable wrapper classes for use by Ice applications (see Chapter 31).
Marshaling Issues
The marshaling semantics of the Ice run time present a subtle thread safety issue that arises when an operation returns data by reference. In C++, the only relevant case is returning an instance of a Slice class, either directly or nested as a member of another type. In Java, .NET, and Python, Slice structures, sequences, and dictionaries are also affected.

32.10 The Ice Threading Model 1013
The potential for corruption occurs whenever a servant returns data by refer-ence, yet continues to hold a reference to that data. For example, consider the following Java implementation:
public class GridI extends _GridDisp{ GridI() { _grid = // ... } public int[][] getGrid(Ice.Current curr) { return _grid; } public void setValue(int x, int y, int val, Ice.Current curr) { _grid[x][y] = val; } private int[][] _grid;}
Suppose that a client invoked the getGrid operation. While the Ice run time marshals the returned array in preparation to send a reply message, it is possible for another thread to dispatch the setValue operation on the same servant. This race condition can result in several unexpected outcomes, including a failure during marshaling or inconsistent data in the reply to getGrid. Synchronizing the getGrid and setValue operations would not fix the race condition because the Ice run time performs its marshaling outside of this synchronization.
One solution is to implement accessor operations, such as getGrid, so that they return copies of any data that might change. There are several drawbacks to this approach:
• Excessive copying can have an adverse affect on performance.
• The operations must return deep copies in order to avoid similar problems with nested values.
• The code to create deep copies is tedious and error-prone to write.

1014 The Ice Run Time in Detail
Another solution is to make copies of the affected data only when it is modified. In the revised code shown below, setValue replaces _grid with a copy that contains the new element, leaving the previous contents of _grid unchanged:
public class GridI extends _GridDisp{ ... public synchronized int[][] getGrid(Ice.Current curr) { return _grid; } public synchronized void setValue(int x, int y, int val, Ice.Current curr) { int[][] newGrid = // shallow copy... newGrid[x][y] = val; _grid = newGrid; } ...}
This allows the Ice run time top safely marshal the return value of getGrid because the array is never modified again. For applications where data is read more often than it is written, this solution is more efficient than the previous one because accessor operations do not need to make copies. Furthermore, intelligent use of shallow copying can minimize the overhead in mutating operations.
Finally, a third approach changes accessor operations to use AMD in order to regain control over marshaling. After annotating the getGrid operation with amd metadata, we can revise the servant as follows:
public class GridI extends _GridDisp{ ... public synchronized void getGrid_async(AMD_Grid_getGrid cb, Ice.Current curr) { cb.ice_response(_grid); } public synchronized void

32.10 The Ice Threading Model 1015
setValue(int x, int y, int val, Ice.Current curr) { _grid[x][y] = val; } ...}
Normally, AMD is used in situations where the servant needs to delay its response to the client without blocking the calling thread. For getGrid, that is not the goal; instead, as a side-effect, AMD provides the desired marshaling behavior. Specifi-cally, the Ice run time marshals the reply to an asynchronous request at the time the servant invokes ice_response on the AMD callback object. Because getGrid and setValue are synchronized, this guarantees that the data remains in a consistent state during marshaling.
Thread Creation and Destruction Hooks
On occasion, it is necessary to intercept the creation and destruction of threads created by the Ice run time, for example, to interoperate with libraries that require applications to make thread-specific initialization and finalization calls (such as COM’s CoInitializeEx and CoUninitialize). Ice provides callbacks to inform an application when each run-time thread is created and destroyed. For C++, the callback class looks as follows:10
class ThreadNotification : public IceUtil::Shared {public: virtual void start() = 0; virtual void stop() = 0;};typedef IceUtil::Handle<ThreadNotification> ThreadNotificationPtr;
To receive notification of thread creation and destruction, you must derive a class from ThreadNotification and implement the start and stop member functions. These functions will be called by the Ice run by each thread as soon as it is created, and just before it exits. You must install your callback class in the Ice run time when you create a communicator by setting the threadHook member of the InitializationData structure (see Section 32.3).
For example, you could define a callback class and register it with the Ice run time as follows:
10.See below for other languages.

1016 The Ice Run Time in Detail
class MyHook : public virtual Ice::ThreadNotification {public: void start() { cout << "start: id = " << ThreadControl().id() << endl; } void stop() { cout << "stop: id = " << ThreadControl().id() << endl; }};intmain(int argc, char* argv[]){ // ... Ice::InitializationData id; id.threadHook = new MyHook; communicator = Ice::initialize(argc, argv, id); // ...}
The implementation of your start and stop methods can make whatever thread-specific calls are required by your application.
For Java and C#, Ice.ThreadNotification is an interface:
public interface ThreadNotification { void start(); void stop();}
To receive the thread creation and destruction callbacks, you must derive a class from this interface that implements the start and stop methods, and register an instance of that class when you create the communicator. (The code to do this is analogous to the C++ version.)
For Python, the interface is:
class ThreadNotification(object): def __init__(self): pass # def start(): # def stop():

32.10 The Ice Threading Model 1017
The Ice run time calls the start and stop methods of the class instance you provide to Ice.initialize (see Section 24.3) when it creates and destroys threads.
Installing Thread Hooks via a Plug-in
The thread hook facility described on page 1015 requires that you modify a program’s source code in order to receive callbacks when threads in the Ice run time are created and destroyed. It is also possible to install thread hooks using the Ice plug-in facility (see Section 32.25), which is useful for adding thread hooks to an existing program that you cannot (or prefer not to) modify.
Ice provides a base class named ThreadHookPlugin for C++, Java, and C# that supplies the necessary functionality. The C++ class definition is shown below:
namespace Ice {class ThreadHookPlugin : public Ice::Plugin {public: ThreadHookPlugin(const CommunicatorPtr& communicator, const ThreadNotificationPtr&); virtual void initialize(); virtual void destroy();};}
The equivalent definitions for Java and C# are quite similar and therefore not presented here.
The ThreadHookPlugin constructor installs the given ThreadNotifi-cation object into the specified communicator. The initialize and destroy methods are empty, but you can subclass ThreadHookPlugin and override these methods if necessary.
In order to create a thread hook plug-in, you must do the following:
• Define and export a factory class (for Java and C#) or factory function (for C++) that returns an instance of ThreadHookPlugin (see Section 32.25.1).
• Implement the ThreadNotification object that you will pass to the ThreadHookPlugin constructor.
• Package your code into a format that is suitable for dynamic loading, such as a shared library or DLL for C++ or an assembly for C#.

1018 The Ice Run Time in Detail
To install your plug-in, use a configuration property like the one shown below:
Ice.Plugin.MyThreadHookPlugin=MyHooks:createPlugin ...
The first component of the property value represents the plug-in’s entry point. For C++, this value includes the abbreviated name of the shared library or DLL (MyHooks) and the name of a factory function (createPlugin).
If your property value is language-specific and the configuration file containing this property is shared by programs in multiple implementation languages, you can use an alternate syntax that is loaded only by the Ice run time for a certain language. For example, here is the C++-specific version:
Ice.Plugin.MyThreadHookPlugin.cpp=MyHooks:createPlugin ...
Refer to Appendix D for more information on the Ice.Plugin properties.
32.10.7 Dispatching Invocations to User Threads
By default, operation invocations and AMI callbacks are executed by a thread from a thread pool. This behavior is simple and convenient for applications because they need not concern themselves with thread creation and destruction. However, there are situations where it is necessary to respond to operation invoca-tions or AMI callbacks in a particular thread. For example, in a server, you might need to update a database that does not permit concurrent access from different threads or, in a client, you might need to update a user interface with the results of an invocation. (Many UI frameworks require all UI updates to be made by a specific thread.)
In Ice for C++, Java, and .NET, you can control which thread receives opera-tion invocations and AMI callbacks, so you can ensure that all updates are made by a thread you choose. The implementation techniques vary slightly for each language and are explained in the sections that follow.
C++ Dispatcher API
To install a dispatcher, you must instantiate a class that derives from Ice::Dispatcher and initialize a communicator with that instance in the InitializationData structure. All invocations that arrive for this communi-cator are made via the specified dispatcher. For example:
class MyDispatcher : public Ice::Dispatcher /*, ... */ // ...};

32.10 The Ice Threading Model 1019
intmain(int argc, char* argv[]){ Ice::CommunicatorPtr communicator; try { Ice::InitializationData initData; initData.properties = Ice::createProperties(argc, argv); initData.dispatcher = new MyDispatcher(); communicator = Ice::initialize(argc, argv, initData); // ... } catch (const Ice::Exception& ex) { // ... } // ...}
The Ice::Dispatcher abstract base class has the following interface:
class Dispatcher : virtual public IceUtil::Shared{public: virtual void dispatch(const DispatcherCallPtr&, const ConnectionPtr&) = 0;};typedef IceUtil::Handle<Dispatcher> DispatcherPtr;
The Ice run time invokes the dispatch method whenever an operation invoca-tion arrives or an AMI invocation completes, passing an instance of Dispatch-erCall and the connection via which the invocation arrived. The job of dispatch is to pass the incoming invocation to an operation implementation. (The connection parameter allows you to decide how to dispatch the operation based on the connection via which it was received.)
You can write dispatch such that it blocks and waits for completion of the invocation because dispatch is called by a thread in the server-side thread pool (for incoming operation invocations) or the client-side thread pool (for AMI call-backs).
The DispatcherCall instance encapsulates all the details of the incoming call. It is another abstract base class with the following interface:

1020 The Ice Run Time in Detail
class DispatcherCall : virtual public IceUtil::Shared{public: virtual ~DispatcherCall() { } virtual void run() = 0;};typedef IceUtil::Handle<DispatcherCall> DispatcherCallPtr;
Your implementation of dispatch is expected to call run on the Dispatch-erCall instance (or, more commonly, to cause run to be called some time later). When you call run, the Ice run time processes the invocation in the thread that calls run.
A very simple way to implement dispatch would be as follows:
class MyDispatcher : public Ice::Dispatcherpublic: virtual void dispatch(const Ice::DispatcherCallPtr& d, const Ice::ConnectionPtr) { d->run(); // Does not throw, blocks until op completes. }};
Whenever the Ice run time receives an incoming operation invocation or when an AMI invocation completes, it calls dispatch which, in turn, calls run on the DispatcherCall instance.
With this simple example, dispatch immediately calls run, and run does not return until the corresponding operation invocation is complete. As a result, this implementation ties up a thread in the thread pool for the duration of the call.
So far, we really have not gained anything because all we have is a callback method that is called by the Ice run time. However, this simple mechanism is sufficient to ensure that we can update a UI from the correct thread.
A common technique to avoid blocking is to use asynchronous method invo-cation (see Section 6.15). In response to a UI event (such as the user pressing a “Submit” button), the application initiates an operation invocation from the corre-sponding UI callback by calling the operation’s begin_ method. This is guaran-teed not to block the caller, so the UI remains responsive. Some time later, when the operation completes, the Ice run time invokes an AMI callback from one of the threads in its thread pool. That callback now has to update the UI, but that can only be done from the UI thread. By using a dispatcher, you can easily delegate

32.10 The Ice Threading Model 1021
the update to the correct thread. For example, here is how you can arrange for AMI callbacks to be passed to the UI thread with MFC:
class MyDialog : public CDialog { ... };class MyDispatcher : public Ice::Dispatcher {public: MyDispatcher(MyDialog* dialog) : _dialog(dialog) { } virtual void dispatch(const Ice::DispatcherCallPtr& call, const Ice::ConnectionPtr&) { _dialog->PostMessage( WM_AMI_CALLBACK, 0, reinterpret_cast<LPARAM>( new Ice::DispatcherCallPtr(call))); }private: MyDialog* _dialog;};
The MyDispatcher class simply stores the CDialog handle for the UI and calls PostMessage, passing the DispatcherCall instance. In turn, this causes the UI thread to receive an event and invoke the UI callback method that was registered to respond to WM_AMI_CALLBACK events.
In turn, the implementation of the callback method calls run:
LRESULTMyDialog::OnAMICallback(WPARAM, LPARAM lParam){ try { Ice::DispatcherCallPtr* call = reinterpret_cast<Ice::DispatcherCallPtr*>(lParam); (*call)->run(); delete call; } catch (const Ice::Exception& ex) { // ... } return 0;}

1022 The Ice Run Time in Detail
The Ice run time calls dispatch once the asynchronous operation invocation is complete. In turn, this causes the OnAMICallback to trigger, which calls run. Because the operation has completed already, run does not block, so the UI remains responsive.
Please see the MFC demo in your Ice distribution for a fully-functional UI client that uses this technique.
Java Dispatcher API
To install a dispatcher, you must instantiate a class that implements Ice.Dispatcher and initialize a communicator with that instance in the InitializationData structure. All invocations that arrive for this communi-cator are made via the specified dispatcher. For example:
public class MyDispatcher implements Ice.Dispatcher{ // ...}public class Server{ public static void main(String[] args) { Ice.Communicator communicator; try { Ice.InitializationData initData = new Ice.InitializationData(); initData.properties = Ice.Util.createProperties(args); initData.dispatcher = new MyDispatcher(); communicator = Ice.Util.initialize(args, initData); // ... } catch (Ice.LocalException & ex) { { // ... } // ... } // ...}
The Ice.Dispatcher interface looks as follows:

32.10 The Ice Threading Model 1023
public interface Dispatcher{ void dispatch(Runnable runnable, Ice.Connection con);}
The Ice run time invokes the dispatch method whenever an operation invoca-tion arrives, passing a Runnable and the connection via which the invocation arrived. The job of dispatch is to pass the incoming invocation to an operation implementation. (The con parameter allows you to decide how to dispatch the operation based on the connection via which it was received.)
You can write dispatch such that it blocks and waits for completion of the invocation because dispatch is called by a thread in the server-side thread pool (for incoming operation invocations) or the client-side thread pool (for AMI call-backs).
Your implementation of dispatch is expected to call run on the Runnable instance (or, more commonly, to cause run to be called some time later). When you call run, the Ice run time processes the invocation in the thread that calls run.
A very simple way to implement dispatch would be as follows:
public class MyDispatcher implements Ice.Dispatcher{ public void dispatch(Runnable runnable, Ice.Connection connection) { // Does not throw, blocks until op completes. runnable.run(); }}
Whenever the Ice run time receives an incoming operation invocation or when an AMI invocation completes, it calls dispatch which, in turn, calls run on the Runnable instance.
With this simple example, dispatch immediately calls run, and run does not return until the corresponding operation invocation is complete. As a result, this implementation ties up a thread in the thread pool for the duration of the call.
So far, we really have not gained anything because all we have is a callback method that is called by the Ice run time. However, this simple mechanism is sufficient to ensure that we can update a UI from the correct thread.
A common technique to avoid blocking is to use asynchronous method invo-cation (see Section 10.17). In response to a UI event (such as the user pressing a “Submit” button), the application initiates an operation invocation from the corre-

1024 The Ice Run Time in Detail
sponding UI callback by calling the operation’s begin_ method. This is guaran-teed not to block the caller, so the UI remains responsive. Some time later, when the operation completes, the Ice run time invokes an AMI response callback from one of the threads in its thread pool. That callback now has to update the UI, but that can only be done from the UI thread. By using a dispatcher, you can easily delegate the update to the correct thread. For example, here is how you can arrange for AMI callbacks to be passed to the UI thread with Swing:
public class Client extends JFrame{ public static void main(final String[] args) { SwingUtilities.invokeLater(new Runnable() { public void run() { try { new Client(args); } catch (Ice.LocalException e) { JOptionPane.showMessageDialog( null, e.toString(), "Initialization failed", JOptionPane.ERROR_MESSAGE); } } }); } Client(String[] args) { Ice.Communicator communicator; try { Ice.InitializationData initData = new Ice.InitializationData(); initData.dispatcher = new Ice.Dispatcher() { public void dispatch(Runnable runnable, Ice.Connection connection) { SwingUtilities.invokeLater(runnable); } }; communicator = Ice.Util.initialize(args, initData);

32.10 The Ice Threading Model 1025
} catch(Throwable ex) { // ... } // ... } // ...}
The dispatch method simply delays the call to run by calling invokeLater, passing it the Runnable that is provided by the Ice run time. This causes the Swing UI thread to eventually make the call to run. Because the Ice run time does not call dispatch until the asynchronous invocation is complete, that call to run does not block and the UI remains responsive.
Please see the swing demo in your Ice distribution for a fully-functional UI client that uses this technique.
C# Dispatcher API
To install a dispatcher, you must initialize a communicator with a delegate of type Ice.Dispatcher in the InitializationData structure. All invocations that arrive for this communicator are made via the specified dispatcher. For example:
public class Server{ public static void Main(string[] args) { Ice.Communicator communicator = null; try { Ice.InitializationData initData = new Ice.InitializationData(); initData.dispatcher = new MyDispatcher().dispatch; communicator = Ice.Util.initialize(ref args, initData); // ... } catch (System.Exception ex) { // ... } // ...

1026 The Ice Run Time in Detail
} // ...}
The Ice.Dispatcher delegate is defined as follows:
public delegate void Dispatcher(System.Action call, Connection con);
The Ice run time calls your delegate whenever an operation invocation arrives, passing a System.Action delegate and the connection via which the invoca-tion arrived. The job of your delegate is to pass the incoming invocation to an operation implementation. (The con parameter allows you to decide how to dispatch the operation based on the connection via which it was received.)
In this example, the delegate calls a method dispatch on an instance of a MyDispatcher class. You can write dispatch such that it blocks and waits for completion of the invocation because dispatch is called by a thread in the server-side thread pool (for incoming operation invocations) or the client-side thread pool (for AMI callbacks).
Your implementation of dispatch is expected to invoke the call delegate (or, more commonly, to cause it to be invoked some time later). When you invoke the call delegate, the Ice run time processes the invocation in the thread that invokes the delegate.
A very simple way to implement dispatch would be as follows:
public class MyDispatcher{ public void dispatch(System.Action call, Ice.Connection con) { // Does not throw, blocks until op completes. call(); }};
Whenever the Ice run time receives an incoming operation invocation or when an AMI invocation completes, it calls dispatch which, in turn, invokes the call delegate.
With this simple example, dispatch immediately invokes the delegate, and that call does not return until the corresponding operation invocation is complete. As a result, this implementation ties up a thread in the thread pool for the duration of the call.

32.10 The Ice Threading Model 1027
So far, we really have not gained anything because all we have is a callback method that is called by the Ice run time. However, this simple mechanism is sufficient to ensure that we can update a UI from the correct thread.
A common technique to avoid blocking is to use asynchronous method invo-cation (see Section 14.16). In response to a UI event (such as the user pressing a “Submit” button), the application initiates an operation invocation from the corre-sponding UI callback by calling the operation’s begin_ method. This is guaran-teed not to block the caller, so the UI remains responsive. Some time later, when the operation completes, the Ice run time invokes an AMI callback from one of the threads in its thread pool. That callback now has to update the UI, but that can only be done from the UI thread. By using a dispatcher, you can easily delegate the update to the correct thread. For example, here is how you can arrange for AMI callbacks to be passed to the UI thread with WPF:
public partial class MyWindow : Window{ private void Window_Loaded(object sender, EventArgs e) { Ice.Communicator communicator = null; try { Ice.InitializationData initData = new Ice.InitializationData(); initData.dispatcher = delegate(System.Action action, Ice.Connection connection) { Dispatcher.BeginInvoke( DispatcherPriority.Normal, action); }; communicator = Ice.Util.initialize(initData); } catch(Ice.LocalException ex) { // ... } } // ...}
The delegate calls Dispatcher.BeginInvoke on the action delegate. This causes WPF to queue the actual asynchronous invocation of action for

1028 The Ice Run Time in Detail
later execution by the UI thread. Because the Ice run time does not invoke your delegate until an asynchronous operation invocation is complete, when the UI thread executes the corresponding call to the EndInvoke method, that call does not block and the UI remains responsive.
The net effect is that you can invoke an operation asynchronously from a UI callback method without the risk of blocking the UI thread. For example:
public partical class MyWindow : Window{ private void someOp_Click(object sender, RoutedEventArgs e) { MyIntfPrx p = ...; // Call remote operation asynchronously. // Response is processed in UI thread. p.begin_someOp().whenCompleted(this.opResponse, this.opException); } public void opResponse() { // Update UI... } public void opException(Ice.Exception ex) { // Update UI... }}
Please see the wpf demo in your Ice distribution for a fully-functional UI client that uses this technique.
Implementation Notes
A call to Communicator::destroy will hang indefinitely if there are pending requests that have not yet been dispatched, therefore it is very important for a dispatcher implementation to ensure that all requests are dispatched.
32.11 Proxies
The introduction to proxies provided in Section 2.2.2 describes a proxy as a local artifact that makes a remote invocation as easy to use as a regular function call. In

32.11 Proxies 1029
fact, processing remote invocations is just one of a proxy’s many responsibilities. A proxy also encapsulates the information necessary to contact the object, including its identity (see Section 32.5) and addressing details such as endpoints (see Section 32.11.3). Proxy methods provide access to configuration and connec-tion information, and act as factories for creating new proxies (see Section 32.11.2). Finally, a proxy initiates the establishment of a new connection when necessary (see Section 36.3).
32.11.1 Obtaining Proxies
An application can obtain a proxy in a number of ways.
Stringified Proxies
The communicator operation stringToProxy creates a proxy from its stringified representation, as shown in the following C++ example:
Ice::ObjectPrx p = communicator->stringToProxy("ident:tcp -p 5000");
See Appendix E for a description of stringified proxies and Section 32.2 for more information on the stringToProxy operation.
Proxy Properties
Rather than hard-coding a stringified proxy as the previous example demon-strated, an application can gain more flexibility by externalizing the proxy in a configuration property. For example, we can define a property that contains our stringified proxy as follows:
MyApp.Proxy=ident:tcp -p 5000
We can use the communicator operation propertyToProxy to convert the prop-erty’s value into a proxy, as shown below in Java:
Ice.ObjectPrx p = communicator.propertyToProxy("MyApp.Proxy");
As an added convenience, propertyToProxy allows you to define subordinate properties that configure the proxy’s local settings. The properties below demon-strate this feature:
MyApp.Proxy=ident:tcp -p 5000MyApp.Proxy.PreferSecure=1MyApp.Proxy.EndpointSelection=Ordered

1030 The Ice Run Time in Detail
These additional properties simplify the task of customizing a proxy without the need to change the application’s code. The properties shown above are equivalent to the following statements:
Ice.ObjectPrx p = communicator.stringToProxy("ident:tcp -p 5000");p = p.ice_preferSecure(true);p = p.ice_endpointSelection(Ice.EndpointSelectionType.Ordered);
The list of supported proxy properties is presented in Section D.9. Note that the communicator prints a warning by default if it does not recognize a subordinate property. You can disable this warning using the property Ice.Warn.UnknownProperties (see Section D.3).
Note that proxy properties can themselves have proxy properties. For example, the following sets the PreferSecure property on the default locator’s router:
Ice.Default.Locator.Router.PreferSecure=1
Factory Methods
As we discuss in Section 32.11.2, proxy factory methods allow you to modify aspects of an existing proxy. Since proxies are immutable, factory methods always return a new proxy if the desired modification differs from the proxy’s current configuration. Consider the following C# example:
Ice.ObjectPrx p = communicator.stringToProxy("...");p = p.ice_oneway();
ice_oneway is considered a factory method because it returns a proxy config-ured to use oneway invocations. If the original proxy uses a different invocation mode, the return value of ice_oneway is a new proxy object.
The checkedCast and uncheckedCast methods can also be considered factory methods because they return new proxies that are narrowed to a particular Slice interface. A call to checkedCast or uncheckedCast typically follows the use of other factory methods, as shown below:
Ice.ObjectPrx p = communicator.stringToProxy("...");Ice.LocatorPrx loc = Ice.LocatorPrxHelper.checkedCast(p.ice_secure(true));
Invocations
An application can also obtain a proxy as the result of an Ice invocation. Consider the following Slice definitions:

32.11 Proxies 1031
interface Account { ... };interface Bank { Account* findAccount(string id);};
Invoking the findAccount operation returns a proxy for an Account object. There is no need to use checkedCast or uncheckedCast on this proxy because it has already been narrowed to the Account interface. The C++ code below demon-strates how to invoke findAccount:
BankPrx bank = ...AccountPrx acct = bank->findAccount(id);
Of course, the application must have already obtained a proxy for the bank object using one of the techniques shown above.
32.11.2 Proxy Methods
Although the core proxy functionality is supplied by a language-specific base class, we can describe the proxy methods in terms of Slice operations as shown below:
bool ice_isA(string id);void ice_ping();StringSeq ice_ids();string ice_id();int ice_getHash();Communicator ice_getCommunicator();string ice_toString();Object* ice_identity(Identity id);Identity ice_getIdentity();Object* ice_adapterId(string id);string ice_getAdapterId();Object* ice_endpoints(EndpointSeq endpoints);EndpointSeq ice_getEndpoints();Object* ice_endpointSelection(EndpointSelectionType t);EndpointSelectionType ice_getEndpointSelection();Object* ice_context(Context ctx);Context ice_getContext();Object* ice_defaultContext();Object* ice_facet(string facet);string ice_getFacet();Object* ice_twoway();bool ice_isTwoway();Object* ice_oneway();

1032 The Ice Run Time in Detail
bool ice_isOneway();Object* ice_batchOneway();bool ice_isBatchOneway();Object* ice_datagram();bool ice_isDatagram();Object* ice_batchDatagram();bool ice_isBatchDatagram();Object* ice_secure(bool b);bool ice_isSecure();Object* ice_preferSecure(bool b);bool ice_isPreferSecure();Object* ice_compress(bool b);Object* ice_timeout(int timeout);Object* ice_router(Router* rtr);Router* ice_getRouter();Object* ice_locator(Locator* loc);Locator* ice_getLocator();Object* ice_locatorCacheTimeout(int seconds);int ice_getLocatorCacheTimeout();Object* ice_collocationOptimized(bool b);bool ice_isCollocationOptimized();Object* ice_connectionId(string id);string ice_getConnectionId();Connection ice_getConnection();Connection ice_getCachedConnection();Object* ice_connectionCached(bool b);bool ice_isConnectionCached();void ice_flushBatchRequests();bool ice_invoke(string operation, OperationMode mode, ByteSeq inParams, out ByteSeq outParams);
These methods can be categorized as follows:
• Remote inspection: methods that return information about the remote object. These methods make remote invocations and therefore accept an optional trailing argument of type Ice::Context (see Section 32.12).
• Local inspection: methods that return information about the proxy’s local configuration.
• Factory: methods that return new proxy instances configured with different features.
• Request processing: methods that flush batch requests and send “dynamic” Ice invocations.

32.11 Proxies 1033
Proxies are immutable, so factory methods allow an application to obtain a new proxy with the desired configuration. Factory methods essentially clone the orig-inal proxy and modify one or more features of the new proxy.
Many of the factory methods are not supported by fixed proxies. Attempting to invoke one of these methods causes the Ice run time to raise FixedProxyEx-ception. See page 12 for a description of fixed proxies and Section 36.7 for addi-tional details.
The core proxy methods are explained in greater detail in Table 32.1.
Table 32.1. The semantics of core proxy methods.
Method Description Remote
ice_isA Returns true if the remote object supports the type indi-cated by the id argument, oth-erwise false. This method can only be invoked on a two-way proxy.
Yes
ice_ping Determines whether the remote object is reachable. Does not return a value.
Yes
ice_ids Returns the type ids of the types supported by the remote object. The return value is an array of strings. This method can only be invoked on a twoway proxy.
Yes
ice_id Returns the type id of the most-derived type supported by the remote object. This method can only be invoked on a twoway proxy.
Yes
ice_getHash Returns a hash value for the proxy for C++. For other lan-guage mappings, use the built-in hash method.
No
ice_getCommunicator Returns the communicator that was used to create this proxy.
No
ice_toString Returns the string representa-tion of the proxy.
No
ice_identity Returns a new proxy having the given identity.
No

1034 The Ice Run Time in Detail
ice_getIdentity Returns the identity of the Ice object represented by the proxy.
No
ice_adapterId Returns a new proxy having the given adapter id.
No
ice_getAdapterId Returns the proxy’s adapter id, or an empty string if no adapter id is configured.
No
ice_endpoints Returns a new proxy having the given endpoints.
No
ice_getEndpoints Returns a sequence of End-point objects representing the proxy’s endpoints. See Section 36.5.2 for more infor-mation.
No
ice_endpointSelection Returns a new proxy having the given selection policy (random or ordered). See Section 36.3.1 for more information.
No
ice_getEndpointSelection Returns the endpoint selection policy for the proxy.
No
ice_context Returns a new proxy having the given request context. See Section 32.12 for more infor-mation on request contexts.
No
ice_getContext Returns the request context associated with the proxy. See Section 32.12 for more infor-mation on request contexts.
No
ice_facet Returns a new proxy having the given facet name. See Chapter 33 for more informa-tion on facets.
No
ice_getFacet Returns the name of the facet associated with the proxy, or an empty string if no facet has been set. See Chapter 33 for more information on facets.
No
ice_twoway Returns a new proxy for making twoway invocations.
No
Table 32.1. The semantics of core proxy methods.
Method Description Remote

32.11 Proxies 1035
ice_isTwoway Returns true if the proxy uses twoway invocations, otherwise false.
No
ice_oneway Returns a new proxy for making oneway invocations (see Section 32.14).
No
ice_isOneway Returns true if the proxy uses oneway invocations, otherwise false.
No
ice_batchOneway Returns a new proxy for making batch oneway invocations (see Section 32.16).
No
ice_isBatchOneway Returns true if the proxy uses batch oneway invocations, oth-erwise false.
No
ice_datagram Returns a new proxy for making datagram invocations (see Section 32.15).
No
ice_isDatagram Returns true if the proxy uses datagram invocations, other-wise false.
No
ice_batchDatagram Returns a new proxy for making batch datagram invocations (see Section 32.16).
No
ice_isBatchDatagram Returns true if the proxy uses batch datagram invocations, otherwise false.
No
ice_secure Returns a new proxy whose endpoints may be filtered depending on the boolean argu-ment. If true, only endpoints using secure transports are allowed, otherwise all end-points are allowed.
No
ice_isSecure Returns true if the proxy uses only secure endpoints, other-wise false.
No
Table 32.1. The semantics of core proxy methods.
Method Description Remote

1036 The Ice Run Time in Detail
ice_preferSecure Returns a new proxy whose endpoints are filtered depending on the boolean argument. If true, endpoints using secure transports are given precedence over endpoints using non-secure transports. If false, the default behavior gives prece-dence to endpoints using non-secure transports.
No
ice_isPreferSecure Returns true if the proxy pre-fers secure endpoints, otherwise false.
No
ice_compress Returns a new proxy whose protocol compression capability is determined by the boolean argument. If true, the proxy uses protocol compression if it is supported by the endpoint. If false, protocol compression is never used.
No
ice_timeout Returns a new proxy with the given timeout value in millisec-onds. A value of -1 disables timeouts. See Section 32.13 for more information on timeouts.
No
ice_router Returns a new proxy configured with the given router proxy. See Chapter 42 for more informa-tion on routers.
No
ice_getRouter Returns the router that is con-figured for the proxy (null if no router is configured).
No
ice_locator Returns a new proxy with the specified locator. See Chapter 38 for more informa-tion on locators.
No
ice_getLocator Returns the locator that is con-figured for the proxy (null if no locator is configured).
No
Table 32.1. The semantics of core proxy methods.
Method Description Remote

32.11 Proxies 1037
ice_locatorCacheTimeout Returns a new proxy with the specified locator cache time-out. When binding a proxy to an endpoint, the run time caches the proxy returned by the loca-tor and uses the cached proxy while the cached proxy has been in the cache for less than the timeout. Proxies older than the timeout cause the run time to rebind via the locator. A value of 0 disables caching entirely, and a value of -1 means that cached proxies never expire. The default value is -1.
No
ice_getLocatorCacheTimeout Returns the locator cache time-out value in seconds.
No
ice_collocationOptimized Returns a new proxy configured for collocation optimization. If true, collocated optimiza-tions are enabled. The default value is true.
No
ice_isCollocationOptimized Returns true if the proxy uses collocation optimization, other-wise false.
No
ice_connectionId Returns a new proxy having the given connection identifier. See Section 36.3.3 for more infor-mation.
No
ice_getConnectionId Returns the connection id, or an empty string if no connection id has been configured.
No
ice_getConnection Returns an object representing the connection used by the proxy. If the proxy is not cur-rently associated with a connec-tion, the Ice run time attempts to establish a connection first. See Section 36.5 for more information.
No
Table 32.1. The semantics of core proxy methods.
Method Description Remote

1038 The Ice Run Time in Detail
32.11.3 Endpoints
Proxy endpoints are the client-side equivalent of object adapter endpoints (see Section 32.4.6). A proxy endpoint identifies the protocol information used to contact a remote object, as shown in the following example:
tcp -h www.zeroc.com -p 10000
This endpoint states that an object is reachable via TCP on the host www.zeroc.com and the port 10000.
A proxy must have, or be able to obtain, at least one endpoint in order to be useful. As defined in Section 2.2.2, a direct proxy contains one or more endpoints:
MyObject:tcp -h www.zeroc.com -p 10000:ssl -h www.zeroc.com -p 10001
ice_getCachedConnection Returns an object representing the connection used by the proxy, or null if the proxy is not currently associated with a con-nection. See Section 36.5 for more information.
No
ice_connectionCached Enables or disables connection caching for the proxy. See Section 36.3.4 for more infor-mation
No
ice_isConnectionCached Returns true if the proxy uses connection caching, otherwise false.
No
ice_flushBatchRequestsbegin_ice_flushBatchRequests
Sends a batch of operation invo-cations synchronously or asyn-chronously (see Section 32.16).
Yes
ice_invokebegin_ice_invoke
Allows dynamic invocation of an operation without the need for compiled Slice definitions. Requests can be sent synchro-nously (see Section 35.3.1) or asynchronously (see Section 35.4).
Yes
Table 32.1. The semantics of core proxy methods.
Method Description Remote

32.11 Proxies 1039
In this example the object with the identity MyObject is available at two sepa-rate endpoints, one using TCP and the other using SSL.
If a direct proxy does not contain the -h option (that is, no host is specified), the Ice run time uses the value of the Ice.Default.Host property (see Appendix D). If Ice.Default.Host is not defined, the localhost interface is used.
An indirect proxy uses a locator (see Chapter 38) to retrieve the endpoints dynamically. One style of indirect proxy contains an adapter identifier:
MyObject @ MyAdapter
When this proxy requires the endpoints associated with MyAdapter, it requests them from the locator.
32.11.4 Endpoint Filtering
A proxy’s configuration determines how its endpoints are used. For example, a proxy configured for secure communication will only use endpoints having a secure protocol, such as SSL.
The factory functions described in Table 32.2 allow applications to manipulate endpoints indirectly. Calling one of these functions returns a new proxy whose endpoints are used in accordance with the proxy’s configuration.
Table 32.2. Proxy factory functions and their effects on endpoints.
Option Description
ice_secure Selects only endpoints using a secure protocol (e.g., SSL).
ice_datagram Selects only endpoints using a datagram protocol (e.g., UDP).
ice_batchDatagram Selects only endpoints using a datagram protocol (e.g., UDP).
ice_twoway Selects only endpoints capable of making twoway invocations (e.g., TCP, SSL). For example, this dis-ables datagram endpoints.

1040 The Ice Run Time in Detail
Upon return, the set of endpoints in the new proxy is unchanged from the old one. However, the new proxy’s configuration drives a filtering process that the Ice run time performs during connection establishment, as described in Section 36.3.1.
The factory functions do not raise an exception if they produce a proxy with no viable endpoints. For example, the C++ statement below creates such a proxy:
proxy = comm->stringToProxy("id:tcp -p 10000")->ice_datagram();
It is always possible that a proxy could become viable after additional factory functions are invoked, therefore the Ice run time does not raise an exception until connection establishment is attempted. At that point, the application can expect to receive NoEndpointException if the filtering process eliminates all endpoints.
An application can also create a proxy with a specific set of endpoints using the ice_endpoints factory function, whose only argument is a sequence of Ice::Endpoint objects. At present, an application is not able to create new instances of Ice::Endpoint, but rather can only incorporate instances obtained by calling ice_getEndpoints on a proxy. Note that ice_getEndpoints may return an empty sequence if the proxy has no endpoints, as is the case with an indirect proxy.
32.11.5 Defaults and Overrides
It is important to understand how proxies are influenced by Ice configuration properties and settings. The relevant properties can be classified into two catego-ries: defaults and overrides.
ice_oneway Selects only endpoints capable of making reliable oneway invocations (e.g., TCP, SSL). For example, this disables datagram endpoints.
ice_batchOneway Selects only endpoints capable of making reliable oneway batch invocations (e.g., TCP, SSL). For exam-ple, this disables datagram endpoints.
Table 32.2. Proxy factory functions and their effects on endpoints.
Option Description

32.11 Proxies 1041
Default Properties
Default properties affect proxies created as the result of an Ice invocation, or by calls to stringToProxy or propertyToProxy. These properties do not influence proxies created by factory methods.
For example, suppose we define the following default property:
Ice.Default.PreferSecure=1
We can verify that the property has the desired affect using the following C++ code:
Ice::ObjectPrx p = communicator->stringToProxy(...);assert(p->ice_isPreferSecure());
Furthermore, we can verify that the property does not affect proxies returned by factory methods:
Ice::ObjectPrx p2 = p->ice_preferSecure(false);assert(!p2->ice_isPreferSecure());Ice::ObjectPrx p3 = p2->ice_oneway();assert(!p3->ice_isPreferSecure());
The default properties are described in Section D.8.
Override Properties
Defining an override property causes the Ice run time to ignore any equivalent proxy setting and use the override property value instead. For example, consider the following property definition:
Ice.Override.Secure=1
This property instructs the Ice run time to use only secure endpoints, producing the same semantics as calling ice_secure(true) on every proxy. However, the property does not alter the settings of an existing proxy, but rather directs the Ice run time to use secure endpoints regardless of the proxy’s security setting. We can verify that this is the case using the following C++ code:
Ice::ObjectPrx p = communicator->stringToProxy(...);p = p->ice_secure(false);assert(!p->ice_isSecure()); // The security setting is retained.
The override properties are described in Section D.8.

1042 The Ice Run Time in Detail
32.12 The Ice::Context Parameter
Methods on a proxy are overloaded with a trailing parameter of type const Ice::Context & (C++), java.util.Map (Java), or Dictionary<string, string> (C#). The Slice definition of this param-eter is as follows:
module Ice { local dictionary<string, string> Context;};
As you can see, a context is a dictionary that maps strings to strings or, conceptu-ally, a context is a collection of name–value pairs. The contents of this dictionary (if any) are implicitly marshaled with every request to the server, that is, if the client populates a context with a number of name–value pairs and uses that context for an invocation, the name–value pairs that are sent by the client are available to the server.
On the server side, the operation implementation can access the received Context via the ctx member of the Ice::Current parameter (see Section 32.6) and extract the name–value pairs that were sent by the client.
Context names beginning with an underscore () are reserved for use by Ice.
32.12.1 Passing a Context Explicitly
Contexts provide a means of sending an unlimited number of parameters from client to server without having to mention these parameters in the signature of an operation. For example, consider the following definition:
struct Address { // ...};interface Person { string setAddress(Address a); // ...};
Assuming that the client has a proxy to a Person object, it could do something along the following lines:

32.12 The Ice::Context Parameter 1043
PersonPrx p = ...;Address a = ...;Ice::Context ctx;ctx["write policy"] = "immediate";p->setAddress(a, ctx);
In Java, the same code would looks as follows:
PersonPrx p = ...;Address a = ...;java.util.Map ctx = new java.util.HashMap();ctx.put("write policy", "immediate");p.setAddress(a, ctx);
In C#, the code is almost identical, except that the context dictionary is type safe:
using System.Collections.Generic;PersonPrx p = ...;Address a = ...;Dictionary<string, string> ctx = new Dictionary<string, string>();ctx["write policy"] = "immediate";p.setAddress(a, ctx);
On the server side, we can extract the policy value set by the client to influence how the implementation of setAddress works. A C++ implementation might look like:
voidPersonI::setAddress(const Address& a, const Ice::Current& c){ Ice::Context::const_iterator i = c.ctx.find("write policy"); if (i != c.ctx.end() && i->second == "immediate") { // Update the address details and write through to the // data base immediately... } else {

1044 The Ice Run Time in Detail
// Write policy was not set (or had a bad value), use // some other database write strategy. }}
For this example, the server examines the value of the context with the key "write policy" and, if that value is "immediate", writes the update sent by the client straight away; if the write policy is not set or contains a value that is not recognized, the server presumably applies a more lenient write policy (such as caching the update in memory and writing it later). The Java version of the opera-tion implementation is essentially identical, so we do not show it here.
32.12.2 Passing a Per-Proxy ContextInstead of passing a context explicitly with an invocation, you can also use a per-proxy context. Per-proxy contexts allow you to set a context on a particular proxy once and, thereafter, whenever you use that proxy to invoke an operation, the previously-set context is sent with each invocation. The proxy base class provides a member function, ice_context, to do this:
namespace IceProxy { namespace Ice { class Object : /* ... */ { public: Ice::ObjectPrx ice_context(const Ice::Context&) const; // ... }; }}
For Java, the corresponding function is:
package Ice;public interface ObjectPrx { ObjectPrx ice_context(java.util.Map newContext); // ...}
For C#, the corresponding method is:
namespace Ice{ public interface ObjectPrx {

32.12 The Ice::Context Parameter 1045
ObjectPrx ice_context(Dictionary<string, string> newContext); // ... }}
ice_context creates a new proxy that stores the passed context. Note that the return type of ice_context is ObjectPrx. Therefore, before you can use the newly-created proxy, you must down-cast it to the correct type. For example, in C++:
Ice::Context ctx;ctx["write policy"] = "immediate";PersonPrx p1 = ...;PersonPrx p2 = PersonPrx::uncheckedCast(p1->ice_context(ctx));Address a = ...;p1->setAddress(a); // Sends no contextp2->setAddress(a); // Sends ctx implicitlyIce::Context ctx2;ctx2["write policy"] = "delayed";p2->setAddress(a, ctx2); // Sends ctx2
As the example illustrates, once we have created the p2 proxy, any invocation via p2 implicitly sends the previously-set context. The final line of the example illus-trates that it is possible to explicitly send a context for an invocation even if the proxy has an implicit context—an explicit context always overrides any implicit context.
Note that, once you have set a per-proxy context, that context becomes immu-table: if you change the context you have passed to ice_context later, that does not affect the per-proxy context of any proxies you previously created with that context because each proxy on which you set a per-proxy context makes a copy of the dictionary and stores that copy.

1046 The Ice Run Time in Detail
32.12.3 Retrieving the Per-Proxy ContextYou can retrieve the per-proxy context by calling ice_getContext on the proxy. If a proxy has no implicit context, the returned dictionary is empty. For C++, the signature is:
namespace IceProxy { namespace Ice { class Object : /* ... */ { public: Ice::Context ice_getContext() const; // ... }; }}
For Java, the signature is:
package Ice;public interface ObjectPrx { java.util.Map ice_getContext(); // ...}
For C#, the signature is:
namespace Ice{ public interface ObjectPrx { Dictionary<string, string> ice_getContext(); }}
32.12.4 Implicit ContextsIn addition to the explicit and the implicit per-proxy contexts we described in the preceding sections, you can also establish an implicit context on a communicator. This implicit context is sent with all invocations made via proxies created by that communicator, provided that you do not supply an explicit context with the call.
Access to this implicit context is provided by the Communicator interface:
module Ice { local interface Communicator { ImplicitContext getImplicitContext();

32.12 The Ice::Context Parameter 1047
// ... };};
getImplicitContext returns the implicit context. If a communicator has no implicit context, the operation returns a null proxy.
You can manipulate the contents of the implicit context via the ImplicitCon-text interface:
local interface ImplicitContext{ Context getContext(); void setContext(Context newContext); string get(string key); string put(string key, string value); string remove(string key); bool containsKey(string key);};
The getContext operation returns the currently-set context dictionary. The setContext operation replaces the currently-set context in its entirety.
The remaining operations allow you to manipulate specific entries:• get
This operation returns the value associated with key. If key was not previously set, the operation returns the empty string.
• put
This operation adds the key–value pair specified by key and value. It returns the previous value associated with key; if no value was previously associated with key, it returns the empty string. It is legal to add the empty string as a value.
• remove
This operation removes the key–value pair specified by key. It returns the previously-set value (or the empty string if key was not previously set).
• containsKey
This operation returns true if key is currently set and false, otherwise. You can use this operation to distinguish between a key–value pair that was explicitly added with an empty string as a value, and a key–value pair that was never added at all.

1048 The Ice Run Time in Detail
Scope of the Implicit Context
You establish the implicit context on a communicator by setting a property, Ice.ImplicitContext. This property controls whether a communicator has an implicit context and, if so, at what scope the context applies. The property can be set to the following values:
• None
With this setting (or if Ice.ImplicitContext is not set at all), the communi-cator has no implicit context, and getImplicitContext returns a null proxy.
• Shared
The communicator has a single implicit context that is shared by all threads. Access to the context via its ImplicitContext interface is interlocked, so different threads can concurrently manipulate the context without risking data corruption or reading stale values.
• PerThread
The communicator maintains a separate implicit context for each thread. This allows you to propagate contexts that depend on the sending thread (for example, to send per-thread transaction IDs).
32.12.5 Interactions of Explicit, Per-Proxy, and Implicit ContextsIf you use explicit, per-proxy, and implicit contexts, it is important to be aware of their interactions:
• If you send an explicit context with an invocation, only that context is sent with the call, regardless of whether the proxy has a per-proxy context and whether the communicator has an implicit context.
• If you send an invocation via a proxy that has a per-proxy context, and the communicator also has an implicit context, the contents of the per-proxy and implicit context dictionaries are combined, so the combination of context entries of both contexts is transmitted to the server. If the per-proxy context and the implicit context contain the same key, but with different values, the per-proxy value takes precedence.
32.12.6 Context Use CasesThe purpose of Ice::Context is to permit services to be added to Ice that require some contextual information with every request. Contextual information can be used by services such as a transaction service (to provide the context of a currently

32.12 The Ice::Context Parameter 1049
established transaction) or a security service (to provide an authorization token to the server). IceStorm (see Chapter 44) uses the context to provide an optional cost parameter to the service that influences how the service propagates messages to down-stream subscribers.
In general, services that require such contextual information can be imple-mented much more elegantly using contexts because this hides explicit Slice parameters that would otherwise have to be supplied by the application programmer with every call.
In addition, contexts, because they are optional, permit a single Slice defini-tion to apply to implementations that use the context, as well as to implementa-tions that do not use it. In this way, to add transactional semantics to an existing service, you do not need to modify the Slice definitions to add an extra parameter to each operation. (Adding an extra parameter would not only be inconvenient for clients, but would also split the type system into two halves: without contexts, we would need different Slice definitions for transactional and non-transactional implementations of (conceptually) a single service.)
Finally, per-proxy contexts permit context information to be passed by through intermediate parts of your program without cooperation of those interme-diate parts. For example, suppose you set a per-proxy context on a proxy and then pass that proxy to another function. When that function uses the proxy to invoke an operation, the per-proxy context will still be sent. In other words, per-proxy contexts allow you to transparently propagate information via intermediaries that are ignorant of the presence of any context.
Keep in mind though that this works only within a single process. If you strin-gify a proxy or transmit it as a parameter over the wire, the per-proxy context is not preserved. (Ice does not write the per-proxy context into stringified proxies and does not marshal the per-proxy context when a proxy is marshaled.)
32.12.7 A Word of Warning
Contexts are a powerful mechanism for transparent propagation of context infor-mation, if used correctly. In particular, you may be tempted to use contexts as a means of versioning an application as it evolves over time. For example, version 2 of your application may accept two parameters on an operation that, in version 1, used to accept only a single parameter. Using contexts, you could supply the second parameter as a name–value pair to the server and avoid changing the Slice definition of the operation in order to maintain backward compatibility.

1050 The Ice Run Time in Detail
We strongly urge you to resist any temptation to use contexts in this manner. The strategy is fraught with problems:
• Missing context
There is nothing that would compel a client to actually send a context when the server expects to receive a context: if a client forgets to send a context, the server, somehow, has to make do without it (or throw an exception).
• Missing or incorrect keys
Even if the client does send a context, there is no guarantee that it has set the correct key. (For example, a simple spelling error can cause the client to send a value with the wrong key.)
• Incorrect values
The value of a context is a string, but the application data that is to be sent might be a number, or it might be something more complex, such as a struc-ture with several members. This forces you to encode the value into a string and decode the value again on the server side. Such parsing is tedious and error prone, and far less efficient than sending strongly-typed parameters. In addition, the server has to deal with string values that fail to decode correctly (for example, because of an encoding error made by the client).
None of the preceding problems can arise if you use proper Slice parameters: parameters cannot be accidentally omitted and they are strongly typed, making it much less likely for the client to accidentally send a meaningless value.
If you are concerned about how to evolve an application over time without breaking backward compatibility, Ice facets are better suited to this task (see Chapter 33). Contexts are meant to be used to transmit simple tokens (such as a transaction identifier) for services that cannot be reasonably implemented without them; you should restrict your use of contexts to that purpose and resist any temp-tation to use contexts for any other purpose.
Finally, be aware that, if a request is routed via one or more Ice routers, contexts may be dropped by intermediate routers if they consider them illegal. This means that, in general, you cannot rely on an arbitrary context value that is created by an application to actually still be present when a request arrives at the server—only those context values that are known to routers and that are consid-ered legitimate are passed on. It follows that you should not abuse contexts to pass things that really should be passed as parameters.

32.13 Connection Timeouts 1051
32.13 Connection Timeouts
A synchronous remote invocation does not complete on the client side until the server has finished processing it. Occasionally, it is useful to be able to force an invocation to terminate after some time, even if it has not completed. Proxies provide the ice_timeout operation for this purpose:
namespace IceProxy { namespace Ice { class Object : /* ... */ { public: Ice::ObjectPrx ice_timeout(Ice::Int t) const; // ... }; }}
For Java (and, analogously, for C#), the corresponding method is:
package Ice;public interface ObjectPrx { ObjectPrx ice_timeout(int t); // ...}
The ice_timeout operation creates a proxy with a timeout from an existing proxy. For example:
Filesystem::FilePrx myFile = ...;FileSystem::FilePrx timeoutFile = FileSystem::FilePrx::uncheckedCast( myFile->ice_timeout(5000));try { Lines text = timeoutFile->read(); // Read with timeout} catch(const Ice::TimeoutException&) { cerr << "invocation timed out" << endl;}Lines text = myFile->read(); // Read without timeout
The parameter to ice_timeout determines the timeout value in milliseconds. A value of indicates no timeout. In the preceding example, the timeout is set to five seconds; if an invocation of read via the timeoutFile proxy does not complete within five seconds, the operation terminates with an Ice::Timeou-
1052 The Ice Run Time in Detail
tException. On the other hand, invocations via the myFile proxy are unaf-fected by the timeout, that is, ice_timeout sets the timeout on a per-proxy basis.
The timeout value set on a proxy affects all networking operations: reading and writing of data as well as opening and closing of connections. If any of these operations does not complete within the timeout, the client receives an exception. Note that, if the Ice run time encounters a recoverable error condition and trans-parently retries an invocation, this means that the timeout applies separately to each attempt. Similarly, if a large amount of data is sent with an operation invoca-tion in several write system calls, the timeout applies to each write, not to the invocation overall.
Timeouts that expire during reading or writing of data are indicated by a TimeoutException. For opening and closing of connections, the Ice run time reserves separate exceptions:
• ConnectTimeoutException
This exception indicates that a connection could not be established within the specified time.
• CloseTimeoutException
This exception indicates that a connection could not be closed within the spec-ified time.
An application normally configures a proxy’s timeout using the ice_timeout method. However, a proxy that originated from a string may already have a timeout specified, as shown in the following example:
// C++string s = "ident:tcp -h somehost -t 5000:ssl -h somehost -t 5000";
In this case, both the TCP and SSL endpoints define a timeout of five seconds. When the Ice run time establishes a connection using one of these endpoints, it uses the endpoint’s timeout unless one was specified explicitly via ice_timeout.
The Ice run time also supports two configuration properties that override the timeouts of every proxy regardless of the settings established via ice_timeout or defined in stringified proxies:
• Ice.Override.ConnectTimeout
This property defines a timeout that is only used for connection establishment. If not defined, its default value is (no timeout). If a proxy has multiple endpoints, the timeout applies to each endpoint separately.

32.14 Oneway Invocations 1053
• Ice.Override.Timeout
This property defines the timeout for invocations. If no value is defined for Ice.Override.ConnectTimeout, the value of Ice.Over-ride.Timeout is also used as the timeout for connection establishment. If not defined, the default value is (no timeout).
Note that timeouts are “soft” timeouts, in the sense that they are not precise, real-time timeouts. (The precision is limited by the capabilities of the underlying oper-ating system.) You should also be aware that timeouts are considered fatal error conditions by the Ice run time and result in connection closure on the client side. Furthermore, any other requests pending on the same connection also fail with an exception. Timeouts are meant to be used to prevent a client from blocking indefi-nitely in case something has gone wrong with the server; they are not meant as a mechanism to routinely abort requests that take longer than intended.
32.14 Oneway Invocations
As mentioned in Chapter 2, the Ice run time supports oneway invocations. A oneway invocation is sent on the client side by writing the request to the client’s local transport buffers; the invocation completes and returns control to the applica-tion code as soon as it has been accepted by the local transport. Of course, this means that a oneway invocation is unreliable: it may never be sent (for example, because of a network failure) or it may not be accepted in the server (for example, because the target object does not exist).
This is an issue in particular if you use active connection management (see Section 36.4): if a server closes a connection at the wrong moment, it is possible for the client to lose already-buffered oneway requests. We therefore recommend that you disable active connection management for the server side if clients use oneway (or batched oneway—see Section 32.16) requests. In addition, if clients use oneway requests and your application initiates server shutdown, it is the responsibility of your application to ensure either that it can cope with the poten-tial loss of buffered oneway requests, or that it does not shut down the server at the wrong moment (while clients still have oneway requests that are buffered, but not yet sent).
If anything goes wrong with a oneway request, the client-side application code does not receive any notification of the failure; the only errors that are reported to the client are local errors that occur on the client side during call invocation (such as failure to establish a connection, for example).

1054 The Ice Run Time in Detail
As a consequence of oneway invocation, if you call ice_ping on a oneway proxy, successful completion does not indicate that the target object exists and could successfully be contacted—you will receive an exception only if something goes wrong on the client side, but not if something goes wrong on the server side. Therefore, if you want to use ice_ping with a oneway proxy and be certain that the target object exists and can successfully be contacted, you must first convert the oneway proxy into a twoway proxy. For example, in C++:
SomeObjectPrx onewayPrx = ...; // Get a oneway proxytry { onewayPrx->ice_twoway()->ice_ping();} catch(const Ice::Exception&) cerr << "object not reachable" << endl;}
Oneway invocations are received and processed on the server side like any other incoming request. If necessary, a server can distinguish a oneway invocation by examining the requestId member of Ice::Current: a non-zero value denotes a twoway request, whereas a value of zero indicates a oneway request.
Oneway invocations do not incur any return traffic from the server to the client: the server never sends a reply message in response to a oneway invocation (see Chapter 37). This means that oneway invocations can result in large effi-ciency gains, especially for large numbers of small messages, because the client does not have to wait for the reply to each message to arrive before it can send the next message.
In order to be able to invoke an operation as oneway, two conditions must be met:
• The operation must have a void return type, must not have any out-parame-ters, and must not have an exception specification.
This requirement reflects the fact that the server does not send a reply for a oneway invocation to the client: without such a reply, there is no way to return any values or exceptions to the client.
If you attempt to invoke an operation that returns values to the client as a oneway operation, the Ice run time throws a TwowayOnlyException.

32.14 Oneway Invocations 1055
• The proxy on which the operation is invoked must support a stream-oriented transport (such as TCP or SSL).
Oneway invocations require a stream-oriented transport. (To get something like a oneway invocation for datagram transports, you need to use a datagram invocation—see Section 32.15.)
If you attempt to create a oneway proxy for an object that does not offer a stream-oriented transport, the Ice run time throws a NoEndpointException.
Despite their theoretical unreliablity, in practice, oneway invocations are reliable (but not infallible [19]): they are sent via a stream-oriented transport, so they cannot get lost except when the connection is shutting down (see Section 36.6.2) or fails entirely. In particular, the transport uses its usual flow control, so the client cannot overrun the server with messages. On the client-side, the Ice run time will block if the client’s transport buffers fill up, so the client-side application code cannot overrun its local transport.
Consequently, oneway invocations normally do not block the client-side appli-cation code and return immediately, provided that the client does not consistently generate messages faster than the server can process them. If the rate at which the client invokes operations exceeds the rate at which the server can process them, the client-side application code will eventually block in an operation invocation until sufficient room is available in the client’s transport buffers to accept the invo-cation. If your application requires that oneway requests never block the calling thread, you can use asynchronous oneway invocations instead.
Regardless of whether the client exceeds the rate at which the server can process incoming oneway invocations, the execution of oneway invocations in the server proceeds asynchronously: the client’s invocation completes before the message even arrives at the server.
One thing you need to keep in mind about oneway invocations is that they may appear to be reordered in the server: because oneway invocations are sent via a stream-oriented transport, they are guaranteed to be received in the order in which they were sent. However, the server’s thread pool may dispatch each invocation in its own thread; because threads are scheduled preemptively, this may cause an invocation sent later by the client to be dispatched and executed before an invoca-tion that was sent earlier. If oneway requests must be dispatched in order, you can use one of the serialization techniques described in Section 32.10.4.
For these reasons, oneway invocations are usually best suited to simple updates that are otherwise stateless (that is, do not depend on the surrounding context or the state established by previous invocations). Refer to Section 32.10 for more information on threading.

1056 The Ice Run Time in Detail
Creating Oneway Proxies
Ice selects between twoway, oneway, and datagram (see Section 32.15) invoca-tions via the proxy that is used to invoke the operation. By default, all proxies are created as twoway proxies. To invoke an operation as oneway, you must create a separate proxy for oneway dispatch from a twoway proxy.
For C++, all proxies are derived from a common IceProxy::Ice::Object class (seeSection 6.11.1). The proxy base class contains a method to create a oneway proxy, called ice_oneway:
namespace IceProxy { namespace Ice { class Object : /* ... */ { public: Ice::ObjectPrx ice_oneway() const; // ... }; }}
For Java and C#, proxies are derived from the Ice.ObjectPrx interface (see Section 10.11.2) and the definition of ice_oneway is:
package Ice;public interface ObjectPrx { ObjectPrx ice_oneway(); // ...}
We can call ice_oneway to create a oneway proxy and then use the proxy to invoke an operation as follows. (We show the C++ version here—the Java and C# versions are analogous.)
Ice::ObjectPrx o = communicator->stringToProxy(/* ... */);// Get a oneway proxy.//Ice::ObjectPrx oneway;try { oneway = o->ice_oneway();} catch (const Ice::NoEndpointException&) { cerr << "No endpoint for oneway invocations" << endl;}// Down-cast to actual type.

32.14 Oneway Invocations 1057
//PersonPrx onewayPerson = PersonPrx::uncheckedCast(oneway);// Invoke an operation as oneway.//try { onewayPerson->someOp();} catch (const Ice::TwowayOnlyException&) { cerr << "someOp() is not oneway" << endl;}
Note that we use an uncheckedCast to down-cast the proxy from ObjectPrx to PersonPrx: for a oneway proxy, we cannot use a checked-Cast because a checkedCast requires a reply from the server but, of course, a oneway proxy does not permit that reply. If instead you want to use a safe down-cast, you can first down-cast the twoway proxy to the actual object type and then obtain the oneway proxy:
Ice::ObjectPrx o = communicator->stringToProxy(/* ... */);// Safe down-cast to actual type.//PersonPrx person = PersonPrx::checkedCast(o);if (person) { // Get a oneway proxy. // PersonPrx onewayPerson; try { onewayPerson = PersonPrx::uncheckedCast(person->ice_oneway()); } catch (const Ice::NoEndpointException&) { cerr << "No endpoint for oneway invocations" << endl; } // Invoke an operation as oneway. // try { onewayPerson->someOp(); } catch (const Ice::TwowayOnlyException&) { cerr << "someOp() is not oneway" << endl; }}

1058 The Ice Run Time in Detail
Note that, while the second version of this code is somewhat safer (because it uses a safe down-cast), it is also slower (because the safe down-cast incurs the cost of an additional twoway message).
32.15 Datagram Invocations
Datagram invocations are the equivalent of oneway invocations for datagram transports. As for oneway invocations, datagram invocations can be sent only for operations that have a void return type and do not have out-parameters or an exception specification. (Attempts to use a datagram invocation with an operation that does not meet these criteria result in a TwowayOnlyException.) In addition, datagram invocations can only be used if the proxy’s endpoints include at least one UDP transport; otherwise, the Ice run time throws a NoEndpointException.
The semantics of datagram invocations are similar to oneway invocations: no return traffic flows from the server to the client and proceed asynchronously with respect to the client; a datagram invocation completes as soon as the client’s trans-port has accepted the invocation into its buffers. However, datagram invocations differ in one respect from oneway invocations in that datagram invocations option-ally support multicast semantics. Furthermore, datagram invocations have addi-tional error semantics:
• Individual invocations may be lost or received out of order.
On the wire, datagram invocations are sent as true datagrams, that is, indi-vidual datagrams may be lost, or arrive at the server out of order. As a result, not only may operations be dispatched out of order, an individual invocation out of a series of invocations may be lost. (This cannot happen for oneway invocations because, if a connection fails, all invocations are lost once the connection breaks down.)
• UDP packets may be duplicated by the transport.
Because of the nature of UDP routing, it is possible for datagrams to arrive in duplicate at the server. This means that, for datagram invocations, Ice does not guarantee at-most-once semantics (see page 14): if UDP datagrams are dupli-cated, the same invocation may be dispatched more than once in the server.
• UDP packets are limited in size.
The maximum size of an IP datagram is 65,535 bytes. Of that, the IP header consumes 20 bytes, and the UDP header consumes 8 bytes, leaving 65,507 bytes as the maximum payload. If the marshaled form of an invoca-

32.15 Datagram Invocations 1059
tion, including the Ice request header (see Chapter 37) exceeds that size, the invocation is lost. (Exceeding the size limit for a UDP datagram is indicated to the application by a DatagramLimitException.)
Because of their unreliable nature, datagram invocations are best suited to simple update messages that are otherwise stateless. In addition, due to the high proba-bility of loss of datagram invocations over wide area networks, you should restrict use of datagram invocations to local area networks, where they are less likely to be lost. (Of course, regardless of the probability of loss, you must design your appli-cation such that it can tolerate lost or duplicated messages.)
Creating Datagram Proxies
To create a datagram proxy, you must call ice_datagram on the proxy, for example:
Ice::ObjectPrx o = communicator->stringToProxy(/* ... */);// Get a datagram proxy.//Ice::ObjectPrx datagram;try { datagram = o->ice_datagram();} catch (const Ice::NoEndpointException&) { cerr << "No endpoint for datagram invocations" << endl;}// Down-cast to actual type.//PersonPrx datagramPerson = PersonPrx::uncheckedCast(datagram);// Invoke an operation as a datagram.//try { datagramPerson->someOp();} catch (const Ice::TwowayOnlyException&) { cerr << "someOp() is not oneway" << endl;}
As for the oneway example in Section 32.14, you can choose to first do a safe down-cast to the actual type of interface and then obtain the datagram proxy, rather than relying on an unsafe down-cast, as shown here. However, doing so may be disadvantageous for two reasons:

1060 The Ice Run Time in Detail
• Safe down-casts are sent via a stream-oriented transport. This means that using a safe down-cast will result in opening a connection for the sole purpose of verifying that the target object has the correct type. This is expensive if all the other traffic to the object is sent via datagrams.
• If the proxy does not offer a stream-oriented transport, the checkedCast fails with a NoEndpointException, so you can use this approach only for proxies that offer both a UDP endpoint and a TCP/IP and/or SSL endpoint.
32.16 Batched Invocations
Oneway and datagram invocations are normally sent as a separate message, that is, the Ice run time sends the oneway or datagram invocation to the server immedi-ately, as soon as the client makes the call. If a client sends a number of oneway or datagram invocations in succession, the client-side run time traps into the OS kernel for each message, which is expensive. In addition, each message is sent with its own message header (see Chapter 37), that is, for n messages, the band-width for n message headers is consumed. In situations where a client sends a number of oneway or datagram invocations, the additional overhead can be considerable.
To avoid the overhead of sending many small messages, you can send oneway and datagram invocations in a batch: instead of being sent as a separate message, a batch invocation is placed into a client-side buffer by the Ice run time. Successive batch invocations are added to the buffer and accumulated on the client side until they are flushed, either explicitly by the client or automatically by the Ice run time.
32.16.1 Proxy Methods
The relevant APIs are part of the proxy interface:
// C++namespace IceProxy {namespace Ice {class Object : /* ... */ {public: Ice::ObjectPrx ice_batchOneway() const; Ice::ObjectPrx ice_batchDatagram() const; void ice_flushBatchRequests();

32.16 Batched Invocations 1061
// ...};}}
The ice_batchOneway and ice_batchDatagram methods convert a proxy to a batch proxy. Once you obtain a batch proxy, messages sent via that proxy are buffered in the client-side run time instead of being sent immediately. Once the client has invoked one or more operations on batch proxies, it can call ice_flushBatchRequests to explicitly flush the batched invocations. This causes the batched messages to be sent “in bulk”, preceded by a single message header. On the server side, batched messages are dispatched by a single thread, in the order in which they were written into the batch. This means that messages from a single batch cannot appear to be reordered in the server. Moreover, either all messages in a batch are delivered or none of them. (This is true even for batched datagrams.)
Asynchronous versions of ice_flushBatchRequests are also available; see the relevant language mapping for more information.
32.16.2 Automatic Flushing
The default behavior of the Ice run time, as governed by the configuration prop-erty Ice.BatchAutoFlush (see Appendix D), automatically flushes batched invocations as soon as a batched request causes the accumulated message to exceed the maximum allowable size. When this occurs, the Ice run time immedi-ately flushes the existing batch of requests and begins a new batch with this latest request as its first element.
For batched oneway invocations, the maximum message size is established by the property Ice.MessageSizeMax, which defaults to 1MB. In the case of batched datagram invocations, the maximum message size is the smaller of the system’s maximum size for datagram packets and the value of Ice.Message-SizeMax.
A client that sends batch requests cannot determine the size of the message that the Ice run time is accumulating for it; automatic flushing is enabled by default as a convenience for clients that unknowingly exceed the maximum message size. A client that requires more deterministic behavior should flush batched requests explicitly at regular intervals.

1062 The Ice Run Time in Detail
32.16.3 Flushing Communicators and Connections
The Communicator and Connection interfaces support synchronous and asyn-chronous versions of flushBatchRequests. As you might expect, the Connec-tion::flushBatchRequests operation flushes all batch requests queued for a particular connection, and the Communicator::flushBatchRequests operation flushes the batch requests of every connection created by a communicator.
The synchronous versions of flushBatchRequests block the calling thread until the batch requests have been successfully written to the local transport. To avoid the risk of blocking, you must use the asynchronous versions instead (assuming they are supported by your chosen language mapping). Note also that the asynchronous version of Communicator::flushBatchRequests never raises an exception, even if an error occurs while flushing one of its connections.
32.16.4 Batched Datagrams
For batched datagram invocations, you need to keep in mind that, if the data for the invocations in a batch substantially exceeds the PDU size of the network, it becomes increasingly likely for an individual UDP packet to get lost due to frag-mentation. In turn, loss of even a single packet causes the entire batch to be lost. For this reason, batched datagram invocations are most suitable for simple inter-faces with a number of operations that each set an attribute of the target object (or interfaces with similar semantics). (Batched oneway invocations do not suffer from this risk because they are sent over stream-oriented transports, so individual packets cannot be lost.)
32.16.5 Compression
Batched invocations are more efficient if you also enable compression for the transport: many isolated and small messages are unlikely to compress well, whereas batched messages are likely to provide better compression because the compression algorithm has more data to work with.11
11.Regardless of whether you used batched messages or not, you should enable compression only on lower-speed links. For high-speed LAN connections, the CPU time spent doing the compression and decompression is typically longer than the time it takes to just transmit the uncompressed data.

32.17 Location Services 1063
32.16.6 Active Connection ManagementAs for oneway invocations (see page 1053), you should disable server-side active connection management (ACM) when using batched invocations over TCP/IP or SSL. With server-side ACM enabled, it is possible for a server to close the connection at the wrong moment and not process a batch (with no indication being returned to the client that the batch was lost).
32.17 Location Services
In Section 2.2.2 we described briefly how the Ice run time uses an intermediary, known as a location service, to convert the symbolic information in an indirect proxy into an endpoint that it can use to communicate with a server. This section expands on that introduction to explain in more detail how the Ice run time inter-acts with a location service. You can create your own location service or you can use IceGrid, which is an implementation of a location service and provides many other useful features as well (see Chapter 38). Describing how to implement a location service is outside the scope of this book.
32.17.1 LocatorsA locator is an Ice object that is implemented by a location service. A locator object must support the Slice interface Ice::Locator, which defines operations that satisfy the location requirements of the Ice run time. Applications do not normally use these operations directly, but the locator object may support an implementation-specific interface derived from Ice::Locator that provides addi-tional functionality. For example, IceGrid’s locator object implements the derived interface IceGrid::Query (see Section 38.6.5).

1064 The Ice Run Time in Detail
32.17.2 Client SemanticsOn the first use of an indirect proxy in an application, the Ice run time may issue a remote invocation on the locator object. This activity is transparent to the applica-tion, as shown in Figure 32.6.
Figure 32.6. Locating an object.
1. The client invokes the operation initialOp on an indirect proxy.
2. The Ice run time checks an internal cache (called the locator cache) to deter-mine whether a query has already been issued for the symbolic information in the proxy. If so, the cached endpoint is used and an invocation on the locator object is avoided. Otherwise, the Ice run time issues a locate request to the locator.
3. If the object is successfully located, the locator returns its current endpoints. The Ice run time in the client caches this information, establishes a connection to one of the endpoints according to the rules described in Section 36.3.1, and proceeds to send the invocation as usual.
4. If the object’s endpoints cannot be determined, the client receives an excep-tion. NotRegisteredException is raised when an identity, object adapter identifier or replica group identifier is not known. A client may also receive NoEndpointException if the location service failed to determine the current endpoints.
As far as the Ice run time is concerned, the locator simply converts the informa-tion in an indirect proxy into usable endpoints. Whether the locator’s implementa-tion is more sophisticated than a simple lookup table is irrelevant to the Ice run
ClientApplication
Ice RunTime
LocationService
Locator
Server
TargetObject
1 initialOp
2 query
3 initialOp

32.17 Location Services 1065
time. However, the act of performing this conversion may have additional seman-tics that the application must be prepared to accept.
For example, when using IceGrid as your location service, the target server may be launched automatically if it is not currently running, and the locate request does not complete until that server is started and ready to receive requests. As a result, the initial request on an indirect proxy may incur additional overhead as all of this activity occurs.
Replication
An indirect proxy may substitute a replica group identifier (see page 13) in place of the object adapter identifier. In fact, the Ice run time does not distinguish between these two cases and considers a replica group identifier as equivalent to an object adapter identifier for the purposes of resolving the proxy. The location service implementation must be able to distinguish between replica groups and object adapters using only this identifier.
The location service may return multiple endpoints in response to a locate request for an adapter or replica group identifier. These endpoints might all corre-spond to a single object adapter that is available at several addresses, or to multiple object adapters each listening at a single address, or some combination thereof. The Ice run time attaches no semantics to the collection of endpoints, but the application can make assumptions based on its knowledge of the location service’s behavior.
When a location service returns more than one endpoint, the Ice run time behaves exactly as if the proxy had contained several endpoints (see Section 36.3.1). As always, the goal of the Ice run time is to establish a connection to one of the endpoints and deliver the client’s request. By default, all requests made via the proxy that initiated the connection are sent to the same server until that connection is closed.
After the connection is closed, such as by active connection management (see Section 36.4), subsequent use of the proxy causes the Ice run time to obtain another connection. Whether that connection uses a different endpoint than previous connections depends on a number of factors, but it is possible for the client to connect to a different server than for previous requests.
Locator Cache
After successfully resolving an indirect proxy, the location service must return at least one endpoint. How the service derives the list of endpoints that corresponds to the proxy is entirely implementation dependent. For example, IceGrid’s loca-

1066 The Ice Run Time in Detail
tion service can be configured to respond in a variety of ways; one possibility uses a simple round-robin scheme, while another considers the system load of the target hosts when selecting endpoints.
A locate request has the potential to significantly increase the latency of the application’s invocation with a proxy, and this is especially true if the locate request triggers additional implicit actions such as starting a new server process. Fortunately, this overhead is normally incurred only during the application’s initial invocation on the proxy, but this impact is influenced by the Ice run time’s caching behavior.
To minimize the number of locate requests, the Ice run time caches the results of previous requests. By default, the results are cached indefinitely, so that once the Ice run time has obtained the endpoints associated with an indirect proxy, it never issues another locate request for that proxy. Furthermore, the default behavior of a proxy is to cache its connection, that is, once a proxy has obtained a connection, it continues to use that connection indefinitely.
Taken together, these two caching characteristics represent the Ice run time’s best efforts to optimize an application’s use of a location service: after a proxy is associated with a connection, all future invocations on that proxy are sent on the same connection without any need for cache lookups, locate requests, or new connections.
If a proxy’s connection is closed, the next invocation on the proxy prompts the Ice run time to consult its locator cache to obtain the endpoints from the prior locate request. Next, the Ice run time searches for an existing connection to any of those endpoints and uses that if possible, otherwise it attempts to establish a new connection to each of the endpoints until one succeeds. Only if that process fails does the Ice run time clear the entry from its cache and issue a new locate request with the expectation that a usable endpoint is returned.
The Ice run time’s default behavior is optimized for applications that require minimal interaction with the location service, but some applications can benefit from more frequent locate requests. Normally this is desirable when imple-menting a load-balancing strategy, as we discuss in more detail below. In order to increase the frequency of locate requests, an application must configure a timeout for the locator cache and manipulate the connections of its proxies.
Locator Cache Timeout
An application can define a timeout to control the lifetime of entries in the locator cache. This timeout can be specified globally using the Ice.Default.Loca-torCacheTimeout property (see Section D.8) and for individual proxies using

32.17 Location Services 1067
the proxy method ice_locatorCacheTimeout (see Section 32.11.2). The Ice run time’s default behavior is equivalent to a timeout value of -1, meaning the cache entries never expire. Using a timeout value greater than zero causes the cache entries to expire after the specified number of seconds. Finally, a timeout value of zero disables the locator cache altogether.
The previous section explained the circumstances in which the Ice run time consults the locator cache. Briefly, this occurs only when the application has invoked an operation on a proxy and the proxy is not currently associated with a connection. If the timeout is set to zero, the Ice run time issues a new locate request immediately. Otherwise, for a non-zero timeout, the Ice run time examines the locator cache to determine whether the endpoints from the previous locate request have expired. If so, the Ice run time discards them and issues a new locate request.
Given this behavior, if your goal is to force a proxy invocation to issue locate requests more frequently, you can do so only when the proxy has no connection. You can accomplish that in several ways:
• create a new proxy, which is inherently not connected by default
• explicitly close the proxy’s existing connection (see Chapter 36)
• disabling the proxy’s connection caching behavior
Of these choices, the last is the most common.
Proxy Connection Caching
By default a proxy remembers its connection and uses it for all invocations until that connection is closed. You can prevent a proxy from caching its connection by calling the ice_connectionCached proxy method with an argument of false (see Section 32.11.2). Once connection caching is disabled, each invocation on a proxy causes the Ice run time to execute its connection establishment process.
Note that each invocation on such a proxy does not necessarily cause the Ice run time to establish a new connection. It only means that the Ice run time does not assume that it can reuse the connection of the proxy’s previous invocation. Whether the Ice run time actually needs to establish a new connection for the next invocation depends on several factors, as explained in Section 36.3.
As with any feature, you should only use it when the benefits outweigh the risks. With respect to a proxy’s connection caching behavior, there is certainly a small amount of computational overhead associated with executing the connection establishment process for each invocation, as well as the risk of significant over-head each time a new connection is actually created.

1068 The Ice Run Time in Detail
Simple Load Balancing
Several forms of load balancing are available to Ice applications. The simplest form uses only the endpoints contained in a direct proxy and does not require a location service. In this configuration, the application can configure the proxy to use the desired endpoint selection type (see Section 36.3.1) and connection caching behavior to achieve the desired results.
For example, suppose that a proxy contains several endpoints. In its default configuration, it uses the Random endpoint selection type and caches its connec-tion. Upon the first invocation, the Ice run time selects one of the proxy’s endpoints at random and uses that connection for all subsequent invocations until the connection is closed. For some applications, this form of load balancing may be sufficient.
Suppose now that we use the Ordered endpoint selection type instead. In this case, the Ice run time always attempts to establish connections using the endpoints in the order they appear in the proxy. Normally an application uses this configura-tion when there is a preferred order to the servers. Again, once connected, the application uses whichever connection was chosen indefinitely.
By disabling the proxy’s connection caching behavior, the semantics undergo a significant change. Using the Random endpoint selection type, the Ice run time selects one of the endpoints at random and establishes a connection to it if one is not already established, and this process is repeated prior to each subsequent invo-cation. This is called per-request load balancing because each request can be directed to a different server. Using the Ordered endpoint selection type is not as common in this scenario; its main purpose would be to fall back on a secondary server if the primary server is not available, but it causes the Ice run time to attempt to contact the primary server during each request.
Load Balancing with a Location Service
A disadvantage of relying solely on the simple form of load balancing described in the previous section is that the client cannot make any intelligent decisions based on the status of the servers. If you want to distribute your requests in a more sophisticated way, you must either modify your clients to query the servers directly, or use a location service that can transparently direct a client to an appro-priate server. For example, the IceGrid location service can monitor the system load on each server host and use that information when responding to locate requests.
The location service may return only one endpoint, which presumably repre-sents the best server (at that moment) for the client to use. With only one endpoint

32.17 Location Services 1069
available, changing the proxy’s endpoint selection type makes no difference. However, by disabling connection caching and modifying the locator cache timeout, the application can force the Ice run time to periodically retrieve an updated endpoint from the location service. For example, an application can set a locator cache timeout of thirty seconds and communicate with the selected server for that period. After the timeout has expired, the next invocation prompts the Ice run time to issue a new locate request, at which point the client might be directed to a different server.
If the location service returns multiple endpoints, the application must be designed with knowledge of how to interpret them. For instance, the location service may attach semantics to the order of the endpoints (such as least-loaded to most-loaded) and intend that the application use the endpoints in the order provided. Alternatively, the client may be free to select any of the endpoints. As a result, the application and the location service must cooperate to achieve the desired results.
You can combine the simple form of load balancing described in the previous section with an intelligent location service to gain even more flexibility. For example, suppose an application expects to receive multiple endpoints from the location service and has configured its proxy to disable connection caching and set a locator cache timeout. For each invocation, Ice run time selects one of the endpoints provided by the location service. When the timeout expires, the Ice run time issues a new locate request and obtains a fresh set of endpoints from which to choose.
32.17.3 Configuring a Client
An Ice client application must supply a proxy for the locator object, which it can do in several ways:
• by explicitly configuring an indirect proxy using the ice_locator proxy method (see Section 32.11.2)
• by calling setDefaultLocator on a communicator, after which all proxies use the given locator by default
• by defining the Ice.Default.Locator configuration property, which causes all proxies to use the given locator by default
The Ice run time’s efforts to resolve an indirect proxy can be traced by setting the following configuration properties:

1070 The Ice Run Time in Detail
Ice.Trace.Network=2Ice.Trace.Protocol=1Ice.Trace.Locator=2
See Appendix D for more information on these properties.
32.17.4 Server Semantics
A location service must know the endpoints of any object adapter whose identifier can be used in an indirect proxy. For example, suppose a client uses the following proxy:
Object1@PublicAdapter
The Ice run time in the client sends the identifier PublicAdapter to the locator, as described in Section 32.17.2, and expects to receive the associated endpoints. The only way the location service can know these endpoints is if it is given them. When you consider that an object adapter’s endpoints may not specify fixed ports, and therefore the endpoint addresses may change each time the object adapter is activated, it is clear that the best source of endpoint information is the object adapter itself. As a result, an object adapter that is properly configured (see Section 32.17.5) contacts the locator during activation to supply its identifier and current endpoints. More specifically, the object adapter registers itself with an object implementing the Ice::LocatorRegistry interface, whose proxy the object adapter obtains from the locator.
Registration Requirements
A location service may require that all object adapters be pre-registered via some implementation-specific mechanism. (IceGrid behaves this way by default.) This implies that activation can fail if the object adapter supplies an identifier that is unknown to the location service. In such a situation, the object adapter’s activate operation raises NotRegisteredException.
In a similar manner, an object adapter that participates in a replica group (see page 13) includes the group’s identifier in the locator request that is sent during activation. If the location service requires replica group members to be configured in advance, activate raises NotRegisteredException if the object adapter’s identifier is not one of the group’s registered participants (see Section 38.9.2).

32.17 Location Services 1071
32.17.5 Configuring a ServerAn object adapter must be able to obtain a locator proxy in order to register itself with a location service. Each object adapter can be configured with its own locator proxy by defining its Locator property, as shown in the example below for the object adapter named SampleAdapter:
SampleAdapter.Locator=IceGrid/Locator:tcp -h locatorhost -p 10000
Alternatively, a server may call setLocator on the object adapter prior to activa-tion. If the object adapter is not explicitly configured with a locator proxy, it uses the default locator as provided by its communicator (see Section 32.17.3).
Two other configuration properties influence an object adapter’s interactions with a location service during activation:
• AdapterId
Configuring a non-empty identifier for the AdapterId property causes the object adapter to register itself with the location service. A locator proxy must also be configured.
• ReplicaGroupId
Configuring a non-empty identifier for the ReplicaGroupId property indi-cates that the object adapter is a member of a replica group (see page 13). For this property to have an effect, AdapterId must also be configured with a non-empty value.
We can use these properties as shown below:
SampleAdapter.AdapterId=SampleAdapterIdSampleAdapter.ReplicaGroupId=SampleGroupIdSampleAdapter.Locator=IceGrid/Locator:tcp -h locatorhost -p 10000
Refer to Section 32.17.4 for information on the pre-registration requirements a location service may enforce.
32.17.6 Process RegistrationAn activation service, such as an IceGrid node (see Chapter 38), needs a reliable way to gracefully deactivate a server. One approach is to use a platform-specific mechanism, such as POSIX signals. This works well on POSIX platforms when the server is prepared to intercept signals and react appropriately (see Section 31.10). On Windows platforms, it works less reliably for C++ servers, and not at all for Java servers. For these reasons, Ice provides an alternative that is both portable and reliable:
1072 The Ice Run Time in Detail
module Ice {interface Process { ["ami"] void shutdown(); void writeMessage(string message, int fd);};};
The Slice interface Ice::Process allows an activation service to request a graceful shutdown of the server. When shutdown is invoked, the object imple-menting this interface is expected to initiate the termination of its server process. The activation service may expect the server to terminate within a certain period of time, after which it may terminate the server abruptly.
One of the benefits of the Ice administrative facility (see Section 32.18) is that it creates an implementation of Ice::Process and makes it available via an administrative object adapter. Furthermore, IceGrid automatically enables this facility on the servers that it activates.
32.18 Administrative Facility
Ice applications often require remote administration, such as when an IceGrid node needs to gracefully deactivate a running server. The Ice run time provides an extensible, centralized facility for exporting administrative functionality. This facility consists of an object adapter named Ice.Admin, an Ice object activated on this adapter, and configuration properties that enable the facility and specify its features.
32.18.1 The admin Object
The Ice.Admin adapter hosts a single object whose identity name is admin. Although this identity name cannot be changed, you can define the identity cate-gory using the configuration property Ice.Admin.InstanceName (see Appendix D). If you enable the Ice.Admin adapter without defining this prop-erty, the category uses a UUID by default and therefore the object’s identity changes with each instance of the process.
In this book, we refer to the administrative object as the admin object.

32.18 Administrative Facility 1073
Facets
As explained in Chapter 33, an Ice object is actually a collection of sub-objects known as facets whose types are not necessarily related. Although facets are typi-cally used for extending and versioning types, they also allow a group of inter-faces with a common purpose to be consolidated into a single Ice object with an established interface for navigation. These qualities make facets an excellent match for the requirements of the administrative facility.
Each facet of the admin object represents a distinct administrative capability. The object does not have a default facet (that is, a facet with an empty name). However, the Ice run time implements two built-in facets that it adds to the admin object:
• Process, described in Section 32.18.4
• Properties, described in Section 32.18.5
An application can control which facets are installed with a configuration property (see Section 32.18.6). An application can also install its own facets if necessary (see Section 32.18.7). Administrative facets are not required to inherit from a common Slice interface.
32.18.2 Enabling the Object AdapterThe administrative facility is disabled by default. To enable it, you must specify endpoints for the administrative object adapter using the property Ice.Admin.Endpoints. In addition, you must do one of the following:
• Define the Ice.Admin.InstanceName property.
• Define the Ice.Admin.ServerId and Ice.Default.Locator prop-erties. If you do not supply a value for Ice.Admin.InstanceName, Ice uses a UUID by default.
The Ice.Admin.ServerId and Ice.Default.Locator properties are typically used in conjunction with an activation service such as IceGrid, as discussed in Section 38.22.
The endpoints for the Ice.Admin adapter must be chosen with caution. Section 32.18.8 addresses the security considerations of using the administrative facility.
It may be necessary to postpone the creation of the administrative object adapter until all facets are installed or other initialization activities have taken place. In this situation, you can define the following configuration property:
Ice.Admin.DelayCreation=1

1074 The Ice Run Time in Detail
When this property is set to a non-zero value, the administrative facility is disabled until the application invokes the getAdmin operation on the communi-cator (see Section 32.18.3).
32.18.3 Using the admin Object
A program can obtain a proxy for its admin object by calling the getAdmin oper-ation on a communicator:
module Ice {local interface Communicator { // ... Object* getAdmin();};};
This operation returns a null proxy if the administrative facility is disabled. The proxy returned by getAdmin cannot be used for invoking operations because it refers to the default facet and, as we mentioned previously, the admin object does not support a default facet. A program must first obtain a new version of the proxy that is configured with the name of a particular administrative facet before invoking operations on it. Although it cannot be used for invocations, the original proxy is still useful because it contains the endpoints of the Ice.Admin object adapter and therefore the program may elect to export that proxy to a remote client.
Remote Administration
To administer a program remotely, somehow you must obtain a proxy for the program’s admin object. There are several ways for the administrative client to accomplish this:
• Construct the proxy itself, assuming that it knows the admin object’s iden-tity, facets, and endpoints. The format of the stringified proxy is as follows:
instance-name/admin -f admin-facet:admin-endpoints
The identity category, represented here by instance-name, is the value of the Ice.Admin.InstanceName property or a UUID if that property is not defined. (Clearly, the use of a UUID makes the proxy much more difficult for a client to construct on its own.) The name of the administrative facet is supplied as the value of the -f option, and the endpoints of the Ice.Admin

32.18 Administrative Facility 1075
adapter appear last in the proxy. See Appendix E for more information on stringified proxies.
• Invoke an application-specific interface for retrieving the admin object’s proxy.
• Use the getServerAdmin operation on the IceGrid::Admin interface, if the remote program was activated by IceGrid (see Section 38.22.3).
Having obtained the proxy, the administrative client must select a facet before invoking any operations. For example, the code below shows how to obtain the configuration properties of the remote program:
// C++Ice::ObjectPrx adminObj = ...;Ice::PropertiesAdminPrx propAdmin = Ice::PropertiesAdminPrx::checkedCast(adminObj, "Properties");Ice::PropertyDict props = propAdmin->getPropertiesForPrefix("");
Here we used an overloaded version of checkedCast to supply the facet name of interest (Properties). We could have selected the facet using the proxy method ice_facet instead, as shown below:
// C++Ice::ObjectPrx adminObj = ...;Ice::PropertiesAdminPrx propAdmin = Ice::PropertiesAdminPrx::checkedCast( adminObj->ice_facet("Properties"));Ice::PropertyDict props = propAdmin->getPropertiesForPrefix("");
This code is functionally equivalent to the first example.A remote client must also know (or be able to determine) which facets are
available in the target server. Typically this information is statically configured in the client, since the client must also know the interface types of any facets that it uses. If an invocation on a facet raises FacetNotExistException, the client may have used an incorrect facet name, or the server may have disabled the facet in question.
32.18.4 The Process FacetAn activation service, such as an IceGrid node (see Chapter 38), needs a reliable way to gracefully deactivate a server. One approach is to use a platform-specific mechanism, such as POSIX signals. This works well on POSIX platforms when the server is prepared to intercept signals and react appropriately (see

1076 The Ice Run Time in Detail
Section 31.10). On Windows platforms, it works less reliably for C++ servers, and not at all for Java servers. For these reasons, the Process facet provides an alter-native that is both portable and reliable.
Section 32.18.8 discusses the security risks associated with enabling the Process facet.
Interface
The Slice interface Ice::Process allows an activation service to request a graceful shutdown of the program:
module Ice {interface Process { ["ami"] void shutdown(); void writeMessage(string message, int fd);};};
When shutdown is invoked, the object implementing this interface is expected to initiate the termination of its process. The activation service may expect the program to terminate within a certain period of time, after which it may terminate the program abruptly.
The writeMessage operation allows remote clients to print a message to the program’s standard output (fd == 1) or standard error (fd == 2) channels.
Application Requirements
The default implementation of the Process facet requires cooperation from an application in order to successfully terminate a process. Specifically, the facet invokes shutdown on its communicator and assumes that the application uses this event as a signal to commence its termination procedure. For example, an applica-tion typically uses a thread (often the main thread) to call the communicator oper-ation waitForShutdown, which blocks the calling thread until the communicator is shut down or destroyed. After waitForShutdown returns, the calling thread can initiate a graceful shutdown of its process.
Refer to Section 32.2 for more information on the communicator operations shutdown and waitForShutdown.
Replacing the Process Facet
You can replace the default Process facet if your application requires a different scheme for gracefully shutting itself down. To define your own facet, create a

32.18 Administrative Facility 1077
servant that implements the Ice::Process interface. As an example, the servant definition shown below duplicates the functionality of the default Process facet:
class ProcessI : public Ice::Process {public: ProcessI(const Ice::CommunicatorPtr& communicator) : _communicator(communicator) {} void shutdown(const Ice::Current&) { _communicator->shutdown(); } void writeMessage(const string& msg, Ice::Int fd, const Ice::Current&) { if(fd == 1) cout << msg << endl; else if(fd == 2) cerr << msg << endl; }private: const Ice::CommunicatorPtr _communicator;};
As you can see, the default implementation of shutdown simply shuts down the communicator, which initiates an orderly termination of the Ice run time’s server-side components and prevents object adapters from dispatching any new requests. You can add your own application-specific behavior to the shutdown method to ensure that your program terminates in a timely manner.
NOTE: As explained in Section 32.2, a servant must not invoke destroy on its communi-cator while executing a dispatched operation.
To avoid the risk of a race condition, the recommended strategy for replacing the Process facet is to delay creation of the administrative facets so that your appli-cation has a chance to replace the facet:
Ice.Admin.DelayCreation=1
With this property defined, the application can safely remove the default Process facet and install its own:

1078 The Ice Run Time in Detail
// C++Ice::CommunicatorPtr communicator = ...communicator->removeAdminFacet("Process");Ice::ProcessPtr myProcessFacet = new MyProcessFacet(...);communicator->addAdminFacet(myProcessFacet, "Process");
The final step is to activate the administrative facility by calling getAdmin on the communicator:
communicator->getAdmin();
Integration with an Activation Service
If the Ice.Admin.ServerId and Ice.Default.Locator properties are defined, the Ice run time performs the following steps after creating the Ice.Admin adapter:
• Obtains proxies for the Process facet and the default locator
• Invokes getRegistry on the proxy to obtain a proxy for the locator registry
• Invokes setServerProcessProxy on the locator registry and supplies the value of Ice.Admin.ServerId along with a proxy for the Process facet
The identifier specified by Ice.Admin.ServerId must uniquely identify the process within the locator registry.
In the case of IceGrid, the node defines the Ice.Admin.ServerId and Ice.Default.Locator properties for each deployed server. The node also supplies a value for Ice.Admin.Endpoints if the property is not defined by the server. See Chapter 38 for more information.
32.18.5 The Properties Facet
An administrator may find it useful to be able to view the configuration properties of a remote Ice application. For example, the IceGrid administrative tools allow you to query the properties of active servers. The Properties facet supplies this functionality.
Interface
The Ice::PropertiesAdmin interface provides access to the communicator’s configuration properties:
32.18 Administrative Facility 1079
module Ice {interface PropertiesAdmin { ["ami"] string getProperty(string key); ["ami"] PropertyDict getPropertiesForPrefix(string prefix);};};
The getProperty operation retrieves the value of a single property, and the getPropertiesForPrefix operation returns a dictionary of properties whose keys match the given prefix. These operations have the same semantics as those in the Ice::Properties interface described in Section 30.9.1.
32.18.6 Filtering Facets
The Ice run time enables all of its built-in administrative facets by default, and an application may install its own facets. You can control which facets the Ice run time enables using the Ice.Admin.Facets property. For example, the following property definition enables the Properties facet and leaves the Process facet (and any application-defined facets) disabled:
Ice.Admin.Facets=Properties
To specify more than one facet, separate them with a comma or white space. A facet whose name contains white space must be enclosed in single or double quotes.
32.18.7 Custom Facets
An application can add and remove administrative facets using the Communicator operations shown below:
module Ice {local interface Communicator { // ... void addAdminFacet(Object servant, string facet); Object removeAdminFacet(string facet);};};
The addAdminFacet operation installs a new facet with the given name, or raises AlreadyRegisteredException if a facet already exists with the same name. The removeAdminFacet operation removes (and returns) the facet with the given name, or raises NotRegisteredException if no matching facet is found.

1080 The Ice Run Time in Detail
The mechanism for filtering administrative facets described in Section 32.18.6 also applies to application-defined facets. If you call addAdminFacet while a filter is in effect, and the name of your custom facet does not match the filter, the Ice run time will not expose your facet but instead keeps a reference to it so that a subsequent call to removeAdminFacet is possible.
32.18.8 Security Considerations
Exposing administrative functionality naturally makes a program vulnerable, therefore it is important that proper precautions are taken.
Issues
With respect to the default functionality, the Properties facet could expose sensitive configuration information, and the Process facet supports a shutdown operation that opens the door for a denial-of-service attack.
Developers should carefully consider the security implications of any addi-tional administrative facets that an application installs.
Remedies
There are several approaches you can take to mitigate the possibility of abuse:
• Disable the administrative facility
The administrative facility is disabled by default, and remains disabled as long as the prerequisites listed in Section 32.18.2 are not met. Note that IceGrid enables the facility in servers that it activates for the following reasons:
• The Process facet allows the IceGrid node to gracefully terminate the process.
• The Properties facet enables IceGrid administrative clients to obtain configuration information about activated servers.
You could disable a facet using filtering, but doing so may disrupt IceGrid’s normal operation.
• Select a proper endpoint
A reasonably secure value for the Ice.Admin.Endpoints property is one that uses the local host interface (-h 127.0.0.1), which restricts access to clients that run on the same host. Incidentally, this is the default value that IceGrid defines for its servers, although you can override that if you like. Note that using a local host endpoint does not preclude remote administration for

32.19 The Ice::Logger Interface 1081
IceGrid servers because IceGrid transparently routes requests on admin objects to the appropriate server via its node (see Section 38.22.3).
If your application must support administration from non-local hosts, we recommend the use of SSL and certificate-based access control (see Chapter 41).
• Filter the facets
After choosing a suitable endpoint, you can minimize risks by filtering the facets to enable only the functionality that is required. For example, if you are not using IceGrid’s server activation feature and do not require the ability to remotely terminate a program, you should disable the Process facet using the mechanism described in Section 32.18.6.
• Consider the object’s identity
The default identity of the admin object has a UUID for its category, which makes it difficult for a hostile client to guess. Depending on your require-ments, the use of a UUID may be an advantage or a disadvantage. For example, in a trusted environment, the use of a UUID may create additional work, such as the need to add an interface that an administrative client can use to obtain the identity or proxy of a remote admin object. An obscure identity might be more of a hindrance in this situation, and therefore specifying a static category via the Ice.Admin.InstanceName property is a reasonable alternative. In general, however, we recommend using the default behavior.
32.19 The Ice::Logger Interface
Depending on the setting of various properties (see Chapter 30), the Ice run time produces trace, warning, or error messages. These messages are written via the Ice::Logger interface:
module Ice { local interface Logger { void print(string message); void trace(string category, string message); void warning(string message); void error(string message); Logger cloneWithPrefix(string prefix); };};

1082 The Ice Run Time in Detail
The cloneWithPrefix operation returns a new logger that logs to the same desti-nation but with a different prefix. (The prefix is used to, for example, provide the name of the process writing the log messages.)
32.19.1 The Default LoggerA default logger is instantiated when you create a communicator. The default logger logs to the standard error output. The trace operation accepts a category parameter in addition to the error message; this allows you to separate trace output from different subsystems by sending the output through a filter.
You can obtain the logger that is attached to a communicator:
module Ice { local interface Communicator { Logger getLogger(); };};
32.19.2 Custom LoggersYou have several options if you wish to install a logger other than the default one:
• Select one of the other built-in loggers (see Section 32.19.3), which allow you to log to a file, to the syslog on Unix, and to the Windows event log
• Supply your own logger implementation in an InitializationData parameter (see Section 32.3) when you create a communicator
• Load a logger implementation dynamically via the Ice plug-in facility (see Section 32.19.4)
Changing the Logger object that is attached to a communicator allows you to inte-grate Ice messages into your own message handling system. For example, for a complex application, you might have an existing logging framework. To integrate Ice messages into that framework, you can create your own Logger implementa-tion that logs messages to the existing framework.
When you destroy a communicator, its logger is not destroyed. This means that you can safely use a logger even beyond the lifetime of its communicator.
32.19.3 Built-In LoggersA file-based logger, enabled via the Ice.LogFile property, is available for all supported languages and platforms. Ice also provides Unix- and Windows-specific

32.19 The Ice::Logger Interface 1083
logger implementations. Finally, for .NET, the default Ice logger uses a TraceL-istener and so can be customized at run time via configuration.
Refer to Appendix D for more information on the properties mentioned in this section.
Unix
You can activate a logger that logs via the Unix syslog implementation by setting the Ice.UseSyslog property. This logger is available for C++, Java, and C# applications.
Windows
On Windows, subclasses of Ice::Service use the Windows application event log by default (see Section 8.3.2). The event log implementation is available for C++ applications.
.NET
The default logger in Ice for .NET writes its messages using the System.Diag-nostics.Trace facility. By default, the Ice run time registers a Console-TraceListener that writes to stderr. You can disable the logging of messages via this trace listener by setting the property Ice.ConsoleListener to zero.
You can change the trace listener for your application via the application’s configuration file. For example:
<configuration> <system.diagnostics> <trace autoflush="true" indentsize="4"> <listeners> <add name="Console" type="System.Diagnostics.EventLogTraceListener" initializeData="true"/> </listeners> </trace> </system.diagnostics></configuration>
This configures a trace listener that logs to the Windows event log.

1084 The Ice Run Time in Detail
32.19.4 Logger Plug-Ins
Installing a custom logger using the Ice plug-in facility has several advantages. Because the logger plug-in is specified by a configuration property and loaded dynamically by the Ice run time, an application requires no code changes in order to utilize a custom logger implementation. Furthermore, a logger plug-in takes precedence over the per-process logger (see Section 32.19.5) and the logger supplied in the InitializationData argument during communicator initial-ization, meaning you can use a logger plug-in to override the logger that an appli-cation installs by default.
Installing a C++ Logger Plug-In
To install a logger plug-in in C++, you must first define a subclass of Ice::Logger:
class MyLoggerI : public Ice::Logger {public: virtual void print(const std::string& message); virtual void trace(const std::string& category, const std::string& message); virtual void warning(const std::string& message); virtual void error(const std::string& message); virtual LoggerPtr void cloneWithPrefix(const string& prefix); // ...};
Next, supply a factory function that installs your custom logger by returning an instance of Ice::LoggerPlugin:
extern "C"{ICE_DECLSPEC_EXPORT Ice::Plugin*createLogger(const Ice::CommunicatorPtr& communicator, const std::string& name, const Ice::StringSeq& args){ Ice::LoggerPtr logger = new MyLoggerI; return new Ice::LoggerPlugin(communicator, logger);}}

32.19 The Ice::Logger Interface 1085
The factory function can have any name you wish; we used createLogger in this example. See Section 32.25.1 for more information on plug-in factory func-tions.
The definition of LoggerPlugin is shown below:
namespace Ice {class LoggerPlugin {public: LoggerPlugin(const CommunicatorPtr&, const LoggerPtr&); virtual void initialize(); virtual void destroy();};}
The constructor installs your logger into the given communicator. The initialize and destroy methods are empty, but you can subclass LoggerPlugin and override these methods if necessary.
Finally, define a configuration property that loads your plug-in into an applica-tion:
Ice.Plugin.MyLogger=mylogger:createLogger
The plug-in’s name in this example is MyLogger; again, you can use any name you wish. The value of the property represents the plug-in’s entry point, in which mylogger is the abbreviated form of its shared library or DLL, and create-Logger is the name of the factory function.
If the configuration file containing this property is shared by programs in multiple implementation languages, you can use an alternate syntax that is loaded only by the Ice for C++ run time:
Ice.Plugin.MyLogger.cpp=mylogger:createLogger
Refer to Appendix D for more information on the Ice.Plugin properties.
Installing a Java Logger Plug-In
To install a logger plug-in in Java, you must first define a subclass of Ice.Logger:
public class MyLoggerI implements Ice.Logger { public void print(String message) { ... } public void trace(String category, String message) { ... } public void warning(String message) { ... } public void error(String message) { ... }

1086 The Ice Run Time in Detail
public Logger cloneWithPrefix(String prefix) { ... } // ...}
Next, define a factory class that installs your custom logger by returning an instance of Ice.LoggerPlugin:
public class MyLoggerPluginFactoryI implements Ice.PluginFactory { public Ice.Plugin create(Ice.Communicator communicator, String name, String[] args) { Ice.Logger logger = new MyLoggerI(); return new Ice.LoggerPlugin(communicator, logger); }}
The factory class can have any name you wish; in this example, we used MyLog-gerPluginFactoryI. See Section 32.25.1 for more information on plug-in factories.
The definition of LoggerPlugin is shown below:
package Ice;public class LoggerPlugin implements Plugin { public LoggerPlugin(Communicator communicator, Logger logger) { // ... } public void initialize() { } public void destroy() { }}
The constructor installs your logger into the given communicator. The initialize and destroy methods are empty, but you can subclass LoggerPlugin and override these methods if necessary.
Finally, define a configuration property that loads your plug-in into an applica-tion:
Ice.Plugin.MyLogger=MyLoggerPluginFactoryI
The plug-in’s name in this example is MyLogger; again, you can use any name you wish. The value of the property is the name of the factory class.

32.19 The Ice::Logger Interface 1087
If the configuration file containing this property is shared by programs in multiple implementation languages, you can use an alternate syntax that is loaded only by the Ice for Java run time:
Ice.Plugin.MyLogger.java=MyLoggerPluginFactoryI
Refer to Appendix D for more information on the Ice.Plugin properties.
Installing a .NET Logger Plug-In
To install a logger plug-in in .NET, you must first define a subclass of Ice.Logger:
// C#public class MyLoggerI : Ice.Logger { public void print(string message) { ... } public void trace(string category, string message) { ... } public void warning(string message) { ... } public void error(string message) { ... } public Logger cloneWithPrefix(string prefix) { ... } // ...}
Next, define a factory class that installs your custom logger by returning an instance of Ice.LoggerPlugin:
// C#public class MyLoggerPluginFactoryI : Ice.PluginFactory { public Ice.Plugin create(Ice.Communicator communicator, string name, string[] args) { Ice.Logger logger = new MyLoggerI(); return new Ice.LoggerPlugin(communicator, logger); }}
The factory class can have any name you wish; in this example, we used MyLog-gerPluginFactoryI. See Section 32.25.1 for more information on plug-in factories. Typically the logger implementation and the factory are compiled into a single assembly.
The definition of LoggerPlugin is shown below:

1088 The Ice Run Time in Detail
// C#namespace Ice {public partial class LoggerPlugin : Plugin { public LoggerPlugin(Communicator communicator, Logger logger) { // ... } public void initialize() { } public void destroy() { }}}
The constructor installs your logger into the given communicator. The initialize and destroy methods are empty, but you can subclass LoggerPlugin and override these methods if necessary.
Finally, define a configuration property that loads your plug-in into an applica-tion:
Ice.Plugin.MyLogger=mylogger.dll:MyLoggerPluginFactoryI
The plug-in’s name in this example is MyLogger; again, you can use any name you wish. The value of the property is the entry point for the factory, consisting of an assembly name followed by the name of the factory class.
If the configuration file containing this property is shared by programs in multiple implementation languages, you can use an alternate syntax that is loaded only by the Ice for .NET run time:
Ice.Plugin.MyLogger.clr=mylogger.dll:MyLoggerPluginFactoryI
Refer to Appendix D for more information on the Ice.Plugin properties.
32.19.5 The Per-Process Logger
Ice allows you to install a per-process custom logger. This logger is used by all communicators that do not have their own specific logger established at the time a communicator is created.
You can set a per-process logger in C++ by calling Ice::setProcess-Logger, and you can retrieve the per-process logger by calling Ice::getPro-cessLogger:
LoggerPtr getProcessLogger();void setProcessLogger(const LoggerPtr&);

32.19 The Ice::Logger Interface 1089
If you call getProcessLogger without having called setProcessLogger first, the Ice run time installs a default per-process logger. Note that if you call setProcessLogger, only communicators created after that point will use this per-process logger; communicators created earlier use the logger that was in effect at the time they were created. (This also means that you can call setProcess-Logger multiple times; communicators created after that point will use whatever logger was established by the last call to setProcessLogger.)
getProcessLogger and setProcessLogger are language-specific APIs that are not defined in Slice. Therefore, for Java and C#, these methods appear in the Ice.Util class.
For applications that use the Application or Service convenience classes and do not explicitly configure a logger, these classes set a default per-process logger that uses the Ice.ProgramName property as a prefix for log messages. The Application class is described in the server-side language mapping chapters; more information on the Service class can be found in Section 8.3.2.
32.19.6 C++ Utility Classes
The Ice run time supplies a collection of utility classes that make use of the logger facility simpler and more convenient. Each of the logger’s four operations has a corresponding helper class:
namespace Ice {class Print {public: Print(const LoggerPtr&); void flush(); ...};class Trace {public: Trace(const LoggerPtr&, const std::string&); void flush(); ...};class Warning {public: Warning(const LoggerPtr&); void flush();

1090 The Ice Run Time in Detail
...};class Error {public: Error(const LoggerPtr&); void flush(); ...};}
The only notable difference among these classes is the extra argument to the Trace constructor; this argument represents the trace category.
To use one of the helper classes in your application, you simply instantiate it and compose your message:
if (errorCondition) { Error err(communicator->getLogger()); err << "encountered error condition: " << errorCondition;}
The Ice run time defines the necessary stream insertion operators so that you can treat an instance of a helper class as if it were a standard C++ output stream. When the helper object is destroyed, its destructor logs the message you have composed. If you want to log more than one message using the same helper object, invoke the flush method on the object to log what you have composed so far and reset the object for a new message.
The helper classes also supply insertion operators to simplify the task of logging an exception. The operators accept instances of std::exception (from which all Ice exceptions derive) and log the string returned by the what method. If you are using GCC, you can also enable the configuration property Ice.PrintStackTraces (see Appendix D), which causes the helper classes to log the stack trace of the exception in addition to the value of what.
32.20 The Ice::Stats Interface
The Ice run time reports bytes sent and received over the wire on every operation invocation via the Ice::Stats interface:

32.20 The Ice::Stats Interface 1091
module Ice { local interface Stats { void bytesSent(string protocol, int num); void bytesReceived(string protocol, int num); }; local interface Communicator { Stats getStats(); // ... };};
The Ice run time calls bytesReceived as it reads from the network and bytes-Sent as it writes to the network. A very simple implementation of the Stats inter-face could look like the following:
class MyStats : public virtual Ice::Stats {public: virtual void bytesSent(const string& prot, Ice::Int num) { cerr << prot << ": sent " << num << "bytes" << endl; } virtual void bytesReceived(const string& prot, Ice::Int) { cerr << prot << ": received " << num << "bytes" << endl; }};
To register your implementation, you must pass it in an Initialization-Data parameter when you call initialize to create the communicator (see Section 32.3):
Ice::InitializationData id;id.stats = new MyStats;Ice::CommunicatorPtr ic = Ice::initialize(id);
You can install a Stats object on either the client or the server side (or both). Here is some example output produced by installing a MyStats object in a simple server:

1092 The Ice Run Time in Detail
tcp: received 14 bytestcp: received 32 bytestcp: sent 26 bytestcp: received 14 bytestcp: received 33 bytestcp: sent 25 bytes...
In practice, your Stats implementation will probably be a bit more sophisticated: for example, the object can accumulate statistics in member variables and make the accumulated statistics available via member functions, instead of simply printing everything to the standard error output.
32.21 Location Transparency
One of the useful features of the Ice run time is that it is location transparent: the client does not need to know where the implementation of an Ice object resides; an invocation on an object automatically is directed to the correct target, whether the object is implemented in the local address space, in another address space on the same machine, or in another address space on a remote machine. Location trans-parency is important because it allows us to change the location of an object implementation without breaking client programs and, by using IceGrid (see Chapter 38), addressing information such as domain names and port numbers can be externalized so they do not appear in stringified proxies.
For invocations that cross address space boundaries (or more accurately, cross communicator boundaries), the Ice run time dispatches requests via the appro-priate transport. However, for invocations that are via proxies for which the proxies and the servants that process the invocation share the same communicator (so-called collocated invocations), the Ice run time, by default, does not send the invocation via the transport specified in the proxy. Instead, collocated invocations are short-cut inside the Ice run time and dispatched directly.12
The reason for this is efficiency: if collocated invocations were sent via TCP/IP, for example, invocations would still be sent via the operating system kernel (using the back plane instead of a network) and would incur the full cost of creating TCP/IP connections, marshaling requests into packets, trapping in and
12.Note that if the proxy and the servant do not use the same communicator, the invocation is not collocated, even though caller and callee are in the same address space.

32.21 Location Transparency 1093
out of the kernel, and so on. By optimizing collocated requests, much of this over-head can be avoided, so collocated invocations are almost as fast as a local func-tion call.
For efficiency reasons, collocated invocations are not completely location transparent, that is, a collocated call has semantics that differ in some ways from calls that cross address-space boundaries. Specifically, collocated invocations differ from ordinary invocations in the following respects:
• Collocated invocations are dispatched in the calling thread instead of being dispatched using the server’s concurrency model.
• The object adapter holding state is ignored: collocated invocations proceed normally even if the target object’s adapter is in the holding state.
• For collocated invocations, classes and exceptions are never sliced. Instead, the receiver always receives a class or exception as the derived type that was sent by the sender.
• If a collocated invocation throws an exception that is not in an operation’s exception specification, the original exception is raised in the client instead of UnknownUserException. (This applies to the C++ mapping only.)
• Class factories are ignored for collocated invocations.
• Timeouts on invocations are ignored.
• If an operation implementation uses an in parameter that is passed by refer-ence as a temporary variable, the change affects the value of the in parameter in the caller (instead of modifying a temporary copy of the parameter on the callee side only).
In practice, these differences rarely matter. The most likely cause of surprises with collocated invocations is dispatch in the calling thread, that is, a collocated invoca-tion behaves like a local, synchronous procedure call. This can cause problems if, for example, the calling thread acquires a lock that an operation implementation tries to acquire as well: unless you use recursive mutexes (see Chapter 31), this will cause deadlock.
The Ice run time uses the following semantics to determine whether a proxy is eligible for the collocated optimization:
• For an indirect proxy, collocation optimization is used if the proxy’s adapter id matches the adapter id or replica group id of an object adapter in the same communicator.
• For a well-known proxy, the Ice run time queries each object adapter to deter-mine if the servant is local.

1094 The Ice Run Time in Detail
• For a direct proxy, the Ice run time performs an endpoint search using the proxy’s endpoints.
When an endpoint search is required, the Ice run time compares each of the proxy’s endpoints against the endpoints of the communicator’s object adapters. Only the transport, address and port are considered; other attributes of an endpoint, such as timeout settings, are not considered during this search. If a match is found, the invocation is dispatched using collocation optimization. Normally this search is executed only once, during the proxy’s first invocation, although the proxy’s connection caching setting influences this behavior (see Section 36.3.4).
Collocation optimization is enabled by default, but you can disable it for all proxies by setting the property Ice.Default.CollocationOptimized=0 (see page 1861). You can also disable the optimization for an individual proxy using the factory method ice_collocationOptimized(false). Finally, for proxies created using propertyToProxy (see Section 32.11.1), the property name.CollocationOptimized configures the default setting for the proxy.
32.22 Automatic Retries
Ice may automatically retry a proxy invocation after a failure. This is a powerful feature that, when used in the proper situations, can significantly improve the robustness of your application without any additional programming effort. The retry facility is governed by one overriding principle: always respect at-most-once semantics. As explained on page 14, at-most-once semantics dictate that the Ice run time in the client must never retry a failed proxy invocation unless Ice guaran-tees that the server has not already received the request, or unless the application declares that it is safe for Ice to violate at-most-once semantics for the request.
To understand the importance of obeying at-most-once semantics, consider the following Slice definition:
interface Account { long withdraw(long amount);};
The withdraw operation removes funds from an account. If an invocation of withdraw fails, automatically retrying the request introduces the risk of a dupli-cate withdrawal unless Ice is absolutely sure that the server has not already executed the request.

32.22 Automatic Retries 1095
The remainder of this section examines automatic retries in more detail.
32.22.1 Request Failure
Ice considers a request to have failed if any of the following conditions are true:
• A connection could not be established
• A connection was lost before the reply was received
• A timeout expired
• An exception occurred while sending the request or receiving the reply
• An error occurred in the server while dispatching the request that causes the server to return an UnknownException or RequestFailedException
NOTE: Ice considers an invocation that results in a user exception to be successful and therefore excludes it from consideration for automatic retries.
Ice must determine the answers to several questions to decide whether to retry a failed request:
1. What kind of error caused the request to fail?
Ice does not bother retrying a request if it knows the same error is going to occur again. For example, Ice never retries an invocation that raises a Marsha-lException, which indicates that there was a problem while encoding or decoding a message. Retrying such an invocation is unlikely to change the outcome.
Ice also never retries exceptions that derive from RequestFailedException because they indicate a permanent failure. One such subclass is OperationNo-tExistException, whose occurrence signals a serious problem in the applica-tion. For instance, it might mean that the client and server are using incompatible Slice definitions, or that the client is trying to invoke operations on the wrong object. The exception to this rule is ObjectNotExistException, which Ice does consider to be worthy of retry if the proxy in question is indi-rect (see page 11) because it gives an application the ability to transparently migrate an Ice object.
In addition to user exceptions and subclasses of RequestFailedException, a server can also return an instance of UnknownException, UnknownLocalEx-ception, or UnknownUserException to indicate that it encountered an unex-
1096 The Ice Run Time in Detail
pected exception while dispatching the request. These exceptions are eligible for retry.
2. When did the error occur?
If the error is still a candidate for retry, Ice needs to know whether the server has received the request. Naturally, the Ice run time in the client cannot possibly know that information until the server confirms it by sending a reply. However, to be conservative Ice assumes that the server has received the request as soon as Ice has written the entire protocol message to the client’s local transport buffers. If the error occurred before Ice managed to write the complete message, retrying the request would not violate at-most-once seman-tics.
The Ice run time in the server also has the ability to notify the client that a request was not dispatched and therefore that it is safe for the Ice run time in the client to retry the request without violating at-most-once semantics. For example, this situation can occur when the server is shutting down while there are pending requests that have yet to be executed. Sending this notification allows a client to transparently fail over to another server.
3. Does the application require strict adherence to at-most-once semantics for this request?
An application can grant permission for Ice to violate at-most-once semantics for certain Slice operations by marking them as idempotent, causing Ice to retry a request that otherwise would be ineligible because the server has already received it. Section 32.22.2 discusses idempotent operations in more detail.
If Ice determines that an invocation cannot be retried, it raises the exception that caused the request failure to the application. On the other hand, if Ice does retry the invocation and the subsequent retries also fail, Ice raises the last exception to the application. For example, if the first attempt fails with ConnectionRefused-Exception and the retry fails with ConnectTimeoutException, the invocation raises ConnectTimeoutException to the application.
32.22.2 Idempotent Operations
Annotating a Slice operation with the idempotent keyword notifies Ice that it can safely violate at-most-once semantics:

32.22 Automatic Retries 1097
interface Account { long withdraw(long amount); idempotent long getBalance();};
Although withdraw clearly requires the stricter treatment, there is no harm in automatically retrying the getBalance operation even if the server executes the same request more than once.
In general, “read-only” operations are good candidates for the idempotent keyword whereas many mutating operations are not. However, the risk of dupli-cate requests is acceptable even for some kinds of mutating operations:
interface Account { long withdraw(long amount); idempotent long getBalance(); idempotent void changeAddress(string newAddress);};
Here we have marked changeAddress as idempotent because executing the request twice has the same effect as executing it only once.
The benefit of the idempotent keyword and the associated relaxation of retry semantics is that an invocation that otherwise might have raised an exception has at least one more chance to succeed. Furthermore, the application does not need to initiate the retry, and in fact the retry activities are completely transparent: if a subsequent retry succeeds, the application receives its results as if nothing went wrong. The invocation only raises an exception once Ice has reached its config-ured retry limits.
32.22.3 Configuring Retries
Retry Intervals
The Ice.RetryIntervals property configures the retry behavior for a communicator and affects invocations on every proxy created by that communi-cator. (Retry behavior cannot be configured on a per-proxy basis.) The value of this property consists of a series of integers separated by whitespace. The number of integers determines how many retry attempts Ice makes, and the value of each entry represents a delay in milliseconds. If this property is not defined, the default behavior is to retry once immediately after the first failure, which is equivalent to the following property definition:
Ice.RetryIntervals=0

1098 The Ice Run Time in Detail
You may want a more elaborate configuration for your application, such as a gradual increase in the delay between retries:
Ice.RetryIntervals=0 100 500 1000
With this setting, Ice retries immediately as in the default case. If the first retry attempt also fails, Ice waits 100 milliseconds before trying again, then 500 milli-seconds, and finally tries one more time after waiting one second.
In some situations you may need to disable retries completely. For example, an application might implement its own retry logic and therefore require imme-diate notification when a failure occurs. Clients that establish a session with a Glacier2 router also need to disable retries (see Section 42.3.4). To prevent auto-matic retries, use a value of -1:
Ice.RetryIntervals=-1
Retry Logging
To monitor Ice’s retry activities, configure your program with the property Ice.Trace.Retry set to a non-zero value:
Ice.Trace.Retry=1
When retry tracing is enabled, Ice logs a message each time it attempts a retry; the log message includes a description of the exception that prompted the retry. Ice also logs a message when it reaches the retry limit.
You can configure Ice to log even more information about retries by setting the property to 2:
Ice.Trace.Retry=2
This setting prompts Ice to include additional details about connections and endpoints.
32.22.4 TimeoutsIf a proxy invocation fails due to a timeout, the application must be prepared for Ice to raise a TimeoutException (see Section 32.13). However, a developer that is testing timeouts in an application may be initially confused to discover that it is taking twice as long as expected for Ice to raise the TimeoutException. Auto-matic retries are usually the reason for this situation.
For example, suppose that a proxy is configured with a one-second timeout and automatic retries are enabled with the default setting. If an invocation on that proxy fails due to a timeout and Ice determines that the invocation is eligible for

32.22 Automatic Retries 1099
retry (using the criteria in Section 32.22.1), Ice immediately tries the invocation again and waits for another timeout period to expire before finally raising Timeou-tException. From the application’s perspective, the invocation fails after approx-imately two seconds.
Consequently, you can compute an approximate worst-case timeout value as follows:
T = t * (N + 1) + D
where t is the timeout value, N is the number of retry intervals, and D is the sum of the retry intervals (the total delay between retries). For example, consider our example from Section 32.22.3 again:
Ice.RetryIntervals=0 100 500 1000
Using this configuration with a one-second timeout, our approximate worst-case timeout is 1 * 5 + 1.6 = 6.6 seconds.
32.22.5 ConnectionsThe behavior of automatic retries is intimately tied to the presence (and absence) of connections. This section describes the errors that cause Ice to close connec-tions, and provides more details about how connections influence retries.
Connection Errors
Ice automatically closes a connection in response to certain fatal error conditions. Of these, the one that is the most likely to affect Ice applications is a timeout (see Section 32.22.4). Other errors that prompt Ice to close a connection include the following:
• a socket error occurs while performing I/O on the connection
• receiving an improperly formatted message
• dispatching an operation to a Java servant raises OutOfMemoryError or AssertionError
When Ice closes a connection in response to one of these errors, all other outstanding requests on the same connection also fail and may be retried if eligible.
Connection Status
One factor that influences retry behavior is the status of the connection on which the failed request was attempted. If the failure caused Ice to close the connection

1100 The Ice Run Time in Detail
(as discussed in the previous section), or if the request failed because Ice could not establish a connection, Ice must try to obtain another connection before it can retry the request. Section 36.3 describes the semantics of connection establish-ment.
It is also important to understand that Ice may not retry the invocation on the original endpoint even if the connection that was used for the initial request remains open. The retry behavior in this case depends on several criteria:
• whether the proxy caches its connection (see Section 36.3.4)
• whether the proxy contains multiple endpoints
• whether other connections exist to any of the proxy’s endpoints
• the proxy’s configured endpoint selection type (see Section 36.3.1)
Generally speaking, you must configure your application carefully if you need fine-grained control over Ice’s retry behavior.
32.23 Dispatch Interceptors
A dispatch interceptor is a server-side mechanism that allows you to intercept incoming client requests before they are given to a servant. The interceptor can examine the incoming request; in particular, it can see whether the request dispatch is collocation-optimized and examine the Current information for the request (which provides access to the operation name, object identity, and so on).
A dispatch interceptor can dispatch a request to a servant and check whether the dispatch was successful; if not, the interceptor can choose to retry the dispatch. This functionality is useful to automatically retry requests that have failed due to a recoverable error condition, such as a database deadlock exception. (Freeze uses dispatch interceptors for this purpose in its evictor implementation—see Section 39.3.)
32.23.1 Dispatch Interceptor API
Dispatch interceptors are not defined in Slice, but are provided as an API that is specific to each programming language. The remainder of this section presents the interceptor API for C++; for Java and .NET, the API is analogous, so we do not show it here.
In C++, a dispatch interceptor has the following interface:

32.23 Dispatch Interceptors 1101
namespace Ice { class DispatchInterceptor : public virtual Object { public: virtual DispatchStatus dispatch(Request&) = 0; }; typedef IceInternal::Handle<DispatchInterceptor> DispatchInterceptorPtr;}
Note that a DispatchInterceptor is-a Object, that is, you use a dispatch interceptor as a servant.
To create a dispatch interceptor, you must derive a class from DispatchIn-terceptor and provide an implementation of the pure virtual dispatch func-tion. The job of dispatch is to pass the request to the servant and to return a dispatch status, defined as follows:
namespace Ice { enum DispatchStatus { DispatchOK, DispatchUserException, DispatchAsync };}
The enumerators indicate how the request was dispatched:
• DispatchOK
The request was dispatched synchronously and completed without an excep-tion.
• DispatchUserException
The request was dispatched synchronously and raised a user exception.
• DispatchAsync
The request was dispatched successfully as an asynchronous request; the result of the request is not available to the interceptor because the result is delivered to the AMD callback when the request completes.
The Ice run time provides basic information about the request to the dispatch function in form of a Request object:

1102 The Ice Run Time in Detail
namespace Ice { class Request { public: virtual bool isCollocated(); virtual const Current& getCurrent(); };}
• isCollocated returns true if the dispatch is directly into the target servant as a collocation-optimized dispatch (see Section 32.21). If the dispatch is not collocation-optimized, the function returns false.
• getCurrent provides access to the Current object for the request (see Section 32.6), which provides access to information about the request, such as the object identity of the target object, the object adapter used to dispatch the request, and the operation name.
Note that Request, for performance reasons, is not thread-safe. This means that you must not concurrently dispatch from different threads using the same Request object. (Concurrent dispatch for different requests does not cause any problems.)
To use a dispatch interceptor, you instantiate your derived class and register it as a servant with the Ice run time in the usual way, by adding the interceptor to the ASM, or returning the interceptor as a servant from a call to locate on a servant locator.
Objective-C Mapping
The Objective-C mapping in Ice Touch does not support AMD, therefore the return type of the dispatch method is simplified to a boolean:
@protocol ICEDispatchInterceptor <ICEObject>-(BOOL) dispatch:(id<ICERequest>)request;@end
A return value of YES is equivalent to DispatchOK and indicates that the request completed without an exception. A return value of NO is equivalent to DispatchUserException.
Similarly, the ICERequest protocol omits the isCollocated method because collocation optimization is not supported.

32.23 Dispatch Interceptors 1103
32.23.2 Using a Dispatch Interceptor
Your implementation of the dispatch function must dispatch the request to the actual servant. Here is a very simple example implementation of an interceptor that dispatches the request to the servant passed to the interceptor’s constructor:
class InterceptorI : public Ice::DispatchInterceptor {public: InterceptorI(const Ice::ObjectPtr& servant) : _servant(servant) {} virtual Ice::DispatchStatus dispatch(Ice::Request& request) { return _servant->ice_dispatch(request); } Ice::ObjectPtr _servant;};
Note that our implementation of dispatch calls ice_dispatch on the target servant to dispatch the request. ice_dispatch does the work of actually (synchronously) invoking the operation.
Also note that dispatch returns whatever is returned by ice_dispatch. For synchronous dispatch, you should always implement your interceptor in this way and not change this return value.
We can use this interceptor to intercept requests to a servant of any type as follows:
ExampleIPtr servant = new ExampleI;Ice::DispatchInterceptorPtr interceptor = new InterceptorI(servant);adapter->add(interceptor, communicator->stringToIdentity("ExampleServant"));
Note that, because dispatch interceptor is-a servant, this means that the servant to which the interceptor dispatches need not be the actual servant. Instead, it could be another dispatch interceptor that ends up dispatching to the real servant. In other words, you can chain dispatch interceptors; each interceptor’s dispatch function is called until, eventually, the last interceptor in the chain dispatches to the actual servant.
A more interesting use of a dispatch interceptor is to retry a call if it fails due to a recoverable error condition. Here is an example that retries a request if it raises a local exception defined in Slice as follows:
local exception DeadlockException { /* ... */ };

1104 The Ice Run Time in Detail
Note that this is a local exception. Local exceptions that are thrown by the servant propagate to dispatch and can be caught there. A database might throw such an exception if the database detects a locking conflict during an update. We can retry the request in response to this exception using the following dispatch implementation:
virtual Ice::DispatchStatus dispatch(Ice::Request& request) { while (true) { try { return _servant->ice_dispatch(request); } catch (const DeadlockException&) { // Happens occasionally } }}
Of course, a more robust implementation might limit the number of retries and possibly add a delay before retrying.You can also retry an asynchronous dispatch. In this case, each asynchronous dispatch attempt creates a new AMD callback object.
• If the response for the retried request has been sent already, the interceptor receives a ResponseSentException. your interceptor must either not handle (or rethrow this exception) or return DispatchAsync.
• If the response for the request has not been sent yet, the Ice run time ignores any call to ice_response or ice_exception on the old AMD callback.
If an operation throws a user exception (as opposed to a local exception), the user exception cannot be caught by dispatch as an exception but, instead, is reported by the return value of ice_dispatch: a return value of DispatchUserException indicates that the operation raised a user excep-tion. You can retry a request in response to a user exception as follows:
virtual Ice::DispatchStatus dispatch(Ice::Request& request) { Ice::DispatchStatus d; do { d = _servant->ice_dispatch(request); } while (d == Ice::DispatchUserException); return d;}
This is fine as far as it goes, but not particularly useful because the preceding code retries if any kind of user exception is thrown. However, typically, we want to retry a request only if a specific user exception is thrown. The problem here is that the dispatch function does not have direct access to the actual exception that

32.24 C++ Strings and Character Encoding 1105
was thrown—all it knows is that some user exception was thrown, but not which one.
To retry a request for a specific user exception, you need to implement your servants such that they leave some “footprint” behind if they throw the exception of interest. This allows your request interceptor to test whether the user exception should trigger a retry. There are various techniques you can use to achieve this. For example, you can use thread-specific storage to test a retry flag that is set by the servant if it throws the exception or, if you use transactions, you can attach the retry flag to the transaction context. However, doing so is more complex; the intended use case is to permit retry of requests in response to local exceptions, so we suggest you retry requests only for local exceptions.
The most common use case for a dispatch interceptor is as a default servant. Rather than having an explicit interceptor for individual servants, you can return a dispatch interceptor as the servant from a call to locate on a servant locator (see 32.9.2). You can then choose the “real” servant to which to dispatch the request inside dispatch, prior to calling ice_dispatch. This allows you to intercept and selectively retry requests based on their outcome, which cannot be done using a servant locator.
32.24 C++ Strings and Character Encoding
On the wire, Ice transmits all strings as Unicode strings in UTF-8 encoding (see Chapter 37). For languages other than C++, Ice uses strings in their language-native Unicode representation and converts automatically to and from UTF-8 for transmission, so applications can transparently use characters from non-English alphabets.
However, for C++, how strings are represented inside a process depends on which mapping is chosen for a particular string, the default mapping to std::string, or the alternative mapping to std::wstring (see Section 6.6.1) as well as the platform.13 This section explains how strings are encoded by the Ice for C++ run time, and how you can achieve automatic conver-sion of strings in their native representation to and from UTF-8.14
By default, the Ice run time encodes strings as follows:
13.The explanations that follow are relevant only for C++. See Sections 32.24.8 and 32.24.9 for string conversion for other languages.

1106 The Ice Run Time in Detail
• Narrow strings (that is, strings mapped to std::string) are presented to the application in UTF-8 encoding and, similarly, the application is expected to provide narrow strings in UTF-8 encoding to the Ice run time for transmis-sion.
With this default behavior, the application code is responsible for converting between the native codeset for 8-bit characters and UTF-8. For example, if the native codeset is ISO Latin-1, the application is responsible for converting between UTF-8 and narrow (8-bit) characters in ISO Latin-1 encoding.
Also note that the default behavior does not require the application to do anything if it only uses characters in the ASCII range. (This is because a string containing only characters in the (7-bit) ASCII range is also a valid UTF-8 string.)
• Wide strings (that is, strings mapped to std::wstring) are automatically encoded as Unicode by the Ice run time as appropriate for the platform. For example, for Windows, the Ice run time converts between UTF-8 and UTF-16 in little-endian representation whereas, for Linux, the Ice run time converts between UTF-8 and UTF-32 in the endian-ness appropriate for the host CPU.
With this default behavior, wide strings are transparently converted between their on-the-wire representation and their native C++ representation as appro-priate, so application code need not do anything special. (The exception is if an application uses a non-Unicode encoding, such as Shift-JIS, as its native wstring codeset.)
32.24.1 Installing String Converters
The default behavior of the run time can be changed by providing application-specific string converters. If you install such converters, all Slice strings will be passed to the appropriate converter when they are marshaled and unmarshaled. Therefore, the string converters allow you to convert all strings transparently into their native representation without having to insert explicit conversion calls when-ever a string crosses a Slice interface boundary.
You can install string converters on a per-communicator basis when you create a communicator by setting the stringConverter and wstringConverter members of the InitializationData structure (see Section 32.3). Any
14.See the demo directory in the Ice for C++ distribution for an example of how to use string converters.
32.24 C++ Strings and Character Encoding 1107
strings that use the default (std::string) mapping are passed through the specified stringConverter, and any strings that use the wide (std::wstring) mapping are passed through the specified wstringCon-verter.
The string converters are defined as follows:
namespace Ice {class UTF8Buffer {public: virtual Byte* getMoreBytes(size_t howMany, Byte* firstUnused) = 0; virtual ~UTF8Buffer() {}};template<typename charT>class BasicStringConverter : public IceUtil::Shared {public: virtual Byte* toUTF8(const charT* sourceStart, const charT* sourceEnd, UTF8Buffer&) const = 0; virtual void fromUTF8(const Byte* sourceStart, const Byte* sourceEnd, std::basic_string<charT>& target) const;};typedef BasicStringConverter<char> StringConverter;typedef IceUtil::Handle<StringConverter> StringConverterPtr;typedef BasicStringConverter<wchar_t> WstringConverter;typedef IceUtil::Handle<WstringConverter> WstringConverterPtr;}
As you can see, both narrow and wide string converters are simply templates with either a narrow or a wide character (char or wchar_t) as the template param-eter.
32.24.2 Converting to UTF-8
If you have a string converter installed, the Ice run time calls the toUTF8 func-tion whenever it needs to convert a native string into UTF-8 representation for transmission. The sourceStart and sourceEnd pointers point at the first

1108 The Ice Run Time in Detail
byte and one-beyond-the-last byte of the source string, respectively. The imple-mentation of toUTF8 must return a pointer to the first unused byte following the converted string.
Your implementation of toUTF8 must allocate the returned string by calling the getMoreBytes member function of the UTF8Buffer class that is passed as the third argument. (getMoreBytes throws a MemoryLimitException if it cannot allocate enough memory.) The firstUnused parameter must point at the first unused byte of the allocated memory region. You can make several calls to getMoreBytes to incrementally allocate memory for the converted string. If you do, getMoreBytes may relocate the buffer in memory. (If it does, it copies the part of the string that was converted so far into the new memory region.) The function returns a pointer to the first unused byte of the (possibly relocated) memory.
Conversion with toUTF8 can fail because getMoreBytes can cause the message size to exceed Ice.MessageSizeMax. In this case, you should let the MemoryLimitException thrown by getMoreBytes propagate to the caller.
Conversion can also fail because the encoding of the source string is internally incorrect. In that case, you should throw a StringConversionFailed exception from toUTF8.
After it has marshaled the returned string into an internal marshaling buffer, the Ice run time deallocates the string.
32.24.3 Converting from UTF-8
During unmarshaling, the Ice run time calls the fromUTF8 member function on the corresponding string converter. The function converts a UTF-8 string into its native form as a std::string. (The string into which the function must place the converted characters is passed to fromUTF8 as the target parameter.)
32.24.4 String Parameters in Local Calls
In C++, and indirectly in Python, Ruby, and PHP, all Ice local APIs are narrow-string based, meaning you could not for example recompile Properties.ice to get property names and values as wide strings.
Installing a narrow-string converter could cause trouble for these local calls if UTF-8 conversion occurs in the underlying implementation. For example, the stringToIdentity operation creates an intermediary UTF-8 string. If this string

32.24 C++ Strings and Character Encoding 1109
contains characters that are not in your native codeset (as determined by the narrow-string converter), the stringToIdentity call will fail.
Likewise, when Ice reads properties from a configuration file, it converts the input (UTF-8 characters) into native strings. This conversion can also fail if the native encoding cannot convert some characters.
Most strings in local calls are never problematic because Ice does not perform
any conversion, for example:
• adapter names in createObjectAdapter
• property names and values in Properties
• ObjectAdapter::createProxy, where the identity conversion occurs only when the proxy is marshaled
Finally, consider the Slice type Ice::Context, which is mapped in C++ as a map<string, string>. The mapping for Context cannot be changed to map<wstring, wstring>, therefore you cannot send or receive any context entry that is not in your narrow-string native encoding when a narrow-string converter is installed.
32.24.5 Built-In String Converters
Ice provides three string converters to cover common conversion requirements:
• UnicodeWstringConverter
This is a string converter that converts between Unicode wide strings and UTF-8 strings. Unless you install a different string converter, this is the default converter that is used for wide strings.
• IconvStringConverter (Linux and Unix only)
This is a string converter that converts strings using the Linux and Unix iconv conversion facility (see Section 32.24.7). It can be used to convert either wide or narrow strings.
• WindowsStringConverter (Windows only)
This string converter converts between multi-byte and UTF-8 strings and uses MultiByteToWideChar and WideCharToMultiByte for its imple-mentation.
These string converters are defined in the Ice namespace.

1110 The Ice Run Time in Detail
32.24.6 Convenience Functions
The Ice namespace provides four convenience functions that make it easy to convert strings to and from UTF-8:
std::stringnativeToUTF8(const Ice::StringConverterPtr&, const std::string&);std::stringnativeToUTF8(const Ice::CommunicatorPtr&, const std::string&);std::stringUTF8ToNative(const Ice::StringConverterPtr&, const std::string&);std::stringUTF8ToNative(const Ice::CommunicatorPtr&, const std::string&);
The overloads allow you to either use the string converter that is configured on a communicator or to explicitly pass a specific string converter that performs the conversion.
32.24.7 The iconv String Converter
For Linux and Unix platforms, Ice provides an IconvStringConverter template class that uses the iconv conversion facility to convert between the native encoding and UTF-8. The only member function of interest is the constructor:
template<typename charT>class IconvStringConverter : public Ice::BasicStringConverter<charT>{public: IconvStringConverter(const char* = nl_langinfo(CODESET)); // ...};
To use this string converter, you specify whether the conversion you want is for narrow or wide characters via the template argument, and you specify the corre-sponding native encoding with the constructor argument. For example, to create a converter that converts between ISO Latin-1 and UTF-8, you can instantiate the converter as follows:

32.24 C++ Strings and Character Encoding 1111
InitializationData id;id.stringConverter = new IconvStringConverter<char>("ISO-8859-1");
Similarly, to convert between the internal wide character encoding and UTF-8, you can instantiate a converter as follows:
InititializationData id;id.stringConverter = new IconvStringConverter<wchar_t>("WCHAR_T");
The string you pass to the constructor must be one of the values returned by iconv -l, which lists all the available character encodings for your machine.
Using the IconvStringConverter template makes it easy to install code converters for any available encoding without having to explicitly write (or call) conversion routines whose implementation is typically non-trivial.
32.24.8 The Ice String Converter Plug-In
The Ice run time includes a plug-in that supports conversion between UTF-8 and native encodings on Unix and Windows platforms. You can use this plug-in to install converters for narrow and wide strings into the communicator of an existing program. This feature is primarily intended for use in scripting language exten-sions such as Ice for Python; if you need to use string converters in your C++ application, we recommend using the technique described in Section 32.24.1 instead.
Note that an application must be designed to operate correctly in the presence of a string converter. A string converter assumes that it converts strings in the native encoding into the UTF-8 encoding, and vice versa. An application that performs its own conversions on strings that cross a Slice interface boundary can cause encoding errors when those strings are processed by a converter.
Installing the Plug-In
You can install the plug-in using a configuration property like the one shown below:
Ice.Plugin.Converter=Ice:createStringConverter iconv=encoding[,encoding] windows=code-page
You can use any name you wish for the plug-in; in this example, we used Converter. The first component of the property value represents the plug-in’s entry point, which includes the abbreviated name of the shared library or DLL (Ice) and the name of a factory function (createStringConverter).
The plug-in accepts the following arguments:

1112 The Ice Run Time in Detail
• iconv=encoding[,encoding]
This argument is optional on Unix platforms and ignored on Windows plat-forms. If specified, it defines the iconv names of the narrow string encoding and the optional wide-string encoding. If this argument is not specified, the plug-in installs a narrow string converter that uses the default locale-depen-dent encoding.
• windows=code-page
This argument is required on Windows platforms and ignored on Unix plat-forms. The code-page value represents a code page number, such as 1252.
The plug-in’s argument semantics are designed so that the same configuration property can be used on both Windows and Unix platforms, as shown in the following example:
Ice.Plugin.Converter=Ice:createStringConverter iconv=ISO8859-1 windows=1252
If the configuration file containing this property is shared by programs in multiple implementation languages, you can use an alternate syntax that is loaded only by the Ice for C++ run time:
Ice.Plugin.Converter.cpp=Ice:createStringConverter iconv=ISO8859-1 windows=1252
Refer to Appendix D for more information on the Ice.Plugin properties.
32.24.9 Dynamically Installing Custom String Converters
If the string converter plug-in described in Section 32.24.8 does not satisfy your requirements, you can implement your own solution with help from the String-ConverterPlugin class:
namespace Ice {class StringConverterPlugin : public Ice::Plugin {public: StringConverterPlugin(const CommunicatorPtr& communicator, const StringConverterPtr&, const WstringConverterPtr& = 0); virtual void initialize();
32.25 Developing a Plug-In 1113
virtual void destroy();};}
The converters are installed by the StringConverterPlugin constructor (you can supply an argument of 0 for either converter if you do not wish to install it). The initialize and destroy methods are empty, but you can subclass StringConverterPlugin and override these methods if necessary.
In order to create a string converter plug-in, you must do the following:
• Define and export a “factory function” that returns an instance of String-ConverterPlugin (see Section 32.25.1).
• Implement the converter(s) that you will pass to the StringConverter-Plugin constructor, or use the ones included with Ice (see Appendix F).
• Package your code into a shared library or DLL.
To install your plug-in, use a configuration property like the one shown below:
Ice.Plugin.MyConverterPlugin=myconverter:createConverter ...
The first component of the property value represents the plug-in’s entry point, which includes the abbreviated name of the shared library or DLL (mycon-verter) and the name of a factory function (createConverter).
If the configuration file containing this property is shared by programs in multiple implementation languages, you can use an alternate syntax that is loaded only by the Ice for C++ run time:
Ice.Plugin.MyConverterPlugin.cpp=myconverter:createConverter ...
Refer to Appendix D for more information on the Ice.Plugin properties.
32.25 Developing a Plug-In
Ice supports a plug-in facility that allows you to add new features and install appli-cation-specific customizations. Plug-ins are defined using configuration properties and loaded dynamically by the Ice run time, making it possible to install a plug-in into an existing program without modification.
Ice uses the plug-in facility to implement some of its own features. Most well-known is IceSSL, a plug-in that adds a secure transport for Ice communication (see Chapter 41). Other examples include the logger plug-in (see Section 32.19.4) and the string converter plug-in (see Section 32.24.8).

1114 The Ice Run Time in Detail
This section describes the plug-in facility in more detail and demonstrates how to implement an Ice plug-in.
32.25.1 Plug-In API
The plug-in facility defines a local Slice interface that all plug-ins must imple-ment:
module Ice {local interface Plugin { void initialize(); void destroy();};};
The lifecycle of an Ice plug-in is structured to accommodate dependencies between plug-ins, such as when a logger plug-in needs to use IceSSL for its logging activities. Consequently, a plug-in object’s lifecycle consists of four phases:
• Construction
The Ice run time uses a language-specific factory API for instantiating plug-ins. During construction, a plug-in can acquire resources but must not spawn new threads or perform activities that depend on other plug-ins.
• Initialization
After all plug-ins have been constructed, the Ice run time invokes initialize on each plug-in. The order in which plug-ins are initialized may be specified using a configuration property (see Section 32.25.3), otherwise the order is undefined. If a plug-in has a dependency on another plug-in, you must configure the Ice run time so that initialization occurs in the proper order. In this phase it is safe for a plug-in to spawn new threads; it is also safe for a plug-in to interact with other plug-ins and use their services, as long as those plug-ins have already been initialized.
If initialize raises an exception, the Ice run time invokes destroy on all plug-ins that were successfully initialized (in the reverse order of initializa-tion) and raises the original exception to the application.
• Active
The active phase spans the time between initialization and destruction. Plug-ins must be designed to operate safely in the context of multiple threads.

32.25 Developing a Plug-In 1115
• Destruction
The Ice run time invokes destroy on each plug-in in the reverse order of initialization.
This lifecycle is repeated for each new communicator that an application creates and destroys.
C++ Factory
In C++, the plug-in factory is an exported function with C linkage having the following signature:
extern "C"{ICE_DECLSPEC_EXPORT Ice::Plugin*functionName(const Ice::CommunicatorPtr& communicator, const std::string& name, const Ice::StringSeq& args);}
You can define the function with any name you wish. We recommend that you use the ICE_DECLSPEC_EXPORT macro to ensure that the function is exported correctly on all platforms. Since the function uses C linkage, it must return the plug-in object as a regular C++ pointer and not as an Ice smart pointer. Further-more, the function must not raise C++ exceptions; if an error occurs, the function must return zero.
The arguments to the function consist of the communicator that is in the process of being initialized, the name assigned to the plug-in, and any arguments that were specified in the plug-in’s configuration.
Java Factory
In Java, a plug-in factory must implement the Ice.PluginFactory interface:
package Ice;public interface PluginFactory { Plugin create(Communicator communicator, String name, String[] args);}
The arguments to the create method consist of the communicator that is in the process of being initialized, the name assigned to the plug-in, and any arguments that were specified in the plug-in’s configuration.

1116 The Ice Run Time in Detail
The create method can return null to indicate that a general error occurred, or it can raise PluginInitializationException to provide more detailed information. If any other exception is raised, the Ice run time wraps it inside an instance of PluginInitializationException.
.NET Factory
In .NET, a plug-in factory must implement the Ice.PluginFactory inter-face:
namespace Ice { public interface PluginFactory { Plugin create(Communicator communicator, string name, string[] args); }}
The arguments to the create method consist of the communicator that is in the process of being initialized, the name assigned to the plug-in, and any arguments that were specified in the plug-in’s configuration.
The create method can return null to indicate that a general error occurred, or it can raise PluginInitializationException to provide more detailed information. If any other exception is raised, the Ice run time wraps it inside an instance of PluginInitializationException.
32.25.2 Plug-In Configuration
Plug-ins are installed using a configuration property of the following form:
Ice.Plugin.Name=entry_point [arg ...]
In most cases you can assign an arbitrary name to a plug-in. In the case of IceSSL, however, the plug-in requires that its name be IceSSL.
The value of entry_point is a language-specific representation of the plug-in’s factory. In C++, it consists of the name of the shared library or DLL containing the factory function, along with the name of the factory function. In Java, the entry point is the name of the factory class, while in .NET the entry point also includes the assembly.
The language-specific nature of plug-in properties can present a problem when applications that are written in multiple implementation languages attempt

32.25 Developing a Plug-In 1117
to share a configuration file. Ice supports an alternate syntax for plug-in properties that alleviates this issue:
Ice.Plugin.Name.cpp=... # C++ plug-inIce.Plugin.Name.java=... # Java plug-inIce.Plugin.Name.clr=... # .NET (Common Language Runtime) plug-in
Plug-in properties having a suffix of .cpp, .java, or .clr are loaded only by the appropriate Ice run time and ignored by others.
Refer to Appendix D for more information on these properties.
32.25.3 Advanced Topics
This section discusses additional aspects of the Ice plug-in facility that may be of use to applications with special requirements.
Plug-In Dependencies
If a plug-in has a dependency on another plug-in, you must ensure that Ice initial-izes the plug-ins in the proper order. Suppose that a custom logger implementation depends on IceSSL; for example, the logger may need to transmit log messages securely to another server. We start with the following C++ configuration:
Ice.Plugin.IceSSL=IceSSL:createIceSSLIce.Plugin.MyLogger=MyLogger:createMyLogger
The problem with this configuration is that it does not specify the order in which the plug-ins should be loaded and initialized. If the Ice run time happens to initialize MyLogger first, the plug-in’s initialize method will fail if it attempts to use the services of the uninitialized IceSSL plug-in.
To remedy the situation, we need to add one more property:
Ice.Plugin.IceSSL=IceSSL:createIceSSLIce.Plugin.MyLogger=MyLogger:createMyLoggerIce.PluginLoadOrder=IceSSL, MyLogger
Using the Ice.PluginLoadOrder property we can guarantee that the plug-ins are loaded in the correct order. Appendix D describes this property in more detail.
The Plug-In Manager
PluginManager is the name of an internal Ice object that is responsible for managing all aspects of Ice plug-ins. This object supports a Slice interface of the

1118 The Ice Run Time in Detail
same name, and an application can obtain a reference to this object using the following communicator operation:
module Ice {local interface Communicator { PluginManager getPluginManager(); // ...};};
The PluginManager interface offers three operations:
module Ice {local interface PluginManager { void initializePlugins(); Plugin getPlugin(string name); void addPlugin(string name, Plugin pi);};};
The initializePlugins operation is used in special cases when an application needs to manually initialize one or more plug-ins, as discussed in the next section.
The getPlugin operation returns a reference to a specific plug-in. The name argument must match an installed plug-in, otherwise the operation raises NotReg-isteredException. This operation is useful when a plug-in exports an interface that an application can use to query or customize its attributes or behavior.
Finally, addPlugin provides a way for an application to install a plug-in directly, without the use of a configuration property.
Delayed Initialization
It is sometimes necessary for an application to manually configure a plug-in prior to its initialization. For example, SSL keys are often protected by a passphrase, but a developer may be understandably reluctant to specify that passphrase in a configuration file because it would be exposed in clear text. The developer would likely prefer to configure the IceSSL plug-in with a password callback instead; however, this must be done before the plug-in is initialized and attempts to load the SSL key. The solution is to configure the Ice run time so that it postpones the initialization of its plug-ins:
Ice.InitPlugins=0
When this property is set to zero, initializing plug-ins becomes the application’s responsibility. The example below demonstrates how to perform this initialization:

32.26 Custom Class Loaders 1119
// C++Ice::CommunicatorPtr ic = ...Ice::PluginManagerPtr pm = ic->getPluginManager();IceSSL::PluginPtr ssl = pm->getPlugin("IceSSL");ssl->setPasswordPrompt(...);pm->initializePlugins();
After obtaining the IceSSL plug-in and establishing the password callback, the application invokes initializePlugins on the plug-in manager object to commence plug-in initialization.
32.26 Custom Class Loaders
Certain features of the Ice for Java run-time necessitate dynamic class loading. Applications with special requirements can supply a custom class loader for Ice to use in the following situations:
• Unmarshaling user exceptions and instances of concrete Slice classes
• Loading Ice plug-ins
• Loading IceSSL certificate verifiers and password callbacks
If an application does not supply a class loader (or if the application-supplied class loader fails to locate a class), the Ice run time attempts to load the class as follows:
• using the system class loader
• using the current thread’s class loader
• using the default class loader (that is, by calling Class.forName)
Note that an application must install object factories for any abstract Slice classes it might receive, regardless of whether the application also installs a custom class loader. Refer to Section 10.14.4 for more information on factories.
To install a custom class loader, set the classLoader member of Ice.InitializationData prior to creating a communicator:
Ice.InitializationData initData = new Ice.InitializationData();initData.classLoader = new MyClassLoader();Ice.Communicator communicator = Ice.Util.initialize(args, initData);
Section 32.3 discusses communicator initialization in greater detail.

1120 The Ice Run Time in Detail
32.27 Summary
In this chapter, we explored the server-side run time in detail. Communicators are the main handle to the Ice run time. They provide access to a number of run time resources and allow you to control the life cycle of a server. Object adapters provide a mapping between abstract Ice objects and concrete servants. Various implementation techniques are at your disposal to control the trade-off between performance and scalability; in particular, servant locators are a central mecha-nism that permits you to choose an implementation technique that matches the requirements of your application.
Ice provides both oneway and datagram invocations. These provide perfor-mance gains in situations where an application needs to provide numerous state-less updates. Batching such invocations permits you to increase performance even further.
The Ice logging mechanism is user extensible, so you can integrate Ice messages into arbitrary logging frameworks, and the Ice::Stats interface permits you to collect statistics for network bandwidth consumption.
Finally, even though Ice is location transparent, in the interest of efficiency, collocated invocations do not behave in all respects like remote invocations. You need to be aware of these differences, especially for applications that are sensitive to thread context.

1121
Chapter 33Facets and Versioning
33.1 Introduction
Facets provide a general-purpose mechanism for non-intrusively extending the type system of an application. This is particularly useful for versioning an applica-tion. Section 33.2 introduces the facet concept and presents the relevant APIs. Section 33.3 presents a few traditional approaches to versioning and their prob-lems. Sections 33.4 to 33.6 show how to use facets to implement versioning, and Section 33.7 discusses design choices when adding versioning to a system.
33.2 Concept and APIs
Up to this point, we have presented an Ice object as a single conceptual entity, that is, as an object with a single most-derived interface and a single identity, with the object being implemented by a single servant. However, an Ice object is more

1122 Facets and Versioning
correctly viewed as a collection of one or more sub-objects known as facets, as shown in Figure 33.1.
Figure 33.1. An Ice object with five facets sharing a single object identity.
Figure 33.1 shows a single Ice object with five facets. Each facet has a name, known as the facet name. Within a single Ice object, all facets must have unique names. Facet names are arbitrary strings that are assigned by the server that imple-ments an Ice object. A facet with an empty facet name is legal and known as the default facet. Unless you arrange otherwise, an Ice object has a single default facet; by default, operations that involve Ice objects and servants operate on the default facet.
Note that all the facets of an Ice object share the same single identity, but have different facet names. Recall the definition of Ice::Current we saw in Section 32.6 once more:
module Ice { local dictionary<string, string> Context; enum OperationMode { Normal, \Nonmutating, \Idempotent }; local struct Current { ObjectAdapter adapter; Identity id; string facet; string operation; OperationMode mode;
"" (Default Facet)
"Facet 2"
"That Facet"
"This Facet"
"Facet 1"
Ice Object
Facets
Facets

33.2 Concept and APIs 1123
Context ctx; int requestId; };};
By definition, if two facets have the same id field, they are part of the same Ice object. Also by definition, if two facets have the same id field, their facet fields have different values.
Even though Ice objects usually consist of just the default facet, it is entirely legal for an Ice object to consist of facets that all have non-empty names (that is, it is legal for an Ice object not to have a default facet).
Each facet has a single most-derived interface. There is no need for the inter-face types of the facets of an Ice object to be unique. It is legal for two facets of an Ice object to implement the same most-derived interface.
Each facet is implemented by a servant. All the usual implementation tech-niques for servants are available to implement facets—for example, you can implement a facet using a servant locator. Typically, each facet of an Ice object has a separate servant, although, if two facets of an Ice object have the same type, they can also be implemented by a single servant (for example, using a default servant, as described in Section 32.9.2).
33.2.1 Server-Side Facet OperationsOn the server side, the object adapter offers a number of operations to support facets:
namespace Ice { dictionary<string, Object> FacetMap; local interface ObjectAdapter { Object* addFacet(Object servant, Identity id, string facet); Object* addFacetWithUUID(Object servant, string facet); Object removeFacet(Identity id, string facet); Object findFacet(Identity id, string facet); FacetMap findAllFacets(Identity id); FacetMap removeAllFacets(Identity id); // ... };};
These operations have the same semantics as the corresponding “normal” opera-tions (add, addWithUUID, remove, and find), but also accept a facet name. The

1124 Facets and Versioning
corresponding “normal” operations are simply convenience operations that supply an empty facet name. For example, remove(id) is equivalent to removeFacet(id, ""), that is, remove(id) operates on the default facet.
findAllFacets returns a dictionary of <facet-name, servant> pairs that contains all the facets for the given identity.
removeAllFacets removes all facets for a given identity from the active servant map, that is, it removes the corresponding Ice object entirely. The opera-tion returns a dictionary of <facet–name, servant> pairs that contains all the removed facets.
These operations are sufficient for the server to create Ice objects with any number of facets. For example, assume that we have the following Slice defini-tions:
module Filesystem { // ... interface File extends Node { idempotent Lines read(); idempotent void write(Lines text) throws GenericError; };};module FilesystemExtensions { // ... class DateTime extends TimeOfDay { // ... }; struct Times { DateTime createdDate; DateTime accessedDate; DateTime modifiedDate; }; interface Stat { idempotent Times getTimes(); };};
Here, we have a File interface that provides operations to read and write a file, and a Stat interface that provides access to the file creation, access, and modifica-tion time. (Note that the Stat interface is defined in a different module and could

33.2 Concept and APIs 1125
also be defined in a different source file.) If the server wants to create an Ice object that contains a File instance as the default facet and a Stat instance that provides access to the time details of the file, it could use:
// Create a File instance.//Filesystem::FilePtr file = new FileI;// Create a Stat instance.//FilesystemExctensions::DateTimePtr dt = new FilesystemExtensions::DateTime;FilesystemExtensions::Times times;times.createdDate = dt;times.accessedDate = dt;times.modifiedDate = dt;FilesystemExtensions::StatPtr stat = new StatI(times);// Register the File instance as the default facet.//Filesystem::FilePrx filePrx = myAdapter->addWithUUID(file);// Register the Stat instance as a facet with name "Stat".//myAdapter->addFacet(stat, filePrx->ice_getIdentity(), "Stat");
The first few lines simply create and initialize a FileI and StatI instance. (The details of this do not matter here.) All the action is in the last two statements:
Filesystem::FilePrx filePrx = myAdapter->addWithUUID(file);myAdapter->addFacet(stat, filePrx->ice_getIdentity(), "Stat");
This registers the FileI instance with the object adapter as usual. (In this case, we let the Ice run time generate a UUID as the object identity.) Because we are calling addWithUUID (as opposed to addFacetWithUUID), the instance becomes the default facet.
The second line adds a facet to the instance with the facet name Stat. Note that we call ice_getIdentity on the File proxy to pass an object identity to addFacet. This guarantees that the two facets share the same object identity.
Note that, in general, it is a good idea to use ice_getIdentity to obtain the identity of an existing facet when adding a new facet. That way, it is guaranteed that the facets share the same identity. (If you accidentally pass a different identity to addFacet, you will not add a facet to an existing Ice object, but instead register a new Ice object; using ice_getIdentity makes this mistake impossible.)

1126 Facets and Versioning
33.2.2 Client-Side Facet Operations
On the client side, which facet a request is addressed to is implicit in the proxy that is used to send the request. For an application that does not use facets, the facet name is always empty so, by default, requests are sent to the default facet.
The client can use a checkedCast to obtain a proxy for a particular facet. For example, assume that the client obtains a proxy to a File instance as shown in Section 33.2.1. The client can cast between the File facet and the Stat facet (and back) as follows:
// Get a File proxy.//Filesystem::FilePrx file = ...;// Get the Stat facet.//FilesystemExtensions::StatPrx stat = FilesystemExtensions::StatPrx::checkedCast(file, "Stat");// Go back from the Stat facet to the File facet.//Filesystem::FilePrx file2 = Filesystem::FilePrx::checkedCast(stat, "");assert(file2 == file); // The two proxies are identical.
This example illustrates that, given any facet of an Ice object, the client can navi-gate to any other facet by using a checkedCast with the facet name.
If an Ice object does not provide the specified facet, checkedCast returns null:
FilesystemExtensions::StatPrx stat = FilesystemExtensions::StatPrx::checkedCast(file, "Stat");if (!stat) { // No Stat facet on this object, handle error...} else { FilesystemExtensions::Times times = stat->getTimes(); // Use times struct...}
Note that checkedCast also returns a null proxy if a facet exists, but the cast is to the wrong type. For example:

33.2 Concept and APIs 1127
// Get a File proxy.//Filesystem::FilePrx file = ...;// Cast to the wrong type.//SomeTypePrx prx = SomeTypePrx::checkedCast(file, "Stat");assert(!prx); // checkedCast returns a null proxy.
If you want to distinguish between non-existence of a facet and the facet being of the incorrect type, you can first obtain the facet as type Object and then down-cast to the correct type:
// Get a File proxy.//Filesystem::FilePrx file = ...;// Get the facet as type Object.//Ice::ObjectPrx obj = Ice::ObjectPrx::checkedCast(file, "Stat");if (!obj) { // No facet with name "Stat" on this Ice object.} else { FilesystemExtensions::StatPrx stat = FilesystemExtensions::StatPrx::checkedCast(file); if (!stat) { // There is a facet with name "Stat", but it is not // of type FilesystemExtensions::Stat. } else { // Use stat... }}
This last example also illustrates that
StatPrx::checkedCast(prx, "")
is not the same as
StatPrx::checkedCast(prx)
The first version explicitly requests a cast to the default facet. This means that the Ice run time first looks for a facet with the empty name and then attempts to down-cast that facet (if it exists) to the type Stat.
The second version requests a down-cast that preserves whatever facet is currently effective in the proxy. For example, if the prx proxy currently holds the

1128 Facets and Versioning
facet name “Joe”, then (if prx points at an object of type Stat) the run time returns a proxy of type StatPrx that also stores the facet name “Joe”.
It follows that, to navigate between facets, you must always use the two-argu-ment version of checkedCast, whereas, to down-cast to another type while preserving the facet name, you must always use the single-argument version of checkedCast.
You can always check what the current facet of a proxy is by calling ice_getFacet:
Ice::ObjectPrx obj = ...;cout << obj->ice_getFacet() << endl; // Print facet name
This prints the facet name. (For the default facet, ice_getFacet returns the empty string.)
33.2.3 Exception Semantics
As we pointed out on page 118, ObjectNotExistException and FacetNotEx-istException have the following semantics:
• ObjectNotExistException
This exception is raised only if no facets exist at all for a given object identity.• FacetNotExistException
This exception is raised only if at least one facet exists for a given object iden-tity, but not the specific facet that is the target of an operation invocation.
If you are using servant locators (see Section 32.7) or default servants (Section 32.9.2), you must take care to preserve these semantics. In particular, if you return null from a servant locator’s locate operation, this appears to the client as an ObjectNotExistException. If the object identity for a request is known (that is, there is at least one facet with that identity), but no facet with the specified name exists, you must explicitly throw a FacetNotExistException from acti-vate instead of simply returning null.
33.3 The Versioning Problem
Once you have developed and deployed a distributed application, and once the application has been in use for some time, it is likely that you will want to make some changes to the application. For example, you may want to add new function-

33.3 The Versioning Problem 1129
ality to a later version of the application, or you may want to change some existing aspect of the application. Of course, ideally, such changes are accomplished without breaking already deployed software, that is, the changes should be back-ward compatible. Evolving an application in this way is generally known as versioning.
Versioning is an aspect that previous middleware technologies have addressed only poorly (if at all). One of the purposes of facets is to allow you to cleanly create new versions of an application without compromising compatibility with older, already deployed versions.
33.3.1 Versioning by Addition
Suppose that we have deployed our file system application and want to add extra functionality to a new version. Specifically, let us assume that the original version (version 1) only provides the basic functionality to use files, but does not provide extra information, such as the modification date or the file size. The question is then, how can we upgrade the existing application with this new functionality? Here is a small excerpt of the original (version 1) Slice definitions once more:
// Version 1module Filesystem { // ... interface File extends Node { idempotent Lines read(); idempotent void write(Lines text) throws GenericError; };};
Your first attempt at upgrading the application might look as follows:
// Version 2module Filesystem { // ... class DateTime extends TimeOfDay { // New in version 2 // ... }; struct Times { // New in version 2 DateTime createdDate;

1130 Facets and Versioning
DateTime accessedDate; DateTime modifiedDate; }; interface File extends Node { idempotent Lines read(); idempotent void write(Lines text) throws GenericError; idempotent Times getTimes(); // New in version 2 };};
Note that the version 2 definition does not change anything that was present in version 1; instead, it only adds two new types and adds an operation to the File interface. Version 1 clients can continue to work with both version 1 and version 2 File objects because version 1 clients do not know about the getTimes operation and therefore will not call it; version 2 clients, on the other hand, can take advan-tage of the new functionality. The reason this works is that the Ice protocol invokes an operation by sending the operation name as a string on the wire (rather than using an ordinal number or hash value to identify the operation). Ice guaran-tees that any future version of the protocol will retain this behavior, so it is safe to add a new operation to an existing interface without recompiling all clients.
However, this approach contains a pitfall: the tacit assumption built into this approach is that no version 2 client will ever use a version 1 object. If the assump-tion is violated (that is, a version 2 client uses a version 1 object), the version 2 client will receive an OperationNotExistException when it invokes the new getTimes operation because that operation is supported only by version 2 objects.
Whether you can make this assumption depends on your application. In some cases, it may be possible to ensure that version 2 clients will never access a version 1 object, for example, by simultaneously upgrading all server’s from version 1 to version 2, or by taking advantage of application-specific constraints that ensure that version 2 clients only contact version 2 objects. However, for some applications, doing this is impractical.
Note that you could write version 2 clients to catch and react to an Opera-tionNotExistException when they invoke the getTimes operation: if the opera-tion succeeds, the client is dealing with a version 2 object, and if the operation raises OperationNotExistsException, the client is dealing with a version 1 object. However, doing this can be rather intrusive to the code, loses static type safety, and is rather inelegant. (There is no other way to tell a version 1 object from a version 2 object because both versions have the same type ID.)

33.3 The Versioning Problem 1131
In general, versioning addition makes sense when you need to add an opera-tion or two to an interface, and you can be sure that version 2 clients do not access version 1 objects. Otherwise, other approaches are needed.
33.3.2 Versioning by Derivation
Given the limitations of the preceding approach, you may decide to upgrade the application as follows instead:
module Filesystem { // Version 1 // ... interface File extends Node { idempotent Lines read(); idempotent void write(Lines text) throws GenericError; };};module FilesystemV2 { // New in version 2 // ... class DateTime extends TimeOfDay { // ... }; struct Times { DateTime createdDate; DateTime accessedDate; DateTime modifiedDate; }; interface File extends Filesystem::File { idempotent Times getTimes(); };};
The idea is to present the new functionality in an interface that is derived from the version 1 interface. The version 1 types are unchanged and the new functionality is presented via new types that are backward compatible: a version 2 File object can be passed where a version 1 File object is expected because FilesystemV2::File is derived from Filesystem::File. Even better, if a version 2 component of the system receives a proxy of formal type File-system::File, it can determine at run time whether the actual run-time type is

1132 Facets and Versioning
FilesystemV2::File by attempting a down-cast: if the down-cast succeeds, it is dealing with a version 2 object; if the down-cast fails, it is dealing with a version 1 object. This is essentially the same as versioning by addition, but it is cleaner as far as the type system is concerned because the two different versions can be distinguished via their type IDs.
At this point, you may think that versioning by derivation solves the problem elegantly. Unfortunately, the truth turns out to be a little harsher:
• As the system evolves further, and new versions are added, each new version adds a level of derivation to the inheritance tree. After a few versions, particu-larly if your application also uses inheritance for its own purposes, the resulting inheritance graph very quickly turns into a complex mess. (This becomes most obvious if the application uses multiple inheritance—after a few versioning steps, the resulting inheritance hierarchy is usually so complex that it exceeds the ability of humans to comprehend it.)
• Real-life versioning requirements are not as simple as adding a new operation to an object. Frequently, versioning requires changes such as adding a field to a structure, adding a parameter to an operation, changing the type of a field or a parameter, renaming an operation, or adding a new exception to an opera-tion. However, versioning by derivation (and versioning by addition) can handle none of these changes.
• Quite often, functionality that is present in an earlier version needs to be removed for a later version (for example, because the older functionality has been supplanted by a different mechanism or turned out to be inappropriate). However, there is no way to remove functionality through versioning by deri-vation. The best you can do is to re-implement a base operation in the derived implementation of an interface and throw an exception. However, the depre-cated operation may not have an exception specification, or if it does, the exception specification may not include a suitable exception. And, of course, doing this perverts the type system: after all, if an interface has an operation that throws an exception whenever the operation is invoked, why does the operation exist in the first place?
There are other, more subtle reasons why versioning by derivation is unsuitable in real-life situations. Suffice it to say here that experience has shown the idea to be unworkable: projects that have tried to use this technique for anything but the most trivial versioning requirements have inevitably failed.

33.3 The Versioning Problem 1133
33.3.3 Explicit Versioning
Yet another twist on the versioning theme is to explicitly version everything, for example:
module Filesystem { // ... interface FileV1 extends NodeV1 { idempotent LinesV1 read(); idempotent void write(LinesV1 text) throws GenericErrorV1; }; class DateTimeV2 extends TimeOfDayV2 { // ... }; struct TimesV2 { DateTimeV2 createdDate; DateTimeV2 accessedDate; DateTimeV2 modifiedDate; }; interface FileV2 extends NodeV2 { idempotent LinesV2 read(); idempotent void write(LinesV2 text) throws GenericErrorV2; idempotent TimesV2 getTimes(); };};
In essence, this approach creates as many separate definitions of each data type, interface, and operation as there are versions. It is easy to see that this approach does not work very well:
• Because, at the time version 1 is produced, it is unknown what might need to change for version 2 and later versions, everything has to be tagged with a version number. This very quickly leads to an incomprehensible type system.
• Because every version uses its own set of separate types, there is no type compatibility. For example, a version 2 type cannot be passed where a version 1 type is expected without explicit copying.
• Client code must be written to explicitly deal with each separate version. This pollutes the source code at all points where a remote call is made or a Slice data type is passed; the resulting code quickly becomes incomprehensible.

1134 Facets and Versioning
Other approaches, such as placing the definitions for each version into a separate module (that is, versioning the enclosing module instead of each individual type) do little to mitigate these problems; the type incompatibility issues and the need to explicitly deal with versioning remain.
33.4 Versioning with Facets
A negative aspect of all the approaches in Section 33.3 is that they change the type system in intrusive ways. In turn, this forces unacceptable programming contor-tions on clients. Facets allow you to solve the versioning problem more elegantly because they do not change an existing type system but extend it instead. We already saw this approach in operation on page 1124, where we added date infor-mation about a file to our file system application without disturbing any of the existing definitions.
In the most general sense, facets provide a mechanism for implementing multiple interfaces for a single object. The key point is that, to add a new interface to an object, none of the existing definitions have to be touched, so no compati-bility issues can arise. More importantly, the decision as to which facet to use is made at run time instead of at compile time. In effect, facets implement a form of late binding and, therefore, are coupled to the type system more loosely than any of the previous approaches.
Used judiciously, facets can handle versioning requirements more elegantly than other mechanisms. Apart from the straight extension of an interface as shown in Section 33.2.1, facets can also be used for more complex changes. For example, if you need to change the parameters of an operation or modify the fields of a structure, you can create a new facet with operations that operate on the changed data types. Quite often, the implementation of a version 2 facet in the server can even re-use much of the version 1 functionality, by delegating some version 2 operations to a version 1 implementation.
33.5 Facet Selection
Given that we have decided to extend an application with facets, we have to deal with the question of how clients select the correct facet. The answer typically involves an explicit selection of a facet sometime during client start-up. For example, in our file system application, clients always begin their interactions

33.5 Facet Selection 1135
with the file system by creating a proxy to the root directory. Let us assume that our versioning requirements have led to version 1 and version 2 definitions of directories as follows:
module Filesystem { // Original version // ... interface Directory extends Node { idempotent NodeSeq list(); // ... };};module FilesystemV2 { // ... enum NodeType { Directory, File }; class NodeDetails { NodeType type; string name; DateTime createdTime; DateTime accessedTime; DateTime modifiedTime; // ... }; interface Directory extends Filesystem::Node { idempotent NodeDetailsSeq list(); // ... };};
In this case, the semantics of the list operation have changed in version 2. A version 1 client uses the following code to obtain a proxy to the root directory:
// Create a proxy for the root directory//Ice::ObjectPrx base = communicator()->stringToProxy("RootDir:default -p 10000");if (!base) throw "Could not create proxy";// Down-cast the proxy to a Directory proxy//

1136 Facets and Versioning
Filesystem::DirectoryPrx rootDir = Filesystem::DirectoryPrx::checkedCast(base);if (!rootDir) throw "Invalid proxy";
For a version 2 client, the bootstrap code is almost identical—instead of down-casting to Filesystem::Directory, the client selects the “V2” facet during the down-cast to the type FileSystemV2::Directory:
// Create a proxy for the root directory//Ice::ObjectPrx base = communicator()->stringToProxy("RootDir:default -p 10000");if (!base) throw "Could not create proxy";// Down-cast the proxy to a V2 Directory proxy//FilesystemV2::DirectoryPrx rootDir = FilesystemV2::DirectoryPrx::checkedCast(base, "V2");if (!rootDir) throw "Invalid proxy";
Of course, we can also create a client that can deal with both version 1 and version 2 directories: if the down-cast to version 2 fails, the client is dealing with a version 1 server and can adjust its behavior accordingly.
33.6 Behavioral Versioning
On occasion, versioning requires changes in behavior that are not manifest in the interface of the system. For example, we may have an operation that performs some work, such as:
interface Foo { void doSomething();};
The same operation on the same interface exists in both versions, but the behavior of doSomething in version 2 differs from that in version 1. The question is, how do we best deal with such behavioral changes?
Of course, one option is to simply create a version 2 facet and to carry that facet alongside the original version 1 facet. For example:

33.6 Behavioral Versioning 1137
module V2 { interface Foo { // V2 facet void doSomething(); };};
This works fine, as far as it goes: a version 2 client asks for the “V2” facet and then calls doSomething to get the desired effect. Depending on your circum-stances, this approach may be entirely reasonable. However, if there are such behavioral changes on several interfaces, the approach leads to a more complex type system because it duplicates each interface with such a change.
A better alternative can be to create two facets of the same type, but have the implementation of those facets differ. With this approach, both facets are of type ::Foo::doSomething. However, the implementation of doSomething checks which facet was used to invoke the request and adjusts its behavior accordingly:
voidFooI::doSomething(const Ice::Current& c){ if (c.facet == "V2") { // Provide version 2 behavior... } else { // Provide version 1 behavior... }}
This approach avoids creating separate types for the different behaviors, but has the disadvantage that version 1 and version 2 objects are no longer distinguishable to the type system. This can matter if, for example, an operation accepts a Foo proxy as a parameter. Let us assume that we also have an interface FooProcessor as follows:
interface FooProcessor { void processFoo(Foo* w);};
If FooProcessor also exists as a version 1 and version 2 facet, we must deal with the question of what should happen if a version 1 Foo proxy is passed to a version 2 processFoo operation because, at the type level, there is nothing to prevent this from happening.
You have two options to deal with this situation:

1138 Facets and Versioning
• Define working semantics for mixed-version invocations. In this case, you must come up with sensible system behavior for all possible combinations of versions.
• If some of the mixed-version combinations are disallowed (such as passing a version 1 Foo proxy to a version 2 processFoo operation), you can detect the version mismatch in the server by looking at the Current::facet member and throwing an exception to indicate a version mismatch. Simultaneously, write your clients to ensure they only pass a permissible version to processFoo. Clients can ensure this by checking the facet name of a proxy before passing it to processFoo and, if there is a version mismatch, changing either the Foo proxy or the FooProcessor proxy to a matching facet:
FooPrx foo = ...; // Get a Foo...FooProcessorPrx fooP = ...; // Get a FooProcessor...string fooFacet = foo->ice_getFacet();string fooPFacet = fooP->ice_getFacet();if (fooFacet != fooPFacet) { if (fooPFacet == "V2") { error("Cannot pass a V1 Foo to a V2 FooProcessor"); } else { // Upgrade FooProcessor from V1 to V2 fooP = FooProcessorPrx::checkedCast(fooP, "V2"); if (!fooP) { error("FooProcessor does not have a V2 facet"); } else { fooP->processFoo(foo); } }}
33.7 Design Considerations
Facets allow you to add versioning to a system, but they are merely a mechanism, not a solution. You still have to make a decision as to how to version something. For example, at some point, you may want to deprecate a previous version’s behavior; at that point, you must make a decision how to handle requests for the deprecated version. For behavioral changes, you have to decide whether to use separate interfaces or use facets with the same interface. And, of course, you must have compatibility rules to determine what should happen if, for example, a

33.7 Design Considerations 1139
version 1 object is passed to an operation that implements version 2 behavior. In other words, facets cannot do your thinking for you and are no panacea for the versioning problem.
The biggest advantage of facets is also the biggest drawback: facets delay the decision about the types that are used and their behavior until run time. While this provides a lot of flexibility, it is significantly less type safe than having explicit types that can be statically checked at compile time: if you have a problem relating to incorrect facet selection, the problem will be visible only at run time and, more-over, will be visible only if you actually execute the code that contains the problem, and execute it with just the right data.
Another danger of facets is to abuse them. As an extreme example, here is an interface that provides an arbitrary collection of objects of arbitrary type:
interface Collection {};
Even though this interface is empty, it can provide access to an unlimited number of objects of arbitrary type in the form of facets. While this example is extreme, it illustrates the design tension that is created by facets: you must decide, for a given versioning problem, how and at what point of the type hierarchy to split off a facet that deals with the changed functionality. The temptation may be to “simply add another facet” and be done with it. However, if you do that, your objects are in danger of being nothing more than loose conglomerates of facets without rhyme or reason, and with little visibility of their relationships in the type system.
In object modeling terms, the relationship among facets is weaker than an is-a relationship (because facets are often not type compatible among each other). On the other hand, the relationship among facets is stronger than a has-a relationship (because all facets of an Ice object share the same object identity).
It is probably best to treat the relationship of a facet to its Ice object with the same respect as an inheritance relationship: if you were omniscient and could have designed your system for all current and future versions simultaneously, many of the operations that end up on separate facets would probably have been in the same interface instead. In other words, adding a facet to an Ice object most often implies that the facet has an is-partly-a relationship with its Ice object. In particular, if you think about the life cycle of an Ice object and find that, when an Ice object is deleted, all its facets must be deleted, this is a strong indication of a correct design. On the other hand, if you find that, at various times during an Ice object’s life cycle, it has a varying number of facets of varying types, that is a good indication that you are using facets incorrectly.
Ultimately, the decision comes down to deciding whether the trade-off of static type safety versus dynamic type safety is worth the convenience and back-

1140 Facets and Versioning
ward compatibility. The answer depends strongly on the design of your system and individual requirements, so we can only give broad advice here. Finally, there will be a point where no amount of facet trickery will get past the point when “yet one more version will be the straw that breaks the camel’s back.” At that point, it is time to stop supporting older versions and to redesign the system.
33.8 Summary
Facets provide a way to extend a type system by loosely coupling new type instances to existing ones. This shifts the type selection process from compile to run time and implements a form of late binding. Due to their loose coupling among each other, facets are better suited to solve the versioning problem than other approaches. However, facets are not a panacea that would solve the versioning problem for free, and careful design is still necessary to come up with versioned systems that remain understandable and maintain consistent semantics.

1141
Chapter 34Object Life Cycle
34.1 Chapter Overview
This chapter discusses object life cycle, in particular with respect to concurrency. The majority of examples in this chapter use C++. However, the issues discussed here apply equally to all programming languages. Moreover, object life cycle is a surprisingly complex topic, so we suggest that you read this chapter in detail, regardless of your choice of programming language.
Sections 34.2 through 34.4 discuss the fundamentals of object life cycle, in particular, what it means for an object to exist and not exist and how life cycle relates to proxies, servants, and Ice objects. Section 34.5 covers object creation and Section 34.6 discusses object destruction, with particular emphasis on concur-rency issues. Section 34.7 discusses alternative approaches to object destruction and Section 34.8 discusses a number of architectural issues with respect to object identity. Section 34.9 presents an implementation of the file system application with life cycle support in C++ and Java and, finally, Section 34.10 shows how to deal with objects that are abandoned by clients.

1142 Object Life Cycle
34.2 Introduction
Object life cycle generally refers to how an object-oriented application (whether distributed or not) creates and destroys objects. For distributed applications, life cycle management presents particular challenges. For example, destruction of objects often can be surprisingly complex, especially in threaded applications. Before we go into the details of object creation and destruction, we need to have a closer look what we mean by the terms “life cycle” and “object” in this context.
Object life cycle refers to the act of creation and destruction of objects. For example, with our file system application, we may start out with an empty file system that only contains a root directory. Over time, clients (by as yet unspecified means) add new directories and files to the file system. For example, a client might create a new directory called MyPoems underneath the root directory. Some time later, the same or a different client might decide to remove this directory again, returning the file system to its previous empty state. This pattern of creation and destruction is known as object life cycle.
The life cycle of distributed objects raises a number of interesting and chal-lenging questions. For example, what should happen if a client destroys a file while another client is reading or writing that file? And how do we prevent two files with the same name from existing in the same directory? Another interesting scenario is illustrated by the following sequence of events:
1. Client A creates a file called DraftPoem in the root directory and uses it for a while.
2. Some time later, client B destroys the DraftPoem file so it no longer exists.
3. Some time later still, client C creates a new DraftPoem file in the root direc-tory, with different contents.
4. Finally, client A attempts to access the DraftPoem file it created earlier.
What should happen when, in the final step, client A tries to use the DraftPoem file? Should the client’s attempt succeed and simply operate on the new contents of the file that were placed there by client C? Or should client A’s attempt fail because, after all, the new DraftPoem file is, in a sense, a completely different file from the original one, even though it has the same name?
The answers to such questions cannot be made in general. Instead, meaningful answers depend on the semantics that each individual application attaches to object life cycle. In this chapter, we will explore the various possible interpreta-tions and how to implement them correctly, particularly for threaded applications.

34.3 Object Existence and Non-Existence 1143
34.3 Object Existence and Non-Existence
Before we talk about how to create and destroy objects, we need to look at a more basic concept, namely that of object existence. What does it mean for an object to “exist” and, more fundamentally, what do we mean by the term “object”?
As mentioned in Section 2.2.2, an Ice object is a conceptual entity, or abstrac-tion that does not really exist. On the client side, the concrete representation of an Ice object is a proxy and, on the server side, the concrete representation of an Ice object is a servant. Proxies and servants are the concrete programming-language artifacts that represent Ice objects.
Because Ice objects are abstract, conceptual entities, they are invisible to the Ice run time and to the application code—only proxies and servants are real and visible. It follows that, to determine whether an Ice object exists, any determina-tion must rely on proxies and servants, because they are the only tangible entities in the system.
34.3.1 Object Non-ExistenceHere is the definitive statement of what it means for an Ice object to not exist:
An Ice object does not exist if an invocation on the object raises an ObjectNo-tExistException.
This may seem self-evident but, on closer examination, is a little more subtle than you might expect. In particular, Ice object existence has meaning only within the context of a particular invocation. If that invocation raises ObjectNotExistEx-ception, the object is known to not exist. Note that this says nothing about whether concurrent or future requests to that object will also raise ObjectNotEx-istException—they may or may not, depending on the semantics that are imple-mented by the application.
Also note that, because all the Ice run time knows about are servants, an ObjectNotExistException really indicates that a servant for the request could not be found at the time the request was made. This means that, ultimately, it is the application that attaches the meaning “the Ice object does not exist” to this excep-tion.
In theory, the application can attach any meaning it likes to ObjectNotExist-Exception and a server can throw this exception for whatever reason it sees fit; in practice, however, we recommend that you do not do this because it breaks with existing convention and is potentially confusing. You should reserve this excep-tion for its intended meaning and not abuse it for other purposes.

1144 Object Life Cycle
34.3.2 Object Existence
The preceding definition does not say anything about object existence if some-thing other than ObjectNotExistException is returned in response to a particular request. So, here is the definitive statement of what it means for an Ice object to exist:
An Ice object exists if a twoway invocation on the object either succeeds, raises a user exception, or raises FacetNotExistException or Operation-NotExistException.
It is self-evident that an Ice object exists if a twoway invocation on it succeeds: obviously, the object received the invocation, processed it, and returned a result. However, note the qualification: this is true only for twoway invocations; for oneway and datagram invocations (see Sections 32.14 and 32.15), nothing can be inferred about the existence of the corresponding Ice object by invoking an opera-tion on it: because there is no reply from the server, the client-side Ice run time has no idea whether the request was dispatched successfully in the server or not. This includes user exceptions, ObjectNotExistException, FacetNotExistExcep-tion, and OperationNotExistException—these exceptions are never raised by oneway and datagram invocations, regardless of the actual state of the target object.
If a twoway invocation raises a user exception, the Ice object obviously exists: the Ice run time never raises user exceptions so, for an invocation to raise a user exception, the invocation was dispatched successfully in the server, and the opera-tion implementation in the servant raised the exception.
If a twoway invocation raises FacetNotExistException, we do know that the corresponding Ice object indeed exists: the Ice run time raises FacetNotExistEx-ception only if it can find the identity of the target object in the Active Servant Map (ASM), but cannot find the facet (see Chapter 33) that was specified by the client.1
1. Note that, if you use servant locators (see Section 32.7), for these semantics to hold, your servant locator must correctly raise FacetNotExistException (instead of returning null or raising ObjectNotExistException) if an Ice object exists, but the particular facet does not exist.

34.3 Object Existence and Non-Existence 1145
As a corollary to the preceding two definitions, we can state:
A facet does not exist if a twoway invocation on the object raises ObjectNo-tExistException or FacetNotExistException.
A facet exists if a twoway invocation on the object either succeeds, or raises OperationNotExistException.
These definitions simply capture the fact that a facet is a “sub-object” of an Ice object: if an invocation raises ObjectNotExistException, we know that the facet does not exist either because, for a facet to exist, its Ice object must exist.
If an operation raises OperationNotExistException, we know that both the target Ice object and the target facet exist. However, the operation that the client attempted to invoke does not. (This is possible only if you use dynamic invocation (see Chapter 35) or if you have mis-matched Slice definitions for client and server.)
34.3.3 Indeterminate Object StateThe preceding definitions clearly state under what circumstances we can conclude that an Ice object (or its facet) does or does not exist. However, the preceding defi-nitions are incomplete because operation invocations can have outcomes other than success or failure with ObjectNotExistException, FacetNotExistExcep-tion, or OperationNotExistException. For example, a client might receive a MarshalException, UnknownLocalException, UnknownException, or Timeout-Exception. In that case, the client cannot draw any conclusions about whether the Ice object on which it invoked a twoway operation exists or not—the exceptions simply indicate that something went wrong while the invocation was processed. So, to complete our definitions, we can state:
If a twoway invocation raises a run-time exception other than ObjectNotEx-istException, FacetNotExistException, or OperationNotExistExcep-tion, nothing is known about the existence or non-existence of the Ice object that was the target of the invocation. Furthermore, it is impossible to deter-mine the state of existence of an Ice object with a oneway or datagram invoca-tion.
34.3.4 Authoritative SemanticsThe preceding definitions capture the fact that, to make a determination of object existence or non-existence, the client-side Ice run time must be able to contact the server and, moreover, receive a reply from the server:

1146 Object Life Cycle
• If the server can be contacted and returns a successful reply for an invocation, the Ice object exists.
• If the server can be contacted and returns an ObjectNotExistException (or FacetNotExistException), the Ice object (or facet) does not exist. If the server returns an OperationNotExistException, the Ice object (and its facet) exists, but does not provide the requested operation, which indicates a type mismatch due to client and server using out-of-sync Slice definitions or due to incorrect use of dynamic invocation.
• If the server cannot be contacted, does not return a reply (as for oneway and datagram invocations), or if anything at all goes wrong with the process of sending an invocation, processing it in the server, and returning the reply, nothing is known about the state of the Ice object, including its existence or non-existence.
Another way of looking at this is that a decision as to whether an object exists or not is never made by the Ice run time and, instead, is always made by the server-side application code:
• If an invocation completes successfully, the server-side application code was involved because it processed the invocation.
• If an invocation returns ObjectNotExistException or FacetNotExistEx-ception, the server-side application code was also involved:
• either the Ice run time could not find a servant for the invocation in the ASM, in which case the application code was involved by virtue of not having added a servant to the ASM in the first place, or
• the Ice run time consulted a servant locator that explicitly returned null or raised ObjectNotExistException or FacetNotExistException.
This means that ObjectNotExistException and FacetNotExistException are authoritative: when you receive these exceptions, you can always believe what they tell you—the Ice run time never raises these exceptions without consulting your code, either implicitly (via an ASM lookup) or explicitly (by calling a servant locator’s locate operation).
These semantics are motivated by the need to keep the Ice run time stateless with respect to object existence. For example, it would be nice to have stronger semantics, such as a promise that “once an Ice object has existed and been destroyed, all future requests to that Ice object also raise ObjectNotExistExcep-tion”. However, to implement these semantics, the Ice run time would have to remember all object identities that were used in the past, and prevent their reuse for new Ice objects. Of course, this would be inherently non-scalable. In addition,

34.3 Object Existence and Non-Existence 1147
it would prevent applications from controlling object identity; allowing such control for applications is important however, for example, to link the identity of an Ice object to its persistent state in a database (see Chapter 39).
Note that, if the implementation of an operation calls another operation, dealing with ObjectNotExistException may require some care. For example, suppose that the client holds a proxy to an object of type Service and invokes an operation provideService on it:
ServicePrx service = ...;try { service->provideService();} catch (const ObjectNotExistException&) { // Service does not exist.}
Here is the implementation of provideService in the server, which makes a call on a helper object to implement the operation:
voidServiceI::provideService(const Ice::Current&){ // ... proxyToHelper->someOp(); // ...}
If proxyToHelper happens to point at an object that was destroyed previously, the call to someOp will throw ObjectNotExistException. If the imple-mentation of provideService does not intercept this exception, the exception will propagate all the way back to the client, who will conclude that the service has been destroyed when, in fact, the service still exists but the helper object used to implement provideService no longer exists.
Usually, this scenario is not a serious problem. Most often, the helper object cannot be destroyed while it is needed by provideService due to the way the application is structured. In that case, no special action is necessary because someOp will never throw ObjectNotExistException. On the other hand, if it is possible for the helper object to be destroyed, provideService can wrap a try-catch block for ObjectNotExistException around the call to someOp and throw an appropriate user exception from the exception handler (such as ResourceUnavailable or similar).

1148 Object Life Cycle
34.4 Life Cycle of Proxies, Servants, and Ice Objects
It is important to be aware of the different roles of proxies, servants, and Ice objects in a system. Proxies are the client-side representation of Ice objects and servants are the server-side representation of Ice objects. Proxies, servants, and Ice objects have completely independent life cycles. Clients can create and destroy proxies with or without a corresponding servant or Ice object in existence, servers can create and destroy servants with or without a corresponding proxy or Ice object in existence and, most importantly, Ice objects can exist or not exist regard-less of whether corresponding proxies or servants exist. Here are a few examples to illustrate this:
{ Ice::ObjectPtr obj = communicator->stringToProxy("hello:tcp -p 10000"); // Proxy exists now.} // Proxy ceases to exist.
This code creates a proxy to an Ice object with the identity Hello. The server for this Ice object is expected to listen for invocations on the same host as the client, on port 10000, using the TCP/IP protocol. The proxy exists as soon as the call to stringToProxy completes and, thereafter, can by used by the client to make invocations on the corresponding Ice object.
However, note that this code says nothing at all about whether or not the corre-sponding Ice object exists. In particular, there might not be any Ice object with the identity Hello. Or there might be such an object, but the server for it may be down or unreachable. It is only when the client makes an invocation on the proxy that we get to find out whether the object exists, does not exist, or cannot be reached.
Similarly, at the end of the scope enclosing the obj variable in the preceding code, the proxy goes out of scope and is destroyed. Again, this says nothing about the state of the corresponding Ice object or its servant. This shows that the life cycle of a proxy is completely independent of the life cycle of its Ice object and the servant for that Ice object: clients can create and destroy proxies whenever they feel like it, and doing so has no implications for Ice objects or servant creation or destruction.
Here is another code example, this time for the server side:

34.4 Life Cycle of Proxies, Servants, and Ice Objects 1149
{ FileIPtr file = new FileI("DraftPoem", root); // Servant exists now.} // Servant ceases to exist.
Here, the server instantiates a servant for a File object by creating a FileI instance. The servant comes into being as soon as the call to new completes and ceases to exist as soon as the scope enclosing the file variable closes. Note that, as for proxies, the life cycle of the servant is completely independent of the life cycle of proxies and Ice objects. Clearly, the server can create and destroy a servant regardless of whether there are any proxies in existence for the corre-sponding Ice object.
Similarly, an Ice object can exist even if no servants exist for it. For example, our Ice objects might be persistent and stored in a database; in that case, if we switch off the server for our Ice objects, no servants exist for these Ice objects, even though the Ice objects continue to exist—the Ice objects are temporarily inaccessible, but exist regardless and, once their server is restarted, will become accessible again.
Conversely, a servant can exist without its corresponding Ice object. The mere creation of a servant does nothing, as far as the Ice run time is concerned. It is only once a servant is added to the ASM (or a servant locator returns the server from locate) that the servant incarnates its Ice object.
Finally, an Ice object can exist independently of proxies and servants. For example, returning to the database example, we might have an Ice server that acts as a front end to an online telephone book: each entry in the phone book corre-sponds to a separate Ice object. When a client invokes an operation, the server uses the identity of the incoming request to determine which Ice object is the target of the request and then contacts the back-end database to, for example, return the street address of the entry. With such a design, entries can be added to and removed from the back-end database quite independently of what happens to proxies and servants—the server finds out whether an Ice object exists only when it accesses the back-end database.
The only time that the life cycle of an Ice object and a servant are linked is during an invocation on that Ice object: for an invocation to complete successfully, a servant must exist for the duration of the invocation. What happens to the servant thereafter is irrelevant to clients and, in general, is irrelevant to the corre-sponding Ice object.
It is important to be clear about the independence of the life cycles of proxies, servants, and Ice objects because this independence has profound implications for

1150 Object Life Cycle
how you need to implement object life cycle. In particular, to destroy an Ice object, a client cannot simply destroy its proxy for an object because the server is completely unaware when a client does this.2
34.5 Object Creation
Now that we understand what it means for an Ice object to exist, we can look at what is involved in creating an Ice object. Fundamentally, there is only one way for an Ice object to come into being: the server must instantiate a servant for the object and add an entry for that servant to the ASM (or, alternatively, arrange for a servant locator to return a servant from its locate operation—see Section 32.7).3
One obvious way for a server to create a servant is to, well, simply instantiate it and add it to the ASM of its own accord. For example:
DirectoryIPtr root = new DirectoryI("/", 0);adapter->addWithUUID(root); // Ice object exists now
The servant exists as soon as the call to new completes, and the Ice object exists as soon as the code adds the servant to the ASM: at that point, the Ice object becomes reachable to clients who hold a proxy to it.
This is the way we created Ice objects for our file system application in earlier chapters. However, doing so is not all that interesting because the only files and directories that exist are those that the server decides to create when it starts up. What we really want is a way for clients to create and destroy directories and files.
34.5.1 Object Factories
The canonical way to create an object is to use the factory pattern [2]. The factory pattern, in a nutshell, says that objects are created by invoking an operation (usually called create) on an object factory:4
2. Distributed object systems such as DCOM implement these semantics. However, this design is inherently non-scalable because of the cost of globally tracking proxy creation and destruction.
3. For the remainder of this chapter, we will ignore the distinction between using the ASM and a servant locator and simply assume that the code uses the ASM. This is because servant locators do not alter the discussion: if locate returns a servant, that is the same as a successful lookup in the ASM; if locate returns null or throws ObjectNotExistException, that is the same as an unsuccessful lookup in the ASM.

34.5 Object Creation 1151
interface PhoneEntry { idempotent string name(); idempotent string getNumber(); idempotent void setNumber(string phNum);};exception PhoneEntryExists { string name; string phNum;};interface PhoneEntryFactory { PhoneEntry* create(string name, string phNum) throws PhoneEntryExists;};
The entries in the phone book consist of simple name–number pairs. The interface to each entry is called PhoneEntry and provides operations to read the name and to read and write the phone number. (For a real application, the objects would likely be more complex and encapsulate more state. However, these simple objects will do for the purposes of this discussion.)
To create a new entry, a client calls the create operation on a PhoneEntry-Factory object. (The factory is a singleton object [2], that is, only one instance of that interface exists in the server.) It is the job of create to create a new PhoneEntry object, using the supplied name as the object identity.
An immediate consequence of using the name as the object identity is that create can raise a PhoneEntryExists exception: presumably, if a client attempts to create an entry with the same name as an already-existing entry, we need to let the client know about this. (Whether this is an appropriate design is something we examine more closely in Section 34.8.)
create returns a proxy to the newly-created object, so the client can use that proxy to invoke operations. However, this is by convention only. For example, create could be a void operation if the client has some other way to eventually get a proxy to the new object (such as creating the proxy from a string, or locating the proxy via a search operation). Alternatively, you could define “bulk” creation operations that allow clients to create several new objects with a single RPC. As
4. Rather than continue with the file system example, we will simplify the discussion for the time being by using the phone book example mentioned earlier; we will return to the file system appli-cation to explore more complex issues in Section 34.9.

1152 Object Life Cycle
far as the Ice run time is concerned, there is nothing special about a factory opera-tion: a factory operation is just like any other operation; it just so happens that a factory operation creates a new Ice object as a side effect of being called, that is, the implementation of the operation is what creates the object, not the Ice run time.
Also note that create accepts a name and a phNum parameter, so it can initialize the new object. This is not compulsory, but generally a good idea. An alternate factory operation could be:
interface PhoneEntryFactory { PhoneEntry* create(string name) throws PhoneEntryExists;};
With this design, the assumption is that the client will call setNumber after it has created the object. However, in general, allowing objects that are not fully initial-ized is a bad idea: it all too easily happens that a client either forgets to complete the initialization, or happens to crash or get disconnected before it can complete the initialization. Either way, we end up with a partially-initialized object in the system that can cause surprises later.5
Similarly, so-called generic factories are also something to be avoided:
dictionary<string, string> Params;exception CannotCreateException { string reason;};interface GenericFactory { Object* create(Params p) throws CannotCreateException;};
The intent here is that a GenericFactory can be used to create any kind of object; the Params dictionary allows an arbitrary number of parameters to be passed to the create operation in the form of name–value pairs, for example:
5. This is the approach taken by COM’s CoCreateObject, which suffers from just that problem.
34.5 Object Creation 1153
GenericFactoryPrx factory = ...;Ice::ObjectPrx obj;Params p;// Make a car.//p["Make"] = "Ford";p["Model"] = "Falcon";obj = factory->create(p);CarPrx car = CarPrx::checkedCast(obj);// Make a horse.//p.clear();p["Breed"] = "Clydesdale";p["Sex"] = "Male";obj = factory->create(p);HorsePrx horse = HorsePrx::checkedCast(obj);
We strongly discourage you from creating factory interfaces such as this, unless you have a good overriding reason: generic factories undermine type safety and are much more error-prone than strongly-typed factories.
34.5.2 Implementing a Factory Operation
The implementation of an object factory is simplicity itself. Here is how we could implement the create operation for our PhoneEntryFactory:
PhoneEntryPrxPhoneEntryFactory::create(const string& name, const string& phNum, const Current& c){ try { CommunicatorPtr comm = c.adapter.getCommunicator(); PhoneEntryPtr servant = new PhoneEntryI(name, phNum); return PhoneEntryPrx::uncheckedCast( c.adapter->add(servant, comm->stringToIdentity(name))); } catch (const Ice::AlreadyRegisteredException&) { throw PhoneEntryExists(name, phNum); }}

1154 Object Life Cycle
The create function instantiates a new PhoneEntryI object (which is the servant for the new PhoneEntry object), adds the servant to the ASM, and returns the proxy for the new object. Adding the servant to the ASM is what creates the new Ice object, and client requests are dispatched to the new object as soon as that entry appears in the ASM (assuming the object adapter is active).
Note that, even though this code contains no explicit lock, it is thread-safe. The add operation on the object adapter is atomic: if two clients concurrently add a servant with the same identity, exactly one thread succeeds in adding the entry to the ASM; the other thread receives an AlreadyRegisteredException. Similarly, if two clients concurrently call create for different entries, the two calls execute concurrently in the server (if the server is multi-threaded); the implementation of add in the Ice run time uses appropriate locks to ensure that concurrent updates to the ASM cannot corrupt anything.
34.6 Object Destruction
Now that clients can create PhoneEntry objects, let us consider how to allow clients to destroy them again. One obvious design is to add a destroy operation to the factory—after all, seeing that a factory knows how to create objects, it stands to reason that it also knows how to destroy them again:
exception PhoneEntryNotExists { string name; string phNum;};interface PhoneEntryFactory { PhoneEntry* create(string name, string phNum) throws PhoneEntryExists; void destroy(PhoneEntry* pe) // Bad idea! throws PhoneEntryNotExists;};
While this works (and certainly can be implemented without problems), it is generally a bad idea. For one, an immediate problem we need to deal with is what should happen if a client passes a proxy to an already-destroyed object to destroy. We could raise an ObjectNotExistException to indicate this, but that is not a good idea because it makes it ambiguous as to which object does not exist: the factory, or the entry. (By convention, if a client receives an ObjectNotExist-Exception for an invocation, what does not exist is the object the operation was

34.6 Object Destruction 1155
targeted at, not some other object that in turn might be contacted by the opera-tion.) This forces us to add a separate PhoneEntryNotExists exception to deal with the error condition, which makes the interface a little more complex.
A second and more serious problem with this design is that, in order to destroy an entry, the client must not only know which entry to destroy, but must also know which factory created the entry. For our example, with only a single factory, this is not a serious concern. However, for more complex systems with dozens of facto-ries (possibly in multiple server processes), it rapidly becomes a problem: for each object, the application code somehow has to keep track of which factory created what object; if any part of the code ever loses track of where an object originally came from, it can no longer destroy that object.
Of course, we could mitigate the problem by adding an operation to the PhoneEntry interface that returns a proxy to its factory. That way, clients could ask each object to provide the factory that created the object. However, that need-lessly complicates the Slice definitions and really is just a band-aid on a funda-mentally flawed design. A much better choice is to add the destroy operation to the PhoneEntry interface instead:
interface PhoneEntry { idempotent string name(); idempotent string getNumber(); idempotent void setNumber(string phNum); void destroy();};
With this approach, there is no need for clients to somehow keep track of which factory created what object. Instead, given a proxy to a PhoneEntry object, a client simply invokes the destroy operation on the object and the PhoneEntry obligingly commits suicide. Note that we also no longer need a separate exception to indicate the “object does not exist” condition because we can raise ObjectNo-tExistException instead—the exception exists precisely to indicate this condi-tion and, because destroy is now an operation on the phone entry itself, there is no ambiguity about which object it is that does not exist.
34.6.1 Idempotency and Life Cycle Operations
You may be tempted to write the life cycle operations as follows:

1156 Object Life Cycle
interface PhoneEntry { // ... idempotent void destroy(); // Wrong!};interface PhoneEntryFactory { idempotent PhoneEntry* create(string name, string phNum) throws PhoneEntryExists;};
The idea is that create and destroy can be idempotent operations because it is safe to let the Ice run time retry the operation in the event of a temporary network failure. However, this assumption is not true. To see why, consider the following scenario:
1. A client invokes destroy on a phone entry.
2. The Ice run time sends the request to the server on the wire.
3. The connection goes down just after the request was sent, but before the reply for the request arrives in the client. It so happens that the request was received by the server and acted upon, and the reply from the server back to the client is lost because the connection is still down.
4. The Ice run time tries to read the reply for the request and realizes that the connection has gone down. Because the operation is marked idempotent, the run time attempts to re-establish the connection and send the request a second time, which happens to work.
5. The server receives the request to destroy the entry but, because the entry is destroyed already, the server returns an ObjectNotExistException to the client, which the Ice run time passes to the application code.
6. The application receives an ObjectNotExistException and falsely concludes that it tried to destroy a non-existent object when, in fact, the object did exist and was destroyed as intended.
A similar scenario can be constructed for create: in that case, the application will receive a PhoneEntryExists exception when, in fact, the entry did not exist and was created successfully.
These scenarios illustrate that create and destroy are never idempotent: sending one create or destroy invocation for a particular object is not the same as sending two invocations: the outcome depends on whether the first invocation succeeded or not, so create and destroy are not idempotent.

34.6 Object Destruction 1157
34.6.2 Implementing a destroy Operation
As far as the Ice run time is concerned, the act of destroying an Ice object is to remove the mapping between its proxy and its servant. In other words, an Ice object is destroyed when we remove its ASM entry. Once the ASM entry is gone, incoming operations for the object raise ObjectNotExistException, as they should.
So, here is the most simple version of destroy:
voidPhoneEntryI::destroy(const Current& c){ try { c.adapter->remove(c.id); } catch (const Ice::NotRegisteredException&) throw Ice::ObjectNotExistException(__FILE__, __LINE__); }}
The implementation removes the ASM entry for the servant, thereby destroying the Ice object. If the entry does not exist (presumably, because the object was destroyed previously), destroy throws an ObjectNotExistException, as you would expect.
Object Destruction and Concurrency
The ASM entry is removed as soon as destroy calls remove on the object adapter. Assuming that we implement create as we saw earlier, so no other part of the code retains a smart pointer to the servant6, this means that the ASM holds the only smart pointer to the servant, so the servant’s reference count is 1. Once the ASM entry is removed (and its smart pointer destroyed), the reference count of the servant drops to zero. In C++, this triggers a call to the destructor of the servant, and the heap-allocated servant is deleted just as it should be; in languages such as Java and C#, this makes the servant eligible for garbage collection, so it will be deleted eventually as well.
Things get more interesting if we consider concurrent scenarios. One such scenario involves concurrent calls to create and destroy. Suppose we have the following sequence of events:
1. Client A creates a phone entry.
6. Or reference to the servant, in languages such as Java and C#.

1158 Object Life Cycle
2. Client A passes the proxy for the entry to client B.
3. Client A destroys the entry again.
4. Client A calls create for the same entry (passing the same name, which serves as the object identity) and, concurrently, client B calls destroy on the entry.
Clearly, something is strange about this scenario, because it involves two clients asking for conflicting things, with one client trying to create an object that existed previously, while another client tries to destroy the object that—unbeknownst to that client—was destroyed earlier.
Exactly what is seen by client A and client B depends on how the operations are dispatched in the server. In particular, the outcome depends on the order in which the calls on the object adapter to add (in create) and remove (in destroy) on the servant are executed:
• If the thread processing client A’s invocation executes add before the thread processing client B’s invocation, client A’s call to add succeeds. Internally, the calls to add and remove are serialized, and client B’s call to remove blocks until client A’s call to add has completed. The net effect is that both clients see their respective invocations complete successfully.
• If the thread processing client Bs invocation executes remove before the thread processing client A’s invocation executes add, client B’s thread receives a NotRegisteredException, which results in an ObjectNotExist-Exception in client B. Client A’s thread then successfully calls add, creating the object and returning its proxy.
This example illustrates that, if life cycle operations interleave in this way, the outcome depends on thread scheduling. However, as far as the Ice run time is concerned, doing this is perfectly safe: concurrent access does not cause problems for memory management or the integrity of data structures.
The preceding scenario allows two clients to attempt to perform conflicting operations. This is possible because clients can control the object identity of each phone entry: if the object identity were hidden from clients and assigned by the server (the server could assign a UUID to each entry, for example), the above scenario would not be possible. We will return to a more detailed discussion of such object identity issues in Section 34.8.
Concurrent Execution of Life Cycle and Non-Life Cycle Operations7
Another scenario relates to concurrent execution of ordinary (non-life cycle) oper-ations and destroy:

34.6 Object Destruction 1159
• Client A holds a proxy to an existing object and passes that proxy to client B.
• Client B calls the setNumber operation on the object.
• Client A calls destroy on the object while Client B’s call to setNumber is still executing.
The immediate question is what this means with respect to memory management. In particular, client A’s thread calls remove on the object adapter while client B’s thread is still executing inside the object. If this call to remove were to delete the servant immediately, it would delete the servant while client B’s thread is still executing inside the servant, with potentially disastrous results.
The answer is that this cannot happen. Whenever the Ice run time dispatches an incoming invocation to a servant, it increments the servant’s reference count for the duration of the call, and decrements the reference count again once the call completes. Here is what happens to the servant’s reference count for the preceding scenario:
1. Initially, the servant is idle, so its reference count is at least 1 because the ASM entry stores a smart pointer to the servant. (The remainder of these steps assumes that the ASM stores the only smart pointer to the servant, so the refer-ence count is exactly 1.)
2. Client B’s invocation of setNumber arrives and the Ice run time increments the reference count to 2 before dispatching the call.
3. While setNumber is still executing, client A’s invocation of destroy arrives and the Ice run time increments the reference count to 3 before dispatching the call.
4. Client A’s thread calls remove on the object adapter, which destroys the smart pointer in the ASM and so decrements the reference to 2.
5. Either setNumber or destroy may complete first. It does not matter which call completes—either way, the Ice run time decrements the reference count as the call completes, so after one of these calls completes, the reference count drops to 1.
6. Eventually, when the final call (setNumber or destroy) completes, the Ice run time decrements the reference count once again, which causes the count to drop to zero. In turn, this triggers the call to delete (which calls the servant’s destructor).
7. This section applies to C++ only.
1160 Object Life Cycle
The net effect is that, while operations are executing inside a servant, the servant’s reference count is always greater than zero. As the invocations complete, the reference count drops until, eventually, it reaches zero. However, that can only happen once no operations are executing, that is, once the servant is idle. This means that the Ice run time guarantees that a servant’s destructor runs only once the final operation invocation has drained out of the servant, so it is impossible to “pull memory out from underneath an executing invocation”.8
34.6.3 Cleaning Up Servant State
Here is a very simple implementation of our PhoneEntryI servant. (Methods are inlined for convenience only. Also note that, for the time being, this code ignores concurrency issues, which we return to in Section 34.6.5.)
class PhoneEntryI : public PhoneEntry {public: PhoneEntryI(const string& name, const string& phNum) : _name(name), _phNum(phNum) { } virtual string name(const Current&) { return _name; } virtual string getNumber(const Current&) { return _phNum; } virtual void setNumber(const string& phNum, const Current&) { _phNum = phNum; } virtual void destroy(const Current& c) {
8. For garbage-collected languages, such as C# and Java, the language run time provides the same semantics: while the servant can be reached via any reference in the application or the Ice run time, the servant will not be reclaimed by the garbage collector.

34.6 Object Destruction 1161
try { c.adapter->remove(c.id); } catch (const Ice::NotRegisteredException&) throw Ice::ObjectNotExistException(__FILE__, __LINE__); } }private: const string _name; string _phNum;};
With this servant, destroy does just the right thing: it calls delete on the servant once the servant is idle, which in turn calls the destructor, so the memory used by the _name and _phNum data members is reclaimed.
However, real servants are rarely this simple. In particular, destruction of an Ice object may involve non-trivial actions, such as flushing a file, committing a transaction, making a remote call on another object, or updating a hardware device. For example, instead of storing the details of a phone entry in member variables, the servant could be implemented to store the details in a file; in that case, destroying the Ice object would require closing the file. Seeing that the Ice run time calls the destructor of a servant only once the servant becomes idle, the destructor would appear to be an ideal place to perform such actions, for example:
class PhoneEntryI : public PhoneEntry {public: // ... ~PhoneEntryI() { _myStream.close(); // Bad idea }private: fstream _myStream;};
The problem with this code is that it can fail, for example, if the file system is full and buffered data cannot be written to the file. Such clean-up failure is a general issue for non-trivial servants: for example, a transaction can fail to commit, a remote call can fail if the network goes down, or a hardware device can be tempo-rarily unresponsive.
If we encounter such a failure, we have a serious problem: we cannot inform the client of the error because, as far as the client is concerned, the destroy call

1162 Object Life Cycle
completed just fine. The client will therefore assume that the Ice object was correctly destroyed. However, the system is now in an inconsistent state: the Ice object was destroyed (because its ASM entry was removed), but the object’s state still exists (possibly with incorrect values), which can cause errors later.
Another reason for avoiding such state clean-up in C++ destructors is that destructors cannot throw exceptions: if they do, and do so in the process of being called during unwinding of the stack due to some other exception, the program goes directly to terminate and does not pass “Go”. (There are a few exotic cases in which it is possible to throw from a destructor and get away with it but, in general, is an excellent idea to maintain the no-throw guarantee for destructors.) So, if anything goes wrong during destruction, we are in a tight spot: we are forced to swallow any exception that might be encountered by the destructor, and the best we can do is log the error, but not report it to the client.
Finally, using destructors to clean up servant state does not port well to languages such as Java and C#. For these languages, similar considerations apply to error reporting from a finalizer and, with Java, finalizers may not run at all. Therefore, we recommend that you perform any clean-up actions in the body of destroy instead of delaying clean-up until the servant’s destructor runs.
Note that the foregoing does not mean that you cannot reclaim servant resources in destructors; after all, that is what destructors are for. But it does mean that you should not try to reclaim resources from a destructor if the attempt can fail (such as deleting records in an external system as opposed to, for example, deallocating memory or adjusting the value of variables in your program).
34.6.4 Life Cycle and Collection Operations
The factory we defined in Section 34.5.1 is what is known as a pure object factory because create is the only operation it provides. However, it is common for factories to do double duty and also act as collection managers that provide addi-tional operations, such as list and find:
// ...sequence<PhoneEntry*> PhoneEntries;interface PhoneEntryFactory { PhoneEntry* create(string name, string phNum) throws PhoneEntryExists;

34.6 Object Destruction 1163
idempotent PhoneEntry find(string name); idempotent PhoneEntries list();};
find returns a proxy for the phone entry with the given name, and a null proxy if no such entry exists. list returns a sequence that contains the proxies of all existing entries.
Here is a simple implementation of find:
PhoneEntryPrxPhoneEntryFactory::find(const string& name, const Current& c){ CommunicatorPtr comm = c.adapter->getCommunicator(); PhoneEntryPrx pe; Identity id = comm->stringToIdentity(name); if (c.adapter->find(id)) { pe = PhoneEntryPrx::uncheckedCast( c.adapter->createProxy(id)); } return pe;}
If an entry exists in the ASM for the given name, the code creates a proxy for the corresponding Ice object and returns it. This code works correctly even for threaded servers: because the look-up of the identity in the ASM is atomic, there is no problem with other threads concurrently modifying the ASM (for example, while servicing calls from other clients to create or destroy).
Cyclic Dependencies
Unfortunately, implementing list is not as simple because it needs to iterate over the collection of entries, but the object adapter does not provide any iterator for ASM entries.9 Therefore, we must maintain our own list of entries inside the factory:
9. The reason for this is that, during iteration, the ASM would have to be locked to protect it against concurrent access, but locking the ASM would prevent call dispatch during iteration and easily cause deadlocks.

1164 Object Life Cycle
class PhoneEntryFactoryI : public PhoneEntryFactory{public: // ... void remove(const string&, const ObjectAdapterPtr&) { IceUtil::Mutex::Lock lock(_namesMutex); set<string>::iterator i = _names.find(name); if (i != _names.end()) _names.erase(i); }private: IceUtil::Mutex _namesMutex; set<string> _names;};
The idea is to have a set of names of existing entries, and to update that set in create and destroy as appropriate. However, for threaded servers, that raises a concurrency issue: if we have clients that can concurrently call create, destroy, and list, we need to interlock these operations to avoid corrupting the _names set (because STL containers are not thread-safe). This is the purpose of the mutex _namesMutex in the factory: create, destroy, and list can each lock this mutex to ensure exclusive access to the _names set.
Another issue is that our implementation of destroy must update the set of entries that is maintained by the factory. This is the purpose of the remove member function: it removes the specified name from the _names set (of course, under protection of the _namesMutex lock). However, destroy is a method on the PhoneEntryI servant, whereas remove is a method on the factory, so the servant must know how to reach the factory. Because the factory is a singleton, we can fix this by adding a static _factory member to the PhoneEntryI class:
class PhoneEntryI : public PhoneEntry {public: // ... static PhoneEntryFactoryIPtr _factory;private: const string _name; string _phNum;};

34.6 Object Destruction 1165
The code in main then creates the factory and initializes the static member vari-able, for example:
PersonI::_factory = new PersonFactoryI;// Add factory to ASM and activate object// adapter here...
This works, but it leaves a bad taste in our mouth because it sets up a cyclic depen-dency between the phone entry servants and the factory: the factory knows about the servants, and each servant knows about the factory so it can call remove on the factory. In general, such cyclic dependencies are a bad idea: if nothing else, they make a design harder to understand.
We could remove the cyclic dependency by moving the _names set and its associated mutex into a separate class instance that is referenced from both PhoneEntryFactoryI and PhoneEntryI. That would get rid of the cyclic dependency as far as the C++ type system is concerned but, as we will see later, it would not really help because the factory and its servants turn out to be mutually dependent regardless (because of concurrency issues). So, for the moment, we’ll stay with this design and examine better alternatives after we have explored the concurrency issues in more detail.
With this design, we can implement list as follows:
PhoneEntriesPhoneEntryFactoryI::list(const Current& c){ Mutex::Lock lock(_namesMutex); CommunicatorPtr comm = c.adapter->getCommunicator(); PhoneEntries pe; set<string>::const_iterator i; for (i = _names.begin(); i != _names.end(); ++i) { ObjectPrx o = c.adapter->createProxy( comm->stringToIdentity(name)); pe.push_back(PhoneEntryPrx::uncheckedCast(o)); } return pe;}
Note that list acquires a lock on the mutex, to prevent concurrent modification of the _names set by create and destroy. In turn, our create implementa-tion now also locks the mutex:

1166 Object Life Cycle
PhoneEntryPrxPhoneEntryFactory::create(const string& name, const string& phNum, const Current& c){ Mutex::Lock lock(_namesMutex); PhoneEntryPrx pe; try { CommunicatorPtr comm = c.adapter->getCommunicator(); PhoneEntryPtr servant = new PhoneEntryI(name, phNum); pe = PhoneEntryPrx::uncheckedCast( c.adapter->add(servant, comm->stringToIdentity(name))); } catch (const Ice::AlreadyRegisteredException&) { throw PhoneEntryExists(name, phNum); } _names.insert(name); return pe;}
With this implementation, we are safe if create and list run concurrently: only one of the two operations can acquire the lock at a time, so there is no danger of corrupting the _names set.
destroy is now trivial to implement: it simply removes the ASM entry and calls remove on the factory:
voidPhoneEntryI::destroy(const Current& c){ // Note: not quite correct yet. c.adapter->remove(_name); _factory->remove(_name, c.adapter);}
Note that this is not quite correct because we have not yet considered concurrency issues for destroy. We will consider this issue in the following section.
34.6.5 Life Cycle and Normal Operations
So far, we have mostly ignored the implementations of getNumber and setNumber. Obviously, getNumber and setNumber must be interlocked against concurrent access—without this interlock, concurrent requests from

34.6 Object Destruction 1167
clients could result in one thread writing to the _phNum member while another thread is reading it, with unpredictable results. (Conversely, the name operation need not have an interlock because the name of a phone entry is immutable.) To interlock getNumber and setNumber, we can add a mutex _m to PhoneEn-tryI:
class PhoneEntryI : public PhoneEntry {public: // ... static PhoneEntryFactoryIPtr _factory;private: const string _name; string _phNum; Mutex _m;};
The getNumber and setNumber implementations then lock _m to protect _phNum from concurrent access:
stringPhoneEntryI::name(const Current&){ return _name;}stringPhoneEntryI::getNumber(const Current&){ // Incorrect implementation! Mutex::Lock lock(_m); return _phNum;}voidPhoneEntryI::setNumber(const string& phNum, const Current&){ // Incorrect implementation! Mutex::Lock lock(_m); _phNum = phNum;}

1168 Object Life Cycle
This looks good but, as it turns out, destroy throws a spanner in the works: as shown, this code suffers from a rare, but real, race condition. Consider the situa-tion where a client calls destroy at the same time as another client calls setNumber. In a server with a thread pool with more than one thread, the calls can be dispatched in separate threads and can therefore execute concurrently.
The following sequence of events can occur:
• The thread dispatching the setNumber call locates the servant, enters the operation implementation, and is suspended by the scheduler immediately on entry to the operation, before it can lock _m.
• The thread dispatching the destroy call locates the servant, enters destroy, successfully removes the servant from the ASM and the _names set, and returns.
• The thread that was suspended in setNumber is scheduled again, locks _m, and now operates on a conceptually already-destroyed Ice object.
Note that, even if we lock _m in destroy, the problem persists:
voidPhoneEntryI::destroy(const Current& c){ // Note: still not correct. IceUtil::Mutex::Lock lock(_m); c.adapter->remove(_name); _factory->remove(_name, c.adapter);}
Even though destroy now locks _m and so cannot run concurrently with getNumber and setNumber, the preceding scenario can still arise. The problem here is that a thread can enter the servant and be suspended before it gets a chance to acquire a lock. With the code as it stands, this is not a problem: setNumber will simply update the _phNum member variable in a servant that no longer has an ASM entry. In other words, the Ice object is already destroyed—it just so happens that the servant for that Ice object is still hanging around because there is still an operation executing inside it. Any updates to the servant will succeed (even though they are useless because the servant’s destructor will run as soon as the last invocation leaves the servant.)
Note that this scenario is not unique to C++ and can arise even with Java synchronized operations: in that case, a thread can be suspended just after the Ice run time has identified the target servant, but before it actually calls the operation

34.6 Object Destruction 1169
on the target servant. While the thread is suspended, another thread can execute destroy.
While this race condition does not affect our implementation, it does affect more complex applications, particularly if the servant modifies external state, such as a file system or database. For example, setNumber could modify a file in the file system; in that case, destroy would delete that file and probably close a file descriptor or stream. If we were to allow setNumber to continue executing after destroy has already done its job, we would likely encounter problems: setNumber might not find the file where it expects it to be or try to use the closed file descriptor and return an error; or worse, setNumber might end up re-creating the file in the process of updating the already-destroyed entry’s phone number. (What exactly happens depends on how we write the code for each oper-ation.)
Of course, we can try to anticipate these scenarios and handle the error condi-tions appropriately, but doing this for complex systems with complex servants rapidly gets out of hand: in each operation, we would have to ask ourselves what might happen if the servant is destroyed concurrently and, if so, take appropriate recovery action.
It is preferable to instead deal with interleaved invocations of destroy and other operations in a systematic fashion. We can do this by adding a _destroyed member to the PhoneEntryI servant. This member is initialized to false by the constructor and set to true by destroy. On entry to every opera-tion (including destroy), we lock the mutex, test the _destroyed flag, and throw ObjectNotExistException if the flag is set:
class PhoneEntryI : public PhoneEntry {public: // ... static PhoneEntryFactoryIPtr _factory;private: const string _name; string _phNum; bool _destroyed; Mutex _m;};PhoneEntryI::PhoneEntryI(const string& name, const string& phNum) : _name(name), _phNum(phNum), _destroyed(false){}
1170 Object Life Cycle
stringPhoneEntryI::name(const Current&){ Mutex::Lock lock(_m); if (_destroyed) throw ObjectNotExistException(__FILE__, __LINE__); return _name;}stringPhoneEntryI::getNumber(const Current&){ Mutex::Lock lock(_m); if (_destroyed) throw ObjectNotExistException(__FILE__, __LINE__); return _phNum;}voidPhoneEntryI::setNumber(const string& phNum, const Current&){ Mutex::Lock lock(_m); if (_destroyed) throw ObjectNotExistException(__FILE__, __LINE__); _phNum = phNum;}voidPhoneEntryI::destroy(const Current& c){ Mutex::Lock lock(_m); if (_destroyed) throw ObjectNotExistException(__FILE__, __LINE__); _destroyed = true; c.adapter->remove(_name); _factory->remove(_name, c.adapter); // Dubious!}

34.7 Removing Cyclic Dependencies 1171
If you are concerned about the repeated code on entry to every operation, you can put that code into a member function or base class to make it reusable (although the benefits of doing so are probably too minor to make this worthwhile).
Using the _destroyed flag, if an operation is dispatched and suspended before it can lock the mutex and, meanwhile, destroy runs to completion in another thread, it becomes impossible for an operation to operate on the state of such a “zombie” servant: the test on entry to each operation ensures that any oper-ation that runs after destroy immediately raises ObjectNotExistException.
Also note the “dubious” comment in destroy: the operation first locks _m and, while holding that lock, calls remove on the factory, which in turn locks its own _namesMutex. This is not wrong as such, but as we will see shortly, it can easily lead to deadlocks if we modify the application later.
34.7 Removing Cyclic Dependencies
In Section 34.6.4, we mentioned that factoring the _names set and its mutex into a separate class instance does not really solve the cyclic dependency problem, at least not in general. To see why, suppose that we want to extend our factory with a new getDetails operation:
// ...struct Details { PhoneEntry* proxy; string name; string phNum;};sequence<Details> DetailsSeq;interface PhoneEntryFactory { // ... DetailsSeq getDetails();};
This type of operation is common in collection managers: instead of returning a simple list of proxies, getDetails returns a sequence of structures, each of which contains not only the object’s proxy, but also some of the state of the corre-sponding object. The motivation for this is performance: with a plain list of
1172 Object Life Cycle
proxies, the client, once it has obtained the list, is likely to immediately follow up with one or more remote calls for each object in the list in order to retrieve their state (for example, to display the list of objects to the user). Making all these addi-tional remote procedure calls is inefficient, and an operation such as getDetails gets the job done with a single RPC instead.
To implement getDetails in the factory, we need to iterate over the set of entries and invoke the getNumber operation on each object. (These calls are collo-cated and therefore very efficient, so they do not suffer the performance problem that a client calling the same operations would suffer.) However, this is potentially dangerous because the following sequence of events is possible:
• Client A calls getDetails.
• The implementation of getDetails must lock _namesMutex to prevent concurrent modification of the _names set during iteration.
• Client B calls destroy on a phone entry.
• The implementation of destroy locks the entry’s mutex _m, sets the _destroyed flag, and then calls remove, which attempts to lock _namesMutex in the factory. However, _namesMutex is already locked by getDetails, so remove blocks until _m is unlocked again.
• getDetails, while iterating over its set of entries, happens to call getNumber on the entry that is currently being destroyed by client B. getNumber, in turn, tries to lock its mutex _m, which is already locked by destroy.
At this point, the server deadlocks: getDetails holds a lock on _namesMutex and waits for _m to become available, and destroy holds a lock on _m and waits for _namesMutex to become available, so neither thread can make progress.
To get rid of the deadlock, we have two options:
• Rearrange the locking such that deadlock becomes impossible.
• Abandon the idea of calling back from the servants into the factory and use reaping instead.
We will explore both options in the next two sections.

34.7 Removing Cyclic Dependencies 1173
34.7.1 Deadlock-Free Lock Acquisition
For our example, it is fairly easy to avoid the deadlock: instead of holding the lock for the duration of destroy, we set the _destroyed flag under protection of the lock and unlock _m again before calling remove on the factory:
voidPhoneEntryI::destroy(const Current& c){ { Mutex::Lock lock(_m); if (_destroyed) throw ObjectNotExistException(__FILE__, __LINE__); _destroyed = true; } // _m is unlocked here. _factory->remove(_name, c.adapter);}
Now deadlock is impossible because no function holds more than one lock, and no function calls another function while it holds a lock. However, rearranging locks in this fashion can be quite difficult for complex applications. In particular, if an application uses callbacks that do complex things involving several objects, it can be next to impossible to prove that the code is free of deadlocks. The same is true for applications that use condition variables and suspend threads until a condition becomes true.
At the core of the problem is that concurrency can create circular locking dependencies: an operation on the factory (such as getDetails) can require the same locks as a concurrent call to destroy. This is one reason why threaded code is harder to write than sequential code—the interactions among operations require locks, but dependencies among these locks are not obvious. In effect, locks set up an entirely separate and largely invisible set of dependencies. For example, it was easy to spot the mutual dependency between the factory and the servants due to the presence of remove; in contrast, it was much harder to spot the lurking deadlock in destroy. Worse, deadlocks may not be found during testing and discovered only after deployment, when it is much more expensive to rectify the problem.

1174 Object Life Cycle
34.7.2 Reaping
Instead of trying to arrange code such that it is deadlock-free in the presence of callbacks, it is often easier to change the code to avoid the callbacks entirely and to use an approach known as reaping:
• destroy marks the servant as destroyed and removes the ASM entry as usual, but it does not call back into the factory to update the _names set.
• Whenever a collection manager operation, such as list, getDetails, or find is called, the factory checks for destroyed servants and, if it finds any, removes them from the _names set.
Reaping can make for a much cleaner design because it avoids both the cyclic type dependency and the cyclic locking dependency.
A Simple Reaping Implementation
To implement reaping, we need to change our PhoneEntryI definition a little. It no longer has a static _factory smart pointer back to the factory (because it no longer calls remove). Instead, the servant now provides a member function _isZombie that the factory calls to check whether the servant was destroyed some time in the past:
class PhoneEntryI : public PhoneEntry {public: // ... bool _isZombie() const;private: const string _name; string _phNum; bool _destroyed; Mutex _m;};
The implementation of _isZombie is trivial: it returns the _destroyed flag under protection of the lock:
boolPhoneEntryI::_isZombie() const{ Mutex::Lock lock(_m); return _destroyed;}

34.7 Removing Cyclic Dependencies 1175
The destroy operation no longer calls back into the factory to update the _names set; instead, it simply sets the _destroyed flag and removes the ASM entry:
voidPhoneEntryI::destroy(const Current& c){ Mutex::Lock lock(_m); if (_destroyed) throw ObjectNotExistException(__FILE__, __LINE__); _destroyed = true; c.adapter->remove(c.id);}
The factory now, instead of storing just the names of existing servants, maintains a map that maps the name of each servant to its smart pointer:
class PhoneEntryFactoryI : public PhoneEntryFactory{public: // Constructor and Slice operations here...private: typedef map<string, PhoneEntryIPtr> PMap; PMap _entries; Mutex _entriesMutex;};
During create (and other operations, such as list, getDetails, and find), we scan for zombie servants and remove them from the _entries map:
PhoneEntryPrxPhoneEntryFactory::create(const string& name, const string& phNum, const Current& c){ Mutex::Lock lock(_entriesMutex); PhoneEntryPrx pe; PhoneEntryIPtr servant = new PhoneEntryI(name, phNum); // Try to create new object. // try { CommunicatorPtr comm = c.adapter->getCommunicator();

1176 Object Life Cycle
pe = PhoneEntryPrx::uncheckedCast(c.adapter->add( servant, comm->stringToIdentity(name))); } catch (const Ice::AlreadyRegisteredException&) { throw PhoneEntryExists(name, phNum); } // Scan for zombies. // PMap::iterator i = _entries.begin(); while (i != _entries.end()) { if (i->second->_isZombie()) _entries.erase(i++); else ++i; } _entries[name] = servant; return pe;}
The implementations of list, getDetails, and find scan for zombies as well. Because they need to iterate over the existing entries anyway, reaping incurs essentially no extra cost:
PhoneEntriesPhoneEntryFactoryI::list(const Current& c){ Mutex::Lock lock(_entriesMutex); CommunicatorPtr comm = c.adapter->getCommunicator(); PhoneEntries pe; PMap::iterator i = _entries.begin(); for (i = _entries.begin(); i != _entries.end(); ++i) { if (i->second->_isZombie()) { _entries.erase(i++); } else { ObjectPrx o = c.adapter->createProxy( comm->stringToIdentity(i->first)); pe.push_back(PhoneEntryPrx::uncheckedCast(o)); ++i; } }

34.7 Removing Cyclic Dependencies 1177
return pe;}// Similar for getDetails and find...
This is a much cleaner design: there is no cyclic dependency between the factory and the servants, either implicit (in the type system) or explicit (as a locking dependency). Moreover, the implementation is easier to understand once you get used to the idea of reaping: there is no need to follow complex callbacks and to carefully analyze the order of lock acquisition. (Note that, depending on how state is maintained for servants, you may also need to reap during start-up and shut-down.)
In general, we recommend that you use a reaping approach in preference to callbacks for all but the most trivial applications: it simply is a better approach that is easier to maintain and understand.
Alternative Reaping Implementations
You may be concerned that reaping increases the cost of create from O(log n) to O(n) because create now iterates over all existing entries and locks and unlocks a mutex in each servant (whereas, previously, it simply added each new servant to the _names set). Often, this is not an issue because life cycle opera-tions are called infrequently compared to normal operations. However, you will notice the additional cost if you have a large number of servants (in the thousands or more) and life cycle operations are called frequently.
If you find that create is a bottleneck (by profiling, not by guessing!), you can change to a more efficient implementation by adding zombie servants to a separate zombie list. Reaping then iterates over the zombie list and removes each servant in the zombie list from the _entries map before clearing the zombie list. This reduces the cost of reaping to be proportional to the number of zombie servants instead of the total number of servants. In addition, it allows us to remove the _isZombie member function and to lock and unlock _entriesMutex only once instead of locking a mutex in each servant as part of _isZombie. We will see such an implementation in Section 34.9.
You may also be concerned about the number of zombie servants that can accumulate in the server if create is not called for some time. For most applica-tions, this is not a problem: the servants occupy memory, but no other resources because destroy can clean up scarce resources, such as file descriptors or network connections before it turns the servant into a zombie. If you really need to prevent accumulation of zombie servants, you can reap from a background thread

1178 Object Life Cycle
that runs periodically, or you can count the number of zombies and trigger a reaping pass once that number exceeds some threshold.
34.8 Object Identity and Uniqueness
In Section 34.5.1, we mentioned that it may not be a good idea to allow clients to control the object identity of the Ice objects they create. Here is the scenario from Section 34.2 once more, re-cast in terms of our phone book application:
1. Client A creates a new phone entry for Fred.
2. Client A passes the proxy for the Fred entry as a parameter of a remote call to another part of the system, say, server B.
3. Server B remembers Fred’s proxy.
4. Client A decides that the entry for Fred is no longer needed and calls Fred’s destroy operation.
5. Some time later, client C creates a new phone entry for a different person whose name also happens to be Fred.
6. Server B decides to get Fred’s phone number by calling getNumber on the proxy it originally obtained from client A.
At this point, things are likely to go wrong: server B thinks that it has obtained the phone number of the original Fred, but that entry no longer exists and has since been replaced by a new entry for a different person (who presumably has a different phone number).
What has happened here is that Fred has been reincarnated because the same object identity was used for two different objects. In general, such reused object identities are a bad idea. For example, consider the following interfaces:
interface Process { void launch(); // Start process.};interface Missile { void launch(); // Kill lots of people.};
Replaying the preceding scenario, if client A creates a Process object called “Thunderbird” and destroys that object again, and client C creates a Missile object called “Thunderbird”, when server B calls launch, it will launch a missile instead of a process.

34.8 Object Identity and Uniqueness 1179
To be fair, in reality, this scenario is unlikely because it tacitly assumes that both objects are implemented by the same object adapter but, in a realistic scenario, the same server would be unlikely to implement both launching of processes and missiles. However, if you have objects that derive from common base interfaces, so objects of different types share the same operation names, this problem is real: operation invocations can easily end up in a destroyed and later recreated object.
Specifically, the preceding scenario illustrates that, when the Ice run time dispatches a request, exactly three items determine where the request ends up being processed:
• the endpoint at which the server listens for incoming requests
• the identity of the Ice object that is the target of the request
• the name of the operation that is to be invoked on the Ice object
If object identities are insufficiently unique, a request intended for one object can end up being sent to a completely different object, provided that the original object used the same identity, that both provide an operation with the same name, and that the parameters passed to one operation happen to decode correctly when interpreted as the parameters to the other operation. (This is rare, but not impos-sible, depending on the type and number of parameters.)
The crucial question is, what do we mean by “insufficiently unique”? As far as the call dispatch is concerned, identities must be unique only per object adapter. This is because the ASM does not allow you to add two entries with the same object identity; by enforcing this, the ASM ensures that each object identity belongs to exactly one servant. (Note that the converse, namely, that servants in ASM entries must be unique, is not the case: the ASM allows you to map different object identities to the same servant, which is useful to, for example, implement stateless facade objects—see Section 32.9.2.) So, as far as the Ice run time is concerned, it is perfectly OK to reuse object identities for different Ice objects.
Note that the Ice run time cannot prevent reuse of object identities either. Doing so would require the run time to remember every object identity that has ever been used, which does not scale. Instead, the Ice run time makes the applica-tion responsible for ensuring that object identities are “sufficiently unique”.
You can deal with the identity reuse problem in several ways. One option is to do nothing and simply ignore the problem. While this sounds facetious, it is a viable option for many applications because, due to their nature, identity reuse is simply impossible. For example, if you use a social security number as a person’s identity, the problem cannot arise because the social security number of a deceased person is not given to another person.

1180 Object Life Cycle
Another option is to allow identity reuse and to write your application such that it can deal with such identities: if nothing bad happens when an identity is reused, there is no problem. (This is the case if you know that the life cycles of the proxies for two different objects with the same identity can never overlap.)
The third option is to ensure that object identities are guaranteed unique, for example, by establishing naming conventions that make reuse impossible, or by using a UUID as the object identity (see Section 32.4.4). This can be useful even for applications for which identity reuse does not pose a problem. For example, if you use IceGrid well-known proxies (see Section 38.6), globally-unique object identities allow you to move a server to a different machine without invalidating proxies to these objects that are held by clients.
In general, we recommend that if an Ice object naturally contains a unique item of state (such as a social security number), you should use that item as the object identity. On the other hand, if the natural object identity is insufficiently unique (as is the case with names of phone book entries), you should use a UUID as the identity. (This is particularly useful for anonymous transient objects, such as session objects, that may not have a natural identity.)
34.9 Object Life Cycle for the File System Application
Now that we have had a look at the issues around object life cycle, let us return to our file system application and add life cycle operations to it, so clients can create and destroy files and directories.
To destroy a file or directory, the obvious choice is to add a destroy operation to the Node interface:
module Filesystem { exception GenericError { string reason; }; exception PermissionDenied extends GenericError {}; exception NameInUse extends GenericError {}; exception NoSuchName extends GenericError {}; interface Node { idempotent string name(); void destroy() throws PermissionDenied;

34.9 Object Life Cycle for the File System Application 1181
}; // ...};
Note that destroy can throw a PermissionDenied exception. This is necessary because we must prevent attempts to destroy the root directory.
The File interface is the same as the one we saw in Chapter 5:
module Filesystem { // ... sequence<string> Lines; interface File extends Node { idempotent Lines read(); idempotent void write(Lines text) throws GenericError; }; // ...};
Note that, because File derives from Node, it inherits the destroy operation we defined for Node.
The Directory interface now looks somewhat different from the previous version:
• The list operation returns a sequence of structures instead of a list of proxies: for each entry in a directory, the NodeDesc structure provides the name, type, and proxy of the corresponding file or directory.
• Directories provide a find operation that returns the description of the nomi-nated node. If the nominated node does not exist, the operation throws a NoSuchName exception.
• The createFile and createDirectory operations create a file and directory, respectively. If a file or directory already exists, the operations throw a NameI-nUse exception.
Here are the corresponding definitions:
module Filesystem { // ... enum NodeType { DirType, FileType }; struct NodeDesc {

1182 Object Life Cycle
string name; NodeType type; Node* proxy; }; sequence<NodeDesc> NodeDescSeq; interface Directory extends Node { idempotent NodeDescSeq list(); idempotent NodeDesc find(string name) throws NoSuchName; File* createFile(string name) throws NameInUse; Directory* createDirectory(string name) throws NameInUse; };};
Note that this design is somewhat different from the factory design we saw in Section 34.5.1. In particular, we do not have a single object factory; instead, we have as many factories as there are directories, that is, each directory creates files and directories only in that directory.
The motivation for this design is twofold:
• Because all files and directories that can be created are immediate descendants of their parent directory, we avoid the complexities of parsing path names for a separator such as “/”. This keeps our example code to manageable size. (A real-world implementation of a distributed file system would, of course, be able to deal with path names.)
• Having more than one object factory presents interesting implementation issues that we will explore in the remainder of this chapter.
The following two sections describe the implementation of this design in C++ and Java. You can find the full code of the implementation (including languages other than C++ and Java) in the demo/book/lifecycle directory of your Ice distribution.
34.9.1 Implementing Object Life Cycle in C++The implementation of our life cycle design has the following characteristics:
• It uses UUIDs as the object identities for nodes. This avoids the object reincar-nation problems we discussed in Section 34.8.
• When destroy is called on a node, the node needs to destroy itself and inform its parent directory that it has been destroyed (because the parent directory is the node’s factory and also acts as a collection manager for child nodes).

34.9 Object Life Cycle for the File System Application 1183
Note that, in contrast to the code in Chapter 9, the entire implementation resides in a FilesystemI namespace instead of being part of the Filesystem namespace. Doing this is not essential, but is a little cleaner because it keeps the implementation in a namespace that is separate from the Slice-generated namespace.
The NodeI Base Class
To begin with, let us look at the definition of the NodeI class:
namespace FilesystemI { class DirectoryI; typedef IceUtil::Handle<DirectoryI> DirectoryIPtr; class NodeI : public virtual Filesystem::Node { public: virtual std::string name(const Ice::Current&); Ice::Identity id() const; protected: NodeI(const std::string& name, const DirectoryIPtr& parent); const std::string _name; const DirectoryIPtr _parent; bool _destroyed; Ice::Identity _id; IceUtil::Mutex _m; }; // ...}
The purpose of the NodeI class is to provide the data and implementation that are common to both FileI and DirectoryI, which use implementation inheri-tance from NodeI.
As in Chapter 9, NodeI provides the implementation of the name operation and stores the name of the node and its parent directory in the _name and _parent members. (The root directory’s _parent member is null.) These members are immutable and initialized by the constructor and, therefore, const.
The _destroyed member, protected by the mutex _m, prevents the race condition we discussed in Section 34.6.5. The constructor initializes

1184 Object Life Cycle
_destroyed to false and creates an identity for the node (stored in the _id member):
FilesystemI::NodeI::NodeI(const string& name, const DirectoryIPtr& parent) : _name(name), _parent(parent), _destroyed(false){ _id.name = parent ? IceUtil::generateUUID() : "RootDir";}
The id member function returns a node’s identity, stored in the _id data member. The node must remember this identity because it is a UUID and is needed when we create a proxy to the node:
IdentityFilesystemI::NodeI::id() const{ return _id;}
The data members of NodeI are protected instead of private to keep them acces-sible to the derived FileI and DirectoryI classes. (Because the implementa-tion of NodeI and its derived classes is quite tightly coupled, there is little point in making these members private and providing separate accessors and mutators for them.)
The implementation of the Slice name operation simply returns the name of the node, but also checks whether the node has been destroyed, as described in Section 34.6.5:
stringFilesystemI::NodeI::name(const Current&){ IceUtil::Mutex::Lock lock(_m); if (_destroyed) throw ObjectNotExistException(__FILE__, __LINE__); return _name;}
This completes the implementation of the NodeI base class.
The DirectoryI Class
Next, we need to look at the implementation of directories. The DirectoryI class derives from NodeI and the Slice-generated Directory skeleton class.

34.9 Object Life Cycle for the File System Application 1185
Of course, it must implement the pure virtual member functions for its Slice oper-ations, which leads to the following (not yet complete) definition:
namespace FilesystemI { // ... class DirectoryI : virtual public NodeI, virtual public Filesystem::Directory { public: virtual Filesystem::NodeDescSeq list(const Ice::Current&); virtual Filesystem::NodeDesc find(const std::string&, const Ice::Current&); Filesystem::FilePrx createFile(const std::string&, const Ice::Current&); Filesystem::DirectoryPrx createDirectory(const std::string&, const Ice::Current&); virtual void destroy(const Ice::Current&); // ... private: // ... };}
Each directory stores its contents in a map that maps the name of a directory to its servant:
namespace FilesystemI { // ... class DirectoryI : virtual public NodeI, virtual public Filesystem::Directory { public: // ... DirectoryI(const ObjectAdapterPtr& a, const std::string& name, const DirectoryIPtr& parent = 0); void removeEntry(const std::string& name); private: typedef std::map<std::string, NodeIPtr> Contents;

1186 Object Life Cycle
Contents _contents; // ... };}
Note that we use the inherited member _m to interlock operations.The constructor simply initializes the NodeI base class:
FilesystemI::DirectoryI::DirectoryI(const string& name, const DirectoryIPtr& parent) : NodeI(name, parent){}
The removeEntry member function is called by the child to remove itself from its parent’s _contents map:
voidFilesystemI::DirectoryI::removeEntry(const string& name){ IceUtil::Mutex::Lock lock(_m); Contents::iterator i = _contents.find(name); if(i != _contents.end()) { _contents.erase(i); }}
Here is the destroy member function for directories:
voidFilesystemI::DirectoryI::destroy(const Current& c){ if (!_parent) throw PermissionDenied("Cannot destroy root directory"); { IceUtil::Mutex::Lock lock(_m); if (_destroyed) throw ObjectNotExistException(__FILE__, __LINE__); if (!_contents.empty()) throw PermissionDenied("Cannot destroy non-empty directory"); c.adapter->remove(id()); _destroyed = true;

34.9 Object Life Cycle for the File System Application 1187
} _parent->removeEntry(_name);}
The code first prevents destruction of the root directory and then checks whether this directory was destroyed previously. It then acquires the lock and checks that the directory is empty. Finally, destroy removes the ASM entry for the destroyed directory and removes itself from its parent’s _contents map. Note that, for the reason we explained in Section 34.7.1, we call removeEntry outside the synchronization.
The createDirectory implementation locks the mutex before checking whether the directory already contains a node with the given name (or an invalid empty name). If not, it creates a new servant, adds it to the ASM and the _contents map, and returns its proxy:
DirectoryPrxFilesystemI::DirectoryI::createDirectory(const string& name, const Current& c){ IceUtil::Mutex::Lock lock(_m); if (_destroyed) throw ObjectNotExistException(__FILE__, __LINE__); if (name.empty() || _contents.find(name) != _contents.end()) throw NameInUse(name); DirectoryIPtr d = new DirectoryI(name, this); ObjectPrx node = c.adapter->add(d, d->id()); _contents[name] = d; return DirectoryPrx::uncheckedCast(node);}
The createFile implementation is identical, except that it creates a file instead of a directory:
FilePrxFilesystemI::DirectoryI::createFile(const string& name, const Current& c){ IceUtil::Mutex::Lock lock(_m); if (_destroyed) throw ObjectNotExistException(__FILE__, __LINE__);

1188 Object Life Cycle
if (name.empty() || _contents.find(name) != _contents.end()) throw NameInUse(name); FileIPtr f = new FileI(name, this); ObjectPrx node = c.adapter->add(f, f->id()); _contents[name] = f; return FilePrx::uncheckedCast(node);}
Here is the implementation of list:
NodeDescSeqFilesystemI::DirectoryI::list(const Current& c){ IceUtil::Mutex::Lock lock(_m); if (_destroyed) throw ObjectNotExistException(__FILE__, __LINE__); NodeDescSeq ret; for (Contents::const_iterator i = _contents.begin(); i != _contents.end(); ++i) { NodeDesc d; d.name = i->first; d.type = FilePtr::dynamicCast(i->second) ? FileType : DirType; d.proxy = NodePrx::uncheckedCast( c.adapter->createProxy(i->second->id())); ret.push_back(d); } return ret;}
After acquiring the lock, the code iterates over the directory’s contents and adds a NodeDesc structure for each entry to the returned vector.
The find operation proceeds along similar lines:
NodeDescFilesystemI::DirectoryI::find(const string& name, const Current& c){ IceUtil::Mutex::Lock lock(_m); if (_destroyed) throw ObjectNotExistException(__FILE__, __LINE__);

34.9 Object Life Cycle for the File System Application 1189
Contents::const_iterator pos = _contents.find(name); if (pos == _contents.end()) throw NoSuchName(name); NodeIPtr p = pos->second; NodeDesc d; d.name = name; d.type = FilePtr::dynamicCast(p) ? FileType : DirType; d.proxy = NodePrx::uncheckedCast( c.adapter->createProxy(p->id())); return d;}
The FileI Class
The constructor of FileI is trivial: it simply initializes the data members of its base class::
FilesystemI::FileI::FileI(const string& name, const DirectoryIPtr& parent) : NodeI(name, parent){}
The implementation of the three member functions of the FileI class is also trivial, so we present all three member functions here:
LinesFilesystemI::FileI::read(const Current&){ IceUtil::Mutex::Lock lock(_m); if (_destroyed) throw ObjectNotExistException(__FILE__, __LINE__); return _lines;}// Slice File::write() operation.voidFilesystemI::FileI::write(const Lines& text, const Current&){ IceUtil::Mutex::Lock lock(_m); if (_destroyed)

1190 Object Life Cycle
throw ObjectNotExistException(__FILE__, __LINE__); _lines = text;}voidFilesystemI::FileI::destroy(const Current& c){ { IceUtil::Mutex::Lock lock(_m); if (_destroyed) throw ObjectNotExistException(__FILE__, __LINE__); c.adapter->remove(id()); _destroyed = true; } _parent->removeEntry(_name);}
Concurrency Considerations
The preceding implementation is provably deadlock free. All member functions hold only one lock at a time, so they cannot deadlock with each other or them-selves. While the locks are held, the functions do not call other member functions that acquire locks, so any potential deadlock can only arise by concurrent calls to another mutating function, either on the same node or on different nodes. For concurrent calls on the same node, deadlock is impossible because such calls are strictly serialized on the mutex _m; for concurrent calls to destroy on different nodes, each node locks its respective mutex _m, releases _m again, and then acquires and releases a lock on its parent (by calling removeEntry), also making deadlock impossible.
34.9.2 Implementing Object Life Cycle in Java
The implementation of our life cycle design has the following characteristics:
• It uses UUIDs as the object identities for nodes. This avoids the object reincar-nation problems we discussed in Section 34.8.
• When destroy is called on a node, the node needs to destroy itself and inform its parent directory that it has been destroyed (because the parent directory is the node’s factory and also acts as a collection manager for child nodes).

34.9 Object Life Cycle for the File System Application 1191
Note that, in contrast to the code in Chapter 13, the entire implementation resides in a FilesystemI package instead of being part of the Filesystem package. Doing this is not essential, but is a little cleaner because it keeps the implementa-tion in a package that is separate from the Slice-generated package.
The NodeI Interface
Our DirectoryI and FileI servants derive from a common NodeI base interface. This interface is not essential, but useful because it allows us to treat servants of type DirectoryI and FileI polymorphically:
package FilesystemI;public interface NodeI{ Ice.Identity id();}
The only method is the id method, which returns the identity of the corre-sponding node.
The DirectoryI Class
As in Chapter 13, the DirectoryI class derives from the generated base class _DirectoryDisp. In addition, the class implements the NodeI interface. DirectoryI must implement each of the Slice operations, leading to the following outline:
package FilesystemI;import Ice.*;import Filesystem.*;public class DirectoryI extends _DirectoryDisp implements NodeI{ public Identity id(); public synchronized String name(Current c); public synchronized NodeDesc[] list(Current c); public synchronized NodeDesc

1192 Object Life Cycle
find(String name, Current c) throws NoSuchName; public synchronized FilePrx createFile(String name, Current c) throws NameInUse; public synchronized DirectoryPrx createDirectory(String name, Current c) throws NameInUse; public void destroy(Current c) throws PermissionDenied; // ...}
To support the implementation, we also require a number of methods and data members:
package FilesystemI;import Ice.*;import Filesystem.*;public class DirectoryI extends _DirectoryDisp implements NodeI{ // ... public DirectoryI(); public DirectoryI(String name, DirectoryI parent); public synchronized void removeEntry(String name); private String _name; // Immutable private DirectoryI _parent; // Immutable private Identity _id; // Immutable private boolean _destroyed; private java.util.Map<String, NodeI> _contents;}
The _name and _parent members store the name of this node and a reference to the node’s parent directory. (The root directory’s _parent member is null.) Similarly, the _id member stores the identity of this directory. The _name, _parent, and _id members are immutable once they have been initialized by the constructor. The _destroyed member prevents the race condition we discussed in Section 34.6.5; to interlock access to _destroyed (as well as the

34.9 Object Life Cycle for the File System Application 1193
_contents member) we can use synchronized methods (as for the name method), or use a synchronized(this) block.
The _contents map records the contents of a directory: it stores the name of an entry, together with a reference to the child node.
Here are the two constructors for the class:
public DirectoryI(){ this("/", null);}public DirectoryI(String name, DirectoryI parent){ _name = name; _parent = parent; _id = new Identity(); _destroyed = false; _contents = new java.util.HashMap<String, NodeI>(); _id.name = parent == null ? "RootDir" : Util.generateUUID();}
The first constructor is a convenience function to create the root directory with the fixed identity “RootDir” and a null parent.
The real constructor initializes the _name, _parent, _id, _destroyed, and _contents members. Note that nodes other than the root directory use a UUID as the object identity.
The removeEntry method is called by the child to remove itself from its parent’s _contents map:
public synchronized voidremoveEntry(String name){ _contents.remove(name);}
The implementation of the Slice name operation simply returns the name of the node, but also checks whether the node has been destroyed, as described in Section 34.6.5:

1194 Object Life Cycle
public synchronized Stringname(Current c){ if (_destroyed) throw new ObjectNotExistException(); return _name;}
Note that this method is synchronized, so the _destroyed member cannot be accessed concurrently.
Here is the destroy member function for directories:
public voiddestroy(Current c) throws PermissionDenied{ if (_parent == null) throw new PermissionDenied("Cannot destroy root directory"); synchronized(this) { if (_destroyed) throw new ObjectNotExistException(); if (_contents.size() != 0) throw new PermissionDenied( "Cannot destroy non-empty directory"); c.adapter.remove(id()); _destroyed = true; } _parent.removeEntry(_name);}
The code first prevents destruction of the root directory and then checks whether this directory was destroyed previously. It then acquires the lock and checks that the directory is empty. Finally, destroy removes the ASM entry for the destroyed directory and removes itself from its parent’s _contents map. Note that, for the reason we explained in Section 34.7.1, we call removeEntry outside the synchronization.
The createDirectory implementation acquires the lock before checking whether the directory already contains a node with the given name (or an invalid empty name). If not, it creates a new servant, adds it to the ASM and the _contents map, and returns its proxy:

34.9 Object Life Cycle for the File System Application 1195
public synchronized DirectoryPrxcreateDirectory(String name, Current c) throws NameInUse{ if (_destroyed) throw new ObjectNotExistException(); if (name.length() == 0 || _contents.containsKey(name)) throw new NameInUse(name); DirectoryI d = new DirectoryI(name, this); ObjectPrx node = c.adapter.add(d, d.id()); _contents.put(name, d); return DirectoryPrxHelper.uncheckedCast(node);}
The createFile implementation is identical, except that it creates a file instead of a directory:
public synchronized FilePrxcreateFile(String name, Current c) throws NameInUse{ if (_destroyed) throw new ObjectNotExistException(); if (name.length() == 0 || _contents.containsKey(name)) throw new NameInUse(name); FileI f = new FileI(name, this); ObjectPrx node = c.adapter.add(f, f.id()); _contents.put(name, f); return FilePrxHelper.uncheckedCast(node);}
Here is the implementation of list:
public synchronized NodeDesc[]list(Current c){ if(_destroyed) throw new ObjectNotExistException(); NodeDesc[] ret = new NodeDesc[_contents.size()]; java.util.Iterator<java.util.Map.Entry<String, NodeI> > pos = _contents.entrySet().iterator(); for(int i = 0; i < _contents.size(); ++i) { java.util.Map.Entry<String, NodeI> e = pos.next(); NodeI p = e.getValue();

1196 Object Life Cycle
ret[i] = new NodeDesc(); ret[i].name = e.getKey(); ret[i].type = p instanceof FileI ? NodeType.FileType : NodeType.DirType; ret[i].proxy = NodePrxHelper.uncheckedCast( c.adapter.createProxy(p.id())); } return ret;}
After acquiring the lock, the code iterates over the directory’s contents and adds a NodeDesc structure for each entry to the returned array.
The find operation proceeds along similar lines:
public synchronized NodeDescfind(String name, Current c) throws NoSuchName{ if (_destroyed) throw new ObjectNotExistException(); NodeI p = _contents.get(name); if (p == null) throw new NoSuchName(name); NodeDesc d = new NodeDesc(); d.name = name; d.type = p instanceof FileI ? NodeType.FileType : NodeType.DirType; d.proxy = NodePrxHelper.uncheckedCast( c.adapter.createProxy(p.id())); return d;}
The FileI Class
The FileI class is similar to the DirectoryI class. The data members store the name, parent, and identity of the file, as well as the _destroyed flag and the contents of the file (in the _lines member). The constructor initializes these members:
package FilesystemI;import Ice.*;import Filesystem.*;import FilesystemI.*;

34.9 Object Life Cycle for the File System Application 1197
public class FileI extends _FileDisp implements NodeI{ // ... public FileI(String name, DirectoryI parent) { _name = name; _parent = parent; _destroyed = false; _id = new Identity(); _id.name = Util.generateUUID(); } private String _name; private DirectoryI _parent; private boolean _destroyed; private Identity _id; private String[] _lines;}
The implementation of the remaining member functions of the FileI class is trivial, so we present all of them here:
public synchronized Stringname(Current c){ if (_destroyed) throw new ObjectNotExistException(); return _name;}public Identityid(){ return _id;}public synchronized String[]read(Current c){ if (_destroyed) throw new ObjectNotExistException(); return _lines;}

1198 Object Life Cycle
public synchronized voidwrite(String[] text, Current c){ if (_destroyed) throw new ObjectNotExistException(); _lines = (String[])text.clone();}public voiddestroy(Current c){ synchronized(this) { if (_destroyed) throw new ObjectNotExistException(); c.adapter.remove(id()); _destroyed = true; } _parent.removeEntry(_name);}
Concurrency Considerations
The preceding implementation is provably deadlock free. All methods hold only one lock at a time, so they cannot deadlock with each other or themselves. While the locks are held, the methods do not call other methods that acquire locks, so any potential deadlock can only arise by concurrent calls to another mutating method, either on the same node or on different nodes. For concurrent calls on the same node, deadlock is impossible because such calls are strictly serialized on the instance; for concurrent calls to destroy on different nodes, each node locks itself, releases itself again, and then acquires and releases a lock on its parent (by calling removeEntry), also making deadlock impossible.
34.10 Avoiding Server-Side Garbage
The preceding sections covered the implementation of object life cycle, that is, how to correctly provide clients with the means to create and destroy objects. However, throughout the preceding discussion, we have tacitly assumed that clients actually call destroy once they no longer need an object. What if this is

34.10 Avoiding Server-Side Garbage 1199
actually not the case? For example, a client might intend to call destroy on an object it no longer needs but crash before it can actually make the call.
To see why this is a realistic (and serious) scenario, consider an on-line retail application. Typically, such an application provides a shopping cart to the client, into which the client can place items. Naturally, the cart and the items it contains will be modelled as server-side objects. The expectation is that, eventually, the client will either finalize or cancel the purchase, at which point the shopping cart and its contents can be destroyed. However, the client may never do that, for example, because it crashes or simply loses interest.
The preceding scenario applies to many different applications and shows up in various disguises. For example, the objects might be session objects that encapsu-late security credentials of a client, or might be iterator objects that allow a client to iterate over a collection of values. The key point is that the interactions between client and server are stateful: the server creates state on behalf of a client, holds that state for the duration of several client–server interactions, and expects the client to inform the server when it can clean up that state. If the client never informs the server, whatever resources are associated with that client’s state are leaked; these resources are termed garbage.
The garbage might be memory, file descriptors, network connections, disk space, or any number of other things. Unless the server takes explicit action, even-tually, the garbage will accumulate to the point where the server fails because it has run out of memory, file descriptors, network connections, or disk space.
In the context of Ice, the garbage are servants and their associated resources. In this section, we examine strategies that a server can use avoid drowning in that garbage.
34.10.1 Approaches to Garbage Collection
The server is presented with something of a dilemma by garbage objects. The difficulty is not in how to remove the garbage objects (after all, the server knows how to destroy each object), but how to identify whether a particular object is garbage or not. The server knows when a client uses an object (because the server receives an invocation for the object), but the server does not know when an object is no longer of interest to a client (because a dead client is indistinguishable from a slow one).
One approach to dealing with garbage is to avoid creating it in the first place: if all interactions between client and server are stateless, the garbage problem does not arise. Unfortunately, for many applications, implementing this approach is

1200 Object Life Cycle
infeasible. The reason is that, in order to turn interactions that are inherently stateful (such as updating a database) into stateless ones, designers are typically forced to keep all the state on the client side, transmit whatever state is required by the server with each remote procedure call, and return the updated state back to the client. In many situations, this simply does not work: for one, the amount of state that needs to be transmitted with each call is often prohibitively large; second, replicating all the state on the client side creates other problems, such as different clients concurrently making conflicting updates to the same data.
The remainder of this section ignores stateless designs. This is not to say that stateless designs are undesirable: where suitable, they can be very effective. However, because many applications simply cannot use them, we focus instead on other ways to deal with garbage.
Mechanisms that identify and reclaim garbage objects are known as garbage collectors. Garbage collectors are well-understood for non-distributed systems. (For example, many programming languages, such as Java and C#, have built-in garbage collectors.)
Non-distributed garbage collectors keep track of all objects that are created, and perform some form of connectivity analysis to determine which objects are still reachable; any objects that are unreachable (that is, objects to which the appli-cation code no longer holds any reference) are garbage and are eventually reclaimed.
Unfortunately, for distributed systems, traditional approaches to garbage collection do not work because the cost of performing the connectivity analysis becomes prohibitively large. For example, DCOM provided a distributed garbage collector that turned out to be its Achilles’ heel: the collector did not scale to large numbers of objects, particularly across WANs, and several attempts at making it scale failed.
An alternative to distributed garbage collection is to use timeouts to avoid the cost of doing a full connectivity analysis: if an object has not been used for a certain amount of time, the server assumes that it is garbage and reclaims the object. The drawback of this idea is that it is possible for objects to be collected while they are still in use. For example, a customer may have placed a number of items in a shopping cart and gone out to lunch, only to find on return that the shopping cart has disappeared in the mean time.
Yet another alternative is to use the evictor pattern: the server puts a cap on the total number of objects it is willing to create on behalf of clients and, once the cap is reached, destroys the least-recently used object in order to make room for a new one. This puts an upper limit on the resources used by the server and eventually

34.10 Avoiding Server-Side Garbage 1201
gets rid of all unwanted objects. But the drawback is the same as with timeouts: just because an object has not been used for a while does not necessarily mean that it truly is garbage.
Neither timeouts nor evictors are true garbage collectors because they can collect objects that are not really garbage, but they do have the advantage that they reap objects even if the client is alive, but forgets to call destroy on some of these objects.
34.10.2 Garbage Collection For Ice Applications
Traditional garbage collection fails in the distributed case for a number of reasons:
• Garbage collectors require connectivity analysis, which is prohibitively expensive. Furthermore, for distributed object systems that permit proxies to be externalized as strings, such as Ice, connectivity analysis is impossible because proxies can exist and travel by means that are invisible to the run time. For example, proxies can exist as records in a database and can travel as strings inside e-mail messages.
• Garbage collectors consider all objects in existence but, for the vast majority of applications, only a small subset of all objects actually ever needs collecting. The work spent in examining objects that can never become garbage is wasted.
• Garbage collectors examine connectivity at the granularity of a single object. However, for many distributed applications, objects are used in groups and, if one object in a group is garbage, all objects in the group are garbage. It would be useful to take advantage of this knowledge, but a garbage collector cannot do this because that knowledge is specific to each application.
In the remainder of this section, we examine a simple mechanism that allows you to get rid of garbage objects cheaply and effectively. The approach has the following characteristics:
• Only those objects that potentially can become garbage are considered for collection.
• Granularity of collection is under control of the application: you can have objects collected as groups of arbitrary size, down to a single object.
• Objects are guaranteed not to be collected prematurely.
• Objects are guaranteed to be collected if the client crashes or suffers loss of connectivity.

1202 Object Life Cycle
• The mechanism is simple to implement and has low run-time overhead.
It is equally important to be aware of the limitations of the approach:
• The approach collects objects if a client crashes, but offers no protection against clients that are still running, but have neglected to destroy objects that they no longer need. In other words, the server is protected against client-side hardware failure and catastrophic client crashes, but it is not protected against faulty programming logic of clients.
• The approach is not transparent at the interface level: it requires changes (albeit minor ones) to the interface definitions for an application.
• The approach requires the client to periodically call the server, thus consuming network resources even if the client is otherwise idle.
Despite the limitations, this approach to garbage collection is applicable to a wide variety of applications and meets the most pragmatic need: how to clean up in case something goes badly wrong (rather than how to clean up in case the client misbe-haves).
An Extra Level of Indirection
Object factories are typically singleton objects that create objects on behalf of various clients. It is important for our garbage collector to know which client created what objects, so the collector can reap the objects created by a specific client if that client crashes. We can easily deal with this requirement by adding the proverbial level of indirection: instead of making a factory a singleton object, we provide a singleton object that creates factories. Clients first create a factory and then create all other objects they need using that factory:
interface Item { /* ...*/ };interface Cart{ Item* create(/* ... */); idempotent string getName(); void destroy(); idempotent void refresh();};interface CartFactory // Singleton{ Cart* create(string name);};

34.10 Avoiding Server-Side Garbage 1203
Clients obtain a proxy to the CartFactory singleton and call create to create a Cart object. In turn, the Cart object provides a create operation to place new objects of type Item into the cart. Note that the shopping cart name allows a client to distinguish different carts—the name parameter is not used to identify clients or to provide a unique identifier for carts. The getName operation on the Cart object returns the name that was used by the client to create it.
Each Cart object remembers which items it created. Because each client uses its own shopping cart, the server knows which objects were created by what client. In normal operation, a client first creates a shopping cart, and then uses the cart to create the items in the cart. Once the client has finished its job, it calls destroy on the cart. The implementation of destroy destroys both the cart and its items to reclaim resources.
To deal with crashed clients, the server needs to know when a cart is no longer in use. This is the purpose of the refresh operation: clients are expected to peri-odically call refresh on their cart objects. For example, the server might decide that, if a client’s cart has not been refreshed for more than ten minutes, the cart is no longer in use and reclaim it. As long as the client calls refresh at least once every ten minutes, the cart (and the items it contains) remain alive; if more than ten minutes elapse, the server simply calls destroy on the cart. Of course, there is no need to hard-wire the timeout value—you can make it part of the application’s configuration. However, to keep the implementation simple, it is useful to have the same timeout value for all carts, or to at least restrict the timeouts for different carts to a small number of fixed choices—this considerably simplifies the imple-mentation in both client and server.
Server-Side Implementation
The implementation of the interfaces on the server side almost suggests itself:
• Whenever refresh is called on a cart, the cart records the time at which the call was made.
• The server runs a reaper thread that wakes up once every ten minutes. The reaper thread examines the timestamp of all carts and, if it finds a cart last time-stamped more than ten minutes ago, it calls destroy on that cart.
• Each cart remembers the items it contains and destroys them as part of its destroy implementation.
Here then is the reaper thread in outline. (Note that we have simplified the code to show the essentials. For example, we have omitted the code that is needed to make

1204 Object Life Cycle
the reaper thread terminate cleanly when the server shuts down. See the code in demo/Ice/session for more detail.)
class ReapThread : public IceUtil::Thread, public IceUtil::Monitor<IceUtil::Mutex>{public: ReapThread(); virtual void run(); void add(const CartPrx&, const CartIPtr&);private: const IceUtil::Time _timeout; struct CartProxyPair { CartProxyPair(const CartPrx& p, const CartIPtr& c) : proxy(p), cart(c) { } const CartPrx proxy; const CartIPtr cart; }; std::list<CartProxyPair> _carts;};typedef IceUtil::Handle<ReapThread> ReapThreadPtr;
Note that the reaper thread maintains a list of pairs. Each pair stores the proxy of a cart and its servant pointer. We need both the proxy and the pointer because we need to invoke methods on both the Slice interface and the implementation inter-face of the cart. Whenever a client creates a new cart, the server calls the add method on the reaper thread, passing it the new cart:
void ReapThread::add(const CartPrx& proxy, const CartIPtr& cart){ Lock sync(*this); _carts.push_back(CartProxyPair(proxy, cart));}
The run method of the reaper thread is a loop that sleeps for ten minutes and calls destroy on any session that has not been refreshed within the preceding ten minutes:
void ReapThread::run(){ Lock sync(*this); while (true) {

34.10 Avoiding Server-Side Garbage 1205
timedWait(_timeout); list<CartProxyPair>::iterator p = _carts.begin(); while (p != _carts.end()) { try { // // Cart destruction may take some time. // Therefore the current time is computed // for each iteration. // if ((IceUtil::Time::now() - p->cart->timestamp()) > _timeout) { p->proxy->destroy(); p = _carts.erase(p); } else { ++p; } } catch (const Ice::ObjectNotExistException&) { p = _carts.erase(p); } } }}
Note that the reaper thread catches ObjectNotExistException from the call to destroy, and removes the cart from its list in that case. This is necessary because it is possible for a client to call destroy explicitly, so a cart may be destroyed already by the time the reaper thread examines it.
The CartFactory implementation is trivial:
class CartFactoryI : CartFactory{public: CartFactoryI(const ReapThreadPtr&); virtual CartPrx create(const std::string&, const Ice::Current&);private: ReapThreadPtr _reaper;};
The constructor is passed the instantiated reaper thread and remembers that thread in the _reaper member.
The create method adds each new cart to the reaper thread’s list of carts:


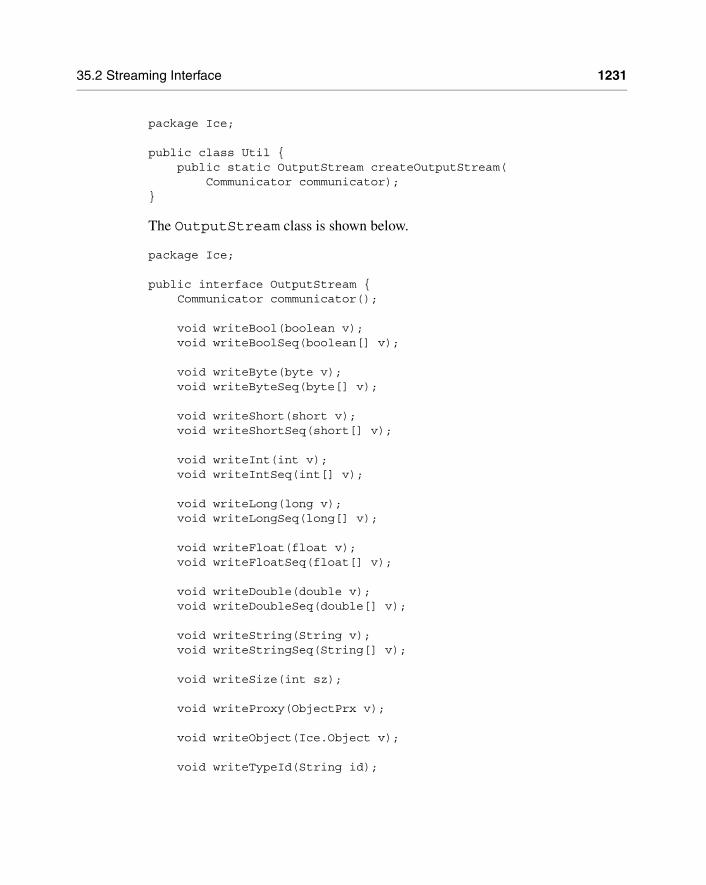


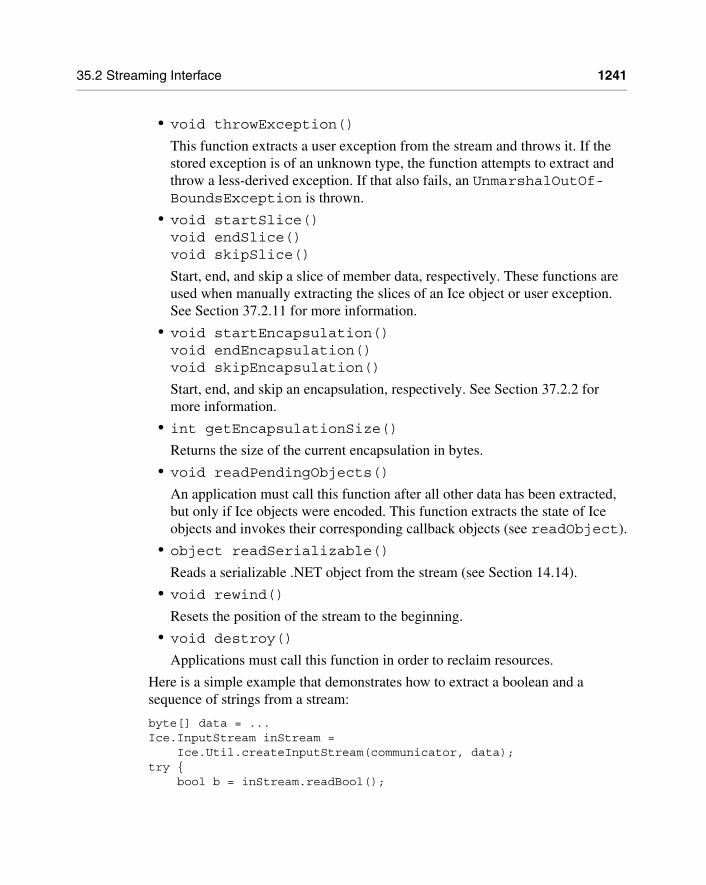
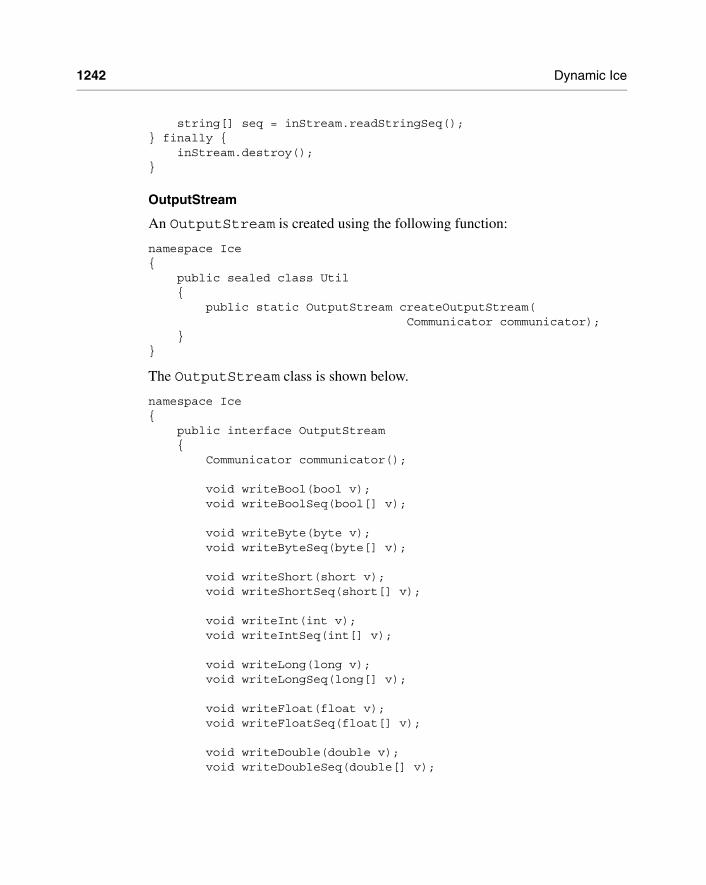


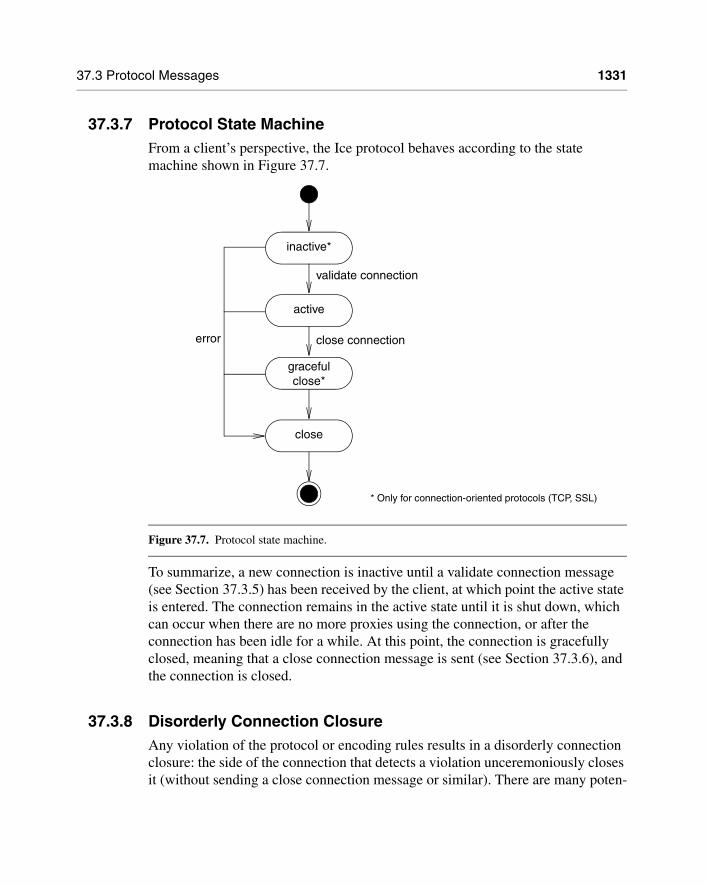


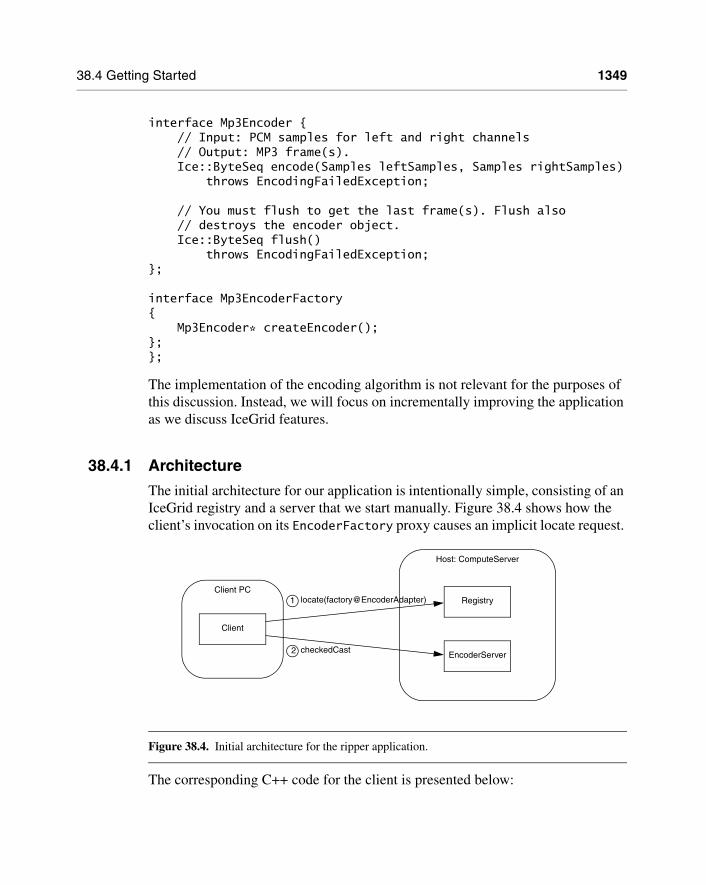


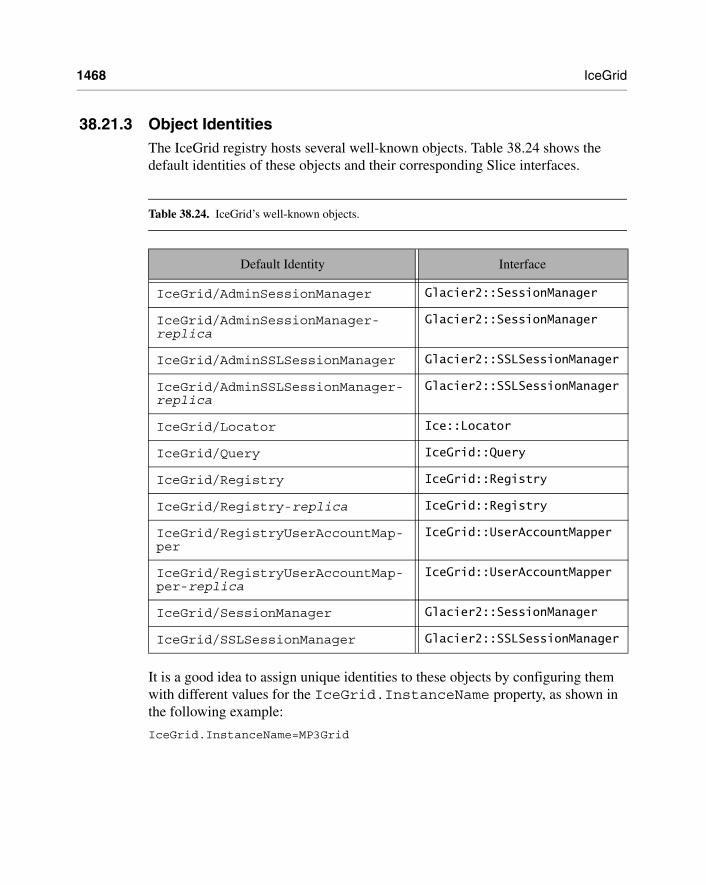


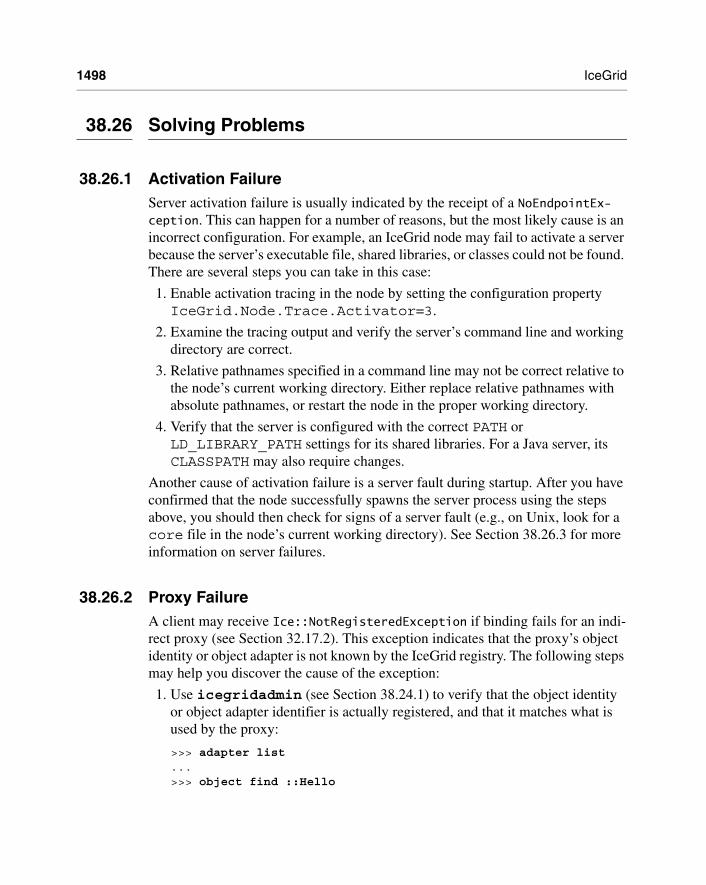


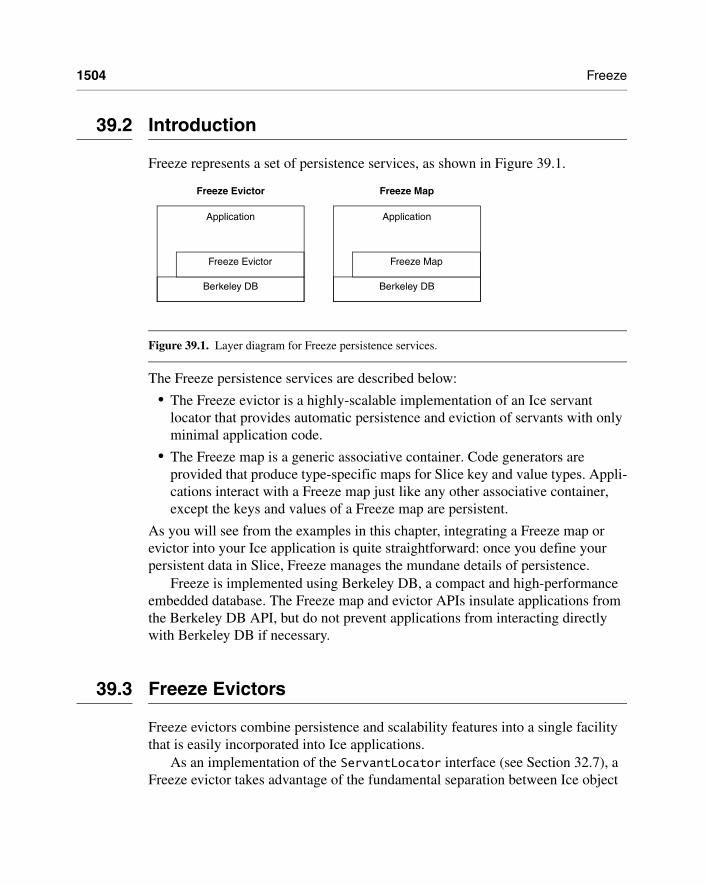


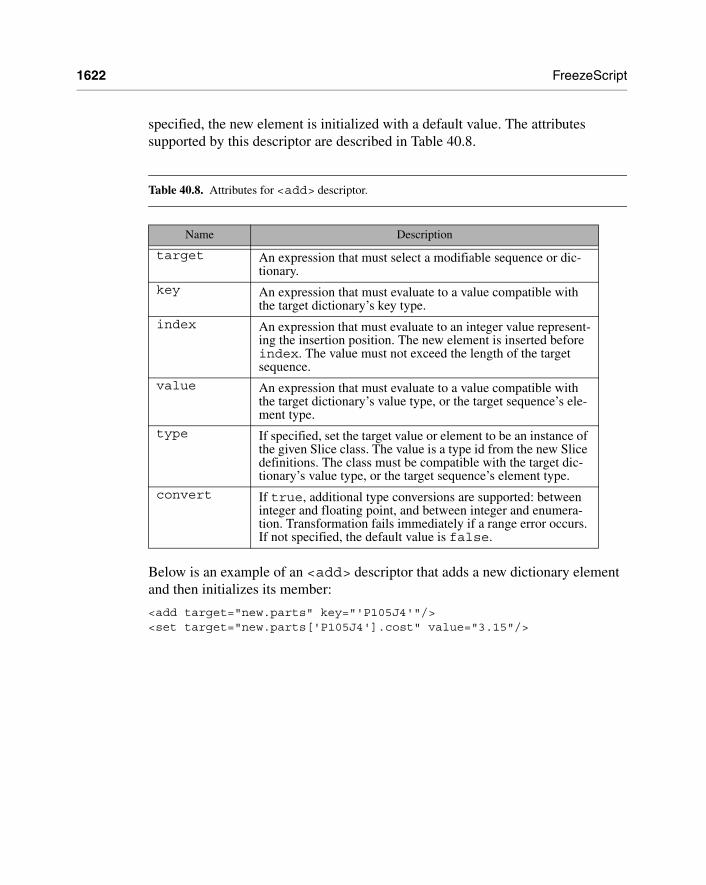


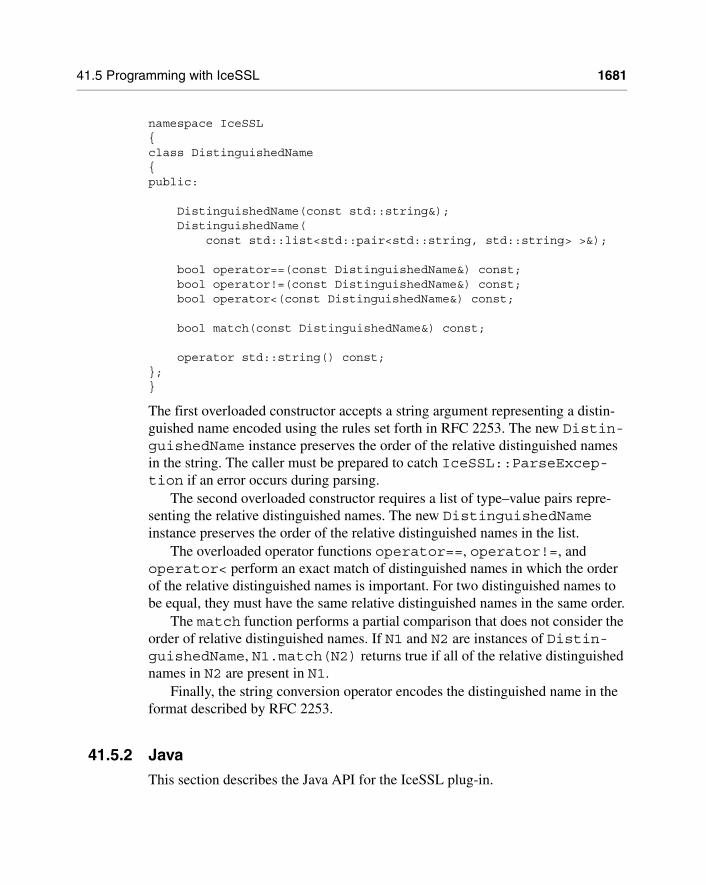


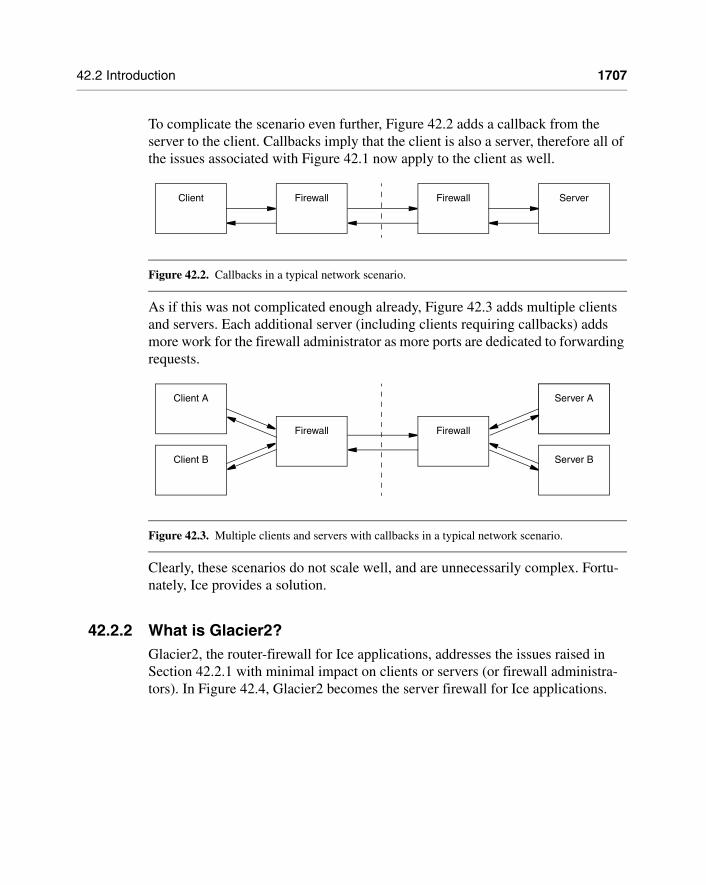
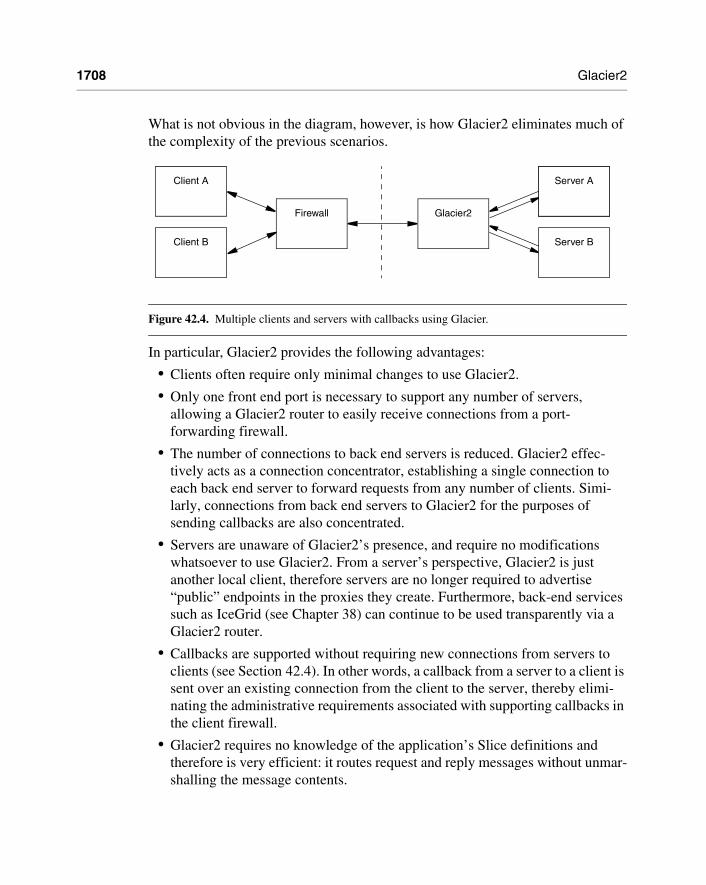


![Michi to no So Good - v1 c1 [batoto]](https://static.fdocuments.net/doc/165x107/613ca8919cc893456e1e920a/michi-to-no-so-good-v1-c1-batoto.jpg)