
Dish4You Cable Routing
36
Dish 4 You Dish 4 You Cable Routing Cable Routing
-
Upload
spicherheidi -
Category
Education
-
view
289 -
download
1
Transcript of Dish4You Cable Routing

Dish 4 YouDish 4 You
Cable RoutingCable Routing

Cable RoutingCable Routing If you were installing at If you were installing at
your own home, how your own home, how would you like the cable would you like the cable runs to look when you runs to look when you finished?finished?
This section will cover This section will cover the process for selecting the process for selecting the best option for which the best option for which cable to use, how to cable to use, how to identify the lines of a identify the lines of a home, and to best hide home, and to best hide cable runs. cable runs.
The steps for doing a The steps for doing a cabling wall fish will also cabling wall fish will also be covered.be covered.

The Walk-ThroughThe Walk-Through
During the walk-through, you will During the walk-through, you will explain the best route for cabling with explain the best route for cabling with the customer. The customer will need the customer. The customer will need to approve your plan before any work to approve your plan before any work can be done.can be done.
You want the customer to accept your You want the customer to accept your plan as the best way to complete the plan as the best way to complete the install. You have to convince them that install. You have to convince them that this is the best plan for their needs.this is the best plan for their needs.

Cable Pre-Wired SystemsCable Pre-Wired Systems Why do you need a certain rating on the Why do you need a certain rating on the
coaxial cable you use?coaxial cable you use? Without a correctly rated cable, the receiver Without a correctly rated cable, the receiver
will not receive all the transponders it needs will not receive all the transponders it needs and some channels will not be viewable.and some channels will not be viewable.
How do you tell the difference between a How do you tell the difference between a high-frequency barrel or wall plate and one high-frequency barrel or wall plate and one that is not rated for the higher that is not rated for the higher frequencies?frequencies? If you are uncertain about the ratings of If you are uncertain about the ratings of
existing cabling or hardware during an existing cabling or hardware during an installation, it is best to replace all existing installation, it is best to replace all existing hardware in a system to ensure every hardware in a system to ensure every component is a DNS approved item.component is a DNS approved item.

Exterior Cable routingExterior Cable routing A line of the home A line of the home
generally refers to an generally refers to an area of the home that area of the home that has a natural vertical or has a natural vertical or horizontal line to them. horizontal line to them. Some examples would be Some examples would be a trim board that runs a trim board that runs the length of the home, the length of the home, the point where the the point where the siding and the foundation siding and the foundation come together creates a come together creates a line, and corner edging line, and corner edging on vinyl siding creates a on vinyl siding creates a line.line.

Cable ClipsCable Clips
Clips should be Clips should be spaced spaced approximately 2 – approximately 2 – 5 feet apart, 5 feet apart, depending on the depending on the sag of the cable. sag of the cable. Place clips as Place clips as needed to keep the needed to keep the cable run neat and cable run neat and clean.clean.

Cable ClipsCable Clips
Make sure that you Make sure that you do notdo not use flex clips use flex clips on vinyl or aluminum on vinyl or aluminum siding. This can siding. This can create a damage create a damage claim and/or trouble claim and/or trouble call. Use the call. Use the appropriate siding appropriate siding clips instead unless clips instead unless you have you have written written permissionpermission from the from the customercustomer

Interior Cable RoutingInterior Cable RoutingDrilling the Point of EntryDrilling the Point of Entry
Locating and Locating and drilling the point(s) drilling the point(s) of entry into the of entry into the customer’s home customer’s home requires a great requires a great deal of thought deal of thought process, critical process, critical thinking, and thinking, and mathematical mathematical measurements and measurements and analysis.analysis.

Drilling the Point of Drilling the Point of Entry (Pg 2)Entry (Pg 2)
When a potential point of entry location near When a potential point of entry location near a receiver is identified, the location must be a receiver is identified, the location must be carefully measured. Measure from a location carefully measured. Measure from a location that is easily identifiable from the outside of that is easily identifiable from the outside of the house. For example, on the inside of the the house. For example, on the inside of the home, you may have determined that the drill home, you may have determined that the drill hole will be 18 inches below the picture hole will be 18 inches below the picture window, and the drill hole is four feet west of window, and the drill hole is four feet west of the picture window. Using these same the picture window. Using these same measurements, this location can be accurately measurements, this location can be accurately identified on the outside of the home.identified on the outside of the home.

Drilling the Point of Drilling the Point of Entry (Pg 3)Entry (Pg 3)
On the outside of the On the outside of the home, at the point home, at the point where you “thought” where you “thought” you would like to drill you would like to drill the hole, you may find the hole, you may find a gas meter, an air a gas meter, an air conditioning unit or conditioning unit or another item to avoid. another item to avoid. If this happens, you If this happens, you will need to repeat the will need to repeat the measurement process measurement process – using a new location.– using a new location.

Wall PenetrationWall Penetration
After confirming After confirming the point of entry the point of entry (POE) is a safe (POE) is a safe location, determine location, determine whether to drill whether to drill from the inside-out from the inside-out or from the or from the outside-in.outside-in.

Wall Penetration (Pg 2)Wall Penetration (Pg 2) Brick & Stucco – From Brick & Stucco – From
outside to insideoutside to inside Damage to the brick Damage to the brick
may result of reversedmay result of reversed Always use a masonry Always use a masonry
drill bitdrill bit Ensure no items are Ensure no items are
located on the inside of located on the inside of the wall where hole will the wall where hole will appearappear
Place the hole at the Place the hole at the same height as other same height as other receptacles in the receptacles in the vicinity.vicinity.

Wall Penetration (Pg 3)Wall Penetration (Pg 3)
Most other Most other surfaces – from surfaces – from inside to outsideinside to outside Use a stud finder to Use a stud finder to
avoid drilling avoid drilling through studs, through studs, electrical wiring electrical wiring and plumbingand plumbing

Wall Penetration (Pg 4)Wall Penetration (Pg 4)
Make sure there is enough cable Make sure there is enough cable slack outside the structure. Not slack outside the structure. Not having enough slack in a cable will having enough slack in a cable will create problems and changes will create problems and changes will need to be made to the installation.need to be made to the installation.
There cannot be more than a 90° There cannot be more than a 90° bend in a cable at any time.bend in a cable at any time.

Waterproofing the Waterproofing the PenetrationPenetration
When weatherproofing the When weatherproofing the wall penetration, the wall penetration, the following rules apply:following rules apply: If feeding one or two wires If feeding one or two wires
through the penetration, through the penetration, feed-thru-bushings must be feed-thru-bushings must be installed and sealed with installed and sealed with silicone.silicone.
If feeding three or four wires If feeding three or four wires through the penetration, no through the penetration, no feed-thru bushings are feed-thru bushings are required, but the required, but the penetrations must be sealed penetrations must be sealed with silicone.with silicone.
If the wires are to be fed If the wires are to be fed through aluminum or metal through aluminum or metal siding, there is a maximum siding, there is a maximum of only of only twotwo wires per wires per penetration and feed-thru penetration and feed-thru bushings and silicone are bushings and silicone are required.required.
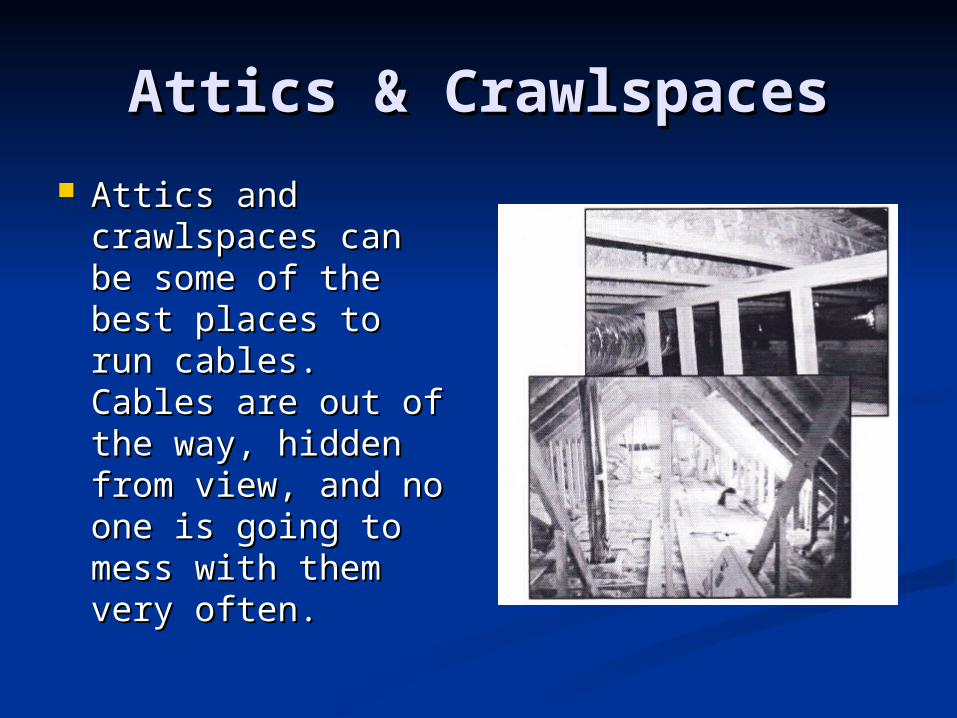
Attics & CrawlspacesAttics & Crawlspaces
Attics and Attics and crawlspaces can be crawlspaces can be some of the best some of the best places to run places to run cables. Cables are cables. Cables are out of the way, out of the way, hidden from view, hidden from view, and no one is and no one is going to mess with going to mess with them very often.them very often.

Attics & Crawlspaces (Pg Attics & Crawlspaces (Pg 2)2)
Some special considerations should be taken Some special considerations should be taken when working in these areas:when working in these areas: In attics, be sure to only step on the rafters, do not In attics, be sure to only step on the rafters, do not
step on the sheetrock. It will not support your step on the sheetrock. It will not support your weight and you will fall through.weight and you will fall through.
Beware of electrical wires and other cabling which Beware of electrical wires and other cabling which could present a trip hazard or an electrical shock could present a trip hazard or an electrical shock hazard.hazard.
Be careful of animals and insects in attics and Be careful of animals and insects in attics and crawlspaces, something may have made a home and crawlspaces, something may have made a home and be willing to defend it.be willing to defend it.
Be sure not to drop tools, you will have to go back Be sure not to drop tools, you will have to go back for them.for them.

Using a Cable Using a Cable Toner/MapperToner/Mapper
A cable toner or cable mapper is A cable toner or cable mapper is frequently used in pre-wired situations frequently used in pre-wired situations to identify and tag the terminating point to identify and tag the terminating point for a cable and to determine whether a for a cable and to determine whether a splitter is located in a system. splitter is located in a system.
The toner/mapper will determine The toner/mapper will determine continuity of a cable line. continuity of a cable line.
A cable toner is used only for one line.A cable toner is used only for one line. The cable mapper can test up to 4 lines.The cable mapper can test up to 4 lines.

Steps to use a Cable Steps to use a Cable TonerToner
1. Attach male unit to 1. Attach male unit to one end of the cable.one end of the cable.
2. Use the toner unit 2. Use the toner unit at other end to find at other end to find the correct cable.the correct cable.
3. Place the toner 3. Place the toner unit on one cable at a unit on one cable at a time until the toner time until the toner unit sounds.unit sounds. Once the unit sounds, Once the unit sounds,
you know you have the you know you have the correct cable.correct cable.

Steps to use a Cable Steps to use a Cable MapperMapper
1. Connect the remotes to 1. Connect the remotes to the cable lines.the cable lines.
2. Connect the master unit 2. Connect the master unit to the other end of the cable to the other end of the cable lines.lines.
3. Press the TEST button3. Press the TEST button The TESTING LED will flash The TESTING LED will flash
quickly.quickly. 4. If no failures are 4. If no failures are
detected, the remote(s) will detected, the remote(s) will be identified in the PASS be identified in the PASS area by lighting an LED for area by lighting an LED for each remote found.each remote found. If no remote is found, or the If no remote is found, or the
cable is shorted, the OPEN cable is shorted, the OPEN or SHORT LEDs will light or SHORT LEDs will light respectively.respectively.

Routing Cable through Routing Cable through CarpetCarpet
If routing through an unfinished If routing through an unfinished basement, the one major consideration basement, the one major consideration is the flooring you may be coming up is the flooring you may be coming up through. Ideally, you should be wall through. Ideally, you should be wall fishing the cable and installing a wall fishing the cable and installing a wall plate at the receiver location.plate at the receiver location.
However, there may be instances where However, there may be instances where you have no alternative other than to you have no alternative other than to drill through the flooring. Keep in mind, drill through the flooring. Keep in mind, this must be a this must be a last resortlast resort for routing for routing the cabling.the cabling.

Steps for Routing Cable Steps for Routing Cable through Carpetthrough Carpet
If the entry location If the entry location coming up from the coming up from the basement is covered with basement is covered with carpeting, you will need carpeting, you will need to prepare the carpet to prepare the carpet before drilling a hole.before drilling a hole.
Remember: Remember: nevernever drill drill directly into the carpet! directly into the carpet! It only takes 2 seconds to It only takes 2 seconds to accumulate 10 inches of accumulate 10 inches of carpet around your drill carpet around your drill bit when drilling through bit when drilling through carpet with your drill set carpet with your drill set to the high speed setting.to the high speed setting.

Steps for Routing Cable Steps for Routing Cable through Carpet (Pg 2)through Carpet (Pg 2)
Using a carpet coupler can reduce Using a carpet coupler can reduce the possible damage claims that can the possible damage claims that can result from directly drilling into the result from directly drilling into the carpet. This tool allows you to safely carpet. This tool allows you to safely drill through carpet without getting drill through carpet without getting the carpet fibers wrapped around the carpet fibers wrapped around the drill bit.the drill bit.

Steps for Routing Cable Steps for Routing Cable through Carpet (Pg 3)through Carpet (Pg 3)
1. Using the utility 1. Using the utility knife, cut a 3 inch knife, cut a 3 inch slot into the slot into the carpet, following carpet, following the grain of the the grain of the carpet.carpet.

Steps for Routing Cable Steps for Routing Cable through Carpet (Pg 4)through Carpet (Pg 4)
2. When the carpet 2. When the carpet coupler is properly coupler is properly placed into the slot placed into the slot in the carpet, the in the carpet, the carpet fibers will carpet fibers will be around the be around the coupler, and the coupler, and the floor should be floor should be clearly visible clearly visible through the center through the center of the coupler.of the coupler.

Steps for Routing Cable Steps for Routing Cable through Carpet (Pg 5)through Carpet (Pg 5)
3. Place the drill 3. Place the drill bit through the bit through the center of the center of the coupler and slowly coupler and slowly drill through the drill through the floor.floor.

Steps for Routing Cable Steps for Routing Cable through Carpet (Pg 6)through Carpet (Pg 6)
4. Remove the 4. Remove the drill bit and the drill bit and the carpet coupler.carpet coupler.

Steps for Routing Cable Steps for Routing Cable through Carpet (Pg 7)through Carpet (Pg 7)
5. Route cables 5. Route cables through the hole through the hole and flatten carpet and flatten carpet back down.back down.

Steps for Routing Cable Steps for Routing Cable through Carpet (Pg 8)through Carpet (Pg 8)
6. A feed through 6. A feed through bushing can be bushing can be placed on the cable placed on the cable and back into the and back into the hole to better hold hole to better hold the carpet down.the carpet down.

Wall FishingWall Fishing When a receiver is located on an interior When a receiver is located on an interior
wall, a wall fish through a crawl space wall, a wall fish through a crawl space or an attic is often the best technique to or an attic is often the best technique to use. use.
Before considering a wall fish, confirm Before considering a wall fish, confirm that the routing cannot be completed that the routing cannot be completed through a better location.through a better location.
However, keep in mind that if the However, keep in mind that if the receiver is located on an interior wall, receiver is located on an interior wall, wall fishing may be the best and/or only wall fishing may be the best and/or only option.option.

Wall Fishing (Pg 2)Wall Fishing (Pg 2) The tools that will be necessary for a wall The tools that will be necessary for a wall
fish include:fish include: A cordless drill with 3/8- or ½-inch bitA cordless drill with 3/8- or ½-inch bit A stud finderA stud finder Measuring tapeMeasuring tape An adequate length of glow rod or fish chainAn adequate length of glow rod or fish chain Flashlights (large and small)Flashlights (large and small) Wire cuttersWire cutters Electrical tapeElectrical tape Safety glassesSafety glasses Safety mask (always worn in attics)Safety mask (always worn in attics) A hard hatA hard hat Water – especially if the attic is warm or hotWater – especially if the attic is warm or hot

Wall Fishing (Pg 3)Wall Fishing (Pg 3)
When working in an When working in an attic, dehydration is attic, dehydration is a consideration. a consideration. Frequent breaks Frequent breaks and water are and water are required. required.
You must be aware You must be aware of how to avoid heat of how to avoid heat stress and heat stress and heat stroke. stroke.

Wall Fishing (Pg 4)Wall Fishing (Pg 4) Safety glasses are Safety glasses are
required during all work required during all work – and are especially – and are especially important during wall important during wall fishes. Dust particles fishes. Dust particles can fall down from the can fall down from the attic.attic.
Wear a safety mask for Wear a safety mask for protection against protection against insulation, dust and insulation, dust and other elements.other elements.
A hard hat is worn as A hard hat is worn as protection from sharp protection from sharp nails that may protrude nails that may protrude from roofing.from roofing.

Wall Fishing (Pg 5)Wall Fishing (Pg 5) You must walk very You must walk very
carefully on 2 x 4 ceiling carefully on 2 x 4 ceiling joists in the attic. The joists in the attic. The greatest concern is that, greatest concern is that, if you do not walk on the if you do not walk on the joists, you could fall joists, you could fall through the ceiling and through the ceiling and injure yourself severely.injure yourself severely.
In addition, damage In addition, damage reports in early 2002 reports in early 2002 indicate that ceiling indicate that ceiling damage – caused by damage – caused by stepping through the stepping through the ceiling – cost an average ceiling – cost an average of $1400 per accident.of $1400 per accident.

Wall Fishing (Pg 6)Wall Fishing (Pg 6)
It is important to note: It is important to note: You will not be able to perform a You will not be able to perform a
wall fish and/or route the cabling wall fish and/or route the cabling inside the wall of houses without an inside the wall of houses without an attic, such as a vaulted ceiling, or a attic, such as a vaulted ceiling, or a house with a finished basement house with a finished basement where you cannot access the inside where you cannot access the inside of the wall, floor or ceiling.of the wall, floor or ceiling.
You will need to discuss other You will need to discuss other possibilities with the customer.possibilities with the customer.

Wall Fishing ToolsWall Fishing Tools


![11. CABLE/HARNESS ROUTING - Honda...2-66 11.CABLE/HARNESS ROUTING [6] HARNESS BAND CLIP [4] IAT (INTAKE AIR TEMPERATURE) SENSOR [3] MAP (MANIFOLD ABSOLUTE PRESSURE) SENSOR [5] …](https://static.fdocuments.net/doc/165x107/6128ea67544a0219773ceb3e/11-cableharness-routing-honda-2-66-11cableharness-routing-6-harness.jpg)


