
Diseño y fabricación de un eje del motor accionado por cadena de Fórmula aplicaciones...
23
Design and Manufacture of a Chain Driven Motor Shaft for Formula Electric Applications by Jack J. Wanderman Submitted to the Department of Mechanical Engineering in Partial Fulfillment of the Requirements for the Degree of Bachelor of Science in Mechanical Engineering at the Massachusetts Institute of Technology June 2013 A~C~1fv~; Liii' I 4 \~ ~ C 2013 Massachusetts Institute of Technology. All rights reserved. I Signature of Author: Dep ent of 4 chanilcal Engineering May 16, 2013 'If Certified by: Anette Hosoi Professor of Mechanical Engineering Thesis Supervisor Accepted by: Anette Hosoi Professor of Mechanical Engineering Undergraduate Officer I . 1 .11 1 - I i
-
Upload
jesus-daniel-berrocal-espino -
Category
Documents
-
view
213 -
download
0
Transcript of Diseño y fabricación de un eje del motor accionado por cadena de Fórmula aplicaciones...

Design and Manufacture of a Chain Driven Motor Shaft for Formula ElectricApplications
by
Jack J. Wanderman
Submitted to theDepartment of Mechanical Engineering
in Partial Fulfillment of the Requirements for the Degree of
Bachelor of Science in Mechanical Engineering
at the
Massachusetts Institute of Technology
June 2013
A~C~1fv~;
Liii'
I
4 \~ ~
C 2013 Massachusetts Institute of Technology. All rights reserved.
I
Signature of Author:Dep ent of 4 chanilcal Engineering
May 16, 2013'If
Certified by:Anette Hosoi
Professor of Mechanical EngineeringThesis Supervisor
Accepted by:Anette Hosoi
Professor of Mechanical EngineeringUndergraduate Officer
I . 1 .11 1 - I i

2

Design and Manufacture of a Chain Driven Motor Shaft for Formula Electric
Applications
by
Jack J. Wanderman
Submitted to the Department of Mechanical Engineeringon May 16, 2013 in Partial Fulfillment of the
Requirements for the Degree of
Bachelor of Science in Mechanical Engineering
ABSTRACT
This document describes the design, manufacture, and testing of a motor shaft assembly that is asubcomponent of the drivetrain system in a Formula Electric racecar. The design covers detailedanalysis of the bearing, sprocket, shaft, pins, and spacer created to meet a set of functionalrequirements. The process of determining these requirements is also covered, along with a set ofbest practices for thoughtful design in general.
An initial phase of testing is covered as well, from the design of the testing apparatus to theexecution of a torsional test on the shaft. With limited data, conclusions are hard to draw withcertainty, but initial results seem to indicate that the shaft performs as expected.
The intent of this document is to serve as an example of the level of detail and thoroughness thatis expected when designing racecar components. To that end, this document should provide anumber of unique examples of how specific problems were modeled and addressed in the design.It should also serve as a template for future documentation of such design efforts.
Thesis Supervisor: Anette HosoiTile: Professor of Mechanical Engineering
3

Acknowledgments
The author would like to thank:
Prof. Anette Hosoi for her patience, guidance, optimism, and flexibility throughout thisproject. She is likely one of the most talented and correspondingly busiest people at MIT, and itwas an honor to receive her one-on-one support.
Andrew Carlson ('12) and Adam Vickerman ('13), who completed the majority of thearchitecture and CAD modeling for the powertrain system. Andrew also was an invaluableresource of machining knowledge and expertise.
Pierce Hayward and Claudio DiLeo for their assistance in preparing and executing theInstron testing.
The MIT Motorsports alumni, current members, faculty advisors, sponsors, and fans. Thisteam has given me more than I can possibly give back. Through outstanding mentorship,management, and friendship, those associated with the team have provided an experienceunrivaled by any course and unmatched by any job. The lessons learned in an early morning, lastminute, crunch-time haze may occasionally be forgotten, but the glow of confidence,understanding, and diligence that comes with that experience will last a lifetime.
4

Table of Contents
Abstract 3
Acknowledgements 4
Table of Contents 5
List of Figures 6
1. Introduction 7
1.1 Formula SAE@ 7
1.2 MIT Motorsports 7
2. Design Methodology and Philosophy 7
2.1 Constraints on the Designer 8
2.2 Constraints on the Assembly 8
2.3 Functional Requirements 9
3. Mechanical Design 9
3.1 Bearing Selection 12
3.2 Sprocket 13
3.3 Shaft 16
3.4 Pin, spacer, and clamping design 18
4. Testing and Validation 20
5. Conclusion 22
6. References 23
5

List of Figures
Figure 1: Powertrain package in CAD 10
Figure 2: Design of sprocket in CAD 12
Figure 3: Finite element analysis of the shaft under torsional load 15
Figure 4: Machining process of the shaft 18
Figure 5: Full shaft assembly, exploded view 19
Figure 6: Shaft testing assembly 20
Figure 7: Plot of torque vs. rotational displacement 21
6

1. Introduction
The motor shaft assembly design that is explained in the following pages was created for useby the MIT Motorsports team to compete in the Formula SAES Electric competition in Lincoln,Nebraska. The assembly is just one part of the overall drivetrain system that will power a full-sized racecar in the event. The shaft assembly was designed to transfer torque from the electricmotor to the chain via a sprocket. Although the scale of the project is small, this document willaddress to great depth every important decision that was made during its design, fabrication, andtesting to provide a thorough example of documentation for the future design work of the team.
1.1 Formula SAE@
Formula SAES is a collegiate level design competition in which university students design,manufacture, and race an open-wheeled racecar. An international group of teams compete indynamic events that test a car's handling, acceleration, and reliability. In addition to racing,teams compete in a set of static events that judge design, cost, and marketing.
SAE International facilitates the completion every year by hosting two US based events. Thelarger completion is held in Detroit, Michigan and draws up to 140 teams every year. Thesmaller completion is held as of this year in Lincoln, Nebraska, and will have 80 traditionalinternal combustion teams, plus a new group of 20 electric-only powertrain teams. SAEInternational publishes a rulebook [1] that outlines regulations for safety, frame construction,powertrain limits, etc. Outside of the limits enumerated in this document, teams are free todesign the car however they wish.
1.2 MIT Motorsports
The MIT Motorsports team was founded in 2001, and has produced 8 internal combustionengine cars to date. The team has achieved a high degree of success with its most recent vehicle,MY 11, placing 9t in the West completion in 2011, and in 16d' place in Detroit last year. Thisyear, the team made the decision to switch to an electric drivetrain to compete in the brand newFormula SAE@ Electric competition. This marks the sharpest change of design direction for theteam to date, and has presented a variety of new and somewhat unforeseen challenges.
2. Design Methodology and Philosophy
This document details in depth the care and consideration that went into the design andmanufacture of a select number of parts. Rather than a manual to guide future team membersthrough a motor shaft design process, it should serve as an example of a thoughtful designexercise. The process of careful researching, planning, modeling, manufacturing, and testingdescribed here should be present in every critical assembly that the team creates.
All extraordinary design comes as a result of maximizing desirable characteristics within theconstraints of the system. The desired characteristics for most of the parts of car are clear - wewant the lightest weight possible part that costs as little as possible. To achieve a high level ofthe design, then, the difficult task becomes accurately characterizing the constraints anddeveloping meaningful functional requirements that will determine the boundaries for the design.
7

2.1 Constraints on the Designer
Before discussing the physical constraints that exist in component design, it is critical to alsodiscuss the constraints on the designer. In fact, a good understanding and management of theseconstraints can make the difference between a completed component and a half-finished venture.
In spite all of the rules, cost regulations, and resource limitations that come as a part of thiscompetition, time has consistently proven to be the biggest factor in limiting the success ofdesigns. Many Formula SAES teams compete on a one year design cycle, meaning that a newcar is produced and brought to competition every year. Such a short cycle pushes designers to beaware of every remaining week until competition. To be an effective designer, such diligence iscritical.
The tendency for many designers when faced with a pressing deadline is to rush through thedetails of a design in order to begin fabrication. While it can be important to know when tocurtail the optimization and analysis of a component, the details of manufacturing and assemblyshould never be overlooked. As Durand [2] mentions, maintaining an accurate tool list for eachcomponent saves time and money for the designer and the team as a whole. Additionally, theexercise of planning out every step of the machining or assembly process for a component canhelp the designer highlight unforeseen problem areas.
In addition to time, the designer may also be limited in his or her own expertise orknowledge in the topic. It seems intuitive that, in order for a designer to achieve a high level ofdesign, he or she needs to utilize highly complex models or tools, the likes of which a new teammember may be unfamiliar with. In fact, this is a fallacy. In truth, almost any member of theteam is capable of excellent design given a basic knowledge of physics. The critical step for adesigner is to abstract the physical problem to the point where it fits within his or her body ofknowledge. Doubt of one's own ability can be as great a constraint to the design as large forcesor limited space.
Similarly, overconfidence is also an important constraint. It is critical for a designer tocontinually ask themselves or others, "How could I be wrong?" An excellent mechanism toformalize this behavior is to institute team or sub-team wide design review meetings, wheremembers of the team are forced to defend their design choices in front of a group.
Finally, a designer is constrained by the design tools and software that is available to him orher. MIT Motorsports uses the most current version of SolidWorks, as provided by themechanical engineering department at MIT, as its primary CAD package. SolidWorksSimulation is the attached FEA package that is used to analyze the strength of designed parts.Although this software is quite powerful, results are only as useful as the original test setupallows them to be. With that in mind, parts are designed with high safety factors. For parts in thedriveline, the team adheres to a factor of safety of 2 at minimum. Furthermore, physics-based,"by hand" calculations should be executed wherever possible to check the validity of FEAcalculations. As a general rule, the team suggests completing these calculations first, beforedoing any FEA.
2.2 Constraints on the Assembly
In a generic assembly for the racecar, designs are typically constrained by some combinationof the following: external loading, geometry of pre-built parts, and rules specific to the assemblyfound in the rules document. Different systems in the car tend to have varying levels of
8

dependence on these constraints. For example, the internal combustion engine used in theprevious iterations of the car was a stock, purchased motorcycle engine. As a result the entiredriveline system needed to be designed to fit and operate around its geometry, but there wererelatively few rules governing that assembly's construction. By contrast, many of the safetysystems on the car are completely custom-made, but their design is heavily regulated in the rules.
In the following sections, this paper will use the motor shaft assembly for the MY13 ElectricVehicle as an example of how to identify and interpret these physical constraints.
2.3 Functional Requirements
Once the constraints of the system have been identified, the designer can construct a list offunctional requirements for the part or assembly. These requirements should be specific andmeasurable. For example "Motor shaft is lightweight" would not be an adequate requirement.Instead, a statement such as "Motor shaft has a dynamic moment of inertia less than 1/100 that ofthe motor itself' would be a good requirement. Some may draw a distinction between functionalrequirements (characteristics that directly relate to the explicit performance and behavior of thepart) and so-called non-functional requirements (other relevant characteristics like cost andserviceability) however this distinction will not be addressed in this paper. For the purposes ofthese parts, all relevant characteristics are relevant to the function of the part, and will thusly bereferred to simply as functional requirements.
3. Mechanical Design
The overall powertrain package is based around a dual motor setup, with each motorindependently powering each of the two rear wheels. The motors selected are Enstroj EMRAXliquid cooled motors. These motors are capable of supplying well over the 42.5 kilowatts ofpower that we expect to be our maximum drawI at 300 Volts. The rated maximum torque for themotors is 220 Newton meters for the purposes of this analysis.2
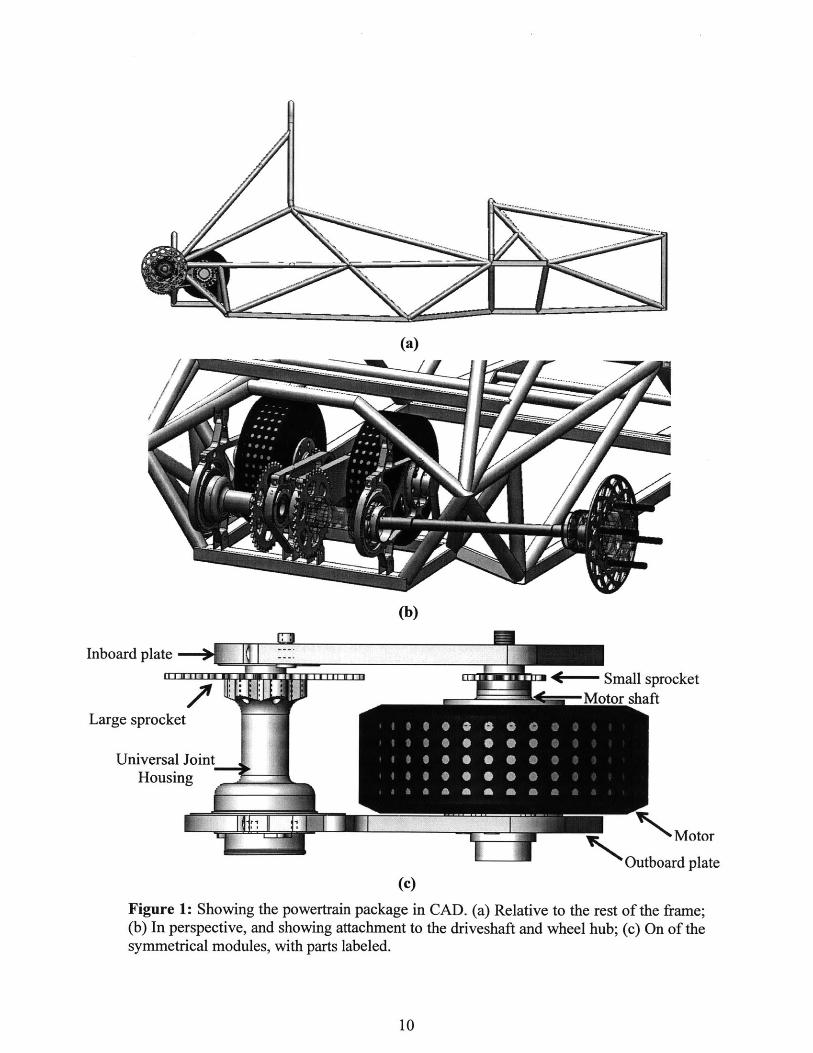
A direct load path from the large sprocket to the motor is desired in order to avoid passingthe relatively large chain tension loads through the frame. Further description of the benefits ofthis direct load path can be seen in [2]. To achieve this, each motor is bolted to an outboard plate,which is in turn bolted to the frame. The driveshaft is connected to a universal joint housing,which is in turn connected to a large sprocket. This housing is supported by bearings in theoutboard plate, as well as an inboard plate to provide moment support for the chain tension loads.The large sprocket is attached by chain to a small sprocket mounted on a shaft that connects tothe motor. The shaft is also supported by a bearing on the inboard plate. In this way, the chaintension load is passed through the compression of the plates, rather than the bending of theframe, allowing for a lightweight, robust design.
1 The rules [1] specify a maximum power draw of 85kW. This will be split between bothmotors.
2 This was the listed maximum torque at the time that the analysis was completed. Sincethen, Enstroj has made more detailed analysis available [3], showing that our expected torquewill be somewhat lower than this original guess. For the purposes of this design, that differencesimply adds an additional safety factor.
9
/
A I(a)
LA(b)
Inboard plate >
Large sprocket
Universal JointHousing
4"- Small sprocket-Motor shaft
! ~N MotorOutboard plate
(c)Figure 1: Showing the powertrain package in CAD. (a) Relative to the rest of the frame;(b) In perspective, and showing attachment to the driveshaft and wheel hub; (c) On of thesymmetrical modules, with parts labeled.
10
IW

The sub-assembly of this system that will be the focus of this paper includes the motor shaft,the small sprocket, the bearing that supports the shaft, the axial retention nut, the spacer thattransmits axial load, and the pins that constrain the sprocket rotationally. From here on, this sub-assembly will be known as the motor shaft assembly.
The constraints mentioned in Section 2.2 include external loads, geometry of thesurrounding parts, and any constraints imposed by the rules. For the motor shaft assembly, thecontest rules do not specify any requirements, so we are left with external loading and thegeometry of the rest of the system as constraints.
To determine the external loading that shaft would encounter, several strategies wereconsidered. Previously published theses by Durand [2] and Scelfo [4], calculate chain tension byestimating vehicle acceleration, and working physically backwards from there. Our chassis teamestimated a vehicle weight of 660 pounds and a maximum forward acceleration of 1.5g. Our tirediameter is 20 inches. The acceleration load is split between both motors, which effectively cutsthe accelerating mass of each system in half, so torque at each large sprocket is
Tiarge = M - a - Rtire = 2 (6-S) (1.5 * 9.8-) - (10 in) = 559 Nm (1)
where Tlarge is the torque at the large sprocket, M is the mass of the car, a is the forwardacceleration, and Rtire is the radius of the tire. Our large sprocket has 37 teeth with a 2 inch pitch.This means that the chain tension force would be
Fchain = Tiarge 559 Nm 1 = 7470 N (2)(nteeth - Pitch) - 2 (37 -0.5 in) - 2
where Fchain is the chain tension force, neeth is the number of teeth in the large sprocket, and Pitchis the pitch of the large sprocket. The torque at the small sprocket with 14 teeth, Tsmaii, would be
Tsmall = Tiarge - = 559Nm - = 211.5 Nm (3)
Alternatively, we can recognize that the motor provides the only reaction torque in eachpowertrain system. To that end, the maximum torque that the small sprocket could see would bemaximum reaction torque that the motor is capable of producing. This information can be foundusing data from the motor manufacturer. In this case, Enstroj listed 220 Newton meters for theEMRAX's peak torque. The fact that this value lines up well with the calculated values fromEquation (3) helps to validate our assumptions.
Using Equation (2) with the new, slightly higher torque yields a final chain tension of 7770N. This tension load is supported through the bolted connection to the motor from the shaft, andby a bearing on the inboard plate. Due to the spacing of the plates and the placement of the largesprocket, the small sprocket teeth will be biased toward the inboard side, meaning that thebearing will take up most of the tension load. By creating a ratio of the lever arms on either sideof the sprocket, we can say that the bearing will support at least 2/3 of the load, or 5180 N.
The lifetime and reliability of the parts must also be considered. We can get a roughestimate of the number of cycles we expect at the motor shaft estimating the total runtime of thecar and an average speed. Typically, even with extensive testing, the team's cars see less than 10
11

hours of runtime, t runtime. An aggressive estimate for an average speed over that time, vcar, is 40mph. With a tooth ratio of 37:14 and a tire diameter, dwheel, of 20 inches, we can say
truntime -Vcar 37 10 hours -40 mph 37)N == 20 ~ 106 (smti dw heel -7 (14 20 Ln-n 14
where Nsmai is the number of expected cycles of the small sprocket and shaft. This tells us that allof the motor shaft components must survive 106 cycles of loading.
Regarding the geometry constraints, there are a few parts that were purchased, and theoverall architecture of the powertrain system had already been designed. The motor shaft neededto bolt on to the stock motor bolt pattern. The sprocket location between the two plates was setwith the architecture of the full powertrain system. Whatever bearing that was selected needed tobe adequately held and retained axially by the /4 inch thick inboard plate. An off-the-shelfsprocket was chosen (more about this in Section 3.2) which had an inner bore of % inch, whichset the diameter for part of the shaft.
Armed with an enumerated set of constraints, we began constructing functionalrequirements for each part in the assembly. In the following sections, the functional requirementsare listed, followed by a description of the design choices that attempted to meet thoserequirements, and finally comments about the relevant manufacturing processes used in theproduction of the part.
3.1 Bearing Selection
3.1.1 Functional Requirements
Functionality:
e Must support 5180 Newtons for 106 cycles without failure
* Must be sealed to an IP65 standard to survive rainy conditions
Manufacturability:
* Must be available from NSK America, a sponsor of the team
Integration:
* Must be less than 0.7 inches in width to allow room for an axial retention flange inthe mounting plate
* Must have a bore large enough to support a shaft diameter that will not deflect morethan 12.5 micron under a 7770 N in three point bending
3.1.2 Design Process
The NSK Bearing catalog [5] contains a wealth of information regarding bearing life. Thereare detailed equations that relate a bearing life constant, Cr, to a specific loading condition. Inthis case however, since Cr is originally calculated using 106 cycles, no extra calculation isneeded. We can simply read the maximum radial load value out of the catalog - again lookingfor a load that exceeds 5180 N. Applying our safety factor of two, we search for Cr values thatare larger than 10360 N.
The two smallest bearings in the catalogue that meet this criterion are the 6302 and the 6303bearing, the latter being a slightly larger in bore, outer diameter, and thickness. This has the
12

disadvantage of adding weight, but may have the advantage of supporting a thicker and thereforestiffer shaft.
A rough estimate for the sensitivity of the shaft can be done by approximating its bendingdeflection between the bearing and the motor as simple three point bending. This does notaccurately match the real world situation, but the simple calculation is useful for comparativepurposes. In three point bending of a cylinder, the deflection of the beam is given by
FL 3 4(56 = -. (5)
48E 7r -r 4
Using this relationship, we can estimate the deflection of in the shaft due to bending, and wecan compare the 15mm bore bearing (6302) with the 17mm bore bearing (6303). In this case,while the larger bore does improve the deflection by close to 40 percent, both of the deflectionsare in the single micron range, which is well within the bounds of our functional requirements.
In this case, while the 6302 bearing seems to be the best option, we must consider theavailability from our sponsor, NSK. We needed the sealed DDU-type bearing in order to safelyoperate in the rain, and the 6302DDU was unavailable at the time of order. The 6303DDU wassubstituted as the next best option.
3.1.3 Manufacturing
The bearing came fully assembled, and required no maintenance. It did need to be pressed into the inboard mounting plate, though. It should be noted that the NSK suggested fit for bearingsthat will have the shaft applying torque is that the bearing be pressed onto the shaft, not into thehousing. In this case however, the bearing was pressed into the plate for ease of assembly. Asexplained in Section 3.3.3, great care was used to make the shaft as close a sliding fit as possibleto insure that there would be no slipping between the shaft and the bearing.
Guidelines for pressing bearings into the housing are given in [5]. It is particularly importantthat the housing bore is appropriately sized using the fit tables in [5] and adjusted for the fact thatthe housing material is aluminum instead of steel. For this application, the appropriateinterference was determined to be approximately .001 inches. When pressing bearings in, forceshould never be applied through the rolling surfaces, so an annular spacer was used to insure thatthe force from the press was only applied through the outer race. Heating the housing prior topressing the bearing in will also allow a shrink fit, which can achieve a tight interference withoutthe application of much force.
3.2 Sprocket
3.2.1 Functional Requirements
Functionality:
e Must transmit 220 Newton meters of torque from shaft to chain without failure
Manufacturability:
e All machining and hardening processes must be achievable with available tools (e.g.no EDM is allowed.)
Integration:
- Must locate axially to specified location on shaft
13

* Must accept size 415 chain
3.2.2 Design Process
There are a number of methods of connecting a sprocket to a shaft in order to transmittorque. The usual strategies involve either a keyway or a splined shaft connection. A keywayinvolves a rectangular channel cut into the outer diameter of the shaft and the inner diameter ofthe sprocket. A metal "key" is inserted into this channel to couple one part to the other.
This design is simple to machine and assemble. However it introduces large stressconcentrations at the bottom edges of the channels. Even ignoring these concentrations, it isrelatively simple to estimate the pressure, P, that would exist on a large keyway if one wereimplemented. If we assume that a keyway is 0.25 inches deep, x, and 0.8 inches long, L, and thatthe inside radius, r, of the sprocket is 0.375 inches, we get
T 1 220Nm 1P = - - -= - = 179MPa (6)
r x-L .375 in 0.25 in -0.8 in
where T is the applied torque. This value is approximately half of the yield strength of 6061Aluminum, and doesn't factor in any of the stress concentration or the uneven loading due to thegeometry of the key. Further FEA confirmed that a keyway would likely result in yielding andfailure in the shaft part.
For higher torque applications, many designers implement toothed, interlocking connectionscalled splines to transmit torque. Although they are effective, it is very difficult to machinesplines. Typically, inside splines must be broached, and outside spline hobbed or extruded. Sincewe had none of these capabilities in-house, we looked to other options for attaching the sprocketand shaft.
The final sprocket design transmits torque to the shaft primarily via friction. By using a nuton a threaded section of the shaft, force can be transmitted through the inner race of the bearing,a spacer, the sprocket, and back into the flange section of the shaft. The amount of force, F,needed to prevent slipping between the sprocket and shaft can be calculated by
F = T - -router - rTnner) 3(rojuter - nner) - 2
where pI is the coefficient of friction between the sprocket and the shaft, and rinner and routercorrespond to the dimensions of the sprocket annulus in contact with the shaft.
In the case that this friction hold slips, it is important that a backup form of torquetransmission exists. To that end, two shear pins are pressed into the shaft and interface with thesprocket. These pins are rated for their shear strength. To withstand the torque,
SS ;> (8)d
where SS is the shear strength, T is the torque, and d is the distance between the two pins.
The teeth of small sprockets must support a large load over a relatively small area, meaningthat they tend to be a highly stressed section of the part. It is for that reason that typical smallsprockets are made of steel, and the teeth are hardened. While making such a sprocket fromscratch would have been possible, it would have diverted engineering and manufacturing effort
14

away from other projects, so in this case the decision was made to purchase an off-the-shelfsprocket and modify it to suit the design application.
In this case, that modification involved facing the sprocket to length such that it would lineup with the large sprocket in the assembly and drilling holes for the shear pins that will carry thetorque load should the friction hold slip.
Since size 415 chain is relatively uncommon, there were very few choices for sprocketsavailable. A Martin sprocket was chosen because the teeth were hardened, but the body was stillmachinable. This gave us increased manufacturing flexibility. The nominal bore of the purchasedsprocket was % inch, and the outer diameter was 1.68 inches. The sprocket came with a keyway,but it was not used.
(a)
Figure 2: Showing design of sprocket (a) as an off-the-shelf part;thickness and shear pin holes.
(b)
(b) with modified
3.2.3 Manufacturing
Since this part was intended to slide on and the motor shaft, properly tolerancing the shearpin holes was crucial. Additionally, since the part was meant to be held by friction on the motorshaft, the flatness of the faced surface was also important.
To achieve these machining steps, a single setup on a mill was utilized. A jig was created bymachining an aluminum plate with a bolt circle along the pitch diameter of the sprocket. Thisallowed machine screws to be fastened between every other tooth with a washer underneath. Bytightening the screws, the sprocket was held firmly to the plate.
The plate was then placed in the mill, and the exact center of the sprocket was located with adial indicator. The flatness of the sprocket was also checked, and adjusted with a rubber malleton the jig plate until the part was within a 0.001 inch flatness variance. The sprocket was faced toits final depth. The pin holes were then drilled, being careful to use a spotting drill first, then a
15
roughly 0.030 inch undersized drill, an finally a 0.001 inch oversized reamer, which was theclosest available to the Machinery's Handbook [6] suggested sliding fit clearance.
3.3 Shaft
3.3.1 Functional Requirements
Functionality:
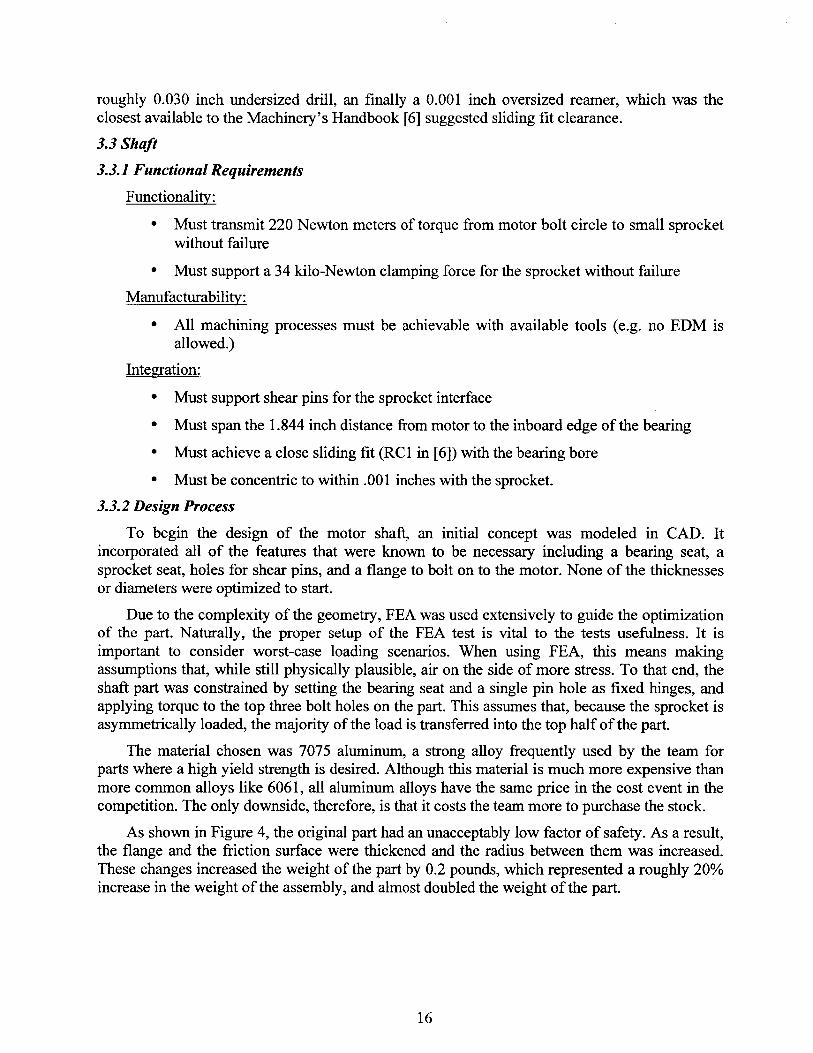
* Must transmit 220 Newton meters of torque from motor bolt circle to small sprocketwithout failure
- Must support a 34 kilo-Newton clamping force for the sprocket without failure
Manufacturability:
* All machining processes must be achievable with available tools (e.g. no EDM isallowed.)
Integration:
* Must support shear pins for the sprocket interface
* Must span the 1.844 inch distance from motor to the inboard edge of the bearing
* Must achieve a close sliding fit (RCl in [6]) with the bearing bore
* Must be concentric to within .001 inches with the sprocket.
3.3.2 Design Process
To begin the design of the motor shaft, an initial concept was modeled in CAD. Itincorporated all of the features that were known to be necessary including a bearing seat, asprocket seat, holes for shear pins, and a flange to bolt on to the motor. None of the thicknessesor diameters were optimized to start.
Due to the complexity of the geometry, FEA was used extensively to guide the optimizationof the part. Naturally, the proper setup of the FEA test is vital to the tests usefulness. It isimportant to consider worst-case loading scenarios. When using FEA, this means makingassumptions that, while still physically plausible, air on the side of more stress. To that end, theshaft part was constrained by setting the bearing seat and a single pin hole as fixed hinges, andapplying torque to the top three bolt holes on the part. This assumes that, because the sprocket isasymmetrically loaded, the majority of the load is transferred into the top half of the part.
The material chosen was 7075 aluminum, a strong alloy frequently used by the team forparts where a high yield strength is desired. Although this material is much more expensive thanmore common alloys like 6061, all aluminum alloys have the same price in the cost event in thecompetition. The only downside, therefore, is that it costs the team more to purchase the stock.
As shown in Figure 4, the original part had an unacceptably low factor of safety. As a result,the flange and the friction surface were thickened and the radius between them was increased.These changes increased the weight of the part by 0.2 pounds, which represented a roughly 20%increase in the weight of the assembly, and almost doubled the weight of the part.
16

it?
(a) (b)Figure 3: Showing finite element analysis of the shaft under torsional load. One of thepin holes and the bearing seat is held as a fixed hinge while 220 Nm of torque is appliedto the top three bolt holes. In (a) the minimum factor of safety is 0.6, indicating yielding;by increasing the flange thickness, (b) increased the factor of safety to 1.07.
Another important takeaway at this stage is the role of "gut checks" and intuition whendesigning with FEA. Due to the simple nature of the loading conditions, it can be possible forFEA to indicate that a part will not yield, even when it is unrealistically small in a dimension.Perhaps the FEA setup failed to capture all of the forces that will be at work. It is the duty of thedesigner to insure that all of the dimensions of the part are reasonable.
For example, the flange on the shaft were it is bolted to the motor was originally 3/32 inchthick. While, the FEA indicates that the safety factor is high, intuition raises issue with the wallthickness. There will be some bending load in the shaft due to chain tension, and less than 0.1inch thick aluminum may seem unreliable to the designer. Furthermore, such a thin flangewould prove very difficult to machine to a high tolerance. A small increase in weight in favor ofa slightly thicker flange was accepted to alleviate these concerns.
Special attention was paid to insure that the outside radii on the shaft were small enough notto interfere with the radii on the bore of the bearing or the sprocket. Furthermore, a threadedsection on the end of the shaft was added to facilitate clamping through the bearing. A 5/8-18thread was used as it was the largest standard size that would accommodate the bearing slidingover it. Fine threads were used to allow for the most flexibility with setting the clamping force. Athread relief was modeled, but was unnecessary due to the thread cutting capability of the lathe.3.3.3 Manufacturing
This part was machined from a piece of 4 inch diameter 7075 aluminum round stock. Thepart was held in a CNC lathe by roughly 2 inch of material behind the flange that would befaced off later in the machining process. The CNC lathe operations turned all of the outsidediameters and cut the threads in the end of the shaft. To insure a close sliding fit for the sprocket
17
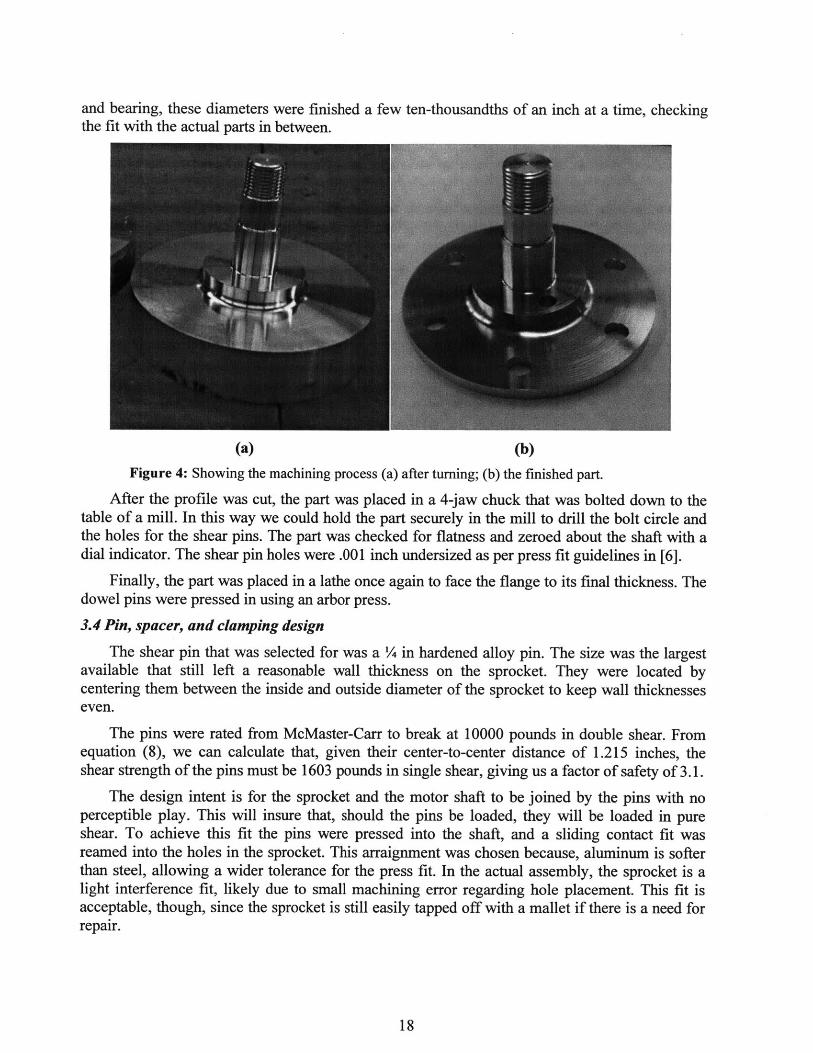
and bearing, these diameters were finished a few ten-thousandths of an inch at a time, checkingthe fit with the actual parts in between.
(a) (b)
Figure 4: Showing the machining process (a) after turning; (b) the finished part.
After the profile was cut, the part was placed in a 4-jaw chuck that was bolted down to thetable of a mill. In this way we could hold the part securely in the mill to drill the bolt circle andthe holes for the shear pins. The part was checked for flatness and zeroed about the shaft with adial indicator. The shear pin holes were .001 inch undersized as per press fit guidelines in [6].
Finally, the part was placed in a lathe once again to face the flange to its final thickness. Thedowel pins were pressed in using an arbor press.
3.4 Pin, spacer, and clamping design
The shear pin that was selected for was a in hardened alloy pin. The size was the largestavailable that still left a reasonable wall thickness on the sprocket. They were located bycentering them between the inside and outside diameter of the sprocket to keep wall thicknesseseven.
The pins were rated from McMaster-Carr to break at 10000 pounds in double shear. Fromequation (8), we can calculate that, given their center-to-center distance of 1.215 inches, theshear strength of the pins must be 1603 pounds in single shear, giving us a factor of safety of 3.1.
The design intent is for the sprocket and the motor shaft to be joined by the pins with noperceptible play. This will insure that, should the pins be loaded, they will be loaded in pureshear. To achieve this fit the pins were pressed into the shaft, and a sliding contact fit wasreamed into the holes in the sprocket. This arraignment was chosen because, aluminum is softerthan steel, allowing a wider tolerance for the press fit. In the actual assembly, the sprocket is alight interference fit, likely due to small machining error regarding hole placement. This fit isacceptable, though, since the sprocket is still easily tapped off with a mallet if there is a need forrepair.
18

As stated in Section 3.2, the pins should only be used as backup from for a friction holdbetween the shaft and the sprocket. From equation (7), we calculate that a clamping force of34kN is necessary to hold the sprocket with friction alone. While this seems somewhat highcompared to the other forces on the system, it still represents only a third of the yield stress of7075 aluminum when spread over a 5/8 inch diameter surface.
A spacer was required to fill the space between the bearing and the sprocket. To evenlytransmit clamping force, flatness needed to be tightly controlled. For this reason, the part wasmachined on a mill instead of a lathe. The surface finish was not ideal, but the part was flat towithin .001 inch. The stress that the spacer would need to undergo is well within the elastic rangeof 6061 aluminum, which was chosen for its light weight and availability.
It was also important to insure that, as the shaft elongates under load, the bearing would notbottom out on the sprocket seat, which has a larger diameter. The thickness of the spacerdetermines a gap between the bearing and the sprocket seat. To determine how large the gapshould be, the axial stiffness of the shaft was considered. Axial elongation can be determined by
F LF= -(9)E A
The diameter of the shaft varies some, but it can be reasonably estimated as a single 0.7 inchdiameter, 1.375 inch long cylinder. In that case, under 34kN of load the extension of the shaftwould be 0.0027 inches. To give this value a factor of safety, the spacer was size such that therewas a .007 inch gap between the sprocket seat and the bearing. Furthermore, with the extensioncalculated, it can now be measured with a micrometer as the nut is tightened to insure the propercompression load is achieved.
Figure 5: Showing the full shaft assembly, exploded view. Components from left toright: bearing, spacer, sprocket, dowel pins, shaft (includes threads, bearing seat, sprocketseat, friction surface, bolt flange).
19

4. Testing and Validation
Modeling and analysis are most meaningful when coupled with real-world validation. Sinceit would be extremely time intensive to test every aspect of an assembly, it is best to focus on theareas that are the highest risk. For the shaft assembly, the biggest question surrounds the analysisof the shaft itself. This analysis relied on FEA which made assumptions about the interfacebetween the sprocket and the friction surface of the shaft which may be incorrect. Morespecifically, although the design and analysis claim that friction will be enough to hold thesprocket and shaft together, the load is probably shared to a degree between friction and theshear pins.
To test the part, an Instron machine capable of applying torque and measuring displacementwas used. The sprocket, spacer, and bearing were removed from the assembly and replaced witha thick-walled steel tube. The tube was clamped down with a nut just like the sprocket, and therewere holes that accepted the shear pins as well. The top end of the tube was made to fit into acollet in the machine. Another steel part was made to bolt on to the flange and fit into the othercollet.
Mounting fixture
Thick-walled tube
Shaft
Figure 6: Showing the shaft testing assembly. A thick-walled tube is internally bolted tothe friction surface of the shaft. The tube, like the sprocket, also has holes for the shearpins. The flange of the shaft is bolted on to a thick steel mounting fixture. The fixture isheld while the tube is turned, and displacement is recorded.
In this way, torque is transferred to the shaft in the same manner as with the sprocket. Bytwisting the assembly and recording torque and rotational displacement, we can see evidence ofany plastic deformation in the part. If the curve remains linear, then the part is operating withinits limits.
To execute this test, the assembly was held as described above in an Instron machinecapable of measuring torsion. Due to limitations of the machine's controller, the test was based
20

on position control rather than torque control. The assembly was turned to 0.9 degrees thenturned backwards to 0. That process was repeated once more. That displacement was chosen bytesting a variety of displacements to find one that would achieve a 220 Newton meter response.In this test, the actual peak load was 230 Newton meters.
25C
z
0
0LI-.
200-
150-
100.
50|k
0
-50 1-
0 0.2 0.4 0.6Rotation (degrees)
1 1.20.8
Figure 7: Showing the relationship of torque and rotational displacement over two
consecutive loading and unloading cycles. The loading path for each cycle is mostlylinear except for the first section, which may be an artifact of the machine. No evidenceof yielding is seen near the peak torque, 230 Nm.
The data contain features that are somewhat unexpected. The unloading pattern does notmatch the loading pattern and in fact quickly begins applying negative torque. Also unexpectedis the small transition plateau around 0.15 degrees. This feature seems consistent with slipping ofsome kind, but it is somewhat unclear what part of the assembly or the machine itself wasslipping.
What can be determined with some certainty is that, once the curve exists the plateau, itappears to behave linearly. If the part were plastically deforming, one would expect to see acharacteristic tail with decreasing slope at the high end of the plot. Instead, the torque goeslinearly with the rotation all the way to the maximum load, indicating that the part is respondingin its elastic regime.
21
I
-- Loading 1------ Unloading 1- Loading 2---- Unloading 2
. 1.

5. Conclusion
There is still work to be done and improvements that can be made to this assembly in thecoming years. Further testing, ideally involving strain readings directly from the part, would bevery useful in gaining a more detailed understanding of the sprocket-shaft interface. Thisinterface could also likely be made much lighter by implementing a splined shaft as opposed to afriction and pin hold. Splines are more difficult to machine, but allow the sprocket to get evensmaller, saving weight.
A complete assembly-wide finite element model would also be useful to characterize forces.These kinds of models typically take much longer to solve, and may require the use of a morepowerful FEA package. Nevertheless, this is an assembly that is limited enough in scope to makesuch analysis possible, and the completion of the exercise would provide a wonderful example ofhow to properly execute such analysis for team members in the future.
This motor shaft assembly is just one small part of a much larger powertrain system, whichitself is only part of the entire racecar. This design exercise is meant to serve as an example andguide for parts and assemblies in general. There was a great deal of modeling, analysis, andthought that went into the creation of each part. This detailed focus is critical to achievingsuccessful design. Cutting corners when it comes to analysis will only lead to delays in the longrun when parts must be redesigned and remade. Ultimately, the goal of every team membershould be the same: achieve good design. If that mentality is diligently followed, a highperformance product will follow.
22

7. References
[1] "2013 Formula SAE Rules." fromhttp://students.sae.org/competitions/formulaseries/rules/2013fsaerules.pdf
[2] Durand, K., 2005, "Design of a Chain Driven Limited Slip Differential and RearDriveline Package for Formula SAE Applications," Unpublished undergraduate thesis,Massachusetts Institute of Technology.
[3] "EMRAX Motors." fromhttp://www.enstroj.si/Electric-products/emrax-motors.html
[4] Scelfo, T., 2006, "Lightweight Torsen Style Limited Slip Differential and Rear DrivelinePackage for Formula SAE," Unpublished undergraduate thesis, Massachusetts Institute ofTechnology.
[5] "NSK Roller Bearing Catalog." fromhttp://www.jp.nsk.com/app0l/en/ctrg/index.cgi?rm=pdfView&pno=el 102k
[6] Oberg, E., Jones, F. D., Horton, H. L., and Ryffel, H. H., 2004, Machinery's Handbook,27th ed., Industrial Press Inc., New York, NY
23