Directions for using SPSS - Washburn University
40
1 | Page Directions for using SPSS Table of Contents Connecting and Working with Files 1. Accessing SPSS ........................................................................................................................................ 2 2. Transferring Files to N:\drive or your computer .................................................................................... 3 3. Importing Data from Another File Format ............................................................................................. 5 4. Exporting Output to use in Word or Other Programs ............................................................................ 7 Entering and Creating Data 5. Typing Data Directly In SPSS ................................................................................................................... 9 6. Creating Dummy Variables from Categorical Data .............................................................................. 12 7. Creating New Variables that are Functions of Other Variables ........................................................... 18 Data Analysis: Qualitative Data 8. Generating Descriptive Statistics of Data ............................................................................................. 19 9. Generating Confidence Intervals .......................................................................................................... 21 10. One-Way Contingency Table ................................................................................................................ 22 11. Two-Way Contingency Table ................................................................................................................ 23 Data Analysis: Quantitative Data 12. Generating Descriptive Statistics of Numerical Data ........................................................................... 24 13. Generating Correlation Matrix ............................................................................................................. 25 14. Linear Regression ................................................................................................................................. 26 15. Szroeter’s Test (Heteroskedasticity)..................................................................................................... 30 16. Analysis of Variance (ANOVA) .............................................................................................................. 34 17. Categorical Data Analysis ..................................................................................................................... 35 18. Spearman’s Rank .................................................................................................................................. 36 Graphical Analysis 19. Control Charts....................................................................................................................................... 37 20. Creating Plots ....................................................................................................................................... 40
Transcript of Directions for using SPSS - Washburn University

1 | P a g e
Directions for using SPSS
Table of Contents Connecting and Working with Files
1. Accessing SPSS ........................................................................................................................................ 2
2. Transferring Files to N:\drive or your computer .................................................................................... 3
3. Importing Data from Another File Format ............................................................................................. 5
4. Exporting Output to use in Word or Other Programs ............................................................................ 7
Entering and Creating Data
5. Typing Data Directly In SPSS ................................................................................................................... 9
6. Creating Dummy Variables from Categorical Data .............................................................................. 12
7. Creating New Variables that are Functions of Other Variables ........................................................... 18
Data Analysis: Qualitative Data
8. Generating Descriptive Statistics of Data ............................................................................................. 19
9. Generating Confidence Intervals .......................................................................................................... 21
10. One-Way Contingency Table ................................................................................................................ 22
11. Two-Way Contingency Table ................................................................................................................ 23
Data Analysis: Quantitative Data
12. Generating Descriptive Statistics of Numerical Data ........................................................................... 24
13. Generating Correlation Matrix ............................................................................................................. 25
14. Linear Regression ................................................................................................................................. 26
15. Szroeter’s Test (Heteroskedasticity) ..................................................................................................... 30
16. Analysis of Variance (ANOVA) .............................................................................................................. 34
17. Categorical Data Analysis ..................................................................................................................... 35
18. Spearman’s Rank .................................................................................................................................. 36
Graphical Analysis
19. Control Charts....................................................................................................................................... 37
20. Creating Plots ....................................................................................................................................... 40

2 | P a g e
Accessing SPSS To connect to SPSS (either from Washburn’s computer labs or your home computer that is connected to
the internet) use the following procedure:
1. Run Remote Desktop Connection. (It is usually found under Start> Programs> Accessories>
Communications > Remote Desktop Connection).
2. When the program asks you what computer to connect to type wustat.washburn.edu and click
Connect.
3. When the computer asks for your User Name and Password, use the one that you use in order to
log onto the computers at Washburn University.
4. After entering your User Name and Password click on the OK button.
5. The WUStat Desktop will overly your existing desktop – including a new “Start” menu (see below).
Note the unusual “bar” at the top with a “Minimize” (-) and “Close” (x) buttons. Pressing the
minimize or pressing the <Alt><Tab> Keys will return you to your own Desktop. The “WUstat”
Desktop is “minimized” to the taskbar. You can end the session by logging off.
6. The SPSS program can be found under the start menu at Start> All Programs > SPSS for Windows>
SPSS 17.0 for Windows.
7. When SPSS starts, you can then open an existing dataset or start a new one.

3 | P a g e
Transferring Files to n:\drive or Your Computer 1. Download Core FTP Light software from http://www.coreftp.com/download.html
2. Install the software and run the program
3. Select File> Connect.
4. Set-up the Washburn Connection as shown below except change the Host to sftp.washburn.edu
and use your Username and Password that you use to log-on to Washburn computers.
5. Select the Connect button.
6. The browser will appear as below. Make sure your directory is /home/Username/.
7. Your computer and their files are on the left hand side directory. Washburn’s n:\drive is on the
right hand side directory. You can transfer files from your home computer to Washburn’s
computer and vice versa.
8. Select the file that you wish to transfer and hit the arrow button in the center of the screen to
send the file to either your computer or WUAD (n:\ drive).

4 | P a g e

5 | P a g e
Importing Data from another File Format 1. Make sure that the file you are attempting to access is saved on WUAD (N: drive).
2. In SPSS select, File> Open> Data.
3. Browse for the file that you wish to import into SPSS. Make sure that you changed the “Files of
type” section at the bottom of the dialog, to the type of file that you wish to open, as illustrated
below. (The program automatically looks only for SPSS files).
4. Click on the file you wish to import.
5. Select Open.

6 | P a g e
6. Make sure you check the box for reading variable names from the first column if the file has labels
in the first column of data.
7. If you are importing a Microsoft Excel file that only has one sheet, then skip to step 9.
8. Select the worksheet and range.
9. Click OK.

7 | P a g e
Exporting Output to Use in Word or Other Programs 1. You can export your statistical output to a number of formats that are useful for presenting your
data. The available formats are Microsoft Excel, Microsoft Word, Html (for the Web), a Text file,
Microsoft PowerPoint, or Portable Document Format (pdf).
2. Once you have completed your statistical analysis, select File> Export.
3. You will bring up the Export Output dialog box shown below.
4. In the Export Format box select the file type that you wish to save the output as.
5. In the Export File box select the Browse button.

8 | P a g e
6. You will bring up the dialog box shown below. Name the file and save it in your WUAD drive (N:
drive).
7. Click on Save.
8. You will now be back to the dialog box from step 3. Click OK.

9 | P a g e
Typing data directly in SPSS 1. In SPSS select, File>New>Data
2. Click on the Variable View tab (at the bottom of the screen).
3. Type in the variable names in the Name column, the type of data (numeric, date, string, …) in the
Type column. As shown below.
4. Once you have labeled your variables, click on the Data View tab.
5. Type in your data for each variable. An example is shown below.

10 | P a g e
6. Save your file by selecting: File>Save.
7. Give your file a name that you will remember and save it to your WUADD account (N: drive).
8. Make sure that the file you are attempting to save is saved on WUAD (N: drive).

11 | P a g e

12 | P a g e
Creating Dummy Variables from Categorical Data These directions will help with creating data that can be used in regression analysis from categorical
data.
Suppose for example, gender is one of your variables and the data was keyed in as “M” or “F”. As the
dataset below shows.
The first step is to create a new variable. To do this, Transform > Compute Variable. The “Target
Variable:” box type in a name for the new variable (for example: Male).
In the “numeric expression:” box type in “1”.

13 | P a g e
Click on the “If…” button. A new menu will pop up. The new menu will look like the one presented
below.

14 | P a g e
You will need to put the formula for male into the box. Y = “M” is the formula given where “Y” is the
original variable name for the qualitative data (“M” or “F”).
Click on the Continue button. Click OK.
Your dataset should now look like the one below.

15 | P a g e
Now you will need to repeat the process for females.
To do this, Transform > Compute Variable. The “Target Variable:” box type in the variable name that
you used previously (for example: Male). If you are doing this immediately after the first part of this
procedure, then the variable name will already be typed in.
Change the “Numeric Expression” from 1 to 0. (see below)

16 | P a g e
You should now have the dialog box below on your screen.

17 | P a g e
Click on the “If…” button. Change the equation to y = “F” and click on the Continue button. Then click
OK.
When the dialog box pops up that asks “Change existing variable?” click OK.
You should now have an indicator (dummy) variable which can be used in regression analysis.

18 | P a g e
Creating New Variables that are Functions of Other Variables You can create new variables that are a function of any other variables in your dataset.
To do this, you need to Transform > Compute Variable.
The “target variable” should be what you wish to name the variable that you are creating.
The “numeric expression” is the formula that you use to create the variable. In the example above a
variable called e2 was created where e2 = RES_1 * RES_1 (or the residual squared).

19 | P a g e
Generating Descriptive Statistics of Data 1. Open or create the data you wish to analyze (see appropriate directions).
2. In SPSS select Analyze> Descriptive Statistics> Frequency.
3. Move the (qualitative or quantitative) variables that you wish to calculate the frequency statistics of
into the Variable(s): box. (In this example X1 and X2 will have frequency statistics calculated).
4. Select the Statistics button.
5. Check the boxes for each of the statistics that you wish to calculate.
6. Select the Continue button.
7. If you wish to plot the data in chart form, select the Charts button (See top illustration).

20 | P a g e
8. Hit the radial button for the chart that you wish to produce.
9. Select the Continue button.
10. You should be back at the original Frequencies window.
11. Select the OK button.

21 | P a g e
Generating Confidence Intervals This page will describe how to create confidence intervals for the mean of a variable. This will not
create confidence intervals for slope coefficients in a regression.
1. Open or create the data you wish to analyze (see appropriate directions).
2. In SPSS select Analyze> Descriptive Statistics> Explore
3. Move the variables that you wish to calculate the confidence interval for into the Dependent List:
box. (In this example X1 and X2 will have confidence intervals calculated).
4. In the display box, select the Statistics radial button.
5. Select the Statistics button.
6. Type in the significance level for the confidence interval you wish to create. The default is a 95%
confidence interval. This will create a 95% confidence interval for the mean of the variables in the
dependent list.
7. Select the Continue button.
8. You should be back at the original Explore window.
9. Select the OK button.
22 | P a g e
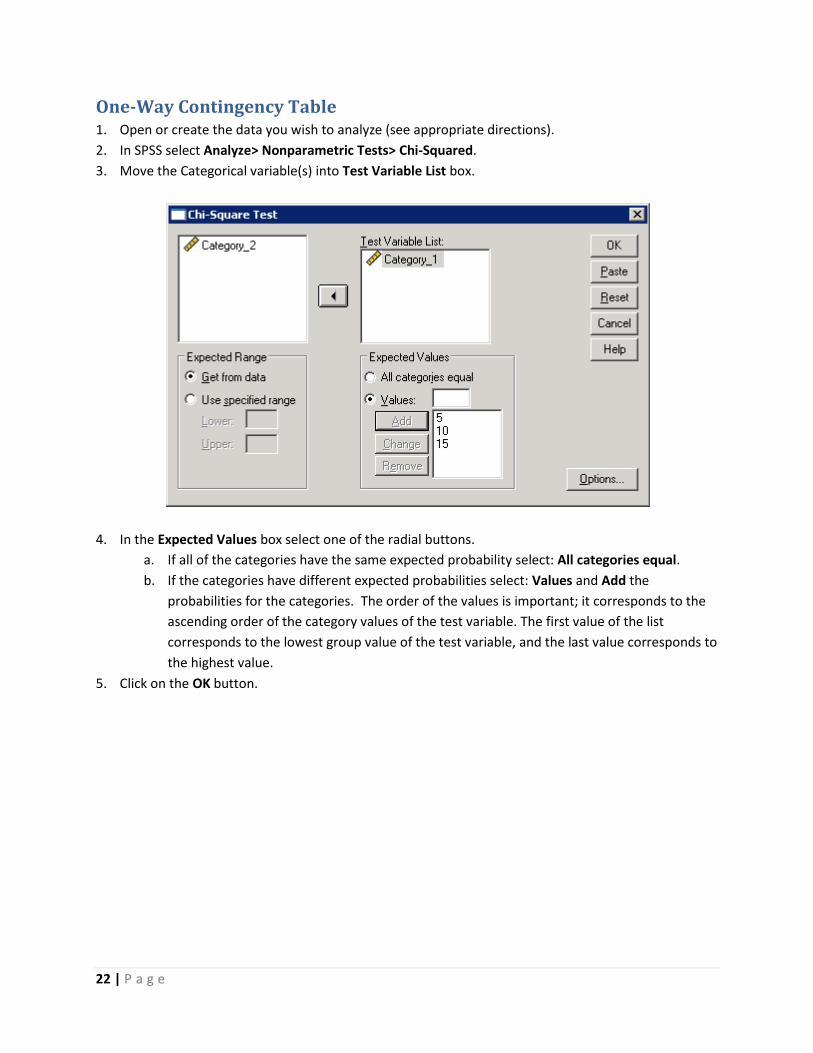
One-Way Contingency Table 1. Open or create the data you wish to analyze (see appropriate directions).
2. In SPSS select Analyze> Nonparametric Tests> Chi-Squared.
3. Move the Categorical variable(s) into Test Variable List box.
4. In the Expected Values box select one of the radial buttons.
a. If all of the categories have the same expected probability select: All categories equal.
b. If the categories have different expected probabilities select: Values and Add the
probabilities for the categories. The order of the values is important; it corresponds to the
ascending order of the category values of the test variable. The first value of the list
corresponds to the lowest group value of the test variable, and the last value corresponds to
the highest value.
5. Click on the OK button.

23 | P a g e
Two-Way Contingency Table 1. Open or create the data you wish to analyze (see appropriate directions).
2. In SPSS select Analyze> Regression> Linear Regression.
3. Move the dependent variables into Dependent: box.
4. Move the independent variables into Independent(s): box.
Analyze*Descriptive Statistics*Crosstabs

24 | P a g e
Generating Descriptive Statistics of Numerical Data 1. Open or create the data you wish to analyze (see appropriate directions).
2. In SPSS select Analyze> Descriptive Statistics> Descriptives
3. Move the variables that you wish to calculate the descriptive statistics of into the Variable(s): box.
(In this example X1 and X2 will have descriptive statistics calculated).
4. Select the Options button.
5. Check the boxes for each of the statistics that you wish to have generated in SPSS. (In this case the
sample mean, standard deviation, minimum, and maximum will be calculated).
6. Select the Continue button.
7. You will be back at the previous screen. Select OK to create the descriptive statistics.

25 | P a g e
Generating Correlation Matrix This will present the Pearson’s correlations (assumption of normality) for your dependent and/or
independent variables. You will need to create the correlation matrix of ALL independent variables to
test for multicollinearity.
1. Open or create the data you wish to analyze (see appropriate directions).
2. In SPSS select Analyze> Correlate> Bivariate
3. Move the variables that you wish to calculate the confidence interval for into the Variables: box. (In
this example Y, X1 and X2 will be in the correlation matrix).
4. In the Correlation Coefficients box, make sure that Pearson is checked (Unless you wish to do a
different correlation calculation. Pearson is the most popular and Spearman is the second most
popular).
5. Select the two-tailed or one-tailed (whichever is appropriate) radial button.
6. Select OK.

26 | P a g e
Linear Regression 1. Open or create the data you wish to analyze (see appropriate directions).
2. In SPSS select Analyze> Regression> Linear Regression.
3. Move the dependent variables into Dependent: box.
4. Move the independent variables into Independent(s): box.
5. Select the Statistics button.
6. Check all the boxes by the statistics that you wish SPSS to calculate. The Covariance matrix can be
used to check for multicollinearity. The Durbin-Watson can be used to test for autocorrelation.
7. Select the Continue button.

27 | P a g e
8. You will now be at the original Linear Regression window.
9. If you wish to use graphical analysis to test for normality or possible heteroskedicity, then select the
Plots button; otherwise, continue on to step 12 (as shown in the illustration in step 4 above).
10. Check the Normal Probability Plot to test for normality and/or the Produce all partial plots to test
for heteroskedacitiy.
11. Click on the Continue button.
12. You will now be at the original Linear Regression window (Shown in step 4).
13. If you wish to save either the residuals or the predicted values of the dependent variable for other
tests or corrections, then click on the Save button; otherwise, continue on to step 16.
14. Check Unstandardized in the “Predicted Values” box to get ŷ and/or check Unstandardized in the
“Residuals” box to get y – ŷ.
15. Click on the Continue button.

28 | P a g e
16. You will now be at the original Linear Regression window (Again shown in step 4).
17. If your data set has missing values or you wish to run the regression through the origin (no y-
intercept), the click on the Options button; otherwise go to step 21.
18. If you are forcing the sample regression line through the origin, then get rid of the check mark in
front of Include constant in the equation.
19. If you have omitted variables, then you need to decide how the program will handle the omitted
variables. In the Missing Variables box: Exclude cases listwise will exclude the whole case if there is
a missing observation in the case and Replace with mean will replace any missing observation with
that variable’s mean.
20. Click on the Continue button.

29 | P a g e
21. You will now be at the original Linear Regression window (See step 4).
22. Click on the OK button.
You will not need to check any boxes for this class that are not checked in the example above.

30 | P a g e
Szroeter’s Test (Heteroskedasticity) You need to get two things to do the test.
The unstandardized residuals.
The rank of the independent variable that you believe to be heteroskedastic
To compute the unstandardized residuals, you will need to run a regression. When you are in Analyze >
Linear Regression, click on the SAVE button .
When the above dialog appears, check “Unstandardized” in the Residuals box.
To compute the rank of the independent variable that is believed to be heteroskedastic do the
following:

31 | P a g e
Begin by running Transform > Rank Cases.
When the Rank Cases dialog appears, put one of your independent variables in the Variable(s): box as I
did below with “taxrate”.
Next you will need to create two variables:

32 | P a g e
1. Rank * Residual
2. Residual * Residual
To do this, you need to Transform > Compute Variable.
The “target variable” should be what you wish to name the variable that you are creating. The “numeric
expression” is the formula that you use to create the variable. An example of the residual squared is
given in the box above.
Finally you will need to calculate the sum of the two variables that you just created. To do this, run
Analyze > Descriptive Statistics > Descriptives.
Put the two variables just created in your “Variable(s):” list as shown below and select the OPTIONS
button.

33 | P a g e
In the Options section you want to check the “Sum” box at the top.

34 | P a g e
Analysis of Variance (ANOVA) The ANOVA test will text for equality of means between two or more samples.
1. Open or create the data you wish to analyze (see appropriate directions). The “y” variable should
have the observations that you need to test in it. The “x1” variable should be a key to which sample
the data comes from.
2. In SPSS select, Analyze> Compare Means > One-Way ANOVA.
Based upon the test that we do in class, you will select the “Bonferroni” test.

35 | P a g e
Categorical Data Analysis (One-Way Chi-Squared Test) 1. Open or create the data you wish to analyze (see appropriate directions).
2. In SPSS select Analyze> Nonparametric Tests > Chi-Square.

36 | P a g e
Spearman’s Rank To test for correlations when there is NO underlying distribution, use Spearman’s rank.
1. Open or create the data you wish to analyze (see appropriate directions).
2. In SPSS select Analyze> Correlate > Bivariate.
7. Move the variables that you wish to calculate the confidence interval for into the Variables: box. (In
this example X1 and X2 will be in the correlation matrix).
8. In the Correlation Coefficients box, make sure that Spearman is checked. Pearson assumes
normality and Spearman is the non-parametric correlation.
9. Select the two-tailed or one-tailed (whichever is appropriate) radial button.
10. Select OK.

37 | P a g e
Control Charts 1. Open or create the data you wish to analyze (see appropriate directions).
2. In SPSS select Analyze> Quality Control > Control Charts.

38 | P a g e

39 | P a g e

40 | P a g e
Creating Plots 1. Open or create the data you wish to analyze (see appropriate directions).
2. In SPSS select Graphs> Chart Builder.
3. Move the dependent variables into Dependent: box.
4. Move the independent variables into Independent(s): box.
Graph Builder uses “Drag and Drop” to choose the Chart Style, X-Axis, and Y-Axis.