Directions for Creating a Story Using PowerPoint...
4
Directions for Creating a Story Using PowerPoint and Photo Story 3 1. Type and illustrate your story in PowerPoint. 2. Now it is time to convert your slides to .jpeg format to get them ready for Photo Story 3. 3. Click on File > Save As… > you will see a Save As Window 4. In the Save as Type: box choose the JPEG File Interchange Format option 5. Click on the Save button. 6. You will see a new “mini” window that asks you Do you want to export every slide in the presentation or only the current slide? 7. You will click on the Every Slide button. 8. You will see a message that tells you that every slide has been saved in your presentation in a folder. The folder will have one picture per slide inside. You will use those pictures to create your Photo Story 3 presentation.
Transcript of Directions for Creating a Story Using PowerPoint...

Directions for Creating a Story Using PowerPoint and
Photo Story 3
1. Type and illustrate your story in PowerPoint.
2. Now it is time to convert your slides to .jpeg format to get
them ready for Photo Story 3.
3. Click on File > Save As… > you will
see a Save As Window
4. In the Save as Type: box choose
the JPEG File Interchange Format
option
5. Click on the Save button.
6. You will see a new “mini” window that
asks you Do you want to export
every slide in the presentation or only the current slide?
7. You will click on the Every
Slide button.
8. You will see a message that
tells you that every slide has been saved in your presentation
in a folder. The folder will have one picture per slide inside.
You will use those pictures to create your Photo Story 3
presentation.

Photo Story 3 is a free program that allows you to create stunning multimedia presentations from digital photographs. You can add great effects such as zooming into a photo or scanning across a scene. Transistions between pictures can be added as can text and special colour and texture effects. You can add music to your presentation either from an existing source or better still, make your own from within the program! The presentation can be saved as something you might watch on a DVD or small enough that you could email it or post it on your website to share. While Photo Story is free (you can download it at http://www.microsoft.com/windowsxp/using/digitalphotography/photostory/ or install it from your ‘Learn IT, Teach IT’ CD) there are some pretty hefty system requirements. Apart from a Pentium III computer with 256mb RAM minimum, you must have Windows XP and Windows Media Player 10 installed (which also can be downloaded for free).
Let’s Begin! Firstly, you need to make sure you have a collection of digital photographs to use. The project will work best if they are of uniform size and orientation (landscape or portrait) and in the JPG format. The more photos you use and the higher quality they are, the bigger your end project will be. For our first project select between 5-10 photos to work with. N.B. Even though we will manipulate the photos in Photo Story, the original photographs will not be altered.
When you open Photo Story 3 you will see a welcome screen. Tick ‘Begin a new story’ and click ‘Next’. Photo Story works within a ‘Wizard’ framework, with stages to be completed in sequence. The first stage is to import your photos. Click ‘Import Pictures’. From the File Browser (see below) find and select the photos you want for your presentation. TIP: Hold down SHIFT when selecting photos to grab multiple photos at once.
You will now see your imported photos on the Timeline. You can select them one by one to edit brightness, contrast, colour e.t.c. When satisfied, click ‘Next’ to go to the next stage.
© Brad Edwards / The Hippo Helper www.thehippohelper.com
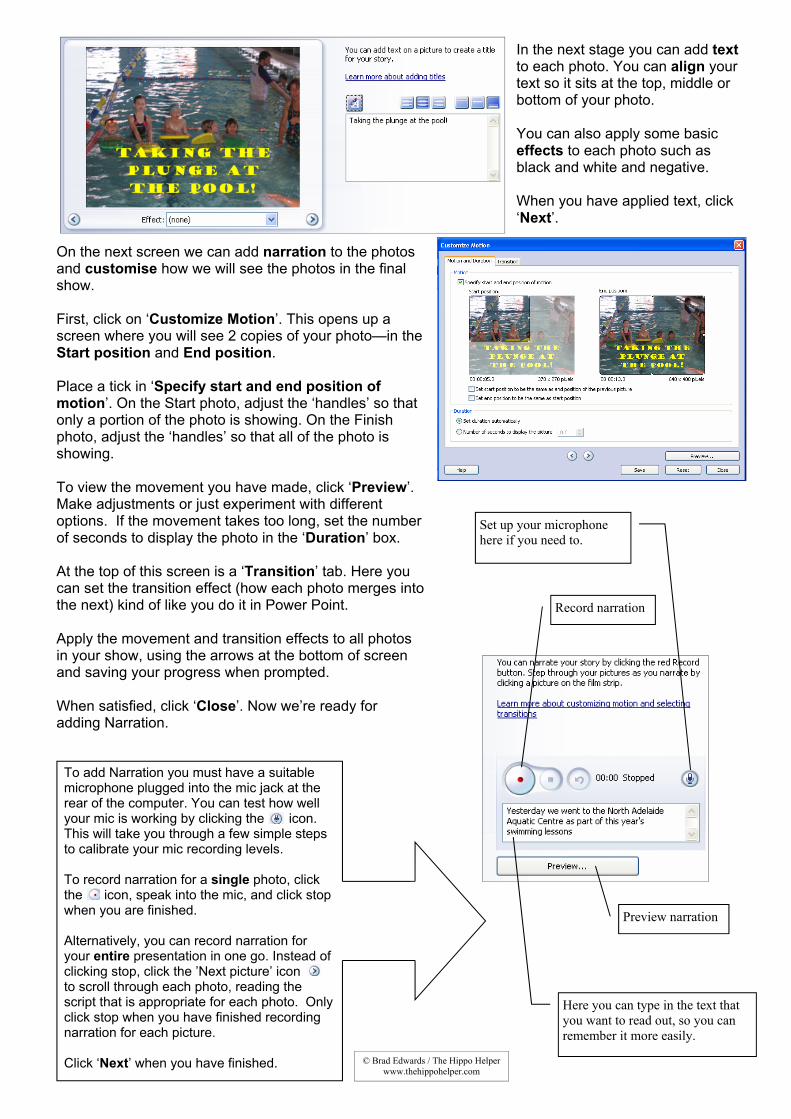
In the next stage you can add text to each photo. You can align your text so it sits at the top, middle or bottom of your photo. You can also apply some basic effects to each photo such as black and white and negative. When you have applied text, click ‘Next’.
On the next screen we can add narration to the photos and customise how we will see the photos in the final show. First, click on ‘Customize Motion’. This opens up a screen where you will see 2 copies of your photo—in the Start position and End position. Place a tick in ‘Specify start and end position of motion’. On the Start photo, adjust the ‘handles’ so that only a portion of the photo is showing. On the Finish photo, adjust the ‘handles’ so that all of the photo is showing. To view the movement you have made, click ‘Preview’. Make adjustments or just experiment with different options. If the movement takes too long, set the number of seconds to display the photo in the ‘Duration’ box. At the top of this screen is a ‘Transition’ tab. Here you can set the transition effect (how each photo merges into the next) kind of like you do it in Power Point. Apply the movement and transition effects to all photos in your show, using the arrows at the bottom of screen and saving your progress when prompted. When satisfied, click ‘Close’. Now we’re ready for adding Narration.
Set up your microphone here if you need to.
Record narration
Here you can type in the text that you want to read out, so you can remember it more easily.
Preview narration
To add Narration you must have a suitable microphone plugged into the mic jack at the rear of the computer. You can test how well your mic is working by clicking the icon. This will take you through a few simple steps to calibrate your mic recording levels. To record narration for a single photo, click the icon, speak into the mic, and click stop when you are finished. Alternatively, you can record narration for your entire presentation in one go. Instead of clicking stop, click the ’Next picture’ icon to scroll through each photo, reading the script that is appropriate for each photo. Only click stop when you have finished recording narration for each picture. Click ‘Next’ when you have finished. © Brad Edwards / The Hippo Helper
www.thehippohelper.com
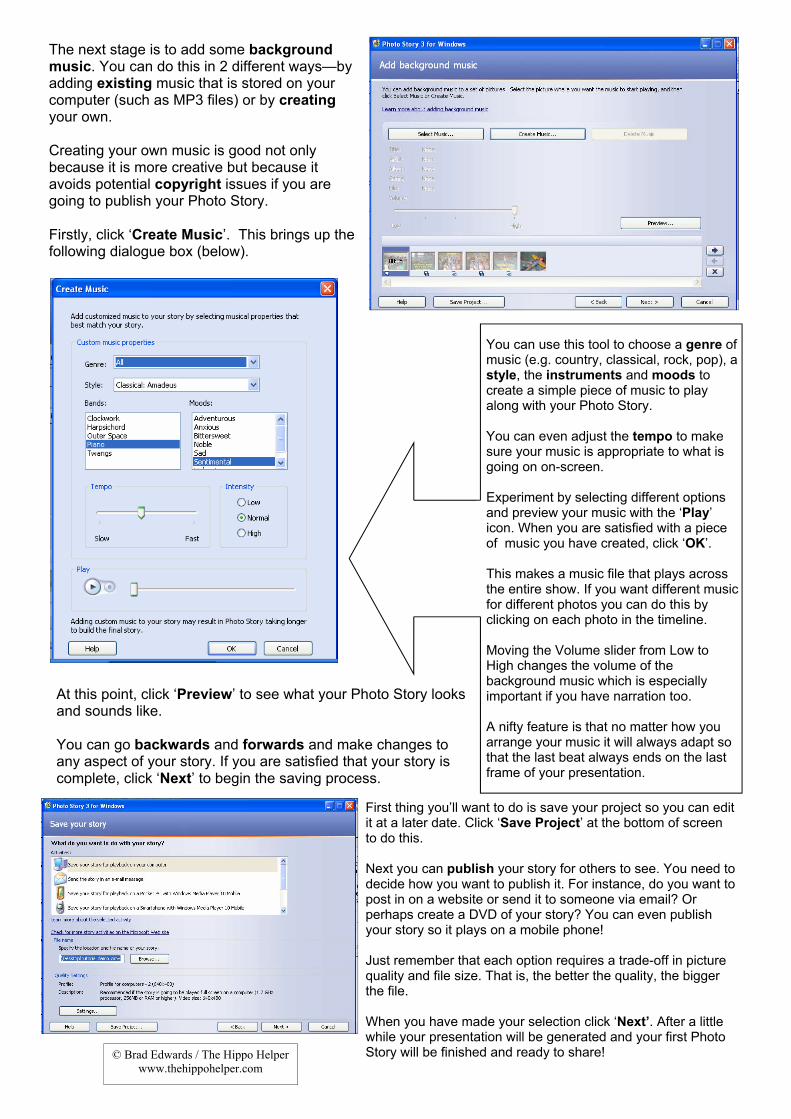
The next stage is to add some background music. You can do this in 2 different ways—by adding existing music that is stored on your computer (such as MP3 files) or by creating your own. Creating your own music is good not only because it is more creative but because it avoids potential copyright issues if you are going to publish your Photo Story. Firstly, click ‘Create Music’. This brings up the following dialogue box (below).
You can use this tool to choose a genre of music (e.g. country, classical, rock, pop), a style, the instruments and moods to create a simple piece of music to play along with your Photo Story. You can even adjust the tempo to make sure your music is appropriate to what is going on on-screen. Experiment by selecting different options and preview your music with the ‘Play’ icon. When you are satisfied with a piece of music you have created, click ‘OK’. This makes a music file that plays across the entire show. If you want different music for different photos you can do this by clicking on each photo in the timeline. Moving the Volume slider from Low to High changes the volume of the background music which is especially important if you have narration too. A nifty feature is that no matter how you arrange your music it will always adapt so that the last beat always ends on the last frame of your presentation.
At this point, click ‘Preview’ to see what your Photo Story looks and sounds like. You can go backwards and forwards and make changes to any aspect of your story. If you are satisfied that your story is complete, click ‘Next’ to begin the saving process.
First thing you’ll want to do is save your project so you can edit it at a later date. Click ‘Save Project’ at the bottom of screen to do this. Next you can publish your story for others to see. You need to decide how you want to publish it. For instance, do you want to post in on a website or send it to someone via email? Or perhaps create a DVD of your story? You can even publish your story so it plays on a mobile phone! Just remember that each option requires a trade-off in picture quality and file size. That is, the better the quality, the bigger the file. When you have made your selection click ‘Next’. After a little while your presentation will be generated and your first Photo Story will be finished and ready to share! © Brad Edwards / The Hippo Helper
www.thehippohelper.com