DINSTAR DAG1000-4S4O with Elastix - Dinstar,VOIP · PDF fileDINSTAR DAG1000-4S4O with Elastix...
16
DINSTAR DAG1000-4S4O with Elastix Setup Guide Shenzhen Dinstar Technologies Co., Ltd. Address: Floor 6, Guoxing Building, Changxing Road, Nanshan District, Shenzhen, China 518057 Telephone: +86 755 2645 6664 Fax: +86 755 2645 6659 Emails: [email protected], [email protected] Website: www.dinstar.com
Transcript of DINSTAR DAG1000-4S4O with Elastix - Dinstar,VOIP · PDF fileDINSTAR DAG1000-4S4O with Elastix...

DINSTAR DAG1000-4S4O with Elastix
Setup Guide
Shenzhen Dinstar Technologies Co., Ltd.
Address: Floor 6, Guoxing Building, Changxing Road, Nanshan District, Shenzhen, China
518057
Telephone: +86 755 2645 6664
Fax: +86 755 2645 6659
Emails: [email protected], [email protected]
Website: www.dinstar.com
A. Elastix Setup Procedure
To setup the Elastix server for the Dinstar DAG1000-4S4O
A1. Login the webpage of Elastix server, the server’s address is determined by customer,
in this paper, we set the Elastix server’s address to be 172.16.200.201.
A2. Please enter the username and password and then press Enter or Submit button to
go to the Dashboard of Elastix server, also the username and password are determined
by customer when install Elastix server.
A3. After login, please go to PBX page to start configuration.

A4. Go to PBX-->Trunks page, click Add SIP Trunk to add one.
A5. When add the SIP trunk, fill in the following information
• Trunk Name: out-o1, for example
Outgoing settings:
•Trunk Name: out-o1, for example
• host: 172.16.66.3

Incoming Settings:
•username: define the username use to authentication when configure the DAG1000’s
FXO port, 1001, for example;
•secret: define the secret
Please click Submit to save the changes.
A6. Configure the outbound route on PBX-->Outbound Route page, fill in the following
information:
•Route Name: define a name for this route, outDag4o1, for example;

Set dial rule for this rule:
This rule defines that, all the dialed numbers should start with 8 and the length of the
dialed numbers should be equal or longer than three.
In Caller ID field, fill in one extension number, to define that this route can only be used by
the corresponding extension. In the upon picture, the route can only be used by extension
6000.
Then please click Submit to save the changes.
Notice: If user want to make the route can be used by any extension, just leave
Caller ID option blank.
A7. Like A5 and A6, Set another trunk and outbound route.
1) Set trunk out-o2 and configure the corresponding outgoing and incoming settings.

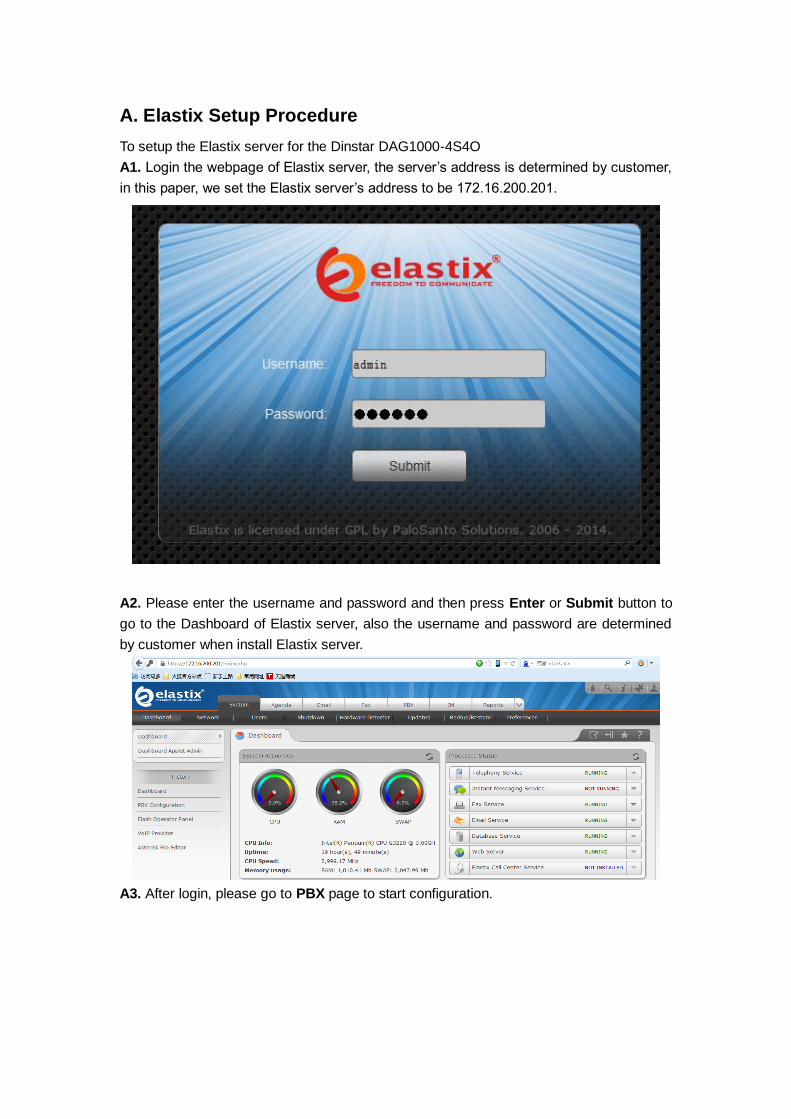
2) Set outbound route outDag4o2, and set the dial patter.

In the upon picture, the route can only be used by extension 6001, also dial sequence
which starts with 9 and is no less than 3 three characters will match this route.
A8. Configure inbound route on PBX-->Inbound Route page
•Description: toDag4o1, for example
•DID number: enter a DID number, s, for example;
Configure destination for this inbound route: customer can set the destination to be an
extension or IVR or others, if make it IVR, customer need configure IVR first. In this
example, we set the destination to be extension 6000.

Click Submit to save the changes.
A8. After finish configuration, please click the notice Apply Configuration Changes Here
to make the configurations effective.
B. DAG1000-4S4O setup procedure
B1. Login the webpage of DAG1000, the IP address is determined by the customer, default IP
of the device is 192.168.11.1, and in this paper, we use 172.16.66.3 as device’s address.
Please fill in the username and password, both are admin by default.
The main page of DAG1000-4S4O VoIP gateway:
•IP Address: 172.16.66.3 in this example
•Firmware Version: DAG1000-4S4O Rev 2.11.08.02 PCB 23.1 LOGIC 0 BIOS 1, Built on

Sep 12 2013, 15:33:46.
Notice: If user need the latest firmware for the device, please send e-mail to
To upgrade a new firmware, please go to Maintenance-->Firmware Upload page, click
to select the firmware file and click to start uploading, after finish,
please restart the device to make the new firmware take effect.
B2. Configure SIP server address on SIP server page.

•SIP Server Address: 172.16.200.201 in this example;
•SIP Server Port: 5060 in this example;
•SIP Register Interval: 1800 in this example;
Click to save the configurations.
B3. Configure authentication information on Port page.
SIP User ID (1001 in this example as configuration of Trunks, please refer to A5)
To VoIP Hotline (DID Number “s” in this example as configuration of Inbound Routes,
please refer to A8)

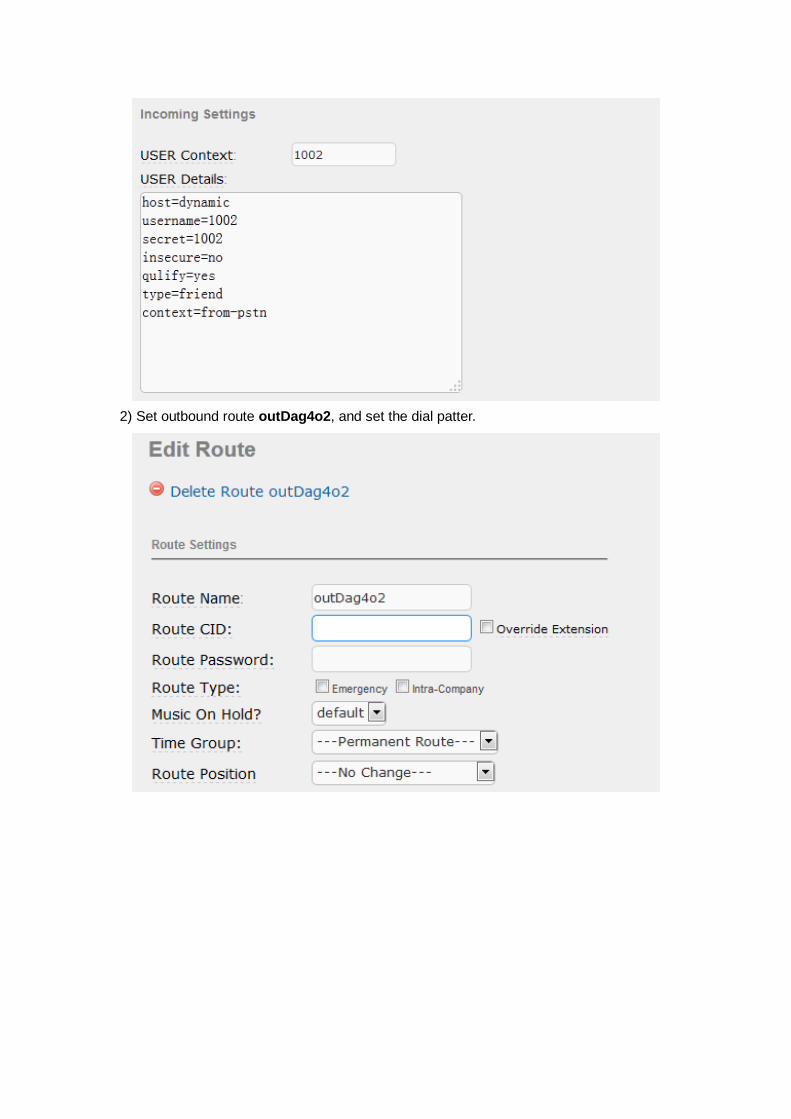
B4. Configure outbound route on Call&Routing-->IP->Tel Routing page.
Description: “out1” in this example
B5 Configure inbound route on the Call & Routing->Tel-IP Routing page
Description: “e1” in this example;
Call from: “Port 4” in this example;

B6. Configure port5 as port4, and set up the corresponding outbound and inbound route.
B7. Enable CID on the Advanced-> FXS/FXO page

Enable One stage dialing
C. Test
C1. Register 6000 and register 6001 to Elastix;
Here we use eyebeam to register 6000 as the example.
C2. Use 6000 to call 810050, call sets up successfully; use 6000 to call 910050, call fails
since route does not match.
C3. Use 6001 to call 810050, call fails, since outbound route does not match; use 6001 to
call 910050, call sets up successfully.
C4. Use a mobile phone to call the port4’s number, according to the inbound route, call
goes to 6000;
C5. Use a mobile phone to call the port5’s number, according to the inbound route, call
goes to 6000.
Notice: If user wants to make different incoming calls goes to different
extensions(or IVR), please setup different DID numbers on Elastix’s Inbound route,
and separate different DID numbers on different port’s Offhook Auto-Dial option.

Example: Set two different Inbound routes on Elastx’s PBX-->Inbound Route page as
following:
Then all the incoming call from port4 will go to extension 6000 and all incoming calls from
port5 will go to extension 6001.