
dinamled (600X600cv) Panel-color adjustable-dinamled
9
Page: 1/ 9 Pb IP20 COLOR TEMPERATURE ADJUSTABLE PANEL (600X600) (Constant-voltage: DC 24V) DN-PA-TC3528CW SECOND GENERATION PRODUCT SPECIFICATION Dinam LED Limited Web: www.dinamled.com Email: [email protected] Contact: Luisa Phone: +86-755-23020300 Mobile: +86-13600151478 Address: B Building, Chuangfu Industrial Zone, Beihuan Road, Shiyan Town, Baoan District Shenzhen China.
description
Â
Transcript of dinamled (600X600cv) Panel-color adjustable-dinamled

Page:1/9
Pb IP20
COLOR TEMPERATURE ADJUSTABLE PANEL (600X600)
(Constant-voltage: DC 24V)
DN-PA-TC3528CW
SECOND GENERATION PRODUCT
SPECIFICATION
Dinam LED LimitedWeb: www.dinamled.comEmail: [email protected]: LuisaPhone: +86-755-23020300Mobile: +86-13600151478Address: B Building, Chuangfu Industrial Zone, Beihuan Road,Shiyan Town, Baoan District Shenzhen China.
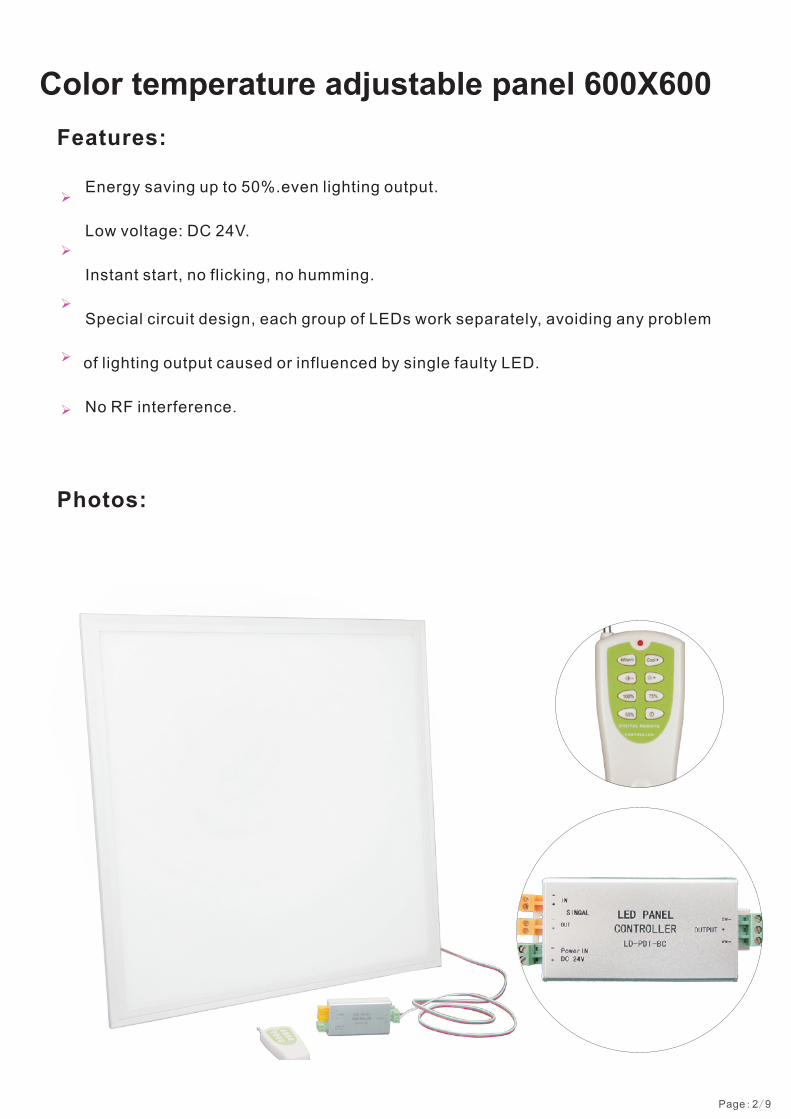
Features:
Energy saving up to 50%.even lighting output.
Low voltage: DC 24V.
Instant start, no flicking, no humming.
Special circuit design, each group of LEDs work separately, avoiding any problem
of lighting output caused or influenced by single faulty LED.
No RF interference.
Page:2/9
Photos:
Color temperature adjustable panel 600X600
Page:3/9
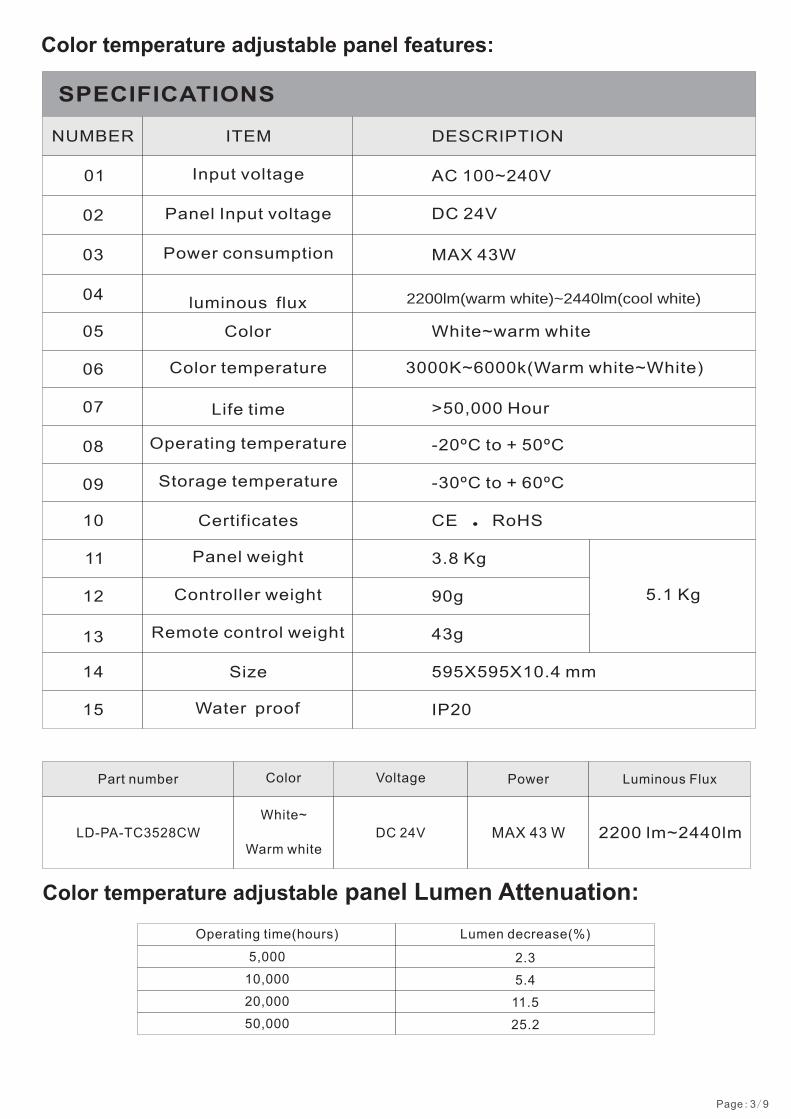
SPECIFICATIONS
NUMBER ITEM DESCRIPTION
Input voltage
Power consumption MAX 43W
AC 100~240V
luminous flux
Color temperature 3000K~6000k(W rm white~White)a
Life time >50,000 Hour
Color White~warm white
Operating temperature
Storage temperature
-20ºC to + 50ºC
-30ºC to + 60ºC
CE .RoHSCertificates
Panel weight 3.8 Kg
Size 595X595X10.4 mm
Water proof IP20
01
05
06
07
08
09
10
11
12
13
P Input voltage anel DC 24V02
03
04
Color temperature adjustable panel features:
Luminous FluxPart number Voltage
White~
Warm white DC 24V LD-PA-TC3528CW
Color Power
MAX 43 W
Color temperature adjustable panel Lumen Attenuation:
Operating time(hours)
5,000
10,000
20,000
50,000
2.3
Lumen decrease(%)
5.4
11.5
25.2
2200 lm~2440lm
Controller weight 90g
Remote control weight 43g
14
15
5.1 Kg
2200lm(warm white)~2440lm(cool white)
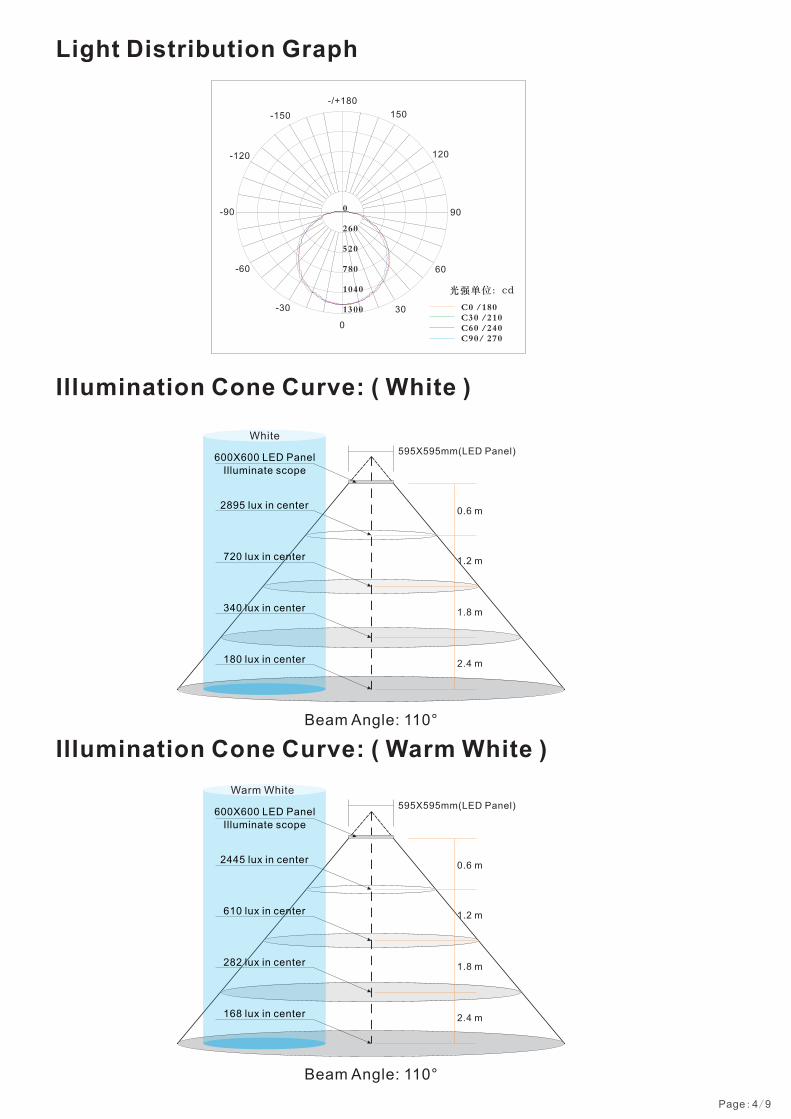
Light Distribution Graph
Illumination Cone Curve: ( White )
Page:4/9
0.6 m
1.2 m
1.8 m
2.4 m
595X595mm(LED Panel)
Beam Angle: 110°
600X600 LED Panel
Illuminate scope
2895 lux in center
720 lux in center
340 lux in center
180 lux in center
White
Illumination Cone Curve: ( White ) Warm
0.6 m
1.2 m
1.8 m
2.4 m
595X595mm(LED Panel)
Beam Angle: 110°
600X600 LED Panel
Illuminate scope
2445 lux in center
610 lux in center
282 lux in center
168 lux in center
Warm White
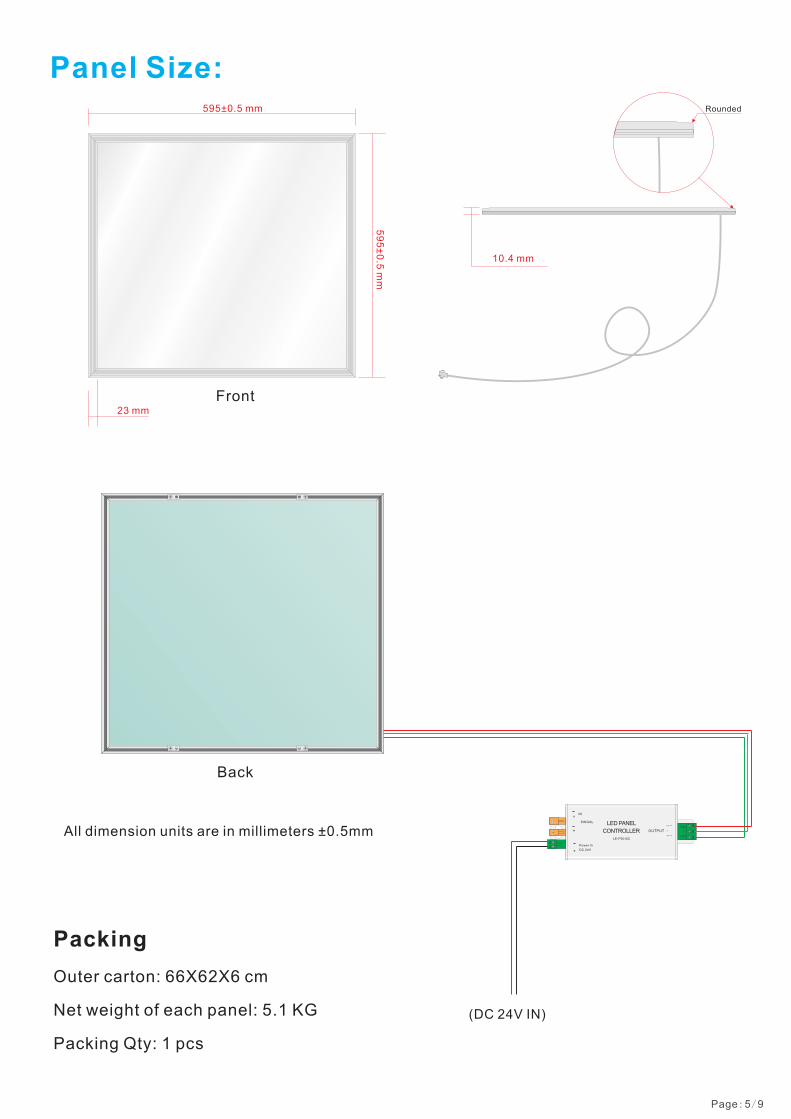
Page:5/9
10.4 mm
Panel Size:
All dimension units are in millimeters ±0.5mm
Packing
Outer carton: 66X62X6 cm
Net weight of each panel: 5.1 KG
Packing Qty: 1 pcs
Back
(DC 24V IN)
Front
595±0.5 mm
59
5 m
m±
0.5
23 mm
Rounded
LED PANEL
CONTROLLERLE-PDI-BC
+
+
+
IN
SINGAL
Power In
DC 24V
CW
OUTPUT +
WW
LED PANEL
CONTROLLERLE-PDI-BC
+
+
+
IN
SINGAL
Power In
DC 24V
CW
OUTPUT +
WW
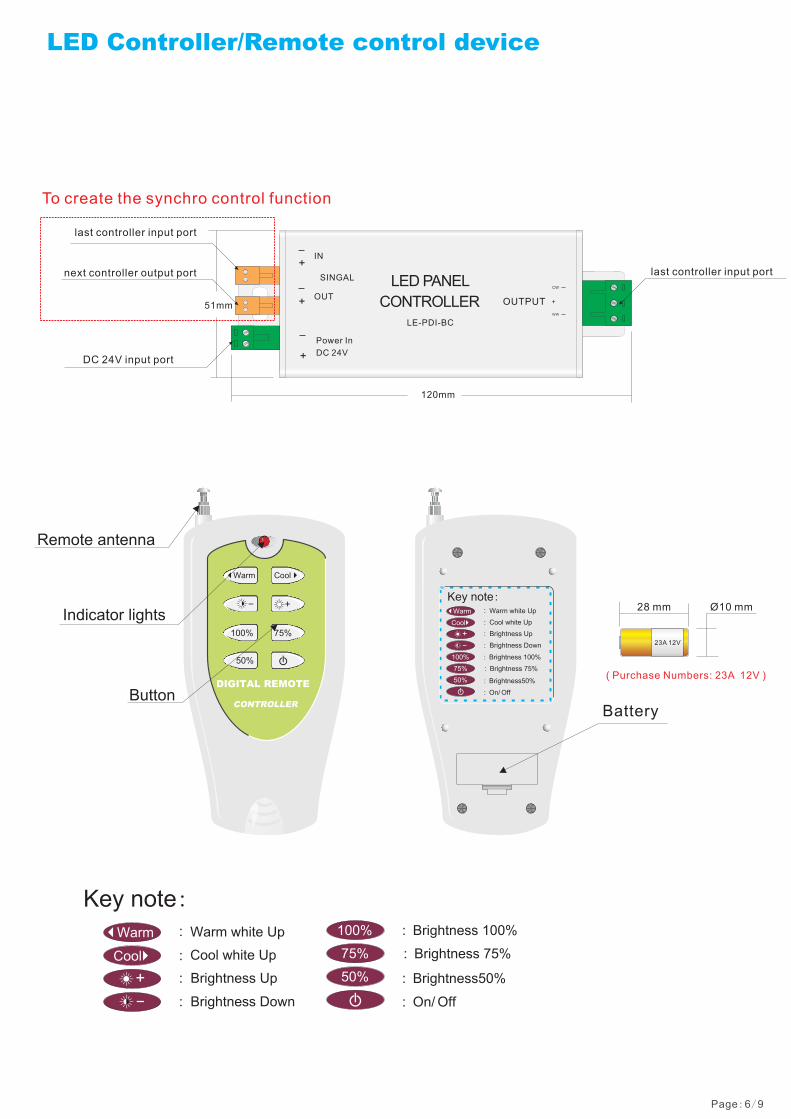
51mm
120mm
OUT
To create the synchro control function
last controller input port
next controller output port last controller input port
DC 24V input port
LED Controller/Remote control device
Remote antenna
Indicator lights
Button
23A 12V
Battery
28 mm Ø10 mm
( Purchase Numbers: 23A 12V )
Page:6/9
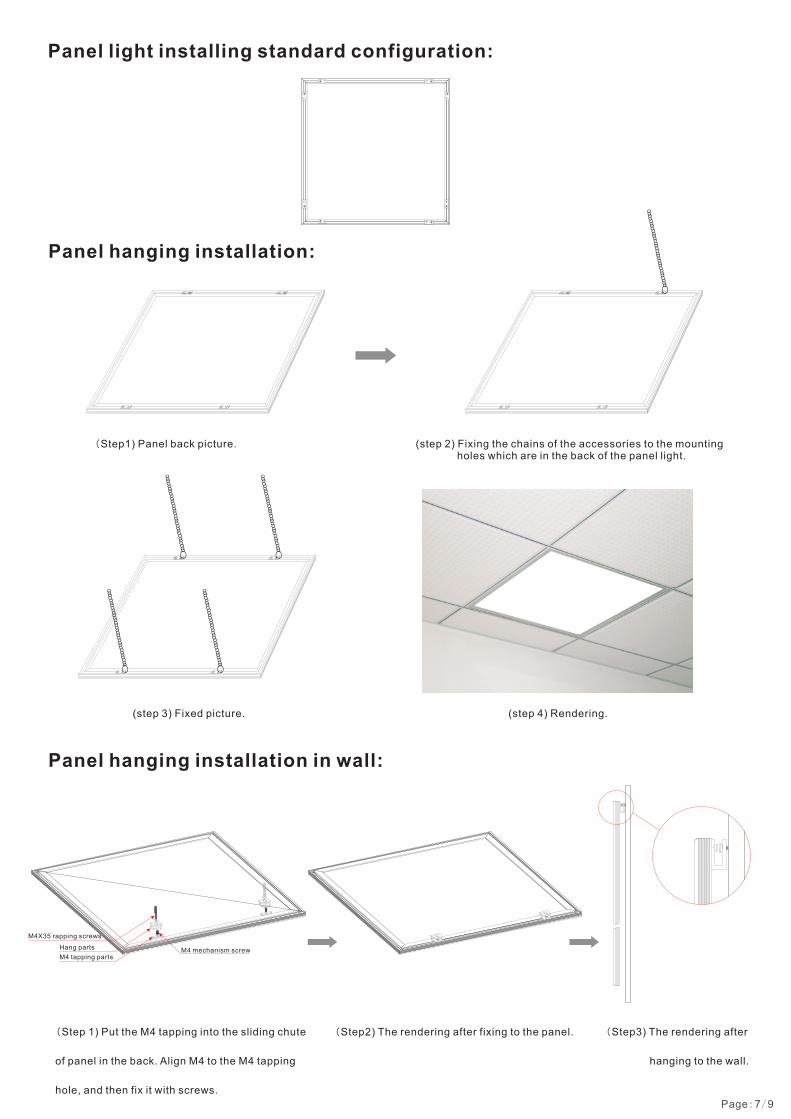
(Step1) anel back picture.P (step 2) Fixing the chains of the accessories to the mounting holes which are in the back of the panel light.
(step 3) Fixed picture. (step 4) Rendering.
Panel hanging installation:
Panel hanging installation in wall:
(Step 1) Put the M4 tapping into the sliding chute
of panel in the back. Align M4 to the M4 tapping
hole, and then fix it with screws.
(Step2) The rendering after fixing to the panel.
M4 tapping parts
Hang parts M4 mechanism screw
M4X35 rapping screws
Panel light installing standard configuration:
Page:7/9
(Step3) The rendering after
hanging to the wall.
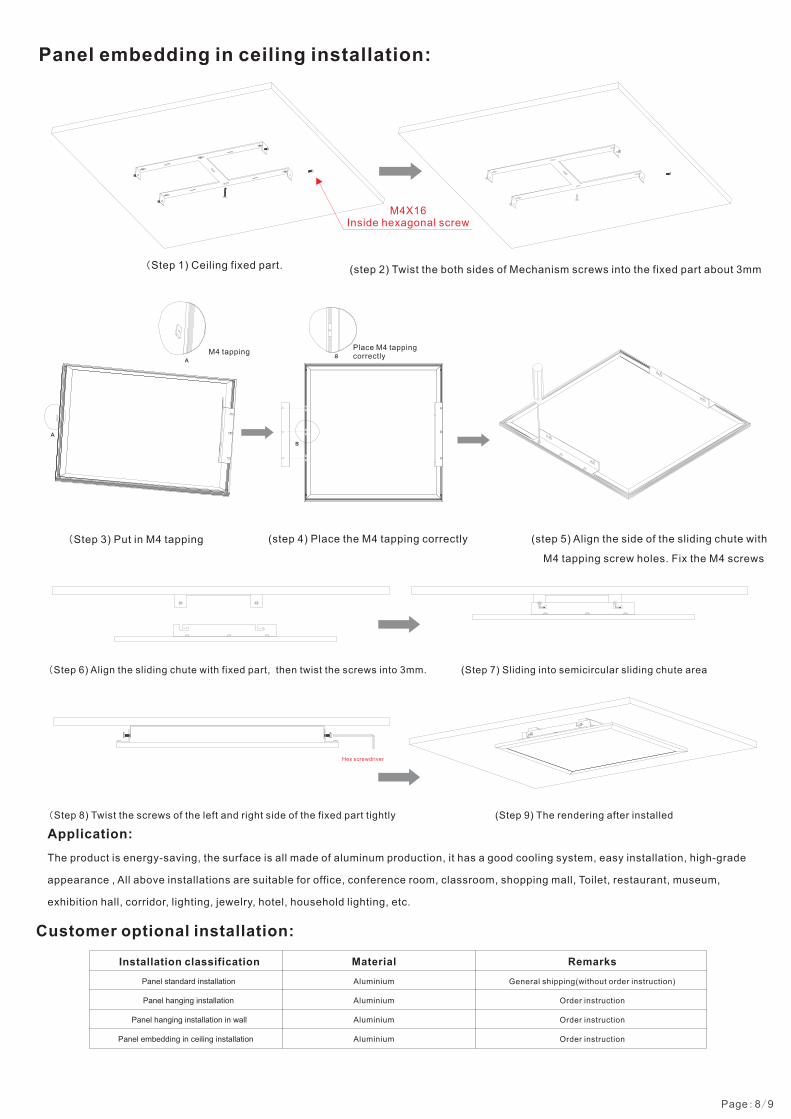
Panel embedding in ceiling installation:
(Step 1) Ceiling fixed part. (step 2) Twist the both sides of Mechanism screws into the fixed part about 3mm
(Step 3) Put in M4 tapping (step 4) Place the M4 tapping correctly (step 5) Align the side of the sliding chute with
M4 tapping screw holes. Fix the M4 screws
(Step 6) Align the sliding chute with fixed part, then twist the screws into 3mm. (Step 7) Sliding into semicircular sliding chute area
(Step 8) Twist the screws of the left and right side of the fixed part tightly
Application:
The product is energy-saving, the surface is all made of aluminum production, it has a good cooling system, easy installation, high-grade
appearance , All above installations are suitable for office, conference room, classroom, shopping mall, Toilet, restaurant, museum,
exhibition hall, corridor, lighting, jewelry, hotel, household lighting, etc.
(Step 9) The rendering after installed
Page:8/9
Customer optional installation:
Panel standard installation
Panel hanging installation
Panel hanging installation in wall
Panel embedding in ceiling installation
General shipping(without order instruction)
Installation classification
Order instruction
Aluminium
Material
Aluminium
Aluminium
Aluminium
Order instruction
Order instruction
Remarks
A
AB
M4 tapping
B
Place M4 tappingcorrectly
M4X16 Inside hexagonal screw
Hex screwdriver
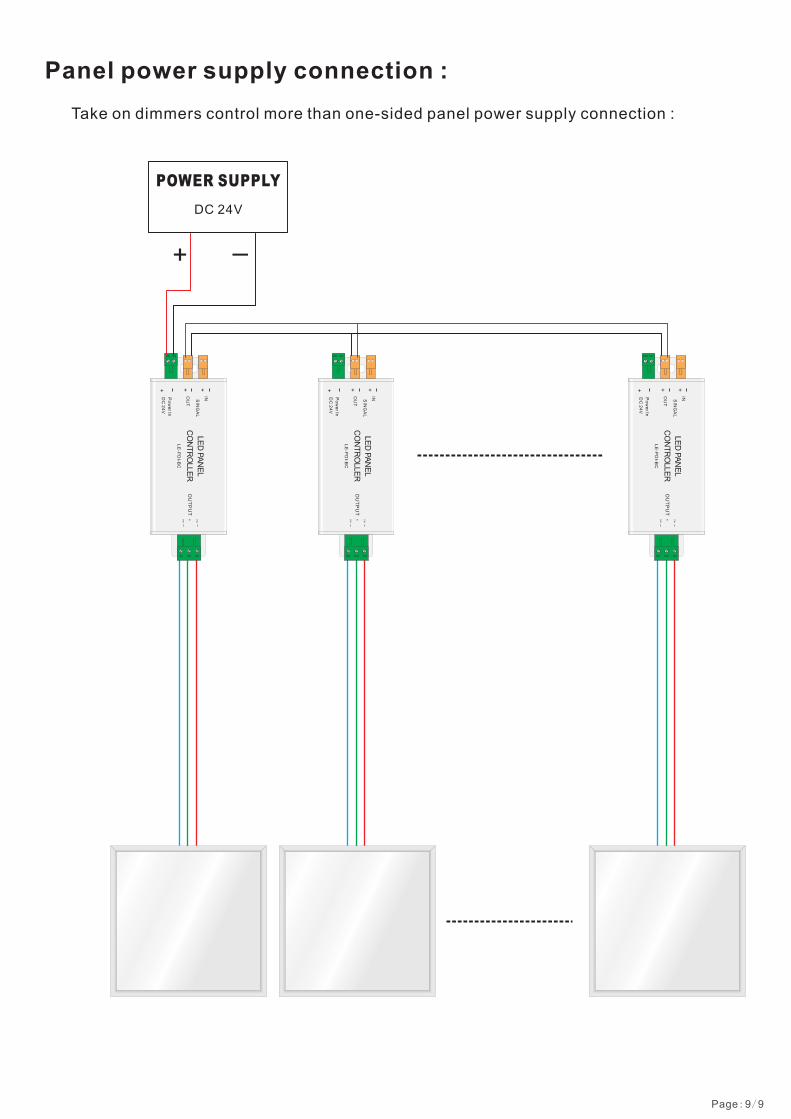
+ -
DC 24V
POWER SUPPLY
Panel power supply connection :
Take on dimmers control more than one-sided panel power supply connection :
Page:9/9
LE
D P
AN
EL
CO
NT
RO
LLE
RL
E-P
DI-B
C
+++
INSIN
GA
L
Po
we
r In
DC
24
V
CW
OU
TP
UT
+WW
OU
T
LE
D P
AN
EL
CO
NT
RO
LLE
RL
E-P
DI-B
C
+++
INSIN
GA
L
Po
we
r In
DC
24
V
CW
OU
TP
UT
+WW
OU
T
LE
D P
AN
EL
CO
NT
RO
LLE
RL
E-P
DI-B
C
+++
INSIN
GA
L
Po
we
r In
DC
24
V
CW
OU
TP
UT
+WW
OU
T


