Digital Video Recorder - NST Video Recorder User... · 2018-08-23 · Digital Video Recorder User...
69
Digital Video Recorder User Manual
Transcript of Digital Video Recorder - NST Video Recorder User... · 2018-08-23 · Digital Video Recorder User...

Digital Video Recorder
User Manual
Regulatory information
FCC information FCC compliance: This equipment has been tested and found to comply with the limits for a digital
device, pursuant to part 15 of the FCC Rules. These limits are designed to provide reasonable
protection against harmful interference when the equipment is operated in a commercial
environment. This equipment generates, uses, and can radiate radio frequency energy and, if not
installed and used in accordance with the instruction manual, may cause harmful interference to
radio communications. Operation of this equipment in a residential area is likely to cause harmful
interference in which case the user will be required to correct the interference at his own expense.
FCC conditions
This device complies with part 15 of the FCC Rules. Operation is subject to the following two
conditions:
1. This device may not cause harmful interference.
2. This device must accept any interference received, including interference that may cause
undesired operation.
EU Conformity Statement
This product and - if applicable - the supplied accessories too are marked with "CE" and comply
therefore with the applicable harmonized European standards listed under the Low Voltage
Directive 2006/95/EC, the EMC Directive 2004/108/EC, the RoHS Directive 2011/65/EU.
2012/19/EU (WEEE directive): Products marked with this symbol cannot be disposed of as
unsorted municipal waste in the European Union. For proper recycling, return this product to your
local supplier upon the purchase of equivalent new equipment, or dispose of it at designated
collection points. For more information, see: www.recyclethis.info.
2006/66/EC (battery directive): This product contains a battery that cannot be disposed of as
unsorted municipal waste in the European Union. See the product documentation for specific
battery information. The battery is marked with this symbol, which may include lettering to
indicate cadmium (Cd), lead (Pb), or mercury (Hg). For proper recycling, return the battery to
your supplier or to a designated collection point. For more information see: www.recyclethis.info.

Precautions and Declaration Tips
Before connecting and operating your DVR, please be advised of the following tips:
Precautions
• Please place DVRs within the permissible range of temperature and humidity.
• Do not install the DVRs in a damp, dust or soot place.
• Place the product horizontally and pay attention to preventing it from falling.
• Installed in a well-ventilated place and do not block the vent.
• Do not place containers filled with on the device.
• Do not place other equipments above the product.
• Do not disassemble this product.
• Please select the hard disk recommended by manufacturers and suitable for the requirements
of the DVR.
Declaration
• Please prevail in kind. The manual is for reference only.
• This manual may contain inaccurate data or printing error.
• The products described in this manual may be updated at any time.
• Screenshots of the manual is not in a machine and only for display.
• If in doubt, obtaining a copy of the latest procedure or the additional document, please
contact with the company's after-sales department.
Trademarks and Registered Trademarks
• Windows and Windows mark are trademarks or registered trademarks of Microsoft
Corporation in the United States and/or other countries.
• HDMI, HDMI mark and High-Definition Multimedia Interface are trademarks or registered
trademarks of HDMI Licensing LLC.
• The products contained in this manual are authorized by HDMI Licensing LLC with the use
right of the HDMI technology.
• VGA is the trademark of IBM.
• UPnPTM
is a certification mark of the UPnPTM
Implementers Corporation.
• Other names of companies and product contained in this manual may be trademarks or
registered trademarks of their respective owners.

Thank you for purchasing our product. If there is any question or request, please do not hesitate to
contact dealer. The figures in this manual are for reference only.
This manual is applicable to the models listed in the following table.
Series Model Type
FT Series 4CH/8CH/16CH Network DVR
FA Series 4CH/8CH/16CH Network DVR
Product Introduction
Product Overview
This product is designed specifically for the field of video surveillance and adopts H.264 video
compression, hard disk recording, TCP/IP transmission and a Linux based OS in addition to some
of the advanced technology in the information technology industry. This enables a more stable,
reliable and high picture quality. This product complies with standards of GB 20815-2006《video
security surveillance digital video recording》promulgated by the State. At the same time, the
product supports the ONVIF protocol(base on《ONVIF ™ Core Specification》Version 2.2) and is
compatible with the network cameras which supports ONVIF protocol. This product can realize
the switching of DVR mode or mixed mode (Mixed mode can both connect with analog
channels and network cameras when the DVR modes only connect with network
cameras) ,recording, playback, monitoring, synchronization of audio and video. Besides, the
products support advanced control technology and strong network data transmission capacity.
Feature
Real-time monitoring
Have a composite video signal interface
Support TV, VGA or HDMI output simultaneously
Compression function
Use H.264 video compression standard
G.711 audio compression standard
Have high definition, low code rate of the video coding and the storage.
Recording function
Support timing, linkage alarm, motion detection, SATA hard and local hard disk
DVR data backup
Network backup
Video playback function
Achieve searching videos by a variety of conditions, playback in local and network.
Support multiple videos playback, fast playing, slow playing and frame-by-frame playback.
Video playback can display the exact time of the incident.
Provide timeline retrieving page for quick searching.
Camera control and alarm
Be controlled by the remote camera
Equip many alarm input interfaces.
Be connected to various types of alarm devices.
Dynamic detection, video loss, video block, multiple alarm output
Scene lighting control can be realized.
Communication Interface
Equip USB 2.0 high-speed interface or ESATA interface;
Allow many backup devices;
Equip standard Ethernet interface;
Plug and play in a variety of network conditions;
Network functions
Support TCP / IP, UDP, RTP / RTSP, DHCP, PPPOE, DDNS, NTP etc.
Support real-time network monitoring, video playback;
Control and management functions;
Built-in WEB Server, you can directly access through a browser;
Mode of operation
You can operate by the front panel or the mouse;
Equip a simple, intuitive graphical interface;

Table of Contents
Chapter 1 Installation ............................................................................................................... 10
1.1 Installation Preparation ........................................................................................... 11
1.2 DVR Installation ..................................................................................................... 11
1.3 Hard Disk Installation ............................................................................................. 11
1.4 Installation of the burner ......................................................................................... 13
Chapter 2 Introduction ............................................................................................................. 14
2.1 The Front Panel ....................................................................................................... 15
2.2 The Rear Panel ........................................................................................................ 16
2.3 Peripheral Connections ........................................................................................... 17
Chapter 3 Basic Operations Guide ........................................................................................... 19
3.1 Power on and Off .................................................................................................... 20
3.1.1 Power On ......................................................................................................... 20
3.1.2 Power Off ........................................................................................................ 20
3.2 Preview and Login in .............................................................................................. 21
3.2.1 Preview ............................................................................................................ 21
3.2.2 Login In ........................................................................................................... 21
3.3 Mode Switching ...................................................................................................... 22
3.4 IP Camera ................................................................................................................ 22
3.4.1 Add IP Camera ................................................................................................ 22
3.4.2 Status Display.................................................................................................. 23
3.5 PTZ Control ............................................................................................................ 24
3.5.1 PTZ configuration ........................................................................................... 24
3.5.2 Quick location ................................................................................................. 24
3.6 Search ...................................................................................................................... 25
3.7 Record ..................................................................................................................... 26
3.8 Alarm ...................................................................................................................... 27
3.8.1 Alarm Configuration ....................................................................................... 27
3.8.2 Alarm Input ..................................................................................................... 28
3.8.3 Alarm Output .................................................................................................. 29
3.8.4 Alarm Status .................................................................................................... 29
3.9 Color Setting ........................................................................................................... 30
3.10 The Input Method .................................................................................................... 31
Chapter 4 Parameter Settings ................................................................................................... 32
4.1 Introduction of Main Menu ..................................................................................... 33
4.2 Video Settings ......................................................................................................... 34
4.2.1 Basic ................................................................................................................ 34
4.2.2 Encoding settings ............................................................................................ 35
4.2.3 Snapshot .......................................................................................................... 36
4.2.4 Net Channel ..................................................................................................... 36
4.3 Record ..................................................................................................................... 38
4.4 Network ................................................................................................................... 40
4.5 PTZ Configuration .................................................................................................. 42
4.6 Alarm ...................................................................................................................... 43
4.6.1 Video Detection ............................................................................................... 43
4.6.2 Alarm input ..................................................................................................... 44
4.6.3 Alarm out ........................................................................................................ 45
4.7 System ..................................................................................................................... 46
4.7.1 Basic ................................................................................................................ 46
4.7.2 Display ............................................................................................................ 47
4.7.3 Storage ............................................................................................................ 48
4.7.4 Abnormity ....................................................................................................... 49
4.7.5 Status ............................................................................................................... 50
4.7.6 Maintain .......................................................................................................... 50
4.7.7 Account ........................................................................................................... 51
4.7.8 RS232 .............................................................................................................. 52
Chapter 5 Web and Client ........................................................................................................ 53
5.1 Web Operation ........................................................................................................ 54
5.1.1 Network Connection ....................................................................................... 54
5.1.2 The control installation and the user login logout ........................................... 54
5.1.3 The Interface of Web Operations .................................................................... 55
5.1.4 The Real-time Monitoring ............................................................................... 56
5.1.5 PTZ Control .................................................................................................... 57
5.1.6 Configuration .................................................................................................. 58
5.1.7 Search Record ................................................................................................. 59
5.1.8 Alarm Configuration ....................................................................................... 60
5.1.9 About ............................................................................................................... 60
5.2 The Client Operations ............................................................................................. 60
Chapter 6 Appendix ................................................................................................................. 61
6.1 Expansion function.................................................................................................. 62
6.2 PTZ Control ............................................................................................................ 64
6.3 HDD Capacity Calculation ..................................................................................... 66
6.3.1 Reference of HDD Capacity Calculation ........................................................ 66
6.3.2 Hard disk problem ........................................................................................... 66
6.4 Common Faults ....................................................................................................... 68

Chapter 1 Installation

1.1 Installation Preparation
Preparation
Prepare a Cross Screwdriver.
Steps
• Remove the metal top cover by removing two screws from the sides of the cover.
• Place the hard disks on a flat table and tighten the screws.
• Connect the power and the data lines to the HDD.
• Reinstall the metal top cover and tighten the screws.
Caution
• Only use the HDD specified by the manufacturer.
• The HDD will be formatted automatically during booting and it may cause data loss.
• The total duration of video data saved is decided by the HDD‘s capability and the DVR‘s
parameters (recording setup, encoding setup).
1.2 DVR Installation
During the installation of the DVR:
1. Use brackets for rack mounting.
2. Ensure there is ample room for audio and video cables.
3. When installing cables, ensure that the bend radius of the cables are no less than five times than
its diameter.
4. Connect both the alarm and RS-485 cable.
5. Allow at least 2cm (≈0.75-inch) of space between racks mounted devices.
6. Ensure the DVR is grounded.
7. Environmental temperature should be within the range of -10 ºC ~ 55 ºC, 14ºF ~ 131ºF.
8. Environmental humidity should be within the range of 10% ~ 90%.
1.3 Hard Disk Installation
Before you start:
Before installing a hard disk drive (HDD), please make sure the power is disconnected from the
DVR. A factory recommended HDD should be used for this installation.
Up to 8 SATA hard disks can be installed on your DVR.
Tools Required: Screwdriver.
Note: As the installation steps of HDD are similar among different models, here we take the steps
of the FT series as an example.
Steps:
1. Remove the cover from the DVR by unfastening the screws on the back and side.

2. Connect one end of the data cable to the motherboard of DVR and the other end to the
HDD.
3. Connect the power cable to the HDD.
4. Place the HDD on the bottom of the device and then fasten the screws on the bottom to fix
the HDD.
5. Re-install the cover of the DVR and fasten screws.
1.4 Installation of the burner
Preparing for Installation
You need a Phillips screwdriver.
The burner installation steps
Unscrew the screw on the side of the chassis and open the case cover.
Use a screwdriver to remove the bracket fixed in middle of the disk.
Open the front panel door and remove the baffle inside.
Connect the burner data cable and the power cord.
Fix the chassis cover.
Precautions
The installation of the built-in burner is only for specific DVR and affects disk space for
installation and interfaces.

Chapter 2 Introduction

2.1 The Front Panel
Figure 2. 1 Front Panel of 4/8ch-FT&FA Series
Figure 2. 2 Front Panel of 16ch-FT&FA
Table 2. 1 Description of Front Panel
Index Name Function
1 IR Receive the remote control signal.
2 Esc Back to previous menu, operation cancel;
Back to live view when playing back records.
3 Direction
Up/Down: Move up or down. Change the settings and increase or
decrease the digital.
Left/Right: Control the playback control bar of the records.
4 Enter
Confirm the operations.
Jump to the default button.
Enter the menu.
5 Fn
The button displays PTZ control and image color when in the state of
the single-screen monitoring.
Simultaneously press the Fn key and the direction key to complete the
settings with the dynamic monitoring area.
Press the Fn key to empty all contents of the edit box.
Press the key to switch among English, Chinese and figure.
Special with the function of each menu page prompts.
6 Num Lock
1~9
Digital input(digital input mode).
Text input(Text input mode).
Image switch(single screen mode).
7 REC Manually start/Stop recording.
8 Function
keys Function keys, Play/Stop Function
9 USB Connect the mouse and HDD.
10 ON/OFF Power on/off.

2.2 The Rear Panel
1234 5 9 8 6 10
11 7
Figure 2. 3 Front Panel of 4/8/16ch-FT&FA
Table 2. 2 Description of Rear Panel
Index Name Description
1 Video in BNC interface for TVI and analog video input.
2 Audio in The input interface of the audio signal
3 Audio out The output interface of the audio signal and CVBS
4 HDMI The output interface of the HDMI video signal
5 VGA The output interface of the VGA video signal
6 RS-485 The interface drawing of the alarm input, the alarm output and
RS-485
7 Alarm in/out The interface of the alarm input, the alarm output
8 Network
interface
The RJ-45network interface
9 USB Port The USB 2.0 interface
10 Power Supply DC 12V power supply.
11 Power Switch Switch for turning on/off the device.

2.3 Peripheral Connections
Wiring of Alarm Input
The alarm input is an open/closed relay. To connect the alarm input to the device, use the
following diagram.
Note:
If the alarm input is not an open/close relay, please connect an external relay between the
alarm input and the device.
Wiring of Alarm Output
To connect to an alarm output (AC or DC load), use the following diagram:
DC Load Connection Diagram AC Load Connection Diagram
For DC load, the jumpers can be used within the limit of 12V/1A safely.
To connect an AC load, jumpers should be left open (you must remove the jumper on the
motherboard in the DVR). Use an external relay for safety (as shown in the figure above).
There are 4 jumpers (JP1, JP2, JP3, and JP4) on the motherboard, each corresponding with one
alarm output. By default, jumpers are connected. To connect an AC load, jumpers should be
removed.
Example:
If you connect an AC load to the alarm output 3 of the DVR, then you must remove the JP 3.
Alarm Connection
To connect alarm devices to the DVR:
1. Disconnect pluggable block from the ALARM IN /ALARM OUT terminal block.
2. Press and hold the orange part of the pluggable block; insert signal cables into slots and release
the orange part. Ensure signal cables are in tight.
3. Connect pluggable block back into terminal block.
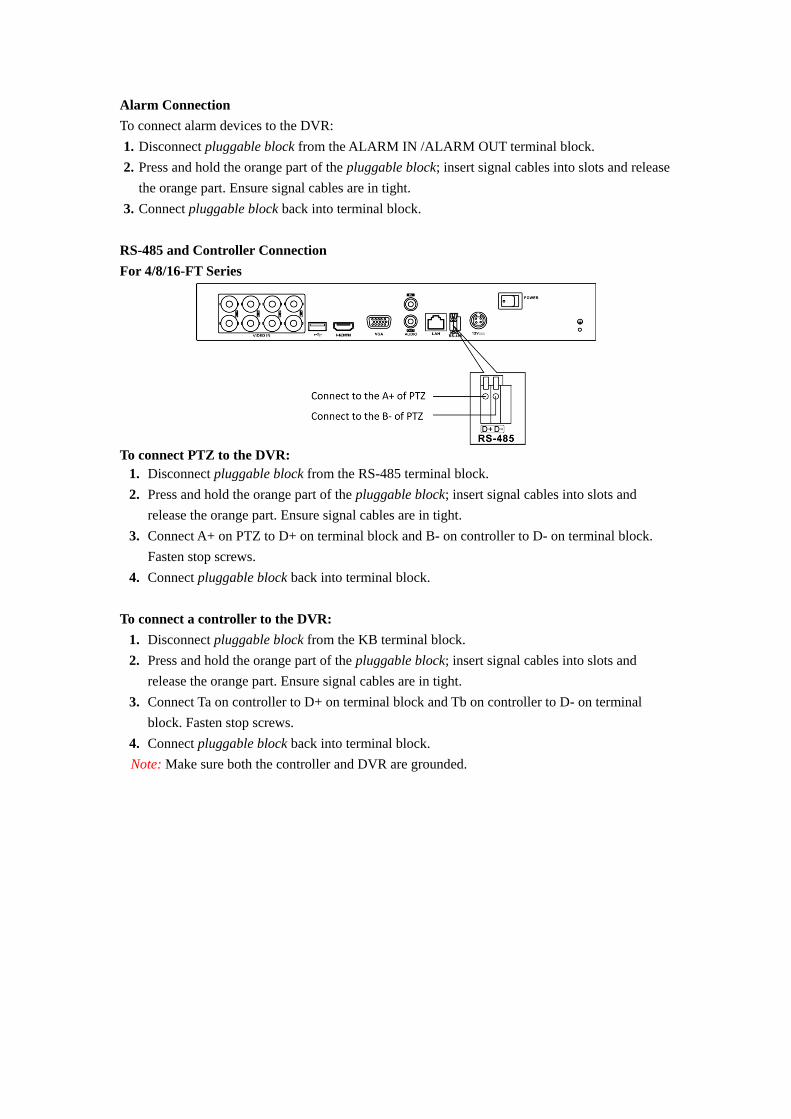
RS-485 and Controller Connection
For 4/8/16-FT Series
To connect PTZ to the DVR:
1. Disconnect pluggable block from the RS-485 terminal block.
2. Press and hold the orange part of the pluggable block; insert signal cables into slots and
release the orange part. Ensure signal cables are in tight.
3. Connect A+ on PTZ to D+ on terminal block and B- on controller to D- on terminal block.
Fasten stop screws.
4. Connect pluggable block back into terminal block.
To connect a controller to the DVR:
1. Disconnect pluggable block from the KB terminal block.
2. Press and hold the orange part of the pluggable block; insert signal cables into slots and
release the orange part. Ensure signal cables are in tight.
3. Connect Ta on controller to D+ on terminal block and Tb on controller to D- on terminal
block. Fasten stop screws.
4. Connect pluggable block back into terminal block.
Note: Make sure both the controller and DVR are grounded.

Chapter 3 Basic Operations Guide

3.1 Power on and Off
3.1.1 Power On
Correctly install and power on the DVR. When the power indicator lit up, The DVR will
automatically detect hardware state of the device during the starting. The booting process will
continue for about 30 seconds. After boot, the equipment sounds and then enters the state of
multi-screen real-time video surveillance.
3.1.2 Power Off
Steps:
There are two proper ways to shut down the DVR. To shut down the DVR:
OPTION 1: Standard shutdown
1. Enter the Shutdown menu.
Menu > Shutdown
Figure 3. 1 Shutdown menu
2. Select the Shutdown button.
3. Click the Yes button.
4. Turn off the power switch on the rear panel when the note appears.
OPTION 2: By operating the front panel
1. Press and hold the POWER button on the front panel for 3 seconds.
2. Enter the administrator‘s username and password in the dialog box for authentication.
3. Select the Shutdown button and Click the Yes button.

3.2 Preview and Login in
3.2.1 Preview
After the device is turned on, you will enter the real-time monitoring interface. Right click and the
following interface will pop up.
Figure 3. 2 Live view
3.2.2 Login In
Click the image above with [main menu], and then input the user name and the password of the
DVR to complete the login.
Note: default user name and password admin, 123456
Figure 3. 3 Login

3.3 Mode Switching
The DVR can work in mixed mode or DVR mode. Mixed-mode can be connected with both
analog cameras and network cameras while DVR mode can only support IP cameras.
Steps:
1. Enter [configuration] – [system]-[channel mode] to select the mode.
2. Restart to complete the setting.
Figure 3. 4 Basic interface
3.4 IP Camera
3.4.1 Add IP Camera
Purpose:
Network channels are used to display remote IPCs. The addition of IPCs shows as the following
interface.
Steps:
1. Enter video interface
2. Select Net Channel tab.
Figure 3. 5 Video interface
3. Check the checkbox after Enable Open.
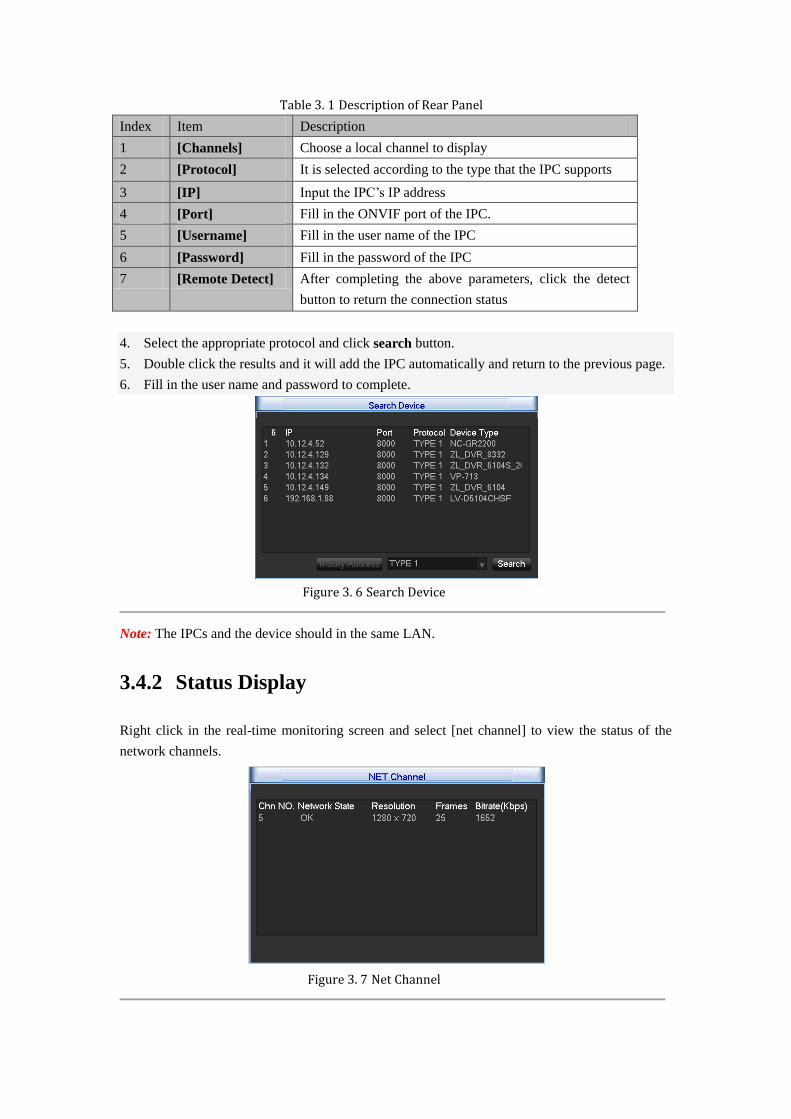
Table 3. 1 Description of Rear Panel
Index Item Description
1 [Channels] Choose a local channel to display
2 [Protocol] It is selected according to the type that the IPC supports
3 [IP] Input the IPC‘s IP address
4 [Port] Fill in the ONVIF port of the IPC.
5 [Username] Fill in the user name of the IPC
6 [Password] Fill in the password of the IPC
7 [Remote Detect] After completing the above parameters, click the detect
button to return the connection status
4. Select the appropriate protocol and click search button.
5. Double click the results and it will add the IPC automatically and return to the previous page.
6. Fill in the user name and password to complete.
Figure 3. 6 Search Device
Note: The IPCs and the device should in the same LAN.
3.4.2 Status Display
Right click in the real-time monitoring screen and select [net channel] to view the status of the
network channels.
Figure 3. 7 Net Channel
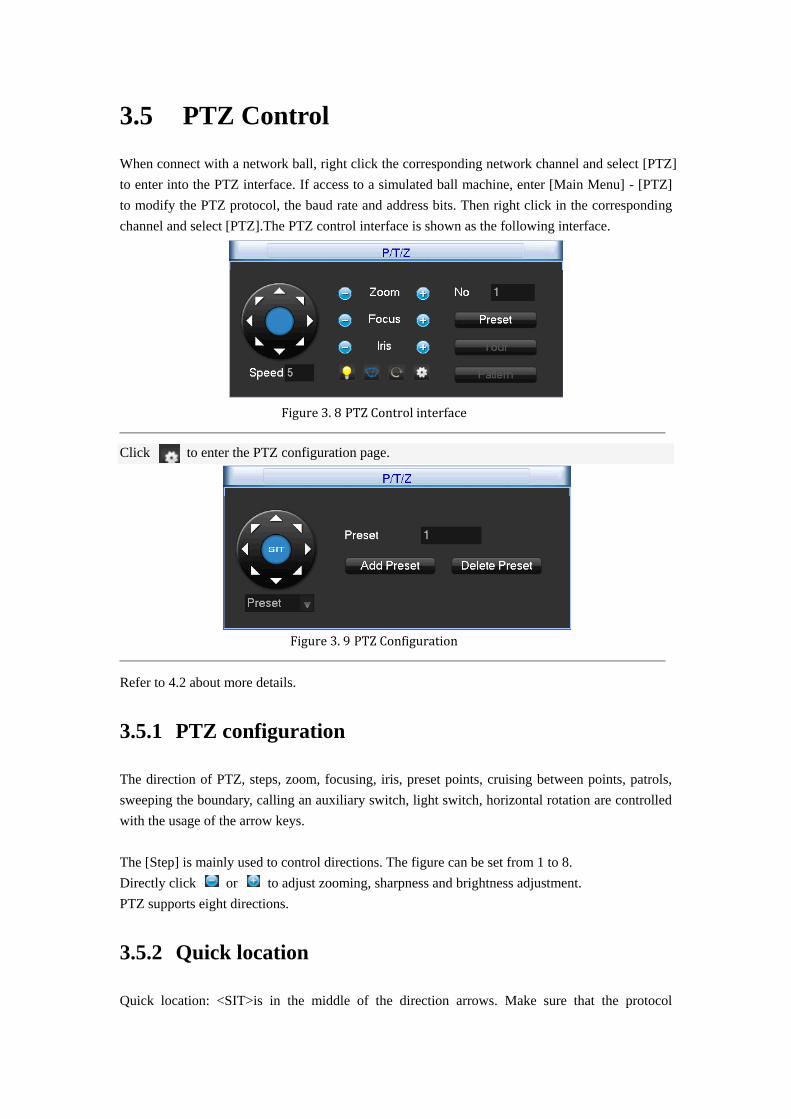
3.5 PTZ Control
When connect with a network ball, right click the corresponding network channel and select [PTZ]
to enter into the PTZ interface. If access to a simulated ball machine, enter [Main Menu] - [PTZ]
to modify the PTZ protocol, the baud rate and address bits. Then right click in the corresponding
channel and select [PTZ].The PTZ control interface is shown as the following interface.
Figure 3. 8 PTZ Control interface
Click to enter the PTZ configuration page.
Figure 3. 9 PTZ Configuration
Refer to 4.2 about more details.
3.5.1 PTZ configuration
The direction of PTZ, steps, zoom, focusing, iris, preset points, cruising between points, patrols,
sweeping the boundary, calling an auxiliary switch, light switch, horizontal rotation are controlled
with the usage of the arrow keys.
The [Step] is mainly used to control directions. The figure can be set from 1 to 8.
Directly click or to adjust zooming, sharpness and brightness adjustment.
PTZ supports eight directions.
3.5.2 Quick location
Quick location: <SIT>is in the middle of the direction arrows. Make sure that the protocol
supports this function. PTZ will turn to the clicked point and move it to the centre of screen.It also
supports zooming. Drag the mouse in the quick location page.The dragged box supports 4 to 16
times zooming. Hold the mouse and drag it up to complete zoom of the box.Drag it down to
narrow the box.
Refer to 7.1.5 about more details.
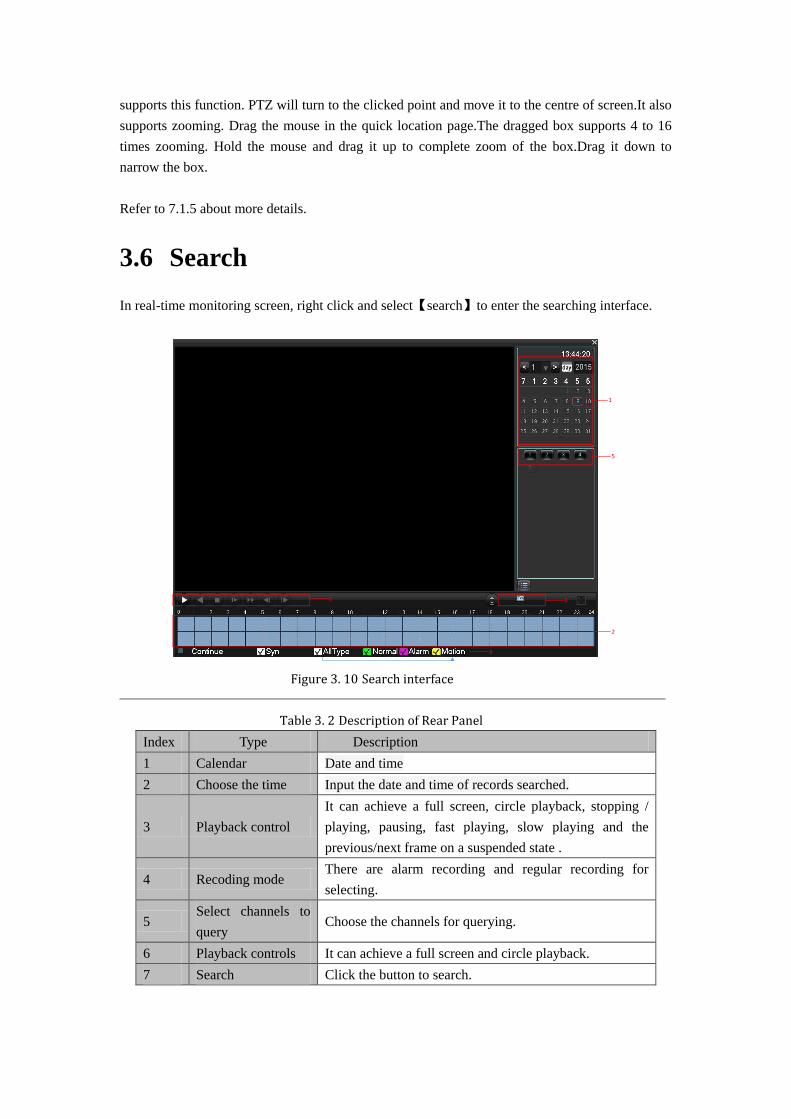
3.6 Search
In real-time monitoring screen, right click and select【search】to enter the searching interface.
1
3
4
5
6
2
Figure 3. 10 Search interface
Table 3. 2 Description of Rear Panel
Index Type Description
1 Calendar Date and time
2 Choose the time Input the date and time of records searched.
3 Playback control
It can achieve a full screen, circle playback, stopping /
playing, pausing, fast playing, slow playing and the
previous/next frame on a suspended state .
4 Recoding mode There are alarm recording and regular recording for
selecting.
5 Select channels to
query Choose the channels for querying.
6 Playback controls It can achieve a full screen and circle playback.
7 Search Click the button to search.
8 Backup Choose files and click ― ‖to backup. Then select a
storage device and recording files.
9 The list of records
128 video records are shown in the list.
Type: R—normal record, A—alarm record, M—motion
detection record.
10 The channel for
playback Choose a channel in which the record plays back.
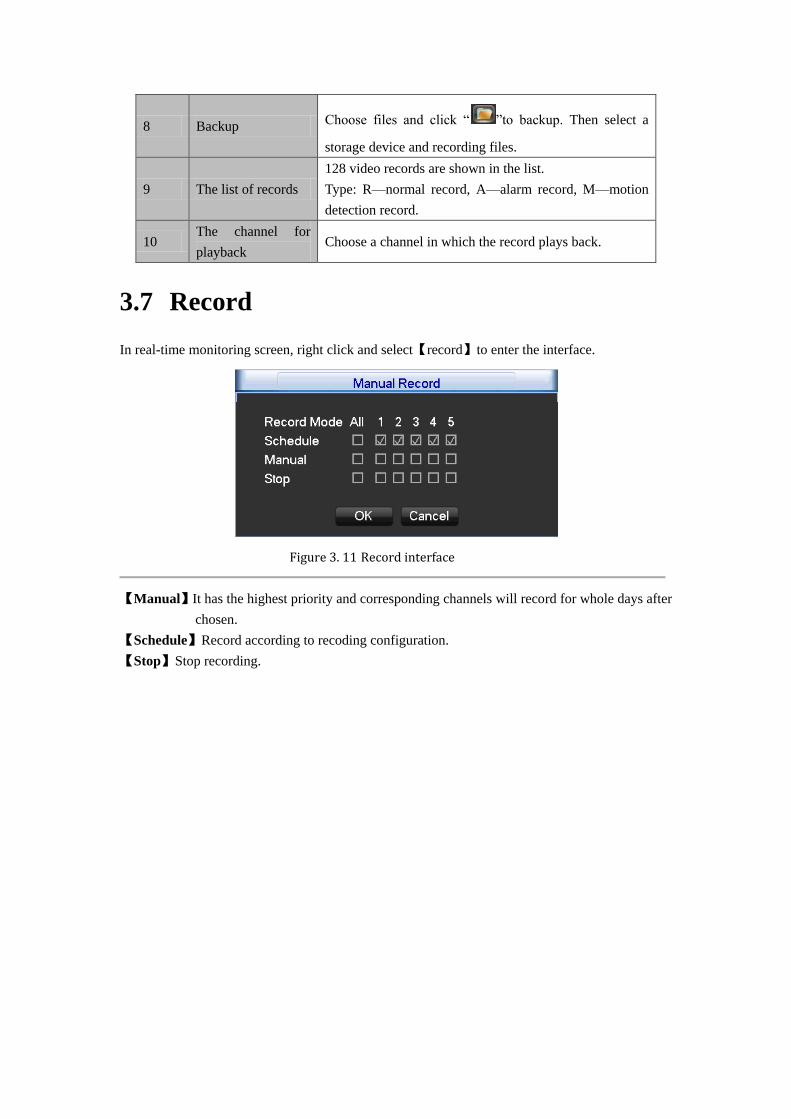
3.7 Record
In real-time monitoring screen, right click and select【record】to enter the interface.
Figure 3. 11 Record interface
【Manual】It has the highest priority and corresponding channels will record for whole days after
chosen.
【Schedule】Record according to recoding configuration.
【Stop】Stop recording.

3.8 Alarm
3.8.1 Alarm Configuration
Detect
Enter [main menu]-[detect].
Figure 3. 12 Alarm Detect interface
Table 3. 3 Description of Alarm Detect
Index Item Description
1 [Channel] Select the channel
2 [Alarm type] Dynamic monitoring, video loss and video blind can be
selected
3 Open the enable switch
4 [Sensitivity] Set sensitivity of the network channels
5 [Set area] It should be set in the IPC
6 [Process] Click the button to set the alarming time, linkage and the
handling method.
Figure 3. 13 Record interface
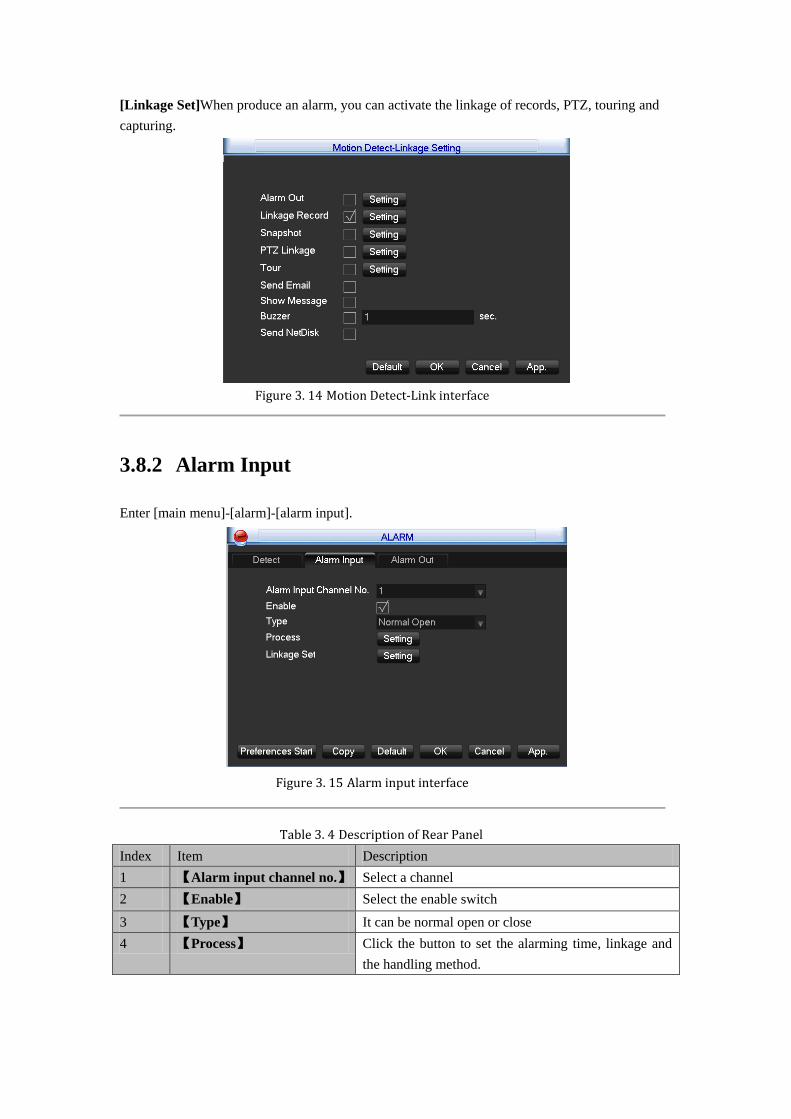
[Linkage Set]When produce an alarm, you can activate the linkage of records, PTZ, touring and
capturing.
Figure 3. 14 Motion Detect-Link interface
3.8.2 Alarm Input
Enter [main menu]-[alarm]-[alarm input].
Figure 3. 15 Alarm input interface
Table 3. 4 Description of Rear Panel
Index Item Description
1 【Alarm input channel no.】 Select a channel
2 【Enable】 Select the enable switch
3 【Type】 It can be normal open or close
4 【Process】 Click the button to set the alarming time, linkage and
the handling method.

3.8.3 Alarm Output
This menu manages alarm output parameters and displays the current state of alarm.
Figure 3. 16 Alarm output interface
Table 3. 5 Description of Alarm output
Index Item Description
1 【Channels】 The number of channels that are in alarm status
2 【Schedule】 Alarm output is in control of alarm configuration
3 【Manual】 Alarm output is on and the status is active
4 【Stop】 Alarm output is off and the status is inactive
5 【Status】 The current status of alarm output
Note: Some models don‘t have the local alarm; please refer to the products descriptions.
3.8.4 Alarm Status
If you select [Show Message] in linkage settings, the following message will pop up when the
alarm occurs.
Figure 3. 17 Alarm status interface
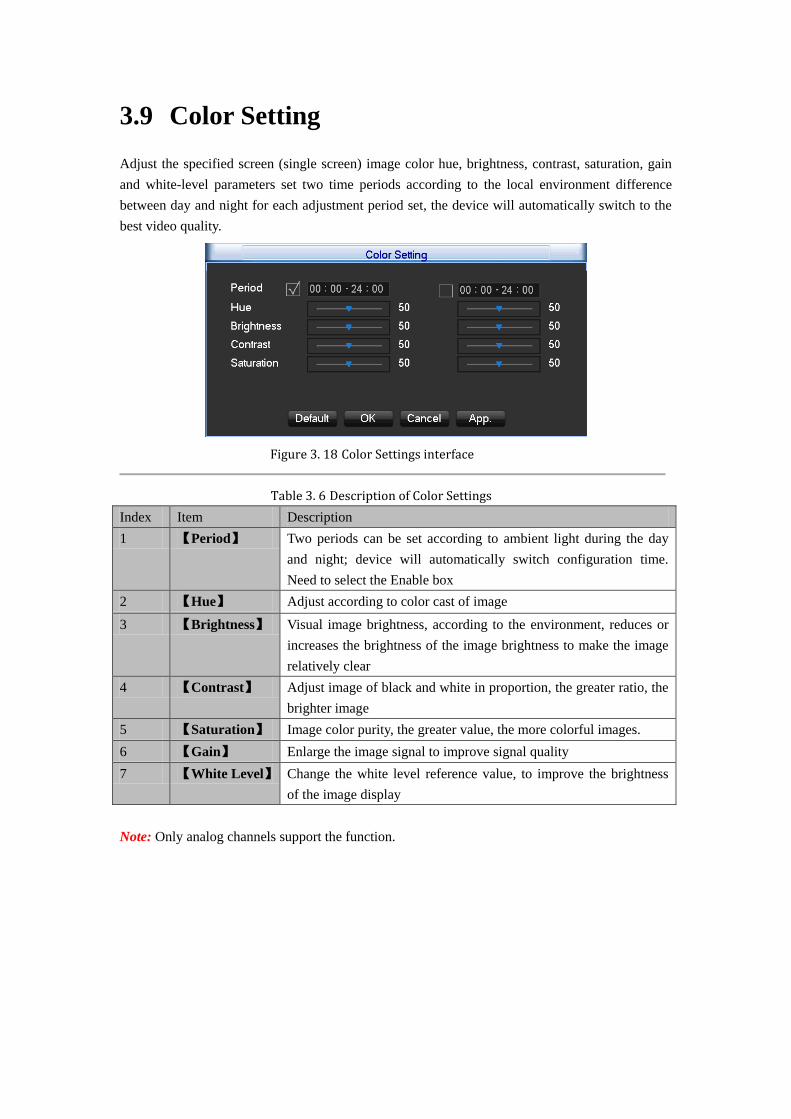
3.9 Color Setting
Adjust the specified screen (single screen) image color hue, brightness, contrast, saturation, gain
and white-level parameters set two time periods according to the local environment difference
between day and night for each adjustment period set, the device will automatically switch to the
best video quality.
Figure 3. 18 Color Settings interface
Table 3. 6 Description of Color Settings
Index Item Description
1 【Period】 Two periods can be set according to ambient light during the day
and night; device will automatically switch configuration time.
Need to select the Enable box
2 【Hue】 Adjust according to color cast of image
3 【Brightness】 Visual image brightness, according to the environment, reduces or
increases the brightness of the image brightness to make the image
relatively clear
4 【Contrast】 Adjust image of black and white in proportion, the greater ratio, the
brighter image
5 【Saturation】 Image color purity, the greater value, the more colorful images.
6 【Gain】 Enlarge the image signal to improve signal quality
7 【White Level】 Change the white level reference value, to improve the brightness
of the image display
Note: Only analog channels support the function.

3.10 The Input Method
In the input box, you can select figures, symbols, English capitalization and the input of Chinese.
Click the mouse to complete the input.‖← ―represents the backspace and ―_ ―represents a space.
Figure 3. 19 English figures interface
Figure 3. 20 Chinese figures interface

Chapter 4 Parameter Settings
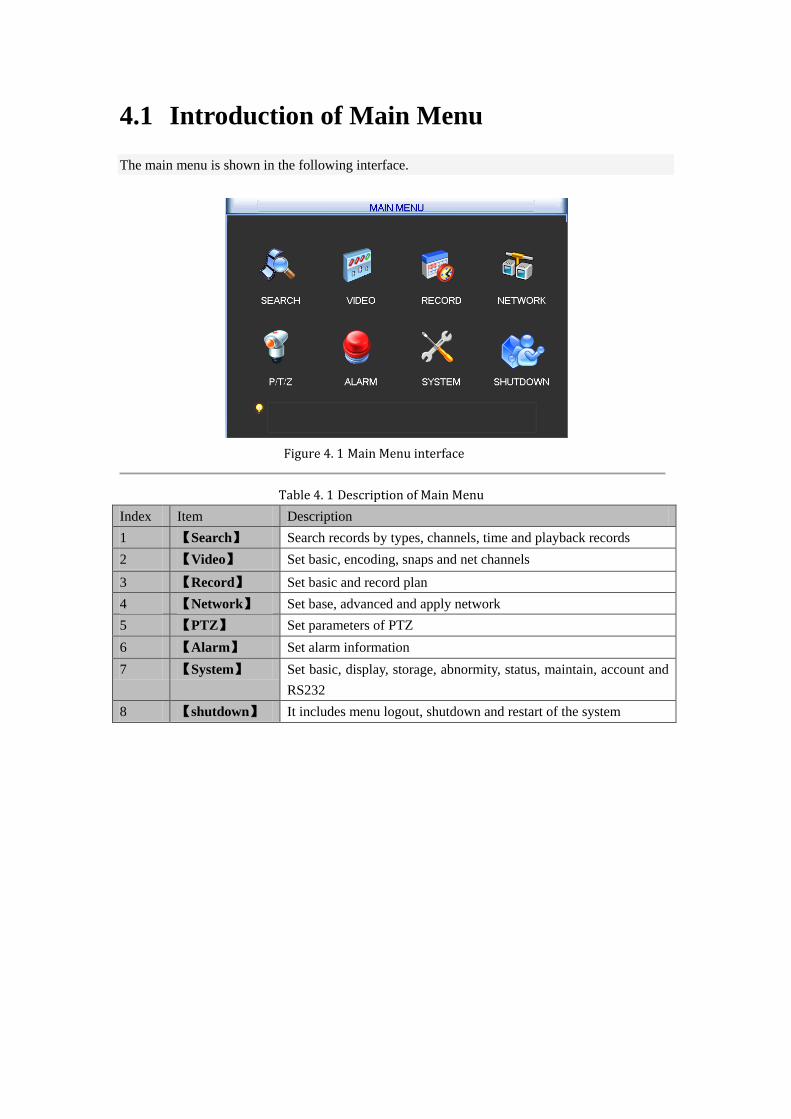
4.1 Introduction of Main Menu
The main menu is shown in the following interface.
Figure 4. 1 Main Menu interface
Table 4. 1 Description of Main Menu
Index Item Description
1 【Search】 Search records by types, channels, time and playback records
2 【Video】 Set basic, encoding, snaps and net channels
3 【Record】 Set basic and record plan
4 【Network】 Set base, advanced and apply network
5 【PTZ】 Set parameters of PTZ
6 【Alarm】 Set alarm information
7 【System】 Set basic, display, storage, abnormity, status, maintain, account and
RS232
8 【shutdown】 It includes menu logout, shutdown and restart of the system
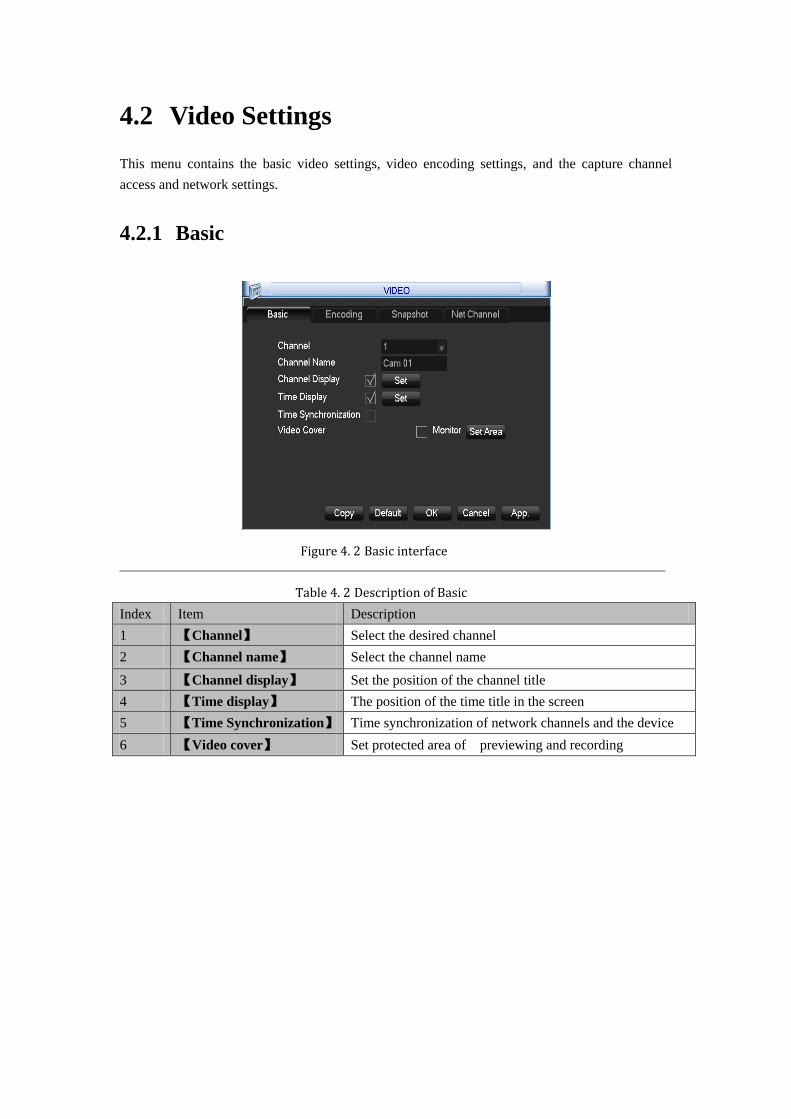
4.2 Video Settings
This menu contains the basic video settings, video encoding settings, and the capture channel
access and network settings.
4.2.1 Basic
Figure 4. 2 Basic interface
Table 4. 2 Description of Basic
Index Item Description
1 【Channel】 Select the desired channel
2 【Channel name】 Select the channel name
3 【Channel display】 Set the position of the channel title
4 【Time display】 The position of the time title in the screen
5 【Time Synchronization】 Time synchronization of network channels and the device
6 【Video cover】 Set protected area of previewing and recording
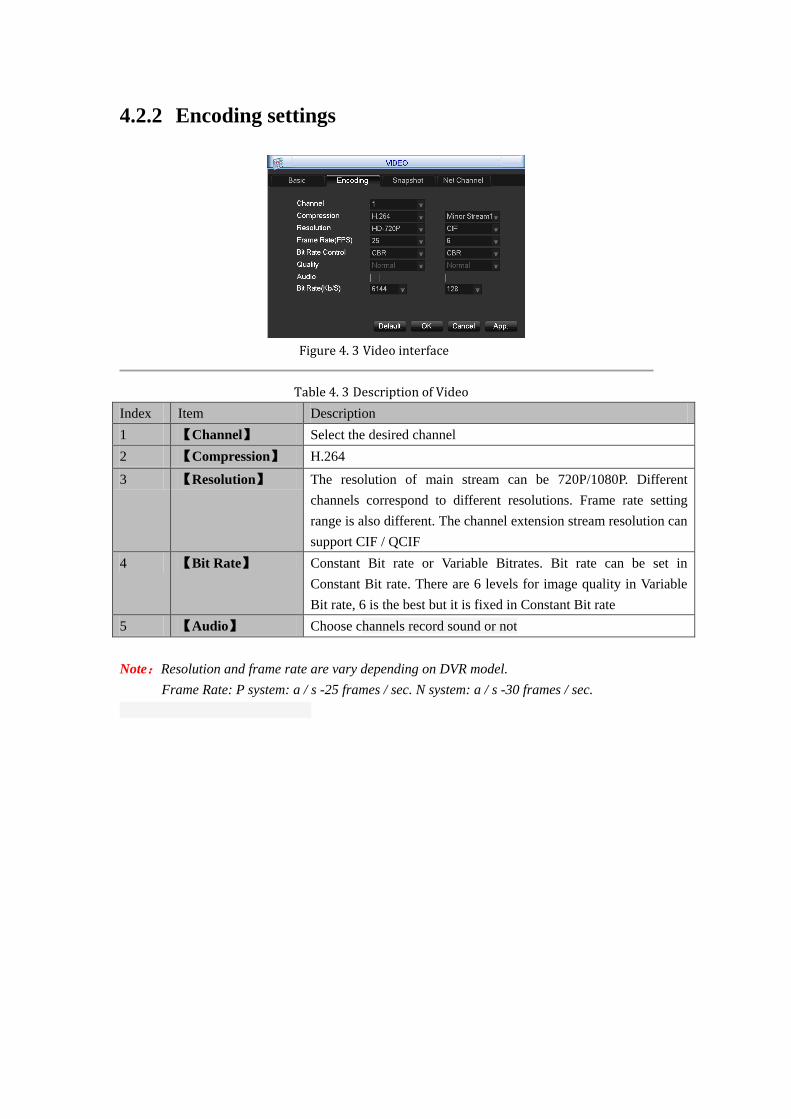
4.2.2 Encoding settings
Figure 4. 3 Video interface
Table 4. 3 Description of Video
Index Item Description
1 【Channel】 Select the desired channel
2 【Compression】 H.264
3 【Resolution】 The resolution of main stream can be 720P/1080P. Different
channels correspond to different resolutions. Frame rate setting
range is also different. The channel extension stream resolution can
support CIF / QCIF
4 【Bit Rate】 Constant Bit rate or Variable Bitrates. Bit rate can be set in
Constant Bit rate. There are 6 levels for image quality in Variable
Bit rate, 6 is the best but it is fixed in Constant Bit rate
5 【Audio】 Choose channels record sound or not
Note:Resolution and frame rate are vary depending on DVR model.
Frame Rate: P system: a / s -25 frames / sec. N system: a / s -30 frames / sec.

4.2.3 Snapshot
Figure 4. 4 Snapshot interface
Table 4. 4 Description of Snapshot
Index Item Description
1 【Channel】 Select a channel
2 【Mode】 Trigger: Crawl images when alarm
3 【Image Size】 CIF capture
4 【Image Quality】 There are 6 levels of quality
5 【Snapshot
frequency】
set highest capture rate for single channel,1s/pc 2s/pc 3s/pc 4s/pc
5s/pc 6s/pc 7s/pc 8s/pc
4.2.4 Net Channel
First, open the enable switch.
Figure 4. 5 Video-Net channel interface

Table 4. 5 Description of Net Channel
Index Item Description
1 【Channel】 Select the desired channel
2 【Protocol】 Choose a protocol supported by IPCs
3 【Address IP】 Input the IP of the IPC
4 【Port】 Input the port of the IPC
5 【User name】 Input the user name of the IPC
6 【Password】 Input the password of the IPC
7 【Detect】 After completing of the above settings, click the detection
button. The dev ice will connect with the IPC and return the
connection status
8 【Search】 Select an appropriate protocol and search. Double click the
search results, and then the device will automatically be added
and return to the network channel interface. You need to fill in
the user name and the password
Figure 4. 6 Search Device interface
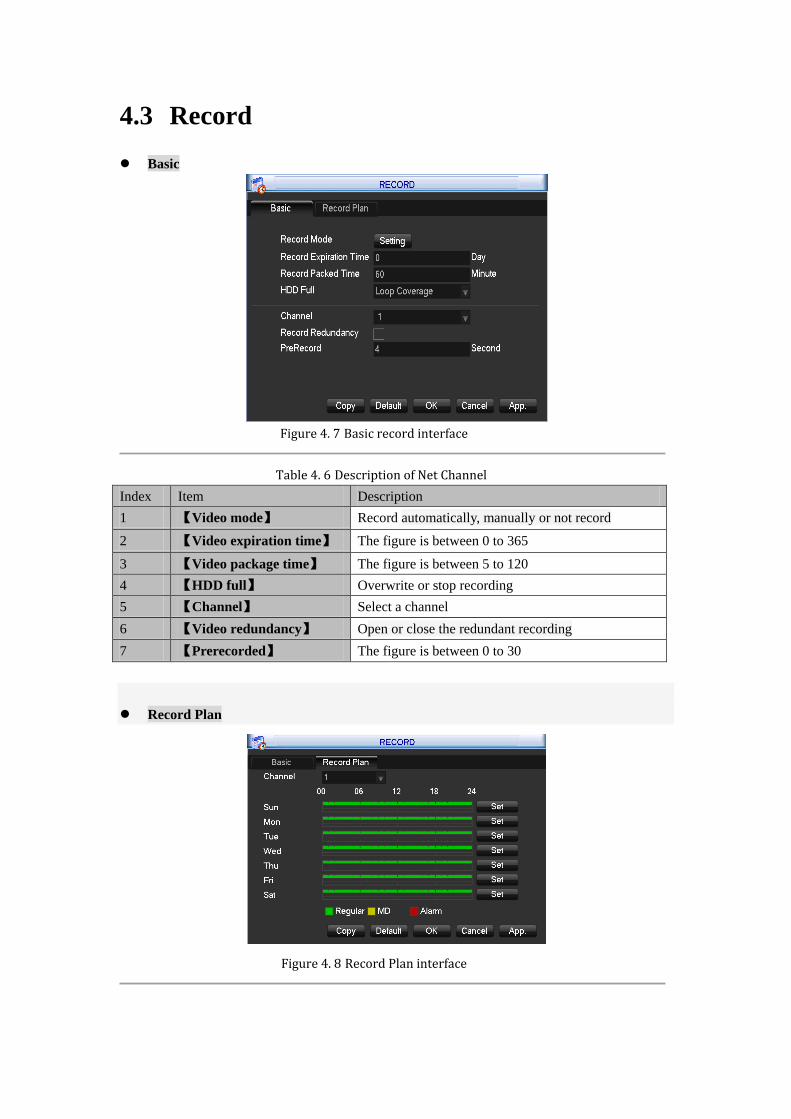
4.3 Record
Basic
Figure 4. 7 Basic record interface
Table 4. 6 Description of Net Channel
Index Item Description
1 【Video mode】 Record automatically, manually or not record
2 【Video expiration time】 The figure is between 0 to 365
3 【Video package time】 The figure is between 5 to 120
4 【HDD full】 Overwrite or stop recording
5 【Channel】 Select a channel
6 【Video redundancy】 Open or close the redundant recording
7 【Prerecorded】 The figure is between 0 to 30
Record Plan
Figure 4. 8 Record Plan interface
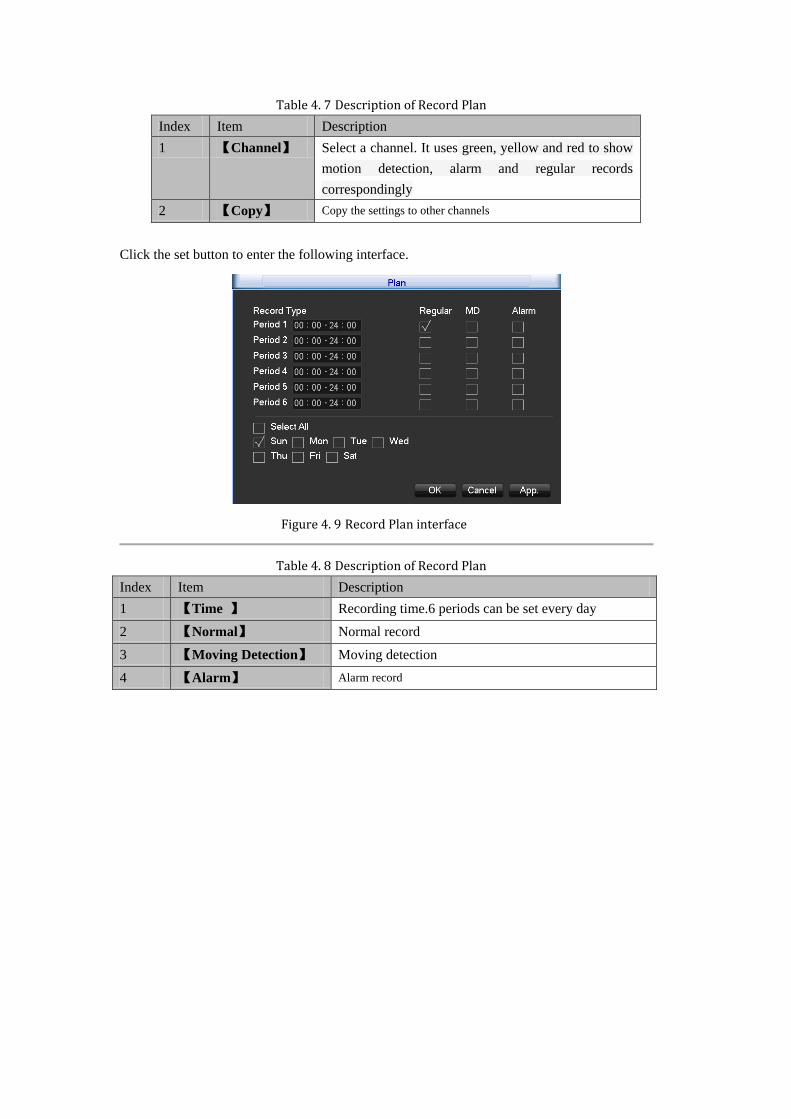
Table 4. 7 Description of Record Plan
Index Item Description
1 【Channel】 Select a channel. It uses green, yellow and red to show
motion detection, alarm and regular records
correspondingly
2 【Copy】 Copy the settings to other channels
Click the set button to enter the following interface.
Figure 4. 9 Record Plan interface
Table 4. 8 Description of Record Plan
Index Item Description
1 【Time 】 Recording time.6 periods can be set every day
2 【Normal】 Normal record
3 【Moving Detection】 Moving detection
4 【Alarm】 Alarm record
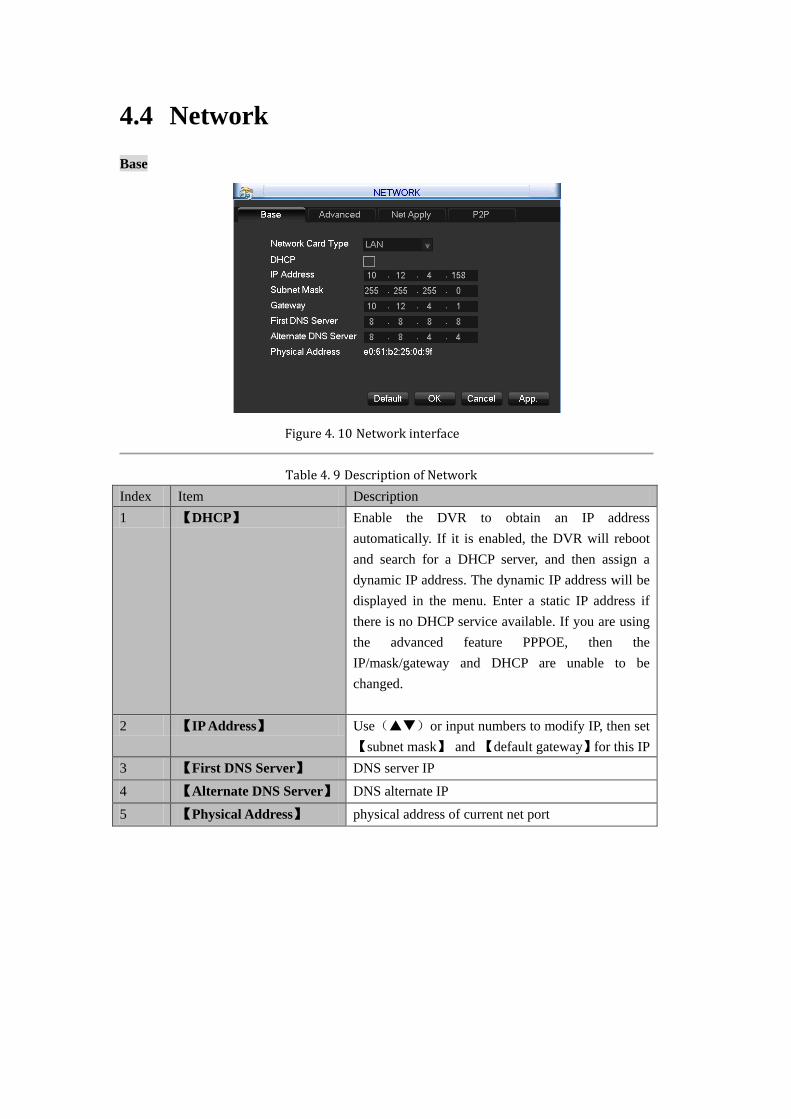
4.4 Network
Base
Figure 4. 10 Network interface
Table 4. 9 Description of Network
Index Item Description
1 【DHCP】 Enable the DVR to obtain an IP address
automatically. If it is enabled, the DVR will reboot
and search for a DHCP server, and then assign a
dynamic IP address. The dynamic IP address will be
displayed in the menu. Enter a static IP address if
there is no DHCP service available. If you are using
the advanced feature PPPOE, then the
IP/mask/gateway and DHCP are unable to be
changed.
2 【IP Address】 Use()or input numbers to modify IP, then set
【subnet mask】 and 【default gateway】for this IP
3 【First DNS Server】 DNS server IP
4 【Alternate DNS Server】 DNS alternate IP
5 【Physical Address】 physical address of current net port

Advance
Figure 4. 11 Network advance interface
Table 4. 10 Description of Network advance
Index Item Description
1 【TCP】 default: 8000, variable
2 【HTTP】 default: 80
3 【UDP】 default: 8001
4 【Multicast】 tick ‗Multicast‘ and set a group in ‗Set‘, IP should be
limited as follow picture, port no limit
Net Apply
Figure 4. 12 Net Apply interface
Table 4. 11 Description of Network apply
Index Item Description
1 【DDNS】 Enable the DVR to register a DDNS hostname, which runs on a
fixed IP address web client. Select DDNS type(NO-IP DDNS,
Dyndns DDNS, HiDView DDNS and so on)Input the registered
server‘s IP, port, username and password. Once completed, you can
login in the Web client by inputting the domain name in IE.
2 【Email】 Enable the function. Set the SMTP server‘s port, username,
password, the sender‘s mailbox and receiver‘s mailbox
3 【FTP】 Choose to upload records or images.
Set FTP server‘s IP address and port (Default:21) .
Create a account in FileZilla Server in the computer.
Fill in the username, password and remote directory which have
been created. Set file length, channel, and time for recording,
type and date and so on. Tick alarm, motion and general records
or images to upload.
4 【NTP】 On/Off NTP. The network time protocol allows the DVR to sync
with NTP server time automatically.
Server IP: Input IP of NTP server.
Port:The default port is 123.
Update cycle: The interval time is between 1 to 65535 min
5 【IP Filter】 DVR authority management. If you enable the white list, only
the filled IPs can be connected. This system supports a max of
64 IPs.
6 【Network
Transmission】
Transfer modes and the number of network connections,
downloads
7 【Alarm
server】
reserved interface
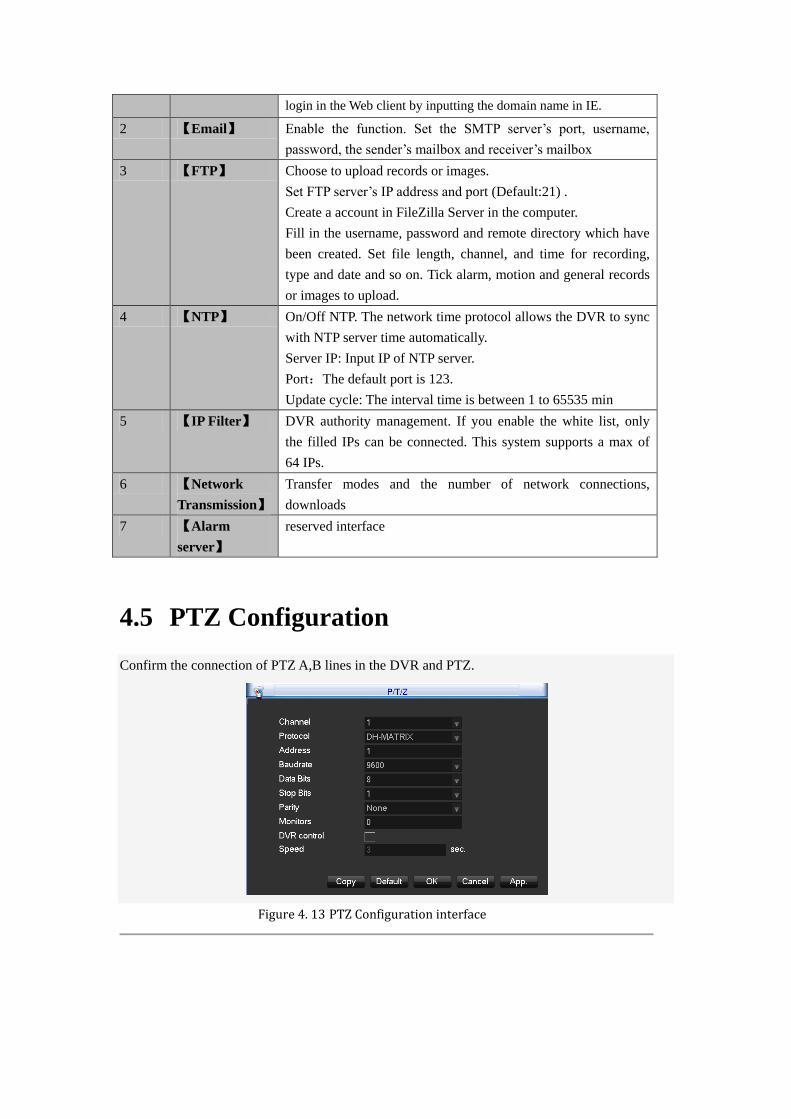
4.5 PTZ Configuration
Confirm the connection of PTZ A,B lines in the DVR and PTZ.
Figure 4. 13 PTZ Configuration interface
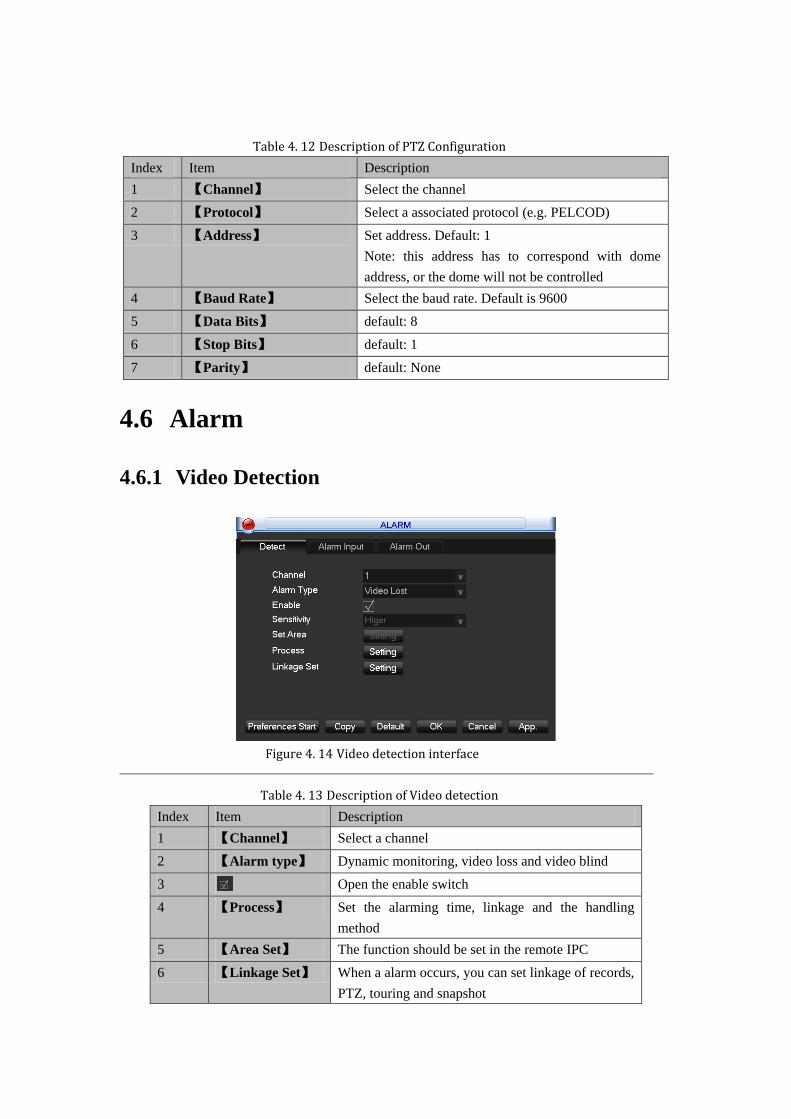
Table 4. 12 Description of PTZ Configuration
Index Item Description
1 【Channel】 Select the channel
2 【Protocol】 Select a associated protocol (e.g. PELCOD)
3 【Address】 Set address. Default: 1
Note: this address has to correspond with dome
address, or the dome will not be controlled
4 【Baud Rate】 Select the baud rate. Default is 9600
5 【Data Bits】 default: 8
6 【Stop Bits】 default: 1
7 【Parity】 default: None
4.6 Alarm
4.6.1 Video Detection
Figure 4. 14 Video detection interface
Table 4. 13 Description of Video detection
Index Item Description
1 【Channel】 Select a channel
2 【Alarm type】 Dynamic monitoring, video loss and video blind
3 Open the enable switch
4 【Process】 Set the alarming time, linkage and the handling
method
5 【Area Set】 The function should be set in the remote IPC
6 【Linkage Set】 When a alarm occurs, you can set linkage of records,
PTZ, touring and snapshot
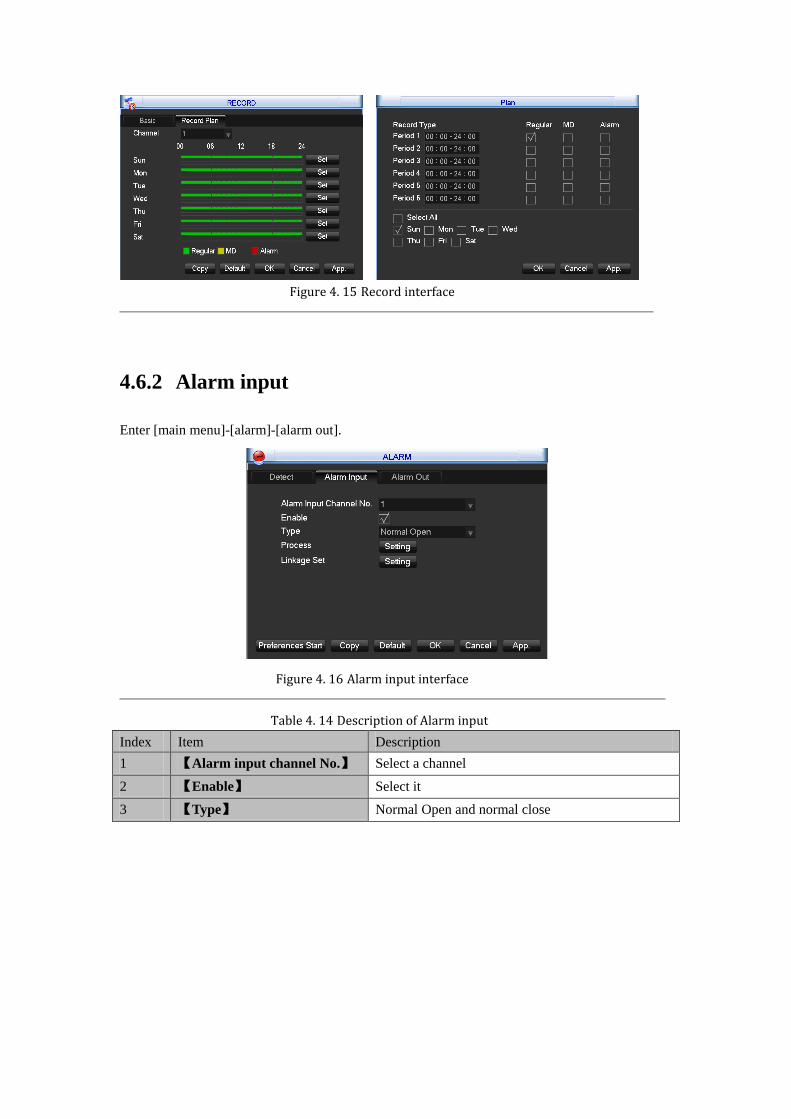
Figure 4. 15 Record interface
4.6.2 Alarm input
Enter [main menu]-[alarm]-[alarm out].
Figure 4. 16 Alarm input interface
Table 4. 14 Description of Alarm input
Index Item Description
1 【Alarm input channel No.】 Select a channel
2 【Enable】 Select it
3 【Type】 Normal Open and normal close
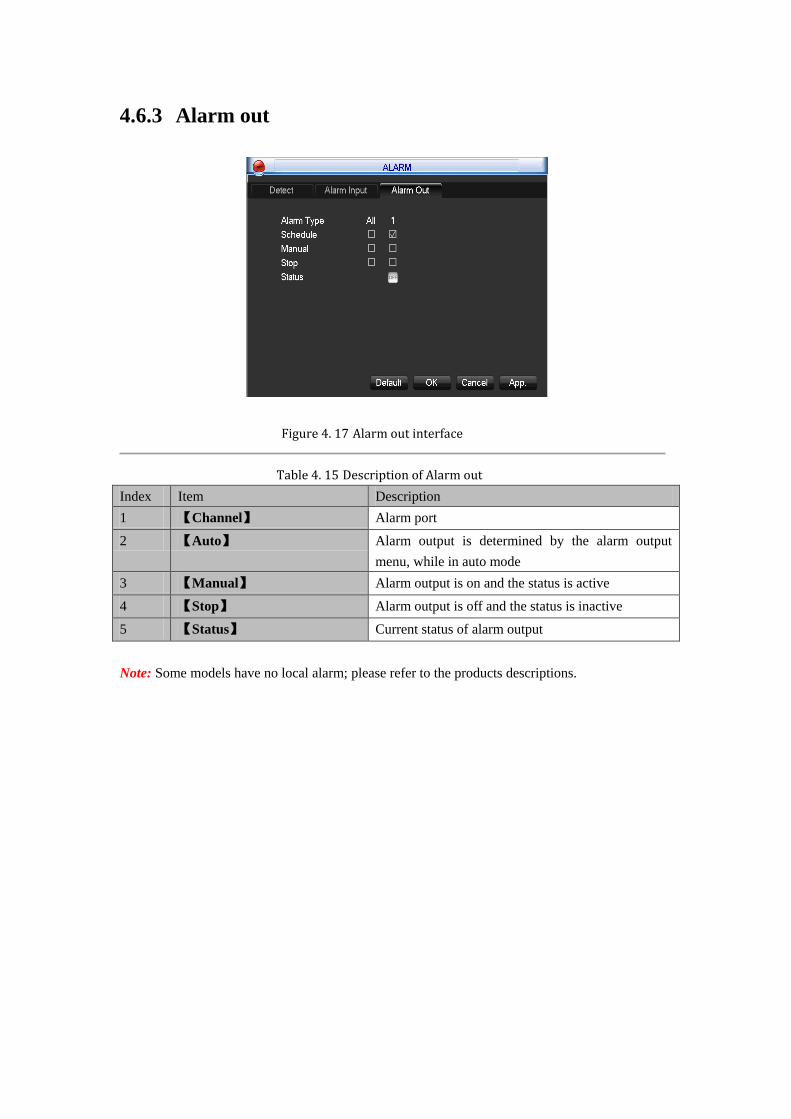
4.6.3 Alarm out
Figure 4. 17 Alarm out interface
Table 4. 15 Description of Alarm out
Index Item Description
1 【Channel】 Alarm port
2 【Auto】 Alarm output is determined by the alarm output
menu, while in auto mode
3 【Manual】 Alarm output is on and the status is active
4 【Stop】 Alarm output is off and the status is inactive
5 【Status】 Current status of alarm output
Note: Some models have no local alarm; please refer to the products descriptions.
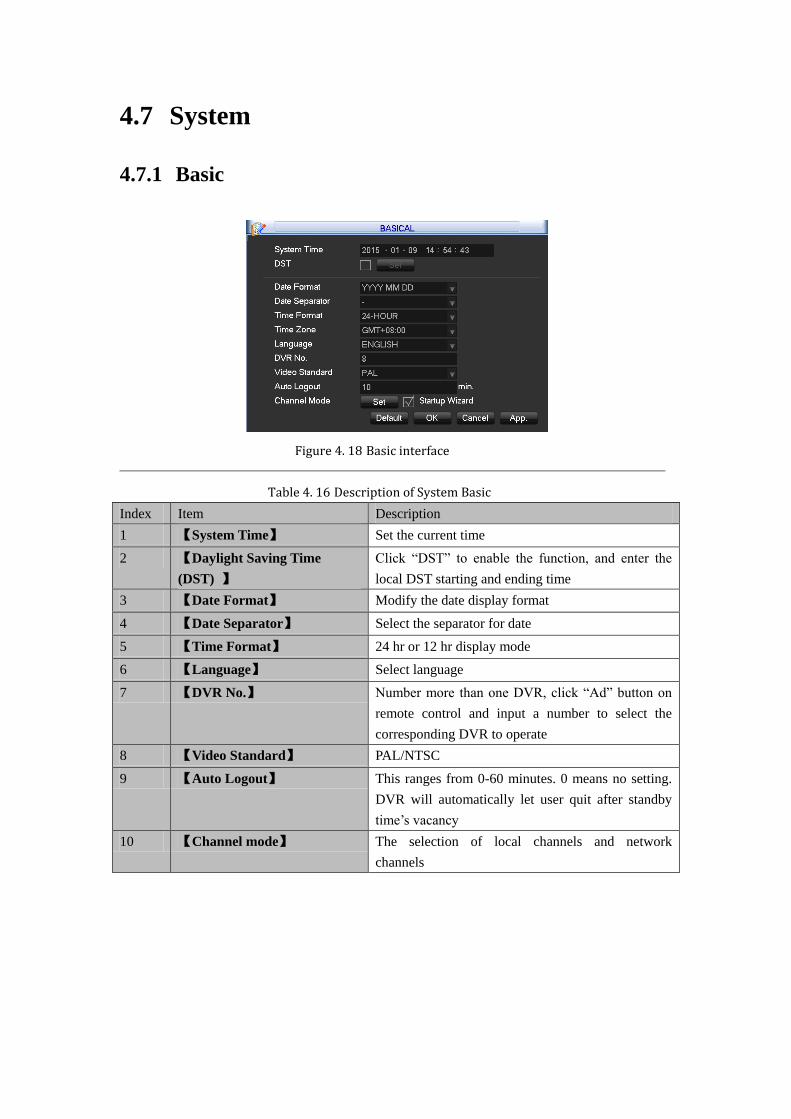
4.7 System
4.7.1 Basic
Figure 4. 18 Basic interface
Table 4. 16 Description of System Basic
Index Item Description
1 【System Time】 Set the current time
2 【Daylight Saving Time
(DST) 】
Click ―DST‖ to enable the function, and enter the
local DST starting and ending time
3 【Date Format】 Modify the date display format
4 【Date Separator】 Select the separator for date
5 【Time Format】 24 hr or 12 hr display mode
6 【Language】 Select language
7 【DVR No.】 Number more than one DVR, click ―Ad‖ button on
remote control and input a number to select the
corresponding DVR to operate
8 【Video Standard】 PAL/NTSC
9 【Auto Logout】 This ranges from 0-60 minutes. 0 means no setting.
DVR will automatically let user quit after standby
time‘s vacancy
10 【Channel mode】 The selection of local channels and network
channels

4.7.2 Display
Output mode
Figure 4. 19 Output Mode interface
Table 4. 17 Description of Output mode
Index Item Description
1 【Menu Transparency】 Adjust transparency
2 【VGA Output】 Select VGA resolution. The default is
1024×768@60Hz
Tour configuration
Setting tour mode and interval between rotation , the time is within 5-120s,the mode include
single screen, four-, eight-, nine-, sixteen-screen.
Figure 4. 20 Tour configuration interface
Table 4. 18 Description of Tour configuration
Index Item Description
1 【Motion Tour Type】 Set the motion detection tour mode
2 【Alarm Tour Type】 Set the alarm tour mode
Note: Shortcut Setting: click the button at the top right corner of the monitoring picture or press
the Shift Key to switch, you can control the tour.
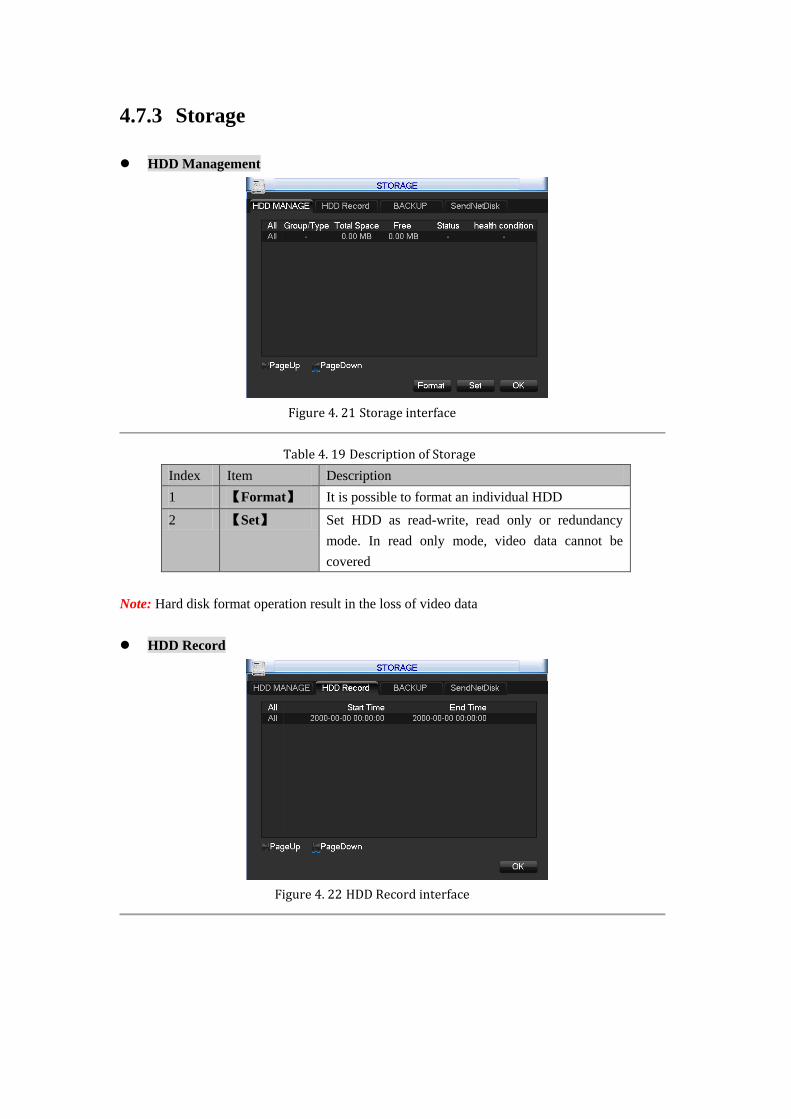
4.7.3 Storage
HDD Management
Figure 4. 21 Storage interface
Table 4. 19 Description of Storage
Index Item Description
1 【Format】 It is possible to format an individual HDD
2 【Set】 Set HDD as read-write, read only or redundancy
mode. In read only mode, video data cannot be
covered
Note: Hard disk format operation result in the loss of video data
HDD Record
Figure 4. 22 HDD Record interface
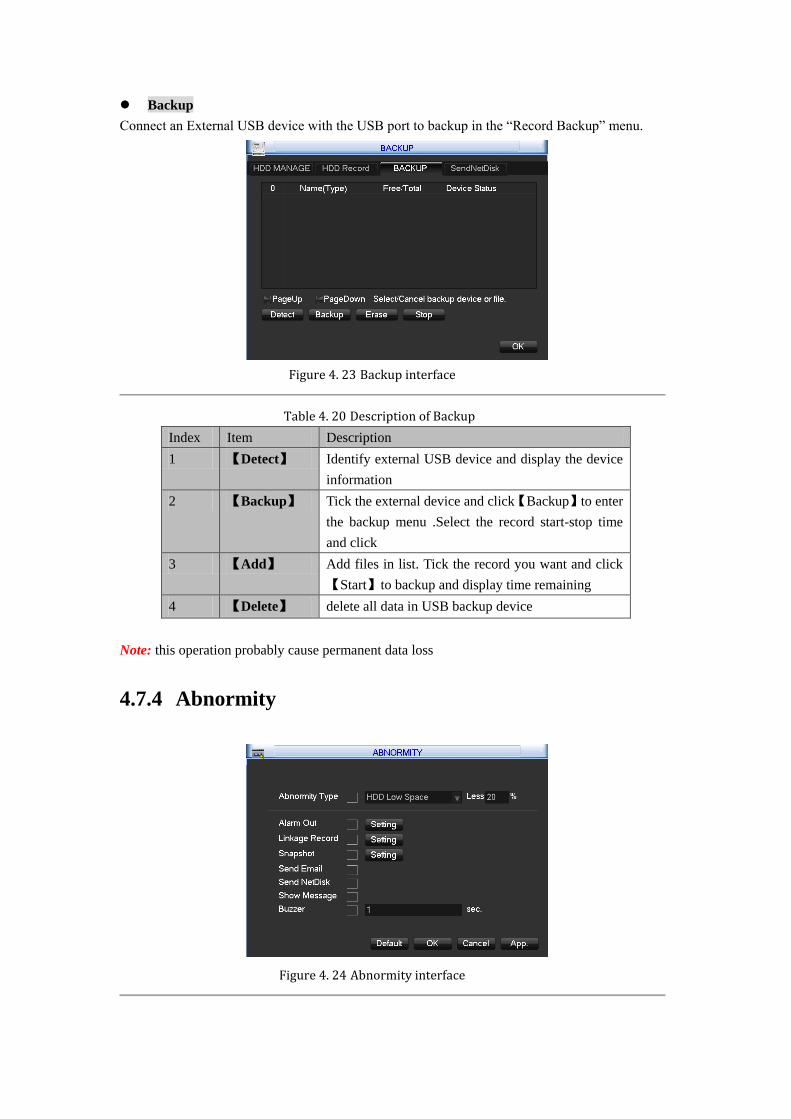
Backup
Connect an External USB device with the USB port to backup in the ―Record Backup‖ menu.
Figure 4. 23 Backup interface
Table 4. 20 Description of Backup
Index Item Description
1 【Detect】 Identify external USB device and display the device
information
2 【Backup】 Tick the external device and click【Backup】to enter
the backup menu .Select the record start-stop time
and click
3 【Add】 Add files in list. Tick the record you want and click
【Start】to backup and display time remaining
4 【Delete】 delete all data in USB backup device
Note: this operation probably cause permanent data loss
4.7.4 Abnormity
Figure 4. 24 Abnormity interface
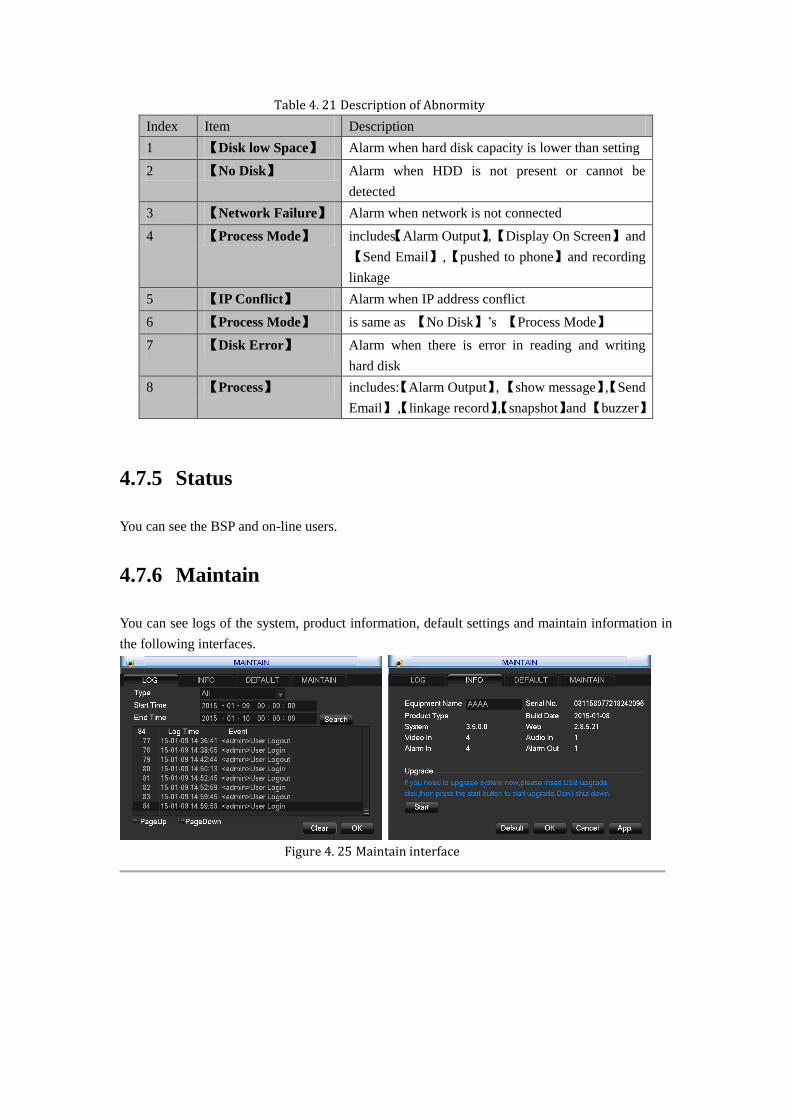
Table 4. 21 Description of Abnormity
Index Item Description
1 【Disk low Space】 Alarm when hard disk capacity is lower than setting
2 【No Disk】 Alarm when HDD is not present or cannot be
detected
3 【Network Failure】 Alarm when network is not connected
4 【Process Mode】 includes【Alarm Output】, 【Display On Screen】 and
【Send Email】,【pushed to phone】and recording
linkage
5 【IP Conflict】 Alarm when IP address conflict
6 【Process Mode】 is same as 【No Disk】‘s 【Process Mode】
7 【Disk Error】 Alarm when there is error in reading and writing
hard disk
8 【Process】 includes:【Alarm Output】, 【show message】,【Send
Email】 ,【linkage record】,【snapshot】and 【buzzer】
4.7.5 Status
You can see the BSP and on-line users.
4.7.6 Maintain
You can see logs of the system, product information, default settings and maintain information in
the following interfaces.
Figure 4. 25 Maintain interface

4.7.7 Account
Figure 4. 26 Account interface
Table 4. 22 Description of Account
Index Item Description
1 【Add users】 add group member information and set authorities.
Default users are: ―admin‖, ―user‖ and hidden ―default‖, the password of first
two username is 123456. ―admin‖ has advanced authorities; ―user‖ only has
surveillance and playback authority. Hidden default: operate in password-less
login mode, cannot delete, DVR login in this name automatically if ―no user
login‖,user can revise limits of power then operate some without login.
Enter【Add users】input username, password and select group and reusable
options. Reusable allows the account to be used by multiple logins.
A user can only belong to one group. User rights cannot exceed group rights.
2 【Modify users】 modify existing group member information and authority
3 【Add group】 add group and set group authorities. Set a group and authorize 60 items
including control panel, shut down, live view、playback, record, record
backup, PTZ control, account, system information, alarm in /out setting,
system configuration, search log, log delete, upgrade, operation authority, etc.
4 【Modify group】 modify existing group information
5 【Modify
Password】
change password. Select a username input the old password and new
password twice. Click【Save】to confirm
Password can be in 1-6 numbers, letters or symbol; blank in beginning and
end is invalid.The account with management authority could change others‘
password.
Note: Group and user names can be from 1-6 characters in length. Valid characters include letter,
numbers, and limited symbols: underline, subtraction sign, dot, you may not use a space as a
leading or ending character.
There is no limit to the number of groups or users. By default there are two different group levels:
admin and user. User management determined upon two levels: the group and the user level.
Group and user names cannot be duplicated, and each user can only belong to one group.

4.7.8 RS232
Figure 4. 27 RS232 interface
Table 4. 23 Description of RS232
Index Item Description
1 【Function】 Select the appropriate the serial
2 【Baud Rate】 Set baud rate
3 【Data Bit】 Default: 8
4 【Stop Bit】 Default: 1
5
Note: Some models are without an RS-232 port, please see Specifications.

Chapter 5 Web and Client

5.1 Web Operation
5.1.1 Network Connection
H&M Series
Check network connection by LCD on front panel, ― ‖ refers connection error.
P Series
Check B-Lamp on front panel, light indicates connection.
Set IP, subnet mask and gateway for computer and DVR. Please assign the same segment IP
address without router, need to set the appropriate subnet mask and gateway with router.
The detail of DVR network configuration please see【Configuration】→【Network Setting】
Ensure the IP is correct and check whether the DVR is on the network by using the Windows
command ―ping‖.
5.1.2 The control installation and the user login logout
Users can remote access to DVR by Internet Explorer, assuming you have a correct network
configuration.
The following interface will pop up when you access the IP address in Internet Explorer.
Figure 5. 1 Login Screen
Install ActiveX: Right click and choose install. If installation is blocked by Windows, please add
the IP as a trusted site or lower your Internet Explorer security settings to allow this.
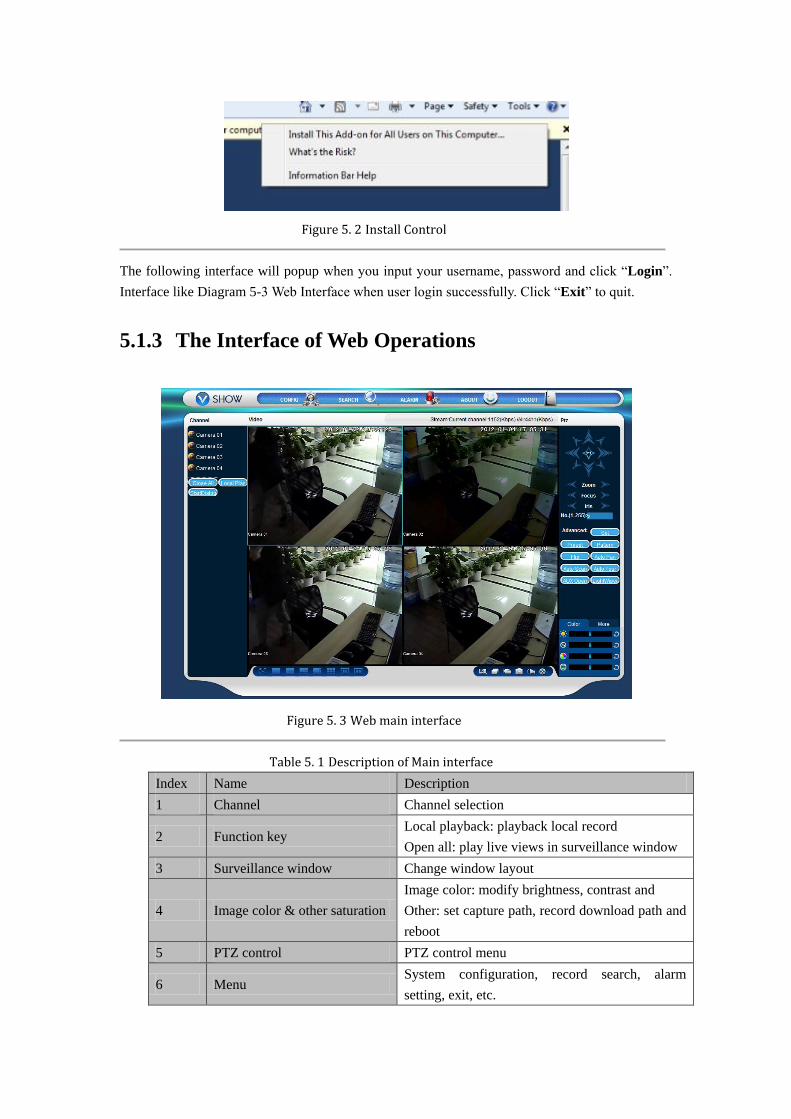
Figure 5. 2 Install Control
The following interface will popup when you input your username, password and click ―Login‖.
Interface like Diagram 5-3 Web Interface when user login successfully. Click ―Exit‖ to quit.
5.1.3 The Interface of Web Operations
Figure 5. 3 Web main interface
Table 5. 1 Description of Main interface
Index Name Description
1 Channel Channel selection
2 Function key Local playback: playback local record
Open all: play live views in surveillance window
3 Surveillance window Change window layout
4 Image color & other saturation
Image color: modify brightness, contrast and
Other: set capture path, record download path and
reboot
5 PTZ control PTZ control menu
6 Menu System configuration, record search, alarm
setting, exit, etc.
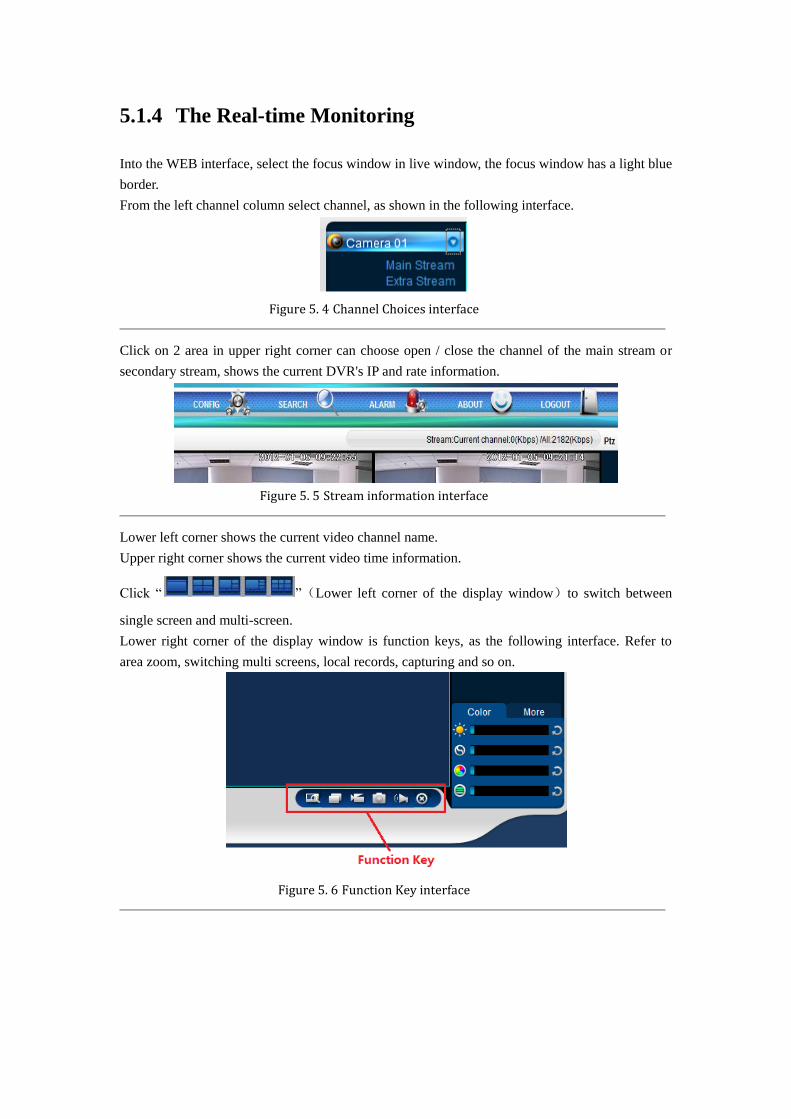
5.1.4 The Real-time Monitoring
Into the WEB interface, select the focus window in live window, the focus window has a light blue
border.
From the left channel column select channel, as shown in the following interface.
Figure 5. 4 Channel Choices interface
Click on 2 area in upper right corner can choose open / close the channel of the main stream or
secondary stream, shows the current DVR's IP and rate information.
Figure 5. 5 Stream information interface
Lower left corner shows the current video channel name.
Upper right corner shows the current video time information.
Click ― ‖(Lower left corner of the display window)to switch between
single screen and multi-screen.
Lower right corner of the display window is function keys, as the following interface. Refer to
area zoom, switching multi screens, local records, capturing and so on.
Figure 5. 6 Function Key interface
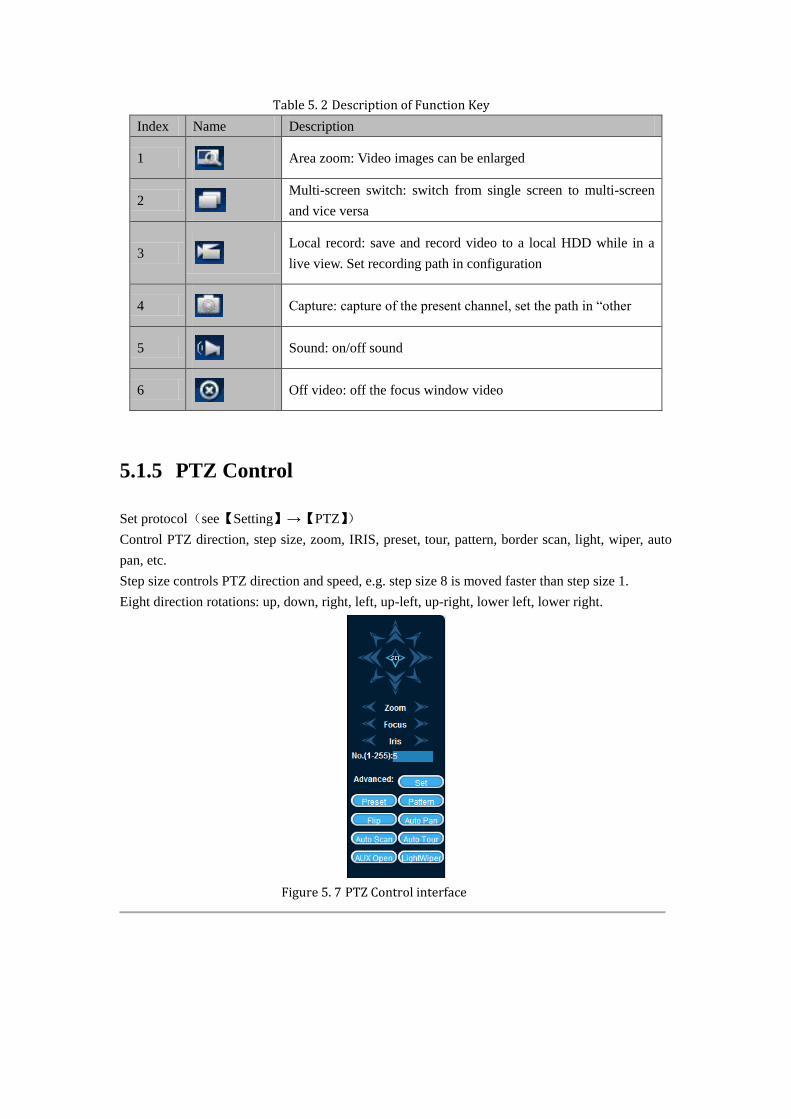
Table 5. 2 Description of Function Key
Index Name Description
1
Area zoom: Video images can be enlarged
2
Multi-screen switch: switch from single screen to multi-screen
and vice versa
3
Local record: save and record video to a local HDD while in a
live view. Set recording path in configuration
4
Capture: capture of the present channel, set the path in ―other
5
Sound: on/off sound
6
Off video: off the focus window video
5.1.5 PTZ Control
Set protocol(see【Setting】→【PTZ】)
Control PTZ direction, step size, zoom, IRIS, preset, tour, pattern, border scan, light, wiper, auto
pan, etc.
Step size controls PTZ direction and speed, e.g. step size 8 is moved faster than step size 1.
Eight direction rotations: up, down, right, left, up-left, up-right, lower left, lower right.
Figure 5. 7 PTZ Control interface

Table 5. 3 Description of PTZ Control
Index Name Description
1 Border scan
Operation: select the camera line scan of the left/right margin by
direction button, and click the Settings button in the left /right
margin position to determine the left border
2 Preset
Operation: modify preset position by direction button and
inputting a preset number, then click ―Add‖ to save
3 Tour
Operation: select ―Tour‖; Point between the first cruise line
cruise input box value. And input numbers in ―Path‖ and
―preset‖. Click【Add Preset】to add one preset in the cruise path,
and repeat to add additional presets. Click 【Clear Preset】to
delete a preset, repeat to delete more
4 Pattern
Operation: Click ―Pattern‖ in order to record an automated
pattern. Then, go back to the PTZ controls in order to modify the
zoom, focus and IRIS, etc. Stop recording in ―Pattern‖ setting to
save the pattern
5 AUX On/off one of AUX
6 Wiper On/off wiper under protocol
5.1.6 Configuration
Access DVR local configuration menu by click ―System Setting‖, the further details please refer
【Local operation guide】
Figure 5. 8 Configuration interface
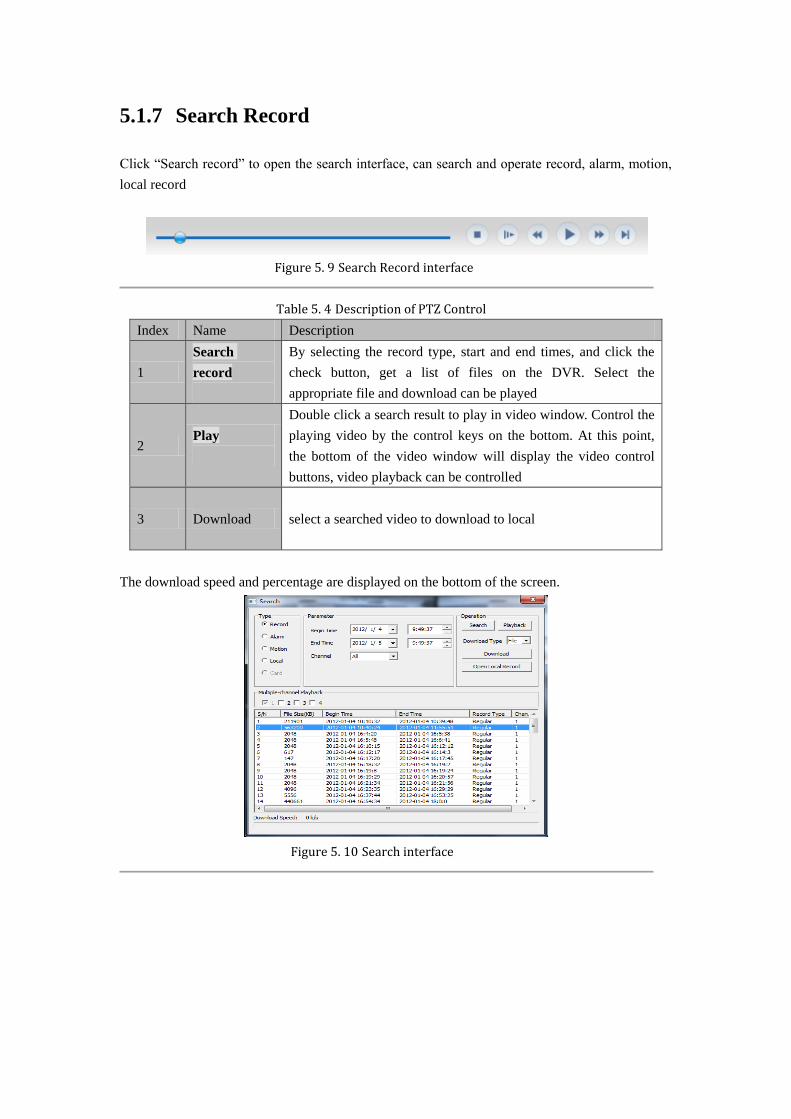
5.1.7 Search Record
Click ―Search record‖ to open the search interface, can search and operate record, alarm, motion,
local record
Figure 5. 9 Search Record interface
Table 5. 4 Description of PTZ Control
Index Name Description
1
Search
record
By selecting the record type, start and end times, and click the
check button, get a list of files on the DVR. Select the
appropriate file and download can be played
2 Play
Double click a search result to play in video window. Control the
playing video by the control keys on the bottom. At this point,
the bottom of the video window will display the video control
buttons, video playback can be controlled
3 Download select a searched video to download to local
The download speed and percentage are displayed on the bottom of the screen.
Figure 5. 10 Search interface

5.1.8 Alarm Configuration
Click the 【Alarm】 to enter the alarm setup menu, users can set up and operate the alarm mode.
Figure 5. 11 Alarm configuration interface
Choose type of alarm on menu, monitor video loss, motion detection, disk full, disk error, video
mask, external alarm.
Click 【Video Pop-up】, open the video loss, motion detection, hard disk full, hard disk failure,
video block, video encoder alarm pop-up linkage.
Click 【prompt】open the prompt: When an alarm occurs in real-time monitoring will popup alarm
window menu.
Click 【Sound Pop-up】, you can choose alarm tone pre-recorded on the local hard drive when an
alarm occurs, tone file in WAV format.
5.1.9 About
Please refer to WEB controls related version information.
5.2 The Client Operations
Please refer to description of HiDView.

Chapter 6 Appendix
6.1 Expansion function
NO-IP(www.no-ip.com)
Register
Register new username at no-ip, click 【Create Account】.
Create domain name, click 【Add a Host】.
Embedded DVR Setting
Open 【Main Menu】→【Management】→【Network】→【Advanced】→【DDNS】→【Enable】
Table 6. 1 DDNS Setting
Name Configuration
DDNS NO-IP DDNS
IP dynupdate.no-ip.com
Port 80
Domain name xxx.xxx.org
Username xxx
Password xxxxxx
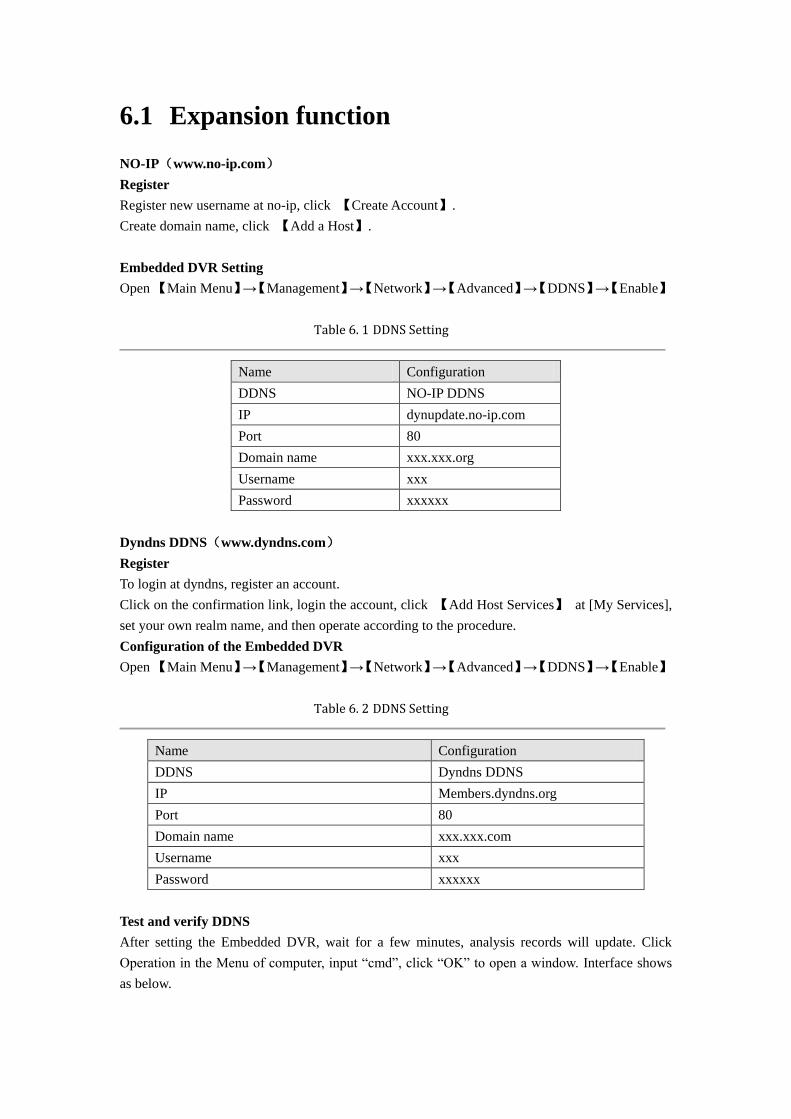
Dyndns DDNS(www.dyndns.com)
Register
To login at dyndns, register an account.
Click on the confirmation link, login the account, click 【Add Host Services】 at [My Services],
set your own realm name, and then operate according to the procedure.
Configuration of the Embedded DVR
Open 【Main Menu】→【Management】→【Network】→【Advanced】→【DDNS】→【Enable】
Table 6. 2 DDNS Setting
Name Configuration
DDNS Dyndns DDNS
IP Members.dyndns.org
Port 80
Domain name xxx.xxx.com
Username xxx
Password xxxxxx
Test and verify DDNS
After setting the Embedded DVR, wait for a few minutes, analysis records will update. Click
Operation in the Menu of computer, input ―cmd‖, click ―OK‖ to open a window. Interface shows
as below.

Figure 6. 1 CMD interface
Input ―ping+ Domain name‖ then presses Enter, as the Ping DNS interface
shows.
Figure 6. 2 Ping DNS interface
The computer will analyze the domain name which is set in the DVR and return to the current IP,
as the picture shows underlined in red. When the IP correspond to the embedded DVR‘s IP in
Public internet, it means the DDNS is setting right. If they are not, please check the network
connection of embedded DVR and DDNS information.
Port Mapping
Port mapping is mapping a port of outside web host‘s IP address to a machine inside web, and
provide the service. When user connects to the port of the IP, the server will automatically map the
request to the corresponding machine inside LAN.With the function of port mapping, we can map
many ports of a machine‘s IP address to different machines‘ different ports inside web. The port
mapping can also have other special agent functions, like POP, SMTP, TELNET, etc.
Theoretically, it can provide more than sixty thousand ports. For example, if we want to map a
web server which has an IP address of 192.168.111.10, we just need to input the IP address and
TCP port 80 into the port mapping chart of the router. There are two ways to map the port: UPnP
function automatically map and modify the router‘s port mapping chart by manual.
Manual port mapping
The first step
Connect the Embedded DVR to the Router, set the static IP.
The second step
Log in Router, enter into the configuration menu of Router, and set the menu. Then get to port, set
the IP distributed by the Embedded DVR, and set the rule of port mapping, add HTTP and TCP
port into mapping list.
Default access ports of Embedded DVR include HTTP port 80 and TCP port 8000, if the
ports are occupied by the other devices; please modify the default port of the Embedded DVR into
other vacant ports.
The third step
Input the public net IP address in the IE, and add the port number of the Embedded DVR you want
to access after the IP, for example: http://155.157.12.227:81. If you want to access by Client
Software, you can use the outer net TCP port directly.
Note: for detail configuration setting, please refer to the user manual of Router.
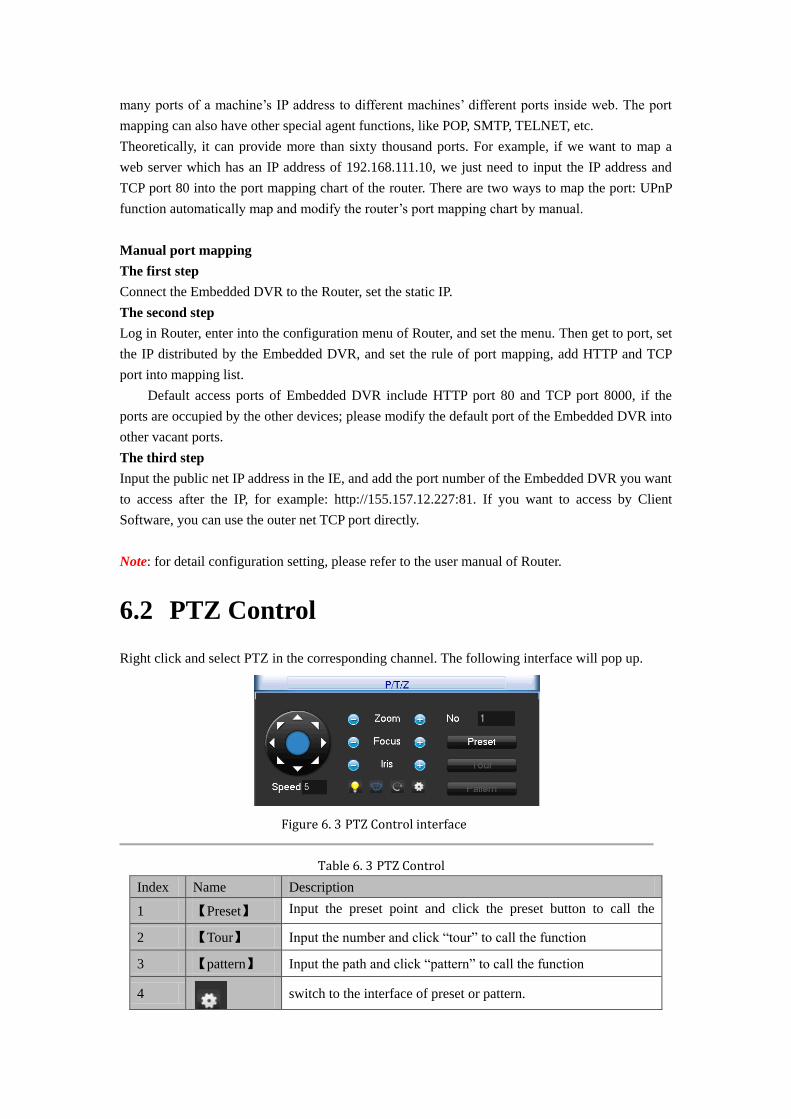
6.2 PTZ Control
Right click and select PTZ in the corresponding channel. The following interface will pop up.
Figure 6. 3 PTZ Control interface
Table 6. 3 PTZ Control
Index Name Description
1 【Preset】 Input the preset point and click the preset button to call the
function 2 【Tour】 Input the number and click ―tour‖ to call the function
3 【pattern】 Input the path and click ―pattern‖ to call the function
4
switch to the interface of preset or pattern.

Preset
Figure 6. 4 Preset interface
Choose preset and input a figure in the input box. Click [Add Preset] to save. Or input the desired
preset value in the preset input box and click [delete preset] to delete.

6.3 HDD Capacity Calculation
6.3.1 Reference of HDD Capacity Calculation
The first time install DVR, please check if the HDD has installed.
The capacity of the HDD
There is no limitation of capacity of single HDD to DVR, please choose the HDD according to the
saving time.
The choose of the Capacity
Computational formula of HDD Capacity:
Whole HDD Capacity = number of the channels × time in need (hour) × spent of HDD Capacity
per hour (MB/hour)
Similarly we can have the formula of recording time:
annelAmountofChhrrHourcupationpeCapacityOc
pacityTotalHDDCahourtimeR
)(
)()(
MB/
MBecording
Note: 1GB=1000MB, not 1GiB=1024MiB, so HDD capacity shown in Base Configuration
under HDD Management less than real marked.
File size per hour (CBR).
Table 6. 4 Record file size
Bit Rate File Bit Rate File Bit Rate File
96k 42M 320k 140M 896k 393M
128k 56M 384k 168M 1.00M 450M
160k 70M 448k 196M 1.25M 562M
192k 84M 512k 225M 1.50M 675M
224k 98M 640k 281M 1.75M 787M
256k 112M 768k 337M 2.00M 900M
File size is more unpredictable when VBR style, please refer to the real size of recording file.
6.3.2 Hard disk problem
Use Detection Tool provided by the HDD manufacturer to detect the Function of HDD to solve
data problem.
We recommend Seagate and Western Digital.
How to detect Seagate HDD
a) Get into www.seagate.com, Click Support & Downloads choose Sea Tools, download tool,
as Diagram 7-1:
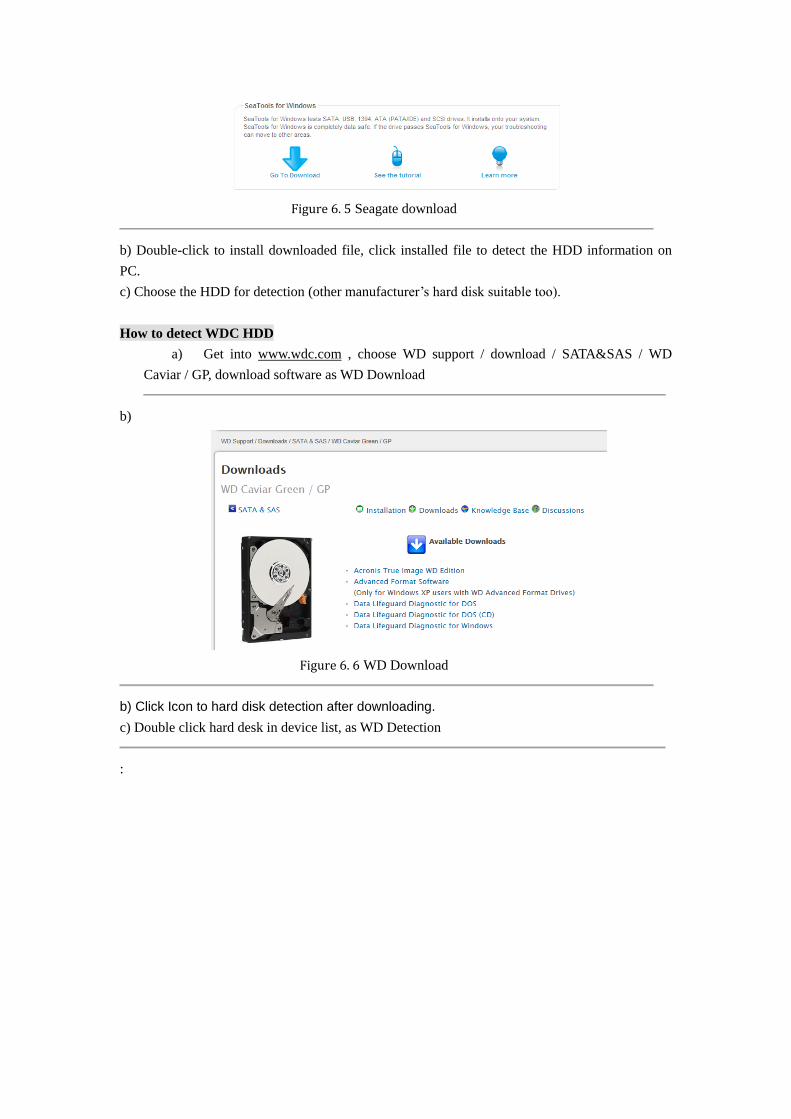
Figure 6. 5 Seagate download
b) Double-click to install downloaded file, click installed file to detect the HDD information on
PC.
c) Choose the HDD for detection (other manufacturer‘s hard disk suitable too).
How to detect WDC HDD
a) Get into www.wdc.com , choose WD support / download / SATA&SAS / WD
Caviar / GP, download software as WD Download
b)
Figure 6. 6 WD Download
b) Click Icon to hard disk detection after downloading.
c) Double click hard desk in device list, as WD Detection
:
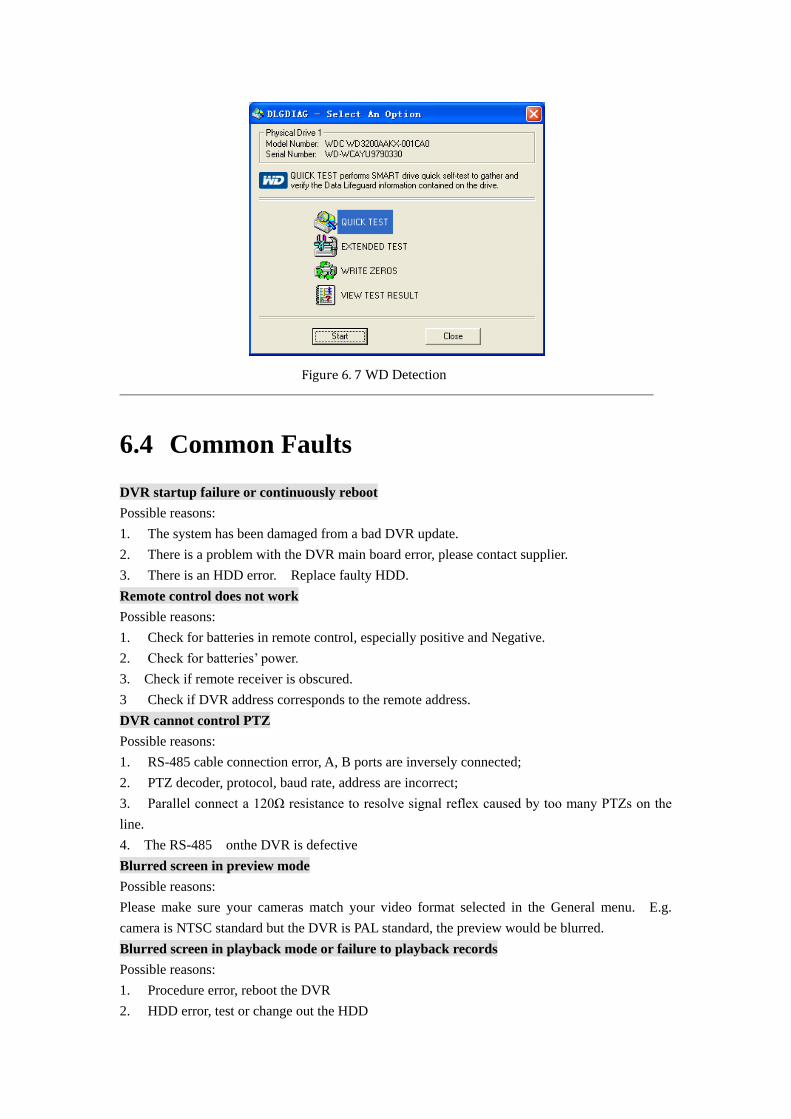
Figure 6. 7 WD Detection
6.4 Common Faults
DVR startup failure or continuously reboot
Possible reasons:
1. The system has been damaged from a bad DVR update.
2. There is a problem with the DVR main board error, please contact supplier.
3. There is an HDD error. Replace faulty HDD.
Remote control does not work
Possible reasons:
1. Check for batteries in remote control, especially positive and Negative.
2. Check for batteries‘ power.
3. Check if remote receiver is obscured.
3 Check if DVR address corresponds to the remote address.
DVR cannot control PTZ
Possible reasons:
1. RS-485 cable connection error, A, B ports are inversely connected;
2. PTZ decoder, protocol, baud rate, address are incorrect;
3. Parallel connect a 120Ω resistance to resolve signal reflex caused by too many PTZs on the
line.
4. The RS-485 onthe DVR is defective
Blurred screen in preview mode
Possible reasons:
Please make sure your cameras match your video format selected in the General menu. E.g.
camera is NTSC standard but the DVR is PAL standard, the preview would be blurred.
Blurred screen in playback mode or failure to playback records
Possible reasons:
1. Procedure error, reboot the DVR
2. HDD error, test or change out the HDD
3. DVR hardware failure, contact your local supplier
Fail to connect DVR through network
Possible reasons:
1、check the physical network connection is correct.
2、check the DVR network configuration parameters.
3、check whether IP conflicts exist in network.
Download records can’t be played
Possible reasons:
1 、Player installation error.
2 、The USB or HDD device has an error.
3 、Do not install graphic software later than DX8.1.
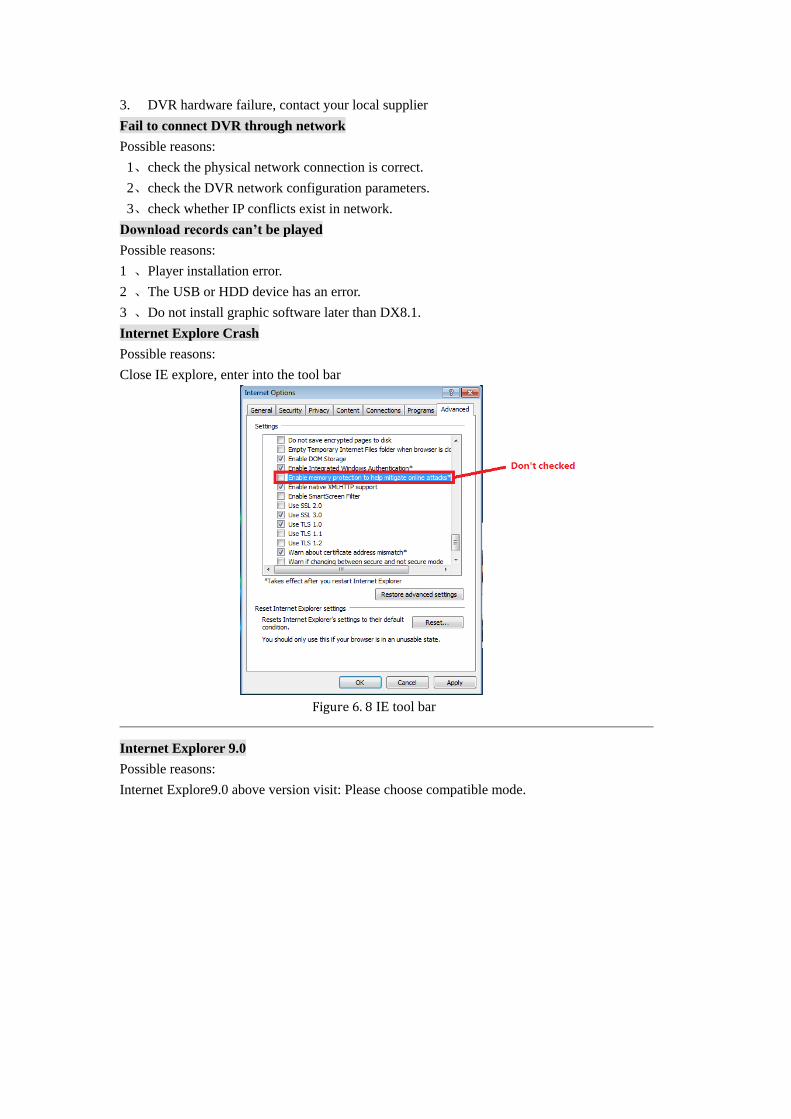
Internet Explore Crash
Possible reasons:
Close IE explore, enter into the tool bar
Figure 6. 8 IE tool bar
Internet Explorer 9.0
Possible reasons:
Internet Explore9.0 above version visit: Please choose compatible mode.