
Web viewTelephone: (you may have multiple entries with ISD/STD code)
Upload
nguyendienCategory
view
214download
0
DIGITAL MP3 PLAYERUSER MANUAL
A-629
0

Please read this manual carefully before operating your unit
Keep this manual convenient for reference.
CatalogueCatalogue-------------------------------------------------------------------------------------------
1

1
1. Preface-------------------------------------------------------------------------------------------2
2. Declaration--------------------------------------------------------------------------------------2
3. Function summarization---------------------------------------------------------------------2
4. Get to know the musical player------------------------------------------------------------3
5. Basic function operation-------------------------------------------------------------------- 4
6. Keys operation definition--------------------------------------------------------------------5
7. Play music --------------------------------------------------------------------------------------5
8. Transform ACT recording files into WAV-------------------------------------------------
7
9. Use FM radio set (Optional)----------------------------------------------------------------7
10. System setting--------------------------------------------------------------------------------
8
11. Electron documentation (optional)-----------------------------------------------------11
12. Use telephone book function (optional)-----------------------------------------------
11
13. Use USB disk-------------------------------------------------------------------------------14
14. Upgrade the player------------------------------------------------------------------------14
15. Other settings-------------------------------------------------------------------------------16
16. Key recommendation---------------------------------------------------------------------19
2

17. USB drive install----------------------------------------------------------------------------
21
18. Troubleshooting----------------------------------------------------------------------------21
19. Follow accessory---------------------------------------------------------------------------
22
20. Technical criterion--------------------------------------------------------------------------
22
1. Preface
This machine is the latest-generation digital walkman equipment. It supports
MP1, MP2, MP3, WMA, ASF and other musical format. Its excellent sound
3

effect, high reliability and graceful appearance match well with each other. It can
be called the first-class works. We whole-heartedly wish that it can bring you
super enjoyment of the digital time.
2. Declaration
Thank you for your purchase.
Please read this manual carefully before using your new player.
Contents in this manual may change possibly for better service.
We have the right to make changes to this manual without notice.
If you have any question with the direction, please search for more detailed
information from our company's website.
3. Function summarization
Exquisite pronouncement design, fashionable anti-rubbing nanometer lens
decorations.
Support many kinds of audio frequency patterns, such as MP1,MP2, MP3,
WMA, ASF, WAV and other musical formats.
Firmware upgrade function, offer latest upgrade software download in the
website, realize this machine's expansion of the function upgrade.
FM receiving, the function of strong automatic or manual searching radio
4

station, let you receive the programmed easily.
Without driving U-disk function, no need of managing program, it can pass on
data, no need of install driver in WIN2000 system or over it.
"Unusual degree space" disk mode, using the subsidiary tools, you can divide
the disk of this machine into two disks and encipher one of them, hide the
space, and prevent this part from seeing and reading, so as to hide the
secret.
Backlight display in blue with time setting.
You can record through the microphone and save them as the voice
documents of WAV and ATC mode. Sectionor contrast Replay, realizing the
true digital replay function.
Seven Equalizer, natural, rock, popular one, Folder, Repeat Folder, Repeat
all, Random, Intro.
Power off. You can set the sleeping and electricity-saving mode so as to use
it more conveniently.
With the full and audiovisual animation menu with corresponding words, you
can use it with high proficiency.
4. Get to know the musical player
Outward appearance and keys
5

1. USB JACK 2. HOLD 3. LCD
4. MODE 5. REC 6. HEADPHONE JACK
7. NECK STRING HOLE 8. PLAY/PAUSE 9. NEXT
10. PREV 11. VOL+ 12. VOL-
Screen display signal
6

1. Work mode 2. File mode / bitrate
3. Circulation mode 4. Song number/song total
5. Music impact mode 6. Play time
7. Electroform quantity reveal 8. Singer / song / Lyric show
Electricity quantity display
This product employs the control of nine-level electricity quantity.
When the electricity quantity is 1.5v, the display shows .
With the time up, the display of the electricity quantity will reduce. When the
battery is almost used up, the battery mode will change into blank . You
7

should change the battery in time.
5. Basic function operation
Enter the menu
You can enter all kinds of menus through pressing the MODE key.
The menu is divided into the main menu (if you want to stop please
press mode key for a long time), the playing sub-menu(press the key for a short
time) and the sub-menu in the stop situation (press the key for a short time).
Skimming operation
Choose the skimming songs and the menu items.
Fast forward and fast backward while playing.
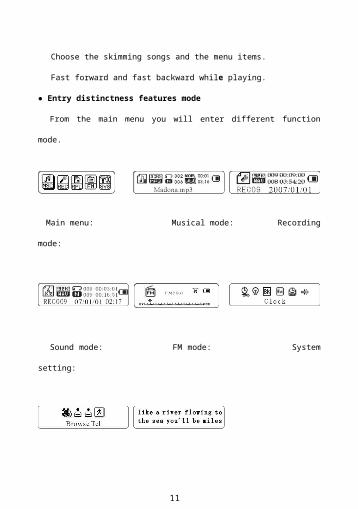
Entry distinctness features mode
From the main menu you will enter different function mode.
Main menu: Musical mode: Recording mode:
8

Sound mode: FM mode: System setting:
TEL Mode: TXT Mode:
Regulating the volume
Press the VOL- key for a short time to turn down the volume and the VOL+
key for a time to turn up the volume.
Turn on/ Turn off
Press the PLAY key for a long time to turn on or turn off the product.
Playing or stopping(record have stay function). From submenu exit.
9

Music mode. Short press Play key. Play music.
Play music. Short press Play key stop play.
Record/stay(short control).stop record (long control)
Record status. Short press Play. stop record
6. Keys operation
1. On "play": boot-strap/play/stop/off play. Here in after all shortened form
"PLAY" key.
2. "Mode" choose option. come into menu. There in after all shortened form
"mode key".
3. "VOL+" key: increase volume, swiftness addition.
4. "VOL-" key : minish volume, swiftness reduce.
5. " " : next item speed.
6. " ": next item, swiftness last.
7. " USB ":USB connector plugs.
8. " PHONES JACK ":earphone standard jack。9. " HOLD ":slide lock key.
10. " REC ":Come into recording mode.
7. Play music
10
Operation program
1. Connect to the phone and plug the phone jack into the product's phone jack.
CAUTION: Listening at high power for a long moment could damage users'
ears.
2. Press the PLAY key for a long time to start up the player and enter the
musical mode. Then you should press the PLAY key for a short time to play
the music.
3. Choose the music
:Choose the previous song
:Choose the next song
4. Control the volume
VOL+: increase the volume
VOL-: decrease the volume
Sound-effect mode:
1. While playing the music
2. Press the Mode Key for a short time to enter the sub-menu of playing.
11

3. press the key to choose.
4. Press the Mode Key for a short time to enter the choice menu of Sound-
effect mode and choose the menu item about Sound-effect mode.
sound effect mode choose:
5. All the Sound-effect illustration (EQ):
Natural 、Rock、Pop、Classial、Soft、Jazz、DBB
6. Press the key to choose and press the Mode key to confirm.
Sound record
Record please insure have enough Battery.
Display sustain every list file save.
Record in recording mode
1. Enter main menu:
2. Press to choose the recording mode.
3. Press the Mode Key for a short time to enter the recording mode.
12

4. Press the Play Key for a short time to start recording. ( Upwards operation,
you can press "REC" key come into recording interphase. )
The recorded sound, long press mode key is saved in "Recording Stopping
Sub-Menu/Master Disk Directory " to set the present directory.
If "Overflow" is displayed on the LCD, the player's memory is full .Please
delete other files to make some space available.
If "Over record" is displayed on the LCD, the current directory has already
had 99 recording files. Please switch to another directory.
Record process respond "Play" key.
Choose recording types
1. In recording stopping interface
2. Press the Mode Key for a short time to enter the recording sub-menu:
3. Press , choose Recording Type Sub-menu item Press the Mode Key for a
13

short time to enter this item.
record type choose interface:
4. Press to choose the suitable Recording Type and Press the Mode Key for
a short time to confirm the chosen type.
5. Press the Play Key to start recording.
Play recorded documents
1. Enter the main menu.
2. Press to chose playing mode.
3. Press the Mode Key to enter the Playing Mode Interface.
4. Re-press the Play Key to start playing.
5. Choose record documents.
Pre. key: choose front singleton record file.
Next key : choose singleton record file.
6. Command volume
VOL+: increase volume.
VOL -: decrease volume.
14

8. Transform ACT recording files into WAV
The ACT format files can be converted into WAV format files by changing
files' name. ACT to. WAV.
9. Use FM radio set (Optional)
1. Enter the main menu
2. Push the NEXT Key to choose the "Receiving Mode"
3. Press the Mode Key for a short time to enter the "Receiving Mode".
4. Automatic Searching
Press the " / " button for 2 seconds (long time press), the player will
auto search for the next Radio station with the 100KHz increment forward or
backward, it will not stop until the a clear radio station has been found. If you
want to cancel the auto search, just press the " / " button again.
5. Fine Tuning
Push the Last Key: single step backward for 100KHz.
Push the Next Key: single step forward for 100KHz.
6. Save the searched frequency
15

Press the Mode Key for a short time to enter the FM sub-menu and re- press
the Mode Key for a short time to save this broadcasting station.
7. Receive the saved broadcasting station
If there is one or more saved broadcasting station, you can press the Play
key for a short time to receive backward in sequence.
8. Inner recording function
You can record the programs what you like while listening to the
broadcasting station programs Press the Mode Key for a short time to enter FM
sub-menu to choose high quality recording or long time recording and you can
record the present program in the recording file. Press the Mode Key for a short
time to quit recording.
9. Control the volume:
VOL+: increase the volume
VOL-: decrease the volume
: You can save up to 20 radio stations in your MP3 player.
: To delete the radio station please refers to the section Delete file below.
10. System setting
16

How to get in
You can set the system parameter here and each item will change with the
upgrade of the firmware.
1. Enter the main menu
2. Press to choose the system setting.
3. Press the Mode Key for a short time to enter the system setting.
Parameter introduction
Recording TimeSet the recorded date and the time while saving
the recording files.
The Time in Poor
Light
The poor light carry out no operation after being
touched, the standing lighted time (second)
Backlight mode Backlight luminous moment.
Language Choice Set different languages
17

Power offSet a count -down time (minute), the product
will be shut down when the time is up
Replay setting Set the working situation on Replay
Contrast Regulation Set the screen's contrast
Online Mode Set the screen's contrast
Memory intoExamine the size of the memory and the
employment.
Firmware version The screen player's firmware edition
Firmware Upgrade The tied firmware upgrade
Exit Quit this interface
Detailed applying directions
Recording time Setting
1. System setting Interface
2. Press the Mode Key for a short time to enter the time recording interface.
Recording Time:
18
3. Press the VOL+ Key for a short time and start setting from the year (VOL- for
the opposite)
4. Press to increase the numerical value ( for the opposite)
5. Regulate done with press Mode key confirm exit.
"Backlight time" enactment
1.System Setting Interface 2.press to choose the
"backlight time"
3.Press the Mode Key for a short 4.Press / to regulate the
19

time to enter the time interface in
backlight.
time.
5.After that please press the Mode
Key to make sure to quit.
Language choice's Setting
Display different operation system languages.
Power off setting
Please refer to the operation method on the time setting in poor light.
The Electricity-saving Mode means: You can set such a time (unit: second).
In the state of stopping, it is calculated from no keystroke .The product is shut
down automatically to save the electricity when the time is up. The number 0
means this function is shut down.
Sleeping Mode means: You can set such a time (unit: minutes) In no matter
what state, it is calculated from no keystroke. The product is shut down
automatically when the time is up and this is used for listening to music before
sleeping.
Caution:
The Sleeping Mode is valid only once after setting .The set time will be
20

cleared automatically after shutting down. If you need that function, set it again
please.
Replay Setting
Refer to the operation about Sound-effect Mode.
The Manual Mode means: Replay A-B can not punctuate automatically. Only
the synthetic setting can do it. The Automatic Mode means that replay A-B can
do it automatically. (It is used for English reading in the state of no music.)
Contrast Regulation:
Refer to the time setting in the poor light.
Online mode
Please consult the setting of Sound-effect Mode to operation.
Some operation systems (the edition before Windows 2K SP4) can't support
the USB disk with two drive letters. So now you need choose to use which disk
(single common disk or single encrypted disk ) after using the function of
unusual degree space. The chosen disk will be displayed after connecting to the
computer.
Memory State
The numbers here means the total capacity of the disk and the percentage
shows the space rate that is used.
Firmware Edition
21

You can see the present Firmware Edition in the player.
Firmware Upgrade
It is the interface for upgrading the Firmware. Enter this interface before
firmware upgrade.
Press the Mode Key for a short time after setting the items and you can
press the Play Key for a short time to quit the menu. The Play Key which has
the function of quitting the menu is valid to all the menus.
11. Electron documentation (optional)
Electron document function
Enter main menu, press Next key choose electron documentation. Press
Mode key enter next menu:
Choose catalogue: choose remove disk root directory.
Press Mode key enter "choose catalogue" interface. Pass press next and
last choose you need read file catalogue, press Mode key exit Last menu. If you
need read file in the remove disk root directory. Follow desuetude choose
22

catalogue.
Choose file consult" choose catalogue mode" enactment.
Press Next key choose "file rad". Press Mode notarizes, you can read you
choose file. In the read time. Pass press Next key or Last key make time
thumb.
12. Use telephone book function (optional)
How to lookup telephone message
Enter main menu: Push Next key choose telephone, press Mode key enter
telephone book, Embody menu as follows:
1. Browse TEL
2. Import Tel File
3. Export Tel File
4. Exit
Press NEXT key choose "Browse TEL", press MODE key enter:
Press NEXT key choose you need lookup object. Press MODE key exit
interface.
Browse TEL, Browse import playing telephone book file, and inside include
Name, E-mail, Mobile telephone, QQ, Telephone, FAX, and communication tool
note. (Therein to must storage import telephone book can enter this function,
23

when system read anything telephone book file, system destined to hint: without
file, press MODE key exit.)
Import tell file: Use the function you can hold user at the computer making
finer telephone book file import update display.
Export tel file: Use this function can hold notes in the disk telephone book
datum export and create file. User in the computer can use furnish tool aim at
process edit.
Telephone book file set up and edit
Edit telephone book file
The disk set up telephone book file can through follow accessory install
program saddlebag set up.
1. Move "Tel book-exe" program. Push "open" key.
24

2. According to dialog box clew input correspond message, Push "Add" key
again. Here system will hold you infilling individual message record in list. If
you need add individual message, repeat handle will do.
3. Press save key, disk will appear one file name is "TEL-BOOK" file.
Here telephone book file already set up.
Telephone book edit
If you input error message, you can use hereinafter handle enter
modification.
1. Press you need modification individual message ubiety register cote. Here
individual message will appear this cote having register item.
25

2. In the individual message modification, Push "Add" key, system will clew:
3. Push "yes" this item already modification. This is note cote will appear one
and the same name two piece note, and message homology.
If modification is name, the will add one piece differ name's note,
hereinbefore handle follow Nought.
Telephone introduction and educe
Introduction telephone book
Use this function hold user in computer facture telephone book file
26

introduction renewal till disk, idiographic step as follows:
Use afford telephone edit tool Tel book.exe facture telephone book datum
save make Tel book. bin file.
Plug into USB line, would Tel book. bin file to copy disk root directory.
Open disk enter telephone book function and enter introduction telephone
book option.
Notarize anon shall just copy introduction Tel book. bin file the rein to content
introduction insert disk.
Educe telephone book
Uses this function can hold deposited in disk telephone book educe and
make file (Tel book-exe), use on the computer Can use afford tool aim at
Process edit? Idiographic step as follows:
Open disk enter telephone book function and enter educe telephone book
option.
Notarize anon shall disk inside telephone book datum educe.
Plug into USB line, In the root directory can locate Tel book. bin file namely
educe telephone book file, copy anon, user can aim at Process edit.
13. Use USB disk
27

The product has the standard USB Disk which supports Windows98 (you
should install the drive program), the system over Windows 2K, Mac OS X 10.3
and over it.
The product supports the USB and offers electricity to the small machine. It
can play without the battery. Please press the Mode Key for a short time in the
waiting state and it will quit to the main menu. Then you can choose the working
mode to enter again.
The product supports the Suspend Mode.
Pass the PC join: play have three display mode.
1.Waiting Situation 2. In the process of
downloading the data
3. Sending the data
14. Upgrade the player
The player can use the tool software installed in the computer to upgrade or
28

maintain the system firmware.
1. Enter main menu
2. Press the to choose the system setting.
3. Press the Mode Key for a short time to enter the system setting.
4. Press the to choose the firmware upgrade.
5. Connect the player to PC.
6. Run the upgrading tool of PC "MP3 Player Update", then click the button "
choosing the new edition hard files".
7. Choose the new firmware program
8. Click the button "Starting to upgrade", the system will begin the upgrade.
9. If you have done the upgrade successfully, the player will hints the following:
29

Firmware upgrade is the function for promoting and optimizing the player. If
you don't use it, the common run of the player itself will not be affected.
Firmware upgrade may cause the product unworkable because of the wrong
operation. Please read the direction carefully before operation. This operation is
suitable to the people with certain basic computer operation knowledge.
The firmware upgrade software of this player can not apply to other players,
vice versa.
15. Other settings
Choose different catalogues (stop sub-menu)
30

It is possible to use a different directory rather than the root directory for the
recording or music playback. The MP3 player can support up to 9 directories,
which the MP3 can use to playback files in there. To do that please, follow the
steps below.
1.In the stopping interface(the
example here is the Music Mode,
recording and playing can choose
the directory)
2. Press Mode Key to enter the
stopping sub-menu.
3. Re-press the Mode Key to enter
the directory choice interface.
4. Press the or the to
choose In The directory.
5. Mode Key to confirm the
31

chosen directory.
Caution: You can set the corresponding individual directory. about Music Mode,
Recording Mode and Playing Mode. That means these three modes are not in
the same directory.
Delete documents (stop sub-menu)
In music mode expand. Sound mode, and FM mode all can delete
comparatively file and keep broadcasting station.
1.In the stopping interface. (FM
naught stop interphase)
2. Press Mode Key to enter the
stopping sub-menu.
3. Press the or the and
choose the single file or all files in
the menu.
4. Press Mode Key for a short time
to enter Deleting interface
32

5. Press the to change "NO" to
"YES".
6. Press the Mode Key to confirm
and then begin to delete.
All the deletion will delete all the related files of the present mode that are
under the present directory.(For example, The action of deleting all in the Music
Mode can only delete the music files but the recording files will not be deleted.)
In FM Radio you can delete the pre-saved radio station in a similar fashion.
Caution: When you are deleting the folder in your computer, be sure to take off
the player safely before plugging out the USB string. Otherwise it will be
showed that the files are not deleted. If the capacity of the battery is low, no
operation for file deletion.
Playing Mode ( Playing the sub-menu)
You can choose different playing modes (like repetition or cycle) while
playing music or recording files. The first item in the playing sub-menu is
Playing Mode. When the choice is confirmed, the player will play according to
the setting rule.
33

REPEAT
NormalNonce list song play done with. Carry over play after
one list music. onto play done with having file stop.
Repeat One Repeat playing one single song
Folder Play all the music in the playing folder.
Repeat Folder Repeat play file inside having music.
Repeat All Repeat playing the music in the directory
SHUFFLE
Random Play the music in the present folder randomly
INTRO
IntroPlay the first ten seconds of all the music in the
present folder in sequence.
Tempo rate (play sub-menu)
You can choose different playing speed (Becoming quicker or slower) when
playing the music (only valid to MP3 files) and recording files. But the tone will
not change.
1. During the music playing.
2. Press the Mode Key for a short time to enter the playing sub-menu.
3. Press the to choose the item of tempo rate menu.
34

4. Press the Mode Key for a short time to enter the menu of the choice of
playing speed.
5. Press the to accelerate the playing, press the Last Key to slow down the
playing.
Caution: Such speed of changing will aim at each song and this will last until
the change of next setting.
Replay Mode (Playing sub-menu)
Get into through playing the sub-menu.
Replay A-B
1. Music playing and playing recording.
2. Press the Mode Key for a short time to enter to play the sub-menu.
3. Press the to choose the menu item of Replay A-B mode.
4. Press the Mode Key for a short time to enter the Replay A-B mode Press the
to confirm the starting point -A.
Press the to confirm the starting point -B.
5. Press the key to confirm the A, then appear B, wait and confirm the B.
6. Press the key to confirm the B.
The replay sign A-B is firm. The product begins to play repeatedly between
the point of A and B. Reaching the set times, it will quit the Replay Mode. You
can press the to re-confirm the point A in this mode. ( About the playing times,
35

you should refer to the Replay times in the next chapter.)
In the replay mode: Repeat mode. you can press VOL+ or VOL-to enter the
playing speed page and press the / to select the playing speed.
The function of reading along ( the voice mode do not have this
function )
1. The product is Replay A-B.
2. Press the to enter the replay mode.
3. The replay sign A-B is changed into the reading alone sign . The product
begins to record the users' voices. The time length is the Replay time of the
former A-B.
4. When the time is up, it plays the original voice, and the sign changes into .
You can press the to enter the contrast function at this time.
Press the to come back to the Replay A-B state at this time.
The contrast function(the voice mode do not have this function )
1. Entering the contrast function, the Replay sign shows as , the original
36

voice is played at this time.
2. After that, the sign is changed into . The reading along voice of the users
is played.
Press the to come back to the state of the replay function now.
In above these three states, you can press the Mode Key for a short time to
quit Replay mode.
Replay times (play sub-menu)
Refer to the time setting of background light.
The replay times determine to quit after how many times of the replay A-B.
Replay gap (play sub-menu)
Refer to the time setting of background light.
The replay gap determines how long the halt time is between this playing and
the previous one (unit: second ).
16. Key recommendation
Unusual Degree Space Function
The general MP3 users are bothered by the leakage of the data. They
don't want their personal data to be seen by others. They should delete these
37

secrets before their friends' lending and this brings a lot of trouble. From now on
the Unusual Degree Space Function offered by this product can solve this
problem completely.
The users can divide the USB disk into two parts randomly with the tool in
this product ( They can see two drive letters in their computers , SP4 should be
installed in Windows 2k, otherwise they can see only one drive letter. If they
want to see another one, they should choose "single common disk " or " single
encrypted disk". in system setting / online mode), encrypt one part ( If not
encrypted, they use two disks.) and hide the content. Without the password
other people can not see this data.
This is the wonderful Unusual Degree Space Function.
1. Connect the player with the computer.
2. Run the installing program kit in this product Mp3 Player Disk Tool.
3. First you will see formatted tool, choose "division and encrypting " item
Please. Choose a suitable capacity for the encrypted disk and pick up the
user name or password. Input the user name in "New User Name" and input the
password in " New Password ". Input the same password in "New Password
Confirmation".
Click the "Start" button, then the division begins.
38

4. The division finishes, the hints are the following.
5. The computer hints new startup after "Confirmation", and confirms this
process.
6. You can see two drive letters after startup (You can only see one drive letter
in the edition before Windows 2k Sp4 ). You will see three files, two of them
are hidden, one is executed file after clicking the encrypted disk. The space
of the disk is only 300K.
39

7. Run the executed file "Rdisk Decrypt.exe" and input the user name and the
pass-word in the dialog box. If correct, the disk can be entered and you can
copy files into it.
8. Connecting the product with the computer each time, you should input the
user name and the password to enter the encrypted disk.
Caution: The action of dividing one disk to two will clean out all the data in the
disk. Please backup the data in the disk in advance. Putting two parts into one
will may clean out all the data.
Warning: Please do not lose the user name and password you input otherwise
you can not use the encrypted disk and can only cancel this the encrypted disk
by combining the partitions. This will spoil the files in the encrypted disk.
40

17. USB drive install
Caution:
1. At FM radiogram state, please don't join USB.
2. At WINDOWS98 system. Maybe appear join USB fixture can not up to snuff
handle or disk symbol not reveal phenomena: here, please open install disk
file straight double click setup. exe press clue on install instanter OK.
18. Troubleshooting
No Power
* Check whether the battery have been inserted
properly.
* Check whether the player is turned ON.
No sound is heard
from earphone.
* Check whether Volume is set "0" and connect
the earphone plugs firmly.
*Check whether the earphone plug is dirty.
* Corrupted MP3 may make a static noise and
the sound may cut off.
*Make sure that the music files are not corrupted.
Characters in LCM
are corrupted
* Check whether the right language has been
selected.
41
FM Reception is
poor.
*Adjust the position of the headphone and player.
*Turn off the power of other electric devices near
the player.
*The headphone may be used as the antenna.
Download of
music files fails.
* Check whether USB cable is damaged and
connected properly.
*Check whether driver is installed correctly.
*Check whether the player's memory is full.
19. Follow accessory
USB line one
Earphone one
Instruction Book one
Installation CD one
AAA Battery one
20. Technology specification
Appearance 79*29*19*(mm)
42

Size
Weight 25g ( cont including battery )
Screen Lattice (128x32) LCD Screen, blue color background
Join the
computer
High-Speed USB2.0 Read speed (MAX):3MB byte/s
Write speed (MAX): 3MB byte/s
CPU Flashing
Memory128MB, 256MB, 512MB, 1GB, 2GB
Power Supply 10 hours
Recording
Rate 8KHz
Record formatWAV (32K bps)、ACT (8K
bps)
Record time35 Hours (AC , 128M
Flash)MP3、WMA、A
SF
Earphone max power (L)10mW(R)10mW(32Ohm)
MP3 bit rate 8K bps - 320K bps
WMA, ASF bit rate 5K bps - 384K bps
Frequency response 20Hz- 20KHz
Signal to Noise ratio 85dB
43

Distortion <0.05%
FM radio
(Optional)
The range of receiving
frequency
76MHz - 90MHz /
87MHz - 108MHz
Channel Number 20+20
The biggest output
power of the
headphone
(L)10Mw
(R)10mW(32Ωhm)
SNR 45dB
Music Formats
supportedMP1、MP2、MP3、WMA、ASF、WAV
Temperature
range-5 ~ +40 Degree
Language
support
Simplified Chinese、Complex Chinese、English、German、French rank sixteen country language.
Operating
systemWindows98/SE/ME/2K/XP、Mac OS 10、Linux 2.4.2
Remark: Mp3 player design and spec may change without notice.
MP3.5A-1
44

CAUTION
The apparatus shall not be exposed to dripping or splashing and that no
objects filled with liquids, such as vases, shall be placed on the apparatus.
Minimum distances around the apparatus for sufficient ventilation.
The ventilation should not be impeded by covering the ventilation openings
with items, such as newspapers, table-cloths, curtains, etc.
Do not place the product in closed bookcases or racks without proper
ventilation.
No naked flame sources, such as lighted candles, should be placed on the
apparatus.
The use of apparatus is in moderate climates.
When the mains plug or an appliance coupler is used as the disconnect
device, the disconnect device shall remain readily operable.
Before scrapping the appliance, remove the batteries and place them in the
appropriate battery collection container.
45


