Digital Mobile Radio - Montgomery County : Home
146
ASTRO ® XTL TM 5000 Digital Mobile Radio W3 Control Head User's Guide
Transcript of Digital Mobile Radio - Montgomery County : Home

ASTRO®
XTLTM
5000Digital Mobile Radio
W3 Control Head
User's Guide


AST
RO
® X
TL™
500
0 D
igita
l Mob
ile
Rad
io w
ith W
3 C
ontr
ol H
ead
Qui
ck R
efer
ence
Car
d
Prod
uct S
afet
y an
d R
F Ex
posu
re C
ompl
ianc
e
ATTE
NTI
ON
! Th
is ra
dio
is re
stric
ted
to o
ccup
atio
nal u
se o
nly
to s
atis
fy
FCC
RF
ener
gy e
xpos
ure
requ
irem
ents
. Bef
ore
usin
g th
is
prod
uct,
read
the
RF
ener
gy a
war
enes
s in
form
atio
n an
d op
erat
ing
inst
ruct
ions
in th
e P
rodu
ct S
afet
y an
d R
F E
xpos
ure
book
let e
nclo
sed
with
you
r rad
io (M
otor
ola
Pub
licat
ion
part
num
ber 6
8810
95C
99) t
o en
sure
co
mpl
ianc
e w
ith R
F en
ergy
exp
osur
e lim
its.
BA
SIC
OPE
RAT
ION
Turn
ing
the
Rad
io O
n an
d O
ff
Sele
ctin
g th
e Zo
ne a
nd M
ode
Mon
itorin
g C
onve
ntio
nal M
odes
Can
celli
ng M
onito
ring
Rec
eivi
ng
Tran
smitt
ing
(Con
vent
iona
l Mod
es)
Tran
smitt
ing
(Tru
nked
Sys
tem
s)
STAT
US
AN
NU
NC
IATO
RS
Thes
e ar
e sm
all s
ymbo
ls th
at a
ppea
r on
the
disp
lay
indi
catin
g th
e st
atus
of c
erta
in ra
dio
func
tions
.
Bef
ore
usin
g th
is p
rodu
ct, r
ead
the
oper
atin
g in
stru
ctio
ns
for s
afe
usag
e co
ntai
ned
in th
e P
rodu
ct S
afet
y an
d R
F E
xpos
ure
book
let e
nclo
sed
with
you
r rad
io.
!C
a u
t i o
n
MO
DE
HO
ME
2A
BC
1Q
Z3
DE
F
4G
HI
5J
KL
6M
NO
7P
RS
8T
UV
9W
XY
0
VO
L
Sid
e B
utto
n 1
(S1)
Sid
e B
utto
n 2
(S2)
Sid
e B
utto
n 3
(S3)
On/
Off
But
ton
(T1)
Pus
h-To
-Tal
k(P
TT) B
utto
n
LED
Indi
cato
r
Alp
hanu
mer
icK
eypa
d
Vol
ume
Con
trol
Mod
e C
ontro
l
Ora
nge
Pro
gram
mab
leB
utto
n(T
2)
Pro
gram
mab
leB
utto
n(T
3) Dis
play
Pre
ss th
e to
p le
ft bu
tton
(T1)
to tu
rn th
e ra
dio
on o
r off.
W
hen
the
radi
o is
pow
ered
on,
the
disp
lay
show
s XTL
5000
. You
will
hea
r a h
igh-
pitc
hed
(goo
d po
wer
-up)
tone
.If
your
radi
o sh
ows
an e
rror
on
pow
er-u
p, c
onta
ct y
our
syst
em m
anag
er fo
r ass
ista
nce.
1Pr
ess >
unt
il th
e di
spla
y sh
ows ZONE.
2Pr
ess m
bel
ow ZONE.
The
disp
lay
show
s th
e cu
rren
t zon
e an
d m
ode.
3Pr
ess >
unt
il th
e di
spla
y sh
ows
the
desi
red
zone
, or
ente
r the
zon
e nu
mbe
r usi
ng th
e ke
ypad
.4
Pres
s O
or t
he P
TT b
utto
n to
sav
e th
e di
spla
yed
zone
as
the
new
hom
e zo
ne.
Take
the
mic
roph
one
off h
ook,
or p
ress
the
prep
rogr
amm
ed M
onito
r but
ton
(S1,
S2,
or S
3).
The
disp
lay
show
s MONITOR ON.
Pla
ce th
e m
icro
phon
e on
hoo
k, o
r pre
ss th
e pr
epro
gram
med
Mon
itor b
utto
n (S
1, S
2, o
r S3)
. Th
e di
spla
y sh
ows MONITOR OFF.
1S
elec
t the
des
ired
zone
and
mod
e.2
Pre
ss V
to a
djus
t the
vol
ume.
1S
elec
t the
des
ired
zone
and
mod
e.2
Pre
ss V
to a
djus
t the
vol
ume.
3W
hen
a m
ode
beco
mes
ava
ilabl
e, p
ress
and
hol
d th
e PT
T bu
tton
to tr
ansm
it; re
leas
e th
e PT
T bu
tton
to
rece
ive.
1Se
lect
the
desi
red
zone
and
mod
e.2
Pres
s V
to a
djus
t the
vol
ume.
3Pr
ess
and
hold
the
PTT
butto
n to
tran
smit;
rele
ase
the
PTT
butto
n to
rece
ive.
Car
rier S
quel
ch
(C)
Indi
cate
s ca
rrie
r squ
elch
is o
pen
to
mon
itor a
ll ac
tive
conv
entio
nal m
ode
traffi
c. W
hen
not d
ispl
ayed
, tra
ffic
is n
ot
open
to m
onito
ring.
Sec
ure
Ope
ratio
n (D
) (S
ecur
e ra
dios
on
ly)
Whe
n so
lid, r
adio
is tr
ansm
ittin
g se
cure
ly.W
hen
flash
ing,
radi
o is
rece
ivin
g se
cure
ly.W
hen
off,
radi
o is
ope
ratin
g in
cle
ar
mod
e.C
all R
ecei
ved
(F)
Flas
hes
whe
n a
Priv
ate
Cal
l, pa
ge, o
r Ph
one
Cal
l is
rece
ived
.Sc
an (G
)W
hen
disp
laye
d, in
dica
tes
the
radi
o is
sc
anni
ng.
Prio
rity
Scan
(H
)In
dica
tes
scan
ning
of a
prio
rity
mod
e (fl
ashi
ng fo
r Prio
rity
1 m
ode;
sol
id fo
r Pr
iorit
y 2
mod
e).
Pro
gram
min
g/Vi
ew M
ode
(I)
Whe
n so
lid, r
adio
is in
vie
w m
ode.
Whe
n fla
shin
g, ra
dio
is in
pro
gram
min
g m
ode.
Dire
ct (J
)W
hen
on, i
ndic
ates
you
are
talk
ing
dire
ctly
to a
noth
er ra
dio
(talk
arou
nd).
Whe
n of
f, yo
u ar
e ta
lkin
g th
roug
h a
repe
ater
.

LED
IND
ICAT
ION
S
GEN
ERA
L FE
ATU
RES
Stat
us (T
runk
ing
Syst
ems
Onl
y)
Sele
ctin
g Tr
ansm
it Po
wer
Lev
el
Send
ing
an E
mer
genc
y A
larm
Send
ing
a Si
lent
Em
erge
ncy
Ala
rm
Can
celli
ng a
n Em
erge
ncy
Ala
rm
Send
ing
an E
mer
genc
y C
all
Fails
oft O
pera
tion
(Tru
nked
Sys
tem
s O
nly)
Mut
ing
Key
pad
Tone
s
Scan
ning
Turn
ing
Scan
On
or O
ff
Del
etin
g N
uisa
nce
Mod
es
Act
ion
LED
Con
ditio
nM
eani
ng
Pres
s th
e PT
T bu
tton
to
trans
mit
Stea
dy re
dN
orm
al tr
ansm
issi
onU
nlit
Not
tran
smitt
ing
Rel
ease
the
PTT
butto
n to
re
ceiv
e
Sin
gle
red
flash
Mod
e bu
sy (c
lear
) (c
onve
ntio
nal m
odes
on
ly)
Two
red
flash
esM
ode
busy
(enc
rypt
ed)
(con
vent
iona
l mod
es
only
)Fl
ashi
ng
gree
nR
ecei
pt o
f pho
ne c
all,
priv
ate
conv
ersa
tion
call,
di
spat
cher
inte
rrup
t cal
l, co
nven
tiona
l sel
ectiv
e ca
ll, o
r Cal
l Ale
rt pa
ge
1Pr
ess <
or >
unt
il th
e di
spla
y sh
ows
the STS
softk
ey.
2Pr
ess m
bel
ow STS
. Th
e di
spla
y sh
ows
the
last
ack
now
ledg
ed s
tatu
s.3
Pres
s <
or >
unt
il th
e di
spla
y sh
ows
the
desi
red
stat
us, o
r ent
er th
e lis
t ite
m’s
num
ber u
sing
the
keyp
ad.
4Pr
ess
the
PTT
butto
n to
tran
smit
the
sele
cted
sta
tus.
5Pr
ess O
to e
xit s
tatu
s an
d re
turn
to th
e ho
me
disp
lay.
1P
ress
< o
r > u
ntil
the
disp
lay
show
s th
e PWR
softk
ey.
2P
ress
m b
elow
PWR.
The
disp
lay
show
s HIGH POWER o
r LOW POWER.
3P
ress
m b
elow
the LOW o
r HIGH s
oftk
ey.
The
radi
o re
turn
s to
the
hom
e di
spla
y.
Pres
s an
d ho
ld th
e or
ange
top
butto
n (T
2).
The
red
LED
ligh
ts s
tead
ily. Y
ou h
ear a
n em
erge
ncy
tone
. The
dis
play
alte
rnat
ely
show
s EMERGENCY
and
the
curre
nt z
one
and
mod
e na
mes
. Whe
n th
e al
arm
is
ackn
owle
dged
by
the
disp
atch
er, y
ou h
ear f
our b
eeps
. Th
e ra
dio
retu
rns
to n
orm
al o
pera
tion.
Pre
ss a
nd h
old
the
oran
ge to
p bu
tton
(T2)
. Th
e ra
dio
trans
mits
the
emer
genc
y w
ithou
t any
ext
erna
l in
dica
tion
than
an
alar
m is
in p
rogr
ess.
Pre
ss a
nd h
old
the
emer
genc
y bu
tton
befo
re th
e al
arm
is
ackn
owle
dged
.Yo
u he
ar a
n ex
it to
ne a
nd th
e ra
dio
retu
rns
to n
orm
al
oper
atio
n. If
the
radi
o do
es n
ot re
turn
to n
orm
al
oper
atio
n, p
ress
the
PTT
butto
n. T
he ra
dio
does
NO
T so
und
an e
xit t
one.
1Pr
ess
and
hold
the
oran
ge to
p bu
tton
(T2)
.Th
e re
d LE
D li
ghts
ste
adily
. You
hea
r a s
hort,
m
ediu
m-p
itche
d em
erge
ncy
tone
. The
dis
play
al
tern
atel
y sh
ows EMERGENCY
and
the
curre
nt z
one
and
mod
e na
mes
.2
Pres
s th
e PT
T bu
tton
and
anno
unce
you
r em
erge
ncy.
3To
exi
t em
erge
ncy
call
mod
e, p
ress
the
emer
genc
y bu
tton
for a
littl
e ov
er 1
-1/2
sec
onds
(or f
or th
e du
ratio
n sp
ecifi
ed b
y yo
ur s
yste
m m
anag
er).
You
hear
a m
ediu
m-p
itche
d ex
it to
ne a
nd th
e ra
dio
retu
rns
to n
orm
al o
pera
tion
Dur
ing
Fails
oft o
pera
tion,
you
hea
r a fa
int b
eepi
ng to
ne
ever
y te
n se
cond
s. T
he ra
dio
unsq
uelc
hes.
The
dis
play
al
tern
atel
y sh
ows FAILSOFT
and
the
curr
ent t
runk
ed
mod
e na
me.
1P
ress
< o
r > u
ntil
the
disp
lay
show
s th
e MUTE
so
ftkey
.2
Pre
ss m
bel
ow MUTE
. Th
e di
spla
y sh
ows TONES ON
or T
ONES OFF
and
the
ON
and
OFF s
oftk
eys.
3P
ress
m b
elow
ON
or O
FF.
The
radi
o sa
ves
your
sel
ectio
n an
d re
turn
s to
the
hom
e di
spla
y.
1P
ress
< o
r > u
ntil
the
disp
lay
show
s th
e SCAN
softk
ey.
2P
ress
m b
elow
SCAN
.Th
e di
spla
y sh
ows SCAN ON
or S
CAN OFF a
nd th
e ON
and OFF s
oftk
eys.
3P
ress
m b
elow
ON
or O
FF.
The
dis
play
sho
ws G
.W
hen
you
sele
ct OFF,
the
radi
o st
ops
scan
ning
and
re
turn
s to
the
hom
e di
spla
y.
1W
hen
the
radi
o is
lock
ed o
nto
the
mod
e yo
u w
ant t
o de
lete
, pre
ss <
or >
unt
il th
e di
spla
y sh
ows
the
NUIS s
oftk
ey, A
ltern
ativ
ely,
pre
ss th
e pr
epro
gram
med
N
uisa
nce
Del
ete
butto
n.
The
mod
e is
del
eted
and
you
hea
r a v
alid
key
-pre
ss
chirp
. 2
To re
sum
e sc
anni
ng th
e de
lete
d m
ode,
turn
sca
n of
f an
d th
en b
ack
on a
gain
.

Dyn
amic
Prio
rity
Cha
nge
(Con
vent
iona
l Ope
ratio
n O
nly)
View
ing
a Sc
an o
r Pho
ne L
ist
Prog
ram
min
g a
List
Tele
phon
e O
pera
tion
Ans
wer
ing
a Te
leph
one
Cal
l
Cal
ling
the
Last
Num
ber D
iale
d
Mak
ing
Del
ayed
-Acc
ess
Cal
ls
1Pr
ess
the
prep
rogr
amm
ed D
ynam
ic P
riorit
y bu
tton
with
the
radi
o lo
cked
ont
o th
e P
riorit
y 2
mod
e. (T
he
Prio
rity
1 m
ode
cann
ot b
e m
odifi
ed.)
You
hear
a v
alid
key
-pre
ss c
hirp
.2
To re
sum
e sc
anni
ng th
e Pr
iorit
y 2
mod
e, tu
rn s
can
off
and
then
on
agai
n.
1P
ress
< o
r > u
ntil
the
disp
lay
show
s th
e VIEW
so
ftkey
.2
Pre
ss m
bel
ow VIEW u
ntil
the
disp
lay
show
s th
e SCAN
or P
HON
sof
tkey
.3
Pre
ss m
bel
ow SCAN o
r PHON.
4P
ress
> to
scr
oll t
hrou
gh th
e lis
t ent
ries.
5P
ress
O o
r the
PTT
but
ton
to e
xit t
he li
st.
The
radi
o re
turn
s to
the
hom
e di
spla
y.
1P
ress
< o
r > u
ntil
the
disp
lay
show
s th
e PROG
so
ftkey
.2
Pre
ss m
bel
ow PROG u
ntil
the
disp
lay
show
s th
e lis
t so
ftkey
opt
ions
(PROG,
CALL
, etc
.).3
Pre
ss m
bel
ow th
e ty
pe o
f lis
t you
wis
h to
acc
ess.
The
disp
lay
show
s a
flash
ing I
indi
cato
r.4
Pre
ss <
or >
unt
il yo
u re
ach
the
list e
ntry
you
w
ish
to e
dit,
or e
nter
the
num
ber o
f the
item
in th
e lis
t us
ing
the
keyp
ad.
5P
ress
the
prep
rogr
amm
ed li
st e
dit (
S2) b
utto
n.6
Use
the
num
eric
key
pad
to m
odify
the
entry
.7
Pre
ss th
e pr
epro
gram
med
S2
butto
n to
sav
e yo
ur
chan
ges.
8P
ress
O to
exi
t pro
gram
min
g m
ode
and
retu
rn to
th
e ho
me
disp
lay.
You
hear
a te
leph
one-
like
ringi
ng s
ound
. The
dis
play
al
tern
atel
y sh
ows PHONE CALL a
nd th
e cu
rrent
mod
e na
me.
The
dis
play
sho
ws
a fla
shin
g F
.1
Pre
ss th
e pr
ogra
mm
ed p
hone
or c
all-r
espo
nse
butto
n.
The F
ann
unci
ator
dis
appe
ars
from
the
disp
lay.
2P
ress
the
PTT
butto
n to
talk
; rel
ease
it to
list
en.
3P
ress
O o
r the
pre
prog
ram
med
pho
ne b
utto
n to
ha
ng u
p.
The
radi
o re
turn
s to
the
hom
e di
spla
y.
1P
ress
< o
r > (o
r the
pre
prog
ram
med
but
ton)
un
til th
e di
spla
y sh
ows
the PHON
sof
tkey
.2
Pre
ss m
bel
ow PHON
. Th
e di
spla
y sh
ows
the
last
pho
ne n
umbe
r dia
led.
With
imm
edia
te a
cces
s, th
e di
spla
y sh
ows PLEASE
WAIT;
oth
erw
ise,
pre
ss th
e PT
T bu
tton.
Trun
ked
Tele
phon
e O
pera
tion:
The
dis
play
sho
ws NO
PHONE; y
ou h
ear a
low
-pitc
hed
tone
whi
ch in
dica
tes
the
radi
o is
out
-of-r
ange
or i
nter
conn
ect i
s no
t in
serv
ice.
If th
e di
spla
y sh
ows PHONE BUSY,
in
terc
onne
ct is
in u
se; t
he ra
dio
will
re-d
ial t
he
num
ber w
hen
inte
rcon
nect
is a
vaila
ble.
If yo
u he
ar a
dia
l ton
e, th
is in
dica
tes
acce
ss w
as
succ
essf
ul.
3P
roce
ed to
ste
p 1
of “T
rans
mit
a P
hone
Cal
l.”
1P
ress
< o
r > u
ntil
the
disp
lay
show
s th
e PHON
softk
ey, o
r pre
ss th
e pr
epro
gram
med
pho
ne b
utto
n.2
Pre
ss m
bel
ow PHON
. The
dis
play
sho
ws
the
last
ph
one
num
ber d
iale
d.3
Use
the
num
eric
key
pad
to e
nter
the
desi
red
phon
e nu
mbe
r.
To m
ake
a de
laye
d-ac
cess
cal
l to
a nu
mbe
r in
the
phon
e lis
t:P
ress
< o
r > to
ent
er th
e ph
one
list.
The
disp
lay
alte
rnat
ely
show
s th
e na
me
and
phon
e nu
mbe
r as
soci
ated
with
the
entry
.
OR
To m
ake
a de
laye
d-ac
cess
cal
l to
a nu
mbe
r at a
lo
catio
n in
the
phon
e lis
t:P
ress
< o
r > to
ent
er th
e ph
one
list.
Then
pre
ss
a lo
catio
n fro
m 1
to 1
9 co
rres
pond
ing
to th
e nu
mbe
r yo
u w
ish
to c
all.
The
disp
lay
alte
rnat
ely
show
s th
e na
me
and
phon
e nu
mbe
r ass
ocia
ted
with
the
entry
.4
Pre
ss th
e PT
T bu
tton.
The
dis
play
sho
ws PLEASE
WAIT.
If y
ou d
o no
t hea
r a d
ial t
one,
pre
ss O
to h
ang
up a
nd re
turn
to S
tep
1.
Trun
ked
Tele
phon
e O
pera
tion:
The
dis
play
sho
ws NO
PHONE; y
ou h
ear a
low
-pitc
hed
tone
whi
ch in
dica
tes
the
radi
o is
out
-of-r
ange
or i
nter
conn
ect i
s no
t in
serv
ice.
The
dis
play
sho
ws PHONE BUSY in
dica
ting
inte
rcon
nect
is in
use
; the
radi
o w
ill re
-dia
l the
num
ber
whe
n in
terc
onne
ct b
ecom
es a
vaila
ble.
If yo
u he
ar a
dia
l ton
e, th
is in
dica
tes
acce
ss w
as
succ
essf
ul. T
he d
ispl
ay s
how
s th
e la
st p
hone
num
ber
dial
ed.
5P
roce
ed to
ste
p 1
of “T
rans
mit
a P
hone
Cal
l.”

Mak
ing
Imm
edia
te-A
cces
s C
alls
Mak
ing
Man
ual-A
cces
s C
alls
Tran
smitt
ing
a Ph
one
Cal
l
TRU
NK
ING
FEA
TUR
ES
Dis
play
ing
the
ID N
umbe
r
Priv
ate
Con
vers
atio
n™ II
, Enh
ance
d Pr
ivat
e C
onve
rsat
ion™
, and
Cal
l Ale
rt
Cal
ling
or P
agin
g th
e La
st ID
Num
ber T
rans
mitt
ed o
r R
ecei
ved
Dire
ctly
Ent
erin
g th
e ID
Num
ber t
o be
Cal
led
or P
aged
Scro
lling
to a
n ID
Num
ber i
n th
e C
all L
ist
1P
ress
< o
r > u
ntil
the
disp
lay
show
s th
e PHON
so
ftkey
, or p
ress
the
prep
rogr
amm
ed p
hone
but
ton.
2P
ress
m b
elow
PHON
. Th
e di
spla
y sh
ows PLEASE WAIT.
If
you
hear
a d
ial t
one,
this
indi
cate
s ac
cess
was
su
cces
sful
. The
dis
play
sho
ws
the
last
pho
ne n
umbe
r di
aled
.If
you
do n
ot h
ear a
dia
l ton
e, p
ress
O to
han
g up
. R
etur
n to
Ste
p 1.
3U
se th
e nu
mer
ic k
eypa
d to
mod
ify th
e ph
one
num
ber.
To m
ake
a de
laye
d-ac
cess
cal
l to
a nu
mbe
r at a
lo
catio
n in
the
phon
e lis
t:P
ress
< o
r > to
ent
er th
e ph
one
list.
Pre
ss a
lo
catio
n fro
m 1
to 1
9 of
the
num
ber y
ou w
ish
to c
all.
The
disp
lay
alte
rnat
ely
show
s th
e na
me
and
phon
e nu
mbe
r ass
ocia
ted
with
the
entry
.
OR
To m
ake
a de
laye
d-ac
cess
cal
l to
a nu
mbe
r usi
ng th
e ph
one
list:
Pre
ss <
or >
to e
nter
the
phon
e lis
t. Th
e di
spla
y al
tern
atel
y sh
ows
the
nam
e an
d ph
one
num
ber
asso
ciat
ed w
ith th
e en
try.
Trun
ked
Tele
phon
e O
pera
tion:
NO PHONE
dis
play
ed
with
a lo
w-p
itche
d to
ne m
eans
radi
o is
out
-of-r
ange
or
inte
rcon
nect
is n
ot in
ser
vice
. PHONE BUSY
disp
laye
d m
eans
inte
rcon
nect
is in
use
; whe
n in
terc
onne
ct is
ava
ilabl
e, n
umbe
r will
be
re-d
iale
d.
A d
ial t
one
mea
ns a
cces
s is
suc
cess
ful.
4P
roce
ed to
ste
p 1
of “T
rans
mit
a P
hone
Cal
l.”
1Pr
ess >
unt
il th
e di
spla
y sh
ows
the PHON s
oftk
ey, o
r pr
ess
the
prep
rogr
amm
ed p
hone
but
ton.
2Pr
ess m
bel
ow PHON.
The
disp
lay
show
s th
e la
st p
hone
num
ber d
iale
d.
3U
se th
e nu
mer
ic k
eypa
d to
ent
er th
e ph
one
acce
ss
code
. Yo
u he
ar a
dia
l ton
e.If
you
do n
ot h
ear a
dia
l ton
e, p
ress
O to
han
g up
. U
se th
e ke
ypad
to c
hang
e th
e ph
one
num
ber.
4P
roce
ed to
ste
p 1
of “T
rans
mit
a P
hone
Cal
l.”
1Pr
ess
the
PTT
butto
n to
sen
d th
e ph
one
num
ber.
2If
the
othe
r par
ty a
nsw
ers,
pre
ss th
e PT
T bu
tton
agai
n to
talk
; rel
ease
it to
list
en.
3Pr
ess O
or t
he p
repr
ogra
mm
ed p
hone
but
ton
to
send
the
hang
-up
code
. Th
e ra
dio
retu
rns
to th
e ho
me
disp
lay.
1P
ress
> u
ntil
the
disp
lay
show
s th
e CALL so
ftkey
. 2
Pre
ss m
bel
ow CALL.
The
disp
lay
show
s RECEIVED ID
, or t
he ID
num
ber
(Priv
ate
Con
vers
atio
n II)
.3
Pre
ss >
(or *
if s
o pr
ogra
mm
ed) t
o di
spla
y MY ID:
and
the
ID n
umbe
r.4
Pre
ss O
to re
turn
to th
e ho
me
disp
lay.
1Pr
ess >
unt
il th
e di
spla
y sh
ows
the CALL (o
r PAGE
for C
all A
lert)
sof
tkey
.
2P
ress
m b
elow
CALL
or P
AGE
(or u
se th
e qu
ick-
resp
onse
but
ton)
. The
dis
play
sho
ws
the
last
ID
trans
mitt
ed o
r rec
eive
d. In
the
case
of p
rivat
e ca
ll, th
e di
spla
y sh
ows RECEIVED ID, o
r the
ID n
umbe
r (P
rivat
e C
onve
rsat
ion
II).
3P
roce
ed to
ste
p 1
of “S
end
a Pr
ivat
e C
onve
rsat
ion
Cal
l” or
“Sen
d a
Cal
l Ale
rt P
age.
”
1P
ress
> u
ntil
the
disp
lay
show
s th
e CALL (o
r PAGE
fo
r Cal
l Ale
rt) s
oftk
ey.
2P
ress
m b
elow
CALL
or P
AGE
(or u
se th
e qu
ick-
resp
onse
but
ton)
. Th
e di
spla
y sh
ows
the
last
ID tr
ansm
itted
or r
ecei
ved.
In
the
case
of p
rivat
e ca
ll, th
e di
spla
y sh
ows
RECEIVED ID
, or t
he ID
num
ber (
Priv
ate
Con
vers
atio
n II)
.3
Use
the
num
eric
key
pad
(0 to
9 k
eys)
to e
nter
the
new
ID n
umbe
r.4
Pro
ceed
to s
tep
1 of
“Sen
d a
Priv
ate
Con
vers
atio
n C
all”
or “S
end
a C
all A
lert
Pag
e.”
1P
ress
> u
ntil
the
disp
lay
show
s th
e CALL (o
r PAGE
fo
r Cal
l Ale
rt) s
oftk
ey.
2P
ress
m b
elow
CALL
or P
AGE
(or u
se th
e qu
ick-
resp
onse
but
ton)
. Th
e di
spla
y sh
ows
the
last
ID tr
ansm
itted
or r
ecei
ved.
In
the
case
of p
rivat
e ca
ll, th
e di
spla
y sh
ows
RECEIVED ID
, or t
he ID
num
ber (
Priv
ate
Con
vers
atio
n II)
.3
Pre
ss <
or >
to e
nter
the
call
list,
or p
ress
m
belo
w LIST.
4P
ress
< o
r > to
scr
oll t
o th
e de
sire
d m
embe
r of
the
list.
5P
roce
ed to
ste
p 1
of “S
end
a Pr
ivat
e C
onve
rsat
ion
Cal
l” or
“Sen
d a
Cal
l Ale
rt P
age.
”

Goi
ng D
irect
ly to
an
ID N
umbe
r in
the
Cal
l Lis
t
Send
ing
a Pr
ivat
e C
onve
rsat
ion
Cal
l
Send
ing
a C
all A
lert
Pag
e
Ans
wer
ing
a Pr
ivat
e (a
nd E
nhan
ced
Priv
ate)
C
onve
rsat
ion
Cal
l
Ans
wer
ing
a C
all A
lert
Pag
e
Aut
omat
ic M
ultip
le S
ite S
elec
tion
(AM
SS)
View
ing
the
Cur
rent
Site
and
For
cing
a S
ite C
hang
e
Lock
ing
and
Unl
ocki
ng a
Site
1P
ress
> u
ntil
the
disp
lay
show
s th
e CALL
(PAGE
for
Cal
l Ale
rt) s
oftk
ey.
2P
ress
m b
elow
CALL o
r PAGE (o
r use
the
prep
rogr
amm
ed q
uick
-resp
onse
but
ton)
. Th
e di
spla
y sh
ows
the
last
ID tr
ansm
itted
or r
ecei
ved.
In
the
case
of p
rivat
e ca
ll, th
e di
spla
y sh
ows
RECEIVED ID, o
r the
ID n
umbe
r (P
rivat
e C
onve
rsat
ion
II).
3P
ress
< o
r > to
ent
er th
e ca
ll lis
t.4
Pre
ss <
or >
to s
crol
l to
the
desi
red
list e
ntry
.5
Pre
ss th
e 0
to 9
key
s to
ent
er th
e lo
catio
n nu
mbe
r. Th
e di
spla
y al
tern
atel
y sh
ows
the
nam
e an
d ID
nu
mbe
r ass
ocia
ted
with
the
entry
. If t
here
are
10
or
mor
e lis
t ent
ries,
the
disp
lay
show
s ID LOC#X_.
Use
the
num
eric
key
pad
agai
n to
ent
er th
e se
cond
di
git o
f the
loca
tion
num
ber.
6P
roce
ed to
ste
p 1
of “S
end
a P
rivat
e C
onve
rsat
ion
Cal
l” or
“Sen
d a
Cal
l Ale
rt Pa
ge.”
1Pr
ess
the
PTT
butto
n to
tran
smit
the
disp
laye
d ID
nu
mbe
r. If
the
radi
o yo
u ar
e ca
lling
is n
ot in
ser
vice
, the
dis
play
sh
ows NO ACKNOWLEDGE. I
f the
oth
er p
arty
doe
s no
t an
swer
with
in 2
0 se
cond
s, th
e di
spla
y sh
ows NO
ANSWER.
2Pr
ess O
to e
xit p
rivat
e ca
ll, o
r pre
ss th
e PT
T bu
tton
to s
peak
.3
Pres
s O
to h
ang
up.
The
radi
o re
turn
s to
the
hom
e di
spla
y.
1Pr
ess
the
PTT
butto
n to
tran
smit
the
disp
laye
d ID
nu
mbe
r. If
the
radi
o yo
u ar
e pa
ging
can
not b
e re
ache
d, y
ou
hear
onl
y on
e be
ep.
2Pr
ess
the
PTT
butto
n to
try
agai
n, o
r pre
ss O
to
hang
up.
If th
e ra
dio
you
calle
d ha
s re
ceiv
ed y
our p
age,
you
w
ill h
ear f
ive
beep
s. T
he ra
dio
retu
rns
to th
e ho
me
disp
lay.
Whe
n a
priv
ate
call
is re
ceiv
ed, t
he d
ispl
ay a
ltern
atel
y sh
ows CALL RECEIVED
and
the
curre
nt m
ode
nam
e. T
he
the F
ann
unci
ator
and
the
gree
n LE
D fl
ash.
You
hea
r tw
o al
ert t
ones
.1
Pre
ss >
unt
il th
e di
spla
y sh
ows
the CALL
sof
tkey
, or
pre
ss th
e pr
epro
gram
med
cal
l res
pons
e bu
tton.
2P
ress
the
call
resp
onse
but
ton
agai
n, o
r pre
ss th
e m
but
ton
belo
w CALL.
The
disp
lay
show
s th
e la
st ID
num
ber t
rans
mitt
ed o
r re
ceiv
ed. I
n th
e ca
se o
f priv
ate
call,
the
disp
lay
show
s RECEIVED ID
, or t
he ID
num
ber (
Priv
ate
Con
vers
atio
n II)
.3
Pre
ss th
e PT
T bu
tton
to a
nsw
er th
e ca
ll.If
you
hear
a b
usy
tone
, the
sys
tem
is b
usy.
4P
ress
O, m
bel
ow CALL
, or t
he p
repr
ogra
mm
ed
call
resp
onse
but
ton
to h
ang
up.
The
radi
o sa
ves
the
calle
r’s ID
num
ber a
nd re
turn
s to
th
e ho
me
disp
lay.
Whe
n a
call
aler
t pag
e is
rece
ived
, the
dis
play
alte
rnat
ely
show
s PAGE RECEIVED a
nd th
e cu
rren
t mod
e na
me.
The
th
e F
ann
unci
ator
and
the
gree
n LE
D fl
ash.
You
hea
r a
four
-bee
p to
ne.
1P
ress
the
PTT
butto
n to
ans
wer
the
page
. Th
e di
spla
y sh
ows
the
curr
ent m
ode.
The
LE
D, a
lert
tone
, and
F tu
rn o
ff. T
he ID
is s
aved
as
the
last
ID
num
ber r
ecei
ved.
2P
ress
the
PTT
butto
n to
talk
, rel
ease
to li
sten
. E
very
one
who
bel
ongs
to th
e ta
lkgr
oup
will
hea
r you
r tra
nsm
issi
on.
OR
If yo
u w
ant t
o re
spon
d to
the
page
with
a P
rivat
e C
all:
a.P
ress
> o
r the
pre
prog
ram
med
cal
l or c
all
resp
onse
but
ton
until
the
disp
lay
show
s CALL.
b.P
ress
m b
elow
CALL
. Th
e di
spla
y sh
ows
the
ID o
f the
pag
ing
radi
o.3
Pro
ceed
to s
tep
1 of
“Sen
d a
Priv
ate
Con
vers
atio
n C
all.”
1P
ress
the
sear
ch b
utto
n m
omen
taril
y.
The
disp
lay
show
s th
e nu
mbe
r of t
he s
ite if
the
radi
o is
lock
ed (o
r SCANNING SITE
if th
e ra
dio
is s
cann
ing)
.2
Pre
ss a
nd h
old
dow
n th
e se
arch
but
ton
whi
le th
e ra
dio
scan
s fo
r a n
ew s
ite.
The
radi
o re
turn
s to
the
hom
e di
spla
y.
1P
ress
> u
ntil
the
disp
lay
show
s SITE.
2P
ress
m b
elow
SITE. T
he d
ispl
ay s
how
s th
e cu
rren
t loc
k st
ate,
and
the LOCK a
nd UNLK
sof
tkey
s.3
Pre
ss m
but
ton LOCK
or U
NLK
. The
radi
o sa
ves
the
new
set
ting
and
retu
rns
to th
e ho
me
disp
lay.

ALE
RT
TON
ES
Type
of T
one
Indi
catio
nA
ctio
n
Sho
rt, lo
w-
pitc
hed
tone
Uns
ucce
ssfu
l pow
er-u
p.
Rad
io fa
iled
self-
test
. R
adio
not
read
y fo
r use
.
Con
tact
you
r se
rvic
e re
pres
enta
tive.
Inva
lid (b
ad) k
ey p
ress
. A
key
pre
ss w
as
reje
cted
.
Tim
e-ou
t tim
er w
arni
ng.
Tran
smis
sion
tim
e w
ill
expi
re in
four
sec
onds
.
Sho
rt,
med
ium
-pi
tche
d to
ne
Valid
(goo
d) k
ey p
ress
. A
key
pre
ss w
as
acce
pted
.
Pre
ssed
em
erge
ncy
butto
n to
ent
er
emer
genc
y. E
mer
genc
y en
tere
d.
Sho
rt, h
igh-
pitc
hed
tone
Suc
cess
ful p
ower
-up.
R
adio
pas
sed
self-
test
.
Con
tinuo
us,
low
-pitc
hed
tone
Tran
smit
on re
ceiv
e-on
ly m
ode.
Pre
ssed
PT
T bu
tton
on re
ceiv
e-on
ly m
ode.
Rel
ease
PTT
bu
tton.
Tran
smit
inhi
bit o
n bu
sy
mod
e. P
ress
ed P
TT
butto
n w
hile
mod
e w
as
busy
.
Inva
lid m
ode.
An
inva
lid
or u
npro
gram
med
op
erat
ion.
Tim
e-ou
t tim
er ti
med
ou
t. Tr
ansm
issi
on w
as
term
inat
ed.
Rel
ease
PTT
bu
tton.
Con
tinuo
us,
med
ium
-pi
tche
d to
ne
Emer
genc
y al
arm
/cal
l ex
it. E
xitin
g.
Fain
t bee
ping
to
ne e
very
10
seco
nds
Fails
oft (
trunk
ed
syst
ems
only
).
“Bah
-bah
-ba
h-ba
h”Ph
one
busy
. All
mod
es
busy
. Rad
io is
in q
ueue
.W
aitin
g fo
r ne
xt
avai
labl
e lin
e.
Trun
ked
syst
em b
usy
(trun
ked
syst
ems
only
). R
adio
is in
que
ue.
Wai
ting
for
next
av
aila
ble
mod
e.
Sin
gle,
m
ediu
m-
pitc
hed
tone
s fo
llow
ed b
y gr
oup
of fo
ur
med
ium
-pi
tche
d to
nes
Your
pag
e ha
s be
en
rece
ived
by
the
targ
et
radi
o.
Gro
up o
f tw
o m
ediu
m-
pitc
hed
tone
s
Priv
ate
Con
vers
atio
n ca
ll or
con
vent
iona
l se
lect
ive
call
rece
ived
.
Gro
up o
f th
ree
med
ium
-pi
tche
d (d
i-di-
dit)
tone
s
Cal
l bac
k (tr
unke
d sy
stem
s on
ly).
A
talk
grou
p is
now
av
aila
ble.
Oka
y to
tra
nsm
it in
that
ta
lkgr
oup.
Gro
up o
f fou
r m
ediu
m-
pitc
hed
tone
s ev
ery
five
seco
nds
Cal
l Ale
rt (p
age)
re
ceiv
ed.
ALE
RT
TON
ES (C
ontin
ued)
Type
of T
one
Indi
catio
nA
ctio
n
ALE
RT
TON
ES (S
ECU
RE-
EQU
IPPE
D
RA
DIO
S O
NLY
)
Type
of T
one
Indi
catio
n A
ctio
n
One
bee
p im
med
iate
ly
afte
r PTT
but
ton
pres
s
Indi
cate
s cl
ear
trans
mis
sion
on
secu
re-e
quip
ped
radi
o.
Six
med
ium
-pi
tche
d to
nes
Key
fail.
Enc
rypt
ion
key
lost
or e
rase
d.R
eloa
d ke
y.
Six
med
ium
-pi
tche
d to
nes
(con
tinuo
us)
Key
fail.
Rad
io s
et in
se
cure
pos
ition
. PTT
is
bein
g pr
esse
d.
Set r
adio
to
“cle
ar,”
or
sele
ct a
cle
ar
mod
e, o
r re
load
key
.
Six
med
ium
-pi
tche
d to
nes
on ra
dio
pow
er-
up
Enc
rypt
ed o
pera
tion
prob
lem
. Rad
io is
set
to
eith
er c
lear
or
secu
re.
Rel
oad
key.
Six
med
ium
-pi
tche
d to
nes
ever
y fiv
e to
ten
seco
nds
Enc
rypt
ed o
pera
tion
prob
lem
. PTT
but
ton
not b
eing
pre
ssed
.
Set r
adio
to
“cle
ar,”
or
sele
ct a
cle
ar
mod
e, o
r re
load
key
.
Con
secu
tive,
m
ediu
m-p
itche
d to
nes
Loss
of e
ncry
ptio
n ke
y du
ring
secu
re
oper
atio
n.
Rel
oad
key.

ASTRO® XTL™ 5000Digital Mobile Radio
withW3 Control Head
User’s Guide
6881096C67-C

This declaration is applicable to your radio only if your radio is labeled with the FCC logo shown below.
DECLARATION OF CONFORMITYPer FCC CFR 47 Part 2 Section 2.1077(a)
Responsible Party Name: Motorola, Inc.Address: 8000 West Sunrise BoulevardPlantation, FL 33322 USAPhone Number: 1-888-567-7347Hereby declares that the product:
Model Name: XTL 5000conforms to the following regulations:
FCC Part 15, subpart B, section 15.107(a), 15.107(d) and section 15.109(a)Class B Digital DeviceAs a personal computer peripheral, this device complies with Part 15 of the FCC Rules. Operation is subject to the following two conditions:
1. this device may not cause harmful interference, and 2. this device must accept any interference received, including interference that
may cause undesired operation.Note: This equipment has been tested and found to comply with the limits for a
Class B digital device, pursuant to part 15 of the FCC Rules. These limits are designed to provide reasonable protection against harmful interference in a residential installation. This equipment generates, uses and can radiate radio frequency energy and, if not installed and used in accordance with the instructions, may cause harmful interference to radio communications. However, there is no guarantee that interference will not occur in a particular installation. If this equipment does cause harmful interference to radio or television reception, which can be determined by turning the equipment off and on, the user is encouraged to try to correct the interference by one or more of the following measures:
• Reorient or relocate the receiving antenna.• Increase the separation between the equipment and receiver.• Connect the equipment into an outlet on a circuit different from that to which
the receiver is connected.• Consult the dealer or an experienced radio/TV technician for help.
ii

Product Safety and RF Exposure Compliance
ATTENTION! This radio is restricted to occupational use only to satisfy FCC RF energy exposure requirements. Before using this product, read the RF energy awareness information and operating instructions in the Product Safety and RF Exposure booklet enclosed with your radio (Motorola Publication part number 6881095C99) to ensure compliance with RF energy exposure limits.
Computer Software CopyrightsThe Motorola products described in this manual may include copyrighted Motorola computer programs stored in semiconductor memories or other media. Laws in the United States and other countries preserve for Motorola certain exclusive rights for copyrighted computer programs, including, but not limited to, the exclusive right to copy or reproduce in any form the copyrighted computer program. Accordingly, any copyrighted Motorola computer programs contained in the Motorola products described in this manual may not be copied, reproduced, modified, reverse-engineered, or distributed in any manner without the express written permission of Motorola. Furthermore, the purchase of Motorola products shall not be deemed to grant either directly or by implication, estoppel, or otherwise, any license under the copyrights, patents or patent applications of Motorola, except for the normal non-exclusive license to use that arises by operation of law in the sale of a product.
Documentation CopyrightsNo duplication or distribution of this document or any portion thereof shall take place without the express written permission of Motorola. No part of this manual may be reproduced, distributed, or transmitted in any form or by any means, electronic or mechanical, for any purpose without the express written permission of Motorola.
DisclaimerThe information in this document is carefully examined, and is believed to be entirely reliable. However, no responsibility is assumed for inaccuracies. Furthermore, Motorola reserves the right to make changes to any products herein to improve readability, function, or design. Motorola does not assume any liability arising out of the applications or use of any product or circuit described herein; nor does it cover any license under its patent rights, nor the rights of others.
Patent DisclosureThis product is covered by one or more of the following United States patents:4,512,035 4,551,856 4,653,117 4,816,774 4,829,594 4,837,853 4,864,2524,885,550 4,914,321 4,918,403 4,959,617 4,975,650 4,994,768 5,006,7305,021,754 5,079,526
MOTOROLA, the Stylized M Logo, ASTRO, SmartZone, and FLASHport are registered in the U.S. Patent & Trademark Office. All other product or service names are the property of their respective owners. P25 radios contain technology patented by Digital Voice Systems, Inc.
© Motorola, Inc. 2004. All Rights Reserved. Printed in the U.S.A. 8/04.
Before using this product, read the operating instructions for safe usage contained in the Product Safety and RF Exposure booklet enclosed with your radio.
!C a u t i o n
ASTRO XTL 5000 Digital Mobile Radio with W3 Control Head iii
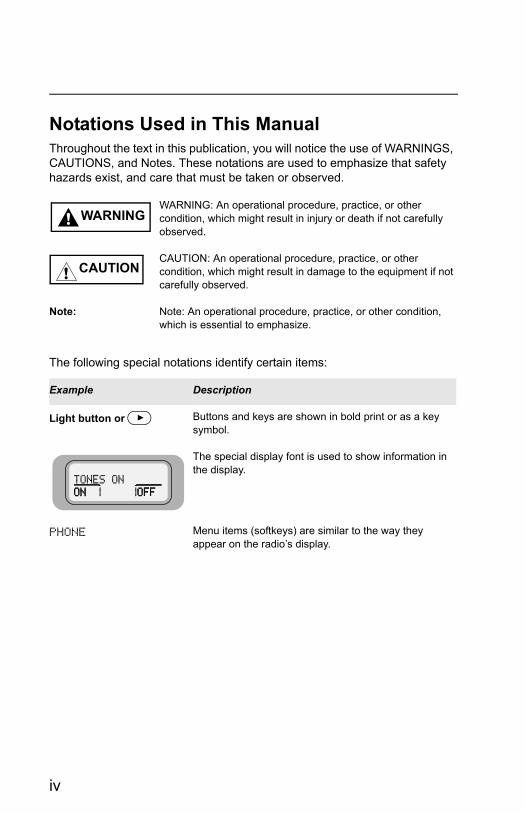
Notations Used in This ManualThroughout the text in this publication, you will notice the use of WARNINGS, CAUTIONS, and Notes. These notations are used to emphasize that safety hazards exist, and care that must be taken or observed.
The following special notations identify certain items:
WARNING: An operational procedure, practice, or other condition, which might result in injury or death if not carefully observed.
CAUTION: An operational procedure, practice, or other condition, which might result in damage to the equipment if not carefully observed.
Note: Note: An operational procedure, practice, or other condition, which is essential to emphasize.
Example Description
Light button or > Buttons and keys are shown in bold print or as a key symbol.
The special display font is used to show information in the display.
PHONE Menu items (softkeys) are similar to the way they appear on the radio’s display.
WARNING!
CAUTION!
iv

Contents
Declaration of Conformity .................................................................. iiComputer Software Copyrights .........................................................iiiDocumentation Copyrights ................................................................iiiDisclaimer .........................................................................................iiiPatent Disclosure ..............................................................................iiiNotations Used in This Manual ........................................................ iv
Getting to Know Your Radio . . . . . . . . . . . . . . . . . . . . 1Major Radio Components ................................................................. 2
The XTL 5000 Radio .................................................................. 2The W3 Control Head ................................................................. 2
Using Your Radio: The Basics .......................................................... 4Turning Your Radio On or Off ..................................................... 4Adjusting the Volume .................................................................. 5Turning the Display/Keypad Light On or Off ............................... 5Browsing Through Menus (Softkeys) ......................................... 5Entering Softkey Menus ............................................................. 6Returning to the HOME Display ................................................. 7Interpreting Radio Status Indicators ........................................... 7Entering Characters Using the Keypad .................................... 13
Basic Radio Operation . . . . . . . . . . . . . . . . . . . . . . . . 15Monitoring Conventional Modes ..................................................... 16Selecting a Zone and Mode (Channel) ........................................... 17Receiving on a Conventional Mode ................................................ 18Changing the Squelch Setting ........................................................ 19Receiving on Trunked Systems ...................................................... 20Transmitting on Conventional Modes .............................................. 21Transmitting on Trunked Systems ................................................... 22Time-Out Timer ............................................................................... 23
Common Radio Features . . . . . . . . . . . . . . . . . . . . . . 25Sending a Status Call (Trunking Only) ............................................ 26Selecting Transmit Power Level ...................................................... 28Conventional Squelch Options ........................................................ 29
Analog Squelch Options ........................................................... 29Digital Squelch Options ............................................................ 29
Sending an Emergency Alarm ........................................................ 30Sending a Silent Emergency Alarm .......................................... 31Sending an Emergency Call ..................................................... 32
ASTRO XTL 5000 Digital Mobile Radio with W3 Control Head v

Muting and Unmuting the Keypad Tones .........................................34Types of Scan ..................................................................................35
Turning Scan On or Off .............................................................37Viewing a Scan List ...................................................................38Programming a Scan List ..........................................................39Deleting Nuisance Modes .........................................................41
PTT-ID (Optional) ............................................................................42Viewing a Page, Call, or Phone List ................................................43Telephone Operation (Conventional and Trunking) .........................44
Answering a Telephone Call .....................................................44Selecting a Phone Number to Call ............................................45Initiating a Telephone Call ........................................................47
Call Alert (Conventional and Trunking) ............................................49Paging the Last ID Number Transmitted or Received ...............49Entering Directly the ID Number to Be Paged ..........................50Scrolling to an ID Number in the Page List ...............................51Going Directly to an ID Number in the Page List ......................52Sending a Call Alert Page .........................................................54Answering a Call Alert Page .....................................................55
Programming a Page, Call, or Phone List Number .........................57Programming a Page, Call, or Phone List Name .............................60Optional External Alarms (Horn and/or Lights) ................................63
Turning External Alarm(s) On ...................................................63Changing or Turning Off the Selected Alarm(s) ........................64When a Call Is Received While Alarms Are Turned On ............65
Conventional Features. . . . . . . . . . . . . . . . . . . . . . . . 67Repeater/Direct Operation ...............................................................67Smart PTT .......................................................................................68Talkgroup Calls ................................................................................69
Selecting a Talkgroup ...............................................................69Selective Calls .................................................................................71
Calling the Last ID Number Transmitted or Received ...............71Entering Directly the ID Number to Be Called ...........................72Scrolling to an ID Number in the Call List .................................73Going Directly to an ID Number in the Call List .........................74Starting a Selective Call ............................................................76Answering a Selective Call .......................................................77
vi

Trunking Features. . . . . . . . . . . . . . . . . . . . . . . . . . . . 79Features Used on Trunking Systems .............................................. 79Viewing Your Radio’s ID Number .................................................... 80Enhanced Private Conversation ..................................................... 81
Calling the Last ID Number Transmitted or Received .............. 81Entering Directly the ID Number to Be Called .......................... 82Scrolling to an ID Number in the Call List ................................. 83Going Directly to an ID Number in the Call List ........................ 84Starting a Private Conversation Call ......................................... 86Answering an Enhanced Private Conversation Call ................. 87
Dynamic Regrouping ...................................................................... 89Electronic (Menu) Mode Selection ............................................ 89Selecting Enable and Disable ................................................... 89Reprogramming Request ......................................................... 90
SmartZone Operation ..................................................................... 91Locking/Unlocking a Site .......................................................... 91Searching for a Site .................................................................. 93Site Trunking ............................................................................ 94Failsoft ...................................................................................... 94
Out-of-Range Indication .................................................................. 95
Secure Features . . . . . . . . . . . . . . . . . . . . . . . . . . . . . 97Features Available on Secure XTL 5000 ........................................ 97Transmitting in Secure and Clear Modes ........................................ 98Selecting an Index (Conventional Only) .......................................... 99Selecting a Key (Conventional Only) ............................................ 100
Accessories . . . . . . . . . . . . . . . . . . . . . . . . . . . . . . . . 103Antennas ....................................................................................... 103Bull Horns for Siren and Public Address ....................................... 104Cables ........................................................................................... 104Microphones ................................................................................. 105Miscellaneous ............................................................................... 105Remote Mounting Kits ................................................................... 106Speakers ....................................................................................... 106Trunnion Kits ................................................................................. 106
ASTRO XTL 5000 Digital Mobile Radio with W3 Control Head vii

Appendix: Maritime Radio Use in the VHF Frequency Range . . . . . . . . . . . . . . . . . . . . . . . 107Special Channel Assignments .......................................................107
Emergency Channel ...............................................................107Non-Commercial Call Channel ...............................................108
Operating Frequency Requirements .............................................108
Glossary . . . . . . . . . . . . . . . . . . . . . . . . . . . . . . . . . . 111
Commercial Warranty and Service . . . . . . . . . . . . . 115Limited Warranty ...........................................................................115Service ...........................................................................................119
Index . . . . . . . . . . . . . . . . . . . . . . . . . . . . . . . . . . . . . 121
W3 Control Head Foldout Page. . . . . . . . . . . . . . . . 127
viii

Getting to Know Your Radio
Motorola XTL 5000 Digital Mobile Radios are sophisticated, state-of-the-art, communication units, pioneering the latest technology in radio electronics. Intelligent and flexible software increases the radio's capability, and permits many of the radio’s features to be customized for your specific needs.
The XTL 5000 Digital Mobile Radio can operate in the following frequency ranges:
VHF UHF 700/800 MHz
136-174 MHz 380-470 MHz 762-776 MHz
450-520 MHz 794-806 MHz
806-825 MHz
851-870 MHz
MODE
VOL
7PRS
0
2ABC
5JKL
8TUV
3DEF6MNO
9WXY
HOME
4GHI
1Q Z
ASTRO XTL 5000 Digital Mobile Radio with W3 Control Head 1

Getting to Know Your Radio
Major Radio ComponentsYour radio has two major components: the radio unit installed in your vehicle and the control head that is used to activate various radio features. You may also have radio accessories installed based on the specific configuration of your radio.
This user guide describes how to use your radio and its control head. The foldout page inside the back cover of this guide contains an illustration of the W3 control head showing all the controls and programmable buttons situated on the control head. Keep this foldout open as a reference as you review the procedures in this user guide.
The XTL 5000 RadioThe XTL 5000 radio unit contains a receiver, a transmitter, and associated internal circuitry. The radio is programmed by your system manager to meet your specific needs and/or those of your workgroup.
The W3 Control HeadThe W3 control head that came with your XTL 5000 radio has the following features (refer to the foldout at the back of this user guide):
• On/Off Button (T1): Used to turn the radio on or off (see page 4).
• Two-line, 14-character-per-line, liquid-crystal display (LCD): Shows alphanumeric messages or feature information as you use your radio. Also displays status annunciators above the character lines, indicating the status of certain radio functions (see page 7).
• Full Keypad: Features 20 keys and used to enter menus, scroll through a list of displayed options, and enter data.
2

Getting to Know Your Radio
The first row contains three dedicated menu-select buttons (see page 6).
The second row contains the left scroll key <, the HOME key O, and the right scroll key >.
The third row has two rocker switches: the VOL rocker button (V) which is used to adjust the volume level up or down, and the MODE rocker button (M) which is used to scroll up or down through the list of available modes.
A set of standard 3 x 4 telephone keys complete the keypad.
• PTT button: Pressed to transmit on the displayed mode and released to receive.
• LED indicator: Green/red light-emitting diode that indicates radio status as you operate various features (see page 9).
• Programmable buttons: Five buttons that can be custom-programmed by your system manager. These are:Orange Programmable Button (T2)Programmed at the factory to activate the Emergency feature.
Programmable Button (T3)
Programmable Side Button 1 (S1)
Programmable Side Button 2 (S2)
Programmable Side Button 3 (S3)
Check with your system manager for information on how these buttons have been programmed. Use the foldout at the back of this manual to record the functions that have been programmed to each button.
ASTRO XTL 5000 Digital Mobile Radio with W3 Control Head 3

Getting to Know Your Radio
Using Your Radio: The BasicsThis subsection gives you the basic knowledge you need in order to use your radio. The following topics are covered:
• Turning Your Radio On or Off (page 4)• Adjusting the Volume (page 5)• Turning the Display/keypad Light On or Off (page 5)• Browsing Through Menu Options or Softkeys (page 5)• Entering Softkey Menus (page 6)• Returning to the HOME Display (page 7)• Interpreting Radio Status Indicators (page 7)• Entering Characters Using the Keypad (page 13)
Turning Your Radio On or OffTo turn your radio on or off:
Press the top left button on the control head (T1).
The display shows XTL 5000. You hear a high-pitched tone indicating the radio has passed a self-check.
If the display shows ERROR XX/XX (where XX/XX is an alphanumeric code) and you hear a low-pitched tone, the radio has failed the self-test.
Do the following:
1 Press the top left button (T1) to turn the radio off.
2 Make sure the power source is not malfunctioning.
3 Press T1 to turn the radio on again.
4

Getting to Know Your Radio
If the radio fails the self-test again, contact your system manager.
Adjusting the VolumeTo adjust the volume to a comfortable level:
Press the Volume rocker button (V) up or down until the desired volume level is reached.
Turning the Display/Keypad Light On or OffThe display light is useful when you need to read the information on the display and locate keys on the keypad in less than optimal lighting conditions (for example, during night time).
To toggle the display and keypad light on or off:
Press the preprogrammed light button. (The default is Side Button 1.)
The Control Head ships from the factory with the backlighting set to ON.
Browsing Through Menus (Softkeys)Softkeys are menu items that appear on the bottom row of the control head’s display. These menu items are software-activated and enable you to access many of the radio’s features without having to activate dedicated mechanical controls. Each menu item has a four-digit alpha label (for example, MUTE and VIEW).
To browse through available softkey options and lists:
Press the < and > scroll key as appropriate.
If you scroll continuously in one direction, the display will wrap around to the beginning of the list. To scroll faster, hold down the desired scroll key.
ASTRO XTL 5000 Digital Mobile Radio with W3 Control Head 5
Getting to Know Your Radio
Entering Softkey MenusTo access a menu item:
Press the menu-select button (m) immediately below the softkey you wish to access.
6

Getting to Know Your Radio
Returning to the HOME DisplayIn most cases, the home display is your radio’s dispatch state, that is, the default channel and zone that your radio operates on. To return to the Home display at any time:
Press the O key for at least one second.
Note: The default channel and zone are programmed by your system manager.
Interpreting Radio Status IndicatorsYour radio has three types of status indicators:
• Status annunciators that appear on the display• LED indicators• Alert tones
Status AnnunciatorsThese are small symbols that appear on the display above the channel name indicating status as you operate various radio features.
Annunciator Indicates...
C Carrier Squelch (Conventional mode only)All active traffic on the selected channel in being monitored during conventional operation.
When not displayed, traffic is not open to monitoring.
D Secure Operation onlyWhen lit solid, radio is transmitting in secure mode.
When flashing, radio is receiving in secure mode.
When off, radio is operating in clear mode.
F Call Received Flashes when a Private Call, Phone Call or page is received.
ASTRO XTL 5000 Digital Mobile Radio with W3 Control Head 7
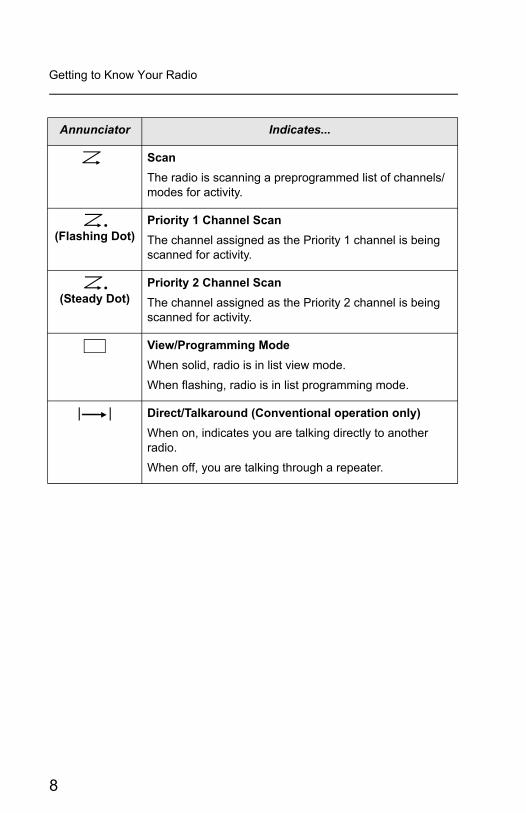
Getting to Know Your Radio
G Scan The radio is scanning a preprogrammed list of channels/modes for activity.
H (Flashing Dot)
Priority 1 Channel ScanThe channel assigned as the Priority 1 channel is being scanned for activity.
H (Steady Dot)
Priority 2 Channel ScanThe channel assigned as the Priority 2 channel is being scanned for activity.
I View/Programming ModeWhen solid, radio is in list view mode.
When flashing, radio is in list programming mode.
J Direct/Talkaround (Conventional operation only)When on, indicates you are talking directly to another radio.
When off, you are talking through a repeater.
Annunciator Indicates...
8
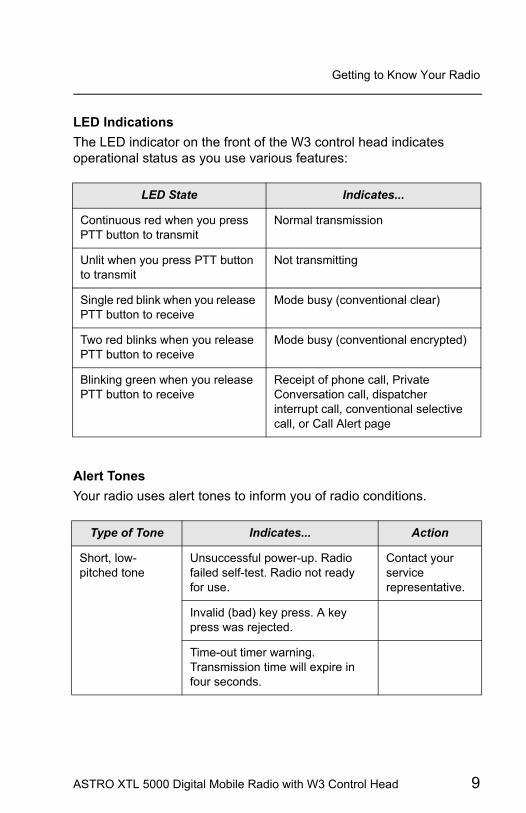
Getting to Know Your Radio
LED IndicationsThe LED indicator on the front of the W3 control head indicates operational status as you use various features:
Alert TonesYour radio uses alert tones to inform you of radio conditions.
LED State Indicates...
Continuous red when you press PTT button to transmit
Normal transmission
Unlit when you press PTT button to transmit
Not transmitting
Single red blink when you release PTT button to receive
Mode busy (conventional clear)
Two red blinks when you release PTT button to receive
Mode busy (conventional encrypted)
Blinking green when you release PTT button to receive
Receipt of phone call, Private Conversation call, dispatcher interrupt call, conventional selective call, or Call Alert page
Type of Tone Indicates... Action
Short, low-pitched tone
Unsuccessful power-up. Radio failed self-test. Radio not ready for use.
Contact yourservice representative.
Invalid (bad) key press. A key press was rejected.
Time-out timer warning. Transmission time will expire in four seconds.
ASTRO XTL 5000 Digital Mobile Radio with W3 Control Head 9

Getting to Know Your Radio
Short, medium-pitched tone
Valid (good) key press. A key press was accepted.
Pressed emergency button to enter emergency. Emergency entered.
Short, high-pitched tone
Successful power-up. Radio passed self-test.
Continuous, low-pitched tone
Transmit on receive-only mode. Pressed PTT button on receive-only mode.
Release PTT button.
Transmit inhibit on busy mode. Pressed PTT button while mode is busy.
Invalid mode. An invalid or unprogrammed operation.
Time-out timer timed out. Transmission terminated.
Release PTT button.
Continuous, medium-pitched tone
Emergency alarm/call exit. Exiting.
Faint beeping tone every ten seconds (trunked systems only)
Failsoft.
“Bah-bah-bah-bah” (trunked systems only)
Trunked system busy. Radio is in queue.
Waiting for next available mode.
Single, medium-pitched tones followed by group of four medium-pitched tones
Your page has been received by the target radio.
Type of Tone Indicates... Action
10

Getting to Know Your Radio
Group of two medium-pitched tones
Private Conversation call received.
Group of three medium-pitched (di-di-dit) tones (trunked systems only)
Call back. A talkgroup is now available.
Okay to transmit in that talkgroup.
Group of four medium-pitched tones every five seconds
Call Alert (page) received by your radio.
Short, medium-pitched tone (trunking only)
Echo received in response to emergency alarms.
Four short, medium-pitched tones
Emergency alarm acknowledged.
Continuous, low-pitched tone
No Emergency. Current trunking personality or conventional system does not have emergency enabled. No emergency tone.
Group of two high-pitched tones
Fast ring in Private call.System is searching for target radio.
Type of Tone Indicates... Action
ASTRO XTL 5000 Digital Mobile Radio with W3 Control Head 11

Getting to Know Your Radio
Alert Tones (Secure-Equipped Radios Only)Your secure-equipped radio uses alert tones to let you know the condition of security features.
Type of Tone Indication Action
One beep immediately after PTT button press
Indicates clear transmission on secure-equipped radio.
Six medium-pitched tones
Keyfail. Encryption key lost or erased.
Reload key.
Six medium-pitched tones (continuous)
Keyfail. Radio set in secure position. PTT is being pressed.
Set radio to clear, or select a clear mode, or reload key.
Six medium-pitched tones on radio power-up
Encrypted operation problem. Radio is set to either clear or secure.
Reload key.
Six medium-pitched tones every five to ten seconds
Encrypted operation problem. PTT button not being pressed.
Set radio to clear, or select a clear mode, or reload key.
Consecutive, medium-pitched tones
Loss of encryption key during secure operation.
Reload key.
12

Getting to Know Your Radio
Entering Characters Using the KeypadYour XTL 5000 radio accepts input through the keypad in the form of numeric or alphanumeric strings. You may use manual keypad entry to select a status or a mode, to program a list, or to dial a phone number.
For instance, when you access the Status function using the STS softkey, the display shows the last successfully acknowledged status first. If you would like to send a different status message, you can scroll to the entry or, in the case of long lists, use the keypad to enter a number corresponding to its numeric location in the list. If you wish to access the twelfth status entry in the list, for example, you can press 1 and then 2, and press the PTT button to transmit that status.
This concludes an introduction on operating your XTL 5000 radio. You can now begin familiarizing yourself with using your radio to perform basic procedures such as transmitting and receiving. These are covered in the following chapter.
ASTRO XTL 5000 Digital Mobile Radio with W3 Control Head 13

Getting to Know Your Radio
Notes
14

Basic Radio Operation
This section describes how to perform the following basic radio procedures:
• Monitoring Conventional Modes (page 16)
• Selecting a Zone and Mode (page 17)
• Receiving on Conventional Modes (page 18)
• Changing the Squelch Setting (page 19)
• Receiving on Trunked Systems (page 20)
• Transmitting on Conventional Modes (page 21)
• Transmitting on Trunked Systems (page 22)
Use the foldout at the back of this user guide as a reference when you review these procedures.
The section also has information on the following feature:
• Time-Out Timer or TOT (page 23)
ASTRO XTL 5000 Digital Mobile Radio with W3 Control Head 15

Basic Radio Operation
Monitoring Conventional ModesTo monitor conventional modes, do the following:
To cancel monitoring:
Take the microphone off the radio’s hook.ORPress the preprogrammed Monitor button (S1, S2, S3, T2, or T3 as appropriate.)
The display shows MONITOR ON indicating that the squelch circuit has been opened, allowing you to monitor all of the traffic on the channel.
Place the microphone on the radio’s hook.ORPress the preprogrammed Monitor button (S1, S2, S3, T2, or T3 as appropriate.)
The display shows MONITOR OFF.
16

Basic Radio Operation
Selecting a Zone and Mode (Channel)A channel is a group of radio characteristics such as transmit/receive frequency pairs stored in your radio. A zone is a grouping of channels. A mode is a combination of zones and channels. Your radio is programmed by your system manager to have channels and zones that you need to perform your day-to-day operations.
When your radio powers up, it defaults to the home mode and zone, the zone that you transmit and receive on. At times, you may need to select a different zone or channel to transmit or receive on, as follows:
1 Press the > button to scroll to the ZONE softkey.
2 Press the m button below ZONE.
The display shows the current zone and mode.
3 Press > or < until the desired zone is displayed.
OR
If you know the zone number, enter it using the keypad.
4 Press the O or PTT button to save the displayed zone as the new home (default) zone.
The zone name stops flashing once it is saved.
5 Press the PTT button to begin transmitting on the displayed zone.
6 To select a particular mode within a zone, press the M button until the desired mode is displayed.
ASTRO XTL 5000 Digital Mobile Radio with W3 Control Head 17
Basic Radio Operation
Receiving on a Conventional ModeFollow these steps to receive on a conventional mode:
1 Select a desired zone and mode (see page 17).
2 When you hear a transmission, use the V rocker switch to adjust the volume to a comfortable listening level if necessary.
Your radio is now set to receive on the selected mode.
Note: If the mode is busy when you radio is receiving a clear signal, the red LED blinks once.
If the mode is busy when your radio is receiving an encrypted signal, the red LED blinks twice.
18
Basic Radio Operation
Changing the Squelch SettingYour radio’s ability to transmit and receive signals varies as you move away from or close to your base station. You can adjust your radio’s squelch to improve its ability to receive transmissions.
Follow these steps to change the squelch setting:
1 Press and hold the preprogrammed Monitor button (S1, S2, S3, T2, or T3 as appropriate).
2 Press the < or > button to scroll to the desired squelch setting.
3 Press the O button.
ASTRO XTL 5000 Digital Mobile Radio with W3 Control Head 19

Basic Radio Operation
Receiving on Trunked SystemsFollow these steps to receive while operating on a trunked system:
1 Select a desired zone and mode (see page 17).
2 When you hear a transmission, use the V rocker switch to adjust the volume to a comfortable listening level if necessary.
Your radio is now set to receive on the selected mode.
20
Basic Radio Operation
Transmitting on Conventional ModesFollow these steps to transmit on a conventional mode:
1 Select a desired zone and mode (see page 17).
When you hear a transmission, use the V rocker switch to adjust the volume to a comfortable listening level if necessary.
2 When a mode becomes available, press and hold the PTT button to transmit. Speak clearly into the microphone.
The red LED lights steadily when the radio is transmitting.
3 Release the PTT button to receive.
Note: If you try to transmit on a receive-only mode, you will hear a continuous low-pitched (“invalid mode”) tone.
ASTRO XTL 5000 Digital Mobile Radio with W3 Control Head 21

Basic Radio Operation
Transmitting on Trunked SystemsFollow these steps to transmit on a trunked system:
1 Select a desired zone and mode (see page 17).
Note: If no secure voice modes are available for a transmission, the display shows NO SECURE. You must switch to a clear mode or wait until a secure voice channel is available before you can transmit.
When you hear a transmission, use the V rocker switch to adjust the volume to a comfortable listening level if necessary.
2 Press and hold the PTT button to transmit.Speak clearly into the microphone.The red LED lights steadily when the radio is transmitting.
3 Release the PTT button to receive.
Notes: If you hear a busy (“bah-bah-bah-bah”) signal, release the PTT button. You hear a “di-di-dit” (“call-back”) tone. You have three seconds to transmit before you hear another busy signal.
If transmission is not possible for some reason, you hear a continuous, low-pitched (“talk prohibit”) tone. Your radio may be out of range.
22
Basic Radio Operation
Time-Out TimerThis feature limits the amount of time you can continuously transmit. Your system manager can program the timer for up to 465 seconds at 15-second intervals. XTL 5000 radios are programmed at the factory to time-out after 60 seconds.
Notes: You hear a low-pitched alert tone four seconds before your transmission to about to expire.
If you hold down the PTT button longer than the programmed time, you hear a continuous, low-pitched tone. This tone ceases to sound when you release the PTT button.
ASTRO XTL 5000 Digital Mobile Radio with W3 Control Head 23

Basic Radio Operation
Notes
24
Common Radio Features
This section contains information and procedures associated with various features that may have been enabled in your radio by your system manager.
The following information is covered in this section:
• Conventional Squelch Options(page 29)
• Types of Scan (page 35)
• PTT-ID (page 42)
The following procedures are covered in this section:
• Sending a status call (trunking systems only) (page 26)
• Selecting the transmit power level (page 28)
• Sending an emergency alarm (page 30)
• Sending a silent emergency alarm (page 31)
• Sending an emergency call (page 32)
• Muting and unmuting keypad tones (page 34)
• Turning scanning on or off (page 37)
• Viewing a scan list (page 38)
• Programming a scan list (page 39)
• Deleting nuisance modes from the scan list (page 41)
• Viewing a page, call, or phone list (page 43)
• Telephone operation (page 44)
• Call Alert (page 49)
• Programming a page, call, or phone list number (page 57)
• Programming a page, call, or phone list name (page 60)
• Optional external alarms (horn and/or lights) (page 63)
ASTRO XTL 5000 Digital Mobile Radio with W3 Control Head 25

Common Radio Features
Sending a Status Call (Trunking Only)A Status Call is a text message sent to the dispatcher informing him or her of your situation. It does not involve a voice transmission. The status call feature is available on both conventional and trunked systems. For example, a status call might indicate to the dispatcher that you are ENROUTE or AT SITE.
Status names are field-programmable. In trunking modes, each radio can have up to eight separate statuses.
Follow these steps to send a status call to your dispatcher:
1 Press the < or > button to scroll to STS.
OR
Press the preprogrammed Status button (S1, S2, S3, T2, or T3 as appropriate) and proceed to step 4.
2 Press the m button below STS.
The display shows the last acknowledged status entry or the first status entry in the list.
3 Press the < or > button to scroll through the available status choices.
Stop scrolling when you reach the desired status (for example, STATUS 3).
4 Press the PTT button to transmit the selected status. The display shows PLEASE WAIT.
The dispatcher transmits an acknowledgment upon receipt of the status. Four tones sound and ACK RECEIVED is displayed by your radio upon receipt. The radio then returns to normal dispatch operation.
• 4 tones
26
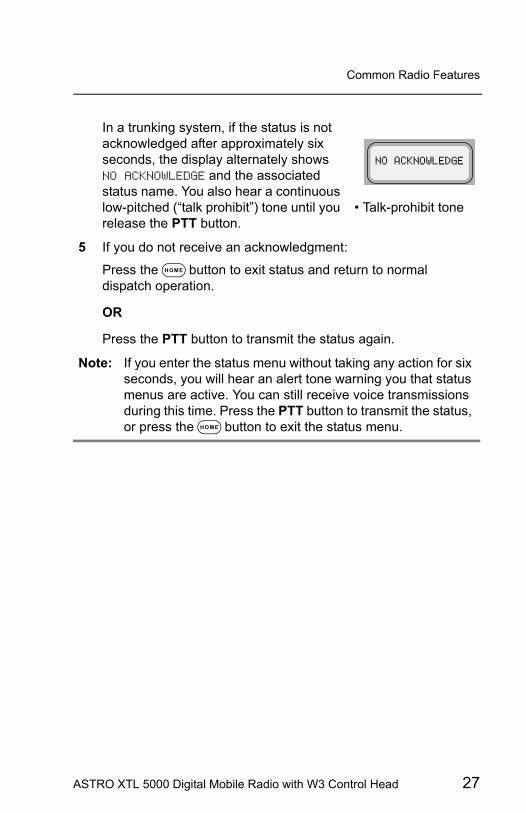
Common Radio Features
In a trunking system, if the status is not acknowledged after approximately six seconds, the display alternately shows NO ACKNOWLEDGE and the associated status name. You also hear a continuous low-pitched (“talk prohibit”) tone until you release the PTT button.
• Talk-prohibit tone
5 If you do not receive an acknowledgment:
Press the O button to exit status and return to normal dispatch operation.
OR
Press the PTT button to transmit the status again.
Note: If you enter the status menu without taking any action for six seconds, you will hear an alert tone warning you that status menus are active. You can still receive voice transmissions during this time. Press the PTT button to transmit the status, or press the O button to exit the status menu.
ASTRO XTL 5000 Digital Mobile Radio with W3 Control Head 27

Common Radio Features
Selecting Transmit Power LevelYou may need to change the transmit power level on your XTL 5000 radio based on operating conditions.
Note: When you power on your radio, it automatically defaults to a HIGH POWER transmit state even if you had selected LOW POWER before you turned the radio off.
1 Press the < or > buttons to scroll to the PWR softkey.
2 Press the m button below PWR.
The display shows HIGH POWER or LOW POWER along with the LOW and HIGH softkeys.
3 Press the m button under LOW or HIGH as appropriate.
The radio automatically returns to the home display.
Note: Press O or the PTT button to discard your change and exit the menu.The radio automatically returns to the home display.
28

Common Radio Features
Conventional Squelch OptionsThe term “squelch” is used to describe the muting of audio circuits when signal levels received by a radio fall below a pre-determined threshold. With carrier squelch, you hear all channel activity that exceeds the radio’s preset squelch level. This squelch level is programmed by your system manager.
Analog Squelch OptionsTone Private-Line (PL), Digital Private-Line (DPL), and network ID are coded squelch modes; carrier squelch is not. Your system manager can program each mode with one of these squelch options as appropriate.
During carrier squelch operation, all traffic on the channel is heard. During PL or DPL operation, your radio responds to only those messages intended specifically for you.
Digital Squelch OptionsEach conventional personality can be programmed for one of the following squelch options in digital mode:
• Digital Carrier-Operated Squelch (COS) — This option allows you to hear all digital traffic.
• Normal Squelch — This option allows you to hear any digital traffic that has the correct network access code.
• Selective Squelch — This option allows you to hear any digital traffic that has the correct network access code and the correct talkgroup.
ASTRO XTL 5000 Digital Mobile Radio with W3 Control Head 29

Common Radio Features
Sending an Emergency AlarmThis feature is useful when you want to alert the dispatcher of an emergency condition. The dispatcher receives your radio ID in addition to the emergency message. An emergency call gives your radio priority over any other traffic on the channel.
Follow the steps below to send an emergency alarm:
Press the orange top button (T2).
The display alternately shows EMERGENCY and the name of the current zone and mode. You hear a short, medium-pitched (“emergency”) tone. • Short tone
When the dispatcher acknowledges the emergency, you hear four short, medium-pitched tones and the display shows ACK RECEIVED. The radio automatically exits emergency mode and returns to the home display.
Note: If you do not receive an acknowledgment for the emergency alarm, the radio automatically re-transmits the emergency alarm. The number of repetitions is preprogrammed by your system manager.
30
Common Radio Features
Sending a Silent Emergency AlarmYour radio may have been programmed for silent emergency based on your needs or the needs of your workgroup.
To activate silent emergency:
1 Press the orange top button (T2).
Your radio sends an emergency signal to the dispatcher, but shows no external indications that the emergency alarm is in progress. The audio is muted.
2 To exit the emergency mode, press and hold the orange top button for more than 1-1/2 seconds.
You hear a medium-pitched exit tone which confirms that the radio has exited successfully. The radio returns to the home display.
ASTRO XTL 5000 Digital Mobile Radio with W3 Control Head 31

Common Radio Features
Sending an Emergency CallThese steps explain the sending of a trunked emergency alarm with call. When sending a trunked emergency call only (not available for conventional emergency), an emergency alarm is not automatically sent to the dispatcher.
1 Press the orange top button (T2).
EMERGENCY and the zone and mode are alternately displayed, and a short, medium-pitched emergency tone sounds.
The emergency alarm is automatically sent to the dispatcher.
2 Press the PTT button and announce your emergency.
The emergency alarm ends and the radio enters the emergency call mode. The radio operates in the normal dispatch manner while in emergency call operation.
3 To exit the emergency call mode, press the orange emergency button (T2) for more than 1-1/2 seconds (programmable).
A medium-pitched exit tone sounds until you release T2. The radio returns to normal operation.
32

Common Radio Features
Notes: The operating mode for your emergency call assumes one of two possible programmed operations:
• For non-revert operation, you will talk on the mode you selected before the emergency call.
• For revert operation, you will talk on a programmed emergency mode.
If you change operating modes while in emergency call operation, the emergency call is moved to, and continues on, the new mode.
Important: Exit the emergency call mode when you have finished.!
ASTRO XTL 5000 Digital Mobile Radio with W3 Control Head 33

Common Radio Features
Muting and Unmuting the Keypad TonesThe tones you hear when you press a key can be muted with this feature.
Note: The radio retains this setting even if it is turned off.
1 Press the < or > button to scroll to MUTE.
2 Press the m button below MUTE.
The display shows TONES ON or TONES OFF, and the ON and OFF softkeys.
3 Press the m button below ON or OFF.
Your selection is saved, and the radio returns to the home display.
Notes: Press the O or PTT button to exit the menu without saving the change.
34
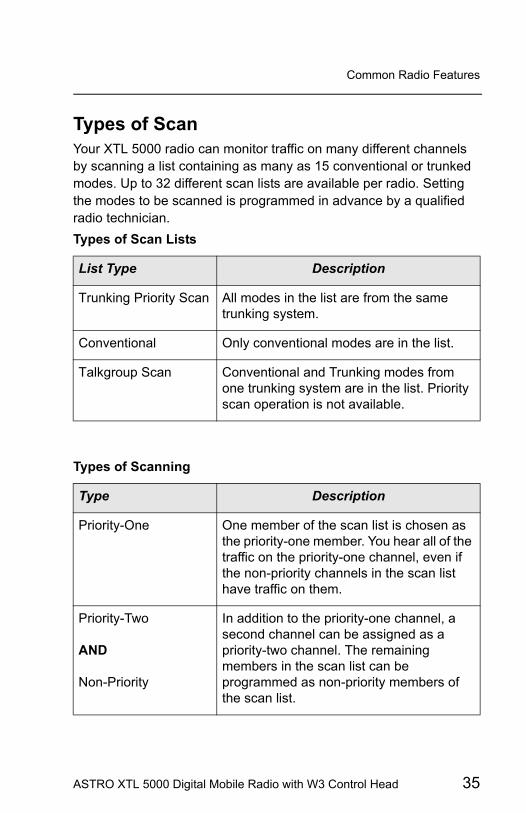
Common Radio Features
Types of ScanYour XTL 5000 radio can monitor traffic on many different channels by scanning a list containing as many as 15 conventional or trunked modes. Up to 32 different scan lists are available per radio. Setting the modes to be scanned is programmed in advance by a qualified radio technician.Types of Scan Lists
List Type Description
Trunking Priority Scan All modes in the list are from the same trunking system.
Conventional Only conventional modes are in the list.
Talkgroup Scan Conventional and Trunking modes from one trunking system are in the list. Priority scan operation is not available.
Types of Scanning
Type Description
Priority-One One member of the scan list is chosen as the priority-one member. You hear all of the traffic on the priority-one channel, even if the non-priority channels in the scan list have traffic on them.
Priority-Two
AND
Non-Priority
In addition to the priority-one channel, a second channel can be assigned as a priority-two channel. The remaining members in the scan list can be programmed as non-priority members of the scan list.
ASTRO XTL 5000 Digital Mobile Radio with W3 Control Head 35
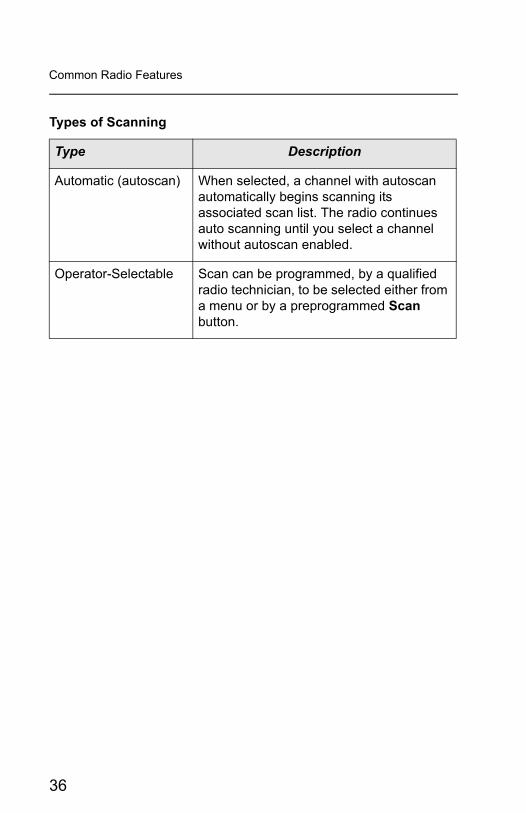
Common Radio Features
Automatic (autoscan) When selected, a channel with autoscan automatically begins scanning its associated scan list. The radio continues auto scanning until you select a channel without autoscan enabled.
Operator-Selectable Scan can be programmed, by a qualified radio technician, to be selected either from a menu or by a preprogrammed Scan button.
Types of Scanning
Type Description
36

Common Radio Features
Turning Scan On or Off1 Press the < or > buttons to scroll
to SCAN.
OR
Press the preprogrammed Scan button (S1, S2, S3, T2, or T3 as appropriate). Press the Scan button again to exit scan.
2 Press m below SCAN.The display shows SCAN ON or SCAN OFF, and the ON and OFF softkeys.
3 Press the m button below ON or OFF.
• If you selected ON, the radio starts scanning and the display shows G.
OR
• If you selected OFF, the radio stops scanning.
The radio returns to the home display.
Note: Press the O button to exit the menu without changing the selection.
ASTRO XTL 5000 Digital Mobile Radio with W3 Control Head 37

Common Radio Features
Viewing a Scan ListThis feature enables you to view the scan list programmed into your radio.
Note: The call, page, and phone lists are handled separately in “Viewing a Page, Call, or Phone List” on page 43.
To view the scan list:
1 Press the < or > buttons to scroll to the VIEW softkey.
2 Press the m button below VIEW.
3 Press the < or > buttons to scroll to the SCAN softkey.
4 Press the m button below SCAN.
The display shows the first entry in the scan list and the G (the scan status annunciator). It also shows the viewing-mode annunciator (a solid ) until you exit list view mode.
5 Press the > button to advance to the next entry in the list.
OR
To directly access an entry, use the keypad to enter its numerical position in the list (any programmed location from 1 to 15).
Notes: When the last entry is displayed, you can press the > button to scroll to the first list entry.
6 Press O to exit the list and return to the home display.
38

Common Radio Features
Programming a Scan ListThis feature lets you change the channels that are included in the current scan list and their priorities.
1 Press < or > to scroll to PROG.
2 Press the m button below PROG.
3 Press the < or > buttons to find SCAN.
4 Press the m button below SCAN to access the scan list.
The display shows the SEL, DEL, and RCL sofkeys. It also shows a flashing I (the programming-mode annunciator) until you exit list programming mode.
5 Press the < to > buttons to scroll through the available zones.
6 Press the MODE rocker switch to scroll through the different modes (channels) of a zone.
OR
To directly access that channel of the current zones, use the keypad to enter a channel’s numeric location in the list.
Note: If the channel is a member of the scan list, the display shows G (the scan status annunciator).
7 Press the m button below SEL to add or remove a channel from the scan list or to change a scan list member’s priority. (The S1, or Select, button also serves the same function.)
ASTRO XTL 5000 Digital Mobile Radio with W3 Control Head 39

Common Radio Features
Each press of SEL changes the member’s priority (Non-Pri, Pri1, Pri2, and off) and is indicated by the scan status annunciators:
G = channel is in the scan list as non-priority
H = channel is in the scan list as the priority 2 channel
H (dot flashing) = channel is in the scan list as the priority 1 channel.
off = remove from the scan list.
Press DEL to delete a mode from the list. (Unlike pressing SEL, pressing DEL removes the selection using a single press rather than toggling through different scan states.)
If the scan list is pre-programmed so that a deletion is not allowed, this function is blocked.
OR
Press RCL repeatedly to view the entire contents of the scan list.
8 Press O to save all changes, exit the programming mode and return to the home display.
40

Common Radio Features
Deleting Nuisance ModesDuring scanning, you can temporarily delete modes you do not want to hear. This feature must be preprogrammed by your system manager.
Follow these steps to delete a nuisance mode:
1 When the radio is locked onto the mode you want to delete,Press the preprogrammed Nuisance Delete button.
OR
Press the < or > buttons to use the NUIS softkey to delete the mode.
A valid key-press chirp tone sounds. The mode is deleted and the radio continues to scan the remaining modes.
Note: You cannot delete priority modes and the designated transmit channel.
2 To resume scanning the deleted mode, turn scan off and then back on again.
ASTRO XTL 5000 Digital Mobile Radio with W3 Control Head 41

Common Radio Features
PTT-ID (Optional)This stands for Push-to-Talk ID. This feature is programmed as needed for each channel by your system manager.
If this feature is made available for your talkgroup, it allows you to see the ID number of the radio from which you are receiving a transmission. This ID could be up to eight characters in length and is shown on your display as well as on your dispatcher’s display.
In addition, your radio ID number is automatically sent when you transmit. For digital voice transmissions, your radio ID is sent continuously during the voice transmission.
42
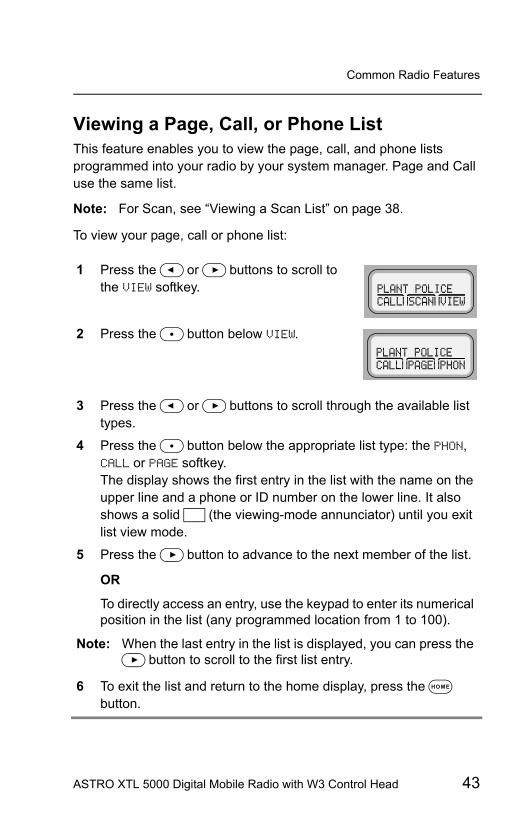
Common Radio Features
Viewing a Page, Call, or Phone ListThis feature enables you to view the page, call, and phone lists programmed into your radio by your system manager. Page and Call use the same list.
Note: For Scan, see “Viewing a Scan List” on page 38.
To view your page, call or phone list:
1 Press the < or > buttons to scroll to the VIEW softkey.
2 Press the m button below VIEW.
3 Press the < or > buttons to scroll through the available list types.
4 Press the m button below the appropriate list type: the PHON, CALL or PAGE softkey.The display shows the first entry in the list with the name on the upper line and a phone or ID number on the lower line. It also shows a solid I (the viewing-mode annunciator) until you exit list view mode.
5 Press the > button to advance to the next member of the list.
OR
To directly access an entry, use the keypad to enter its numerical position in the list (any programmed location from 1 to 100).
Note: When the last entry in the list is displayed, you can press the > button to scroll to the first list entry.
6 To exit the list and return to the home display, press the O button.
ASTRO XTL 5000 Digital Mobile Radio with W3 Control Head 43

Common Radio Features
Telephone Operation (Conventional and Trunking)You can use your radio in a manner similar to a standard telephone.
Answering a Telephone Call
When your radio receives a telephone call:
• Telephone-like ringing sounds.• PHONE CALL and the present mode are
alternately displayed.• The Call-Received status annunciator
(F) flashes in the display.
Note: Incoming phone numbers are not stored in the phone list.
1 Press the programmed Phone or Call-Response button.
Note: The Call-Received status annunciator is no longer displayed.
2 Press the PTT button to talk; release the PTT button to listen.
3 Press O or the Phone button to hang up. The radio returns to the home display.
44

Common Radio Features
Selecting a Phone Number to CallYou can select a phone number to call either from the keypad or from a phone list.
Enter a Number on the Keypad
1 Press > to scroll to PHON.
Note: If your radio has a programmed Phone button, press it to skip directly to step 3.
2 Press the m button below PHON.
The display shows the last transmitted phone number. If this is the correct phone number, go to step 4.
3 Press the numeric keys.
Note: Some phone networks require a pause in the phone dialing sequence. To place a pause in a 34-digit phone number, press * first and then # (P for pause is displayed).
4 Press the PTT button to dial the phone number.
The phone number called remains on the display.
If the system does not acknowledge the call, your radio displays NO ACKNOWLEDGE.
ASTRO XTL 5000 Digital Mobile Radio with W3 Control Head 45
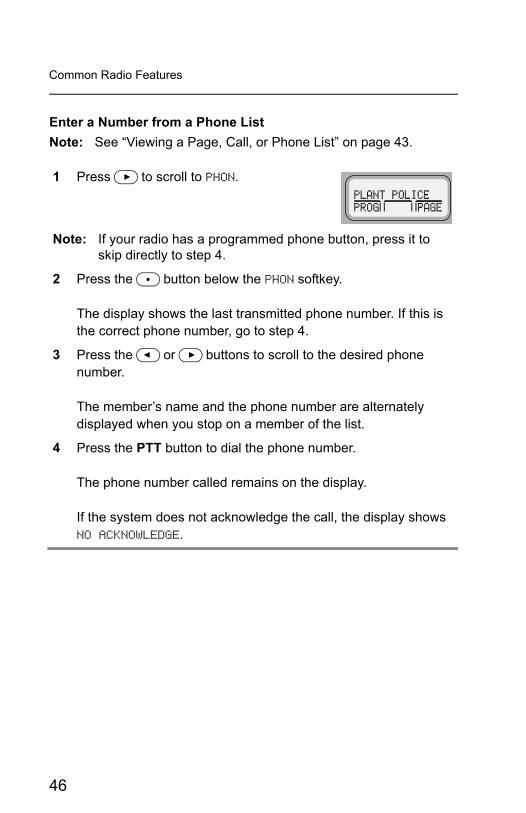
Common Radio Features
Enter a Number from a Phone ListNote: See “Viewing a Page, Call, or Phone List” on page 43.
1 Press > to scroll to PHON.
Note: If your radio has a programmed phone button, press it to skip directly to step 4.
2 Press the m button below the PHON softkey.
The display shows the last transmitted phone number. If this is the correct phone number, go to step 4.
3 Press the < or > buttons to scroll to the desired phone number.
The member’s name and the phone number are alternately displayed when you stop on a member of the list.
4 Press the PTT button to dial the phone number.
The phone number called remains on the display.
If the system does not acknowledge the call, the display shows NO ACKNOWLEDGE.
46

Common Radio Features
Initiating a Telephone CallThe display shows the desired telephone number.
Press the PTT button to initiate the phone call to the number on the display.
The phone number being called remains on the display.
If the system does not acknowledge the call, your radio displays NO ACKNOWLEDGE.
Notes:
• If the phone system is malfunctioning or not currently available, the display shows NO PHONE, and you hear a continuous tone when you press the PTT button.
• If the phone system is busy, and not available at all, then the display will show PHONE BUSY. If you hear a continuous tone, the system phone connection is busy. Exit phone mode and try again.
• If the display shows PHONE BUSY and you hear a busy tone, then there is no channel available, and the radio will automatically connect when the channel is ready.
• After reaching the number you are calling, you might need to dial an extension number before you can reach your party. You also have the option of sending in additional digits (overdial) to the telephone system (for example, credit card numbers and PINs).
- If your radio is programmed for live overdial, every digit pressed after the phone call has been established is sent into the telephone system.
- If your radio is programmed for buffered overdial, the digits pressed are queued into the radio’s memory, and they are all sent in together upon the next PTT button press. You cannot send in digits and talk on the same PTT button press. If you press the PTT button to send the digits, you must release the PTT button and press it again if you wish to transmit your voice.
ASTRO XTL 5000 Digital Mobile Radio with W3 Control Head 47

Common Radio Features
5 If the calling party answers, converse in the normal manner.
Press the PTT button to talk; release the PTT button to listen.
Note: Motorola trunked radios generate a high-pitched tone when the radio’s PTT button is released. This is heard by the landline party and is an indicator to begin talking.
6 When you have finished your conversation, or if the display shows NO PHONE or NO ACKNOWLEDGE, hang up by pressing O or the phone button.
The radio returns to the home display.
48

Common Radio Features
Call Alert (Conventional and Trunking)With Call Alert, your radio can receive, respond to, and send pages (like a beeper), depending upon how it is programmed.
Paging the Last ID Number Transmitted or Received
1 Press the > button to scroll to PAGE for Call Alert.
2 Press the m button below PAGE.
The display shows the last ID number transmitted or received.
3 Go to “Sending a Call Alert Page” on page 54 to send your page.
ASTRO XTL 5000 Digital Mobile Radio with W3 Control Head 49
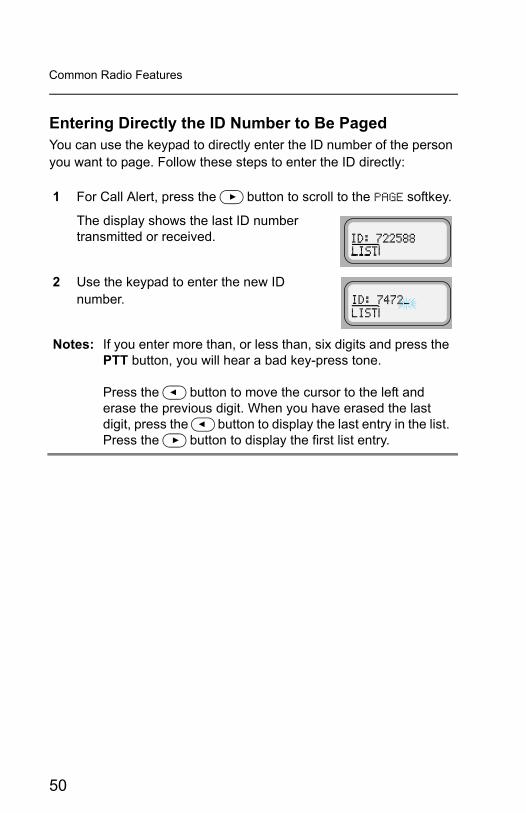
Common Radio Features
Entering Directly the ID Number to Be PagedYou can use the keypad to directly enter the ID number of the person you want to page. Follow these steps to enter the ID directly:
1 For Call Alert, press the > button to scroll to the PAGE softkey.
The display shows the last ID number transmitted or received.
2 Use the keypad to enter the new ID number.
Notes: If you enter more than, or less than, six digits and press the PTT button, you will hear a bad key-press tone.
Press the < button to move the cursor to the left and erase the previous digit. When you have erased the last digit, press the < button to display the last entry in the list. Press the > button to display the first list entry.
50

Common Radio Features
Scrolling to an ID Number in the Page ListNote: See “Viewing a Page, Call, or Phone List” on page 43.
1 Press the > button to scroll to PAGE for Call Alert.
2 Press the m button below PAGE.
The display shows the last ID number transmitted or received.
3 Press the > or < buttons to scroll through the list.
The member’s name and ID number are alternately displayed when you stop.
Note: The last member of the list equals the last ID number transmitted or received. This is the same as location 00 in the list.
4 Refer to “Sending a Call Alert Page” on page 54 to send your page.
ASTRO XTL 5000 Digital Mobile Radio with W3 Control Head 51

Common Radio Features
Going Directly to an ID Number in the Page ListNote: See “Viewing a Page, Call, or Phone List” on page 43.
1 Press the > button to scroll to PAGE for Call Alert.
2 Press the m button below PAGE.
The display shows the last ID number transmitted or received.
3 Press the > or < buttons to scroll through the list.
Note: The last member of the list equals the last ID number transmitted or received. This is the same as location 00 in the list.
4 Do the following:
• Press the numeric keys to enter the first digit of the location number.
That position in the list is immediately displayed only if there are fewer than 10 members. The member’s name and ID number are alternately displayed.
OR
If there are 10 or more members, LOC#X_ is displayed (where X is a 0 or a 1 and it is the first digit entered).
The cursor flashes to show the location of the second digit.
• Press the numeric keys to enter the second digit of the location number.
The member’s name and ID number are alternately displayed.
52

Common Radio Features
Note: The display shows INVALID ENTRY if you enter a nonexisting number (for example, 24). The radio will revert back to step 4.
5 Refer to “Sending a Call Alert Page” on page 54 for sending a page.
ASTRO XTL 5000 Digital Mobile Radio with W3 Control Head 53

Common Radio Features
Sending a Call Alert PageFollow these steps to send a call alert page:
1 Press the PTT button.
If you hear five tones, the system has received the ID number. The radio you called is on the air and has received your page. Your radio automatically returns to the home display.
If you hear only one tone, the system has received the ID number, but the radio you are paging is not on the air. Proceed to the next step.
2 To try paging the number again, press the PTT button.
OR
To hang up, press the O button to hang up. The radio returns to the home display.
Note: If you hear a low-pitched alert tone and the display shows NO ACKNOWLEDGE, the radio you called did not acknowledged the Call Alert within six seconds. Try again or press the O button to exit.
54

Common Radio Features
Answering a Call Alert Page
You can answer a Call Alert page using the PTT button or using Enhanced Private Call.
Answering a Page Using PTT Button
If you hear a recurring four-beep tone, your radio is receiving a Call Alert page. The display alternately shows the current mode name and PAGE RECEIVED. The green LED and Call-Received status annunciator (F) flash.
Note: The four-beep tone will continue until you answer the page or reset the radio.
To turn-off the Call Alert audible and visual indicators:
Press any keypad key or control head button (except the preprogrammed light button or Vol rocker switch), or change the mode.
Press the PTT button.
The display shows the current mode. The audible alert, LED, and F status annunciator turn off.
The radio stores the ID number of the paging radio as the last ID number received.
Note: Pressing the PTT button enables you to transmit, and releasing it enables you to listen to a transmission. Everyone in the talkgroup will hear your voice when you transmit.
ASTRO XTL 5000 Digital Mobile Radio with W3 Control Head 55

Common Radio Features
Answering a Page Using Enhanced Private Call
1 Press the programmed quick-response or call button.
OR
Press the > button until the display shows the CALL softkey.
Press the m button below CALL.
The display shows the ID number of the paging radio.
2 Press the PTT button.
The ID number is transmitted.
3 Pause for one second to allow the alert tone to sound on the receiving radio.
Release the PTT button to listen to the transmission.
Notes: The display shows NO ANSWER if the party does not answer within 20 seconds. An alert tone sounds and the telephone-like ringing will stop.
The display shows NO ACKNOWLEDGE if the called radio is not in service. No ringing will sound.
4 Press the PTT button to continue with your Private Conversation after you hear the other party’s voice.
5 Press the O button to hang up. The radio returns to the home display.
56

Common Radio Features
Programming a Page, Call, or Phone List NumberThis feature lets you change the ID numbers assigned to the call lists used by the trunked Private Conversation™ and Call Alert features, as well as the phone numbers used by the phone feature.
Notes: Programming the scan list is handled separately in “Programming a Scan List” on page 39.
Page and Call use the same list.
1 Press the < or > button to scroll to the PROG softkey.
2 Press the m button below PROG.
3 Press the < or > buttons to scroll through the available list types.
4 Press the m button below PHON, CALL or PAGE as appropriate to access the call list you want to edit.
The display shows the first member’s name above either the phone number or above the radio ID number. It also shows a flashing I (the programming-mode annunciator) until you exit list programming mode.
5 Press the < or > buttons to view other list members.
OR
To directly access an entry, use the keypad to enter its numerical position in the list (any programmed location from 1 to 100).
6 Press S1 (the Number Selected button in the programming mode) to enter number edit mode.
ASTRO XTL 5000 Digital Mobile Radio with W3 Control Head 57

Common Radio Features
The following table shows what keys to press and how many times to press them to enter a character.
7 Erase the old number by pressing the < button to delete each digit.
Note: If you accidentally erase all the numbers, press the < or > button to exit without making any changes. Start again at step 5. To return to the home display without making any changes, press the O button.
8 Press the numeric keys (0 through 9) to enter the new number.
The blinking cursor indicates the position of the next number to be added.
To enter a number at the blinking cursor, refer to the following table.
Key
Number of times the key is pressed
1 2 3 4 5 6 7 8 9
0 0 ( ) < >
1 1 & %
2 A B C 2 a b c
3 D E F 3 d e f
4 G H I 4 g h i
5 J K L 5 j k l
6 M N O 6 m n o
7 P Q R S 7 p q r s
8 T U V 8 t u v
9 W X Y Z 9 w x y z
* * / + - =
# # . ! ? , ;
58

Common Radio Features
Note: Some phone networks require a pause in the phone dialing sequence. To enter a pause in a phone number (up to 16 digits), press * first, and then #. The display shows P for pause.
9 Do one of the following:
• Press the S1 button to save your changes.
You can continue to edit other numbers by returning to step 5.
OR
• Press O to exit the number editing mode without saving the changes.
10 Press O to exit the programming mode and return to the home display.
ASTRO XTL 5000 Digital Mobile Radio with W3 Control Head 59

Common Radio Features
Programming a Page, Call, or Phone List NameThis feature lets you change the ID names assigned to the call lists used by the trunked Private Conversation and Call Alert features, as well as the phone names used by the phone feature.
1 Press < or > to scroll to PROG.
2 Press the m button below PROG.
3 Press < or > to scroll through the entire display of list types.
4 Do one of the following:
• Press the m button below PHON to access the phone list,
OR
• Press the m button below CALL or PAGE to access the call list.
The display shows the first member’s name above either the phone number or above the radio ID number.
The display shows the programming-mode annunciator (a flashing I) until you exit the programming list mode.
60
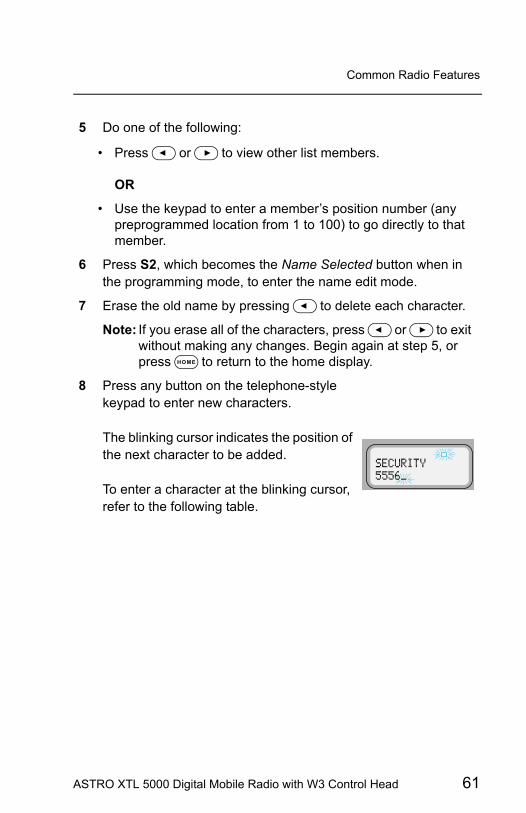
Common Radio Features
5 Do one of the following:
• Press < or > to view other list members.
OR
• Use the keypad to enter a member’s position number (any preprogrammed location from 1 to 100) to go directly to that member.
6 Press S2, which becomes the Name Selected button when in the programming mode, to enter the name edit mode.
7 Erase the old name by pressing < to delete each character.
Note: If you erase all of the characters, press < or > to exit without making any changes. Begin again at step 5, or press O to return to the home display.
8 Press any button on the telephone-style keypad to enter new characters.
The blinking cursor indicates the position of the next character to be added.
To enter a character at the blinking cursor, refer to the following table.
ASTRO XTL 5000 Digital Mobile Radio with W3 Control Head 61

Common Radio Features
Refer to the table on page 58 to see what keys to press and how many times to press them to select a character.
Note: To leave a space in the text, press > twice.
9 Do one of the following:
• Press the S2 button to save your changes.
You can continue to edit other names by returning to step 5.
OR
• Press O to exit the name editing mode without saving the changes.
10 Press O to exit the programming mode and return to the home display.
62

Common Radio Features
Optional External Alarms (Horn and/or Lights)Your radio can be equipped to activate external alarms when a Call Alert page, Selective Call, or Private Conversation call is received.
This feature is useful when you must leave the vehicle, but need to receive any incoming messages. Because this option requires the installation of additional relays, ask the system administrator if this option is installed.
Turning External Alarm(s) OnNon-Permanent Horn and/or Lights
1 Press the > button to scroll to the H/L softkey.
2 Press the m button below H/L.
3 Press the m button below H+L, HORN, or LGTS to enable horn and lights, only horn, or only lights, respectively. The display alternately shows the enabled alarm(s) and the selected mode.
The radio will remember the current state of the horn and lights feature when the radio is turned off.
ASTRO XTL 5000 Digital Mobile Radio with W3 Control Head 63

Common Radio Features
Permanent Horn and/or LightsThe radio will always power-up with the last-selected alarm(s) enabled. To view which alarm(s) are enabled:
Changing or Turning Off the Selected Alarm(s)
1 Press the > button to scroll to H/L.
2 Press the m button below H/L.
The top line of the display shows the enabled alarm(s).
3 Press the O button to go to the home display.
1 Press the > button to scroll to H/L.
2 Press the m button below H/L.
3 Press the button below OFF, H+L, HORN, or LGTS to turn off or change the selected alarm(s).
64

Common Radio Features
When a Call Is Received While Alarms Are Turned On
Non-rearmableTo turn off the external alarm(s), press the m button below H/L or
any other control head button, except V.
When the external alarm(s) are turned off, the feature is deactivated. To reactivate the feature, perform the steps of “Turning External Alarm(s) On” on page 63.
RearmableTo turn off the external alarm(s), press any control head button,
except V. When the external alarm(s) are turned off, they are automatically rearmed.
When a call is received, the vehicle’s horn sounds for four seconds, and/or the vehicle’s lights turn on for 60 seconds. (These time intervals can be changed by the system administrator.)
The display alternates between the type of call received (CALL RECEIVED, or PAGE RECEIVED) and the selected mode name. The green LED and the Call-Received status annunciator both flash.
ASTRO XTL 5000 Digital Mobile Radio with W3 Control Head 65

Common Radio Features
Notes
66

Conventional Features
This chapter shows you how to access features available in conventional operation. The following topics are covered:
• Repeater/Direct Operation (page 67)• Smart PTT (page 68)• Talkgroup Calls (page 69)• Selective Calls (page 71)
Repeater/Direct OperationTwo types of operation are available with this feature:
If repeater/direct is associated with a mode, that mode is programmed by your system manager for repeater or direct operation.
Direct You can bypass the repeater and talk directly to another radio. The transmit and receive frequencies are identical.
Repeater You talk through the repeater, thereby increasing the radio’s range. The transmit and receive frequencies differ.
ASTRO XTL 5000 Digital Mobile Radio with W3 Control Head 67

Conventional Features
Smart PTTSmart PTT is a feature that can be programmed for modes according to your needs and/or the needs of your workgroup. This gives the system manager better control of radio operations. You may notice two differences in radio operation while on a mode programmed for Smart PTT:
• You will not be able to transmit and will hear a continuous alert tone until you release the PTT button. If the red LED flashes when the radio is receiving, this indicates the mode is busy.
• The monitor function is disabled.Three radio-wide variations of smart PTT can be enabled on your radio:
Transmit Inhibit on Busy Channel
You will not be able to transmit if any traffic is detected on the mode.
Transmit Inhibit on Busy Mode with Wrong Squelch Code feature
You will not be able to transmit on an active mode with a squelch code other than your own; or with an encryption key other than your own if your radio is secure-equipped. You can transmit if the PL code is the same as yours.
Quick-Key Override This feature can work with variation 1 or 2. You can override transmit-inhibit by quick-keying the radio; in other words, pressing the PTT button twice within the time programmed for Smart PTT Quick-Key Timer. (The default value is half a second).
68

Conventional Features
Talkgroup CallsThis feature enables your system manager to define a group of conventional system users who can share the use of a conventional channel. Talkgroups can be associated with a personality as programmed by your system manager, or you can select them yourself.
If you have a radio that is secure-equipped, encryption keys are slaved to talkgroups. When talkgroups are enabled, encryption keys can be selected by changing the active talkgroup. (See “Secure Features” on page 97 for more information.)
Selecting a TalkgroupFollow the steps below to select a talkgroup:
1 Press the < or > buttons until the display shows the TGRP softkey.
2 Press the m button directly below TGRP.
The display shows the last user-selected and stored talkgroup, and the available menu entries.
3 Press the < or > buttons to scroll through the list of talkgroups.
OR
Use the keypad to enter the number of the desired index.
4 Press the m button directly below PSET (PRESET) to select the preset or programmed talkgroup.
OR
Press the m button directly below SEL (SELECT) to save the currently displayed talkgroup and return to the home display.
ASTRO XTL 5000 Digital Mobile Radio with W3 Control Head 69

Conventional Features
Note: If the encryption key slaved to the new talkgroup is erased, the display shows KEY FAIL. You hear a momentary key fail tone.
If the encryption key slaved to the new talkgroup is not allowed, the display shows ILLEGAL KEY. You hear a momentary illegal key tone.
5 Press the O button to exit this menu.
70

Conventional Features
Selective CallsWith the Selective Call feature, your radio conversation is heard only by you and the other party involved.
Calling the Last ID Number Transmitted or Received
1 Press the > button to scroll to CALL for Selective Call.
2 Press the m button below CALL.
The display shows the last ID number transmitted or received. RECEIVED ID, as the incoming caller’s ID number (Private Conversation II), is displayed for Private Conversation.
3 Refer to “Starting a Selective Call” on page 76 to place your call.
ASTRO XTL 5000 Digital Mobile Radio with W3 Control Head 71

Conventional Features
Entering Directly the ID Number to Be CalledYou can use the keypad to directly enter the ID number of the person you want to call. Follow these steps to enter the ID directly:
1 For Selective Call, press the > button to scroll to the CALL softkey.
The display shows the last ID number transmitted or received. For Private Conversation, it also shows RECEIVED ID as the incoming caller’s ID number (Private Conversation II).
2 Use the keypad to enter the new ID number.
Notes: If you enter more than, or less than, six digits and press the PTT button, you will hear a bad key-press tone.
Press the < button to move the cursor to the left and erase the previous digit. When you have erased the last digit, press the < button to display the last entry in the list. Press the > button to display the first list entry.
72

Conventional Features
Scrolling to an ID Number in the Call ListThe same call list is shared by the Private Conversation.
1 Press the > button to scroll to CALL for Selective Call.
2 Press the m button below CALL.
The display shows the last ID number transmitted or received. RECEIVED ID, or the incoming caller’s ID number (Private Conversation II) is displayed for Private Conversation.
3 Press > or < to scroll through the list.
The member’s name and ID number are alternately displayed when you stop.
Note: The last member of the list equals the last ID number transmitted or received. This is the same as location 00 in the list.
4 Refer to “Starting a Selective Call” on page 76 to place your call.
ASTRO XTL 5000 Digital Mobile Radio with W3 Control Head 73

Conventional Features
Going Directly to an ID Number in the Call List
1 Press > to scroll to CALL for Selective Call.
2 Press the m button below CALL.
The display shows the last ID number transmitted or received. RECEIVED ID or the incoming caller’s ID number (Private Conversation II) is displayed for Private Conversation.
3 Press > or < to scroll through the list.
Note: The last member of the list equals the last ID number transmitted or received. This is the same as location 00 in the list.
4 Do the following:
• Press the numeric keys to enter the first digit of the location number.
That position in the list is immediately displayed only if there are fewer than 10 members. The member’s name and ID number are alternately displayed.
OR
If there are 10 or more members, LOC#X_ is displayed (where X is a 0 or a 1 and it is the first digit entered).
The cursor flashes to show the location of the second digit.
74

Conventional Features
• Press the numeric keys to enter the second digit of the location number.
The member’s name and ID number are alternately displayed.
Note: The display shows INVALID ENTRY if you enter a nonexisting number (for example, 24). The radio will revert back to step 4.
5 Refer to “Starting a Selective Call” on page 76 to place your call.
ASTRO XTL 5000 Digital Mobile Radio with W3 Control Head 75

Conventional Features
Starting a Selective CallFollow the steps below to initiate a Selective Call:
1 Press the PTT button.
The radio transmits the ID number.
2 Pause for one second for the alert tone to sound on the receiving radio.
Notes: If the party does not answer within 20 seconds, the display shows NO ANSWER. You hear an alert tone and the telephone-like ringing stops.
If the radio you called is not in service. the display shows NO ACKNOWLEDGE. You will not hear ringing.
3 When the person you called answers, press the PTT button to respond.
4 To hang up, press the O button.
The radio returns to the home display.
76

Conventional Features
Answering a Selective Call
If you hear two alert tones (repeating every five seconds for 20 seconds) sound, CALL RECEIVED and the present mode are alternately displayed.
The green LED and the Call-Received status annunciator (F) flash.
Note: If you do not answer within 20 seconds, the radio returns to the home display.
1 To answer a call, press the > button. The display shows the CALL softkey.
OR
If your radio has a programmed call-response or call button, press it to see the display shown in step 2. Proceed to step 3.
2 Press the m button below CALL.
The display shows the last ID number transmitted or received either as RECEIVED ID, or as the incoming caller’s ID number (Private Conversation II).
Note: If you press the PTT button before you press the quick-response button, your response is transmitted to everyone in the talkgroup. Press the PTT button to answer the call.
3 A busy tone indicates the system is busy. If you hear a call-back tone, a mode is available. The radio automatically keys up for three seconds, after which you can begin speaking.
ASTRO XTL 5000 Digital Mobile Radio with W3 Control Head 77

Conventional Features
4 To hang up, do one of the following:
• Press the O button.
OR
• Press the m button below CALL.
OR
• Press the preprogrammed quick-response button if your radio has one.
The caller’s ID number is saved as the last ID number received.
The radio returns to the home display.
78

Trunking Features
Features Used on Trunking SystemsThis chapter shows you how to access features available on trunking systems. The following topics are covered:
• Viewing Your Radio’s ID Number (page 80)• Enhanced Private Conversation (page 81)• Dynamic Regrouping (page 89)• SmartZone Operation (page 91)• Out-of-Range Indication (page 95)
ASTRO XTL 5000 Digital Mobile Radio with W3 Control Head 79

Trunking Features
Viewing Your Radio’s ID Number
1 Press the > button until the display shows the CALL softkey.
2 Press the m button below CALL.
The display shows RECEIVED ID or the actual ID number.
3 Press the < button.
OR
If you are in the preprogrammed call list, press the * button.
The display shows MY ID: and the ID number.
4 Press the O button to return to the home display.
80

Trunking Features
Enhanced Private ConversationWith Enhanced Private Conversation™, your radio conversation is heard only by you and the other party involved.
Calling the Last ID Number Transmitted or Received
1 Press the > button to scroll to CALL for Private Conversation.
2 Press the m button below CALL.
The display shows the last ID number transmitted or received. RECEIVED ID, as the incoming caller’s ID number (Private Conversation II), is displayed for Private Conversation.
3 Refer to “Starting a Private Conversation Call” on page 86 to place your call.
ASTRO XTL 5000 Digital Mobile Radio with W3 Control Head 81

Trunking Features
Entering Directly the ID Number to Be CalledYou can use the keypad to directly enter the ID number of the person you want to call. Follow these steps to enter the ID directly:
1 For Private Conversation, press the > button to scroll to the CALL softkey.
The display shows the last ID number transmitted or received. For Private Conversation, it also shows RECEIVED ID as the incoming caller’s ID number (Private Conversation II).
2 Use the keypad to enter the new ID number.
Notes: If you enter more than, or less than, six digits and press the PTT button, you will hear a bad key-press tone.
Press the < button to move the cursor to the left and erase the previous digit. When you have erased the last digit, press the < button to display the last entry in the list. Press the > button to display the first list entry.
82

Trunking Features
Scrolling to an ID Number in the Call ListThe same call list is shared by Selective Call.
1 Do one of the following:
• Press > to scroll to CALL for Private Conversation.
2 Press the m button below CALL.
The display shows the last ID number transmitted or received. RECEIVED ID, or the incoming caller’s ID number (Private Conversation II) is displayed for Private Conversation.
3 Press > or < to scroll through the list.
The member’s name and ID number are alternately displayed when you stop.
Note: The last member of the list equals the last ID number transmitted or received. This is the same as location 00 in the list.
4 Refer to “Starting a Private Conversation Call” on page 86 to place your call.
ASTRO XTL 5000 Digital Mobile Radio with W3 Control Head 83

Trunking Features
Going Directly to an ID Number in the Call List
1 Press > to scroll to CALL for Private Conversation.
2 Press the m button below CALL.
The display shows the last ID number transmitted or received. RECEIVED ID or the incoming caller’s ID number (Private Conversation II) is displayed for Private Conversation.
3 Press > or < to scroll through the list.
Note: The last member of the list equals the last ID number transmitted or received. This is the same as location 00 in the list.
4 Do the following:
• Press the numeric keys to enter the first digit of the location number.
That position in the list is immediately displayed only if there are fewer than 10 members. The member’s name and ID number are alternately displayed.
OR
If there are 10 or more members, LOC#X_ is displayed (where X is a 0 or a 1 and it is the first digit entered).
The cursor flashes to show the location of the second digit.
84

Trunking Features
• Press the numeric keys to enter the second digit of the location number.
The member’s name and ID number are alternately displayed.
Note: The display shows INVALID ENTRY if you enter a nonexisting number (for example, 24). The radio will revert back to step 4.
5 Refer to “Starting a Private Conversation Call” on page 86 to place your call.
ASTRO XTL 5000 Digital Mobile Radio with W3 Control Head 85
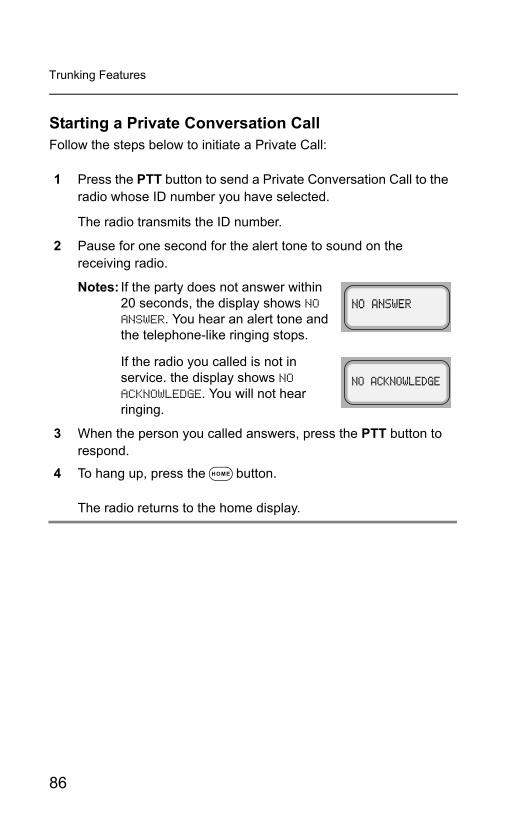
Trunking Features
Starting a Private Conversation CallFollow the steps below to initiate a Private Call:
1 Press the PTT button to send a Private Conversation Call to the radio whose ID number you have selected.
The radio transmits the ID number.
2 Pause for one second for the alert tone to sound on the receiving radio.
Notes: If the party does not answer within 20 seconds, the display shows NO ANSWER. You hear an alert tone and the telephone-like ringing stops.
If the radio you called is not in service. the display shows NO ACKNOWLEDGE. You will not hear ringing.
3 When the person you called answers, press the PTT button to respond.
4 To hang up, press the O button.
The radio returns to the home display.
86

Trunking Features
Answering an Enhanced Private Conversation Call
If you hear two alert tones (repeating every 5 seconds for 20 seconds) sound, CALL RECEIVED and the present mode are alternately displayed.
The green LED and the Call-Received status annunciator (F) flash.
Green LED flashesF flashes
Note: If you do not answer within 20 seconds, the radio returns to the home display.
1 To answer a call, press the > button. The display shows the CALL softkey.
OR
If your radio has a programmed call-response or call button, press it to see the display shown in step 2. Proceed to step 3.
2 Press the m button below CALL.
The display shows the last ID number transmitted or received either as RECEIVED ID, or as the incoming caller’s ID number (Private Conversation II).
Note: If you press the PTT button before you press the quick-response button, your response is transmitted to everyone in the talkgroup. Press the PTT button to answer the call.
3 A busy tone indicates the system is busy. If you hear a call-back tone, a mode is available. The radio automatically keys up for three seconds, after which you can begin speaking.
ASTRO XTL 5000 Digital Mobile Radio with W3 Control Head 87

Trunking Features
4 To hang up, do one of the following:
• Press the O button.
OR
• Press the m button below CALL.
OR
• Press the preprogrammed quick-response button if your radio has one.
The caller’s ID number is saved as the last ID number received.
The radio returns to the home display.
88

Trunking Features
Dynamic RegroupingThis feature is programmed in each radio by a qualified radio technician. During special operations, dynamic regrouping allows the dispatcher to temporarily reassign selected radios to a single trunked mode so they can communicate with each other.
Electronic (Menu) Mode SelectionDynamic Regrouping is transparent to you until the dispatcher activates it. You hear an invalid-mode tone if you select dynamic regrouping from the radio menu and it is not active.
• If you hear a gurgle-like tone, dynamic regrouping is activated. Transmit and receive as usual.
• When the dispatcher cancels dynamic-regrouping:
– The radio returns to the pre-dynamic regrouping mode if the dynamic regrouping mode was selected.
– The radio remains active on the selected mode if the dynamic regrouping mode was not selected.
Selecting Enable and DisableThe dispatcher can classify regrouped radios as select-enabled or select-disabled.
• Select-enabled radios can be changed to any available mode including the dynamic regrouping mode, once the dynamic position is selected.
• Select-disabled radios can not be changed from the dynamic mode that the dispatcher has selected.
Note: Scan, phone, and Private Conversation cannot be selected while the radio is select disabled.
ASTRO XTL 5000 Digital Mobile Radio with W3 Control Head 89

Trunking Features
Reprogramming RequestThis feature allows you to tell the dynamic regrouping console you want a new dynamic regrouping assignment.
1 Press > to scroll to RPGM.
Note: If your radio has a programmed reprogram-response button, press it for quick access to the reprogram request feature.
2 Press the m button below RPGM.
The display shows REPROGRAM RQST on the first line, and the reprogram request is sent to the dynamic regrouping console.
You hear five tones if the console acknowledged your request. Your radio returns to the home display.
You hear one tone if the system received the request, but the console did not acknowledge it. Go to the next step.
3 Press the PTT button to transmit the request, or press the O button to hang up and return to the home display.
Note: If the dynamic regrouping console fails to acknowledge your request in six seconds, the display shows NO ACKNOWLEDGE and you hear a low-pitched alert tone. Repeat the reprogram request, or press the O button to hang up.
90

Trunking Features
SmartZone OperationA SmartZone® system allows up to 50 sites in a wide-area trunking system. Site switching features allow the radio to quickly switch to other sites within the SmartZone system. These features are based on signal strength and site preferences. No action is required on your part for site switching.
However, your radio does have other SmartZone features that you can access.
Locking/Unlocking a Site
1 Do one of the following:
• Press > until the display shows SITE. Go to step 2.
OR
• Press the preprogrammed Site Lock button to display the current lock state. Go to step 3.
OR
• Press and hold the preprogrammed Site Lock button. The lock state (SITE LOCKED or SITE UNLOCKED) will change once.Release the button to save the new lock state. Go to step 4.
2 Press the m button below SITE.
The display shows the current lock state (SITE LOCKED in this case) together with UNLK and LOCK softkeys on the lower line.
Note: You can view the current site by pressing the preprogrammed search button.
ASTRO XTL 5000 Digital Mobile Radio with W3 Control Head 91

Trunking Features
3 Press the m button below either UNLK or LOCK. The new lock state is saved.
4 The home display returns.
92
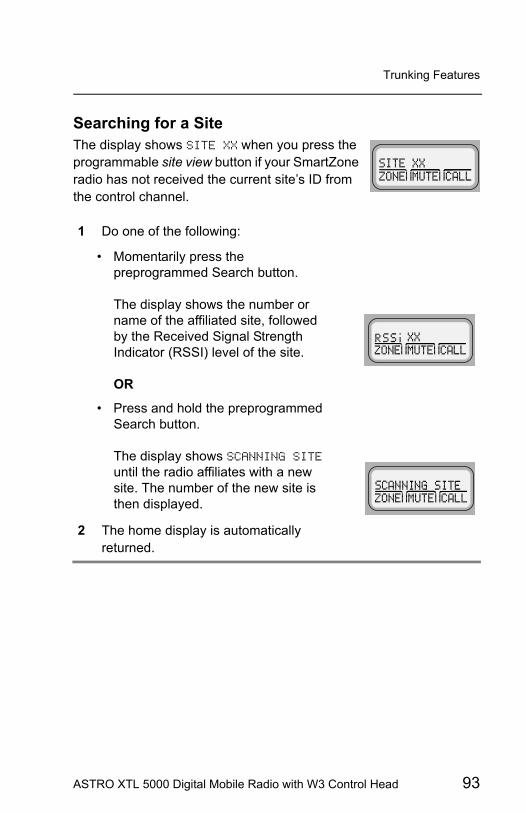
Trunking Features
Searching for a SiteThe display shows SITE XX when you press the programmable site view button if your SmartZone radio has not received the current site’s ID from the control channel.
1 Do one of the following:
• Momentarily press the preprogrammed Search button.
The display shows the number or name of the affiliated site, followed by the Received Signal Strength Indicator (RSSI) level of the site.
OR
• Press and hold the preprogrammed Search button.
The display shows SCANNING SITE until the radio affiliates with a new site. The number of the new site is then displayed.
2 The home display is automatically returned.
ASTRO XTL 5000 Digital Mobile Radio with W3 Control Head 93

Trunking Features
Site TrunkingSITE TRUNKING is alternately displayed (if so programmed) with the selected mode whenever the radio’s usable site is not communicating with the SmartZone controller. You can only communicate with other radios operating at the same site when SITE TRUNKING is displayed. No wide-area calls can be made from a site-trunking site.
FailsoftIf a trunking system experiences a complete failure, the radio will revert to failsoft operation and automatically switch to its failsoft channel. During failsoft, trunking repeaters will transmit a medium-pitched tone every 10 seconds. The radio periodically leaves failsoft to search for a trunking site. The radio returns to failsoft if no trunking sites are found.
If you press the PTT button while the radio is searching for a trunking site, the radio returns to failsoft and transmits. In failsoft, you can only communicate with other radios on the same mode and site. No wide-area call can be made from a failsoft mode. When the trunking system returns to normal operation, your radio will automatically leave the failsoft operation and return to trunked operation.
94

Trunking Features
Out-of-Range IndicationThe out-of-range display/audible indication feature can be enabled by your system manager. The display alternately shows OUT OF RANGE and the current selected mode name. You hear a low-pitched tone every six seconds:
• When the radio is out of range of the system and can no longer lock onto the control channel,
OR• When the radio is in failsoft and cannot lock onto the failsoft
channel.The out-of-range indication remains in effect until one of the following conditions occur:
• The radio locks on a control channel.• The radio locks on a failsoft channel.• The radio is turned off.
ASTRO XTL 5000 Digital Mobile Radio with W3 Control Head 95

Trunking Features
Notes
96

Secure Features
Features Available on Secure XTL 5000This chapter covers features available on XTL 5000 Digital Mobile Radios with secure encryption. The following topics are covered:
• Transmitting in Secure and Clear Modes (page 98)• Selecting an Index (Conventional Only) (page 99)• Selecting a Key (Conventional Only) (page 100)
Note: The information in this section applies to both conventional and trunked systems.
ASTRO XTL 5000 Digital Mobile Radio with W3 Control Head 97

Secure Features
Transmitting in Secure and Clear ModesIf your radio is secure-capable, you can transmit messages in secure mode.
To transmit a message in secure or encrypted mode:
1 Press and release the preprogrammed Secure button when your radio is on personalities or talkgroups that have been designated by your system manager for secure transmissions.
2 Press the PTT button to transmit while the radio is on a personality or talkgroup programmed for secure.
The radio will begin transmitting in secure mode. The display shows D (secure status annunciator) when the transmission is in progress.
To transmit a message in non-encrypted or clear mode:
Press and release the preprogrammed Secure button again.
The radio will transmit in clear mode when you press the PTT button. The display does not show the D status annunciator.
Note: You cannot change from secure to clear while the PTT button is pressed. The radio will generate an illegal tone and the transmission will be ended.
Secure-equipped radios automatically determine whether a voice message is being received in secure or clear mode. This allows you to receive either type of message without having to reset the preprogrammed Secure button.
98

Secure Features
Selecting an Index (Conventional Only)This feature allows you to select one or more groups of encryption keys from among those stored in the radio. For example, you might have a group of three keys in one encryption index and a separate group of three keys in a second index. You can switch automatically from one set of keys to the other by changing indices. Every mode that was slaved to one of the original keys now has the equivalent new key instead.
Follow these steps to select an index:
1 Press the > button until the display shows the INDX softkey.
2 Press the m button below INDX.
The display shows the last-selected and stored index. Your radio has two indices.
3 Press the < or > buttons to select the other index.
ORIf you have a Direct Entry Keypad (DEK), press the 1 or 2 key on the keypad.
You will hear a positive tone. The display does not change.
OR
Press the m button below IND1 or IND2 to select INDEX 1 or INDEX 2.
4 Press the m button below SEL to confirm the change in the index and exit the menu.
Note: To abort index selection, press the PTT button, the Mode rocker switch, or the O button. The index remains unchanged.
ASTRO XTL 5000 Digital Mobile Radio with W3 Control Head 99
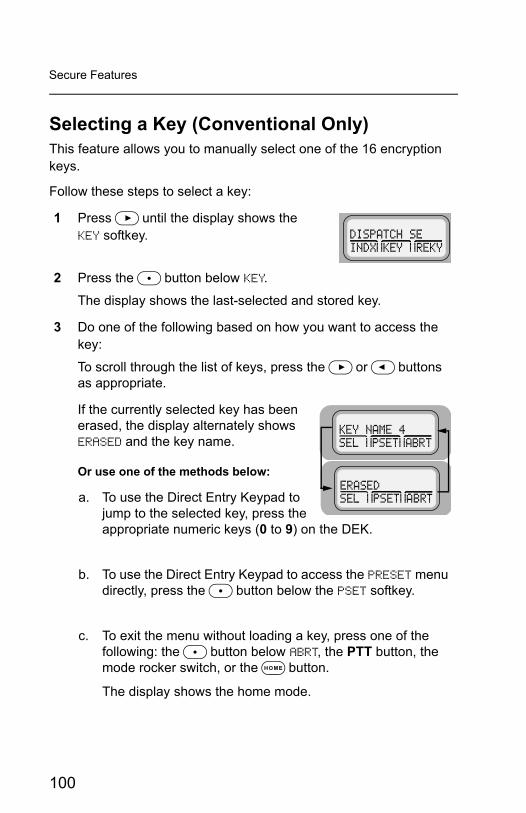
Secure Features
Selecting a Key (Conventional Only)This feature allows you to manually select one of the 16 encryption keys.
Follow these steps to select a key:
1 Press > until the display shows the KEY softkey.
2 Press the m button below KEY.
The display shows the last-selected and stored key.
3 Do one of the following based on how you want to access the key:
To scroll through the list of keys, press the > or < buttons as appropriate.
If the currently selected key has been erased, the display alternately shows ERASED and the key name.
Or use one of the methods below:
a. To use the Direct Entry Keypad to jump to the selected key, press the appropriate numeric keys (0 to 9) on the DEK.
b. To use the Direct Entry Keypad to access the PRESET menu directly, press the m button below the PSET softkey.
c. To exit the menu without loading a key, press one of the following: the m button below ABRT, the PTT button, the mode rocker switch, or the O button.
The display shows the home mode.
100

Secure Features
d. To load the currently selected (displayed) key and exit the menu, press the m button below the SEL softkey.
The display shows the home mode.
Notes: If the selected (displayed) key has been erased, you will hear keyfail tones after you exit the menu. This indicates that you have selected an erased key.
If the selected (displayed) key is not allowed, the display shows ILLEGAL KEY. You will hear a momentary illegal key tone.
ASTRO XTL 5000 Digital Mobile Radio with W3 Control Head 101

Secure Features
Notes
102

Accessories
Motorola provides the following approved accessories to improve the productivity of your XTL 5000 mobile two-way radio.
For a list of Motorola-approved antennas, batteries, and other accessories, visit the following web site which lists approved accessories: http://www.motorola.com/cgiss/index.shtml
Antennas
HAD4006_ VHF, 136–144 MHz, quarterwave whip, roof mount
HAD4007_ VHF, 144–150.8 MHz, quarterwave, roof mount
HAD4008_ VHF, 150.8–162 MHz, quarterwave, roof mount
HAD4009_ VHF, 162–174 MHz, quarterwave, roof mount
HAD4016_ VHF, 136–162 MHz, quarterwave, wideband, roof mount
HAD4017_ VHF, 146–174 MHz, quarterwave, wideband, roof mount
RAD4002_RB VHF, 136–144 MHz, quarterwave
RAD4003_RB VHF, 144–150.8 MHz, quarterwave
RAD4004_RB VHF, 150.8–162 MHz, quarterwave
RAD4005_RB VHF, 162–174 MHz, quarterwave
RAD4010_RB VHF, 136–174 MHz, halfwave, roof mount
HAE4003_ UHF, 450–470 MHz, quarterwave whip
HAE4004_ UHF, 470–512 MHz, quarterwave
HAE4011_ UHF, 450–470 MHz, 3.5 db, roof mount
HAE4012_ UHF, 470–495 MHz, 3.0 db, roof mount
HAE4013_ UHF, 494–512 MHz, 3.0 db, roof mount
HAE6010_ UHF, 380–433 MHz, 3.5 db gain
HAE6011_ UHF, 380–433 MHz, 5.0 db gain
HAE6012_ UHF, 380–433 MHz, quarterwave whip
ASTRO XTL 5000 Digital Mobile Radio with W3 Control Head 103

Accessories
Bull Horns for Siren and Public Address
Cables
HAE6013_ UHF, 380–470 MHz, 2.0 db gain, wideband
HAE6014_ UHF, 380–433 MHz, quarterwave whip, motorcycle
HAE6015_ UHF, 450–512 MHz, broadband
HAE6016_ UHF, 490–512 MHz, quarterwave whip, motorcycle
RAE4014_RB UHF, 450–470 MHz, 5.0 db
RAE4016_RB UHF, 494–512 MHz, 5.0 db gain
RAE4024_RB UHF, 450–482 MHz, quarterwave whip, motorcycle
HAF4013_ 764–870 MHz, quarterwave, roof mount
HAF4014_ 764–870 MHz, quarterwave, roof mount
HAF4015_ 762–870 MHz, 3.0 db, motorcycle
HAF4016_ 764–870 MHz, quarterwave, roof mount
HAF4017_ 764–870 MHz, quarterwave, roof mount
TDN6251_ Round with chrome finish
TDN6252_ Rectangular with chrome finish
TDN6253_ Underhood with gray finish
TDN6254_ Round with gray finish
HKN4191_ Power, high-power, dash-mount
HKN4192_ Power, 20-ft., remote-mount
HKN4356_ 17-ft. (W4/5/7/9)
HKN6096_ Y, remote-mount (W3)
HKN6155_ Flash/programming, ASTRO Spectra Plus (3085001D01)
104

Accessories
Microphones
Miscellaneous
HKN6160_ Data, 6-ft., dash-mount (kit)
HKN6161_ Data, 20-ft., dash-mount (kit)
HKN6163_ USB
HLN4952_ Fuse kit for green/orange leads
YKN4246_ 30-ft.
YKN4248_ 50-ft.
YKN4249_ 75-ft.
YKN4255_ 115-ft.
YKN4256_ 150-ft.
YKN4261_ 10-ft.
YLN1148_ Armored, for handset/hangup mic
HMN1061_ Standard (W9)
HMN1079_ Motorcycle palm
HMN1080_ Standard palm
HMN1081_ System 9000
HLN5113_ Emergency footswitch
HLN6188_ Emergency pushbutton
HLN6372_ Key lock mount
ASTRO XTL 5000 Digital Mobile Radio with W3 Control Head 105

Accessories
Remote Mounting Kits
Speakers
Trunnion Kits
H1519_ W3, package with 20-ft. cable
H1803_ Remote-to-dash
H1804_ Dash-to-remote
HSN4031_ 7.5 W MCS external
HSN4032_ 13 W MCS external
HSN4038_ 7.5 W remote
HSN4039_ 13 W remote
HSN6003_ Motorcycle, weather-resistant
HLN6909_ Quick-release, high-powerHLN6910_ Standard high-power
106

Appendix: Maritime Radio Use in the VHF Frequency RangeSpecial Channel AssignmentsEmergency ChannelIf you are in imminent and grave danger at sea and require emergency assistance, use VHF Channel 16 to send a distress call to nearby vessels and the United States Coast Guard. Transmit the following information, in this order:1 “MAYDAY, MAYDAY, MAYDAY.”
2 “THIS IS _____________________, CALL SIGN __________.”
State the name of the vessel in distress 3 times, followed by the call sign or other identification of the vessel, stated 3 times.
3 Repeat “MAYDAY” and the name of the vessel.
4 “WE ARE LOCATED AT _______________________.”
State the position of the vessel in distress, using any information that will help responders to locate you, e.g.:
• latitude and longitude • bearing (state whether you are using true or magnetic north) • distance to a well-known landmark• vessel course, speed or destination
5 State the nature of the distress.
6 Specify what kind of assistance you need.
7 State the number of persons on board and the number needing medical attention, if any.
8 Mention any other information that would be helpful to responders, such as type of vessel, vessel length and/or tonnage, hull color, etc.
9 “OVER.”
10 Wait for a response.
11 If you do not receive an immediate response, remain by the radio and repeat the transmission at intervals until you receive a response. Be prepared to follow any instructions given to you.
ASTRO XTL 5000 Digital Mobile Radio with W3 Control Head 107

Appendix: Maritime Radio Use in the VHF Frequency Range
Non-Commercial Call ChannelFor non-commercial transmissions, such as fishing reports, rendezvous arrangements, repair scheduling, or berthing information, use VHF Channel 9.
Operating Frequency RequirementsA radio designated for shipboard use must comply with Federal Communications Commission Rule Part 80 as follows:• on ships subject to Part II of Title III of the Communications Act,
the radio must be capable of operating on the 156.800 MHz frequency
• on ships subject to the Safety Convention, the radio must be capable of operating:• in the simplex mode on the ship station transmitting
frequencies specified in the 156.025–157.425 MHz frequency band, and
• in the semiduplex mode on the two frequency channels specified in the table below.
Note: Simplex channels 3, 21, 23, 61, 64, 81, 82, and 83 cannot be lawfully used by the general public in US waters.
Additional information about operating requirements in the Maritime Services can be obtained from the full text of FCC Rule Part 80 and from the US Coast Guard.
Table A-1: VHF Marine Channel List
Channel Number
Frequency (MHz)Transmit Receive
1 156.050 160.650
2 156.100 160.700
* 156.150 160.750
4 156.200 160.800
5 156.250 160.850
6 156.300 –
7 156.350 160.950
8 156.400 –
108

Appendix: Maritime Radio Use in the VHF Frequency Range
9 156.450 156.450
10 156.500 156.500
11 156.550 156.550
12 156.600 156.600
13** 156.650 156.650
14 156.700 156.700
15** 156.750 156.750
16 156.800 156.800
17** 156.850 156.850
18 156.900 161.500
19 156.950 161.550
20 157.000 161.600
* 157.050 161.650
22 157.100 161.700
* 157.150 161.750
24 157.200 161.800
25 157.250 161.850
26 157.300 161.900
27 157.350 161.950
28 157.400 162.000
60 156.025 160.625
* 156.075 160.675
62 156.125 160.725
63 156.175 160.775
* 156.225 160.825
65 156.275 160.875
66 156.325 160.925
67** 156.375 156.375
68 156.425 156.425
Table A-1: VHF Marine Channel List (Continued)
Channel Number
Frequency (MHz)Transmit Receive
ASTRO XTL 5000 Digital Mobile Radio with W3 Control Head 109

Appendix: Maritime Radio Use in the VHF Frequency Range
* Simplex channels 3, 21, 23, 61, 64, 81, 82, and 83 cannot be lawfully used by the general public in US waters.
** Low power (1 W) only*** Guard bandNote: A – in the Receive column indicates that the channel is transmit
only.
69 156.475 156.475
71 156.575 156.575
72 156.625 –
73 156.675 156.675
74 156.725 156.725
75 *** ***
76 *** ***
77** 156.875 –
78 156.925 161.525
79 156.975 161.575
80 157.025 161.625
* 157.075 161.675
* 157.125 161.725
* 157.175 161.775
84 157.225 161.825
85 157.275 161.875
86 157.325 161.925
87 157.375 161.975
88 157.425 162.025
Table A-1: VHF Marine Channel List (Continued)
Channel Number
Frequency (MHz)Transmit Receive
110
Glossary
ACK Acknowledgment of communication.
Channel A group of characteristics, such as transmit/receive frequency pairs, radio parameters, and encryption encoding.
Coded Squelch Used on conventional channels to make sure you hear only the communication meant for you.
Control Channel In a trunking system, one of the channels that is used to provide a continuous, two-way/data communications path between the central controller and all radios on the system.
Conventional Typically refers to radio-to-radio communications, sometimes through a repeater. You share a frequency, or frequencies, with other users without the aid of a central controller to assign communication channels. Therefore, you should monitor each channel before transmitting to avoid interfering with another user who may be transmitting.
Cursor A visual tracking marker (a blinking line) that indicates a location on the display.
Digital Private-Line (DPL)
A continuous, sub-audible data signal, transmitted with the carrier.
Dispatcher An individual who has radio system management duties.
Failsoft A back-up system allowing you to communicate in a non-trunked, conventional mode should the trunked system fail.
FCC Federal Communications Commission.
Hang Up Disconnect.
ASTRO XTL 5000 Digital Mobile Radio with W3 Control Head 111
Glossary
Home Display The first display information after the radio completes its self test.
LCD Liquid-Crystal Display.
Mode A programmed combination of operating parameters; for example, a channel or talkgroup.
Mode-Slaving Radio programmed to automatically give the proper operation for a given mode you have selected.
Monitoring (Conventional Operation)
Press a programmed monitor button to listen to traffic on the active channel. This way, you can avoid talking over someone else’s conversation.
Page A one-way alert, with audio and/or display messages.
Push-To-Talk (PTT) Button
The PTT button engages the transmitter and places the radio in transmit (send) operation when pressed. Press this button to transmit, and release it to receive.
Repeater A conventional radio feature, in which you talk through a receive/transmit facility that re-transmits received signals in order to improve communications range and coverage.
RF Radio Frequency. A part of the general frequency spectrum between the audio and infrared light regions (about 10 kHz to 10,000,000 MHz).
112

Glossary
Squelch The muting of audio circuits when received signal levels fall below a pre-determined threshold. With carrier squelch, you hear all channel activity which exceeds the radio’s preset squelch level.
Standby An operating condition whereby the radio’s speaker is muted but still continues to receive data.
Talkgroup An organization (or group) of radio users who communicate with each other, using the same communication path.
Tone Private-Line (PL) Coded Squelch
A continuous sub-audible tone transmitted with the carrier.
Trunking The automatic sharing of communications paths between a large number of users. Allows radio users to share a smaller number of frequencies because a repeater, or communications path, is assigned to a talkgroup for the length of a conversation.
Zone A grouping of channels or talkgroups.
ASTRO XTL 5000 Digital Mobile Radio with W3 Control Head 113

Glossary
Notes
114

Commercial Warranty and Service
Limited WarrantyMOTOROLA COMMUNICATION PRODUCTS
I. WHAT THIS WARRANTY COVERS AND FOR HOW LONG:MOTOROLA INC. (“MOTOROLA”) warrants the MOTOROLA manufactured Communication Products listed below (“Product”) against defects in material and workmanship under normal use and service for a period of time from the date of purchase as scheduled below:
Motorola, at its option, will at no charge either repair the Product (with new or reconditioned parts), replace it (with a new or reconditioned Product), or refund the purchase price of the Product during the warranty period provided it is returned in accordance with the terms of this warranty. Replaced parts or boards are warranted for the balance of the original applicable warranty period. All replaced parts of Product shall become the property of MOTOROLA.
This express limited warranty is extended by MOTOROLA to the original end user purchaser only and is not assignable or transferable to any other party. This is the complete warranty for the Product manufactured by MOTOROLA. MOTOROLA assumes no obligations or liability for additions or modifications to this warranty unless made in writing and signed by an officer of MOTOROLA. Unless made in a separate agreement between MOTOROLA and the original end user purchaser, MOTOROLA does not warrant the installation, maintenance or service of the Product.
MOTOROLA cannot be responsible in any way for any ancillary equipment not furnished by MOTOROLA which is attached to or used in connection with the Product, or for operation of the Product with any ancillary equipment, and all such equipment is expressly excluded from this warranty. Because each system which may use the Product is unique, MOTOROLA disclaims liability for range, coverage, or operation of the system as a whole under this warranty.
ASTRO XTL 5000 Portable Units One (1) Year
Product Accessories One (1) Year
ASTRO XTL 5000 Digital Mobile Radio with W3 Control Head 115

Commercial Warranty and Service
II. GENERAL PROVISIONS:This warranty sets forth the full extent of MOTOROLA'S responsibilities regarding the Product. Repair, replacement or refund of the purchase price, at MOTOROLA’s option, is the exclusive remedy. THIS WARRANTY IS GIVEN IN LIEU OF ALL OTHER EXPRESS WARRANTIES. IMPLIED WARRANTIES, INCLUDING WITHOUT LIMITATION, IMPLIED WARRANTIES OF MERCHANTABILITY AND FITNESS FOR A PARTICULAR PURPOSE, ARE LIMITED TO THE DURATION OF THIS LIMITED WARRANTY. IN NO EVENT SHALL MOTOROLA BE LIABLE FOR DAMAGES IN EXCESS OF THE PURCHASE PRICE OF THE PRODUCT, FOR ANY LOSS OF USE, LOSS OF TIME, INCONVENIENCE, COMMERCIAL LOSS, LOST PROFITS OR SAVINGS OR OTHER INCIDENTAL, SPECIAL OR CONSEQUENTIAL DAMAGES ARISING OUT OF THE USE OR INABILITY TO USE SUCH PRODUCT, TO THE FULL EXTENT SUCH MAY BE DISCLAIMED BY LAW.
III. STATE LAW RIGHTS:SOME STATES DO NOT ALLOW THE EXCLUSION OR LIMITATION OF INCIDENTAL OR CONSEQUENTIAL DAMAGES OR LIMITATION ON HOW LONG AN IMPLIED WARRANTY LASTS, SO THE ABOVE LIMITATION OR EXCLUSIONS MAY NOT APPLY.
This warranty gives specific legal rights, and there may be other rights which may vary from state to state.
IV. HOW TO GET WARRANTY SERVICE:You must provide proof of purchase (bearing the date of purchase and Product item serial number) in order to receive warranty service and, also, deliver or send the Product item, transportation and insurance prepaid, to an authorized warranty service location. Warranty service will be provided by Motorola through one of its authorized warranty service locations. If you first contact the company which sold you the Product, it can facilitate your obtaining warranty service. You can also call Motorola at 1-888-567-7347 US/Canada.
116

Commercial Warranty and Service
V. WHAT THIS WARRANTY DOES NOT COVER:A) Defects or damage resulting from use of the Product in other
than its normal and customary manner.
B) Defects or damage from misuse, accident, water, or neglect.
C) Defects or damage from improper testing, operation, maintenance, installation, alteration, modification, or adjustment.
D) Breakage or damage to antennas unless caused directly by defects in material workmanship.
E) A Product subjected to unauthorized Product modifications, disassemblies or repairs (including, without limitation, the addition to the Product of non-Motorola supplied equipment) which adversely affect performance of the Product or interfere with Motorola's normal warranty inspection and testing of the Product to verify any warranty claim.
F) Product which has had the serial number removed or made illegible.
G) Rechargeable batteries if:
• any of the seals on the battery enclosure of cells are broken or show evidence of tampering.
• the damage or defect is caused by charging or using the battery in equipment or service other than the Product for which it is specified.
H) Freight costs to the repair depot.
I) A Product which, due to illegal or unauthorized alteration of the software/firmware in the Product, does not function in accordance with MOTOROLA’s published specifications or the FCC type acceptance labeling in effect for the Product at the time the Product was initially distributed from MOTOROLA.
ASTRO XTL 5000 Digital Mobile Radio with W3 Control Head 117

Commercial Warranty and Service
J) Scratches or other cosmetic damage to Product surfaces that does not affect the operation of the Product.
K) Normal and customary wear and tear.
VI. PATENT AND SOFTWARE PROVISIONS:MOTOROLA will defend, at its own expense, any suit brought against the end user purchaser to the extent that it is based on a claim that the Product or parts infringe a United States patent, and MOTOROLA will pay those costs and damages finally awarded against the end user purchaser in any such suit which are attributable to any such claim, but such defense and payments are conditioned on the following:
A) that MOTOROLA will be notified promptly in writing by such purchaser of any notice of such claim;
B) that MOTOROLA will have sole control of the defense of such suit and all negotiations for its settlement or compromise; and
C) should the Product or parts become, or in MOTOROLA’s opinion be likely to become, the subject of a claim of infringement of a United States patent, that such purchaser will permit MOTOROLA, at its option and expense, either to procure for such purchaser the right to continue using the Product or parts or to replace or modify the same so that it becomes non-infringing or to grant such purchaser a credit for the Product or parts as depreciated and accept its return. The depreciation will be an equal amount per year over the lifetime of the Product or parts as established by MOTOROLA.
MOTOROLA will have no liability with respect to any claim of patent infringement which is based upon the combination of the Product or parts furnished hereunder with software, apparatus or devices not furnished by MOTOROLA, nor will MOTOROLA have any liability for the use of ancillary equipment or software not furnished by MOTOROLA which is attached to or used in connection with the
118

Commercial Warranty and Service
Product. The foregoing states the entire liability of MOTOROLA with respect to infringement of patents by the Product or any parts thereof.
Laws in the United States and other countries preserve for MOTOROLA certain exclusive rights for copyrighted MOTOROLA software such as the exclusive rights to reproduce in copies and distribute copies of such Motorola software. MOTOROLA software may be used in only the Product in which the software was originally embodied and such software in such Product may not be replaced, copied, distributed, modified in any way, or used to produce any derivative thereof. No other use including, without limitation, alteration, modification, reproduction, distribution, or reverse engineering of such MOTOROLA software or exercise of rights in such MOTOROLA software is permitted. No license is granted by implication, estoppel or otherwise under MOTOROLA patent rights or copyrights.
VII. GOVERNING LAW:This Warranty is governed by the laws of the State of Illinois, USA.
ServiceProper repair and maintenance procedures will assure efficient operation and long life for this product. A Motorola maintenance agreement will provide expert service to keep this and all other communication equipment in perfect operating condition. A nationwide service organization is provided by Motorola to support maintenance services. Through its maintenance and installation program, Motorola makes available the finest service to those desiring reliable, continuous communications on a contract basis. For a contract service agreement, please contact your nearest Motorola service or sales representative, or an authorized Motorola dealer.
Express Service Plus (ESP) is an optional extended service coverage plan, which provides for the repair of this product for a period of three years from the date of shipment from the factory, or the date of delivery if purchased from an authorized Motorola two-way radio dealer. For more information about ESP, contact the Motorola Radio Support Center, 2204 Galvin Drive, Elgin, IL 60123, 1-800-227-6772.
ASTRO XTL 5000 Digital Mobile Radio with W3 Control Head 119

Commercial Warranty and Service
Notes
120
Index
Symbols700/800, VHF/UHF frequencies.....1
Aalarm
sending emergency .................30sending silent emergency ........31
alarmscall received while on ..............65non-rearmable .........................65optional external
permanent horn and lights ...64purpose ................................63turning on and off .................63
rearmable ................................65selected, turning on and off .....64
alert tonesgeneral ......................................9secure-equipped radios ...........12
analog squelch options ...............29annunciator
call received ..............................7carrier squelch ...........................7direct .........................................8priority scan ...............................8programming view mode ...........8purpose .....................................7scan ...........................................8secure operation .......................7
answeringcall alert page (Enhanced Private Call) .......................................56
call alert page (PTT button) .....55private conversation call ....77, 87telephone call ..........................44
autoscan .....................................36
Bbasic radio operation ..................15button
menu select ...............................3programmable side
S1 .......................................... 3S2 .......................................... 3S3 .......................................... 3
programmable topT2 .......................................... 3T3 .......................................... 3
Ccall
send a status .......................... 26sending emergency ................ 32talkgroup ................................. 69
Call Alert ..................................... 81call alert page
answering using Enhanced Private Call ........................... 56
answering using PTT button ... 55sending ................................... 54
call listdirectly accessing last ID number ..................... 52, 74, 84
scrolling to last ID number ..................... 51, 73, 83
call received status annunciator ... 7calling last ID number ........... 71, 81carrier squelch status annunciator ................................ 7
channeldefinition ................................. 17selecting .................................. 17
conventional modereceiving ................................. 18scan ........................................ 35squelch options ....................... 29transmitting ............................. 21
conventional operationencryption key selection ........ 100key index selection ................. 99
Ddeleting nuisance modes ............ 41digital carrier-operated squelch .. 29digital squelch options ................ 29
ASTRO XTL 5000 Digital Mobile Radio with W3 Control Head 121

Index
direct entry of last ID number .........................50, 72, 82
direct status annunciator ...............8display
description .................................5dynamic regrouping
mode (menu) selection ............89purpose ...................................89reprogram request ...................90select-disabled .........................89select-enabled .........................89
Eediting
selecting characters .................62electronic (menu) mode selection 89emergency alarm
sending ....................................30sending silent ..........................31
emergency call, sending .............32encryption key selection ............100Enhanced Private Conversation ..81entering telephone number
from phone list .........................45on keypad ................................45
external alarmsoptional (horns and lights) .......63permanent horn and lights .......64turning on and off ....................63
Ffailsoft
operation .................................94tone .........................................94
featurescommon radio ..........................25trunking ....................................79
frequency rangeVHF ...........................................1
frequency ranges700/800 MHz .............................1UHF ...........................................1
Gglossary ....................................111
HHOME key ................................3, 7
Iidentifying radio by PTT-ID ......... 42index selection ............................ 99indicator
LED ...........................................9out-of-range ............................ 95
initiating a telephone call ............ 47
Kkey
encryption ............................... 99HOME ...................................3, 7left scroll ....................................3right scroll ..................................3
keypaddescription .................................2entering telephone number ..... 45HOME key .................................3left scroll key .............................3manual entry ........................... 13menu select buttons ..................3MODE switch ............................3muting tones ........................... 34right scroll key ...........................3selecting characters ................ 62VOL (volume) switch .................3
Llast ..............................................71last ID number
calling ................................71, 81direct entry ..................50, 72, 82directly accessing ........52, 74, 84paging ..................................... 81scrolling call list ...........51, 73, 83
122

Index
LED indicator ................................9left scroll key .................................3
Mmanual keypad entry ..................13menu select buttons ......................3mode
conventionalreceiving ..............................18transmitting ..........................21
definition ..................................17selection ..................................17
MODE switch ................................3modes
deleting nuisance ....................41monitoring conventional ..........16
monitoring conventional modes ..16muting keypad tones ...................34
Nnon-priority scan .........................35non-rearmable alarms .................65normal squelch ...........................29nuisance modes, deleting ...........41
Ooperation
basic radio ...............................15repeater/direct .........................67smart PTT ...............................68SmartZone ..............................91telephone ................................44
operator-selectable scan .............36options
analog squelch ........................29conventional squelch ...............29digital squelch .........................29
out-of-range indication ................95override, quick-key ......................68
Ppaging last ID number .................81
patent disclosure ..........................iiipower, selecting transmit ............ 28priority scan ................................ 35priority scan status annunciator .... 8private conversation call
answering ......................... 77, 87sending ............................. 76, 86sending call alert page ............ 54
program a scan list ..................... 39programming
namecall list ................................. 60page list ............................... 60phone list ............................. 60
numbercall list ................................. 57page list ............................... 57phone list ............................. 57
scan list ................................... 39programming view mode status annunciator ................................. 8
PTT (Push-to-Talk)smart ....................................... 68
PTT-IDidentifying a radio .................... 42
Push-to-Talk Identification (PTT-ID) ................................... 42
Qquick-key override ...................... 68
Rradio
basic operation ....................... 15scanning mode lists ................ 35
radio features, common .............. 25rearmable alarms ........................ 65receiving
on conventional modes ........... 18on trunked systems ................. 20
regroupingdynamic .................................. 89select-disabled radios ............. 89
ASTRO XTL 5000 Digital Mobile Radio with W3 Control Head 123
Index
select-enabled radios ..............89repeater/direct operation .............67reprogram request .......................90right scroll key ...............................3
SS1 programmable side button .......3S2 programmable side button .......3S3 programmable side button .......3scan list
programming ...........................39viewing ....................................38
scan status annunciator ................8scanning
autoscan ..................................36conventional scan ....................35mode lists ................................35non-priority ...............................35operator-selectable ..................36priority ......................................35talkgroup scan .........................35trunking priority scan ...............35turning on and off ....................37
scroll keys, description ..................5scrolling to last ID number .........................51, 73, 83
secure operation status annunciator .................................7
select-disable regrouping ............89selected alarms, turning on and off .......................................64
select-enable regrouping .............89selecting
characters ................................62encryption key .......................100key index .................................99talkgroups ................................69telephone number to call .........45transmit power .........................28zone and mode (channel) ........17
selectionchannel ....................................17mode .......................................17
zone ........................................ 17selective squelch ........................ 29sending
call alert page .......................... 54emergency alarm .................... 30emergency call ........................ 32private conversation call ....76, 86silent emergency alarm ........... 31
service ......................................119silent emergency alarm ...............31site
lock .......................................... 91trunking ................................... 94
site view search .......................... 93smart PTT ................................... 68SmartZone system
operation ................................. 91site lock ................................... 91site trunking ............................. 94site view search ....................... 93
softkeys, description .....................5squelch
digital carrier-operated ............ 29normal ..................................... 29options
analog .................................. 29digital ................................... 29
selective .................................. 29status
annunciators .............................7call ........................................... 26
switchMODE .......................................3VOL (volume) ............................3
TT2 programmable button ..............3T3 programmable button ..............3talkgroup
calls ......................................... 69scan ........................................ 35selection .................................. 69
telephone call
124

Index
answering ................................44initiating ...................................47
telephone numberentering from phone list ...........45entering on keypad ..................45selection ..................................45
telephone operation, description ................................44
time-out timer ..............................23timer, time-out .............................23tones
alert (general) ............................9alert (secure-equipped radios) 12failsoft ......................................94muting keypad .........................34
transmit power, selecting ............28transmitting
on conventional modes ...........21on trunked systems .................22
trunkingfailsoft ......................................94features ...................................79priority scan .............................35programming page, call, and phone list names ....................60
programming page, call, and phone list numbers ................57
SmartZone operation ..............91status calls ..............................26
systemsreceiving .............................. 20transmitting .......................... 22
viewing page, call, and phone lists ....................................... 43
UUHF frequencies ........................... 1
VVHF frequency ............................. 1
maritime radio use ................ 107viewing
call list ..................................... 43page list .................................. 43phone list ................................ 43scan list ................................... 38
VOL (volume) switch .................... 3
Wwarranty .................................... 115
Zzone
definition ................................. 17selection .................................. 17
ASTRO XTL 5000 Digital Mobile Radio with W3 Control Head 125

Index
Notes
126

127
Foldout Page
MODE
HOME
2ABC 3DEF
5JKL 6MNO
8TUV 9WXY
0
VOL
Side Button 1 (S1)
Side Button 2 (S2)
Side Button 3 (S3)
LEDIndicator
AlphanumericKeypad
Mode Control
ProgrammableButton(T2)
ProgrammableButton(T3)
DisplaySoftkeys
W3 Control Head
1 Q Z
4GHI
7PRS
On/OffButton(T1)
Push-To-Talk(PTT) Button
VolumeControl
Orange
Menu-selectbuttons


6881096C67-C*6881096C67*
MOTOROLA, the Stylized M Logo, ASTRO, SmartZone, and FLASHport are registered in the U.S. Patent and Trademark Office.
All other product or service names are the property of their respective owners.
© Motorola, Inc. 2004.
All rights reserved. Printed in U.S.A.
Motorola, Inc.
8000 West Sunrise Boulevard
Ft. Lauderdale, FL 33322