
Digital Media Player User Guide - Zendesk€¦ · Digital Media Player User Guide 8.2 12 For...
28
Digital Media Player User Guide ADMINISTRATOR GUIDE VERSION 8.2 Technical Service 1.866.815.7719
Transcript of Digital Media Player User Guide - Zendesk€¦ · Digital Media Player User Guide 8.2 12 For...

Digital Media Player User Guide
ADMINISTRATOR GUIDEVERSION 8.2
Technical Service 1.866.815.7719

Table of Contents Introduction .......................................................................................................... 1!Content Library ..................................................................................................... 2!
Search for a Title .................................................................................................................. 2!Edit Content Title ………………………………………………………………………………………………………………3 Extend Content License Dates ............................................................................................... 4!
Play Content on Demand ....................................................................................... 5!Create a Schedule .................................................................................................. 6!
Point and Click Scheduling ..................................................................................................... 6!Drag and Drop Scheduling .................................................................................................... 7!Interval Scheduling ............................................................................................................... 8!
Manage Schedules ................................................................................................. 9!Copy a Schedule ................................................................................................................... 9!View Your Existing Schedule ................................................................................................. 10!Delete a Schedule ................................................................................................................ 11!Delete Scheduled Content .................................................................................................... 12!Change the Time of Scheduled Content ................................................................................. 13!
Export a Schedule ................................................................................................ 14!Intermissions ...................................................................................................... 15!
Automatic Intermissions (Next Up) ....................................................................................... 15!Customize the Intermission (Playlist) ..................................................................................... 16!Auxiliary Input Intermission……………………………………………………………………………………………….17 Turn Off Intermission ........................................................................................................... 17!
Add Custom Content to the Library ..................................................................... 18!Video Settings ..................................................................................................... 20!
Video Resolution .................................................................................................................. 20!Brand the Channel ............................................................................................................... 20!
Settings ............................................................................................................... 22!Check Drive Space ............................................................................................................... 22!Application Localization and Culture ...................................................................................... 22!Conduct a DMP Health Check…………………………………………………….………………………………………23 DMP Alias ........................................................................................................................... 23!Export Activity Logs ............................................................................................................. 23!

For assistance, call toll-free: 1-866-815-7719 or 1-314-984-6295 1
Digital Media Player User Guide 8.2 1 For assistance, call toll-free: 1-866-815-7719 or 1-314-984-6295
DMP Home Screen
Double-click Preview to see the content playing now.
Displays information about the content currently playing.
Introduction
Congratulations on the successful installation of your new Digital Media Player! This User Guide is a reference tool for the Digital Media Player (DMP) software. There are many functions designed to make implementing a custom movie channel simple and easy. If you have any questions regarding the DMP software or equipment, please contact us! You may reach a Swank Technical Representative by calling 866-815-7719 or 314-984-6295. The DMP software consists of the following modules:
• Content Library – See all loaded content and add your own custom content.
• Intermission Manager – Maximize round-the-clock programming with an automated intermission or a custom playlist.
• Scheduling Manager – Create, copy, modify and export scheduled content.
• Content Updates – Receive new releases from Swank via USB hard drive or network.
• General Settings - Special functionality and system logging. • Video Settings – Manage the audio, video and overlay settings for the DMP output signal.

DIGITAL MEDIA PLAYER USER GUIDE2
Digital Media Player User Guide 8.2 2 For assistance, call toll-free: 1-866-815-7719 or 1-314-984-6295
Content Library If you ordered content from Swank, it will be delivered on a USB drive in a separate shipment. To add content to the library, please follow the directions that are included with the drive. If you did not receive a drive, please contact your Swank Movie Programmer. After the content has been loaded, click the Content Library tab for a list of available titles.
The library details the title, duration, license start and end date, and indicates if the content was provided by you. If you do not see any titles in the Content Library, see the section “Create a Schedule.” Search for a Title To sort the titles, click on any heading.
Search for a title by typing a portion of the content’s name in the Filter field:
For assistance, call toll-free: 1-866-815-7719 or 1-314-984-6295 3
Digital Media Player User Guide 8.2 3 For assistance, call toll-free: 1-866-815-7719 or 1-314-984-6295
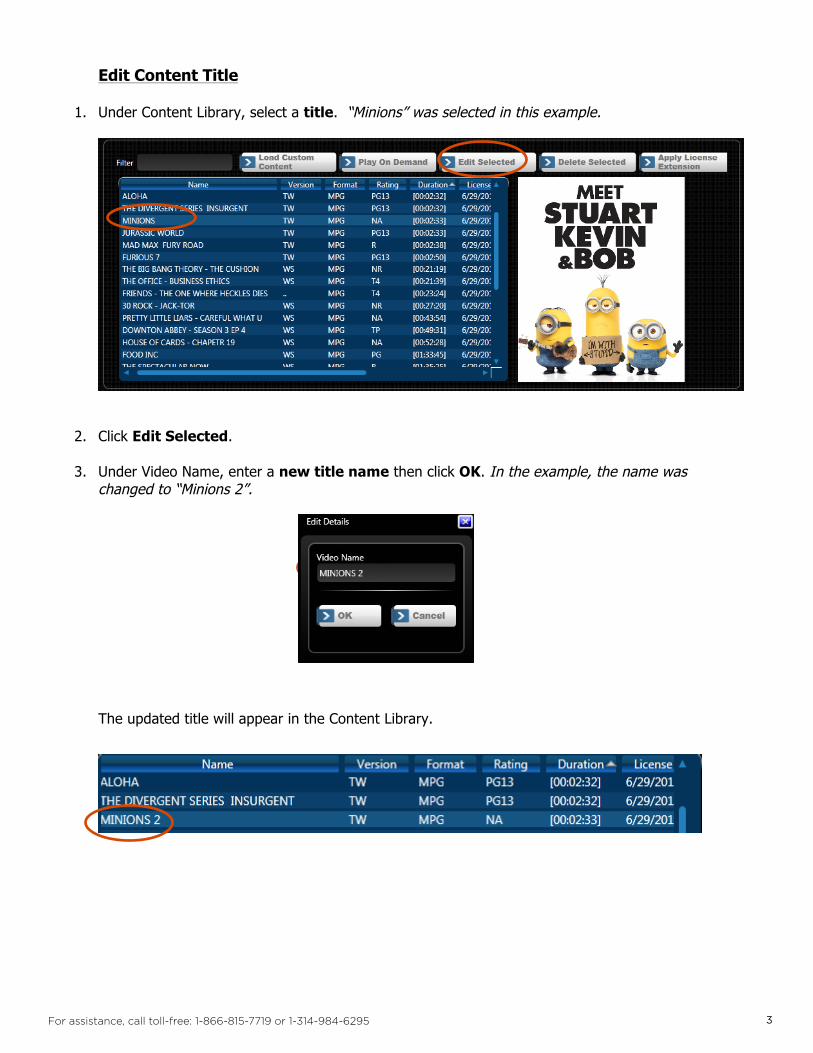
Edit Content Title
1. Under Content Library, select a title. “Minions” was selected in this example.
2. Click Edit Selected.
3. Under Video Name, enter a new title name then click OK. In the example, the name was changed to “Minions 2”.
The updated title will appear in the Content Library.

DIGITAL MEDIA PLAYER USER GUIDE4
Digital Media Player User Guide 8.2 4 For assistance, call toll-free: 1-866-815-7719 or 1-314-984-6295
Extend Content License Dates
All of the content provided by Swank Motion Pictures has a license period. Content may not be played or scheduled outside of that license range. In certain circumstances, you may need to discuss extending the license date with your Swank Movie Programmer. If the date is extended, you will receive a code from Swank Motion Pictures. The steps below show how to extend the license date using the code. 1. Under Content Library, click Apply License Extension.
2. Copy the coupon code that was sent to you by Digital Services via email and paste it in the upper
text box.
3. Click Apply to make the license range changes to the content.
4. If you go to the Content Library tab, you will see the list of content and the new license range.
For assistance, call toll-free: 1-866-815-7719 or 1-314-984-6295 5
Digital Media Player User Guide 8.2 5 For assistance, call toll-free: 1-866-815-7719 or 1-314-984-6295
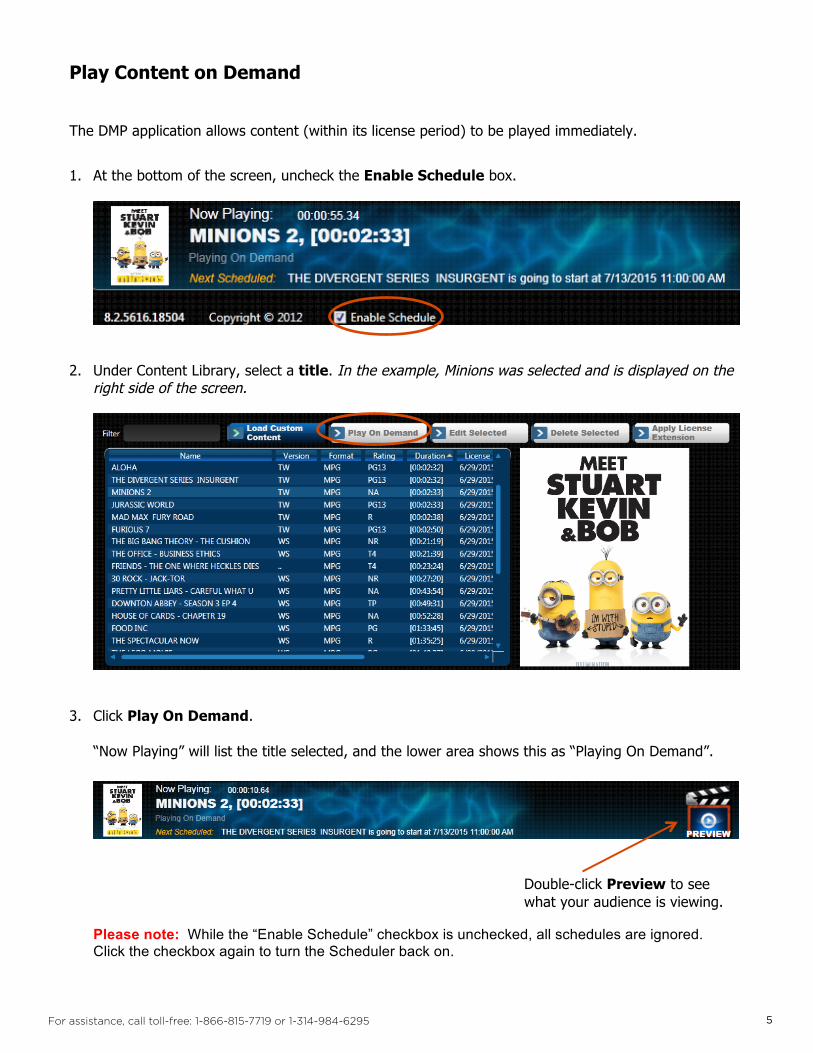
Play Content on Demand
The DMP application allows content (within its license period) to be played immediately.
1. At the bottom of the screen, uncheck the Enable Schedule box.
2. Under Content Library, select a title. In the example, Minions was selected and is displayed on the right side of the screen.
3. Click Play On Demand. “Now Playing” will list the title selected, and the lower area shows this as “Playing On Demand”.
Double-click Preview to see what your audience is viewing.
Please note: While the “Enable Schedule” checkbox is unchecked, all schedules are ignored. Click the checkbox again to turn the Scheduler back on.

DIGITAL MEDIA PLAYER USER GUIDE6
Digital Media Player User Guide 8.2 6 For assistance, call toll-free: 1-866-815-7719 or 1-314-984-6295
Create a Schedule Create a schedule to meet your needs and flexibility. You may add content to your schedule whenever you choose. Click the Scheduling menu.
If you would like to create a schedule, please continue to read below:
Point and Click Scheduling 1. Select a Start Date
Click on the calendar icon. Click on the first day of your schedule. For the above example, today is July 12 and we will be adding to the schedule for July 13.
2. Select a Title Click on a title to select it. Be sure to check the End License Date when selecting titles. In this example, Minions 2 is selected. Click Add to Selected Schedule. 3.

For assistance, call toll-free: 1-866-815-7719 or 1-314-984-6295 7
Digital Media Player User Guide 8.2 7 For assistance, call toll-free: 1-866-815-7719 or 1-314-984-6295
Enter a Start Time
Enter a time or click the icon for a selection. Click OK. The title will be added to the schedule at right. In the example, Minions 2 trailer was added to the schedule at 8:00 a.m.
4. Select Additional Titles
Repeat steps 2 and 3 as needed to complete your schedule.
Drag and Drop Scheduling
1. Select a Start Date Click on the calendar icon. Click on the first day of your schedule. In the example, today is November 17 and the schedule will begin on November 18.
2. Select a Title Click on a title and drag it to the schedule at the time you want the movie to start. In the example, Minions 2 was added to the schedule at 8:58 a.m.
3. Repeat step 2 as needed to complete your schedule.

DIGITAL MEDIA PLAYER USER GUIDE8
Digital Media Player User Guide 8.2 8 For assistance, call toll-free: 1-866-815-7719 or 1-314-984-6295
Interval Scheduling
1. Select a Start Date Click on the calendar icon. Click on the first day of your schedule. In the example, today is November 17 and the schedule will begin on November 18.
2. Select a Timeframe Select an interval – you may schedule on the hour, every half hour, every quarter hour or continuously.
3. Select a Title Double-click on any title. In the example, Minions 2 was selected and added to the schedule.
4. Select Additional Titles Repeat step 3. Titles will be added based on the interval selected in step 2.
Digital Media Player User Guide 8.2 9 For assistance, call toll-free: 1-866-815-7719 or 1-314-984-6295
Manage Schedules
Copy a Schedule You may copy an existing day or series of days, and use that as a template for creating future schedules. For best results, answer these questions:
• Does my date range overlap with content already scheduled?
• Does my date range overlap with itself? For example, does content on the last day end when content on my first day is scheduled to begin?
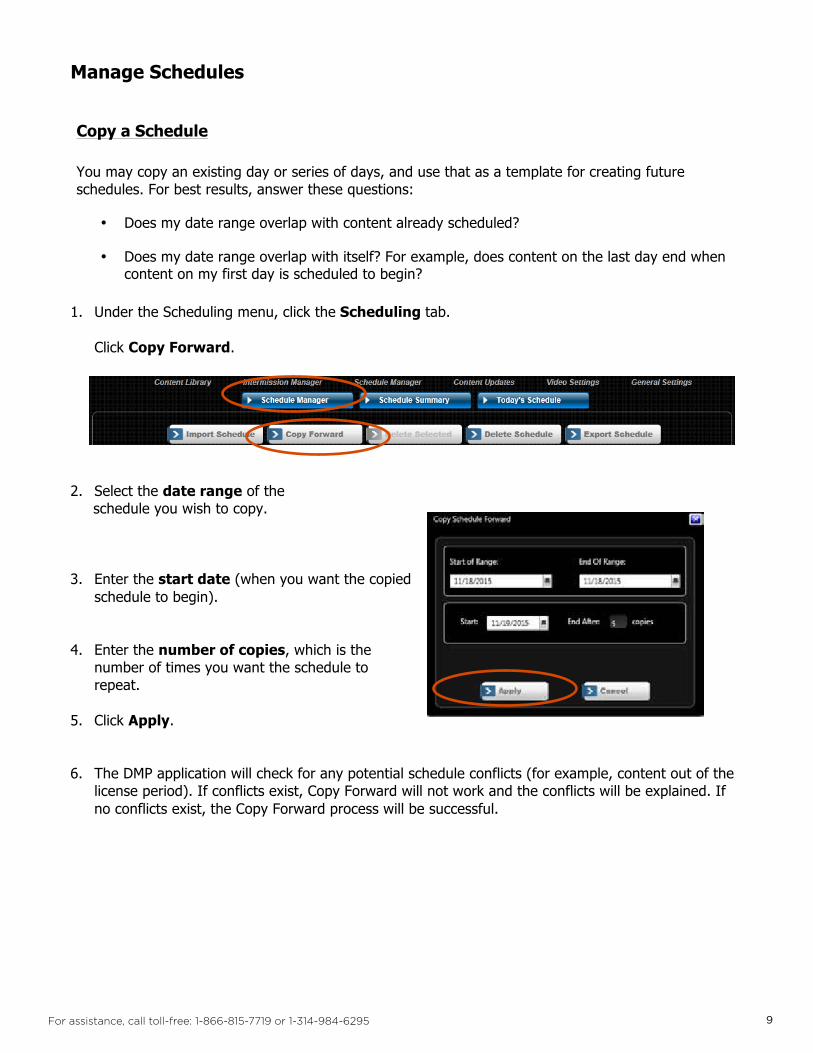
1. Under the Scheduling menu, click the Scheduling tab.
Click Copy Forward.
2. Select the date range of the schedule you wish to copy. 3. Enter the start date (when you want the copied
schedule to begin). 4. Enter the number of copies, which is the
number of times you want the schedule to repeat.
5. Click Apply.
6. The DMP application will check for any potential schedule conflicts (for example, content out of the license period). If conflicts exist, Copy Forward will not work and the conflicts will be explained. If no conflicts exist, the Copy Forward process will be successful.
For assistance, call toll-free: 1-866-815-7719 or 1-314-984-6295 9
Digital Media Player User Guide 8.2 9 For assistance, call toll-free: 1-866-815-7719 or 1-314-984-6295
Manage Schedules
Copy a Schedule You may copy an existing day or series of days, and use that as a template for creating future schedules. For best results, answer these questions:
• Does my date range overlap with content already scheduled?
• Does my date range overlap with itself? For example, does content on the last day end when content on my first day is scheduled to begin?
1. Under the Scheduling menu, click the Scheduling tab.
Click Copy Forward.
2. Select the date range of the schedule you wish to copy. 3. Enter the start date (when you want the copied
schedule to begin). 4. Enter the number of copies, which is the
number of times you want the schedule to repeat.
5. Click Apply.
6. The DMP application will check for any potential schedule conflicts (for example, content out of the license period). If conflicts exist, Copy Forward will not work and the conflicts will be explained. If no conflicts exist, the Copy Forward process will be successful.

DIGITAL MEDIA PLAYER USER GUIDE10
Digital Media Player User Guide 8.2 10 For assistance, call toll-free: 1-866-815-7719 or 1-314-984-6295
View Your Existing Schedule
The schedule summary shows what has been scheduled and how much content is scheduled on each day over any particular month. 1. Under the Scheduling menu, click Schedule Summary.
2. The calendar displays when content is showing and how many titles are scheduled. Click on any day in the calendar.
3. A schedule summary appears on the left side of the screen for the day you selected.

For assistance, call toll-free: 1-866-815-7719 or 1-314-984-6295 11
Digital Media Player User Guide 8.2 11 For assistance, call toll-free: 1-866-815-7719 or 1-314-984-6295
Delete a Schedule
1. Under the Scheduling menu, click the Scheduling tab.
2. Click Delete Schedule.
3. Under start of range, enter the beginning date of the schedule to be deleted.
Under end of range, enter the last date of the schedule to be deleted. If you only need to delete a single day, then enter the same date into both fields.
After both dates are filled in, click OK.

DIGITAL MEDIA PLAYER USER GUIDE12
Digital Media Player User Guide 8.2 12 For assistance, call toll-free: 1-866-815-7719 or 1-314-984-6295
Delete Scheduled Content
1. Under the Scheduling menu, click the Scheduling tab.
2. Click on the calendar icon. Select the day of the schedule to be modified.
3. Click on the title to delete. In the example, “Jurassic World” is selected.
Click Delete Selected. 4. Click OK to delete the title or Cancel to keep the title.

For assistance, call toll-free: 1-866-815-7719 or 1-314-984-6295 13
Digital Media Player User Guide 8.2 13 For assistance, call toll-free: 1-866-815-7719 or 1-314-984-6295
Change the Time of Scheduled Content
1. Under the Scheduling menu, click the Scheduling tab.
2. Click on the calendar icon. Select the day of the schedule to be modified.
3. Double-click on the title to modify. In the
example, Jurassic World was selected.
4. Enter a new start time or click the clock to select times on the hour.
5. Click OK to change the time.
DIGITAL MEDIA PLAYER USER GUIDE14
Digital Media Player User Guide 8.2 14 For assistance, call toll-free: 1-866-815-7719 or 1-314-984-6295
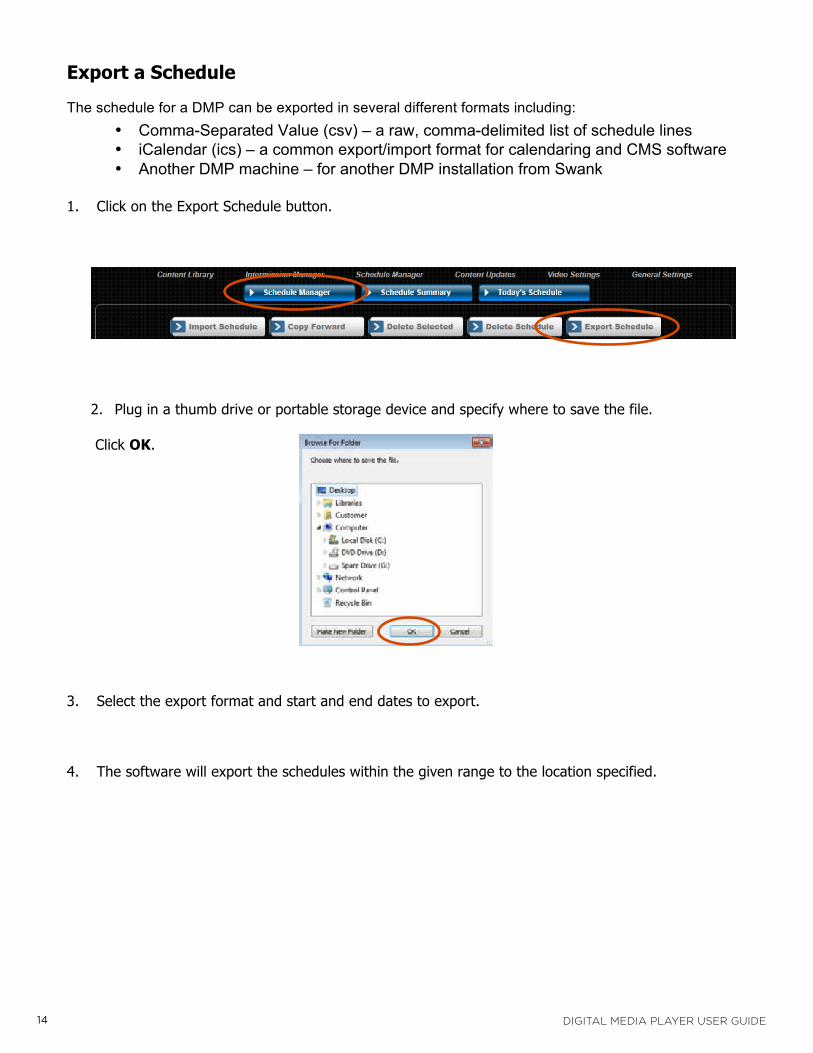
Export a Schedule
The schedule for a DMP can be exported in several different formats including: • Comma-Separated Value (csv) – a raw, comma-delimited list of schedule lines • iCalendar (ics) – a common export/import format for calendaring and CMS software • Another DMP machine – for another DMP installation from Swank
1. Click on the Export Schedule button.
2. Plug in a thumb drive or portable storage device and specify where to save the file. Click OK.
3. Select the export format and start and end dates to export.
4. The software will export the schedules within the given range to the location specified.
For assistance, call toll-free: 1-866-815-7719 or 1-314-984-6295 15
Digital Media Player User Guide 8.2 15 For assistance, call toll-free: 1-866-815-7719 or 1-314-984-6295
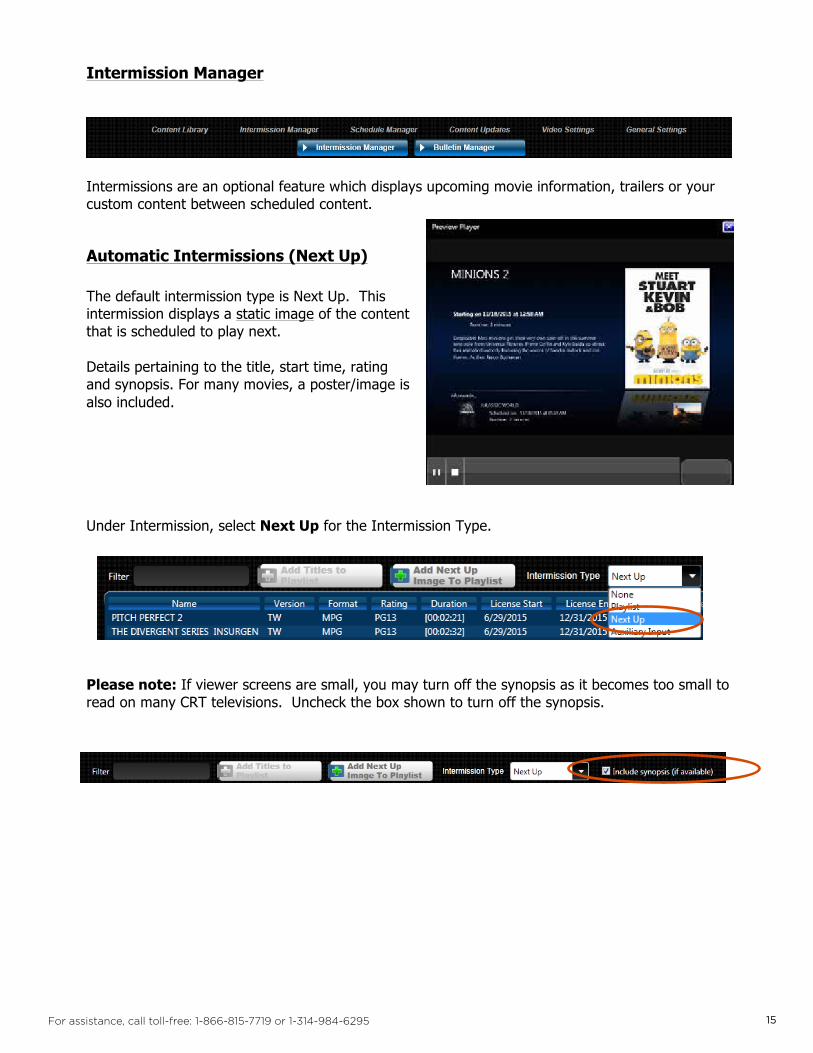
Intermission Manager
Intermissions are an optional feature which displays upcoming movie information, trailers or your custom content between scheduled content.
Automatic Intermissions (Next Up) The default intermission type is Next Up. This intermission displays a static image of the content that is scheduled to play next. Details pertaining to the title, start time, rating and synopsis. For many movies, a poster/image is also included.
Under Intermission, select Next Up for the Intermission Type.
Please note: If viewer screens are small, you may turn off the synopsis as it becomes too small to read on many CRT televisions. Uncheck the box shown to turn off the synopsis.

DIGITAL MEDIA PLAYER USER GUIDE16
Digital Media Player User Guide 8.2 16 For assistance, call toll-free: 1-866-815-7719 or 1-314-984-6295
Customize the Intermission (Playlist) With the Playlist transmission, you may select content to play as the intermissions. 1. Under Intermission, select Playlist for the Intermission Type.
2. Select the titles to include in the Intermission. To select multiple titles, click a title and hold the Shift key then click additional titles. In the following example, Minions 2 was selected.
3. Click Add Titles to Playlist. The title is added to the Playlist. Note: You must select at least one title or viewers will see blank video. The green bars show the current place in the playlist.
The DMP allows a user to add the “Next Up” image into your playlist, so that you can still advertise the next scheduled playback within your playlist. 1. Click the “Add Next Up Image to Playlist” button. 2. In the new window, use the up/down arrows to change the number of minutes to show the image – from 0.5 minutes (30 seconds) to 1200 minutes. 3. Click “OK” to add the entry to the playlist. You will now see a row added to your playlist of “Next Up Image”, with a runtime of the time you gave. The Next Up images can be placed into the playlist as many times as desired.
The Playlist operates from top to bottom then repeats, always remembering where it left off. If the Playlist is interrupted by scheduled content, the next title in the Playlist will play during the next open timeslot in the schedule.

For assistance, call toll-free: 1-866-815-7719 or 1-314-984-6295 17
Digital Media Player User Guide 8.2 17 For assistance, call toll-free: 1-866-815-7719 or 1-314-984-6295
Re-order the titles by clicking the up or down arrows. Delete a title from the Playlist by selecting the title and clicking Delete Title.
Auxiliary Input Intermission (Aux Input)
The DMP software supports playing external video/audio sources when in-between scheduled playbacks. Consult your installation guide for details on connecting your external source to the Swank DMP.
To enable this feature, select “Aux Input” from the dropdown list. There will be a brief initialization as the connection is established to the external source. Once complete, the player will route any signal it receives to the existing output connections.
When the schedule reaches a time to play a title, it will change the outputs back to local content, and play the scheduled title. After the scheduled title has finished, the external content will once again show.
Turn Off Intermission You may not want any content to play when scheduled content is not playing.
Under Intermission, select None for the Intermission Type.
DIGITAL MEDIA PLAYER USER GUIDE18
Digital Media Player User Guide 8.2 18 For assistance, call toll-free: 1-866-815-7719 or 1-314-984-6295
Add Custom Content to the Library The DMP supports a wide range of formats. Be sure to test the video and audio playback of your custom content on the DMP, as not all video creation and encoding programs are the same. If you experience any issues or are unable to add the content, re-encode your video to MPEG-2 Program Stream and try again. If you have any questions, please call Swank Technical Service for help at 866-815-7719 or 314-984-6295. Certain types of video source files may be added to the DMP immediately:
• WMV • MPEG-1 • MPEG-2 Program Stream (*Preferred Format) • MPEG-2 Transport Stream • QuickTime (H264, MPEG-4, and MPEG-2) • MPEG-4 • AVI (uncompressed) • FLV
Other file types must be converted before adding to the DMP:
• Microsoft PowerPoint® • Shockwave • Flash SWF • QuickTime (Sorenson, 3GPP, 3GPP2) • Any files where the DMP cannot determine the runtime
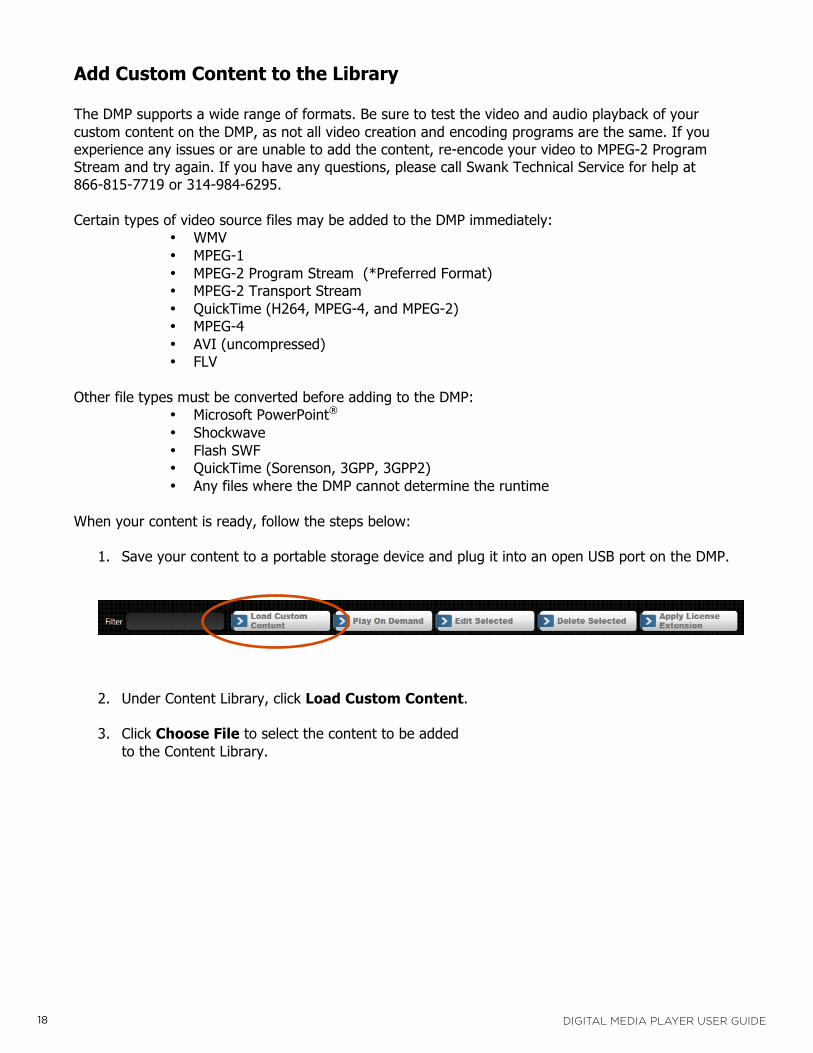
When your content is ready, follow the steps below:
1. Save your content to a portable storage device and plug it into an open USB port on the DMP.
2. Under Content Library, click Load Custom Content. 3. Click Choose File to select the content to be added
to the Content Library.

For assistance, call toll-free: 1-866-815-7719 or 1-314-984-6295 19
Digital Media Player User Guide 8.2 19 For assistance, call toll-free: 1-866-815-7719 or 1-314-984-6295
Add Custom Content (Continued) 4. Enter a Video Title for your content.
This title will appear in the Content Library.
In the example, Example Video was entered. Click OK.
5. Under Content Library, check for the addition of your content.
DIGITAL MEDIA PLAYER USER GUIDE20
Digital Media Player User Guide 8.2 20 For assistance, call toll-free: 1-866-815-7719 or 1-314-984-6295
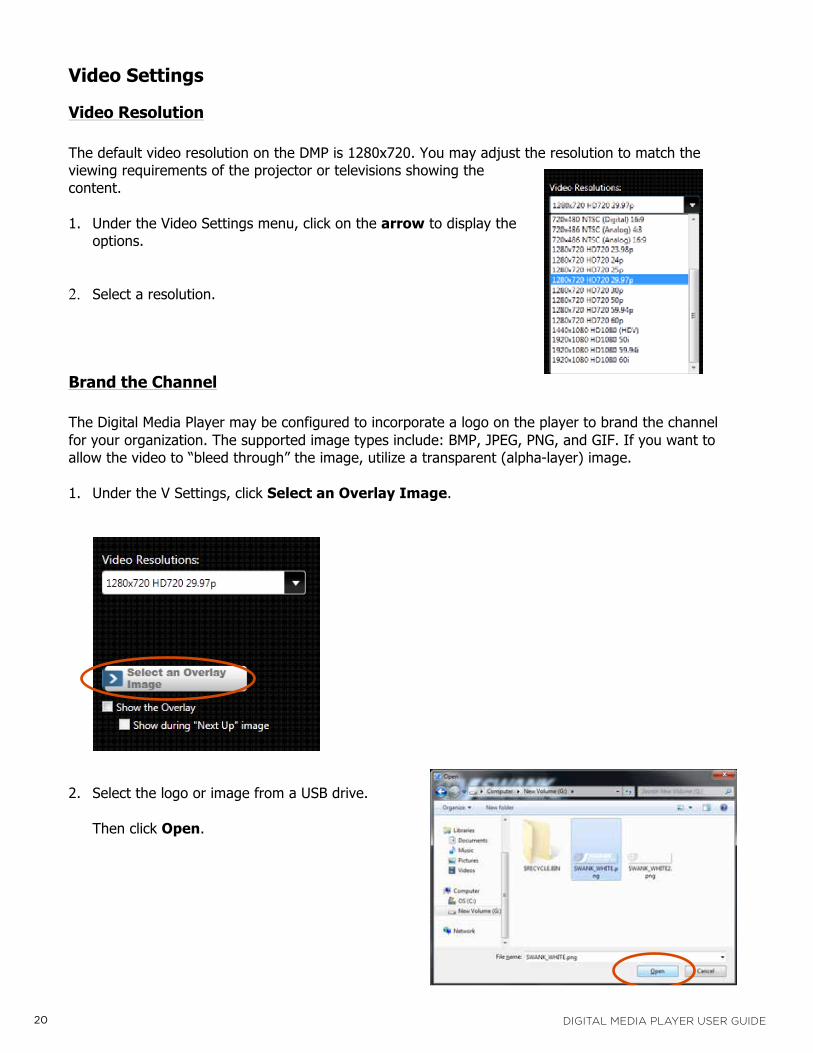
Video Settings
Video Resolution The default video resolution on the DMP is 1280x720. You may adjust the resolution to match the viewing requirements of the projector or televisions showing the content. 1. Under the Video Settings menu, click on the arrow to display the
options.
2. Select a resolution.
Brand the Channel The Digital Media Player may be configured to incorporate a logo on the player to brand the channel for your organization. The supported image types include: BMP, JPEG, PNG, and GIF. If you want to allow the video to “bleed through” the image, utilize a transparent (alpha-layer) image. 1. Under the V Settings, click Select an Overlay Image.
2. Select the logo or image from a USB drive.
Then click Open.

For assistance, call toll-free: 1-866-815-7719 or 1-314-984-6295 21
Digital Media Player User Guide 8.2 21 For assistance, call toll-free: 1-866-815-7719 or 1-314-984-6295
The image selected will appear on the Settings page. In this example, the Swank logo was added to the player.
3. Click the “Show the Overlay” box. The image you selected appears on the output screen as shown below. The example on the left shows a solid image, and the image on the right displays an image with alpha-layer transparency.
4. Click the “Show during “Next Up” image if you want to show the logo in this location. The example
on the left shows a solid image, and the image on the right displays an image with alpha-layer transparency.

DIGITAL MEDIA PLAYER USER GUIDE22
Digital Media Player User Guide 8.2 22 For assistance, call toll-free: 1-866-815-7719 or 1-314-984-6295
Settings The audio output level can also be adjusted. Use the slider to adjust the amount of gain/loss on the output line.
Settings
There are several functions under Settings to help ensure that the DMP runs smoothly.
Check Drive Space Under General Settings, you may see how much storage space is used and still available for content in the DMP.
Application Localization and Culture
You may adjust the localization of the DMP into other languages from the dropdown list below. More languages will be coming soon.

For assistance, call toll-free: 1-866-815-7719 or 1-314-984-6295 23
Digital Media Player User Guide 8.2 23 For assistance, call toll-free: 1-866-815-7719 or 1-314-984-6295
Conduct a DMP Health Check 1. Under Settings, click Health Check.
2. You will receive a message with the DMP’s status. If you have any concerns, please call us for assistance.
3. Click OK to close the message.
DMP Alias
The DMP software supports a visible “alias,” which will appear in the footer of the main application UI. This text field allows admins to place a brief note for themselves, and have it show within the software. One example would be a note of “Channel 20,” which would remind an admin which closed-circuit channel that this machine is attached to.
To use this field, click on the text box next to “DMP Alias” and begin typing. The message will appear in the footer of the display after every keystroke, located next to the “Enable Schedule” checkbox.
Export Activity Logs
If you have any issues with the DMP, our technical support team will be happy to assist you. Often they will request an export of the machine’s logs for analysis. This can be created in just a few clicks.
1. Click Export Logs.
2. Select a location to save the exported log files, and click OK. (It is the easiest to save to the Desktop. After clicking OK, the process may need a minute.)
3. You will receive a message that the export has been saved. Click OK.
The zip file is typically very small, and is easy to attach to an email.

DIGITAL MEDIA PLAYER USER GUIDE24
Notes

For assistance, call toll-free: 1-866-815-7719 or 1-314-984-6295 25


