DIGITAL CAMERA C-100 - olympusamerica.com · DIGITAL CAMERA C-100 D-370 OPERATION MANUAL. 2...
22
● Thank you for purchasing an Olympus digital camera. ● Follow the procedures in this manual to install the USB driver. Following other procedures may result in incorrect installation. CONNECTING THE CAMERA TO A PC DIGITAL CAMERA C-100 D-370 OPERATION MANUAL
Transcript of DIGITAL CAMERA C-100 - olympusamerica.com · DIGITAL CAMERA C-100 D-370 OPERATION MANUAL. 2...

� Thank you for purchasing an Olympus digital camera.
� Follow the procedures in this manual to install the USB driver. Following
other procedures may result in incorrect installation.
CONNECTINGTHE CAMERA
TO A PC
DIGITAL CAMERA
C-100D-370OPERATION MANUAL
2
INTRODUCTION
This manual explains in detail how to connect your camera to a personal
computer. Read it carefully and keep it in a safe place for future reference.
ABOUT THIS MANUAL
� The contents of this publication are subject to change without notice. For
the latest information, please contact your local Olympus representative.
� Considerable care was taken in preparing this manual. If, however, you
have any queries or note any errors or omissions, please contact your
local Olympus representative.
� Duplication of this manual, in whole or in part, other than for personal
use, without the prior permission of Olympus is prohibited. Reproduction
without permission is strictly prohibited.
TRADEMARKS
� Microsoft products, such as Windows and Internet Explorer are registered
trademarks or trademarks of Microsoft Corporation in the United States of
America and in other countries.
� Macintosh and Apple are registered trademarks of Apple Computers, Inc.
� Other brand names and product names mentioned in this manual are
trademarks or registered trademarks of their respective owners.
3
INDEX
FOR Windows (98/Me/2000) USERS 5
FOR Macintosh (Mac OS9) USERS 15
FOR OTHER OS USERS 21
Window
sM
acintosh
4
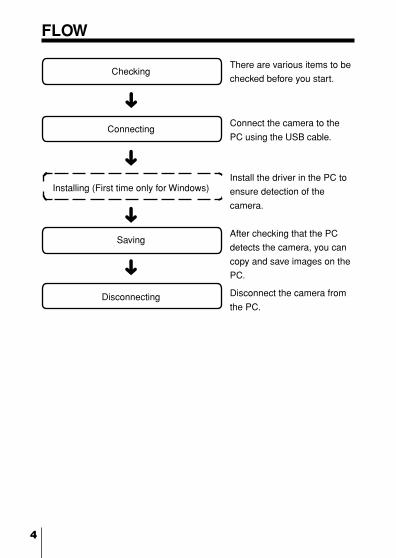
FLOW
Checking
Connecting
Installing (First time only for Windows)
Saving
Disconnecting
There are various items to be
checked before you start.
Connect the camera to the
PC using the USB cable.
Install the driver in the PC to
ensure detection of the
camera.
After checking that the PC
detects the camera, you can
copy and save images on the
PC.
Disconnect the camera from
the PC.
➜➜
➜➜
5
Window
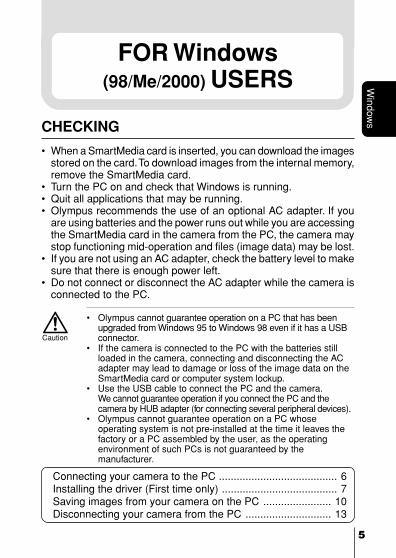
sCHECKING
• When a SmartMedia card is inserted, you can download the imagesstored on the card. To download images from the internal memory,remove the SmartMedia card.
• Turn the PC on and check that Windows is running.• Quit all applications that may be running.• Olympus recommends the use of an optional AC adapter. If you
are using batteries and the power runs out while you are accessingthe SmartMedia card in the camera from the PC, the camera maystop functioning mid-operation and files (image data) may be lost.
• If you are not using an AC adapter, check the battery level to makesure that there is enough power left.
• Do not connect or disconnect the AC adapter while the camera isconnected to the PC.
Caution
• Olympus cannot guarantee operation on a PC that has beenupgraded from Windows 95 to Windows 98 even if it has a USBconnector.
• If the camera is connected to the PC with the batteries stillloaded in the camera, connecting and disconnecting the ACadapter may lead to damage or loss of the image data on theSmartMedia card or computer system lockup.
• Use the USB cable to connect the PC and the camera.We cannot guarantee operation if you connect the PC and thecamera by HUB adapter (for connecting several peripheral devices).
• Olympus cannot guarantee operation on a PC whoseoperating system is not pre-installed at the time it leaves thefactory or a PC assembled by the user, as the operatingenvironment of such PCs is not guaranteed by themanufacturer.
Connecting your camera to the PC ........................................ 6Installing the driver (First time only) ....................................... 7Saving images from your camera on the PC ....................... 10Disconnecting your camera from the PC ............................. 13
FOR Windows(98/Me/2000) USERS
6
Window
s
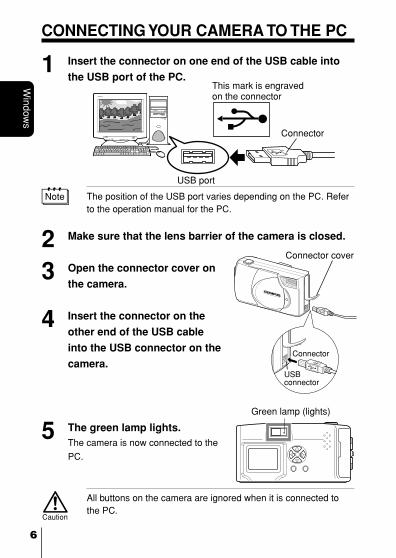
CONNECTING YOUR CAMERA TO THE PC
1 Insert the connector on one end of the USB cable into
the USB port of the PC.
Note The position of the USB port varies depending on the PC. Referto the operation manual for the PC.
2 Make sure that the lens barrier of the camera is closed.
3 Open the connector cover on
the camera.
4 Insert the connector on the
other end of the USB cable
into the USB connector on the
camera.
5 The green lamp lights.The camera is now connected to the
PC.
Caution
All buttons on the camera are ignored when it is connected tothe PC.
This mark is engravedon the connector
Connector
USB port
Green lamp (lights)
Connector cover
Connector
USBconnector
7
Window
sINSTALLING THE DRIVER (FIRST TIME ONLY)
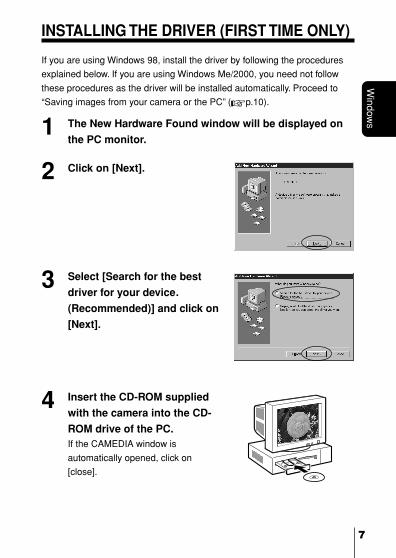
If you are using Windows 98, install the driver by following the procedures
explained below. If you are using Windows Me/2000, you need not follow
these procedures as the driver will be installed automatically. Proceed to
“Saving images from your camera or the PC” ( p.10).
1 The New Hardware Found window will be displayed on
the PC monitor.
2 Click on [Next].
3 Select [Search for the best
driver for your device.
(Recommended)] and click on
[Next].
4 Insert the CD-ROM supplied
with the camera into the CD-
ROM drive of the PC.If the CAMEDIA window is
automatically opened, click on
[close].

8
Window
s
INSTALLING THE DRIVER (FIRST TIME ONLY)
5 Select [Specify a location:]
and click on [Browse].
6 Click on + on the left of the
CD-ROM drive icon.
7 Click on + on the left of the
[Usb] folder.
8 Select the [Win98] folder in
[USB] folder and click on
[OK].
9
Window
sINSTALLING THE DRIVER (FIRST TIME ONLY)
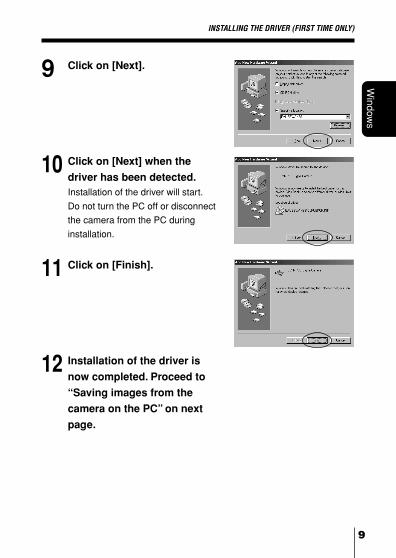
9 Click on [Next].
10 Click on [Next] when the
driver has been detected.Installation of the driver will start.
Do not turn the PC off or disconnect
the camera from the PC during
installation.
11 Click on [Finish].
12 Installation of the driver is
now completed. Proceed to
“Saving images from the
camera on the PC” on next
page.
10
Window
s
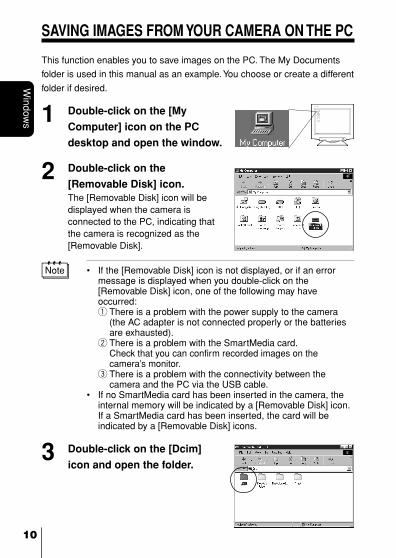
SAVING IMAGES FROM YOUR CAMERA ON THE PC
This function enables you to save images on the PC. The My Documents
folder is used in this manual as an example. You choose or create a different
folder if desired.
1 Double-click on the [My
Computer] icon on the PC
desktop and open the window.
2 Double-click on the
[Removable Disk] icon.The [Removable Disk] icon will bedisplayed when the camera isconnected to the PC, indicating thatthe camera is recognized as the[Removable Disk].
Note • If the [Removable Disk] icon is not displayed, or if an errormessage is displayed when you double-click on the[Removable Disk] icon, one of the following may haveoccurred:1 There is a problem with the power supply to the camera
(the AC adapter is not connected properly or the batteriesare exhausted).
2 There is a problem with the SmartMedia card.Check that you can confirm recorded images on thecamera’s monitor.
3 There is a problem with the connectivity between thecamera and the PC via the USB cable.
• If no SmartMedia card has been inserted in the camera, theinternal memory will be indicated by a [Removable Disk] icon.If a SmartMedia card has been inserted, the card will beindicated by a [Removable Disk] icons.
3 Double-click on the [Dcim]
icon and open the folder.

11
Window
s
Example
Folder number
4 Double-click on the
[100olymp] icon and open the
folder.The image files (JPEG files) will be
displayed and you can check the
icons (P1010001.jpg, etc.).
Note • Files are assigned serial numbers from 0001 to 9999.• When file number 9999 has been reached, the folder is
assigned the next number.• The month included in the file name is indicated by the
numbers 1 to 9 for January to September, and A to C forOctober, November and December respectively.
Example
Month / Day / File number
SAVING IMAGES FROM YOUR CAMERA ON THE PC
5 Double-click on the [My
Documents] icon on the
desktop and open the window.
When the [My Documents] icon is not
found on the desktop, select
[Windows Explorer] from the [Start]
menu, display the Exploring window,
and then double-click on [My
Documents].
The [My Documents] window will
open.
12
Window
s
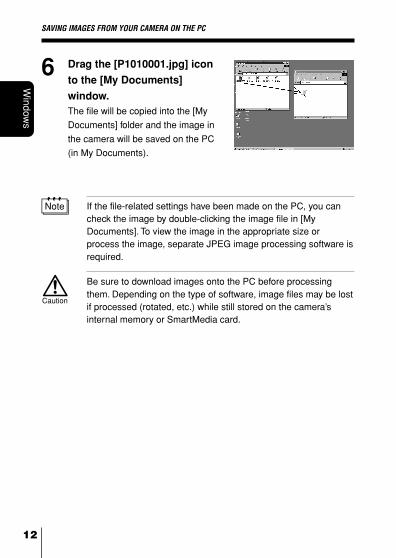
6 Drag the [P1010001.jpg] icon
to the [My Documents]
window.The file will be copied into the [My
Documents] folder and the image in
the camera will be saved on the PC
(in My Documents).
Note If the file-related settings have been made on the PC, you cancheck the image by double-clicking the image file in [MyDocuments]. To view the image in the appropriate size orprocess the image, separate JPEG image processing software isrequired.
Caution
Be sure to download images onto the PC before processingthem. Depending on the type of software, image files may be lostif processed (rotated, etc.) while still stored on the camera’sinternal memory or SmartMedia card.
SAVING IMAGES FROM YOUR CAMERA ON THE PC

13
Window
sDISCONNECTING YOUR CAMERA FROM THE PC
FOR Windows 98 USERS
1 Check that the green lamp on
the camera is lit.
2 Select [Removable Disk] icon
in the [My Computer] window
and right-click on it to display
the pull-down menu.
3 Select [Eject] in the menu and
left-click on it.
4 Check that the green lamp on
the camera goes off.
5 Remove the USB cable from the PC.
6 Remove the USB cable from
the camera.
Green lamp (lit)
Green lamp (should be off)
14
Window
s
DISCONNECTING YOUR CAMERA FROM THE PC
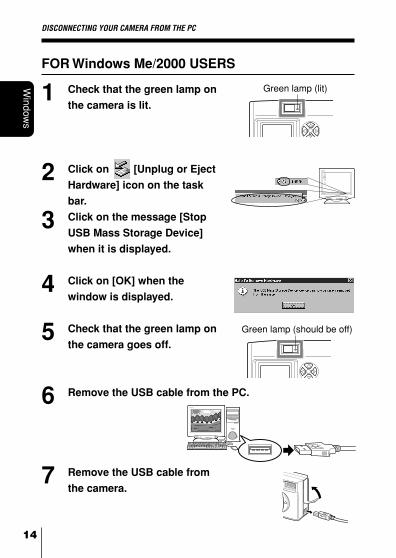
FOR Windows Me/2000 USERS
1 Check that the green lamp on
the camera is lit.
2 Click on [Unplug or Eject
Hardware] icon on the task
bar.
3 Click on the message [Stop
USB Mass Storage Device]
when it is displayed.
4 Click on [OK] when the
window is displayed.
5 Check that the green lamp on
the camera goes off.
6 Remove the USB cable from the PC.
7 Remove the USB cable from
the camera.
Green lamp (lit)
Green lamp (should be off)
15
Macintosh
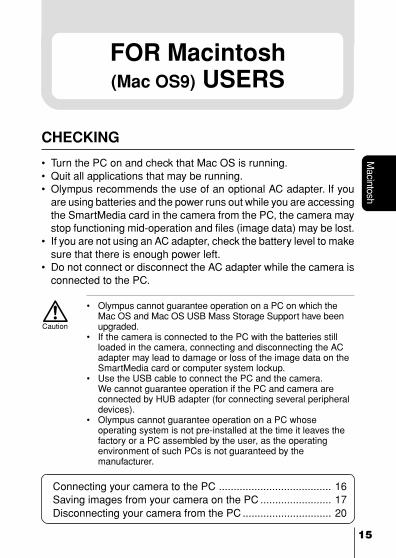
CHECKING
• Turn the PC on and check that Mac OS is running.• Quit all applications that may be running.• Olympus recommends the use of an optional AC adapter. If you
are using batteries and the power runs out while you are accessingthe SmartMedia card in the camera from the PC, the camera maystop functioning mid-operation and files (image data) may be lost.
• If you are not using an AC adapter, check the battery level to makesure that there is enough power left.
• Do not connect or disconnect the AC adapter while the camera isconnected to the PC.
Caution
• Olympus cannot guarantee operation on a PC on which theMac OS and Mac OS USB Mass Storage Support have beenupgraded.
• If the camera is connected to the PC with the batteries stillloaded in the camera, connecting and disconnecting the ACadapter may lead to damage or loss of the image data on theSmartMedia card or computer system lockup.
• Use the USB cable to connect the PC and the camera.We cannot guarantee operation if the PC and camera areconnected by HUB adapter (for connecting several peripheraldevices).
• Olympus cannot guarantee operation on a PC whoseoperating system is not pre-installed at the time it leaves thefactory or a PC assembled by the user, as the operatingenvironment of such PCs is not guaranteed by themanufacturer.
Connecting your camera to the PC ...................................... 16Saving images from your camera on the PC ........................ 17Disconnecting your camera from the PC .............................. 20
FOR Macintosh(Mac OS9) USERS
16
Macintosh
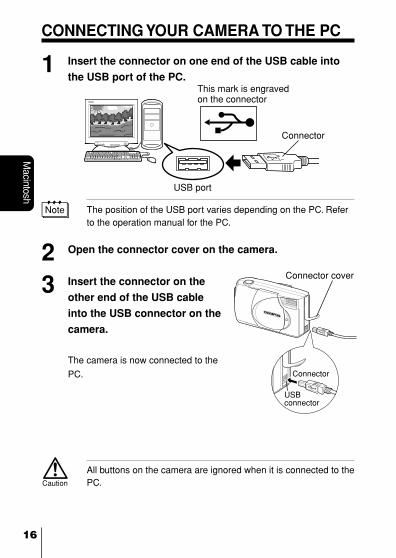
CONNECTING YOUR CAMERA TO THE PC
1 Insert the connector on one end of the USB cable into
the USB port of the PC.
Note The position of the USB port varies depending on the PC. Referto the operation manual for the PC.
2 Open the connector cover on the camera.
3 Insert the connector on the
other end of the USB cable
into the USB connector on the
camera.
The camera is now connected to the
PC.
This mark is engravedon the connector
Connector
USB port
Caution
All buttons on the camera are ignored when it is connected to thePC.
Connector cover
Connector
USBconnector

17
Macintosh
SAVING IMAGES FROM YOUR CAMERA ON THE PC
This function enables you to save images on the PC (the Hard Disk is used
in this manual).
1 Double-click on the [untitled]
icon displayed on the desktop
by connecting the camera to
the PC and open the window.
Note • If the [Untitled] icon is not displayed, or if an error message isdisplayed when you double-click on the [Untitled] icon, one ofthe following may have occurred:1 There is a problem with the power supply to the camera
(the AC adapter is not connected properly or the batteriesare exhausted).Make sure that the AC adapter is connected properly orcheck the level of the batteries.
2 There is a problem with the SmartMedia card.Check that you can confirm images recorded on theSmartMedia card on the camera’s monitor.
3 There is a problem with the connectivity between thecamera and the PC via the USB cable.
• If no SmartMedia card has been inserted in the camera, theinternal memory will be indicated by a [untitled] icon. If aSmartMedia card has been inserted, tthe card will beindicated by a [untitled] icons.
18
Macintosh
Example
Folder number
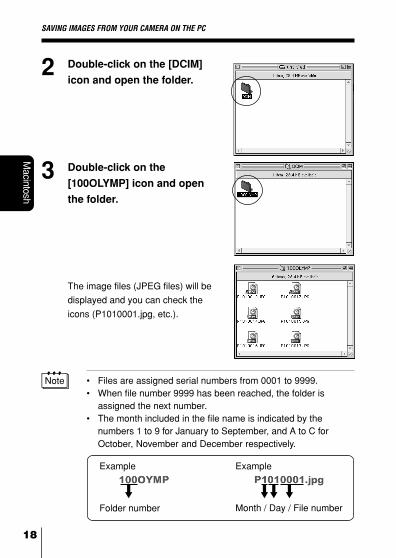
2 Double-click on the [DCIM]
icon and open the folder.
3 Double-click on the
[100OLYMP] icon and open
the folder.
The image files (JPEG files) will be
displayed and you can check the
icons (P1010001.jpg, etc.).
Note • Files are assigned serial numbers from 0001 to 9999.• When file number 9999 has been reached, the folder is
assigned the next number.• The month included in the file name is indicated by the
numbers 1 to 9 for January to September, and A to C forOctober, November and December respectively.
Example
Month / Day / File number
SAVING IMAGES FROM YOUR CAMERA ON THE PC

19
Macintosh
4 Double-click on the Hard Disk
icon on the desktop and open
the window.
The Hard Disk window will open.
5 Drag the [P1010001.jpg] icon
to the Hard Disk window.The image in the camera will be
saved on the PC (in the Hard Disk).
Note If the file-related settings have been made on the PC, you cancheck the image by double-clicking the image file in the HardDisk. To view the image in the appropriate size or process theimage, separate JPEG image processing software is required.
Caution
Be sure to download images onto the PC before processingthem. Depending on the type of software, image files may be lostif processed (rotated, etc.) while still stored on the camera’sinternal memory or SmartMedia card.
SAVING IMAGES FROM YOUR CAMERA ON THE PC

20
Macintosh
DISCONNECTING YOUR CAMERA FROM THE PC
1 Check that the green lamp on
the camera is lit.
2 Select the Drive icon on the
desktop and drag it to the
Trash can.
3 Check that the green lamp on
the camera goes off.
4 Remove the USB cable from
the PC.
5 Remove the USB cable from
the camera.
➜
Green lamp (lit)
Green lamp (should be off)

21
The USB cable supplied with the camera cannot be used with the following
OS.
Windows 95 / Windows NT / Mac OS other than Mac OS9
If you are using a SmartMedia card, you can transfer image data to the PC
by another method.
Does your PC have a USB interface (is there a terminal on the back, side
or all sides of your PC with the symbol ) ?
Use the USB cable supplied.
Use the optional
PC card adapter.
* Cannot be used with Windows NT.
Use the optionalfloppy diskadapter.
Is your OS oneof the following?Windows 98Windows 2000Windows MeMac OS9
Does your PC have a built-in PC card slot?
Does your PC have a built-in floppy disk drive?
No Yes
No Yes
Yes
No
Contact your local Olympus representative.
FOR OTHER OS USERS
No Yes
Use the optional SmartMediaReader/Writer.