Digital Banking Guide - Launch Credit Union
46
Digital Banking Guide
Transcript of Digital Banking Guide - Launch Credit Union

Digital Banking Guide

1
Contents Getting Started ....................................................................................................................................... 3
How to Self-Enroll in Digital Banking ....................................................................................... 3
How to Register a Device ......................................................................................................... 3
How to use the “Forgot Password” Feature ........................................................................... 4
How to use Quick Actions........................................................................................................ 5
How to Group & Reorder accounts ........................................................................................ 6
How to Link accounts ............................................................................................................... 6
Accounts .................................................................................................................................................. 8
Transactions ............................................................................................................................... 8
Details ......................................................................................................................................... 8
Additional options found inside of accounts ........................................................................ 9
Messages ............................................................................................................................................... 11
How to Inquire about a Transaction ..................................................................................... 11
How to inquire about Generic Account Topics .................................................................. 12
The Messages Inbox ............................................................................................................... 13
Apply for a Loan................................................................................................................................... 14
Open a Sub Account .......................................................................................................................... 15
Transactions .......................................................................................................................................... 16
Funds Transfer .......................................................................................................................... 16
Bill Pay ...................................................................................................................................... 17
Member Transfer ..................................................................................................................... 21
Send Money ............................................................................................................................. 22
Direct Pay ................................................................................................................................. 23
Deposit Check ......................................................................................................................... 23
Online Activity Center ............................................................................................................ 24
eDocuments / Statements ..................................................................................................... 25
Loan Payments ........................................................................................................................ 26
Stop Payment .......................................................................................................................... 26
Branches ................................................................................................................................................ 27
Services .................................................................................................................................... 28
Skip A Pay ................................................................................................................................ 28

2
Courtesy Pay Opt Out ............................................................................................................ 29
Add External Account ............................................................................................................ 29
Verify External Account ......................................................................................................... 30
Check Reorder ........................................................................................................................ 30
Mobile Deposit Enrollment ..................................................................................................... 30
My Credit Card ........................................................................................................................ 31
Update Contact Info ............................................................................................................... 31
Statement Delivery Preference ............................................................................................. 31
Cardswap ................................................................................................................................. 31
Settings ................................................................................................................................................... 34
Account Preferences .............................................................................................................. 34
Security Preferences ............................................................................................................... 34
Login History ............................................................................................................................. 35
Alerts ......................................................................................................................................... 36
Themes ..................................................................................................................................... 39
Accessibility ............................................................................................................................. 39
Personal Finance Manager ............................................................................................................... 40
Personal Finance Manager Widgets .................................................................................... 40
Additional Tips & Resources .............................................................................................................. 45
Password Tips & Recommendations ..................................................................................... 45
Password Pitfalls To Avoid ...................................................................................................... 45

3
Getting Started
How to Self-Enroll in Digital Banking
To enroll as a new user, visit the homepage of Launch CU’s website. To register as a new user, click on the User ID field to display the entire Digital Banking login box. Click the “Enroll in digital banking” link right below the password field. Follow the prompts to complete the enrollment process.
How to Register a Device Registering a browser and device will help you login to Digital Banking quicker by avoiding the secure access code process. In addition, you will not be able to utilize the “Forgot Password” feature if you have not registered your device and browser. By registering a browser or device, you are confirming that it is always under your control, and that you intend to use it again to access Digital Banking in the future. To Register a Device for the First Time
1. Login to Digital Banking by entering your current User ID and Password into the Digital Banking login box.
2. Enter your secure access code once you receive it, and then click “submit.” 3. You will now have the option to register your device. If you plan to access digital
banking from this device in the future, click “register device.” If the device is public, do not register it.
You will need to re-register the browser and device again in the following circumstances
• If you delete or reinstall the mobile banking app. • If your browser does not save cookies. • If you clear your browser history. The way that Digital Banking will remember your
device is by placing a cookie on your browser. If you clear your cookies, you remove the cookie that the system uses to recognize your device.
• If we reset your registration for security purposes.

4
How to use the “Forgot Password” Feature You can use the “Forgot Password” link to reset your password if you have forgotten it.
You will only be able to use this feature if you have registered your device and browser. In addition, you will not be able to use this feature if you have entered your password incorrectly three times. Entering your password incorrectly three times will result in being locked out of Digital Banking. If you have been locked out, you will need to contact us to unlock you.
To reset your password
1. Navigate to the homepage of Launch CU’s website. 2. Click “Forgot Password” right above the login box.
3. Enter your User ID, then click “Submit.” 4. A secure access code is required to confirm your identity. Select how you would
like to receive your secure access code. 5. Enter your secure access code into the provided field and click “submit.” 6. You will be taken to a screen to reset your password. Enter your new password,
confirm your new password, and then click “submit.” 7. After this is completed, you will be taken to your main dashboard in Digital Banking.

5
How to use Quick Actions From the homepage of Digital Banking, you will be able to see each account you can view history for. The sidebar of each account includes the following options: Quick Transfer, View Activity, Nickname Account, and Settings.
View Activity
View Activity will let you see all activity on your specific accounts. You are able to search transactions and add filters to help you find what you need fast. You can filter by time, transaction type, and minimum to maximum amount, check number, or transaction category. You can also print and download your transactions right from the View Activity Page.
Quick Transfers Quick transfer will allow you to quickly transfer money between accounts.
1. Click the three vertical dots next to the account you wish to transfer funds from. 2. Click “Quick Transfer.” 3. The “From account” field will default to the account you selected Quick Transfer on. 4. Select the account you would like to transfer funds to. 5. Enter the amount you would like to transfer and press the “transfer funds”
button.
6. You will receive a message that confirms the transaction was processed. Click the “X” to get back to the main dashboard.
Nickname Account
Nickname Account allows you to change the name that is displayed on your homepage for each of your accounts.

6
Settings
The Settings option automatically directs you to the details screen of your account. Here you can view your Routing Number and Account Number as well as choose your Account Visibility for your homepage.
How to Group & Reorder accounts You are able to customize your view on the homepage of Digital Banking by grouping accounts. You are able to group both internal and external accounts that are aggregated in Personal Finance Manager. You can also move your account tiles to customize the appearance of your homepage. To move your account tiles
• On a desktop or laptop: Use a mouse to drag-and-drop the tile to a new location. • On a mobile device: Tap a tile and drag it to the new location.
You may wish to create an account group for your external accounts or loan products. To create a new account group
1. Click on an account tile and drag it to the new group icon towards the bottom right-hand side of the screen.
2. When the tile is dropped on the new group icon, a field will appear. Enter a name for the new group and click the check mark to save the changes.
You can rename a group by clicking on the pencil icon to the right of the title.
How to Link accounts Launch CU makes it possible to link your accounts from other financial institutions to your Digital Banking dashboard. This will help you manage your finances by seeing balances and transactions all in one place.
You will not be able to make transfers by simply linking your external accounts. To make transfers to an external account, you will need to set up and verify the external account for electronic transfers.
To link an external account
1. Click the “Link Account” button at the top of the homepage of Digital Banking.
2. The disclosure will appear. Read the terms and click “Agree.” 3. A list of popular financial institutions will appear. Either select a financial institution from
the list by clicking the logo or type the name or URL of the financial institution into the search box.
4. Enter your login credentials for your external account. Once you have entered your login credentials, a list of your accounts from the other financial institution will appear. Make
7
sure the accounts you want to show on your main dashboard are visible. You can turn accounts off by toggling between visible and hidden. Once you have selected your accounts, click “continue.”
5. You will receive a confirmation message that states your accounts have been added to your dashboard. Click “done.”
6. After you link your accounts, they will appear in a linked accounts group on the homepage of Digital Banking. Keep in mind, you may need to log out and back into Digital Banking order for the new linked account to appear in your dashboard.
7. Complete these steps to link additional external accounts.
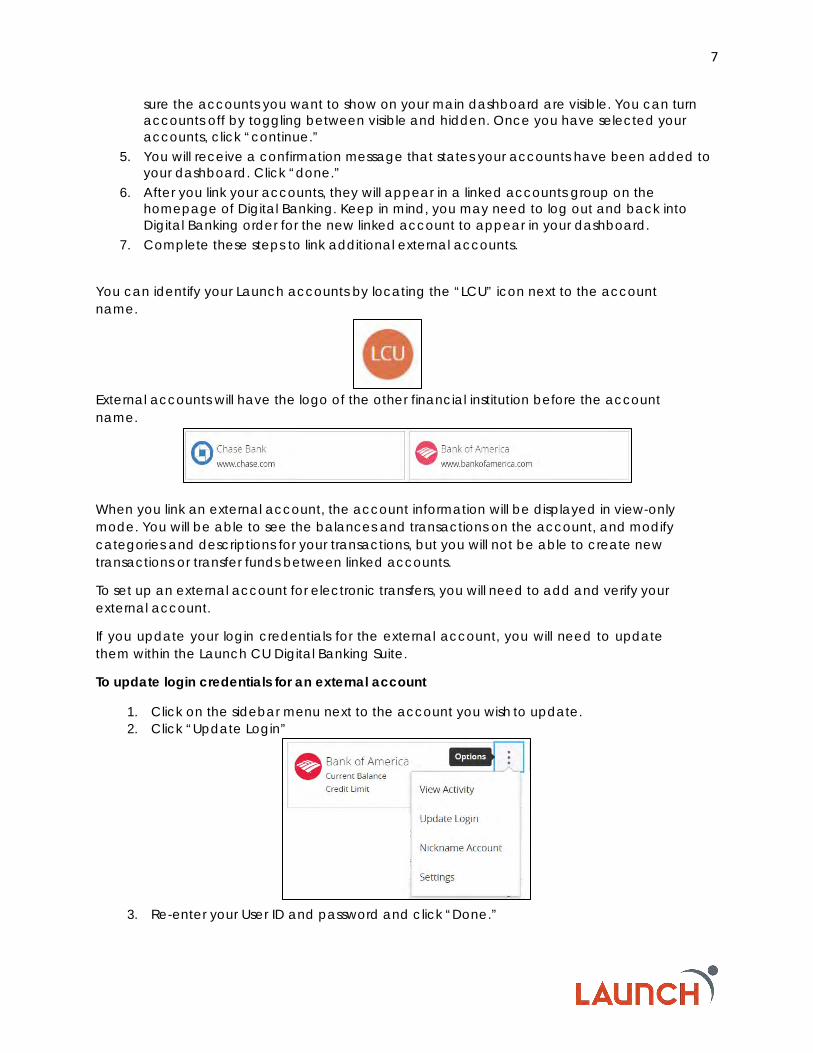
You can identify your Launch accounts by locating the “LCU” icon next to the account name.
External accounts will have the logo of the other financial institution before the account name.
When you link an external account, the account information will be displayed in view-only mode. You will be able to see the balances and transactions on the account, and modify categories and descriptions for your transactions, but you will not be able to create new transactions or transfer funds between linked accounts.
To set up an external account for electronic transfers, you will need to add and verify your external account.
If you update your login credentials for the external account, you will need to update them within the Launch CU Digital Banking Suite.
To update login credentials for an external account
1. Click on the sidebar menu next to the account you wish to update. 2. Click “Update Login”
3. Re-enter your User ID and password and click “Done.”

8
Accounts Each of the account tiles on your digital banking dashboard contain details about the account itself as well as a list of the transactions that have been processed.
Transactions Each transaction has an option menu with different helpful tools. This option menu is represented by 3 vertical dots to the right of the transaction amount (also referred to as a kabob menu).
Toggle Details
This option opens the details regarding the specified transaction. The information found on this page includes Category, Date, and type of transaction (debit or credit).
This option allows you to print the details of the specified transaction.
Change Category
This option allows you to choose a category for the different types of transaction. This tool is helpful when you are using the Personal Finance Manger found on your digital banking dashboard.
You can also click on the category icon next to the transaction description to make this change.
Split Transaction
This option is also helpful when you are using the Personal Finance Manager. When you visit retailors that sell multiple types of products you can specify how much you spent in each category.
Ask a Question
This option allows you to send a secure message to Launch to inquire about the specified transaction.
Details The details tab in each account contains different information depending on the type of account you are looking at. It also contains options for account visibility on both the Home screen as well as the Financial Tools. If you click on the slider you can choose if the account appears in either of these areas. A check mark means it will appear and an “X” means it will not appear,
Savings Account Details: • Available Balance • Current Balance • Routing Number • Account Number
Checking Account Details: • Current Balance • Available Balance • Routing Number • MICR (checking account number)

9
Loan Account Details:
• Account Number • Previous YTD Interest Amount • Last Payment Date • Next Payment Amount • Next Payment Date
Mortgage Loan Details: • Interest Rate • Current Balance • Original Amount • Last Payment Date
Credit card accounts are redirected to My Card Info for both transactions and details.
Additional options found inside of accounts
Search
The search feature allows you to quickly lookup transactions based on the description.
Filter
The filter feature is a more advanced form of the search feature. You can choose from options like Time Period, Transaction Type, Check number, and/or amount

10
Quick Transfer
The quick transfer feature here is similar to the quick transfer quick action feature on the dashboard. The difference is that here the “To account” field is already populated, and you will need to select the account you would like to transfer from.
Export
The export feature allows you to export the transaction information that is displayed on the page into different file formats to be used outside of digital banking. The file options include Excel spreadsheets (xls and csv), Microsoft OFX, Quicken, and Quickbooks.
The print feature allows you to print the transaction information that is displayed on the page.

11
Messages We understand our members’ desire to have peace of mind when it comes to their finances. This includes being able to contact us about a transaction in a convenient way. With our Digital Banking Suite, you can send us messages about a specific transaction or any generic topic regarding your account right from Digital Banking.
How to Inquire about a Transaction
1. Click the account you have a question about from your main dashboard in Digital Banking.
2. From the Account Transactions Page, click on the transaction you have a question about.
3. Click the options menu to the right of the amount and select “Ask a question”.
4. Enter your message into the message field. Make sure to include as much detail as possible in your message.
5. Click the attachments box (Optional) to attach any necessary documents to your message.
6. When you are satisfied with your message, click “Send Message”. 7. A box will appear that confirms your message has been sent. Click “Close.” 8. You will be taken to your message inbox. This is where you will receive a reply
from us and conduct future correspondence regarding the transaction.

12
How to inquire about Generic Account Topics
There are two options for sending messages about generic topics.
Option 1:
1. Click on the account you have a question about. 2. Click the options menu from the main account screen and select “Ask a question”.
3. Enter your message into the message field. Make sure to include as much detail as possible in your message.
4. Click the attachments box (Optional) to attach any necessary documents to your message.
5. When you are satisfied with your message, click “Send Message”. 6. A box will appear that confirms your message has been sent. Click “Close.” 7. You will be taken to your message inbox. This is where you will receive a reply
from us and conduct future correspondence regarding the transaction.
Option 2:
1. Click on the Messages option from the Main Menu. 2. Click on the pencil icon on the right side of the page.

13
3. Enter your message into the message field. Make sure to include as much detail as possible in your message.
4. Click the attachments box (Optional) to attach any necessary documents to your message.
5. When you are satisfied with your message, click “Send Message”. 6. A box will appear that confirms your message has been sent. Click “Close.” 7. You will be taken to your message inbox. This is where you will receive a reply from
us and conduct future correspondence regarding the transaction.
The Messages Inbox The messages inbox is located in the left navigation menu in digital banking. Here you can view messages you sent as well as responses to those messages.

14
Apply for a Loan One of the most popular features in the digital banking suite is the Apply for a Loan feature. By using this feature inside of digital banking all your personal information will prefill for you and you can focus on the important loan details.
1. Click the “Apply Now” button to get started on your request. 2. Fill in the required information for the loan you are interested in. 3. Accept Terms and Conditions and Approve the Credit Report Authorization. 4. Click “Submit Application” to send your request to one of our amazing loan specialists
who will contact you to complete the loan process.
Note: If at any time during the application you want to leave and come back later you can click “Save & Complete Later” button and return to the home page. When you return to the Apply for a Loan page you will see your incomplete loan at the bottom of the page. Just click the “Resume” button to continue your application. Applications are available for 30 days from the date they are created.

15
Open a Sub Account
A Sub Account is a secondary account such as a savings, checking, or money market account that shares a relationship with an account that already exist. Here at Launch we have made it easy for our members to open sub accounts through our secure digital banking platform. No need to visit a branch.
Types of Accounts that can be opened in digital banking:
• Additional Savings • Holiday Club Savings • Classic Checking • Elite Checking • Money Market
Once you have selected the Open a Sub Account option in the navigation menu it only takes 4 steps to open your new sub account.
1. Select an account to work with a. You must be the primary member on an account to open a sub account.
2. Select the type of Sub Account you wish to open. 3. Fill out the required information & view the disclosures. 4. Review the information and click “Submit”.
Your new account will be immediately available on your home screen and you can begin using it right away.

16
Transactions Located in the left navigation menu, the transaction option contains all the features related to the movement of your funds. Everything from Funds Transfers, Bill payments, Loan payments, and more.
Funds Transfer Setting up single transfers or recurring transfers is easy!
1. Click on “Transactions” then “Funds Transfer” from the main navigation menu.
2. In the “From” field, select either your Launch CU Checking or Savings account. 3. In the “To” field, select the account or loan which you would like to transfer funds
to. 4. In the amount field, type the amount you would like to transfer. 5. The frequency field is where you can decide if you want this to be a single
transfer or a recurring transfer. 6. For a single transfer just leave the default selection of “One Time Transfer”.
a. Select the “Transfer Date” you would like the transfer to occur. b. Enter a Memo (optional) that will appear in the transaction details.
7. For a recurring transfer select the Frequency you would like the transfer to occur.

17
a. Select a Start Date. b. Select the Repeat Duration. There are two options for Repeat Duration. “Forever
(Until I Cancel)” & “Until Date (Set An End Date)”. c. If you choose “Until Date”, you will need to enter an End Date for your
transaction. d. Enter a Memo (optional) that will appear in the transaction details.
8. Once you have reviewed your transaction details, click “Transfer Funds.” 9. You will receive a message confirming that your recurring transaction has been set
up. Click “Close” to go back to your home screen or click “View in Online Activity Center” to return to your Online Activity Center.
Once you have set up a recurring transaction, it will appear under the “Recurring Transactions” tab in your Online Activity Center
Bill Pay Launch’s Bill Pay service makes paying your bills quick and easy. It is a great way to make utility payments, credit card payments, or payments to pretty much anyone.
For assistance with our Bill Pay service please contact 1-877-233-0488 Monday thru Friday 7:30am-2:00am EST.
Enrolling
When enrolling in Bill Pay for the first time you will be asked to accept the terms and conditions and select the checking account you would like to pay your bills from. You will then be automatically directed to the Bill Pay site to begin setting up your payees.
After enrollment, when you visit the Bill Pay page you will be able utilize the quick bill pay format inside of Digital Banking without having to visit the Bill Pay site.
When you visit the Bill Pay page you can:
• Add/Manage your payees o To add a payee, click the “Add Payee” button.

18
o To Manage a payee, click on the three vertical dots next to the payee and select either “Edit” or “Delete”
• Schedule Payments o To schedule a payment, first find the payee you wish to pay, select the
pay from account in the column next to the payee and enter the amount and the date of the payment in the remaining columns. Once you are finished click “Review Payments”.
• View a history of your payment activity

19
• View/Pay any ebills you have set up
o Available ebills will be highlighted in Blue at the top of your payee list.
o To view your ebill click on the three vertical dots next to the payee and select “Mange ebills”
o To pay your ebill you can fill in the amount and deliver on date from the main page or click the three vertical dots and select “Pay Now”.

20
More functionality is available by visiting the Bill Pay site. To do so click on “Options” and “Visit Bill Pay Site”. Here you can:
• Set up eBills • View a Calendar of scheduled payments and Holidays • Add pay from accounts • View/Edit personal information • Set up Notifications • Review FAQ’s • Live Chat with a Bill Pay agent
For assistance navigating the Bill Pay site you can visit the help page. Here you can find helpful information for setting up ebills, scheduling rush payments, and more.

21
Member Transfer To complete a member-to-member transfer, all you need is the other Launch CU member’s account information and last name.
To make a single member-to-member transfer….
1. Click “Transactions” then “Member Transfer” from the main navigation menu. 2. Click either “Single Transfer” to conduct a one-time transfer, or click “Link Account” if you
plan to make more than one transfer to the other member, or if you need to create a recurring or future dated transfer.
If you wish to link multiple Launch CU accounts to yours, we recommend linking one account at a time to avoid confusion.
To link another member’s Launch CU account to yours…
1. Click the “Link Account” option from the Member Transfer Page. 2. Enter the account number of the Launch CU member you wish to transfer funds to
in the “To Account Number” field. 3. In the “Account Type” drop-down, select either Checking or Savings. 4. In the “Suffix Field”, enter either 0 for Savings or 90 for Checking. 5. Enter the first three letters of the other member’s last name. 6. Click submit. 7. You will receive confirmation that the account has been linked. Click “Done.”
After you have successfully linked the account, you may need to sign out and back into Digital Banking in order to see the other member’s account on your Funds Transfer Page.
Once you have signed back in, we recommend nicknaming the other Launch CU member’s account so you can easily find it for future transfers.
To nickname the linked account…
1. Click “Settings” then “Account Preferences” from the main navigation menu. 2. To nickname another member’s account, click on the account you wish to
nickname, and then click the pencil icon under “Online Display Name”. 3. Enter your nickname, and then click the check mark. 4. Once you have nicknamed your account, it will appear on the Funds Transfer Page
in the “To” drop-down menu.
To complete a member-to-member transfer…
1. Click “Transactions” then “Funds Transfer” from the main navigation menu. 2. Select the account you would like to transfer funds from, then select the other
member’s account that you would like to transfer funds to. 3. Enter the amount, and if you wish to make this a recurring transaction follow these steps:
a. Choose an option from the Frequency dropdown menu. b. Select a start date. c. Select how long you would like the transaction to repeat from the “Repeat
Duration” section. • Forever (until I cancel)

22
• Until Date (set an end date) d. If you choose the “Until Date” option, then select the End Date for the
transaction. e. Once you are satisfied, click the “Transfer Funds” button. f. You will receive confirmation that your transaction has been processed.
Click “Close.”
Send Money The send money feature in digital banking allows you to send funds from your debit card to someone’s email or mobile number where they can collect the funds. This feature is similar to services like Apple Pay or Samsung Pay. There is a $1.00 fee for this service. Just click “Send Money” to get started.
How to send money…
1. Fill in the Recipient Name, Email or Mobile #, and amount. 2. Select the card you wish to use. (You can have multiple cards on your account) 3. Fill in the memo field with a short description of the transaction.
a. This information will appear for the recipient to see as well as in your transaction details.
4. Click “Submit” 5. A screen will appear prompting you to enter your pin number.
a. Note: For security, the buttons reshuffle each time you enter a number.

23
6. The next screen will ask you to review your request. Click “Continue” 7. Your send money transaction will now appear in your send money history.
The recipient of your send money transaction will receive either an email or text message with the link to retrieve the funds. This page contains information on the amount, any memo information, and the sender’s name.
How to receive the funds…
1. Enter the First Name, Last Name, and Debit Card information where the funds should be deposited.
2. Accept the terms of service 3. Click “Deposit Payment”
Direct Pay Direct Pay offers an easy and convenient interface that presents real-time payments and balances. Direct Pay provides members with a single, elegant view of all their bills, making it easy to track recently paid bills and upcoming bill due dates. Direct Pay comes equipped with all of the modern features online users have come to expect including push notifications, insights on spending, and real-time payments. Best of all, Direct Pay allows members to use their debit card (or account number) to pay bills.
How to Get Started With Direct Pay…
Direct Pay is easy to set up within Digital Banking. All you have to do to get started with Direct Pay is search and select a company and follow the prompts for entering the online credentials for the merchant that you wish to pay. Direct Pay will sync the account in minutes.
Deposit Check The Deposit Check feature is only available on the Launch mobile app.
1. Select the account to use for your deposit. 2. Enter the amount of the check 3. Sign the back of your check

24
4. Print the following statement below your signature: “For Mobile Deposit Only at Launch CU”.
5. Click “Capture Image” 6. Take a picture of the Front of the check by clicking the camera in the top right of the
screen. 7. Take a picture of the Back of the check. 8. Review your check images and click “Submit Deposit”
Helpful Tips:
• Photo must be taken in a well-lit room. • Photo must be taken on a flat surface. • Photo must be taken on a neutral background. Example: no verbiage or graphics around
or behind the item. • Brightness on phone needs to be turned up (from settings). • Penmanship needs to be clear and legible. • Check needs to be in good condition. Example: Flat with no folds, waves, or tears. • Photo needs to be of good quality. Example: the item needs to be lined up in rectangle
and must be in focus
Submitted checks can be viewed in the Online Activity Center as well as in the “More” menu on the Home screen of your mobile app.
Online Activity Center The online activity center is the central location for viewing and/or changing single fund transfers, recurring fund transfers, loan payments, and mobile check deposits.
Search
You can search for transfers under the Single Transactions tab simply by typing in any information that is related to the transfer you are looking for. Date, Status, Tracking ID, Account name, and Amount are all details you can use to search. You can save your search for future use by clicking on the Star icon next to the search box and clicking “Save as New”.

25
You can print the information displayed on the page using the printer icon next to the search box. If you have used the search or filter feature, then the print option will only print the data that is displayed on the screen. If you do not search or filter, then the print feature will print all data.
Export
The export feature allows you to save a digital copy of your data to your device. Once you click on the downward facing arrow icon next to the search box you will be asked to select if you want to export the External Transfer information or the Funds Transfer information. Click on “download” next the data you wish to export. Once you are finished you can click “Close”. The data is exported as an Excel spreadsheet.
Filters
The Filters option allows you to do a more in-depth search of your transfer history. By clicking on the three horizontal lines icon next to the search box the optional filters will display. You can filter by Transaction Type, Status, Account, a Start and End Date, and even a Min and Max amount.
eDocuments / Statements The eDocuments feature is where you can access your statement information. Once you select the account you wish to see statements for you will be redirected to the Document page where you will find the folders for all your previous Launch statements.

26
Loan Payments You can make payments directly to all your Launch loans by using the Loan Payments option. Just fill in all the required information and click submit and your payment will be made automatically.
You can also make your payments recurring by checking the box next to the amount that says, “Make this a recurring transaction”. Additional fields will display regarding frequency and start and end dates. Once you fill in all required information click “Submit” to schedule your payment.
Stop Payment The Stop Payment feature allows you to put a stop on a single check or multiple checks you have written. Fill in the requested information and click “Request Stop Payment”.
This Stop will be active for 6 months.

27
Branches The branches feature is similar to google maps allowing you to locate the Launch branch closest to you. If you click on one of the branches you will see details such as the address and operating hours.

28
Services The Services area of digital banking contains features to help assist members with the most frequently used financial services offered at Launch.
Skip A Pay Our Skip A Pay program gives you the ability to defer the payment on an eligible loan for a small fee of $35.00 for each qualifying loan payment. The payment will be added to the end of your loan term.
Note: You can only request to skip one monthly loan payment per year. To skip a payment for another qualifying loan, repeat this process.
1. Select the Loan you would like to skip the payment for. 2. Select the account you would like to pay the fee from or enter the debit card
information you would like to cover the fee with. 3. Click “Next”
The next section requires a unique code to complete the Skip A Pay request. Follow the instructions on the screen and click “Confirm” to complete your request.

29
Courtesy Pay Opt Out Courtesy pay is a backup to other overdraft protection options and will only be activated if the funds are not available. A Courtesy Pay fee will be assessed if the item is paid by Courtesy Pay. If you choose to opt-out of Courtesy Pay, you are subject to an NSF fee for each check or ACH item returned.
1. Select the account you wish to opt out of the service 2. Click “Submit”
Add External Account This feature allows you to request that an external account (an account you have at another financial institution) be linked for electronic transfers. This is a two-part process that is completed in the Verify External Account section of this user guide.
To add an external account…
1. Enter the account number 2. Choose the Account Type (either checking or savings) 3. Enter the Routing number for the financial institution 4. Click “Continue”
Two "micro" deposits will be generated and sent to your external account (typically within 5 business days). Micro deposits are random deposits in amounts less than $1. Once you have received these two micro deposits in your external account, make note of both amounts as you will need them later in the verification process.
Please Note:
• Only domestic (U.S.) banks are allowed. • If the micro deposits do not appear in your account within the specified timeframe,
contact the other financial institution to verify that you are using the correct routing number as some institutions do not use a single number for all account types.

30
Verify External Account This feature is the second step in the process of adding an external account. You will need the two micro deposit amounts that were deposited into your external account.
To verify an external account…
1. Click the account you wish to verify 2. Enter the two amounts of the micro deposits that we put into your external account.
a. The deposit amounts should be entered in cents, so for example, five cents should be entered as 05. You do not need to include decimals or a dollar sign.
3. Click “Continue” You will receive notice that your external account has been successfully verified, and you can now use it to transfer funds. Once you have completed the verification process, you will be able to see your external account from the Funds Transfer Page.
Check Reorder Launch makes it easy for you to reorder your checks without having to visit a branch. By using the Check Reorder feature you will be redirected to the Harland Clarke website where all of your account information will prepopulate for you for a quick and easy reorder process. Just follow the instructions on the website.
Mobile Deposit Enrollment In order to utilize our Mobile Check Deposit, you will first need to visit this page to enroll.
1. Check the box to accept our Terms and Conditions 2. Click “Accept”

31
My Credit Card The My Credit Card feature takes you to the account overview site where you can view all of your credit card information, make payments, and view past statements.
1. Check the card you want to view
2. Links you to the Account Overview site for your credit card.
Update Contact Info The update contact info feature allows you to update the contact information that the credit union has on file for you. This includes Physical Address, Mailing Address, Phone Numbers, and Email Addresses. This is the easiest way to update your information whenever it changes.
Statement Delivery Preference Statement Delivery Preference allows you to change the way you receive your statements. You can choose between Electronic statements (the fastest way to receive your statements) or Paper statements.
How to sign up for eStatements…
1. Choose “Electronic Statements” in the account statement delivery dropdown. 2. Enter a valid email address 3. Accept the E-Statement Delivery Disclosure 4. Click “Submit
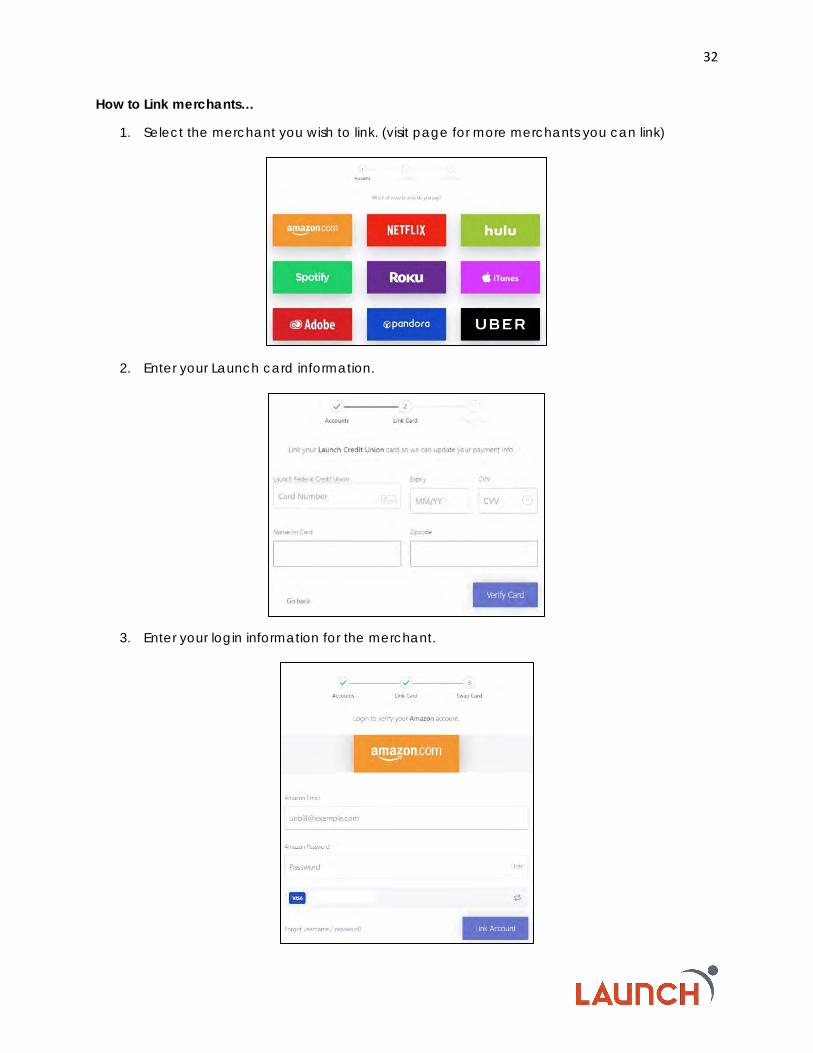
Cardswap When cards expire or need to be reissued, Launch makes it easy to update all your favorite merchants with the new information right inside of digital banking with our Cardswap service. Here you can link your Launch credit and debit cards to online merchants you utilize and when they expire you can update all those merchants without having to visit all of their websites.
32
How to Link merchants…
1. Select the merchant you wish to link. (visit page for more merchants you can link)
2. Enter your Launch card information.
3. Enter your login information for the merchant.

33
4. When your success message appears click “Finish”
You can now link additional accounts, swap your card for new card information, and update notification methods any time from this page.

34
Settings
Account Preferences In Account Preferences you can see all your internal, external, and linked accounts and manage how they display on your dashboard. You can change Group names, change Account Display Names, move accounts to new groups, and decide if you they should display on your dashboard and financial tools.
Security Preferences In Security Preferences you can change your Password, User ID, and Secure Delivery methods. It is important to remember to update your Secure Delivery methods anytime your information changes. This is how we will send your secure access codes when they are needed.
To change your password…
1. Click “Settings” then “Security Preferences” from the main navigation menu. 2. Click “Change Password.” 3. Enter your old password. 4. Enter your new password. 5. Confirm your new password. 6. Review your changes, and then click “Change Password.”
a. Keep in mind, your new password must be between 8 and 15 characters long, must contain at least 1 number, 1 lower case character, and 1 special character.

35
To change your User ID…
1. Click “Settings” then “Security Preferences” from the main navigation menu. 2. Click “Change User ID.” 3. Enter a new User ID into the field.
a. Keep in mind, your new User ID must be between 8 and 15 characters long.
b. Once you are satisfied with your changes, click “Submit.”
To make changes to how you receive your secure access codes…
1. Click “Settings” then “Security Preferences” from the main navigation menu. 2. Click “Secure Delivery.”
a. To edit a current contact method, click the pencil icon next to the bit of information you would like to change.
b. Once you are satisfied with your changes, click check mark icon. If you wish to cancel at any time, click the “X” icon.
To add a new contact method…
a. Scroll to the bottom of the Secure Delivery page, and select either, “New Text Number”, “New Voice Number”, or “New Email Address”.
b. Enter the information into the fields, then click the save icon.
To delete a contact…
1. Click on the trash icon next to the secure delivery contact you would like to delete.
Login History To an effort to protect your important financial information, Launch has made it possible for you monitor logins to your account through our Login History feature. Here you will find Date & Times of logins, the location the login originated from, the device that was used and the type of browser that was used.

36
If a login appears suspicious, please check your account for fraudulent transactions or modified contact information. If you see fraudulent transactions, please be sure to change your password immediately and contact us.
Alerts Alerts remind you of important events, warn you about the status of each of your accounts, and notify you when transactions occur. Some alerts are automatically generated by the system, such as security alerts, but some alerts you can create and customize yourself.
When you create an alert for your accounts, you specify the conditions that trigger the alert, as well as the way you want to be notified. Alert conditions vary depending on the alert type.
Reminder Alerts
Date alerts remind you of a specific date such as a birthday, anniversary, vacation, travel, or general date. To access date alerts, click on “Settings” then “Alerts” from your main navigation menu.
1. Select “Reminder” from the “New Alert” menu at the top right corner of the Alerts Page.
2. Choose the type of event you would like to create from the events dropdown menu.
a. Options Include: Birthday, Anniversary, Vacation, Travel, General, Meeting, Call, Wakeup and Appointment.
3. Select the date you would like the event to occur. a. If you would like to be notified every year for this occurrence, make sure the
box next to “Recurs Every Year” is checked.
4. Enter the message that will appear for your event. (Adding a message is not a requirement.)

37
5. Select how you would like to be notified. You can choose to be notified via Email, Voice, Text Message or Secured Message. Enter your contact information for that delivery method.
a. If you choose text message, you will need to agree to the SMS terms and conditions. Check the box next to “Agree to Terms.”
6. Click the orange “Create Alert” button.
Account Alerts
Account alerts notify you when the balance in one of your accounts drops below or rises above a specific threshold.
1. Select “Account Alert” from the “New Alert” menu at the top right corner of the Alerts Page.
2. Select which account you would like to set the alert for from the Account dropdown menu.
3. Select “Current Balance” or “Available Balance” if you select a checking or savings account, or “Next Payment Amount” or “Previous Year-To-Date Interest Amount” if you select a loan.
a. Check or Savings Account example:
b. Loan example:
4. Select “More Than”, “Less Than” or “Exactly” and enter an amount.
a. Select greater than if you wish to know when your balance is above a certain threshold, “less than” if you would like to be notified when your balance drops below a certain threshold, or “exactly”.
5. Select how you would like to be notified. You can choose to be notified via Email, Voice, Text Message or Secured Message. Enter your contact information for that delivery method.
a. If you select to be notified via text message, you will need to agree to the SMS terms and conditions. Click the box next to “Agree To Terms.”
6. Click the orange “Create Alert” button.

38
History Alerts
History alerts can notify you when a debit transaction or credit transaction is greater than, less than or exactly an amount you specify, when a specific check number posts, or when a transaction description matches text that you specify.
1. Click on “Settings” then “Alerts” from the main navigation menu. 2. Select “History Alert” from the “New Alert” menu at the top right corner of the Alerts
Page. 3. Select either “Debit Transaction,” “Credit Transaction,” “Check Number,” or
“Description.”
4. Follow the prompts to complete setting up your alert. • For Debit & Credit Transactions choose “more than”, “less than” or “exactly” and
enter the amount of the transaction. • For Check Number and Description enter the text you would like to be notified of.
5. Select the account you would like to set the history alert for. 6. Select how you would like to be notified. You can choose to be notified via Email,
Voice, Text Message or Secured Message. Enter your contact information for that delivery method.
• If you select to be notified via text message, you will need to agree to the SMS terms and conditions. Click the box next to “Agree To Terms.”
7. Click the orange “Create Alert” button.
Online Transaction Alert
Online transaction alerts can notify you about the status of a check reorder, external transfer, funds transfer, or stop payment.
1. Click “Settings” then “Alerts” from the main navigation menu. 2. Select “Online Transaction Alert” from the “New Alert” menu at the top right corner
of the Alerts Page. 3. Choose the type of alert you would like to set by selecting an option from the
Transaction dropdown menu. a. “Check Reorder,” “External Transfer,” “Funds Transfer,” or “Stop Payment”.
4. Select the account you would like to set the alert for. 5. Select the status of the transaction.
a. “Authorized”, “Cancelled”, “Drafted”, “Failed” or “Processed”. 6. Select how you would like to be notified. You can choose to be notified via Email,
Voice, Text Message or Secured Message. Enter your contact information for that delivery method.
a. If you select to be notified via text message, you will need to agree to the SMS terms and conditions. Click the box next to “Agree To Terms.”
7. Click the orange “Create Alert” button.

39
Edit & Turn off Alerts
You are able to edit your existing alerts right from Digital Banking.
To edit or delete an existing alert…
1. Click the “Edit” link in the bottom left of the alert you would like to edit or delete.
2. To make changes to the criteria, click on the specific criteria. a. If you select to be notified via text message, you will need to agree to the
SMS terms and conditions. Click the box next to “Agree to Terms.” 3. Click the orange “Set” button. 4. If you would like to delete this alert, click the grey “Delete” button.
To turn off alerts…
1. Click the slider to the right of the Alert details to turn the alert on or off.
a. If the button is a check mark the alert is enabled. If the button is an “X” it is disabled.
Themes The Launch CU Digital Banking Suite will allow you to choose a theme to add a more personal effect to your Digital Banking experience. These themes will change the background image, colors, and fonts in your dashboard.
1. Click the theme you would like to switch to. Your selection will be applied immediately across all supported devices.
Accessibility The accessibility setting allows you to enable high contrast mode. This will change the color of your menu from grey to white.
1. Check the box to enable High Contrast Mode.

40
Personal Finance Manager
Launch’s Digital Banking Suite provides you with money management widgets aimed to help you budget and save better. You can find your money management widgets at the top of the page on your main dashboard in Digital Banking.
Personal Finance Manager has five widgets, which include the Net Worth Widget, the Budget Widget, the Spending Widget, the Trends Widget, and the Debts Widget.
• The Net Worth Widget: Allows you to see the total value of all internally held and linked accounts, showing your net worth over time.
• The Budget Widget: Helps you set budgets for each spending category as well as track your progress towards those categories each month. The first time you use the budget widget you have the option to start from scratch or have Personal Finance Manager auto-generate you budget based on your spending.
• The Spending Widget: Allows you to see a visual representation of how you are spending your money over time. If you wish to view past spending habits, simply click on the calendar, and select the dates you would like to view.
• The Trends Widget: Builds even further on your budgeting categories to help you track spending over time as compared to your income.
• The Debts Widget: Allows you to see all of your debt accounts in one place, and calculate how making additional payments, or paying off your debt completely could affect your total debt over time.
Personal Finance Manager Widgets The Launch CU Digital Banking Suite has many widgets available within Personal Finance Manager to help you manage your finances better. To access available widgets, use the navigation menu at the top of your ribbon on the home screen of Digital Banking.
The Budget Widget
We understand that proper budgeting is very important to helping you manage your finances. The Budget Widget in Personal Finance Manager is a great way to help you keep track of your spending and save more.
You can access the budget widget by clicking “Budget” from the top ribbon on the home screen of your Digital Banking dashboard. The budget widget helps you set budgets for each spending category, as well as track your progress towards those categories each month.
The first time you use the budget widget you have the option to start from scratch or have Personal Finance Manager auto-generate your budget based on your spending. We suggest that you elect to auto- generate your budget, as the system will create a budget for you based on your spending history. Keep in mind, you can always make changes to your budget at any time.

41
After you have created your budget, or requested that your budget be auto generated, your budget categories will appear in bubble form. The bubbles help you see both the health of your finances, as well as how close you are to reaching your budget limits.
You will notice that there are three colors of bubbles. A green bubble indicates that less than 80% of the budget for that category has been spent, a yellow bubble indicates that more than 80% of the budget for that category has been spent, and a red bubble indicates that more than 100 percent of the budget for that category has been spent.
To view Transactions in a Budget Category…
The budgeting tool will allow you to quickly see all transactions by category. To view a list of all the transactions within a certain category, click on a bubble to select that category, and then click “Transactions” to load a list of all the transactions within that category.
You are able to edit certain aspects of individual transactions within the Budget Widget. To add a tag, click on a transaction, then click the “+” icon next to “tags.” Enter your new tag into the field, then click “Save.”
When you are satisfied with your changes, click the arrow to go back to the list of your transactions. Click the arrow again to go back to that specific spending category. If you wish to get back to your full budget, click the arrow one more time.

42
You can also add additional budget categories.
1. Click the “Add New Budget” button from the homepage of your Budget Widget.
2. Use the menu to scroll and select an additional category. The ones that are not currently being used are greyed out. Click the “+” icon to add a new budget category.
3. You will be prompted to enter a budgeted amount for the category. Once
you are satisfied click “Save”. 4. Once you have made your selections, click the arrow to go back. You will
notice that your new categories have been added. a. Click the icon related to the category you just added to view the settings
that have been set for you. You can edit the budget for that specific category by clicking “Edit Budget”. Enter your new budget amount and click “Save.” To return to your overall budget, press the back arrow.
You can also add a child budget to a main budget category.
1. Click on a budget category, then click “Add New Sub-Budget”
2. Next, select a subcategory from the list, or click the “Add Subcategory” option to create your own subcategory. You can then edit the child budget by giving it a monetary value. Make sure to click “Save” to save your child budget.
3. To go back to your main budget, click the back button one more time.
If you do not like to view your budget in bubble form, you can choose to view your budget in list form.

43
The Net Worth Widget
The Net Worth Widget will allow you to see the total value of all internally held and linked accounts by showing your net worth over time. You can adjust the time to view by six months, nine months, or one year.
Click a circle on the line to see your net worth gains and losses. A window will appear showing you the amount of change that occurred within each of your accounts during that month.
The Spending Widget
The Spending Widget will allow you to see a visual representation of how you are spending your money over a period of time. You are able to change the timeframe by clicking on the arrows to switch the month or use the calendar icon to select a specific date range.
To view details on a specific category, double-click the category from the wheel, or from the side menu. This will show you how much you have spent in a specific category during the time you selected. If you are spending less than 3 percent in any given category, it will be displayed as “Other Category” on the wheel.
44
The Trends Widget
The Trends Widget builds even further on your budgeting categories by helping you track your spending over time as compared to your income. It shows your spending history by category, along with a line that correlates to your income.
This widget will help you quickly determine if you are spending more than you are making. To show the actual spending in a specific category, hover your mouse over a colored area. Click a category area in the graph to help you drill down into the selected category and show any relevant subcategories. Click any of the data points to display a list of transactions for the selected category for that month. Click on an individual transaction to view the details of that transaction.
The Debt Widget
The Debt Widget will help you see all your debt accounts in one place. This widget will help you calculate how making additional payments or paying off your debt completely can affect your debt over time.
The main view displays the trending graph for paying off all your debt. Hover your mouse over a section of the graph to show how much you owe based on the current model. Click the information icon to see how snowballing could help you pay down your debt more quickly. You will notice that both the amount, and the time saved are predominately displayed.
If you don’t want to use the fastest payoff first method, you can set the priority to “Highest Interest First,” “Lowest Balance First,” or “Highest Balance First” by clicking on the drop-down menu in the navigation bar.
• Fastest Payoff First- Your debts are ordered by which debt you will pay off soonest based on balance, annual percentage rate (APR), and minimum payment. Your additional amount towards your debts is applied in that order as you pay off your debts.
• Highest Interest First- Your debts are ordered from the highest APR to the lowest APR. Your additional amount towards your debts is applied in that order as you pay off your debts.
• Lowest Balance First- Your debts are ordered by balance amount from lowest to highest. Your additional amount towards your debts is applied in that order as you pay off your debts.
• Highest Balance First- Your debts are ordered by balance amount from highest to lowest. Your additional amount towards your debts is applied in that order as you pay off your debts.
45
Additional Tips & Resources Password Tips & Recommendations Creating a strong password for your Digital Banking account is very important to keeping your personal and financial information safe. Here are some tips to help you create a strong password to safeguard your sensitive information.
• Create unique, original passwords for every account you have. • Use the longest practical password. • Use a mix of upper- and lower-case letters. • Include one or more numbers. • Do not use repeating or adjacent characters. • Use at least one special character. • Avoid using software or toolbars that store your passwords. • Change your password regularly.
Password Pitfalls To Avoid
• Do not choose a password or security code that others could easily guess. • Do not reuse passwords for multiple sites. • Never use your account number as your password. • Do not use personal contact information, such as your address or phone number for
your password. • Do not use personal information, such as your name, birthday, Social Security
Number, passport number, or the names of family members, friends, or pets. • Do not use sequences of characters such as “1234567” or “abcdefg”. • Do not rely on look-alike substitutions of numbers or symbols alone. Passwords
such as P@ssw0rd are still easy to guess. • Do not use dictionary words.
For more Digital Banking resources please visit
1. Launch CU’s YouTube Channel https://www.youtube.com/channel/UCd4LB_7x7ybq9CIhnvuQzJg?view_as=subscriber
2. The Launch CU Blog https://www.launchcu.com/blog/
3. Launch CU’s Digital Banking Page https://www.launchcu.com/personal-banking/digital-banking/