Dexcom G5 Mobile Continuous Glucose Monitoring (CGM ......The Dexcom G5 Mobile Continuous Glucose...
68
Getting Started Guide Dexcom G5 Mobile Continuous Glucose Monitoring (CGM) System
Transcript of Dexcom G5 Mobile Continuous Glucose Monitoring (CGM ......The Dexcom G5 Mobile Continuous Glucose...
Dexcom G5 Mobile CGM System Getting Started Guide • 1
Getting Started Guide
Dexcom G5 Mobile Continuous
Glucose Monitoring (CGM) System

Getting Started Guide
Dexcom G5 Mobile Continuous
Glucose Monitoring (CGM) System
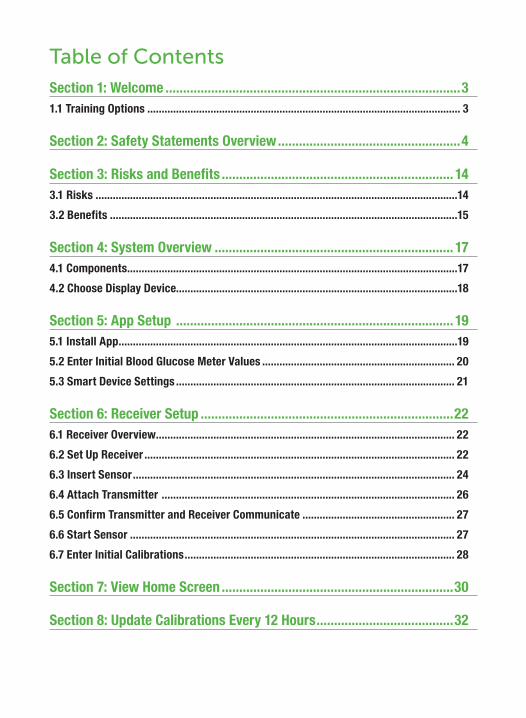
Table of ContentsSection 1: Welcome ....................................................................................31.1 Training Options ............................................................................................................. 3
Section 2: Safety Statements Overview ....................................................4
Section 3: Risks and Benefits .................................................................. 143.1 Risks ..............................................................................................................................14
3.2 Benefits .........................................................................................................................15
Section 4: System Overview .................................................................... 174.1 Components ...................................................................................................................17
4.2 Choose Display Device..................................................................................................18
Section 5: App Setup ............................................................................... 195.1 Install App ......................................................................................................................19
5.2 Enter Initial Blood Glucose Meter Values ................................................................... 20
5.3 Smart Device Settings ................................................................................................. 21
Section 6: Receiver Setup ........................................................................226.1 Receiver Overview ........................................................................................................ 22
6.2 Set Up Receiver ............................................................................................................ 22
6.3 Insert Sensor ................................................................................................................ 24
6.4 Attach Transmitter ...................................................................................................... 26
6.5 Confirm Transmitter and Receiver Communicate ..................................................... 27
6.6 Start Sensor ................................................................................................................. 27
6.7 Enter Initial Calibrations .............................................................................................. 28
Section 7: View Home Screen ..................................................................30
Section 8: Update Calibrations Every 12 Hours .......................................32
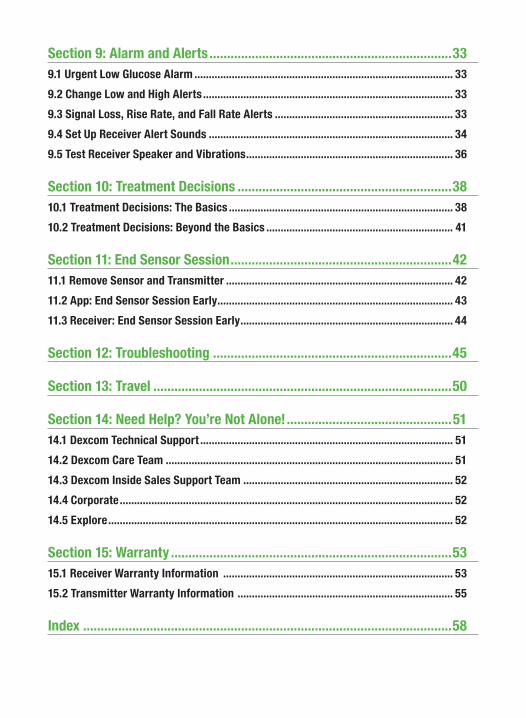
Section 9: Alarm and Alerts .....................................................................339.1 Urgent Low Glucose Alarm .......................................................................................... 33
9.2 Change Low and High Alerts ....................................................................................... 33
9.3 Signal Loss, Rise Rate, and Fall Rate Alerts .............................................................. 33
9.4 Set Up Receiver Alert Sounds ..................................................................................... 34
9.5 Test Receiver Speaker and Vibrations ........................................................................ 36
Section 10: Treatment Decisions .............................................................3810.1 Treatment Decisions: The Basics .............................................................................. 38
10.2 Treatment Decisions: Beyond the Basics ................................................................. 41
Section 11: End Sensor Session ...............................................................4211.1 Remove Sensor and Transmitter ............................................................................... 42
11.2 App: End Sensor Session Early .................................................................................. 43
11.3 Receiver: End Sensor Session Early .......................................................................... 44
Section 12: Troubleshooting ....................................................................45
Section 13: Travel .....................................................................................50
Section 14: Need Help? You’re Not Alone! ...............................................5114.1 Dexcom Technical Support ........................................................................................ 51
14.2 Dexcom Care Team .................................................................................................... 51
14.3 Dexcom Inside Sales Support Team ......................................................................... 52
14.4 Corporate .................................................................................................................... 52
14.5 Explore ........................................................................................................................ 52
Section 15: Warranty ................................................................................5315.1 Receiver Warranty Information ................................................................................ 53
15.2 Transmitter Warranty Information ........................................................................... 55
Index .........................................................................................................58
3 • Dexcom G5 Mobile CGM System Getting Started Guide
Section 1: WelcomeCongratulations on making the Dexcom G5 Mobile Continuous Glucose Monitoring (CGM) System (Dexcom G5 Mobile) part of your life!
The Dexcom G5 Mobile allows you to see sensor glucose readings (readings) every five minutes for up to seven days. These readings can help you find trends and patterns in your glucose levels, allowing you to see where your glucose levels have been, which direction they are headed, and how fast they are rising or falling.
1.1 Training OptionsKnowing about the Dexcom G5 Mobile is your first step in creating a successful CGM experience. Before using it, learn about it.
You can train in the following ways:
• Self-train with the Dexcom G5 Mobile Tutorial• Train with our Dexcom Patient Care Team
Toll free: 1.888.738.3646Toll: 1.858.200.0200Monday through Friday, 5:30 am to 8 pm PST (subject to change)
• Train with your healthcare professional using this Getting Started Guide
Before you begin and anytime you have questions, review your user guide. Listed below are your options to get the full user guide:
• Download as an eBook or view/print from: dexcom.com/guides
• Request form to receive a free printed copy from: dexcom.com/guides
• Request a free printed copy by mail: Business reply card in back
• Request a free printed copy by phone: Toll free: 1.888.738.3646 Toll: 1.858.200.0200

Dexcom G5 Mobile CGM System Getting Started Guide • 4
Section 2: Safety Statements Overview Indications for UseThe Dexcom G5 Mobile Continuous Glucose Monitoring System (Dexcom G5 Mobile) is a glucose monitoring system indicated for the management of diabetes in persons age 2 years and older. The Dexcom G5 Mobile is designed to replace fingerstick blood glucose testing for diabetes treatment decisions.
Interpretation of the Dexcom G5 Mobile results should be based on the glucose trends and several sequential readings over time. The Dexcom G5 Mobile also aids in the detection of episodes of hyperglycemia and hypoglycemia, facilitating both acute and long-term therapy adjustments.
The Dexcom G5 Mobile is intended for single patient use and requires a prescription.
Important User InformationFailure to use the Dexcom G5 Mobile and its components according to the instructions for use and all indications, contraindications, warnings, precautions, and cautions may result in you missing a severe hypoglycemia (low blood glucose) or hyperglycemia (high blood glucose) occurrence and/or making a treatment decision that may result in injury. If your glucose alerts and readings from your Dexcom G5 Mobile do not match your symptoms or expectations, use a fingerstick blood glucose value from your blood glucose meter to make diabetes treatment decisions. Seek medical attention when appropriate.
Please review the product instructions before using the Dexcom G5 Mobile. Indications, contraindications, warnings, precautions, cautions, and other important user informa-tion can be found in the product instructions that are included with, or accompany, the Dexcom G5 Mobile. Discuss with your healthcare professional how you should use the information displayed on the Dexcom G5 Mobile to help manage your diabetes. The product instructions contain important information on troubleshooting the Dexcom G5 Mobile and on the performance characteristics of the system.
Contraindications
MRI/CT/Diathermy Do not wear the Dexcom G5 Mobile (sensor, transmitter, and receiver) during Magnetic Resonance Imaging (MRI), Computed Tomography (CT) scan, or high-frequency electrical heat (diathermy) treatment.
5 • Dexcom G5 Mobile CGM System Getting Started Guide
The Dexcom G5 Mobile has not been tested during MRI or CT scans or with diathermy treatment. The magnetic fields and heat could damage the components of the Dexcom G5 Mobile, which may cause it to display inaccurate blood glucose readings or may prevent alerts.
MedicationsTaking medications with acetaminophen (such as Tylenol or Excedrin® Extra Strength) while wearing the Dexcom G5 Mobile may inaccurately raise the glucose readings generated by the Dexcom G5 Mobile. The level of inaccuracy depends on the amount of acetaminophen active in your body and is different for each person. Do not rely on continuous glucose monitoring (CGM) data produced by the Dexcom G5 Mobile if you have recently taken acetaminophen.
Warnings
Sensor FracturesDo not ignore sensor fractures. Sensors may fracture or detach from the sensor pod on rare occasions. If a sensor breaks and no portion of it is visible above the skin, do not attempt to remove it. Seek professional medical help if you have symptoms of infection or inflammation—redness, swelling, or pain—at the insertion site. If you experience a broken sensor, please report this to our Technical Support department at 1.888.738.3646 (toll free) or 1.858.200.0200 (toll).
Do Not Use Damaged GoodsIf the Dexcom G5 Mobile receiver or Dexcom G5 Mobile transmitter is damaged or cracked, do not use it. This could create an electrical safety hazard or malfunction, causing possible electrical shocks resulting in injury. In addition, a damaged or cracked Dexcom G5 Mobile receiver or Dexcom G5 Mobile transmitter may cause the Dexcom G5 Mobile System not to function properly.
ChokingDo not allow young children to hold the sensor or transmitter without adult supervision. The sensor and transmitter include small parts that may pose a choking hazard.
Avoid StrangulationUse USB cable only as directed and store safely. Misuse of the USB cable can present a strangulation risk.
Dexcom G5 Mobile CGM System Getting Started Guide • 6
The following warnings may result in the consequence of missing severe hypoglycemia (low blood glucose) or hyperglycemia (high blood glucose) or making a treatment decision that results in injury:
Review Training MaterialsThoroughly review the training materials included with your Dexcom G5 Mobile before use. Incorrect use of the Dexcom G5 Mobile could lead you to misunderstand information produced by the system or might affect the system’s performance.
Diabetes Treatment DecisionsIf your Dexcom G5 Mobile does not display a sensor glucose reading and an arrow or if you are getting inaccurate or inconsistent readings, use a fingerstick blood glucose value from your blood glucose meter to make diabetes treatment decisions.
Do Not Ignore Low/High SymptomsDo not ignore symptoms of low or high glucose. If your glucose alerts and readings do not match your symptoms or expectations, you should obtain a fingerstick blood glucose value from your blood glucose meter to make diabetes treatment decisions or seek immediate medical attention.
Who Shouldn’t UseThe Dexcom G5 Mobile was not evaluated or approved for the following persons:
• Pregnant women• Persons on dialysis
Do not use the Dexcom G5 Mobile CGM System in critically ill patients. It is not known how different conditions or medications common to the critically ill pop-ulation may affect performance of the system. Sensor glucose readings may be inaccurate in critically ill patients.
The Dexcom G5 Mobile’s accuracy has not been tested in people within these groups and the system’s glucose readings may be inaccurate.
Calibrate on ScheduleWhat is calibrating and why it is important? Calibration is the process of making sure your sensor continues to be accurate. Your sensor doesn’t automatically
7 • Dexcom G5 Mobile CGM System Getting Started Guide
know what your glucose levels are—you have to teach your system what a given BG value is by entering in a KNOWN glucose value from your BG meter.
Calibrate the Dexcom G5 Mobile at least once every 12 hours. The Dexcom G5 Mobile needs to be calibrated in order to provide accurate readings. Do not use the Dexcom G5 Mobile for diabetes treatment decisions unless you have followed the prompts from the device and calibrated every 12 hours after the initial calibration.
PlacementDo not insert the sensor component of the Dexcom G5 Mobile in a site other than the belly/abdomen (ages 2 years and older) or the upper buttocks (ages 2 to 17 years). The placement and insertion of the sensor component of the Dexcom G5 Mobile is not approved for other sites. If placed in other areas, the Dexcom G5 Mobile may not function properly.
Prior to Initial Calibration: Data/Alarm/AlertDo not expect sensor glucose readings or Alarms/Alerts from the Dexcom G5 Mobile until after the 2-hour startup. The Dexcom G5 Mobile will NOT provide any sensor glucose readings or Alarms/Alerts until after the 2-hour startup ends AND you complete the startup calibration. Use fingerstick glucose values from your blood glucose meter during the 2-hour startup.
Sensor StorageStore the sensor at temperatures between 36°F-77°F for the length of the sensor’s shelf life. You may store the sensor in the refrigerator if it is within this temperature range. The sensor should not be stored in the freezer.
Storing the sensor improperly might cause the sensor glucose readings to be inaccurate.
Smart Device SettingsYour smart device’s internal settings override any G5 Mobile app setting. In addition, accessory devices (like a smart watch or other wearable smart devices) might override your smart device’s Alarm, Alert, and notification settings.
Dexcom G5 Mobile CGM System Getting Started Guide • 8
To receive Alarm or Alerts you must:• Make sure the notifications for the G5 Mobile app are turned on in
the setting’s menu of your smart device.• Check that the Dexcom G5 Mobile app hasn’t been shut down by
your smart device.• Turn on Bluetooth on your smart device.• Turn off the Do Not Disturb feature on your smart device (if
available).• Restart the G5 Mobile app after your smart device is restarted.• Set the volume on your smart device at a level you can hear. • Do not close app; always run the app in the background.• Make sure accessory devices do not override your smart device
settings.If the settings on your smart device are incorrect, your Dexcom G5 Mobile may not function properly.
The Dexcom G5 Mobile Alarm/Alert vibrations are not any different from other vibrating apps on your smart device. Medical device apps, like the G5 Mobile app, may not always have special priorities over your smart device’s features. App notifications or Alerts may sound or feel the same as notifications from another app. The only way to know is to look at the screen.
Missed an Alarm or Alert? An Alarm or Alert from the G5 Mobile app cannot be heard through your smart device’s speakers if headphones are plugged in. Make sure you unplug your headphones when you are done using them, otherwise you might not hear an Alarm or Alert from the Dexcom G5 Mobile.
Precautions
HydroxyureaHydroxyurea is a medication used in the treatment of diseases including cancer and sickle cell anemia; it is known to interfere with readings from your sensor. If you are taking hydroxyurea, your sensor glucose readings will be higher than your actual glucose, which could result in missed hypoglycemia alerts or errors in diabetes management, such as giving yourself a higher dose of insulin due to falsely high sensor glucose values. The level of inaccuracy depends on the amount of hydroxyurea in your body. Do not use your Dexcom CGM System for diabetes treatment decisions if you are taking hydroxyurea. Talk to your physician about alternative glucose monitoring approaches.
9 • Dexcom G5 Mobile CGM System Getting Started Guide
Sensor PackageDo not use the Dexcom G5 Mobile sensor if its sterile package has been damaged or opened. Using a non-sterile sensor might cause infection.
Clean and Dry Before UsingDo not open the sensor package until you have washed your hands with soap and water, and let them dry. You may contaminate the insertion site and suffer an infection if you have dirty hands while inserting the sensor.
Do not insert the sensor until you have cleaned the skin near the insertion site with a topical antimicrobial solution, such as isopropyl alcohol, and allowed the skin to dry. Inserting into unclean skin might lead to infection. Do not insert the sensor until the cleaned area is dry so the sensor adhesive will stick better.
Reusable: Don’t Throw AwayDo not discard your transmitter. It is reusable. The same transmitter is used for each session until you have reached the end of the transmitter’s battery life.
The following precautions may result in the consequence of missing severe hypoglycemia (low blood glucose) or hyperglycemia (high blood glucose) or making a treatment decision that results in injury:
Be Accurate, Be QuickTo calibrate the system, enter the exact blood glucose value displayed on your blood glucose meter within five minutes of a carefully performed fingerstick.
Do not enter Dexcom G5 Mobile sensor glucose readings for calibration. Entering incorrect blood glucose values, blood glucose values obtained more than 5 minutes before entry, or sensor glucose readings might affect sensor performance.
Treatment DecisionsMake diabetes treatment decisions based on the combination of the sensor glucose reading, trend arrow, and/or alerts generated by the Dexcom G5 Mobile.
Expiration DateDo not use Dexcom G5 Mobile sensors beyond their expiration date. Before inserting a sensor, confirm the expiration date that is listed on the package label in the following format: YYYY-MM-DD.
Dexcom G5 Mobile CGM System Getting Started Guide • 10
Do not use sensors that are beyond their expiration date, because the sensor glucose readings might not be accurate.
Sensor PlacementAvoid using the same spot repeatedly for sensor insertion. Rotate your sensor placement sites, and do not use the same site for two sensor sessions in a row. Using the same site might cause scarring or skin irritation.Avoid inserting the sensor in areas that are likely to be bumped, pushed, or com-pressed or areas of skin with scarring, tattoos, or irritation as these are not ideal sites to measure glucose. Insertion in these areas might affect sensor accuracy.
Avoid injecting insulin or placing an insulin pump infusion set within three inches of the sensor. The insulin might affect sensor performance.
Use Correct Transmitter, Receiver, and SensorDifferent generations of Dexcom CGM System transmitters and receivers are not interchangeable with each other.
The Dexcom G5 Mobile transmitter and receiver are not compatible with the Dex-com G4 PLATINUM CGM System transmitter and receiver. The Dexcom G5 Mobile will not work if you mix the transmitter and receiver from different generations.
You can use a Dexcom G4 PLATINUM sensor with the Dexcom G5 Mobile System. Before using the sensor, make sure the sensor label says “Dexcom G5 Mobile/G4 PLATINUM Sensor” or “Dexcom G4 PLATINUM Sensor.”
Communication RangeDo not separate the transmitter and receiver by more than 20 feet. The transmis-sion range from the transmitter to the receiver is up to 20 feet without obstruc-tion. Wireless communication does not work well through water so the range is much less if you are in a pool, shower, etc.
Types of obstruction differ and have not been tested. If your transmitter and receiver are farther than 20 feet apart or are separated by an obstruction, they might not communicate or the communication distance may be shorter.
11 • Dexcom G5 Mobile CGM System Getting Started Guide
Setting Alarm/Alert NotificationsWhen using both a receiver and a smart device with your Dexcom G5 Mobile, you must set your settings separately in each. If you set up one device and then use another, you might not get an Alarm or Alert.
Using an accessory device (like a smart watch) might override your smart device sounds. Alarm or Alerts might vibrate or be heard on the accessory instead of your smart device. After connecting any accessories, make sure that the smart device settings allow you to continue receiving Alarm or Alerts on the smart device.
Is it On?If the receiver or smart device is turned off (Shut Down), it will not display sensor data, information, Alarm or Alerts generated by the Dexcom G5 Mobile. Make sure the display devices are turned on; otherwise you won’t get sensor glucose readings or Alarm or Alerts.
Test ReceiverTest your receiver speaker and vibration often. To test the speaker and vibration use the Speaker Test or go through the Try It menu option. Always test if your receiver gets wet or dropped.
To use the Speaker Test, plug the receiver in to charge to see the Speaker Test screen. Proceed through the speaker test. To use the Try It menu option, go to the Sounds menu and select Try It. Either way, if it doesn’t vibrate and beep, contact Technical Support.
If the vibration motor and/or speaker on your receiver is not functioning properly you may miss a severe low or high Alarm/Alert. Use the app on your smart device until this issue is resolved.
Keep Receiver Clean and DryDo not get dirt or water in the USB port and do not submerge in water.
If dirt or water gets into the USB port, the receiver could become damaged and stop displaying readings or providing Alerts; you might miss a severe low or high glucose event.
Dexcom G5 Mobile CGM System Getting Started Guide • 12
No Alternative Site Testing - Fingerstick OnlyDo not use alternative site blood glucose testing (blood from your palm or fore-arm, etc.) for calibration. Alternative site blood glucose values may be different from those taken from a fingerstick blood glucose test and may not represent the timeliest blood glucose value. Use a blood glucose value taken only from a finger-stick for calibration. Using alternative site blood glucose values for calibration might affect Dexcom G5 Mobile accuracy.
When Not to CalibrateDo not calibrate if your blood glucose is changing at a significant rate, typically more than 2 mg/dL per minute. Do not calibrate when your receiver screen is showing the rising or falling single arrow or double arrow, which indicates that your blood glucose is rapidly rising or falling. Calibrating during rapid rise or fall of blood glucose may affect sensor accuracy.
Don’t Share Your TransmitterDo not share your transmitter with another person or use a transmitter from another person. The Dexcom G5 Mobile is a prescription-only medical device and is meant, or indicated, for individual use only.
The transmitter is tied to the sensor glucose readings. If the transmitter is used by more than one person, the glucose readings, alerts, and reports may be wrong.
Airport ScannersBe aware of airport body scanners and baggage x-rays when you travel. Do not place any part of the Dexcom G5 Mobile system in the baggage x-ray machine or body scanner. Ask for visual inspection instead:
• Baggage x-ray machine: Instead of putting any part of your Dexcom G5 Mobile through the baggage x-ray, ask the TSA officers to visually inspect it.
• Body scanner: When you are wearing your Dexcom G5 Mobile, request hand-wanding or full-body pat-down and visual inspection instead of going through the Advanced Imaging Technology (AIT) body scanner. AIT is also called millimeter wave scanner.
13 • Dexcom G5 Mobile CGM System Getting Started Guide
Do not rely on CGM readings while being checked by an x-ray or hand-wand metal detector. Once you have cleared the security checkpoint area, you can resume using CGM data. Although the system has been tested with several metal detectors and hand-wands, it is unknown if exposure to certain x-ray, hand-wands, and/or AIT body scanners can affect the system performance and results in you missing a severe low or high glucose event.
If you are unsure of whether the airport scanner is a metal detector, an AIT body scanner or an x-ray, ask the TSA officer or request hand-wanding or full-body pat-down.
CautionU.S. law restricts the sale of the Dexcom G5 Mobile to sale by or on order of a physician.
Dexcom G5 Mobile CGM System Getting Started Guide • 14
Section 3: Risks and Benefits3.1 RisksThere are some risks with using real-time CGM.
Not Receiving Alarm/AlertsIf you aren’t getting your CGM Alarm/Alerts, you run the risk of not knowing you are having a severe low or high glucose event. Some hardware issues preventing Alarm/Alerts:
• Alert function is turned off.• Transmitter and display device are out of range.• Receiver or smart device isn’t showing readings. For example, when there are
data gaps due to being out of range or a system error.• Receiver or smart device battery is dead.• Unable to hear Alarm/Alerts or feel vibration.• App not running in the background.• On Apple devices, Signal Loss Alert won’t be heard if device is silenced or in
Do Not Disturb.
Using CGM for Treatment DecisionsIf you are taking acetaminophen, your sensor glucose readings may be falsely high, causing you to potentially miss a low glucose event or treat a high glucose event with insulin. Do not make any treatment decision based on your CGM when acetaminophen is active in your body.
In order to use CGM for your treatment decisions, you must calibrate a minimum of once every 12 hours to help keep your CGM system accurate. If you do not calibrate at this minimum frequency and make treatment decisions based on your CGM, you may not be getting the most accurate information and could miss a high or low glucose event.
In order to use CGM for your treatment decisions, you must have:
1. Sensor glucose reading
2. Trend arrow
For more information on how to make treatment decisions using your Dexcom G5 Mobile, see Section 10.
If you have symptoms of low or high glucose, but your CGM is not showing high or low glucose sensor readings, take a fingerstick blood glucose (BG) measurement with your blood glucose meter (meter). If you are a caregiver of someone using the Dexcom G5 Mobile, watch how they act. If their symptoms don’t match the CGM, take a fingerstick BG measurement.
15 • Dexcom G5 Mobile CGM System Getting Started Guide
3.2 BenefitsDaily habits impact your glucose levels. With the Dexcom G5 Mobile, you can track how your exercise, carbs, stress levels, medication, or illness, influence your glucose levels.
Knowing Your Trends
Providing sensor glucose readings every five minutes, for up to seven days, the Dexcom G5 Mobile helps you detect trends and patterns. Trend information as well as the trend arrow reveals where your glucose is now, where it has been, where it’s heading, and how fast it’s changing. This provides you with a more complete picture of your glucose.
Your BG meter is your backup when/if your CGM is not showing a sensor glucose reading or your symptoms do not match your sensor readings. Remember to wash your hands before taking a fingerstick.
Sensor Glucose Reading Different from Your Expectations or SymptomsThe sensor glucose reading can be different from your expectations and symptoms. In this case, wash your hands and take a fingerstick blood glucose measurement with your BG meter to confirm your expectations and symptoms. If your sensor readings and meter values are different, you can calibrate your CGM system. Wash and dry your hands, repeat the BG measurement, and, if still different, recalibrate.
If you’re not receiving an Alarm/Alert, and not taking fingerstick BG measurements, you may be unaware of low or high glucose levels.
Sensor Insertion RisksInserting the sensor and wearing the adhesive patch might cause infection, bleeding, pain, or skin irritations (e.g., redness, swelling, bruising, itching, scarring, or skin discoloration). The chance of this happening is low.
The Dexcom G5 Mobile uses the same sensor as the previous CGM system—the Dexcom G4 PLATINUM. The Dexcom G4 PLATINUM System clinical studies and complaint data showed slight redness and swelling occurring only in a few patients.
During Dexcom’s G4 PLATINUM System’s clinical study, no sensor wires broke; however, there is a remote chance sensor fragments could break or detach and remain under your skin. Sterile broken sensor wires don’t pose a significant medical risk.
If a sensor wire breaks off or detaches and remains under your skin, contact your healthcare professional and call Dexcom’s Technical Support toll free, 24/7, at 1.888.738.3646 or toll at 1.858.200.0200 within 24 hours.
Dexcom G5 Mobile CGM System Getting Started Guide • 16
References:Battelino, T., Phillip, M., Bratina, N., Nimri, R., Oskarsson, P., & Bolinder, J. (2011). Effect of Continuous Glucose Monitoring on Hypoglycemia in Type 1 Diabetes. Diabetes Care, 34 (4), 795-800.
Garg, S., Zisser, H., Schwartz, S., Bailey, T., Kaplan, R., Ellis, S., & Jovanovic, L. (2005). Improvement in Glycemic Excursions With a Transcutaneous, Real-Time Continuous Glucose Sensor: A Randomized Controlled Trial. Diabetes Care, 29 (1), 44-50.
Juvenile Diabetes Research Foundation Continuous Glucose Monitoring Study Group. (2010). Quality-of-Life Measures in Children and Adults with Type 1 Diabetes. Diabetes Care, 33 (10), 2175-2177.
Juvenile Diabetes Research Foundation Continuous Glucose Monitoring Study Group , Tamborlane, W. V., Beck, R. W., Bode, B. W., Buckingham, B., Chase, H. P., Clemons, R., ... & Xing, D. (2008). Continuous glucose monitoring and intensive treatment of type 1 diabetes. The New England Journal of Medicine, 359(14), 1464-1476.
Ohkubo, Y., Kishikawa, H., Araki, E., Miyata, T., Isami, S., Motoyoshi, S., & Shichiri, M. (1995). Intensive Insulin Therapy Prevents the Progression of Diabetic Microvascular Complications in Japanese Patients with Non-insulin-dependent Diabetes Mellitus: A Randomized Prospective 6-year Study. Diabetes Research and Clinical Practice, 28 (2), 103-117.
Making Treatment Decisions Based on Your CGM
With Dexcom G5 Mobile, you can now use the readings to make your diabetes treatment decision (like how much insulin to take, when to treat a low glucose, etc.) when you have the key pieces of CGM information – your trend arrow and sensor glucose reading. If you are using the Dexcom G5 Mobile to make treatment decisions, make sure your Alerts are on. Talk to your healthcare professional to determine your best Alert levels.
Helping Your Diabetes ManagementThe Alarm/Alerts features (see Section 9) keep you aware of your glucose levels. Alerts notify you when your glucose goes outside your target range or is rapidly falling or rising, letting you take action before you get too low or too high. The Urgent Low Glucose Alarm lets you know when you are dangerously or urgently low, going below 55 mg/dL. By taking corrective measures, you lessen the time spent in your low/high range, while increasing time in your targeted range (Battelino, 2011; Garg, 2005). If you are using the Dexcom G5 Mobile to make treatment decisions, make sure your Alerts are on. See Section 10 for Treatment Decisions.
Real-time CGM can help improve your A1C as well as improve the quality of your glucose control. If your A1C is at or below 7%, using a CGM such as the Dexcom G5 Mobile, helps reduce hypoglycemia (Juvenile Diabetes Research Foundation Continuous Glucose Monitoring Study Group, 2008).
Lowering your A1C, increasing your time in your target range while decreasing time in low/high BG range is believed to reduce your risk of diabetes-related complications (Ohkubo, 1995).
Some people perceive an increase in their quality of life and peace of mind when using real-time CGM. (Juvenile Diabetes Research Foundation Continuous Glucose Monitoring Study Group, 2010).
17 • Dexcom G5 Mobile CGM System Getting Started Guide
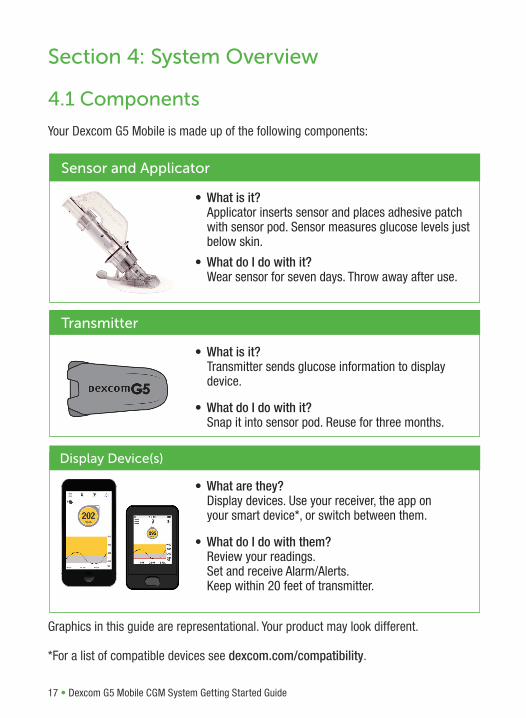
Section 4: System Overview
4.1 Components
Your Dexcom G5 Mobile is made up of the following components:
• What are they? Display devices. Use your receiver, the app on your smart device*, or switch between them.
• What do I do with them? Review your readings. Set and receive Alarm/Alerts. Keep within 20 feet of transmitter.
Display Device(s)
• What is it? Transmitter sends glucose information to display device.
• What do I do with it? Snap it into sensor pod. Reuse for three months.
Transmitter
• What is it? Applicator inserts sensor and places adhesive patch with sensor pod. Sensor measures glucose levels just below skin.
• What do I do with it? Wear sensor for seven days. Throw away after use.
Sensor and Applicator
Graphics in this guide are representational. Your product may look different.
*For a list of compatible devices see dexcom.com/compatibility.
Dexcom G5 Mobile CGM System Getting Started Guide • 18
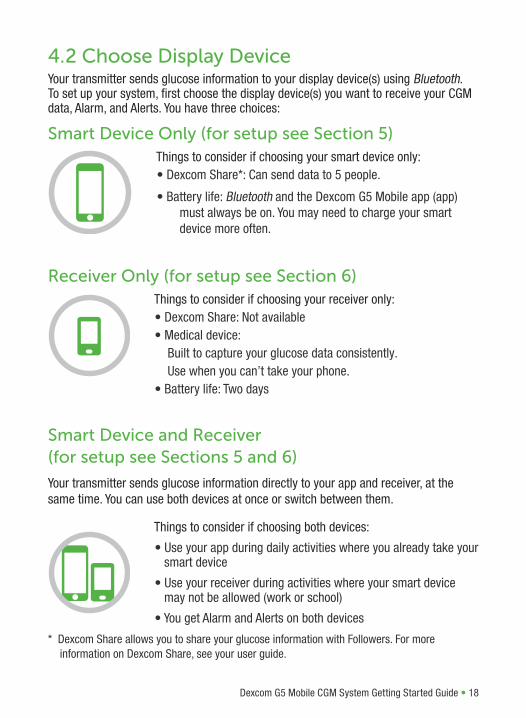
4.2 Choose Display DeviceYour transmitter sends glucose information to your display device(s) using Bluetooth. To set up your system, first choose the display device(s) you want to receive your CGM data, Alarm, and Alerts. You have three choices:
Smart Device Only (for setup see Section 5)Things to consider if choosing your smart device only:• Dexcom Share*: Can send data to 5 people.
• Battery life: Bluetooth and the Dexcom G5 Mobile app (app) must always be on. You may need to charge your smart device more often.
Receiver Only (for setup see Section 6)Things to consider if choosing your receiver only:• Dexcom Share: Not available• Medical device: Built to capture your glucose data consistently. Use when you can’t take your phone.• Battery life: Two days
Smart Device and Receiver(for setup see Sections 5 and 6)
Your transmitter sends glucose information directly to your app and receiver, at the same time. You can use both devices at once or switch between them.
Things to consider if choosing both devices:
• Use your app during daily activities where you already take your smart device
• Use your receiver during activities where your smart device may not be allowed (work or school)
• You get Alarm and Alerts on both devices
* Dexcom Share allows you to share your glucose information with Followers. For more information on Dexcom Share, see your user guide.
App Setup
19 • Dexcom G5 Mobile CGM System Getting Started Guide
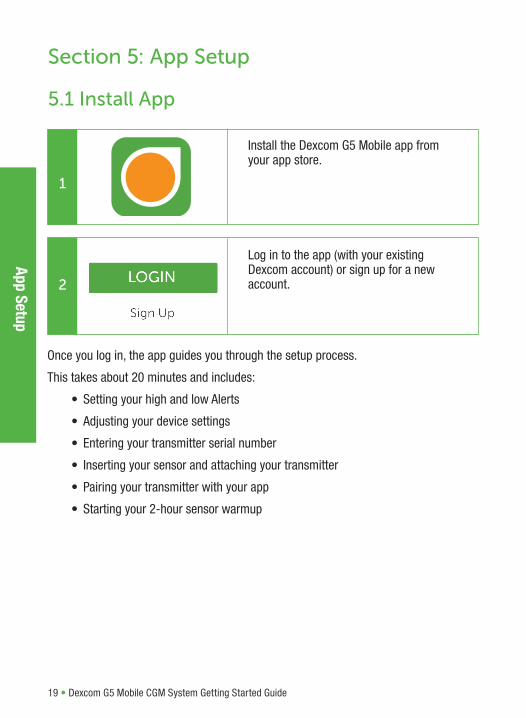
Install the Dexcom G5 Mobile app from your app store.
Log in to the app (with your existing Dexcom account) or sign up for a new account.
1
2
Section 5: App Setup
5.1 Install App
Once you log in, the app guides you through the setup process.
This takes about 20 minutes and includes:
• Setting your high and low Alerts
• Adjusting your device settings
• Entering your transmitter serial number
• Inserting your sensor and attaching your transmitter
• Pairing your transmitter with your app
• Starting your 2-hour sensor warmup

App
Setu
p
Dexcom G5 Mobile CGM System Getting Started Guide • 20
4
Tap the circle to enter the first of two meter values.
At the end of the 2-hour warmup, you must enter two separate blood glucose (BG) meter (meter) values before readings begin.
5.2 Enter Initial Blood Glucose Meter Values
5
Enter the exact value from your meter within 5 minutes of testing.
Tap SAVE.
2
Wash hands with soap and water, never gel cleaners. Dry your hands.
Washing and drying your hands before using your meter helps ensure accuracy.
3
Test your BG using your meter. Use fingertips only.
Your app alerts you when you need to enter your two meter values.
Go to your app to enter values.1
6
Repeat steps above to enter the second meter value.
Entering two separate values ensures an accurate reading.
App Setup
21 • Dexcom G5 Mobile CGM System Getting Started Guide
5.3 Smart Device Settings
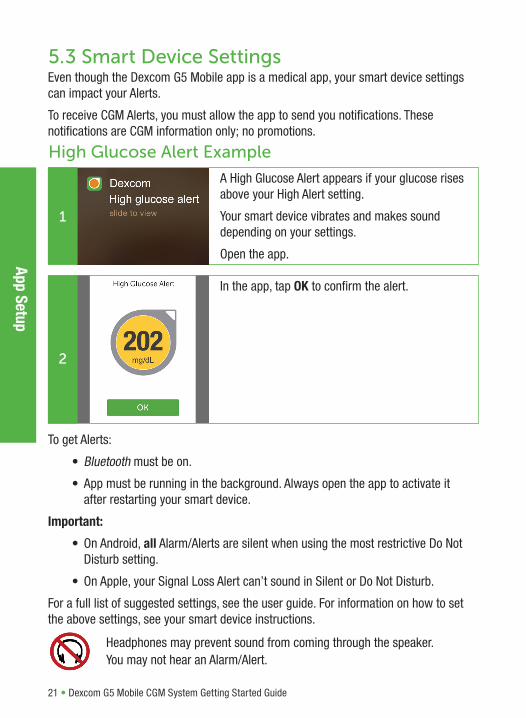
To get Alerts:
• Bluetooth must be on.
• App must be running in the background. Always open the app to activate it after restarting your smart device.
Important:
• On Android, all Alarm/Alerts are silent when using the most restrictive Do Not Disturb setting.
• On Apple, your Signal Loss Alert can’t sound in Silent or Do Not Disturb.
For a full list of suggested settings, see the user guide. For information on how to set the above settings, see your smart device instructions.
Even though the Dexcom G5 Mobile app is a medical app, your smart device settings can impact your Alerts.
To receive CGM Alerts, you must allow the app to send you notifications. These notifications are CGM information only; no promotions.
Headphones may prevent sound from coming through the speaker. You may not hear an Alarm/Alert.
In the app, tap OK to confirm the alert.
1
2
A High Glucose Alert appears if your glucose rises above your High Alert setting.
Your smart device vibrates and makes sound depending on your settings.
Open the app.
High Glucose Alert Example
Rece
iver
Set
up
Dexcom G5 Mobile CGM System Getting Started Guide • 22
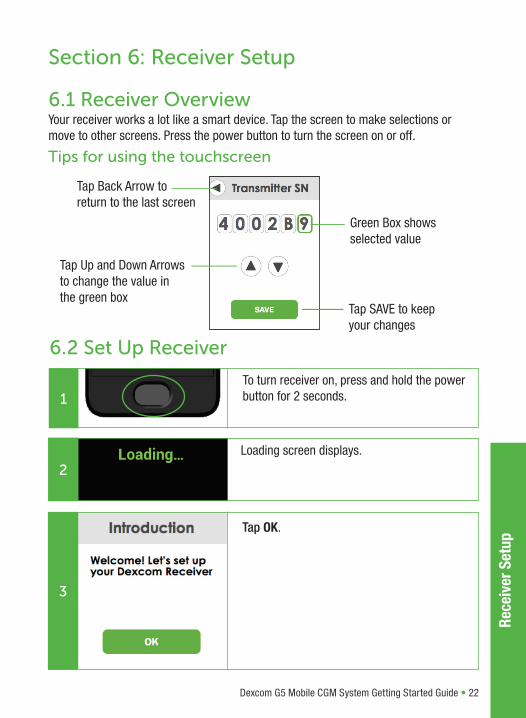
Section 6: Receiver Setup
6.1 Receiver Overview
To turn receiver on, press and hold the power button for 2 seconds.
2Loading screen displays.
3
Tap OK.
1
Tap Back Arrow to return to the last screen
Green Box shows selected value
Tap SAVE to keep your changes
Tap Up and Down Arrows to change the value in the green box
Tips for using the touchscreen
6.2 Set Up Receiver
Your receiver works a lot like a smart device. Tap the screen to make selections or move to other screens. Press the power button to turn the screen on or off.

Receiver Setup
23 • Dexcom G5 Mobile CGM System Getting Started Guide
Find your SN on the backs of your transmitter and transmitter box.
Tap up from 9 or down from 0 to choose a letter.
4
5
Date format: Year / Month / Day.Time format: Hour / Minute / AM or PM.
6
Set Low Alert between 60-100 mg/dL.
Receiver alerts you when you are at or below your Low Alert setting.
7
Set High Alert between 120-400 mg/dL.
Receiver alerts you when you are at or above your High Alert setting.
The first time you start your receiver, the setup wizard walks you through entering your date/time, transmitter serial number (SN), and setting up your Low/High Alerts.

Rece
iver
Set
up
Dexcom G5 Mobile CGM System Getting Started Guide • 24
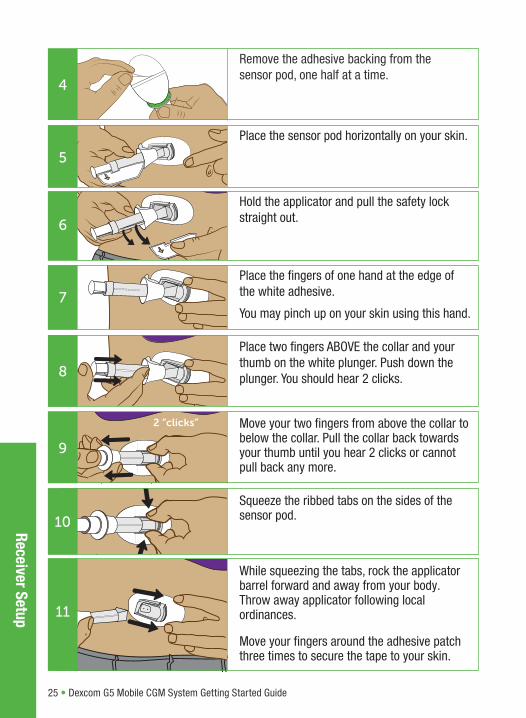
6.3 Insert SensorBefore you begin, get familiar with your applicator.
Gather:
• Alcohol wipes• Sensor• Transmitter• Optional: Skin preparation or adhesive products (Mastisol®, Skin Tac™)
Choose an insertion site. It should be:
• At least 3 inches from insulin pump infusion set or injection site • Away from waistband, scarring, tattoos, irritation• Unlikely to be bumped or pushed
Plunger
Applicator barrel (has small needle and sensor)
Transmitter Latch
Safety Lock
Collar
Sensor PodRelease Tab Adhesive
Clean your skin at the sensor placement site with an alcohol wipe.
Let dry.2
Optional: Create an empty, sideways oval:• Don’t get any skin adhesive inside the oval• Let skin adhesive dry (see manufacturer’s instructions)
• Insert sensor on clean skin at center of oval
3
Ages 18 years or older::Insert in your belly
Ages 2-17 years:Insert in your upper behind or belly
1
Wash and dry hands.
Receiver Setup
25 • Dexcom G5 Mobile CGM System Getting Started Guide
Move your two fingers from above the collar to below the collar. Pull the collar back towards your thumb until you hear 2 clicks or cannot pull back any more.
2 “clicks”
9
Squeeze the ribbed tabs on the sides of the sensor pod.10
Place the sensor pod horizontally on your skin.
5
Hold the applicator and pull the safety lock straight out. 6
Place the fingers of one hand at the edge of the white adhesive.
You may pinch up on your skin using this hand. 7
Place two fingers ABOVE the collar and your thumb on the white plunger. Push down the plunger. You should hear 2 clicks. 8
While squeezing the tabs, rock the applicator barrel forward and away from your body. Throw away applicator following local ordinances.
Move your fingers around the adhesive patch three times to secure the tape to your skin.
11
Remove the adhesive backing from the sensor pod, one half at a time.
4
Rece
iver
Set
up
Dexcom G5 Mobile CGM System Getting Started Guide • 26
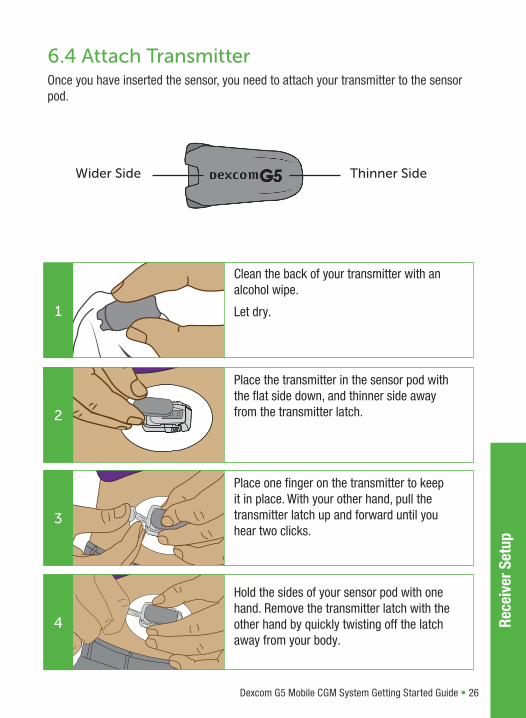
6.4 Attach Transmitter Once you have inserted the sensor, you need to attach your transmitter to the sensor pod.
Clean the back of your transmitter with an alcohol wipe.
Let dry. 1
Place the transmitter in the sensor pod with the flat side down, and thinner side away from the transmitter latch.2
Hold the sides of your sensor pod with one hand. Remove the transmitter latch with the other hand by quickly twisting off the latch away from your body.
4
Place one finger on the transmitter to keep it in place. With your other hand, pull the transmitter latch up and forward until you hear two clicks.
3
Wider Side Thinner Side
Receiver Setup
27 • Dexcom G5 Mobile CGM System Getting Started Guide
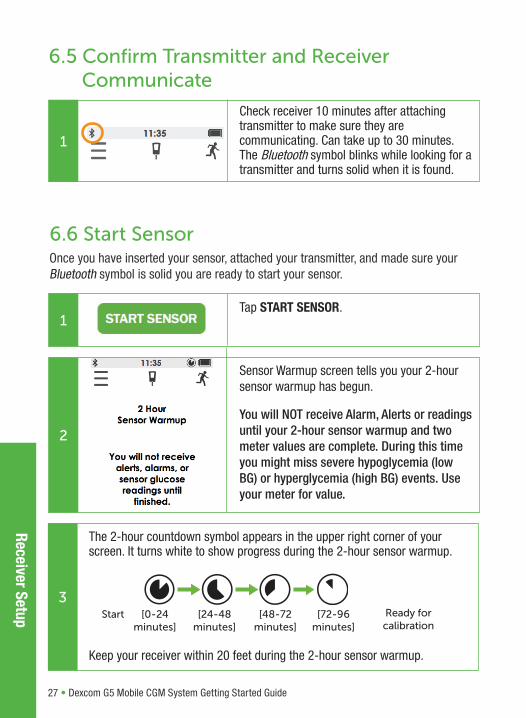
6.5 Confirm Transmitter and Receiver Communicate
1
2
Tap START SENSOR.
Sensor Warmup screen tells you your 2-hour sensor warmup has begun.
You will NOT receive Alarm, Alerts or readings until your 2-hour sensor warmup and two meter values are complete. During this time you might miss severe hypoglycemia (low BG) or hyperglycemia (high BG) events. Use your meter for value.
Check receiver 10 minutes after attaching transmitter to make sure they are communicating. Can take up to 30 minutes. The Bluetooth symbol blinks while looking for a transmitter and turns solid when it is found.
[0-24minutes]
[24-48minutes]
[72-96minutes]
Ready for calibration
[48-72minutes]
Start
The 2-hour countdown symbol appears in the upper right corner of your screen. It turns white to show progress during the 2-hour sensor warmup.
3
Keep your receiver within 20 feet during the 2-hour sensor warmup.
1
6.6 Start SensorOnce you have inserted your sensor, attached your transmitter, and made sure your Bluetooth symbol is solid you are ready to start your sensor.
Rece
iver
Set
up
Dexcom G5 Mobile CGM System Getting Started Guide • 28
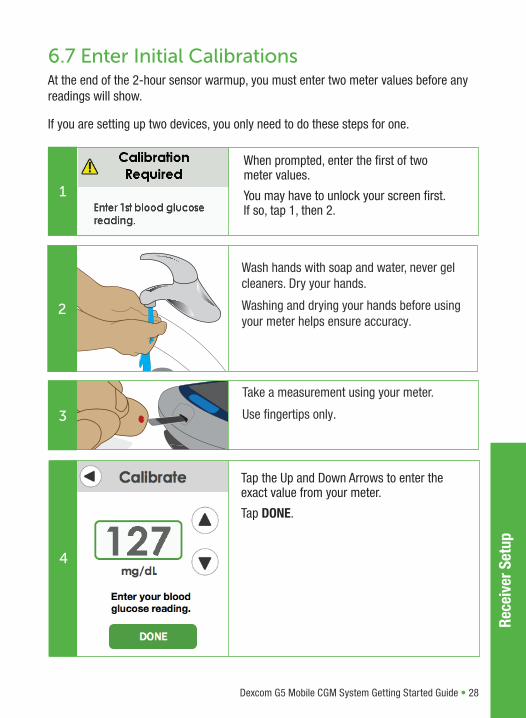
6.7 Enter Initial CalibrationsAt the end of the 2-hour sensor warmup, you must enter two meter values before any readings will show.
If you are setting up two devices, you only need to do these steps for one.
When prompted, enter the first of two meter values.
You may have to unlock your screen first. If so, tap 1, then 2.
1
2
Wash hands with soap and water, never gel cleaners. Dry your hands.
Washing and drying your hands before using your meter helps ensure accuracy.
3
Take a measurement using your meter.
Use fingertips only.
Tap the Up and Down Arrows to enter the exact value from your meter.
Tap DONE.
4
Receiver Setup
29 • Dexcom G5 Mobile CGM System Getting Started Guide
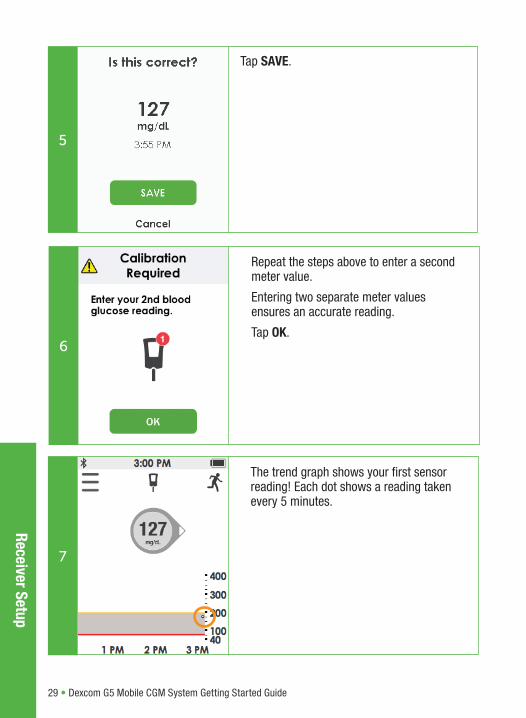
Tap SAVE.
Repeat the steps above to enter a second meter value.
Entering two separate meter values ensures an accurate reading.
Tap OK.
5
6
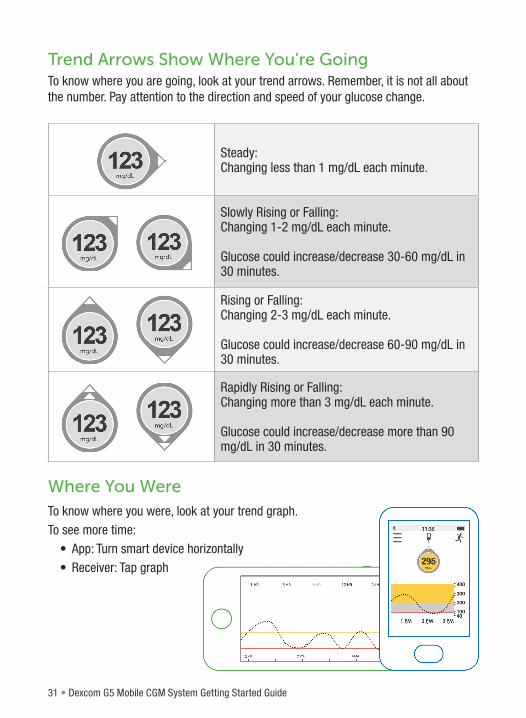
The trend graph shows your first sensor reading! Each dot shows a reading taken every 5 minutes.
7
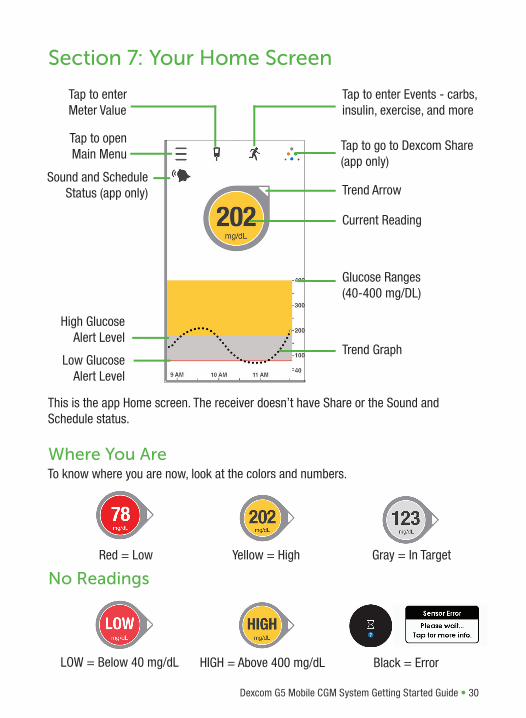
Dexcom G5 Mobile CGM System Getting Started Guide • 30
Trend Arrow
Current Reading
Trend GraphLow Glucose
Alert Level
High GlucoseAlert Level
Tap to go to Dexcom Share(app only)
Tap to enter Events - carbs, insulin, exercise, and more
Tap to open Main Menu
Tap to enterMeter Value
Glucose Ranges (40-400 mg/DL)
Section 7: Your Home Screen
This is the app Home screen. The receiver doesn’t have Share or the Sound and Schedule status.
To know where you are now, look at the colors and numbers. Where You Are
Red = Low Yellow = High Gray = In Target
LOW = Below 40 mg/dL
No Readings
HIGH = Above 400 mg/dL Black = Error
Sound and Schedule Status (app only)
31 • Dexcom G5 Mobile CGM System Getting Started Guide
Steady:Changing less than 1 mg/dL each minute.
Slowly Rising or Falling: Changing 1-2 mg/dL each minute.
Glucose could increase/decrease 30-60 mg/dL in 30 minutes.
Rising or Falling:Changing 2-3 mg/dL each minute.
Glucose could increase/decrease 60-90 mg/dL in 30 minutes.
Rapidly Rising or Falling:Changing more than 3 mg/dL each minute.
Glucose could increase/decrease more than 90 mg/dL in 30 minutes.
Trend Arrows Show Where You’re GoingTo know where you are going, look at your trend arrows. Remember, it is not all about the number. Pay attention to the direction and speed of your glucose change.
To know where you were, look at your trend graph.To see more time:
• App: Turn smart device horizontally• Receiver: Tap graph
Where You Were
Dexcom G5 Mobile CGM System Getting Started Guide • 32
Tips for Entering Calibrations
Do Calibrate:
Don’t Calibrate:
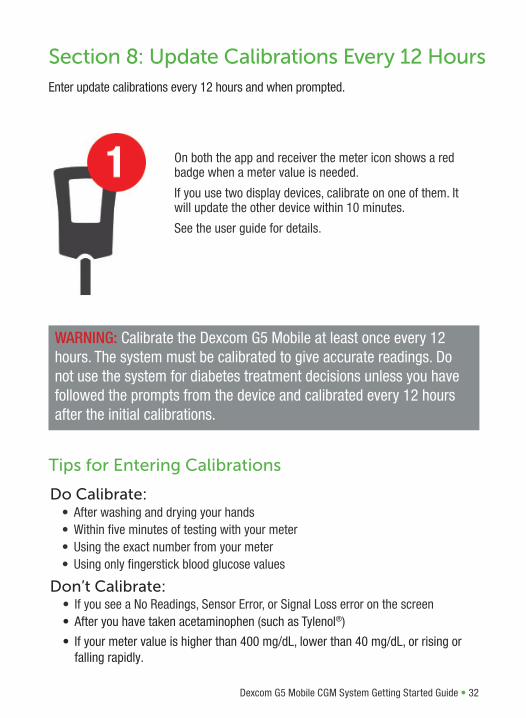
Section 8: Update Calibrations Every 12 HoursEnter update calibrations every 12 hours and when prompted.
• If you see a No Readings, Sensor Error, or Signal Loss error on the screen• After you have taken acetaminophen (such as Tylenol®)
• If your meter value is higher than 400 mg/dL, lower than 40 mg/dL, or rising or falling rapidly.
• After washing and drying your hands• Within five minutes of testing with your meter• Using the exact number from your meter• Using only fingerstick blood glucose values
WARNING: Calibrate the Dexcom G5 Mobile at least once every 12 hours. The system must be calibrated to give accurate readings. Do not use the system for diabetes treatment decisions unless you have followed the prompts from the device and calibrated every 12 hours after the initial calibrations.
On both the app and receiver the meter icon shows a red badge when a meter value is needed.
If you use two display devices, calibrate on one of them. It will update the other device within 10 minutes.
See the user guide for details.
33 • Dexcom G5 Mobile CGM System Getting Started Guide
Section 9: Alarm and Alerts
The Dexcom G5 Mobile sends Alarm and Alerts to your app or your reciever, depending on which one you use. When you use both the app and the receiver at the same time, remember to change and confirm Alarm and Alerts on each device separately.
If using the app, learn how to ensure you get your Alarm/Alerts in 5.3 Smart Device Settings.
9.1 Urgent Low Glucose AlarmThe Dexcom G5 Mobile has an automatic Urgent Low Glucose Alarm set at 55 mg/dL. This is the only notice you can’t turn off or change.
9.2 Change Low and High AlertsPart of your initial setup included setting your Low/High Alerts. You can change these settings at any time. To change your Low/High Alert, go to Menu > Alerts in your app or receiver. For detailed steps see the user guide.
9.3 Signal Loss, Rise Rate, and Fall Rate AlertsSignal Loss: Signal loss happens when your display device and transmitter stopcommunicating. You won’t get sensor glucose readings when this occurs. To prevent orfix this, make sure you are within range (20 feet) of your receiver, without obstructions.To stop getting Signal Loss Alerts, turn this OFF. The default is ON.
• On Apple devices, Silent and Do Not Disturb prevent the Signal Loss Alert from making sound and vibration.
When your transmitter and display device connect after a Signal Loss or similar issue, up to three hours of missed readings can fill in on the graph.
Rise and Fall Rates: By default, the Rise and Fall Rate Alerts are turned OFF; you canturn them ON, and customize them.
When the Rise or Fall Rate Alerts are on, you receive Alerts telling you your glucose ischanging at a rapid (2 mg/dL/min) or very rapid (3 mg/dL/min) rate. Use this to avoidstaying high or low for long.

Dexcom G5 Mobile CGM System Getting Started Guide • 34
9.4 Set Up Receiver Alert Sounds
Vibrate: Use when you want to be alerted by vibration instead of sound.
Exception: The Urgent Low Glucose Alarm at 55 mg/dL will still make a sound. It will alert you by vibration first, followed by beeps 5 minutes later if not confirmed.
Normal: This is the default. It is a medium volume.
Soft: Use when you want your Alert sound to be discreet. This sets all the Alarm and Alerts to lower volume beeps.
HypoRepeat: Use when you want extra alerts for the Urgent Low Glucose Alarm.
This repeats the Urgent Low Glucose Alarm every 5 seconds until you confirm it or your reading rises above 55 mg/dL.
Attentive: Use when you want your Alert to be noticeable.
This sets all the Alarm and Alerts to loud with distinctive melodies.
You can choose your receiver Alert sounds. The sound you choose affects all Alerts. The default is Normal. See below for an overview of the different sound options.
NOTE: No matter what sound you pick, all Alerts will notify you by vibrating first. There will be no audible beep if you confirm the Alert after the first vibration.
35 • Dexcom G5 Mobile CGM System Getting Started Guide
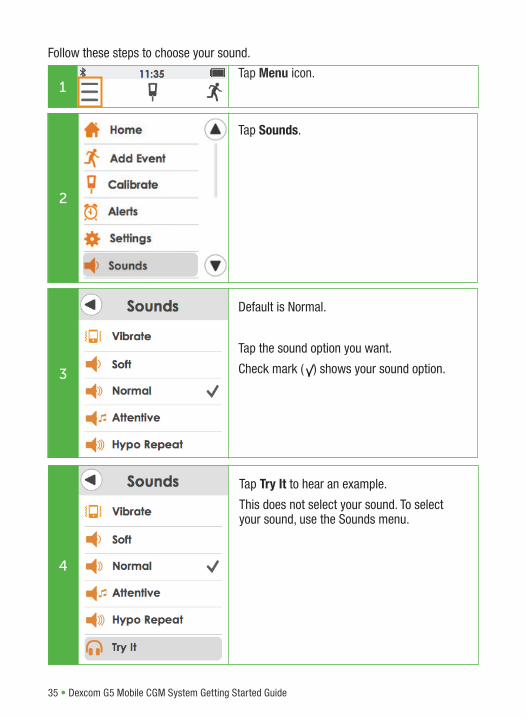
Follow these steps to choose your sound.
Tap Sounds.
2
3
Default is Normal.
Tap the sound option you want.
Check mark ( ) shows your sound option.
4
Tap Try It to hear an example.
This does not select your sound. To select your sound, use the Sounds menu.
Tap Menu icon.1
Dexcom G5 Mobile CGM System Getting Started Guide • 36
9.5 Test Receiver Speaker and VibrationsYou have to hear and feel an Alarm or Alert to respond to it. But what if the receiver’s speaker or vibrations aren’t working? Test them!
When you plug in the receiver to charge, you’ll see a Speaker Test screen for a few seconds. Use the speaker test to listen for the test beep and feel for the test vibrations. If you get the beep and vibrations, great! The speaker and vibrations work! You’ll hear and feel your Alarm and Alerts. But if the receiver doesn’t beep and/or vibrate, it may be broken and you won’t hear and/or feel the Alarm or Alerts.
To test your speaker and vibrations, follow these steps:
Plug receiver into the wall to charge.
1
Tap Test Now quickly before screen disappears.
If screen disappears too quickly, unplug receiver and go to first step.
The light shows the receiver is charging.
3
4
Listen for the beeps and feel for the vibrations.
Is your receiver set to Vibrate or Soft? This test will still work. If speaker and vibrations work, receiver will beep loudly and vibrate anyway.
2
37 • Dexcom G5 Mobile CGM System Getting Started Guide
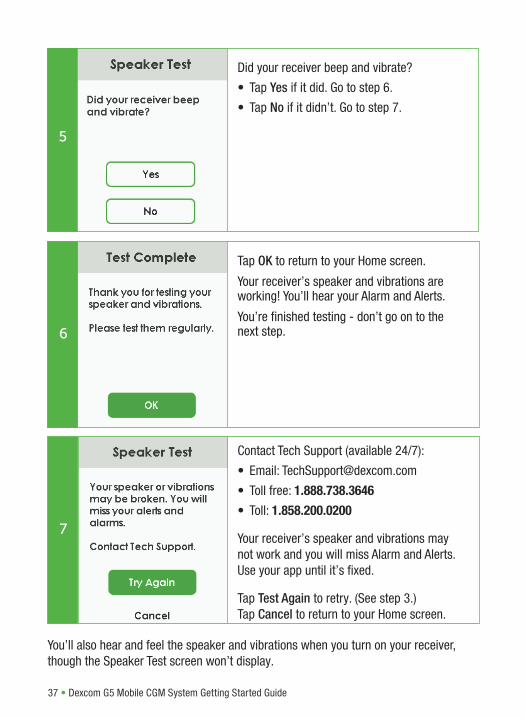
Tap OK to return to your Home screen.
Your receiver’s speaker and vibrations are working! You’ll hear your Alarm and Alerts.
You’re finished testing - don’t go on to the next step.
You’ll also hear and feel the speaker and vibrations when you turn on your receiver, though the Speaker Test screen won’t display.
Contact Tech Support (available 24/7):
• Email: [email protected]
• Toll free: 1.888.738.3646• Toll: 1.858.200.0200
Your receiver’s speaker and vibrations may not work and you will miss Alarm and Alerts. Use your app until it’s fixed.
Tap Test Again to retry. (See step 3.) Tap Cancel to return to your Home screen.
6
7
Did your receiver beep and vibrate?
• Tap Yes if it did. Go to step 6.
• Tap No if it didn’t. Go to step 7.
5
Dexcom G5 Mobile CGM System Getting Started Guide • 38
Section 10: Treatment Decisions
You can use your Dexcom G5 Mobile to make treatment decisions. But how do you know you’re ready? Start by discussing the basics listed below with your healthcare professional (HCP). Get your questions answered. Together, decide when you’re ready.
Whether you’re new to Dexcom or experienced, you should keep using your meter to make treatment decisions until you know how Dexcom works for you. Don’t rush! It may take days, weeks or months for you to gain confidence in using your CGM to make treatment decisions. Confirm your readings using your meter so you understand that:• The accuracy you experience with each newly inserted sensor may vary• A sensor might work differently in different situations (meals, exercise, first day of use, etc.)
10.1 Treatment Decisions: The BasicsWork with your HCP and learn the basics: When do you need to use a meter instead of relying on your Dexcom G5 Mobile? How can you avoid insulin stacking?
Even when you’re confident using your Dexcom G5 Mobile to make treatment decisions, there are times when you must use your meter:
Symptoms: Always use your meter if symptoms don’t match readings.
You know your body, listen to it.
Acetaminophen: Always use your meter if you have taken acetaminophen. Medications containing acetaminophen (such as Tylenol®, Excedrin®, Sudafed®, Robitussin®) can give you a false high reading.
Calibration: Always use your meter to calibrate at sensor start and every 12 hours. Calibrating less often may cause inaccurate readings. When calibrating wash hands with soap and water, never gel cleaners.
39 • Dexcom G5 Mobile CGM System Getting Started Guide
Not stacking insulin is important, whether you use your meter, your Dexcom G5 Mobile, or both.
Insulin Stacking: Don’t take insulin doses too close together, or “stack” insulin. You don’t want to go low; wait at least 2 hours between doses. Sometimes, it’s best to watch and wait.
Some users have reported that performance may vary significantly between sensors; pay attention to how each newly inserted sensor is working for you when deciding whether to make treatment decisions based on your readings. See the user guide for more information on what to do if your readings and meter values or symptoms don’t match. If your readings don’t consistently match your symptoms or meter values, then talk to your HCP about how you should be using the system to help manage your diabetes. Your HCP can help you decide how you should best use this device.
Once you and your HCP are comfortable, you’re ready to make treatment decisions using your Dexcom G5 Mobile! Try it out using these flow charts.
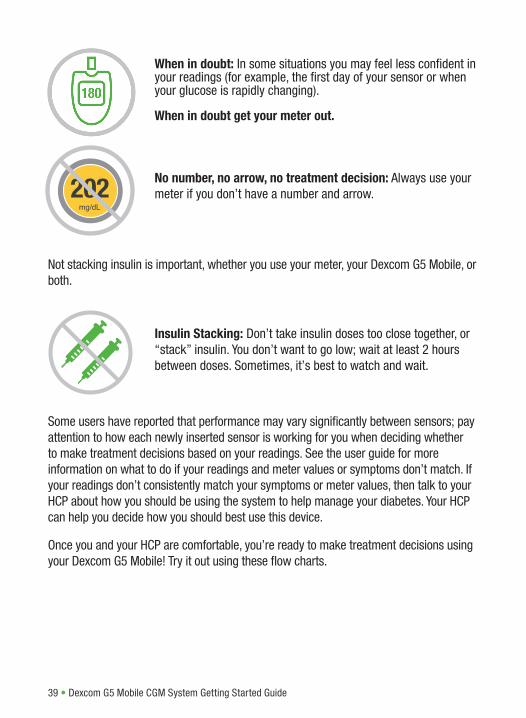
When in doubt: In some situations you may feel less confident in your readings (for example, the first day of your sensor or when your glucose is rapidly changing).
When in doubt get your meter out.
No number, no arrow, no treatment decision: Always use your meter if you don’t have a number and arrow.202
mg/dL
Dexcom G5 Mobile CGM System Getting Started Guide • 40
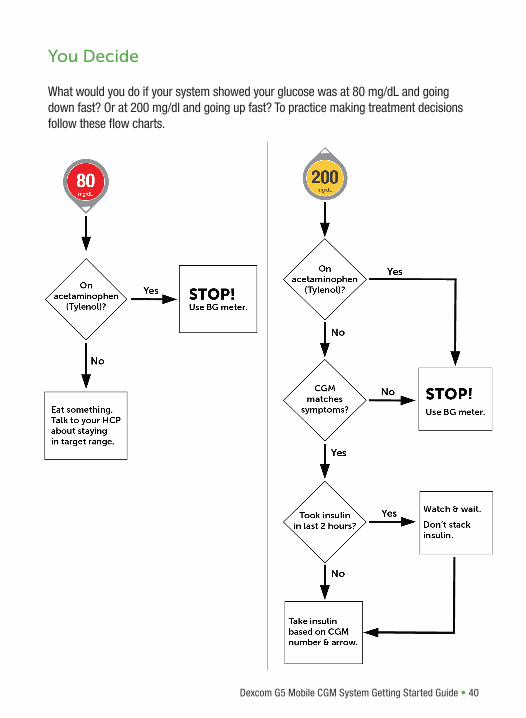
You Decide
What would you do if your system showed your glucose was at 80 mg/dL and going down fast? Or at 200 mg/dl and going up fast? To practice making treatment decisions follow these flow charts.
41 • Dexcom G5 Mobile CGM System Getting Started Guide
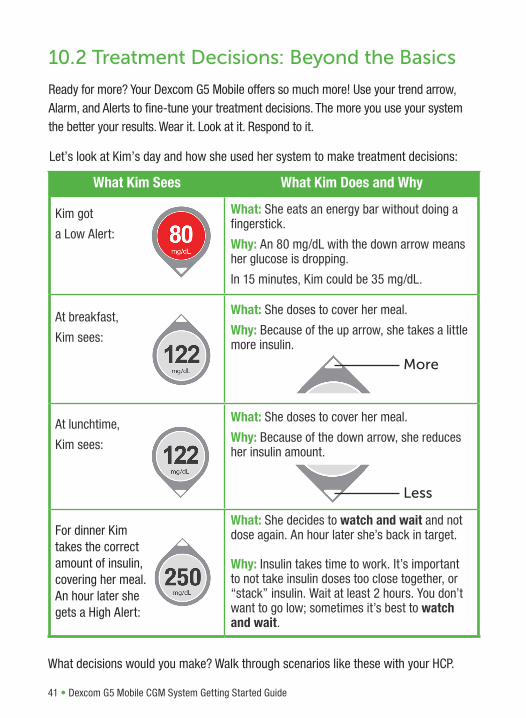
10.2 Treatment Decisions: Beyond the Basics
Ready for more? Your Dexcom G5 Mobile offers so much more! Use your trend arrow, Alarm, and Alerts to fine-tune your treatment decisions. The more you use your system the better your results. Wear it. Look at it. Respond to it.
What Kim Sees What Kim Does and Why
Kim got
a Low Alert:
What: She eats an energy bar without doing a fingerstick.
Why: An 80 mg/dL with the down arrow means her glucose is dropping.
In 15 minutes, Kim could be 35 mg/dL.
At breakfast,
Kim sees:
What: She doses to cover her meal.
Why: Because of the up arrow, she takes a little more insulin.
At lunchtime,
Kim sees:
What: She doses to cover her meal.
Why: Because of the down arrow, she reduces her insulin amount.
For dinner Kimtakes the correctamount of insulin,covering her meal.An hour later shegets a High Alert:
What: She decides to watch and wait and not dose again. An hour later she’s back in target.
Why: Insulin takes time to work. It’s important to not take insulin doses too close together, or “stack” insulin. Wait at least 2 hours. You don’t want to go low; sometimes it’s best to watch and wait.
What decisions would you make? Walk through scenarios like these with your HCP.
More
Less
Let’s look at Kim’s day and how she used her system to make treatment decisions:
Dexcom G5 Mobile CGM System Getting Started Guide • 42
3
Section 11: End Sensor Session
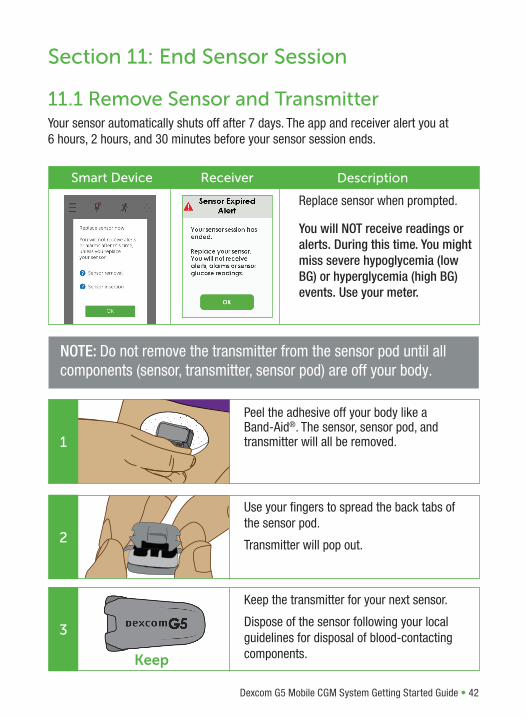
11.1 Remove Sensor and TransmitterYour sensor automatically shuts off after 7 days. The app and receiver alert you at 6 hours, 2 hours, and 30 minutes before your sensor session ends.
Use your fingers to spread the back tabs of the sensor pod.
Transmitter will pop out.
Keep the transmitter for your next sensor.
Dispose of the sensor following your local guidelines for disposal of blood-contacting components.
2
Keep
NOTE: Do not remove the transmitter from the sensor pod until all components (sensor, transmitter, sensor pod) are off your body.
Peel the adhesive off your body like a Band-Aid®. The sensor, sensor pod, and transmitter will all be removed.1
Replace sensor when prompted.
You will NOT receive readings or alerts. During this time. You might miss severe hypoglycemia (low BG) or hyperglycemia (high BG) events. Use your meter.
Smart Device Receiver Description
43 • Dexcom G5 Mobile CGM System Getting Started Guide
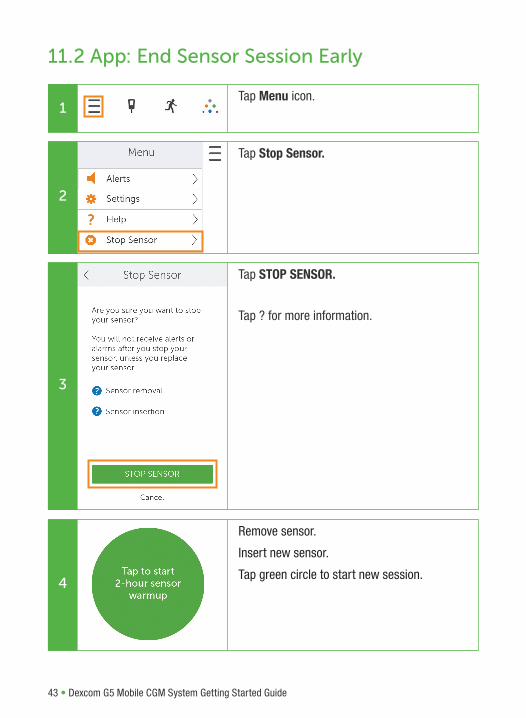
11.2 App: End Sensor Session Early
Tap Menu icon.1
Tap Stop Sensor.
2
Tap STOP SENSOR.
Tap ? for more information.
3
Remove sensor.
Insert new sensor.
Tap green circle to start new session.4
Dexcom G5 Mobile CGM System Getting Started Guide • 44
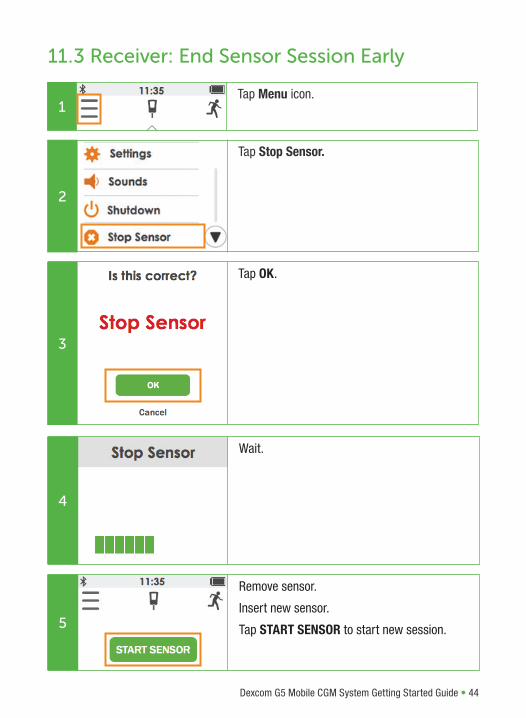
11.3 Receiver: End Sensor Session Early
Tap Menu icon.1
Tap Stop Sensor.
2
Tap OK.
3
Wait.
4
Remove sensor.
Insert new sensor.
Tap START SENSOR to start new session.5
45 • Dexcom G5 Mobile CGM System Getting Started Guide
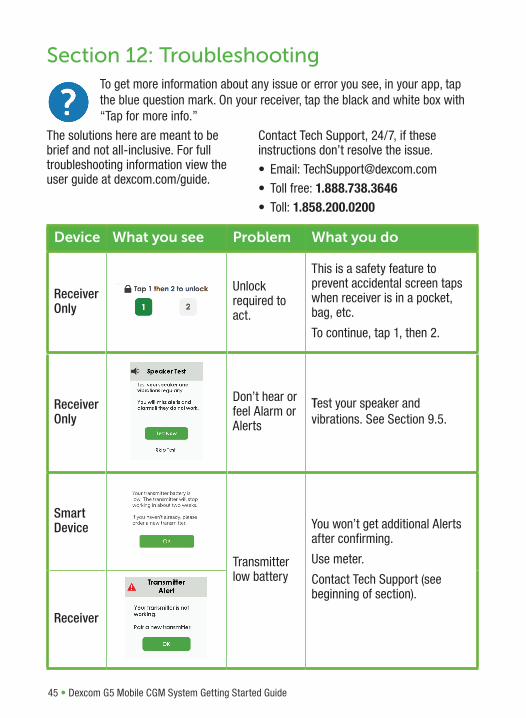
Section 12: Troubleshooting
Device What you see Problem What you do
Receiver Only
Unlock required to act.
This is a safety feature to prevent accidental screen taps when receiver is in a pocket, bag, etc.
To continue, tap 1, then 2.
Receiver Only
Don’t hear or feel Alarm or Alerts
Test your speaker and vibrations. See Section 9.5.
Smart Device
Transmitter low battery
You won’t get additional Alerts after confirming.
Use meter.
Contact Tech Support (see beginning of section).
Receiver
To get more information about any issue or error you see, in your app, tap the blue question mark. On your receiver, tap the black and white box with “Tap for more info.”
Contact Tech Support, 24/7, if these instructions don’t resolve the issue. • Email: [email protected] • Toll free: 1.888.738.3646• Toll: 1.858.200.0200
The solutions here are meant to be brief and not all-inclusive. For full troubleshooting information view the user guide at dexcom.com/guide.
Dexcom G5 Mobile CGM System Getting Started Guide • 46
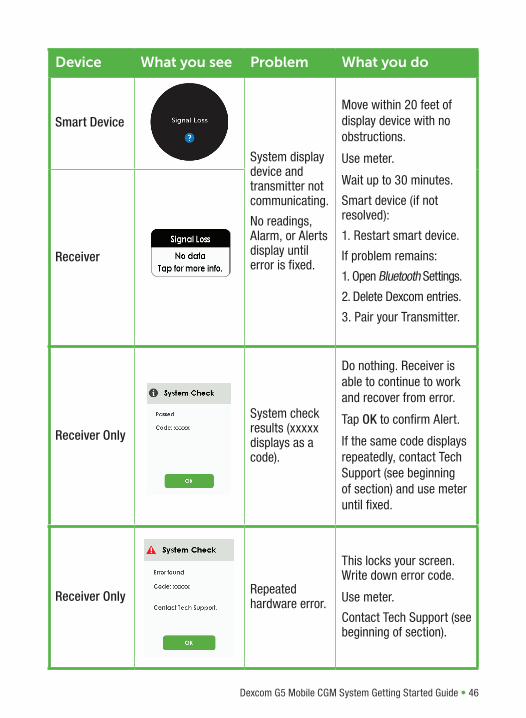
Device What you see Problem What you do
Smart Device
System display device and transmitter not communicating.
No readings, Alarm, or Alerts display until error is fixed.
Move within 20 feet of display device with no obstructions.
Use meter.
Wait up to 30 minutes.
Smart device (if not resolved):
1. Restart smart device.
If problem remains:
1. Open Bluetooth Settings.
2. Delete Dexcom entries.
3. Pair your Transmitter.
Receiver
Receiver Only
System check results (xxxxx displays as a code).
Do nothing. Receiver is able to continue to work and recover from error.
Tap OK to confirm Alert.
If the same code displays repeatedly, contact Tech Support (see beginning of section) and use meter until fixed.
Receiver Only Repeated hardware error.
This locks your screen. Write down error code.
Use meter.
Contact Tech Support (see beginning of section).
47 • Dexcom G5 Mobile CGM System Getting Started Guide
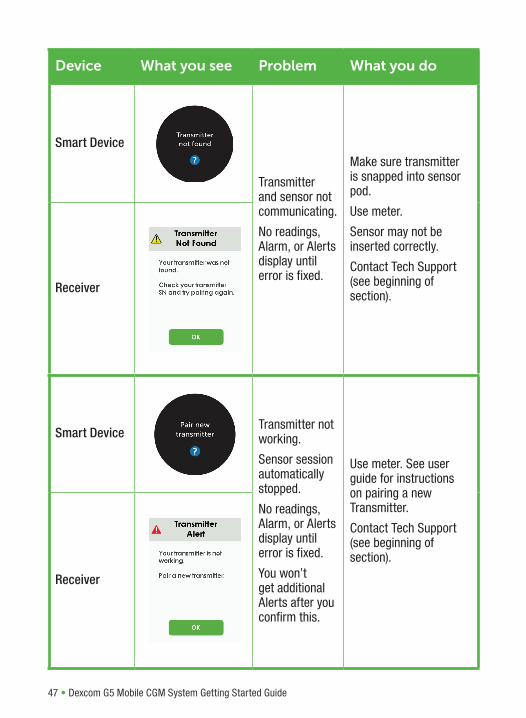
Device What you see Problem What you do
Smart Device
Transmitter and sensor not communicating.
No readings, Alarm, or Alerts display until error is fixed.
Make sure transmitter is snapped into sensor pod.
Use meter.
Sensor may not be inserted correctly.
Contact Tech Support (see beginning of section).
Receiver
Smart DeviceTransmitter not working.
Sensor session automatically stopped.
No readings, Alarm, or Alerts display until error is fixed.
You won’t get additional Alerts after you confirm this.
Use meter. See user guide for instructions on pairing a new Transmitter.
Contact Tech Support (see beginning of section).
Receiver

Dexcom G5 Mobile CGM System Getting Started Guide • 48
Device What you see Problem What you do
Smart Device
Not getting readings.
No readings, Alarm, or Alerts display until error is fixed.
Wait up to 3 hours while system autocorrects.
Check transmitter—is it properly inserted into the sensor pod?
Tap error for more information.
Use meter.
If this continues for over 3 hours, contact Tech Support (see beginning of section).
Receiver
Smart Device
Not getting readings.
No readings, Alarm, or Alerts display until error is fixed.
Wait up to 30 minutes while system fixes itself.
Use meter.
Tap error for more information.
If this continues for over 30 minutes, contact Tech Support (see beginning of section).
Receiver
49 • Dexcom G5 Mobile CGM System Getting Started Guide
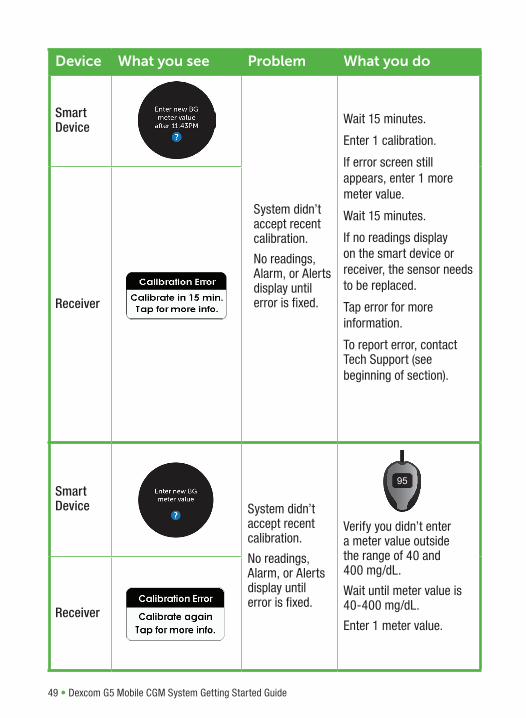
Device What you see Problem What you do
Smart Device
System didn’t accept recent calibration.
No readings, Alarm, or Alerts display until error is fixed.
Wait 15 minutes.
Enter 1 calibration.
If error screen still appears, enter 1 more meter value.
Wait 15 minutes.
If no readings display on the smart device or receiver, the sensor needs to be replaced.
Tap error for more information.
To report error, contact Tech Support (see beginning of section).
Receiver
Smart Device System didn’t
accept recent calibration.
No readings, Alarm, or Alerts display until error is fixed.
Verify you didn’t enter a meter value outside the range of 40 and 400 mg/dL.
Wait until meter value is 40-400 mg/dL.
Enter 1 meter value.Receiver
95

Dexcom G5 Mobile CGM System Getting Started Guide • 50
Section 13: Travel
Go through walk-in metal detectors or be hand-wanded without worrying about damaging your transmitter or sensor.
If you’re concerned or uncomfortable about walking through the metal detector, the Transportation Security Administration (TSA) requests that you tell the Security Officer you’re wearing a continuous glucose monitor and want a full-body pat-down with a visual inspection of your sensor and transmitter.
Let the Security Officer know the sensor can’t be removed because it’s inserted under the skin.
Use of AIT body scanners (also called millimeter wave scanners) has not been tested and may affect the system. Therefore, we recommend avoiding them and requesting hand-wanding or full-body pat-down and visual inspection instead.
Don’t put your system components through baggage x-ray machines.
Before your screening process begins, ask the Security Officer to perform a visual inspection of the receiver and your extra sensors. Place all system components in a separate bag before handing over to the Security Officer.
To use your smart device, receiver, or both to get glucose information while in the plane:
• Smart device: When you switch to airplane mode, keep Bluetooth on
• Receiver: Keep receiver on
Contact your airline for their policies.
Still Have Questions?Visit the TSA website at tsa.gov if you have any questions or concerns.
Email: [email protected]
Phone: 1.855.787.2227
51 • Dexcom G5 Mobile CGM System Getting Started Guide
Section 14: Need Help? You’re Not Alone!14.1 Dexcom Technical SupportThis group provides replacement units, resolves technical issues, and takes product complaints.
Call your Dexcom Technical Support Team, 24 hours a day, 7 days a week, if something is wrong with your system. The Dexcom Technical Support Team helps you with all CGM system-related issues, including CGM software issues. Dexcom Technical Support does not offer medical advice.
By Email: [email protected]
If you prefer to email, to help us help you best, include the following information in your email:
• Name of patient• Patient’s date of birth• Description of technical problem• When the problem happened (date and time)• Patient’s address • Patient’s phone number• Item SKU number and description (for example, name of the device)• Lot number and/or serial number(s) of affected devices (for example, sensor)• Your preferred contact method and information so Dexcom can reach you if
needed. For example: by phone 555-555-5555 after 5 pm Pacific Time
If you are using the app, you can use it to email technical support: Menu > Help > Contact Dexcom > Technical Support > Email
By Phone: Toll free: 1.888.738.3646; Toll: 1.858.200.0200
14.2 Dexcom Care TeamThe Dexcom Care Team is a group of Certified Diabetes Educators (CDE®) and Registered Nurses (RNs) offering you customer care and individualized education services around Dexcom CGM.
Dexcom Care provides education and support throughout your CGM experience, such as:
• Initial CGM product training• Ongoing Dexcom product education (for example, how to use a specific feature) • How to maximize Dexcom CGM use• Dexcom CGM reporting software and features• How to review and understand Dexcom CGM reports

Dexcom G5 Mobile CGM System Getting Started Guide • 52
By Phone Toll free: 1.888.738.3646; Toll: 1.858.200.0200
Available Monday-Friday 5:30 am - 8:00 pm PST (subject to change)
By Email: [email protected]
If you prefer email, include the following information in your email:
• Name of patient• Patient’s date of birth• Contact phone number• Reason for inquiry or education needed
14.3 Dexcom Inside Sales Support TeamFor help with:
• First-time orders• Re-orders• Tracking shipments • Locating a local Dexcom representative
By Internet: dexcom.com/order
By Phone: Toll free: 1.888.738.3646; Toll: 1.858.200.0200
By Email: [email protected]
By Fax: 1.877.633.9266
14.4 CorporateDexcom website: dexcom.com
Dexcom address: 6340 Sequence Drive, San Diego, CA 92121
14.5 ExploreDexcom makes CGM education easier for you with interactive web-based education programs. Go to: dexcom.com and click Support from the menu.
See how you can share your CGM data with friends and family with Dexcom Share and Follow. Go to: dexcom.com/apps
Have questions? They may be answered in the FAQ section on the Dexcom website.
53 • Dexcom G5 Mobile CGM System Getting Started Guide
Section 15: Warranty
15.1 Receiver Warranty Information Dexcom G5 Mobile CGM System Limited Warranty
What’s Covered and for How Long?Dexcom, Inc. (“Dexcom”) provides a limited warranty to the original purchaser (“you” or “Purchaser”) that the Dexcom receiver (the “receiver”) is free from defects in material and workmanship under normal use (“Limited Warranty”) for the period starting from the shipment date and continuing for a year following the shipment date (“Warranty Period”):
Dexcom receiver: 1 year from shipment date
NOTE: If you received this receiver as a replacement for an in-warranty receiver, the Limited Warranty for the original receiver shall continue for the Warranty Period on the original receiver, but the replacement is not subject to any other warranty.
What’s Not Covered?This Limited Warranty is based on the Purchaser properly using the CGM system in accordance with the documentation provided by Dexcom. You are not permitted to use the CGM system otherwise. You understand that misusing the CGM system, improperly accessing it or the information it processes and transmits, “jailbreaking” or “rooting” your CGM system or cell phone, and taking other unauthorized actions may put you at risk, cause the CGM system to malfunction, is not permitted and voids your Limited Warranty.
This Limited Warranty does not cover: 1. Defects or damage resulting from accident, misuse, abuse, neglect, unusual
physical, electrical or electromechanical stress, modification of any part of the product, or cosmetic damage.
2. Equipment with the ID number removed or made illegible.3. All surfaces and other externally exposed parts that are scratched or damaged
due to normal use.4. Malfunctions resulting from the use of the receiver in conjunction with
accessories, ancillary products, and peripheral equipment, whether hardware or software, not furnished or approved by Dexcom.
5. Defects or damage from improper testing, operation, maintenance, installation, or adjustment.
6. Installation, maintenance, and service of products or services other than the CGM system (which may be subject to a separate limited warranty), whether provided
Dexcom G5 Mobile CGM System Getting Started Guide • 54
by Dexcom or any other party; this includes your cell phone or smart device and your connection to the Internet.
7. Equipment which has been taken apart physically or which has had any of its software accessed in any unauthorized manner.
8. Water damage to the receiver.a. Receiver is not water resistant.b. Do not get the receiver wet at any time.
Dexcom’s Obligations Under the Limited WarrantyDuring the Warranty Period, Dexcom will replace, without charge to purchaser, any defective Dexcom G5 Mobile receiver.
To return, you must send the receiver to an authorized Dexcom Technical Support Department. Make sure you package the receiver adequately for shipping.
The return package needs to include:1. Receiver2. Sales receipt or comparable substitute proof of sale showing the date of
purchase 3. Receiver’s Serial Number 4. Seller’s name and address
Call Dexcom Technical Support Department for delivery information help:
• Toll free: 1.888.738.3646• Toll: 1.858.200.0200
Upon receipt, Dexcom will promptly replace the defective receiver.
If Dexcom determines the receiver isn’t covered by this Limited Warranty, Purchaser must pay all shipping charges for the receiver’s return by Dexcom.
Limits on Dexcom’s Warranty and Liability ObligationsThe Limited Warranty described above is the exclusive warranty for the receiver, and in lieu of all other warranties, expressed or implied, either in fact or by operation of law, statutory or otherwise.
Dexcom expressly excludes and disclaims all other warranties, including without limitation any warranty of merchantability, fitness for a particular purpose, or non-infringement, except to the extent prohibited by applicable law.
Dexcom shall not be liable for any special, incidental, consequential, or indirect damages, however caused, and on any theory of liability, arising in any way out of the sale, use, misuse, or inability to use, any Dexcom G5 Mobile or any feature or service provided by Dexcom for use with the Dexcom G5 Mobile.
55 • Dexcom G5 Mobile CGM System Getting Started Guide
These limits on Dexcom’s warranty and liability obligations apply even if Dexcom, or its agent, has been advised of such damages and notwithstanding any failure of essential purpose of this Limited Warranty and the limited remedy provided by Dexcom.
This Limited Warranty is only provided to the original Purchaser and can’t be transferred to anyone else, and states Purchaser’s exclusive remedy.
If any portion of this Limited Warranty is illegal or unenforceable by reason of any law, such partial illegality or enforceability shall not affect the enforceability of the remainder of this Limited Warranty. This Limited Warranty will be enforced to the maximum extent permitted by law.
15.2 Transmitter Warranty Information Dexcom G5 Mobile Transmitter Limited Warranty
What’s Covered and for How Long?Dexcom, Inc. (“Dexcom”) provides a limited warranty to the original purchaser that the Dexcom G5 Mobile transmitter is free from defects in material and workmanship under normal use for the period commencing on the date of first use by the original purchaser (the “Date of First Use”) and expiring three (3) months thereafter; provided, that, the Date of First use occurs within five (5) months of the date of shipment (or disbursement) of the transmitter to the original purchaser.
NOTE: If you received this transmitter as a replacement for an in-warranty transmitter, the Limited Warranty for the original transmitter shall continue for the Warranty Period on the original transmitter, but the replacement is not subject to any other warranty.
What’s Not Covered?This Limited Warranty is based on the Purchaser properly using the CGM system in a timely manner and in accordance with the documentation provided by Dexcom. You are not permitted to use the CGM system otherwise. You understand that misusing the CGM system, improperly accessing it or the information it processes and transmits, “jailbreaking” or “rooting” your CGM system or cell phone, and taking other unauthorized actions may put you at risk, cause the CGM system to malfunction, is not permitted and voids your Limited Warranty.
This Limited Warranty does not cover: 1. Defects or damage resulting from accident, misuse, abuse, neglect, unusual
physical, electrical or electromechanical stress, modification of any part of the product, or cosmetic damage.
2. Equipment with the ID number removed or made illegible. 3. All surfaces and other externally exposed parts that are scratched or damaged
due to normal use.

Dexcom G5 Mobile CGM System Getting Started Guide • 56
4. Malfunctions resulting from the use of the transmitter in conjunction with accessories, ancillary products, and peripheral equipment, whether hardware or software, not furnished or approved by Dexcom.
5. Defects or damage from improper testing, operation, maintenance, installation, or adjustment.
6. Installation, maintenance, and service of products or services other than the CGM system (which may be subject to a separate limited warranty), whether provided by Dexcom or any other party; this includes your cell phone or smart device and your connection to the Internet.
7. Equipment which has been taken apart physically or which has had any of its software accessed in any unauthorized manner.
8. Water damage to transmitter.a. Beyond specifications listed in Dexcom G5 Mobile user guide. Your options
to get the user guide: i. Download or view: dexcom.com/guides ii. Online request form to receive a free printed copy: dexcom.com/guide iii. Request a free copy by mail iv. Request a free copy by phone Toll free: 1.888.738.3646 Toll: 1.858.200.0200 v. Located on dexcom.com
Dexcom’s Obligations Under the Limited WarrantyDuring the Warranty Period, Dexcom will replace, without charge to purchaser, any defective Dexcom G5 Mobile transmitter.
To return, you must send the transmitter to an authorized Dexcom Technical Support Department. Make sure you package the transmitter adequately for shipping.
The return package needs to include:1. Transmitter2. Sales receipt or comparable substitute proof of sale showing the date of
purchase 3. Transmitter’s Serial Number 4. Seller’s name and address
Call Dexcom Technical Support for delivery information or help:
• Toll free: 1.888.738.3646• Toll: 1.858.200.0200
Upon receipt, Dexcom will promptly replace the defective transmitter.
If Dexcom determines the transmitter isn’t covered by this Limited Warranty, Purchaser must pay all shipping charges for the transmitter’s return by Dexcom.
57 • Dexcom G5 Mobile CGM System Getting Started Guide
Limits on Dexcom’s Warranty and Liability ObligationsThe Limited Warranty described above is the exclusive warranty for the transmitter, and in lieu of all other warranties, expressed or implied, either in fact or by operations of law, statutory or otherwise.
Dexcom expressly excludes and disclaims all other warranties, including without limitation any warranty merchantability, fitness for a particular purpose, or non-infringement, except to the extent prohibited by applicable law.
Dexcom shall not be liable for any special, incidental, consequential, or indirect damages, however caused, and on any theory of liability, arising in any way out of the sale, use, misuse, or inability to use, any Dexcom G5 Mobile or any feature or service provided by Dexcom for use with the Dexcom G5 Mobile.
These limits on Dexcom’s warranty and liability obligations apply even if Dexcom, or its agent, has been advised of such damages and notwithstanding any failure of essential purpose of this Limited Warranty and the limited remedy provided by Dexcom.
This Limited Warranty is only provided to the original Purchaser and can’t be transferred to anyone else, and states Purchaser’s exclusive remedy.
If any portion of this Limited Warranty is illegal or unenforceable by reason of any law, such partial illegality or enforceability shall not affect the enforceability of the remainder of this Limited Warranty.
This Limited Warranty will be enforced to the maximum extent permitted by law.
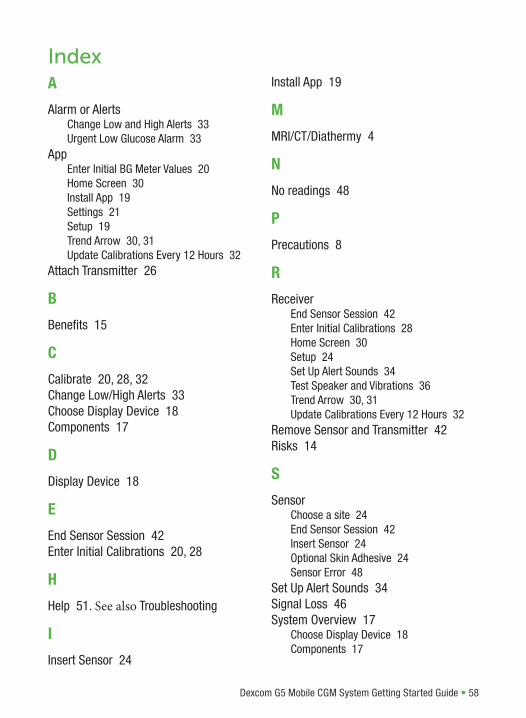
Dexcom G5 Mobile CGM System Getting Started Guide • 58
IndexA
Alarm or AlertsChange Low and High Alerts 33Urgent Low Glucose Alarm 33
AppEnter Initial BG Meter Values 20Home Screen 30Install App 19Settings 21Setup 19Trend Arrow 30, 31Update Calibrations Every 12 Hours 32
Attach Transmitter 26
B
Benefits 15
C
Calibrate 20, 28, 32Change Low/High Alerts 33Choose Display Device 18Components 17
D
Display Device 18
E
End Sensor Session 42Enter Initial Calibrations 20, 28
H
Help 51. See also Troubleshooting
I
Insert Sensor 24
Install App 19
M
MRI/CT/Diathermy 4
N
No readings 48
P
Precautions 8
R
ReceiverEnd Sensor Session 42Enter Initial Calibrations 28Home Screen 30Setup 24Set Up Alert Sounds 34Test Speaker and Vibrations 36Trend Arrow 30, 31Update Calibrations Every 12 Hours 32
Remove Sensor and Transmitter 42Risks 14
S
SensorChoose a site 24End Sensor Session 42Insert Sensor 24Optional Skin Adhesive 24Sensor Error 48
Set Up Alert Sounds 34Signal Loss 46System Overview 17
Choose Display Device 18Components 17
59 • Dexcom G5 Mobile CGM System Getting Started Guide
T
Training Options 3Transmitter
Attach 26Transmitter Not Found 48. See also Troubleshooting
Travel 50Treatment Decisions 38, 41Trend Arrow 30, 31Troubleshooting 45
Calibration Errors 49No Readings 48Sensor Errors 46Sensor Glucose Readings 48Signal Loss 46Speaker Test 36, 45System check 46Transmitter Errors 45, 47
W
Warnings 5Warranty 53
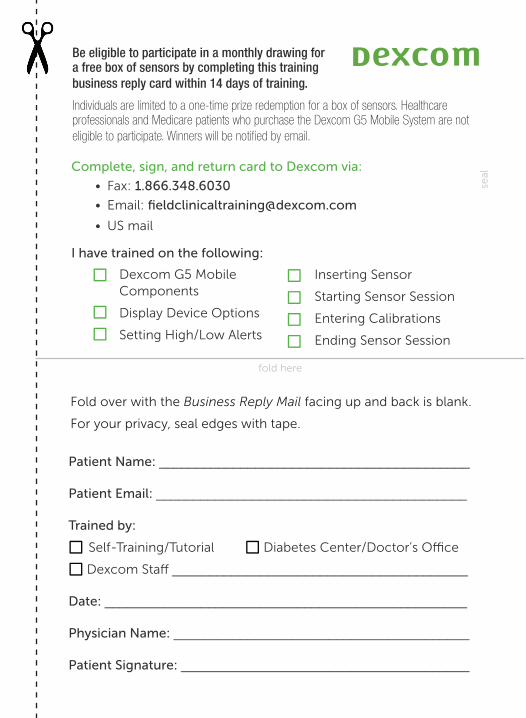
Complete, sign, and return card to Dexcom via:
• Fax: 1.866.348.6030
• Email: [email protected]
• US mail
I have trained on the following:
Patient Name: __________________________________________
Patient Email: __________________________________________
Trained by:
n Self-Training/Tutorial n Diabetes Center/Doctor’s Office
n Dexcom Staff ________________________________________
Date: _________________________________________________
Physician Name: ________________________________________
Patient Signature: _______________________________________
Dexcom G5 MobileComponents
Display Device Options
Setting High/Low Alerts
n
nn
fold here
seal
Fold over with the Business Reply Mail facing up and back is blank.
For your privacy, seal edges with tape.
Be eligible to participate in a monthly drawing for a free box of sensors by completing this training business reply card within 14 days of training.
Inserting Sensor
Starting Sensor Session
Entering Calibrations
Ending Sensor Session
nnnn
Individuals are limited to a one-time prize redemption for a box of sensors. Healthcare professionals and Medicare patients who purchase the Dexcom G5 Mobile System are not eligible to participate. Winners will be notified by email.
ATTN.: TRAINING DEPT. DEXCOM, INC. 6340 SEQUENCE DR. SAN DIEGO, CA 92121-9942
NO POSTAGENECESSARY
IF MAILEDIN THE
UNITED STATES
BUSINESS REPLY MAIL FIRST-CLASS MAILSAN DIEGO CA PERMIT NO 28592
POSTAGE WILL BE PAID BY ADDRESSEE
Artwork for User Defined (4.25" x 6")Layout: dex com.LYTMarch 15, 2010
Produced by DAZzle Designer, Version 9.0.05(c) 1993-2009, Endicia, www.Endicia.comU.S. Postal Service, Serial #
IMPORTANT: DO NOT ENLARGE, REDUCE OR MOVE the FIM and POSTNET barcodes. They are only valid as printed! Special care must be taken to ensure FIM and POSTNET barcode are actual size AND placed properly on the mail piece to meet both USPS regulations and automation compatibility standards.
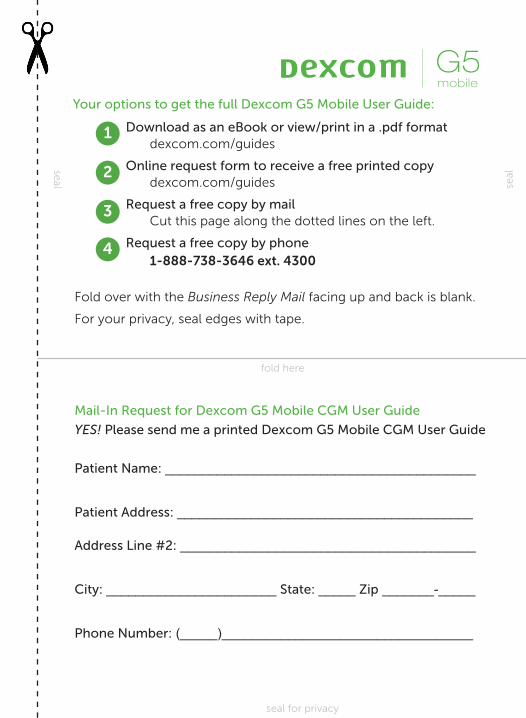
Your options to get the full Dexcom G5 Mobile User Guide:
Mail-In Request for Dexcom G5 Mobile CGM User Guide
YES! Please send me a printed Dexcom G5 Mobile CGM User Guide
Patient Name: __________________________________________
Patient Address: ________________________________________
Address Line #2: ________________________________________
City: _______________________ State: _____ Zip _______-_____
Phone Number: (_____)__________________________________
Download as an eBook or view/print in a .pdf format dexcom.com/guides
Online request form to receive a free printed copy dexcom.com/guides
Request a free copy by mail Cut this page along the dotted lines on the left.
Request a free copy by phone 1-888-738-3646 ext. 4300
seal for privacy
Fold over with the Business Reply Mail facing up and back is blank.
For your privacy, seal edges with tape.
seal
seal
fold here
1
2
3
4
ATTN.: TRAINING DEPT. DEXCOM, INC. 6340 SEQUENCE DR. SAN DIEGO, CA 92121-9942
NO POSTAGENECESSARY
IF MAILEDIN THE
UNITED STATES
BUSINESS REPLY MAIL FIRST-CLASS MAILSAN DIEGO CA PERMIT NO 28592
POSTAGE WILL BE PAID BY ADDRESSEE
Artwork for User Defined (4.25" x 6")Layout: dex com.LYTMarch 15, 2010
Produced by DAZzle Designer, Version 9.0.05(c) 1993-2009, Endicia, www.Endicia.comU.S. Postal Service, Serial #
IMPORTANT: DO NOT ENLARGE, REDUCE OR MOVE the FIM and POSTNET barcodes. They are only valid as printed! Special care must be taken to ensure FIM and POSTNET barcode are actual size AND placed properly on the mail piece to meet both USPS regulations and automation compatibility standards.


65 • Dexcom G5 Mobile CGM System Getting Started Guide
LBL015015 Rev 006 MT24705Rev date: 03/2020
Dexcom, Inc.6340 Sequence DriveSan Diego, CA 92121 USA
Phone: 858.200.0200Tech Support: 888.738.3646Web: dexcom.com
Covered by patents www.dexcom.com/patents.Dexcom, Dexcom Follow, and Dexcom Share are registered trademarks of Dexcom, Inc. in the United States and may be in other countries. Bluetooth is a registered trademark owned by Bluetooth SIG, Inc. Apple is a trademark of Apple Inc., registered in the U.S. and other countries. Android is a registered trademark owned by Alphabet Inc. All other marks are property of their respective owners.
© 2020 Dexcom, Inc. All rights reserved.