Blended Learning: Interactive Lectures, Games, Badges & SCORM

Intermediate PowerPoint
Developing Interactive Lectures with PowerPoint 2007 [Type the document subtitle]

CFD Workshop - Developing Interactive Lectures with PowerPoint 2007 2 | P a g e
Developed by W. Mei Fang, Senior Instructional Designer, Center for Faculty Development and Support, SJSU
Table of Contents
Customize Slide Theme and Background ........................................................................................ 2
Apply Animated Effects .................................................................................................................... 3
Insert SmartArt ................................................................................................................................. 4
Insert Media Object - Sound ............................................................................................................. 6
Insert Media Object – Movie ............................................................................................................. 7
Format the Appearance of Image Objects ....................................................................................... 8
Insert and Manipulate Shapes ........................................................................................................ 10
Create Action Buttons .................................................................................................................... 10
Insert Action Button to the Slide Master ......................................................................................... 12
Apply Transitional Animated Effect between Slides ....................................................................... 14

CFD Workshop - Developing Interactive Lectures with PowerPoint 2007 3 | P a g e
Developed by W. Mei Fang, Senior Instructional Designer, Center for Faculty Development and Support, SJSU
Customize Slide Theme and Background 1. Go to the View tab and select Slide Master view. The set of layout templates appears.
2. Click on the Themes icon and select the design theme that fits your need. As your cursor
rolls over you can preview the effects. 3. Click on the red Close icon on the upper right to return to your Normal view.
Apply Animated Effects 1. Highlight the object or text placeholder you want to apply an animation effect. 2. Go to the Animation tab and select Custom Animations. The Custom Animation panel appears on
the right.
3. Click on the down arrow next to Add Effect icon you will see four categories of effects: entrance
effect, emphasis effect, exit effect, and Motion Paths.

CFD Workshop - Developing Interactive Lectures with PowerPoint 2007 4 | P a g e
Developed by W. Mei Fang, Senior Instructional Designer, Center for Faculty Development and Support, SJSU
4. Click on More Effects to see the sub groups of options in the Effects. Click on an effect label and see the preview take place in your slide. Click OK when done.
5. The selected effect appears in the panel below the options of Start (when will the effect take place, such as after mouse click, automatically after the last mouse click, or at the same time of the last mouse click), Directions (direction of the effect in motion, such as from left, from top, etc.), and Speed (motion speed of the effect). If you want to change the effect, just select this item in the panel and go to click on down arrow next to (previously the Add Effect icon) the Change icon and repeat the selection process. Most effects will have options for Direction and Speed.
6. When you double click on the effect item, you will see more options for effect control.
Insert SmartArt 1. In your slide click on the SmartArt Graphic icon in your text placeholder. (Or you can go to the
Insert tab and navigate to SmartArt icon)
OR 2. Base on your need, select the group of SmartArt objects in the list and the options of that group
appears on the right. Click on the miniature of the SmartArt object that you need and the object is inserted in your slide.

CFD Workshop - Developing Interactive Lectures with PowerPoint 2007 5 | P a g e
Developed by W. Mei Fang, Senior Instructional Designer, Center for Faculty Development and Support, SJSU
3. Type directly in the text placholders in the SmartArt or click on the arrows on the left to expand the
text input panel. Click the Close icon on the upper right of this input panel when done.

CFD Workshop - Developing Interactive Lectures with PowerPoint 2007 6 | P a g e
Developed by W. Mei Fang, Senior Instructional Designer, Center for Faculty Development and Support, SJSU
Insert Media Object - Sound 1. Go to the Insert tab and navigate to Sound in the Media group.
2. Select Insert from File, the file directory window will appear. Locate your sound file and click
Insert. Sound files in .wav, .aiff, mp3 formats are compatible. The rest of the procedure is the same as inserting sound from the Clip Organizer in the following paragraphs.
3. Select Sound from Clip Organizer. The panel of Clip Organizer appears on the right. 4. Input a key word in the Search field and click Go. The selected file/s will show up below the
Results should be field in your panel. Click on the down arrow next to the sound clip icon of your choice and click on Insert to import the sound clip to your slide.
5. After the sound clip is being inserted to your slide, the following dialog box appears to ask you when to play the media file: immediately or when clicked.
CFD Workshop - Developing Interactive Lectures with PowerPoint 2007 7 | P a g e
Developed by W. Mei Fang, Senior Instructional Designer, Center for Faculty Development and Support, SJSU
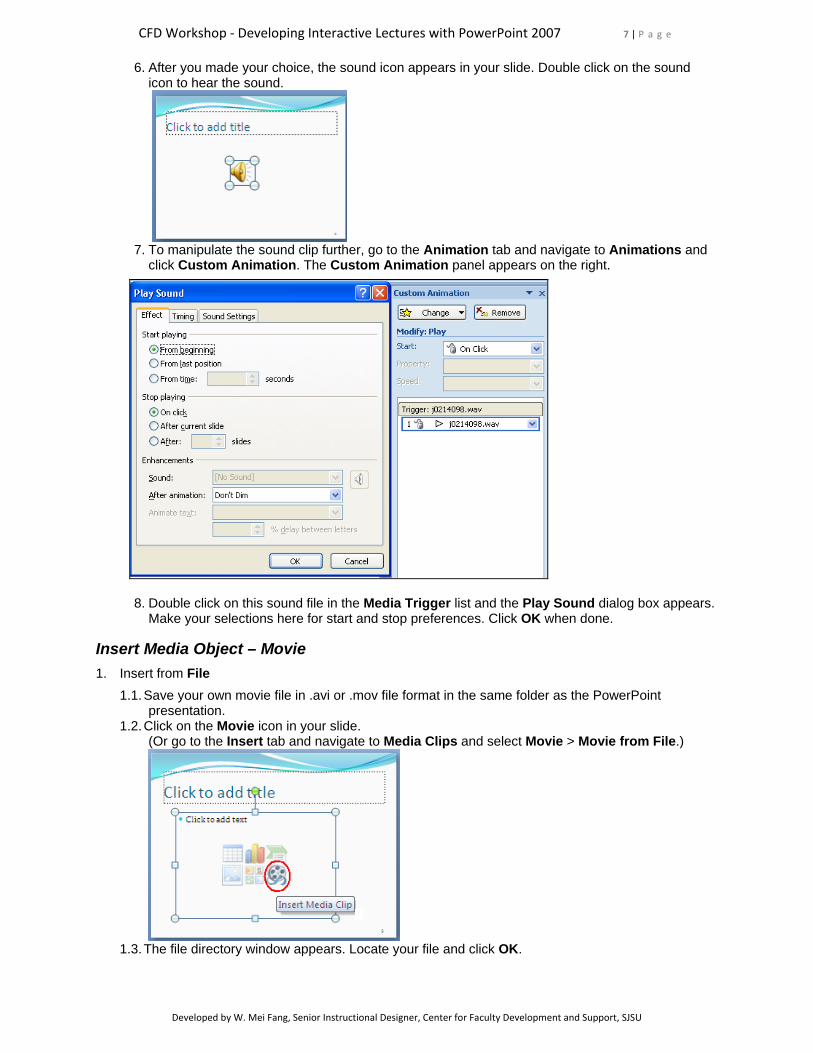
6. After you made your choice, the sound icon appears in your slide. Double click on the sound icon to hear the sound.
7. To manipulate the sound clip further, go to the Animation tab and navigate to Animations and
click Custom Animation. The Custom Animation panel appears on the right.
8. Double click on this sound file in the Media Trigger list and the Play Sound dialog box appears. Make your selections here for start and stop preferences. Click OK when done.
Insert Media Object – Movie 1. Insert from File
1.1. Save your own movie file in .avi or .mov file format in the same folder as the PowerPoint presentation.
1.2. Click on the Movie icon in your slide. (Or go to the Insert tab and navigate to Media Clips and select Movie > Movie from File.)
1.3. The file directory window appears. Locate your file and click OK.

CFD Workshop - Developing Interactive Lectures with PowerPoint 2007 8 | P a g e
Developed by W. Mei Fang, Senior Instructional Designer, Center for Faculty Development and Support, SJSU
1.4. The following dialog box appears asking you when the file should be played: automatically or when clicked. Select your preference and the first frame of your movie will be inserted to your slide
1.5. To manipulate the movie further, go to the Movie/Options tab and click on one of the functions:
Movie Options, Arrange or Size option groups. For example, when you click on the Movie Options group, more options when to start movie, play full, etc. will appear.
2. Create a hyperlink that links to a movie clip on the Internet: 2.1. Highlight the text or object that will be linked. 2.2. Go to the Insert tab and select Hyperlink in the Links group. 2.3. Input or paste the copied URL (i.e. URL of a Youtube movie) into the Address field. Click OK
when done. Test movie in the Slide Show view mode. 3. Insert from the Clip Organizer or online Clip Organizer Gallery
3.1. Clip Arts Gallery only offers animated images when you select movies as the file type. It does not offer video clips yet.
3.2. Enter the search key words and select Movies as the file type under Results should be field. Click the Go button. The findings appear as icons in the panel below. Next to each of these icons you will find a yellow star that differentiates an animated image from a static image.
3.3. Click the icon to insert to slide. Test movie in the Slide Show view mode. 4. Insert from the Clip Organizer or online Clip Organizer Gallery
4.1. Clip Arts Gallery only offers animated images when you select movies as the file type. It does not offer video clips yet.
4.2. Enter the search key words and select Movies as the file type under Results should be field. Click the Go button. The findings appear as icons in the panel below. Next to each of these icons you will find a yellow star that differentiates an animated image from a static image.
4.3. Click the icon to insert to slide.
Format the Appearance of Image Objects 1. Select image object in your slide. The Format/Picture Tools tab appears. Click on the Format tab.

CFD Workshop - Developing Interactive Lectures with PowerPoint 2007 9 | P a g e
Developed by W. Mei Fang, Senior Instructional Designer, Center for Faculty Development and Support, SJSU
2. Remember to select your objects to be formatted first then apply the formatting functions from the groups.
2.1. In the Adjust group you can use the functions to change the overall appearance of the content of your image.
2.2. In the Picture Styles group you can add frames or simple dimensions to your image object. You can further manipulate the dimensions or colors in this group of functions
2.3. In the Arrange group, you can group or ungroup the objects. 2.4. When you have similar images, you could group them as one collage and to provide one
alternative text (alt text) to the group, 2.4.1. Go to the Insert ribbon, select Shapes. Go to the bottom of the list of Shapes and select
Create a Drawing Canvas. A canvas in dotted line appears. 2.4.2. Insert the images in the Canvas. Select all the images (shift key +mouse click selection),
Right click on one of the images and the option list appears. 2.4.3. Click on Grouping and select the Group command. Now the images are grouped as one
image. Notice only one green handle and few less white corner anchor points appear .
2.4.4. To add Alt Text, right click on the Canvas and select Format Picture and the Format Picture window appears. Select the Alt text tab and Input your description of the collage.
2.5. In the Size group, you can use the Crop tool to remove unwanted areas of your image or specific a specific size manipulation.
CFD Workshop - Developing Interactive Lectures with PowerPoint 2007 10 | P a g e
Developed by W. Mei Fang, Senior Instructional Designer, Center for Faculty Development and Support, SJSU
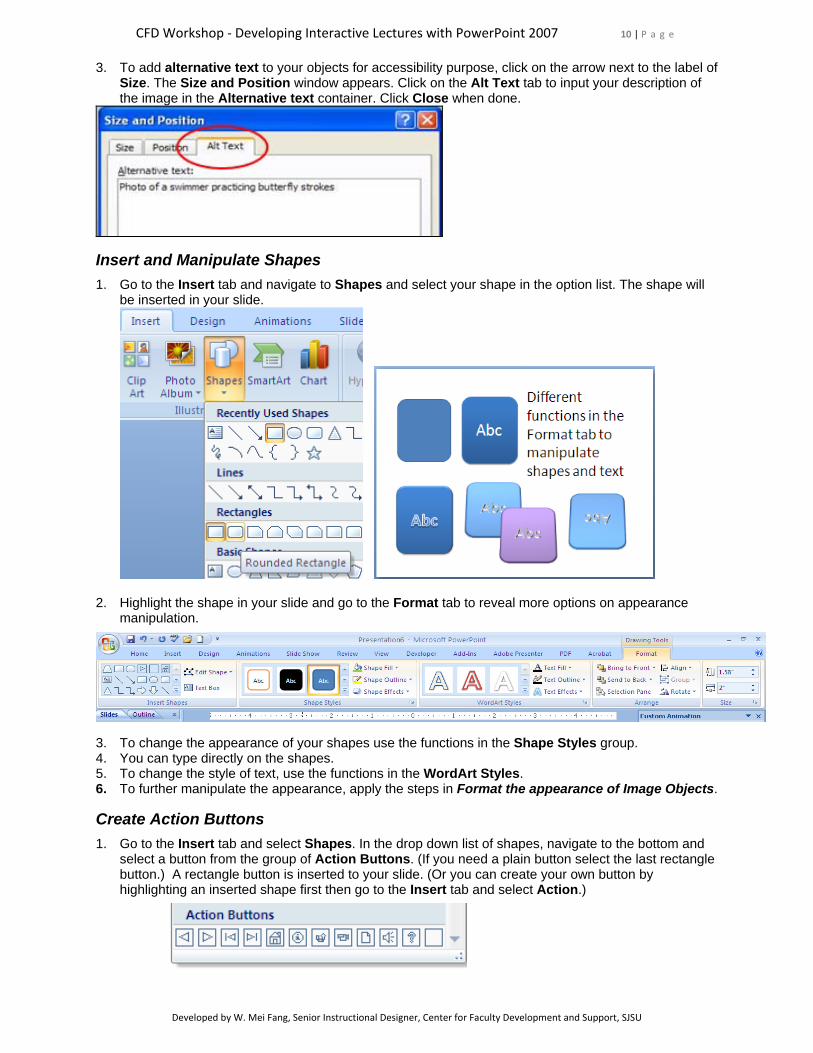
3. To add alternative text to your objects for accessibility purpose, click on the arrow next to the label of Size. The Size and Position window appears. Click on the Alt Text tab to input your description of the image in the Alternative text container. Click Close when done.
Insert and Manipulate Shapes 1. Go to the Insert tab and navigate to Shapes and select your shape in the option list. The shape will
be inserted in your slide.
2. Highlight the shape in your slide and go to the Format tab to reveal more options on appearance manipulation.
3. To change the appearance of your shapes use the functions in the Shape Styles group. 4. You can type directly on the shapes. 5. To change the style of text, use the functions in the WordArt Styles. 6. To further manipulate the appearance, apply the steps in Format the appearance of Image Objects.
Create Action Buttons 1. Go to the Insert tab and select Shapes. In the drop down list of shapes, navigate to the bottom and
select a button from the group of Action Buttons. (If you need a plain button select the last rectangle button.) A rectangle button is inserted to your slide. (Or you can create your own button by highlighting an inserted shape first then go to the Insert tab and select Action.)

CFD Workshop - Developing Interactive Lectures with PowerPoint 2007 11 | P a g e
Developed by W. Mei Fang, Senior Instructional Designer, Center for Faculty Development and Support, SJSU
2. Select the button that fits your need in terms of navigation or media files launch options. 3. The Action Button is inserted to your slide and the Action Settings dialog box appears.
4. Select the Hyperlink to radio button as your action option and your Hyperlink action option list is highlighted. Click on the scroll bar to reveal more options for navigation action.
5. For example, you can select a slide in your file or select another PowerPoint file as the hyperlink
destination. Click OK when done. 6. Test action in Slide Show view mode and test the action button.

CFD Workshop - Developing Interactive Lectures with PowerPoint 2007 12 | P a g e
Developed by W. Mei Fang, Senior Instructional Designer, Center for Faculty Development and Support, SJSU
Insert Action Button to the Slide Master 1. If you want to create an action button, or background graphics, on every page, such as a go to home
button, you should create them in the Slide Master layout templates such that one application will affect all slides.
2. Go to the View tab and select Slide Master view. Select the top number 1 master. 3. Repeat the steps of Creating Action Buttons to insert button and apply action.
4. Click the Normal view to return to your slides. You will see the Home button appear in all your slides.

CFD Workshop - Developing Interactive Lectures with PowerPoint 2007 13 | P a g e
Developed by W. Mei Fang, Senior Instructional Designer, Center for Faculty Development and Support, SJSU
5. If there is a slide master layout that you prefer not to have any buttons or any background graphics, select the layout of that slide and go to the slide Master tab and select Hide Background Graphics function.

CFD Workshop - Developing Interactive Lectures with PowerPoint 2007 14 | P a g e
Developed by W. Mei Fang, Senior Instructional Designer, Center for Faculty Development and Support, SJSU
Apply Transitional Animated Effect between Slides 1. Go to the Animations tab and navigate to the Transitions to This Slide group. As your cursor rolls
over the miniature icons of effect you can see the preview of the effect in your slide.
2. Click on the expand-down arrow next to the icons to reveal more options.
3. You can apply an effect to a specific slide or all slides. If all, select the Apply To All button.