Designer bacteria bio… · 4 Introduction to synthetic biology and practical key 5 Overview figure...
12
National Centre for Biotechnology Education Designer bacteria S ynthetic biology kit Student’s guide 1.2
Transcript of Designer bacteria bio… · 4 Introduction to synthetic biology and practical key 5 Overview figure...

National Centre forBiotechnology Education
Designer bacteria
Synthetic biology kit
Student’s guide1.2

2
Synthetic Biology for Schools

3
Contents page
1 Front cover
3 Contents page
4 Introduction to synthetic biology and practical key
5 Overview figure of the practical
6 Key principles
7 Learning outcomes and key terms
8-9 Technical help and understanding the practical
10-11 The practical: step-by-step guide
12 The results
Synthetic Biology for Schools
www.ncbe.reading.ac.uk

4
Synthetic Biology for Schools
Engineering biological systemsSynthetic means to synthesise something that mimics a natural product. In chemistry, specific reagents can be combined in a controlled environment to produce a whole range of products such as salts, acids and medicines. In the textile industry, synthetic fibres are made such as nylon or acrylic. These can offer certain advantages over natural fibres for instance being designed to be water or stain resistant.
In biology, synthetic has a similar meaning; scientists can design biological systems for a tailor-made purpose. These pre-designed systems could be individual molecules, cells, or whole tissues or organisms. They can display functions not found naturally in the environment and so the construction of such systems are tightly regulated.
Synthetic biology is a rapidly growing area of research, systems are often modelled using computer software before they are synthesised. Bacteria and yeast are widely used since it is easy to incorporate new genetic information into their cells, giving them the blueprint for a new protein or compound. An example
of this is the production of artemisinin, which is an antimalarial drug normally isolated from Artemisia annua, a herb commonly called sweet wormwood. This is an expensive process and there is an insufficient supply due to the short growing season of the herb. Scientists have come up with two routes to biosynthetically produce this antimalarial drug, one uses yeast and the other uses moss. In both cases the scientists introduce the genes needed for the yeast or moss cells to first produce the precursor molecule to artemisinin, which is then converted into the antimalarial drug. The production of this drug using moss looks very promising since it can be done quickly and efficiently on a very large scale, meaning the costs would be relatively low.
Scientists are only just scratching the surface of what will be possible in the future through synthetic biology, from bacteria or enzymes that could break down plastics and waste to those that could produce renewable energy sources. It is an exciting time to be a scientist!
Practical Key
The 1.5 ml yellow tube contains ligase and buffer containing ATP for ligation of your plasmid
NCBE-GFP-Amp
plasmid
Green fluorescent protein gene
Ampicillin resistance gene
Origin of replication to enable bacteria to replicate the plasmid
NCBE-RFP-Amp
plasmid
Red fluorescent protein gene
Ampicillin resistance gene
Origin of replication to enable bacteria to replicate the plasmid
The 1.5 ml red tube contains the RFP plasmid
The 1.5 ml green tube contains the GFP plasmid
The small 0.5 ml green tube contains restriction enzymes to digest the GFP plasmid
The small 0.5 ml red tube contains restriction enzymes to digest the RFP plasmid
N C B E - K a n -
plasmid
Kanamycin resistance gene
Origin of replication to enable bacteria to replicate the plasmid
The 1.5 ml purple tube contains the Kan- plasmid
The small 0.5 ml purple tube contains restriction enzymes to digest the Kan- plasmid
The 1.5 ml screw top tube will be given to you for the transformation. It contains 1 ml of DH10B E. coli
The 1.5 ml clear tube will be given to you for the transformation. It contains calcium chloride solution, which you will use as your transformation buffer
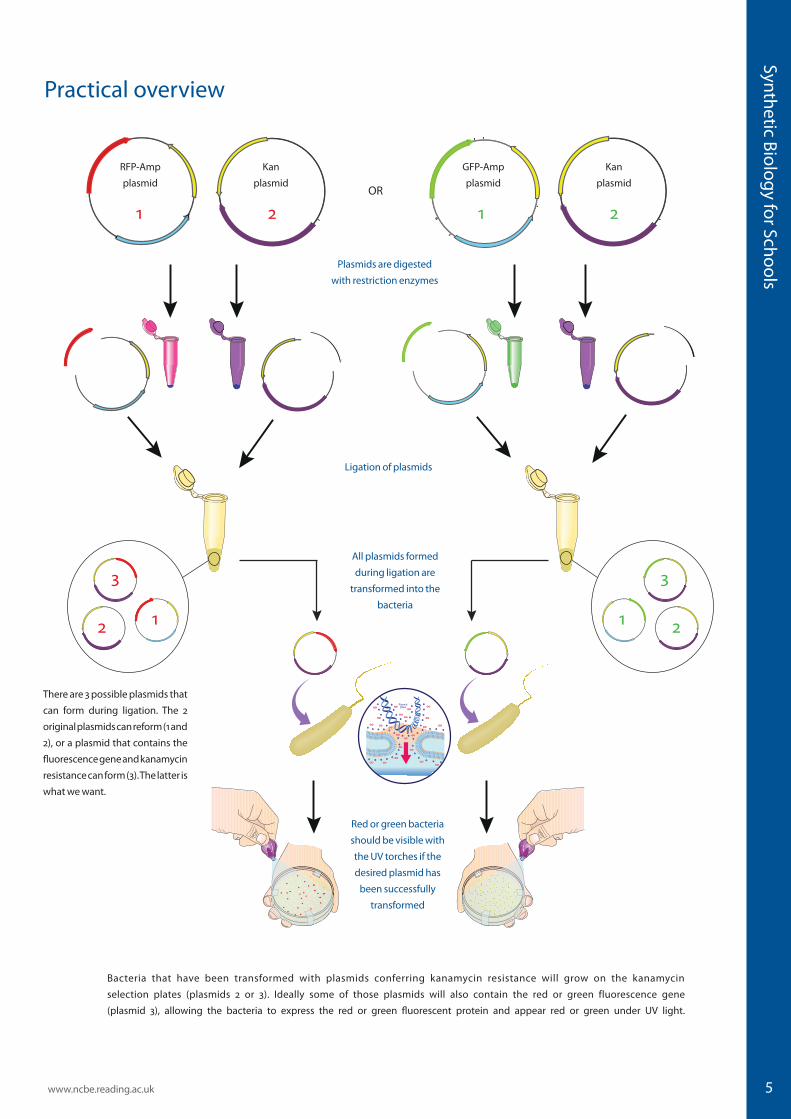
In this practical you will be undertaking some synthetic biology. You will have the choice of whether to make red or green fluorescent bacteria. First you will need to cut the fluorescent gene of choice out of the starting plasmid and ligate it into a plasmid containing a kanamycin resistance gene. You can then transform the resulting plasmid into the bacteria, which will express the fluorescent protein and fluoresce red or green under UV light.
5
Synthetic Biology for Schools
www.ncbe.reading.ac.uk
Practical overview
Bacteria that have been transformed with plasmids conferring kanamycin resistance will grow on the kanamycin
selection plates (plasmids 2 or 3). Ideally some of those plasmids will also contain the red or green fluorescence gene
(plasmid 3), allowing the bacteria to express the red or green fluorescent protein and appear red or green under UV light.
PlasmidDNA
OR
RFP-Amp
plasmid
GFP-Amp
plasmid
Kan
plasmid
Kan
plasmid
Plasmids are digested
with restriction enzymes
Ligation of plasmids
There are 3 possible plasmids that
can form during ligation. The 2
original plasmids can reform (1 and
2), or a plasmid that contains the
fluorescence gene and kanamycin
resistance can form (3). The latter is
what we want.
All plasmids formed
during ligation are
transformed into the
bacteria
Red or green bacteria
should be visible with
the UV torches if the
desired plasmid has
been successfully
transformed
1 21 2
12
3
1 2
3

6
Synthetic Biology for Schools
Key principlesIn this practical, we will cover many aspects of biotechnology and genetic modification, such as plasmids, restriction enzymes, ligation and bacterial transformation. You will gain experience in using restriction enzymes to cut out the fluorescent gene of choice and insert this into a second plasmid using ligase. You will learn about marker genes and the need for antibiotic resistance genes in genetic engineering. During the transformation section you will get to practice aseptic technique along with learning how to transform bacteria and why steps such as heat shock are necessary.
In biotechnology small circular pieces of DNA, called plasmids, are often used to transport genetic information into an organism so the gene of interest (GOI) can be expressed. These plasmids will contain control regions such as promoters, which are specific sequences that tell the bacteria where the start of the gene is during transcription. Additionally, a termination sequence is also needed that shows the bacteria where the gene ends.
Below is the starting plasmid for those making green bacteria. It contains the green fluorescent protein gene (GFP) that you will cut out and insert into the plasmid containing the kanamycin resistance gene. The control regions are labelled, as are the cut sites for the restriction enzymes. For those making red bacteria, the plasmid looks the same except there is a red fluorescent protein gene instead. The cut sites and control regions are the same as the plasmid shown.
Green fluorescent protein gene
Ampicillin resistance gene
Origin of replication to enable bacteria to replicate the plasmid
Restriction enzyme cut site 2
Restriction
enzyme cut site 1
Promoter for
GFP gene
Promoter for
ampicillin gene
Termination region
for GFP gene
Restriction enzyme cut site 1 is cut by EcoRI. This restriction enzyme recognises the following sequence and cuts as shown by the arrows
5’ GAATTC 3’
3’ CTTAAG 5’
5’ G AATTC 3’
3’ CTTAA G 5’
EcoRI leaves overhanging ends after cuttingCut sites The overhanging ends following cutting or “sticky ends”, as they are commonly called, will be the same if the same restriction enzyme is used. This is why we use the same restriction enzymes to cut both the fluorescent gene and the kanamycin resistance plasmid, so the “sticky ends” complement each other and the gene can be easily inserted into the plasmid in the right orientation (see theory task on page 7 and task sheet).
5’ ACTAGT 3’
3’ TGATCA 5’
5’ A CTAGT 3’
3’ TGATC A 5’
SpeI leaves overhanging ends after cuttingCut sites
Restriction enzyme cut site 2 is cut by SpeI. This restriction enzyme recognises the following sequence and cuts as shown by the arrows
Restriction enzymes are produced by bacteria to protect themselves from invading phage viruses, we can purify the restriction enzymes from bacteria for use in scientific research. EcoRI is isolated from Escherichia coli, which is where it gets its name. SpeI is isolated from Sphaerotilus sp. Restriction enzymes vary in price depending on how easy they are to produce (how fast growing the bacteria are and how large the yield of enzyme is from a defined volume of bacteria).

7
Synthetic Biology for Schools
www.ncbe.reading.ac.uk
The theory taskEach group will either make red or green fluorescent bacteria. You will each be given the corresponding theory task.
This task shows you what your starting plasmids look like, and how when you cut both plasmids with the same two restriction enzymes, the green or red gene can only fit into the second plasmid containing the kanamycin resistance gene in the desired orientation. Refer to the instructions shown on the theory task.
Restriction enzymes. Each enzyme only recognises a specific sequence of bases on the DNA strand. Restriction enzymes will allow you to cut out your desired gene so you can move it into another DNA plasmid.
Ligase: Ligase is an enzyme that catalyses the formation of phosphodiester bonds on double stranded DNA. It acts like glue, allowing you to insert your fluorescent gene into another plasmid. The bases from the sticky ends will align by complementary base pairing at both cut sites and the ligase will join the DNA strands by forming phosphodiester bonds on both strands so the plasmid is once again a circular piece of DNA.
At the end of this practical you should understand how synthetic biologists engineer plasmids, using both restriction enzymes and ligase. You should also understand how these plasmids are then transformed into bacteria and how the bacteria express the new genetic material. In addition, you should have a good grasp of aseptic technique.
After reading page 6, you should now be able to visualise how the restriction enzymes will cut your plasmids. Restriction enzymes must be kept at -20 °C or they loose their efficacy, however this wouldn’t be practical for a school experiment. The restriction enzymes you are going to use are dried to eliminate this problem; you will resuspend the enzymes when you add your plasmids to the enzyme tubes.
Following digestion you will mix your two plasmids and add ligase to stick the fluorescent gene into the kanamycin resistance plasmid. The insertion of the fluorescent gene into the kanamycin resistance plasmid will happen by chance, since obviously the fluorescent gene could also re-insert into its original plasmid. However, at least some of the desired plasmid should be made.
The plasmids will be transformed into bacteria, only those with the fluorescent gene and the kanamycin resistance gene will be able to grow on the plates and fluoresce red or green.
Some key terms and definitions for you to remember are shown below.
Learning outcomes and key terms
Antibiotic resistance genes: It is important to have an antibiotic resistance gene on your final plasmid so that only those bacteria that have been successfully transformed can grow on the antibiotic selection plates. Kanamycin tends to be more stable than ampicillin, which is why we want to cut the fluorescent gene out of its original plasmid that contains an ampicillin resistance gene and insert it into a plasmid containing a kanamycin resistance gene. This gene enables the bacteria to produce an enzyme, which inactivates the kanamycin allowing them to grow.
Marker genes: In biotechnology we often want bacteria to produce a specific compound or protein that can then be purified, it is therefore useful to be able to identify which bacterial colony on a plate has successfully taken up the plasmid containing the GOI. This can be done by using, for example, a fluorescent marker gene. This may be coupled with a GOI so that any bacteria that have been successfully transformed with the GOI are fluorescent and can therefore be easily identified.
In this practical we are not trying to produce a specific compound or protein that we can purify, but keep in mind that another gene could be included on the plasmid with the fluorescent gene, so that a fluorescent bacterial colony would demonstrate the presence of the desired gene.
AATTC G
AATTC G
DNA from
kanamycin
resistance
plasmid
DNA from
fluorescent
green gene
Both been cut with EcoRI
Commplementary base pairing ensures the gene is inserted in the right orientation and the arrows show where the ligase forms a phosphodiester bond

8
Synthetic Biology for Schools
The microsyringes are designed to be fitted with disposable tips, just like micropipettes. Each tip should be used only once, then thrown away. The tips are marked at 1, 5, 10 and 20 microlitres (µl), allowing small volumes of liquid to be dispensed with precision. The best results will be obtained if you observe the following precautions:
• Ensure the tip is firmly on the microsyringe to ensure a tight seal and to make sure it doesn’t fall off during pipetting.
• Never pull the plunger right out of the microsyringe — when the plunger is re-inserted the seal may become damaged.
• Before you load the microsyringe, pull the plunger out a little (1–2 mm). This will give you some extra air with which to expel the last drop of liquid from the tip.
• When you dispense liquids, hold the microsyringe as near to vertical as possible, and at eye level so that you can see what you are doing.
• Remove the liquid from the point of the microsyringe tip by holding it against the inner wall of the tube into which you are transferring the liquid.
• Do not touch the point of the microsyringe tip with your fingers. There are proteases and DNases on your skin, which may contaminate and break down the enzymes and DNA.
Mass A microgram is one millionth of a gram
1 000 micrograms (µg) = 1 milligram (mg) 1 000 milligrams = 1 gram (g)
Volume A microlitre is one millionth of a litre 1 000 microlitres (µl) = 1 millilitre (ml)
1 000 millilitres = 1 litre (l)
Microsyringe
10 µl
1 µl
Graduated tip
Hold here Do not touch
the point!
Using the microsyringes
In molecular biology we work with very small volumes of liquid, sometimes we need to use less than 1 microlitre (µl). A microlitre is 1000th of a millilitre (ml) and 1 millilitre is 1000th of a litre (l). An average glass of juice or water is 250 ml, so this would contain 250, 000 µl.
We need very precise techniques and equipment to work with such small volumes. Generally in a research lab we would use micropipettes. These allow us to move microlitre volumes from one tube to another, however, they are expensive. In this practical, you are going to be using a microsyringe, which is a simplified version of the micropipette.
Using small volumes
Water baths
In this practical you will need 2 water baths. For the restriction enzyme digest you will need a water bath at 37 °C since this is the optimum temperature for enzymes to cut DNA. If you are doing the optional enzyme denaturation step you will need a second water bath set to 80 °C. For the ligation you will need a water bath set to 65 °C to denature the ligase and for the transformation you will need a water bath set to 42 °C to heat shock the bacteria. If the practical is being carried out in one go then the 37 °C water bath can be increased to 42 °C after the digest and the 80 °C water bath can be turned down to 65 °C. It is very important to check the temperature of the water baths with a thermometer since the control dial on a water bath is not very accurate.
Understanding the practical
5 µl
20 µl
Micropipette

9
Synthetic Biology for Schools
www.ncbe.reading.ac.uk
Incubator
You will need to use an incubator set to 37 °C to incubate your plates after transformation. You will first incubate your plates for 30 minutes with the lid uppermost so that the bacteria can soak into the agar. You will then invert them, so the base is uppermost for 24 hours to allow the transformed bacteria to grow.
It is safe to incubate the transformed bacteria in this practical at 37 °C since the E.coli strain we are using is non-pathogenic. However, aseptic technique must be followed to minimise the chances of any other microorganisms growing on the agar plates.
Plasmid DNA enters bacteria through holes
in cell membrane
The heat-shock step dramatically increases the number of pores that open on the bacterial cell membrane and forces the plasmid to enter the bacterial cells. This greatly increases the amount of plasmid that is taken up into the cells. The bacteria are returned to the ice to allow the membrane fluidity to return to normal. They are then ready to be plated out onto the antibiotic selection plates.
What’s really happening in the transformation..
During the bacterial transformation we are trying to get the bacteria to take in the new plasmid that encodes the kanamycin resistance gene and either the red or green fluorescence gene.
The first step is to get rid of the media the bacteria have been growing in and replace it with cold calcium chloride solution. The bacteria are incubated on ice in this buffer; during this time pores will start to open on the bacterial plasma membrane.
DNA is negatively charged, as is the membrane, which makes it hard for the plasmid to enter the cell. Positively charged calcium ions found in calcium chloride help neutralise the negatively charged DNA and cell membrane.
Please leave at 37 °C
overnight
You should wash your hands with soap and then clear your work area and wipe the work surface with disinfectant solution. Each group will need:
• a container of disinfectant for contaminated waste
• a Bunsen burner.
Aseptic technique
Light the Bunsen burner and set it to a hot blue flame so there is a strong upward draught. You should try to work within 30 cm of the flame to keep things sterile. Your pipettes and spreader that you will use for the transformation are sealed in a sterile wrapper. When you take these out to use, unwrap from the top (the bulb end of the pipette and straight end of the spreader) this will minimise the chances of contamination.
All equipment that comes into contact with the bacteria should be disposed of in the waste container. After you have finished the transformation, turn off your Bunsen burner and wipe down your work area with disinfectant solution. Then wash your hands with soap.
Freeze pointsThese are stages when the practical can be stopped and continued at another time. After both digestion and ligation the practical can be paused by freezing the plasmids. The practical can be stopped at both freeze points or just one. When you wish to continue with the practical, thaw the plasmids at room temperature and move to the next step.

10
Synthetic Biology for Schools
10
Close the lids and incubate all small enzyme tubes for 5 minutes at room temperatute.
Label the tubes with your initials.
Flick the enzyme tubes (both small purple tube and small red or green tube) to resuspend the enzyme mixture. There should be no blue spots at the bottom of the tube where there is a concentrated area of dried enzyme. Tap the base of the tube on the bench so all the liquid returns to the bottom.
Make sure the lids of the small enzyme tubes are firmly closed and clearly labelled before inserting them into the foam tube holders. Put them in the 37 °C water bath for 15 minutes to allow the restriction enzymes to digest the plasmids.
Optional step:
Transfer the tubes to the 80 °C water bath for 10 minutes to denature the restriction enzymes. This step will increase the efficiency of the practical by 10-20 % but it isn’t necessary if you are short of time.
Digesting the plasmids
Ligation
OR
Transfer 20 μl of digested plasmid from either the small red or green tube into the yellow ligase tube
AND
Transfer 20 μl from the small purple tube into the yellow ligase tube.
Flick the yellow tubes gently to mix and then incubate them for 10 minutes at ROOM TEMPERATURE. Put them in the 65 °C water bath for 10 minutes to denature the ligase.
Transfer 20 μl from large red tube to small red tube using the microsyringe
Each group should choose whether to make red or green fluorescent bacteria.
Those making red bacteria will need a large and small red tube. Those making green will need a large and small green tube.
All groups will need large and small purple tubes since these are for the kanamycin resistance plasmid (Kan- plasmid).
Transfer 20 μl from large green tube to small green tube using the microsyringe
OR
Transfer 20 μl from large purple tube to small purple tube using the microsyringe
Dried restriction enzymesKan- plasmid
The Practical
Each group will need a yellow tube, label it with your initials. Before opening the tube you will need to spin it for 5 seconds in a centrifuge to make sure all the ligase is at the bottom.
RFP plasmid GFP plasmid
Freeze point
Freeze point

11
Synthetic Biology for Schools
www.ncbe.reading.ac.uk
TransformationRefer to aseptic technique on page 9 to see how to set up your work space for the transformation. Each group will also need:
A tube of calcium chloride kept on ice
One agar plate containing the antibiotic kanamycin
Two 1.5 ml pipettes
A spreader1 screw cap tube containing 1 ml of DH10B E. coli
The bacteria need to be spun in a microcentrifuge, the tubes should be balanced with each other and spun at 2,250 x g for 2 minutes to pellet the bacteria.
NCBE microcentrifuge
Add 4 drops of cold calcium chloride solution to the bacteria. Replace the lid and gently flick the tube to resuspend the pellet, there should be no clumps of bacteria left.
The bacteria
are fragile so be
gentle.
Transfer 20 μl of ligation into your bacterial tube. Very gently flick the tube to mix it and put the tube on ice for 15 minutes.
Visible bacterial pellet after
centrifugation
The supernatant should have gone from cloudy to clear in your bacterial tube. Pour the supernatant into the waste disinfectant.
You will now heat shock the bacteria. Check the temperature of the 42 °C water bath using a thermometer and insert the bacterial tubes into the foam tube holders.
Transfer the tubes from the ice to the 42 °C water bath for 35 seconds and then transfer straight back to the ice for 2 minutes.
Partially lift the lid of your kanamycin plate and transfer all of the bacterial culture into the centre of the plate.
Move the plates to the 37 °C incubator with the lid uppermost to allow the transformation to soak into the agar. Leave them like this for 30 minutes. Do this as soon as possible after plating.
Tape the plate. Clearly label with your name, the date and the experiment.
After 30 minutes, the plates should be inverted so the base is uppermost (your teacher may choose to do this step). Then incubate the plates at 37 °C for 24-48 hours.
Use the spreader to spread the bacteria out over the surface of the plate.
You will not get positive results if your bacteria
haven’t pelleted. So DO NOT continue unless they have
Please leave at 37 °C
overnight

National Centre for Biotechnology Education, University of Reading, 2 Earley Gate, Reading RG6 6AU. United Kingdom Tel: + 44 (0) 118 9873743. eMail: [email protected] Web: www.ncbe.reading.ac.uk
Copyright © Fiona Lane, 2019
Synthetic Biology for Schools
Scientific questions and recording your results
You should record how many red or green colonies you have and count how many colonies you have in total, so you can calculate the percentage of colonies with the desired plasmid and see how efficient the experiment was.
If the bacterial colonies are very dense on the plate and it is too difficult to count all the colonies, you can measure an area of 1-2 cm2, which looks representative, and count the number of colonies within that area and then scale up the result for the whole plate, (area of a plate is 60 cm2).
Some of the colonies on the plate are white and do not fluoresce red or green. Can you think why this might be? These bacteria must have kanamycin resistance to be able to grow on the plate but do not have the red or green gene. Can you explain this?
Why is it necessary for the plasmid to contain kanamycin resistance as well as the red or green fluorescent gene?
Why do you think it is useful for scientists to be able to move genes between plasmids?
Why are bacteria so useful in synthetic biology?
24 to 48 hours later...
The plates should be left to grow at 37 °C for a minimum of 24 hours. Sometimes if the transformation efficiency is low it may take longer for red or green colonies to appear. The red colonies will appear red even without UV light.
The green colonies appear white in daylight and will only appear green under UV light, so the bacterial colonies will need to be checked carefully with the UV torch.
The Results
12


![Practical Applications of Synthetic Aperture Imaging1].pdfPractical Applications of Synthetic Aperture Imaging Svetoslav Ivanov Nikolov , Jacob Kortbek and Jørgen Arendt Jenseny BK](https://static.fdocuments.net/doc/165x107/5e967b2323913f3c9d325c69/practical-applications-of-synthetic-aperture-imaging-1pdf-practical-applications.jpg)