Deltek First Vision 7.6 Essentials Administrator Guide
71
Deltek First Vision Essentials Administrator Guide September 22, 2021
Transcript of Deltek First Vision 7.6 Essentials Administrator Guide
Deltek First Vision Essentials Administrator Guide
September 22, 2021

Vision Essentials Administrator Guide ii
While Deltek has attempted to verify that the information in this document is accurate and complete, some typographical or technical errors may exist. The recipient of this document is solely responsible for all decisions relating to or use of the information provided herein.
The information contained in this publication is effective as of the publication date below and is subject to change without notice.
This publication contains proprietary information that is protected by copyright. All rights are reserved. No part of this document may be reproduced or transmitted in any form or by any means, electronic or mechanical, or translated into another language, without the prior written consent of Deltek, Inc.
This edition published September 2021.
© Deltek, Inc.
Deltek’s software is also protected by copyright law and constitutes valuable confidential and proprietary information of Deltek, Inc. and its licensors. The Deltek software, and all related documentation, is provided for use only in accordance with the terms of the license agreement. Unauthorized reproduction or distribution of the program or any portion thereof could result in severe civil or criminal penalties.
All trademarks are the property of their respective owners.
Vision Essentials Administrator Guide iii
Contents Overview ....................................................................................................................................................... 1
Information about Optional Components ................................................................................................... 1 Description of Standard Cloud Services ....................................................................................................... 2
Types of Environments .............................................................................................................................. 2 Production Environments .......................................................................................................................... 2 Non-Production Environments .................................................................................................................. 2
Implementation Non-Production Environments ..................................................................................... 2 Standard Non-Production Environments ............................................................................................... 2 Additional Non-Production Environments .............................................................................................. 3 Preview Environments ........................................................................................................................... 3 Additional Databases ............................................................................................................................. 3
Cloud Levels .............................................................................................................................................. 3 Components Not Supported Across All Cloud Levels ........................................................................... 5
Configuration Databases (Sandboxes) ..................................................................................................... 5 Production Database Replica ................................................................................................................ 5 Additional Production Database Replica ............................................................................................... 5 Additional Non-Production Database Replica ....................................................................................... 5
Disaster Recovery ..................................................................................................................................... 5 Identifying Administrators .............................................................................................................................. 6
Proxy Administrators ................................................................................................................................. 7 Staying Informed ........................................................................................................................................... 8
Cloud Solutions Support Site..................................................................................................................... 8 If You Need Assistance ............................................................................................................................... 10
Customer Services .................................................................................................................................. 10 Support Center Site ................................................................................................................................. 10
Activate and Implement Vision Essentials .................................................................................................. 11 Welcome Email and Provisioning ............................................................................................................ 11 New Customer ......................................................................................................................................... 11 Migrating from On-Premises Vision ......................................................................................................... 11
Effect of Migration on Your Database .................................................................................................. 11 Timing .................................................................................................................................................. 12
Providing Single Sign-On with Microsoft Azure Active Directory ................................................................ 13 Important Considerations for the SSO Model .......................................................................................... 13 Support for Multi-Factor Authentication ................................................................................................... 13
Vision Essentials Administrator Guide iv
Configure Single Sign-On using Azure AD.............................................................................................. 13 Sign Up for a Microsoft Azure AD Account .......................................................................................... 14 Configure Azure AD Connect .............................................................................................................. 14 Add and Configure the Deltek Vision Application ................................................................................ 15 Set Up Trust between the Deltek Vision Application and Deltek Vision Client .................................... 19 Add and Configure the Deltek Vision Client Application ...................................................................... 21 Complete the Trust between the Deltek Vision Application and Deltek Vision Client ......................... 22 Complete Azure AD Configuration in Vision Essentials ...................................................................... 24 Complete User Configuration in Vision Essentials .............................................................................. 24 Log In Using Windows Authentication ................................................................................................. 24
Role Security and User Accounts ............................................................................................................... 26 Creating and Configuring Roles and Accounts ....................................................................................... 26
Configuring Security Roles .................................................................................................................. 27 Setting Up User Accounts .................................................................................................................... 27
Password Policies ................................................................................................................................... 28 Providing Users with Access to Vision Essentials ...................................................................................... 30
Alternative Interfaces — Flexibility and Accessibility .............................................................................. 30 Smart Client System Requirements ........................................................................................................ 30
Recommended Minimum Software Requirements for Accessing Vision via Smart Client .................. 30 Enable ClickOnceSupport in Microsoft Edge Based on Chromium ..................................................... 31
iAccess System Requirements ................................................................................................................ 31 Recommended Minimum Software Requirements for Accessing Vision iAccess ............................... 31
Touch System Requirements .................................................................................................................. 32 Recommended Minimum Requirements for Accessing Vision Touch Applications ............................ 32
Distributing Vision URLs to Employees ................................................................................................... 32 Set Language .......................................................................................................................................... 33 Set Up Vision Touch Apps....................................................................................................................... 33
Communicating with Deltek......................................................................................................................... 35 Service Requests .................................................................................................................................... 35 Submit a Service Request ....................................................................................................................... 37 Exceptions to Annual Support Case Allowance ...................................................................................... 38 Backup and Retention Policy................................................................................................................... 38 Upgrades and Cumulative Updates ........................................................................................................ 39
For Enterprise Cloud Customers ......................................................................................................... 39 Process Server ............................................................................................................................................ 40
Run Immediately ...................................................................................................................................... 40

Vision Essentials Administrator Guide v
Schedule .................................................................................................................................................. 40 Printing ........................................................................................................................................................ 41
Preview .................................................................................................................................................... 41 Email/Schedule ........................................................................................................................................ 42 Download ................................................................................................................................................. 42
Email Considerations .................................................................................................................................. 43 Size Limit ................................................................................................................................................. 43 Default Sender for Outgoing Mail ............................................................................................................ 43
Supplemental Fonts .................................................................................................................................... 44 Batch Billing ................................................................................................................................................ 45 Audit Trail Logging ...................................................................................................................................... 46 Exchange Rate Updates ............................................................................................................................. 47 Reporting ..................................................................................................................................................... 48
Scheduling Reports ................................................................................................................................. 48 Report Timestamps ................................................................................................................................. 49 Deploying Custom Reports...................................................................................................................... 49
Vision Xtend API ......................................................................................................................................... 51 Direct Database Access .............................................................................................................................. 52
Manage ODBC Accounts ........................................................................................................................ 52 Edit or Disable ODBC Accounts .............................................................................................................. 53 Install and Configure the ODBC Driver ................................................................................................... 53 Connect to Your Vision Database ........................................................................................................... 56 Use ODBC Connectivity with Linux ......................................................................................................... 57
Vision Performance Management ............................................................................................................... 58 Install VPM Desktop Tool ........................................................................................................................ 58 Connecting VPM Desktop Tool to Data Sources .................................................................................... 58 Connecting Excel to Vision Analysis Cubes ............................................................................................ 62
Additional Documentation ........................................................................................................................... 65

Overview
Vision Essentials Administrator Guide 1
Overview Welcome to Deltek First Vision Essentials, which delivers Deltek’s project-based ERP solution via the cloud to meet the ever-changing needs of small and mid-sized organizations. The cloud delivery of the Vision application allows you to leverage its availability anywhere and at any time, while reducing your total cost of ownership and maintenance.
As the Vision Essentials Administrator for your company, you are responsible for the following:
Creating and configuring role security and user accounts.
Distributing Vision access information to all company employees.
Working with Deltek on service requests related to your Vision Essentials solution.
This guide provides you with the information necessary to perform successfully in your role as a Vision Essentials Administrator.
Information about Optional Components This guide also includes information about some optional components of Vision Essentials.
If your organization has purchased: Read:
Deltek First Flex Cloud option Direct Database Access
Deploying Custom Reports
Custom Report Add-on Deploying Custom Reports
Vision Performance Management module Direct Database Access

Description of Standard Cloud Services
Vision Essentials Administrator Guide 2
Description of Standard Cloud Services This section describes the services that are provided with Deltek cloud products. Certain services are only available in premium offerings or with additional subscription fees. Check with your account manager or your customer success manager if you are interested in adding any services.
Types of Environments A number of different types of application environments are available with Deltek’s cloud products. An environment is the collection of software and infrastructure components necessary to operate a product. This includes shared security services, monitoring, web and application servers, database servers, operating systems, compute, storage, memory, and network. Each environment can have one or more customer-specific database instances associated with it, which may require an additional subscription fee. For certain offerings, additional non-production environments or production or non-production database replicas may be purchased for a minimum 1-year subscription.
Each environment has a specific purpose and is available with specific offerings.
Production Environments All Deltek cloud services provide a production environment that is held to the highest operational standards. These environment instances are highly secure and managed under strict control. Only authorized Deltek Cloud Operations employees are allowed access to the infrastructure and application layers of the solution. Customer access is provisioned through the application front-end or through specific and tightly controlled methods, such as an application-specific API layer.
These environments serve as the focal point for disaster recovery replication and backup procedures. Customers generally have only one production instance, unless they have more than one company or entity, running under separate subscriptions.
Non-Production Environments Any application environment that is not designated for live production use is considered a non-production environment. Service for non-production environments differs from service for production environments. For example, Deltek considers a service incident to be “severity 1” if it causes processing to cease. Because this would never happen in a non-production environment, the highest level severity incident for a non-production environment is severity 2.
Other aspects of service differ from, or do not apply to, certain non-production environments, including practices for backups and retention, disaster recovery, access management, access levels, performance, uptime, and service levels. Common non-production environments are described in this section.
All non-production environments offer different availability and service levels than production environments.
Implementation Non-Production Environments This type of non-production environment is used during implementation. In Essentials and Flex offerings, this environment is only available during implementation.
Standard Non-Production Environments Deltek Enterprise cloud offerings include an always-on test and development non-production environment. After you go live in your production environment, you can use this environment to perform ongoing development or implementation/configuration work.

Description of Standard Cloud Services
Vision Essentials Administrator Guide 3
If you have a Foundations, Essentials, or Essentials Flex offering, you must upgrade your service to Enterprise to have an always-on test and development non-production environment.
Deltek will refresh a test and development database with data from the production server up to 12 times per year, by request only.
Additional Non-Production Environments With Enterprise offerings, you can add other non-production environments for a minimum of 1 year, at an additional cost. You can use these environments for development, training, testing, configuration, system integration, or other purposes.
Deltek will refresh an environment with data from the production server up to 12 times per year, by request only.
Preview Environments With Enterprise offerings, you can request a preview environment prior to the release of a new version of the software. Use a preview environment to test your extensions or configurations with the new software without disrupting your test and development non-production environment.
If you have a Deltek Flex offering, Deltek will provide a preview environment prior to each upgrade to a new version of the software.
Additional Databases Many of Deltek’s cloud solutions can support one or more database instances of the application, to be used for non-production activates, such as reporting, configuration, testing, or development. These additional databases are free of charge with some offerings, and available at an additional charge with others.
Cloud Levels Review the components offered as part of the Basic, Flex, and Enterprise levels of the Vision Cloud offering.
Basic Flex Enterprise
User Interfaces Vision Desktop Application
iAccess
Vision Mobile Application
Custom Deployment
Custom SQL Reports (1)
(unlimited)
(unlimited)
Custom Core Code
SQL Stored Procedures
SQL Custom Triggers
SQL Custom Tables

Description of Standard Cloud Services
Vision Essentials Administrator Guide 4
Basic Flex Enterprise
SQL Custom Views
SQL Custom Indexes
Administrator Choice of Upgrade Timing
Integration ODBC – Access Read Only (2)
ODBC – Read/Write
Vision Xtend API Access
Environments Production
One Sandbox Database in Production Environment
(3)
Test
(3)
Development
(3) (4)
Preview Prior To Upgrade (5)
AWS Regions United States (US East)
Disaster Recovery (US West)
Canada Central (6)
Australia ANZ (Sydney)
Disaster Recovery (Singapore)
EU West (Ireland)
Disaster Recovery (Germany)
Footnotes (1) The Custom Report Add-On, which allows for 10 custom reports, can be added to Basic.
(2) Vision Performance Management (VPM) includes ODBC access without the need for Flex Cloud, but only for use with VPM.
(3) Enterprise customers can pay for additional sandbox, development, or test environments.
(4) Enterprise Development environments support ODBC read/write/execute rights.
(5) For major releases with fundamental changes preview environments may be provided for Basic Cloud.

Description of Standard Cloud Services
Vision Essentials Administrator Guide 5
(6) We have Data Residency in Canada. We do not have a regionally diverse disaster recovery, but we do have precautions to preserve business continuity in the event of a local failure at the sever application level.
Components Not Supported Across All Cloud Levels SQL Server Integration Services
Custom Method Workflow DLLs
Third Party Custom DLLs
Custom Web Service Hosting
Server Access via RDP
Configuration Databases (Sandboxes)
Production Database Replica With the Foundations, Essentials, Flex, and Enterprise offerings, you receive one additional production configuration database replica, which is housed in the production environment and treated as a production database only for backup and retention purpose. Use the production database replica for reporting and configuration testing. Production database replicas offer different availability and service levels than production environments. See the availability and service information for Non-Production Environments.
Additional Production Database Replica With Foundations, Essentials, Flex, and Enterprise offerings, you can purchase an additional production database replica, with the same characteristics as the first replica.
Additional Non-Production Database Replica With Enterprise offerings only, you can purchase additional databases for your always-on test and development non-production environments or any other non-production environments that you have purchased.
Disaster Recovery Deltek provides a disaster recovery environment with all offerings. Unless otherwise specified, the disaster recovery site is more than 250 miles away (DR250) from the production hosting facility.
On an annual basis, Deltek coordinates and executes a disaster recovery test of each cloud offering, usually on a weekend between May and September. You will receive advance notice of the testing and may be asked to validate the disaster recovery site once it has been brought online. After a successful test, the service is rolled back to the production environment.

Identifying Administrators
Vision Essentials Administrator Guide 6
Identifying Administrators All Vision Essentials customer accounts are required to have at least one active/valid Vision Essentials Administrator at all times. Two additional Administrators can also be identified, allowing for a maximum of three Administrators per company. When your Vision Essentials order was processed, at least one Administrator was identified.
When more than one Administrator is identified for an account, they are treated equally. Each Administrator has the same authority to administer your company’s Vision Essentials solution and each receives the same communications from Deltek.
Deltek recommends that each company have at least two Administrators to ensure that communications are always received and someone is always available to carry out service requests.
You can manage the Administrators on your account through the Support Center site.
To manage Administrators: 1. Go to http://support.deltek.com.
2. Log in to the Support Center site using the credentials provided to you when your initial Vision Essentials order process was completed.
If you do not have a username and password for the Support Center site, contact your firm’s Vision Administrator. If you forget your username or password, you can click the Need Help? button on the Support Center login screen.
3. Select Manage Company Contacts in the Administer section.
4. Click on the name of any user who should have Vision Essentials Administrator rights. This opens
a window where you can update information about the user.
5. Click Yes in the SaaS Administrator field.
6. Click Update Contact.

Identifying Administrators
Vision Essentials Administrator Guide 7
Proxy Administrators Because you can have up to three Administrators for your account, you have the room to set up a temporary “proxy” Administrator. For example, if you are working with a Deltek partner during your implementation, getting help with data conversion, configuration, training, and so on, you can make the partner an Administrator. Then the partner can act on your behalf when working with Deltek Customer Care and Cloud Operations. This approach can help expedite many implementation steps.
To use a “proxy” Administrator, add that person to your contacts via the Support Center site, then designate him or her to be a SaaS Administrator, as described above.

Staying Informed
Vision Essentials Administrator Guide 8
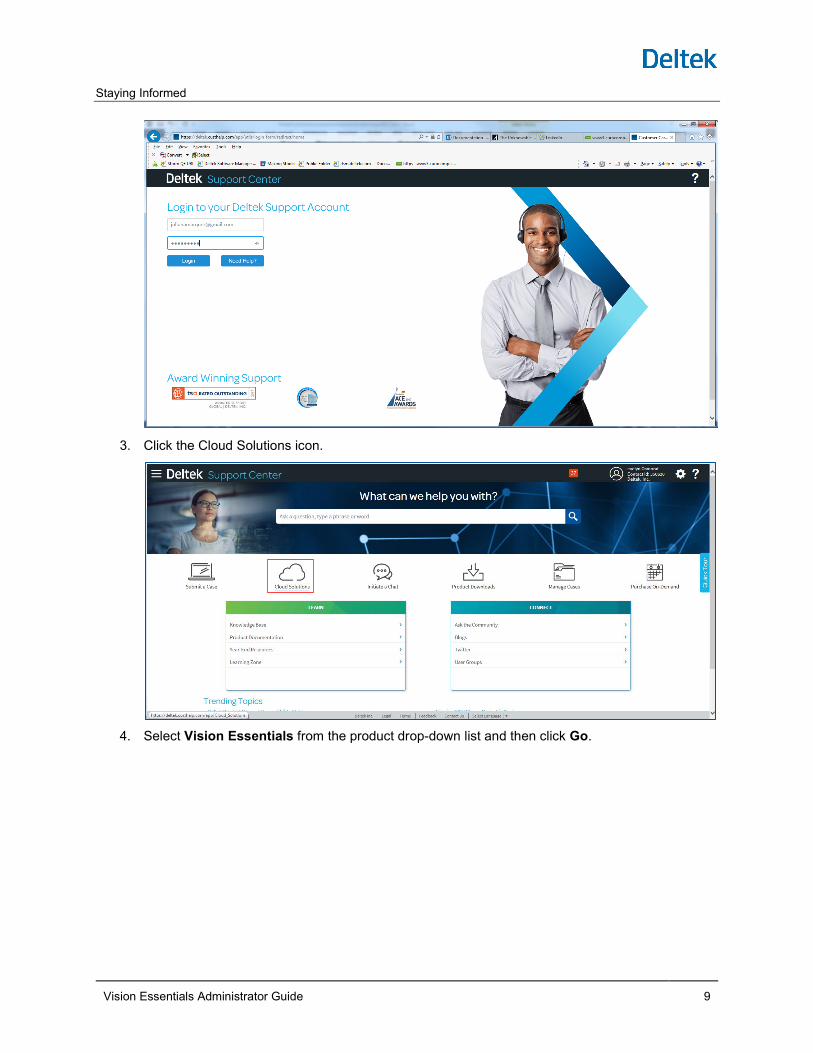
Staying Informed Cloud Solutions Support Site On the Support Center site, Deltek provides an area devoted solely to its cloud-based products. This area includes guides, videos, and other resources to help you learn about Vision Essentials.
To go to the Cloud Solutions page:
1. Go to http://support.deltek.com.
2. Log in to the Support Center site using the credentials provided to you when your initial Vision Essentials order process was completed.
If you do not have a username and password for the Support Center site, contact your firm’s Vision Administrator.
If you forget your username or password, you can click the Need Help? button on the Support Center login screen.
Staying Informed
Vision Essentials Administrator Guide 9
3. Click the Cloud Solutions icon.
4. Select Vision Essentials from the product drop-down list and then click Go.

If You Need Assistance
Vision Essentials Administrator Guide 10
If You Need Assistance If you need assistance using your Vision Essentials solution, Deltek makes a wealth of information and expertise readily available to you through our Customer Care organization.
While many of the processes outlined in this document are available only to your company’s Vision Essentials Administrator, support cases can be initiated by designated individuals within your organization according to the standard support model. In addition, these individuals can leverage the Deltek Customer Care offerings described in the following sections.
Customer Services For over 20 years, Deltek has maintained close relationships with client firms, helping with their problems, listening to their needs, and getting to know their individual business environments. A full range of customer services has grown out of this close contact, including the following:
Extensive self-support options through the Support Center site.
Phone and email support from Customer Care analysts
Technical services
Consulting services
Custom programming
Classroom, on-site, and Web-based training
Find out more about these and other services from the Support Center site.
Support Center Site The Deltek Support Center site is a support Web portal for Deltek customers who purchase Vision Essentials.
The following are some of the many options that you have at the Support Center site:
Search Deltek’s knowledge base
Ask questions, exchange ideas, and share knowledge with other Deltek customers through the Support Center Community.
Display or download product information, such as release notes, user guides, technical information, and white papers
Submit a support case and check on its progress
Transfer requested files to a Customer Care analyst
Subscribe to Deltek communications about your Deltek products and services
Receive alerts of new Deltek releases and hot fixes
Read blogs for expert advice about Deltek products
If you need assistance using the Support Center site, the online help available on the Support Center site provides answers for most questions

Activate and Implement Vision Essentials
Vision Essentials Administrator Guide 11
Activate and Implement Vision Essentials The process that you follow to activate and implement Vision Essentials depends on your current situation:
The process is fairly simple if you are a new Deltek customer, starting in Vision with a blank database, or if you are migrating from a Vision on-premises instance to Vision in the cloud. Follow the steps outlined below.
If you are converting to Vision from a different system, Deltek highly recommends that you work with Deltek Services or a Deltek partner on your conversion and implementation.
Welcome Email and Provisioning Immediately after your order is completed, you will receive a welcome email to let you know that your new Vision solution is being provisioned.
When the provisioning process is completed, your Vision Essentials Administrator will receive an activation email.
New Customer If you are a new customer, the activation email contains the URL that you use to access your empty Vision production database and begin implementation.
For security reasons, the activation email does not include credentials for accessing the Vision database. Your Vision Essentials Administrator will receive two separate emails containing credentials, one email for the ADMIN user ID and one for the ADMIN password.
The credentials for the ADMIN account are the only credentials that you will receive. It is your responsibility to set up user accounts for others in your organization, as described in Role Security and User Accounts.
Migrating from On-Premises Vision If you are migrating from an on-premises instance of Vision, follow the same steps as a new customer, plus steps to move your data to the cloud. The activation email sent to the Vision Essentials Administrator includes instructions for uploading your current on-premises Vision database for a test restoration, and then uploading a final database and going live.
Use the Deltek File Transfer Tool to upload your database. Follow the steps in the document, Deltek File Transfer Tool. Make sure that:
You upload both your transaction database and your FILESTREAM database.
The database backups for both databases are in sync (taken from the same backup run).
Effect of Migration on Your Database During both the test and live restore, the transaction database is left exactly as it is in your on-premises instance. These are the only exceptions:
System-wide Password Policies are updated, as described in the Password Policies section. This may impact all current Vision users.
Vision Essentials does not support Windows Authentication (Integrated Security). You must change user accounts that were set up to use Windows Authentication so that they use native Vision security.

Activate and Implement Vision Essentials
Vision Essentials Administrator Guide 12
For all user accounts that are set up to use Windows Authentication, the migration process disables the accounts and removes their passwords. The Administrator must re-enable the accounts, assign temporary passwords, communicate this information to users, and force users to reset their passwords during the next login.
Because Windows Authentication is not supported, before you migrate, you must ensure that you have at least one user account that is:
Set up to use native Vision security, not Windows Authentication.
Has administrative rights.
Without this account, you will not be able to log into Vision after migrating. Be sure to note the username and password of the account.
Vision Essentials offers a single-sign-on solution using Windows Azure Active Directory that closely mimics the Windows Authentication functionality. For more information, see Providing Single Sign-On for Vision Essentials with Microsoft Azure Active Directory.
Timing The standard timing for migration is this:
1. A company uploads its database after the close of business, prior to 8:00 PM ET.
2. Within one business day, Deltek makes the database active and available and sends the Vision Essentials Administrator an email with login information. (Please consider weekends and holidays when you plan your migration.)
If any problems occur during the migration process, Deltek Customer Care will contact you. You may need to upload your database again.
Do not shut down your on-premises instance of Vision until your Vision Essentials database is restored successfully and you have verified that it works.

Providing Single Sign-On with Microsoft Azure Active Directory
Vision Essentials Administrator Guide 13
Providing Single Sign-On with Microsoft Azure Active Directory This section applies only if you use Microsoft Azure Active Directory (Azure AD) to provide single sign-on for Vision Essentials.
If you use Microsoft Azure AD’s single sign-on feature, you will not be able to use the Microsoft Office and Desktop Integration (MODI) feature, which lets you integrate Vision information with Microsoft Word, Microsoft PowerPoint, and Microsoft Outlook.
Microsoft Azure AD’s single sign-on feature lets Vision Essentials users log on to Vision Essentials using their Windows usernames and passwords instead of using separate Vision Essentials usernames and passwords. To set up single sign-on, a Vision Essentials administrator must complete the following configuration steps, described in more detail below.
To configure single sign-on using Azure AD: 1. Sign up for a Microsoft Azure AD account.
2. In Azure AD, complete the single sign-on configuration process.
3. In Vision Essentials, complete the fields on the Azure Active Directory tab in Configuration » General » System Settings.
4. In Vision Essentials, complete the settings on the General tab in Configuration » Security » Users that are related to single-sign on.
Important Considerations for the SSO Model Currently, the most common single sign-on model used by Vision Essentials customers is to synchronize users and passwords to Windows Azure Active Directory.
An alternative method is to set up Windows Azure Active Directory to federate back to your local Active Directory via ADFS (Active Directory Federation Services), to authenticate users via your on-premises Active Directory. With this model, you do not need to synchronize users and passwords to Windows Azure Active Directory.
Support for Multi-Factor Authentication Windows Azure Active Directory supports multi-factor authentication.
Configure Single Sign-On using Azure AD To set up single-sign on, a Vision Essentials administrator completes the following main steps:
1. Sign up for Microsoft Azure AD account.
2. Configure Azure AD Connect.
3. Add and configure the Deltek Vision application.
4. Setup trust between the Deltek Vision application and Deltek Vision client.
5. Add and configure the Deltek Vision client application.
6. Complete the trust between the Deltek Vision application and the Deltek Vision client.

Providing Single Sign-On with Microsoft Azure Active Directory
Vision Essentials Administrator Guide 14
7. In Deltek Vision Essentials, complete Azure AD configurations.
8. In Deltek Vision Essentials, complete the user configuration.
9. Have each user log in and enable Windows Authentication.
Sign Up for a Microsoft Azure AD Account If your firm does not already have a Microsoft Azure AD account, you can sign up for a free account at https://azure.microsoft.com/en-us/free.
Microsoft also offers an Azure AD Premium account for a cost at https://azure.microsoft.com/en-us/trial/get-started-active-directory. The Premium edition is not required for using the single sign-on solution for Vision Essentials.
Configure Azure AD Connect To learn about Azure AD Connect, see Microsoft’s Integrating your on-premises identities with Azure Active Directory. To review and complete the prerequisites for Azure AD Connect, including hardware requirements, see Microsoft’s Prerequisites for Azure Active Directory Connect (Azure AD Connect.
Deltek recommends that you do not install Azure AD Connect on your domain controllers.
To configure Azure AD Connect: 1. Download and install the Microsoft Online Services Sign-In Assistant for IT Professionals RTW
(msoidcli_64.msi) from the following Microsoft web page, using the instructions provided on the web page:
Microsoft Online Services Sign-In Assistant for IT Professionals RTW
2. Download and install the Azure Active Directory Module for Windows PowerShell for the 64-bit version (AdministrationConfig-en.msi) from the following link:
Azure Active Directory Module for Windows PowerShell (64-bit version)
Download the latest version that is in general availability; see Microsoft documentation.
3. Download and install Microsoft Azure Active Directory Connect (AdministrationConfig-en.msi) using the following Microsoft link: Azure Active Directory Connect.
Review the account and permissions information at the following Microsoft web page: Azure AD Connect: Accounts and Permissions.
You must set up the following required accounts with a username and password:
Windows Azure Active Directory (Global Administrator)
On-Premise Active Directory (Enterprise Administrator)
For more information, see Managing Azure AD Connect.
Depending on the size of your on-premises Active Directory, the installation of Azure AD Connect can take some time, especially if you select the option to synchronize users at the end of the installation.
4. Log in to your Windows Azure portal and verify that users are synchronized with Windows Azure AD.

Providing Single Sign-On with Microsoft Azure Active Directory
Vision Essentials Administrator Guide 15
5. Test a user on the Microsoft Apps portal at: https://myapps.microsoft.com.
You will not see any applications, but you can test authentication.
Use an existing user name and password for the test.
For troubleshooting information, see: https://msdn.microsoft.com/library/azure/jj151834.aspx.
Add and Configure the Deltek Vision Application To add and configure the Deltek Vision application:
1. Go to https://portal.azure.com to launch the Azure portal.
2. Select Azure Active Directory.
3. From the Manage menu, select App registrations.
4. From the actions at the top of the App Registrations screen, select + New registration.
5. On the Register an Application screen, perform the following actions:
a. In the Name field, enter Deltek Vision.
b. Under Supported account types, select Accounts in this organizational directory only.
c. Under Redirect URI (Optional), select Web and then enter your customer URL.
For example, for ABC Engineers, enter https://abcengineers.deltekfirst.com/abcengineers
d. Click Register to create and save the application.
The properties of the Deltek Vision application are displayed.

Providing Single Sign-On with Microsoft Azure Active Directory
Vision Essentials Administrator Guide 16
6. Hover over the Application (client) ID and click the clipboard icon to store the ID for future use. You will enter this ID into the Server Client ID field of the Azure Active Directory tab in Vision Configuration » General » System Settings.
7. From the Manage menu, select Certificates & secrets.
8. On the Certificates and Secrets screen, click + New client secret. a. In the Description field, enter DeltekVisionKey.
b. Under Expires, select Never. c. Click Add to generate the secret value.
d. Click the clipboard icon beside the secret value to save the value for future use. You will enter this value on the Azure Active Directory tab in Vision Configuration » General » System Settings.

Providing Single Sign-On with Microsoft Azure Active Directory
Vision Essentials Administrator Guide 17
9. From the Manage menu, select Authentication.
10. On the Authentication screen, under Redirect URIs, perform the following actions:
The URL entries are case-sensitive and you must press TAB after you enter each one. Users must enter the exact URLs, in supported browsers, to access the application.
a. In the Type field, select Web for each URL. The first URL must be the one that users use to launch Vision.
b. Enter your customer URL; for example, use this format but replace “abcengineers” with your customer URL:
https://abcengineers.deltekfirst.com/abcengineers
c. Enter the URL to launch the desktop application: https://deltekvisionclient
d. If you use iAccess, Touch Time, or Touch CRM, add the following URLs. You may
encounter an error in Azure Authentication if the italicized parts of the URLs are not entered correctly.
URLs
iAccess https://abcengineers.deltekfirst.com/iaccess/login/OAuth2AuthorizeReturn
CRM https://abcengineers.deltekfirst.com/abcengineers/touch/crm
https://abcengineers.deltekfirst.com/abcengineers/touch/time/visionshared/backend/oauth2authorizereturn.php
https://abcengineers.deltekfirst.com/abcengineers/touch/time/visionshared/backend/oauth2idtokenreturn.php
https://abcengineers.deltekfirst.com/abcengineers/touch/time/visionshared/backend/oauth2idtokennativereturn.php
Time https://abcengineers.deltekfirst.com/abcengineers/time
https://abcengineers.deltekfirst.com/abcengineers/time/visionshared/backend/oauth2idtokennativereturn.php
https://abcengineers.deltekfirst.com/abcengineers/time/visionshared/backend/oauth2idtokenreturn.php
https://abcengineers.deltekfirst.com/abcengineers/time/visionshared/backend/oauth2authorizereturn.php

Providing Single Sign-On with Microsoft Azure Active Directory
Vision Essentials Administrator Guide 18
e. In the Advanced settings section, under Allow public client flows, set the Enable the following mobile and desktop flows field to No.
f. In the Supported account types section, select the Accounts in this organizational directory only option.
g. Click Save at the top.
11. From the Manage menu, select API permissions. a. On the API Permissions screen, click Grant admin consent for your domain beside the
Add a permission link, to make it available for end-users.
b. Click Yes to grant consent for the requested permissions.
Providing Single Sign-On with Microsoft Azure Active Directory
Vision Essentials Administrator Guide 19
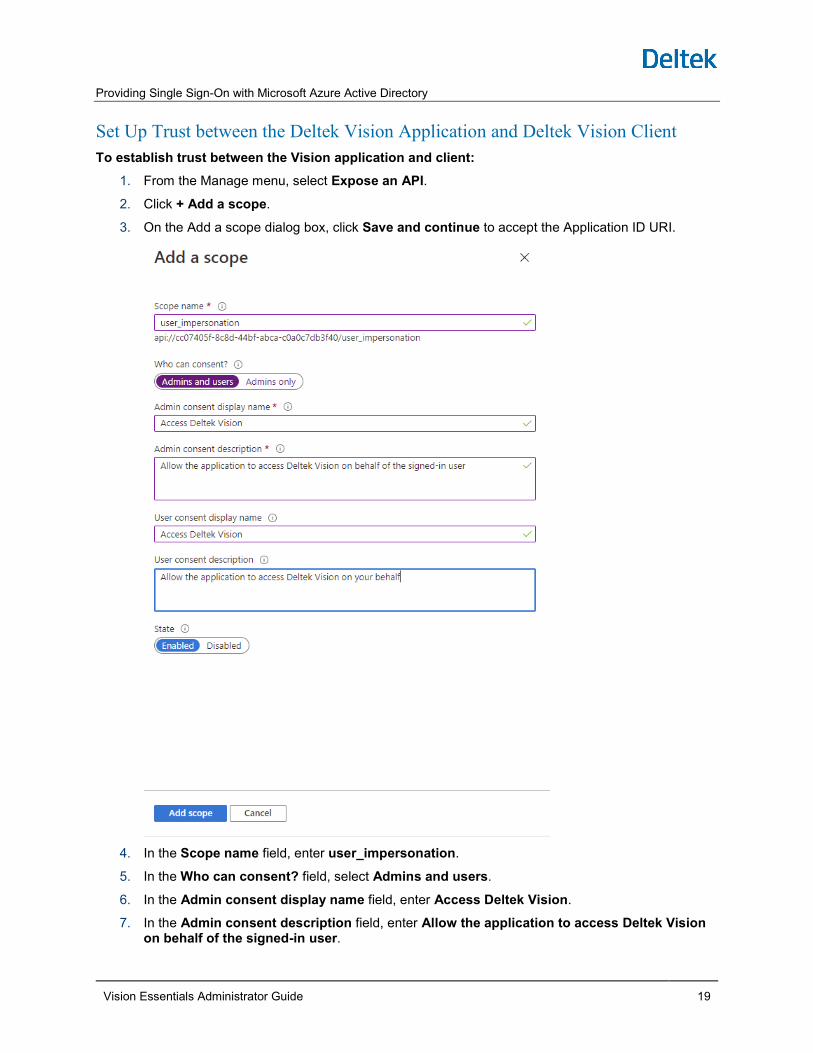
Set Up Trust between the Deltek Vision Application and Deltek Vision Client To establish trust between the Vision application and client:
1. From the Manage menu, select Expose an API. 2. Click + Add a scope.
3. On the Add a scope dialog box, click Save and continue to accept the Application ID URI.
4. In the Scope name field, enter user_impersonation.
5. In the Who can consent? field, select Admins and users.
6. In the Admin consent display name field, enter Access Deltek Vision.
7. In the Admin consent description field, enter Allow the application to access Deltek Vision on behalf of the signed-in user.
Providing Single Sign-On with Microsoft Azure Active Directory
Vision Essentials Administrator Guide 20
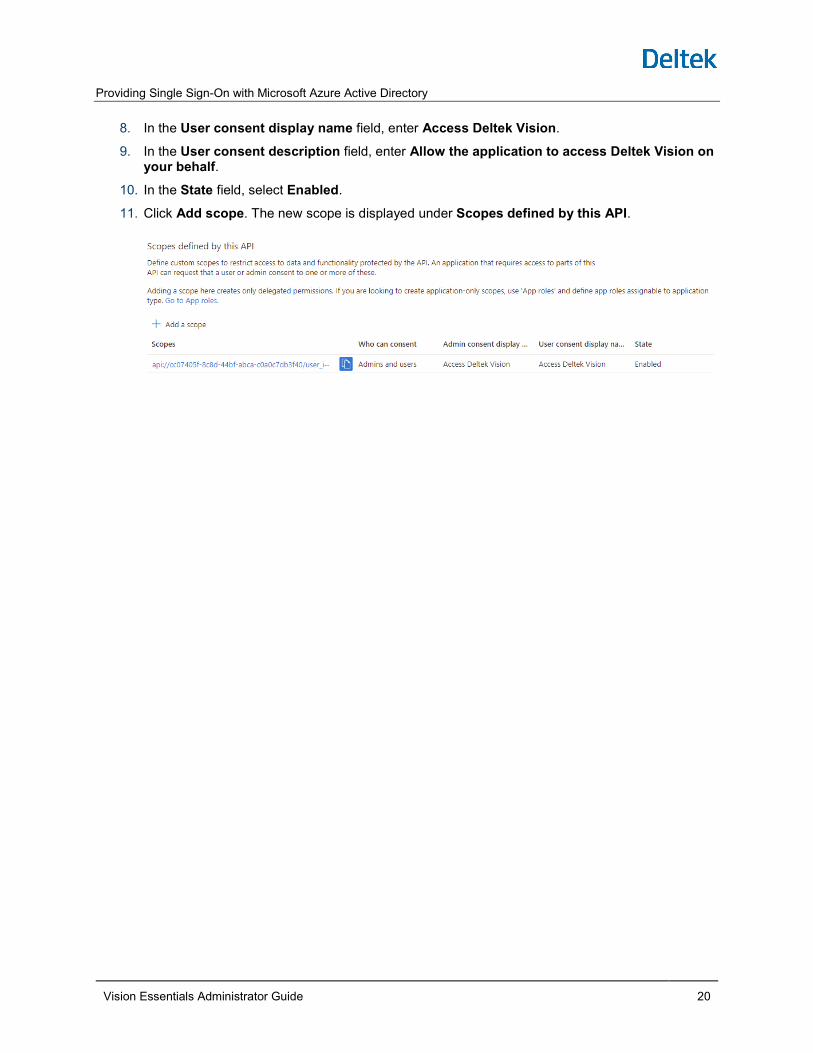
8. In the User consent display name field, enter Access Deltek Vision.
9. In the User consent description field, enter Allow the application to access Deltek Vision on your behalf.
10. In the State field, select Enabled.
11. Click Add scope. The new scope is displayed under Scopes defined by this API.

Providing Single Sign-On with Microsoft Azure Active Directory
Vision Essentials Administrator Guide 21
Add and Configure the Deltek Vision Client Application To add and configure the Deltek Vision client application:
1. Launch the Microsoft Azure AD portal https://portal.azure.com and log in.
2. From Azure Services, select Azure Active Directory.
3. From the Manage menu, select App registrations.
4. From the actions at the top of the screen, click + New registration.
5. On the Register an Application screen:
a. In the Name field, enter Deltek Vision (Client) b. Under Supported account types, select Accounts in this organizational directory
only.
c. URI (Optional), select Public client (mobile & desktop) and enter the URL: https://deltekvisionclient.
6. Click Register to create and save the application.
The properties of the Deltek Vision (Client) application are displayed.
7. Hover over the Application (client) ID and click the clipboard icon to the right to store the ID for future use.
You will enter this ID into the Client ID field of the Azure Active Directory tab in Vision Configuration » General » System Settings.
8. From the Manage menu, select Authentication.
9. In the Supported account types section, select Accounts in the organizational directory only.

Providing Single Sign-On with Microsoft Azure Active Directory
Vision Essentials Administrator Guide 22
10. In the Advanced settings section, under Allow public client flows, select No in the Enable the following mobile and desktop flows: field.
11. Click Save at the top.
12. From the Manage menu, select API permissions.
a. On the API Permissions screen, click Grant admin consent for your domain beside the Add a permission link, to make it available for end-users.
b. Click Yes to grant consent for the requested permissions.
13. At the top, click Save.
Complete the Trust between the Deltek Vision Application and Deltek Vision Client To complete setting up trust between the Vision application and client:
1. From the navigation tree on the left, select Azure Active Directory.
2. From the Manage menu, select App registrations.
3. On the App Registration screen, select the Deltek Vision (Client) application.
4. From the Manage menu, select API permissions.
5. On the API Permissions screen, click + Add a permission.
6. In the Request API permissions dialog box, select APIs my organization uses from the choices at the top of the screen.
7. Use the search field to find and select Deltek Vision.
8. Select the Deltek Vision application from the search results.
9. Under What type of permissions does your application require?, select Delegated permissions.
10. In the Select permissions section, select user_impersonation (Access Deltek Vision).

Providing Single Sign-On with Microsoft Azure Active Directory
Vision Essentials Administrator Guide 23
11. Click Add permissions.
The new permission will appear under the list of API permissions.
12. On the API Permissions screen, click Grant admin consent for your domain next to the Add a
permission link to make it available for end-users.
13. Click Yes to grant consent for the requested permissions.
14. Complete the Azure AD configuration steps in Vision Essentials.

Providing Single Sign-On with Microsoft Azure Active Directory
Vision Essentials Administrator Guide 24
Complete Azure AD Configuration in Vision Essentials Complete the following steps in Vision Essentials:
1. From the Vision Essentials Navigation menu, click Configuration » General » System Settings.
2. On the General System Settings form, click the Azure Active Directory tab, and complete the fields on the tab:
Domain Name (Tenant): Enter your on-premises active directory domain name (for example abcengineering.com). If you do not have .com in your domain name, contact your system administrator or a Deltek consultant.
Client ID: Enter the Application ID that was generated when you added and configured the Deltek Vision (Client) application in Azure AD. This is described in step 8 of Add and Configure the Deltek Vision (Client) Application.
Server Client ID: Enter the Application ID that was generated when you added and configured the Deltek Vision application in Azure AD. This is described in step 8 of Add and Configure the Deltek Vision Application.
Server Key (Secret): Enter the key value that was generated for the key added for the Deltek Vision application in Azure AD. This is described in step 11 of Add and Configure the Deltek Vision Application.
Authentication type: From the drop-down list, select Windows Azure prompts user for login credentials (default).
3. Click Save on the toolbar.
Complete User Configuration in Vision Essentials When you set up users and passwords in Vision Essentials in Configuration » Security » Users, you must enter the following for each user on the General tab:
Select the Windows Authentication check box.
In the Domain field, enter your domain name (example: abcengineers.com).
Log In Using Windows Authentication After the Vision Essentials Administrator sets up single sign-on, each user must follow a set of login steps to enable Windows Authentication. Before users can log in, you must give them their Azure active directory domain account usernames and passwords.

Providing Single Sign-On with Microsoft Azure Active Directory
Vision Essentials Administrator Guide 25
To log in, each user must follow these steps:
1. Launch your company's Vision Essentials URL (for example, https://abcengineers.deltekfirst.com/abcengineers.)
2. On the login screen, select the Windows Authentication option.
The Username and Password fields become disabled.
3. Click the Log In button.
4. On the Microsoft dialog box that requests your Azure credentials, enter your Azure email address and click Next.
5. On the Microsoft dialog box that requests your password, enter your Azure password.
6. On the Microsoft dialog box that requests permission to access the Visoin Essentials application, click Accept.
Once your credentials are validated, Vision Essentials opens.

Role Security and User Accounts
Vision Essentials Administrator Guide 26
Role Security and User Accounts Creating and Configuring Roles and Accounts When you are given access to the Vision Essentials environment, the Vision Essentials Administrator account is already set up for you. The initial username and password for this account are included in two separate emails sent to you. You will be asked to change your password after your initial log in.
The Vision Essentials Administrator account includes full administrative permissions that give you full access to all areas of the Vision software that have been licensed to your organization. As the Vision Essentials Administrator, you then have the responsibility of creating user accounts and assigning passwords to your organization’s employees.
If your organization is migrating from an on-premises instance of Vision to the Vision Essentials offering, all existing user accounts and passwords remain unchanged and fully enabled after the migration is complete. Only the password for the ADMIN account is reset, as specified in your welcome letter.
User accounts that were set up to use Windows Authentication (Integrated Security) will need to be changed to use native Vision security. The Deltek First Vision Essentials cloud solution does not support Windows Authentication. Therefore, at the time of migration, all user accounts that were set up to use Windows Authentication will have their passwords removed and accounts disabled. The Administrator will need to enable these user accounts, assign temporary passwords, communicate this information to the users, and force the users to reset their passwords at the next login.
You establish role security parameters and set up user accounts in Vision by accessing Configuration » Roles and Configuration » Users and Passwords from the Navigation menu. You set up security roles based on your organization’s requirements and then create a user account for each employee that needs to access the application. For more detailed information on setting up security roles and user accounts, see the Vision Online Help system or check out the many offerings from Deltek University.
You can grant full administrative permissions to any user account you create. However, only the account set up for the Vision Essentials Administrator will have this level of permissions at the time of your initial activation.
If you lose or forget your Vision Essentials Administrator password, you must submit a service request through Deltek Customer Care to restore access to the Administrator account. The process of resetting the Vision Essentials Administrator’s account is described in more detail in the Service Requests section of this document.

Role Security and User Accounts
Vision Essentials Administrator Guide 27
Configuring Security Roles
Setting Up User Accounts In Configuration » Security » Users, set up user accounts and passwords, and associate accounts with employees.

Role Security and User Accounts
Vision Essentials Administrator Guide 28
If you set up Microsoft Azure Active Directory for single sign-on for Vision Essentials, in the grid on the Users tab, you must complete the following for each user:
Select the Windows Authentication check box.
In the Domain field, enter your domain name (example: abcengineers.com).
Password Policies This section is not applicable if you set up Microsoft Azure Active Directory for single sign-on for Vision Essentials.
Deltek works continuously to protect the security, privacy, and integrity of the data stored within each customer’s instance of Vision Essentials.
As a result, when a new customer environment is activated, Vision Essentials is configured with the following default password policies enabled:
Minimum Password Length: 8
Require at least one digit in all passwords: Yes
Require at least one special character: Yes
Passwords expire after 90 days.
Do not allow password to be reused for 360 days.
Disable users after 5 invalid logon attempts
If your organization is migrating from an on-premises instance of Vision to the Vision Essentials offering, these password policies are enabled in the Vision Essentials environment regardless of what password policies were in effect in your on-premises configuration.
As a result, some users in your organization may be required to reset their password during their first log in so that their passwords comply with the default Vision Essentials password policies.
You have the ability to change the default password policies at any time. However, Deltek strongly recommends that you retain the default password policies to maintain an adequate level of security.
You can configure password policies in Vision by accessing Configuration » Security » Password Policies from the Navigation menu.

Role Security and User Accounts
Vision Essentials Administrator Guide 29

Providing Users with Access to Vision Essentials
Vision Essentials Administrator Guide 30
Providing Users with Access to Vision Essentials Alternative Interfaces — Flexibility and Accessibility Users can access the Vision Essentials solution in three different ways, so that they can access what they need, when they need it, from anywhere. The interface a user chooses is based on the person’s role, the functionality he or she needs to access, and the device he or she is using to access Vision. The three interfaces are:
Vision “smart client” — The Vision “smart client” (sometimes referred to as “Vision core”) is a lightweight client that is loaded onto the user’s workstation the first time the user launches Vision Essentials. The smart client provides full access to all Vision functionality and can only be used on a Windows PC.
Vision IAccess — iAccess is an additional interface through which users can access commonly used Vision functionality. iAccess is targeted primarily at front office workers in an organization (project managers, general employees, business developers, executives). Currently, most iAccess functionality is focused on the project management role, but the solution will expand over time to provide quick and simple access to key parts of Vision for other roles. iAccess can be accessed from a browser (Internet Explorer, Chrome, Firefox, or Safari), is platform agnostic, and can also be accessed from a browser on tablet devices (iOS or Android).
Vision Touch — Touch is the name for all of the Vision mobile applications, which are available for iOS and Android devices. Each Touch application is targeted at a specific Vision function, such as timesheet entry or CRM.
Smart Client System Requirements The Vision “smart client” is a lightweight client that is loaded onto the user’s workstation automatically the first time the user launches Vision Essentials using the company-specific URL provided in your welcome email. When enhancements and updates are applied to Vision Essentials, updates to the “smart client” are sometimes required. In some instances, when a user logs in, a download and installation of updated “smart client” software starts automatically.
Recommended Minimum Software Requirements for Accessing Vision via Smart Client
Internet Connection A broadband connection with at least 1,024 Kbps (1 MB) symmetrical throughput speeds is the minimum recommendation. Many factors contribute to the performance of any cloud-based software solution. When determining the bandwidth necessary for your organization, it is important to consider that a company’s Internet connection typically supports a broad range of functionality (email, Internet access, other cloud software, and so on). The recommendations provided here are the minimum required for Vision Essentials, without excessive resources competing for Internet bandwidth. Additional bandwidth may be required, based on company size and Internet needs beyond those required to run Vision optimally.
Operating System Windows 10, 32-bit or 64-bit
Windows 8.1, 32-bit or 64-bit
Windows 7, 32-bit or 64-bit

Providing Users with Access to Vision Essentials
Vision Essentials Administrator Guide 31
Web Browsers Internet Explorer 11 or later
Microsoft Edge (latest build)
Microsoft Edge based on Chromium
Business Applications Microsoft Office 2013 (32-bit only for MODI)
Microsoft Office 2010 (32-bit only for MODI)
Other The following components can be downloaded from their respective company’s websites:
Microsoft .NET Framework 4.6.2
Acrobat Reader 9.x
Enable ClickOnceSupport in Microsoft Edge Based on Chromium If you are using Microsoft Edge based on Chromium, the desktop client may not launch when you click its link. Enable the ClickOnceSupport in the browser's settings.
1. Launch another tab or window
2. In the address bar, enter edge:\\flags in the address bar and press ENTER.
3. In the browser's settings, enable ClickOnceSupport. 4. Click Restart. 5. When prompted to open the file, click Open.
iAccess System Requirements iAccess is a browser-based tool that is both browser and platform agnostic. No downloads, installations, or plug-ins are required to run iAccess. All that is required is the URL provided at the time of activation.
Recommended Minimum Software Requirements for Accessing Vision iAccess
Internet Connection A broadband connection with at least 1,024 Kbps (1 MB) symmetrical throughput speeds is recommended.
Many factors contribute to the performance of any cloud-based software solution. When determining the bandwidth necessary for your organization, it is important to consider that a company’s Internet connection typically supports a broad range of functionality (email, Internet access, other cloud software, and so on). The recommendations provided here are the minimum required for Vision Essentials, without excessive resources competing for Internet bandwidth. Additional bandwidth may be required, based on company size and Internet needs beyond those required to run Vision optimally.
Operating Systems Windows 10 — 32-bit or 64-bit
Windows 8 / 8.1 — 32-bit or 64-bit

Providing Users with Access to Vision Essentials
Vision Essentials Administrator Guide 32
Windows 7 SP1 — 32-bit or 64-bit
Windows XP SP3 — Chrome only
Web Browser Internet Explorer 10 or later
Chrome 40 or later
Safari 5 or later
Firefox 35 or later
Microsoft Edge
Device Android Tablets
iPad
Touch System Requirements Touch is the name for Vision mobile applications, all of which are available for iOS and Android devices. Each Touch application is targeted at a specific Vision function, such as timesheet entry or CRM.
Recommended Minimum Requirements for Accessing Vision Touch Applications
Mobile Operating System Apple iOS 5.0 or higher
Android 2.3.3 and higher (excluding 3.x)
Windows Phone 8.1 or higher
Devices All devices that support the mobile operating systems listed above
Tablet devices are supported, but application screens are designed for smaller phone screens
Distributing Vision URLs to Employees Once you complete the Vision on-boarding process, you, the Vision Essentials Administrator, will receive an Activation email that includes the URLs that all employees will use to access Vision Essentials.
The email will include four URLs, formatted similarly to these:
Vision “smart client” — https://companyname.deltekfirst.com/companyname
iAccess — https://companyname.deltekfirst.com/companyname/iAccess
Touch Time — https://companyname.deltekfirst.com/companyname/Time
Touch CRM — https://companyname.deltekfirst.com/companyname/CRM
The Touch CRM application is available only if your organization owns a Deltek First Vision Essentials bundle that includes the Vision CRM component.

Providing Users with Access to Vision Essentials
Vision Essentials Administrator Guide 33
You can distribute these URLs (along with each user’s credentials) to all employees in your organization who need to access Vision interfaces. However, you should ensure that all user accounts are set up in Vision Essentials prior to distributing the URLs.
For added convenience, users can bookmark the smart client URL and/or create a shortcut to this URL.
Vision Essentials smart client must be launched using Internet Explorer 8 or later.
Vision Essentials smart client will not launch using Chrome, Firefox, or Safari.
Users who have a browser other than Internet Explorer as their default browser can still create a shortcut for launching Vision Essentials. This can be done using standard Windows shortcut functionality, with the Target field entered as in the example below (with the paths and URL replaced with those specific to the company and workstation).
"C:\Program Files\Internet Explorer\iexplore.exe" https://companyname.deltekfirst.com/companyname
Set Language If your organization uses multiple languages with Deltek First Vision Essentials, a user can select a user interface language from the smart client login screen. This language setting applies only to the user who sets it and can be re-set at each login. The last language selected is remembered for the next login. Users can select only those languages that your organization is licensed to use.
Set Up Vision Touch Apps Your Deltek First Vision Essentials solution includes access to all mobile applications associated with the Vision modules for which you are licensed. URLs for the Touch application are included with your Activation email.
Users need to install the applications from the appropriate application stores. Search for “Deltek” in the application store to see the applications available to be installed on your users’ devices.

Providing Users with Access to Vision Essentials
Vision Essentials Administrator Guide 34
When a user installs and launches an application, the user is prompted for the URL provided in the Activation email. The user enters the URL, clicks Connect, and enters his or her user ID and password.

Communicating with Deltek
Vision Essentials Administrator Guide 35
Communicating with Deltek Service Requests As the Vision Essentials Administrator for your company, you can request additional services from Deltek as part of your annual subscription fee.
Service requests must be submitted by a designated Vision Essentials Administrator. If Deltek receives a service request from someone other than a designated Vision Essentials Administrator, the request will be rejected.
Many of these service requests can be submitted via the Deltek Cloud Solutions self-service page, available on the Support Center site. For those service requests that are not available through the Deltek Cloud Solutions page, open a support case through the Support Center site.
Service Request Purpose
Admin Password Reset
If you lose or forget the password for your Vision administrator account, you (the Vision Essentials Administrator) can use the Support Center site to submit a request for a password reset. When you submit a password reset request, you must include the user ID of the account that needs the password reset. These requests are typically completed within 2 business hours.
Analysis Cube Refresh
If you own the Vision Performance Management module, your analysis cubes are refreshed automatically every night. You can submit a service request to have your cubes refreshed at another time, typically within 4 hours after you submit the request. Once you submit the request, stop all transactional activity to prevent data integrity issues in the cubes.
Database Upload If you are moving to Vision Essentials from on-premises Vision or a different product, you must upload your migrated or converted database as part of the implementation process. Submit a service request to initiate this process. You will be directed to the Deltek File Transfer Tool and related instructions.
If databases were uploaded by 8 PM EST Friday, they will be restored for go live by 8 AM EST on the following Monday.
If you have ODBC users configured in your database, the ODBC access for these users need to be reconfigured after the completing the restore.
Manage ODBC Account for Development Environment
If you need to deploy and test stored procedures in a development environment, you can submit a service request to create an ODBC account which has read, write, and execute rights. You can request to create the account, to change the password for the account, or to delete it. These requests are typically completed within three buisness days. Deltek Customer Care will notify you when the process is completed.
For more information, refer to the How to Manage ODBC Account for Development Environment article in the Deltek Support Site.

Communicating with Deltek
Vision Essentials Administrator Guide 36
Service Request Purpose
Production Database Backup Download
You can request a backup copy of your Vision database, which will be sent to you via secure FTP. When you request a backup, be sure to specify the point in time that the backup should reflect. You are allowed 4 backup copies of your database annually. Database backup requests are typically completed within 3 business days.
If you need a secure FTP site to receive your back up, you must complete a Data Consent Case.
For information, see Backup and Retention Policy.
Database Refresh Use the Database Refresh service request to refresh a database from a copy of another database. For example, you can refresh your sandbox database from a copy of your production database. A sandbox is a separate database within the Deltek Vision production environment that can be used for testing new configurations, exploring functionality and training. If you do not have a sandbox, you can use the Database Refresh service request to have one created for your Deltek Vision instance. When requesting a sandbox, Deltek Cloud Operations will create a copy of the existing production database, properly rename the copy, and add it to the instance of Deltek Vision as a separate item on the Database pull down field on the login screen.
You are allowed a single sandbox however; a SaaS Administrator can request that your sandbox be refreshed. This process will replace the existing sandbox with the latest production data. You are allowed 6 sandbox refreshes annually. Once a sandbox creation/refresh request is submitted, Customer Care will email the requestor the sandbox information within the next 3 business days.
Production Database Restore
If you need to restore your database to a previous point in time, submit a backup restore request. Vision Essentials customer databases are backed up every 24 hours. You are allowed 4 backup restores annually. Backup restores are typically completed as soon as possible.
For information, see Backup and Retention Policy.
SQL Script Upload If you need to run a script against your transaction database, create the script and use the SQL Script Upload service to upload and run it. You might do this, for example, to run a batch update to clean up a large number of records, or to deploy a stored procedure to the database. This process cannot run SQL scripts that return data, only those that make changes to the database. You are responsible for writing SQL scripts and stored procedures that maintain the integrity of your database.
These requests are typically completed within 1 business day. Deltek Customer Care will notify you when the process is completed.
Upload Performance Management Dashboard Image
If you own the Vision Performance Management (VPM) module and would like to use a custom image in VPM workbooks, submit a service request to upload the image file to the Vision Essentials environment. Once the image is uploaded, you can reference it by filename in your VPM workbooks.
VPM Analysis Cube User Access/Removal
If you own the Vision Performance Management (VPM) module, you can give employees the ability to access analysis cubes via the OLAP data pump. You can also take this access away from an employee. Submit a service request listing the employees to be added or removed. This request is typically completed within 5 business days.

Communicating with Deltek
Vision Essentials Administrator Guide 37
Service Request Purpose
Changing an Absent Administrator
If all of your Vision Essentials Administrators are no longer with your company and a new Administrator needs to be designated, you must submit a request to Deltek Customer Care. This request must include a formal letter on company letterhead and have the signature of an officer of your organization. The request should include the new Administrator’s name, email address, title, and phone number. You can submit your request via the Support Center site, or you can fax your request to Deltek at 1.339.469.8970. This request is typically completed within 2 business days.
Vantagepoint Preview Environment
As a Vision Essentials Cloud customer, you can request a Vantagepoint preview environment. This preview environment makes it easy for your company to explore, test, and train your teams to prepare for your upgrade to Vantagepoint. A preview environment request can take up to 3 weeks depending on customer demand. Preview environments are automatically updated to the latest version of Vantagepoint. The preview environment will remain available until 30 days after the production environment has been upgraded to Vantagepoint. Customers are allowed two preview environment refreshes; subsequent refreshes will be counted against the annual database refresh limit.
Submit a Service Request To submit a service request:
1. Go to http://support.deltek.com.
2. Log in to the Support Center site using the credentials provided to you when your initial Vision Essentials order process was completed.
If you do not have a username and password for the Support Center site, contact your firm’s Vision Administrator.
If you forget your username or password, you can click the Need Help? button on the Support Center login screen.
3. On the Home page, click the Cloud Solutions link.
4. Select Vision Essentials from the product drop-down list, and click Go

Communicating with Deltek
Vision Essentials Administrator Guide 38
5. Select an option from the Service Requests list, supply any additional information that is
requested, and click Submit. If the service request that you need is not listed, return to the home page, click the Submit a Case link, and enter information about your request.
Exceptions to Annual Support Case Allowance The following cases do not count against your annual support case allowance:
Cases that identify a defect in Vision
Cases that result in a request for an enhancement to Vision
Cases initiated by a Deltek consultant
Cases related to early adoption of a version of Vision that is not yet generally available
Requests for access to the Support Center site
In addition, if you are a Deltek First (cloud) customer, your case allowance is not affected by:
Cases related to hosting or infrastructure
Requests for system administration procedures that you cannot perform without Deltek assistance, such as backups and restores
Backup and Retention Policy The Deltek Cloud Operations provide a point in time restore of the production database up to seven days. Data in the production databases is backed up and retained in the following manner:
Objects Backup Frequency Retention Period
Data Daily 7 days
Data Weekly (every Saturday) 30 days
Transaction Logs Every 15 minutes

Communicating with Deltek
Vision Essentials Administrator Guide 39
The backup and retention policy is subject to ongoing review and change.
Upgrades and Cumulative Updates Deltek applies software upgrades and cumulative updates to the Vision Essentials environment on a regular basis, during planned maintenance windows. You will receive messages in the Vision application and via email to alert you to these maintenance windows. These communications will include details for each upgrade and cumulative update. If an upgrade or cumulative update has any significant effect on functionality that could change how you use Vision, Deltek will communicate information about the change prior to the planned installation date of the maintenance package.
For Enterprise Cloud Customers Special policies apply to Vision Enterprise Cloud customers:
Cumulative updates: Deltek will deploy cumulative updates based on your needs. Deltek will work with you to determine which cumulative updates are applied to your environment and when they are applied. This process includes determining maintenance windows and performing testing in a non-production environment. In some cases, Deltek will require that you take a cumulative update and will work with you to manage its deployment.
New versions: Deltek will use your input to plan the deployment of version upgrades. Prior to the upgrade, Deltek will deploy a preview environment for you, using the new version. Use this environment for testing and custom/integration rework. Once your testing is completed and you feel comfortable with the version upgrade, Deltek will work with you to determine a maintenance window and schedule a time to upgrade your production environment with the new version.
Deltek requires that the version that you are running in your production environment is either in the Active or Maintenance support phase. You cannot run a version that is in the Sustaining support phase. This requirement will be considered when planning for version upgrades.
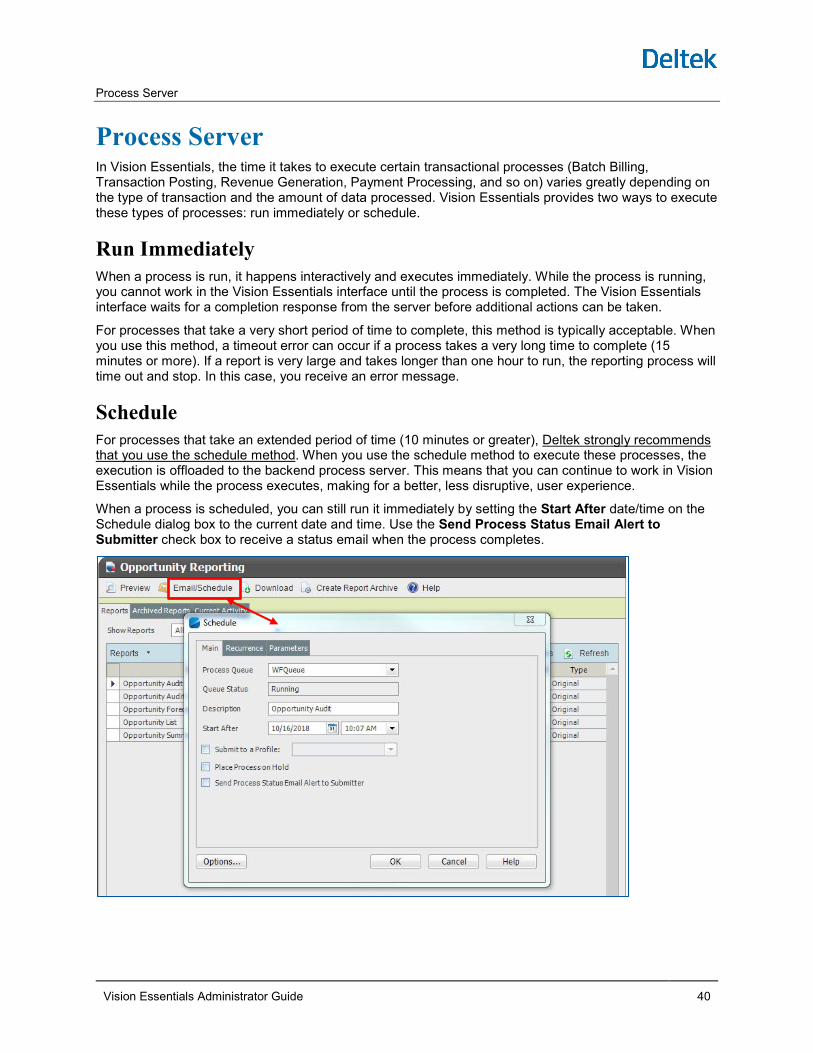
Process Server
Vision Essentials Administrator Guide 40
Process Server In Vision Essentials, the time it takes to execute certain transactional processes (Batch Billing, Transaction Posting, Revenue Generation, Payment Processing, and so on) varies greatly depending on the type of transaction and the amount of data processed. Vision Essentials provides two ways to execute these types of processes: run immediately or schedule.
Run Immediately When a process is run, it happens interactively and executes immediately. While the process is running, you cannot work in the Vision Essentials interface until the process is completed. The Vision Essentials interface waits for a completion response from the server before additional actions can be taken.
For processes that take a very short period of time to complete, this method is typically acceptable. When you use this method, a timeout error can occur if a process takes a very long time to complete (15 minutes or more). If a report is very large and takes longer than one hour to run, the reporting process will time out and stop. In this case, you receive an error message.
Schedule For processes that take an extended period of time (10 minutes or greater), Deltek strongly recommends that you use the schedule method. When you use the schedule method to execute these processes, the execution is offloaded to the backend process server. This means that you can continue to work in Vision Essentials while the process executes, making for a better, less disruptive, user experience.
When a process is scheduled, you can still run it immediately by setting the Start After date/time on the Schedule dialog box to the current date and time. Use the Send Process Status Email Alert to Submitter check box to receive a status email when the process completes.

Printing
Vision Essentials Administrator Guide 41
Printing When you run a report in Vision you have three options—Preview, Email/Schedule, and Download.
If a report is very large and takes longer than one hour to run, the reporting process will time out and stop. Consider scheduling such reports.
Preview
When you choose the Preview option, the report opens in a report preview window.
From the preview window, click the Printer icon to open a standard Windows Print dialog box from which you can select any printer (local or network) configured in your Windows environment.

Printing
Vision Essentials Administrator Guide 42
Email/Schedule
The Email/Schedule action opens the standard email dialog box. This lets you email the report as an attachment on messages to the required individuals, or schedule the report to be run later and then emailed.
Download
The Download action opens a dialog box that lets you choose the download format for the report, the desired page range, and whether to open or save the resulting report. After you select an option, the report runs and then opens or prompts you to specify a save location for the report.

Email Considerations
Vision Essentials Administrator Guide 43
Email Considerations Size Limit Throughout Vision Essentials, the limit on email size is 15 MB. In general, the only time you might exceed this limit is when emailing large reports.
You will receive an error message when the limit is exceeded.
Default Sender for Outgoing Mail When Vision Essentials sends an email message, it uses the email address in the Default Sender field on the Email tab in Configuration » General » General System Settings. Vision Essentials also uses this address if an employee sends an email message from within Vision Essentials and that employee does not have an associated email address.
As part of implementing Vision Essentials, make sure that the Default Sender field contains an appropriate internal email address. Keep in mind that recipients may reply to emails sent from this email address, so use the email address of someone who can monitor these responses.

Supplemental Fonts
Vision Essentials Administrator Guide 44
Supplemental Fonts Deltek's cloud environment includes fonts provided by Microsoft as standard for the Windows Server operating system. In addition to the Windows Server OS fonts, the following fonts are installed and available to all Cloud customers:
• IDAutomationHC39M
• IDAutomationOCRa
• IDAutomationOCRb
• MICR13B

Batch Billing
Vision Essentials Administrator Guide 45
Batch Billing When you use Vision’s Batch Billing feature, you must select the <local printer> option to generate invoices. When you select this option, you may receive a message indicating that you cannot print invoices using the <local printer> option; you can ignore this message.
After you run the batch bill, click the Previously Run Batches tab to print/preview the invoices via PDF.
You can control how long previously run batches are available using the Retain Invoices for up to field on the Billing Session Options dialog available from the Batch Billing form.

Audit Trail Logging
Vision Essentials Administrator Guide 46
Audit Trail Logging When you use the audit trail logging feature in Vision Essentials, you can maintain audit trail history for up to 30 days, as determined by this setting:
Configuration » General » System Settings » Number of days to retain audit history
You cannot enter a value higher than 30 for this setting.
If you are migrating to Vision Essentials from an on-premises implementation of Vision and you currently maintain history for longer than 30 days, the migration process will:
Set the Number of days to retain audit history value to 30.
Purge any audit trail history that is greater than 30 days old.
If you need to retain audit history for greater than 30 days, you have two options:
Run audit trail reports, download them, and store them locally.
Request database backups and store them locally.

Exchange Rate Updates
Vision Essentials Administrator Guide 47
Exchange Rate Updates If you use the Vision multicurrency feature, you can schedule and automate the updating of exchange rates. Deltek partners with XE.com, a popular online foreign exchange tools and services company, to supply up-to-date exchange rates to Vision users.
It is up to you to contact XE.com, pay for their exchange rate services, and configure Vision to work with their data.
To set up a data feed from XE.com to Vision: 1. Send an email to [email protected] containing the following information:
Your company name and address.
The full name, email address, and phone number of the primary billing contact at your company.
That you want to use exchange rate information with Deltek Vision in the cloud.
2. Establish a contract and payment process with XE.com.
3. Follow XE.com’s instructions for configuring and activating your account.
4. Configure Vision to use XE.com data:
a. In Vision, click Configuration » General » System Settings » XE.com Rates tab.
b. Follow the instructions in the Vision online help.

Reporting
Vision Essentials Administrator Guide 48
Reporting Scheduling Reports
If a report is very large and takes longer than one hour to run, the reporting process will time out and stop. Consider scheduling such reports.
Use the Email/Schedule function to schedule a report to run at a later time.
To schedule a report:
1. Click the Email/Schedule button to open the Email Report dialog box.
2. Enter the recipient’s email address and click Schedule.

Reporting
Vision Essentials Administrator Guide 49
3. Enter information on the Schedule dialog box and click OK.
Report Timestamps The report servers for the Vision Essentials environment are hosted in various locations and time zones. As a result, the timestamp that appears on your Vision reports may not represent the time for the time zone in which you are running the report. Instead, the timestamp will reflect the time for the time zone in which the report server running the report is located.
Deploying Custom Reports If you purchased the Deltek First Flex Cloud option or the Custom Report Add-On, you can deploy your own custom reports to your production environment.
The Vantagepoint cloud solution will not include the SSRS Report Builder component. Customers that would like to develop and deploy custom reports must do so locally using SQL Server Data Tools for Visual Studio.
Upload custom reports via the Custom Reports tab in Utilities » Report Administration. Use the following syntax to name the RDL, where XXXXX is your 5-digit client ID:
00000XXXXX_ReportName.rdl
If a custom report has sub-reports, each sub-report must be uploaded and named using this syntax.

Reporting
Vision Essentials Administrator Guide 50
Each report listed in the grid on the Custom Reports tab should have a status of Synchronized.
If the status is Missing in report server, that means that the report definition is present in the database but is not loaded on the report server. This problem can occur if your production database gets out of synch with the report server. Click Synchronize from the toolbar to resolve the problem.
If the status is Missing in database, that means that the report has been loaded on the report server but is not present in the database. Re-upload the RDL file to resolve the problem.
Be sure to retain backups of all of your custom report RDL files. Deltek is not responsible for retaining the RDL files used to create your custom reports. However, you can download an RDL from the database using the Download button on the Custom Reports tab.

Vision Xtend API
Vision Essentials Administrator Guide 51
Vision Xtend API All subscribers to Vision Essentials have access to the Vision Xtend API, which they can use to interact with Vision.
Your URL to access the Vision Xtend API is based on the URL that you use to access Vision. The format is:
https://<customer name>.deltekfirst.com/<customer name>/visionWS.asmx. For example, if your URL for accessing Vision is https://cohenassoc.deltekfirst.com/cohenassoc, then your URL for the API is: https://cohenassoc.deltekfirst.com/cohenassoc/visionWS.asmx.
For more information about how to use the Vision Xtend API, see the Knowledge Base on the Support Center site.

Direct Database Access
Vision Essentials Administrator Guide 52
Direct Database Access If your organization subscribes to the Deltek First Flex Cloud offering, you can use ODBC to establish a secure, read-only connection to your Vision transaction database. You can connect tools such as Microsoft Excel, Microsoft Access, or the Business Intelligence Development Studio directly to your database.
Manage ODBC Accounts Before you can use the ODBC connection, you need to set up the accounts you will need for ODBC access. Use Vision security configuration (Configuration » Security » Users) to enable, edit, and disable ODBC accounts. You can have up to five active ODBC accounts.
To enable a user to have ODBC access: 1. Go to Configuration > Security > Users and find the user who needs ODBC access.
2. On the General tab, select the Enable Cloud ODBC Connectivity option, enter the user’s email address, and enter a password. (Email addresses are used to ensure that usernames are unique across all organizations that use Vision.) Click Save.

Direct Database Access
Vision Essentials Administrator Guide 53
You will receive two notifications:
One now, saying that the account was created and that the Deltek Cloud Operations team will need to complete the process.
Another later, from Deltek Customer Care, when the configuration is completed.
Edit or Disable ODBC Accounts To edit or disable an account, go to Configuration > Security > Users and find the user. You can change the password or deselect the Enable Cloud ODBC Connectivity option to disable the account.
Install and Configure the ODBC Driver You must install and configure a driver on every workstation that will be used to connect to the Vision database.
The user who installs the ODBC drivers must, at a minimum, have local administrator privileges.
To install and configure the driver: 1. Download the ODBC driver installer from this link:
https://dsm.deltek.com/DFVE/ODBC/HDPDriver.zip
2. Extract all the files in the downloaded zip file to a folder on your computer.
3. Execute either the 32-bit or 64-bit .EXE installer file. Execute the file that corresponds to the application from which you will be connecting via ODBC.
4. Launch the appropriate ODBC Administrator (32-bit or 64-bit).
5. From the ODBC Data Source Administrator dialog box, create either a User DSN or System DSN. User DSNs are for a single user; System DSNs are available to all users of the workstation. Select the User DSN or System DSN tab, based on your needs.

Direct Database Access
Vision Essentials Administrator Guide 54
6. Click Add. In the Create New Data Source dialog box, select DataDirect HDP 4.2 and click
Finish.
7. In the ODBC Cloud Driver Setup dialog box, enter a name in the Data Source field. This can be
any name that helps you identify the data source. You do not need to add a value in the Description field.
8. In the Hybrid Data Pipeline Source field, enter the database name and service URL that you received from Deltek Customer Care when you requested the ODBC accounts. Leave the Port Number field as is.
9. On the Security tab, ensure that the Enable SSL check box is selected.

Direct Database Access
Vision Essentials Administrator Guide 55
10. Click Test Connect, enter the credentials that you received from Deltek Customer Care when
you requested the ODBC accounts, and click OK.
11. When the Connection established! message displays, lick OK.
12. Click OK on the ODBC Cloud Driver Setup dialog box and click OK on the ODBC Data Source Administrator dialog box.
13. The final step is to add two entries to the registry. If you need help doing this, see your system administrator. Follow these steps:
a. For a User DSN, go to: \HKEY_CURRENT_USER\Software\ODBC\ODBC.INI\<datasource>
For a System DSN, go to: \HKEY_LOCAL_MACHINE\SOFTWARE\Wow6432Node\ODBC\ODBC.INI\<datasource>
The <datasource> value is the name you entered in Data Source in Step 7.
b. Add a new String Value with the name WorkArounds and a value of 16777218.
c. Add a new String Value with the name WorkArounds2 and a value of 8192.

Direct Database Access
Vision Essentials Administrator Guide 56
Connect to Your Vision Database Once the ODBC driver is installed and configured, you can make a connection between the workstation and the Vision database, using any application that supports ODBC connectivity.
The instructions below use Microsoft Excel as an example. The process for other applications may not be exactly the same, but will be very similar.
To connect to the Vision database: 1. Go to the application from which you want to connect to the Vision database and initiate an
ODBC connection.
2. Select the data source that you entered in the Data Source field in Step 7 above.
3. Enter your credentials for the database connection.

Direct Database Access
Vision Essentials Administrator Guide 57
4. Build a query.
5. Execute the query.
Use ODBC Connectivity with Linux This guide focuses on setting up ODBC connectivity on the Windows platform. However, you can also set up Vision Essentials ODBC functionality using Linux. Here are some general instructions.
To set up ODBC connectivity with Linux: 1. Set up ODBC accounts in the same way that you would using Windows.
2. Download the ODBC driver installer for Linux from this link:
https://dsm.deltek.com/DFVE/ODBC/HDPLinuxDriver.zip
Select either the 32-bit or 64-bit .BIN file. Select the file that corresponds to the application from which you will conect via ODBC.
3. Follow the same general steps for installing and configuring the driver that are described here for Windows. Specify the service URL, data source name, port number of 443, and encryption method of 1.

Vision Performance Management
Vision Essentials Administrator Guide 58
Vision Performance Management Vision Essentials customers who subscribe to the Vision Performance Management (VPM) module have access to additional dashboard and data visualization functions.
If you are a VPM user, you should:
Learn about some basic concepts, which are covered in the Vision online help system. Launch online help from Vision, go to Reporting Overview > Performance Management Overview, and browse through the topics there.
Download and install the VPM Desktop Tool, which lets you create custom data visualization maps. You can see these visualization maps in the Desktop Tool or publish them to your Vision Essentials environment.
Daily Downtime for Maintenance
The cube data that powers VPM is not live data but a snapshot of your transaction database at a single point in time. Every day, the Deltek Cloud Operations team refreshes your data and performs general maintenance. During this time, VPM content is not available.
Downtime occurs between 20:00 and 3:15 daily, based on the local time of the data center that hosts your Vision instance. Deltek currently has data centers in Europe (Germany), the United States (East Coast) and Australia (Sydney). Your Vision instance is typically hosted by the data center closest to the highest concentration of your users.
Install VPM Desktop Tool Install the VPM Desktop Tool on the Windows computers of all VPM users. You can install it on as many computers as needed.
To install the VPM Desktop Tool: 1. Click the appropriate link below and download the
DeltekVisionPerformanceManagementDesktopTool_##.msi file:
VPM Desktop Tool Download – 32-bit
VPM Desktop Tool Download – 64 bit
2. Double-click the file to the start the installation process.
3. Follow the installation steps, accepting all of the default settings.
Connecting VPM Desktop Tool to Data Sources The VPM Desktop Tool allows you to connect to two data sources – the Vision Analysis Cubes or the Vision transaction database. To connect the Desktop Tool to the Analysis Cubes you will use the OLAP data pump connectivity information you were provided by Deltek Customer Care when your VPM was provisioned within your cloud instance of Vision.
To connect to the transactional database, you will use the ODBC connectivity described in the previous section of this document. Instructions for establishing each of these connections are provided below.
Connecting to the Analysis Cubes When VPM was provisioned for your organization, you were provided, via email, with an OLAP data pump URL and associated credentials. This information is required to complete the steps below. When

Vision Performance Management
Vision Essentials Administrator Guide 59
VPM is provisioned, only a single OLAP data pump account is configured. To request additional OLAP data pump accounts, see KB article #80746.
To connect to Analysis Cubes: 1. Launch the Desktop Tool.
2. On the Connect menu, select Microsoft Analysis Services.
3. On the Microsoft Analysis Services dialog box, enter the OLAP data pump URL and the
associated credentials and click OK.

Vision Performance Management
Vision Essentials Administrator Guide 60
4. Select the cube with which you would like to work and proceed to build your workbook.
Connecting to the Transaction Database Connecting to the transaction database from the Desktop Tool requires the DataDirect ODBC driver described in the previous section of this document. The steps below assume that the driver has been successfully installed and that a DSN that connects to the Vision database has been setup and tested.
To connect to the transaction database: 1. Launch the Desktop Tool.
2. From the Connect menu, select Other Databases (ODBC).

Vision Performance Management
Vision Essentials Administrator Guide 61
3. On the Other Databases dialog box, select the DSN that you have set up for ODBC connectivity to your database and click Connect.
4. Enter the necessary credentials and click OK.
5. On the Other Databases dialog box, click OK to finalize the connection.

Vision Performance Management
Vision Essentials Administrator Guide 62
6. After you are connected, you can build a SQL query to extract the desired data.
VPM for Deltek First Vision Essentials does not currently support publishing workbooks that use a direct connection to the SQL transaction database so that they can be viewed from / included on the Vision dashboard. Workbooks developed using a connection to the Vision transaction database can only be viewed in the VPM Desktop Tool.
Connecting Excel to Vision Analysis Cubes As an organization using VPM, you have the ability to not only connect to the analysis cubes form the Desktop Tool but from any tool that supports connections to Microsoft Analysis Services. One such tool is Microsoft Excel and the steps below describe how to make this connection. This example uses Microsoft Excel 2013 – exact commands and screenshots might differ slightly for other versions.
To connect Excel to Vision Analysis Cubes: 1. Launch Excel from within the desired worksheet.
2. On the Data ribbon, select From Other Sources and then select From Analysis Services from the menu.

Vision Performance Management
Vision Essentials Administrator Guide 63
3. On the Connect to Database Server page of the Data Connection Wizard, enter the OLAP data pump URL and the associated credentials and then click Next.
4. On the Select Database and Table page, select the desired cube and then click Next.
5. On the Save Data Connection File and Finish page, adjust the data source filename if necessary.
6. Select the Save Password in File check box if you want to store the password for the data connection in the file, preventing the need to enter the password each time the workbook is opened. Consider the security implications of storing the password in the file. Click Finish.

Vision Performance Management
Vision Essentials Administrator Guide 64

Additional Documentation
Vision Essentials Administrator Guide 65
Additional Documentation The following table lists additional related Deltek documentation that can help you get started with Vision Essentials. All the documents listed in this table are available from the Knowledge Base section of the Support Center site.
Document Name Description
Getting Started Guide This guide provides all the basic information necessary to get started using Deltek First. You’ll find information on navigation tools, lookup lists, online help, reporting, and other system-wide features.
Quick Reference Cards Quick Reference Cards are single page documents that provide basic information on commonly used areas of Deltek First.
The following titles are available:
Create Client from Vendor Utility
Create a Standard Purchase Order
Create a Voucher from a Purchase Order
Dashboard
Desktop and Microsoft Office Integration (MODI)
Expense Report
Generic Resource Assignments and Resource Utilization
Navigation Tree Designer
Project Planning
Screen Designer
SF330 Proposals
Template-Based Emails
Timesheet
User Options
Visualizations

About Deltek Better software means better projects. Deltek delivers software and information solutions that enable superior levels of project intelligence, management and collaboration. Our industry-focused expertise makes your projects successful and helps you achieve performance that maximizes productivity and revenue. www.deltek.com