Dell EMC XC640 Series Hyper-Converged Appliance...
24
Dell EMC XC640 Series Hyper-Converged Appliance Solutions Guide
Transcript of Dell EMC XC640 Series Hyper-Converged Appliance...
Dell EMC XC640 Series Hyper-Converged ApplianceSolutions Guide

Notes, cautions, and warnings
NOTE: A NOTE indicates important information that helps you make better use of your product.
CAUTION: A CAUTION indicates either potential damage to hardware or loss of data and tells you how to avoid the problem.
WARNING: A WARNING indicates a potential for property damage, personal injury, or death.
© 2017 - 2018 Dell Inc. or its subsidiaries. All rights reserved. Dell, EMC, and other trademarks are trademarks of Dell Inc. or its subsidiaries. Other trademarks may be trademarks of their respective owners.
2018 - 04
Rev. A01
Contents
1 About Dell EMC XC640 Hyper-Converged Appliances solution...................................................................... 4
2 Documentation references.............................................................................................................................5
3 License management..................................................................................................................................... 6Setting up Nutanix Customer Portal................................................................................................................................6
Managing the license................................................................................................................................................... 7
4 Deploying an appliance.................................................................................................................................. 8Before you begin................................................................................................................................................................ 8Setting up your appliance for first use............................................................................................................................ 9
Deploying XC Series appliances................................................................................................................................. 9Default cluster credentials................................................................................................................................................ 11
5 Downloading and installing software applications......................................................................................... 13Downloading OpenManage Essentials........................................................................................................................... 13Installing Dell OpenManage Essentials on a separate management server...............................................................13Dell Nautilus....................................................................................................................................................................... 14
6 Monitoring XC Series appliances.................................................................................................................. 15Monitoring the appliance by using iDRAC..................................................................................................................... 15Monitoring the appliance by using Dell OpenManage Essentials................................................................................15Monitoring an appliance by using Nutanix Web Console............................................................................................. 16Monitoring an appliance by using Nutanix Prism.......................................................................................................... 16
7 Updating firmware........................................................................................................................................ 17Updating drive firmware with Dell Nautilus................................................................................................................... 17
8 Replacing hardware...................................................................................................................................... 19Replacing components with no cluster data................................................................................................................. 19Replacing failed front hard drive and SSD components that contain cluster data..................................................20
9 Recovering an appliance...............................................................................................................................21
10 Getting help............................................................................................................................................... 22Contacting Dell EMC....................................................................................................................................................... 22Dell EMC SupportAssist..................................................................................................................................................22Locating Service Tag....................................................................................................................................................... 22Quick Resource Locator..................................................................................................................................................23
A Bare metal recovery.....................................................................................................................................24Creating a RASR USB disk for Hyper-V........................................................................................................................ 24Creating a RASR USB disk for ESXi and AHV..............................................................................................................24
Contents 3
About Dell EMC XC640 Hyper-Converged Appliances solution
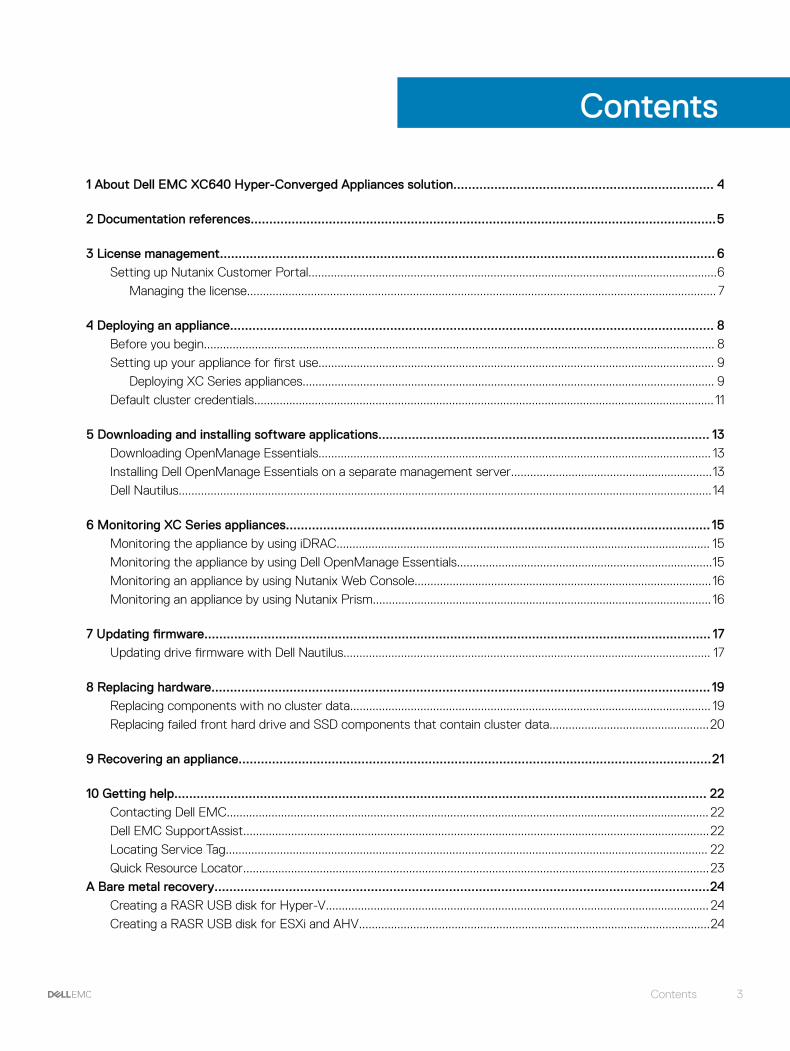
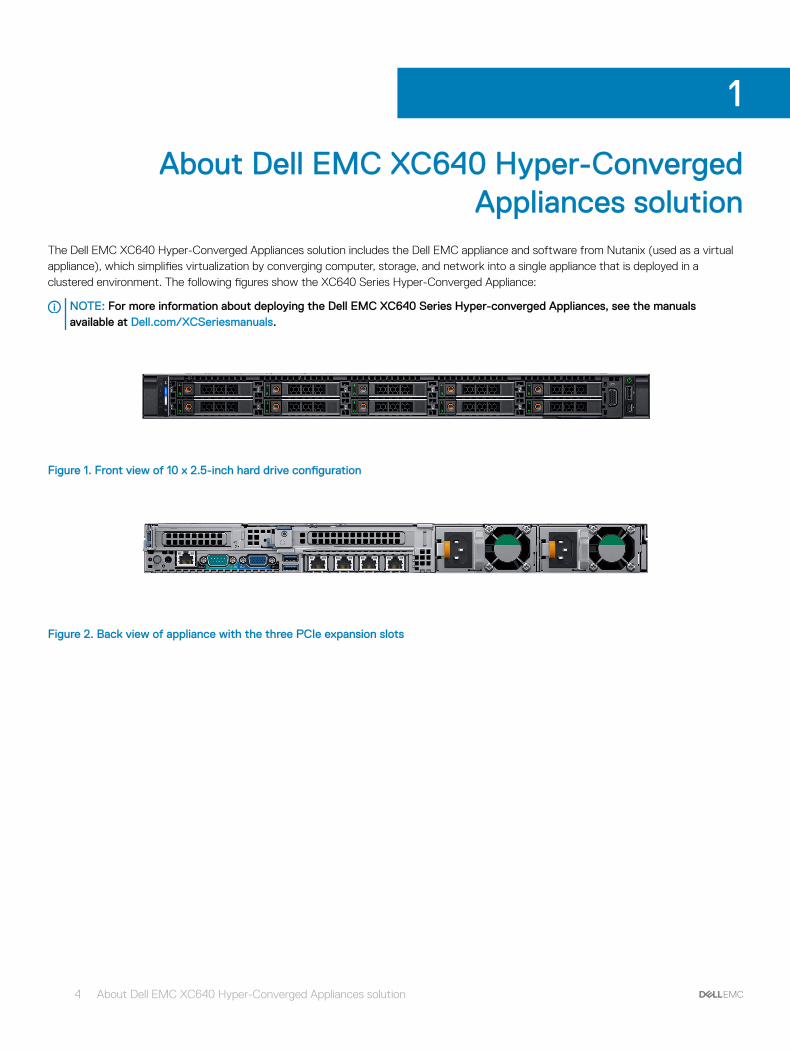
The Dell EMC XC640 Hyper-Converged Appliances solution includes the Dell EMC appliance and software from Nutanix (used as a virtual appliance), which simplifies virtualization by converging computer, storage, and network into a single appliance that is deployed in a clustered environment. The following figures show the XC640 Series Hyper-Converged Appliance:
NOTE: For more information about deploying the Dell EMC XC640 Series Hyper-converged Appliances, see the manuals available at Dell.com/XCSeriesmanuals.
Figure 1. Front view of 10 x 2.5-inch hard drive configuration
Figure 2. Back view of appliance with the three PCIe expansion slots
1
4 About Dell EMC XC640 Hyper-Converged Appliances solution

Documentation referencesTable 1 provides the reference document link on the Dell support site for Nutanix solution software documentation, Dell EMC documentation, and supported hardware, firmware, and software.
Table 1. Documentation references
Information Link
Nutanix solution software documentationSee the Dell EMC XC640 Series Hyper-Converged Appliances Support Matrix available at Dell.com/XCSeriesmanuals
Dell EMC documentation
Supported hardware, firmware, and software
2
Documentation references 5
License managementNOTE: This chapter does not apply to XC Core appliances.
The Nutanix virtual computing platform consists of various features that enable you to administer your environment according to your current and future requirements.
You can use the default feature set of the Nutanix solution software, upgrade to an enhanced feature set, update your license for a longer term, or reassign existing licenses to nodes or clusters as required.
There are two types of licenses. They are:
• Starter license
• Pro and Ultimate license
Starter license:
Each Nutanix node and block is delivered with a default Starter license, which is issued for a six-year term that begins on the shipping date for your appliance order. You are not required to register this license on the Nutanix Customer Portal account that was assigned to you when you purchased your nodes.
Pro and Ultimate licenses
The Pro and Ultimate license types require you to download a license file from the Nutanix Customer Support Portal and install it on your cluster. When you upgrade to a Pro or Ultimate license, or add nodes or clusters to your environment with these licensed features, you must generate the license file, download it, and then install it.
NOTE: The most current information about your license is available at the Nutanix Customer Support Portal. You can view information about license types, expiration dates, and any free license inventory (that is, unassigned available licenses).
Setting up Nutanix Customer PortalIf you are new to Nutanix Support, create a personal profile on the Nutanix Customer Portal. Creating a personal profile enables you to manage your licenses.
NOTE: The Nutanix Customer Portal is also required to access some of the advanced Nutanix documentation.
Perform the following steps to set up your Nutanix Customer Portal:
1 Go to http://portal.nutanix.com, click +Create account, type the required information, and then click Register.
An email would be sent to your registered email address. Click the verification link to activate your account. The Welcome screen is displayed.
2 Select Support Portal, type the Serial Number or Service Tag of your appliance, and then click Activate.
NOTE: To find the Service Tag of your appliance, see the Locating Service Tag section in this document.
The Customer Portal account is now created and allows you to manage your licenses.
3
6 License management
Managing the licensePerform the following steps to manage your licenses:
1 In Nutanix Documentation portal, open the Web Console Guide, and then see the License Management section.
For more information about accessing Web Console Guide, see the Documentation Matrix section in the Dell EMC XC640 Series Hyper-Converged Appliances Support Matrix available at Dell.com/XCSeriesmanuals.
2 Perform the relevant licensing tasks for your appliance.
License management 7
Deploying an appliance
Before you beginBefore you deploy an appliance, ensure that you read through this document and familiarize yourself with the process and required materials.
WARNING: Before you set up and operate your appliance, review the safety instructions that shipped with your storage enclosure.
WARNING: The weight of your appliance with all the physical disk drives installed (full weight) is 35-70 lbs.
WARNING: Your appliance must be installed by Dell EMC certified service technicians.
CAUTION: Before installing your appliance in the rack, ensure that the weight of the appliance does not exceed the weight limit of the rack. For more information, see the Rack Installation instructions that is shipped with your appliance.
CAUTION: It is important that you complete all the tasks in this guide before doing other configurations.
NOTE: For weight stability, always load the rack by using bottom-up approach.
NOTE: This solution is deployed by Dell EMC Services.
Ensure that the following items are available:
• Power cables
• Network cables—optical and/or copper (Intel SFP+ or Category 6 Ethernet)
• Rail kit
• Nutanix documentation
• Dell EMC Documentation
NOTE: For more information about the Dell EMC documentation and Nutanix documentation, see the Documentation matrix section in Dell EMC XC640 Series Hyper-Converged Appliances Support Matrix available at Dell.com/XCSeriesmanuals.
NOTE: The Boot Optimized Server Storage (BOSS) card shipped with XC Series appliances is the appliance boot device. This PCIe card supports up to two M.2 SATA SSDs configured in RAID1 for high availability. Write intensive activities and processes leveraged by XC Series appliances, are intended to take place on the SSDs and HDDs and not the BOSS boot device. Any applications defaulting write activity to the BOSS boot drive should be redirected accordingly.
The following are some of the examples of write intensive applications not to be run on the boot device:
• Appliance Center Agents
– System Center Configuration Manager (CCMExec.exe)
– System Center Operations Manager (MonitoringHost.exe)
• Write‐intensive Agents
• Databases
• Disk management utilities (third-party disk defragmentation or partitioning tools)
• More roles outside of the appliance’s intended use (web server, domain controller, RDS, and so on.).
• Client‐based Antivirus (Hyper-V only)
• Virtual machines: Ensure that the virtual machines run only on Solid State Drives (SSDs) and Hard Disk Drives (HDDs).
4
8 Deploying an appliance

Setting up your appliance for first useMake sure that your appliance components are properly installed. Your appliance is shipped with physical disk drives, power supply units (PSUs), and fan components. Ensure that all components are properly seated and are not dislodged or damaged during shipping.
1 Install the appliance in a rail.
The appliance requires a compatible rack and a rack installation kit. For more information about rail installation for the appliance, see the Rack Installation instructions that shipped with your appliance.
2 Cable your solution based on the best practices cabling diagram shown in the following image:
NOTE: At a minimum, there are three appliancess in a cluster.
Figure 3. Cabling an appliance
1 Management Network 2 Host Network
NOTE: The preferred setup is to connect the management port across all three appliancess to the same switch (management network).
Deploying XC Series appliancesThe flow of tasks in deploying the XC Series appliances is shown in the following image:
Figure 4. Deployment workflow process
The deployment of XC Series appliances involves running the first time boot scripts, creating an XC cluster, and configuring the storage cluster with Hypervisor Management Interface.
Deploying an appliance 9
First time boot scripts
Use the first time boot script information that applies to your appliance and associated hypervisor.
First time boot scripts for Nutanix AOS
Nutanix AOS is installed on each appliance. As Nutanix AOS is preconfigured, it does not require more first time configuration. The XC Series appliances boot to the hypervisor and are ready to be clustered after the CVM has all the services up and running.
Running first time boot scripts for VMware vSphere
After the appliance is racked and cabled, run the VMware vSphere boot script. When you run the first time boot script, the following tasks are completed:
NOTE: These first time boot scripts run automatically upon the first boot of the appliance and include multiple reboots.
• Creating vSwitch Nutanix, internal and external port groups and vmkernal interface with address on internal portgroup
• Activating vMotion and management on the default external vmkernel interface (vmk0)
• Enabling TSM-SSH, TSM, sshClient, nfsClient, and ntpClient through the firewall
• Denying vprobeServer through the firewall
• Setting advanced ESXi parameters
• Enabling auto-start, setting the default RAM, and number of vCPU for the CVM
• Electing applicable data-disk storage controller for PCI pass-through
• Disabling drivers associated with pass-through storage controllers
• Installing the following VIBs: Nutanix VAAI, updated ixgbe and igb driver, and GPU VIBs (if applicable)
• Renaming local VMFS datastore to standard naming convention: NTNX-local-ds-<block id>-<node_position>
• Starting CVM and checking for the existence of /tmp/svm_boot_succeeded• Restarting host
Running first time boot scripts for Microsoft Hyper-V
After the appliance is racked and cabled, run the Microsoft Hyper-V boot script. When you run the first time boot script, the following tasks are completed:
NOTE: These first time boot scripts run from a first time boot scripts wizard and require minimal user intervention.
• Setting up vSwitch or LBFO NIC Team
• Installing NIC drivers (Intel), Cygwin, ipmiutil, and Python
• Registering CVM as a VM
• Attaching disks to CVM
• Enabling auto-start, sets the default RAM and number of vCPU for the CVM.
• Starting CVM and checks for the existence of /tmp/svm_boot_succeeded.
• Restarting host.
Creating a cluster
You can create a Nutanix storage cluster by using one of the following ways:
• Using Nutanix Foundation from all locally discovered appliances that are ready to be clustered
• Creating a cluster manually by using command line interface
10 Deploying an appliance
During this process, you can set the following parameters:
• Cluster maximum Redundancy Factory (RF)
• Cluster name
• Cluster virtual IP (optional for AHV and vSphere)
• Subnet mask and default gateway (iDRAC, hypervisor, and CVM)
• Domain Name Servers (DNS)
• Network Time Protocol (NTP) servers (hypervisor NTP N/A for Hyper-V)
• Hypervisor hostnames
• Appliance IPs (iDRAC, hypervisor, and CVM)
• Reinstallation of new hypervisor and CVM (optional with Nutanix Foundation CVM)
Configuring a cluster by using Nutanix Prism
NOTE: For information about Nutanix, see the Dell EMC XC640 Series Hyper-Converged Appliances Support Matrix available at Dell.com/XCSeriesmanuals. The document name varies depending on the solution software version you are running.
Acropolis Hypervisor (AHV)
1 Create storage pool and containers through the Nutanix web console.
2 Create, deploy, and manage virtual machines through the Nutanix web console.
NOTE: For more information, see the Acropolis Virtualization Administration Guide. To access Acropolis Virtualization Administration Guide, see the Documentation Matrix section in the Dell EMC XC640 Series Hyper-Converged Appliances Support Matrix available at Dell.com/XCSeriesmanuals.
VMware vSphere
1 Create storage pools through the Nutanix web console.
2 Create and mount containers as NFS datastores on appropriate hosts through the Nutanix web console.
3 Manually add and configure vSphere clusters by using the Nutanix guidelines.
NOTE: For more information, see the vSphere Administration Guide. To access vSphere Administration Guide, see the Documentation Matrix section in the Dell EMC XC640 Series Hyper-Converged Appliances Support Matrix available at Dell.com/XCSeriesmanuals.
Microsoft Hyper-V
1 Create storage pools and containers through the Nutanix web console.
2 Run Hyper-V setup script from any CVM to join hosts to a domain, create a Hyper-V failover cluster, and register a storage cluster as an SMB share.
3 Optionally, add a cluster to System Center Virtual Machine Manager either with the Hyper-V setup script or manually.
Default cluster credentialsThe default cluster credentials for the appliance differ from those stated at the beginning of all Nutanix documentation. The following table contains the default credentials for each for each interface in the appliance:
NOTE: The default password is not set for ESXi hosts.
Deploying an appliance 11
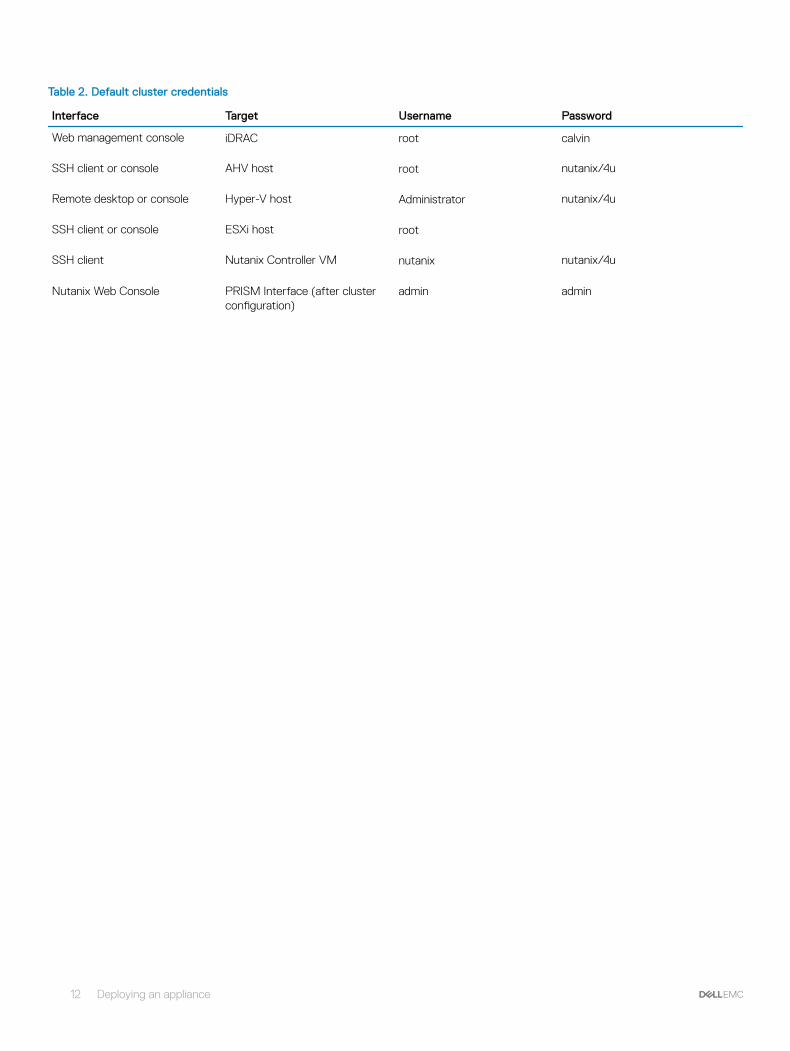
Table 2. Default cluster credentials
Interface Target Username Password
Web management console iDRAC root calvin
SSH client or console AHV host root nutanix/4u
Remote desktop or console Hyper-V host Administrator nutanix/4u
SSH client or console ESXi host root
SSH client Nutanix Controller VM nutanix nutanix/4u
Nutanix Web Console PRISM Interface (after cluster configuration)
admin admin
12 Deploying an appliance
Downloading and installing software applicationsOpenManage Essentials is a hardware management application that provides a comprehensive view of the appliance and its components. OpenManage Essentials enables you to:
• Discover and list the appliance inventory
• Monitor the health of an appliance
• Perform appliance updates and remote tasks
• View hardware inventory and compliance reports
NOTE: For more information about the supported OpenManage Essentials versions, see the Dell EMC XC640 Series Hyper-Converged Appliances Support Matrix available at Dell.com/XCSeriesmanuals.
Topics:
• Downloading OpenManage Essentials
• Installing Dell OpenManage Essentials on a separate management server
• Dell Nautilus
Downloading OpenManage Essentials• To download OpenManage Essentials management software, go to Dell.com/support/home or the Dell TechCenter website at
DellTechCenter.com/OME.
• To download the OpenManage Essentials User’s Guide, go to Dell.com/openmanagemanuals.
NOTE: To install OpenManage Essentials, you must have local appliance administrator privileges, and the appliance you are using must meet the criteria mentioned in the Installation Prerequisites and Minimum Requirements section of the OpenManage Essentials User’s Guide, go to Dell.com/openmanagemanuals.
NOTE: OpenManage Essentials must be installed on the management network or a network that has access to the IMPI or iDRAC ports.
Installing Dell OpenManage Essentials on a separate management serverPerform the following steps to install OpenManage Essentials on a separate management server:
1 Go to Dell.com/openmanagemanuals and open the OpenManage Essentials User’s Guide.
2 Go to the Installation Prerequisites and Minimum Requirements section and complete the tasks as described.
3 Go to the Installing OpenManage Essentials section and complete the tasks as described.
Install the following optional software applications:
• Dell OpenManage Essentials
• Dell Repository Manager
NOTE: Install Dell Repository Manager only if you want to customize the Firmware Bundles and Update Packages.
5
Downloading and installing software applications 13
Dell NautilusDell Nautilus is a general maintenance release utility for updating firmware for SAS and SATA drives (or disks).
NOTE: For information about the supported Dell Nautilus version number, see Dell EMC XC640 Series Hyper-Converged Appliances Support Matrix available at Dell.com/XCSeriesmanuals.
Perform the following steps to download the Dell Nautilus Firmware Update Utility for SAS and SATA disk Solid State Drives (SSDs):
1 Go to Dell.com/support/drivers.
2 In the Customized support section, in the Enter your Service Tag or Express Service Code box, type the Service Tag of your Dell EMC XC640, and then click Submit.
NOTE: If you do not have a Service Tag, select Detect My Product to allow the appliance to automatically detect your Service Tag, or select Choose from a list of all Dell products to select your product from the Product Selection page.
3 On the Product Support page, click Drivers & downloads.
4 From the Operating System drop-down menu, select Not Applicable.
5 Go to the SAS Drive section and search for Dell Nautilus Firmware Utility for SAS and SATA disk and SSDs.
6 Click Download. Click Download again to download the .exe file. In your Download folder, locate the latest version of Dell Nautilus and click to expand the compressed files.
7 In the extracted folder, run USBMake Utility.
8 Create the bootable Nautilus package and complete one of the following tasks:
• To create a bootable CD or DVD image (ISO), click Create Bootable CD Image and follow instructions. Copy the .iso image file to CD, or save the bootable ISO on a management workstation.
• Connect a USB flash drive to the appliance and follow instructions to create a bootable USB flash drive.
14 Downloading and installing software applications
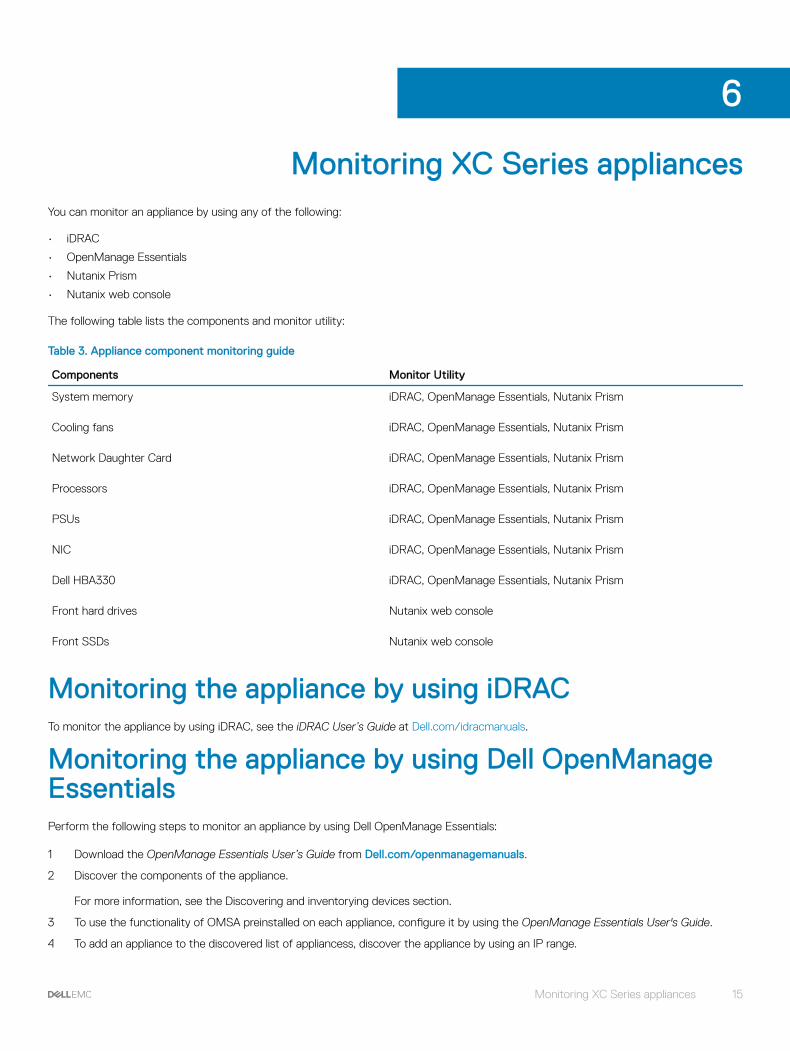
Monitoring XC Series appliancesYou can monitor an appliance by using any of the following:
• iDRAC
• OpenManage Essentials
• Nutanix Prism
• Nutanix web console
The following table lists the components and monitor utility:
Table 3. Appliance component monitoring guide
Components Monitor Utility
System memory iDRAC, OpenManage Essentials, Nutanix Prism
Cooling fans iDRAC, OpenManage Essentials, Nutanix Prism
Network Daughter Card iDRAC, OpenManage Essentials, Nutanix Prism
Processors iDRAC, OpenManage Essentials, Nutanix Prism
PSUs iDRAC, OpenManage Essentials, Nutanix Prism
NIC iDRAC, OpenManage Essentials, Nutanix Prism
Dell HBA330 iDRAC, OpenManage Essentials, Nutanix Prism
Front hard drives Nutanix web console
Front SSDs Nutanix web console
Monitoring the appliance by using iDRACTo monitor the appliance by using iDRAC, see the iDRAC User’s Guide at Dell.com/idracmanuals.
Monitoring the appliance by using Dell OpenManage EssentialsPerform the following steps to monitor an appliance by using Dell OpenManage Essentials:
1 Download the OpenManage Essentials User’s Guide from Dell.com/openmanagemanuals.
2 Discover the components of the appliance.
For more information, see the Discovering and inventorying devices section.
3 To use the functionality of OMSA preinstalled on each appliance, configure it by using the OpenManage Essentials User's Guide.
4 To add an appliance to the discovered list of appliancess, discover the appliance by using an IP range.
6
Monitoring XC Series appliances 15
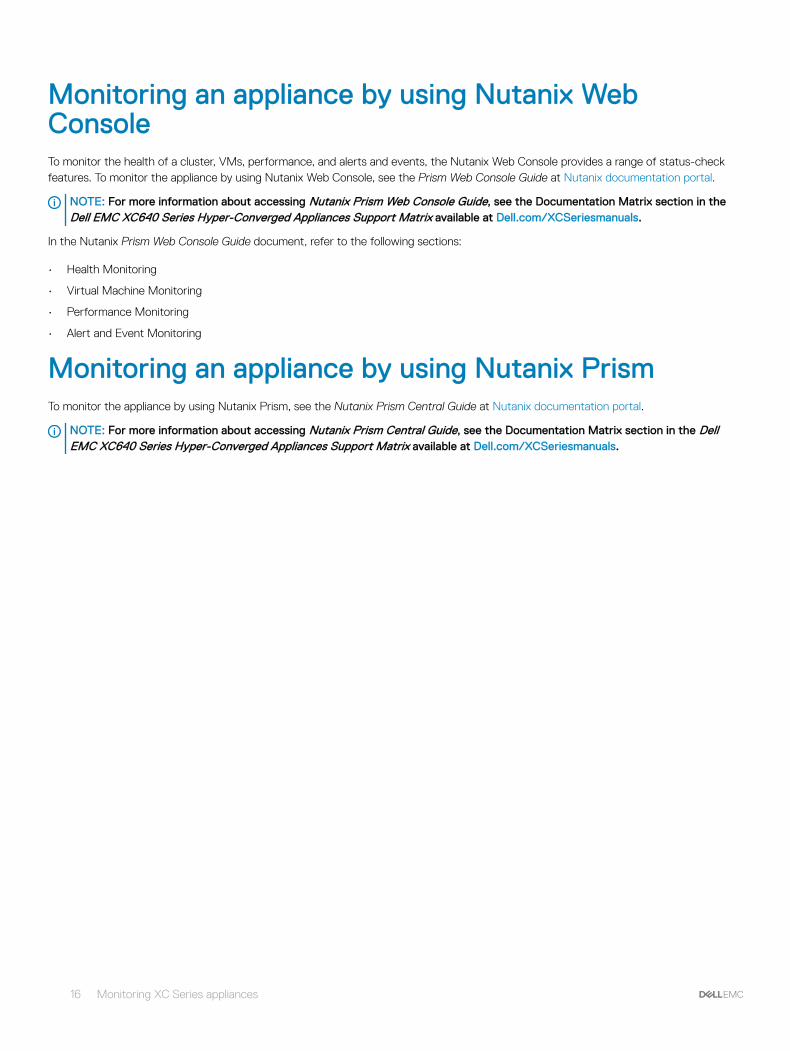
Monitoring an appliance by using Nutanix Web ConsoleTo monitor the health of a cluster, VMs, performance, and alerts and events, the Nutanix Web Console provides a range of status-check features. To monitor the appliance by using Nutanix Web Console, see the Prism Web Console Guide at Nutanix documentation portal.
NOTE: For more information about accessing Nutanix Prism Web Console Guide, see the Documentation Matrix section in the Dell EMC XC640 Series Hyper-Converged Appliances Support Matrix available at Dell.com/XCSeriesmanuals.
In the Nutanix Prism Web Console Guide document, refer to the following sections:
• Health Monitoring
• Virtual Machine Monitoring
• Performance Monitoring
• Alert and Event Monitoring
Monitoring an appliance by using Nutanix PrismTo monitor the appliance by using Nutanix Prism, see the Nutanix Prism Central Guide at Nutanix documentation portal.
NOTE: For more information about accessing Nutanix Prism Central Guide, see the Documentation Matrix section in the Dell EMC XC640 Series Hyper-Converged Appliances Support Matrix available at Dell.com/XCSeriesmanuals.
16 Monitoring XC Series appliances
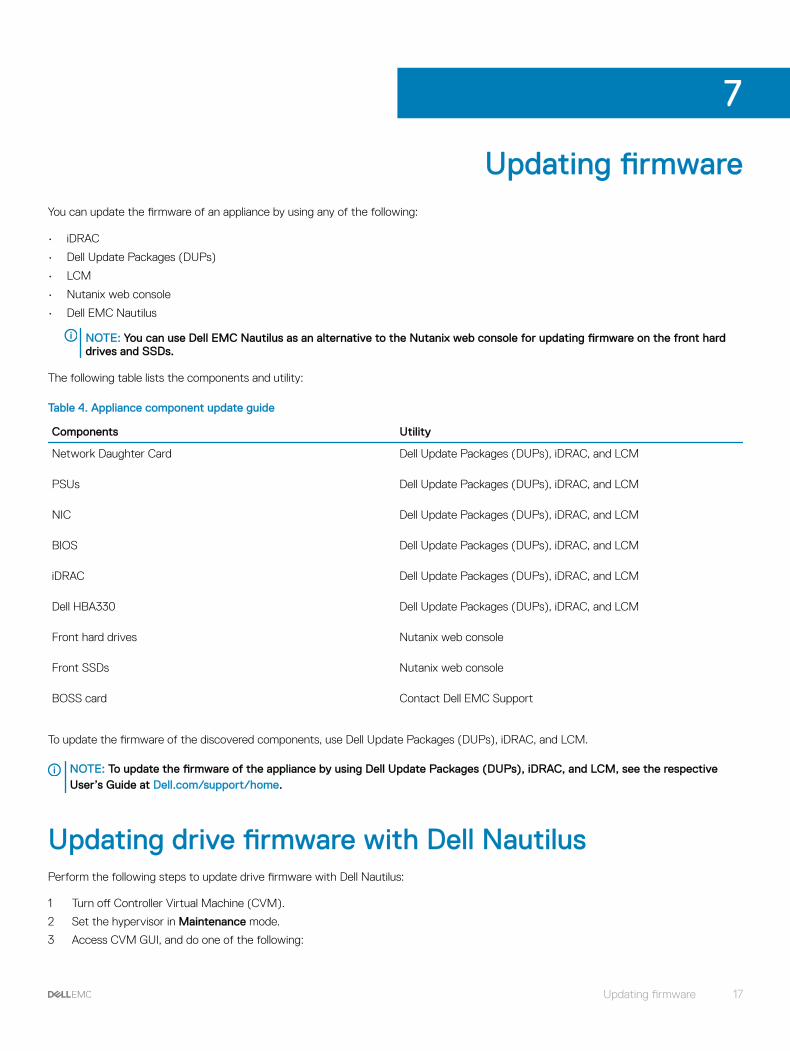
Updating firmwareYou can update the firmware of an appliance by using any of the following:
• iDRAC
• Dell Update Packages (DUPs)
• LCM
• Nutanix web console
• Dell EMC Nautilus
NOTE: You can use Dell EMC Nautilus as an alternative to the Nutanix web console for updating firmware on the front hard drives and SSDs.
The following table lists the components and utility:
Table 4. Appliance component update guide
Components Utility
Network Daughter Card Dell Update Packages (DUPs), iDRAC, and LCM
PSUs Dell Update Packages (DUPs), iDRAC, and LCM
NIC Dell Update Packages (DUPs), iDRAC, and LCM
BIOS Dell Update Packages (DUPs), iDRAC, and LCM
iDRAC Dell Update Packages (DUPs), iDRAC, and LCM
Dell HBA330 Dell Update Packages (DUPs), iDRAC, and LCM
Front hard drives Nutanix web console
Front SSDs Nutanix web console
BOSS card Contact Dell EMC Support
To update the firmware of the discovered components, use Dell Update Packages (DUPs), iDRAC, and LCM.
NOTE: To update the firmware of the appliance by using Dell Update Packages (DUPs), iDRAC, and LCM, see the respective User’s Guide at Dell.com/support/home.
Updating drive firmware with Dell NautilusPerform the following steps to update drive firmware with Dell Nautilus:
1 Turn off Controller Virtual Machine (CVM).
2 Set the hypervisor in Maintenance mode.
3 Access CVM GUI, and do one of the following:
7
Updating firmware 17
• Connect the keyboard or monitor or mouse device to the ports on the XC640 appliance.
• Connect to the iDRAC GUI.
NOTE: For more information about configuring and accessing the iDRAC GUI, see the iDRAC Quick Start Guide at Dell.com/idracmanuals.
4 Press F11 to restart the appliance and open BIOS boot manager.
5 To mount Dell Nautilus ISO or the USB key to the appliance, select EFI Boot Manager.
6 From the EFI boot list, select Virtual CD or USB drive.
7 Click Update Firmware.
Dell Nautilus updates all hard drives and SSD firmware for all hard drives and SSDs connected to the appliance.
18 Updating firmware
Replacing hardwareThis section describes high-level tasks to replace the components within the appliance.
To perform the hardware replacement tasks, you have to download the below documents from Dell.com/XCSeriesmanuals:
• Nutanix Hardware Replacement Documentation
NOTE: For more information about downloading the Nutanix Hardware Replacement Documentation, see the Documentation matrix section in the Dell EMC XC640 Series Hyper-Converged Appliance Support Matrix available at Dell.com/XCSeriesmanuals.
• Dell EMC XC640 Series Hyper-Converged Appliance Service and Installation Manual
After downloading these documents, you are ready to proceed with the below hardware replacement tasks:
• Replacing components with no cluster data
• Replacing failed front hard drive and SSD components that contain cluster data
Topics:
• Replacing components with no cluster data
• Replacing failed front hard drive and SSD components that contain cluster data
Replacing components with no cluster dataYou can replace the following hardware components that do not contain cluster data:
• System memory
• Cooling fans
• Network Daughter Cards or Network Interface Cards
• PSUs
Perform the following steps to replace the components with no cluster data:
1 Turn off the node for the relevant hypervisor.
For more information see the Failure of Components that do not Contain Cluster Data section in the Nutanix Hardware Replacement Guide on the Nutanix documentation portal.
NOTE: For more information about accessing Nutanix Hardware Replacement Guide, see the Documentation Matrix section in the Dell EMC XC640 Series Hyper-Converged Appliances Support Matrix available at Dell.com/XCSeriesmanuals.
2 Replace the failed component.
For more information, see the Installing and removing components section in Dell EMC XC640 Series Hyper-Converged Appliance Installation and Service Manual available at Dell.com/XCSeriesmanuals.
3 Restart the appliance of the relevant hypervisor.
For more information, see the Failure of Components that do not Contain Cluster Data section in the Nutanix Hardware Replacement Guide on the Nutanix documentation portal.
NOTE: For more information about accessing Nutanix Hardware Replacement Guide, see the Documentation Matrix section in the Dell EMC XC640 Series Hyper-Converged Appliances Support Matrix available at Dell.com/XCSeriesmanuals.
8
Replacing hardware 19
Replacing failed front hard drive and SSD components that contain cluster dataPerform the following steps to replace the failed front hard drive and SSDs that contain cluster data:
1 Identify the failed hard drive or SSD.
For more information, see the Data Drive Failure section in the Nutanix Hardware Replacement Guide on the Nutanix documentation portal.
NOTE: For more information about accessing Nutanix Hardware Replacement Guide, see the Documentation Matrix section in the Dell EMC XC640 Series Hyper-Converged Appliances Support Matrix available at Dell.com/XCSeriesmanuals.
2 Remove the failed hard drive or SSD.
For more information, see the Installing and removing components, hard drives, Removing a hot-swap hard drive, and Installing a hot-swap hard drive sections in Dell EMC XC640 Series Hyper-Converged Appliance Installation and Service Manual available at Dell.com/XCSeriesmanuals.
NOTE: Before installing the new hard drives and SSDs, ensure that any foreign RAID configuration available in the appliance must be removed. Otherwise, they will not be recognized by the CVM.
3 Install a new hard drive or SSD.
For more information, see the Completing Data Drive Replacement and complete the replacement of the failed hard drive or SSD sections in the Nutanix Hardware Replacement Guide on the Nutanix documentation portal.
NOTE: For more information about accessing Nutanix Hardware Replacement Guide, see the Documentation Matrix section in the Dell EMC XC640 Series Hyper-Converged Appliances Support Matrix available at Dell.com/XCSeriesmanuals.
20 Replacing hardware
Recovering an applianceDell EMC provides an option to recover the appliance in the event of an appliance failure or a cluster node failure. For more information about recovering an appliance, contact Dell EMC support.
9
Recovering an appliance 21
Getting help
Topics:
• Contacting Dell EMC
• Dell EMC SupportAssist
• Locating Service Tag
• Quick Resource Locator
Contacting Dell EMCNOTE: If you do not have an active internet connection, you can find contact information on your purchase invoice, packing slip, bill, or Dell EMC product catalog.
Dell EMC provides several online and telephone-based support and service options. Availability varies by country and product, and some services may not be available in your area. To contact Dell EMC for sales, technical support, or customer service issues:
1 Go to Dell.com/support/home.
2 Select your support category.
3 Verify your country or region in the Choose a Country/Region drop-down menu at the upper-right corner of the page.
4 Select the appropriate service or support link based on your requirement.
Dell EMC SupportAssistFor an enhanced Support Experience, Dell EMC recommends installing and configuring Dell EMC SupportAssist.
Dell EMC SupportAssist is a software application that transparently collects information about your appliance and automatically creates support cases when issues are detected. Dell EMC SupportAssist helps Dell EMC to provide you an enhanced, personalized, and efficient support experience. Dell EMC uses the data to solve common problem, designs and markets the products.
For more information about installing and configuring Dell EMC SupportAssist, see: http://www.dell.com/en-us/work/learn/supportassist-servers-storage-networking.
Locating Service TagYour appliance is identified by a unique Express Service Code and Service Tag number. This information is used by Dell EMC to route support calls to the appropriate service provider.
10
22 Getting help
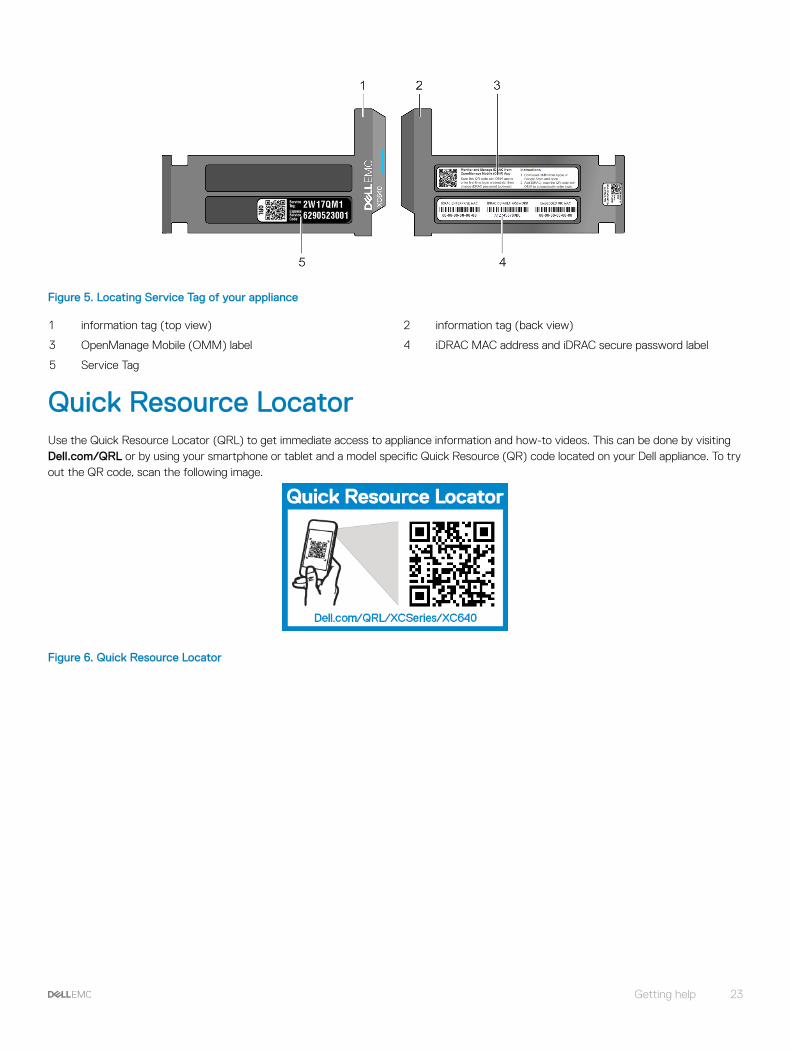
Figure 5. Locating Service Tag of your appliance
1 information tag (top view) 2 information tag (back view)
3 OpenManage Mobile (OMM) label 4 iDRAC MAC address and iDRAC secure password label
5 Service Tag
Quick Resource LocatorUse the Quick Resource Locator (QRL) to get immediate access to appliance information and how-to videos. This can be done by visiting Dell.com/QRL or by using your smartphone or tablet and a model specific Quick Resource (QR) code located on your Dell appliance. To try out the QR code, scan the following image.
Figure 6. Quick Resource Locator
Getting help 23

Bare metal recoveryTo maintain a fast and efficient bare metal recovery option, Dell EMC recommends using the Rapid Appliance Self-Recovery (RASR) tool.
WARNING: When you create a RASR USB disk, all the data saved on the USB disk is deleted.
WARNING: When you perform a Factory Restore on your appliance with the RASR USB backup disk, all the data saved on the appliance is deleted.
After bare metal recovery deployment, you can create a RASR USB disk by using any of the following methods:
• Creating a RASR USB disk for Hyper-V
• Creating a RASR USB disk for ESXi and AHV
Topics:
• Creating a RASR USB disk for Hyper-V
• Creating a RASR USB disk for ESXi and AHV
Creating a RASR USB disk for Hyper-V1 Insert a USB disk that is 16 GB or higher, into an available USB slot of the appliance.
2 From the Windows 2016 desktop, double-click the Make RASR USB disk icon to launch a utility that creates the RASR USB disk.
IMPORTANT: The USB disk contains factory installed configuration information specific for this appliance and must not be used in another appliance. As a best practice, clearly label the newly created USB disk with the appliance's Service Tag.
NOTE: This process may take few minutes depending on the speed of the USB device.
Creating a RASR USB disk for ESXi and AHV1 Insert a USB drive that is 16 GB or higher into an available USB slot of the appliance.
2 Open the IDRAC console, boot to the SD card.
3 Select Local SD Card.
The RASR screen is displayed.
4 Select Option 2 - creating USB key.
NOTE: This process may take a few minutes depending on the speed of the USB device.
A
24 Bare metal recovery