Dell EMC Boot Optimized Server Storage-S1topics-cdn.dell.com/pdf/boss-s-1_Users-Guide_en-us.pdf ·...
30
Dell EMC Boot Optimized Server Storage-S1 User's Guide
Transcript of Dell EMC Boot Optimized Server Storage-S1topics-cdn.dell.com/pdf/boss-s-1_Users-Guide_en-us.pdf ·...

Dell EMC Boot Optimized Server Storage-S1 User's Guide

Notes, cautions, and warnings
NOTE: A NOTE indicates important information that helps you make better use of your product.
CAUTION: A CAUTION indicates either potential damage to hardware or loss of data and tells you how to avoid the
problem.
WARNING: A WARNING indicates a potential for property damage, personal injury, or death.
© 2017 - 2019 Dell Inc. or its subsidiaries. All rights reserved. Dell, EMC, and other trademarks are trademarks of Dell Inc. or its subsidiaries. Other trademarks may be trademarks of their respective owners.
2019 - 10
Rev. A07
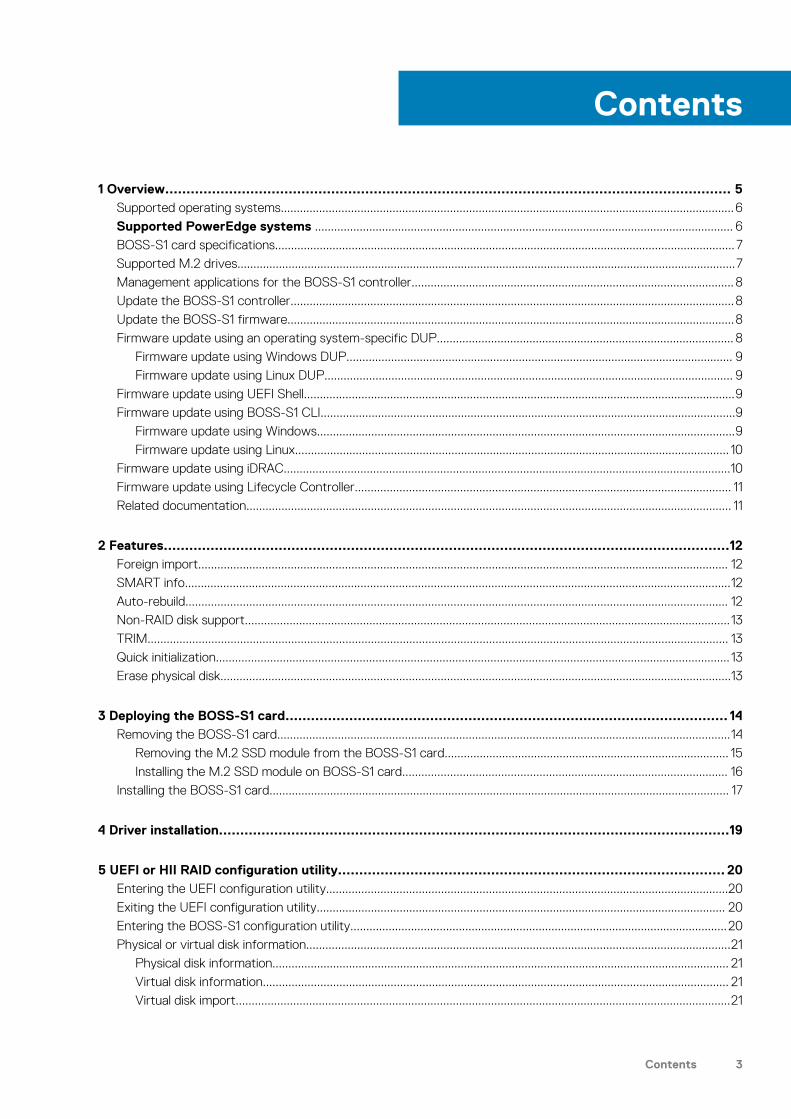
1 Overview..................................................................................................................................... 5Supported operating systems..............................................................................................................................................6Supported PowerEdge systems ................................................................................................................................... 6BOSS-S1 card specifications................................................................................................................................................ 7Supported M.2 drives............................................................................................................................................................7Management applications for the BOSS-S1 controller..................................................................................................... 8Update the BOSS-S1 controller...........................................................................................................................................8Update the BOSS-S1 firmware............................................................................................................................................8Firmware update using an operating system-specific DUP............................................................................................. 8
Firmware update using Windows DUP......................................................................................................................... 9Firmware update using Linux DUP................................................................................................................................ 9
Firmware update using UEFI Shell.......................................................................................................................................9Firmware update using BOSS-S1 CLI..................................................................................................................................9
Firmware update using Windows...................................................................................................................................9Firmware update using Linux........................................................................................................................................ 10
Firmware update using iDRAC............................................................................................................................................10Firmware update using Lifecycle Controller...................................................................................................................... 11Related documentation........................................................................................................................................................ 11
2 Features.....................................................................................................................................12Foreign import...................................................................................................................................................................... 12SMART info...........................................................................................................................................................................12Auto-rebuild.......................................................................................................................................................................... 12Non-RAID disk support........................................................................................................................................................13TRIM...................................................................................................................................................................................... 13Quick initialization................................................................................................................................................................. 13Erase physical disk................................................................................................................................................................13
3 Deploying the BOSS-S1 card........................................................................................................ 14Removing the BOSS-S1 card..............................................................................................................................................14
Removing the M.2 SSD module from the BOSS-S1 card......................................................................................... 15Installing the M.2 SSD module on BOSS-S1 card...................................................................................................... 16
Installing the BOSS-S1 card................................................................................................................................................ 17
4 Driver installation........................................................................................................................19
5 UEFI or HII RAID configuration utility........................................................................................... 20Entering the UEFI configuration utility..............................................................................................................................20Exiting the UEFI configuration utility................................................................................................................................ 20Entering the BOSS-S1 configuration utility......................................................................................................................20Physical or virtual disk information.....................................................................................................................................21
Physical disk information............................................................................................................................................... 21Virtual disk information.................................................................................................................................................. 21Virtual disk import...........................................................................................................................................................21
Contents
Contents 3

Creating a virtual disk.......................................................................................................................................................... 21Deleting virtual disks............................................................................................................................................................22RAID rebuild..........................................................................................................................................................................22Erase physical disk...............................................................................................................................................................22Controller information......................................................................................................................................................... 22
Clear controller configuration.......................................................................................................................................22
6 BOSS-S1 CLI commands............................................................................................................. 23Using CLI commands from Windows................................................................................................................................23Using CLI commands from Linux.......................................................................................................................................23Using CLI commands from ESXi........................................................................................................................................23Supported BOSS-S1 CLI commands.................................................................................................................................24
7 Troubleshooting......................................................................................................................... 25ROM version for BOSS reported as firmware version in iDRAC interface..................................................................25Firmware update of M.2 drive on BOSS-S1 controller fails........................................................................................... 25BOSS-S1 CLI displays No Adapter Found error in Linux................................................................................................ 25LC log displays fan unavailability error.............................................................................................................................. 26Updating BOSS-S1 controller firmware using iDRAC or LC fails...................................................................................26Physical disk size not updated in iDRAC.......................................................................................................................... 26Physical disk/Virtual disk missing in iDRAC......................................................................................................................26Back Ground Activity task progress in HII does not report real-time status............................................................... 26Virtual disk state will be generated twice......................................................................................................................... 27Character limitation while naming a virtual disk...............................................................................................................27VMFS datastore is disabled on the 14th generation of PowerEdge systems that are shipped with VMware
ESXi installed on BOSS-S1............................................................................................................................................. 27Physical disk not visible to operating system...................................................................................................................27Virtual disk not visible to operating system......................................................................................................................27Drive replacement................................................................................................................................................................27Controller replacement....................................................................................................................................................... 28Controller failure.................................................................................................................................................................. 28Unable to boot to M.2 drive installed in slot 1..................................................................................................................28CLI reports unsupported features.....................................................................................................................................28Failure to install ESXi on RAID 1.........................................................................................................................................28System not responding.......................................................................................................................................................29Management port not responding.................................................................................................................................... 29
8 Getting help...............................................................................................................................30Contacting Dell EMC.......................................................................................................................................................... 30Documentation feedback................................................................................................................................................... 30
4 Contents

OverviewBOSS-S1 is a simple RAID solution card designed specifically for booting a server's operating system. The card supports up to two 6 Gbps M.2 SATA drives. The BOSS-S1 adapter card has a x8 connector using PCIe gen 2.0 x2 lanes, available only in the low-profile and full-height form factors. The BOSS-S1 modular card has a dedicated slot in modular servers.
NOTE: BOSS-S1 card allows you to create only one virtual disk from the available physical disks. Specifying the size of a
virtual disk is not supported.
NOTE: There are no status LEDs on the BOSS-S1 card.
Figure 1. Features of the BOSS-S1 adaptercard
1. SATA drive connector (2)2. 80 mm M.2 SATA drive 13. 80 mm M.2 SATA drive 2
Figure 2. Features of the BOSS-S1 modular card
1. Modular BOSS-S1 card2. SATA drive connector3. 80 mm M.2 SATA drive
Topics:
• Supported operating systems• Supported PowerEdge systems • BOSS-S1 card specifications• Supported M.2 drives• Management applications for the BOSS-S1 controller
1
Overview 5
• Update the BOSS-S1 controller• Update the BOSS-S1 firmware• Firmware update using an operating system-specific DUP• Firmware update using UEFI Shell• Firmware update using BOSS-S1 CLI• Firmware update using iDRAC• Firmware update using Lifecycle Controller• Related documentation
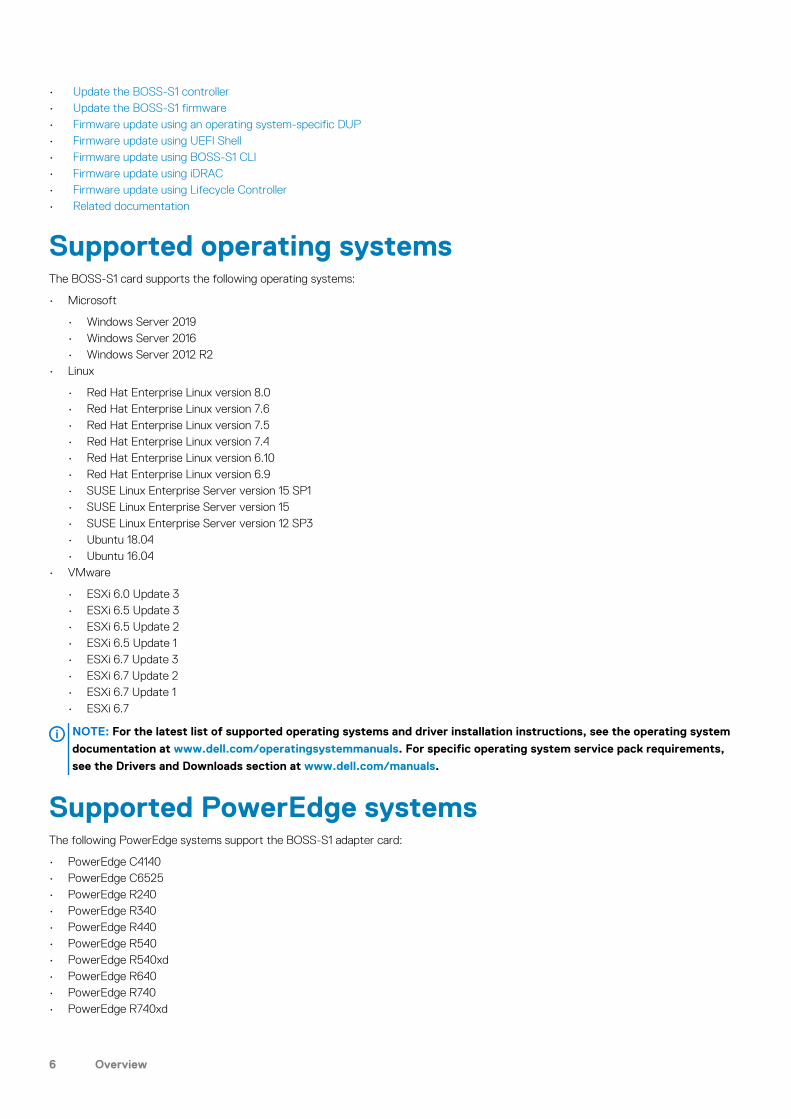
Supported operating systemsThe BOSS-S1 card supports the following operating systems:
• Microsoft
• Windows Server 2019• Windows Server 2016• Windows Server 2012 R2
• Linux
• Red Hat Enterprise Linux version 8.0• Red Hat Enterprise Linux version 7.6• Red Hat Enterprise Linux version 7.5• Red Hat Enterprise Linux version 7.4• Red Hat Enterprise Linux version 6.10• Red Hat Enterprise Linux version 6.9• SUSE Linux Enterprise Server version 15 SP1• SUSE Linux Enterprise Server version 15• SUSE Linux Enterprise Server version 12 SP3• Ubuntu 18.04• Ubuntu 16.04
• VMware
• ESXi 6.0 Update 3• ESXi 6.5 Update 3• ESXi 6.5 Update 2• ESXi 6.5 Update 1• ESXi 6.7 Update 3• ESXi 6.7 Update 2• ESXi 6.7 Update 1• ESXi 6.7
NOTE: For the latest list of supported operating systems and driver installation instructions, see the operating system
documentation at www.dell.com/operatingsystemmanuals. For specific operating system service pack requirements,
see the Drivers and Downloads section at www.dell.com/manuals.
Supported PowerEdge systemsThe following PowerEdge systems support the BOSS-S1 adapter card:
• PowerEdge C4140• PowerEdge C6525• PowerEdge R240• PowerEdge R340• PowerEdge R440• PowerEdge R540• PowerEdge R540xd• PowerEdge R640• PowerEdge R740• PowerEdge R740xd
6 Overview

• PowerEdge R940• PowerEdge R6415• PowerEdge R7415• PowerEdge R7425• PowerEdge R6515• PowerEdge R6525• PowerEdge R7515• PowerEdge T140• PowerEdge T340• PowerEdge T440• PowerEdge T640
The following PowerEdge systems support the BOSS-S1 modular card:
• PowerEdge C6420• PowerEdge FC640• PowerEdge M640 (for M1000e)• PowerEdge M640 (for VRTX)• PowerEdge MX840c• PowerEdge MX740c
BOSS-S1 card specificationsThe following table lists the BOSS-S1 card feature specifications:
Table 1. BOSS-S1 card feature specifications
Feature BOSS-S1 card
RAID levels RAID 1
Stripe size Supports default 64K stripe size only
Battery backup unit No
Non-volatile cache No
Virtual disk cache function Write through
Maximum number of virtual disks 1
Maximum number of drives supported 2
Support for Non-RAID disks Yes (supports up to two disks)
Drive types 6 Gbps M.2 SATA SSDs
PCIe support Gen 2
Disk cache policy Drive default
TRIM Non-RAID mode
Supported M.2 drivesThe BOSS-S1 card supports the following M.2 drives:
Table 2. BOSS-S1 card supported M.2 drives
Drive Model Capacity
Intel M.2 S4510 240 GB, 480 GB
Intel M.2 S3520 120 GB, 240 GB, 480 GB
Micron M.2 5100 240 GB, 480 GB
Overview 7

NOTE: Dell EMC recommends that you use the BOSS-S1 card only as an operating system boot device.
NOTE: Ensure that M.2 drives have the latest firmware. You can download the latest firmware from www.dell.com/
support/home.
Management applications for the BOSS-S1 controllerManagement applications enable you to manage and configure the RAID system, create and manage the disk group, and provide online maintenance. The management applications for BOSS-S1 card include:
• Unified Extensible Firmware Interface (UEFI) RAID Configuration Utility—This storage management application is integrated into the system BIOS (F2). See UEFI/HII RAID configuration utility.
• Dell OpenManage Storage Management—This application enables you to perform controller and enclosure functions for all supported RAID controllers and enclosures from a single graphical or command-line interface. For more information, see the Dell OpenManage Storage Management User's Guide at www.dell.com/openmanagemanuals.
• BOSS-S1 Command Line Interface (CLI) Utility—This application enables you to check controller, physical disk and virtual disk status while booted to an operating system. The application is also used to check SMART information of the physical disks and display controller. Windows systems use the mvsetup utility while Linux systems use the mvcli utility. The BOSS-S1 CLI Utility also supports ESXi. For more information about CLI commands, see BOSS-S1 CLI commands.
NOTE: To use the mvsetup Windows utility, the BOSS-S1 management driver must first be installed. You can
download the latest Windows driver from www.dell.com/support/home Linux/ESXi mvcli does not require a driver.
NOTE: To remove mvcli from operating systems, uninstall BOSS-S1 drivers from the operating systems or remove
the libraries and the executable files.
NOTE: Systems Management through iDRAC/LC is not enabled in the firmware version A00. It is available in A01 and
later versions.
• iDRAC and LC—This application enables you to effectively monitor the RAID and network controllers installed on the system using iDRAC and LC without an operating system installed on the system. For more information, see the Integrated Dell Remote Access Controller 9 User's Guide at www.dell.com/idracmanuals.
Update the BOSS-S1 controllerCAUTION: Ensure that you have installed the latest firmware version available at Dell.com/support.
You can update controller firmware using Lifecycle Controller (LC), iDRAC, or UEFI shell. The controller firmware can be updated using the BOSS-S1 command line interface (CLI) utility and Dell Update Package (DUP) when booted to an operating system. You can download the latest DUP and BOSS-S1 CLI from www.dell.com/support/home.
Update the BOSS-S1 firmwareBOSS-S1 card firmware updates can be done using the following methods:
• operating system Dell Update Packages• UEFI Shell• BOSS-S1 CLI• iDRAC• Lifecycle Controller
Firmware update using an operating system-specific DUPDownload the latest operating system Dell Update Package (DUP) from SAS-RAID_Firmware_xxxxx_xxxx_xxx.exe for Windows and SAS-RAID_Firmware_xxxxx _xxxx_xxx.bin for Linux from www.dell.com/support/home and install it for monolithic servers.
8 Overview

Download the latest modular operating system DUP from SAS-RAID_Firmware_xxxxx_xxxx_xxx.exe for Windows and SAS-RAID_Firmware_xxxxx _xxxx_xxx.bin for Linux from www.dell.com/support/home and install it.
Firmware update using Windows DUPPerform the following steps to update using Windows:
NOTE: Ensure that you have Administrator privileges for Windows.
1. Download the latest Dell Update Package (DUP) for Windows from the www.dell.com/support/home.
2. Double-click the EXE file and click Install.After the inventory collection and firmware validation processes are complete, the installed version and package version are displayed.
NOTE: Installed version refers to the current firmware version of the controller, and package version refers to the
DUP version.
3. Click Yes to continue.
4. Click Yes.
5. Verify the installed firmware version in HII or using BOSS-S1 CLI.
Firmware update using Linux DUPPerform the following steps to update using Linux:
NOTE: Ensure that you have Root/Sudo privileges for Linux/ESXi.
1. Download the latest Dell Update Package (DUP) for Linux from the www.dell.com/support/home.
2. Go to the downloaded file path and provide the permissions to execute the DUP file.
3. Execute the BIN file ./SAS-RAID_Firmware_xxxxx_xxxx_xxx.bin.
4. When prompted, press Q to proceed.After the inventory collection and firmware validation processes are complete, the installed version and package version are displayed.
5. To continue press Y+Enter or N+Enter to cancel.
6. Press Y+Enter when prompted.
7. Verify the installed firmware version in HII, iDRAC or BOSS-S1 CLI.
Firmware update using UEFI ShellPerform the following steps to update your firmware using UEFI Shell:
1. Download the SAS-RAID_Firmware_xxxxx_UEFI_Axx.zip from www.dell.com/support/home and unzip the file.
2. Copy the files onto a UEFI bootable USB drive and map it to the system.
3. Reboot the system from the USB drive, and go to UEFI.
4. Type the command fs0:/fs1: to enter the file system and locate the file.
NOTE: File system partitions may vary depending on your system configuration. Browse through the fsx to locate
the USB disk.
5. Run the file run.nsh to flash the firmware.
6. On successful update of firmware type Exit to exit from the UEFI shell and reboot the system.
7. Verify the installed firmware version in HII, iDRAC or BOSS-S1 CLI.
Firmware update using BOSS-S1 CLIDownload the appropriate CLI application file from www.dell.com/support/home for your Windows or Linux operating system.
Firmware update using WindowsFollowing are the steps to update the firmware using the BOSS-S1 command line interface.
1. Download the SAS-RAID_Firmware_xxxxx_UEFI_Axx.zip from www.dell.com/support/home and extract the zip file.
Overview 9
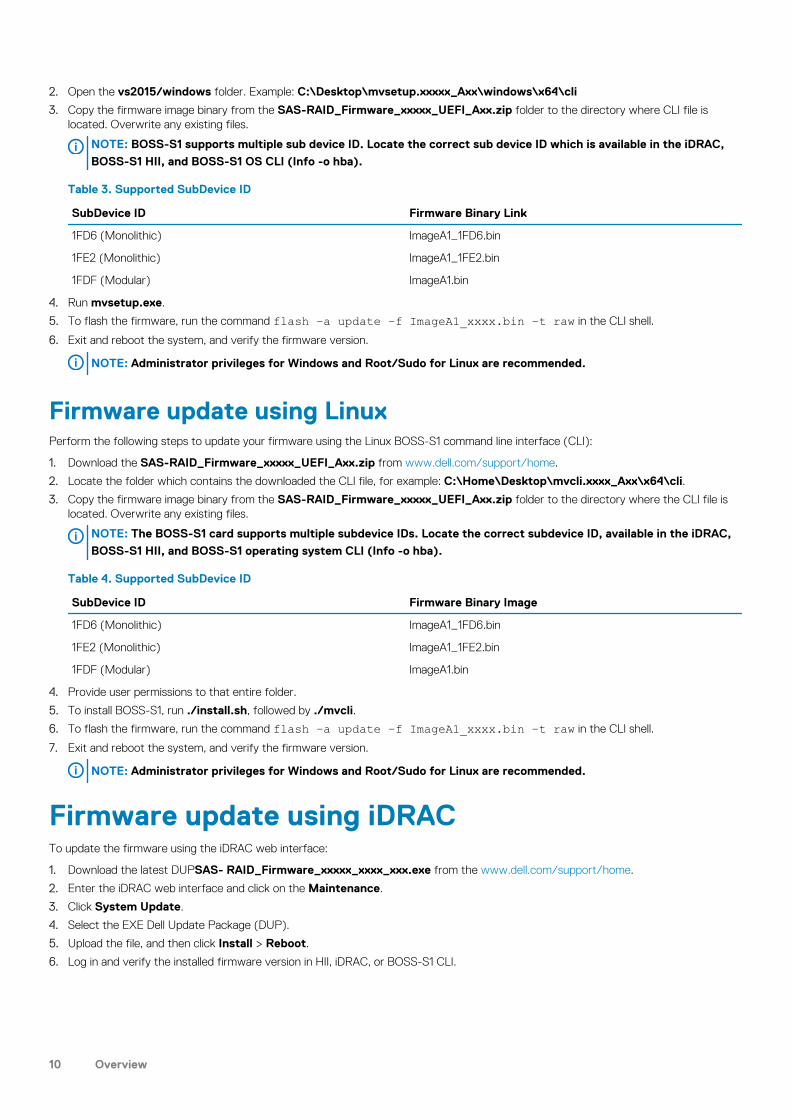
2. Open the vs2015/windows folder. Example: C:\Desktop\mvsetup.xxxxx_Axx\windows\x64\cli
3. Copy the firmware image binary from the SAS-RAID_Firmware_xxxxx_UEFI_Axx.zip folder to the directory where CLI file is located. Overwrite any existing files.
NOTE: BOSS-S1 supports multiple sub device ID. Locate the correct sub device ID which is available in the iDRAC,
BOSS-S1 HII, and BOSS-S1 OS CLI (Info -o hba).
Table 3. Supported SubDevice ID
SubDevice ID Firmware Binary Link
1FD6 (Monolithic) ImageA1_1FD6.bin
1FE2 (Monolithic) ImageA1_1FE2.bin
1FDF (Modular) ImageA1.bin
4. Run mvsetup.exe.
5. To flash the firmware, run the command flash –a update –f ImageA1_xxxx.bin –t raw in the CLI shell.
6. Exit and reboot the system, and verify the firmware version.
NOTE: Administrator privileges for Windows and Root/Sudo for Linux are recommended.
Firmware update using LinuxPerform the following steps to update your firmware using the Linux BOSS-S1 command line interface (CLI):
1. Download the SAS-RAID_Firmware_xxxxx_UEFI_Axx.zip from www.dell.com/support/home.
2. Locate the folder which contains the downloaded the CLI file, for example: C:\Home\Desktop\mvcli.xxxx_Axx\x64\cli.
3. Copy the firmware image binary from the SAS-RAID_Firmware_xxxxx_UEFI_Axx.zip folder to the directory where the CLI file is located. Overwrite any existing files.
NOTE: The BOSS-S1 card supports multiple subdevice IDs. Locate the correct subdevice ID, available in the iDRAC,
BOSS-S1 HII, and BOSS-S1 operating system CLI (Info -o hba).
Table 4. Supported SubDevice ID
SubDevice ID Firmware Binary Image
1FD6 (Monolithic) ImageA1_1FD6.bin
1FE2 (Monolithic) ImageA1_1FE2.bin
1FDF (Modular) ImageA1.bin
4. Provide user permissions to that entire folder.
5. To install BOSS-S1, run ./install.sh, followed by ./mvcli.
6. To flash the firmware, run the command flash –a update –f ImageA1_xxxx.bin –t raw in the CLI shell.
7. Exit and reboot the system, and verify the firmware version.
NOTE: Administrator privileges for Windows and Root/Sudo for Linux are recommended.
Firmware update using iDRACTo update the firmware using the iDRAC web interface:
1. Download the latest DUPSAS- RAID_Firmware_xxxxx_xxxx_xxx.exe from the www.dell.com/support/home.
2. Enter the iDRAC web interface and click on the Maintenance.
3. Click System Update.
4. Select the EXE Dell Update Package (DUP).
5. Upload the file, and then click Install > Reboot.
6. Log in and verify the installed firmware version in HII, iDRAC, or BOSS-S1 CLI.
10 Overview

Firmware update using Lifecycle ControllerTo update the firmware using the Lifecycle Controller:
1. Download the DUP file from the www.dell.com/support/home and copy the .exe DUP file to a local drive.Example of the file name: SAS- RAID_Firmware_xxxxx_xxxx_xxx.exe.
2. Open Virtual Console and boot into Lifecycle Controller by pressing F10 at boot time.
3. Select Get the Latest firmware on the dashboard window.
4. Select Local Drive (CD/DVD/USB).Enter the name of EXE file and select Update.
5. After successful installation, reboot and verify the installed firmware version in the HII, iDRAC, or BOSS-S1 CLI.
NOTE: BOSS-S1 firmware update through iDRAC/Lifecycle Controller is supported only on firmware version A01 and
above. For more information see Updating BOSS-S1 controller firmware using iDRAC or LC fails.
NOTE: For Information on how to update using the CLI, see BOSS-S1 CLI commands.
Related documentationNOTE:
• For all storage controllers and PCIe SSD documents, go to www.dell.com/storagecontrollermanuals.
• For all Dell OpenManage documents, go to www.dell.com/openmanagemanuals.
• For all operating system documents, go to www.dell.com/operatingsystemmanuals.
• For all PowerEdge documentation, go to www.dell.com/poweredgemanuals.
Overview 11

FeaturesThe BOSS-S1 card supports the following features:Topics:
• Foreign import• SMART info• Auto-rebuild• Non-RAID disk support• TRIM• Quick initialization• Erase physical disk
Foreign importA virtual disk is considered foreign if it is not native to the adapter.
• A virtual disk is considered native to the adapter if:
• the virtual disk was created or imported on the adapter.• A physical disk is considered native to the adapter if:
• There is no previous virtual disk metadata on the adapter and the physical disk are unconfigured.• When the virtual disk corresponding to the physical disks is deleted
The system must be rebooted after performing foreign import.
To check for previous virtual disk metadata, see Controller Information. Only a virtual disk or physical disk native to the adapter will be presented to the operating system.
Upon migrating two foreign drives to a controller, you must do either of the following:
• Clear the controller configuration if using unconfigured drives — Clear Controller Configuration.• Import the virtual disk if using configured drives — Virtual Disk Import.
SMART infoSMART monitors certain physical aspects of the disk electronics to help detect predictable disk failures. Data on SMART-compliant physical disks can be monitored to identify changes in values and determine whether the values are within the threshold limits. Any electrical failures in the disk can cause degradation in the performance before failure.
A SMART failure is also referred to as a predicted failure. There are numerous factors that predict physical disk failures, such as a read error rate, throughput performance, and changes in spin-up time. In addition, there are factors related to read/write surface failure, such as seek error rate and excessive bad blocks.
NOTE: The BOSS-S1 CLI displays error messages with the status OK and NOT OK along with smart attributes.
Auto-rebuildA virtual disk rebuild will begin on system boot automatically if the native virtual disk is degraded and a valid rebuild target is present. A valid rebuild target is any functional drive attached to the BOSS-S1 device which is not part of the native virtual disk and is of equal or greater storage capacity. An auto-rebuild occurs without prompting the user, and any data on the rebuild target is overwritten.
2
12 Features

Non-RAID disk supportBy default, all disks are in an unconfigured state.
NOTE:
• For the BOSS-S1 card, unconfigured drives are automatically non-RAID drives. To convert RAID drives to non-RAID
drives, delete the virtual disk.
• The BOSS-S1 only supports one configured (RAID) and two unconfigured states. The BOSS-S1 card does not break
unconfigured drives into RAID and non-RAID states.
TRIMTRIM (Non-RAID physical disk) allows an operating system to delete a block of data that is no longer considered in use by SSDs. For supported operating systems, the TRIM command resolves the write amplification issue. When an operating system deletes a file, the file is marked for deletion in the file system, but the contents on the disk are not actually erased. As a result, the SSDs do not know the Logical Block Addressing (LBA) previously occupied can be erased. With the introduction of TRIM, when a file is deleted, the operating system sends a TRIM command along with the LBAs that do not contain valid data to the physical disk.
Quick initializationQuick initialization is a feature that enables you to erase the files and file systems from the virtual disk while keeping the virtual disk configuration intact.
Erase physical diskThe erase physical disk feature deletes metadata from the physical disk. This feature can be enabled only when the physical disk is not part of any virtual disk.
CAUTION: Performing erase physical disk removes all the data from the physical disk.
Features 13

Deploying the BOSS-S1 cardThis section provides a set of high-level installation and removal instructions for the BOSS-S1 card.
Topics:
• Removing the BOSS-S1 card• Installing the BOSS-S1 card
Removing the BOSS-S1 cardCAUTION: Many repairs may only be done by a certified service technician. You should only perform troubleshooting and
simple repairs as authorized in your product documentation, or as directed by the online or telephone service and
support team. Damage due to servicing that is not authorized by Dell is not covered by your warranty. Read and follow
the safety instructions that are shipped with your product.
1. Turn off the system, including any attached peripherals, and disconnect the system from the electrical outlet and peripherals.
NOTE: It is recommended that you always use a static mat and static strap while working on components in the
interior of the system.
2. Open the system.
3. Locate the BOSS-S1 card on the system board.
CAUTION: To prevent damage to the card, hold the card by its edges only.
4. If you are removing a BOSS-S1 modular card, loosen the screw that secures the card to the system board.
5. After ensuring that the PCIe bracket is unobstructed, lift the card to remove it from the connector on the system board.
Figure 3. Removing the BOSS-S1 adapter card
a. BOSS-S1 adapter cardb. card connector on the system board
3
14 Deploying the BOSS-S1 card

Figure 4. Removing the BOSS-S1 modular card
a. BOSS-S1 modular cardb. card connector on the system board
Removing the M.2 SSD module from the BOSS-S1 cardCAUTION: Many repairs may only be done by a certified service technician. You should only perform troubleshooting and
simple repairs as authorized in your product documentation, or as directed by the online or telephone service and
support team. Damage due to servicing that is not authorized by Dell is not covered by your warranty. Read and follow
the safety instructions that are shipped with your product.
1. Turn off the system, including any attached peripherals, and disconnect the system from the electrical outlet and peripherals.
NOTE: It is recommended that you always use a static mat and static strap while working on components in the
interior of the system.
2. Open the system.
3. Remove the BOSS-S1 card from the system. See Removing the BOSS-S1 card.
4. Remove the screw that secures the M.2 SSD module to the BOSS-S1 card.
5. Slide and remove the M.2 SSD module away from the card.
Deploying the BOSS-S1 card 15

Figure 5. Removing the M.2 SSD module from the BOSS-S1 adapter card
a. module connector (2)b. screw (2)c. M.2 SSD module (2)
Figure 6. Removing the M.2 SSD module from the BOSS-S1 modular card
a. module connectorb. M.2 SSD module
Installing the M.2 SSD module on BOSS-S1 cardCAUTION: Many repairs may only be done by a certified service technician. You should only perform troubleshooting and
simple repairs as authorized in your product documentation, or as directed by the online or telephone service and
support team. Damage due to servicing that is not authorized by Dell is not covered by your warranty. Read and follow
the safety instructions that are shipped with your product.
1. Align the M.2 SSD module connectors with the connectors on the card.
2. Tilt the M.2 SSD module downwards until the module is seated firmly on the card.
3. CAUTION: To avoid damage to the card, ensure that you do not over tighten the screw.
16 Deploying the BOSS-S1 card

Tighten the screw to secure the M.2 SSD module to the card.
Figure 7. Installing M.2 SSD module on the BOSS-S1 card
a. module connector (2)b. screw (2)c. M.2 SSD module (2)
Figure 8. Installing the M.2 SSD module on the BOSS-S1 modular card
a. module connectorb. M.2 SSD module
Installing the BOSS-S1 cardCAUTION: Many repairs may only be done by a certified service technician. You should only perform troubleshooting and
simple repairs as authorized in your product documentation, or as directed by the online or telephone service and
support team. Damage due to servicing that is not authorized by Dell is not covered by your warranty. Read and follow
the safety instructions that are shipped with your product.
1. Turn off the system, including any attached peripherals, and disconnect the system from the electrical outlet and peripherals.
NOTE: It is recommended that you always use a static mat and static strap while working on components in the
interior of the system.
Deploying the BOSS-S1 card 17

2. Open the system.
3. Hold the card by its edges and align the card connector with the connector on the system board.
CAUTION: To prevent damage to the card, hold the card by its edges only.
4. Press the card-edge down until the card is fully seated.
5. If you are installing a modular card, tighten the screw that secures the card to the system board.
6. Close the system.
7. Reconnect the system to its electrical outlet and turn the system on, including any attached peripherals.
Figure 9. Installing the BOSS-S1 adapter card
a. BOSS-S1 cardb. card connector on the system board
Figure 10. Installing the BOSS-S1 modular card
a. modular cardb. card connector on the system board
18 Deploying the BOSS-S1 card
Driver installationThe BOSS-S1 card uses the native AHCI driver of the supported operating systems.
Windows driver installation — The Driver Update Package (DUP) updates drivers on the systems running Windows Server 2012 R2 and later operating systems. A DUP is an executable application that updates drivers for specific devices. A DUP supports command line interface and silent execution. For more information, see www.dell.com/support/home.
Linux driver installation — The Driver Update Disk (DUD) images are created only for those operating system releases in which the native, or in-box driver is insufficient for installation.
ESXi driver installation — By default, native AHCI driver is the inbox for installation.
4
Driver installation 19

UEFI or HII RAID configuration utilityThe Unified Extensible Firmware Interface (UEFI) RAID configuration utility is a storage management application integrated into the system BIOS <F2>. It is used to configure and manage RAID disk groups, virtual disks, and physical disks. This utility is independent of the operating system.
The following topics provide information about using the UEFI RAID configuration utility. For more information, see the online help option in the UEFI RAID configuration utility.
NOTE: Use the UEFI RAID configuration utility for initial setup and disaster recovery. Certain advanced features are also
offered in the utility.
Topics:
• Entering the UEFI configuration utility• Exiting the UEFI configuration utility• Entering the BOSS-S1 configuration utility• Physical or virtual disk information• Creating a virtual disk• Deleting virtual disks• RAID rebuild• Erase physical disk• Controller information
Entering the UEFI configuration utilityPerform the following steps to boot to the UEFI configuration utility:
1. Turn on the system.
2. While the system is booting, press <F2> to enter System Setup.
3. Click Device Settings.Device Settings lists all the RAID controllers in the system.
To access the management menu for the controller, use the arrow keys or the mouse.
NOTE: For more information in all the options, click Help, available on the top right-hand corner of the browser
screen. Help information for individual option menus can also be viewed by scrolling down on each option.
NOTE: Some of the options within the UEFI RAID configuration utility are not present if the controller does not
support the corresponding feature. Options may also be disabled if the feature is not supported in the existing
configuration.
Exiting the UEFI configuration utilityTo exit the UEFI configuration utility, perform the following steps:
1. Click Finish at the bottom-right corner on the System Setup Main Menu screen.A warning message confirming your choice appears.
2. Click Yes to exit the configuration utility.
NOTE: Depending on the device configuration changes, exiting the UEFI configuration utility may prompt for a
system reboot.
Entering the BOSS-S1 configuration utility1. Enter the UEFI configuration utility. See Entering the UEFI RAID configuration utility
5
20 UEFI or HII RAID configuration utility

The Device Settings screen displays a list of NIC ports and the BOSS-S1 configuration utility.
2. To enter BOSS-S1 configuration utility, click BOSS-S1 Configuration Utility.The list of Configuration Options appears:
• Physical/Virtual Disk Information — view the properties of physical disks and virtual disks• Create RAID Configuration — configure a virtual disk• Delete RAID Configuration — delete a virtual disk• RAID Rebuild — rebuild a degraded RAID volume, if a suitable peer drive is available• Erase Physical Disk — clear data on a physical disk• Controller Information — view BOSS-S1 adapter information
Physical or virtual disk informationThe Physical/virtual disk information menu allows you to view physical disk properties and virtual disk properties.
Physical disk informationTo view physical disk information:
1. Enter the BOSS-S1 Configuration utility. See Entering the BOSS-S1 Configuration Utility.2. Click Physical/Virtual disk information.
All available physical disks are displayed.3. Select a physical disk to view its information.
Virtual disk informationTo view virtual disk information:
1. Enter the BOSS-S1 Configuration utility. See Entering the BOSS-S1 Configuration Utility.2. Click Physical/Virtual disk information.3. Select Virtual disk info.
All available virtual disks are displayed.4. Select a virtual disk to view its information.5. Observe quick initialization information in the virtual disk information.
Virtual disk importThe Import operation sets a foreign virtual disk as native to the configuration.
1. Enter the BOSS-S1 Configuration utility. See Entering to BOSS-S1 Configuration Utility.
2. Click Physical/Virtual disk information.
3. Click Virtual disk information.
4. Select the virtual disk.
5. Select Yes for the option Would you like to import this virtual disk?.
NOTE: This option is only available when the controller detects a foreign disk.
6. Click OK, and then click Import.
7. Click Back untill you return to the screen.
8. Click Finish, and then click Yes to save the settings.
Creating a virtual disk1. Enter the BOSS-S1 Configuration Utility. See Entering the BOSS-S1 Configuration Utility.
2. Click Create RAID Configuration.
3. Select the physical disks.
4. Click Next.
UEFI or HII RAID configuration utility 21

5. Type a name for the virtual disk in the Name field.
NOTE: Adding special characters in the virtual disk name is not supported.
6. Select Yes for the option Would you like to create this virtual disk? and click OK.
7. Click Next, and then click OK.A virtual disk is created with quick initialization by default.
Deleting virtual disks1. Enter the BOSS-S1 configuration utility. See Entering the BOSS-S1 Configuration Utility.
2. Click Delete RAID configuration.
3. Select the virtual disk.
4. Select Yes for the option Are you sure you want to delete the selected Virtual Disk?.
5. Click OK, and then click Next to delete the selected virtual disk.
RAID rebuildYou can manually rebuild a degraded virtual disk. RAID rebuild is available only when a degraded RAID volume is present and there is an available target device. If a foreign virtual disk is in rebuild state, rebuild starts automatically after you import the virtual disk and reboot the server. Clear configuration operation does not affect any background activity, like rebuild.
Erase physical diskNOTE: Erase physical disk is not supported when the physical disk is a part of virtual disk.
1. Enter the BOSS-S1 Configuration Utility. See Entering the BOSS-S1 Configuration Utility.
2. Click Erase Physical Disk.
3. Select the devices by selecting the check box next to the available physical disk configuration.
4. Select Yes for the option Would you like to erase this Physical Disk?.
5. Click Next.
After the physical disk is successfully erased, the Physical Disk Information tab shows the physical disk status as unconfigured.
Controller informationThe Controller information menu allows you to view the properties of the RAID Controller.
1. Enter the BOSS-S1 configuration utility. See Entering the BOSS-S1 Configuration Utility.
2. Click Controller information.
The RAID adapter information is displayed.
Clear controller configurationThe clear config operation is used to clear RAID metadata from the adapter.
NOTE: The clear config operation does not delete any data on the virtual disk.
1. Click Controller information.
2. Select Clear Config.
3. Click OK.
22 UEFI or HII RAID configuration utility

BOSS-S1 CLI commandsThis section provides information about the methods to use the BOSS-S1 command line interface (CLI) for performing a variety of controller and enclosure specific operations.
The BOSS-S1 CLI utility is supported on the following operating systems:
• Windows• Linux• ESXi
Topics:
• Using CLI commands from Windows• Using CLI commands from Linux• Using CLI commands from ESXi• Supported BOSS-S1 CLI commands
Using CLI commands from WindowsFollow these procedures to run the command line interface (CLI) commands using the Windows operating system:
1. Download the latest MVSETUP BOSS-S1 utility for Windows from www.dell.com/support/home.
2. Extract the content of the mvsetup_xxxx_Axx.zip file on the system.
3. Navigate to the directory where you have extracted the content of the mvsetup_xxxx_Axx.zip file and run the mvsetup.exe file.The CLI window, within which you can run BOSS-S1 CLI commands, is displayed. where you can run the BOSS-S1 CLI commands.
Using CLI commands from LinuxFollow these procedures to run the Command Line Interface (CLI) commands using the Linux operating system:
1. Download the latest MVCLI BOSS-S1 utility for Linux from www.dell.com/support/home.
2. Extract the content of the mvcli.xxxx_Axx.zip file on the system.
3. Navigate to the directory to which you have extracted the content of the mvcli.xxxx_Axx.zip file and run the ./install and ./mvcli files.The CLI window, within which you can run BOSS-S1 CLI commands, appears.
Using CLI commands from ESXiFollow these procedures to run the command line interface (CLI) commands using the ESXi operating system:
1. Install ESXi on a host machine.
2. Use WinSCP or SCP and copy the attached files into the /tmp/ directory.
3. Log in to an ESXi shell using putty.
4. Change the directory to cd /tmp.
5. Run the command, - esxcli software vib install -d /tmp/SAS-RAID_BOSS-S1_CLI_Axx.zip to install the offline bundle.Successful commands are reported at the command line.
6. Enter the directory cd /opt/Marvell and run the command at the CLI normally.
NOTE: ESXi 6.5 U1 or ESXi 6.0 U3 P06 is the minimum requirement to install the BOSS-S1 CLI utility.
6
BOSS-S1 CLI commands 23

Supported BOSS-S1 CLI commandsThe following table lists the supported BOSS-S1 command line interface (CLI) commands. For more information about the commands, type > help.
NOTE: The BOSS-S1 CLI utility only supports the following commands:
Table 5. Supported CLI commands
CLI commands Description Windows Usage Linux / VMware Usage
info -o hba Display BOSS-S1 controller information.
mvsetup info -o hba ./mvcli info -o hba
info -o vd Display virtual drive information. mvsetup info -o vd ./mvcli info -o vd
info -o pd Display physical drive information. mvsetup info -o pd ./mvcli info -o pd
smart -p <PD_ID> Display SMART information of physical drive.
mvsetup smart -p 0 ./mvcli smart -p 0
NOTE: SMART reports the health status of the M.2 disks. Refer to the SMART status return once the command is executed.
event Display controller events. mvsetup event ./mvcli event
NOTE: There may be inconsistency in the events that are listed in BOSS CLI and other management interfaces that include Dell EMC Open Manage Storage Services.
flash Enables you to perform controller firmware upgrade.
mvsetup flash -a update -f <image binary file> -t raw
./mvcli flash -a update -f <image binary file> -t raw
help Details help for all commands or for only one command.
mvsetup help info ./mvcli help info
24 BOSS-S1 CLI commands

TroubleshootingTo get help with your Dell BOSS-S1 card, you can contact your Dell Technical Service representative or see Dell.com/support.Topics:
• ROM version for BOSS reported as firmware version in iDRAC interface• Firmware update of M.2 drive on BOSS-S1 controller fails• BOSS-S1 CLI displays No Adapter Found error in Linux• LC log displays fan unavailability error• Updating BOSS-S1 controller firmware using iDRAC or LC fails• Physical disk size not updated in iDRAC• Physical disk/Virtual disk missing in iDRAC• Back Ground Activity task progress in HII does not report real-time status• Virtual disk state will be generated twice• Character limitation while naming a virtual disk• VMFS datastore is disabled on the 14th generation of PowerEdge systems that are shipped with VMware ESXi installed on BOSS-S1• Physical disk not visible to operating system• Virtual disk not visible to operating system• Drive replacement• Controller replacement• Controller failure• Unable to boot to M.2 drive installed in slot 1• CLI reports unsupported features• Failure to install ESXi on RAID 1• System not responding• Management port not responding
ROM version for BOSS reported as firmware version in iDRAC interfaceIssue: Starting with BOSS-S1 A01 release, BOSS-S1 versions are tracked using the ROM version. Therefore, iDRAC may
report the ROM version as firmware version. For example, 2.5.13.2008 for A01, 2.5.13.2009 for A02, or 2.5.13.3011 for A03.
Corrective Action: This is an expected behavior and no action is required.
Firmware update of M.2 drive on BOSS-S1 controller failsIssue: Firmware update of M.2 drives using the iDRAC web interface fails when the drive is in foreign state.
Corrective Action: Import the foreign configuration before updating the firmware of the drives.
BOSS-S1 CLI displays No Adapter Found error in LinuxIssue: BOSS-S1 CLI displays No Adapter Found error message in the Linux operating system.
7
Troubleshooting 25

Probable Cause: Using the BOSS-S1 CLI, when you run the CLI commands using non-administrative user privileges, the error No Adapter found is displayed.
Corrective Action: Use root/sudo administrator privilege while you run the CLI commands.
LC log displays fan unavailability errorIssue: LC log displays The BOSS-S1 device does not have a fan installed in it error message.
Probable Cause: Currently there is no fan requirement for BOSS-S1, which might be required in future based on M.2 thermal requirement.
Corrective Action: No action required. This error message can be ignored.
Updating BOSS-S1 controller firmware using iDRAC or LC failsIssue: Updating firmware on a BOSS-S1 controller from versions A00 to A01 using iDRAC/LC fails.
Probable Cause: The systems management support is not enabled in the firmware version A00. iDRAC/LC update is supported only on the firmware version A01 and later.
Corrective Action: Use UEFI, OS DUP, or BOSS -S1 CLI to update firmware.
Physical disk size not updated in iDRACProbable Cause: When Collect System Inventory on Reboot (CSIOR) is disabled, iDRAC displays partial information about BOSS-S1
components.
Corrective Action: Ensure that CSIOR is enabled in iDRAC for the server to collect the system inventory on reboot.NOTE: Ensure that the BOSS-S1 controller firmware and iDRAC firmware are updated to the latest
version.
Physical disk/Virtual disk missing in iDRACProbable Cause: When Collect System Inventory on Reboot (CSIOR) is disabled, iDRAC displays partial information about BOSS-S1
components.
Corrective Action: Ensure that CSIOR is enabled in iDRAC for the server to collect the system inventory on reboot.NOTE: Ensure that the BOSS-S1 controller firmware and iDRAC firmware are updated to the latest
version.
Back Ground Activity task progress in HII does not report real-time statusIssue: Back Ground Activity (BGA) task progress in HII does not report the real-time status of running tasks.
Probable Cause: This is an expected firmware behavior, and there is no functionality loss.
Corrective Action: It is recommended that you check the BOSS-S1 CLI for status.
NOTE: BOSS-S1 Command Line Interface (CLI) and Dell EMC Open Manage Storage Services only report events for the
tasks that are completed.
26 Troubleshooting

Virtual disk state will be generated twiceIssue: Events related to virtual disk state will be generated twice in BOSS-S1 CLI and Open Manage Storage Services
(OMSS).
Probable Cause: This occurs when Dell EMC PowerEdge Servers perform a cold reboot.
Corrective Action: These events can be safely ignored as there is no functionality loss.
Character limitation while naming a virtual diskIssue: Limitation in the number of characters while creating a virtual disk name
Corrective Action: It is recommended that you use maximum of 10 characters while naming the virtual disk.
VMFS datastore is disabled on the 14th generation of PowerEdge systems that are shipped with VMware ESXi installed on BOSS-S1Issue: Installation of ESXi on a BOSS-S1 device does not have VMFS datastore enabled by default, and disables VMFS if
you use a custom image for installation. This issue occurs when using ESXi version 6.5.x or later on the BOSS-S1 card.
Corrective Action: When you have VMware ESXi installed on BOSS-S1, it is recommended that you use the BOSS-S1 device only as a boot device and disable VMFS if you are installing a custom image. For more information, see https://kb.vmware.com/s/article/2004582 and https://kb.vmware.com/s/article/2145210.
NOTE: The scratch partition is created and configured during VMware ESXi installation in addition
to boot support on BOSS-S1.
Physical disk not visible to operating systemIssue: One or both physical disks are not appearing for use by an operating system.
Probable Cause: A physical disk will not be presented to the operating system in the following scenarios:
• There is RAID metadata on the physical disk and no RAID metadata on the controller.• The BOSS-S1 controller has RAID metadata on it and the physical disk does not have the RAID metadata on it.
Corrective Action: If the RAID metadata is on the controller, follow the steps listed in Clear Controller Configuration.
If the RAID metadata is on the physical disk, follow the steps specified in Erase physical disk.
Alternatively, if you want to keep the RAID drive, refer to Virtual Disk Not visible to Operating System
Virtual disk not visible to operating systemIssue: In RAID mode a virtual disk is not appearing for use by an operating system.
Probable Cause: Virtual disks will not be presented to the system if they are not native to the controller.
Corrective Action: Import the virtual disk via HII as specified in section Virtual Disk Import.
Drive replacementIssue: An installed drive is not listed in the BOSS-S1 configuration utility.
Troubleshooting 27

OpenManage reports Physical disk offline state.
Probable Cause: Drive is either in failure state or has corrupted firmware.
Corrective Action: Reseat drive to ensure drive is inserted correctly. If error persists, attempt to update drive firmware using DUP. If error is still present, replace erroneous drive.
Controller replacementIssue: Controller's UEFI configuration utility menu entry not appearing.
Probable Cause: This is either a firmware or a hardware fault.
Corrective Action: • Flash the latest firmware on the BOSS adapter.• If the problem persists, shutdown the server and unplug the BOSS-S1 adapter.• Plug the BOSS-S1 adapter into the PCIe slot.• Boot the system and check the UEFI configuration utility menu again.
If the issue persists, see Controller Failure.
NOTE: Ensure that the system is completely disconnected from all power sources before making any hardware changes.
Controller failureIssue: BOSS-S1 device is not presented to system.
Probable Cause: Hardware fault on the card.
Corrective Action: Replace the BOSS-S1 adapter.
Unable to boot to M.2 drive installed in slot 1Issue: When two unconfigured bootable M.2 drives are inserted into the BOSS-S1 device, only the slot 0 drive may be
used as a boot drive.
Probable Cause: Working as designed, BIOS only allows booting from the first listed boot device, in this case, slot 0 per peripheral controller. This only occurs in legacy BIOS boot mode.
Corrective Action: Remove the drive from slot 1 and install it in slot 0.
CLI reports unsupported featuresIssue: Several commands, options, or other features listed by the CLI state that they are unsupported when run.
Probable Cause: CLI shows the same information on all Marvell products, but only implements the functions which are pertinent to that platform or system.
Corrective Action: Use supported features.
Failure to install ESXi on RAID 1Issue: Attempting to install ESXi on a RAID 1 results in an invalid partition table error.
Probable Cause: If an unconfigured physical disk containing an ESXi partition is used in a virtual disk, any attempts to install a partition of ESXi on this virtual disk will raise an error due to failure to clear out the previous partition.
Corrective Action: Delete the existing RAID 1, run erase physical disk on both drives, re-create the RAID 1 with quick initialization ON, then attempt to reinstall ESXi on the virtual disk.
28 Troubleshooting
System not respondingIssue Systems with ESXi OS stops responding.
Corrective Action: Ensure that the latest version of ESXi OS is installed.
Management port not respondingIssue BOSS-S1 management port not responding in ESXi.
Corrective Action: Ensure that the latest version of ESXi OS is installed.
Troubleshooting 29

Getting help
Contacting Dell EMCDell EMC provides several online and telephone based support and service options. If you do not have an active internet connection, you can find contact information about your purchase invoice, packing slip, bill, or Dell EMC product catalog. Availability varies by country and product, and some services may not be available in your area. To contact Dell EMC for sales, technical assistance, or customer service issues:
1. Go to www.dell.com/support/home.
2. Select your country from the drop-down menu on the lower right corner of the page.
3. For customized support:
a) Enter your system Service Tag in the Enter your Service Tag field.b) Click Submit.
The support page that lists the various support categories is displayed.
4. For general support:
a) Select your product category.b) Select your product segment.c) Select your product.
The support page that lists the various support categories is displayed.
5. For contact details of Dell EMC Global Technical Support:
a) Click Global Technical Support.b) The Contact Technical Support page is displayed with details to call, chat, or e-mail the Dell EMC Global Technical Support team.
Documentation feedbackClick the Feedback link in any of the Dell EMC documentation pages, fill out the form, and click Submit to send your feedback.
8
30 Getting help