Dec-11 Retro-fitting the 2-position derailleur.
12
1 Dec-11 dr retro fit ds Retro-fitting the 2-position derailleur. If you are a dealer making this upgrade, please hand this instruction set to your customer after fitting. Contents: What you need Assembly procedure Possible problems Using the derailleur Maintenance What you need: Tools: Spanner 15mm AF. Chain rivet tool. Hex keys (allen keys) 1.5, 2.0, 2.5 & 3.0mm. Cable assembly (inner including "dogleg" and spring tube): see Note 4 below. The conversion kit comprises: Chain tensioner assembly Chain pusher assembly, with screw M5x12 and bearing spacer in place Chain pusher "wing plate" (or stop plate) and its nylon spacer Cable spring outer, cable stops, and screw M3 x 30 Trigger, assembled with bell & cap Lever, threaded cable nipple and cable ferrule Trigger clip band and M5x16 screw Sprockets, (12T/16T 2-spd, 13T/16T BWR 6-spd, 13T/15T Sram 6-spd) Sprocket spacer and chain guide disc Chain, ½" x 3/32" x 100 link (102 link for 2-spd with 54T chainwheel)) For some kits a complete rear-wheel (& rimtape) is also included. Notes. 1. The chain supplied is 3/32” wide. On some earlier Bromptons, the chainring may be too wide to accept this chain: if so, fit a new chainwheel/crank, or else request 1/8” chain, available from Brompton (an 1/8" chain gives slightly slicker changes for the derailleur, but the clearances are tight, and it may be that it is only after several hours' use that parts will bed in to give a smooth transmission). 2. For a 6-spd conversion with a 44T or 46T chainwheel (rather than std 50T), remove 2 links from the new chain to make 98 links (if 54T, you must get 102 link chain). For a 2-spd conversion, use 100 links for 50T, & 98 links for 44T. 3. Hook (holding front fork to rear frame when folded). If the earlier wire hook is fitted, there is not much clearance between the hook and the changer mechanism when the bike is folded. If a hook is damaged or bent wrong, it may foul against the changer whenever the bike is folded: so make sure that the hook engages correctly with the chainstay. Alternatively, use the new stronger Brompton hook (introduced in Spring 2002): the hook itself is moulded, and gives better clearance. 4. Cables. You need to have the correct kit of cables to suit the model type (M, P, H or S), available from Brompton. For M-types, before Jan 2004 we shipped bikes with a shorter wheel-base than now (1015mm rather than 1045mm: you can tell the difference because on the longer bikes the main hinge is a casting, whereas on the earlier short-wheel-base models it is a forging, which is hand-brazed). For shorter bikes, use the shorter cables if possible.
Transcript of Dec-11 Retro-fitting the 2-position derailleur.

1
Dec-11 dr retro fit ds
Retro-fitting the 2-position derailleur.
If you are a dealer making this upgrade, please hand this instruction set to your customer
after fitting.
Contents: What you need
Assembly procedure
Possible problems
Using the derailleur
Maintenance
What you need:
Tools: Spanner 15mm AF.
Chain rivet tool.
Hex keys (allen keys) 1.5, 2.0, 2.5 & 3.0mm.
Cable assembly (inner including "dogleg" and spring tube): see Note 4 below.
The conversion kit comprises:
Chain tensioner assembly
Chain pusher assembly, with screw M5x12 and bearing spacer in place
Chain pusher "wing plate" (or stop plate) and its nylon spacer
Cable spring outer, cable stops, and screw M3 x 30
Trigger, assembled with bell & cap
Lever, threaded cable nipple and cable ferrule
Trigger clip band and M5x16 screw
Sprockets, (12T/16T 2-spd, 13T/16T BWR 6-spd, 13T/15T Sram 6-spd)
Sprocket spacer and chain guide disc
Chain, ½" x 3/32" x 100 link (102 link for 2-spd with 54T chainwheel))
For some kits a complete rear-wheel (& rimtape) is also included.
Notes.
1. The chain supplied is 3/32” wide. On some earlier Bromptons, the chainring may be
too wide to accept this chain: if so, fit a new chainwheel/crank, or else request 1/8”
chain, available from Brompton (an 1/8" chain gives slightly slicker changes for the
derailleur, but the clearances are tight, and it may be that it is only after several
hours' use that parts will bed in to give a smooth transmission).
2. For a 6-spd conversion with a 44T or 46T chainwheel (rather than std 50T), remove
2 links from the new chain to make 98 links (if 54T, you must get 102 link chain). For
a 2-spd conversion, use 100 links for 50T, & 98 links for 44T.
3. Hook (holding front fork to rear frame when folded). If the earlier wire hook is
fitted, there is not much clearance between the hook and the changer mechanism
when the bike is folded. If a hook is damaged or bent wrong, it may foul against the
changer whenever the bike is folded: so make sure that the hook engages correctly
with the chainstay. Alternatively, use the new stronger Brompton hook (introduced
in Spring 2002): the hook itself is moulded, and gives better clearance.
4. Cables. You need to have the correct kit of cables to suit the model type (M, P, H or
S), available from Brompton. For M-types, before Jan 2004 we shipped bikes with a
shorter wheel-base than now (1015mm rather than 1045mm: you can tell the
difference because on the longer bikes the main hinge is a casting, whereas on the
earlier short-wheel-base models it is a forging, which is hand-brazed). For shorter
bikes, use the shorter cables if possible.

2
ASSEMBLY PROCEDURE.
SUMMARY:
Remove rear wheel and chain, and clean up frame
Press-fit wing plate with spacer
Screw chain pusher assembly (CHPUA) to frame
Fit cable outer and cable stops
Feed inner cable through, compress spring, and screw dogleg to CHPUA
Fit new sprockets to rear wheel
Fit rear wheel, and the new chain & chain tensioner
Initial stop screw adjustment on CHPUA
Fit trigger
Connect cable to lever
Final settings, and reconnect hub-gear cable.
REMOVE REAR WHEEL AND CHAIN AND CLEAN UP.
Remove rear wheel as outlined in the Owner's Manual. If you wish to avoid deflating the
tyre, remove a brake pad. The chain has no connecting link, and is removed by pressing out
one of the pins, and disconnecting. Don't be tempted to re-use the old chain: it is the wrong
length, and anyway will probably have stretched and won't run well on the new sprockets. The original chain-tensioner is also no longer required, but keep the special retaining nut
and washer.
Screw securing the rear carrier stays or mudguard stays to the RH rear axle plate: on
earlier bikes (pre-April 2002), the nut is on the inside and would end up uncomfortably
close to the chain after assembly. If this is the case, this nut should be unscrewed, and the
screw removed and then inserted from the inside, with the nut outside: keep the number of
washers, and their position in the stack, the same as originally. (Not relevant on an E-
version).
It's a good idea to clean up the right hand chain-stay, the existing cables and the right side of
the main-frame (inside the chain wheel), not just to make working pleasanter, but, more
important, to avoid dirt getting into the new cable during assembly.
WING PLATE
Remove the plastic plug screw fitted to the
hexagonal boss, HXB: use a small screw-driver,
taking care not to damage the slot in the screw. (If
you can't get this screw out, drill it out carefully
using a 4mm or 4.2mm drill, and then clear the
threads with a spiral-flute M5 plug tap).
Place the plastic spacer, SP, over the hex boss, fig
DR1, and address the small wing plate WP to this
boss. The orientation must be as shown in fig DR2 (the two surfaces
SH & SL facing outwards): address the wing plate to the hex boss so
that you feel the male hex starting to key into the hole in the wing
plate (if necessary, try the wing plate the other way up). Using a
suitable drift, tap the wing plate gently down till it's near-enough flush
HXB
SP
WP fig
DR1
fig DR3

3
with the end of the hex boss (fig DR3). If the paint
is thicker than normal, you may find that light
tapping is insufficient to drive the WP onto the
boss HXB: if so, carefully scrape away some of the
excess paint from each of the six flats on the boss,
and try again.
CHAIN PUSHER ASSEMBLY, CHPUA
Make sure that neither of the two setting screws in this
is projecting inwards from its hexagonal housing, fig
DR4.
There is a ball bearing in this assembly, and for protection, water-resistant grease has been
applied to the seals each side. It is best to avoid disturbing this grease, and to keep the head
of the M5 x 12 screw and the thick spacing washer
W in contact with the bearing during assembly. Do
not omit this spacing washer or allow it to fall off
during assembly.
Unscrew the black cap from the end of the screw
(and discard it), and secure the screw tight into the
HXB, fig DR5. The raised oval boss, V, has to lie
inside the frame tube. Check that the assembly can
rotate freely to and fro.
CABLE OUTER AND CABLE STOPS
The "rear cable stop assembly" CSTRA, fig DR7,
is in fact two parts, one pushed onto the other,
and these should be kept together: first check
that the "nose" of this fits through the loop in
the cable-guide-rear CGR. If it doesn't fit, prise
the loop open carefully with a screw driver (if
the cable-stop is unacceptably loose here, then
carefully bend the wire so as to make the loop
tighter).
For the outer cable, correct routing is important, fig CR1. The derailleur cable should lie
under the other rear cable(s), so push them up and out of the way while feeding it through.
And, for neatness at the front end, avoid twisting the new cable around the others.
SH SL
fig DR2
fig DR4
HXB W
V M5
fig DR5
CSTRA CGR fig DR7

4
You can feed the outer cable from the front or
the rear: either way the cable must pass (starting
at the rear end) outside the forward leg of the
rear cable guide CGR, inside the tension tube TT,
through the centre cable guide CGC, and through
the cable gatherer CABGATH. With the cable in
place, fit the forward cable stop, CSTF, over the
back-end of the cable (the CSTF to be the correct
way round, chamfer pointing aft), and then push
the cable and the CSTF aft till the chamfer on the
CSTF is a snug fit against the loop in the cable
guide CGR. Finally fit the CSTRA back through the
loop in CGR and into the CSTF.
Let the other cables fall back down to their
normal routing. Leave the forward end of the
derailleur cable unconnected for the time being.
INNER CABLE AND SPRING
Feed the spring, fig DR8, onto the front of the inner cable, and
let the spring pass outside the spring tube ST to rest against the
dogleg DL. Next, feed the inner cable through the cable stops
and into the outer cable from the rear.
The dogleg DL at the end of the cable now has to be connected
to the CHPUA, fig DR9, which involves compressing the spring (note: you may well find this
easier with the bike upside-down, i.e. not as in fig DR9). If you are to avoid kinking the inner
cable (which is important), you
have to take care during this
stage not to allow the spring to
jump loose! You need both
hands to compress the spring:
so have the M3x30 screw to
hand, ready for fitting while you
hold the spring compressed. To
compress the spring, feed
20mm or 30mm at a time onto
the spring tube, ST, gripping it
in place each time. Move the
"dogleg" and spring-tube
forwards till the forward end of the spring tube ST has entered the cable-stop CSTRA: the
dogleg DL should now be in the correct position for connecting to the chain pusher,
CHPUA. With one hand holding the dogleg to keep the spring compressed, feed the screw
down (or up) through hole H in CHPUA, and right into the counterbored portion U of the
dogleg: you can now relax. Do up the screw while supporting the dogleg: the action is fairly
CGR
TT
CGC
CABGATH
fig CR1
CSTF CSTRA CGR
fig DR8
ST
DL
DL fig DR9
CHPUA M3x30
CSTRA
5
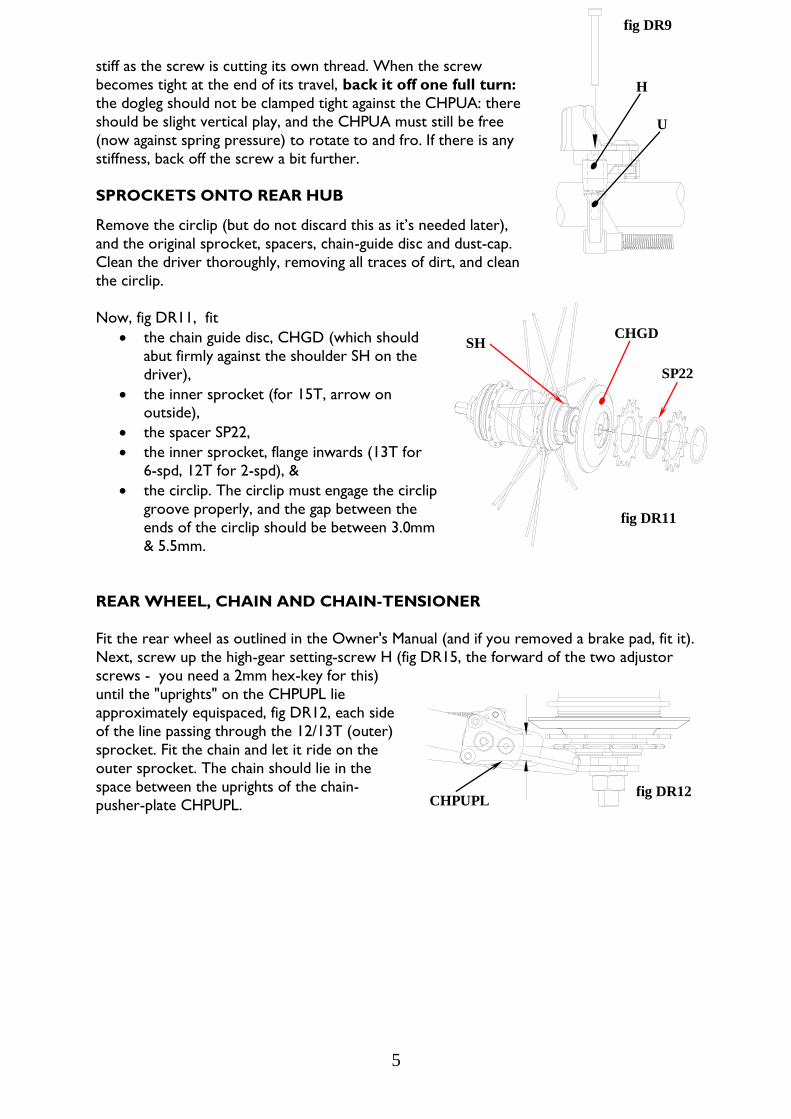
stiff as the screw is cutting its own thread. When the screw
becomes tight at the end of its travel, back it off one full turn:
the dogleg should not be clamped tight against the CHPUA: there
should be slight vertical play, and the CHPUA must still be free
(now against spring pressure) to rotate to and fro. If there is any
stiffness, back off the screw a bit further.
SPROCKETS ONTO REAR HUB
Remove the circlip (but do not discard this as it’s needed later),
and the original sprocket, spacers, chain-guide disc and dust-cap.
Clean the driver thoroughly, removing all traces of dirt, and clean
the circlip.
Now, fig DR11, fit
the chain guide disc, CHGD (which should
abut firmly against the shoulder SH on the
driver),
the inner sprocket (for 15T, arrow on outside),
the spacer SP22,
the inner sprocket, flange inwards (13T for
6-spd, 12T for 2-spd), &
the circlip. The circlip must engage the circlip
groove properly, and the gap between the
ends of the circlip should be between 3.0mm
& 5.5mm.
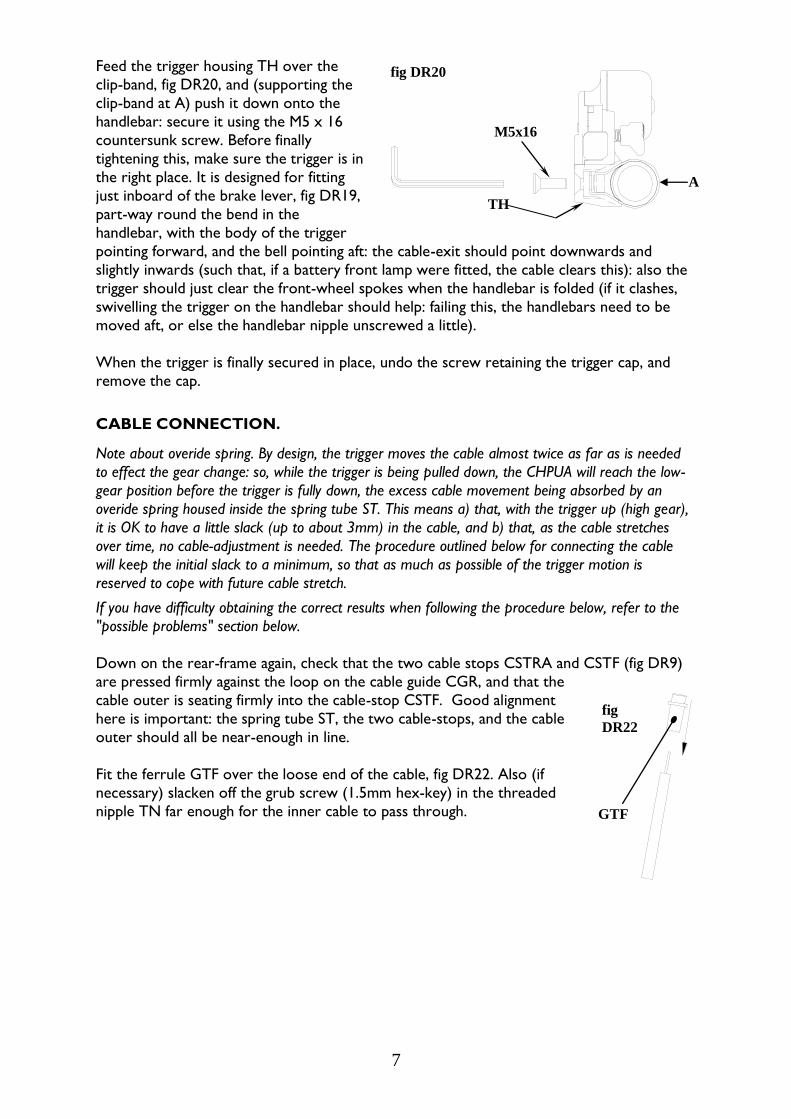
REAR WHEEL, CHAIN AND CHAIN-TENSIONER
Fit the rear wheel as outlined in the Owner's Manual (and if you removed a brake pad, fit it).
Next, screw up the high-gear setting-screw H (fig DR15, the forward of the two adjustor
screws - you need a 2mm hex-key for this)
until the "uprights" on the CHPUPL lie
approximately equispaced, fig DR12, each side
of the line passing through the 12/13T (outer)
sprocket. Fit the chain and let it ride on the
outer sprocket. The chain should lie in the
space between the uprights of the chain-
pusher-plate CHPUPL. CHPUPL fig DR12
U
H
fig DR9
SH CHGD
SP22
fig DR11

6
Chain-tensioner: first check that both idlers spin
freely, and can move in and out on their
spindles. The actual fitting of a Brompton
derailleur chain-tensioner requires a technique
slightly different from that for a standard chain-
tensioner, viz the fixed idler on the chain-
tensioner-base, CTIDLB, has to lie between the
"uprights" of the chain-pusher-plate. So, with the
chain-tensioner inclined slightly outwards as
shown in Fig DR14 (chain omitted in this figure), feed the idler CTIDLB between these
uprights, and then feed the chain-tensioner base onto the rear axle plate RAXP till it abuts
squarely. Secure it, fig DR15, using the original chain-tensioner-nut CTN and its washer (this
nut should not be done up too tight,
8NM max torque).
Draw up the slack in the chain, and
feed it over the idler wheel on the
sprung arm, CTIDLA: the bike needs
to be parked (or at least the rear
wheel partially folded) to do this.
PRELIMINARY ADJUSTMENT
Before connecting the cable, re-adjust
the "high-gear" setting screw, H. The
idea is that, during normal forward
pedalling the inner "upright" IU of the
CHPUPL should be as close as
possible, fig DR16, to the inner side of
the fixed idler wheel without actually
rubbing (or at least, if rubbing, barely
exerting any pressure): this
arrangement gives the slickest gear
change, with the minimum wear.
Rotating the cranks forward, adjust the
screw to suit.
TRIGGER FITTING
The trigger wants to sit forward of the
handlebar, on the left hand side, with the bell
and clip-band facing aft, fig DR19. In the right
position, it should neither affect folding nor be
vulnerable when folded.
Open up the clip-band, fig DR18, feed it over the handlebar
at this point, and squeeze the two ends together.
CTIDLB
RAXP fig DR14
IU
fig DR16
CTIDLA
CTN
L H
fig DR15
CHPUPL
fig DR19
fig DR18
7
Feed the trigger housing TH over the
clip-band, fig DR20, and (supporting the
clip-band at A) push it down onto the
handlebar: secure it using the M5 x 16
countersunk screw. Before finally
tightening this, make sure the trigger is in
the right place. It is designed for fitting
just inboard of the brake lever, fig DR19,
part-way round the bend in the
handlebar, with the body of the trigger
pointing forward, and the bell pointing aft: the cable-exit should point downwards and
slightly inwards (such that, if a battery front lamp were fitted, the cable clears this): also the
trigger should just clear the front-wheel spokes when the handlebar is folded (if it clashes,
swivelling the trigger on the handlebar should help: failing this, the handlebars need to be
moved aft, or else the handlebar nipple unscrewed a little).
When the trigger is finally secured in place, undo the screw retaining the trigger cap, and
remove the cap.
CABLE CONNECTION.
Note about overide spring. By design, the trigger moves the cable almost twice as far as is needed
to effect the gear change: so, while the trigger is being pulled down, the CHPUA will reach the low-
gear position before the trigger is fully down, the excess cable movement being absorbed by an
overide spring housed inside the spring tube ST. This means a) that, with the trigger up (high gear),
it is OK to have a little slack (up to about 3mm) in the cable, and b) that, as the cable stretches
over time, no cable-adjustment is needed. The procedure outlined below for connecting the cable
will keep the initial slack to a minimum, so that as much as possible of the trigger motion is
reserved to cope with future cable stretch.
If you have difficulty obtaining the correct results when following the procedure below, refer to the
"possible problems" section below.
Down on the rear-frame again, check that the two cable stops CSTRA and CSTF (fig DR9)
are pressed firmly against the loop on the cable guide CGR, and that the
cable outer is seating firmly into the cable-stop CSTF. Good alignment
here is important: the spring tube ST, the two cable-stops, and the cable
outer should all be near-enough in line.
Fit the ferrule GTF over the loose end of the cable, fig DR22. Also (if
necessary) slacken off the grub screw (1.5mm hex-key) in the threaded
nipple TN far enough for the inner cable to pass through.
fig DR20
A
TH
M5x16
GTF
fig
DR22

8
Next, fig DR23, with the TN in place
through the hole in the lever (and the
lever still out of the trigger housing)
feed the inner cable through the nipple
TN at the angle shown till the cable abuts
the surface K on the lever. Do up the
screw in the nipple to secure the cable.
[Note: if you allow more cable to extend past the nipple than is allowed by surface K, this
loose end will interfere with the free movement of the lever, and cause poor gear-changing.]
Now, holding the ferrule GTF in one hand and the lever in your other hand, pull the inner
cable out a couple of times (taking care not to kink the cable). You will feel the resistance of
the springs: this action should make sure that the cable ends and stops are all settled
correctly in place.
When assembling the lever into the trigger housing, the
bike should be fully unfolded in order to set the cable
correctly. This correct setting is obtained by fitting the
ferrule GTF so that its flange F engages one particular
preferred slot of the four slots S, fig DR24, in the
housing. To do this, fit the lever part-way onto its pivot
(the raised boss), and then pull "gently" down (see note
below) on the ferrule, away from the lever: allow the
lever to rotate anti-clockwise till it turns no further. At
this stage decide which slot to fit the ferrule into: the
correct slot is the one in line with the flange F, or else
the next available slot nearer to the trigger-lever (i.e.
such that the cable-inner becomes slightly slacker).
Feed the lever fully into position on its pivot in the
housing, and let the cable ferrule drop squarely into the
selected slot. Secure the trigger cap back into place, squeezing it together towards the
housing where the cable enters.
Note: when putting a pre-load onto the cable, this must be a gentle pre-load only, to take
up the slack without moving the inner relative to the outer, i.e. a load just sufficient to make
sure that the cable outer abuts properly against its stops.
FINAL SETTINGS
The first stage is to check that the cable setting is OK. Operate the trigger a few times, and
move it back to the UP position. Rotate the cranks forward. The CHPUA should be fully
"out", with the stop-screw H contacting the surface SH of the wing plate WP: if it isn't in
contact, then the cable is too tight, and the ferrule GTF needs to be moved up a slot in the
trigger. Also check for play in the cable: grasp the cable outer just where it comes out of the
trigger and pull it up and down, but not hard enough to move the CHPUA: if there is more
than 3mm of slack, then the ferrule GTF needs to be moved down a slot. A further check is
to move the trigger slowly down from the up position while pedalling forward: the CHPUA
should complete its movement to the inner, low-gear position well before the trigger has
latched down.
If all is well, the only setting now
required is that for the low gear.
Rotate the cranks forward, and pull
K
TN
fig DR23
F
GTF
OU fig DR17
CTIDLB
S
fig
DR24
9
the trigger down. The CHPUA will be pushing the fixed idler wheel CTIDLB too far
inwards. Screw up the low-gear setting screw L (fig DR15) until the CHPUPL no longer
bears against the CTIDLB. Next, back off the screw so that the outer upright OU (fig DR17)
of the CHPUPL is as close as possible to the outer edge of the CTIDLB without actually
rubbing.
Now rotate the cranks forward, and operate the trigger repeatedly. If all is OK,
forward rotation of the cranks through about a quarter (or 3/8ths) of a turn should be
enough for the chain to complete its transfer from one sprocket to the other (whether
high to low, or vice-versa),
when changing "down", there should (as mentioned above) be plenty of trigger
movement still in hand when the chain moves across, and
in each gear the "pushing" surface of the CHPUPL should be just not rubbing against the
idler. If a change in one direction or the other is not slick, slacken the appropriate stop screw, but
not so much that the CHPUPL is rubbing against the idler wheel (or at least, if rubbing,
barely exerting any pressure).
Finally, for a 6-spd, reconnect the hub-gear control (for detail see Owner's Manual). Screw
the indicator rod/chain GICH into the axle (screw it right in, and then, to align, back it off
not more than ½ a turn), and connect the other end to the gear-cable anchorage, and adjust
to get the right gear setting.
POSSIBLE PROBLEMS
PROBLEMS DURING ASSEMBLY OF THE RETRO-FIT KIT
CHPUA not free to rotate to and fro after fitting
The cause can be the omission of the special washer that should be fitted between the
bearing and the hexagon boss on the frame, or (less likely) a faulty bearing.
Cable inner wire will not reach up to surface K on the trigger
Possible causes are
outer cable not seating properly in the cable-stop CSTF or in the ferrule GTF
the initial adjustment of the high-gear setting screw on the CHPUA has not been
done
inner cable not running freely through the outer: one or other may be damaged
outer cable too long: if this cable near enough follows, on its route down and back,
the path of the other rear control cable(s), then this is probably not the cause
inner cable too short
If the outer cable is not unduly long, and the inner cable passes through (and can be clamped
in) the threaded nipple TN, then connect the cable regardless (it does not matter if it
doesn't reach surface K). Otherwise, cut the outer cable to suit. If the inner cable actually is
too short to be useable, then a new one is needed.
Cable too loose even with the ferrule in the outermost slot on the trigger
inner cable has slipped in the threaded nipple
inner cable too long
outer cable too short

10
PROBLEMS ON COMPLETION OF FITTING RETRO-FIT KIT
Unsatisfactory change on pulling the trigger down
Possible causes are
low-gear setting screw in CHPUA is too tight
the cable has too much slack (moving the ferrule GTF to a slot further from the
trigger should cure this)
one or both idlers on the chain-tensioner not moving freely in/out
CHPUA not moving feely, see note below
Unsatisfactory change on pushing the trigger up
Possible causes are
high-gear setting screw in CHPUA is too tight
the cable is too tight (moving the ferrule GTF to a slot nearer to the trigger should
cure this)
on a Sram 6-spd, inner 15T sprocket the wrong way round
inner cable not sliding freely in outer
one or both idlers on the chain-tensioner not moving freely in/out
CHPUA not moving feely, see note below
Note about CHPUA assembly. Anything that prevents the free rotation of the CHPUA can
cause the gear change to be unsatisfactory. Providing it is not a sticking cable, you can tell
that the CHPUA is not free if, when you change gear, your manually helping the CHPUA to
move remedies the problem. It is advisable, when diagnosing problems here, to remove the
chain tensioner. The following are possible causes:
the tube ST not moving freely in and out of the CSTRA: the cause would normally
be misalignment of the cable stops, perhaps because the outer cable is forcing them
out of line through being routed wrongly (see fig CR1) and/or because the loop at
the aft end of the CGR is crooked (it can, with care, be bent straight)
dogleg DL too tight against the CHPUA: slacken the M3 x 30 screw slightly
CHPUA not correctly assembled to the hex boss on the rear frame: the special thick spacer must be in place under the bearing, and the screw tight
faulty bearing in the CHPUA.

11
NOTES, for the Brompton derailleur user.
Using the derailleur
You may find that most gear-changes you make are with the right hand trigger, with the left
hand trigger used for fine tuning. Do not however neglect to use the left hand trigger for
long periods: this can lead to uneven wear. And if you ride in muddy conditions, make at
least some of your gear changes using the LH trigger.
Changing gear on the move. You can use the same technique for both hub gear and
derailleur changes: carry on pedalling forwards, but take the load off the pedals.
Changing gear when stationary. Avoid moving the left-hand, derailleur, trigger when
stationary. If you need a lower gear for starting off, then use the right-hand trigger (to select
a lower gear in the hub): it's usually necessary to back-pedal while changing the hub-gear
when stopped.
If you do move the left-hand trigger to make a derailleur change when stopped, no harm
should result if you back-pedal or push the bike backwards, but pedalling forward (inevitably
under load when you move off) will result in a jarring gear change, with the possibility of
damage to the transmission.
Derailleur changes while coasting to a halt: turn the cranks forward to effect the change
before you come to a stop.
When folding the bike and bringing the front wheel alongside the rear wheel, try to avoid
knocking the CHPUA with the hook. If your bike has an "old-style" hook (on these the hook
itself is bent wire with a black plastic cover), you should consider fitting the new-style hook
(where the hook is a nylon moulding attached to the wire form): this gives better clearance
on folding, and anyway performs better as a latch.
Maintenance
1. Keep the chain well lubricated, as ever.
2. For slick changes, the CHPUPL wants to be as close to the idler wheel (as in figs
DR16/17) as possible, without rubbing. Wear should be low, but from time to time
one or both of the setting screws in CHPUA (fig DR15) may need adjusting.
3. Dirt preventing free movement of the CHPUA. The dirt that accumulates from
normal road use in wet or dry conditions should not cause problems, but it might:
allowing mud to dry onto the mechanism without changing gear will almost certainly
cause difficulties. If needed, clean away any excess dirt here from time to time: an
air-gun or a jet of water should help. If a thorough cleaning is called for, you will have
to disconnect the CHPUA from the rear frame (the chain tensioner will also need
removing, but there is no need to disconnect the CHPULEG): before reassembly
wipe waterproof grease over each bearing seal.
4. Dirt preventing the free movement of the chain-tensioner-idlers in and out along
their shafts: again, this should not occur. But if it does, first clean the dust-shields
which project into the idlers. If this doesn't do the trick, dismantle the idlers and
their spindles, clean up, and regrease (if there are obvious signs of wear to either
idlers or spindles, replace both): for this disassembly, you first have to prise off the
dustcaps on the idler wheels.

12
5. Chain "jumping" on the sprockets: the cause will normally be an accumulation of dirt
(or snow) between the sprockets (it can also occur if a new chain is fitted to old
sprockets).
6. Replacement chains and sprockets. If fitting a new chain, fit new rear sprockets, and
vice versa. The sprockets are special, and have to be obtained from your Brompton
dealer. As for chain, use Sachs PC10, 1/2" x 3/32”. If you have a 50T chainwheel, the
chain must have 100 links, for a 54T chainwheel use 102 link chain, and for a 44T
chainwheel use 98 link chain.


![Front derailleur - Manuals & Technical Documentssi.shimano.com/pdfs/dm/DM-FD0003-06-ENG.pdfInstallation of the front derailleur (Front triple) 2 [A-B] (B) (A) Align the flat portion](https://static.fdocuments.net/doc/165x107/5b1a811f7f8b9a41258db440/front-derailleur-manuals-technical-of-the-front-derailleur-front-triple-2.jpg)