Debian Tutorial - users · Debian is a free operating system (OS) for your computer. An operating...
112
Debian Tutorial Havoc Pennington <[email protected]> 16 March 1999 Copyright Notice c 1998 Software in the Public Interest and individual contributors. Permission is granted to make and distribute verbatim copies of this manual provided the copyright notice and this permission notice are preserved on all copies. Permission is granted to copy and distribute modified versions of this manual under the conditions for verbatim copying, provided also that the sections that reprint "The GNU General Public License," "The GNU Library General Public License," and other clearly marked sections held under separate copyright are reproduced under the conditions given within them, and provided that the entire resulting derived work is distributed under the terms of a permission notice identical to this one. Permission is granted to copy and distribute translations of this manual into another language under the conditions for modified versions. "The GNU General Public License" and "The GNU Library General Public License" may be included in a translation approved by the Free Software Foundation instead of in the original English. At your option, you may distribute verbatim and modified versions of this document under the terms of the GNU General Public License, excepting the clearly marked sections held under separate copyright.
Transcript of Debian Tutorial - users · Debian is a free operating system (OS) for your computer. An operating...
Debian Tutorial
Havoc Pennington <[email protected]>
16 March 1999
Copyright Notice
c�
1998 Software in the Public Interest and individual contributors.
Permission is granted to make and distribute verbatim copies of this manual provided the copyright noticeand this permission notice are preserved on all copies.
Permission is granted to copy and distribute modified versions of this manual under the conditions forverbatim copying, provided also that the sections that reprint "The GNU General Public License," "TheGNU Library General Public License," and other clearly marked sections held under separate copyright arereproduced under the conditions given within them, and provided that the entire resulting derived work isdistributed under the terms of a permission notice identical to this one.
Permission is granted to copy and distribute translations of this manual into another language under theconditions for modified versions. "The GNU General Public License" and "The GNU Library GeneralPublic License" may be included in a translation approved by the Free Software Foundation instead of inthe original English.
At your option, you may distribute verbatim and modified versions of this document under the terms of theGNU General Public License, excepting the clearly marked sections held under separate copyright.
i
Contents
1 About this manual 1
1.1 Acknowledgements . . . . . . . . . . . . . . . . . . . . . . . . . . . . . . . . . . . . . . . 1
2 Introduction 3
2.1 What is Debian? . . . . . . . . . . . . . . . . . . . . . . . . . . . . . . . . . . . . . . . . . 3
2.1.1 What’s an operating system, and what sort of operating system is Debian? . . . . . . 3
2.1.2 Who creates Debian? . . . . . . . . . . . . . . . . . . . . . . . . . . . . . . . . . . 4
2.2 What’s free software? . . . . . . . . . . . . . . . . . . . . . . . . . . . . . . . . . . . . . . 4
2.3 How to Read This Book . . . . . . . . . . . . . . . . . . . . . . . . . . . . . . . . . . . . . 5
2.4 The Linux Documentation Project . . . . . . . . . . . . . . . . . . . . . . . . . . . . . . . 6
3 Getting started 7
3.1 A multiuser, multitasking operating system . . . . . . . . . . . . . . . . . . . . . . . . . . 7
3.2 Logging in . . . . . . . . . . . . . . . . . . . . . . . . . . . . . . . . . . . . . . . . . . . . 8
3.3 Keys . . . . . . . . . . . . . . . . . . . . . . . . . . . . . . . . . . . . . . . . . . . . . . . 9
3.4 Command history and editing the command line . . . . . . . . . . . . . . . . . . . . . . . . 9
3.5 Logging in as root . . . . . . . . . . . . . . . . . . . . . . . . . . . . . . . . . . . . . . . . 10
3.6 Virtual consoles . . . . . . . . . . . . . . . . . . . . . . . . . . . . . . . . . . . . . . . . . 11
3.7 Shutting down . . . . . . . . . . . . . . . . . . . . . . . . . . . . . . . . . . . . . . . . . . 12
4 The Basics 13
4.1 The command line and man pages . . . . . . . . . . . . . . . . . . . . . . . . . . . . . . . 13
CONTENTS ii
4.1.1 Describing the command line . . . . . . . . . . . . . . . . . . . . . . . . . . . . . 14
4.2 Files and Directories . . . . . . . . . . . . . . . . . . . . . . . . . . . . . . . . . . . . . . 15
4.2.1 Introduction to files . . . . . . . . . . . . . . . . . . . . . . . . . . . . . . . . . . . 15
4.2.2 Using files: a tutorial . . . . . . . . . . . . . . . . . . . . . . . . . . . . . . . . . . 17
4.3 Processes . . . . . . . . . . . . . . . . . . . . . . . . . . . . . . . . . . . . . . . . . . . . 20
4.4 The shell . . . . . . . . . . . . . . . . . . . . . . . . . . . . . . . . . . . . . . . . . . . . . 20
4.5 Managing processes with Bash . . . . . . . . . . . . . . . . . . . . . . . . . . . . . . . . . 21
4.6 A few Bash features . . . . . . . . . . . . . . . . . . . . . . . . . . . . . . . . . . . . . . . 24
4.6.1 Tab Completion . . . . . . . . . . . . . . . . . . . . . . . . . . . . . . . . . . . . . 24
4.7 Managing your identity . . . . . . . . . . . . . . . . . . . . . . . . . . . . . . . . . . . . . 25
5 Reading documentation and getting help 26
5.1 Kinds of documentation . . . . . . . . . . . . . . . . . . . . . . . . . . . . . . . . . . . . . 26
5.2 Using info . . . . . . . . . . . . . . . . . . . . . . . . . . . . . . . . . . . . . . . . . . . . 27
5.3 Viewing text files with more and less . . . . . . . . . . . . . . . . . . . . . . . . . . . . . . 27
5.4 HOWTOs . . . . . . . . . . . . . . . . . . . . . . . . . . . . . . . . . . . . . . . . . . . . 27
5.5 Getting help from a person . . . . . . . . . . . . . . . . . . . . . . . . . . . . . . . . . . . 28
5.5.1 Dos and Don’ts of asking a question . . . . . . . . . . . . . . . . . . . . . . . . . . 28
5.6 Getting information from the system . . . . . . . . . . . . . . . . . . . . . . . . . . . . . . 29
6 Using the shell 30
6.1 Environment variables . . . . . . . . . . . . . . . . . . . . . . . . . . . . . . . . . . . . . 30
6.1.1 Parent and child processes . . . . . . . . . . . . . . . . . . . . . . . . . . . . . . . 32
6.2 Where commands live: the PATH variable . . . . . . . . . . . . . . . . . . . . . . . . . . . 33
6.3 Aliases and shell functions . . . . . . . . . . . . . . . . . . . . . . . . . . . . . . . . . . . 34
6.4 Controlling input and output . . . . . . . . . . . . . . . . . . . . . . . . . . . . . . . . . . 36
6.5 Specifying how and when to run commands . . . . . . . . . . . . . . . . . . . . . . . . . . 37
6.6 Filename expansion ("Wildcards") . . . . . . . . . . . . . . . . . . . . . . . . . . . . . . . 37
6.7 Interactive/non-interactive . . . . . . . . . . . . . . . . . . . . . . . . . . . . . . . . . . . 38
6.7.1 Interactive shells . . . . . . . . . . . . . . . . . . . . . . . . . . . . . . . . . . . . 38
CONTENTS iii
7 More on files 40
7.1 Permissions . . . . . . . . . . . . . . . . . . . . . . . . . . . . . . . . . . . . . . . . . . . 40
7.1.1 File Ownership . . . . . . . . . . . . . . . . . . . . . . . . . . . . . . . . . . . . . 41
7.1.2 Mode . . . . . . . . . . . . . . . . . . . . . . . . . . . . . . . . . . . . . . . . . . 42
7.1.3 Permissions in practice . . . . . . . . . . . . . . . . . . . . . . . . . . . . . . . . . 44
7.2 What files are on my system? Where can I put my own files? . . . . . . . . . . . . . . . . . 45
7.3 Using a filemanager . . . . . . . . . . . . . . . . . . . . . . . . . . . . . . . . . . . . . . . 47
8 Creating and editing text files 48
8.1 What’s a text file? . . . . . . . . . . . . . . . . . . . . . . . . . . . . . . . . . . . . . . . . 48
8.2 Text editors . . . . . . . . . . . . . . . . . . . . . . . . . . . . . . . . . . . . . . . . . . . 48
8.3 Creating and editing a text file with vi . . . . . . . . . . . . . . . . . . . . . . . . . . . . . 49
8.3.1 Creating a file . . . . . . . . . . . . . . . . . . . . . . . . . . . . . . . . . . . . . . 49
8.3.2 Editing an existing file . . . . . . . . . . . . . . . . . . . . . . . . . . . . . . . . . 50
9 Customizing the shell 57
9.1 .rc files and ls -a . . . . . . . . . . . . . . . . . . . . . . . . . . . . . . . . . . . . . . . 57
9.2 System-wide vs. user-specific configuration . . . . . . . . . . . . . . . . . . . . . . . . . . 57
10 The X Window System 59
10.1 Starting the X environment . . . . . . . . . . . . . . . . . . . . . . . . . . . . . . . . . . . 59
10.2 Intro: What is X . . . . . . . . . . . . . . . . . . . . . . . . . . . . . . . . . . . . . . . . . 60
10.3 Basic X operations . . . . . . . . . . . . . . . . . . . . . . . . . . . . . . . . . . . . . . . 61
10.3.1 The mouse . . . . . . . . . . . . . . . . . . . . . . . . . . . . . . . . . . . . . . . 61
10.3.2 X clients . . . . . . . . . . . . . . . . . . . . . . . . . . . . . . . . . . . . . . . . 61
10.3.3 Troubleshooting . . . . . . . . . . . . . . . . . . . . . . . . . . . . . . . . . . . . 61
10.3.4 Leaving the X environment . . . . . . . . . . . . . . . . . . . . . . . . . . . . . . . 62
10.4 Customizing your X startup . . . . . . . . . . . . . . . . . . . . . . . . . . . . . . . . . . . 62
11 Text tools 65
11.1 Regular expressions . . . . . . . . . . . . . . . . . . . . . . . . . . . . . . . . . . . . . . . 65

CONTENTS iv
12 File tools 68
12.1 Backup tools . . . . . . . . . . . . . . . . . . . . . . . . . . . . . . . . . . . . . . . . . . 68
12.2 File compression with gzip . . . . . . . . . . . . . . . . . . . . . . . . . . . . . . . . . . 68
12.3 Splitting files into smaller pieces . . . . . . . . . . . . . . . . . . . . . . . . . . . . . . . . 69
12.4 Finding files . . . . . . . . . . . . . . . . . . . . . . . . . . . . . . . . . . . . . . . . . . . 70
12.5 Determining a file’s contents . . . . . . . . . . . . . . . . . . . . . . . . . . . . . . . . . . 71
13 Using disks 72
13.1 Concepts . . . . . . . . . . . . . . . . . . . . . . . . . . . . . . . . . . . . . . . . . . . . 72
13.2 mount and /etc/fstab . . . . . . . . . . . . . . . . . . . . . . . . . . . . . . . . . . . 73
13.2.1 Mounting a filesystem . . . . . . . . . . . . . . . . . . . . . . . . . . . . . . . . . 73
13.2.2 Example: Mounting a CD-ROM . . . . . . . . . . . . . . . . . . . . . . . . . . . . 74
13.2.3 /etc/fstab: Automating the mount process . . . . . . . . . . . . . . . . . . . . 76
13.2.4 Removable disks (floppies, Zip disks, etc. ) . . . . . . . . . . . . . . . . . . . . . . 77
13.3 PPP . . . . . . . . . . . . . . . . . . . . . . . . . . . . . . . . . . . . . . . . . . . . . . . 78
13.3.1 Introduction . . . . . . . . . . . . . . . . . . . . . . . . . . . . . . . . . . . . . . . 78
13.3.2 Preparation . . . . . . . . . . . . . . . . . . . . . . . . . . . . . . . . . . . . . . . 78
13.3.3 The Easy Way: wvdial . . . . . . . . . . . . . . . . . . . . . . . . . . . . . . . . 79
13.3.4 Doing It Manually . . . . . . . . . . . . . . . . . . . . . . . . . . . . . . . . . . . 80
14 Removing and installing software 81
14.1 The dpkg package utility . . . . . . . . . . . . . . . . . . . . . . . . . . . . . . . . . . . . 81
14.2 What a package maintenance utility does . . . . . . . . . . . . . . . . . . . . . . . . . . . . 81
14.3 Apt . . . . . . . . . . . . . . . . . . . . . . . . . . . . . . . . . . . . . . . . . . . . . . . 81
14.3.1 Configuring Apt . . . . . . . . . . . . . . . . . . . . . . . . . . . . . . . . . . . . 81
14.3.2 Using apt-get. . . . . . . . . . . . . . . . . . . . . . . . . . . . . . . . . . . . . . . 83
14.4 Using dselect. . . . . . . . . . . . . . . . . . . . . . . . . . . . . . . . . . . . . . . . . . . 84
14.5 Using dpkg manually . . . . . . . . . . . . . . . . . . . . . . . . . . . . . . . . . . . . . . 84
14.6 Compiling software yourself . . . . . . . . . . . . . . . . . . . . . . . . . . . . . . . . . . 85
14.7 Proprietary software not in .deb format . . . . . . . . . . . . . . . . . . . . . . . . . . . . . 85
CONTENTS v
15 Troubleshooting 86
15.1 Debian is frozen or crashed! . . . . . . . . . . . . . . . . . . . . . . . . . . . . . . . . . . 86
15.2 My terminal isn’t behaving properly . . . . . . . . . . . . . . . . . . . . . . . . . . . . . . 86
15.3 The computer beeps when I press a key, and my screen shows a text file and/or a lot of ˜symbols. . . . . . . . . . . . . . . . . . . . . . . . . . . . . . . . . . . . . . . . . . . . . . 87
16 Advanced topics 88
16.1 Introduction to shell scripting . . . . . . . . . . . . . . . . . . . . . . . . . . . . . . . . . . 88
16.1.1 What and why . . . . . . . . . . . . . . . . . . . . . . . . . . . . . . . . . . . . . 88
16.1.2 A simple example . . . . . . . . . . . . . . . . . . . . . . . . . . . . . . . . . . . 88
16.2 Advanced files . . . . . . . . . . . . . . . . . . . . . . . . . . . . . . . . . . . . . . . . . . 88
16.2.1 The real nature of files: hard links and inodes . . . . . . . . . . . . . . . . . . . . . 88
16.2.2 Types of files . . . . . . . . . . . . . . . . . . . . . . . . . . . . . . . . . . . . . . 90
16.2.3 The proc filesystem . . . . . . . . . . . . . . . . . . . . . . . . . . . . . . . . . . 93
16.2.4 Advanced aspects of file permissions . . . . . . . . . . . . . . . . . . . . . . . . . 94
16.2.5 chattr . . . . . . . . . . . . . . . . . . . . . . . . . . . . . . . . . . . . . . . . . . 95
16.2.6 Large-scale copying . . . . . . . . . . . . . . . . . . . . . . . . . . . . . . . . . . 95
16.2.7 Other concepts not yet covered, but should be . . . . . . . . . . . . . . . . . . . . . 95
16.3 Compiling the kernel . . . . . . . . . . . . . . . . . . . . . . . . . . . . . . . . . . . . . . 96
16.4 A few words on security . . . . . . . . . . . . . . . . . . . . . . . . . . . . . . . . . . . . 96
16.5 Programming on Linux . . . . . . . . . . . . . . . . . . . . . . . . . . . . . . . . . . . . . 96
17 Where to from here? 97
17.1 Other Debian manuals to read . . . . . . . . . . . . . . . . . . . . . . . . . . . . . . . . . 97
17.2 Other resources . . . . . . . . . . . . . . . . . . . . . . . . . . . . . . . . . . . . . . . . . 97
18 Contributing to Debian: How can I help? 98
18.1 Submit bug reports . . . . . . . . . . . . . . . . . . . . . . . . . . . . . . . . . . . . . . . 98
18.2 Other things . . . . . . . . . . . . . . . . . . . . . . . . . . . . . . . . . . . . . . . . . . . 98
CONTENTS vi
A A brief survey of available applications 99
A.1 (Subheadings could copy the structure of the menu system) . . . . . . . . . . . . . . . . . . 99
B Summary of GNU/Linux system components 100
C Appendix C: Booting the system 101
D Miscellaneous 103
D.1 Unix History . . . . . . . . . . . . . . . . . . . . . . . . . . . . . . . . . . . . . . . . . . 103
D.2 GNU/Linux History . . . . . . . . . . . . . . . . . . . . . . . . . . . . . . . . . . . . . . . 104
D.3 The Linux kernel’s version numbering . . . . . . . . . . . . . . . . . . . . . . . . . . . . . 105
1
Chapter 1
About this manual
This is the Debian Tutorial. It is aimed at readers who are new to Debian GNU/Linux. It assumes no priorknowledge of GNU/Linux or other Unix-like systems, but it does assume very basic general knowledgeabout computers and hardware (you should know what the basic parts of a computer are, and what onemight use a computer to do).
This manual is meant to be read in order; each chapter assumes some knowledge of prior chapters, thoughyou may find it useful to skip around.
There is also a Debian Reference Guide planned, which will be more comprehensive but less introductory.
This tutorial assumes that you have already installed and configured Debian GNU/Linux according to theinstallation manual (which is incomplete as of this writing). However, you may want to look over the tutorialbefore you install, in order to learn more about Debian.
In general this tutorial tries to explain the reasons for things, and help you understand what’s going on insidethe system. The idea is to empower you to solve new problems and get the most out of your computer. Thusthere’s plenty of theory, history, and fun facts thrown in with the "How To" aspects of the manual.
Please send comments about this manual to the Debian Documentation Project mailing list <[email protected]>. We’re especially interested in whether it was helpful to you, and how wecould make it better. If you get confused while reading, or notice that we use a term without explaining itfirst, please email us.
Please, DO NOT send the authors technical questions about Debian, as there are other forums for that. See‘Getting help from a person’ on page 28. Only send mail regarding the manual itself to the above address.
To find the latest version of this manual, go to http://www.debian.org/doc/ and follow the links.
1.1 Acknowledgements
Many people have helped with this manual.
Chapter 1. About this manual 2
The biggest thanks go to Larry Greenfield and his Linux User’s Guide, which formed the basis for themanual. The Linux User’s Guide is a part of the Linux Documentation Project.
Many thanks to those who have helped me edit the manual; they have made it far, far better. If you thoughtthis manual was pleasant to read, send your thanks to Thalia Hooker and Day Irmiter.
Thanks to Richard Stallman of the Free Software Foundation for advice, editing, and offering to publish thetext.
Thanks to James Treacy for letting me borrow some of his writings from the Debian web site.
Thanks to everyone who has written parts of the manual: Craig Sawyer wrote about shells, Ole Tetlie iswriting about programming, Oliver Elphick contributed discussion of some basic utilities, Ivan E. Moore IIcontributed the discussion of PPP.
Many people have submitted patches and comments, including Eric Fischer and Mike Touloumtzis.
Many thanks to Ardo van Rangelrooij for getting things started and maintaining the DebianDoc DTD usedto write the manual.
Of course, it’s impossible to thank the hundreds of Debian developers and thousands of free software authorsthat gave us something to write about and use.
Thanks also to anyone I left out, since I’m sure I screwed this up. I hope no one will take offense — pleaseemail me and let me know if your name should be here.
3
Chapter 2
Introduction
2.1 What is Debian?
Debian is a free operating system (OS) for your computer. An operating system is the set of basic programsand utilities that make your computer run. At the core of an operating system is the kernel. The kernel isthe most fundamental program on the computer: it does all the basic housekeeping and lets you start otherprograms. Debian uses the Linux kernel, a completely free piece of software started by Linus Torvalds andsupported by (probably over 1000) programmers worldwide. A large part of the basic tools that fill out theoperating system come from the (GNU project (http://www.gnu.org)), and these tools are also free.Of course, what people want is application software: programs to help them get what they want to do done,from editing documents to running a business to playing games to writing more software. Debian comeswith over 1000 packages (precompiled software bundled up in a nice format for easy installation on yourmachine) — all of it free.
It’s a bit like a tower. At the base is Linux. On top of that are all the basic tools, mostly from GNU. Next isall the application software that you run on the computer: much of this is also from GNU. The Debian de-velopers act as architects and coordinators — carefully organizing the system and fitting everything togetherinto an integrated, stable operating system: Debian GNU/Linux.
2.1.1 What’s an operating system, and what sort of operating system is Debian?
An operating system is the collection of software that makes a computer usable. It manages hardwaredevices and provides utilities and applications.
Debian GNU/Linux is based on the Unix operating system, which has a long history (see ‘Unix History’ onpage 103). Debian is basically compatible with Unix, but adds a significant number of additional features.
The design philosophy of GNU/Linux (and Unix) is to distribute its functionality into small, multipurposeparts. That way, you can easily achieve new functionality and new features by combining the small parts
Chapter 2. Introduction 4
(programs) in new ways. Debian is like an erector set; you can build all sorts of things with it.
When you’re using an operating system, you want to minimize the amount of work you put into getting yourjob done. Debian supplies many tools that can help you, but only if you know what these tools do. Spendingan hour trying to get something to work and then finally giving up isn’t very productive. This manual willteach you about the core tools that make up Debian: what tools to use in what situations, and how to tiethese various tools together.
2.1.2 Who creates Debian?
Debian is an all-volunteer internet development project. There are hundreds of volunteers working on it.Most are in charge of a small number of software packages and are intimately familiar with the softwarethey package.
These volunteers work together by following a strict set of guidelines governing how packages are assem-bled. These guidelines are developed cooperatively in discussions on internet mailing lists and internet relaychat (IRC) forums.
2.2 What’s free software?
When Debian developers and users speak of "free software", they refer to freedom rather than price. Debianis free in this sense: you are free to modify and redistribute it, and will always have access to the sourcecode for this purpose. The Debian Free Software Guidelines (http://www.debian.org/social_contract#guidelines) describe in more details exactly what is meant by "free". The Free SoftwareFoundation (http://www.fsf.org), originator of the GNU project, is another source of information.You can find a more detailed discussion of free software on the Debian web site (http://www.debian.org/intro/free).
Free software is sometimes called Open Source (R) software — Open Source is a certification mark. SinceOpen Source (R) is trademarked, only truly free software can call itself Open Source (R). You may encountervendors who try to mislead you by claiming their software is "free", while in reality it has significant stringsattached. The Open Source (R) trademark gives you some assurance that the software really is free software.’Open Source software’ is occasionally abbreviated ’OSS’.
You may be wondering: why would people spend hours of their own time to write software, carefullypackage it, and then give it all away? The answers are as varied as the people who contribute.
Many believe in sharing information and having the freedom to cooperate with one another, and feel that freesoftware encourages this. There’s a long tradition starting in the 1950s upholding these values, sometimescalled the Hacker Ethic. (You can read more about it in Steven Levy’s enjoyable book, Hackers: Heroes ofthe Computer Revolution.)

Chapter 2. Introduction 5
Others want to learn more about computers. More and more people are looking for ways to avoid theinflated price of commercial software. A growing crowd contribute as a thank you for all the great freesoftware they’ve received from others.
Many in academia create free software to help get the results of their research into wider use. Businesseshelp maintain free software so they can have a say in how it develops — there’s no quicker way to get anew feature than to implement it yourself or hire a consultant to do so! Business is also interested in greaterreliability and the ability to choose between support vendors.
Still others see free software as a social good, democratizing access to information and preventing excessivecentralization of the world’s information infrastructure. Of course, a lot of us just find it great fun.
Debian is so committed to free software that we thought it would be useful if it was formalized in a docu-ment of some sort. Our Social Contract (http://www.debian.org/social_contract) promisesthat Debian will always be 100% free software. When you download a package from the Debian maindistribution, you can be sure it meets our Free Software Guidelines.
Although Debian believes in free software, there are cases where people want or need to put proprietarysoftware on their machine. Whenever possible Debian will support this; though proprietary software is notincluded in the main distribution, it is sometimes available on the ftp site in the non-free directory, andthere are a growing number of packages whose sole job is to install proprietary software we are not allowedto distribute ourselves.
It is important to distinguish commercial software from proprietary software. Proprietary software is non-free software, while commercial software is software sold for money. Debian permits commercial softwareto be a part of the main distribution, but not proprietary software. Remember that the phrase "free software"does not refer to price; it is quite possible to sell free software. For more clarification of the terminology,see http://www.opensource.org or http://www.fsf.org/philosophy/categories.html.
2.3 How to Read This Book
The best way to learn about almost any computer program is at your computer. Most people find that readinga book without using the program isn’t beneficial. The best way to learn Unix and GNU/Linux is by usingthem. Use GNU/Linux for everything you can. Experiment. Don’t be afraid — it’s possible to mess thingsup, but you can always reinstall. Keep backups and have fun!
Debian isn’t as intuitively obvious as some other operating systems. Thus, you will probably end up readingat least the first few chapters. GNU/Linux is like a race car, a master chef’s kitchen, or a classic novel; itspower and complexity make it difficult to approach at first, but far more rewarding in the long run.
The suggested way to learn is to read a little, then play a little. Keep playing until you’re comfortable withthe concepts, and then start skipping around in the book. You’ll find a variety of topics are covered, someof which you might find interesting and some of which you’ll find boring. After a while, you should feelconfident enough to start using commands without knowing exactly what they do. This is a good thing.
Chapter 2. Introduction 6
A helpful thing to know: if you ever mistakenly type a command, or don’t know how to exit a program, C-c(the Ctrl key and the lowercase letter c held simultaneously) will often stop the program.
2.4 The Linux Documentation Project
This manual borrows heavily from the Linux Documentation Project’s Linux User’s Guide, by Larry Green-field. Thanks Larry! That project has a number of other excellent manuals, many of them targetted atmore experienced users and system administrators. The LDP also maintains the Linux HOWTOs, an in-valuable resource you should become familiar with. You can find the LDP at their homepage (http://sunsite.unc.edu/LDP/).
7
Chapter 3
Getting started
So you’ve just finished installing Debian! Congratulations. Dive right in and start learning to use it.
As a part of the install process, you should have figured out how to boot the Debian system (with a specialfloppy disk, by simply turning your computer on, or by holding down the Alt key at the LILO prompt andselecting Linux).
3.1 A multiuser, multitasking operating system
As we mentioned earlier (‘What is Debian?’ on page 3), the design of Debian GNU/Linux comes from theUnix operating system. Unlike common desktop OS’s such as DOS, Windows, and MacOS, Unix is usuallyfound on large servers and multiuser systems.
This means that Debian has features those other OS’s lack. It allows a large number of people to use thesame computer at once, as long as each user has their own terminal
1.
To permit many users to work at once, Debian must permit many programs and applications to run simulta-neously. This feature is called multitasking.
Much of the complexity (and power) of Unix-like systems stems from these two features. For example, thesystem must have a way to keep users from accidentally deleting each other’s files, and it has to coordinatethe many programs running at once, e.g. to ensure that they don’t all use the hard drive at the same time.
If you keep in mind what Debian was originally designed to do, many aspects of it will make a lot moresense. You’ll learn to take advantage of the power of these features.
1(A terminal is just a keyboard and a screen, connected to the computer through the network, over a modem, or directly. Yourkeyboard and monitor form a terminal which is directly attached to the computer: this special terminal is often called the console.)
Chapter 3. Getting started 8
3.2 Logging in
To use Debian you must identify yourself to the system. This is so it knows who you are, what you havepermission to do, and what your preferences are.
To this end, you have a user name or login — if you installed Debian yourself, you should have been askedto give such a name during installation. If you are logging on to a system administered by someone else,you’ll have to ask them for an account on the system, and a corresponding username.
You also have a password, so no one else can pretend to be you. If you don’t have a password, anyone canlog on to your computer from the Internet, and do bad things (see ‘A few words on security’ on page 96). Ifyou’re worried about security, you should have a password.
Many people prefer to trust others not to do anything malicious with their account; hopefully your workenvironment doesn’t encourage paranoia. This is a perfectly reasonable attitude; it depends on your personalpriorities, and your environment. Obviously a home system does not need to be as secure as a militaryinstallation. Debian allows you to be as secure or as insecure as you like.
When you start Debian, you’ll see a prompt; a request from the computer for some information. In this case,the prompt is login:.
You should enter your username, and when requested, your password. The password does not appear on thescreen as you type it — that’s so no one can look over your shoulder and see what it is. Press Enter afterboth the username and the password. If you type your username or password incorrectly, you’ll have to startover.
If you do it correctly, you’ll see a brief message and then a $ prompt. The $ is printed by a special programcalled the shell, and is thus called a shell prompt: this is where you give commands to the system.
Try entering the command whoami now. There is a cursor to the right of the shell prompt. Your cursor isa small underscore or rectangle which indicates where you’re typing; it should move as you type. Alwayspress RET (the Enter or Return key) when you’re done typing a shell command.
whoami tells your username. You’ll then get a new shell prompt.
For the rest of the manual, when we say to enter a command, you should type it at the shell prompt andpress the RET key. On some keyboards, this key is labeled Enter and on others it’s Return. Same key,different name.
When you’re done working, you may want to log out of the system. To exit the shell, enter the exitcommand. Keep in mind that if you remain logged in, someone could come along and use your account.Hopefully you can trust those in your office or home not to do this; but if you do not trust your environment,you should be certain to log out when you leave.
Chapter 3. Getting started 9
3.3 Keys
Before going on, it’s important to be familiar with the conventions in this manual for describing key com-mands.
When you should simultaneously hold down multiple keys, a notation like C-a will be used. This means"hold the control key, and type lowercase letter a." Other abbreviations include the Alt key, A, and the Metakey M. Some keyboards have both Alt and Meta; most home computers have only Alt, but the Alt keybehaves like a Meta key. So if you have no Meta key, try the Alt key instead.
Keys like Alt and Meta are called modifier keys because they change the meaning of standard keys likethe letter A. Sometimes you need to hold down more than one modifier; for example, M-C-a means tosimultaneously press Meta, Ctrl, and lowercase a.
Some keys have a special notation; for example, RET (Return/Enter), DEL (Delete or sometimes Backspace),ESC (Escape). These should be fairly self-explanatory.
Spaces instead of hyphens mean to type the keys in sequence. So, for example, C-a x RET means tosimultaneously type Control and lowercase a, followed by the letter x, followed by pressing Return.
3.4 Command history and editing the command line
Whatever you type after the shell prompt before pressing RET is called a command line — it’s a line oftext that commands the computer to do something. The Debian default shell offers several features to makeentering command lines easy.
You can scroll up to previous commands to run them again, or modify them slightly and then run them again.Try this: enter any command, such as whoami; then press the up arrow key. The whoami command willreappear at the prompt. You can then press RET to run whoami a second time.
If you’ve entered several commands, you can keep pressing the up arrow key to go back through them. Thisfeature is handy if you’re doing the same thing several times, or if you type a command incorrectly and wantto go back to fix it. You can press the down arrow key to move in the other direction, toward your morerecent commands. If there are no more commands to move to, the computer will beep.
You can also move around on the command line to make changes. The easiest way is with the left and rightarrow keys — try typing whoasmi instead of whoami, then use the left arrow key to move back to the s.You can erase the s with the Backspace or Delete keys.
There are more advanced features as well (no need to memorize them all now, though). Try typing C-a.This moves you to the beginning of the line. C-k (the k stands for "kill") deletes until the end of the line— try it from the middle of the command line. Using C-a followed by C-k, you can delete the entirecommand line. C-y pastes the last thing you killed, inserting it at the current cursor position (y stands for"yank," as in "yank it back"). C-e will move the cursor at the end of the command line.
Go ahead and play around with command line editing to get a feel for it. Experiment.
Chapter 3. Getting started 10
3.5 Logging in as root
Since Debian is a multiuser system, it’s designed to keep any one user or program from breaking the entiresystem. The kernel will not allow normal users to change important system files. This means that thingsstay the way they’re supposed to, safe from accidents, viruses, and even malicious pranks. Unlike otheroperating systems, Debian is safe from these threats. You won’t need an antivirus program.
However, sometimes you need to change important system files — for example, you might want to installnew software, or configure your network connection. To do so, you have to have greater powers than anormal user; you must become the root user (also called the superuser).
To become root, just log on with the username root and the root password, if you have it. Hopefully youremember the password from when you installed the system — if not, you have a problem. 2
At many sites, only the system administrator has the root password, and only the system administrator cando the things that one must be root to do. If you’re using your own personal computer, you are the systemadministrator, of course. If you don’t have root privileges, you will have to rely on your system administratorto perform any tasks that require root privileges.
Sometimes you’ll have the root password even on a shared corporate or educational server, because thesysadmin trusts you to use it properly. In that case, you’ll be able to help administer the system and cus-tomize it for your needs. But you should be sure to use the password responsibly, respecting other users atall times.
If you have the password, try logging on as root now. Enter the whoami command to verify your identity.Then log out immediately. When you’re root, the kernel will not protect you from yourself, because root haspermission to do anything at all to the system. For example, you can type rm -rf / and erase your entiresystem in a few keystrokes. (Needless to say, you should NOT type this). Don’t experiment while you’reroot. In fact, don’t do anything as root, unless absolutely necessary. This isn’t a matter of security, but ratherof stability. Your system will run much better if it can keep you from making silly mistakes.
You may find the su command more convenient than logging in as root. su allows you to assume theidentity of another user, usually root unless you specify someone else. (You can remember that su standsfor Super User, though some say it stands for Set UserID.)
Try this:
1. Log on as yourself, i.e. not as root.
2. whoami
Confirm your username.
2The solution to this problem is fairly technical. You have to boot with a rescue disk, mount your normal root partition, and edit/etc/passwd to remove the old root password. Ask for help if this doesn’t make sense to you (see ‘Getting help from a person’on page 28).
Chapter 3. Getting started 11
3. su
Enter the su command. It will prompt for a password; enter the root password. If you give the correctpassword, you should see a new shell prompt. By default, root’s shell prompt is # rather than $.
4. whoami
This should give "root" as your new username.
5. exit
Exit the root shell. Your prompt will return to $.
6. exit
Exit your own shell.
When you’re doing system administration tasks, you should do as much as possible as yourself. Then su,do the part that requires root privileges, and exit to turn off privileges so you can no longer harm anything.
You can use su to assume the identity of any user on the system, not just root. To do this, type su userwhere user is the user you want to become. You’ll have to know their password, of course, unless you’reroot at the time or they have no password.
3.6 Virtual consoles
The Linux kernel supports virtual consoles. These are a way of making your single screen and keyboardseem like multiple terminals, all connected to the same system. Thankfully, using virtual consoles is oneof the simplest things about Debian: there are "hot keys" for switching among the consoles quickly. To tryit, log in to your system, and type A-F2 (simultaneously press the Alt key, and F2, that is, function keynumber 2).
You should find yourself at another login prompt. Don’t panic: you are now on virtual console (VC) number2! Log in here and do some things — more whoami’s or whatever — to confirm that this is a real loginshell. Now you can return to virtual console number 1, with A-F1. Or you can move on to a third virtualconsole, in the obvious way (A-F3).
Debian comes with six virtual consoles enabled by default, accessed with the Alt key and function keysF1-F6 (technically, there are more virtual consoles enabled, but only 6 of them allow you to log in. Theothers are used for the X Window System or other special purposes).
If you’re using the X Window System, it will generally start up on the first unused virtual console —probably VC 7. Also, to switch from the X virtual console to one of the first six, you’ll have to add Ctrl tothe key sequence. So that’s C-A-F1 to get to VC 1. But you can go from a text VC to the X virtual consoleusing only Alt. If you never leave X, you won’t have to worry about this; X automatically switches you toits virtual console when it starts up.
Chapter 3. Getting started 12
Once you get used to them, virtual consoles will probably become an indispensable tool for getting manythings done at once. (The X Window System serves much the same purpose, providing multiple windowsrather than multiple consoles). You can run a different program on each VC or log on as root on one VC andas yourself on another. Or everyone in the family can use their own VC — this is especially handy if youuse X, in which case you can run several X sessions at once, on different virtual consoles.
3.7 Shutting down
Do not just turn off the computer! You risk losing valuable data!
If you are the only user of your computer, you might want to turn the computer off when you’re done withit.
3
Unlike most versions of DOS, it’s a bad thing to just hit the power switch when you’re done using thecomputer. It is also bad to reboot the machine (with the reset button) without first taking proper precautions.The Linux kernel, in order to improve performance, has a disk cache. This means it temporarily storesinformation meant for permanent storage in RAM: since memory is thousands of times faster than a disk,this makes many file operations move more quickly. Periodically, the information Linux has in memory isactually written to the disk. This is called syncing. In order to turn off or reboot the computer, you’ll haveto tell the computer to clear everything out of memory and put it in permanent storage.
To reboot, just type reboot, or press C-A-DEL (that’s Control, Alt, and Delete).
To shut down, you’ll have to be root. As root, just type the command shutdown -h now. This willgo through the entire shutdown procedure, including the sync command which clears the disk cache asdescribed above. When you see System halted, it’s safe to turn off the computer. If you have AdvancedPower Management (APM) support in your kernel and BIOS, the computer might shut itself off and saveyou the trouble. APM is common in laptops and is also found in certain desktop mainboards.
Some people find it simplest to shut down by typing C-A-DEL to reboot, then powering off the computerbefore the Linux kernel begins to reload. However, once the kernel begins to load, you have to wait for it tofinish and then properly reboot or shutdown again.
3To avoid possibly weakening some hardware components, only turn off the computer when you’re done for the day. Power upand power down are the two greatest contributors to wear and tear on computer components. Turning the computer on and off oncea day is probably the best compromise between your electric bill and your computer’s lifespan.
13
Chapter 4
The Basics
4.1 The command line and man pages
We’ve already discussed the command line, that is commands you type after the shell prompt. This sectiondescribes the structure of more complicated command lines.
A minimal command line contains just a command name, such as whoami. But other things are possible.For example, you might type:
man whoami
This command requests the online manual for the whoami program (you may have to press the space barto scroll through the documentation, or press q to quit). A more complicated example:
man -k Postscript
This command line has three parts. It begins with the command name, man. Then it has an option or switch,-k, followed by an argument, Postscript. Some people refer to everything except the command nameas the parameters of the command. So, options and arguments are both parameters.
Options change the behavior of a command, switching on particular features or functionality. They usuallyhave a - before them. The GNU utilities also have "long forms" for the options; the long form of -k is--apropos. Enter man -h or man --help to get a full list of options for the man command. Everycommand will have its own set of options, though most have --help and --version options. Somecommands are bizarre; tar, for example, does not require the - before its options, for historical reasons.
Anything which isn’t an option and isn’t the command name is an argument. In this case, Postscript.Arguments can serve many purposes; most commonly, they are filenames that the command should operate
Chapter 4. The Basics 14
on. In this case, Postscript is the word you want man to search for. In the case of man whoami, theargument was the command you wanted information about.
Breaking down the man -k Postscript command line:
� man, the command name, tells the computer to look at the manual pages. These provide documen-tation for commands. For example, man whoami will give you documentation on the whoamicommand.
� -k, the option, changes the behavior of man. Normally man expects a command name for an ar-gument, such as whoami, and looks for documentation of that command. But with the -k or --apropos option, it expects the argument to be a keyword. It then gives a list of all manual pageswith that keyword in their description.
� Postscript is the argument; since we used the -k option, it’s the keyword to search for.
� -k and Postscript are both parameters.
Go ahead and type man -k Postscript, and you will see a list of all the manual pages on your sys-tem that have something to do with Postscript. If you haven’t installed much software, you might seePostscript: nothing appropriate instead.
4.1.1 Describing the command line
Note: This is a skippable section, if you want to move on.
There’s a traditional concise way of describing command syntax 1 that you should know. For example, ifyou type man man to get the manual page about man, you’ll see several syntax descriptions beginning withthe command name man. One of them will look like this:
man -k [-M path] keyword ...
Anything in brackets ([]) is an optional unit. So you don’t have to use the -M option, but if you do, youmust use a path argument. You must use the -k option and the keyword argument. The ... means thatyou could have more of whatever came before it, so you could look up several keywords.
Let’s look at one of the more complex descriptions from the man manual page:
man [-c|-w|-tZT device] [-adhu7V] [-m system[,...]] [-Llocale] [-p string] [-M path] [-P pager] [-r prompt] [-Slist] [-e extension] [[section] page ...] ...
1Syntax means the correct ways to combine various options and arguments.
Chapter 4. The Basics 15
There’s no need to go through all of this (and don’t worry about what it all means), but do pay attention tothe organization of the description.
First, clusters of options usually mean you can use one or more of them in different combinations, so -adhu7V means you can also use -h. However, you can’t always use all combinations; this descriptiondoesn’t make that clear. For example, -h is incompatible with other options, but you could do man -du.Unfortunately the description’s format does not make this clear.
Second, the | symbol means "or". So you can use either the -c, the -w, or the -tZT options, followed bya device argument.
Third, notice that you can nest the brackets, since they indicate an optional unit. So if you have a section,you must also have a page, since page is not optional within the [[section] page] unit.
There’s no need to memorize any of this, just refer to this section as you read documentation.
4.2 Files and Directories
4.2.1 Introduction to files
Files are a facility for storing and organizing information, analagous to paper documents. They’re organizedinto directories, which are called folders on some other systems. Let’s look at the organization of files on aDebian system:
/ A simple / represents the root directory. All other files and directories are contained in the rootdirectory. If you are coming from the DOS/Windows world, / is very similar to what C: is for DOS,that is the root of the filesystem. A notable difference between DOS and Linux however, is thatDOS keeps several filesystems: C: (first hard disk), A: (first floppy disk), D: (either CD-ROM orsecond hard disk) while Linux has all its files organized above the same / root. See ‘mount and/etc/fstab’ on page 73 for more details.
/home/janeq This is the home directory of user "janeq". Reading left to right, to get to this directoryyou start in the root directory, enter directory home, then enter directory janeq.
/etc/X11/XF86Config This is the configuration file for the X Window System. It resides in the X11subdirectory of the /etc directory. /etc is in turn a subdirectory of the root directory, /.
Things to note:
� Filenames are case sensitive. That is, MYFILE and MyFile are different files.
� The root directory is referred to as simply /. Don’t confuse this "root" with the root user, the user onyour system with "super powers."
Chapter 4. The Basics 16
� Every directory has a name which can contain any letters or symbols except /. The root directory isan exception; its name is / (pronounced "slash" or "the root directory") and it cannot be renamed.2
� Each file or directory is designated by a fully-qualified filename, absolute filename, or path, giving thesequence of directories which must be passed through to reach it. The three terms are synonymous.All absolute filenames begin with the / directory, and there’s a / between each directory or file in thefilename. The first / is the name of a directory, but the others are simply separators to distinguish theparts of the filename.
The words used here can be confusing. Take the following example:
/usr/share/keytables/us.map.gz
This is a fully-qualified filename; some people call it a path. However, people will also refer tous.map.gz alone as a filename. 3
� Directories are arranged in a tree structure. All absolute filenames start with the root directory. Theroot directory has a number of branches, such as /etc and /usr. These subdirectories in turnbranch, into still more subdirectories, such as /etc/init.d and /usr/local. The whole thingtogether is called the "directory tree."
You can think of an absolute filename as a route from the base of the tree (/) to the end of somebranch (a file). You’ll also hear people talk about the directory tree as if it were a family tree: thussubdirectories have "parents," and a path shows the complete ancestry of a file.
There are also relative paths that begin somewhere other than the root directory. More on this later.
� There’s no directory that corresponds to a physical device, such as your hard disk. This differs fromDOS and Windows, where all paths begin with a device name such as C:
�. The directory tree is
meant to be an abstraction of the physical hardware, so you can use the system without knowing whatthe hardware is. All your files could be on one disk — or you could have 20 disks, some of themconnected to a different computer elsewhere on the network. You can’t tell just by looking at thedirectory tree, and nearly all commands work just the same way no matter what physical device(s)your files are really on.
Don’t worry if all this isn’t completely clear yet. There are many examples to come.
2While you can use almost any letters or symbols in a file name, in practice it’s a bad idea. It is better to avoid any charactersthat often have special meanings on the command line, including: { } ( ) [ ] ’ ‘ " � / > < | ; ! # & ˆ * %@
Also avoid putting spaces in filenames. If you want to separate words in a name, good choices are the period, hyphen, andunderscore. You could also capitalize each word, LikeThis.
3There is also another use for the word "path" . The intended meaning is usually clear from the context.
Chapter 4. The Basics 17
4.2.2 Using files: a tutorial
To use your system you’ll have to know how to create, move, rename, and delete files and directories. Thissection describes how to do so with the standard Debian commands.
The best way to learn is to try things. As long as you aren’t root (and haven’t yet created any importantpersonal files), there’s nothing you can mess up too seriously. Jump in — type each of these commands atthe prompt and press enter:
1. pwd
One directory is always considered the current working directory for the shell you’re using. You canview this directory with the pwd command, which stands for Print Working Directory. pwd prints thename of the directory you’re working in — probably /home/yourname.
2. ls
ls stands for "list", as in "list files". When you type ls, the system displays a list of all the filesin your current working directory. If you’ve just installed Debian, your home directory may well beempty. If your working directory is empty, ls produces no output, since there are no files to list.
3. cd /
cd means Change Directory. In this case, you’ve asked to change to the root directory.
4. pwd
Verify that you’re working in the root directory.
5. ls
See what’s in /.
6. cd
Typing cdwith no arguments selects your home directory as the current working directory — /home/yourname.Try pwd to verify this.
Before continuing, you should know that there are actually two different kinds of filename. Some of thembegin with /, the root directory, such as /etc/profile. These are called absolute filenames becausethey refer to the same file no matter what your current directory is. The other kind of filename is relative.
Two directory names are used only in relative filenames: . and ... The directory . refers to the currentdirectory and .. is the parent directory. These are "shortcut" directories. They exist in every directory.Even the root directory has a parent directory — it’s its own parent!
So filenames which include . or .. are relative, because their meaning depends on the current directory. IfI’m in /usr/bin and type ../etc, then I’m referring to /usr/etc. If I’m in /var and type ../etc,
Chapter 4. The Basics 18
then I’m referring to /etc. Note that a filename without the root directory at the front implicitly has ./ atthe front. So you can type local/bin or ./local/bin and it means the same thing.
A final handy tip: the tilde ˜ is equivalent to your home directory. So typing cd ˜ is the same as typingcd with no arguments. Also, you can type things like cd ˜/practice/mysubdirectory to changeto the directory /home/yourname/practice/mysubdirectory. In a similar way, ˜vincent isequivalent to the home directory of the user "vincent", which is probably something like /home/vincent;so ˜vincent/docs/debian.ps is equivalent to /home/vincent/doc/debian.ps.
Here are some more file commands to try out, now that you know about relative filenames. cd to your homedirectory before you begin.
1. mkdir practice
In your home directory, make a directory called practice. You’ll use this directory to try out someother commands. You might type ls to verify that your new directory exists.
2. cd practice
Change directory to practice.
3. mkdir mysubdirectory
Create a subdirectory of practice.
4. cp /etc/profile .
cp is short for "copy." /etc/profile is just a random file on your system, don’t worry aboutwhat it is for now. We’ve copied it to . — recall that . just means "the directory I’m in now", or thecurrent working directory. So we’ve created a copy of /etc/profile, and put it in our practicedirectory. Try typing ls to verify that there’s indeed a file called profile in your working directory,alongside the new mysubdirectory.
5. more profile
View the contents of the file profile. more is used to view the contents of text files. It’s calledmore because it shows a screenfull of the file at a time, and you press the space bar to see more.more will exit when you get to the end of the file, or when you type q (quit).
6. more /etc/profileVerify that the original looks just like the copy you made.
7. mv profile mysubdirectory
mv stands for "move". We’ve moved the file profile from the current directory into the subdirectorywe created earlier.
8. ls
Verify that profile is no longer in the current directory.

Chapter 4. The Basics 19
9. ls mysubdirectory
Verify that profile has moved to mysubdirectory.
10. cd mysubdirectory
Change to the subdirectory.
11. mv profile myprofile
Note that unlike some operating systems, there is no difference between moving a file and renaming it.Thus there’s no separate rename command. Note that the second argument to mv can be a directoryto move the file or directory into, or a new filename. cp works the same way.
As usual, you can type ls to see the result of mv.
12. mv myprofile ..
Just as . means "the directory I’m in now", .. means "parent of the current directory", in this casethe practice directory we created earlier. Use ls to verify that that’s where myprofile is now.
13. cd ..
Change directories to the parent directory — in this case practice, where you just put mypro-file.
14. rm myprofile
rm means "remove" — this deletes myprofile. Be careful! Deleting a file on a GNU/Linux systemis permanent — there is no undelete. If you rm it, it’s gone, forever. Be carefull! Deleting a file on aGNU/Linux system is permanent — there is no undelete. If you rm it, it’s gone, forever.
15. rmdir mysubdirectory
rmdir is just like rm, only it’s for directories. Notice that rmdir only works on empty directories— if the directory contains files, you must delete those files first, or alternatively use rm -r in placeof rmdir.
16. cd ..
Move out of the current directory, and into its parent directory. Now you can type:
17. rmdir practice
This will delete the last remnants of your practice session.
So now you know how to create, copy, move, rename, and delete files and directories. You also learnedsome shortcuts, like typing simply cd to jump to your home directory, and . and .. to refer to the currentdirectory and its parent, respectively. You should also remember the concept of the root directory, or /, andthe alias ˜ for your home directory.
Chapter 4. The Basics 20
4.3 Processes
We mentioned before that GNU/Linux is a multitasking system. It can do many tasks at once. Each of thesetasks is called a process. The best way to get a sense of this is to type top at the shell prompt. You’ll get alist of processes, sorted according to how much of the computer’s processing time they’re using. The orderwill continuously change before your eyes. At the top of the display, there’s some information about thesystem: how many users are logged in, how many total processes there are, how much memory you haveand how much you’re using.
In the far left column, you’ll see the user owning each process. The far right column shows which commandinvoked the process. You’ll probably notice that top itself, invoked by you, is near the top of the list (sinceanytime top checks on CPU usage, it will be active and using CPU to do the check).
Note all the commands ending in d — such as kflushd and inetd — the d stands for daemon4 . Adaemon is a non-interactive process, that is, it’s run by the system and users never have to worry about it.Daemons provide services like internet connectivity, printing, or email.
Now press u and give top your user name when it asks. The u command asks to see only those processesbelonging to you; it allows you to ignore all the daemons and whatever other people are doing. You mightnotice bash, the name of your shell. You’ll pretty much always be running bash.
Note that column two of the top display shows you the PID, or Process IDentification number. Eachprocess is assigned a unique PID. You can use the PID to control individual processes — more on that later.Another useful trick: type "?" to get a list of top commands.
You may wonder about the difference between a "process" and a "program" — in practice people use theterms interchangeably. Technically, the program is the set of instructions written by a programmer, and kepton disk. The process is the working instantiation of the program kept in memory by Linux. But it’s not thatimportant to keep the terms straight.
Much of your interaction with a computer involves controlling processes. You’ll want to start them, stopthem, and see what they’re up to. Your primary tool for this is the shell.
4.4 The shell
The shell is a program that allows you to interact with your computer. It’s called a shell because it providesan environment for you to work in — sort of a little electronic home for you as you compute. (Think hermitcrab.)
The simplest function of the shell is to launch other programs. You type the name of the program you wantto run, followed by the arguments you want, and the shell asks the system to run the program for you.
4daemon originally means Disks And Extensions MONitor
Chapter 4. The Basics 21
Of course, graphical windowing systems also fill this need. Technically, Windows 95 provides a graphicalshell, and the X Window System is another kind of graphical shell — but "shell" is commonly used to mean"command line shell."
Needless to say, the hackers who work on shells aren’t satisfied with simply launching commands. Yourshell has a bewildering number of convenient features if you want to take advantage of them.
There are countless different shells available; most are based on either the Bourne shell or the C shell, twoof the oldest shells. The original Bourne shell’s program name is sh while csh is the C shell. Bourne shellvariants include the Bourne Again Shell from the GNU project (bash, the Debian default), the Korn shell(ksh), and the Z shell (zsh). There is also ash, a traditionalist implementation of the Bourne shell. Themost common C shell variant is tcsh (the t pays tribute to the TENEX and TOPS-20 operating systems,which inspired some of tcsh’s improvements over csh).
Bash is probably the best choice for new users. It is the default, and has all the features you’re likely to need.But all the shells have loyal followings; if you want to experiment, install some different shell packages andchange your shell with the chsh command. Just type chsh, supply a password when asked, and chose ashell. When you next log in, you’ll be using the new shell.
4.5 Managing processes with Bash
Debian is a multitasking system, so you need a way to do more than one thing at once. Graphical environ-ments like X provide a natural way to do this; they allow multiple windows on the screen at any one time.Naturally, Bash (or any other shell) provides similar facilities.
Earlier you used top to look at the different processes on the system. Your shell provides some convenientways to keep track of only those processes you’ve started from the command line. Each command line startsa job (also called a process group) to be carried out by the shell. A job can consist of a single process or aset of processes in a pipeline — more on pipelines later.
Entering a command line will start a job. Try typing man cp and the cp manual page will appear on thescreen. The shell will go into the background, and return when you finish reading the manual page (or typeq to quit rather than scrolling through the whole thing).
But say you’re reading the manual page, and you want to do something else for a minute. No problem. TypeC-z while you’re reading to suspend the currently foregrounded job, and put the shell in the foreground.When you suspend a job, Bash will first give you some information on it, and then a shell prompt. You willsee something like this on the screen:
NAMEcp - copy files
SYNOPSIS
Chapter 4. The Basics 22
cp [options] source destcp [options] source... directoryOptions:[-abdfilprsuvxPR] [-S backup-suffix] [-V {numbered,existing,simple}] [--backup] [--no-dereference] [--force][--interactive] [--one-file-system] [--preserve] [--recursive] [--update] [--verbose] [--suffix=backup-suffix][--version-control={numbered,existing,simple}] [--archive][--parents] [--link] [--symbolic-link] [--help] [--version]
DESCRIPTION--More--[1]+ Stopped man cp$
Note the last two lines. The next-to-last is the job information, and then you have a shell prompt.
Bash assigns a job number to each command line you run from the shell. This allows you to refer to theprocess easily. In this case, man cp is job number 1, displayed as [1]. The + means that this is the lastjob you had in the foreground. Bash also tells you the current state of the job — Stopped— and the job’scommand line.
There are many things you can do with jobs. With man cp still suspended, try this:
1. man ls
Start a new job.
2. C-z
Suspend the man ls job by pressing Control and lowercase z; you should see its job information.
3. man mv
Start yet another job.
4. C-z
Suspend it.
5. jobs
Ask Bash for a display of current jobs:
$ jobs[1] Stopped man cp
Chapter 4. The Basics 23
[2]- Stopped man ls[3]+ Stopped man mv$
Notice the - and +, denoting respectively the next-to-last and last foregrounded jobs.
6. fg
Place the last foregrounded job (man mv, the one with the +) in the foreground again. If you pressthe spacebar, the man page will continue scrolling.
7. C-z
Re-suspend man mv.
8. fg %1
You can refer to any job by placing a % in front of its number. If you use fg without specifying a job,the last active one is assumed.
9. C-z
Re-suspend man cp.
10. kill %1
Kill off job 1. Bash will report the job information:
$ kill %1[1]- Terminated man cp$
Bash is only asking the job to quit, and sometimes a job will not want to do so. If the job doesn’tterminate, you can add the -9 option to kill to stop asking and start demanding. For example:
$ kill -9 %1[1]- Killed man mv$
The -9 option forcibly and unconditionally kills off the job. 5
5In technical terms, kill simply sends a signal. By default it sends a signal which requests termination (TERM, or signal 15);but you can also specify a signal, and signal 9 (KILL) is the signal which forces termination. The command name kill is notnecessarily appropriate to the signal sent; for example, sending the TSTP (terminal stop) signal suspends the process but allows itto be continued later.

Chapter 4. The Basics 24
11. top
Bring the top display back up. Give the u command in top to see only your processes. Look inthe right-hand column for the man ls and man mv commands. man cp won’t be there since youkilled it. top is showing you the system processes corresponding to your jobs; notice that the PID onthe left of the screen does not correspond to the job number.
You may not be able to find your processes because they’re off the bottom of the screen; if you’reusing X, you can resize the xterm to solve this problem.
Even these simple jobs actually consist of multiple processes, including the man process and the pagermore which handles scrolling a page at a time. You may notice the more processes are also visiblein top.
You can probably figure out how to clean up the remaining two jobs. You can either kill them (with thekill command) or foreground each one (with fg) and exit it. Remember that the jobs command will tellyou the list existing jobs and their status.
One final note: the documentation for Bash is quite good, but it is found in the Info help system ratherthan the man pages. To read it, type info bash. See ‘Using info’ on page 27 for instructions on usingthe info program. Bash also contains a very good summary of its commands accessible by the helpcommand. help displays a list of available topics; more informations about each of them being accessiblewith the command help topicname; Try to type
help cd
for example. This will give you details on the -P and -L arguments recognized by cd.
4.6 A few Bash features
This section mentions just a few of the most commonly used Bash features; for a more complete discussionsee ‘Using the shell’ on page 30.
4.6.1 Tab Completion
The Bash shell can guess what filename or command you are trying to type, and automatically finish typingit for you. Just type the beginning of a command or filename, and press TAB. If Bash finds a single uniquecompletion, it will finish the word and put a space after it. If it finds multiple possible completions, it willfill out the part all completions have in common and beep. You can then enter enough of the word to makeit unique, and press TAB again. If it finds no completions, it will simply beep.
Chapter 4. The Basics 25
4.7 Managing your identity
Unix-like systems are multiuser, and so you have your own electronic identity as a user on the system. Typefinger yourusername to have a look at some of the information about you that’s publically available.To change the name and shell listed there, you can use the commands chfn and chsh. Only the superusercan change your login (username) and directory. You’ll notice that it says "No plan" — a "plan" is justsome information you can make available to others. To create a plan, put whatever information you wantpeople to see in a file called .plan— to do this you’ll use a text editor (see ‘Creating and editing text files’on page 48). Then finger yourself to see your plan. Others can finger you to see your plan, and to checkwhether you’ve received new mail or read your mail.
Note that this finger information is available to the entire Internet by default. If you don’t want this, readabout configuring inetd and the file /etc/services— eventually the installation manual will describethis configuration, for now you might try the man pages, or just put nonsense in for your finger information.
26
Chapter 5
Reading documentation and getting help
5.1 Kinds of documentation
Unfortunately documentation on Unix-like systems is a little disorganized. On Debian, you can find docu-mentation in at least the following places:
� man pages, read with the man command.
� info pages, read with the info command.
� The /usr/doc/package directories, where package is the name of the Debian package.
� /usr/doc/HOWTO/ contains the Linux Documentation Project’s HOWTO documents, if you’veinstalled the Debian packages containing them.
� Many commands have a -h or --help option. Type the command name followed by one of theseoptions to try it.
� The Debian Documentation Project has written some manuals, including this one. Check out theirhome page (http://www.debian.org/~elphick/ddp/).
� The Debian support page (http://www.debian.org/support/) has a FAQ and other re-sources. You can also try the Linux web site (http://www.linux.org).
� You can buy many proprietary books with helpful information. Most people praise the O’Reilly brandvery highly. However, do consider supporting freely modifiable and redistributable manuals suchas this one when possible. If you want hard copy, purchasing free manuals from the Free SoftwareFoundation (available at many bookstores, such as Borders, and direct from the FSF) supports thecreation of more free software.
Chapter 5. Reading documentation and getting help 27
The confusing variety of documentation sources exists for many reasons. For example, info is supposedto replace man, but man hasn’t disappeared yet. However, it’s nice to know that so much documentationexists!
So where to look for help? Here are some suggestions:
� Use the man pages and the --help or -h option to get a quick summary of a command’s syntax andoptions. Also use man if a program doesn’t yet have an info page.
� Use info if a program has info documentation.
� If neither of those work, look in /usr/doc/packagename.
� /usr/doc/packagename often has Debian-specific information, even if there’s a man page orinfo page.
� Use the HOWTOs for instructions on how to set up a particular thing, or information on your particularhardware. For example, the Ethernet HOWTO has a wealth of information on ethernet cards, and thePPP HOWTO explains in detail how to set up PPP.
� Use the Debian Documentation Project manuals for conceptual explanations and Debian-specific in-formation.
� If all else fails, ask someone. See ‘Getting help from a person’ on the next page.
Using man pages is discussed above in ‘The command line and man pages’ on page 13. (It’s very simple:press the spacebar to go to the next page, and press q to quit reading.) info, viewing files in /usr/doc,and asking for help from a person are all discussed in this chapter.
5.2 Using info
A brief keystroke summary/tutorial, mention TkInfo, apologize for ridiculous keystrokes.
5.3 Viewing text files with more and less
Use these to view some docs. Mention zless and when to use it.
5.4 HOWTOs
In addition to their books, the Linux Documentation Project has made a series of short documents describinghow to set up a particular aspect of GNU/Linux. For instance, the SCSI-HOWTO describes some of the
Chapter 5. Reading documentation and getting help 28
complications of using SCSI — a standard way of talking to devices — with GNU/Linux. In general, theHOWTOs have more specific information about particular hardware configurations, and will be more up todate than this manual.
There are Debian packages for the HOWTOs. doc-linux-text contains the various HOWTOs in text form;while the doc-linux-html package contains the HOWTOs in (surprise!) browsable HTML format. Note alsothat Debian has packaged translations of the HOWTOs in various languages that you may prefer if English isnot your native language. 1 If you’ve installed one of these, you should have them in /usr/doc/HOWTO.However, you may be able to find more recent versions on the net on the LDP Project home page (http://sunsite.unc.edu/LDP/).
5.5 Getting help from a person
The correct place to ask for help with Debian is the debian-user mailing list <[email protected]>.If you know how to use IRC (Internet Relay Chat), there is a #debian channel on irc.debian.org.You can find general GNU/Linux help on the comp.os.linux.* Usenet hierarchy. You can searchpast Usenet questions and answers with the DejaNews service (http://www.dejanews.com). Itis also possible to hire paid consultants to provide guaranteed support services. The Debian web site(http://www.debian.org) has more information on many of these resources.
Again, please do not ask the authors of this tutorial for help. We probably don’t know the answer to yourspecific problem anyway; if you mail debian-user, you will get higher-quality responses, and morequickly.
Always be polite and make an effort to help yourself by reading the documentation. Remember, Debian isa volunteer effort and people are doing you a favor by giving their time to help you. Many of them chargehundreds of dollars for the same services during the day.
5.5.1 Dos and Don’ts of asking a question
� DO read the obvious documentation first. Things like command options and what a command doeswill be there.
� DO check the HOWTO documents if your question is about setting up something, such as PPP orEthernet.
� DO try to be sure the answer isn’t in this tutorial (though we realize an index would be helpful—we’reworking on it!).
� DON’T be afraid to ask, after you’ve made a basic effort to look it up.
1Debian have packages for the German, French, Spanish, Italian, Japanese, Korean, Polish, Swedish and Chinese versions ofthe HOWTOs; usually available in the package doc-linux-languagecode, with languagecode being fr for French, es for Spanish,etc. ..
Chapter 5. Reading documentation and getting help 29
� DON’T be afraid to ask for conceptual explanations, advices, and other things not often found in thedocumentation.
� DO include any information that seems relevant. You’ll almost always want to mention the versionof Debian you’re using. You may also want to mention the version of any pertinent packages: thecommand dpkg --status packagenamewill tell you this. It’s also useful to say what you’vetried so far and what happened. Please include the exact error messages, if any.
� DON’T apologize for your ignorance, or make excuses for being a newbie. There’s no reason every-one should be a GNU/Linux expert to use it, any more than everyone should be a mechanic to use acar.
� DON’T post or mail in HTML. Some versions of Netscape and Internet Explorer will post in HTMLrather than plain text. Most people will not even read these posts, because they are difficult to read inmost mail programs. There should be a setting somewhere in the preferences to disable HTML.
� DO be polite. Remember that Debian is an all-volunteer effort, and anyone who helps you is doing itjust because they’re a nice person.
� DO re-mail your question to the list if you’ve gotten no responses after several days. Perhaps therewere lots of messages and it was overlooked. Or perhaps no one knows the answer — if no oneanswers the second time, this is a good bet. You might want to try including more information thesecond time.
� DO answer questions yourself, when you know the answer. Debian depends on everyone doing theirpart — if you ask a question, and later on someone else asks the same question, you’ll know how toanswer it. Do so!
5.6 Getting information from the system
When diagnosing problems or asking for help, you’ll need to get information about your system. Here aresome ways to do so.
/var/log/*, dmesg, uname -a
30
Chapter 6
Using the shell
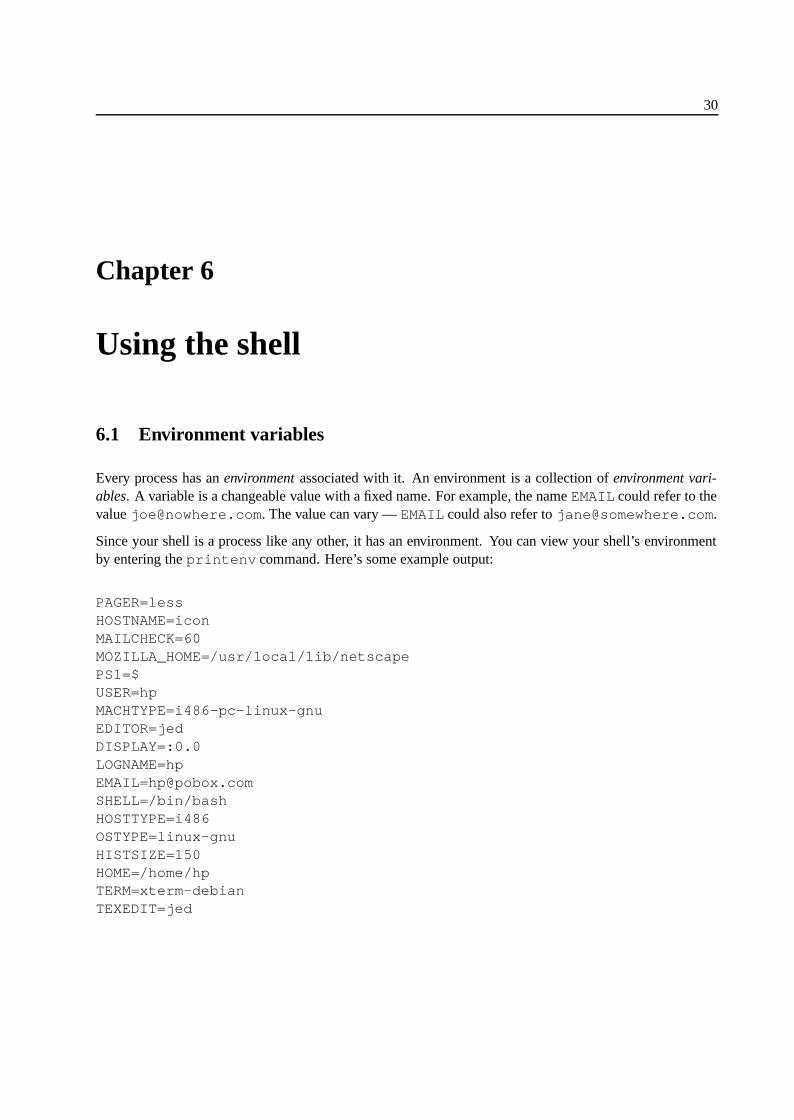
6.1 Environment variables
Every process has an environment associated with it. An environment is a collection of environment vari-ables. A variable is a changeable value with a fixed name. For example, the name EMAIL could refer to thevalue [email protected]. The value can vary — EMAIL could also refer to [email protected].
Since your shell is a process like any other, it has an environment. You can view your shell’s environmentby entering the printenv command. Here’s some example output:
PAGER=lessHOSTNAME=iconMAILCHECK=60MOZILLA_HOME=/usr/local/lib/netscapePS1=$USER=hpMACHTYPE=i486-pc-linux-gnuEDITOR=jedDISPLAY=:[email protected]=/bin/bashHOSTTYPE=i486OSTYPE=linux-gnuHISTSIZE=150HOME=/home/hpTERM=xterm-debianTEXEDIT=jed
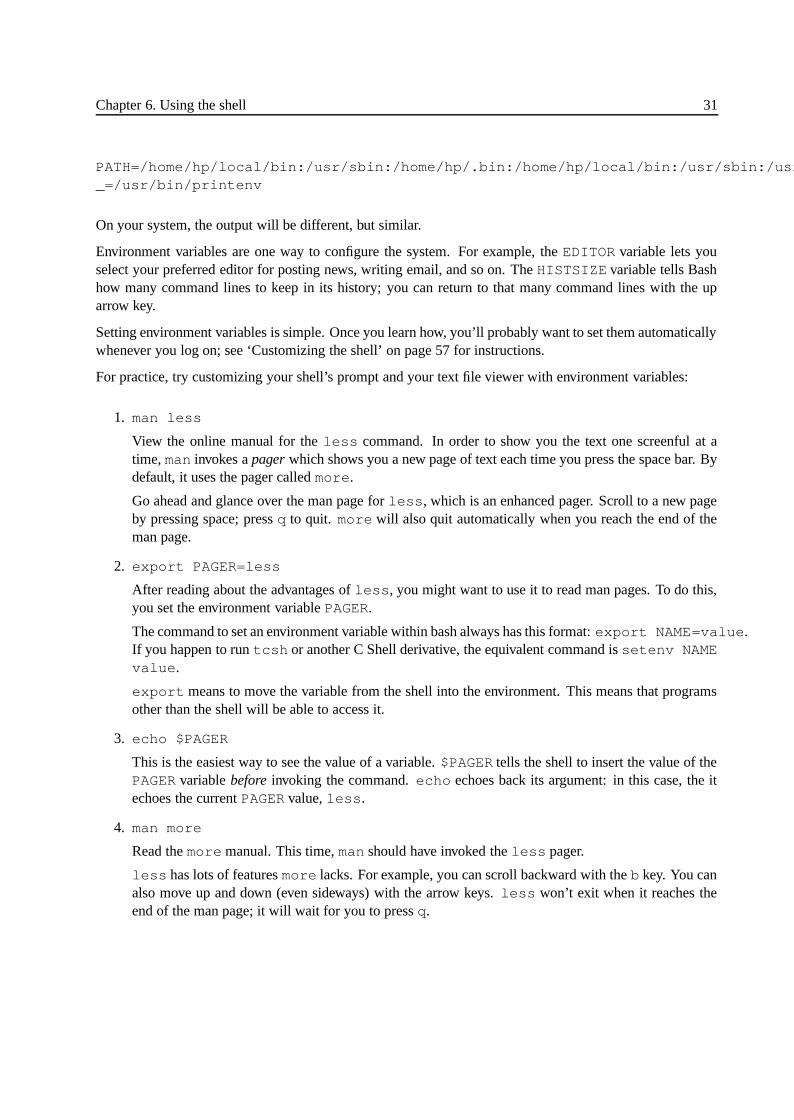
Chapter 6. Using the shell 31
PATH=/home/hp/local/bin:/usr/sbin:/home/hp/.bin:/home/hp/local/bin:/usr/sbin:/usr/local/bin:/usr/bin:/bin:/usr/bin/X11:/usr/games:._=/usr/bin/printenv
On your system, the output will be different, but similar.
Environment variables are one way to configure the system. For example, the EDITOR variable lets youselect your preferred editor for posting news, writing email, and so on. The HISTSIZE variable tells Bashhow many command lines to keep in its history; you can return to that many command lines with the uparrow key.
Setting environment variables is simple. Once you learn how, you’ll probably want to set them automaticallywhenever you log on; see ‘Customizing the shell’ on page 57 for instructions.
For practice, try customizing your shell’s prompt and your text file viewer with environment variables:
1. man less
View the online manual for the less command. In order to show you the text one screenful at atime, man invokes a pager which shows you a new page of text each time you press the space bar. Bydefault, it uses the pager called more.
Go ahead and glance over the man page for less, which is an enhanced pager. Scroll to a new pageby pressing space; press q to quit. more will also quit automatically when you reach the end of theman page.
2. export PAGER=less
After reading about the advantages of less, you might want to use it to read man pages. To do this,you set the environment variable PAGER.
The command to set an environment variable within bash always has this format: export NAME=value.If you happen to run tcsh or another C Shell derivative, the equivalent command is setenv NAMEvalue.
export means to move the variable from the shell into the environment. This means that programsother than the shell will be able to access it.
3. echo $PAGER
This is the easiest way to see the value of a variable. $PAGER tells the shell to insert the value of thePAGER variable before invoking the command. echo echoes back its argument: in this case, the itechoes the current PAGER value, less.
4. man more
Read the more manual. This time, man should have invoked the less pager.
less has lots of features more lacks. For example, you can scroll backward with the b key. You canalso move up and down (even sideways) with the arrow keys. less won’t exit when it reaches theend of the man page; it will wait for you to press q.
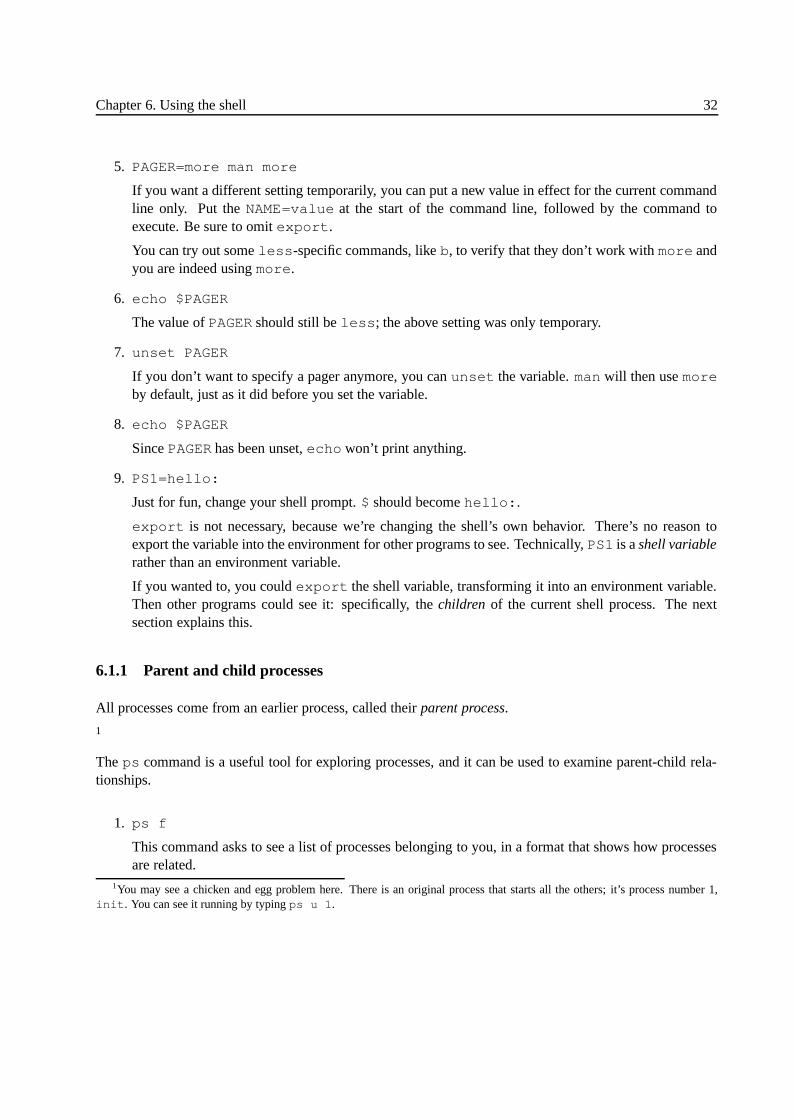
Chapter 6. Using the shell 32
5. PAGER=more man more
If you want a different setting temporarily, you can put a new value in effect for the current commandline only. Put the NAME=value at the start of the command line, followed by the command toexecute. Be sure to omit export.
You can try out some less-specific commands, like b, to verify that they don’t work with more andyou are indeed using more.
6. echo $PAGER
The value of PAGER should still be less; the above setting was only temporary.
7. unset PAGER
If you don’t want to specify a pager anymore, you can unset the variable. man will then use moreby default, just as it did before you set the variable.
8. echo $PAGER
Since PAGER has been unset, echo won’t print anything.
9. PS1=hello:
Just for fun, change your shell prompt. $ should become hello:.
export is not necessary, because we’re changing the shell’s own behavior. There’s no reason toexport the variable into the environment for other programs to see. Technically, PS1 is a shell variablerather than an environment variable.
If you wanted to, you could export the shell variable, transforming it into an environment variable.Then other programs could see it: specifically, the children of the current shell process. The nextsection explains this.
6.1.1 Parent and child processes
All processes come from an earlier process, called their parent process.
1
The ps command is a useful tool for exploring processes, and it can be used to examine parent-child rela-tionships.
1. ps f
This command asks to see a list of processes belonging to you, in a format that shows how processesare related.
1You may see a chicken and egg problem here. There is an original process that starts all the others; it’s process number 1,init. You can see it running by typing ps u 1.
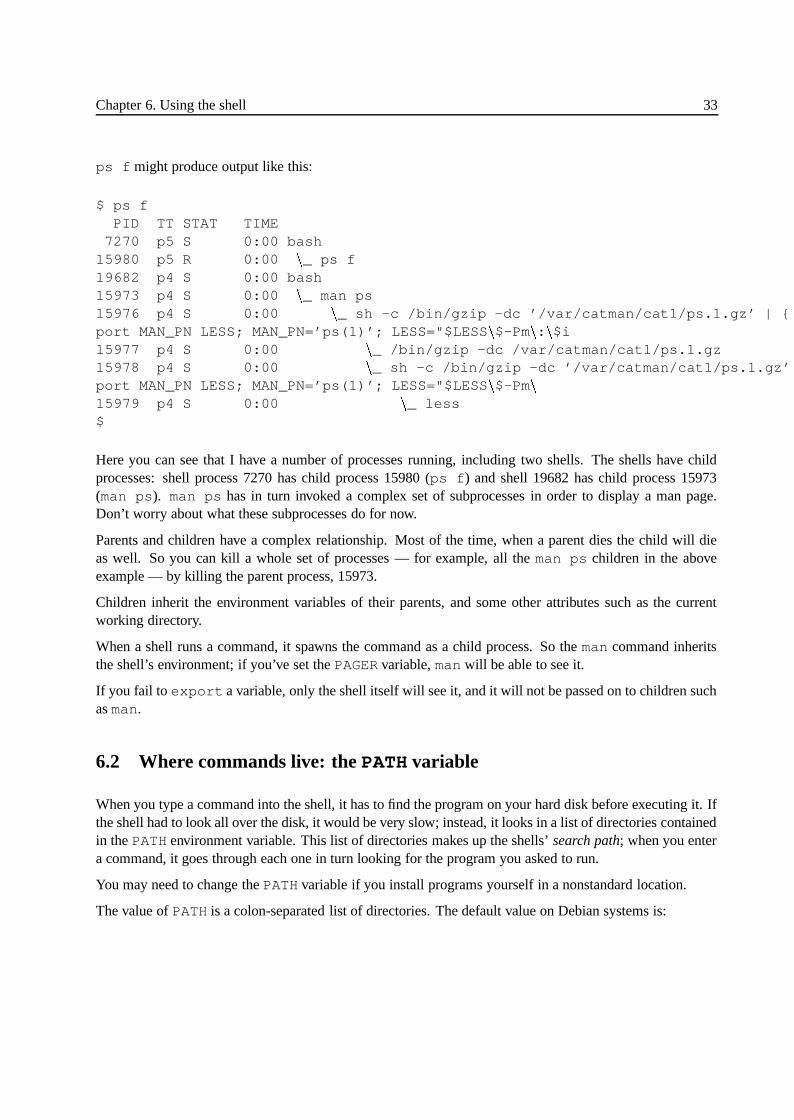
Chapter 6. Using the shell 33
ps f might produce output like this:
$ ps fPID TT STAT TIME7270 p5 S 0:00 bash
15980 p5 R 0:00�_ ps f
19682 p4 S 0:00 bash15973 p4 S 0:00
�_ man ps
15976 p4 S 0:00�_ sh -c /bin/gzip -dc ’/var/catman/cat1/ps.1.gz’ | { ex-
port MAN_PN LESS; MAN_PN=’ps(1)’; LESS="$LESS�$-Pm
�:
�$i
15977 p4 S 0:00�_ /bin/gzip -dc /var/catman/cat1/ps.1.gz
15978 p4 S 0:00�_ sh -c /bin/gzip -dc ’/var/catman/cat1/ps.1.gz’ | { ex-
port MAN_PN LESS; MAN_PN=’ps(1)’; LESS="$LESS�$-Pm
�
15979 p4 S 0:00�_ less
$
Here you can see that I have a number of processes running, including two shells. The shells have childprocesses: shell process 7270 has child process 15980 (ps f) and shell 19682 has child process 15973(man ps). man ps has in turn invoked a complex set of subprocesses in order to display a man page.Don’t worry about what these subprocesses do for now.
Parents and children have a complex relationship. Most of the time, when a parent dies the child will dieas well. So you can kill a whole set of processes — for example, all the man ps children in the aboveexample — by killing the parent process, 15973.
Children inherit the environment variables of their parents, and some other attributes such as the currentworking directory.
When a shell runs a command, it spawns the command as a child process. So the man command inheritsthe shell’s environment; if you’ve set the PAGER variable, man will be able to see it.
If you fail to export a variable, only the shell itself will see it, and it will not be passed on to children suchas man.
6.2 Where commands live: the PATH variable
When you type a command into the shell, it has to find the program on your hard disk before executing it. Ifthe shell had to look all over the disk, it would be very slow; instead, it looks in a list of directories containedin the PATH environment variable. This list of directories makes up the shells’ search path; when you entera command, it goes through each one in turn looking for the program you asked to run.
You may need to change the PATH variable if you install programs yourself in a nonstandard location.
The value of PATH is a colon-separated list of directories. The default value on Debian systems is:
Chapter 6. Using the shell 34
/usr/local/bin:/usr/bin:/bin:/usr/bin/X11:/usr/games
This value is defined in the file /etc/profile and applies to all users. You can easily change the value,just as you can change any environment variable.
If you type the command ls, the shell will first look in /usr/local/bin; ls isn’t there, so it willtry /usr/bin; when that fails, it will check /bin. There it will discover /bin/ls, stop its search,and execute the program /bin/ls. If /usr/bin/X11/ls existed (it doesn’t, but pretend), it would beignored.
You can see which ls the shell is going to use with the type command. type ls will give you theanswer /bin/ls — try it yourself.
Try asking where type itself resides:
$ type typetype is a shell builtin
type isn’t actually a program; it’s a function provided by the shell. However, you use it just like an externalprogram. 2
There are a number of commands like this; type man builtins to read the man page describing them.In general, you don’t need to know whether a command is a builtin or a real program; however, builtins willnot show up in the output of ps or top since they aren’t separate processes. They’re just part of the shell.
6.3 Aliases and shell functions
If you use the same command often, you might get tired of typing it. bash lets you write shorter aliases foryour commands. You can also write shell functions, which are custom commands made up of several othercommands.
Say you always use the --almost-all and --color=auto options to ls. You quickly get tired oftyping ls --almost-all --color=auto. So you make an alias:
alias myls=’ls --almost-all --color=auto’
Now you can type myls instead of the full command. To see what myls really is, run the command typemyls. To see a list of aliases you’ve defined, type simply alias on a line by itself.
Shell functions are a little more flexible than aliases. An alias simply substitutes a longer command whenyou type a shorter one. Functions let you use a series of commands to perform some action.
First let’s see how a shell function could be used in place of the above alias:
2If you’re running a C Shell derivative, the equivalent builtin to type is which.
Chapter 6. Using the shell 35
myls() {ls --almost-all --color=auto $*
}
The above is called a function definition, because it gives a function name (myls), then defines the meaningof the name (some commands to execute). To define a function, write its name, followed by (). Theninclude the commands to execute inside braces ({}). The portion inside braces is known as the body of thefunction.
The arguments to the function can be referred to as $*. So if you type:
myls /usr /etc
$* will be /usr /etc, the two arguments. If there are no arguments, $* will be empty.
You can also refer to the arguments by number. So $1 in the function body would be replaced by /usr,and $2 would be replaced by /etc. Type in this function (you can type it at the shell prompt; hit returnafter each line):
print_arguments() {echo "First argument: $1"echo "Second argument: $2"echo "All arguments: $*"
}
You can verify you entered the function definition correctly with the type command; type print_argumentsshould say:
print_arguments is a functionprint_arguments (){
echo "First argument: $1";echo "Second argument: $2";echo "All arguments: $*"
}
Try the function out. If you enter print_arguments one two it will display:
First argument: oneSecond argument: twoAll arguments: one two
There are many more complex things you can do in a shell function; you’re limited only by your imagination.For more, see ‘Introduction to shell scripting’ on page 88.
Chapter 6. Using the shell 36
6.4 Controlling input and output
Stdin, stdout, pipelines, and redirection
Every process has at least three connections to the outside world. The standard input is one source of theprocess’s data; the standard output is one place the process sends data; and the standard error is a place theprocess can send error messages. (These are often abbreviated stdin, stdout, and stderr.)
The words ‘source’ and ‘place’ are intentionally vague. These standard input and ouput locations can bechanged by the user; they could be the screen, the keyboard, a file, even a network connection. The user canspecify which locations to use.
When you run a program from the shell, usually standard input comes from your keyboard and standardoutput and error both go to your screen. However, you can ask the shell to change these defaults.
For example, the echo command sends it output to standard output, normally the screen. But you can sendit to a file instead, with the output redirection operator, ’>’. For example, to put the word "Hello" in the filemyfile:
echo Hello > myfile
Use cat or your text file pager (more or less) to view myfile’s contents.
You can change the standard input of a command with the input redirection operator, ’<’. For example,more < myfilewill display the contents of myfile. This is not useful in practice; for convenience, themore command accepts a filename argument. So you can simply say more myfile and the effect willbe the same.
Under the hood, more < myfile means that the shell opens myfile, then feeds its contents to thestandard input of more. more myfile, without the redirection operator, means that the more commandreceives one argument, myfile, opens the file itself, and then displays the file.
There’s a reason for the double functionality, however. For example, you can connect the standard output ofone command to the standard input of another. This is called a pipeline, and it uses the pipe operator, ’|’.
Perhaps you want to see the GNU General Public License in reverse. To do this, you use the tac command(it’s cat, only backward). Try it out:
tac /usr/doc/copyright/GPL
Unfortunately, it goes by too quickly to read. So you only get to see a couple of paragraphs. The solution isa pipeline:
tac /usr/doc/copyright/GPL | more
Chapter 6. Using the shell 37
This takes the standard output of tac, which is the GPL in reverse, and sends it to the standard input ofmore.
You can chain as many commands together as you like. Say you have an inexplicable desire to replace everyG with Q; for this you use the command tr G Q, like this:
tac /usr/doc/copyright/GPL | tr G Q | more
You could get the same effect using temporary files and redirection. For example:
tac /usr/doc/copyright/GPL > tmpfiletr G Q < tmpfile > tmpfile2more < tmpfile2rm tmpfile tmpfile2
Clearly a pipeline is more convenient.
6.5 Specifying how and when to run commands
"modifiers" like batch, at, nohup, nice
6.6 Filename expansion ("Wildcards")
Often you want a command to work with a group of files. "Wildcards" are used to create a filename ex-pansion pattern: a series of characters and wildcards that expands to a list of filenames. For example, thepattern /etc/* expands to a list of all the files in /etc 3. * is a wildcard which can stand for any seriesof characters, so the pattern /etc/* will expand to a list of all the filenames beginning with /etc/.
This filename list is most useful as a set of arguments for a command. For example, the /etc directorycontains a series of subdirectories called rc0.d, rc1.d, etc. Normally to view the contents of these, youwould type:
ls /etc/rc0.d /etc/rc1.d /etc/rc2.d /etc/rc3.d /etc/rc4.d /etc/rc5.d /etc/rc6.d /etc/rcS.d
This is tedious. Instead, you can use the ? wildcard:
ls /etc/rc?.d
3Actually, files beginning with . are not included in the expansion of *
Chapter 6. Using the shell 38
/etc/rc?.d expands to a list of filenames which begin with rc, followed by any single character, fol-lowed by .d.
Available wildcards are:
* Matches any group of 0 or more characters
? Matches exactly one character
[...] If you enclose some characters in brackets, the result is a wildcard which matches those characters.For example, [abc] matches either a, or b, or c. If you add a ˆ after the first bracket, the sense isreversed; so [ˆabc] matches any character that is not a, b, or c. You can include a range, such as[a-j], which matches anything between a and j. The match is case sensitive, so to allow any letter,you must use [a-zA-Z].
Expansion patterns are simple, once you see some concrete examples:
*.txt This will give you a list of any filename which ends in .txt, since the * matches anything at all.
*.[hc] This gives a list of filenames which end in either .h or .c.
a?? This gives you all three-letter filenames that begin with a.
[ˆa]?? This gives you all three-letter filenames that do not begin with a.
a* This gives you every filename that starts with a, regardless of how many letters there are.
6.7 Interactive/non-interactive
Bash has two different modes: interactive and non-interactive. Interactive means you can type into it, andhave it do things for you. Non-interactive shells interpret shell scripts, similar to DOS batch files. You giveit a list of commands to carry out, and it goes and does them, but without your intervention. You don’t seeall the commands being typed in, Of course any output will be recorded somewhere (the standard output, orstdout, normally the screeen or a log file). We will get more into non-interactive shells a little later on.
6.7.1 Interactive shells
Interactive shells will take a very long time for one to master, just because they’re so powerful — you’llprobably never learn everything! There is just so much out there that a shell can do, and of course it’salways changing. We will talk about bash here, and some basic commands that will make your life with ashell easier. In bash, one can have several different things going on all at once, and this can get confusing.
Chapter 6. Using the shell 39
A shell is a Line Oriented or command line environment. The shell will always prompt you with a prompt,whenever it is waiting on you to do things. The default debian prompt is a $. At the $ prompt is where youcan type in commands to tell linux to do things, it can be a program name, or it can be a "builtin" commandthat the shell provides for your convenience.
40
Chapter 7
More on files
In ‘Files and Directories’ on page 15 we covered moving/renaming files with mv, copying them with cp,removing them with rm, removing directories with rmdir, and creating directories with mkdir. Thischapter will cover some more aspects of files.
7.1 Permissions
GNU and Unix systems are set up to allow many people to use the same computer, while keeping certainfiles private or keeping certain people from modifying certain files. You can verify this for yourself:
1. Log in as yourself, i.e. NOT as root.
2. whoami
Verifies that you are not root.
3. rm /etc/resolv.conf
You should be told "Permission denied." /etc/resolv.conf is an essential system configurationfile — you aren’t allowed to change or remove it unless you’re root. This keeps you from accidentallymessing up the system, and if the computer is a public one such as at an office or school, it keeps usersfrom messing up the system on purpose.
Now type ls -l /etc/resolv.conf
This will give you output that looks something like this:
-rw-r--r-- 1 root root 119 Feb 23 1997 /etc/resolv.conf
Chapter 7. More on files 41
The -l option to ls requests all that additional information. The info on the right is easy - the size of the fileis 119 bytes, the date the file was last changed is Feb 23 1997, the file’s name is /etc/resolv.conf.On the left side of the screen, things get a little more complicated.
First, the brief, technical explanation: the -rw-r--r-- is the mode of the file, the 1 is the number of hardlinks to this file (or the number of files in a directory), and the two root are the user and group owning thefile.
So that was cryptic. Let’s go through it slowly (except the hard links part — for that see ‘The real nature offiles: hard links and inodes’ on page 88).
7.1.1 File Ownership
Every file has two owners — a user, and a group. The above case is a little confusing, since there’s a groupcalled root in addition to the root user. Groups are just collections of users who are collectively permittedaccess to some part of the system. A good example is a games group. Just to be mean, you might set upyour system so that only people in a games group are allowed to play games.
A more practical example: say you’re setting up a computer for a school. You might want certain files to beaccessible only to teachers, not students, so you put all the teachers in a single group. Then you can tell thesystem that certain files belong to members of the group teachers, and that no one else can access thosefiles.
Here are some things you can do to explore groups on your system:
1. groups
Typing this at the shell prompt will tell you what groups you’re a member of. It’s likely that you’re amember of only one group, which is identical to your username.
2. more /etc/group
This file lists the groups that exist on your system. Notice the root group (the only member of thisgroup is the root user), and the group which corresponds to your username. There are also groups likedialout (users who are allowed to dial out on the modem), and floppy (users who can use thefloppy drive). However, your system is probably not configured to make use of these groups — it’slikely that only root can use the floppy or the modem right now. For details about this file, try readingman group.
3. ls -l /home
Observe how every user’s directory is owned by that user and that user’s personal group. (If you justinstalled Debian, you may be the only user.)

Chapter 7. More on files 42
7.1.2 Mode
In addition to being owned by one user and one group, every file and directory also has a mode, whichdetermines who’s allowed to read, write, and execute the file. There are a few other things also determinedby the mode, but they’re advanced topics so we’ll skip them for now.
The mode looks like this in the ls output: -rw-r--r--. There are ten "elements" here, and the modeactually consists of twelve bits (think of bits as switches which can be on or off). But for now, we’ll consideronly nine of these bits: those that control read, write, and execute permissions for the user owning the file,the group owning the file, and others (everyone on the system, sometimes called world).
Notice that three kinds of permission (read, write, execute) times three sets of people who can have permis-sion (user, group, others) makes a total of nine elements.
In the mode line, the first "element" gives the type of the file. The - in this case means it’s a regular file.If it was d, we’d be looking at a directory. There are other possibilities too complex to go into now (see‘Advanced aspects of file permissions’ on page 94).
The remaining nine "elements" are used to display the 12 bits that make up the file’s mode. The basic 9 bits(read, write, and execute for user, group, and other) are displayed as three blocks of rwx.
So if all permissions are turned on and this is a regular file, the mode will look like this: -rwxrwxrwx. Ifit was a directory with all permissions turned off for others and full permissions for user and group, it wouldbe drwxrwx---.
(The remaining three bits are displayed by changing the x to s, t, S, or T, but this is a complex topic we’resaving for ‘Advanced aspects of file permissions’ on page 94.)
For regular files, "read", "write", and "execute" have the following meanings:
� Read permission, indicated by r, gives permission to examine the contents of a file. For directories,it gives permission to list the contents of the directory.
� Write permission, indicated by w, gives permission to make changes to a file. For directories, it givespermission to create and remove files in the directory.
� Execute permission, indicated by x, gives permission to run the file as a command. Clearly it onlymakes sense to set execute permission if the file actually is a command.
Since directories can never be executed, the execute bit has a different meaning. For directories,execute permission means permission to access files in the directory. Note that this interacts withwrite permissions: execute permissions must be set to be able to access files in a directory at all,so without execute permission on a directory, write permission is useless. Execute permission fordirectories is often called "search" permission, since it really has nothing to do with execution. "Fileaccess" permission would probably be a still better name.
Directory modes are a little confusing, so here are some examples of the effects of various combinations:

Chapter 7. More on files 43
� r--
The user, group, or other with these permissions may list the contents of the directory, but nothingelse. The files in the directory can’t be read, changed, deleted, or manipulated in any way. The onlypermitted action is reading the directory itself, that is, seeing what files it contains.
� rw-
Write permission has no effect in the absence of execute permission, so this mode behaves just likethe above mode.
� r-x
This mode permits the files in a directory to be listed, and permits access to those files. However, filescan’t be created or deleted. Access means that you can view, change, or execute the files as permittedby the files’ own permissions.
� --x
Files in this directory can be accessed, but the contents of the directory can’t be listed, so you haveto know what filename you’re looking for in advance (unless you’re a good guesser). Files can’t becreated or deleted.
� rwx
You can do anything you want with the files in this directory, as long as it’s permitted by the permis-sions on the files themselves.
Directory write permission determines whether you can delete files in a directory — a read-only file canbe deleted, if you have permission to write to the directory containing it. You can’t delete a file from aread-only directory, even if you’re allowed to make changes to the file. File permissions have nothing to dowith deleting files.
This also means that if you own a directory you can always delete files from it, even if those files belong toroot.
Directory execute permission determines whether you have access to files — and thus whether file permis-sions come into play. If you have execute permissions to a directory, file permissions for that directorybecome relevant. Otherwise file permissions just don’t matter; you can’t access the files anyway.
If you have execute permission for the directory, file permissions determine whether you can read the con-tents of the file, change the file, and/or execute the file as a command.
Finally, permission to change permissions on a file or directory is not affected by the permissions of thatfile or directory. Rather, you can always change the permissions on files or directories that you own, but noton files owned by someone else, as long as you are permitted access to the file. So if you can access a fileyou own at all (that is, you have execute permission for the directory containing it) then you can change itspermissions.
Chapter 7. More on files 44
This means that you can’t permanently remove permissions from yourself because you can always give themback. Say you remove user write permission from a file you own, then try to change the file. It won’t bepermitted, but you can always give yourself write permission again and then change the file. The only wayto lose the ability to change permissions back is to lose access to the file entirely.
7.1.3 Permissions in practice
This section goes through a short example session to demonstrate how permissions are used.
To change permissions, we’ll use the chmod command.
1. cd; touch myfile
There are a couple of new tricks here. First, you can use ; to put two commands on one line. You cantype the above as:
$ cd$ touch myfile
or as:
$ cd; touch myfile
and the same thing will end up happening.
Recall that cd by itself returns you to your home directory. touch is normally used to change themodification time of the file to the current time, but it has another interesting feature: if the file doesn’texist, touch creates the file. So we’re using it to create a file to practice with. Use ls -l to confirmthat the file has been created, and notice the permissions mode:
$ ls -l-rw-r--r-- 1 havoc havoc 0 Nov 18 22:04 myfile
Obviously the time and user/group names will be different when you try it. The size of the file is 0,since touch creates an empty file. -rw-r--r-- is the default permissions mode on Debian .
2. chmod u+x myfile
This command means to add (+) execute (x) permissions for the user (u) who owns the file. Use ls-l to see the effects.
3. chmod go-r myfile
Here we’ve subtracted (-) read permission (r) from the group (g) owning the file, and from everyoneelse (others, o). Again, use ls -l to verify the effects.

Chapter 7. More on files 45
4. chmod ugo=rx myfile
Here we’ve set (=) user, group, and other permissions to read and execute. This sets permissions toexactly what you’ve specified, and unsets any other permissions. So all rx should be set, and all wshould be unset. Now, no one can write to the file.
5. chmod a-x myfile
a is a shortcut for ugo, or "all". So all the x permissions should now be unset.
6. rm myfile
We’re removing the file, but without write permissions. rm will ask if you’re sure:
rm: remove ‘myfile’, overriding mode 0444?
You should respond by typing y and pressing enter. This is a feature of rm, not a fact of permissions- permission to delete a file comes from the directory permissions, and you have write permission inthe directory. However, rm tries to be helpful, figuring that if you didn’t want to change the file (andthus removed write permission), you don’t want to delete it either, so it asks you.
What was that 0444 business in the question from rm? The permissions mode is a twelve-digit binarynumber, like this: 000100100100. 0444 is this binary number represented as an octal (base 8) number,which is the conventional way to write a mode. So you can type chmod 444 myfile instead of chmodugo=r myfile. This is fully explained in ‘Advanced aspects of file permissions’ on page 94.
7.2 What files are on my system? Where can I put my own files?
Now that you can navigate the directory tree, let’s take a guided tour of the files and directories you createdwhen you installed Debian. If you’re curious, cd to each directory and type ls to see its contents. If thelisting doesn’t fit on the screen, try ls | more, where | is the "pipe" character, generally found on thesame key with backslash.
/ As already mentioned, this is the root directory, which contains every other directory.
/root But don’t get / confused with /root! /root is the home directory of the root user, or superuser.It’s a directory called /root, but it isn’t the root directory /.
/home This is where all normal users — that is, all users except root — have their home directories. Homedirectories are named after the user who owns them, for example, /home/jane. If you’re using alarge system at a school or business, your system administrator may create additional directories tocontain home directories: /home1 and /home2 for example. On some other systems, you’ll see anadditional level of subdirectories: /home/students/username, /home/staff/username,etc. ..

Chapter 7. More on files 46
Your home directory is where you put all your personal work, email and other documents, and personalconfiguration preferences. It’s your home on the system.
/bin This directory contains "binaries," executable files which are essential to the operation of the system.Examples are the shell (bash), and file commands such as cp.
/sbin This directory contains "system binaries", utilities that the root user or system administrator mightwant to use, but probably you won’t want to use in your day-to-day activities.
/usr /usr contains most of the files you’ll be interested in. It has many subdirectories: /usr/bin and/usr/sbin are pretty much like /bin and /sbin, except that the directories in /usr are notconsidered "essential to the operation of the system".
While not essential to get the computer working,/usr does contain the applications you’ll use to getreal work done. Also in /usr you’ll find the /usr/man, /usr/info, and /usr/doc directories— these contain manual pages, info pages, and other documentation, respectively. And don’t forget/usr/games!
/usr/local The Debian system doesn’t install anything in this directory. You should use it if you wantto install software that you compile yourself, or any software not contained in a Debian package. Youcan also install software in your home directory, if you’ll be the only one using it.
/etc /etc contains all the system-wide configuration files. Whenever you want to change something thataffects all users of your computer — such as how you connect to the internet, or what kind of videocard you have — you’ll probably have to log on as root and change a file in /etc.
/tmp Here you’ll find temporary files, most of them created by the system. This directory is generallyerased on a regular basis, or every time you reboot the system. You can create files here if you want,just be aware they might get deleted automatically.
/var /var contains "variable" files, that the system changes automatically. For example, incoming mailis stored here. The system keeps a log of its actions here. There are a number of other automaticallygenerated files here as well. You’ll mostly be interested in the contents of /var/log, where you canfind error messages and try to figure out what you’re system’s up to if something goes wrong.
Clearly there are many more directories on the system, too many to describe every one.
For changing things, you’ll usually want to confine yourself to your home directory and /etc. On a Debiansystem, there’s rarely an occasion to change anything else, because everything else is automatically installedfor you.
/etc is used to configure the system as a whole. You’ll use your own home directory, a subdirectoryof /home, for configuring your own preferences, and storing your personal data. The idea is that on aday-to-day basis you confine yourself to /home/yourname, so there’s no way you can break anything.Occasionally you log in as root to change something in a system-wide directory, but only when absolutely
Chapter 7. More on files 47
necessary. Of course, if you’re using Debian at a school or business and someone else is the system admin-istrator, you won’t have root access and will only be able to change your home directory. This limits whatyou can do with the system.
7.3 Using a filemanager
Instead of moving files around by hand, you can use a file manager. If you move a lot of files around a filemanager can make your work more efficient. There are text-based file managers, such as GNU MidnightCommander (type mc), and a number of file managers for the X Window System (for example gmc for theX Window version of GNU Midnight Commander).
Describing each of these is outside the scope of this manual; but you may want to try them out if thecommand line doesn’t meet your needs.
48
Chapter 8
Creating and editing text files
8.1 What’s a text file?
A text file is simply a normal file that happens to contain human-readable text. There’s nothing special aboutit otherwise. The other kind of file, a binary file, is meant to be interpreted by the computer.
You can view either kind of file with the less file pager, if you have it installed (install it if you haven’t,it’s quite useful). Type less /etc/profile to view a sample text file — notice that you can read thecharacters, even if their meaning is obscure. Type less /bin/ls to view a binary file; as you can see,the ls program is not meant to be read by humans.
The difference between the two kinds of files is purely a matter of what they contain, unlike some othersystems (such as DOS or MacOS) which actually treat the files differently.
Text files can contain shell scripts, documentation, copyright notices, or any other human-readable text.
Incidentally, this illustrates the difference between source code and binary executables. /bin/ls is a bi-nary executable you can download from Debian, but you can also download a text file which tells the com-puter how to create /bin/ls. This text file is the source code. Comparing /bin/ls to /etc/profileillustrates how important source code is if someone wants to understand and modify a piece of software.Free software provides you or your consultants with this all-important source code.
8.2 Text editors
A text editor is a program used to create and change the contents of text files. Most operating systems havea text editor; DOS has edit, Windows has Notepad, MacOS has SimpleText.
Debian provides a bewildering variety of text editors. vi and emacs are the classic two, probably both themost powerful and the most widely used. Both vi and emacs are quite complex and require some practice,
Chapter 8. Creating and editing text files 49
but they can make editing text extremely efficient. emacs runs both in a terminal and under the X WindowSystem; vi normally runs in a terminal but the vim variant has a -g option which allows it to work with X.
Simpler editors include nedit, ae, jed, and xcoral. nedit and xcoral provide easy-to-use XWindow System graphical interfaces. There are also several vi variants, and an Emacs variant calledXEmacs.
This tutorial will not cover the use of any particular editor in detail, though we will briefly introduce vi sinceit is small, fast, nearly always available, and you may need to use it sometime regardless of your preferrededitor. Emacs provides an excellent interactive tutorial of its own; to read it, load Emacs with the emacscommand and type F1 t. Emacs is an excellent choice for new users interested in a general-purpose orprogramming editor.
8.3 Creating and editing a text file with vi
vi (pronounced "vee eye") is really the only editor that comes with almost every Unix-like operating system,and Debian is no exception. vi was originally written at the University of California at Berkeley. Theeditor’s name is short for "visual", referring to the fact that vi provides a visual display of the text file; thiswas once considered a unique feature, giving you an idea how old the program is.
vi is somewhat hard to get used to, but has many powerful features. In general, we suggest that a new useruse Emacs for daily tasks such as programming. However, vi is sometimes more convenient or the onlyavailable editor; it is also a much smaller file to download.
The following discussion of vi should also apply to vi variants such as elvis and vim.
8.3.1 Creating a file
1. vi testfile
In your home directory, invoke vi by typing vi followed by the name of the file you wish to create.You will see a screen with a column of tildes (˜) along the left side. vi is now in command mode.Anything you type will be understood as a command, not as content to add to the file. In order toinput text, you must type a command.
2. i
The two basic input commands are i, which means "insert the text I’m about to type to the left of thecursor", and a, which means "append the text I’m about to type to the right of the cursor". Since youare at the beginning of an empty file, either of these would work. We picked i arbitrarily.
3. Type in some text; here’s a profound statement from philosopher Charles Sanders Peirce, if you can’tthink of your own:
Chapter 8. Creating and editing text files 50
And what, then, is belief? It is the demi-cadencewhich closes a musical phrase in the symphony of ourintellectual life. We have seen that it has justthree properties: First, it is something that we areaware of; second, it appeases the irritation of doubt;and, third, it involves the establishment in ournature of a rule of action, or, say for short, ahabit.
Press RET after each line, since vi will not move to the next line automatically; when you finishtyping, press the ESC key to leave insert or append mode and return to command mode.
4. :wq
If you’ve done everything correctly, when you type this command it should appear at the bottom ofyour screen, below all the ˜ characters. The : tells vi you’re about to give a series of commands; thew means to write the file you’ve just typed in — in most new programs this is called "save" — and theq means to quit vi. So you should be back at the shell prompt.
5. cat testfile
cat will display the file you typed on the screen.
Don’t remove testfile, we’ll use it in the next tutorial section.
As you use vi, always remember that pressing ESC will return you to command mode. So if you getconfused, press ESC a couple times and start over.
vi has an annoying tendency to beep whenever you do something you aren’t supposed to, like type anunknown command; don’t be alarmed by this.
8.3.2 Editing an existing file
To use vi, you only need to read ‘Moving around in a file’ on this page and ‘Deleting text’ on the next page.Later sections explain advanced features, but they are not strictly necessary, though often more efficient andless tedious.
Moving around in a file
To move around in a file, Debian’s vi allows you to use the arrow keys. The traditional keys also work,however; they are h for left, j for down, k for up, and l for right. These keys were chosen because they areadjacent on on the home row of the keyboard, and thus easy to type. Many people use them instead of thearrow keys since they’re faster to reach with your fingers.
Chapter 8. Creating and editing text files 51
1. vi testfile
Open the file you created earlier with vi. You should see the text you typed before.
2. Move around the file with the arrow keys or the hjkl keys. If you try to move to far in any direction,vi will beep and refuse to do so; if you want to put text there, you have to use an insertion commandlike i or a.
3. :q
Exit vi.
Deleting text
1. vi testfile
Open your practice file again.
2. dd
The dd command deletes a line; the top line of the file should be gone now.
3. x
x deletes a single character; the first letter of the second line will be erased. Delete and backspacedon’t work in vi, for historical reasons1 . Some vi variants, such as vim will let you use backspaceand delete.
4. 10x
If you type a number before a command, it will repeat the command that many times. So this willdelete 10 characters.
5. 2dd
You can use a number with the dd command as well, deleting two lines.
6. :q
This will cause an error, because you’ve changed the file but haven’t saved yet. There are two waysto avoid this; you can :wq, thus writing the file as you quit, or you can quit without saving:
7. :q!
With an exclamation point, you tell vi that you really mean it, and it should quit even though the fileisn’t saved. If you use :q! your deletions will not be saved to testfile; if you use :wq, they willbe.
1The keyboard of some very old terminals (from the 60s) had no BackSpace or Delete key
Chapter 8. Creating and editing text files 52
8. cat testfile
Back at the shell prompt, view testfile. It should be shorter now, if you used :wq, or be un-changed if you used :q!.
:q! is an excellent command to remember, because you can use it to bail out if you get hopelessly confusedand feel you’ve ruined the file you were editing. Just press ESC a few times to be sure you’re in commandmode and then type :q!. This is guaranteed to get you out of vi with no damage done.
You now know everything you need to do basic editing; insertion, deletion, saving, and quitting. Thefollowing sections describe useful commands for doing things faster; you can skip over them if you like.
Sophisticated movement
There are many motion commands, here’s a quick summary:
w Move to the start of the next word
e Move to the end of the next word
E Move to the end of the next word before a space
b Move to the start of the previous word
0 (zero) Move to the start of the line
ˆ Move to the first word of the current line
$ Move to the end of the line
RET Move to the start of the next line
- Move to the start of the previous line
G Move to the end of the file
1G Move to the start of the file
nG Move to line number n
C-G Display the current line number
H Top line of the screen
M Middle line of the screen
L Bottom of the screen
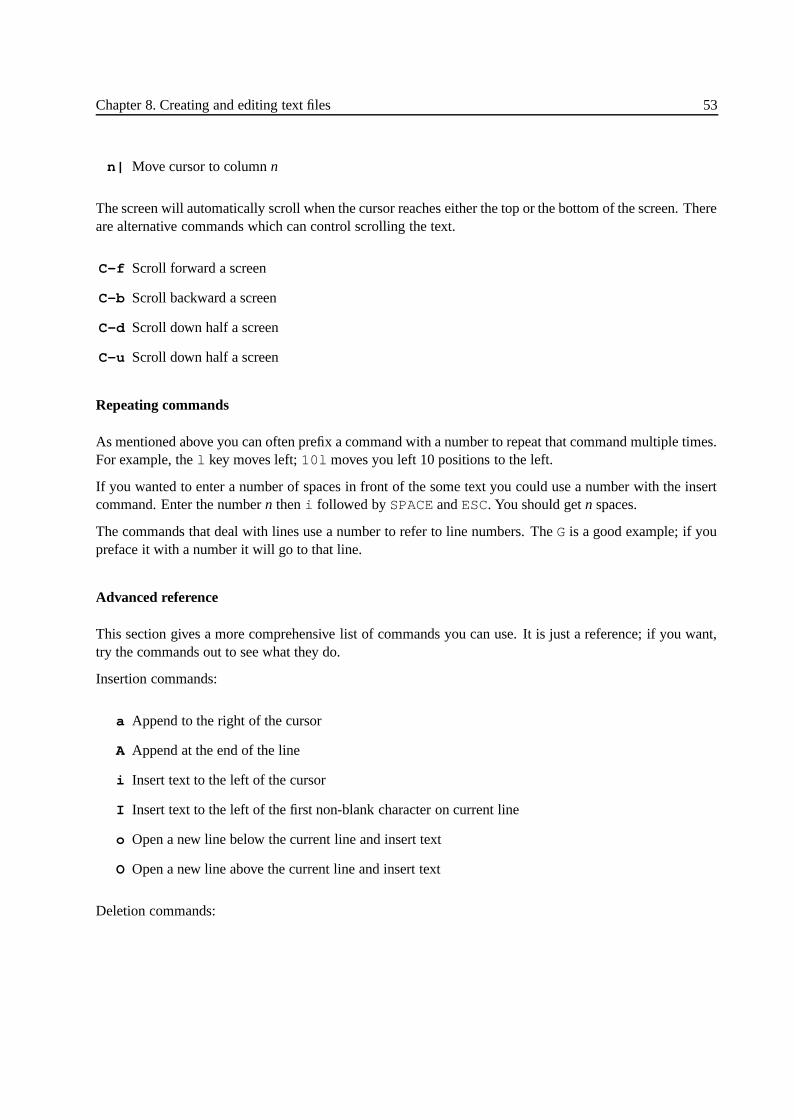
Chapter 8. Creating and editing text files 53
n| Move cursor to column n
The screen will automatically scroll when the cursor reaches either the top or the bottom of the screen. Thereare alternative commands which can control scrolling the text.
C-f Scroll forward a screen
C-b Scroll backward a screen
C-d Scroll down half a screen
C-u Scroll down half a screen
Repeating commands
As mentioned above you can often prefix a command with a number to repeat that command multiple times.For example, the l key moves left; 10l moves you left 10 positions to the left.
If you wanted to enter a number of spaces in front of the some text you could use a number with the insertcommand. Enter the number n then i followed by SPACE and ESC. You should get n spaces.
The commands that deal with lines use a number to refer to line numbers. The G is a good example; if youpreface it with a number it will go to that line.
Advanced reference
This section gives a more comprehensive list of commands you can use. It is just a reference; if you want,try the commands out to see what they do.
Insertion commands:
a Append to the right of the cursor
A Append at the end of the line
i Insert text to the left of the cursor
I Insert text to the left of the first non-blank character on current line
o Open a new line below the current line and insert text
O Open a new line above the current line and insert text
Deletion commands:
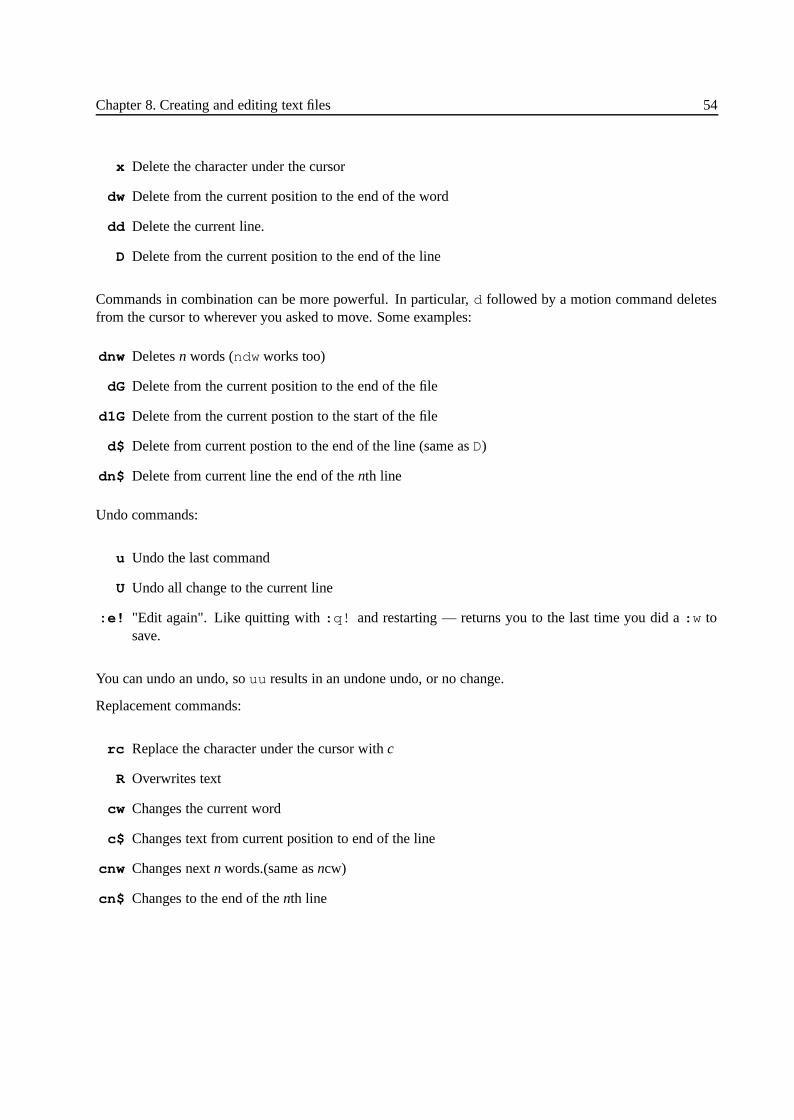
Chapter 8. Creating and editing text files 54
x Delete the character under the cursor
dw Delete from the current position to the end of the word
dd Delete the current line.
D Delete from the current position to the end of the line
Commands in combination can be more powerful. In particular, d followed by a motion command deletesfrom the cursor to wherever you asked to move. Some examples:
dnw Deletes n words (ndw works too)
dG Delete from the current position to the end of the file
d1G Delete from the current postion to the start of the file
d$ Delete from current postion to the end of the line (same as D)
dn$ Delete from current line the end of the nth line
Undo commands:
u Undo the last command
U Undo all change to the current line
:e! "Edit again". Like quitting with :q! and restarting — returns you to the last time you did a :w tosave.
You can undo an undo, so uu results in an undone undo, or no change.
Replacement commands:
rc Replace the character under the cursor with c
R Overwrites text
cw Changes the current word
c$ Changes text from current position to end of the line
cnw Changes next n words.(same as ncw)
cn$ Changes to the end of the nth line
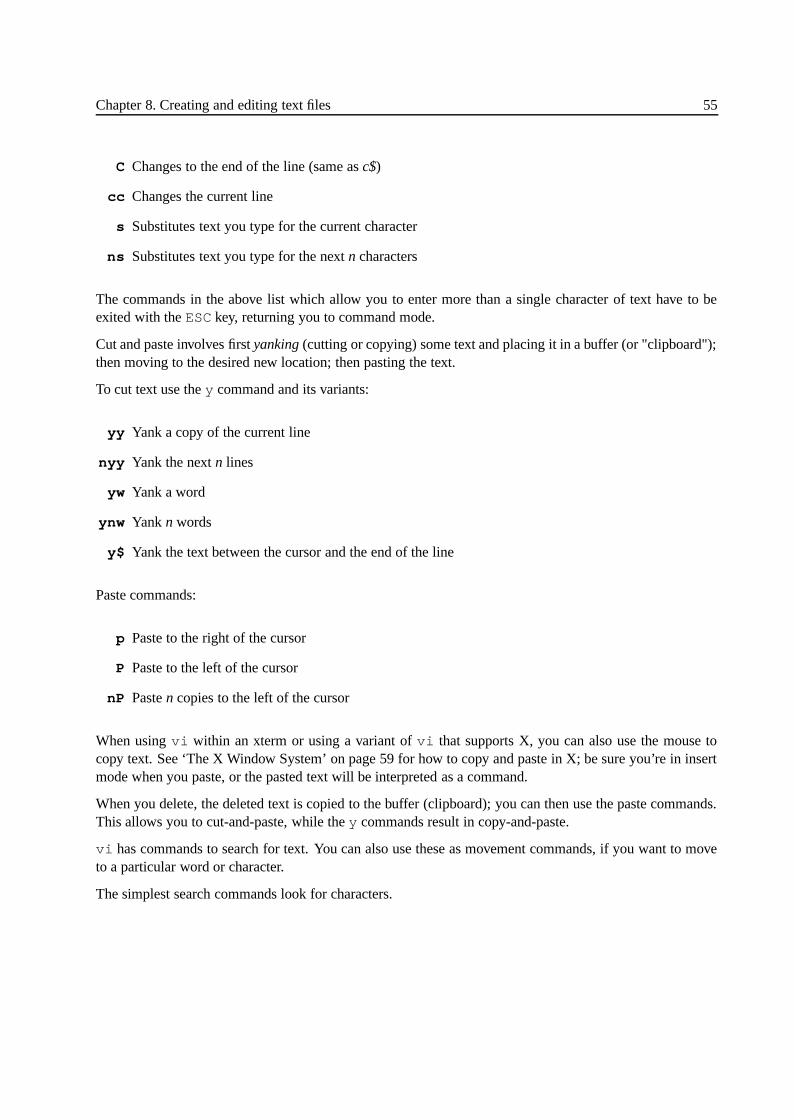
Chapter 8. Creating and editing text files 55
C Changes to the end of the line (same as c$)
cc Changes the current line
s Substitutes text you type for the current character
ns Substitutes text you type for the next n characters
The commands in the above list which allow you to enter more than a single character of text have to beexited with the ESC key, returning you to command mode.
Cut and paste involves first yanking (cutting or copying) some text and placing it in a buffer (or "clipboard");then moving to the desired new location; then pasting the text.
To cut text use the y command and its variants:
yy Yank a copy of the current line
nyy Yank the next n lines
yw Yank a word
ynw Yank n words
y$ Yank the text between the cursor and the end of the line
Paste commands:
p Paste to the right of the cursor
P Paste to the left of the cursor
nP Paste n copies to the left of the cursor
When using vi within an xterm or using a variant of vi that supports X, you can also use the mouse tocopy text. See ‘The X Window System’ on page 59 for how to copy and paste in X; be sure you’re in insertmode when you paste, or the pasted text will be interpreted as a command.
When you delete, the deleted text is copied to the buffer (clipboard); you can then use the paste commands.This allows you to cut-and-paste, while the y commands result in copy-and-paste.
vi has commands to search for text. You can also use these as movement commands, if you want to moveto a particular word or character.
The simplest search commands look for characters.
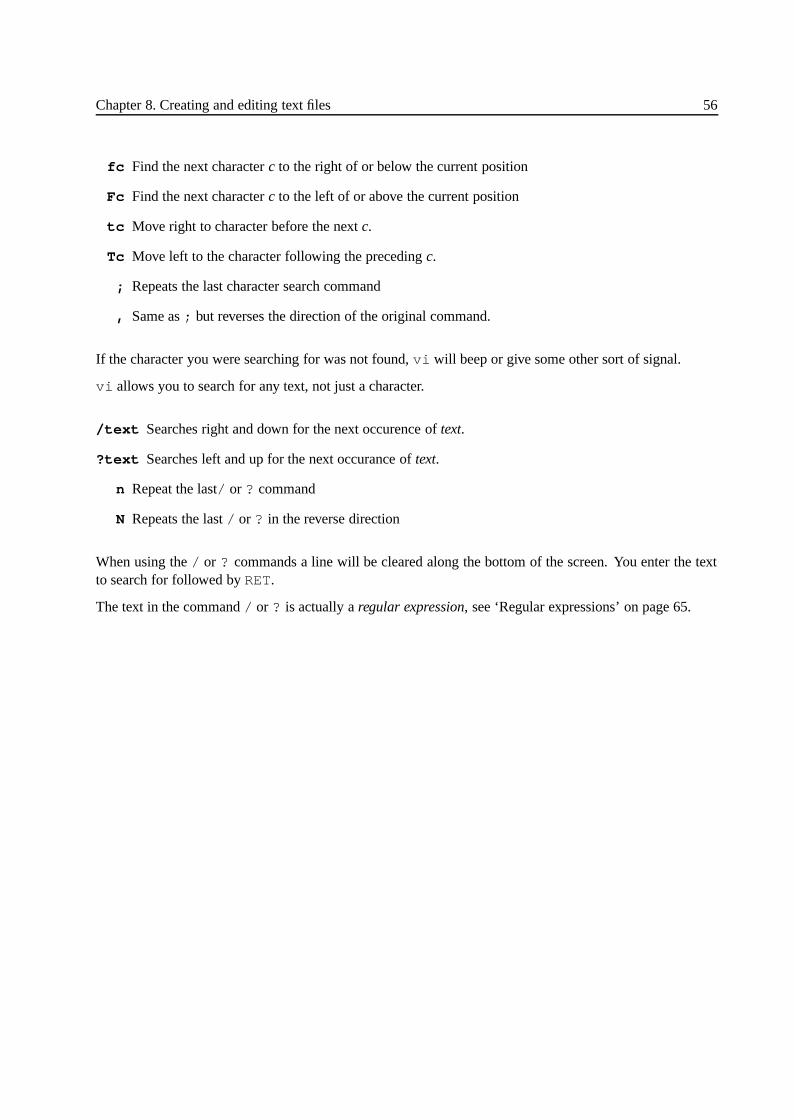
Chapter 8. Creating and editing text files 56
fc Find the next character c to the right of or below the current position
Fc Find the next character c to the left of or above the current position
tc Move right to character before the next c.
Tc Move left to the character following the preceding c.
; Repeats the last character search command
, Same as ; but reverses the direction of the original command.
If the character you were searching for was not found, vi will beep or give some other sort of signal.
vi allows you to search for any text, not just a character.
/text Searches right and down for the next occurence of text.
?text Searches left and up for the next occurance of text.
n Repeat the last/ or ? command
N Repeats the last / or ? in the reverse direction
When using the / or ? commands a line will be cleared along the bottom of the screen. You enter the textto search for followed by RET.
The text in the command / or ? is actually a regular expression, see ‘Regular expressions’ on page 65.
57
Chapter 9
Customizing the shell
9.1 .rc files and ls -a
When you type ls, files beginning with a dot are not listed. Traditionally, files which contain configurationinformation, user preferences, and so on begin with a dot; these are hidden and out of your way while youdo you day-to-day work. Sample dotfiles are ˜/.emacs, ˜/.newsrc, ˜/.bashrc, ˜/.xsession,˜/.fvwmrc, etc. .. These are used by Emacs, newsreaders, the Bash shell, the X Window System, and thefvwmwindow manager, respectively. It is conventional to end the dotfile name with rc, but some programsdon’t. There are also directories beginning with a dot, such as ˜/.gimp and ˜/.netscape, which storepreferences for the Gimp and Netscape.
Sometimes a program will create a dotfile automatically; for example, Netscape allows you to edit yourpreferences with a graphical dialog and then it saves your choices. Other times you will create them yourselfusing a text editor; this is the traditional way to do it, but you have to learn the peculiar format of each file— inconvenient at first, but it can give you a lot of power.
To see dotfiles, you must use the -a option to ls. The long form of -a is --all, if you find that easierto remember. You can also use -A or --almost-all, which includes all dotfiles except . and .. —remember that . is the current directory, and .. is the parent of the current directory; since these areguaranteed to be in every directory, there is no real reason to list them with ls. You already know they arethere.
9.2 System-wide vs. user-specific configuration
It’s important to remember that there are two different kinds of configuration on a Debian system. System-wide configuration affects all users. System-wide settings are made in the /etc directory. You might con-figure the way the system connects to the internet, for example; or have web browsers on the system always
Chapter 9. Customizing the shell 58
start on the company home page. Since you want these settings to apply to all users, you make the changesin /etc. Sample configuration files in /etc include /etc/X11/XF86Config,/etc/lynx.cfg, and/etc/ppp/options. In fact nearly all the files in /etc are configuration files.
Normally you must be root to change system-wide settings.
User configuration affects only a single user. Dotfiles are used for user configuration. For example, the file˜/.newsrc stores a list of which Usenet (discussion group) articles you have read, and which groups youare subscribed to. This allows newsreaders such as trn or Netscape to display unread articles in the groupsyou’re interested in. This information will be different for every user on the system, so each user has theirown .newsrc file in their home directory.
59
Chapter 10
The X Window System
This chapter describes the X Window System graphical user interface. It assumes that you have alreadysuccessfully configured X as described in the Installation Manual (again, the install manual is not yet written;for now you will need to use the XFree86 HOWTO, the contents of /usr/doc/X11, and this chapter).Once you install X, you can enter the X environment by typing startx or via xdm, depending on yourchoice during configuration.
10.1 Starting the X environment
There are two ways of starting X. The first is to start X manually when you feel like using it. To do so, login to one of the text consoles, and type startx. This will start X and switch you to its virtual console.
The second (and recommended) way to use X is with xdm, or X Display Manager. Basically xdm gives youa nice graphical login prompt on the X virtual console (probably VC 7), and you log in there.
By default, either method will also start an xterm, which is a small window containing a shell prompt. Atthe shell prompt, you can type any commands just as you would on a text VC. So you can follow all theexamples in this tutorial using xterm; the only difference between an xterm and the text console is thatyou don’t have to log on to the xterm, since you already logged on to X.
There are also a lot of things you can do only in X, which are covered in this chapter.
One note: the default xterm has a smallish font. If you have a small monitor or very high resolution or badeyesight, you may want to fix this. Follow these steps:
1. Move the mouse pointer into the center of the xterm window.
2. Hold down the Control key and the right mouse button simultaneously. This will give you a fontmenu.
3. Point to the font you want and release the mouse button.
Chapter 10. The X Window System 60
10.2 Intro: What is X
A GUI (Graphical User Interface) is part and parcel of the Windows or Mac operating systems. It’s basicallyimpossible to write an application for those systems which does not use the GUI, and the systems can’t beused effectively from the command line. GNU/Linux is more modular, that is, made up of many small,independent components which can be used or not according to one’s needs and preferences. One of thesecomponents is the X Window System, or simply X1.
X itself is a means for programs to talk to your mouse and video card, without knowing what kind of mouseand video card you have. That is, it’s an abstraction of the graphics hardware. User applications talk to X,in X’s language; X then translates into the language of your particular hardware. This means that programsonly have to be written once, and they work on everyone’s computer.
In X jargon, the program which speaks to the hardware is known as an X server. User applications that askthe X server to show windows or graphics on the screen are called X clients. The X server includes a videodriver, so you must have an X server which matches your video card.
The X server doesn’t provide any of the features one might expect from a GUI, such as resizing and rear-ranging windows. A special X client, called a window manager, draws borders and titlebars for windows,resizes and arranges windows, and provides facilities for starting other X clients from a menu. Specificwindow managers may have additional features.
Window managers available on a Debian system include fvwm, fvwm2, icewm, afterstep, olvwm,wmaker, mwm, twm, enlightenment and others. You’ll probably want to try them all and pick yourfavorite. (For information on window managers, and other fun stuff about X, X11.org (http://www.x11.org) is a nice site.)
Neither the X server nor the window manager provide a file manager; that is, there aren’t any windowscontaining icons for your files and directories. You can launch a file manager as a separate application;there are many of them available, though unfortunately there aren’t yet any good icon-based ones. TheGNOME desktop project is developing an icon-based file manager and other GUI facilities, however. Seethe GNOME project home page (http://www.gnome.org) for the latest news on this.
A final feature of X is its network transparency, meaning that X clients don’t care if they’re talking to an Xserver on the same machine or an X server somewhere on the network. In practical terms, this means youcan run a program on a more powerful remote machine, but display it on your desktop computer.
1It’s also sometimes called X11 or X Window. Please note that "X Windows" is not correct and you’re likely to offend thepurists if you use this incorrect term.
Chapter 10. The X Window System 61
10.3 Basic X operations
10.3.1 The mouse
The mouse in X works pretty much the same as the mouse on other systems, except that it has three buttons.If your mouse only has two, you can simulate the third (middle) button by clicking both buttons simultane-ously. This is kind of tricky and annoying, so investing in a $15 3-button mouse probably isn’t a bad idea.These are available from just any computer retailer.
The buttons are numbered from left to right, assuming you have a right-handed mouse, so button one is on theleft, two in the middle, three on the right. You may see either the numbers or the locations in documentation.
X has a simple built-in copy-and-paste facility. To select text to copy, you click and drag with the leftmouse button. This should select the text to copy, assuming the application you’re using has copy-and-pastesupport. To paste the text, you click the middle mouse button in a different X application. For example, ifyou receive an email containing an URL, you can select the URL with the left button, then click in your webbrowser’s "Location" field with the middle button to paste it in.
10.3.2 X clients
Programs that communicate with the X server are called X clients. Most of these programs will ask the Xserver to display windows on the screen.
You start an X client the same way you start any other Debian program. Simply type the name of the clienton the command line. Try typing xterm into an existing xterm, and a new xterm client will appear on thescreen.
You may notice that the original xterm is now useless, since your shell is waiting for the second xterm tofinish. To avoid this problem, you can run the X client in the background — add a & after the commandname, like this: xterm &. If you forget, you can place a running process in the background. First suspendthe process with C-z, and then place it in the background with the bg command.
If you use a program often, your window manager will generally provide a way to put that program on aconvenient graphical menu.
10.3.3 Troubleshooting
Sometimes when you launch an X client from a graphical menu, you won’t be able to see any error messagesif it fails. You can find any error messages in the file ˜/.xsession-errors.
Chapter 10. The X Window System 62
10.3.4 Leaving the X environment
To leave X, you will need to use a menu. Unfortunately for beginners, this is different for every windowmanager, and for most window managers can be configured in many ways. If there’s an obvious menu,look for an entry like "Exit" or "Close Window Manager". If you don’t see a menu, try clicking each ofthe mouse buttons on the background of the screen. If all else fails, you can forcibly kill the X server bypressing C-A-Backspace. Forcibly killing the server will destroy any unsaved data in open applications.
10.4 Customizing your X startup
When you start X, Debian will run some shell scripts which start your window manager and other X clients.By default, a window manager, an xconsole and an xterm will be started for you.
To customize your X startup, the file /etc/X11/configmust contain the line allow-user-xsession.If it does not, become root and add the line now. Then log back in as yourself and continue the tutorial. 2
To run the clients of your choice when X starts, you create an executable shell script called .xsession inyour home directory.
1. touch ˜/.xsession
This creates the file.
2. chmod u+x ˜/.xsession
Make the file executable.
Once .xsession is created, you need to edit it to do something useful with your favorite text editor.You can do anything you want to in this script. However, when the script’s process terminates, X will alsoterminate.
In practical terms this means that you often end the script with a call to exec. Whatever program youexec will replace the script process with itself, so commands found after the exec line will be ignored.The program you exec will become the new "owner" of the script process, which means that X will terminatewhen this new program’s process terminates.
Say you end your .xsession with the line: exec fvwm. This means that the fvwmwindow manager will berun when X starts. When you quit the fvwm window manager, your X session will end and all other clientswill be shut down. You do not have to use a window manager here; you could exec xterm, in which casetyping exit in that particular xterm would cause the entire X session to end.
2You can see how Debian’s X startup works in the file /etc/X11/Xsession. Note that the behavior of/etc/X11/Xsession can be changed by modifying the file /etc/X11/config, which specifies a few system-wide pref-erences.
Chapter 10. The X Window System 63
If you want to run other clients before doing your exec, you will need to run them in the background.Otherwise .xsession will pause until each client exits, then continue to the next line. See the previoussection on running jobs in the background (basically you want to put an ampersand at the end, e.g. xterm&).
You can take advantage of this behavior, though. If you want to run commands at the end of your X session,you can have your .xsession run a window manager or the like and wait for it to finish. That is, leaveoff the exec and the &, just put fvwm by itself. Then put the commands of your choice after fvwm.
It would probably help to look at a few sample .xsession files. In all the examples, replace fvwm withthe window manager of your choice.
The simplest .xsession just runs a window manager:
exec fvwm
This will run fvwm, and the X session will end when fvwm exits. If you do it without the exec, everythingwill appear to behave the same way, but behind the scenes .xsession will hang around waiting forfvwm, and .xsession will exit after fvwm does. Using exec is slightly better because fvwm replaces.xsession instead of leaving it waiting. You can use the ps or top command to verify this.
A more useful .xsession runs a few clients before starting the window manager. For example, you mightwant some xterms and an xclock whenever you start X. No problem:
xterm &xterm &xclock &exec fvwm
Two xterms and an xclock start up in the background, and then the window manager is launched. When youquit the window manager, you’ll also quit X.
You might try it without the backgrounding just to see what happens. Do this:
xtermxclockexec fvwm
xterm will start, and wait for you to exit it. Then xclock will start; you’ll have to exit xclock before fvwmwill start. The commands are run in sequence, since the script waits for each one to exit.
You can use sequential execution to your advantage. Perhaps you want to keep track of when you stopworking every day:
Chapter 10. The X Window System 64
xterm &xclock &fvwmdate >> ~/logout-time
This will fork off an xterm and an xclock, then run fvwm and wait for it to finish. When you exit fvwm, itwill move on to the last line, which appends the current date and time to the file ˜/logout-time.
Finally, you can have a program other than the window manager determine when X exits:
xclock &fvwm &exec xterm
This script will run xclock and fvwm in the background, and then replace itself with xterm. When you exitthe xterm, your X session will end.
The best way to learn how to use .xsession is to try some of these things out. Again, be sure you usechmod to make it executable — this is a common error.
65
Chapter 11
Text tools
head, tail, grep, wc, tr, sed, perl and so on
11.1 Regular expressions
A regular expression is a description of a set of characters. This description can be used to search througha file by looking for text that matches the regular expression. Regular expressions are analagous to shellwildcards (see ‘Filename expansion ("Wildcards")’ on page 37), but they are both more complicated andmore powerful.
A regular expression is made up of text and metacharacters. A metacharacter is just a character with aspecial meaning. Metacharacters include: . * [] -
�ˆ $.
If a regular expression contains only text (no metacharacters), then it matches that text. For example, theregular expression ’my regular expression’ matches the text ’my regular expression’, andnothing else. Regular expressions are usually case-sensitive.
You can use the egrep command to display all lines in a file which contain a regular expression. Its syntaxis:
egrep ’regexp’ filename1 ... 1
For example, to find all lines in the GPL which contain the word GNU, you type:
egrep ’GNU’ /usr/doc/copyright/GPL
egrep will print the lines to standard output.
1The single quotes are not always needed, but they never hurt.
Chapter 11. Text tools 66
If you want all lines which contain freedom, followed by some indeterminate text, followed by GNU, youcan do:
egrep ’freedom.*GNU’ /usr/doc/copyright/GPL
The . means "any character"; the * means "zero or more of the preceding thing," in this case "zero or moreof any character." So .* matches pretty much any text at all. egrep only matches on a line-by-line basis,so freedom and GNU have to be on the same line.
Here’s a summary of regular expression metacharacters:
. Matches any single character except newline.
* Matches zero or more occurences of the preceding thing. So the expression a* matches 0 or morelowercase a, and .* matches zero or more characters.
[characters] The brackets must contain one or more characters; the whole bracketed expression matchesexactly one character out of the set. So [abc] matches one a, one b, or one c; it does not match 0characters, and it does not match a character other than these three.
ˆ Anchors your search at the beginning of the line. The expression ˆThe matches The only at thebeginning of a line; there can’t be spaces or other text before The. If you want to allow spaces, youcan permit 0 or more space characters like this: ˆ *The.
$ Anchors at the end of the line. end$ requires the text end to be at the end of the line, with nointervening spaces or text.
[ˆcharacters] ˆ reverses the sense of a bracketed character list. So [ˆabc] matches any singlecharacter, except a, b, or c.
[character-character] You can include ranges in a bracketed character list. To match any lower-case letter, use [a-z]. You can have more than one range; so to match the first three or last threeletters of the alphabet, try [a-cx-z]. To get any letter, any case, try [a-zA-Z]. You can mixranges with single characters and with the ˆ metacharacter; for example, [ˆa-zBZ] means "any-thing except a lowercase letter, capital B, or capital Z."
() You can use parentheses to group parts of the regular expression, just as you do in a mathematicalexpression
| | means "or" — you can use it to provide a series of alternative expressions. Usually you want to putthe alternatives in parentheses, like this: c(ad|ab|at) matches cad or cab or cat. Without theparentheses, it would match cad or ab or at instead
�Escapes any special characters; if you want to find a literal *, you type
�*. The slash means to ignore
*’s usual special meaning.

Chapter 11. Text tools 67
Here are some more examples, to help you get a feel for things:
c.pe matches cope, cape, caper
c�.pe matches c.pe, c.per
sto*p matches stp, stop, stoop
car.*n matches carton, cartoon, carmen
xyz.* matches xyz and anything after it; some tools, like egrep, only match until the end of the line.
ˆThe matches The at the beginning of a line
atime$ matches atime at the end of a line
ˆOnly$ matches a line which consists solely of the word Only— no spaces, no other characters, nothing.Only Only is allowed
b[aou]rn matches barn, born, burn
Ver[D-F] matches VerD, VerE, VerF
Ver[ˆ0-9] matches Ver followed by any non-digit
the[ir][re] matches their, therr, there, theie
[A-Za-z][A-Za-z]* matches any word which consists of only letters, and at least one letter. Will notmatch numbers or spaces
68
Chapter 12
File tools
12.1 Backup tools
tar, cpio, dump; also large-scale copying, cp -a etc.
(Perhaps something on how to back up only /home and /etc if you only have a floppy drive, since manyhome users won’t have a tape drive)
How to use tar to copy lots of files, or back up your files. Tarballs. I’m thinking this should be a brief sectionaimed at single-user systems, with a more thorough sysadmin discussion in a different manual.
Backup commands (contributed by Oliver Elphick, section to be cleaned up and elaborated):
dump - dumps one filesystem at a time; its command options assume that you are using half-inch tape(maximum 45Mb per reel) so it’s a bit annoying when using DAT (2Gb or more). Probably the best forregular backups. Can’t be used for NFS-mounted filesystems.
cpio - ‘find [directories] -print | cpio -ovH newc -B >/dev/st0’
tar - ‘tar cvf /dev/st0 [directories]’
afio - like cpio; supports pre-compression of files before archiving.
tob - front-end for afio
12.2 File compression with gzip
Often it would be nice to make a file smaller: say to download it faster, or so it takes up less space on yourdisk. The program to do this is called gzip (GNU Zip).
1. cd; cp /etc/profile ./mysamplefile
Chapter 12. File tools 69
Switch to your home directory, then copy an arbitrarily chosen file (/etc/profile) to your currentdirectory in the process renaming it mysamplefile. This gives us a file to play with using gzip.
2. ls -l
List the contents of the current directory. Note the size of mysamplefile.
3. gzip mysamplefile
Compress mysamplefile.
4. ls -l
Observe the results: mysamplefile is now called mysamplefile.gz. It’s also a good bitsmaller.
5. gunzip mysamplefile.gz; ls -l
Uncompress. Observe that mysamplefile has returned to its original state. Notice that to uncom-press one uses gunzip, not gzip.
6. rm mysamplefile
Remove the file, since it was just to practice with.
12.3 Splitting files into smaller pieces
Sometimes a file is too big to fit on a disk, or you don’t want to send a huge file over the net in a singlechunk. You can split the file using the split utility, and reassemble it using the cat (concatenate) utility.
1. cd; cp /bin/bash myfile; ls -l myfile
Copy the bash executable to a file in your home directory called myfile. Observe that myfileoccupies a little over 400,000 bytes, or around 400 kilobytes.
2. split -b100k myfile myprefix
Splits the file into sections of 100 kilobytes, naming the sections myprefixaa, myprefixab, etc.Type ls -l so see the results.
You can specify any number after the -b: choose one that makes sense. If you leave off the k, itwill be understood as bytes instead of kilobytes. If you use m instead of k, it will be understood asmegabytes.
3. cat myprefix* > mynewfile
Concatenate all the files and write them to mynewfile. (The * and > are tricks you’ll learn inanother chapter .)
4. rm myfile mynewfile myprefix*
Remove everything.
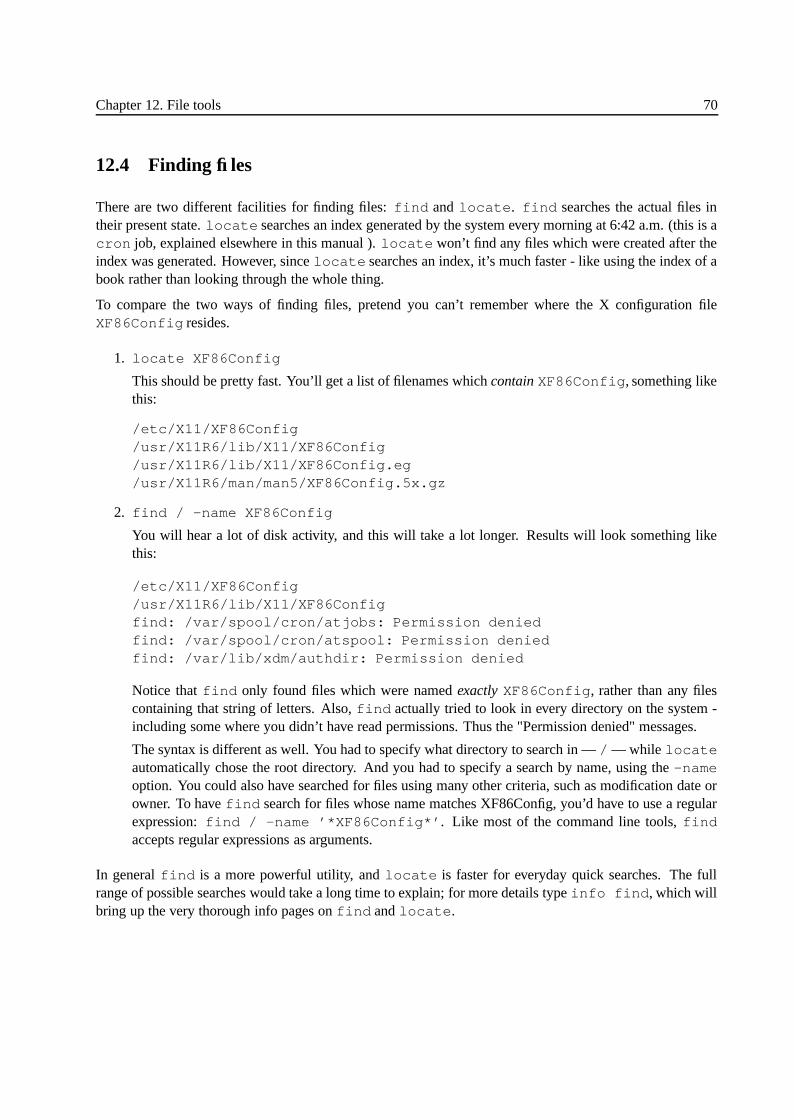
Chapter 12. File tools 70
12.4 Finding files
There are two different facilities for finding files: find and locate. find searches the actual files intheir present state. locate searches an index generated by the system every morning at 6:42 a.m. (this is acron job, explained elsewhere in this manual ). locate won’t find any files which were created after theindex was generated. However, since locate searches an index, it’s much faster - like using the index of abook rather than looking through the whole thing.
To compare the two ways of finding files, pretend you can’t remember where the X configuration fileXF86Config resides.
1. locate XF86Config
This should be pretty fast. You’ll get a list of filenames which contain XF86Config, something likethis:
/etc/X11/XF86Config/usr/X11R6/lib/X11/XF86Config/usr/X11R6/lib/X11/XF86Config.eg/usr/X11R6/man/man5/XF86Config.5x.gz
2. find / -name XF86Config
You will hear a lot of disk activity, and this will take a lot longer. Results will look something likethis:
/etc/X11/XF86Config/usr/X11R6/lib/X11/XF86Configfind: /var/spool/cron/atjobs: Permission deniedfind: /var/spool/cron/atspool: Permission deniedfind: /var/lib/xdm/authdir: Permission denied
Notice that find only found files which were named exactly XF86Config, rather than any filescontaining that string of letters. Also, find actually tried to look in every directory on the system -including some where you didn’t have read permissions. Thus the "Permission denied" messages.
The syntax is different as well. You had to specify what directory to search in — / — while locateautomatically chose the root directory. And you had to specify a search by name, using the -nameoption. You could also have searched for files using many other criteria, such as modification date orowner. To have find search for files whose name matches XF86Config, you’d have to use a regularexpression: find / -name ’*XF86Config*’. Like most of the command line tools, findaccepts regular expressions as arguments.
In general find is a more powerful utility, and locate is faster for everyday quick searches. The fullrange of possible searches would take a long time to explain; for more details type info find, which willbring up the very thorough info pages on find and locate.
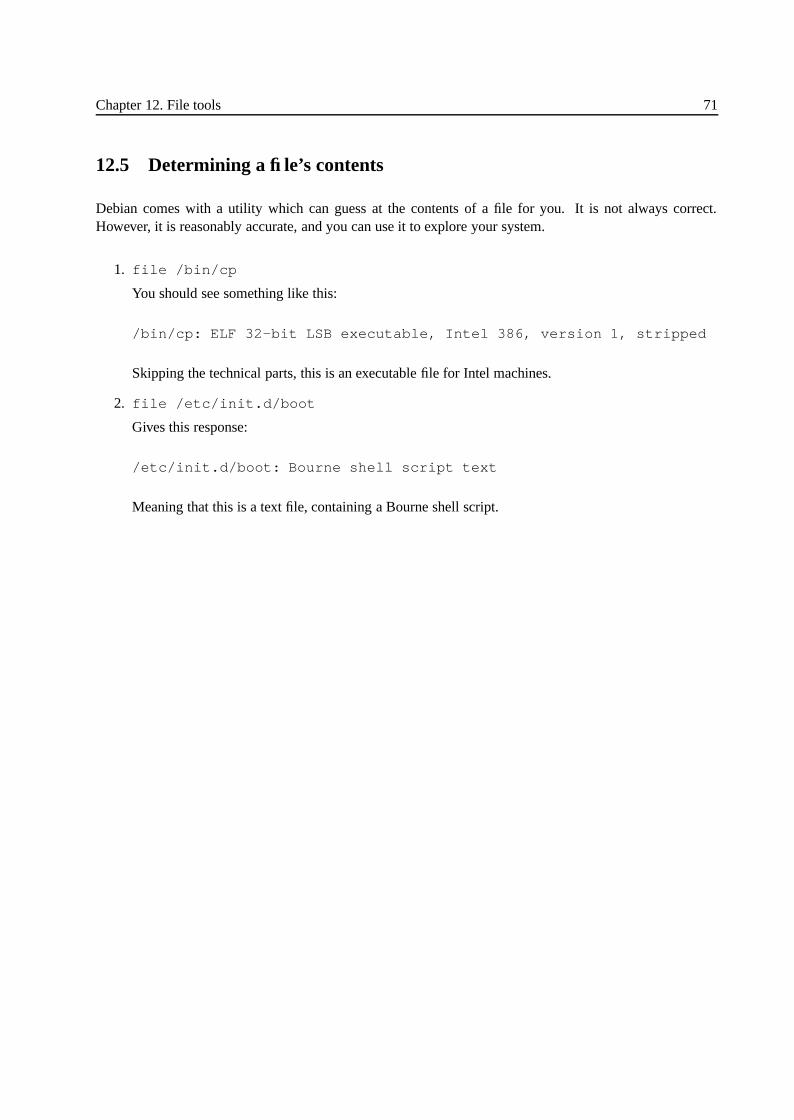
Chapter 12. File tools 71
12.5 Determining a file’s contents
Debian comes with a utility which can guess at the contents of a file for you. It is not always correct.However, it is reasonably accurate, and you can use it to explore your system.
1. file /bin/cp
You should see something like this:
/bin/cp: ELF 32-bit LSB executable, Intel 386, version 1, stripped
Skipping the technical parts, this is an executable file for Intel machines.
2. file /etc/init.d/boot
Gives this response:
/etc/init.d/boot: Bourne shell script text
Meaning that this is a text file, containing a Bourne shell script.
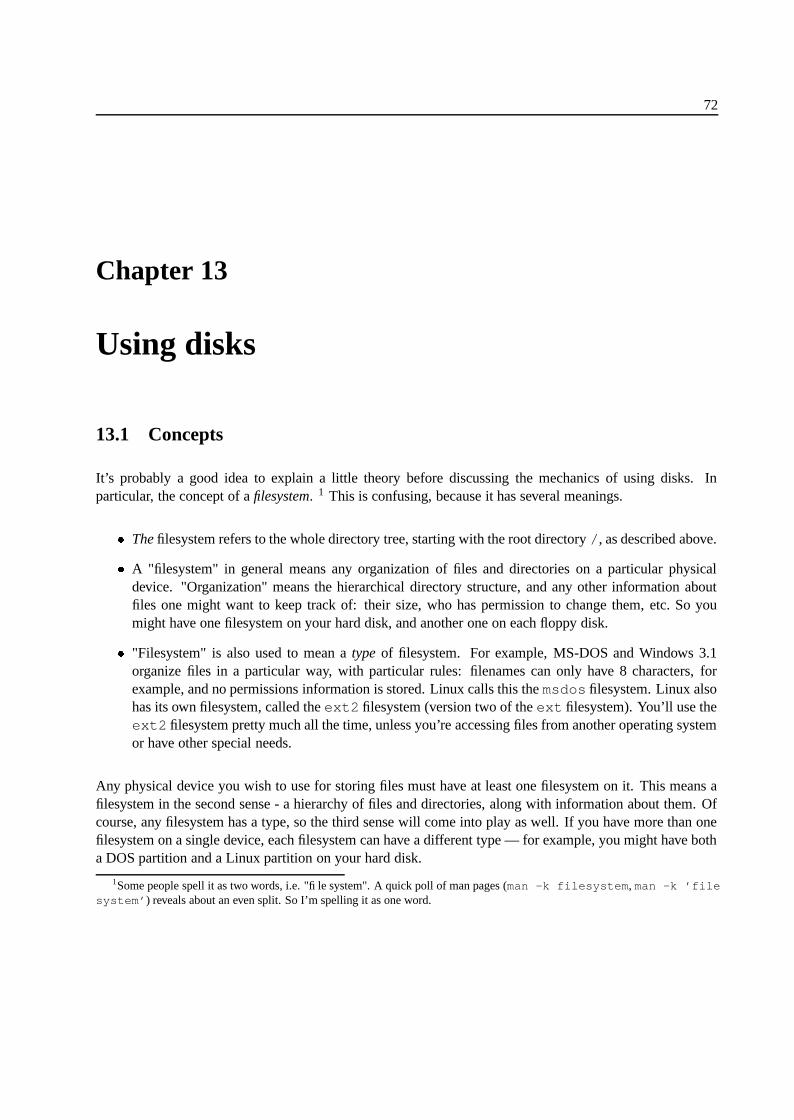
72
Chapter 13
Using disks
13.1 Concepts
It’s probably a good idea to explain a little theory before discussing the mechanics of using disks. Inparticular, the concept of a filesystem. 1 This is confusing, because it has several meanings.
� The filesystem refers to the whole directory tree, starting with the root directory /, as described above.
� A "filesystem" in general means any organization of files and directories on a particular physicaldevice. "Organization" means the hierarchical directory structure, and any other information aboutfiles one might want to keep track of: their size, who has permission to change them, etc. So youmight have one filesystem on your hard disk, and another one on each floppy disk.
� "Filesystem" is also used to mean a type of filesystem. For example, MS-DOS and Windows 3.1organize files in a particular way, with particular rules: filenames can only have 8 characters, forexample, and no permissions information is stored. Linux calls this the msdos filesystem. Linux alsohas its own filesystem, called the ext2 filesystem (version two of the ext filesystem). You’ll use theext2 filesystem pretty much all the time, unless you’re accessing files from another operating systemor have other special needs.
Any physical device you wish to use for storing files must have at least one filesystem on it. This means afilesystem in the second sense - a hierarchy of files and directories, along with information about them. Ofcourse, any filesystem has a type, so the third sense will come into play as well. If you have more than onefilesystem on a single device, each filesystem can have a different type — for example, you might have botha DOS partition and a Linux partition on your hard disk.
1Some people spell it as two words, i.e. "file system". A quick poll of man pages (man -k filesystem, man -k ’filesystem’) reveals about an even split. So I’m spelling it as one word.

Chapter 13. Using disks 73
It’s important to distinguish the filesystem from the low-level format of the disk. In the DOS and Macintoshworlds, the filesystem is called the high-level format. When you format a disk using one of those operatingsystems, generally you both perform a low-level format and create a file system (high-level format). OnGNU and Unix systems, one generally says simply "format" to mean low-level format, and "making afilesystem" to mean high-level format.
Formatting has to do with the particulars of the physical device, such as the exact physical location of yourdata on a floppy disk (on the edge or near the center of the disk for example). The filesystem is the level oforganization you have to worry about — names of directories and files, their sizes, etc.
13.2 mount and /etc/fstab
This section describes how to mount a floppy or Zip disk, the /dev directory, and distributing the directorytree over multiple physical devices or partitions.
13.2.1 Mounting a filesystem
On a GNU/Linux system there’s no necessary correspondence between directories and physical devices, asthere is in Windows where each drive has its own directory tree beginning with a letter (such as C:
�).
Instead, each physical device such as a hard disk or floppy disk has one or more filesystems on it. Inorder to make a filesystem accessible, it’s assigned to a particular directory in another filesystem. To avoidcircularity, the root filesystem (which contains the root directory /) is not contained by any other filesystem— you have access to it automatically when you boot Debian.
A directory in one filesystem which contains another filesystem is known as a mount point. A mount point isa directory in a first filesystem on one device (such as your hard disk) which "contains" a second filesystem,perhaps on another device (such as a floppy disk). To access a filesystem, you must mount it at some mountpoint.
So, for example, you might mount a CD at the mount point /cdrom. This means that if you look in thedirectory /cdrom, you’ll see the contents of the CD. The /cdrom directory itself is actually on your harddisk. For all practical purposes the contents of the CD become a part of the root filesystem, and whentyping commands and using programs it doesn’t make any difference what the actual physical location ofthe files is. You could have created a directory on your hard disk called /cdrom, and put some files in it,and everything would behave in exactly the same way. Once you mount a filesystem, there’s no need to payany attention to physical devices.
However, before mounting a filesystem, or to actually create a filesystem on a disk that doesn’t have oneyet, it’s necessary to refer to the devices themselves. All devices have names, and these are located in the/dev directory. If you type ls /dev now, you’ll see a pretty lengthy list of every possible device youcould have on your Debian system.
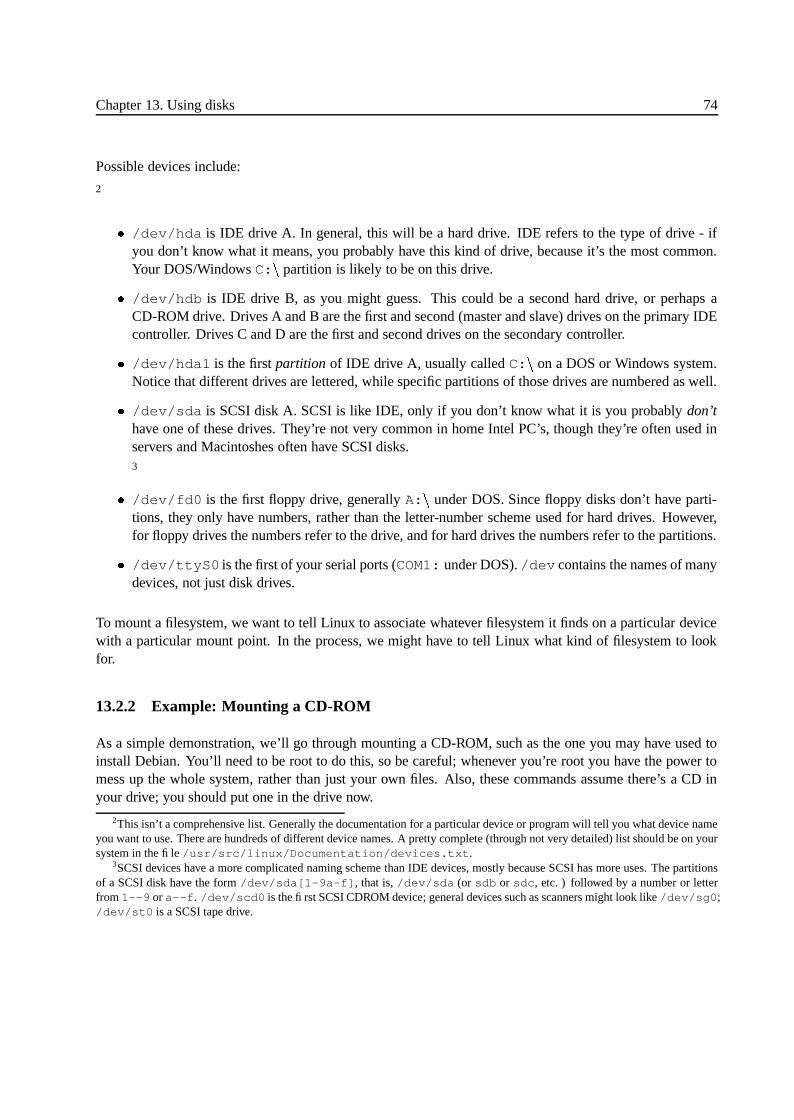
Chapter 13. Using disks 74
Possible devices include:
2
� /dev/hda is IDE drive A. In general, this will be a hard drive. IDE refers to the type of drive - ifyou don’t know what it means, you probably have this kind of drive, because it’s the most common.Your DOS/Windows C:
�partition is likely to be on this drive.
� /dev/hdb is IDE drive B, as you might guess. This could be a second hard drive, or perhaps aCD-ROM drive. Drives A and B are the first and second (master and slave) drives on the primary IDEcontroller. Drives C and D are the first and second drives on the secondary controller.
� /dev/hda1 is the first partition of IDE drive A, usually called C:�
on a DOS or Windows system.Notice that different drives are lettered, while specific partitions of those drives are numbered as well.
� /dev/sda is SCSI disk A. SCSI is like IDE, only if you don’t know what it is you probably don’thave one of these drives. They’re not very common in home Intel PC’s, though they’re often used inservers and Macintoshes often have SCSI disks.3
� /dev/fd0 is the first floppy drive, generally A:�
under DOS. Since floppy disks don’t have parti-tions, they only have numbers, rather than the letter-number scheme used for hard drives. However,for floppy drives the numbers refer to the drive, and for hard drives the numbers refer to the partitions.
� /dev/ttyS0 is the first of your serial ports (COM1: under DOS). /dev contains the names of manydevices, not just disk drives.
To mount a filesystem, we want to tell Linux to associate whatever filesystem it finds on a particular devicewith a particular mount point. In the process, we might have to tell Linux what kind of filesystem to lookfor.
13.2.2 Example: Mounting a CD-ROM
As a simple demonstration, we’ll go through mounting a CD-ROM, such as the one you may have used toinstall Debian. You’ll need to be root to do this, so be careful; whenever you’re root you have the power tomess up the whole system, rather than just your own files. Also, these commands assume there’s a CD inyour drive; you should put one in the drive now.
2This isn’t a comprehensive list. Generally the documentation for a particular device or program will tell you what device nameyou want to use. There are hundreds of different device names. A pretty complete (through not very detailed) list should be on yoursystem in the file /usr/src/linux/Documentation/devices.txt.
3SCSI devices have a more complicated naming scheme than IDE devices, mostly because SCSI has more uses. The partitionsof a SCSI disk have the form /dev/sda[1-9a-f], that is, /dev/sda (or sdb or sdc, etc. ) followed by a number or letterfrom 1--9 or a--f. /dev/scd0 is the first SCSI CDROM device; general devices such as scanners might look like /dev/sg0;/dev/st0 is a SCSI tape drive.
Chapter 13. Using disks 75
1. su
If you haven’t already, you need to either log in as root or gain root privileges with the su (super user)command. If you use su, enter the root password when prompted.
2. ls /cdrom
See what’s in the /cdrom directory before you start. If you don’t have a /cdrom directory, you mayhave to make one using mkdir /cdrom.
3. mount
Typing simply mount with no arguments lists the currently mounted filesystems.
4. mount -t iso9660 CD device /cdrom
For this command, you should substitute the name of your CD-ROM device for CD device in theabove command line. If you aren’t sure, /dev/cdrom is a good guess since the install process shouldhave created this symbolic link on the system. If that fails, try the different IDE devices: /dev/hdc,etc. You should see a message like:
mount: block device /dev/hdc is write-protected, mounting read-only
The -t option specifies the type of the filesystem, in this case iso9660. Most CDs are iso9660.The next argument is the name of the device to mount, and the final argument is the mount point.There are many other arguments to mount; see the manual page for details.
Once a CD is mounted, you may find that your drive tray will not open. You must unmount the CDbefore removing it.
5. ls /cdrom
Confirm that /cdrom now contains whatever is on the CD in your drive.
6. mount
Look at the list of filesystems again, noticing that your CD drive is now mounted.
7. umount /cdrom
This unmounts the CD. It’s now safe to remove the CD from the drive. Notice that the command isumount with no "n", even though it’s used to unmount the filesystem.
8. exit
Don’t leave yourself logged on as root. Log out immediately, just to be safe.
Chapter 13. Using disks 76
13.2.3 /etc/fstab: Automating the mount process
The file /etc/fstab (it stands for "file system table") contains descriptions of filesystems that you mountoften. These filesystems can then be mounted with a shorter command, such as mount /cdrom. You canalso configure filesystems to mount automatically when the system boots. You’ll probably want to mountall of your hard disk filesystems when you boot.
Look at this file now, by typing more /etc/fstab. It will have two or more entries that were configuredautomatically when you installed the system. It probably looks something like this:
# /etc/fstab: static file system information.## <file system> <mount point> <type> <options> <dump > <pass>/dev/hda1 / ext2 defaults 0 1/dev/hda3 none swap sw 0 0proc /proc proc defaults 0 0
/dev/hda5 /tmp ext2 defaults 0 2/dev/hda6 /home ext2 defaults 0 2/dev/hda7 /usr ext2 defaults 0 2
/dev/hdc /cdrom iso9660 ro,noauto 0 0/dev/fd0 /floppy auto noauto,sync 0 0
The first column lists the device the filesystem resides on. The second lists the mount point, the thirdthe filesystem type. The line beginning by proc is a special filesystem . Notice that the swap partition(/dev/hda3 in the example) has no mount point, so the mount point column contains none.
The last three columns may require some explanation.
The fifth column is used by the dump utility to decide when to back up the filesystem. In most cases youcan put 0 here.
The sixth column is used by fsck to decide in what order to check filesystems when you boot the system.The root filesystem should have a 1 in this field, filesystems which don’t need to be checked (such as theswap partition) should have a 0, and all other filesystems should have a 2. It’s worth noting that the swappartition isn’t exactly a filesystem in the sence that it does not contain files and directories, but is just usedby the Linux kernel as secondary memory. However, for historical reasons, the swap partitions are still listedin the same file than the filesystems.
Column four contains one or more options to use when mounting the filesystem. Here’s a brief summary(some of these probably won’t make much sense yet — they’re here for future reference):
async and sync Do I/O synchronously or asynchronously. Synchronous I/O writes changes to files im-mediately, while asynchronous I/O may keep data in buffers and write it later, for efficiency reasons.
Chapter 13. Using disks 77
ro and rw Mount the filesystem read-only or read-write. If you don’t need to make any changes to thefilesystem, it’s a good idea to mount it read-only so you don’t accidentally mess something up. Also,read-only devices (such as CD-ROM drives and floppy disks with write protection tabs) should bemounted read-only.
auto and noauto When the system boots, or whenever you type mount -a, mount tries to mount allthe filesystems listed in /etc/fstab. If you don’t want it to automatically mount a filesystem, youshould use the noauto option. It’s probably a good idea to use noautowith removable media suchas floppy disks, because there may or may not be a disk in the drive. You’ll want to mount thesefilesystems manually after you put in a disk.
dev and nodev Use or ignore device files on this filesystem. You might use nodev if you mount the rootdirectory of another system on your system — you don’t want your system to try to use the deviceson the other machine.
user and nouser Permit or forbid ordinary users to mount the filesystem. nousermeans that only rootcan mount the filesystem. This is the normal arrangement. You might use the user option to accessthe floppy drive without having to be root.
exec and noexec Allow or do not allow the execution of files on this filesystem. Probably you won’tneed these options.
suid and nosuid Allow or do not allow the suid bit to take effect. Probably you won’t need theseoptions.
defaults Equivalent to: rw, dev, suid, exec, auto, nouser, async. You can specify defaultsfollowed by other options to override specific aspects of defaults.
13.2.4 Removable disks (floppies, Zip disks, etc. )
Add the following lines to your /etc/fstab file:
/dev/sda1 /mnt/zip ext2 noauto,user 0 0/dev/sda4 /mnt/dos msdos noauto,user 0 0
From then on, you’ll be able to mount the DOS formated Zip disks with the command mount /mnt/dos,and Linux formated Zip disks with the command mount /mnt/zip. 4
4If you have SCSI hard disks in your system, you’ll have to change sda by sdb or sdc, etc. .. in the example above.
Chapter 13. Using disks 78
13.3 PPP
13.3.1 Introduction
If you connect to the internet over a phone line, you’ll want to use PPP (Point-To-Point Protocol). This is thestandard connection method offered by ISPs (Internet Service Providers). In addition to using PPP to dialyour ISP, you can have your computer listen for incoming connections — this lets you dial your computerfrom a remote location.
This section is a quick-start no-frills guide to setting up PPP on Debian. If it turns out that you need moredetails, see the excellent PPP HOWTO (http://metalab.unc.edu/LDP/HOWTO/PPP-HOWTO.html) from the Linux Documentation Project. The HOWTO goes into much more detail if you’re interestedor have unique needs.
13.3.2 Preparation
Configuring PPP on GNU/Linux is straightforward once you have all the information you’ll need. Debianmakes things even easier with its simple configuration tools.
Before you start, be sure you have all the information provided by your ISP. This might include:
� Username or login
� Password
� Your static IP (Internet Protocol) address, if any (these look like 209.81.8.242)
� Bitmask (this will look something like 255.255.255.248)
� The IP addresses of your ISPs name server (or DNS).
� Any special login procedure required by the ISP.
Next, you’ll want to investigate your hardware setup: whether your modem works with GNU/Linux, andwhich serial port it’s connected to.
There’s a simple rule which determines whether your modem will work. If it’s a "WinModem" or "host-based modem", it won’t work. These modems are cheap because they have very little functionality, andrequire the computer to make up for their shortcomings. Unfortunately, this means they are complex toprogram, and manufacturers generally do not make the specifications available for developers.
If you have a modem with its own on-board circuitry, you should have no trouble at all.
On GNU/Linux systems, the serial ports are referred to as /dev/ttyS0, /dev/ttyS1, and so on. Yourmodem is almost certainly connected to either port 0 or port 1, equivalent to COM1: and COM2: under
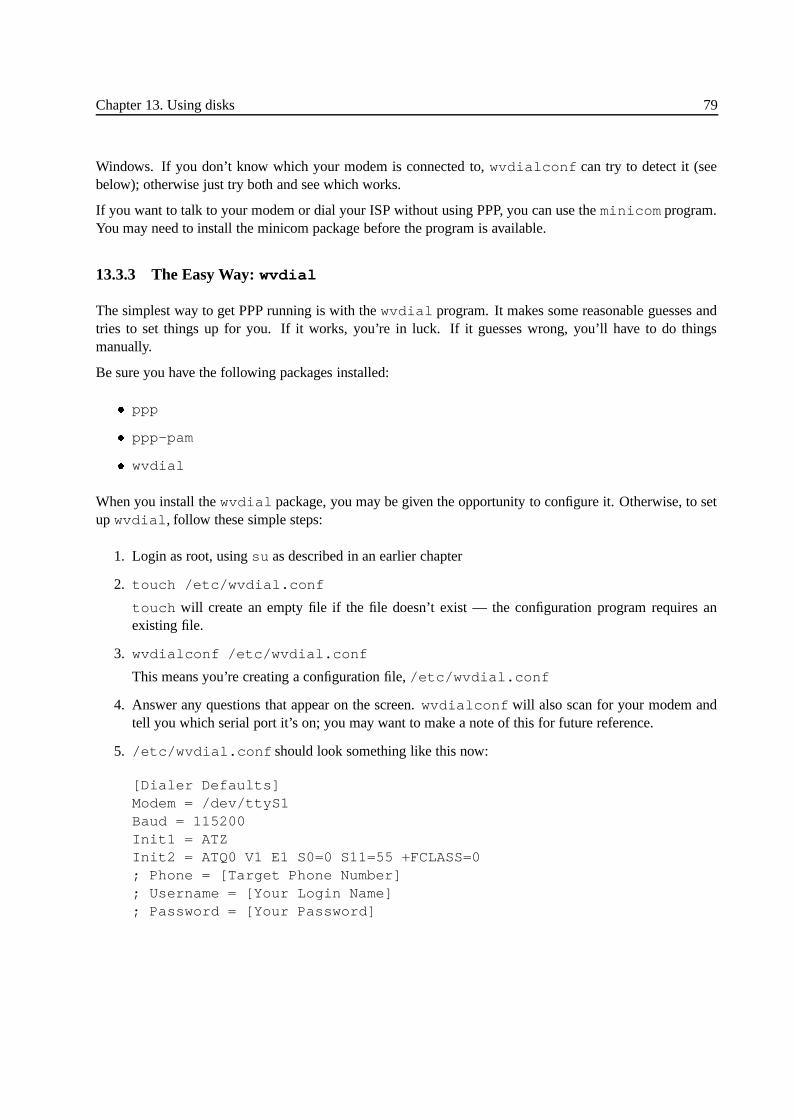
Chapter 13. Using disks 79
Windows. If you don’t know which your modem is connected to, wvdialconf can try to detect it (seebelow); otherwise just try both and see which works.
If you want to talk to your modem or dial your ISP without using PPP, you can use the minicom program.You may need to install the minicom package before the program is available.
13.3.3 The Easy Way: wvdial
The simplest way to get PPP running is with the wvdial program. It makes some reasonable guesses andtries to set things up for you. If it works, you’re in luck. If it guesses wrong, you’ll have to do thingsmanually.
Be sure you have the following packages installed:
� ppp
� ppp-pam
� wvdial
When you install the wvdial package, you may be given the opportunity to configure it. Otherwise, to setup wvdial, follow these simple steps:
1. Login as root, using su as described in an earlier chapter
2. touch /etc/wvdial.conf
touch will create an empty file if the file doesn’t exist — the configuration program requires anexisting file.
3. wvdialconf /etc/wvdial.conf
This means you’re creating a configuration file, /etc/wvdial.conf
4. Answer any questions that appear on the screen. wvdialconf will also scan for your modem andtell you which serial port it’s on; you may want to make a note of this for future reference.
5. /etc/wvdial.conf should look something like this now:
[Dialer Defaults]Modem = /dev/ttyS1Baud = 115200Init1 = ATZInit2 = ATQ0 V1 E1 S0=0 S11=55 +FCLASS=0; Phone = [Target Phone Number]; Username = [Your Login Name]; Password = [Your Password]

Chapter 13. Using disks 80
Just replace the information in brackets with the proper information and remove the semicolons fromthe beginning of those lines and you’re done! Here is what a completed wvdial.conf file shouldlook like:
[Dialer Defaults]Modem = /dev/ttyS1Baud = 115200Init1 = ATZInit2 = ATQ0 V1 E1 S0=0 S11=55 +FCLASS=0Phone = 5551212Username = beavisPassword = password
Now that wvdial.conf is set up, to connect to your ISP just type wvdial. If it doesn’t work, you’llprobably have to delve into manual PPP configuration.
13.3.4 Doing It Manually
This still isn’t all that difficult, though it’s slightly harder than wvdial. The quick-and-easy summary: typepppconfig as root, answer the questions, then type pon to log on, and poff to log off. We’ll go into alittle more detail though.
81
Chapter 14
Removing and installing software
14.1 The dpkg package utility
14.2 What a package maintenance utility does
An application or utility program usually involves quite a few files. It might involve libraries, data fileslike game scenarios or icons, configuration files, manual pages and documentation. When you install theprogram, you want to make sure you have all the files you need in the right place.
You’d also like to be able to uninstall the program. When you uninstall, you want to be sure all the associatedfiles are deleted. However, if a program you still have on the system needs those files, you want to be sureyou keep them.
Finally, you’d like to be able to upgrade a program. When you upgrade, you want to delete obsolete filesand add new ones, without breaking any part of the system.
The Debian package system solves these problems. It allows you to install, remove, and upgrade softwarepackages, which are neat little bundles containing the program files and information that helps the computermanage them properly. Debian packages have filenames ending in the extension .deb, and they’re availableon the ftp site or on your official Debian CD-ROM.
14.3 Apt
14.3.1 Configuring Apt
Debian now supplies a tool named Apt (for "A Package Tool") to help the administrators to add or removesoftware more easily. Your first task will be to customize the /etc/apt/sources.list configuration
Chapter 14. Removing and installing software 82
file. This package resource list is used to locate archives of the package distribution system in use on the sys-tem. The source list is designed to support any number of active sources and a variety of source media. Thefile lists one source per line, with the most preferred source listed first. The format of a sources.listentry is:
deb uri distribution [component1] [component2] [...]
The URI for the deb type must specify the base of the Debian distribution, from which APT will find theinformation it needs. distribution can specify an exact path, in which case the components must be omittedand distribution must end with a slash (/). This is useful for when only a particular sub-section of the archivedenoted by the URI is of interest. If distribution does not specify an exact path, at least one component mustbe present.
The currently recognized URI types are cdrom, file, http, and ftp.
file The file scheme allows an arbitrary directory in the file system to be considered an archive. This isuseful for NFS mounts and local mirrors or archives.
cdrom The cdrom scheme allows APT to use a local CDROM drive with media swapping. Use the apt-cdrom(8) program to create cdrom entires in the source list.
http The http scheme specifies an HTTP server for the archive. If an environment variable $http_proxy isset with the format http://server:port/, the proxy server specified in $http_proxy will be used. Usersof authenticated HTTP/1.1 proxies may use a string of the format http://user:pass@server:port/. Notethat this is an insecure method of authentication.
ftp The ftp scheme specifies an FTP server for the archive. APT´s FTP behavior is highly configurable;for more information see the apt.conf(5) manual page.
copy The copy scheme is identical to the file scheme except that packages are copied into the cache direc-tory instead of used directly at their location. This is usefull for people using a zip disk to copy filesaround with APT.
A few examples:
deb http://www.debian.org/archive stable main contrib
Uses HTTP to access the archive at www.debian.org, and uses the stable/main and stable/contrib areas.
deb ftp://ftp.debian.org/debian unstable main contrib non-free
Uses FTP to access the archive at ftp.debian.org, under the /debian directory, and uses the unstable/main,unstable/contrib and unsunstable/non-free areas.

Chapter 14. Removing and installing software 83
deb ftp://ftp.debian.org/debian stable main
Uses FTP to access the archive at ftp.debian.org, under the /debian directory, and uses the stable/main area.
If this line appears as well as the one in the previous example in sources.list, a single FTP sessionwill be used for both resource lines.
deb file:/home/vincent/debian stable main contrib non-free
Uses the archive stored locally (or NFS mounted) at /home/vincent/debian for stable/main, stable/contrib,and stable/non-free.
14.3.2 Using apt-get.
apt-get is the command-line tool for handling packages, and may be considered the user’s "back-end" toapt. apt-get is very straightforward to use.
apt-get [options] [command] [package ...]
Where command is one of:
update update is used to resynchronize the package overview files from their sources. The overviews ofavailable packages are fetched from the location(s) specified in /etc/apt/sources.list. Forexample, when using a Debian archive, this command retrieves and scans the Packages.gz files, sothat information about new and updated packages is available. An update should always be performedbefore an upgrade dist-upgrade.
upgrade upgrade is used to install the newest versions of all packages currently installed on the systemfrom the sources enumerated in /etc/apt/sources.list. Packages currently installed withnew versions available are retrieved and upgraded; under no circumstances are currently installedpackages removed, or packages not already installed retrieved and installed. New versions of currentlyinstalled packages that cannot be upgraded without changing the install status of another package willbe left at their current version. An apt-get updatemust be performed first so that apt-get knowsthat new versions of packages are available.
dist-upgrade dist-upgrade, in addition to performing the function of upgrade, also intelligently han-dles changing dependencies with new versions of packages; apt-get has a "smart" conflict resolutionsystem, and it will attempt to upgrade the most important packages at the expense of less importantones if necessary. The /etc/apt/sources.list file contains a list of locations from which toretrieve desired package files.
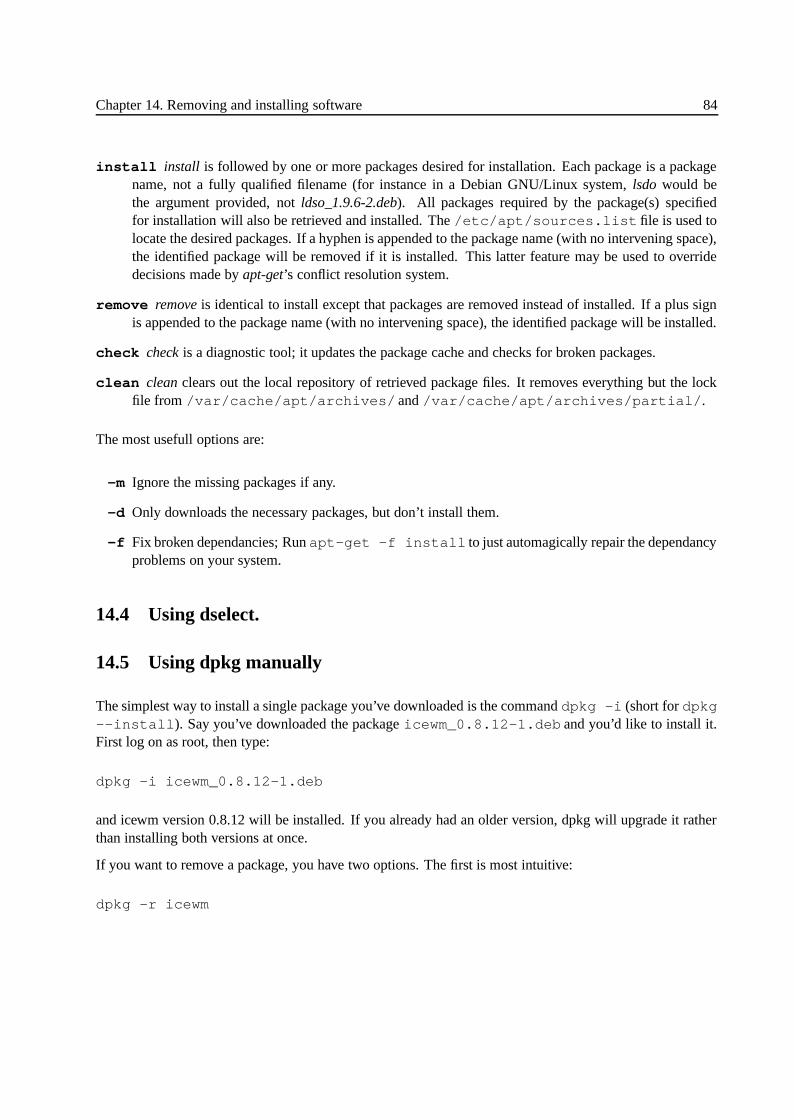
Chapter 14. Removing and installing software 84
install install is followed by one or more packages desired for installation. Each package is a packagename, not a fully qualified filename (for instance in a Debian GNU/Linux system, lsdo would bethe argument provided, not ldso_1.9.6-2.deb). All packages required by the package(s) specifiedfor installation will also be retrieved and installed. The /etc/apt/sources.list file is used tolocate the desired packages. If a hyphen is appended to the package name (with no intervening space),the identified package will be removed if it is installed. This latter feature may be used to overridedecisions made by apt-get’s conflict resolution system.
remove remove is identical to install except that packages are removed instead of installed. If a plus signis appended to the package name (with no intervening space), the identified package will be installed.
check check is a diagnostic tool; it updates the package cache and checks for broken packages.
clean clean clears out the local repository of retrieved package files. It removes everything but the lockfile from /var/cache/apt/archives/ and /var/cache/apt/archives/partial/.
The most usefull options are:
-m Ignore the missing packages if any.
-d Only downloads the necessary packages, but don’t install them.
-f Fix broken dependancies; Run apt-get -f install to just automagically repair the dependancyproblems on your system.
14.4 Using dselect.
14.5 Using dpkg manually
The simplest way to install a single package you’ve downloaded is the command dpkg -i (short for dpkg--install). Say you’ve downloaded the package icewm_0.8.12-1.deb and you’d like to install it.First log on as root, then type:
dpkg -i icewm_0.8.12-1.deb
and icewm version 0.8.12 will be installed. If you already had an older version, dpkg will upgrade it ratherthan installing both versions at once.
If you want to remove a package, you have two options. The first is most intuitive:
dpkg -r icewm
Chapter 14. Removing and installing software 85
This will remove the icewm package (-r is short for --remove). Note that you give only the ’icewm’ for--remove, while --install requires the entire .deb filename.
--remove will leave configuration files for the package on your system. A configuration file is defined asany file you might have edited in order to customize the program for your system or your preferences. Thisway, if you later reinstall the package, you won’t have to set everything up a second time.
However, you might want to erase the configuration files too, so dpkg also provides a --purge option.dpkg --purge icewm will permanently delete every last file associated with the icewm package.
14.6 Compiling software yourself
You’ll have to have -dev packages installed.
Put it in /usr/local, /opt, or your home directory.
The configure –prefix; make; make install routine.
14.7 Proprietary software not in .deb format
What to do with this annoying stuff (wrapper packages, /usr/local)
86
Chapter 15
Troubleshooting
15.1 Debian is frozen or crashed!
If your Debian system freezes up, it is possibly a bug and the system has crashed. However, it’s fair tosay that this doesn’t happen very often — many people go for months or even years without a crash, evenunder heavy use. GNU/Linux is extremely reliable. If you have problems more often than this, somethingis probably wrong; ask for help (see ‘Getting help from a person’ on page 28).
However, it is much more common for the screen to freeze due to a bug in the X server, especially whenswitching to and from the X virtual console. The newer X servers are more likely to do this, or simply crash;it’s hard for the XFree86 project to keep up with the latest features of every video card available.
If the screen freezes, the system is usually still alive, you simply can’t interact with it from the console. Ifyou’re on a network, you should be able to log in from another workstation. Once logged in you can rebootin an orderly way (i.e. type reboot). If you aren’t on a network, pressing C-A-DELwill work most of thetime. If neither of these works, you may have to simply shut down the system and let fsck repair the diskon your next boot.
15.2 My terminal isn’t behaving properly
Sometimes you terminal will get stuck in reverse video mode, will refuse to move to a new line when youpress return, will print garbage characters, or otherwise not work properly. This is almost always the resultof attempting to view a binary file with cat or more (sometimes it’s also caused by a bug in a program).You can try to recover by entering the reset command. If it did nothing, try typing echo C-vESCc (ie:press C-v, then ESC, then ’c’). If that fails, log out and back in.
The problem is that terminals are controlled with special control sequences which tell them to enter reversevideo mode, position the cursor, etc. If you send a binary file to the terminal, the file may happen to containthese control sequences. Thus the terminal will get confused.
Chapter 15. Troubleshooting 87
15.3 The computer beeps when I press a key, and my screen shows a text fileand/or a lot of ˜ symbols.
You’ve inadvertently gotten stuck in vi. See ‘Creating and editing a text file with vi’ on page 49.
88
Chapter 16
Advanced topics
(Should advanced topics be here? I think it would be nice to have some of these, just to show people thepossibilities and give some conceptual explanation that won’t really be in a reference manual. Also it alwaysfeels nice to make it to a chapter called "advanced topics". Self-esteem booster for the newbie. :)
16.1 Introduction to shell scripting
16.1.1 What and why
Automate simple tasks.
16.1.2 A simple example
Ideas?
16.2 Advanced files
16.2.1 The real nature of files: hard links and inodes
Each file on your system is represented by an inode (for Information Node; pronounced "eye-node"): aninode contains all the information about the file. However, the inode is not directly visible. Instead, eachinode is linked into the filesystem by one or more hard links. Hard links contain the name of the file, and theinode number. The inode contains the file itself, i.e., the location of the information being stored on disk,its access permissions, the type of the file, and so on. The system can find any inode once it has the inodenumber.
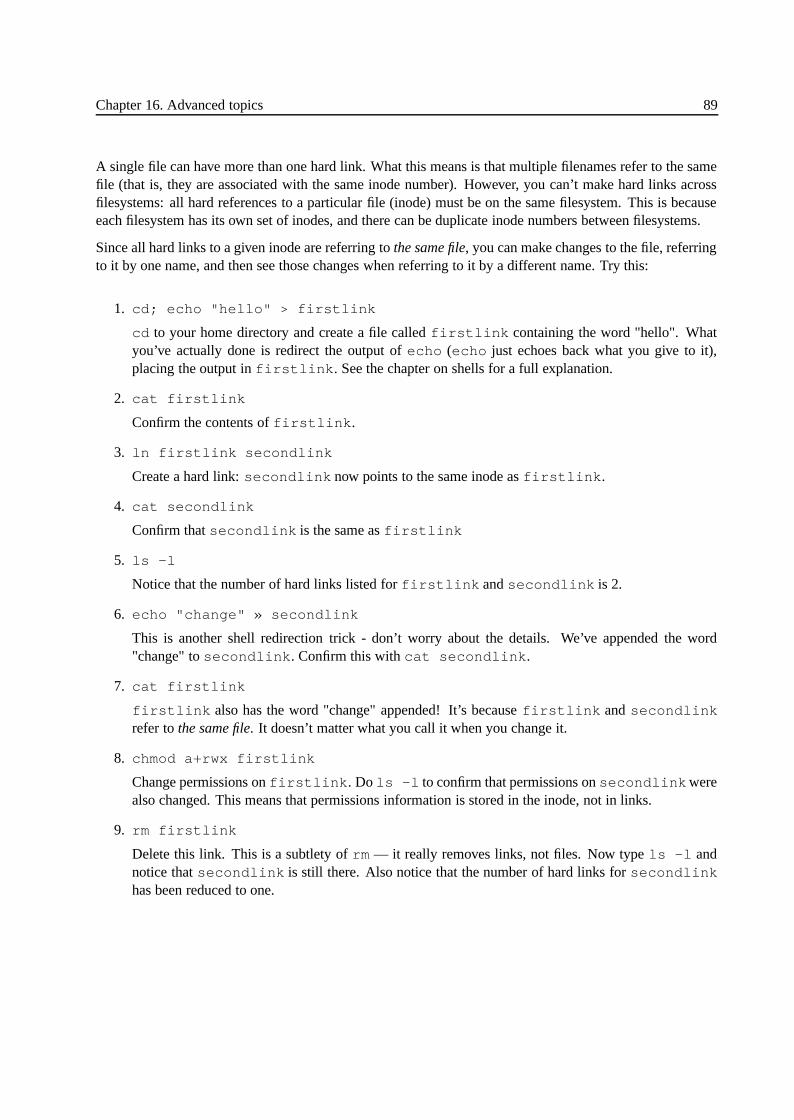
Chapter 16. Advanced topics 89
A single file can have more than one hard link. What this means is that multiple filenames refer to the samefile (that is, they are associated with the same inode number). However, you can’t make hard links acrossfilesystems: all hard references to a particular file (inode) must be on the same filesystem. This is becauseeach filesystem has its own set of inodes, and there can be duplicate inode numbers between filesystems.
Since all hard links to a given inode are referring to the same file, you can make changes to the file, referringto it by one name, and then see those changes when referring to it by a different name. Try this:
1. cd; echo "hello" > firstlink
cd to your home directory and create a file called firstlink containing the word "hello". Whatyou’ve actually done is redirect the output of echo (echo just echoes back what you give to it),placing the output in firstlink. See the chapter on shells for a full explanation.
2. cat firstlink
Confirm the contents of firstlink.
3. ln firstlink secondlink
Create a hard link: secondlink now points to the same inode as firstlink.
4. cat secondlink
Confirm that secondlink is the same as firstlink
5. ls -l
Notice that the number of hard links listed for firstlink and secondlink is 2.
6. echo "change" » secondlink
This is another shell redirection trick - don’t worry about the details. We’ve appended the word"change" to secondlink. Confirm this with cat secondlink.
7. cat firstlink
firstlink also has the word "change" appended! It’s because firstlink and secondlinkrefer to the same file. It doesn’t matter what you call it when you change it.
8. chmod a+rwx firstlink
Change permissions on firstlink. Do ls -l to confirm that permissions on secondlinkwerealso changed. This means that permissions information is stored in the inode, not in links.
9. rm firstlink
Delete this link. This is a subtlety of rm — it really removes links, not files. Now type ls -l andnotice that secondlink is still there. Also notice that the number of hard links for secondlinkhas been reduced to one.
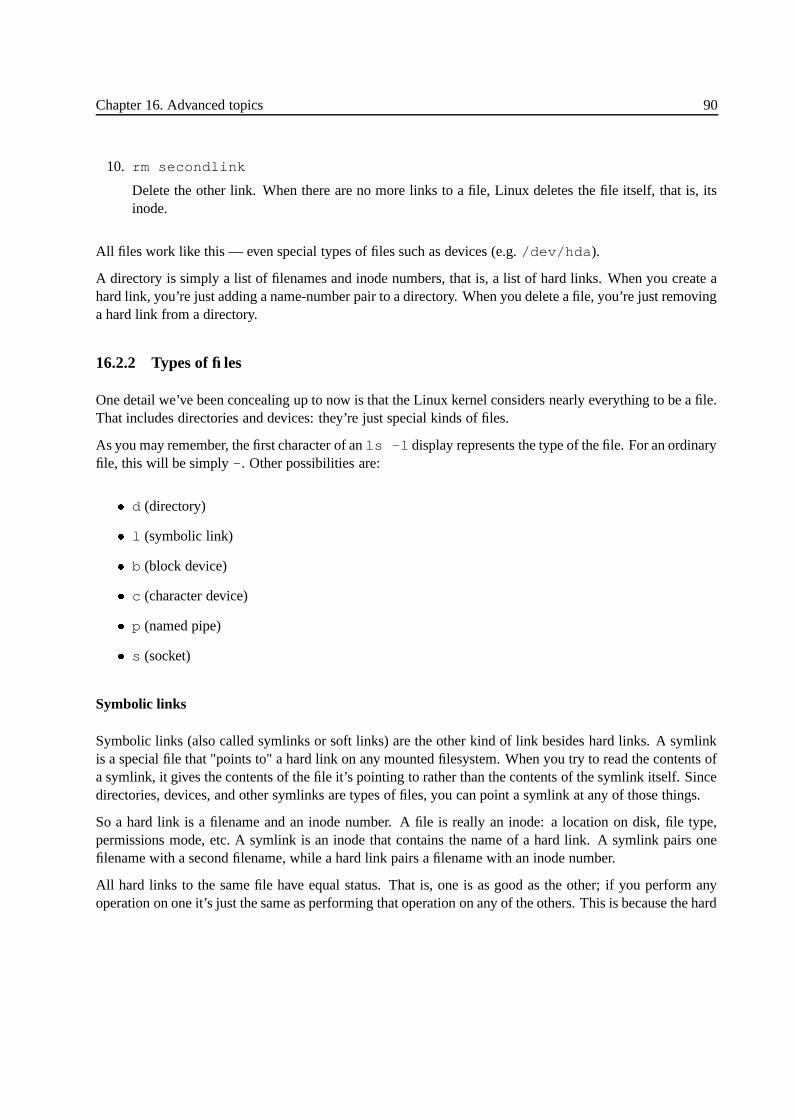
Chapter 16. Advanced topics 90
10. rm secondlink
Delete the other link. When there are no more links to a file, Linux deletes the file itself, that is, itsinode.
All files work like this — even special types of files such as devices (e.g. /dev/hda).
A directory is simply a list of filenames and inode numbers, that is, a list of hard links. When you create ahard link, you’re just adding a name-number pair to a directory. When you delete a file, you’re just removinga hard link from a directory.
16.2.2 Types of files
One detail we’ve been concealing up to now is that the Linux kernel considers nearly everything to be a file.That includes directories and devices: they’re just special kinds of files.
As you may remember, the first character of an ls -l display represents the type of the file. For an ordinaryfile, this will be simply -. Other possibilities are:
� d (directory)
� l (symbolic link)
� b (block device)
� c (character device)
� p (named pipe)
� s (socket)
Symbolic links
Symbolic links (also called symlinks or soft links) are the other kind of link besides hard links. A symlinkis a special file that "points to" a hard link on any mounted filesystem. When you try to read the contents ofa symlink, it gives the contents of the file it’s pointing to rather than the contents of the symlink itself. Sincedirectories, devices, and other symlinks are types of files, you can point a symlink at any of those things.
So a hard link is a filename and an inode number. A file is really an inode: a location on disk, file type,permissions mode, etc. A symlink is an inode that contains the name of a hard link. A symlink pairs onefilename with a second filename, while a hard link pairs a filename with an inode number.
All hard links to the same file have equal status. That is, one is as good as the other; if you perform anyoperation on one it’s just the same as performing that operation on any of the others. This is because the hard
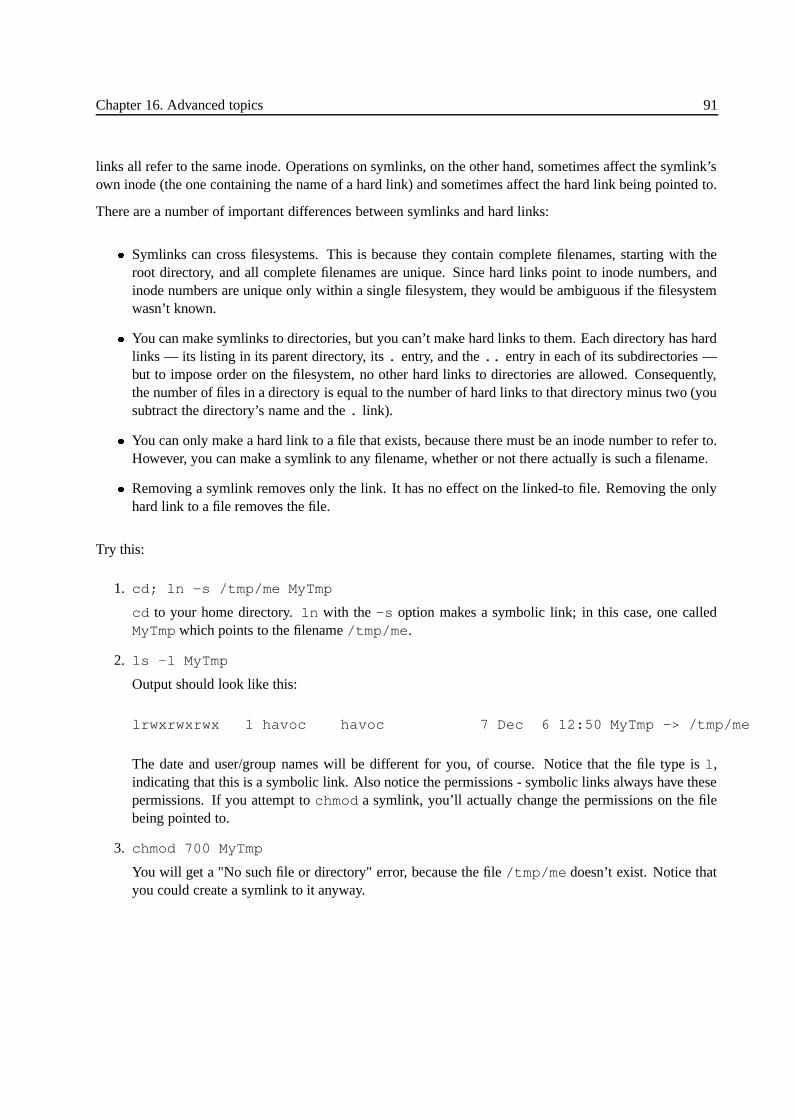
Chapter 16. Advanced topics 91
links all refer to the same inode. Operations on symlinks, on the other hand, sometimes affect the symlink’sown inode (the one containing the name of a hard link) and sometimes affect the hard link being pointed to.
There are a number of important differences between symlinks and hard links:
� Symlinks can cross filesystems. This is because they contain complete filenames, starting with theroot directory, and all complete filenames are unique. Since hard links point to inode numbers, andinode numbers are unique only within a single filesystem, they would be ambiguous if the filesystemwasn’t known.
� You can make symlinks to directories, but you can’t make hard links to them. Each directory has hardlinks — its listing in its parent directory, its . entry, and the .. entry in each of its subdirectories —but to impose order on the filesystem, no other hard links to directories are allowed. Consequently,the number of files in a directory is equal to the number of hard links to that directory minus two (yousubtract the directory’s name and the . link).
� You can only make a hard link to a file that exists, because there must be an inode number to refer to.However, you can make a symlink to any filename, whether or not there actually is such a filename.
� Removing a symlink removes only the link. It has no effect on the linked-to file. Removing the onlyhard link to a file removes the file.
Try this:
1. cd; ln -s /tmp/me MyTmp
cd to your home directory. ln with the -s option makes a symbolic link; in this case, one calledMyTmp which points to the filename /tmp/me.
2. ls -l MyTmp
Output should look like this:
lrwxrwxrwx 1 havoc havoc 7 Dec 6 12:50 MyTmp -> /tmp/me
The date and user/group names will be different for you, of course. Notice that the file type is l,indicating that this is a symbolic link. Also notice the permissions - symbolic links always have thesepermissions. If you attempt to chmod a symlink, you’ll actually change the permissions on the filebeing pointed to.
3. chmod 700 MyTmp
You will get a "No such file or directory" error, because the file /tmp/me doesn’t exist. Notice thatyou could create a symlink to it anyway.
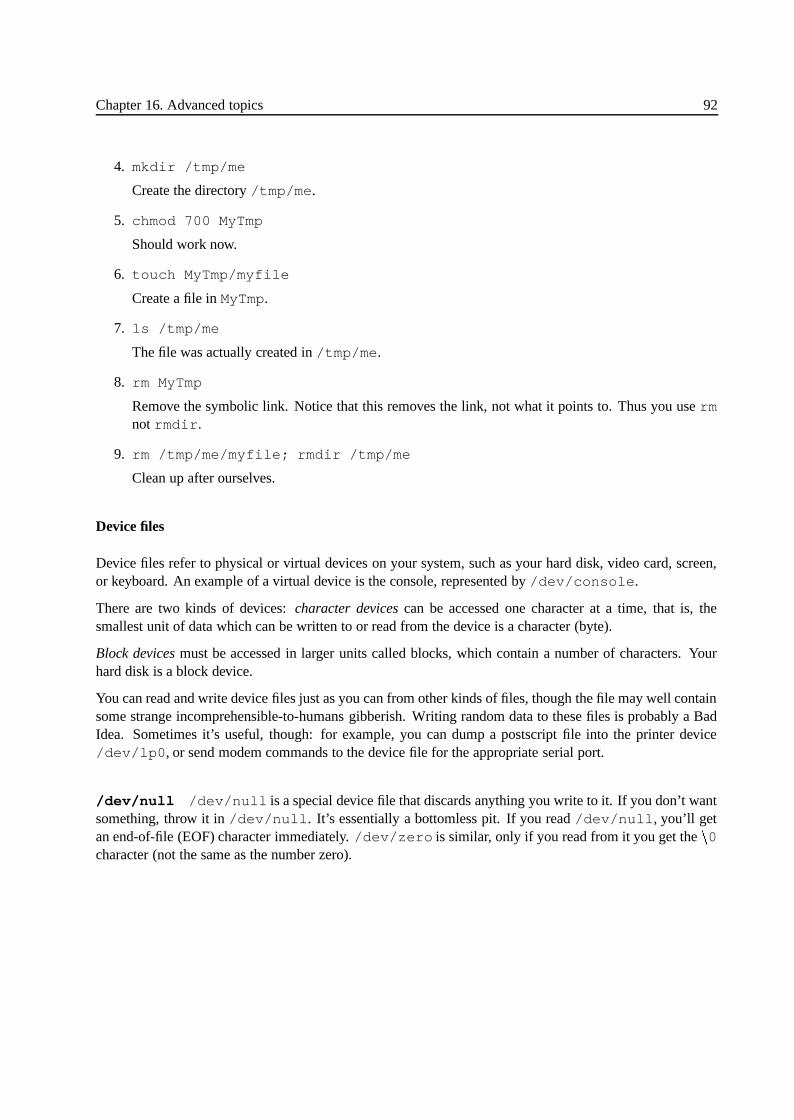
Chapter 16. Advanced topics 92
4. mkdir /tmp/me
Create the directory /tmp/me.
5. chmod 700 MyTmp
Should work now.
6. touch MyTmp/myfile
Create a file in MyTmp.
7. ls /tmp/me
The file was actually created in /tmp/me.
8. rm MyTmp
Remove the symbolic link. Notice that this removes the link, not what it points to. Thus you use rmnot rmdir.
9. rm /tmp/me/myfile; rmdir /tmp/me
Clean up after ourselves.
Device files
Device files refer to physical or virtual devices on your system, such as your hard disk, video card, screen,or keyboard. An example of a virtual device is the console, represented by /dev/console.
There are two kinds of devices: character devices can be accessed one character at a time, that is, thesmallest unit of data which can be written to or read from the device is a character (byte).
Block devices must be accessed in larger units called blocks, which contain a number of characters. Yourhard disk is a block device.
You can read and write device files just as you can from other kinds of files, though the file may well containsome strange incomprehensible-to-humans gibberish. Writing random data to these files is probably a BadIdea. Sometimes it’s useful, though: for example, you can dump a postscript file into the printer device/dev/lp0, or send modem commands to the device file for the appropriate serial port.
/dev/null /dev/null is a special device file that discards anything you write to it. If you don’t wantsomething, throw it in /dev/null. It’s essentially a bottomless pit. If you read /dev/null, you’ll getan end-of-file (EOF) character immediately. /dev/zero is similar, only if you read from it you get the
�0
character (not the same as the number zero).
Chapter 16. Advanced topics 93
Named pipes (FIFOs)
A named pipe is a file that acts like a pipe. You put something into the file, and it comes out the other end.Thus it’s called a FIFO, or First-In-First-Out: the first thing you put in the pipe is the first thing to come outthe other end.
If you write to a named pipe, the process which is writing to the pipe doesn’t terminate until the informationbeing written is read from the pipe. If you read from a named pipe, the reading process waits until there’ssomething to read before terminating. The size of the pipe is always zero — it doesn’t store data, it just linkstwo processes like the shell |. However, since this pipe has a name, the two processes don’t have to be onthe same command line or even be run by the same user.
You can try it by doing the following:
1. cd; mkfifo mypipe
Makes the pipe.
2. echo "hello" > mypipe &
Puts a process in the background which tries to write "hello" to the pipe. Notice that the processdoesn’t return from the background; it is waiting for someone to read from the pipe.
3. cat mypipe
At this point the echo process should return, since cat read from the pipe, and the cat process willprint hello.
4. rm mypipe
You can delete pipes just like any other file.
Sockets
Sockets are similar to pipes, only they work over the network. This is how your computer does networking:you may have heard of "WinSock", which is sockets for Windows.
We won’t go into these further, because you probably won’t have occasion to use them unless you’re pro-gramming. However, if you see a file marked with type s on your computer, you know what it is.
16.2.3 The proc filesystem
The Linux kernel makes a special filesystem available, which is mounted under /proc on Debian systems.This is a "pseudo-filesystem" — it doesn’t really exist on any of your physical devices.
The proc filesystem contains information about the system and running processes. Some of the "files" in/proc are reasonably understandable to humans (try typing cat /proc/meminfoor cat /proc/cpuinfo)

Chapter 16. Advanced topics 94
while some others are arcane collections of numbers. Often, system utilities use these to gather informationand present it to you in a more understandable way.
People frequently panic when they notice one file in particular — /proc/kcore — which is generallyhuge. This is (more or less) a copy of the contents of your computer’s memory. It’s used to debug the kernel.It doesn’t actually exist anywhere, so don’t worry about its size.
If you want to know about all the things in /proc, type man 5 proc.
16.2.4 Advanced aspects of file permissions
Using numeric arguments with chmod
Earlier in this chapter, we briefly mentioned that you can set file permissions using numbers. The numericnotation is called an absolute mode, as opposed to the symbolic notation (e.g. u+rx) which is often calleda relative mode. This is because the number specifies an exact mode to set, and the symbol just specifies achange to make (e.g. "add user read and execute permissions").
The numeric mode is a series of four octal digits or twelve binary digits. Each octal (base eight) digitrepresents three binary digits: one octal digit and three binary digits are two ways to represent the decimaldigits 0 through 7.
Deriving a particular mode is pretty straightforward. You simply add up the modes you want to combine, orsubtract modes you don’t want. For example, user permissions, with only read permission turned on, wouldbe 100 in binary. User permissions with write only would be 010 binary. User permissions with read andwrite both turned on would be 100 + 010 = 110. Alternatively, you could put it in octal: 4 + 2 =6.
For the full mode, simply add up digits from this table:
0001 others, execute0002 others, write0004 others, read0010 group, execute0020 group, write0040 group, read0100 user, execute0200 user, write0400 user, read1000 sticky bit2000 set group id4000 set user id
To use the table, first decide what permissions you want to set. Then add up the numbers for those permis-sions. The total is your mode. For example, to get mode 0755:

Chapter 16. Advanced topics 95
0001 o=x0004 o=r0010 g=x0040 g=r0100 u=x0200 u=w
+ 0400 u=r-------0755 u=rwx go=rw
You’d actually call this mode simply 755, without the leading 0, because chmod automatically adds zeroesat the beginning of the mode — 7 means mode 0007.
To set a file to 755, you’d type chmod 755 myfile.
755 is a very common mode for directories, as it allows anyone to use the directory but only the owner tocreate and delete files in the directory. 644 is the analogous mode for files, and it is also very common. Itallows anyone to use the file but only the owner can change it. For executable files, 755 is a common mode;this is just 644 plus execute permissions (644 + 111 = 755).
16.2.5 chattr
A useful tip?
16.2.6 Large-scale copying
cp -a and variants on the theme.
how to copy an old system to a new one.
FIXME whoops, I also listed this topic under Backup Tools. need to decide.
16.2.7 Other concepts not yet covered, but should be
fsck, dd, fdisk, etc.
what package is a file in?
MSDOS vs. Mac vs. Unix text files
sync
Chapter 16. Advanced topics 96
16.3 Compiling the kernel
How, what, and why
16.4 A few words on security
The basics of security from a user standpoint. Maintaining one’s privacy. What other users can see of youraccount.
16.5 Programming on Linux
Something about the Linux programming environment. Aimed at, say, people taking CS101. Nothing onhow to program, just Emacs, gcc, gdb, ddd, etc. as programming tools.
Likely based on debug.tex
97
Chapter 17
Where to from here?
17.1 Other Debian manuals to read
17.2 Other resources
A few good URLs, directions to meta-documents.
98
Chapter 18
Contributing to Debian: How can I help?
18.1 Submit bug reports
How to do that with the "bug" package
18.2 Other things
Whatever we want to say here.

99
Appendix A
A brief survey of available applications
(Would this be useful? Or does dselect really do the job? It seems like there are a significant number ofdebian-user and newsgroup questions to the effect of "I’m looking for an application that does X". Wecould just list what exists, more or less, maybe recommend one option over another when there’s an obviouschoice.)
A.1 (Subheadings could copy the structure of the menu system)
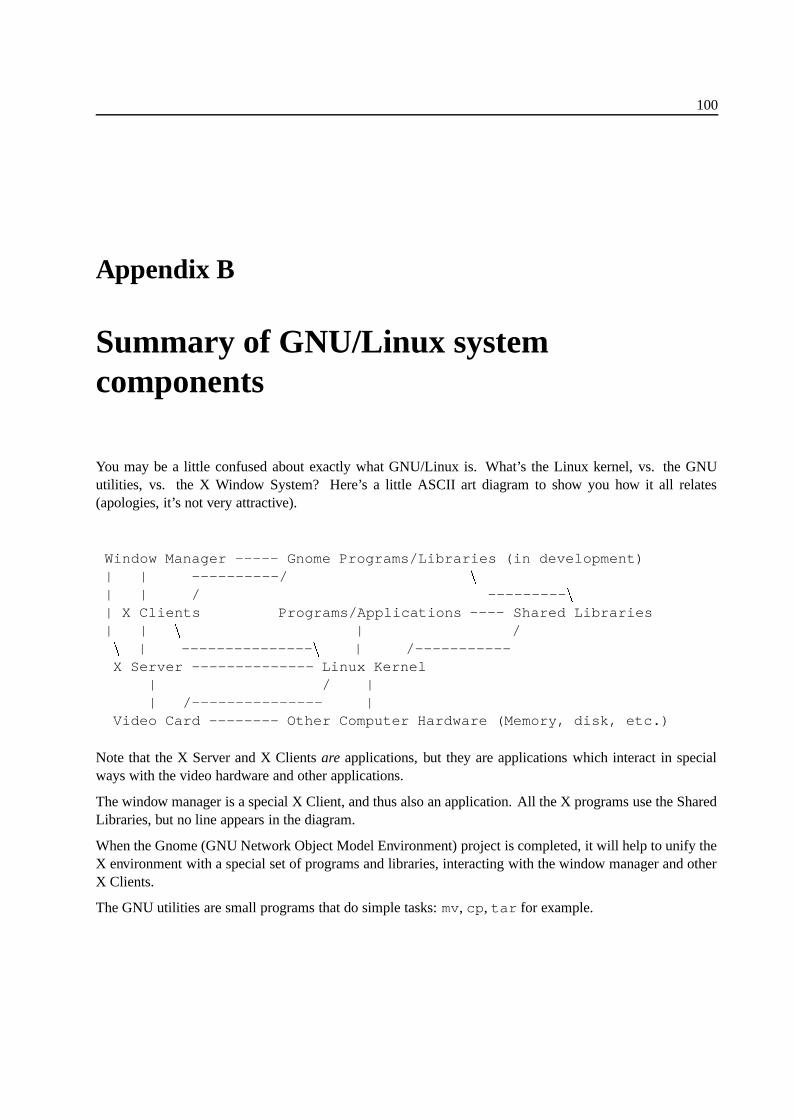
100
Appendix B
Summary of GNU/Linux systemcomponents
You may be a little confused about exactly what GNU/Linux is. What’s the Linux kernel, vs. the GNUutilities, vs. the X Window System? Here’s a little ASCII art diagram to show you how it all relates(apologies, it’s not very attractive).
Window Manager ----- Gnome Programs/Libraries (in development)| | ----------/
�
| | / ---------�
| X Clients Programs/Applications ---- Shared Libraries| |
�| /�
| ---------------�
| /-----------X Server -------------- Linux Kernel
| / || /--------------- |
Video Card -------- Other Computer Hardware (Memory, disk, etc.)
Note that the X Server and X Clients are applications, but they are applications which interact in specialways with the video hardware and other applications.
The window manager is a special X Client, and thus also an application. All the X programs use the SharedLibraries, but no line appears in the diagram.
When the Gnome (GNU Network Object Model Environment) project is completed, it will help to unify theX environment with a special set of programs and libraries, interacting with the window manager and otherX Clients.
The GNU utilities are small programs that do simple tasks: mv, cp, tar for example.
101
Appendix C
Appendix C: Booting the system
This appendix describes what happens during the GNU/Linux boot process.
How you boot your system depends on how you set things up when you installed Debian. Most likely, youjust turn the computer on. But you may have to insert a floppy disk first.
Linux is loaded by a program called LILO, or LInux LOader. LILO can also load other operating systems,and ask you which system you’d like to load.
The first thing that happens when you turn on an Intel PC is that the BIOS executes. BIOS stands for BasicInput Output System. It’s a program permenantly stored in the computer on read-only chips. It performssome minimal tests, and then looks for a floppy disk in the first disk drive. If it finds one, it looks for a "bootsector" on that disk, and starts executing code from it, if any. If there is a disk, but no boot sector, the BIOSwill print a message like:
Non-system disk or disk error
Removing the disk and pressing a key will cause the boot process to continue.
If there isn’t a floppy disk in the drive, the BIOS looks for a master boot record (MBR) on the hard disk. Itwill start executing the code found there, which loads the operating system. On GNU/Linux systems, LILO,the LInux LOader, can occupy the MBR, and will load GNU/Linux.
Thus, if you opted to install LILO on your hard drive, you should see the word LILO as your computer startsup. At that point you can press the left Shift key to select which operating system to load - press Tab tosee a list of options. Type in one of those options, and press return. LILO will boot the requested operatingsystem.
If you don’t press the Shift key, LILO will automatically load the default operating system after about 5seconds. If you like, you can change what system LILO loads automatically, which systems it knows howto load, and how long it waits before loading one automatically.
Chapter C. Appendix C: Booting the system 102
If you didn’t install LILO on your hard drive, you probably created a boot disk. The boot disk will haveLILO on it. All you have to do is insert the disk before you turn on your computer and the BIOS will find itbefore it checks the MBR on the hard drive. To return to a non-Linux OS, take out the boot disk and restartthe computer (from Linux, be sure you follow the proper procedure for restarting: see ‘Shutting down’ onpage 12 for details.)
LILO loads the Linux kernel from disk, and then lets the kernel take over. (The kernel is the central programof the operating system, in control of all other programs.) The kernel discards the BIOS and LILO.
On non-Intel platforms, things work a little differently. But once you boot, everything is more or less thesame.
Linux looks at the type of hardware it’s running on. It wants to know what type of hard disks you have,whether or not you have a bus mouse, whether or not you’re on a network, and other bits of trivia like that.Linux can’t remember things between boots, so it has to ask these questions each time it starts up. Luckily,it isn’t asking you these questions—it’s asking the hardware! While it boots, the Linux kernel will printmessages on the screen describing what it’s doing.
The query process can cause problems with your system, but if it was going to, it probably would have whenyou first installed GNU/Linux. If you’re having problems, consult the installation instructions, or ask on amailing list.
The kernel merely manages other programs, so once it is satisfied everything is okay, it must start anotherprogram to do anything useful. The program the kernel starts is called init. After the kernel starts init,it never starts another program. The kernel becomes a manager and a provider of services.
Once init is started, it runs a number of scripts (files containing commands), which prepare the systemto be used: they do some routine maintenance and start up a lot of programs which do things like display alogin prompt, listen for network connections, and keep a log of the computer’s activities.
103
Appendix D
Miscellaneous
This chapter contains interesting information that didn’t fit in the rest of the manual, such as historical notes.It may be moved to another manual in the future, or made into a coherent chapter.
D.1 Unix History
In 1969, Bell Telephone Laboratories (Bell Labs, a division of AT& T) was working with General Electricand Project MAC of MIT to write an operating system called Multics. To make a long story slightly shorter,Bell Labs decided the project wasn’t going anywhere and broke out of the group. This left Bell Labs withouta good operating system.
Ken Thompson and Dennis Ritchie decided to sketch out an operating system that would meet their needs.Bell Labs had an unused PDP-7 computer that Thompson wanted to put to use, so he implemented the systemthey had designed on that machine. As a pun on Multics, Brian Kernighan, another Bell Labs researcher,gave the system the name Unix. The group was able to get funding to buy a better computer, a PDP-11, byproposing a plan to write a word processing system. Rather than write the word processor from scratch, theymade it an application that ran under Unix, which they ported to the PDP-11.
Later, Dennis Ritchie invented the "C" programming language. In 1973, Unix was rewritten in C insteadof the original assembly language.1 In 1977, Unix was moved to a new machine through a process calledporting away from the PDP machines it had run on previously. This was aided by the fact Unix was writtenin C since much of the code could simply be recompiled and didn’t have to be rewritten.
In the late 1970’s, AT& T was forbidden from competing in the computing industry, so it licensed Unix tovarious colleges and universities very cheaply. It was slow to catch on outside of academic institutions butwas eventually popular with businesses as well. The Unix of today is different from the Unix of 1970. It
1"Assembly language" is a very basic computer language that is tied to a particular type of computer. It is usually considered achallenge to program in.

Chapter D. Miscellaneous 104
has two major variations: System V, from Unix System Laboratories (USL), a subsidiary of SCO2, and theBerkeley Software Distribution (BSD). The USL version is now up to its forth release, or SVR43, whileBSD’s latest version is 4.4. However, there are many different versions of Unix besides these two. Mostproprietary versions of Unix derive from one of the two groupings. The versions of Unix that are actuallyused usually incorporate features from both variations.
Current proprietary versions of Unix for Intel PCs cost between $500 and $2000, with the exception ofSolaris x86 which has been crushed by free Unix clones and forced to lower prices.
D.2 GNU/Linux History
Debian traces its roots to the founding of the GNU project in 1984 by Richard M. Stallman. GNU (GNU’sNot Unix) is a project of the Free Software Foundation; their goal was and is to replace the Unix operatingsystem with free software. They had written almost an entire operating system by the early 1990s, but thekernel was missing. Fortunately, Linux appeared to fill this gap.
The primary author of the Linux kernel is Linus Torvalds. Since his original versions, it has been improvedby countless numbers of people around the world. It is a clone, written entirely from scratch, of the Unixoperating system. Neither USL, nor the University of California, Berkeley, were involved in writing Linux.One of the more interesting facts about Linux is that development occurs simultaneously around the world.People from Australia to Finland contributed to Linux and will hopefully continue to do so.
Linux began with a project to explore the 386 chip. One of Linus’s earlier projects was a program that wouldswitch between printing AAAA and BBBB. This later evolved into Linux.
Linux has been copyrighted under the terms of the GNU General Public License (GPL). This is a licensewritten by the Free Software Foundation (FSF) that is designed to keep software free. In brief, it says thatalthough you can charge as much as you’d like for a copy, you can’t prevent the person you sold it to fromselling it, giving it away, or modifying it. It also means that the source code4 must also be available. This isuseful for programmers. Anybody can modify Linux and even distribute their modifications, provided thatthey keep the code under the same copyright — the GPL.
Debian is called GNU/Linux because it is a product of two massive efforts, the Linux kernel and the GNUproject. Still, focusing on only these two contributions leaves out tens of thousands of contributors. It’simpossible to keep track of everyone who’s made Debian what it is today.
The following two lists, of leaders and release milestones, are copyrighted by Software in the Public Interestand may be redistributed but not modified.
Debian has had several leaders since its beginnings in 1993.
2Previously, USL was owned by AT& T and later Novell3A cryptic way of saying "System Five, Release Four".4The source code of a program is what the human programmer reads and writes. It is later translated into machine code that the
computer interprets.
Chapter D. Miscellaneous 105
� Ian Murdock founded Debian in August 1993 and led it until March 1996. This effort was sponsoredby the FSF’s GNU project for one year (November 1994 to November 1995).
� Bruce Perens led Debian from April 1996 until December 1997
� Ian Jackson led Debian from January 1998 until February 1999.
� Wichert Akkerman is the current Debian leader since February 1999.
Here are a few of the major Debian release milestones:
� 0.01-0.90 were released between August 1993 and December 1993
� 0.91 released January 1994 (around 30 developers, primitive packager)
� 0.93R5 released in March 1995 (dpkg makes its first appearance)
� 0.93R6 released in November 1995 (around 60 developers, a.out, first dselect)
� 1.0 was never released. It later became version 1.1
� 1.1 ’Buzz’ released June 1996 (474 packages, 2.0 kernel, fully ELF, dpkg)
� 1.2 ’Rex’ released December 1996 (848 packages, 120 developers)
� 1.3 ’Bo’ released July 1997 (974 packages, 200 developers)
� 2.0 ’Hamm’ released July 1998 (1500+ packages, 400+ developers, glibc2)
� 2.1 ’Slink’ is scheduled for release in early March 1999.
D.3 The Linux kernel’s version numbering
The first number in Linux’s version number indicates truly huge revisions. These change very slowly: rightnow version 2 is the latest. The second number indicates less major revisions. Even second numbers signifymore stable, dependable versions of Linux while odd numbers are developer’s versions that are more proneto bugs. The final version number is the minor release number—every time a new version is released thatmay just fix small problems or add minor features, that number is increased by one. Right now the stablekernel is 2.0, and the developer’s kernel is 2.1. When 2.1 is ready, it will become stable kernel 2.2. Thelatest version of the stable kernel is currently 2.0.35, though that may well change by the time you read this.The 2.2 stable release is expected soon.


![Lucas Nussbaum [email protected] - Debian -- The Universal Operating System](https://static.fdocuments.net/doc/165x107/61fb30552e268c58cd5b3509/lucas-nussbaum-emailprotected-debian-the-universal-operating-system.jpg)


