
de carne Electric Meat Grinder · 3. Place the grinding plate over the cutter on the feed screw...
2
FEATURES 1. On/Off/Reverse switch 2. Motor housing 3. Attachment opening 4. Food pusher and lid 5. Aluminum hopper 6. Grinder/feeder head 7. Feed screw pin 8. Cutting blade 9. Cutting plate (medium) 10. Cutting plate (coarse) 11. Sausage attachment (small) 12. Sausage attachment (large) 13. Screwing ring nut 14. Sausage spacer 15. Power cord (not shown) 4 5 6 3 2 7 10 13 9 8 14 11 12 1 ASSEMBLY INSTRUCTIONS Make sure unit is unplugged while assembling. Assemble the meat grinder feeder head prior to attaching to the housing. 1. Insert the feed screw pin into the open end of the attachment. 2. Place the cutter with the flat side facing out toward you over the feed screw pin (this is an important step or the meat grinder will not work). 3. Place the grinding plate over the cutter on the feed screw pin. 4. Screw on the ring nut by turning it clockwise and hand tighten. 5. Fit the hopper onto the top of the meat grinder and put a mixing bowl under the grinder to catch food. 6. Insert grinder/feeder head tightly into attachment opening. Twist onto lock. 7. Use the food pusher to gently feed food, one piece at a time. Do not force the food into the grinder/feeder head. INSTRUCCIONES DE OPERACIÓN Modo de empleo 1. Lave y seque todas las piezas antes del primer uso. Lave las piezas metálicas a mano, ya que no son aptas para lavavajillas. 2. Coloque el aparato sobre una superficie llana y segura. 3. Asegúrese de que el interruptor esté en la posición de apagado “OFF”. 4. Conecte la cabeza a la unidad principal. 5. Conecte el cable a una toma de corriente. 6. Coloque un plato o un cuenco ancho y poco profundo bajo la salida de la cabeza. 7. Encienda el aparato, poniendo el interruptor en la posición “ON”. IMPORTANTE: siempre encienda el aparato antes de agregar alimentos. 8. Coloque los alimentos en la tolva y utilice el empujador para introducir los pedazos en la boca de alimentación. CÓMO HACER SALCHICHAS Los accesorios para embutidos permiten hacer salchichas frescas con carne presazonada. 1. Si usa tripas secas, permita que remojen en agua fría hasta que se suavicen. Luego, enjuáguelas en agua tibia, asegurándose que el agua pase por toda la tripa. Conecte la cabeza ensamblada a la unidad principal. 2. Muela la carne y las especias deseadas, según las instrucciones en la página 4 del manuel de instrucciones. 3. Coloque los pedazos de carne en la tolva y encienda (“ON”) el aparato. Empuje la carne en la boca de alimentación hasta que la carne molida empiece a salir del accesorio para embutidos. Apague (“OFF”) el aparato y haga un nudo al final de la tripa. 4. Encienda (“ON”) de nuevo el aparato y siga llenando la salchicha, dejando aproximadamente 2 pulgadas (5 cm) de tripa vacía. 5. Apague (“OFF”) el aparato, retire la tripa del accesorio para embutidos y ate un nudo al final de la misma. Pinche la salchicha todo a lo largo, usando un cuchillo o una aguja, para eliminar las burbujas de aire. 6. Si desea hacer ristra de salchichas, tuerza la tripa a intervalos regulares. NOTA: para evitar estirar o reventar la tripa, no haga salchichas muy gruesas. La carne se dilatará ligeramente durante la cocción. 1. Introduzca el tornillo de alimentación en la boca de salida de la cabeza. 2. Instale el separador de salchichas sobre la punta del tornillo de alimentación, alineando las muescas del separador con las aberturas en el tornillo de alimentación. 3. Introduzca el embudo deseado en la tuerca de sujeción y coloque la tuerca sobre la boca de salida, girando en sentido horario (a mano) para apretar. USO COMO EMBUTIDORA DE CARNE Ensamblado del aditamento embutidor de carne Asegúrese de que el aparato esté desconectado antes de ensamblarlo. Ensamble la cabeza antes de conectarla a la unidad principal. IMPORTANTE: No tire esta hoja. Lea esta información antes de usar su nueva moledora de carne por primera vez. Guarde esta información para futura referencia. Estos útiles consejos complementan el manual de instrucciones. Para lograr un rendimiento óptimo y una operación segura, lea el manual de instrucciones. Electric Meat Grinder QUICK REFERENCE GUIDE PG-35382-ESP
Transcript of de carne Electric Meat Grinder · 3. Place the grinding plate over the cutter on the feed screw...

FEATURES 1. On/Off/Reverse switch 2. Motor housing 3. Attachment opening 4. Food pusher and lid 5. Aluminum hopper 6. Grinder/feeder head 7. Feed screw pin 8. Cutting blade 9. Cutting plate (medium) 10. Cutting plate (coarse) 11. Sausage attachment (small) 12. Sausage attachment (large) 13. Screwing ring nut 14. Sausage spacer 15. Power cord (not shown)
4
5
6 3 2
7
10
13
98
1411
12
1
ASSEMBLY INSTRUCTIONS Make sure unit is unplugged while assembling. Assemble the meat grinder feeder head prior to attaching to the housing.
1. Insert the feed screw pin into the open end of the attachment.
2. Place the cutter with the flat side facing out toward you over the feed screw pin (this is an important step or the meat grinder will not work).
3. Place the grinding plate over the cutter on the feed screw pin.
4. Screw on the ring nut by turning it clockwise and hand tighten.
5. Fit the hopper onto the top of the meat grinder and put a mixing bowl under the grinder to catch food.
6. Insert grinder/feeder head tightly into attachment opening. Twist onto lock.
7. Use the food pusher to gently feed food, one piece at a time. Do not force the food into the grinder/feeder head.
INSTRUCCIONES DE OPERACIÓN Modo de empleo
1. Lave y seque todas las piezas antes
del primer uso. Lave las piezas
metálicas a mano, ya que no son aptas
para lavavajillas.
2. Coloque el aparato sobre una
superficie llana y segura.
3. Asegúrese de que el interruptor esté
en la posición de apagado “OFF”.
4. Conecte la cabeza a la unidad
principal.
5. Conecte el cable a una toma de
corriente.
6. Coloque un plato o un cuenco ancho
y poco profundo bajo la salida de la
cabeza.
7. Encienda el aparato, poniendo el
interruptor en la posición “ON”.
IMPORTANTE: siempre encienda el
aparato antes de agregar alimentos.
8. Coloque los alimentos en la tolva y
utilice el empujador para introducir los
pedazos en la boca de alimentación.
CÓMO HACER SALCHICHAS Los accesorios para embutidos permiten hacer salchichas frescas con carne presazonada.
1. Si usa tripas secas, permita que remojen en agua fría hasta que se suavicen. Luego, enjuáguelas en agua tibia, asegurándose que el agua pase por toda la tripa. Conecte la cabeza ensamblada a la unidad principal.
2. Muela la carne y las especias deseadas, según las instrucciones en la página 4 del manuel de instrucciones.
3. Coloque los pedazos de carne en la tolva y encienda (“ON”) el aparato. Empuje la carne en la boca de alimentación hasta que la carne molida empiece a salir del accesorio para embutidos. Apague (“OFF”) el aparato y haga un nudo al final de la tripa.
4. Encienda (“ON”) de nuevo el aparato y siga llenando la salchicha, dejando aproximadamente 2 pulgadas (5 cm) de tripa vacía.
5. Apague (“OFF”) el aparato, retire la tripa del accesorio para embutidos y ate un nudo al final de la misma. Pinche la salchicha todo a lo largo, usando un cuchillo o una aguja, para eliminar las burbujas de aire.
6. Si desea hacer ristra de salchichas, tuerza la tripa a intervalos regulares.
NOTA: para evitar estirar o reventar la tripa, no haga salchichas muy gruesas. La carne se dilatará ligeramente durante la cocción.
1. Introduzca el tornillo de alimentación en la boca de salida de la cabeza.
2. Instale el separador de salchichas sobre la punta del tornillo de alimentación, alineando las muescas del separador con las aberturas en el tornillo de alimentación.
3. Introduzca el embudo deseado en la tuerca de sujeción y coloque la tuerca sobre la boca de salida, girando en sentido horario (a mano) para apretar.
USO COMO EMBUTIDORA DE CARNE Ensamblado del aditamento embutidor de carne Asegúrese de que el aparato esté desconectado antes de ensamblarlo.
Ensamble la cabeza antes de conectarla a la unidad principal.
IMPORTANTE: No tire esta hoja. Lea esta información antes de usar su nueva moledora de carne por primera vez.
Guarde esta información para futura referencia.
Estos útiles consejos complementan el manual de instrucciones. Para lograr un rendimiento óptimo y una operación segura, lea el manual de instrucciones.
Electric Meat Grinder
QUICK REFERENCE GUIDE
PG-35382-ESP
IMPORTANT! Do not discard. Read before operating your new Electric Meat Grinder.
Keep for further reference.
These helpful hints are intended to be a supplement to the Instruction Booklet. In order to ensure proper operation and optimum performance, please read the entire Instruction Booklet.
OPERATION How To Use
1. Before first use, wash and dry all
parts of the Cuisinart® Electric Meat
Grinder. Hand wash metal parts. Not
dishwasher safe.
2. Place the Cuisinart® Electric Meat
Grinder on a stable work surface.
3. Make sure the On/Off/Reverse switch
is in the OFF position.
4. Secure the meat grinder assembly to
the unit.
5. Insert plug into wall outlet.
6. Place a wide, shallow bowl or plate
beneath the grinder tube to catch food.
7. Switch appliance to ON position. The
Cuisinart® Electric Meat Grinder must
ALWAYS be ON before adding food.
8. Place food on the hopper and use
pusher to feed food through opening.
TO MAKE SAUSAGES The sausage attachments allow you to blend meats and spices for homemade sausages.1. If you have purchased dry casings, they must be soaked in cold water until they become soft and pli-
able, and then rinsed under lukewarm water, being sure that the water is running through the casings. Assemble the Electric Meat Grinder with sausage maker attachment per instructions on page 4–5.
2. Grind meat and seasonings of your choice, following the instructions on page 4.
3. Place ground meat in the hopper and turn the unit ON. Push the meat into the die-cast hopper opening with pusher until the mixture appears at the end of the sausage attachment. Turn the unit OFF and tie a knot at the end of the 2-inch casing overhang.
4. Turn unit ON and feed more ground meat into the die-cast hopper opening until all the meat has been used or the casing is approximately 2 inches from being completely full.
5. Turn unit OFF, remove the end of the casing from the sausage attachment, and tie a knot in the open end of the casing. Use a knife or needle to poke holes in the length of sausage to let out air bubbles.
6. Sausages can be made to the desired length by twisting the casing at intervals.
NOTE: To avoid over-stretching and splitting the casing, do not make the sausages too thick. The meat mixture will expand slightly during cooking.
1. Insert the feed screw pin into the open end of the grinder.
2. Place the sausage spacer with the notches fitting into the notch openings on the feed screw pin.
3. Place the sausage nozzle onto the ring nut and screw it onto the meat grinder nozzle by turning it clockwise and hand tighten.
SAUSAGE MAKER Assembling Sausage Maker Attachment Make sure unit is unplugged while assembling. Assemble the sausage maker attachment prior to attaching to the housing.
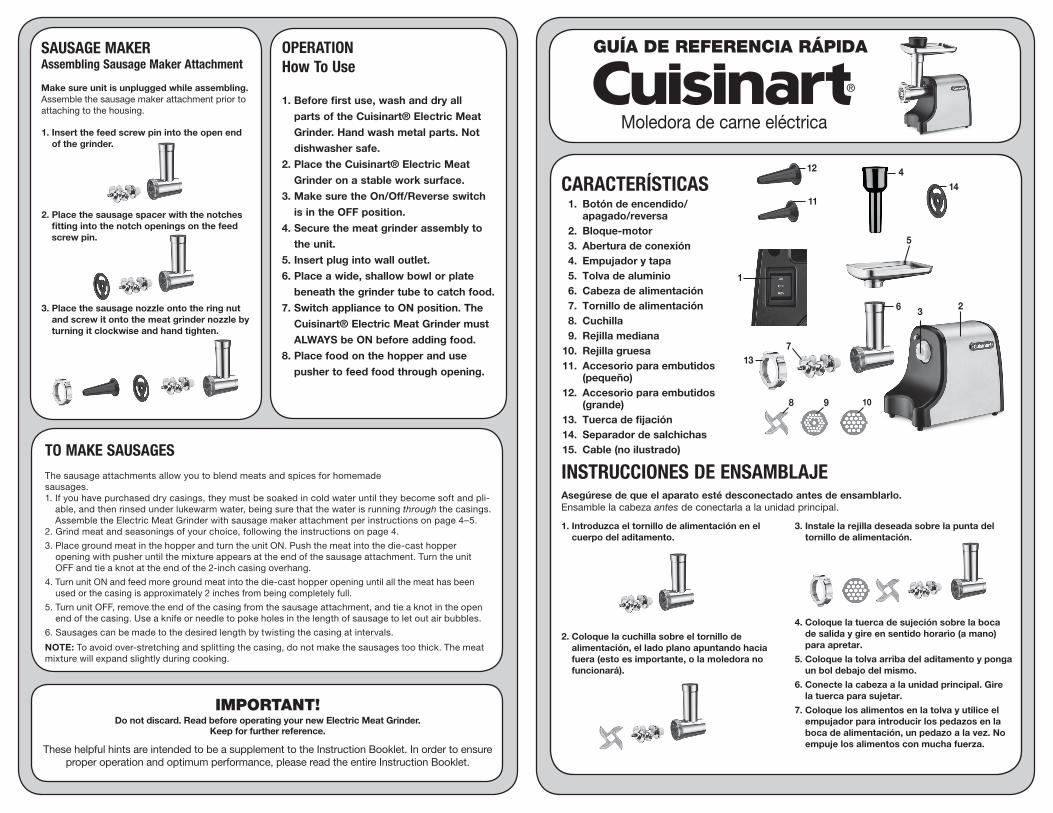
CARACTERÍSTICAS 1. Botón de encendido/
apagado/reversa 2. Bloque-motor 3. Abertura de conexión 4. Empujador y tapa 5. Tolva de aluminio 6. Cabeza de alimentación 7. Tornillo de alimentación 8. Cuchilla 9. Rejilla mediana 10. Rejilla gruesa 11. Accesorio para embutidos
(pequeño) 12. Accesorio para embutidos
(grande) 13. Tuerca de fijación 14. Separador de salchichas 15. Cable (no ilustrado)
4
5
6 3 2
7
10
13
98
1411
12
1
INSTRUCCIONES DE ENSAMBLAJE Asegúrese de que el aparato esté desconectado antes de ensamblarlo. Ensamble la cabeza antes de conectarla a la unidad principal.
1. Introduzca el tornillo de alimentación en el cuerpo del aditamento.
2. Coloque la cuchilla sobre el tornillo de alimentación, el lado plano apuntando hacia fuera (esto es importante, o la moledora no funcionará).
3. Instale la rejilla deseada sobre la punta del tornillo de alimentación.
4. Coloque la tuerca de sujeción sobre la boca de salida y gire en sentido horario (a mano) para apretar.
5. Coloque la tolva arriba del aditamento y ponga un bol debajo del mismo.
6. Conecte la cabeza a la unidad principal. Gire la tuerca para sujetar.
7. Coloque los alimentos en la tolva y utilice el empujador para introducir los pedazos en la boca de alimentación, un pedazo a la vez. No empuje los alimentos con mucha fuerza.
Moledora de carne eléctrica
GUÍA DE REFERENCIA RÁPIDA


