DCR-SX40/SX41/SX60 - Appliance Parts · A l_T,e B 'I_T,e BF l_T,e B3 'I?q_e C Type SE "I ... 133,e)...
105
DCR-SX40/SX41/SX60 Digital Video Camera Recorder Operating Guide Guia de operaciones M£MO_Y 5TI[K T_ S_I_S © 2009 Sony Corporation
Transcript of DCR-SX40/SX41/SX60 - Appliance Parts · A l_T,e B 'I_T,e BF l_T,e B3 'I?q_e C Type SE "I ... 133,e)...

DCR-SX40/SX41/SX60Digital Video Camera Recorder
Operating Guide
Guia de operaciones
M£MO_Y 5TI[K T_ S_I_S
© 2009 Sony Corporation

Owner'sRecord
The model and serial numbers are locatedon the bottom. Record the serial number
in the space provided below. Refbr to thesenumbers whenew, r you call upon your Sonydealer regarding this product.
Model No. DCR-
Serial No.
Model No. AC-
Serial No.
To reduce fire or shock hazard, do not
expose the unit to rain or moisture.
Do not expose the batteries to
excessive heat such as sunshine, fire orthe like.
CAUTION: TO RED[ CE THE RISK OF ELECTRIC SHOCK.
DO NOT REMOVE COVER (OR BACK)
NO USER-SERVICEAB E PARTS INSIDE
REFER SERVICING TO QUALIFIED S£RVICE PERSONNEL.
This symbol is intendedto alert the user to the
presence of uninsulated"dangerous wfltage" withinthe product's enclosurethat may be of sufficientmagnitude to constitutea risk of electric shock to
persons.
This symbol is intendedto alert the user to the
presence of importantoperating and maintenance(servicing) instructions inthe literature accompanyingthe appliance.

SAVE THESE INSTRUCTIONS.DANGER - TO REDUCE THE RISK OF FIREOR ELECTRIC SHOCK,CAREFULLY FOLLOW THESEINSTRUCTIONS.• Read these instructions.
• Keep these instructions.
• Heed all warnings.• Follow all instructions.
• Do not use this apparatus near water.
• Clean only with dry cloth.
• Do not block a W w.ntilation openings. Install in accordance with the manufhcturer's
instructions.
• Do not install near a W heat sources such as radiators, heat registers, stoves, or other
apparatus (including amplifiers) that produce heat.
• Do not detbat the satbty purpose of the polarized or grounding-type plug. A polarized plug
has two blades with one wider than the other. A grounding type plug has two blades and a
third grounding prong. The wide blade or the third prong are provided for your safet}: If
the provided plug does not fit into your outlet, consult an electrician for replacement of theobsolete outlet.
• Protect the power cord from being walked on or pinched particularly at plugs, conw.nience
receptacles, and the point where they exit from the apparatus.
• Only use attachments/accessories specified by the manufacturer.
• Use only with the cart, stand, tripod, bracket, or table specified by the manufacturer, or
sold with the apparatus. When a cart is used, use caution when moving the cart/apparatus
combination to awfid injury from tip-ow.r.
m
• Unplug this apparatus during lightning storms or when unused for long periods of time.
• Refer all servicing to qualified service personnel. Servicing is required when the apparatus
has been damaged in any wa}; such as power-supply cord or plug is damaged, liquid has
been spilled or objects haw. fallen into the apparatus, the apparatus has been exposed to
rain or moisture, does not operate normall}; or has been dropped.
• If the shape of the plug does not fit the power outlet, use an attachment plug adaptor of the
proper configuration fbr the power outlet.

Representative plug of power supply cord of countries/regions around the world.
Go o o G oA l_T,e B 'I_T,e BF l_T,e B3 'I?q_e C Type SE "I?q_e O "I_T,e
(American (British Type) (British Type) (British'I?_pe) ((EE'I_,pe) (CEE'I_pe) (Ocean 'I_,pe)
133,e)
The representatiw, supply voltage and plug type are described in this chart.
Depend on an area, Diffbrent type of plug and supply voltage are used.
Attention: Power cord meeting demands from each country shall be used.
- For only the United States
Use a UL Listed, 1.5-3 m (5-10 ft.), Type SPT-2 or NISPT-2, AWG no. 18 power supply cord,
rated for 125 V 7 A, with a NEMA 1-15P plug rated for 125 V 15 A"
Europe
Countries/regions Voltage Frequency(Hz) Plug typeAustria 230 50 C
Belgimn 230 50 C
Czech 220 50 C
I)enmark 230 50 C
Finland 230 50 C
France 230 50 C
Germany 230 50 CGreece 220 50 C
Hungary 220 50 CIceland 230 50 C
Ireland 230 50 C/BF
Italy 220 50 C
I,uxemburg 230 50 C
Netherlands 230 50 C
Norway 230 50 C
Poland 220 50 C
Portugal 230 50 C
Romania 220 50 C
Russia 220 50 C
Slovak 220 50 C
Spain 127/230 50 CSweden 230 50 C
Switzerland 230 50 C
UK 240 50 BF
Asia
Countries/regions Voltage Frequency(Hz) Plug type
China 220 50 A
Hong Kong 200/220 50 BF
India 230/240 50 C
Indonesia 127/230 50 C
Japan 100 50/60 A
Korea (rep) 220 60 C
Malaysia 240 50 BF
Philippines 220/230 60 A/C
Singapore 230 50 BF
Taiwan 110 60 A
Thailand 220 50 (/BF
Countries/regions Voltage Frequency(Hz) Plugtype
VietllalIl 220 50 A/(
Oceania
Countries/regions Voltage Frequency(Hz) PlugtypeAustralia 240 50 O
New Zealand 230/240 50 O
North America
Countries/regions Voltage Frequency(Hz) Plugtype
Canada 120 60 A
USA 120 60 A
Central America
Countries/regions Voltage Frequency(Hz) PlugtypeBahamas 120/240 60 A
Costa Rica 110 60 A
Cuba 110/220 60 A/C
Dominican (rep) 110 60 A
El Salvador 110 60 AGuatemala 120 60 A
Honduras 110 60 A
Jamaica 110 50 AMexico 120/127 60 A
Nicaragua 120/240 60 APanama 110/220 60 A
South America
Countries/regions Voltage Frequency(Hz) Plugtype
Argentina 220 50 (/BF/O
Brazil 127/220 60 A/C
Chile 220 50 C
Colombia 120 60 A
Peru 220 60 A/C
\_,nezuela 120 60 A
Middle East
Countries/regions Voltage Frequency(Hz) Plugtype
h'an 220 50 C/BF
Iraq 220 50 C/BF
Israel 230 50 C
Saudi Arabia 127/220 50 A/C/BF
Turkey 220 50 C
UAE 240 50 C/BF
Africa
Countries/regions Voltage Frequency(Hz) Plugtype
Algeria 127/220 50 (
Congo (dem) 220 50 C
Egypt 220 50 C
Ethiopia 220 50 C
Kenya 240 50 C/BF
Nigeria 230 50 C/BF
South Africa 220/230 50 C/BF
Tanzania 230 50 C/BF
Tunisia 220 50 C
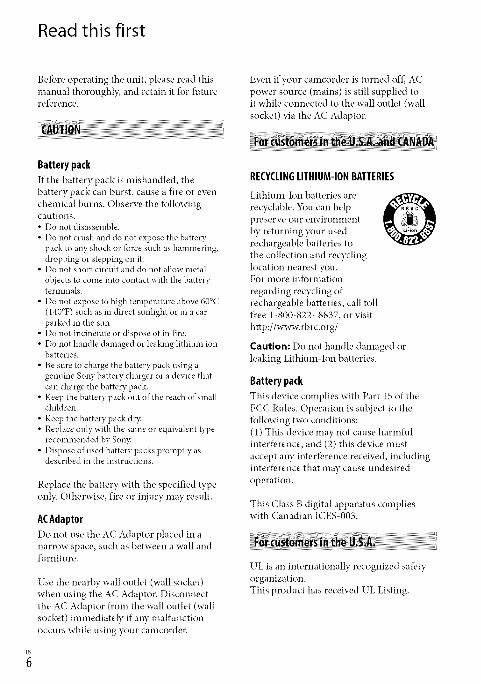
Read this first
Betbre operating the unit, please read this
manual thoroughl?; and retain it for futurereference.
Battery pack
If the battery pack is mishandled, the
battery pack can burst, cause a fire or ew, n
chemical burns. Obserw, the fbllowingcautions.• Do not disassemble.
• Do not crush and do not expose the batterypack to any shock or lbrce such as hammering,
dropping or stepping on it.• Do not short circuit and do not allow metal
objects to come into contact with the batteryterminals.
• Do not expose to high temperature above 60°C(140°F) such as in direct sunlight or in a car
parked in the sun.• Do not incinerate or dispose of in fire.• Do not handle damaged or leaking lithium ion
batteries.
• Be sure to charge the battery pack using agenuine Sony battery charger or a device that
can charge the battery pack.• Keep the battery pack out of the reach of small
children.
• Keep the battery pack dr)c• Replace onlywith the same or equNalent tTpe
recommended by Son_
• Dispose of used battery packs promptly asdescribed in the instructions.
Replace the battery with the specified type
onb: Otherwise, fire or injury may result.
ACAdaptor
Do not use the AC Adaptor placed in anarrow space, such as between a wall andfurniture.
Use the nearby wall outlet (wall socket)when using the AC Adaptor. Disconnectthe AC Adaptor from the wall outlet (wallsocket) immediately if aW malfunctionoccurs while using your camcorder.
Ew, n if your camcorder is turned off., ACpower source (mains) is still supplied toit while connected to the wall outlet (wall
socket) via the AC Adaptor.
aaa a ARECYCLIR6LITHIUM-IORBATTERIES
Lithium-Ion batteries are
recyclable. You can helppreserw, our environlnentby returning your usedrechargeable batteries tothe collection and recyclinglocation nearest you.For more infbnnation
regarding recycling ofrechargeable batteries, call tollfree 1-800-822- 8837, or visit
http://www.rbrc.org/
Caution: Do not handle damaged orleaking Lithium-Ion batteries.
Battery pack
This device complies with Part 15 of the
FCC Rules, Operation is subject to the
following two conditions:
(1) This device 1nay not cause harmfulinterfk, rence, and (2) this device must
accept any interference receiw, d, including
interfk, rence that may cause undesired
operation,
This Class B digital apparatus complieswith Canadian ICES-003.
UL is an internationally recognized safbty
organization.
This product has received UL Listing.

If you haw, aW questions about thisproduct, you may call:SoW Customer Infi_rmation Center1-800-222-SONY (7669).The number below is f;_r the FCC related
matters only.
RegulatoryInformation
Declaration of ConformityTrade Name: SONYModel No.: DCR-SX40, DCR-SX41,DCR-SX60
Responsible Party:So W Electronics Inc.Address: 16530 Via Esprillo, San Diego,CA 92127 U.S.A.
Telephone No.: 858-942-2230This device complies with Part 15 of theFCC Rules. Operation is subject to thef;_llowing two conditions: (1) This devicemay not cause harmful interfk,rence,and (2) this device must accept anyinterfk,rence receiw, d, includinginterfk,rence that may cause undesiredoperation.
CAUTION
You are cautioned that any changes ormodifications not expressly approw, d inthis manual could void your authority tooperate this equipment.
Note
This equipment has been tested and t_mnd
to comply with the limits fi_r a Class B
digital device, pursuant to Part 15 of theFCC Rules.
These limits are designed to provide
reasonable protection against harmfulinterfk, rence in a residential installation.
This equipment generates, uses, and
can radiate radio frequency energy and,if not installed and used in accordance
with the instructions, may cause harmfulinterfk, rence to radio communications.
Howew, r, there is no guarantee that
interfk, rence will not occur in a particular
installation. If this equipment does causeharmful interfk, rence to radio or television
reception, which can be determined by
turning the equipment off and on, the
user is encouraged to try to correct the
interfk, rence by one or more of the fi_llowingmeasures:
- Reorient or relocate the receiving antenna.
- Increase the separation between theequipment and receiver.
- Connect the equipment into an outlet ona circuit different f¥om that to which thereceiver is connected.
- Consult the dealer or an experienced radioTV technician *br help.
The supplied interface cable must be usedwith the equipment in order to comply withthe limits fi_r a digital device pursuant toSubpart B of Part 15 of FCC Rules.
The numbers in ( ) are the supplied
quantity.
[] AC Adaptor (1)
[] Power cord (Mains lead) (1)
[] A/V connecting cable (1) []
[] USB cable (1) []
[] Rechargeable battery pack NP-FH30 (1)
[] CD-ROM "Handycam Application
Software" (1) (p. 24)- "PMB" (software) including "PMBGuide"- "Handycam Handbook" (PDF)
[] "Operating Guide" (This manual) (1)
[] []
• See page 38 *k_r"Memory Sticl4' media you canuse with this camcorder.

Using the camcorder
• The camcorder is not dustproofi.,d, dripproo_bd
or waterproofi.,d. See "Precautions" (p. 47).
• Do not do any of the f___llowingwhen the
_ll (Movie)/O (Photo) lamps (p. 14) or
the access lamp (p. 38) are lit or flashing.
Otherwise, the recording media may be
damaged, recorded images may be lost or othermalfimctions could occur.
- ejecting "Memory Stick PRO Duo" media
- removing the battery pack or AC Adaptorfi'om the camcorder
• When connecting your camcorder to anotherdevice with a cable, be sure to insert the
connector plug in the correct wa3c Pushing the
plug *brcibly into the terminal will damage the
terminal and may result in a mal*hnction of the
camcorder.
• If you repeat recording/deleting images fbr
a long time, f)cagmentation of data occurs on
the recording media. Images cannot be saved
or recorded. In such a case, save your images
on some type of external media first, and then
perIbrm [MEDIA FORMAT] (p. 36).
• The LCD screen is manuIhctured using
extremely high-precision technolog> so over
99.99% of the pixels are operational for ef_-_.,ctive
use. However, there may be some tiny black
points and/or bright points (white, red, blue,
or green in color) that appear constantly on the
LCD screen. These points are normal results of
the manuIhcturing process and do not aI_-i.,ctthe
recording in any way.
On recording
• Bef___restarting to record, test the recording
function to make sure the image and sound are
recorded without aW problems.
• Compensation fbr the contents of recordings
cannot be provided, even if recording or
playback is not possible due to a malfunction of
the camcorder, recording media, etc.
• TV color systems di*_-i.,rdepending on the
country/region. To view your recordings on a
T'v; you need an NTSC system based T'vl
• Television programs, fihns, video tapes,
and other materials may be copyrighted.
Unauthorized recording of such materials may
be contrary to the copyright laws.
• To prevent your image data f)combeing lost,
save all your recorded images on external media
periodicall3c It is recommended that you save
the image data on a disc such as a DVD R using
your computer. Also, you can save your image
data using a DVD writer, VCR, or DVD/HDDrecorder.
About changing the language setting
• The on-screen displays in each local language
are used fbr illustrating the operating
procedures. Change the screen language befbre
using the camcorder if necessary (p. 15).
About this manual
• The images of the LCD screen used in this
manual for illustration purposes are captured
using a digital still camera, and therefbre may
appear different f?comthe actual images of theLCD screen.
• In this Operating Guide, the internal memory
of the camcorder and "Memory Stick PRO Duo"
media are called "recording media"
• In this Operating Guide, both "Memory Stick
PRO Duo" media and "Memory Stick PRO_HG
Duo" media are refi.,rred as "Memory Stick PRODuo" media.
• _\m will find the "Handycam Handbook" (PDF)
on the supplied CD ROM (p. 44).• The screenshots are fi'om Windows Vista. The
scenes may vary depending on the operating
system of the computer.
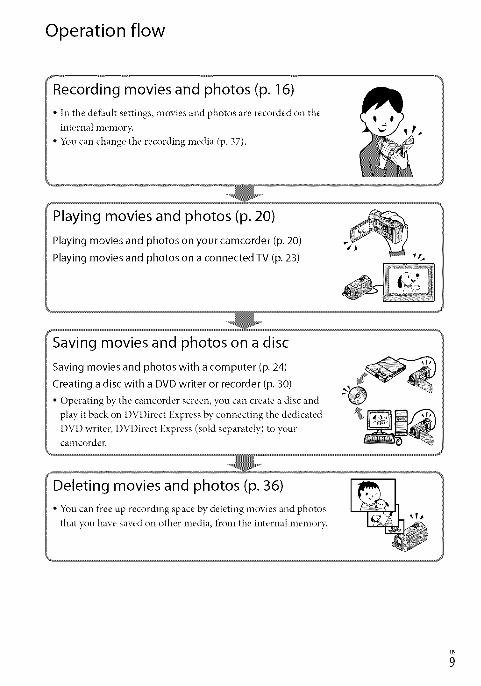
Operation flow
Recording movies and photos (p. 16)
• In the default settings, movies and photos are recorded on the
internal memor):
• You can change the recording media (p. 37).
Playing movies and photos (p. 20)
Playing movies and photos on your camcorder (p. 20)
Playing movies and photos on a connected TV (p. 23)
Saving movies and photos with a computer (p. 24)
Creating a disc with a DVD writer or recorder (p. 30)
• Operating by the camcorder screen, you can create a disc and
play it back on DVDirect Express by connecting the dedicated
DVD writer, DVDirect Express (sold separately) to your
camcorder.

Table of contents
IMPORTANTSAFETYINSTRUCTIONS............................................................ 3
Read this first ......................................................................................... 6
Operation flow ....................................................................................... 9
_ Getting startedStep 1: Charging the battery pack ............................................................. 12
Charging the battery pack abroad .................................................... 13
Step 2:Turning the power on, and setting the date and time ........................... 14
Changing the language setting ........................................................ 15
RecordingRecording ........................................................................................... 16
Recording and playing movies and photos easily(Easy Handycam operation) ............................................................ 19
_ PlaybackPlayback on the camcorder ..................................................................... 20
Playing images on a TV .......................................................................... 23
_ Saving movies and photos with a computerPreparing a computer (Windows) ............................................................. 24
When using a Macintosh ................................................................ 24
Creating a disc with one touch (One Touch Disc Burn) .................................... 26
Importing movies and photos to a computer (Easy PC Back-up) ........................ 27
Changing the destination drive or folder for movies and photos ............... 28
Starting PMB (Picture Motion Browser) ....................................................... 28
Creating a disc ..................................................................................... 29
Copying a disc ............................................................................. 29
Editing movies ............................................................................ 29
Capturing photos from a movie ....................................................... 29
Saving images with a DVD writer, recorderCreating a disc with the dedicated DVD writer, DVDirect Express ...................... 30
Creating a disc with a DVD writer, etc., other than DVDirect Express................... 33
Creating a disc with a recorder, etc............................................................ 34

Making good use of your camcorderDeleting movies and photos .................................................................... 36
Coping with shooting conditions .............................................................. 37
Changing the recording media ................................................................. 37
To check the recording media settings ............................................... 38
Dubbing or copying movies and photos from the internal memory to
"Memory Stick PRO Duo"media ....................................................... 39
Customizing your camcorder with menus ................................................... 40
Using the HELP function ................................................................ 40
Getting detailed information from the"Handycam Handbook". ........................ 44
_ Additional information_ lroubleshooting ............................................................................... 45
Precautions ......................................................................................... 47
Specifications ...................................................................................... 49
Screen indicators .................................................................................. 52
Parts and controls ................................................................................. 53
Index ................................................................................................. 54
Z
3

Step 1" Charging the battery pack
CHGlamp--
1 DC plug
I DC IN jack
"Ibthe wall outl_'tAC Adaptor (wall socket)
Battery pack Power cord (Mains lead)
You can charge the "InIoLITHIUM" battery pack (H series) after attaching it to your
camcorder.
• 5_u cannot attach any "IntbLITHIUM" battery pack other than the H series to your camcorder.
Turn offyour camcorder by closing the LCDscreen.
Attach the battery pack by sliding it in the direction of the arrow until itclicks.
Connect the AC Adaptor and the power cord (mains lead) to yourcamcorder and the wall outlet (wall socket).
• Be sure that the • mark on the DC phtg is fhcingdown.
The CHG (charge) lamp lights up and charging starts. The CHG (charge) lamp turns off
when the battery pack is fully charged.
Z_ When the battery is char0ed, disconnect the AC Adaptor from the DC IN
jack of your camcorder.
• See page 50 on charging, recording and playing time.

• When )Tourcamcorder is on, you can check the approximate amount of remaining batter), power with the
remaining batter), indicator at the upper left on the LCD screen.
To remove the battery pack
(;lose the LCD screen. Slide the BATT (batter},) release lever @ and remove the batter}, pack
®.
To use a wall outlet (wall socket) as a power source
Make the same connections as "Step 1: Charging the batter}, pack."
Notes on the battery pack and the AC Adaptor
• When you remove the hattery pack or disconnect the AC Adaptor, close the LCD screen and make sure
that the 1_ (Movie)/O (Photo) lamps (p. 14) are turned of_L
• Do not short-circuit the DC plug of the AC Adaptor or battery terminal with any metallic objects. This
may cause a malfunction.
• In the deflmlt setting, the power turns off automatically if you leave ),our camcorder without any
operation for about 5 minutes, to save battery power ([A.SHUT OFF]).
63
You can charge the battery pack in any countries!regions using the AC Adaptor Supplied with
your camcorder within the AC 100 V: 240 V, 50 Hz/60 Hz range.
, Do not use an electronic voltage transformer.
_3
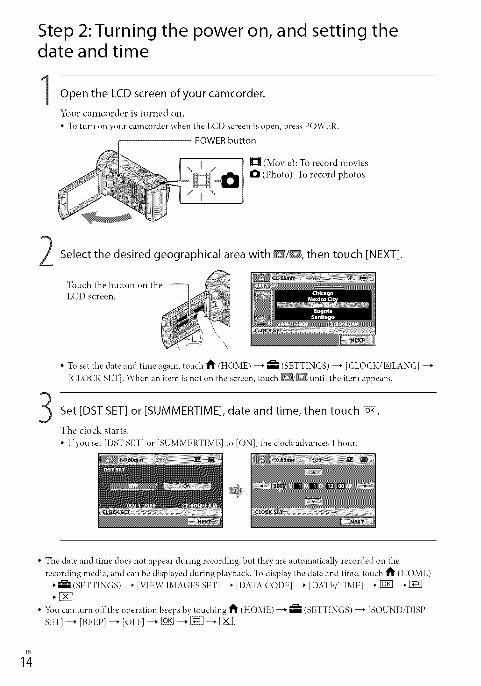
Step 2:Turning the power on, and setting thedate and time
1Open the LCD screen of your camcorder.
Your camcorder is turned on.
• To turn on your camcorder when the LCD screen is open, pressPOWER.
POWERbutton
(Movie): To record movies
O (Photo): To record photos
/ I ........
Select the desired geographical area with D/_, then touch [NEXT].
Touch the button on the
LCD screen.
• To set the date and time again, touch _ (HOME) _ _ (SETTINGS) _ [CLOCK/FXlLANGI
[CLOCK SET]. When an item is not on the screen, toud_ _/_ until the item appears.
Set [DST SET] or [SUMMERTIME], date and time, then touch [N].
The clock starts.
• If you set [DST SET]or [SUMMERTIME]to [ONI, the clockadvances 1hour.
• The date and time does not appear during recording, but they are automatically recorded on therecording media, and can be displayed during playback. Tu display the date and time, touch 1_ (HOME)
--_ _ (SETTINGS) --_ [VIEW IMAGES SET] --_ [DATA CODE] --' [DATE/TIME] --_ l_ --_ [g_]
_[X].
• 5_u can turn offthe operation beeps by touching 1_ (HOME) _ _ (SETTINGS) _ [SOUND/DISP
SET] _ [BEEP] _ [OFF] _ [_{] _ _ _ [_.

To turn off the power
Close the LCD screen. The H (Movie) lamp flashes for a tbw seconds and the power is turned
of£
POWERbutton
• 5%u can turn off your camcorder also by pressing POWER.
• When [POWER ON BY LCD] (p. 42) is set to [OFF], turn offyour camcorder by pressing POWER.
changing the language setting _
You Can Change the on screen displays to Show messages in a specified language, _-_
Touch _1" (HOME) _ _- (SETTINGS) _ [CLOCK/gLANG] _ [{_LANGUAGE SET]
_ a desired language _ I_1 _ [_ _ IX].
_5

Recording
In the default setting, movies are recorded on the
internal memory (p. 37).
Fasten the grip belt.
.... Open the lens cover.
\
0
Open the LCD screen of your camcorder.
Your camcorder is turned on.
• To tuna on )Tourcamcorder when the LCD screen is alreadyopen, press POWER(p. 14).

D,_ Press START/STOP to start recording.
START/STOP button Power zoom lever
_oomin T _T
0:00:14[30mi_
[STBY] ---+ [REC]
To stop recording, press START/STOP again.
• Ybu can magnify images with the power zoom lever. Move the power zoom lever slightly for aslower zoom. Move it further fbr a *hster zoom.
If you close the LCD screen during recording, the camcorder stops recording.
See page 50 on the recordable time of movies.
When a movie file exceeds 2 GB, the next movie file is created automaticall3c
5_u can change the recording media (p. 37).
You can change the recording mode of movies (p. 42).
[g:2 STEADYSHOT] is set to [ON] in the deihult setting.
To adjust the angle of the LCD panel, first open the LCD panel 90 degrees to the camcorder @, and then
actiust the angle (g). If you rotate the LCD panel 180 degrees to the lens side @, you can record movies/
photos in mirror mode.
@ 90 degrees (max.) --
@ 180 degrees (max.)
@ 90 degrees to the camcorder
• You can increase the zooming level by using the digital zoom. Set the zooming level by touching
tlt (HOME) --* _ (SETTINGS) --* [MOVIE SETTINGS] --_ [DIGITAL ZOOM] --* the desired setting--, [_ --, [iN-, IX].
g3
_7

In the default setting, photos are recorded on the internal memory (p. 37).
Open the lens cover.
Open the LCD screen of your camcorder.
Your camcorder is turned on.
• To tuna on )Tourcamcorder when the LCD screen is alreadyopen, press POWER(p. 14).
Press MODE to turn on the 0 (Photo) lamp.
• The aspect ratio of the screen becomes 4:3.

Press PHOTO lightly to adjust the focus, then press it fully. Power zoom lever
When IIIIIIIIdisappears, the photo is recorded.
• Move the power zoom lever slightly for a slower zoom. Move it i_.*rtherfbr a f_ster zoom.
• 5_u can check the recordable number of photos on the LCD screen (p. 52).
• To change the unage size, touch _1t (HOME) _ (SETTINGS) --+ [PHOTO SETTINGS] --+
[[]IMAGE SIZE] _ a desired setting --* []_] --* _ --_ [_.
• _u cannot record photos while _ is displayed.
Recording and playing movies and photos easily (Easy Handycamoperation)
Simply press EASY.
To cancel Easy Handycam operation, press EASY again after you finish recording, or menu
operations. During Easy Handycam operation, you can set basic options, such as changing
the image size or deleting lmages_ among the setting and adjustment items. Other items are
set automatically.
• When Easy Handycam operation is starte& nearly all menu settings are reset to the default settings
_mtomatically. (Some menu items retain the settirgs that were made betbre Easy Handycam
operation.)
3S.
appears during Easy Handycam operation mode.
_9

Playbackon thecamcorderIn the default setting, movies and photos on the internal memory are played (p. 37).
Open the LCDscreen of your camcorder.
Your camcorder is turned on.
• To tuna on ):our camcorder when the LCD screen is already open, press POWER (p. 14).
Touch [] (VIEW IMAGES).
[] (VIEW IMAGES)
The VISUAL INDEX screen appears after some seconds.
Touch the _11(Movie) tab @ --_ a desired movie @.
To the index screen of
scenes by a certain interval(Film Roll Index)
Previous
Next
To return to
recording *node
To the index screen of
face scenes (Face Index)
To the list of recordingdates
• I1_1appears with the movie or photo that was most recently played or recorded. If you touch the
movie or photo with II_1,you can continue playback ficom the previous time. (1_ appears on the
photo recorded on the "Memory Stick PRO Duo" media.)
2;

Your camcorder starts playing the selected movie.
Vnlume
To
ro fast-fnrward
To fast-reverse ro pause/play
• When playback f)com the selected movie reaches the last movie, the screen returns to the VISUALINDEX screen.
• Touch _[_ during pause to play back movies slowly.
• As you repeat touching [_/[_ during playback, movies are played as fhst as about 5 timesabout 10 times _ about 30 times _ about 60 times.
• _bu can turn on or offthe on-screen display by pressing DISP located on the panel behind the LCD
panel.
• The recording date, time, and shooting conditions are recorded automatically during recording.
This inibrmation is not displayed during recording, but you can display it during playback bytouching tlk (HOME) _ _ (SETTINGS) _ [VIEW IMAGES SET] --_ ]DATA CODE] --' a
desired setting _ _ _ [_] _ I_.
To adjust the sound volume of movies
While playing back movies, touch _ ---+ adjust with tNE]/[NE] ---+ [_].
• 5_m can adjust the sound volume fi'onr the OPTION MENU (p. 40).
Touch the I_ (Photo) tab @ --_ a desired photo @ on the VISUAL INDEX screen.
"13

Your camcorder displays the selected photo.
Previous
To the VISUAL
INDEX screen
To start/stop slide show
NextOPTION MENU
• 5_u can zoom in the photo by moving the power zoom lever while viewing photos (PB ZOOM). If you
touch a point in the PB ZOOM t_mme, the point comes to the center in the fi'ame.
• When viewing photos recorded on "Memory Stick PRO Duo" media, _ _ (playback tblder) appears on
the screen.

Playing images on a TV
Connect your camcorder to the input jack ofa TV or VCR using the A/V connecting cable
[] or an A/V connecting cable with S VIDE() [_. Connect your camcorder to the wall
outlet (wall socket) using the supplied AC Adaptor for this operation (p. 13). Refk, r also to the
instruction manuals supplied with the devices to be connected.
[] A/V connecting cable (supplied)
Connecting to another device via the A/V jack using an A/V connecting cable.[] A/V connecting cable with SVIDEO (sold separately)
When connecting to another device via the S VIDEO jack, by using an A/V connecting cablewith an S VIDEO cable (sold separately), higher quality images can be produced than with anA/V connecting cable. Connect the white and red plugs (left/right audio) and the S VIDE() plug
(S VIDEO channel) of the A/V connecting cable with an S VIDEO cable (sold separately). Theyellow plug connection is not necessar)c Connecting only the S VIDEO plug will not outputaudio.
A/V R
A/V Remote Connector
m
VIDEO@
IDEO (Ydlow)
AUDIO
(White) (Red)
'*............. _ (Yellow)
_ Jo :Signal flow
VCRs or TVs
Set the input selector of the TV to the input your camcorder will be
connected to.
• For details, refer to the instruction manuals supplied with the T'_(
Connect your camcorder to a TV with the A/V connecting cable ([_,supplied) or an A/V connecting cable with S VIDEO ([_, sold separately).
• Colmect your camcorder to the input jack of the T'vi
Play back movies and photos on your camcorder (p. 20).
• You can set the aspect ratio according to the connected TV (wide/4:3)by touching t_ (HOME)--+(SETTINGS) --' [OUTPUT SETTINGS]--_ [TV TYPE]--_ [16:9] or [4:3]--' {1_ --' _--_ IX]. 2s3

Preparing a computer
(Windows)
You can perfbrm following operations using
"PMB (Picture Motion Browser)."
-hnporting images to a computer
-Viewing and editing imported images
-Creating a disc
-Uploading movies and photos to websites
To save movies and photos using a
computer, install "PMB" from the supplied
CD-ROM beforehand.
• Do not _brmat the internal memory of your
camcorder ficom a computer. 5_ur camcorder
may not operate correctly.
• 5_u can create discs using 12 cm discs of
tbllowing type with "PMB2- DVD-R/DVD+R/DVD+R DL:
Unrewritable
- DVD- RW/DVD+ RW:
Rewritable
r x2 rMicrosoft \,'_indows XP SP3/\,'_ indows VistaSpu -3
Intel Pentium III: 1 GHz or faster
J{ .....
DirectX 9.0c or later (This product is based
on DirectX technolog,_: It is necessary to haveDirectX installed.)
256 MB or more
Other system requirements _br OS shouldbe *net.
Disk volume required fbr installation:Approximately 500 MB (5 GB or more *nay
be necessary when creating DVD discs).
iiMinimum 1,024 x 768 dots
• Operation with all computer environments is
not assured.
_ Standard installation is required. Operation is
not assured if tfie OS has been upgraded or in amulti boot environment.
_264 bit editions and Starter (Edition) are not
supported.
_ Starter (Edition) is not supported.
When using a Macintosh
The supplied software "PMB" is not
supported by Macintosh computers.
To process photos using a Macintosh
computer connected to your camcorder,
see the following website.
http:h guide.d-imaging.sony.co.jp/mac
lllS! US
Install "PMB" before connecting your
camcorder to a computer.
• Ifa version of"PMB" supplied with another
device has already been installed on the
computer, check the version. (The version
number is displayed by clicking [Help] - [About
PMB].) Compare the version nmnber of the
supplied CD-ROM with that oftfie previouslyinstalled "PMB;' check to ensure that the
versions have been installed in order, ficom the
lower to the higfier. If tfie version number of
the previously installed "PMB" is higher than
that of the "PMB" of your camcorder, uninstall
"PMB" ficom the computer and then reqnstall
it in order, *_'omlower to fiigfier. If you install a
higher version of"PMB" first, some fimctions
may not work correctly.
• Seepage44onthe"HandycamHandbook2
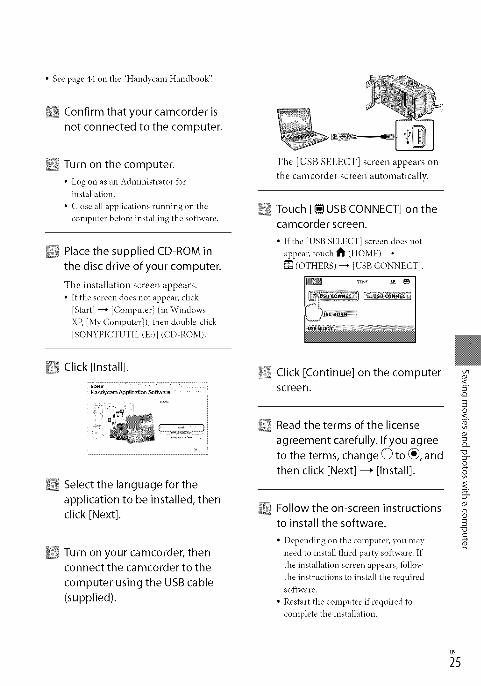
Confirm that your camcorder is
not connected to the computer.
_ Turn on the computer.
• Log on as an Administrator Ibr
installation.
• Close all applications running on the
computer belbre installing the software.
_ Place the supplied CD-ROM in
the disc drive of your computer.
The installation screen appears.
• If the screen does not appear, click
[Start] _ [Computer] (in Windows
XP, [My Computer]), then double click
[SONYPICTUTIL (E:)] (CD-ROM).
_ Click [Install].
Ha_dycam Application SoRwa_e
_ Select the language for the
application to be installed, then
click [Next].
_ Turn on your camcorder, thenconnect the camcorder to the
computer using the USB cable
[supplied).
The [USB SELECT] screen appears on
the camcorder screen automatically.
_ Touch [I_IUSB CONNECT] on thecamcorder screen.
• If the [USB SELECT] screen does not
appear, touch t_ (HOME)
{_ (OTHERS) _ [USB CONNECT].
Click [Continue] on the computer
screen.
D Read the terms of the license
agreement carefully. If you agreeto the terms, change C) to _, and
then click [Next] --_ [Install].
_fJ Follow the on-screen instructions
to install the software.
• Depending on the computer, you may
need to install third party software. If
the installation screen appears, lbllow
the instructions to install the requiredsoftware.
• Restart the computer if required to
complete the installation.
<.
3<o
o_
o
8
8"u
oD
_5

When the installation is completed,
following icons will appear.
Remow, the CD-ROM from your
computer.
PNB Guide
• Other icons may appear.
• No icon may appear depending on the
installation procedure.
• The "Handycam Handbook" is not
installed in this procedure (p. 44).
To disconnect your camcorder from thecomputer
Click the _ icon at the bottom
right of the desktop of the
computer--_ [Safely remove USB
Mass Storage Device].
Creating a disc withone touch
(OneTouch Disc Burn)
You can saw' movies and photos on a disc
by simply pressing "*_)(DISC BURN)
on your camcorder. Movies and photos
recorded on your camcorder that haw, not
yet been saved with One Touch Disc Burn
can be saw, d on a disc automatically.
• Install "PMB" befbrehand (p. 24), however, donot start "PMB2
• Connect your camcorder to the wall outlet (wall
socket) using the AC Adaptor supplied for this
operation (p. 13).• With '*_ (DISC BURN) on },our camcorder,
you can save movies and photos recorded on
the internal memory only.
Turn on your computer, and place
an empty disc on the DVDdrive.• See page 24 fbr the type of discs you can
use.
• Ifa W other software than "PMB" starts
automatically, shut it down.
Turn on your camcorder, and
connect it to the computer usingthe USB cable (supplied).
Touch [END] --_ [YES] on thecamcorder screen.
_ Disconnect the USB cable.
Press *:D(DISC BURN).
2;

Follow the instructions on the
computer screen.
• Movies and photos are not saved on the
computer when you perfbrm One Tuuch DiscBurn.
Importing movies andphotos to a computer
(Easy PC Back-up)
Movies and photos recorded on your
camcorder that haw, not yet been saw,d
with Easy PC Back-up can be imported
to a computer automaticall'_: Turn on the
computer beforehand.• Connect },ourcamcorder to the wall outlet (wall
socket) using the supplied AC Adaptor fbr thisoperation (p. 13).
Turn on your camcorder, and
connect it to the computer using
the USB cable (supplied).
The [USB SELECT] screen appears onthe camcorder screen.
Touch [1_ USB CONNECT] to
import images from the internal
memory, or [_]USB CONNECT] to
import images from a"MemoryStick PRO Duo" media.
The [Handycam Utility] window
appears on the computer screen.
<.
o_
o
8"u
0D
_7

3 On the computer screen, click[EasyPCBack-up] -_, [Import].
Starting PMB (Picture
Motion Browser)
Double-click the "PMB" short-cut icon on
the computer screen.
Movies and photos are imported to
your computer.
When the operation is completed, the
"PMB" screen appears.
• When the operation is completed, a screen
to indicate that movies are being analyzed
may appear. It may take a long time to
analyze movies. In the meantime, you can
operate "PMB2
• If the icon is not displayed on the computer
screen, click [Start] _ [All Programs]
[SoW Picture Utility] _ [PMB] to start "PMB2
You can view, edit, or create discs of movies
and photos using "PMB."
For details on how to use "PMB;' read the
"PMB Guide." Double-click the "PMB
Guide" short-cut icon on the computer
screen to open the "PMB Guide;'
• See "PMB Guide" on importing selected movies
and photos p. 28k
Changing the destination drive
or folder for movies and photos
On the [Handycam Utility] screen in
step 3 above, click [Easy PC Back-up] --+
[Change]. On the screen displayed, you
can select the drive or folder where the
images are to be saved.
• If the icon is not displayed on the computer
screen, click [Start] _ [All Programs]
[SoW Picture Utility] _ [Help] _ [PMB
Guide]. _\m can also open the "PMB Guide"
from [Help] of"PMB2

Creating a disc
You can create a disc by selecting movies
and photos previously imported to your
computer (p. 27).
Turn on your computer, and place
an empty disc on the DVD drive.
• See page 24 for the type of discs you can use.
• If any other software than "PMB" starts
automatically, shut it down.
Double-click the"PMB"short-cut
icon on the computer screen to
start'PMB."
• 5_u may start "PMB" also hy clicking
[Start] _ [All Programs] _ [Sony
Picture Utility] _ [PMB].
Click [Folders] or [Calendar] on
the left side in the window, and
select the folder or date, then
select the movies and photos.
• To select plural movies and photos, hold
the Ctrl key down and click thmnbnails.
At the top of the window, click
[Manipulate] ---+[DVD-Video(SD)Creation].The window used to select movies and
photos appears.
• To add movies _mdphotos to the previously
selected ones, select the movies and photos
in the main window and drag and drop onto
the window fbr selecting movies and photos.
Followthe instructions on the
screen to create a disc.
• It may take a long time to create a disc.
Copying a disc
You can copy a recorded disc to another
disc using "Video Disc Copier."
Click [Start] --_ [All Programsl -+ [Son}-
Picture Utility] --+ [Video Disc Copier]
to start the software. See "Video Disc
Copier" help on the operation.
Editing movies
You can cut out only necessary parts
from a movie and save it as another file.
Using "PMB;' select the movie you
want to edit, then dick [Manipulate]
--,, [Video Trimming] on the menu m
display the Video Trimming window. See
--PMB Guide" on the operation (p. 28L
Capturing photos from a movie
You can save a frame of a movie as a
photo file,
On the movie playback window of
"PMB;' dick _-*1_1to display [Save Frame]
windows. See "PMB Guide" on the
operation (p. 28k
Click
<.g
o_
o
8
_9

Creating a disc withthe dedicated DVD
writer, DVDirect
Express
The [DIS(; BURN] screen appears onthe camcorder screen.
Operating by the camcorder screen, you
can saw, movies to a disc when using a
dedicated DVD writer, DVDirect Express
(sold separately). You can also play back
these images on the created disc.Refer also to the instruction manual
supplied with the DVD writer.• DVDirect Express is referred to as "DVD
writer" in this section.
• Only unused discs of the *bllowingtypes canbe used:- 12cmDVD R- 12cmDVD+R
• The device does not support twoqayered discs.
• SonyDVD writer may not be available in somecountries/regions.
Turn on your camcorder, and
connect the DVD writer to the _'
(USB) jack of your camcorder with
the USB cable of the DVD writer.
Press *_)(DISC BURN) on the DVD
writer.
Movies recorded on the internal
memory that haw, not been saw, d on
a W discs will be recorded onto the
disc.
After the disc has been created, the disc
tray on the DVD writer opens and youcan remow, the disc.
• _u can also operate with _'_ (DISCBURN) on your camcorder.
Repeat steps 2 and 3 when the
total memory size of movies tobe burnt exceeds that of the disc.
The [EXTERNAL DRIVE] screen
appears on the camcorder screen.
• Use the supplied AC Adaptor as the power
source (p. 13). When using battery power, the
DVD writer does not work.
Insertan unused disc into the
DVD writer, and close the disc
tray.
After the operation is completed,
touch _ --_ [END] on the
camcorder screen.
• Touch [EJECTDIS(;] and remove anyinserted disc.
Close the disc tray on the DVD
writer, and disconnect the USB
cable.
3;
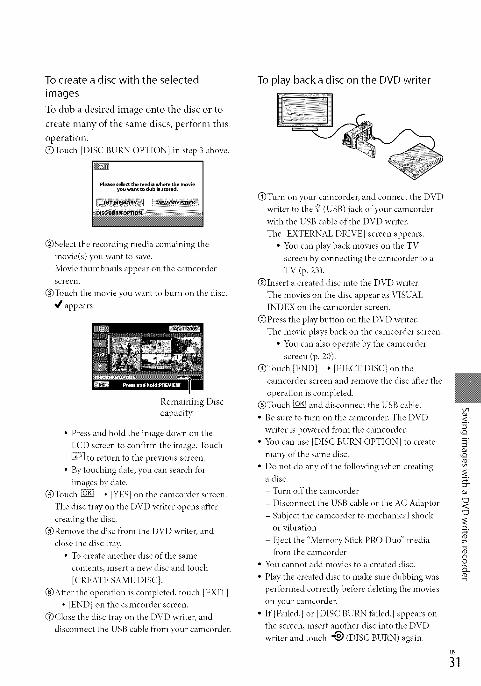
To create a disc with the selected
images
To dub a desired image onto the disc or to
create many of the same discs, perfi_rm this
operation.@Touch [DISC BURNOPTION[ in step 3 above.
To play backa disc on the DVD writer
@Select the recording media containing the
movie(s) you want to save.
Movie thumbnails appear on the camcorderscreen.
@Touch the movie you want to burn on the disc.
_/appears.
Remaining Disc
capacity
• Press and hold the image down on the
LCD screen to confirm the image. Touch
to return to the previous screen.
• By touching date, you can search fbr
images by date.@Touch [_0 _ [YES] on the camcorder screen.
The disc tray on the DVD writer opens after
creating the disc.
@Remove the disc from the DVD writer, and
close the disc tra?c
• To create another disc of the same
contents, insert a new disc and touch
[CREATE SAME DISC].
@After the operation is completed, touch [EXIT]
--* [END] on the camcorder screen.
@Close the disc tray on the DVD writer, and
disconnect the USB cable from your camcorder.
@Turn on your camcorder, and connect the DVD
writer to the _' (USB) jack of your camcorderwith the USB cable of the DVD writer.
The [EXTERNAL DRIVE] screen appears.
• 5_u can play back movies on the TV
screen by connecting the camcorder to a
TV (p. 23).
@Insert a created disc into the DVD writer.
The movies on the disc appear as VISUALINDEX on the camcorder screen.
@Press the play button on the DVD writer.
The movie phws back on the camcorder screen.
• 5_u can also operate by the camcorder
screen (p. 20).@Touch [END] _" [EJECT DISC] on the
camcorder screen and remove the disc after the
operation is completed.@Touch _ and disconnect the USB cable.
• Be sure to turn on the camcorder. The DVD
writer is powered from the camcorder.
• 5_u can use [DISC BURN OPTION] to create
many of the same disc.
• Do not do any of the lbllowing when creatinga disc.
- Turn offthe camcorder
- Disconnect the USB cable or the AC Adaptor
- Subject the camcorder to mechanical shockor vibration
- Eject the "Memory Stick PRO Duo" mediafrom the camcorder
• 5_u cannot add movies to a created disc.
• Play the created disc to make sure dubbing was
peribrmed correctly befbre deleting the movies
on your canlcorder.
• If [Failed.[ or [DISC BURN fhiled.] appears on
the screen, insert another disc into the DVD
writer and touch *_ (DISC BURN) again.
<.
<_
g
3S.

• IfthetotalmemorysizeofmoviestobeburntbytheDISCBURNoperationexceedsthatofthedisc,disccreationstopswhenthelimitisreached.Thelastmovieonthediscmaybecutoffi
• Disccreationtimetodubmoviestothelinfitofthediscisabout20to60minutes.Itmaytakemoretimedependingontherecordingmodeorthenumberofscenes.
• 5_ucanplaybackcreateddiscsonageneralDVDplayer.Ifplaybackisnotpossiblelbranyreason,connectthecamcordertotheDVDwriter,andthenplayback.
• Thediscmarkappearsonthecamcorderscreen.
• DVDirectExpressmaynotbeavailableinsomecountries/regions.

Creating a disc with aDVD writer, etc., other
than DVDirect Express
You can save movies on a disc by
connecting your camcorder to disc creation
devices, such as a Sony DVD writer other
than DVDirect Express, with the USB
cable. Refbr also to the instruction manuals
supplied with the devices to be connected.
The method used to create a disc by
connecting your camcorder to a SoW DVDwriter with the USB cable is described here.
• Connect your camcorder to the wall outlet (wallsocket)using the supplied AC Adaptor [-}orthis
operation (p. 13).
• SonyDVDwriter may not be available in some
countries/regions.
Turn on your camcorder, and
connect a DVD writer, etc., to the
_' (osg) jack of your camcorder
with the USB cable (supplied).
Record movies on the connected
device.
• For details, ref_:rto the instruction
manuals supplied with the deviceto beconnected.
After the operation is completed,
touch [END] --_ [YES] on the
camcorder screen.
Disconnect the USB cable.
The [USB SELECT] screen appears onthe camcorder screen.
Touch [I_ USB CONNECT] when
movies are recorded on the
internal memory, or [_3USBCONNECT] when movies are
recorded on "Memory Stick PRODuo" media on the camcorder
screen.
<.vo
vo
c_
3
_3

Creating a disc with arecorder, etc.
You can dub images played back on your
camcorder to a disc or video cassette,
by connecting your camcorder to a disc
recorder, a Sony DVD writer other than
DVDirect Express, ect., with the A/V
connecting cable. Connect the device
in either way of [] or []. Refer also to
the instruction manuals supplied with
the devices to be connected. Select the
recording media that contains movies you
want to dub before starting the operation
(p. 37).
• Connect your camcorder to the wall outlet (wall
socket) using the supplied AC Adaptor lbr this
operation (p. 13).
[] A/V connecting cable (Supplied)Connect the A/V connecting cable to the
input jacks of another device.
[] AN connecting cable with SVIDEO (soldseparately)
When connecting to another device
via the S VIDE() jack, by using an A/Vconnecting cable with an S VIDEO cable
(sold separately), higher quality images canbe produced than with an A/V connecting
cable. Connect tire white and red plug(left/right audio) and the S VIDEO plug
(S VIDE() channel) of the A/V connectingcable with an S VIDEO cable. If youconnect the S VIDEO plug only, you will
hear no sound. The yellow plug (video)
connection is not necessar)_
A/V Remote
Connector
A/V R
(Yellow)
Input
SVIDEO
@
VIDEO
@_(Yellow)
(White)
:>AUDIO
g>(Red)
-m
Signal flow
Insertthe recording media in the
recording device.
• If your recording device has an input
selector, set it to the input mode.
Connectyour camcorder to the
recording device (a disc recorder,etc.) with the A/V connecting
cable [] (supplied) or an A/V
connecting cable with SVlDEO
[] (sold separately).
• Colmect your calncorder to the input jacks
of the recording device.

Start playback on your
camcorder, and record it on the
recording device.
• Ref_.'rto the instruction manuals supplied
with your recording device [-}ordetails.
When dubbing is finished, stop
the recording device, and then
your camcorden
• Since dubbing is peribrmed via analog data
transfi.,r, the image quality may deteriorate.
• To hide the screen indicators (such as a counter,
etc.) on the screen of the monitor device
connected, touch t_ (HOME)
(SETTINGS) _ [OUTPUT SETTINGS]
[DISP OUTPUT] --+ [LCD PANEL] (the
defhult setting) _ _ _ [_ _ IX].
• To record the date/time or camera settings data,touch _ (HOME) _ _- (SETTINGS)
[VIEW IMAGES SET] _ [DATA CODE] _ a
desired setting _ [_[] _ [_{_]_ IX].
In addidion, touch t_ (HOME)
(SETTINGS) _ [OUTPUT SETTINGS]
--+ [DISP OUTPUT] _ IV-OUT/PANEL]g}N-, [3_--_ IN2
• When the screen size of display devices(T'v; etc.) is 4:3, touch t_ (HOME)
_- (SETTINGS) _ [OUTPUT SETTINGS]
-+ [TV TYPE] _ [4:31 _ [_[] _ _
• When you connect a monaural device, connect
the yellow plug of the A/V connecting cable
to the video input jack, and the white (left
channel) or the red (right channel) plug to the
audio input jack on the device.
• Sony DUD writer may not be available in some
countries/regions.
<.
3
_5

Deleting movies and
photos
You can free media space by deleting
movies and photos from recording media.
Select the recording medium that contains
the movies and photos you want to delete
before starting the operation (p. 37).
Touch _ (HOME) --_ I_1 (OTHERS)
--_ [DELETE].
To delete movies, touch
[IVll DELETE] --_ [g31 DELETE].
• To delete photos, touch [ []DELETE]
[ [] DELETE].
Touch and display the,/mark
on the movies or photos to bedeleted.
Formatting deletes all the movies and
photos to recow, r recordable free space.
• Connect your camcorder to the wall outlet (wall
socket) using the AC Adaptor supplied for this
operation (p. 13).
• To avoid the loss of important images, you
should save them (p. 24) beIbre fbrmatting the
recording media.
• Protected movies and photos will also be
deleted.
Touch t1_ (HOME) --_
I_ (MANAGE MEDIA) --_ [MEDIA
FORMAT].
Touch the recording media to
be formatted (lINT. MEMORY] or
[MEMORY STICK]).
_i Touch [YES] --_ [YES] --_ [Q]_.
Touch _ --_ [YES] --_ _ --_ E8].
• To delete all movies at one time
In step 2, touch [E::_DELETE] _ [E::_DELETEALL] _ [YES] _ [YES] _ _ _ IX].
• To delete all photos at one time
In step 2, touch [[] DELETE] _ [[]DELETE
ALL] _ [YES] _ [YES] _ []_}_]_ [_.
• While [Executing...] is disphwed, do not close
the LCD screen, oprate the buttons on the
camcorder, disconnect the AC Adaptor, or eject
the "Memory Stick PRO Dug' media from your
camcorder. (The access lamp is lit or flashing
while fbrmatting the medium.)
3;

Coping with shootingconditions
A wide variety of settings and adjustment
options are available on the menu (p. 40).
To adjust the exposure fbr backlit subject,
press [] (backlight) to display []. To cancel
the backlight function, press [] (backlight)
again.
Attach the tripod (sold separately) to the
tripod receptacle using a tripod screw (sold
separately, the length of the screw must be
less than 5.5 mm (7132 in.)).
Changing therecording media
You can select the internal memory or
"Memory Stick PRO Dud' media as the
recording, playback, or editing medium on
your camcorder. Select the medium to be
used fbr movies and photos separately.
In the default setting, both movies and
photos are recorded on the internal
nlenlory.
i( l_S Photos/v J
"Men ory St ok" media
• 5_u can do recording, playback, and editing
operations on the selected medium.
• See page 50 ior the recordable time of movies.
Touch t1_ (HOME) --_
I_ (MANAGE MEDIA) --_ [MOVIE
MEDIA SET].
The [MOVIE MEDIA SET] screen
appears.
Touch the desired medium.
_i Touch [YES] --_ I_.
The recording medium is changed.
_xT.
g
o
3
_7

Touch @ (HOME) --_
(MANAGE MEDIA) --_ [PHOTO
MEDIA SET].
The [PHOTO MEDIA SET] screen
appears.
Touch the desired recordingmedium.
_] Touch [YES]--_ _.
The recording medium is changed.
To check the recording media
settings
Light up the H (Movie) lamp to check
the recording medium used for movies.
or the O (Photo) lamp for photos. The
media icon is displayed at the top rightcorner of the screen.
_: Internal memory
1223:"Memory Stick PRO Duo" media
Types of"Memory Stick" media you canuse with your camcorder
• For recording movies, it is recommended that
you use "Memory Stick PRO Duo" media of512MBor largermarked with:
- MEMORYSTICKPRODUO("MemoryStickPRO Dud' media)×
- M[MORYSTIEI(PRO-HGDu0("Memory StickPRO HG Duo" media)
Marked with Mark2 or not, either can
be used.
• "Memory Stick PRO Duo" media of up to 16GBare confirmed to work with this camcorder.
Open the "Memory Stick Duo"
media cover, and insert the
"Memory Stick PRO Duo" media
into the "Memory Stick Duo"
media slot until it clicks.
• If you force the "Memory Stick PRO Duo"
media into the slot in the wrong direction,
the "Memory Stick PRO Duo" media, the
"Memory Stick Duo" media slot, or image
data may be damaged.
• Close the "Memory Stick Duo" media
cover after inserting the "Memory StickPRO Duo" media.
• Set the recording medium to [MEMORY
STICK] to record movies and/or photos on
"Memory Stick PRO Duo" media (p. 37).
Access lamp
The [Create a new hnage Database
File.] screen appears when you insert
new "Memory Stick PRO Duo" media
while the n (Movie) lamp is lit.

Touch [YES].
• To record only photos on "Memory Stick
PRO Duo" media, touch [NO].
• If ]Failed to create a new Image Database File.
It may be possible that there is not enough
fl'ee space.] is displayed in step 2, lbrmat the
"Memory Stick PRO Dud' media (p. 36).
To eject the "Memory Stick PRODuo"media
Open the "Memory Stick Duo" media cover
and lightly push the "Memory Stick PRODuo" media in once.
• Do not open the "MenaoryStick Duo" mediacoverduring recording.
• When inserting or ejecting the "MemoryStickPRO Duo" media, be careful so that the
"Memory StickPRO Duo" media does not popout and drop.
Dubbing 0r c0pying moviesand photos from the internal
memory to"Memory Stick PRODuo, media
Touch t_ (HOME) _ [_ (OTHERS)
[MOVIE DUB]![PHOTO COPY], then
follow the displays on the screen. g
&
8&
_9

Customizing yourcamcorder with menus
• Menu items are described in more details with
color pbotos in the "Hand>,cam Handbook"
(p. 44).
\Vhen you touch t111"(HOME), the HOME
MENU appears. You can change the
settings of your camcorder.
t11t (HOME) --
Touch the desired category--_
the menu item to be changed.
Menu item
Using th e HELP function
To see th e descriptions on the HOME
MENU, touch [] (HEL P) on the HOM E
MENU screen: (The bottom of_ turns
...................................................want to know about.
The o._ OPTION MENU appears just like
the pop-up window that appears when you
right-click the mouse on a computer. The
menu items you can change in the context
appear.
(OPTION) --
ICategory
Follow the instruction on the
screen.
_ After completing the setting,touch 15_.
• When the item is not o17the screen, touch
• To return to the previous screen,touch[3_N.
• To hide the HOME MENU screen,touch
• _!bucannot select the grayed items orsettings.
Touch the desired tab --_ the
item to change the setting.
Menu item
ITab
After completing the setting,touch Fo_I.
• When the item you want is not on the screen,
touch another tab. (There maybe no tab.)
• _Mucannot use the OPTION MENU during
Easy Handycam operation.

(CAMERA) category
MOVIE .........................................p. 16
PHOTO........................................p. 18
(VIEW IMAGES) category
VISUAL INDEX...........................p. 20
_FILM ROLL...........................p. 20
[]FACE ........................................p. 20
PLAYLIST.....................................Displays and plays a movie playlist.
[_ (OTHERS) category
DELETE
_l! DELETE........................p. 36
[]DELETE ........................p. 36
PHOTO CAPTURE....................Captures photos ii'om desired scenes of"movies.
MOVIE DUB ...............................p. 39PHOTO COPY
COPY by select ...............p. 39
COPY by date ..................p. 39
EDIT
g21!DELETE........................p. 36
[]DELETE ........................p. 36
PROTECT.....................Sets the protection to avoid deleting movies.
[] PROTECT.....................Sets the protection to avoid deleting photos.
g21tDIVIDE .........................Divides movies.
PLAYLISTEDIT
E:_ADD..............................Adds a movie to a playlist.
g::_ADD by date ..............Adds movies recorded on the same day at one time in a playlist.
ERASE ...........................Erases a movie flcom a playlist.
ERASE ALL...................Erases all movies ficom a playlist.
MOVE ............................Changes the order of movies in a playlist.
USB CONNECT
_1 USB CONNECT ..........Connects the internal memory via USB.
_USB CONNECT ..........Connects the "Memory Stick PRO Duo" media via USB.
DISC BURN .......................p. 26
BATTERYINFO ..........................Displays the battery infbrmation.
(MANAGE MEDIA) category
MOVIE MEDIA SET ..................p. 37
PHOTO MEDIA SET .................p. 38
MEDIA INFO ..............................Displays infbrmation on the recording media, such as flceespace.
_xT.g
r0
o
8r0

MEDIA FORMAT ....................... p. 36
REPAIR IMG.DB F...................... p. 46
(SETTINGS) category
MOVIE SETTINGS
REC MODE ........................ Sets the mode to record movies. When recording fhst moving subjects, a
high image quality, such as [HQ], is recommended.
WIDE SELECT ................... Sets the horizontal to vertical ratio when recording movies.
DIGITAL ZOOM ............... p. 17
gEltSTEADYSHOT ............ p. 17
AUTO SLW SHUTTR....... Adjusts the shutter speed automaticall3_
GUIDEFRAME .................. Displays the frame to make sure the subject is horizontal or vertical.
g_! REMAINING SET ....... Sets how the remaining recording time of the media is to be displayed.
[] FACE SET ...................... Sets to create the Face Index screen.
PHOTO SETTINGS
[] IMAGE SIZE ................ Sets the photo size.
FILE NO ............................. Sets how to assign the file number.
AUTO SLW SHUTTR....... Adjusts the shutter speed automaticall3c
GUIDEFRAME .................. Displays the frame to make sure the subject is horizontal or vertical.
VIEW IMAGES SET
DATA CODE ...................... Displays the detailed recording data during playback.
SOUND/DISP SET
VOLUME ............................ p. 21
BEEP ................................... p. 14
LCD BRIGHT ..................... Adjusts the brightness of the LCD screen.
LCD BL LEVEL .................. Adjusts the backlight of the LCD screen.
LCD COLOR ...................... Adjusts the color intensity of the LCD screen.
OUTPUT SETTINGS
TVTYPE ............................. p. 23
DISP OUTPUT .................. Sets whether the on screen displays appear on the TV screen or not.
CLOCK/[] LANG
CLOCK SET ....................... p. 14
AREA SET .......................... p. 14
DST SET//SUMMERTIME p. 14
[]LANGUAGE SET ......... p. 15
GENERAL SET
DEMO MODE ................... Sets whether the demonstration appears or not.
CALIBRATION .................. Calibrates the touch panel.
A.SHUT OFF ..................... Changes the [A.SHUT OFF] setting (p. 13).
POWER ON BY LCD ....... Sets whether or not the camcorder is turned on and offwhen you open
and close the LCD screen.
• [SOUND/DISP SET] is changed to [SOUND SETTINGS] during Easy Han@cam operation.

ThetollowingitemsareavailableontheOPTIONMENUonly.I1_tab
SPOTMTR/FCS................Adjuststhebrightnessandfocusfortheseletedsubjectsimultaneousl)_SPOTMETER....................Adjuststhebrightnessofimagestoasubiectyoutouchonthescreen.SPOTFOCUS....................Focusesonasubjectyoutouchonthescreen.TELE MACRO ...................Shoots a subiect in tbcus with, the background out of lbcus.
EXPOSURE........................Adjusts the brightness of movies and photos.
FOCUS ...............................Focuses manuall)_
SCENE SELECTION.........Selects an appropriate recording setting according to the type of scene,such as night view or beach.
WHITE BAL.......................Adjusts the white balance.
tab
FADER................................Fades scenes in or out.
tab
BLT-INZOOM MIC..........Records movies with directional sound relatiw, to the zoom setting.
MICREF LEVEL.................Sets the microphone level.
SELF-TIMER......................Used during photo recording.
The tab depends on the situation/no tab
SLIDE SHOW ....................Plays a series of photos.
SLIDE SHOW SET............Sets the repetition option for the slide shox_c
_:57.g
o5n_
o
8n_
_3
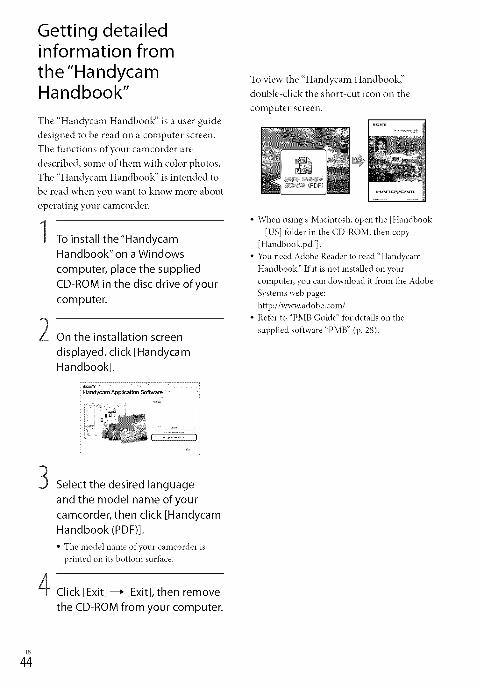
Getting detailedinformation from
the"HandycamHandbook"
The "Handycam Handbook" is a user guide
designed to be read on a computer screen.
The functions of your camcorder are
described, some of them with color photos.
The "Handycam Handbook" is intended to
be read when you want to know more about
operating your camcorder.
To install the"Handycam
Handbook" on a Windows
computer, place the supplied
CD-ROM in the disc drive of your
computer.
2 On the installation screen
displayed, click [Handycam
Handbook].
H_dyeam A£plication Software
Select the desired language
and the model name of your
camcorder, then click [HandycamHandbook (PDF)].
• The model name of your camcorder isprinted on its bottom surfhce.
Click [Exit] --_ [Exit], then remove
the CD-ROM from your computer.
To view the "Handycam Handbook;'
double-click the short-cut icon on the
computer screen.
• When using a Macintosh, open the [Handbook]
[US] folder in the CD-ROM, then copy
[Handbook.pdf].
• _!\mneed Adobe Reader to read "Handycam
Handbook." If it is not installed on your
computer, you can download it from the Adobe
Systems web page:
http://x_q_v.adobe.com/• Re*br to "PMB Guide" *br details on the
supplied software "PMB" (p. 28).

Troubleshooting
If you run into a W problems using your
camcorder, use the fbllowing table to
troubleshoot the problem. If the problem
persists, disconnect the power source and
contact your Sony dealer.
Notesbeforesendingyourcamcorderfor repair
• 5_ur camcorder maybe required to initialize
or change the current internal memory of your
camcorder, depending on the problem. In theevent of this, the data stored on the internal
memory will be deleted. Be sure to save the
data on the internal memory on other media
(backup) befbre sending your camcorder tbr
repair. \Ve will not compensate you tbr any loss
of internal memory data.
• During repair, we may check a minimum
amount of data stored on the internal memory
in order to investigate the problem. However,
your SoW dealer will neither copy nor retain
your data.
• See the "Handycam Handbook" (p. 44) for
details on the symptoms of your camcorder,
and "PMB Guide" (p. 28) on connecting your
camcorder to a computer.
The power does not turn on.
• Attach a charged battery pack to the
camcorder (p. 12).
• Connect the plug of the AC Adaptor to the
wall outlet (wall socket) (p. 12).
The camcorder does not operate even
when the power is set to on.
• It takes a few seconds for your camcorder to
be ready to shoot atXer the power is turned on.This is not a malfunction.
• Disconnect the AC Adaptor from the wall
outlet (wall socket) or remove the battery
pack, then reconnect it after about 1 minute.
If your camcorder still does not work, press
RESET (p. 53) using a pointed object. (If you
press RESET, all settings, including the clock
setting, are reset.)
Your camcorder gets warm.
• 52mr camcorder may become warm during
operation. This is not a malfunction.
The power abruptly turns off.
• Use the AC Adaptor (p. 13).
• Turn on the power again.
• Charge the battery pack (p. 12).
Pressing START/STOP or PHOTO does not
record images.
• Press MODE to turn on the _ (Movie) or
I_ (Photo) lamp.
• "*2mr camcorder is recording the image you
haste just shot on the recording media. You
cannot make any new recordings during this
period.
• The recording media is tElL Delete
unnecessary images (p. 36).
• The total number of movie scenes or photos
has exceeded the recordable capacity of your
camcorder. Delete unnecessary images (p. 36).
"PMB"cannot be installed.
• Check the computer environment or
installation procedure required to install
"PMB" (p. 24).
"PMB" does not work correctly.
• Quit "PMB" and restart }Tourcomputer.
The camcorder is not recognized by the
computer, o
• Disconnect devices from the USB jack of the 5.
computer other than the keyboard, mouse,
and your camcorder.
• Disconnect the USB cable from the computer _.and your camcorder, and restart the computer,
then connect the computer and your
camcorder again in the proper order.
_5

If indicators appear on the LCD screen,
check the fbllowing.
If the problem persists ew, n after you
haw, tried to fix a couple of times, contact
your Sony dealer or local authorized SoW
service facility.
C:04:DD
• The battery pack is not an "InfoLITHIUM"
battery pack (H series). Use an
"IntbLITHIUM" battery pack (H series)
(p. 12).
• Connect the DC plug of the AC Adaptor to the
DC IN jack of your camcorder securely (p. 12).
C:13:DD / C:32:DD
• Remove the power source. Reconnect it and
operate your camcorder again.
E:20:DD / E:31:DD / E:61:DD / E:62:DD
/ E:91 :DD / E:94:DD
• _)ur camcorder needs to be repaired. Contact
your Sony dealer or local authorized SoW
service facility. Inform them of the 5-digit
code, which starts f_com"E;'
101-0001
• When the indicator flashes slowly, the file is
damaged or unreadable.
• The internal memory of your camcorder is
tull. Delete unnecessary images on the internal
memory (p. 36).
• An error may have occurred with the internal
memory drive in your camcorder.
• No "Memory Stick PRO Dug' media is
inserted (p. 38).
• When the indicator flashes, there is not
enough free space tot recording images. Delete
unnecessary images (p. 36), or format the
"Memory Stick PRO Duo" media (p. 36) after
storing the images on other media.
• The hnage Database File is damaged. Check
the hnage Database File by touching
(HOME) _ _ (MANAGE MEDIA)
[REPAIR IMG.DB E] _ recording media.
• The "Memory Stick PRO Dug' media is
damaged. Format the "Memory Stick PRO
Duo" media with your camcorder (p. 36).
• Incompatible "Memory Stick Duo" media isinserted (p. 38).
{_ o....._
• Access to the "Memory Stick PRO Dug' media
was restricted on another device.
• The camcorder is unstead3c Hold the camcoMer
steady with both hands. However, note that
the camera shake warning indicator does not
disappear.
• The recording media is full. Delete unnecessary
images (p. 36).
• Battery power is lox_:

Precautions
On use and care
• Do not use or store the camcorder and
accessories in the fbllowing locations:
- Anywhere extremely hot, cold or hmnid.
Never leave them exposed to temperaturesabove 60 °C (140 °F), such as under direct
sunlight, near heaters or in a car parked in
the sun. They may malfunction or become
defbrmed.
- Near strong magnetic fields or mechanical
vibration. The camcorder may malftmction.
- Near strong radio waves or radiation. The
camcorder may not be able to record properl}c
- Near AM receivers and video equipment.
Noise may occur.
- On a sandy beach or anFwhere dust}c If
sand or dust gets in your camcorder, it maymalfunction. Sometimes this malfunction
cannot be repaired.- Near windows or outdoors, where the LCD
screen or the lens may be exposed to direct
sunlight. This damages the inside of the LCD
screen.
• Operate your camcorder on DC 6.8 V/7.2 V
(battery pack) or DC 8.4 V (AC Adaptor).
• For DC or AC operation, use the accessories
recommended in these operating instructions.
• Do not let your camcorder get wet, fbr example,
fl'om rain or sea water. If your camcorder
gets wet, it may malfimction. Sometimes this
malfunction cannot be repaired.
• If any solid object or liquid gets inside the
casing, unplug },our camcorder and have it
checked by a Sony dealer befbre operating it
any further.
• Avoid rough handling, disassembling,
modifying, physical shock, or impact such
as hanunering, dropping or stepping on the
product. Be particularly careful of the lens.
• Keep the LCD screen closed when you are not
using },our camcorder.
• Do not wrap },our camcorder with a towel, fbr
example, and operate it. Doing so might cause
heat to build up inside.
• When disconnecting the power cord (mains
lead), pull it by the plug and not the cord.
• Do not damage the power cord (mains lead)
such as by placing anything hea,,T on it.
• Do not use a deibrmed or damaged battery
pack.
• Keep metal contacts clean.
• If the battery electrolytic liquid has leaked:
- Consult }Tourlocal authorized Sony service
fhcilit}_
- \\_sh off any liquid that may have contacted
},our skin.
- If any liquid gets in },our eyes, wash with
plenty of water and consult a doctor.
When not using your camcorder for a
long time
• To keep your camcorder in optimum state fbr a
long time, turn it on and let it run by recording
and playing back images about once a month.
• Use up the battery pack completely befbre
storing it.
LCD screen
• Do not exert excessive pressure on the LCD
screen, as it may cause damage.
• If your camcorder is used in a cold place, a
residual image may appear on the LCD screen.This is not a malfimction.
• While using },our camcorder, the back of
the LCD screen may heat up. This is not amalfimction.
To clean the LCD screen
• If fingerprints or dust make the L('D screen
dirty, it is reconuuended that you use a soft
cloth to clean it. When you use the LCD
Cleaning Kit (sold separately), do not apply the
cleaning liquid directly to the LCD screen. Use
cleaning paper moistened with the liquid.
On handling the casing
• If the casing is soiled, clean the camcorder body
with a soft cloth lightly moistened with water,
and then wipe the casing with a dry soft cloth.
• Avoid the fbllowing to avoid damage to thefinish:
g
_7

- Using chemicals such as thinner, benzine,
alcohol, chemical cloths, repellent, insecticideand sunscreen
- Handling the camcorder with above
substances on your hands
- Leaving the casing in contact with rubber or
vinyl objects fbr a long period of time
About care and storage of the lens
• Wipe the surihce of the lens clean with a soft
cloth in the fbllowing instances:
- When there are fingerprints on the lenssurfilce
- In hot or hmnid locations
- When the lens is exposed to salty air such assitthe seaside
• Store in a well ventilated location subject tolittle dirt or dust.
• To prevent mold, periodically clean the lens asdescribed above.
On charging the pre-installed
rechargeable battery
_ttr camcorder has a pre installed rechargeable
battery to retain the date, time, and other settings
even when the camcorder is turned off The pre
installed rechargeable battery is ahvays charged
while your camcorder is connected to the wall
outlet (wall socket) via the AC Adaptor or while
the battery pack is attached. The rechargeable
battery will be fldly discharged in about 3 months
if you do not use ?Tourcamcorder at all. Use
your camcorder after charging the preqnstalled
rechargeable batter3c However, even if the pre
installed rechargeable battery is not charged, the
camcorder operation will not be affbcted as long
as you are not recording the date.
Procedures
Connect your camcorder to a wall outlet (wall
socket) using the supplied AC Adaptor, and leaveit with the LCD screen closed for more than 24
hours.
Note on disposal/transfer of the
camcorder
Even if you peribrm [MEDIA FORMAT] (p. 36)
or formatting, some data might not be entirely
deleted f)comthe internal memor}c
When you transfer the camcorder, it is
recommended that you perfbrm [ _1 EMPTY]
(See "Getting detailed information fi'om the
"Handycam Handbook'' on page 44.) to prevent
the recovery of your data. Also, when you dispose
of the camcorder, it is reconnnended that you
destroy the actual bo@ of the camcorder.
Note on disposal/transfer of'MemoryStick PRO Duo" media
Even if you delete data in the "Memory Stick PRO
Duo" media or lbrmat the "Memory Stick PRO
Duo" media on your camcorder or a computer,
you may not delete data from the "Memory Stick
PRO Dud' media completel}c When you give the
"Memory Stick PRO Dud' media to somebody, it
is recommended that you delete data completely
using data deletion software on a computer. Also,
when you dispose of the "Memory Stick PRO
Duo" media, it is recommended that you destroy
the actual body of the "Memory Stick PRO Dud'media.
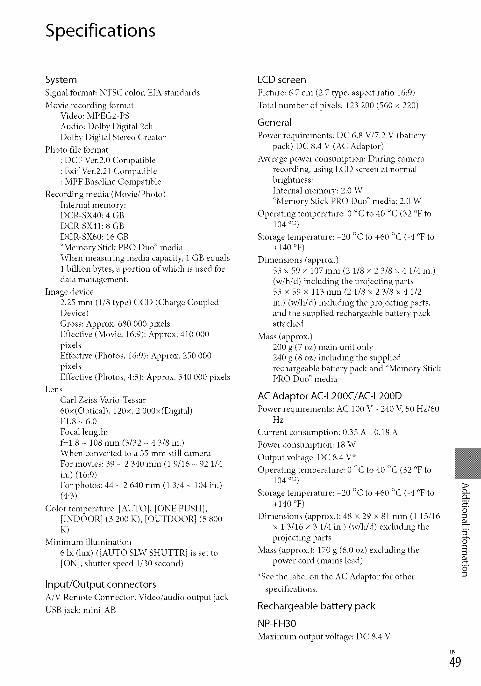
Specifications
System
Signal fbrmat: NTSC color, EIA standards
Movie recording lbrmatVideo: MPEG2 PS
Audio: Dolby Digital 2chDolby Digital Stereo Creator
Photo file lbrmat
: DCF Ver.2.0 Compatible
: Exif'v\,r.2.21 Compatible: MPF Baseline Compatible
Recording media (Movie/Photo)Internal memory:DCR SX40:4 GBDCR SX41:8 GBDCR-SX60:16 GB
"Memory Stick PRO Duo" mediaWhen measuring media capacity, 1 GB equals1 billion bytes, a portion of which is used fbrdata management.
Image device2.25 mm (1/8 type) CCD (Charge CoupledDevice)Gross: Approx. 680 000 pixelsEffective (Movie, 16:9): Approx. 410 000pixelsEffectNe (Photos, 16:9): Approx. 250 000pixelsEffectNe (Photos, 4:3): Approx. 340 000 pixels
LensCarl Zeiss Vario Tessar
60x(Optical), 120x, 2 000x (Digital)F1.8 - 6.0
Focal length:f_-l.8 _ 108 mm (3/32 - 4 3/8 in.)When converted to a 35 mm still camera
For movies: 39 _ 2 340 mm (1 9/16 _ 92 1/4in.) (16:9)
For photos: 44 _ 2 640 mm (1 3/4 _ 104 in.)(4:3)
Color temperature: [AUTO], [ONE PUSH],[INDOOR] (3 200 K), [OUTDOOR] (5 800K)
Minimum illmnination
6 Ix (lux) ([AUTO SLW SHUTTR] is set to[ON], shutter speed 1/30 second)
Input/Output connectors
A/V Remote Connector: Video/audio output jack
USB jack: minbAB
LCD screen
Picture: 6.7 cm (2.7 type, aspect ratio 16:9)
Total number of pixels: 123 200 (560 x 220)
General
Power requirements: D(" 6.8 V/7.2 V (batterypack) DC 8.4 V (AC Adaptor)
Average power consumption: During camerarecording, using LCD screen at normalbrightness:Internal memory: 2.0 W"Memory Stick PRO Dud' media: 2.0 W
Operating temperature: 0 °C to 40 °C (32 °F to104 °F)
Storage temperature: 20 °C to +60 °C ( 4 °F to+140 °F)
Dimensions (approx.)53 x 59 x 107mni (2 1/8 x 2 3/8 x 4 1/4 in.)(w/h/d) including the projecting parts53×59× 113mm(21/8x23/8x41/2in.) (w/h/d) including the projecting parts,and the supplied rechargeable battery packattached
Mass (approx.)200 g (7 oz) main unit only240 g (8 oz) including the suppliedrechargeable battery pack and "Memory StickPRO Dud' media
AC Adaptor AC-L200C/AC-L200D
Power requirements: AC 100 V _ 240 V, 50 Hz/60Hz
Current consumption: 0.35 A _ 0.18 A
Power consumption: 18 W
Output voltage: DC 8.4 V×
Operating temperature: 0 °C to 40 °C (32 °F to104 °F)
Storage temperature: 20 °C to +60 °C ( 4 °F to+140 °F)
Dimensions (approx.): 48 × 29 x 81 mm (1 15/16x 1 3/16 x 3 1/4 in.) (w/h/d) excluding theprojecting parts
Mass (approx.): 170 g (6.0 oz) excluding thepower cord (mains lead)
×See the label on the AC Adaptor fbr other
specifications.
Rechargeable battery pack
NP-FH30
Maximum output voltage: DC 8.4 V
g
_9
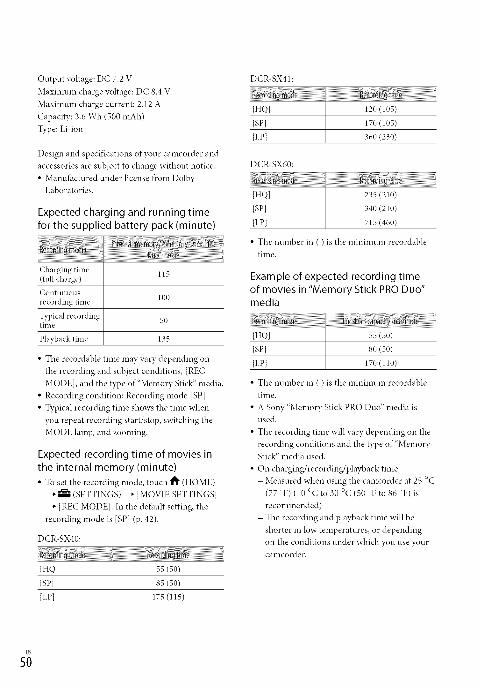
Output voltage: DC 7.2 V
Maximum charge voltage: DC 8.4 V
Maximum charge current: 2.12 A
Capacity: 3.6 Wh (500 mAh)
Type: Lbion
Design and specifications of your camcorder and
accessories are subject to change without notice.
• Manuihctured under license ficom DolbyLaboratories.
Expected charging and running timefor the supplied battery pack (minute)
Charging time 115(full charge)
( olltilnlous
recording time 100
Typical recording 50time
Playback time 135
• The recordable time may vary depending on
the recording and subject conditions, [REC
MODE], and the type of "Memory Stick" media.
• Recording condition: Recording mode [SP]
• Typical recording time shows the time when
you repeat recording start/stop, switching the
MODE lamp, and zooming.
Expected recording time of movies in
the internal memory (minute)
• To set the recording mode, touch _ (HOME)
_ (SETTINGS) _ [MOVIE SETTINGS]
[REC MODE]. In the defimlt setting, the
recording mode is [SP] (p. 42).
DCR-SX40:
[HQ] 55 (50)
[SP] 85 (50)
[LP] 175(115)
DCR- SX41 :
[HQ] 120 (105)
[SP] 170 (105)
[LP] 360 (230)
DCR4X60:
[HQ] 235 (210)
[SP] 340 (210)
[LP] 715 (460)
• The number in ( ) is the minimum recordable
time.
Example of expected recording timeof movies in "Memory Stick PRO Duo"media
[HQ] 55 (50)
[SP] 80 (50)
[LP] 170 (110)
• The number in ( ) is the minimum recordable
time.
• A Sony "Memory Stick PRO Duo" media isused.
• The recording time will vary depending on the
recording conditions and the type of "MemoryStick" media used.
• On charging/recording/playback time
- Measured when using the camcorder at 25 °C
(77 °F) (10 °C to 30 °C (50 °F to 86 °F) is
recommended)
- The recording and playback time will be
shorter in low temperatures, or depending
on the conditions under which you use your
canlcorder.
s;

On trademarks
• "Handycam" and _r'Jy_ln are
registered trademarks of Sony Corporation.• "Memory Stick)' %_, ..;' "Memory Stick Duo;'
"_EMORY5TIERrluo;' "Memory Stick PRODuo;' "MEMORY5TICKPRO DUO""MemoryStick PRO HG Duo;' "MEM[IRYSTI[I(PR[I-HGBUD
;' "Memory Stick Micro;' "MagicGate;'"Mz_G IC{_'_TE;' "MagicGate Memory
Stick" and "MagicGate Memory Stick Duo" aretrademarks or registered trademarks of SoW
Corporation.• "InfbLITHIUM" is a trademark of Sony
Corporation.• "DVDirect" is a trademark of SoW
Corporation.• Dolby and the double D symbol are trademarks
of Dolby Laboratories.• Microsoft, Windows, Windows Media,
Windows Vista, and DirectX are either
registered trademarks or trademarks of
Microsoft Corporation in the United States and/or other countries.
• Macintosh and Mac OS are registered
trademarks of Apple Inc. in the U.S. and othercountries.
• Intel, Intel Core, and Pentimn are trademarks
or registered trademarks of Intel Corporationor its subsidiaries in the United States and other
countries.
• Adobe, the Adobe logo, and Adobe Acrobat
are either registered trademarks or trademarksof Adobe Systems Incorporated in the UnitedStates and/or other countries.
All other product names mentioned herein may
be the trademarks or registered trademarks of
their respective companies. Furthermore, rMand(N are not mentioned in each case in this manual.
g
5"

Screen indicators
Upper left Center Upper right
-c:::=::::!c::::::z.
Bottom
Upper left
HOME button
_Q) Self-timer recording
"g"g BLT-IN ZOOM MIC
|!, MICREF LEVEL low
4:.._33 WIDE SELECT
C_ 60 min Remaining battery
[_ Return button
Center
[STBY]/[REC] Recording status
v[TdAU_0.2M Photo size
CD Slide show set
_O "_lr' _ Warning
Playback mode
Upper right
_ _ Recording mode (HQ/SP/LP)
[E] Recording/playback/editing media
0:00:00 Counter (hour:minute:second)
[OOmin] Estimated recordingremaining time
WHITE BLACKFADER FADER FADER
9999 O" _ Approximate number of
9999 O-12_ recordable photos andrecording media
_ Playback fblder
Current playing movie or100/112 photo/Number of total
recorded movies or photos
Bottom
[_ Face Index
t_ _ -" Manual focus
,) _ _@-•.'!}i-:[] --'_ _:_ SCENE SELECTION
_',6'__,6_ _m,a White balance
'_ SteadyShot off
SPOT MTR/FCS/SPOTMETER/EXPOSURE
T_ TELL MACRO
[] Bacldight
OPTION button
[] VIEW IMAGES button
Slide show button
I:11lOl-OOOlData file name
101-0005
Protected image
VISUAL INDEX button
• Indicators and their positions are approximate
and may differ t)'om wlmt you actually see.

Parts and controls
Figures in ( ) are refk,rence pages.
[] Lens (Carl Zeiss lens)
_]Grip belt (16)
_] Hook for a shoulder belt
[_] DC IN jack (12)
[_] A/V Remote Connector (23, 34)
[] LENS COVER switch (16, 18)
[] Built-in microphone
[] Power zoom lever (17, 19)
[] PHOTO button (19)
[] MODE button (18)
[] _ (Movie)/l_ (Photo) lamps (14)
[] Battery pack (12)
[] Tripod receptacle (37)
[] BATT (battery) release lever (13)
[] CHG (charge) lamp (12)
[] START/STOP button (17)
[_ LCD screen/Touch panel (14)
If you rotate the LCD panel 180 degrees, you
can close the LCD panel with the LCD screen
lhcing out. This is convenient during playback
operations.
[]
[][][]
[_ POWER button (15)
[] EASY button (19)
[] RESET button
Press RESET to initialize all the settings
including the clock setting.
[] [] (Backlight) button (37)
[] DISP (display) button (21)
[] Speaker
[] "_ (DISC BURN) button (26)
[]"Memory Stick Duo"media slot (38)
[_ Access lamp (Internal memory, "Memory
Stick PRO Duo" media) (38)
While the lamp is lit or flashing, the
camcorder is reading or writing data.
_] _ (osg)jack (30, 31,33)
3>
g5"
_3

Index
A/V connecting cable...........23, 34
Backlight ...................................... 37
Battery .......................................... 12
Capturing photos l)coma movie ......................................... 29
Charging the battery abroad .....13
Charging the battery pack .........12
Computer ..................................... 24
Computer system ........................ 24
Copy ............................................. 39
Copying a disc ............................. 29
Creating a disc ............................ 29
DATE/TIME ................................ 14
DELETE ....................................... 36
Destination drive or folder ........ 28
Disc recorder ............................... 34
DST SET ...................................... 14
Dubbing ....................................... 39
DVDirect Express ....................... 30
DVD writer .................................. 30
Easy Handycam operation ........ 19
Easy PC Back up ........................ 27
Editing movies ............................ 29
Format .......................................... 36
Handycam Handbook ................44
HELP function ............................40
HOME MENU ......................40, 41
Install ............................................ 24
Language ...................................... 15
Macintosh .................................... 24
Maintenance ................................ 47
"Memory Stick" media ...............38
"Memory Stick PRO HG Duo"media ............................................ 38
"Memory Stick PRO Duo"media ............................................ 38
Menus ........................................... 40
Movies .................................... 16, 20
One Touch Disc Burn ................26
Operation beeps .......................... 14
Operation flow .............................. 9
OPTION MENU .................. 40, 43
Parts and controls .......................53
Photos .................................... 18, 21
Playback .......................................20
PMB(Picture Motion Browser) ...24, 28
PMB Guide .................................. 28
Recording .................................... 16
Recording and playback time ...50
Recording media .........................37
Repair ........................................... 45RESET .......................................... 53
Screen indicators ........................ 52
Self-diagnosis display .................46
Setting the date and time ........... 14
Software .......................................24
Specifications .............................. 49
Supplied item s ............................... 7
Tripod ........................................... 37
Troubleshooting .......................... 45
Turning the power on ................ 14
TV ................................................. 23
TV Type .......................................23
USB......................................... 24, 30
Using a wall outlet (wall socket)as a power source ........................ 13
VISUAL INDEX .........................20
Volum e......................................... 21
\_lrning indicators .....................46Windows ...................................... 24
Zoom ............................... 17, 19, 22

Lea este apartado en primer lugar
Antes de utilizar la unidad, lea
detenidamente este manual y cons_.rwqopara futuras consultas.
Nombre del producto:Videocamaratvlodelo:DCR-SX40/SX60
POR FAVOR LEA DETALLADAMENTE ESTE MANUAL
DE INSTRUCCIONES ANTES DE CONECTAR Y OPERAR
ESTE EQUIPO.
RECUERDEOUE UN MAL USO DE SU APARATO
PODRiA ANULAR LA GARANTiA.
Parareducirel riesgode incendiosoelectrocution, noexponga la unidada laIluvia nia la humedad.
No exponga laspilasa fuentes decalorexcesivo,comola luz solardirecta, el fuegoosimilares.
Bateria
Si la bateria se manipula indebidamente,puede explotar y causar un incendio oprovocarle quemaduras quimicas. Tenga encuenta las siguientes precauciones.• No desmonte el producto.• No aplaste ni exponga la baterla a impactos tales
como golpeso caidas,ni la deje caer o la pise.• No provoque on cortocircuito en la bateria
ni permita que objetosmet_ilicosentren encontacto con sus terminales.
• No exponga la bateria a temperaturas superiores
a 60 °Ccomo a la luz solar directa, o en elinterior de on automdvil estacionado al sol.
• No la incinere ni la arroje al fuego.• No manipule baterias de iones de litio dafiadas
o que presenten fugas.• Asegfiresede cargar la bateria con on
cargador de baterias original de Sony o con undispositivo que pueda cargarla.
• Mantenga la bateria fnera del alcance de nifios
pequefios.• Mantenga la bateria seca.• Sustitfiyala dnicamente por otra del nlismo tipo
o equivalente recomendada por Son?_• Deshfigase de la baterias usada lo antes posible
segdn el procedimiento que se describe en lasinstr ucciones.
Sustituya la bateria unicamente por otra deltipo especificado. De lo contrario, es posibleque se produzcan incendios o lesiones.
Adaptadordealimentaciondeca
No utilice el adaptador de alimentaci6nde ca colocado en un espacio angosto, talcomo entre una pared y los muebles.
Si utiliza el adaptador de alimentacidn deca con{,ctelo a un tomacorriente de paredcercano. Si se produce alguna falla defuncionamiento al utilizar la videoc_hnara,
desconecte el adaptador de alimentaci6n deca del tomacorriente de inmediato.
Aunque la videoc_hnara est{, apagada,seguir_i recibiendo adaptador dealimentaci6n de ca (corriente dom{,stica)
mientras est{, conectada a la toma de paredmediante el adaptador de alimentaci6n deca

Los ndmeros entre ( ) indican la cantidad
suministrada.
[] Adaptador de alimentaci6n de ca (1)
[] Cable de alimentaci6n (1)
[] Cable de conexi6n de A/V (1) []
[] Cable USB (1) []
[] Bateria recargable NP-FH30 (1)
[] CD-ROM "Handycam Application
Software" (1) (Dig. 21)
- "PMB" (software) incluida la "Gula de PMB"
- "Gula prrictica de Handycanf' (PDF)
[] "Guia de operaciones" (este manual) (1)
[] []
• Consulte la prigina 35 para obtener infbrmacidn
acerca de los "Memory Stick" que puedenutilizarse con esta videocrimara.
Uso de la videockmara
• La videocrilnara no estri protegida contra el
poNo, las salpicaduras ni el agua. Consulte
"Precauciones" (prig. 44).
• No realice ninguna de las siguientes acciones si
los indicadores de modo _ (pellcula)/
I1_ 0btografla) (prig. 10) o el indicador
de acceso (prig. 35) estrin encendidos o
parpadeando. Si 1o hace, podrla daflar el soporte
de grabaci6n, perder las imrigenes grabadas uocasionar otras fhllas de funcionamiento.
- expulsar el "Memory Stick PRO Duo"
- extraer la baterla o el adaptador dealimentacidn de ca de la videocrimara
• Cuando conecte la videocrimara a otto
dispositivo mediante un cable, asegdrese de
insertar la clavija del conector en la direcci6n
correcta. Si inserta la clavija a la fuerza en el
terminal, daflarri el terminal, lo que podrlaocasionar una *;aliade flmcionamiento en la
videocrimara.
Si graba o elimina imrigenes repetidamente
durante mucho tiempo, los datos del soporte de
grabacidn se fimgmentarrin. Las imrigenes no se
pueden guardar ni grabar. En tal caso, guarde
primero las imrigenes en algdn tipo de soporte
externo y, a continuaci6n, ejecute [FORMAT.
SOPORTE] (prig. 33).
La pantalla de cristal liquido estri fabricada con
tecnologia de mrixima precisidn, por lo que
mris de199,99% de los pixeles son funcionales.
Sin embargo, es posible que aparezcan
constantemente algunos pequefios puntos
negros o brillantes (blancos, rojos, azules o
verdes) en la pantalla de cristal liquido. Estos
puntos son el resultado normal del proceso de
*hbricacidn y no afectan en modo alguno a la
grabacidn.
Orabaci6n
• Antes de comenzar a grabar, pruebe las
funciones de grabaci6n para asegurarse de que
la imagen y el sonido se graben sin problemas.
• No es posible compensar el contenido de
las grabaciones, aun si la grabacidn o la
reproduccidn no son posibles a causa de una
_hlla de funcionamiento de la videocrimara, de
los soportes de grabacidn, etc.• Los sistemas de televisi6n en color varian
en funcidn del pals o la regi6n. Si desea ver
sus grabaciones en un televisor, necesita untelevisor con sistema NTSC.
• Los programas de televisidn, peliculas, cintas de
video y demris materiales pueden estar sujetos a
derechos de autor. La grabacidn no autorizada
de tales materiales puede ir en contra de las
leyes sobre los derechos de antor.
• Para evitar que se pierdan sus datos de imagen,
guarde peri6dicamente todas las imrigenes
grabadas en soportes externos. Se recomienda
guardar los datos de imagen en un disco
como, pot ejemplo, un DVD R mediante la
computadora. Tambi{'n puede guardar los
datos de imagen mediante una grabadora de
DVD, una videograbadora o una grabadora de
DVD/HDD.

Acerca del cambio del ajuste de idioma
• Para ilustrar los procedimientos operativos
se utilizan indicaciones en pantalla en cada
idioma local. Si es necesario, cambie el idioma
de la pantalla antes de utilizar la videocrimara
(prig. 11).
Acerca de este manual
• Las imrigenes de la pantalla de cristal liquido
que se utilizan en este manual con fines
ilustrativos se tomaron con una crimara digital
de imrigenes fijas, por lo que pueden parecer
dif_.'rentes a las mostradas en la pantalla de
cristal liquido.
• En esta Guia de operaciones, la memoria
interna de la videocrimara y el "Memory Stick
PRO Duo" reciben el nombre de "soportes de
grabacidff'.
• En esta Guia de operaciones, el "Memory Stick
PRO Dud' y el "Memory Stick PRO HG Duo"
se denominan "Memory Stick PRO Dud'.
• Encontrarri la "Guia prrictica de Han@canf'
(PDF) en el CD ROM suministrado (prig. 41).
• Las capturas de pantalla corresponden a
Windows Vista. Las escenas pueden variar
en funcidn del sistema operativo de la
computadora.

Flujo de funcionamiento
Grabaci6n de peliculas y fotografias(p_g. 12)
• En la configuracidn predeterminada, las peliculas y las
fotografias se graban ell la memoria interna.
• Es posible cambiar el soporte de grabaci6n (Dig. 34).
Reproducci6n de peliculas y fotografias(p_g. 16)
Reproducci6n de peliculas y fotografias en la videockmara
(pkg. 16)
Reproducci6n de peliculas y fotografias en un televisor
conectado (pkg. 19)
I**
Grabaci6n de peliculas y fotografias en undisco
Grabaci6n de peliculas y fotografias con una computadora
(pkg. 21 )
Creaci6n de un disco con una grabadora de DVD (pkg. 28)
• Mediante la pantalla de la videoc_imara, puede crear un disco y
reproducirlo en DVDirect Express mediante la conexi6n de la
grabadora de DVD especifica, DVDirect Express (se w.nde pot
separado) a la videoc_hnara.

Tabla de contenido
Lea este apartado en primer lugar ............................................................... 2
Flujo de funcionamiento .......................................................................... 5
_ Procedimientos inicialesPaso 1: Carga de la bateria ........................................................................ 8
Carga de la bateria en el extranjero ..................................................... 9
Paso 2: Encendido y ajuste de la fecha y la hora ............................................ 10
Cambio del ajuste de idioma ........................................................... 11
GrabacidnGrabaci6n ........................................................................................... 12
Grabaci6n y reproducci6n sencilla de peliculas y fotografias
(funcionamiento en modo Easy Handycam) ........................................ 15
_ Reproducci6nReproducci6n en la videoc_mara .............................................................. 16
Reproducci6n de im_genes en un televisor ................................................. 19
_ Grabaci6n de peliculas y fotografias con una computadoraPreparaci6n de una computadora (Windows) .............................................. 21
AI usar un Macintosh ..................................................................... 21
Creaci6n de un disco con un solo toque (One louch Disc Burn) ........................ 24
Importaci6n de peliculas y fotografias a una computadora (Easy PC Back-up) ....... 25
Cambio de la unidad o carpeta de destino para las peliculas y
fotografias .................................................................................. 25
Inicio de PMB (Picture Motion Browser) ...................................................... 26
Creaci6n de un disco ............................................................................. 26
Copia de un disco ......................................................................... 27
Edici6n de peliculas ...................................................................... 27
Captura de fotografias desde una pelicula .......................................... 27
_ Almacenamiento de im_genes con una grabadora de DVDCreaci6n de un disco con la grabadora de DVD especifica DVDirect Express ......... 28
Creaci6n de un disco con una grabadora de DVD u otro dispositivo distinto de
DVDirect Express .................................................................................. 30
Creaci6n de un disco con una grabadora, etc ............................................... 31

Utilizaci6n correcta de la videoc_maraEliminaci6n de peliculas y fotografias ........................................................ 33
Copia con condiciones de filmaci6n .......................................................... 34
Cambio del soporte de grabaci6n ............................................................. 34
Para comprobar los ajustes del soporte de grabaci6n ............................ 35
Copia de peliculas y fotografias de la memoria interna en un
"Memory Stick PRO Duo". ............................................................... 36
Personalizaci6n de la videoc&mara mediante los menus ................................. 36
Uso de la funci6n HELP .................................................................. 37
Obtenci6n de informaci6n detallada en la "Guia pr_ctica de Handycam". ............ 41
_ Informaci6n complementaria_ Soluci6n de problemas ....................................................................... 42
Precauciones ....................................................................................... 44
Especificaciones ................................................................................... 46
Indicadores de la pantalla ....................................................................... 49
Piezas y controles ................................................................................. 50
[ndice ................................................................................................ 51
n©
©

Paso I" Carga de la bateria
Indicador CHG --
Clavija de cc
Toma DC IN
AI tomacorriente deAdaptador de alimentaci6n de ca pared
gateria Cable de alimentacidn
Puede cargar la bateria "InIbLITHIUM" (serie H) despu{,s de instalarla en la videoc_imara.
• No es posible conectar ninguna baterfa "InIbLITHIUM" que no sea de la serie H en la videoc_imara.
Cierre la pantalla de cristal liquido para apagar la videoc_mara.
Deslice la bateria en la direcci6n de la flecha hasta que encaje para
instalarla.
Conecte el adaptador de alimentacidn de ca y el cable de alimentacidn a
la videoc_mara y al tomacorriente de pared.
• Compruebe que la marca • de la clavija de cc est_orientada hacia abajo.
E1 indicador CHG (carga) se ilumina y se inicia el proceso de carga. E1indicador CHG
(carga) se apaga cuando la bateria est_icompletamente cargada.
Cuando la bateria est_ cargada, desconecte el adaptador de alimentaci6nde ca de la toma DC IN de la videocamara.
• Consulte la pfigina 47 para obtener inibrmacidn sobre los tiempos de carga, grabacidn y reproduccidn.
• Con la videoctlmara encendida, es posible consultar el indicador de energia restante de la bateria en la
esquina superior izquierda de la pantalla de cristal lfquido, que le indicanl la carga restante aproximadade la bateria.

Para extraer la bateria
Cierre la pantalla de cristal liquido. Deslice la palanca de desbloqueo BATT (bateria) (_) y
extraiga la bateria @.
Para utilizar un tomacorriente de pared como fuente de alimentaci6n
Realice las mismas conexiones que se indican en el apartado "Paso 1: Carga de la bateria".
Notas sobre la bateria y el adaptador de alimentaci6n de ca
• Antes de extraer la baterla o de desconectar el adaptador de alimentacidn de ca cierre la Dmtalla de cristal
llquido y asegfiresede que los indicadores_l (pelicula)/O (fbtograf_'a)(prig.10) est&lapagados.• No provoque tm cortocircuito en la clavijade cc del adaptador de alimentacidn de ca ni en el terminal de __
la baterla con ningtin objeto metrilico.Silo hace, puede ocasionar una *;aliade funcionamiento.• En el ajuste predeterminado, la alimentacidn se apagaautomriticamente si no utiliza la videocrimara N"
durante unos 5 minuto, para ahorrar energia de la bateria ([APAGADOAUTO])• o
Puede Cargar la bateria en cualquier pals o regidn con el adaptador de alimentaci6n de ca
suministrado con la videoc_mara dentro de un rango de Ca de entre 100 Vy 240 v 50 Hz/60Hz
, No utilice un transformador de voltaje electrdnico.
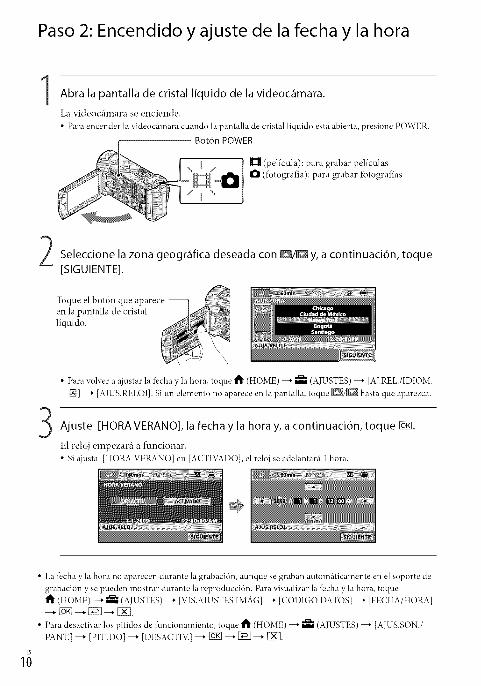
Paso 2: Encendido y ajuste de la fecha y la hora
I Abra la pantalla de cristal liquido de la videoc_mara.
La videoc_imara se enciende.
• Para encender la videoc_'mlaracuando la pantalla de cristal llquido est_iabierta, presione POWER.
Bot6n POWER
(pelicula): para grabar pellculas
O (fbtografia): para grabar fbtografias
/ I ........
Seleccione la zona geogrMica deseada con _/D y, a continuaci6n, toque[SIGUIENTE].
• Para volver a _\justar la fi.'cha y la hora, toque t_ (HOME) _ _ (AIUSTES) _ [AI.REL./IDIOM.
IgI] _ [AJUS.RELOJ]. Si un elemento no aparece en la pantalla, toque _/_ hasta que aparezca.
Ajuste [HORAVERANO],la fecha y la hora y, a continuaci6n, toque _.
E1 reloj empezar_i a funcionar.
• Si ajusta [HORA VERANO] en [ACTI_v%DO], el reloj se adelantartl 1 hora.
18
• La fecha y la hora no aparecen durante la grabacidn, aunque se graban automtlticamente en el soporte de
grabaci6n y se pueden mostrar durante la reproducci6n. Para visualizar la fecha y la hora, toque
t_ (HOME) -+ _ (AJUSTES) _ [VIS.AJUSTES IMAG] _ [CODI(;O DATOS] _ [FECHA/HORA]
• Para desactivar los pitidos de funcionamiento, toque 1_ (HOME) _ _ (AIUSTES) _ [AIUS.SON./
PANT.] --_ [PITIDO] _ [DESACTFv2] --_ [_ --_ F_q --_ IX].

Para apagar la videockmara
Cierre la pantalla de cristal liquido. E1 indicador ]_ (pelicula) parpadea durante unos
segundos y la videoc_mara se apaga.
Bot6n POWER
• Tambi&l puede apagar la videocrimara al presionar POWER.
• Si ajusta [ENCEND.CON LCD] (prig. 40) en [I-)ESACTIX(], presione POWER para apagar lavideocfimara.
g_Es posible modificar las indicaciones en pantalla para que muestren los mensajes en un
idioma determinado,
Toque _ (HOME) --_ _ (MUSTES) _ [AJ.RELdIDIOM.tN] _ [AJUSTE IDIOMAt_] _.
_ el idioma deseado _ {B_ _ [_] _ [2_. __:
g

GrabaciOn
En el ajuste predeterminado, las peliculas se graban
en la memoria interna (Dig. 34).
Ajuste la correa de sujeci6n.
\
Abra la tapa del objetivo.
0
Abra la pantalla de cristal liquido de la videoc_imara.
La videoc_imara se enciende.
• Para encender la videocamara cuando la pantalla de cristal liquido ya esta abierta, presione
POWER (Dig. 10).

D,_ Presione START/STOP para iniciar la grabaci6n.
Bot6n START/STOP
Palanca del
zoom motorizado
w T
_ 60rain ? Z'FO;OO:14[30mi__
[ESPERA] _ [GRAB.]
Gran Tde0bjetiv0
angular
Para detener la grabacidn, presione de nuevo START/STOP. P0
• Es posible ampliar im_igenes mediante la palanca del zoom motorizado. Mueva la palanca del zoom nmotorizado levemente para obtener tm zoom mils lento. Mu&mla rmls para obtener tm zoom mils _:rfipido.
Si cierra la pantalla de cristal llquido durante la grabacidn, la videoc_imara dejar_i de grabar.
Consulte la Digina 47 para conocer el tiempo de grabacidn de las pellculas.
Cuando un archivo de pellcula supera los 2 GB el siguiente archivo de pellcula se crea autormlticamente.
Es posible cambiar el soporte de grabacidn (p_ig. 34).
Puede cambiar el modo de grabacidn de pellculas (Dig. 39).
[g::_STEADYSHOTI est_iajustado en [ACTIVADOI en el ajuste predeterminado.
Para ajustar el _ingulo del panel de cristal llquido, abra primero dicho panel 90 grados respecto a la
videoc_imara @ y, a continuaci6n, ajuste el _ingulo (2). Si gira el panel de cristal llqnido 180 grados hacia
el lado del objetivo (2), podr_i grabar pellculas o *btogra_as en el modo de espejo.
@ 90 grados (m_'tx.) --
@ 180 grados (m_ix.)
(_) 90 grados respecto a lavideoc_imara
• Puede aumentar el nivel de zoom si usa el zoom digital. Para ajustar el nivel de aplicacidn del zoom, toquet_ (HOME) _ _ (AJUSTES) _ [AJUSTES PEL.CAM] _ [ZOOM DIGITAL] _ el ajuste deseado
_3

En el ajuste predeterminado, las fbtografias se graban ell la memoria interna (Dig. 34).
Abra la tapa del objetivo.
Abra la pantalla de cristal liquido de la videoc_mara.
La videoctimara se enciende.
• Para encender la videoc_'mlaracuando la pantalla de cristal llquido ya est_'_abierta, presionePOWER (Dig. 10).
Presione MODE para encender el indicador 0 (fotografia).
• E1formato de la pantalla cambia a 4:3.
11

Presione PHOTO levemente para ajustar el enfoque y luego presidnelo
completamente. Palanca del
zoom motorizado
w T
Gran Teleobjetivo
r_ .... _ angular
Parpadea --+ Se enciende
Cuando IIIIIIIIdesaparece, se graba la fbtografia.
• Mueva la palanca del zoom motorizado levemente para obtener tm zoom mils lento. Mu&mla rmls
para obtener un zoom rmls r_ipido.
• Puede comprobar el nfimero de fbtograf_as que puede grabar en la pantalla de cristal liquido (Dig. 49).
• Para cambiar el tamafio de imagen, toque _ (HOME) --_ _--- (AJUSTES) --_ [AJUST.FOTO CAM.] --*
[_TAM.IMAGEN] _ el _\iuste deseado _ _ _ []_ -+ IX].
• No es posible grabar fotograf_as mientras aparece I_.
Grabaci6n y reproducci6n sencilla de peliculas y fotografias(funcionamiento en modo Easy Handyca m)
Simplemente presione EASY.
Para cancelar el funcionamiento en modo Easy Handycam, vuelva a presionar EASY cuando
termine la grabacidn o las operaciones del menfi. Durante el funcionamiento en modo Easy
Handycam, se pueden ajustar las opciones b_isicas, como el cambio del tamafio de imagen o
la eliminaci6n de im_igenes, entre los elementos de configuration y ajuste. Otros elementos se
ajustan autom_iticamente.
- Cuando se inicia el tundonamiento en modo EasyHandycam, casi todos los aiustes del men6 se
resmblecen autom_iticamente a sus valores predeterminados. (Algunos elementos de men6 conservan
los ajus_es realizados antes del tuncionamiento en modo Easy Handycam
63
aparece durante el funcionamiento en modo Easy Handycam.

Reprod ucci6nEn el ajuste predeterminado, se reproducen las peliculas y fotografias ahnacenadas en la
memoria interna (prig. 34).
Abra la pantalla de cristal liquido de la videoc_mara.
La videocthnara se enciende.
• Para encender la videoc_imaracuando la pantalla de cristal liquido ya est_iabierta, presione
POWER (Dig. 10).
Toque [] (VISUALIZAR IMAGENES).
[] (VISUALIZAR IMAGENES)
La pantalla VISUAL INDEX aparece luego de algunos segundos.
Toque laficha _11(pelicula) @ -_ la pelicula deseada @.
A la pantalla de fndice de A la pantalla de indiceescenas por un intervalo de escenas de carasdeterminado (Indice de (Indice de caras)
rollos de pelicula) lista de fechas de
Anterior grabacion
Siguiente
Para regresar al modo
de grabaci6n
• II_1 aparece con la pelicula o la fbtografia que se reprodujo o grab6 m_is recientemente. Si toca la
pelicula o la fbtografia con la marca ID,-I,podr_i reanudar la reproduccidn desde el punto en que se
detuvo la t'fltima vez. (_ aparece en la fotografia grabada en el "Memory Stick PRO Duo").

La videoc_hnara comenzar_i a reproducir la pelicula seleccionada.
Aj
Avance rfipido
Rebobinado rfipido Pausa/reproduccidn
• Cuando la reproducci6n desde la pellcula seleccionada llega a la filtima pelicula, vuelve a mostrarse
la pantalla VISUAL INDEX.
• Toque [_/[_ durante la pausa para reproducir la pellcula en ctlmara lenta.
• Si sigue tocando [_/[_ durante la reproducci6n, las pellculas se reproducen con un aumento
de velocidad aproximado de 5 veces _ 10 veces _ 30 veces _ 60 veces.
• Puede activar o desactNar la visualizaci6n en pantalla si presiona DISP que se encuentra en el panel
detr_'_sdel panel de cristal llquido.
• La _cha y hora de grabacidn, asl como las condiciones de filmacidn, se guardan autom_iticamente
durante la grabacidn. Esta in*brmacidn no se muestra durante la grabaci6n, per(} es posiblevisualizarla durante la reproduccidn si toca t_ (HOME) _" _ (AJUSTES) -+ [VIS.MUSTES
IMAG] _ [CODIGO DATOS] _" el ajuste deseado _" _ _ [_ _ []_.
Para ajustar el volumen del sonido de las peliculas
Durante la reproduccidn de peliculas, toque N_ --+ ajuste con [N_/[NE] --+ [3_.
• Tambi&l puede ajustar el volumen del sonido desde OPTION MENU (Dig. 37).
g
R
Toque la ficha I_ (fotografia) @ --_ una fotografia deseada (_) en la pantallaVISUAL INDEX.
_7

La videoc_imara muestra la fotografia seleccionada.
Anterior
Permite visualizar la -
pantalla VISUAL INDEX
Permite iniciar o detener
una presentacidn dediapositivas
Siguiente
OPTION MENU
• Para acercar una fotografia, mueva la palanca del zoom motorizado mientras visualiza fotografias (PB
ZOOM). Si toca un punto en el marco de PB ZOOM, el punto aparece en el centro del marco.
• Si visualiza tbtografias grabadas en un "Memory Stick PRO Dud; aparece _n • (carpeta de
reproduccidn) en la pantalla.

Reproducci6n de im genes en un televisor
Conecte la videocthnara a la toma de entrada de un televisor o una videograbadora mediante
el cable de conexi6n de A/V [] o un cable de conexi6n de A/V con S VIDE() [_. Conecte la
videocthnara al tomacorriente de pared con el adaptador de alimentaci6n de ca suministrado
para esta operaci6n (p_ig. 9). Consulte adem_is el manual de instrucciones suministrado con
los dispositiw_s que conecte.
[] Cable de conexi6n de A/V (suministrado)Conexidn de otto dispositivo a tray& de la toma A/V mediante un cable de conexi6n de A/V.
[] Cable de conexi6n de A/Vcon SVIDEO(se vende pot separado)Si realiza la conexi6n a otro dispositivo a tray,s de la toma S VIDEO mediante un cable deconexidn de A/V con un cable de S VIDE() (sevende por separado), podr_iobtener imfigenesde mayor calidad que con un cable de conexion de A/V. Conecte 1asclavijas blanca y roja (audioizquierdo/derecho) y la clavija de S VIDEO (canal S VIDE()) del cable de conexion de A/V conun cable de S VIDEO (se vende por separado). No es necesario conectar la clavija amarilla. Si seconecta solamente la clavija de S VIDEO, no se emitirfi audio.
A/V R
Conector remoto de A/V
m
I; VIDEO@
IDEO (amarillo)
AUDIO(blanco) (rojo)
Videograbadoras otelevisores
...........J",.. : Flujo de seflales
Ajuste el selector de entrada del televisor en la entrada a la que conectar_ lavideoc_mara.
• Para obtener rmls informacidn, consulte los manuales de instrucciones sttministrados con el
televisor.
N.... Conecte la videoc_mara a un televisor mediante el cable de conexi6n de
A/V ([_], suministrado) o mediante un cable de conexi6n de A/V con
S VIDEO ([_], se vende pot separado).
• Conecte ]avideocMnara a la tonra de entrada gel televisor.
_9

Reproduzca peliculas y fotografias en la videoc_mara (p_g. 16).
• Para ajustar el fbrmato segt'mel televisor conectado (panor_imico/4:3)toque t_ (HOME)_--- (AJUSTES)--' [AIUSTESSALIDA]--* [TIPO TV] --' [16:91o [4:31--' [_ --* [_ --* [N_.
2;

Preparaci6n de una
computadora (Windows)Puede realizar las siguientes operaciones
usando "PMB (Picture Motion Browser)".
-hnportacidn de imtigenes a una
computadora
-Visualizacidn y edicidn de im_igenes
importadas
- Creaci6n de un disco
- Carga de peliculas y fotografias en sitios
Web
Para guardar peliculas y fotografias usando
una computadora, primero instale "PMB"
desde el CD-ROM suministrado.
• No fbrmatee la memoria interna de la
videoctlmara mediante una computadora
o puede qne la videocfimara no funcionecorrectamente.
• Es posible crear discos con los siguientes tiposde discos de 12 cm mediante "PMB'_
- DVD-R/DVD+R/DVD+R DL:
No regrabable- DVD-RW/DVD+RW:
Regrabable
.....
Microsoft Windows XP SP3_2/Windows VistaSPI-×3
Intel Pentium III: 1 GHz o m_is veloz
iiDirectX 9.0c o posterior (este producto se
basa en la tecnologla DirectX. Es necesariotenet DirectX instalado).
256 MB o m_is
Es posible que deban cumplirse otros
requisitos del sistema operativo.
_i!j_!_!_!ai___Volumen en disco necesario para lainstalacidn: aproximadamente 500 MB (es
posible que se necesiten 5 GB o mils paracrear discos DVD).
1 024 x 768 puntos como mlnimo
Puerto USB (debe proporcionarse como
estfindar, Hi-Speed USB (compatible con USB2.0)), grabadora de DVD (se requiere unidad
de CD-ROM para la instalaci6n)
No segarantiza el funcionamiento con todos los
entornos de computadora.
×_Se requiere la instalacidn esffmdar. No se
garantiza el funcionamiento en actualizaciones
de los sistemas operativos ni en entornos de
inicio mOltiple.
.×2Las ediciones de 64 bits y Starter (Edition) no
son compatibles.
×'No es compatible con Starter (Edition).
AI usar un Macintosh
E1 software "PMB" suministrado no
es compatible con compumdoras
Macintosh. Para procesar fotografias
usando una computadora Macintosh
conectada a la videoc_imara, consulte el
siguiente sitio Web.
http://guide.d-imaging.sony.co.jp/mac/
n'IslesJ
c_.
,<
3
3"D
K©

Instale "PMB" antes de conectar la
videoc_imara a la computadora.
• Si ya tiene instalada una versi6n de "PMB"
suministrada con otro dispositivo, revise la
versi6n. (El nfmero de versi6n aparece al
hacer clic en [Ayuda] - [Acerca de PMB]).
Compare el nfmero de versi6n del CD ROMsuministrado con el del software "PMB"
previamente instalado para asegurarse de que
ambas versiones se hayan instalado en omen,
desde la m_is antigua a la mils reciente. Si el
nfimero de versidn del software "PMB" que
ya tiene instalado es superior al del software"PMB" de la videocfimara, desinstale "PMB"
de la computadora e inst_ilelo nuevamente en
orden, comenzando con la versidn mils antigua.Si instala una versidn mils reciente de "PMB"
primero, es posible que algunas fl.mciones no
operen correctamente.
• Consulte la pfigina 41 de la "Guia prfictica de
Handycam'_
_ Haga clicen [Instalar].
H_ldycam Apl_ication Soflwa_e ii
i .....: i
Seleccione el idioma para la
aplicaci6n que desea instalar
y, a continuaci6n, haga clic en
[Siguiente].
@ Encienda la videoc_mara y
con6ctela a la computadoramediante el cable USB
(suministrado).
Verifique que la videoc_mara no
est6 conectada a la computadora.
_ Encienda la computadora.
• Inicie sesidn como administrador parallevar a cabo la instalaci6n.
• Antes de instalar el software, cierre todas
las aplicaciones en ejecuci6n.
_ Coloque el CD-ROM suministrado
en la unidad de disco de la
computadora.
Aparecer_i la pantalla de instalacidn.
• Si la pantalla no aparece, haga clic en
[Inicio] _ [Equipo] (en Windows XP, [Mi
PC]) y, a continuacidn, haga doble clic en
[SONYPICTUTIL (E:)] (CD-ROM).
Aparece la pantalla [SELEC.USB]
en la pantalla de la videocthnara
automtiticamente.
_ Toque [_CONEXION USB] en la
pantalla de la videoc_mara.
• Si no aparece la pantalla [SELE('.USB],
toque _ (HOME) _ m (OTROS)
[CONEXION USB].
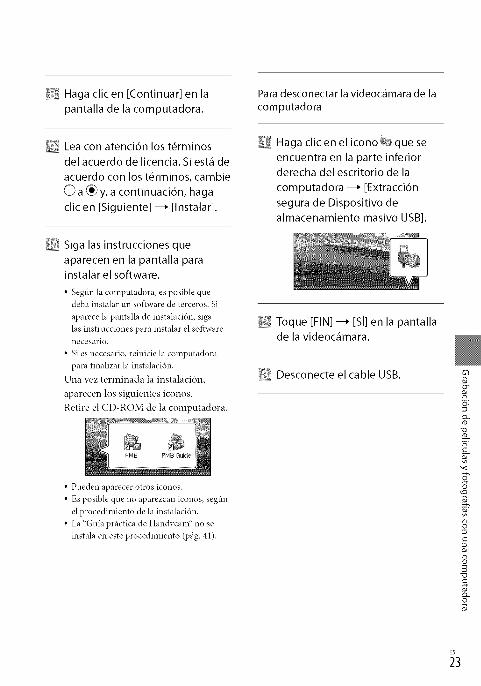
Haga clic en [Continuar] en la
pantalla de la computadora.
_ Lea con atenci6n los t6rminosdel acuerdo de licencia. Si est_ de
acuerdo con los t6rminos, cambie
Oa _y, a continuaci6n, haga
clic en [Siguiente] _ [Instalar].
_] Siga las instrucciones que
aparecen en la pantalla para
instalar el software.
• Segfin la computadora, es posible quedeba instalar un sot}ware de terceros. Si
aparece la pantalla de instalaci6n, sigalas instrucciones para ins*alar el software
necesario.
• Si es necesario, reinicie la computadora
para finalizar la instalacidn.
Una w'z terminada la instalacidn,
aparecen los siguientes iconos.
Retire el CD-ROM de la computadora.
• Pueden aparecer otros iconos.
• Es posible qtle no aparezcan iconos, segfin
d procedimiento de la instalacidn.
• La "Gula prrictica de Handycanf' no se
instala en este procedimiento (prig. 41).
Para desconectar la videockmara de la
computadora
Haga clic en el icono _ que se
encuentra en la parte inferiorderecha del escritorio de la
computadora --_ [Extracci6n
segura de Dispositivo dealmacenamiento masivo USB].
_'_ Toque [FIN] --_ [S[] en la pantallade la videockmara.
_ Desconecte el cable USB. Gh
¥
,<
3
3
3"D
O
_3

Creaci6n de un disco
con un solo toque(OneTouch Disc Burn)
Puede guardar peliculas y fotografias en un
disco con solo presionar el botdn "_ (DISC
BURN) de la videoohnara. Las peliculas
y fotografias grabadas en la videoohnara
que to&via no se hayan guardado con One
Touch Disc Burn se pueden grabar en un
disco auton_iticamente.
• Instale "PMB" de antemano (Dig. 22), pero no
inicie el programa todavla.• Conecte la vkteoc_imara al tomacorriente de
pared mediante el adaptador de alimentaci6n
de ca smninistrado para realizar esta operaci6n
(p_ig. 9).• Con la funci6n '_ (DISC BURN) de la
videoc_imara, puede guardar pellculas y
lbtografias grabadas en la memoria internasolamente.
1Encienda la computadora y
coloque un disco vac[o en la
unidad de DVD.
• Consulte la p_'_gina21 para conocer los
tipos de disco que puede usar.
• Si algfin programa de software que no sea
"PMB" se inicia autormlticamente, ci{'rrelo.
Encienda la videoc_mara y
con&tela a la computadoramediante el cable USB
(suministrado).
Presione *_)(DISC BURN).
Siga las instrucciones de la
pantalla de la computadora.
• Las peliculas y fbtograflas no se graban en la
computadora cuando ejecuta One Touch DiscBurn.

Importaci6n de
peliculas y fotografiasa una computadora
(Easy PC Back-up)Las peliculas y fbtografias grabadas
ell la videoc_imara que todavia no se
hayan guardado con Easy PC Back-up
se pueden importar a una computadora
autom_iticamente. Encienda la computadora
ell primer lugar.• Conecte la videocrimaraal tomacorriente de
pared con el adaptador de alimentaci(m de casuministrado para esta operacidn (prig.9).
I Encienda la videoc_mara y
con&tela a la computadoramediante el cable USB
(suministrado).
Aparece la pantalla [SELEC.USB] en la
pantalla de la videoc_imara.
Toque [_CONEXION USB] para
importar im_genes desde la
memoria interna, o
[K3CONEXION USB] para
importar im_genes desde un
"Memory Stick PRO Duo".
Aparece la ventana [Handycam Utility]
ell la pantalla de la computadora.
En la pantalla de la computadora,
haga clic en [Easy PC Back-up] --_
[Importar].
Las peliculas y fotografias se importan
a la computadora.
A1 finalizar la operaci6n, aparece la
pantalla "PMB".
• A1finalizar la operacidn, es posible que
aparezca una pantalla para indicar que las
pellculas se estrin analizando. Puede que
el proceso de analizar las pellculas tome
bastante tiempo. Mientras tanto, puede
utilizar "PMB'_
• Consulte la "Gula de PMB" para obtener mris
iniormacidn sobre la importacidn de pellculas y
ibtograflas seleccionadas (prig. 26).
Cambio de la unidad o carpetade destino para las peliculas y
fotog rafias
En la pantalla [Handycam Utility] de]
paso 3 anterior, haga clic en [Easy PC
Back-up] --_ [Cambiar]. En la pantalla
que aparece, puede seleccionar la unidad
o carpeta donde desea guardar las
im_igenes.
63
a_
c
,<
3
33"u
Ko
_5

Inicio de PMB (Picture
Motion Browser)
Haga doble clic ell el icono de acceso
directo de "PMB" ell la pantalla de la
computadora.
• Si el icono no aparece en la pantalla de la
computadora, haga clic en [Inicio] _ [Todos
los programas] _ [Sony Picture Utility]
[PMB] para iniciar "PMB'_
Puede w'r, editar o crear discos de peliculas
y totografias usando "PMB".
Para obtener m_is informacidn acerca del
funcionamiento de "PMB", lea la "Guia de
PMB". Haga done clic en el icono de acceso
directo de la "Guia de PMB" en la pantalla
de la computadora para abrir la "Guia de
PMB".
• Si el icono no aparece en la pantalla de la
computadora, haga clic en [Inicio] _ [Todos
los programas] _ [Sony Picture Utility]
[Ayuda] _ [Guia de PMB]. Tambi_'n puede
abrir la "Guia de PMB" desde la [Ayuda] de"PMB':
Creaci6n de un disco
Puede crear un disco mediante la seleccidn
de peliculas y tbtografias importadas
previamente en la computadora (Dig. 25).
Endenda la computadoray
coloque un disco vacio en launidad de DVD.
• Consulte la Digina 21 para conocer los
tipos de disco que puede usar.
• Si algt'm programa de software que no sea"PMB" se inicia autom_iticamente, ci_rrelo.
Haga doble clicen el icono de
acceso directo de"PMB"en la
pantalla de la computadora parainiciar"PMB".
• Tambi&lpuede iniciar "PMB" al hacer clicen [Inicio] _ [Todoslos programas][SonyPicture Utility]_ [PMB].
Haga clic en [Carpetas]
o [Calendario] en el lado
izquierdo de la ventana y
seleccione la carpeta o la fecha
y, a continuaci6n, seleccione
las peliculas y las fotografiasdeseadas.
• Para seleccionar varias peliculas yfbtografias, mantenga presionada la teclaCtrl y hagaclic en las miniaturas.
2;

En la parte superior de la
ventana, haga clic en [Manipular]
--_ [Creaci6n de DVD-Video (SD)].
Aparece la wultana que se usa para
seleccionar peliculas y totografias.
• Para agregar peliculas y/btograi_as a
la seleccidn realizada anteriormente,
sdeccione las pellculas y tbtogratlas en
la ventana principal y arr_istrelas hasta
la ventana de seleccidn de pellculas ylbto raf_as.
5 Siga las instrucciones de la
pantalla para crear un disco.
• Puede que el proceso de creacidn gel discotome bastante tiempo.
Copia deun discoEs posible copiar un d isco grabad ° en
otto disc9 mediante :'Video D>c Copier!'.
Haga clic en [Inicio] _ [Todos los
programas] _ [Sony Picture Utility]
[Video Disc Copier] para iniciar el
software: Constflte la ayuda de i!Vide0
Disc Copier'! par a 0btene racerca del funcionamiento.
Edici6n de peliculas
Puede cortar s6lo las partes necesarias de
una pelicula y guardarlas en otro archivo_
Use "PMB _ para seleccionar la pelicula
que desea editar y, a continuacion,
haga clic en [Manipular] "-+ [Video
Trimming] en el mend para abrir la
ventana Video Trimming. Consulte la
"Guia de PMB" para obtener informacion
acerca de la operacion (Dig. 26).
Captura de fotografias desde una
pelicu la
Puede guardar un fotograma de una
pelicula como archivo de fotografia.
En la ventana de reproducci6n de
peliculas de "PMB".haga clic en Pill para
mostrar la ventana [Guardar fotograma].
Consulte la _'Guia de PMB" para obtener
informacion acerca de la operaclon
_Dig. 26).
Hagaclic en
G3
r_
,<
8
8
o
_7
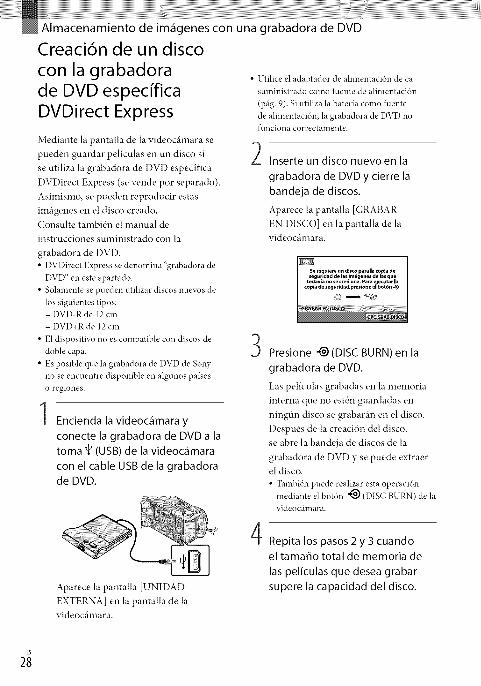
Creaci6n de un disco
con la grabadorade DVD especifica
DVDirect Express
Mediante la pantalla de la videoc_imara se
pueden guaMar peliculas en un disco si
se utiliza la grabadora de DVD especifica
DVDirect Express (sew, nde per separado).
Asimismo, se pueden reproducir estas
invigenes en el disco creado.
Consulte tambi_,n el manual de
instrucciones suministrado con la
grabadora de DVD.
• DVDirect Express se denomina "grabadora de
DVD" en este apartado.
• Solamente se puedon utilizar discos nuevos de
los siguientos tipos:- DVD-R de 12 cm
- DVD+R de 12 cm
• E1dispositivo no es compatible con discos de
done capa.
• Es posible que la grabadora de DVD de Sony
no se encuentre disponible en algunos palses
o regiones.
I Encienda la videoc_mara y
conecte la grabadora de DVD a la
toma _ (USB) de la videoc_mara
con el cable USB de la grabadora
de DVD.
Aparece la pantalla [UNIDAD
EXTERNA] ell la pantalla de lavideoc_hnara.
• Utilice el adaptador de alimentacidn de casuministrado come fuente de alimentacidn
(Dig. 9). Si utiliza la baterla come flwnte
de alimentacidn, la grabadora de DVD nofunciona correctamente.
Inserte un disco nuevoen la
grabadora de DVD y cierre la
bandeja de discos.
Aparece la pantalla [GRABAR
EN DISCO] en la pantalla de la
videoc_imara.
3 Presione *_) (DISC BURN) en la
grabadora de DVD.
Las peliculas grabadas ell la memoria
interna que no est{,n guardadas en
ningun disco se grabar_in en el disco.
Despu{,s de la creaci6n del disco,
se abre la bandeja de discos de la
grabadora de DVD y se puede extraerel disco.
• Tambi_npuede realizar esta operacidnmediante el botdn '_ (DISC BURN)de lavideocMnara.
Repita los pasos 2y 3 cuando
el tamafio total de memoria de
las peliculas que desea grabar
supere la capacidad del disco.

Cuando finalice la operacidn,
toque _ --_ [FIN] en la pantalla
de la videoc_mara.
• Toque [EXPULSAR DISCO] y retire
cualquier disco qne se encuentre insertado.
Cierre la bandeja de discos de la
grabadora de DVDy desconecteel cable USB.
Para crear un disco con las imkgenesseleccionadas
Para copiar una imagen deseada en el disco
o para crear muchos discos iguales, realice
esta operaci6n.@Toque [OPC.GRAB.DISCO]en el paso 3
anterior.
• Si toca la fecha, podr_i buscar las im_igenes
por fbcha.@Toque [_ _ [SI] en la pantalla de la
videoc_imara.
La bandeja de discos de la grabadora de DVD
se abre despu& de crear el disco.
@Extraiga el disco de la grabadora de DVD y
cierre la bandeja de discos.• Para crear otro disco con el mismo
contenido, inserte un disco nuevo y toque
[CREAR UN DISCO IGUALI.
@Cuando finalice la operacidn, toque [SALIR]
[FIN] en la pantalla de la videoc_imara.
@Cierre la bandeja de discos de la grabadora
de DVD y desconecte el cable USB de lavideoc_imara.
Para reproducir un disco en lagrabadora de DVD
@Seleccione el soporte de grabacidn que contiene
las peliculas que desea guardar.
Aparecen imfigenes en miniatura de las
peliculas en la pantalla de la videocfimara.
@Toque la pelicula que &see copiar en el disco.
Aparece _/.
Capacidadrestante del disco
• Mantenga presionada la imagen en
la pantalla de cristal liquido para
confirmarla. Toque _ para voNer a la
pantalla anterior.
@Encienda la videocfimara y conecte la :>5"
grabadora de DVD a la toma _' (USB) de la
videoc_imara con el cable USB de la grabadorade DVD.
Aparece la pantalla [UNIDAD EXTERNA]. N"
• Para reproducir peliculas en la pantalla odel televisor, conecte la videocfimara al
televisor (Dig. 19). _i
@Inserte un disco creado en la grabadora deDVD.
Las peliculas del disco aparecerfin comoVISUAL INDEX en la pantalla de lavideoc_imara.
@Presione el botdn de reproduccidn en la
grabadora de DVD. _-La pelicula se reproduce en la pantalla de la _-
ovideoc_imara. _0
• Tambi_m puede realizar esta operacidn
mediante la pantalla de la videocfimara
(Dig. 16). 5
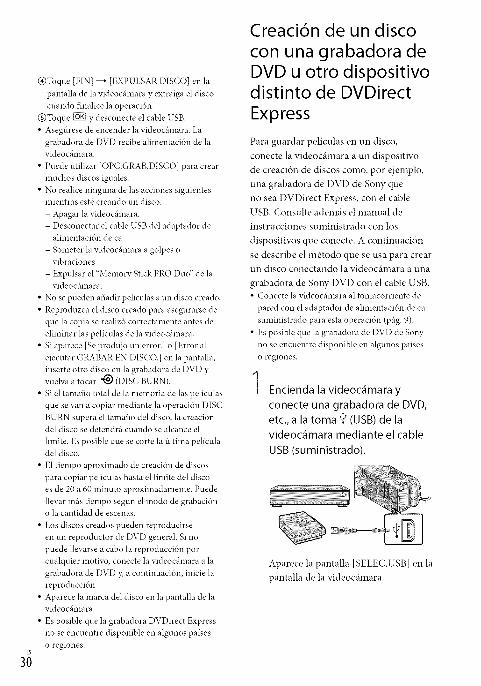
3;
@Toque [FIN] _ [EXPULSAR DISCO] en la
pantalla de la videocfimara y extraiga el disco
cuando finalice la operacidn.
@Toque _ y desconecte el cable USB.
• Asegfirese de encender la videocfimara. La
grabadora de DVD recibe alimentacidn de lavideoc_imara.
• Puede utilizar [OPC.GRAB.DISCO] para crear
nmchos discos iguales.
• No realice ninguna de las acciones siguientesmientras est_ creando un disco.
- Apagar la videocfimara.
- Desconectar el cable USB del adaptador dealimentacidn de ca
- Someter la videoc_imara a golpes ovibraciones.
- Expulsar el "Memory Stick PRO Dug' de lavideoc_imara.
• No se pueden afiadir peliculas a un disco creado.
• Reproduzca el disco creado para asegurarse de
que la copia se realiz6 correctamente antes de
eliminar las peliculas de la videocfimara.
• Si aparece [Se produjo un error.] o [Error al
ejecutar GRABAR EN DISCO.] en la pantalla,
inserte otro disco en la grabadora de DVD yvuelva a tocar "9 (DISC BURN).
• Si el tamafio total de la memoria de las peliculasque se van a copiar mediante la operacidn DISC
BURN supera el tamaflo del disco, la creacidndel disco se detendrfi cuando se alcance el
limite. Es posible que se corte la filtima peliculadel disco.
• E1tiempo aproximado de creacidn de discos
para copiar peliculas hasta el limite del disco
es de 20 a 60 minuto aproximadamente. Puede
llevar mtis tiempo segfln el modo de grabacidno la cantidad de escenas.
• Los discos creados pueden reproducirse
en un reproductor de DVD general. Si no
puede llevarse a cabo la reproducci6n por
cualquier motivo, conecte la videocfimara a la
grabadora de DVD y, a continuacidn, inicie la
reproduccidn.
• Aparece la marca del disco en la pantalla de lavideoc_imara.
• Es posible que la grabadora DVDirect Express
no se encuentre disponible en algunos paises
o regiones.
Creaci6n de un disco
con una grabadora de
DVD u otro dispositivodistinto de DVDirect
Express
Para guardar peliculas en un disco,
conecte la videoc_hnara a un dispositivo
de creacidn de discos como, por ejemplo,
una grabadora de DVD de Sony que
no sea DVDirect Express, con el cableUSB. Consulte adem_is el manual de
instrucciones suministrado con los
dispositiw_s que conecte. A continuaci6n
se describe el m{,todo que se usa para crearun disco conectando la videoc_hnara a una
grabadora de SoW DVD con el cable USB.• Conecte la videoc_imaraal tomacorriente de
pared con el adaptador de alimentaci6n de casuministrado para esta operacidn (p_ig.9).
• Es posible que la grabadora de DVD de Sonyno se encuentre disponibleen algunos paiseso regiones.
Encienda la videoc_mara y
conecte una grabadora de DVD,etc., a la toma _ (USB) de la
videoc_mara mediante el cable
USB (suministrado).
Aparece la pantalla [SELEC.USB] ell la
pantalla de la videoc_hnara.

En la pantalla de la videoc_mara,
toque [I_CONEXION USB] si
graba las pelfculas en la memoriainterna, o [:_E]CONEXlON USB] si
las graba en un "Memory StickPRO Duo".
Grabe las pelfculas en el
dispositivo conectado.
• Para obtener rm'_sdetalles, consulte el
manual de instrucciones suministrado con
los dispositivos que conecte.
Cuando finalice la operaci6n,
toque [FIN]---+[S[]en la pantallade la videocamara.
Desconecte el cable USB.
Creaci6n de un disco
con una grabadora,etc.
Es posible copiar im_igenes reproducidas en
la videoc_hnara en un disco o videocasete
si conecta la videoc_hnara auna grabadora
de DVD de So W que no sea DVDirect
Express, etc. con el cable de conexi6n de
A/V. Conecte el dispositivo de la manera
[] o _. Consulte adem_s el manual
de instrucciones suministrado con los
dispositivos que conecte, Seleccione
el soporte de grabaci6n que contiene
las peliculas que desea copiar antes de
comenzar la operaci6n (p_g. 34).
• Conecte la videoc_imara al tomacorriente de
pared con el adaptador de alimentacidn de ca
suministrado para esta operacidn (p_'_g.9).
[] Cable de conexi6n de A/V (suministrado)Conecte el cable de conexion de A/V a las
tomas de entrada de otto dispositivo.
[] Cable de conexi6n de AN con S VIDEO
(se vende por separado)Si realiza la coilexi611 a otro dispositivo atrav& de la toma S VIDEO mediante un
cable de conexi6n de A/V con un cable de
S VIDEO (se vende por separado), podr_'t
obtener im;_genes de mayor calidad quecon un cable de conexi6n de A/V. Conecte
la clavija blanca y roja (audio izquierdo/derecho) y la clavija de S VIDEO (canalS VIDEO) del cable de conexi6n de A/Vcon un cable de S VIDEO. Si conecta s61o
la clavija de S VIDEO, no escuchar_i el
sonido. No es necesario conectar la clavijaamarilla (video).
3>
g8
g-
o

Conector
remoto de A/V
A/V R
!
(amarillo)
Entrada
s VIDEO
@
VIDEO
(amarillo)
(blanco)1E>
AUDIO
N>
(rojo)
........... FIujo de sefiales
Inserte el soporte de grabaci6n
en el dispositivo de grabaci6n.
• Si el dispositivo de grabacidn tiene tm
selector de entrada, ajfistelo en el modo
de entrada.
Conecte la videocamara al
dispositivo de grabaci6n
(grabadora de discos, etc.)
mediante el cable de conexi6n de
A/V [] (suministrado) o un cable
de conexi6n de A/V con SVlDEO
[] (se vende por separado).
• Conecte la videoc_imara a las tomas de
entrada del dispositivo de grabacidn.
Inicie la reproducci6n en la
videoc_mara y gr_bela en el
dispositivo de grabaci6n.
• Para obtener m_is infbrmacidn, consulte los
manuales de instrucciones suministrados
con el dispositivo de grabaci6n.
Cuando finalice la copia, detenga
el dispositivo de grabaci6n y, acontinuaci6n, la videocamara.
• Debido a que la copia se realiza a trav{'s de la
transfi.'rencia de datos analdgica, es posible que
la calidad de imagen se deteriore.
• Para ocultar los indicadores de la pantalla
(como el contador, etc.) del dispositivo de
visualizaci6n conectado, toque _ (HOME)
_ (AJUSTES) _ [AJUSTES SALIDA]
[SALIDA PANT.] _ [LCD] (ajuste
predeterminado) _ [_ _ [_ _ ]XI.
• Para grabar los datos de f?cha y hora o deconfiguracidn de la c_imara, toque t_" (HOME)
_ (AIUSTES) _ [VIS.AIUSTES IMAG]
[CODIGO DATOS] _ un ajuste deseado
Asimismo, toque t_ (HOME)
(AJUSTES) _ [AJUSTES SALIDA]
[SALIDA PANT.] --' [SALW/LCD] --_ 1_ --_
[3N-+ gg2• Si el tamaflo de la pantalla de los dispositivos
de visualizacidn (televisor, etc.) es 4:3, toque(HOME) _ _ (AIUSTES) _ [AIUSTES
SALIDA]-+ [TWO TV] _ [4:3] _ _
• Si conecta la videocfimara a un dispositivo
monoaural, introduzca la clavija amarilla delcable de conexidn de A/V en la toma de entrada
de video, y la clavija blanca (canal izquierdo) o
la roja (canal derecho) en la toma de entrada de
audio del dispositivo.
• Es posible que la grabadora de DVD de Sony
no se encuentre disponible en algunos palses
o regiones.

Eliminaci6n de
peliculas y fotografias
Puede liberar espacio en el soporte de
grabacidn si borra peliculas y fotografias
ahnacenadas en {,1.
Seleccione el soporte de grabaci6n
que contiene las peliculas y fotografias
que desea borrar antes de comenzar la
operaci6n (prig. 34).
Toque _ (HOME) --_ [_ (OTROS)
--_ [BORRAR].
Para eliminar peliculas, toque
[llzlt BORRAR] --_ [ltzll BORRAR].
• Para eliminar fbtos, toque [ []BORRAR]
[ [] BORRAR].
Toque e incluya la marca 4en las
peliculas o fotografias que desee
eliminar.
E1 formateo borra todas las peliculas y
fotografias para recuperar espacio libre
grabable.• Conecte la videoctlmara al tomacorriente de
pared mediante el adaptador de alimentaci6n
de ca suministrado para realizar esta operaci6n
(p_ig. 9).
• Para evitar la p4rdida de imtlgenes importantes,
debe guardarlas (Dig. 21) antes de fbrmatear el
soporte de grabaci6n.
• Las peliculas y fbtografias protegidas tambi4nse borran.
Toque _ (HOME) -_
(GESTIONAR SOPORTE) --_
[FORMAT.SOPORTE].
_ Toque el soporte de grabaci6n
que desea formatear ([MEMORIA
INTERNA] o [MEMORY STICK]).
Toque _ ---_ [sf] --_ [_ --_ [3K?.
• Para borrar todas las peliculas de una vez
En el paso 2, toque [g_ BORRAR]
[gZ_BORRAR TODO] _ [Sf] _ [SI] _ [__[_.
• Para borrar todas las fbtografias de una vez
En el paso 2, toque [[]BORRAR]
[[]BORRAR TODO] _ [SI] _ [SI] _ []_N_[_.
_i Toque [S[] --_ [S[] --_ 1]_].
c
• Mientras se muestra [En ejecucidn...], no
cierre la pantalla de cristal liquido, no utilice _:
los botones de la videocfimara, no desconecte el
adaptador de alimentacidn de ca ni expulse el"Memory Stick PRO Dud' de la videoc_imara. _"
(El indicador de acceso permanece iluminado o
parpadea mientras se fbrmatea el soporte). _-
¢h
_3

Copia con condicionesde filmaci6n
En el mend existe una amplia variedad
de opciones de ajustes y configuracidn
(pig. 36).
Para ajustar la exposicidn de motiw)s a
contraluz, presione [] (contraluz) para que
aparezca []. Para cancelar la funci6n de
contraluz, presione de nuew_ [] (contraluz).
Coloque un tripode (sew, nde
pot separado) en el recept_iculo
correspondiente mediante un tornillo para
tripode (se w, nde pot separado; la longitud
del tornillo debe ser inf_,rior a 5,5 ram)
Recept_iculo deltrlpode
Cambio del soporte degrabaci6n
Puede seleccionar la memoria interna o el
"Memory Stick PRO Duo" como soporte
de grabaci6n, reproducci6n o edici6n en
la videoc_imara. Seleccione el soporte que
desea usar para peliculas y fotografias pot
separado.
En la configuraci6n predeterminada, las
peliculas y las fotografias se graban en lamemoria interna.
UPeliculas
"Men ory St ok"
• Puede realizar operaciones de grabaci6n,
reproduccidn o edici6n en el soporteseleccionado.
• Consulte la Digina 47 para conocer el tiempo de
grabaci6n de las peliculas.
Toque tlt (HOME) --_
(GESTIONAR SOPORTE) --_
[AJ.SOPORTE PEL.].
Aparece la pantalla [AJ.SOPORTE
PEEl.
Toque el soporte deseado.
_i Toque [S[] --_ [_.
E1 soporte de grabacidn se cambia.
31
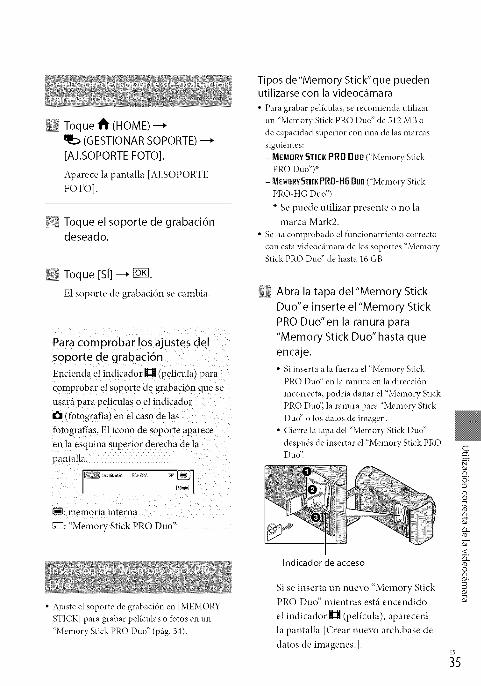
Toque tlt (HOME) --_
(GESTIONAR SOPORTE) --_
[AJ.SOPORTE FOTO].
Aparece la pantalla [AJ.SOPORTE
FOTO].
Toque el soporte de grabaci6ndeseado.
_] Toque [S[] --_ [_.
E1 soporte de grabacidn se cambia.
Para com probar los ajustes del
soporte de grabaci6n
Encienda el indicador _ (pelicula) para
comprobar el soporte de grabaci6n que se
usani para peliculas o el indicador
O !fotografia) en el caso de las
fotografias. E1icono de soporte aparece
en la esquina superior derecha de la
pantalla.
_): memoria interna
EEl:"Memory Stick PRO Duo"
• Ajuste el soporte de grabacidn en [MEMORY
STICK] para grabar peliculas o iotos en un
"Memory Stick PRO Duo" (Dig. 34).
Tipos de"Memory Stick"que puedenutilizarse con la videockmara
• Para grabar peliculas, se recomienda utilizarun "Memory StickPRO Duo" de 512 MB ode capacidad superior con una de las marcas
siguientes:- MEMORY STICK PRO Duo ("Memory Stick
PRO Duo")_- MEMORYSrl[l(PRO-HG11110("Memory Stick
PRO HG Duo")
Se puede utilizar presente o no lamarca Mark2.
• Se ha comprobado el funcionamiento correctocon esta videoctimarade lossoportes "MemoryStickPRO Duo" de hasta 16 GB
@ Abra la tapa del"Memory Stick
Duo"e inserte el "Memory Stick
PRO Duo"en la ranura para
"Memory Stick Duo" hasta que
encaje.
• Si inserta a la fuerza el "Memory StickPRO Dud' en la ranura en la direcci6n
incorrecta, podria dafiar el "Memory Stick
PRO Duo'; la ranura para "Memory Stick
Dud' o los datos de imagen.
• Cierre la tapa del "Memory Stick Duo"
despu{'s de insertar el "Memory Stick PRODud_
Indicador de acceso
Si se inserta un nuew_ "Memory StickPRO Duo" mientras est_iencendido
el indicador H (pelicula), apareceni
la pantalla [Crear nuew_ arch.base de
datos de imtigenes.].
n
_0
_5

Toque [S[].
• Para grabar solamente iotos en un
"Memory Stick PRO Duo,; toque [NO].
Personalizaci6n de lavideoc mara mediante
los menOs
• Los elementos de men6 se describen con mils
detalles y ibtografias en color en la "Gula
pr_ictica de Han@cam" (p_ig. 41).
• Si aparece [Error al crear un nuevo archivo de
base de datos de imtlgenes. Es posible que no
exista suficiente espacio libre.l en el paso 2,
fi_rmatee el "Memory Stick PRO Duo,' (Dig. 33).
Para expulsar el "Memory Stick PRO
Duo"
Abra la tapa del "Memory Stick Duo" y
presione ligeramente el "Memory Stick
PRO Duo" una w'z.
• No abra la tapa del "Memory Stick Dud'
durante la grabacidn.
• A1insertar o expulsar el "Memory Stick PRO
Dud; tenga cuidado de que el "Memory Stick
PRO Duo'' no salga disparado y se caiga.
Copia de peliculas y fotografiasde la memoria interna en un
"Memory Stick PRO Duo"
Toque t_" (HOME) -+ I_t (OTROS) -4
[COPIA PELICULA] ![COPIAR FOTO]
y,a continuacion, slga las instrucciones
que aparecen en la pantalla.
A1 tocar 1_ (HOME), aparece el HOME
MENU. Puede cambiar los ajustes de la
videoc_imara.
t_ (HOME)
Toque la categoria deseada --_
el elemento de menO que deseacambiar.
Elemento de menfi
I
Categorla
Siga las instrucciones que
aparecen en la pantalla.
3;

_ Cuando finalice el ajuste, toquegg].• Si el elemento no aparece en la pantalla,
toque _/D,• Para volver a la pantalla anterior, toque
Cg_l.
• Para ocultar la pantalla HOME MENU,toque [X_.
• No puede seleccionar loselementos o
a)ustesque aparecen aenuados.
_ Toque la ficha deseada --_ el
elemento cuyo ajuste desea
cambiar.
Elemento de mend
Uso de la funci6n HELP
Para ver las descripciones del HOME
MENU, toque [] (HELP', en la pantalla
HOME MENU. {Lapar_e inferior del []
se ilumina en naranja), A continuacion.
toque el elemento de memi del que deseaobtener informacion.
E1_ OPTION MENU se abre igual que las
w,ntanas emergentes que aparecen al hacer
dic con e[ bot6n derecho de[ mouse de una
computadora. Aparecen los elementos de
menti que puede cambiar en el contexto.
(OPTION) --
Ficha
Cuando finalice el ajuste, toque
• Si el elemento que desea no se muestra en la
pantalla, toque otra ficha. (Es posible qne no
haya fichas).
• No se puede utilizar el OPTION MENUdurante el funcionamiento en modo Easy
Handycam.
r_
_7

Categoria _ (TOMA DE IMP,GENES)
PELfCULA...................................prig. 12
FOTO............................................p fig. 14
Categoria r_ (VISUALIZAR IMP,GENES)
VISUAL INDEX...........................prig. 16
_ROLLO PELiC.......................prig. 16
I_ICARA ......................................prig. 16
PLAYLIST.....................................Permite visualizar y reproducir una playlist de pellculas.
Categoria {_ (OTROS)
BORRAR
_I_ BORRAR ...................... prig. 33
[] BORRAR ....................... prig. 33
TOMA FOTOGRAF. ................... Permite
COPIA PEL[CULA ..................... prig. 36
COPIAR FOTO
COPIAR por selec ........... prig. 36
COPIAR por fecha .......... prig. 36
EDIT
gl BORRAR ...................... prig. 33
[] BORRAR ....................... prig. 33
gl PROTEGER .................. Permite
[] PROTEGER .................. Permite
DIVI DI R ........................ Permite
EDIClON PLAYLIST
AIqADI R....................... Permite
_I_AIqADIR p.fecha ........ Permite
I_ BORRAR ....................... Permite
I_ BORRAR TODO .......... Permite
@ MOVER ......................... Permite
CONEXION USB
@ CON EXION USB .........Permite
_CONEXION USB ........ Permite
USB.
GRABAR EN DISCO ........ prig. 24
INFORM.BATER[A ..................... Permite
capturar _btograf_'as de las escenas deseadas de las pellculas.
ajustar la protecci6n para evitar ]a eliminaci6n de pellculas.
ajustar la proteccidn para evitar la eliminacidn de *btograf_'as.
dividir pellculas.
afladir una pellcula a una playlist.
afladir a la vez a una playlist las pellculas grabadas el mismo dia.
borrar una pellcula de una playlist.
borrar todas las pellculas de una playlist.
cambiar el orden de las peliculas de una playlist.
conectar la memoria interna mediante una conexidn USB.
conectar el "Memory Stick PRO Duo" a trav{'s de una conexidn
visualizar in*brmacidn sobre ]a baterla.
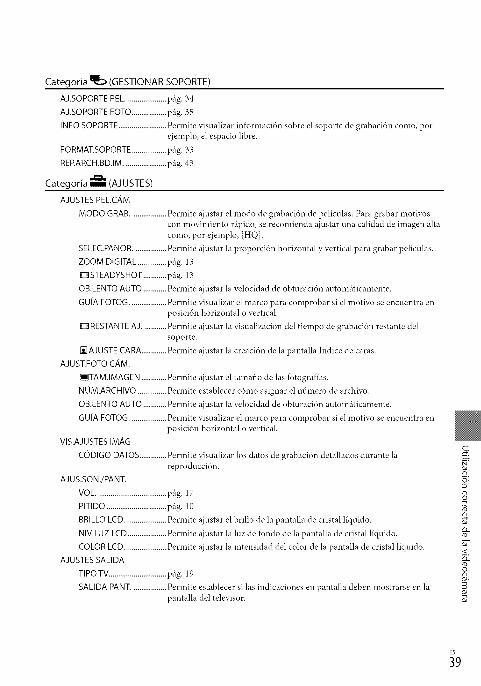
Categoria _ (GESTIONAR SOPORTE)
AJ.SOPORTEPEL.....................prig. 34
AJ.SOPORTEFOTO..................prig. 35
INFO SOPORTE .........................Permite visualizar infbrmacidn sobre el soporte de grabacidn como, porejemplo, el espacio libre.
FORMAT.SOPORTE ..................prig. 33
RERARCH.BD.IM...................... prig. 43
Categoria _ (AJUSTES)
AJUSTESPEL.CAM
MODO GRAB.................. Permite ajustar el modo de grabacidn de pellculas. Para grabar motivoscon movimiento r@ido, se recomienda ajustar una calidad de imagen alta
como, por ejemplo, [HQ].
SELEC.PANOR................. Permite ajustar la proporcidn horizontal y vertical para grabar peliculas.
ZOOM DIGITAL...............prig. 13
g3tSTEADYSHOT ............prig. 13
OB.LENTO AUTO ............Permite ajustar la velocidad de obturacidn automriticamente.
GUiA FOTOG................... Permite visualizar el marco para comprobar si el motivo se encuentra enposicidn horizontal o vertical.
g:_RESTANTEAJ ............ Permite ajustar la visualizacidn del tiempo de grabacidn restante delsoporte.
_AJUSTE CARA.............Permite ajustar la creacidn de la pantalla Indice de caras.
AJUST.FOTOCAM.
_TAM.IMAGEN .............Permite ajustar el tamafio de las fotograf]as.
NOM.ARCHIVO ...............Permite establecer cdmo asignar el nfimero de archivo.
OB.LENTO AUTO ............Permite ajustar la velocidad de obturacidn automriticamente.
GUiA FOTOG................... Permite visualizar el marco para comprobar si el motivo se encuentra enposicidn horizontal o vertical.
VIS.AJUSTESIMAG
CODIGO DATOS..............Permite visualizar los datos de grabacidn detallados durante lareproduccidn.
AJUS.SON./PANT.
VOL.................................... prig. 17
PITIDO ...............................prig. 10
BRILLOLCD......................Permite ajustar el brillo de la pantalla de cristal llquido.
NIV LUZ LCD....................Permite ajustar la luz de fbndo de la pantalla de cristal llquido.
COLOR LCD......................Permite ajustar la intensidad del color de la pantalla de cristal llquido.
AJUSTESSALIDA
TIPO TV..............................prig. ]9
SAmDA PANT.................. Permite establecer si las indicaciones en pantalla deben mostrarse en lapantalla del televisor.
c
n
_9

AJ.REL./IDIOM. r_
AJUS.RELOJ......................prig. 10
AJUS.ZONA ......................prig. 10
HORAVERANO...............prig. 10
AJUSTE IDIOMA_ ........prig. 11AJUST.GENERALES
MODO DEMO ..................Permite establecer si debe mostrarse la demostraci6n.
CALIBRACION .................Permite calibrar el panel trictil.
APAGADO AUTO............Permite cambiar el ajuste de [APAGADO AUTO] (prig. 9).
ENCEND.CON LCD.........Permite establecer si la videocrimara se encenderri y apagarri al abrir ycerrar la pantalla de cristal llquido.
• [AJUS.SON./PANT.] cambia a [AIUSTES SONIDO] durante el fl.mcionamiento en modo Easy
Handycam.
4;
Los siguientes elementos se encuentran disponibles en el OPTION MENU solamente.
Ficha II_
MED./ENF.PUNTO..........Permite ajustar simu]trineamente e] bri]]o y e] enfbque de] motivoseleccionado.
MEDID.PUNTO ................Permite ajustar el brillo de las imrigenes de acuerdo con el motivo que setoque en la pantalla.
ENFOQ.PUNTO ...............Permite enibcar un motivo que se toque en la pantalla.
TELE MACRO ...................Permite fbtografiar un motivo enibcado con el fbndo desenibcado.
EXPOSICION....................Permite ajustar el brillo de pelfculas y lbtogral_'as.
ENFOQUE.........................Permite realizar el enfbque manualmente.
SELEC.ESCENA................Permite seleccionar un ajuste de grabacidn adecuado segtin el tipo deescena como, pot ejemplo, una vista nocturna o una playa.
BAL.BLANCOS.................Permite ajustar el balance de blancos.
Ficha
DESVANECEDOR............Permite amuentar o desvanecer gradualmente las escenas.
Ficha
MIC.ZOOM INCOR.........Permite grabar pelfculas con sonido direccional segtin el ajuste del zoom.
NIVELREFMIC.................Permite ajustar el nivel del micrdfuno.
AUTODISPAR...................Se utiliza durante la grabacidn de fbtograflas.
La ficha depende de la situaci6n/sin ficha
PRES.DIAP.........................Permite reproducir una serie de fbtograflas.
AJUS.PASEDIAPO..........Permite ajustar la opcidn de repeticidn para ]a presentacidn dediapositivas.
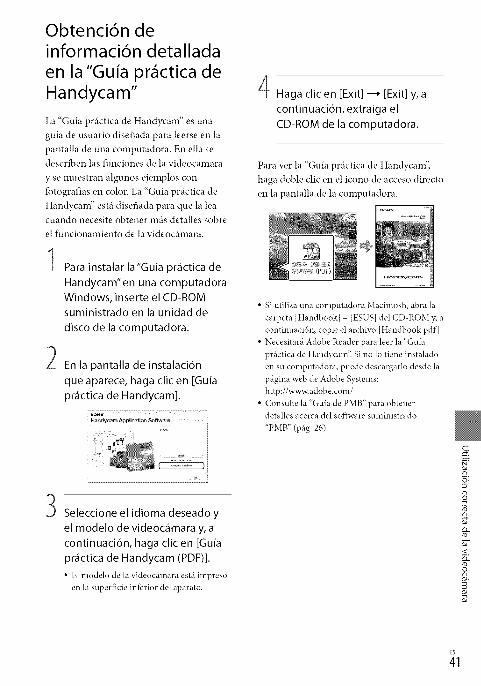
Obtenci6n deinformaci6n detallada
en la"Guia pr ctica de
Handycam"
La "Guia prtictica de Handycam" es una
guia de usuario diseflada para leerse en la
pantalla de una computadora. En ella se
describen las funciones de la videoc_imara
y se muestran algunos ejemplos con
fi)tografias en color. La "(;uia prtictica de
Hand},cam" est;i disefiada para que la lea
cuando necesite obtener mtis detalles sobre
el funcionamiento de la videocthnara.
1 Para instalar la"Guia practica de
Handycam"en una computadora
Windows, inserte el CD-ROMsuministrado en la unidad de
disco de la computadora.
En la pantalla de instalaci6n
que aparece, haga clic en [Guia
pr_ctica de Handycam].
H;mdycam AppJk_ation Software
_, .......
3 Seleccione el idioma deseado y
el modelo de videocamara y, a
continuaci6n, haga clic en [Guia
pr_ctica de Handycam (PDF)].
• E1modelo de la videoc_hnaraest_iimpresoen la superficieinferior del aparato.
Haga clic en [Exit] --_ [Exit] y, a
continuaci6n, extraiga el
CD-ROM de la computadora.
Para ver la "Guia prtictica de Handycam",
haga doble clic en el icono de acceso directo
en la pantalla de la computadora.
• Si utiliza una computadora Macintosh, abra la
carpeta [Handbook] [ESUS] del CD ROM y, a
continuacidn, copie el archivo [Handbook.pdf].
• Necesitartl Adobe Reader para leer la "Guia
prtlctica de Han@cam" Si no lo tiene instalado
en su computadora, puede descargarlo desde la
pfigina web de Adobe Systems:
http://w_: adob e.com/
• Consulte la "Guia de PMB" para obtenerdetalles acerca del software suministrado
"PMB" (ptlg. 26).
c
n

Soluci6n de
problemas
Si surge algtin problema al utilizar la
videoc_hnara, consulte la tabla siguiente
para solucionarlo. Si el problema persiste,
desconecte la fuente de alimentacidn y
pdngase en contacto con su distribuidor
de Son};
N0tas antes de enviar lavide0c_ mara a reparaci6n
• Es posible que la videocrimara deba inicializarse
o que necesite un reemplazo de la memoria
interna actual, dependiendo del problema. Ental caso, los datos ahnacenados en la memoria
interna se eliminarrin. Asegflrese de guardar los
datos de la memoria interna en otro soporte
(copia de seguridad) antes de enviar la crimara
a reparar. No offecemos ningfln tipo de
compensacidn por la p&dida de los datos de la
lnemoria interna.
• Durante la reparaci6n, es posible que revisemosuna cantidad minima de los datos ahnacenados
en la memoria interna a fin de investigar el
problema. Sin embargo, el distribuidor de Sony
no copiarri ni conservarri sus datos.
• Consulte la "Guia prrictica de Handycam"
(prig. 41) para obtener informacidn acerca
de los sintomas de la videocrimara, y la "Guia
de PMB" (prig. 26) para obtener intbrmacidnacerca de la conexion de la videocrimara a una
computadora.
La videoc_mara no se enciende.
• Instale una bateria cargada en la videocrimara
(prig. 8).
• Conecte la clavija del adaptador de
alimentacidn de ca al tomacorriente de pared
(prig. 8).
La videoc_mara no opera aun cuando laalimentaci6n est_ activada.
• Despu_s de encender la videocrimara, tarda
unos cuantos segundos en estar lista para
tomar imrigenes. No se trata de una falla detuncionamiento.
• Desconecte el adaptador de alimentaci6n
de ca del tomacorriente de pared o extraiga
la bateria, y vuelva a realizar la conexidn
transcurrido aproximadamente 1 minuto. Si
la videocrimara sigue sin funcionar, presione
RESET (prig. 50) con un objeto puntiagudo.
(Si presiona RESET, se restablecerrin todos los
ajustes, incluido el del reloj).
La videoc_mara se calienta.
• Es posible que la videocrimara se calientedurante el funcionamiento. No se trata de una
falla de funcionamiento.
La alimentaci6n se desconecta
repentinamente.
• Utilice el adaptador de alimentaci6n de ca
(prig. 9).• Encienda la videocrimara de nuevo.
• Cargue la bateria (prig. 8).
AI presionar START/STOP o PHOTO no se
graban las im_genes.
• Presione MODE para encender el indicador
H (pelicula) o I_ (fotografia).
• La videocrimara estri grabando en el soporte de
grabacidn la imagen que acaba de tomar. No
se pueden realizar nuevas grabaciones durante
este periodo.
• E1 soporte de grabacidn estri lleno. Elimine las
imrigenes innecesarias (prig. 33).
• E1 ntS.mero total de escenas de pelicula o
fotografias super6 la capacidad de grabacidn
de la videocrimara. Elimine las imrigenes
innecesarias (prig. 33).
No se puede instalar"PMB".
• Revise el entorno de la computadora o el
procedimiento de instalacidn necesario para
instalar "PMB" (prig. 21 ).
"PMB" no funciona correctamente.
• Cierre "PMB" y reinicie la computadora.

La computadora no reconoce lavideoc_mara.
• Desconecte los dispositivos de la toma USB
de la computadora, a excepci6n del teclado, el
mouse y la videocrimara.
• Desconecte el cable USB de la computadora
y la videocrimara. Reinicie la computadora
y, a continuaci6n, vuelva a conectar la
computadora y la videocrimara en el orden
correcto.
Si en la pantalla de cristal liquido aparecen
indicadores, compruebe lo siguiente.
Si el problema persiste aun despu{,s de
intentar solucionarlo varias veces, p6ngase
en contacto con su distribuidor de Sonyo con un centro de servicio t{,cnico local
autorizado de Sony.
C:04:1_1_
• La bateria 21oes una bateria "InfoLITHIUM"
(serie H). Use una bateria "InfoLITHIUM"
(serie H) (prig. 8).
• Conecte firmemente la clavija de cc del
adaptador de alimentaci6n de ca a la toma DC
IN de la videocrimara (prig. 8).
C:13:ININ / C:32:ININ
• Desconecte la fuente de alimentaci6n.
Con{'ctela de nuevo y vuelva a poner enfuncionamiento la videocrimara.
E:20:I_I_ / E:31:1_1_ / E:61:1_1_ /
E:62:1_1_ / E:91:1_1_ / E:94:1_1_
• La videocrimara requiere una reparacidn.
P6ngase en contacto con su distribuidor de
Sony o con el centro de servicio t_cnico local
autorizado de Son?_ Indiquele el c6digo de 5
digitos que comienza pot la letra "E".
101-0001
• Si el indicador parpadea lentamente, significa
que el archivo estri daflado o que no se puede
leer.
• La memoria interna de la videocrmara estr
llena. Elimine las imrigenes innecesarias de la
memoria interna (prig. 33).
• Se produ)o un error en la memoria interna dela videocfimara.
• La bateria dispone de poca energia.
• No se insert6 ningO.n "Memory Stick PRO
Duo" (prig. 35).
• Si el indicador parpadea, significa que no
queda espacio libre suficiente para grabar
imrigenes. Elimine las imrigenes innecesarias
(prig. 33) o formatee el "Memory Stick PRO
Duo" (prig. 33) despuOs de ahnacenar las
imrigenes en otto soporte.
• E1archivo de base de datos de imrigenes estri
daflado. Para comprobar el archivo de base de
datos de imrigenes, toque 1_"(HOME)
(GESTIONAR SOPORTE) _" [REP.
ARCH.BD.IM.] _" soporte de grabaci6n.
• E1"Memory Stick PRO Dud' esta daflado.
Formatee el "Memory Stick PRO Dug' con la
videocrimara (prig. 33).
• Se insert6 un "Memory Stick Dug'
incompatible (prig. 35).
[_ o---n
• Se restringi6 el acceso al "Memory Stick PRO
Duo" en otto dispositivo.
5-
8"D
_3
Precauciones
• La videocfimara se encuentra en posicidn
inestable. Sostenga la videocfimara firmemente
con ambas manos. No obstante, tenga en cuenta
que el indicador de advertencia de vibraci6n de
la cfimara no desaparecerfi.
• E1soporte de grabacidn esttl lleno. Elimine las
imtlgenes innecesarias (p_ig. 33).
Uso y cuidados
• No utilice ni almacene la videoc_imara y los
accesorios en los siguientes lugares:
- En lugares extremadamente c_'didos, fi'ios
o hfimedos. Nunca los deje expuestos a
temperaturas superiores a 60 °C como, pot
ejemplo, bajo la luz solar directa, cerca decalefi_ctores o en un automdvil estacionado
bajo el sol, ya que podrlan defbrmarse o sufi'ir*hllas de ftmcionamiento.
- Cerca de campos magn4ticos intensos ovibraciones mecfinicas. La videoc_hnara
podrla suf?dr *hllas de *hncionamiento.
- Cerca de ondas radiofl;nicas potentes o
radiaciones. Es posible que la videoc_imara no
pueda grabar correctamente.
- Cerca de receptores de AM y de equipos de
video. Es posible que se produzcan ruidos.
- En una playa o cualquier lugar con
mucho polvo. Si entra arena o polvo en la
videoctlmara, pueden causar una *;aliade
funcionamiento. En ocasiones, esta *;aliade
funcionamiento puede resultar irreparable.- Cerca de ventanas o en el exterior, donde la
pantalla de cristal llquido o el objetivo pueden
quedar expuestos a la luz solar directa. Esto
podrla dafiar el interior de la pantalla de
cristal llquido.• Alimente la videoc_imara con cc de 6,8 V/
7,2 V (bateria) o cc de 8,4 V (adaptador de
alimentacidn de ca)• Para alimentar la videocfimara con cc o ca
utilice los accesorios recomendados en este
manual de instrucciones.
• No permita que la videocfimara se moje; por
ejemplo, bt\jo la lluvia o por el agua del mar.
Si la videocfimara se moja, podria sufi'ir *hllas
de fimcionamiento. En ocasiones, esta *;aliade
funcionamiento puede resultar irreparable.
• Si dentro de la videoctlmara entra algfln objeto
o llquido, descon4ctela y haga que la revise un
distribuidor de Sony antes de volver a utilizarla.
• Evite manipular, desmontar o modificar la
videocfimara bruscamente y exponerla a
golpes o impactos como martillazos, caldas o
pisotones. Sea especialmente cuidadoso con el
objetivo.

• Cuandonoutilicelavideocfimara,mantengalapantalladecristalllquidocerrada.
•Noutilicelavideoctlmaraenvueltaenunatoalla,porejemplo.Silohace,puederecalentarseinternamente.
• Cuandodesconecteelcabledealimentacidn,tiredelenchuibynuncadelcable.
• Procurenodafiarelcabledealimentacidnalcolocarunobjetopesadosobre41.
•Nouselabateriasiestfidefbrmadaodafiada.• Mantengalimpiosloscontactosmettilicos.• Siseproducenfugasdellfqnidoelectrollticodelapila:-Pdngaseencontactoconuncentrodeserviciot4cnicolocalautorizadodeSon?_
-Lfinpieseconaguacualquierllquidoquehayaentradoencontactoconlapiel.
-Sileentraliquidoenlosojos,ltlveselosconaguaabundanteyacudaaunm4dico.
Si no va a utilizar la videockmara
durante un tiempo prolongado
• Para mantener la videocamara en 6ptimo estado
durante mucho tiempo, enci4ndala y d4jela
flmcionar grabando y reproduciendo imfigenes
aproximadamente una vez al rues.
• Agote la baterfa completamente antes de
guardarla.
Pantalla de cristal liquido
• No ejerza excesiva presidn sobre la pantalla de
cristal lfquido porqne puede dafiarse.
• Cuando utilice la videoctlmara en un lugar f)do,
es posible que en la pantalla de cristal llquido
aparezca una imagen residual. No se trata deuna fhlla de funcionamiento.
• Mientras utiliza la videoctlmara, la parte
posterior de la pantalla de cristal llquido se
puede calentar. No se trata de una *:aliadeflmcionamiento.
Para limpiar la pantalla de cristal liquido
• Si la pantalla de cristal liquido se ensucia de
huellas dactilares o polvo, se recomienda el uso
de un patio suave para limpiarla. Si utiliza el kit
de limpieza para la pantalla de cristal llquido (se
vende pot separado), no aplique el liquido de
limpieza directamente sobre la pantalla. Utilice
papel de limpieza hmnedecido con el lfquido.
Manipulaci6n de la unidad
• Si la unidad est_i sucia, limpie el cuerpo de la
videoc_imara con un patio suave ligeramente
humedecido con agua y, a continuacidn, limpie
la unidad con un patio suave y seco.
• No realice ninguna de las acciones siguientes
para evitar daflar el acabado:
- Usar productos qnfinicos como dilwentes,
bencina, alcohol, patios con productos
quimicos, repelentes, insecticidas y pantallassolares
- Utilizar la videocamara con las sustancias
mencionadas en las lnanos
- Dejar la unidad en contacto con objetos de
goma o vinilo durante un tiempo prolongado
Cuidado y almacenamiento del
objetivo
• Frote la superficie del objetivo con un patio
suave en los casos siguientes:
- Cuando haya huellas dactilares en la
superficie del objetivo
- En lugares c_ilidos o h(unedos
- Cuando el objetivo est4 expuesto al aire salado
como, por ejemplo, a orillas del mar
• Gmlrdelo en un lugar bien ventilado donde no
haya suciedad ni mucho polvo.
• Para evitar la aparici6n de moho, limpie el
objetNo periddicamente como se ha descritoanteriormente.
Carga de la bateria recargable
preinstalada
La videoc_imara contiene una baterla recargable
preinstalada para conservar la fecha, la hora
y otros ajustes aunque est4 apagada. La pila
recargable preinstalada siempre se carga mientrasla videocfimara estfi conectada al tomacorriente
5-
3"zJ
_5

Especificaciones
de pared a trav{,s del adaptador de alimentacidnde ca o cuando tiene la bateria insertada. La
bateria recargable se descargar_i completamente
transcurridos aproximadamente 3 meses sino utiliza la videoctlmara en absoluto. Utilice
la videocfimara despu& de cargar la bateria
recargable preinstalada. Sin embargo, aunque no
est_ cargada, el funcionamiento de la videoc_'nnara
no se verfi af_ctado, siempre que no se est{'
grabando la fecha.
Procedimientos
Conecte la videoc_hnara a un tomacorriente de
pared mediante el adaptador de alimentacidn de
ca suministrado y d_jela con la pantalla de cristal
liquido cerrada durante m_isde 24 horas
Nota sobre la eliminaci6n o
transferencia de la videockmara
Aunque ejecute [FORMAT.SOPORTE] (p_ig. 33)
o realice un fbrmateo, es posible que algunos
datos no se eliminen pot completo de la memoriainterna.
Si transfiere la videoc_imara, es recomendable
que ejecute [ _ VACIAR] (consulte "Obtencidn
de inibrmacidn detallada en la "Guia pr_ictica de
Handycam" " en la p_igina 41) para impedir que
otra persona recupere sus datos. Ademfis, cuando
deseche la videoc_'nnara, se recomienda que
destruya el cuerpo real del aparato.
Nota acerca de la eliminaci6n o
transferencia del "Memory Stick PRO
Duo"
Aunque borre los datos del "Memory Stick PRODud' o lo lormatee en la videoctlmara o en una
computadora, es posible que no se borren los
datos que contiene completamente. Si entrega
el "Memory Stick PRO Dud' a otra persona, se
recomienda eliminar los datos completamentemediante un software de eliminacidn de datos
en una computadora. Ademfis, cuando deseche
el "Memory Stick PRO Dud; es recomendable
destruir fisicamente el "Memory Stick PRO Duo'_
Sistema
Formato de la serial: color NTSC, estfindares EIA
Formato de grabacidn de peliculasVideo: MPEG2 PS
Audio: Dolby Digital de 2 canales,Dolby Digital Stereo Creator
Formato de archivo de fbtografias: compatible con DCF Vet.2,0
: compatible con ExifVer.2,21: compatible con MPF Baseline
Soportes de grabacidn (peliculas/lbtografias)Memoria interna:DCR SX40:4 GBDCR SX41:8 GBDCR-SX60:16 GB
"Memory Stick PRO Duo"En el c_ilculo de la capacidad del soporte,1 GB equivale a rail millones de bytes, partede los cuales se utiliza para la administracidnde datos.
Dispositivo de imagenCCD (dispositivo de acoplamiento pot carga)de 2,25 mm (tipo 1/8)Bruto: aprox. 680 000 pixelesEf_.'ctivo (peliculas, 16:9):aprox. 410 000 pixelesEf_.'ctivo (fbtografl'as, 16:9):aprox. 250 000 pixelesEf_.'ctivo (fbtografl'as, 4:3):aprox. 340 000 pixeles
ObjetivoCarl Zeiss Vario Tessar
60x(dptico), 120×, 2 000×(digital)F1,8 _ 6,0Distancia focal: f_-l,8 _ 108 mm
Si se convierte en una ctlmara de im_igenesl_iasde 35 mmPara peliculas: 39 _ 2 340 mm (16:9)Para fbtograflas: 44 _ 2 640 mm (4:3)
Temperatura de color: [AUTOM.], [UNA PULS.],[INTERIOR] (3 200 K), [EXTERIOR](5 800 K)
Iluminacidn minima
6 lx (lux) (lOB.LENTO AUTO] ajustado en[ACTIVADO], velocidad de obt uracidn de1/30 de segundo)
Conectores de entrada/salida
Conector remoto de A/V: toma de salida deaudio/video
Toma USB: minbAB
4;
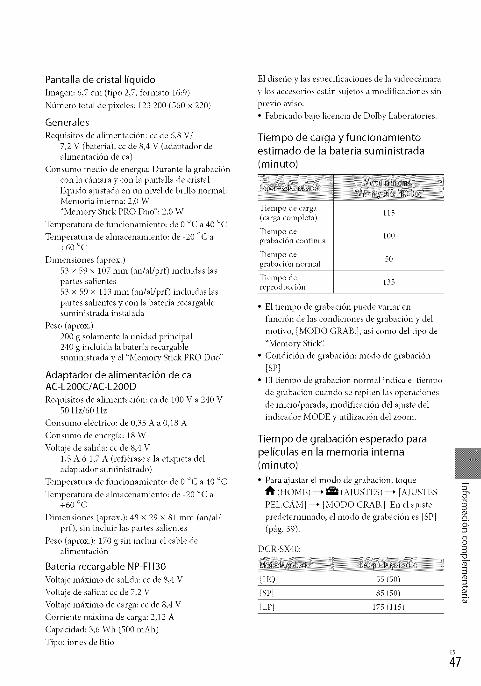
Pantalla de cristal liquido
Imagen: 6,7 cm (tipo 2,7, lorlnato 16:9)
Ntimero total de pixeles: 123 200 (560 × 220)
Generales
Requisitos de alimentacidn: cc de 6,8 V/7,2 V (bateria), cc de 8,4 V (adaptador dealimentaci6n de ca)
Consumo medio de energia: Durante la grabacidncon la ctlmara y con la pantalla de cristalliquido ;\justada en un nivel de brillo normal:Memoria interna: 2,0 W"Memory Stick PRO Duo": 2,0 W
Temperatura de flmcionamiento: de 0 °C a 40 °C
Temperatura de ahnacenamiento: de -20 °C a+60 °C
Dimensiones (aprox.)53 × 59 × 107 mm (an/al/prf) incluidas laspartes salientes53 x 59 x 113 mm (an/al/prf) incluidas laspartes salientes y con la bateria recargablesuministrada instalada
Peso (aprox.)200 g solamente la unidad principal240 g incluida la bateria recargablesuministrada y el "Memory Stick PRO Duo"
Adaptador de alimentaci6n de caAC-L200C/AC-L200D
Requisitos de alimentacidn: ca de 100 V a 240 V50 Hz/60 Hz
Consumo el&trico: de 0,35 A a 0,18 A
Consumo de energia: 18 W
Voltaje de salida: cc de 8,4 V1,5 A 6 1,7 A (refi&ase a la etiqueta deladaptador suministrado)
Temperatura de flmcionamiento: de 0 °C a 40 °C
Temperatura de ahnacenamiento: de -20 °C a+60 °C
Dimensiones (aprox.): 48 x 29 x 81 mm (an/al/prf), sin incluir las partes salientes
Peso (aprox.): 170 g sin incluir el cable dealimentacidn
Bateria recargable NP-FH30
Voltaje m_iximo de salida: cc de 8,4 V
Voltaje de salida: cc de 7,2 V
Voltaje mfiximo de carga: cc de 8,4 V
Corriente mfixima de carga: 2,12 A
Capacidad: 3,6 Wh (500 mAh)
Tipo: Jones de litio
E1disefio y las especificaciones de la videoc_imara
y los accesorios estfin sujetos a modificaciones sin
previo aviso.
• Fabricado bajo licencia de Dolby Laboratories.
Tiempo de carga y funcionamientoestimado de la bateria suministrada
(minuto)
Tiempo de carga 115(carga completa)
Tiempo de 100grabacidn continua
Tiempo de 50grabacidn normal
Tiempo de 135reproduccidn
• E1tiempo de grabacidn puede variar en
funcidn de las condiciones de grabaci6n y del
motivo, [MODO GRAB.], asi como del tipo de
"Memory Stick'_
• Condici6n de grabaci6n: modo de grabaci6n
[sp]• E1tiempo de grabaci6n normal indica el tiempo
de grabaci6n cuando se repiten las operaciones
de inicio/parada, modificaci6n del ajuste del
indicador MODE y utilizaci6n del zoom.
Tiempo de grabaci6n esperado parapeliculas en la memoria interna(minuto)
• Para ajustar el modo de grabacidn, toquet_ (HOME) --' _ (AIUSTES)--_ [AJUSTES
PEL.CAM]_ [MODO GRAB.].En el ajustepredetenninado, el modo de grabacidn es [SP]
(p@ 39).
DCR-SX40:
[HQ] 55 (50)
[SP] S5 (50)
[LP] 175 (115)
3-¢j
=*
_7

DCR-SX41:
[HQ] 120 (105)
[SP] 170 (105)
[LP] 360 (230)
DCDSX60:
[HQ] 235 (210)
[SP] 340 (210)
[LP] 715 (460)
• Los ndmeros entre par('ntesis ( ) indican el
tiempo minimo de grabacidn.
Ejemplo de tiempo de grabaci6nprevisto de las peliculas en un "MemoryStick PRO Duo"
[HQ] 55 (50)
[SP] 80(50)[LP] 170 (110)
• Los nOmeros entre par('ntesis ( ) indican el
tiempo minimo de grabacidn.
• Se usa un "Memory Stick PRO Dud' de Son3c
• E1tiempo de grabacidn variarfi en flmcidn
de las condiciones de grabacidn y del tipo de
"Memory Stick" que se utilice.
• Acerca del tiempo de carga/grabacidn/
reproduccidn
- Calculado con la videocfimara a 25 °C (se
recomienda una temperatura de 10 °C a30 °C)
- En funcidn de las condiciones en las qne
utilice la videoc_imara, es posible que el
tiempo de grabacidn y reproduccidn se yea
reducido en condiciones de baja temperatura.
Marcascomerciales• "Handycanf' y _ta,_nr-J'yc_,Krn son marcas
comerciales registradas de Sony Corporation.• "Memory Stick'; "_ '; "Memory Stick Duo'_
"MEMORYSTIgKDUff; "Memory Stick PRO
Dud; "MEMORYSTICKPRO Duo'; "MemoryStick PRO HG Dud; "MEMa_YSTI[tPR[I-Rfi [luff;
"Memory Stick Micrd; "MagicGate';"M_t_.G ! C GZ_Tt='; "Magic Gate MemoryStick" y "MagicGate Memory Stick Dud' sonmarcas comerciales o marcas colnerciales
registradas de Sony Corporation.• "InibLITHIUM" es una marca comercial de
Sony Corporation.• "DVDirect" es una marca comercial de Sony
Corporation.• Dolby y el simbolo de double D son marcas
comerciales de Dolby hboratories.• Microsoft, Windows, Windows Media,
Windows Vista y DirectX son marcascomerciales registradas o marcas comerciales deMicrosoft Corporation en los Estados Unidos
y/o en otros paises.• Macintosh y Mac OS son marcas comerciales
registradas de Apple Inc. en los EE. UU. y en
otros paises.• Intel, Intel Core y Pentium son marcas
comerciales o marcas comerciales registradas
de Intel Corporation o de sus subsidiarias en los
Estados Unidos y otros paises.• Adobe, el logotipo de Adobe y Adobe Acrobat
son marcas comerciales registradas o marcas
comerciales de Adobe Systems Incorporated enlos Estados Unidos y/o en otros paises.
Todos los derails nombres de productos
mencionados en este manual pueden ser marcas
comerciales o marcas comerciales registradas de
sus respectivas compafiias. Adem_is, vv y @ no se
inclwen de fbrma expresa en todos los casos eneste manual.

Indicadores de lapantallaParte superior Parte superior
izquierda Parte central derecha
Parte inferior
Parte superior izquierda
Botdn HOME
Grabacion con disparadorOautom_itico
._- MIC.ZOOM INCOR.
|1, NIVEL REFMIC bajo
4:....3a SELEC.PANOR.
C_ 60 rain Baterla restante
[3_[] Botdn de retroceso
Parte central
[ESPERA]/[GRAB.] Estado de grabacidn
vFvaAg_0,aa Tamafio de las fotograflas
CD Presentacidn dediapositivas ajustada
r,_ '_IIF _ Advertencia
Modo de reproduccidn
Parte superior derecha
NO _ LP Modo de grabacidn(HQ/SP/LP)
{2B Soporte de grabacidn/reproducci6n/edicidn
Contador (hora:minuto:0:00:00segundo)
[00rain] Tiempo de grabaci6nrestante estimado
ilti_;_ii__i__!i_i_i_i_i_i_i_i_i_i_i_i_i_i_i_i_i_i_i_i_i_i_i_i_i_i_i_i_i_i_i_i_i_i_i_i_i_i_i_i_i_i_i_i_i_i_i_i_i_i_ii!i̧_!i_!_ii_!______][]][]][]][]][]][]][]][]][]][]][]][]][]][]][]]__{____i!FUNO FUNOSLANCO.Eo_o DESVANECEDOR
Ntlmero aproximado de9999 I_1-{_ fbtograflas que se pueden
9999 I_1-[_ grabar y soporte degrabacion
* Carpeta de reproduccion
Pellcula o imagen en
100/112 reproducci6n/nOmerototal de peliculas oimfigenes grabadas
Parte inferior
[] Indice de caras
IA *- Enfbque manual
_i_i_[] i'_ l_ SELECESCENA
-_ ;_ _m_ Bahmce de blancos
_1_>_ SteadyShot desactivado
MED./ENEPUNTO/-_* MEDID.PUNTO/
EXPOSICION
T_ TELE MACRO
[] Contraluz
Botdn OPTION
Bot6n VISUALIZAR[] IMAGENES
Bot6n de presentaci6n dediapositivas
101-0001 Nombre del archivo de
I1_ 101-0005 datos
Imagen protegida
[] Bot6n VISUAL INDEX
• Los indicadores y sus posiciones son
aproximados y pueden variar respecto de st*
apariencia real.
5-
m
8"D
_9

Piezas y controles
Los nthneros entre ( ) corresponden alas
p_iginas de refk, rencia.
[] Bot6n START/STOP (I 3)
[] Correa de sujeci6n (I 2)
[] Gancho para la bandolera
[]Toma DC IN (8)
[] Conector remoto de A/V (I 9, 32)
s;
[_ Objetivo (objetivo Carl Zeiss)
[_ Interruptor LENS COVER (12, 14)
[_ Micr6fono incorporado
[]
Palanca del zoom motorizado (13, 15)
[] Bot6n PHOTO (I 5)
[] Bot6n MODE (I 4)
[_ Indicadores I_ (pelicula)/It'll (fotografia)
(10)
[_ Bateria (8)
[] Receptaculo del tripode (34)
[] Palanca de desbloqueo BATT (bateria) (9)
[_ Indicador CHG (carga) (8)
[] Pantalla de cristal liquido/panel t_ctil (I 0)
Si gira el panel de cristal llquido on 180 grados,
podnl cerrarlo con la pantalla de cristal llquido
mirando hacia f_.*era.Esta opcidn resulta
prfictica para las operaciones de reproduccidn.
[]
[][][]
[] Bot6n POWER (11 )
[] Bot6n EASY (15)
[] Bot6n RESET
Presione RESET para inicializar todos los
_\justes,inc]uido e] del re]oj.
[] Bot6n [] (Contraluz) (34)
[] Bot6n DISP (pantalla) (17)
[] Altavoz
[] Bot6n '@ (DISC BURN)(24)
[] Ranura para "Memory Stick Duo" (35)
[] Indicador de acceso (memoria interna,
"Memory Stick PRO Duo") (35)
Si el indicador est_iencendido o parpadeando,
significa que la videoctlmara esttl leyendo oescribiendo datos.
[]Toma t) (USB) (28, 29, 30)

Indice
Ajuste de la *)cha y la hora ........ 10
Bateria ............................................ 8
BORRAR ..................................... 33
Cable de conexi6n de A/V................................................. 19, 31
Captura de fotografias desdeuna pelicula .................................27
Carga de la bateria ........................ 8
Carga de la bateria en elextranjero ....................................... 9
Computadora .............................. 21
Contraluz ..................................... 34
Copia ............................................ 36
Copia de un disco .......................27
Copiar .......................................... 36Creacidn de un disco .................. 26
DVDirect Express .......................28
Easy PC Back up ........................ 25
Edicidn de peliculas ...................27Elementos suministrados ............3
Encendido de la videocamara... 10
Especificaciones .......................... 46
FECHA/HORA ........................... 10
Flujo de t'uncionamiento .............5
Formato ........................................ 33
Fotograt_'as .............................14, 17Funcidn HELP ............................ 37
Funcionamiento en modo
Easy Handycam .......................... 15
Grabaci6n .................................... 12
Grabadora de discos ...................31
Grabadora de DVD .................... 28
Guia de PMB ...............................26
Guia pr_ictica de Handycam......41
HOME MENU ...................... 36, 38
Idioma .......................................... 11
Indicadores de advertencia .......43
Indicadores de la pantalla ..........49Instalaci6n ................................... 21
Macintosh .................................... 21
Mantenimiento ...........................44
"Memory Stick". .......................... 35
"Memory Stick PRO Duo". ........35
"Memory Stick PRO HG Duo"....................................................... 35
Menfis ........................................... 36
One Touch Disc Burn ................ 24
OPTION MENU .................. 37, 40
Para usar un tomacorriente
de pared como t'uente dealimentaci6n .................................. 9
Peliculas ................................. 12, 16
Piezas y controles ........................ 50Pitidos de funcionamiento ........10
PMB (Picture MotionBrowser) .......................... 21, 22, 26
Reparaci6n ................................... 42
Reproduccidn .............................. 16
RESET .......................................... 50
Sistema de la computadora .......21Software ....................................... 21
Solucidn de problemas ...............42
Soportes de grabacidn ................ 34
Televisor ....................................... 19
Tiempo de grabacidn yreproducci6n ............................... 47
Tipo TV ....................................... 20
Tripode ......................................... 34
Unidad o carpeta de destino .....25
USB.........................................21, 28
VISUAL INDEX ......................... 16
Visualizaci6n de auto
diagn6 stico .................................. 43
Volumen ...................................... 17
Windows ...................................... 21
Zoom ............................... 13, 15, 18
g

Additional information on this product and
answers to frequently asked questions call be
found at our Customer Support Website.
Puede encontrar mS.s informaci6n sobre este
producto y respuestas alas preguntas m_is frecuentes
en nuestro sitio Web de atencidn al cliente.
htt p://www.sony.net/
_ rinted on 70% or more recycled paperusing VOC (Volatile Organic Compound)-free vegetable oil based ink.
Impreso en papel reciclado en un 70% omils utilizando tinta hecha con aceite
vegetal exento de compuesto organico
volitil (COV).
Printed in China
IIIIIIIIIIIII4132764110


![öw ÿ 15ÿ Environmental Sensitivity Index Map (fukushima 15)...l_T N-NKO\ l_T N-NKO\ Qq {, 8 S÷ Qq {, 1 0 S÷ Qq {, 9 S÷ T xï l8] \ T m\0«0ó0È0ê0ü0¯0é0Ö0´0ë0ÕX4 l_T](https://static.fdocuments.net/doc/165x107/60bc5d28e3c1cd189709c330/w-15-environmental-sensitivity-index-map-fukushima-15-lt-n-nko-lt.jpg)