2011 PaymentSecurityPracticesTrendsReport CyberSource Trustwave
DbProtect 6.2Administrator’s GuideLast Modified September 9, 2010
Application Security, [email protected]
Administrator’s Guide
Chapter 1 - Introduction 4Product, Guide, and Documentation Suite Overview 5Intended Audience 7DbProtect Version Compatibility Matrix, and Determining the Current Version of Installed DbProtect Applications 8Customer Support 9Chapter 2 - Overview of DbProtect Administration 10Indentifying DbProtect Components 11Chapter 3 - Performing ASAP Updates and DbProtect Upgrades 14Performing an ASAP Update 15Upgrading DbProtect Components 18Chapter 4 - Starting and Stopping DbProtect 19Chapter 5 - Monitoring the Health of DbProtect 21Monitoring the Health of Your Sensors 22Chapter 6 - Data Management 25Database Maintenance 26DbProtect Backup 27Restoring DbProtect 28Appendices 29Appendix A: System Component Troubleshooting 30Appendix B: Troubleshooting the Java Run Time Environment (JRE) Security Settings on Internet Explorer 6 and 7 31Appendix C: Understanding the Syslog Message Format (with Sample Syslog Message) 34Appendix D: Modifying the Sensor "Listener" Port Number 38Appendix E: DbProtect Log Files 39Appendix F: CIDR Notation 42Appendix G: Moving or Changing Your Data Stores 44Appendix H: Clearing Your Java Cache 45Appendix I: Installing Certificates 46Appendix J: Installing and Configuring a Host-Based Sensor for Oracle to Monitor Oracle Databases on an Oracle RAC 49Appendix K: DbProtect System Event Logging 51Appendix L: Monitoring Oracle Databases in an Oracle Fail Safe Environment: Sensor and Cluster Configuration Steps 54Appendix M: Configuring Your Host-Based Sensor (Installed on a
Application Security, Inc. 2

Administrator’s Guide
*nix Platform) to Start Automatically Upon System Reboot 59Appendix N: Enabling (and Disabling) Single Sign-On to the Db-Protect Console 62
Application Security, Inc. 3

Administrator’s Guide
Chapter 1 - IntroductionThis chapter explains what’s in the DbProtect Administrator’s Guide, the intended audience, and the components of DbProtect.
What you will find in this chapter:
• Product, Guide, and Documentation Suite Overview
• Intended Audience
• DbProtect Version Compatibility Matrix, and Determining the Current Version of Installed DbProtect Applications
• Customer Support.
Application Security, Inc. 4

Administrator’s Guide
Product, Guide, and Documentation Suite OverviewThis section includes an overview, an explanation of conventions used, and a listing of other DbProtect guides available for customers.
What you will find in this section:
• About DbProtect
• What you will find in this guide
• If you need more help.
About DbProtect The Industry’s Only Complete Database Security Solution
A centrally-managed enterprise solution for comprehensive database security, DbProtect combines discovery, vulnerability scanning, real-time audit and threat management to help organizations reduce risk and enhance compliance. The integrated suite is comprised of the company’s flagship solutions for database vulnerability management and real-time database audit and threat management which protect enterprise organizations around the world from all internal and external threats, while also ensuring that those organizations meet or exceed regulatory compliance requirements.
Applying the proven security industry best practices of vulnerability management, structured risk mitigation, and real-time intrusion monitoring, coupled with extensive enterprise features (including fine-grained access controls, and centralized management and reporting), DbProtect delivers comprehensive security and auditing capabilities to complex, diverse enterprise database environments.
Address Database Threats and Provide Protection with Proven Technology
• Tamper Evident Privileged Audit and Threat Management defends against misuse, fraud and abuse from internal and external users.
• Comprehensive Vulnerability Management identifies and reduces risk.
• Real-Time Monitoring and Intrusion Detection immediately identifies database attacks or misuse.
• Compensating Controls, including Patch Gap management, assists with prioritizing of database security patches and defending against attack.
• Improved Integration enables reporting on security patch progress, risk mitigation impact, and overall compliance status.
Application Security, Inc. 5
Administrator’s Guide
• Application Awareness provides critical insight into IT infrastructure enabling organizations to better understand their database inventory, and thereby mitigate compliance risk factors, as well as addressing database security needs.
• Industry-leading Knowledgebase utilizes the most comprehensive catalog of database-specific threats, many discovered by Team SHATTER, our own research and development team.
• DbProtect’s ASAP Update mechanism ensures protection remains up to date. This allows users to immediately identify and detect worms, buffer overflows, and privilege escalation exposures and attacks enabling a timely, informed, and fast response.
Enhance Regulatory Compliance Efforts
DbProtect enables enterprises to ground compliance efforts in the database applications that house regulated data – be it material financial transactions, critical intellectual property, or sensitive personal information. The solution also supports forensic investigations and analysis. This approach to database security includes:
• Robust access and authentication controls
• Privileged and non-privileged user monitoring
• Vulnerability and threat management
• Audit and threat management with proactive real-time alerts
• Defined security policies to guide user activity.
These security components collectively facilitate regulatory compliance and create active and intelligent protection mechanisms for databases. By grounding efforts in the databases where sensitive data spends the bulk of its existence, the suite helps customers comply with a variety of business and regulatory requirements including the PCI Data Security Standard, HIPAA, GLBA, California Security Breach Information Act (SB 1386), Sarbanes-Oxley Act, Basel II, ISO 27001/17799, DISA-STIG, FISMA, NIST 800-53, PIPEDA, Canada’s Bill 198, and MITS.
What you will findin this guide
This guide consists of the following chapters:
• Chapter 2 - Overview of DbProtect Administration
• Chapter 3 - Performing ASAP Updates and DbProtect Upgrades
• Chapter 4 - Starting and Stopping DbProtect
• Chapter 5 - Monitoring the Health of DbProtect
• Chapter 6 - Data Management
• Appendices.
If you need morehelp
You can contact Application Security, Inc. Customer Support any time by emailing [email protected], or by calling 1-866-9APPSEC or 1-212-912-4100.
Application Security, Inc. 6
Administrator’s Guide
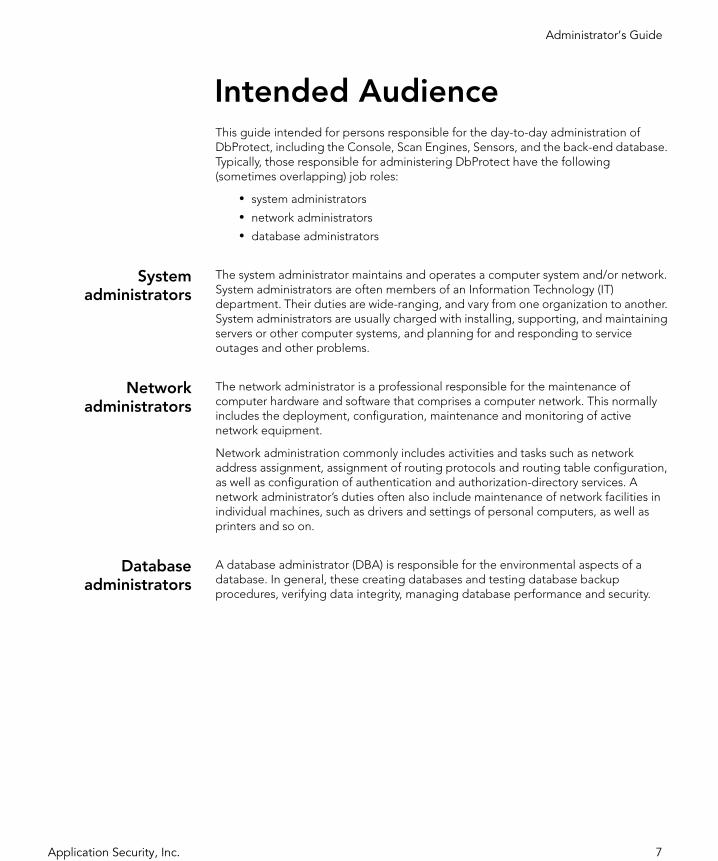
Intended AudienceThis guide intended for persons responsible for the day-to-day administration of DbProtect, including the Console, Scan Engines, Sensors, and the back-end database. Typically, those responsible for administering DbProtect have the following (sometimes overlapping) job roles:
• system administrators
• network administrators
• database administrators
Systemadministrators
The system administrator maintains and operates a computer system and/or network. System administrators are often members of an Information Technology (IT) department. Their duties are wide-ranging, and vary from one organization to another. System administrators are usually charged with installing, supporting, and maintaining servers or other computer systems, and planning for and responding to service outages and other problems.
Networkadministrators
The network administrator is a professional responsible for the maintenance of computer hardware and software that comprises a computer network. This normally includes the deployment, configuration, maintenance and monitoring of active network equipment.
Network administration commonly includes activities and tasks such as network address assignment, assignment of routing protocols and routing table configuration, as well as configuration of authentication and authorization-directory services. A network administrator’s duties often also include maintenance of network facilities in individual machines, such as drivers and settings of personal computers, as well as printers and so on.
Databaseadministrators
A database administrator (DBA) is responsible for the environmental aspects of a database. In general, these creating databases and testing database backup procedures, verifying data integrity, managing database performance and security.
Application Security, Inc. 7

Administrator’s Guide
DbProtect Version Compatibility Matrix, and Determining the Current Version of Installed DbProtect Applications
DbProtect versioncompatibility
matrix
The following matrix defines compatible versions of distributed DbProtect components.
Determining thecurrent versions of
DbProtectsoftware
components
To determine the current versions of any installed DbProtect software components log into DbProtect, choose the Administration tab and click on About DbProtect in the navigation menu.
Suite VersionSupported Versions of:
Scan Engine Sensor
6.2 6.4, 6.5, 6.6, 6.7 3.10, 3.11, 3.12, 3.13
6.1 6.2, 6.3, 6.4, 6.5, 6.6, 6.7 3.9, 3.10, 3.11, 3.12
6.0 6.0, 6.1, 6.2, 6.3 3.8, 3.9, 3.10, 3.11
Application Security, Inc. 8

Administrator’s Guide
Customer SupportCustomer Support is available from 9 A.M. to 9 P.M. (GMT -5) Monday through
Friday, except for company holidays. You may contact technical support for the list of company holidays.
Extended support of 24x7 is available as an added cost. You may contact [email protected] if you require this service.
Telephone (in the U.S.): 1-866-927-7732
Telephone (outside the U.S.): 1-212-912-4100
Email: [email protected]
Application Security, Inc. 9
Administrator’s Guide
Chapter 2 - Overview of DbProtect AdministrationThis chapter provides an oveview of DbProtect administration.
What you will find in this chapter:
• Indentifying DbProtect Components.
Application Security, Inc. 10
Administrator’s Guide
Indentifying DbProtect ComponentsThis section is intended to help you understand and identify the DbProtect software release components.
What you will find in this section:
• Conceptual diagram
• Console
• Sensors
• Scan Engines.
Application Security, Inc. 11
Administrator’s Guide
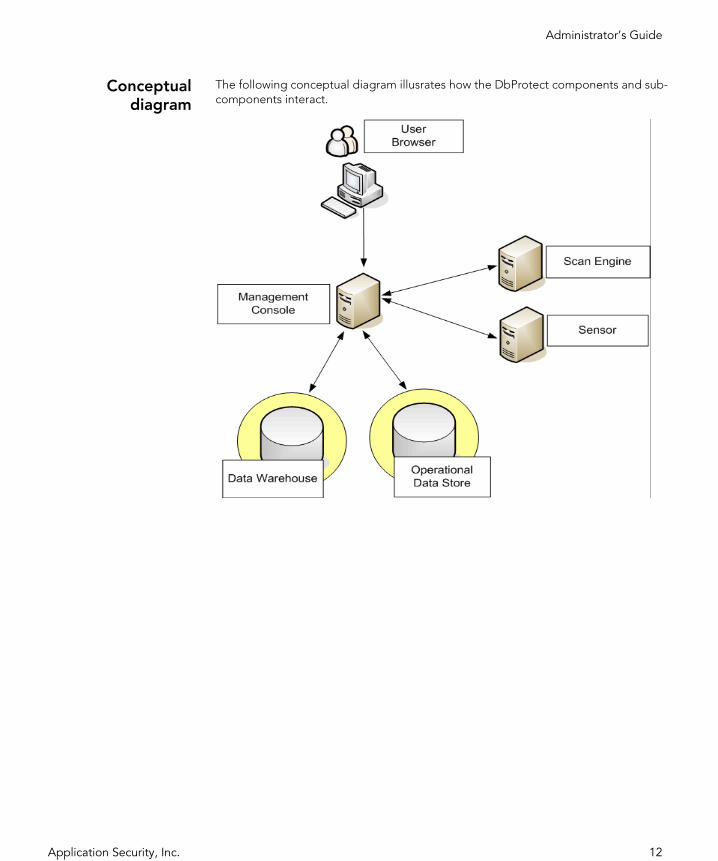
Conceptualdiagram
The following conceptual diagram illusrates how the DbProtect components and sub-components interact.
Application Security, Inc. 12

Administrator’s Guide
Console The Console is the web browser-based, graphical component of DbProtect that allows users to navigate to the various features of DbProtect Audit and Threat Management, DbProtect Vulnerability Management, Rights Management, Asset Management, etc.
Sensors Sensors deliver database-specific monitoring and alerting.
There are two types of Sensors available:
• host-based Sensors, which monitor databases on the host server
• network-based Sensors, which monitor databases on the network.
Sensors fire alerts when they detect a violation of rules or when a monitored event occurs.
Scan Engines Scan Engines discover database applications within your network, assess their security vulnerabilities by running penteration tests and audits and perform user rights reviews by collecting information about database users, objects and roles.
Application Security, Inc. 13
Administrator’s Guide
Chapter 3 - Performing ASAP Updates and DbProtect UpgradesDbProtect allows you to:
• ASAP Update your system to deploy new policies, checks and rules without upgrading the software.
• Upgrade software components to take advantage of new features available in newer software releases.
Application Security, Inc. 14
Administrator’s Guide
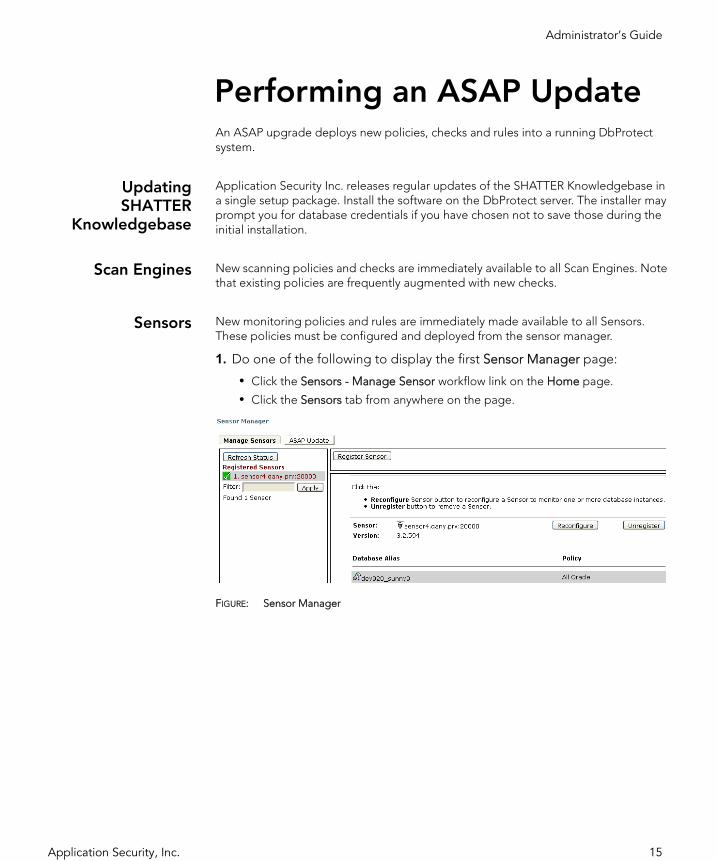
Performing an ASAP UpdateAn ASAP upgrade deploys new policies, checks and rules into a running DbProtect system.
UpdatingSHATTER
Knowledgebase
Application Security Inc. releases regular updates of the SHATTER Knowledgebase in a single setup package. Install the software on the DbProtect server. The installer may prompt you for database credentials if you have chosen not to save those during the initial installation.
Scan Engines New scanning policies and checks are immediately available to all Scan Engines. Note that existing policies are frequently augmented with new checks.
Sensors New monitoring policies and rules are immediately made available to all Sensors. These policies must be configured and deployed from the sensor manager.
1. Do one of the following to display the first Sensor Manager page:
• Click the Sensors - Manage Sensor workflow link on the Home page.
• Click the Sensors tab from anywhere on the page.
FIGURE: Sensor Manager
Application Security, Inc. 15

Administrator’s Guide
2. Click the ASAP Update button to display the security Rule ASAP Update page of the Sensor Manager.
FIGURE: Sensor Manager (security Rule ASAP Update page)
The summary portion of the page displays information about your registered Sensors, including whether the sensor has the latest available rules or needs a software update.
3. Check one or more Sensors that contain ASAP Updateable security Rules.
Hint: You can check the “select all” checkbox in the upper-left corner of the lower portion of the page to select all Sensors that are ASAP Updateable with the latest available security Rules.
4. Click the Update Rules button. The Status column provides a real-time ASAP Update status.
Note: You can click the Cancel button to cancel the ASAP Update of a Sensor. If the Status column indicates an ASAP Update is Pending, the ASAP Update is cancelled completely. However, if the Status column indicates an ASAP Update is In Progress, DbProtect completes its update of the Sensor that is being ASAP Updated, and then cancels the ASAP Update of all queued Sensors.
Summary portion
“Select all” checkbox Available rules version
Current rules version
Refresh link
Application Security, Inc. 16

Administrator’s Guide
Important: Once you have ASAP Updated a Sensor with the latest available security Rules, you may have to re-configure your Sensor, and re-deploy the configuration information to the Sensor, in order for the new security Rules to take effect on the database instances you are monitoring; for more information, see Configuring a Sensor and deploying the configuration information in the DbProtect User’s Guide.
5. Click the Manage Sensors button to return to the main Sensor Manager page.
Application Security, Inc. 17

Administrator’s Guide
Upgrading DbProtect Components
Upgrading yourDbProtect
components
A DbProtect upgrade installs newer versions of the software. Upgrade is similar to a first-time install of DbProtect and will automatically detect components that need to be upgraded. For more information on installing or upgrading DbProtect components, see the DbProtect Installation Guide.
Application Security, Inc. 18
Administrator’s Guide
Chapter 4 - Starting and Stopping DbProtect
Starting andstopping
DbProtect serviceson Windows
DbProtect includes the following Windows services:
• DbProtect Naming & Directory Service• DbProtect Enterprise Services Host• DbProtect Message Collector• DbProtect Scan Engine Proxy• DbProtect Scan Engine Host• DbProtect Scan Engine• DbProtect Sensor• IBM Cognos 8.
These services are configured to start whenever Windows starts.
You can stop and restart these services manually, in any order, using the Windows Services snap-in (services.msc) or the command-line net stop and net start.
It is recommended to carefuly plan system outage and stop services only when no Vulnerability Assessment or Rights Review jobs are running. Running jobs will fail when a service is stopped.
Starting andstopping the
Sensors on *nixplatforms
DbProtect includes the following Windows services:
To start and stop the Sensors on a *nix platform:
1. To start a host-based Sensor on a *nix platform, do the following:
• Log in as the user you created in during the installation process (appradar, for example).
• Once you are successfully authenticated as this user, go to the util directory where you installed the host-based Sensor (for example:/opt/ASIappradar/sensor/util).
• Run the command: ./appradar_start
2. To stop a host-based Sensor on a *nix platform, do the following:
• Log in as the user you created in during the installation process (appradar, for example).
Application Security, Inc. 19
Administrator’s Guide
• Once you are successfully authenticated as this user, go to the util directory where you installed the host-based Sensor (for example:/opt/ASIappradar/sensor/util).
• Run the command: ./appradar_stop
Application Security, Inc. 20
Administrator’s Guide
Chapter 5 - Monitoring the Health of DbProtectWhat you will find in this chapter:
• Monitoring the Health of Your Sensors.
Application Security, Inc. 21

Administrator’s Guide
Monitoring the Health of Your SensorsYou can monitor the "health" of your registered Sensors via the Sensor Manager and the Dashboard. If you’re not receiving Alerts, it could be because your registered Sensor is "unhealthy". A "healthy" Sensor is:
• "up and running" on the database SID or instance where it is registered
• actively collecting/interpreting data and firing Alerts to DbProtect in accordance with its deployed Policies.
You can use the:
• Sensor Manager to determine whether your registered Sensors are “healthy”; for more information, see Monitoring the Health of Your Sensors (Via the Sensor Manager)
• Dashboard to determine whether your registered Sensors are “healthy”; for more information, see the DbProtect User’s Guide.
A “healthy” Sensor also contains up-to-date Policies.
Hint: If you’re having trouble establishing a connection between the Console and a Sensor installed on Microsoft Windows 2008 (i.e., a host-based Sensor for Oracle on Windows, a host-based Sensor for DB2 on Windows, a host-based Sensor for Microsoft SQL Server on Windows, or any network-based Sensor), make sure IPV6 support is not enabled on the network adapter, and that your Microsoft Windows Firewall is disabled.
Monitoring theHealth of Your
Sensors (Via theSensor Manager)
You can monitor the “health” of your registered Sensors via the Sensor Manager and the Dashboard. If you’re not receiving Alerts, it could be because your registered Sensor is “unhealthy”. A “healthy” Sensor is:
• “up and running” on the database SID or instance where it is registered
• actively collecting/interpreting data and firing Alerts to DbProtect in accordance with its deployed Policies.
Application Security, Inc. 22

Administrator’s Guide
To monitor the “health” of your Sensors via the Sensor Manager:
1. Do one of the following:
• Click the Sensors - Manage Sensor workflow link on the Home page.
• Click the Sensors tab from anywhere on the page.
The first Sensor Manager page displays your registered Sensors.
FIGURE: Sensor Manager
2. If the color-coded icon next to your registered Sensor is:
• green, then the Sensor is “healthy”
• red, then the Sensor is “unhealthy”.
Note: Click the Refresh Status button to view the most current state of your Sensors’ “health”.
Monitoring theHealth of Your
Sensors (Via theDashboard)
You can monitor the “health” of your registered Sensors via the Sensor Manager and the Dashboard. If you’re not receiving Alerts, it could be because your registered Sensor is “unhealthy”. A “healthy” Sensor is:
• “up and running” on the database SID or instance where it is registered
• actively collecting/interpreting data and firing Alerts to DbProtect in accordance with its deployed Policies.
Application Security, Inc. 23
Administrator’s Guide
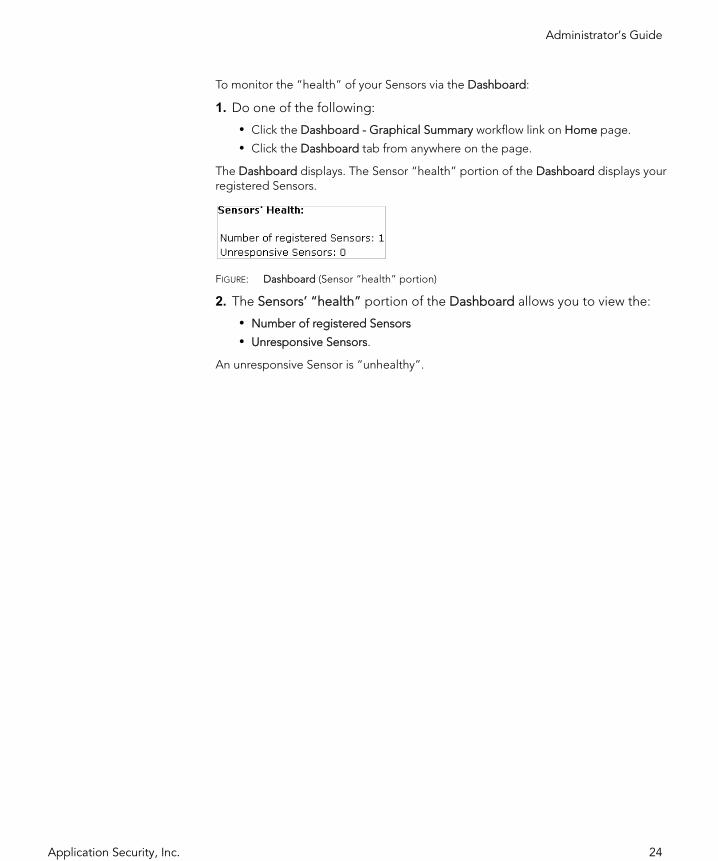
To monitor the “health” of your Sensors via the Dashboard:
1. Do one of the following:
• Click the Dashboard - Graphical Summary workflow link on Home page.
• Click the Dashboard tab from anywhere on the page.
The Dashboard displays. The Sensor “health” portion of the Dashboard displays your registered Sensors.
FIGURE: Dashboard (Sensor “health” portion)
2. The Sensors’ “health” portion of the Dashboard allows you to view the:
• Number of registered Sensors
• Unresponsive Sensors.
An unresponsive Sensor is “unhealthy”.
Application Security, Inc. 24

Administrator’s Guide
Chapter 6 - Data ManagementWhat you will find in this chapter:
• Database Maintenance
• DbProtect Backup
• Restoring DbProtect.
Application Security, Inc. 25

Administrator’s Guide
Database Maintenance
Setting upDatabase
Maintenance Plans
DbProtect uses several databases. It is important to setup a regular maintenance plan according to your database administration standards, including database and transaction log backup to maintain a healthy system.
Application Security, Inc. 26
Administrator’s Guide
DbProtect Backup
Which SystemComponents
Should I Backup?
DbProtect is comprised of several system components distributed across your network. AppSecInc recommends you only backup the data repositories and reinstall the software to recover a failed system or backup complete servers using backup software of your choice.
Backup of DataRepositories
All DbProtect data repositories are SQL Server databases. You can use the SQL Server backup utilities to back up all theDbProtect databases. It is not necessary to stop DbProtect services to perform a backup. For more information, see your SQL Server documentation.
Application Security, Inc. 27
Administrator’s Guide
Restoring DbProtectTo restore DbProtect, reinstall the software, then restore database backups using Microsoft SQL Server tools.
It is important that you restore databases on top of the same version of the software that you were running before a system failure. You may upgrade the system to newer software at a later time.
Application Security, Inc. 28
Administrator’s Guide
AppendicesWhat you will find in this chapter:
• Appendix A: System Component Troubleshooting
• Appendix B: Troubleshooting the Java Run Time Environment (JRE) Security Settings on Internet Explorer 6 and 7
• Appendix C: Understanding the Syslog Message Format (with Sample Syslog Message)
• Appendix D: Modifying the Sensor "Listener" Port Number
• Appendix E: DbProtect Log Files
• Appendix F: CIDR Notation
• Appendix G: Moving or Changing Your Data Stores
• Appendix H: Clearing Your Java Cache
• Appendix I: Installing Certificates
• Appendix J: Installing and Configuring a Host-Based Sensor for Oracle to Monitor Oracle Databases on an Oracle RAC
• Appendix K: DbProtect System Event Logging
• Appendix L: Monitoring Oracle Databases in an Oracle Fail Safe Environment: Sensor and Cluster Configuration Steps
• Appendix M: Configuring Your Host-Based Sensor (Installed on a *nix Platform) to Start Automatically Upon System Reboot
• Appendix N: Enabling (and Disabling) Single Sign-On to the DbProtect Console
• Appendix N: Enabling (and Disabling) Single Sign-On to the DbProtect Console.
Application Security, Inc. 29

Administrator’s Guide
Appendix A: System Component TroubleshootingYou may occasionally encounter a system component-related issue. We recommend you contact Application Security, Inc. Customer Support at [email protected] with the following information.
• Detailed information about your environment, including the operating system(s), network topology or any other information that may help troubleshoot the issue(s)
• Detailed DbProtect product version information from the About DbProtect menu in the Administration tab or product version information if unavailable
• If a problem is related to DbProtect installation, a .zip package of DbProtect install log files in %temp%\DbProtectSetup
• If a problem is related to an operational issue with DbProtect, a .zip package of DbProtect log files in %ProgramFiles%\AppSecInc\Logs
• If a problem is related to an operational issue with a sensor, a .zip pacakge of Sensor log files in <sensor installation directory>\logs.
Application Security, Inc. 30
Administrator’s Guide
Appendix B: Troubleshooting the Java Run Time Environment (JRE) Security Settings on Internet Explorer 6 and 7If you are experiencing difficulty logging in and connecting to DbProtect, you may need to troubleshoot the Java Runtime Environment (JRE) security settings on your Internet Explorer (IE) 6 or 7 web browser. This appendix explains how.
If your web browser is IE 6. Proper Active X controls and “enable third-party browser extensions” security settings may not be enabled on your IE 6 browser. If this is the case, you will encounter an error message you attempt to authenticate, and you can’t log in to the DbProtect Console. To troubleshoot this problem, see Enabling proper Active X controls and “enable third-party browser extensions” security settings (using IE 6).
If your web browser is IE 7. JRE 1.6 may be disabled and/or multiple JREs may be enabled on your client (i.e., the location from which your IE 7 browser is running). JRE 1.6 must be enabled in order for you to connect to the DbProtect Console. If JRE 1.6 is disabled, or if multiple JREs of different versions are enabled on your client, then you will encounter an error message when you attempt to authenticate, and you can’t log in to the DbProtect Console. To troubleshoot this problem, see Ensuring JRE 1.6 is Enabled and Temporarily Disabling Other JREs on Your Client Machine (Using IE 7).
Application Security, Inc. 31

Administrator’s Guide
Enabling properActive X controls
and “enable third-party browser
extensions”security settings
(using IE 6)
Note: The following security settings should be the default values in your IE 6 web browser. You should only change the settings if you’re experiencing difficulty logging into the DbProtect Console.
To enable proper Active X controls and “enable third-party browser extensions” security settings on IE 6:
1. Launch IE 6.
2. Do the following to display the Security Settings dialog box:
• Choose: Tools > Internet Options.
• Click the Security tab.
• Click the Custom Level button.
3. Set the following security settings to Enable or Prompt:
• Download signed ActiveX controls
• Run ActiveX controls and plug-ins.
4. Click the OK button.
5. Click the Advanced tab.
The Security Settings dialog box displays.
FIGURE: Internet Explorer Advanced Settings dialog box
6. Check Enable Third-party browser extensions (requires restart).
7. Click the OK button.
8. Close and re-launch IE 6.
Application Security, Inc. 32
Administrator’s Guide
Try to log back into the DbProtect Console. If you continue to experience trouble, contact Application Security, Inc. Customer Support at [email protected].
Ensuring JRE 1.6 isEnabled andTemporarily
Disabling OtherJREs on Your
Client Machine(Using IE 7)
To ensure JRE 1.6 is enabled, and to temporarily disable multiple JREs on your client machine (using IE 7):
1. Launch IE 7.
2. Do the following:
• Choose: Tools > Internet Options.
• Click the Advanced tab.
The Settings dialog box displays.
3. Scroll down to the Java (Sun) portion of the dialog box and verify the following:
• JRE 1.6 is enabled (i.e., the box must be checked)
• multiple JRE installations are listed.
JRE 1.6 must be enabled in order for you to connect to the DbProtect Console. If it is not, check the JRE 1.6 box.
If JRE 1.6 is enabled, and other JRE versions are also enabled, then you must temporarily disable them by un-checking the boxes.
4. Click the Apply button.
5. Click the OK button.
6. Close and re-launch IE 7.
7. Try to log back into the DbProtect Console; for more information. If you continue to experience trouble, contact AppSecInc Customer Support at [email protected].
Application Security, Inc. 33
Administrator’s Guide
Appendix C: Understanding the Syslog Message Format (with Sample Syslog Message)This appendix consists of the following topics:
• Understanding the ArcSight CEF Format for Syslog Messages
• Modifying the Syslog Configuration
• Syslog Error Logging
• Syslog Message Format
• Sample Syslog Message.
Understanding theArcSight CEF
Format for SyslogMessages
The Syslog messages sent out by the Sensors are in ArcSight CEF, a standard format for logging security alert messages. These messages can be sent remotely over the UDP network protocol or locally to a Syslog daemon on the same machine as the Sensor.
Modifying theSyslog
Configuration
You can modify the Syslog configuration without restarting the Sensor by deploying a new sensor.xml file.
Syslog ErrorLogging
The Syslog dispatcher does not send messages about its own status to the DbProtect Console or to the intended recipients of Syslog messages. Instead, DbProtect logs these errors on the Sensor side in the appsensor.log file. Since UDP is a connection-less protocol, the Syslog dispatcher receives no notification that its messages are being received, so it does not have any mechanism for replaying Alerts like the DbProtect Console dispatcher. If DbProtect:
• can resolve a hostname with an IP address, the Syslog dispatcher assumes the address is valid and sends Syslog alerts to it until instructed otherwise by the DbProtect Console
• cannot resolve a hostname, an error message is written to appsensor.log.
Application Security, Inc. 34
Administrator’s Guide
Syslog MessageFormat
Each Syslog message is UTF-8 encoded and has a maximum length of 1024 bytes. Syslog messages will vary slightly depending on which type of database your Sensor is monitoring. If any of the keys in the extension are missing values at the time of message construction, the entire key = value expression for the key is omitted from the message.
DbProtect Syslog messages adhere to the following format:
time hostname prefix extension msg
Where:
• Time is the local time when the Sensor detects an event, in the form: Month Date HH:MM:SS. For example, Apr 16 10:05:57.
• Hostname is either the hostname or the IP address of the machine that the Sensor is running on, e.g., 172.16.33.18.
• Prefix is a CEF-specific format that has the following structure: CEF:CVER|VENDOR|PRODUCT|PVER|SIGNATURE_ID|NAME|SEVERITY|
In the DbProtect implementation:
-CVER is the CEF version (hard-coded to 0).
-VENDOR is the vendor name, i.e., Application Security, Inc. (hard-coded to ASI).
-PRODUCT is the product’s legacy name, i.e., AppRadar (hard-coded to AR).
-PVER, the application version, is determined internally by the Sensor, e.g., 3.12 rev.13.
-SIGNATURE_ID is the rule ID, a non-negative integer of up to five digits, with no leading zeros, e.g., 3105.
-NAME is the Application Security, Inc. Rule title, truncated a maximum of 128 bytes, if needed, e.g., Accessing list of logins.
-SEVERITY is an integer determined by the Application Security, Inc. risk level via the following mapping.
For general Alerts: High is mapped to 8, Medium is mapped to 6, Low is mapped to 4, Info is mapped to 2.
For self-audit Alerts:: High is mapped to 9, Medium is mapped to 7, Low is mapped to 5, Info is mapped to 3.
• Extension is a space-delimited list of key-value pairs. The CEF standard lists multiple predefined keys and also allows for user-defined keys. DbProtect uses some of both. Fields in the extension will appear in the exact order they are listed below. Each field in the extension has a maximum field length, which is expressed in bytes. The maximum field length is used to truncate the value section of each key = value field, if necessary. For example, if the value corresponding to the key msg is configured with a maximum field length of 10 and the actual value is select * from sysobjects, the entire field is printed in the Syslog message as msg=select * f.
Application Security, Inc. 35
Administrator’s Guide
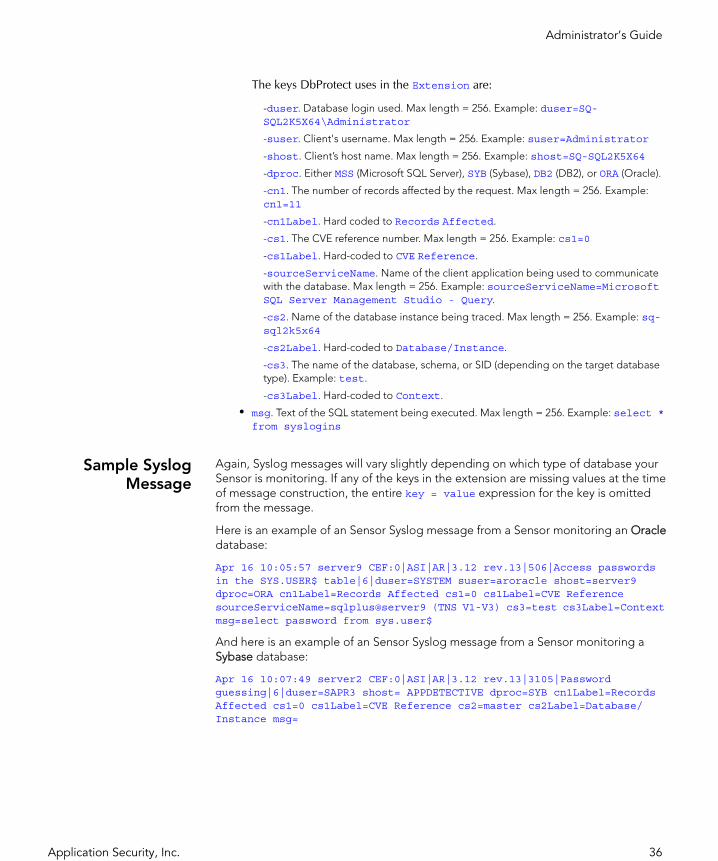
The keys DbProtect uses in the Extension are:
-duser. Database login used. Max length = 256. Example: duser=SQ-SQL2K5X64\Administrator
-suser. Client's username. Max length = 256. Example: suser=Administrator
-shost. Client’s host name. Max length = 256. Example: shost=SQ-SQL2K5X64
-dproc. Either MSS (Microsoft SQL Server), SYB (Sybase), DB2 (DB2), or ORA (Oracle).
-cn1. The number of records affected by the request. Max length = 256. Example: cn1=11
-cn1Label. Hard coded to Records Affected.
-cs1. The CVE reference number. Max length = 256. Example: cs1=0
-cs1Label. Hard-coded to CVE Reference.
-sourceServiceName. Name of the client application being used to communicate with the database. Max length = 256. Example: sourceServiceName=Microsoft SQL Server Management Studio - Query.
-cs2. Name of the database instance being traced. Max length = 256. Example: sq-sql2k5x64
-cs2Label. Hard-coded to Database/Instance.
-cs3. The name of the database, schema, or SID (depending on the target database type). Example: test.
-cs3Label. Hard-coded to Context.
• msg. Text of the SQL statement being executed. Max length = 256. Example: select * from syslogins
Sample SyslogMessage
Again, Syslog messages will vary slightly depending on which type of database your Sensor is monitoring. If any of the keys in the extension are missing values at the time of message construction, the entire key = value expression for the key is omitted from the message.
Here is an example of an Sensor Syslog message from a Sensor monitoring an Oracle database:
Apr 16 10:05:57 server9 CEF:0|ASI|AR|3.12 rev.13|506|Access passwords in the SYS.USER$ table|6|duser=SYSTEM suser=aroracle shost=server9 dproc=ORA cn1Label=Records Affected cs1=0 cs1Label=CVE Reference sourceServiceName=sqlplus@server9 (TNS V1-V3) cs3=test cs3Label=Context msg=select password from sys.user$
And here is an example of an Sensor Syslog message from a Sensor monitoring a Sybase database:
Apr 16 10:07:49 server2 CEF:0|ASI|AR|3.12 rev.13|3105|Password guessing|6|duser=SAPR3 shost= APPDETECTIVE dproc=SYB cn1Label=Records Affected cs1=0 cs1Label=CVE Reference cs2=master cs2Label=Database/Instance msg=
Application Security, Inc. 36

Administrator’s Guide
If, after the truncation of individual fields in the prefix and extension, the entire Syslog message is longer than 1024 bytes, the Syslog message as a whole is truncated to 1024 bytes before being sent.
For example, if the msg field of the extension is 2048 bytes long but all other prefix and extension fields are 8 bytes long, the msg field is truncated to 256 bytes as explained above, and since the message now contains no more than 1024 bytes, no additional truncation is needed. However, if cs2, cs3, sourceServiceName and msg are all greater than 256 bytes, they are all truncated to 256 bytes individually, but now the entire message is longer than 1024 bytes and the actual Syslog message sent contains only the first 1024 bytes of the message.
SELF-AUDIT ALERTS
The same Syslog message format described above is also used for Sensor self-audit Alerts, except with an empty Extension. For example:
Jun 18 16:08:05 192.168.29.1 CEF:0|ASI|AR|3.3|1003|Sensor started|9|
These are only applicable to self-audit Alerts sent from the Sensor. These include: Sensor stopped, Sensor started, Sensor registered, Sensor unregistered, ASAP on Sensor initiated, and Sensor configured. Other self-audit Alerts sent from the DbProtect Console to itself are not sent via Syslog since they are not sent from the Sensor.
Application Security, Inc. 37
Administrator’s Guide
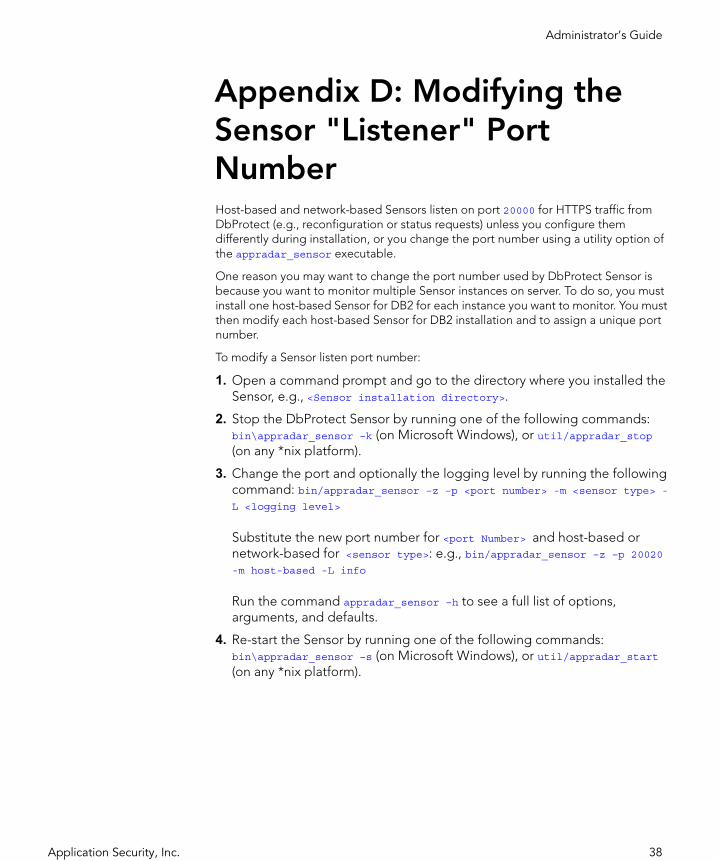
Appendix D: Modifying the Sensor "Listener" Port Number Host-based and network-based Sensors listen on port 20000 for HTTPS traffic from DbProtect (e.g., reconfiguration or status requests) unless you configure them differently during installation, or you change the port number using a utility option of the appradar_sensor executable.
One reason you may want to change the port number used by DbProtect Sensor is because you want to monitor multiple Sensor instances on server. To do so, you must install one host-based Sensor for DB2 for each instance you want to monitor. You must then modify each host-based Sensor for DB2 installation and to assign a unique port number.
To modify a Sensor listen port number:
1. Open a command prompt and go to the directory where you installed the Sensor, e.g., <Sensor installation directory>.
2. Stop the DbProtect Sensor by running one of the following commands: bin\appradar_sensor –k (on Microsoft Windows), or util/appradar_stop (on any *nix platform).
3. Change the port and optionally the logging level by running the following command: bin/appradar_sensor –z –p <port number> -m <sensor type> -L <logging level>
Substitute the new port number for <port Number> and host-based or network-based for <sensor type>: e.g., bin/appradar_sensor –z –p 20020 -m host-based -L info
Run the command appradar_sensor –h to see a full list of options, arguments, and defaults.
4. Re-start the Sensor by running one of the following commands: bin\appradar_sensor –s (on Microsoft Windows), or util/appradar_start (on any *nix platform).
Application Security, Inc. 38

Administrator’s Guide
Appendix E: DbProtect Log FilesThis appendix explains:
• DbProtect Log Files
• Sensor Log Files
• Scan Engine Log Files.
DbProtect LogFiles
INSTALLATION LOG FILES
DbProtect install, upgrade and uninstall log files are located in %Temp%\DbProtectSetup.
OPERATIONAL LOG FILES
DbProtect operational log files are located in %ProgramFiles%\AppSecInc\Logs.
Application Security, Inc. 39
Administrator’s Guide
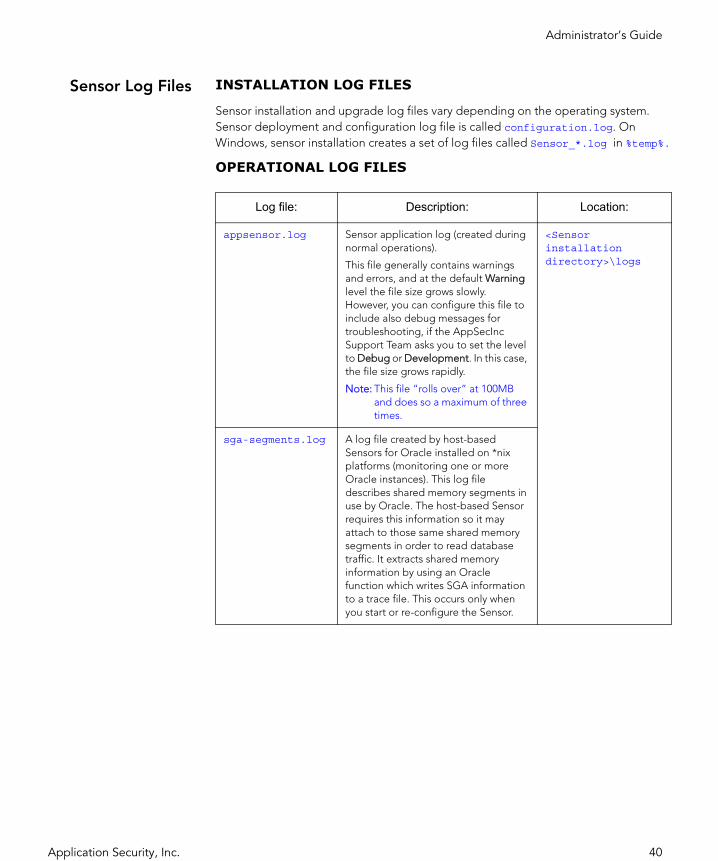
Sensor Log Files INSTALLATION LOG FILES
Sensor installation and upgrade log files vary depending on the operating system. Sensor deployment and configuration log file is called configuration.log. On Windows, sensor installation creates a set of log files called Sensor_*.log in %temp%.
OPERATIONAL LOG FILES
Log file: Description: Location:
appsensor.log Sensor application log (created during normal operations).
This file generally contains warnings and errors, and at the default Warning level the file size grows slowly. However, you can configure this file to include also debug messages for troubleshooting, if the AppSecInc Support Team asks you to set the level to Debug or Development. In this case, the file size grows rapidly.
Note: This file “rolls over” at 100MB and does so a maximum of three times.
<Sensor installation directory>\logs
sga-segments.log A log file created by host-based Sensors for Oracle installed on *nix platforms (monitoring one or more Oracle instances). This log file describes shared memory segments in use by Oracle. The host-based Sensor requires this information so it may attach to those same shared memory segments in order to read database traffic. It extracts shared memory information by using an Oracle function which writes SGA information to a trace file. This occurs only when you start or re-configure the Sensor.
Application Security, Inc. 40

Administrator’s Guide
REPLAY LOG FILES
Also in the logs directory are Sensor log files related to “store-&-forward”, i.e., AppSecInc’s method of storing Alerts temporarily in case DbProtect becomes unavailable. These are more commonly known as the replay log files. They come in two forms:
• *.replay.log, which contains Alerts to be forwarded to DbProtect when it becomes available
• *.replay.log.bookmark, which is a bookmark pointing to the replay log indicating where forwarding left off the last time it ran.
If DbProtect becomes unavailable, these files ensure your Alerts will continue to be logged. They store Alerts in binary form which are “replayed” to DbProtect when it is back online.
The growth rate of the Alert log files depends on Alert rate and size. An average replay log grows at rate of approximately 2k/second -- but only when the Sensor cannot communicate with DbProtect .
The number of and size of Alert log files depends on how many Alerts per second are being fired and how long the Message Collector component of DbProtect has been down. Once it’s back online, the replay logs will not shrink in size, but rather they will disappear one file at a time.
Replay logs “roll over” at 500MB and continue to do so every 500MB until DbProtect becomes available.
Scan Engine LogFiles
INSTALLATION LOG FILES
Scan Engine installation creates a set of log files called ScanEngine_*.log in %temp%.
OPERATIONAL LOG FILES
Scan Engines create log files in S%ProgramFiles%\AppSecInc\Logs.
Application Security, Inc. 41

Administrator’s Guide
Appendix F: CIDR NotationIn CIDR notation, an IP address is represented as A.B.C.D /n, where /n is called the IP prefix or network prefix. The IP prefix identifies the number of significant bits used to identify a network. For example, 192.9.205.22 /18 means, the first 18 bits are used to represent the network and the remaining 14 bits are used to identify hosts. Common prefixes are 8, 16, 24, and 32.
The following table contains CIDR to Netmask Translation information
CIDRNetmask (Dot
Notation) Number of Hosts
/1 128.0.0.0
/2 192.0.0.0
/3 224.0.0.0
/4 240.0.0.0
/5 248.0.0.0
/6 252.0.0.0
/7 254.0.0.0
/8 255.0.0.0
/9 255.128.0.0
/10 255.192.0.0
/11 255.224.0.0
/12 255.240.0.0
/13 255.248.0.0
/14 255.252.0.0
/15 255.254.0.0
/16 255.255.0.0
/17 255.255.128
/18 255.255.192.0
/19 255.255.224.0
/20 255.255.240.0
Application Security, Inc. 42

Administrator’s Guide
/21 255.255.248.0
/22 255.255.252.0
/23 255.255.254.0
/24 255.255.255.0 256
/25 255.255.255.128 128
/26 255.255.255.192 64
/27 255.255.255.224 32
/28 255.255.255.240 16
/29 255.255.255.248 8
/30 255.255.255.252 4
/31 255.255.255.254 2
/32 255.255.255.255 1
Application Security, Inc. 43
Administrator’s Guide
Appendix G: Moving or Changing Your Data StoresPlease contact Application Security, Inc. Customer Support at [email protected] for a step-by-step guide and assistance in moving the DbProtect data stores.
Application Security, Inc. 44

Administrator’s Guide
Appendix H: Clearing Your Java CacheIf you are experiencing difficulty logging into the DbProtect Console, you may need to clear your Java cache. Application Security, Inc. also recommends you clear your Java cache after an upgrade. The Java cache does not get automatically cleared following a reboot.
To clear your Java cache:
1. Choose Start > Control Panel to display the Control Panel.
2. Double click the Java icon to display the Java Control Panel dialog box.
3. With the default General tab selected, click the Settings... button (in the Temporary Internet Files section of the dialog box) to display the Temporary Files Settings dialog box.
4. Click the Delete Files... button to clear your Java cache.
5. Close your web browser and attempt to log into the DbProtect Console again.
Application Security, Inc. 45
Administrator’s Guide
Appendix I: Installing CertificatesStarting with DbProtect 2008.1 R2, Application Security, Inc. removed the Certificates tab from the Configuration Manager Tool. Formerly, this option allowed you to install your company's own certificate to eliminate browser messages that indicated issues with the "website's security certificate". Security concerns necessitated the removal of this option. However, as this appendix explains, you can install a custom certificate using command line tools provided with DbProtect.
This appendix consists of the following topics:
• Overview
• Definitions
• Pre-installation
• Installation
• Converting to PEM format
• Post-installation.
Overview Importing a private key into DbProtect can be somewhat tricky. Your primary goal is to make sure you import the private key and certificate chain into the DbProtect keystore..
Definitions Some key definitions follow:
• <DbProtect Installation Directory>. Location of the instaleld DbProtect folder, e.g., %ProgramFiles%\AppSecInc.
• <Java Home>. Location of an installed Java JRE. Application Security, Inc. recommends you use the one located at <DbProtect Installation Directory>\Common Files\jre.
Application Security, Inc. 46
Administrator’s Guide
Pre-installation 1. Backup the original keystore located in: <DbProtect Installation Directory>\EnterpriseServicesHost\keys\key.store
2. Locate the keystore password in the file <DbProtect Installation Directory>\EnterpriseServicesHost\tomcat\conf\server.xml. This appendix will refer to this file as: [storepass].
The keytool and java tools are both located in <Java Home>\bin.
The openssl tool is located in <DbProtect Installation Directory>\EnterpriseServicesHost\bin.
Installation 1. Open a command line, and cd to: <DbProtect Installation Directory>\EnterpriseServicesHost\keys
2. Enter: keytool -genkey -alias user-cert -keystore key.store -storepass [storepass]. The user-cert value can be an alias of your choice.
3. You are prompted to answer several questions. When prompted to enter:
• your first and last name, enter the DbProtect hostname
• a password, press <ENTER>.
4. Enter: keytool -certreq -alias user-cert -file user-cert.csr -keystore key.store -storepass [storepass]
5. Send the generated certificate request (user-cert.csr) to the either an internal certificate authority or a public certificate authority for signing. The certificate authority should respond with a signed certificate (user-cert.pem) and their own public certificate (cacert.pem). If your certificate authority does not send you a certificate in PEM format, see Converting to PEM format.
6. Save the signed certificate and root CA certificates to:<DbProtect Installation Directory>\EnterpriseServicesHost\keys
7. Enter: keytool -import -alias root-ca -noprompt -file cacert.pem -keystore key.store -storepass [storepass]
8. Enter: keytool -import -alias user-cert -file user-cert.pem -keystore key.store -storepass [storepass]
9. Enter: keytool -delete -alias appsecinc-appradar -keystore key.store -storepass [storepass]. This removes the old certificate generated during Console installation.
Converting to PEMformat
If your certificate you recieve from yout CA is not in PEM format, you can use openssl to convert it. Enter: openssl x509 -in [certificate] -inform DER -out [certificate].pem -outform PEM
Application Security, Inc. 47

Administrator’s Guide
Post-installation After installation you need to check that all of the certificates that you imported are in the keystore. Do the following:
1. Enter: keytool -list keystore key.store -storepass [storepass]
2. Make sure you see an entry for each certificate that you entered. You will see the alias you chose for the certificate, as well as the certificate thumbprint.
3. Ensure that there is an entry for DbProtect's mykey certificate.
4. Re-start the Enterprise Services Host for the changes to take effect. Once the system has started, you should be able to browse to the the DbProtect URL without seeing error messages about mismatched hostname or untrusted certificates.
Application Security, Inc. 48

Administrator’s Guide
Appendix J: Installing and Configuring a Host-Based Sensor for Oracle to Monitor Oracle Databases on an Oracle RACOracle Real Application Clusters (RAC) allows multiple computers to run Oracle relational database management system (RDBMS) software simultaneously while accessing a single database, thus providing a clustered database. In a non-RAC Oracle database, by contrast, a single instance accesses a single database.
In order to configure a host-based Sensor to monitor databases on an Oracle RAC, do the following:
1. Install a host-based Sensor for Oracle on each node in your Oracle RAC. For more information, go to the appropriate operating system-dependent topic in the DbProtect Installation Guide:
• Host-based Sensor for Oracle (on Solaris) - installation steps
• Host-based Sensor for Oracle (on AIX) - installation steps
• Host-based Sensor for Oracle (on HP-UX) - installation steps
• Host-based Sensor for Oracle (on Red Hat Enterprise Linux) - installation steps
• Host-based Sensor for Oracle (on Windows) - installation steps
2. In the DbProtect Console, register each host-based Sensor for Oracle you installed in Step 1. If you installed your host-based Sensor for Oracle on:
• Windows, see Configuring a host-based Sensor to monitor Oracle SIDs and services and deploying the configuration information (when Sensor is installed on Windows) in the DbProtect User’s Guide for more information
• any supported *nix operating system (i.e., Solaris, AIX, HP-UX, or Red Hat Enterprise Linux), see Configuring a host-based Sensor to monitor Oracle SIDs and services and deploying the configuration information (when Sensor is installed on a *nix-based operating system) in the DbProtect User’s Guide for more information.
Application Security, Inc. 49
Administrator’s Guide
3. In the DbProtect Console, configure an instance for each host-based Sensor for Oracle you registered in Step 2. Make sure your Instance Alias is:
• unique for each registered host-based Sensor for Oracle
• is easily identifiable for the database you are monitoring
• easily identifies the node where the Sensor is installed (e.g., Oracle RAC Node 1, Oracle RAC Node 2, etc.).
If you installed your host-based Sensor for Oracle on:
• Windows, see Configuring a host-based Sensor to monitor Oracle SIDs and services and deploying the configuration information (when Sensor is installed on Windows) in the DbProtect User’s Guide for more information
• any supported *nix operating system (i.e., Solaris, AIX, HP-UX, or Red Hat Enterprise Linux), see Configuring a host-based Sensor to monitor Oracle SIDs and services and deploying the configuration information (when Sensor is installed on a *nix-based operating system) in the DbProtect User’s Guide for more information.
4. When configuring each instance, also ensure you deploy the exact same Policy for each host-based Sensor for Oracle (otherwise, you may get inconsistent results for the Alerts you are expecting to see).
Again, if you installed your host-based Sensor for Oracle on:
• Windows, see Configuring a host-based Sensor to monitor Oracle SIDs and services and deploying the configuration information (when Sensor is installed on Windows) in the DbProtect User’s Guide for more information
any supported *nix operating system (i.e., Solaris, AIX, HP-UX, or Red Hat Enterprise Linux), see Configuring a host-based Sensor to monitor Oracle SIDs and services and deploying the configuration information (when Sensor is installed on a *nix-based operating system) in the DbProtect User’s Guide for more information.
Application Security, Inc. 50

Administrator’s Guide
Appendix K: DbProtect System Event LoggingDbProtect reports user login and logout events to the Windows Event Log. This appendix consists of the following topics:
• What is the Windows Event Log?
• DbProtect logged events
• Viewing DbProtect events
• Disabling DbProtect logging events
• Enabling DbProtect logging events.
What is theWindows Event
Log?
The Microsoft Windows operating system has a centralized log service that allows applications running under it to report events. The Windows Event Log has three log sources:
• system
• application
• security.
The Windows Event Viewer allows you to view events reported to the Windows Event Log. For more information about the the Windows Event Log and the Windows Event Viewer, go to http://support.microsoft.com/kb/308427
DbProtect loggedevents
DbProtect logs system events to the Windows Event Log. The events logged are:
• User Successful Login
• User Failed Login
• User Logout.
When an event occurs, DbProtect creates a Windows Event. The Windows one of these events occursEvent Viewer allows you to view these events.
Viewing DbProtectevents
You can locate DbProtect events in the Windows Event Viewer under the “Application" log source. DbProtect specifies the Event Source as "DbProtect".
Application Security, Inc. 51
Administrator’s Guide
DisablingDbProtect logging
events
By default, the writing of events to the Windows Event Log is enabled. It is possible to disable the writing of events to the Windows Event Log.
In order to disable the writing of events, follow the steps below:
1. Locate the log4j.properties file as described in Appendix H: Manually Changing the Logging Level for the Console by Modifying the log4j.properties File in the DbProtect User’s Guide.
2. Open the file for editing.
3. Locate the following section in the file:
#---------------------------------------------------------------------
#
# This section handles appender settings for A (System Audit)
#
#---------------------------------------------------------------------
# Uncomment below to set Audit to be a RollingFileAppender
#log4j.appender.A=org.apache.log4j.RollingFileAppender
#log4j.appender.A.File=../../../GUI/logs/SystemAudit.log
#log4j.appender.A.layout=org.apache.log4j.PatternLayout
#log4j.appender.A.layout.ConversionPattern=%d{EEE dd MMM HH:mm:ss} - %m%n
# Uncomment below to set Audit to write to the Windows event Log
log4j.appender.A=org.apache.log4j.nt.NTEventLogAppender
log4j.appender.A.source=DbProtect
log4j.appender.A.layout=org.apache.log4j.PatternLayout
log4j.appender.A.layout.ConversionPattern=%d{EEE dd MMM HH:mm:ss} - %m%n
4. Comment the lower section (with the heading: "Uncomment below to set Audit to write to the Windows event Log") by placing a # character at the start of the line. Do this for all lines in the section.
5. Uncomment the upper section (with the heading: "Uncomment below to set Audit to be a RollingFileAppender") by removing the # character from the start of the line. Do this for all lines in the section.
6. Save the log4j.properties file.
7. Re-start the Console for the changes to take effect.
Application Security, Inc. 52
Administrator’s Guide
EnablingDbProtect logging
events
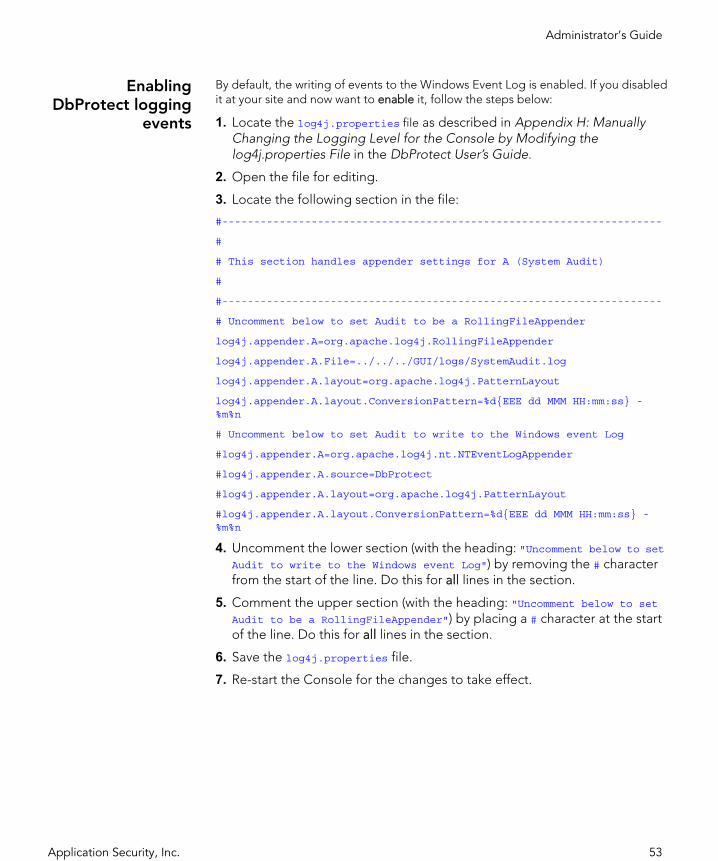
By default, the writing of events to the Windows Event Log is enabled. If you disabled it at your site and now want to enable it, follow the steps below:
1. Locate the log4j.properties file as described in Appendix H: Manually Changing the Logging Level for the Console by Modifying the log4j.properties File in the DbProtect User’s Guide.
2. Open the file for editing.
3. Locate the following section in the file:
#---------------------------------------------------------------------
#
# This section handles appender settings for A (System Audit)
#
#---------------------------------------------------------------------
# Uncomment below to set Audit to be a RollingFileAppender
log4j.appender.A=org.apache.log4j.RollingFileAppender
log4j.appender.A.File=../../../GUI/logs/SystemAudit.log
log4j.appender.A.layout=org.apache.log4j.PatternLayout
log4j.appender.A.layout.ConversionPattern=%d{EEE dd MMM HH:mm:ss} - %m%n
# Uncomment below to set Audit to write to the Windows event Log
#log4j.appender.A=org.apache.log4j.nt.NTEventLogAppender
#log4j.appender.A.source=DbProtect
#log4j.appender.A.layout=org.apache.log4j.PatternLayout
#log4j.appender.A.layout.ConversionPattern=%d{EEE dd MMM HH:mm:ss} - %m%n
4. Uncomment the lower section (with the heading: "Uncomment below to set Audit to write to the Windows event Log") by removing the # character from the start of the line. Do this for all lines in the section.
5. Comment the upper section (with the heading: "Uncomment below to set Audit to be a RollingFileAppender") by placing a # character at the start of the line. Do this for all lines in the section.
6. Save the log4j.properties file.
7. Re-start the Console for the changes to take effect.
Application Security, Inc. 53

Administrator’s Guide
Appendix L: Monitoring Oracle Databases in an Oracle Fail Safe Environment: Sensor and Cluster Configuration StepsThis appendix explains how to configure a host-based Sensor for Oracle (on Windows) in an Oracle Fail Safe environment. It also explains how to configure your Oracle Fail Safe cluster, once you have properly configured your Sensor.
In this appendix:
• About Oracle Fail Safe
• Oracle Fail Safe vs. Oracle RAC
• Sensor configuration steps (Oracle Fail Safe)
• Cluster configuration steps (Oracle Fail Safe).
About Oracle FailSafe
Oracle Fail Safe, a type of Oracle cluster, is a core feature included with every Oracle 11g, Oracle 10g and Oracle9i license for Microsoft Windows 2000 and Microsoft Windows 2003. Oracle Fail Safe is integrated with Microsoft Cluster Server to allow you to configure and verify Microsoft Windows clusters and to automatically fail over Oracle databases and applications.
Oracle Fail Safe is essentially a Microsoft Clustering Services (MSCS) plug-in. In an MSCS architecture, two systems share the same disk, which only one system controls at a time. In the event of a failure (determined by the heartbeat mechanism), the standby system replaces the instance currently running the Oracle instance (and controlling the storage).
Oracle Fail Safe vs.Oracle RAC
Oracle Fail Safe differs in several ways from Oracle Real Application Cluster (RAC); for more information on installing and configuring a host-based Sensor for Oracle (on Windows) to monitor Oracle databases on a RAC, see Appendix J: Installing and Configuring a Host-Based Sensor for Oracle to Monitor Oracle Databases on an Oracle RAC.
Application Security, Inc. 54
Administrator’s Guide
Oracle Fail Safe is generally considered easier to implement and administer than RAC. Most organizations that run applications on Microsoft Windows have already implemented MSCS and are familiar with it. In addition, Oracle Fail Safe is a core feature of Oracle9i and Oracle10g for Windows, so you won’t need additional licenses.
Another key difference: unlike Oracle RAC (which can run in a Microsoft Windows or on a *nix-based platform), Oracle Fail Safe runs on Microsoft Windows only. Thus, this appendix is only relevant if you are configuring a host-based Sensor for Oracle (on Windows); for more information, see Configuring a host-based Sensor to monitor Oracle SIDs and services and deploying the configuration information (when Sensor is installed on Windows) in the DbProtect Installation Guide.
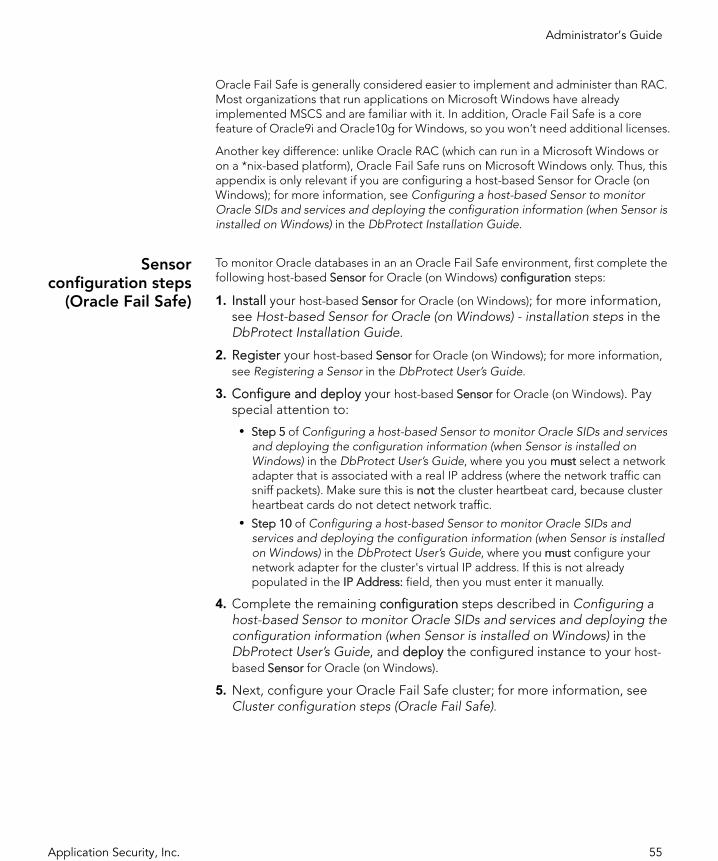
Sensorconfiguration steps
(Oracle Fail Safe)
To monitor Oracle databases in an an Oracle Fail Safe environment, first complete the following host-based Sensor for Oracle (on Windows) configuration steps:
1. Install your host-based Sensor for Oracle (on Windows); for more information, see Host-based Sensor for Oracle (on Windows) - installation steps in the DbProtect Installation Guide.
2. Register your host-based Sensor for Oracle (on Windows); for more information, see Registering a Sensor in the DbProtect User’s Guide.
3. Configure and deploy your host-based Sensor for Oracle (on Windows). Pay special attention to:
• Step 5 of Configuring a host-based Sensor to monitor Oracle SIDs and services and deploying the configuration information (when Sensor is installed on Windows) in the DbProtect User’s Guide, where you you must select a network adapter that is associated with a real IP address (where the network traffic can sniff packets). Make sure this is not the cluster heartbeat card, because cluster heartbeat cards do not detect network traffic.
• Step 10 of Configuring a host-based Sensor to monitor Oracle SIDs and services and deploying the configuration information (when Sensor is installed on Windows) in the DbProtect User’s Guide, where you must configure your network adapter for the cluster's virtual IP address. If this is not already populated in the IP Address: field, then you must enter it manually.
4. Complete the remaining configuration steps described in Configuring a host-based Sensor to monitor Oracle SIDs and services and deploying the configuration information (when Sensor is installed on Windows) in the DbProtect User’s Guide, and deploy the configured instance to your host-based Sensor for Oracle (on Windows).
5. Next, configure your Oracle Fail Safe cluster; for more information, see Cluster configuration steps (Oracle Fail Safe).
Application Security, Inc. 55
Administrator’s Guide
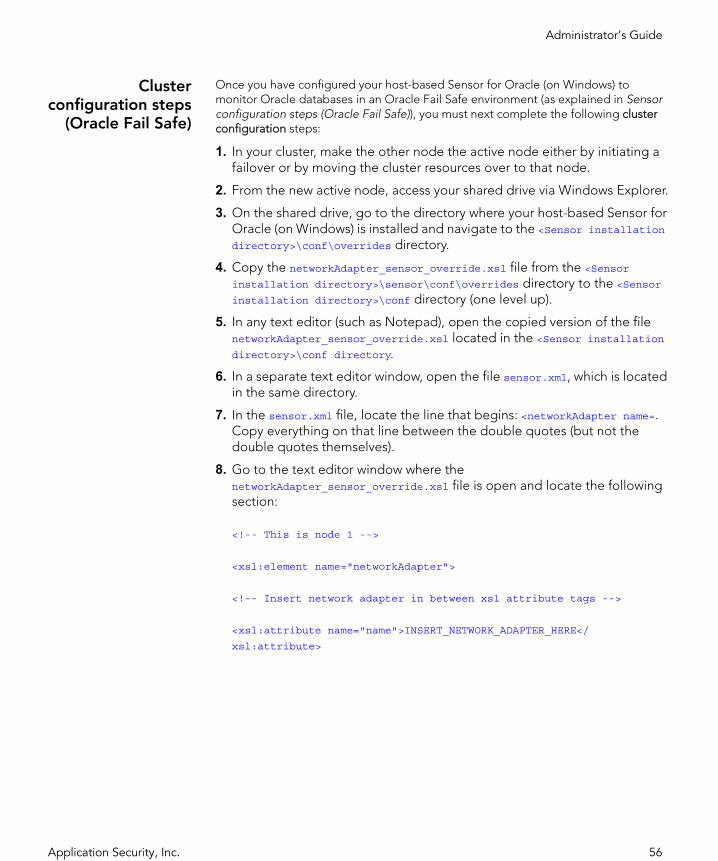
Clusterconfiguration steps
(Oracle Fail Safe)
Once you have configured your host-based Sensor for Oracle (on Windows) to monitor Oracle databases in an Oracle Fail Safe environment (as explained in Sensor configuration steps (Oracle Fail Safe)), you must next complete the following cluster configuration steps:
1. In your cluster, make the other node the active node either by initiating a failover or by moving the cluster resources over to that node.
2. From the new active node, access your shared drive via Windows Explorer.
3. On the shared drive, go to the directory where your host-based Sensor for Oracle (on Windows) is installed and navigate to the <Sensor installation directory>\conf\overrides directory.
4. Copy the networkAdapter_sensor_override.xsl file from the <Sensor installation directory>\sensor\conf\overrides directory to the <Sensor installation directory>\conf directory (one level up).
5. In any text editor (such as Notepad), open the copied version of the file networkAdapter_sensor_override.xsl located in the <Sensor installation directory>\conf directory.
6. In a separate text editor window, open the file sensor.xml, which is located in the same directory.
7. In the sensor.xml file, locate the line that begins: <networkAdapter name=. Copy everything on that line between the double quotes (but not the double quotes themselves).
8. Go to the text editor window where the networkAdapter_sensor_override.xsl file is open and locate the following section:
<!-- This is node 1 -->
<xsl:element name="networkAdapter">
<!-- Insert network adapter in between xsl attribute tags -->
<xsl:attribute name="name">INSERT_NETWORK_ADAPTER_HERE</
xsl:attribute>
Application Security, Inc. 56

Administrator’s Guide
9. Paste the information you copied in Step 6 from the sensor.xml file to the location in Step 7. Specifically, you must paste the information you copied in Step 6 between the tags <xsl:attribute name="name"> and </xsl:attribute> so it replaces the string reading: INSERT_NETWORK_ADAPTER_HERE. The string INSERT_NETWORK_ADAPTER_HERE should no longer be visible once you paste the actual network adapter information for node 1 from the sensor.xml file into this location.
10.Open a command prompt window in the Sensor's <installation directory>\bin directory on the shared drive.
11.From the command prompt window, run the utility: list_net_adapter.exe
12.The list_net_adapter.exe utility outputs the list of network adapters it detects on cluster node. Note which network adapter corresponds to the real IP address for that node (i.e., not the cluster heartbeat network adapter).
13.Copy the network adapter information.
14.Paste the network adapter information into the area of the networkAdapter_sensor_override.xsl file reserved for the other node of your Oracle Fail Safe cluster. It should be just below the location from Step 8. It looks something like this:
<!-- This is node 2 -->
<xsl:element name="networkAdapter">
<!-- Insert network adapter in between xsl attribute tags -->
<xsl:attribute name="name">INSERT_NETWORK_ADAPTER_HERE</
xsl:attribute>
Again, paste the network adapter information between the tags <xsl:attribute name="name"> and </xsl:attribute>, replacing the string that reads: INSERT_NETWORK_ADAPTER_HERE. The string INSERT_NETWORK_ADAPTER_HERE should no longer be visible once the actual network adapter information for node 2 from the list_net_adapter.exe utility is pasted in this location.
15.Save the changes made to networkAdapter_sensor_override.xsl, then close the file.
16.Restart the DbProtect Sensor service. You can do this in either of two ways:
• Stop then start the DbProtect Sensor service from the Windows Service Control Manager on the cluster's active node.
• Bring the DbProtect Sensor Cluster resource offline, then bring it online again in the Cluster Administrator on either custer node.
Application Security, Inc. 57

Administrator’s Guide
17.Once the host-based Sensor for Oracle (on Microsoft Windows) restarts, a new file displays in your Sensor installation's <Sensor installation directory>\conf directory. The new file is named: sensor_transformed.xml. This new file contains two occurrences of the <networkAdapter> XML element, which the Sensor uses to monitor your Oracle Fail Safe cluster.
Application Security, Inc. 58

Administrator’s Guide
Appendix M: Configuring Your Host-Based Sensor (Installed on a *nix Platform) to Start Automatically Upon System RebootIn most cases when you configure an Oracle or DB2 database on a *nix server, the server is set up to automatically start the database and bring up Oracle or DB2 upon system restart/reboot. In such cases, you can also have your host-based Sensor for Oracle or DB2 automatically come up when the server (where the Sensors are installed) gets rebooted.
This appendix explains how to configure your host-based Sensor for Oracle on a *nix platform (i.e., Solaris, AIX, or Red Hat Enterprise Linux) or DB2 on a *nix platform (i.e., (i.e., Solaris, AIX, HP-UX, or Red Hat Enterprise Linux) to automatically start up whenever you restart your system. In order to accomplish this goal, you must customize the startup file (located in your <Sensor installation directory>/util directory) to fit your *nix environment.
To configure your host-based Oracle or DB2 Sensors (installed on a *nix platform) to start automatically upon system reboot:
1. Copy the appradar_startup.sh (for example to arstart).
2. Make the following modifications to the new arstart file.
user=sensor_user
SENSOR_DIR=sensor_dir
prog=”DbProtect Sensor”
Replace the account sensor_user with whatever account name you use to run your host-based Sensor (installed on a *nix platform). Replace the path sensor_path with the path to the <Sensor installation directory> i.e. /home/aroracle/ASIappradar/sensor
Application Security, Inc. 59
Administrator’s Guide
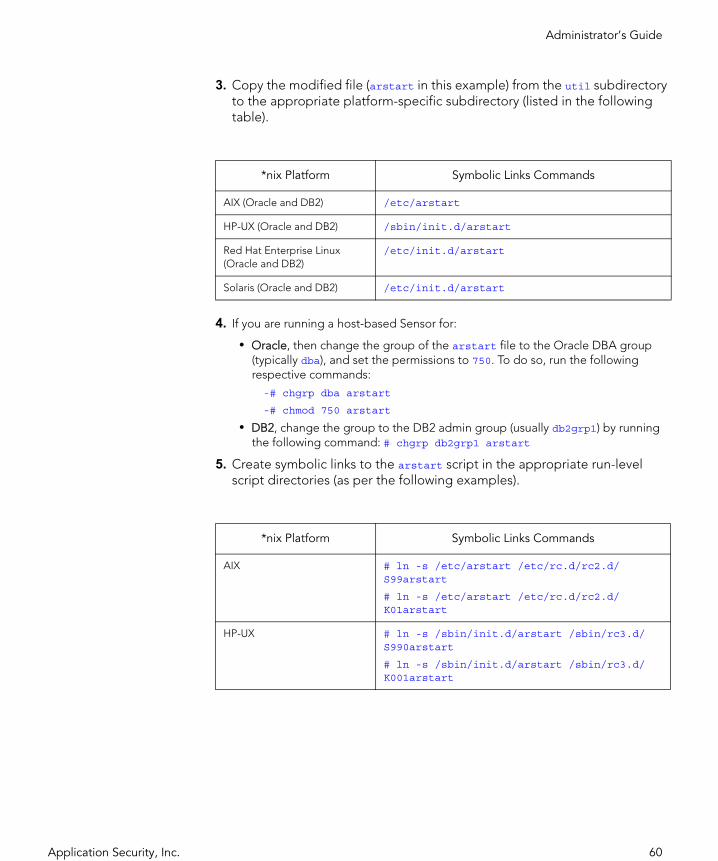
3. Copy the modified file (arstart in this example) from the util subdirectory to the appropriate platform-specific subdirectory (listed in the following table).
4. If you are running a host-based Sensor for:
• Oracle, then change the group of the arstart file to the Oracle DBA group (typically dba), and set the permissions to 750. To do so, run the following respective commands:
-# chgrp dba arstart
-# chmod 750 arstart
• DB2, change the group to the DB2 admin group (usually db2grp1) by running the following command: # chgrp db2grp1 arstart
5. Create symbolic links to the arstart script in the appropriate run-level script directories (as per the following examples).
*nix Platform Symbolic Links Commands
AIX (Oracle and DB2) /etc/arstart
HP-UX (Oracle and DB2) /sbin/init.d/arstart
Red Hat Enterprise Linux (Oracle and DB2)
/etc/init.d/arstart
Solaris (Oracle and DB2) /etc/init.d/arstart
*nix Platform Symbolic Links Commands
AIX # ln -s /etc/arstart /etc/rc.d/rc2.d/S99arstart
# ln -s /etc/arstart /etc/rc.d/rc2.d/K01arstart
HP-UX # ln -s /sbin/init.d/arstart /sbin/rc3.d/S990arstart
# ln -s /sbin/init.d/arstart /sbin/rc3.d/K001arstart
Application Security, Inc. 60

Administrator’s Guide
Note: The specific link names (e.g., S99arstart) are dependent on the specific configuration of your database server. You must execute the arstart script right after the startup script for Oracle (typically dbora) or DB2 (typically db2start).
Red Hat Enterprise Linux # ln -s /etc/init.d/arstart /etc/rc.d/rc3.d/S99arstart
# ln -s /etc/init.d/arstart /etc/rc.d/rc5.d/K01arstart
# ln -s /etc/init.d/arstart /etc/rc.d/rc5.d/S99arstart
# ln -s /etc/init.d/arstart /etc/rc3.d/K01arstart
Solaris # ln -s /etc/init.d/arstart /etc/rc3.d/S99arstart
*nix Platform Symbolic Links Commands
AIX # ln -s /etc/arstart /etc/rc.d/rc2.d/S99arstart
# ln -s /etc/arstart /etc/rc.d/rc2.d/K01arstart
Application Security, Inc. 61

Administrator’s Guide
Appendix N: Enabling (and Disabling) Single Sign-On to the DbProtect ConsoleDbProtect allows you to use Windows authentication to log into the DbProtect Console using a login mechanism known as single sign-on (SSO). For security purposes, SSO is ideally combined with strong authentication methods like smart cards or one-time password tokens.
There are numerous benefits to implementing SSO. For example, SSO reduces the proliferation of user accounts and passwords and enables a more secure environment. SSO also eliminates the need for DbProtect users to remember an additional password. Other benefits include:
• Reducing time spent re-entering passwords for the same identity
• Reducing IT costs due to lower number of IT help desk calls about passwords
• Security on all levels of entry/exit/access to systems without the inconvenience of re-prompting users
• Centralized reporting for compliance adherence.
This appendix consists of the following topics:
• Enabling SSO to the DbProtect Console
• Disabling SSO to the DbProtect Console.
Enabling SSO tothe DbProtect
Console
In order to enable SSO, you must modify several configuration files.
Do the following:
1. Locate the following configuration files in the <DbProtect Home>\EnterpriseServicesHost\tomcat\conf\Catalina\localhost folder:
• appdetective.xml• appradar.xml• dbprotect.xml.
Application Security, Inc. 62
Administrator’s Guide
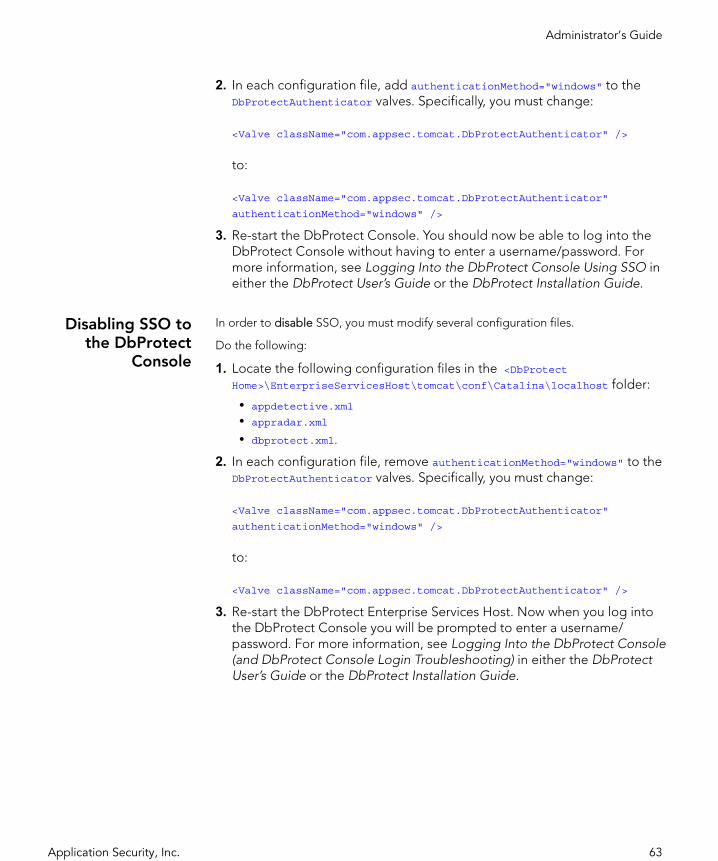
2. In each configuration file, add authenticationMethod="windows" to the DbProtectAuthenticator valves. Specifically, you must change:
<Valve className="com.appsec.tomcat.DbProtectAuthenticator" />
to:
<Valve className="com.appsec.tomcat.DbProtectAuthenticator"
authenticationMethod="windows" />
3. Re-start the DbProtect Console. You should now be able to log into the DbProtect Console without having to enter a username/password. For more information, see Logging Into the DbProtect Console Using SSO in either the DbProtect User’s Guide or the DbProtect Installation Guide.
Disabling SSO tothe DbProtect
Console
In order to disable SSO, you must modify several configuration files.
Do the following:
1. Locate the following configuration files in the <DbProtect Home>\EnterpriseServicesHost\tomcat\conf\Catalina\localhost folder:
• appdetective.xml• appradar.xml• dbprotect.xml.
2. In each configuration file, remove authenticationMethod="windows" to the DbProtectAuthenticator valves. Specifically, you must change:
<Valve className="com.appsec.tomcat.DbProtectAuthenticator"
authenticationMethod="windows" />
to:
<Valve className="com.appsec.tomcat.DbProtectAuthenticator" />
3. Re-start the DbProtect Enterprise Services Host. Now when you log into the DbProtect Console you will be prompted to enter a username/password. For more information, see Logging Into the DbProtect Console (and DbProtect Console Login Troubleshooting) in either the DbProtect User’s Guide or the DbProtect Installation Guide.
Application Security, Inc. 63