Issued to - textfiles.com · r reu interface 1 maintenance doc ... m.od r
User's Guide .
C09-000 1-07
Release 3.0
DBCjl012 Data Base Computer
User's Guide·
C09-000 1-07
Release 3.0
Copyright, 1987, Teradata Corporation
All rights reserved. No part of this document may be copied or reproduced in any form or by any means without the prior written consent of Teradata. Teradata Corporation, 12945 Jefferson Boulevard, Los Angeles, CA 90066.
ii C09-OOOI-07
EFFECTIVE PAGES
This is the -07 version of the DBC/1012(R) Data Base Computer User's Guide. Revision levels of individual pages are given below.
Page Revision
Title Page -07 Effective Pages -07 Preface (v through xx) -07 Contents -07
1- 1 through 1- 8 -07
2- 1 through 2- 2 -07
3- 1 through 3-30 -07
4- 1 through 4- 8 -07
5- 1 through 5-20 -07
6- 1 through 6-38 -07
7- 1 through 7-20 -07
8- 1 through 8-6 -07
9- 1 through 9- 10 -07
10-1 through 10-12 -07
11-1 through 11-14 -07
Appendix A-1 -07
Appendix B-1 through B-22 -07
Appendix C-1 through C-2 -07
Appendix D-1 through D-4 -07
Index X-1 through X-13 -07
DBC/1012 is a registered trademark of Teradata Corporation.
C09-0001-07 iii
Design Change Requests (DCRs) Reflected in this Revision:
DCR 3101 DCR 2214 DCR 3167 DCR 2507 DCR 3785 DCR 2775 DCR 3578 DCR 2515
Discrepancy Reports (DRs) Reflected in this Revision:
DR 7729 DR 7789 DR 8202 DR 7811 DR 8202
iv C09-0001-07
PREFACE
This preface describes the structure of the DBC/1012 Data Base Computer User's Guide and tells you what we expect you to know before you begin to read the guide.
ABOUT YOU
If you are not familiar with the DBC/1012 Data Base Computer, you will find it useful to read DBC/1012 Data Base Computer Concepts and Facilities before using this guide.
Except for Chapter 4, which requires some knowledge of MVS/TSO and VM/CMS, you needn't have a background in data processing to use this guide. However, you will benefit from some familiarity with computers and data base management systems.
Because a large portion of this guide is devoted to communicating with the DBC/1012 Data Base Computer from an interactive terminal, you should be familiar with the operation of your 3270-type keyboard terminal. Read the user's guide for that terminal before you read this guide.
ABOUT THIS DOCUMENT
This document is the DBC/1012 Data Base Computer User's Guide. Its purpose is to describe how to communicate with the DBC/1012 in order to work with data stored in the DBC/1012.
This document has 11 chapters:
• Chapter 1 gives you an overview of the relational data base concept and describes the facilities for communicating with the DBC/1012.
• Chapter 2 shows you how to get established as a DBC/1012 user and log on to your organization's host computer in order to communicate with the DBC/1012.
• Chapter 3 shows you how to enter, edit, and view the results of DBC/SQL statements during a session with ITEQ, the interactive facility for communicating with the DBC/1012.
• Chapter 4 shows you how to enter jobs that consist of a number of DBC/SQL statements using BTEQ, the batch facility for communicating with the DBC/I012.
• Chapter 5 shows you how to use DBC/SQL features with ITEQ or BTEQ commands to create attractive, informative
-reports.
C09-OOOl-07 v
• Chapter 6 shows you how to enter DBC/SQL SELECT statements, which are used to query data stored on the DBC/1012.
• Chapter 7 shows you how to create data structures (tables and views) on the DBC/1012.
• Chapter 8 shows you how to insert, update, and remove data from a table.
• Chapter 9 shows you how to create a macro (a sequence of DBC/SQL statements that may be stored and used repeatedly to operate on DBC/1012 data).
• Chapter 10 shows you how to create data bases and users, and give users privileges for working with your data.
• Chapter 11 shows you how to obtain information about data that is stored on the DBC/1012.
Chapters 1 through 5 describe the facilities -- ITEQ and BTEQ -that enable you to communicate with the DBC/1012 using DBC/SQL statements. Chapters 6 through 11 describe the use of the DBC/SQL statements themselves.
Appendixes provide supplemental information. This guide contains four appendixes:
• Appendix A is a fold-out copy of the Personnel data base, which is used to illustrate examples throughout this guide.
• Appendix B provides a syntax summary of the various language components that are used to communicate with the DBC/I012.
• Appendix C lists the functions that the system automatically assigns to PF keys on your terminal, keyboard, and that are used regularly when communicating with the DBC/1012 through ITEQ.
• Appendix D shows you how to define output files that are used for storing and printing results during an interactive session with the DBC/I012.
This document also contains an index.
From time to time, the material in this document is revised. To help you keep track of the various revisions, we will provide you with the following information for each revision:
vi C09-0001-07
• The date of the revision
• The software release of the revision
• Change bars in the margin to indicate what information has changed.
ABOUT DBC/IOI2 DOCUMENTS
The DBC/IOI2 User's Guide is one of a set of manuals that describe the DBC/IOI2 Data Base Computer. The complete set includes:
• DBC/IOI2 Data Base Computer Concepts and Facilities (document number C02-0001)
The concepts document is written for senior executives, managers, and technical personnel. The document presents an overview of the DBC/IOI2 Data Base Computer System, addressing such topics as architecture, user facilities, system facilities, hardware and software structure, operating characteristics, and configuration specifications.
• DBC/IOI2 Data Base Computer User's Guide (document number C09-OOOI)
The user's guide is written for the non-DP user. The guide presents a basic introduction to ITEQ, addressing such topics as ITEQ sessions, on-line edits, queries, print formats, and table creation and modification. It also explains macros, privileges, and the Data Dictionary/Directory.
• DBC/IOI2 Data Base Primer (document number C09-0002)
The Primer is written for new computer users. It teaches basic DBC/IOI2 query statements, offering hands-on examples for users to try at their own pace.
• DBC/IOI2 ITEQ Keypad Template (document number Cg9-0002)
The template, which fits over the terminal keyboard's PF-key keypad, shows the assignment of PF keys to ITEQ commands.
C09-OOOI-07 vii
viii
• DBC/IOI2 Data Base Computer Reference Manual (document number C03-0001)
The reference manual is written for technical personnel. The manual presents the details of language syntax, DBC/SQL statements, ITEQ commands, BTEQ commands, and the Data Dictionary/Directory.
• DBC/IOI2 Data Base Computer Messages Reference Manual (document number C03-0002)
The messages manual is written for all users. It lists and explains all error messages and return codes generated by the by DBC/IOI2 Data Base Computer.
• DBC/IOI2 Data Base Computer Reference Cards (document numbers C04-0001, C04-0002, C04-0003)
The reference cards are written for all users. There are three cards to a set. Each card is a multi-panel, fan-folded summary of language notation, syntax, and acceptable abbreviations. The first card lists DBC/SQL statements and Data Dictionary/Directory views, the second card lists ITEQ and BTEQ commands, and the third card lists COBOL and PL/I Preprocessor statements.
• DBC/IOI2 Data Base Computer Operator's Guide (document number CIS-OOOI)
The operator's guide is written for DBC/IOI2 operators. The guide presents features of the DBC/lOI2 and its console, as well as their operating procedures, programs, and status indicators.
• DBC/lOI2 Data Base Computer Utilities Reference Manual (document number Cll-OOOI)
The utilities manual is written for DBC/IOI2 operators and technical personnel. The manual presents the utilities that are used to load, dump, and restore data, initialize and configure a DBC/IOI2 system, and perform system maintenance.
• DBC/IOI2 Data Base Computer Support Utilities Manual (document number B07-0031)
The support utilities manual describes the utilities used by Teradata support personnel to format disks, add and delete AMPs, copy data from one AMP to another, initially load software, and rebuild user tables.
C09-DOOI-D7
• DBC/IOI2 Data Base Computer System Manual (document number CIO-OOOI)
The system manual is written for system programmers, application programmers, and data base administrators. The manual presents the many considerations and tradeoffs for designing and querying DBC/IOI2 data bases and tables, as well as the details of performance, productivity, startup and shutdown, and software maintenance.
• DBC/IOI2 Data Base Computer Host Interface Manual (document number CI2-0001)
The host interface manual is written for programmers who use the Call-Level Interface Version I (CLIvI) rather than a language preprocessor to communicate with the DBC/IOI2 system. The manual presents the details of information flow, data structures, and the interface routines. The manual covers CLIvI for hosts.
• DBC/IOI2 Data Base Computer Call-Level Interface Manual (document number C12-0006)
The Call-Level Interface manual is written for programmers who use the Call-Level Interface Version 2 (CLIv2) rather than a language preprocessor to communicate with the DBC/I012 system. The manual presents the details of information flow, data structures, and the interface routines. The manual covers CLIv2 for workstations.
• DBC/I012 Data Base Computer COP Interface Manual (document number CI2-000S)
The COP interface manual is written for system programmers. The manual presents the details of information flow, data structures, and interface routines in the COP Interface software.
C09-OOOI-07 ix
x
• DBC/1012 Data Base Computer Network Reference Manual (document number C03-0003)
The network reference manual is written for network administrators. The manual gives an overview of the COP interface and the components involved. It also describes how to change the configuration of a DBC/1012 to add COPs and LANS and how to install and configure Teradata's workstation-resident software. The steps and an example are provided for IBM PCs and compatibles using TCP/IP, IBM PCs and compatibles using ISO/OSI, and AT&T 3B2s using TCP/IP.
• DBC/1012 Data Base Computer Workstation User's Guide (document number C09-0003)
The user's guide covers the use of BTEQ, showing examples of using BTEQ on-line, debugging and submitting BTEQ scripts, converting from screen displays to reports sent to a print file, and using DBC/SQL macros. For each set of BTEQ commands, it describes when and how to use them and how the commands are related. It also describes each command in detail.
• DBC/lOl2 Data Base Computer CICS Interface Manual (document number C12-0002)
The CICS interface manual is written for programmers who access the resources of the DBC/lOl2 system through CICS.
• DBC/1012 Data Base Computer MVS and VM Host Software Manual (document number C13-000l)
The MVS/VM host software manual is written for programmers who must understand the Teradata software that resides on the MVS or VM host. The manual describes SVC mode and cross memory services mode under MVS, and corresponding operation under VM.
• DBC/1012 Data Base Computer Planning Guide (document number C07-000l)
The planning guide is written for personnel who are responsible for the hardware, software, and facility preparation for the DBC/1012. The guide presents physical planning issues and environmental characteristics, as well as software planning and installation considerations.
C09-DOOl-07
• DBC/1012 Data Base Computer MVS Software Installation Guide (document number C16-000l)
The MVS software installation guide is written for technical personnel. The guide provides procedures for installing Teradata MVS interface software.
• DBC/1012 Data Base Computer Preprocessor Reference Manual (document number C03-000S)
The Preprocessor manual is written for the COBOL and PL/I application programmer. This manual presents details of preprocessor use and includes examples in COBOL and PL/I.
• DBC/1012 Data Base Computer Glossary (document number GOI-OOOI)
S. Leamy July 1987
This Glossary is intended for anyone who uses the Teradata DBC/IOI2 data base computer. This Glossary is a comprehensive document of terms, phrases, accronyms, etc., that apply to any hardware, software, or firmware matter that pertains to the Teradata DBC/lOl2 data base computer.
Los Angeles, California
C09-0001-07 xi

xii C09-OOOl-07
CONTENTS
Chapter Page
CHAPTER 1
1.1 1.2 1.3 1.4
CHAPTER 2
2.1 2.2 2.3
CHAPTER 3
3.1 3.1.1 3.1.2 3.1.3 3.1.4 3.1.5 3.1.6 3.2 3.2.1 3.2.1.1 3.2.1.1.1 3.2.1.1.2 3.2.1.1.3 3.2.1.1.4 3.2.1.2 3.2.1.3 3.2.1.4 3.2.1.5 3.2.2 3.2.3 3.2.3.1 3.2.3.2 3.3 3.3.1 3.3.2 3.3.3 3.3.3.1 3.3.3.2 3.3.3.3 3.3.4 3.3.5
C09-0001-07
WHAT IS THE DBC/1012 DATA BASE COMPUTER? •• 1- 1
HOW A DBC/1012 DATA BASE IS ORGANIZED HOW YOU COMMUNICATE THROUGH ITEQ • • HOW YOU COMMUNICATE THROUGH BTEQ SUMMARY AND PREVIEW • • • • • • • •
1- 3 1- 6 1- 7 1- 7
GETTING ESTABLISHED AS A DBC/1012 USER • 2- 1
GETTING ESTABLISHED AS A USER • • • • • 2- 1 LOGGING ON TO THE HOST COMPUTER 2- 2 SUMMARY AND PREVIEW • • • • • • • • • • 2- 2
COMMUNICATING WITH THE DBC/1012 USING ITEQ •
COMMUNICATING IN AN ITEQ SESSION • . . • Starting ITEQ • • • • • • • • • • • • Logging on to the DBC/1012 • • . • • Understanding System Status Messages Interpreting the ITEQ Display Screen Entering Commands and Statements Ending an ITEQ Session • • • • • • •
EDITING DBC/SQL STATEMENTS • • • • • • • • • Entering a Statement from the Input Area
Using PF Keys to Execute Commands Using Default Assignments ••••• Assigning PF Keys During a Session Assigning PF Keys During Startup Displaying PF Key Assignments • • •
Changing the Size of the Input Area Entering a Statement • • • • • • • . • Editing a Statement ••••••••• Entering a New Statement • • • • • • •
Editing a Statement in the Display Area • Aborting a Statement • • • • • •
Aborting a Statement Under TSO Aborting a Statement Under VM • •
VIEWING STATEMENT RESULTS • • • Using Display Commands • • • • • • • Choosing a Formatting Mode • • • Paging Through a Result • • • • • • •
Paging Forward • • • • • • • • Paging Backward ••• • • • • • • • • Redisplaying the Current Result Page •
Viewing a Wide Result • •• •• • • • . Changing Formatting Mode During Display.
3- 1
3- 1 3- 1 3- 3 3- 5 3- 6 3- 7 3- 8 3- 9 3-11 3-11 3-11 3-12 3-13 3-13 3-14 3-14 3-15 3-17 3-17 3-18 3-19 3-20 3-22 3-22 3-24 3-24 3-25 3-26 3-27 3-27 3-29
xiii
3.3.6 3.4
CHAPTER 4
4.1 4.2 4.2.1 4.2.2 4.3 4.4
CHAPTER 5
5.1 5.1.1 5.1.2 5.1.2.1 5.1.2.2 5.1.2.3 5.1.2.4 5.1.2.5 5.1.3 5.1.3.1 5.1.3.2 5.1.3.3 5.1.4 5.2 5.3
CHAPTER 6
6.1 6.2 6.3 6.4 6.4.1 6.4.2 6.4.3 6.4.4 6.4.5 6.4.6 6.4.7 6.4.8 6.4.9 6.4.10 6.4.11 6.4.11.1 6.4.11.2 6.4.11.3 6.5 6.5.1
xiv
Filing a Result for Later Use SUMMARY AND PREVIEW • • • • • • • •
· . . . · . . . USING BTEQ • • . . . . . . . . . . . BTEQ COMMANDS • • • • • • • • • RUNNING A BTEQ JOB • • • • • • • • • • • • •
Running BTEQ Under TSO • RUNNING BTEQ UNDER VM/CMS . .
EXTRACTING DBC/1012 DATA TO A HOST DATA SET SUMMARY AND PREVIEW • • • • • • • • • • • •
CREATING REPORTS USING ITEQ AND BTEQ •
CREATING A REPORT USING ITEQ • • • • • • • • Using Format Defaults • • • • • • • • • • Setting Format Specifications • • • • • •
Displaying Format Specifications • • • Viewing the Effect of Format Commands Def ining a Report Ti tIe • • • • • • • Specifying a Null Character • • • Suppressing Repeating Values • • •
Using DBC/SQL Report Writing Aids •••• Defining Summaries (WITH Clause) ••• Specifying Column Format • • • • • • • Defining Headings and Summary Titles •
printing a Report • • •• •••••• CREATING A REPORT USING BTEQ •• •••• SUMMARY AND PREVIEW • • • • • • • •
QUERYING TABLE DATA . . . . . . · . . . STRUCTURING A DBC/SQL STATEMENT • • • • ESTABLISHING A DEFAULT DATA BASE •• •• SELECTING COLUMNS • • • • • •• •••• SELECTING ROWS • • . • • • • • •• •••
Specifying Order (ORDER BY) • • • • • Eliminating Duplicate Rows (DISTINCT) • • Satisfying Several Conditions (AND) ••• Satisfying One of Many Conditions (OR) Narrowing a Search Condition (NOT) ••• Obtaining Matching Values (IN, NOT IN) Specifying a Range (BETWEEN ••• AND) ••• Matching Characters (LIKE) ••••••• Satisfying a Calculated Condition • • • • Searching For NULL Values • • • • • • • • Combining SELECT statements • • • • • • •
UNION Operator • • • • • • • • • • • • INTERSECT Operator • • •• •••• MINUS • • • • • • • • • • • • • • • •
OBTAINING RESULTS ARITHMETICALLY • • • • • • Using Arithmetic Expressions ••••
3-29 3-29
4- 1
4- 2 4- 4 4- 4 4- 5 4- 6 4- 8
5- 1
5- 1 5- 1 5- 3 5- 4 5- 4 5- 5 5- 5 5- 5 5- 6 5- 7 5- 8 5-11 5-12 5-14 5-20
6- 1
6- 1 6- 2 6- 3 6- 5 6- 6 6- 7 6- 8 6- 9 6- 9 6-11 6-13 6-14 6-15 6-16 6-17 6-18 6-19 6-21 6-21 6-21
C09-000l-07
6.5.2 6.6 6.6.1 6.6.2 6.6.3 6.7 6.7.1 6.7.2 6.7.2.1 6.7.2.2 6.8 6.8.1 6.8.2 6.9 6.10 6.11 6.12 6.13
CHAPTER 7
7.1 7.1.1 7.1.1.1 7.1.1.2 7.1.1.3 7.1.1.4 7.1.1.5 7.1.2 7.1.2.1 7.1.2.2 7.1.3 7.1.4 7.1.4.1 7.1.4.2 7.1.4.3 7.2 7.3 7.3.1 7.3.2 7.3.3 7.3.4 7.3.5 7.3.6 7.4 7.4.1 7.4.2 7.4.3 7.5 7.6 7.7 7.8
C09-0001-07
Using Aggregate Operations • • • • • • • OPERATING ON DATES • • • • • • • • • • • • •
Using Arithmetic Operations ••• Using Comparison Operations • • • • • • • Converting to Another Format or Notation
CHARACTER STRING EXPRESSIONS • • • • • • • • Concatenation Operator • • • • . • • • • String Functions • • • • • • • •
SUBSTR • • • • • • • • • • • • • • • • INDEX • • • • • • • • • • • •
SUMMARIZING INFORMATION BY GROUPS .•••• Selecting Specific Groups ••••••.• Selecting Specific Rows • • • • • • • • •
SELECTING RELATED DATA FROM SEVERAL TABLES • SELECTING RELATED DATA FROM THE SAME TABLE • BUILDING SEARCH CONDITIONS • • • • • • • • • LOCKING A TABLE FOR ACCESS • •••••• SUMMARY AND PREVIEW • • • • •• ••••
DEFINING AND MANAGING DATA . . . CREATING TABLES • • • • • • •• ••••
Specifying Column Attributes • • • • Specifying Data Type • •• .••. Specifying Default Control • • • • • • Specifying Case • • • •• •••• Specifying Format •••••• • • • • Specifying a Title ••••••••••
Specifying Data Protection • • • • • • • Providing for Fallback Data • • • • • Providing for Journal Tables • • • • •
COMPRESSing Field Entries • • • • • • • • Establishing Indexes ••••••••••
Defining a primary Index • • • • • • • Defining a Secondary Index • • • • • • Defining Unique Indexes • • •
LOADING A NEW TABLE WITH EXISTING DATA • • • ALTERING A TABLE DEFINITION • • • .
Adding and Dropping Columns • • • • • • • Changing Attributes • • • • • • • • • • • Changing the Fallback Option •• • • • • Changing the JOURNAL Option • • • • • • • Changing the Data Type Attribute • • • • Redefining a Primary Index • • • • • • •
USING VIEWS • • • • • • • • • • • • Creating a View • • • • • • • • • • • • • Creating a View with a Locking Clause Replacing a View • • • • • • • • • • • •
DOCUMENTING TABLES, COLUMNS, VIEWS ••••• RENAMING TABLES AND VIEWS • • • • • • • • • REMOVING TABLES AND VIEWS • • • SUMMARY AND PREVIEW • • • . • • ••••
6-22 .6-26 6-26 6-27 6-27 6-28 6-28 6-30 6-30 6-31 6-31 6-32 6-33 6-33 6-34 6-35 6-37 6-38
7- 1
7- 2 7- 2 7- 4 7- 6 7- 6 7- 6 7- 6 7- 6 7- 7 7- 7 7- 8 7- 8 7- 9 7- 9 7-10 7-10 7-11 7-12 7-12 7-13 7-13 7-13 7-14 7-15 7-16 7-17 7-17 7-18 7-19 7-20 7-20
xv
CHAPTER 8 ADDING AND CHANGING TABLE DATA • · · • · · • 8- 1
8.1 INSERTING ROWS • · · · · • · · · · · • · · · 8- 1 8.1.1 Specifying Insert Data · · · · · • · 8- 2 8.1.2 Inserting Data by Query · • • · • · · 8- 2 8.2 UPDATING ROW DATA · · · · · · · · · · · · · 8- 3 8.2.1 Specifying New Data •••••••• · 8- 3 8.2.2 Specifying an Arithmetic Expression · • · 8- 3 8.3 DELETING ROW DATA · · · · · · · · · 8- 4 8.4 USING A VIEW TO ADD OR CHANGE DATA · • · 8- 4 8.5 SUMMARY AND PREVIEW · · · • • · · · · · 8- 6
CHAPTER 9 USING MACROS . · · · · · · · · · · · · · 9- 1
9.1 CREATING A MACRO · · · · · · • • • · · · 9- 2 9.1.1 Identifying Parameters · · · · · · · · · 9- 3 9.1.2 Defining the Macro · · · · · · · · · 9- 3 9.1.3 Documenting a Macro · · · · · · · 9- 3 9.1.4 Aborting a Macro · · · · · · · · 9- 4 9.2 EXECUTING A MACRO · · · · · · · · · · · 9- 5 9.3 DEBUGGING A MACRO · · · · · 9- 6 9.4 REPLACING A MACRO · · · · · · · · · · · 9- 7 9.5 RENAMING A MACRO · · · · · · · · · · · · 9- 8 9.6 FORMATTING MACRO RESULTS · · · · · · · · 9- a 9.7 DISPLAYING A FORMATTED MACRO RESULT 9- 9 9.8 REMOVING A MACRO · · · · · · · · 9-10 9.9 SUMMARY AND PREVIEW · · · · · · · · 9-10
CHAPTER 10 SHARING DBC/I012 FACILITIES · · · · · · · · 10- 1
10.1 WHAT ARE PRIVILEGES? · · · · · · · · · · 10- 1 10.2 GRANTING PRIVILEGES · · · · · · · · · · 10- 4 10.2.1 Granting Privileges to a User · · · · · · 10- 6 10.2.2 Granting All privileges to a User · · 10- 7 10.2.3 Granting Privileges to a Group of Users · 10- 7 10.2.4 Revoking Privileges · · · · · · · · · 10- 7 10.3 CREATING USERS · · · · · · · · · · · · · lO- a 10.4 CREATING DATA BASES · · · · · · · · 10- 9 10.5 MODIFYING USERS AND DATA BASES · · · · · 10-10 10.6 REMOVING USERS AND DATA BASES · · · · · 10-11 10.7 TRANSFERRING DATA BASE OWNERSHIP • · · · 10-12 10.8 SUMMARY AND PREVIEW · · · · · · · · · · 10-12
CHAPTER 11 VIEWING DATA BASE INFORMATION · · • · · Il- l
11.1 QUERYING DATA DICTIONARY/DIRECTORY VIEWS · · Il- l 11.1.1 Querying The Databases View · · · · • · · 11- 2 11.1.2 Querying The Tables View • · · · · · • · 11- 4 11.1.3 Querying The Columns View · · · · · · · · lI- S 11.1.4 Qu~rying The UserGrantedRights View · · · 11- 7 11.1.5 Querying The UserRights View · · · · • · 11- 9 11.1.6 Querying The SessionInfo View · · · · · · 11- 9
xvi C09-0001-07
11.2 11.2.1 11.2.2
Appendix
APPENDIX A
APPENDIX B
B.1 B.2 B.3 B.4 B.5
APPENDIX C
APPENDIX D
D.1 D.2
INDEX
Figure
1-1 1-2 1-3 3-1 3-2 3-3 4-1 10-1
C09-0001-07
· . . · . . . . . USING THE HELP STATEMENT • Usage Notes • • • • • • Examples • • • • • • •
· . . · . . . · . . . . . APPENDIXES
PERSONNEL DATA BASE · . . . . . . . ... . .
SYNTAX SUMMARY . . · · · · · · · · DBC/SQL STATEMENTS · · · · · · · · · · DBC/SQL MODIFIERS · · · · · · ITEQ COMMANDS . . · · · · · · · · · · BTEQ COMMANDS · · · · · · · · · · DATA DICTIONARY/DIRECTORY VIEW FORMATS
DEFAULT PF KEYS FOR ITEQ COMMANDS · ·
DEFINING ITEQ OUTPUT FILES · . . DEFINING A PRINT OUTPUT FILE • • • • • DEFINING A RESULT OUTPUT FILE • • • •
· · · · · · · · · · · · · · · ·
· · ·
· . .
. . . . . . . . . . . . . . . . . . . . . .
ILLUSTRATIONS
Communicating with the DBC/1012 (MVS) Table in a Data Base • • • • • • • Example Tables in a Personnel Data Base ITEQ Startup Screen ••• • • • • • • ITEQ Display Screen •••••• • • • Result of a SELECT Statement • • • • • Selecting and Storing Data Using BTEQ Creating Data Bases and Users • • • •
· · · · · · ·
· · · · • · · · · · · · · ·
11-10 11-11 11-12
A- 1
B- 1
B- 2 B-10 B-11 B-15 B-20
C- 1
D- 1
D- 1 D- 3
X- 1
Page
I- I 1- 3 1- 4 3- 1 3- 6 3- 7 4- 7
10- 3
xvii
Table
3-1 3-2 3-3 3-4 3-5 3-6 3-7 3-8 4-1 5-1 5-2 5-3 6-1 6-2 6-3 6-4 6-5 7-1 7-2 10-1 10-2 11-1 11-2 C-l C-2
xviii
ITEQ Status and System Messages • • • • • • 3- 5 Edit Commands Used for Input, Display Areas 3- 9 Edit Commands Only For Display Area •• • • 3-10 Default PF Key Assignments, Edit Commands 3-11 Aborting a Statement Under TSO • • • • • 3-19 Aborting a Statement Under VM • • • • • • • 3-21 Display Commands • • • • • • • • • • • • • • 3-22 Default PF Assignments, Display Commands • • 3-23 BTEQ Commands (2 parts) •••.•••• 4- 2 ITEQ Format Commands • • • • • • • • • • 5- 3 Format Characters • • • • • • • • • • • • • 5- 9 BTEQ Formatting Commands (2 parts) • • • •• 5-15 Comparison Operations ••• •• •••• 6- 5 Logical Operations • • • • • • • •• •• 6- 8 Expressions Using Set Operators • • 6-11 Ari thmetic Operators . • • • • • • • 6-15 Aggregate Operators . . • • • • • •.• • 6-22 Data Type Phrases (2 parts) ••• ••• 7- 4 Default Control Phrases • . • •• ••• 7- 6 Privileges Needed for Statement (2 parts) • 10- 4 Privileges Implicitly Granted to Creator • 10- 5 End User Dictionary/Directory Views ••.• 11- 1 Privilege Codes ••.• • • • • • • • • . • 11- 7 Default PF Keys for Edit, PRINT Commands C- 1 Default PF Keys for Display Commands • • c- 1
C09-000l-07
CHAPTER I WHAT IS THE DBC/IOI2 DATA BASE COMPUTER?
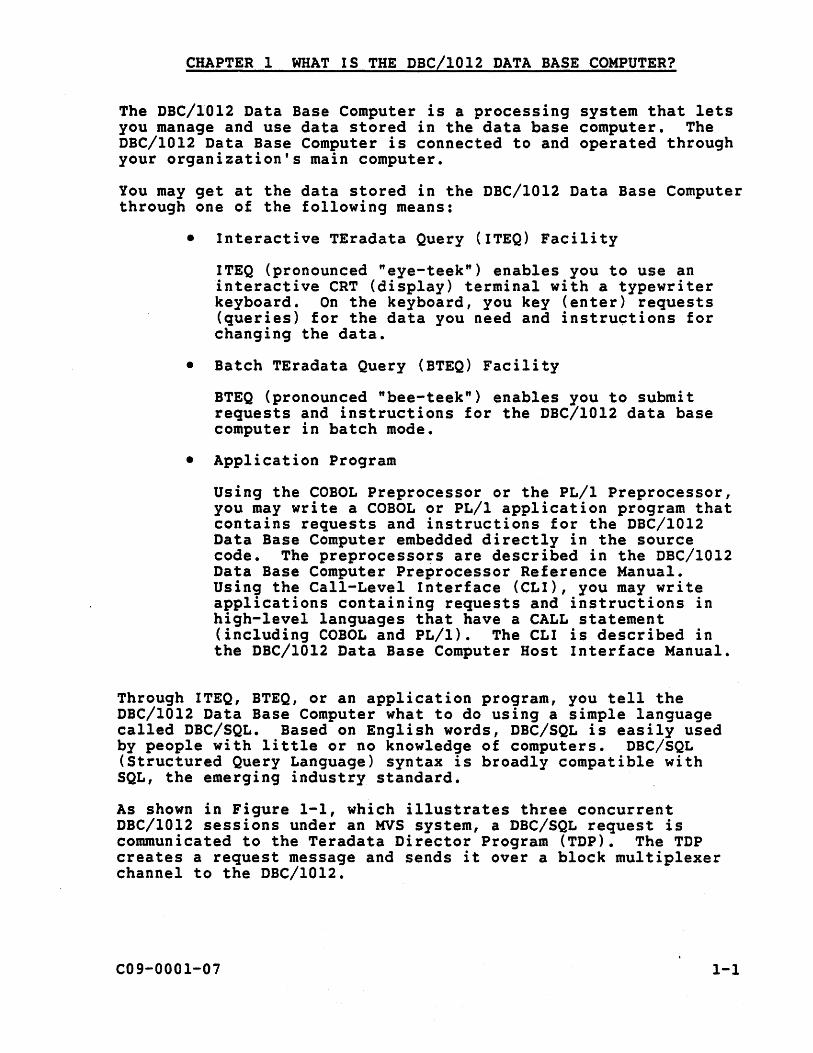
The DBC/IOI2 Data Base Computer is a processing system that lets you manage and use data stored in the data base computer. The DBC/IOI2 Data Base Computer is connected to and operated through your organization's main computer.
You may get at the data stored in the DBC/I012 Data Base Computer through one of the following means:
• Interactive TEradata Query (ITEQ) Facility
ITEQ (pronounced "eye-teek") enables you to use an interactive CRT (display) terminal with a typewriter keyboard. On the keyboard, you key (enter) requests (queries) for the data you need and instru~tions for changing the data.
• Batch TEradata Query (BTEQ) Facility
BTEQ (pronounced "bee-teek") enables you to submit requests and instructions for the DBC/I012 data base computer in batch mode.
• Application Program
Using the COBOL Preprocessor or the PL/l Preprocessor, you may write a COBOL or PL/I application program that contains requests and instructions for the DBC/I012 Data Base Computer embedded directly in the source code. The preprocessors are described in the DBC/I012 Data Base Computer Preprocessor Reference Manual. Using the Call-Level Interface (CLI), you may write applications containing requests and instructions in high-level languages that have a CALL statement (including COBOL and PL/l). The CLI is described in the DBC/I012 Data Base Computer Host Interface Manual.
Through ITEQ, BTEQ, or an application program, you tell the DBC/I012 Data Base Computer what to do using a simple language called DBC/SQL. Based on English words, DBC/SQL is easily used by people with little or no knowledge of computers. DBC/SQL (Structured Query Language) syntax is broadly compatible with SQL, the emerging industry standard.
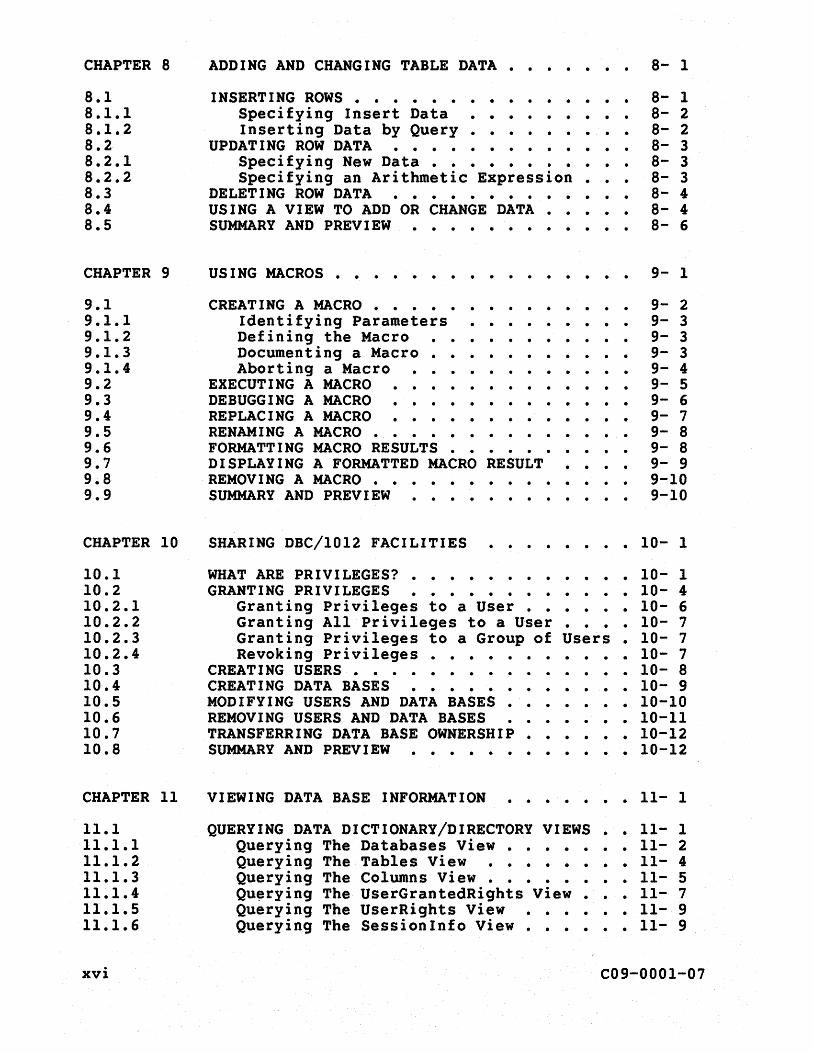
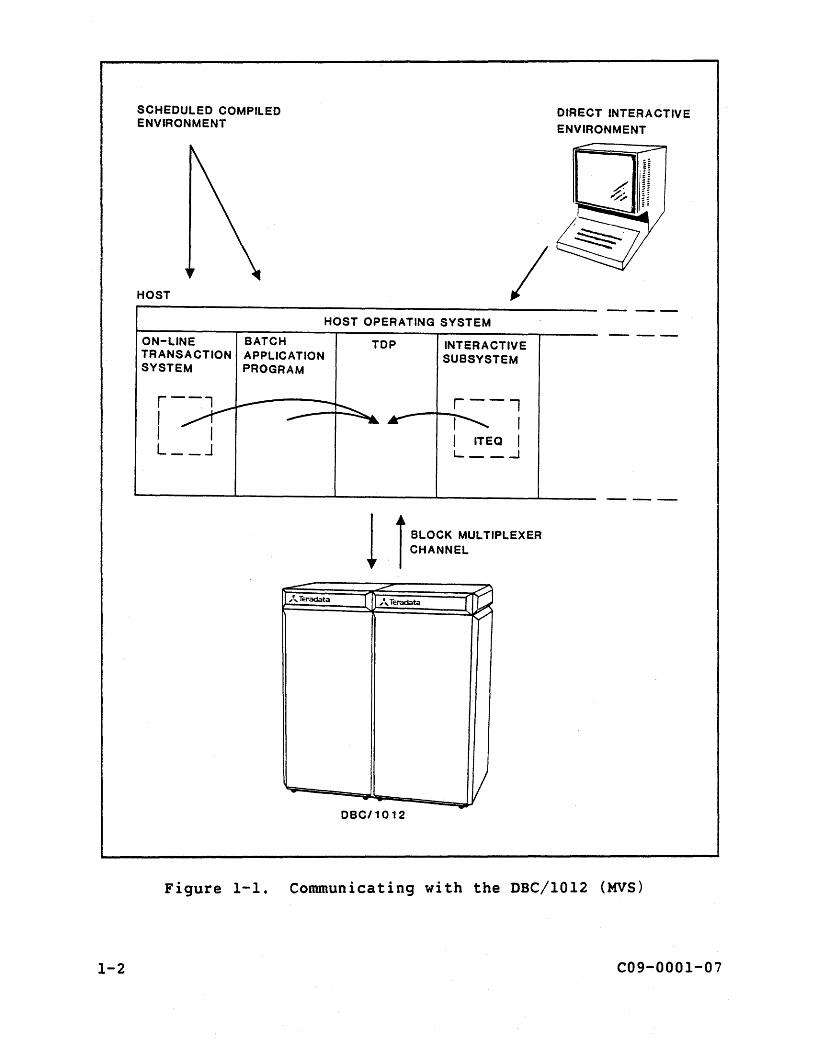
As shown in Figure 1-1, which illustrates three concurrent DBC/lOI2 sessions under an MVS system, a DBC/SQL request is communicated to the Teradata Director Program (TDP). The TDP creates a request message and sends it over a block multiplexer channel to the DBC/lOl2.
C09-OOOl-07 1-1
SCHEDULED COMPILED ENVIRONMENT
HOST / HOST OPERATING SYSTEM
ON-LINE BATCH TRANSACTION APPLICATION SYSTEM PROGRAM
..::::::::::::: /,Teradata
"'=-
1
TOP INTERACTIVE SUBSYSTEM
r---, ~-r---_
I I I ITEQ I L. __ -1
1 t BLOCK MULTIPLEXER I CHANNEL
- ,B /, Teradata
~
V --OBC/1012
DIRECT INTERACTIVE ENVIRONMENT
Figure 1-1. Communicating with the DBC/1012 (MVS)
1-2 C09-000l-07
DBC/SQL requests are called "statements." DBC/SQL statements may be used to:
• Define data: create and modify data structures.
• Select data: query a data base.
• Manipulate data: insert, delete, and update data.
• Create macros: store and execute sequences of DBC/SQL statements as a single operation.
• Control data: define data bases and users, establish access rights, and secure data.
General use of DBC/SQL statements is described in Chapters 6 through 10 of this guide. For more detailed information on all DBC/SQL statements, refer to the DBC/1012 Data Base Computer Reference Manual.
1.1 HOW A DBC/1012 DATA BASE IS ORGANIZED
Data on the DBC/1012 Data Base Computer is organized into relational data bases. Think of a relational data base as a collection of related data organized into a number of tables.
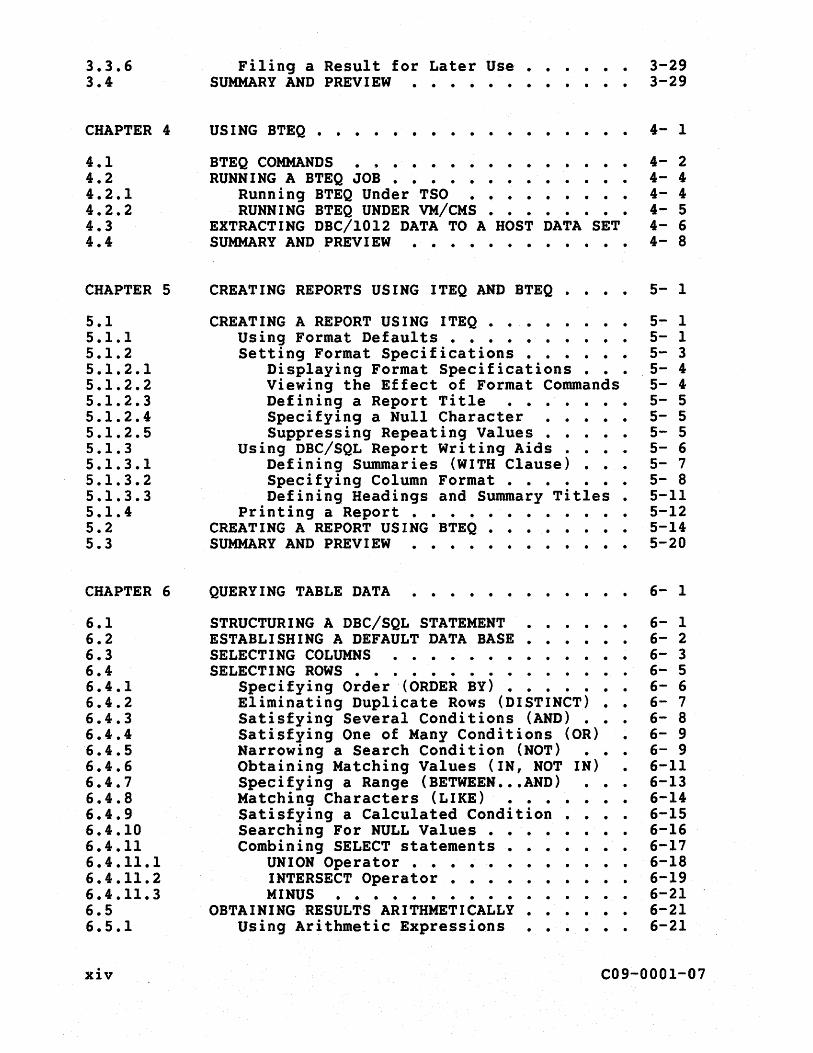
A table represents data in two dimensions, as vertical columns and horizontal rows. When you create a table, you give it a name. For example, the table shown in Figure 1-2 is named Mobile_Homes.
C09-OOOl-07 1-3
columns
MOBILE_HOMES I I I v v v
MODEL NAME I SQ_FEET I COLOR
--> Biscayne I 1,400 I pink --------------~----------------
--> El Dorado I 1,600 I yellow
rows --> Seaview 1,400 I blue
--> Del Fuego 1,700 I rust
--> Knol1woode I 1,100 I green
Figure 1-2. Table in a Data Base
You also give each column a name, which you then use when you refer to specific table data. Column names in the Mobile_Homes table are Model_Name, Sq_Feet, and Color.
Each row represents an entry in the table. The intersection of a column and a row is called a "field". For example, the fourth row of the Mobile Homes table has three fields. The data in its Model_Name field Is "Del Fuego".
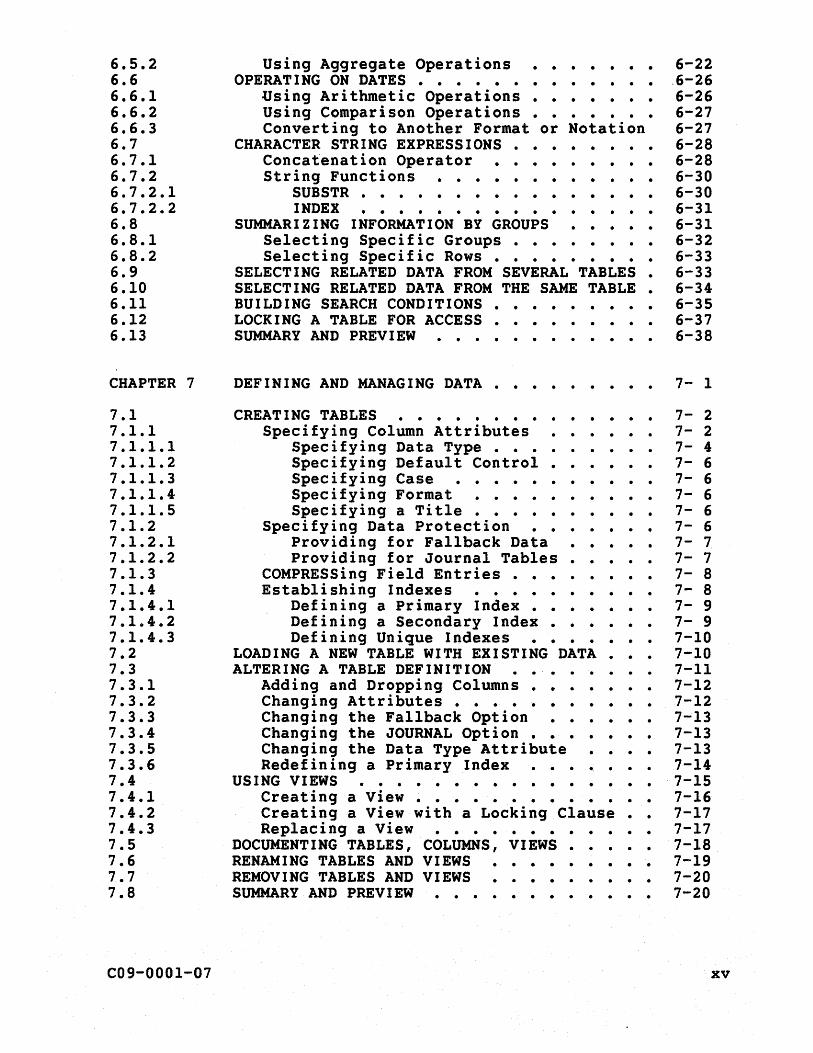
Figure 1-3 shows two example tables that are part of a data base named "Personnel" in a fictitious company. While not intended to represent the complex needs of an actual company, these tables are used throughout this guide to illustrate the principles of DBC/SQL usage. (A foldout copy of the example tables is provided in Appendix A at the back of this guide for easy reference when studying the DBC/SQL examples in this guide.)
1-4 C09-000l-07

n 0 \D I
0 0
Table: Employee tzj 0 ~. ....
\Q I c:: 0
Emp No Name .£eE~~ Job Title _~~~r! !.r! !X.P DOB Sex Race HStat EdLev ~~£ -10001- ----- ----- 4i/oj/27 Peterson J 100 Payroll Ck 25,000.00 5 H C H 12 0
10002 Moffit H 100 Recruiter 35,000.00 3 45/11/16 F B W 18 0 1'1 " fD
1000) Leidner P 300 secretary 2),000.00 13 48/07/12 F C M 16 0
10004 Smith T 500 Engineer 42,000.00 10 51/01/31 H C H 18 0 .... I
w 10005 Jones M 100 Vice Pres 50,000.00 13 40/02/13 F B D 16 0
10006 Kemper R 600 Assembler 29,000.00 7 47/09/12 H C M 12 1
10007 AgullarJ 600 Manager 45,000.00 11 49/07/09 H S H 16 0
10008 Phan A 300 Vice Pres 55,000.00 12 47/05/07 F A M 18 0
tzJ ~ PI
10009 Marston A 500 Secretary 22,000.00 8 53/07/03 H c H 14 0
10010 Reed C 500 Technician 30,000.00 4 49/04/08 M C D 16 0
a 10011 Chin M 100 Controller 38,000.00 11 55/11/27 F A H 16 0 '0 .... t1)
10012 Watson L 500 Vice Pres 56,000.00 8 43/10/03 H c S 20 0 1001) Regan R 600 Purchaser 44,000.00 10 48/10/20 F C H 16 0
to3 PI
10014 Inglls C 500 Tech Writer 34,000.00 5 38/03/07 M C S 16 0
10015 Omura H 500 Programmer 40,000.00 8 54/04/24 M A S 16 0 0-.... fD
10016 Carter J 500 Engineer 44,000.00 20 35/03/12 H C M 20 0 10017 Greene" 100 PayroU"Ck 32,500.00 15 55/11/27 M N M 16 0
(I) 10018 Russell S 300 President 65,000.00 25 32/06/05 M B [) 16 0
~. 10019 Newman P 600 Test Tech 28,600.0p 6 56/08/29 F C M 12 0
::s 10020 Brangel B 700 Salesperson 30,000.00 5 47/10/15 F C S 16 0
PI 10021 Smith T 700 Manager 45,000.00 10 46/07/29 F B S 16 0 10022 Clements D 700 Salesperson 38,000.00 9 44/08/23 M c M 16 0
~ ----------
(I)
tot (I)
0 ::s Table: Department ::s (I)
Dept No "£.e£.t~~~ ___ !",£~~n~ Lac ~'E'~~ ..... 100 Administration 5 NYC 10005
0 PI
300 Exec Office 3 NYC 10018
r1" PI 500 Engineering 7 ATL 10012
tl:I 600 Manufacturing 4 CHI 10007
PI (I)
700 Marketing 3 NYC 10021 (I)
.... I
U1
fames and contents of the example tables are as follows:
• 2
• Employee
For each employee, the Employee table lists the employee number (EmpNo), name (Name), department number (DeptNo), job title (JobTitle), salary (Salary), years of experience (YrsExp), date of birth (DOB), sex (Sex), race (Race), marital status (MStat), education level (EdLev), and handicap status (HCap).
• Department
For each company department, the Department table lists the department number (DeptNo), department name . (DeptName), employee count (EmpCount), location (Loc), and employee number of the department manager (MgrNo) •
HOW YOU COMMUNICATE THROUGH ITEQ
sing ITEQ, you enter a DBC/SQL statement at your interactive erminal. The DBC/I012 processes the statement and ITEQ displays he result on the terminal screen. ITEQ allows you to:
-6
• Enter, Edit, and Execute DBC/SQL Statements
You can enter and execute DBC/SQL statements from the terminal. If the result of a DBC/SQL query does not satisfy your needs, yo~ can progressively modify the statement without re-keying it after each execution.
• Control the Display
When the result of a DBC/SQL statement is too long or too wide to fit on one screen, you can scroll up and down or move the terminal screen right or left to view the entire result.
• Format Output and Write Reports
You can format the result of a query for display on your terminal screen or for printing on a printer.
• Store and Execute a Sequence of DBC/SQL Statements
You can define, store, and later execute sequentially a group of DBC/SQL statements and ITEQ format commands. This group is called a "macro".
C09-OOOI-07
• Display Reference Information
You can display statements that define tables, macros, and other data base objects, as well as ITEQ format controls currently in effect. Using a DBC/SQL HELP statement (Chapter 11), you may obtain information about data bases and their objects.
• Save or Discard the Result of a Query
You can save or discard the result of the last executed DBC/SQL statement.
• Control the Operation of the Terminal
You can use program function keys on the terminal keyboard to enter frequently used ITEQ commands.
Chapters 3 and 5 of this guide show you how to use the DBC/1012 Data Base Computer from your terminal via ITEQ.
1.3 HOW YOU COMMUNICATE THROUGH BTEQ
BTEQ allows you to submit one or more DBC/SQL statements to the DBC/1012 for processing in batch mode. BTEQ commands included with the DBC/SQL statements provide for session control, formatting of DBC/SQL results, and handling of· output data.
BTEQ enables you to load data to or extract data from DBC/1012 data bases. BTEQ also provides comprehensive report formatting features.
Chapter 4 shows you how to create and submit a BTEQ job, and how to use BTEQ to select data using values stored in a host input file and then store the result in a host file. Chapter 5 shows you how to create a report through BTEQ.
1.4 SUMMARY AND PREVIEW
This chapter briefly described a DBC/1012 data base and discussed the ways in which you may access and use data in DBC/1012 data bases. The following chapter discusses how you get established as a DBC/1012 user and log on to your organization's host computer to begin a session with the DBC/1012.
C09-OOOI-07 1-7

1-8 C09-OOOl-07
CHAPTER 2 GETTING ESTABLISHED AS A DBC/1012 USER
This chapter discusses the prerequisites for using data stored in a DBC/lOl2 data base:
• Establishing yourself as a DBC/lOl2 user
• Logging on to your organization's host computer in order to begin a DBC/IOl2 session
2.1 GETTING ESTABLISHED AS A USER
Before logging on to the DBC/lOl2 Data Base Computer, you will normally need to obtain:
• A username
Your username is a unique identification (often your own name) that enables the DBC/I012 to recognize you as a user.
• A password
Your password is used to authenticate your username. It should be kept secret to prevent another from accessing data under your username.
In some cases, you may also need to obtain:
• An account number
This identifier is associated with your username and is used for accounting purposes.
• A tdpid
If your organization has a number of DBC/I012 Data Base Computers that are used through the host computer to which your terminal is attached, a tdpid identifies which of the DBC/I012 Data Base Computers you wish to use for your session. If there is a single DBC/I012 attached to the host computer, a tdpid is not needed.
Chapter 3 describes how to use these components in the ITEQ LOGON command in order to communicate with the DBC/1012 using ITEQ. Chapter 4 describes how to use the same components to communicate with the DBC/I012 through BTEQ.
C09-OOOl-07 2-1
2.2 LOGGING ON TO THE HOST COMPUTER
Before logging on to the DBC/IOI2, you must log on to one of the following interactive subsystems at a 3270-type keyboard terminal attached to your organization's host computer:
• MVS Time Sharing Option (TSO)
• VM Conversational Monitor System (CMS)
The interactive subsystem allows you to use the computer with a number of other users in a conversational manner.
If you are using the DBC/I012 through ITEQ, after logging on to the interactive subsystem you may opt to define ddnames (TSO) or file names (CMS) for output files that you will need for your ITEQ session. These files may be saved for later use by an application program, or printed on a system printer. Defining output files is described in Appendix D.
If you do not define output files, they are set by default, as follows:
• When you issue the ITEQ FILE command during an ITEQ session to save the result of the current SELECT or EXECUTE MACRO statement, a host flat file is created with a logical record length of 30004 bytes. Under TSO, a data set with ddname ITEQDSKI is created to store the result; under CMS, a file named ITEQDSKl is cre.ated.
• When you issue the ITEQ PRINT command during an ITEQ session to print a result, a file (ddname ITEQPRTI/file name ITEQPRTI DATA) containing the result of the current statement is sent to a printer. System output class (wide paper or narrow paper) is determined by your organization's installation.
If you are using the DBC/IOl2 through BTEQ, you define output files using the facilities of the subsystem under which BTEQ is running (refer to Chapter 4).
2.3 SUMMARY AND PREVIEW
This chapter discussed getting established as a user and logging on to your organization's host computer in order to begin a session with the DBC/IOl2. The following chapter shows you how to communicate with the DBC/lOl2 through ITEQ.
2-2 C09-OOOI-07
CHAPTER 3 COMMUNICATING WITH THE DBC/1012 USING ITEQ
This chapter shows you how to use a 3270-type keyboard terminal to:
• Communicate with the DBC/1012 during an ITEQ session
• Edit DBC/SQL statements
• View statement results
Use of ITEQ report formatting features is discussed in Chapter 5.
3.1 COMMUNICATING IN AN ITEQ SESSION
After you have logged on to your organization's host computer, you may start ITEQ, log on to the DBC/I012, and begin entering DBC/SQL statements and ITEQ commands.
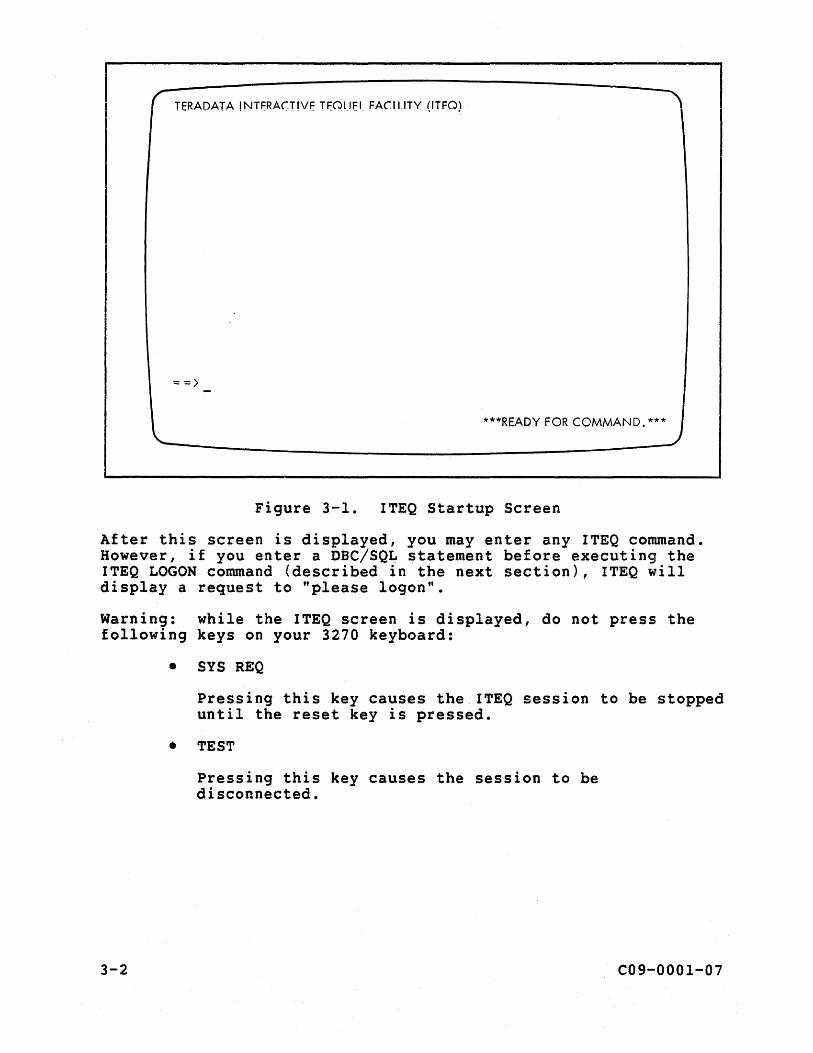
3.1.1 Starting ITEQ
If the output files needed for your ITEQ session are determined by default, as described in Chapter 2, you may start ITEQ without any preliminaries by keying the command,
ITEQ
where the cursor is positioned and pressing ENTER. The cursor is the small underline or box character, blinking or nonblinking, that moves as you key.
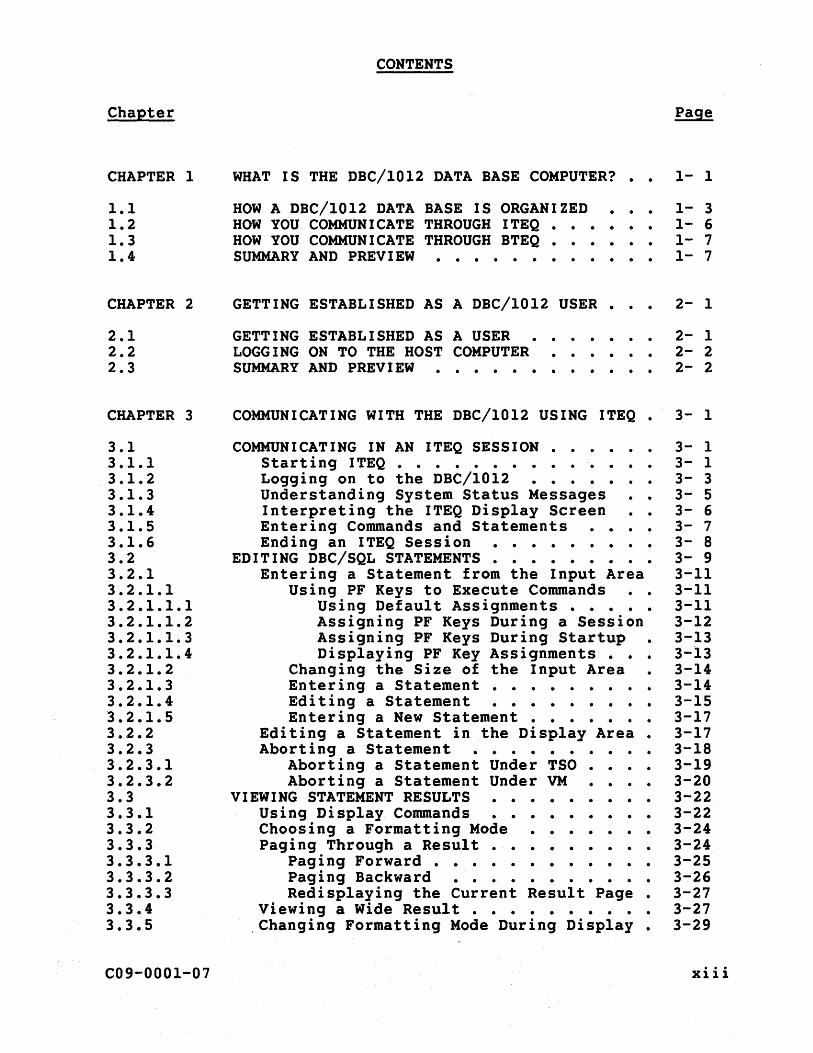
ITEQ displays the screen shown in Figure 3-1.
C09-000l-07 3-1
r TERADATA !NTERACT!VE TEQUEL FAC!LlTY (lTEQ)
= =)
***READY FOR COMMAND. ***
Figure 3-1. ITEQ Startup Screen
After this screen is displayed, you may enter any ITEQ command. However, if you enter a DBC/SQL statement before executing the ITEQ LOGON command (described in the next section), ITEQ will display a request to "please logon".
Warning: while the ITEQ screen is displayed, do not press the following keys on your 3270 keyboard:
3-2
• SYS REQ
Pressing this key causes the ITEQ session to be stopped until the reset key is pressed.
• TEST
Pressing this key causes the session to be disconnected.
C09-000l-07
3.1.2 Logging on to the DBC/1012
To log on to the host computer, do the following:
1. Key in the LOGON command (abbreviated LOG), your username, your password, and any account identifier required by your organization. For example, if your username is Omura, your password H, and the account number deptSOO, you would key the words,
LOGON Omura, H, 'deptSOO';
opposite the arrow (==» where the cursor is positioned. Note that, although there must be a space between the LOGON keyword and username, there need not be spaces between the identifiers in the command. Terminate the LOGON command by a semicolon.
2. Press ENTER.
After you have completed these two steps, and the DBC/1012 recognizes your username and password, ITEQ responds with the message,
LOGON COMPLETED.
at the top of the screen. If a STARTUP string is defined for you using a STARTUP clause in the CREATE USER or MODIFY USER statements (Chapter 10), the processing result is displayed following this mes.age.
The status message,
*** READY FOR COMMAND.***
appears at the bottom of the screen.
If you have entered your username, password or account identifier incorrectly, ITEQ displays an error message.
If a tdpid is included in your logon sequence, enter the tdpid before your username, for example,
LOGON 4/0mura, H, 'deptSOO';
Note the space between LOGON and the tdpid, 4, and the slash character (I) separating the tdpid from the username.
If the security of your password is critical and you are located where someone might be able to see it as you log on to ITEQ, press the RETURN key on your keyboard after keying your username, then key your password and other information on the line below the arrow. During logon, this second line does not display what you enter.
C09-OOOl-07 3-3
It may be possible for you to log on to the DBC/1012 by simply specifying the LOGON command with your username and no password, for example,
LOGON Omura ;
However, some users are not able to log on in this manner. You may want to check with your System Administrator to see if this logon option is available.
You may start ITEQ and log on to the DBC/1012 by keying only one command, for example:
• Under TSO:
ITEQ LOG{'4/0mura, H, "dept500"');
• Under CMS:
ITEQ 4/Omura,H, 'dept500';
By including this command in your TSO STARTUP CLIST or CMS PROFILE EXEC, you may automatically start ITEQ and log on to the DBC/I012 when you log on to TSO or CMS.
3-4 C09-0001-07
3.1.3 Understanding System Status Messages
The message READY FOR COMMAND is one of a number of messages that give you information about system status during you~ ITEQ terminal session. The most common messages that appear are listed in Table 3-1.
Table 3-1. ITEQ Status and System Messages
Message Meaning
READY FOR COMMAND ITEQ is ready to accept a new command or a DBC/SQL statement.
COMMAND IN PROCESS ITEQ is processing a command or has sent a statement to the DBC/1012 system and is waiting for a response.
DATA AVAILABLE. More data from the last data-generating READY FOR COMMAND command or statement (for example,
SELECT) is available for viewing or printing.
END OF DATA. The display area currently holds the last READY FOR COMMAND page of results from a data-generating
command or statement.
INCOMPLETE STATEMENT. READY FOR COMMAND
The current statement is incomplete, and must be corrected before it can be processed.
You are now ready to enter DBC/SQL statements and ITEQ commands.
C09-0001-07 3-5

3.1.4 Interpreting the ITEQ Display Screen
Figure 3-2 shows the general format of the ITEQ display screen.
==>
Display Area (20 lines in this example)
1 2 3 4 5 6 7 8 9 10 11 12 13 14 15 16 17 18 19 20
- - - - - - - - - - - - -21-
Input Area (3 lines) 22 ________________ 23_
Status Area (1 line) 24
Figure 3-2. ITEQ Display Screen
The display area normally is used to display responses to ITEQ commands and DBC/SQL statements. However, you can also use this area to compose a lengthy DBC/SQL statement, to modify views or macros, or to correct a previously entered DBC/SQL statement.
The input area is normally used to enter ITEQ commands and DBC/SQL statements.
The status area is used to display ITEQ status and system messages.
3-6 C09-000l-07
3.1.5 Entering Commands and Statements
When the READY FOR COMMAND message appears in the status area, you may enter a DBC/SQL statement or execute an ITEQ command. If the statement or command is incomplete (for example, not terminated by a semicolon), the message INCOMPLETE STATEMENT. READY FOR COMMAND appears on the status area.
When a DBC/SQL statement is entered, it is sent to the DBC/1012 for processing. The statement remains displayed in the input area during processing and display of the response. Thus, if the statement you enter is in error or its result is not satisfactory, you may modify the statement with a minimum of rekeying. You modify the statement using the edit commands discussed below, and then re-enter the statement for processing.
An ITEQ command is executed in the host computer. When executed, the command is erased from the input area. Depending on the command, there may also be some visible change on the terminal screen to indicate execution.
To enter a DBC/SQL statement or to execute an ITEQ command, position the cursor opposite the arrow at the beginning of the input area and key the statement or command, terminating it by a semicolon (i). To enter the statement or execute the command, press ENTER.
In Figure 3-3, a user has keyed a SELECT statement in the input area and pressed ENTER. In response, the result (three columns of data) has been displayed in the display area. Note that the original statement remains displayed in the input area.
A processing message appearing above the result indicates the type of processing that was performed and gives processing statistics. The status area indicates that the response is complete and that you may enter a new DBC/SQL statement or execute an ITEQ command.
C09-OOOI-07 3-7
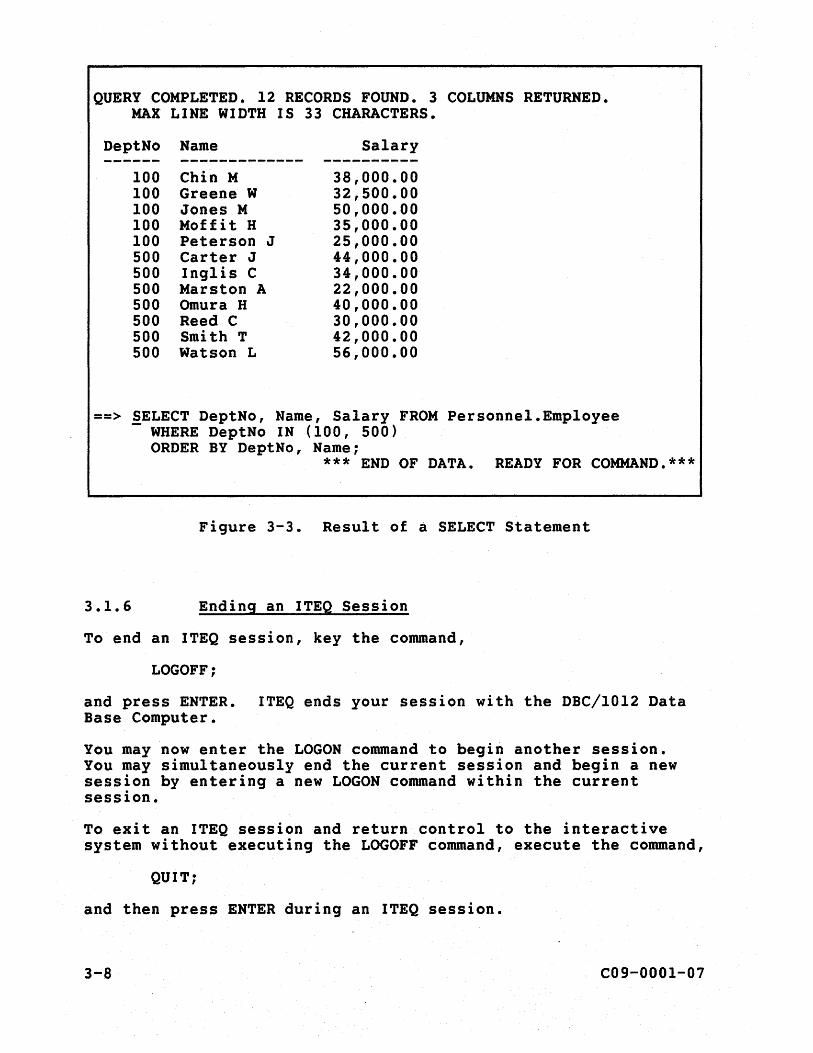
QUERY COMPLETED. 12 RECORDS FOUND. 3 COLUMNS RETURNED. MAX LINE WIDTH IS 33 CHARACTERS.
DeptNo Name
100 Chin M 100 Greene W 100 Jones M 100 Moffit H 100 Peterson J 500 Carter J 500 Inglis C 500 Marston A 500 Omura H 500 Reed C 500 Smith T 500 Watson L
Salary
38,000.00 32,500.00 50,000.00 35,000.00 25,000.00 44,000.00 34,000.00 22,000.00 40,000.00 30,000.00 42,000.00 56,000.00
==> SELECT DeptNo, Name, Salary FROM Personnel.Employee - WHERE DeptNo IN (100, 500)
ORDER BY DeptNo, Name; *** END OF DATA. READY FOR COMMAND.***
Figure 3-3. Result of a SELECT Statement
3.1.6 Ending an ITEQ Session
To end an ITEQ session, key the command,
LOGOFF;
and press ENTER. ITEQ ends your session with the DBC/1012 Data Base Computer.
You may now enter the LOGON command to begin another session. You may simultaneously end the current session and begin a new session by entering a new LOGON command within the current session.
To exit an ITEQ session and return control to the interactive system without executing the LOGOFF command, execute the command,
QUIT;
and then press ENTER during an ITEQ session.
3-8 C09-000l-07
3.2 EDITING DBC/SQL STATEMENTS
During an interactive session with the DBC/I012 Data Base Computer, you may key a statement for entry in either the input area or the display area of the screen.
Normally, you execute commands and enter statements from the input area. When you enter a new statement from the input area, you may simultaneously view the result of the statement previously processed in the display area.
However, because the display area is usually larger than the input area (see Figure 3-2), entering and editing a long DBC/SQL statement or macro from the display area may be more convenient because it enables you to view the statement in its entirety. Also, a ,statement or macro that is entered in the display area (or that is displayed there using the SHOW command) may be printed by executing the PRINT command.
You use ITEQ edit commands to help you key and edit DBC/SQL statements in the input area or the display area. Table 3-2 summarizes the ITEQ edit commands that apply to both the input area and the display area. Table 3-3 summarizes the commands that affect only the display area. (Any abbreviation allowed in keying a command is indicated in parentheses following the command syntax.)
C09-0001-07 3-9

3-10
Table 3-2. Edit Commands Used for Input, Display Areas
Command Function
ADD: Adds one blank line following the line on which the cursor is positioned. (The cursor is the small underline or box character, blinking or nonblinking, that moves as you key.)
CLEAR Removes the current contents of the input area or the display area so that a new statement or
INPUT: command may be keyed there.
DOWN [n]: Moves the display down three lines or n number of lines. ([] is used to indicate an optional parameter.)
JOIN: Appends the next line of characters to the cursor position on the current line, overlaying the cursor and erasing any characters to the right of the cursor. (You must assign a PF key to this command, as described below.)
REMOVE: Removes the line on which the cursor is positioned.
SPLIT: Creates a new line following the current line and moves characters right of (and including) the cursor to the new line. (You must assign a PF key to this command, as described below.)
UP [n]: Moves the display up three lines or n number of lines. ([] is used to indicate an optional parameter.)
Table 3-3. Edit Commands Only For Display Area
Command
INPUT:
SHOW: (SHO:)
SUBMIT: (SUB:)
Function
Sets the display area for input.
Re-displays the current statement in the display area so that it may be edited or printed.
Executes a statement keyed or edited in the display area.
C09-0001-07
You may execute an edit command by keying it in the input area and pressing ENTER to execute it. However, you may find it more convenient to press a PF key assigned to the command, as discussed below.
In general, successful execution of an edit command is indicated by an appropriate movement on the terminal screen. If successfully executed from the input area, a command is erased from that area upon execution. If the command fails, the cursor moves to the beginning of the input area and the unsuccessful command, if executed from that area, remains displayed.
3.2.1 Entering a Statement from the Input Area
As discussed above, when you enter a DBC/SQL statement from the input area, the statement remains there during processing and display of its processing message and its result. If an error message or the result tells you that the statement is in error, you may edit the command or statement without rekeying the entire input string and re-enter it.
3.2.1.1 Using PF Keys to Execute Commands
To use ITEQ edit commands to edit a statement in the input area, you use program function (PF) keys that have been assigned to these commands. A command is then executed by pressing the appropriate PF key.
3.2.1.1.1 Using Default Assignments
When you log on to (start to use) ITEQ, certain PF keys are automatically assigned to ITEQ commands. This automatic assignment is called a "default." Default PF key assignments for edit commands are listed in Table 3-4. (The heading "87-key" designates the settings for a 3270-type terminal with an 87-key keyboard; "75-key" designates settings for the 75-key 3270 keyboard.)
C09-OOOI-07 3-11
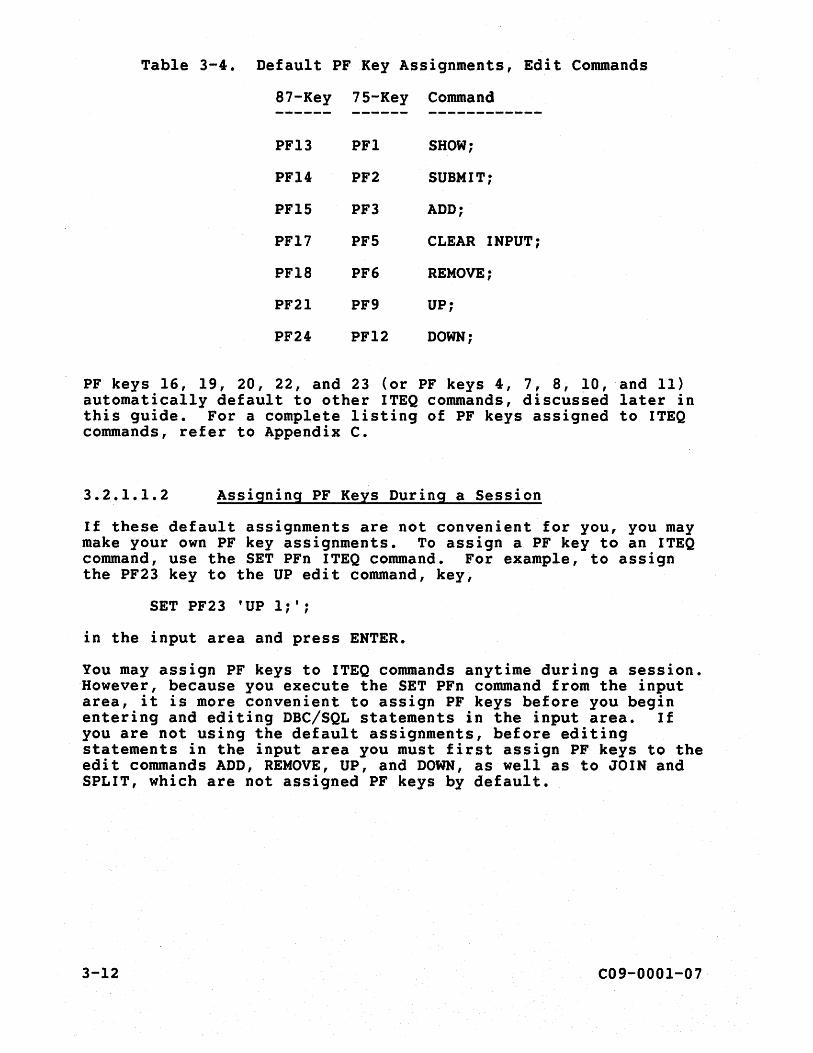
Table 3-4. Default PF Key Assignments, Edit Commands
87-Key 75-Key Command ------ ------ ------------PFl3 PF1 SHOW;
PF14 PF2 SUBMIT;
PF15 PF3 ADD;
PF17 PF5 CLEAR INPUT;
PF18 PF6 REMOVE;
PF21 PF9 UP;
PF24 PF12 DOWN;
PF keys 16, 19, 20, 22, and 23 (or PF keys 4, 7, 8, 10, and 11) automatically default to other ITEQ commands, discussed later in this guide. For a complete listing of PF keys assigned to ITEQ commands, refer to Appendix C.
3.2.1.1.2 Assigning PF Keys During a Session
If these default assignments are not convenient for you, you may make your own PF key assignments. To assign a PF key to an ITEQ command, use the SET PFn ITEQ command. For example, to assign the PF23 key to the UP edit command, key,
SET PF23 'UP 1;';
in the input area and press ENTER.
You may assign PF keys to ITEQ commands anytime during a session. However, because you execute the SET PFn command from the input area, it is more convenient to assign PF keys before you begin entering and editing DBC/SQL statements in the input area. If you are not using the default assignments, before editing statements in the input area you must first assign PF keys to the edit commands ADD, REMOVE, UP, and DOWN, as well as to JOIN and SPLIT, which are not assigned PF keys by default.
3-12 C09-0001-07
3.2.1.1.3 Assigning PF Keys During Startup
Your own PF key assignments may be made automatically when you log on to the DBC/1012. You may provide for this in an earlier session by entering a DBC/SQL MODIFY USER statement for yourself that specifies the assignments in a STARTUP string that is executed when you log on to the DBC/1012~ (The MODIFY USER statement is described in Chapter 10.)
For example, to assign PF keys to SPLIT and JOIN commands during subsequent logons if your username were Inglis, you would key:
MODIFY USER Inglis AS STARTUP = 'ECHO "SET PFI ""SPLIT;"";";
ECHO "SET PF2 ""JOIN;"";";';
In the STARTUP string, each ITEQ edit command is enclosed within a SET PFn command and each PFn command is enclosed within a DBC/SQL ECHO statement. The ECHO statement (discussed in Chapter 9), is needed to convey the command to ITEQ.
The entire STARTUP string is enclosed by apostrophes. Each SET PFn command is identified within the string by double apostrophes, each edit command by quadruple apostrophes. (Use of apostrophes in DBC/SQL is described in Chapter 6.) Each ECHO statement and edit command, as well as the MODIFY USER statement itself, is terminated by a semicolon.
Note that, when PF keys 1 through 12 are assigned to ITEQ commands, the ALT key must be pressed along with the PF key to execute the command.
3.2.1.1.4 Displaying PF Key Assignments
To display currentPF key assignments during an ITEQ session, execute the SHOW CONTROL command, as follows:
SHOW CONTROL;
This command also displays the current setting of ITEQ display and format commands.
The editing example presented in the section "Editing a Statement," below, assumes that you are using the default PF key assignments.
C09-0001-07 3-13
3.2.1.2 Changing the Size of the Input Area
The original size of the input area is three lines. If you expect normally to be entering DBC/SQL statements that are longer than three lines, you can increase the size of the input area.
The size of the input area is changed using the SET INPUTAREA SIZE command. For example, to increase the size of the input area to five lines, key the following command in the input area and press ENTER:
SET INPUTAREA SIZE 5;
3.2.1.3 Entering a Statement
You may enter as long a statement as you like in the input area without increasing the size of the area. For example, given an input area size of three lines, assume that you wish to enter the following DBC/SQL statement in the input area:
SELECT DeptNo, Name, Salary FROM Employee WHERE DeptNo IN (100, 500, 600) WITH SUM (Salary) (TITLE 'TOTAL') BY DeptNo ORDER BY Name;
Use the ~ollowing procedure to enter this statement:
1. Erase the input area by pressing the PF17 key (assigned to the CLEAR INPUT edit command). The cursor is positioned opposite the arrow at the beginning of the input area.
2. Key the first three lines of the statement, pressing the return key on the terminal keyboard to position the cursor at the beginning of the next line. (There are now no blank lines remaining in the input area.)
3. Press ENTER to cause the first three lines of the statement to be recorded by ITEQ. ITEQ re-displays the last line that you keyed on the first line of the input area.
4. Key the rest of your multi-line statement and terminate it with a semicolon (;).
5. Press ENTER to send this last line to ITEQ. When ITEQ recognizes the semicolon as ending the statement, it submits the entire statement for processing and displays the first three lines in the input area.
3-14 C09-OOOl-07
If you correctly key a DBC/SQL statement and terminate it by a semicolon, ITEQ has no concern for the format in which you enter the statement. The statement above could be keyed in three lines, as follows:
==> SELECT DeptNo, Name, Salary FROM Employee WHERE DeptNo IN (100, SOO, 600) WITH SUM (Salary) (TITLE 'TOTAL') BY Dep tNo ORDER BY Name; _
Note that, even when you continue to key beyond the end of a line, ITEQ is able to interpret interruptions in the statement (Dep-tNo, in the example) accurately as long as the statement is keyed correctly.
3.2.1.4 Editing a Statement
Assume that, after keying the first seven lines of a lengthy statement, you realize that you have misspelled a word in the second line. To correct the word, use the following procedure:
1. Press the PF2l key (assigned to the UP edit command) until the second line appears.
2. Move the cursor to the incorrect word.
3. Key the correct spelling over it.
4. Press the PF24 key (assigned to the DOWN edit command) to return to the line that you were keying so that you may complete the statement.
S. Press ENTER to submit the statement for processing.
Note that, while you are executing the UP and DOWN edit commands, different statement lines are being moved into the first line of the input area opposite the arrow. If one of these lines is too long to fit on that line, the line is wrapped around into the second line of the input area, and the next line of the statement is positioned in the third line of the input area.
You may add a line to a statement by pressing the PFlS key (assigned to the ADD edit command). For example, to add a clause between lines 2 and 3 of the SELECT statement above,
1. position the cursor at line 2
2. Press PFlS
3. Key the new clause on the blank line created after line 2
C09-OOOl-07 3-15

To delete a line from a statement,
1. Position the cursor anywhere on the line to be deleted
2. Press the PF18 key (assigned to the REMOVE edit command)
To delete part of a line from any position in the line to the end of the line,
1. position the cursor on the first character to be deleted
2. Press the ERASE EOF key on the terminal keyboard
To insert characters within a statement line,
1. Position the cursor at the point where the characters are to be added
2. Press the INSERT key on the terminal keyboard
3. Key the characters
4. Press the RESET key to cancel insert mode
To de1ete characters in a statement line,
1. position the cursor on the first character to be deleted
2. Press the DELETE key repeatedly until the characters are deleted
To insert new material (for example, a clause) within a statement line that already extends across the screen,
1. position the cursor at the point in the line where the insertion is to occur
2. Press the PF key that you have assigned to· the SPLIT command
3. Insert the material on the split line
To move the material on the next line to the current line,
1. Position the cursor at the point on the line where the material is to be moved
3-16 C09-OOOl-O?

2. Press the PF key that you have assigned to the JOIN command
3. The material is moved to the current line, overwriting the cursor and any characters between the cursor and the end of the line.
When editing a complete statement (that is, one terminated by a semicolon) in the input area, be careful not to press ENTER by accident, thereby inadvertently entering the statement before it is ready to be processed.
3.2.1.5 Entering a New Statement
After ITEQ has displayed the result of a DBC/SQL statement in the display area, you may enter a new statement. To do this, either key over the previous statement in the input area or first erase the statement from the input area by pressing the PF17 key (CLEAR INPUT) •
If you key the new statement over the previous one, use the ERASE EOF (End Of Field) key to erase the remains of the present line. ERASE EOF erases a line from the cursor position to the end of the line.
When you enter a new statement, the display area is cleared.
3.2.2 Editing a Statement in the Display Area
The display area is used in two ways: to display the result of processing a DBC/SQL statement, or to enter a statement. To enter a statement in the display area, use the following procedure:
1. Execute the INPUT edit command to tell the system that the display area will now be used for statement input. This action positions the cursor at the beginning of the display area.
2. Key the DBC/SQL statement, using the edit commands listed in Tables 3-2 and 3-3. (When the display area is set for input, only ITEQ edit commands may be executed. )
3. Press the PF14 key (assigned to the SUBMIT edit command) to enter the statement for processing. ITEQ displays the first three lines of the statement in the input area and resets the display area for display of the result. Note that, if the ~irst line of the statement is too long to fit opposite the arrow in the
C09-OOOl-07 3-17

input area, the line is wrapped around into the second line of the input area, and the second line of the statement is positioned in the third line of the input area.
If the result of the statement is not what you wanted, you may do one of two things. You may:
1. Edit the statement displayed in the input area and press ENTER to re-enter the statement for processing. The new result is displayed in the display area.
2. Edit the statement in the display area by pressing the PF13 key (assigned to the SHOW command). The display area is converted for statement entry and the statement is displayed there, overwriting the unsatisfactory result. Re-enter the corrected statement for processing by executing the SUBMIT command (PF14).
If you execute an edit command incorrectly from the input area while you are editing a statement in the display area, the statement is erased and an error message is displayed. To redisplay the statement that you were editing, press the PA2 key.
A statement that appears in the display area may be printed using the PRINT command, described in Chapter 5 and Appendix D.
3.2.3 Aborting a Statement
If you want to terminate processing of a DBC/SQL statement after the statement is entered but before processing is completed, execute the ITEQ ABORT command. This is the only command that may be executed when the status area message reads "COMMAND IN PROCESS".
Executing the ABORT command has much the same effect as entering the DBC/SQL ABORT statement, described in Chapter 9. That is, it aborts the current transaction. However, the DBC/SQL ABORT statement is used within a macro or a transaction that is processed by a language preprocessor to abort a transaction unconditionally in response to an error condition. The ABORT command, by contrast, is used interactively -- and may not be executed in time to stop a transaction. (Refer to item 3 in the dialogue described in Tables 3-5 and 3-6, below.)
If the statement aborted by the ABORT command is a data definition or data manipulation statement, any change made to the data base is backed out. For a SELECT statement, any result is deleted. Locks on the data base that were initiated by the
3-18 C09-000l-07
aborted statement are released. (For a discussion of locks, refer to "Concurrency Control" in DBC/1012 Data Base Computer Concepts and Facilities.)
The simplest way to execute the ABORT command is to press a PF key assigned to the command via a startup string, as described above.
3.2.3.1 Aborting a Statement Under TSO
You may abort processing of the current DBC/SQL statement as described in Table 3-5:
• Interrupt ITEQ (1)
• Enter the ABORT command (2)
• (The statement is aborted (3a) or the statement completes (3b»
Following the attempt (successful or unsuccessful) to perform the abort, you may:
• Continue the ITEQ session (4a)
• Exit ITEQ and return to TSO normally (4b)
• Interrupt and exit ITEQ (4c)
C09-000l-07 3-19
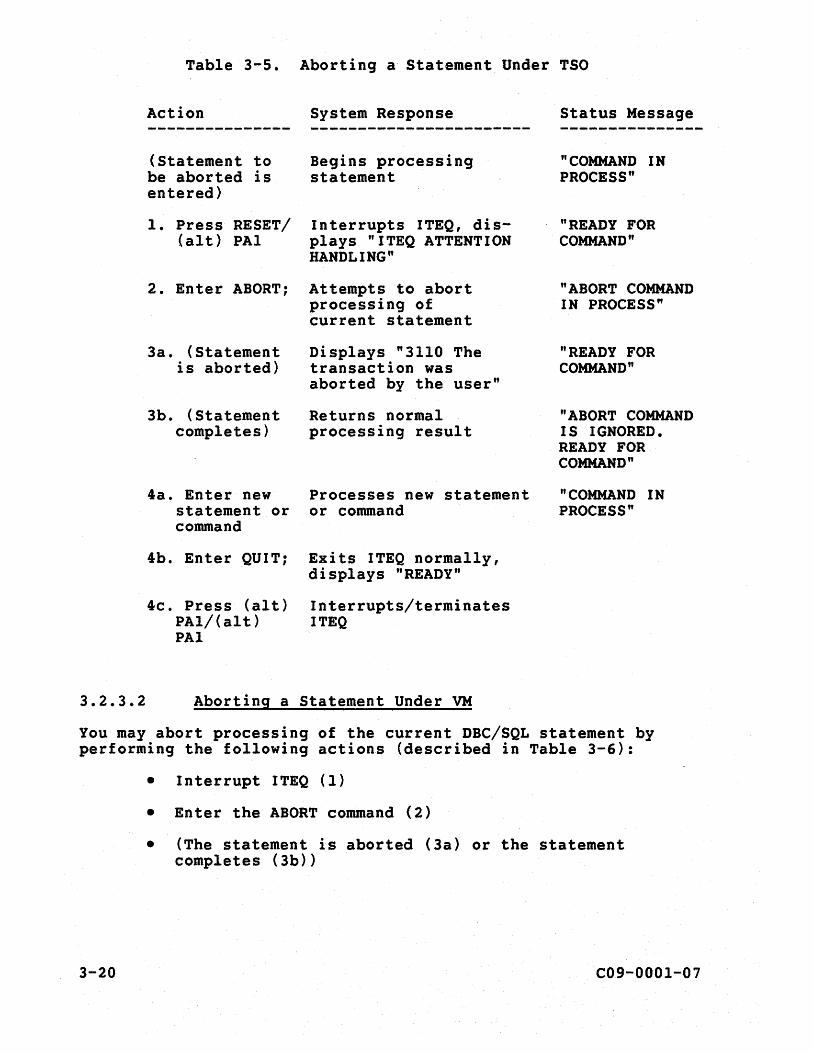
3.2.3.2
Table 3-5. Aborting a Statement Under TSO
Action
(Statement to be aborted is entered)
1. Press RESET/ (alt) PAl
2. Enter ABORT;
3a. (Statement is aborted)
3b. (Statement completes)
4a. Enter new statement or command
4b. Enter QUIT;
4c. Press (alt) PAI/(alt) PAl
System Response
Begins processing statement
Interrupts ITEQ, displays "ITEQ ATTENTION HANDLING"
Attempts to abort processing of current statement
Displays "3110 The transaction was aborted by the user"
Returns normal processing result
Processes new statement or command
Exits ITEQ normally, displays "READY"
Interrupts/terminates ITEQ
Aborting a Statement Under VM
Status Message
"COMMAND IN PROCESS"
"READY FOR COMMAND"
"ABORT COMMAND IN PROCESS"
"READY FOR COMMAND"
"ABORT COMMAND IS IGNORED. READY FOR COMMAND"
"COMMAND IN PROCESS"
You may abort processing of the current DBC/SQL statement by performing the following actions (described in Table 3-6):
• Interrupt ITEQ (1)
• Enter the ABORT command (2)
• (The statement is aborted (3a) or the statement completes (3b»
3-20 C09-000l-07
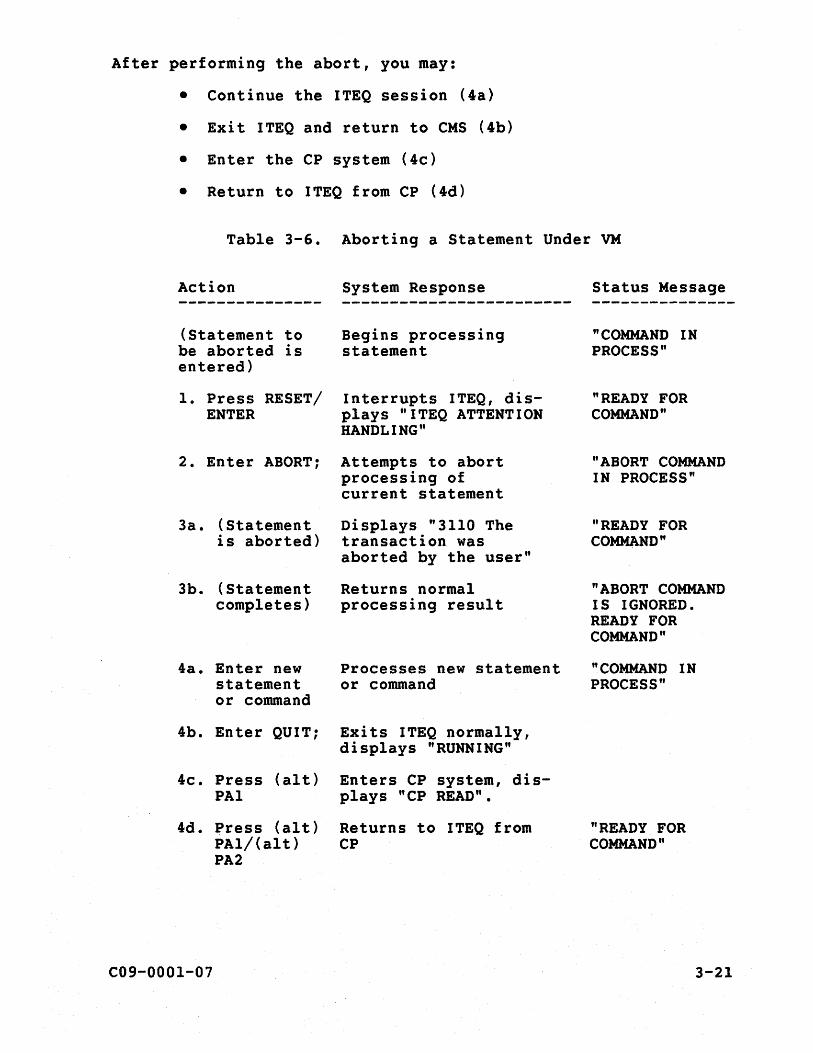
After performing the abort, you may:
• Continue the ITEQ session (4a)
• Exit ITEQ and return to eMS (4b)
• Enter the CP system (4c)
• Return to ITEQ from CP (4d)
Table 3-6. Aborting a Statement Under VM
Action
(Statement to be aborted is entered)
1. Press RESET/ ENTER
2. Enter ABORT;
3a. (Statement is aborted)
3b. (Statement completes)
4a. Enter new statement or command
4b. Enter QUIT;
4c. Press (alt) PAl
System Response
Begins processing statement
Interrupts ITEQ, displays "ITEQ ATTENTION HANDLING"
Attempts to abort processing of current statement
Displays "3110 The transaction was aborted by the user"
Returns normal processing result
Processes new statement or command
Exits ITEQ normally, displays "RUNNING"
Enters CP system, displays "CP READ".
4d. Press (alt) Returns to ITEQ from PA1/(alt) CP PA2
C09-0001-07
Status Message
"COMMAND IN PROCESS"
"READY FOR COMMAND"
"ABORT COMMAND IN PROCESS"
"READY FOR COMMAND"
"ABORT COMMAND IS IGNORED. READY FOR COMMAND"
"COMMAND IN PROCESS"
"READY FOR COMMAND"
3-21
3.3 VIEWING STATEMENT RESULTS
Normally, the result of a SELECT statement does not exceed the size of the display area of your terminal screen. Sometimes, however, the displayed result of a statement or macro exceeds the length or width of the display area. When this happens, ITEQ formats the lengthy result into pages corresponding to the size of the display area.
Until you discard a result, you may view it at your terminal or file it for later use. The result also may be formatted and printed as a report, as discussed in Chapter 5.
When you enter a new SELECT statement or a macro containing a SELECT statement, the result of any previous statement is automatically discarded. Executing a CANCEL command also deletes the result of the present query.
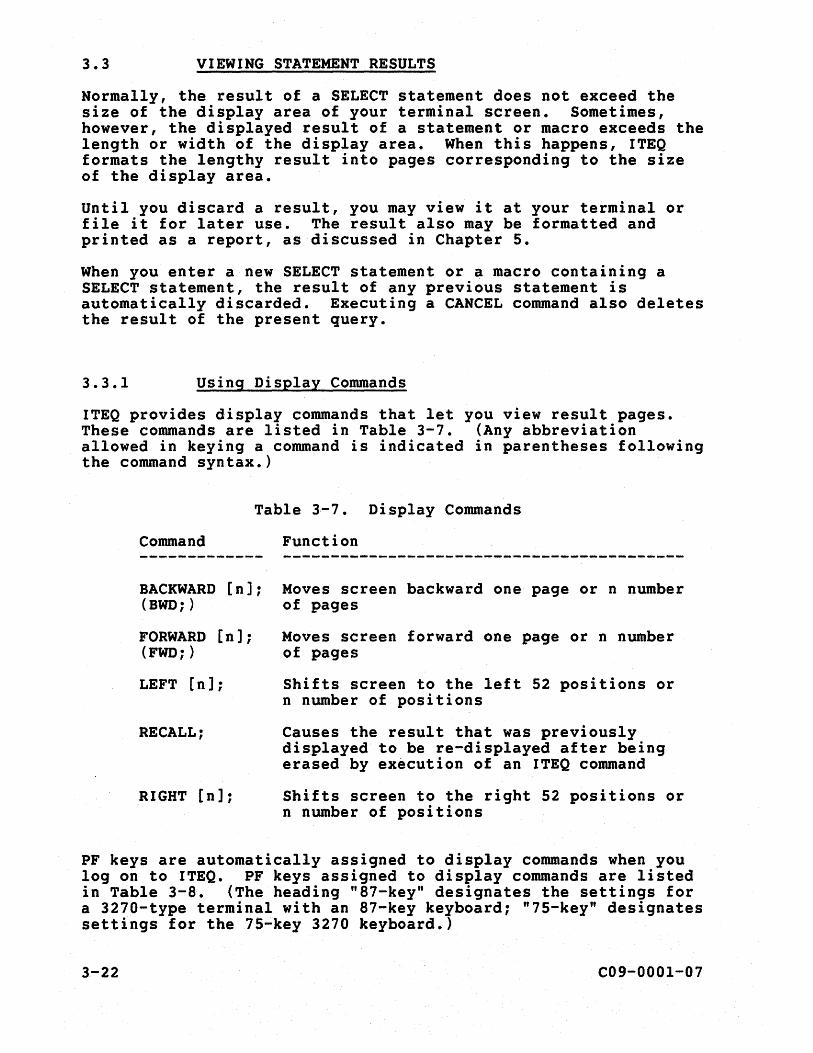
3.3.1 Using Display Commands
ITEQ provides display commands that let you view result pages. These commands are listed in Table 3-7. (Any abbreviation allowed in keying a command is indicated in parentheses following the command syntax.)
Table 3-7. Display Commands
Command
BACKWARD [n]; (BWD; )
FORWARD [n]; (FWD; )
LEFT [n];
RECALL;
RIGHT [n];
Function
Moves screen backward one page or n number of pages
Moves screen forward one page or n number of pages
Shifts screen to the left 52 positions or n number of positions
Causes the result that was previously displayed to be re-displayed after being erased by execution of an ITEQ command
Shifts screen to the right 52 positions or n number of positions
PF keys are automatically assigned to display commands when you log on to ITEQ. PF keys assigned to display commands are listed in Table 3-8. (The heading "87-key" designates the settings for a 3270-type terminal with an 87-key keyboard; "75-key" designates settings for the 75-key 3270 keyboard.)
3-22 C09-000l-07
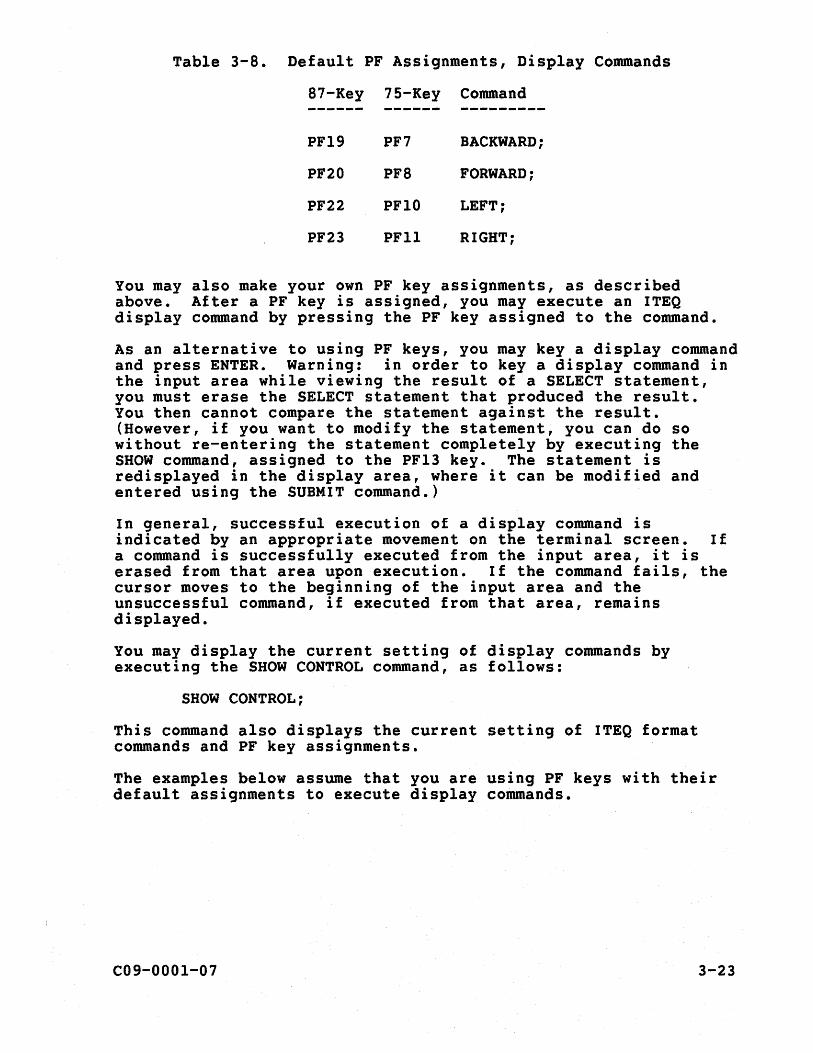
Table 3-8. Default PF Assignments, Display Commands
87-Key 75-Key Command ------ ------ ---------PF19 PF7 BACKWARD;
PF20 PF8 FORWARD;
PF22 PFIO LEFT;
PF23 PFll RIGHT:
You may also make your own PF key assignments, as described above. After a PF key is assigned, you may execute an ITEQ display command by pressing the PF key assigned to the command.
As an alternative to using PF keys, you may key a display command and press ENTER. Warning: in order to key a display command in the input area while viewing the result of a SELECT statement, you must erase the SELECT statement that produced the result. You then cannot compare the statement against the result. (However, if you want to modify the statement, you can do so without re-entering the statement completely by executing the SHOW command, assigned to the PF13 key. The statement is redisplayed in the display area, where it can be modified and entered using the SUBMIT command.)
In general, successful execution of a display command is indicated by an appropriate movement on the terminal screen. If a command is successfully executed from the input area, it is erased from that area upon execution. If the command fails, the cursor moves to the beginning of the input area and the unsuccessful command, if executed from that area, remains displayed.
You may display the current setting of display commands by executing the SHOW CONTROL command, as follows:
SHOW CONTROL;
This command also displays the current setting of ITEQ format commands and PF key assignments.
The examples below assume that you are using PF keys with their default assignments to execute display commands.
C09-OOOl-O? 3-23
3.3.2 Choosing a Formatting Mode
The format in which the result of a SELECT statement is displayed depends on the formatting mode that is in effect when the result is returned. ITEQ formatting modes are Format or Unformat.
You use Format mode to tailor a result into. report (Chapter 5), which may be viewed or printed for later reference. When a result is displayed in Format mode, the processing message that contains the statistics for the result is displayed by itself as the first result "page". Selected data is formatted into consecutive pages, each containing date, page number, report title, and column headings.
You use Unformat mode for viewing data on the terminal screen (although an unformatted result may also be filed or printed). When a result is displayed in Unformat mode, the processing message, along with selected data and column headings, are displayed as a single entity. If the result exceeds the size of the display area, you may view the result as consecutive screen pages without column headings or other embellishment~
Unformat mode is used here to show you how to use display control commands. Nevertheless, display control commands are likewise used to display a formatted result.
When you log on to ITEQ and begin a session, Unformat mode is automatically set and remains in effect until changed. To change to Format mode, execute the command,
SET FORMAT; (or SET FORMAT ON;)
Any subsequent SELECT result is then formatted according to any format commands executed earlier in the session.
To reinstate Unformat mode, execute,
SET FORMAT OFF;
Subsequent results are then unformatted, as described above. Certain format commands, discussed in Chapter 5, may also be applied to an unformatted result.
3.3.3 Paging Through a Result
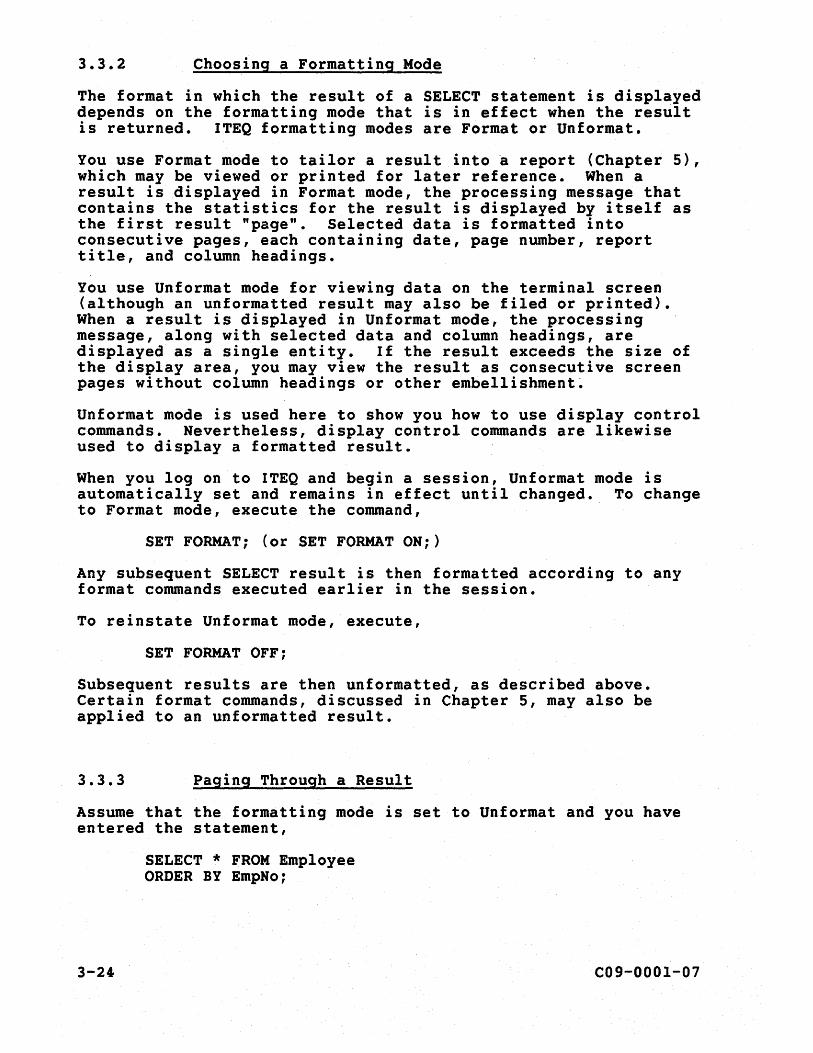
Assume that the formatting mode is set to Unformat and you have entered the statement,
3-24
SELECT * FROM Employee ORDER BY EmpNo;
C09-OOOl-07
The following screen is displayed:
QUERY COMPLETED. 22 RECORDS FOUND. 12 COLUMNS RETURNED. MAXIMUM LINE WIDTH IS 100 CHARACTERS (EXCEEDS PRINT LINEWIDTH).
EmpNo Name DeptNo JobTitle Salary YrsExp ----- ------------ ------ ---------- ---------- -------
10001 Peterson J 100 Bookkeeper 25,000.00 5 42/0 10002 Moffit H 100 Recruiter 35,000.00 3 45/1 10003 Leidner P 300 Secretary 23,000.00 13 48/0 10004 Smith T 500 Engineer 42,000.00 10 51/0 10005 Jones M 100 Vice Pres 50,000.00 13 40/0 10006 Kemper R 600 Assembler 29,000.00 7 47/0 10007 Aguilar J 600 Manager 45,000.00 11 49/0 10008 Phan A 300 Vice Pres 55,000.00 12 47/0 10009 Marston A 500 Secretary 22,000.00 8 53/0 10010 Reed C 500 Technician 30,000.00 4 49/0 10011 Chin M 100 Accountant 38,000.00 11 55/1 10012 Watson L 500 Vice Pres 56,000.00 8 43/1 10013 Regan R 600 Purchaser 44,000.00 10 48/1 10014 Inglis C 500 Tech Writer 34,000.00 5 38/0 10015 Omura H 500 Programmer 40,000.00 8 54/0
==>_SELECT * FROM Employee ORDER BY EmpNo;
*** DATA AVAILABLE. READY FOR COMMAND.***
The status message ***DATA AVAILABLE. READY FOR COMMAND.*** (displayed in the status area) indicates that the statement has returned more data than can be displayed in a single screen. To see the next page of the result, page forward.
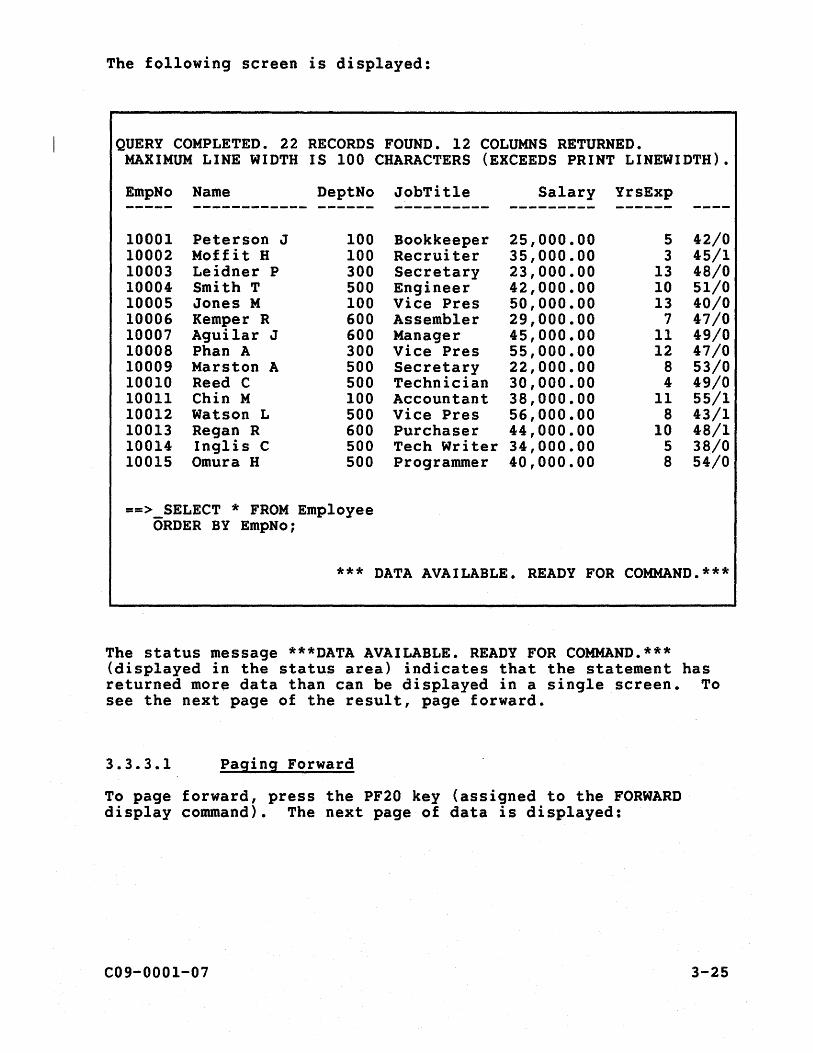
3.3.3.1 Paging Forward
To page forward, press the PF20 key (assigned to the FORWARD display command). The next page of data is displayed:
C09-000l-07 3-25
10016 Carter J 500 10017 Greene W 100 10018 Russell S 300 10019 Newman P 600 10020 Brangel B 700 10021 Smith T 700 10022 Clements D 700
==> SELECT * FROM Employee ORDER BY EmpNo;
Engineer 44,000.00 20 35/0 Payroll Ck 32,500.00 15 55/1 President 65,000.00 25 32/0 Test Tech 28,600.00 6 56/0 Salesperson 30,000.00 5 47/1 Manager 45,000.00 10 46/0 Salesperson 38,000.00 9 44/0
*** END OF DATA. READY FOR COMMAND.***
The status message ***END OF DATA. READY FOR COMMAND.*** . indicates that this is the last page of the statement result.
Regardless of the length of a result, you may press PF20 to display each consecutive page until you reach the last page, indicated by ***END OF DATA. READY FOR COMMAND.***. At this point, pressing PF20 has no effect.
3.3.3.2 Paging Backward
With the second page of the result displayed, press the PF19 key (assigned to the BACKWARD display command). The first result page is again displayed.
Unless you are viewing the first page of a result, you may press PF19 to display each preceding page until you reach the first page, on which the processing message for the result is displayed. At this point, pressing PF19 has no effect.
If you are viewing any page of a result, -executing the command,
BACKWARD *;
3-26 C09-0001-07
displays the first result page.
3.3.3.3 Redisplaying the Current Result Page
After a result page is erased from the display area, executing the command,
RECALL;
causes the page to be re-displayed. For example, when you enter an erroneous ITEQ command while viewing a result page, the page may be erased in order to display an appropriate error message. Executing RECALL re-displays the erased page.
3.3.4 Viewing a Wide Result
On the first page of the example result above, the processing message informs you that the maximum print line width is 100 characters. This message warns you that a report based on this result will not fit on B.5- by II-inch paper (which has an BO-character maximum line width).
Note that the message also alerts you to the fact that more data is available to the right of the current display, because the width of a terminal display is BO characters. Also, the display is obviously split at the YrsExp column.
Imagine the terminal screen as a magnifying glass through which you are viewing the result. To view the portion of the result that is not visible, you move the magnifying glass (that is, shift the screen) to the right. You shift the screen to the right by pressing the PF23 key (assigned to the RIGHT display command). The screen shifts to the right 52 character positions to display the following:
C09-000l-07 3-27
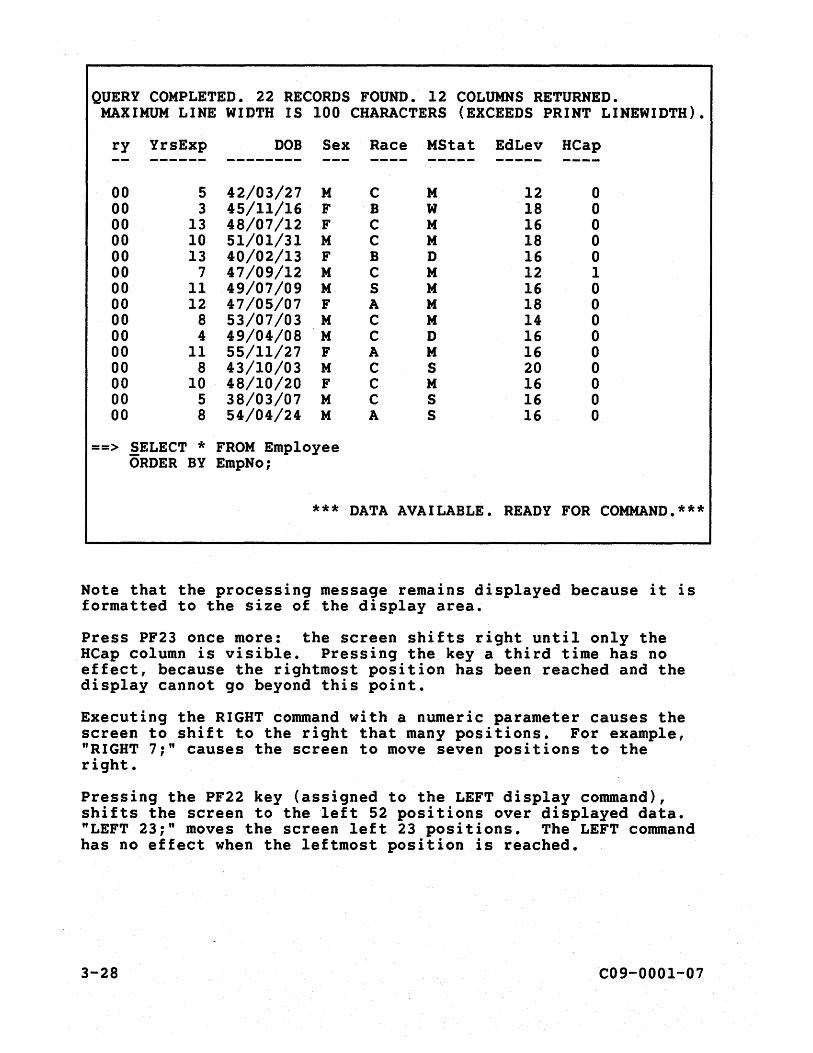
QUERY COMPLETED. 22 RECORDS FOUND. 12 COLUMNS RETURNED. MAXIMUM LINE WIDTH IS 100 CHARACTERS (EXCEEDS PRINT LINEWIDTH).
ry YrsExp DOB Sex Race MStat EdLev HCap -- ------ -------- --- ---- ----- ------ ----
00 5 42/03/27 M C M 12 0 00 3 45/11/16 F B W 18 0 00 13 48/07/12 F C M 16 0 00 10 51/01/31 M C M 18 0 00 13 40/02/13 F B D 16 0 00 7 47/09/12 M C M 12 1 00 11 49/07/09 M S M 16 0 00 12 47/05/07 F A M 18 0 00 8 53/07/03 M C M 14 0 00 4 49/04/08 M C D 16 0 00 11 55/11/27 F A M 16 0 00 8 43/10/03 M C S 20 0 00 10 48/10/20 F C M 16 0 00 5 38/03/07 M C S 16 0 00 8 54/04/24 M A S 16 0
==> SELECT * FROM Employee ORDER BY EmpNo;
*** DATA AVAILABLE. READY FOR COMMAND.***
Note that the processing message remains displayed because it is formatted to the size of the display area.
Press PF23 once more: the screen shifts right until only the HCap column is visible. Pressing the key a third time has no effect, because the rightmost position has been reached and the display cannot go beyond this point.
Executing the RIGHT command with a numeric parameter causes the screen to shift to the right that many positions. For example, "RIGHT 7;" causes the screen to move seven positions to the right.
Pressing the PF22 key (assigned to the LEFT display command), shifts the screen to the ~eft 52 positions over displayed data. "LEFT 23;" moves the screen left 23 positions. The LEFT command has no effect when the leftmost position is reached.
3-28 C09-0001-07
3.3.5 Changing Formatting Mode During Display
While you are viewing an unformatted result, you may decide to format the result as a report. To set Format mode, do the following:
1. Execute the "SET FORMAT ON;" command
2. Execute the "BACKWARD *;" command
The unformatted result disappears and the processing message appears by itself as the first result page. Executing a FORWARD command displays the first page of the formatted result. Use the same procedure, using the "SET FORMAT OFF;" command, to change a result from formatted to unformatted.
3.3.6 Filing a Result for Later Use
Before entering a subsequent query, you may execute the command,
FILE;
to store the spooled result of the current SELECT statement or macro. When control is returned to the interactive system, this file is stored in a flat file that is allocated to a system data set with the name ITEQDSKl (under TSO) or to a system file with the name ITEQDSKl DATA (under CMS). The file is created in TEXT form so that it may be used later by an application program.
The maximum logical record length for a result file is 32,000 bytes.
3.4 SUMMARY AND PREVIEW
This chapter showed you how to begin and end an interactive ITEQ session, enter and edit DBC/SQL statements, and view statement results. The next chapter shows you how to communicate with the DBC/lOl2 using BTEQ.
C09-000l-07 3-29

3-30 C09-0001-07
CHAPTER 4 USING BTEQ
BTEQ is a batch-oriented tool used to submit a job to the DBC/I012 for processing_ The job consists of a "script" containing one or more DBC/SQL statements, plus BTEQ commands that are used for session control, formatting of DBC/SQL results, and handling of output data. In addition, BTEQ may used as an on-line interface.
BTEQ features include:
• Use of more than one DBC/SQL statement per request
• Display of response time for each request
• Ability to read data from and write data to files maintained on the host computer
• Ability to repeat a request
• Use of more than one session for improved performance
• Ability to perform conditional tests and branching
In addition, BTEQ provides sophisticated report-writing commands that allow you to:
• Create report headings and footings that allow for automatic substitution of current values for date, time, and page number
• Specify page breaks or skipped lines on a specified column change
• Compress long lines to match a specified column width.
• Reposition summary line titles on specified columns.
This chapter lists the BTEQ commands and shows you how to:
• Invoke BTEQ under the MVS/TSO or VM/CMS interactive subsystem
• Submit a BTEQ script for processing
• Define a BTEQ script to select data using an input file that contains key values
C09-OOOl-07 4-1
Using BTEQ to select and format data into a report for display or printing is described in Chapter 5.
4.1 BTEQ COMMANDS
A BTEQ command consists of command keyword prefixed by a period character (.). The command keyword may be followed by parameters, including special characters and other keywords. As an option, a BTEQ command may end with a semicolon (;).
Table 4-1 lists BTEQ session control and data handling commands. Format specification commands are discussed in Chapter 5. For a complete discussion of any of these commands, refer to the DBC/1012 Data Base Computer Reference Manual.
Table 4-1. BTEQ Commands (1 of 2)
Activity Command Function
Session • LOGOFF Terminates a DBC/1012 Control session without exiting BTEQ.
• LOGON
.QUIT/EXIT
.SESSIONS
Establishes a DBC/1012 session.
Terminates a DBC/1012 session (if necessary), and exits BTEQ.
Specifies the number-of DBC/1012 sessions that BTEQ is to use.
Data Handling .CMS Executes a CMS command (VM/CMS only) •
= [n]
• EXPORT
• GOTO
• HANG
4-2
Causes BTEQ to repeat the preceding DBC/SQL request a specified number of times.
Sends the result of a SELECT statement to an output file other than SYSPRINT.
Transfers control forward to a LABEL statement that matches a specified label.
Causes BTEQ to pause •
C09-0001-07
Table 4-1. BTEQ Commands (2 of 2)
Activity Command Function
Data'Handling .HELP BTEQ Returns a list of syntaxes of BTEQ commands.
.IF
. IMPORT
• LABEL
.QUIET
• REMARK
• REPEAT
. RUN
.SHOW CONTROL
.SHOW VERSION
.TDP
.TSO
C09-OOOI-07
Tests an error code or an activity count to determine whether a conditional action is performed. Specifies a file other than DATA from which BTEQ reads data when a USING clause is specified.
Identifies a statement as a label that can be used by the GOTO statement.
Limits BTEQ output to reporting only errors and request processing statistics.
Enables the user to include up to three lines of commentary.
Causes BTEQ to repeat the next DBC/SQL request a specified number of times, or until the input file is out of data.
Reads BTEQ commands or DBC/SQL requests from a specified file. When EOF is reached, control transfers to the SYSIN data set while in batch mode, or to the user's terminal while in on-line mode.
Reports settings of most or all of the formatting controls.
Reports the current level of BTEQ software modules
Sets the default TDP to be used for future logons.
Executes a TSO command (MVS/TSO only) while "BTEQ is running.
4-3
4.2 RUNNING A BTEQ JOB
BTEQ may be run in the following host operating system environments:
• MVS
BTEQ is normally used in batch mode under MVS. However, BTEQ also may be run interactively under TSO, or from the DBC/1012 system console •
• VM
BTEQ may be used in batch mode under VM/CMSBATCH. BTEQ also may be used interactively under CMS.
The following sections show how to run BTEQ under the interactive TSO or CMS subsystems.
4.2.1 Running BTEQ Under TSO
You may invoke BTEQ on-line by entering,
BTEQ
You also may invoke BTEQ directly by entering,
CALL 'datasetname(ITBMAIN),
where "datasetname" is the name of the load library that contains the BTEQ program (ITBMAIN).
You may pass a parameter to BTEQ by entering,
CALL 'datasetname(ITBMAIN), '.TDP TDPO'
(In this example, the BTEQ TDP command is used to specify the default DBC/1012 system that is to be used for subsequent logons.)
Any data set that is to be used with the BTEQ commands RUN, EXPORT, or IMPORT must be preallocated unless the user intends to use the BTEQ TSO command to allocate files during BTEQ processing.
Because BTEQ normally does not use DD streams to communicate with the terminal, DD streams need not be allocated.
When BTEQ is used in an MVS environment, standard MVS job control l~nguage (JCL) cards are used to submit a BTEQ job to the DBC/1012. The following is an example of BTEQ JCL:
4-4 C09-0001-07
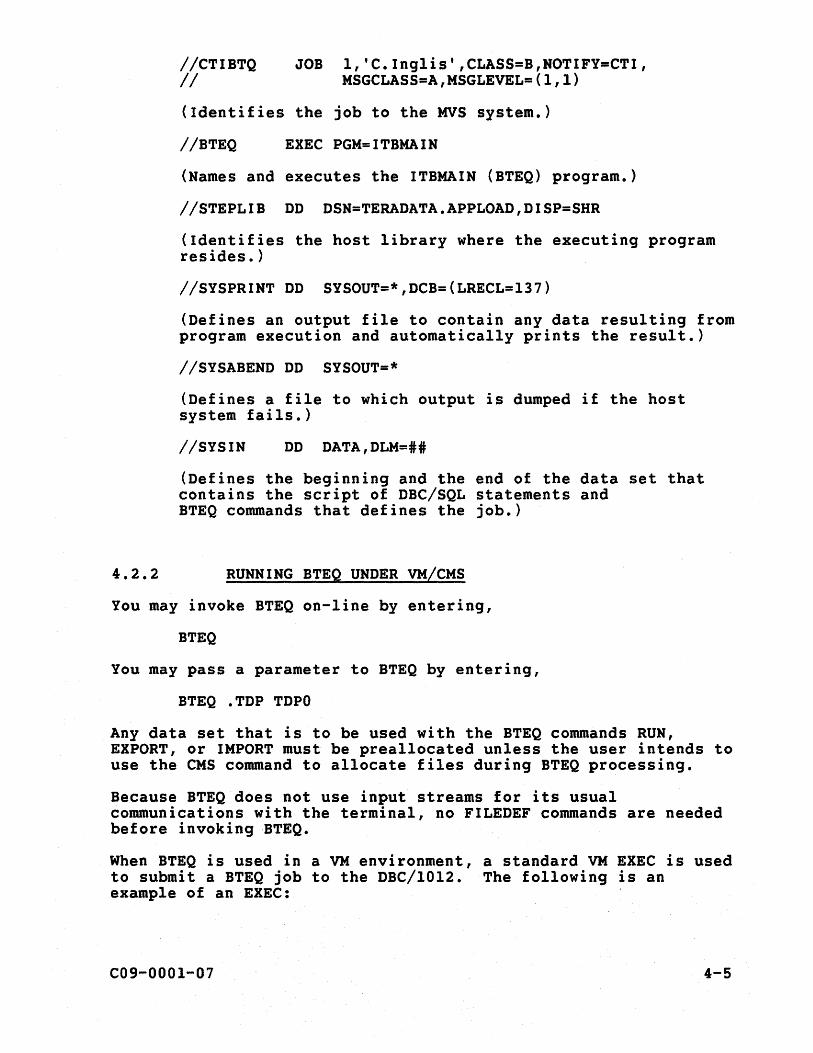
4.2.2
/ICTIBTQ II
JOB 1,'C.Inglis',CLASS=B,NOTIFY=CTI, MSGCLASS=A,MSGLEVEL=(l,l)
(Identifies the job to the MVS system.)
/IBTEQ EXEC PGM=ITBMAIN
(Names and executes the ITBMAIN (BTEQ) program.)
//STEPLIB DD DSN=TERADATA.APPLOAD,DISP=SHR
(Identifies the host library where the executing program resides.)
//SYSPRINT DD SYSOUT=*,DCB=(LRECL=137)
(Defines an output file to contain any data resulting from program execution and automatically prints the result.)
//SYSABEND DD SYSOUT=*
(Defines a file to which output is dumped if the host system fails.)
//SYSIN DD DATA,DLM=##
(Defines the beginning and the end of the data set that contains the script of DBC/sQL statements and BTEQ commands that defines the job.)
RUNNING BTEQ UNDER VM/CMS
You may invoke BTEQ on-line by entering,
BTEQ
You may pass a parameter to BTEQ by entering,
BTEQ .TDP TDPO
Any data set that is to be used with the BTEQ commands RUN, EXPORT, or IMPORT must be preallocated unless the user intends to use the CMS command to allocate files during BTEQ processing.
Because BTEQ does not use input streams for its usual communications with the terminal, no FILEDEF commands are needed before invoking 'BTEQ.
When BTEQ is used in a VM environment, a standard VM EXEC is used to submit a BTEQ job to the DBC/I012. The following is an example of an EXEC:
C09-OOOI-07 4-5

4.3
"FILEDEF SYSPRINT TERMINAL (LRECL 137 RECFM VA)"
(Defines an output file to contain any data resulting from program execution and automatically prints the result.)
"FILEDEF SYSABEND TERMINAL"
(Defines a file to which output is dumped if the host system fails.)
"FILEDEF SYSIN DISK" filename filetype filemode
(Identifies the input file that contains the BTEQ input stream: the script of DBC/SQL statements and BTEQ commands.)
EXTRACTING DBC/IOI2 DATA TO A HOST DATA SET
The example in Figure 4-1 shows how BTEQ maybe used under TSO to select data from the Employee table and save it in a host data set (SAVEDATA). Rows are selected according to values of EmpNo (the prime key for the Employee table) contained in an input data set (DATA).
4-6 C09-OOOI-O?
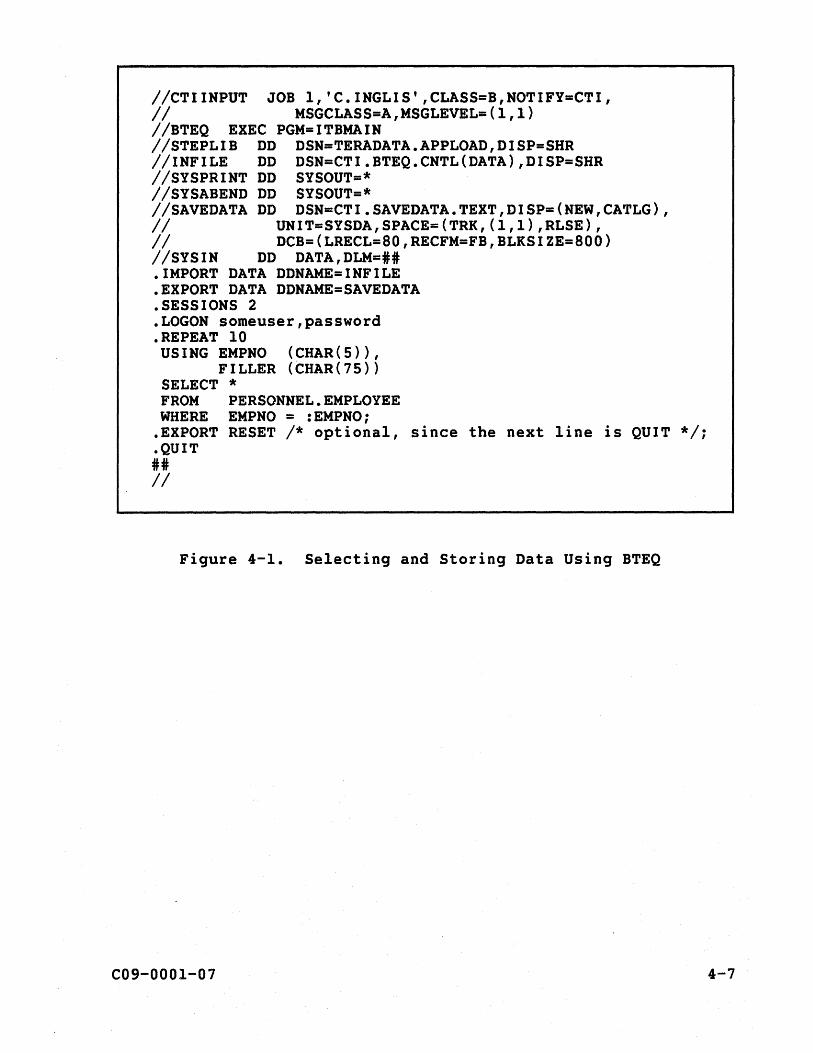
IlcTIINPUT JOB 1,'C.INGLIS',CLASS=B,NOTIFY=CTI, II MSGCLASS=A,MSGLEVEL=(l,l) IIBTEQ EXEC PGM=ITBMAIN IlsTEPLIB DD DSN=TERADATA.APPLOAD,DISP=SHR IIINFILE DD DSN=CTI.BTEQ.CNTL(DATA),DISP=SHR IISYSPRINT DD SYSOUT=* IISYSABEND DD SYSOUT=* IlsAVEDATA DD DSN=CTI.SAVEDATA.TEXT,DISP=(NEW,CATLG), II UNIT=SYSDA,SPACE=(TRK,(l,l),RLSE), II DCB=(LRECL=80,RECFM=FB,BLKSIZE=800) IISYSIN DD DATA,DLM=## .IMPORT DATA DDNAME=INFILE .EXPORT DATA DDNAME=SAVEDATA .SESSIONS 2 .LOGON someuser,password .REPEAT 10 USING EMPNO (CHAR(S»,
FILLER (CHAR(75» SELECT * FROM PERSONNEL. EMPLOYEE WHERE EMPNO = :EMPNO;
.EXPORT RESET 1* optional, since the next line is QUIT *1;
.QUIT ## II
Figure 4-1. Selecting and Storing Data Using BTEQ
C09-000l-07 4-7
The DBC/SQL script consists of a single SELECT statement preceded by a a USING modifier. The modifier describes the data that is used to qualify rows selected from Employee. Note that the USING modifier must precede the DBC/SQL statement that it modifies.
BTEQ commands used for this job and their functions are:
4.4
• IMPORT
Causes BTEQ to read data from the DATA data set.
• EXPORT
Sends the data selected to the SAVEDATA data set.
• SESSIONS
Causes BTEQ to open" two sessions to process the job.
• LOGON
Logs the user on to the number of DBC/1012 sessions specified by SESSIONS.
• REPEAT
Causes BTEQ to repeat the SELECT request 10 times.
• EXPORT RESET
Cancels the EXPORT function following the select operation. Any processing results are now directed to SYSPRINT. (In this example, this command is optional because the next command is QUIT.)
• QUIT
Terminates the DBC/1012 session and exits BTEQ.
SUMMARY AND PREVIEW
This chapter described the capabilities of BTEQ and showed you how to submit a simple BTEQ job. The following chapter describes the report writing capabilities of ITEQ and BTEQ.
4-8 C09-000l-07
CHAPTER 5 CREATINt REPORTS USING ITEQ AND BTEQ
Both ITEQ and BTEQ provide commands that enable you to format a DBC/SQL result into a report. In addition, DBC/SQL has formatting features that you may use with either ITEQ or BTEQ formatting features to produce an informative, attractive report.
This chapter shows you how to produce a report using the DBC/SQL features with ITEQ or BTEQ commands.
5.1 CREATING A REPORT USING ITEQ
In Chapter 3 you set a formatting mode (Forma~ or Unformat) and used display commands to view an unformatted result, that is, a result displayed in Unformat mode. As you recall, the unformatted result was contained on one or more screen pages, with the processing message displayed at the top of the first page preceding the result.
For a result displayed in Format mode, the processing message is displayed by itself as the first page of a result. Result data is formatted on consecutive pages, each containing date, page number, report title, and column headings. Formatted pages are displayed according to the format specifications that have been set during the session.
5.1.1 Using Format Defaults
You set Format mode by executing the SET FORMAT command while in Unformat mode. If you have not set any format specifications during a session, a query result in Format mode is displayed according to ITEQ-defined ("default") format specifications.
Let's assume that you have entered the following statement in Format mode:
SELECT DeptNo, Name, Salary FROM Employee WHERE DeptNo IN (100, 700) ORDER BY Name;
The processing message for the statement result,
RETRIEVE COMPLETED. 7 RECORDS FOUND. 3 COLUMNS RETURNED. MAXIMUM LINE WIDTH IS 32 CHARACTERS.
appears by itself as the first result page.
Execute the FORWARD command and the first page of the result is displayed:
C09-000l-07 5-1
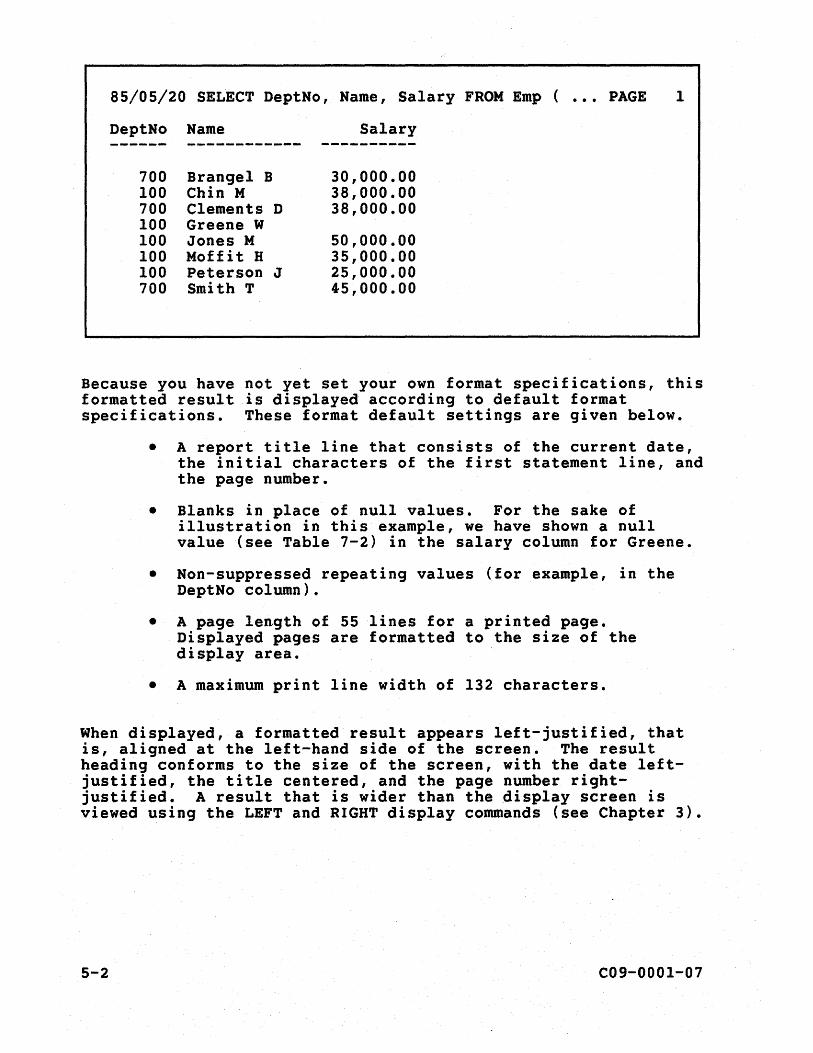
85/05/20 SELECT DeptNo, Name, Salary FROM Emp ( ••• PAGE 1
DeptNo Name Salary
700 Brangel B 30,000.00 100 Chin M 38,000.00 700 Clements D 38,000.00 100 Greene W 100 Jones M 50,000.00 100 Moffit H 35,000.00 100 Peterson J 25,000.00 700 Smith T 45,000.00
Because you have not yet set your own format specifications, this formatted result is displayed according to default format specifications. These format default settings are given below.
• A report title line that consists of the current date, the initial characters of the first statement line, and the page number.
• Blanks in place of null values. For the sake of illustration in this example, we have shown a null value (see Table 7-2) in the salary column for Greene.
• Non-suppressed repeating values (for example, in the DeptNo column).
• A page len.gth of 55 lines for a printed page. Displayed pages are formatted to the size of the display area.
• A maximum print line width of 132 characters.
When displayed, a formatted result appears left-justified, that is, aligned at the left-hand side of the screen. The result heading conforms to the size of the screen, with the date leftjustified, the title centered, and the page number rightjustified. A result that is wider than the display screen is viewed using the LEFT and RIGHT display commands (see Chapter 3).
5-2 C09-QOOl-07
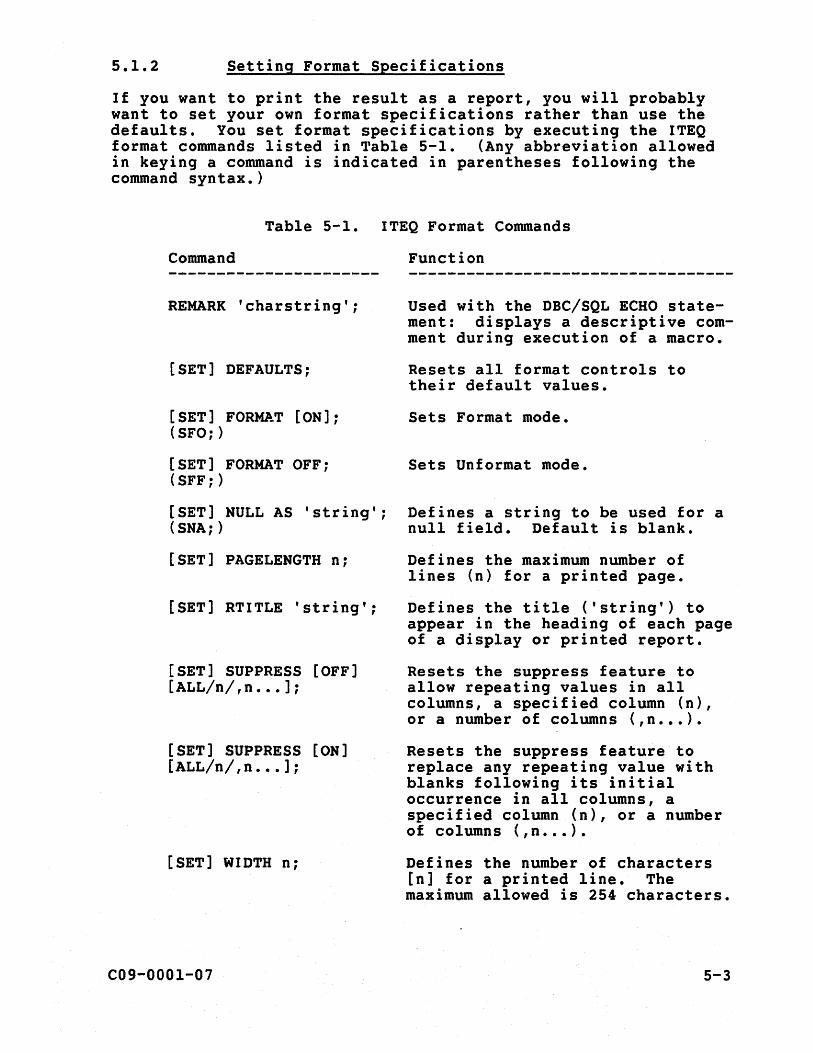
5.1.2 Setting Format Specifications
If you want to print the result as a report, you will probably want to set your own format specifications rather than use the defaults. You set format specifications by executing the ITEQ format commands listed in Table 5-1. (Any abbreviation allowed in keying a command is indicated in parentheses following the command syntax.)
Table 5-1. ITEQ Format Commands
Command Function
REMARK 'charstring'; Used with the DBC/SQL ECHO statement: displays a descriptive comment during execution of a macro.
[SET] DEFAULTS; Resets all format controls to their default values.
[SET] FORMAT [ON]; Sets Format mode. (SFO; )
[SET] FORMAT OFF; Sets Unforrnat mode. (SFF; )
[SET] NULL AS 'string'; (SNA; )
[SET] PAGELENGTH n;
[SET] RTITLE 'string';
[SET] SUPPRESS [OFF] [ALL/n/,n ••• ];
[SET] SUPPRESS [ON] [ALL/n/,n ••• ];
[SET] WIDTH n;
C09-OOOl-07
Defines a string to be used for a null field. Default is blank.
Defines the maximum number of lines (n) for a printed page.
Defines the title ('string') to appear in the heading of each page of a display or printed report.
Resets the suppress feature to allow repeating values in all columns, a specified column (n), or a number of columns (,n ••• ).
Resets the suppress feature to replace any repeating value with blanks following its initial occurrence in all columns, a specified column (n), or a number of columns (,n ••• ).
Defines the number of characters [n] for a printed line. The maximum allowed is 254 characters.
5-3
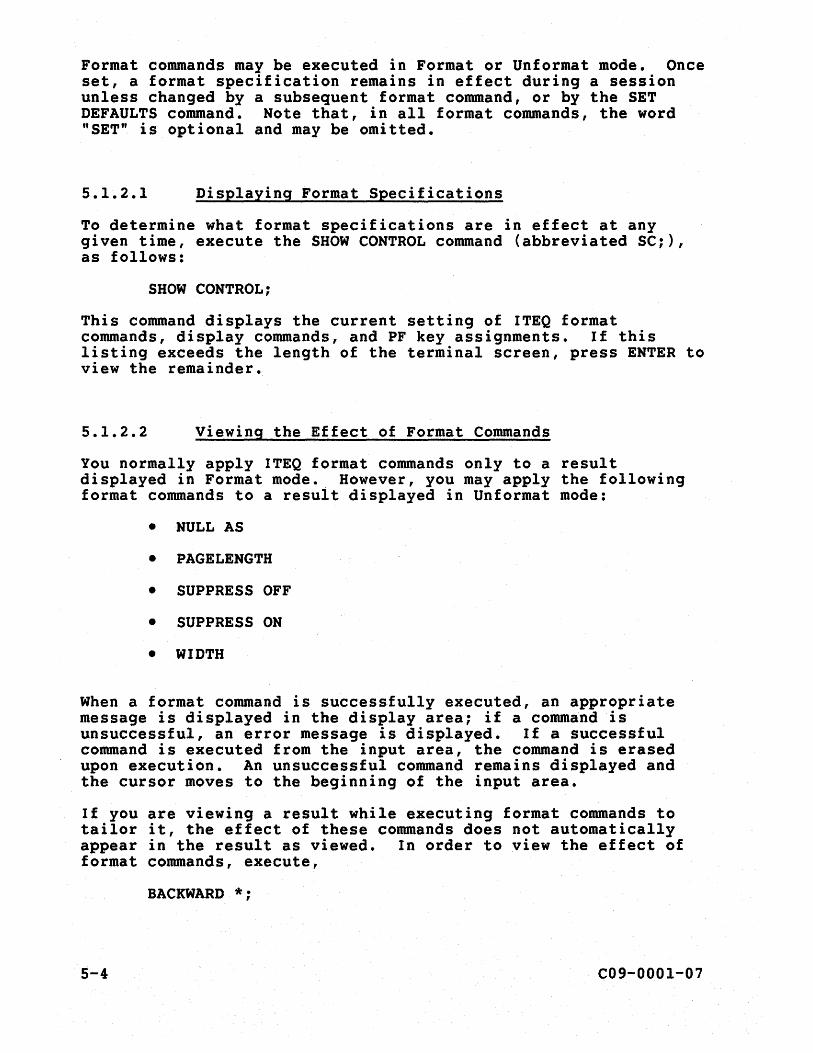
Format commands may be executed in Format or Unformat mode. Once set, a format specification remains in effect during a session unless changed by a subsequent format command, or by the SET DEFAULTS command. Note that, in all format commands, the word "SET" is optional and may be omitted.
5.1.2.1 Displaying Format Specifications
To determine what format specifications are in effect at any given time, execute the SHOW CONTROL command (abbreviated SC;), as follows:
SHOW CONTROL;
This command displays the current setting of ITEQ format commands, display commands, and PF key assignments. If this listing exceeds the length of the terminal screen, press ENTER to view the remainder.
5.1.2.2 Viewing the Effect of Format Commands
You normally apply ITEQ format commands only to a result displayed in Format mode. However, you may apply the following format commands to a result displayed in Unformat mode:
• NULL AS
• PAGE LENGTH
• SUPPRESS OFF
• SUPPRESS ON
• WIDTH
When a format command is successfully executed, an appropriate message is displayed in the display area; if a command is unsuccessful, an error message is displayed. If a successful command is executed from the input area, the command is erased upon execution. An unsuccessful command remains displayed and the cursor moves to the beginning of the input area.
If you are viewing a result while executing format commands to tailor it, the effect of these commands does not automatically appear in the result as viewed. In order to view the effect of format commands, execute,
BACKWARD *;
5-4 C09-OOOl-07
The screen goes blank, then the processing message is displayed as part of the first page of the result in Unformat mode.
In Format mode, the processing message for the result is displayed on a page by itself. To display the first page of the newly formatted result, execute,
FORWARD;
5.1.2.3 Defining a Report Title
To define a report title for a result, execute the RTITLE command. For example, the following command,
RTITLE 'SALARY REPORTIIDEPARTMENTS 100 and 700';
defines the title,
SALARY REPORT DEPARTMENTS 100 and 700
for the example result above. Note the use of the double-slash <II) character to break the title string into two lines. A title may be broken into up to three lines.
A report title may be up to 254 characters long. A title longer than 254 characters is truncated.
5.1.2.4 Specifying a Null Character
Because the Salary field in Greene's row is null, you may specify a character to appear there in place of the default blank. For example, to place a hyphen in the field, execute,
5.1.2.5
NULL AS '-' . ,
Suppressing Repeating Values
To suppress the repeating column ~alues in column 1 (the DeptNo column), execute the command,
SUPPRESS ON 1;
Because there are no repeating values in other columns of the result, you could execute,
C09-000l-07 5-5
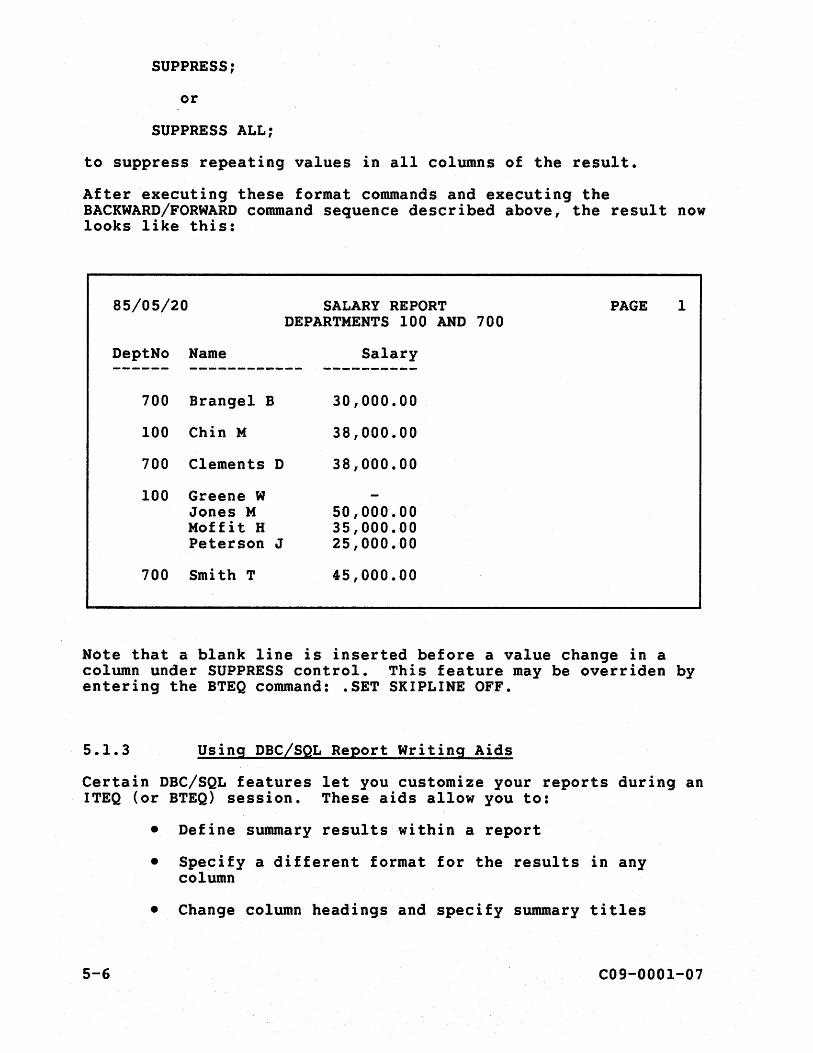
SUPPRESS;
or
SUPPRESS ALL;
to suppress repeating values in all columns of the result.
After executing these format commands and executing the BACKWARD/FORWARD command sequence described above, the result now looks like this:
85/05/20 SALARY REPORT PAGE 1 DEPARTMENTS 100 AND 700
DeptNo Name Salary ------ ------------ ----------
700 Brangel B 30,000.00
100 Chin M 38,000.00
700 Clements D 38,000.00
100 Greene W Jones M 50,000.00 Moffit H 35,000.00 Peterson J 25,000.00
700 Smith T 45,000.00
Note that a blank line is inserted before a value change in a column under SUPPRESS control. This feature may be overriden by entering the BTEQ command: .SET SKIPLINE OFF.
5.1.3 Using DBC/SQL Report Writing Aids
Certain DBC/SQL features let you customize your reports during an ITEQ (or BTEQ) session. These aids allow you to:
• Define summary results within a report
• Specify a different format for the results in any column
• Change column headings and specify summary titles
5-6 C09-000l-07
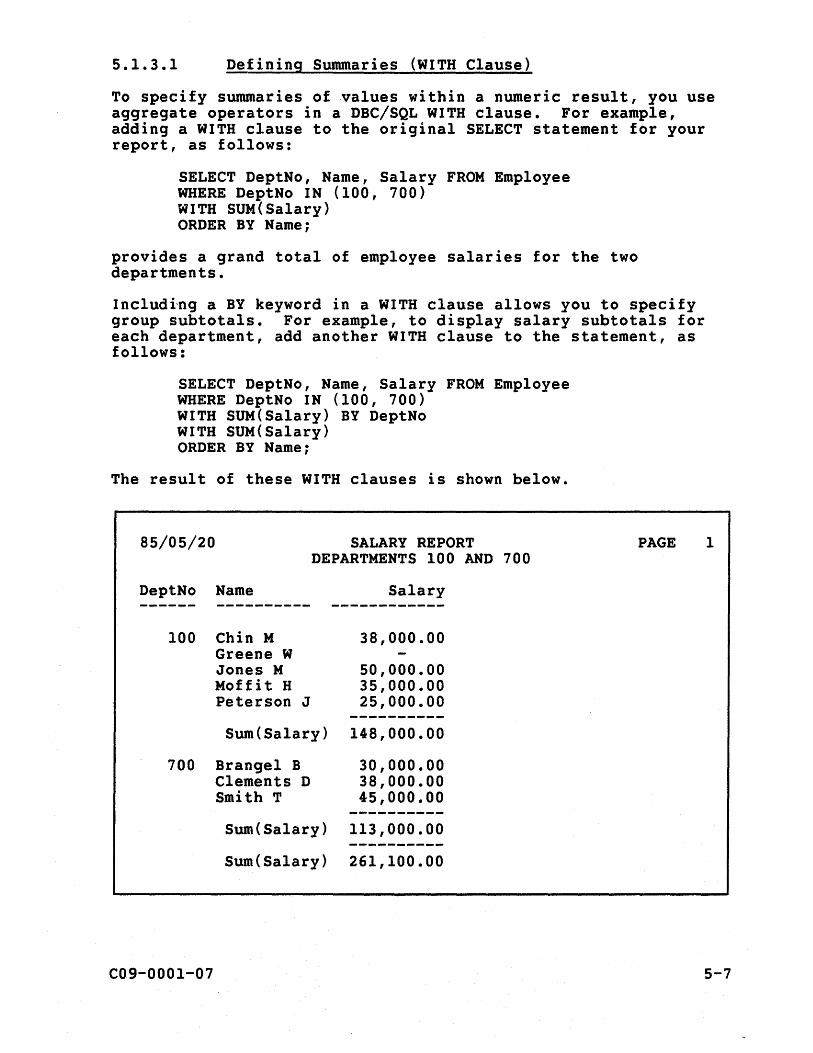
5.1.3.1 Defining Summaries (WITH Clause)
To specify summaries of values within a numeric result, you use aggregate operators in a DBC/SQL WITH clause. For example, adding a WITH clause to the original SELECT statement for your report, as follows:
SELECT DeptNo, Name, Salary FROM Employee WHERE DeptNo IN (100, 700) WITH SUM(Sa1ary) ORDER BY Name;
provides a grand total of employee salaries for the two departments.
Including a BY keyword in a WITH clause allows you to specify group subtotals. For example, to display salary subtotals for each department, add another WITH clause to the statement, as follows:
SELECT DeptNo, Name, Salary FROM Employee WHERE DeptNo IN (100, 700) WITH SUM(Salary) BY DeptNo WITH SUM(Salary) ORDER BY Name;
The result of these WITH clauses is shown below.
85/05/20 SALARY REPORT DEPARTMENTS 100 AND 700
DeptNo Name Salary
100 Chin M 38,000.00 Greene W Jones M 50,000.00 Moffit H 35,000.00 Peterson J 25,000.00
----------Sum(Salary) 148,000.00
700 Brangel B 30,000.00 Clements D 38,000.00 Smith T 45,000.00
----------Sum(Salary) 113,000.00
----------Sum(Salary) 261,100.00
C09-000l-07
PAGE 1
5-7
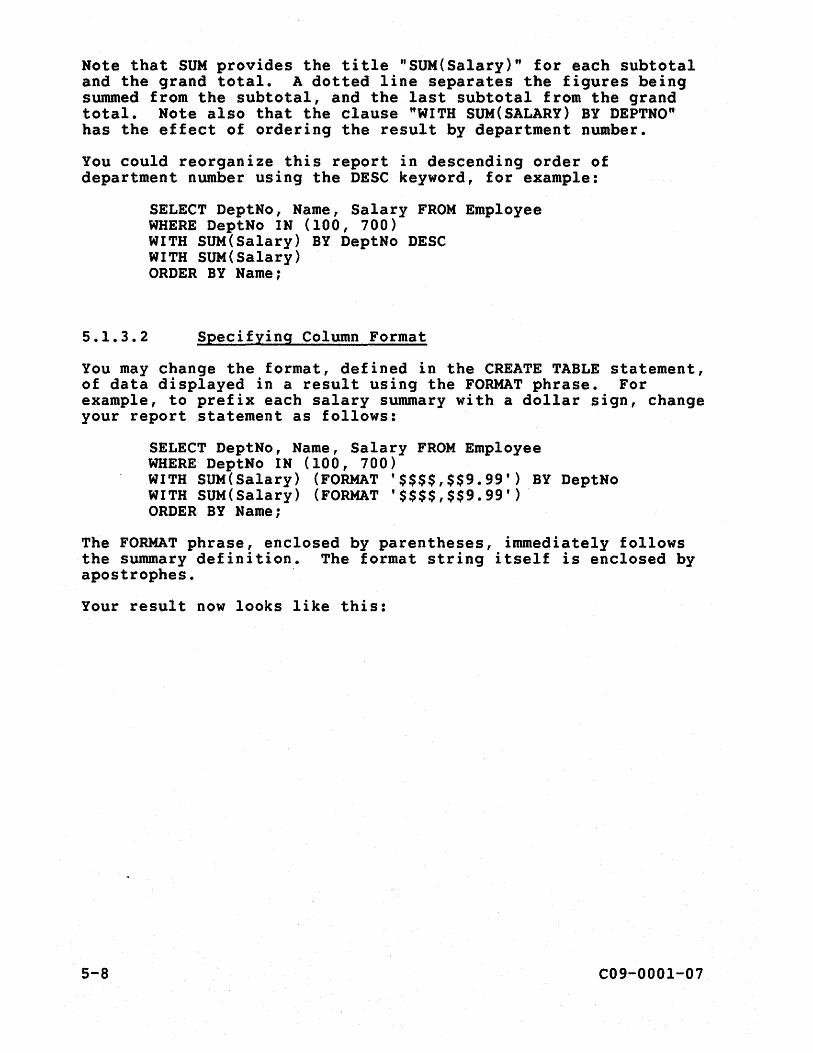
Note that SUM provides the title "SUM(Salary)" for each subtotal and the grand total. A dotted line separates the figures being summed from the subtotal, and the last subtotal from the grand total. Note also that the clause "WITH SUM(SALARY) BY DEPTNO" has the effect of ordering the result by department number.
You could reorganize this report in descending order of department number using the DESC keyword, for example:
5.1.3.2
SELECT DeptNo, Name, Salary FROM Employee WHERE DeptNo IN (100, 700) WITH SUM(Salary) BY DeptNo DESC WITH SUM(Salary) ORDER BY Name;
Specifying Column Format
You may change the format, defined in the CREATE TABLE statement, of data displayed in a result using the FORMAT phrase. For example, to prefix each salary summary with a dollar sign, change your report ~tatement as follows:
SELECT DeptNo, Name, Salary FROM Employee WHERE DeptNo IN (100, 700) WITH SUM(Salary) (FORMAT '$$$$,$$9.99') BY DeptNo WITH SUM(Salary) (FORMAT '$$$$,$$9.99') ORDER BY Name;
The FORMAT phrase, enclosed by parentheses, immediately follows the summary definition. The format string itself is enclosed by apostrophes. .
Your result now looks like this:
5-8 C09-000l-07

85/05/20 SALARY REPORT DEPARTMENTS 100 AND 700
DeptNo Name Salary
100 Chin M 38,000.00 Greene W Jones M 50,000.00 Moffit H 35,000.00 Peterson J 25,000.00
----------------------Sum(Sa1ary) $148,000.00
700 Brange1 B 30,000.00 Clements D 38,000.00 Smith T 45,000.00
----------------------Sum(Sa1ary) $113,000.00
----------------------Sum(Sa1ary) $261,100.00
PAGE
Placed immediately following a column name, a FORMAT phrase changes the format of all data in the column. For example, in the statement,
SELECT Name, Salary (FORMAT '$$$$$9') FROM Employee WHERE DeptNo = 600 AND Sa1ary/12 < 2500;
1
the phrase FORMAT '$$$$$9' eliminates the comma and decimal places defined for the Salary column (refer to the CREATE TABLE statement in Chapter 7) and specifies an initial dollar sign for each value in the Salary column.
Name Salary
Kemper R $29000 Newman P $28600
Table 5-2 lists the characters that you may use in a FORMAT phrase and explains their use. A FORMAT phrase cannot exceed 18 digit positions (17 if the phrase contains the E character).
C09-OOOI-07 5-9
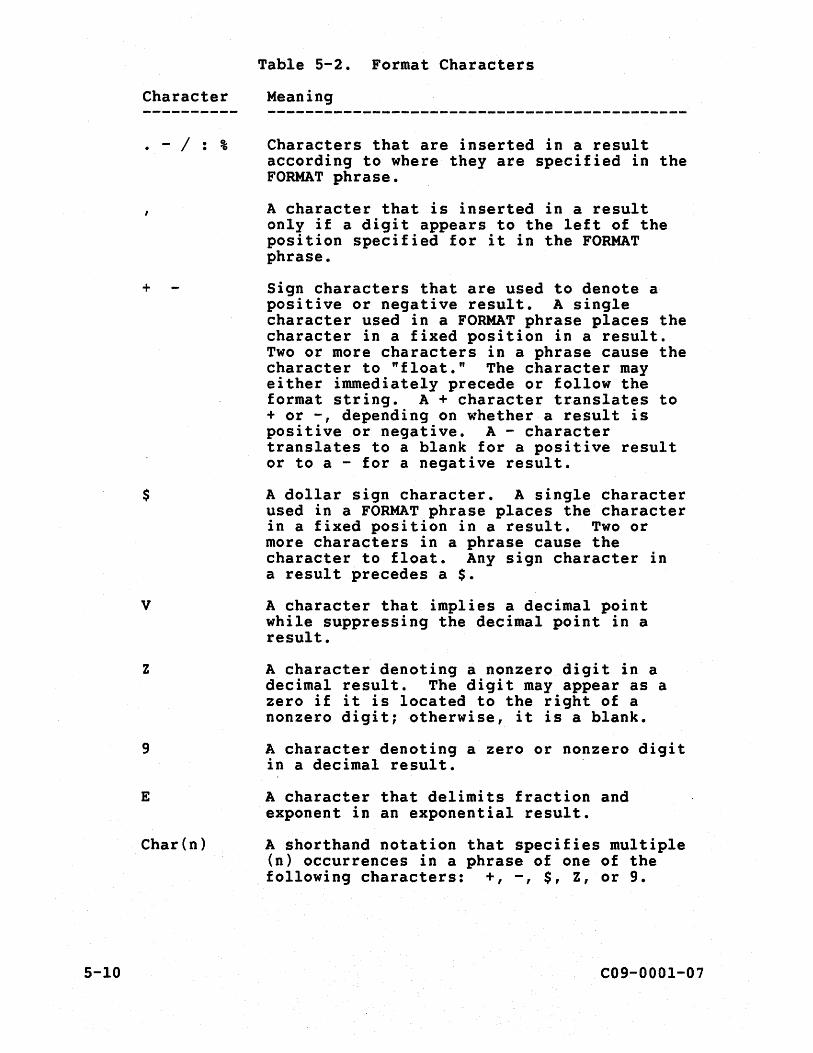
Character
• - / : %
+
$
v
z
9
E
Char(n)
5-10
Table 5-2. Format Characters
Meaning
Characters that are inserted in a result according to where they are specified in the FORMAT phrase.
A character that is inserted in a result only if a digit appears to the left of the position specified for it in the FORMAT phrase.
Sign characters that are used to denote a positive or negative result. A single character used in a FORMAT phrase places the character in a fixed position in a result. Two or more characters in a phrase cause the character to "float." The character may either immediately precede or follow the format string. A + character translates to + or -, depending on whether a result is positive or negative. A - character translates to a blank for a positive result or to a - for a negative result.
A dollar sign character. A single character used in a FORMAT phrase places the character in a fixed position in a result. Two or more characters in a phrase cause the character to float. Any sign character in a result precedes a $.
A character that implies a decimal point while suppressing the decimal point in a result.
A character denoting a nonzero digit in a decimal result. The digit may appear as a zero if it is located to the right of a nonzero digit; otherwise, it is a blank.
A character denoting a zero or nonzero digit in a decimal result. .
A character that delimits fraction and exponent in an exponential result.
A shorthand notation that specifies multiple (n) occurrences in a phrase of one of the following characters: +, -, $, Z, or 9.
C09-000l-07
If a FORMAT phrase specifies a format that is inappropriate to a result, a number of asterisks (*) (corresponding to the number of characters specified by the phrase) is returned in place of the result to indicate an error.
The following table shows results specified by various example FORMAT phrases:
FORMAT Phrase Data Result -------------------- ------- --------(FORMAT '$$9.99') .069 $0.07 (FORMAT '$$9.99') 1095 ****** (FORMAT 'ZZ,ZZ9.99') 1095 1,095.00 (FORMAT '9.99E99') 1095 1.09E03 (FORMAT '999V99') 123.456 12346 (FORMAT '$(5).9(2)') 1 $1.00 (FORMAT '999-9999') 8278777 827-8777 (FORMAT 'ZZ,ZZ9.99-') 1095 1,095.00-
Note that the DBC/1012 truncates integers and rounds other kinds of numbers.
5.1.3.3 Defining Headings and Summary Titles
You may change the column headings of a result (originally defined when the table was created), as well as the titles of summary results, using the DBC/SQL TITLE phrase.
Use TITLE in your report statement to provide more meaningful headings for the Name and DeptNo columns and more descriptive titles for the department subtotals and the grand total:
SELECT DeptNo (TITLE 'DeptIINumber'), Name (TITLE 'EmployeeIIName'), Salary FROM Employee WHERE DeptNo IN (100, 700) WITH SUM(Salary) (TITLE 'Dept TOTAL', FORMAT '$$$$,$$9.99') BY DeptNo WITH SUM(Salary) (TITLE 'TOTAL***', FORMAT '$$$$,$$9.99') ORDER BY Name;
The TITLE phrase is enclosed by parentheses. If a FORMAT phrase is also used for column or summary data, TITLE may share the same set of parentheses.
Apostrophes are used to delimit the title string. Also, note the use of a double slash (II) to break a title into separate lines.
Your result now looks like this:
C09-0001-07 5-11
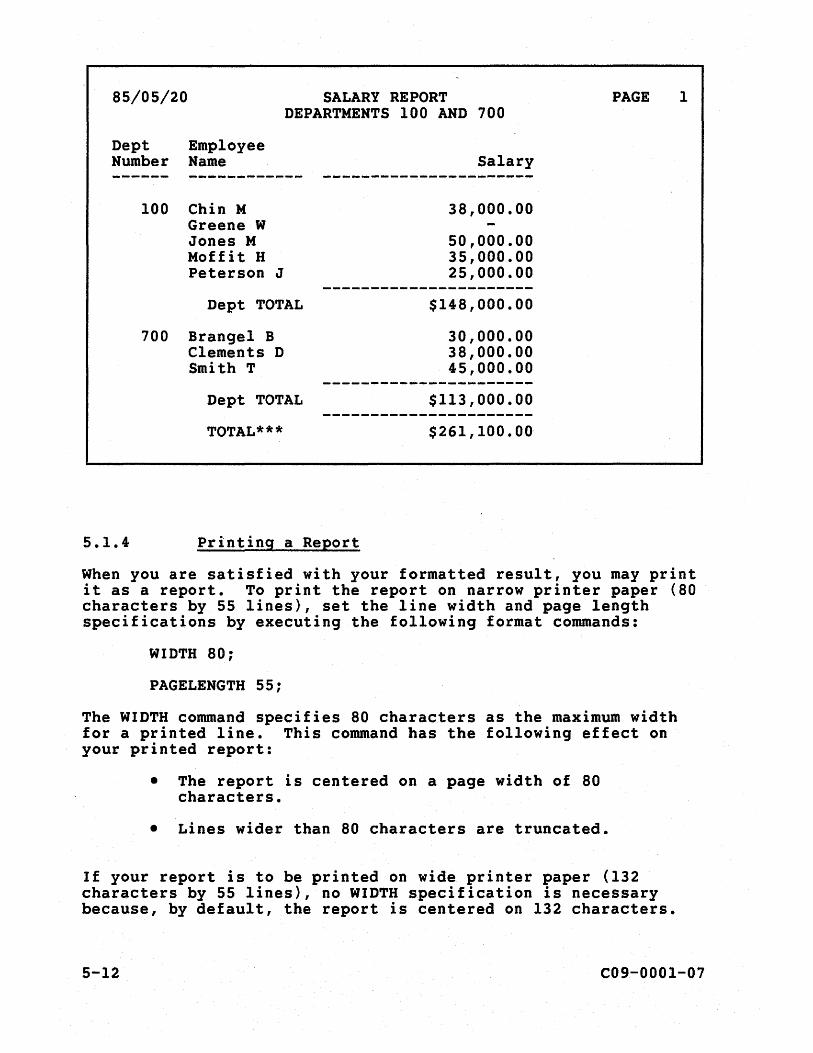
85/05/20 SALARY REPORT DEPARTMENTS 100 AND 700
Dept Employee Number Name Salary
5.1.4
100 Chin M 38,000.00 Greene W Jones M Moffit H Peterson J
Dept TOTAL
700 Brangel B Clements D Smith T
Dept TOTAL
TOTAL***
Printing a Report
50,000.00 35,000.00 25,000.00
$148,000.00
30,000.00 38,000.00 45,000.00
$113,000.00
$261,100.00
PAGE 1
When you are satisfied with your formatted result, you may print it as a report. To print the report on narrow printer paper (80 characters by 55 lines), set the line width and page length specifications by executing the following format commands:
WIDTH 80;
PAGELENGTH 55;
The WIDTH command specifies 80 characters as the maximum width for a printed line. This command has the following effect on your printed report:
• The report is centered on a page width of 80 characters.
• Lines wider than 80 characters are truncated.
If your report is to be printed on wide printer paper (132 characters by 55 lines), no WIDTH specification is necessary because, by default, the report is centered on 132 characters.
5-12 C09-0001-07
If a WIDTH 80 specification is used for printing a report on wide paper, the report is printed off-center on 80 columns. Note that a WIDTH command may specify no fewer than 20 characters.
The PAGELENGTH command specifies up to 55 lines to a printed page. This causes the printed report to be centered vertically on a 55-line page of wide or narrow paper. Note that a PAGE LENGTH 55 specification is optional because the default for the PAGE LENGTH command is 55 lines.
The maximum line width that you may specify using WIDTH is 254 characters. Both WIDTH and PAGELENGTH commands remain in effect until the end of the session or until changed by subsequent WIDTH and PAGE LENGTH commands.
To cause your report to be printed when control is returned to the interactive system, execute the PRINT command,
PRINT;
The report is printed according to system defaults determined by your DBC/1012 installation. That is, a report file with ddname ITEQPRTl {under TSO} or file name ITEQPRTI DATA {under CMS} is sent to a specific printing device and its contents printed on wide or narrow printer paper. You may override these defaults using the TSO Allocate command or the CMS Filedef command, as shown in Appendix D.
Note that you may execute the PRINT command by pressing the PF16 key (larger keyboard) or the PF4 key (smaller keyboard). PF keys, discussed in Chapter 3 and Appendix C, are automatically assigned at logon. (For complete information about the PRINT command, refer to DBC/1012 Data Base Computer Reference Manual.)
The printed report, centered on narrow paper, looks like this:
C09-OOOl-07 5-13
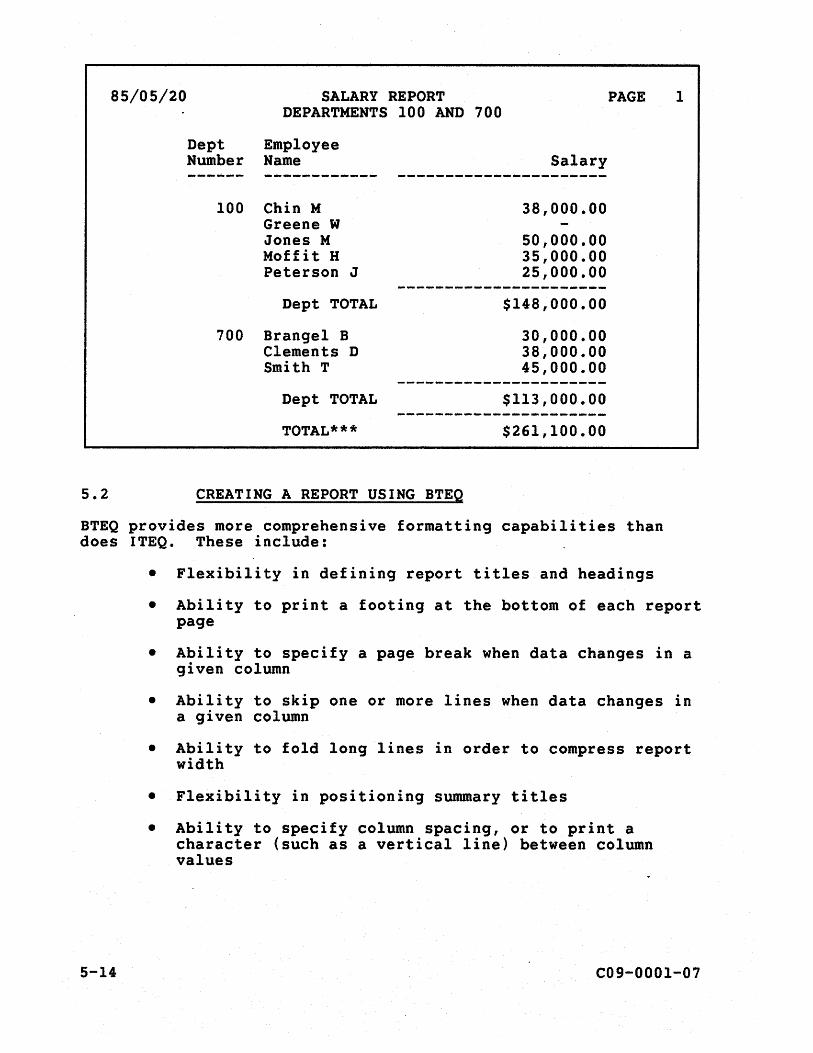
85/05/20
5.2
SALARY REPORT DEPARTMENTS 100 AND 700
Dept Employee Number Name Salary
100 Chin M 38,000.00 Greene W Jones M Moffit H Peterson J
Dept TOTAL
700 Brange1 B Clements D Smith T
Dept TOTAL
TOTAL***
CREATING A REPORT USING BTEQ
50,000.00 35,000.00 25,000.00
·$148,000.00
30,000.00 38,000.00 45,000.00
$113,000.00
$261,100.00
PAGE 1
BTEQ provides more comprehensive formatting capabilities than does ITEQ. These include:
• Flexibility in defining report titles and headings
• Ability to print a footing at the bottom of each report page
• Ability to specify a page break when data changes in a given column
• Ability to skip one or more lines when data changes in a given column
• Ability to fold long lines in order to compress report width
• Flexibility in positioning summary titles
• Ability to specify column spacing, or to print a character (such as a vertical line) between column values
5-14 C09-0001-07
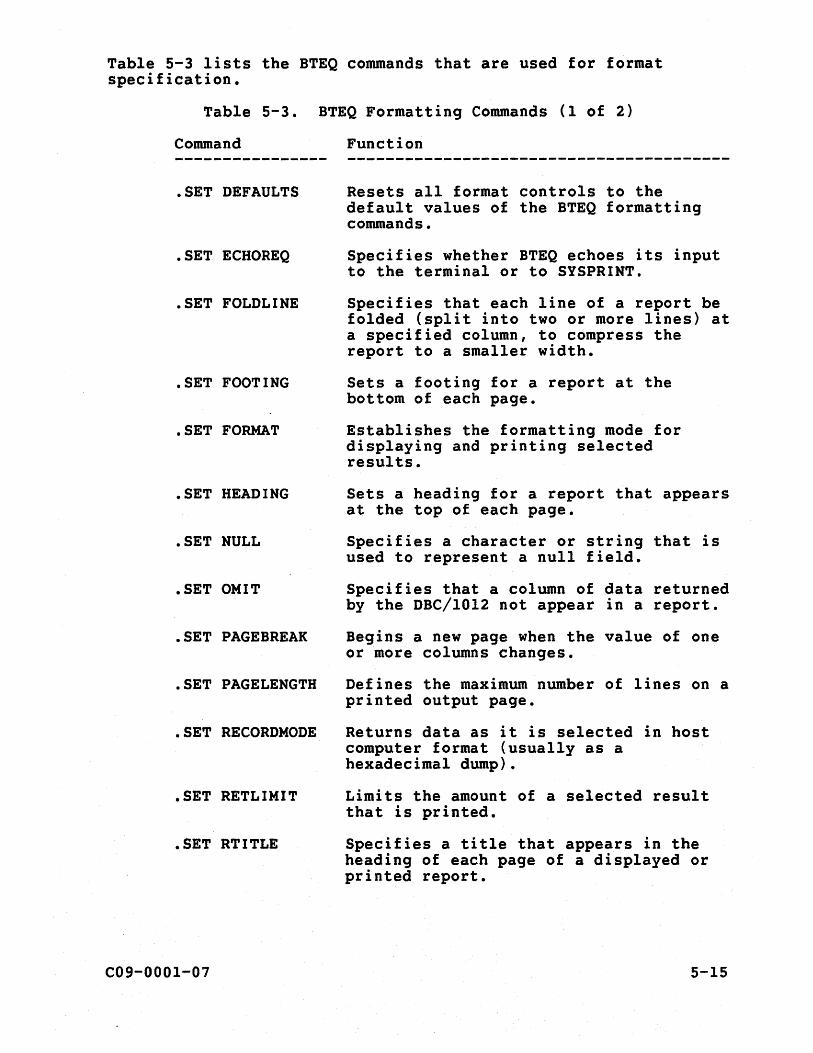
Table 5-3 lists the BTEQ commands that are used for format specification.
Table 5-3. BTEQ Formatting Commands (1 of 2)
Command Function
.SET DEFAULTS Resets all format controls to the default values of the BTEQ formatting commands •
• SET ECHOREQ Specifies whether BTEQ echoes its input to the terminal or to SYSPRINT •
• SET FOLDLINE Specifies that each line of a report be folded (split into two or more lines) at a specified column, to compress the report to a smaller width •
• SET FOOTING Sets a footing for a report at the bottom of each page •
• SET FORMAT Establishes the formatting mode for displaying and printing selected results •
• SET HEADING Sets a heading for a report that appears at the top of each page •
• SET NULL Specifies a character or string that is used to represent a null field •
• SET OMIT Specifies that a column of data returned by the DBC/1012 not appear in a report •
• SET PAGEBREAK Begins a new page when the value of one or more columns changes •
• SET PAGELENGTH Defines the maximum number of lines on a printed output page •
• SET RECORDMODE Returns data as it is selected in host computer format (usually as a hexadecimal dump) •
• SET RETLIMIT Limits the amount of a selected result that is printed •
• SET RTITLE Specifies a title that appears in the heading of each page of a displayed or printed report.
C09-OOOl-07 5-15
Table 5-3. BTEQ Formatting Commands (2 of 2)
Command Function
.SET SEPARATOR Specifies the number of spaces between the columns of a report •
• SET SIDETITLES positions column headings and summary titles to the left of the data that they represent •
• SET SKIPDOUBLE Prints two blank lines when the value in one or more columns changes •
• SET SKIPLINE Prints one blank line when the value in one or more columns changes •
• SET SUPPRESS Specifies whether consecutive repeating values in a selected result are printed (or displayed) •
• SET TITLEDASHES Specifies whether a line of dash characters is printed immediately preceding a summary title (as shown in the example report •
• SET TRANSLATE Specifies whether data is trans-lated from ASCII to EBCDIC before it is printed •
• SET UNDERLINE Prints a dashed line across the page when the value of one or more specified columns changes •
• SET WIDTH Sets the page width.
The complete set of BTEQ format specification commands is described in the DBC/1012 Data Base Computer Reference Manual. Here, BTEQ report-writing capabilities are illustrated using a subset of BTEQ commands.
The following BTEQ job illustrates the use of BTEQ format specification commands combined with the DBC/SQL formatting features discussed above to create a report:
5-16 C09-000l-07
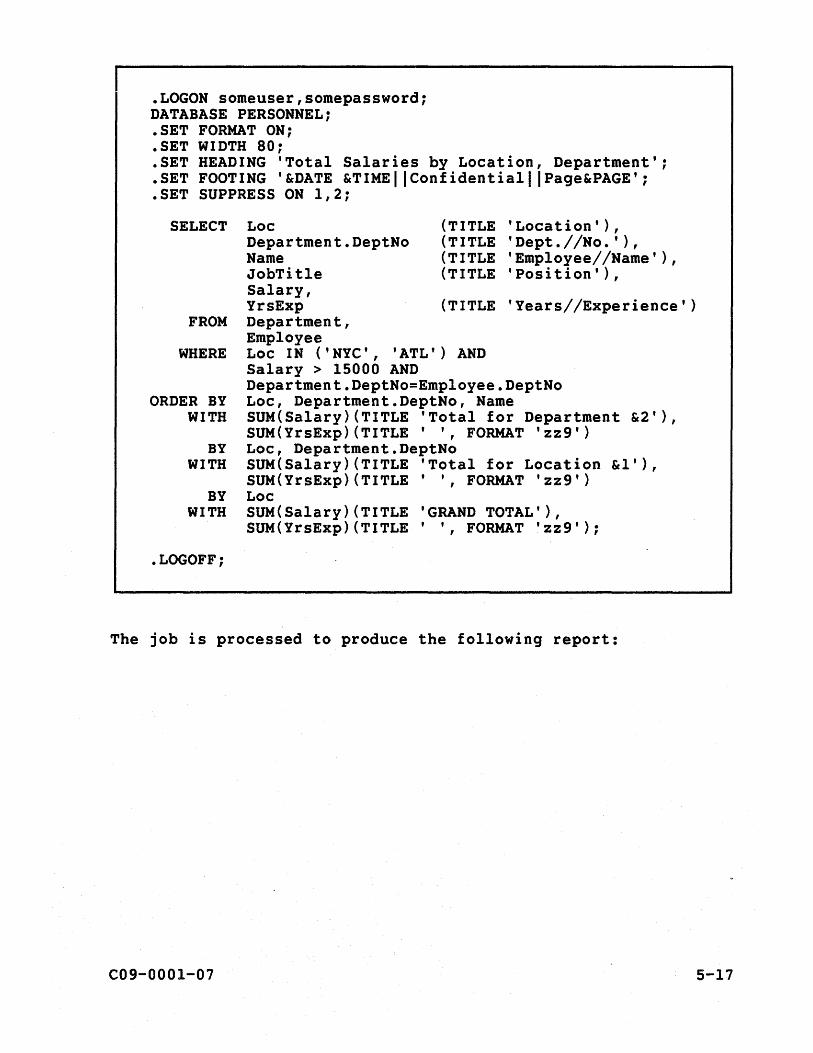
.LOGON someuser,somepassword; DATABASE PERSONNEL; .SET FORMAT ON; .SET WIDTH 80; .SET HEADING 'Total Salaries by Location, Department'; .SET FOOTING '&DATE &TIMEIIConfidentia11 IPage&PAGE'; .SET SUPPRESS ON 1,2;
SELECT Loc (TITLE 'Location'), Department.DeptNo (TITLE 'Dept.IINo.'), Name (TITLE 'Emp1oyeel/Name'), JobTit1e (TITLE 'Position'), Salary, YrsExp (TITLE 'Yearsl/Experience')
FROM Department, Employee
WHERE Loc IN ('NYC', 'ATL') AND Salary > 15000 AND Department.DeptNo=Emp1oyee.DeptNo
ORDER BY Loc, Department.DeptNo, Name WITH SUM{Sa1ary){TITLE 'Total for Department &2'),
SUM{YrsExp){TITLE ' " FORMAT 'zz9') BY Loc, Department.DeptNo
WITH SUM{Sa1ary){TITLE 'Total for Location &1'), SUM{YrsExp){TITLE ' " FORMAT 'zz9')
BY Loc WITH SUM{Sa1ary){TITLE 'GRAND TOTAL'),
SUM{YrsExp){TITLE ' " FORMAT 'zz9');
• LOGOFF;
The job is processed to produce the following report:
C09-0001-07 5-17
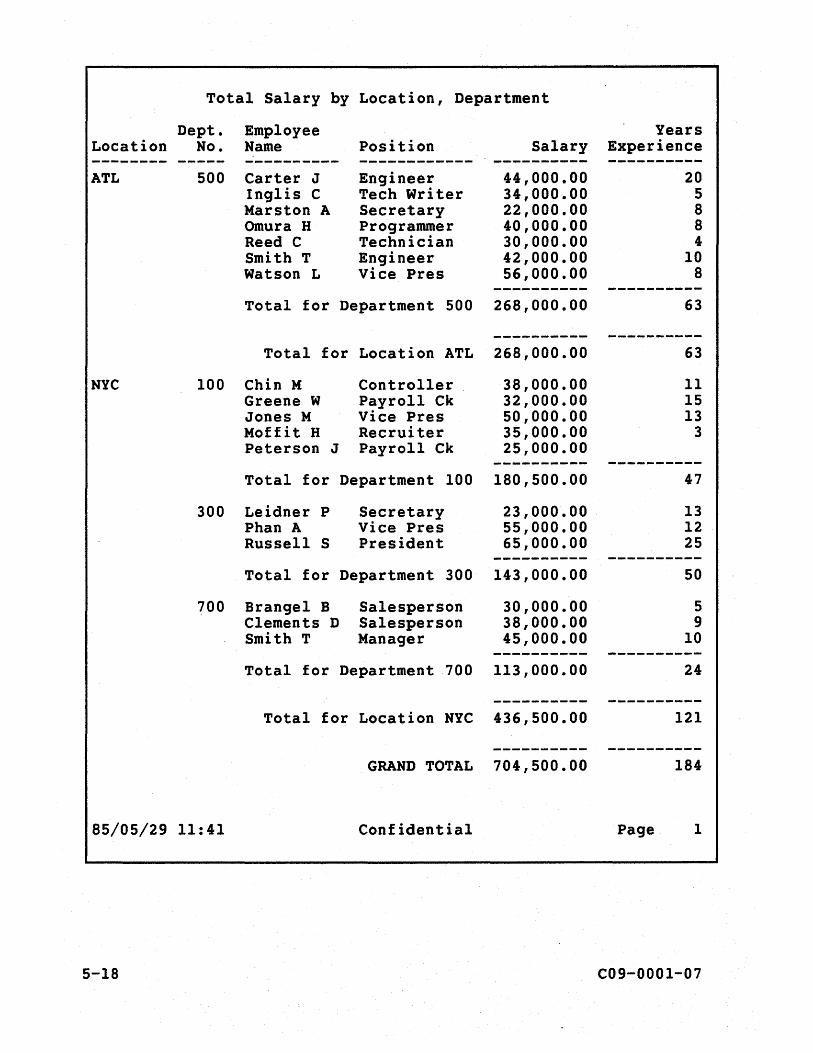
Total Salary by Location, Department
Dept. Employee Years Location No. Name Position Salary Experience -------- ----- ---------- ------------ ---------- ----------ATL 500 Carter J Engineer 44,000.00 20
Inglis C Tech Writer 34,000.00 5 Marston A Secretary 22,000.00 8 Omura H Programmer 40,000.00 8 Reed C Technician 30,000.00 4 Smith T Engineer 42,000.00 10 Watson L Vice Pres 56,000.00 8
---------- ----------Total for Department 500 268,000.00 63
---------- ----------Total for Location ATL 268,000.00 63
NYC 100 Chin M Controller 38,000.00 11 Greene W Payroll Ck 32,000.00 15 Jones M Vice Pres 50,000.00 13 Moffit H Recruiter 35,000.00 3 Peterson J Payroll Ck 25,000.00
-------_ ... - ----------Total for Department 100 180,500.00 47
300 Leidner P Secretary 23,000.00 13 Phan A Vice Pres 55,000.00 12 Russell S President 65,000.00 25
---------- ----------Total for Department 300 143,000.00 50
700 Brangel B Salesperson 30,000.00 5 Clements D Salesperson 38,000.00 9 Smith T Manager 45,000.00 10
---------- ----------Total for Department 700 113,000.00 24
---------- ----------Total for Location NYC 436,500.00 121
---------- ----------GRAND TOTAL 704,500.00 184
85/05/29 11:41 Confidential Page 1
5-18 C09-0001-07

In this example, the DBC/sQL script consists of a SELECT statement. BTEQ commands and their functions are:
• LOGON
Logs the user on to a BTEQ session.
• SET FORMAT
Activates BTEQ format commands.
• SET WIDTH
Specifies that the report be centered on 80 characters (narrow printer paper).
• SET HEADING
Causes the specified heading to be centered on the report page. (Use the II character to divide the heading into up to three separate, centered lines. Use the !! character to separate each line into up to three separate sections, the first left-justified, the second centered, and the third right-justified.) A BTEQ SET RTITLEcommand (similar to the ITEQ SET RTITLE command) is also available for report headings.
• SET FOOTING
Prints a report title at the bottom of each report page, flanked on the left by current date and time and on the right by page number.
• SET SUPPRESS
Suppresses repeating values in column 1 (entitled "Location") and column 2 (entitled Dept. No.).
• LOGOFF
Terminates the DBC/l012 session without exiting BTEQ.
The BTEQ substitution feature (&) is used to insert the column 2 value in the first subtotal line, the column 1 value in the second subtotal line.
C09-000l-07 5-19
5.3 SUMMARY AND PREVIEW
This chapter showed you how to format a report using ITEQ or BTEQ commands and DBC/SQL features. The next chapter shows you how to compose a DBC/SQL SELECT statement so that you can query data stored on the DBC/IOl2.
5-20 C09-OOOl-0?
CHAPTER 6 QUERYING TABLE DATA
The DBC/SQL SELECT statement lets you query (request data from) tables and views in a DBC/lOl2 data base. (A view, described in Chapter 7, is a pseudo-table that lets you see portions of tables, or combined tables and views.) SELECT is used in the same way for tables or views.
The examples in this and subsequent chapters are based on the Personnel data base introduced in Chapter 1. An example statement is followed immediately by the result. An ellipsis ( • • • ) means that a series of elements could be continued or repeated.
For your convenience, a foldout copy of the entire sample Personnel data base is provided in Appendix A.
6.1 STRUCTURING A DBC/SQL STATEMENT
A DBC/SQL statement normally consists of a statement keyword, column names, data base name, table name, and optional clauses introduced by keywords. A statement is terminated by a semicolon. For example, in
SELECT DeptNo, Name, Salary FROM Personnel.Employee WHERE DeptNo IN (100, 500) ORDER BY DeptNo, Name;
SELECT is the statement keyword. "DeptNo" , "Name", and "Salary" are column names. "Personnel" is the data base name, "Employee" the table name. These names constitute the "select list" for the statement. "WHERE DeptNo IN (100, 500)" and "ORDER BY DeptNo, Name" are optional clauses that are introduced by the keywords "WHERE" and "ORDER BY".
A DBC/SQL statement may be punctuated as follows: a period (.) separating the data base name from the table name, and the table name from the first column name (except for SELECT); a comma (,) separating subsequent column names in the select list, or column names or parameters in an optional clause.
You may enter any of these statement components in any combination of uppercase and lowercase letters, for example,
employee EMPLOYEE eMpLoYeE
DBC/SQL recognizes all combinations as long as they are spelled correctly. For emphasis in this guide, keywords appear in uppercase letters, user-defined names in initial capitals and lowercase letters.
C09-OOOl-07 6-1
Sets of single, double, quadruple (and so on) apostrophes are used in DBC/SQL statements to enclose character strings and constants. For example, in the statement,
MODIFY USER Inglis AS STARTUP = 'ECHO' 'SET PFl ""SPLIT:"":":
ECHO "SET PF2 ""JOIN:"":";';
sets of apostrophes are used to denote, for example, that the SPLIT command is nested within the SET PFI command, the SET PFI command nested within the ECHO statement, and ECHO within the MODIFY USER statement.
Thus, the SPLIT command is set off by quadruple apostrophes ("") to distinguish it from the SET PFI command, which is set off by double apostrophes (") to distinguish it from the ECHO statement, which is set off by single apostrophes (') to distinguish it from the MODIFY USER statement.
Other examples of the use of apostrophes in a string are:
'Tab "A'" , 'Tab 'A'" 'Smi th' 's'
6.2 ESTABLISHING A DEFAULT DATA BASE
During a session with the DBC/I012, you may repeatedly query, define, or manipulate data from the same data base. To avoid keying the data base name every time you enter a DBC/SQL statement, define a default data base by specifying its name in a DATABASE statement. Once defined, a default data base remains in effect until the end of a session or until it is replaced by a subsequent DATABASE statement.
After you establish a default data base, DBC/SQL automatically supplies the name of the data base every time you enter a statement without specifying a data base name. For example, after entering the following statement,
DATABASE Personnel;
you may enter the SELECT statement above in the following form:
SELECT DeptNo, Name, Salary FROM Employee WHERE DeptNo IN (100, 500) ORDER BY DeptNo, Name;
To establish a default data base, you must have some privilege on a data base, macro, table, user, or view in that data base. (Privileges are discussed in Chapter 10.)
6-2 C09-0001-07

During an ITEQ session, you may define a default data base for subsequent ITEQ sessions. Enter a MODIFY USER statement with a DEFAULT DATA BASE clause that specifies the name of a data base that will be invoked each time you log on. For example, the following statement automatically establishes Personnel as Peterson's default data base at the next logon:
MODIFY USER Peterson AS DEFAULT DATABASE = Personnel ;
(The MODIFY USER statement is described in Chapter 10.)
Henceforth, the statement examples in this guide assume that you have established Personnel as your default data base.
6.3 SELECTING COLUMNS
To get data from a data base, you use the SELECT statement. In the SELECT statement, you specify the table columns from which to get the data, the data base that you want (if you have not already established a default data base), and the table (or tables) that you need within that data base.
For example, to request all the data in the Name, Salary, and JobTitle columns of the Employee table, enter:
SELECT Name, Salary, JobTitle FROM Employee;
C09-0001-07 6-3
Name Salary JobTitle ------------ ---------- ----------Newman P 28,600.00 Test Tech Chin M 38,000.00 Controller Aguilar J 45,000.00 Manager Russell S 65,000.00 President Clements D 38,000.00 Salesperson Kemper R 29,000.00 Assembler Inglis C 34,000.00 Tech writer Leidner P 23,000.00 Secretary Smith T 45,000.00 Manager Watson L 56,000.00 Vice Pres Smith T 42,000.00 Engineer Carter J 44,000.00 Engineer Phan A 55,000.00 Vice Pres Regan R 44,000.00 Purchaser Greene W 32,500.00 Payroll Ck Marston A 22,000.00 Secretary Moffit H 35,000.00 Recruiter Reed C 30,000.00 Technician Omura H 40,000.00 Programmer Brangle B 30,000.00 Salesperson Peterson J 25,000.00 Payroll Ck
Note that the left-to-right order of the columns in a result is determined by the order in which the column names are entered in the statement. Note also that, as long as a statement contains the correct separators (. , i), the spacing between statement components may vary. For example, the statement above could be entered as:
SELECT Name, Salary,JobTitle FROM Employee;
To request all the data in the Employee table, enter:
SELECT * FROM Employee;
The asterisk character (*) specifies that the data in all columns of the table be returned. The result is the Employee table shown in Appendix A.
When you are entering a SELECT statement, you may abbreviate SELECT to SEL. For example, to SELECT all the data in the Name and EdLev columns in the Employee table, you may enter the statement as:
SEL Name, EdLev FROM Employee;
6-4 C09-000l-07
6.4 SELECTING ROWS
To get data from specific rows of a table, you use the WHERE clause of the SELECT statement. That portion of the clause following the keyword WHERE causes DBC/SQL to search for rows that satisfy the specified condition. For example, to get the name, salary, and title of each employee in Department 100, the WHERE clause is used as follows:
SELECT Name, Salary, JobTitle FROM Employee WHERE DeptNo = 100;
Name Salary JobTit1e ------------ ---------- ----------Chin M 38,000.00 Controller Greene W 32,500.00 Payroll Ck Moffit H 35,000.00 Recruiter Peterson J 25,000.00 Payroll Ck
Note the use of the = comparison operator to specify the search condition in this WHERE clause. The comparison operators listed in Table 6-1 are routinely used to specify WHERE search conditions.
Form
Table 6-1. Comparison Operations
Meaning
value1 = va1ue2 value1 > value2 va1uel < va1ue2 valuel <> va1ue2 valuel -,= va1ue2 value1 <= value2 valuel >= value2 valuel [NOT]
BETWEEN va1ue2 AND value3
valuel is equal to value2 valuel is greater than value2 valuel is less than value2 valuel and va1ue2 are not equal valuel and value2 are not equal valuel is less than or equal to value2 valuel is greater than or equal to value2 valuel is greater than or equal to value2
and less than or equal to value3
The following sections tell you how to use DBC/SQL features in a SELECT statement to:
• Specify the order in which a result is to be returned
• Eliminate duplicate rows in a result
C09-000l-0? 6-5
• Return data that satisfies several search conditions
• Return data that satisfies one of several search conditions
• Narrow a search condition
• Return data that matches certain values and character combinations
• Return values within a specified range
• Return values that contain specific combinations of characters
• Return data that satisfies a calculated condition
6.4.1 Specifying Order (ORDER BY)
You can specify the sequence of returned data by using the ORDER BY clause of the SELECT statement. For example, to list the name and years of experience of each employee in Department 600 in ascending order of seniority, enter:
SELECT Name, YrsExp FROM Employee WHERE DeptNo = 600 ORDER BY YrsExp;
Name YrsExp
Newman P 6 Kemper R 7 Regan R 10 Aguilar J 11
You may reference more than one column in an ORDER BY clause and specify an ascending (ASC) or descending (DESC) order. Ascending order is the default.
For example, to list the department numbers, names, and years of experience of all employees in ascending order of department number (the default) and descending order of seniority, enter the statement,
6-6 C09-0001-07
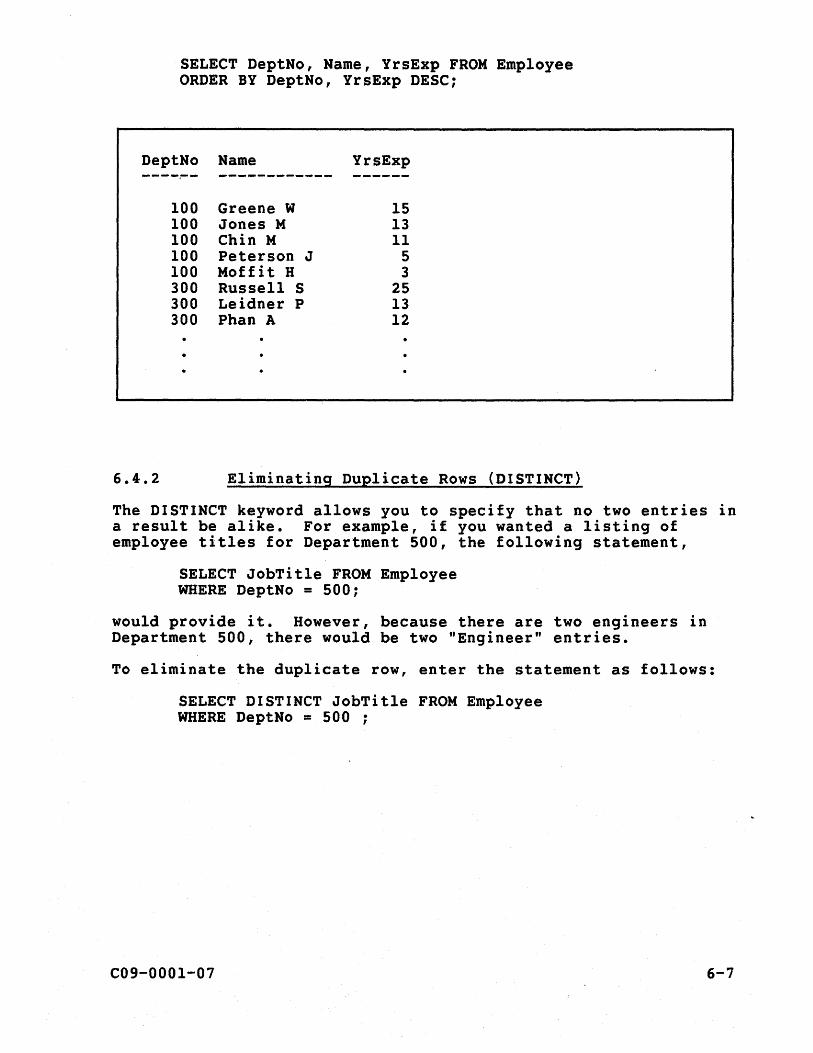
SELECT DeptNo, Name, YrsExp FROM Employee ORDER BY DeptNo, YrsExp DESC:
DeptNo Name YrsExp ------ ------------ ------
100 Greene W 15 100 Jones M 13 100 Chin M 11 100 Peterson J 5 100 Moffit H 3 300 Russell S 25 300 Leidner P 13 300 Phan A 12
6.4.2 Eliminating Duplicate Rows (DISTINCT)
The DISTINCT keyword allows you to specify that no two entries in a result be alike. For example, if you wanted a listing of employee titles for Department 500, the following statement,
SELECT JobTitle FROM Employee WHERE DeptNo = 500:
would provide it. However, because there are two engineers in Department 500, there would be two "Engineer" entries.
To eliminate the duplicate row, enter the statement as follows:
SELECT DISTINCT JobTitle FROM Employee WHERE DeptNo = 500 :
C09-0001-07 6-7
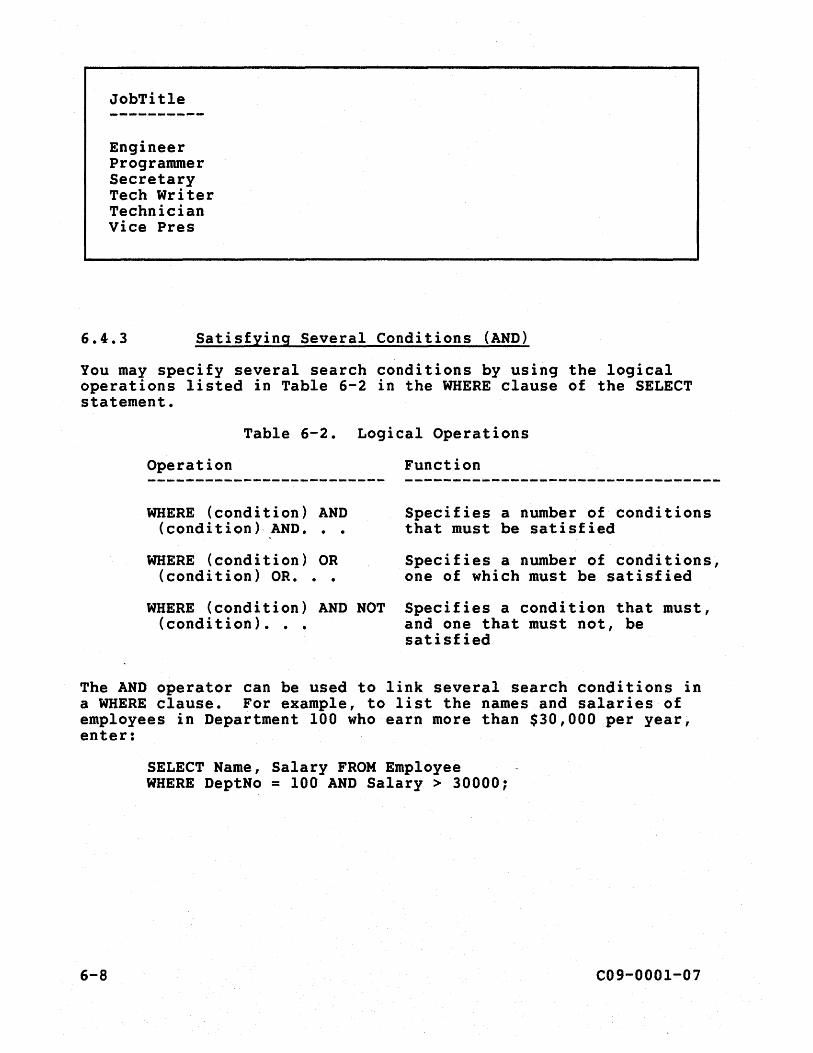
JobTitle
Engineer Programmer Secretary Tech Writer Technician Vice Pres
6.4.3 Satisfying Several Conditions (AND)
You may specify several search conditions by using the logical operations listed in Table 6-2 in the WHERE clause of the SELECT statement.
Table 6-2. Logical Operations
Operation Function
WHERE (condition) AND (condition) AND.
WHERE (condition) OR (condition) OR •••
WHERE (condition) AND NOT (condi tion). • •
Specifies a number of conditions that must be satisfied
Specifies a number of conditions, one of which must be satisfied
Specifies a condition that must, and one that must not, be satisfied
The AND operator can be used to link several search conditions in a WHERE clause. For example, to list the names and salaries of employees in Department 100 who earn more than $30,000 per year, enter:
6-8
SELECT Name, Salary FROM Employee WHERE DeptNo = 100 AND Salary> 30000;
C09-000I-07

Name
Chin M Greene W Moffit H
6.4.4
Salary
38,000.00 32,500.00 35,000.00
Satisfying One of Many Conditions (OR)
Use the logical operator OR in a WHERE clause to specify one of two search conditions for selecting table rows. For example, to list the names, salaries, marital status, and sex of employees who are either women (F) or single (S), enter:
SELECT Name, Salary, MStat, Sex FROM Employee WHERE Sex = 'F' OR MStat = 's' :
Name Salary MStat Sex ------------ ---------- -----
Newman P 28,600.00 M F Chin M 38,000.00 M F Watson L 56,000.00 S M Marston A 22,000.00 M F Moffit H 35,000.00 W F Inglis C 34,000.00 S M Leidner P 23,000.00 M F Smith T 45,000.00 S F Brangle B 30,000.00 S F Phan A 55,000.00 M F Regan R 44,000.00 M F Omura H 40,000.00 S M
6.4.5 Narrowing a Search Condition (NOT)
Because it is sometimes easier to specify search conditions that you don't want used in selecting rows, use the NOT logical operator to narrow the search. For example, to get the name, salary, department number, and marital status of each employee in Departments 100 or 500 who is not married, enter the following query:
C09-0001-07 6-9

SELECT Name, Salary, DeptNo, MStat FROM Employee WHERE (DeptNo = 100 OR DeptNo = 500) AND MStat NOT = 'M';
Name Salary DeptNo MStat -------------- ---------- ------ -----Watson L 56,000.00 500 S Moffit H 35,000.00 100 W Inglis C 34,000.00 500 S Omura H 40,000.00 500 S Reed C 30,000.00 500 D
The NOT keyword narrows the selection to employees who are single, widowed, or divorced.
In the clauses above, there are actually three search conditions:
1. DeptNo = 100
2. DeptNo = 500
3. MStat NOT = 'M'
The parentheses cause the first two search conditions, "DeptNo = 100" and "DeptNo = 500," to be considered together. The composite result of these two conditions is then evaluated in terms of the third condition.
Because, by default, the NOT operator is evaluated first in a statement, then AND, then OR, the statement above would have the same result without the parentheses. However, this is not always true. Parentheses are often needed to group search conditions in order to override this default precedence.
Consider the following statement, containing the same three search conditions:
SELECT Name, Salary, DeptNo, MStat FROM Employee WHERE DeptNo = 100 OR (DeptNo = 500 AND MStat NOT = 'M');
without parentheses, the result of this statement is the same as that of the first. However, with parentheses to group them, the conditions "DeptNo = 500" and "NOT MStat = 'M'" are considered together. The result of this composite condition -- unmarried employees in Department 500 -- is merged with the result of the first condition: all employees in Department 100, married and unmarried.
6-10 C09-000l-07
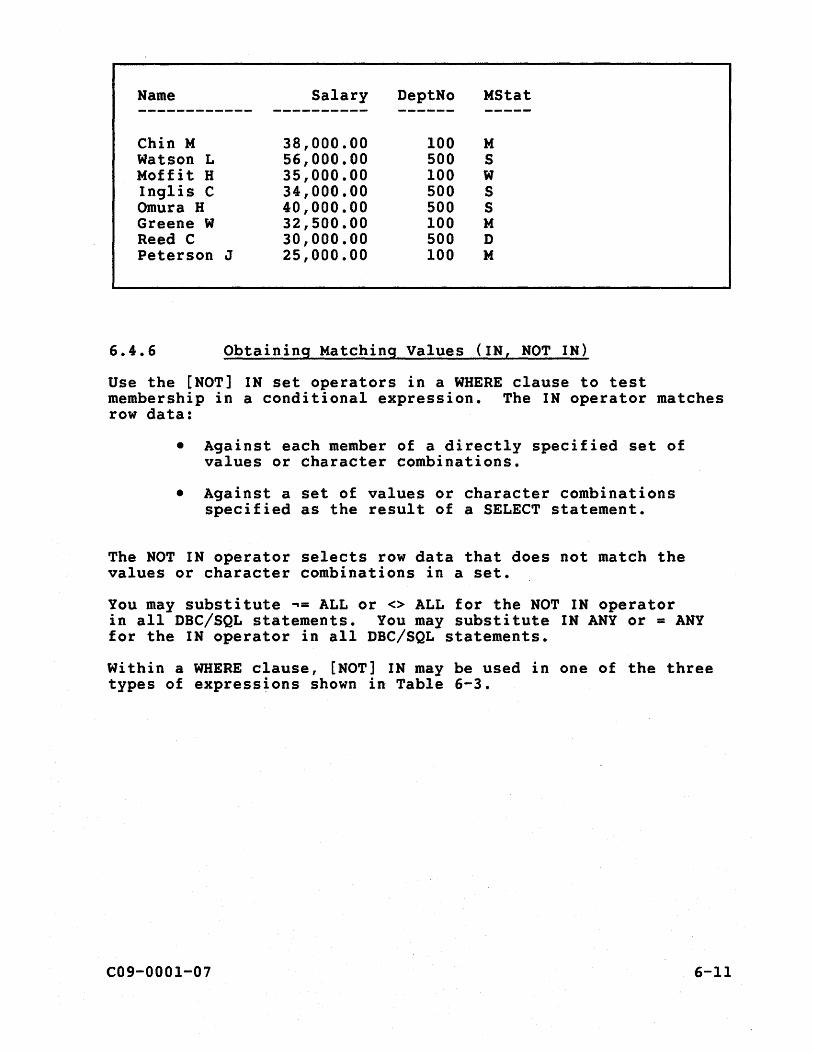
Name Salary DeptNo MStat ------------ ---------- ------ -----Chin M 38,000.00 100 M Watson L 56,000.00 500 S Moffit H 35,000.00 100 W Inglis C 34,000.00 500 S Omura H 40,000.00 500 S Greene W 32,500.00 100 M Reed C 30,000.00 500 D Peterson J 25,000.00 100 M
6.4.6 Obtaining Matching Values (IN, NOT IN)
Use the [NOT] IN set operators in a WHERE clause to test membership in a conditional expression. The IN operator matches row data:
• Against each member of a directly specified set of values or character combinations.
• Against a set of values or character combinations specified as the result of a SELECT statement.
The NOT IN operator selects row data that does not match the values or character combinations in a set.
You may substitute ~= ALL or <> ALL for the NOT IN operator in all DBC/SQL statements. You may substitute IN ANY or = ANY for the IN operator in all DBC/SQL statements.
Within a WHERE clause, [NOT] IN may be used in one of the three types of express~ons shown in Table 6-3.
C09-000l-0? 6-11
Table 6-3. Expressions Using Set Operators
Expression Meaning
1. value [NOT] IN (constant, constant, ••• )
2. value [NOT] IN (SELECT statement)
3. (valuel,value2, ••• ) [NOT] IN (SELECT statement)
The value is [is not] included in the set specified
The value is [is not] included in the result of a SELECT statement
The values are [are not] included in the result of a SELECT statement
The first type of expression is illustrated using the following statement:
SELECT Name, Salary, DeptNo FROM Employee WHERE DeptNo IN (100, 500) AND MStat NOT = 'M';
In the WHERE clause of this statement, IN selects rows of the Employee table in which department number corresponds to (is IN) 100 or 500.
Note that the result of this statement is identical to that of the statement above:
SELECT Name, Salary, DeptNo FROM Employee WHERE (DeptNo = 100 OR DeptNo = 500) AND MStat NOT = 'M';
To select rows of the Employee table in which department number does not correspond to (is NOT IN) 100 or 500, enter:
SELECT Name, Salary, DeptNo FROM Employee WHERE DeptNo NOT IN (100, 500);
In the second type of expression, a set is defined as the result of a SELECT statement. For example, if you wanted a list of company employees who work in New York, you could enter the following statement:
SELECT Name FROM Employee WHERE DeptNo IN
(SELECT DeptNo FROM Department WHERE Loc='NYC');
The expression in the WHERE clause of this statement asks the DBC/1012 to locate employee names whose department numbers match (are IN) the set of department numbers that result from entering the SELECT statement in parentheses.
6-12 C09-0001-07
To illustrate the third type of expression using set operators, we imagine that the identifier for Department is contained in two columns, DeptNoA and DeptNoB. To select the names of employees whose row data for DeptNoA and DeptNoB matches the identifiers of departments located in New York, enter:
SELECT Name FROM Employee WHERE (DeptNoA,DeptNoB) IN
(SELECT DeptNoA, DeptNoB FROM Department WHERE Loc='NYC');
Note that when the values in two or more columns are matched against members of a specified set, the column names are enclosed in parentheses.
6.4.7 Specifying a Range (BETWEEN ••• AND)
To select values that fall within a certain range, use the BETWEEN ••• AND comparison operator in the WHERE clause of the SELECT statement. For example, to get a list of names, salaries, and titles for employees in Department 500 who earn between $30,000 and $40,000 per year, enter the following statement:
SELECT Name, Salary, JobTitle FROM Employee WHERE DeptNo = 500 AND Salary BETWEEN 30000 AND 40000;
Name Salary JobTitle ------------ -------~-- ----------Inglis C 34,000.00 Tech Writer Omura H 40,000.00 Programmer Reed C 30,000.00 Technician
Note that BETWEEN ••• AND includes the range values themselves.
The logical operator NOT may be used with BETWEEN ••• AND. For example, the clause,
WHERE DeptNo = 500 AND Salary NOT BETWEEN 30000 AND 40000;
would list the names of employees who earn less than (and not including) 30,000 and more than (and not including) 40,000.
C09-000l-07 6-13
6.4.8 Matching Characters (LIKE)
At times, you may want to search for a specific character "string", or a combination of characters that partially match a given string. To obtain data that contains specific combinations of characters, use the LIKE partial-string operator.
The form for using the LIKE partial-string operator is:
expr [NOT] LIKE 'pattern-string'
where pattern-string may contain any character string. You may use the characters "%" and "_" anywhere in "pattern-string". The "%" character represents any string of zero or more characters. The "_" character represents any single character. The following examples illustrate uses of the LIKE partial-string operator.
For example, to get a listing of all employees whose last names begin with "P", enter the following query:
Name
SELECT Name FROM Employee WHERE Name LIKE 'P%';
Phan A Peterson J
To select a list of all employees with the letter "a" as the second letter in their last name, enter the following query:
Name
SELECT Name FROM Employee WHERE Name LIKE '_a%' ;
Marston A Watson ·L Carter J
In the preceding statement, both the "%" character and the" " character are used. If the partial-string is changed to " a-", for example,
6-14 C09-OOOI-07

SELECT Name FROM Employee WHERE Name LIKE '_a_' ;
only three-character last names, with "A" as the second letter, would be returned. Because none of the employee names contained in the Employee table fit this description, no rows are returned.
The NOT operator also may be used with LIKE. The following clause,
WHERE Name NOT LIKE 'P%';
would give you the names of all employees except Peterson and Phan.
6.4.9 Satisfying a Calculated Condition
You may select rows that satisfy a calculated condition by including arithmetic operators in the WHERE clause of the SELECT statement. Arithmetic operators are listed in Table 6-4.
Table 6-4.
Operator
+
* / MOD **
Arithmetic Operators
Meaning
add subtract multiply divide modulus (remainder) exponentiation
(The MOD operator calculates the remainder in a division operation. For example, 60 MOD 7 = 4: 60 divided by 7 equals 8, with a remainder of 4.)
For example, to list the names and salaries of employees in Department 600 who earn less than $2500 per month, enter the following:
SELECT Name, Salary FROM Employee WHERE DeptNo = 600 AND Salary/12 < 2500;
C09-000l-07 6-15
Name
Newman P Kemper R
Salary
28,600.00 29,000.00
In the statement above, "Salary/12" is an arithmetic expression. A WHERE clause may contain any number of arithmetic expressions. Expressions may be grouped in parentheses to specify precedence, as described in the following section.
6.4.10 Searching For NULL Values
At times, you may want to search for, or possibly exclude, null values in your search condition. To determine whether or not null values are contained in row data, use the IS [NOT] NULL operator.
The IS NULL operator tests row data for the presence of null values. For example ~ to search for, the names of all employees who have a null value in the DeptNo column, you could enter the following statement:
SELECT Name FROM Employee WHERE DeptNo IS NULL;
The result of this query is the names of all employees with a null value in the DeptNo field. Because all employees contained in the Employee table have been assigned to a department, no rows will be returned.
NOw, if you wished to exclude null values from the results of a query, you would use the NOT NULL Operator. For example, to search for the names of all employees with a value other than null in the JobTitle column, you would enter the following statement:
SELECT Name FROM Employee WHERE JobTitle IS NOT NULL;
The result of this query is the names of all employees with a value other than null in the JobTitle column. When you enter this stat$ment, the names of all employees are returned because every employee has been given a jobtitle.
If you wish to search for null and non-null values in the same statement, the search condition for null values must be included separately from any other search conditions. For example, if you
6-16 C09-000l-07
wanted to select the names of all employees with the jobtitle of vice pres, manager, or null, you would enter the following statement:
6.4.11
SELECT Name, JobTitle FROM Employee WHERE JobTitle IN ('Manager' or 'Vice Pres') OR (Jobtitle IS NULL);
Combining SELECT statements
Set operators allow you to manipulate the answers to two or more SELECT statement by combining the statements into a single query. That is, each SELECT statement is executed separately to produce a result (answer set), which consists of a set of rows. The specified set operator is then applied to the answer sets and a final result is returned.
The set operators and their functions are listed in the following table.
Operator
UNION
INTERSECT
MINUS
Function
Combines the results of two or more SELECT statements
Returns result rows that are in all of answer sets generated by individual SELECT statements
Subtracts the result rows generated by the second SELECT statement from the result rows generated by the first SELECT statement
In order for a group of SELECT statements to be connected by set operators, the statements must follow these rules:
• All SELECT statements in the query must have the same number of expressions. For example, if the first SELECT statement contains 3 expressions, all succeeding SELECT statement must contain 3 expressions.
• The data types of corresponding items in each SELECT statement must be compatible. That is, if the first column in the first SELECT statement is character data type, then each succeeding SELECT statement must be character data type.
• Each SELECT statement must identify the table that data is to come from, even if all SELECT statements reference the same table.
C09-OOOl-07 6-17
• An ORDER BY clause (as described above) may only be used on the 1ast SELECT statement and specify the order of the final result.
• An ORDER BY clause may only contain numeric constants. For example, to order by the first column in your result set, ORDER BY 1. A GROUP BY clause (as described below) is only allowed in an individual SELECT statement and applies only to that SELECT statement and not to the result.
• A set operator cannot be used in a subquery.
• A set operator cannot be used in a view definition.
6.4.11.1 UNION Operator
You may use the UNION operator to combine the results of two or more SELECT statements.· That is, the "answers" to all SELECT statement are combined into a single result and any duplicate rows are eliminated from the result.
For example, to determine the department number and names of all employees in departments 500 and 600, you could enter the following statement:
6-18
SELECT DeptNo, Name FROM Employee WHERE DeptNo = 500
UNION
SELECT DeptNo, Name FROM Employee WHERE DeptNo = 600 ;
C09-000l-07
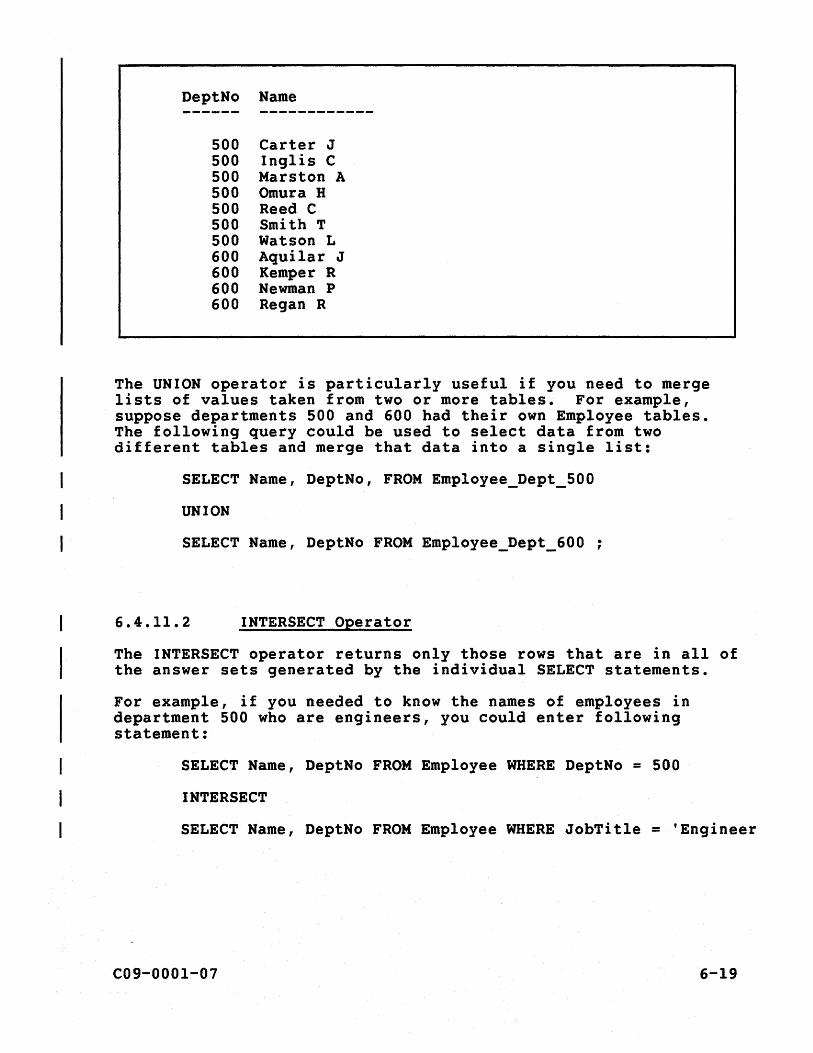
DeptNo Name
500 Carter J 500 Inglis C 500 Marston A 500 Omura H 500 Reed C 500 Smith T 500 Watson L 600 Aquilar J 600 Kemper R 600 Newman P 600 Regan R
The UNION operator is particularly useful if you need to merge lists of values taken from two or more tables. For example, suppose departments 500 and 600 had their own Employee tables. The following query could be used to select data from two different tables and merge that data into a single list:
SELECT Name, DeptNo, FROM Employee_Dept_500
UNION
SELECT Name, DeptNo FROM Employee_Dept_600 ;
6.4.11.2 INTERSECT Operator
The INTERSECT operator returns only those rows that are in all of the answer sets generated by the individual SELECT statements.
For example, if you needed to know the names of employees in department 500 who are engineers, you could enter following statement:
SELECT Name, DeptNo FROM Employee WHERE DeptNo = 500
INTERSECT
SELECT Name, DeptNo FROM Employee WHERE JobTitle = 'Engineer
C09-000l-07 6-19
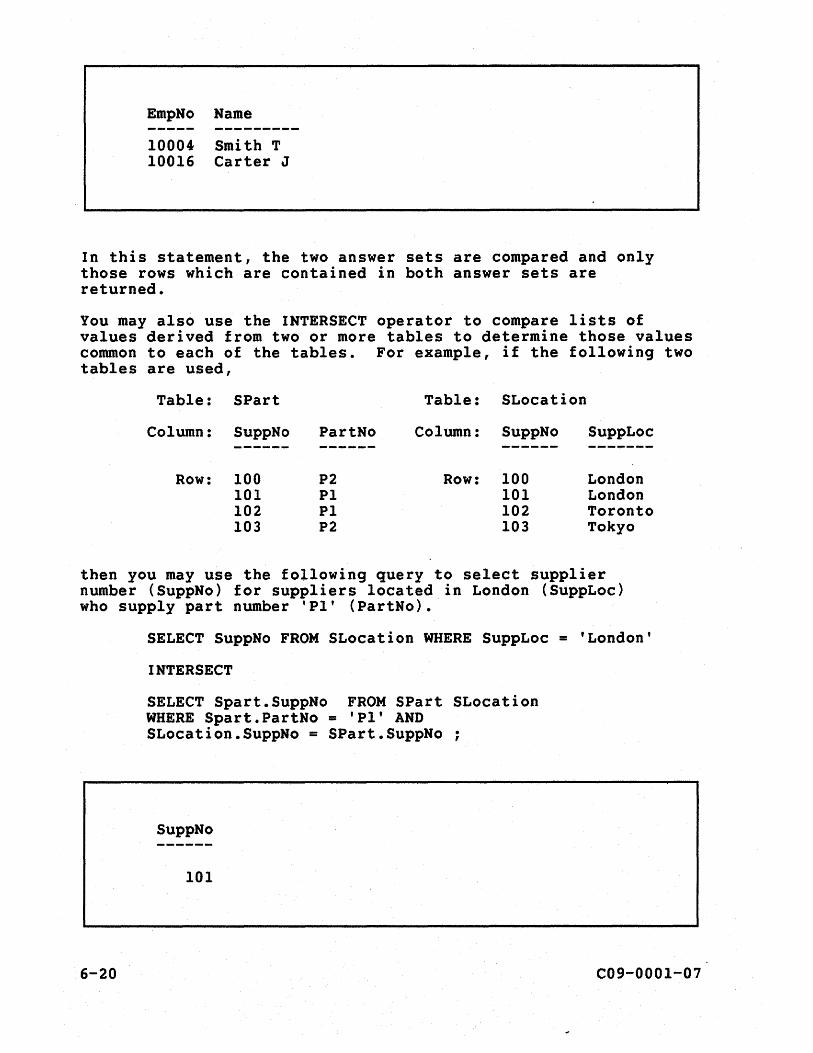
EmpNo Name
10004 Smith T 10016 Carter J
In this statement, the two answer sets are compared and only those rows which are contained in both answer sets are returned.
You may also use the INTERSECT operator to compare lists of values derived from two or more tables to determine those values common to each of the tables. For example, if the following two tables are used,
Table: SPart Table: SLocation
Column: SuppNo PartNo Column: SuppNo SuppLoc ------ ------ ------ -------
Row: 100 P2 Row: 100 London 101 PI 101 London 102 PI 102 Toronto 103 P2 103 Tokyo
then you may use the following query to select supplier number (SuppNo) for suppliers located in London (SuppLoc) who supply part number 'PI' (PartNo).
6-20
SELECT SuppNo FROM SLocation WHERE SuppLoc = 'London'
INTERSECT
SELECT Spart.SuppNo FROM SPart SLocation WHERE Spart.PartNo = 'PI' AND SLocation.SuppNO = SPart.SuppNo :
SuppNO
101
C09-0001-07
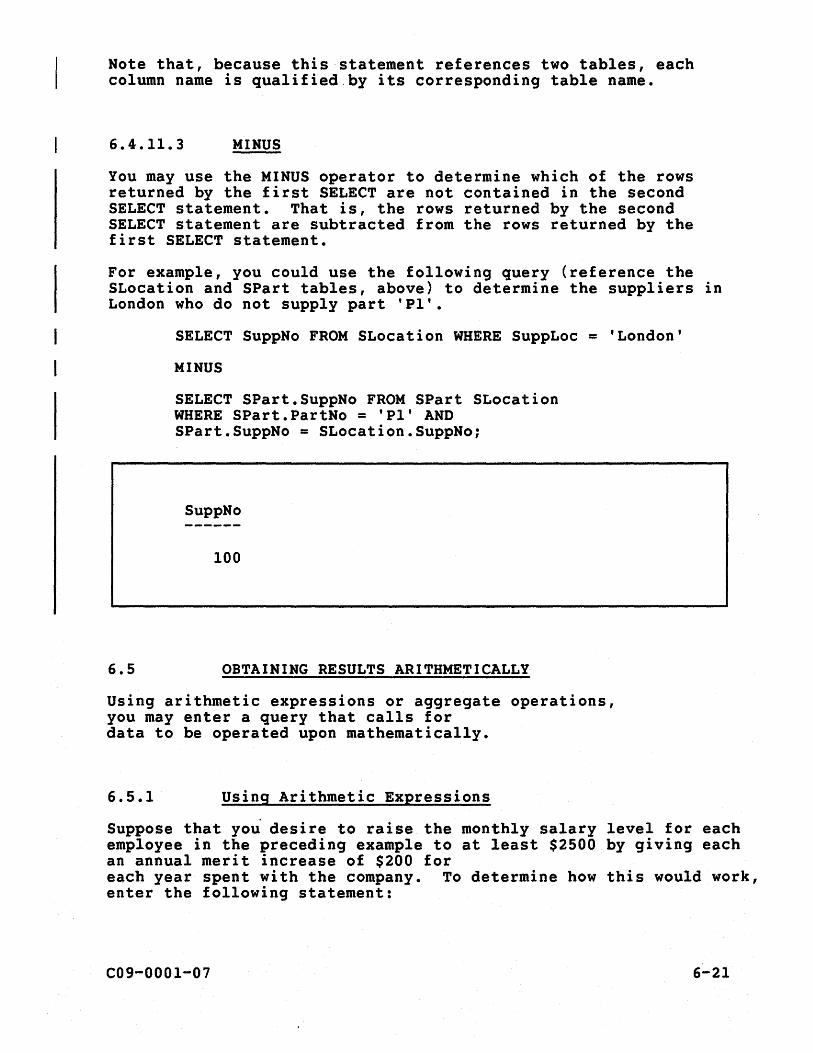
Note that, because this statement references two tables, each column name is qualified.by its corresponding table name.
6.4.11.3 MINUS
You may use the MINUS operator to determine which of the rows returned by the first SELECT are not contained in the second SELECT statement. That is, the rows returned by the second SELECT statement are subtracted from the rows returned by the first SELECT statement.
For example, you could use the following query (reference the SLocation and SPart tables, above) to determine the suppliers in London who do not supply part 'PI'.
6.5
SELECT SuppNo FROM SLocation WHERE SuppLoc = 'London'
MINUS
SELECT SPart.SuppNo FROM SPart SLocation WHERE SPart.PartNo = 'PI' AND SPart.SuppNo = SLocation.SuppNo;
SuppNo
100
OBTAINING RESULTS ARITHMETICALLY
Using arithmetic expressions or aggregate operations, you may enter a query that calls for data to be operated upon mathematically.
6.5.1 Using Arithmetic Expressions
Suppose that you desire to raise the monthly salary level for each employee in the preceding example to at least $2500 by giving each an annual merit increase of $200 for each year spent with the company. To determine how this would work, enter the following statement:
C09-000l-07 6-21
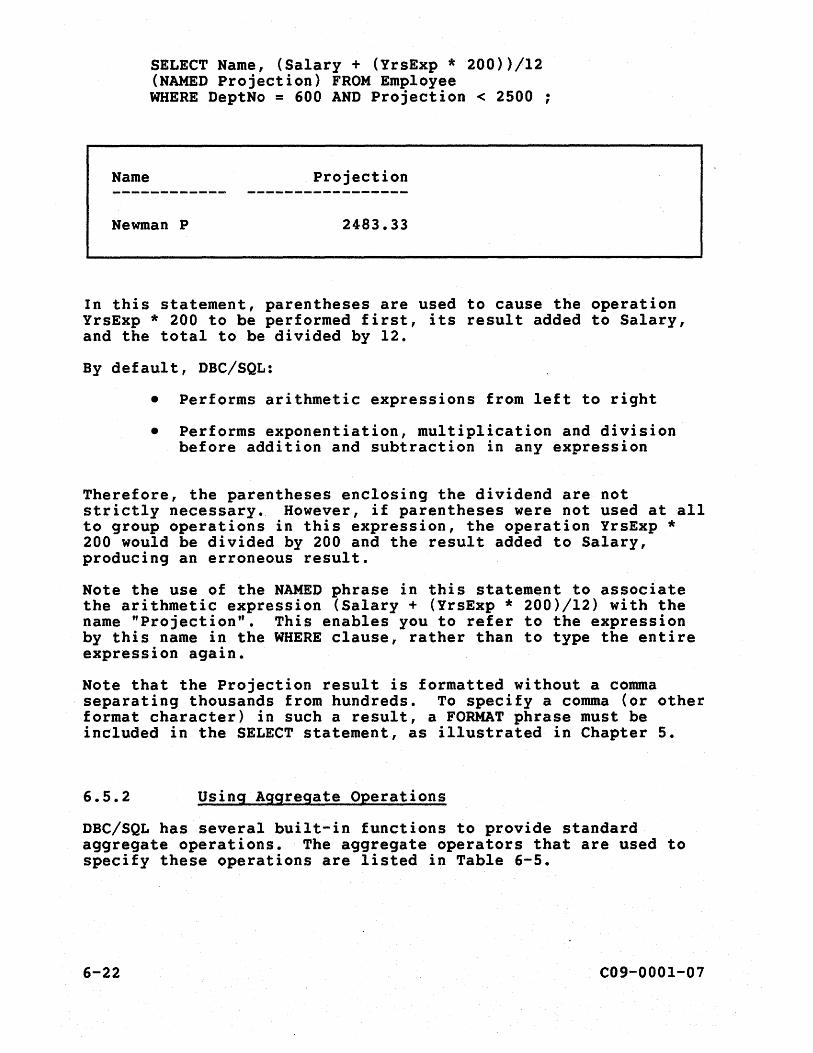
SELECT Name, (Salary + (YrsExp * 200»/12 (NAMED Projection) FROM Employee WHERE DeptNo = 600 AND Projection < 2500 ;
Name Projection
Newman P 2483.33
In this statement, parentheses are used to cause the operation YrsExp * 200 to be performed first, its result added to Salary, and the total to be divided by 12.
By default, DBC/SQL:
• Performs arithmetic expressions from left to right
• Performs exponentiation, multiplication and division before addition and subtraction in any expression
Therefore, the parentheses enclosing the dividend are not strictly necessary. However, if parentheses were not used at all to group operations in this expression, the operation YrsExp * 200 would be divided by 200 and the result added to Salary, producing an erroneous result.
Note the use of the NAMED phrase in this statement to associate the arithmetic expression (Salary + (YrsExp * 200)/12) with the name "Projection". This enables you to refer to the expression by this name in the WHERE clause, rather than to type the entire expression again.
Note that the Projection result is formatted without a comma . separating thousands from hundreds. To specify a comma (or other
format character) in such a result, a FORMAT phrase must be included in the SELECT statement, as illustrated in Chapter 5.
6.5.2 Using Aggregate Operations
DBC/SQL has several built-in functions to provide standard aggregate operations. The aggregate operators that are used to specify these operations are listed in Table 6-5.
6-22 C09-0001-07
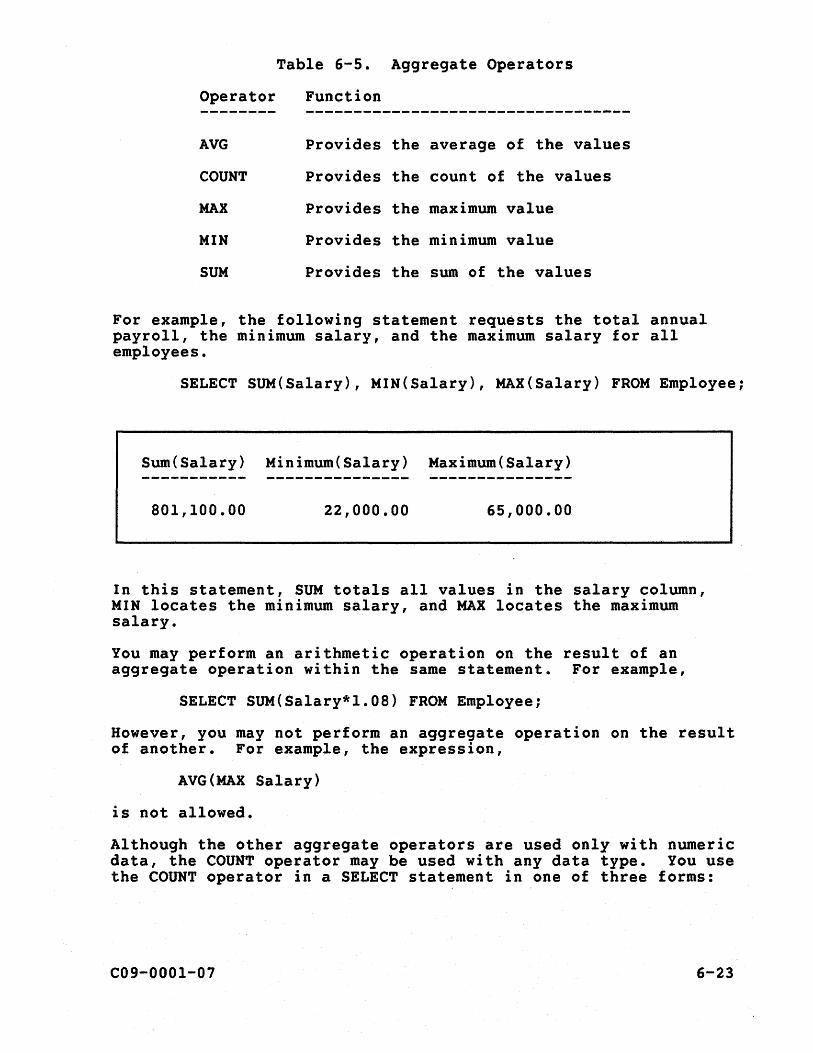
Table 6-5. Aggregate Operators
Operator Function
AVG Provides the average of the values
COUNT Provides the count of the values
MAX Provides the maximum value
MIN Provides the minimum value
SUM Provides the sum of the values
For example, the following statement requests the total annual payroll, the minimum salary, and the maximum salary for all employees.
SELECT SUM(Salary), MIN(Salary), MAX(Salary) FROM Employee;
Sum(Salary) Minimum(Salary) Maximum(Salary)
SOl,lOO.OO 22,000.00 65,000.00
In this statement, SUM totals all values in the salary column, MIN locates the minimum salary, and MAX locates the maximum salary.
You may perform an arithmetic operation on the result of an aggregate operation within the same statement. For example,
SELECT SUM(Salary*l.OS) FROM Employee;
However, you may not perform an aggregate operation on the result of another. For example, the expression,
AVG(MAX Salary)
is not allowed.
Although the other aggregate operators are used only with numeric data, the COUNT operator may be used with any data type. You use the COUNT operator in a SELECT statement in one of three forms:
C09-000l-0? 6-23
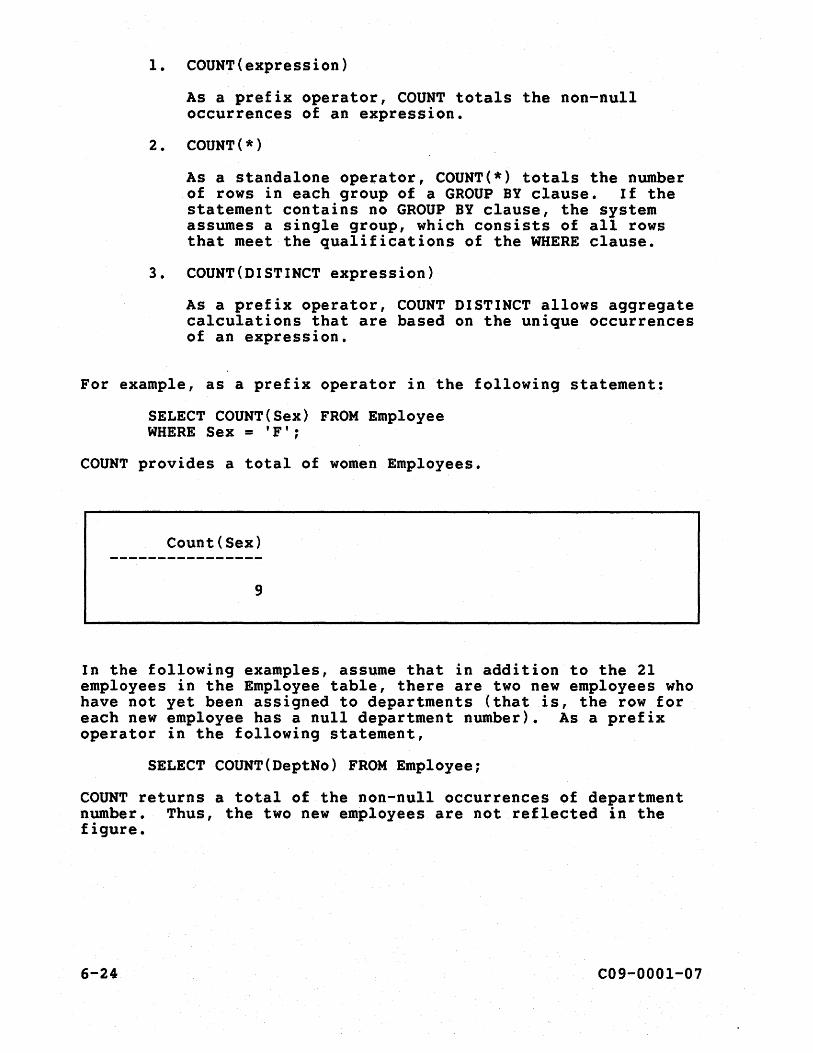
1. COUNT(expression)
As a prefix operator, COUNT totals the non-null occurrences of an expression.
2. COUNT(*)
As a standalone operator, COUNT(*) totals the number of rows in each group of a GROUP BY clause. If the statement contains no GROUP BY clause, the system assumes a single group, which consists of all rows that meet the qualifications of the WHERE clause.
3. COUNT(DISTINCT expression)
As a prefix operator, COUNT DISTINCT allows aggregate calculations that are based on the unique occurrences of an expression.
For example, as a prefix operator in the following statement:
SELECT COUNT{Sex) FROM Employee WHERE Sex = 'F';
COUNT provides a total of women Employees.
Count{Sex)
9
In the following examples, assume that in addition to the 21 employees in the Employee table, there are two new employees who have not yet been assigned to departments (that is, the row for each new employee has a null department number). As a prefix operator in the following statement,
SELECT COUNT(DeptNo) FROM Employee;
COUNT returns a total of the non-null occurrences of department number. Thus, the two new employees are not reflected in the figure.
6-24 C09-000l-07
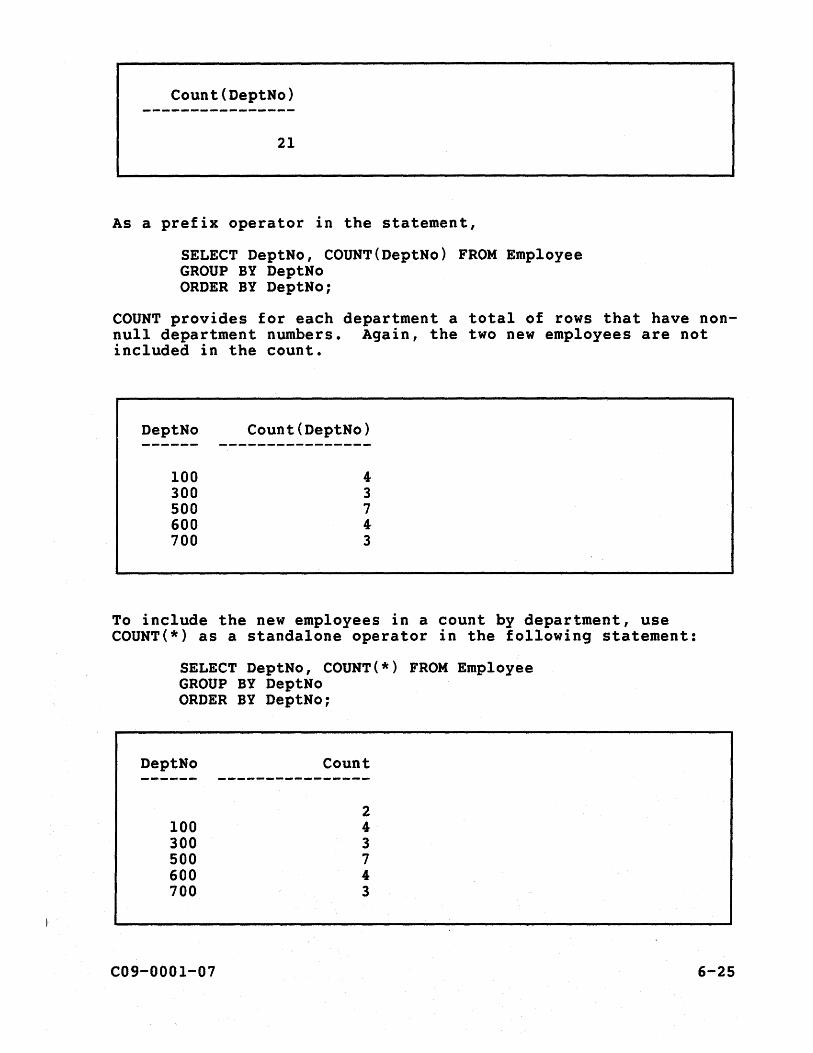
Count (DeptNo)
21
As a prefix operator in the statement,
SELECT DeptNo, COUNT (DeptNo) FROM Employee GROUP BY DeptNo ORDER BY DeptNo;
COUNT provides for each department a total of rows that have nonnull department numbers. Again, the two new employees are not included in the count.
DeptNo Count(DeptNo)
100 4 300 3 500 7 600 4 700 3
To include the new employees in a count by department, use COUNT(*) as a standalone operator in the following statement:
SELECT DeptNo, cOUNT(*) FROM Employee GROUP BY DeptNo ORDER BY DeptNo;
DeptNo Count
2 100 4 300 3 500 7 600 4 700 3
C09-000l-07 6-25
To find out how many departments exist in the Employee table, use COUNT (DISTINCT) as a prefix operator in the following statement:
SELECT COUNT (DISTINCT DeptNo) FROM Employee;
Count(Distinct(DeptNo»
5
6.6 OPERATING ON DATES
In the CREATE TABLE statement for the Employee table in Chapter 7, the data type for the DOB (Date of Birth) column is defined as DATE. The following kinds of operations may be performed on data that has the DATE data type:
• Arithmetic (addition, subtraction, and division)
• Comparison
• Conversion
6.6.1 Using Arithmetic Operations
To list women employees who are currently over 40 years old, the following statement might be entered:
SELECT Name, DOB FROM Employee WHERE DATE - DOB > 40*365 AND Sex = 'F';
Name DOB
Smith T Jul 29 1946 Moffit H Nov 16 1945
6-26 C09-000l-07
Note that the built-in value for DATE that is used in the expression is the current date.
To project a date 93 days from Moffit's date of birth, enter:
SELECT Name, DOB + 93 FROM Employee WHERE Name = 'Moffit H';
Name (DOB+93)
Moffit H 46/02/17
6.6.2 Using Comparison Operations
To list employees who were born between March 7, 1938, and August 25, 1942, the following query could be entered:
SELECT Name, DOB FROM Employee WHERE DOB BETWEEN 380307(DATE) AND 420825(DATE) ORDER BY DOB;
Name DOB
Inglis C Mar 07 1938 Peterson J Mar 27 1942
6.6.3 converting to Another Format or Notation
To change the date format displayed in the preceding example to an alternate date format (refer to Table 7-1) modify the statement as follows.
SELECT Name, DOB (FORMAT '99/99/99') FROM EmploY'ee WHERE DOB BETWEEN 380307{DATE) AND 420825{DATE) ORDER BY DOB;
C09-000l-07 6-27
Entering the modified statement changes the display as follows:
Name DaB
Inglis C 38/03/07 Peterson J 42/03/27
To change the display from date format to integer, modify the statement as follows:
SELECT Name, DaB (INTEGER) FROM Employee WHERE DOB BETWEEN 380307(DATE) AND 420825(DATE) ORDER BY DaB;
The display is changed as follows:
Name DOB
Inglis C 380307 Peterson J 420327
6.7 CHARACTER STRING EXPRESSIONS
You can perform operations on character strings by using either of these DBC/SQL features:
• Concatenation Operator
• String Functions
6-28 C09-000l-07
6.7.1 concatenation Operator
Concatenation considers a string containing left and right expressions separated by II. It then forms a separate string by concatenating the arguments.
'JobTitle' II 'Assembler'
the concatenated string is:
'JobTitle Assembler'
Concatenation operators are used to combine different expressions. The following example illustrates usage of the concatenation operator.
SELECT Name I I " , I I EmpNo FROM Employee;
«Name " ') EmpNo)
Newman P, 10019 Chin M, 10011 Aguilar J, 10007 Russell S, 10018-Clements D, 10022 Kemper R, 10006 Inglis C, 10014 Leidner P, 10003 Smith T, 10021 Carter J, 10016 Phan A, 10018 Regan R, 10013 Greene W, 10017 Marston A, 10009 Moffit H, 10002 Reed C, 10010 Omura H, 10015 Brangle B, 10020 Peterson J, 10001
When a column is defined as CHAR(n) (a fixed-length data type), some of the values stored in the column might contain trailing blanks. To prevent trailing blanks from appearing in a concatenated string, you may append the concatenation operator with an optional TRIM function. The TRIM function causes trailing blanks to be suppressed in the concatenated string. For example, if a Names table is created that includes a First Name and a Last_Name column containing the following information:
C09-000l-07 6-29
First Name CHAR(12) has the value of 'Mary Last_Name CHAR(12) has the value of 'Jones
the operation,
SELECT TRIM (Last_Name) I I' 'II TRIM(First_Name) FROM Names;
results in the string:
Jones, Mary
In this example, the seven trailing blanks at the end of the string 'Jones ' and the eight trailing blanks at the end of the string 'Mary , have been suppressed.
Now, when the TRIM function is removed, the statement,
SELECT Last Name I I' 'I I First Name FROM Names;
returns in the string,
Jones ,Mary
In this example, the trailing blanks are not suppressed.
6.7.2 String Functions
There are two string functions:
• SUBSTR
• INDEX
6.7.2.1 SUBSTR
The SUBSTR function returns a substring of a given string, starting at position nl, lasting for the character length of n2:
SUBSTR (string, nl [ , n2])
thus, the following SUBSTR operation:
SUBSTR ('Engineering', 1, 3)
would result in:
'Eng'
6-30 C09-000l-07
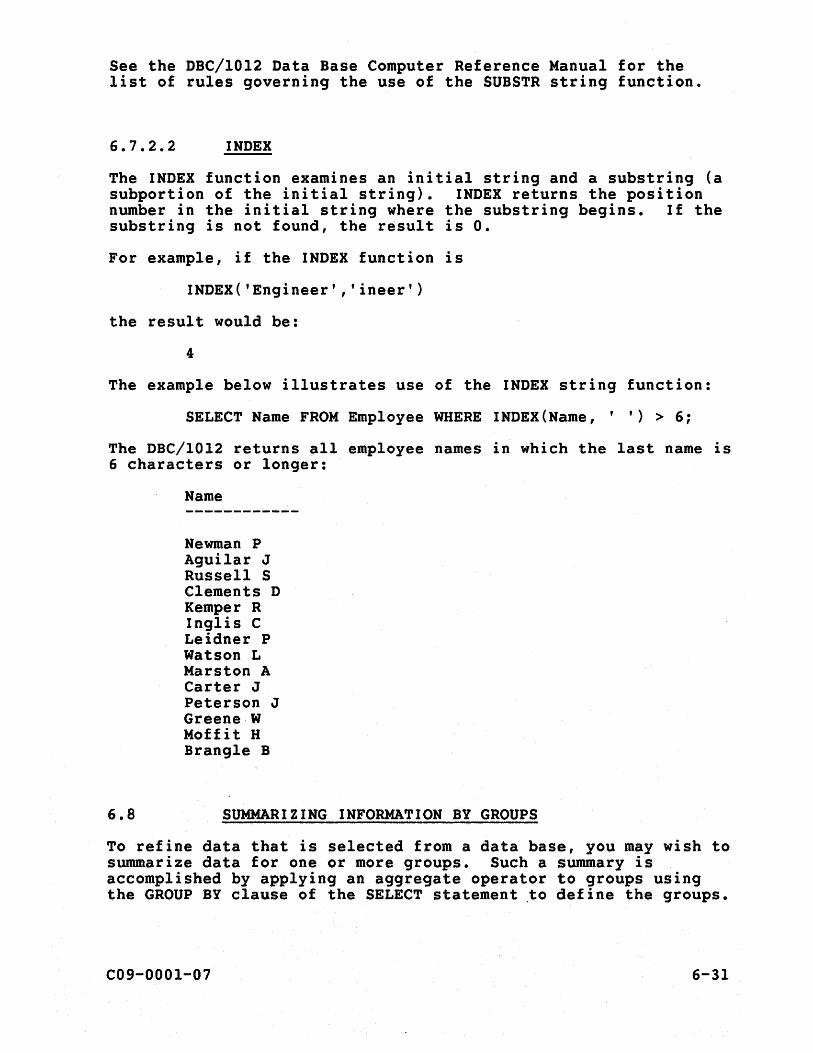
See the DBC/1012 Data Base Computer Reference Manual for the list of rules governing the use of the SUBSTR string function.
6.7.2.2 INDEX
The INDEX function examines an initial string and a substring (a subportion of the initial string). INDEX returns the position number in the initial string where the substring begins. If the substring is not found, the result is o. For example, if the INDEX function is
INDEX('Engineer' ,'ineer')
the result would be:
4
The example below illustrates use of the INDEX string function:
SELECT Name FROM Employee WHERE INDEX(Name, , ') > 6;
The DBC/1012 returns all employee names in which the last name is 6 characters or longer:
6.8
Name
Newman P Aguilar J Russell S Clements D Kemper R Inglis C Leidner P Watson L Marston A Carter J Peterson J Greene·W Moffit H Brang1e B
SUMMARIZING INFORMATION BY GROUPS
To refine data that is selected from a data base, you may wish to summarize data for one or more groups. Such a summary is accomplished by applying an aggregate operator to groups using the GROUP BY clause of the SELECT statement to define the groups.
C09-0001-07 6-31
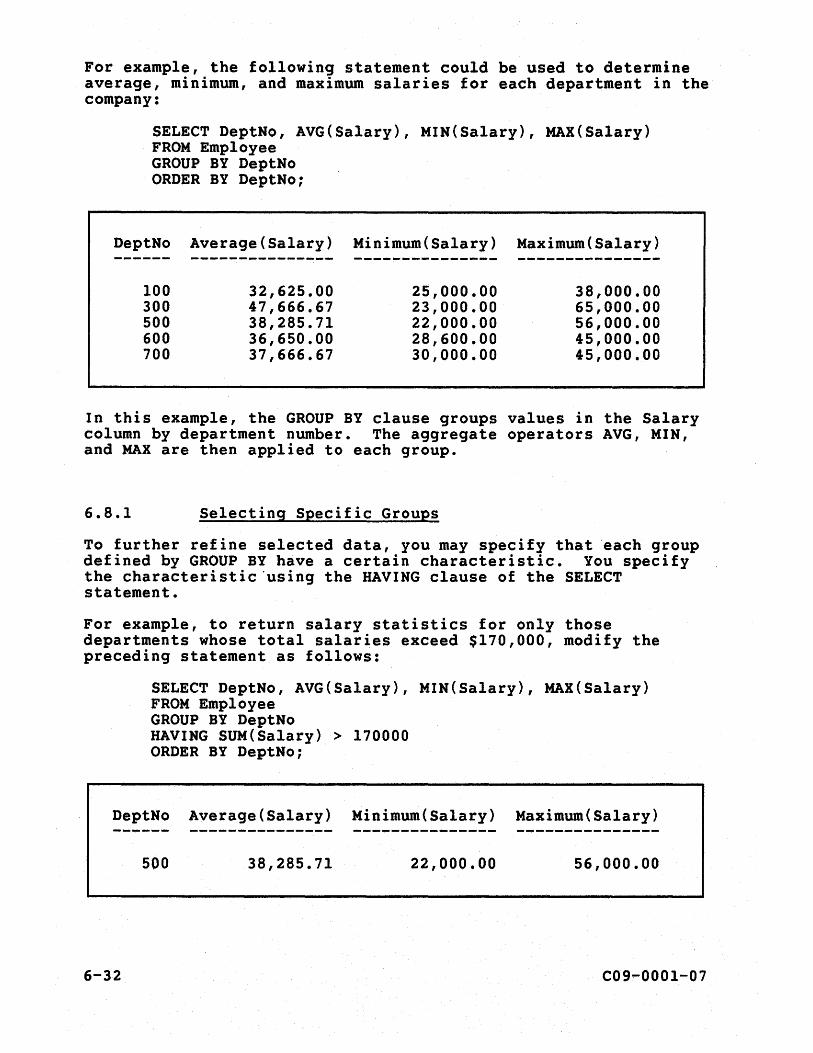
For example, the following statement could be used to determine average, minimum, and maximum salaries for each department in the company:
SELECT DeptNo, AVG(Salary), MIN(Salary), MAX(Salary) FROM Employee GROUP BY DeptNo ORDER BY DeptNo;
DeptNo Average (Salary) Minimum(Sa1ary) Maximum(Sa1ary) ------ --------------- --------------- ---------------
100 32,625.00 25,000.00 38,000.00 300 47,666.67 23,000.00 65,000.00 500 38,285.71 22,000.00 56,000.00 600 36,650.00 28,600.00 45,000.00 700 37,666.67 30,000.00 45,000.00
In this example, the GROUP BY clause groups values in the Salary column by department number. The aggregate operators AVG, MIN, and MAX are then applied to each group.
6.8.1 Selecting Specific Groups
To further refine selected data, you may specify that 'each group defined by GROUP BY have a certain characteristic. You specify the characteristic 'using the HAVING clause of the SELECT statement.
For example, to return salary statistics for only those departments whose total salaries exceed $170,000, modify the preceding statement as follows:
SELECT DeptNo, AVG(Salary), MIN(Sa1ary), MAX(Sa1ary) FROM Employee GROUP BY DeptNo HAVING SUM(Salary) > 170000 ORDER BY DeptNo;
DeptNo Average(Salary) Minimum(Sa1ary) Maximum(Salary)
500 38,285.71 22,000.00 56,000.00
6-32 C09-0001-07
6.8.2 Selecting Specific Rows
A WHERE clause also may be used with GROUP BY and HAVING to select rows to be included in a group result. In this case, WHERE is evaluated before GROUP BY, which is evaluated before HAVING.
For example, to exclude the salaries of the company president, vice presidents, and managers in the summation above, you could modify the statement in the following way:
SELECT DeptNo, SUM(Sa1ary), AVG(Salary), MIN(Salary), MAX(Salary) FROM Employee WHERE JobTit1e NOT IN ('President', 'Vice Pres', 'Manager') GROUP BY DeptNo HAVING SUM(Salary) > 170000 ORDER BY 1;
In this statement, the number 1 refers to the first expression (DeptNo) in the select list. As a convenience, numbers referring to the position of expressions in the select list may be used in the following DBC/SQL clauses:
• ORDER BY
• WITH. • • BY
Note that when non-aggregate groups (for example, DeptNo in the previous example) are selected along with aggregate groups, the non-aggregate groups are always included in the GROUP BY clause. If they are not, an error message is returned by the DBC/IOl2.
6.9 SELECTING RELATED DATA FROM SEVERAL TABLES
You may want to select data from the rows of more than one table or view, or a combination of tables and views. The result of such a query is called a "join". In order for different tables and views to be joined, the tables and views must have one column in common.
The join operation joins the tables or views on their common column. Because more than one table or view is specified in the statement that defines the join, the names of the columns must be fully qualified by the names of their tables.
In the following example, the Employee and Department tables are joined on the DeptNo column in order to find the location of a writer.
C09-000l-07 6-33
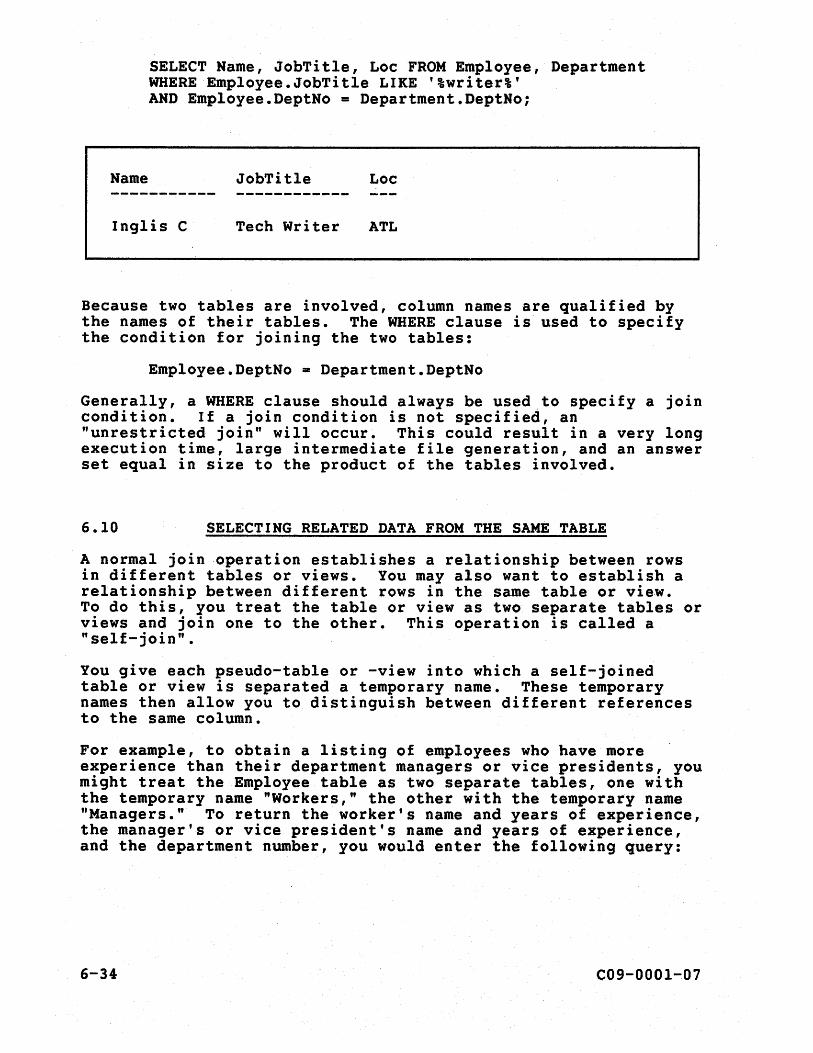
Name
SELECT Name, JobTitle, Loc FROM Employee, Department WHERE Employee.JobTitle LIKE '%writer%' AND Employee.DeptNo = Department.DeptNo;
JobTitle Loc
Inglis C Tech Writer ATL
Because two tables are involved, column names are qualified by the names of their tables. The WHERE clause is used to specify the condition for joining the two tables:
Employee.DeptNo = Department.DeptNo
Generally, a WHERE clause should always be used.to specify a join condition. If a join condition is not specified, an "unrestricted join" will occur. This could result in a very long execution time, large intermediate file generation, and an answer set equal in size to the product of the tables involved.
6.10 SELECTING RELATED DATA FROM THE SAME TABLE
A normal join operation establishes a relationship between rows in different tables or views. You may also want to establish a relationship between different rows in the same table or view. To do this, you treat the table or view as two separate tables or views and join one to the other. This operation is called a "self-join".
You give each pseudo-table or -view into which a self-joined table or view is separated a temporary name. These temporary names then allow you to distinguish between different references to the same column.
For example, to obtain a listing of employees who have more experience than their department managers or vice presidents, you might treat the Employee table as two separate tables, one with the temporary name "Workers," the other with the tempora~y name "Managers." To return the worker's name and years of experience, the manager's or vice president's name and years of experience, and the department number, you would enter the following query:
6-34 C09-OOOl-07
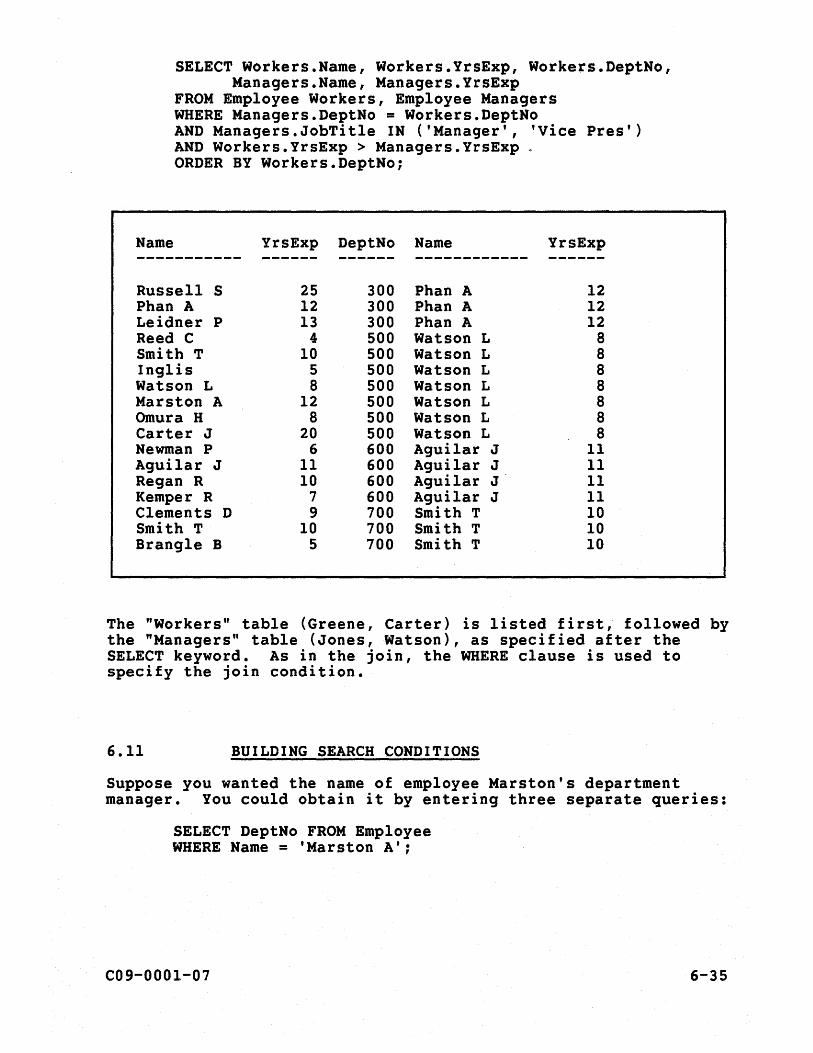
SELECT Workers.Name, Workers.YrsExp, Workers.DeptNo, Managers.Name, Managers.YrsExp
FROM Employee Workers, Employee Managers WHERE Managers.DeptNo = Workers.DeptNo AND Managers.JobTitle IN ('Manager', 'Vice Pres') AND Workers.YrsExp > Managers.YrsExp ~ ORDER BY Workers.DeptNo;
Name YrsExp DeptNo Name YrsExp ----------- ------ ------ ------------ ------
Russell S 25 300 Phan A 12 Phan A 12 300 Phan A 12 Leidner P 13 300 Phan A 12 Reed C 4 500 Watson L 8 Smith T 10 500 Watson L 8 Inglis 5 500 Watson L 8 Watson L 8 500 Watson L 8 Marston A 12 500 Watson L 8 Omura H 8 500 Watson L 8 Carter J 20 500 Watson L 8 Newman P 6 600 Aguilar J 11 Aguilar J 11 600 Aguilar J 11 Regan R 10 600 Aguilar J 11 Kemper R 7 600 Aguilar J 11 Clements D 9 700 Smith T 10 Smith T 10 700 Smith T 10 Brangle B 5 700 Smith T 10
The "Workers" table (Greene, Carter) is listed first, followed by the "Managers" table (Jones, Watson), as specified after the SELECT keyword. As in the join, the WHERE clause is used to specify the join condition.
6.11 BUILDING SEARCH CONDITIONS
Suppose you wanted the name of employee Marston's department manager. You could obtain it by entering three separate queries:
SELECT DeptNo FROM Employee WHERE Name = 'Marston A';
C09-0001-07 6-35

DeptNo
500
The answer to the first query, 500, provides the critical parameter for the WHERE clause of the second query:
SELECT MgrNo FROM Department WHERE DeptNo = 500 ;
MgrNo
10012
The answer to the second query, 10012, provides the critical parameter for the WHERE clause of the third query:
Name
SELECT Name FROM Employee WHERE EmpNo = 10012;
Watson L
Using the subquery feature of DBC/SQL, you may obtain the final result of these three queries by entering a single query composed of three subqueries. The first query above is referenced (nested) in the WHERE clause of the second query, and the second query is referenced in the WHERE clause of the third, as follows:
6-36 C09-0001-07

SELECT Name FROM Employee WHERE EmpNo IN
(SELECT MgrNo FROM Department WHERE DeptNo IN
(SELECT DeptNo FROM Employee WHERE Name = 'Marston A'»;
The IN operator is used to reference each level of subquery. Parentheses indicate the boundary of each subquery.
The same result could be obtained using one level, as follows:
SELECT Name FROM Employee WHERE EmpNo IN
(SELECT MgrNo FROM Department WHERE Employee.Name = 'Marston A' AND Department.DeptNo = Employee.DeptNo) ;
In this case, the subquery joins the Employee and Departmertt tables.
6.12 LOCKING A TABLE FOR ACCESS
To ensure that data is consistent (that is, that pending transactions against the data are completed or fully backed out), a SELECT statement places a read lock on the table or tables (or, for a prime-key query, on one or more rows of these tables) that contain the data that it is querying. If the SELECT statement places a read lock on a table, the table cannot be updated while the query is being processed.
Conversely, while table data is being updated, a write lock causes requests for read locks to be queued. Thus, query users may often be locked out, or cause other users to be locked out, even if these users are not concerned with consistency.
If you are not concerned about data consistency, place an ACCESS lock on a table before entering your SELECT statement. For example:
LOCK TABLE Employee IN ACCESS MODE SELECT Name,Salary,JobTitle FROM Employee WHERE DeptNo=100;
In this example, the SELECT statement is processed concurrently with any UPDATE statements for the Employee table.
C09-0001-07 6-37
6.13 SUMMARY AND PREVIEW
This chapter showed you how to structure a DBC/SQL SELECT statement to obtain data from DBC/1012 data bases. The next chapter shows you how to use DBC/SQL data definition statements to:
• Create, modify, rename, and drop tables.
• Create and drop indexes.
• Create, rename, and drop views.
• Document tables, columns, and views.
,
6-38 C09-QOOI-07
CHAPTER 7 DEFINING AND MANAGING DATA
A DBC/1012 data base is a collection of related tables used to organize data. All of an organization's data may be organized into a number of data bases.
When you are established as a user of your organization's DBC/1012 Data Base Computer, you are allocated space for your own data base. As an owner, you may define and manage your own data. As a DBC/I012 user, you may also be granted data definition privileges on other data bases.
Data is defined using the following DBC/SQL data definition statements:
• CREATE/ALTER/DROP/RENAME TABLE
• CREATE/DROP/RENAME/REPLACE VIEW
• CREATE/DROP/RENAME/REPLACE MACRO
• CREATE/DROP INDEX
• CREATE/MOD I FY/DROP/USER/DATABASE
• GRANT
• REVOKE
• GIVE
• COMMENT
• DATABASE
This chapter shows you how to use data definition statements to:
• Create, modify, rename, and drop tables
• Create and drop indexes
• Create, rename, and drop views
.' Document tables, columns, and views
The GRANT, REVOKE, and GIVE statements are discussed in Chapter 10.
Note that any data definition statement must be entered as a single-statement request. It may not be entered as part of a multi-statement transaction or defined as a macro. A data
C09-0001-07 7-1

definition statement may be bracketed between BEGIN TRANS~CTION and END TRANSACTION statements as long as it is the only statement in the transaction.
The examples in this chapter assume that you have all privileges on the Personnel data base.
7.1 CREATING TABLES
You may define a table in a data base using the CREATE TABLE statement. For example, enter the following statement to create the example Employee table used in this guide:
CREATE TABLE Employee, FALLBACK (EmpNo SMALLINT FORMAT '9(5)' BETWEEN 10001 AND 32001
NOT NULL, Name VARCHAR(12) NOT NULL, DeptNo SMALLINT FORMAT '999' BETWEEN 100 AND 900, JobTit1e VARCHAR(12), Salary DECIMAL(8,2) FORMAT 'ZZZ,ZZ9.99'
BETWEEN 1.00 AND 999000.00, YrsExp BYTEINT FORMAT 'Z9' BETWEEN -99 AND 99, DOB DATE FORMAT 'MMMBDDbYYYY' NOT NULL, Sex CHAR(l) UPPERCASE NOT NULL, Race CHAR(l) UPPERCASE, MStat CHAR(l) UPPERCASE, EdLev BYTEINT FORMAT 'Z9' BETWEEN 0 AND 22 NOT NULL, HCap BYTEINT FORMAT 'Z9' BETWEEN -99 AND 99)
UNIQUE PRIMARY INDEX (EmpNQ) INDEX(Name);
In the above CREATE TABLE statement, you specify the name of the new table .. the field names of its columns, the attributes of its columns, and any index and fallback options.
7.1.1 Specifying Column Attributes
You specify each column name after the table has been named and the optional FALLBACK option has been specified. Following each column name, you specify the attributes of the data to be included in the column, enclosed by parentheses. Attributes include:
7-2
• Data Type
A specification of the kind of data to be included in the column.
C09-0001-07
• Default Control
A value to be included in the column if no value is explicitly entered, or a control for null values.
• Case
A specification of how character data is to be stored and displayed.
• Range
An upper and lower limit on numeric data that is stored.
• Format
A specification of how numeric data is to be stored and displayed.
• Title
A title that is displayed instead of the column name.
C09-OOOI-07 7-3
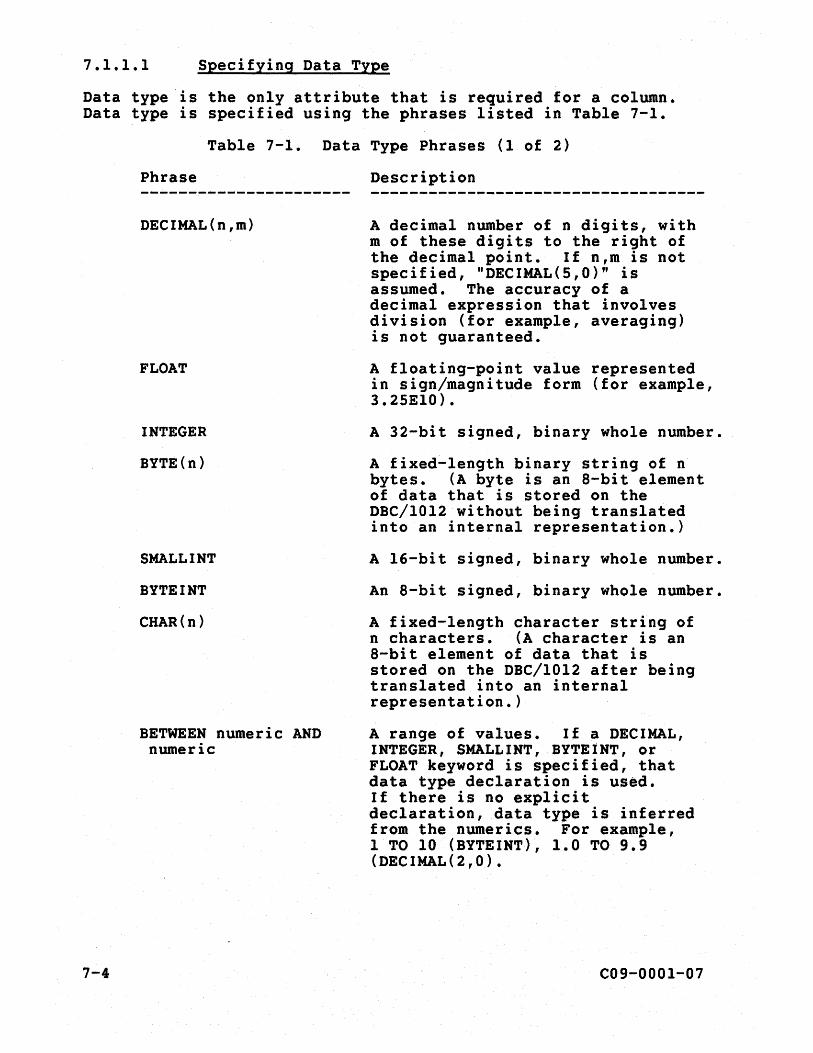
7.1.1.1 Specifying Data Type
Data type 'is the only attribute that is required for a column. Data type is specified using the phrases listed in Table 7-1.
Table 7-1. Data Type Phrases (1 of 2)
Phrase Description
DECIMAL(n,m) A decimal number of n digits, with m of these digits to the right of the decimal point. If n,m is not specified, "DECIMAL(S,O)" is assumed. The accuracy of a decimal expression that involves division (for example, averaging) is not guaranteed.
FLOAT A floating-point value represented in sign/magnitude form (for example, 3.25ElO).
INTEGER A 32-bit signed, binary whole number.
BYTE(n) A fixed-length binary string of n bytes. (A byte is an a-bit element of data that is stored on the DBC/lOl2 without being translated into an internal representation.)
SMALLINT A l6-bit signed, binary whole number.
BYTEINT An a-bit signed, binary whole number.
CHAR(n) A fixed-length character string of n characters. (A character is an a-bit element of data that is stored on the DBC/1012 after being translated into an internal representation.)
BETWEEN numeric AND A range of values. If a DECIMAL, numeric INTEGER, SMALLINT, BYTEINT, or
FLOAT keyword is specified, that data type declaration is used. If there is no explicit declaration, data type is inferred from the numerics. For example, 1 TO 10 (BYTEINT), 1.0 TO 9.9 (DECIMAL(2,0).
7-4 C09-000l-07
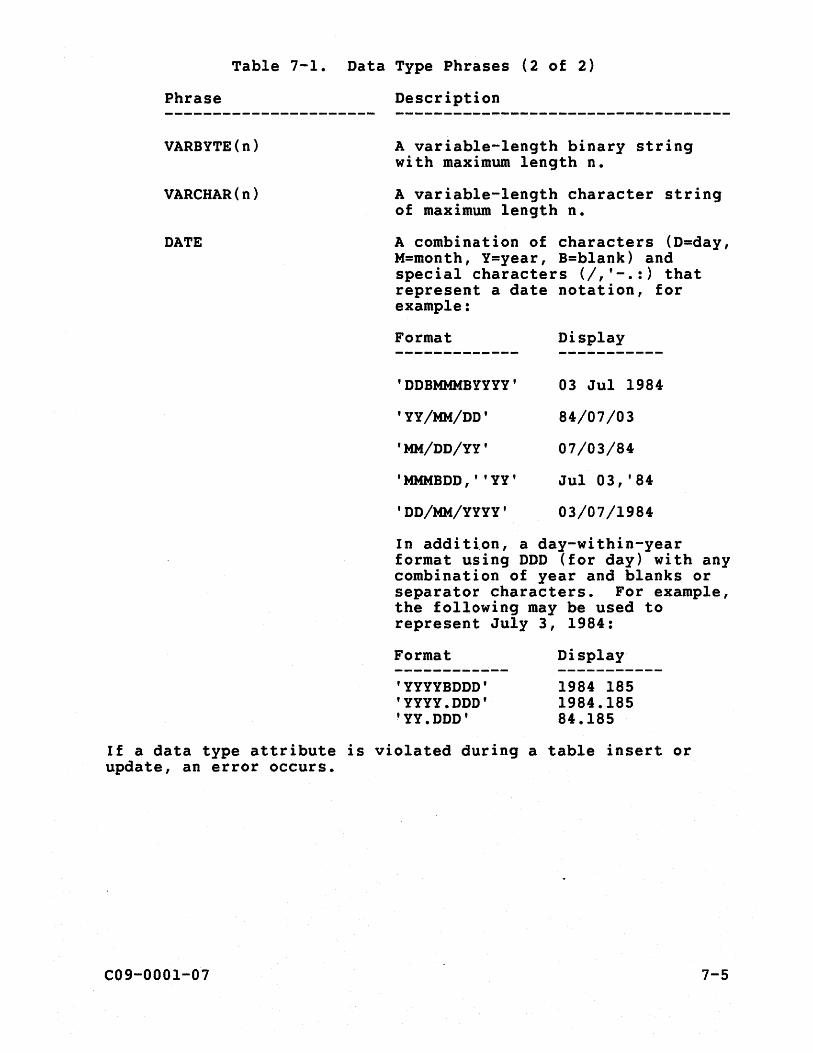
Table 7-1. Data Type Phrases (2 of 2)
Phrase Description
VARBYTE(n) A variable-length binary string with maximum length n.
VARCHAR(n) A variable-length character string of maximum length n.
DATE A combination of characters (D=day, M=month, Y=year, B=blank) and special characters (/,'-.:) that represent a date notation, for example:
Format Display ------------- -----------'DDBMMMBYYYY' 03 Jul 1984
'YY/MM/DD' 84/07/03
'MM/DD/YY' 07/03/84
, MMMBDD, ' 'YY' Ju103,'84
'DD/MM/YYYY' 03/07/1984
In addition, a day-within-year format using DDD (for day) with any combination of year and blanks or separator characters. For example, the following may be used to represent July 3, 1984:
Format
'YYYYBDDD' 'YYYY.DDD' 'YY.DDD'
Display
1984 185 1984.185 84.185
If a data type attribute is violated during a table insert or update, an error occurs.
C09-000l-07 7-5
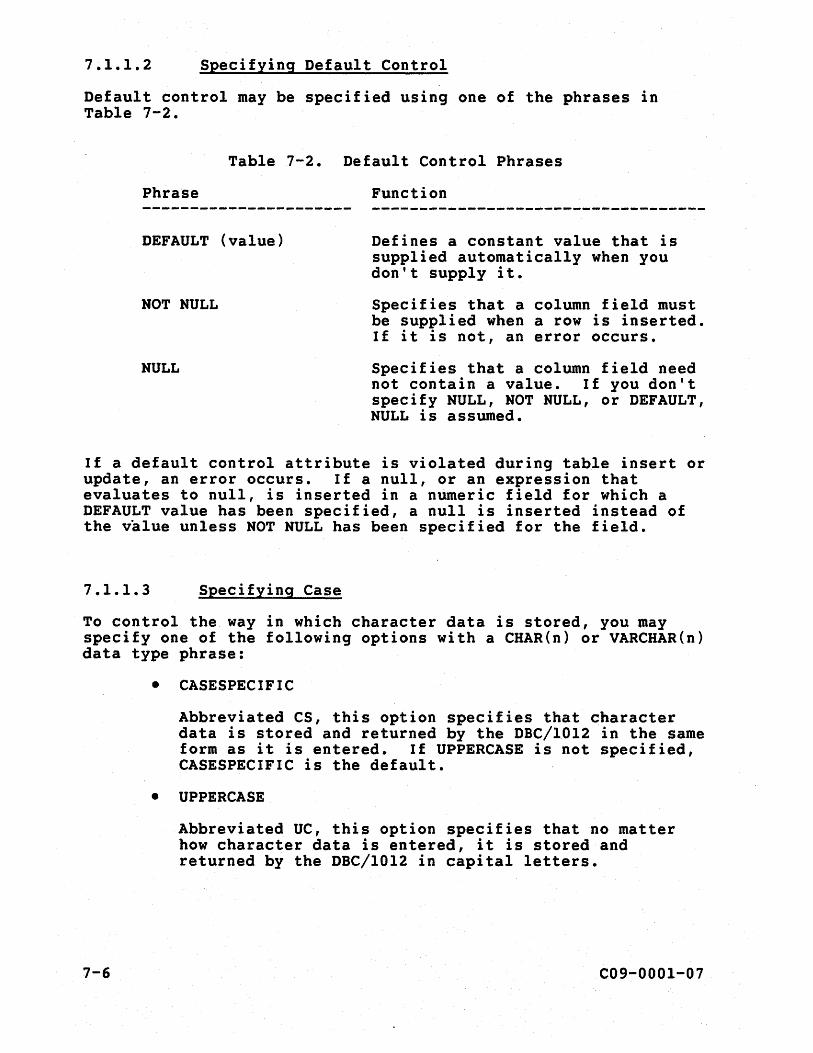
7.1.1.2 Specifying Default Control
Default control may be specified using one of the phrases in Table 7-2.
Table 7-2. Default Control Phrases
PhraSe Function
DEFAULT (value) Defines a constant value that is supplied automatically when you don't supply it.
NOT NULL Specifies that a column field must be supplied when a row is inserted. If it is not, an error occurs.
NULL Specifies that a column field need not contain a value. If you don't specify NULL, NOT NULL, or DEFAULT, NULL is assumed.
If a default control attribute is violated during table insert or update, an error occurs. If a null, or an expression that evaluates to null, is inserted in a numeric field for which a DEFAULT value has been specified, a null is inserted instead of the value unless NOT NULL has been specified for the field.
7.1.1.3 Specifying Case
To control the way in which character data is stored, you may specify one of the following options with a CHAR(n) or VARCHAR(n) data type phrase:
7-6
• CASESPECIFIC
Abbreviated CS, this option specifies that character data is stored and returned by the DBC/IOI2 in the same form as it is entered. If UPPERCASE is not specified, CASESPECIFIC is the default.
• UPPERCASE
Abbreviated UC, this option specifies that no matter how character data is entered, it is stored and returned by the DBC/IOI2 in capital letters.
C09-0001-07
For example, in the CREATE TABLE statement above, values in the Sex column are stored and returned in capitals. Therefore, even if Sex data is entered as in the following statement,
INSERT INTO Employee (Name, EmpNo, DOB, Sex, EdLev) VALUES ('Trexler K', 10023, 'Jul 12 1948', 'm', 12);
the data is stored and displayed as:
Sex
M
7.1.1.4 Specifying Format
You may specify the way in which numeric data is displayed using the format characters listed in Table 5-2.
7.1.1.5 Specifying a Title
You may define a display title for a column other than the column name using a TITLE phrase, discussed in Chapter 5. For example, the specification for the Name column in the CREATE TABLE statement above might be entered as:
Name CHAR(12) NOT NULL TITLE 'EmployeeIIName',
The phrase "TITLE 'EmployeeIIName'" causes the heading,
Employee Name
to be displayed or printed in a result rather than:
Name
As described in Chapter 5, a double-slash character (II) in a TITLE phrase causes a title to be broken into separate lines.
7.1.2 Specifying Data Protection
Protection for data is provided by FALLBACK and JOURNAL options. The FALLBACK option specifies that, in addition to the primary copy of a table, a secondary copy (referred to as the fallback copy) is also maintained. The fallback copy is accessed whenever the primary copy is unavailable.
C09-0001-07 7-7
The JOURNAL option provides data protection through system generated before and after journals of changed data. These journals may be used to either restore or reverse changes made to table data. (For more information on the JOURNAL option, refer to chapter 10, "Creating Users" and "Creating Data Bases.")
When a data base is created, the default FALLBACK and JOURNAL options are typically specified for all tables created under the user or data base. You may, however, override these options in a CREATE TABLE statement.
7.1.2.1 Providing for Fallback Data
Unless you have specified NO FALLBACK in creating a data base or user, the DBC/1012 system automatically maintains a secondary, or "fallback," copy of the data in any table created in the data base. This fallback copy is accessed whenever the primary copy is unavailable.
If you wish to create a fallback copy of a new table in a data base for which NO FALLBACK is specified, you must specify the FALLBACK option in your CREATE TABLE statement. Conversely, if you do not want to create a fallback copy of a new table in a data base or user space for which FALLBACK is in effect, you must specify the NO FALLBACK option in the CREATE TABLE statement for the new table.
7.1.2.2 Providing for Journal Tables
If you do not specify a JOURNAL option in a CREATE TABLE statement, then the DBC/1012 automatically uses the journal option as specified for the data base or user in which the table is being created.
If you wish to override the default journal setting, you must specify the new JOURNAL option in your CREATE TABLE statement. When you specify a new JOURNAL option, you must indicate the level of journaling to be maintained. That is, you specify the type (before and/or after) and the number (single or dual) of change image journal maintained for the table. In addition, you may specify the name of the journal table to which the change images are written. Note that if define a new journal table, then that the specified journal table must already exist.
7-8 C09-0001-07
7.1.3 COMPRESSing Field Entries
The COMPRESS option allows you to suppress a common value in a statement, thereby saving storage space on the DBC/1012. A field in a table column can be compressed to a null space if its value is:
• NULL
• the value given in parentheses after the COMPRESS keyword
For example, you can compress specific data in a CREATE TABLE statement by entering the following:
CREATE TABLE Employee, FALLBACK (EmpNo INTEGER NOT NULL COMPRESS 0, MStat CHAR(l) NULL COMPRESS 'M',
COMPRESS has two limitations:
1. It cannot be used on a variable length character or byte field.
2. Although COMPRESS saves disk space, it uses more data access time. COMPRESS is not recommended unless the column will include a high percentage of compressed values, or if the column is type BYTEINT, SMALLINT, or CHAR(n) if n is a small number.
7.1.4 Establishing Indexes
The CREATE TABLE statement lets you establish indexes during table creation. An index is a key defined on the values in one or'more columns of a table. Because the DBC/1012 uses these values as a key for locating rows on the AMPs, the index makes query processing more efficient.
You may create a table without defining a primary index. However, if a primary index is not specified in the CREATE TABLE statement, the DBC/I012 will automatically establish the first column of a table as the primary index. If a table contains more than one column, a NON-UNIQUE primary index is defined. If a table contains only one column, a UNIQUE primary index is defined. In the CREATE TABLE statement for the Employee table, EmpNo is established as the primary index.
C09-000l-07 7-9
In addition to the primary index, you may also establish a number of secondary indexes for a table. In the CREATE TABLE statement above, Name is defined as a secondary index.
7.1.4.1 Defining a Primary Index
You may define a primary index on one or more columns of a table. For example, because the EmpNo column in the Employee table contains a unique value for each employee, it is chosen as the primary index and made the first column of the table.
After defining a primary index, documentation of the index may be easier if the primary index column is made the first column of the table.
After the table is created, you may redefine a primary index only by entering a new CREATE TABLE statement, as described below.
7.1.4.2 Defining a Secondary Index
Creating secondary indexes for a table speeds processing of multi-row queries and complex operations, such as joins. However, such an advantage is not achieved without a tradeoff.
Every secondary index defined for a table requires a secondary index subtable. Secondary index subtables take up extra space on disk, and must be changed every time the table is changed. If FALLBACK is specified for the table, the processing load is doubled for an insert, update, or delete operation because the operation must be performed on both primary and secondary copies of the table and secondary index subtables.
Secondary indexes may be created or changed as desired after table creation. To establish additional secondary indexes after a table is created, use the CREATE INDEX statement. For example, the statement,
CREATE INDEX (DeptNo) ON Employee;
defines another secondary index on the DeptNo column of the Employee table.
A secondary index may be removed by entering the DROP INDEX statement,for example,
DROP INDEX (DeptNo) ON Employee;
To define or remove a secondary index on a table, you must have th~ privilege of dropping the table from the data base.
7-10 C09-000l-07
7.1.4.3 Defining Unique Indexes
In a definition of a primary or secondary index, you may use the UNIQUE keyword to prohibit the use of the same index value for more than one row. Referencing a unique index in a SELECT statement makes processing more efficient and improves response time.
7.2 LOADING A NEW TABLE WITH EXISTING DATA
You may create a new table and load it with data from an existing table, view, or combination of views and tables using the following procedure:
1. Enter a CREATE TABLE statement for the new table.
2. Insert data from the existing table, view, or combination using an INSERT statement with an embedded query, as described in Chapter 8.
This procedure requires that you have the SELECT privilege on all referenced views and tables.
For example, to create a Manager table using Department Number and Employee Number information from the Employee table, enter the following two statements in sequence:
CREATE TABLE Manager, NO FALLBACK (EmpNo INTEGER FORMAT 'ZZZZ9', Name VARCHAR(12) NOT NULL)
UNIQUE PRIMARY INDEX (EmpNo);
INSERT INTO Manager SELECT EmpNo, Name FROM Employee WHERE JobTitle IN ('Manager', 'Vice Pres');
If the column attributes defined for a new table differ from those of the columns whose data is being inserted via the INSERT statement, the data takes on the attributes of the new table.
Even if the names of the columns whose data is to be inserted into corresponding columns of the new table differ from the column names of the new table, the data is correctly ins,erted as long as the SELECT statement lists the column names of the data to be inserted in the order that the corresponding columns are listed in the CREATE TABLE statement that was used to create the new table. This is true even if the new table has a column that is to contain data derived, either arithmetically or by aggregate operation, from the column data in the existing table.
C09-000l-07 7-11

In the following example, a new table of employee names and monthly salaries is loaded with data from the Employee table.
CREATE TABLE EmpMonthSal, NO FALLBACK (EmpNo SMALLINT NOT NULL FORMAT '9(5)', Name CHAR ( 12) , Salary DECIMAL(8,2) )
PRIMARY INDEX (EmpNo);
INSERT INTO EmpMonthSal SELECT EmpNo, Name, Salary/12 FROM Employee;
Again, the data selected from Employee.EmpNo and Employee.Name and that derived from Employee.Salary maps positionally to EmployeeMonthSal.EmpNo, EmpMonthSal.Name,and EmpMonthSal.Salary, as defined in the CREATE TABLE statement for EmpMonthSal.
7.3 ALTERING A TABLE DEFINITION
After a table is created, you may change its definition in the following ways:
1. Add or drop one or more columns from the table
2. Change the default control, format, and title attributes for a column
3. Change the fallback option for the table
4. Change the data type attribute for one or more columns
5. Redefine the table's primary index
The first three kinds of definition changes are made using the ALTER TABLE statement, as described below. Note that all three kinds of changes can be made using the same ALTER TABLE statement.
To change a column's data type attribute or redefine a table's primary index, you must enter a new CREATE TABLE statement using the procedure discussed below.
7-12 C09-OOOl-07
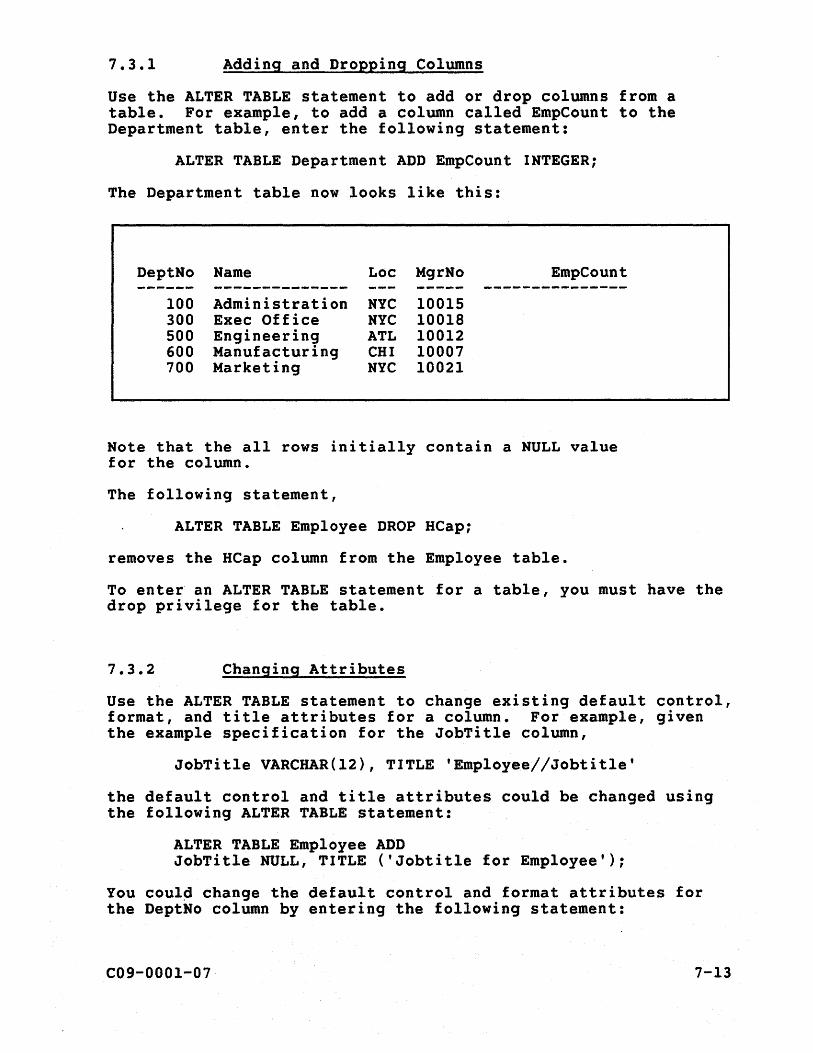
7.3.1 Adding and Dropping Columns
Use the ALTER TABLE statement to add or drop columns from a table. For example, to add a column called EmpCount to the Department table, enter the following statement:
ALTER TABLE Department ADD EmpCount INTEGER;
The Department table now looks like this:
DeptNo Name Loc MgrNo EmpCount ------ -------------- ----- ---------------
100 Administration NYC 10015 300 Exec Office NYC 10018 500 Engineering ATL 10012 600 Manufacturing CHI 10007 700 Marketing NYC 10021
Note that the all rows initially contain a NULL value for the column.
The following statement,
ALTER TABLE Employee DROP HCap;
removes the HCap column from the Employee table.
To enter an ALTER TABLE statement for a table, you must have the drop privilege for the table.
7.3.2 Changing Attributes
Use the ALTER TABLE statement to change existing default control, format, and title attributes for a column. For example, given the example specification for the JobTitle column,
JobTitle VARCHAR(12), TITLE 'Employee//Jobtitle'
the default control and title attributes could be changed using the following ALTER TABLE statement:
ALTER TABLE Employee ADD JobTitle NULL, TITLE ('Jobtitle for Employee');
You coul~ change the default control and format attributes for the DeptNo column by entering the following statement:
C09-000l-07 7-13

7.3.3
ALTER TABLE Employee ADD DeptNo (NULL, FORMAT 'ZZZ9');
Changing the Fallback Option
Use the ALTER TABLE statement to create or remove the fallback copy of a table. For example, to eliminate the fallback copy of the Employee table, enter:
ALTER TABLE Employee, NO FALLBACK;
To reinstate fallback for Employee, enter:
ALTER TABLE Employee, FALLBACK;
7.3.4 Changing the JOURNAL Option
Use the ALTER TABLE statement to modify or create the journaling setting for a table. For example, suppose a NewEmployee table currently specified just a single before-image journal. To add a single copy of an after-image journal, enter:
ALTER TABLE NewEmployee, AFTER JOURNAL;
7.3.5 Changing the Data Type Attribute
To change the data type attribute for one or more columns of a table, use the following procedure:
1. Using a different name, create a new table that contains the changed data type attributes.
2. Insert column data from the old table into the new table using an INSERT statement with an embedded query, as shown in Chapter 8.
3. Drop the old table, as described later in this chapter.
4. Rename the new table with the name of the old table, as described later in this chapter.
For example, you could use the following sequence of statements to expand the data type attribute for the Name column from 12 to 14 characters:
7-14 C09-000l-07
CREATE TABLE Temp, FALLBACK (EmpNo INTEGER NOT NULL FORMAT 'ZZZZ9', Name CHAR(14) NOT NULL,
HCap BYTEINT FORMAT 'Z9') UNIQUE PRIMARY INDEX (Name);
INSERT INTO Temp SELECT * FROM Employee; DROP TABLE Employee; RENAME TABLE Temp to Employee;
A different name (Temp) is used in re-creating the Employee table because the Employee table already exists. Entering a CREATE TABLE statement for an existing table causes an error.
To facilitate re-creating a table according to step 1 above, you may display the CREATE TABLE statement for the table by executing an ITEQ SHOW TABLE command (abbreviated. ST;). For example, the following command,
SHOW TABLE Employee;
sets the display area for input and displays a synthesized CREATE TABLE statement for the Employee table.
When the CREATE TABLE statement is displayed, you may change the statement as described in step 1 (that is, change the table name and index) using ITEQ edit commands and enter the new table definition by executing the ITEQ SUBMIT command, as described in Chapter 3. You may then continue with steps 2, 3, and 4.
7.3.6 Redefining a Primary Index
To redefine a primary index for a table, use a procedure similar to that for changing the data type attribute:
1. Using a different name, create a new table that contains the changed index.
2. Insert column data from the old table into the new table.
3. Drop the old table.
4. Change the temporary name of the new table to that of the old table.
C09-000l-07 7-15
7.4 USING VIEWS
A view is a device through which you may change data in, or select data from, selected portions of a data base. A view may consist of portions of one or more tables, or a combination of tables and views. Views look like stored tables. They have rows and columns and, in general, may be used as if they were tables.
Views have a number of important advantages. You may use a view to:
• Simplify queries of a large table or several tables.
• Protect the security of your data by allowing other users access only to non-sensitive columns and rows in any table.
• Constrain the values that are inserted or updated in the underlying table.
• Enable other users to insert, update, or delete specified data in a table, as described in Chapter 8.
Though it may display the same data, a view need not resemble its underlying table or tables. A view may:
• Have its own unique name and arbitrary names for its columns.
• Order columns differently from its underlying tables.
• Contain only selected table columns to which users of the view have access.
• Include only certain rows selected from the underlying tables.
• Include columns from more than one table.
• Include new columns by applying arithmetic expressions to data from its underlying tables.
To create a view in a data base, you must have the create view privilege for the data base.
7-16 C09-OOOI-07

7.4.1 Creating a View
You create a view by entering a CREATE VIEW statement. In that statement, you name the view, identify its columns, and specify its rows with a SELECT statement.
For example, suppose a Personnel clerk needs access to employee numbers, names, job titles, and department names, but not to confidential information such as salary. You might define for the clerk a view containing this information using the following statement:
CREATE VIEW Employee Info (Number, Name, Position, Department) AS
SELECT EmpNo, Name, JobTitle, DeptName (TITLE 'Department Name')
FROM Employee, Department WHERE Employee.DeptNo = Department.DeptNo AND JobTitle NOT IN ('Vice Pres', 'Manager') ;
The statement specifies a join between Employee and Department tables. The WHERE clause specifies the condition for the join (on DeptNo) and excludes information for vice presidents and managers.
Different names are assigned to the EmpNo, JobTitle, and DeptName columns. Also, the TITLE phrase for the DeptName column specifies the title "Department Name" rather than "Department" for output that is displayed or printed.
After creating the view, you grant the clerk retrieval privileges to it, as described in Chapter 10. If the clerk subsequently wants a list of all non-managerial employees in the Administration department and their positions, he would enter the statement,
SELECT Name, position FROM Employee_Info WHERE Department = 'Administration';
to produce the following list:
Name
Peterson J Moffit H Chin M Greene W
COg-00001-07
position
Payroll Ck Recruiter Controller Payroll Ck
7-17
7.4.2 Creating a View with a Locking Clause
You may include a locking clause, as described in chapter 7, in a CREATE VIEW statement. The locking clause allows you to override the default lock placed on the table or tables named in the view definition whenever that view is referenced in a DBC/SQL statement.
For example, when you reference the Employee Info view (defined above) in a SELECT statement, a read lock is-automatically placed on the Employee table. The read lock ensures that the data you are selecting is up to date (that is, any pending changes to the data are completed or fully backed out).
Conversely, if the Employee Info view is referenced in an UPDATE statement (as described in chapter 8), a write lock is placed on the Employee table. A write lock places any SELECT statements on hold until the update operation has completed. Thus, query users may often be locked out, or cause other users to be locked out.
Typically, a locking clause is included in a CREATE VIEW statement to allow users to concurrently update and query the same table. In this instance, an ACCESS lock, which allows users to query a table that has been locked for write access, is specified in a CREATE VIEW statement.
For example, to place an ACCESS lock on the Employee table each time the Employee Info view is referenced in a DBC/SQL statement, you may enter the-following statement:
CREATE VIEW Employee Info (Number, Name, Position, Department) AS
LOCKING Employee FOR ACCESS SELECT EmpNo, Name, JobTitle,
DeptName (TITLE 'Department Name') FROM Employee, Department WHERE Employee.DeptNo = Department.DeptNo AND JobTitle NOT IN ('Vice Pres', 'Manager')
Note that the data selected when an ACCESS lock is in place may not be up to date because the data is concurrently being modified. Therefore, an access lock should only be used for a casual inspection of data.
7.4.3 Replacing a View
You change a view using the REPLACE VIEW statement. This statement is equivalent to entering a DROP VIEW statement followed by a CREATE VIEW statement.
For example, to change the department name column in the Employee_Info view to a department number column, enter the following statement,
7-18 C09-QOOI-07

REPLACE VIEW Employee_Info (Number, Name, Position, Department)
AS SELECT Employee.EmpNo, Name, JobTitle, DeptNo WHERE JobTitieNOT IN ('Vice Pres', 'Manager');
You must have the drop privilege on a view to replace it.
If you enter a REPLACE VIEW statement for a view that does not exist, the system will create the view using the specifications of the REPLACE statement.
During an ITEQ session, you may display and change the current definition of a view by employing the SHOW VIEW command, as described earlier under "Modifying a Table Definition." For example, the statement,
SHOW VIEW Employee_Info;
displays the most recent CREATE or REPLACE statement for the Employee Info view in the display area, where you may change it using ITEQ edit commands.
7.5 DOCUMENTING TABLES, COLUMNS, VIEWS
After creating a table or a view, you may define and store a descriptive comment about the table or view, and about one or more of the table's columns (or fields). That comment may then be accessed by another user who wants information about the table, view, or column.
You define a comment using the COMMENT statement:
[ DATABASE ] [ USER ] [ TABLE ]
COMMENT [ON] [ VIEW ] objref [IS] ['string']; [ COLUMN ] [AS] [ FIELD ] [ MACRO ]
For example, to store a comment about the Name column of the Employee table, enter,
COMMENT ON FIELD Employee.Name IS 'Emp name: last name and first initial';
Note that the message is enclosed by apostrophes. FIELD is used to qualify the column name absolutely, and is needed only if the same name is applied to another object in the data base.
C09-QOOl-07 7-19
Once a message is stored, any user may display the message by entering the COMMENT statement, for example,
COMMENT ON FIELD Employee.Name;
The message is returned as follows:
Emp name: last name and first initial
To comment on a table, column, or view, you must have the drop privilege on the table. No privilege is needed to display a message. However, if a view contains more than 70 columns, a COMMENT may not be stored or selected from that view. The text of a comment may not be longer than 255 characters and must be enclosed by apostrophes.
Note that, if you enter a COMMENT statement for a table or view that has the same name as a data base, any comment stored for the data base is returned. To return a comment on the table or view, you must qualify its name, for example,
COMMENT ON Personnel.Employee;
7.6 RENAMING TABLES AND VIEWS
You may rename an existing table or view using the RENAME statement. For example, to change the name of the Temp table to Employee, enter,
RENAME TABLE Temp TO Employee;
To rename the view Employee_Info as EmpList, enter the following statement,
RENAME VIEW Employee_Info TO EmpList;
Note that if you wish to rename a table or view that is not contained in the same data base as your current default data base setting, you must qualify both the old and new table or view name with the name of the data base in which the item is contained. For example, to rename the view Employee_Info to EmpList if your default data base setting is other than Personnel, enter the following statement:
RENAME VIEW Personnel.Employee_Info to Personnel.EmpList;
You must have the drop privilege on the table or view to rename it.
7-20 C09-OOOI-07
7.7 REMOVING TABLES AND VIEWS
You may remove a table or view from a data base using the DROP TABLE or DROP VIEW statement. For example, to remove the Employee table, enter,
DROP TABLE Employee;
To remove the Emplist view, enter,
DROP VIEW Emplist;
You must have the drop privilege on the table or view to remove it.
7.8 SUMMARY AND PREVIEW
This chapter showed you how to work with tables and views. The next chapter shows you how to:
• Insert rows in a table.
• Update data in existing rows.
• Remove rows from a table.
• Use a view to add or change data.
C09-OOOI-07 7-21

7-22 C09-OOOl-07

CHAPTER 8 ADDING AND CHANGING TABLE DATA
After creating a table, you need to insert the rows that contain its data. Later, you may need to update or delete table data. This chapter shows you how to:
• Insert rows in a table
• Update data in existing rows
• Remove rows from a table
• Use a view to add or change data
Inserting, updating, and deleting rows change the content of a table, not its structure. Changing table structure involves adding and deleting columns, as described in Chapter 7.
8.1 INSERTING ROWS
The INSERT statement adds a new row or a number of new rows to a table. You may use this statement in the following ways:
• By directly specifying the row data to be inserted
• By retrieving from another table the row data to be inserted
Data inserted in a table must conform to the following constraints:
• In general, the data must conform to the data attributes of the columns of the table, as specified in its CREATE TABLE statement. (However, integer data may be stored in a column defined as DECIMAL.)
• DATE data in character form must be entered according to the format specified in the CREATE TABLE statement.
If these restrictions are not observed, an INSERT statement produces an error and is not processed. For example, if a statement does not supply a value for a column whose attributes include NOT NULL, the statement fails.
To insert data in a table, you must have the insert privilege on the table.
C09-000l-07 8-1
8.1.1 Specifying Insert Data
To add a row to the Employee table for new employee Robertson, you may enter the following statement:
INSERT INTO Employee (Name, EmpNo, DeptNo, DOB, Sex, EdLev) VALUES ('Robertson B', 10005, 300, 'Nov 17 1957, 'M', 18);
In this example, you list the columns that are to receive the data, and then you specify the data to be inserted, in the same order as the columns are listed. When you don't specify a field value for a column, a null value is stored.
You could achieve the same result using the following statement:
INSERT INTO Employee VALUES (10005, 'Robertson B', 300"" 'Nov 17 1957','M'",l8,);
In this example, you don't need to specify column names for fields because you have entered field data in the same order as the columns are defined in the Employee table. Nevertheless, a comma is needed as a place marker for each field whose data is not specified.
8.1.2 Inserting Data by Query
You may insert rows in a table by selecting rows from another table or a view. For example, assume that you have created a table named Promotion to identify employees who are eligible for promotion on the basis of seniority. Promotion has three columns: Name, Department, and Experience.
To insert data in Promotion, you may select row data from the Employee table using the following statement:
INSERT INTO Promotion SELECT Name, DeptNo, YrsExp FROM Employee WHERE YrsExp > 10;
As discussed in Chapter 7 (Loading a Table With Existing Data), the data from the three columns of Employee map positionally into the three columns of Promotion because their names are listed in the SELECT statement in the same order as Promotion's columns are defined in the CREATE TABLE statement. Note the use of the WHERE clause to specify a condition for selecting the rows that are to be included in the table.
To insert data by query, you must have the SELECT privilege on the tables or views from which you are retrieving the data.
8-2 C09-0001-07

8.2 UPDATING ROW DATA
You use the UPDATE statement to add data to null entries in a table column or to change the data in non-null entries. UPDATE is used in the following ways:
• To directly specify the new data that is to replace the old
• To specify an arithmetic expression for calculating new values from old
Data specified in an UPDATE statement must conform to the constraints listed above for the INSERT statement. In order to update the data in a table, you must have the update privilege on the table.
8.2.1 Specifying New Data
To complete the information for the row inserted above for new employee Leidner, enter:
UPDATE Employee SET JobTitle='Secretary', Salary=23000, YrsExp=13, Race='C', MStat='M', EdLev=16, HCap=O
WHERE EmpNo=10003i
You use a WHERE clause to specify one or more rows to which data is to be added. In this example, the WHERE clause specifies EmpNo, the primary index for the Employee table, to speed processing.
As in an INSERT statement, the data specified in an UPDATE statement must match the constraints of the table columns that it affects.
8.2.2 Specifying an Arithmetic Expression
You may use an arithmetic expression in an UPDATE statement to calculate new values from existing column data. For example, entering the following statement gives all employees in Department 300 a 10 percent salary increase:
UPDATE Employee SET Salary=Salary * 1.1 WHERE DeptNo = 300;
C09-000l-07 8-3

8.3 DELETING ROW DATA
You may remove row data from a table using the DELETE statement. For example, entering the statement,
DELETE FROM Employee WHERE EmpNo=I0003;
removes employee Leidner from the Employee table.
In this statement, the WHERE clause determines which row (or rows) are affected. As in the UPDATE statement example above, use of the prime key for the Employee table in the WHERE clause speeds processing.
'The statement,
DELETE FROM Employee ALL;
removes all rows from the Employee table. The Employee table still exists, but as an empty table.
Data may also be deleted from a table by joining it with one or more tables in order to specify the conditions for the delete. For example, if a company reorganization caused employees in the New York area to be removed to a separate data base, these employees could be deleted from the Employee table as follows:
8.4
DELETE FROM Employee WHERE Employee.DeptNo=Department.DeptNo AND Department.Loc='NYC';
USING A VIEW TO ADD OR CHANGE DATA
Using a view name instead of a table name in an UPDATE, INSERT, or DELETE statement adds, changes, or removes data in the table (or tables) upon which the view is based. For example, updating data via a view changes data in the underlying table. Inserting or deleting rows via a view adds or removes rows from the underlying table.
Consider the following view, Staff Info, which is designed to give a personnel clerk retrieval access to employee numbers, names, job titles, department numbers, sex, date of births, and education levels for all employees accept vice presidents and managers:
8-4
CREATE VIEW Staff Info (Number, Name,- Position, Department, Sex, DOB, EdLev
AS SELECT Employee.EmpNo, Name, JobTitle, DeptNo, Sex, DOB, EdLev
WHERE JobTitle NOT IN ('Vice Pres', 'Manager'):
C09-0001-07
If the owner of Staff Info has the insert privilege on the Employee table and the clerk also has the insert privilege on Staff Info, the clerk may use this view to add new rows to Employee. For example, entering the statement,
INSERT INTO Staff Info (Number, Name, Position, Department, Sex~ DOB, EdLev)
VALUES (10024, 'Crowell N', 'Secretary', 200, 'F', 'Jun 031960',16);
inserts a row in the underlying Employee table that contains only the specified information.
Note that the constraint on Staff_Info,
WHERE JobTit1e NOT IN ('Vice Pres', 'Manager')
is applied to any insert using this view. Therefore, the preceding INSERT statement would fail if the position entered for Crowell were "Vice Pres" or "Manager".
Entering the statement,
UPDATE Staff_Info SET Department=300 WHERE Number = 10024;
changes the department number (from 200 to 300) entered for Crowell in the preceding INSERT statement. To update a table via a view, you must have the update privilege on the view and the view owner must have the update privilege on the table.
Entering the statement,
DELETE FROM Staff Info WHERE Number = 10024;
removes the entire row for Crowell from Employee. To delete rows using a view, you must have the delete privilege on the view and the view owner must have the delete privilege on the table.
To insert and change row data through a view, the view must be defined with the following constraints:
• The view may reference only one table; it may not define a join.
• No two columns in the view may reference the same table column.
• Each column in the view must correspond to a column in the underlying table. There may be no calculated columns.
C09-000l-07 8-5

• Data for columns must be entered in the order the columns appear in the view or be identified by column name.
• The view must include any column in the underlying table that is declared as NOT NULL.
• No two view columns may reference the same column in the underlying table.
• View columns must not include declared attributes such as data types.
• If the CREATE VIEW statement used to define a view contains a WHERE clause, all values inserted or changed through the view must satisfy any constraints specified in the WHERE clause.
A view is a useful device for allowing other users to access table data. However, as the preceding examples suggest, granting another user insert, update, and delete privileges via a view means relinquishing some control over your data. Consider granting such privileges very carefully.
8.5 SUMMARY AND PREVIEW
This chapter showed you how to add new data to a table and change existing table data. The next chapter shows you how to:
• Create, execute, debug (correct), replace, rename, and remove a macro.
• Format and view macro results.
8-6 C09-OOOI-07
CHAPTER 9 USING MACROS
You may find yourself repeatedly. entering the same sequence of DBC/SQL statements to perform a given operation. To save time and reduce the possibility of keying errors, define and store these statements as a "macro", a group of statements that are defined and executed together. When you execute the macro, the statements comprising it are processed in the proper sequence. The result is displayed at your terminal as though you had entered each statement individually.
You may create a macro and grant the privilege of executing it to others. For example, you may create a macro to enable a novice user to perform a complex operation on data within the DBC/1012 DataBase Computer. In executing the macro, the user need not be aware of the data base being accessed, the tables affected, or even the result.
A macro' may contain:
• DBC/SQL statements other than data definition statements (refer to Chapter 7)
• Certain ITEQ commands
• Certain BTEQ commands
• Parameters that are specified each time the macro is executed
Regardless of the number of DBC/SQL statements in a macro, the DBC/1012 Data Base Computer treats the macro as a single transaction. When you execute the macro, either all of its statements are successfully processed or none are. If the macro fails, it is aborted; any changes made to data are backed out and the data base is returned to its condition before execution.
When you execute a macro, each statement acquires an appropriate read or write lock to ensure the consistency of data that is used by many users simultaneously. A read lock enables users to query the same data at the same time, while disallowing any changes in the data. A write lock prevents queries of data that is being changed.
A multi-statement operation may be defined using BEGIN TRANSACTION and END TRANSACTION statements (refer to the DBC/1012 Data Base Computer Reference Manual, chapter 6). In an ITEQ session, it is preferable to define such an operation using a macro.
This is because BEGIN TRANSACTION causes a data base to be locked to other users until a statement sequence is completed with an
C09-000l-07 9-1
END TRANSACTION. If you were to enter such a sequence within ITEQ, the data base could remain locked to other users for an excessive period of time while you keyed and entered each DBC/SQL statement and ended the sequence with an END TRANSACTION statement.
This chapter shows you how to:
• Create, execute, debug (correct), replace, rename, and remove a macro
• Format and view macro results
9.1 CREATING A MACRO
You create a macro using the CREATE MACRO statement. To create a macro within a data base, you must either be the owner of the data base or have been granted the privilege of creating a macro within the data base.
For example, assume that you have entered the statement shown below to create a macro named NewEmp in Personnel, the default data base.
CREATE MACRO NewEmp (number (INTEGER), name (VARCHAR(12», dept (INTEGER, 100 TO 900), position (VARCHAR(12», birthdate (DATE, FORMAT 'MMMbDDbYYYY'), sex (CHAR(l», education (BYTEINT»
AS (INSERT INTO Employee (EmpNo, Name, DeptNo, JobTitle, DOB, Sex, EdLev)
VALUES (:number, :name, :dept, :position, :birthdate, :sex, :education);
SELECT * FROM Employee WHERE EmpNo=:number;);
When you execute NewEmp using the EXECUTE statement, you are performing two operations:
1. Adding a new value for employee number, employee name, department number, jobtitle, sex, data of birth, and education level to the Employee table by means of the INSERT statement
2. Verifying that the new information was correctly entered by means of the SELECT statement
9-2 C09-000l-0?
The following sections describe how a CREATE MACRO statement is used to create a macro.
9.1.1 Identifying Parameters
Parameters are constant values that are entered in the EXECUTE statement for a macro. Parameters are optional, and may be defined in a CREATE MACRO statement.
Following the macro name in your CREATE MACRO statement, specify the names and attributes of any parameters. In the statement above, "number", "name", and other parameters are defined. Note that data type is a required attribute for a parameter. Other attributes may include format and default. As described in Chapter 7, a format is expressed by a format phrase and a default by a default control phrase. Value ranges for parameters are not checked when the macro is executed. They serve only to establish an implicit data type.
When you execute a macro, if you supply a parameter value in the EXECUTE statement that does not conform to specified formats, data types, and defaults, an error message is displayed.
For more information about default controls, refer to Chapter 3 of the DBC/1012 Data Base Computer Reference Manual.
9.1.2 Defining the Macro
Following the AS keyword,. specify the statements that comprise the macro, each terminated by a semicolon. The entire set of statements is enclosed by parentheses.
The : character indicates that the field values to be inserted in these columns (or expressions for deriving the field values, as discussed in Chapter 8, "Specifying Insert Data") are identified at execution time by the appropriate parameter name. For example, in the EXECUTE MACRO statement shown below, "name='Chin M'" supplies the parameter for "Name=:name" in the CREATE MACRO statement above.
9.1.3 Documenting a Macro
After creating a macro, you may define and store a descriptive comment about the macro. That comment may then be accessed by another user who wants information about the macro.
C09-000l-07 9-3
You define a comment using the COMMENT statement:
COMMENT [ON] [MACRO] objref [AS] ['string']; [IS]
For example, to store a comment about NewEmp, enter,
COMMENT ON MACRO NewEmp IS 'Executing this macro with the required parameters adds a new empl.oyee number, name, department number, job title, sex, date of birth, and education level to the Employee table and selects the new information';
Note that the comment is enclosed by apostrophes. MACRO is used to qualify the macro name absolutely, and is needed only when the same name is applied to another object in the data base.
To comment on a macro, you must have the drop privilege for the macro. The text of a comment may be no longer than 255 characters.
Once the comment is stored, any user may display it using the COMMENT statement. To display the stored comment on NewEmp, enter,
COMMENT ON NewEmp;
Note that, if you enter a COMMENT statement for a macro, table, or view that has the same name as a data base, any comment stored for the data base is returned. To return a comment on the macro or table, you must qualify its name, for example,
COMMENT ON Personnel.NewEmp;
9.1.4 Aborting a Macro
You may define a condition for stopping the execution of a macro by including a DBC/SQL ABORT statement in the macro. If the condition is encountered during execution, the macro is aborted. That is, the transaction in process is concluded, locks on the data base are released, any changes made to data are backed out, and any spooled output is deleted.
For example, to restrict the NewEmp macro from being used to add employees to the Executive Office department, add an ABORT statement, as follows:
9-4 C09-000l-07
CREATE MACRO NewEmp (number (INTEGER), name (VARCHAR(12», dept (INTEGER, 100 TO 900), position (VARCHAR(12», birthdate (DATE, FORMAT "MMMbDDbYYYY'), sex (CHAR(l» education (BYTEINT»
AS (ABORT 'Department 300 not valid' WHERE :dept = 300;
INSERT INTO Employee (EmpNo, Name, DeptNo, JobTitle, DOB, Sex, EdLev)
VALUES (:number, :name, :dept, :position, :birthdate, :sex, :education);
SELECT * FROM Employee WHERE EmpNo=:number;);
You specify the abort condition ":dept = 300" in Following the ABORT keyword, you may specify the optional error message, enclosed in apostrophes. displayed on the terminal screen if the macro is specified condition.
a WHERE clause. text of an This message is
aborted for the
9.2 EXECUTING A MACRO
Once it is stored, you execute a macro by entering an EXECUTE statement that supplies its name and required parameters. If you have created the macro for another user, you must grant to that user the privilege of executing it.
For example, entering the statement,
EXECUTE NewEmp (dept=700, name='C1ements D', number=10024, position='Salesperson', birthdate='Aug 23 1944', sex='M', education=16);
adds Clements D to the Employee table. The statement supplies constant values (identified by parameter names) for the DeptNo, Name, EmpNo, JobTitle, and Sex columns, and then selects the new information. Note that the parameters don't have to be entered in the same order as in the CREATE MACRO statement as long as they are separated by commas and identified by parameter name.
You could also enter the following statement:
EXECUTE NewEmp (10024, 'Clements D', 700, 'Salesperson', 'Aug 23 1944', 'm', 16);
In this case, you do no specify parameter names because the parameters are entered in the same order as in the CREATE MACRO statement.
C09-000l-07 9-5
9.3 DEBUGGING A MACRO
You may debug (correct) a macro by executing it and viewing the results. If execution fails because of a statement error or if a statement result is unsatisfactory, you may modify and replace the macro using the procedures described in the following section.
The debugging process is easier if the macro is executed in Unformat, rather than Format, mode. This is because in Unformat mode, the processing message for each executed statement, along with any accompanying result, is displayed in the order in which each statement is processed in the macro.- Thus, you may quickly judge the correctness of individual statements.
In contrast, when a macro is executed in Format mode, a processing message is displayed only for macro execution itself, and not for each statement. This makes it more difficult to identify problems.
When a macro is executed in Unformat mode, column headings for each statement result appear only once, at the beginning of the result. Processing messages and results that exceed the size of a single display screen are formatted into consecutive pages that may be viewed using the ITEQ display commands described in Chapter 3.
To help you page backward and forward through an output spool file that contains a number of lengthy statement results, the FORWARD and BACKWARD commands presented in Chapter 3 provide a "skip" feature. When you execute the command,
FORWARD SKIP; (abbreviated FWDS;)
while viewing a statement result, the display "skips" to the first page of the next statement result. If you are viewing the result of the last statement in the macro, the final page of that result (at the end of the spool file) is displayed.
Executing,
BACKWARD SKIP; (abbreviated BWDS;)
displays the last page of the previous result. If you are viewing the first statement result, the first page of that result (at the beginning of the spool file) is displayed.
9-6 C09-0001-07
9.4 REPLACING A MACRO
You might expand NewEmp to insert data in other columns of the Employee table by adding parameters to the current definition. To do this:
1. Display the current definition of the macro using the SHOW MACRO command (abbreviated SM;)
2. Modify the definition using ITEQ edit commands
3. Re-enter the definition using the REPLACE MACRO statement
To display NewEmp for modification, execute,
SHOW MACRO Employee.NewEmpi
This ITEQ command sets the display area of your terminal screen for input and displays NewEmp.
Because NewEmp has never been replaced, its original CREATE MACRO statement, shown above, is displayed. If the macro had been modified, the most recent REPLACE MACRO statement used to modify it would be displayed.
Using the edit commands described in Chapter 3, you now modify the CREATE MACRO statement as follows so that NewEmp may be used to insert Salary and YrsExp information for a new employee:
REPLACE MACRO NewEmp (number (INTEGER), name (VARCHAR(12», dept ( SMALL I NT) , position (VARCHAR(12», salary (BYTEINT), experience (INTEGER), birthdate (DATE, FORMAT "MMMbDDbYYYY'), sex (CHAR(l», education (BYTEINT»
AS (ABORT 'Department 300 not valid' WHERE :dept = 300;
INSERT INTO Employee (EmpNo, Name, Deptno, Jobtitle, Salary, YrsExp, DOB, Sex, EdLev)
VALUES (:number, :name, :dept, :position, :salary, :experience, :birthdate, :sex, :education);
SELECT * FROM Employee WHERE EmpNo=:number;);
You change "CREATE MACRO" to "REPLACE MACRO." (Re-entering a CREATE MACRO statement for an existing macro causes an error.) New parameters and data type phrases are added.
C09-000l-07 9·-7

To replace the old definition of NewEmp with this new one, enter the REPLACE MACRO statement from the display area using the SUBMIT command, as described in Chapter 3 (Editing a Statement in the Display Area).
If you enter a REPLACE MACRO statement for a macro that does not exist (that is, for which a CREATE MACRO statement has not been entered), the macro is created according to the specifications of the REPLACE statement.
9.5 RENAMING A MACRO
You may rename an existing macro using the RENAME statement. For example, to change the name of the macro above from NewEmp to AddEmp, enter the following:
RENAME MACRO NewEmp TO AddEmp;
Note that if you wish to rename a macro that is not contained in the same data base as your current default data base setting, you must qualify both the old and new macro name with the name of the data base in which the macro is contained. For example, to rename the macro NewEmp to AddEmp (as in the previous example) if your default data base setting is other than Personnel, enter the following,
RENAME MACRO Personnel.NewEmp to Personnel.AddEmp;
Thereafter, statements that reference the macro must use the new name. To change the name of a macro, you must have the drop privilege on the macro.
9.6 FORMATTING MACRO RESULTS
By including ITEQ or BTEQ format commands (Chapter 5) in a macro, you may generate reports based on the results of SELECT statements contained in the macro. In a macro, you may use:
• ITEQ format commands and the SET PFn command
• Any BTEQ command
In a macro, you place ITEQ or BTEQ commands within DBC/SQL ECHO statements. ECHO statements are used to convey the commands to ITEQ or BTEQ for processing.
For example, the following statement uses ITEQ format commands enclosed in ECHO stat~ments to create a macro that displays the example salary report defined in Chapter 5:
9-8 CO,9-000l-07
CREATE MACRO Sal rep AS ( ECHO 'SET FORMAT ON;'; ECHO 'SET WIDTH 72;'; ECHO 'SET PAGE LENGTH 55;'; ECHO 'SET RTITLE "SALARY REPORT//DEPARTMENTS 100 and 700";' ECHO 'SET SUPPRESS ON 2;'; ECHO 'SET NULL AS "-";'; ECHO 'REMARK' 'Departments 100 and 700 only";'; SELECT Name (TITLE 'Employee//Name'), DeptNo (TITLE 'Dept//Number'), Salary FROM Employee WHERE DeptNo IN (100, 700) WITH SUM(Salary) (TITLE 'Dept TOTAL') BY DeptNo WITH SUM(Salary) (TITLE 'TOTAL***') ORDER BY Name;);
The ECHO statement requires that ITEQ commands be enclosed by sets of apostrophes, as described in Chapter 3.
The REMARK command is used to display a descriptive comment about the macro at the terminal.
9.7 DISPLAYING A FORMATTED MACRO RESULT
When you execute a macro in Format mode, the system displays a message concerning the success or failure of macro execution and the text of any echoed remark before displaying the result. processing messages for individual statements within the macro are suppressed. (When a macro is executed in Unformat mode, the system displays a processing message for each ITEQ command executed, as well as the text of a remark.)
You may execute a macro in only one formatting mode. ITEQ does not process format specification commands in a macro that occur following a DBC/SQL statement. Thus, it is not possible to set Format mode on and later set defaults within the same macro.
Query results are formatted into display pages according to specifications in effect for individual statements. You may view result pages using the display commands described in Chapter 3, complemented by the "FORWARD SKIP" and "BACKWARD SKIP" options discussed earlier in this chapter.
Macro results may be printed (refer to Chapter 5) or filed (refer to Chapter 3).
C09-000l-07 9-9
9.8 REMOVING A MACRO
To remove a macro from a data base, enter the DROP statement, for example,
DROP MACRO AddEmp;
To drop a macro, you must have the drop privilege for the macro (refer to Chapter 10).
9.9 SUMMARY AND PREVIEW
This chapter showed you how to use macros. The next chapter shows you how to use data definition statements to:
• Grant and revoke privileges.
• Create and drop users and data bases.
• Give ownership of a data base to another user.
9-10 C09-0001-07
CHAPTER 10 SHARING DBC/I012 FACILITIES
This chapter shows you how to use DBC/SQL data definition statements to:
• Grant and revoke privileges
• Create and drop users and data bases
• Give ownership of a data base to another user
As noted in Chapter 7, any data definition statement must be entered as a single-statement request. It may not be entered as part of a multi-statement request or defined as a macro. If a data definition statement is bracketed between BEGIN TRANSACTION and END TRANSACTION statements, it must be the only statement in the transaction.
10.1 WHAT ARE PRIVILEGES?
When first installed, the DBC/1012 Data Base Computer contains a single data base called "DBC". DBC is usually managed by the system administrator.
To protect the security of system tables within DBC that are used by DBC/1012 software, the system administrator usually assigns all DBC disk space not needed for system tables to a DBC/1012 administrator data base. The administrator then allocates disk space from the administrator data base to other data bases and users within your organization.
Think of the system administrator as the "owner" of DBC and, therefore, of the data bases and users created from it. As owner, the administrator may exercise all of the following privileges:
• CREATE DATABASE
Create a new data base from the disk space of an existing data base.
• CREATE USER
Define a username for a new user on the DBC/I012 system and assign disk space from an existing data base for the new user's data.
C09-000l-07 10-1

10-2
• MODIFY DATABASE, USER
Change any of the options specified for a data base or user.
• CREATE TABLE, INDEX, VIEW, and MACRO
Create tables~ indexes, views, and macros within a data base.
• DROP
Remove data bases and users from the DBC/I012 system and return the freed disk space to the originating data base; remove tables, indexes, views, and macros from a data base.
• SELECT
Query data in a table or view.
• INSERT, UPDATE, and DELETE
Insert, modify, and remove rows from a table.
• EXECUTE
Execute a macro in a data base.
• GRANT
Grant any privilege to another user.
• REVOKE
Take back any privilege granted.
• CHECKPOINT
Create a synchronization entry in a journal table that may be used to either restore or reverse changes made to table data.
• DUMP
Rollback and/or rollforward data tables using a journal table.
• RESTORE
Restore table data and journal tables from an archive copy.
C09-000l-07
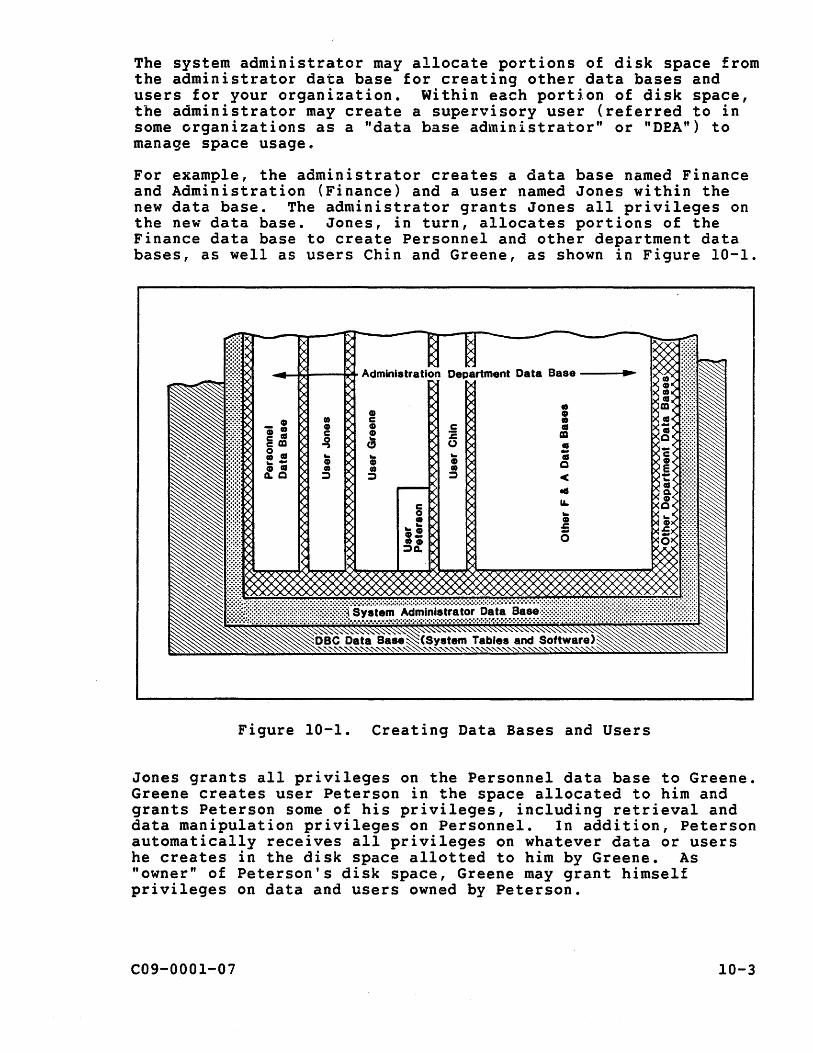
The system administrator may allocate portions of disk space from the administrator data base for creating other data bases and users for your organization. Within each portion of disk space, the administrator may create a supervisory user (referred to in some organizations as a "data base administrator" or "DEA") to manage space usage.
For example, the administrator creates a data base named Finance and Administration (Finance) and a user named Jones within the new data base. The administrator grants Jones all privileges on the new data base. Jones, in turn, allocates portions of the Finance data base to create Personnel and other department data bases, as well as users Chin and Greene, as shown in Figure 10-1.
Figure 10-1. Creating Data Bases and Users
Jones grants all privileges on the Personnel data base to Greene. Greene creates user Peterson in the space allocated to him and grants Peterson some of his privileges, including retrieval and data manipulation privileges on Personnel. In addition, Peterson automatically receives all privileges on whatever data or users he creates in the disk space allotted to him by Greene. As "owner" of Peterson's disk space, Greene may grant himself privileges on data and users owned by Peterson.
C09-Q001-07 10-3
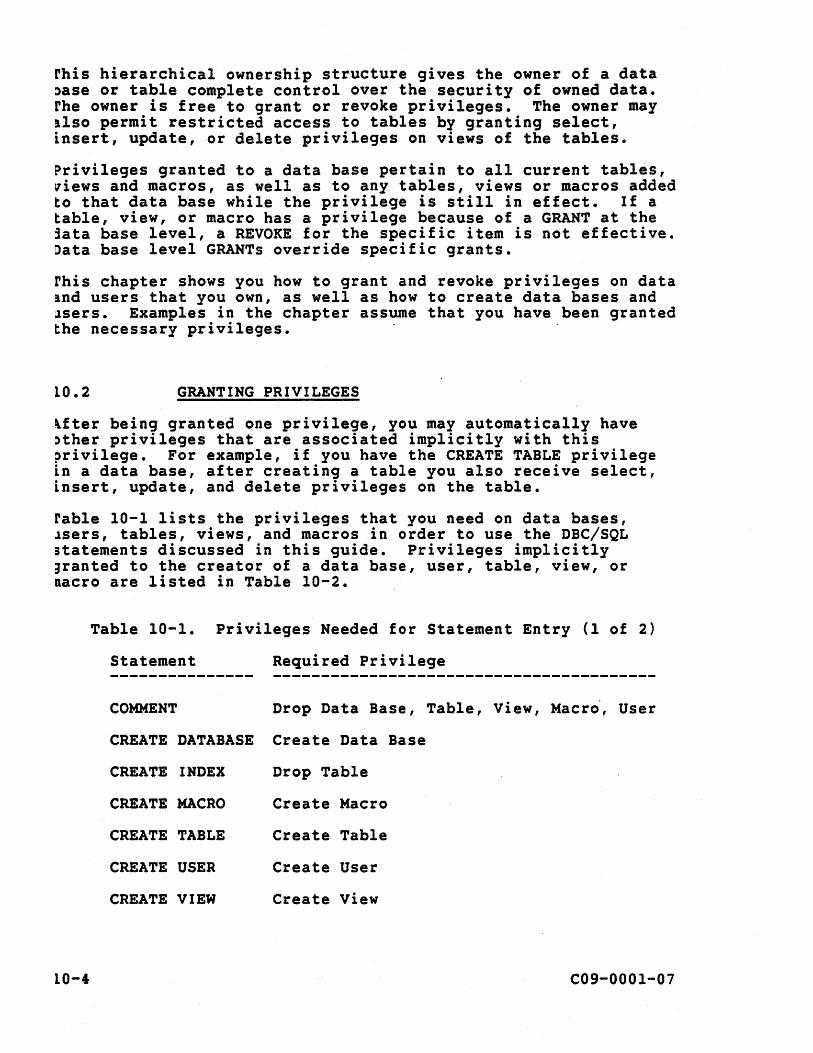
rhis hierarchical ownership structure gives the owner of a data )ase or table complete control over the security of owned data. rhe owner is free to grant or revoke privileges. The owner may !lso permit restricted access to tables by granting select, insert, update, or delete privileges on views of the tables.
~rivileges granted to a data base pertain to all current tables, ~iews and macros, as well as to any tables, views or macros added to that data base while the privilege is still in effect. If a table, view, or macro has a privilege because of a GRANT at the iata base level, a REVOKE for the specific item is not effective. Data base level GRANTs override specific grants.
rhis chapter shows you how to grant and revoke privileges on data !nd users that you own, as well as how to create data bases and lsers. Examples in the chapter assume that you have been granted the necessary privileges.
10.2 GRANTING PRIVILEGES
~fter being granted one privilege, you may automatically have )ther privileges that are associated implicitly with this ~rivilege. For example, if you have the CREATE TABLE privilege in a data base, after creating a table you also receive select, insert, update, and delete privileges on the table.
rable 10-1 lists the privileges that you need on data bases, lsers, tables, views, and macros in order to use the DBC/SQL statements discussed in this guide. Privileges implicitly ;ranted to the creator of a data base, user, table, view, or nacro are listed in Table 10-2.
Table 10-1. Privileges Needed for Statement Entry (1 of 2)
Statement Required Privilege
COMMENT Drop Data Base, Table, View, Macr~, User
CREATE DATABASE Create Data Base
CREATE INDEX Drop Table
CREATE MACRO Create Macro
CREATE TABLE Create Table
CREATE USER Create User
CREATE VIEW Create View
10-4 C09-OOOl-07
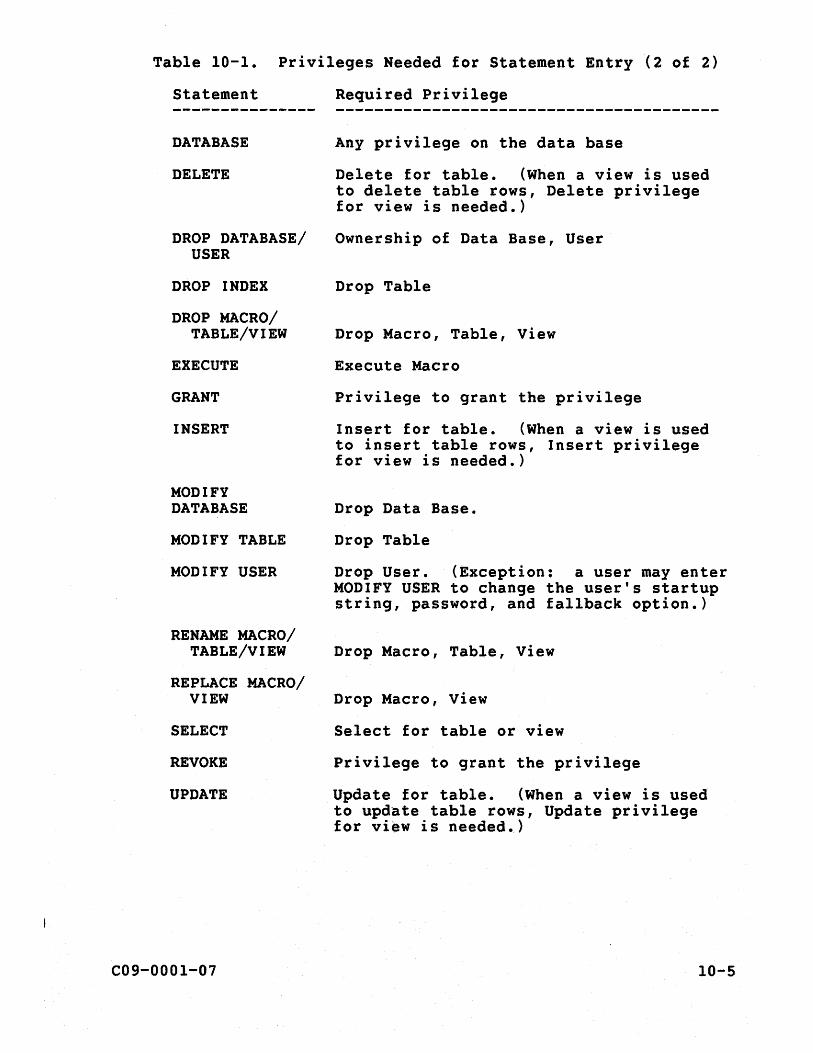
Table 10-1. Privileges Needed for Statement Entry (2 of 2)
Statement Required Privilege
DATABASE Any privilege on the data base
DELETE Delete for table. (When a view is used to delete table rows, Delete privilege for view is needed.)
DROP DATABASE/ Ownership of Data Base, User USER
DROP INDEX Drop Table
DROP MACRO/ TABLE/VIEW Drop Macro, Table, View
EXECUTE Execute Macro
GRANT Privilege to grant the privilege
INSERT Insert for table. (When a view is used to insert table rows, Insert privilege for view is needed.)
MODIFY DATABASE Drop Data Base.
MODIFY TABLE Drop Table
MODIFY USER Drop User. (Exception: a user may enter MODIFY USER to change the user's startup string, password, and fallback option.)
RENAME MACRO/ TABLE/VIEW Drop Macro, Table, View
REPLACE MACRO/ VIEW Drop Macro, View
SELECT Select for table or view
REVOKE Privilege to grant the privilege
UPDATE Update for table. (When a view is used to update table rows, Update privilege for view is needed~)
C09-OOOl-07 10-5

10.2.1
Table-lO-2. Privileges Implicitly Granted to Creator
Statement Privileges Obtained
CREATE DATABASE, All privileges on data bases, users, USER macros, tables, and views created in
the data base
CREATE MACRO Drop Macro, Execute, and Grant on the created macro
CREATE TABLE, Delete, Drop, Grant, Insert, Select, VIEW and Update on the created table or
view
Granting Privileges to a User
Use the GRANT statement to extend your privileges to others. For example, the statement,
GRANT SELECT ON Employee_Info TO Peterson;
gives Peterson a limited select privilege on the Employee table via the Employee_Info view created in Chapter 6.
To grant limited select, insert, and update privileges on Employee to Peterson and Moffit, enter the following statement:
GRANT SELECT, INSERT, UPDATE ON Employee_Info TO Peterson, Moffit;
Note that each of these statements specifies the privilege being granted, the object on which the privilege is granted, and the user or users receiving the privilege.
To allow Peterson to create tables in the Personnel data base, enter:
GRANT CREATE TABLE ON Personnel TO Peterson;
To allow Peterson also to drop tables in Personnel, enter:
GRANT DROP TABLE ON Personnel TO Peterson;
To allow Peterson to create and drop tables in Personnel, enter:
GRANT TABLE ON Personnel TO Peterson;
To include the GRANT privilege, enter:
10-6
GRANT TABLE ON Personnel TO Peterson WITH GRANT OPTION;
C09-000l-07
(Note that the GRANT DATABASE, GRANT TABLE, GRANT USER, GRANT MACRO, and GRANT VIEW statements convey both create and drop privileges.)
10.2.2 Granting All Privileges to a User
Use the ALL keyword to grant all privileges (except the GRANT privilege) on an object. To grant all privileges on the ,Department table to Peterson, enter one of the following statements:
GRANT ALL ON Department TO Peterson;
GRANT ALL RIGHTS ON Department TO Peterson;
To grant all privileges on user Greene's data base to Peterson, enter:
GRANT ALL ON Greene TO Peterson;
To grant all privileges except CREATE TABLE on user Greene's data base, enter:
GRANT ALL BUT CREATE TABLE ON Greene TO Peterson;
10.2.3 Granting privileges to a Group of Users
Use the ALL keyword to grant one or more privileges to a group of users. For example, to enable all users created in the Finance data base to query the Department table, enter:
GRANT SELECT ON Department TO ALL Finance;
If DBA Jones decided to extend this privilege to all DBC/1012 users in your organization, Jones would enter:
GRANT SELECT ON Personnel.Department TO PUBLIC;
10.2.4 Revoking Privileges
Use the REVOKE statement to take away any privilege you have 9ranted. With the exception of the keyword REVOKE, the REVOKE statement is identical to the GRANT statement.
For example, to deprive Peterson of privileges on user Greene's data base, enter:
REVOKE ALL ON Greene TO Peterson;
C09-000l-07 10-7

If Peterson later needs some of the privileges that were revoked, they may specifically be re-granted.
10.3 CREATING USERS
Assume that the DBC/IOI2 Data Base Computer has just been installed. Using the CREATE DATABASE statement, the system administrator has created from DBC a DBC/IOI2 administrator data base and data bases for each of the departments in your organization -- Finance, Executive Office, Engineering, Manufacturing, and Marketing.
The system administrator defines Jones as a user by entering the CREATE USER statement, as follows:
CREATE USER Jones FROM Finance AS PERMANENT = 100000 BYTES, PASSWORD = Veep, FALLBACK, SPOOL = 1000000 BYTES, BEFORE JOURNAL, AFTER JOURNAL, DEFAULT JOURNAL TABLE = FinCopy, ACCOUNT = 'Administration', STARTUP = 'ECHO "EXECUTE PresentTime;";' DEFAULT DATABASE = Finance ;
This statement assigns the username and password that Jones needs to log on to the DBC/1012 Data Base Computer. The optional FROM clause permanently allocates to Jones 100,000 bytes of disk space from that belonging to Finance. If FROM were not specified, space would be allocated from space belonging to the system administrator.
The FALLBACK option specifies that a secondary copy of any table created in Jones' user space is maintained in addition to the primary copy, for use in case the primary copy becomes unavailable. If NO FALLBACK was specified, only the primary copy would be maintained. Because FALLBACK is the default setting, if Jones had not specified whether or not a FALLBACK copy should be maintained, the DBC/1012 automatically keeps a secondary copy. (For an explanation of the fallback concept, refer to DBC/IOI2 Data Base Computer Concepts and Facilities.)
The JOURNAL option specifies the default level of journaling maintained for tables created in user Jones' disk space. BEFORE JOURNAL indicates that a before-image journal is maintained and AFTER JOURNAL indicates that an after-image journal is maintained. The journal table to which the change images are wri tten is specif.ied in the DEFAULT JOURNAL TABLE clause. In this example, FinCopy is the name of the journal table. (Note that a user may be created with many different combinations of before- and/or after-image journals. For a complete description of how you may specify the JOURNAL option, refer to the DBC/lOI2 Data Base Computer Reference Manual.)
10-8 C09-0001-07
The SPOOL option specifies the maximum space allocated to spool files on the DBC/1012. A spool file holds the result of a DBC/SQL statement for examination or printing. If SPOOL were not specified, the amount of spool space allocated to Finance also would be available to Jones.
The ACCOUNT option identifies for accounting purposes the department or budget responsible for disk space accumulated by the new user. If ACCOUNT were not specified, disk space usage would be charged to the owner data base. If Jones had more than one account, the account names would be specified in parentheses, for example:
ACCOUNT = ('Administration', 'Exec Office')
The optional STARTUP clause may contain one or more DBC/SQL statements that will condition the session environment each time Jones logs on. In this example, the STARTUP clause contains a macro named PresentTime that will display the current date and time whenever Jones logs on to the DBC/1012.
The DEFAULT DATABASE option identifies Finance as the default data base for every DBC/SQL statement that Jones enters after logging on. This eliminates the need for Jones to qualify with "Finance." the names of tables, views, and other objects used in statements. If after logging on, Jones wished to establish a default data base other than Finance, she could enter a DATABASE statement. Note that entering a DATABASE statement will change the default data base setting for the current session only.
As a user, Jones has the following privileges in her user space:
• CREATE and DROP TABLE, VIEW, MACRO
• SELECT, INSERT, UPDATE, DELETE
• EXECUTE
10.4 CREATING DATA BASES
After creating Jones as a user, the system administrator grants Jones all privileges on' the Finance data base, including those for creating and dropping data bases and users. One of the first data bases Jones creates is Personnel.
To create this data base, Jones enters the following CREATE DATABASE statement:
CREATE DATABASE Personnel FROM Finance AS PERMANENT = 1000000 BYTES, SPOOL = 10000000 BYTES, FALLBACK, ACCOUNT = 'Administration' BEFORE JOURNAL, AFTER JOURNAL,
C09-000l-07 10-9
DEFAULT JOURNAL TABLE = FinCopy ;
Except for omission of the PASSWORD, STARTUP clause, and DEFAULT DATABASE options, the CREATE DATABASE statement is identical in syntax to the CREATE USER statement.
10.5 MODIFYING USERS AND DATA BASES
You may change the definition'of a user or data base using the MODIFY USER or MODIFY DATABASE statements. Again, except for omission of the PASSWORD, STARTUP clause, and DEFAULT DATABASE options, the MODIFY DATABASE statement is identical in syntax to the MODIFY USER statement.
In order to modify a user or data base, you must have the drop privilege on the user or data base. An exception is the MODIFY USER statement, which allows you to change your own PASSWORD, STARTUP, FALLBACK, DEFAULT JOURNAL, and DEFAULT DATABASE options in your user definition.
For example, to change her password from "Veep" to "VP", Jones may enter the following statement:
MODIFY USER Jones AS PASSWORD = VP:
Except for the new password, Jones' user definition remains as specified in th~ CREATE USER statement above.
If Jones wishes to increase the disk space as well as the space allocated to spool files for the Personnel data base, Jones may enter the following statement:
MODIFY DATABASE Personnel AS PERMANENT = 10000000 BYTES, SPOOL = 100000000 BYTES;
Except for PERMANENT and SPOOL, the specifications defined in the CREATE DATABASE statement above remain in effect.
You may use modify statements to change the default journal specified for a data base or user, but certain restrictions do apply. For example, suppose the journal table "FinCopy" resides under Jones. If she wants to change the default journal from "FinCopy" to "Jrnl1," then she must first drop the current default by entering the following statement. This statement removes "FinCopy" as the default and drops it from the system. If there are any existing tables that use "FinCopy" as their journal table, then the statement will return an error message.
MODIFY USER Jones AS DROP DEFAULT JOURNAL TABLE = FinCopy ;
10-10 C09-0001-07
Now that the present default has been dropped, Jones may specify the new default by entering:
MODIFY USER Jones AS DEFAULT JOURNAL TABLE = Jrnll ;
(Because a data base or user name was not specified for "Jrnll" the table is created under Jones' user space.)
Conversely, if the default journal resides in a data base or user other than the one being modified, then you need only enter one modify statement. For example, if Jones wants to change the default journal for the Personnel data base from "FinCopy" to "Jrnll," where Jrnll resides in Jones' user space, she would enter:
MODIFY DATABASE Personnel AS DEFAULT JOURNAL TABLE = Jones.Jrnll ;
(Note that, when a modify statement changes the default journal setting for a user or data base, existing tables that use the original default journal option will retain the original journal setting. To change the journal option for an existing table, you must explicitly change it in an ALTER TABLE statement.)
10.6 REMOVING USERS AND DATA BASES
To remove users and data bases, use the DROP statement. For example, to drop user Peterson, enter:
DROP USER Peterson;
To drop the Personnel data base, enter:
DROP DATABASE Personnel;
To minlmlze the possibility of a user or data base being dropped unintentionally, all tables, users, views, and macros within a data base or user space must be dropped before a DROP statement can be entered for the user or data base. You may drop these objects using the DELETE DATABASE statement.
For example, entering the statement,
DELETE DATABASE Personnel;
drops all objects in the Personnel data base while retaining Personnel as a named data base.
The statement,
DELETE USER Peterson;
C09-0001-07 10-11
Note that, if a data base or user contains a journal table in their disk space, then the data base or user cannot be dropped until the journal table is removed from the system. To drop the journal table, you must use a modify statement as described in the previous section. A DELETE statement will not cause a journal table to be dropped.
To enter a DELETE DATABASE statement for a data base or user, you must have the DROP privilege for the data base or user.
10.7 TRANSFERRING DATA BASE OWNERSHIP
To delegate responsibility for all Personnel matters to controller Chin, Jones transfers ownership of the Personnel data base to Chin using the following GIVE statement:
GIVE Personnel to Chin;
Jones is able to transfer ownership of the Personnel data base to Chin because Jones owns this data base.
10.8 SUMMARY AND PREVIEW
This chapter showed you how to grant and revoke privileges on a data base or user space, how to create, modify, and remove data bases and users, and how to transfer ownership of a data base. The next chapter shows you how to query Data Dictionary/Director tables or use the HELP statement to obtain information about data stored in DBC/1012 data bases.
10-12 C09-000l-07
CHAPTER 11 VIEWING DATA BASE INFORMATION
From time to time, you will need to know what data is available to you on your organization's DBC/1012 Data Base Computer, what form it is in, how to query it, what privileges you have granted to other users, and what privileges have been granted to you. Up-to-date information about all the data bases and users maintained on your DBC/1012 is available from the Data Dictionary/Directory, a collection of system tables.
You may obtain Data Dictionary/Directory information in two ways:
1. By querying system-defined views of Data Dictionary/Directory tables
2. By entering the DBC/SQL HELP statement for a data object
This chapter shows you how to query Data Dictionary/Directory views and how to use the HELP statement.
11.1 QUERYING DATA DICTIONARY/DIRECTORY VIEWS
As described in Chapter 7, a view is a virtual table that serves as a "window" through which you may see a portion of one of more tables or views or a combination of tables and views. Data Dictionary/Directory views may be queried as though they were actual tables.
Data Dictionary/Directory views and their contents are summarized in Table 11-1.
C09-0001-07 11-1
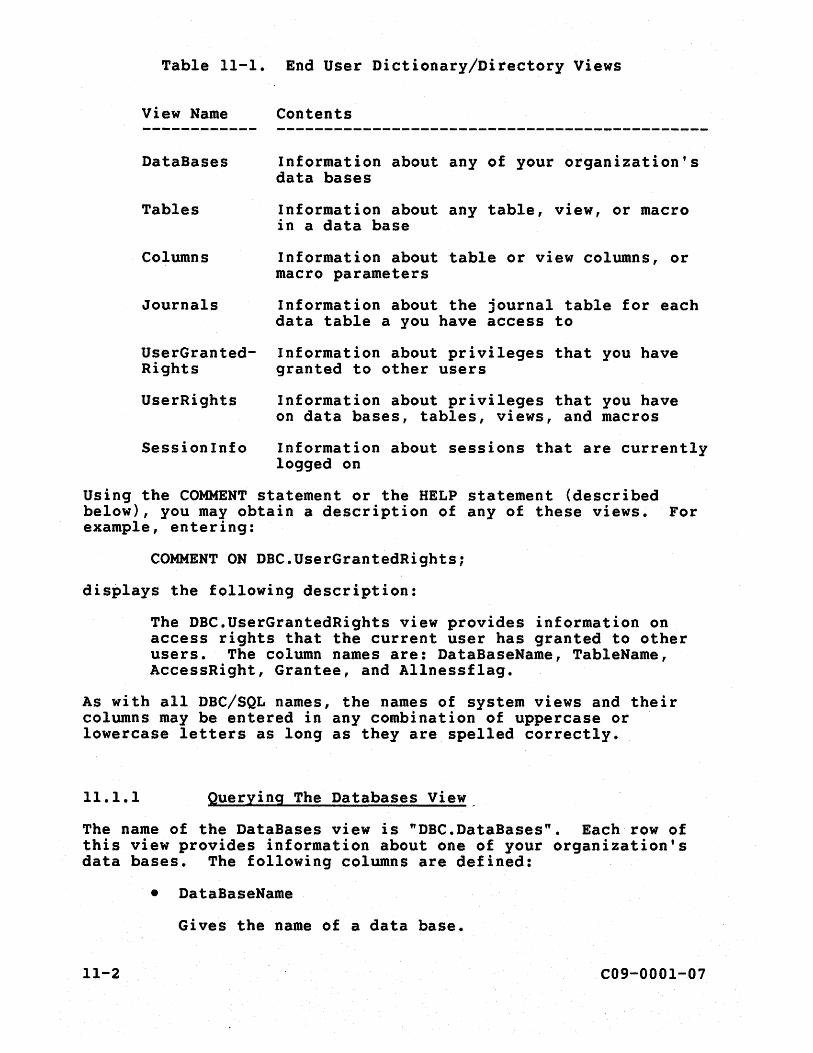
Table 11-1.
View Name
DataBases
Tables
Columns
Journals
UserGrantedRights
UserRights
SessionInfo
End User Dictionary/Directory Views
Contents
Information about any of your organization's data bases
Information about any table, view, or macro in a data base
Information about table or view columns, or macro parameters
Information about the journal table for each data table a you have access to
Information about privileges that you have granted to other users
Information about privileges that you have on data bases, tables, views, and macros
Information about sessions that are currently logged on
Using the COMMENT statement or the HELP statement (described below), you may obtain a description of any of these views. For example, entering:
COMMENT ON DBC.UserGrantedRights;
displays the following description:
The DBC.UserGrantedRights view provides information on access rights that the current user has granted to other users. The column names are: DataBaseName, TableName, AccessRight, Grantee, and Allnessf1ag.
As with all DBC/SQL names, the names of system views and their columns may be entered in any combination of uppercase or ' lowercase letters as long as they are spelled correctly.
11.1.1 Querying The Databases View
The name of the DataBases view is "DBC.DataBases". Each row of this view provides information about one of your organization's data bases. The following columns are defined:
• DataBaseName
Gives the name of a data base.
11-2 C09-0001-07
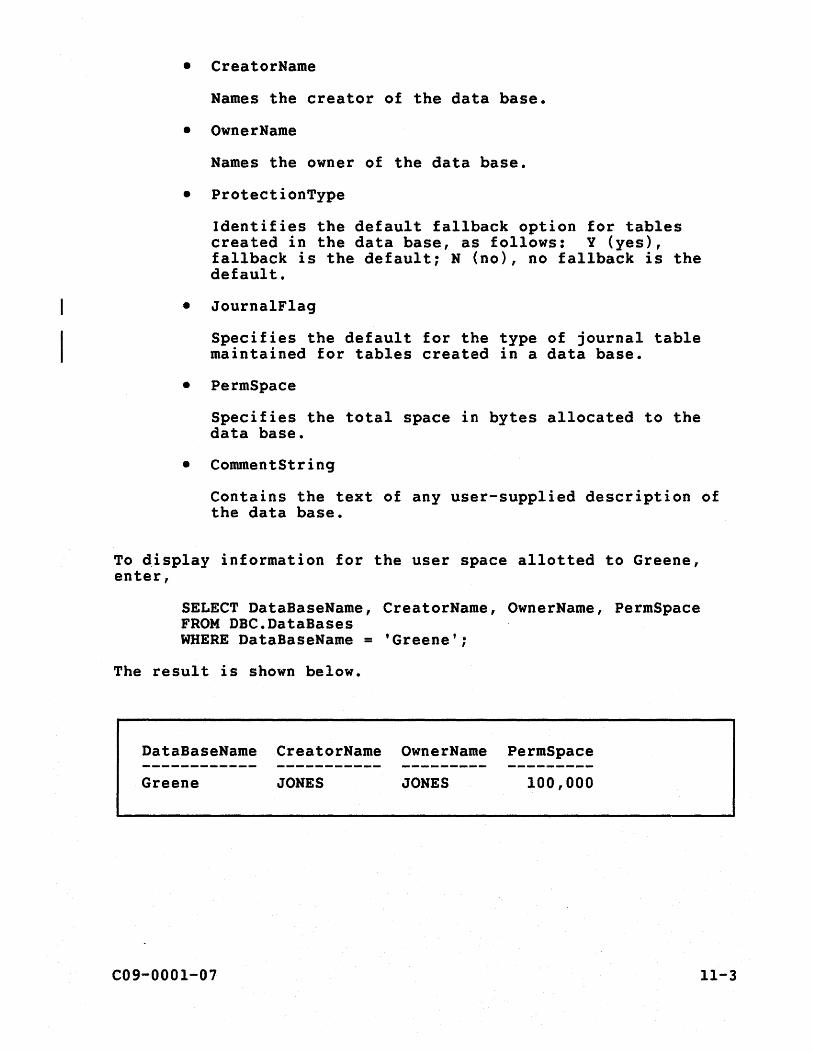
• CreatorName
Names the creator of the data base.
• OwnerName
Names the owner of the data base.
• ProtectionType
Identifies the default fallback option for tables created in the data base, as follows: Y (yes), fallback is the default; N (no), no fallback is the default.
• JournalFlag
Specifies the default for the type of journal table maintained for tables created in a data base.
• PermSpace
Specifies the total space in bytes allocated to the data base.
• CommentString
Contains the text of any user-supplied description of the data base.
To display information for the user space allotted to Greene, enter,
SELECT DataBaseName, CreatorName, OwnerName, PermSpace FROM DBC.DataBases WHERE DataBaseName = 'Greene';
The result is shown below.
DataBaseName CreatorName OwnerName PermSpace
Greene JONES JONES 100,000
C09-000l-07 11-3
11.1.2 Querying The Tables View
The name of the Tables view is "DBC.Tables". Each row of this view provides information about a table, view, or macro in one of your organization's data bases. The following columns are defined:
• DataBaseName
Identifies the data base in which the table, view, or macro resides.
• TableName
Gives the name of the table, view, or macro.
• TableKind
Identifies the type, as follows: T (table), V (view), M (macro).
• ProtectionType
Specifies whether the fallback option is in effect for the table, as follows: Y (yes), fallback is the default; N (no), no fallback is the default.
• JournalFlag
Specifies the default for the type of journal table maintained for the table.
• CreatorName
Names the creator of the table, view, or macro.
• RequestText
Contains the most recent data definition statement for the table, view, or macro.
• CommentString
Contains the text of any user-supplied description of the table, view, or macro.
To display information for all tables, views, and macros in the Personnel data base, enter,
SELECT TableName, CreatorName, TableKind, ProtectionType FROM DBC.Tables WHERE DataBaseName = 'Petsonnel';
The result is shown below.
11-4 C09-OOOl-07
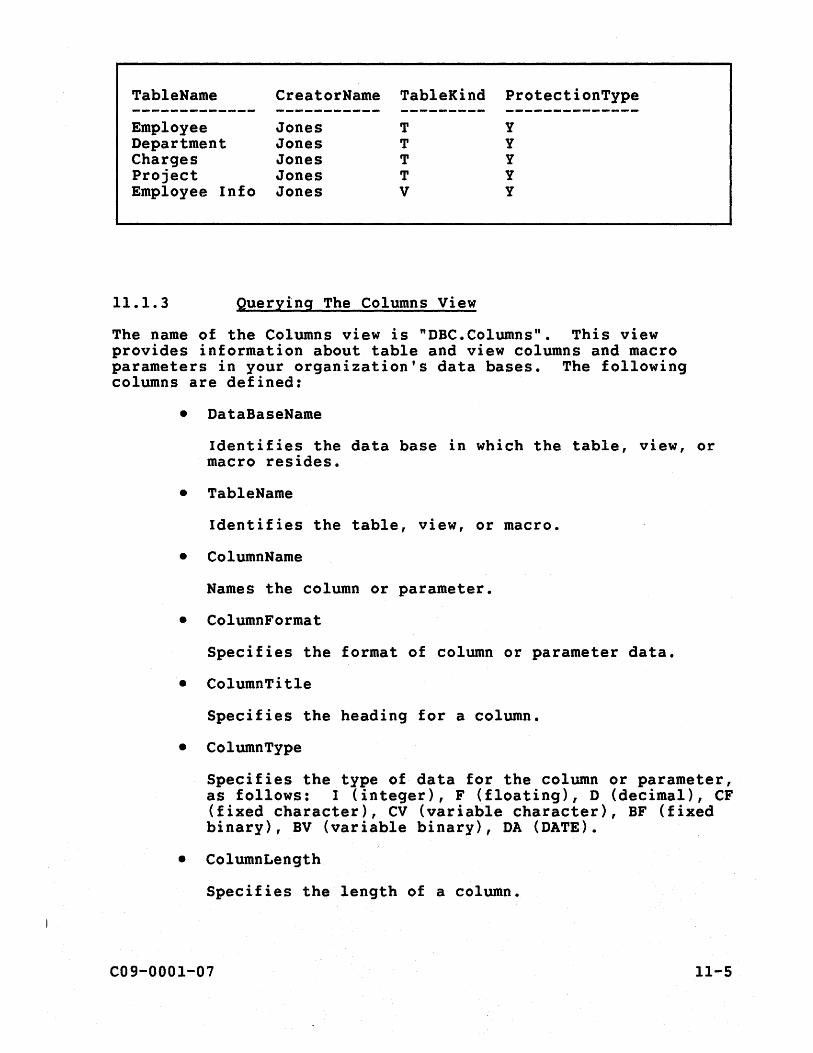
TableName CreatorName TableKind ProtectionType -------------- ----------- --------- --------------Employee Jones T y Department Jones T Y Charges Jones T Y Project Jones T Y Employee Info Jones V y
11.1.3 Querying The Columns View
The name of the Columns view is "DBC.Columns". This view provides information about table and view columns and macro parameters in your organization's data bases. The following columns are defined:
• DataBaseName
Identifies the data base in which the table, view, or macro resides.
• TableName
Identifies the table, view, or macro.
• ColumnName
Names the column or parameter.
• ColumnFormat
Specifies the format of column or parameter data.
• ColumnTitle
Specifies the heading for a column.
• ColumnType
Specifies the type of data for the column or parameter, as follows: I (integer), F (floating), D (decimal), CF (fixed character), CV (variable character), BF (fixed binary), BV (variable binary), DA (DATE).
• ColumnLength
Specifies the length of a column.
C09-OOOl-07 11-5
• DefaultValue
Specifies any default value assigned to the column or parameter.
• RangeLow
If a range is specified, defines the lowest value that the column or parameter may contain.
• RangeHi
If a range is specified, defines the highes·t value that the column or parameter may contain.
• Nu11ab1e
Specifies whether the column or parameter may contain a null value, as follows: Y (yes), N (no).
• CommentString
Contains the text of any user-supplied description of the column or parameter.
• DecimalTota1Digits
Specifies the total number of digits (left and right of the decimal point) for a decimal field.
• DecimalFractiona1Digits
Specifies the number of fractional digits (right of the decimal point) for a decimal field.
• Columnid
Specifies a 2-byte identifier used for ordering columns.
• UppercaseF1ag
Specifies whether a character field is uppercase (UC), lowercase (LC)i or casespecific (CS).
To display information about the columns in the Employee table, enter,
SELECT ColumnName, ColumnFormat, RangeLow, RangeHi FROM DBC.Columns WHERE DataBaseName = 'Personnel' AND TableName = 'Employee';
The result is shown below.
11-6 C09-OOOI-07

ColumnName ColumnFormat RangeLow RaogeHi ---------- ------------ ----------- -----------EmpNo 9(5) 1.00010E 04 9.99990E 04 Name X(12) DeptNo 999 1.OaOOOE 02 9.00000E 02 JobTitle X(12) Salary zzz,zz9.99 1.00000E 00 9.99000E 05 YrsExp z9 -9.90000E 01 9.90000E 01
11.1.4 Querying The UserGrantedRights View
The name of the UserGrantedRights view is "DBC.UserGrantedRights". Each row of this view provides information about a privilege that you have granted to another user on a data base, table, view, or macro. The following columns are defined:
• DataBaseName
Gives the name of the data base on which the privilege was granted.
• TableName
Gives the name of the table, view, or macro on which the privilege was granted.
• Grantee
Identifies the user who was granted the privilege.
• AccessRight
Identifies the privilege by a code, listed in Table 11-2.
• AllnessFlag
Specifies whether the privilege was granted to all users owned by the grantee.
C09-000l-07 11-7
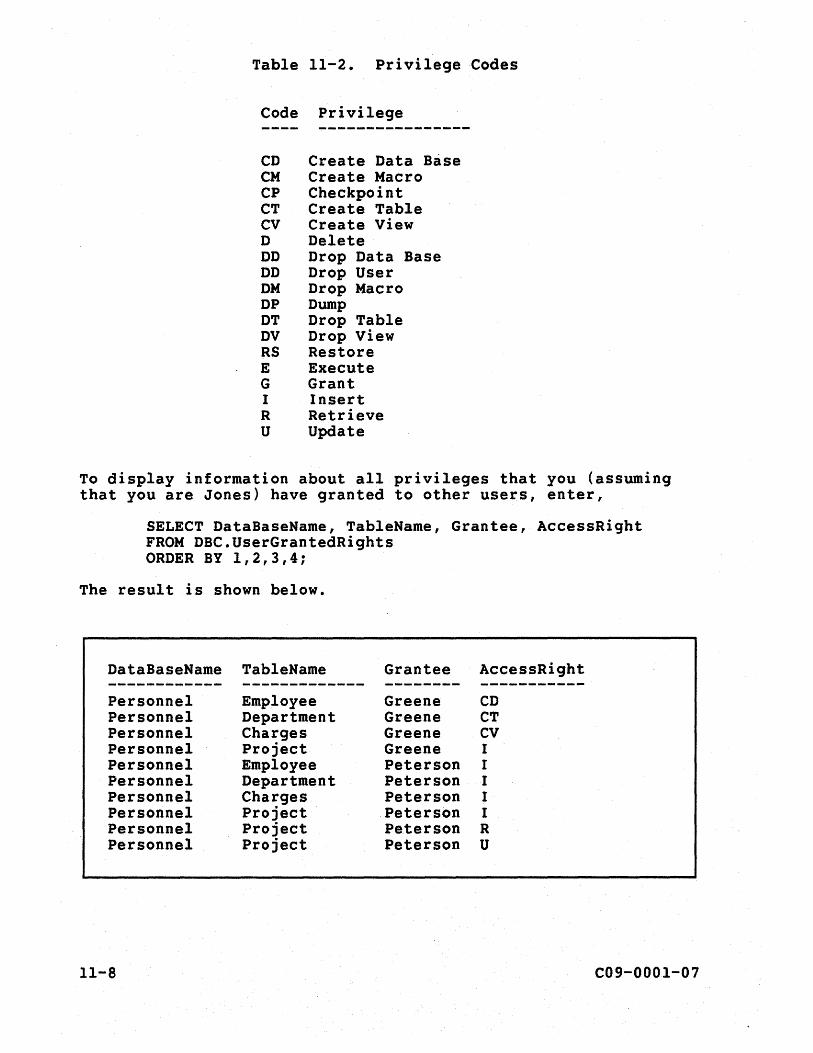
Table 11-2. Privilege Codes
Code Privilege
CD Create Data Base CM Create Macro CP Checkpoint CT Create Table CV Create View D Delete DD Drop Data Base DD Drop User DM Drop Macro DP Dump DT Drop Table DV Drop View RS Restore E Execute G Grant I Insert R Retrieve U Update
To display information about all privileges that you (assuming that you are Jones) have granted to other users, enter,
SELECT DataBaseName, TableName, Grantee, AccessRight FROM DBC.UserGrantedRights ORDER BY 1,2,3,4;
The result is shown below.
DataBaseName TableName Grantee AccessRight -----_ .... _---- ------------- -------- -----------Personnel Employee Greene CD Personnel Department Greene CT Personnel Charges Greene CV Personnel Project Greene I Personnel Employee Peterson I Personnel Department Peterson I Personnel Charges Peterson I Personnel Project Peterson I Personnel Project Peterson R Personnel Project Peterson U
11-8 C09-0001-07
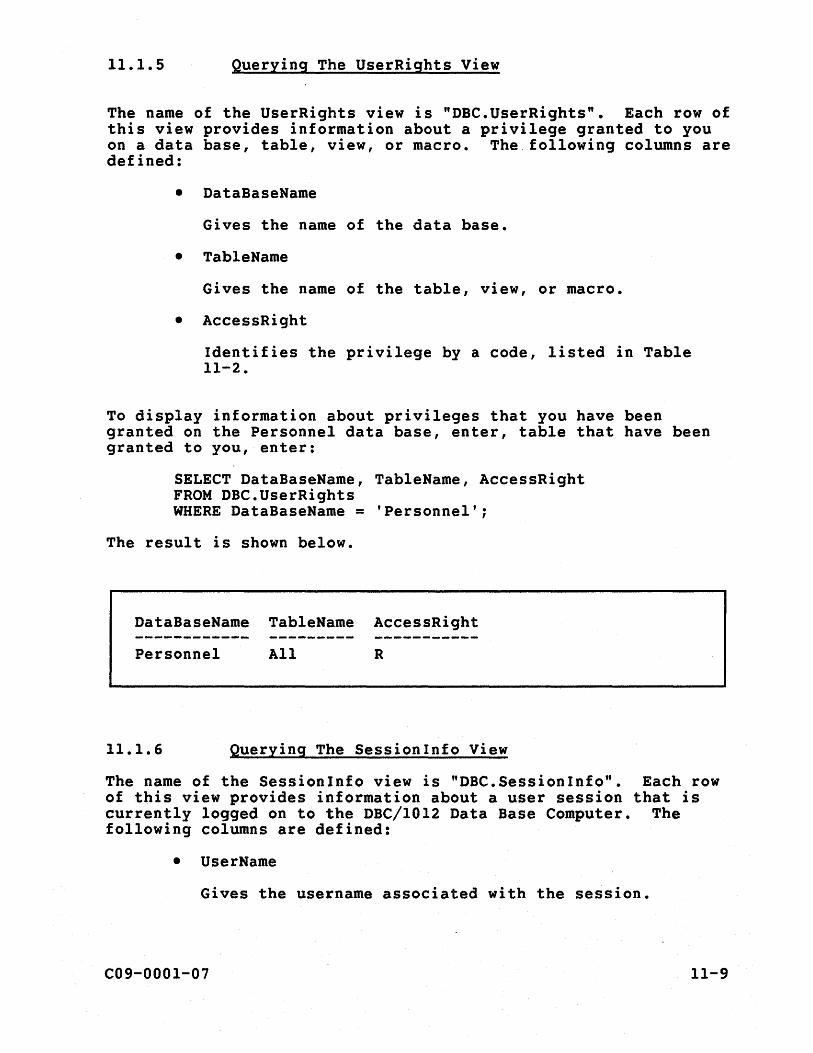
11.1.5 Querying The UserRights View
The name of the UserRights view is "DBC.UserRights". Each row of this view provides information about a privilege granted to you on a data base, table, view, or macro. The following columns are defined:
• DataBaseName
Gives the name of the data base.
• TableName
Gives the name of the table, view, or macro.
• AccessRight
Identifies the privilege by a code, listed in Table 11-2.
To display information about privileges that you have been granted on the Personnel data base, enter, table that have been granted to you, enter:
SELECT DataBaseName, TableName, AccessRight FROM DBC.UserRights WHERE DataBaseName = 'Personnel';
The result is shown below.
DataBaseName TableName AccessRight
Personnel All R
11.1.6 Querying The SessionInfo View
The name of the Sessionlnfo view is "DBC.SessionInfo". Each row of this view provides information about a user session that is currently logged on to the DBC/lOI2 Data Base Computer. The following columns are defined:
• UserName
Gives the username associated with the session.
C09-0001-07 11-9
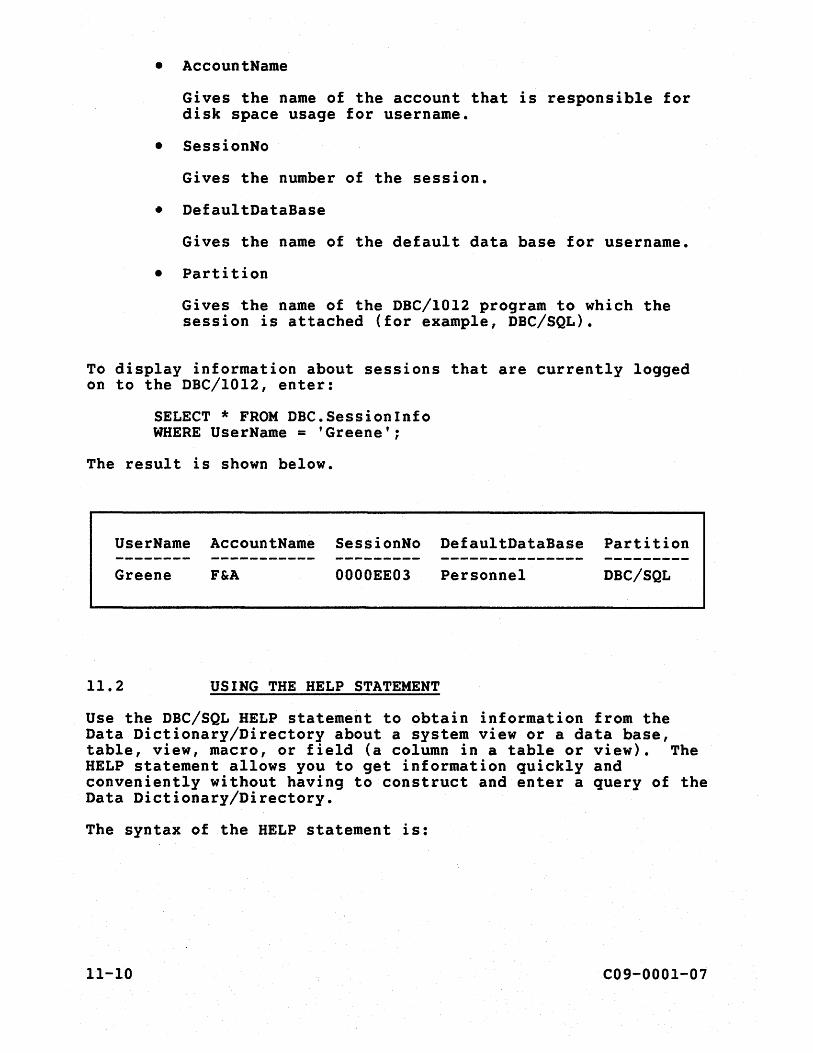
• AccountName
Gives the name of the account that is responsible for disk space usage for username.
• SessionNo
Gives the number of the session.
• DefaultDataBase
Gives the name of the default data base for username.
• Partition
Gives the name of the DBC/I012 program to which the session is attached (for example, DBC/SQL).
To display information about sessions that are currently logged on to the DBC/I012, enter:
SELECT * FROM DBC.SessionInfo WHERE UserName = 'Greene';
The result is shown below.
UserName AccountName SessionNo DefaultDataBase Partition
Greene F&A OOOOEE03 Personnel DBC/SQL
11.2 USING THE HELP STATEMENT
Use the DBC/SQL HELP statement to obtain information from the Data Dictionary/Directory about a system view or a data base, table, view, macro, or field (a column in a table or view). The HELP statement allows you to get information quickly and conveniently without having to construct and enter a query of the Data Dictionary/Directory.
The syntax of the HELP statement is:
11-10 C09-OOOl-07
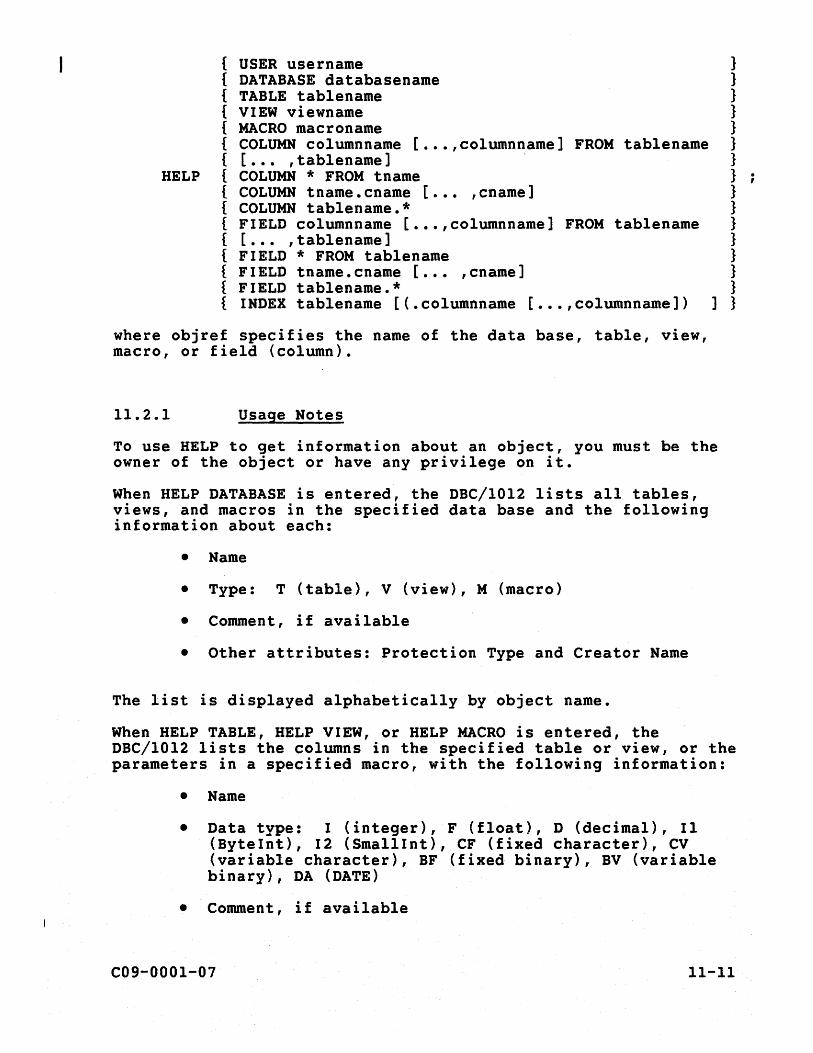
{ USER username } { DATABASE databasename } { TABLE tablename } { VIEW viewname } { MACRO macroname } { COLUMN columnname [ .•• ,columnname] FROM tablename } { [ ••. ,tablename] }
HELP {COLUMN * FROM tname } { COLUMN tname.cname [ ••• ,cname] } { COLUMN tablename.* } { FIELD columnname [ ••• ,columnname] FROM tablename } { [ ••• ,tablename] } { FIELD * FROM tablename } { FIELD tname.cname [ •.• ,cname] } { FIELD tablename.* } { INDEX tablename [(.columnname [ ••• ,columnname]) ]}
where objref specifies the name of the data base, table, view, macro, or field (column).
11.2.1 Usage Notes
To use HELP to get information about an object, you must be the owner of the object or have any privilege on it.
When HELP DATABASE is entered, the DBC/1012 lists all tables, views, and macros in the specified data base and the following information about each:
• Name
• Type: T (table), V (view), M (macro)
• Comment, if available
• Other attributes: Protection Type and Creator Name
The list is displayed alphabetically by object name.
When HELP TABLE, HELP VIEW, or HELP MACRO is entered, the DBC/1012 lists the columns in the specified table or view, or the parameters in a specified macro, with the following information:
• Name
• Data type: I (integer), F (float), D (decimal), II (ByteInt), 12 (SmallInt), CF (fixed character), CV (variable character), BF (fixed binary), BV (variable binary), DA (DATE)
• Comment, if available
C09-OOOl-07 11-11
• Other attributes: Format, Title, Max Length, Decimal Digits, Range Constraints, Uppercase, Default
The list is displayed in the order in which the objects were defined.
HELP TABLE and HELP VIEW are useful for recalling the name of a column and the kind of data that it contains. HELP MACRO can be used in conjunction with the COMMENT statement to obtain information about using the macro.
When HELP COLUMN or HELP FIELD is entered, the DBC/1012 lists the attributes of the specified column(s). In addition to items displayed for HELP TABLE or VIEW, the display indicates whether the column is in an index, and if so, what kind of index.
The HELP INDEX statement is used to provide information about all the indexes or a selected index of a table. The response to the HELP INDEX statement includes the following information about each index:
• Unique: N (no), Y (yes)
• Primary or Secondary: P (primary), S (secondary)
• Name(s) of the column{s) that comprise the index
11.2.2 Examples
The following examples illustrate use of the HELP statement.
Entering the statement,
HELP TABLE Personnel.Department;
causes the DBC/1012 to display the following information about the Department table:
Column Name Type Comment
DeptNo DeptName EmpCount Loc MgrNo
I CV I CF I
Department number Department name Number of employees in department Department location Employee number of department manager
(The display is truncated; other fields occur to the right.)
The statement,
HELP MACRO Personnel.NewEmp;
11-12 C09-OOOl-O?
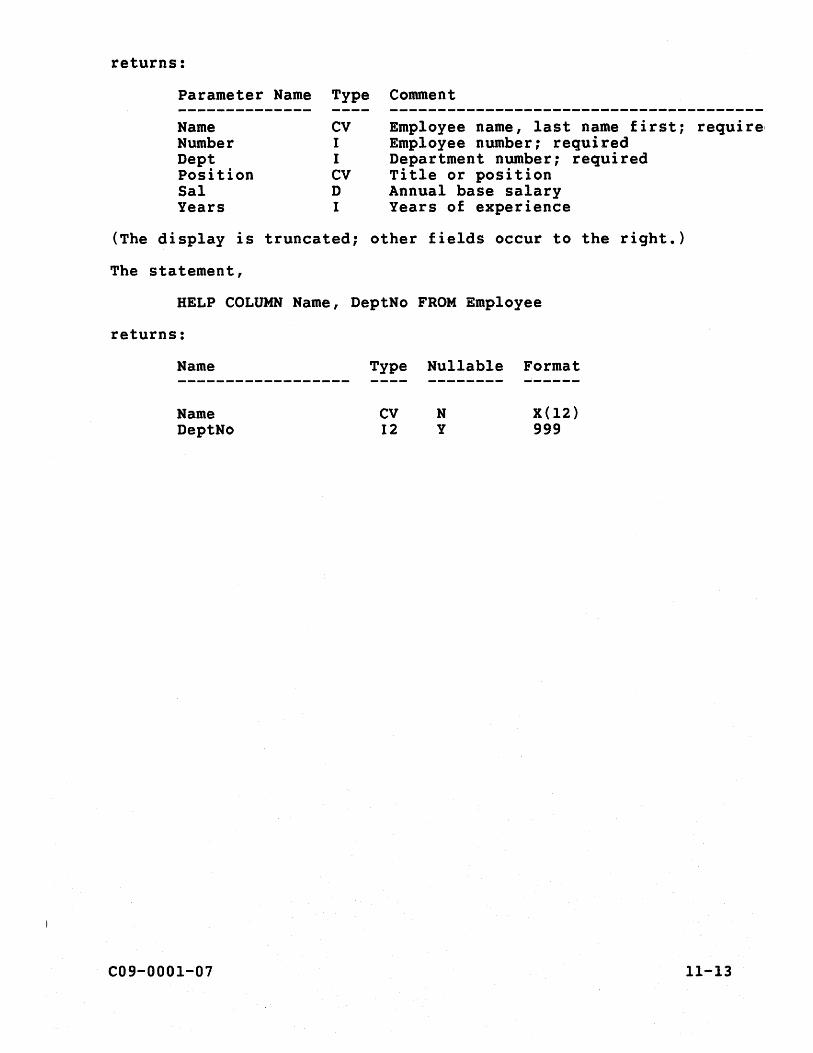
returns:
Parameter Name Type Comment
Name Number Dept position Sal Years
CV I I CV D I
Employee name, last name first; require l
Employee number; required Department number; required Title or position Annual base salary Years of experience
(The display is truncated; other fields occur to the right.)
The statement,
HELP COLUMN Name, DeptNo FROM Employee
returns:
Name
Name DeptNo
C09-0001-07
Type Nullable Format
CV 12
N Y
X(12) 999
11-13

11-14 C09-OOOI-07

APPENDIX A PERSONNEL DATA BASE
CREATE TABLE Charge., FALLBACK Tab1 .. Charges CREATE TABLE Project, FALLBACK
(EmpNo SMALlINT FORMAT '9(5)' (ProUd CHAR(8) TITLE 'Projectll Id' NOT NULL,
TITLE 'Employeelild' BETWEEN 10001 AND 32001 NOT NULl, Project
Descriplion VARCHAR(25) TITLE' Projeci Description',
ProUd CHAR (8) TITLE 'Projectll Id' NOT NULl, Employee Week RecDale DATE FORMAT 'YY/MM/DD' TITLE 'Received/IDale',
WkEnd DATE TITLE 'WeekllEnding', Id Id Ending Hours Due Dale DATE FORMAT 'YY/MMIOD' TITLE 'Due IIDale',
Hours DECIMAl(4,1) FORMAT 'ZZ9.9' BETWEEN 0.5 AND 999.5) -------- -------- -------- --- -- ComDale DATE FORMAT 'YY/MMIDD' TITLE 'Compll/Oale')
PRIMARY INDEX (EmpNo, ProUd) 10015 API-000l 83,02 18 30,5 UNIQUE PRIMARY INDEX (ProUd);
INDEX (ProUd); 10010 AR1-0002 83102 18 12.5 10001 PAY-OOOI 83; 11 18 4.5 Tablet ProJ.ct 10019 ARI-0003 83/02 04 28.0 10004 ENG-0003 83;1118 40.0 100io EOI-0001 83110, 07 10.0 Project Received Due Comp1 10003 OEI-OOOI 83:03 18 23.0 Id -Project Description Date Date Date
CREATE TABLE Employee, FALLBACK 10015 AR1-0002 83,02,25 24.0 -------- ------------------------- -------- -------- --------10001 PAY-OOOI 83:09,30 5.0
(EmpNo SMALlINT FORMAT '9(5)' BETWEEN 10001 AND 32001 NOT NULl, 10011 PAY-OOOI 83/04/15 31.0 OEI-0003 OlE Batch System 82/11/21 83/10,'27 83/10/27 Name VARCHAR (12) NOT NULl, 10016 ENG-0003 83'02,25 2.5 AP2-0002 AlP Payable Online System 82/08/09 83:04:10 83 /04110 DeplNo SMALlINT FORMAT '999' BETWEEN 100 AND 900, 10014 OE1-0001 83 l 01,21 30.5 AR1-0002 A'R RECV Onlln. System 82/08/09 83/04/10 83/04t10 _ JobTIlle VARCHAR (12), 10003 OE1-0001 83/02,25 10.5 OE2-0001 OlE Data Base Design 82/11/21 83/10/27 83/10,21 Salary DECIMAL (8,2) FORMAT 'ZZZ,ZZ9.99· BETWEEN 1.00 AND 999000.00, 10019 API-0003 83/02/11 20.5 AR1-0003 AIR RECV Batch System 82:08/09 83/04/10 83,04/20 YrsExp BYTEINT FORMAT 'Z9' BETWEEN -99 AND 99, 10016 ENG-0002 83/01/14 32.0 AR2-0001 AIR RECV Data Base Design 82/08/09 83/04/10 83/04110 OOB DATE FORMAT 'MMMbDDbYYYY' NOT NULl, 10017 PAY-OOOI 83/08 / 26 33.0 AR2-0002 A;R RECV 00110. Systell 82/08/09 83/04/10 83:04' 10 Sex CHAR(1) UPPERCASE NOT NULL, 10014 OEI-000l 83/01128 30.0 AP2-0001 AiP Payable DB Design 82/08/09 83/04/10 83/04/10
Race CHAR(l) UPPERCASE, 10010 API-0002 83/02.'18 10.0 AP2-0003 AlP Payabl. Batch System 82/08/09 83/04/10 83/04/10
MSlat CHAR(1) UPPERCASE, 10016 ENG-0002 83/0520 32.0 PAY-0002 Payroll .ile laint.oanc. 83/01/01 83/12/31 84/01/31
Edlev BYTEINT FORMAT 'Z9' BETWEEN 0 AND 22 NOT NUll, 10001 PAY-0002 83/10 21 34.5 OE2-0003 O'E Batch System 82111/21 83110/21 83'11115
HCap BYTEINT FORMAT 'Z9' BETWEEN -99 AND 99) 10004 ENG-0002 83/07 29 53.0 ENG-0002 Design 'idg.t Pwr Supply 78/01/02 79/07/19 78/08/08
UNIQUE PRIMARY INDEX (EmpNo) 10014 OEI-0002 83:01 'H 20.0 AP1-0001 A'P Payab1. DB Deslgn 82/08/09 83/04/10 83/04/10
INDEX (Name); 10002 OEI-0001 83/04'15 33.5 ENG-0003 Deslgo 'idg.t 'rame 18/01/02 80/10/21 81:05/05 10002 OEI-OOOI 83/03 11 12.0 API-0003 A'P Payable Batch System 82108/09 83/04/10 83/04/21
OEI-0001 OlE Data Bas. D.sigo 82/11/21 83/10/21 83110121 OEI-0002 OlE Onlln. System 82/11/21 83/10/21 83/10/21 API-0002 AlP Payable 0011n. System 82/08/09 83/04/10 83 /04/21 ARI-0001 AIR RECV Data Bas. D.slgo 82/08/09 83/04/10 83/04/21 PAY-OOOI Payroll Syst •• Data Eotry 83/01101 83112/31 84/01/10
Tabl •• Employ .. AR2-0003 AIR RECV Batch SYlt •• 82/08/09 83/04/10 83/04/10 OE2-0002 OlE Online System 82/11/21 83/10/21 83/11110 ENG-0004 Assemble Aod T.st .idget 81/04/10 81110/21 81/10/26
EmpNo Name DeptNo JobTltle Salary YrsExp DOB Sex Race IIStat EdLev HCap ENG-OOOI Deslgo Widg.t Boards 18/01/02 18/12/31 18/12/06
----- ------------ ------ ------------ ---------- ------ ----------- --- ---- ----- ----- ----
10019 Newman P 600 Test Tech 28,600.00 6 Aug 29 1956 .r C II 12 0 10011 Chin II 100 Controller 38,000.00 11 Nov 29 1955 r A II 16 0
CREATE TABLE Department, FALLBACK
10007 A~ul1ar J 600 lIanager 45,000.00 11 Jul 09 1949 II S II 16 0 (DeplNo SMAlUNT FORMAT '999' BETWEEN 100 AND 900 NOT NULl,
10018 Russell S 300 President 65,000.00 25 Juo 05 1932 II B D 16 0 DeptName VARCHAR(14),
10022 Clements 0 700 Salesperson 38,000.00 9 Aug 23 1944 II C II 16 0 Loc CHAR(3),
10006 Kemper R 600 AsselDbler 29,000.00 1 Sep 12 1947 II C II 12 0 MgrNo SMALLINT FORMAT '9(5)' BETWEEN 10001 AND 32001 NOT NULL) 10014 Ing11s C 500 Tech Wrl ter 34,000.00 5 liar 07 1938 II C S 16 0 UNIQUE PRIMARY INDEX (DepINo); 10003 Leidner P 300 Secretary 23,000.00 13 Jul 12 1948 r C II 16 0 10021 Smi th T 700 lIanager 45,000.00 10 Jul 29 1946 r B S 16 0 10012 Watson L 500 Vlce Pres 56,000.00 8 Oct 03 1943 II C S 20 0 10004 Smith T 500 Engineer 42,000.00 10 Oct 31 1951 II C II 18 0 Tabl .. D.partm.ot 10016 Carter J 500 Engineer 44,000.00 20 liar 12 1935 II C II 20 0 10008 Phan A 300 Vice Pres .55,000.00 12 Jun 07 1947 r A II 18 0 10013 Regan R 600 Purchaser 44,000.00 '0 Oct 20 1948 F C II 16 0 DeptNo Department Loc IIgrNo
I
10011 Greene W 100 Payroll Ck 32,500.00 15 Nov 27 1955 II N II 16 0 ----- -------------- --- -----10009 lIarston A 500 Secretary 22,000.00 12 Jun 01 1947 r A II 18 0 10002 lIottit H 100 Recrui ter 35,000.00 3 Nov 16 1945 F B W 18 0 100 Administration NYC 10011 10010 Reed C 500 Technician 30,000,00 4 Apr 08 1949 II C D 16 0 600 lIanutactur ing CHI 10001 10015 Omura H 500 Programmer 40,000.00 8 Apr 24 1954 II A S 16 0 500 Engineering ArL 10012 10020 Brange 1 B 700 Salesperson 30,000.00 5 Oct 15 1947 P C S 16 0 300 Exec Ottic. NYC 10018 10001 Peterson J 100 Payroll Ck 25,000.00 5 liar 27 1942 II C II 12 0 700 lIarketlng NYC 10021
ft ____ L. __ 41ft8 ..

APPENDIX B SYNTAX SUMMARY
This appendix summarizes the syntax of:
• DBC/SQL statements
• DBC/SQL statement modifiers
• ITEQ commands
• BTEQ commands
• Data Dictionary/Directory views
The notation here is as elsewhere:
• Uppercase characters indicate keywords.
• Italic characters indicate that a value or name is to be substituted' in their place.
• Underscores indicate the default value.
• Special characters, including blanks, are required as shown unless specifi~d otherwise.
• Braces indicate a choice; one of the options within the braces must be entered.
• Brackets indicate an optional entry.
• Horizontal ellipses indicate a phrase that can be repeated.
• Vertical ellipses indicate omitted portions in the statement or command.
C09-OOOl-07 B-1
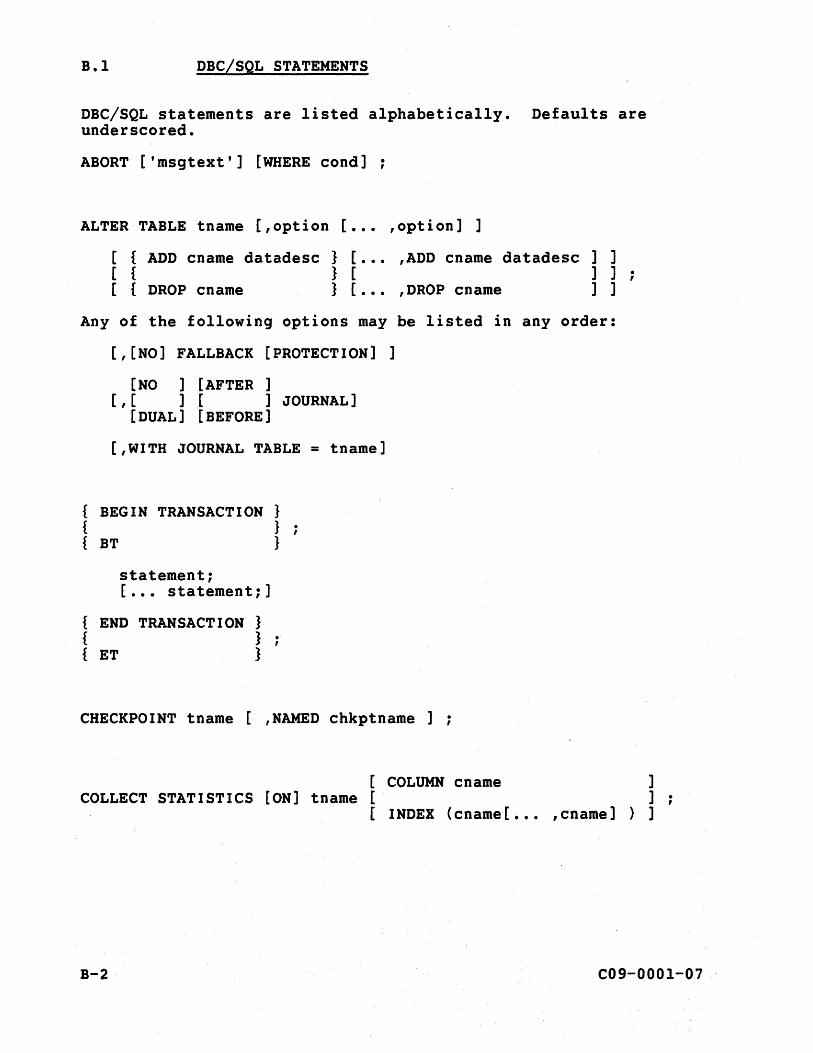
B.l DBC/SQL STATEMENTS
DBC/SQL statements are listed alphabetically. Defaults are underscored.
ABORT ['msgtext'] [WHERE cond] :
ALTER TABLE tname [,option [ ••• ,option] ]
[ { ADD cname datadesc } [ . . . ,ADD cname datadesc ] ] [ { } [ ] ] . , [ { DROP cname } [ . . . ,DROP cname ] ]
Any of the following options may be listed in any order:
[,[NO] FALLBACK [PROTECTION] ]
[NO ] [AFTER ] [ , [ ] [ ] JOURNAL]
[ DUAL] [ BEFORE]
[,WITH JOURNAL TABLE = tname]
{ BEGIN TRANSACTION } { } { BT }
statement; [ ••• statement;]
{ END TRANSACTION } { } { ET }
CHECKPOINT tname [ ,NAMED chkptname ] :
[ COLUMN cname ] COLLECT STATISTICS [ON] tname [ ] :
[ INDEX (cname [ • •• , cname] ) ]
B-2 C09-OOOl-07
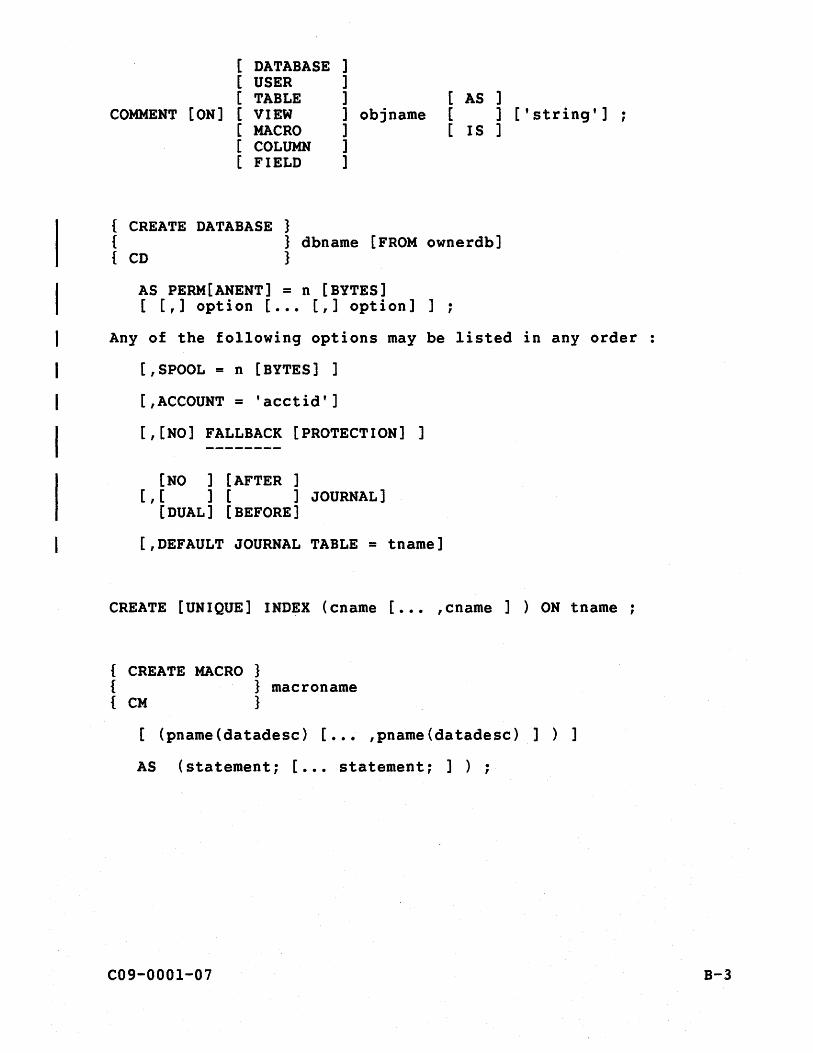
[ DATABASE ] [ USER ] [ TABLE ] [ AS ]
COMMENT [ON] [ VIEW ] objname [ ] ['string'] [ MACRO ] [ IS ] [ COLUMN ] [ FIELD ]
{ CREATE DATABASE } { } dbname [FROM ownerdb] { CD }
AS PERM[ANENT] = n [BYTES] [ [,] option [ ••• [,] option] ] ;
Any of the following options may be listed in any order
[,SPOOL = n [BYTES] ]
[,ACCOUNT = 'aeetid']
[,[NO] FALLBACK [PROTECTION] ]
[NO ] [AFTER ] [,[ ] [ ] JOURNAL]
[DUAL] [BEFORE]
[,DEFAULT JOURNAL TABLE = tname]
CREATE [UNIQUE] INDEX (ename [ ••• ,ename ] ) ON tname
{ CREATE MACRO } { } maeroname { CM }
[ (pname(datadese) [ ••• ,pname(datadese) ] ) ]
AS (statement; [ ••• statement; ] ) ;
C09-000l-07 B-3
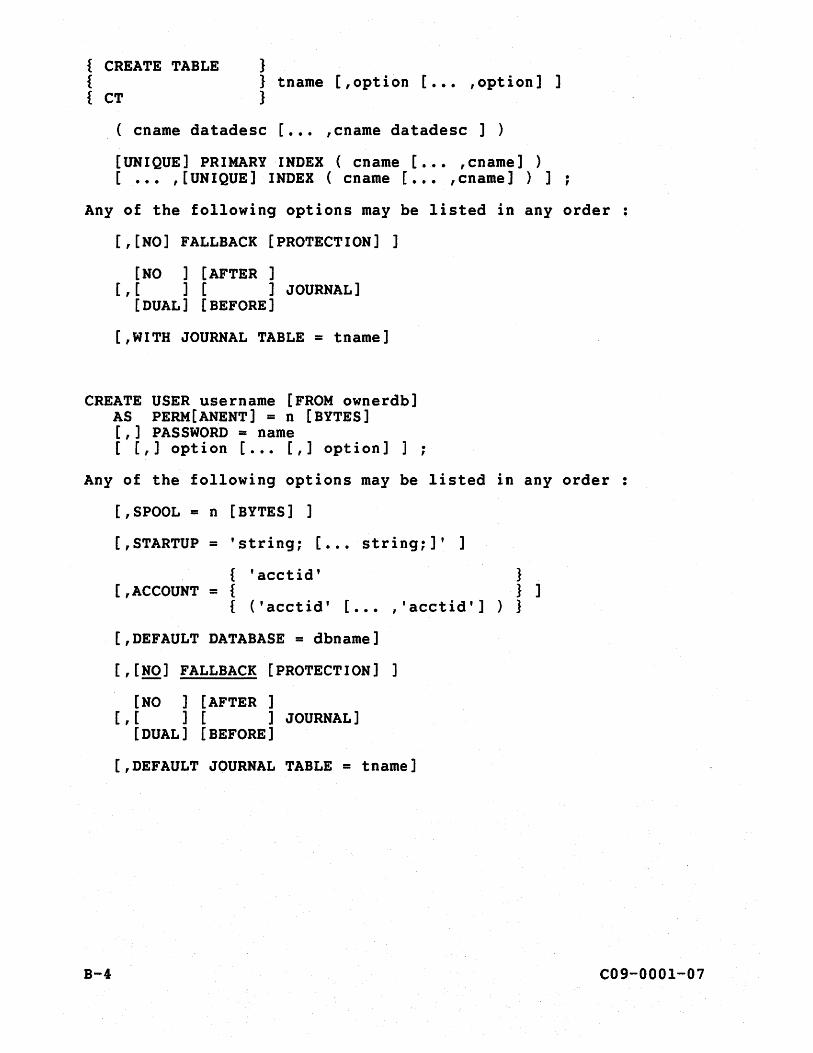
} { CREATE TABLE { { CT
} tname [,option [ ••• ,option] ] }
( ename datadese [ ••• ,ename datadese ] )
[UNIQUE] PRIMARY INDEX ( cname [ ••• ,enamel ) [ ••• , [UNIQUE] INDEX ( cname [... , ename] ) ] ;
Any of the following options may be listed in any order
[,[NO] FALLBACK [PROTECTION] ]
[NO ] [AFTER ] [ , [ ] [ ] JOURNAL]
[DUAL] [BEFORE]
[,WITH JOURNAL TABLE = tname]
CREATE USER username [FROM ownerdb] AS PERM[ANENT] = n [BYTES] [,] PASSWORD = name [ [,] opt i on [... [,] opt i on] ] ;
Any of the following options may be listed
[,SPOOL = n [BYTES] ]
[,STARTUP = 'string; [ . . . string; ] , ]
{ 'acctid' [ ,ACCOUNT = {
{ ( 'acetid' [ ... , 'acctid' ]
[,DEFAULT DATABASE = dbname]
[,[NO] FALLBACK [PROTECTION] ]
[NO ] [AFTER ] [ , [ ] [ ] JOURNAL]
[DUAL] [BEFORE]
[,DEFAULT JOURNAL TABLE = tname]
in any order
} } ]
) }
. .
B-4 C09-OOOl-07
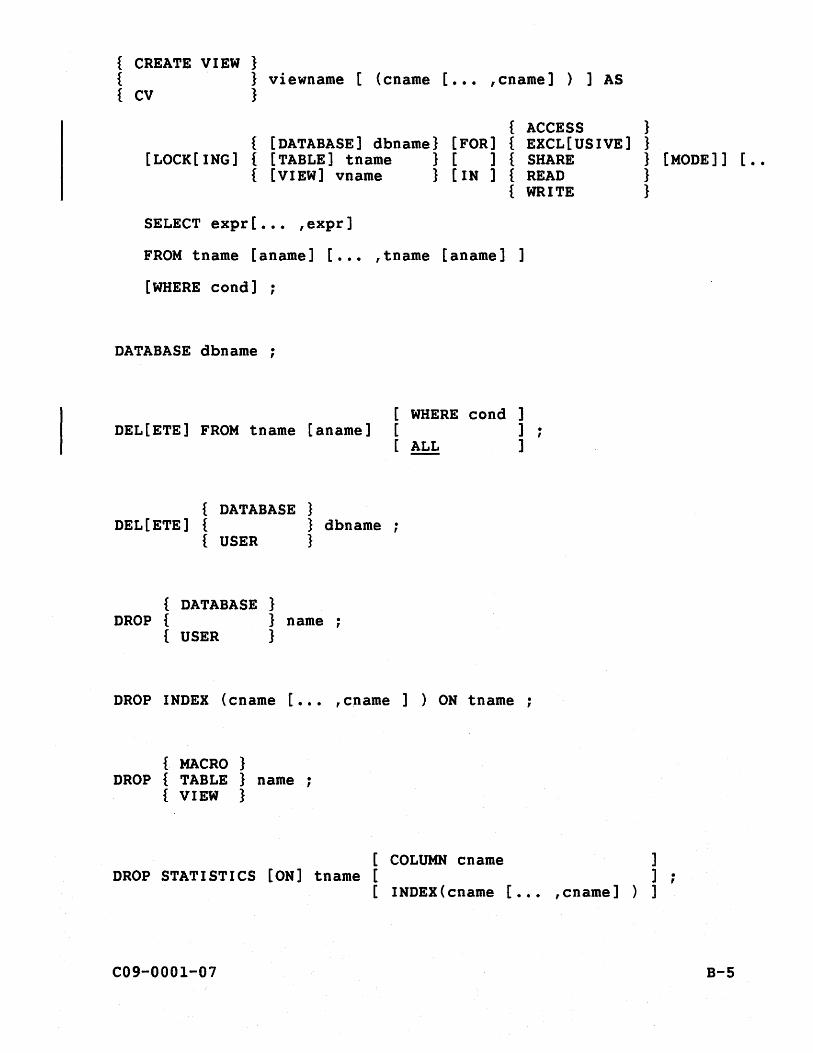
{ CREATE VIEW } { } viewname [ (ename [ ••• ,enamel ) ] AS { cv }
{ ACCESS } { [DATABASE] dbname} [FOR] { EXCL[USIVE] }
[LOCK[ING] { [TABLE] tname } [ ] { SHARE } [MODE]] [ •• { [VIEW] vname } [IN] { READ }
{ WRITE }
SELECT expr[ •.• ,expr]
FROM tname [aname] [ ••• ,tname [aname] ]
[WHERE eond] ;
DATABASE dbname ;
[ WHERE eond ] DEL[ETE] FROM tname [aname] [ ]
[ ALL ]
{ DATABASE } DEL[ETE] { } dbname
{ USER }
{ DATABASE } DROP { } name
{ USER }
DROP INDEX (ename [ ••• ,ename ] ) ON tname
{ MACRO } DROP { TABLE } name ;
{VIEW }
[ COLUMN enarne ] DROP STATISTICS [ON] tname [ ] ;
[ INDEX ( en arne [ •. 0 , en ame ] ) ]
C09-0001-07 B-5
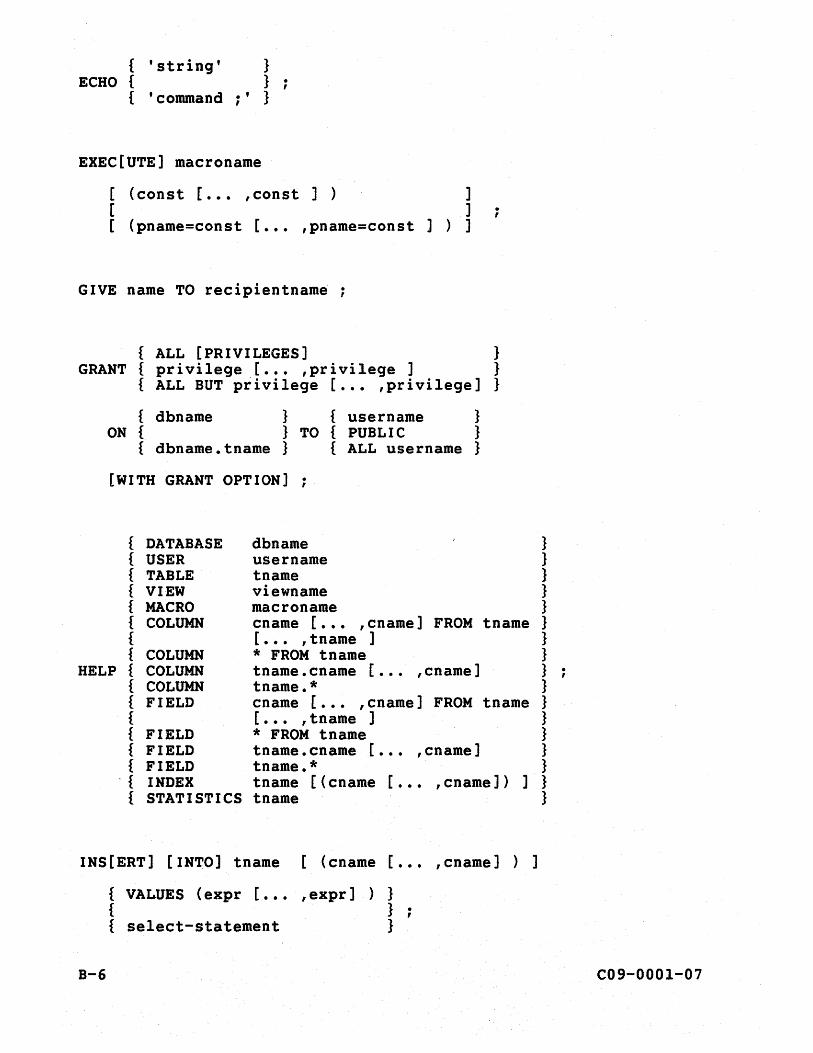
{ ECHO {
{
'string' } }
'command ;' }
EXEC[UTE] macroname
[ (const [ ••• ,eonst ] ) ] [ ] [ (pname=eonst [ ••• ,pname=eonst ] ) ]
GIVE name TO reeipientname
{ ALL [PRIVILEGES] GRANT { privilege [ . . . ,privilege ]
{ ALL BUT privilege [ . . . ,privilege]
{ dbname } { username } ON { } TO { PUBLIC }
{ dbname.tname } { ALL username }
[WITH GRANT OPTION] . ,
{ DATABASE dbname { USER username { TABLE tname { VIEW viewname { MACRO maeroname
. ,
} } }
{ COLUMN ename [ ••• ,enamel FROM tname { [ ... ,tname ] { COLUMN * FROM tname
HELP { COLUMN tname.cname [ . . . ,ename] { COLUMN tname.* { FIELD ename [ . . . ,enamel FROM tname { [ ... ,tname ] { FIELD * FROM tname { FIELD tname.cname [ . . . ,ename] { FIELD tname.*
. { INDEX tname [(ename [ . . . ,enamel) ] { STATISTICS tname
INS[ERT] [INTO) tname [ (cname [ .•• ,enamel ) ]
{ VALUES (expr [... , expr ) ) } { } ; { select-statement }
B-6
} } } } } } } } } } } } } } } } }
C09-OOOl-07
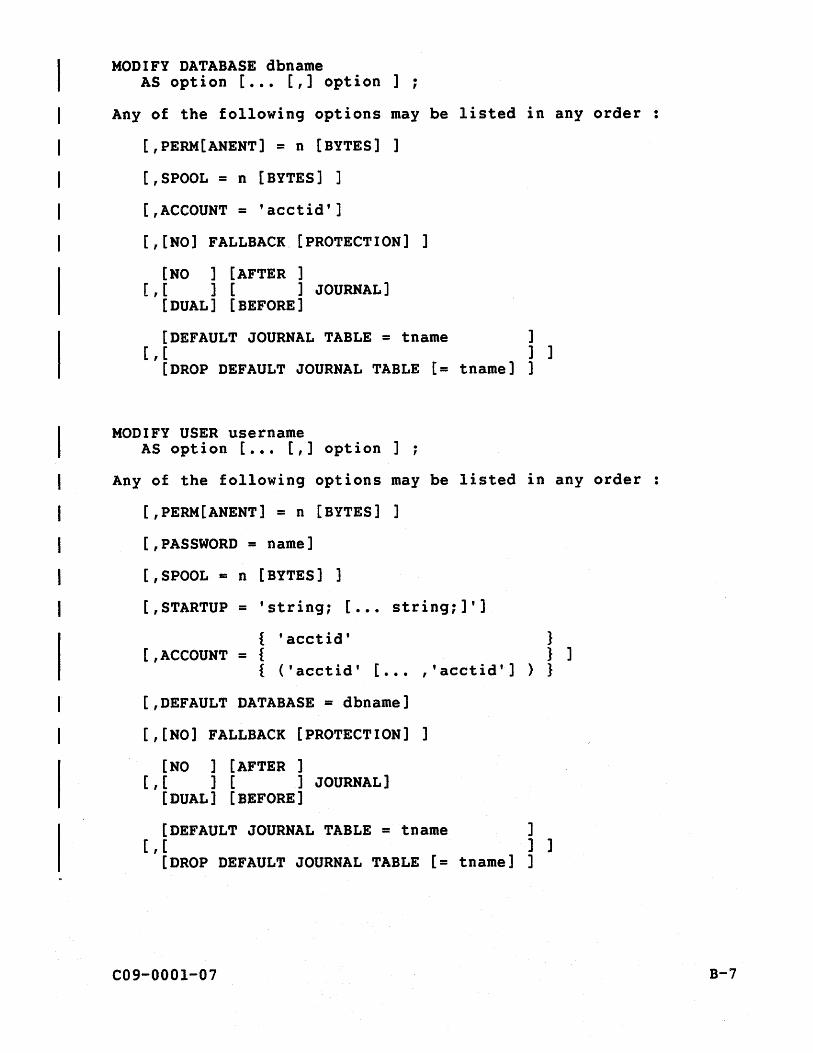
MODIFY DATABASE dbname AS option [ ••• [,] option] ;
Any of the following options may be listed in any order
[,PERM[ANENT] = n [BYTES] ]
[,SPOOL = n [BYTES] ]
[,ACCOUNT = 'acctid']
[,[NO] FALLBACK. [PROTECTION] ]
[NO ] [AFTER ] [ , [ ] [ ] JOURNAL]
[DUAL] [BEFORE]
[DEFAULT JOURNAL TABLE = tname ] [ , [ ] ]
[DROP DEFAULT JOURNAL TABLE [= tname] ]
MODIFY USER username AS option [ ••. [,] option] ;
Any of the following options may be listed in any order :
[,PERM[ANENT] = n [BYTES] ]
[,PASSWORD = name]
[,SPOOL = n [BYTES] ]
[,STARTUP = 'string; [ ••• string;]']
{ 'acctid' [ , ACCOUNT = {
} } ]
{ (' acct id' [ ••• , , acct id '] ) }
[,DEFAULT DATABASE = dbname]
[,[NO] FALLBACK [PROTECTION] ]
[NO ] [AFTER ] [ , [ ] [ ] JOURNAL]
[DUAL] [BEFORE]
[DEFAULT JOURNAL TABLE = tname ] [ , [ ] ]
[DROP DEFAULT JOURNAL TABLE [= tname] ]
C09-OOOI-07 B-7
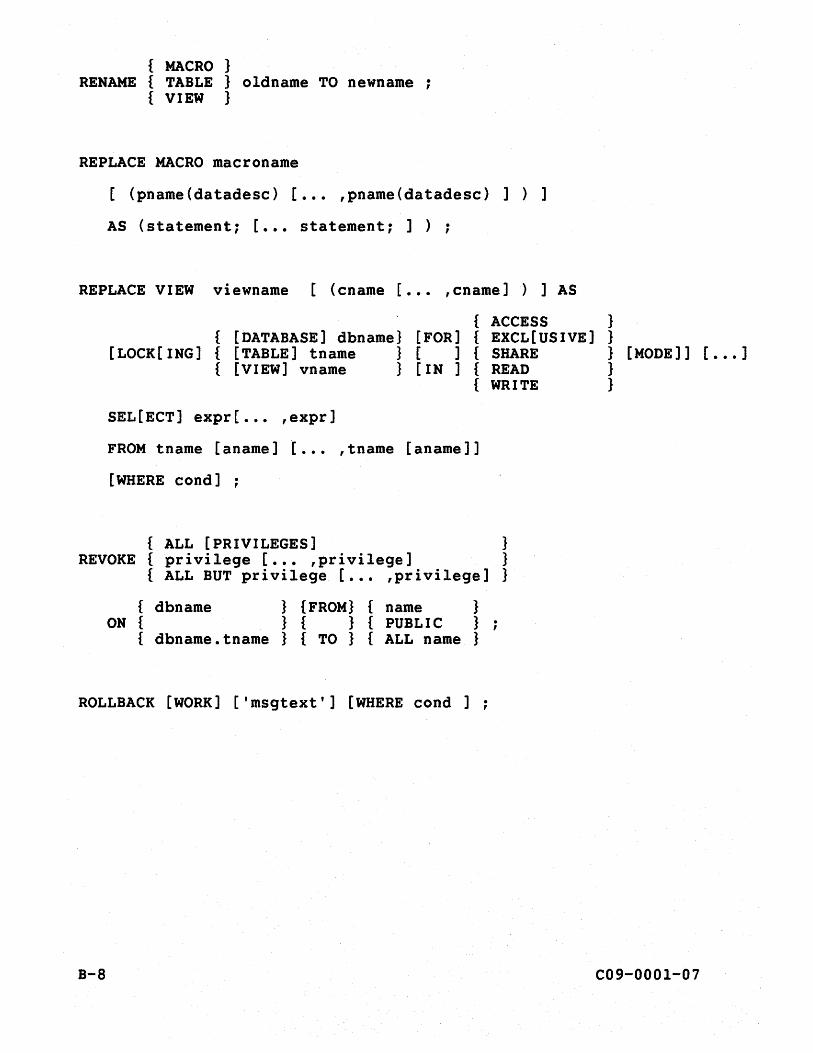
{ MACRO } RENAME { TABLE } oldname TO newname ;
{VIEW }
REPLACE MACRO macroname
[ (pname{datadesc) [ ••• ,pname(datadese) ] ) ]
AS (statement; [ ••• statement; ] ) ;
REPLACE VIEW viewname [(cname [ ••• ,enamel ) ] AS
{ ACCESS } { [DATABASE] dbname} [FOR] { EXCL[USIVE] }
[LOCK[ING] { [TABLE] tname } [ ] { SHARE } [MODE]] [ ••• ] { [VIEW] vname } [IN] { READ }
{ WRITE }
SEL [ ECT ] expr [ • •• , expr ]
FROM tname [aname] [ .•• ,tname [aname]]
[WHERE cond] ;
{ ALL [PRIVILEGES] } REVOKE { privilege [ ••• ,privilege] }
{ ALL BUT privilege [ ••• ,privilege] }
{ dbname } {FROM} { name } ON { } { } { PUBLIC } ;
{ dbname.tname } { TO } { ALL name }
ROLLBACK [WORK] ['msgtext'] [WHERE cond ] ;
B-8 C09-OOOl-O?
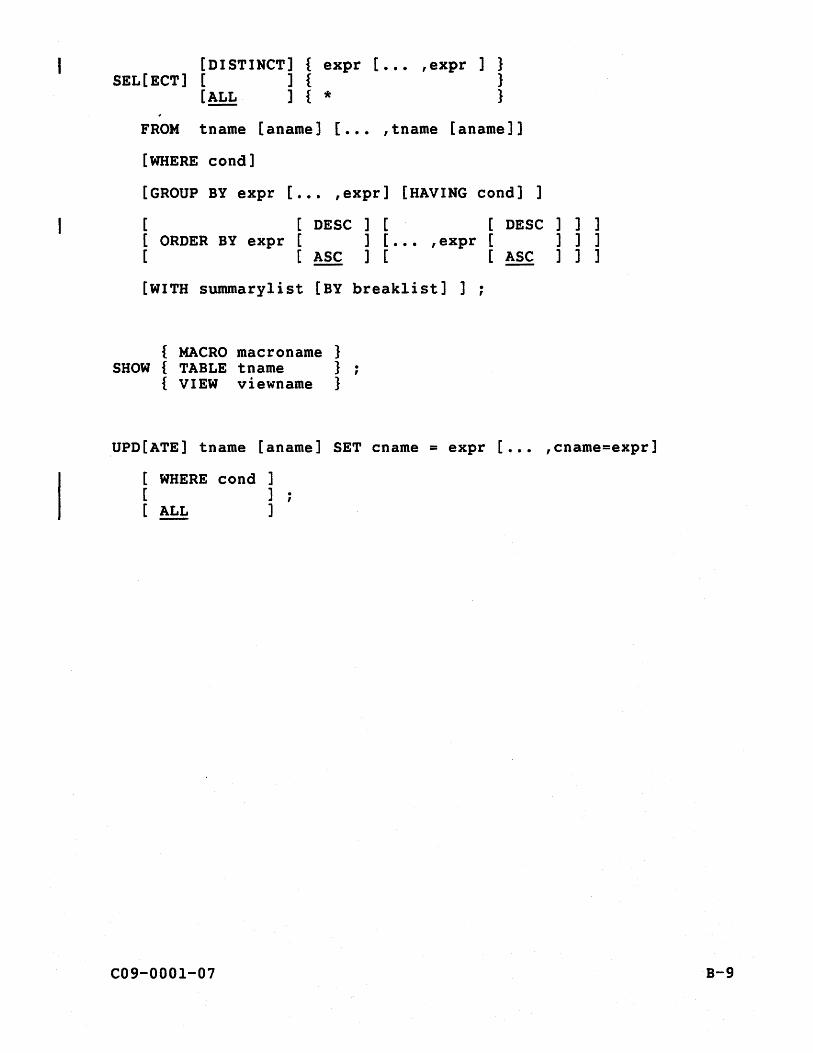
[DISTINCT] { expr [ ••• ,expr ] } SEL[ECT] [ ] { }
[ALL ] { * }
FROM tname [aname] [ ••• ,tname [aname]]
[WHERE cond]
[GROUP BY expr [ ••. ,expr] [HAVING cond] ]
[ [ DESC ] [ [ DESC ] ] ] [ ORDER BY expr [ ] [... ,expr [ ] ] ] [ [ASC ] [ [ASC ]]]
[WITH summarylist [BY breaklist] J ;
{ MACRO macroname } SHOW { TABLE tname }
{VIEW viewname }
UPD[ATE] tname [aname] SET cname = expr [ ••• ,cname=expr]
[ WHERE cond ] [ ] [ ALL ]
C09-0001-07 B-9
B.2 DBC/SQL MODIFIERS
DBC/SQL modifiers are listed alphabetically. These modifiers can be used with any DBC/SQL statement.
EXPLAIN statement ;
{ ACCESS } { [DATABASE] dbname } [FOR] { EXCL[USIVE] }
LOCK[ING] { [TABLE] tname } [ ] { SHARE } [MODE] { [VIEW] vname } [IN] { READ }
{ WRITE } [ statement ] ;
USING name (datadesc) [ .•. ,name (datadesc) ]
statement ;
B-lO C09-000l-07
B.3 ITEQ COMMANDS
ITEQ commands are listed alphabetically. Defaults are underscored.
ABORT ;
ADD ;
{ { BACKWARD [ * ]}} { { [ SKIP ] } } {{ [ n ]}}; { { BWD [1] } } { BWDS }
CAN[CEL]
CLEAR INPUT
[ n ] DO [·WN] [ ];
[ 3 ]
FILE [name] ;
{ {FORWARD [ SKIP ] } } {{ [ n ]}}; { {FWD [1] } } { FWDS }
INPUT ;
JOIN ;
C09-0001-07 B-11
[n ] LE[FT] [ ];
[ 52 ]
LOGOFF ;
LOG[ON] [tdpid/] username [,password [,'acctid'] ;
PRINT [name]
QUIT ;
RECALL
{ REMARK } { } 'string' {RMK }
REM[OVE] ;
[n ] RI [GHT] [ ]
[ 52 ]
{ [SET] DEFAULTS } { } ; { SD }
{ [ON ]} { [SET] FORMAT [ ] } { [ OFF ] } ; { SFO } { SFF }
B-12 C09-0001-07
{ [SET] INPUTAREA SIZE [ n ] } { [ ]}; { SIS [ 3 ] }
{ [SET] NULL [AS] } { } 'string' { SNA }
{ [SET] PAGE LENGTH [n ]} { [ ]}; { SPL [ 55 ] }
[SET] PFn 'command;'
{ [SET] RTITLE } { } 'string' { SRT }
{ [ON ]} { [SET] SUPPRESS [ ] } { [ OFF] } [ n [, { SSF } [ { SSO } [ ALL
{ [SET] WIDTH [ n ] } { [ ]} { SW [132] }
SHO[W]
{ SHOW CONTROL J { } { SC }
C09-OOOl-07
n, n, .••• ] ] ] ]
B-13
{ { { SHOW { { { { { SM { SV { 'ST
SPLIT ;
SUB [MIT]
[ n ] UP [ ]
[ 3 ]
B-14
MACRO } } VIEW } } TABLE } }
} objname . , } } }
C09-000l-07
B.4 BTEQ COMMANDS
BTEQ commands are listed alphabetically. Defaults are underscored.
[ ems-command ] .eMS [ ]
[ SUBSET ]
{ DATA DDNAME=ddname [,LIMIT=n] } { INDICDATA DDNAME=ddname [,LIMIT=n] }
.EXPORT { REPORT DDNAME=ddname [,LIMIT=n] } { DIF [DATALABELS] DDNAME=ddname } { RESET }
= [ n ]
.GOTO 1abe1name
.HANG n
.HELP BTEQ
{ ERROR CODE } .IF { } operator n THEN command
{ ACTIVITYCOUNT }
{ DATA } .IMPORT { } DDNAME=ddname [,SKIP=n]
{ INDICDATA }
.LABEL labelname
• LOGOFF
C09-000l-07 B-15
·LOGON [tdpid/] username [,password [,'acctid'] ]
{ .QUIT } [ n ] { .EXIT } [ ERRORCODE ]
.REMARK 'string [//string//string],
[n] .REPEAT [*]
.RUN DDNAME=ddname [,SKIP=n]
.[SET] DEFAULTS
[ OFF ] .[SET] ECHOREQ [ ]
[ON ]
[ OFF ] [ n [, n , .[SET] FOLDLINE [ ] [
[ON ] [ ALL
.[SET] FOOTING 'string'
[ OFF ] • [SET ] FORMAT [ ]
[ON ]
.[SET] HEADING 'string'
[ OFF] .[SET] INDICDATA [ ]
[ ON ]
B-16
n, ••• ] ] ] ]
C09-OOOl-07
·[SET] NULL [AS] 'string'
[ OFF ] [ n [, n • [ SET] OMI T [ ] [
[ON ] [ ALL
,n ••• ] ] ] ]
[ OFF ] [ n [, n .[SET] PAGEBREAK [ ] [
[ON ] [ ALL
.[SET] PAGELENGTH n
[ OFF ] .[SET] QUIET [ ]
[ON ]
[ OFF ] .[SET] RECORDMORE [ ]
[ON ]
.[SET] RETLIMIT n
[ OFF ] .[SET] RETRY [ ]
[ON ]
.[SET] RTITLE 'string'
[ .[SET] SEPARATOR [
[
'string' ] ]
n ]
.[SET] SESSIONS n
C09-OOOl-O?
,n ••• ] ] ] ]
B-1?
[ OFF ] .[SET] SIDETITLES [ ] [withnumber]
[ON ]
[ OFF ] [ n [, n , n ••• ] ] ] ]
.[SET] SKIPDOUBLE [ ] [ [ON ] [ ALL
[ OFF ] [ n [, n .[SET] SKIPLINE [ ] [
[ON ] [ ALL
[ OFF ] [ n [, n .[SET] SUPPRESS [ ] [
[ON ] [ ALL
[ OFF ]
, n ••• ] ] ] ]
, n ••• ] ] ] ]
.[SET] TITLEDASHES [ ] [ n[,n ,n ••• ] ] [~ ]
[ OFF ] .[SET] TRANSLATE [ ]
[ON ]
[ OFF ] [ n [, n .[SET] UNDERLINE [ ] [
[ON ] [ ALL
.[SET] WIDTH n
.SHOW CONTROL[S]
.SHOW VERSION
.TDP TDPn
B-18
, n ••• ] ] ] ]
C09-0001-07

.TDP nn[nnnnnn] (optional form for VM users only)
.TSO string
C09-0001-07 B-19
B.5 DATA DICTIONARY/DIRECTORY VIEW FORMATS
Data Dictionary/Directory view formats are listed alphabetically.
DBC.AccountInfo {[ UserName, AccountName ] } ;
{ [ UserName, DataBaseName, TableName, ] } DBC.AllRights {[ ] }
{ [AccessRight, GrantorName ] }
{ [ AMP, DataBaseName, AccountName, ] } DBC.AllSpace {[ TableName, MaxPerm, MaxSpool, ]};
{ [ CurrentPerm, CurrentSpool, ] } { [ PeakPerm, PeakSpool ] }
DBC.AMPusage { [ AccountName, UserName, CPUTime, DiskIO ] } ;
DBC.Children {[ Child, Parent ]}
{ [ DataBaseName, TableName, ColumnName, { [ ColumnFormat, ColumnTitle, ColumnType,
DBC.Columns { [ ColumnLength, DefaultValue, RangeLow, { [ RangeHi, Nullable, Commentstring, . { [ DecimalTotalDigits, DecimalFractionalDigits, { [ ColumnId, UppercaseFlag
{ [ DataBaseName, CreatorName, OwnerName, ] } DBC.DataBases {[ ProtectionType, JournalFlag, ] } ;
{ [ PermSpace, CommentString ] }
DBC.DeleteSecurityLog {[ LogDate, LogTime ] } ;
{ [ AMP, DataBaseName, AccountName, ]} DBC.DiskSpace {[ MaxPerm, MaxSpool, CurrentPerm, ]};
{ [ CurrentSpool, PeakPerm, PeakSpool ] }
] } ] } ] } ] } ] } ] }
B-20 C09-000l-0?
. ,
{ [ ErrDate, ErrTime, Processor, DBC.ErrorLog { [
{ [ Event, LineNumber, Text, Message
] } ] } ; ] }
DBC.ErrorMsgs {[ Errorcode, ErrorText ] }
{ [ CreateDate, CreateTime, EventNum, ] { [ EventType, UserName, ] { [ DataBaseName, ObjectType, ] { [ AllAMPsFlag, RestartSeqNum, ]
DBC.Events { [ OperationlnProcess, TableName, ] { [ CheckpointName, LinkingEventNum, ] { [ DataSetName, LockMode, ] { [ JournalUsed, JournalSaved, ] { [ IndexPresent, DupeDumpSet ]
{ [ CreateDate, CreateTime, { [ EventNum, EventType,
DBC.Events_Configuration { [ UserName, LogProcessor, { [
DBC.Events_Media
PhyProcessor, { [ ProcessorState, { [ RestartSeqNum
{ [ CreateDate, CreateTime, { [ EventNum, EventType, { [ UserName, DataSetName, { [ VolSerialNo, DupeDumpSet, { [ VolSequenceNum
] } ] } ] } ; ] } ] }
} } } } } } } } }
] } ] } ] } ] } ] } ] }
DBC.lndices { [ DataBaseName, TableName, IndexNumber, { [ IndexType, UniqueFlag, ColumnName,
] } ] } ; ] } { [ ColumnPosition
{ [ Tables_DB, TableName, ]} DBC.Journals { [ ] } ;
DBC.LogOn9ff
C09-000l-07
{ [ Journals_DB, JournalName] }
{ [ LogDate, LogTime, UserName, { [ { [ AccountName, Event, LogicalHostld
] } ] } ; ] }
B-2l


] } DBC.ResUseview
{ [ TheDate, TheTime, Number, Proc, { [ { [ Secs, Hits, Cpu, Disk, Host, Chan
] } ; ] }
{ [ LogDate, LogTime, LogType, ]} DBC.SecurityLog { [ UserName, AccountName, ] } ;
{ [ ObjectName, TableName, Text ] }
{ [ UserName, AccountName, SessionNo, ] } DBC.Sessionlnfo {[ ] }
{ [ DefaultDataBase, Partition ] }
{ [ DataBaseName, TableName, TableKind, ] } DBC.Tables {[ ProtectionType, JournalFlag, CreatorName, ] }
{ [ RequestText, CommentString ] }
{ [ AMP, DataBaseName, AccountName, ]} DBC.TableSize {[ ] } ;
{ [ TableName, CurrentPerm, PeakPerm ] }
{ [ DataBaseName, TableName, ] } DBC.UserGrantedRights {[ Grantee, AccessRight, ]};
{ [ AllnessFlag ] }
{ [ DataBaseName, TableName, ] } DBC.UserRights {[ ] }
{ [ AccessRight, GrantorName ] }
{ [ UserName, CreatorName, ] } { [ PasswordLastModDate, ] } { [ PasswordLastModTime, Ownername, ] }
DBC.Users { [ PermSpace, SpoolSpace, protectionType, ] } . , { [ JournalFlag, StartUpString, ] } { [ DefaultAccount, DefaultDataBase, . ] } { [ CommentString ] }
B-22 C09-OOOI-07
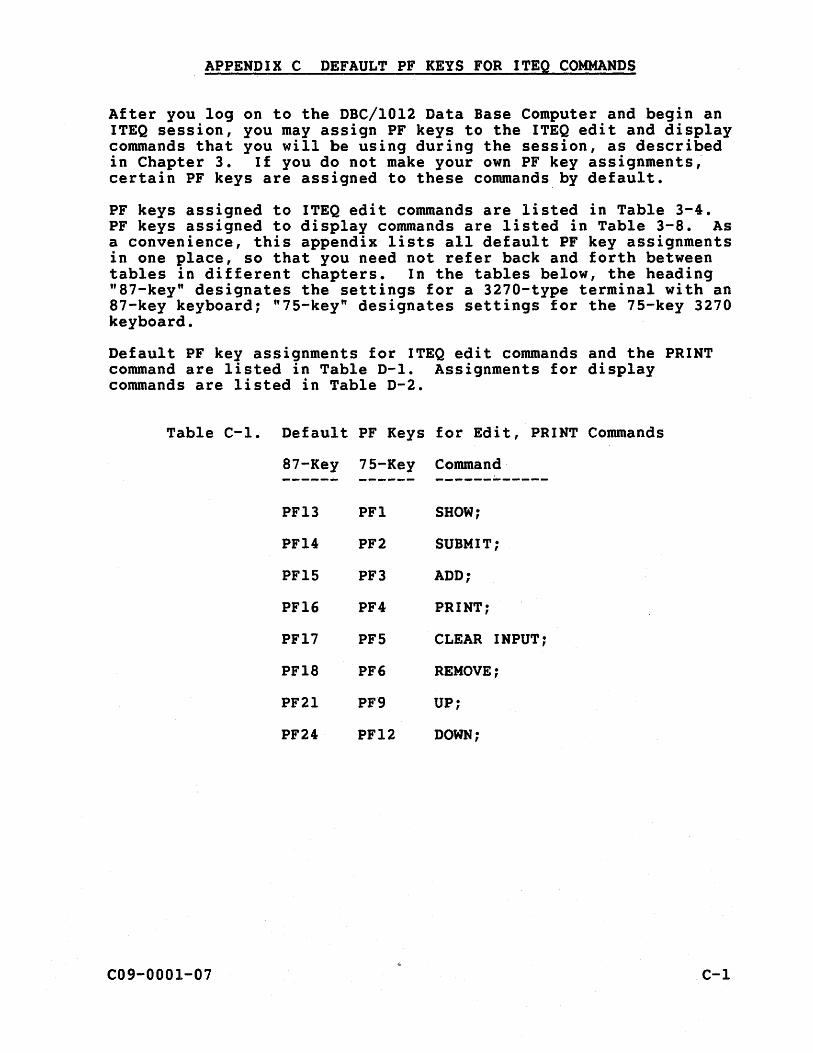
APPENDIX C DEFAULT PF KEYS FOR ITEQ COMMANDS
After you log on to the DBC/1012 Data Base Computer and begin an ITEQ session, you may assign PF keys to the ITEQ edit and display commands that you will be using during the session, as described in Chapter 3. I f you do not make your own PF key assignments ,. certain PF keys are assigned to these commands by default.
PF keys assigned to ITEQ edit commands are listed in Table 3-4. PF keys assigned to display commands are listed in Table 3-8. As a convenience, this appendix lists all default PF key assignments in one place, so that you need not refer back and forth between tables in different chapters. In the tables below, the heading "87-key" designates the settings for a 3270-type terminal with an 87-key keyboard~ "75-key" designates settings for the 75-key 3270 keyboard.
Default PF key assignments for ITEQ edit commands and the PRINT command are listed in Table D-l. Assignments for display commands are listed in Table D-2.
Table C-l. Default PF Keys for Edit, PRINT Commands
87-Key 75-Key Command ------ ------ ------~------
PF13 PFI SHOW~
PFl4 PF2 SUBMIT~
PFl5 PF3 ADD;
PFl6 PF4 PRINT~
PFl7 PF5 CLEAR INPUT~
PF18 PF6 REMOVE~
PF21 PF9 UP~
PF24 PF12 DOWN;
C09-000l-07 C-l
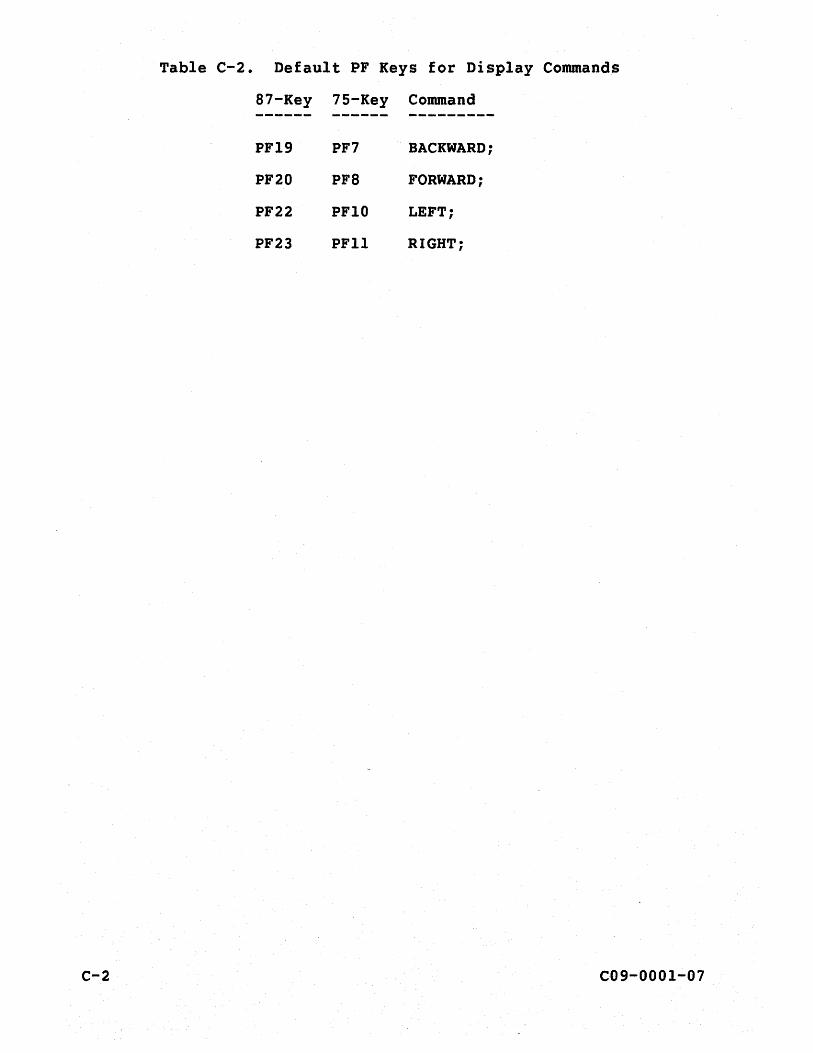
Table C-2. Default PF Keys for Display Commands
87-Key 75-Key Command ------- ------ --_ .... _----
PFl9 PF7 BACKWARD;
PF20 PF8 FORWARD;
PF22 PFIO LEFT;
PF23 PFll RIGHT;
C-2 C09-OOOI-07
APPENDIX D DEFINING ITEQ OUTPUT FILES
This appendix shows you how to define output files for storing or printing a result during an ITEQ session. If you do not explicitly define output files, these are defined automatically by your organization's DBC/IOI2 installation.
Under TSO or VM, you may use any or all of the following ddnames or file names for your ITEQ session:
Ddname File Name -------- -------------ITEQPRTI ITEQPRTI DATA ITEQPRT2 ITEQPRT2 DATA ITEQPRT3 ITEQPRT3 DATA ITEQDSKI ITEQDSKI DATA ITEQDSK2 ITEQDSK2 DATA ITEQDSK3 ITEQDSK3 DATA ITEQDSK4 ITEQDSK4 DATA ITEQDSKS ITEQDSKS DATA ITEQDSK6 ITEQDSK6 DATA ITEQDSK7 ITEQDSK7 DATA ITEQDSK8 ITEQDSK8 DATA
Use ddnames ITEQPRTI through ITEQPRT3/file names ITEQPRTI DATA through ITEQPRT3 DATA to define print output files. Use ITEQDSKI through ITEQDSK8/ITEQDSKI DATA through ITEQDSK8 DATA to define output files for storing session results.
If output files are not defined by name, ITEQPRTI/ITEQPRTI DATA is used by default for the print output file, ITEQDSKI/ITEQDSKI DATA for the result output file.
D.I DEFINING A PRINT OUTPUT FILE
Before starting ITEQ from TSO or VM, or during your ITEQ session, you may define a print output file using the following commands:
• Under TSO:
tso attrib printatt Irecl(8S) recfm(v)
tso allocate ddname(iteqprt2) sysout(b) using(printatt)
C09-OOOI-07 D-I
• Under VM:
CMS;
filedef iteqprt2 printer (recfm vba lrecl 85
cp spool printer cont class b
return
This sequence of commands:
• Enters TSO/CMS
• Defines the following file attributes:
A logical record length of 85 bytes for a print line width of 80 characters (one extra byte for printer control character and four extra bytes for a record descriptor word for each record)
A variable record format
• Assigns the file to output class B
After defining a print output file, during your ITEQ session you may send the current result to be printed on 8.5- by II-inch paper by executing the following ITEQ PRINT command:
PRINT iteqprt2;
A print output file is deallocated/cleared and made available for printing when you log off TSO/CMS. To deallocate/clear a print output file during your iteq session to make it immediately available for printing, execute:
D-2
• Under TSO:
tso free iteqprt2
• Under CMS:
CMS;
filedef iteqprt2 clear
cp spool printer nocont
cp close print
return
C09-0001-07
For complete information about the ITEQ PRINT command, refer to the DBC/lOl2 Data Base Computer Reference Manual. For more information about TSO Allocate, Free, and Output commands, refer to OS/VS2 TSO Command Language Reference (IBM). For more information about CMS and CP commands, refer to VM/SP CMS Command and Macro Reference and VM/SP CP Command Reference (IBM).
D.2 DEFINING A RESULT OUTPUT FILE
You use the TSO Allocate/CMS Filedef commands to define output files for storing spooled results during your DBC/IOI2 session. These output files may then be kept and cataloged for later use.
For example, you may establish file attributes and define an output file during your ITEQ session using the following commands:
• Under TSO:
tso attrib dbcparms lrecl(200) blksize(3600) recfm(vb) dsorg(ps)
tso allocate ddname(iteqdsk2) new dsname('iteqdsk2') using(dbcparms) catalog
• Under VM:
CMS;
filedef iteqdsk2 disk iteqdsk2 data a5 (lrecl 200 blksize 3600 recfm v dsorg ps)
return
This sequence of commands:
• Enters TSO/CMS
• Defines the following file attributes:
A logical record length of 20,000 bytes (the maximum allowed in ITEQ is 32,'160 .bytes)
A block size of 3600 bytes
A variable record format
A physical sequential format
• Defines an output file named ITEQDSK2 with the attributes specified above.
C09-0001-07 D-3
After defining' a result output file, during your ITEQ session you may cause the current result to be stored by executing the ITEQ FILE command:
FILE iteqdsk2;
When you log off ITEQ (or explicitly deallocate/clear the output file during your ITEQ session, as discussed above), the result is stored and catalogued in your directory as "ITEQDSK2"/"ITEQDSK2 DATA AS".
For complete information about the ITEQ FILE command, refer to the DBC/10I2 Data Base Computer Reference Manual. For more information about TSO Attribute, Allocate, and Free commands, refer to OS/VS2 TSO Command Language Reference (IBM). For more information about the CMS Filedef command, refer to VM/SP CMS Command and Macro Reference.
D-4 C09-OOOI-07
INDEX
D = ALL operator ••• 6-ll
<> ALL operator ••• 6-ll
'% character used with LIKE operator ••• 6-14
character used with LIKE operator ••• 6-14
= ANY operator ••• 6-ll
ABORT command ••• 3-18, 3-21 ABORT statement ••• 3-l8, 9-4, 9-5 access lock ••• 6-37 account identifier ••• 2-1, 3-3, 11-10 ACCOUNT option ••• lO-9 ADD command ••• 3-l0, 3-12, 3-15
C09-000l-07 X-I
administrator data base ••• lO-l, 10-3 AFTER JOURNAL option'.'see JOURNAL option ••• lO-8 aggregate operators ••• 5-7, 6-22, 6-26
use with non-aggregate values ••• 6-32 ALL keyword ••• lO-7 ALTER TABLE statement ••• 7-11
adding and dropping columns ••• 7-12 changing column attributes ••• 7-12 changing the FALLBACK option ••• 7-13
AND operator ••• 6-8 apostrophe
ABORT statement ••• 9-5 character string ••• 6-2 COMMENT statement ••• 7-18, 9-4 constant ••• 6-2 ECHO statement ••• 9-9 format string ••. 5-8 startup string ••• 3-13 title string ••• 5-11
application prog~am ••• l-l see also COBOL Preprocessor ••• l-l
arithmetic expressions ••• 6-l5, 6-21 date ••• 6-26, 6-27 in UPDATE statement ••• 8-3 views ••• 7-15 with aggregate result ••• 6-23
arithmetic operators •.• see arithmetic expressions AS keyword
CREATE MACRO statement ••• 9-2 CREATE TABLE statement ••• 7-2
ASC keyword ••• 6-6 asterisk
all co1umns ••• 6-4 COUNT operation ••. 6-24 format error ••• 5-1l paging ••• 3-29
AVG operator ••• 6-23
BACKWARD command ••• 3-22, 3-26, 5-4, 5-6, 9-6 skip feature ••• 9-6, 9-9
batch environment ••• l-l, 1-7, 4-4 Batch Teradata Query ••• see BTEQ BEFORE JOURNAL option'.'see JOURNAL option ••• 10-8 BEGIN/END TRANSACTION statements ••• 9-l BETWEEN numeric AND numeric range constraint ••• 7-4 BETWEEN ••• AND operator ••• 6-13 BTEQ ••• l-1, 2-2, 4-1
commands ••• 4-2, 4-3
X-2 C09-000l-07
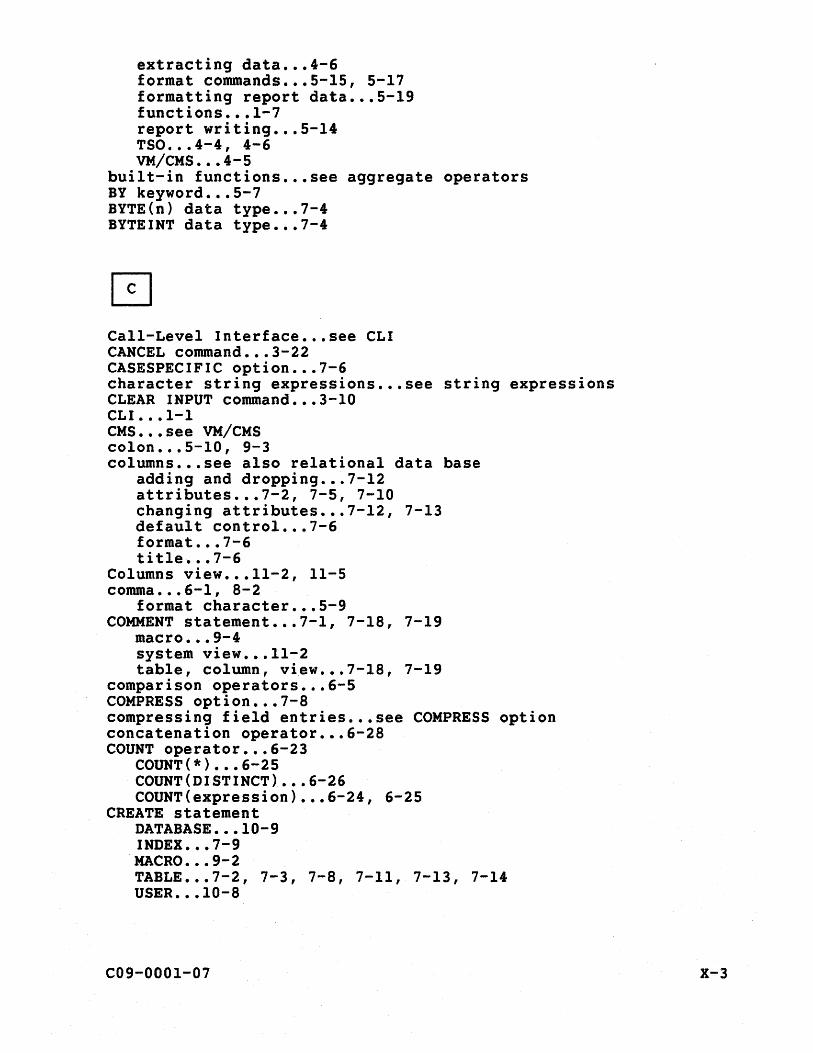
extracting data ••• 4-6 format commands ••• 5-l5, 5-17 formatting report data ••• 5-l9 functions ••• 1-7 report writing ••• 5-l4 TSO ••• 4-4, 4-6 VM/CMS ••• 4-5
built-in functions ••• see aggregate operators BY keyword ••• 5-7 BYTE(n) data type ••• 7-4 BYTEINT data type ••• 7-4
Call-Level Interface ••• see CLI CANCEL command ••• 3-22 CASESPECIFIC option ••• 7-6 character string expressions ••• see string expressions CLEAR INPUT command ••• 3-10 CLI ••• l-l CMS ••• see VM/CMS colon ••• 5-l0, 9-3 columns ••• see also relational data base
adding and dropping ••• 7-l2 attributes ••• 7-2, 7-5, 7-10 changing attributes ••• 7-l2, 7-13 default control ••• 7-6 format ••• 7-6 title ••• 7-6
Columns view ••• 11-2, 11-5 comma ••• 6-l, 8-2
format character ••• 5-9 COMMENT statement ••• 7-l, 7-18, 7-19
macro ••• 9-4 system view ••• 11-2 table, column, view ••• 7-l8, 7-19
comparison operators ••• 6-5 COMPRESS option ••• 7-8 compressing field entries ••• see COMPRESS option concatenation operator ••• 6-28 COUNT operator ••• 6-23
COUNT(*) ••• 6-25 COUNT(DISTINCT) ••• 6-26 COUNT(expression) ••• 6-24, 6-25
CREATE statement DATABASE ••• lO-9 INDEX ••• 7-9 MACRO ••• 9-2 TABLE ••• 7-2, 7-3, 7-8, 7-11, 7-13, 7-14 USER ••• lO-8
C09-000l-07 X-3
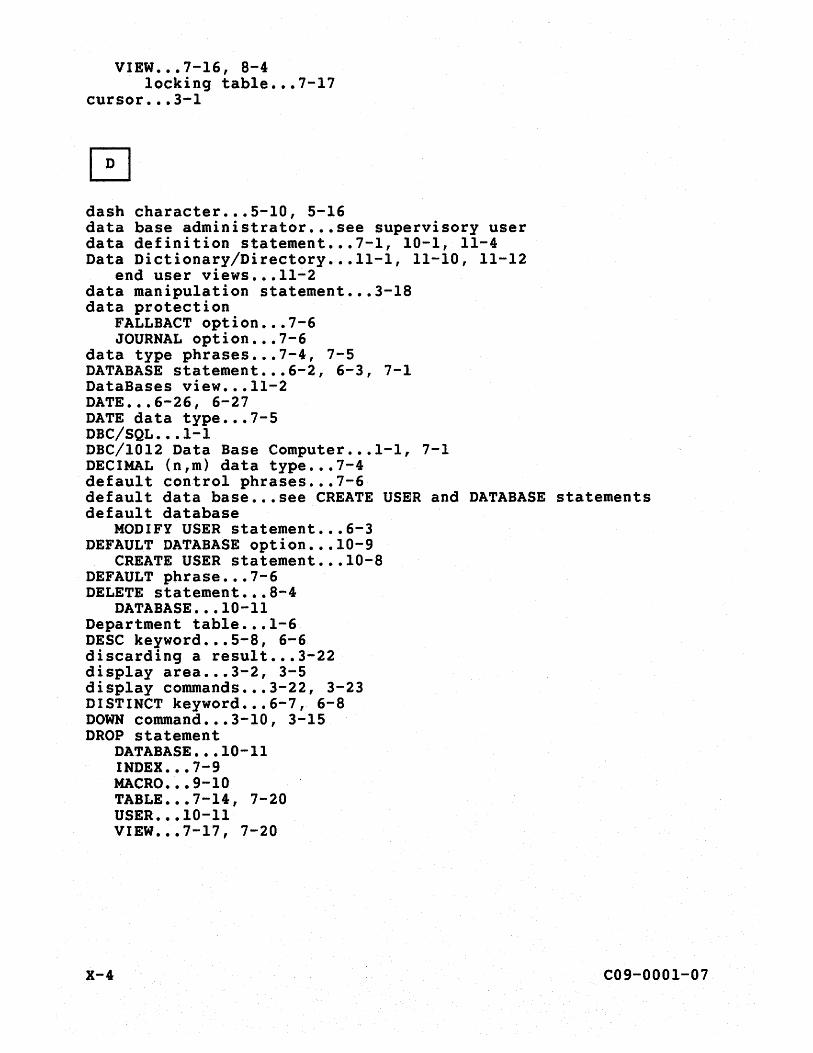
VIEW ••• 7-16, 8-4 locking table ••• 7-l7
cursor ••• 3-l
dash character ••• 5-10, 5-16 data base administrator ••• see supervisory user data definition statement ••• 7-1, 10-1, 11-4 Data Dictionary/Directory ••• 1l-l, 11-10, 11-12
end user views ••• 1l-2 data manipulation statement ••• 3-1S data protection
FALLBACT option ••• 7-6 JOURNAL option ••• 7-6
data type phrases ••• 7-4, 7-5 DATABASE statement ••• 6-2, 6-3, 7-1 DataBases view ••• 1l-2 DATE ••• 6-26, 6-27 DATE data type ••• 7-5 DBC/SQL ••• 1-1 DBC/1012 Data Base Computer ••• 1-l, 7-1 DECIMAL (n,m) data type ••• 7-4 default control phrases ••• 7-6 default data base ••• see CREATE USER and DATABASE statements default database
MODIFY USER statement ••• 6-3 DEFAULT DATABASE option ••• lO-9
CREATE USER statement ••• lO-8 DEFAULT phrase ••• 7-6 DELETE statement ••• 8-4
DATABASE ••• 10-11 Department table ••• 1-6 DESC keyword ••• 5-8, 6-6 discarding a result ••• 3-22 display area ••• 3-2, 3-5 display commands ••• 3-22, 3-23 DISTINCT keyword ••• 6-7, 6-8 DOWN command ••• 3-l0, 3-15 DROP statement
X-4
DATABASE ••• 10-ll INDEX ••• 7-9 MACRO ••• 9-10 TABLE ••• 7-l4, 7-20 USER ••• lO-l1 VIEW ••• 7-l7, 7-20
C09-QOOl-07
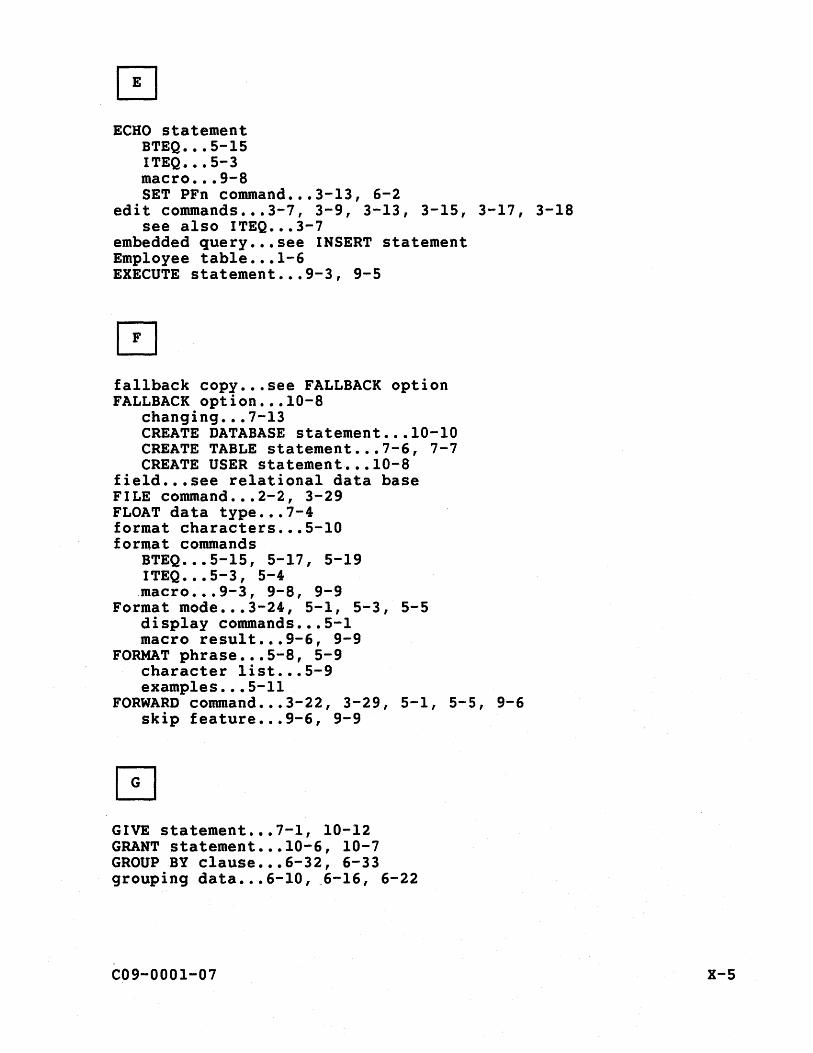
ECHO statement BTEQ ••• 5-15 ITEQ ••• 5-3 macro ••• 9-8 SET PFn command ••• 3-l3, 6-2
edit commands ••• 3-7, 3-9, 3-13, 3-15, 3-17, 3-18 see also ITEQ ••• 3-7
embedded query ••• see INSERT statement Employee tab1e ••• 1-6 EXECUTE statement ••• 9-3, 9-5
fallback copy ••• see FALLBACK option FALLBACK option .•• lO-8
changing ••• 7-l3 CREATE DATABASE statement ••• lO-lO CREATE TABLE statement ••• 7-6, 7-7 CREATE USER statement ••• lO-8
fie1d ••• see relational data base FILE command ••• 2-2, 3-29 FLOAT data type ••• 7-4 format characters ••• 5-l0 format commands
BTEQ ••• 5-l5, 5-17, 5-19 ITEQ ••• 5-3, 5-4
.macro ••• 9-3, 9-8, 9-9 Format mode ••• 3-24, 5-1, 5-3, 5-5
display commands ••• 5-l macro resu1t ••• 9-6, 9-9
FORMAT phrase ••• 5-8, 5-9 character list ••• 5-9 examp1es ••• 5-ll
FORWARD command ••• 3-22, 3-29, 5-1, 5-5, 9-6 skip feature ••• 9-6, 9-9
GIVE statement ••• 7-l, 10-12 GRANT statement ••• 10-6, 10-7 GROUP BY c1ause ••• 6-32, 6-33 grouping data ••• 6-10, _6-16, 6-22
C09-000l-07 X-5
HAVING clause ••• 6-32, 6-33 HELP statement ••• ll-l0, 11-12
COLUMN ••• 11-12 FIELD ••• 11-12 INDEX ••• ll-12 MACRO ••• 11-13 TABLE ••• ll-12 VIEW ••• 11-12
IN ANY operator ••• 6-11 IN operator ••• 6-11
selecting values in a set ••• 6-12 specifying subqueries ••• 6-37
index ••• 7-8 primary ••• 7-9, 7-14 secondary ••• 7-9 unique ••• 7-10
INDEX string function ••• 6-31 input area ••• 3-14 INPUT command ••• 3-10 INSERT statement ••• 8-2, 8-5
embedded query ••• 7-10 in a view ••• 8-4, 8-5 macro ••• 9-2 restrictions ••• 8-1
INTEGER data type ••• 7-4 Interactive Teradata Query ••• see ITEQ INTERSECT operator ••• 6-17, 6-19 IS NULL operator ••• 6-16 ITEQ ••• l-l, 2-2, 3-1, 3-4, 3-7, 3-8, 3-12, 3-14, 3-18
X-6
commands ••• 3-7, 3-8, 3-12 display ••• 3-22 displayarea ••• 3-10 PF keys ••• C-l summary ••• 3-9
defining output files ••• D-l print file ••• D-l result file ••• D-3
format commands ••• 5-3, 5-4 functions ••• 1-6, 1-7 interrupt ••• 3-l9 PF keys ••• see PF keys report writing ••• 5-1, 5-5, 5-6 screen ••• 3-2
C09-000l-07
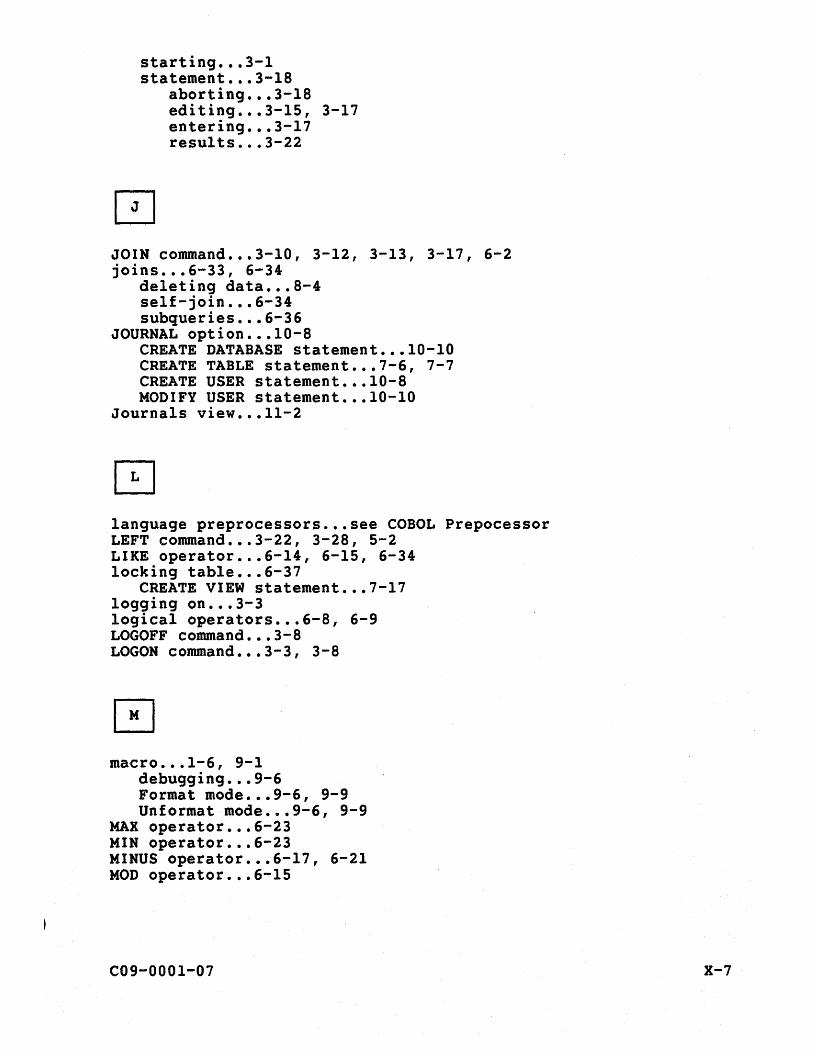
starting ••• 3-l statement ••• 3-l8
aborting ••• 3-l8 editing ••• 3-l5, 3-17 entering ••• 3-l7 results ••• 3-22
JOIN command ••• 3-l0, 3-12, 3-13, 3-17, 6-2 joins ••• 6-33, 6-34
deleting data ••• 8-4 self-join ••• 6-34 subqueries ••• 6-36
JOURNAL option ••• lO-8 CREATE DATABASE statement ••• lO-lO CREATE TABLE statement ••• 7-6, 7-7 CREATE USER statement ••• lO-8 MODIFY USER statement ••• lO-lO
Journals view ••• 11-2
language preprocessors ••• see COBOL Prepocessor LEFT command ••• 3-22, 3-28, 5-2 LIKE operator ••• 6-l4, 6-15, 6-34 locking table ••• 6-37
CREATE VIEW statement ••• 7-17 logging on ••• 3-3 logical operators ••• 6-8, 6-9 LOGOFF command ••• 3-8 LOGON command ••• 3-3, 3-8
macro ••• 1-6, 9-1 debugging ••• 9-6 Format mode ••• 9-6, 9-9 Unformat mode ••• 9-6, 9-9
MAX operator ••• 6-23 MIN operator ••• 6-23 MINUS operator ••• 6-l7, 6-21 MOD operator ••• 6-l5
C09-0001-07 X-7
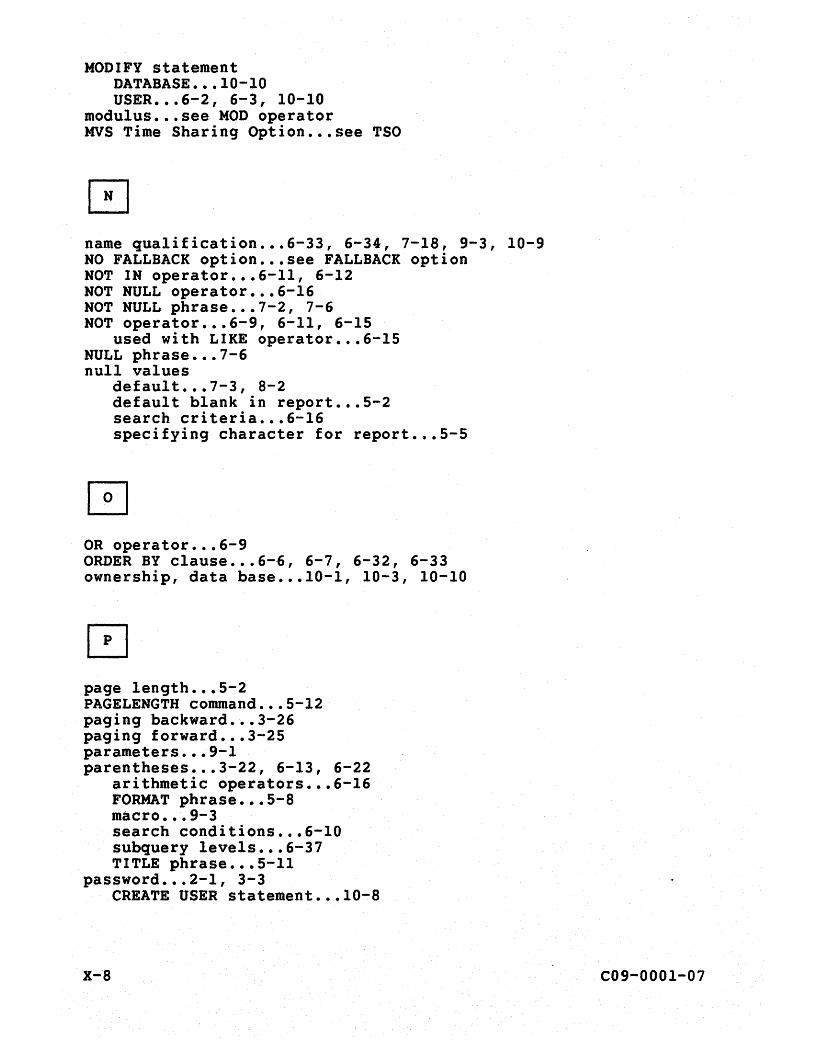
MODIFY statement DATABASE ••• 10-10 USER ••• 6-2, 6-3, 10-10
modulus ••• see MOD operator MVS Time Sharing Option ••• see TSO
name qualification ••• 6-33, 6-34, 7-18, 9-3, 10-9 NO FALLBACK option ••• see FALLBACK option NOT IN operator .•• 6-11, 6-12 NOT NULL operator ••• 6-16 NOT NULL phrase ••• 7-2, 7-6 NOT operator ••• 6-9, 6-11, 6-15
used with LIKE operator ••• 6-15 NULL phrase ••• 7-6 null values
default ••• 7-3, 8-2 default blank in report ••. 5-2 search criteria .•• 6-16 specifying character for report ••• 5-5
OR operator ••• 6-9 ORDER BY clause ••• 6-6, 6-7, 6-32, 6-33 ownership, data base ••• 10-1, 10-3, 10-10
page length ••• 5-2 PAGELENGTH command ••• 5-12 paging backward ••• 3-26 paging forward ••• 3-25 parameters ••• 9-1 parentheses ••• 3-22, 6-13, 6-22
arithmetic operators ••• 6-16 FORMAT phrase ••• 5-8 macro ••• 9-3 search conditions ••• 6-10 subquery levels ••• 6-37 TITLE phrase ••• 5-11
password ••• 2-1, 3-3 CREATE USER statement ••• 10-8
X-8 C09-0001-07
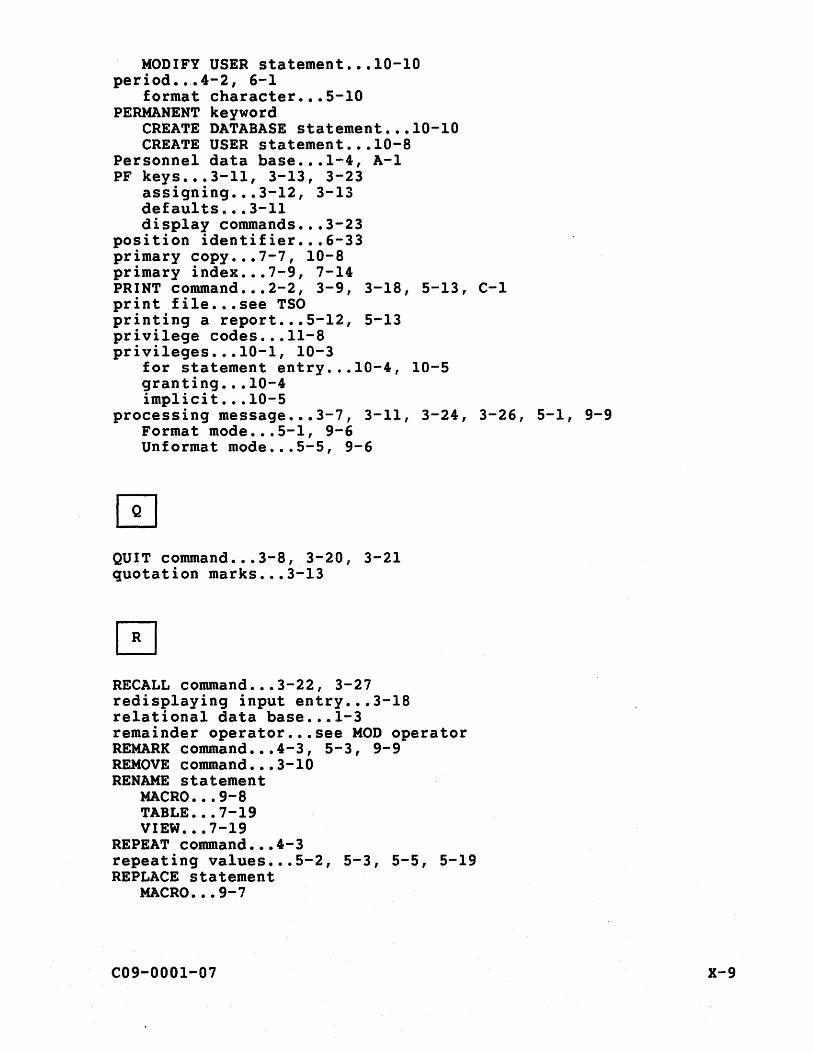
MODIFY USER statement ••• lO-lO period ••.• 4-2, 6-1
format character ••• 5-l0 PERMANENT keyword
CREATE DATABASE statement ••• lO-lO CREATE USER statement ••• l0-8
Personnel data base ••• 1-4, A-I PF keys ••• 3-ll, 3-13, 3-23
assigning ••• 3-l2, 3-13 defaults ••• 3-ll display commands ••• 3-23
position identifier ••• 6-33 primary copy ••• 7-7, 10-8 primary index ••• 7-9, 7-14 PRINT command .•• 2-2, 3-9, 3-18, 5-13, C-l print file ••• see TSO printing a report ••• 5-l2, 5-13 privilege codes ••• ll-8 privileges ••• lO-l, 10-3
for statement entry ... 10-4, 10-5 granting ••• 10-4 implicit ••• 10-5
processing message ••• 3-7, 3-11, 3-24, 3-26, 5-1, 9-9 Format mode •.. 5-1, 9-6 Unformat mode ••. S-S, 9-6
QUIT command ••• 3-8, 3-20, 3-21 quotation marks ••• 3-13
RECALL command ••• 3-22, 3-27 redisplaying input entry ••• 3-18 relational data base ••• 1-3 remainder operator ••• see MOD operator REMARK command ••• 4-3, 5-3, 9-9 REMOVE command ••• 3-l0 RENAME statement
MACRO ••• 9-8 TABLE ••• 7-19 VIEW ••• 7-19
REPEAT command ••• 4-3 repeating values ••• 5-2, 5-3, 5-5, 5-19 REPLACE statement
MACRO ••• 9-7
C09-000l-07 X-9
VIEW ••• 7-17, 7-18 report heading ••• 5-14, 5-19 report title ••• 5-1, 5-2, 5-5, 5-14, 5-19 REVOKE statement ••• lO-7 RIGHT command ••• 3-22, 3-28, 5-2 row ••• see relational data base RTITLE command ••• 5-5 RUN command ••• 4-3
sample table ••• 1-4 screen ••• 1-6
display area ••• 3-6, 3-9, 3-10, 3-17 input area ••• 3-6, 3-9, 3-14
commands ••• 3-ll ITEQ display screen ••• 3-6 processing message ••• 3-7 status area ••• 3-6, 3-25
secondary copy ••• 7-7, 10-8 secondary index ••• 7-9 security ••• lO-l SEL, abbreviation for SELECT ••• 6-4 SELECT statement ••• 3-S, 3-22, 6-3, 6-9, 6-12, 6-21, 6-23, 6-32,
6-33 BTEQ ••• 4-7 embedded query ••• 8-2
self-join ••• 6-34, 6-35 semicolon ••• 3-3, 4-2, 6-1, 9-3 SessionInfo view ••• ll-2, 11-9 SET DEFAULTS command ••• 5-4 SET FORMAT command
BTEQ ••• 5-l5, 5-19 ITEQ ••• 3-24, 5-1
SET FORMAT OFF command ••• 3-24, 3-29, 5-3 SET HEADING command ••• 5-19 SET INPUTAREA SIZE command ••• 3-14 SET NULL AS command ••• 5-3, 9-9 set operators ••• 6-l2
combining SELECT statements ••• 6-17 SET PAGE LENGTH command
BTEQ ••• 5-l5 ITEQ ••• 5-3
SET PFn command ••• 3-12, 3-13, 6-2, 9-8 SET RTITLE·command
BTEQ ••• 5-l5 ITEQ ••• 5-3
SET SUPPRESS command ••• 5-5 BTEQ ••• 5-l6, 5-19 ITEQ ••• 5-3
X-IO C09-000l-07
SET WIDTH command ••• 5-3, 5-19 SHOW command ••• 3-10 SHOW CONTROL command
BTEQ ••• 4-3 ITEQ ••• 3-23, 5-4
SHOW statement MACRO ••• 9-7 VIEW ••• 7-18
slash character BTEQ ••• 5-19 ITEQ ••• 5-10, 6-15 logon string ••• 3-3
SMALLINT data type ••• 7-4 SPLIT command ••• 3-10, 3-12, 3-13, 3-16, 6-2 SPOOL option ••• 10-9 STARTUP clause ••• 10-9 STARTUP string
apostrophes in ••• 6-2 CREATE USER statement ••• 10-8
statements, DBC/SQL .•. 1-3 status area ••. 3-6, 3-7, 3-18, 3-25 status messages ••• 3-5, 3-19, 3-25, 3-26 storing a result ••• 2-2, D-1 string expressions .•. 6-28
concatenation operator ••• 6-28 string functions ••. 6-28
string functions •.• 6-28 INDEX ••• 6-30, 6-31 SUBSTR ••. 6-30
SUBMIT command ••• 3-10, 3-17, 3-18, 3-23 subqueries ••• 6-36, 6-37 SUBSTR string function .•• 6-30 SUM operator ••• 5-7, 5-8, 6-23 summarizing information by groups ••• 6-32, 6-33 summary results ••• 5-6, 5-11 supervisory user ••• 10-3 SUPPRESS command ••• 5-5 system administrator ••. 10-1, 10-3, 10-8, 10-9
table ••• see relational data base how to load a new table with existing data ••• 7-10
Tables view ••• 11-2, 11-4 TDP ••• 1-1 tdpid ••• 2-1, 3-3 Teradata Director Program ••• see TDP TITLE phrase
column headings ••• 5-11, 7-6 summary titles .... S-11
C09-0001-07 X-II
views ••• 7-16 transaction
aborting ••• 3-lB, 3-19, 3-21 BEGIN/END TRANSACTION statements ••• 7-2, 9-1 data definition statements ••• lO-l macro ••• 9-1 multi-statement •• ·.7-2
TRIM function concatenation operator ••• 6-29
TSO ••• 2-2, 3-29 aborting a statement ••• 3-19 Allocate command ••• 5-13, D-l, D-3, D-4 BTEQ ••• 4-1, 4-3, 4-4, 4-6 CLIST ••• 3-4 logging on ••• 3-4 print file ••• 2-2, D-l, D-2 storing results ••• 2-2, D-3, D-4
Unformat mode ••• 3-24, 5-3, 5-5 display commands ••• 5-l macro result ••• 9-6, 9-9
UNION operator ••• 6-l7, 6-lB unique index ••• 7-l0 UP command .•• 3-l0, 3-12, 3-15 UPDATE statement ••• 8-3
constraints ••• B-3 view ••• B-5
UPPERCASE option ••• 7-6 user identification ••• see username UserGrantedRights view ••• 11-2, 11-7 username ••• 2-1, 3-3, 3-13
CREATE USER statement ••• lO-l, 10-B SessionInfo view ••• 11-9
UserRights view .•• 11-2, 11-9 USING modifier ••• 4-B
VARBYTE(n) data type ••• 7-5 VARCHAR(n) data type ••• 7-S views ••• 7-l5, 7-16, 11-1
adding, changing data ••• B-4, B-6 creating a view ••• 7-15 replacing a view ••• 7-17 system-defined ••• see Data Dictionary/Directory
X-12 C09-QOOl-07
VM/CMS ••• 2-2 aborting a statement ••• 3-20, 3-21 BTEQ ••• 4-1, 4-2, 4-4, 4-5 logging on ••• 2-2, 3-4 print file ••• 5-13, D-l, D-2 PROFILE EXEC ••• 3-4 storing results ••• 3-29, D-3
WHERE clause ••• 6-5, 6-12 in a join ••• 6-34 in a self-join ••• 6-35 in UPDATE statement ••• 8-3
WIDTH command ••• 5-12 WITH clause ••• 5-7, 5-8, 5-11
specifying report subtotals ••• 5-7 WITH GRANT OPTION ••• see GRANT statement
C09-0001-07 X-13