DAY 1: Circular Quay to Greenwich Wharf€¦ · DAY 1 - Four Day Walk A Sydney Harbour Circle Walk...
7
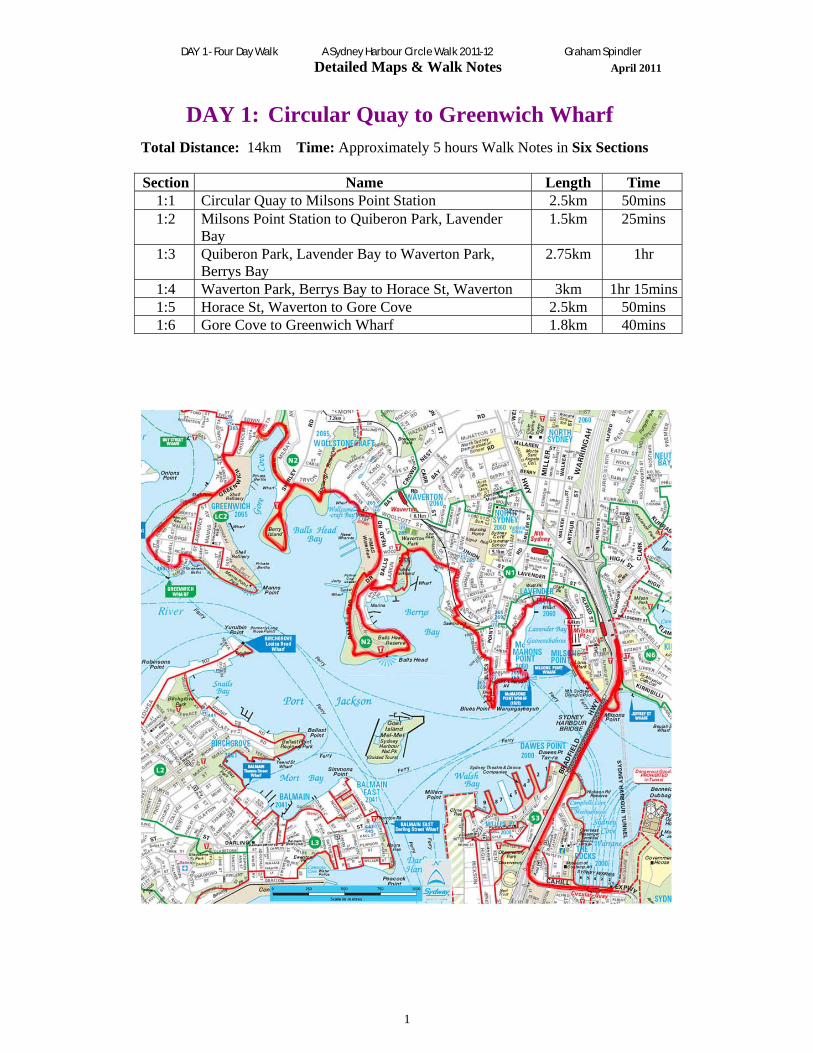
DAY 1 - Four Day Walk A Sydney Harbour Circle Walk 2011-12 Graham Spindler Detailed Maps & Walk Notes April 2011 1 DAY 1: Circular Quay to Greenwich Wharf Total Distance: 14km Time: Approximately 5 hours Walk Notes in Six Sections Section Name Length Time 1:1 Circular Quay to Milsons Point Station 2.5km 50mins 1:2 Milsons Point Station to Quiberon Park, Lavender Bay 1.5km 25mins 1:3 Quiberon Park, Lavender Bay to Waverton Park, Berrys Bay 2.75km 1hr 1:4 Waverton Park, Berrys Bay to Horace St, Waverton 3km 1hr 15mins 1:5 Horace St, Waverton to Gore Cove 2.5km 50mins 1:6 Gore Cove to Greenwich Wharf 1.8km 40mins
Transcript of DAY 1: Circular Quay to Greenwich Wharf€¦ · DAY 1 - Four Day Walk A Sydney Harbour Circle Walk...
DAY 1 - Four Day Walk A Sydney Harbour Circle Walk 2011-12 Graham Spindler
Detailed Maps & Walk Notes April 2011
1
DAY 1: Circular Quay to Greenwich Wharf Total Distance: 14km Time: Approximately 5 hours Walk Notes in Six Sections Section Name Length Time
1:1 Circular Quay to Milsons Point Station 2.5km 50mins 1:2 Milsons Point Station to Quiberon Park, Lavender
Bay 1.5km 25mins
1:3 Quiberon Park, Lavender Bay to Waverton Park, Berrys Bay
2.75km 1hr
1:4 Waverton Park, Berrys Bay to Horace St, Waverton 3km 1hr 15mins 1:5 Horace St, Waverton to Gore Cove 2.5km 50mins 1:6 Gore Cove to Greenwich Wharf 1.8km 40mins

DAY 1 - Four Day Walk A Sydney Harbour Circle Walk 2011-12 Graham Spindler
Detailed Maps & Walk Notes April 2011
2
Day 1:1 - Circular Quay to Milsons Point Station Distance: 2.5km Approximate time: 50 minutes Condition: Paved footpaths, flights of steps either end of Bridge. Public Transport: Circular Quay and Milsons Pt Stations; Circular Quay, Jeffrey St and Luna Park Wharves – buses at each. Facilities: Shops and hotels at Circular Quay, Kirribilli and Milsons Point; toilets at Circular Quay and Milsons Point Stations.
Circled numbers refer to text points in accompanying Background and Historical Notes
Walk Guide The Walk begins at the eastern (Opera House) end of Circular Quay. This is also the starting point for the Circular Quay to South Head and Eastern Beaches Coastal Walk. Beyond Wharf 2, take the glass-housed lift (3) up to the footpath of the Cahill Expressway (Cahill Walk). Turn right (west) and follow the footpath along and up to the bridge. It turns right (north) to end at a platform and steps that drop to join the Bridge footway. The walk across the
DAY 1 - Four Day Walk A Sydney Harbour Circle Walk 2011-12 Graham Spindler
Detailed Maps & Walk Notes April 2011
3
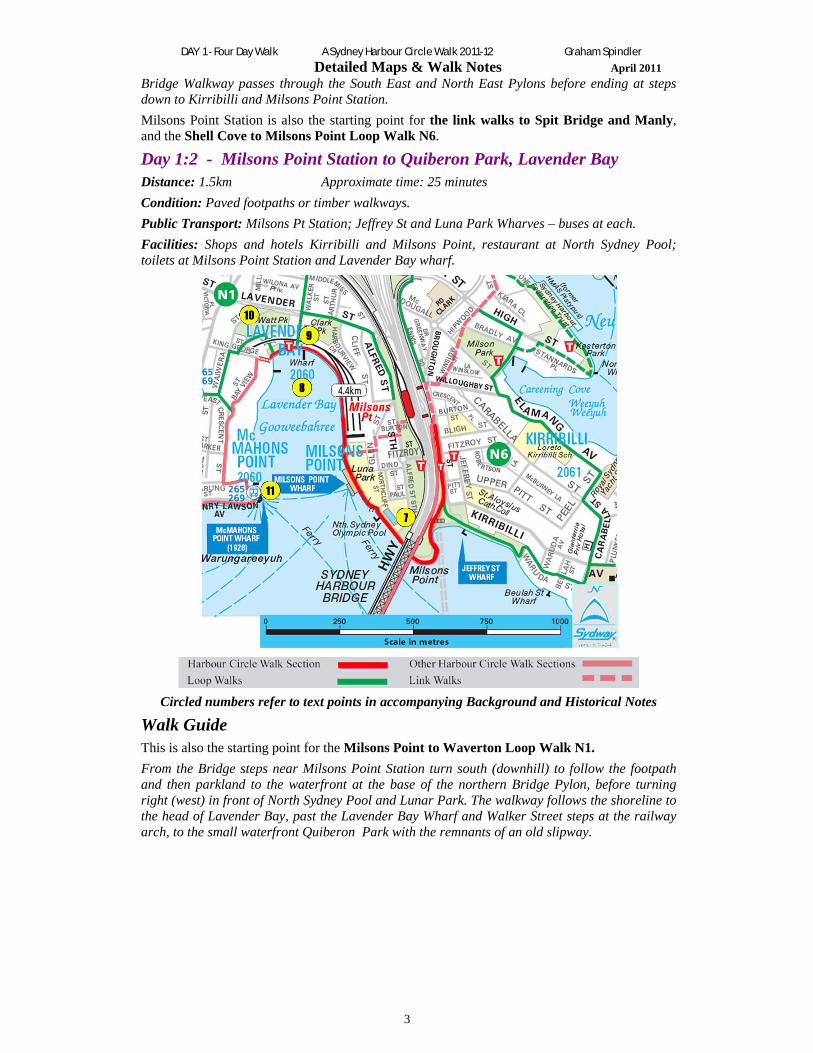
Bridge Walkway passes through the South East and North East Pylons before ending at steps down to Kirribilli and Milsons Point Station. Milsons Point Station is also the starting point for the link walks to Spit Bridge and Manly, and the Shell Cove to Milsons Point Loop Walk N6.
Day 1:2 - Milsons Point Station to Quiberon Park, Lavender Bay Distance: 1.5km Approximate time: 25 minutes Condition: Paved footpaths or timber walkways. Public Transport: Milsons Pt Station; Jeffrey St and Luna Park Wharves – buses at each. Facilities: Shops and hotels Kirribilli and Milsons Point, restaurant at North Sydney Pool; toilets at Milsons Point Station and Lavender Bay wharf.
Circled numbers refer to text points in accompanying Background and Historical Notes
Walk Guide This is also the starting point for the Milsons Point to Waverton Loop Walk N1. From the Bridge steps near Milsons Point Station turn south (downhill) to follow the footpath and then parkland to the waterfront at the base of the northern Bridge Pylon, before turning right (west) in front of North Sydney Pool and Lunar Park. The walkway follows the shoreline to the head of Lavender Bay, past the Lavender Bay Wharf and Walker Street steps at the railway arch, to the small waterfront Quiberon Park with the remnants of an old slipway.

DAY 1 - Four Day Walk A Sydney Harbour Circle Walk 2011-12 Graham Spindler
Detailed Maps & Walk Notes April 2011
4
Day 1:3 - Quiberon Park, Lavender Bay to Waverton Park, Berrys Bay Distance: 2.75km Approximate time: 1 hour Condition: Paved or earth footpaths, steps and inclines (Lavender Bay, McMahons Point, Blues Point, Sawmillers Reserve). Public Transport: North Sydney and Waverton Stations; McMahons Point Wharf – buses at each and Blues Point Rd. Facilities: No shops on direct route (shops nearby in Blues Point Rd near King George St corner, and near corner of Union and Dumbarton Sts); toilets at Lavender Bay wharf, Blues Point Reserve, Waverton Park.
Circled numbers refer to text points in accompanying Background and Historical Notes
Walk Guide From Quiberon Park, follow the footpath west of the old slipway, then the path and steps up past the electricity sub-station to King George St. Turn left along Bayview St to join East Crescent St, continuing south until reaching the lookout at the Warung St end. From Warung St turn left (towards Lavender Bay), down the steps down to McMahons Point itself and its Ferry Wharf. Turn right and follow Henry Lawson Ave, then turn left into the waterfront Blues Point Reserve. Near the Point itself take the steps up to the flat headland and walk back towards Blues Point
DAY 1 - Four Day Walk A Sydney Harbour Circle Walk 2011-12 Graham Spindler
Detailed Maps & Walk Notes April 2011
5
Tower and then down to Blues Point Rd. Turn left into West Crescent St and follow this to its end at Sawmillers Reserve. The upper pathway in the Reserve leads through to a zigzag path up to Munro St. Cross the railway bridge off Munro and turn left into and down Dumbarton St, then left again to pass under the railway via John St into Waverton Park at the head of Berrys Bay.
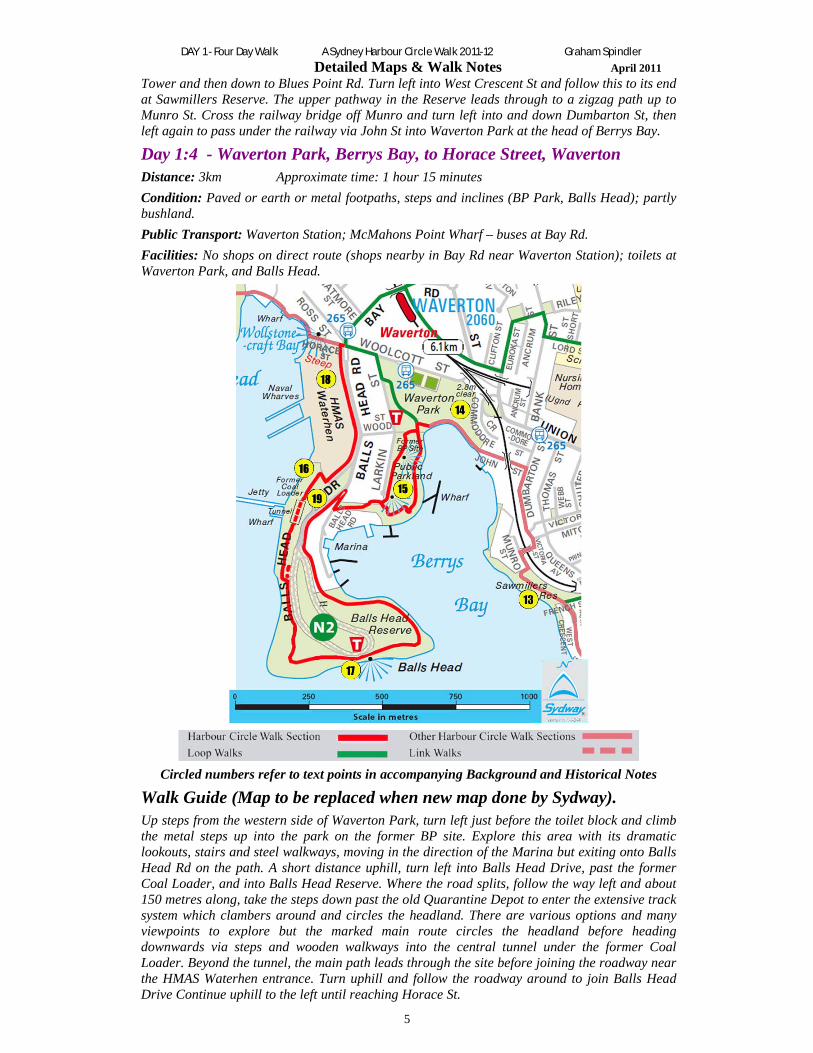
Day 1:4 - Waverton Park, Berrys Bay, to Horace Street, Waverton Distance: 3km Approximate time: 1 hour 15 minutes Condition: Paved or earth or metal footpaths, steps and inclines (BP Park, Balls Head); partly bushland. Public Transport: Waverton Station; McMahons Point Wharf – buses at Bay Rd. Facilities: No shops on direct route (shops nearby in Bay Rd near Waverton Station); toilets at Waverton Park, and Balls Head.
Circled numbers refer to text points in accompanying Background and Historical Notes
Walk Guide (Map to be replaced when new map done by Sydway). Up steps from the western side of Waverton Park, turn left just before the toilet block and climb the metal steps up into the park on the former BP site. Explore this area with its dramatic lookouts, stairs and steel walkways, moving in the direction of the Marina but exiting onto Balls Head Rd on the path. A short distance uphill, turn left into Balls Head Drive, past the former Coal Loader, and into Balls Head Reserve. Where the road splits, follow the way left and about 150 metres along, take the steps down past the old Quarantine Depot to enter the extensive track system which clambers around and circles the headland. There are various options and many viewpoints to explore but the marked main route circles the headland before heading downwards via steps and wooden walkways into the central tunnel under the former Coal Loader. Beyond the tunnel, the main path leads through the site before joining the roadway near the HMAS Waterhen entrance. Turn uphill and follow the roadway around to join Balls Head Drive Continue uphill to the left until reaching Horace St.

DAY 1 - Four Day Walk A Sydney Harbour Circle Walk 2011-12 Graham Spindler
Detailed Maps & Walk Notes April 2011
6
This is also the starting point for the Waverton to Wollstonecraft Loop Walk N2.
Day 1:5 - Horace Street, Waverton to Gore Cove Distance: 2.5km Approximate time: 50 minutes Condition: Paved or unpaved footpaths, steps and inclines (Horace Street, Wandakiah, Berry Island and Gore Cove), mainly bushland. Public Transport: Waverton and Wollstonecraft Stations; McMahons Point Wharf – buses at both and Bay and Shirley Roads. Facilities: No shops on direct route (shops nearby in Bay Rd near Waverton Station); toilets at Berry Island.
Circled numbers refer to text points in accompanying Background and Historical Notes
Walk Guide Turn into Horace St. Soon steps drop down alongside HMAS Waterhen. About halfway down, take the level footpath to the right and follow it around into the Wandakiah apartment development and Oyster Cove Reserve. Continue along the waterfront, across the steel pedestrian bridge and up steps into Badangi Reserve. Having climbed up into Badangi Reserve from Oyster Cove Reserve, turn left at the track intersection and then, shortly afterwards, right to walk parallel to and just below Tryon Av to reach Shirley Rd. Turn downhill on Shirley Rd and into Berry Island Reserve. At the reserve, follow the circular track around this former island before re-entering Shirley Rd for a few metres back uphill. Turn left into the Gore Cove Track immediately uphill from the District Fisheries Office. The track leads downhill and then turns right to skirt above Gore Cove before dropping down to a reclaimed, wooded area at the head of the Cove. Follow the waterfront about 100m to the footbridge over the stone banked stream. The track to the right follows Berry Creek towards Wollstonecraft Station, while the Harbour Circle crosses the footbridge and leads up to Greenwich. The eastern end of the footbridge is also the starting point for the link walk to Waverton and the Gore Hill Loop Walk LC1.

DAY 1 - Four Day Walk A Sydney Harbour Circle Walk 2011-12 Graham Spindler
Detailed Maps & Walk Notes April 2011
7
Day 1:6 - Gore Cove to Greenwich Wharf Distance: 1.8km Approximate time: 40 minutes Condition: Paved or unpaved footpaths, steps and inclines (steep ones at Gore Cove, others Greenwich Point Reserve), partly bushland. Public Transport: Greenwich Wharf – buses at this and along Greenwich Rd. Facilities: No shops on direct route (shops nearby in Greenwich Rd north of Evelyn St); toilets at Berry Island.
Circled numbers refer to text points in accompanying Background and Historical Notes
Walk Guide From the footbridge at the head of Gore Cove, take the path, which soon reaches steep steps, up through Holloway Reserve to the lookout at the head of Vista St in Greenwich. Turn right and then left into Edwin St. Turn left again into Chisholm St. The small lane on the western side of the street between numbers 21 and 25 is also the start and end point for the Greenwich Loop Walk LC2. Follow Chisholm St down and around until it meets Greenwich Rd at the oil terminal. Turn left into Greenwich Rd and follow it around to Shell Park. Cross the Park to go down steps marked Lane Cove Bushwalk 1, keeping to the left track, and follow the waterfront around through bushland to Greenwich Point and, soon after, Lower Serpentine Rd and Greenwich Wharf.