B-65322EN_02 Fanuc AC Servo Amplifires Bi Series Description Manual

RGB ELEKTRONIKA AGACIAK CIACIEKSPÓŁKA JAWNA Jana Dlugosza 2-6 Street51-162 WrocławPoland
[email protected] +48 71 325 15 05
www.rgbautomatyka.pl
www.rgbelektronika.pl
DATASHEET
www.rgbautomatyka.plwww.rgbelektronika.pl
OTHER SYMBOLS:
A03B-0807-C156
A03B0807C156, A03B0807 C156, A03B0807-C156, A03B 0807C156, A03B 0807 C156, A03B 0807-C156,A03B-0807C156, A03B-0807 C156, A03B-0807-C156
FANUC

YOUR PARTNER IN MAINTENANCE
At our premises in Wrocław, we have a fully equipped servicing facility. Here we perform all the repair works and test each later sold unit. Our trained employees, equipped with a wide variety of tools and having several testing stands at their disposal, are a guarantee of the highest quality service.
OUR SERVICES
ENCODERS
SERVO DRIVERS
LINEAR ENCODERS
SERVO AMPLIFIERS
CNC MACHINES
MOTORS
POWER SUPPLIERS
OPERATOR PANELS
CNC CONTROLS
INDUSTRIAL COMPUTERS
PLC SYSTEMS
Repair this product with RGB ELEKTRONIKA ORDER A DIAGNOSIS
Buy this product at RGB AUTOMATYKA BUY

CONNECTION MANUAL
B-64303EN-4/01
FANUC Series 0 -MODEL D*
Dual Check Safety

• No part of this manual may be reproduced in any form. • All specifications and designs are subject to change without notice. The products in this manual are controlled based on Japan’s “Foreign Exchange and Foreign Trade Law”. The export from Japan may be subject to an export license by the government of Japan. Further, re-export to another country may be subject to the license of the government of the country from where the product is re-exported. Furthermore, the product may also be controlled by re-export regulations of the United States government. Should you wish to export or re-export these products, please contact FANUC for advice. In this manual we have tried as much as possible to describe all the various matters. However, we cannot describe all the matters which must not be done, or which cannot be done, because there are so many possibilities. Therefore, matters which are not especially described as possible in this manual should be regarded as ”impossible”. This manual contains the program names or device names of other companies, some of which are registered trademarks of respective owners. However, these names are not followed by ® or ™ in the main body.

B-64303EN-4/01 DEFINITION OF WARNING, CAUTION, AND NOTE
s-1
DEFINITION OF WARNING, CAUTION, AND NOTE This manual includes safety precautions for protecting the user and preventing damage to the machine. Precautions are classified into Warning and Caution according to their bearing on safety. Also, supplementary information is described as a Note. Read the Warning, Caution, and Note thoroughly before attempting to use the machine.
WARNING Applied when there is a danger of the user being
injured or when there is a danger of both the user being injured and the equipment being damaged if the approved procedure is not observed.
CAUTION
Applied when there is a danger of the equipment being damaged, if the approved procedure is not observed.
NOTE The Note is used to indicate supplementary
information other than Warning and Caution. • Read this manual carefully, and store it in a safe place.


B-64303EN-4/01 PREFACE
p-1
PREFACE
Description of this manual The manual consists of the following chapters: Chapter 1, "OVERVIEW" Chapter 2, "SYSTEM CONFIGURATION" Chapter 3, "SAFETY FUNCTIONS" Chapter 4, "INSTALLATION" Chapter 5, "I/O SIGNALS" Chapter 6, "PARAMETERS" Chapter 7, "START-UP" Chapter 8, "ALARM MESSAGE" Chapter 9, "DIAGNOSIS" Chapter 10, "SAMPLE SYSTEM CONFIGURATION" Chapter 11, "APPLICATION OF OTHER FUNCTIONS" Chapter 12, "COMPONENTS LIST" Appendix A, "DIRECTIVES, STANDARDS AND TECHNICAL CONDITIONS FOR 3RD PARTY SERVO / SPINDLE MOTORS & ENCODERS WHEN APPLYING FANUC / GE FANUC DUAL-CHECK SAFETY"
Applicable models This manual can be used with the following models. The abbreviated names may be used.
Model name Abbreviation
FANUC Series 0i -TD 0i -TD
FANUC Series 0i -MD 0i -MD Series 0i -D 0i -D
NOTE 1 The FANUC Series 0i Mate – MODEL D does not
support this function. 2 For explanatory purposes, these models may be
classified as shown below: - T series: 0i -TD - M series: 0i -MD
3 Some functions described in this manual may not be applied to some products.
For details, refer to the Descriptions (B-64302EN). 4 For the 0i-D, parameters need to be set to enable
or disable some basic functions. For these parameters, refer to Section 4.51, " PARAMETERS OF 0i-D / 0i Mate-D BASIC FUNCTIONS" in the PARAMETER MANUAL (B-64310EN).

PREFACE B-64304EN-4/01
p-2
Related manuals of Series 0i -D The following table lists the manuals related to Series 0i -D. This manual is indicated by an asterisk (*).
Table 1 Related manuals
Manual name Specification number
DESCRIPTIONS B-64302EN CONNECTION MANUAL (HARDWARE) B-64303EN CONNECTION MANUAL (FUNCTION) B-64303EN-1 USER’S MANUAL (Common to Lathe System/Machining Center System)
B-64304EN
USER’S MANUAL (For Lathe System) B-64304EN-1 USER’S MANUAL (For Machining Center System) B-64304EN-2 MAINTENANCE MANUAL B-64305EN PARAMETER MANUAL B-64310EN START-UP MANUAL B-64304EN-3 Programming Macro Executor PROGRAMMING MANUAL B-64303EN-2 Macro Compiler PROGRAMMING MANUAL B-64303EN-5 C Language Executor PROGRAMMING MANUAL B-64303EN-3 PMC PMC PROGRAMMING MANUAL B-64393EN Network PROFIBUS-DP Board CONNECTION MANUAL B-64403EN Fast Ethernet / Fast Data Server OPERATOR’S MANUAL B-64414EN DeviceNet Board CONNECTION MANUAL B-64443EN FL-net Board CONNECTION MANUAL B-64453EN Dual Check Safety Dual Check Safety CONNECTION MANUAL B-64303EN-4 *Operation guidance function MANUAL GUIDE i (Common to Lathe System/Machining Center System) OPERATOR’S MANUAL
B-63874EN
MANUAL GUIDE i (For Machining Center System) OPERATOR’S MANUAL
B-63874EN-2
MANUAL GUIDE i (Set-up Guidance Functions) OPERATOR’S MANUAL
B-63874EN-1
MANUAL GUIDE 0i OPERATOR’S MANUAL B-64434EN TURN MATE i OPERATOR’S MANUAL B-64254EN

B-64303EN-4/01 PREFACE
p-3
Related manuals of SERVO MOTOR The following table lists the manuals related to SERVO MOTOR αi/βi series
Table 2 Related manuals
Manual name Specification number
FANUC AC SERVO MOTOR αi series DESCRIPTIONS
B-65262EN
FANUC AC SPINDLE MOTOR αi series DESCRIPTIONS
B-65272EN
FANUC AC SERVO MOTOR βi series DESCRIPTIONS
B-65302EN
FANUC AC SPINDLE MOTOR βi series DESCRIPTIONS
B-65312EN
FANUC SERVO AMPLIFIER αi series DESCRIPTIONS
B-65282EN
FANUC SERVO AMPLIFIER βi series DESCRIPTIONS
B-65322EN
FANUC SERVO MOTOR αis series FANUC SERVO MOTOR αi series FANUC AC SPINDLE MOTOR αi series FANUC SERVO AMPLIFIER αi series MAINTENANCE MANUAL
B-65285EN
FANUC SERVO MOTOR βis series FANUC AC SPINDLE MOTOR βi series FANUC SERVO AMPLIFIER βi series MAINTENANCE MANUAL
B-65325EN
FANUC AC SERVO MOTOR αi series FANUC AC SERVO MOTOR βi series FANUC LINEAR MOTOR LiS series FANUC SYNCHRONOUS BUILT-IN SERVO MOTOR DiS series PARAMETER MANUAL
B-65270EN
FANUC AC SPINDLE MOTOR αi/βi series, BUILT-IN SPINDLE MOTOR Bi series PARAMETER MANUAL
B-65280EN
This manual mainly assumes that the FANUC SERVO MOTOR αi series of servo motor is used. For servo motor and spindle information, refer to the manuals for the servo motor and spindle that are actually connected.


B-64303EN-4/01 TABLE OF CONTENTS
c-1
TABLE OF CONTENTS DEFINITION OF WARNING, CAUTION, AND NOTE .................................s-1 PREFACE....................................................................................................p-1 1 OVERVIEW .............................................................................................1
1.1 DIRECTIVES AND STANDARDS.................................................................. 2 1.1.1 Directives..................................................................................................................2 1.1.2 Related Safety Standards..........................................................................................2 1.1.3 Risk Analysis and Evaluation...................................................................................3 1.1.4 Certification Test ......................................................................................................3
1.2 DEFINITION OF TERMS............................................................................... 4 1.2.1 General Definition of Terms ....................................................................................4 1.2.2 Definition of Terms Related to the Safety Function.................................................4
1.3 BASIC PRINCIPLE OF DUAL CHECK SAFETY ........................................... 5 1.3.1 Features of Dual Check Safety .................................................................................5 1.3.2 Compliance with the Safety Standard ......................................................................5
1.3.2.1 Latent error detection and cross-check ................................................................ 7 1.3.2.2 Safety monitoring cycle and cross-check cycle ................................................... 7 1.3.2.3 Error analysis ....................................................................................................... 8 1.3.2.4 Remaining risks ................................................................................................... 8
1.4 GENERAL INFORMATION ......................................................................... 10
2 SYSTEM CONFIGURATION.................................................................11 3 SAFETY FUNCTIONS...........................................................................12
3.1 APPLICATION RANGE ............................................................................... 13 3.2 BEFORE USING THE SAFETY FUNCTION ............................................... 15
3.2.1 Important Items to Check Before Using the Safety Function ................................15 3.2.2 MCC off Test of the Safe Stop Function................................................................15
3.3 STOP........................................................................................................... 16 3.3.1 Stopping the Spindle Motor ...................................................................................16 3.3.2 Stopping the Servo Motor ......................................................................................17 3.3.3 Stop States ..............................................................................................................17
3.4 SAFE-RELATED I/O SIGNAL MONITORING ............................................. 19 3.5 EMERGENCY STOP................................................................................... 29 3.6 SAFE SPEED MONITORING...................................................................... 30 3.7 SAFE MACHINE POSITION MONITORING ............................................... 32 3.8 MCC OFF TEST .......................................................................................... 34 3.9 SAFETY POSITION SWITCH FUNCTION .................................................. 37 3.10 SAFETY RELATED PARAMETERS CHECK FUNCTION........................... 39 3.11 PARAMETER LOCK FUNCTION ................................................................ 39 3.12 SEFETY POSITION ERROR MONITORING FUNCTION ........................... 40 3.13 AMPLIFIER CIRCUIT MONITORING FUNCTION....................................... 41 3.14 SAFETY BRAKE SIGNAL OUTPUT FUNCTION ........................................ 42 3.15 CPU SELF TEST FUNCTION...................................................................... 43 3.16 RAM CHECK FUNCTION............................................................................ 44

TABLE OF CONTENTS B-64304EN-4/01
c-2
3.17 CRC CHECK FUNCTION............................................................................ 44 3.18 SAFE STOP MONITORING ........................................................................ 45 3.19 SAFE SERVO STOP FUNCTION................................................................ 46
3.19.1 Monitoring of the Excitation-Off Signal ................................................................47 3.19.2 User Ladder Processing..........................................................................................49 3.19.3 Assignment of Programmable Safety I/O Signals ..................................................50 3.19.4 Connections ............................................................................................................51 3.19.5 Restrictions.............................................................................................................53
3.20 SAFE SPINDLE STOP FUNCTION............................................................. 54 3.20.1 Monitoring of the Excitation-Off Signal ................................................................55 3.20.2 User Ladder Processing..........................................................................................57 3.20.3 Assignment of Programmable Safety I/O Signals ..................................................59 3.20.4 Connections ............................................................................................................60 3.20.5 Restrictions.............................................................................................................62
3.21 DUAL BRAKE MONITOR FUNCTION......................................................... 63 3.21.1 Brake Test...............................................................................................................63 3.21.2 Brake Test Procedure .............................................................................................63 3.21.3 Details of Brake Test ..............................................................................................66 3.21.4 Suspension and Restart of Brake Test ....................................................................67 3.21.5 Brake Configuration ...............................................................................................68
4 INSTALLATION ....................................................................................70 4.1 OVERALL CONNECTION DIAGRAM ......................................................... 71
5 I/O SIGNALS.........................................................................................79 5.1 OVERVIEW ................................................................................................. 80 5.2 SIGNAL ADDRESS ..................................................................................... 81 5.3 SIGNALS ..................................................................................................... 87 5.4 PROGRAMMABLE SAFETY I/O SIGNAL ................................................. 107 5.5 NOTE ON 2-PATH CONTROL (T SERIES) .............................................. 108
5.5.1 2-path Control (T Series)......................................................................................108
6 PARAMETERS....................................................................................109 6.1 OVERVIEW ............................................................................................... 110 6.2 DATA TYPE............................................................................................... 111 6.3 REPRESENTATION OF PARAMETERS .................................................. 112 6.4 STANDARD PARAMETER STTING TABLES........................................... 113 6.5 PARAMETERS.......................................................................................... 115 6.6 PROFIBUS-DP PARAMETER SETTINGS ................................................ 145
7 START-UP...........................................................................................147 7.1 START-UP OPERATION........................................................................... 148
7.1.1 Acceptance Test and Report for Safety Functions ...............................................148 7.2 START-UP OF THE SAFETY FUNCTION ................................................ 150
7.2.1 Initial Start-up.......................................................................................................150 7.2.2 Series (2nd and Subsequent Machines) Startup ...................................................152 7.2.3 Troubleshooting ...................................................................................................152
8 ALARM MESSAGE.............................................................................153

B-64303EN-4/01 TABLE OF CONTENTS
c-3
9 DIAGNOSIS.........................................................................................161 9.1 MCC OFF TEST STATUS SCREEN ......................................................... 162 9.2 CROSS CHECK DATA SCREEN .............................................................. 163 9.3 FLOW MONITORING SCREEN ................................................................ 167 9.4 FEED LIMIT MONITORING SCREEN....................................................... 168 9.5 SAFE MACHINE POSITIONING MONITORING SCREEN ....................... 170 9.6 SAFETY POSITION ERROR MONITORING SCREEN............................. 171 9.7 DIAGNOSIS SCREEN............................................................................... 172
10 SAMPLE SYSTEM CONFIGURATION...............................................175 10.1 SAMPLE CONFIGURATION ..................................................................... 176
10.1.1 Example of Configuration Using a Single MCC..................................................176 10.1.2 Example of Configuration Using Multiple MCCs ...............................................177
10.2 SAMPLE CONNECTIONS......................................................................... 178 10.2.1 Emergency Stop Signal (*ESP)............................................................................178 10.2.2 Guard Open Request Signal (ORQ) .....................................................................179 10.2.3 Test Mode Signal (OPT) ......................................................................................179 10.2.4 Guard Open Inhibit Signal (*OPIHB), Monitoring Result Signal (RSVx,RSPs),
Safety check Request Signal (*VLDVx,*VLDPs)...............................................180 10.2.5 MCC Off Signal (*MCF,*MCFVx,*MCFPs,*DCALM), MCC
Contact State Signal (*SMC) ...............................................................................184 10.3 EXAMPLE OF APPLICATION ................................................................... 185
10.3.1 Rotating the Spindle Manually in the Emergency Stop State ..............................185
11 APPLICATION OF OTHER FUNCTIONS ...........................................186 11.1 OVERVIEW ............................................................................................... 187 11.2 EXTERNAL DECELERATION................................................................... 188
11.2.1 Overview ..............................................................................................................188 11.2.2 Specifications .......................................................................................................189 11.2.3 Signals ..................................................................................................................191
11.2.3.1 Details on signals............................................................................................. 191 11.2.3.2 Signal address .................................................................................................. 192
11.2.4 Parameters ............................................................................................................192 11.3 SPINDLE OUTPUT CONTROL BY THE PMC .......................................... 195
11.3.1 Overview ..............................................................................................................195 11.3.2 Specifications .......................................................................................................196 11.3.3 Signals ..................................................................................................................197
11.3.3.1 Details on signals............................................................................................. 197 11.3.3.2 Signal address .................................................................................................. 198
11.3.4 Parameters ............................................................................................................198 11.4 SPINDLE POSITIONING (T SERIES) ....................................................... 199
11.4.1 Overview ..............................................................................................................199 11.4.2 Specifications .......................................................................................................200 11.4.3 Signals ..................................................................................................................202
11.4.3.1 Details on signals............................................................................................. 202 11.4.3.2 Signal address .................................................................................................. 203
11.4.4 Parameters ............................................................................................................203 11.5 Cs CONTOUR CONTROL......................................................................... 211
11.5.1 Overview ..............................................................................................................211 11.5.2 Specifications .......................................................................................................212

TABLE OF CONTENTS B-64304EN-4/01
c-4
11.5.3 Signals ..................................................................................................................213 11.5.3.1 Details on signals............................................................................................. 213 11.5.3.2 Signal address .................................................................................................. 214
11.5.4 Parameters ............................................................................................................215 11.6 SPINDLE ORIENTATION.......................................................................... 218
11.6.1 Overview ..............................................................................................................218 11.6.2 Specifications .......................................................................................................218 11.6.3 Signals ..................................................................................................................219
11.6.3.1 Details on signals............................................................................................. 219 11.6.3.2 Signal address .................................................................................................. 220
11.6.4 Parameters ............................................................................................................221 11.6.5 Sequence...............................................................................................................224
12 COMPONENTS LIST ..........................................................................225 12.1 HARDWARE COMPONENTS ................................................................... 226
12.1.1 Series 0i-MODEL D.............................................................................................226 12.1.2 Hardware Components for Other Units................................................................227
12.2 SOFTWARE .............................................................................................. 230 12.3 SERVO AMPLIFIER .................................................................................. 231
APPENDIX
A Directives, Standards and Technical Conditions for 3rd Party Servo / Spindle Motors & Encoders when Applying FANUC / GE Fanuc Dual-check Safety ............................................................239 A.1 GENERAL ................................................................................................. 240 A.2 MANDATORY STANDARDS AND DIRECTIVES...................................... 241 A.3 SPINDLES................................................................................................. 243
A.3.1 Spindle Motors – Driven by FANUC / GE Fanuc Spindle Amplifier..................243 A.3.2 Spindle Encoder – Speed / Position Feedback Sensor Embedded in Motor ........243
A.4 SERVO ...................................................................................................... 244 A.4.1 Servo Motors – Driven by FANUC / GE Fanuc Servo Amplifier .......................244 A.4.2 Servo Encoder – Speed / Position Feedback Sensor Embedded in Motor ...........244
A.4.2.1 Encoder with FANUC / GE Fanuc Serial Interface......................................... 244 A.4.2.2 A/B-Phase Sine-wave Interface Connected to FANUC / GE Fanuc
Interpolation Circuit......................................................................................... 244

B-64303EN-4/01 1.OVERVIEW
- 1 -
1 OVERVIEW Setup for machining, which includes attaching and detaching a workpiece to be machined, and moving it to the machining start point while viewing it, is performed with the protection door opened. The Dual Check Safety function provides a means for ensuring a high level of safety with the protection door opened. The simplest method of ensuring safety when the protection door is open is to shut off power to the motor drive circuit by configuring a safety circuit with a safety relay module. In this case, however, no movements can be made on a move axis (rotation axis). Moreover, since the power is shut off, some time is required before machining can be restarted. This drawback can be corrected by adding a motor speed detector to ensure safety. However, the addition of an external detector may pose a response problem, and the use of many safety relay modules results in a large and complicated power magnetic cabinet circuit. With the Dual Check Safety function, two independent CPUs built into the CNC monitor the speed and position of motors in dual mode. An error in speed and position is detected at high speed, and power to the motor is shut off via two independent paths. Processing and data related to safety is cross-checked by two CPUs. To prevent failures from being built up, a safety-related hardware and software test must be conducted at certain intervals time. The Dual Check Safety system need not have an external detector added. Instead, only a detector built into a servo motor or spindle motor is used. This configuration can be implemented only when those motors, detectors built into motors, and amplifiers that are specified by FANUC are used. The Dual Check Safety function ensures safety with the power turned on, so that an operator can open the protection door to work without turning off the power. A major feature of the Dual Check Safety function is that the required time is very short from the detection of an abnormality until the power is shut off. A cost advantage of the Dual Check Safety function is that external detectors and safety relays can be eliminated or simplified. If a position or speed mismatch is detected by a cross-check using two CPUs, the safety function of the Dual Check Safety works the power to be shut off (MCC off) to the motor drive circuit.
IMPORTANT The Dual Check Safety function cannot monitor the
stop state of the motors.

1.OVERVIEW B-64303EN-4/01
- 2 -
1.1 DIRECTIVES AND STANDARDS
1.1.1 Directives Machine tools and their components must satisfy the EC directives listed below. The FANUC CNC systems with the Dual Check Safety function are compatible with all of these directives.
Directives Directive 98/37/EC 1998 Safety of machinery
Directive 2004/108/EC 2004 Electromagnetic compatibility
Directive 2006/95/EC 2006 Low Voltage Equipment
1.1.2 Related Safety Standards To be compatible with the directives, especially the machine directive, the international standards and European standards need to be observed.
Important safety standards ISO 12100-1:2003
Safety of machinery - Basic concepts, general principles for design - Part 1: Basic terminology, methodology
ISO 12100-2:2003 Safety of machinery - Basic concepts, general principles for design - Part 2: Technical principles and specifications
EN954-1 1996 Safety of machinery - Safety-related parts of control systems - Part 1: General principles for design
ISO 14121-1:2007 Safety of machinery - Principles for risk assessment IEC 60204-1:2005 Safety of machinery - Electrical equipment of machines
Part 1: General requirements ISO 13849-1:2006 Safety of machinery -- Safety-related parts of control systems -- Part 1:
General principles for design ISO 13849-2:2006 Safety of machinery -- Safety-related parts of control systems -- Part 2:
Validation IEC 61508:2000 Functional safety of electrical/electronic/programmable electronic
safety-related systems-- part 1-part 7 IEC 62061:2005 Safety of machinery - Functional safety of safety-related electrical, electronic
and programmable electronic control systems
B-64303EN-4/01 1.OVERVIEW
- 3 -
1.1.3 Risk Analysis and Evaluation
According to the machine directive, the manufacturer of a machine or machine components and a responsible person who supplies a machine or machine components to the market must conduct risk evaluation to identify all risks that can arise in connection with the machine or machine components. Based on such risk analysis and evaluation, a machine and machine components must be designed and manufactured. Risk evaluation must reveal all remaining risks and must be documented.
1.1.4 Certification Test Certification of the dual check safety function
The German certification organization TUV PS has certified that the dual check safety function satisfies the safety standards.

1.OVERVIEW B-64303EN-4/01
- 4 -
1.2 DEFINITION OF TERMS
1.2.1 General Definition of Terms
Reliability and safety Reliability and safety are defined by EN292-1 as follows:
Term Definition Reliability Capability of a machine, machine component, or equipment to
perform its required function under a specified condition for a specified period
Safety Capability of a machine to perform its function without injuring the health under a condition of use for an intended purpose specified in the operator's manual and allow its transportation, installation, adjustment, maintenance, disassembly, and disposal
1.2.2 Definition of Terms Related to the Safety Function
Safety-related I/O signal
Safety-related I/O signals are input/output signals monitored by two systems. These signals are valid for each feed axis and spindle with a built-in safety function, and are used with each monitoring system. Example: Protection door state signal
Safety stop When a safety stop occurs, power to the drive section is shut off. The drive section can generate neither a torque nor dangerous operation. The following are measures for incorporating the safety stop feature: Contactor between the line and drive system (line contactor) Contactor between the power section and drive motor (motor contactor) If an external force is applied (such as a force applied onto a vertical axis), an additional measure (such as a mechanical brake) must be securely implemented to protect against such a force.
Safety limitation speed When the drive system has reached a specified limitation speed, a transition is made to the safe stop state. A measure must be implemented to prevent a set limitation speed from being changed by an unauthorized person.
Safety machine position When the drive system has reached a specified positional limit, a transition is made to the safety stop state. When a positional limit is set, a maximum move distance traveled until a stop occurs must be considered. A measure must be implemented to prevent a set positional limit from being changed by an unauthorized person.

B-64303EN-4/01 1.OVERVIEW
- 5 -
1.3 BASIC PRINCIPLE OF DUAL CHECK SAFETY
1.3.1 Features of Dual Check Safety Dual Check Safety function has the following features. • Two-channel configuration with two or more independent CPUs • Cross-check function for detecting latent errors
Detection A servo motor detector signal is sent via the servo amplifier and is applied to the CNC through the FSSB interface. Then, it is fed to two CPUs: a CNC CPU and a Servo CPU. A spindle motor detector signal is sent via the spindle amplifier and is applied to the CNC connected through the serial interface. Then, it is fed to two CPUs: a CNC CPU and a CPU built into the spindle amplifier. The safety related signal such as guard signal is sent via the independent I/O unit and is applied to the CNC through the I/O link interface. Then, it is fed to two CPUs: a CNC CPU and a PMC CPU.
Evaluation The safety function is monitored independently by a CNC CPU and servo CPU or by a CNC CPU and spindle CPU. Each CPU cross-checks data and results at certain intervals.
Response If the monitoring function detects an error, the CNC CPU and the servo/spindle CPU switch off the MCC via independent paths to shut off the power to the feed axis and spindle.
1.3.2 Compliance with the Safety Standard The Dual Check Safety function satisfies the requirements of the following safety standard. • EN954-1 :1997 Category 3 • IEC62061 :2005 SIL2 • IEC61508 :2000 SIL2 • ISO13849-1 :2006 PL d
These safety standards require the following: • The safety function of a safety-related portion must not degrade
when a single failure occurs. • Single errors must be detected at all times when natural
execution is possible. To satisfy these requirements, the Dual Check Safety function is implemented using the two-channel configuration shown below.

1.OVERVIEW B-64303EN-4/01
- 6 -
PMCCPU
Cross-checkMotor detector
電磁接触器
Shut off power
ServoSpindle
CPU
Door switch signal
Magneticcontactor
CPUCNCCNCCPU
Shut off power
results of data andsignal
Monitoring of servo motor and spindle motor movement Data output from the detector built into each motor is transferred to the CNC through the amplifier. The safety of this path is ensured by using motors and amplifiers specified by FANUC.
Cross-monitoring using 2 CPUs Two CPUs built into the CNC are used to cross-monitor the safety function. Each CPU is periodically checked for errors. If one system fails, the servo and spindle can be stopped safely.
Power shutoff via two paths If an error is detected, the power is shut off via two power shutoff paths. The paths need to be tested for built-up failures within a certain time.
Input signal safety Safety-related input signals such as the protection door lock/unlock signal are monitored doubly. If a mismatch between the two occurrences of a signal is detected, the power to the motor drive circuit is shut off. This cross-check is constantly made.
Output signal safety A signal is output (via two paths) to the relay used to shut off the power to the motor drive circuit. An error is detected by a MCC off Test. For detection of built-up failures, a MCC off Test needs to be conducted at certain intervals. This MCC off Test is not mandatory when machining is performed with the protection door closed. (The MCC off Test should be performed, before the protection door is open after the certain intervals.)

B-64303EN-4/01 1.OVERVIEW
- 7 -
1.3.2.1 Latent error detection and cross-check
Detection of latent errors This detection function can detect latent software and hardware errors in a system that has a two-channel configuration. So, the safety-related portions of the two channels need to be tested at least once within an allowable period of time for latent errors. An error in one monitoring channel causes a mismatch of results, so that a cross-check detects the error.
CAUTION Forced detection of a latent error on the MCC
shutoff path must be performed by the user through a MCC off Test (after power-on and at intervals of a specified time (within normally 24 hours)). When the system is operating in the automatic mode (when the protection door is closed), this detection processing is not requested as mandatory. But, before the protection door opens after the specified time, the detection processing is required mandatory. If this has not been performed, lock for the protection door should not be released.
Cross-check
A latent safety-related error associated with two-channel monitoring can be detected as a result of cross-checking.
NOTE An error detected as the result of forced latent
error detection or cross-checking leads to a safety stop state. (See Subsec. 3.3.3).
1.3.2.2 Safety monitoring cycle and cross-check cycle
The safety function is subject to periodical monitoring in a monitoring cycle. The following functions are monitored at every 8ms. • Safe speed monitoring (servo motor) • Safe machine position monitoring (servo motor) • Safe position error monitoring (servo motor) The cross-check cycle represents a cycle at which all I/O data subject to cross-checking is compared. Cross-check cycle: 8 ms

1.OVERVIEW B-64303EN-4/01
- 8 -
1.3.2.3 Error analysis The table below indicates the results of system error analysis controlled by the Dual Check Safety function.
Error analysis when the protection door is open Error Cause Action
Excessive speed for Spindle axis
Amplifier or control unit failure, operation error, etc.
Safety limitation speed monitoring functionEN60204-1 Category 1/0 stop
Excessive speed for feed axis
Amplifier or control unit failure, operation error, etc.
Safety limitation speed monitoring functionEN60204-1 Category 1/0 stop
Feed axis safety machine position error
Amplifier or control unit failure, operation error, etc.
Safety machine position monitoring function EN60204-1 Category 1/0 stop
Input/output signal error
Wiring error, control unit failure, etc. Safe-related I/O signal monitoring functionEN60204-1 Category 1/0 stop
Error analysis when the protection door is closed
Error Cause Action Input/output signal error
Wiring error, control unit failure, etc. Safe-related I/O signal monitoring function EN60204-1 Category 1/0 stop
1.3.2.4 Remaining risks
The machine tool builder is to make a failure analysis in connection with the control system and determine the remaining risks of the machine. The Dual Check Safety system has the following remaining risks: a) The safety function is not active until the control system and
drive system have fully powered up. The safety function cannot be activated if any one of the components of the control or drive is not powered on.
b) Interchanged phases of motor connections, reversal in the signal of encoder and reversal mounting of encoder can cause an increase in the spindle speed or acceleration of axis motion. If abnormal speed detected, system controlled to brake to zero speed, but no effective for above error. MCC off is not activated until the delay time set by parameter has expired. Electrical faults (component failure etc.) may also result in the response described above.
c) Faults in the absolute encoder can cause incorrect operation of the safety machine position monitoring function.
d) With a 1-encoder system, encoder faults are detected in a single channel, but by various HW and SW monitoring functions. The parameter related to encoder must be set carefully. Depending on the error type, a category 0 or category 1 stop function according to EN60204-1 is activated.
e) The simultaneous failure of two power transistors in the inverter may cause the axis to briefly (motion depend on number of pole pairs of motor)

B-64303EN-4/01 1.OVERVIEW
- 9 -
Example: An 8-pole synchronous motor can cause the axis to move by
a maximum of 45 degrees. With a lead-screw that is directly driven by, e.g.16mm per revolution, this corresponds to a maximum linear motion of approximately 2.0mm.
f) When a limit value is violated, the speed may exceed the set value briefly or the axis/spindle overshoot the set point position to a greater or lesser degree during the period between error detection and system reaction depending on the dynamic response of the drive and the parameter settings (see Section Safety-Functions)
g) The category 0 stop function according to EN60204-1 means that the spindles/axes are not braked to zero speed, but coast to a stop (this may take a very long time depending on the level of kinetic energy involved). This must be noted, for example, when the protective door locking mechanism is opened.
h) Amplifiers (drive power modules) and motors must always be replaced by the same equipment type or else the parameters will no longer match the actual configuration and cause Dual check Safety to respond incorrectly.
i) Dual check Safety is not capable of detecting errors in parameterization and programming made by the machine tool builder. The required level of safety can only be assured by thorough and careful acceptance.
j) There is a parameter that MCC off test is not to be made in the self test mode at power-on as in the case of machine adjustment. This parameter is protected, only changed by authorized person. IF MCC off test is not conducted, MCC may not be off at stop response is measured.
k) Safety machine position monitoring function does not apply to the spindle axis.
l) During machine adjustment, an exact motion may be executed incorrectly until the safety functions setup correctly and confirm test is completely.
m) Before the reference point return is performed and the MCC off test is performed, it may be dangerous because the correct operation does not be guaranteed. So, the careful operations are required when the machine is operated in the status that the protection door opens.
n) The delay timer is prepared for the cross-checking of the safety related input/output signals. When the inconsistency exists between the signal from the 2 paths, system will recognize this failure, after this time is passed. The system will start the sequence of MCC shut-off, when this time is passed after the inconsistency is detected.
o) Even if <Signal State via PMC> does not match <Signal State via DCSPMC> for the time specified by parameter No. 13810 after the CNC starts, no alarm occurs.

1.OVERVIEW B-64303EN-4/01
- 10 -
1.4 GENERAL INFORMATION The following requirements must be fulfilled for the Dual-Check System: • All conditions of the certification report have to be respected. • The machine manufacturer is asked to check for insulation and
protection connections before shipping the machine. • The procedures for the changes in the System (either HW or SW)
should be referred to maintenance manual (B-64305EN). When safety related components are exchanged, confirmation test regarding safety functions can be performed according to Chapter 7.
• Programming in ladder logic should be referred to PMC programming manual (B-64393EN).
Training
FANUC Training Center provides versatile training course for the person who is concerned with hardware installation, maintenance and operation. FANUC recommend studying and learning in the training center how efficiently operate FANUC products. There are 3 CNC training course. [ CNC ELEMENTARY COURSE ] Provides basics of CNC functions, operation and programming. The course is recommended before taking more specialized training courses to gain best effects. MAIN ITEMS OF TRAINING • CNC functions • Configuration of CNC • Configuration and function of servo system • Basic programming of CNC • Part programming of milling machine • Part programming of turning machine • Introduction of Custom Macro function More information and course registration Yamanakako-mura, Yamanashi Prefecture : 401-0501, JAPAN Phone : 81-555-84-6030 Fax : 81-555-84-5540 Internet: www.fanuc.co.jp/eschool

B-64303EN-4/01 2.SYSTEM CONFIGURATION
- 11 -
2 SYSTEM CONFIGURATION The Dual Check Safety function has the following components.
Applicable CNC FANUC Series 0i-MODEL D
Amplifier, Motor and I/O For details on applicable amplifiers, motors, and I/O units, see Chapter 12, "COMPONENTS LIST".
NOTE The servo amplifiers and servo motors connected
to the CNC via the I/O link interface do not support the Dual Check Safety function.

3.SAFETY FUNCTIONS B-64303EN-4/01
- 12 -
3 SAFETY FUNCTIONS

B-64303EN-4/01 3.SAFETY FUNCTIONS
- 13 -
3.1 APPLICATION RANGE The Dual Check Safety function assumes the following configuration: A) At least, one protective door is provided. B) If protective door is closed, safety is assured. When the operator makes a request to open the protective door, the safety functions are enabled, and the protective door can be unlocked. While the protective door is open, the active safety functions assure safety. When the request to open the protective door is canceled, the protective door is locked, and the safety functions are disabled. The Dual Check Safety function provides these safety functions while the protective door is open, as described above. Some of the safety functions continue working while the protective door is closed.
WARNING The machine tool builder is responsible for the
followings. - To secure the safety by the sequence to make
safety function effective according to the status of the protective door
- To secure the safety while the protective door is closed
- To secure the safety related to the other moving components and so on except FANUC servo motors and spindle motors controlled by the Dual Check Safety function, while the protective door is open
Safety function
The Dual Check Safety function has the following safety functions: • Safe-related I/O signal dual monitoring Emergency stop input, protective door open/close state, relay state for turning off the MCC Output signal for shutting off the power (turning the MCC off) To detect the latent cause of an abnormal state of this output, a
MCC off Test must be made. • Spindle motor Safe speed monitoring • Servo motor Safe speed monitoring Safe machine position monitoring Safe position error monitoring

3.SAFETY FUNCTIONS B-64303EN-4/01
- 14 -
CAUTION This safety function is enabled while the protective
door is open after a request to open the protective door is made. If the request to open the protective door is canceled and if the protective door is closed, this safety function is disabled. The dual input check of the safe-related I/O signal monitoring function and the emergency stop function are always active, regardless of whether the protective door is opened or closed.
Protective door
Servo motor
Spindle motor
Power down
(MCC)
CNC
Servo
Spindle software
Common power supply
Servo amplifier
Spindle amplifier
Safe speed monitoring
Safe speed monitoring.Safe machine position monitoring. Safe position error monitoring.
Door lock open/close monitoring
Cross check
Cross check
CNC
Dual monitoring of MCC Dual power down Detection of latent cause of error by MCC off test
Safe speed of servo motor and machine position are checked by the CNC and the Servo in redundant mode
The CNC and the spindle check the safe speed of the spindle motor in redundant mode.
Dual monitoring of
protective door state
Protective door lock
signal
Power down
Dual monitoring
of MCC
Dual monitoring of
emergency stop signal
PMC
Emergency stop
Safety related signal is checked by the CNC(DCS PMC) and the PMC in redundant mode
Power down direction
DCSPMC

B-64303EN-4/01 3.SAFETY FUNCTIONS
- 15 -
3.2 BEFORE USING THE SAFETY FUNCTION
3.2.1 Important Items to Check Before Using the Safety Function When using the safety function for the first time upon assembly of the machine, replacing a part, or changing a safety parameter (such as a safe speed limit or safe range as described in Chapter 6), the user must check that all safety parameters are correct and that all safety functions are working normally. A return reference position must be made on each axis. The user must also check the absolute position of the machine. For details, see Chapter 7, “START UP.”
3.2.2 MCC off Test of the Safe Stop Function An MCC off Test of the safe stop function monitors the contact state of the electromagnetic contactor (MCC), compares the state with a command to the electromagnetic contactor, and checks that the safe stop function works normally. The user of the machine must carry out the test. This test must be carried out when the CNC is turned on or when 24 hours have elapsed after the previous test is completed. If the CNC is turned on or if 24 hours have elapsed after the previous test is completed, a guard open request (protective door open request) should not be accepted until the test is performed. A machine tool builder must make the ladder program to realize this sequence.

3.SAFETY FUNCTIONS B-64303EN-4/01
- 16 -
3.3 STOP
3.3.1 Stopping the Spindle Motor Because the spindle motor is an induction type motor, power-down during rotation causes the motor to continue rotating for a certain amount of time. From a safety standpoint, the motor may have to be stopped immediately. If an error is detected and the spindle is judged to be controlled, it is possible to stop spindle motor by the ladder program. In case of emergency stop and abnormal condition of safety related I/O, it is necessary to design the ladder program to shut off the power after waiting the specified time elapses. To speed down and stop the spindle, the PMC must input the spindle Emergency Stop signals (*ESPA<Gn071.1> and *ESPB<Gn075.1>). When this signal is input, the spindle slows down and stops. (A Ladder program for inputting this signal in case of alarm must be created.) The input of *EMG emergency stop input (connector CX4) of the common power supply or βiSVSP also has the same effect. If the Emergency Stop signal is connected to emergency stop input (connector CX4) of common power supply or βiSVSP, the spindle slows down and stops in the emergency stop state. If the spindle does not stop in spite of the stop command, the MCC is shut off. If this processing is not performed, power-down causes the spindle motor to continue rotating at the speed prior to power-down (and eventually stopping in the end).
CAUTION 1 When the servo alarm or spindle alarm related to
the communication error or position detector is caused, MCC off signal corresponding to the servo or spindle is output. Shut off the MCC after executing appropriate procedure such as spindle stop operation. According to the setting value of the parameter, MCC off signals of all axes, which belong to the same path of the spindle that causes an alarm, are output. Shut off the MCC after executing appropriate procedure such as spindle stop operation.
2 A controlled stop can be made based on parameter settings on occurrence of a safe speed over alarm.
3 Since the synchronous spindle motor is a synchronous motor, not an induction motor, power interruption causes a dynamic break stop depending on the system configuration.

B-64303EN-4/01 3.SAFETY FUNCTIONS
- 17 -
3.3.2 Stopping the Servo Motor Because the servo motor is a synchronous motor, power-down results in a dynamic brake stop. The dynamic brake stop is electric braking in which the excited rotor is isolated from the power source and the generated electric energy is used up in the winding. An internal resistor provides additional braking. Unlike an induction motor, the servo motor does not coast because of this function. If the input of the Emergency Stop signal or an error of a safe-related signal or speed monitoring is detected, the CNC automatically specifies a command to zero the speed and reduces the speed to zero (controlled stop). After the motor slows down and stops, the power is turned off, and the motor is brought into the dynamic brake stop state. To slow down and stop the motor, some parameters must be specified in the CNC. If those parameters are not specified, the motor is immediately brought into the dynamic brake stop state. When abnormal state is detected in monitoring safety speed or so on, a dynamic brake stop is made.
3.3.3 Stop States The following stop states are possible.
Safe stop state The power to the motor is shut off (MCC off state) in this state. If the spindle motor can be controlled, the ladder program must shut off the power after the spindle motor is slowed down to a stop. If the spindle motor cannot be controlled, the power is immediately shut off. If the servo motor can be controlled, the motor is slowed down to a stop and then brought into the dynamic brake stop state. If the motor cannot be controlled, the motor is immediately brought into the dynamic brake stop state. If the power is shut off immediately, the spindle motor continues at the same speed prior to the abnormal event and eventually comes to a stop. If the spindle motor can be slowed down to a stop, the operation is performed as instructed by the PMC and then the power is shut off. For the synchronous spindle motor, immediate power interruption causes a dynamic break stop depending on the system configuration.

3.SAFETY FUNCTIONS B-64303EN-4/01
- 18 -
Controlled stop state The power to the motor is not shut off. The servo motor and the spindle motor are controlled to stop. In the controlled stop state of either motor, the safety function is active if the condition for enabling the safety function is satisfied (the door is open). If a further abnormal event occurs, the motor is brought into the safe stop state by the ladder program.
WARNING 1 The machine tool builder must design the machine
so that the machine is kept in the stop state if the power to the servo motor driving circuit is shut off. Example) Brake mechanism that would not drop the vertical axis after the power is shut off
2 If the power to the spindle motor driving circuit is shut off, the spindle motor continues rotating at the speed before the power-down and eventually comes to a stop. A measure must be taken so that this coasting does not affect safety.

B-64303EN-4/01 3.SAFETY FUNCTIONS
- 19 -
3.4 SAFE-RELATED I/O SIGNAL MONITORING A set of safe-related I/O signals are connected to the two channels of the I/O respectively. As for safe-related I/O signals, a pair of signals are prepared and connected to each I/O through different paths. The two independent CPUs individually check the input signals. If a mismatch between two corresponding signals is found, the system enters the safe stop state. The following safe-related I/O signals are monitored or output in redundant mode: • Emergency stop input signal • Protective door state input signal (Request to monitor for each
axis) • Input signal for selecting safety speed monitoring and safety
position monitoring • Input signal for monitoring the MCC contact state • Output signal for turning off the MCC (power-down) • Output signal for position switch • Output signal for brake control • User defined safe-related I/O signals In order to setup double monitoring system, machine tool builder must connect safety signals to both I/O Link #1, #2 and I/O Link#3, PROFIBUS-DP.
IMPORTANT If the safety input signals, except for Emergency
Stop input signals, are connected to the I/O module, a Ladder program must be created to establish a one-to-one relationship between the actual input (X) and the input to the CNC (G).
The duplicated signals are always checked for a mismatch, regardless of whether the safety function is active or not. When a signal state changes, the pair of signals may not match for some period because of a difference in response. The Dual Check Safety function checks whether a mismatch between the two signals continues for a certain period of time, so that an error resulting from the difference in response can be avoided. The check period must be specified as a safety parameter.
Parameter number Name 1945 Safe-related input/output signal check timer
The following signals are not defined as safe-related I/O signals and are not duplicated. The signals, however, are necessary for the system. • Input signal for making a protective door open request • Input signal for starting the test mode • Output signal for requesting a MCC off Test

3.SAFETY FUNCTIONS B-64303EN-4/01
- 20 -
This section briefly describes the signals. For details, see Chapter 5, “I/O SIGNALS.” For specific connections, see the sample system configuration in Chapter 10, “SAMPLE SYSTEM CONFIGURATION”.
NOTE 1 Dual Check Safety PMC (DCS PMC) 2 For the PMC, refer to "PMC PROGRAMMING
MANUAL (B-64393EN)". 3 When I/O Link and PROFIBUS-DP are connected
to DCS PMC at the same time, the X/Y signals cannot be allocated to PROFIBUS-DP.
4 Please activate “Broken wire detection” of the slave, which connect with PROFIBUS network as Safety-related I/O. As for detail, please refer to Section 6.6, “PROFIBUS-DP parameter settings”.
CAUTION
Ladder functional instruction MOVB, MOVD and MOVW cannot be used with ladder for Dual Check Safety PMC. Use MOVN instead of them.
IMPORTANT Some I/O signals related to the Dual Check Safety
function are set for each machine group. With the FS0i-D, the number of machine groups is 1 at all times. In this case, those signals that are set for each machine group are always assigned to the first path. So, use the signal area for the first path to input/output those signals.

B-64303EN-4/01 3.SAFETY FUNCTIONS
- 21 -
I/O related with Dual Check Safety Function n = (NC path number - 1) (for PMC) m = (NC path number - 1) × 20 (for DCS PMC)
Symbol Signal name I/O address 1 *ESP Emergency Stop signal <X0008.4> (PMC)
<X0008.4> (DCS PMC) Dual input monitoring
2 *SGOPN Guard State signal Machine side signal Dual input *VLDVx Safety Check Request signal (Servo) <Gn750.0 to 4> (PMC)
<G(002+m).0 to 4> (DCS PMC) Dual input monitoring
3 *VLDPs Safety Check Request signal (Spindle) <Gn751.0 to 1> (PMC)
<G(003+m).0 to 1> (DCS PMC) Dual input monitoring
SVAn/ SVBn
Safety Speed / Safety Position Selection signal (Servo)
<Gn752.0 to 4/Gn753.0 to 4> (PMC) <G(004+m).0 to 4 / G(005+m).0 to 4> (DCS PMC)
Dual input monitoring
4 SPAn/ SPBn
Safety Speed Selection signal (Spindle) <Gn754.0 to 1/.4 to 5> (PMC) <G(006+m).0 to 1/.4 to 5> (DCS PMC)
Dual input monitoring
5 *SMC MCC Contact State signal <Gn748.6> (PMC) <G(000+m).6> (DCS PMC)
Dual input monitoring
*DCALM MCC Off signal (for all system)
<F0748.7> (PMC) <F000.7> (DCS PMC)
Dual output
*MCF MCC Off signal (for each machine group)
<Fn748.1> (PMC) <F(000+m).1> (DCS PMC)
Dual output
*MCFVx MCC Off signal (for each servo axis)
<Fn752.0 to 4> (PMC) <F(004+m).0 to 4> (DCS PMC)
Dual output 6
*MCFPs MCC Off signal (for each spindle)
<Fn753.0 to 1> (PMC) <F(005+m).0 to 1> (DCS PMC)
Dual output
7 BRKx Safety Brake signal (Servo) <Fn754.0 to 4> (PMC) <F(006+m).0 to 4> (DCS PMC)
Dual output
8 SPS Safety Position Switch signal <Fn755 to 758> (PMC) <F(007+m) to (010+m)> (DCS PMC)
Dual output
Dual input monitoring
9
Programmable Safety I/O signals
Dual output10 ORQ Guard Open Request signal <Gn191.3> (PMC) Input 11 OPT Test Mode signal <Gn191.2> (PMC) Input 12 *OPIHB Guard Open Inhibit signal <Fn191.0> (PMC)
<F(019+m).0> (DCS PMC) Dual output
RSVx Monitoring result signal (Servo) <Fn750.0 to 4> (PMC) <F(002+m).0 to 4> (DCS PMC)
Dual output
13 RSPs Monitoring result signal (Spindle) <Fn751.0 to 1> (PMC)
<F(003+m).0 to 1> (DCS PMC) Dual output
14 RQT MCC Off Test Execution Request signal <Fn191.2> (PMC) Output 15 POSEx Position Information Effect signal
(Servo) <Fn766.0 to 4> (PMC) <F(018+m).0 to 4> (DCS PMC)
Dual output
16 STBT Brake Test Start signal <Gn193.2> (PMC) Input 17 RQBT Brake Test Execution Request signal <Fn191.3> (PMC) Output
3.SAFETY FUNCTIONS B-64303EN-4/01
- 22 -
Safe-related I/O
1. *ESP Emergency Stop signal (input) This signal is Emergency Stop signal and is monitored in redundant mode. The signal is connected to the *ESP input of the servo amplifier as well.
2. *SGOPN Guard State signal (Machine side input signal) The signal is provided for double monitoring of the protective door state. The signal is connected so that it is normally set to 1 while the protective door is closed and locked (door closed) and set to 0 otherwise (door opened). These states are implemented by the combination of the safety door and safety relays. The PMC ladder for safety check must check the state of axes by asserting the Safety Request signal, when a protective door is open.
3. *VLDVx, *VLDPs Safety Check Request signal (input) These signals are monitored in redundant mode. These signals request safety check when a protective door is open. These signals are prepared for each axis and each spindle. CNC monitors these signals. If safe speed range of a servo motor is exceeded in the door open state, the system enters the controlled stop state. If an axis is still not stopped, the system enters the safe stop state. If safe speed range of a spindle motor is exceeded in the door open state, the spindle motor enters free run state. (The spindle motor can also enter the controlled stop state when the safe speed range is exceeded, depending on the parameter setting.) If the spindle motor is not decelerated, the system enters the safe stop state.
4. SVAx/SVBx,SPAs/SPBs Safety Speed / Safety Position Selection signal (input) These signals are monitored in redundant mode. SVA/SVB are the signals to select safety speed / safety position for each servo axis. SPA/SPB are the signals to select safety speed for each spindle. (The values of safety speed / safety position are given by the parameters.)
5. *SMC MCC Contact State signal (input) The MCC contact state is monitored in redundant mode. In normal operation, the MCC is closed, therefore whether the contact of a relay is in an abnormally closed state cannot be detected. In the test mode, it can be detected whether the contact of relay is abnormally closed.

B-64303EN-4/01 3.SAFETY FUNCTIONS
- 23 -
6. *DCALM, *MCF, *MCFVx, *MCFPs MCC Off signal (output) With these signals, the MCC is shut off by 2 channels I/O when either one of these signals state is “0”. *DCALM is to allow turning off MCC of all system when I/O cross check alarm or some problems of safety check function are found. *MCF is to allow turning on MCC of each machine group according to emergency stop or MCC off Test. (With the FS0i-D, the number of machine groups is 1 at all times. So, the signals set for each machine group are always assigned to the first path.) *MCFVx is to allow turning on MCC of each axis according to monitor safety speed of servo axis or so on. *MCFPs is to allow turning on MCC of each spindle according to the result of monitoring safety speed of spindle. These signals are assigned on both PMC and DCS PMC. Machine tool builder must output the signal to shut off MCC when either one of these signal is “0”.
7. BRKx Safety Brake signal (output) These signals are output to control the brake of each servo axis.
8. SPS1 to SPS32 (SPS1 to SPS64 in case of T series with 2-path system) Safety Position Switch (output)
These signals show whether the machine position of each axis is stayed within the range specified by the parameters or not. When a one-path system is used, up to 32 points can be set. When a two-path system is used with the T series, up to 64 points can be set.
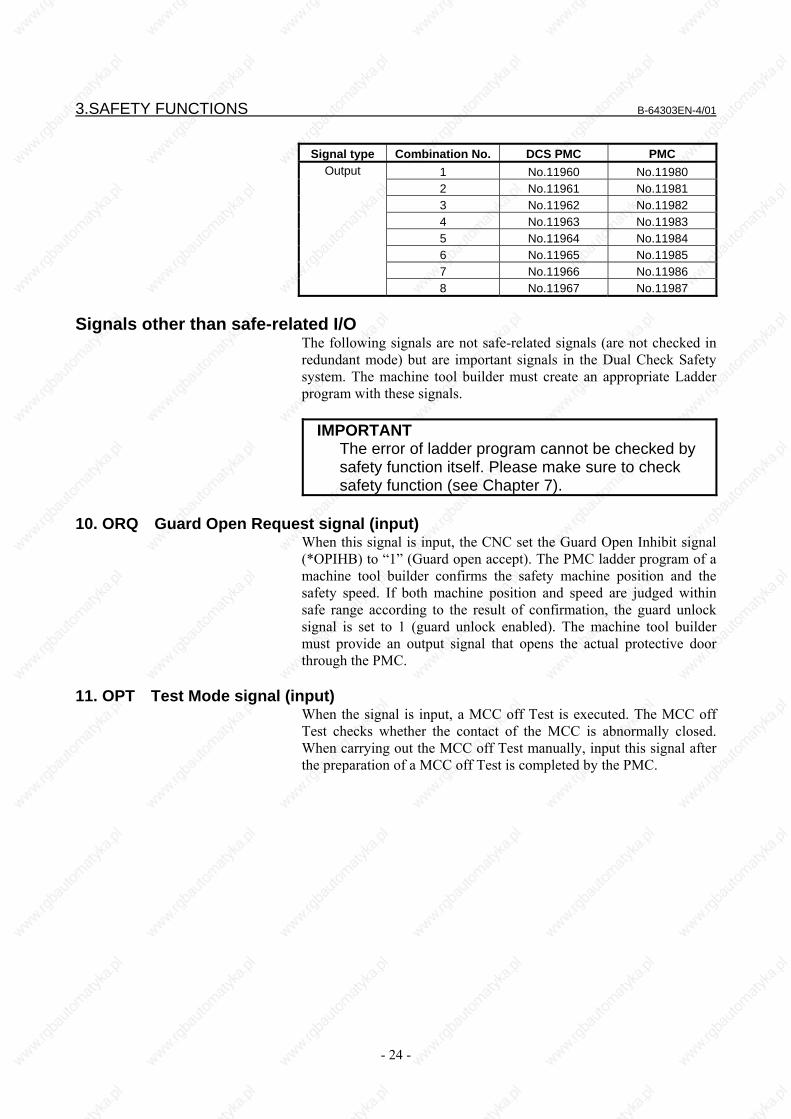
9. Programmable Safety I/O signals (input/output) The 8 bytes (64 bit) programmable safe I/Os can be freely defined as the different address from the above basic safe signals. Each byte of 8 byte programmable safe I/Os can be assigned on either address of X/Y or R or D by parameter. Each byte of the programmable safe I/O between the PMC and DCS PMC is cross-checked by the CNC and PMC. The combinations of cross-checking these signals are defined by using Safety parameters as follows.
Signal type Combination No. DCS PMC PMC 1 No.11950 No.11970 2 No.11951 No.11971 3 No.11952 No.11972 4 No.11953 No.11973 5 No.11954 No.11974 6 No.11955 No.11975 7 No.11956 No.11976
Input
8 No.11957 No.11977
3.SAFETY FUNCTIONS B-64303EN-4/01
- 24 -
Signal type Combination No. DCS PMC PMC 1 No.11960 No.11980 2 No.11961 No.11981 3 No.11962 No.11982 4 No.11963 No.11983 5 No.11964 No.11984 6 No.11965 No.11985 7 No.11966 No.11986
Output
8 No.11967 No.11987
Signals other than safe-related I/O The following signals are not safe-related signals (are not checked in redundant mode) but are important signals in the Dual Check Safety system. The machine tool builder must create an appropriate Ladder program with these signals.
IMPORTANT The error of ladder program cannot be checked by
safety function itself. Please make sure to check safety function (see Chapter 7).
10. ORQ Guard Open Request signal (input)
When this signal is input, the CNC set the Guard Open Inhibit signal (*OPIHB) to “1” (Guard open accept). The PMC ladder program of a machine tool builder confirms the safety machine position and the safety speed. If both machine position and speed are judged within safe range according to the result of confirmation, the guard unlock signal is set to 1 (guard unlock enabled). The machine tool builder must provide an output signal that opens the actual protective door through the PMC.
11. OPT Test Mode signal (input) When the signal is input, a MCC off Test is executed. The MCC off Test checks whether the contact of the MCC is abnormally closed. When carrying out the MCC off Test manually, input this signal after the preparation of a MCC off Test is completed by the PMC.

B-64303EN-4/01 3.SAFETY FUNCTIONS
- 25 -
12. *OPIHB Guard Open Inhibit signal (output) When the Guard Open Request signal (ORQ) is input, the CNC sets this signal to “1”. The machine tool builder must design the PMC ladder logic by this signal. If this signal is set to “1”, the PMC confirms safety machine position and safety speed. If the result of confirmation is judged safe, PMC turns on the signal to release guard lock and outputs the signal to open the actual protective door. If the protective door is unlocked (*SGOPN becomes “0”) while the signal is set to 0, PMC will notify alarm occurrence to an operator by lighting a lamp or so on and bring the motor into the safe stop state.
NOTE This signal is not output while MCC off Test is
carried out.
13. RSVx, RSPs Monitoring Result signal (output) These signals show the result of monitoring safety machine position and safety speed of each axis and the result of monitoring safety speed of each spindle. When Guard Open Inhibit signal (*OPIHB) is set to “1”, a machine tool builder can judge whether the machine is in the safety state or not according to these signals. If safety is confirmed as a result, turn on the signal to unlock the guard lock and output the signal to open the actual protective door.
14. RQT MCC Off Test Execution Request signal (output) If the execution of a MCC off Test is required, this signal is output. At power-on, this signal is always output. If this signal is output, a MCC off Test must be executed.
15. POSEx Position Information Effect signal (output) This signal is output when Dual Check Safety Function is effective and the reference point is established. When the reference point is not established, the machine system is in danger state because Safety Machine Position Monitoring and Safety Position Error Monitoring are not active. If this signal is “0”, Machine Tool Builder has to control not to open the protective door.
16. STBT Brake Test Start signal (input) When this signal is input, a brake test is executed. When a brake test is executed, the brake mechanism is checked by a combination of the Safety Brake signals *BRKx (PMC, DSC PMC) doubly monitored.
17. RQBT Brake Test Execution Request signal (output) This signal is output when a brake test needs to be executed. When the power is turned on, this signal is always output. When this signal is output, execute a brake test.

3.SAFETY FUNCTIONS B-64303EN-4/01
- 26 -
Guard Open Request signal and Guard Unlock signal
*OPIHB F
24V
X
Door open request
Ladder
Ladder
ORQ-IORQ
Protective door lock
G
Y
Protective door
CNC(PMC)
F RSVxRSPx
POSExF
The figure shows a sample connection of the protective door open request switch and the guard unlock signal. In the normal state, the door lock state is changed as follows before the safety monitoring state is established.
Door lock state transition
ORQ-I ORQ *OPIHB RSVx RSPs POSEx
Protective door lock(*SGOPN)
A 0 0 0 Locked A protective door open request is not made, and the door is locked.
Normal operating state
B 1 0 0 Locked A guard open request is made. C1 1 1 0 Locked The request is transferred to the CNC. C2 1 1 1 Locked The CNC receives the request. D 1 1 1 1 1 Locked Reference point is established and a safe
speed check, a machine position check and a position error check prove that there is no failure and that the CNC can enter the safe state.
E 1 1 1 1 1 Unlocked (*SGOPN=0)
The actual safety door is unlocked. Operations can be performed with the door open.
Safety functionis enabled.
D 1 1 1 1 1 Locked The door is closed and locked again. F 0 1 1 1 1 Locked The guard open request is canceled. G 0 0 1 1 1 Locked The CNC is notified of the release of the
above request.
A 0 0 0 Locked The CNC receives the release of the above request.
NOTE The PMC ladder must be designed to monitor
whether the protective door is open (*SGOPN is set to 0) while ORQ is set to 0. If the door open is detected, the PMC ladder judges that an abnormal event has occurred and enters the safe stop state. This can occur, for instance, when the door happens to open (or to be unlocked) while machining is in progress with the protective door closed.

B-64303EN-4/01 3.SAFETY FUNCTIONS
- 27 -
Timing diagram from door close state to door open state The following diagram shows the timings at which the door is opened and closed again.
ORQ
*OPIHB
Actual door unlock signal
*SGOPN (Safety related I/O signal)
Door closed Door opened
(1) (2) (3) (4) (5)
t
Door opened
ORQ_P
Actual door unlock signal
RSVx RSPs
POSEx
(1) When the Guard Open Request signal (ORQ) is input, the CNC
returns the answer signal (*OPIHB) to PMC. (2) The PMC ladder program checks that the machine position,
speed and position error are within safe ranges by the Monitoring Result signal (RSVx/RSPs) and the reference point is established by the Position Information Effect signal (POSEx). Then, it turns on the guard unlock signal. (Caution)
This example assumes that the protective door has an electromagnetic lock mechanism. While the door is open, the unlock signal is turned off.
(3) The door is open. (4) The protective door is closed and locked. After this, the Guard
Open Request signal (ORQ) must be turned off. (Caution) (5) When the Guard Open Request signal (ORQ) is turned off, the
CNC turned off the answer signal (*OPIHB).

3.SAFETY FUNCTIONS B-64303EN-4/01
- 28 -
CAUTION 1 The RSVx and RSPs are redundant and output to
both PMCs (PMC and DCSPMC). Since the RSVx and RSPs signals, the monitoring results of two independent circuits, are output to two PMCs, the output states of the results may not match temporarily (when, for example, the spindle speed is close to the safe speed). Therefore, keep the following in mind when only RSVx and RSPs are used as conditions for releasing a guard lock. Confirm that RSVx and RSPs of the PMCs (PMC and DCSPMC) are both placed in the safe state before releasing a guard lock. When RSVx and RSPs of one PMC are used as conditions for releasing a guard lock, keep in mind that, before releasing a guard lock, wait until the speed becomes low enough after RSVx and RSPs enter the safe state.
When the protective door is assumed to be open if RSVx and RSPs of only one PMC enter the safe state, a safe speed limit monitoring alarm may occur depending on the result of the other monitoring state.
2 Ensure a time of 100 ms or longer (“t” in the figure) from when the door is closed (locked) until the Guard Open Request signal (ORQ) goes off. If this time requirement is not satisfied, an alarm may be raised when the door is closed (locked). Design an operator panel to inform an operator that Guard Open Request signal (ORQ) is turned on by lighting a lamp.

B-64303EN-4/01 3.SAFETY FUNCTIONS
- 29 -
3.5 EMERGENCY STOP The Emergency Stop signal is monitored in redundant mode. When the emergency stop is input, the servo motor slows down to a stop (Caution) and enters the dynamic brake stop. The spindle slows down to a stop (Caution) as instructed by the PMC (Ladder program), and then the power is shut off.
CAUTION To enable the function to slow down and stop the
servo motor, the corresponding parameter must be specified. If the parameter is not specified, the motor immediately enters the dynamic brake stop state. The spindle motor slows down and stops as instructed by the PMC (Ladder program). If the PMC does not instruct this, the motor maintains the high speed prior to the power-down and coasts. If an illegal speed is specified because of a failure on the PMC side while the safety function is active (the protective door is open), the CNC enters the safe stop state.
WARNING
In the emergency stop state, the processing to open or close the protective door depends on the Ladder program created by the machine tool builder. For example, when the protective door is prohibited from being opened in the emergency stop state (when, for example, the spindle rotates at a speed not allowed in situations where the protective door is open, that is a speed exceeding the safe speed limit), the processing needs to be implemented by the ladder program.
IMPORTANT Emergency Stop Button must fulfill the Standard
IEC60947-5-1. This is mandatory.

3.SAFETY FUNCTIONS B-64303EN-4/01
- 30 -
3.6 SAFE SPEED MONITORING If the safe speed range is exceeded while the protective door is open, the Dual Check Safety function immediately enters the stop state. If each axis or spindle is not stopped, the Dual Check Safety function enters the safety stop state. For each feed axis and spindle, up to four safe speed ranges can be specified in safety parameters. Both the CNC and the SV/SP monitor whether a safe speed is kept on each feed axis and spindle. Limit speed can be changed by the Safety Speed / Safety Position Selection signals (SVAn/SVBn for feed axis, SPAn/SPBn for spindle).
Safety Speed/Safety Position Selection signal Safety speed parameter
Name SVAn/ SPAn
SVBn/ SPBn Feed axis Spindle
Safety speed 1 0 0 No.13821 No.4372Safety speed 2 1 0 No.13822 No.4438Safety speed 3 0 1 No.13823 No.4440Safety speed4 1 1 No.13824 No.4442
When excess limit error is detected, Monitoring Result signal (RSVx/RSPs) is set to “0”. In this situation, if Safety Check Request signal (*VLDVx/ *VLDPs) is “0” and safety monitor is executed, an alarm is generated.
Error detected CPU Alarm CNC SV0494/SP0757 SV SV0476 SP SP9069(SPINDLE ALARM 69)
CAUTION
1 When an illegal speed is detected for the servo axis, if the axis is not stopped after the time specified in the parameter, the MCC Off signal (*MCFVx) is turned to “0”.
2 When an illegal speed is detected for the spindle axis, CNC checks whether the spindle speed decelerates continuously or not. If acceleration is detected, the MCC Off signal (*MCFPs) is turned to “0”.
3 For the spindle, bit 1 (CTLSTP) of parameter No. 4399 can be used to select a stop method (free run stop or controlled stop) on occurrence of a safe speed excess alarm.

B-64303EN-4/01 3.SAFETY FUNCTIONS
- 31 -
IMPORTANT 1 A gear ratio, ball screw, and the like must be
carefully selected so that a safe speed can be kept on the feed axis.
2 Before inputting the Guard Open Request signal (ORQ), reduce each axial speed and spindle speed to a safe speed range or below. If a speed exceeds the limit, do not unlock the protective door. The PMC ladder must be designed that the power to the driving circuit is shut off (safe stop state) if the door is forced open.
WARNING
The safe speed monitoring function monitors whether the traveling speed exceeds a specified limit. The function cannot monitor the stop state (zero speed). If an error causes a movement on the feed axis at a speed lower than the safe speed range while the protective door is open, for instance, the function cannot detect this state. The machine must be designed so that this state does not affect the safety of the machine system.

3.SAFETY FUNCTIONS B-64303EN-4/01
- 32 -
3.7 SAFE MACHINE POSITION MONITORING While the door is open, the Dual Check Safety function checks whether the position on each feed axis is within the safe machine position range defined by safety parameters. If it detects a machine position beyond the safety range, the Dual Check Safety function immediately enters the stop state. If each axis is not stopped, the Dual Check Safety function enters the safety stop state. For each feed axis, up to four safe positions can be specified in safety parameters. Both the CNC and the Servo monitor whether each axis is within the safety position. The range of the safety machine position can be changed by the Safety Speed / Safety Position Selection signals (SVAn/SVBn for feed axis).
Safety Speed/Safety Position Selection signal
Safety machine position parameter Name
SVAn SVBn + direction - directionSafety machine
position 1 0 0 No.13831 No.13832
Safety machine position 2
1 0 No.13833 No.13834
Safety machine position 3
0 1 No.13835 No.13836
Safety machine position 4
1 1 No.13837 No.13838
When “out of position error” is detected, Monitoring Result signal (RSVx) is set to “0”. In this situation, if Safety Check Request signal (*VLDVx) is “0” and safety monitor is executed, an alarm is generated.
Error detected CPU Alarm CNC SV0495 SV SV0477
CAUTION
1 The safe machine position monitoring function does not keep monitoring the specified range. Only after the function detects that a position on a feed axis exceeds the range, the system enters the stop state. Accordingly, in the stop state, an over travel has occurred on the feed axis. The travel distance depends on the traveling speed and other conditions.
2 When an “out of position error” is detected, if the axis is not stopped after the time specified in the parameter, the MCC Off signal (*MCFVx) is turned to “0”.
B-64303EN-4/01 3.SAFETY FUNCTIONS
- 33 -
The user of the machine must first carry out a reference position return in order to obtain the initial position. If the reference position return is not carried out, the check function is disabled. This check function is enabled after the reference position is established. (The function cannot be disabled by any means after the reference position is established.) A safe machine position limit on each feed axis is specified in a safety parameter.
CAUTION A machine operator must confirm whether the
machine reference position is established correctly by checking the actual machine position and position display of the CNC.
At power-on, the safety function does not work. After power-on, the CNC checks whether a reference position return is completed. If the reference position return is completed and if the protective door is open, safe machine position monitoring, safe speed monitoring and safety position error monitoring are performed. Then, the safety functions start working. If the reference position return is not completed, safe machine position monitoring cannot be performed because the coordinates are not established. In this state, the machine position monitoring function is disabled. After a reference position return is made, this function is enabled. Depending on the safety parameter setting, however, an alarm may be raised. To avoid this alarm, specify the safe machine position parameters before making a reference position return.
CAUTION 1 The machine coordinate of the safety function is
based on position feed back. So it does not always indicate the same value as the machine coordinate based on the summation of the command value.
2 This function is activated only in position control mode.

3.SAFETY FUNCTIONS B-64303EN-4/01
- 34 -
3.8 MCC OFF TEST A MCC off Test must be carried out in intervals of 24 hours, so that the safety functions would not be damaged by a possible cause of failure. A message telling that the MCC off Test must be carried out is displayed at power-on or when 24 hours have elapsed after the previous MCC off Test. The machine tool builder must set up the machine not to open the protective door before a MCC off Test is not completed. The protective door can be opened only after the MCC off Test is carried out accordingly. A MCC off Test performs the test to turn on and off MCC by controlling *SMC signal in order to confirm whether the circuit to shut off MCC is normal. The MCC off Test is performed both on PMC and DCS PMC. If the MCC off Test is not completed within the time specified by the parameter No.1946 (MCC off Test timer), servo alarm SV0488 is generated. It is necessary to carry out the MCC off Test before the protective door is open, when power is on or 24 hours have elapsed after previous MCC off Test. The PMC ladder program must be designed to carry out the following control. <1> When MCC off Test request signal (RQT) is set to “1” at
power-on or in case 24 hours are elapsed after the previous MCC off Test, the protective door is locked till the MCC off Test is performed. But the operator can operate the machine while the protective door is closed.
<2> When the MCC off Test request signal (RQT) is turned to “0”, the protective door can be unlocked.
*MCF (DCS PMC)1 2 3 4 5
*MCF (PMC)
*SMC (PMC)
Timer
Test No.
Timer limit
Test completion Test start
Example) DO state during MCC off Test
*SMC (DCS PMC)
128
RQT

B-64303EN-4/01 3.SAFETY FUNCTIONS
- 35 -
Test number Description 1 When the *MCF signals on both the PMC and DCSPMC
sides are 1, confirm that the MCC is on. (*SMC = 0) 2 Confirm that the MCC turns off when the *MCF signal on
the DCSPMC side is set to 0. (*SMC = 1) 3 Confirm that the MCC turns on when the *MCF signal on
the DCSPMC side is returned to 1. (*SMC = 0) 4 Confirm that the MCC turns off when the *MCF signal on
the PMC side is set to 0. (*SMC = 1) 5 Confirm that the MCC turns on when the *MCF signal on
the PMC side is returned to 1. (*SMC = 0) 128 This state is entered when tests 1 to 5 end successfully.
IMPORTANT Carry out the MCC off Test with the protective door
closed. As the test shuts off the MCC, prepare the system for mechanical MCC shut-off before starting the MCC off Test.
The following describes notes and a timing chart during the MCC off Test. <1> Before performing the MCC off Test, stop the feed axis and
spindle. <2> When the MCC off Test ends, the MCC Off Test Execution
Request signal goes off. After the MCC Off Test Execution Request signal goes off, set the test mode signal to off.
<3> When the vertical axis is present, take measures such as preparing a brake circuit for drop prevention. Take 500 ms or more from when the brake is driven until test start signal OPT is activated, in the ladder.
<4> Do not connect a peripheral device or noise filter between the MCC and the common power supply. Otherwise, the test may not terminate normally.
<5> Enable the servo off signals (SVF1-5) after applying a brake to the servo axis connected to the common power supply to be tested. If the servo off signals are not input, an alarm may occur during the test.
<6> When the power failure backup module is connected, the ready signal (contact output signal RDY) of the power failure backup module goes off during the MCC off Test. Therefore, make considerations to eliminate a problem in the ladder. A possible measure is to mask the ready signal by the test mode signal.

3.SAFETY FUNCTIONS B-64303EN-4/01
- 36 -
[Timing chart of the MCC off Test]
MCC off Test start (Signal from the user)
During a test
Vertical axis brake (Signal from the user)
Test mode signal OPT (Gn191.2)
Brake on
500 ms or more
Servo off signal SVF1 to 5 (Gn126.0 to 4)
MCC Off Test Execution Request signal RQT (Fn191.2)
During the MCC off Test
Power failure backup module ready signal RDY (contact output)
Contact on
Contact off

B-64303EN-4/01 3.SAFETY FUNCTIONS
- 37 -
3.9 SAFETY POSITION SWITCH FUNCTION It is checked whether the machine position is within the range of safety position switch. The checked result is outputted to the Safety Position Switch signal. The correspondence between axes and each signal is specified by the parameters. In case of 1 path system, up to 32 points can be specified. In the case of a 2-path system based on the T series, up to 64 points can be set. When a machine position of controlled axis is within a range, which is specified by the safety parameters, this signal is output.
0
1
Parametersetting value
Parametersetting value
The signals are output after establishment of the reference position. The signal is not output before the completion of return to reference position. The “machine position” is the actual machine position (which is calculated using feedback of position detector), not the commanded position. The comparison of position for safe position switch is executed in detection unit. If the machine position equals parameter setting value, the safe position switch signal is output. The safe position switch signal is not output for axis which the Dual Check Safety (bit 6 (DCN) of parameter No.1904=1)) is not applied to. Safety Position switch can be assigned up to 16 points per 1 group to the output signal (F area) and totally up to 4 groups can be used in the CNC system. Two areas per a path are provided to assign. It is possible to assign the signal to an appropriate area. Safe position switch signals can be assigned to arbitrary controlled axes. (All points can be also assigned to one axis.) The assignment of controlled axes is set by the safety parameters (No.13880 to No.13911, No.10501 to No.10532). And the signals can be also assigned to the rotary axes. When inconsistency between the position switch on PMC and that on DCS PMC is lasted for the time that is specified by the parameter No.1945, the safety function sets MCC Off signal (*DCALM) to “0” and generates the alarm “safe I/O cross check error” (PW0010/PW0011).

3.SAFETY FUNCTIONS B-64303EN-4/01
- 38 -
NOTE The machine coordinate of the safety function is
based on position feed back. So it does not always indicate the same value as the machine coordinate based on the summation of the command value.
Two machine coordinates that are calculated by two CPU independently are not always the same because the position feedback is continuously changed a little. As there is a possibility that the condition of two signals is different from each other near the boundary, do not stop an axis near the boundary.
CAUTION
This function is activated only in position control mode.
• Hysteresis Position switch sometimes turns on and off repeatedly near the
boundary of position switch area by very small vibration of a servo motor. According to this problem, position switch is inconvenient to use. So “hysteresis” described below is applied.
Maximum limit of position switch
Minimum limit of position switch
Width of hysteresis Width of hysteresisActivated area of position switch
Fig.3.9(a) Measuring area of position switch in case state of switch is “0”
Minimum limit of position switch
Maximum limit of position switch
Activated area of position switch
Fig.3.9(b) Measuring area of position switch in case state of switch is “1” The position switch is checked at every sampling period. When the minimum and maximum limit of position switch are given like above figure, activated area is checked by the area shown in the figure 3.9(a) considering hysteresis if the state of position switch measured at last time is “0”. And activated area is checked by the area shown in the figure 3.9(b) not considering hysteresis if the state of position switch measured at last time is “1”. According to this, it is possible to suppress frequent changing of position switch.

B-64303EN-4/01 3.SAFETY FUNCTIONS
- 39 -
3.10 SAFETY RELATED PARAMETERS CHECK FUNCTION At every power-on, the CNC checks whether the safety related parameters are destroyed and are transferred to the SV, the SP and the PMC normally or not. The SV, the SP and the PMC also check whether the safety related parameters are transferred from the CNC normally or not. If some problem is found in this check, an alarm is generated and the MCC is shut off. (*DCALM=0)
3.11 PARAMETER LOCK FUNCTION Parameters related to the Dual Check Safety function (safety parameters) can be locked to protect against modification. The parameter No.3225 and No.3226 unlock these parameters. The following parameters are locked. No.0980, No.0981, No.0982, No.1023, No.1240, No.1838, No.1839, No.1840, No.1841, No.1842, No.1902#6, No1904, No.1945, No.1946, No.1948, No.1950, No.3225, No.3717, No.3797, No.4372, No.4438, No.4440, No.4442, No.4448, No.4460, No.10500 to No.10596, No.11950 to No.11957, No.11960 to No.11967, No.11970 to No.11977, No.11980 to No.11987, No.13805, No.13810, No.13811, No.13821 to No.13829, No.13831 to No.13838, No.13840 to No.13843, No.13880 to No.13911, No.13912 to No.13919, No.13920 to No.13951, No.13960 to No.13991
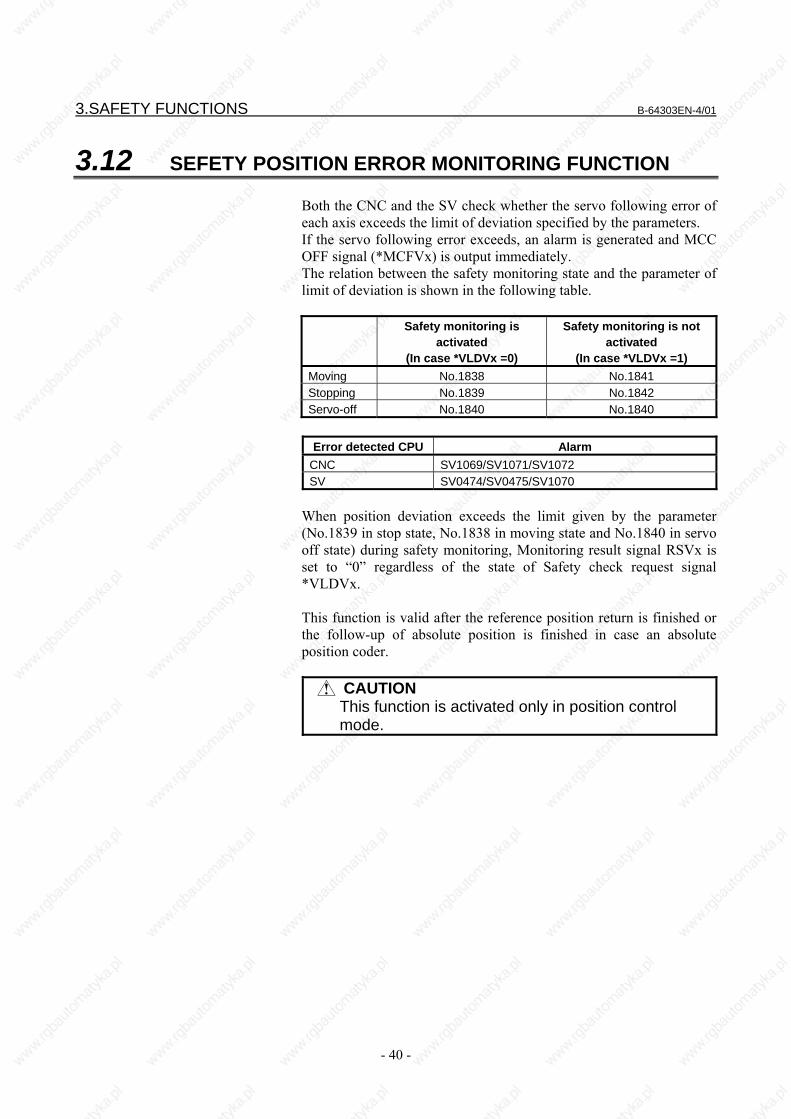
3.SAFETY FUNCTIONS B-64303EN-4/01
- 40 -
3.12 SEFETY POSITION ERROR MONITORING FUNCTION Both the CNC and the SV check whether the servo following error of each axis exceeds the limit of deviation specified by the parameters. If the servo following error exceeds, an alarm is generated and MCC OFF signal (*MCFVx) is output immediately. The relation between the safety monitoring state and the parameter of limit of deviation is shown in the following table.
Safety monitoring is activated
(In case *VLDVx =0)
Safety monitoring is not activated
(In case *VLDVx =1) Moving No.1838 No.1841 Stopping No.1839 No.1842 Servo-off No.1840 No.1840
Error detected CPU Alarm
CNC SV1069/SV1071/SV1072 SV SV0474/SV0475/SV1070
When position deviation exceeds the limit given by the parameter (No.1839 in stop state, No.1838 in moving state and No.1840 in servo off state) during safety monitoring, Monitoring result signal RSVx is set to “0” regardless of the state of Safety check request signal *VLDVx. This function is valid after the reference position return is finished or the follow-up of absolute position is finished in case an absolute position coder.
CAUTION This function is activated only in position control
mode.
B-64303EN-4/01 3.SAFETY FUNCTIONS
- 41 -
3.13 AMPLIFIER CIRCUIT MONITORING FUNCTION The SV and the SP transmit the data of plural axes to amplifiers through one electronic circuit (LSI). The CNC, the SV and the SP check whether this transmission is performed normally without placing data on wrong address. In case of servo amplifier, the CNC axis numbers kept by the CNC are compared with the CNC axis numbers kept by the SV. In case of spindle amplifier, the spindle numbers kept by the CNC are compared with the spindle number kept by the SP. The checking sequence is as follows.
Checking sequence for servo amplifier <1> When a servo amplifier is set up at the first time, an alarm
SV0498 is generated. At that time, the CNC transfers the CNC axis numbers to the SV and the SV keeps the data. Then the power of all CNC system (amplifiers are included) must be turned off and on.
When an alarm is generated after the configuration of servo amplifiers is changed, it is necessary to carry out the operation to send the CNC axis numbers to servo amplifiers. Set the parameter No.2212#4 to “1” then return to “0”. Then turned off the power of all CNC system (amplifiers are included.)
<2> After the power-on, the CNC and the SV start monitoring the CNC axis numbers. The CNC monitors by comparing the CNC axis number kept by the CNC itself with that kept by the SV. The SV monitors by comparing the CNC axis numbers kept by the SV with that sent by the CNC.
When some error is found, an alarm SV0478 or SV0496 is output, and MCC Off signal (*DCALM) is turned to “0”.
Checking sequence for spindle amplifier
<1> When spindle is set up, the spindle numbers are transferred from the SP to the CNC.
<2> The CNC compares the spindle numbers kept by the CNC itself with that sent from spindle amplifier. If inconsistency is found, an alarm SP0756 is output and MCC Off signal (*DCALM) is turned to “0”.
<3> The SP compares the spindle numbers with that kept by the SP. If inconsistency is found, alarm SP9070 (Spindle alarm 70) is output, and MCC Off signal (*DCALM) is turned to “0”.

3.SAFETY FUNCTIONS B-64303EN-4/01
- 42 -
3.14 SAFETY BRAKE SIGNAL OUTPUT FUNCTION The CNC and the SV output the Safety Brake signal (*BRKx) to control the mechanical brake. When this signal is “0”, mechanical brake must be activated. When this signal is “1”, mechanical brake is allowed to be released. When the inconsistency between the break signal on PMC and that on DCS PMC is lasted for the time that is specified by the parameter No.1945, the safety function sets MCC Off signal (*DCALM) to “0” and generates the alarm “safe I/O cross check error” (PW0010/PW0011).
B-64303EN-4/01 3.SAFETY FUNCTIONS
- 43 -
3.15 CPU SELF TEST FUNCTION The CNC, the PMC, the SV and the SP carry out the following self-diagnosis. If the error is detected, the alarm is generated and sets MCC Off signal (*DCALM) to “0”. <1> CPU check It is checked whether each CPU runs normally or not. It is checked whether the instructions related to safety function is
executed normally or not. Error detected CPU ALARM
CNC PW0014 PMC PW0009 SV SV0484 SP SP9074 (Spindle alarm 74)
<2> Program monitoring It is confirmed whether all safety related function run normally.
Error detected CPU ALARM CNC PW0017/SV0490 PMC PW0008 (DCS PMC)/PW0009 (PMC) SV SV0484 SP SP9076 (Spindle alarm 76)/SP0755
<3> Cross check It is checked whether the result of the judgment about the safety
related function of a CPU is consistent with that of another CPU. If some error is found, an alarm is output.
ALARM SV relation SV0490/SV0484 SP relation SP9072 (Spindle alarm 72)/
SP9077 (Spindle alarm 77)/ SP9078 (Spindle alarm 78)/ SP0755
PMC relation PW0008 (DCS PMC)/PW0009 (PMC)

3.SAFETY FUNCTIONS B-64303EN-4/01
- 44 -
3.16 RAM CHECK FUNCTION ECC (Error Check and Correct) function is applied to the battery back-upped file memory. Then a single-bit error is corrected. And, when an error that cannot be corrected occurs, memory parity error is generated. Other memory for Dual Check Safety is checked as follows:(If the error is detected, the alarm is generated and sets MCC Off signal (*DCALM) to “0”) (1) Test at power-on The several test patterns are written to the RAM area. It is
checked whether the written test data are read correctly. If read error occurs, an alarm is generated.
(2) Test during normal operation RAM area is checked in turn at constant interval during normal
operation. The several test patterns are written to the RAM. It is checked whether the written test data are read correctly. If read error occurs, an alarm is generated.
Alarm detected CPU Alarm
CNC PW0016 SV SV0484
PMC PW0008 (DCS PMC)/PW0009 (PMC) SP SP9016 (Spindle alarm 16)
3.17 CRC CHECK FUNCTION At power-on and after power on, the data that are related to Dual Check Safety and stored in the ROM area are checked. The CNC software, the servo software, the PMC software and the spindle software are checked. If some error is found, an alarm is generated. After power on
Error detected Software Alarm CNC software CRC CHECK ERROR: NC BASIC. Servo software SERVO ROM TEST: CRC CHECK ERRORPMC management software LED “6” Spindle software Spindle alarm 75
After power on
Error detected Software Alarm CNC software PW0018 CRC CHECK ERROR PMC management software SYS-ALM199 NON MASK INTERRUPT
OTHER-CPU

B-64303EN-4/01 3.SAFETY FUNCTIONS
- 45 -
3.18 SAFE STOP MONITORING When a safety door is open, safe stop monitoring for servo axis and spindle can be realized by the combination of several functions.
Safe stop monitoring for servo axis According to the safe speed monitoring for servo axis and the safe positing error monitoring, CNC and Servo monitor actual feedrate and deviation of each axis. When a safety door is open, monitoring of stop condition of each axis can be performed by the combination of the following three functions. a) By the safety speed monitoring function, check whether the
actual feed rate is lower than the safety level. If the feedrate exceeds the safety limit, an alarm is generated.
Actual speed is calculated with the feedback of a position detector. So, even if command feedrate is 0, actual feedrate may be detected as not 0 when an axis is moved by external power. Set the value of safety limit that does not cause an alarm when feedrate command is 0.
b) By the safe positioning error monitoring function, check whether position deviation is within a safety limit. If an axis is moved unexpectedly, an alarm is generated.
c) According to “Axis moving signal MVx (Fn102)”, check whether axis motion command is not given. (Axis moving signal is prepared for PMC and is not double check signal.)
Safe stop monitoring for spindle
In monitoring of the safe speed limit of the spindle, the actual speed of the spindle motor is monitored at the CNC and spindle. When a safety door is open, monitoring of stop condition of each spindle can be performed by the combination of the following two functions. a) By the safety speed monitoring function, check whether the
actual speed is lower than the safety level. If the feedrate exceeds the safety limit, an alarm is generated.
Actual speed is calculated with the feedback of a position detector. So, even if command speed is 0, actual speed may be detected as not 0 when a spindle is moved by external power. Set the value of safety limit that does not cause an alarm when speed command is 0.
b) There is a possibility that spindle rotate at speed lower than safety speed limit. Then it is necessary to select the function to make position control loop, such as spindle positioning (T series), Cs contouring control or spindle orientation.

3.SAFETY FUNCTIONS B-64303EN-4/01
- 46 -
3.19 SAFE SERVO STOP FUNCTION During machine tool setup, the operator may attach or detach a workpiece in the machining area with the protective door opened. Conventionally, the following measures have been used to ensure safety in such work: • The emergency stop state is set to turn off the power to the
spindle and feed axes. • A device such as a magnetic contactor is installed between the
servo amplifier and servo motor and between the spindle amplifier and spindle motor.
This function turns off the power to the servo axis in a safe manner based on the dual monitoring function. For this purpose, this function outputs the state signal (excitation-off signal) of the power output circuit built into the servo amplifier as two independent signals from the servo amplifier and assigns them as Programmable Safety I/O signals (Section 5.4). By using this function, safety can be secured in turning off the power to the servo axis only, without using an emergency stop or magnetic contactor. So, machine usability can be enhanced. A function for rotating the servo axis by power with the door open can be additionally used by setting a servo axis rotation enable switch.
αi SP
αi SV
αi PS
AC reactor
Magnetic contactor
SpindleMotor
Servo Motor
PMC CPU
CNC CPU
Cross
check
Servo axis rotation enable switch
Protective door
Cut command and check signal
Guard State signal
Servo Axis RotationEnable Switch signal(SVEN1,2)
Servo Excitation-Off signal 1 (AS2-1)
Servo Excitation-Off signal 2 (AS2-2)
Contact output
SafetyI/O
State monitor ladder
State monitor ladder
Servo Excitation-Off Request signal (*DOFEXT)
SafetyI/O

B-64303EN-4/01 3.SAFETY FUNCTIONS
- 47 -
Safety function When the protective door is open, the safety function monitors whether the power to the servo motor is turned off, without turning off the magnetic contactor connected to the power supply, or the input power supply, of the main circuit of the servo amplifier. If an error is detected during monitoring, the magnetic contactor of the power supply is turned off to turn off the power to the main circuit.
3.19.1 Monitoring of the Excitation-Off Signal Assign the two Excitation-Off signals (AS2-1 and AS2-2) output from the αi SV as Programmable Safety I/O signals to check signal matching. Moreover, monitor whether the excitation-on and excitation-off states are normal, by using two types of ladders, namely, PMC ladder and DCS PMC ladder. If an error is detected, secure safety by turning off the magnetic contactor of the αi PS to turn off the power to the main circuit. When additionally using a function for rotating the servo axis by power with the door open, assign the two switch signals (SVEN1 and SVEN2) output from the servo axis rotation enable switch as Programmable Safety I/O signals to check signal matching.

3.SAFETY FUNCTIONS B-64303EN-4/01
- 48 -
Signal connection diagram (example)
I/O Link
X,Y
G,F
Rxxx.b
Rxxx.c
Rxxx.a
Guard Open Request signal ORQ_I
Guard Unlock signal
Guard State signal *SGOPN
1st channel error
SVAx Gn752.0
ORQ Gn191.3
VLDVx Gn750.0
User ladder(Timing chart provided in the next section)
AS2-1
SV Output Contact signal
AS2
SVAx G(004+m).0
VLDVx G(002+m).0
AS2-2 Ryyy.a
Safety I/O
SVEN2 Ryyy.b
Fn750.0 RSVx
I/O Link
X,Y
G,F
User ladder (Timing chart provided in the next section)
Ryyy.d
Programmable Safety I/O
2nd channel error
Servo Excitation-Off
Request signal *DOFEXT SVEN1
PMC
DCS PMC
SVEN1
SVEN2
Servo Axis Rotation Enable Switch signal

B-64303EN-4/01 3.SAFETY FUNCTIONS
- 49 -
3.19.2 User Ladder Processing
Processing on the PMC side • With the Guard Open Request signal (ORQ), motor excitation is
turned off (*DOFEXT=0) then the excitation-off state (AS2=1) is confirmed. Next, the locking of the protective door (guard lock signal) is released.
• If AS2-1=0 or AS2-2=0 (contact open) (servo excitation-on) for a certain time(*1) when *SGOPN is 0 (door open) and SVEN is 0 (Servo Axis Rotation Enable Switch signal turned off), an error is assumed to issue a 1st channel (or 2nd channel) alarm.
- Timing chart 1
Error judgment processing by the PMC side ladder
AS2-1
Servo axis being rotated Protective door open
Servo axis excitation-on
Protective door closed
ORQ
*DOFEXT
*SGOPN
Error state
(*1) The issue of an alarm is suppressed with a timer.
SVEN1
*OPIHB, RSVx, RSPs, POSEx
1st channel error
Protective Door
Open State signal
Guard Unlock signal
points are monitored.
Set to 0 if normal.
(*1) An alarm condition is detected for the period until servo
excitation is turned off (AS2-1=1) after the Servo Axis Rotation Enable Switch signal (SVEN1) is switched from on to off. However, by setting a timer on the ladder side, ensure that no alarm is detected during this period.

3.SAFETY FUNCTIONS B-64303EN-4/01
- 50 -
Processing on the DCS PMC side • If AS2-1=0 or AS2-2=0 (contact open) (servo excitation-on) for
a certain time(*1) when *SGOPN is 0 (door open) and SVEN is 0 (Servo Axis Rotation Enable Switch signal turned off), an error is assumed to issue a 1st channel (or 2nd channel) alarm.
- Timing chart 2
Error judgment processing by the DCS PMC side ladder
AS2-2
Servo axis being rotated Protective door open
Servo axis excitation-on
Protective door closed
*SGOPN
Error state
(*1) The issue of an alarm is suppressed with a timer.
SVEN2
2nd channel error
Contact: Closed
Contact: Open
points are monitored.
Set to 0 if normal.
(*1) An alarm condition is detected for the period until servo
excitation is turned off (AS2-2=1) after the Servo Axis Rotation Enable Switch signal (SVEN2) is switched from on to off. However, by setting a timer on the ladder side, ensure that no alarm is detected during this period.
3.19.3 Assignment of Programmable Safety I/O Signals
Assign Rxxx of the PMC and Ryyy of the DCS PMC as Programmable Safety I/O signals (input) for double monitoring. Thus, the CNC and PMC doubly check whether the Rxxx and Ryyy bits match each other at all times.
Rxxx a b c d AS2-1 SVEN1 1st channel error “0”
Ryyy a b c d AS2-2 SVEN2 “0” 2nd channel error
The 1st channel error signal or 2nd channel error signal set to 1 indicates an error state. So, by monitoring for matching with the state of 0, an error state is detected. If a mismatch occurs due to an error state, safety is secured by turning off the magnetic contactor of the αi PS to turn off the power to the main circuit.

B-64303EN-4/01 3.SAFETY FUNCTIONS
- 51 -
3.19.4 Connections In addition to Dual Check Safety connections, a connection from connector CN7 on the αi SV to the I/O Unit (I/O Link#3) is required. On a system that uses a servo axis rotation enable switch, a connection from the switch is additionally required. (Indicated in heavy lines).
CNC
I/O-LINK (JD51A)
Guard State signal *SGOPN
Servo Axis Rotation Enable Switch signalSVEN
Servo Excitation- Off signal 2 AS2-2
I/O Unit
CPD1
JD1BJD1A
24VDC
3ch I/O Link adapter
JD44A-1JD51B
JD44A-2
JD1A
JD44A-1
I/O Unit
CPD1
JD1BJD1A
24VDC
I/O Unit
CPD1
JD1BJD1A
I/O Link #1,#2
I/O Link #3
FSSB(COP10A) COP10B
COP10A
CZ1
JF1αi SV
To 2nd Servo Amp CN7Servo Excitation-Off Request signal *DOFEXT
Servo Excitation- Off signal 1 AS2-1

3.SAFETY FUNCTIONS B-64303EN-4/01
- 52 -
Connection from αi SV connector CN7 to I/O Link#3
αi SV CN7 I/O Unit
(A3) AS1 24V
(A4) AS2 DI
0V
Safety relay
D2100 series connector
Tyco Electronics
Contact open: Excitation-on
Contact closed: Excitation-off
αi SV CN7 I/O Unit
(A1) 24V
(A2) *DOFEXT DO
0V
Safety relay
D2100 series connector
Tyco Electronics
24V 24V
Contact open: Excitation-off
Contact closed: Excitation-on
- Coil and contact specification of the safety relay of connector CN7 Allowable voltage range for input to the coil: 20.4 VDC to 26.4 VDC Rated contact load: 30 VDC/6 A (resistive load)
CAUTION 1 If the connector is connected incorrectly, the 24 V
power externally supplied can damage the internal circuitry of the αi SV. Use special care when connecting the connector.
2 At the time of shipment from factory, a dummy connector for connecting CN7-A1 with CN7-A2 is set. When this function is not used, use the servo amplifier without removing the dummy connector.
3 Be careful not to short-circuit 24V (CN7-A1).

B-64303EN-4/01 3.SAFETY FUNCTIONS
- 53 -
3.19.5 Restrictions
- System configuration To use this function, the following αi series servo amplifier supporting the function for doubly outputting the Servo Excitation-Off signal needs to be used: • Servo amplifier based on the drawing number A06B-6127-H1uv
(uv = 02, 03, 04, 05) Moreover, the following Dual Check Safety function needs to be used: • Programmable Safety I/O signal (Section 5.4)

3.SAFETY FUNCTIONS B-64303EN-4/01
- 54 -
3.20 SAFE SPINDLE STOP FUNCTION During machine tool setup, the operator may attach or detach a workpiece in the machining area with the protective door opened. Conventionally, the following measures have been used to ensure safety in such work: • The emergency stop state is set to turn off the power to the
spindle and feed axes. • A device such as a magnetic contactor is installed between the
servo amplifier and servo motor and between the spindle amplifier and spindle motor.
This function turns off the power to the spindle in a safe manner based on the dual monitoring function. For this purpose, this function outputs the state signal (excitation-off signal) of the power output circuit built into the spindle amplifier as two independent signals from the spindle amplifier and assigns them as Programmable Safety I/O signals (Section 5.4). By using this function, safety can be secured in turning off the power to the spindle only, without using an emergency stop or magnetic contactor. So, machine usability can be enhanced. A function for rotating the spindle by power with the door open can be additionally used by setting a spindle rotation enable switch.
αi SP
αi SV
αi PS
AC reactor
Magnetic
contactor
Spindle
Motor
Servo
Motor
PMC CPU
CNC CPU
Cross
check
Spindle
rotation enable
switch
Protective door
Cut command and check signal
Guard State
signal
Spindle Rotation
Enable Switch
signal (SPEN1,2)
Spindle Excitation-Off signal 1
Spindle Excitation-Off signal 2
Contact
output
Safety
I/O
State monitor ladder
State monitor ladder
(EXOF1)
(EXOF2)
Safety
I/O

B-64303EN-4/01 3.SAFETY FUNCTIONS
- 55 -
Safety function When the protective door is open, the safety function monitors whether the power to the spindle motor is turned off, without turning off the magnetic contactor connected to the power supply, or the input power supply, of the main circuit of the spindle amplifier. If an error is detected during monitoring, the magnetic contactor of the power supply is turned off to turn off the power to the main circuit.
3.20.1 Monitoring of the Excitation-Off Signal Assign the two Excitation-Off signals (EXOF1 and EXOF2) output from the αiSP or βiSVSP as Programmable Safety I/O signals to check signal matching. Moreover, monitor whether the excitation-on and excitation-off states are normal, by using two types of ladders, namely, PMC ladder and DCS PMC ladder. If an error is detected, secure safety by turning off the magnetic contactor of αiPS or βiSVSP to turn off the power to the main circuit. (The Excitation-Off signal (EXOF1) is the Excitation-Off signal (EXOFA) that is actually output from the αiSP or βiSVSP, it is forcibly masked to 1 at power-on time. For the difference between EXOF1 and EXOFA, see timing chart 2 shown in the next subsection.) When additionally using a function for rotating the spindle by power with the door open, assign the two switch signals (SPEN1 and SPEN2) output from the spindle rotation enable switch as Programmable Safety I/O signals to check signal matching.

3.SAFETY FUNCTIONS B-64303EN-4/01
- 56 -
Signal connection diagram (example)
I/O Link
X,Y
G,F
Fn047.4
Rxxx.a
Rxxx.b
Rxxx.c
EXOFA
Guard Open Request signal ORQ_I
*ESPA Guard Unlock signal
Guard State signal *SGOPN
SPEN1
SPEN2
1st channel error
Gn071.1
SPAs Gn754.0
ORQ Gn191.3
VLDPs Gn751.0
User ladder(Timing chart provided in the next section)
EXOF1
SP Output Contact signal
EXOF2
SPAs G(006+m).0
VLDPs G(003+m).0
EXOF2 Ryyy.a
Safety I/O
SPEN2 Ryyy.b
Fn751.0 RSPs
I/O Link
X,Y
G,F
User ladder(Timing chart provided in the next section)
Ryyy.d 2nd channel error
Programmable Safety I/O
Spindle Rotation Enable Switch signal
PMC
DCS PMC
SPEN1

B-64303EN-4/01 3.SAFETY FUNCTIONS
- 57 -
3.20.2 User Ladder Processing
Processing on the PMC side • With the Guard Open Request signal (ORQ), the spindle is
stopped then the excitation-off state (EXOF=1) is confirmed. Next, the locking of the protective door (guard lock signal) is released.
• If EXOF1=0 or EXOF2=0 (contact open) (servo excitation-on) for a certain time(*1) when *SGOPN is 0 (door open) and SPEN is 0 (Spindle Rotation Enable Switch signal turned off), an error is assumed to issue a 1st channel (or 2nd channel) alarm.
- Timing chart 1
Error judgment processing by the PMC side ladder
EXOF1
Spindle being rotated Protective door open
Spindle excitation-on
Protective door closed
ORQ
*ESPA, MRDYA
*SGOPN
points are monitored.
Set to 0 if normal.
Error state
(*1) The issue of an alarm is suppressed with a timer.
SPEN1
*OPIHB, RSVx, RSPs, POSEx
1st channel error
Protective Door
Open State signal
Guard Unlock signal
(*2)
(*1) An alarm condition is detected for the period until spindle
excitation is turned off (EXOF1=1) after the Spindle Rotation Enable Switch signal (SPEN1) is switched from on to off. However, by setting a timer on the ladder side, ensure that no alarm is detected during this period.
(*2) The excitation-on state (EXOF1=0 or EXOF2=0: Contact open) is set when the Spindle Excitation signal SFRA (G70.5) or SRVA (G70.4), or the orientation command ORCMA (G70.6) is set to 1. (The G signal is applicable to the first spindle.)

3.SAFETY FUNCTIONS B-64303EN-4/01
- 58 -
• At power-on time, EXOFA is not output normally until the serial spindle is started. So, EXOF1 input to the dual monitoring function is forcibly masked to 1 by setting a timer.
- Timing chart 2
Processing at power-on time EXOFA
EXOF1
At power-on time, this signal is forcibly
set to 1 by a ladder for a certain time until
the serial spindle is started.
To be input by a PMC
ladder
Processing on the DCS PMC side • If EXOF1=0 or EXOF2=0 (contact open) (spindle excitation-on)
for a certain time(*) when *SGOPN is 0 (door open) and SPEN is 0 (Spindle Rotation Enable Switch signal turned off), an error is assumed to issue a 1st channel (or 2nd channel) alarm.
- Timing chart 3
Error judgment processing by the DCS PMC side ladder
EXOF2
Servo axis being rotated Protective door open
Spindle excitation-on
Protective door closed
*SGOPN
points are monitored.
Set to 0 if normal.
Error state
(*1) The issue of an alarm is suppressed with a timer.
SPEN2
2nd channel error
Contact: Closed
Contact: Open
(*1) An alarm condition is detected for the period until spindle
excitation is turned off (EXOF2=1) after the Spindle Rotation Enable Switch signal (SPEN2) is switched from on to off. However, by setting a timer on the ladder side, ensure that no alarm is detected during this period.

B-64303EN-4/01 3.SAFETY FUNCTIONS
- 59 -
3.20.3 Assignment of Programmable Safety I/O Signals Assign Rxxx of the PMC and Ryyy of the DCS PMC as Programmable Safety I/O signals (input) for double monitoring. Thus, the CNC and PMC doubly check whether the Rxxx and Ryyy bits match each other at all times.
Rxxx a b c d EXOF1 SPEN1 1st channel error “0”
Ryyy a b c d EXOF2 SPEN2 “0” 2nd channel error
The 1st channel error signal or 2nd channel error signal set to 1 indicates an error state. So, by monitoring for matching with the state of 0, an error state is detected. If a mismatch occurs due to an error state, safety is secured by turning off the magnetic contactor of the αi PS to turn off the power to the main circuit.

3.SAFETY FUNCTIONS B-64303EN-4/01
- 60 -
3.20.4 Connections In addition to Dual Check Safety connections, a connection from connector JX4 on the αiSP or connector JX6 on the βiSVSP to the I/O Unit (I/O Link#3) is required. On a system that uses a spindle rotation enable switch, a connection from the switch is additionally required. (Indicated in heavy lines).
αi Series
CNC
I/O-LINK (JD51A)
FSSB(COP10A)
SPDL(JA41) JA7B
JA7A JYA2
TB2To 2nd Spindle Amp
αi SP
Guard State signal *SGOPN
JX4
Spindle Excitation-Off signal 2 EXOF2
I/O Unit
CPD1
JD1BJD1A
24VDC
COP10B
COP10A
TB2
JF1αi SV
To 2nd Servo Amp
3ch I/O Link adapter
JD44A-1JD51B
JD44A-2
JD1A
JD44A-1
I/O Unit
CPD1
JD1BJD1A
24VDC
I/O Unit
CPD1
JD1BJD1A
I/O Link #3
I/O Link #1,#2
Spindle Rotation Enable Switch signalSPEN

B-64303EN-4/01 3.SAFETY FUNCTIONS
- 61 -
βiSVSP Series
CNC
I/O-LINK (JD51A)
FSSB(COP10A)
SPDL(JA41) JA7B
JA7A JYA2
TB2To 2nd Spindle Amp
Guard State signal *SGOPN
JX6
Spindle Excitation-Off signal 2 EXOF2
I/O Unit
CPD1
JD1BJD1A
24VDC
COP10B
COP10A
CZ2
JF1
βi SVSPTo 2nd Servo Amp
3ch I/O Link adapter
JD44A-1JD51B
JD44A-2
JD1A
JD44A-1
I/O Unit
CPD1
JD1BJD1A
24VDC
I/O Unit
CPD1
JD1BJD1A
I/O Link #3
I/O Link #1,#2
Spindle Rotation Enable Switch signalSPEN

3.SAFETY FUNCTIONS B-64303EN-4/01
- 62 -
Connection JX4 of αiSP and I/O Link#3 or Connection JX6 of βiSVSP) and I/O Link#3
αi SP βiSVSP
JX4
JX6
I/O Unit
(11) COMEXOF 24V
(13) EXOF2 DI
0V
Semiconductor-based
insulated output
Half-pitch connector
Hirose Electric
Connector case
FI40B-20S-CVS5
Contact open: Excitation-on
Contact closed: Excitation-off
- Specification of contact output of the αiSP or βiSVSP
Circuit type: Polarized photocoupler Rated voltage: 30 VDC or less Output current: DC 40 mA or less Saturation voltage: 1.5 V or less (at an output current of 40 mA)
CAUTION If the connector is connected incorrectly, the 24 V
power externally supplied can damage the internal circuitry of the αiSP and βiSVSP. Use special care when connecting the connector.
3.20.5 Restrictions
- System configuration
To use this function, the following αi series spindle amplifiers or βiSVSP series supporting the function for doubly outputting the Spindle Excitation-Off signal needs to be used: • For 200V system
A06B-6141-H002 to H055#H580 A06B-6142-H002 to H055#H580
A06B-6164-H201 to H343#H580 • For 400V system
A06B-6151-H006 to H100#H580 A06B-6152-H006 to H100#H580
Moreover, the following Dual Check Safety function needs to be used: • Programmable Safety I/O signal (Section 5.4)

B-64303EN-4/01 3.SAFETY FUNCTIONS
- 63 -
3.21 DUAL BRAKE MONITOR FUNCTION With the Dual Check Safety function, mechanical control is exercised on the servo axis brake to secure the safety of the brake, by using the doubly output Safety Brake signal (*BRKx). This function conducts a test periodically on the servo axis brake to secure the safety of brake control mentioned above.
Residual risk When this function is used, the following risk is known to be present: If a brake failure occurs between a brake test and the next brake test on the vertical axis for which the brake mechanism is not redundant, a drop on the axis can occur when servo motor excitation is turned off by an emergency stop or servo alarm.
3.21.1 Brake Test A brake test can be conducted for a servo axis that has a brake. A brake test may be conducted only for those axes including the vertical axis that require brake control. For each axis, whether to conduct a brake test can be selected using parameter No. 13912. As with MCC off Test, a brake test is to be performed when the power is turned on and when time t has elapsed after the previous test. (Set the value of t in parameter No. 13913.)
3.21.2 Brake Test Procedure
Starting a brake test <1> The Brake Test Execution Request signal RQBT is set to 1 when
the power is turned on and when time t has elapsed after the previous brake test (the value of t is set in parameter No. 13913). When the Brake Test Execution Request signal RQBT is set to 1, conduct a brake test. Even if RQBT is set to 1, operation can be continued until the current machining is completed. To secure safety, however, a brake test should be conducted as soon as possible.
<2> Clear all NC alarms and set the JOG mode then retract the brake test target axis to a safe position.
<3> The execution of a brake test is started by setting the Brake Test Start signal STBT to 1.

3.SAFETY FUNCTIONS B-64303EN-4/01
- 64 -
NOTE In a brake test, a move command is issued to the
servo motor. So, ensure that the position control mode and servo-on state are set. No brake test is conducted when the test target axis is in a mode (speed control or torque control mode) other than the position control mode, in the servo-off state, or in torque limit control. When the test start condition is not satisfied, alarm DS0039 or DS0040 is issued. The cause of alarm DS0039 or DS0040 is indicated in diagnosis No. 3701.
Brake test execution
<4> When the NC accepts brake test execution, a test is conducted on the brake test target axes simultaneously. By combining the states of two Safety Brake signals *BRKx (PMC, DCS PMC), three patterns of test are conducted on each axis in the order from test 1 to test 3 as indicated below.
Test 1 Test 2 Test 3
*BRKx (PMC) 0 0 1 *BRKx (DCS PMC) 0 1 0 State of brake Applied Applied Applied
Ending a brake test
<5> Upon normal completion of test on all test target axes, the Brake Test Execution Request signal RQBT is set to 0. If an error occurs during test, alarm DS0039 or DS0040 is issued. Even if alarm DS0039 or DS0040 is issued, servo motor excitation is kept. In this state, however, automatic operation cannot be continued. Retract the axes to a safe position by manual operation then turn off the power. Next, take action for the brake in trouble. To conduct another brake test, perform a reset operation once to clear the alarm state beforehand.
<6> Upon normal completion of test, set the Brake Test Start signal STBT to 0.

B-64303EN-4/01 3.SAFETY FUNCTIONS
- 65 -
Brake test timing chart
NOTE 1 Set a travel distance, speed command, and tolerance for position deviation
to be used for a brake test in parameter No. 13916, parameter No. 13917, and parameter No. 13918, respectively, beforehand.
2 Be sure to close the protective door when conducting a brake test. To secure safety, specify a ladder so that if the Brake Test Execution Request signal RQBT is set to 1, the protective door is not opened until completion of a brake test even when a protective door open request is issued.
3 Do not conduct a brake test when the protective door is open. Specify a ladder so that when the protective door is open, the Brake Test Start signal STBT is not set to 1.
4 When a brake test target axis is under synchronization control, composite control, or superposition control (T series), no brake test can be conducted. Cancel synchronization control, composite control, or superposition control beforehand.
5 If alarm DS0039 or DS0040 is issued in a brake test, axis movements can be made by manual operation. However, automatic operation is enabled only after clearing the alarm by a reset. When performing an automatic operation, ensure that safety is secured. If a brake test is suspended for a cause such as an alarm, the target axis may not return to the original position.
6 A fixed override value of 100% is applied to a speed command. Dry run is also disabled.
7 During a brake test, interlock/machine lock is enabled.
CAUTION During a brake test, an axis movement can occur. So, make an axis
movement beforehand to a safe position that causes no interference.
0 1
1 0
Test 1
*BRKx (DCS PMC)
(Axis by axis)
Brake Test Execution
Request signal (RQBT)
Brake Test Startsignal (STBT)
1 0 1
0
Test sequence Under test
<2> <1>
*BRKx (PMC)
(Axis by axis)
Test 2 Test 3
<3> <5> <6> <4>

3.SAFETY FUNCTIONS B-64303EN-4/01
- 66 -
3.21.3 Details of Brake Test The following operations are performed in brake tests 1 to 3: (a) The Safety Brake signal *BRKx is output according to a test
pattern. The torque limit value of a brake test target axis is used as a torque limit value for brake test. A torque limit value can be set in parameter No. 13915.
(b) Time t1 is awaited until the brake has been applied to enable a command to be issued. (Time t1 is set in parameter No. 13914.)
(c) A position command from the NC is output according to the travel distance set in parameter No. 13916 and the speed command set in parameter No. 13917.
(d) A position deviation is checked to see if the brake has been applied normally when the issue of commands is completed. If the brake has been applied normally, no axis movement is made. So, the position deviation corresponding to a specified travel distance is accumulated. The range of position deviation to be checked is the corresponding position deviation plus/minus the tolerance value (parameter No. 13918). Parameter No. 13919 is used to set time t2 for checking whether the brake has been applied normally. If the position deviation is outside the range, alarm DS0039 or DS0040 is issued, assuming that the brake has not been applied normally.
(e) Upon completion of checking, a command is issued to return the accumulated position deviation to the original value.
(f) Time t1 (parameter No. 13914) is awaited before starting the next test.

B-64303EN-4/01 3.SAFETY FUNCTIONS
- 67 -
Brake test timing chart
3.21.4 Suspension and Restart of Brake Test
Suspension based on STBT=0
A brake test is suspended by setting the Brake Test Start signal STBT to 0 during the test. When the signal is set to 0, the test sequence being executed is suspended, and the Safety Brake signal *BRKx and torque limit are returned to the original states.
Suspension based on an emergency stop or servo alarm If a brake test is suspended for an emergency stop or servo alarm, the brake test is forcibly terminated even during a test sequence, and operation for returning the Safety Brake signal *BRKx and torque limit to the original states is performed after reset-based excitation. During a brake test, ensure that brake control is exercised by monitoring the Servo Ready signal SA (Fn000.6) as well as the Safety Brake signal *BRKx.
Suspension based on a reset or mode switching If a brake test is suspended for a reset or mode switching, the test sequence under execution is suspended. However, operation for returning the Safety Brake signal *BRKx and torque limit to the original states is not performed. The test is restarted by setting the Brake Test Start signal STBT to 1 again.
t1 Command (Distance/
speed) Cancel command
t2
Torque limit Valid
Next testTest
(a)
Invalid 1
0
*BRKx (PMC,DCS PMC)
Command (POS)
+ command
− command
No command
(b) (c) (d)
t1
Error monitor
(e) (f)
Monitored
Not monitored

3.SAFETY FUNCTIONS B-64303EN-4/01
- 68 -
3.21.5 Brake Configuration This function assumes the following two brake configurations:
Brake configuration 1
24V
M
0V
O
Built-in motor brake
CNC
PMC
I/O Module 1
RL
*BRKx
JD51
JD1B
JD44A-1
DCS PMC
I/O Module 2
I/O Link Channel 1
I/O Link Channel 3
I/O Link branching adapter
0V
RL
0V
O
I
I
*BRKxJD1B
JD51B
JD1A

B-64303EN-4/01 3.SAFETY FUNCTIONS
- 69 -
Brake configuration 2
24V
M
0V
O
CNC
PMC
I/O Module 1
RL
*BRKx
JD51
JD1B
JD44A-1
DCS PMC
I/O Module 2
I/O Link Channel 1
I/O Link Channel 3
I/O Link branching adapter
0V
RL
0V
O
I
I
*BRKxJD1B
JD51B
JD1A
24V
0V
Built-in motor brake External
brake

4.INSTALLATION B-64303EN-4/01
- 70 -
4 INSTALLATION The hardware installation such as field wiring, power supply, etc. should be referred to connection manual for CNC units and for servo amplifier. EMC problem should be referred to EMC guideline manual. Degree of IP protection: Servo Motors: IP55 Spindle Motors: IP54 with oil-seal, IP40 without oil-seal Servo and Spindle amplifiers: IP1x CNC and other accessories: IPxx
NOTE Servo/Spindle amplifiers, CNC are to be installed in
IP54 protected cabinets. The peripheral units and the control unit have been designed on the assumption that they are housed in closed cabinets. As for the environmental conditions for each unit, such as CNC controller, servo amplifier and etc, please refer to each connection manual.

B-64303EN-4/01 4.INSTALLATION
- 71 -
4.1 OVERALL CONNECTION DIAGRAM In case of using the 2 channel I/O link
CNC Main board
I/O-LINK(JD51A)
3ch I/O Link branching adapter JD51B
JD44A-1
JD44A-2
JD1A
24VDC
Distribution-type I/O board
CPD1
JD1B
JD1A
JA3
Operator’s panel
24VDC
I/O UNIT etc CPD1
JD1B
JD1A
Power magnetic cabinet
Manual pulse generator
24VDC
I/O UNIT etc CPD1
JD1B
JD1A
I/O LINK #1/#2 (general I/O, safety-related I/O)
I/O LINK #3 (Safety-related I/O)
Power magnetic cabinet
Above shows only the 2 channel I/O link for the safety-related I/Os of the Dual Check Safety Function. As for the other connections, please refer to the Connection manual.
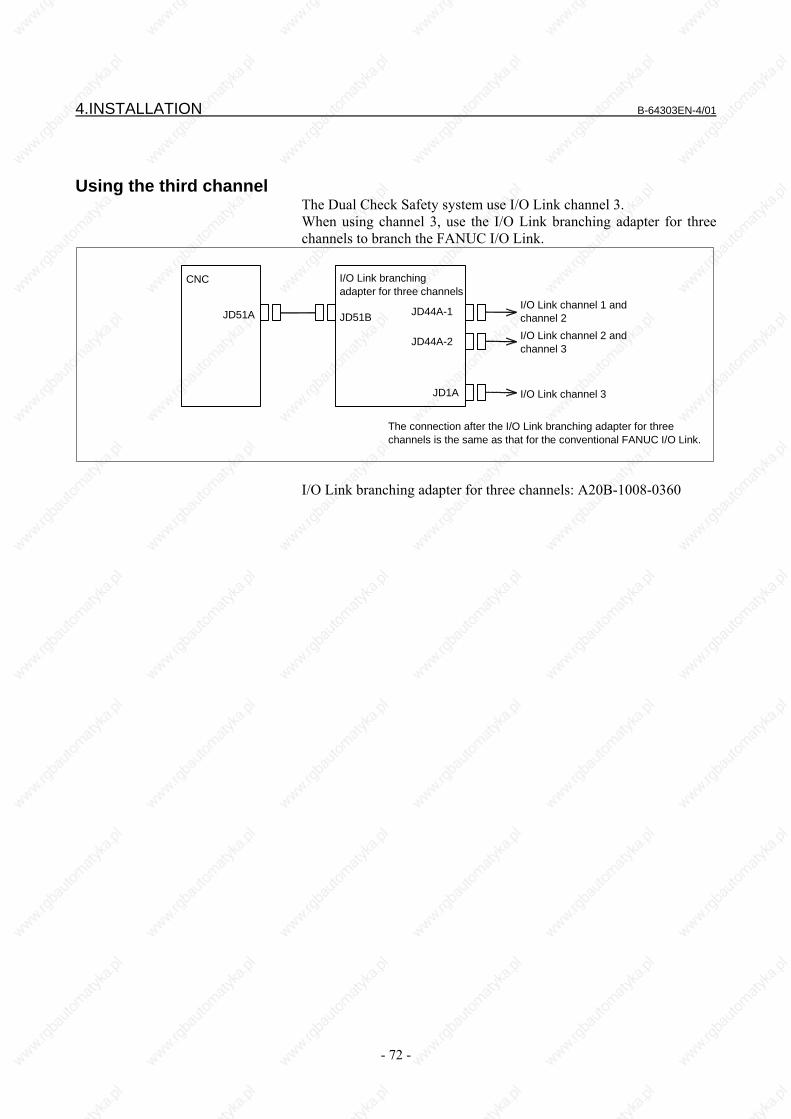
4.INSTALLATION B-64303EN-4/01
- 72 -
Using the third channel The Dual Check Safety system use I/O Link channel 3. When using channel 3, use the I/O Link branching adapter for three channels to branch the FANUC I/O Link.
I/O Link branching adapter for three channels
JD51B JD44A-1
JD44A-2
CNC
JD51A I/O Link channel 1 and channel 2
The connection after the I/O Link branching adapter for three channels is the same as that for the conventional FANUC I/O Link.
JD1A
I/O Link channel 2 and channel 3
I/O Link channel 3
I/O Link branching adapter for three channels: A20B-1008-0360

B-64303EN-4/01 4.INSTALLATION
- 73 -
Connection between the CNC and I/O Link branching adapter for three channels
The +5V pin is provided to use the optical I/O Link adapter for optical fiber transmission. When not using the optical I/O Link adapter, leave the +5V pin unconnected.
Cable connection
Recommended cable connectors: PCR-E20FA (Honda Tsushin Kogyo Co., Ltd.)
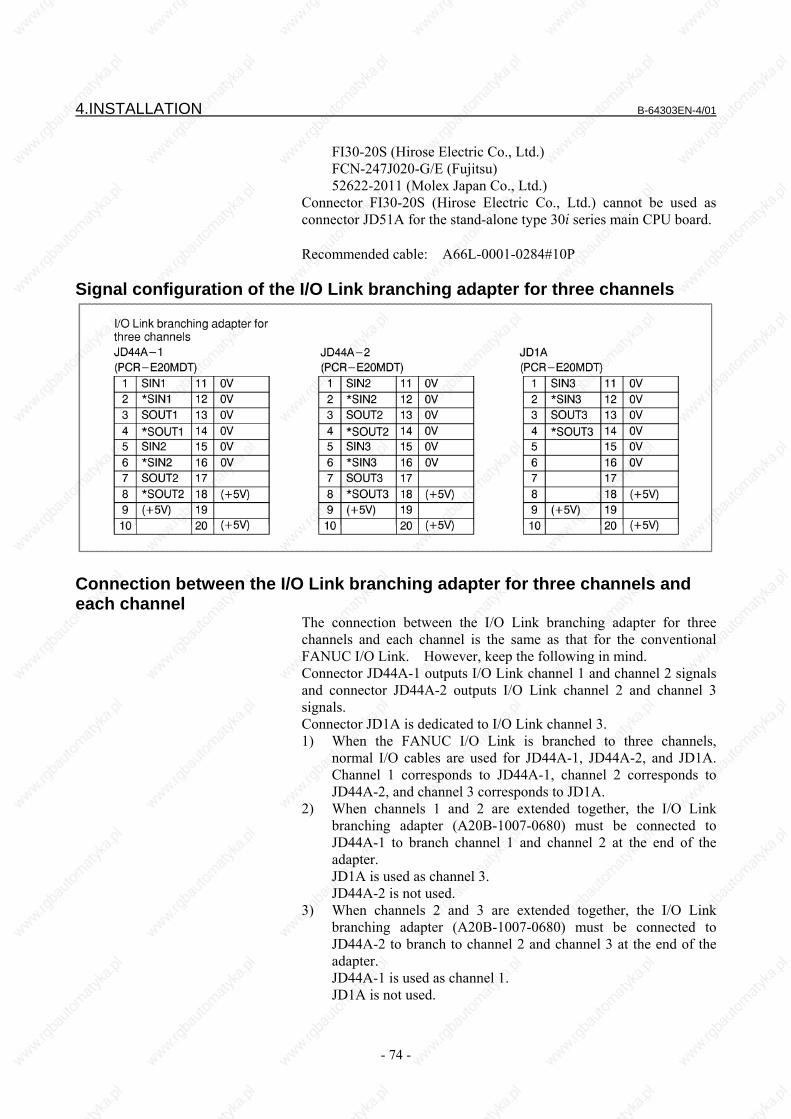
4.INSTALLATION B-64303EN-4/01
- 74 -
FI30-20S (Hirose Electric Co., Ltd.) FCN-247J020-G/E (Fujitsu) 52622-2011 (Molex Japan Co., Ltd.) Connector FI30-20S (Hirose Electric Co., Ltd.) cannot be used as connector JD51A for the stand-alone type 30i series main CPU board. Recommended cable: A66L-0001-0284#10P
Signal configuration of the I/O Link branching adapter for three channels
Connection between the I/O Link branching adapter for three channels and each channel
The connection between the I/O Link branching adapter for three channels and each channel is the same as that for the conventional FANUC I/O Link. However, keep the following in mind. Connector JD44A-1 outputs I/O Link channel 1 and channel 2 signals and connector JD44A-2 outputs I/O Link channel 2 and channel 3 signals. Connector JD1A is dedicated to I/O Link channel 3. 1) When the FANUC I/O Link is branched to three channels,
normal I/O cables are used for JD44A-1, JD44A-2, and JD1A. Channel 1 corresponds to JD44A-1, channel 2 corresponds to JD44A-2, and channel 3 corresponds to JD1A.
2) When channels 1 and 2 are extended together, the I/O Link branching adapter (A20B-1007-0680) must be connected to JD44A-1 to branch channel 1 and channel 2 at the end of the adapter.
JD1A is used as channel 3. JD44A-2 is not used. 3) When channels 2 and 3 are extended together, the I/O Link
branching adapter (A20B-1007-0680) must be connected to JD44A-2 to branch to channel 2 and channel 3 at the end of the adapter.
JD44A-1 is used as channel 1. JD1A is not used.

B-64303EN-4/01 4.INSTALLATION
- 75 -
1) When three channels are branched
CNC
JD51A
I/O Link branching adapter for three channels
JD51B JD44A-1
JD44A-2
JD1A
Channel 1
Channel 2
Channel 3
2) When channels 1 and 2 are extended together
JD44B JD1A-1
Channel 3
CNC
JD51A
I/O Link branching adapter for three channels
JD51B JD44A-1
JD44A-2
JD1A
Channel 1
Channel 2
I/O Link branching adapter (A20B-1007-0680)
JD1A-2
3) When channels 2 and 3 are extended together
JD44B JD1A-1
CNC
JD51A
I/O Link branching adapter for three channels
JD51B JD44A-1
JD44A-2
JD1A
Channel 2
Channel 3
Channel 1 I/O Link branching adapter (A20B-1007-0680)
JD1A-2

4.INSTALLATION B-64303EN-4/01
- 76 -
Connection between the I/O Link branching adapter for three channels and I/O Link branching adapter for two channels
The +5V pin is provided to use the optical I/O Link adapter for optical fiber transmission. When not using the optical I/O Link adapter, leave the +5V pin unconnected.
Cable connection
Recommended cable connectors: PCR-E20FA (Honda Tsushin Kogyo Co., Ltd.) FI30-20S (Hirose Electric Co., Ltd.)

B-64303EN-4/01 4.INSTALLATION
- 77 -
FCN-247J020-G/E (Fujitsu) 52622-2011 (Molex Japan Co., Ltd.) Connector FI30-20S (Hirose Electric Co., Ltd.) cannot be used as connector JD51A for the stand-alone type 30i series main CPU board. Recommended cable: A66L-0001-0284#10P
Cable length
JD51A JD51B
JD1A
JD1B LA
CNC I/O Link branching adapter I/O Unit
LBJD44A-1
JD44A-2
The total of LA and LB must not exceed 10 m; where LA is the length of the cable between connector JD51A on the CNC and connector JD51B on the I/O Link branching adapter, and LB is the length of the cable between connector JD44A-1, JD44A-2, or JD1A on the I/O Link branching adapter and connector JD1B on the I/O unit. When all cables are accommodated in the same cabinet, however, a total cable length of up to 15 m is allowed.

4.INSTALLATION B-64303EN-4/01
- 78 -
Installation of the I/O Link branching adapter for three channels Install the I/O Link branching adapter for three channels in a hermetically sealed cabinet like the CNC.
External dimensions of the I/O Link branching adapter for three channels
Unit : mm
2334
JD44A-2 JD44A-1 JD1A
80
45
105
JD51B
Allow a clearance of about 10 cm above the adapter for connection and routing of cables.
Installation of the I/O Link branching adapter for three channels 1) Installation on the DIN rail
25
35
Unit: mm
Recommended DIN rail 2) Screwing
11.6
902-M4
Unit: mm
Drilling on the plate

B-64303EN-4/01 5.I/O SIGNALS
- 79 -
5 I/O SIGNALS

5.I/O SIGNALS B-64303EN-4/01
- 80 -
5.1 OVERVIEW The Dual Check Safety Function provides two input paths and two output paths for safe-related signals (safety signals). For input signals (safety input signals), two paths are used: one path for input to the CNC via I/O Link#3 or PROFIBUS-DP (Note1), and another for input to the PMC via I/O Link#1,#2. The CNC (DCS PMC) and the PMC exchange the safety input signals with each other at all times to check each other. If a mismatch is found between a safety input signal via one path and the same signal via another path and such a state lasts for the period set in a parameter or more, the CNC (DCS PMC) and the PMC independently detect an alarm. (Dual-check for safety input signals) For output signals (safety output signals), two paths are also used: one path for output from the CNC via the I/O Link#3 or PROFIBUS-DP, and another for output from the PMC via the I/O Link#1,#2. The MCC Off signal (*MCF) is output via these two paths. When both a signal via one path and the same signal via another path are 1, the signal is assumed to be 1. If either is 0, the signal is assumed to be 0. That is, if the signal (*MCF of DCS PMC)(Note2) via the I/O Link#3 or PROFIBUS-DP and the signal (*MCF of PMC)(Note2) via the I/O Link#1,#2 are both 1, the MCC may be turned on. If either is 0, the MCC must be turned off. In Subsection 5.3, a signal name is followed by its symbol and addresses <via I/O Link#1,#2> and <via I/O Link#3 or PROFIBUS-DP>. Then, for an input signal, its classification, function, and operation are described, in this order. For an output signal, its classification, function, and output condition are described in this order. For information about the emergency stop mode and MCC off Test mode described in Subsection 5.3, see Subsection 5.3.
NOTE 1 I/O Link and PROFIBUS-DP can not be used for
the safety X/Y signals at the same time. 2 DCS PMC : Dual Check Safety PMC PMC : For the PMC, refer to "PMC
PROGRAMMING MANUAL (B-64393EN)".

B-64303EN-4/01 5.I/O SIGNALS
- 81 -
5.2 SIGNAL ADDRESS
Via I/O Link#1/#2 PMC (n=0 or 1 (NC path number - 1))
#7 #6 #5 #4 #3 #2 #1 #0
X0008 *ESP
#7 #6 #5 #4 #3 #2 #1 #0
Gn008 *ESP
#7 #6 #5 #4 #3 #2 #1 #0
Gn191 ORQ OPT
#7 #6 #5 #4 #3 #2 #1 #0
Gn193 STBT
#7 #6 #5 #4 #3 #2 #1 #0
Gn748 *SMC
#7 #6 #5 #4 #3 #2 #1 #0
Gn749
#7 #6 #5 #4 #3 #2 #1 #0
Gn750 *VLDV5 *VLDV4 *VLDV3 *VLDV2 *VLDV1
#7 #6 #5 #4 #3 #2 #1 #0
Gn751 *VLDP2 *VLDP1
#7 #6 #5 #4 #3 #2 #1 #0
Gn752 SVA5 SVA4 SVA3 SVA2 SVA1
#7 #6 #5 #4 #3 #2 #1 #0
Gn753 SVB5 SVB4 SVB3 SVB2 SVB1
#7 #6 #5 #4 #3 #2 #1 #0
Gn754 SPB2 SPB1 SPA2 SPA1

5.I/O SIGNALS B-64303EN-4/01
- 82 -
#7 #6 #5 #4 #3 #2 #1 #0
Fn191 RQBT RQT *OPIHB
#7 #6 #5 #4 #3 #2 #1 #0
Fn748 *DCALM *MCF
#7 #6 #5 #4 #3 #2 #1 #0
Fn749
#7 #6 #5 #4 #3 #2 #1 #0
Fn750 RSV5 RSV4 RSV3 RSV2 RSV1
#7 #6 #5 #4 #3 #2 #1 #0
Fn751 RSP2 RSP1
#7 #6 #5 #4 #3 #2 #1 #0
Fn752 *MCFV5 *MCFV4 *MCFV3 *MCFV2 *MCFV1
#7 #6 #5 #4 #3 #2 #1 #0
Fn753 *MCFP2 *MCFP1
#7 #6 #5 #4 #3 #2 #1 #0
Fn754 *BRK5 *BRK4 *BRK3 *BRK2 *BRK1
#7 #6 #5 #4 #3 #2 #1 #0
Fn755 SPS08 SPS07 SPS06 SPS05 SPS04 SPS03 SPS02 SPS01
#7 #6 #5 #4 #3 #2 #1 #0
Fn756 SPS16 SPS15 SPS14 SPS13 SPS12 SPS11 SPS10 SPS09
#7 #6 #5 #4 #3 #2 #1 #0
Fn757 SPS24 SPS23 SPS22 SPS21 SPS20 SPS19 SPS18 SPS17
#7 #6 #5 #4 #3 #2 #1 #0
Fn758 SPS32 SPS31 SPS30 SPS29 SPS28 SPS27 SPS26 SPS25
#7 #6 #5 #4 #3 #2 #1 #0
Fn766 POSE5 POSE4 POSE3 POSE2 POSE1

B-64303EN-4/01 5.I/O SIGNALS
- 83 -
Via I/O Link#3 or PROFIBUS-DP DCS PMC (m=0, 20 ((NC path number - 1) × 20))
#7 #6 #5 #4 #3 #2 #1 #0
X0008 *ESP
#7 #6 #5 #4 #3 #2 #1 #0
G000+m *SMC
#7 #6 #5 #4 #3 #2 #1 #0
G001+m
#7 #6 #5 #4 #3 #2 #1 #0
G002+m *VLDV5 *VLDV4 *VLDV3 *VLDV2 *VLDV1
#7 #6 #5 #4 #3 #2 #1 #0
G003+m *VLDP2 *VLDP1
#7 #6 #5 #4 #3 #2 #1 #0
G004+m SVA5 SVA4 SVA3 SVA2 SVA1
#7 #6 #5 #4 #3 #2 #1 #0
G005+m SVB5 SVB4 SVB3 SVB2 SVB1
#7 #6 #5 #4 #3 #2 #1 #0
G006+m SPB2 SPB1 SPA2 SPA1
#7 #6 #5 #4 #3 #2 #1 #0
G007+m
#7 #6 #5 #4 #3 #2 #1 #0
G008+m
#7 #6 #5 #4 #3 #2 #1 #0
G019+m *ESP

5.I/O SIGNALS B-64303EN-4/01
- 84 -
#7 #6 #5 #4 #3 #2 #1 #0
F000+m *DCALM *MCF
#7 #6 #5 #4 #3 #2 #1 #0
F001+m
#7 #6 #5 #4 #3 #2 #1 #0
F002+m RSV5 RSV4 RSV3 RSV2 RSV1
#7 #6 #5 #4 #3 #2 #1 #0
F003+m RSP2 RSP1
#7 #6 #5 #4 #3 #2 #1 #0
F004+m *MCFV5 *MCFV4 *MCFV3 *MCFV2 *MCFV1
#7 #6 #5 #4 #3 #2 #1 #0
F005+m *MCFP2 *MCFP1
#7 #6 #5 #4 #3 #2 #1 #0
F006+m *BRK5 *BRK4 *BRK3 *BRK2 *BRK1
#7 #6 #5 #4 #3 #2 #1 #0
F007+m SPS08 SPS07 SPS06 SPS05 SPS04 SPS03 SPS02 SPS01
#7 #6 #5 #4 #3 #2 #1 #0
F008+m SPS16 SPS15 SPS14 SPS13 SPS12 SPS11 SPS10 SPS09
#7 #6 #5 #4 #3 #2 #1 #0
F009+m SPS24 SPS23 SPS22 SPS21 SPS20 SPS19 SPS18 SPS17
#7 #6 #5 #4 #3 #2 #1 #0
F010+m SPS32 SPS31 SPS30 SPS29 SPS28 SPS27 SPS26 SPS25
#7 #6 #5 #4 #3 #2 #1 #0
F018+m POSE5 POSE4 POSE3 POSE2 POSE1
#7 #6 #5 #4 #3 #2 #1 #0
F019+m *OPIHB

B-64303EN-4/01 5.I/O SIGNALS
- 85 -
NOTE 1 The signals with a background color are
cross-check target signals. 2 The Emergency Stop signals in X address are
double checking signals. 3 Position switch signals as many as indicated below
are provided, depending on the number of paths: (1) When one path is used: 32 points maximum (2) When two paths are used with the T series:
64 points maximum 4 The following signals are provided for each
machine group. Emergency Stop (*ESP: X0008), Test Mode signal(OPT), Guard Open Request signal(ORQ), Guard Open Inhibit signal(*OPIHB), MCC Off signal (*MCF), MCC Contact State signal (*SMC), MCC Off Test Execution Request signal (RQT)
(With the FS0i-D, the number of machine groups is 1 at all times.)
5 With the FS0i-D, the signals (Fxxxx/Gxxxx) prepared for each machine group are located in the signal area for the first path at all times.

5.I/O SIGNALS B-64303EN-4/01
- 86 -
Interface Signals between the CNC and the PMC The addresses for the interface signals (F and G signal addresses viewed from the CNC) between the CNC and the PMC are shown below.
- [For 1-path CNC] PMC
F0000~ G0000~
DCSPMC
F0000~ G0000~
T - [When two paths are used with a CNC of the T series]
CNC path 1
PMC
F0000~ G0000~
DCSPMC
F000~ G000~
CNC path 2
PMC
F1000~ G1000~
DCSPMC
F020~ G020~
The signal for the x-th axis of the k-th path is placed in the (x - 1)-th bit in the address (G or F) for the k-th path in the above figure. PMC ( n = k-1 )
#7 #6 #5 #4 #3 #2 #1 #0
Gn??? 5th axis 4th axis 3rd axis 2nd axis 1st axis
#7 #6 #5 #4 #3 #2 #1 #0
Fn??? 5th axis 4th axis 3rd axis 2nd axis 1st axis DCS PMC ( m = (k-1) × 20 )
#7 #6 #5 #4 #3 #2 #1 #0
G0??+m 5th axis 4th axis 3rd axis 2nd axis 1st axis
#7 #6 #5 #4 #3 #2 #1 #0
F0??+m 5th axis 4th axis 3rd axis 2nd axis 1st axis

B-64303EN-4/01 5.I/O SIGNALS
- 87 -
5.3 SIGNALS
Emergency Stop signal (input) *ESP <PMC: X0008.4><DCS PMC: X0008.4> (for each machine group) *ESP <PMC: Gn008.4> <DCS PMC: G019+m.4> (for each path)
This is Emergency Stop signal. The Emergency Stop signal must be connected to the Emergency Stop input of the amplifier.
[Classification] Input signal (Dual signal) [Function] Stops machine movement immediately in an emergency.
0: Emergency stop state 1: Normal state
[Operation] When Emergency Stop signal (*ESP) is set to 0, the CNC is reset, and the system enters emergency stop state. A machine tool builder must output a signal to shut off directly the MCC when “MCC Off signal” (*MCF) is set to “0”. In emergency stop state, a machine tool builder must check “MCC Contact State signal” (*SMC). If *SMC signal is “0” (MCC is on), a machine tool builder must not release the guard lock signal of protective door. In general, Emergency Stop signal (*ESP) is specified by the pushbutton switch B contact. When an emergency stop occurs, the servo ready signal SA is set to 0. If the input of the Emergency Stop signal is detected, the CNC automatically specifies a command to zero the speed of a servo motor and reduces the speed to zero (controlled stop). (See below caution) After the servo motor slows down and stops, the power is turned off, and the servo motor is brought into the dynamic brake stop state. The spindle motor is slowed down by the PMC command (see below caution) and the power is shut off.
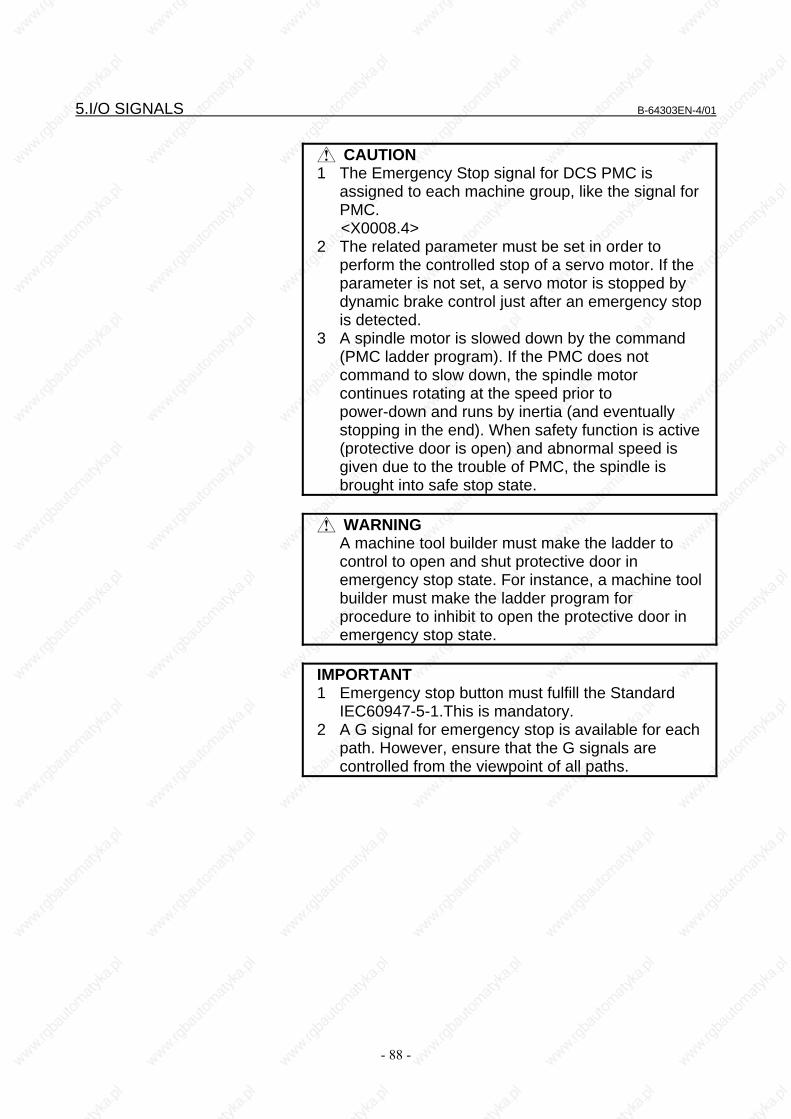
5.I/O SIGNALS B-64303EN-4/01
- 88 -
CAUTION 1 The Emergency Stop signal for DCS PMC is
assigned to each machine group, like the signal for PMC. <X0008.4>
2 The related parameter must be set in order to perform the controlled stop of a servo motor. If the parameter is not set, a servo motor is stopped by dynamic brake control just after an emergency stop is detected.
3 A spindle motor is slowed down by the command (PMC ladder program). If the PMC does not command to slow down, the spindle motor continues rotating at the speed prior to power-down and runs by inertia (and eventually stopping in the end). When safety function is active (protective door is open) and abnormal speed is given due to the trouble of PMC, the spindle is brought into safe stop state.
WARNING
A machine tool builder must make the ladder to control to open and shut protective door in emergency stop state. For instance, a machine tool builder must make the ladder program for procedure to inhibit to open the protective door in emergency stop state.
IMPORTANT 1 Emergency stop button must fulfill the Standard
IEC60947-5-1.This is mandatory. 2 A G signal for emergency stop is available for each
path. However, ensure that the G signals are controlled from the viewpoint of all paths.

B-64303EN-4/01 5.I/O SIGNALS
- 89 -
Example of protective door open/shut sequence The following figure shows the sequence in case of emergency stop.
*ESP
*SMC
Actual door lock releasing signal
*SGOPN (Safety related I/O)
Door closedDoor opened
(1) (2) (3) (4) (5)
t
Door closed
EMG_P
Actual door open/close signal
RSVxRSPs
A machine tool builder must design the ladder program as follows: (1) In case Emergency Stop signal (*ESP) is input, the guard lock
signal is turned off after confirming safety machine position, safety speed and safety position error by the Monitoring Result signals RSVx/RSPs.
(2) In this example, it is assumed that a protective door with an electronic door lock is applied. When a door is opened, door lock releasing signal must be turned off. At the same time, Guard State signal (*SGOPN: machine side signal) is changed to show guard-releasing state.
(3) This is door open state (4) Protective door is shut and locked. Then Emergency Stop signal
(*ESP) is released (“1”). Pay attention the time “t”. (5) After Emergency Stop signal is released, CNC turns MCC Off
signal (*MCF) to “1”.
Test Mode signal (input) OPT <PMC:Gn191.2> (for each machine group)
When this signal is input, MCC off Test is carried out. MCC off Test checks whether the contact of the MCC is abnormally closed or not. MCC Off Test Execution Request signal (RQT) notifies that MCC off Test should be executed. Input this signal while servo ready signal (SA) is set to “1”. When MCC off Test is carried out by manual operation, input this signal after preparing to carry out MCC off Test by PMC.

5.I/O SIGNALS B-64303EN-4/01
- 90 -
[Classification] Input signal (Single signal) [Function] This signal notifies CNC to enter MCC off Test mode.
0: Not enter MCC off Test mode 1: Enter MCC off Test mode Test Mode signal (OPT) through I/O Link#3, PROFIBUS-DP is not provided.
[Operation] When this signal (OPT) is set to “1”, CNC turns on/off MCC in various combinations with MCC Off signals *MCF(PMC)/*MCF(DCS PMC). And CNC checks whether MCC Contact State signals *SMC(PMC)/ *SMC(DCS PMC) are input in proper combination corresponding to the combination with MCC Off signals. However MCC off Test should not be carried out in case of emergency stop state, servo alarm state or spindle alarm state. If MCC off Test is not completed within the time specified by the parameter No.1946, a servo alarm SV0488 occurs.
CAUTION 1 While MCC off Test is being carried out, do not
turn Test Mode signal (OPT) to “0”. 2 The MCC shall have forced guided contacts , and
must fulfill the standard IEC60204 and IEC 60255. This is mandatory.
3 Before performing the MCC off Test, stop the spindle and feed axis. For axes (such as the vertical axis) that move when the MCC is turned off, apply a brake in advance regardless of the state of the brake signal (*BRKx) to place the axes in the servo off state.
WARNING
While the MCC off Test processing is in progress, the MCC Off signal (*MCF) goes high and low to turn on and off the MCC. Carry out the MCC off Test in such a state that the turning on or off of the MCC will not cause a problem.
NOTE If MCC off Test is executed when MCC is forced to
shut off in emergency stop state, servo alarm state or spindle alarm state, the test cannot be executed normally. MCC off Test should be executed only when the test can be executed normally.

B-64303EN-4/01 5.I/O SIGNALS
- 91 -
Example 1) Timing chart 1 of MCC off test (normal state)
Example 2) Timing chart 2 of MCC off test (abnormal state)
*MCF (DCS PMC) 1 2 3 4
*MCF (PMC)
*SMC (DCS PMC)
Timer
Test No.
Timer limit
Test start
*SMC (PMC)
Alarm
*MCF (DCS PMC) 1 2 3 4 5
*MCF (PMC)
*SMC (DCS PMC)
Timer
Test No.
Timer limit
Test completion Test start
*SMC (PMC)
128

5.I/O SIGNALS B-64303EN-4/01
- 92 -
Guard Open Request signal (input) ORQ <PMC: Gn191.3>(for each machine group)
This signal is input when an operator intends to release the guard lock and open the protective door.
[Classification] Input signal (Single signal) [Function] In order to open the protective door, this signal requests CNC to
unlock the guard lock with the Dual Check Safety Function. Guard Open Request signal (ORQ) is not input via the DCS PMC. 0: Not request to open guard lock. 1: Request to open guard lock
[Operation] When CNC detects that the Guard Open Request signal (ORQ) is 1, CNC returns Guard Open Inhibit signal (*OPIHB). A machine tool builder must design the PMC ladder program so that the guard lock is released after judging the result of safety machine position check, safety speed check, safety position error check to be safe or other safety condition such as Dual Check alarm status signal to be safe. This signal is not a safety signal that is checked doubly. But this is an important signal to make up the safety system. Then a machine tool builder must design the proper ladder program to deal with this signal.
IMPORTANT The mistake of the ladder program cannot be
checked. So be sure to perform the confirmation of the safety function. (refer to the chapter 7)
Guard State signal (Machine side input signal) *SGOPN <PMC:X machine side signal><DCS PMC:X machine side signal> (for each safety door)
Input the guard state of the protective door to this signal. When the protective door is open (Guard State signal (*SGOPN) =0), set Safety Check Request signal (*VLDVx, *VLDPs) to “0” in order to activate the alarm monitoring of safety functions.
[Classification] Input signal (Dual signal) [Function] Guard State signal informs CNC of the guard open/closed state for the
Dual Check Safety Function. 0: Guard open state 1: Guard closed state
[Operation] When Guard State signal (*SGOPN) is “0”, the ladder program turn Safety Check Request signal (*VLDVx, *VLDPs) to “0” in order to activate the alarm monitoring of safety speed, safety machine position and safety position error. If the ladder program detects abnormal condition in each CPU, it generates a safety related alarm and stops motors.
IMPORTANT As for the contacts for Guard State signal, it is
recommended to fulfill the Standard IEC60947-5-1.

B-64303EN-4/01 5.I/O SIGNALS
- 93 -
MCC Contact State (input) *SMC <PMC: Gn748.6><DCS PMC: G(000+m).6> (for each machine group)
The state of MCC contact is checked doubly. It is not possible to check whether the contact of MCC is melted and adhered abnormally because MCC contact is closed during normal operation. The state of MCC contact can be checked by performing MCC off Test.
[Classification] Input signal (Dual signal) [Function] MCC Contact State signals (*SMC) inform CNC of the MCC state for
the Dual Check Safety Function. 0: MCC-on state 1: MCC-off state
[Operation] MCC Contact State signals (*SMC) is used to check if the MCC Off signals (*MCF) operates normally in MCC off Test mode. When the MCC Contact State signals (both *SMC(PMC) and *SMC(DCS PMC)) are 1 in the emergency stop state (*ESP=0), it is possible to design the ladder program to release the guard lock.
CAUTION Input this signal according to the MCC state.
Safety Check Request signal (input) *VLDVx <PMC:Gn750.0 to 4><DCS PMC:G(002+m).0 to 4> (for each axis) *VLDPs <PMC:Gn751.0 to 1><DCS PMC:G(003+m).0 to 1> (for each spindle)
If these signals are set to “0” when Guard State signal (*SGOPN: machine side signal) is “0”, the alarm monitoring of safety speed limit, safety machine position and safety position error is activated.
[Classification] Input signal (Dual signal) [Function] Safety Check Request signals request each CPU to carry out the safety
check for the Dual Check Safety Function. These signals select a servo axis and a spindle that must be checked when a protective door is open. 0: Alarm by safety check is monitored, as a protective door is open. 1: Alarm by safety check is not monitored, as a protective door is
closed [Operation] Each CPU carries out the safety check of the servo axis and the
spindle that are selected by these signals. (Safety speed limit for a spindle, safety speed, safety machine position and safety position error for a servo axis.) If each CPU finds out any problem, it generates a safety related alarm and stops motors.

5.I/O SIGNALS B-64303EN-4/01
- 94 -
Guard Open Inhibit signal (output) *OPIHB <PMC: Fn191.0><DCS PMC: F(019+m).0> (for each machine group)
CNC returns these signals as answer when CNC detects that Guard Open Request signal (ORQ) is set to “1”.
[Classification] Output signal (Not checked doubly) [Function] When CNC receives Guard Open Request signal (ORQ) =1, CNC
returns these signal as answer. CNC outputs Guard Open Inhibit signal (*OPIHB) through both PMC and DCS PMC. 0: Inhibit guard open 1: Permit guard open
[Operation] A machine tool builder can release a guard lock by his ladder program when Guard Open Inhibit signal (*OPIHB) =1, Monitoring Result signal (RSVx/RSPs) =1 and the condition of machine side is confirmed to be safe.
NOTE During the MCC off Test, this signal is set to "0"
regardless of the state of the guard open request signal (ORQ).
IMPORTANT The mistake of the ladder program cannot be
checked. So be sure to perform the confirmation of the safety function. (refer to the chapter 7)
Monitoring Result signal (output) RSVx <PMC:Fn750.0 to 4><DCS PMC:F(002+m).0 to 4> (for each axis) RSPs <PMC:Fn751.0 to 1><DCS PMC:F(003+m).0 to 1> (for each spindle)
These signals show the result of monitoring safety speed, safety machine position and safety position error. By checking these signals, a machine tool builder can judge whether a machine is in safe state or not. When a machine is judged to be in safe state, it is necessary to turn on the signal for releasing a guard lock and outputs a signal actually to open a protective door.
[Classification] Output signal (Output to both PMC but not checked doubly) [Function] These signals show the result of monitoring of the Dual Check Safety
Function. These signals notify that an abnormal condition is detected in safety monitoring function of the Dual Check Safety Function, such as safety speed check, safety machine position check and safety position error check. In the following case, these signals are turned to “0”. 0: In dangerous condition (Abnormal condition is detected by
safety function.) In the following case, these signals are turned to “1”. 1: In safe condition (Abnormal condition is not detected.)

B-64303EN-4/01 5.I/O SIGNALS
- 95 -
[Operation] Each CPU notifies PMC of the result of safety monitoring through these signal. A machine tool builder can release a guard lock by his ladder program when Guard Open Inhibit signal (*OPIHB) =1, these Monitoring Result signal (RSVx/RSPs) =1 and the condition of machine side is confirmed to be safe.
MCC Off signal (output) *DCALM <PMC: F0748.7><DCS PMC: F000.7> (for all system)
In case this signal is “0”, MCC is shut off through 2 channels of I/O line respectively. This signal is set to “0”, when a crosscheck alarm of safety related signals or a CPU self-diagnosis alarm occurs. A machine tool builder makes a ladder program to output a signal to shut off MCC when this signal is turned to “0”. If necessary, control DO signal for peripheral devices.
[Classification] Output signal (This signal output to both PMC but is not monitored doubly)
[Function] This is a signal to turn on MCC when both a crosscheck alarm and a CPU self-diagnosis alarm are not caused. 0: MCC off 1: MCC on
[Operation] When each CPU finds out any abnormal condition, it generates an alarm and turns off this signal at the same time.
NOTE When the spindle motor (induction motor) is
powered off while rotating, the motor performs free-running at the speed before power-off, eventually stopping after a period of time. In some cases, however, it is better to stop the motor as early as possible for safety.
When the spindle is decided to be controlled even if the MCC Off signal is set to "0", the rotation of the spindle can be stopped under control of the ladder program (controlled stop). To do this, make a ladder program that interrupts power upon lapse of the timer set time after the MCC Off signal is set to "0".

5.I/O SIGNALS B-64303EN-4/01
- 96 -
MCC Off signal (output) *MCF <PMC: Fn748.1, DCS PMC: F(000+m).1> (for each machine group)
In case this signal is “0”, MCC is shut off through 2 channels of I/O Link line respectively. This signal is set to “0”, when Emergency Stop signal (*ESP ) is “0” or MCC off Test is carried out. A machine tool builder makes a ladder program to output a signal to shut off MCC when this signal is turned to “0”.
[Classification] Output signal (This signal output to both PMC but is not monitored doubly)
[Function] When the Dual Check Safety Function is applied, this signal allows turning on MCC. When either MCC Off signal through PMC or that through DCS PMC is “0”, MCC is turned off. When both MCC Off signal through PMC and that through DCS PMC is “1”, MCC is turned on. 0: MCC off 1: MCC on
[Operation] When Emergency Stop signal is input, CNC turns off this signal. When MCC off Test is carried out, CNC turns off this signal, too.
[Output condition] In the following case, this signal turns to “0” (not permit MCC on) • MCC off Test is carried out. • In emergency stop state In other than the above case, this signal turns to “1” (permit MCC on).
NOTE When the spindle motor (induction motor) is
powered off while rotating, the motor performs free-running at the speed before power-off, eventually stopping after a period of time. In some cases, however, it is better to stop the motor as early as possible for safety.
When the spindle is decided to be controlled even if the MCC Off signal is set to "0", the rotation of the spindle can be stopped under control of the ladder program (controlled stop). To do this, make a ladder program that interrupts power upon lapse of the timer set time after the MCC Off signal is set to "0".

B-64303EN-4/01 5.I/O SIGNALS
- 97 -
MCC Off signal (output) *MCFVx <PMC: Fn752.0 to 4><DCS PMC: F(004+m).0 to 4> (for each axis)
In case this signal is “0”, MCC is shut off through 2 channels of I/O line respectively. This signal is set to “0”, when an alarm occurs in safety speed limit check, safety machine position check or safety position error check for each servo axis. A machine tool builder makes a ladder program to output a signal to shut off the MCC of the path that the axis belongs, when this signal is turned to “0”.
[Classification] Output signal (This signal output to both PMC but is not monitored doubly)
[Function] When the Dual Check Safety Function is applied, this signal allows turning on MCC. 0: MCC off 1: MCC on
[Operation] If each CPU finds out the abnormal state of the axis when Safety Check Request signal for the axis (*VLDVx)=0, each CPU brings the axis into controlled stop state at first. In case of an alarm of Safety Speed Monitoring or Safety Machine Position Monitoring, each CPU watches whether the axis is decelerated and stopped or not. If the axis does not stop, each CPU turns this signal corresponding to the alarm axis to “0”. In case of an alarm of Safety Position Error Monitoring, each CPU turns this signal corresponding to the alarm axis to “0” immediately. In case of an alarm other than described above and related to data communication or position detector, each CPU turns this signal corresponding to the alarm axis to “0” immediately. But according to the parameter setting, it is possible to turn to “0” this signals of all the axes belonged to the path that involves the alarm axis in case of any servo alarms.
NOTE When the spindle motor (induction motor) is
powered off while rotating, the motor performs free-running at the speed before power-off, eventually stopping after a period of time. In some cases, however, it is better to stop the motor as early as possible for safety.
When the spindle is decided to be controlled even if the MCC Off signal is set to "0", the rotation of the spindle can be stopped under control of the ladder program (controlled stop). To do this, make a ladder program that interrupts power upon lapse of the timer set time after the MCC Off signal is set to "0".

5.I/O SIGNALS B-64303EN-4/01
- 98 -
MCC Off signal (output) *MCFPs <PMC: Fn753.0 to 1><DCS PMC: F(005+m).0 to 1> (for each spindle)
In case this signal is “0”, MCC is shut off through 2 channels of I/O Link line respectively. This signal is set to “0”, when an alarm occurs in safety speed check for each spindle. A machine tool builder makes a ladder program to output a signal to shut off the MCC of the path that the spindle belongs, when this signal is turned to “0”.
[Classification] Output signal (This signal output to both PMC but is not monitored doubly)
[Function] When the Dual Check Safety Function is applied, this signal allows turning on MCC. 0: MCC off 1: MCC on
[Operation] When the safe speed limit monitoring alarm is detected because the Safety Check Request signal (*VLDPs ) of each spindle is 0, each CPU first sets the spindle to the free-running state or the controlled stop state. After that, if the spindle is not decelerated, each CPU turns this signal to “0”. In case of an alarm other than described above and related to data communication or position detector, each CPU turns this signal corresponding to the alarm spindle to “0” immediately. But according to the parameter setting (No.10500#1 = 1), it is possible to turn to “0” this signals of all the spindles belonged to the path that involves the alarm spindle in case of any spindle alarms.
MCC Off Test Execution Request signal (output) RQT <PMC:Fn191.2> (for each machine group)
[Classification] Output signal (Single signal) [Function] This signal notifies that MCC off Test mode is required and a check
should be made to determine whether the safety output signals (MCC Off signal (*MCF)) operate normally. When MCC Off Test Execution Request signal (RQT) is set to 1, set MCC off Test mode and carry out a safety output signal MCC off Test as soon as possible. When MCC Off Test Execution Request signal (RQT) is 1, a machine tool builder must make ladder not to release a guard lock. Once a guard is closed when MCC Off Test Execution Request signal (RQT) is set to “1” while a guard is open by Guard Open Request signal (ORQ), it is necessary not to release a guard lock until MCC off Test request signal (RQT) turns to “0”. When MCC Off Test Execution Request signal (RQT) is 1, the following screen is displayed and the warning “EXECUTE MCC TEST” is displayed.

B-64303EN-4/01 5.I/O SIGNALS
- 99 -
MCC Off Test Execution Request signal (RQT) is not output via the DCS PMC. Make a ladder program to lock a protective door when MCC Off Test Execution Request signal (RQT) =1.
[Output condition] In the following case, this signal is set to “1”. • MCC off Test is not completed after power-on (when bit 3 (STP)
of parameter No.10500 is 0). • Twenty-four hours have elapsed since the completion of the last
MCC off Test. In the following case, this signal sets to “0”. • MCC off Test is completed.
CAUTION Do not turn Test Mode signal (OPT) to “0” during
MCC off Test.
WARNING While the MCC off Test processing is in progress,
the MCC Off signal (*MCF) goes high and low to turn on and off the MCC. Carry out the MCC off Test in such a state that the turning on or off of the MCC will not cause a problem.

5.I/O SIGNALS B-64303EN-4/01
- 100 -
Safety Brake signal (output) *BRKx <PMC:Fn754.0 to 4><DCS PMC:F(006+m).0 to 4> (for each axis)
This signal is used to control mechanical brake of each axis. CNC and SV output Safety Brake signal (*BRKx) to control mechanical brake. When *BRKx is “0”, mechanical brake is active. When *BRKx is “1”, mechanical brake is not active.
[Classification] Output signal (Dual signal) [Function] When the Dual Check Safety Function is applied, this signal notifies
to activate a mechanical brake. When MCC is off, a brake should be activated.
[Operation] In emergency stop state or alarm state, a mechanical brake is activated by this signal. A machine tool builder must connect this signal to a mechanical brake.
[Output condition] In the following case, this signal is “1”. • Releasing brake state In the following case, this signal is “0”. • Activating brake state
CAUTION During the MCC off Test, the MCC is turned off
and on several times. The brake state of the signal may change depending on the state of the MCC.
For the control of the brake during the MCC off Test, see "MCC off Test".
(a) In case *BRKx signal is “0”
*ESP
*BRKx 1
0
1
0
Emergency Stop state (*ESP signal is “0”)
Alarm
*BRKx 1
0
1
0
Servo alarm occurs
Power
*BRKx 1
0
1
0
Power-on

B-64303EN-4/01 5.I/O SIGNALS
- 101 -
(b) In case *BRKx signal is “1” When emergency stop is released (*ESP signal is “1”), MCC can
be enabled l (*MCF signal is “1”). After that, when MCC is turned on, Safety Brake signal *BRKx is turned to “1” after the time specified by the parameter No.1950 is elapsed.
*MCF 1
0
*ESP 1
0
MCC 1
0
*BRKx 1
0
Timer for brake signal
NOTE Regular maintenance of a brake must be done.

5.I/O SIGNALS B-64303EN-4/01
- 102 -
Safety Position Switch signal (output) SPS1 to SPS32<PMC:Fn755 to Fn758><DCS PMC:F(007+m) to F(010+m)>
This signal shows whether the machine position of a servo axis is within the range specified by the parameter or not.
[Classification] Output signal (Dual signal) [Function] This signal notifies that the machine position of the axis specified by
the safety parameter (No.13880 to No.13911) is within the range specified by the safety parameter (No.13920 to No.13951, No.13960 to No.13991). In case of single path system, up to 32 points can be used. When a two-path system is used with the T series, 32 points in the area for the second path can be additionally used. Then up to 64 points can be used at maximum. This signal notifies that the machine position of the axis specified by the safety parameter (No.10501 to No.10532) is within the range specified by the safety parameter (No.10533 to No.10564, No.10565 to No.10596). NOTE In a two-path system, 64 points of safety position
switch output destinations can be assigned to each path in units of 16 points. For details, see the descriptions of parameter No. 13840 to No. 13843 in Chapter 6, "PARAMETERS".
[Output condition] In the following case, this signal is set to “1”.
• The machine position of the axis is within the specified range. In the following case, this signal is set to “0”. • The machine position of the axis is out of the specified range.
[Note] When the axis is just on the boundary of the range (machine position is equal to parameter setting value), it is regarded that the machine position is within the range. If the state of two Safety Position Switch of the signal of DCS PMC side and the signal of PMC side is different more than the specified period, each CPU shuts off MCC by DCS alarm. (A safety-related I/O cross-check error (PW0010 or PW0011) is output.) NOTE Position switch signal is activated when the reference
point correspond to the axis is established after power-on. The state of position switch is kept to “0” till then.
Once activating, position is always checked and state of signal is changed according to the result of checking. Even if the reference point is lost, the state of signal is changed according to the coordinate kept in both CNC and servo CPU. So if the special procedure is required when the reference point is lost, design the ladder program by combining with Position Information Effect signal (POSEx).

B-64303EN-4/01 5.I/O SIGNALS
- 103 -
Safety Speed/Safety Position Selection signal A (input) SVAx <PMC:Gn752.0 to 4> <DCS PMC:G(004+m).0 to 4> (for each axis) SPAs <PMC:Gn754.0 to 1> <DCS PMC:G(006+m).0 to 1> (for each spindle) Safety speed/safety position selection signal B (input) SVBx <PMC:Gn753.0 to 4> <DCS PMC:G(005+m).0 to 4> (for each axis) SPBs <PMC:Gn754.4 to 5> <DCS PMC:G(006+m).4 to 5> (for each spindle)
[Classification] Input signal (Dual signal) [Function] When the Dual Check Safety Function is activated, it is possible to
select safety limit speed and safety machine position of each axis. This signal is prepared for each axis and each spindle. The final number in the signal name shows the number of the controlled axis and spindle. SVAx, SVBx x 1: Select safety speed/safety machine position of the 1st axis 2: Select safety speed/safety machine position of the 2nd axis 3: Select safety speed/safety machine position of the 3rd axis 4: Select safety speed/safety machine position of the 4th axis 5: Select safety speed/safety machine position of the 5th axis SPAs, SPBs s 1: Select safety speed of the 1st spindle 2: Select safety speed of the 2nd spindle
[Operation] According to the combination of Safety Speed/Safety Machine Position Selection signal, safety speed and safety machine position are selected as the following table.
Safety Speed/ Safety Machine Position
Selection signal Safety limit speed Safety machine position
SVAn SVBn SPAn SPBn
Parameter for servo axis
Parameter for spindle
+ direction parameter
- direction parameter
Safety limit speed 1 Safety machine position 10 0 No.13821 No.4372 No.13831 No.13832
Safety limit speed 2 Safety machine position 21 0
No.13822 No.4438 No.13833 No.13834Safety limit speed 3 Safety machine position 3
0 1 No.13823 No.4440 No.13835 No.13836
Safety limit speed 4 Safety machine position 41 1
No.13824 No.4442 No.13837 No.13838
CAUTION Safety Speed/Safety Machine Position Selection
signal is a safety signal. This signal is input through both PMC and DCS PMC. Both CNC and PMC check doubly inconsistency of this signal.

5.I/O SIGNALS B-64303EN-4/01
- 104 -
Position Information Effect signal (output) POSEx <PMC: Fn766.0 to 4><DCS PMC: F(018+m).0 to 4> (for each axis)
This signal is output when Dual Check Safety function is activated and the reference point is established. When the reference point is not established, the machine system is in danger state because Safety Machine Position Monitoring and Safety Position Error Monitoring are not active. If this signal is “0”, Machine Tool Builder has to control not to open the protective door.
[Classification] Output signal (This signal output to both PMC but is not monitored doubly)
[Function] This signal informs whether the reference point is established or not. 0: The reference point is not established. 1: The reference point is established.
[Operation] Each CPU informs whether the reference point is established or not. In the following case, this signal is turned to “1”. • After the reference point is established. • When the follow up operation of absolute pulse coder is finished
after power-on In the following case, this signal is turned to “0”. • When the reference point is lost
NOTE In case that the reference point is re-established,
this signal is turned to “0” till the reference point is re-established from the dog-signal is turned off.

B-64303EN-4/01 5.I/O SIGNALS
- 105 -
Programmable Safety I/O signals (input/output) [Classification] Input/Output signal (Dual signal) [Function] The 8 bytes (64 bit) programmable safe I/Os can be freely defined as
the different address from the above basic safe signals. Each byte of 8 byte programmable safe I/Os can be assigned on either address of X/Y or R or D by parameter. Each byte of the programmable safe I/O between the PMC and DCS PMC is cross-checked by the CNC and PMC. CNC CPU(DCS PMC) PMC CPU(PMC)
I/O Link#3 or PROFIBUS-DP
I/O Link#1 or I/O Link#2
CNC and PMC monitor each signal.
:
:
Input Signal 8
Output Signal 1
Input Signal 2
Input Signal 1
Output Signal 2
Output Signal 8
:
:
Input Signal 8
Output Signal 1
Input Signal 2
Input Signal 1
Output Signal 2
Output Signal 8
[Operation] The combinations of cross-checking these signals are defined by using Safety parameters as follows.
Signal type Combination No. CNC (DCS PMC) PMC (PMC) 1 No.11950 No.11970 2 No.11951 No.11971 3 No.11952 No.11972 4 No.11953 No.11973 5 No.11954 No.11974 6 No.11955 No.11975 7 No.11956 No.11976
Input
8 No.11957 No.11977 1 No.11960 No.11980 2 No.11961 No.11981 3 No.11962 No.11982 4 No.11963 No.11983 5 No.11964 No.11984 6 No.11965 No.11985 7 No.11966 No.11986
Output
8 No.11967 No.11987

5.I/O SIGNALS B-64303EN-4/01
- 106 -
Brake Test Start signal (input) STBT <PMC: Gn193.2> (for each machine group)
[Classification] Input signal (Single signal) [Function] Input signal for starting and suspending a brake test
When this signal is switched from 0 to 1, a brake test is started. Upon normal completion of brake test, the Brake Test Execution Request signal RQBT is set to 0. So, upon confirmation of RQBT set to 0, this signal is also switched from 1 to 0. If this signal is switched from 1 to 0 during a brake test, the brake test is suspended upon completion of the test sequence currently under execution. A brake test can be restarted from the beginning by setting this signal to 1 again.
Brake Test Execution Request signal (output) RQBT <PMC: Fn191.3> (for each machine group)
[Classification] Output signal (Single signal) [Function] Output signal for requesting a brake test
When this signal is set to 1, execute a brake test. Even if this signal is set to 1, operation can be continued until the current machining is completed. To secure safety, however, a brake test should be conducted as soon as possible by setting the Brake Test Start signal STBT to 1. Upon normal completion of brake test, this signal is set to 0.

B-64303EN-4/01 5.I/O SIGNALS
- 107 -
5.4 PROGRAMMABLE SAFETY I/O SIGNAL The programmable safety I/O signal is a safety signal that can be defined by the machine tool builder. The Dual Check Safety function monitors both the safety signal determined by the system and the programmable safety I/O signal defined by the machine tool builder redundantly. The programmable safety I/O signal is defined by parameters. (See also the description of the programmable safety I/O signal in Section 5.3.)
How to turn off programmable safety I/O signal When it is confirmed that *DCALM, *MCF, *MCFVx and *MCFPs is “0”, turn programmable safety I/O signal off if necessary. (a) In case MCC off Test is carried out, When RQT=1 and OPT=1, ignore *MCF=0. (b) In case of emergency stop (*ESP=0) When *ESP=0, ignore *MCF=0.

5.I/O SIGNALS B-64303EN-4/01
- 108 -
5.5 NOTE ON 2-PATH CONTROL (T SERIES)
T This section describes cautions about safe-related I/O signals that should be taken in 2-path control.
5.5.1 2-path Control (T Series) Two-path control is used, for example, when one workpiece is machined using two tools simultaneously with independent programs. An alarm is checked on a path-by-path basis. If a servo alarm is issued on a path, the MCC of all axes of the path are shut off. If an alarm related to the safety check function is issued, the MCC is also shut off on a path-by-path basis. So, basically, a safety area needs to be set on a path-by-path basis. If multiple safety areas are set within one path, the MCC may be shut off for an alarm in another area. If a safety area is configured using an axis that belongs to one of the paths selected by switching, the MCC of another axis of the path may not be shut off when an alarm is issued. If an axis that belongs to one of the paths selected by switching is used, make connections so that the MCCs of both paths are shut off at the same time. Two sets of cross-check target safety input signals, one set for the PMC and the other for the DCS PMC, are used for each path. Ensure that the two sets are exactly the same.
CAUTION When “Composite control” or “Path speed control
of Multi path control” is specified, it is possible to give a command to control a servo axis or a spindle in another path. But in this case, the correspondence between a path and a belonging servo axis or spindle is not changed. An alarm related to a servo axis or a spindle occurs in the path that the axis and the spindle originally belong to, and MCC shut off signal correspond to the axis or spindle is output also in original path.
Then, as the path that gives a command and the path that an axis and a spindle belongs to should be regarded as the same group, it is necessary to wire MCC off signal (*MCFVx, *MCFPs) to shut off the MCC of both path at the same time when “Composite control” or “Path speed control of Multi path control” is specified.

B-64303EN-4/01 6.PARAMETERS
- 109 -
6 PARAMETERS

6.PARAMETERS B-64303EN-4/01
- 110 -
6.1 OVERVIEW The parameters related to the Dual Check Safety function (safety parameters) are protected by a code (No. 3225) for the safety parameters. The value of a safety parameter cannot be modified unless the same value as the code for the safety parameters is set as the key (No. 3226) for the safety parameters. The safety parameters are stored in two locations on the CNC. The CNC, PMC, servo and spindle software check the matching of the parameters stored at the two locations. If a mismatch is found, an alarm is issued. If the setting of a safety parameter is modified, the power must be turned off then back on. The new setting of the parameter becomes effective after the power is turned back on.

B-64303EN-4/01 6.PARAMETERS
- 111 -
6.2 DATA TYPE Parameters are classified by data type as follows:
Data type Valid data range Remarks Bit Bit machine group
Bit path
Bit axis
Bit spindle
0 or 1
Byte Byte machine group Byte path Byte axis Byte spindle
-128 to 127 0 to 225
Some parameters handle these types of data as unsigned data.
Word Word machine group Word path Word axis Word spindle
-32768 to 32767 0 to 65535
Some parameters handle these types of data as unsigned data.
2-word 2-word machine group 2-word path 2-word axis 2-word spindle
0 to ±999999999
Some parameters handle these types of data as unsigned data.
Real Real machine group Real path Real axis Real spindle
See the Standard Parameter Setting Tables.
NOTE 1 Each of the parameters of the bit, bit machine group, bit path, bit axis, and bit
spindle types consists of 8 bits for one data number (parameters with eight different meanings).
2 Machine group type indicates that parameters are available for the maximum number of machine groups and independent data can be set for each machine group. With the 0i -D, the maximum number of machine groups is 1 at all times.
3 Path type indicates that parameters are available for the maximum number of paths and independent data can be set for each path.
4 Axis type indicates that parameters are available for the maximum number of controlled axes and independent data can be set for each controlled axis.
5 Spindle type indicates that parameters are available for the maximum number of spindles and independent data can be set for each spindle.
6 The valid data range for each data type indicates a general range. The range varies according to the parameters. For the valid data range of a specific parameter, see the explanation of the parameter.

6.PARAMETERS B-64303EN-4/01
- 112 -
6.3 REPRESENTATION OF PARAMETERS
Parameters of the bit type, bit machine group type, bit path type, bit axis type, and bit spindle type
#7 #6 #5 #4 #3 #2 #1 #0 0000 EIA NCR ISP CTV TVC
Parameters other than the bit-type parameters above 1023 Number of the servo axis for each axis
NOTE 1 The parameters, which are described here, are related directly to Dual Check Safety
function. As for the other parameters, please refer to the parameter manual (B-64310EN).
2 A parameter usable for only one of the lathe system (T series) and machining center system (M series) is indicated using two rows as shown below. When a row is blank, the parameter is not usable with the corresponding series. Basically, set those parameters to 0.
[Example 1]
Parameter HTG is a parameter common to the M and T series, but Parameters RTV and ROC are parameters valid only for the T series.
1403
RTV ROCHTGHTG
T seriesM series
#7 #6 #5 #4 #3 #2 #1 #0
[Example 2]
The following parameter is provided only for the M series.
1411 Cutting feedrate
T series
M series
3 When "to" is inserted between two parameter numbers, there are parameters with
successive numbers between the two starting and ending parameter numbers, but those intermediate parameter numbers are omitted for convenience.
4 The lower-case letter "x" or "s" following the name of a bit-type parameter indicates the following: - ” x” : Bit axis type parameters - ” s” : Bit spindle type parameters
Data No. Data (Data #0 to #7 are bit positions.)
Data No. Data

B-64303EN-4/01 6.PARAMETERS
- 113 -
6.4 STANDARD PARAMETER STTING TABLES
Overview This section defines the standard minimum data units and valid data ranges of the CNC parameters of the real type, real machine group type, real path type, real axis type, and real spindle type. The data type and unit of data of each parameter conform to the specifications of each function.
Explanation
(A) Length and angle parameters (type 1)
Unit of data Increment system
Minimum data unit Valid data range
IS-A 0.01 -999999.99 to +999999.99 IS-B 0.001 -999999.999 to +999999.999
mm degree
IS-C 0.0001 -99999.9999 to +99999.9999 IS-A 0.001 -99999.999 to +99999.999 IS-B 0.0001 -99999.9999 to +99999.9999 inch IS-C 0.00001 -9999.99999 to +9999.99999
(B) Length and angle parameters (type 2)
Unit of data Increment system
Minimum data unit Valid data range
IS-A 0.01 0.00 to +999999.99 IS-B 0.001 0.000 to +999999.999
mm degree
IS-C 0.0001 0.0000 to +99999.9999 IS-A 0.001 0.000 to +99999.999 IS-B 0.0001 0.0000 to +99999.9999 inch IS-C 0.00001 0.00000 to +9999.99999
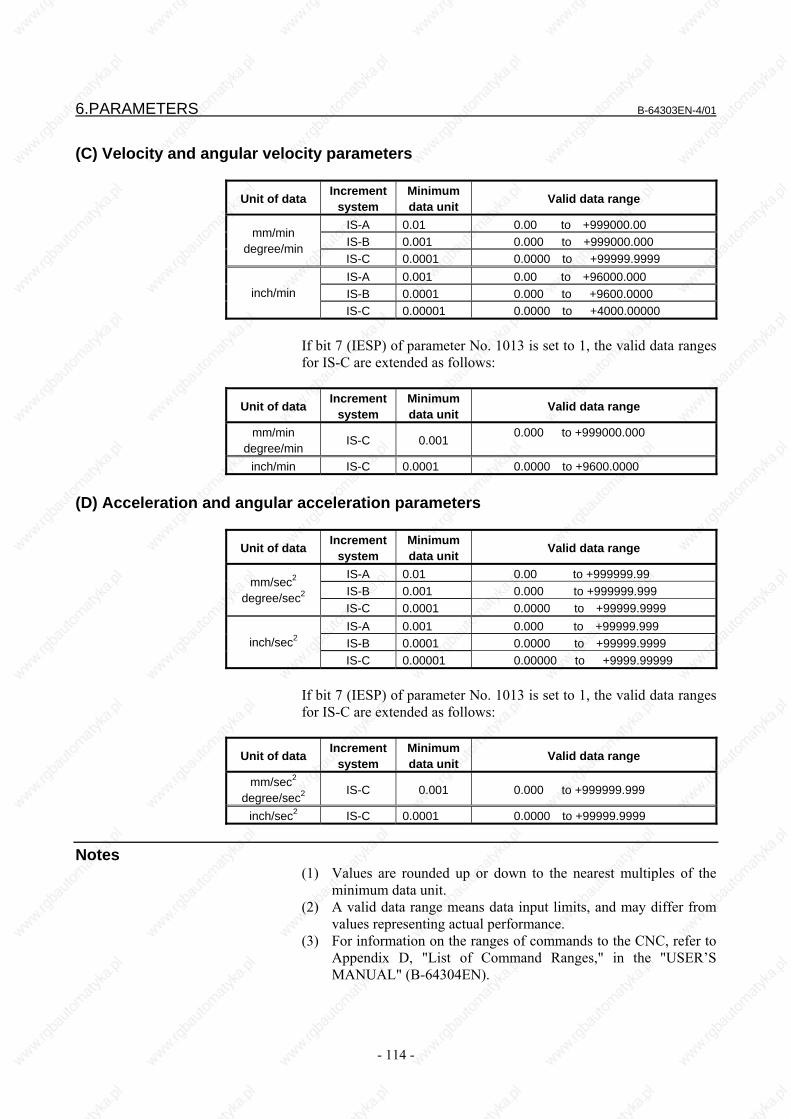
6.PARAMETERS B-64303EN-4/01
- 114 -
(C) Velocity and angular velocity parameters
Unit of data Increment system
Minimum data unit Valid data range
IS-A 0.01 0.00 to +999000.00 IS-B 0.001 0.000 to +999000.000
mm/min degree/min
IS-C 0.0001 0.0000 to +99999.9999 IS-A 0.001 0.00 to +96000.000 IS-B 0.0001 0.000 to +9600.0000 inch/min IS-C 0.00001 0.0000 to +4000.00000
If bit 7 (IESP) of parameter No. 1013 is set to 1, the valid data ranges for IS-C are extended as follows:
Unit of data Increment system
Minimum data unit Valid data range
mm/min degree/min
IS-C 0.001 0.000 to +999000.000
inch/min IS-C 0.0001 0.0000 to +9600.0000
(D) Acceleration and angular acceleration parameters
Unit of data Increment system
Minimum data unit Valid data range
IS-A 0.01 0.00 to +999999.99 IS-B 0.001 0.000 to +999999.999
mm/sec2 degree/sec2
IS-C 0.0001 0.0000 to +99999.9999 IS-A 0.001 0.000 to +99999.999 IS-B 0.0001 0.0000 to +99999.9999 inch/sec2 IS-C 0.00001 0.00000 to +9999.99999
If bit 7 (IESP) of parameter No. 1013 is set to 1, the valid data ranges for IS-C are extended as follows:
Unit of data Increment system
Minimum data unit Valid data range
mm/sec2 degree/sec2
IS-C 0.001 0.000 to +999999.999
inch/sec2 IS-C 0.0001 0.0000 to +99999.9999
Notes (1) Values are rounded up or down to the nearest multiples of the
minimum data unit. (2) A valid data range means data input limits, and may differ from
values representing actual performance. (3) For information on the ranges of commands to the CNC, refer to
Appendix D, "List of Command Ranges," in the "USER’S MANUAL" (B-64304EN).

B-64303EN-4/01 6.PARAMETERS
- 115 -
6.5 PARAMETERS
0980 Machine group number of each path
NOTE When this parameter is set, the power must be
turned off before operation is continued. [Input type] Parameter input [Data type] Byte path [Valid data range] 1
Set the machine group number which each path belongs. When using the 0i -D, set 1 in this parameter at all times.
NOTE When 0 is set, the setting of 1 is assumed.
0981 Absolute path number of each axis
NOTE When this parameter is set, the power must be
turned off before operation is continued. [Input type] Parameter input [Data type] Byte axis [Valid data range] 1, 2
Set the path to which each axis belongs.
NOTE 1 If 0 is set for all axes, the parameter is
automatically set according to the setting of the number of controlled axes of each path.
2 If a value not within the valid data range is set, each axis is assumed to belong to the first path.

6.PARAMETERS B-64303EN-4/01
- 116 -
0982 Absolute path number of each spindle
NOTE When this parameter is set, the power must be
turned off before operation is continued. [Input type] Parameter input [Data type] Byte spindle [Valid data range] 1, 2
Set the path to which each spindle belongs.
NOTE 1 If 0 is set for all axes, the parameter is automatically
set according to the setting of the number of controlled axes of each path.
2 If a value not within the valid data range is set, each axis is assumed to belong to the first path.
3 If the rotation tool control function based on a servo motor is enabled, the servo motor used as a tool rotation axis is treated as a spindle. So, the path to which the tool rotation axis belongs needs to be set.
1023 Servo axis number of each axis
NOTE When this parameter is set, the power must be
turned off before operation is continued. [Input type] Parameter input [Data type] Byte axis [Valid data range] 0 to Number of controlled axis
Set the servo axis for each control axis. Usually set to same number as the control axis number. The control axis number is the order number that is used for setting the axis-type parameters or axis-type machine signals * With an axis for which Cs contour control/spindle positioning is
to be performed, set -(spindle number) as the servo axis number. Example) When exercising Cs contour control on the fourth
controlled axis by using the first spindle, set -1. * For tandem controlled axes or electronic gear box (EGB)
controlled axes, two axes need to be specified as one pair. So, make a setting as described below. Tandem axis: For a master axis, set an odd (1, 3, 5, 7, ...) servo
axis number. For a slave axis to be paired, set a value obtained by adding 1 to the value set for the master axis.
EGB axis: For a slave axis, set an odd (1, 3, 5, 7, ...) servo axis number. For a dummy axis to be paired, set a value obtained by adding 1 to the value set for the slave axis.

B-64303EN-4/01 6.PARAMETERS
- 117 -
1240 Coordinates value of the reference position in the machine coordinate system
NOTE When this parameter is set, the power must be
turned off before operation is continued. [Input type] Parameter input [Data type] Real axis [Unit of data] mm, inch, degree (machine unit)
[Minimum unit of data] Depend on the increment system of the applied axis [Valid data range] 9 digit of minimum unit of data (Refer to standard parameter setting
table(A).) (When the increment system is IS-B, -999999.999 to +999999.999) Set the coordinate values of the reference position in the machine coordinate system.
1838 Position deviation limit for each axis in moving state during safety check
NOTE When this parameter is set, the power must be
turned off before operation is continued. [Input type] Parameter input [Data type] 2-word axis [Unit of data] Detection unit [Valid data range] 0 to 99999999
Position deviation limit for each axis in moving state for safety check of Dual Check Safety function is specified. If position deviation of a moving axis exceeds position deviation limit while Safety Check is carried out (Safety Monitoring Request “*VLDVx” =0), a servo alarm (SV0475, SV1071) is generated and axes are stopped immediately like emergency stop state. In Dual Check Safety function, position deviation is always checked by CNC and Servo. In case that Safety Check is carried out (Safety Monitoring Request “*VLDVx” =0), the servo alarm (SV0475,SV1071) is generated when each CPU finds out that the deviation exceeds position deviation limit in moving state.

6.PARAMETERS B-64303EN-4/01
- 118 -
1839 Position deviation limit for each axis in stopped state during safety check
NOTE When this parameter is set, the power must be
turned off before operation is continued. [Input type] Parameter input [Data type] 2-word axis [Unit of data] Detection unit [Valid data range] 0 to 99999999
Set the positioning deviation limit in stopped state for each axis for Dual Check Safety function. If the position deviation at halt time exceeds the position deviation limit at halt time set in this parameter during safety monitoring (when the Safety Check Request signal *VLDVx is set to 0), servo alarm SV0474 or SV1072 is issued. In Dual Check Safety function, position deviation is always checked by CNC and Servo. In case that Safety Check is carried out (Safety Monitoring Request “*VLDVx” =0), servo alarm (SV0474,SV1072) is generated when each CPU finds out that the deviation exceeds position deviation limit in stopped state.
1840 Position deviation limit for each axis in servo-off state during safety check
NOTE When this parameter is set, the power must be
turned off before operation is continued. [Input type] Parameter input [Data type] 2-word axis [Unit of data] Detection unit [Valid data range] 0 to 99999999
Set the positioning deviation limit in servo-off state for each axis for Dual Check Safety function. If the positioning deviation in servo off state exceeds the positioning deviation limit in servo off state, which is set in this parameter, a servo alarm (SV1069 or SV1070) occurs. In Dual Check Safety function, position deviation is always checked by CNC and Servo. If it is detected that the position deviation in servo off state is exceeded, a servo alarm (SV1069 or SV1070) occurs.

B-64303EN-4/01 6.PARAMETERS
- 119 -
1841 Position deviation limit of each axis in moving state during other than Dual Check Safety monitoring (for Dual Check Safety Function)
NOTE When this parameter is set, the power must be
turned off before operation is continued. [Input type] Parameter input [Data type] 2-word axis [Unit of data] Detection unit [Valid data range] 0 to 99999999
Set the positioning deviation limit in moving state for each axis for Dual Check Safety function, in case that Safety Check is not carried out (Safety Monitoring Request “*VLDVx”=1). In case that Safety Check is not carried out (Safety Monitoring Request “*VLDVx” =1), servo alarm (SV0475,SV1071) is generated and operation is stopped immediately (as in emergency stop), when each CPU finds out that the deviation exceeds position deviation limit in moving state. If the value of this parameter is “0”, the parameter No.1828 is used for the value of deviation limit in moving state. In case that Safety Check is carried out (Safety Monitoring Request “*VLDVx” =0), the parameter No.1838 is used for the value of deviation limit in moving state.

6.PARAMETERS B-64303EN-4/01
- 120 -
1842 Position deviation limit of each axis in stopped state during other than Dual Check Safety monitoring (for Dual Check Safety Function)
NOTE When this parameter is set, the power must be
turned off before operation is continued. [Input type] Parameter input [Data type] 2-word axis [Unit of data] Detection unit [Valid data range] 0 to 99999999
Set the positioning deviation limit in stopped state for each axis for Dual Check Safety function, in case that Safety Check is not carried out (Safety Monitoring Request “*VLDVx”=1). In case that Safety Check is not carried out (Safety Monitoring Request “*VLDVx” =1), servo alarm (SV0474,SV1072) is generated and operation is stopped immediately (as in emergency stop), when each CPU finds out that the deviation exceeds position deviation limit in stopped state. If the value of this parameter is “0”, the parameter No.1829 is used for the value of deviation limit in stopped state. In case that Safety Check is carried out (Safety Monitoring Request “*VLDVx” =0), the parameter No.1839 is used for the value of deviation limit in stopped state.
#7 #6 #5 #4 #3 #2 #1 #0 1902 DCE
NOTE When at least one of these parameters is set, the
power must be turned off before operation is continued.
[Input type] Parameter input [Data type] Bit
# 6 DCE Dual Check Safety function is
0: inactive. 1: active. This parameter invalidates Dual Check Safety function temporarily. In the system with Dual Check Safety function, this parameter is used when the system set up without wiring and ladder related with Dual Check Safety in order to set up other function.

B-64303EN-4/01 6.PARAMETERS
- 121 -
NOTE 1 When Dual Check Safety function is used, this
parameter must be set to “1”. If Dual Check Safety function is ordered and this parameter is “0”, an alarm (DS0022) is displayed at power-on. This alarm can be reset by pushing “CAN” and “RESET” key on MDI at the same time.
2 When the Dual Check Safety function is disabled, almost safety-related functions become disabled. Only the following functions become enabled when the Dual Check Safety function is disabled. • MCC Off signal *MCF (for each machine
group) The state of MCC Off signal *MCF on the PMC
and DCS PMC sides changes depending on the state of the emergency stop signal on the PMC side (the state of the emergency stop signal on the DCS PMC side has no effect). The MCC off Test is disabled.
• Brake signal *BRKx (for each axis) Brake signal *BRKx operates only on the PMC
side. Note that the signal on the DCS PMC side always indicates the brake release state. The output signals other than the above are described below.
(1) The following signals always indicate "1" on both the PMC and DCS PMC sides.
- MCC Off signal *DCALM (one for each system)
- MCC Off signals *MCFVx (for each axis) and *MCFPs (for each spindle)
- Safety monitoring result signals RSVx (for each axis) and RSPs (for each spindle)
(2) The following signals always indicate "0" on both the PMC and DCS PMC sides.
- Safe Position Switch signals SPS1 to SPS32
- Guard Open Inhibit signal *OPIHB - MCC Off Test Execution Request signal
RQT - Position Information Effect signal POSEx

6.PARAMETERS B-64303EN-4/01
- 122 -
#7 #6 #5 #4 #3 #2 #1 #0 1904 DCNx
NOTE When at least one of these parameters is set, the
power must be turned off before operation is continued.
[Input type] Parameter input [Data type] Bit axis
# 6 DCNx The checks of the target axis by Dual Check Safety function are:
0: carried out. 1: not carried out.
NOTE 1 It is not possible to inhibit each check of Dual
Check Safety Function of all axes by the parameter DCN.
2 Set the DCNx bit to 1 for the slave axis under tandem control or for the tool axis of an electronic gear box (M series).
3 The checks by the Dual Check Safety function are not carried out on an axis for which the DCNx bit is set to 1. Set the DCNx bit to 0 for normal axes.
1945 Safety input signal check timer
NOTE When this parameter is set, the power must be
turned off before operation is continued. [Input type] Parameter input [Data type] Word machine group [Unit of data] msec [Valid data range] 0 to 1000
Input/output signals related to Dual Check Safety function (safety double input/output signals) are transmitted through two paths, “I/O Link #1 or #2” and “I/O Link#3 or PROFIBUS-DP”. CNC CPU and PMC CPU exchange the input/output signals with each other at all time to check each other. If a mismatch between double input/output signals through two paths lasts greater than the time set in this parameter, alarm PW0010, PW0011, PW0012, or PW0013 is generated. If a value of less than 16 is specified, it is assumed that 16 ms is specified. If a value of more than 1000 is specified, it is assumed that 1000 ms is specified.
NOTE All paths are checked using the setting of this
parameter.

B-64303EN-4/01 6.PARAMETERS
- 123 -
1946 MCC off Test timer
NOTE When this parameter is set, the power must be
turned off before operation is continued. [Input type] Parameter input [Data type] Word machine group [Unit of data] msec [Valid data range] 0 to 32767
When MCC off Test mode is selected with Dual Check Safety function, CNC CPU carries out MCC off Test by the safety output signal (*MCF). If MCC off Test is not completed within the time set in this parameter, a servo alarm SV0488 is generated. If a value of less than 0 is specified, it is assumed that 10000 ms is specified.
NOTE All paths are checked using the setting of this
parameter.
1948 MCC off timer
NOTE When this parameter is set, the power must be
turned off before operation is continued. [Input type] Parameter input [Data type] Word machine group [Unit of data] msec [Valid data range] 0 to 32767
• CNC CPU and PMC CPU set MCC Off signal (*MCFVx) to 0, when an axis is not stopped within the time set by this parameter after Safe Speed Monitoring or Safe Machine Position Monitoring function of Dual Check Safety function detects abnormal condition.
• When there is no spindle (spindle for which *VLDPs = 1 is set) not being monitored for its safety, MCC Off signal *MCF (for each machine group) is set to "0" upon elapse of the time set in this parameter after an emergency stop is made.
• When a crosscheck alarm or CPU self diagnosis alarm occurs, MCC Off signal *DCALM (one for each system) is set to "0" upon elapse of the time set in this parameter. If a crosscheck alarm or CPU self diagnosis alarm related to the spindle occurs, however, the time set in this parameter takes no effect.
NOTE All paths are checked using the setting of this
parameter.

6.PARAMETERS B-64303EN-4/01
- 124 -
1950 Brake signal timer
NOTE When this parameter is set, the power must be
turned off before operation is continued. [Input type] Parameter input [Data type] Word machine group [Unit of data] msec [Valid data range] 0 to 32767
Set a time period from when CNC CPU and Servo CPU in Dual Check Safety function detects that the servo amplifier is ready (MCC on state) until Safety Brake signal (*BRKx) goes 1 (brake release enabled).
NOTE All paths are checked using the setting of this
parameter.

B-64303EN-4/01 6.PARAMETERS
- 125 -
3225 Code for safety parameters
NOTE When this parameter is set, the power must be
turned off before operation is continued. [Input type] Parameter input [Data type] 2-word [Valid data range] 0 to 99999999
Set a code (password) for protecting against modifications to parameters related to Dual Check Safety function (safety parameters). When a code for safety parameters is set other than the value “0”, the parameters are locked. In this state, the setting (code) is not displayed but is blank, and safety parameter input is disabled. If an attempt is made to input data in a locked safety parameter, the result indicated in the table below is produced, depending on the method of input. No attempt is successful.
Input method Result MDI input Warning “WRITE PROTECT” Input via reader/puncher interface No alarm is generated. But parameter
input is disabled. Input through window function Completion code 7 (WRITE PROTECT) If the value other than “0” is set to this parameter, the safety parameter cannot be modified. The safety parameters can be set when the safety parameters are not locked, that is, when the code for safety parameters is 0, or when the code for safety parameters is the same as the key for safety parameters (No. 3226). The following safety parameters are protected by a code for safety parameters: No.0980, No.0981, No.0982, No.1023, No.1240, No.1838, No.1839, No.1840, No.1841, No.1842, No.1902#6, No1904, No.1945, No.1946, No.1948, No.1950, No.3225, No.3717, No.3797, No.4372, No.4438, No.4440, No.4442, No.4448, No.4460, No.10500 to No.10596, No.11950 to No.11957, No.11960 to No.11967, No.11970 to No.11977, No.11980 to No.11987, No.13805, No.13810, No.13811, No.13821 to No.13829, No.13831 to No.13838, No.13840 to No.13843, No.13880 to No.13911, No.13912 to No.13919, No.13920 to No.13951, No.13960 to No.13991
NOTE Once parameters are locked, the lock must be
released or memory must be cleared before the safety parameters can be modified. Moreover, the code for the safety parameters cannot be modified in locked condition. Be careful when setting a code for safety parameters.

6.PARAMETERS B-64303EN-4/01
- 126 -
3226 Key for safety parameters
NOTE When this parameter is set, the power must be
turned off before operation is continued. [Input type] Parameter input [Data type] 2-word [Valid data range] 0 to 99999999
When the same value as the code for safety parameters No.3225 is set in this parameter, the key is opened to enable modifications to the safety parameters. The value set in this parameter is not displayed. When the value other than 0 is set to the code for safety parameters No.3225 and the value is different from this parameter, the key is locked and the safety parameters can not be modified. When the power is turned off, the value set in this parameter is cleared to 0. Then the power-off results in the locked state.
3717 Motor number to each spindle
NOTE When this parameter is set, the power must be
turned off before operation is continued. [Input type] Parameter input [Data type] Byte spindle [Valid data range] 0 to Maximum number of controlled axes
Set a spindle amplifier number to be assigned to each spindle. 0: No spindle amplifier is connected. 1: Spindle motor connected to amplifier number 1 is used. 2: Spindle motor connected to amplifier number 2 is used. 3: Spindle motor connected to amplifier number 3 is used.
NOTE When using an analog spindle, set the analog
spindle at the end of the spindle configuration. (Example) When a system uses three spindles (two serial spindles and one analog spindle) in total, set 3 as the spindle amplifier number (this parameter) of the analog spindle.

B-64303EN-4/01 6.PARAMETERS
- 127 -
#7 #6 #5 #4 #3 #2 #1 #0 3797 DCNs
NOTE When this parameter is set, the power must be
turned off before operation is continued. [Input type] Parameter input [Data type] Bit spindle
# 0 DCNs Each safety check of Dual Check Safety function for the specified
spindle is 0: carried out. 1: not carried out. Set “1” to this bit for the spindle that is not required to apply Dual Check Safety.
4372 Safe speed 1 for each spindle
4438 Safe speed 2 for each spindle
4440 Safe speed 3 for each spindle
4442 Safe speed 4 for each spindle
NOTE When these parameters are set, the power must be
turned off before operation is continued. [Input type] Parameter input [Data type] Word spindle [Unit of data] min-1 [Valid data range] 0 to 32767
Set a safe speed for each spindle in terms of motor speed. In case Dual Check Safety function is activated, CNC and Spindle always check the speed of each spindle motor. When it is detected that revolution speed of spindle exceeds safety speed limit, Monitoring Result signal (RSPs) is set to “0”. Moreover if the safety check is carried out (Safety Check Request signal *VLDPs =”0”), an alarm SP0757(CNC side) or SP9069(Spindle side) occurs. Safety Speed can be set up to 4 data. Which speed should be selected is decided by Safety Speed Selection signal (SPAs/SPBs). Please refer more detail to the description about Safety Speed/Safety Position Selection signal.

6.PARAMETERS B-64303EN-4/01
- 128 -
#7 #6 #5 #4 #3 #2 #1 #0 4399 CTLSTP
[Input type] Parameter input [Data type] Bit spindle
# 1 CTLSTP When the safe speed over alarm is detected:
0: Performs a free running stop. 1: Performs a controlled stop. (When the motor speed is reduced to
the zero-speed detection signal (SST) level or less, excitation is turned off.)
4448 Stop check level
NOTE When this parameter is set, the power must be
turned off before operation is continued. [Input type] Parameter input [Data type] Word spindle [Unit of data] min-1 [Valid data range] 0 to 32767
When the speed of the spindle motor is reduced to the speed specified by this parameter or less during free running or controlled stop operation due to the safe speed over alarm, the motor is assumed to have stopped. The setting value must be lower than the parameter “Safe Speed for each spindle”.
#7 #6 #5 #4 #3 #2 #1 #0 10500 STP APM AVM
NOTE When at least one of these parameters is set, the
power must be turned off before operation is continued.
[Input type] Parameter input [Data type] Bit path
# 0 AVM In case that a servo alarm occurs,
0: MCC off signal (*MCFVx) is turned to “0” when some alarm occurs.
1: MCC off signal (*MCFVx) is turned to “0” when any alarm occurs.
In case that this parameter is set to “1”, MCC off signal (*MCFVx) of all axes, which belong to the same path as the alarm axis, are turned to “0” when a servo alarm occurs.

B-64303EN-4/01 6.PARAMETERS
- 129 -
# 1 APM In case that a spindle alarm (SPxxxx) occurs 0: MCC off signal (*MCFPs) is turned to “0” when some alarm
occurs. 1: MCC off signal (*MCFPs) is turned to “0” when any alarm
occurs. In case that this parameter is set to “1”, MCC off signal (*MCFPs) of all spindles, which belong to the same path as the alarm spindle, are turned to “0” when a spindle alarm occurs.
# 3 STP When the power is turned on, a MCC off test is: 0: Carried out. (The screen is changed to Dual Check Safety
Diagnosis screen automatically and the warning "EXECUTE MCC TEST" is displayed at power-on, and MCC off Test execution request signal (RQT) is output.)
1: Not carried out.
NOTE 1 The STP parameter is used temporarily, for
example, when a MCC off Test is not to be made at power-on as in the case of machine adjustment.
2 After adjustment, set STP = 0. 3 Even when STP = 1, a MCC off Test is required if
the power is turned 24 hours or more after the completion of the previous MCC off Test.
4 Set the same value for all paths. 5 The screen is changed to “ALARM SCREEN” when
an alarm occurs at power-on. In this case, Dual Check Safety Diagnosis screen is not displayed at power-on automatically.
13810 Timer to start safety I/O signal after power-on
NOTE When this parameter is set, the power must be
turned off before operation is continued. [Input type] Parameter input [Data type] Word [Unit of data] msec [Valid data range] 0 to 32767
In Dual Check Safety function, the time from “CNC start-up” to “I/O cross check error start” is specified just after power-on.
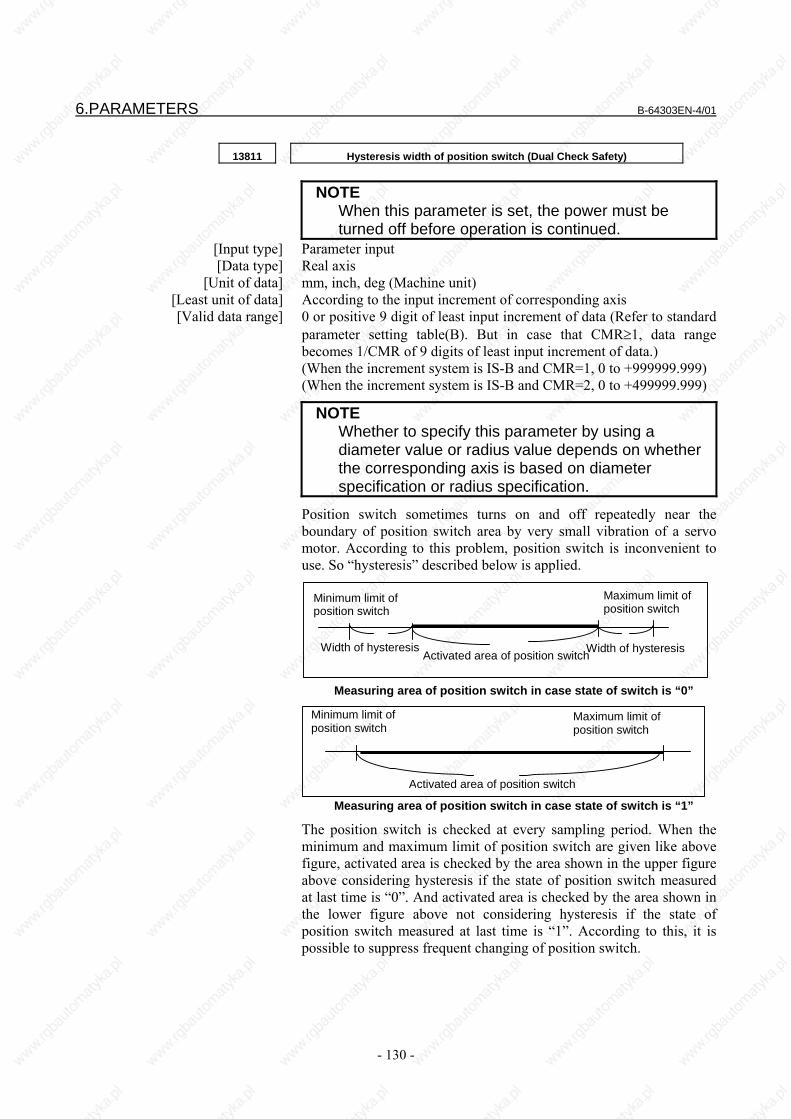
6.PARAMETERS B-64303EN-4/01
- 130 -
13811 Hysteresis width of position switch (Dual Check Safety)
NOTE When this parameter is set, the power must be
turned off before operation is continued. [Input type] Parameter input [Data type] Real axis [Unit of data] mm, inch, deg (Machine unit) [Least unit of data] According to the input increment of corresponding axis [Valid data range] 0 or positive 9 digit of least input increment of data (Refer to standard
parameter setting table(B). But in case that CMR≥1, data range becomes 1/CMR of 9 digits of least input increment of data.) (When the increment system is IS-B and CMR=1, 0 to +999999.999) (When the increment system is IS-B and CMR=2, 0 to +499999.999)
NOTE Whether to specify this parameter by using a
diameter value or radius value depends on whether the corresponding axis is based on diameter specification or radius specification.
Position switch sometimes turns on and off repeatedly near the boundary of position switch area by very small vibration of a servo motor. According to this problem, position switch is inconvenient to use. So “hysteresis” described below is applied.
Maximum limit of position switch
Minimum limit of position switch
Width of hysteresis Width of hysteresisActivated area of position switch
Measuring area of position switch in case state of switch is “0”
Minimum limit of position switch
Maximum limit of position switch
Activated area of position switch Measuring area of position switch in case state of switch is “1”
The position switch is checked at every sampling period. When the minimum and maximum limit of position switch are given like above figure, activated area is checked by the area shown in the upper figure above considering hysteresis if the state of position switch measured at last time is “0”. And activated area is checked by the area shown in the lower figure above not considering hysteresis if the state of position switch measured at last time is “1”. According to this, it is possible to suppress frequent changing of position switch.

B-64303EN-4/01 6.PARAMETERS
- 131 -
13821 Safety limit speed 1 in position control for each axis
13822 Safety limit speed 2 in position control for each axis
13823 Safety limit speed 3 in position control for each axis
13824 Safety limit speed 4 in position control for each axis
NOTE When these parameters are set, the power must
be turned off before operation is continued. [Input type] Parameter input [Data type] Real axis [Unit of data] mm/min, inch/min, degree/min (machine unit)
[Minimum unit of data] Depend on the increment system of the applied axis [Valid data range] Refer to the standard parameter setting table (C)
(When the increment system is IS-B, 0.0 to +240000.0) Set a safety speed for each axis in position control. CNC and Servo always check the velocity command of each axis in Dual Check Safety function. If an axis for which a speed higher than the safety speed is specified is detected, the Monitoring Result signal RSVx is set to 0. Moreover if Safety Check request signal (*VLDVx) is set to “0”, an alarm SV0476 or SV0494 is generated for the corresponding axis. A safety speed parameter for each axis in feed control is from No.13826 to No.13829. Up to 4 safety speed can be specified. Safety speed is selected by Safety Speed / Safety Position Selection signal (SVAx/SVBx). As for the detail of Safety Speed / Safety Position Selection signal, refer to the description about Safety Speed / Safety Position Selection signal.
NOTE 1 The safety speed checks are made on the basis of
the speed converted to the detection unit. Accordingly, a calculation error may occur.
2 After safety speed parameters No.13821 to No.13824 have been set, the power must be turned off then back on for the setting to become effective
3 For diameter specification, set the speed by the diameter (use changes in diameter/rev or in diameter/min).

6.PARAMETERS B-64303EN-4/01
- 132 -
13825 Speed regarded as axis stop for Dual Check Safety
NOTE When this parameter is set, the power must be
turned off before operation is continued. [Input type] Parameter input [Data type] Real axis [Unit of data] mm/min, inch/min, degree/min (machine unit)
[Minimum unit of data] Depend on the increment system of the applied axis [Valid data range] 0 to 10000
This parameter sets the speed regarded as axis stop in case that an abnormal condition is found in safety speed check or safety machine position check of Dual Check Safety function. When an abnormal condition is found in safety speed check or safety machine position check, a servo alarm occurs. And whether MCC off signal (*MCFVx) is turned off or not is decided by judging if an axis is stopped after the decided time elapse. At that time, this parameter gives the speed to judge axis stop. In case an abnormal condition is detected and an axis is stopped within the given time, an MCC is not turned off. Then the system can be recovered by reset operation without power-off.
NOTE 1 For diameter specification, set the speed by the diameter (use changes in
diameter/rev or in diameter/min). 2 In case of velocity control, set the value calculated by the following formula
to this parameter when R(min-1) is the velocity, at which the axis is regarded as stopped.
Setting value = R × PLS × Minimum data unit (Machine unit) × N / CMR PLS: Pulse per one revolution of motor (Detection unit)
CMR: Command multiplier N: In case of diameter specification, N=2.
In case of radius specification, N=1. Minimum data unit: Refer to “STANDARD PARAMETER SETTING TABLE”.

B-64303EN-4/01 6.PARAMETERS
- 133 -
13826 Safety limit speed 1 in velocity control for each axis
13827 Safety limit speed 2 in velocity control for each axis
13828 Safety limit speed 3 in velocity control for each axis
13829 Safety limit speed 4 in velocity control for each axis
NOTE When these parameters are set, the power must
be turned off before operation is continued. [Input type] Parameter input [Data type] 2-word axis [Unit of data] min-1 [Valid data range] 0 to maximum motor speed
This parameter sets the safety speed 1 to 4 for each axis in velocity control mode in Dual Check Safety function.
13831 Safety machine position 1 for each axis (+ direction)
13832 Safety machine position 1 for each axis (- direction)
13833 Safety machine position 2 for each axis (+ direction)
13834 Safety machine position 2 for each axis (- direction)
13835 Safety machine position 3 for each axis (+ direction)
13836 Safety machine position 3 for each axis (- direction)
13837 Safety machine position 4 for each axis (+ direction)
13838 Safety machine position 4 for each axis (- direction)
NOTE When these parameters are set, the power must
be turned off before operation is continued. [Input type] Parameter input [Data type] Real axis [Unit of data] mm, inch, degree (machine unit)
[Minimum unit of data] Depend on the increment system of the applied axis [Valid data range] 9 digits of minimum unit of data (Refer to standard parameter setting
table(A). But in case that CMR≥1, data range becomes 1/CMR of 9 digits of minimum unit of data.) (When the increment system is IS-B and CMR=1, -999999.999 to +999999.999) (When the increment system is IS-B and CMR=2, -499999.999 to +499999.999)
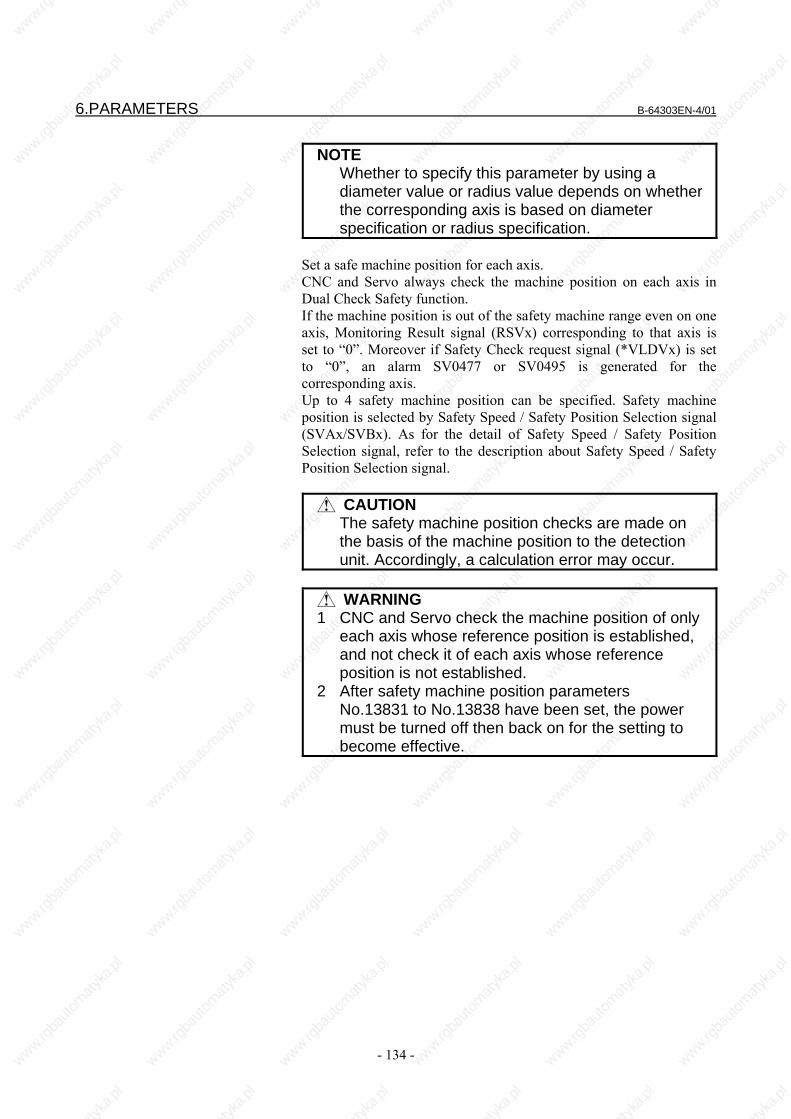
6.PARAMETERS B-64303EN-4/01
- 134 -
NOTE Whether to specify this parameter by using a
diameter value or radius value depends on whether the corresponding axis is based on diameter specification or radius specification.
Set a safe machine position for each axis. CNC and Servo always check the machine position on each axis in Dual Check Safety function. If the machine position is out of the safety machine range even on one axis, Monitoring Result signal (RSVx) corresponding to that axis is set to “0”. Moreover if Safety Check request signal (*VLDVx) is set to “0”, an alarm SV0477 or SV0495 is generated for the corresponding axis. Up to 4 safety machine position can be specified. Safety machine position is selected by Safety Speed / Safety Position Selection signal (SVAx/SVBx). As for the detail of Safety Speed / Safety Position Selection signal, refer to the description about Safety Speed / Safety Position Selection signal.
CAUTION The safety machine position checks are made on
the basis of the machine position to the detection unit. Accordingly, a calculation error may occur.
WARNING
1 CNC and Servo check the machine position of only each axis whose reference position is established, and not check it of each axis whose reference position is not established.
2 After safety machine position parameters No.13831 to No.13838 have been set, the power must be turned off then back on for the setting to become effective.

B-64303EN-4/01 6.PARAMETERS
- 135 -
13840 Address to which safety position switch 1 to 16 are assigned
13841 Address to which safety position switch 17 to 32 are assigned
Address to which safety position switch 33 to 48 are assigned 13842
Address to which safety position switch 49 to 64 are assigned 13843
NOTE When these parameters are set, the power must
be turned off before operation is continued. [Input type] Parameter input [Data type] Byte [Valid data range] 0, 1, 10, 11
According to this parameter, the address to output 64 points of position switch signals can be assigned for each 16 points. When one path is used, up to 32 safety position switches can be set. When two paths are used with the T series, up to 64 safety position switches can be set. The assigning addresses are Fn755 to Fn756 (PMC) / F(007+m) to F(008+m) (DCS PMC) and Fn757 to Fn758 (PMC) / F(009+m) to F(010+m) (DCS PMC) in each path. (n: 0 to 1, m: (0 to 1) × 20) The units of this parameter value specifies which address the signal of each path should be output to, “Fn755 to Fn756” (PMC) / “F(007+m) to F(008+m)” (DCS PMC) or “Fn757 to Fn758” (PMC) / “F(009+m) to F(010+m)” (DCS PMC).
Setting value Assigned address
0 Fn755 to Fn756(PMC),
F(007+m) to F(008+m) (DCS PMC)
1 Fn757 to Fn758(PMC),
F(009+m) to F(010+m) (DCS PMC) The tens of this parameter value specify which path the signal should be output to.
Setting value Output path 0 Path 1 1 Path 2
The relationship between parameter settings and assigned addresses is shown below.
Setting value Assigned address (PMC) Assigned address (DCS PMC)
00 F0755 - F0756 F007 - F008 01 F0757 - F0758 F009 - F010 10 F1755 - F1756 F027 - F028 11 F1757 - F1758 F029 - F030

6.PARAMETERS B-64303EN-4/01
- 136 -
[Example] Parameter
No. Setting value Output address of position switch signal
13840 00 F755-F756 (1st to 16th position switch)(PMC) F007-F008 (1st to 16th position switch)(DCS PMC)
13841 10 F1755-F1756 (17th to 32nd position switch) (PMC) F027-F028 (17th to 32nd position switch)(DCS PMC)
13842 01 F757-F758 (33rd to 48th position switch) (PMC) F009-F010 (33rd to 48th position switch)(DCS PMC)
13843 11 F1757-F1758 (49th to 64th position switch) (PMC) F029-F030 (49tht to 64th position switch)(DCS PMC)
NOTE 1 If all setting values are “0”, the output address is
regarded as follows. Position switch 1 to 16: F755-F756(PMC) /
F007-F008(DCS PMC) Position switch 17 to 32: F757-F758(PMC) /
F009-F010(DCS PMC) Position switch 33 to 48: F1755-F1756(PMC) /
F027-F028(DCS PMC) Position switch 49 to 64: F1757-F1758(PMC) /
F029-F030(DCS PMC) 2 Do not assign two or more position switch to the
same address.

B-64303EN-4/01 6.PARAMETERS
- 137 -
13880 Axis corresponding to the 1st safe position switch
: :
13911 Axis corresponding to the 32nd safe position switch
Axis corresponding to the 33rd safe position switch 10501
: :
Axis corresponding to the 64th safe position switch 10532
NOTE When these parameters are set, the power must
be turned off before operation is continued. [Input type] Parameter input [Data type] Byte [Valid data range] 0 to Number of controlled axes
These parameters specify the control-axes numbers corresponding to the 1st thorough 64th safe position switch functions. When one path is used, up to 32 safety position switches can be set. When two paths are used with the T series, up to 64 safety position switches can be set. A corresponding position switch signal is output to “I/O Link#1 or #2” and “I/O Link#3, #4 or PROFIBUS-DP” when the machine coordinate value of a corresponding axis is within the range that is set using a parameter.
NOTE 1 Set 0 for those position switch numbers that are
not to be used. (The safe position switch signal of that number is not output.)
The safe position switch signal for the axis whose parameter No.1904#6 is 1 (Dual Check Safety function is disabled) is not output.
2 After safety position switch parameters No.13880 to No.13911, No.10501 to No.10532 have been set, the power must be turned off then back on for the setting to become effective
13912 Enable/disable brake test
NOTE When this parameter is set, the power must be
turned off before operation is continued.
[Input type] Parameter input [Data type] Integer axis [Valid data range] 0,1
This parameter enables or disables brake test. To disable brake test, set this parameter to 0. To enable brake test, set this parameter to 1.

6.PARAMETERS B-64303EN-4/01
- 138 -
13913 Brake test interval
NOTE When this parameter is set, the power must be
turned off before operation is continued.
[Input type] Parameter input [Data type] Word [Unit of data] Time [Valid data range] 0 to 168
This parameter sets a time interval between two successive brake tests. When the time set in this parameter has elapsed after a brake test, the Brake Test Execution Request signal RQBT is set to 1. When 0 is set in this parameter, the setting of 8 hours is assumed.
13914 Time t1 after output of the brake signal until the brake operates
NOTE When this parameter is set, the power must be
turned off before operation is continued.
[Input type] Parameter input [Data type] Integer axis [Unit of data] msec [Valid data range] 0 to 999999999
To ensure correct timing relative to the *BRKx signal until a move command is issued in a brake test on each axis, this parameter sets a time after controlling of the *BRKx signal until the brake is applied and a time after controlling of the *BRKx signal until the brake is released. If a time for applying the brake differs from a time for releasing the brake, set a longer time. When 0 is set in this parameter, the setting of 400 ms is assumed.
13915 Brake test current limit override value
NOTE When this parameter is set, the power must be
turned off before operation is continued.
[Input type] Parameter input [Data type] Integer axis [Unit of data] (100/255)% [Valid data range] 0 to 255
This parameter sets a current limit override value applicable to a brake test. The relationship between a set value and torque limit override value is as follows:
Torque limit override value = (Setting/255) × 100(%) When 0 is set in this parameter, the setting of 12% is assumed.

B-64303EN-4/01 6.PARAMETERS
- 139 -
13916 Travel distance to be specified for brake test
NOTE When this parameter is set, the power must be
turned off before operation is continued.
[Input type] Parameter input [Data type] Real axis [Unit of data] mm, inch, degree (machine unit)
[Minimum unit of data] Depend on the increment system of the applied axis [Valid data range] 9 digit of minimum unit of data (refer to standard parameter setting
table (A)) (When the increment system is IS-B, -999999.999 to +999999.999) This parameter sets a travel distance on each axis to be specified for brake test. When 0 is set in this parameter, the setting of 1.000 mm (or value equivalent to 1.000 mm on an inch machine) or 1.000 degree is assumed.
CAUTION If a value smaller than the tolerance value
(parameter No. 13918) for position deviation to be monitored in a brake test is set in this parameter, the brake test may not be conducted normally.
NOTE For an axis based on diameter specification, set a
diameter value.
13917 Speed command to be specified for brake test
NOTE When this parameter is set, the power must be
turned off before operation is continued.
[Input type] Parameter input [Data type] Real axis [Unit of data] mm/min, inch/min, degree/min (machine unit)
[Minimum unit of data] Depend on the increment system of the applied axis [Valid data range] Refer to the standard parameter setting table (C)
(When the increment system is IS-B, 0.0 to +240000.0) This parameter sets a speed to be specified for each axis in a brake test. When 0 is set in this parameter, the setting of 10 mm/min (value equivalent to 10 mm/min on an inch machine) or 10 degrees/min is assumed.

6.PARAMETERS B-64303EN-4/01
- 140 -
13918 Tolerance value for position deviation to be monitored in brake test
NOTE When this parameter is set, the power must be
turned off before operation is continued.
[Input type] Parameter input [Data type] Integer axis [Unit of data] Detection unit [Valid data range] 0 to 999999999
This parameter sets a tolerance value for position deviation to be monitored in a brake test on each axis. In a comparison made between a travel distance and position deviation when brake control is exercised, the normal range spans from the reference position deviation plus the setting of this parameter to the reference position deviation minus the setting of this parameter. If a value not within the normal range is detected, alarm DS0039 or DS0040 is issued. When 0 is set in this parameter, the setting of 100 is assumed. Normal position deviation range
Reference position deviation (position deviation relative to a specified value)
13919 Position deviation monitor time t2 in brake test
NOTE When this parameter is set, the power must be
turned off before operation is continued.
[Input type] Parameter input [Data type] Integer axis [Unit of data] msec [Valid data range] 0 to 32767
This parameter sets time t2 for position deviation monitoring in a brake test on each axis. During this time, torque is applied to the brake. When 0 is set in this parameter, the setting of 1000 ms is assumed.
Tolerance value Tolerance value

B-64303EN-4/01 6.PARAMETERS
- 141 -
13920 Maximum operation range of the 1st safe position switch
: :
13951 Maximum operation range of the 32nd safe position switch
Maximum operation range of the 33rd safe position switch 10533
: :
Maximum operation range of the 64th safe position switch 10564
NOTE When these parameters are set, the power must
be turned off before operation is continued. [Input type] Parameter input [Data type] Real [Unit of data] mm, inch, degree (machine unit)
[Minimum unit of data] Depend on the increment system of the reference axis [Valid data range] 9 digits of minimum unit of data (Refer to standard parameter setting
table(A). But in case that CMR≥1, data range becomes 1/CMR of 9 digits of minimum unit of data.) (When the increment system is IS-B and CMR=1, -999999.999 to +999999.999) (When the increment system is IS-B and CMR=2, -499999.999 to +499999.999)
NOTE Whether to specify this parameter by using a
diameter value or radius value depends on whether the corresponding axis is based on diameter specification or radius specification.
These parameters set the maximum operation range of the 1st through 64th safe position switches. When one path is used, up to 32 safety position switches can be set. When two paths are used with the T series, up to 64 safety position switches can be set.
CAUTION 1 When the machine position is on the boundary of
the specified ranges (machine position = parameter setting value), it is considered within the specified ranges.
2 When the setting of operation range is “maximum operation range < minimum operation range”, the safe position switch is not output.
3 If parameter No.13920 to No.13951, No.13533 to No.13564 are changed, please turn the power of the machine off once.

6.PARAMETERS B-64303EN-4/01
- 142 -
13960 Minimum operation range of the 1st safe position switch
: :
13991 Minimum operation range of the 32nd safe position switch
Minimum operation range of the 33rd safe position switch 10565
: :
Minimum operation range of the 64th safe position switch 10596
NOTE When these parameters are set, the power must
be turned off before operation is continued. [Input type] Parameter input [Data type] Real [Unit of data] mm, inch, degree (machine unit)
[Minimum unit of data] Depend on the increment system of the reference axis [Valid data range] 9 digits of minimum unit of data (Refer to standard parameter setting
table(A). But in case that CMR≥1, data range becomes 1/CMR of 9 digits of minimum unit of data.) (When the increment system is IS-B and CMR=1, -999999.999 to +999999.999) (When the increment system is IS-B and CMR=2, -499999.999 to +499999.999)
NOTE Whether to specify this parameter by using a
diameter value or radius value depends on whether the corresponding axis is based on diameter specification or radius specification.
These parameters set the minimum operation range of the 1st through 64th safe position switches. When one path is used, up to 32 safety position switches can be set. When two paths are used with the T series, up to 64 safety position switches can be set.
CAUTION 1 When "machine position = parameter setting", the
safety position switch operation range is assumed to be satisfied.
2 When the setting of operation range is “maximum operation range < minimum operation range”, the safe position switch is not output.
3 If parameter No.13960 to No.13991, No.10565 to No.10596 are changed, please turn the power of the machine off once.

B-64303EN-4/01 6.PARAMETERS
- 143 -
11950 1st byte address of Safety input signal for CNC CPU
: :
11957 8th byte address of Safety input signal for CNC CPU
NOTE When these parameters are set, the power must
be turned off before operation is continued. [Input type] Parameter input [Data type] 2-word [Valid data range] 0 to 3999999
Besides the standard safety I/O signals, 8-byte (64-bit) Programmable Safety I/O signals can be freely defined. These parameters set the address of the 1st through 8th double checked input signals of CNC CPU (DCS PMC). Setting value = TYPE + ADRS ADRS = Byte address
TYPE Meaning 0 This signal is not checked.
1000000 X address 2000000 R address 3000000 D address
Setting example) X8 : setting value = 1000008 R8 : setting value = 2000008
11960 1st byte address of Safety output signal for CNC CPU
: :
11967 8th byte address of Safety output signal for CNC CPU
NOTE When these parameters are set, the power must
be turned off before operation is continued. [Input type] Parameter input [Data type] 2-word
[Valid data range] 0 to 3999999 Besides the standard safety I/O signals, 8-byte (64-bit) Programmable Safety I/O signals can be freely defined. These parameters set the address of the 1st through 8th double checked output signals of CNC CPU(DCS PMC). Setting value = TYPE + ADRS ADRS = Byte address
TYPE Meaning 0 This signal is not checked.
1000000 Y address 2000000 R address 3000000 D address
Setting example) Y8 : setting value = 1000008 R8 : setting value = 2000008

6.PARAMETERS B-64303EN-4/01
- 144 -
11970 1st byte address of Safety input signal for PMC CPU
: :
11977 8th byte address of Safety input signal for PMC CPU
NOTE When these parameters are set, the power must
be turned off before operation is continued. [Input type] Parameter input [Data type] 2-word [Valid data range] 0 to 104999999
Besides the standard safety I/O signals, 8-byte (64-bit) Programmable Safety I/O signals can be freely defined. These parameters set the address of the 1st through 8th double checked input signals of PMC CPU. Setting value = TYPE + ADRS ADRS = Byte address
TYPE Meaning 0 This signal is not checked
101000000 X address 102000000 R address 103000000 D address 104000000 E address
Setting example) X8 : setting value = 101000008 E8 : setting value = 104000008
11980 1st byte address of Safety output signal for PMC CPU
: :
11987 8th byte address of Safety output signal for PMC CPU
NOTE When these parameters are set, the power must
be turned off before operation is continued. [Input type] Parameter input [Data type] 2-word [Valid data range] 0 to 104999999
Besides the standard safety I/O signals, 8-byte (64-bit) Programmable Safety I/O signals can be freely defined. These parameters set the address of the 1st through 8th double checked output signals of PMC CPU. Setting value = TYPE + ADRS ADRS = Byte address
TYPE Meaning 0 This signal is not checked
101000000 Y address 102000000 R address 103000000 D address 104000000 E address
Setting example) X8 : setting value = 101000008 E8 : setting value = 104000008

B-64303EN-4/01 6.PARAMETERS
- 145 -
6.6 PROFIBUS-DP PARAMETER SETTINGS PROFIBUS DI/DO signals can be assigned to Dual Check Safety PMC per each slot unit. To configure PROFIBUS parameters, please refer to Part II, "SETTING” of “FANUC PROFIBUS-DP board (for Series 0i-MODEL-D) Operator’s manual / B-64404EN”. The following is the additional information relating to Dual Check Safety function.
Assigning PROFIBUS DI/DO signals to Dual Check Safety PMC Assigning PROFIBUS DI/DO signals to Dual Check Safety PMC can be set up as follows. 1. Press soft key [DI/DO] ([DI/DO ADDR]) to display the DI/DO
ADDRESS screen. 2. Set the DI/DO addresses (DI ADDR and DO ADDR) according
to the following format. S : <PMC-address> For R0500 of Dual Check Safety PMC, for example, “S:R0500” must be entered. X and R address is available to DI ADDRess. Y and R address is available to DO ADDRess. If there is no “:” key in your CNC unit, it is substituted with the “/” or “EOB” key.
Broken wire detection
“Broken wire detection” enables slaves to monitor the communication interval, detect the communication error when a slave cannot receive data from the Master, and clear the DO data which is received from Master. “Broken wire detection” and “Watchdog time” are configured with Slave parameters which are transferred from Master to Slaves during initialization.

6.PARAMETERS B-64303EN-4/01
- 146 -
When PROFIBUS-DP signal is used for Dual Check Safety function, please activate “Broken wire detection”. “Watchdog time” should be set to several times longer than the refresh time in consideration of re-transmission. The refresh time can be observed in STATUS INFORMATION screen of PROFIBUS setting screen. “Broken wire detection” and “Watchdog time” can be configured in PROFIBUS setting screen. When “1” is set into “WD”, “Broken wire detection” becomes active. “Watchdog time” is calculated with the following expression. 10 × WD_FACT1 × WD_FACT2 (ms) For example, in the following setting, “Broken wire detection” will activate when a watchdog time of 250ms expires.

B-64303EN-4/01 7.START-UP
- 147 -
7 START-UP

7.START-UP B-64303EN-4/01
- 148 -
7.1 START-UP OPERATION The machine tool builder has to do tests for insulation and protective bonding. Testing must be performed according to Chapter 19.2 and 19.3 of the standard IEC 60204-1 by an appropriately authorized person and recorded.
Continuity of the protective bonding circuit When the machine is installed and the electrical connections are complete, including those to the power supply, the continuity of the protective bonding circuit can be verified by a loop impedance test in accordance with 612.6.3 of IEC 60364-6-61. For further details, please refer to Chapter 19.2 of IEC 60204-1.
Insulation resistance tests The insulation resistance measured at 500 V d.c. between the power circuit conductors and the protective bonding circuit is to be not less than 1 M Ω. For further details, please refer to Chapter 19.3 of IEC 60204-1.
7.1.1 Acceptance Test and Report for Safety Functions
Acceptance test for Safety function The machine tool builder is to conduct a Dual Check Safety function check test during machine start-up operation. In this test, limits need to be exceeded to check that the Dual Check Safety function operates normally.
Acceptance report A qualified person is to check each Dual Check Safety function and record the test results in a check report.
NOTE When modifying Dual Check Safety function data,
conduct an additional check test on the modified Dual Check Safety function and record the test results in a check report.
Safety-related I/O monitoring test
Data cross-check operation is tested with the I/O device connector detached.
MCC off Test check The test mode signal is used to check that a MCC off Test is conducted. Negative test: Conduct a MCC off Test by disconnecting the MCC contact
signal (input). Check that an alarm is issued and the MCC remains to be shut off.

B-64303EN-4/01 7.START-UP
- 149 -
Safety limitation speed monitoring test
This test checks that when the actual speed exceeds a speed limit, safety stop state is set by a stop response.
Safety machine position monitoring test A positional limit test is conducted by making many different movements. A positional limit is placed at the center of an axis, and the position is moved at many different speeds in a rapid traverse mode. Thus, the distance traveled on the axis until stop state is set by a stop response is measured. The machine tool builder is to determine a safety limit stop position including a safety margin.
Data modification The user needs to enter the correct password before setting safety parameters with the system. After a safety parameter is modified, a check test needs to be conducted on the related safety function, and the test results need to be recorded in a report.

7.START-UP B-64303EN-4/01
- 150 -
7.2 START-UP OF THE SAFETY FUNCTION
7.2.1 Initial Start-up
Main flow
Step 1
Initial state First, check that the machine starts up normally when the Dual
Check Safety function is disabled.
Preparation 1 Disable the Dual Check Safety function
Bit 6 (DCE) of parameter No. 1902 = 0
Preparation 2 Wire to control the MCC
Connect the relay to control MCC with I/O output
NOTE When the Dual Check Safety function is disabled,
the MCC Off signal (*DCALM, *MCFVx, *MCFPs) is set to “1”. (The MCC Off signal (*MCF) changes according to the state of the emergency stop signal on the PMC side.) So, make a ladder program to output DO signal to control the relay for the MCC control according to the MCC Off signal.
Step 2
DCS PMC side I/O setting Make the settings as for the I/O Link#3 or PROFIBUS. Make a
ladder program for the safe related I/O. (PMC/DCS PMC) In case PROFIBUS is used, please refer to the Section 6.6,
“Assignment of PROFIBUS DI/DOs to Dual Check Safety PMC”
Disable dual checksafety Machine start-up
Safety related I/Osetting
Safety parameter input

B-64303EN-4/01 7.START-UP
- 151 -
Step 3 Safety parameter input Enable the Dual Check Safety function, and enter the safety
parameters. Preparation 1 Enable the Dual Check
Safety function Bit 6 (DCE) of parameter No. 1902 = 1
Set the safety parameters indicated in the table below. Parameter setting Meaning
980 Machine group number of each path 981 Absolute path number of each axis 982 Absolute path number of each spindle 1023 Servo axis number of each axis 1240 Coordinates value of the reference position in the
machine coordinate system 1838 Position deviation limit for each axis in moving state 1839 Position deviation limit for each axis in stopped state 1840 Position deviation limit for each axis in servo-off state 1841 Position deviation limit of each axis in moving state
during other than Dual Check Safety monitoring (for Dual Check Safety Function)
1842 Position deviation limit of each axis in stopped state during other than Dual Check Safety monitoring (for Dual Check Safety Function)
1904#6 Enable safety function for each axis 1945 Timer for safety input signal check 1946 Timer for MCC off Test 1948 Timer for MCC off 1950 Break signal timer 3717 Motor number to each spindle
3797#0 Enable safety function for each spindle 4372 Safety speed 1 on each spindle 4438 Safety speed 2 on each spindle 4440 Safety speed 3 on each spindle 4442 Safety speed 4 on each spindle 4448 Speed regarded as spindle stop for Dual Check Safety
13821 Safety speed 1 on each axis 13822 Safety speed 2 on each axis 13823 Safety speed 3 on each axis 13824 Safety speed 4 on each axis 13825 Speed regarded as axis stop for Dual Check Safety 13831 Safety position 1 (+ direction) on each axis 13832 Safety position 1 (- direction) on each axis 13833 Safety position 2 (+ direction) on each axis 13834 Safety position 2 (- direction) on each axis 13835 Safety position 3 (+ direction) on each axis 13836 Safety position 3 (- direction) on each axis 13837 Safety position 4 (+ direction) on each axis 13838 Safety position 4 (- direction) on each axis

7.START-UP B-64303EN-4/01
- 152 -
Step 4 If alarm SV0478 or SV0496 occurs, set the parameter No.2212#4 is set to “1” and then set to “0”. Then turn off the CNC and the amplifier. And turn on the CNC and the amplifier.
Step 5 Execution of general machine tests Axis and spindle optimization Dual Check Safety function adjustment (safety limitation speed, safety machine position, Safe position error monitoring)
Step 6 Test for checking the safety function Check test execution and report creation
Step 7 Parameter preservation Save all parameters including the safety parameters. The
parameters are used to start up the series.
Step 8 Set a password. A password is used to disable unauthorized persons from
modifying safety parameters. Before safety parameters of the equipment for which a password (parameter No. 3225) is set can be modified, the password value must be set as the keyword (parameter No. 3226). Only those persons authorized to conduct a check test should know the password value.
7.2.2 Series (2nd and Subsequent Machines) Startup
The parameters for the safety monitoring function are transferred together with other parameters to the CNC as in the case of normal series start-up. Perform a safety function check test in addition to the normal start-up procedure.
7.2.3 Troubleshooting Alarms related to the safety function are output on the ALARM screen. Correct the cause of trouble according to the chapter describing alarms and messages in this manual. When a component related to the safety function is to be replaced, an authorized person must conduct a safety function check test.

B-64303EN-4/01 8.ALARM MESSAGE
- 153 -
8 ALARM MESSAGE
Alarm When Dual Check Safety function finds out some abnormal condition in safety check and generates an alarm, the alarm can be reset by reset operation if the abnormal condition is cleared. However, if the problem related with the system is found and an alarm is generated when unfit condition is found by double check function of signals or so on, alarm cannot be cancelled by a reset. In this case, to cancel the alarms, turn off the power.
Servo Alarms (SV alarm) No. Message Description
SV0474 EXCESS ERROR (STOP:SV) The Servo detected that the positional deviation during stopping exceeded the parameter (No. 1839, No.1842) setting value.
SV0475 EXCESS ERROR (MOVE:SV) The Servo detected that the positional deviation during traveling exceeded the parameter (No. 1838, No.1841) setting value. (Dual Check Safety)
SV0476 ILLEGAL SPEED CMD. (SV) The Servo detected that the specified speed on the axis exceeded the safety speed (parameter No. 13821 to 13824, No. 13826 to 13829) during safety monitoring (the safety check request signal (*VLDVx) is 0). When the guard is open, confirm a proper value is set to parameter (No. 13821 to 13824, No. 13826 to 13829), and the operation is done within the safety speed.
SV0477 ILLEGAL MACHINE POS.(SV) The Servo detected that the machine position on the axis is not in the safetyarea (parameter No.13831 to 13838) during safety monitoring (the safety check request signal (*VLDVx) is 0). When the guard is open, confirm a proper value is set to parameter No.13831 to 13838 and do an operation in the safety area. The safe machine position monitoring is done after the machine reference position is established.
SV0478 ILLEGAL AXIS DATA (SV) The Servo detected that an error occurred on the axis during axis data transfer. If the alarm occurs after performing axis number setting for the servo amplifier, set parameter No.2212#4 to 1, and reset the bit to 0, and then turn off the power to the entire system. When a multiaxis amplifier is used, the alarm may not be cleared even if the above operation is performed once. In this case, repeat the operation on the axis for which the alarm persists until it is cleared. In the other case, replace the servo amplifier if the alarm occurred.
SV0481 SAFETY PARAM ERROR(SV) Error detected for safety parameter check function by Servo. SV0484 SAFETY FUNCTION ERROR
(SV) An error occurred in safety functions of Servo: 1) The Servo or CNC detected the inexecution of servo software safety
functions. 2) A mismatch between the servo software results of the safety functions
and the CNC results of them occurred. 3) An error occurred in a servo CPU test. 4) An error occurred in a servo RAM test.
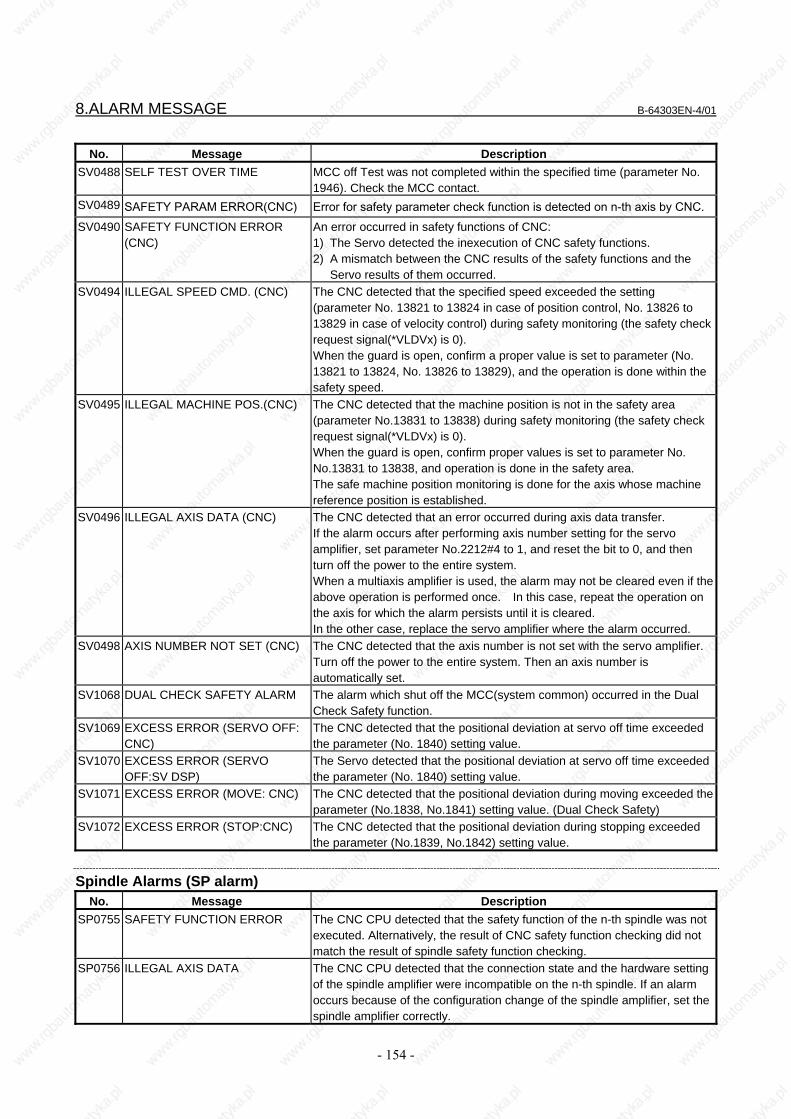
8.ALARM MESSAGE B-64303EN-4/01
- 154 -
No. Message Description SV0488 SELF TEST OVER TIME MCC off Test was not completed within the specified time (parameter No.
1946). Check the MCC contact. SV0489 SAFETY PARAM ERROR(CNC) Error for safety parameter check function is detected on n-th axis by CNC.SV0490 SAFETY FUNCTION ERROR
(CNC) An error occurred in safety functions of CNC: 1) The Servo detected the inexecution of CNC safety functions. 2) A mismatch between the CNC results of the safety functions and the
Servo results of them occurred. SV0494 ILLEGAL SPEED CMD. (CNC) The CNC detected that the specified speed exceeded the setting
(parameter No. 13821 to 13824 in case of position control, No. 13826 to 13829 in case of velocity control) during safety monitoring (the safety check request signal(*VLDVx) is 0). When the guard is open, confirm a proper value is set to parameter (No. 13821 to 13824, No. 13826 to 13829), and the operation is done within the safety speed.
SV0495 ILLEGAL MACHINE POS.(CNC) The CNC detected that the machine position is not in the safety area (parameter No.13831 to 13838) during safety monitoring (the safety check request signal(*VLDVx) is 0). When the guard is open, confirm proper values is set to parameter No. No.13831 to 13838, and operation is done in the safety area. The safe machine position monitoring is done for the axis whose machine reference position is established.
SV0496 ILLEGAL AXIS DATA (CNC) The CNC detected that an error occurred during axis data transfer. If the alarm occurs after performing axis number setting for the servo amplifier, set parameter No.2212#4 to 1, and reset the bit to 0, and then turn off the power to the entire system. When a multiaxis amplifier is used, the alarm may not be cleared even if the above operation is performed once. In this case, repeat the operation on the axis for which the alarm persists until it is cleared. In the other case, replace the servo amplifier where the alarm occurred.
SV0498 AXIS NUMBER NOT SET (CNC) The CNC detected that the axis number is not set with the servo amplifier. Turn off the power to the entire system. Then an axis number is automatically set.
SV1068 DUAL CHECK SAFETY ALARM The alarm which shut off the MCC(system common) occurred in the Dual Check Safety function.
SV1069 EXCESS ERROR (SERVO OFF: CNC)
The CNC detected that the positional deviation at servo off time exceeded the parameter (No. 1840) setting value.
SV1070 EXCESS ERROR (SERVO OFF:SV DSP)
The Servo detected that the positional deviation at servo off time exceeded the parameter (No. 1840) setting value.
SV1071 EXCESS ERROR (MOVE: CNC) The CNC detected that the positional deviation during moving exceeded the parameter (No.1838, No.1841) setting value. (Dual Check Safety)
SV1072 EXCESS ERROR (STOP:CNC) The CNC detected that the positional deviation during stopping exceeded the parameter (No.1839, No.1842) setting value.
Spindle Alarms (SP alarm)
No. Message Description SP0755 SAFETY FUNCTION ERROR The CNC CPU detected that the safety function of the n-th spindle was not
executed. Alternatively, the result of CNC safety function checking did not match the result of spindle safety function checking.
SP0756 ILLEGAL AXIS DATA The CNC CPU detected that the connection state and the hardware setting of the spindle amplifier were incompatible on the n-th spindle. If an alarm occurs because of the configuration change of the spindle amplifier, set the spindle amplifier correctly.

B-64303EN-4/01 8.ALARM MESSAGE
- 155 -
No. Message Description SP0757 SAFETY SPEED OVER The CNC CPU detected that during safety monitoring (the safety check
request signal(*VLDPs) is 0), the spindle motor speed was greater than the safety speed (parameter No. 4372, 4438, 4440, or 4442) on the n-th spindle. Operate within the safety speed.
SP1700 SAFETY PARAM ERROR The CNC CPU detected error in safety parameter check function.
Alarms requiring power to be turned off (PW alarm) No. Message Description
PW0008 CPU SELF TEST ERROR(DCS PMC)
The DCS PMC detected the error in the CPU self test function and RAM check function.
PW0009 CPU SELF TEST ERROR(PMC)
The PMC detected the error in the CPU self test function and RAM check function.
PW0010 SAFE I/O CROSS CHECK ERROR(DCS PMC)
The DCS PMC detected the error of system define safe I/O in the I/O cross check function.
PW0011 SAFE I/O CROSS CHECK ERROR(PMC)
The PMC detected the error of system define safe I/O in the I/O cross check function.
PW0012 USER I/O CROSS CHECK ERROR(DCS PMC)
The DCS PMC detected the error of user define safe I/O in the I/O cross check function.
PW0013 USER I/O CROSS CHECK ERROR(PMC)
The PMC detected the error of user define safe I/O in the I/O cross check function.
PW0014 CPU TEST ALARM (CNC) An error occurred in a CNC CPU test. PW0015 SAFETY PARAM ERROR The CNC detected error for safety parameter check function. PW0016 RAM CHECK ERROR The CNC detected error in RAM check function. PW0017 INEXECUTION OF SAFETY
FUNCTIONS The CNC detected abnormal condition in the execution of CNC safety functions.
PW0018 CRC CHECK ERROR The CNC detected the CRC check error in the CNC ROM.
Other alarms (DS alarm) No. Message Description
DS0022 DUAL CHECK SAFETY IS NOT
WORKED Dual Check Safety function is unavailable by setting a parameter No.1902#6 to 0.
Serial Spindle Alarms
No. Message SP indication Faulty location and remedy Description
SP9016 SSPA:16 RAM ERROR
16 Replace the Spindle amplifier control printed-circuit board.
An error in a spindle amplifier control circuitcomponent was detected. (Error in RAM for external data)
SP9069 SAFETY SPEED OVER
69 1) Check the speed command. 2) Check the parameter setting.3) Check the sequence.
Safety speed exceeded A motor speed exceeding the safety speed was detected when the safety speed monitoring is enabled. Alternatively, an error was detected at free-run stop time.
SP9070 ILLEGAL AXIS DATA
70 Match the setting on the spindle amplifier side to the connection state.
Axis data error The connection state of the spindle amplifier does not match the amplifier setting.

8.ALARM MESSAGE B-64303EN-4/01
- 156 -
No. Message SP indication Faulty location and remedy Description
SP9071 SAFETY PARAMETER ERROR
71
1) Reenter the safety parameters.
2) Replace the Spindle amplifier control printed-circuit board.
Safety parameter error An error wad detected in safety parameter checking.
SP9072 MISMATCH RESULT OF MOTOR SPEED CHECK
72 1) Replace the Spindle amplifier control printed-circuit board.
2) Replace the main board or sub-CPU board on the CNC.
Motor speed judgment mismatch A motor speed judgment mismatch occurred between the CNC and spindle amplifier.
SP9074 CPU TEST ERROR
74 Replace the Spindle amplifier control printed-circuit board.
An error was detected in CPU test.
SP9075 CRC ERROR 75 Replace the Spindle amplifier control printed-circuit board.
An error was detected in ROM CRC test.
SP9076 INEXECUTION OF SAFETY FUNCTIONS
76 Replace the Spindle amplifier control printed-circuit board.
Safety function not executed Any safety function was not executed.
SP9077 MISMATCH RESULT OF AXIS NUMBER CHECK
77 1) Replace the Spindle amplifier control printed-circuit board.
2) Replace the main board or sub-CPU board on the CNC.
Axis number judgment mismatch An axis number check result mismatch occurred between the CNC and spindle amplifier.
SP9078 MISMATCH RESULT OF SAFETY PARAMETER CHECK
78 1) Replace the Spindle amplifier control printed-circuit board.
2) Replace the main board or sub-CPU board on the CNC.
Safety parameter judgment mismatch A safety parameter check result mismatch occurred between the CNC and spindle amplifier.
SP9079 INITIAL TEST ERROR
79 Replace the Spindle amplifier control printed-circuit board.
The safety functions at power-up for spindle were not executed.
Boot System Alarms
Message Description CRC CHECK ERROR:NC BASIC. CRC error occurs in CNC BASIC ROM. Please install CNC BASIC ROM in flash
memory again.
Servo Alarms to turn MCC off Signal (*MCFVx) to “0” In case that the parameter No.10500#0 (AVM) is set to “0”, the MCC off Signal (*MCFVx) of an alarm axis is turned to “0” immediately when the alarm related to data communication or detector occurs. The following table shows this kind of servo alarm.
Number Message Description SV0301 APC ALARM: COMMUNICATION
ERROR Since the absolute-position detector caused a communication error, the correct machine position could not be obtained. (data transfer error) The absolute-position detector, cable, or servo interface module is thought to be defective.
SV0302 APC ALARM: OVER TIME ERROR Since the absolute-position detector caused an overtime error, the correct machine position could not be obtained. (data transfer error)The absolute-position detector, cable, or servo interface module is thought to be defective.
SV0303 APC ALARM: FRAMING ERROR Since the absolute-position detector caused a framing error, the correct machine position could not be obtained. (data transfer error)The absolute-position detector, cable, or servo interface module is thought to be defective.

B-64303EN-4/01 8.ALARM MESSAGE
- 157 -
Number Message Description SV0304 APC ALARM: PARITY ERROR Since the absolute-position detector caused a parity error, the
correct machine position could not be obtained. (data transfer error)The absolute-position detector, cable, or servo interface module is thought to be defective.
SV0305 APC ALARM: PULSE ERROR Since the absolute-position detector caused a pulse error, the correct machine position could not be obtained. The absolute-position detector or cable is thought to be defective.
SV0306 APC ALARM: OVER FLOW ERROR Since the amount of positional deviation overflowed, the correct machine position could not be obtained. Check parameter No. 2084 and No. 2085.
SV0307 APC ALARM: MOVEMENT EXCESS ERROR
Since the machine moved excessively, the correct machine position could not be obtained.
SV0360 ABNORMAL CHECKSUM(INT) The checksum alarm occurred on the built–in Pulsecoder. SV0361 ABNORMAL PHASE DATA(INT) The phase data abnormal alarm occurred on the built–in
Pulsecoder. SV0362 ABNORMAL REV. DATA(INT) The speed count abnormal alarm occurred on the built-in
Pulsecoder. SV0363 ABNORMAL CLOCK(INT) The clock alarm occurred on the built–in Pulsecoder. SV0364 SOFT PHASE ALARM(INT) A digital servo soft detected an abnormality on the built in
Pulsecoder. SV0365 BROKEN LED(INT) The digital servo software detected abnormal data on the built–in
Pulsecoder. SV0366 PULSE MISS(INT) A pulse error occurred on the built–in Pulsecoder. SV0367 COUNT MISS(INT) A count error occurred on the built–in Pulsecoder. SV0368 SERIAL DATA ERROR(INT) The communications data could not be received from the built–in
Pulsecoder. SV0369 DATA TRANS. ERROR(INT) A CRC error or stop bit error occurred in the communications data
from the built–in Pulsecoder. SV0380 BROKEN LED(EXT) Separate detector error SV0381 ABNORMAL PHASE (EXT) An abnormal alarm in the position data occurred on the separate
linear scale. SV0382 COUNT MISS(EXT) A count error occurred on the separate detector. SV0383 PULSE MISS(EXT) A pulse error occurred on the separate detector. SV0384 SOFT PHASE ALARM(EXT) The digital servo software detected abnormal data on the separate
detector. SV0385 SERIAL DATA ERROR(EXT) The communications data could not be received from the separate
detector. SV0386 DATA TRANS. ERROR(EXT) A CRC error or stop bit error occurred in the communications data
from the standalone detector. SV0387 ABNORMAL ENCODER(EXT) An abnormality occurred on a separate detector. For more
information, contact the scale manufacturer. SV0445 SOFT DISCONNECT ALARM The digital servo software detected a disconnected Pulsecoder. SV0448 UNMATCHED FEEDBACK ALARM The sign of the feedback signal from the standalone detector is
opposite to that from the feedback signal from the built–on Pulsecoder.
SV0453 SPC SOFT DISCONNECT ALARM
Software disconnection alarm of the α pulse coder. Turn off the power to the CNC, then remove and insert the pulse coder cable. If this alarm is issued again, replace the pulse coder.
SV0460 FSSB DISCONNECT The FSSB connection was discontinued. Or, the FSSB connection cable was disconnected or broken. The amplifier was turned off. In the amplifier, the low-voltage alarm occurred.

8.ALARM MESSAGE B-64303EN-4/01
- 158 -
Number Message Description SV0462 SEND CNC DATA FAILED The correct data could not be received on a slave side because of
the FSSB communication error. SV0463 SEND SLAVE DATA FAILED The correct data could not be received in the servo software
because of the FSSB communication error. SV0474 EXCESS ERROR(STOP:SV ) The Servo detected that the positional deviation during stopping
exceeded the parameter (No. 1839, No.1842) setting value. SV0475 EXCESS ERROR(MOVE:SV) The Servo detected that the positional deviation during traveling
exceeded the parameter (No. 1838, No.1841) setting value. SV1067 FSSB:CONFIGURATION
ERROR(SOFT)
The FSSB configuration error occurred. (Detected in software). Or, there is a difference in the type of connected amplifier and FSSB setting.
SV5134 FSSB:OPEN READY TIME OUT In the initialization, the FSSB could not be in an open ready sate. The axis card is thought to be defective.
SV5136 FSSB:NUMBER OF AMP. IS INSUFFICIENT
The number of amplifier identified by the FSSB is insufficient than the number of control axes. Or, the setting of the number of axes or the amplifier connection is in error.
SV5137 FSSB:CONFIGURATION ERROR An FSSB configuration error occurred. The connecting amplifier type is incompatible with the FSSB setting value.
SV5139 FSSB : ERROR Servo initialization did not terminate normally. The optical cable may be defective, or there may be an error in connection to the amplifier or another module. Check the optical cable and the connection status.
SV5197 FSSB:OPEN TIME OUT The CNC permitted the opening of the FSSB, but the FSSB is not opened. Check the connection between the CNC and amplifier.
Spindle Alarms to turn MCC off Signal (*MCFPs) to “0”
In case that the parameter No.10500#1 (APM) is set to “0”, the MCC off Signal (*MCFPs) of an alarm spindle is turned to “0” immediately when the alarm related to data communication or detector occurs. The following table shows this kind of spindle alarm.
Number Message Description SP1220 NO SPINDLE AMP. Either the cable connected to a serial spindle amplifier is broken, or
the serial spindle amplifier is not connected. SP1225 CRC ERROR (SERIAL SPINDLE) A CRC error (communications error) occurred in communications
between the CNC and the serial spindle amplifier. SP1226 FRAMING ERROR (SERIAL
SPINDLE) A framing error occurred in communications between the CNC and the serial spindle amplifier.
SP1227 RECEIVING ERROR (SERIAL SPINDLE)
A receive error occurred in communications between the CNC and the serial spindle amplifier.
SP1228 COMMUNICATION ERROR (SERIALSPINDLE)
A communications error occurred between the CNC and the serial spindle amplifier.
SP1229 COMMUNICATION ERROR SERIALSPINDLE AMP.
A communications error occurred between serial spindle amplifiers (motor Nos. 1 and 2, or motor Nos. 3–4).
SP1245 COMMUNICATION DATA ERROR A communication data error was detected on the CNC. SP1246 COMMUNICATION DATA ERROR A communication data error was detected on the CNC. SP1247 COMMUNICATION DATA ERROR A communication data error was detected on the CNC. SP1976 SERIAL SPINDLE COMMUNICATION
ERROR The amplifier No. could not be set to the serial spindle amplifier.
SP1977 SERIAL SPINDLE COMMUNICATIONERROR
An error occurred in the spindle control software.

B-64303EN-4/01 8.ALARM MESSAGE
- 159 -
Number Message Description SP1978 SERIAL SPINDLE COMMUNICATION
ERROR A time–out was detected during communications with the serial spindle amplifier.
SP1979 SERIAL SPINDLE COMMUNICATION ERROR
The communications sequence was no longer correct during communications with the serial spindle amplifier.
SP1980 SERIAL SPINDLE AMP. ERROR Defective SIC–LSI on serial spindle amplifier SP1981 SERIAL SPINDLE AMP. ERROR An error occurred during reading of the data from SIC–LSI on the
analog spindle amplifier side. SP1982 SERIAL SPINDLE AMP. ERROR An error occurred during reading of the data from SIC–LSI on the
serial spindle amplifier side. SP1983 SERIAL SPINDLE AMP. ERROR Could not clear on the spindle amplifier side. SP1987 SERIAL SPINDLE CONTROL ERROR Defective SIC–LSI on the CNC
Number Message Amplifier
indication*1
Faulty location and remedy Description
SP9073 MOTOR SENSOR DISCONNECTED
73
1) Replace the feedback cable. 2) Check the shield processing. 3) Check and correct the
connection. 4) Adjust the sensor.
The motor sensor feedback signal is not present. (connector JYA2)
SP9081 1-ROT MOTOR SENSOR ERROR
81
1) Check and correct the parameter.
2) Replace the feedback cable. 3) Adjust the sensor.
The one-rotation signal of the motor sensor cannot be correctly detected. (connector JYA2)
SP9082 NO 1-ROT MOTOR SENSOR 82
1) Replace test feedback cable. 2) Adjust the sensor.
The one-rotation signal of the motor sensor is not generated. (connector JYA2)
SP9083 MOTOR SENSOR SIGNAL ERROR 83
1) Replace the feedback. 2) Adjust the sensor.
An irregularity was detected in a motor sensor feedback signal. (connector JYA2)
Reference of Dual Check Alarm message Dual Check Alarm by Servo CPU and CNC CPU
No. Message (Servo) No. Message (CNC)
SV0474 EXCESS ERROR(STOP:SV ) SV1072 EXCESS ERROR(STOP:CNC) SV0475 EXCESS ERROR(MOVE:SV) SV1071 EXCESS ERROR(MOVE:CNC) SV0476 ILLEGAL SPEED CMD.(SV ) SV0494 ILLEGAL SPEED CMD.(CNC) SV0477 ILLEGAL MACHINE POS.(SV) SV0495 ILLEGAL MACHINE POS.(CNC) SV0478 ILLEGAL AXIS DATA(SV) SV0496 ILLEGAL AXIS DATA(CNC) SV0481 SAFETY PARAM ERROR(SV) SV0489 SAFETY PARAM ERROR(CNC) SV0484 SAFETY FUNCTION ERROR(SV) SV0490 SAFETY FUNCTION ERROR(CNC) SV1070 EXCESS ERROR(SERVO OFF:SV) SV1069 EXCESS ERROR(SERVO OFF:CNC)
Dual Check Alarm by Spindle CPU and CNC CPU
No. Message (Spindle) No. Message (CNC)
SP9069 (69)
SAFETY SPEED OVER SP0757 SAFETY SPEED OVER
SP9070 (70)
ILLEGAL AXIS DATA SP0756 ILLEGAL AXIS DATA

8.ALARM MESSAGE B-64303EN-4/01
- 160 -
No. Message (Spindle) No. Message (CNC) SP9071
(71) SAFETY PARAMETER ERROR SP1700 SAFETY PARAM ERROR
SP9072 (72)
MISMATCH RESULT OF MOTOR SPEED CHECK
SP9076 (76)
INEXECUTION OF SAFETY FUNCTIONS
SP9077 (77)
MISMATCH RESULT OF AXIS NUMBER CHECK
SP9078 (78)
MISMATCH RESULT OF SAFETY PARAMETER CHECK
SP0755 SAFETY FUNCTION ERROR
Dual Check Alarm by PMC CPU and CNC CPU (Power must be off)
No. Message (PMC) No. Message (CNC)
PW0009 CPU SELF TEST ERROR(PMC) PW0008 CPU SELF TEST ERROR(DCS PMC) PW0011 SAFE I/O CROSS CHECK ERROR(PMC) PW0010 SAFE I/O CROSS CHECK ERROR(DCS PMC)PW0013 USER I/O CROSS CHECK ERROR(PMC) PW0012 USER I/O CROSS CHECK ERROR(DCS PMC)

B-64303EN-4/01 9.DIAGNOSIS
- 161 -
9 DIAGNOSIS The diagnosis screen for the maintenance operation of the Dual Check Safety function is displayed in the group of [SYSTEM] screens. To display the Dual Check Safety diagnosis screen, press the function key SYSTEM then press the [DUAL CHECK] soft key displayed by pressing the continuous menu key [+] several times. The state of MCC OFF TEST, the state of signals in case that the alarm related to safety occurs and the cause of alarm is displayed on the Dual Check Safety diagnosis screen. If an alarm is issued during execution of the dual brake monitor function, information about brake test is displayed on the diagnosis screen.
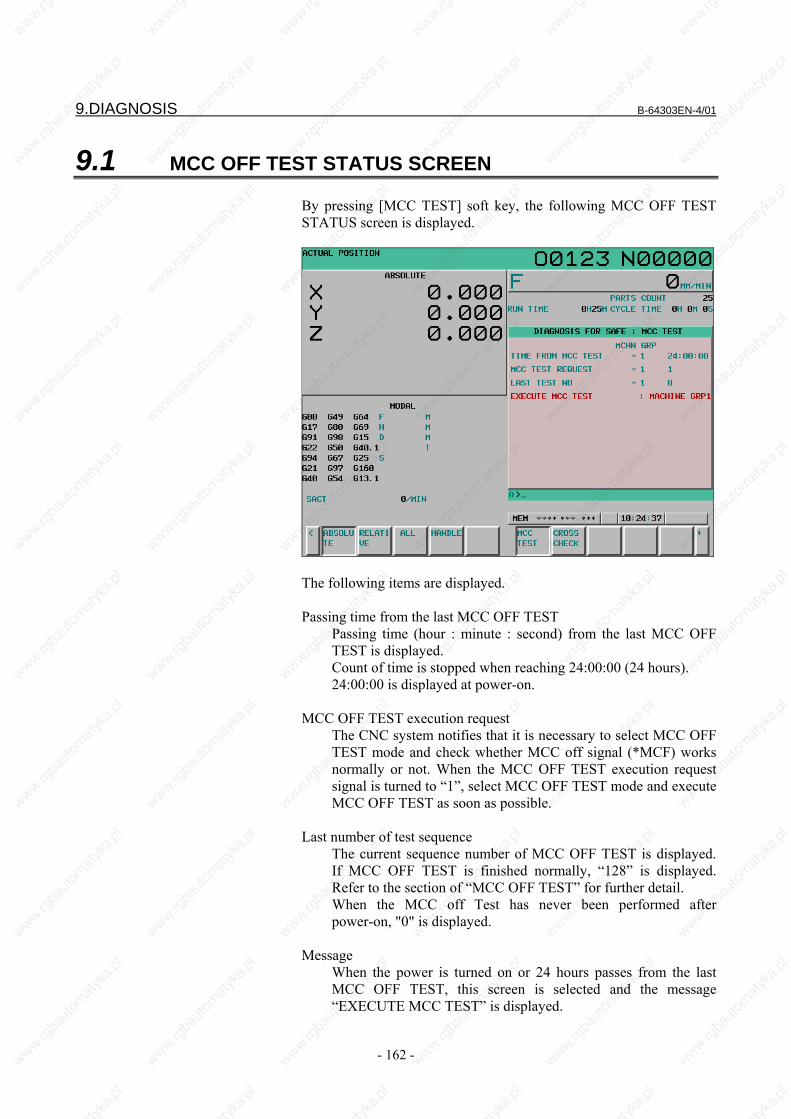
9.DIAGNOSIS B-64303EN-4/01
- 162 -
9.1 MCC OFF TEST STATUS SCREEN By pressing [MCC TEST] soft key, the following MCC OFF TEST STATUS screen is displayed.
The following items are displayed. Passing time from the last MCC OFF TEST Passing time (hour : minute : second) from the last MCC OFF
TEST is displayed. Count of time is stopped when reaching 24:00:00 (24 hours). 24:00:00 is displayed at power-on. MCC OFF TEST execution request The CNC system notifies that it is necessary to select MCC OFF
TEST mode and check whether MCC off signal (*MCF) works normally or not. When the MCC OFF TEST execution request signal is turned to “1”, select MCC OFF TEST mode and execute MCC OFF TEST as soon as possible.
Last number of test sequence The current sequence number of MCC OFF TEST is displayed.
If MCC OFF TEST is finished normally, “128” is displayed. Refer to the section of “MCC OFF TEST” for further detail.
When the MCC off Test has never been performed after power-on, "0" is displayed.
Message When the power is turned on or 24 hours passes from the last
MCC OFF TEST, this screen is selected and the message “EXECUTE MCC TEST” is displayed.

B-64303EN-4/01 9.DIAGNOSIS
- 163 -
9.2 CROSS CHECK DATA SCREEN The CROSS CHECK DATA screen displays.
[ALARM INFORMATION] SCREEN Press the [CROSS CHECK] soft key then the screen shown below appears. This screen shows the DI/DO status when the cross check alarm occurs.

9.DIAGNOSIS B-64303EN-4/01
- 164 -
[DI SIGNAL STAUS] SCREEN Press the page key and select the second page. The screen
shown below appears. This screen shows the current DI status. If there is difference of DI state between PMC and DCS PMC, “#” is displayed on the left side of the address.
[DO SIGNAL STATUS] SCREEN Press the page key and select the third page. The screen shown
below appears. This screen shows the current DO status. If there is difference of DO state between PMC and DCS PMC, “#” is displayed on the left side of the address.

B-64303EN-4/01 9.DIAGNOSIS
- 165 -
[SPINDLE STATUS] SCREEN Press the page key and select the fourth screen. The screen
shown below appears. When the judging result of safety function of CNC is not the same as other CPU, the cross check alarm occurs. This screen shows the cause of cross check alarm related to a spindle.
Cross check data about the following items for the spindle CPU and CNC CPU is displayed. When no alarm is detected in a cross check, the results of the current check are indicated. When an alarm is detected in a cross check, the held data is indicated upon detection.
Bit (symbol) Description N Set to "1" when a safety parameter failure is detected. O Set to "1" when an axis data failure is detected. P Set to "1" when the speed exceeds "Safety Limit Speed
for each Spindle" set by the parameter.

9.DIAGNOSIS B-64303EN-4/01
- 166 -
[SERVO STATUS] SCREEN Press the page key and select the fifth page. The screen shown
below appears. When the judging result of safety function of CNC is not the same as other CPU, the cross check alarm occurs. This screen shows the cause of cross check alarm related to a servo motor.
Cross check data about the following items for the servo CPU and CNC CPU is displayed. When no alarm is detected in a cross check, the results of the current check are indicated. When an alarm is detected in a cross check, the held data is indicated upon detection.
Bit (symbol) Description J Set to "1" when the amount of positional deviation exceeds
"Positional Deviation Limit during Safety Monitoring" set by the parameter.
K Set to "1" when the speed exceeds "Safety Limit Speed for each Axis" set by the parameter.
L Set to "1" when the machine position falls outside the range of "Safety Machine Position for each Axis" set by the parameter.
M Set to "1" when an axis data failure is detected. N Set to "1" when a safety parameter failure is detected.

B-64303EN-4/01 9.DIAGNOSIS
- 167 -
9.3 FLOW MONITORING SCREEN The FLOW MONITORING screen displays. Press the [+] continuous menu soft key. And press the [FLOW MONIT.] soft key. The screen shown below appears. This screen shows the counter for program flow monitoring.
If each safety function works normally, the present value shows the same value as the default.
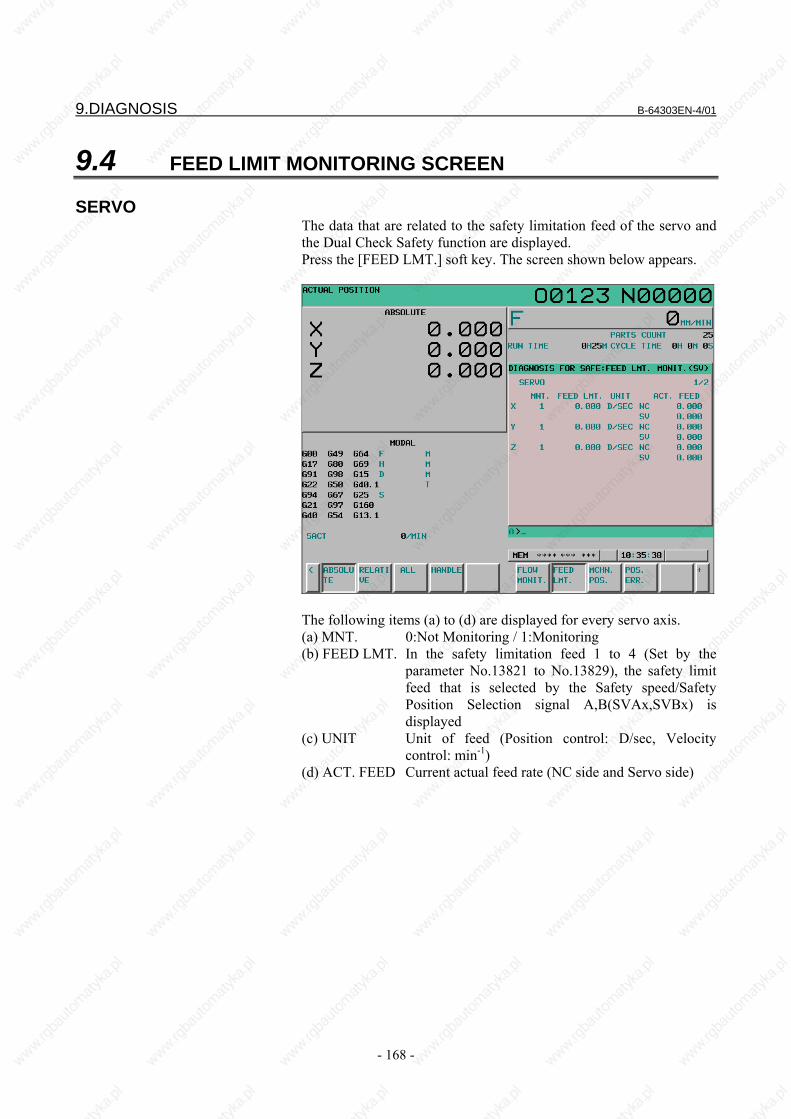
9.DIAGNOSIS B-64303EN-4/01
- 168 -
9.4 FEED LIMIT MONITORING SCREEN
SERVO The data that are related to the safety limitation feed of the servo and the Dual Check Safety function are displayed. Press the [FEED LMT.] soft key. The screen shown below appears.
The following items (a) to (d) are displayed for every servo axis. (a) MNT. 0:Not Monitoring / 1:Monitoring (b) FEED LMT. In the safety limitation feed 1 to 4 (Set by the
parameter No.13821 to No.13829), the safety limit feed that is selected by the Safety speed/Safety Position Selection signal A,B(SVAx,SVBx) is displayed
(c) UNIT Unit of feed (Position control: D/sec, Velocity control: min-1)
(d) ACT. FEED Current actual feed rate (NC side and Servo side)

B-64303EN-4/01 9.DIAGNOSIS
- 169 -
SPINDLE The data that are related to the safety limitation feed of the spindle and the Dual Check Safety function are displayed. Press the page key , the screen of the Safety limitation feed of
the spindle shown below appears.
The following items (a) to (d) are displayed for every spindle axis. (a) MNT. 0:Not Monitoring / 1:Monitoring (b) FEED LMT. In the Safety feed limit 1 to 4 (Set by the parameter
No.4372, 4438, 4442 to 4444), the safety limit feed that is selected by the Safety speed/Safety Position Selection signal A,B (SPAx, SPBx) is displayed
(c) UNIT Unit of the feed (min-1) (d) ACT. FEED Current actual feed rate(NC side and Spindle side)

9.DIAGNOSIS B-64303EN-4/01
- 170 -
9.5 SAFE MACHINE POSITIONING MONITORING SCREEN The data that are related to the safe machine positioning monitoring of the Dual Check Safety function are displayed. Press the [MCHN. POS] soft key, The screen shown below appears.
The following items (a) to (c) are displayed for every servo axis. (a) MNT. 0:Not Monitoring / 1:Monitoring/-: The reference
position is not established (b) RANGE In the safety machine position 1 to 4 (Set by the
parameter No.13830 to 13838), the upper limit value and lower limit value of the safety machine position that are selected by the Safety speed/Safety Position Selection signal A,B (SPAx, SPBx) are displayed
(c) MCHN. POS. Current machine position (NC side and Spindle side)

B-64303EN-4/01 9.DIAGNOSIS
- 171 -
9.6 SAFETY POSITION ERROR MONITORING SCREEN The data that are related to the safety position error monitoring of the Dual Check Safety function are displayed. Press the [POS. ERR.] soft key, the screen shown below appears.
The following items (a) to (c) are displayed for every servo axis. (a) MNT. 0:Not Monitoring / 1:Monitoring/-: The reference
position is not established (b) LIMIT From the safety position error limits at stop time/move
time/servo-off time, the pertinent safety position error limit is displayed by judging the current state.
(c) POS. ERR. Current positioning error (NC side and Servo side)

9.DIAGNOSIS B-64303EN-4/01
- 172 -
9.7 DIAGNOSIS SCREEN If an alarm is issued during execution of the dual brake monitor function, information about brake test is displayed on the diagnosis screen. To display the diagnosis screen, press the function key SYSTEM then press the [DIAGNOSIS] soft key.
Display data
Diagnosis 3700 Brake test sequence number [Data type] Word axis [Valid data range] 0 to 128
This item displays the current test sequence number for each axis when a Dual Check Safety brake test is being executed. When a test is suspended, the suspended sequence number is displayed.
0 : Test not started (normal state) 1 : Torque limit change
10 : Test 1 Brake applied, wait for a timer 11 : Test 1 Move 12 : Test 1 Position deviation check 13 : Test 1 Move in reverse direction 14 : Test 1 Brake released, wait for a timer 20 : Test 2 Brake applied, wait for a timer 21 : Test 2 Move 22 : Test 2 Position deviation check 23 : Test 2 Move in reverse direction 24 : Test 2 Brake released, wait for a timer 30 : Test 3 Brake applied, wait for a timer 31 : Test 3 Move 32 : Test 3 Position deviation check 33 : Test 3 Move in reverse direction 34 : Test 3 Brake released, wait for a timer
2 : Torque limit released 128 : Normal termination
The test sequence numbers correspond to the states indicated in the brake test timing chart below.

B-64303EN-4/01 9.DIAGNOSIS
- 173 -
Brake test timing chart
Diagnosis 3701 Cause for brake test suspension [Data type] Word axis [Valid data range] 0 to 128
When a brake test being conducted is suspended for a cause such as an alarm, this item indicates the cause with one of the following numbers:
0 : Normal state (no suspension performed) 1 : An alarm was issued at the start of a brake test. 2 : PMC axis control was exercised at the start of a brake test. 3 : A mode other than the JOG mode was set at the start of a
brake test. 4 : An axis movement was being made at the start of a brake
test. 6 : The servo-off or emergency stop state was set at the start of a
brake test. 7 : A reset was being made at the start of a brake test. 8 : A torque limit was applied at the start of a brake test. 9 : Torque control or speed control was exercised at the start of
a brake test. 10 : Automatic operation was being performed at the start of a
brake test. 20 : A brake test was suspended for an alarm detected by position
deviation checking during brake test. (A brake error was detected.)
21 : During brake test, the D-READY signal or V-READY signal of the amplifier was turned off.
22 : A brake test being conducted was suspended by a reset or mode switching. (Restart operation is needed.)
Command (Distance/
speed) Cancel command
Position deviation monitor
Torque limit Valid
Next testTest
Invalid
1
0
*BRKx (PMC,DCS PMC)
Command (POS)
+ command
− command
No command
10
20
30
11
21
31
12
22
32
Error monitor
13
23
33
14
24
34
Monitored
Not monitored
Brake applied
Brake released
Test 1
Test 2
Test 3
Sequence No.

9.DIAGNOSIS B-64303EN-4/01
- 174 -
23 : A brake test being conducted was suspended for another cause.
24 : The mode of control was switched to torque control or speed control during brake test.
25 : A brake test being conducted was suspended by an emergency stop.

B-64303EN-4/01 10.SAMPLE SYSTEM CONFIGURATION
- 175 -
10 SAMPLE SYSTEM CONFIGURATION

10.SAMPLE SYSTEM CONFIGURATION B-64303EN-4/01
- 176 -
10.1 SAMPLE CONFIGURATION
10.1.1 Example of Configuration Using a Single MCC
I/O UNIT(I/OLINK#1/#2)
OPERATOR’S PANEL
CNC
PMC
ORQORQ_P
OPT OPT_P
*ESP1
*ESP_X *ESPG
RQT
ESP
+24V
*VLDVx*VLDPs
+24V
DOORLOCK
*OPIHB
RSVx RSPs
MCC OFF
DOOR STATUS
DCS PMC I/O UNIT(I/OLINK#3)
*ESP2
*VLDVx*VLDPs
*SMC
*SMC
*DCALM*MCF *MCFVx *MCFPs
*DCALM*MCF *MCFVx *MCFPs
+24V
+24V
MCC OFF
0V
MCC STATUS
DOOR STATUSMCC STATUS
Servo amplifier
Spindle amplifier
Common power supply
24V
0V
U
V
200A 200B
SPINDLE Motor
Servo Motor
Servo Motor
U
V W
LINE CONTACTOR(MAIN MCC)
(*SGOPN)
*SGOPN

B-64303EN-4/01 10.SAMPLE SYSTEM CONFIGURATION
- 177 -
10.1.2 Example of Configuration Using Multiple MCCs
I/O UNIT(I/OLINK#1/#2)
OPERATOR’S PANEL
CNC
PMC
ORQORQ_P
OPTOPT_P
*ESP1
*ESP_X *ESPG
RQT
ESP
+24V
*VLDVx*VLDPs
+24V
DOORLOCK
*OPIHBRSVxRSPs
MCC OFF1A
DOOR STATUS
DCS PMC I/O UNIT (I/OLINK#3)
*ESP2
*VLDVx*VLDPs
*SMC
*SMC
*DCALM*MCF *MCFVx1*MCFPs1
*DCALM*MCF *MCFVx1*MCFPs1
+24V
+24V
MCC OFF1B
MCC STATUS
DOOR STATUSMCC STATUS
Servo amplifier
Spindle amplifier
Common power supply 24V
0VU
V
200A 200B
U
V W
LINE CONTACTOR (MAIN MCC)
(*SGOPN)
*SGOPN
MCC OFF2A
*DCALM*MCF *MCFVx2*MCFPs2
*DCALM*MCF *MCFVx2*MCFPs2
Servo amplifier
Spindle amplifier
Common power supply 24V
200A 200B
U
V W
LINE CONTACTOR(MAIN MCC 2)

10.SAMPLE SYSTEM CONFIGURATION B-64303EN-4/01
- 178 -
10.2 SAMPLE CONNECTIONS
10.2.1 Emergency Stop Signal (*ESP)
*ESP (X0008.4)
I/O-Link#1 I/O UNIT
*ESP (X0008.4)
I/O-Link#3 I/O Unit
+24V
CX4 ESP
Common power supply
0V
NOTE Use a two-contact emergency stop button with a forced guided contact mechanism. Connect the emergency stop button to the PSM(common power supply), as illustrated in the figure. When the signal is input, the spindle slows down and stops. Input a power-down factor to [Gn008.4] other than the signal from the emergency stop button. Create a Ladder program so that [X0008.4] becomes a factor of [Gn008.4].
X000n.n
I/O-Link I/O UNIT PMC
Ladder program Emergency stop factor
other than emergency stop button
Emergency stop factor
*ESPG (Gn008.4)
Machine side
X0008.4Emergency stop button
IMPORTANT Emergency stop button must fulfill the Standard
IEC60947-5-1.This is mandatory.

B-64303EN-4/01 10.SAMPLE SYSTEM CONFIGURATION
- 179 -
10.2.2 Guard Open Request Signal (ORQ)
NOTE
Create a Ladder program of conditions for making a guard open request and then input the program to the PMC side. When the guard open request signal (ORQ) is input, CNC will output the *OPNIHB signal. After the ladder program confirms the safety status, the signal for the guard unlock enable signal should be outputted by the ladder program. Also, the ladder program should inform the status of guard open by the *VLDVx and *VLDPs signals. If the input of ORQ is canceled while the guard is open, the ladder program should enter a safely stopped status (state in which the guard is open although the guard open request signal is not input). Close the guard (*VLDVx and *VLDPs are set to 1), then cancel this signal.
10.2.3 Test Mode Signal (OPT)
X000n.n
I/O-Link I/O UNIT+24V Test start button
PMC
Ladder program
OPT
NOTE When all the conditions for the MCC off test become ready, this signal (OPT) should be set to “1”.

10.SAMPLE SYSTEM CONFIGURATION B-64303EN-4/01
- 180 -
10.2.4 Guard Open Inhibit Signal (*OPIHB), Monitoring Result Signal (RSVx,RSPs), Safety check Request Signal (*VLDVx,*VLDPs)
+24V
SW1 SW2
SW3
0V
0V
X000n.n
I/O Link#1,#2 I/O UNIT
Y000n.n
PMC
(Guard state *SGOPN)
RY1
RY2
RY1
RY2
RY3
RY3RY3
RY1 RY2
Guard-monitoring limit switch
Safety relay
[Sample control components]
SW1/SW2:
Guard state monitoring
switch with forced guided
contact
SW3:
Guard lock switch
RY1, RY2, RY3:
Safety relay
Guard closed
Ladder program
(Guard Lock)
*VLDVx*VLDPs
*OPIHB
RSVx RSPs
I/O Link#3 I/O UNIT
X00m.n Ladder program
*VLDVx*VLDPs
DCS PMC
(Guard state *SGOPN) RSVx
RSPs Y000n.n (Guard Lock)
0V
(Note)

B-64303EN-4/01 10.SAMPLE SYSTEM CONFIGURATION
- 181 -
OPERATING PRINCIPLE This section describes the operation of various guard monitoring limit switches with lock mechanism and safety relays. State transition of components
SW1 SW2 SW3 RY1 RY2 RY3 *SGOPN(*VLDVx, *VLDPs)
1 Guard closed Protection door locked
CLOSE CLOSE CLOSE ON ON OFF 1
2 Guard closed Protection door unlocked
CLOSE CLOSE OPEN OFF ON OFF 0
3 Guard opened Protection door unlocked
OPEN OPEN OPEN OFF OFF ON 0
4 Guard opened Protection door locked
OPEN OPEN CLOSE OFF OFF ON 0
1 Guard closed Protection door locked
CLOSE CLOSE CLOSE ON ON OFF 1
In a normal operation, the transition of 1, 2, 3, 4, 1, and so on is repeated. RY3 detects whether RY1 and RY2 contacts are made. If an unusual event is detected, *SGOPN input is turned off.
NOTE The VLDVx and VLDPs signals monitor the state of the protective door and their states affect the Dual Check Safety function. The illustrated sample system determines that the protection door is open (sets *VLDVx and *VLDPs to 0) when the guard is unlocked. When the guard open request signal (ORQ) is accepted, CNC will negate the guard open inhibit signal (*OPIHB). Machine tool builder can create the signal to release the guard-lock by his ladder program, when the following conditions are met. *OPIHB=1, RSVx and RSPs to be refered=1 and the safety conditions of the machine The safety monitor signals (RSVx and RSPs) are redundant output signals. Each set of RSVx and RSPs monitors the speed or other data items with a separate circuit. Therefore, a temporary mismatch may occur between both sets when, for example, one set of RSVx and RSPs has been shifted to the safe state, while the other set is not yet shifted to the safe state (for example, situations where the spindle is in a deceleration state). In such a case, if a circuit that releases a guard lock based on the state of one set of RSVx and RSPs is created, an alarm such as speed limit monitoring may occur depending on the state of the other set of RSVx and RSPs.

10.SAMPLE SYSTEM CONFIGURATION B-64303EN-4/01
- 182 -
• To prevent this, create a circuit that releases a guard lock when both sets of RSVx and RSPs have shifted to the safe state as shown by (NOTE) in the figure
• Or a circuit that releases a guard lock after a while from when RSVx and RSPs shift to the safe state.
When using a guard lock switch of two-contact type, the safety relay can be omitted as shown in the following figure.

B-64303EN-4/01 10.SAMPLE SYSTEM CONFIGURATION
- 183 -
+24V
SW1 SW2
SW3
0V
Guard monitoring limit switch
[Example of control parts] SW1/SW2 :
Guard state monitoring switch with the forced guided contact
SW3/SW4 : Guard lock switch
SW3
SW4
When the protective door is open
Example of connection when both the guard state monitoring switch and the guard lock switch are of two-contact type.
X000n.n
I/O Link#1,#2I/O UNIT
Y000n.n
PMC
Guard open state (*SGOPN)
Ladder program
Guard lock
*VLDVx*VLDPs
*OPIHBRSVx RSPs
I/O Link#3 I/O UNIT
X000m.n Ladder program
*VLDVx*VLDPs
DCS PMC
Guard open state (*SGOPN)
RSVx RSPs
Y000n.n Guard lock
0V
(Note)

10.SAMPLE SYSTEM CONFIGURATION B-64303EN-4/01
- 184 -
10.2.5 MCC Off Signal (*MCF,*MCFVx,*MCFPs,*DCALM), MCC Contact State Signal (*SMC)
X000n.n
I/O Link #1, #2 I/O UNIT
I/O UNIT#3 I/O UNIT
Y000n.n
PMC
*MCF *MCFVx, *MCFPs *DCALM
0V
Common power supply
+24V
200A
200B
U V W
0V
Electromagnetic contactor (MAIN MCC)
CX3 MCC
*SMC
DCS PMC
*MCF *MCFVx, *MCFPs*DCALM
*SMC X000n.n
Y000n.n
NOTE Only in case that all the signals (*MCF, *MCFVx, *MCFPs, *DCALM) of the PMC side are “1”, the signal which turns on the MCC should be asserted by the ladder program. Also in the DCS PMC side, similar logic should be made. Also connect the MCC control signal to common power supply, as illustrated in the figure. If an error occurs in the common power supply, the common power supply turns off the MCC. Any equipment should not be connected on the 3- phase AC line between the MAIN MCC and common power supply.
NOTE The MCC shall have forced guided contacts , and must fulfill the standard IEC60204 and IEC 60255. This is mandatory.

B-64303EN-4/01 10.SAMPLE SYSTEM CONFIGURATION
- 185 -
10.3 EXAMPLE OF APPLICATION
10.3.1 Rotating the Spindle Manually in the Emergency Stop State The Dual Check Safety function allows the spindle to rotate at a safe speed by using the safe speed limit monitoring function even when the protective door is open. In some cases, the operator rotates the spindle manually by entering the emergency stop state to interrupt excitation of the spindle with the protective door open. Generally, the safe speed limit with the protective door open is set to a much lower value. Therefore, if the spindle is rotated manually, the rotation speed may exceed the safe speed limit. To prevent a safe speed limit monitoring alarm from occurring even in the case above, it is necessary to create a ladder program that implements the following circuitry. (1) Method by the Safety Check Request signal (*VLDPs) When the MCC is placed in the off state (*SMC = 1) in the
emergency stop state, a safety monitoring alarm can be disabled by setting *VLDPs to "1" even if the protective door is open.
(2) Method by the safe speed limit/safe machine position selection
signals (SPAs and SPBs) Switching between SPAs and SPBs is made depending on
whether the MCC is placed in the off state (*SMC = 1) in the emergency stop state.
As the safe speed setting (parameter) selected when the MCC is placed in the off state in the emergency stop state (*SMC = 1), select a value that does not cause a safety monitoring alarm to occur even when the operator rotates the spindle manually.

11.APPLICATION OF OTHER FUNCTIONS B-64303EN-4/01
- 186 -
11 APPLICATION OF OTHER FUNCTIONS

B-64303EN-4/01 11.APPLICATION OF OTHER FUNCTIONS
- 187 -
11.1 OVERVIEW The Dual Check Safety function becomes easier to use when combined with various other functions. This section describes the functions. Part of the section assumes the use of the Dual Check Safety function. Therefore, if the function is not used, the specifications described in the chapter may differ. Since only a summary is provided for each function, refer to the Connection Manual (Function) (B-64303EN-1) or other documents for detailed specifications. Section 11.2 describes combination with external deceleration, Section 11.3 describes combination with spindle output control by the PMC, Section 11.4 describes combination with spindle positioning, Section 11.5 describes combination with Cs contour control, and Section 11.6 describes combination with spindle orientation.

11.APPLICATION OF OTHER FUNCTIONS B-64303EN-4/01
- 188 -
11.2 EXTERNAL DECELERATION
11.2.1 Overview The Dual Check Safety function uses the CNC CPU and monitor DSP to separately monitor the speed of the feed axis (safe speed monitoring function). When the safe speed is exceeded by some axes with the protective door closed after a guard open request is input (RSVx = 0), the protective door needs to be locked by the ladder program to prevent it from opening. When the safe speed is exceeded in some axes with the protective door open (*VLDVx = 0), alarm SV0476 or SV0494 occurs to stop the servo motor. The external deceleration function decelerates the speed of the feed axis to the external deceleration speed specified in the parameter by inputting the external deceleration signal. A maximum of three external deceleration speeds can be set. The Dual Check Safety function and external deceleration function can be used to construct a machine that operates as shown below. • Automatically reduces the speed of the feed axis to the safe speed
or lower after a guard open request is input to allow the guard to open.
• Prevents an alarm by the safe speed limit monitoring function from occurring by limiting the speed of the feed axis to the safe speed limit or less with the protective door open.
To use the external deceleration function, set bit 2 (EDC) of parameter No. 8131 to 1. For speed control of the spindle, see Section 11.3, "SPINDLE OUTPUT CONTROL BY THE PMC."
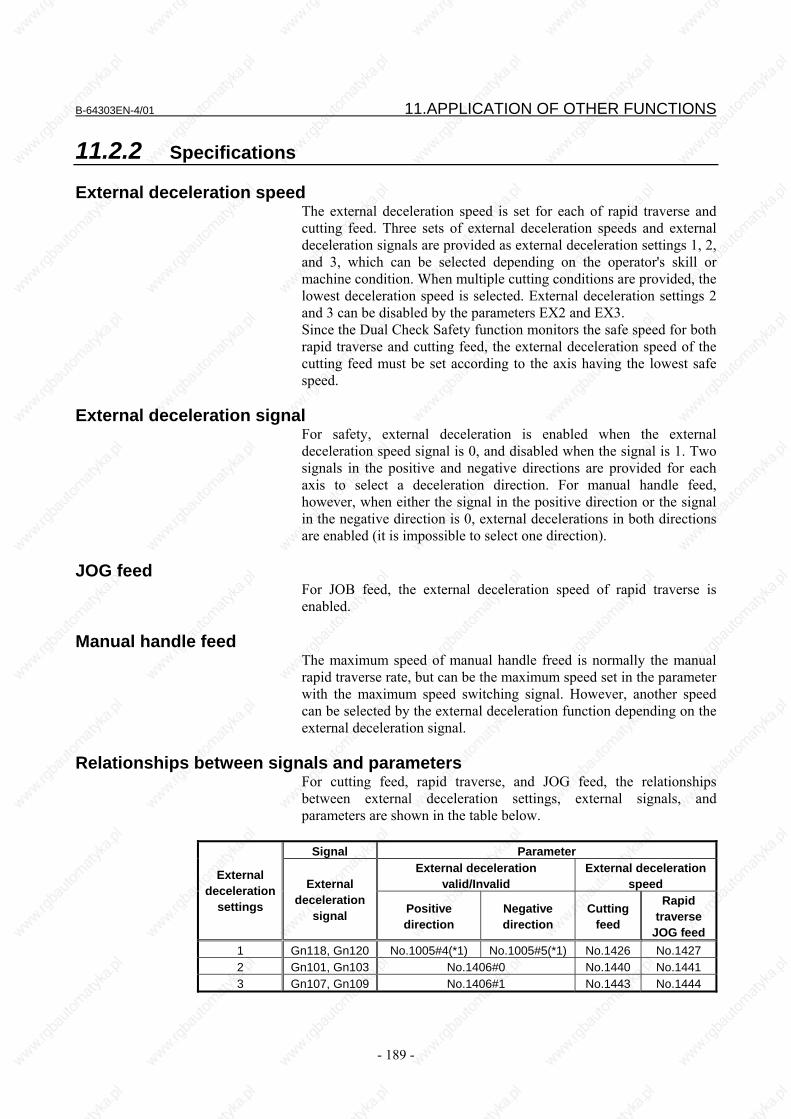
B-64303EN-4/01 11.APPLICATION OF OTHER FUNCTIONS
- 189 -
11.2.2 Specifications
External deceleration speed The external deceleration speed is set for each of rapid traverse and cutting feed. Three sets of external deceleration speeds and external deceleration signals are provided as external deceleration settings 1, 2, and 3, which can be selected depending on the operator's skill or machine condition. When multiple cutting conditions are provided, the lowest deceleration speed is selected. External deceleration settings 2 and 3 can be disabled by the parameters EX2 and EX3. Since the Dual Check Safety function monitors the safe speed for both rapid traverse and cutting feed, the external deceleration speed of the cutting feed must be set according to the axis having the lowest safe speed.
External deceleration signal For safety, external deceleration is enabled when the external deceleration speed signal is 0, and disabled when the signal is 1. Two signals in the positive and negative directions are provided for each axis to select a deceleration direction. For manual handle feed, however, when either the signal in the positive direction or the signal in the negative direction is 0, external decelerations in both directions are enabled (it is impossible to select one direction).
JOG feed For JOB feed, the external deceleration speed of rapid traverse is enabled.
Manual handle feed The maximum speed of manual handle freed is normally the manual rapid traverse rate, but can be the maximum speed set in the parameter with the maximum speed switching signal. However, another speed can be selected by the external deceleration function depending on the external deceleration signal.
Relationships between signals and parameters For cutting feed, rapid traverse, and JOG feed, the relationships between external deceleration settings, external signals, and parameters are shown in the table below.
Signal Parameter External deceleration
valid/Invalid External deceleration
speed External
deceleration settings
External deceleration
signal Positive direction
Negative direction
Cutting feed
Rapid traverse
JOG feed1 Gn118, Gn120 No.1005#4(*1) No.1005#5(*1) No.1426 No.1427 2 Gn101, Gn103 No.1406#0 No.1440 No.1441 3 Gn107, Gn109 No.1406#1 No.1443 No.1444

11.APPLICATION OF OTHER FUNCTIONS B-64303EN-4/01
- 190 -
(*1) To enable the external deceleration function in cutting feed, both of bits 4 and 5 of parameter No. 1005 need to be set to 1. (In rapid traverse and JOG feed, external deceleration is enabled regardless of this setting.)
In manual handle feed, the relationships between external deceleration settings, external signals, and parameters are shown in the table below.
Signal Parameter External deceleration
settings External
deceleration signal
Manual handle feed maximum speed switching signal
External deceleration valid/Invalid
External deceleration
speed 1 - (*2) Gn023.3 - No.1434(*4)
2 Gn101, Gn103 Gn023.3(*3) No.1406#0 No.1442(*4)
3 Gn107, Gn109 Gn023.3(*3) No.1406#1 No.1445(*4)
(*2) The external deceleration signal (Gn118, Gn120) of external
deceleration setting 1 has no effect on the maximum speed of manual handle feed.
(*3) In manual handle feed, Gn023.3 and both of Gn101 and Gn103 need to be operated to enable external deceleration setting 2, and Gn023.3 and both of Gn107 and Gn109 need to be operated to enable external deceleration setting 3.
(*4) The maximum speed for manual handle feed is usually the manual handle feedrate. When the manual handle feed maximum feedrate change signal HNDLF (Gn023.3) is set to 1, the speed set in these parameters is applied.

B-64303EN-4/01 11.APPLICATION OF OTHER FUNCTIONS
- 191 -
11.2.3 Signals
11.2.3.1 Details on signals
Manual handle feed maximum feedrate change signal HNDLF <Gn023.3>
[Classification] Input signal [Function] This signal switches to or from the maximum manual handle feedrate. [Operation] When this signal is 1, the speed set in parameter No. 1434 is assumed
as the manual handle feed maximum speed. When external deceleration setting 2 or 3 is used, the speed set in parameter No. 1442 or 1445 can also be enabled.
External deceleration signals *+ED1 to *+ED5 <Gn118.0 to 4> *-ED1 to *-ED5 <Gn120.0 to 4> *+ED21 to *+ED25 <Gn101.0 to 4> *-ED21 to *-ED25 <Gn103.0 to 4> *+ED31 to *+ED35 <Gn107.0 to 4> *-ED31 to *-ED35 <Gn109.0 to 4>
[Classification] Input signal [Function] This signal selects which external deceleration to apply for each
direction of the control axes with the external deceleration function. In a signal name, "+" and "-" indicate a direction, the second number from the end indicates the target setting, and the last number indicates the control axis number. *±EDnx ± +: Feed in the positive direction -: Feed in the negative direction n : External deceleration setting 1 2: External deceleration setting 2 3: External deceleration setting 3 x 1: External deceleration for 1st axis 2: External deceleration for 2nd axis 3: External deceleration for 3rd axis 4: External deceleration for 4th axis 5: External deceleration for 5th axis
[Operation] When this signal is 0, the feedrate of the corresponding axis in the corresponding direction is decreased to the corresponding speed. In manual handle feed, however, when the external deceleration signal in either the positive direction or the negative direction is 0, external decelerations in both directions are enabled (it is impossible to select one direction). The external deceleration signal (Gn118, Gn120) of external deceleration setting 1 has no effect on the maximum speed of manual handle feed.

11.APPLICATION OF OTHER FUNCTIONS B-64303EN-4/01
- 192 -
11.2.3.2 Signal address
#7 #6 #5 #4 #3 #2 #1 #0
Gn023 HNDLF
#7 #6 #5 #4 #3 #2 #1 #0
Gn101 *+ED25 *+ED24 *+ED23 *+ED22 *+ED21
Gn103 *-ED25 *-ED24 *-ED23 *-ED22 *-ED21
#7 #6 #5 #4 #3 #2 #1 #0
Gn107 *+ED35 *+ED34 *+ED33 *+ED32 *+ED31
Gn109 *-ED35 *-ED34 *-ED33 *-ED32 *-ED31
#7 #6 #5 #4 #3 #2 #1 #0
Gn118 *+ED5 *+ED4 *+ED3 *+ED2 *+ED1
Gn120 *-ED5 *-ED4 *-ED3 *-ED2 *-ED1
11.2.4 Parameters
#7 #6 #5 #4 #3 #2 #1 #0 1005 EDMx EDPx
[Input type] Parameter input [Data type] Bit axis
# 4 EDPx In cutting feed, an external deceleration signal in the + direction for
each axis is: 0: Invalid 1: Valid
# 5 EDMx In cutting feed, an external deceleration signal in the - direction for each axis is: 0: Invalid 1: Valid
CAUTION In rapid traverse, JOG feed, and manual handle
feed, external deceleration is enabled regardless of the settings of bits 4 (EDPx) and 5 (EDMx) of parameter No. 1005.

B-64303EN-4/01 11.APPLICATION OF OTHER FUNCTIONS
- 193 -
#7 #6 #5 #4 #3 #2 #1 #0 1406 EX3 EX2
[Input type] Parameter input [Data type] Bit path
# 0 EX2 External deceleration function setting 2 is:
0: Invalid 1: Valid
# 1 EX3 External deceleration function setting 3 is: 0: Invalid 1: Valid
1426 External deceleration rate setting 1 in cutting feed 1440 External deceleration rate setting 2 in cutting feed 1443 External deceleration rate setting 3 in cutting feed
[Input type] Parameter input [Data type] Real path [Unit of data] mm/min, inch/min, degree/min (machine unit)
[Minimum unit of data] Depend on the increment system of the reference axis [Valid data range] Refer to the standard parameter setting table (C)
(When the increment system is IS-B, 0.0 to +999000.0) Set an external deceleration rate for cutting feed or positioning of linear interpolation type (G00).
1427 External deceleration rate setting 1 for each axis in rapid traverse 1441 External deceleration rate setting 2 for each axis in rapid traverse 1444 External deceleration rate setting 3 for each axis in rapid traverse
[Input type] Parameter input [Data type] Real axis [Unit of data] mm/min, inch/min, degree/min (machine unit)
[Minimum unit of data] Depend on the increment system of the applied axis [Valid data range] Refer to the standard parameter setting table (C)
(When the increment system is IS-B, 0.0 to +999000.0) Set the external deceleration rate of rapid traverse for each axis.

11.APPLICATION OF OTHER FUNCTIONS B-64303EN-4/01
- 194 -
1434 Maximum manual handle feedrate setting 1 for each axis 1442 Maximum manual handle feedrate setting 2 for each axis 1445 Maximum manual handle feedrate setting 3 for each axis
[Input type] Parameter input [Data type] Real axis [Unit of data] mm/min, inch/min, degree/min (machine unit)
[Minimum unit of data] Depend on the increment system of the applied axis [Valid data range] Refer to the standard parameter setting table (C)
(When the increment system is IS-B, 0.0 to +999000.0) Set a maximum manual handle feedrate for each axis.

B-64303EN-4/01 11.APPLICATION OF OTHER FUNCTIONS
- 195 -
11.3 SPINDLE OUTPUT CONTROL BY THE PMC
11.3.1 Overview The Dual Check Safety function uses the CNC CPU and spindle DSP to separately monitor the spindle speed (safe speed monitoring function). When the safe speed is exceeded by some axes with the guard closed after a guard open request is input (RSPs = 0), the protective door needs to be locked by the ladder program to prevent it from opening. When the safe speed is exceeded by some axes with the guard open (*VLDPs = 0), alarm SP0757 or SP9069 occurs to stop the spindle (in the free running or controlled stop state). Spindle output control by PMC is a function of controlling the speed and polarity of spindle motor rotation of each spindle by using the PMC. The Dual Check Safety function and spindle output control by PMC can be used to construct a machine that operates as shown below. • Automatically reduces the speed of the spindle motor to the safe
speed or lower after a guard open request is input to allow the guard to open.
• Prevents an alarm by the safe speed limit monitoring function from occurring by limiting the speed of the spindle motor to the safe speed limit or less with the guard open.
For speed control of the feed axis, see Section 11.2, "EXTERNAL DECELERATION."

11.APPLICATION OF OTHER FUNCTIONS B-64303EN-4/01
- 196 -
11.3.2 Specifications
Switching control Spindle output control function by the PMC can be used to specify the following: • Spindle motor speed (number of rotations) • Output polarity for each spindle motor (direction of rotation) Usually, the CNC is used to control the speed and polarity of the first spindle motor. If a multi-spindle control function (T series) is added (bit 3 (MSP) of parameter No. 8133 = 1), the CNC can also control the second spindle motor. Spindle output control by the PMC can be used to specify that either the CNC or the PMC is used to set each of the spindle motor speed and output polarity. If TYPE-A is specified (bit 2 (MSI) of parameter No. 3709 is 0) when multi-spindle control is used, signals for the second spindle cannot be used.
Specifying the spindle motor speed The PMC can be used to specify the spindle motor speed upon executing the following: • Switching the controller from the CNC to the PMC, by issuing
SINDx signal • Setting the spindle motor speed data, calculated by the PMC, in
spindle control signals R01Ix to R12Ix When controlled by the PMC, the spindle motor speed is not affected by any signal (for example, the spindle speed override signal) or parameter settings (for example, the maximum speed clamp parameter) related to the spindle speed command of the CNC spindle control function. However, the individual spindle stop signals (*SSTPx <Gn027.3 and 4>) during use of multi-spindle control are enabled (bit 3 (MSP) of parameter No. 8133 = 1). The spindle motor speed data is obtained from the following expression. Its value can range from 0 to 4095: Spindle motor speed data = (Spindle motor speed/Maximum spindle motor speed)×4095 Normally, the speed of the spindle is actually controlled. If a gear train is used to connect the spindle to the spindle motor, first obtain the maximum spindle speed at the maximum spindle motor speed. Spindle motor speed data = (Spindle speed/Maximum spindle speed)×4095 By using this expression, the spindle motor speed data can easily be obtained.
Specifying the output polarity for the spindle motor The PMC can specify the spindle motor output polarity when the following are executed: • Switching the controller from the CNC to the PMC, by issuing an
SSINx signal • Specifying the output polarity to the SGNx signal

B-64303EN-4/01 11.APPLICATION OF OTHER FUNCTIONS
- 197 -
11.3.3 Signals
11.3.3.1 Details on signals
Spindle motor speed command selection signal SIND <Gn033.7> (for 1st spindle) SIND2 <Gn035.7> (for 2nd spindle)
[Classification] Input signal [Function] This signal specifies that either the CNC or PMC is used to control the
spindle motor speed command. [Operation] When this signal is 0, the spindle motor speed command is controlled
by the CNC. When this signal is 1, the spindle motor speed command is controlled by the PMC.
Spindle motor speed command signals R01I to R12I <Gn032.0 to Gn033.3> (for 1st spindle) R01I2 to R12I2 <Gn034.0 to Gn035.3> (for 2nd spindle)
[Classification] Input signal [Function] When the spindle motor speed command is controlled by the PMC, set
the value obtained from the following expression for this signal in binary. Spindle motor speed data = (Spindle motor speed/Maximum spindle motor speed)×4095
Spindle motor command polarity selection signals SSIN <Gn033.6> (for 1st spindle) SSIN2 <Gn035.6> (for 2nd spindle)
[Classification] Input signal [Function] This signal specifies that either the CNC or PMC is used to control the
output polarity of the spindle motor speed command. [Operation] When this signal is 0, the output polarity of the spindle motor speed
command is controlled by the CNC. When this signal is 1, the output polarity of the spindle motor speed command is controlled by the PMC.
Spindle motor command polarity command signals SGN <Gn033.5> (for 1st spindle) SGN2 <Gn035.5> (for 2nd spindle)
[Classification] Input signal [Function] When the output polarity of the speed command for the spindle motor
is controlled by the PMC, set this signal. [Operation] When this signal is 0, the output polarity of spindle is the positive
direction. When this signal is 1, the output polarity of spindle is the negative direction.

11.APPLICATION OF OTHER FUNCTIONS B-64303EN-4/01
- 198 -
11.3.3.2 Signal address
#7 #6 #5 #4 #3 #2 #1 #0
Gn032 R08I R07I R06I R05I R04I R03I R02I R01I
Gn033 SIND SSIN SGN R12I R11I R10I R09I
#7 #6 #5 #4 #3 #2 #1 #0
Gn034 R08I2 R07I2 R06I2 R05I2 R04I2 R03I2 R02I2 R01I2
Gn035 SIND2 SSIN2 SGN2 R12I2 R11I2 R10I2 R09I2
11.3.4 Parameters
#7 #6 #5 #4 #3 #2 #1 #0 3709 MSI
[Input type] Parameter input [Data type] Bit path
# 2 MSI In multi-spindle control, the SIND signal is valid
0: Only when the first spindle is valid (SIND signal for the 2nd, 3rd spindle becomes ineffective) (TYPE-A)
1: For each spindle irrespective of whether the spindle is selected (Each spindle has its own SIND signal). (TYPE-B)

B-64303EN-4/01 11.APPLICATION OF OTHER FUNCTIONS
- 199 -
11.4 SPINDLE POSITIONING (T SERIES)
T
11.4.1 Overview The Dual Check Safety function uses the CNC CPU and spindle DSP to separately monitor the spindle speed (safe speed monitoring function). When monitoring the stop state of the spindle with the safe speed monitoring function, set the safe speed parameter to a non-zero value by considering a margin according to the machine. This is because the actual speed cannot be assumed to be 0. In this case, the spindle may rotate at a speed less than the set safe speed, so it is necessary to position the spindle by forming a position control loop at the same time. The spindle positioning function positions the spindle with the spindle motor and position coder or the like. To use the spindle positioning function, set bit 1 (AXC) of parameter No. 8133 to 1. The Cs contour control function and the spindle positioning function cannot be used at the same time.

11.APPLICATION OF OTHER FUNCTIONS B-64303EN-4/01
- 200 -
11.4.2 Specifications
Spindle positioning Spindle positioning is performed as follows. • Cancel the spindle rotation mode, which is used for turning with
the spindle rotating, and enter the spindle positioning mode. • Position the spindle in the spindle positioning mode. • Cancel the spindle positioning mode and enter the spindle
rotation mode.
Selecting a spindle positioning axis Any axis address can be set (with parameter No. 1020) as the axis name of an axis to be subject to spindle positioning. To set the servo axis number of the spindle positioning axis (with parameter No. 1023), use a negative value (-(the number of a spindle to be subject to spindle positioning)).
Switching to spindle positioning mode Orientation is required when spindle positioning is performed for the first time after the spindle motor is used as a normal spindle or when spindle positioning is resumed after the spindle positioning is suspended. Orientation is the function for stopping the spindle at a fixed position. The grid shift function can be used to shift the orientation position from 0 to 360 degrees (parameter No. 4073). Orientation can be specified by the M code set in parameter No. 4960. The direction of orientation is set in RETSV (bit 4 of parameter No. 4000). The position where orientation is completed is assumed as the program zero point. However, the coordinate system setting (G92 (for G-code system B, C) or G50 (for G-code system A)) or automatic coordinate system setting (bit 0 (ZPR) of parameter No.1201) can be used to change the program zero point.
Positioning command There are two types of spindle positioning: semi-fixed angle positioning and optional angle positioning.

B-64303EN-4/01 11.APPLICATION OF OTHER FUNCTIONS
- 201 -
Semi-fixed angle positioning Semi-fixed angle positioning is specified with an M code (parameter
No.4960). Six values (Mx to M(x + 5)) can be specified and x needs to be set in parameter No. 4962 in advance. By specifying the number (n) of used M codes in parameter No. 4964, any of the values from Mx to M(x+(n-1)) not exceeding M(x+(255-1)) (255 ways) can be specified. The positioning angles corresponding to the values are shown in the table below. The value of base rotation angle y is set in parameter No. 4963. The rotation direction is set in bit 1 (IDM) of parameter No. 4950. Incremental specification is always assumed.
M code Indexing angle (Example) y=30deg
Mx y 30 deg M(x+1) 2y 60 deg M(x+2) 3y 90 deg M(x+3) 4y 120 deg M(x+4) 5y 150 deg M(x+5) 6y 180 deg
: : : M(x+n-1) ny 30×n deg
Optional angle positioning
Optional angle positioning is specified by an axis angle followed by a signed value. Use the G00 mode to specify this positioning. Example) C-1000
The minimum setting unit is 0.001 degrees and the allowable specification range is between -999999.999 degrees and 999999.999 degrees. A command with a decimal point is also allowed. The position of the decimal point denotes the degree position. Example) C35.0 = C35 deg
Feedrate and acceleration/deceleration type The feedrate used in positioning is the rapid traverse rate set in parameter No. 1420. An override of 100%, 50%, 25%, or F0 (parameter No. 1421) can be applied to the rapid traverse rate. Liner acceleration/deceleration is used as the acceleration/deceleration type.
Spindle positioning reset Switching from the spindle positioning mode to the spindle rotation mode is specified by the M code set in parameter No. 4961.

11.APPLICATION OF OTHER FUNCTIONS B-64303EN-4/01
- 202 -
11.4.3 Signals
11.4.3.1 Details on signals
Spindle stop complete signal SPSTPA <Gn028.6> (for 1st spindle) SPSTPB <Gn402.1> (for 2nd spindle)
[Classification] Input signal [Function] The CNC checks that this signal turns 1 and then performs orientation
before spindle positioning, spindle positioning, or spindle positioning cancellation.
Spindle unclamp signal SUCLPA <Fn038.1> (for 1st spindle) SUCLPB <Fn400.1> (for 2nd spindle)
[Classification] Output signal [Function] This signal specifies that spindle mechanical clamping be released in a
spindle positioning sequence. When the signal turns 1, release spindle clamping on the machine side (release the brake or draw the pin).
[Output condition] For details, refer to the sequence (time chart) in the Connection Manual (Function) (B-64303EN-1).
Spindle unclamp completion signal *SUCPFA <Gn028.4> (for 1st spindle) *SUCPFB <Gn400.1> (for 2nd spindle)
[Classification] Input signal [Function] This signal indicates that unclamping the spindle is complete in
response to the spindle unclamp signal SUCLPs.
Spindle clamp signal SCLPA <Fn038.0> (for 1st spindle) SCLPB <Fn401.1> (for 2nd spindle)
[Classification] Output signal [Function] This signal specifies that the spindle be clamped mechanically in a
spindle positioning sequence. When the signal turns 1, perform spindle clamping on the machine side (insert the brake or pin).
[Output condition] For details, refer to the sequence (time chart) in the Connection Manual (Function) (B-64303EN-1).
Spindle clamp completion signal *SCPFA <Gn028.5> (for 1st spindle) *SCPFB <Gn401.1> (for 2nd spindle)
[Classification] Input signal [Function] This signal indicates that clamping the spindle is complete in response
to the spindle clamp signal SCLPs.

B-64303EN-4/01 11.APPLICATION OF OTHER FUNCTIONS
- 203 -
Spindle orientation completion signal ZP1 to ZP5 <Fn094.0 to 4>
[Classification] Output signal [Function] This signal indicates that spindle orientation of the spindle positioning
axis is completed. [Output condition] When the orientation of spindle positioning is completed, this signal is
1. When spindle positioning is performed or released, this signal is 0.
11.4.3.2 Signal address
#7 #6 #5 #4 #3 #2 #1 #0
Gn028 SPSTPA *SCPFA *SUCPFA
Gn400 *SUCPFB
Gn401 *SCPFB
Gn402 SPSTPB
#7 #6 #5 #4 #3 #2 #1 #0
Fn038 SUCLPA SCLPA
Fn094 ZP5 ZP4 ZP3 ZP2 ZP1
Fn400 SUCLPB
Fn401 SCLPB
11.4.4 Parameters
#7 #6 #5 #4 #3 #2 #1 #0 1013 ISCx ISAx
[Input type] Parameter input [Data type] Bit axis
For an axis to be subject to spindle positioning, set ISAx to ISCx to 0.
1020 Program axis name for each axis
[Input type] Parameter input [Data type] Byte axis
Set the axis name of an axis to be subject to spindle positioning.
1023 Number of the servo axis for each axis
[Input type] Parameter input [Data type] Byte axis
This parameter sets the relationships between the individual axes and the servo axis numbers. For an axis to be subject to spindle positioning, set the number of the spindle to be subject to spindle positioning preceded by a minus sign.

11.APPLICATION OF OTHER FUNCTIONS B-64303EN-4/01
- 204 -
1260 The shift amount per one rotation of a rotation axis
[Input type] Parameter input [Data type] Real axis
For the rotation axis, set the amount of movement for one turn. For the spindle positioning axis, set 360.0.
1820 Command multiplier for each axis (CMR)
[Input type] Parameter input [Data type] Byte axis
Set a value of 2 targeted for spindle positioning.
1821 Reference counter size for each axis
[Input type] Parameter input [Data type] 2-word axis
Set a value of 10000 targeted for spindle positioning.
3720 Number of position coder pulses
[Input type] Parameter input [Data type] 2-word spindle
Set the number of position coder pulses. For spindle positioning, set 4096.
3721 Number of gear teeth on the position coder side
[Input type] Parameter input [Data type] Word spindle
Set the number of gear teeth on the position coder side in speed control (such as feed per revolution and threading). For spindle positioning, set 2n (where n is an integer greater than or equal to 0).
3722 Number of gear teeth on the spindle side
[Input type] Parameter input [Data type] Word spindle
Set the number of gear teeth on the spindle side in speed control (such as feed per revolution and threading). For spindle positioning, set 1.

B-64303EN-4/01 11.APPLICATION OF OTHER FUNCTIONS
- 205 -
#7 #6 #5 #4 #3 #2 #1 #0 4000 RETSV
[Input type] Parameter input [Data type] Bit spindle
# 4 RETSV The reference position return direction of the spindle in spindle
positioning is: 0: CCW (counterclockwise) 1: CW (clockwise)
4044 Proportional gain of the velocity loop in servo mode (HIGH gear) 4045 Proportional gain of the velocity loop in servo mode (LOW gear)
[Input type] Parameter input [Data type] Word spindle
Set a proportional gain for the velocity loop on spindle positioning.
4052 Integral gain of the velocity loop in the servo mode (HIGH gear) 4053 Integral gain of the velocity loop in the servo mode (LOW gear)
[Input type] Parameter input [Data type] Word spindle [Unit of data] [Valid data range] 0 to 32767
Set an integral gain of the velocity loop on spindle positioning.
4056 Gear ratio (HIGH gear) 4057 Gear ratio (MEDIUM HIGH gear) 4058 Gear ratio (MEDIUM LOW gear) 4059 Gear ratio (LOW gear)
[Input type] Parameter input [Data type] Word spindle [Unit of data] Motor speed per spindle rotation × 100 [Valid data range] 0 to 32767
These parameters set the gear ration between the spindle and spindle motor.
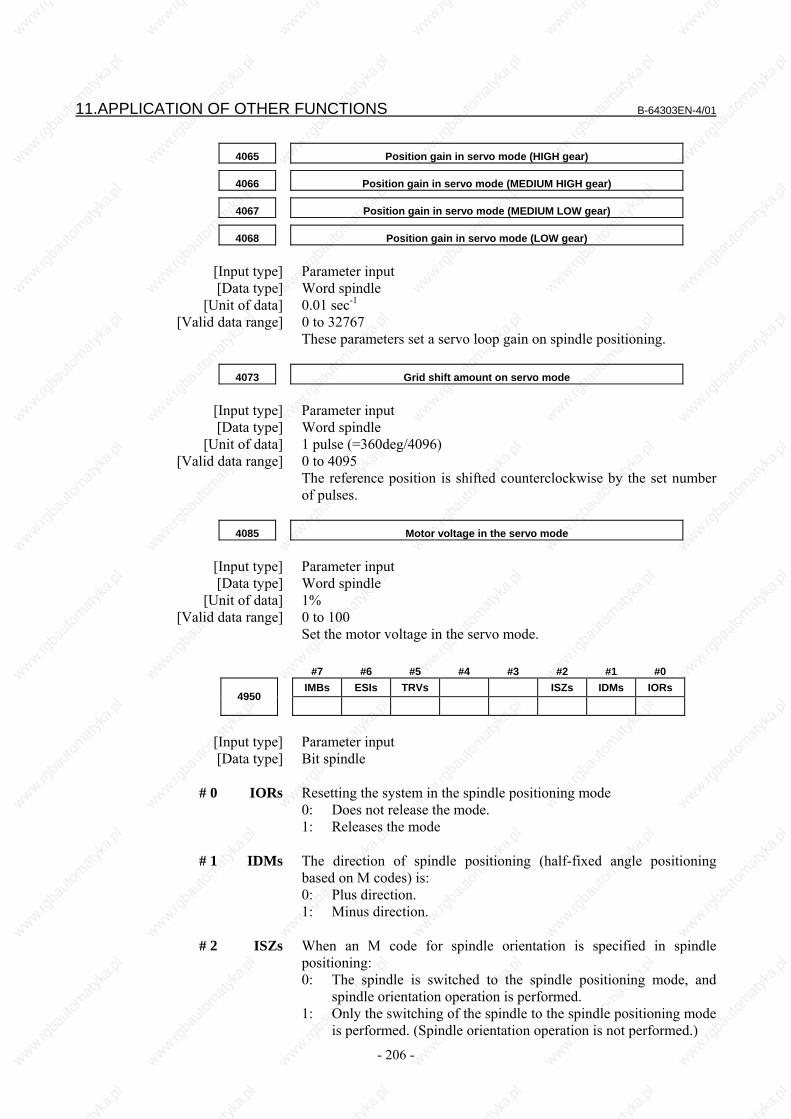
11.APPLICATION OF OTHER FUNCTIONS B-64303EN-4/01
- 206 -
4065 Position gain in servo mode (HIGH gear) 4066 Position gain in servo mode (MEDIUM HIGH gear) 4067 Position gain in servo mode (MEDIUM LOW gear) 4068 Position gain in servo mode (LOW gear)
[Input type] Parameter input [Data type] Word spindle [Unit of data] 0.01 sec-1 [Valid data range] 0 to 32767
These parameters set a servo loop gain on spindle positioning.
4073 Grid shift amount on servo mode
[Input type] Parameter input [Data type] Word spindle [Unit of data] 1 pulse (=360deg/4096) [Valid data range] 0 to 4095
The reference position is shifted counterclockwise by the set number of pulses.
4085 Motor voltage in the servo mode
[Input type] Parameter input [Data type] Word spindle [Unit of data] 1% [Valid data range] 0 to 100
Set the motor voltage in the servo mode.
#7 #6 #5 #4 #3 #2 #1 #0 IMBs ESIs TRVs ISZs IDMs IORs
4950
[Input type] Parameter input [Data type] Bit spindle
# 0 IORs Resetting the system in the spindle positioning mode
0: Does not release the mode. 1: Releases the mode
# 1 IDMs The direction of spindle positioning (half-fixed angle positioning based on M codes) is: 0: Plus direction. 1: Minus direction.
# 2 ISZs When an M code for spindle orientation is specified in spindle positioning: 0: The spindle is switched to the spindle positioning mode, and
spindle orientation operation is performed. 1: Only the switching of the spindle to the spindle positioning mode
is performed. (Spindle orientation operation is not performed.)

B-64303EN-4/01 11.APPLICATION OF OTHER FUNCTIONS
- 207 -
# 5 TRVs The rotation direction for spindle positioning is:
0: Same as the specified sign. 1: Opposite to the specified sign.
NOTE When a serial spindle is used, this parameter is
invalid for the specification of a rotation direction for the orientation command.
# 6 ESIs The unit of rapid traverse rate on the spindle positioning axis is:
0: Not increased by a factor of 10. 1: Increased by a factor of 10.
# 7 IMBs When the spindle positioning function is used, half-fixed angle positioning based on M codes uses: 0: Specification A 1: Specification B In the case of half-fixed angle positioning based on M codes, three types of spindle positioning operations can occur: (1) The spindle rotation mode is cleared, then the mode is switched
to the spindle positioning mode. (After switching to the spindle positioning mode, spindle orientation operation is also performed.)
(2) Spindle positioning is performed in the spindle positioning mode. (3) The spindle positioning mode is cleared, then the mode is
switched to the spindle rotation mode. • In the case of specification A: Operations (1) to (3) are specified using separate M codes.
(1) Specified using an M code for switching to the spindle positioning mode. (See parameter No.4960)
(2) Specified using M codes for specifying a spindle positioning angle. (See parameter No.4962)
(3) Specified using M codes for clearing spindle positioning operation. (See parameter No.4961.)
• In the case of specification B: When M codes for specifying a spindle positioning angle are
specified, operations (1) to (3) are performed successively. (See parameter No.4962.) (However, spindle orientation operation of (1) is not performed.)

11.APPLICATION OF OTHER FUNCTIONS B-64303EN-4/01
- 208 -
M code specifying the spindle orientation 4960
[Input type] Parameter input [Data type] 2-word spindle [Valid data range] 6 to 97
Set an M code for switching to the spindle positioning mode.
NOTE 1 Do not set an M code that duplicates other M
codes used for spindle positioning. 2 Do not set an M code used with other functions
(such as M00-05, 30, 98, and 99, and M codes for calling subprograms).
M code releasing the spindle positioning mode
4961
[Input type] Parameter input [Data type] 2-word spindle [Valid data range] 6 to 97
Set an M code for canceling the spindle positioning mode on the spindle positioning axis.
NOTE 1 Do not set an M code that duplicates other M
codes used for spindle positioning. 2 Do not set an M code used with other functions
(such as M00-05, 30, 98, and 99, and M codes for calling subprograms).

B-64303EN-4/01 11.APPLICATION OF OTHER FUNCTIONS
- 209 -
M code for specifying a spindle positioning angle 4962
[Input type] Parameter input [Data type] 2-word spindle [Valid data range] 6 to 9999999
Two methods are available for specifying spindle positioning. One method uses axis address for arbitrary-angle positioning. The other use an M code for half-fixed angle positioning. This parameter sets an M code for the latter method. In this parameter, set an M code to be used for half-fixed angle positioning based on M codes. Six M code from Mα to M(α+5) are used for half-fixed angle positioning, when α is the value of this parameter. • When the number of M codes is set in parameter No. 4964, let α
be the value set in parameter No. 4962, and let β be the value set in parameter No. 4964. Then, β M codes from Mα to M(α+β-1) are used as M codes for half-fixed angle positioning based on M codes.
The table below indicates the relationship between the M codes and positioning angles.
M code Positioning angle Example:
Positioning angle when θ = 30°
Mα θ 30° M(α+1) 2θ 60° M(α+2) 3θ 90° M(α+3) 4θ 120° M(α+4) 5θ 150° M(α+5) 6θ 180°
: : : M(α+β-1) β×θ β×30°
β represents the number of M codes set in parameter No. 4964. (When parameter No. 4964 is set to 0, β = 6.) θ represents the basic angular displacement set in parameter No.4963.
NOTE 1 Do not set an M code that duplicates other M
codes used for spindle positioning. 2 Do not set an M code used with other functions
(such as M00-05, 30, 98, and 99, and M codes for calling subprograms).

11.APPLICATION OF OTHER FUNCTIONS B-64303EN-4/01
- 210 -
Basic angle for half-fixed angle positioning 4963
[Input type] Parameter input [Data type] Real spindle [Unit of data] Degree
[Minimum unit of data] Depend on the increment system of the applied axis [Valid data range] 0 to 60
This parameter sets a basic angular displacement used for half-fixed angle positioning using M codes.
Number of M codes for specifying a spindle positioning angle 4964
[Input type] Parameter input [Data type] 2-word spindle [Valid data range] 0 to 255
This parameter sets the number of M codes used for Half-fixed angle positioning using M codes. As many M codes as the number specified in this parameter, starting with the M code specified in parameter No.4962, are used to specify half-fixed angle positioning. Let α be the value of parameter No.4962, and let β be the value of parameter No.4964. That is, M codes from Mα to M(α+β-1) are used for half-fixed angle positioning. Setting this parameter to 0 has the same effect as setting 6. That is, M code from Mα to M(α+5) are used for half-fixed angle positioning.
NOTE 1 Make sure that M codes from Mα to M (α+β-1) do
not duplicate other M codes. 2 Do not set an M code that duplicates other M
codes used for spindle positioning. 3 Do not set an M code used with other functions
(such as M00-05, 30, 98, and 99, and M codes for calling subprograms).

B-64303EN-4/01 11.APPLICATION OF OTHER FUNCTIONS
- 211 -
11.5 Cs CONTOUR CONTROL
11.5.1 Overview The Dual Check Safety function uses the CNC CPU and spindle DSP to separately monitor the spindle motor speed (safe speed monitoring function). When the stop status of the spindle is monitored by the safe speed monitoring function, set the safe speed parameter to a value including a margin appropriate for the machine instead of 0 because the actual speed cannot be assumed to be 0. Since the spindle may rotate at a speed less than the set safe speed in this case, it is necessary to position the spindle with a position control loop formed at the same time. The Cs contour control function makes spindle positioning control (spindle contour control). When Cs contour control is performed, the configuration of the spindle detector is restricted. For details, refer to the FANUC AC SPINDLE MOTOR αi series Parameter Manual (B-65280EN) or other documents. To use Cs contour control, set bit 2 (SCS) of parameter No. 8133 to 1. The Cs contour control function and the spindle positioning function cannot be used at the same time.
11.APPLICATION OF OTHER FUNCTIONS B-64303EN-4/01
- 212 -
11.5.2 Specifications
Cs contour control mode The Cs contour control change signal is used to switch between spindle rotation control (method of controlling the rotation of the spindle with the velocity command) and spindle contour control (method of controlling the rotation of the spindle with the move command). The mode for spindle contour control is called the Cs contour control mode. The manual and automatic operation of the spindle in the Cs contour control mode can be performed as with normal servo axes. Although interpolation is enabled for the spindle and servo axis in the Cs contour control mode, this subsection describes only spindle positioning, not interpolation of the spindle and servo axis.
Setting the Cs contour control axis The axis targeted for Cs contour control is placed as one axis of CNC control axes. Any of the control axes can be selected as the Cs contour control axis, but one of -1 to -2 (The 1st to 2nd logical spindle is used as the Cs axis.) must be set for specifying the servo axis number (parameter No. 1023). The Cs contour control axis must be set as a rotation axis (bit 0 (ROTx) of parameter No. 1006 is 1 and parameter No. 1022 is 0). The axis name (parameter No. 1020) of the Cs contour control axis can be arbitrarily selected. To use the second spindle within the path as a Cs axis, set bit 7 (CSS) of parameter No. 3704 to 1.
Shifting to Cs contour control To shift from the spindle rotation control mode to the Cs contour control mode, set the Cs contour control change signal CON (or CONS1 to CONS2) to 1. This immediately stops the spindle and then executes mode switching.
Shifting to spindle rotation control To shift from the Cs contour control mode to the spindle rotation control mode, set the Cs contour control change signal CON (or CONS1 to CONS2) to 0. Before switching, make sure that the move command for the spindle during automatic or manual operation is fully completed. If the switching is made while the spindle is rotating, the interlock state is entered or an alarm indicating a too large positional deviation occurs.
B-64303EN-4/01 11.APPLICATION OF OTHER FUNCTIONS
- 213 -
11.5.3 Signals
11.5.3.1 Details on signals
Cs contour control change signal CON <Gn027.7>
[Classification] Input signal [Function] When the Cs contour control function is used, this signal specifies
switching between the spindle rotation control mode and Cs contour control mode for the first spindle within the path. When this signal is set to 1, the spindle is switched from the spindle rotation mode to the Cs contour control mode. When this signal is set to 1 while the spindle is rotating, the spindle stops immediately and then enters the Cs contour control mode. When this signal is set to 0, the spindle is switched from the Cs contour control mode to the spindle rotation mode.
CAUTION This signal is enabled only when bit 7 (CSS) of
parameter No. 3704 is 0. When bit 7 (CSS) of parameter No. 3704 is 1
(when Cs-axis contour control by the individual spindles is used), use the Cs contour change signals (CONS1(Gn274.0) to CONS2(Gn274.1)) of the individual spindles.
Cs contour control change completion signal FSCSL <Fn044.1>
[Classification] Output signal [Function] This signal indicates that the Cs contour control mode is entered. [Output condition] In the spindle rotation control mode, this signal is 0.
In the Cs contour control mode, this signal is 1.
CAUTION This signal is enabled only when bit 7 (CSS) of
parameter No. 3704 is 0. When bit 7 (CSS) of parameter No. 3704 is 1
(when Cs contour control by the individual spindles is used), use the Cs contour change completion signals (FCCS1(Fn274.0) to FCCS2(Fn274.1)) of the individual spindles.

11.APPLICATION OF OTHER FUNCTIONS B-64303EN-4/01
- 214 -
Cs contour control change signals in each axis CONS1 to CONS2 <Gn274.0 to Gn274.1>
[Classification] Input signal [Function] When the Cs contour control function is used, this signal specifies
switching between the spindle rotation control mode and Cs axis control mode for the first and second spindles within the path. When this signal is set to 1, the spindles are switched from the spindle rotation mode to the Cs contour control mode. When this signal is set to 1 while the spindles are rotating, the spindles stop immediately and then enter the Cs contour control mode. When these signals are set to 0, the spindles are switched from the Cs contour control mode to the spindle rotation mode.
CAUTION These signals are enabled only when bit 7 (CSS) of
parameter No. 3704 is 1 (when Cs contour control by the individual spindles is used).
When bit 7 (CSS) of parameter No. 3704 is 0, use the Cs contour change signal (CON(Gn027.7)).
Cs contour control change completion signals in each axis FCCS1 to FCCS2 <Fn274.0 to Fn274.1>
[Classification] Output signal [Function] This signal indicates that the first and second spindles within the path
are switched to the Cs contour control mode. [Output condition] In the spindle rotation control mode, these signals are 0.
In the Cs contour control mode, these signals are 1.
CAUTION These signals are enabled only when bit 7 (CSS) of
parameter No. 3704 is 1 (when Cs contour control by the individual spindles is used).
When bit 7 (CSS) of parameter No. 3704 is 0, use the Cs contour change completion signal (FSCSL(Fn044.1)).
11.5.3.2 Signal address
#7 #6 #5 #4 #3 #2 #1 #0
Gn027 CON Gn274 CONS2 CONS1
#7 #6 #5 #4 #3 #2 #1 #0
Fn044 FSCSL Fn274 FCCS2 FCCS1

B-64303EN-4/01 11.APPLICATION OF OTHER FUNCTIONS
- 215 -
11.5.4 Parameters
#7 #6 #5 #4 #3 #2 #1 #0 1006 DIAx ROTx
[Input type] Parameter input [Data type] Bit axis
# 0 ROTx Setting linear or rotation axis.
0: Linear axis. 1: Rotation axis. Set 1 for the Cs contour control axis.
# 3 DIAx The move command for each axis is based on: 0: Radius specification 1: Diameter specification Set 0 for the Cs contour control axis.
1022 Setting of each axis in the basic coordinate system
[Input type] Parameter input [Data type] Byte axis
Specify whether each axis is one of the three basic axes (X, Y, Z) or one of their parallel axes. Set 0 for the Cs contour control axis.
1023 Number of the servo axis for each axis
[Input type] Parameter input [Data type] Byte axis
Set relationships between the individual axes and the servo axis numbers. Set one of -1 to -2 (1 to 2: logical spindle number) for the Cs contour control axis. (Setting value) -1 : Cs contour control axis by the first logical spindle -2 : Cs contour control axis by the second logical spindle
CAUTION 1 When Cs contour control is to be exercised on the
second spindle within the path, bit 7 (CCS) of parameter No. 3704 needs to be set to 1.
2 One spindle cannot be set as multiple Cs contour control axes.
1260 The shift amount per one rotation of a rotation axis
[Input type] Parameter input [Data type] Real axis
Set the amount of a shift per one rotation of a rotation axis. Set 360.0 for the Cs contour control axis.

11.APPLICATION OF OTHER FUNCTIONS B-64303EN-4/01
- 216 -
1820 Command multiplier for each axis (CMR)
[Input type] Parameter input [Data type] Byte axis
Set 2 for the Cs contour control axis.
#7 #6 #5 #4 #3 #2 #1 #0 3704 CSS
[Input type] Parameter input [Data type] Bit path
# 7 CSS On the second spindle in the path, Cs contour control is:
0: Not performed. 1: Performed. To exercise Cs contour control on the second spindle in the path, set this bit to 1.
#7 #6 #5 #4 #3 #2 #1 #0 4000 RETRN
[Input type] Parameter input [Data type] Bit spindle
# 3 RETRN The reference position return direction of the spindle in Cs contour
control is: 0: CCW (counterclockwise) 1: CW (clockwise)
4046 Speed loop proportional gain in Cs contour control (HIGH gear) 4047 Speed loop proportional gain in Cs contour control (LOW gear)
[Input type] Parameter input [Data type] Word spindle [Unit of data] [Valid data range] 0 to 32767
Set the speed loop proportional gain in Cs contour control.
4054 Speed loop integral gain in Cs contour control (HIGH gear) 4055 Speed loop integral gain in Cs contour control (LOW gear)
[Input type] Parameter input [Data type] Word spindle [Unit of data] [Valid data range] 0 to 32767
Set the speed loop integral gain in Cs contour control.

B-64303EN-4/01 11.APPLICATION OF OTHER FUNCTIONS
- 217 -
4056 Gear ratio (HIGH gear) 4057 Gear ratio (MEDIUM HIGH gear) 4058 Gear ratio (MEDIUM LOW gear) 4059 Gear ratio (LOW gear)
[Input type] Parameter input [Data type] Word spindle [Unit of data] Motor speed per spindle rotation × 100 [Valid data range] 0 to 32767
These parameters set the gear ration between the spindle and spindle motor.
4069 Position gain in Cs contour control (HIGH gear) 4070 Position gain in Cs contour control (MEDIUM HIGH gear) 4071 Position gain in Cs contour control (MEDIUM LOW gear) 4072 Position gain in Cs contour control (LOW gear)
[Input type] Parameter input [Data type] Word spindle [Unit of data] 0.01 sec-1 [Valid data range] 0 to 32767
Set the servo loop gain in Cs contour control.
4086 Motor voltage in Cs contour control
[Input type] Parameter input [Data type] Word spindle [Unit of data] 1% [Valid data range] 0 to 100
Set the motor voltage in Cs contour control.
4135 Amount of grid shift in Cs contour control
[Input type] Parameter input [Data type] 2-word spindle [Unit of data] 1 pulse (=0.001deg) [Valid data range] -360000 to +360000
The reference position of the spindle shifts counterclockwise by the specified number of pluses.

11.APPLICATION OF OTHER FUNCTIONS B-64303EN-4/01
- 218 -
11.6 SPINDLE ORIENTATION
11.6.1 Overview The Dual Check Safety function uses the CNC CPU and spindle DSP to separately monitor the spindle motor speed (safe speed monitoring function). When the stop status of the spindle is monitored by the safe speed monitoring function, set the safe speed parameter to a value including a margin appropriate for the machine instead of 0 because the actual speed cannot be assumed to be 0. Since the spindle may rotate at a speed less than the set safe speed in this case, it is necessary to position the spindle with a position control loop formed at the same time. The spindle orientation function stops the spindle at a fixed position using the position coder mounted on the spindle. For details, refer to the FANUC AC SPINDLE MOTOR αi series Parameter Manual (B-65280EN) or other documents. To use the spindle orientation function, set bit 4 (NOR) of parameter No. 8135 to 0.
11.6.2 Specifications
Orientation The orientation command (ORCMx) can be used to stop the spindle at a fixed position. When the orientation command is entered while the spindle is rotating, the spindle decelerates immediately and stops at the fixed position.
Switching to the orientation mode When the orientation command signal ORCMx is set to 1, spindle rotation control mode (method of controlling the rotation of the spindle with the velocity command) is switched to the orientation mode.
Switching to spindle rotation control When the orientation command signal ORCMx is set to 0, the orientation mode is switched to the spindle rotation control mode. As soon as the orientation command signal is set to 0, the velocity command for spindle rotation control becomes valid and the spindle rotates. For safety, set the forward/reverse spindle rotation commands (SFRx/SRVx) and the velocity command to 0.

B-64303EN-4/01 11.APPLICATION OF OTHER FUNCTIONS
- 219 -
11.6.3 Signals
11.6.3.1 Details on signals
Orientation command signal ORCMA <Gn070.6> (for 1st spindle) ORCMB <Gn074.6> (for 2nd spindle)
[Classification] Input signal [Function] This signal specifies spindle orientation.
When this signal is set to 1, the spindle immediately decelerates during rotation and stops at a fixed position. Be sure to set the signal to 0 before power-on.
Emergency stop signal *ESPA <Gn071.1> (for 1st spindle) *ESPB <Gn075.1> (for 2nd spindle)
[Classification] Input signal [Function] This signal specifies an emergency stop.
When the signal is set to 1, the spindle motor and spindle amplifier become ready to operate. When the signal is set to 0, the spindle motor immediately decelerates and then stops. By monitoring the orientation completion signal (ORARx), set the signal to 0 if there is a deviation from the stop position. Since the spindle motor becomes ready to rotate when the signal is set to 1, the spindle motor immediately rotates upon receiving the rotation command. Therefore, immediately after setting this signal to 0, reset the command signals (velocity command, forward command, and reverse command) for the spindle amplifier.
Power interruption signal MPOFA <Gn073.2> (for 1st spindle) MPOFB <Gn077.2> (for 2nd spindle)
[Classification] Input signal [Function] This signal turns off the excitation of the motor.
By setting the signal to 1, the excitation of the spindle motor can be turned off to enable free running. By monitoring the orientation completion signal (ORARx), set the signal to 1 if there is a deviation from the stop position. The excitation of the motor can be turned on again after the motor stops (zero speed signal SSTx = 1). Even if this signal is set to 0, excitation cannot be turned on while the motor is rotating (SSTx = 0). After turning off the excitation of the motor, reset the command signals (velocity command, forward command, and reverse command) for the spindle amplifier.

11.APPLICATION OF OTHER FUNCTIONS B-64303EN-4/01
- 220 -
Orientation completion signal ORARA <Fn045.7> (for 1st spindle) ORARB <Fn049.7> (for 2nd spindle)
[Classification] Output signal [Function] This signal is set to 1 when the orientation command is entered and
the spindle stops near the specified fixed position. [Output condition] This signal is set to 1 when all conditions below are satisfied.
• ORCMx (orientation command) = 1 • SSTx (zero speed detection signal) = 1 • The spindle is present near the fixed position. The conditions of proximity to the fixed position are set by the parameter (orientation completion signal detection level: No. 4075). This signal is set to 0 when the spindle deviates from the fixed position due to application of an external force or other causes. To monitor the stop status of the spindle by setting a spindle positioning loop with the spindle orientation function, set a sequence that interrupts the power of the spindle motor if there is deviation from the stop position by monitoring the signal.
Zero speed detection signal SSTA <Fn045.1> (for 1st spindle) SSTB <Fn049.1> (for 2nd spindle)
[Classification] Output signal [Function] This signal is set to 1 when the rotation speed of the actual spindle
motor becomes equal to or less than the zero speed detection level.
11.6.3.2 Signal address
#7 #6 #5 #4 #3 #2 #1 #0
Gn070 MRDYA ORCMA SFRA SRVA Gn071 *ESPA Gn073 MPOFA Gn074 MRDYB ORCMB SFRB SRVB Gn075 *ESPB Gn077 MPOFB
#7 #6 #5 #4 #3 #2 #1 #0
Fn045 ORARA SSTA Fn049 ORARB SSTB

B-64303EN-4/01 11.APPLICATION OF OTHER FUNCTIONS
- 221 -
11.6.4 Parameters
#7 #6 #5 #4 #3 #2 #1 #0 4003 DIRCT2 DIRCT1
[Input type] Parameter input [Data type] Bit spindle
# 2 DIRCT1 Setting of rotation direction at spindle orientation # 3 DIRCT 2
DIRCT2 DIRCT1 Rotation direction at spindle orientation 0 0 By rotation direction immediately before (It is CCW at
the power on.) 0 1 By rotation direction immediately before (It is CW at
the power on.) 1 0 CCW (counterclockwise) direction looking from shaft
of motor 1 1 CW (clockwise) direction looking from shaft of motor
4031 Position coder method orientation stop position
[Input type] Parameter input [Data type] Word spindle [Unit of data] 1 pulse unit (360°/4096) [Valid data range] 0 to 4096
Set the position coder method orientation stop position.
4038 Spindle orientation speed
[Input type] Parameter input [Data type] Word spindle [Unit of data] 1min-1 [Valid data range] 0 to 32767
This parameter sets the orientation speed at the end of the spindle.
4042 Velocity loop proportional gain on orientation (HIGH gear) 4043 Velocity loop proportional gain on orientation (LOW gear)
[Input type] Parameter input [Data type] Word spindle [Unit of data] [Valid data range] 0 to 32767
This parameter sets the velocity loop proportional gain for spindle orientation.

11.APPLICATION OF OTHER FUNCTIONS B-64303EN-4/01
- 222 -
4050 Velocity loop integral gain on orientation (HIGH gear) 4051 Velocity loop integral gain on orientation (LOW gear)
[Input type] Parameter input [Data type] Word spindle [Unit of data] [Valid data range] 0 to 32767
This parameter sets the velocity loop integral gain for spindle orientation.
4056 Gear ratio (HIGH gear) 4057 Gear ratio (MEDIUM HIGH gear) 4058 Gear ratio (MEDIUM LOW gear) 4059 Gear ratio (LOW gear)
[Input type] Parameter input [Data type] Word spindle [Unit of data] Motor speed per spindle rotation × 100 [Valid data range] 0 to 32767
These parameters set the gear ration between the spindle and spindle motor.
4060 Position gain on orientation (HIGH gear) 4061 Position gain on orientation (MEDIUM HIGH gear) 4062 Position gain on orientation (MEDIUM LOW gear) 4063 Position gain on orientation (LOW gear)
[Input type] Parameter input [Data type] Word spindle [Unit of data] 0.01 sec-1 [Valid data range] 0 to 32767
These parameters set the position gain for orientation.
4064 Modification rate of position gain on orientation completion
[Input type] Parameter input [Data type] Word spindle [Unit of data] 1% [Valid data range] 0 to 1000
This data is used to set the modification rate of position gain on spindle orientation completion.

B-64303EN-4/01 11.APPLICATION OF OTHER FUNCTIONS
- 223 -
4075 Orientation completion signal detection level (limits of in-position)
[Input type] Parameter input [Data type] Word spindle [Unit of data] 1 pulse unit (360°/4096) [Valid data range] 0 to 100
This data is used to set the detecting level of orientation completion signal (ORARx). When the spindle position is located within the setting data on orientation completion, the bit of orientation completion signal (ORARx) in the spindle control signals is set to "1".
4076 Motor speed limit ratio on orientation
[Input type] Parameter input [Data type] Word spindle [Unit of data] 1% [Valid data range] 0 to 100
This data is used to set motor speed limit ratio on orientation.
4077 Orientation stop position shift value
[Input type] Parameter input [Data type] Word spindle [Unit of data] 1 pulse unit (360°/4096) [Valid data range] -4095 to 4095
In the position coder method orientation, set this data to shift stop position.
4084 Motor voltage setting on orientation
[Input type] Parameter input [Data type] Word spindle [Unit of data] 1% [Valid data range] 0 to 100
This parameter sets the motor voltage for orientation.
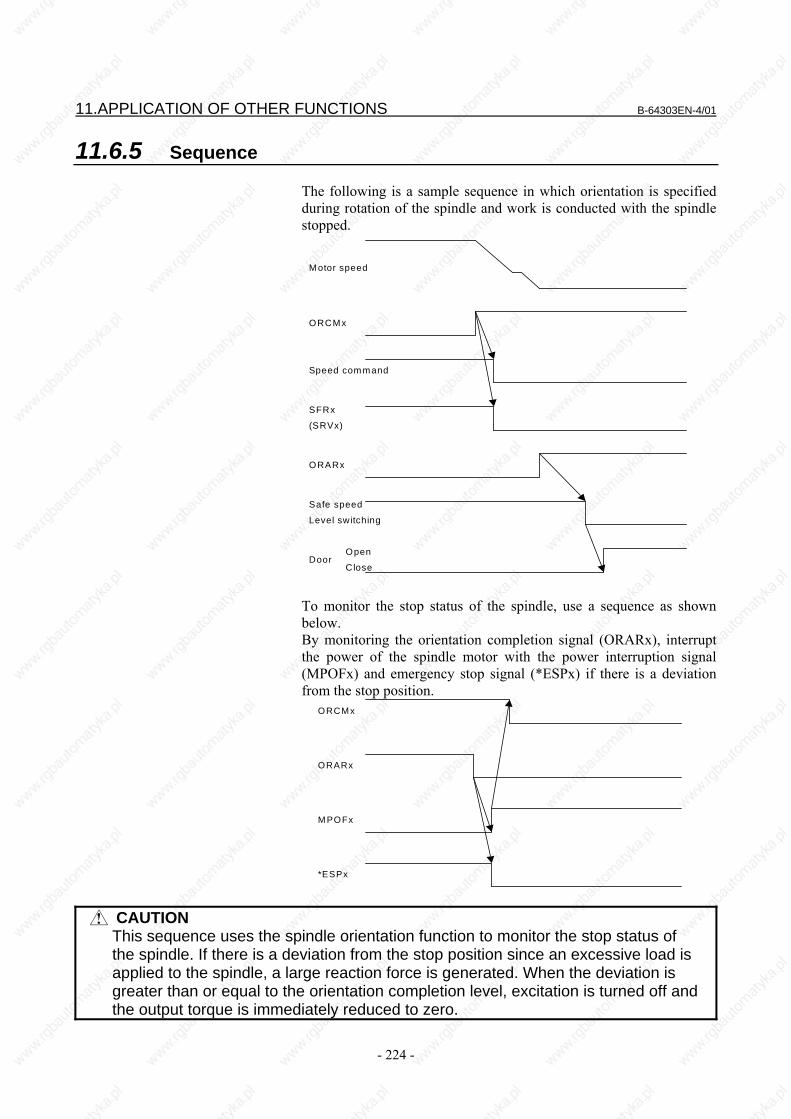
11.APPLICATION OF OTHER FUNCTIONS B-64303EN-4/01
- 224 -
11.6.5 Sequence The following is a sample sequence in which orientation is specified during rotation of the spindle and work is conducted with the spindle stopped.
Motor speed
ORCMx
SFRx
(SRVx)
ORARx
Safe speed
Level switching
Door
Speed command
Open
Close To monitor the stop status of the spindle, use a sequence as shown below. By monitoring the orientation completion signal (ORARx), interrupt the power of the spindle motor with the power interruption signal (MPOFx) and emergency stop signal (*ESPx) if there is a deviation from the stop position.
ORARx
M POFx
*ESPx
ORCMx
CAUTION This sequence uses the spindle orientation function to monitor the stop status of
the spindle. If there is a deviation from the stop position since an excessive load is applied to the spindle, a large reaction force is generated. When the deviation is greater than or equal to the orientation completion level, excitation is turned off and the output torque is immediately reduced to zero.

B-64303EN-4/01 12.COMPONENTS LIST
- 225 -
12 COMPONENTS LIST

12.COMPONENTS LIST B-64303EN-4/01
- 226 -
12.1 HARDWARE COMPONENTS
12.1.1 Series 0i-MODEL D
CNC Control unit No. Description Specification
Number Remarks
1 Main board A1 A20B-8200-0541 2 Main board A3 A20B-8200-0543 3 Axes control card A1 A20B-3300-0635 4 Axes control card A2 A20B-3300-0638 5 Axes control card A3 A20B-3300-0637 6 Axes control card B2 A20B-3300-0632 7 Axes control card B3 A20B-3300-0631 8 FROM/SRAM module A1
(FROM 64MB, SRAM 1MB) A20B-3900-0242
9 FROM/SRAM module B1 (FROM 128MB, SRAM 1MB)
A20B-3900-0240
10 FROM/SRAM module B2 (FROM 128MB, SRAM 2MB)
A20B-3900-0241
11 Power supply 0 slot A20B-8200-0560 12 Power supply 2 slot A20B-8200-0570 13 Inverter (for 8.4-inch color LCD) A20B-8002-0703 14 Inverter (for 10.4-inch color LCD) A20B-8002-0702 15 PROFIBUS-DP master board A20B-8101-0050 16 PROFIBUS-DP slave board A20B-8101-0100
NOTE Only the hardware for the Dual Check Safety
function is indicated above.

B-64303EN-4/01 12.COMPONENTS LIST
- 227 -
12.1.2 Hardware Components for Other Units
Other unit for CNC No. Description Specification Number Remarks 1 Separate detector I/F unit (Basic 4 axes) A02B-0303-C205
2 Separate detector I/F unit (Additional 4 axes) A02B-0236-C204
3 Analog input separate detector interface unit (Basic 4 axes)
A06B-6061-C201
4 Optical I/O Link adapter A13B-0154-B001
5 Optical adapter A13B-0154-B003
6 Spindle connector adapter A13B-0180-B001
7 I/O Unit for 0i A02B-0309-C001 DI/DO: 96/64 With manual pulse generator I/F
8 I/O module for operator's panel A1 A03B-0815-K200 DI/DO: 72/56 (DI : General=16, Matrix=56), With manual pulse generator I/F
9 I/O module for operator's panel B1 A03B-0815-K202 DI/DO: 48/32 With manual pulse generator I/F
10 I/O module for operator's panel B2 A03B-0815-K203 DI/DO: 48/32 11 I/O module for connector panel Basic A03B-0815-C001 DI/DO: 24/16 12 I/O module for connector panel Extension A A03B-0815-C002 DI/DO: 24/16
With manual pulse generator I/F 13 I/O module for connector panel Extension B A03B-0815-C003 DI/DO: 24/16 14 I/O module for connector panel Extension C A03B-0815-C004 DO: 16 (2A output) 15 I/O module for connector panel Extension D A03B-0815-C005 Analog input 16 I/O module type-2 for connector panel B1 A03B-0815-C040 DI/DO:48/32
With manual pulse generator I/F 17 I/O module type-2 for connector panel B2 A03B-0815-C041 DI/DO:48/32
Without manual pulse generator I/F 18 I/O module type-2 for connector panel E1 A03B-0815-C042 DI/DO:48/32 19 Terminal Type I/O module Basic Module A03B-0823-C001 DI/DO:24/16
With I/O Link I/F 20 Terminal Type I/O module Extension module A A03B-0823-C002 DI/DO:24/16
With manual pulse generator I/F 21 Terminal Type I/O module Extension module B A03B-0823-C003 DI/DO:24/16
Without manual pulse generator I/F 22 Terminal Type I/O module Extension module C A03B-0823-C004 DO: 16 (2A output) 23 Terminal Type I/O module Extension module D A03B-0823-C005 Analog input 24 Machine operator's panel Main panel A A02B-0319-C242 Key with both symbol and English
indicated With alphabetic MDI Three-point pressing supported
25 Machine operator's panel Main panel B A02B-0319-C243 Key with both symbol and English indicated Three-point pressing supported
26 Machine operator's panel Sub panel A A02B-0236-C232 27 Machine operator's panel Sub panel B A02B-0236-C233 28 Machine operator's panel Sub panel B1 A02B-0236-C235 29 Machine operator's panel Sub panel C A02B-0236-C234 30 Machine operator's panel Sub panel C1 A02B-0236-C236 31 Small Machine operator's panel A02B-0299-C152#M,T

12.COMPONENTS LIST B-64303EN-4/01
- 228 -
No. Description Specification Number Remarks 32 Small Machine operator's panel B A02B-0309-C151#M,T 33 Operator's panel connection unit (source DO: A) A16B-2202-0731 DI/DO: 64/32 34 Operator's panel connection unit (source DO: B) A16B-2202-0730 DI/DO: 96/64 35 Handy machine operator's panel A02B-0259-C221#A 36 Interface unit for Handy machine operator's panel A02B-0259-C220 37 FANUC I/O LINK connection unit A A20B-2000-0410 Electrical-Optical I/F 38 FANUC I/O LINK connection unit B A20B-2000-0411 Electrical-Electrical I/F 39 FANUC I/O LINK connection unit C A20B-2000-0412 Optical-Optical I/F 40 FANUC I/O Link-AS-i converter
(for AS-I Ver.2.0) A03B-0817-C001
41 FANUC I/O Link-AS-i converter (for AS-I Ver.2.1)
A03B-0817-C002
42 I/O Link signal divider (2ch) A20B-1007-0680 43 I/O Link signal divider (3ch) A20B-1008-0360 44 I/O unit base module ABU10A A03B-0819-C001 45 I/O unit base module ABU05A A03B-0819-C002 46 I/O unit base module ABU10B A03B-0819-C003 47 I/O unit base module ABU05B A03B-0819-C004 48 I/O unit interface module AIF01A A03B-0819-C011 49 I/O unit interface module AIF01B A03B-0819-C012 50 DC digital input module AID32A1 A20B-9000-0970
A03B-0819-C101
51 DC digital input module AID32B1 A20B-9000-0971 A03B-0819-C102
52 DC digital input module AID16D A03B-0819-C104 53 DC digital input module AID16L A03B-0819-C114 54 DC digital input module AID32E1 A03B-0819-C105 55 DC digital input module AID32F1 A03B-0819-C106 56 DC digital input module AIA16G A03B-0819-C107 57 DC digital input module AID32F2 A03B-0819-C109 58 DC digital input module AID32E2 A03B-0819-C110 59 DC digital input module AID32H1 A03B-0819-C111 60 DC digital input module AID16G A03B-0819-C115 61 DC digital output module AOD08D A03B-0819-C152 62 DC digital output module AOD16D A03B-0819-C154 63 DC digital output module AOD32D1 A03B-0819-C156 64 AC digital output module AOA05E A03B-0819-C157 65 AC digital output module AOA08E A03B-0819-C158 66 AC digital output module AOA12F A03B-0819-C159 67 Relay output module AOR08G A03B-0819-C160 68 Relay output module AOR16G A03B-0819-C161 69 Relay output module AOR16H2 A03B-0819-C165 70 DC digital output module AOD32D2 A03B-0819-C167 71 DC digital output module AOD16D2 A03B-0807-C171 72 AC digital output module AOA05E A03B-0819-C176 73 AC digital output module AOA08E A03B-0819-C177 74 AC digital output module AOA12F A03B-0819-C178 75 Relay output module AOR08G A03B-0819-C179 76 Relay output module AOR16G A03B-0819-C180 77 DC digital output module AOD16DP A03B-0819-C182 78 DC digital output module AOD08DP A03B-0819-C183 79 DC digital input/output module AIO40A A03B-0807-C200

B-64303EN-4/01 12.COMPONENTS LIST
- 229 -
No. Description Specification Number Remarks 80 Relay output module AOR16G2 A03B-0819-C184

12.COMPONENTS LIST B-64303EN-4/01
- 230 -
12.2 SOFTWARE
CNC CPU software Name Series/Edition Remarks
FS0i-TD D6F1/06~ FS0i-MD D4F1/06~
PMC CPU software
Name Series / Edition Remarks PMC BASIC 40B0/01~
Servo control software
Name Series / Edition Remarks Servo DSP 90C5/02~ Servo DSP 90E5/02~
Spindle software
Name Series / Edition Remarks Spindle Software (αiSP series) 9D80/01~
Spindle Software (βiSVSP series) 9D80/11~

B-64303EN-4/01 12.COMPONENTS LIST
- 231 -
12.3 SERVO AMPLIFIER
SERVO AMPLIFIER αi series (200V)
- Common power supply Series Name Model Name Specification Number Remarks
αi PS 5.5 A06B-6140-H006 αi PS 11 A06B-6140-H011
αi PS 15 A06B-6140-H015
αi PS 26 A06B-6140-H026
αi PS 30 A06B-6140-H030
αi PS 37 A06B-6140-H037
αi PS series
αi PS 55 A06B-6140-H055
αi PSR 3 A06B-6115-H003 αi PSR series (Resistance regeneration type)
αi PSR 5.5 A06B-6115-H006
- Spindle Amplifier
Series Name Model Name Specification Number Remarks αi SP 2.2 TYPE A A06B-6141-H002#Hxxx
αi SP 5.5 TYPE A A06B-6141-H006#Hxxx
αi SP 11 TYPE A A06B-6141-H011#Hxxx
αi SP 15 TYPE A A06B-6141-H015#Hxxx
αi SP 22 TYPE A A06B-6141-H022#Hxxx
αi SP 26 TYPE A A06B-6141-H026#Hxxx
αi SP 30 TYPE A A06B-6141-H030#Hxxx
αi SP 37 TYPE A A06B-6141-H037#Hxxx
αi SP 45 TYPE A A06B-6141-H045#Hxxx
αi SP 55 TYPE A A06B-6141-H055#Hxxx
αi SP 2.2 TYPE B A06B-6142-H002#Hxxx
αi SP 5.5 TYPE B A06B-6142-H006#Hxxx
αi SP 11 TYPE B A06B-6142-H011#Hxxx
αi SP 15 TYPE B A06B-6142-H015#Hxxx
αi SP 22 TYPE B A06B-6142-H022#Hxxx
αi SP 26 TYPE B A06B-6142-H026#Hxxx
αi SP 30 TYPE B A06B-6142-H030#Hxxx
αi SP 37 TYPE B A06B-6142-H037#Hxxx
αi SP 45 TYPE B A06B-6142-H045#Hxxx
αi SP series
αi SP 55 TYPE B A06B-6142-H055#Hxxx
Note) xxx = 580

12.COMPONENTS LIST B-64303EN-4/01
- 232 -
- Servo Amplifier Series Name Model Name Specification Number Remarks
αi SV 4 A06B-6117-H101 αi SV 20 A06B-6117-H103 αi SV 20L A06B-6117-H153
αi SV 40 A06B-6117-H104
αi SV 40L A06B-6117-H154
αi SV 80 A06B-6117-H105
αi SV 80L A06B-6117-H155
αi SV 160 A06B-6117-H106
αi SV 160L A06B-6117-H156
αi SV 360 A06B-6117-H109 αi SV 4/4 A06B-6117-H201 αi SV 4/20 A06B-6117-H203
αi SV 20/20 A06B-6117-H205
αi SV 20/20L A06B-6117-H255
αi SV 20/40 A06B-6117-H206
αi SV 20/40L A06B-6117-H256
αi SV 40/40 A06B-6117-H207
αi SV 40/40L A06B-6117-H257
αi SV 40/80 A06B-6117-H208
αi SV 40/80L A06B-6117-H258
αi SV 80/80 A06B-6117-H209
αi SV 80/80L A06B-6117-H259
αi SV 80/160 A06B-6117-H210
αi SV 160/160 A06B-6117-H211
αi SV 4/4/4 A06B-6117-H301
αi SV 20/20/20 A06B-6117-H303
αi SV series
αi SV 20/20/40 A06B-6117-H304
- Detector (αi series)
Name Module Name Specification Number Remarks αiA1000 A860-2000-T3x1
αiA16000 A860-2001-T3x1
αiI1000 A860-2005-T3x1 βA64B A860-0374-T3x3
Pulsecoder
βi64B A860-0379-T3x3
αiMZ A860-2110-V001
αiM A860-2100-V001 αiBZ A86L-0050-0024#x Sensor head only
(The specification number of the sensor unit is A860-2120-Txxx.)
Spindle sensor
αi CZ A860-2140-Tx11 A860-216x-Tx11

B-64303EN-4/01 12.COMPONENTS LIST
- 233 -
- High Resolution Serial Output Circuit Name Module Name Specification Number Remarks
2048/1ch A860-0333-T201 2048/1ch A860-0333-T301 2048/1ch A860-0333-T701
High resolution serial output circuit
2048/1ch A860-0333-T801
SERVO AMPLIFIER αi series (400V)
- Common power supply Series Name Model Name Specification Number Remarks
αi PS 11HV A06B-6150-H011
αi PS 18HV A06B-6150-H018
αi PS 30HV A06B-6150-H030 αi PS 45HV A06B-6150-H045
αi PS 75HV A06B-6150-H075
αi PS series
αi PS 100HV A06B-6150-H100
- Spindle Amplifier
Series Name Model Name Specification Number Remarks αi SP 5.5HV TYPE A A06B-6151-H006#Hxxx
αi SP 11HV TYPE A A06B-6151-H011#Hxxx
αi SP 15HV TYPE A A06B-6151-H015#Hxxx
αi SP 30HV TYPE A A06B-6151-H030#Hxxx αi SP 45HV TYPE A A06B-6151-H045#Hxxx
αi SP 75HV TYPE A A06B-6151-H075#Hxxx αi SP 100HV TYPE A A06B-6151-H100#Hxxx
αi SP 5.5HV TYPE B A06B-6152-H006#Hxxx αi SP 11HV TYPE B A06B-6152-H011#Hxxx
αi SP 15HV TYPE B A06B-6152-H015#Hxxx αi SP 30HV TYPE B A06B-6152-H030#Hxxx
αi SP 45HV TYPE B A06B-6152-H045#Hxxx
αi SP 75HV TYPE B A06B-6152-H075#Hxxx
αi SP series
αi SP 100HV TYPE B A06B-6152-H100#Hxxx
Note) xxx = 580

12.COMPONENTS LIST B-64303EN-4/01
- 234 -
- Servo Amplifier Series Name Model Name Specification Number Remarks
αi SV 10HV A06B-6127-H102
αi SV 10HVL A06B-6127-H152
αi SV 20HV A06B-6127-H103
αi SV 20HVL A06B-6127-H153
αi SV 40HV A06B-6127-H104
αi SV 40HVL A06B-6127-H154
αi SV 80HV A06B-6127-H105
αi SV 80HVL A06B-6127-H155
αi SV 180HV A06B-6127-H106
αi SV 360HV A06B-6127-H109
αi SV 10/10HV A06B-6127-H202
αi SV 10/10HVL A06B-6127-H252
αi SV 20/20HV A06B-6127-H205
αi SV 20/20HVL A06B-6127-H255
αi SV 20/40HV A06B-6127-H206
αi SV 20/40HVL A06B-6127-H256
αi SV 40/40HV A06B-6127-H207
αi SV 40/40HVL A06B-6127-H257
αi SV 40/80HV A06B-6127-H208
αi SV series
αi SV 80/80HV A06B-6127-H209
SERVO AMPLIFIER βi series
- Servo Amplifier
Series Name Model Name Specification Number Remarks βi SV 4 A06B-6130-H001
βi SV 20 A06B-6130-H002 βi SV 40 A06B-6130-H003
βi SV series
βi SV 80 A06B-6130-H004
SERVO AMPLIFIER βi series (400V)
- Servo Amplifier
Series Name Model Name Specification Number Remarks βi SV 10HV A06B-6131-H001
βi SV 20HV A06B-6131-H002 βi SV series
βi SV 40HV A06B-6131-H003

B-64303EN-4/01 12.COMPONENTS LIST
- 235 -
- Servo Amplifier Series Name Model Name Specification Number Remarks
βi SVSP 20/20-7.5 A06B-6164-H201#H580
βi SVSP 20/20-11 A06B-6164-H202#H580
βi SVSP 40/40-15 A06B-6164-H223#H580
βi SVSP 20/20/40-7.5 A06B-6164-H311#H580
βi SVSP 20/20/40-11 A06B-6164-H312#H580
βi SVSP 40/40/40-15 A06B-6164-H333#H580
βi SVSP series
βi SVSP 40/40/80-15 A06B-6164-H343#H580


APPENDIX


B-64303EN-4/01 APPENDIX
- 239 -
A.Directives, Standards and Technical Conditions for 3rd Party Servo / Spindle
Motors & Encoders when Applying FANUC / GE Fanuc Dual-check Safety
A Directives, Standards and Technical Conditions for 3rd Party Servo / Spindle Motors & Encoders when Applying FANUC / GE Fanuc Dual-check Safety

APPENDIX B-64303EN-4/01
- 240 -
A.Directives, Standards and Technical Conditions for 3rd Party Servo / Spindle Motors & Encoders when Applying FANUC / GE Fanuc Dual-check Safety
A.1 GENERAL Applying 3rd party servo/spindle motors and 3rd party feedback devices with FANUC / GE Fanuc Dual-check Safety Function these 3rd party devices must comply with specific mandatory standards and directives, i. e. regulations regarding - EMC and LVD - IP classification - Electrical safety and environmental testing Further details regarding standards and directives to comply with are described under chapter 2 “Mandatory Standards and Directives”. Please refer to it. The components also need to meet the technical requirements as specified in this document.

B-64303EN-4/01 APPENDIX
- 241 -
A.Directives, Standards and Technical Conditions for 3rd Party Servo / Spindle
Motors & Encoders when Applying FANUC / GE Fanuc Dual-check Safety
A.2 MANDATORY STANDARDS AND DIRECTIVES
(1) The standards and directives to be followed in general are listed below. 73/23/EEC Low voltage directive (LVD) 93/68/EEC Council directive from 19th February 1973 on the
approximation of the laws of the member states relating electrical equipment designed for use in certain voltage limits (relating to electromagnetic compatibility)
89/336/EEC Electromagnetic compatibility (EMC)
92/31/EEC Council directive from 3rd May 1989 on the approximation of the laws of the member states
98/37/EEC Machinery directive DIN EN 60068 Environmental testing EN 60204-1:1998 Safety of machinery - electrical equipment of
machines EN 60529:1991 Degrees of protection provided by enclosures (IP
code), applicable for encoders (feedback devices) IEC 60034-1:1999 General requirements for motors, to be
considered for spindle/servo motors
(2) The standards and directives the 3rd party spindle/servo motors must comply with are listed below.
IEC 60034-1:1999 Rotating electrical machines - part 1: rating and performance
IEC 60034-5:2000 Rotating electrical machines - part 5: degrees of protection provided by the integral design of rotating electrical machines (IP code) – classification, applicable for motors
IEC 60034-11:1978 Rotating electrical machines - part 11: built-in thermal protection - chapter 1: rules for protection of rotating electrical machines
EN 61000-6-2:1999 Electromagnetic compatibility (EMC) - generic immunity standard
Part 2: industrial environment EN 55011-2:1998 Limits and methods of measurement of radio
disturbance characteristics of industrial, scientific and medical (ISM) radio-frequency equipment

APPENDIX B-64303EN-4/01
- 242 -
A.Directives, Standards and Technical Conditions for 3rd Party Servo / Spindle Motors & Encoders when Applying FANUC / GE Fanuc Dual-check Safety
(3) The standards and directives the linear motors and 3rd party feedback devices must comply with are listed below.
EN 60335-1:1995 Safety of household and similar electrical appliances - part 1: General requirements
EN 61000-6-2:1999 Electromagnetic compatibility (EMC) - generic immunity standard
Part 2: industrial environment EN 55011-2:1998 Limits and methods of measurement of radio
disturbance characteristics of industrial, scientific and medical (ISM) radio-frequency equipment
(4) The standards and directives the 3rd party feedback devices must comply with
are listed below. EN 50178:1997 Electronic equipment for use in power
installations EN 61000-6-2:1999 Electromagnetic compatibility (EMC) - generic
immunity standard Part 2: industrial environment EN 55011-2:1998 Limits and methods of measurement of radio
disturbance characteristics of industrial, scientific and medical (ISM) radio-frequency equipment
NOTE 1 All products should be considered that the
electrical safety of the final products can be guaranteed.
2 Degrees of protection provided by enclosures should be guaranteed according mandatory regulations for the machine applications.

B-64303EN-4/01 APPENDIX
- 243 -
A.Directives, Standards and Technical Conditions for 3rd Party Servo / Spindle
Motors & Encoders when Applying FANUC / GE Fanuc Dual-check Safety
A.3 SPINDLES
A.3.1 Spindle Motors – Driven by FANUC / GE Fanuc Spindle Amplifier
• 3-phase AC asynchronous motor, compact type or built-in type • Input voltage: 200 V AC or 400 V AC • Winding switching available, e.g. start/delta or 2 different
windings like star/star • Number of pole-pairs: 1, 2, 3 or 4 • Rated current must be equal or less than rated current of Spindle
Amplifier. • Maximum current must be equal or less than maximum current of
Spindle Amplifier. • Applicable maximum speed of spindle motors
maximum speed = 60 / pole-pairs * max output freq.
A.3.2 Spindle Encoder – Speed / Position Feedback Sensor Embedded in Motor
• Signal type: A/B-phase sine-wave for speed feedback
Z-phase (one-per-rotation) signal for position feedback
• Signal specifications: see Attachment 1

APPENDIX B-64303EN-4/01
- 244 -
A.Directives, Standards and Technical Conditions for 3rd Party Servo / Spindle Motors & Encoders when Applying FANUC / GE Fanuc Dual-check Safety
A.4 SERVO
A.4.1 Servo Motors – Driven by FANUC / GE Fanuc Servo Amplifier • 3-phase AC synchronous motor, compact type • Input voltage: 200 V AC or 400 V AC • Number of pole-pairs actually limited to 72 • Applicable maximum speed of servomotors = 60/pole-pairs * fmax
(fmax = 266 Hz) • Rated current must be equal or less than rated current of servo
amplifier • Maximum current must be equal or less than maximum current of
servo amplifier • Maximum peak current of servo amplifier must be less than
demagnetization current of motor. • Current at dynamic braking must not exceed the maximum DB
current. Maximum DB current depends on servo amplifier model (DB resistor, relay contacts).
• Regenerated energy at dynamic braking must not exceed the DB resistor capacity. DB resistor capacity depends on servo amplifier model.
A.4.2 Servo Encoder – Speed / Position Feedback Sensor
Embedded in Motor
A.4.2.1 Encoder with FANUC / GE Fanuc Serial Interface • Signal type: Special FANUC serial interface (e.g.: αA1000S,
RCN723F, LC191F) • Number of pulses per revolution: up to 224 ppr
A.4.2.2 A/B-Phase Sine-wave Interface Connected to FANUC / GE Fanuc Interpolation Circuit
• Signal type: sine-wave 1V (peak-to-peak), e.g. Heidenhain ERM 180 • Number of pulses per revolution: up to 32768 ppr (32768 * 512 = 224 ppr) • Signal specification: see Attachment 2 • Maximum input frequency: 200 kHz

B-64303EN-4/01 APPENDIX
- 245 -
A.Directives, Standards and Technical Conditions for 3rd Party Servo / Spindle
Motors & Encoders when Applying FANUC / GE Fanuc Dual-check Safety
Attachment 1: Specification of 3rd Party Spindle Encoders
The GE Fanuc SPM does not include the terminating resistor (like e.g. Siemens). Depending on the sensor supply voltage and the sensor output impedance, the signal amplitude varies. In order to match the sensor output signals with the amplifier input requirement, the terminating resistor might be necessary. See table on following page for required signal specs. If the terminating resistor is required, place it outside the SPM.
Rt is defined by the specification of the 3rd party sensor Z-Phase Signal (Type B) A/B-Phase Signal
Z-Phase Signal (Type A)
3rd
Party
Sensor
JY2
or J
Y5
Rt
MA
*MA
Rt
MB
*MB
Rt
MZ
*MZ

APPENDIX B-64303EN-4/01
- 246 -
A.Directives, Standards and Technical Conditions for 3rd Party Servo / Spindle Motors & Encoders when Applying FANUC / GE Fanuc Dual-check Safety
A/B-Phase Signals
Symbol Check Terminal Value
1 Maximum Frequency Fmax 205 kHz in Spec A 256 kHz in Spec B
Vpp Spec A
0.50 Vpp min 1.2 Vpp max (incl. tolerances)
2 Signal Amplitude (MA - *MA) (MB - *MB) Vpp
Spec B 0.60 Vpp min 1.2 Vpp max (incl. tolerances)
3 Signal Offset Voffs ± 100 mV max
4 Signal Amplitude Difference (MA - *MA) / (MB - *MB)
Vppdef 1.00 ± 0.10 V max
5 Phase Offset (MA - *MA) (MB - *MB)
Vphase
PA1 and PB1 (from JY2) PA2 and PB2 (from JY5)
90 ± 3 deg
Z-Phase Signal
Type A Symbol Check Terminal Value
1 Pulse Width (MZ - *MZ)
twz 4 µsec min
Vppz 0.25 V min 2
Signal Amplitude of Reference Signal (MZ - *MZ) x 2.4 Vpnz
PS1 (from JY2) PS2 (from JY5)
0.25 V min
SPM type 1 (JY2): N4005#4 = 1 SPM type 4 (JY5): N4004#4 = 1
Type B Symbol Check Terminal Value
1 Pulse Width (MZ - *MZ)
twz 4 µsec min
2 Signal Amplitude of Reference Signal (MZ - *MZ) x 2.4
Vpz 0.25 V min
3 Signal Offset (Z - *Z)
Voffz
PS1 (from JY2) PS2 (from JY5)
3.5 V max 2 V min
SPM type 1 (JY2): N4005#4 = 0 SPM type 4 (JY5): N4004#4 = 0

B-64303EN-4/01 APPENDIX
- 247 -
A.Directives, Standards and Technical Conditions for 3rd Party Servo / Spindle
Motors & Encoders when Applying FANUC / GE Fanuc Dual-check Safety
Attachment 2: Specification of 3rd Party Servo Encoders


B-64303EN-4/01 INDEX
i-1
INDEX <Number>
2-path Control (T Series)...............................................108
<A> A/B-Phase Sine-wave Interface Connected to FANUC /
GE Fanuc Interpolation Circuit .....................................244
Acceptance Test and Report for Safety Functions ........148
ALARM MESSAGE.....................................................153
AMPLIFIER CIRCUIT MONITORING FUNCTION ...41
APPLICATION OF OTHER FUNCTIONS .................186
APPLICATION RANGE................................................13
Assignment of Programmable Safety I/O Signals ...... 50,59
<B> BASIC PRINCIPLE OF DUAL CHECK SAFETY..........5
BEFORE USING THE SAFETY FUNCTION...............15
Brake Configuration........................................................68
Brake Test .......................................................................63
Brake Test Procedure ......................................................63
<C> Certification Test...............................................................3
Compliance with the Safety Standard ...............................5
COMPONENTS LIST ..................................................225
Connections................................................................ 51,60
CPU SELF TEST FUNCTION .......................................43
CRC CHECK FUNCTION .............................................44
CROSS CHECK DATA SCREEN ...............................163
Cs CONTOUR CONTROL...........................................211
<D> DATA TYPE................................................................. 111
DEFINITION OF TERMS................................................4
Definition of Terms Related to the Safety Function..........4
DEFINITION OF WARNING, CAUTION, AND
NOTE............................................................................. s-1
Details of Brake Test.......................................................66
Details on signals .............................. 191,197,202,213,219
DIAGNOSIS .................................................................161
DIAGNOSIS SCREEN .................................................172
Directives ..........................................................................2
DIRECTIVES AND STANDARDS .................................2
Directives, Standards and Technical Conditions for 3rd
Party Servo / Spindle Motors & Encoders when Applying
FANUC / GE Fanuc Dual-check Safety........................239
DUAL BRAKE MONITOR FUNCTION.......................63
<E> EMERGENCY STOP .....................................................29
Emergency Stop Signal (*ESP).....................................178
Encoder with FANUC / GE Fanuc Serial Interface.......244
Error analysis ....................................................................8
EXAMPLE OF APPLICATION...................................185
Example of Configuration Using a Single MCC...........176
Example of Configuration Using Multiple MCCs.........177
EXTERNAL DECELERATION...................................188
<F> Features of Dual Check Safety..........................................5
FEED LIMIT MONITORING SCREEN ......................168
FLOW MONITORING SCREEN.................................167
<G> GENERAL ....................................................................240
General Definition of Terms .............................................4
GENERAL INFORMATION .........................................10
Guard Open Inhibit Signal (*OPIHB), Monitoring
Result Signal (RSVx,RSPs), Safety check Request
Signal (*VLDVx,*VLDPs) ...........................................180
Guard Open Request Signal (ORQ) ..............................179
<H> HARDWARE COMPONENTS....................................226
Hardware Components for Other Units.........................227
<I> I/O SIGNALS..................................................................79
Important Items to Check Before Using the Safety
Function ..........................................................................15
Initial Start-up ...............................................................150
INSTALLATION............................................................70
<L> Latent error detection and cross-check..............................7
<M> MANDATORY STANDARDS AND DIRECTIVES...241

INDEX B-64303EN-4/01
i-2
MCC Off Signal (*MCF,*MCFVx,*MCFPs,*DCALM),
MCC Contact State Signal (*SMC) ..............................184
MCC OFF TEST.............................................................34
MCC off Test of the Safe Stop Function.........................15
MCC OFF TEST STATUS SCREEN...........................162
Monitoring of the Excitation-Off Signal .................... 47,55
<N> NOTE ON 2-PATH CONTROL (T SERIES)...............108
<O> OVERALL CONNECTION DIAGRAM........................71
<P> PARAMETER LOCK FUNCTION................................39
Parameters........................... 109,115,192,198,203,215,221
PREFACE ......................................................................p-1
PROFIBUS-DP PARAMETER SETTINGS.................145
PROGRAMMABLE SAFETY I/O SIGNAL................107
<R> RAM CHECK FUNCTION ............................................44
Related Safety Standards...................................................2
Remaining risks.................................................................8
REPRESENTATION OF PARAMETERS...................112
Restrictions................................................................. 53,62
Risk Analysis and Evaluation ...........................................3
Rotating the Spindle Manually in the Emergency Stop
State ..............................................................................185
<S> SAFE MACHINE POSITION MONITORING ..............32
SAFE MACHINE POSITIONING MONITORING
SCREEN .......................................................................170
SAFE SERVO STOP FUNCTION .................................46
SAFE SPEED MONITORING .......................................30
SAFE SPINDLE STOP FUNCTION..............................54
SAFE STOP MONITORING..........................................45
SAFE-RELATED I/O SIGNAL MONITORING ...........19
SAFETY BRAKE SIGNAL OUTPUT FUNCTION ......42
SAFETY FUNCTIONS ..................................................12
Safety monitoring cycle and cross-check cycle ................7
SAFETY POSITION ERROR MONITORING
SCREEN .......................................................................171
SAFETY POSITION SWITCH FUNCTION..................37
SAFETY RELATED PARAMETERS CHECK
FUNCTION ....................................................................39
SAMPLE CONFIGURATION......................................176
SAMPLE CONNECTIONS ..........................................178
SAMPLE SYSTEM CONFIGURATION.....................175
SEFETY POSITION ERROR MONITORING
FUNCTION.....................................................................40
Sequence .......................................................................224
Series (2nd and Subsequent Machines) Startup.............152 Series 0i-MODEL D......................................................226
SERVO..........................................................................244
SERVO AMPLIFIER....................................................231
Servo Encoder – Speed / Position Feedback Sensor
Embedded in Motor.......................................................244
Servo Motors – Driven by FANUC / GE Fanuc Servo
Amplifier .......................................................................244
Signal address.................................... 192,198,203,214,220
SIGNAL ADDRESS .......................................................81
Signals............................................... 191,197,202,213,219
SIGNALS........................................................................87
SOFTWARE .................................................................230
Specifications .................................... 189,196,200,212,218
Spindle Encoder – Speed / Position Feedback Sensor
Embedded in Motor.......................................................243
Spindle Motors – Driven by FANUC / GE Fanuc
Spindle Amplifier..........................................................243
SPINDLE ORIENTATION...........................................218
SPINDLE OUTPUT CONTROL BY THE PMC..........195
SPINDLE POSITIONING (T SERIES) ........................199
SPINDLES ....................................................................243
STANDARD PARAMETER STTING TABLES .........113
START-UP....................................................................147
START-UP OF THE SAFETY FUNCTION ................150
START-UP OPERATION ............................................148
STOP...............................................................................16
Stop States.......................................................................17
Stopping the Servo Motor ...............................................17
Stopping the Spindle Motor ............................................16
Suspension and Restart of Brake Test .............................67
SYSTEM CONFIGURATION........................................11
<T> Test Mode Signal (OPT) ...............................................179
Troubleshooting ............................................................152
<U> User Ladder Processing..............................................49,57

Rev
isio
n R
ecor
d
FAN
UC
Ser
ies
0i-M
OD
EL
D D
ual C
heck
Saf
ety
CO
NN
EC
TIO
N M
AN
UA
L (B
-643
03E
N-4
)
01
D
ec.,
2008
__
____
____
____
____
____
____
____
____
____
___
Edi
tion
Dat
e C
onte
nts
Edi
tion
Dat
e C
onte
nts

B-64303EN-4/01
* B - 6 4 3 0 3 E N - 4 / 0 1 *