Data-Viewer Web Part for SharePoint 2007
26
Overview System Requirements Installation Configuration Using the Data - Viewer Web Part Licensing and Activation About the Setup Program Installing the Data - Viewer Web Part Upgrading the Data - Viewer Web Part Manually Activating the Product Feature for a Site Collection Locating the Error Log File(s) Uninstalling the Data - Viewer Web Part Manually Installing or Uninstalling the Data - Viewer Web Part Installed Files and Code Access Security Before installing the product, read the Installing the Product section of the Online Documentation and review KB.12464: Best Practices for Installing Bamboo Products . To access the Setup program: 1. Download the self-extracting product EXE from the storefront and save it to a local folder on the SharePoint server. 2. Double-click the product EXE file to extract the contents of the product download. 3. The Setup program will automatically start. To start the Setup program manually, double-click the Setup.bat file in the root of the folder where the product files were extracted. The Setup program may look different for different product versions. See examples below of the two Setup programs that are currently in use. Both versions of the Setup program work the same way. Note: The minimum screen resolution to view the Setup program is 1024x768. The Setup program contains links to each product component under the Components header on the left. Click on any of these links to view a description of the component on the right. The component description contains important information about where to install the component and the required permissions for the installation account. Read this information carefully before proceeding. Each product may have several components, which fall into the following categories: Prerequisites: Some products include prequisite components that must be installed before the Bamboo product core components. Not all products will have prerequisites. Examples of prerequisites include the Shared Assemblies Library, Microsoft AJAX Extensions, and Bamboo AJAX Config. Core Components: The product will include one or more core components that are required for the Bamboo product to work. Optional Items: Optional items provide additional features or functionality but are not required to use the Bamboo product. Not all products will have optional items. Examples of optional items include the MashPoint Runtime Components and sample ASP.NET applications. Data-Viewer Web Part for SharePoint 2007 Release 3.2 (HW37) System Requirements Operating System Microsoft Windows Server 2003 and 2008 Server SharePoint Release 3: - Microsoft Windows SharePoint Services 3.0 or Microsoft Office SharePoint Server 2007 With Service Pack 2 - Microsoft .NET Framework 2.0 or 3.0 Browser Microsoft Internet Explorer 7 or higher Installation About the Setup Program
Transcript of Data-Viewer Web Part for SharePoint 2007

� Overview
� System Requirements
� Installation
� Configuration
� Using the Data-Viewer Web Part
� Licensing and Activation
� About the Setup Program
� Installing the Data-Viewer Web Part
� Upgrading the Data-Viewer Web Part
� Manually Activating the Product Feature for a Site Collection
� Locating the Error Log File(s)
� Uninstalling the Data-Viewer Web Part
� Manually Installing or Uninstalling the Data-Viewer Web Part
� Installed Files and Code Access Security
Before installing the product, read the Installing the Product section of the Online Documentation and review KB.12464: Best Practices for Installing Bamboo
Products.
To access the Setup program:
1. Download the self-extracting product EXE from the storefront and save it to a local folder on the SharePoint server.
2. Double-click the product EXE file to extract the contents of the product download.
3. The Setup program will automatically start. To start the Setup program manually, double-click the Setup.bat file in the root of the folder where the
product files were extracted.
The Setup program may look different for different product versions. See examples below of the two Setup programs that are currently in use. Both versions of the
Setup program work the same way.
Note: The minimum screen resolution to view the Setup program is 1024x768.
The Setup program contains links to each product component under the Components header on the left. Click on any of these links to view a description of the
component on the right. The component description contains important information about where to install the component and the required permissions for the
installation account. Read this information carefully before proceeding.
Each product may have several components, which fall into the following categories:
� Prerequisites: Some products include prequisite components that must be installed before the Bamboo product core components. Not all products will have
prerequisites. Examples of prerequisites include the Shared Assemblies Library, Microsoft AJAX Extensions, and Bamboo AJAX Config.
� Core Components: The product will include one or more core components that are required for the Bamboo product to work.
� Optional Items: Optional items provide additional features or functionality but are not required to use the Bamboo product. Not all products will have optional
items. Examples of optional items include the MashPoint Runtime Components and sample ASP.NET applications.
Data-Viewer Web Part for SharePoint 2007
Release 3.2 (HW37)
System Requirements
Operating System Microsoft Windows Server 2003 and 2008
Server SharePoint Release 3:
- Microsoft Windows SharePoint Services 3.0 or Microsoft Office SharePoint Server 2007 With
Service Pack 2
- Microsoft .NET Framework 2.0 or 3.0
Browser Microsoft Internet Explorer 7 or higher
Installation
About the Setup Program

� Licensing: All products will include the Bamboo Web License Manager or Bamboo License Manager. Licensing is required to activate a product license. It is not
required during 30-day product trials.
� Help: The Setup program also contains links to the Online Documentation and the Installation and Licensing Quick Start Guide. Links to other product-related
resources, like the Bamboo Knowledge Base, may also be included.
After reviewing the installation location and required installation permissions for a component, click the Install button at the bottom of the Setup screen to install
it. If the product includes multiple components, click the Install button for each component.
Click the Home icon to return to the Setup main page.
About the extracted product files:
The extracted product files include the file Setup.bat, which launches the Setup program, and may also include the following folders:
� \[Product].wsp: Contains the solution deployment file for this product. There may be more than one product WSP folder, depending on the
product.
� \docs: Contains the Installation and Licensing Quick Start Guide.
� \msi : Contains installation executables for this product.
� \res: Contains files required by the Setup program.
� There may be other folders, depending on the requirements for the product.
Read all of the following information before installing the product:
� Recommendations for a Successful Installation
� Installation Location
� Required Installation Permissions
� Installation Instructions
Follow these guidelines to ensure a successful installation:
1. Back up your system.
2. Make sure that your system meets the requirements listed in the System Requirements section.
3. Review KB.12464: Best Practices for Installing Bamboo Products before installing any product.
4. Review the Installation Location and Required Installation Permissions for each product before installing it.
5. Stop the World Wide Web Publishing Service before installation.
TOP
If you are installing a Bamboo product in a SharePoint farm environment, make sure to start the installation on the correct server. The required installation location
is listed in the Setup program in the description for each component.
Most Bamboo products must be installed on one Web front-end (WFE) server in the SharePoint farm where the Windows SharePoint Services Web Application
service is running. Check Central Administration > Operations > Topology and Services for a list of servers running this service. The product will
automatically be deployed to all other WFE servers in your farm.
TOP
Required installation permissions are listed in the Setup program in the description for each component. For most Bamboo products, the installation account must
have the following permissions:
� Member of the local server Administrators group
� Member of the SharePoint Farm Administrators group
� Site collection administrator (for automatic feature activation)
TOP
Stop! If you are upgrading from a previous version of the same product, make sure to check for important information in Upgrading from Previous Versions
before installing.
1. If the Setup program is not already running, double-click the Setup.bat file in the root of the product folder to launch it.
2. Select the product component in the Setup program. Verify the installation location and required permissions and then click Install.
3. Click Next to begin the installation. Verify that the system checks pass successfully, then read and accept the End-User License Agreement.
4. In the Deployment Targets screen, select the Web application(s) where you want to install the product. Leave the Automatically activate features option
checked to activate product features during installation. Click Next to begin installation.
Note: If you prefer to activate product features manually after installation, uncheck the Automatically activate features option, then read Manually
Installing the Product
Recommendations for a Successful Installation
Installation Location
Required Installation Permissions
Installation Instructions
Activating the Product Features in the Online Documentation.
5. When installation is complete, review the summary screen to confirm that the product installed successfully. Click Close.
TOP
If you have already installed an older version of this product and you want to install the new version, then you will need to perform the following upgrade
procedure.
To upgrade:
1. Double-click the product EXE file.
2. Select the component you want to upgrade, then click the Install button.
3. Click Next to perform system checks.
4. Click Next after the system checks have completed, then select the Repair/Upgrade option, and click Next.
5. After the component has been upgraded successfully, click Finish.
Product feature activations can be done automatically at the site collection level when the product is installed. There are several reasons why you may need to
manually activate (or deactivate) Bamboo product features:
� You opted out of automatic feature activation during installation.
� You add a new site collection and want to add Bamboo features to it.
� You want to remove Bamboo product features from an existing site collection.
To manually activate (or deactivate) Bamboo product features, follow the instructions below.
Note: You must be a SharePoint site collection administrator to activate or deactivate features. Site collection administrators are assigned in SharePoint Central
Administration.
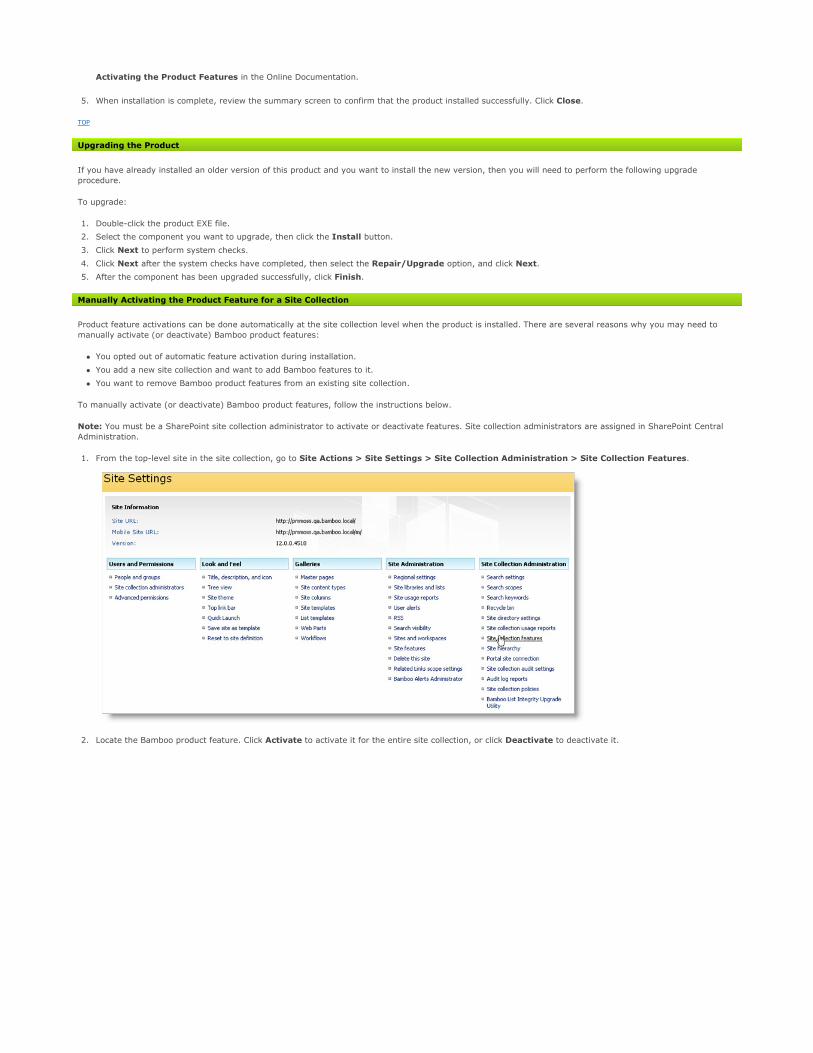
1. From the top-level site in the site collection, go to Site Actions > Site Settings > Site Collection Administration > Site Collection Features.
2. Locate the Bamboo product feature. Click Activate to activate it for the entire site collection, or click Deactivate to deactivate it.
Upgrading the Product
Manually Activating the Product Feature for a Site Collection

Errors for this product are logged to %SystemDrive%\Windows\Temp\BambooSolutions\bsc_bamboo_%processid%.log on the server in the SharePoint farm
running the Windows SharePoint Services Web Application service. Refer to Topology and Services in SharePoint Central Administration for a list of servers
running this service.
1. Double-click the the product EXE file.
2. From the Setup program, click the product component button under the Components section, and then click Install.
3. The program performs the system checks again. Once that has successfully completed, the program prompts you to Repair/Upgrade or Remove the solution.
Select Remove, and click Next.
� Manual Product Installation
� Manual Product Uninstallation
WARNING: Bamboo recommends using the Setup program to install product components whenever possible. The Setup program is designed to ensure a successful
product installation. Manual installation may lead to unexpected behavior during product configuration, licensing, or use, especially if your SharePoint environment
contains issues normally detected and resolved when running the Setup program.
The exact steps for manual installation will vary depending on the version of SharePoint the product is for, your SharePoint environment, and the individual product
features. The information provided here includes general instructions for most product installation scenarios you may encounter. Read all sections carefully
before manually installing a product.
� About the Installation Files
� Important Notes About Manual Installation
� Manually Starting a Component Setup Application
� Manually Installing and Deploying a Product Solution (WSP)
� Manually Installing a Product MSI
TOP
When you extract the product EXE, several folders are created that contain installation files and Setup program configuration files. For manual installation, you will
be accessing the following folders that contain installation files:
� \[Component].wsp - There may be several folders ending in .wsp, depending on your product. Each WSP folder contains the installation files for a SharePoint
solution.
� \msi - The MSI folder may contain multiple files ending in .msi. Each .msi file is a single Windows installer package.
TOP
Locating the Error Log Files
Uninstalling the Product
Manual Product Installation and Uninstallation
Manual Product Installation
About the Installation Files
Important Notes About Manual Installation

� Bamboo Web License Manager: If a product includes Bamboo Web License Manager (\Bamboo.Web.Licensing.wsp), add the solution to the solution store
on the server running the Central Administration service, and deploy the solution to the Central Administration Web application.
� Shared Assemblies Library (SharePoint 2007): If a product includes the Shared Assemblies Library (\msi\Bamboo.Core.V1.2.msi), you must install the
MSI on all Web front-end servers in the farm.
� Microsoft AJAX Extensions (SharePoint 2007): If a product includes the Microsoft AJAX Extensions (\msi\ASPAJAXExtSetup.msi), you must install the
MSI on all Web front-end servers in the farm.
� Bamboo AJAX Config (SharePoint 2007): If a product includes the Microsoft AJAX Extensions, the Bamboo AJAX Config (\Bamboo.AJAX.Config.wsp)
solution must also be deployed. Deploy the solution to all Web applications in the farm where the product will be installed. You may also need to deploy this
solution to the Central Administration Web application. Consult the Online Documentation for your product for more information.
� \msi\*.x64.msi: Some MSI installers in the \msi installation folder have a 32-bit version and a 64-bit version. The 64-bit version will include .x64 in the file
name. Run the version of the MSI that is appropriate for your operating system. Do not install both.
� PackInstallation.wsp: Some products include an installation folder called PackInstallation.wsp. This folder is not needed during the manual installation
process and can be ignored.
TOP
For your convenience, each component Setup application can be started directly from the Bamboo Setup program. The Bamboo Setup program can be started by
double-clicking the file Setup.bat in the root of the extracted product folder.
If you prefer to start an individual product component Setup from the product installation folder instead of from the Bamboo Setup program, navigate to its
installation folder and double-click the \[Component].wsp\Setup.exe or \msi\[Component].msi file. The installation wizard for that component will start.
Follow the installation instructions provided in the Online Documentation for your product.
For example: To install and deploy just the Bamboo AJAX Config component from the product installation folders, navigate to the \Bamboo.AJAX.Config.wsp
folder and double-click the file Setup.exe.
If you start a component Setup application this way, you do not need to follow instructions for Manually Installing and Deploying a Product Solution.
TOP
Before installing, stop the World Wide Web Publishing Service (W3SVC). This will ensure that no system files that need to be updated are locked, which may
cause the installation to fail.
Your product may include several SharePoint solutions in multiple \[Component].wsp installation folders. Follow all steps in this section for each solution.
The instructions in this section use the stsadm.exe command, which can be found in the following location:
� SharePoint 2007: %PROGRAMFILES%\Common Files\Microsoft Shared\Web Server Extensions\12\BIN
� SharePoint 2010: %PROGRAMFILES%\Common Files\Microsoft Shared\Web Server Extensions\14\BIN
Step 1: Add the solution to the SharePoint solution store
Perform this step on one server in your SharePoint farm running the SharePoint 2007 Windows SharePoint Services Web Application service or the SharePoint
2010 Microsoft SharePoint Foundation Web Application service. Use an account that is a member of the local server Administrators group.
Note: For the Bamboo Web License Manager solution (\Bamboo.Web.Licensing.wsp), perform these steps on a server running the Central Administration
service.
� Run the following command to add each SharePoint solution to the solution store:
stsadm.exe -o addsolution -filename [path]\[Component].wsp\cab\[Component].wsp
[path] - the path to the extracted installation folders
[Component] - the name of the component you are installing, as shown in the installation folder. The name of the component in the cab sub-folder may be
different than the installation folder name.
Step 2: Deploy the SharePoint solution
After installing a SharePoint solution, it must be deployed to one or more Web applications. This section provides instructions for deploying from the command line
or from SharePoint Central Administration. Pick the method that best fits your requirements.
Option 1: Command-line Deployment
Perform these steps on one server in your SharePoint farm running the SharePoint 2007 Windows SharePoint Services Web Application service or the
SharePoint 2010 Microsoft SharePoint Foundation Web Application service. Use an account that is a member of the local server Administrators group.
Note: For the Bamboo Web License Manager solution (Bamboo.UI.Licensing.wsp), perform these steps on a server running the Central Administration service.
1. Schedule the solution for deployment to the SharePoint solution store using one of the options below.
� Deploy a solution to a specific Web application (repeat for multiple Web applications):
stsadm.exe -o deploysolution -name [Component].wsp -immediate -url [http://WebApplicationUri:portNumber]
-allowGacDeployment -allowCasPolicies
[Component] - the name of the component you installed, as shown in the cab installation sub-folder
Manually Starting a Component Setup Application
Manually Installing and Deploying a Product Solution (WSP)
[http://WebApplicationUri:portNumber] - the URL and Port for the target Web application
� Deploy a solution to all Web applications EXCEPT the Central Administration Web application:
stsadm.exe -o deploysolution -name [Component].wsp -immediate -allcontenturls
-allowGacDeployment -allowCasPolicies
[Component] - the name of the component you installed, as shown in the cab installation sub-folder
2. Execute the deployment job on each Web front-end server in the farm:
stsadm.exe -o execadmsvcjobs
Option 2: Deployment from SharePoint Central Administration
Perform these steps using an account that is a member of the SharePoint Farm Administrators group.
1. SharePoint 2007: In SharePoint Central Administration, click the Operations link. In the Global Configuration section, click the Solution Management link.
SharePoint 2010: In SharePoint Central Administration, click the System Settings link. In the Farm Management section, click the Manage farm solutions
link.
2. Click on the name of the solution you just installed.
3. Click the Deploy Solution link.
4. Select the Web application to deploy to and a deployment schedule, and then click OK.
Step 3: Manually Activate the Product Feature
After the Bamboo product solution is deployed, it must be activated in each site collection before it can be used.
Perform these steps using an account that is a SharePoint site collection administrator.
1. From the top-level site in the site collection, go to Site Actions > Site Settings > Site Collection Administration > Site Collection Features.
2. Locate the Bamboo product feature and click Activate to activate it for the entire site collection. Some products have more than one feature. Refer to the
Online Documentation for your product for more information about manual feature activation.
TOP
Your product may include several components in the \msi installation folder, in addition to or instead of SharePoint solutions. Double-click on each MSI file to install
it.
MSI files must be installed on each server where the product is installed. Read the Important Notes About Manual Installation section for information about specific
MSI files included with Bamboo products.
Note: Some MSI installers in the \msi installation folder have a 32-bit and 64-bit version. The 64-bit version will include .x64 in the file name. Run the version of
the MSI that is appropriate for your operating system. Do not install both.
If you prefer to run the MSI installer from the command line, refer to the Microsoft TechNet article Msiexec (command-line options) for installation options.
TOP
Products may include a combination of SharePoint solutions (WSPs) and components installed using an MSI installer. Refer to the original installation files for
information about the components that may have been installed. To manually uninstall a product component, read the following sections:
� Manually Uninstalling a SharePoint Solution
� Manually Uninstalling a Product MSI
� After Uninstalling a Product
Your product may include several SharePoint solutions. Follow all steps in this section for each solution that you want to uninstall.
For command-line uninstallation, you will need the name of the SharePoint solution that was deployed. This can be found in the cab installation sub-folder for a
component.
The instructions in this section use the stsadm.exe command, which can be found in the following location:
� SharePoint 2007: %PROGRAMFILES%\Common Files\Microsoft Shared\Web Server Extensions\12\BIN
� SharePoint 2010: %PROGRAMFILES%\Common Files\Microsoft Shared\Web Server Extensions\14\BIN
To uninstall a SharePoint solution from the command line:
1. Schedule the solution to be retracted from the Web application (Example 1) or from all Web applications EXCEPT Central Administration (Example 2):
Example 1: stsadm.exe -o retractsolution -name [Component].wsp -immediate -url [http://WebApplicationUri:Port]
Example 2: stsadm.exe -o retractsolution -name [Component].wsp -immediate -allcontenturls
Manually Installing a Product MSI
Manual Product Uninstallation
Manually Uninstalling a SharePoint Solution

[Component] - the name of the installed component, as shown in the cab installation sub-folder
[http://WebApplicationUri:portNumber] - the URL and Port for the Web application where the solution is installed
2. Execute the retraction job on each Web front-end server in the farm:
stsadm.exe -o execadmsvcjobs
3. Delete the solution from the SharePoint solution store only AFTER the retraction job is complete:
stsadm.exe -o deletesolution -name [Component].wsp
[Component] - the name of the installed component, as shown in the cab installation sub-folder
Additional Information:
� The Bamboo AJAX Config and Bamboo Core solutions may be used by multiple Bamboo products. Do not uninstall them unless you are certain they are no
longer in use.
TOP
If a product was installed using an MSI installer, it will be listed in the installed Programs and Features list in the Control Panel. To uninstall it, click on the name
of the program and click Uninstall.
If you prefer to uninstall the MSI from the command line, refer to the Microsoft TechNet article Msiexec (command-line options) for installation options.
Additional Information:
� The Bamboo Core and Microsoft AJAX Extensions may be used by multiple Bamboo products. Do not uninstall these unless you are certain they are no longer
used.
� Some product MSIs, like Bamboo Core and Microsoft AJAX Extensions, are installed on all Web front-end servers in the farm. To completely uninstall these
components, you must uninstall them from each Web front-end server where they were installed.
TOP
Uninstalling a product will not remove product-related Web Parts from SharePoint site pages. To remove a Web Part from a page after a product is uninstalled:
1. On the page that contains the Web Part, go to Site Actions > Edit Page.
2. Click the Edit menu for the Web Part and select Delete.
3. Exit Edit Mode to save the page.
TOP
The following files are installed as part of the Bamboo Data-Viewer Web Part package:
The installation process also updates your web.config file. If you cannot install the Web Part using the automated process and plan to install it manually, be sure to
add the following to your web.config file:
< SafeControl Assembly="Bamboo.SPGridView, Version=1.0.0.0, Culture=neutral, PublicKeyToken=2cc91efae2d531be" Namespace="Bamboo.WebParts"
TypeName="*" Safe="True" />
The following PermissionSet and CodeGroup markup may be installed by wppackager. For complete details on code access permissions within SharePoint, read the
code access security whitepaper listed in the References section.
If you must install this Web Part manually, the following security is needed if a custom security policy file is to be implemented:
Uninstalling a Product MSI
After Uninstalling a Product
Installed Files
Filename Type Purpose
Bamboo.SPGridView.dll Assembly Web Part Assembly
Bamboo.Licensing.dll Assembly Licensing Assembly installed in the GAC
Bamboo.SPGridView.wsp In case you need to install this Web Part
manually.
Code Access Security
Class Name Version Public Key Blob
StrongNameMembershipCondition Bamboo.SPGridView 1 0x002400000480000094000000060200000024000052534131000400000100010099189C71722AEBE6ADF12BF1FF2828C9DC20BFB75D
StrongNameMembershipCondition Bamboo.Licensing 1 0024000004800000940000000602000000240000525341310004000001000100A76FDA645D3FCF461C428E0112290EABE802951AFA07
Permission Custom Setting
System.Data.SqlClient.SqlClientPermission Unrestricted="true"
System.Web.AspNetHostingPermission Level="Medium"
System.Security.Permissions.FileIOPermission Unrestricted="true"
System.Security.Permissions.RegistryPermission Unrestricted="true"
System.Security.Permissions.ReflectionPermission Flags="3"
SecurityPermission Flags="Execution, ControlThread, ControlPrincipal,
UnmanagedCode"
SharePointPermission ObjectModel="True"
WebPartPermission Connections="True"

To set up your own custom security policy, refer to the following links for more information.
The Bamboo Solutions FAQ at:
� http://store.bamboosolutions.com/KB/attachments/SharePoint%20WP-CAS%20FAQ-GUID0e4c183d940f4138baa254aa9db73e40.pdf
� http://msdn.microsoft.com/library/default.asp?url=/library/en-us/odc_SP2003_ta/html/sharepoint_wsscodeaccesssecurity.asp
� Adding the Data-Viewer Web Part to a Page
� Configuring the Data-Viewer Web Part
� Styling the Data-Viewer Web Part
� Localizing the Data-Viewer Web Part
After the product is installed, it is available in the Virtual Server Gallery. Users with the Designer or Full Control permission levels can add the Web Part to web site
pages.
To add the Web Part to a page:
1. On a web site page, click Site Actions in the upper right corner.
2. Select Edit Page.
3. Find the zone where you want to install the Web Part and click Add a Web Part.
4. From the Add Web Parts window, find and select the product check box, and then click Add.
To create a new Data-Viewer Web Part grid view, add the Bamboo Data-Viewer Web Part to a page and modify the Web Part properties. The following settings
are available for the Data-Viewer Web Part:
� Data Source and Data Source Settings (Required)
� Available Columns (Required)
� Nested Data Settings
� Group By Settings
� Sort Settings
� Filter Settings
� Conditional Formatting Settings
� Calculated Settings
� Dynamic Settings
� Export Settings
� Item Limit Settings
� Style Settings
� Language Settings
� Scrollbar Settings
� Asynchronous Page Load
� Saving the Data-Viewer Web Part Configuration (Required)
Select the type of Data Source you want to connect to and configure the associated Data Source Settings.
� SharePoint List: Select this option to display data from a SharePoint list or library.
� Site: Enter the site containing the list or library you want to display in the Data-Viewer Web Part and click the green arrow to refresh the Master List
System.Net.WebPermission <ConnectAccess><URI uri=".*"/>
</ConnectAccess>
System.Security.Permissions.EnvironmentPermission Read="TEMP;TMP;USERNAME;OS;COMPUTERNAME"
Configuration
Adding the Web Part to a Page
Configuring the Data-Viewer Web Part
Data Source and Data Source Settings (Required)

drop-down with the lists and libraries from that site. You can enter the site URL as a static URL (http://domain/site) or a relative URL (./site). Note:
Relative URLs should be used for SharePoint Web applications containing multiple Alternative Access Mappings (AAM) or if the Web Part is part of a site
template.
� Master List: Select a SharePoint list or library to include in the Data-Viewer Web Part. This list acts as a master list when you choose to display nested
child list data in the Web Part.
� List View: Select an available list view to apply filter settings configured for the selected list or library. See the Filter Settings section below for more
information.
� SQL Server: Select this option to display data from a SQL table or view.
� Server Name: Enter the name of the SQL server instance.
� Database Name: Enter the name of the database you want to connect to.
� Windows Authentication: Select this check box if you want to use the currently logged in user to access the SQL database. You must have enabled
Windows Authentication as the Authentication Mode in SQL Server in order to access the database successfully. If you do not select this check box, then
you must enter a SQL user name and password to access the database. NOTE: Windows Authentication mode is only supported if the SQL Server is on
the same server as the Web front-end server, as would be the case in SharePoint Standalone deployments.
� User Name: Enter a SQL user name that has access rights to the database.
� Password: Enter the SQL password.
� Connect: Click the Connect button to connect to the database and populate the Master Table/View drop-down list.
� Master Table/View: Select a SQL table. This table acts as a master table when you choose to display nested child table data in the Web Part.
� List Rollup: Select this option to display items from a Bamboo List Rollup in the Data-Viewer Web Part. For more information about the Bamboo List Rollup
Web Part, visit the product page or view the Online Documentation.
� List Rollup Type: Select the List Rollup type you want to use. Select List Rollup - Classic Edition if the List Rollup was created using the Bamboo List
Rollup Classic Edition Web Part. Select List Rollup Web Part if the List Rollup was created using the Bamboo List Rollup Schema Designer Web
Part.
� Enter the URL for the page where the Bamboo List Rollup data view/form resides: Enter the appropriate page or site URL for the List Rollup and
click the green arrow to refresh the Master List drop-down with available Data Views or List Rollup Schemas.
� List Rollup - Classic Edition: If the List Rollup was created using the Bamboo List Rollup Classic Edition Web Part, enter the page where the
List Rollup Data View resides. You can enter the page URL as a static URL (http://domain/site/default.aspx) or a relative URL (./site/default.aspx).
Note: Relative URLs should be used for SharePoint Web applications containing multiple Alternative Access Mappings (AAM) or if the Web Part is
part of a site template.
� List Rollup Web Part: If the List Rollup was created using the Bamboo List Rollup Schema Designer Web Part, enter the path to the site where
the Bamboo List Rollup Schema Designer Web Part resides. You can enter the site URL as a static URL (http://domain/site) or a relative URL
(./site). Note: Relative URLs should be used for SharePoint Web applications containing multiple Alternative Access Mappings (AAM) or if the Web
Part is part of a site template.
� Master List: Select the List Rollup Data View or List Rollup Schema you want to display in the Data-Viewer Web Part.

� MashPoint/BDC: Select this option to connect to legacy data using either Bamboo MashPoint or the SharePoint Business Data Catalog (BDC). To enable this
option, install the MashPoint Runtime Components provided with the Data-Viewer Web Part installation package.
TOP
Once you have selected your data source, you must select the columns you want displayed in the Data-Viewer Web Part.
� Select the columns you want to display in the Available Columns list on the left and click the > button to add them to the display column list on the right.
Hold down the SHIFT or CTRL key to select and move more than one column.
� To add all columns to the displayed columns list, click the >> button.
� To remove a column from the list of displayed columns, select the column or columns to remove and click the < button.
� To remove all columns, click the << button.
� To reorder the displayed columns, select a column and click the up or down arrows.
TOP
Nested Data Settings allow you to display child data connected to the master data source. The nested data must exist in the same location as the master data
source and be the same data source type.
� Nested Data Settings for SharePoint List data sources:
� Show Nested Data: Select this check box to show nested SharePoint List data in the Data-Viewer Web Part.
� Child List: Select the child SharePoint List you want to display.
� Child List View: Select an available list view to apply filter settings configured for the selected list or library.
� Child Column: Select the column in the child list that has data that matches the data in the Parent Column field. This creates a link between the two
data sets that enables you to view the nested data in the Data-Viewer Web Part. The Child Column must be the same column data type as the Parent
Column.
� Parent Column: Select the column from the parent (i.e. master) list that has data that matches the data in the Child Column field. This creates a link
between the two data sets that enables you to view the nested data in the Data-Viewer Web Part. The Parent Column must be the same column data type
as the Child Column.
� Child List Available Columns: Select the child list columns that you want to display in the Data-Viewer Web Part. These columns are displayed directly
beneath the master list row in the Web Part. Read Using the Data-Viewer Web Part for more information on using the nested data display features.
� Nested Data Settings for List Rollup data sources:
� Show Nested Data: Select this check box to show nested List Rollup data in the Data-Viewer Web Part.
� Child List: Select the child List Rollup data view you want to display.
� Child Column: Select the column in the child list that has data that matches the data in the Parent Column field. This creates a link between the two
Available Columns (Required)
Nested Data Settings (Optional)

data sets that enables you to view the nested data in the Data-Viewer Web Part.
� Parent Column: Select the column from the parent (i.e. master) list that has data that matches the data in the Child Column field. This creates a link
between the two data sets that enables you to view the nested data in the Data-Viewer Web Part.
� Child List Available Columns: Select the child list columns that you want to display in the Data-Viewer Web Part. These columns are displayed directly
beneath the master list row in the Web Part. Read Using the Data-Viewer Web Part for more information on using the nested data display features.
� Nested Data Settings for SQL Server data sources:
� Show Nested Data: Select this check box to show nested SQL Server data in the Data-Viewer Web Part.
� Child Table: Select the child SQL table you want to display.
� Child Column: Select the column in the child list that has data that matches the data in the Parent Column field. This creates a link between the two
tables that enables you to view the nested data in the Data-Viewer Web Part.
� Parent Column: Select the column from the parent (i.e. master) list that has data that matches the data in the Child Column field. This creates a link
between the two tables that enables you to view the nested data in the Data-Viewer Web Part.
� Child Table Available Columns: Select the child list columns that you want to display in the Data-Viewer Web Part. These columns are displayed
directly beneath the master list row in the Web Part. Read Using the Data-Viewer Web Part for more information on using the nested data display
features.
TOP
Use Group By Settings to group data in the Data-Viewer Web Part by a selected column or field.
� Select a Field: Select a column or field to group the data by in the Data-Viewer Web Part.
� Show Groups in Ascending/Descending Order: Select a sort option for the grouped data.
� By default, show groupings Collapsed or Expanded: Select whether to expand or collapse groups by default.
TOP
Use Sort Settings to sort data in the Data-Viewer Web Part by a selected column or field.
� Select a Field: Select a column or field to sort the data by in the Data-Viewer Web Part.
� Show Items in Ascending/Descending Order: Select a sort option.
TOP
Under Filter Settings, select the Use Filter option to filter the data displayed in the Data-Viewer Web Part.
� Show items when: Select the column or field to filter by, select the comparison operator (i.e. is equal to), and then enter the value to filter on. The filter
value can include the SharePoint variable [Me] to match the currently-logged-in user or [Today] to match the current date.
� Show more filter fields: Click this link to filter by more than one criteria using AND/OR logic.
To use a list view, select the Use List View option.
Group By Settings (Optional)
Sort Settings (Optional)
Filter Settings (Optional)

TOP
You can apply conditional formatting to master data and nested data using the options described below. Note: See the limitations listed below.
� Master Data Formatting and Nested Data Formatting: The Master Data Formatting section is always available and allows you to apply conditional
formatting to data in your data source. The Nested Data Formatting section is only available if you have nested data configured for a data source.
� Format Items When: Select the column and a comparison operator, and then enter the value to match. The filter value can include the SharePoint variable
[Me] to match the currently logged on user or [Today] to match the current date.
� Format Preview: Click the Format Preview box to set formatting options. You can set font color (foreground), background color, underlining, font size,
alignment, and other options.
� Apply background color to entire row: Select this check box to apply the background color to the entire row instead of only the cell that contains the format
criteria.
� Add another conditional format: Click this link to add another condition.
Conditional Formatting Limitations
When applying Conditional Formatting, keep in mind the following limitations:
� Changes to the font color (foreground color) cannot be applied to linked items, such as Person or Group column types, the Lookup column type, and the
Title column with the "linked to item" or "linked to item with edit menu" attribute.
� No formatting is applied to Lookup columns that allow multiple values.
� When applying a background color to a Title column, use the Title column with "linked to item with edit menu".
� When configuring conditional formatting condition using the % Complete column, enter the condition value as a whole number (i.e. 25 for 25% or 10 for
10%).
TOP
The Data-Viewer Web Part can display count, sum, average, max, or min calculated values for any column in the master or child data set.
� Parent Grid Settings and Child Grid Settings: The Parent Grid Settings section is always available and allows you to apply a calculation to a column in
your data source. The Child Grid Settings section is only available if you have nested data configured for a data source.
Conditional Formatting Settings (Optional)
Calculated Settings (Optional)
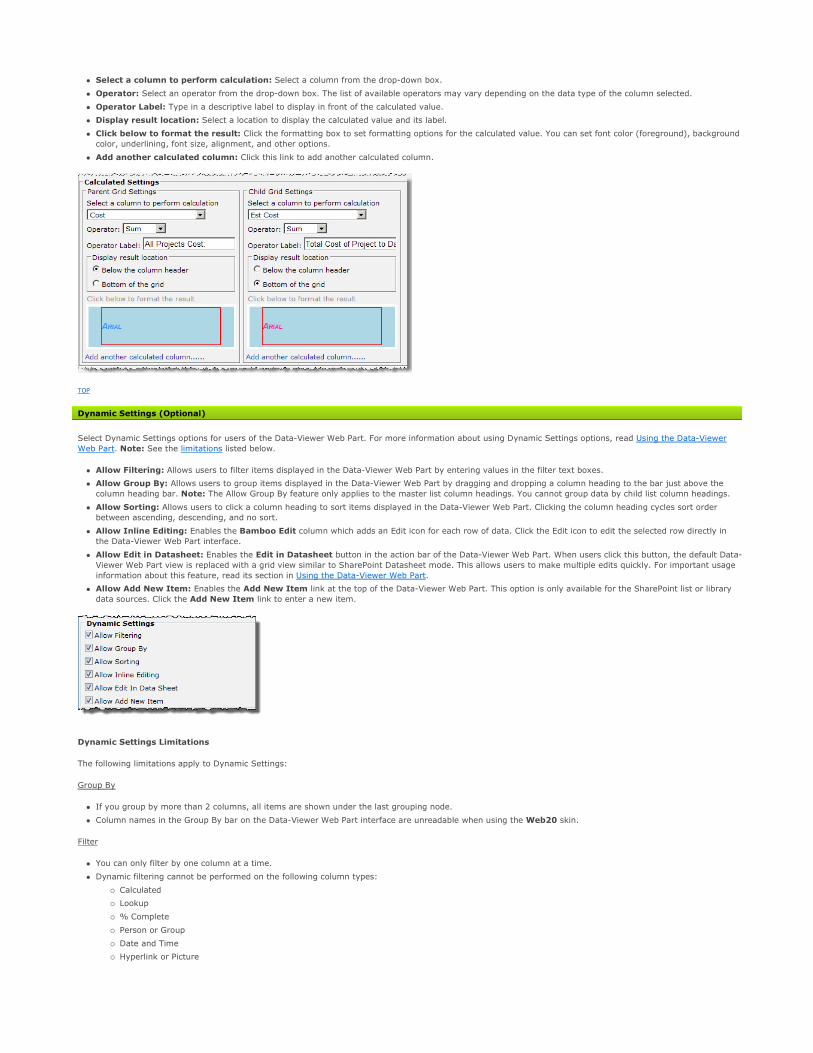
� Select a column to perform calculation: Select a column from the drop-down box.
� Operator: Select an operator from the drop-down box. The list of available operators may vary depending on the data type of the column selected.
� Operator Label: Type in a descriptive label to display in front of the calculated value.
� Display result location: Select a location to display the calculated value and its label.
� Click below to format the result: Click the formatting box to set formatting options for the calculated value. You can set font color (foreground), background
color, underlining, font size, alignment, and other options.
� Add another calculated column: Click this link to add another calculated column.
TOP
Select Dynamic Settings options for users of the Data-Viewer Web Part. For more information about using Dynamic Settings options, read Using the Data-Viewer
Web Part. Note: See the limitations listed below.
� Allow Filtering: Allows users to filter items displayed in the Data-Viewer Web Part by entering values in the filter text boxes.
� Allow Group By: Allows users to group items displayed in the Data-Viewer Web Part by dragging and dropping a column heading to the bar just above the
column heading bar. Note: The Allow Group By feature only applies to the master list column headings. You cannot group data by child list column headings.
� Allow Sorting: Allows users to click a column heading to sort items displayed in the Data-Viewer Web Part. Clicking the column heading cycles sort order
between ascending, descending, and no sort.
� Allow Inline Editing: Enables the Bamboo Edit column which adds an Edit icon for each row of data. Click the Edit icon to edit the selected row directly in
the Data-Viewer Web Part interface.
� Allow Edit in Datasheet: Enables the Edit in Datasheet button in the action bar of the Data-Viewer Web Part. When users click this button, the default Data-
Viewer Web Part view is replaced with a grid view similar to SharePoint Datasheet mode. This allows users to make multiple edits quickly. For important usage
information about this feature, read its section in Using the Data-Viewer Web Part.
� Allow Add New Item: Enables the Add New Item link at the top of the Data-Viewer Web Part. This option is only available for the SharePoint list or library
data sources. Click the Add New Item link to enter a new item.
Dynamic Settings Limitations
The following limitations apply to Dynamic Settings:
Group By
� If you group by more than 2 columns, all items are shown under the last grouping node.
� Column names in the Group By bar on the Data-Viewer Web Part interface are unreadable when using the Web20 skin.
Filter
� You can only filter by one column at a time.
� Dynamic filtering cannot be performed on the following column types:
� Calculated
� Lookup
� % Complete
� Person or Group
� Date and Time
� Hyperlink or Picture
Dynamic Settings (Optional)

Sort
� When sorting on a Number or Currency data type, the data is sorted as a string data type.
Inline Editing
� The Inline Edit form does not currently support the following column types:
� Lookup with multiple values
� Calculated
� Multiple Lines of Text
These items are not displayed in the Inline Edit form.
Edit in Data Sheet
� Multiple lines of text columns configured as Rich text or Enhanced rich text are displayed as plain-text fields with HTML markup in Datasheet mode.
� Values for Lookup, Choice columns configured as Checkboxes (allow multiple selections), and Person or Group columns are displayed with hash values
in Datasheet mode.
TOP
Export Settings allow users to export parent and child data from the Data-Viewer Web Part to Microsoft Excel. Note: See the limitations listed below.
� Allow Export to Excel: Enables the Master Grid Excel Report Export button to export data from the master data source to Microsoft Excel. If nested
child data is configured, the Hierarchy Grid Excel Export button is also displayed, and will export child data to a separate Microsoft Excel workbook.
� Allow Export to MS Project: This feature is only available with the MS Project Integration Web Part in SharePoint Project Management Central.
Export Settings Limitations
� The exported Excel file doesn't retain conditional formatting colors applied in the Data-Viewer Web Part.
� The export function cannot export master and child data to the same Excel workbook. You must export them to separate workbooks.
TOP
Use the Item Limit Settings to set a limit for the number of items displayed per page and the total number of items the Data-Viewer Web Part can display.
� Allow Limiting Items: Select this check box to enable limiting items.
� Number of Items per Page: Enter the number of items to display per page.
� Number of Total Items: Enter the total number of items that can be displayed.
TOP
Use Style Settings to configure the look and feel of the Data-Viewer Web Part.
� Skin: Select from twelve different skins with different color and style themes.
� Custom CSS: Select this option to customize the CSS for the Web Part directly. Click the Custom CSS button to display a window where you can edit the CSS.
Read Styling the Web Part for more information.
TOP
To localize the Data-Viewer Web Part user interface and tool pane settings for your language, follow the instructions provided in Localizing the Data-Viewer Web
Part and then select the appropriate language file in the Language Settings box.
NOTE: The translation options for Spanish, French, German and English are all in English when the product is installed. You must customize the files to translate the
Export Settings (Optional)
Item Limit Settings (Optional)
Style Settings (Optional)
Language Settings (Optional)
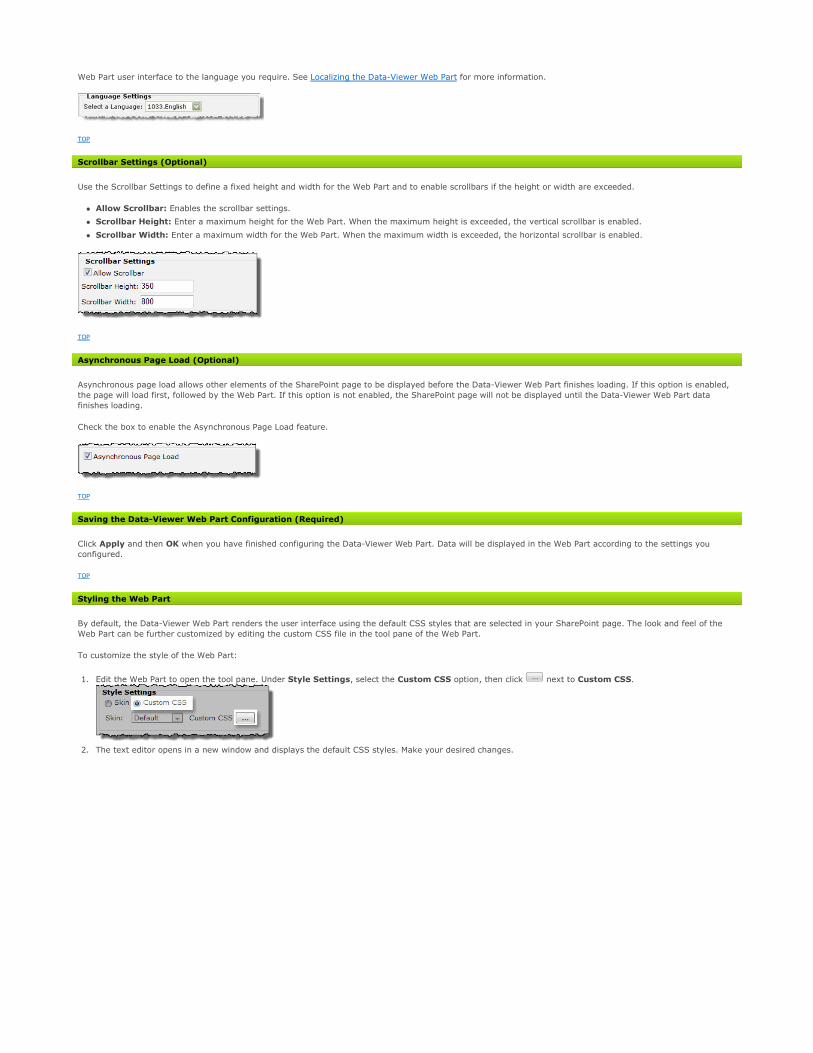
Web Part user interface to the language you require. See Localizing the Data-Viewer Web Part for more information.
TOP
Use the Scrollbar Settings to define a fixed height and width for the Web Part and to enable scrollbars if the height or width are exceeded.
� Allow Scrollbar: Enables the scrollbar settings.
� Scrollbar Height: Enter a maximum height for the Web Part. When the maximum height is exceeded, the vertical scrollbar is enabled.
� Scrollbar Width: Enter a maximum width for the Web Part. When the maximum width is exceeded, the horizontal scrollbar is enabled.
TOP
Asynchronous page load allows other elements of the SharePoint page to be displayed before the Data-Viewer Web Part finishes loading. If this option is enabled,
the page will load first, followed by the Web Part. If this option is not enabled, the SharePoint page will not be displayed until the Data-Viewer Web Part data
finishes loading.
Check the box to enable the Asynchronous Page Load feature.
TOP
Click Apply and then OK when you have finished configuring the Data-Viewer Web Part. Data will be displayed in the Web Part according to the settings you
configured.
TOP
By default, the Data-Viewer Web Part renders the user interface using the default CSS styles that are selected in your SharePoint page. The look and feel of the
Web Part can be further customized by editing the custom CSS file in the tool pane of the Web Part.
To customize the style of the Web Part:
1. Edit the Web Part to open the tool pane. Under Style Settings, select the Custom CSS option, then click next to Custom CSS.
2. The text editor opens in a new window and displays the default CSS styles. Make your desired changes.
Scrollbar Settings (Optional)
Asynchronous Page Load (Optional)
Saving the Data-Viewer Web Part Configuration (Required)
Styling the Web Part

3. Click Save to save your changes.
For additional information, click the links below:
� Data-Viewer Web Part Class Selectors
� Default Data-Viewer Web Part CSS
� Additional References
The Data-Viewer Web Part uses the following class selectors to define each element of the Web Part:
Data Grid (entire grid)
Table Contents and Border
Rows and Alternating Rows
Data-Viewer Web Part Class Selectors

Selected Editing Row
Group Header
Footer Bar

Filter Row
TOP
The default CSS for the Data-Viewer Web Part is listed below:
div.RadGrid_Default
{
border: solid 1px #3b5a82;
font: normal 11px Tahoma, Arial, Verdana, Sans-serif;
text-align: left;
background: white;
}
.RadGrid_Default a
{
color: #000000 !important;
}
.MasterTable_Custom
{
border-collapse: separate !important;
color: #27413e;
}
.MasterTable_Custom th
{
padding-left:4px;
background: SteelBlue !important;
}
.MasterTable_Custom td
{
padding-left:5px !important;
}
.GridHeader_Custom,
.ResizeHeader_Custom
{
font: bold 10px;
background: #d3dbe9 url('Img/GridHeaderBg.gif') repeat-x;
height: 19px;
color: #27413e !important;
border-bottom: solid 1px #9eb6ce;
}
.GridHeader_Custom a
{
color: #27413e !important;
text-decoration: none;
}
.GridRow_Custom,
.GridAltRow_Custom
{
background: YellowGreen;
height: 19px;
}
.GridRow_Custom td,
.GridAltRow_Custom td,
.GridEditRow_Custom td
{
border-right: solid 1px #d0d7e5;
border-bottom: solid 1px #d0d7e5;
}
.GridEditRow_Custom
{
background: #ffffe1;
}
.GridEditRow_Custom input
{
font-size: 11px;
Default Data-Viewer Web Part CSS

}
.GridPager_Custom
{
background: #9ab5db url('Img/GriPagerBg.gif') repeat-x;
height: 15px;
color: white;
}
.GridFooter_Custom
{
background: #fbfbfb;
height: 19px;
color: #666;
}
.GridFooter_Custom td
{
border: solid 1px #fbfbfb;
border-top: 1px solid #637783;
padding:0 4px;
}
.GridFooter_Custom td a
{
color: #666;
}
.GridPager_Custom td a
{
color: #ffffff;
}
.GridPager_Custom td a:hover,
.GridFooter_Custom td a:hover
{
color: #000000;
}
tr.GroupHeader_Custom
{
background: #e4ecf7;
height: 22px;
}
td.GridHeader_Custom input
{
width: auto;
float: left;
border: solid 1px #3b5a82;
background: #fafafa;
font: bold 10px Verdana, Arial, Sans-serif;
color: #989cb0;
height: 14px;
vertical-align:middle;
}
.GridFilterRow_Custom
{
background: Yellow !important;
}
TOP
For additional information and CSS examples, visit http://www.w3schools.com/css/css_reference.asp.
TOP
Bamboo products can display user interface and tool pane text in your local language. To change the language a product displays, perform the steps described
below. Click a link below for detailed information about each step.
1. Customize a language file.
2. Select the customized language file in the product configuration.
There are four language files included with Bamboo products:
� 1031.German.xml
� 1033.English.xml
� 1034.Spanish.xml
� 1036.French.xml
These files are located in the wpresources folder. This folder may be located under the following paths:
Additional References
Localizing Bamboo Products
Customizing Language Files

� \\servername\drive\Inetpub\wwwroot\wss\VirtualDirectories\port\wpresources\[Product]
� \\servername\drive\Program Files\Common Files\Microsoft Shared\web server extensions\wpresources\[Product]
The German, Spanish and French files have not yet been translated; they are still in English. Edit these files directly to provide your own translation of the product
user interface and tool pane text. To make sure that these files are not overwritten when you upgrade the product, copy the default file for the language you want
to the wpresources folder and rename it, for example: CompanyName.1036.French.xml. If you do not rename the files you modify, these files will be overwritten
when the product is upgraded.
To create language files for languages other than German, English, Spanish, or French, copy one of the existing language files and rename it. Then edit the file to
provide your own translation.
The installation program will not remove or overwrite translation files you have created if they are named differently from the default resource files included with
the product. However, product upgrades may require that you modify custom translation files to include new resource strings that were added for the new product
version. The product will display the missing resource string IDs after an upgrade is completed. Copy these resource string IDs from a default language file to your
custom translation file and make the appropriate changes for your language.
The instructions below for changing language file settings apply to Bamboo products with settings configured in the Web Part tool pane or Web Part Settings pop-up
page.
Changing Language Settings in the Web Part Tool Pane
1. Click the edit drop-down arrow on the Web Part title bar and select Modify Shared Web Part.
2. In the Language settings section of the Web Part tool pane, select the language file you want to use.
3. Click Apply and then OK in the Web Part tool pane to apply your changes.
Changing Language Settings in the Web Part Settings Pop-up Page
1. From the Web Part, click the edit drop-down arrow on the Web Part title bar and select Modify Shared Web Part.
2. Click the [Product] Settings button in the Web Part tool pane.
Selecting a New Language File for a Product
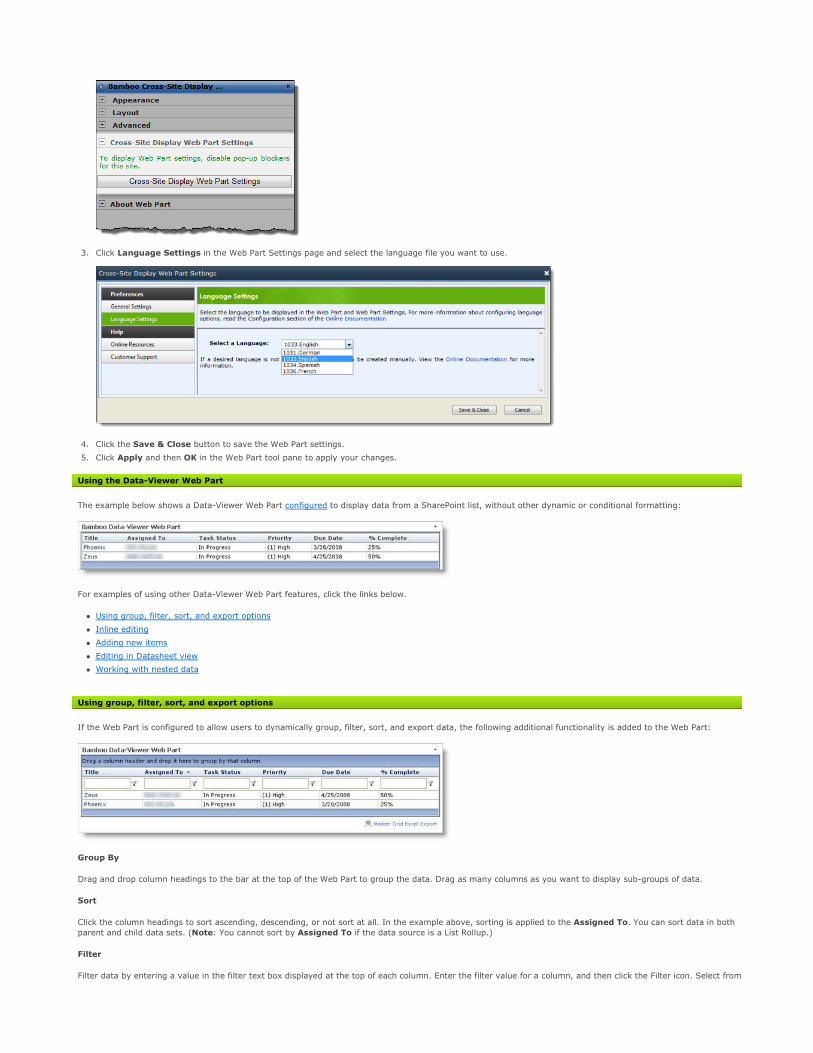
3. Click Language Settings in the Web Part Settings page and select the language file you want to use.
4. Click the Save & Close button to save the Web Part settings.
5. Click Apply and then OK in the Web Part tool pane to apply your changes.
The example below shows a Data-Viewer Web Part configured to display data from a SharePoint list, without other dynamic or conditional formatting:
For examples of using other Data-Viewer Web Part features, click the links below.
� Using group, filter, sort, and export options
� Inline editing
� Adding new items
� Editing in Datasheet view
� Working with nested data
If the Web Part is configured to allow users to dynamically group, filter, sort, and export data, the following additional functionality is added to the Web Part:
Group By
Drag and drop column headings to the bar at the top of the Web Part to group the data. Drag as many columns as you want to display sub-groups of data.
Sort
Click the column headings to sort ascending, descending, or not sort at all. In the example above, sorting is applied to the Assigned To. You can sort data in both
parent and child data sets. (Note: You cannot sort by Assigned To if the data source is a List Rollup.)
Filter
Filter data by entering a value in the filter text box displayed at the top of each column. Enter the filter value for a column, and then click the Filter icon. Select from
Using the Data-Viewer Web Part
Using group, filter, sort, and export options

a list of comparison operators such as equal to, contains, starts with, etc. If you want to change the filter for the data set, enter a new filter value in the same or
another column. Only one filter can be applied to a data set at a time. To remove a filter, click the filter icon and select No Filter.
Export to Excel
Export your master and child data to Microsoft Excel by clicking the Master Grid Excel Export button (to export master data) or the Hierarchy Grid Excel
Export button (to export child data). The Hierarchy Grid Excel Export button will only be available if nested data is displayed in the Web Part.
TOP
If the Allow Inline Editing option is enabled for the Data-Viewer Web Part, a Bamboo Edit column is added as the first column in the view. Click the Edit icon to
edit master data directly in the Data-Viewer Web Part, as shown in the example below.
Note: To edit Person or Group column types, type the name of the person to search for and click the magnifying glass icon.
TOP
If the Allow Add New Item option is enabled for the Data-Viewer Web Part, the Add New Item button is displayed at the top of the Data-Viewer Web Part. Click
this button to enter in new item information in the New Item pop-up form.
Note: This option is available only for SharePoint list and library data sources.
TOP
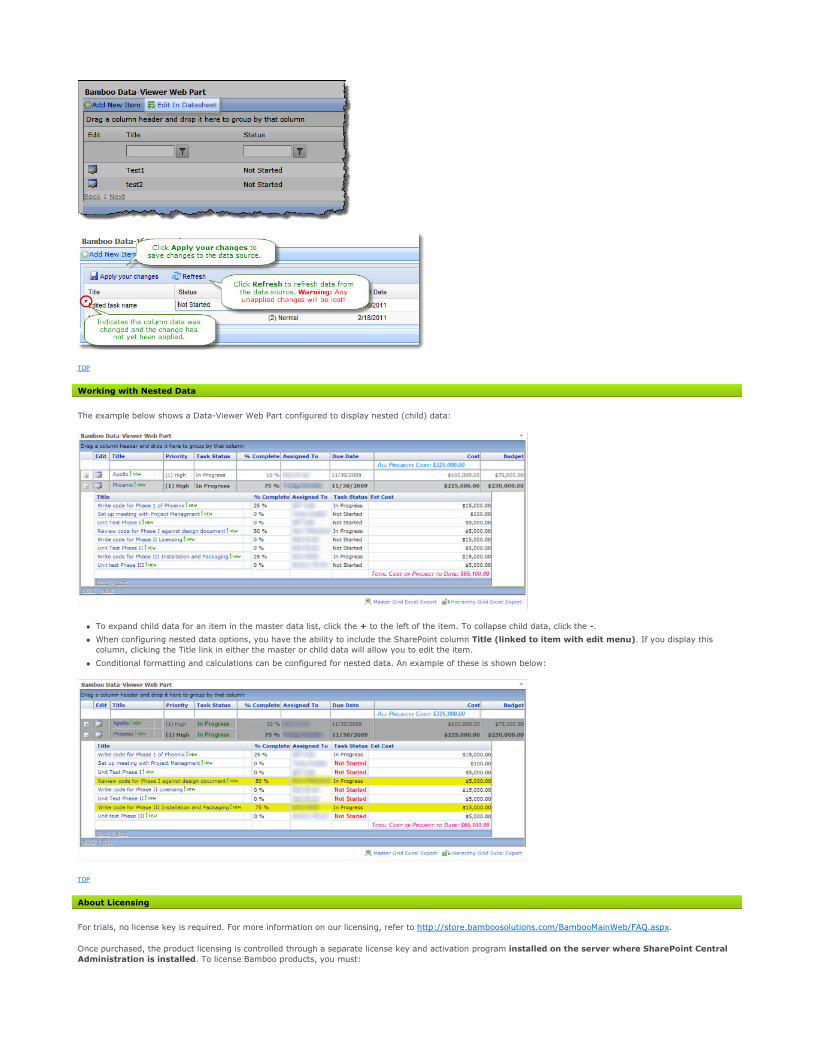
The Data-Viewer Web Part includes a Datasheet view mode to allow quick edits to multiple items. If the Allow Edit in Data Sheet option is enabled, the Edit in
Datasheet button is displayed at the top of the Web Part. Click this button to switch to Datasheet mode, which replaces the default Web Part view with a grid view
similar to SharePoint Datasheet mode.
� To edit a column, click on it and make your changes. Updated columns will be marked with a red triangle in the upper left corner. This indicates that there are
changes that have not yet been saved to the data source.
� When you are finished making changes, click the Apply your changes button at the top of the datasheet to save changes to the data source. Important:
CHANGES WILL NOT BE SAVED until you click Apply your changes.
� To refresh data with any changes that may have been made in the data source, click the Refresh button at the top of the datasheet. Note: Any updates that
were not applied before refreshing will be lost.
� To return to the default Data-Viewer Web Part view, click the Show in Standard View button at the top of the Web Part. Note: Any updates that were not
applied before changing views will be lost.
� Some column types may display with additional markup. Always use the edit features to the right of the value to select or search for new values when changing
these columns. For a list of columns affected, read the Dynamic Settings section in Configuring the Data-Viewer Web Part.
Inline Editing
Adding New Items
Editing in Datasheet View
TOP
The example below shows a Data-Viewer Web Part configured to display nested (child) data:
� To expand child data for an item in the master data list, click the + to the left of the item. To collapse child data, click the -.
� When configuring nested data options, you have the ability to include the SharePoint column Title (linked to item with edit menu). If you display this
column, clicking the Title link in either the master or child data will allow you to edit the item.
� Conditional formatting and calculations can be configured for nested data. An example of these is shown below:
TOP
For trials, no license key is required. For more information on our licensing, refer to http://store.bamboosolutions.com/BambooMainWeb/FAQ.aspx.
Once purchased, the product licensing is controlled through a separate license key and activation program installed on the server where SharePoint Central
Administration is installed. To license Bamboo products, you must:
Working with Nested Data
About Licensing

1. Install the Bamboo Web License Manager on the SharePoint server where SharePoint Central Administration is installed (just install one time - not for each
product that you install).
2. From Bamboo Web License Manager, locate the product you want to activate, enter in your license key(s) and activate the product on the servers you want the
product to run - all from one place. You can activate the license online or via email.
You can also check the licensing status of Bamboo products you installed to determine whether a product trial will soon expire or whether the product has been
deactivated or not.
You must be a machine and SharePoint Farm administrator to install and run the Bamboo Web License Manager.
1. On the server where SharePoint Central Administration is installed, then from the Setup program screen, click the Bamboo Web License Manager component
button, then click Install.
2. Click Next to continue.
3. The program performs some system checks to determine whether your server is ready for installation. Click Next to continue.
4. The program is restricted to only install the Bamboo Web License Manager on the server where it detects the SharePoint Central Administration has been
installed. This Web application should be already selected for you as well as the Automatically activate this feature check box. Click Next to continue.
5. The Bamboo Web License Manager is then installed on the server. Click Next to view a details screen of the installation.
6. Click Close.
For troubleshooting and additional information, see the Knowledge Base or log into My Bamboo.
TOP
1. Open SharePoint Central Administration (make sure you have the proper access rights to log in), click Operations under the Central Administration section of
the left navigation bar.
2. Under the Bamboo Solutions Corporation section, click Bamboo Web License Manager. Note: If you have not yet installed any Bamboo products, the
Web License Manager does not show any products.
Installing the Bamboo Web License Manager
Licensing and Activating the Web Part

3. Expand the Individual Products or Suites section (depending on the product you want to license), locate your product, and click the product name to view
the license status or click the drop-down arrow to Activate/Deactivate or view the Status.
4. Do one of the following:
� If you want to activate the product without viewing the status, click Activate/Deactivate from the drop-down (see screenshot above).
� If you are viewing the licensing Status, then click the status to activate or deactivate the license.
5. Do one of the following:
� To activate online, type or copy and paste the license key into the field provided and click Activate.

� To activate by email, enter the license key and select the Activate by E-mail check box, then click Activate.
6. If you choose to activate by email, click the [email protected] email address and send the License Key and Machine Key to Bamboo Support.
Our Support Team will reply with an activation key that you will then type into the boxes provided. Then click Activate.
7. Your product has now been activated and is ready for use.
8. Optional Step: Click the Choose License Server(s) link. This page allows you to select all the web front end servers you may want to install Bamboo
products on. However, this is optional. Please read the license servers page to determine your selections. Click OK, after you have made your selections.
TOP