Data Projector - PDF.TEXTFILES.COMpdf.textfiles.com/manuals/STARINMANUALS/Sony Video... ·...
43
© 2002 Sony Corporation VPL-PX15/FX51 4-091-024-01(1) VPL-PX15 VPL-FX51 Data Projector お買い上げいただきありがとうございます。 ソフト ェア 、安 のための 意 を らな いと、 を することがあります。 この 扱 に 、 を るための な 意 と の り扱 いかたを してあります。この取扱説明書をよくお読みのうえ、 を お いください。お みになったあと 、いつで られるところに ず保 してください。 取扱説明書(ネットワーク編) Operating Instructions for Networking Instructions en cas de mise en réseau Manual de instrucciones de red Bedienungsanleitung für das Arbeiten im Netzwerk Manuale di rete JP GB FR ES DE IT CS
Transcript of Data Projector - PDF.TEXTFILES.COMpdf.textfiles.com/manuals/STARINMANUALS/Sony Video... ·...

© 2002 Sony Corporation
VP
L-P
X15/F
X51
4-091-024-01(1)
VPL-PX15VPL-FX51
Data Projector
お買い上げいただきありがとうございます。
ソフトウェア製品は、安全のための注意事項を守らないと、健康を害することがあります。
この取扱説明書には、健康を守るための重要な注意事項と製品の取り扱いかたを示してあります。この取扱説明書をよくお読みのうえ、製品をお使いください。お読みになったあとは、いつでも見られるところに必ず保管してください。
取扱説明書(ネットワーク編)
Operating Instructions for Networking
Instructions en cas de mise en réseau
Manual de instrucciones de red
Bedienungsanleitung für das Arbeiten im Netzwerk
Manuale di rete
JP
GB
FR
ES
DE
IT
CS

3 (GB)
GB
...........................................................................................................................................................................................................• Microsoft, Windows and PowerPoint are the registered trademarks of Microsoft Corporation in the United States and/or
other countries.• All other product and company names mentioned herein are trademarks or registered trademarks of their respective owners.• ORiNOCO is a registered trademark of Proxim Corporation.
(continued)
Table of Contents
Before UsingFeatures..................................................................... 5 (GB)Precautions ............................................................... 6 (GB)About This Manual .................................................... 6 (GB)
PreparationPreparations for Using the Networking Function .. 7 (GB)
System Configuration ................................................... 7 (GB)Using the PC Card......................................................... 8 (GB)Setting for Networking Function .................................. 8 (GB)Using the Remote Commander ..................................... 8 (GB)Using the Net Mouse Function ..................................... 8 (GB)
Setting Up the Projector .......................................... 9 (GB)Setting the User Information ......................................... 9 (GB)Setting the System......................................................... 9 (GB)Setting the Date and Clock.......................................... 10 (GB)Setting the On-board LAN .......................................... 10 (GB)Setting Up a Wireless LAN Environment
— when a zero configuration card is used ..............11 (GB)Setting Up a Wireless LAN Environment
— when a VAIO or ORiNOCO wireless LAN PCcard is used ..............................................................11 (GB)
Setting the Password ................................................... 13 (GB)Assigning an Application Software to the FUNCTION Key
on the Remote Commander ................................... 13 (GB)Setting Up from a Computer ....................................... 14 (GB)
Basic Operation Flowcharts .................................. 15 (GB)Operations from the Projector ..................................... 15 (GB)Operations from a Computer....................................... 17 (GB)
OperationOperations from the Projector ............................... 20 (GB)
Preparations ................................................................. 20 (GB)Running a Presentation of a PowerPoint File Using
the Slide Viewer ..................................................... 21 (GB)Projecting an Excel File Using the Worksheet Viewer or
Word File Using the Document Viewer ................. 23 (GB)

4 (GB)
Table of Contents
Running a Slide Show Using the Image Viewer ......... 25 (GB)Connecting to the Internet ........................................... 27 (GB)Using the Remote Desktop Function .......................... 27 (GB)
Operations from a Computer ................................. 28 (GB)Preparations ................................................................. 28 (GB)Starting the browser for accessing the projector ......... 28 (GB)Accessing the projector using the Auto Projector Search
function .................................................................. 28 (GB)Running a Presentation of a PowerPoint File Using
the Slide Viewer ..................................................... 29 (GB)Projecting an Excel File Using the Worksheet Viewer
or Word File Using the Document Viewer ............. 32 (GB)Projecting an Image Using the Image Viewer............. 34 (GB)Using File Manager ..................................................... 37 (GB)Controlling the Projector from a Computer ................ 38 (GB)
OthersMaintenance Function............................................ 39 (GB)
Checking the Indicators on the Projector— when operating from a computer ...................... 39 (GB)
Using the e-Mail Report Function .............................. 39 (GB)Troubleshooting...................................................... 43 (GB)

5 (GB)
Features
Auto Projector Search function
If Windows Me or Windows XP is installed in yourcomputer, you can easily get access to the projector’sWeb browser by double-clicking the correspondingprojector’s icon in the My Network window of thecomputer. You can promptly start a presentation.
Net Mouse function
This function allows you to operate the projector forsetup, run a presentation, etc. with the mouse andkeyboard of a computer by displaying the projectorwindow on the computer.
File Manager
Use of a computer’s Web browser enables you to addfiles stored in the computer to the projector or deletefiles stored in the projector by operating the computer.
Projector information via web browser
You can check the present status of the projector andversion information of the projector on the computerdisplay.
e-Mail Report function
The projector enables the sending of mail that containsthe time of replacement of the projector lamp, erroroccurrence, etc., to the mail addresses that have beenspecified.
SNMP available
When an SNMP (Simple Network ManagementProtocol) is used for the network management, you canalso manage the projector by the SNMP.
Memory function
The projector can store a file imported from acomputer or a memory card.When you store the file, you can create a password toprevent unauthorized people from opening it.
PC card slot incorporated
The projector is equipped with a PC card slot.Inserting the PC memory card, in which data arestored, into this slot allows you to run a presentationeasily without using a computer.
The projector is compatible with networking.Connecting to a Local Area Network (LAN) allowsyou to run a presentation using a file stored in acomputer connected by the same LAN. You can openthe file from a computer located far away from theprojector as well as one in the same conference room.Connecting to the Internet only with the projector isalso available.When you have access to the projector by using theWeb browser of a computer, you can control theprojector from that computer.
Connection to a LAN
The projector is equipped with the ETHER connectorand a PC card slot, which allows you to connect theprojector to LAN by using the LAN cables. Installing awireless LAN PC card to the PC card slot enableswireless LAN connection.
Presentation Viewer
The projector has built-in simple MicrosoftPowerPoint, Microsoft Excel and Microsoft Wordviewer funtions, named Slide Viewer, WorksheetViewer and Document Viewer, respectively. Thefunctions allow you to run a slide show using aPowerPoint file or to project an Excel or Word filewithout any conversion.
Image Viewer
The projector has built-in Image Viewer function,allowing you to view images created in the JPEG,BMP, GIF or PNG format, to set up a slide show, andto run a slide show using the images.
Remote Desktop
This projector is compatible with the Remote Desktopfeature incorporated in Windows XP Professional. Theprojector can access a computer on the same LAN,allowing projection of any file stored on that computer,as if it were in front of you.
Web browser built-in
The Internet Explorer 5.5 or its equivalent is built intothe projector, allowing you to connect to the Internet.
Befo
re Usin
g

6 (GB)
Precautions
CautionBefore you turn off the projector or reset it byusing the supplied Remote Commander, make sureto exit any application software which is running.Otherwise, system damage may occur and you maynot be able to restart the network function.
• Recommended system requirements for the projectorare as follows:– Microsoft Windows 98, Microsoft Windows 98 SE,
Microsoft Windows 2000, Microsoft Windows Me,Microsoft Windows XP Professional
– Suitable browsers are Internet Explorer 5.0 or laterversions.
• The viewers of the projector are compatible withPowerPoint, Excel and Word of Windows Office 97and 2000. However, some features of the applicationsmay not be correctly displayed.
• Make sure to use the specified/recommended wirelessLAN PC card and PC memory card. Also use thespecified/recommended wireless LAN PC card toinstall into the connected computers.Using a device not specified/recommended maycause incorrect operations.
For the specified/recommended devices, see the supplied“Specified/recommended PC Card.”
• To prevent data loss, make backup of data frequently.In no event will Sony be liable for any loss of data.
• Please note that the software specifications aresubject to change without notice.
• Some of the illustrations in this manual may differfrom the actual application software.
About This Manual
This manual explains networking operations of theVPL-PX15 and VPL-FX51 Data Projector.On-line Help files are also available. When you accessthe Web server of the projector, a Help sentence willappear on a computer when you rest the pointer overeach item.You can open the help file of the network projector byclicking Help from the Start menu on the desktop.However, some network features are not supported bythe projector. The Help file for Slide Viewer,Worksheet Viewer, Image Viewer or DocumentViewer opens when you click the button on the toolbar of the respective application window.
Refer to the Operating Instructions of this model foroperations other than networking.
About the supplied softwareThe projector furnishes the software and theaccompanying documentation of Sony and itslicensors.• It is prohibited to modify or disassemble the
software or the accompanying documentation, inwhole or in part, except permission. In addition, itis prohibited to transfer, license or disclose thesoftware, or the accompanying documentation, inwhole or in part, to any third party exceptpermission. Finally, it is prohibited to use thesoftware and the accompanying documentation, inwhole or in part, on any product or system otherthan the projector.
• Sony and its licensors do not warrant that thesoftware or the accompanying documentation willmeet your requirements or that the operation of thesoftware will be uninterrupted or error free.
• Sony and its licensors will not be liable, and youwill have no remedy for damages for any claim ofany kind whatsoever, concerning your use of thesoftware or the accompanying documentation,regardless of legal theory, and whether arising intort or contract. In no event will Sony or itslicensors be liable to you for any special, indirect,incidental, or consequential damages of any kind,including, but not limited to, compensation,reimbursement or damages on account of the lossof present or prospective profits, loss of data, or forany other reason whatsoever concerning your useof the software or the accompanyingdocumentation.
• Software specifications are subject to changewithout notice and may not necessarily be identicalto current retail versions.

7 (GB)
This section describes the tasks that are required forusing the networking function of the projector.
System Configuration
For details on connections, refer to the OperatingInstructions of the projector.
Connecting to LAN using the LAN cables
Connecting to wireless LAN using thewireless LAN access point
Connecting to wireless LAN without usingthe wireless LAN access point (Peer toPeer mode)
Using the memory card
Preparations for Using the Networking Function
LAN cable
LAN cable
LAN cable
Computer
Computer
Computer
toHub/router
Wireless LAN PC card(IEEE802.11b compliant)
Wireless LAN PCcard (IEEE802.11bcompliant)
to Hub/router
Computer
Computer
Wireless LAN PC card(specified)(IEEE802.11b compliant)
Wireless LAN accesspoint (IEEE802.11bcompliant) Projector
Projector
PC memorycard (Type II)
LANcable
ETHERconnector
PC CARD slot
Left side of the VPL-PX15Front of the VPL-FX51
PC CARD slot
Wireless LAN PCcard (IEEE802.11bcompliant)
Computer
PC CARD slot
Wireless LAN PCcard (IEEE802.11bcompliant)
Projector
Prep
aration

8 (GB)
Preparations for Using the Networking Function
Using the PC Card
The PC CARD slot of INPUT B (VPL-PX15) orINPUT C (VPL-FX51) on the projector accepts onePCMCIA Type II PC card. To connect to a LAN, it isnecessary to insert the specified/recommendedwireless LAN PC card into this slot.You can also insert the recommended PC memory cardinto this slot. Storing the file created with MicrosoftPowerPoint, Excel or Word, or the image file in amemory card enables you to project a file or run apresentation without connecting to a computer.
Notes
• Do not turn off the projector or restart the networkprojector while the PC card is writing or reading.
• Be sure to use the specified/recommended wirelessLAN PC card or PC memory card. For the specified/recommended cards, see the supplied “Specified/recommended PC Card.”
• The driver software for the specified/recommendedPC cards is installed into the projector at the factory.Installing any other driver software is not requiredand cannot be done.
For inserting and removing the PC card, refer to theOperating Instructions of the projector.
Setting for Networking Function
To activate the networking function of the projector,do the following setup.
x For VPL-PX15Set INPUT-B FUNC. in the INSTALL SETTINGmenu to ON.
For detailed information, see the Operating Instructions ofthe projector.
x For VPL-FX51Set INPUT-C FUNC. in the INSTALL SETTINGmenu to ON.
For detailed information, see the Operating Instructions ofthe projector.
Using the Remote Commander
When you operate the projector for setting up theprojector, running a slide show, etc., use the suppliedRemote Commander. Before operation, set the PJ/NETWORK select switch on the Remote Commanderto NETWORK. You cannot connect a mouse andkeyboard to the projector.
Using the Net Mouse Function
When you operate the projector for setup, type anInternet address, run a presentation, etc., you can do soby operating the mouse and keyboard of a computer.
Note
Only Internet Explorer Version 5.0 or later is availablefor using the Net Mouse function.
1 Start the Internet Explorer Version 5.0 or later onthe computer.
2 Enter the IP address of the projector.Type “http://xxx.xxx.xxx.xxx (IP address of theprojector)/netmouse”.The window of the projector appears on thecomputer.
3 Operate with the mouse of the computer within theprojector window displayed on the computer.The operations of the mouse and keyboard reflectthose on the projector screen and you can operatethe projector.
Note
When the network environment is heavily loaded,movement of the mouse on the projector may not besmooth.

9 (GB)
Setting Up the Projector
3 Click the User tab and input Name andOrganization.
4 Click the Projector tab and input Location,Installation, Lens, and Memo.
Setting the System
You have to set the projector name for identification inthe network configuration.
1 From the Start menu, click Control Panel in theNetwork Projector window.
2 Double-click the System icon.The System Properties dialog box appears.
3 Click the Projector Name tab and input Name andDescription.
Basic setups such as IP address and wireless LANsettings are necessary for networking operations of theprojector. You can set them up either from theprojector or a computer connected to the same LAN.
Before setting up
• Turn on the projector with the #/ 1 key on thesupplied Remote Commander or control panel of theprojector.
• Confirm that INPUT-B FUNC. (VPL-PX15) orINPUT-C FUNC. (VPL-FX51) in the INSTALLSETTING menu is set to ON.
• Press the INPUT key on the supplied RemoteCommander or control panel of the projector to selectINPUT B (VPL-PX15) or INPUT C (VPL-FX51).The Network Projector window opens.
• Set the PJ/NETWORK select switch on the RemoteCommander to NETWORK.
• When you are setting up the items from the projector,using the Net Mouse function is convenient.For details on the Net Mouse function, see page 8 (GB).
• You can also set up from the projector using thescreen keyboard displayed on the projector’s screen,and operate with the supplied remote commander.For information on the screen keyboard, see page 21 (GB).
Setting the User Information
You have to set the user and projector information.This information is used for the e-mail Reportfunction.
1 From the Start menu, click Control Panel in theNetwork Projector window.
2 Double-click the User Information icon.The User Information Properties dialog boxappears.

10 (GB)
Setting the Date and Clock
The clock is displayed on the task bar of the NetworkProjector window. To set the date and time, follow thesteps below.
1 From the Start menu, click Control Panel in theNetwork Projector window.
2 Double-click the Date/Time icon.
3 Set the date and time.
Setting the On-board LAN
Setting up the network configuration, such as IPaddress setting, is necessary for building a LANconnection. The IP address of the projector will bedisplayed on the task bar of the Network Projectorwindow of the projector.If the connection environment is changed, you need toset up the network configuration again.
1 From the Start menu, click Control Panel in theNetwork Projector window.
2 Double-click the Network Connections icon.The window appears and the available networkicons are displayed.
3 Double-click the On-board LAN icon.The On-board LAN settings dialog box appears.
4 Confirm that the “Specify an IP address” radiobutton is selected, and set the necessary items.The IP Address is initially set to “192.168.0.1,”and the Subnet Mask is set to “255.255.0.0” at thefactory.
5 Click the Name Servers tab to display the NameServers dialog box, then set the necessary items.
6 Click the OK button.The window in step 2 reappears.
When you use a wireless LAN PC cardFollow the steps below.
1 Click the right button of the mouse on the On-boardLAN icon.
2 Click “Disable”.
When you want to use On-board LAN, click “Enable”.
Setting priority of On-board LAN and wirelessLANWhen priority is set, the connection is automaticallyselected according to priority and you do not need toset “Enable”/“Disable”. The second connection isselected when the first connection is disconnected.
1 Click Advanced on the menu bar.The Advanced setting window appears.
2 Set priority in the Advanced Adaptor Settingswindow.
Setting Up the Projector

11 (GB)
Setting Up a Wireless LANEnvironment — when a zeroconfiguration card is used
Set up IP address, Name servers and WirelessNetworks.
1 From the Start menu, click Control Panel in theNetwork Projector window.
2 Double-click the Network Connections icon.The window appears and the available networkicons are displayed.
3 Double-click the icon of the Wireless LAN.The settings dialog box appears.
4 Confirm that the “Specify an IP address” radiobutton is selected, and set the necessary items.The IP Address is initially set to “Obtain an IPaddress via DHCP” at the factory.
5 Click the Name Servers tab to display the NameServers dialog box, then set the necessary items.
6 Click the Wireless Networks tab to display theWireless Networks dialog box and click the accesspoint to be connected.
7 Click the OK button.
Setting Up a Wireless LANEnvironment — when a VAIO orORiNOCO wireless LAN PC cardis used
Set up IP address, Name servers and WirelessNetworks.
Using a wireless LAN access point
Set up the access point you are connecting to asfollows.
1 From the Start menu, click Control Panel in theNetwork Projector window.
2 Double-click the Wireless LAN icon.The Wireless LAN settings dialog box appears.
3 Click the radio button for Nickname, and type anickname in the selected text box.
4 Click the Edit button.The Access Point settings dialog box appears.
5 Enter a Nickname.The Nickname identifies the access point. Enter upto 32 characters for the Nickname usingalphanumeric characters and symbols (ASCIIcharacters). If multiple access points exist, makesure to assign a different name to each one.
(continued)

12 (GB)
6 Enter the Access Point ID.Type the ID specified for the access point you areconnecting to.
7 Enter the Encryption Key.Type the encryption key, if it is set and is active onthe access point.
8 Click the OK button.The Wireless LAN settings dialog box reappears.
9 Click the radio button of the Nickname you wantto use, and click the OK button.Connection is made to the selected access point.
To connect to an access point which isalready configuredIf multiple access points exist, you can assign up tofour Nicknames for them. If you want to connect to anaccess point which is already configured, select a radiobutton next to the relevant Nickname then click theOK button in the Wireless LAN settings window.Connection is made to the selected access point.
Note
When the manufacturer of the wireless LAN cardinserted into the projector and that of the wirelessLAN access point are not the same, how to enter theencryption key may differ. If the encryption keyappears in hexadecimal values, enter the hexadecimalvalues for Encryption Key.
When no communication is taking placebetween the access point and the projectorIf the channel for the access point is set to 12–14, set itto any channel between 1 and 11.
Notes
• Contact qualified Sony personnel if any troubleoccurs when you are using the specified/recommended Sony wireless LAN PC card.
• If the manufacturer of the wireless LAN card andthat of the wireless LAN access point are not thesame, communication by enabled encryption does nottake place correctly.
Peer to Peer (Ad-hoc) mode
To connect to a wireless LAN between the projectorand computers without using the wireless LAN accesspoint, follow the steps below on the projector only.
1 Follow steps 1 to 5 in “Using a wireless LANaccess point.” In the Access Point settings dialogbox, set the Nickname of this mode.
2 Click the checkbox next to Peer to Peer.
3 Enter an optional Access Point ID.You can type up to 32 alphanumeric characters forthe ID.
4 Enter the Encryption Key if you want to make itactive.
5 Click the OK button.The Wireless LAN settings dialog box reappears.
6 Click the radio button of the Nickname youentered in step 1.The Peer to Peer mode takes effect.
For the computers connected it is required to enter thesame Access Point ID and Encryption Key as thoseentered in the procedure above and an optionalNickname. For details, refer to the OperatingInstructions of the wireless LAN PC card inserted intothe computers.
Notes
• Use wireless LAN PC cards of the samemanufacturer both for the projector and the computer.
• If Peer to Peer (Ad-hoc) is configured on one of theconnected computers, perform step 1, then steps 3 to6 above to enter the same Access Point ID andEncryption Key as those of the computer and anoptional Nickname on the projector.
• Select Peer to Peer (Ad-hoc) only for one of theprojector and computers on the same LAN.
• When you use Peer to Peer (Ad-hoc) mode, you needto set a dedicated IP address and Subnet Mask forthis mode on the projector and the computer.
Setting Up the Projector

13 (GB)
Setting the Password
You can set a password for protection against accessfrom remote network users.
1 From the Start menu, click Control Panel in theNetwork Projector window.
2 Double-click the Password icon.The Password Properties dialog box appears.
3 Specify the Password for Administrator, then enterthe same password again in the Confirm passwordtext box for Administrator.The Name of Administrator is preset as “root” atthe factory. It cannot be changed.
4 Specify the Name and Password for User, thenenter the same password in the Confirm passwordtext box for User.
When you are required to enter the password forAdministrator or User while you are operating theprojector from a computer, enter the Name andPassword which you set in steps 3 and 4.
Assigning an ApplicationSoftware to the FUNCTION Keyon the Remote Commander
If you assigned an application to the FUNCTION 1 or2 key on the supplied Remote Commander, a touch ofthe key enables you to start that application. Thescreen keyboard is assigned to the FUNCTION 3 keyat the factory, and you cannot reassign or cancel thatassignment.
For detailed information about the screen keyboard, seepage 21 (GB).
1 From the Start menu, click Control Panel in theNetwork Projector window.
2 Double-click the Launch Keys icon.The Launch Keys Settings dialog box appears.
3 Click Browse for the key (1 or 2) to which youwant to assign an application software, then clickthe application you want from the application list.
4 Repeat step 3 if you want to assign an applicationto the other key.
5 Click the OK button.

14 (GB)
Setting Up the Projector
Setting Up from a Computer
When you want to type letters using a keyboard, set upfrom a computer.
Notes
• Connect a single computer you are using for setups tothe projector if the IP address of the projector is notchanged from the factory-preset one.
• If the browser of your computer is set to “Access theInternet using a proxy server,” enter the IP address ofthe projector in the box “Access the Internet withoutusing a proxy server” when you have access to theprojector from your computer.
• The computer may not accept the password for theprojector, depending on the version of the browser. Inthis case, restart the browser.
Opening the setup window
1 Start the computer’s browser software (InternetExplorer 5.0 or later).
2 Type “http://xxx.xxx.xxx.xxx (for the IP address ofthe projector)/setup”.If the IP address is not changed from the factory-preset one, type “http://192.168.0.1/setup” (Whenusing On-board LAN).If the number of the IP address starts from 0 (zero),enter the number without 0.Example: 192.168.000.001 c 192.168.0.1The Password dialog box appears.
3 Enter the Name and Password for Administrator.If the Password setting is not changed from thefactory-preset one, enter “root” in the Name textbox.The Setup window appears.
4 Click the icon to be set up.Set up the items in the same way from theprojector.
5 Click the APPLY button.

15 (GB)
This section describes the operation flowchart forusing the projector via a network or for using the built-in network function of the projector. There are twotypes of flowcharts; for operations from a computerand for those from the projector. For details, see thepages in parenthesis.
Required conditions• The projector and computer are connected to the
same LAN.• The projector and computer are turned on.• The INPUT-B FUNC. (VPL-PX15) or INPUT-C
FUNC. (VPL-FX51) is set to ON in the INSTALLSETTING menu.
• The input of the projector is set to INPUT B (VPL-PX15) or INPUT C (VPL-FX51).
Basic Operation Flowcharts
Running a presentation using a file storedin the projector or memory card
By using a PowerPoint file stored in the projector or inthe PC memory card, you can run a presentation byoperating the projector only.
Starting the Presentation Viewer (page 22)
Double-click the Presentation Viewer icon.
Selecting a file you want to use for your presentation(page 22)
Select the PowerPoint file you want in the Open Filedialog box. The Slide Viewer starts, and the selected fileappears in slide view.
Setting up a slide show (page 22)
Set which slides to use and how toadvance a slide in a slide show.
Running a slide show
Operations from the Projector
Running a presentation using a file storedin the computer
Immediately after you open a file created withPowerPoint stored in a computer, you can start apresentation by operating the projector.
Starting My Projector (page 22)
Double-click the My Projector icon.
Selecting a file you want to use for your presentation(page 22)
Enter the name of a computer that stores the file to use,and select the PowerPoint file. Slide Viewer starts andthe selected file appears in slide view.
Setting up a slide show (page 22)
Set which slides to use and how toadvance a slide in a slide show.
Running a slide show

16 (GB)
Operations from a Computer
Running a slide show using an image filestored in the projector or memory card
You can run a slide show using an image file stored inthe projector or memory card by operating theprojector only.
Starting the Image Viewer (page 26)
Double-click the Image Viewer icon.
Selecting the files you want to use for your slideshow (page 26)
Click the folder which contains the files you want. All theslides contained in the folder are displayed in thumbnailwindows.
Selecting the slides you want to use for a slide show (page 26)
Select the slides you want to use. If you want to select allthe slides displayed in thumbnail windows, click Selectall from the Slide Show menu.
Setting up an image (page 26)
Zooming or rotating a slide.
Running a slide show (page 26)
Select how to advance a slide. A slide show starts.
Projecting an Excel or Word file stored ina computer
You can project an Excel or Word file stored in acomputer on the same LAN by operating the projector.
Projecting an Excel or Word file stored inthe projector or memory card
You can project an Excel or Word file stored in theprojector or memory card onto the projector.
Basic Operation Flowcharts
Starting My Projector (page 24)
Double-click the My Projector icon.
Selecting a file you want to project (page 24)
Enter the name of a computer that stores the requiredfile, and select an Excel or Word file. If you select anExcel file, Worksheet Viewer starts. If you select a Wordfile, Document Viewer starts.
Starting the Presentation Viewer (page 24)
Double-click the Presentation Viewer icon.
Selecting a file you want to project (page 24)
Select an Excel or Word file in the Open File dialog box.If you select an Excel file, Worksheet Viewer starts. Ifyou select a Word file, Document Viewer starts. Theselected file is projected on the projector.

17 (GB)
Connecting to the Internet
Running a presentation using the RemoteDesktop function
If Windows XP Professional is installed in yourcomputer, the projector can access your computer onthe same LAN and project all the data and applicationsstored in that computer.
Accessing the computer where the file you want isstored (page 27)
Double-click the Remote Desktop icon, and enter the IPaddress of the computer.
Logging on to the computer (page 27)
When the log on window of the computer is projected onthe projector, enter the user name and password of thecomputer. The desktop window of the computer isprojected on the projector.
Selecting the file you want to use for yourpresentation (page 27)
Select the file you want, and project it on the projector.
Starting the Internet Browser (page 27)
Double-click the Internet Browser icon.
Selecting PRESENTATION VIEWER (page 30)
Select the PRESENTATION VIEWER icon in theApplication Select window.
Starting a Web browserof a computer toaccess the projector(page 28)
Start a Web browser,and enter the projector’sIP address.
[When using the AutoProjector Searchfunction]Accessing the projector
(page 28)
Double-click the icon inthe My Network window.
Operations from a Computer
Running a presentation using a filecreated with PowerPoint
You can control a presentation using a file created withPowerPoint from a computer.
Finding a file you want to use for your presentation(page 30)
Select where the file is stored, the computer or projector,then select the PowerPoint file you want. The SlideViewer starts.
Setting up a slide show (page 30)
Set which slides to use and how toadvance a slide in a slide show.
Running a slide show

18 (GB)
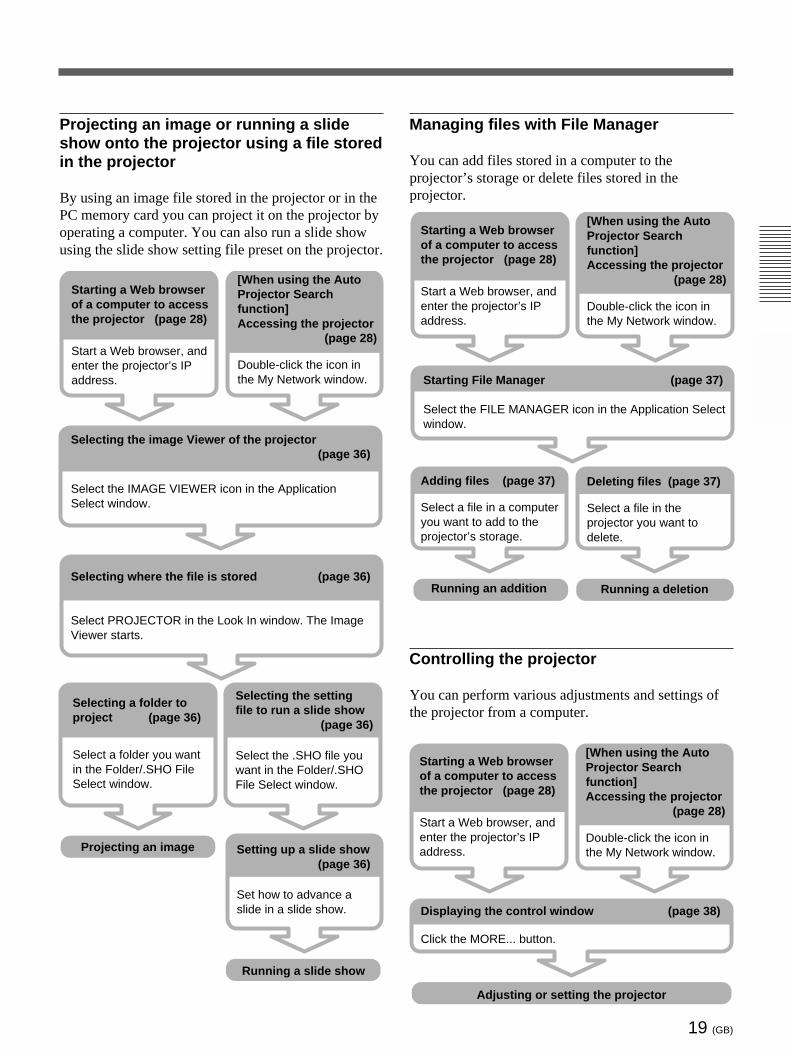
Operations from a Computer
Projecting an image onto the projectorusing a file stored in a computer
You can project an image onto the projector byoperating from a computer.
Basic Operation Flowcharts
Selecting the Image Viewer of the projector(page 34)
Select the IMAGE VIEWER icon in the ApplicationSelect window.
Selecting where the file is stored (page 34)
Select COMPUTER in the Look In window. The ImageViewer starts.
Finding a file you want to project on the projector(page 35)
Select the image file you want by clicking the Browsebutton.
Projecting an image
Starting a Web browserof a computer to accessthe projector (page 28)
Start a Web browser, andenter the projector’s IPaddress.
[When using the AutoProjector Searchfunction]Accessing the projector
(page 28)
Double-click the icon inthe My Network window.
Selecting PRESENTATION VIEWER (page 30)
Select the PRESENTATION VIEWER icon in theApplication Select window.
Finding a file you want to project on the projector(page 32)
Select where the file is stored, the computer or projector,then select an Excel or Word file you want. If you selectan Excel file, Worksheet Viewer starts. If you select aWord file, Document Viewer starts.
Projecting the Excel or Word file
Starting a Web browserof a computer to accessthe projector (page 28)
Start a Web browser, andenter the projector’s IPaddress.
[When using the AutoProjector Searchfunction]Accessing the projector
(page 28)
Double-click the icon inthe My Network window.
Projecting an Excel or Word file onto theprojector
You can display an Excel or Word file on the projectorby operating from a computer.
19 (GB)
Managing files with File Manager
You can add files stored in a computer to theprojector’s storage or delete files stored in theprojector.
Controlling the projector
You can perform various adjustments and settings ofthe projector from a computer.
Starting File Manager (page 37)
Select the FILE MANAGER icon in the Application Selectwindow.
Displaying the control window (page 38)
Click the MORE... button.
Adjusting or setting the projector
Deleting files (page 37)
Select a file in theprojector you want todelete.
Running a deletion
Adding files (page 37)
Select a file in a computeryou want to add to theprojector’s storage.
Running an addition
[When using the AutoProjector Searchfunction]Accessing the projector
(page 28)
Double-click the icon inthe My Network window.
Starting a Web browserof a computer to accessthe projector (page 28)
Start a Web browser, andenter the projector’s IPaddress.
[When using the AutoProjector Searchfunction]Accessing the projector
(page 28)
Double-click the icon inthe My Network window.
Starting a Web browserof a computer to accessthe projector (page 28)
Start a Web browser, andenter the projector’s IPaddress.
Selecting the image Viewer of the projector(page 36)
Select the IMAGE VIEWER icon in the ApplicationSelect window.
Selecting where the file is stored (page 36)
Select PROJECTOR in the Look In window. The ImageViewer starts.
Selecting a folder toproject (page 36)
Select a folder you wantin the Folder/.SHO FileSelect window.
Selecting the settingfile to run a slide show
(page 36)
Select the .SHO file youwant in the Folder/.SHOFile Select window.
Projecting an image Setting up a slide show(page 36)
Set how to advance aslide in a slide show.
Running a slide show
Projecting an image or running a slideshow onto the projector using a file storedin the projector
By using an image file stored in the projector or in thePC memory card you can project it on the projector byoperating a computer. You can also run a slide showusing the slide show setting file preset on the projector.
[When using the AutoProjector Searchfunction]Accessing the projector
(page 28)
Double-click the icon inthe My Network window.
Starting a Web browserof a computer to accessthe projector (page 28)
Start a Web browser, andenter the projector’s IPaddress.

20 (GB)
Operations from the ProjectorOperations from the Projector
Preparations
Before starting• Confirm that INPUT-B FUNC. (VPL-PX15) or
INPUT-C FUNC. (VPL-FX51) in the INSTALLSETTING menu is set to ON.
• Using the Net Mouse function allows you to operatethe projector screen with the mouse and keyboard ofthe computer.For details, see “Using the Net Mouse Function” on page8 (GB).
• When you use the supplied remote commander,switch the PJ/NETWORK select switch toNETWORK.
Opening the Network Projector window
To perform networking operations without connectingto a computer, display the Network Projector windowon the projector.
1 Turn on the projector.
2 Set the input to the projector to INPUT B (VPL-PX15) or INPUT C (VPL-FX51).The Network Projector window appears.
Names and functions of the NetworkProjector window
6 7 8 90
1
2
3
4
5
1My Projector iconBrowses the folders in the projector.Double-clicking the icon shows the Memory card icon,etc.
2Remote Desktop iconDouble-click the icon to use the Remote Desktopfunction.
3 Presentation Viewer iconSelect when you want to run a presentation using thefile created with PowerPoint or you want to project anExcel or Word file on the projector.
4 Internet Browser iconDouble-clicking the icon connects to the Internet.
5 Image Viewer iconDouble-clicking the icon starts Image Viewer forrunning a slide show using image files stored in theprojector or memory card.
6 Start menu
7 IP addressShows the IP address of the projector. You can verifyit when you are accessing the projector from acomputer.

21 (GB)
Running a Presentation of aPowerPoint File Using the SlideViewer
You can run a presentation by using a file withPowerPoint stored in a computer located in the sameconference room or far from the projector.Even when a computer is not connected to theprojector, you can also start the presentation using afile stored in the projector’s storage or in the memorycard installed into the PC CARD slot.
About the Slide Viewer window
1 2435 6 7
8
1Menu bar
Menu Command Function
File
View
Slide Show
8 Screen keyboard iconClicking the icon displays the screen keyboard on theprojector screen. You can operate the projector forsetups or enter a URL by using the supplied RemoteCommander. The screen keyboard has two pages.Clicking the Shift key changes the page.
x About the supplied Remote Commander• When the PJ/NETWORK select switch on the
supplied Remote Commander is set to NETWORK,the TAB, ESCAPE, ENTER and arrow keys on theCommander function the same as those on thekeyboard.
• Pressing the R CLICK key on the supplied RemoteCommander on the screen keyboard icon opens thesub menu. Clicking Remote, then On enables you touse the arrow keys on the Remote Commander asthose on the screen keyboard and to select the keys.
9 Clock
q; Desktop icon
Opens files stored in theprojector.
Opens the recently used fileswhich are shown in thesubmenu.
Indicates version informationon the program.
Closes the currently displayedfile.
Shows a slide in Note Viewmode.
Shows a slide in Slide Viewmode.
Runs a slide show.
Runs a slide show.
Sets up the slide show.
Selects to appear or disappearthe slide.
Open
Recent Files
About
Close
Note View
Slide View
Slide Show
View Show
Set Up Show
Select Slide
(continued)
Op
eration

22 (GB)
Operations from the Projector
2 / (Move Slide up/down) buttonsChanges the order of the slide display.
3 (Note View) buttonShows a slide and speaker’s note.
4 (Slide View) buttonShows a slide.
5 (Slide Show) buttonRuns a slide show.
6 Show list boxClick to open the drop-down list and select theCustom Show you want to display.
7 (Help) buttonClick to display the Help topic for the Slide Viewer.
8 File nameThe name of a file is displayed.
Running a presentation
Using a file stored in a computer connected tothe LAN
1 Double-click the My Projector icon in the NetworkProjector window.
2 Enter “\\ xxxx (name of a computer you want toaccess)” in the address column, then click theEnter button.If the password is set for the selected computer,enter the password.The shared folders for the computer are displayed.
Note
You have to set “On-board LAN” (page 10 (GB))or “wireless LAN” (pages 11 (GB) - 12 (GB)) andalso set share files with a computer you want toaccess.
3 Select the folder which contains the PowerPointfile (.ppt or .pps file) you want to run apresentation, then double-click that file.The Slide Viewer starts.
4 When you want to set up the slide show, click SetUp Show from the View Show menu.The Set Up Show dialog box opens.For details, see Help for Slide Viewer.
5 Click Run from the View Show menu to run theslide show.
Using a file stored in the projector or in thememory card
1 Double-click the Presentation Viewer icon in theNetwork Projector window.The Presentation Viewer starts, and the Open Filedialog box appears.
2 From Storage (for storage) or Storage Card (for thememory card) of My Projector, select thePowerPoint file you want, and click the OK button.The Slide Viewer starts, and the selected fileappears in slide view.
3 Perform steps 4 and 5 in “Using a file stored in acomputer connected to the LAN.”
Switching the slide view modeSlide Viewer has three view modes; Slide Show, SlideView and Note View, each of which gives you adifferent way of showing a slide. Display a view byclicking its corresponding command from the Viewmenu. Clicking its button on the tool bar also switchesthe view.
About Help for the Slide Viewer
For details on operations with the Slide Viewer, seeHelp. Clicking the button on the tool bar opens theHelp topic.

23 (GB)
Projecting an Excel File Usingthe Worksheet Viewer or WordFile Using the Document Viewer
You can project Excel or Word files stored in acomputer on the same LAN. You can also projectthose stored in the projector or in the memory cardwithout connecting a computer.
About the Worksheet Viewer window
5 64231
1 Name boxIdentifies the currently selected cell.
2Menu bar
* When Split is selected, the command in parentheses isdisplayed. Selecting it restores the normal window.
3 Sheet tabsDisplays the names of sheets. Click the sheet tab tomake a sheet active.
4 Zoom boxClick to select the magnification to reduce orenlarge the display of an active worksheet.
5 Cell contents barDisplays the result or constant value of the active cell.
6 (Help) buttonDisplays the Help topic for the Worksheet Viewer.
(continued)
Menu Command Function
File
View
Opens files stored in theprojector.
Opens the recently used fileswhich are shown in thesubmenu.
Indicates version informationon the program.
Closes the currently displayedfile.
Opens the Zoom dialog box toenlarge or reduce the display.
Splits the displayed windowinto multiple panes.
Height: Sets height in Set RowHeight dialog box.Auto Fit: Adjusts heightautomatically.
Width: Sets width in SetColumn Width dialog box.Auto Fit: Adjusts width withinthe selected range.
Open
Recent Files
About
Close
Zoom
Split (RemoveSplit*)
Row
Column

24 (GB)
Operations from the Projector
About the Document Viewer window
2 31
1Menu bar
2 Zoom boxClick to select the magnification to reduce orenlarge the displayed page.
3 (Help) buttonDisplays the Help topic for the Document Viewer.
Projecting an Excel or Word file
Using a file stored in a computer connected tothe LAN
1 Follow steps 1 and 2 in “Running a presentation— Using a file stored in a computer connected tothe LAN” on page 22 (GB).
2 Select the folder which contains an Excel or Wordfile you want to project on the projector, thendouble-click that file.If the password is set for the selected computer,enter the password.When you select the Excel file, Worksheet Viewerstarts and a worksheet of the selected file isprojected on the projector. When selecting theWord file, Document Viewer starts and the firstpage of the document is projected.
Using a file stored in the projector or in thememory card
1 Double-click the Presentation Viewer icon in theNetwork Projector window.The Presentation Viewer starts, and the Open Filedialog box appears.
2 From Storage (for storage) or Storage Card (for thememory card) of My Projector, select the Excel orWord file you want to project, and click the OKbutton.When you select the Excel file, Worksheet Viewerstarts and a worksheet of the selected file isprojected on the projector. When selecting theWord file, Document Viewer starts and the firstpage of the document is projected.
Changing the size or display area of theprojected worksheetWhen you want to zoom in or out the projectedworksheet or page, or change the area of the worksheetin view, see Help for Worksheet Viewer or DocumentViewer.
About Help for Worksheet Viewer orDocument Viewer
For details on operation with Worksheet Viewer orDocument Viewer, see Help. Clicking the button onthe tool bar opens the Help topic.
Menu Command Function
File
View
Opens files stored in theprojector.
Recently stored files aredisplayed. Clicking one of themopens that file.
Indicates version informationon the program.
Closes the currently displayedfile.
Enlarges or reduces thedisplayed page so that thewidth of the page fits thewindow.
Reduces the displayed page sothat the whole page fits thewindow.
Displays two pages at thesame time in the window.
Opens the Zoom dialog box forenlarging or reducing thedisplayed window.
Displays the pop-up menu forchanging the currentlydisplayed method.
Open
Recent files
About
Close
Page Width
Whole Page
2 Pages
Zoom
Full Screen

25 (GB)
6 (Full screen) buttonDisplays the full-screen window of a slide you choose.
7Menu bar
8 Folder dialog boxBrowses the folders stored in the projector or amemory card installed in the projector.
9 Slide display areaDisplays thumbnail images of the slides included inthe folder you select.
Running a Slide Show Using theImage Viewer
You can display thumbnail images of the files stored inthe projector or a memory card installed in theprojector, then run a slide show by selecting theimages you want.When you start the Image Viewer of the projector andselect the folder which contains the files you want, themain window opens.
About the main window of the ImageViewer
7 48 35 12
9
6
1 (Help) buttonClick to display the Help topic for the Image Viewer.
2 SlideClicking a slide displays a green frame around theslide. This indicates that the slide is selected.
3 (Slide Show Setting) buttonOpens the Slide Show Setting dialog box for zooming,rotating, etc.
4 (View Show) buttonClicking the button opens the sub menu for advancinga slide.
5 (Information) buttonOpens the information dialog box of the selected slide.
Menu Command Function
File
View
Slide Show
`
Indicates version informationon the program.
Closes the currently displayedfile.
Displays the full-screen windowof an image you choose.
Opens the information dialogbox of the selected image.
Sorts the slides in a folder byspecified order.
Runs a slide show byadvancing a slide selected inthe sub menu.
Sets up the slide show in detail.
Selects all the slides includedin the thumbnail window.
Cancels any selection of slidesin thumbnail images.
Loads the slide show settingfile stored.
Stores the current slide showsetting as a setting file(Extension is “.SHO.”)
About
Close
Full Screen
Information
Sort slides
View Show
Slide ShowSetting
Select all
Clear all
Load...
Save...
(continued)

26 (GB)
Operations from the Projector
Displaying a full-screen image
You can display a full-screen image of an thumbnailimage selected from the main window.
1 Double-click the Image Viewer icon in theNetwork Projector window.The Image Viewer starts.
2 Select the folder which contains the image filesyou want to display from the folder dialog box.You can choose the folder stored in the projectoror a memory card installed in the projector.The main window opens, showing thumbnailimages of the slides contained in the selectedfolder.
3 Select a slide you want to display by clicking athumbnail slide.The green frame appears on the selected slide.
4 Right-click the slide to select Full Screen, clickFull Screen from the View menu, or click the button on the tool bar.The slide is displayed to fit the projector screen.
Running a slide show
1 Follow steps 1 and 2 in “Displaying a full-screenimage.”
2 Select slides you want to use for your slide show.• Check the Slide Show check box on each slide
you want to use. Check all the slides you areusing.
• To use all of the slides in the selected folder,click Select all from the Slide Show menu.
• If you have already stored the slide show settingfiles, click Load... from the Slide Show menu todisplay the Load Slide show setting file dialogbox. Select the file you want.
For details on the Slide show setting files, see “Savingthe slide show setting.”
3 When you want to set up the slide, such aszooming or rotating of an image, click Slide ShowSetting from the Slide Show menu or click the button on the tool bar.
The Slide Show Setting dialog box appears.
Change the settings and click the OK or Savebutton.
Note
When projecting a large size image file such asthose in UXGA format, it may not be opened orrotated due to lack of memory. In this case, reducethe image to obtain a smaller file size.
4 Click View Show from the Slide Show menu, orclick the button on the tool bar.The sub menu for choosing how to advance a slideopens. Clicking one of the options starts a slideshow.
Saving the slide show setting
You can run a slide show repeatedly by using the filesstored as the slide show setting files (.SHO files). Youcan also change the settings of the stored setting files.
To save the file
1 Click Save... from the Slide Show menu.The Save Slide show setting file dialog box opens.
2 Enter the file name, then click the OK button.The saved files are shown in the Load Slide showsetting file dialog box.
To save after changing the settingsClick Slide Show Setting from the Slide Show menuto open the Slide Show Setting dialog box, and changethe settings. Click the Save button to open the SaveSlide show setting file dialog box. Follow step 2.

27 (GB)
To change the settings after saving
1 Click Slide Show Setting from the Slide Showmenu.The Slide Show Setting dialog box opens.
2 Click Load.The Load Slide show setting file dialog box opens.
3 Select the file for which you want to change thesettings, and click the OK button.The Slide Show Setting dialog box opens.
4 Change the settings, then click the Save button.
To change the setting in the main window
1 Click Load... from the Slide Show menu.The Load Slide show setting file dialog box opens.
2 Select the file you want to change, and click theOK button.The main window opens.
3 Change the checks in the Slide Show check boxesof the slides.
About Help for Image Viewer
For details on operations with Image Viewer, see Help.Clicking the button on the tool bar opens the Helptopic.
Connecting to the Internet
1 Double-click the Internet Browser icon in theNetwork Projector window.The Internet Browser window appears.
2 Click the software keyboard icon on the task bar todisplay the screen keyboard, then enter the addressfor the homepage you want.
Using the Remote DesktopFunction
The projector is compatible with Remote Desktopfeature for Windows XP Professional. The featureallows the projector to access all the data stored in acomputer equipped with Windows XP Professional onthe same LAN. Only a single projector in a conferenceroom allows running a presentation.
Note
To use the Remote Desktop function, it it required forthe computer to register the remote desktop users whoare permitted to get access to the computer. Set theRemote Desktop setting by clicking Control Panel,selecting System and then System Properties.
1 Double-click the Remote Desktop icon on thedesktop window of the projector.The Remote Desktop setting window opens.
2 Enter the IP address of the computer in which thefile you want is stored.The log on window for the computer is displayed.
3 Enter the user name and password of the computer.When the projector logs on to the computer, thedesktop window of the computer appears on theprojector screen.
4 Operate the projector to select the file you wantand to run a presentation.
28 (GB)
Operations from a ComputerOperations from a Computer
Notes
• Do not have access to the projector from two or more computers simultaneously.
• If the browser of your computer is set to “Access theInternet using a proxy server,” enter the IP address ofthe projector in the box “Access the Internet withoutusing a proxy server” when you have access to theprojector from your computer.
• The computer may not accept the password for theprojector, depending on the version of the browser. Inthis case, restart the browser.
• If the browser on a computer exits without closing theapplication, the projector automatically returns to theinitial Network Projector window after about 30seconds. In this case, restart the browser.
Accessing the projector using theAuto Projector Search function
When you are using a computer equipped withWindows Me or Windows XP, you can access theprojector without starting the browser on the computer.
Note
It is necessary to add the Universal Plug and Playcomponent on the computer to use the Auto ProjectorSearch function. Click Control Panel, then select Add/Remove Programs.From the Start menu, click Programs, System, and thenService Manager to display the control window. In thecontrol window, press B to use once or set the start-upmode of the property to Auto to use thereafter.
1 Double-click the My Network icon.
2 Double-click the projector icon.The Application Select window appears.
When the password is set for the projector, thepassword setting dialog box appears. Enter theName and Password for User.
For information on the Application Select window, see“Names and functions of the Application Selectwindow.”
Operations that follow the above steps are shownon pages 29 (GB) to 38 (GB).
Preparations
Before starting
x For VPL-PX15Confirm that the INPUT-B FUNC. is set to ON in theINSTALL SETTING menu.
x For VPL-FX51Confirm that the INPUT-C FUNC. is set to ON in theINSTALL SETTING menu.
Starting the browser foraccessing the projector
In order to control the projector from a computer, youhave to access the projector by starting the browser onthe computer. Suitable browsers are Internet Explorer5.0 or later versions.
If your computer is equipped with Windows Me orWindows XP and you use the Auto Projector Searchfunction, the following procedure is not necessary.Access the projector by using the procedure describedin “Accessing the projector using the Auto ProjectorSearch function.”
1 Turn on the projector.
2 Set the input to the projector to INPUT B (VPL-PX15) or INPUT C (VPL-FX51).
3 Switch on the computer.
4 Start the browser on the computer.
5 Enter the IP address of the projector.Type “http://xxx.xxx.xxx.xxx (for the IP address ofthe projector).”You can verify the IP address as it is displayed onthe task bar in the Network Projector window.The Application Select window appears.
When the password is set for the projector, thepassword setting dialog box appears. Enter theName and Password for User.
For information on the Application Select window, see“Names and functions of the Application Selectwindow.”
Operations that follow the above steps are shownon pages 29 (GB) to 38 (GB).

29 (GB)
Names and functions of the ApplicationSelect window
Having access to the projector opens the ApplicationSelect window. The following shows the names andfunctions of the icons and buttons in the window.
4 23
5 6
1
87
1 Language select buttonClicking opens the language select drop-down list.Each window has help sentences shown on the lowerpart of the window. You can display them in English,French, German, Spanish or Italian.
2 FILE MANAGER iconStarts the File Manager to manage the files stored inthe projector.
3 IMAGE VIEWER iconOpens the setup window for projecting image files.
4 PRESENTATION VIEWER iconOpens the select window for starting the PowerPointviewer (Slide Viewer), Excel viewer (WorksheetViewer) or Word viewer (Document Viewer).
5 #/1 (on/standby) buttonTurns the projector on or sets it to standby mode.
6 HelpResting the pointer over each item displays theinstructions for the item. This makes your operationseasier in each window.
7 Input select buttonsSelect the input to the projector.The INPUT C button does not exist in the window forthe VPL-PX15.
8MORE... buttonOpens the control window for the projector.
Notes
• It may take time to display the file depending on yournetwork configuration.
• Capacity of one file to be sent is 15 MB maximum.• As the Slide Viewer, Worksheet Viewer and
Document Viewer are the basic PowerPoint, Exceland Word functions, respectively, they do not supportsome features of other software. We recommend youshould project the file you are using for yourpresentation on the projector before starting thepresentation.
• The display on the computer may be different fromthe original display from the projector.
• The following fonts are available for the PresentationViewer; Arial, Arial Black, Comic Sans MS, CourierNew, Georgia, Impact, Symbol, Tahoma, Times NewRoman, Verdana and Wingdings.
Running a Presentation of aPowerPoint File Using the SlideViewer
When you intend to run a presentation withPowerPoint in a conference room, you can control thepresentation by operating your computer in the sameroom or in the location far away from the projector.
What you can do with the Slide Viewer
You can• run a slide show using the file created with
PowerPoint.• show a custom slide show if created.• show a speaker’s note or hide it.• show a slide or hide it.• set timings to advance a slide during a slide show.
You can select an automatic or manual slide show.

30 (GB)
Operations from a Computer
To store the selected file into the projectorClick to check the “save in projector” checkbox.You can set the password for the file, if necessary.Specify the password in the “password” text box.This disables the file to open from now on unlessyou enter the password.The file will be stored when you click the Set Upor View button.
Note
When you delete a file using File Manager,entering the password is not required even if thepassword is set for the file.
When you select PROJECTOR in step 2The file list showing the files stored in theprojector or a memory card appears. Click thePowerPoint file you want. The selected file nameis displayed in the text box.
4 Set up your slide show, if necessary. Click the SetUp button in the File Select window.The Set Up Show window appears. You canspecify slides you want to use for your slide showand set how to advance a slide in the slide show.Resting the mouse pointer over each item shows itsinstruction on the lower part of the window.
Running a presentation
1 Click the PRESENTATION VIEWER icon in theApplication Select window.The Look In window appears.
2 Click to select where to search for the file youwant to use for your presentation.COMPUTER: To select a file stored in a
computerPROJECTOR: To select a file stored in the
projector
The File Select window appears.
3 Select the file you want to use for yourpresentation.
When you select COMPUTER in step 2Clicking Browse opens the file select window on acomputer. Click the PowerPoint file (.ppt or .ppsfile) you want. You can also select the file byentering the file name in the Browse text box. Theselected file name is displayed in the Browse textbox.
BACK buttonClick to return to theprevious window.
Password setting box
HOME buttonClick to return to theApplication Select window.

31 (GB)
Note
If you are running a presentation using the filestored in a computer, the file is transferred to theprojector at the time you click the Set Up button. Itwill take a little time to display the Set Up Showwindow on the computer. How long it takesdepends on the file size. During this time amessage will appear.
5 Click the View button in the File Select window orclick the View Show button in the Set Up Showwindow.The slide show starts.
Note
If you are running a presentation using the filestored in a computer, the file is transferred to theprojector at the time you click the View button. Itwill take a little time to display a slide show on theprojector screen. How long it takes depends on thefile size. During this time a message will appear.
To end the slide showClick the End Show button. (See page 32 (GB).)The File Select window returns.
Note
If the message “Projector’s memory is full” appearswhen clicking the View or Set Up button, deleteunnecessary files stored in the projector using the FileManager (page 37 (GB)), then try to run the slide showagain. If the message “File size is too large.” appears,reduce the file size, then try to run the slide showagain.
Tip :You may make it smaller by clicking Option, thenSave from the Tools menu, and unchecking Save Fastin the PowerPoint application.
About the window displayed while thepresentation is running
The following window is displayed during apresentation.
4 23
65 7 8 9 qa0
1
1 NOTES buttonSelects to display/remove a speaker’s note.
2 SLIDE buttonSelects to display/remove a slide show on/from acomputer’s display.
3 File name/slide numberShows the name of a file and which slide is displayed.
(continued)

32 (GB)
Operations from a Computer
Projecting an Excel File Usingthe Worksheet Viewer or WordFile Using the Document Viewer
You can project an Excel or Word file on the projectorby operating a computer.When you select an Excel file, the Worksheet Viewerstarts and a worksheet of the selected file is projectedon the projector screen. When you select an Excel file,the Document Viewer starts and the first page of theselected file is projected on the projector screen.
What you can do with the WorksheetViewer or Document Viewer
You can• display Excel worksheets or Word documents to fill
the projector screen.• zoom in or out the projected worksheet or document
page.
Note
As the Worksheet Viewer or Document Viewer are asimple Excel or Word viewer function, it does notsupport some features.
Projecting an Excel or Word file
1 Follow steps 1 to 3 in “Running a PresentationUsing the Slide Viewer — Running a presentation”on page 30 (GB). Make sure to select an Excel file(.xls file) or Word file (.doc file) in step 3.
2 Click the View button.The Worksheet Viewer starts when you select anExcel file, and the worksheet of the selcted file isdisplayed on the projector.The Document Viewer starts when you select aWord file, and the first page of the selected file isdisplayed on the projector.
4 SlideShows the currently displayed slide in the slide show.The projector’s screen displays only this slide.
5b PREVIOUS buttonReturns to the previous slide or Animation settingduring the slide show.
6 Slide text boxClicking opens the slide name drop-down list.When you select a specific slide from the list, it will beshown.
7NEXT B buttonAdvances to the next slide or Animation settingimmediately.
8 Set Up Show buttonReturns to the Set Up Show window.
9 End Show buttonEnds or suspends the slide show to return to the FileSelect window.
q; NoteDisplays a speaker’s note. It is not displayed on theprojector screen.
qav HOME buttonReturns to the Application Select window.

33 (GB)
Example: Worksheet Viewer window
When you rest the mouse pointer over each button oritem, its instructions will appear on the bottom of thewindow.
Notes
• The range of the displayed area of a worksheet on acomputer and that of the projected area on theprojector is not the same.
• When you click a cell on a computer for worksheetViewer, the cell becomes active if the selected cell iswithin the area displayed on the projector. If theselected cell is outside the displayed area, the areawith the selected cell is centered on the projector’sdisplay.
About the window displayed while theWorksheet Viewer is running
9 qaq;87 qs
24 3 156
1 buttonSelects the bottom rightmost cell of the displayedworksheet.
2 Zoom text boxClicking opens the drop-down list to select the ratioof enlargement or reduction. The worksheet isenlarged or reduced with the currently selected cellcentered.
3 Pane text boxWhen the displayed worksheet is split into multiplepanes, click to open the drop-down list and selectthe desired pane from Top Left, Top Right, BottomLeft and Bottom Right.
4 Sheet text boxClicking opens the drop-down list of the sheetnames included in the displayed workbook. Selecting asheet name displays the selected sheet.
5 buttonSelects the top leftmost cell of the worksheet.
6 File NameShows the file name currently displayed.
7 Selected CellShows the column and row numbers of the selectedcell.
8WorksheetDisplays the worksheet which is currently projected onthe projector.
9 Scroll barsUse to scroll the area displayed on the computer left orright, or up or down. To scroll, drag the box or clickthe arrows.
q; END buttonEnds or suspends the worksheet display to return to theFile Select window.
qa v Home buttonReturns to the Application Select window.
qs Scroll buttonsEach click or button moves the area displayed onthe projector one row to the left or right.Each click or button moves the area displayed onthe projector one line up or down.
(continued)

34 (GB)
Operations from a Computer
About the window displayed while theDocument Viewer is running
9876
24 3 15
q;
1 Scroll buttonsClicking or button scrolls the displayed page leftor right.Clicking or button scrolls the displayed page up ordown.
2 buttonDisplays the previous page.
3 Zoom text boxClicking opens the drop-down list to select the ratioof enlargement or reduction. The displayed page isenlarged or reduced.
4 Page text boxClicking opens the drop-down list of the pagenumbers. Selecting the page number displays theselected page.
5 File nameShows the name of the currently displayed Word file.
6UPDATE buttonClicking this buttom displays the same window as thatbeing projected on the projector.
7Document pageDisplays the page which is currently projected on theprojector by clicking the UPDATE button.
8 END buttonEnds or suspends the Word file display to return to theFile Select window.
9v HOME buttonReturns to the Application Select window.
q; buttonDisplays the next page.
Projecting an Image Using theImage Viewer
You can project an image file stored in any computeron the same LAN or stored in the projector’s storageor in the memory card installed in the projector. Youcan also run a slide show using the slide show settingfile (.SHO file) preset in the projector.
Projecting an image stored in a computeron the projector
1 Click the IMAGE VIEWER icon in theApplication Select window.The Look In window appears.
2 Click COMPUTER.The Image Viewer of the projector starts, and theImage Viewer window opens.
Resting the mouse pointer over each item shows itsinstruction on the lower part of the window.

35 (GB)
3 Select an image file to display.Click Browse to open the file select window on acomputer. Double-click the file you want.The selected file name is displayed in the Browsetext box.
4 Click the SHOW button.A full-screen image of the selected file is displayedon the projector.
Note
When projecting a large size image file such as thosein UXGA format, it cannot be opened due to lack ofmemory. In this case, reduce the image to obtain asmaller file size.
To save time taken for transferring dataWhen clicking the SHOW button, the file is transferredto the projector. It will take a little time to display animage on the projector’s screen. To display the imageimmediately, transfer all the files you want to use tothe projector before starting your presentation.
1 After step 3 in “Projecting an image stored in acomputer on the projector,” click the SENDbutton.The selected file name appears in the TemporaryFile list and the file is transferred to the projector.Repeat this step until all the files you want areshown in the Temporary File dialog box.
2 Double-click the file name listed in the TemporaryFile dialog box.A full-screen image of the selected file is displayedon the projector.
Note
If the memory of the Temporary File list is full, thedata transferred earlier will be erased.
About the window displayed while theImage Viewer is running
1
6 74
2
3 5
1 File nameShows the file name of the currently displayed image.
2 SlideBy clicking the SHOW button or the file name listed inthe Temporary File, the current picture projected onthe projector appears.
3 Zoom text boxClicking opens the drop-down list to select the ratioof enlargement or reduction for the image.
4 Rotate text boxClicking opens the drop-down list to select theangle of rotation for the image.
Note
When projecting a large size image file such as thosein UXGA format, it cannot be rotated due to lack ofmomory. In this case, reduce the image to obtain asmaller file size.
5 Scroll buttonsClicking the arrows changes the display area of theimage on the screen, if the enlarged image does not fitthe screen.
6 END buttonEnds or suspends the full-screen display to return tothe File Select window.
7v HOME buttonReturns to the Application Select window.
(continued)

36 (GB)
Operations from a Computer
Note
When you exit the Image Viewer window by clickingthe END or HOME button, the files listed in theTemporary File will be automatically erased. To storethe files, add them to the projector using the FileManager function.
For details, see “Using File Manager” on page 37 (GB).
Running a presentation using an imagefile stored in the projector
1 Click the IMAGE VIEWER icon in theApplication Select window.The Look In window appears.
2 Click PROJECTOR.The Image Viewer of the projector starts, and theFolder/.SHO File Select window opens.
3 Click the folder you want or the folder thatcontains the slide show setting file (.SHO file) inthe Folder list on the left of the window.The contents of the selected folder are listed on theright.
For details on .SHO files, see “Saving the slide showsetting” on page 26 (GB).
4 Select a folder or .SHO file you want to use, thenclick the SELECT button.The Image Viewer window appears (see the rightcolumn).
5 Select an image file you want to project on theprojector.
When you select a folder in step 4Image files contained in the selected folder arelisted on the right.
Click the file you want.A full-screen image of the selected file is projectedon the projector.Resting the mouse pointer over each item on theleft of the window shows its instructions on thelower part.
When you select an .SHO file in step 4The selected .SHO file appears on the right.
Select how to advance slides, and click the SHOWbutton. The slide show starts.Resting the mouse pointer over each item on thewindow shows its instructions on the lower part.
END buttonEnds or suspends thedisplay to return to theFile Select window.
v HOME buttonReturns to the ApplicationSelect window.
37 (GB)
About the window displayed while theImage Viewer is running
The same window as that in “About the windowdisplayed while the Image Viewer is running” on page35 (GB) appears.The NEXT button on the .SHO file select window is toadvance to the next slide immediately during the slideshow. The PREVIOUS button is to go back to theprevious slide.
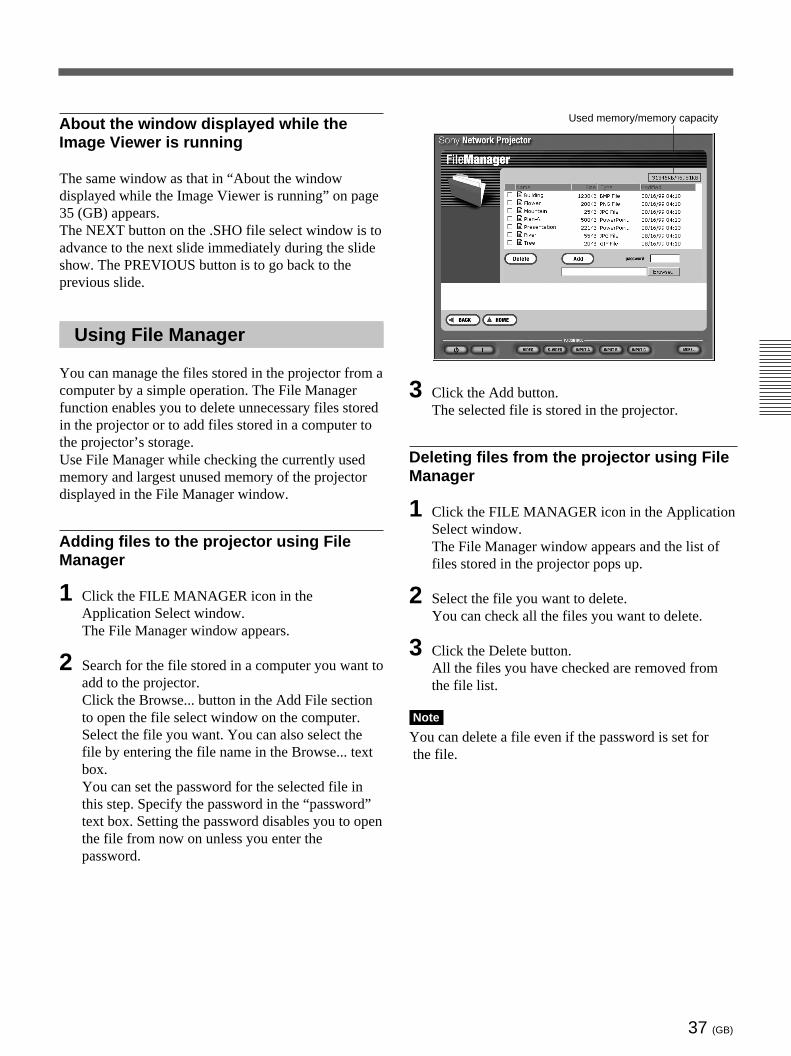
Using File Manager
You can manage the files stored in the projector from acomputer by a simple operation. The File Managerfunction enables you to delete unnecessary files storedin the projector or to add files stored in a computer tothe projector’s storage.Use File Manager while checking the currently usedmemory and largest unused memory of the projectordisplayed in the File Manager window.
Adding files to the projector using FileManager
1 Click the FILE MANAGER icon in theApplication Select window.The File Manager window appears.
2 Search for the file stored in a computer you want toadd to the projector.Click the Browse... button in the Add File sectionto open the file select window on the computer.Select the file you want. You can also select thefile by entering the file name in the Browse... textbox.You can set the password for the selected file inthis step. Specify the password in the “password”text box. Setting the password disables you to openthe file from now on unless you enter thepassword.
Used memory/memory capacity
3 Click the Add button.The selected file is stored in the projector.
Deleting files from the projector using FileManager
1 Click the FILE MANAGER icon in the ApplicationSelect window.The File Manager window appears and the list offiles stored in the projector pops up.
2 Select the file you want to delete.You can check all the files you want to delete.
3 Click the Delete button.All the files you have checked are removed fromthe file list.
Note
You can delete a file even if the password is set for the file.

38 (GB)
Operations from a Computer
Controlling the Projector from aComputer
You can perform various adjustments and settings ofthe projector on a computer’s display. Three controlwindows are available; GENERAL, PICTURE CTRLand SETTINGS windows, each with differentfunctions.The functions of the buttons in the windows are thesame as those on the Remote Commander suppliedwith the projector.
For details on the buttons, see the Operating Instructions ofthe projector.
The illustrations shown in the steps below are for theVPL-PX15.
1 Click the MORE... button in the PJ CONTROLsection.The GENERAL window appears.
2 Click the function tab to select the window youwant.
GENERAL window
(VPL-PX15)
PICTURE CTRL window
(VPL-PX15)x For VPL-PX15The COLOR TEMP (HIGH, LOW) buttonsfunction the same as the settings in the menu.
x For VPL-FX51The DDE (OFF, PROGRESSIVE, FILM) andRGB ENHANCER +/– buttons function the sameas the settings in the menus.
SETTINGS window
(VPL-PX15)
x For VPL-PX15The ASPECT (4:3, 16:9) and STATUS (ON, OFF)buttons function the same as the settings in themenu.
x For VPL-FX51The ASPECT (4:3, 16:9) and LAMP MODE(STANDARD, LOW) buttons function thesame as the settings in the menus.
3 Click the button to adjust or set.

39 (GB)
Maintenance Function Oth
ersChecking the Indicators on theProjector — when operatingfrom a computer
You can check the present status of the indicators onthe control panel of the projector on a computerdisplay.
1 Start Internet Explorer 5.0 or later versions on thecomputer.
2 Type “http://xxx.xxx.xxx.xxx (for the IP address ofthe projector)/info” as a URL.If you do not change the factory-set IP address,type “http://192.168.0.1/info” (when using an on-board LAN).
3 Enter the name and password of the Administrator.The Information window appears.
The illustration below is for the VPL-PX15.2
3 4
1
5
1 Projector StatusShows the present status of the projector.
2 ProjectorShows the information on the projector.
3 SystemShows the versions of the OS (Operating System) andapplication currently used.
4 UPDATE buttonClick to update the latest information.
5 Error StatusShows the present status of the indicators on thecontrol panel of the projector.
For information on the indicators, see the OperatingInstructions.
Using the e-Mail Report Function
What you can do with the e-Mail Reportfunction
• Reports installation status of the projector, userinformation, etc. periodically. You can specify thetransmitting date of mails (Regular Report).
• If any error occurs with the projector, reports itimmediately (Error Report).
• Sends a warning mail when a preset used time of theprojector lamp has been reached (Lamp Reminder).
• Sends a warning mail when a preset maintenancetime of the projector has been reached (MaintenanceReminder).

40 (GB)
Maintenance Function
Setting for e-Mail Report function whenoperating from the projector
To use the e-Mail Report function, set the mailaddresses and date to where and when mail is to besent, and which mail functions you are using.
1 From the Start menu, select Control Panel, thenselect e-Mail Report.The e-Mail setting window opens.
2 Click the Mail tab.The following window opens.
3 Set the addresses where mail is to be sent.Enter mail addresses in the TO: and CC: textboxes. The same mail can be sent to three differentaddresses at the same time.
4 Set the time and day when mail is to be sent, andthe mail function you are using (Error Report,Lamp Reminder and/or Maintenance Reminder).
5 Click the Server tab.
The mail server setting window opens.
6 Set the allocated mail address, and SMTP of themail server.For details, refer to the e-Mail Report Help.
7 When all the settings are complete, click the OKbutton.
To send test mailYou can send mail as a test to confirm whether it issent to the specified addresses. Click the Test Mailbutton.
About Help for e-Mail Report
For details on operation with e-Mail Report function,see Help. Clicking the button on the tool bar opensthe Help topic.

41 (GB)
The Regular Report contains the following items:Product Information: Model name, Serial number,
Version informationUser Information: User name, Organization name,
Place where the projector is installedInformation: Used time of the projector lamp, Lamp
mode, etc.Memo
3 APPLY buttonClick when setting of all the items is complete.
4Maintenance ReminderSelecting this check box and entering the hours of usewhen maintenance is required for the projector in thetext box enables you to receive mail that informs youwhen the preset time has been reached. You canspecify the time between 1 and 99999 hours.The elapsed time is displayed in the Elapsed Hourstext box. Selecting the RESET check box and clickingAPPLY reset the elapsed time to zero.
5 NEXT buttonCloses this window and opens the setting window forthe mail server.
6 Lamp ReminderSelecting this check box and entering the used hours ofthe projector lamp in the text box enables you toreceive mail that informs you of the replacement timeof the projector lamp when the preset time has beenreached. You can specify the time between 1 and 9999hours.
7 Error ReportSelecting this check box allows sending of an errorreport if any error occurs with the projector.
Notes
• If the days of the week are specified without selectingthe Every Week on Days check box, you cannotreceive the Regular Report. If the preset day on theEvery Month on Day does not exist in the month, youwill receive mail on the last day of the month.
• You cannot specify the day of the week or day of themonth if the Every Week on Days or Every Month onDay check box is not selected.
• Specifying the hours for Lamp Reminder orMaintenance Reminder is not available if thecorresponding check box is not selected.
Setting for e-Mail Report function whenoperating from a computer
To use the e-Mail Report function, set the mailaddresses and date to where and when mail is to besent, and which mail functions you are using.
1 Display the Setup window on the computer.For how to display the Setup window, see “Opening thesetup window” on page 14 (GB).
2 Click the e-Mail Report icon in the Setup window.The setting window of the e-Mail Report functionopens.See the explanations described below for how toset each item.
3 5 6 7
12
4
1 Address text boxesEnter mail addresses in the TO: and CC: text boxeswhere you want to receive mail. The projector enablesto send mail to three different addresses. You can enterup to 128 characters for each address.
2 Regular ReportA report on the present status of the projector, userinformation, etc. of the projector is periodically sent bymail.Set the timing to send mail as follows:At: Specifies the time when mail is to be sent. Select
the hour from the drop-down list.Every Week on Days: Selecting this check box allows
mail to be sent on the selected days every week.Mon/Tue/Wed/Thu/Fri/Sat/Sun: Specifies the days
of the week. You can check two or more days.Every Month on Day: Selecting this check box and
selecting the day from the drop down list enables tosend a mail on the defined day every month.

42 (GB)
Maintenance Function
Setting the mail server — when operatingfrom a computer
After the mail setting is complete, click the NEXTbutton.The mail server setting window opens.
6
12
53 4
1Mail AddressType the allocated mail address. You can enter up to128 characters.
2 SMTPType the address of the mail server. You can enter upto 128 characters.
3Mail FormSelects the mail form from Standard or Simple. WhenSimple is selected, the mail with a simple message issent in the following cases:– an error occurs.– a preset used time of the projector lamp has been
reached.
4BACK buttonCloses this window and opens the mail settingwindow.
5 Test MailSends mail as a test to confirm whether it is sent to thespecified addresses. Select the Send check box, thenclick the APPLY button.
6APPLY buttonClick this button when the mail server setting iscomplete or when you send a test mail.
Note
If the following items have not been set or areincorrectly set, the error message appears and the testmail is disabled:• TO: text box in the mail setting window• Mail Address in the mail server window• SMTP

43 (GB)
Troubleshooting
If the projector appears to be operating erratically, try to diagnose andcorrect the problem, using the following guide. If the problem still persists,consult with qualified Sony personnel.
Setting/Connecting
Symptom
A connection to the network is notestablished.
The computer cannot access to theprojector.
Causes and remedies
• The PC card is not properly inserted into the PC CARD slot.t Check that the card is facing correctly, then push the card into the slot until it
is firmly seated.• The cable is not properly connected to the ETHER connector.t Insert the plug of the cable to the connector firmly.
• The wireless LAN PC card and wireless LAN access point you are using are notthe specified/recommended ones.t Use the specified/recommended devices. Use of those not specified/
recommended may cause incorrect operation.For information on the specified/recommended cards, etc., see the attached“Specified/recommended PC Card.”
• The network environment is not properly set up.t Check the network configuration settings of the projector.
(pages 10 (GB) - 12 (GB))t When you control the projector by using the computer’s Web browser, check
the network settings on the computer as well.• When you use a wireless LAN PC card (VAIO/ORiNOCO), Enable is selected.t Select Disable. (page 10 (GB)).
• When you are using the wireless LAN PC card, the wireless LAN is not properlyset up.t Check that the Access Point ID and Encryption Key in the Connecting
Status dialog box are set to the same numbers as those of the connectedaccess point (page 11 (GB)).
• When you are using the wireless LAN PC card, Peer to Peer mode is notproperly set up.t Select Peer to Peer only on a piece of equipment connected to the same
wireless LAN (page 12 (GB)).• The channel of the access point is set to 12–14.t Set the channel of the access point to 1–11.
• The wireless LAN PC card, memory card or access point still does not operateproperly after checking the above.t Consult with the manufacturer of the card or access point you use. When
you are using the specified Sony wireless LAN PC card, consult with thequalified Sony personnel.
• The setting of INPUT-B FUNC. (VPL-PX15) or INPUT-C FUNC. (VPL-FX51) inthe INSTALL SETTING menu is not correct.t Set it to ON.
• The browser of your computer is set to “Access the Internet using a proxyserver.”t Enter the IP address of the projector in the box “Access the Internet without
using a proxy server.”• You entered the projector’s IP address started with 0 (zero).t Do not enter 0 at the beggining of the number.
Example: 192.168.000.001 c192.168.0.1
(continued)
Causes and remedies
In the text of the file, fonts or styles not supported by the Slide Viewer, WorksheetViewer or Document Viewer are used.t Only the following fonts are available for the Slide Viewer. Other fonts will be
replaced with these fonts; Arial, Arial Black, Comic Sans MS, Courier New,Georgia, Impact, Symbol, Tahoma, Times New Roman, Verdana, Wingdings. Ifreplaced, an end of paragraph may change according to tab or pharagraphsettings.Styles not supported by the Slide Viewer will be replaced with supported styles.
Presentation
Symptom
Fonts or styles change in a PowerPoint,Excel or Word file.

44 (GB)
Causes and remedies
You cannot display characters that the Slide Viewer, Worksheet Viewer orDocument Viewer does not support.t Use the file created in English, French, Spanish, German, Italian, Chinese,
Portuguese or Korean which are supported.
The file is using the features that are not supported by the Slide Viewer,Worksheet Viewer or Document Viewer of the projector, or the file is created withPowerPoint 2002, Excel 2002 or Word 2002.t The features will be replaced with those that are supported. Apply effects
that are supported if nothing is displayed.
The memory of the projector is full.t Delete unnecessary files stored in the projector using File Manager to
increase memory capacity.
File size exceeds the capacity for transition to the projector.t Check empty memory capacity in the File Manager window, then decrease
the file’s capacity by dividing it into smaller files.t Click Option then Save from the Tool menu on the PowerPoint, then
remove the check from Save Fast.
Presentation
Symptom
Some characters are not displayed in aPowerPoint, Excel or Word file.
Some features of a PowerPoint, Excel orWord file are not properly displayed orsuch effects are not displayed at all.
A slide show cannot be run. Themessage “Projector’s storage is full.Delete the file stored in the projector.”appears.
A slide show cannot be run. Themessage “File size is too large. Decreasefile size in any way; for example, bydividing it into smaller files, then try torestart the slide show.” appears.
© 2002 WESTTEK LLC. All Rights Reserved. WESTTEK and the WT Logo are registered trademarks of WESTTEK,LLC.The SONY VPL-Series projector contains materials owned by Sony and Sony suppliers, including WESTTEK, LLC.Your purchase of the SONY VPL-Series projector gives you a limited right to use these materials, solely as a part of theSONY VPL-Series projector and only as necessary to use the SONY VPL-Series projector in the manner described inthe accompanying documentation. Your purchase of the SONY VPL-Series projector does not transfer any ownership inthese materials to you and you are forbidden to use them for any purpose other than as part of the SONY VPL-Seriesprojector. These materials are protected by copyright law and international treaties. Any unauthorized use, reproductionor distribution of such materials, or any portion of them, may result in severe civil and criminal penalties, and will beprosecuted to the maximum extent permissible under law.
Troubleshooting
Others
Symptom
The Auto Projector Search or RemoteDesktop function does not work.
The projector screen freezes.
The message “Password is set for thefile. Enter password.” appears.
The message “You might have enteredthe wrong password. Enter it again.”appears.
Causes and remedies
• The necessary setting is not done on the connected computer.t Perform the necessary setting for the corresponding function on the
computer (page 27 (GB) or page 28 (GB)).
The software of the projector is frozen.t Once you set INPUT-B FUNC. (VPL-PX15) or INPUT-C FUNC. (VPL-FX51)
in the INSTALL SETTING menu to OFF, then reset it to ON.
The password is set for the projector or the file.t Enter the password. When the IP address is not changed from the factory-
preset one, enter “root” in the Name text box for Administrator.
The password you entered is not correct.t Enter the correct password.
Internet browser
Symptom
Internet Browser for the projector cannotbe started.
You cannot get access to the homepages with the Internet browser of theprojector, or some of them are notdisplayed.
Causes and remedies
The projector is not connected to the LAN.t Check the setups for the On-board LAN and wireless LAN environment.
(pages 10 (GB)–12 (GB))
Plug-in software such as Media Player and Real Player is required, or a homepage you are accessing is created in Java format.t As the Internet browser of the projector is not compatible with plug-in
software, it cannot display home pages that use Media Player or RealPlayer. The browser of the projector is not compatible with Java format.