DameWare MRC Evaluation Guide
33
DameWare Mini Remote Control (Standalone) Evaluation Guide
Transcript of DameWare MRC Evaluation Guide

DameWareMini Remote Control
(Standalone)
Evaluation Guide

Legal
Copyright © 2015 SolarWinds Worldwide, LLC. All rights reserved worldwide.
No part of this document may be reproduced by any means nor modified, decompiled, disassembled, published ordistributed, in whole or in part, or translated to any electronic medium or other means without the written consentof SolarWinds. All right, title, and interest in and to the software and documentation are and shall remain theexclusive property of SolarWinds and its respective licensors.
SOLARWINDS DISCLAIMS ALL WARRANTIES, CONDITIONS OR OTHER TERMS, EXPRESS OR IMPLIED, STATUTORYOR OTHERWISE, ON SOFTWARE AND DOCUMENTATION FURNISHED HEREUNDER INCLUDING WITHOUTLIMITATION THE WARRANTIES OF DESIGN, MERCHANTABILITY OR FITNESS FOR A PARTICULAR PURPOSE, ANDNONINFRINGEMENT. IN NO EVENT SHALL SOLARWINDS, ITS SUPPLIERS, NOR ITS LICENSORS BE LIABLE FORANY DAMAGES, WHETHER ARISING IN TORT, CONTRACT OR ANY OTHER LEGAL THEORY EVEN IF SOLARWINDSHAS BEEN ADVISED OF THE POSSIBILITY OF SUCH DAMAGES.
The SOLARWINDS, the SOLARWINDS & Design, DAMEWARE, ORION, and other SolarWinds marks, identified onthe SolarWinds website, as updated from SolarWinds from time to time and incorporated herein, are registeredwith the U.S. Patent and Trademark Office and may be registered or pending registration in other countries. Allother SolarWinds trademarks may be common law marks or registered or pending registration in the UnitedStates or in other countries. All other trademarks or registered trademarks contained and/or mentioned hereinare used for identification purposes only and may be trademarks or registered trademarks of their respectivecompanies. Microsoft®, Windows®, and SQL Server® are registered trademarks of Microsoft Corporation in theUnited States and/or other countries.
The DameWare third party libraries are covered with more accuracy and detail in http://www.sol-arwinds.com/documentation/3rdPartySoftware/3rdParty.htm
DameWare version 12.0, revised 10/6/2015
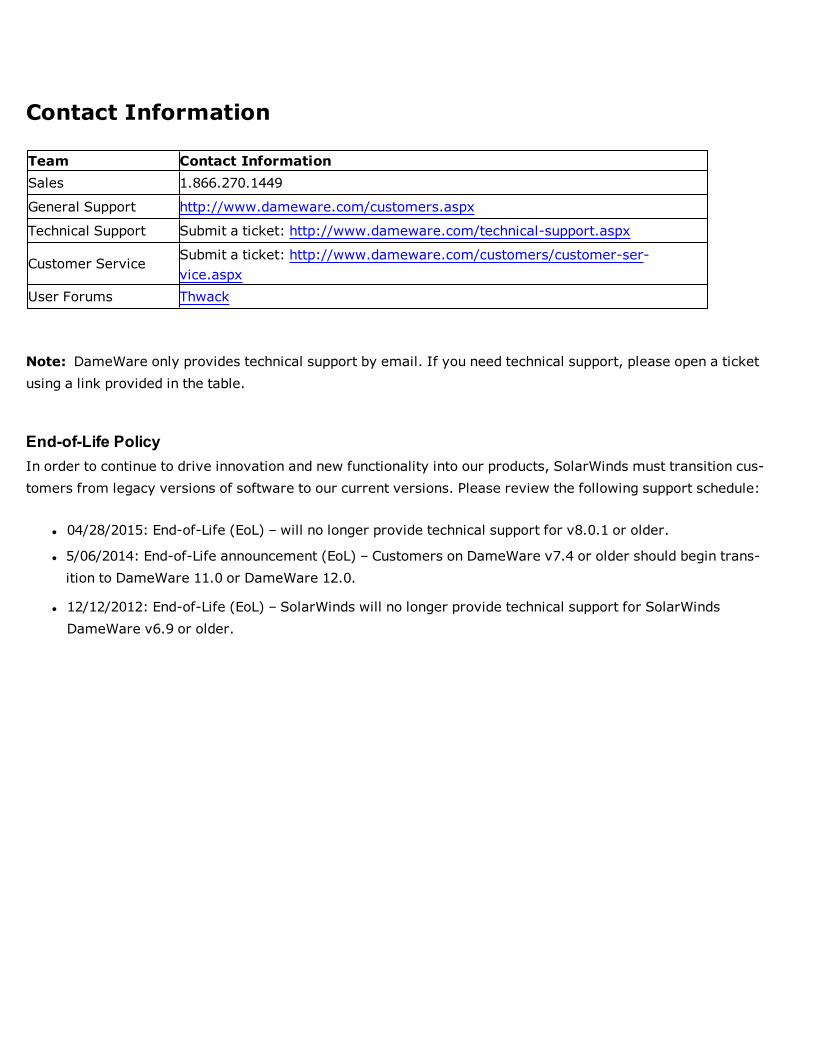
Contact Information
Team Contact InformationSales 1.866.270.1449
General Support http://www.dameware.com/customers.aspx
Technical Support Submit a ticket: http://www.dameware.com/technical-support.aspx
Customer Service Submit a ticket: http://www.dameware.com/customers/customer-ser-vice.aspx
User Forums Thwack
Note: DameWare only provides technical support by email. If you need technical support, please open a ticketusing a link provided in the table.
End-of-Life PolicyIn order to continue to drive innovation and new functionality into our products, SolarWinds must transition cus-tomers from legacy versions of software to our current versions. Please review the following support schedule:
l 04/28/2015: End-of-Life (EoL) – will no longer provide technical support for v8.0.1 or older.
l 5/06/2014: End-of-Life announcement (EoL) – Customers on DameWare v7.4 or older should begin trans-ition to DameWare 11.0 or DameWare 12.0.
l 12/12/2012: End-of-Life (EoL) – SolarWinds will no longer provide technical support for SolarWindsDameWare v6.9 or older.

Introduction
Introduction to DameWare Mini Remote ControlDameWare Mini Remote Control is a powerful, centralized remote control application that allows you to seam-lessly connect to remote systems. You can securely authenticate to computers, troubleshoot and solve problems,and chat with end users on computers running Windows, Mac OSX, or Linux.
Key features include:
l Controlling end users' computersl The ability to connect to Windows, Mac OSX, and Linuxl Multiple authentication types, including CACl The ability to connect to unattended sessionsl Rapid client agent deployment
Why Install DameWare Mini Remote ControlDameWare Mini Remote Control allows you to quickly connect to remote computers through a client agent using avariety of connection options and privileges to control remote computers. Using true remote desktop sharing, youcan control the end user's computer while the end user is still connected. Mini Remote Control can connect to com-puters running most versions of Windows (Vista, 7, 8, 8.1, 2008 (including R2), 2012 (including R2), and 10), MacOSX, and Linux.
In addition to being an easy-to-use remote control application, Mini Remote Control provides a rich feature setthat complements its main function. Mini Remote Control integrates with highly secure environments by providingmultiple authentication methods, including Smart Card authentication. You can quickly connect to unattended ses-sions or powered-down computers and automatically deploy the remote client agent. Mini Remote Control alsocomes with built-in chat functionality and one-click screenshots.
How DameWare Mini Remote Control WorksDameWare Mini Remote Control is an agent-based remote control application and therefore consists of two parts:
l The Mini Remote Control application
l The Mini Remote Control client agent service
The Mini Remote Control application is the program installed on your local system that you use to connect to theMini Remote Control client agent and control the remote computers.

The Mini Remote Control client agent service is the software component deployed to computers that allows theMini Remote Control application to control them. This service runs in the background of the remote system underthe Local System account. When there is not an active Mini Remote Control connection, the service uses little tonone of the remote system's CPU.
When the Mini Remote Control application attempts to connect to the Mini Remote Control client agent, the clientagent authenticates the credentials locally before allowing the connection. The installed client agent service doesnot pose a security risk to the remote computer because all user privileges are granted by the operating systemon the remote computer. Using Mini Remote Control does not provide users with greater privileges than theywould have if they logged on to the computer locally. Every privilege the Mini Remote Control user has must beallowed by the remote computer.


Installation
Installing DameWare Mini Remote ControlThe DameWare Mini Remote Control installation is a two step process. You must:
l install the Mini Remote Control applicationl deploy the Mini Remote Control client agent
Install the Mini Remote Control application on your computer. Use the application to connect to and controlremote computers.
Install the Mini Remote Control client agent on any remote computer to which you need to connect. While the cli-ent agent can be deployed each time the application connects to a client, you can also preemptively deploy the cli-ent agent to computers.
Use the following topics to install the Mini Remote Control application and deploy the client agent.
l System Requirements
l Installing the DameWare Mini Remote Control Application
l Licensing
l MRC Client Agent Service Installation Methods
l Common Error Messages
System RequirementsBefore you install the Mini Remote Control application or client agents, review the following system requirements.
DameWare Mini Remote Control ApplicationHardware
Install DameWare Mini Remote Control on a computer that meets the following minimum requirements:
l 1 GHz CPU
l 20 MB RAM
l 150 MB available hard drive space
Operating System
Install DameWare Mini Remote Control on a computer running any of the following operating systems:

l Windows Vista
l Windows Server 2008 (including R2)
l Windows 7
l Windows Server 2012 (including R2)
l Windows 8
l Windows 8.1
l Windows 10
DameWare Mini Remote Control Integration
DameWare Mini Remote Control can integrate with SolarWinds Web Help Desk version 12.2.0.
DameWare Mini Remote Control Client Agent
Install the DameWare Mini Remote Control client agent on remote computers running any of the following oper-ating systems:
l Windows Vista
l Windows Server 2008 (including R2)
l Windows 7
l Windows Server 2012 (including R2)
l Windows 8
l Windows 8.1
l Windows 10
DameWare Mini Remote Control can also connect to remote computers running any of the following operating sys-tems using the VNC protocol:
l Debian 5.0 and later with VNC enabled
l CentOS 5 and 6 with VNC enabled
l Ubuntu 10.04.1 LTS to 10.04.3 LTS, 11.10, and 12.04 LTS with VNC enabled
l Red Hat Enterprise Linux 5 and later with VNC enabled
l Fedora 15 and 16 with VNC enabled
l Mac OS X with VNC enabled
A video card on the remote system that supports the following:
l Bitmap transfers
l Windows API, SetDIBits and GetDIBits functions
l A single color plane
Additionally, at least one TCP port must be open so the Mini Remote Control application can communicate with theMini Remote Control client agent.
Ports Used for Mini Remote ControlIf a remote system is running the DameWare Mini Remote Control client agent service, Mini Remote Control onlyuses a single TCP port to connect to it. The default TCP port is 6129; however, you can specify any of the 65,000valid TCP ports in the Mini Remote Control application properties. Since TCP 6129 is a well known port for the MiniRemote Control program, DameWare recommends you choose a different port to ensure the most secure con-nections.
If a remote system is not running the Mini Remote Control client agent service, Mini Remote Control attempts toinstall it over the remote operating system’s installed protocols for File & Printer Sharing.
Microsoft defines File & Printer Sharing as:
l UDP 137 (Name)
l UDP 138 (Datagram)
l TCP 139 (Session)
l TCP 445 (Direct Hosting)
If you do not want Mini Remote Control to install the client agent service using these ports, or Mini RemoteControl is unable to connect to the remote system using these ports, install the service using another installationmethod. For additional information, see Mini Remote Control Client Agent Service Installation Methods.
LicensingLicensing
DameWare standalone software is licensed per user, and each license allows you to install on 3 computers. TheRemote Support Client Agent Service is not licensed and there are no additional fees for installing the service onremote systems. For example, if you have 10 computers running Remote Support and you use Remote Support tomanage 10,000 remote systems, you only need to license the 10 Remote Support computers to maintain com-pliance with the SolarWinds End User License Agreement (EULA). To purchase licenses, visitwww.dameware.com.

The DameWare centralized version is licensed per user, but the licensing and activation occur on the DameWareCentral Server using the centralized license key. The centralized license includes a licensed user count, and eachauthorized DameWare user reduces the number of available user licenses. For example, if you purchased a 10user license, you can install and use Remote Support or Mini Remote Control from any computer so long as youcan logon to the DameWare Central Server and do not exceed 10 users. The Mini Remote Control Client Agent Ser-vice in the centralized version is not licensed and there are no additional fees for installing it.
Note: To comply with the SolarWinds EULA, you cannot activate both standalone and centralized software at thesame time.
Installing the Mini Remote Control ApplicationDameWare provides an intuitive wizard to guide your installation. You can also install the application using thecommand line. The following procedure will complete your installation of the DameWare Mini Remote ControlApplication.
l Install the application with the installerl Install the application from the command line
You need administrator privileges to install the Mini Remote Control application. If the computer on which you areinstalling Mini Remote Control has previously had a DameWare product, not including the Mini Remote Control cli-ent service, the previous settings are applied unless you delete the DameWare database.
Install the Application with the Installer
To install the DameWare Mini Remote Control application using the installer:
1. Log on as an administrator
2. Navigate to your download location and launch the DameWareMRC executable file.
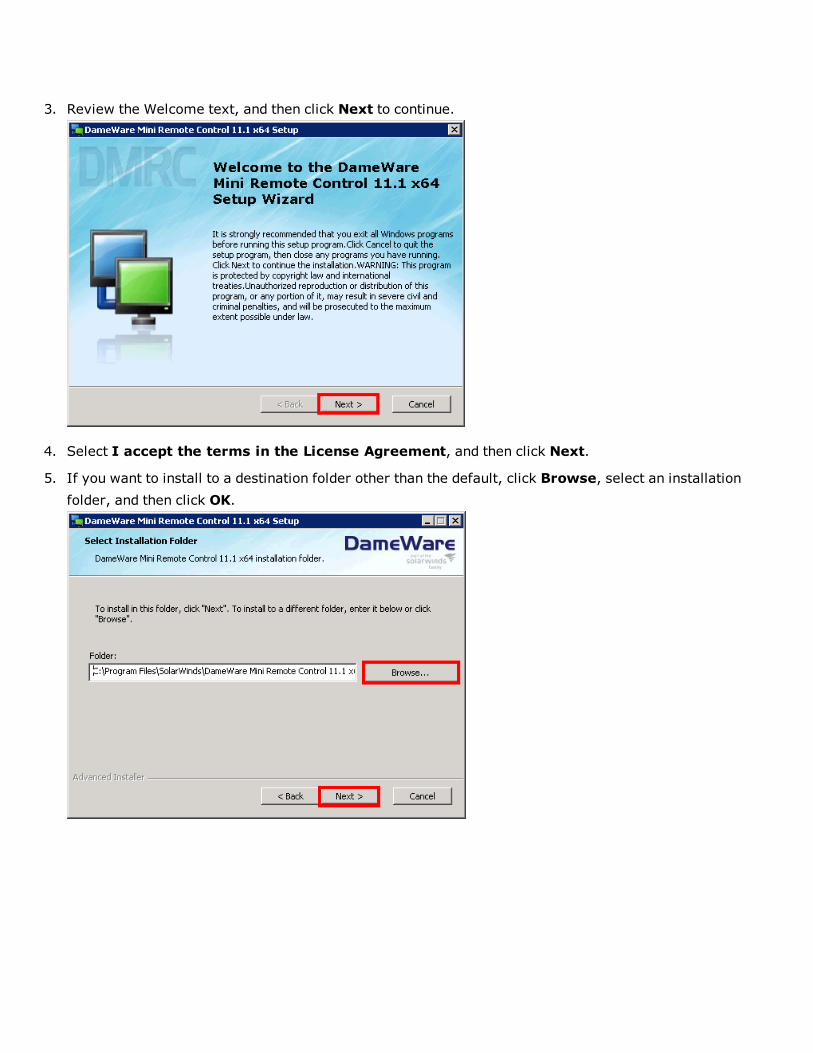
3. Review the Welcome text, and then click Next to continue.
4. Select I accept the terms in the License Agreement, and then click Next.
5. If you want to install to a destination folder other than the default, click Browse, select an installationfolder, and then click OK.

6. Select which application shortcuts you want the DameWare installer to create.
7. Click Install to begin the installation.
8. Enter the email address you provided to DameWare when you registered for the software, and then clickContinue.

9. When prompted, click Continue Evaluation.
10. Click Close.
11. Click Finish to complete the installation wizard and exit.
After you have completed installing the Mini Remote Control application, launch the application by clickingDameWare Mini Remote Control in Start > Programs > SolarWinds > DameWare Mini Remote Con-trol to deploy a client agent from the application.
Install the Application from the Command Line
You can use command line options to install the Mini Remote Control application without being prompted forlicense information.
Notes:
l You must run the commands with Administrator permissionsl Use %WINDIR%\System32 instead of relative pathsl You cannot install through a proxy server that also requires authentication
To install Remote Support or Mini Remote Control using the MSI installer in evaluation mode:
Use the following command at the command line or in an installer script. Replace the variables in this exampleaccording to the values in the Arguments section.
msiexec /i fileName.msi /qn APPDIR="C:\Program Files\DameWare programName\" reboot=reallysuppress SILENT=yes
To install Remote Support or Mini Remote Control using the EXE installer in evaluation mode:

Use the following command at the command line or in an installer script. Replace the variables in this exampleaccording to the values in the Arguments section.
fileName.exe /args "/qn APPDIR=\"C:\Program Files\DameWare programName\" reboot=reallysuppress SILENT=yes"
Arguments
The following is a list of arguments you can use on the command line.
l /args "argumentsHere" (EXE only) instructs the EXE installer to pass the arguments inside the quotationmarks along to the MSI installer.
l APPDIR="C:\Program Files\DameWare programName\" specifies the installation directory. Enter RemoteSupport or Mini Remote Control in place of programName to use the default installation directory.
l SILENT=yes instructs the installer to install the program silently.l SA_KEY=licenseKey (licensed only) contains the license key for licensed installations. Enter a valid licensekey in place of licenseKey.
l SA_EMAIL=emailAddress (licensed only) contains the administrator's email address for licensed install-ations. Enter a valid email address in place of emailAddress.
l SA_FIRST_NAME=firstName (licensed - optional) contains the administrator's first name. Enter the firstname in place of firstName.
l SA_LAST_NAME=lastName (licensed - optional) contains the administrator's last name. Enter the last name inplace of lastName.
l SA_PHONE_NUMBER=phoneNumber (licensed - optional) contains the administrator's phone number. Enter avalid phone number in place of phoneNumber.
l SA_PROXY_ADDRESS=proxyAddress (licensed - optional) contains the address of the proxy server the pro-gram should use to connect to the SolarWinds licensing server. If applicable, enter the proxy server's IPaddress or hostname in place of proxyAddress.
l SA_PROXY_PORT=proxyPort (licensed - optional) contains the port the program should use to connect to theproxy server. If applicable, enter the proxy port number in place of proxyPort.
l INSTALLSTANDALONE=1 installs the standalone version. Use 0 to install the centralized version.l CENTRALSERVERHOSTNAME=centralServerHostName contains the DameWare Central Server's host name.l CENTRALSERVERPORT=portNumber contains the port number to the DameWare Central Server. By default,this is 6133.
l CSUSER=centralServerUser contains the login name of a Central Server user.l CSPASSWORD=SWORD=centralServerUserPassword contain the password of the Central Server user.
Mini Remote Control Client Agent Service Installation MethodsYou can deploy the DameWare Mini Remote Control client agent to a single computer as needed or you can deployto multiple computers at once.

If you want to deploy a single instance, you can deploy it to a remote computer in one of the following ways:
l Installing the Service On-demandl Installing the Service from the Mini Remote Control Applicationl Installing Using MSI + MST Installersl Installing Using EXE Installersl Installing the Service Manually
If you want to deploy to multiple computers, you can deploy it in one of the following ways:
l Deploying Custom MSI Packages
Note: The Mini Remote Control application is backwards compatible with Mini Remote Control client agents fromversion 7.0. If the Mini Remote Control application connects to an unsupported agent, it prompts you to install anewer version of the client agent.
The Windows operating system requires location Administrator rights to install, remove, start, stop, or upgradethe Mini Remote Control client agent service on remote systems.
Installing the Service On-demand
When Mini Remote Control attempts to connect to a computer, it tries to connect through the client agent. If the cli-ent agent is not present on the remote computer, you are prompted to install the client agent.
Note:
l The remote operating system must have the File & Printer Sharing protocols and the File & Printer Sharingports opened.
To install the client agent service on-demand:
1. Open a remote connection dialog by clicking File > Connect.2. Enter the Host Name or IP Address and administrative credentials.3. Click Connect.4. When prompted to install the client agent service, click OK.
Installing the Service from the Mini Remote Control Application
You can push the client agent to a computer using an option in the Mini Remote Control application console.
Note:
l The remote operating system must have the File & Printer Sharing protocols and the File & Printer Sharingports opened.

l The remote agent may run in the following modes:n Direct and remote connections: This enables you to connect to computers using on-premise accessand off-premise access through DameWare Internet proxy.
n Direct connection only: This enables you to connect to computers using on-premise access only.
To install the service from the Mini Remote Control application:
1. Click Install Service... from the File menu.2. Enter the host name or IP address of the computer on which you want to install the service.3. If you want to manually start the service each time a connection is opened, select Set Service Startuptype to "Manual" default is "Automatic".
4. If you want to configure the settings of the Mini Remote Control client agent service to copy to the remotesystem, click the Configure... button.
5. If you want to copy the DWRCS.reg file from the local system to the remote system with pre-configured MiniRemote Control client agent service settings, select Include Configuration File (DWRCS.reg). Thisoption is available after you have created configuration settings.
6. If you want to connect in FIPS Encryption Mode, select Copy FIPS Modules (approximately 9 MB).7. Select Overwrite any existing configuration on remote host to recreate the configuration file in the
remote machine.Note: After pushing an agent with the Overwrite any exciting configuration on remote host func-tionality, you need to approve the agent on remote machine again.
8. Click OK.
The Mini Remote Control application deploys the service to the remote computer.
Installing Using MSI + MST Installers
MSI installation contains the remote host, while MST contains the configuration for target host to be able to use itin the Remote mode.
The MSI and MST installers are saved at the following locations:
l MSI installer at c:\Program Files (x86)\SolarWinds\DameWare Central Server-\WebServerStaticContent\binary\
l MST installer at c:\Program Files (x86)\SolarWinds\DameWare Central Server-\WebServerStaticContent\binary\Remote Configuration\
To deploy the remote host with the remote configuration, open the command line and enter the transformationcommand:
msiexec /i DWRCS_Vista_64.msi TRANSFORMS=transform_DWRCS_Vista_64.mst

Note: Add OVERWRITEREMOTECFG=1 to overwrite the remote configuration. By default, remote configuration issaved on the target machine.
Installing Using EXE Installers
You may install the remote hosts directly from extracting the installer (EXE) file. The installer contains both theRemote Host installation (MSI) and Remote Host configuration (MST). EXE installer is located in the DameWareProxy machine, and is unique for each proxy and configuration.
The EXE installer is saved at c:\Program Files (x86)\SolarWinds\DameWare Central Server-\WebServerStaticContent\binary\
By default, remote host installation does not overwrite the Remote Host configuration. To apply a clear con-figuration, run the installation with OVERWRITEREMOTECFG=1.
Once you add the custom installation arguments, you must specify the default arguments as well. Otherwise, theremote host will be installed without configuration and will be run in Direct mode only. SolarWinds recommendsto use the following command line arguments:
DWRCS_Vista_64.exe -ap "TRANSFORMS=transform_DWRCS_Vista_64.mst OVERWRITEREMOTECFG=1"
Installing the Service ManuallyNotes:
l In this installation method, agents will be available in Direct mode only, without Remote connection mode.l For manual installation with Remote connection support, copy DWRCSU.inst at c:\Program Files (x86)\SolarWinds\DameWare Central Server\ into the Remote Host folder at c:\Windows\dwrcs\ and restart theRemote Host.
To manually install the Mini Remote Control client agent service:
1. Navigate to your DameWare installation folder, usually located at C:\Program Files\SolarWinds\DameWareMini Remote Control.
2. Copy the following files to a location or device you can access from the remote computer:l DameWare.LogAdjuster.exe.configl SolarwindsDiagnostics.exe.configl DameWare.Diagnosticsl cpprest110_xp_1_2.dlll DWRCChat.dlll DWRCK.dlll DWRCRSS.dll

l DWRCSE.dlll DWRCSET.dlll DWRCSh.dlll DWSGRWRP.dlll ICSharpCode.SharpZipLib.dlll log4cxx.dlll log4net.dlll SolarWinds.Logging.dlll SolarWinds.Orion.Common.dlll DameWare.LogAdjuster.exel DWRCS.EXEl DWRCST.EXEl SolarwindsDiagnostics.exel DWRCS.Logging.xmll DWRCST.Logging.xmll LogConfigurations.xml
3. On the remote computer, create a new folder in the Windows directory called "dwrcs" (C:\Windows\dwrcs).4. Place the copied files in the new folder.
Deploying Custom MSI Packages
Install the client agent on your local machine, and then use the DameWare MSI Builder to build a custom MSIpackage for the Mini Remote Control client agent service, including custom settings. You can then send the file tothe remote system via your normal distribution process, such as group policies, or download it from the remotesystem, and then execute the installer. This installation method also opens the necessary TCP port on the Win-dows Firewall when it starts up.
Note: Before you create your custom MSI package, you may want to pre-configure the client agent with hostnames, log settings, authentication choices, or other settings to deploy the custom configuration with the clientagent.
To build a custom MSI package for the Mini Remote Control client agent service:
1. Install and configure the client agent on the computer with the Mini Remote Control application.
2. Open the DameWare Mini Remote Control Package Builder: Start > All Programs > SolarWinds >DameWare Mini Remote Control > DameWare Mini Remote Control Client Agent MSI Builder.
3. Complete the following fields in the Package Builder dialog:
l Profile: Select a pre-defined MSI package profile to populate the rest of the fields with your pre-ferred settings. To save a new profile, complete the rest of the Package Builder dialog, enter a new

name in the Profile box, and then click the save icon.
l Target O/S: The operating system on the target system(s).
l Include FIPS Modules: Includes the FIPS Modules in the MSI package. These files are required torun the client agent service in FIPS Encryption Mode.
l Install the mirror driver: Includes the Mini Remote Control Mirror Driver in the MSI package.
l Install the keyboard driver: Includes the Mini Remote Control Virtual Keyboard Driver in the MSIpackage.
l Install the smart card driver: Includes the Mini Remote Control Smart Card Driver in the MSIpackage.
l Client Agent Settings: Click the Client Agent icon to open the Mini Remote Control client agent ser-vice settings dialog:
l When you configure these settings through the Package Builder, the application saves the settings inthe installer to deploy to one or more remote systems.
l Output Folder: Enter or browse to the folder you want to install the service to on the remote system(s).
4. Click Build MSI to build the MSI package and save it to the output folder, which is the DameWare install-ation folder by default.
You can deploy the custom MSI package as you would any other MSI.
Common Error MessagesThe following is a list of common errors encountered when installing DameWareand potential solutions to thoseerrors. These errors are generally related to some type of system or network configuration issue within a networkenvironment and can usually be duplicated outside of DameWare software.
Error Codes Error Potential Solutions
System Error: 5The credentials forthe remote computerwere rejected
l The user account must have sufficient rights to logon locally tothe remote computer.
SystemError: 51
Windows cannot findthe network path
Verify that the network path is correct and the target computer isturned on

Error Codes Error Potential Solutions
SystemError: 53
Cannot connect to theremote computer
l Ensure that File & Network sharing is enabled and the ports areopen.
l Check that the operating system is configured for Names Res-olution.
l Enable NetBios.
SystemError: 1300
Not all privileges orgroups referenced areassigned to the caller
This is frequently related to User Access Control or the Windows Fire-wall. Run the installer as an Administrator or login to the computerwith the Administrator or Domain Administer account.
SystemError: 1603
A fatal error occurredduring installation
If you have uninstalled DameWare and try to reinstall it, you mayneed to remove the registry keys.
SystemError: 1707
The network addressis invalid
This is related to the Novell Network Client. Try to connect with thehost name or deploy the client agent with the MSI builder.
SystemError: 1814
The specifiedresource name cannotbe found in the imagefile
Some or all of the operating system's Standard PerformanceIndexes (counters) are either missing or corrupt. See KB 300092 formore information.
Winsock Con-nectError: 10050
Cannot establish aconnection to theremote computer
Ensure that the network is up, that you can access the remote com-puter, and that the firewall has not blocked the connection.
Winsock Con-nectError: 10054
The connection wasforcibly closed by theremote computer
This can be caused if the application has stopped, the remote com-puter rebooted, the remote computer uses a hard close, or keep-alive activity.
Winsock Con-nectError: 10060
Connection timed outThis may be due to a firewall configuration issue, a names resolutionissue, or a network routing issue.
Winsock Con-nectError: 10061
The remote computeractively refused theconnection
l Reset the TCP port on both local and remote computers.l Ensure that the default TCP port is the same on both local andremote computers.
l Ensure that no other program is using the TCP port.
Winsock Con-nectError: 11001
Host not foundThe host name could not be found in the database queried. Checkthat you can access the host with the name or use the IP address
Winsock Con- Could not resolve the Check your DNS table or use the IP address instead

Error Codes Error Potential Solutions
nectError: 11004
host name
For more information on common errors, see KB 300005.

Connecting to Agents
Connecting to AgentsAfter you have installed both the Mini Remote Control application and the client agents, you may need to makeother modifications to establish successful connections between them. Use the following sections to help you con-nect between the application and client agents.
l What privileges do I need to connect with DMRC
l Establishing a Remote Connection over the Internet
l Connecting through a Firewall
l VNC Setup
What privileges do I need to connect with DMRC?After the client agent is installed, you do not need administrator privileges to access the remote computers.However, if you wish to modify the client agent service, you must connect with an administrator account.
Note: You must use an administrator account to connect to a 32-bit agent that has been installed on a 64-bit com-puter.
Non-Administrator Mode
By default, the remote user is prompted to allow a non-administrator access to their computer. If permission isnot explicitly granted by the remote user each time you attempt to connect to the computer, you cannot connectto the remote computer through the Mini Remote Control client agent. You can configure the client agent to allownon-administrator users to connect without the remote user's permission.
To allow non-administrators to connect without prompting:
1. On the remote computer, open the client agent's properties by right-clicking the service in the system trayand selecting Settings...
2. Navigate to the Access tab.3. Clear the checkbox on Permission required for these account types.4. Click OK.
When a user connects to the client agent without administrator privileges, a non-dismissible dialog informs usersthat the client is running in "Non-Administrator Mode".
Administrators Only Mode
You can configure the client agent to require an administrator account. Administrators are any user who is part ofthe local administrator group.

To allow only administrators to connect:
1. On the remote computer, open the client agent's properties by right-clicking the service in the system trayand selecting Settings...
2. Navigate to the Access tab.3. Select Allow only administrators to connect.4. Click OK.
Establishing a Remote Connection over the InternetThe Mini Remote Control application connects to the client agent service using a direct TCP connection from theapplication to the client agents. Although this method may not be as convenient as establishing a VPN or SSL con-nection to a LAN, for many users it provides a necessary means of providing remote support for customers oradministration for remote machines not on a LAN. Since Mini Remote Control uses TCP, the local and remote com-puters and router/firewalls may need to be configured to allow the connection. If you do not want to modify therouter/firewall or cannot modify the router/firewall, you can use the Reverse Connection feature - it requires noconfiguration of the remote site's router/firewall.
Perform the following steps on the remote computer/network and the local machine respectively.
On the remote computer/network:
1. Configure port forwarding in the hardware router/firewall for the designated TCP port and forward allinbound traffic for this TCP port to the correct Private (LAN) IP address behind the firewall.
2. Open the designated TCP port on any software firewalls that may be present on this machine. This willinstruct the DMRC Client Agent Service to listen on this TCP port (default is 6129). Note that Mini Remote Con-trol configures the Windows Firewall automatically.
On the local computer (with the Mini Remote Control application installed):
1. Open the DMRC application.2. For the Host Name or IP address, enter the Public (WAN) IP address of the remote site's router/firewall.3. Specify the appropriate User ID & Password.4. Click the Settings button to specify the correct TCP port.5. Click the OK button.6. Click the Connect button.
When the remote site's router/firewall sees the inbound traffic on the designated TCP port it will forward thetraffic to the correct machine on the internal network.

If you are simultaneously connecting to multiple machines behind a router/firewall (over the Internet), using theProxy feature of DMRC eliminates the need to forward a TCP port to each machine behind the router/firewall.
Note: DMRC's Proxy feature is different from the DameWare Internet Proxy. The DameWare Internet Proxy isonly used with Internet Sessions.
Reversing a Connection
You can use the client agent to initiate an outbound connection to the Mini Remote Control application. This neg-ates the need to open the remote site's firewall/router and the need to provide credentials to the Mini Remote Con-trol application. However, the router/firewall of the Mini Remote Control application user must by configured toreceive the reverse connection.
To initiate a Reverse Connection
Note: The client agent must be installed before you can open a reverse connection to the Mini Remote Controlapplication.
On the local network/machine:
1. Open the DMRC application. Select the File menu and the options in that drop-down menu will include onecalled, "Accept Incoming Connection".
2. Selecting this option will display a dialog box where the designated TCP Port Number (default is 6130) can beentered. If the local machine has multiple network cards (NICs), choose the appropriate one to use for thereverse connection from the "Bind Address" options.
On the remote machine:
1. When the DMRC Client Agent Service is installed on a remote machine, the following SysTray icon becomesvisible:
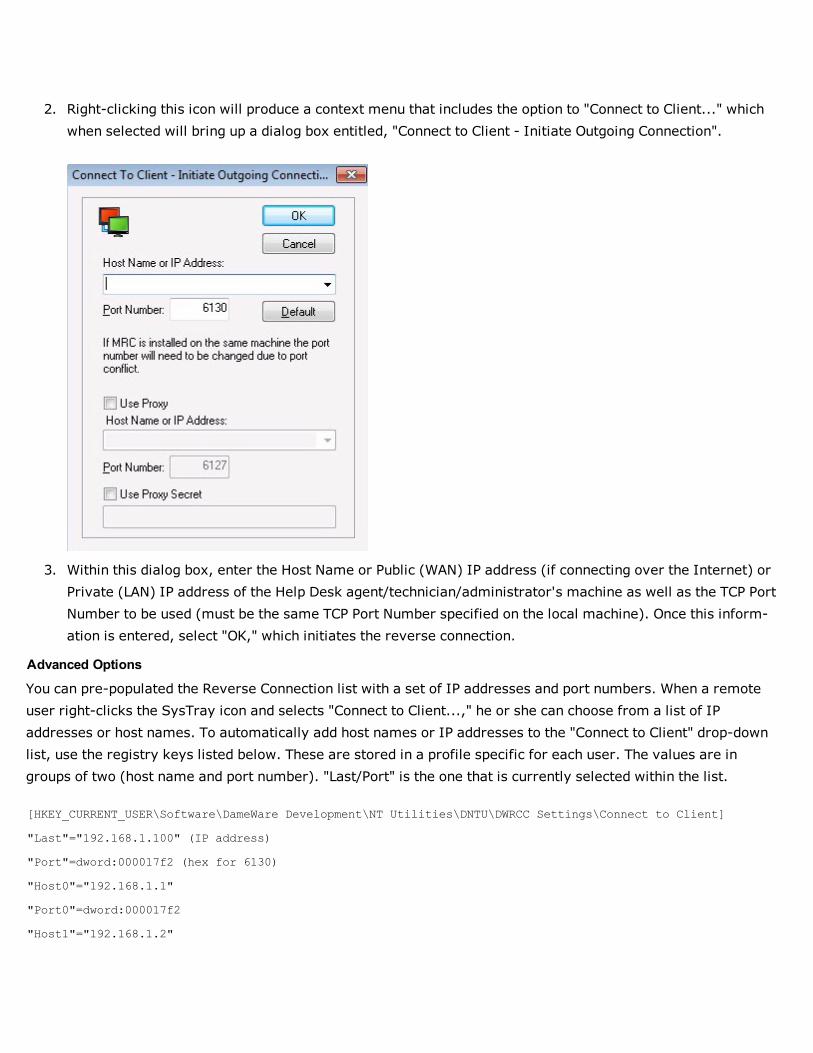
2. Right-clicking this icon will produce a context menu that includes the option to "Connect to Client..." whichwhen selected will bring up a dialog box entitled, "Connect to Client - Initiate Outgoing Connection".
3. Within this dialog box, enter the Host Name or Public (WAN) IP address (if connecting over the Internet) orPrivate (LAN) IP address of the Help Desk agent/technician/administrator's machine as well as the TCP PortNumber to be used (must be the same TCP Port Number specified on the local machine). Once this inform-ation is entered, select "OK," which initiates the reverse connection.
Advanced Options
You can pre-populated the Reverse Connection list with a set of IP addresses and port numbers. When a remoteuser right-clicks the SysTray icon and selects "Connect to Client...," he or she can choose from a list of IPaddresses or host names. To automatically add host names or IP addresses to the "Connect to Client" drop-downlist, use the registry keys listed below. These are stored in a profile specific for each user. The values are ingroups of two (host name and port number). "Last/Port" is the one that is currently selected within the list.
[HKEY_CURRENT_USER\Software\DameWare Development\NT Utilities\DNTU\DWRCC Settings\Connect to Client]
"Last"="192.168.1.100" (IP address)
"Port"=dword:000017f2 (hex for 6130)
"Host0"="192.168.1.1"
"Port0"=dword:000017f2
"Host1"="192.168.1.2"

"Port1"=dword:000017f2
..........
..........
"Hostx"="192.168.1.100"
"Portx"=dword:000017f2
Connecting through a FirewallIf you connect to remote sites through a firewall, you should pre-install the client agent. After the client agent isinstalled, you only need one port open in your firewall or router. If you install the client agent when you firstattempt to connect to the remote computer, you must open multiple ports to install the client agent and open theTCP port used to connect the application to the client agent. The client agent is installed using the same ports usedto access shared resources, and DameWare does not recommend opening these ports on any perimeter firewall.
The default TCP port for communication is 6129 but can be set to anything from both the application and the clientagent.
The TCP ports required for connecting through a firewall are documented by Microsoft and depend on the Oper-ating System version (Windows Vista/Windows 7/2008), the Network protocol installed, and how the network isconfigured.
Example:
The Windows Vista/Windows 7/2008 redirector and server components support Direct Hosting over SMB for com-municating with other computers running these Operating Systems. Direct Hosting over SMB does not useNetBIOS for name resolution. DNS is used for name resolution and the Microsoft networking communication issent directly over TCP without a NetBIOS header. Direct Hosting of SMB over TCP/IP uses TCP & UDP port 445instead of the NetBIOS session TCP port 139. DNS Direct Hosting also uses port 445 (TCP and UDP).
By default, both NetBIOS and Direct Hosting are enabled on Windows Vista, and both are tried in parallel when anew connection is established. The first to succeed in connecting is used for any given attempt. NetBIOS overTCP/IP support can be disabled to force all traffic to use TCP/IP Direct Hosting.
Changing the Default Port
You must change the default port to the same port number on both the application and the client agent.
To change the port settings on the application:
1. Click the Default Host Properties... button in the View menu.2. On the Remote Options tab, change the port number.3. Click OK.

To change the port settings on the client agent:
1. Right-click on the client agent in the system tray, and select Properties.2. On the General tab, change the port number.3. Click OK.
VNC SetupThe connection settings, Use VNC Viewer and Use Intel AMT KVM, in the Remote Connect dialog allow MiniRemote Control users to connect to remote systems running Linux and Mac operating systems as well as systemsrunning on Intel vPro hardware that supports the AMT KVM feature. For this to work, the remote system must berunning a VNC server, similar to the Remote Desktop service in Windows. In some cases, enabling VNC is as easyas enabling the option as a setting in the operating system. In other cases, you may have to install a separateVNC server application, such as Real VNC.
For additional information about Real VNC, visit their website: http://www.realvnc.com/.
Sample Procedures
The procedure to set up a VNC server on a remote system will vary based on the operating system and versionthe system is running. However, the following procedures illustrate typical scenarios for Linux, Mac, and vProoperating systems.
Linux
To configure a VNC server in Linux using the Gnome Remote Desktop:
1. Open the Gnome desktop preferences. For example, in Fedora distros:
a. Click the Fedora icon.
b. Point to Desktop > Preferences, and then select Remote Desktop Preferences.
2. Configure the settings according to your preferences.
3. Click Close.
Mac OS X
Note:
l A VNC server on Mac OS X 10.8 (Mountain Lion) may not work correctly as it has not been signed with anApple developer certificate.

l VNC server 5.0.x may not be able to properly wake a Mac display from sleep under OS X 10.8.l VNC server 5.0.x cannot interact with a retina display.
To configure a VNC server in Mac OS X 10.4 or 10.6:
1. Click the Apple menu, and then select System Preferences.
2. In the Internet and Network section, click the Sharing icon.
3. Select Apple Remote Desktop, and then click Start.
4. If necessary, set a password for VNC connections:
a. Click Access Privileges.
b. Select VNC viewers may control screen with password, and then enter a password.
c. Click OK.
To configure a VNC server in Mac OS X 10.7:
1. Click the Apple menu, and then select System Preferences.
2. In the Internet and Network section, click the Sharing icon.
3. Select Screen Sharing.
4. If necessary, set a password for VNC connections:
a. Click Computer Settings...
b. Select VNC viewers may control screen with password, and then enter a password.
c. Click OK.
vPro hosts
To configure Intel vPro hosts for AMT KVM connections:
1. Reboot the host, and then enter its BIOS configuration menu.
2. Under AMT Options, select the following options:
l Firmware Verbosity
l AMT Setup Prompt
3. Reboot the host, and then enter the Management Engine BIOS Extension (MBEx): Just after the BIOS startupscreen, press Ctrl+P.
4. If you are prompted for a password, enter the default password, admin, and then create a new password.
5. In the Intel ME Platform Configuration menu, select Activate Network Access.
6. In the Intel ME Network Setup menu, select Intel ME Network Name Settings.

7. Select Host Name, and then enter the hostname for the host.
8. Press Esc to return to the previous menu.
9. SelectManageability Feature Selection, and then ensure it is enabled in the lower pane.
10. Select SOL/IDER.
11. In the SOL/IDER menu, enable the following options:
l SOL
l IDER
l Legacy Redirection Mode
12. Return to the previous menu, and then select KVM Configuration.
13. In the KVM Configuration menu, select KVM Feature Selection, and then ensure it is enabled in the lowerpane.
14. In the upper pane, select User Opt-in, and then select User Consent is required for KVM Session inthe lower pane.
15. In the upper pane, select Opt-in Configurable from remote IT, and then select Enable Remote Con-trol of KVM Opt-In Policy in the lower pane.
16. Press Esc until you are prompted to leave the MEBx menu.
Source: http://www.howtogeek.com/56538/

Quick Tour
DameWare Mini Remote Control Quick TourThe following sections guide you through the most common task, such as enabling logging, using DMRC with ter-minal services, and saving host lists.
l Enabling Remote Logging
l Using Smart Cards
l How to backup and restore the saved host list
l Forcing Encryption Levels
Enabling Remote LoggingThe remote logging feature of the Mini Remote Control client agent enables administrators to send a copy of theMini Remote Control entries recorded on the remote computer's Application Event log to a logging server. The loghost must have a Mini Remote Control client agent installed on it. Remote logging is often turned on to complywith PCI logging requirements.
Remote logging requires changes to the client agent and the log host and that both run the same version of theMini Remote Control client agent.
To enable remote logging:
1. Ensure that the Mini Remote Control client agent server is running.2. Make the following changes to the client agent:
l Select the "Enable Remote Logging" settingl Enter the IP address, Host Name, or FQDN of log hostl Enter the TCP port that the Mini Remote Control Client Agent Service is configured to listen on, on theremote machine (Log Host Port Number)
3. Restart the service on the client.4. On the log host, make the following changes to the client agent:
l Select the "Enable Logging to this host" settingl Enter the Log Path for the local computer, such as C:\DameWare Log Files\ (a UNC path is not valid)l Enter the Maximum Log File size in bytes
5. Restart the service on the log host.
When the Mini Remote Control Client Agent Service on the machine sees an inbound logging request, it will take inthe log entry and then append it to the DWRCS.CSV file in the specified log path folder. If the file does not exist,one will be created.
The DWRCS.CSV log file :

All entries are then recorded or appended to the DWRCS.CSV log file, which is a standard CSV (Comma SeparatedValue) formatted file that can be opened using a third-party reporting tool (i.e. Excel, etc.).
Using Smart CardsSmart cards provide a form of two-factor authentication to securely login. You can use smart cards with MiniRemote Control to log in remotely and interactively. Interactive login allow users of the DMRC software to accessremote machines and interactively login with their PIN while they are at the Logon Desktop, as if they were phys-ically at the console of the remote machine. Remote Smart Card Authentication and Interactive Login withinDameWare Development software also does not require any type of Smart Card middleware, and does notrequire a Smart Card reader attached to the remote machine.
Requirements
The following is a list of requirements necessary for DameWare Mini Remote Control to authenticate successfullywith smart cards.
1. Smart Card Login & Authentication is only supported on Windows Vista and above.2. Microsoft's Smart Card Services (scardsvr) must be installed.3. The Operating System and network implementation must be configured properly for Smart Card authen-
tication. The Smart Card & PIN must have sufficient rights to Login to the remote machine. Unfortunately,DameWare's support department does not provide training seminars on how to implement and configure aSmart Card environment. However, the following Smart Card documentation on Microsoft's website may behelpful.
4. A Smart Card reader must be installed on the local machine.5. According to Microsoft's Requirements, if the "Net Use" command can be successfully executed to access a
remote machine using a Smart Card, the user should also have the ability to install, remove, start, or stopthe DMRC Client Agent Service, or successfully use DNTU's LogonAs feature, via Smart Card authentication.
6. According to Microsoft, Smart Card Authentication to Active Directory requires that Smart Card workstations,Active Directory, and Active Directory Domain Controllers be configured properly. Active Directory musttrust a certification authority to authenticate users based on certificates from that CA. Both Smart Card work-stations and Domain Controllers must be configured with correctly configured certificates.
Notes:
l A Smart Card reader is not required on the remote machine.l When using smart card authentication interactively, a "New Hardware Found" notification may be displayedon the remote computer.
You can elect to use smart card authentication when you create your host entry on the Mini Remote Control applic-ation, or you can choose to use smart card authentication in the client agent's settings.

How to Backup and Restore the saved host listThe Saved Host list and settings are saved to a Mini Remote Control database file, MRCCv2.db. For security,DameWare uses Microsoft's Security APIs to encrypt and store the credentials associated with each host entry,and the credentials are not transferred or backed up with the saved host list.
The MRCCv2.dbf file is usually found in the application data folder under "DameWare Development" or in theDameWare installation folder. For example, you can find the file in the location C:\Users\{Username}\Ap-pData\Roaming\DameWare Development for the following Operating Systems.
l Windows Vistal Windows 7l Windows 2008
Hosts are automatically saved to the Saved Hosts lists. If you wish to ensure that all hosts are saved, click thesave button when creating a new host.
Backup the Saved Host List
To backup the saved host list, copy the MRCCv2.dbf file to your backup location.
Restore the Saved Host List
The steps to restore or import the saved host list are the same.
1. Save the MRCCv2.db file to the computer.2. Open the Mini Remote Control application.3. Open the Remote Connect dialog by clicking File > Open.4. In the File menu, select Import... and click from MRCCv2.db File.5. Browse to the location of the file, and click OK.
Forcing Encryption LevelsMRC encrypts all credentials and other session negotiation information using Microsoft’s built-in CryptographicService Providers & CryptoAPIs to support strong encryption for authentication and session negotiation (keyexchange). Mini Remote Control always uses multiple encryption algorithms and always tries to negotiate thestrongest keys possible based on what the local and remote systems' Crypto Subsystem can agree upon.
You can choose to encrypt the following:
l General datal Images

l Simple File Transfers
You can choose your encryption levels in both the Mini Remote Control application and in the remote client agent.The encryption level selected on the client agent will supercede choices made in the Mini Remote Control applic-ation.
These configurable options allow you to comply more easily with government regulations or your organization'ssecurity policy. It also provides a convenient default level of security for your remote computers.
To force encryption levels on the agent client:
1. Ensure that the Mini Remote Control client agent server is running.2. On the General tab, click the Sessions button.3. Select Force Encryption.4. Choose the appropriate encryption level.5. Restart the service on the client.
If you want to force encryption levels on all your client agents, you can export the client agent settings to theremote computers using an MSI. See Mini Remote Control Client Agent Service Installation Methods for moreinformation.


![C-MRC it gb de Ed01 2007reducta-im.hr/katalozi/zupcasti_reduktori_rc.pdfSELEZIONE RIDUTTORE - MRC 1400 [min-1] SPEED REDUCER SELECTION - MRC GETRIEBEAUSWAHL - MRC 0.09 kW (0.12 HP)](https://static.fdocuments.net/doc/165x107/6108c986e8f90f642023ce89/c-mrc-it-gb-de-ed01-2007reducta-imhrkatalozizupcastireduktorircpdf-selezione.jpg)