DAMAGE CONTROL AND REPAIR T - Photoshop Restoration & Retouching

DAMAGE CONTROL AND REPAIR
The torture we put our old photographs through—storing them in damp basements or hot attics,
carrying them in wallets, folding, tearing, cutting, scribbling on them, and pasting them into albums—all leave telltale marks, cracks, rips, tears, and misshapen corners. So if this is so bad for photographs, why do we put them through the gauntlet of abuse? Because we value, treasure, and cherish them. We like carrying pictures of loved ones in our wallets or purses; we take pleasure in making the family photo album or collage; and sadly, we often don’t realize that the basement or attic isn’t the best place to store a valuable print.
So rather than relegating the damaged photos to a dark, forgotten basement corner or a hot, dusty attic, let’s get them out, scan them in, and learn to:
• Eliminate cracks, tears, and rips
• Make stains, scribbles, and discoloration disappear
• Repair antique documents
• Remove distractions and correct the perspective
Continuing with the techniques addressed in Chapter 5, “Dust, Mold, and Texture Removal,” the tools used to tackle these challenges include:
• The Clone Stamp and all the Healing Brush tools
• Layers and Quick Mask
• Warp option of the Transform tool
• The Lens Correction filter
6
200 Photoshop Restoration & Retouching
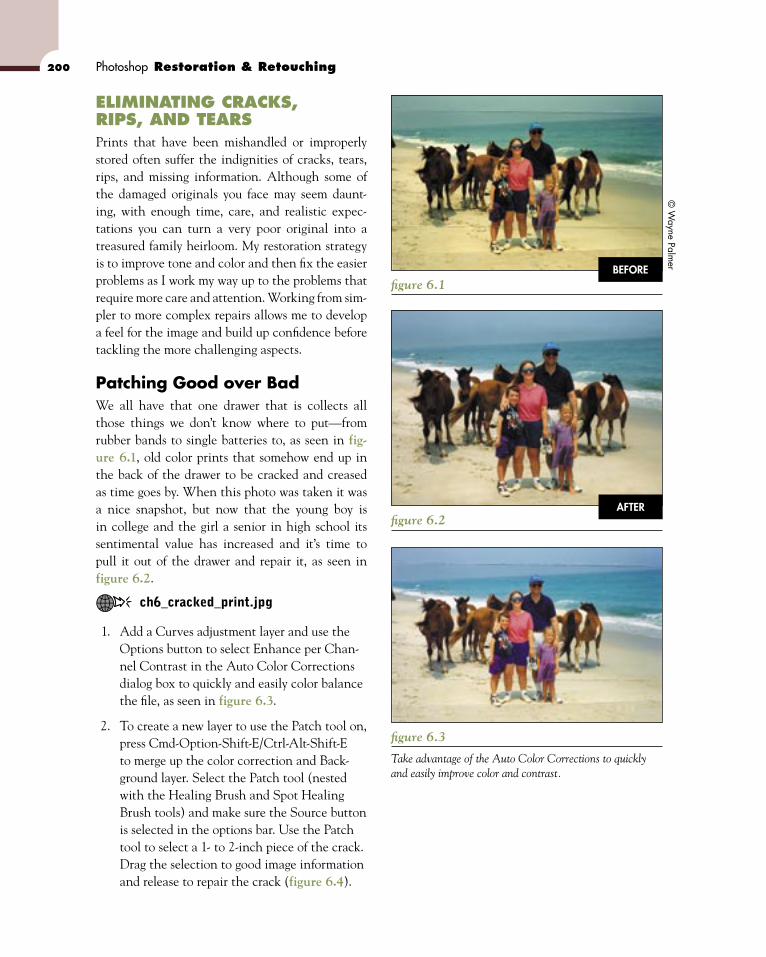
ELIMINATING CRACKS, RIPS, AND TEARSPrints that have been mishandled or improperly stored often suffer the indignities of cracks, tears, rips, and missing information. Although some of the damaged originals you face may seem daunt-ing, with enough time, care, and realistic expec-tations you can turn a very poor original into a treasured family heirloom. My restoration strategy is to improve tone and color and then fix the easier problems as I work my way up to the problems that require more care and attention. Working from sim-pler to more complex repairs allows me to develop a feel for the image and build up confidence before tackling the more challenging aspects.
Patching Good over BadWe all have that one drawer that is collects all those things we don’t know where to put—from rubber bands to single batteries to, as seen in fig-ure 6.1, old color prints that somehow end up in the back of the drawer to be cracked and creased as time goes by. When this photo was taken it was a nice snapshot, but now that the young boy is in college and the girl a senior in high school its sentimental value has increased and it’s time to pull it out of the drawer and repair it, as seen in figure 6.2.
ch6_cracked_print.jpg
1. Add a Curves adjustment layer and use the Options button to select Enhance per Chan-nel Contrast in the Auto Color Corrections dialog box to quickly and easily color balance the file, as seen in figure 6.3.
2. To create a new layer to use the Patch tool on, press Cmd-Option-Shift-E/Ctrl-Alt-Shift-E to merge up the color correction and Back-ground layer. Select the Patch tool (nested with the Healing Brush and Spot Healing Brush tools) and make sure the Source button is selected in the options bar. Use the Patch tool to select a 1- to 2-inch piece of the crack. Drag the selection to good image information and release to repair the crack (figure 6.4).
BEFORE
AFTER
figure 6.1
figure 6.2
figure 6.3
Take advantage of the Auto Color Corrections to quickly and easily improve color and contrast.
© W
ayne Palmer
Chapter 6 Damage Control and Repair 201
figure 6.4
Select the damaged area with the Patch tool, then drag the selection over good information and release to heal the crack.
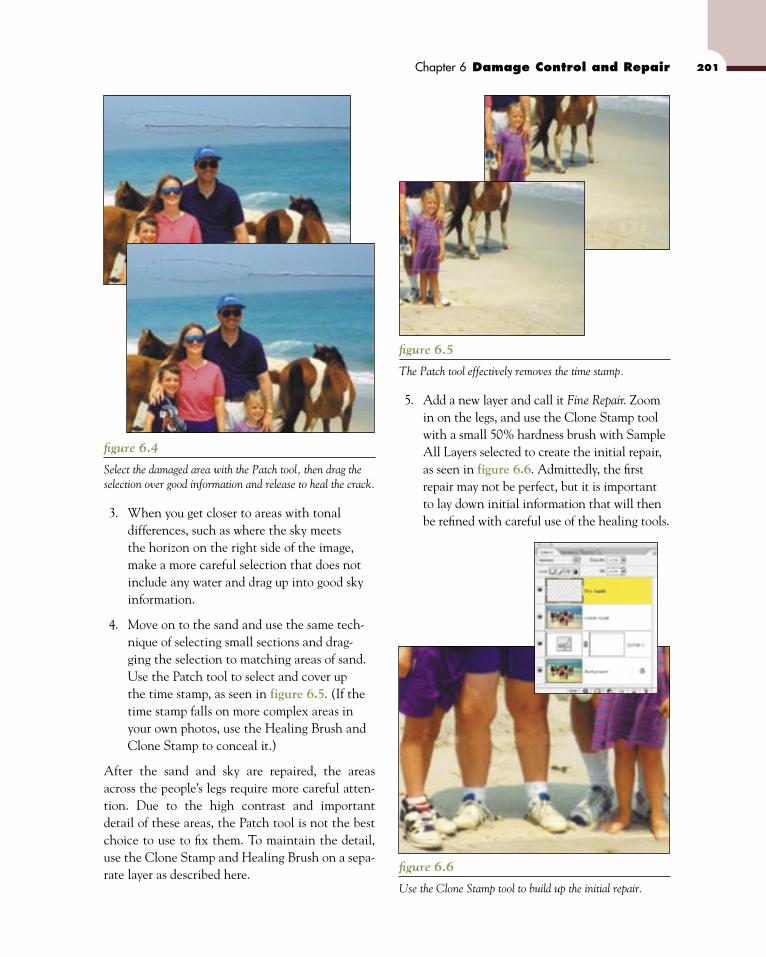
3. When you get closer to areas with tonal differences, such as where the sky meets the horizon on the right side of the image, make a more careful selection that does not include any water and drag up into good sky information.
4. Move on to the sand and use the same tech-nique of selecting small sections and drag-ging the selection to matching areas of sand. Use the Patch tool to select and cover up the time stamp, as seen in figure 6.5. (If the time stamp falls on more complex areas in your own photos, use the Healing Brush and Clone Stamp to conceal it.)
After the sand and sky are repaired, the areas across the people’s legs require more careful atten-tion. Due to the high contrast and important detail of these areas, the Patch tool is not the best choice to use to fix them. To maintain the detail, use the Clone Stamp and Healing Brush on a sepa-rate layer as described here.
figure 6.5
The Patch tool effectively removes the time stamp.
5. Add a new layer and call it Fine Repair. Zoom in on the legs, and use the Clone Stamp tool with a small 50% hardness brush with Sample All Layers selected to create the initial repair, as seen in figure 6.6. Admittedly, the first repair may not be perfect, but it is important to lay down initial information that will then be refined with careful use of the healing tools.
figure 6.6
Use the Clone Stamp tool to build up the initial repair.
202 Photoshop Restoration & Retouching
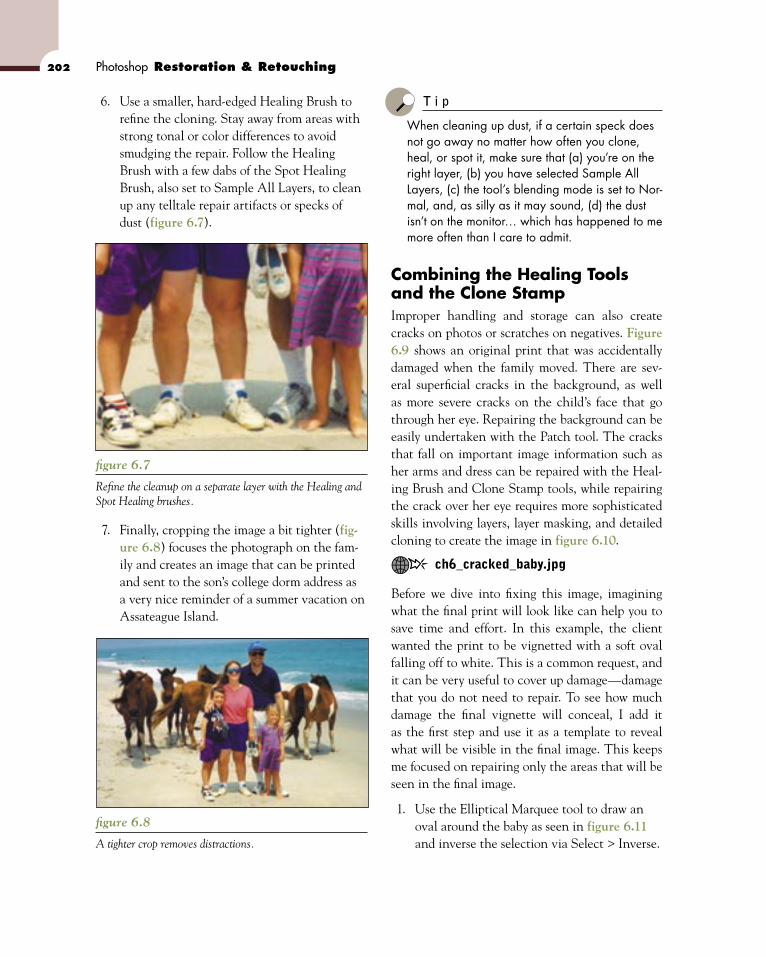
6. Use a smaller, hard-edged Healing Brush to refine the cloning. Stay away from areas with strong tonal or color differences to avoid smudging the repair. Follow the Healing Brush with a few dabs of the Spot Healing Brush, also set to Sample All Layers, to clean up any telltale repair artifacts or specks of dust (figure 6.7).
T i p
When cleaning up dust, if a certain speck does not go away no matter how often you clone, heal, or spot it, make sure that (a) you’re on the right layer, (b) you have selected Sample All Layers, (c) the tool’s blending mode is set to Nor-mal, and, as silly as it may sound, (d) the dust isn’t on the monitor… which has happened to me more often than I care to admit.
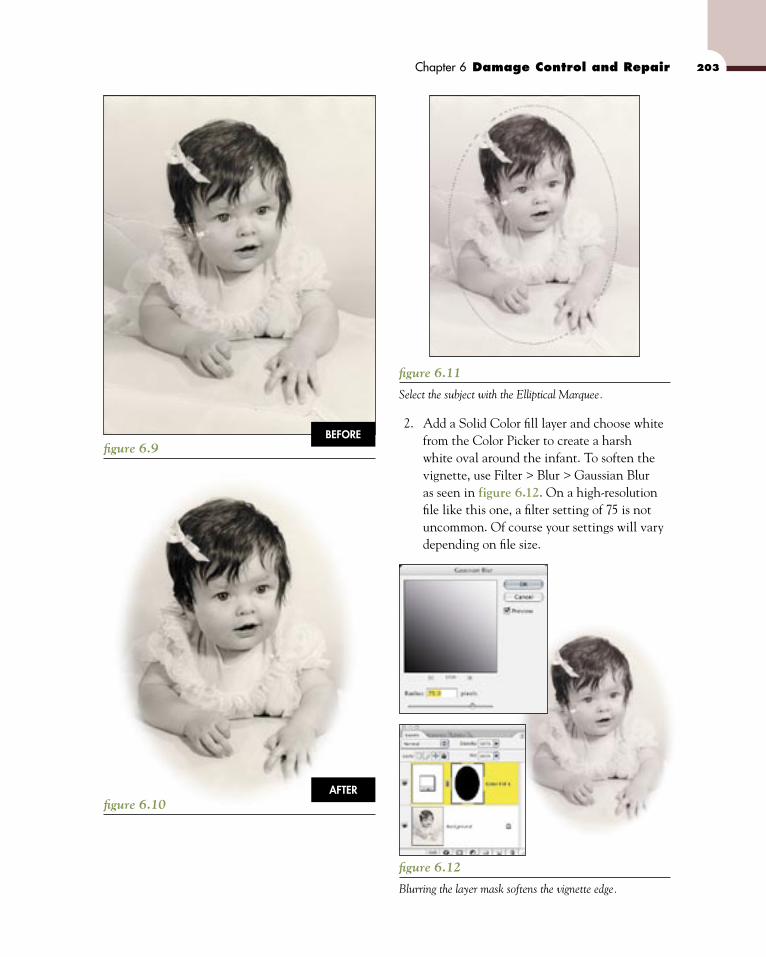
Combining the Healing Tools and the Clone StampImproper handling and storage can also create cracks on photos or scratches on negatives. Figure 6.9 shows an original print that was accidentally damaged when the family moved. There are sev-eral superficial cracks in the background, as well as more severe cracks on the child’s face that go through her eye. Repairing the background can be easily undertaken with the Patch tool. The cracks that fall on important image information such as her arms and dress can be repaired with the Heal-ing Brush and Clone Stamp tools, while repairing the crack over her eye requires more sophisticated skills involving layers, layer masking, and detailed cloning to create the image in figure 6.10.
ch6_cracked_baby.jpg
Before we dive into fixing this image, imagining what the final print will look like can help you to save time and effort. In this example, the client wanted the print to be vignetted with a soft oval falling off to white. This is a common request, and it can be very useful to cover up damage—damage that you do not need to repair. To see how much damage the final vignette will conceal, I add it as the first step and use it as a template to reveal what will be visible in the final image. This keeps me focused on repairing only the areas that will be seen in the final image.
1. Use the Elliptical Marquee tool to draw an oval around the baby as seen in figure 6.11 and inverse the selection via Select > Inverse.
figure 6.7
Refine the cleanup on a separate layer with the Healing and Spot Healing brushes.
7. Finally, cropping the image a bit tighter (fig-ure 6.8) focuses the photograph on the fam-ily and creates an image that can be printed and sent to the son’s college dorm address as a very nice reminder of a summer vacation on Assateague Island.
figure 6.8
A tighter crop removes distractions.
Chapter 6 Damage Control and Repair 203
figure 6.11
Select the subject with the Elliptical Marquee.
2. Add a Solid Color fill layer and choose white from the Color Picker to create a harsh white oval around the infant. To soften the vignette, use Filter > Blur > Gaussian Blur as seen in figure 6.12. On a high-resolution file like this one, a filter setting of 75 is not uncommon. Of course your settings will vary depending on file size.
BEFORE
AFTER
figure 6.9
figure 6.10
figure 6.12
Blurring the layer mask softens the vignette edge.

204 Photoshop Restoration & Retouching
3. As the close-up views in figure 6.13 shows, a lot of damage is covered and so does not need to be repaired. Keep this vignetted layer at the top of your layer stack and turn it on and off to check how much to repair. For safety’s sake, I do work past the transparent areas to insure that all required repairs are done.
figure 6.14
Improving overall density with Levels.
figure 6.13
Creating the vignette first shows how far you’ll have to go with your repairs.
4. To offset the slight fading, add a Levels adjust-ment layer and move the shadow point to the right to where the tonal information starts and move the highlight slider to the left, as seen in figure 6.14.
5. With vignette layer turned off, press Cmd-Option-Shift-E/Ctrl-Alt-Shift-E to merge up the Background and Levels adjustment layer and create a new working surface. Name this new layer Crack Repair and activate the Patch tool, making sure that the Patch option is set to Source.
6. Starting with the smaller cracks, circle one section with the Patch tool and move it to good information (figure 6.15).
figure 6.15
Repairing smaller areas creates information needed to fix larger problems.
Chapter 6 Damage Control and Repair 205
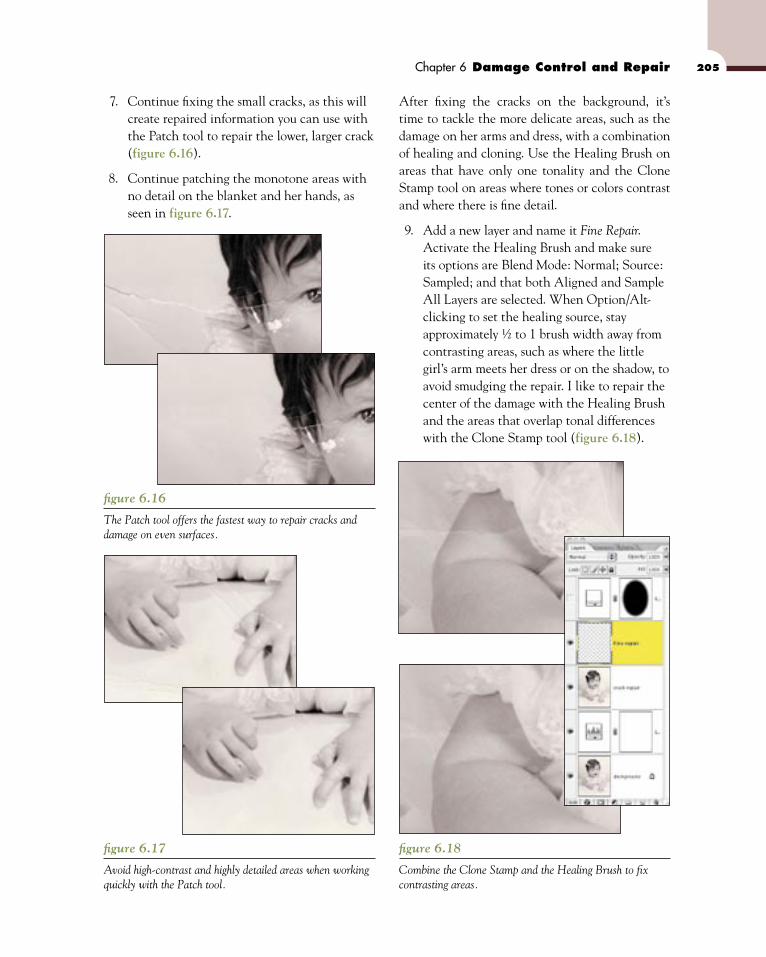
7. Continue fixing the small cracks, as this will create repaired information you can use with the Patch tool to repair the lower, larger crack (figure 6.16).
8. Continue patching the monotone areas with no detail on the blanket and her hands, as seen in figure 6.17.
figure 6.16
The Patch tool offers the fastest way to repair cracks and damage on even surfaces.
figure 6.17
Avoid high-contrast and highly detailed areas when working quickly with the Patch tool.
After fixing the cracks on the background, it’s time to tackle the more delicate areas, such as the damage on her arms and dress, with a combination of healing and cloning. Use the Healing Brush on areas that have only one tonality and the Clone Stamp tool on areas where tones or colors contrast and where there is fine detail.
9. Add a new layer and name it Fine Repair. Activate the Healing Brush and make sure its options are Blend Mode: Normal; Source: Sampled; and that both Aligned and Sample All Layers are selected. When Option/Alt-clicking to set the healing source, stay approximately ½ to 1 brush width away from contrasting areas, such as where the little girl’s arm meets her dress or on the shadow, to avoid smudging the repair. I like to repair the center of the damage with the Healing Brush and the areas that overlap tonal differences with the Clone Stamp tool (figure 6.18).
figure 6.18
Combine the Clone Stamp and the Healing Brush to fix contrasting areas.

206 Photoshop Restoration & Retouching
10. The severe damage on her face requires spe-cial care. Repairing areas where entire pieces of print emulsion are missing requires some creative borrowing. Rather than cloning or healing over the large empty surface, use the following technique to rebuild the paper tex-ture quickly. Add a new layer and name it Face.
11. Starting from the outside, where the smaller, simpler cracks are, work your way in with the Healing Brush set to Normal and Sample All Layers. By working from outside to inside, as shown in figure 6.19, you are building up more and more area to sample from to repair the larger areas.
figure 6.20
Select good image information.
14. Move and rotate the pasted piece into posi-tion (figure 6.21) and press Return/Enter. Then Option/Alt-click the Layer Mask button to add a black layer mask that conceals the new area.
figure 6.19
Working from the easier to the harder areas builds up useful image information.
12. Use a 1- to 2-pixel feathered Lasso tool to generously select good cheek area, as seen in figure 6.20.
13. Choose Edit > Copy Merged (Cmd-Shift-C/Ctrl-Shift-C) to copy all the visible layers. Choose Select > Deselect to insure that the copied piece will be pasted without a layer mask. Now choose Edit > Paste.
figure 6.21
Rotate the piece into place to cover up as much damage as possible.
15. Use a soft, white Paintbrush on the layer mask to paint back the cheek texture (figure 6.22) and to blend in the new area use the Gaussian Blur filter on the layer mask with a setting between 5 and 10 pixels. If necessary, use the Healing Brush to clean up any details on the layer.

Chapter 6 Damage Control and Repair 207
figure 6.22
Paint on the layer mask to conceal the damage.
16. The patched area is a bit darker than the surrounding area. Option/Alt-click the Cre-ate new fill or adjustment layer button, select Curves, and select Group with Previous Layer to Create Clipping Mask to make sure the following tonal adjustment affects only the cheek and not the entire image.
17. Pull the curve up ever so gently to lighten the area and match the rest of the face (figure 6.23). I often find it easier to make the clipped area a touch lighter or darker than needed and use the layer opacity to fine-tune the match.
18. Add a new layer and take advantage of the repaired crack to continue healing and clon-ing her face (figure 6.24).
figure 6.23
Use a clipped Curves layer to match tonality.
figure 6.24
Working layer by layer and piece by piece rebuilds the face.

208 Photoshop Restoration & Retouching
19. To repair the delicate eye layer, you could try to use the other eye as a source, similar to repairing the cheek, but we are so sensitive to eyes and how they look that copying, pasting, and flipping eyes seems to make eyes look odd or uncomfortable. I prefer to add a new layer and use a small, hard-edged Clone Stamp tool to build up information, as seen in figure 6.25. Most important: If I make a bad stroke, it’s easy to immediately undo it and start again. Avoid the temptation to clone over the bad spot—that never works at all.
21. Refine the cloned eye repair with a few dabs of the Spot Healing Brush and then continue to fix the remaining cracks. After repairing the cheek and eye, the remaining work will feel very easy.
Putting It All Together Over the years, the photographs we cherish tend to get folded, cracked, torn, and damaged. If you’re lucky, you’ll at least have all the pieces to recon-struct the image. If you’re not so lucky, you’ll have to make up image information to reconstruct miss-ing pieces.
As you can see in figure 6.26, the original print had been torn into five pieces. At first this looked like a daunting job, but after scanning the pieces on a flatbed scanner, using a piece of foam core to hold the pieces in place, the challenge morphed into a digital jigsaw puzzle that required piecing the parts together and removing the ragged edges. The image came to life, as you can see in figure 6.27.
T i p
When scanning large print pieces or prints that are larger than your flatbed scanner platen, do not overlap pieces or change the print orienta-tion by rotating pieces. That will vary the reflec-tance of the paper texture, making the pieces difficult to merge.
Many scanners try to auto correct the exposure when you select the area to scan. When working with oversized pieces that you plan to reassemble, either turn off the auto exposure feature or scan the entire bed for each section without doing a new preview to keep the exposures the same.
ch6_sailor.jpg
1. Using the Lasso tool without feather, roughly select the first piece, as shown in figure 6.28.
2. Select the Magic Wand and Option/Alt-click the white areas within the selection to sub-tract the large white areas of the scanner lid (figure 6.29). Don’t remove the ripped paper edges from the selection; they may contain valuable image details.
figure 6.25
Use a small, hard-edged Clone Stamp tool to repair the eye.
20. Use a softer-edged brush when repairing the edges of the iris and catchlight. As you can see in the undamaged eye, these areas are naturally softer and it is best to mimic the natural contours and transitions.

Chapter 6 Damage Control and Repair 209
figure 6.28
Roughly select a piece of the image with the Lasso tool.
BEFORE
AFTER
figure 6.26
figure 6.27
figure 6.29
Use the Magic Wand to quickly subtract the white areas of the scanner bed.

210 Photoshop Restoration & Retouching
3. Choose Cmd-J/Ctrl-J or Layer > New > Layer via Copy to place the selected print piece onto its own layer. I highly recommend naming the layers, as shown in figure 6.30.
figure 6.31
Use Edit > Free Transform to position and rotate each piece roughly into place.
figure 6.30
After copying a section to its own layer, it is best to name it.
4. You can make new layers only out of selec-tions with pixel image information. Select the Background layer and repeat steps 1 through 3 for each piece of the image.
5. Because the Background layer is still intact, it could be confusing to see it while you are moving the individual pieces around. To block it from view but maintain the image data, click the Background layer and add a new layer. Fill this with white to conceal the original Background layer.
6. When you have all the pieces on their own layers, the next step is to straighten them out. Select View > Show > Grid to use the grid and guides as a visual aid for alignment. (If the grid doesn’t appear, make sure that View > Extras is checked.) Use Edit > Free Trans-form to position and rotate each piece roughly into place, as shown in figure 6.31.
7. With the Move tool set to Auto Select Layer and Show Transform Controls, grab the lower-left corner piece and move it toward the large lower-right corner (figure 6.32). These two pieces come together well, but the ripped edge of the right corner print is covering up good image information of the left corner.
figure 6.32
Setting Auto Select Layer and Show Transform Controls will allow you to easily grab and move pieces with the Move tool.
8. To control how the pieces come together, you could erase the ripped paper edge, but that approach is risky because it can be difficult to control, and erasing deletes pixels—some-thing that always makes me very nervous. To control what is visible without actually removing it, use a layer mask on the piece of the image that is blocking good image infor-mation. In this case, the ripped edge of the large right piece is covering image informa-tion of the left piece.
9. Add a layer mask to the lower right corner layer and use a small, hard-edged black brush to paint over the ripped edge. It will look as though you are erasing, but you’re not, as you can see in figure 6.33. The black brush on the layer mask is concealing the image infor-mation, not deleting it.

Chapter 6 Damage Control and Repair 211
figure 6.33
Adding a layer mask and painting on it with a black brush hides the ripped edges without actually deleting them.
10. Continue moving pieces together and adding layer masks wherever the torn paper is block-ing good image information, as seen in figure 6.34.
11. Once the pieces are together, create a Work in Progress (WIP) layer at the top of the layer stack, as you see in figure 6.35. Do this by choosing Select > All, Edit > Copy Merged, and Edit > Paste or use the new CS2 key-board shortcut Cmd-Option-Shift-E/Ctrl-Alt-Shift-E.
12. Use a combination of cloning and healing as described previously to repair the remaining cracks and to build up image data.
When the pieces first tumbled out of the envelope, the job looked like a hopeless cause. By thinking of them as a puzzle, they can be pieced together seam-lessly to create the final image.
figure 6.34
Continuing to match pieces together while hiding torn areas with layer masks.
figure 6.35
Refine the restoration on a merged WIP layer with the Clone Stamp and Healing Brush tools.