CV 282 - Gaggenau
64
en Instruction manual CV 282 Flex induction cooktop with integrated ventilation system
Transcript of CV 282 - Gaggenau
en Instruction manual
CV 282Flex induction cooktop with integrated ventilation system
2
en
Table of contents
enInstruction manual
8Intended use 5
(Important safety information 6
]Causes of damage 8
7Environmental protection 9
Saving energy 9Environmentally-friendly disposal 9
fInduction cooking 10
Advantages of induction cooking 10Cookware 10
*Getting to know your appliance 12
Your new appliance 12Special accessories 12The control panel 13Residual heat indicator 14Operating modes 14
KBefore using for the first time 15
Initial use 15Setting Home Connect 15
jTwist-Pad with Twist knob 15
Removing the twist knob 15Storing the twist knob 15
1Operating the appliance 16
Switching the hob on and off 16Setting a hotplate 16Switching the ventilation system on and off 17Intensive setting 17Automatic start 18Automatic mode with sensor control 18Run-on function 18Interval ventilation 18Chef's recommendations 19
|Flex function 21
Advice on using cookware 21As two independent hotplates 21As a single hotplate 21
uTransfer function 22
ˆ Professional cooking function 23
Activation 23Deactivating 23Changing the settings 23
OTimer functions 24
Cooking timer 24The short-term timer 24Timer plus 25Stopwatch function 25
vBooster function for pots 25
Activating 25Deactivating 25
xBooster function for pans for pans 26
Recommendations for use 26Activating 26Deactivating 26
zKeep warm function 27
Activating 27Deactivating 27
ÜAutomatic functions 27
Types of automatic functions 28Suitable cookware 28Sensors and special accessories 29Functions and heat settings 29Recommended dishes 32
AChildproof lock 40
Activating and deactivating the childproof lock 40
kDisplay cleaning protection 40
bAutomatic safety cut-out 40
‚Wireless temperature sensor 41
Preparing and maintaining the wireless temperature sensor 41Connecting the wireless temperature sensor to the control panel 42Cleaning 42Changing the battery 43Declaration of Conformity 43
QBasic settings 44
To access the basic settings: 45
oHome Connect 46
Setting up 46Home Connect settings 47Software update 49Remote diagnostics 50About data protection 50Declaration of Conformity 50
3

en
tCookware test 50
hPower manager 51
DCleaning 51
Cleaning agents 51Components to be cleaned or replaced 52Hob surround (only on appliances with hob surrounds) 52Hob 52Ventilation system 53Cleaning the overflow container 55Twist knob 55Wireless temperature sensor 55
{Frequently Asked Questions (FAQ) 56
3Trouble shooting 58
4Customer service 60
Product number (E no.) and production number (FD no.) 60
Additional information on products, accessories, replacement parts and services can be found at www.gaggenau.com and in the online shop www.gaggenau.com/zz/store
4

Intended use en
8Intended use
Intended useRead these instructions carefully. Only then will you be able to operate your appliance safely and correctly. Retain the instruction manual and installation instructions for future use or for subsequent owners.
Check the appliance after removing it from the packaging. If it has suffered any damage in transport, do not connect the appliance, contact the Technical Assistance Service and provide written notification of the damage caused, otherwise you will lose your right to any type of compensation.
Only a licensed professional may connect appliances without plugs. Damage caused by incorrect connection is not covered under warranty.
This appliance must be installed according to the installation instructions included.
This appliance is intended for private domestic use and the household environment only. The appliance must only be used for the preparation of food and beverages. The cooking process must be supervised. A short cooking process must be supervised without interruption. Only use the appliance in enclosed spaces.
This appliance is intended for use up to a maximum height of 2000 metres above sea level.
Do not use covers. These can cause accidents, for example due to overheating, catching fire or materials shattering.
Only use safety devices or child protection grilles approved by ourselves. Unsuitable safety devices or child protection grilles may result in accidents.
This appliance is not intended for operation with an external clock timer or a remote control.
Dangerous or explosive materials and vapours must not be extracted.
Ensure that no small parts or liquids get into the appliance.
This appliance may be used by children over the age of 8 years old and by persons with reduced physical, sensory or mental capabilities or by persons with a lack of experience or knowledge if they are supervised or are instructed by a person responsible for their safety how to use the appliance safely and have understood the associated hazards.
Children must not play with, on, or around the appliance. Children must not clean the appliance or carry out general maintenance unless they are at least 15 years old and are being supervised.
Keep children below the age of 8 years old at a safe distance from the appliance and power cable.
When using the cooking functions, set the hotplate on which you have placed the saucepan with the temperature sensor.
If you wear an active implantable medical device (e.g. a pacemaker or defibrillator), check with your doctor that it complies with Council Directive 90/385/EEC of 20th June 1990, DIN EN 45502-2-1 and DIN EN 45502-2-2, and that it has been chosen, implanted and programmed in accordance with VDE-AR-E 2750-10. If these conditions are satisfied, and if, in addition, non-metal cooking utensils and cookware with non-metal handles are used, it is safe to use this induction hob as intended.
5
en Important safety information
m ( Important safety information
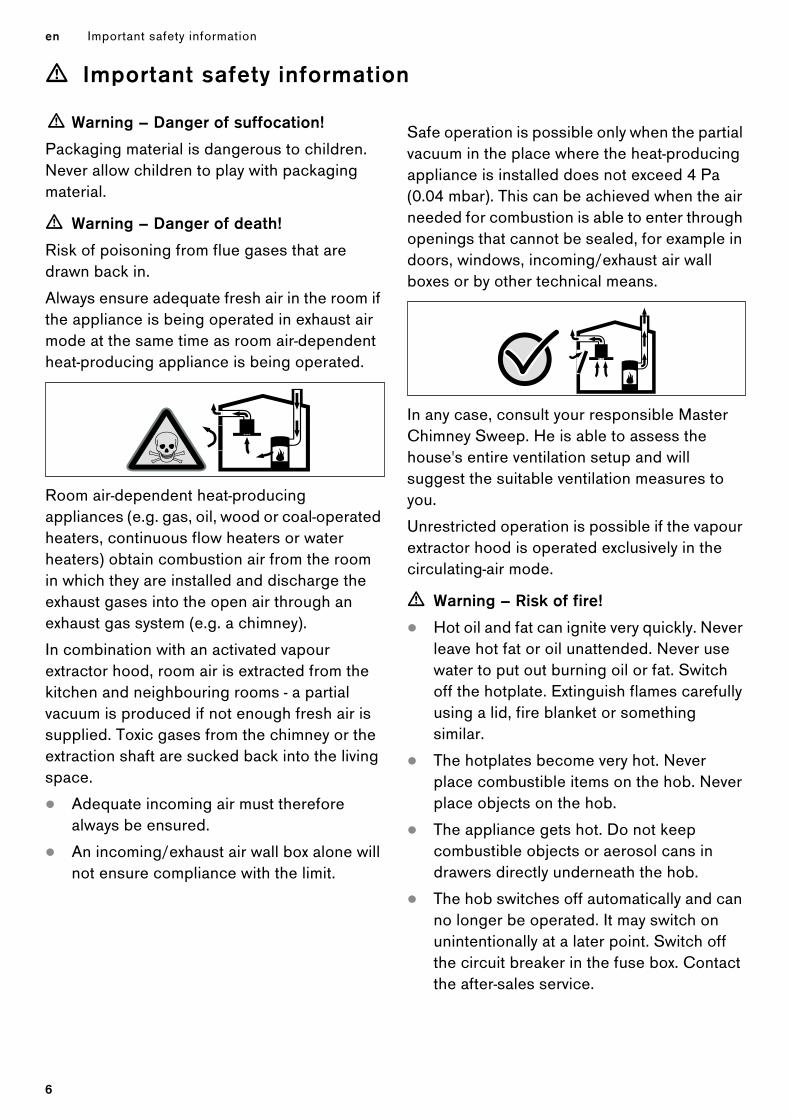
Important safety informationm Warning – Danger of suffocation!
Packaging material is dangerous to children. Never allow children to play with packaging material.
m Warning – Danger of death!
Risk of poisoning from flue gases that are drawn back in.
Always ensure adequate fresh air in the room if the appliance is being operated in exhaust air mode at the same time as room air-dependent heat-producing appliance is being operated.
Room air-dependent heat-producing appliances (e.g. gas, oil, wood or coal-operated heaters, continuous flow heaters or water heaters) obtain combustion air from the room in which they are installed and discharge the exhaust gases into the open air through an exhaust gas system (e.g. a chimney).
In combination with an activated vapour extractor hood, room air is extracted from the kitchen and neighbouring rooms - a partial vacuum is produced if not enough fresh air is supplied. Toxic gases from the chimney or the extraction shaft are sucked back into the living space.
▯ Adequate incoming air must therefore always be ensured.
▯ An incoming/exhaust air wall box alone will not ensure compliance with the limit.
Safe operation is possible only when the partial vacuum in the place where the heat-producing appliance is installed does not exceed 4 Pa (0.04 mbar). This can be achieved when the air needed for combustion is able to enter through openings that cannot be sealed, for example in doors, windows, incoming/exhaust air wall boxes or by other technical means.
In any case, consult your responsible Master Chimney Sweep. He is able to assess the house's entire ventilation setup and will suggest the suitable ventilation measures to you.
Unrestricted operation is possible if the vapour extractor hood is operated exclusively in the circulating-air mode.
m Warning – Risk of fire!
▯ Hot oil and fat can ignite very quickly. Never leave hot fat or oil unattended. Never use water to put out burning oil or fat. Switch off the hotplate. Extinguish flames carefully using a lid, fire blanket or something similar.
Risk of fire! ▯ The hotplates become very hot. Never place combustible items on the hob. Never place objects on the hob.
Risk of fire! ▯ The appliance gets hot. Do not keep combustible objects or aerosol cans in drawers directly underneath the hob.
Risk of fire! ▯ The hob switches off automatically and can no longer be operated. It may switch on unintentionally at a later point. Switch off the circuit breaker in the fuse box. Contact the after-sales service.
6

Important safety information en
Risk of fire! ▯ Fatty deposits in the grease filter may catch fire. Regularly clean the grease filter. Never operate the appliance without a grease filter.
Risk of fire! ▯ When the ventilation system is switched on, fatty deposits in the grease filter may catch fire. Never work with naked flames close to the appliance (e.g. flambéing). Do not install the appliance near a solid fuel heating appliance (e.g. wood- or coal-burning) unless a sealed, non-removable cover is fitted. There must be no flying sparks.
m Warning – Risk of burns!
▯ The hotplates and surrounding area (particularly the hob surround, if fitted) become very hot. Never touch the hot surfaces. Keep children at a safe distance.
Risk of burns! ▯ The hotplate heats up but the display does not work. Switch off the circuit breaker in the fuse box. Contact the after-sales service.
Risk of burns! ▯ Metal objects on the hob quickly become very hot. Never place metal objects (such as knives, forks, spoons and lids) on the hob.
Risk of burns! ▯ The ventilation grille will quickly become extremely hot if it is placed on the hob. Never place the ventilation grille on the hob. Do not place any pans or other hot objects on the ventilation grille.
Risk of fire!! ▯ After each use, always turn off the hob at the main switch. Do not wait until the hob turns off automatically after the pan is removed.
Risk of burns! ▯ The accessible parts become very hot when in operation. Never touch hot parts. Keep children at a safe distance.
Risk of burns! ▯ The appliance becomes hot during operation. If hot liquids penetrate the appliance, leave the appliance to cool before removing the ventilation grille, the metal grease filter or the overflow container.
m Warning – Risk of electric shock!
▯ Incorrect repairs are dangerous. Repairs may only be carried out and damaged power cables replaced by one of our trained after-sales technicians. If the appliance is defective, unplug the appliance from the mains or switch off the circuit breaker in the fuse box. Contact the after-sales service.
Risk of electric shock! ▯ Do not use any high-pressure cleaners or steam cleaners, which can result in an electric shock.
Risk of electric shock! ▯ A defective appliance may cause electric shock. Never switch on a defective appliance. Unplug the appliance from the mains or switch off the circuit breaker in the fuse box. Contact the after-sales service.
Risk of electric shock! ▯ Cracks or fractures in the glass ceramic may cause electric shocks. Switch off the circuit breaker in the fuse box. Contact the after-sales service.
m Warning – Electromagnetic hazards!
▯ This appliance complies with safety and electromagnetic compatibility standards. However, people with pacemakers or insulin pumps must refrain from using this appliance. It is impossible to ensure that all of these devices available on the market comply with current electromagnetic compatibility standards, and that interference which may prevent the device from working correctly will not occur. It is also possible that people with other types of devices, such as a hearing aids, could experience some discomfort.
Hazard due to magnetism! ▯ The wireless temperature sensor and the twist knob are magnetic. The magnetic elements may damage electronic implants, e.g. pacemakers or insulin pumps. People fitted with electronic implants should therefore not carry the temperature sensor or the twist knob in their pocket and always keep these items at least 10 cm away from their pacemaker or similar medical device.
7

en Causes of damage
m Warning – Risk of injury!
▯ When cooking in a bain marie, the hob and cooking container could shatter due to overheating. The cooking container in the bain marie must not directly touch the bottom of the water-filled pot. Only use heat-resistant cookware.
Risk of injury! ▯ Saucepans may suddenly jump due to liquid between the pan base and the hotplate. Always keep the hotplate and saucepan bases dry.
Risk of injury! ▯ Cookware and cooktops become very hot. Never reach across the hot cooktop or take hold of hot cookware.
Risk of injury! ▯ The wireless cooking sensor is equipped with a battery, which may become damaged if it is exposed to high temperatures. Remove the sensor from the cookware and store it away from any heat sources.
Risk of injury! ▯ The temperature sensor may be very hot when removing it from the saucepan. Wear oven gloves or use a tea towel to remove it.
Risk of injury! ▯ Unsuitable woks may cause accidents. Only use woks supplied by the manufacturer (available as optional accessories).
]Causes of damage
Causes of damageCaution!
– Rough pan bases may scratch the hob.
– Objects that are hard or sharp may damage the hob. Do not allow hard or sharp objects to fall on the hob.
– Heating cookware when empty may cause surface damage. Never leave empty cookware on the heat.
– Hot pots or pans may damage the hob. Never place hot pots or pans on the control panel, the displays/indicators, the hob surround or the ventilation grille.
– Never leave aluminium foil or plastic containers on hot hotplates as this may damage the hob. No not use oven liners.
– Using unsuitable cleaning products may cause surface damage, discolouration and stains. Only use cleaning products that are suitable for this type of hob.
– Friction from pots and pans may cause surface damage and discolouration. Always lift pots and pans up before repositioning them; do not slide them across the surface of the hob.
– Burnt-on food may cause surface damage and staining. Immediately remove any food that has boiled over using a glass scraper.
– Salt, sugar and sand may cause surface damage. Do not use the hob as a work surface or storage space.
– Using cookware with a rough base may cause surface damage. Check all cookware before use.
– Sugar and foods with a high sugar content may cause surface damage or conchoidal fracturing. Immediately remove any food that has boiled over using a glass scraper.
8
Environmental protection en
7Environmental protection
Environmental protectionIn this section, you can find information about saving energy and disposing of the appliance.
Saving energy
▯ Always place suitable lids on saucepans. Cooking without a lid consumes significantly more energy. Use a glass lid so that you can see into the pan without having to lift the lid.
▯ Use pots and pans with flat bases. Uneven bases increase the energy consumption.
▯ The base diameter of pots and pans should be the same size as the hotplate. Please note: Cookware manufacturers often specify the diameter of the top of the saucepan, which is usually larger than the diameter of the base of the saucepan.
▯ Use small saucepans for small quantities. Using a large saucepan with little in it consumes a lot of energy.
▯ Cook with only a little water. This will save energy and preserve the vitamins and minerals in vegetables.
▯ Switch back to a lower heat setting in good time. This will save energy.
▯ During cooking, ensure that there is a sufficient supply of air to enable the ventilation system to work efficiently and with a low level of operating noise.
▯ Adjust the fan speed to the amount of steam produced during cooking. Only use intensive mode when required. The lower the fan speed, the less energy is consumed.
▯ If cooking produces large amounts of steam, select a higher fan speed in good time. If the cooking steam has already spread around the kitchen, the ventilation system will need to be operated for longer.
▯ Switch the appliance off when you are not using it.
▯ Clean and (if required) replace the filter at regular intervals in order to increase the effectiveness of the ventilation system and to prevent the risk of fire.
Environmentally-friendly disposalDispose of packaging in an environmentally-friendly manner.
The wireless temperature sensor is battery-powered. Dispose of used batteries in an environmentally responsible manner.
This appliance is labelled in accordance with European Directive 2012/19/EU concerning used electrical and electronic appliances (waste electrical and electronic equipment - WEEE). The guideline determines the framework for the return and recycling of used appliances as applicable throughout the EU.
9
en Induction cooking
fInduction cooking
Induction cookingAdvantages of induction cookingInduction cooking is very different from traditional cooking methods, as heat builds up directly in the item of cookware. This offers numerous advantages:
▯ Saves time when boiling and frying.
▯ Saves energy.
▯ Easier to care for and clean. Spilled food does not burn on as quickly.
▯ Heat control and safety – the hob increases or decreases the heat supply as soon as the user changes the setting. The induction hotplate stops the heat supply as soon as the cookware is removed from the hotplate, without having to switch it off first.
CookwareOnly use ferromagnetic cookware for induction cooking, such as:
▯ Cookware made from enamelled steel
▯ Cookware made from cast iron
▯ Special induction-compatible cookware made from stainless steel.
To check whether your cookware is suitable for induction cooking, refer to the section entitled ~ "Flex function".
To achieve a good cooking result, the ferromagnetic area on the base of the pan should match the size of the hotplate. If a hotplate does not detect an item of cookware, try placing it on another hotplate with a smaller diameter.
If the flexible cooking zone is being used as a single cooking zone, larger items of cookware can be used as these are particularly suited to this area. You can find information on positioning cookware in the section entitled ~ "Flex function" on page 21.
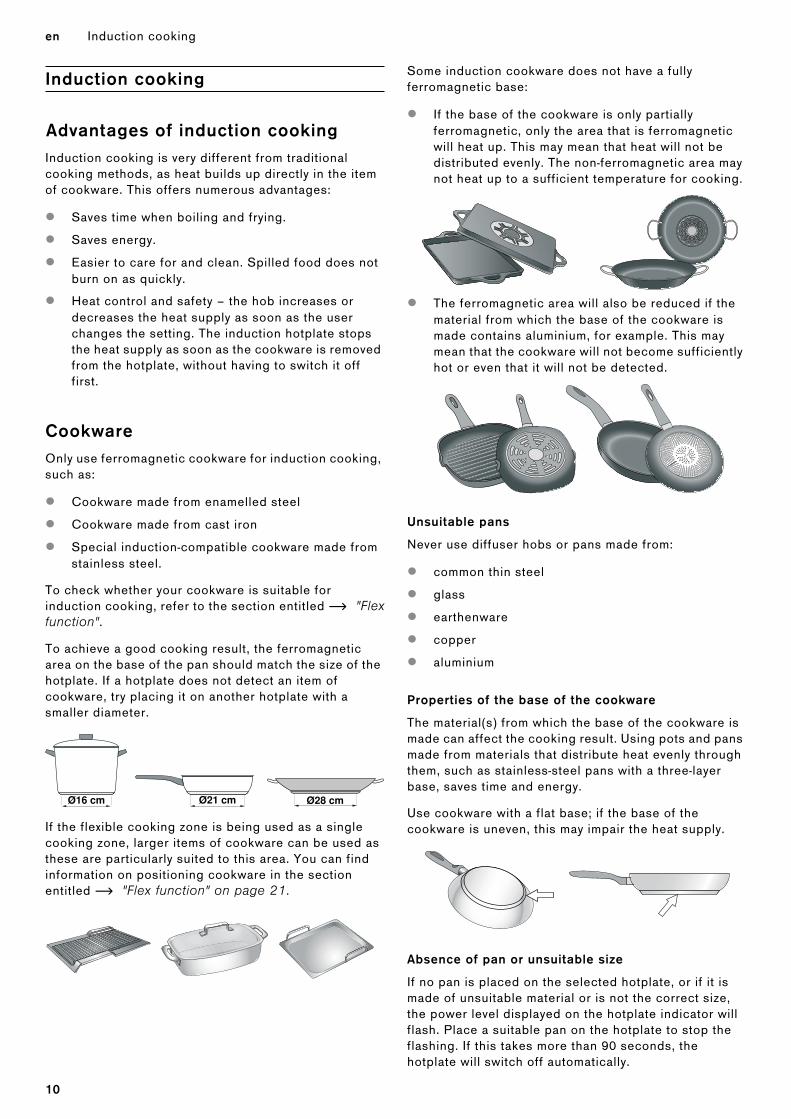
Some induction cookware does not have a fully ferromagnetic base:
▯ If the base of the cookware is only partially ferromagnetic, only the area that is ferromagnetic will heat up. This may mean that heat will not be distributed evenly. The non-ferromagnetic area may not heat up to a sufficient temperature for cooking.
▯ The ferromagnetic area will also be reduced if the material from which the base of the cookware is made contains aluminium, for example. This may mean that the cookware will not become sufficiently hot or even that it will not be detected.
Unsuitable pans
Never use diffuser hobs or pans made from:
▯ common thin steel
▯ glass
▯ earthenware
▯ copper
▯ aluminium
Properties of the base of the cookware
The material(s) from which the base of the cookware is made can affect the cooking result. Using pots and pans made from materials that distribute heat evenly through them, such as stainless-steel pans with a three-layer base, saves time and energy.
Use cookware with a flat base; if the base of the cookware is uneven, this may impair the heat supply.
Absence of pan or unsuitable size
If no pan is placed on the selected hotplate, or if it is made of unsuitable material or is not the correct size, the power level displayed on the hotplate indicator will flash. Place a suitable pan on the hotplate to stop the flashing. If this takes more than 90 seconds, the hotplate will switch off automatically.
10
Induction cooking en
Empty pans or those with a thin base
Do not heat empty pans, nor use pans with a thin base. The hob is equipped with an internal safety system. However, an empty pan may heat up so quickly that the "automatic switch off" function may not have time to react and the pan may reach very high temperatures. The base of the pan could melt and damage the glass on the hob. In this case, do not touch the pan and switch the hotplate off. If it fails to work after it has cooled down, please contact the Technical Assistance Service.
Pan detection
Each hotplate has a lower limit for pan detection. This depends on the diameter of the ferromagnetic area of the cookware and the material from which its base is made. For this reason, you should always use the hotplate that best matches the diameter of the base of the pan.
11
en Getting to know your appliance
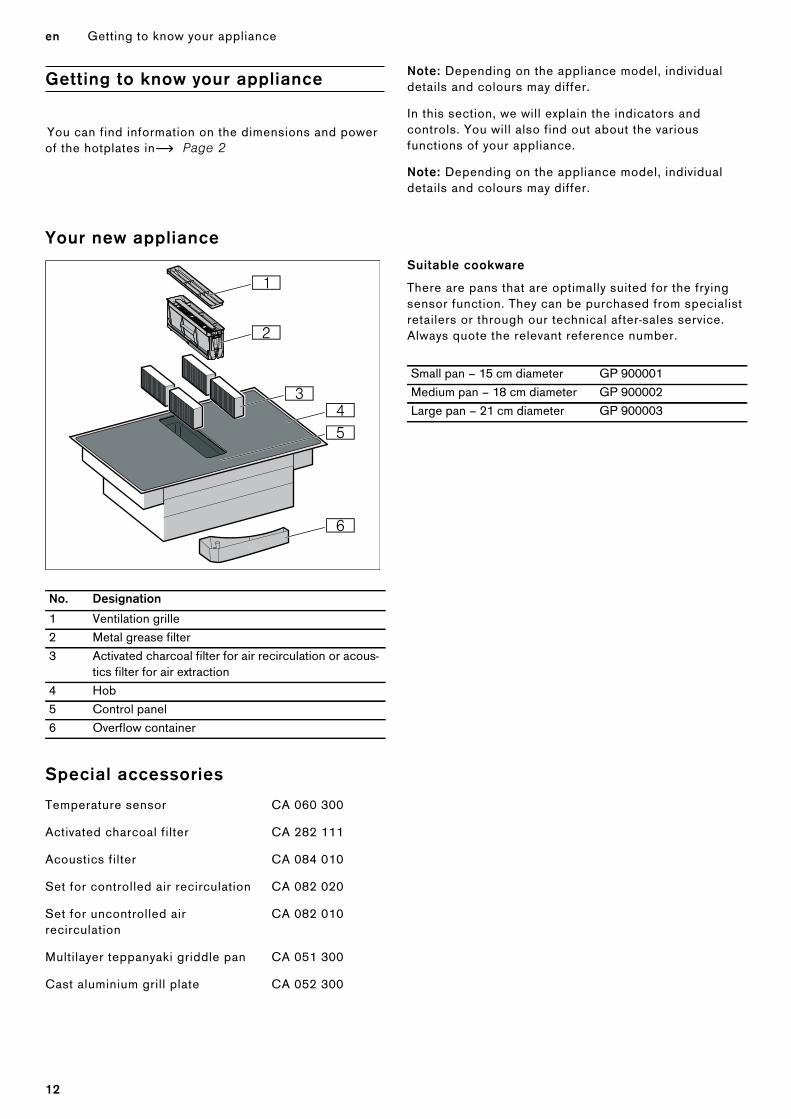
*Getting to know your appliance
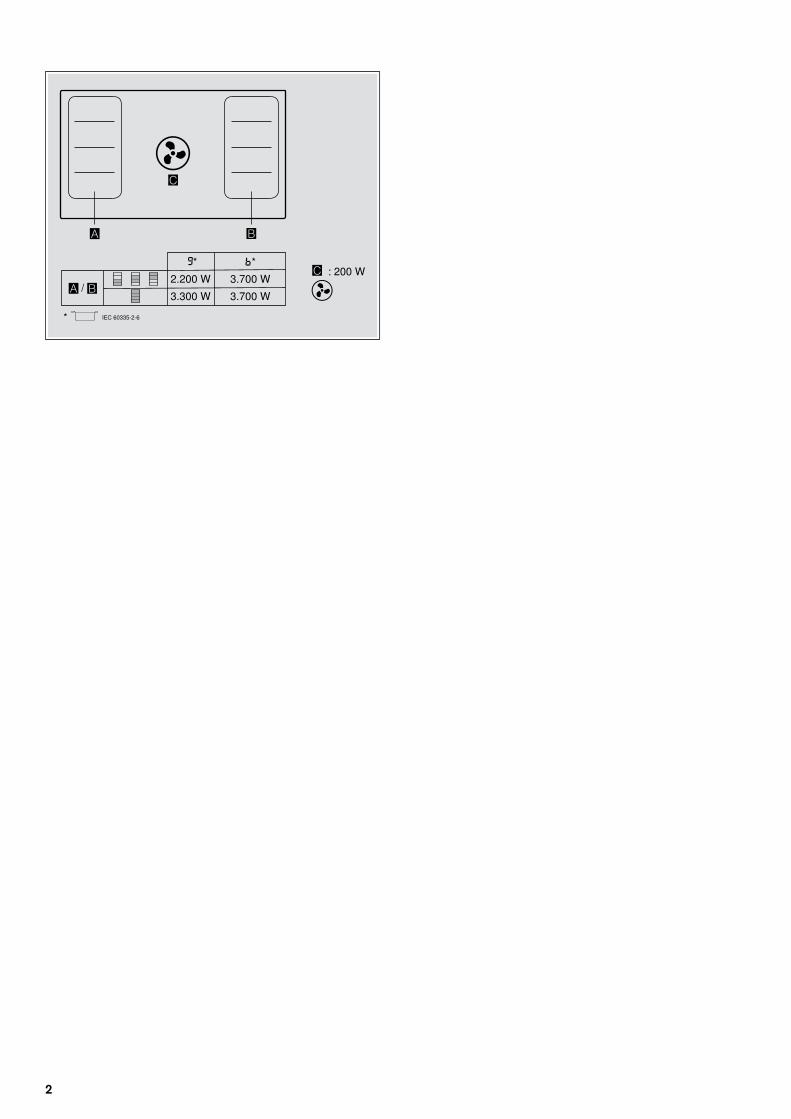
Getting to know your applianceYou can find information on the dimensions and power of the hotplates in~ Page 2
Note: Depending on the appliance model, individual details and colours may differ.
In this section, we will explain the indicators and controls. You will also find out about the various functions of your appliance.
Note: Depending on the appliance model, individual details and colours may differ.
Your new appliance
Special accessories
Suitable cookware
There are pans that are optimally suited for the frying sensor function. They can be purchased from specialist retailers or through our technical after-sales service. Always quote the relevant reference number.
No. Designation
1 Ventilation grille2 Metal grease filter3 Activated charcoal filter for air recirculation or acous-
tics filter for air extraction4 Hob5 Control panel6 Overflow container
Temperature sensor CA 060 300
Activated charcoal filter CA 282 111
Acoustics filter CA 084 010
Set for controlled air recirculation CA 082 020
Set for uncontrolled air recirculation
CA 082 010
Multilayer teppanyaki griddle pan CA 051 300
Cast aluminium grill plate CA 052 300
Small pan – 15 cm diameter GP 900001Medium pan – 18 cm diameter GP 900002Large pan – 21 cm diameter GP 900003
12
Getting to know your appliance en
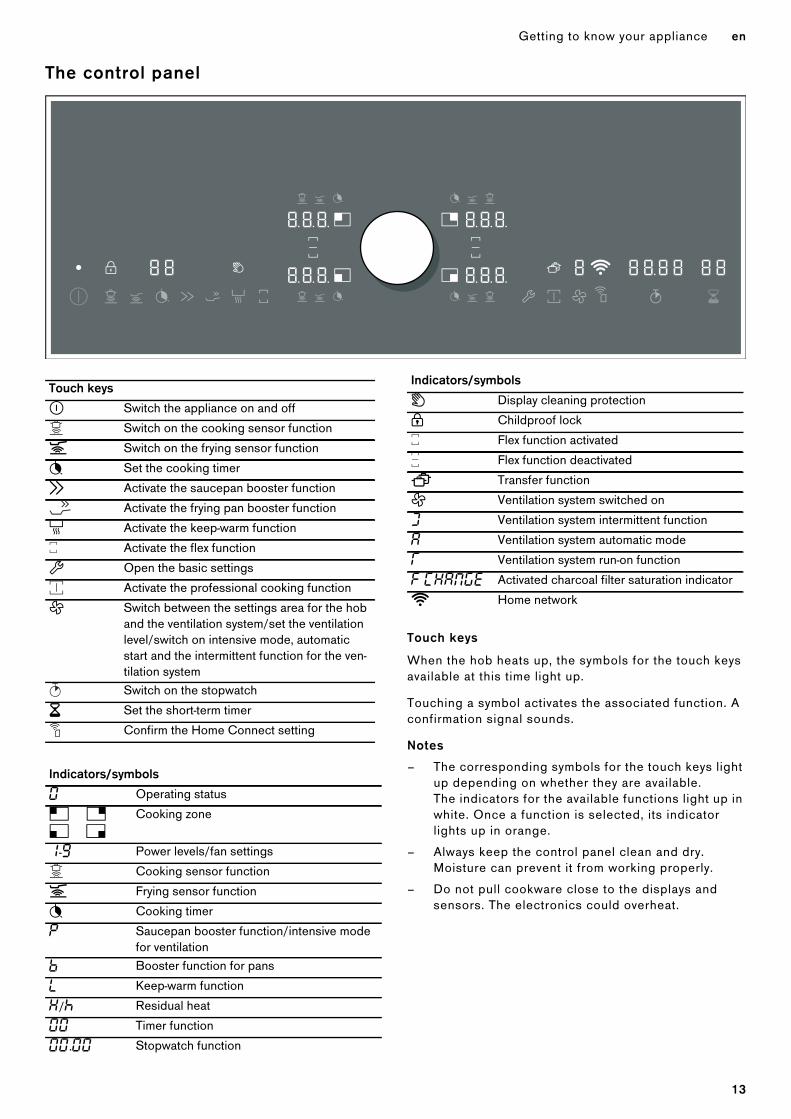
The control panel
Touch keys
When the hob heats up, the symbols for the touch keys available at this time light up.
Touching a symbol activates the associated function. A confirmation signal sounds.
Notes
– The corresponding symbols for the touch keys light up depending on whether they are available. The indicators for the available functions light up in white. Once a function is selected, its indicator lights up in orange.
– Always keep the control panel clean and dry. Moisture can prevent it from working properly.
– Do not pull cookware close to the displays and sensors. The electronics could overheat.
Touch keys
ÿ Switch the appliance on and off
¨ Switch on the cooking sensor function
Ú Switch on the frying sensor function
6 Set the cooking timer
Ž Activate the saucepan booster function
© Activate the frying pan booster function
£ Activate the keep-warm function
ª Activate the flex function
t Open the basic settings
¬ Activate the professional cooking function
} Switch between the settings area for the hob and the ventilation system/set the ventilation level/switch on intensive mode, automatic start and the intermittent function for the ven-tilation system
® Switch on the stopwatch
Š Set the short-term timer
· Confirm the Home Connect setting
Indicators/symbols
‹ Operating status
v x u y
Cooking zone
‚-Š Power levels/fan settings
¨ Cooking sensor function
Ú Frying sensor function
6 Cooking timer
˜ Saucepan booster function/intensive mode for ventilation
› Booster function for pans
– Keep-warm function
•/œ Residual heat
‹‹ Timer function
‹‹.‹‹ Stopwatch function
Ò Display cleaning protection
H Childproof lock
ª Flex function activated
« Flex function deactivated
ˆ Transfer function
} Ventilation system switched on
» Ventilation system intermittent function
‘ Ventilation system automatic mode
¥ Ventilation system run-on function
” ’•‘¯®“ Activated charcoal filter saturation indicator
D Home network
Indicators/symbols
13
en Getting to know your appliance
The hotplates
Residual heat indicatorThe hob has a residual heat indicator for each hotplate. This indicates that a hotplate is still hot. Do not touch a hotplate while the residual heat indicator is lit up.
The following indicators are shown depending on the amount of residual heat:
▯ Display •: High temperature
▯ Display œ: Low temperature
If you remove the cookware from the hotplate during cooking, the residual heat indicator and the selected heat setting will flash alternately.
When the hotplate is switched off, the residual heat indicator will light up. Even after the hob has been switched off, the residual heat indicator will stay lit for as long as the hotplate is still warm.
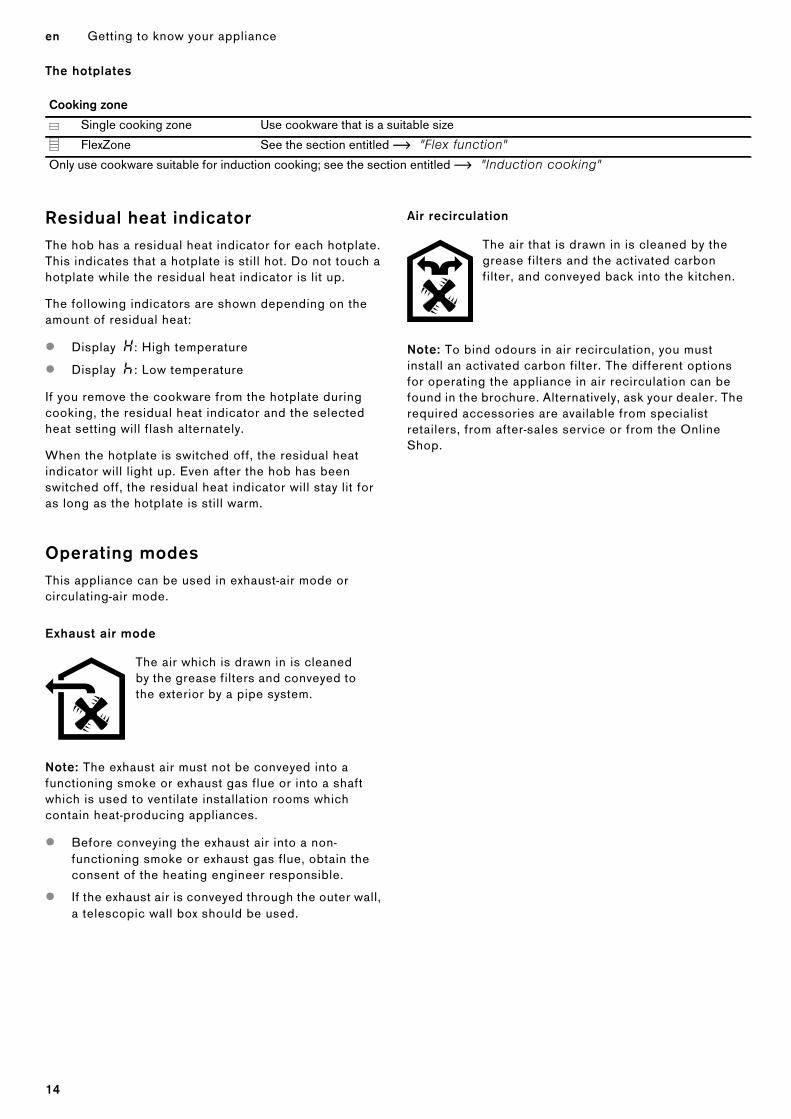
Operating modesThis appliance can be used in exhaust-air mode or circulating-air mode.
Exhaust air mode
Note: The exhaust air must not be conveyed into a functioning smoke or exhaust gas flue or into a shaft which is used to ventilate installation rooms which contain heat-producing appliances.
▯ Before conveying the exhaust air into a non-functioning smoke or exhaust gas flue, obtain the consent of the heating engineer responsible.
▯ If the exhaust air is conveyed through the outer wall, a telescopic wall box should be used.
Air recirculation
Note: To bind odours in air recirculation, you must install an activated carbon filter. The different options for operating the appliance in air recirculation can be found in the brochure. Alternatively, ask your dealer. The required accessories are available from specialist retailers, from after-sales service or from the Online Shop.
Cooking zone
Û Single cooking zone Use cookware that is a suitable size
á FlexZone See the section entitled ~ "Flex function"
Only use cookware suitable for induction cooking; see the section entitled ~ "Induction cooking"
The air which is drawn in is cleaned by the grease filters and conveyed to the exterior by a pipe system.
The air that is drawn in is cleaned by the grease filters and the activated carbon filter, and conveyed back into the kitchen.
14

Before using for the first time en
KBefore using for the first time
Before using for the first timePlease read the following information before using the appliance for the first time:
Clean the appliance and all accessory parts thoroughly.
Before you can use your new appliance, you must apply certain settings.
Initial use
Note: When it is delivered, the appliance is preset to air recirculation mode.
Possible settings:
▯ In air recirculation mode, if ’Š is displayed, the value ‹ (factory setting) is set.
▯ In air extraction mode, if ’Š is displayed, the value ‚ is set.
To switch the appliance to air extraction mode, see ~ "Basic settings" on page 44.
Setting Home ConnectWhen you first switch on the appliance, you are prompted to set up your home network. The D symbol will be lit dimly for a few seconds on the display panel. To begin setting up the connection, touch the · symbol and proceed in accordance with the information given in the section entitled ~ "Home Connect". To exit the initial set-up, touch any symbol.
jTwist-Pad with Twist knob
Twist-Pad with Twist knobThe twistpad is the control panel where you can use the twist knob to select the hotplates and heat settings.
The twist knob is magnetic and is placed in the middle of the area marked on the twistpad. To activate a hotplate, press the twist knob so that it tilts in the appropriate area for the required hotplate. Turning the twist knob selects the heat setting.
Position the twist knob on the twist pad so that it is in the centre of the indicators which delimit the twist pad area.
Note: Even if the twist knob is not entirely central, this will not affect how the twist knob works.
Removing the twist knobRemoving the twist knob activates the wipe protection function.
The twist knob can be removed during cooking. The wipe protection function is activated for 10 minutes. If the twist knob is not returned to its position before this time elapses, the hob will switch off.
m Warning – Risk of fire!
If a metallic object is placed in the twist pad area during these 10 minutes, the hob may continue to heat up. For this reason, always switch off the hob using the main switch.
Storing the twist knobA strong magnet is located inside of the twist knob. Keep the twist knob away from magnetic data carriers such as credit cards and cards with magnetic strips. Otherwise, these data carriers may be damaged beyond repair.
The magnet may also cause faults on televisions and screens.
Note: The twist knob is magnetic. Metal particles stuck to the bottom may scratch the surface of the hob. Always clean the twist knob thoroughly.
15
en Operating the appliance
1Operating the appliance
Operating the applianceThis chapter explains how to set a hotplate. The table shows heat settings and cooking times for various meals.
m Warning – Risk of burns!
The ventilation grille will quickly become extremely hot if it is placed on the hob. Never place the ventilation grille on the hob. Do not place any pans or other hot objects on the ventilation grille.
Note: Switch on the ventilation system when you start cooking and switch it off again a few minutes after you have finished cooking. This is the most effective way of removing steam from the kitchen.
Note: Never use the appliance without the container, metal grease filter or ventilation grille.
Switching the hob on and offUse the main switch to switch the hob on and off.
When you first switch on the appliance, you are prompted to set up your home network. The D symbol will be lit dimly for a few seconds on the display panel. To begin setting up the connection, touch the · symbol and proceed in accordance with the information given in the section entitled ~ "Home Connect". To exit the initial set-up, touch any symbol.
To switch on: Position the twist knob on the control panel. Touch the # symbol. The symbols for the cooking zones and the functions available at this time light up. ‹ lights up next to the cooking zones. The hob is ready for use.
To switch off: Touch the # symbol until the display goes out. All the hotplates are switched off. The residual heat indicator remains lit until the cooking zones have cooled down sufficiently.
Notes
– If the appliance has not been connected to your home network or the connection has been broken, network connection initial set-up will be activated whenever you switch on the hob.
– The hob switches off automatically if all cooking zones and the ventilation have been switched off for more than 20 seconds.
– The selected settings are stored for 5 seconds after the hob has been switched off. If the hob is switched back on during this time, the heat settings that were previously set will flash. To apply these settings, tap on the twist knob within the next 5 seconds. If you do not tap the twist knob or if you touch a different sensor button, all the previous settings will be deleted.
Setting a hotplateSet the required hotplate using the twist knob.
Heat setting 1 = lowest setting.
Heat setting 9 = highest setting.
Every heat setting has an intermediate setting. This is shown in the hotplate display as .5.
Notes
– To protect the fragile parts of your appliance from overheating and electrical overloading, the hob may temporarily reduce the power.
– In order to prevent the appliance from producing excess noise, the hob may temporarily reduce the power.
Selecting a hotplate and heat setting
The hob must be switched on.
1 Select the hotplate. To do this, touch the twist knob in the appropriate area for the required hotplate.
2 Within the next 10 seconds, turn the twist knob until the required heat setting appears in the heat setting display.
The heat setting is set.
Notes
– When placing an item of cookware on the flexible cooking zone, it must be positioned correctly according to size; see the section entitled ~ "Flex function" on page 21.The cookware is detected and the cooking zone is selected automatically. You can now configure the settings.
– If the indicators flash after you have changed the settings, check whether the cookware is suitable for induction cooking. See the section entitled ~ "Cookware test" on page 50.
Changing the heat setting
Select the hotplate and change the heat setting using the twist knob.
16
Operating the appliance en
Switching off the hotplate
Select the hotplate and turn the twist knob until ‹ appears. The hotplate switches itself off and the residual heat indicator lights up.
Notes
– If no pan has been placed on the hotplate, the selected power level flashes. After a certain time has elapsed, the hotplate switches off.
– If there is cookware on the hotplate before switching the hob on, this is detected at most 20 seconds after touching the main switch and the hotplate is selected automatically. Set the heat setting within the next 10 seconds. Otherwise the hotplate will switch itself off again after 20 seconds.Even if there are several pots and pans on the hob when it is switched on, only one item of cookware is detected.
– The ventilation system must be switched off separately. ~ "Switching off the ventilation system" on page 17
Switching the ventilation system on and off
Note: Always adjust the setting according to the current conditions. To eliminate strong cooking smells, select a high fan setting.
Note: Using tall items of cookware may prevent the extraction system from working at optimum power. The extraction power can be improved by placing a lid on the cookware at an angle.
Note: Do not obstruct the ventilation openings. Do not place any objects on the ventilation grille. Doing so would reduce the performance of the ventilation system.
Switching on the ventilation system
1 Touch the } symbol.The } symbol will be lit orange. The ventilation system will start at fan setting ƒ. The fan setting that is selected will be shown on the display panel.
Notes
– Heat settings cannot be changed while the ventilation system fan settings are being configured.
– During a period of a few seconds, a fan setting for the ventilation system can be selected. The } symbol will be lit white when the Twist knob can be used to configure the heat settings again.
2 Use the twist knob to select the required setting.The fan setting that is selected will be shown on the display panel.
3 To set a different fan setting, touch the } symbol and use the twist knob to select the required setting.The fan setting that is selected will be shown on the display panel.
Switching off the ventilation system
If you want to switch off the appliance, touch the # symbol. If you only want to switch off the ventilation system, proceed as follows:
1 Touch the } symbol.
2 Use the twist knob to select the fan setting ‹.
3 Touch the } symbol to switch to the setting area for the hob.
Intensive settingActivate intensive mode if strong odours or large amounts of steam are produced. In this mode, the ventilation system briefly operates at maximum power. It automatically switches back to a low setting after a short time.
Switching on
1 Touch the } symbol.
2 Turn the rotary knob until ˜ appears.
Intensive mode is now activated.
Note: After 6 minutes, the appliance will automatically switch back to fan setting „.
17
en Operating the appliance
Switching off
1 Touch the } symbol.
2 Use the twist knob to select the fan setting ‹.
3 Touch the } symbol to switch to the setting area for the hob.
Automatic startDepending on the basic settings selected, the following options will be available once you have selected the fan setting for a cooking zone:
▯ The ventilation system will not start.
▯ The ventilation system will start at the fan setting selected by the sensor.
▯ The ventilation will start at a specified fan setting.
Select the option you want to use in the basic settings. The basic settings also offer the option to adjust the sensitivity of the sensor.
Automatic mode with sensor control
Switching on
1 Touch the } symbol.The ventilation starts with fan setting ƒ.
2 Turn button to the right until ‘ is displayed.
3 Touch the } symbol.The optimum setting is set automatically using a sensor.
Switching off
1 Touch the } symbol.
2 Use the twist knob to select another fan setting or turn it until ‹ appears. The fan setting that is selected will be shown on the display panel. Automatic mode with sensor control is switched off.
Run-on function
Note: The run-on function will only start if at least one of the cooking zones has been switched on for at least a minute.
The run-on function leaves the ventilation system running for a few minutes after it has been switched off. This eliminates any remaining cooking smells. The ventilation system will switch off automatically afterwards.
If the automatic function with sensor-controlled run-on is activated in the basic settings, the run-on will stop automatically when the appliance is switched off.
When the appliance is switched off or all of the cooking zones are switched off, ¥ will be shown on the display panel. } will be lit white. The run-on function is now on.
Switching off
1 Touch the } symbol.The } symbol will be lit orange.
2 Use the twist knob to select the required fan setting ‹.
3 Touch the } symbol.The run-on function will be switched off.
The run-on function will be switched off if the appliance is switched on and one of the cooking zones is switched back on.
Interval ventilation
Switching on
With interval ventilation, the ventilation switches on automatically for 6 minutes every hour.
1 Touch the } symbol.
2 Turn the twist knob until » appears.
3 Touch the } symbol.The Intermittent function has now been activated.
Note: After power is turned off, » and } symbol light up.
Switching off
1 Touch the } symbol.
2 Use the twist knob to select the fan setting ‹.
3 Touch the } symbol to switch to the setting area for the hob.Intermittent ventilation has now been switched off.
18
Operating the appliance en
Chef's recommendations
Recommendations
▯ Stir occasionally when heating up purees, creamy soups and thick sauces.
▯ For preheating, select a heat setting 8 or 9.
▯ When cooking with the lid on, turn the heat setting down as soon as steam escapes between the lid and the cookware.
▯ After cooking, keep the lid on the cookware until you serve the food.
▯ To cook with the pressure cooker, follow the manufacturer's instructions.
▯ Do not cook food for too long, otherwise nutrients will be lost. The kitchen timer can be used to set the optimum cooking time.
▯ For healthier cooking results, oils and fats should not be heated to their smoke point.
▯ To brown food, fry small portions in succession.
▯ Cookware may reach high temperatures while the food is cooking. We recommend that you use oven gloves.
▯ You can find recommendations for energy-efficient cooking in the section entitled ~ "Environmental protection" on page 9.
Cooking table
The table shows which heat setting is suitable for each type of food. The cooking time may vary depending on the type, weight, thickness and quality of the food.
Power level Cooking time (mins)
MeltingChocolate, coating 1 - 1.5 -Butter, honey, gelatine 1 - 2 -
Heating and keeping warmStew, e.g. lentil stew 1.5 - 2 -Milk* 1.5 - 2.5 -Scalded sausages* 3 - 4 -
Defrosting and heatingSpinach, frozen 3 - 4 15 - 25Goulash, frozen 3 - 4 35 - 55
Poaching, simmeringPotato dumplings* 4.5 - 5.5 20 - 30Fish* 4 - 5 10 - 15White sauces, e.g. Béchamel sauce 1 - 2 3 - 6Whisked sauces, e.g. Béarnaise sauce, Hollandaise sauce 3 - 4 8 - 12
Boiling, steaming, stewingRice (with double the volume of water) 2.5 - 3.5 15 - 30Rice pudding*** 2 - 3 30 - 40Unpeeled boiled potatoes 4.5 - 5.5 25 - 35Boiled potatoes 4.5 - 5.5 15 - 30Pasta* 6 - 7 6 - 10Stew 3.5 - 4.5 120 - 180Soups 3.5 - 4.5 15 - 60Vegetables 2.5 - 3.5 10 - 20Vegetables, frozen 3.5 - 4.5 7 - 20Stew in a pressure cooker 4.5 - 5.5 -* Without a lid
** Turn several times
*** Preheat to heat setting 8–8.5
19
en Operating the appliance
BraisingRolled roasting joint 4 - 5 50 - 65Pot roast 4 - 5 60 - 100Goulash*** 3 - 4 50 - 60
Roasting/frying with little oil*Escalope, plain or breaded 6 - 7 6 - 10Escalope, frozen 6 - 7 6 - 12Chops, plain or breaded** 6 - 7 8 - 12Steak (3 cm thick) 7 - 8 8 - 12Poultry breast (2 cm thick)** 5 - 6 10 - 20Poultry breast, frozen** 5 - 6 10 - 30Rissoles (3 cm thick)** 4.5 - 5.5 20 - 30Hamburgers (2 cm thick)** 6 - 7 10 - 20Fish and fish fillet, plain 5 - 6 8 - 20Fish and fish fillet, breaded 6 - 7 8 - 20Fish, breaded and frozen, e.g. fish fingers 6 - 7 8 - 15Prawns and scampi 7 - 8 4 - 10Sautéing fresh vegetables and mushrooms 7 - 8 10 - 20Stir-fry, vegetables, meat cut in strips Asian-style 7 - 8 15 - 20Stir fries, frozen 6 - 7 6 - 10Pancakes (cooked one after the other) 6.5 - 7.5 -Omelette (cooked one after the other) 3.5 - 4.5 3 - 10Fried egg 5 - 6 3 - 6
Deep-fat frying* (150–200 g per portion in 1–2 l oil, deep-fat fried in portions)Frozen products, e.g. chips, chicken nuggets 8 - 9 -Croquettes, frozen 7 - 8 -Meat, e.g. chicken portions 6 - 7 -Fish, breaded or battered 6 - 7 -Vegetables, mushrooms, breaded, beer-battered or tempura 6 - 7 -Small baked items, e.g. doughnuts, beer-battered fruit 4 - 5 -
Power level Cooking time (mins)
* Without a lid
** Turn several times
*** Preheat to heat setting 8–8.5
20
Flex function en
|Flex function
Flex functionThe flexible cooking zone can be used as a single hotplate or as two independent hotplates, as required.
It consists of four inductors that work independently of each other. If the flex function is in use, only the area that is covered by cookware is activated.
Advice on using cookwareTo ensure that the cookware is detected and heat is distributed evenly, correctly centre the cookware:
As two independent hotplatesThe flexible cooking zone is used like two independent hotplates.
Activating
See the section entitled ~ "Operating the appliance" on page 16
As a single hotplateUsing the entire cooking zone by connecting both hotplates.
Linking the two hotplates
1 Set down the cookware. Select one of the two hotplates in the flexible cooking zone and set the heat setting.
2 Touch the ª symbol. The ª indicator lights up next to the cooging zone display.
The flexible cooking zone has now been activated. The heat setting appears in the two displays for the flexible cooking zone.
Notes
– If both hotplates are set to different heat settings before being linked, switch both hotplates to 0 on activation.
– If there is a cooking timer programmed for one hotplate, this will also be assigned to the second hotplate when the two are linked.
Changing the heat setting
Select one of the two hotplates assigned to the flexible cooking zone and set the heat setting using the twist knob.
Adding new cookware
1 Set down additional cookware in the appropriate position according to size. If correctly positioned, cookware is detected and the hotplate is selected automatically; the corresponding part of the display ª flashes.
2 Use the twist knob to confirm the setting within 90 seconds. The indicators stop flashing and the cookware is heated up.
Note: If the indicators continue to flash, check whether the cookware is suitable for induction cooking
Note: If the cookware is moved to the hotplate being used or lifted up, the hotplate begins an automatic search and the heat setting selected previously is retained.
Unlinking the two hotplates
1 Select one of the two hotplates assigned to the flexible cooking zone.
2 Touch the ª symbol.
3 The « symbol appears in the cooking zone display.
This deactivates the flexible cooking zone. The two hotplates will now function independently.
Note: If the hob is switched off, and then switched back on again later, the flexible cooking zone is reset to function as two independent hotplates.
As a single hotplate
Diameter smaller than or equal to 13 cm Place the cookware on one of the four positions that can be seen in the illus-tration.
Diameter greater than 13 cm Place the cookware on one of the three positions that can be seen in the illustration.
If the cookware takes up more than one hotplate, place it starting on the upper or lower edge of the flexible cooking zone.
As two independent hotplates
The front and rear hotplates each have two inductors and can be used independently of each other. Select the required heat setting for each of the hotplates. Use only one item of cookware on each hotplate.
21
en Transfer function
uTransfer function
Transfer functionYou can use this function to transfer the settings of one hotplate to another.
This function can also be used on the flexible cooking zones.
Note: You can find additional information on the correct positioning of cookware in the section entitled ~ "Flex function" on page 21.
1 Remove any cookware from the hob. The hotplate indicator will start flashing. The hotplate is not heating up.
2 Set the cookware down on a flexible hotplate within the next 90 seconds. The new hotplate will be detected and the ˆ symbol will light up. The applied heat setting will flash in the hotplate display.
3 Use the twist knob to select the new hotplate within 90 seconds. The setting has been transferred.
Notes
– Move the cookware to a hotplate that is not switched on, which has not yet been preset and on which no other cookware has yet been placed.
– If the Flex function is activated by moving an item of cookware across the flexible cooking zone, the settings will be automatically applied.
– A set cooking time or the cooking sensor function will also be transferred to the new hotplate. The frying sensor function will not be transferred.
– The booster functions can only be moved from left to right or from right to left when none of the hotplates are active.
– If a new item of cookware is set down on another hotplate before the settings have been confirmed, this function will be ready for both pieces of cookware. Confirm the desired hotplate.
– If more than one piece of cookware is moved, the function will only be ready for the piece of cookware that was moved last.
– During the adjustment time, you can return the cookware to the original hotplate. The hotplate then continues to heat up using the previous setting, without the need for confirmation.
22

Professional cooking function en
ˆ Professional cooking function
Professional cooking functionYou can use the professional chef function to display the preset heat settings for each hotplate. Set down a suitable item of cookware within 8 minutes to apply the default value.
Activation
1 Switch on the hob.
2 Touch the ¬ symbol.The preset power levels light up on the cooking zone displays. The flexible cooking zones on the left-hand side are linked.
3 Set down a suitable item of cookware within 8 minutes. Once the cookware has been detected, the corresponding cooking zone is selected. You can adjust the power level using the twist knob.The power level indicators for the unoccupied cooking zones start flashing when the adjustment time has elapsed.
4 Touch the ¬ symbol again within 90 seconds to extend the professional cooking function. If you do not touch the symbol, the unused cooking zones switch themselves off.
Notes
– Only the keep-warm function and the flex function can be set in professional cooking mode.
– If an unsuitable item of cookware is set down (e.g. aluminium cookware), the power level indicator flashes until this cookware is removed. To check whether your cookware is suitable for induction cooking, refer to the section entitled ~ "Cookware test".
Deactivating
To end the function immediately: Touch the ¬ symbol. Switch all hotplates to heat setting ‹. The ¬ symbol lights up white.
Function ends automatically: If no suitable cookware is set down after 8 minutes have elapsed, the ¬ symbol and the corresponding hotplate displays start flashing for 90 seconds. Touch the ¬ symbol twice to switch off the function. If you do not touch the ¬ symbol, the professional cooking function switches off automatically after 90 seconds. The ¬ symbol lights up white and unoccupied hotplates switch to heat setting ‹. Hotplates that are in use retain the original heat setting.
Changing the settingsYou can change the default settings in the "Basic settings" menu. See the section entitled ~ "Basic settings"
23
en Timer functions
OTimer functions
Timer functionsYour hob has three timer functions:
▯ Cooking timer
▯ Timer
▯ Stopwatch function
Cooking timerThe hotplate automatically switches off after the time that is set has elapsed.
You can set a time from 1 to 99 minutes. The time elapses in the timer display in minutes, the final half a minute is displayed in seconds.
Setting procedure:
1 Select the hotplate and the required heat setting.
2 Touch the 6 symbol.The 6 indicator lights up. ‹‹ lights up in the timer display.
3 Use the twist knob to select the required cooking time.
4 Touch the 6 symbol to confirm the selected time.
The cooking time begins to elapse.
Note: If the flexible cooking zone is selected as the only hotplate, the set time for the entire cooking zone is the same.
Frying/cooking sensor function
If a cooking time has been programmed for a hotplate and the frying sensor or cooking sensor function is activated, the cooking time will begin to count down immediately, instead of once the selected temperature setting has been reached.
Changing or deleting the time
Select the hotplate and then touch the 6 symbol.
Change the cooking time using the twist knob or set to ‹‹ to delete it.
When the time has elapsed
The hotplate switches off. A signal sounds, ‹ appears in the hotplate display and ‹‹ flashes in the timer display. Touch any symbol or press the twist knob; the displays go out and the audible signal ceases.
Notes
– If a cooking time has been programmed for several hotplates, the cooking time that ends first will appear in the timer display. The 6 indicator for the hotplate lights up orange.
– Select the relevant hotplate to call up the remaining cooking time for a hotplate. The cooking time will appear for 10 seconds.
The short-term timerYou can set a time from 1 to 99 minutes on the short-term timer.
This functions independently from the hotplates and from other settings. This function does not automatically switch off a hotplate.
How to activate the function
1 Touch the Š symbol; ‹‹ appears in the timer display.
2 Select the required time using the twist knob.
3 Touch the Š symbol again to confirm the selected time.
The cooking time begins to elapse.
Changing or deleting the time
Touch the Š symbol and use the twist knob to change the time or set it to ‹‹.
When the time has elapsed
A signal sounds for three minutes. ‹‹ flashes in the timer display. Touch the Š symbol again: The displays go out and the audible signal ceases.
24
Booster function for pots en
Timer plus
If you press and hold the symbol Š for a few seconds before the audible signal ceases, the stopwatch is activated.
The display for the stopwatch shows the elapsed time since the end of the set timer time. The time that was previously set flashes in the timer display.
Press and hold the Š symbol for a few seconds. This stops the stopwatch, and the indicators go out.
The function has been deactivated.
Stopwatch functionThe stopwatch shows the cooking time that has elapsed so far in minutes and seconds (mm.ss). The maximum duration is 99 minutes and 59 seconds (99.59). If this value is reached, the display starts again at 00.00.
The stopwatch works independently of the hotplates and other settings. This function does not automatically switch off a hotplate.
Activating
Touch the ® symbol. ‹‹.‹‹ appears in the stopwatch display.
The time begins to elapse.
Deactivating
Touching the ® symbol stops the stopwatch function. The stopwatch displays remain lit.
If you touch the ® symbol again while it is still orange, the time will continue to elapse.
If you touch and hold the ® symbol, the displays will go out.
The function is deactivated.
vBooster function for pots
Booster function for potsThis function allows large volumes of water to be heated up even more quickly than with the power setting Š. The saucepan booster function temporarily increases the maximum output of the selected hotplate.
This function can always be activated for a hotplate, provided the other hotplate in the same group is not in use (see illustration).
Note: The booster function can also be activated on the flexible cooking zone if this is being used as a single hotplate.
Activating
1 Select the hotplate.
2 Touch the Ž symbol.The ˜ indicator lights up.
The function has now been activated.
Deactivating
1 Select the hotplate.
2 Touch the Ž symbol, turn the twist knob or select a different function.The ˜ indicator goes out and the hotplate switches back to the Š heat setting.
The function is deactivated.
Notes
– In certain circumstances, this function may switch itself off automatically in order to protect the electronic elements inside the hob.
– If a heat setting was set before activating the function, this will be automatically applied again after deactivating the function.
25
en Booster function
xBooster function for pans
Booster functionThis function enables you to heat cookware faster than when using heat setting Š.
After deactivating the function, select the appropriate heat setting for your food.
This function can always be activated for a hotplate, provided the other hotplate in the same group is not in use (see illustration).
Note: The booster function for pans can also be activated on the flexible cooking zone if this is being used as a single hotplate.
Recommendations for use
▯ Always use cookware that has not been pre-heated.
▯ Use pots and pans with a flat base. Do not use cookware with a thin base.
▯ Never leave empty cookware, oil, butter or lard to heat up unattended.
▯ Do not place a lid on the cookware.
▯ Place the cookware on the centre of the hotplate. Ensure that the diameter of the base of the cookware corresponds to the size of the hotplate.
▯ You can find information on the type, size and positioning of the cookware in section ~ "Induction cooking"
Activating
1 Select a hotplate.
2 Touch the © symbol. The › indicator lights up.
The function has now been activated.
Deactivating
1 Select a hotplate.
2 Touch the © symbol, turn the twist knob or select a different function. The › display goes out. The heat setting Š lights up in the display for the hotplate.
The function is deactivated.
Notes
– After 30 seconds, this function automatically switches itself off.
– If a power level was set before activating the frying pan function, this is automatically applied again after deactivating the function.
26
Keep warm function en
zKeep warm function
Keep warm functionThis function is suitable for melting chocolate or butter and for keeping food warm.
Activating
1 Select the required hotplate.
2 Touch the £ symbol within the next 10 seconds.– lights up on the display.
The function has now been activated.
Deactivating
1 Select the hotplate.
2 Touch the £ symbol, turn the twist knob or select a different function.The – indicator goes out. The hotplate switches itself off and the residual heat indicator lights up.
The function is deactivated.
ÜAutomatic functions
Automatic functionsThe automatic functions make cooking easy and always give you excellent results. The recommended temperature settings are suitable for any type of cooking.
They enable you to cook without using excessive heat and promise the perfect cooking and frying results.
Sensors measure the heat of the saucepan or frying pan throughout the cooking process. This ensures that the power is continuously controlled and that the right temperature is maintained.
Food can be added once the selected temperature has been reached. Food will not be overheated and liquids will not boil over.
The frying sensor function is available for all hotplates.
The cooking sensor function is available on all hotplates if a wireless temperature sensor is connected.
In this section, you will find information on:
▯ Automatic function types
▯ Suitable cookware
▯ Sensors and special accessories
▯ Functions and heat settings
▯ Recommended dishes
27

en Automatic functions
Types of automatic functionsThe automatic functions are used to select the best cooking method for each kind of food.
The table shows the various different function settings that are available for the automatic functions:
Suitable cookwareSelect the hotplate with the diameter that most closely matches that of the base of the cookware and place the cookware in the centre of this hotplate.For the cooking functions, use cookware that is tall enough that, when the required volume of water is added, the water level is higher than the silicone patch for the wireless sensor.There are frying pans that are optimally suited to the frying sensor function. These can be purchased from specialist retailers or through our technical after-sales service or our official website. Always quote the relevant reference number:
▯ GP900001 small pan (15 cm diameter)
▯ GP900002 medium pan (18 cm diameter)
▯ GP900003 large pan (21 cm diameter)
▯ CA051300 Teppanyaki. Recommended for the flexible cooking zone only
▯ CA052300 griddle plate. Recommended for the flexible cooking zone only.
These frying pans have a non-stick coating so that you can fry food with a small amount of oil.Notes
– The frying sensor function has been configured specifically for this type and size of pan.
– Using a pan of a different size or one that is poorly positioned on the flexible cooking zones may result in the frying sensor function not being activated. See the section entitled ~ "Flex function" on page 21.
– Other types of pan may overheat and reach a temperature above or below the selected temperature level. Try the lowest temperature level to begin with and change it if necessary.
Any cookware that is suitable for induction cooking can be used with the cooking functions. You can find information on which types of cookware can be used with an induction hob in the section entitled ~ "Induction cooking" on page 10.
The table of automatic functions lists the cookware that is suitable for each function.
Automatic functions Temperature levels Cookware Availability Activating
Frying sensor function
Frying with a little oil 1, 2, 3, 4, 5 All cooking zones Ú
Cooking sensor function
Keeping warm, heating 70 °C All cooking zones ¨
Poaching in milk 85 °C All cooking zones ¨
Poaching in water 90 °C All cooking zones ¨
Boiling 100 °C All cooking zones ¨
Cooking in a pressure cooker 115 °C All cooking zones ¨
Deep-fat frying at a low temperature 160 °C All cooking zones ¨
Deep-fat frying at a medium temperature 170 °C All cooking zones ¨
Deep-fat frying at a high temperature 180 °C All cooking zones ¨
*Preheat with the lid on and deep-fat fry with the lid off.
If the hob does not have a wireless cooking sensor; you can purchase one from specialist retailers, our after-sales service or our official website.
28
Automatic functions en
Sensors and special accessoriesThe sensors measure the temperature of the saucepan or frying pan throughout the cooking process. This ensures that the power is controlled with high precision and that the right temperature is maintained:
Your hob has two different temperature measuring systems:
▯ Frying sensor function: Temperature sensors are located underneath the hob. These monitor the temperature of the base of the frying pan.
▯ Cooking sensor function: A wireless temperature sensor transmits the temperature of the saucepan to the control panel. The sensor is attached to the saucepan.
A wireless temperature sensor is required for the cooking sensor function. You can purchase this from specialist retailers, from our technical after-sales service or from our official website – you will need to quote the reference number CA060300.
You can find more information about the wireless temperature sensor in the section entitled ~ "Preparing and maintaining the wireless temperature sensor" on page 41.
Functions and heat settings
Frying sensor function
You can use the frying sensor function to pan-fry food with a small amount of oil.
This function is available for all hotplates.
Advantages
▯ The hotplate only heats when necessary. This saves energy. Oil and fat will not overheat.
▯ An audible signal will sound once the empty frying pan has reached the optimal temperature for adding the oil and food.
Notes
– Do not place a lid on the frying pan. Otherwise, the function will not activate correctly. You can use a splatter guard to prevent fat from splashing out.
– Use oil or fat that is suitable for frying. If you are using butter, margarine, cold-pressed olive oil or lard, use temperature setting 1 or 2.
– Never leave fat or oil unattended while you are heating it.
– If the hotplate is at a higher temperature than the cookware or vice versa, the temperature sensor will not be activated correctly.
– For frying with a large amount of oil, always use the cooking sensor function. For frying with a large amount of oil in the saucepan, set the temperature to 170-180° C.
Temperature settings
Temperature level Suitable for
1 very low Preparing and reducing sauces, stewing vegetables and frying food in extra virgin olive oil, butter or mar-garine.
2 low Frying food in extra virgin olive oil, butter or margarine, e.g. omelettes.3 medium - low Frying fish and thick food such as meatballs and sausages.4 medium - high Frying steaks (well done), breaded frozen products, and thin food such as schnitzel, strips of meat and
vegetables.5 high Frying food at high temperatures, e.g. rare steaks (rare or medium), potato fritters and fried potatoes.
29
en Automatic functions
Setting procedure
Select the appropriate temperature level from the table. Set an empty item of cookware down on the cooking zone.
1 Select the hotplate and touch the Ú symbol. The Ú symbol lights up in the hotplate display and the temperature setting ‘‚ is displayed.
2 Within the next 10 seconds, select the required temperature setting using the twist knob.
3 The hotplate display shows the progress of the heating process from ¬ to ª and flashes alternately with the set heat setting. Once the set frying temperature has been reached, a signal will sound and the heating indicator will go out. The heat setting is displayed again.
4 Once the frying temperature has been reached, add the fat and then the food to the pan.
Note: Turn the food so that it does not burn.
Switching off the frying sensor function
Select the hotplate and touch the Ú symbol or set the temperature setting to ‹ using the twist knob. A signal sounds and the Ú symbol goes out. The function is deactivated.
Cooking sensor function (optional)
You can use this function to heat, simmer or cook food, or cook it in a pressure cooker or fry it in a saucepan with sufficient oil at a controlled temperature.
The cooking sensor function is available for all hotplates.
Benefits
▯ The hotplate only heats when necessary. This saves energy. Oil or fat will not overheat.
▯ The temperature is continuously monitored.This prevents the food from spilling over. The temperature does not need to be readjusted.
▯ An audible signal will sound once the water or oil has reached the optimal temperature for adding the food. The table shows whether the food needs to be added right at the start.
Notes
– Use pots and pans with a flat base. Do not use pots and pans with a thin or domed base.
– Pour liquid into the saucepan until the liquid level is higher than the silicone patch on the outside of the pan.
– When frying with a small amount of oil, use the frying sensor function.
– Position the saucepan in such a way that the temperature sensor is not pointing towards a different pan.
– Do not remove the temperature sensor from the saucepan during cooking.
– Remove the temperature sensor from the saucepan after cooking. Caution: The temperature sensor may be very hot.
Temperature ranges
Tips for cooking with the cooking sensor function
▯ Heating up/keeping warm: Portioned frozen products, e.g. spinach. Place the frozen product in the cookware. Add the volume of water specified by the manufacturer. Cover the cookware and set the temperature to 70 °C. Stir during cooking.
▯ Cooking: Thicken foods, e.g. sauces. Bring the food to the boil at the recommended temperature. Once the food has thickened, simmer at 85 °C.
After the audible signal sounds, keep the food at this temperature for the required time.
▯ Boiling: Heat up water with the lid on. It will not boil over. Set the temperature to 100 °C.
Cooking sensor func-tion
Temperature range
Suitable for
Heating, Keepting warm
60 - 70 °C e.g. soups, punch
Simmering 80 - 90 °C e.g. rice, milkBoiling 90 - 100 °C e.g. pasta, vegeta-
blesCooking in a pressure cooker
110 - 120 °C e.g. chicken, stew
Frying with a large amount of oil in the saucepan
170 - 180 °C e.g. doughnuts, meatballs
30
Automatic functions en
▯ Cooking in a pressure cooker: Follow the manufacturer's recommendations. Continue cooking for the recommended time once the audible signal has sounded. Set the temperature to 115 °C.
▯ Frying with a large amount of oil in the saucepan: Heat the oil with the lid on. Once the audible signal has sounded, remove the lid and add the food. Set the temperature to 175 °C.
Notes
– Before you cook anything, make sure that the silicone patch is completely dry.
– Always cook with the lid on. Exception: "Frying with a large amount of oil in the saucepan", temperature 170 °C.
– If an audible signal does not sound, make sure that the lid is on the saucepan.
– Never leave oil unattended when it is being heated. Use oil or fat that is suitable for frying.Do not mix different cooking fats together, e.g. oil and lard. Mixtures of different fats may froth up when hot.
– If you are not satisfied with the cooking result, e.g. when cooking potatoes, next time use more water but keep the recommended temperature setting.
Setting the boiling point
The point at which water starts to boil depends on the height of your home above sea level. You can change the boiling point if water is boiling too strongly or not strongly enough. To do this, proceed as follows:
▯ Select the basic setting ™†; see the section entitled ~ "Basic settings" on page 44.
▯ The basic setting is set to 3 by default. If your home is between 200 and 400 metres above sea level, there is no need to change the boiling point. If not, choose the correct setting from the following table according to your altitude:
Note: The 100 °C temperature setting provides efficient cooking even if the water does not bubble very strongly during the heating process. If you are not satisfied with the boiling result, however, you can change the boiling point setting.
Connecting the wireless temperature sensor to the control panel
You will need to connect the wireless temperature sensor to the control panel before using the cooking sensor functions for the first time.
To connect the wireless temperature sensor to the control panel, follow the instructions below:
1 Call up the basic setting ™†; see the section entitled ~ "Basic settings" on page 44.The ¨ symbol lights up white.
2 Press the ¨ symbol. A signal sounds and the ¨ symbol lights up orange. The cooking zone indicators light up white and the cooking sensor indicators on the cooking zones flash.Briefly press the ¨ symbol on the wireless temperature sensor within 30 seconds.
3 Detection successful: The wireless temperature sensor is detected in a few seconds. Three short beeps sound and the ¨ symbol changes from orange to white. The cooking sensor indicators on the cooking zones go out.Detection failed: Five beeps will sound. The ¨ symbol immediately changes from orange to white and the cooking sensor indicators on the cooking zones go out.
▯ The cooking sensor function is made available once the temperature sensor has been connected to the control panel correctly.
▯ If there is a fault with the temperature sensor, the connection may not be established correctly for the following reasons:
– Bluetooth communication error.– You did not press the ¨ symbol on the
temperature sensor within 30 seconds of selecting a hotplate.
– The battery in the temperature sensor has run out.
Reset the wireless temperature sensor and follow the connection procedure once again.
▯ If the temperature sensor and the control panel are not connected correctly due to a transmission error, follow the connection procedure once again.
If no connection can be established, inform the after-sales service.
Resetting the wireless temperature sensor
1 Touch and hold the ¨ symbol for approximately 8-10 seconds. While you are doing this, the temperature sensor's LED indicator will light up three times. When the LED lights up for the third time, it will start to reset the temperature sensor. At this point, you will need to lift your finger off the symbol. Once the LED goes out, this means that the wireless temperature sensor has been reset.
2 Repeat the connection procedure from point 2.
Height Setting value ™†
0–100 m ‚100–200 m ƒ200–400 m „*
400–600 m …600–800 m †800–1000 m ‡1000–1200 m ˆ1200–1400 m ‰Over 1400 m Š* Basic setting
31
en Automatic functions
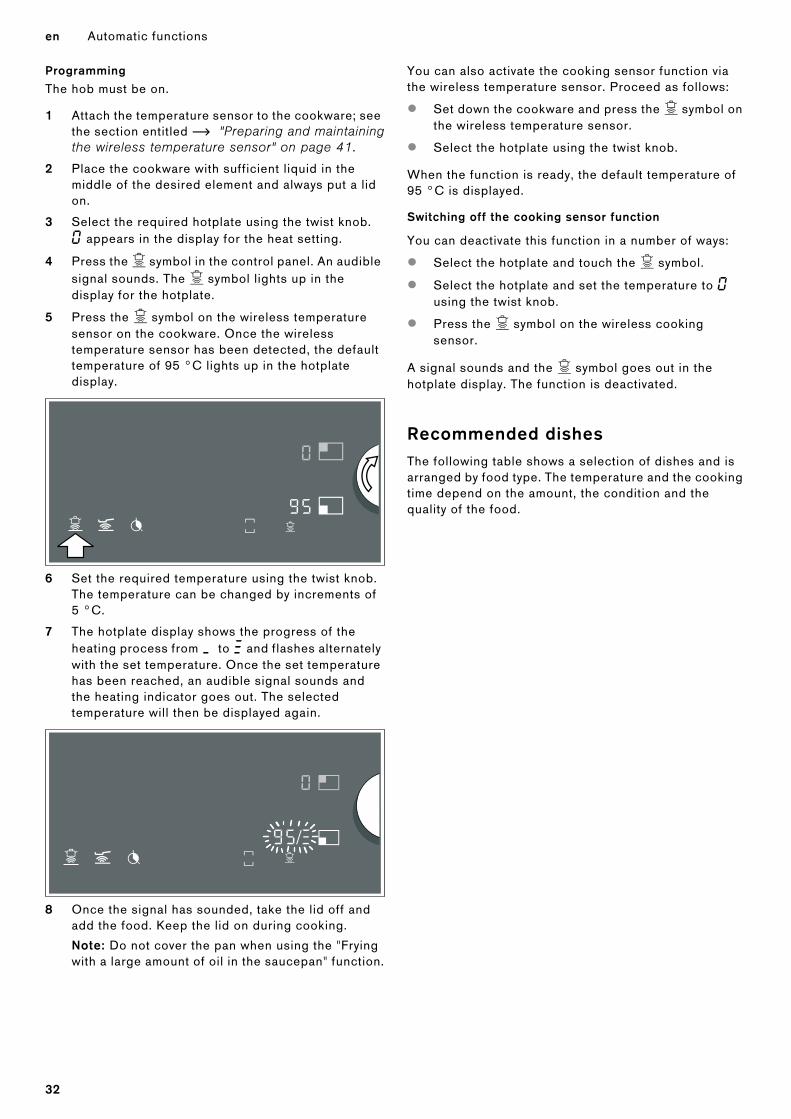
Programming
The hob must be on.
1 Attach the temperature sensor to the cookware; see the section entitled ~ "Preparing and maintaining the wireless temperature sensor" on page 41.
2 Place the cookware with sufficient liquid in the middle of the desired element and always put a lid on.
3 Select the required hotplate using the twist knob. ‹ appears in the display for the heat setting.
4 Press the ¨ symbol in the control panel. An audible signal sounds. The ¨ symbol lights up in the display for the hotplate.
5 Press the ¨ symbol on the wireless temperature sensor on the cookware. Once the wireless temperature sensor has been detected, the default temperature of 95 °C lights up in the hotplate display.
6 Set the required temperature using the twist knob. The temperature can be changed by increments of 5 °C.
7 The hotplate display shows the progress of the heating process from ¬ to ª and flashes alternately with the set temperature. Once the set temperature has been reached, an audible signal sounds and the heating indicator goes out. The selected temperature will then be displayed again.
8 Once the signal has sounded, take the lid off and add the food. Keep the lid on during cooking.
Note: Do not cover the pan when using the "Frying with a large amount of oil in the saucepan" function.
You can also activate the cooking sensor function via the wireless temperature sensor. Proceed as follows:
▯ Set down the cookware and press the ¨ symbol on the wireless temperature sensor.
▯ Select the hotplate using the twist knob.
When the function is ready, the default temperature of 95 °C is displayed.
Switching off the cooking sensor function
You can deactivate this function in a number of ways:
▯ Select the hotplate and touch the ¨ symbol.
▯ Select the hotplate and set the temperature to ‹ using the twist knob.
▯ Press the ¨ symbol on the wireless cooking sensor.
A signal sounds and the ¨ symbol goes out in the hotplate display. The function is deactivated.
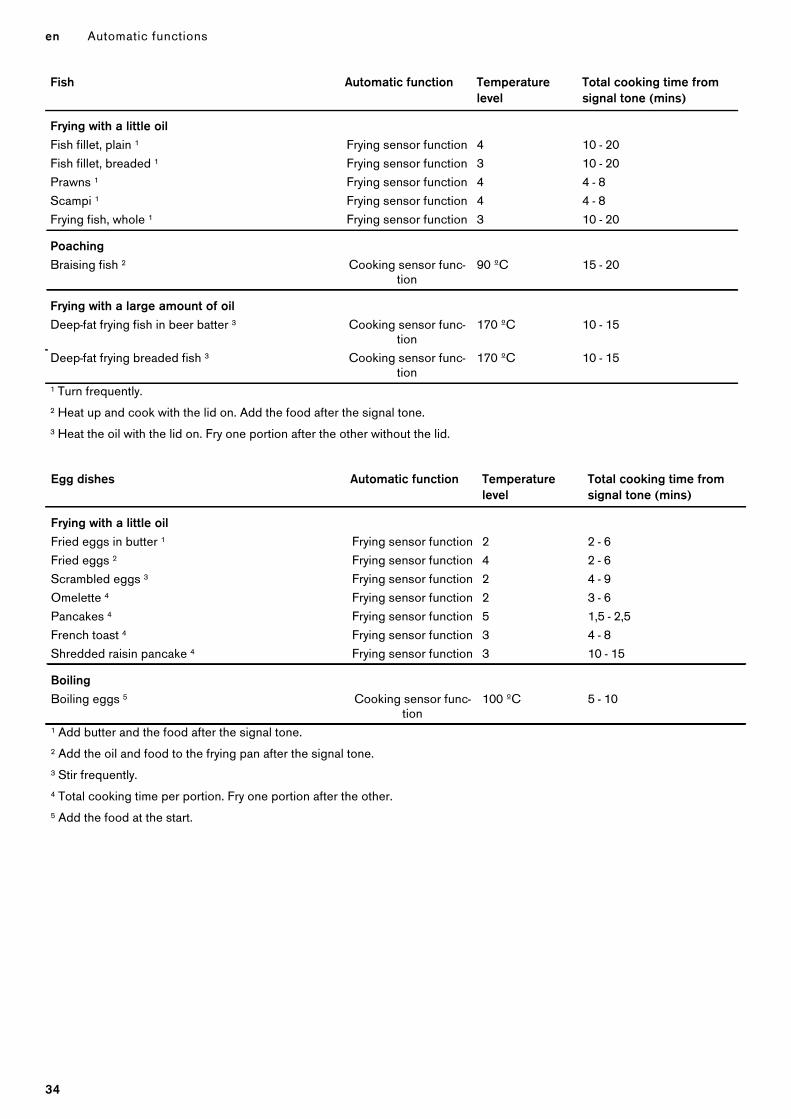
Recommended dishesThe following table shows a selection of dishes and is arranged by food type. The temperature and the cooking time depend on the amount, the condition and the quality of the food.
32

Automatic functions en
Meat Automatic function Temperature level
Total cooking time from signal tone (mins)
Frying with a little oilEscalope, plain 1 Frying sensor function 4 6 - 10Escalope, breaded 1 Frying sensor function 4 6 - 10Fillet 2 Frying sensor function 4 6 - 10Chops 1 Frying sensor function 3 10 - 15Cordon bleu 1 Frying sensor function 4 10 - 15Wiener Schnitzel 1 Frying sensor function 4 10 - 15Steak, rare (3 cm thick) 2 Frying sensor function 5 6 - 8Steak, medium (3 cm thick) 2 Frying sensor function 5 8 - 12Steak, well done (3 cm thick) 1 Frying sensor function 4 8 - 12Poultry breast (2 cm thick) 1 Frying sensor function 3 10 - 20Strips of meat 3 Frying sensor function 4 7 - 12Gyros 3 Frying sensor function 4 7 - 12Bacon 1 Frying sensor function 2 5 - 8Minced meat 3 Frying sensor function 4 6 - 10Hamburgers (1.5 cm thick) 1 Frying sensor function 3 6 - 15Rissoles (2 cm thick) 1 Frying sensor function 3 10 - 20Filled rissoles 1 Frying sensor function 3 10 - 20Boiled sausages 1 Frying sensor function 3 8 - 20Raw sausages 1 Frying sensor function 3 8 - 20
PoachingSausages 4 Cooking sensor func-
tion90 ºC 10 - 20
BoilingMeatballs 4 Cooking sensor func-
tion100 ºC 20 - 30
Stewing poultry 4 Cooking sensor func-tion
100 ºC 60 - 90
Viennese boiled beef 4 Cooking sensor func-tion
100 ºC 60 - 90
Cooking in a pressure cookerChicken in a pressure cooker 5 Cooking sensor func-
tion115 ºC 15 - 25
Beef in a pressure cooker 5 Cooking sensor func-tion
115 ºC 15 - 25
Frying with a large amount of oilDeep-fat frying chicken portions 6 Cooking sensor func-
tion170 ºC 10 - 15
Deep-frying meatballs 6 Cooking sensor func-tion
170 ºC 10 - 15
1 Turn frequently.2 Add the oil and the food after the signal tone.3 Stir frequently.4 Heat up and cook with the lid on. Add the food after the signal tone.5 Add the food at the start.6 Heat the oil with the lid on. Fry one portion after the other without the lid.
33
en Automatic functions
Fish Automatic function Temperature level
Total cooking time from signal tone (mins)
Frying with a little oilFish fillet, plain 1 Frying sensor function 4 10 - 20Fish fillet, breaded 1 Frying sensor function 3 10 - 20Prawns 1 Frying sensor function 4 4 - 8Scampi 1 Frying sensor function 4 4 - 8Frying fish, whole 1 Frying sensor function 3 10 - 20
PoachingBraising fish 2 Cooking sensor func-
tion90 ºC 15 - 20
Frying with a large amount of oilDeep-fat frying fish in beer batter 3 Cooking sensor func-
tion170 ºC 10 - 15
Deep-fat frying breaded fish 3 Cooking sensor func-tion
170 ºC 10 - 15
1 Turn frequently.2 Heat up and cook with the lid on. Add the food after the signal tone.3 Heat the oil with the lid on. Fry one portion after the other without the lid.
Egg dishes Automatic function Temperature level
Total cooking time from signal tone (mins)
Frying with a little oilFried eggs in butter 1 Frying sensor function 2 2 - 6Fried eggs 2 Frying sensor function 4 2 - 6Scrambled eggs 3 Frying sensor function 2 4 - 9Omelette 4 Frying sensor function 2 3 - 6Pancakes 4 Frying sensor function 5 1,5 - 2,5French toast 4 Frying sensor function 3 4 - 8Shredded raisin pancake 4 Frying sensor function 3 10 - 15
BoilingBoiling eggs 5 Cooking sensor func-
tion100 ºC 5 - 10
1 Add butter and the food after the signal tone.2 Add the oil and food to the frying pan after the signal tone.3 Stir frequently.4 Total cooking time per portion. Fry one portion after the other.5 Add the food at the start.
34

Automatic functions en
Vegetables and pulses Automatic function Temperature level
Total cooking time from signal tone (mins)
Frying with a little oilGarlic 1 Frying sensor function 2 2 - 10Onions, braised 1 Frying sensor function 2 2 - 10 Fried onions 1 Frying sensor function 3 5 - 10Courgettes 2 Frying sensor function 3 4 - 12Aubergines 2 Frying sensor function 3 4 - 12Peppers 1 Frying sensor function 3 4 - 15Frying green asparagus 2 Frying sensor function 3 4 - 15Mushrooms 1 Frying sensor function 4 10 - 15Sautéing vegetables in oil 1 Frying sensor function 1 10 - 20Glazed vegetables 1 Frying sensor function 3 6 - 10
BoilingBroccoli 3 Cooking sensor func-
tion100 ºC 10 - 20
Cauliflower 3 Cooking sensor func-tion
100 ºC 10 - 20
Brussels sprouts 3 Cooking sensor func-tion
100 ºC 30 - 40
Green beans 3 Cooking sensor func-tion
100 ºC 15 - 30
Chickpeas 4 Cooking sensor func-tion
100 ºC 60 - 90
Peas 3 Cooking sensor func-tion
100 ºC 15 - 20
Lentils 4 Cooking sensor func-tion
100 ºC 45 - 60
Cooking in a pressure cookerVegetables in a pressure cooker 4 Cooking sensor func-
tion115 ºC 3 - 6
Chickpeas in a pressure cooker 4 Cooking sensor func-tion
115 ºC 25 - 35
Haricot beans in a pressure cooker 4 Cooking sensor func-tion
115 ºC 25 - 35
Lentils in a pressure cooker 4 Cooking sensor func-tion
115 ºC 10 - 20
Frying with a large amount of oilDeep-fat frying breaded vegetables 5 Cooking sensor func-
tion170 ºC 4 - 8
Deep-fat frying vegetables in beer batter 5 Cooking sensor func-tion
170 ºC 4 - 8
Deep-fat frying breaded mushrooms 5 Cooking sensor func-tion
170 ºC 4 - 8
Deep-fat frying mushrooms in beer batter 5 Cooking sensor func-tion
170 ºC 4 - 8
1 Stir frequently.2 Turn frequently.3 Heat up and cook with the lid on. Add the food to the frying pan after the signal tone.4 Add the food at the start.5 Heat the oil with the lid on. Fry one portion after the other without the lid.
35

en Automatic functions
Potatoes Automatic function Temperature level
Total cooking time from signal tone (mins)
Frying with a little oilFried potatoes (made from unpeeled boiled potatoes) 1 Frying sensor function 5 6 - 12Fried potatoes (made from raw potatoes) 1 Frying sensor function 4 15 - 25Potato pancakes 2 Frying sensor function 5 2,5 - 3,5Swiss rösti 3 Frying sensor function 2 50 - 55Glazed potatoes 1 Frying sensor function 3 10 - 15
PoachingCooking potato dumplings 4 Cooking sensor func-
tion85 ºC 30 - 40
BoilingBoiling potatoes 5 Cooking sensor func-
tion100 ºC 30 - 45
Cooking in a pressure cookerPotatoes in a pressure cooker 5 Cooking sensor func-
tion115 ºC 10 - 20
1 Stir frequently.2 Total cooking time per portion. Fry one portion after the other.3 Add the oil and food to the frying pan after the signal tone.4 Heat up and cook with the lid on. Add the food after the signal tone.5 Add the food at the start.
Pasta and cereals Automatic function Temperature level
Total cooking time from signal tone (mins)
PoachingRice 1 Cooking sensor func-
tion90 ºC 25 - 35
Polenta 2 Cooking sensor func-tion
85 ºC 3 - 8
Semolina pudding 2 Cooking sensor func-tion
85 ºC 5 - 10
BoilingPasta 2 Cooking sensor func-
tion100 ºC 7 - 10
Pastry parcels and filled dumplings 2 Cooking sensor func-tion
100 ºC 6 - 15
Cooking in a pressure cookerRice in a pressure cooker 3 Cooking sensor func-
tion115 ºC 5 - 8
1 Heat up and cook with the lid on. Add the food after the signal tone.2 Stir frequently.3 Add the food at the start.
36

Automatic functions en
Soups Automatic function Temperature level
Total cooking time from signal tone (mins)
PoachingInstant creamy soups 1 Cooking sensor func-
tion90 ºC 10 - 15
BoilingHome-made broths 2 Cooking sensor func-
tion100 ºC 60 - 90
Instant soups 1 Cooking sensor func-tion
100 ºC 5 - 10
Cooking in a pressure cookerHome-made broths in a pressure cooker 2 Cooking sensor func-
tion115 ºC 20 - 30
1 Stir frequently.2 Add the food at the start.
Sauces Automatic function Temperature level
Total cooking time from signal tone (mins)
Frying with a little oilTomato sauce with vegetables 1 Frying sensor function 1 25 - 35Béchamel sauce 1 Frying sensor function 1 10 - 20Cheese sauce 1 Frying sensor function 1 10 - 20Reducing sauces 1 Frying sensor function 1 25 - 35Sweet sauces 1 Frying sensor function 1 15 - 251 Stir frequently.
Desserts Automatic function Temperature level
Total cooking time from signal tone (mins)
PoachingRice pudding 1 Cooking sensor func-
tion85 ºC 40 - 50
Porridge 1 Cooking sensor func-tion
85 ºC 10 - 15
Chocolate pudding 1 Cooking sensor func-tion
85 ºC 3 - 5
BoilingCompote 2 Cooking sensor func-
tion100 ºC 15 - 25
Frying with a large amount of oilDeep-fat frying jam-filled doughnuts 3 Cooking sensor func-
tion160 ºC 5 - 10
Deep-fat frying ring doughnuts 3 Cooking sensor func-tion
160 ºC 5 - 10
Deep-fat frying buñuelos 3 Cooking sensor func-tion
160 ºC 5 - 10
1 Stir frequently.2 Add the food at the start.3 Heat the oil with the lid on. Fry one portion after the other without the lid.
37
en Automatic functions
Frozen products Automatic function Temperature level
Total cooking time from signal tone (mins)
Frying with a little oilEscalope 1 Frying sensor function 4 15 - 20Cordon bleu 1 Frying sensor function 4 10 - 30Poultry breast 1 Frying sensor function 4 10 - 30Chicken nuggets 1 Frying sensor function 4 10 - 15Gyros 2 Frying sensor function 4 10 - 15Kebab 2 Frying sensor function 4 10 - 15Fish fillet, plain 1 Frying sensor function 3 10 - 20Fish fillet, breaded 1 Frying sensor function 3 10 - 20Fish fingers 1 Frying sensor function 4 8 - 12Frying chips 2 Frying sensor function 5 4 - 6Stir-fries 2 Frying sensor function 3 6 - 10Spring rolls 1 Frying sensor function 4 10 - 30Camembert 1 Frying sensor function 3 10 - 15
Keeping warm, heatingVegetables in a creamy sauce 2 Cooking sensor func-
tion70 ºC 15 - 20
BoilingGreen beans 3 Cooking sensor func-
tion100 ºC 15 - 30
Frying with a large amount of oilDeep-fat frying chips 4 Cooking sensor func-
tion180 ºC 4 - 8
1 Turn frequently.2 Stir frequently.3 Heat up and cook with the lid on. Add the food after the signal tone.4 Heat the oil with the lid on. Fry one portion after the other without the lid.
Other Automatic function Temperature level
Total cooking time from signal tone (mins)
Frying with a little oilCamembert 1 Frying sensor function 3 7 - 10Croutons 2 Frying sensor function 3 6 - 10Dried ready meals 3 Frying sensor function 1 5 - 10Toasting almonds 4 Frying sensor function 4 3 - 15Toasting nuts 4 Frying sensor function 4 3 - 15Toasting pine nuts 4 Frying sensor function 4 3 - 15
Keeping warm, heatingHeating goulash soup 5 Cooking sensor func-
tion70 ºC 10 - 20
Heating mulled wine 5 Cooking sensor func-tion
70 ºC 5 - 15
1 Turn frequently.2 Stir frequently.3 Add the water after the signal tone. Add the food as soon as the water boils.4 Add the food after the signal tone.5 Add the food at the start.
38
Automatic functions en
PoachingHeating milk 5 Cooking sensor func-
tion85 ºC 3 - 10
Other Automatic function Temperature level
Total cooking time from signal tone (mins)
1 Turn frequently.2 Stir frequently.3 Add the water after the signal tone. Add the food as soon as the water boils.4 Add the food after the signal tone.5 Add the food at the start.
39
en Childproof lock
AChildproof lock
Childproof lockYou can prevent the hotplate from being switched on unintentionally.
Activating and deactivating the childproof lockThe hob must be switched off.
To activate: Remove the twist knob from the hotplate.A signal sounds. The H indicator lights up for 10 seconds. The hob is locked.
To deactivate: Place the twist knob on the twistpad.
Note: Removing the twist knob when the hotplate is switched on initially activates the display cleaning protection function. If the twist knob is not put back on after 10 minutes, the hotplate switches itself off and the child lock is activated.
kDisplay cleaning protection
Display cleaning protectionIf you wipe over the control panel while the hob is switched on, settings may be changed. To avoid this, the hob has a function you can use to lock the control panel for cleaning.
To activate: Remove the twist knob. An audible signal sounds. The − indicator and the hob settings flash. The heating process is interrupted. If a cooking timer is set, it will be paused. The control panel is locked for 10 minutes. You can now wipe over the surface of the control panel without altering the settings.
To deactivate: Put the twist knob back on within 10 minutes. The control panel is unlocked. The hob continues operating with the previous settings. To end the function early, put the twist knob back on before the 10 minutes have elapsed.
bAutomatic safety cut-out
Automatic safety cut-outIf a hotplate operates for an extended period and no settings are changed, the automatic safety shut-off is activated.
The hotplate stops heating. A signal sounds and the residual heat indicator œ or • appears in the hotplate display.
When you touch any symbol, the display switches off. The hotplate can now be set again.
The point at which the safety shut-off becomes active depends on which heat setting has been set (after 1 to 10 hours)..
40
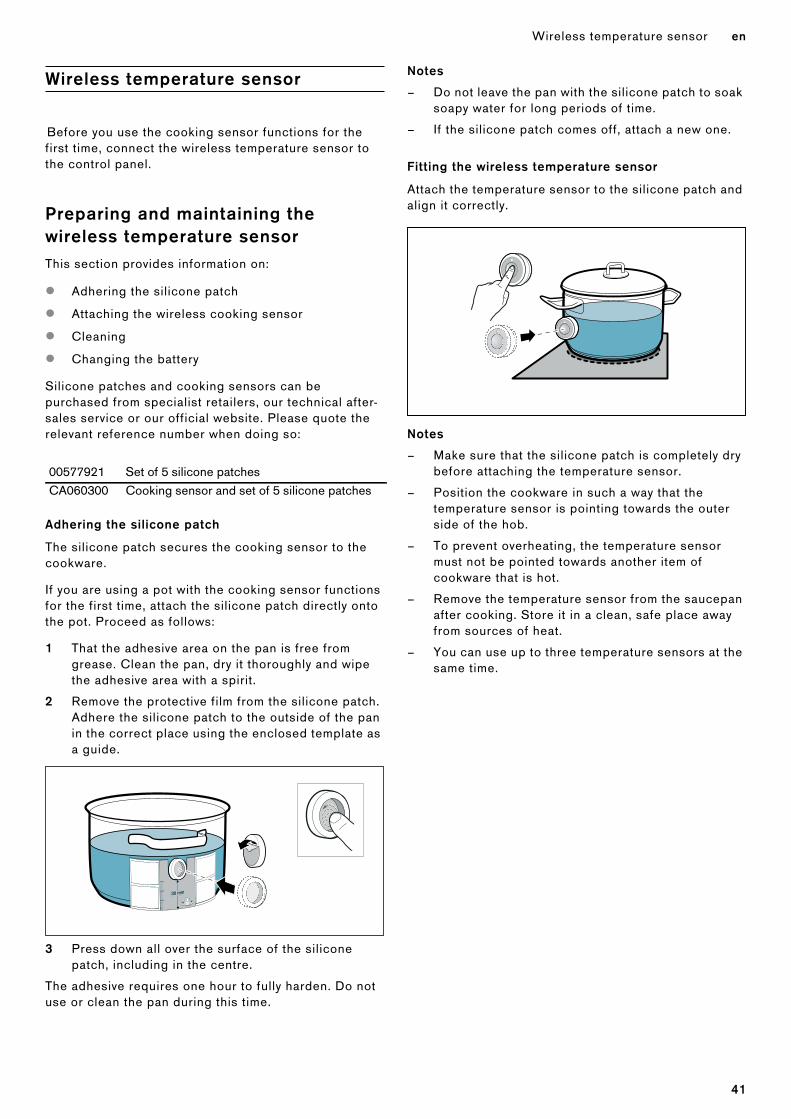
Wireless temperature sensor en
‚Wireless temperature sensor
Wireless temperature sensorBefore you use the cooking sensor functions for the first time, connect the wireless temperature sensor to the control panel.
Preparing and maintaining the wireless temperature sensor This section provides information on:
▯ Adhering the silicone patch
▯ Attaching the wireless cooking sensor
▯ Cleaning
▯ Changing the battery
Silicone patches and cooking sensors can be purchased from specialist retailers, our technical after-sales service or our official website. Please quote the relevant reference number when doing so:
Adhering the silicone patch
The silicone patch secures the cooking sensor to the cookware.
If you are using a pot with the cooking sensor functions for the first time, attach the silicone patch directly onto the pot. Proceed as follows:
1 That the adhesive area on the pan is free from grease. Clean the pan, dry it thoroughly and wipe the adhesive area with a spirit.
2 Remove the protective film from the silicone patch. Adhere the silicone patch to the outside of the pan in the correct place using the enclosed template as a guide.
3 Press down all over the surface of the silicone patch, including in the centre.
The adhesive requires one hour to fully harden. Do not use or clean the pan during this time.
Notes
– Do not leave the pan with the silicone patch to soak soapy water for long periods of time.
– If the silicone patch comes off, attach a new one.
Fitting the wireless temperature sensor
Attach the temperature sensor to the silicone patch and align it correctly.
Notes
– Make sure that the silicone patch is completely dry before attaching the temperature sensor.
– Position the cookware in such a way that the temperature sensor is pointing towards the outer side of the hob.
– To prevent overheating, the temperature sensor must not be pointed towards another item of cookware that is hot.
– Remove the temperature sensor from the saucepan after cooking. Store it in a clean, safe place away from sources of heat.
– You can use up to three temperature sensors at the same time.
00577921 Set of 5 silicone patchesCA060300 Cooking sensor and set of 5 silicone patches
41
en Wireless temperature sensor
Connecting the wireless temperature sensor to the control panel
To connect the wireless cooking sensor to the control panel, proceed as follows:
1 Select the basic setting ™†; see the section entitled ~ "Basic settings".The ¨ symbol lights up white.
2 Touch the ¨ symbol. A signal sounds and the ¨ symbol lights up orange. The cooking zone indicators light up white and the cooking sensor indicators on the hotplates flash.Briefly touch the ¨ symbol on the wireless cooking sensor within the next 30 seconds.
3 Detection successful: The wireless temperature sensor is detected within a few seconds. Three short beeps sound and the ¨ symbol changes from orange to white. The cooking sensor indicators on the cooking zones go out.Detection failed: Five beeps will sound. The ¨ symbol immediately changes from orange to white and the cooking sensor indicators on the cooking zones go out.
▯ The cooking functions are made available as soon as the wireless cooking sensor has been connected to the control panel correctly.
▯ If there is a fault with the wireless cooking sensor, the connection may not be established correctly for the following reasons:
– Bluetooth communication error.– You have not pressed the ¨ symbol on the
cooking sensor within 30 seconds of selecting the cooking zone.
– The battery in the wireless cooking sensor is almost flat.
Reset the wireless cooking sensor and repeat the connection procedure.
▯ If there are problems with the connection due to a transmission error, repeat the connection procedure.
If a connection cannot be established, inform the after-sales service.
Resetting the wireless temperature sensor
1 Touch and hold the ¨ symbol for approximately 8-10 seconds. While you are doing this, the temperature sensor's LED indicator will light up three times. When the LED lights up for the third time, it will start to reset the temperature sensor. At this point, you will need to lift your finger off the symbol. Once the LED goes out, this means that the wireless temperature sensor has been reset.
2 Repeat the connection procedure from point 2.
CleaningDo not clean the wireless temperature sensor in the dishwasher.
Temperature sensor
Clean the temperature sensor with a damp cloth. Never clean it in the dishwasher. Do not immerse it in water or clean it under running water.
Remove the temperature sensor from the saucepan after cooking. Store it in a clean, safe place (such as in its packaging) away from sources of heat.
Silicone patch
Clean and dry before attaching to the temperature sensor. Dishwasher safe.
Note: Cookware with the silicone patch must not be left to soak for long periods in soapy water.
Temperature sensor window
The sensor window must always be clean and dry. Proceed as follows:
▯ Remove dirt and oil splatters regularly.
▯ Use a soft cloth or cotton buds and window cleaner for cleaning.
Notes
– Do not use abrasive cleaning agents such as scouring pads, scrubbing brushes or cream cleaners.
– Do not touch the sensor window with your fingers. This may make it dirty or scratch it.
42
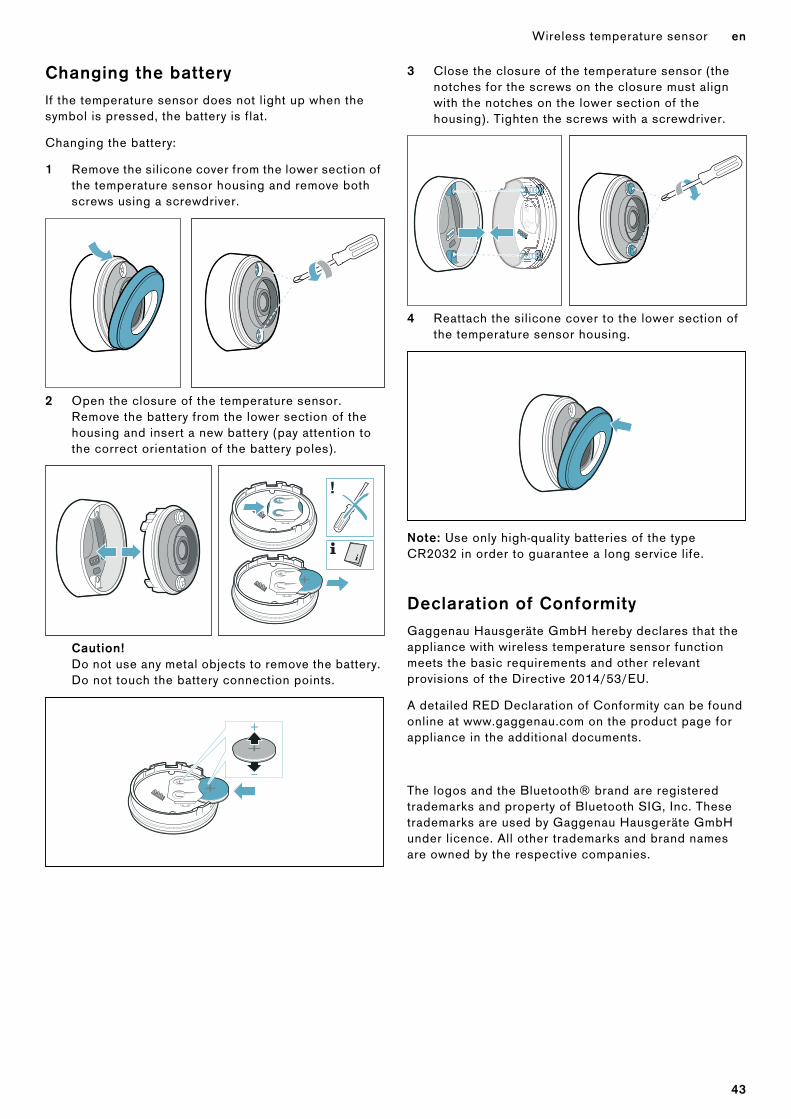
Wireless temperature sensor en
Changing the batteryIf the temperature sensor does not light up when the symbol is pressed, the battery is flat.
Changing the battery:
1 Remove the silicone cover from the lower section of the temperature sensor housing and remove both screws using a screwdriver.
2 Open the closure of the temperature sensor. Remove the battery from the lower section of the housing and insert a new battery (pay attention to the correct orientation of the battery poles).
Caution!Do not use any metal objects to remove the battery. Do not touch the battery connection points.
3 Close the closure of the temperature sensor (the notches for the screws on the closure must align with the notches on the lower section of the housing). Tighten the screws with a screwdriver.
4 Reattach the silicone cover to the lower section of the temperature sensor housing.
Note: Use only high-quality batteries of the type CR2032 in order to guarantee a long service life.
Declaration of ConformityGaggenau Hausgeräte GmbH hereby declares that the appliance with wireless temperature sensor function meets the basic requirements and other relevant provisions of the Directive 2014/53/EU.
A detailed RED Declaration of Conformity can be found online at www.gaggenau.com on the product page for appliance in the additional documents.
The logos and the Bluetooth® brand are registered trademarks and property of Bluetooth SIG, Inc. These trademarks are used by Gaggenau Hausgeräte GmbH under licence. All other trademarks and brand names are owned by the respective companies.
43
en Basic settings
QBasic settings
Basic settingsThe appliance has various basic settings. These basic settings can be altered to suit your individual requirements.
Indicator Function
™‚
Signal tones
‹¯ All signals are switched on.*
ΠMost of the signals are switched off.
™ƒ
Time for selecting the hotplate
† The hotplate remains selected for 5 seconds.
‚‹ The hotplate remains selected for 10 seconds.*
‚† The hotplate remains selected for 15 seconds.
ΠUnlimited: The hotplate which was set last remains selected.
™„
Power management function. Limiting the total power of the hob
The available settings depend on the maximum power of the hob.
‹”” Deactivated. Maximum power of the hob. */**
‚ 1000 W minimum power.
‚. 1500 W
...
„ 3000 W recommended for 13 A.
„. 3500 W recommended for 16 A.
… 4000 W
…. 4500 W recommended for 20 A.
...
Š or Š. Maximum power of the hob.**
™…
Restoring the factory settings
‹”” Keep personal settings.*
‹¯ Restore factory settings.
™†
Cooking sensor function
Connecting the wireless temperature sensor to the hob
Set according to height above sea level:
‚ - ƒ Decrease
„ Basic setting
… - Š Increase
™‡
Professional chef function.
Select individual hotplates to preset the heat setting for the professional chef function.
Preset values*: Left flexible zone: ‚.† Top right hotplate: †.‹ Bottom right hotplate: Š.‹
™ˆ
Cookware, checking the result of the cooking process
‹ Not suitable
‚ Not perfect
ƒ Suitable
44

Basic settings en
To access the basic settings:The hob must be off.
1 Switch on the hob.
2 Touch the t symbol within the next 10 seconds.The first four displays provide product information. Turn the twist knob to view the individual displays.
3 Touch the t symbol again to access the basic settings.™‚ and ‹¯ light up as a presetting in the displays.
4 Touch the t symbol repeatedly until the required function is displayed.
5 Then use the twist knob to select the required setting.
6 Touch the t symbol for at least 4 seconds.
The settings have been saved.
Leaving the basic settings
Turn off the hob with the main switch.
™Š
Set air recirculation mode or air extraction mode
‹ Air recirculation mode is set.*
‚ Air extraction mode is set.
™‘
Setting automatic start
‘ Switched on.The ventilation system will start at the fan setting selected by the sensor.*
‚, ƒ or „ Switched on. The ventilation system will start at fan setting ‚, ƒ or „.
ΠSwitched off.
™›
Set the sensor sensitivity for the ventilation system
‚ Lowest sensor sensitivity setting.
ƒ Medium sensor sensitivity setting.*
„ Highest sensor sensitivity setting.
™™
Set the automatic function with sensor-controlled run-on
‹”” Switched off.
‹¯ Switched on.*
™š
Home Connect
~ "Home Connect settings"* Factory setting
** The hob's maximum power is shown on the rating plate.
Product information Display screen
After-sales service index (ASSI) ‹‚Production number ”šProduction number 1 Š†.
Production number 2 ‹.†
45
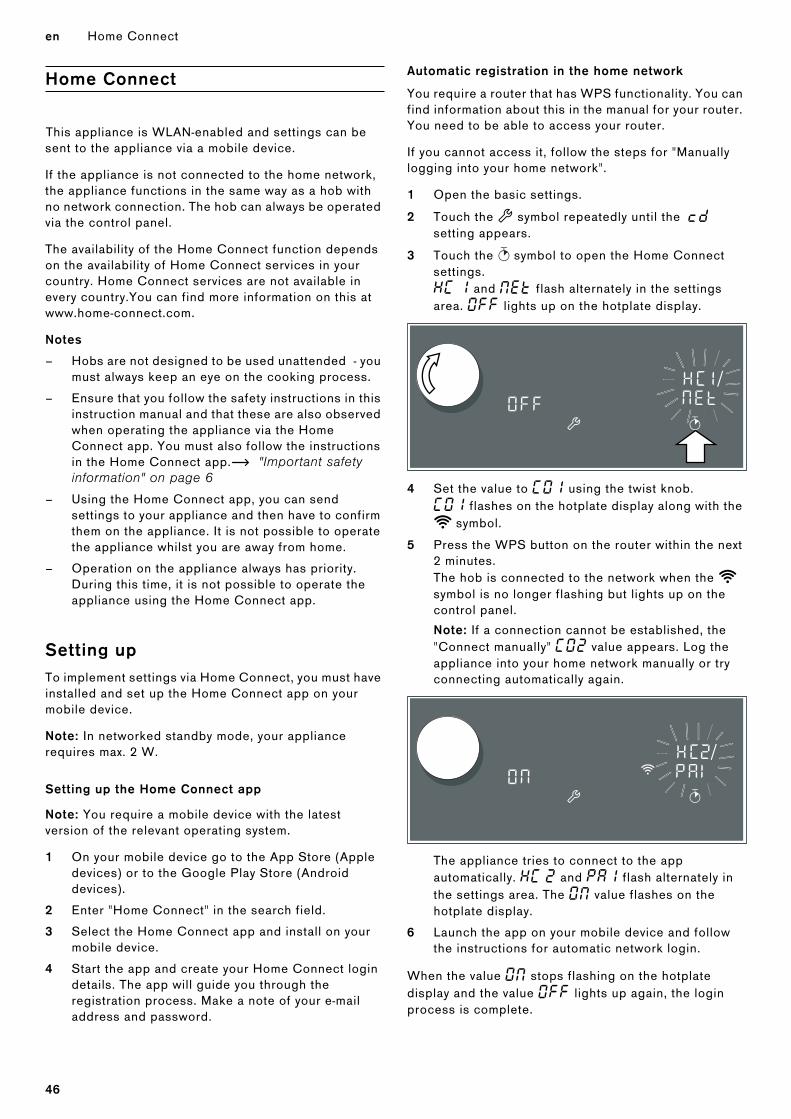
en Home Connect
oHome Connect
Home ConnectThis appliance is WLAN-enabled and settings can be sent to the appliance via a mobile device.
If the appliance is not connected to the home network, the appliance functions in the same way as a hob with no network connection. The hob can always be operated via the control panel.
The availability of the Home Connect function depends on the availability of Home Connect services in your country. Home Connect services are not available in every country.You can find more information on this at www.home-connect.com.
Notes
– Hobs are not designed to be used unattended - you must always keep an eye on the cooking process.
– Ensure that you follow the safety instructions in this instruction manual and that these are also observed when operating the appliance via the Home Connect app. You must also follow the instructions in the Home Connect app.~ "Important safety information" on page 6
– Using the Home Connect app, you can send settings to your appliance and then have to confirm them on the appliance. It is not possible to operate the appliance whilst you are away from home.
– Operation on the appliance always has priority. During this time, it is not possible to operate the appliance using the Home Connect app.
Setting upTo implement settings via Home Connect, you must have installed and set up the Home Connect app on your mobile device.
Note: In networked standby mode, your appliance requires max. 2 W.
Setting up the Home Connect app
Note: You require a mobile device with the latest version of the relevant operating system.
1 On your mobile device go to the App Store (Apple devices) or to the Google Play Store (Android devices).
2 Enter "Home Connect" in the search field.
3 Select the Home Connect app and install on your mobile device.
4 Start the app and create your Home Connect login details. The app will guide you through the registration process. Make a note of your e-mail address and password.
Automatic registration in the home network
You require a router that has WPS functionality. You can find information about this in the manual for your router. You need to be able to access your router.
If you cannot access it, follow the steps for "Manually logging into your home network".
1 Open the basic settings.
2 Touch the t symbol repeatedly until the ™š setting appears.
3 Touch the ® symbol to open the Home Connect settings.•’ ‚ and ¯“£ flash alternately in the settings area. ‹”” lights up on the hotplate display.
4 Set the value to ’‹‚ using the twist knob.’‹‚ flashes on the hotplate display along with the D symbol.
5 Press the WPS button on the router within the next 2 minutes.The hob is connected to the network when the D symbol is no longer flashing but lights up on the control panel.
Note: If a connection cannot be established, the "Connect manually" ’‹ƒ value appears. Log the appliance into your home network manually or try connecting automatically again.
The appliance tries to connect to the app automatically. •’ ƒ and ˜‘‚ flash alternately in the settings area. The ‹¯ value flashes on the hotplate display.
6 Launch the app on your mobile device and follow the instructions for automatic network login.
When the value ‹¯ stops flashing on the hotplate display and the value ‹”” lights up again, the login process is complete.
46
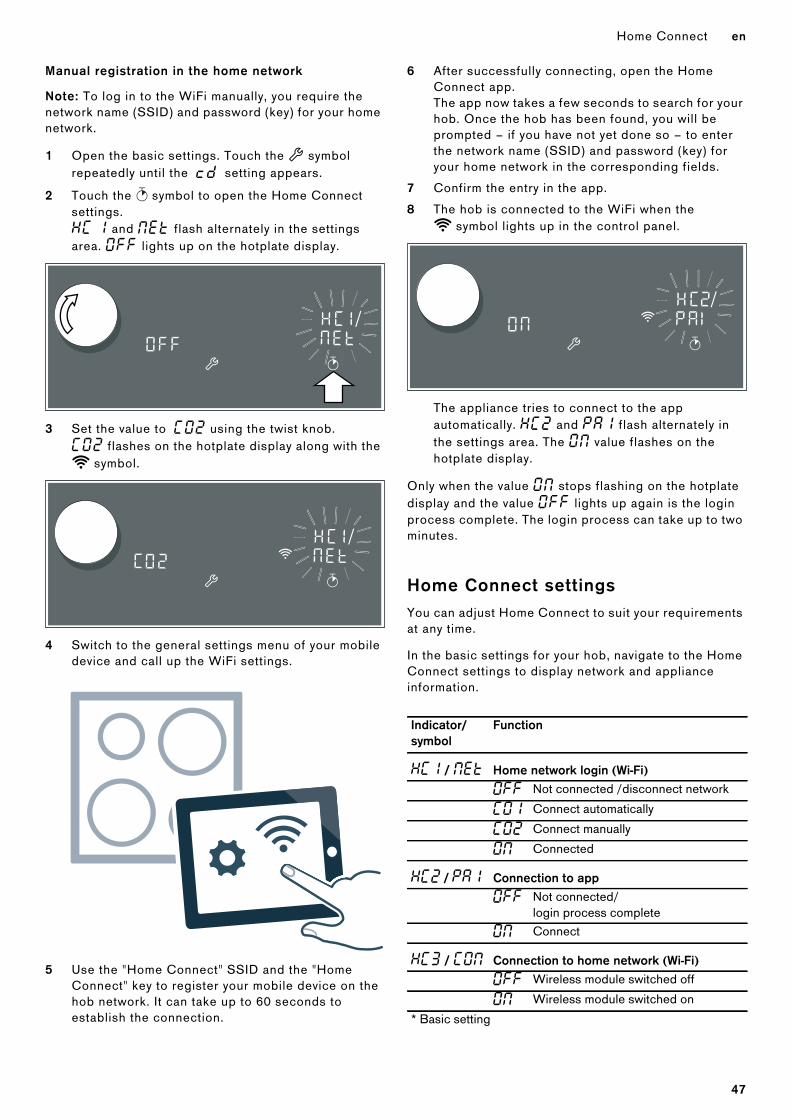
Home Connect en
Manual registration in the home network
Note: To log in to the WiFi manually, you require the network name (SSID) and password (key) for your home network.
1 Open the basic settings. Touch the t symbol repeatedly until the ™š setting appears.
2 Touch the ® symbol to open the Home Connect settings.•’ ‚ and ¯“£ flash alternately in the settings area. ‹”” lights up on the hotplate display.
3 Set the value to ’‹ƒ using the twist knob.’‹ƒ flashes on the hotplate display along with the D symbol.
4 Switch to the general settings menu of your mobile device and call up the WiFi settings.
5 Use the "Home Connect" SSID and the "Home Connect" key to register your mobile device on the hob network. It can take up to 60 seconds to establish the connection.
6 After successfully connecting, open the Home Connect app. The app now takes a few seconds to search for your hob. Once the hob has been found, you will be prompted – if you have not yet done so – to enter the network name (SSID) and password (key) for your home network in the corresponding fields.
7 Confirm the entry in the app.
8 The hob is connected to the WiFi when the D symbol lights up in the control panel.
The appliance tries to connect to the app automatically. •’ƒ and ˜‘‚ flash alternately in the settings area. The ‹¯ value flashes on the hotplate display.
Only when the value ‹¯ stops flashing on the hotplate display and the value ‹”” lights up again is the login process complete. The login process can take up to two minutes.
Home Connect settingsYou can adjust Home Connect to suit your requirements at any time.
In the basic settings for your hob, navigate to the Home Connect settings to display network and appliance information.
Indicator/symbol
Function
•’‚ / ¯“£ Home network login (Wi-Fi)
‹”” Not connected /disconnect network
’‹‚ Connect automatically
’‹ƒ Connect manually
‹¯ Connected
•’ƒ / ˜‘‚ Connection to app
‹”” Not connected/ login process complete
‹¯ Connect
•’„ / ’‹¯ Connection to home network (Wi-Fi)
‹”” Wireless module switched off
‹¯ Wireless module switched on
* Basic setting
47

en Home Connect
Notes
– The •’ƒ setting is only displayed if the appliance is connected to your home network.
– The •’„ setting is only displayed if the appliance has previously been connected to a network.
– The •’† setting is only displayed if an update is available.
– The •’‡ setting is only displayed if the after-sales service is attempting to connect to the appliance. You can end this at any time after granting access.
– The •’ˆ and •’‰ settings are only displayed if there is Wi-Fi connection.
Deactivating WLAN
If WiFi has been activated, you can use the Home Connect functions.
Note: In networked standby mode, your appliance requires a maximum of 2 W.
1 Open the basic setting ™š.
2 Touch the ® symbol repeatedly until the •’„ and ’‹¯ settings flash alternately.‹¯ lights up on the hotplate display.
3 Set the value to ‹”” using the twist knob.
This deactivates WiFi; the D symbol goes out on the control panel.
Note: The network settings will be stored. When the WiFi function is activated again, the hob will try to reconnect to the previously stored network.
Disconnecting from the network
You can disconnect your hob from the network at any time.
Note: If your hob is disconnected from the network, it is not possible to operate it using Home Connect.
1 Open the basic setting ™š.
2 Touch the ® symbol repeatedly until the •’‚ and ¯“£ settings flash alternately.‹¯ lights up on the hotplate display.
3 Set the value to ‹”” using the twist knob.
This disconnects the appliance from your home network; the D symbol goes out on the control panel.
Connecting to the network
1 Open the basic setting ™š.
2 Touch the p symbol repeatedly until the •’‚ and ¯“£ settings flash alternately.‹”” lights up on the hotplate display.
•’… / ¥“† Settings via app
‹”” Switched off
‹¯ Switched on*
•’† / —˜š Software update
š“” Update available and ready for installa-tion
‚¯† Start installation
•’‡ / ¥“š Remote access by after-sales service
‹”” Not authorised
‹¯ Authorised
•’ˆ / †£¥ Wi-Fi signal strength
¯‘ Not connected to home network (Wi-Fi)
‚ Signal strength 1 (weak)
ƒ Signal strength 2 (moderate)
„ Signal strength 3 (good)
•’‰ / †“¥ Connection to Home Connect server
¯‘ Not connected
‹¯ Connected
Indicator/symbol
Function
* Basic setting
48
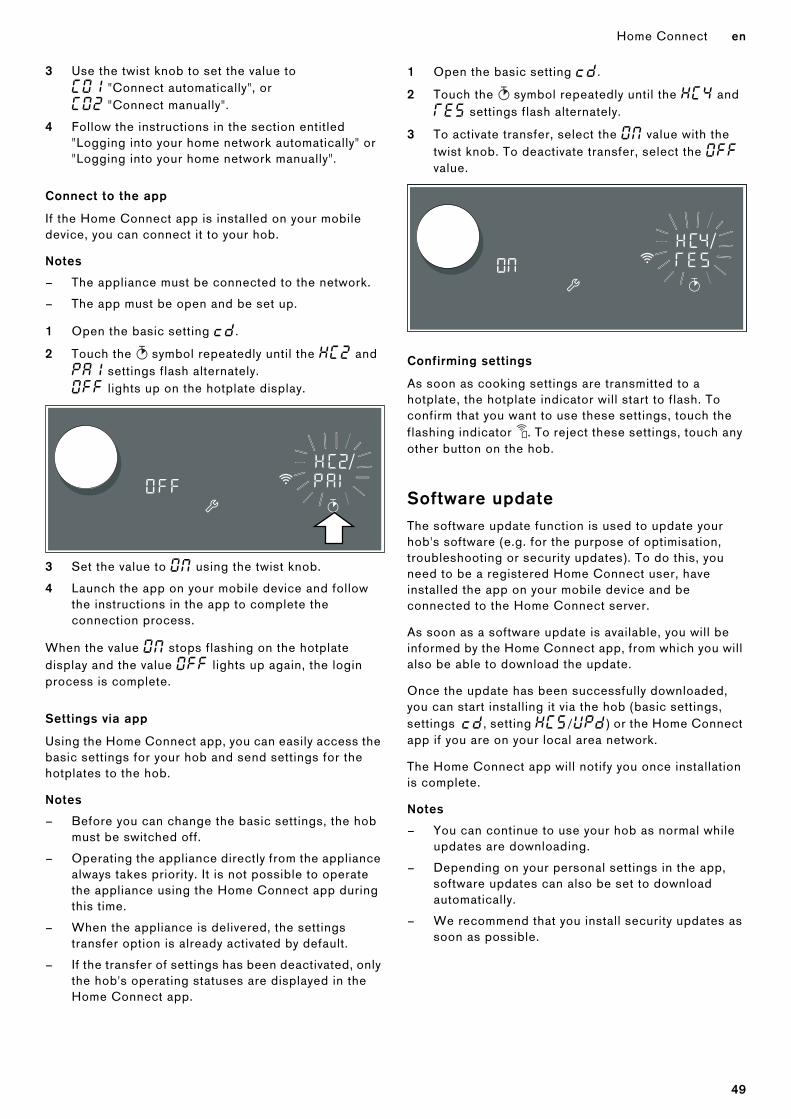
Home Connect en
3 Use the twist knob to set the value to’‹‚ "Connect automatically", or’‹ƒ "Connect manually".
4 Follow the instructions in the section entitled "Logging into your home network automatically" or"Logging into your home network manually".
Connect to the app
If the Home Connect app is installed on your mobile device, you can connect it to your hob.
Notes
– The appliance must be connected to the network.
– The app must be open and be set up.
1 Open the basic setting ™š.
2 Touch the p symbol repeatedly until the •’ƒ and ˜‘‚ settings flash alternately.‹”” lights up on the hotplate display.
3 Set the value to ‹¯ using the twist knob.
4 Launch the app on your mobile device and follow the instructions in the app to complete the connection process.
When the value ‹¯ stops flashing on the hotplate display and the value ‹”” lights up again, the login process is complete.
Settings via app
Using the Home Connect app, you can easily access the basic settings for your hob and send settings for the hotplates to the hob.
Notes
– Before you can change the basic settings, the hob must be switched off.
– Operating the appliance directly from the appliance always takes priority. It is not possible to operate the appliance using the Home Connect app during this time.
– When the appliance is delivered, the settings transfer option is already activated by default.
– If the transfer of settings has been deactivated, only the hob's operating statuses are displayed in the Home Connect app.
1 Open the basic setting ™š.
2 Touch the p symbol repeatedly until the •’… and ¥“† settings flash alternately.
3 To activate transfer, select the ‹¯ value with the twist knob. To deactivate transfer, select the ‹”” value.
Confirming settings
As soon as cooking settings are transmitted to a hotplate, the hotplate indicator will start to flash. To confirm that you want to use these settings, touch the flashing indicator ·. To reject these settings, touch any other button on the hob.
Software updateThe software update function is used to update your hob's software (e.g. for the purpose of optimisation, troubleshooting or security updates). To do this, you need to be a registered Home Connect user, have installed the app on your mobile device and be connected to the Home Connect server.
As soon as a software update is available, you will be informed by the Home Connect app, from which you will also be able to download the update.
Once the update has been successfully downloaded, you can start installing it via the hob (basic settings, settings ™š, setting •’†/—˜š) or the Home Connect app if you are on your local area network.
The Home Connect app will notify you once installation is complete.
Notes
– You can continue to use your hob as normal while updates are downloading.
– Depending on your personal settings in the app, software updates can also be set to download automatically.
– We recommend that you install security updates as soon as possible.
49
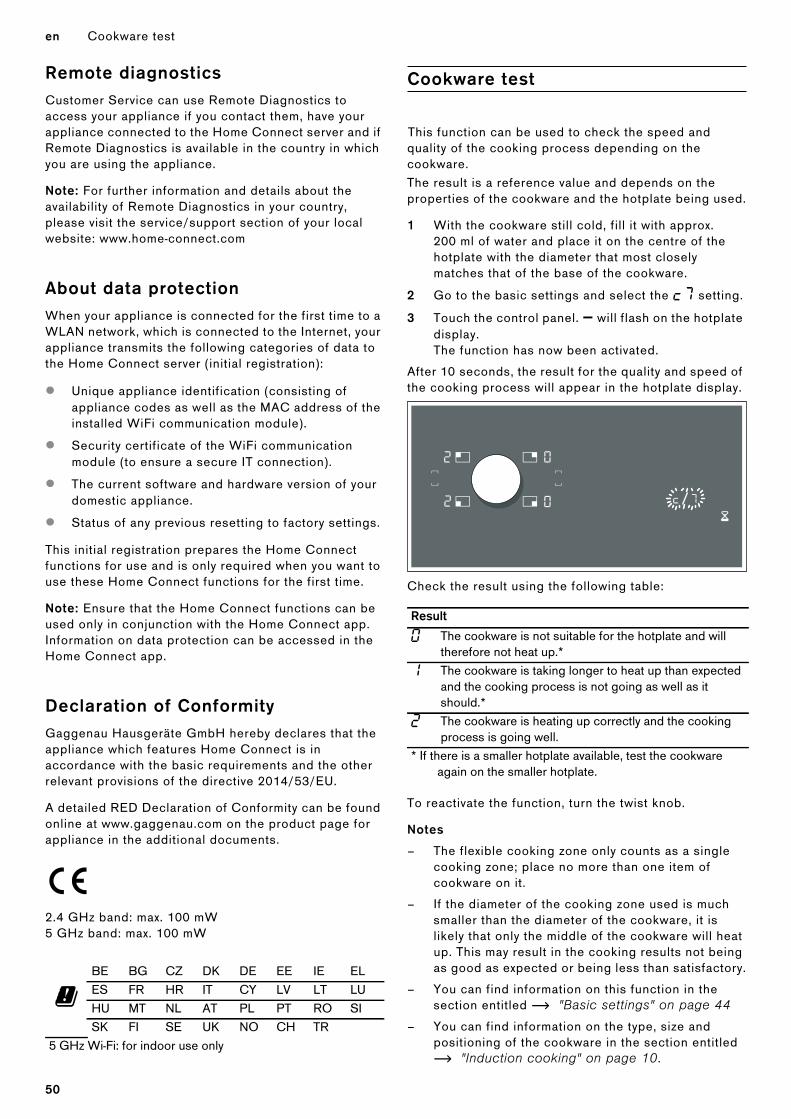
en Cookware test
Remote diagnosticsCustomer Service can use Remote Diagnostics to access your appliance if you contact them, have your appliance connected to the Home Connect server and if Remote Diagnostics is available in the country in which you are using the appliance.
Note: For further information and details about the availability of Remote Diagnostics in your country, please visit the service/support section of your local website: www.home-connect.com
About data protectionWhen your appliance is connected for the first time to a WLAN network, which is connected to the Internet, your appliance transmits the following categories of data to the Home Connect server (initial registration):
▯ Unique appliance identification (consisting of appliance codes as well as the MAC address of the installed WiFi communication module).
▯ Security certificate of the WiFi communication module (to ensure a secure IT connection).
▯ The current software and hardware version of your domestic appliance.
▯ Status of any previous resetting to factory settings.
This initial registration prepares the Home Connect functions for use and is only required when you want to use these Home Connect functions for the first time.
Note: Ensure that the Home Connect functions can be used only in conjunction with the Home Connect app. Information on data protection can be accessed in the Home Connect app.
Declaration of ConformityGaggenau Hausgeräte GmbH hereby declares that the appliance which features Home Connect is in accordance with the basic requirements and the other relevant provisions of the directive 2014/53/EU.
A detailed RED Declaration of Conformity can be found online at www.gaggenau.com on the product page for appliance in the additional documents.
2.4 GHz band: max. 100 mW 5 GHz band: max. 100 mW
tCookware test
Cookware testThis function can be used to check the speed and quality of the cooking process depending on the cookware.The result is a reference value and depends on the properties of the cookware and the hotplate being used.
1 With the cookware still cold, fill it with approx. 200 ml of water and place it on the centre of the hotplate with the diameter that most closely matches that of the base of the cookware.
2 Go to the basic settings and select the ™ˆ setting.
3 Touch the control panel. A will flash on the hotplate display. The function has now been activated.
After 10 seconds, the result for the quality and speed of the cooking process will appear in the hotplate display.
Check the result using the following table:
To reactivate the function, turn the twist knob.
Notes
– The flexible cooking zone only counts as a single cooking zone; place no more than one item of cookware on it.
– If the diameter of the cooking zone used is much smaller than the diameter of the cookware, it is likely that only the middle of the cookware will heat up. This may result in the cooking results not being as good as expected or being less than satisfactory.
– You can find information on this function in the section entitled ~ "Basic settings" on page 44
– You can find information on the type, size and positioning of the cookware in the section entitled ~ "Induction cooking" on page 10.
yBE BG CZ DK DE EE IE ELES FR HR IT CY LV LT LUHU MT NL AT PL PT RO SISK FI SE UK NO CH TR
5 GHz Wi-Fi: for indoor use only
Result
‹ The cookware is not suitable for the hotplate and will therefore not heat up.*
‚ The cookware is taking longer to heat up than expected and the cooking process is not going as well as it should.*
ƒ The cookware is heating up correctly and the cooking process is going well.
* If there is a smaller hotplate available, test the cookware again on the smaller hotplate.
50
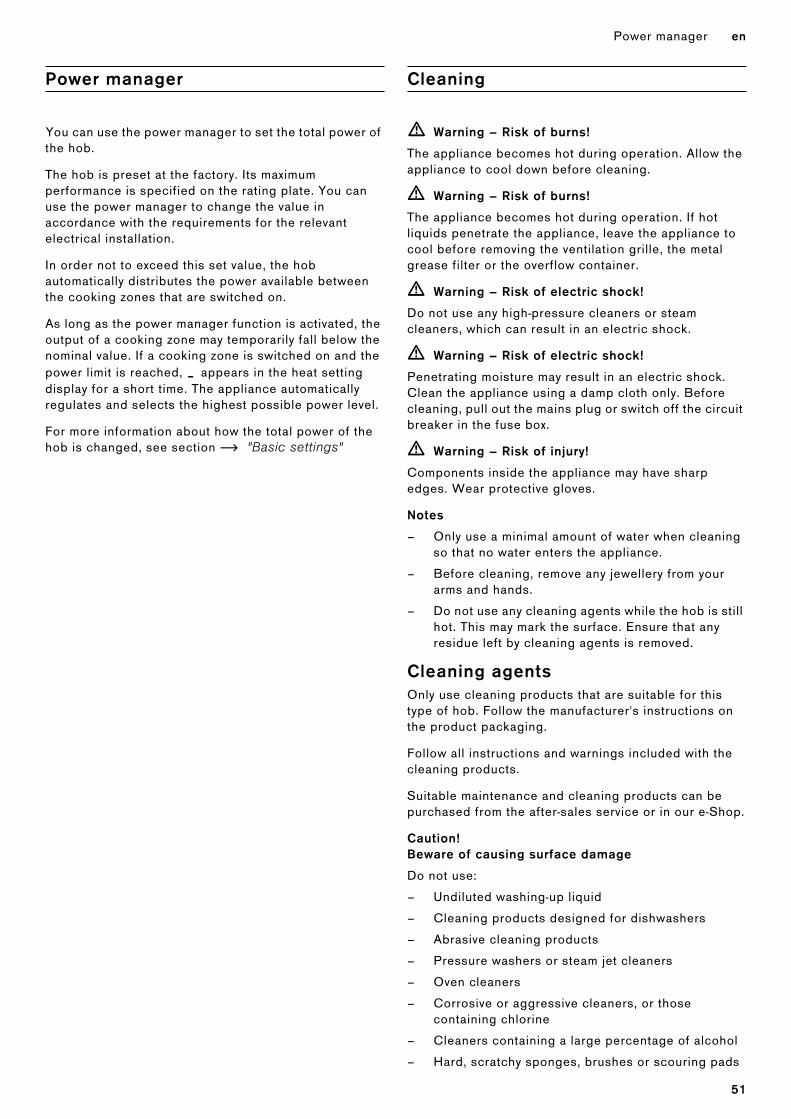
Power manager en
hPower manager
Power managerYou can use the power manager to set the total power of the hob.
The hob is preset at the factory. Its maximum performance is specified on the rating plate. You can use the power manager to change the value in accordance with the requirements for the relevant electrical installation.
In order not to exceed this set value, the hob automatically distributes the power available between the cooking zones that are switched on.
As long as the power manager function is activated, the output of a cooking zone may temporarily fall below the nominal value. If a cooking zone is switched on and the power limit is reached, ¬ appears in the heat setting display for a short time. The appliance automatically regulates and selects the highest possible power level.
For more information about how the total power of the hob is changed, see section ~ "Basic settings"
DCleaning
Cleaningm Warning – Risk of burns!
The appliance becomes hot during operation. Allow the appliance to cool down before cleaning.
m Warning – Risk of burns!
The appliance becomes hot during operation. If hot liquids penetrate the appliance, leave the appliance to cool before removing the ventilation grille, the metal grease filter or the overflow container.
m Warning – Risk of electric shock!
Do not use any high-pressure cleaners or steam cleaners, which can result in an electric shock.
m Warning – Risk of electric shock!
Penetrating moisture may result in an electric shock. Clean the appliance using a damp cloth only. Before cleaning, pull out the mains plug or switch off the circuit breaker in the fuse box.
m Warning – Risk of injury!
Components inside the appliance may have sharp edges. Wear protective gloves.
Notes
– Only use a minimal amount of water when cleaning so that no water enters the appliance.
– Before cleaning, remove any jewellery from your arms and hands.
– Do not use any cleaning agents while the hob is still hot. This may mark the surface. Ensure that any residue left by cleaning agents is removed.
Cleaning agentsOnly use cleaning products that are suitable for this type of hob. Follow the manufacturer's instructions on the product packaging.
Follow all instructions and warnings included with the cleaning products.
Suitable maintenance and cleaning products can be purchased from the after-sales service or in our e-Shop.
Caution!Beware of causing surface damage
Do not use:
– Undiluted washing-up liquid
– Cleaning products designed for dishwashers
– Abrasive cleaning products
– Pressure washers or steam jet cleaners
– Oven cleaners
– Corrosive or aggressive cleaners, or those containing chlorine
– Cleaners containing a large percentage of alcohol
– Hard, scratchy sponges, brushes or scouring pads
51
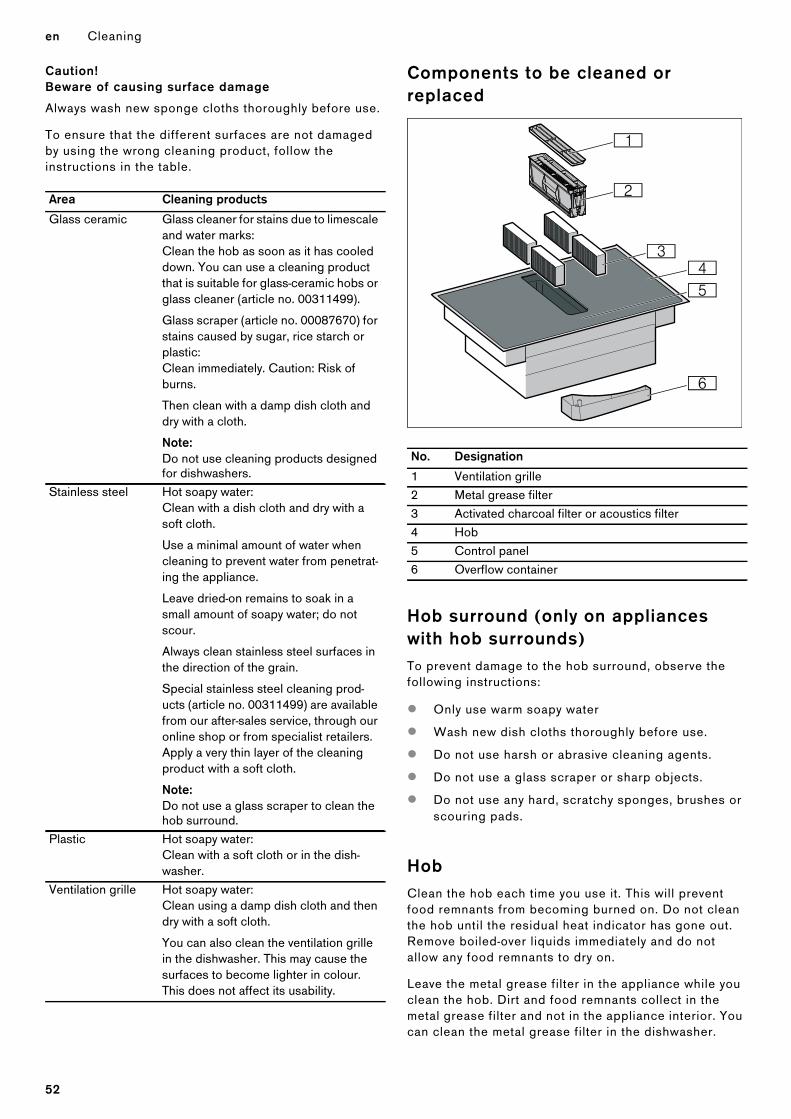
en Cleaning
Caution!Beware of causing surface damage
Always wash new sponge cloths thoroughly before use.
To ensure that the different surfaces are not damaged by using the wrong cleaning product, follow the instructions in the table.
Components to be cleaned or replaced
Hob surround (only on appliances with hob surrounds)To prevent damage to the hob surround, observe the following instructions:
▯ Only use warm soapy water
▯ Wash new dish cloths thoroughly before use.
▯ Do not use harsh or abrasive cleaning agents.
▯ Do not use a glass scraper or sharp objects.
▯ Do not use any hard, scratchy sponges, brushes or scouring pads.
HobClean the hob each time you use it. This will prevent food remnants from becoming burned on. Do not clean the hob until the residual heat indicator has gone out. Remove boiled-over liquids immediately and do not allow any food remnants to dry on.
Leave the metal grease filter in the appliance while you clean the hob. Dirt and food remnants collect in the metal grease filter and not in the appliance interior. You can clean the metal grease filter in the dishwasher.
Area Cleaning products
Glass ceramic Glass cleaner for stains due to limescale and water marks: Clean the hob as soon as it has cooled down. You can use a cleaning product that is suitable for glass-ceramic hobs or glass cleaner (article no. 00311499).
Glass scraper (article no. 00087670) for stains caused by sugar, rice starch or plastic: Clean immediately. Caution: Risk of burns.
Then clean with a damp dish cloth and dry with a cloth.
Note: Do not use cleaning products designed for dishwashers.
Stainless steel Hot soapy water: Clean with a dish cloth and dry with a soft cloth.
Use a minimal amount of water when cleaning to prevent water from penetrat-ing the appliance.
Leave dried-on remains to soak in a small amount of soapy water; do not scour.
Always clean stainless steel surfaces in the direction of the grain.
Special stainless steel cleaning prod-ucts (article no. 00311499) are available from our after-sales service, through our online shop or from specialist retailers. Apply a very thin layer of the cleaning product with a soft cloth.
Note: Do not use a glass scraper to clean the hob surround.
Plastic Hot soapy water: Clean with a soft cloth or in the dish-washer.
Ventilation grille Hot soapy water: Clean using a damp dish cloth and then dry with a soft cloth.
You can also clean the ventilation grille in the dishwasher. This may cause the surfaces to become lighter in colour. This does not affect its usability.
No. Designation
1 Ventilation grille2 Metal grease filter3 Activated charcoal filter or acoustics filter4 Hob5 Control panel6 Overflow container
52
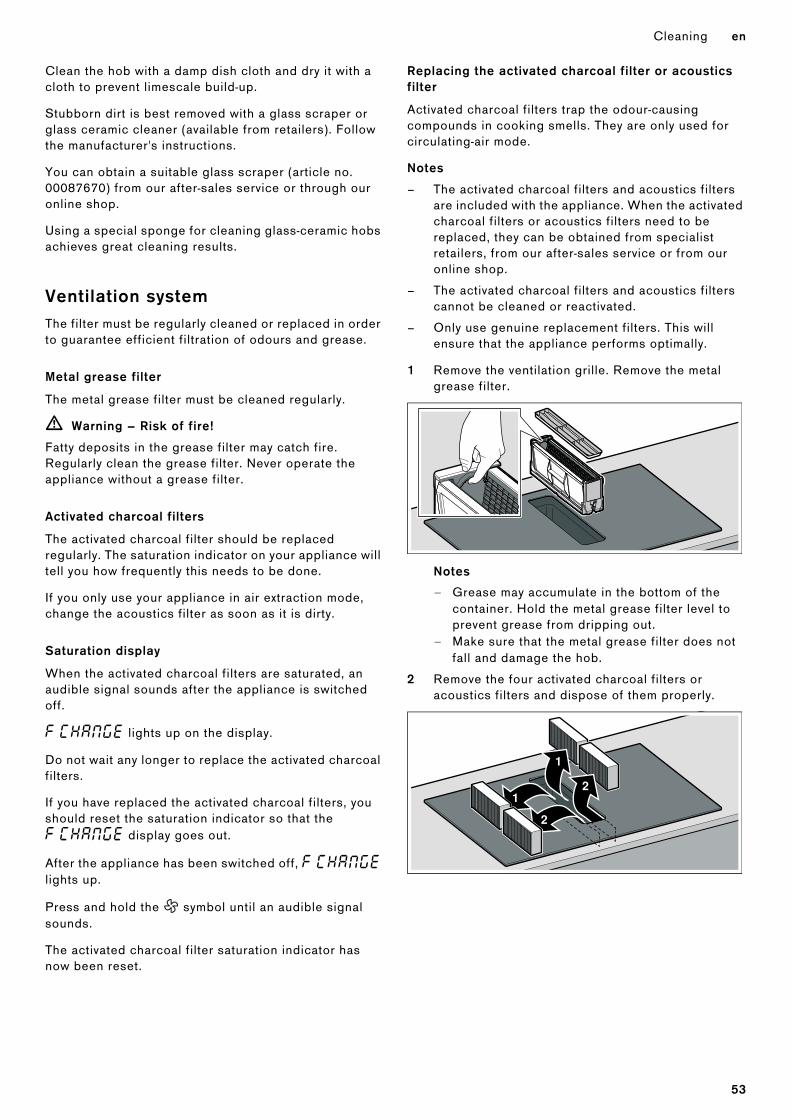
Cleaning en
Clean the hob with a damp dish cloth and dry it with a cloth to prevent limescale build-up.
Stubborn dirt is best removed with a glass scraper or glass ceramic cleaner (available from retailers). Follow the manufacturer's instructions.
You can obtain a suitable glass scraper (article no. 00087670) from our after-sales service or through our online shop.
Using a special sponge for cleaning glass-ceramic hobs achieves great cleaning results.
Ventilation systemThe filter must be regularly cleaned or replaced in order to guarantee efficient filtration of odours and grease.
Metal grease filter
The metal grease filter must be cleaned regularly.
m Warning – Risk of fire!
Fatty deposits in the grease filter may catch fire. Regularly clean the grease filter. Never operate the appliance without a grease filter.
Activated charcoal filters
The activated charcoal filter should be replaced regularly. The saturation indicator on your appliance will tell you how frequently this needs to be done.
If you only use your appliance in air extraction mode, change the acoustics filter as soon as it is dirty.
Saturation display
When the activated charcoal filters are saturated, an audible signal sounds after the appliance is switched off.
” ’•‘¯®“ lights up on the display.
Do not wait any longer to replace the activated charcoal filters.
If you have replaced the activated charcoal filters, you should reset the saturation indicator so that the ” ’•‘¯®“ display goes out.
After the appliance has been switched off, ” ’•‘¯®“ lights up.
Press and hold the } symbol until an audible signal sounds.
The activated charcoal filter saturation indicator has now been reset.
Replacing the activated charcoal filter or acoustics filter
Activated charcoal filters trap the odour-causing compounds in cooking smells. They are only used for circulating-air mode.
Notes
– The activated charcoal filters and acoustics filters are included with the appliance. When the activated charcoal filters or acoustics filters need to be replaced, they can be obtained from specialist retailers, from our after-sales service or from our online shop.
– The activated charcoal filters and acoustics filters cannot be cleaned or reactivated.
– Only use genuine replacement filters. This will ensure that the appliance performs optimally.
1 Remove the ventilation grille. Remove the metal grease filter.
Notes
– Grease may accumulate in the bottom of the container. Hold the metal grease filter level to prevent grease from dripping out.
– Make sure that the metal grease filter does not fall and damage the hob.
2 Remove the four activated charcoal filters or acoustics filters and dispose of them properly.
53
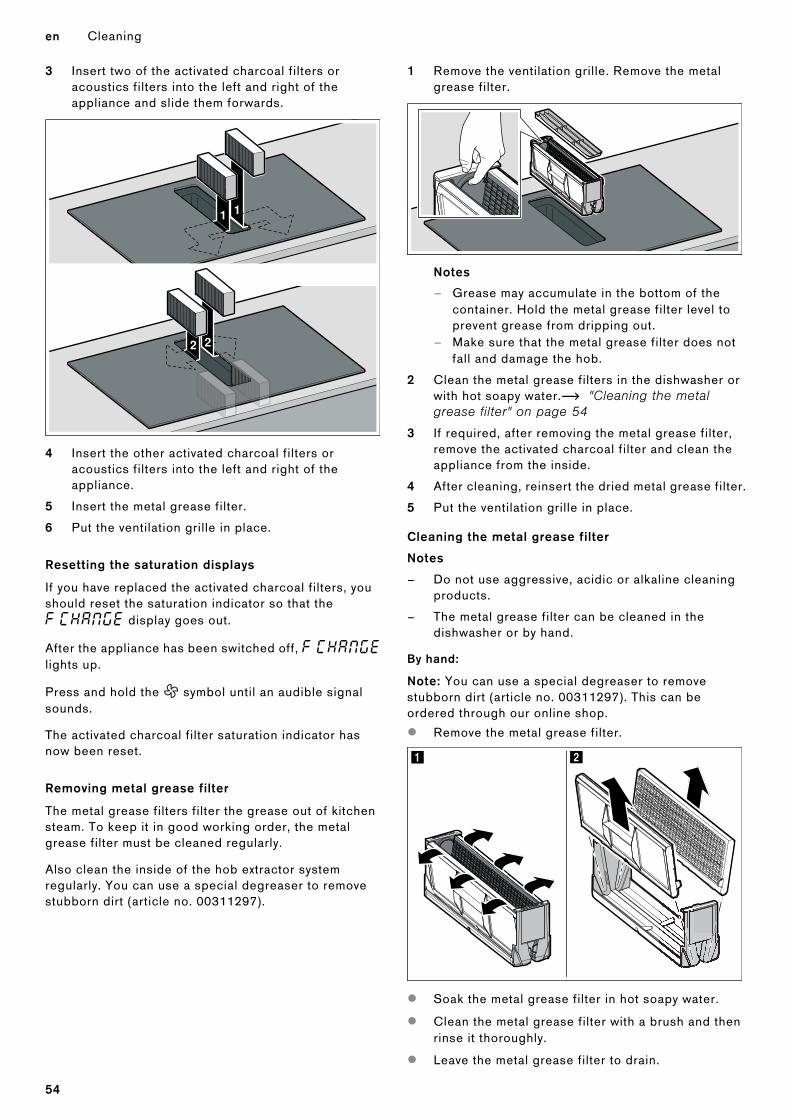
en Cleaning
3 Insert two of the activated charcoal filters or acoustics filters into the left and right of the appliance and slide them forwards.
4 Insert the other activated charcoal filters or acoustics filters into the left and right of the appliance.
5 Insert the metal grease filter.
6 Put the ventilation grille in place.
Resetting the saturation displays
If you have replaced the activated charcoal filters, you should reset the saturation indicator so that the ” ’•‘¯®“ display goes out.
After the appliance has been switched off, ” ’•‘¯®“ lights up.
Press and hold the } symbol until an audible signal sounds.
The activated charcoal filter saturation indicator has now been reset.
Removing metal grease filter
The metal grease filters filter the grease out of kitchen steam. To keep it in good working order, the metal grease filter must be cleaned regularly.
Also clean the inside of the hob extractor system regularly. You can use a special degreaser to remove stubborn dirt (article no. 00311297).
1 Remove the ventilation grille. Remove the metal grease filter.
Notes
– Grease may accumulate in the bottom of the container. Hold the metal grease filter level to prevent grease from dripping out.
– Make sure that the metal grease filter does not fall and damage the hob.
2 Clean the metal grease filters in the dishwasher or with hot soapy water.~ "Cleaning the metal grease filter" on page 54
3 If required, after removing the metal grease filter, remove the activated charcoal filter and clean the appliance from the inside.
4 After cleaning, reinsert the dried metal grease filter.
5 Put the ventilation grille in place.
Cleaning the metal grease filter
Notes
– Do not use aggressive, acidic or alkaline cleaning products.
– The metal grease filter can be cleaned in the dishwasher or by hand.
By hand:
Note: You can use a special degreaser to remove stubborn dirt (article no. 00311297). This can be ordered through our online shop.
▯ Remove the metal grease filter.
▯ Soak the metal grease filter in hot soapy water.
▯ Clean the metal grease filter with a brush and then rinse it thoroughly.
▯ Leave the metal grease filter to drain.
54
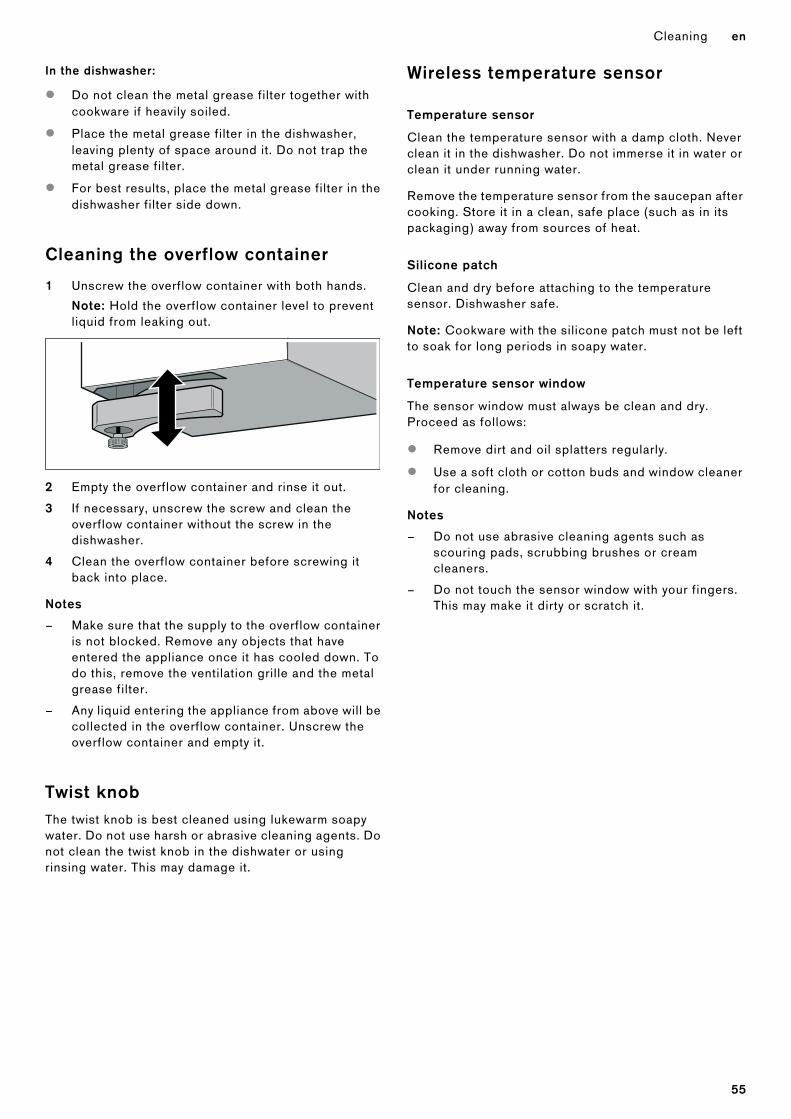
Cleaning en
In the dishwasher:
▯ Do not clean the metal grease filter together with cookware if heavily soiled.
▯ Place the metal grease filter in the dishwasher, leaving plenty of space around it. Do not trap the metal grease filter.
▯ For best results, place the metal grease filter in the dishwasher filter side down.
Cleaning the overflow container
1 Unscrew the overflow container with both hands.
Note: Hold the overflow container level to prevent liquid from leaking out.
2 Empty the overflow container and rinse it out.
3 If necessary, unscrew the screw and clean the overflow container without the screw in the dishwasher.
4 Clean the overflow container before screwing it back into place.
Notes
– Make sure that the supply to the overflow container is not blocked. Remove any objects that have entered the appliance once it has cooled down. To do this, remove the ventilation grille and the metal grease filter.
– Any liquid entering the appliance from above will be collected in the overflow container. Unscrew the overflow container and empty it.
Twist knobThe twist knob is best cleaned using lukewarm soapy water. Do not use harsh or abrasive cleaning agents. Do not clean the twist knob in the dishwater or using rinsing water. This may damage it.
Wireless temperature sensor
Temperature sensor
Clean the temperature sensor with a damp cloth. Never clean it in the dishwasher. Do not immerse it in water or clean it under running water.
Remove the temperature sensor from the saucepan after cooking. Store it in a clean, safe place (such as in its packaging) away from sources of heat.
Silicone patch
Clean and dry before attaching to the temperature sensor. Dishwasher safe.
Note: Cookware with the silicone patch must not be left to soak for long periods in soapy water.
Temperature sensor window
The sensor window must always be clean and dry. Proceed as follows:
▯ Remove dirt and oil splatters regularly.
▯ Use a soft cloth or cotton buds and window cleaner for cleaning.
Notes
– Do not use abrasive cleaning agents such as scouring pads, scrubbing brushes or cream cleaners.
– Do not touch the sensor window with your fingers. This may make it dirty or scratch it.
55
en Frequently Asked Questions (FAQ)
{Frequently Asked Questions (FAQ)
Frequently Asked Questions (FAQ)
Using the appliance
Why can I not switch on the hob and why is the childproof lock symbol lit?The childproof lock is now active.
You can find information about this function in the section entitled ~ "Childproof lock".
Why are the illuminated displays flashing and why is a signal sounding?Remove any liquid or remnants of food from the control panel. Remove any objects from the control panel.
You can find out how to deactivate the audible signal in the section entitled ~ "Basic settings".
The ventilation system does not switch on even though the automatic start is set.Switch on the ventilation system manually or check the configuration of the automatic mode. You can find additional information about this in the section entitled ~ "Basic settings".
The ventilation system runs with too much or too little power in sensor control mode.The sensor sensitivity for the ventilation system is incorrectly configured.
You can find additional information about this setting in the section entitled ~ "Basic settings".
The ventilation system remains on even though the cooking zones have been switched off.Manually switch off the ventilation system.
You can find additional information about this setting in the section entitled ~ "Operating the appliance".
The ventilation system switches on even though the appliance is switched off.The run-on function with sensor control is selected.
You can find additional information about this setting in the section entitled ~ "Basic settings".
The air intake is too weak.Ensure that the metal grease filter is clean.
To find out how to clean and replace the filter, refer to the section entitled ~ "Cleaning".
Noises
Why I can hear noises while I'm cooking?Noises may be generated while using the hob depending on the base material of the cookware. These noises are a normal part of induction technology. They do not indicate a defect.
Possible noises:
A low humming noise like the one a transformer makes:Occurs when cooking at a high heat setting. The noise disappears or becomes quieter when the heat setting is reduced.
Low whistling noise:Occurs when the cookware is empty. This noise disappears when water or food is added to the cookware.
Crackling:Occurs when using cookware made from different layers of material or when using cookware of different sizes and different materials at the same time. The loudness of the noise can vary depending on the quantity of food being cooked or the cooking method.
High-pitched whistling noises:Can occur when two hotplates are used at the highest heat setting at the same time. The whistling noises disappear or become quieter when the heat setting is reduced.
Fan noise:The hob is equipped with a fan that switches on automatically at high temperatures. The fan may continue to run even after you have switched off the hob if the temperature detected is still too high.
56
Frequently Asked Questions (FAQ) en
Cookware
Which types of cookware can be used with the induction hob?Read the information on which types of cookware are suitable for induction.
Why is the hotplate not heating up and why is the heat setting flashing?The hotplate on which the cookware is standing is not switched on.
Ensure that you have switched on the relevant hotplate.The cookware is too small for the hotplate that is switched on or it is not suitable for induction cooking.
Read the information on the type, size and positioning of the cookware.
Why is it taking so long for the cookware to heat up or why is it not heating up sufficiently despite being on a high heat set-ting?
The cookware is too small for the hotplate that is switched on or it is not suitable for induction cooking.
Read the information on the type, size and positioning of the cookware.
Cleaning
How do I clean the induction hob?Optimal results can be achieved with cleaning products specifically for use on glass-ceramic surfaces. Do not use harsh or abrasive cleaning products, dishwasher detergents (concentrates) or floor cloths.
To find out how to clean and care for the hob, refer to the section entitled ~ "Cleaning".
There is water in the cabinet underneath the hob.Check whether the overflow container is full.
To find out how to clean the overflow container, refer to the section entitled ~ "Cleaning".
How often do I need to clean the overflow container?Clean the overflow container frequently.
To find out how to clean the overflow container, refer to the section entitled ~ "Cleaning".
How often do I need to clean the metal grease filter?Clean the metal grease filter regularly.
To find out how to clean and care for the filter, refer to the section entitled ~ "Cleaning".
57
en Trouble shooting
3Trouble shooting
Trouble shootingUsually, faults are small matters that are easy to eliminate. Please read the information in the table before calling the after-sales service.
m Warning – Risk of electric shock!
Incorrect repairs are dangerous. Repairs may only be carried out and damaged power cables replaced by one of our trained after-sales technicians. If the appliance is defective, unplug the appliance from the mains or switch off the circuit breaker in the fuse box. Contact the after-sales service.
Fault/indicator or symbol Possible cause Solution
The appliance is not work-ing
The plug is not plugged into the mains Connect the appliance to the mains electricity sup-ply
Power failure Check whether other kitchen appliances are work-ing
The fuse is faulty Check in the fuse box to make sure that the fuse for the appliance is in working order
The buttons for the ventila-tion system functions do not light up.
The motor control system is not working. Call the after-sales service.
The ventilation system is not working.
The motor or the control system is faulty. Call the after-sales service.
The symbol lighting is not working.
The control unit is faulty. Call the after-sales service.
” ’•‘¯®“ The activated charcoal filter is saturated. Replace the activated charcoal filter. ~ "Cleaning" on page 51
” ’•‘¯®“ The saturation indicator is lit even though the filter has been cleaned or replaced.
Reset the saturation indicator. ~ "Resetting the saturation displays" on page 54
Nothing on the display The power supply has been disconnected. Use other electrical appliances to check whether a short circuit has occurred in the power supply.
The appliance has not been connected as shown in the circuit diagram.
Ensure that the appliance has been connected as shown in the circuit diagram.
Electronics fault. If you are unable to rectify the fault, contact the technical after-sales service.
A signal sounds The control panel is wet or an object is cov-ering it.
Dry the control panel or remove the object.
”ƒ / “‰ƒ‹ˆ / “ˆ‹‚† The electronics have overheated and have switched off the affected cooking zone.
Wait until the electronics have cooled down suffi-ciently. Then touch any symbol on the hob.
”… / “‰ƒ‹‰ / “ˆ‹‚† The electronics have overheated and all of the cooking zones have been switched off.
Ӡ + heat setting and sig-nal tone
There is a hot pan near the control panel. There is a risk that the electronics will over-heat.
Remove the pan. The fault code will go out shortly afterwards. You can resume cooking.
Ӡ and signal tone There is a hot pan near the control panel. The cooking zone has been switched off to protect the electronics.
Remove the pan. Wait a few seconds. Touch any touch control. When the fault code on the display goes out, you can resume cooking.
”‚ / ”‡ The cooking zone has overheated and has been switched off to protect your work sur-face.
Wait until the electronics have cooled down suffi-ciently before switching the cooking zone on again.
”‰ The cooking zone has been operating con-tinuously for an extended period.
The automatic safety cut-out function has been acti-vated. See the section entitled ~ "Automatic safety cut-out" on page 40.
”Š The flex function cannot be activated. Touch any touch control to check the fault code. You can use the remaining cooking zones to cook as usual. Contact our technical after-sales service.
Do not place hot pans on the control panel.
58
Trouble shooting en
Notes
– If “ appears on the display, select the relevant cooking zone and hold the twist knob in order to read the fault code.
– If the fault code is not listed in the table, disconnect the hob from the mains power supply and wait 30 seconds before reconnecting it. If this code is displayed again, contact the technical after-sales service and specify which fault code has appeared.
– If a fault occurs, the appliance will not switch to standby mode.
“ˆ‹‚‹ The hob is unable to connect to your home network or the extractor hood.
Acknowledge the fault code by touching any of the buttons. You can cook as usual without a connec-tion.
If this code is displayed again, contact the techni-cal after-sales service.
“‰ƒ‹ƒ The temperature sensor has overheated and the cooking zone has been switched off.
Wait until the temperature sensor has cooled down sufficiently before activating the function again.
“‰ƒ‹„ The temperature sensor has overheated and all of the cooking zones have been switched off.
If you are not using the temperature sensor, remove it from the cookware and keep it away from the other cooking zones and sources of heat. Switch the cooking zones back on.
“‰ƒ‹… The battery in the temperature sensor is dead.
Replace the 3 V CR2032 battery. See the section entitled "Changing the battery".
“‰ƒ‹† The temperature sensor is no longer con-nected.
Switch the function off and on again.
“‰ƒ‹‡ The temperature sensor is broken/faulty. Contact our technical after-sales service.
The temperature sensor indicator does not light up
The temperature sensor does not respond and the indicator does not light up.
Replace the 3 V CR2032 battery. See the section entitled "Changing the battery".
If this does not solve the problem, press and hold the symbol on the temperature sensor for 8 sec-onds and then reconnect the temperature sensor to the hob.
If the problem persists, contact the technical after-sales service.
The indicator on the tem-perature sensor flashes twice.
The battery in the temperature sensor has almost run out. You may be interrupted the next time you cook by the battery running out.
Change the 3 V CR2032 battery. See the section entitled "Changing the battery".
The indicator on the tem-perature sensor flashes three times.
The temperature sensor is no longer con-nected.
Press and hold the symbol on the temperature sen-sor for 8 seconds and then reconnect the tempera-ture sensor to the hob.
“Š‹‹‹
“Š‹‚‹
The operating voltage is incorrect/outside of the normal operating range.
Contact your electricity supplier.
—…‹‹ The hob is not connected correctly Disconnect the hob from the power supply. Make sure that it has been connected as shown in the circuit diagram.
š“ Demo mode is activated Disconnect the hob from the power supply. Wait 30 seconds and then reconnect it. Touch any touch control in the next 3 minutes. Demo mode is now deactivated.
Fault/indicator or symbol Possible cause Solution
Do not place hot pans on the control panel.
59
en Customer service
4Customer service
Customer serviceOur after-sales service is there for you if your appliance needs to be repaired. We will always find an appropriate solution, also in order to avoid after-sales personnel having to make unnecessary visits.
Product number (E no.) and production number (FD no.)Always quote the E number (product number) and FD number (production number) of your appliance when contacting the after-sales service.
The rating plate bearing these numbers can be found:
▯ On the appliance certificate.
▯ On the underside of the hob.
The product number (E no.) can be found on the glass-ceramic hob. You can check the after-sales service index (KI) and production number (FD no.) by going to the basic settings. Refer to the section entitled ~ "Basic settings" to find out how to do this.
Please note that a visit from an after-sales service engineer is not free of charge in the event that the appliance has been misused, even during the warranty period.
Please find the contact data of all countries in the enclosed customer service list.
To book an engineer visit and product advice
Trust the expertise of the manufacturer, and rest assured that the repair will be carried out by trained service technicians using original spare parts for your domestic appliance.
GB 0344 892 8988 Calls charged at local or mobile rate.
IE 01450 2655 0.03 € per minute at peak. Off peak 0.0088 € per minute.
AU 1300 368 339
NZ 09 477 0492
60


*9001463989*
900
1463
989
(000
120) en