
Curriculum Resource Guide - Joan Mitchell...
51
Curriculum Resource Guide Joan Mitchell (far left) with fellow students in Louis Rittman’s class at the School of the Art Institute of Chicago, circa 1946
Transcript of Curriculum Resource Guide - Joan Mitchell...

Curriculum Resource Guide
Joan Mitchell (far left) with fellow students in Louis Rittman’s class at the School of the Art Institute of Chicago, circa 1946


1
CURRICULUM RESOURCEART EDUCATION PROGRAM
ContentsJoan Mitchell Foundation Curriculum Resource 3
How To Use This Resource 4
Student Needs and Capabilities by Grade Level 5ELEMENTARY SCHOOL . . . . . . . . . . . . . . . . . . . . 5
GRADES K-2 . . . . . . . . . . . . . . . . . . . . . . . . . . 5
GRADES 3-5 . . . . . . . . . . . . . . . . . . . . . . . . . . 5
MIDDLE SCHOOL, GRADES 6-8 . . . . . . . . . . . . . . . 5
HIGH SCHOOL, GRADES 9-12 . . . . . . . . . . . . . . . . 6
SOS Resources 7MENTORSHIP AND ARTIST COMMUNITY BUILDING . . . . 7
PORTFOLIO DEVELOPMENT . . . . . . . . . . . . . . . . . 7
ART CAREER EXPLORATION . . . . . . . . . . . . . . . . . 7
YOUNG ARTIST RESIDENCIES . . . . . . . . . . . . . . . . 7
Classroom Management 8WORKING WITH OUR TEACHING PARTNERS AND COUN-SELORS . . . . . . . . . . . . . . . . . . . . . . . . . . . . 8
TIPS FOR WORKING WITH YOUR TEACHING PARTNER . . 8
TIPS FOR WORKING WITH COUNSELORS . . . . . . . . . . 8
ORGANIZE PHYSICAL SPACE . . . . . . . . . . . . . . . . 9
GENERAL GUIDELINES FOR BEHAVIOR . . . . . . . . . . . 9
GENERAL FIRST DAY STRATEGIES . . . . . . . . . . . . . . 9
GENERAL GUIDELINES FOR BEHAVIOR . . . . . . . . . . . 9
ROUTINES AND TRANSITIONS . . . . . . . . . . . . . . . 10
ROUTINE & TRANSITION TECHNIQUES . . . . . . . . . . 11
Behavior Issues 12ELEMENTARY SCHOOL . . . . . . . . . . . . . . . . . . . 12
MIDDLE SCHOOL AND HIGH SCHOOL . . . . . . . . . . . 12
Inquiry 13ELEMENTARY . . . . . . . . . . . . . . . . . . . . . . . . 13
MIDDLE SCHOOL & HIGH SCHOOL . . . . . . . . . . . . 13
OPEN ART INQUIRY . . . . . . . . . . . . . . . . . . . . . 14
DIRECTED ART INQUIRY . . . . . . . . . . . . . . . . . . 14
GENERAL ART INQUIRY GUIDE . . . . . . . . . . . . . . . 15
Classroom Reflection 16ELEMENTARY . . . . . . . . . . . . . . . . . . . . . . . . 16
REFLECTION TIPS . . . . . . . . . . . . . . . . . . . . . . 16
MIDDLE SCHOOL AND HIGH SCHOOL . . . . . . . . . . . 17
Classroom Discussion 18ELEMENTARY . . . . . . . . . . . . . . . . . . . . . . . . 18
MIDDLE SCHOOL AND HIGH SCHOOL . . . . . . . . . . . 18
Education Lingo 19
Anecdotes From The Field 22
Table of Concepts and Mediums 25K-2 CONCEPTS . . . . . . . . . . . . . . . . . . . . . . . 26
K-2 MEDIUMS . . . . . . . . . . . . . . . . . . . . . . . . 27
3-5 CONCEPTS . . . . . . . . . . . . . . . . . . . . . . . 31
3-5 MEDIUMS . . . . . . . . . . . . . . . . . . . . . . . . 32
MS/HS CONCEPTS . . . . . . . . . . . . . . . . . . . . . 36
MS/HS MEDIUMS . . . . . . . . . . . . . . . . . . . . . . 37
END NOTES . . . . . . . . . . . . . . . . . . . . . . . . . 41
Sample Lesson Plans 42SAMPLE LESSON PLAN FOR EARLY ELEMENTARY STUDENTS . . . . . . . . . . 42
SAMPLE LESSON PLAN FOR HIGH SCHOOL STUDENTS . . . . . . . . . . . . . . 45
Credits 49

3
CURRICULUM RESOURCEART EDUCATION PROGRAM
Joan Mitchell Foundation Curriculum Resource
As Artist-Teachers in the Joan Mitchell Foundation’s Art Education Program we have the opportunity to powerfully affect the lives of our students. We invite them into a world of expression and discovery that is enjoyable and supports their creative, intellectual and social growth . We guide them through a process of self-exploration in efforts to nurture their creative thinking skills and further develop their ability to create and interpret art . We recognize that these skills reach beyond the studio; they are life-skills that engender curiosity, introspection and self-awareness .
The benefits of the arts are under scrutiny. Schools are preoccupied with meeting federal standards and administering budget cuts that directly affect arts education. As artists working with young children and youth, we have an opportunity to share what we know about living as creative human beings in a world that does not always encourage or understand the necessity for creativity . The Joan Mitchell Foundation Arts Education Program provides a platform for building a community of arts-engaged citizens within each of the venues in which we work . Through our classes we form relationships with our students, their parents and families, community center staff, and others.
Before we can begin to develop trusting relationships with our students, we need to take time to learn where they are coming from. It is up to us to find out as much as we can, so that we may relate to them in a way that they welcome and understand . In this program, students come from a broad
spectrum of experience . This can include race, ethnic and cultural identity, religious practice, socioeconomic status, sexual orientation, gender identity, and gender .
For many, the experience of social injustice is a very real part of their lives . At times, students’ personal experiences will take center stage in the classroom . Artist-Teachers must work, at every stage of development, to establish a sensitive classroom environment that is receptive to each individual and their experiences . It is our job to help them discover and believe in the relevance of their own unique perspective and channel it through creative means .
Developing a personal teaching philosophy happens over time. Typically it’s something we arrive at by reflecting on our classroom experiences, learning what works and what doesn’t and aligning this practical understanding with our unique pedagogical goals and convictions . It is helpful to consider our own learning styles as young students and the ways we responded to our learning environments . Remembering our own teachers and examining what it was that we loved or hated about them can illuminate a personal undercurrent in the way we teach . When some kids, or the things they do, get to us and we don’t know why, our own educational experiences may provide a clue . When issues come up for us in our teaching practice, sustained reflective practice helps us understand ourselves as students as well as teachers .

4
CURRICULUM RESOURCEART EDUCATION PROGRAM
How To Use This Resource
The freedom to create curriculum and individual lesson plans is one of the strengths of the Joan Mitchell Foundation Art Education Program (hereafter referred to as AEP) . This Curriculum Resource is meant to support your individual ideas and curriculum designs as an Artist-Teacher in any way that best serves your needs . It can assist you in creating, writing and implementing curriculum no matter your level of experience. Within its pages you will find information, techniques or tips that may be useful to your teaching practice . For more experienced Artist-Teachers, some of this information will already be familiar, please regard this as an affirmation of your experience and knowledge. It is our wish that this document be a true resource that will build upon the strengths you already possess .
Amongst the sites served by the AEP, conditions and concerns vary widely and the differences between After-school Programs (ASA) and our selection of self-selected programs such as Saturday Studios (SAT) are worth mentioning . Logistically, all SAT and many other self-selected classes are three-hours long and meet once a week . They
tend to attract an art-enthusiastic student body, which makes it possible to focus on long term, in-depth projects . ASA classes meet for one to two hours twice weekly . They are usually implemented under the umbrella of a larger after-school program with many variables and participants . ASA students may like art, but may not have chosen to be in art class . Time constraints and conditions of the site need to be taken into consideration when developing lesson plans . Taking into account the generalizations of these programs, each Artist-Teacher will evaluate the variables and design accordingly .
Each section of this document begins with a guiding question that leads to a discussion of relevant issues for the age and grade level . There is information regarding developmental abilities and skills. At the end of the document you will find charts that specifically addresses concepts, mediums, techniques, and vocabulary according to developmental stages . It is by no means comprehensive . Your ideas, expertise and intuition can only make it better .

5
CURRICULUM RESOURCEART EDUCATION PROGRAM
Student Needs and Capabilities by Grade Level
ELEMENTARY SCHOOL
What do we want our students to experience? What do we want our students to learn?Young children are inherently curious and interested in exploring their surroundings . This curiosity extends to a natural enthusiasm for art materials and a desire to use them to express their own ideas . Regrettably, many children have little or no opportunity to make art either in school or at home. Many children are often confined to a world dominated by testing and right answers at school, and of television and video games at home . As a result the options for self-expression are limited . Art is a medium through which they can express visually and viscerally what they might not be able to put in words .
The tactile experience of materials at a young age creates sensory awareness and manual dexterity . It encourages observation, experimentation, invention, discovery, and reflection. Trying out original ideas builds self-confidence and fosters a sense of purpose . Inquiry-based projects that utilize open-ended questioning and looking at art expand children’s awareness . They learn that artists experiment with materials, have individual perspectives, and are inspired by the things they see and experience . In turn, children can learn to express themselves through visual language, become involved with visual culture and develop skills in manipulating materials .
GRADES K-2
How can we help very young students develop foundational skills in critical thinking and technique? What do you know that you want to share with them?In general, children in grades K-2 are open and eager to learn . Exploration through creative play and a variety of materials is essential to the development of both mind and body . They thrive on routine and clear expectations . Their interests and concerns are with the self and their immediate surroundings: family, pets, school, teachers, close friends, their community, toys, etc. Developing fine and gross motor skills needs to happen in concert with their social and emotional development . Concepts, materials and techniques should be presented slowly and in small increments so that our youngest
students may easily and naturally build their skills while they have fun .
GRADES 3-5
How can we help them build on what they already know? What will help them make the transition to self-aware upper elementary students without losing their natural curiosity and candor?For the most part, this is a delicate period when this age group becomes more influenced by peer interaction and external culture . Creatively, they are more self-critical and concerned with being right . While they are more capable of dealing with unexpected changes in routine they still need structure and clear expectations . They are still very concrete thinkers, but are now able to engage in more abstract thinking than in early childhood . The challenge with this age group, especially as they enter fifth grade, is how to get them to value individual ideas and the unique qualities of their expression . Their tendency is to want to be just like their peers and also to reproduce imagery that they view as accepted . As artists we can offer alternatives to this conformity.
MIDDLE SCHOOL, GRADES 6-8
How can you help middle-school students get out of their own way?This is the time in young people’s lives when their concern with themselves, their appearance and their friends begin to take precedence over all other things . In thinking about how we present projects to this age, it is important to always take this outlook into account . As Artist-Teachers they need us to be a reliable person of authority first and foremost. They want to be able to count on us and still be able to challenge us . We have to find the delicate balance between implementing our authority and using light-handed humor to create an atmosphere of trust .
This age group has a lot to say . Although they may be shy or reticent at first, they want to discuss things deeply, especially if it is directly related to them . More time should be allotted for inquiry-based discussion and reflection. They are capable of engaging in protracted projects and with more focus .

6
CURRICULUM RESOURCEART EDUCATION PROGRAM
They also may be interested in mastering representation and want to reproduce imagery that they view as “acceptable .” The trick here is to help them become critically aware as viewers and learn to appreciate a wider range of visual expression, especially with regard to mediums and styles that are unfamiliar to them . Exposure to a broader spectrum of artistic expression must be balanced with providing the concrete foundational tools that will support them in their quest for realistic representation . Overall, they should exact more substance in the art they make .
Middle school students tend to be very critical of their work . In a critique they may be more willing to hear real criticism and feedback particularly from each other . Although they are overwhelmingly concerned with peer acceptance, they are also keenly aware of superficial praise from adults and are looking for authentic responses . They might enjoy working in small groups in which one person facilitates the discussion so that each artist talks about his or her piece . On occasion, a student may want to destroy or discard their work . It’s up to us to find ways to help them be accepting of their learning process, even in moments of frustration .
Social media often plays a large role in the lives of middle school students . Policies and rules regarding social media and use of devices may vary depending on site, age group, and program . While we must abide by the rules established by our community partners, there will likely be instances where it will be up to you to determine how you want to address these issues . Studio protocol concerning cell phones and other devices should be established on the first day . If your students are constantly texting or plugged into their sounds, less than a desirable amount of their attention may be directed towards their work . On the other hand, it may be part of their work . Some teachers have embraced it by creating blogs, Twitter accounts and Facebook pages specifically for their classes in order to channel this energy productively . Consider your policies carefully to ensure the best outcomes for your students .
They may also be thinking about applying to art high schools and have specific types of work that they need to prepare for their portfolios . You are a valuable resource and support in this area . In addition, you may direct them towards other programs in the JMF AEP geared specifically to supporting students as they develop their portfolios and deepen their involvement with art . The full range of JMF programming can be found on the AEP section of the Foundation’s website .
HIGH SCHOOL, GRADES 9-12
How can we support our students to acquire more self-confidence as young artists?Helping teenage students to develop artistic skills and expressive tools is a starting place . As this period in their lives is ruled by self-discovery as well as self-doubt, the tendency to peer conformity deepens and can inhibit individual expression . They may be used to delivering the accepted response or try to project a public self-image that does not reflect what they are truly experiencing. Using peer-approved imagery such as popular cartoon characters, heart symbols, and the like are often a first impulse and functions as a kind of shorthand in place of more authentic communication. We can help them develop less superficial communication skills through deconstruction of popular culture . This is a logical and appropriate way to encourage critical thinking . Helping them to reframe such media through observation and research can be an empowering experience for them personally and artistically . By treating and respecting them as independent thinkers, and having serious and meaningful conversations, we can create an environment of trust and openness in which students feel free to express themselves honestly . Once students feel safe to participate, peer driven reflection is also a valuable tool. Knowledge gained through critique can be a motivating force for deeper creative expression . We can encourage teenagers to trust in their decision-making abilities by taking them seriously .
We may find that high school students are interested in knowing how artists they admire have achieved their mastery . Their focus may be intensely geared towards accelerating their own skills to approximating those levels . At the same time, they may be open to exploring new mediums and techniques that they consider sophisticated .
High School students should also be encouraged to engage in individual works for longer periods, do more revisions, make more complex imagery, and be involved with deeper concepts . They should feel comfortable working on skill-building and transferring their skills to projects of their own design .
It often becomes apparent that one or more of our students has a truly deep interest in pursuing art beyond our class . Fortunately JMF offers a variety of self-selecting programs to cater to their interests and needs (if you are not familiar with the range of our programmatic offerings for high school students, we strongly urge you to visit the AEP section of the JMF website) . Sharing your own experience, as an artist and answering their questions honestly would be truly welcome .

7
CURRICULUM RESOURCEART EDUCATION PROGRAM
SOS Resources
The Student Opportunities and Support (SOS) program encompasses all self-selecting programs and is designed to give students personalized assistance beyond regular class instruction. It offers individualized student support, which may include portfolio reviews, mentorship, goal setting, and college visits . SOS programming encompasses:
MENTORSHIP AND ARTIST COMMUNITY BUILDING
» One-on-One consultations with SOS Manager and/or Artist-Teachers
» Other Support Resources include: » JMFSOS Facebook Group » Other SOS programs also maintain their own
respective Facebook groups
PORTFOLIO DEVELOPMENT
» Saturday Studio Portfolio Development (MS & HS)
» Middle School Portfolio Preparation After School Program
» Young Adult Program
» Summer Portfolio Intensive
» Figure Drawing Workshop
» Portfolio Redefined and Art Degree Demystified
ART CAREER EXPLORATION
» jumpstART
» Careers in the Arts Fair
» Summer Internships
» CALL Apprenticeship
» Individual Specialized Internships
YOUNG ARTIST RESIDENCIES
» Oxbow Art Camp Scholarships
» Ashcan Studio Scholarships
The AEP encourages AT’s to regard themselves as both teachers and mentors . When working with the middle schoolers, high schoolers and young adults who populate SOS programs this is especially important because these young people are actively making decisions about their future schooling and careers . It is important to create a space where students can explore their individual artistic interests but it is equally important to develop the kinds of skills required to enter and succeed in art programs and their corresponding professional fields. Skills such as engaging in group dialogue about art, public speaking, writing artist statements, documenting artwork, and engaging with artist-professionals should be incorporated into the curriculum .
AT’s must be prepared to meet students at various stages of their progress and communicate with them about their individual goals and expectations for the class . You may be working with a variety of learners, including students with special needs, so it is important to be flexible and adaptive to different ways of receiving and processing information. Using a blend of questioning and intuition will help to pinpoint individual needs . The diversity of the student’s goals brings enrichment to the classroom and creates an energized learning experience for both students and teachers alike .

8
CURRICULUM RESOURCEART EDUCATION PROGRAM
Classroom Management
What does classroom management really mean?The term “classroom management” can seem dry and conventional, but the reality is that when we institute strong classroom management tools they eventually become a seamless part of our teaching that supports the success of our classes . Classroom management provides an organizing structure from which we can develop a setting and a way of working together . This means familiarizing ourselves with the site, the staff, our teaching partners and the particular space where art class will happen . Establishing clear lines of communication for working with our teaching partners and counselors is crucial . Organizing the physical space is essential for fluid movement and accessibility in the art room. Understanding the challenges of the space and finding creative solutions to deal with them will make teaching and learning much easier and more fun . Establishing general guidelines for behavior provides reasonable limits within which students will feel comfortable participating . Routines are necessary to support those guidelines and art class activities . As students become familiar with routines they know what to expect, making for a smooth process . Transitions from one activity to another can be tricky . Giving advance notice or a signal to indicate a move to a new activity or area in the class prepares students for the change that is about to take place. This varies for different age groups. All these elements work together to create effective classroom management .
WORKING WITH OUR TEACHING PARTNERS AND COUNSELORS
As part of an initial meeting between Leads and Assistants, strategies for working together should be discussed so that you can support each other with the students . It is important to establish an understanding and agreement on each other’s areas of responsibility . It will help immeasurably to discuss in advance how to handle behavior issues, how to talk to students about their artwork, how to organize materials, and any other issues you feel are relevant to the class . Inevitably things will come up, checking in regularly will make it easier to deal with hurdles . This is also true for working with the staff at your site. Learn what signals they use to get attention, such as “signs up” (a term used by our community partner, the St . Nicks Alliance, to get students to stop working, quiet down, and look up) . You may not necessarily use the same
one but you should share what you use with them . Share your behavior guidelines with the staff. Help them understand that sitting out during art class should not be used as a punishment because, even though art is fun, important learning is going on .
TIPS FOR WORKING WITH YOUR TEACHING PARTNER
» Meet and talk before starting your program .
» Put each other’s cell numbers in your phones .
» Always be on time for class unless you have a real emergency .
» Have regular check-in times .
» Challenge yourself to share critical feedback with your teaching partner when you notice aspects of the class that could be improved through change .
TIPS FOR WORKING WITH COUNSELORS
» Have a get-to-know-you conversation just before or at the start of the term .
» You might have a professional development meeting for counselors on understanding AEP philosophy .
» Create a worksheet for counselors to reflect on their own teaching philosophy:
» “Why are you here? What do you hope to learn from this job? What is your teaching philosophy? Why do you want to work with children?”
» Let the counselor know what role you would like them to hold in the classroom .
» Have specific tasks for them to do each class.
» Try to develop a consensus with them regarding student behavior guidelines .
» Provide guidance on how to respond to student work . For example: Student, “Do you like my artwork?” Counselor, “Do you like it?” Student, “Yes”, Counselor, “What do you like about it?”
» Give specific direction when counselors are distracted, flirting, bringing in food, using cell phones, or engaging in other distracting behaviors .
» Be sensitive to authority issues with counselors .
» Give counselors positive feedback .

9
CURRICULUM RESOURCEART EDUCATION PROGRAM
ORGANIZE PHYSICAL SPACE
If you are in a classroom with movable tables and chairs, consider how you can arrange them to best support the needs of your students and projects . Ideally, there should be an area for meeting as a group, for active working, for supplies, storage and display during each session . It can be difficult for all these needs to be met simultaneously but each Artist-Teacher figures out how to make it work for them . This may sound nearly impossible because we are so often in borrowed spaces that limit our resources, but this is where improvisation comes into play . For example, display might mean holding artwork up for students to see, using a magnetic board, stringing a temporary clothesline or laying things out on a table or even the floor.
» For younger groups, have tables and chairs in the work area arranged before they arrive . (In some spaces you will have to put them back the way they were before you leave) .
» Arranging tables so that small clusters of students can share materials works well .
» Try changing the furniture arrangement on occasion to signal a new project, theme or way of working together .
» If these arrangements are not working, be flexible, change them .
» For older students, you may include them in arranging the furniture .
» Have a designated space for students to put their backpacks and jackets .
» Have a designated space for group meetings . If possible use carpet squares, mats or fabric to create a group meeting area for elementary students . You can ask older students to bring their chairs to the designated space .
» Enough materials for the session should be prepared and accessible to students according to the routines you set up . With very young students put materials out in small quantities .
» Distribute materials using simple containers such as baskets, bowls, trays and small cardboard boxes .
» Designate a space to store work-in-progress that will keep it undisturbed until the next class .
» Older students may be able to maintain their own work within portfolios or folders that are stored in the classroom .
GENERAL GUIDELINES FOR BEHAVIOR
As Artist-Teachers we have certain expectations for our students’ behavior and we need to let them know what those expectations are . Expectations will vary based on the age group . It’s important to know what our own limits are when in the classroom . What one Artist-Teacher considers chaos, another might consider creative energy . Whatever term you want to use, Studio Guidelines, Class Rules, Behavior Expectations, Studio Agreements, or something else, establishing a clear set of expectations for behavior is important from day one and helps to hold all accountable .
GENERAL FIRST DAY STRATEGIES
» Learn all the students’ names as quickly as possible . When students hear their own names, they are much more likely to listen . Referring to students by name also signals that we know and remember them .
» Make a seating chart .
» Have them make nametags .
» Create sketchbooks or portfolios with their names on the cover .
» Play ice-breaker games .
» Make a chart listing student responsibilities, counselor responsibilities, and Artist-Teacher responsibilities .
GENERAL GUIDELINES FOR BEHAVIOR
» Discuss guidelines with students by asking: Why do we have rules? What rules of behavior makes sense for the art studio? What guidelines should we establish so that everyone feels safe and comfortable to express him/herself?
» Compare behavior requirements at home and in the classroom .
» Post behavior guidelines in a central location as necessary . If you prefer, with older students, create a contract for studio behavior that can be signed by each student .
» Post consequences and direct students to it when necessary .
» Work as a team with your site director . In some sites, you may want to invite the site director to stop by during your group meeting at the beginning of the term . This lets the

1 0
CURRICULUM RESOURCEART EDUCATION PROGRAM
students know that the staff leaders are also interested in their progress in the art studio .
» Acknowledge good behavior: “Thank you Shari for listening carefully to the instructions . You may get your materials first.” “Thank you James for sharing the pastels and taking care that they don’t fall on the floor.” “I noticed Marco that you really looked at Rina’s painting and thought about what you would say before making a very positive and supportive statement .”
» Use reminders to come to order and appropriate consequences when students are too disorderly .
» If after giving three reminders the disruption continues, it is appropriate to briefly separate the disrupting student. For K-2 you may want to give a one or two-minute break from the main activity until the student is ready to participate again . “Take a moment to think about how to participate with the group so that we all feel comfortable together and then you may return .”
» Share the power with your students . Ask a student to help you in getting the attention of the class .
» Instead of general compliments, encourage specific positive behaviors to help students understand what is expected . For example, “Alanna, I like the way you cleaned up your work area before getting your coat,” instead of “Alanna you’re a good girl .”
» Give verbal compliments to students who are behaving positively instead of focusing attention on students with bad behavior .
» Set clear rules about cell phones and devices (these should be consistent with any pre-established policies created by the community partner) .
» Describe the sound of productive art making .
» Familiarize yourself with developmentally appropriate practice .
ROUTINES AND TRANSITIONS
Whatever your teaching style, establishing some basic routines will support your students’ full participation and help them know what to expect . Starting from the moment they enter the classroom, be clear about what your plan is; where you expect them to put their things, where you expect them to sit, and your agenda for the session, etc . This will vary according to age group . Elementary students thrive on routine, where middle school and high school students need flexibility that takes their independence into account. For example, in an elementary class you might begin with a circle time in which you discuss the plan for the day . However in a high school class you might begin with a self directed warm up exercise that relates to the current project .
What makes transitions tricky is that you are asking students to stop what they are doing and do something completely different. This might involve moving to another part of the room, getting supplies, cleaning up, stopping work, reflecting, and preparing to leave. The transition usually involves a physical change as well as a mental change . While short in duration, it is actually a complicated process in which you need to prepare your students ahead of time for the change that is about to happen . For example, when it is time to stop painting and begin cleaning up students should receive five, three, and one-minute warnings so that they can mentally prepare . Since they know what is coming next, they are more likely to cooperate . Routines and signals are an effective part of making good transitions. Use an established signal on a consistent basis to initiate your transitions . If, as part of your routines, individual students have assigned tasks, the clean up will likely be more expedient and efficient. In middle school and high school students are usually in charge of their own clean up but you need to give specific directions so that they know what is expected of them .

1 1
CURRICULUM RESOURCEART EDUCATION PROGRAM
ROUTINE & TRANSITION TECHNIQUES
The following codes apply to the following suggestions:
Applies to Elementary
Applies to Middle School
Applies to High School
» Have students enter the room in an orderly fashion, one to five at a time. The focused students are given the opportunity to participate in demonstrations, receive materials first, etc.
» Use breathing techniques to relax and calm the group, or change the energy .
» You can also change the energy of the room with sound . Use a chime or musical instrument to bring students to attention and mindfulness . The sound can invoke a calming effect. “When you hear it, listen or be quiet.” Practice this throughout the class until the students understand and respond .
» It can be intimidating with a new group to introduce a “signal” for attention . Test out your signal with the class when you introduce it . “We are going to practice using this ______ as a signal for attention . Everyone speak to your neighbor and when you hear the signal, stop and listen .” After trying it once as a practice, tell the class you will be using it again later without warning to see if they still hear it .
» Signal phrases: “If you hear my voice, touch the end of your nose .” “If you hear my voice clap once” “Signs are up” “If I say Apple, you say Pear .”
“I am looking to see who is ready to…”
» Movement games can also relax the group and re-focus their attention .
» Have music playing in the classroom for concentration during the work period . It may be better to have instrumental music versus music with lyrics .
» Establish helpers in the class to give out and put away materials . Change them periodically so that everyone has a turn .
» With elementary age students it’s important to give instructions at least three times . It is normal to do this as a matter of course . For example: “In five minutes it will be time to stop drawing.” “You have one minute until we have to stop drawing .” “Ok, everyone put your pencils down .” “Thank you Edward for putting your pencil down .” “I see that most everyone has put their pencils down, we are just waiting for one or two more people .”
1 2
CURRICULUM RESOURCEART EDUCATION PROGRAM
Behavior Issues
ELEMENTARY SCHOOL
As mentioned above, it is necessary to reinforce and acknowledge positive behavior . For example, “I am looking to see who is ready to get their materials and start working .” As soon as one person is selected and begins, the rest will usually want to do the same . If there is someone who is continually disruptive try giving her/him a job as a helper . Perhaps they just need to move around the room . But be careful not to continually reward disruptive behavior . The idea is to redirect the energy to something more positive .
In some instances a student might prefer to work at a separate table from the others in their “private studio” in order to concentrate . Make this option available to students who are distracted by others .
If the volume has gotten out of control, try playing a game involving silence (use movement and gesture in place of verbiage) . This is usually fun and brings the volume back to acceptable levels after the game is over .
MIDDLE SCHOOL AND HIGH SCHOOL
Older students want to avoid looking nerdy . Rather then singling out the ones paying attention you can announce, “Whoever is ready to work, may get their materials and begin .” In this way the choice is self-directed and eventually everyone will get to work .
If there is a student who is really acting out, speak to him or her privately to avoid embarrassing them . One approach is to ask how they’re feeling . You may get a clue as to why they aren’t focusing . Who knows what went on in their life before they arrived to class . This may not help with a student who is very angry or withdrawn, but letting that student know you care about them and would like them to participate is a good place to begin . Other times you might encounter a student who just doesn’t like art or want to be there. Try to find out what interests her/him and see if there is a way to make a connection with art and their interests .
Set appropriate boundaries between counselors and students to deal with student/counselor crushes . Middle school students often have questions about life in general that they are too embarrassed to ask . You can establish a forum for answering anonymous questions as part of a weekly routine . One way to do this is to have students place the questions in a paper bag . The teacher pulls a question out of the bag and answers (skipping anything inappropriate) during each class session, as needed . Students may add questions as they have them .

1 3
CURRICULUM RESOURCEART EDUCATION PROGRAM
Inquiry
Inquiry is a method by which teaching and learning happen through a process of questioning and self-directed experimentation . At its most basic, inquiry is a search for information, or truth, through investigation and dialogue . An inquiry approach is meant as an alternative to presenting information in a didactic way such as a lecture; a lecture format requires students to be passive whereas Inquiry questions require active engagement . They challenge students to figure out their own ways to solve creative problems by tapping into their innate sense of curiosity . This fosters important life skills such as:
» Learning to observe the world thoughtfully and ask questions
» Participate in dialogue with peers by sharing individual discoveries, experiences and perspectives
» Learning to apply their knowledge and previous life experience to their creative work
» This process of questioning and discovery is an ideal way for students to engage with new materials and techniques . Inquiry methods may be used in all aspects of teaching and learning about art including:
» Cultivating multifaceted understandings of artworks
» Developing new art making skills
» Exploring concepts and themes for art making
» Reflecting on the works created by self and peers.
As with all aspects of education, it is important that inquiry-based projects and discussions are age appropriate .
ELEMENTARY
Encourage young learners to share information and ideas as well as their personal perspective . This validates their experiences and allows them to speak to each other in their own words. This builds the confidence needed for self-directed research and problem solving . Inquiry can also be used to help them reflect on their art-making process.
For instance, having them ask each other what has been surprising or difficult about a project encourages them to pay attention to their experiences . One example of using an Inquiry-based approach with young learners is leading them through a visual scavenger hunt that demands close observation and interpretation of an image .
Give students opportunities to explore unfamiliar materials and try out new techniques before using them in a project . Invite students to research the origins and history of the materials they are using . Ask them to create their own “how to” instruction sheets or charts for using materials that they have explored . Make available a variety of images by artists using the same materials or techniques but in different ways.
Have regular periods when students look at and discuss art works related to their projects . The guide to inquiry-based interpretation of art (see Open Art Inquiry below) works very well with this age group .
MIDDLE SCHOOL & HIGH SCHOOL
What is the difference between making statements of observation as opposed to statements of opinion?We can encourage middle and high school students to question the world around them . Use inquiry methods to analyze advertising and media culture . Young people tend to accept what is marketed to them at face value . Encouraging them to question what is presented, to investigate the motives beneath the surface and to distinguish between fact and opinion is a key component to developing their critical thinking skills . Helping them ask questions that directly relate to self-identity can stimulate personal awareness—How do they consider themselves in relation to the art? Choosing projects with a focus on themes that are relevant to them can encourage self-directed research .

1 4
CURRICULUM RESOURCEART EDUCATION PROGRAM
OPEN ART INQUIRY
When using Inquiry to understand artworks, each person brings their own life experience to visual interpretation . As educators, it is our responsibility to facilitate a space in which different perspectives can be expressed without judgment . By providing an environment in which they can be both artists and investigators we can help to enable a sense of self-direction and independence . We can begin by initiating dialogues through open-ended questioning that will help students come to a personal understanding of the visual languages around them through their own insight and analysis, rather than interpreting the art for them . It is our job as facilitators of such discussions to make room for multiple readings and interpretations, not favoring one over others . In the instance of an open dialogue about a work of art we begin by asking students what they particularly notice about the work. Using reflective listening, we paraphrase their comments and manually indicate what part of the work the students are referring to (as in Visual Thinking Strategies also called VTS . More about this in the Discussion section) . We continually ask students to look deeper and longer . We ask students to always refer back to the work to support their statements . We try to encourage the participation of every student . We have no particular goal in looking at this work other than facilitating a deep and rich experience of looking and understanding of the work .
DIRECTED ART INQUIRY
This doesn’t mean that we might not, on occasion, direct the questioning toward a particular set of understandings that will lead towards a learning objective . For example, we might want students to understand how a particular artist creates a mood in his/her painting so that they may later employ similar techniques in their own work . In such a case our questions would be sequentially directed to a particular kind of focused observation such as in the following examples .
Observing: Woman Ironing by Pablo Picasso » 1st question: What is going on in this picture?
» 2nd question: What might it feel like to be this woman? What do you see that tells you that?
» 3rd question: What do you notice about the gesture of her body?
» 4th question: What do you notice about the color in this painting?
» 5th question: Why do you think Picasso would choose to use these kinds of colors?
» 6th question: What are some techniques that Picasso used that you might use to create a mood in your own painting?
Pablo Picasso, Woman Ironing (La repasseuse), 1904 . Oil on canvas, 45 3/4 x 28 3/4 inches (116 .2 x 73 cm) . Solomon R . Guggenheim Museum, New York, Thannhauser Collection, Gift, Justin K . Thannhauser . © 2015 Estate of Pablo Picasso / Artists Rights Society (ARS), New York .

1 5
CURRICULUM RESOURCEART EDUCATION PROGRAM
Observing: Beauvais by Joan Mitchell » 1st question: What is going on in this picture? (or) What are
some things you notice about this picture?
» 2nd question: What might it feel like to be inside this picture?
» 3rd question: What do you notice about the color in this painting?
» 4th question: What do you notice about the brushstrokes in this painting?
» 5th question: Why do you think Mitchell would use these kinds of brushstrokes?
» 6th question: What are some techniques that Mitchell used that you might use to create a mood in your own painting
GENERAL ART INQUIRY GUIDE
A general guide to facilitating a good dialogue using inquiry to interpret artworks (with thanks to Learning Through Art, Solomon R . Guggenheim Museum):
1 Ask questions that cannot be answered with yes or no .
2 Ask questions that don’t require a particular “right” answer or that contain the answer within the question .
3 Use sequential questioning: strict observations, general interpretations, focused interpretations .
4 Solicit several responses to each question through (1) wait time—at least five seconds after asking the question and (2) follow-up questions—Does anyone have anything to add? Do others agree/disagree?
5 Respond positively to a wide range of responses .
6 Spend a significant amount of time at the beginning the discussion eliciting observations and asking for details about the artwork, before letting students move on to interpretation .
7 Focus students’ comments on the artwork by asking questions such as, “Where do you see that?” or “Can you point that out for us?”
8 Ask students to back up their interpretations or assertions with evidence from the artwork .
9 Call up students’ prior knowledge and experiences and ask them to make connections between these ideas and the artwork . Inquire about the students’ feelings regarding the artwork .
10 Offer factual information about the artwork when relevant and available . Know the subject well enough to answer questions but feel comfortable saying, “I don’t know” or “I will find out for you” when asked for facts.
11 Respond to interpretations that are unfounded or that are factually wrong, by using facts about the work, by asking students to look closer for evidence, or by asking if others in the class agree or disagree and why . Use a tone that is positive and affirming.
12 Select images that are age-appropriate (often representational images that suggest a narrative are easiest for your learners to discuss and linger on) and that further your teaching goals and objectives .
13 Prepare questions (and try to answer with multiple responses) ahead of time so that you can facilitate the discussion with a goal in mind . (This is a good way to make sure your questions are open-ended but not too vague) .
Joan Mitchell, Beauvais, 1986 . Oil on canvas, 110 1/4 x 157 1/2 in . Private collection . © Estate of Joan Mitchell .
1 6
CURRICULUM RESOURCEART EDUCATION PROGRAM
Classroom Reflection
When we reflect, we are looking back on something and giving it careful consideration. Reflection is a deep and important part of being an artist . It is a way to investigate how artists work. Formal reflections can encourage students to develop new vocabulary, articulate process, form their own ideas, determine next-steps, and build community . It helps the Artist Teacher assess student understanding and abilities as well as the success of their own lesson. Self-reflection is the ability to practice introspection and a willingness to learn about oneself. Individual, as well as formal group reflections, are possible within your curriculum, but teachers need to define for themselves what type of reflection will work in a given situation. It is necessary to plan reflection times into your curriculum or they likely will not occur .
It is important to make a distinction between a reflection and a formal critique . Although there is overlap between the two, the key difference is that reflections focus on positive and affirming elements of their artistic process and exclude negative critical assessments . Pointing out how and why an artwork could have been more successful is important and useful for art students who are mature enough to knowingly and willingly sign on for such critical feedback . However foisting critical feedback on to young people can undermine their confidence, hurt their feelings, and dampen their enthusiasm for art. Therefore we encourage reflection instead of critique . There may be occasions where some high school students and young adults are ready to engage in critique . If you work with students who demonstrate requisite maturity, be sure to outline the purposes of the critique process and establish some ground rules to prevent them from being unnecessarily harsh or unproductive .
ELEMENTARY
When asked to reflect, elementary students tend to identify recognizable imagery and stop there . It is necessary to set up a structure within which they can look more deeply at their own and their classmates’ art work . This can happen in a variety of ways. Reflection does not need to always happen at the beginning or end or a structured time but it needs to happen regularly . Use moments that feel authentic to engage . On some occasions when students are in full art-making mode it may not be appropriate to stop and reflect.
REFLECTION TIPS
(These tips can work for elementary as well as older students .)
» Show all of the artwork one at a time, like a slide show . This can be done at the end of class or as an opener for the following class to refresh everyone’s memories .
» Alternatively, hang all artworks so they can be viewed together and in relation to one another .
» Invite a small group of students to arrange artworks for the class by set criteria: “Place group landscapes and seascapes separately” or “Try arranging these portraits in a row from happiest to saddest” (best for age 9 and up) .
» Gallery Walk: When works are challenging to collect (such as sculptures or wet paintings), clean up all materials and arrange the artwork on the tabletops . As a starting point, you may want to ask students what the objectives of the project were . Invite students to gather around the table to view the work or travel around the tables in a single file line. You might initiate reflective comments with a prompt like “Try and pick out the piece you think is most interesting/successful/well-made/ surprising, etc .” Follow with, “What interests you about this work?”
» Acknowledge good reflective practice: “What you said, Malik, about Arturo’s work shows that you were looking for the deeper meaning behind the symbols .”
» Have students write one word that reflects a feeling prompted from a painting (best for age 9 and up) .
» Have students brainstorm a list of descriptive words that goes beyond happy/sad and descriptive words about the way things look: texture etc .
» Mid Class Reflection: Select two students (prior to taking the mid class break) whose works are fulfilling the expectations of the project. Invite them to briefly share their work . Students in class can make comments/ask questions . This can be helpful for students who may not understand the project . It gives the class a visual example and time to work back into their pieces with new info/ideas . Give students time to silently look at their work and evaluate what they wish to accomplish in the time remaining (best for age 7 and up) .

1 7
CURRICULUM RESOURCEART EDUCATION PROGRAM
» Turn and Talk: Students pair up and tell their partner about their work . One minute for each artist is ideal . AT’s need to monitor time and announce: “Next artist, your turn .” For older elementary students, AT’s can guide the conversation with talking points . For example: “How does this piece fulfill project expectations? How did the artist use the materials and techniques?” This exercise is good to use when time is limited and individual presentations are not an option .
» Individual and Group Presentations: Give an individual student or small group space to give a 1-3 min presentation and then take questions from the class . Presenters can refer to project guidelines or other prompts on the board to provide focus for questions or comments . It’s best if this can be a student-lead discussion, with AT’s facilitating direction as needed (best for age 9 and up) .
MIDDLE SCHOOL AND HIGH SCHOOL
Reflective process can stimulate deep discussions for older students, even when focusing on the formal elements of their work . It is important to set up a supportive environment to sustain older students’ greater ability and willingness to participate in both formal and personal reflections. Humor and a sense of theatrics can keep students engaged, as well as including them in facilitating this process .
» Reflections should be non-confrontational. The tone of the discussion can be set by encouraging older students to begin sentences with “I’m interested in” and “I’m wondering about” versus likes and dislikes .
» Another way to facilitate reflection is to have students place their work near someone else’s work where they think there is a dialogue/relationship . Ask, “How are these works talking to each other? “
» Place 3D work on display . Students circle and pick one work that is not their own to sketch from two different views. Students can explain how the sculpture is different based on the angle it is viewed from .
» Each student selects a classmate’s artwork to discuss . When addressing the class they can explain how it is different or similar to their own. This activity can stimulate a focused dialogue about the art .
» Gallery walk with index cards – each student can write a question or comment about each work . When students get back to their work they have a stack of index cards and can decide what is most relevant to respond to .

1 8
CURRICULUM RESOURCEART EDUCATION PROGRAM
Classroom Discussion
Discussion helps students to examine the matters at hand, explore solutions, and provide each other with different viewpoints . It cultivates good speaking and listening skills as they reflect upon each other’s ideas. As an Artist-Teacher, it’s important to ask yourself what kinds of discussions you are comfortable with and how you will deal with sensitive subject matter . Creating a safe environment for discussion enables students (and teachers) to strengthen group communication . Participation in discussion keeps students engaged and can help to balance who is contributing in class and how much . Finding ways to ensure that all voices in the room receive equal time and attention can be challenging, but it is crucial to a healthy classroom dynamic . Some discussions happen organically and others need to be cultivated .
ELEMENTARY
With younger students it is important to set simple guidelines for discussion such as listening carefully to each others comments, raising hands and waiting for each other to finish speaking . Elementary students have a tendency to free associate and it can be easy to veer off topic. Bring younger children back into the discussion by calling attention to the pertinent information they are sharing, and moving away from the random comments . Coaxing conversation out of shy students can be difficult as well. This is when techniques like “turn and talk” or small peer group conversations can be helpful . On the other hand, we may have students who take a great deal of time to answer . In these instances it’s important to give the student a time frame within which to respond or suggest that further discussion happen during the work period .
» After asking a question, wait a few seconds before calling on anyone . This gives students who may process language slower time to process your words .
» Respond positively to incomplete answers and keep digging, “You are on the right track with that answer but I think we can say more about it, can anyone build of off what Cherise said?”
» Ask students for agreement or disagreement with statements made by other students and to support their comments with evidence or experiences .
» Ask students if anyone has anything else to add to the discussion that was not yet mentioned .
» Create space for quiet students: “For this next question, I’d love to hear from someone who hasn’t had a chance to speak yet today” or “Everyone who has not had a chance to speak, please raise your hand so I can see you .”
» Discussion starters: » List descriptive words about the way things look:
texture, form, placement, etc . » List 5 adjectives that describe the artwork (best
for ages 9 and up) . » Ask, “What is the mood of the artwork?” » Ask, “what is a question you would ask of this
artwork?” » Ask, “What would have happened right before or
after the moment shown in this artwork?”
MIDDLE SCHOOL AND HIGH SCHOOL
Older students are generally more capable of participating in complex discussions . Sometimes adolescent students feel an urgency to talk about topics that are relevant to their lives but not necessarily on our agenda as educators . We can provide a safe environment within which to guide discussions that are both reflective and personal as older students grapple with self-identity and often times, uncertainty about their futures . Ideally an Artist-Teacher can take some time out to engage students in such discussions . On the occasions where time is tight it is important to at least acknowledge the student’s needs; “I think you bring up an important subject but I don’t think we have time to give it the attention it deserves just this minute . Can we return to that during the break?”

1 9
CURRICULUM RESOURCEART EDUCATION PROGRAM
Education Lingo
The worlds of education and art education include a wide spectrum of terms commonly used amongst people in those communities . It can be helpful to become familiar with various educational philosophies and associated terminology to enhance your own practice . What follows is a very abbreviated index of such educational jargon used by assorted sectors of the community, particularly in relation to K-12 . Keep in mind that as in any language, terms go out of favor and new ones become popular, just as pedagogical methods gain popularity in the broader educational community for a couple of years and are then replaced by something new . Having a clear sense of your own philosophy and the over arching art educational philosophy of the AEP will be your compass . Whether or not you have named the methods you are using or the particular practices you have put in place in the art room, it might be useful to match up with some of these terms what you and your students are experiencing. Many of these terms and definitions have been quoted directly or abbreviated from EdSpeak, by Diane Ravitch, ASCD, 2007 and will be noted with (DR) .
Ability: Current competence in doing something, either mental or physical as opposed to aptitude, which refers to what an individual is potentially able to do (DR) . At this time in NYS efforts are being made to include students of a wide range mental and physical abilities in all activities including grouping students with disabilities in classes with typically developing students .
Accountable Talk: Talk by students about what they are learning, supported by evidence from the discipline of study (DR) . This strongly relates to art inquiry methods, such as Visual Thinking Strategies method, that require the respondent to back up their statements with visual evidence from the subject artwork .
Active Learning: Any situation in which students learn by doing rather than by sitting at their desks reading, filling out worksheets, or listening to a teacher (DR) .
Assessment-Driven: A description of curriculum content and teaching practices that are based on assessments used for accountability purposes (DR) . While in theory, curriculum in NYC is based on standards; the current emphasis on test scores is forcing more and more schoolteachers to “teach to the test .”
Attention Deficit Disorder (ADD): A condition that interferes with a person’s ability to concentrate and
control impulses and behavior . Students diagnosed with ADD tend to have problems initiating tasks (and staying on them) and focusing on conversations or activities; they may be disorganized, impulsive, easily distracted, fidgety, and restless. They may also find it difficult to use their short-term working memory and access recall and to manage their emotions appropriately .
Attention Deficit Hyperactivity Disorder (ADHD): A condition that interferes with a person’s ability to regulate activity level, inhibit behavior, and attend to tasks in developmentally appropriate ways . People with ADHD may move rapidly from one task to another without completing any of them . Hyperactivity, a disorder of the central nervous system, also makes it difficult for affected students to control their motor functions . Many students with learning disabilities exhibit behaviors associated with attention problems but do not necessarily have ADD or ADHD (DR) . In schools, classroom teachers are usually provided with the necessary information about students’ diagnoses and may be able to proceed with an Individual Education Program (IEP) for such students that will help them progress educationally . In out-of-school programs we are not usually given such information and therefore must rely on intuition, observation and trial and error to help such students be successful .
Backwards Planning: Also called Backwards Design as outlined in Understanding by Design by Grant Wiggins and Jay McTighe . A method of curriculum development that begins knowing what you want the students to learn, understand and be able to do as a result of teaching this curriculum, developing lessons that will result in that learning, and creating evidence-based assessments of that learning throughout the teaching and learning process .
Banking Theory of Education: A term implying that the teacher-led classroom, is fundamentally oppressive . This concept, developed by Brazilian radical educator and theorist Paulo Freire in Pedagogy of the Oppressed, holds that the teacher’s act of ‘filling’ the students heads with predetermined knowledge is akin to banking; that it relies on the authority of the teacher and the passivity of the student; and it undermines critical consciousness (DR) .
Behavioral Objective: An objective that describes the behaviors that students are supposed to learn in class, such as problem solving, explaining and manipulating .
Best Practices: A phrase derived from the business sector to describe what are thought to be the most effective methods to improve productivity and profit. Assertions

2 0
CURRICULUM RESOURCEART EDUCATION PROGRAM
about best practices are not always grounded in impartial reviews of evidence about effectiveness. Advocates believe that best practices should be shared for the benefit of educators seeking solutions to specific problems. Critics regard the phrase as a term of art applied by partisans of different educational methods to advance their own favored approaches (DR) .
Career Education: Schooling that aims to prepare students for a job or vocation (DR) .
Child Centered Education: A philosophy of education in which the students’ interests—not the school’s curriculum or the teacher’s plan—set the instructional agenda . Child-centeredness is a defining feature of progressive education, especially the currently popular form known as constructivism (DR)
Classroom Management: The way a teacher organizes and administers routines to make classroom life as productive and satisfying as possible . Classroom management includes but is much broader than discipline . For example, teachers with good classroom management skills explain classroom routines and may even begin the school year by having students practice expected procedures as a way of minimizing disruptions and maximizing the time for instruction (DR) .
Constructivism: A philosophy of teaching based on the belief that students learn by constructing their own knowledge . Constructivist methods center on exploration, hands-on experience, inquiry, self-paced learning, peer teaching, and discussion . Constructivism is a direct lineal descendant of progressive education as espoused by John Dewey and his disciples, especially William Heard Kilpatrick . Constructivists suggest that only constructed knowledge—knowledge that one works through oneself—is truly integrated and understood . Proponents of constructivism maintain that one learns best through a process of discovery in which there is dissonance between old facts and ideas and new ones, which then motivates the student to figure out new understandings . Critics of constructivism say that this approach relies too much on student-initiated inquiry, that it unfairly disparages the value of instruction, and that constructivist methods place a heavy burden on teachers . Constructivism is identified with inquiry learning, discovery learning, student-centered instruction, and other forms of learning in which the teacher avoids or minimizes Direct Instruction (DR) .
Cooperative Discipline: Classroom strategies to deal with disruptive students through the use of praise, encouragement, and kindness rather than punishment or
sanctions . Such an approach aims to build students’ self-esteem and thereby get them to behave better and cooperate with others in the future .
Critical Thinking: the trained ability to think clearly and dispassionately . Critical thinking is logical thinking based on sound evidence, involving the ability to gather and analyze information and solve problems; it is the opposite of biased, sloppy thinking . Critics of the term think that educators have turned it into an empty cliché, since there is a tendency to refer to any sort of thinking as critical thinking .
Curriculum: A description of what teachers are supposed to teach and students are supposed to learn in each course of study, often delineated for each grade . The curriculum describes what is taught but does not prescribe how that content is taught (DR) .
Differentiated Instruction: A form of instruction that seeks to maximize each student’s growth by recognizing that students have different ways of leaning, different interests, and different ways of responding to instruction. In practice, it involves offering several different learning experiences in response to students’ varied needs . Advocates of differentiated instruction say that it helps students progress by meeting their diverse, individual needs . Critics say that planning multiple learning experiences is time-consuming and that it requires extensive training (DR) .
Direct Instruction (DI): Instruction in which the teacher explains the purpose of what will be taught and presents the content in a clear, orderly way, with students responding mainly to the teacher’s questions . Advocates of DI say that it is more effective than constructivist methods. Critics contend that it is dull and dampens students’ interest in learning (DR) .
Disruptive Student: A student who speaks out of turn or acts inappropriately with such frequency or intensity that it is difficult or impossible for the teacher to teach and for other students to learn (DR) .
Edspeak: A language spoken by those inside the education profession . Edspeak is often not comprehensible to people outside the profession . The term is modeled on George Orwell’s ‘newspeak’ from his novel 1984 . Also known as educationese, eduspeak, and pedagogese (DR) .
Facilitator of Learning: A teacher who helps students construct their own knowledge rather than transmitting the knowledge (DR)
Inclusion: The practice of placing students with disabilities in regular classrooms in accordance with federal law . To the maximum extent possible, students with disabilities are supposed to be educated alongside their peers in regular

2 1
CURRICULUM RESOURCEART EDUCATION PROGRAM
education classrooms unless ‘the nature or severity of the disability of a child is such that education in regular classes with the use of supplementary aids and services cannot be achieved satisfactorily’ (DR) .
Learner Outcomes: Specific expectations of what students are supposed to know or be able to do as a result of a specific course or learning activity (DR).
Learning Disability: A physical, cognitive, neurological, or psychological disorder that impedes a student’s ability to learn (DR) .
Learning Style: The mode of learning that is most effective for a given student. Advocates of learning style theory claim that people learn through various channels—visual, tactile, auditory, written, or kinesthetic, for example—and that one or more of these will be the dominant learning style for a particular student (DR) .
Montessori: An educational approach that is essentially constructivist, developed by Maria Montessori (a doctor and educator), who emphasized “freedom within limits” and education based on a child’s natural development . Many K-12 schools worldwide use the Montessori Method of education .
Pedagogy: The study of education and education practice . Also a philosophy about the best way to teach . Pedagogy is not the same as curriculum: whereas curriculum details what to teach, pedagogy details how to teach (DR) .
Reflection: The process of thinking about what one is doing or what one has finished doing. For example, students may be encouraged to reflect on their writing (actions or artwork), and teachers to reflect on their practice. Reflection on one’s behavior and efforts should involve self-critique, self-analysis, and self-evaluation . However the term today is often misunderstood to mean reflecting on one’s feelings rather than engaging in any sort of critical self-assessment (DR) .
Reggio Emilia: A town in Italy where, after WWII, a teacher developed what is known as the Reggio Emilia Approach to education in which students learn through a process of discovery by following their interests and creating their own questions about the world around them . Teachers and parents are integrated as collaborators in the educational process based on children’s questions . Reggio incorporates basic educational theories developed by early progressive pedagogical theorists, practitioners and psychologists such as Dewey, Piaget, Vygotsky and others .
Scaffolding: Scaffolding in education is analogous to scaffolding in construction: just as a building’s scaffolding is a temporary framework that is withdrawn when the structure is strong enough to stand on its own, so too is scaffolding in
the classroom removed when students achieve competence in the targeted area . In any classroom, the teacher’s goal is to enable students to perform tasks on their own, with a minimum of adult aid. Effective scaffolding occurs when the teacher explains an assignment, brings the task to an appropriate level of difficulty, breaks the task into a doable sequence of operations, provides feedback, and helps students gain mastery of new knowledge (DR) .
Studio Habits of Mind: A term that refers to eight skills or attitudes used in art classes as coined by Hetland, Winner, Veenema, and Sheridan in their book, Studio Thinking, Teacher’s College Press, New York, 2007 . The eight “dispositions” are Develop Craft, Engage and Persist, Envision, Express, Observe, Reflect, Stretch and Explore, and Understand the Art World .
Universal Design for Learning: Also referred to as UDL, “is a set of principles for curriculum development that give all individuals equal opportunities to learn . UDL provides a blueprint for creating instructional goals, methods, materials, and assessments that work for everyone—not a single, one-size-fits-all solution but rather flexible approaches that can be customized and adjusted for individual needs . Guidelines for UDL provides multiple means of Representation, Action and Expression and Engagement” as developed by non-profit organization CAST. As schools increasingly include children with a wide range of disabilities in general education classrooms, UDL is being incorporated more widely . http://www .cast .org/udl/
Visual Thinking Strategies (VTS): a structured method of teaching through looking at and discussing visual art . http://www .vtshome .org/
Waldorf: An educational method based on the educational philosophy of Rudolph Steiner, which has been adopted by a number of schools known as the Waldorf Schools . Steiner’s philosophy centered around what he identified as three developmental stages of childhood taking about seven years each . A well researched overview of his pedagogy and history can be found here: http://en .wikipedia .org/wiki/Waldorf_education

2 2
CURRICULUM RESOURCEART EDUCATION PROGRAM
Anecdotes From The Field
Artist-Teacher experiences that are universal and may be helpful to your classroom .
ResponsibilityNatalie Beall
There was a 5th grade student in my after-school class who would often finish early and then put his head down. He was also in the process of learning English, so our communication was limited . One day I had my camera with me and I asked him if he would help me take photos of the other students as they worked . I demonstrated how to set up the shots and then he took over . This kid was a natural! From then on I asked him to take photographs after he finished his projects. I think it gave him a sense of purpose and responsibility in an otherwise stressful situation .
AuthorshipAndy Vernon Jones
In a summer program with middle school students, we were working on a digital photography project where students were photographing each other enacting group scenarios and doing other kinds of expressive modeling . When we got to the phase of downloading, editing and printing images, several students showed more interest in working on and exhibiting pictures that they themselves appeared in, than those they shot . As educators, we decided that the students modeling and performance was of equal value (and constituted authorship) as the taking of the photographs . For our show, some students chose to exhibit images they had taken while others exhibited images they were in, or both . We included a written statement at the show about the evolution and complex group nature of authorship in our project .
ConfidenceBeth Krebs
I had a student last year who seemed to lack confidence—she would give up on things pretty quickly, was reluctant to share her ideas during reflection and seemed fearful of embarrassing herself . Part way through the year she asked a question about abstract versus representational art . I decided to make the following week’s lesson a response to
her question and explained that when I presented the lesson . I think she felt acknowledged and more confident because her question had been important enough to develop a class around . She was a little more ready to contribute after that .
BehaviorAndres Laracuente
In an after school class, an individual’s destructive and negative behavior was dominating the group . In an attempt to resolve the situation, we (teachers and site director) met with her, but I feel that the issue of her negative behavior was not effectively addressed. It was, in essence, a failure on our part . I learned to never “corner” a student because it felt way too aggressive and harsh . The best intentions of trying to talk things out were ruined by bad timing, space, and location . It would have been better to have found a safe, private and quiet space where we could talk things out without being rushed and try to establish a balanced dynamic . Not three adults against one kid .
FriendshipLauren Luloff
In a 3rd grade class, an after-school student was feeling very discouraged . He was starting to cry, so we went outside to talk . He cried and cried and talked about how his art is never good, how he felt he couldn’t do it, etc . I really sort of let him go—crying and expressing himself . I asked if he was having a hard day and he said yes . I tried to encourage him and explained that his art is really good, and everyone’s art gets better with practice . Each person’s work is special and unique, and everyone feels discouraged sometimes . In the next class, we started by discussing ways to honor our unique works and worlds . A few weeks later, he made me a drawing saying “Friends Forever .” As a teacher, it was really listening and talking that he needed from me—friendship, love and support .
IdentityCarlos Mateu
One of my experiences is that students who come from a Hispanic/Latino background identify with me . One student
2 3
CURRICULUM RESOURCEART EDUCATION PROGRAM
said that I look like his uncle . Another held my hand and was insisting that I have to meet his grandma . Many of them feel more comfortable speaking in Spanish . The color of the skin also makes a good connection with them .
Learning StyleRose Nestler
In an after school class, there was a young student who repeatedly had a hard time beginning projects . We would help him start to work but he resisted taking ownership of his piece and wanted us to stay with him . He also had a tendency to distract others at his table when he was not focused . We realized he was craving our attention, but we wanted to give him that attention when he was making an effort to stay focused . We decided to step back and wait until he initiated work on his own . However, he would rarely begin his projects on his own and when he did his confidence was so low he would ask to begin again on a new piece of paper several times .
In a summer class I had this student again and while he still had trouble getting started, he really excelled at the sculpture project we were working on . I realized he was engaged with and needed the hands-on experience of clay and wire sculptures versus the flatwork we were making in after school. While the sculptural materials held his interest longer, he still had a tendency to distract his peers when he finished early. To counteract this, I made him responsible for various tasks and jobs with clean up, etc . He responded very positively to managing clean up tasks and it helped him to stay focused and avoid distracting other students from their work .
I realized that all along he just needed projects that met his learning style and skill level . Giving him more responsibility and an art project that he could connect with and succeed at made all the difference in the world.
DestructionLance Paladino
During a drawing project with 4th and 5th graders, a student became frustrated with his work and wanted to destroy it . I was conscious of the fact that if I allowed him to destroy it and start over, it may create a domino effect within an otherwise productive classroom . Still, he was stuck and needed help shifting his focus because his frustration was negatively affecting his presence in the classroom.
We talked about why he was unhappy with the work . I made a number of observations about the strengths and interesting qualities of the drawing, but it was clear that he did not want to continue . I shared similar moments when I had let a drawing go and what I had learned from the experience . I felt it was appropriate to allow him to start over, as he could think of nothing else . We agreed that he could throw out the work but he had to follow a specific set of steps. First, he had to rip up the drawing into the smallest pieces possible so that he could not recognize any part of the original work . As he did this his mood changed . His face lightened and he became engaged in the process . Next, he had to gather the remnants of the drawing into one pile, walk across the room without dropping anything and throw it away . The artist took care in gathering all of the pieces . I walked with him, supporting his efforts, as he threw everything into the trash in one swift motion . These steps created a ritual that was an extension of the creative process . It successfully took the artist’s over-focus on what was not working and directed it into other creative and fun activities .
Build/Erase/Adjust
Steps:1 . Destroying something with an adult’s permission .2 . Ripping the work into many small pieces as a cathartic release .3 . Gathering the pieces .4 . Walking carefully to the trash without dropping any pieces .5 . Throwing them all out so they land in the trash at the same time .
6 . Laughing and having fun .
DisappointmentMaia Palileo
With a 3rd grade class, we were working on a long-term group project. It was a big collaborative effort, using wood blocks and Model Magic to create a building . They spent several weeks on it and worked hard . It involved building, drawing, and painting from observation. As the final step they worked together to paint the building and put on details with the model magic . Once completed, the dilemma became “who takes it home?” The class was very disappointed that each would not get to take the artwork home . Only one child took the work home (which was decided through a game of rock paper scissors). Reflecting on this disappointment, we were able to better prepare the 2nd class about the ownership of

2 4
CURRICULUM RESOURCEART EDUCATION PROGRAM
collaborative art works . In retrospect, we would not have sent the project home with only one student . One resolution could have been to make a separate section for each to take home . For example, the project could have been built in separate pieces that could fit together like a puzzle to form a whole, but still retain individual components .
BoredomMeghan Turbitt
In my classroom, students are given a certain amount of independence and freedom . There are multiple options for students at any given time: books/comics to read, sketchbooks, free drawing paper, etc . If a student isn’t engaged in a project or says they are bored, there is always a choice for them to do something else . This comes from my own experience in my studio practice . If I don’t feel up to working on a painting or comic I’ve been struggling with, I always have the choice and supplies to do something else .
EmotionsAbraham Salazar
Working with students can be very intense because you can remember being a student yourself and can relate to their experiences . I recall a student that had an issue with anger . It was difficult for him to express his feelings and this made him frustrated . One day he got upset with another student and he was unable to contain his emotions . I spoke with him outside the classroom and said that sometimes, in life, it is hard to not be angry . I explained that you cannot avoid it, but you can always control what happens after you react . We talked for fifteen minutes and I felt that he was beginning to understand my point . I told him that I would help to ensure that he stayed positive in class . I let him know that he could reach out to me at anytime and was always welcome to come make art .
CopyGeorgia Wall
Inspired by the collage and illustrations of the children’s author, Ezra Jack Keats, my 4th grade students were creating collage representations of objects they had brought from home using construction paper . Some students were working very slowly and carefully but other students were working quickly and finished within five minutes. I was trying
to consider how to deal with the disparity in work time and ended up having the few students who had finished switch work with one another and copy their classmates collage . In the end, this created interesting doubles and introduced an element of copying and repetition into the lesson . I asked the students to copy another person’s collage but change one thing . Over time the representations became more abstracted . At the end of the lesson, we were able to have a conversation about how it felt to copy, the choices the students made when they had the ability to change one thing, and how the image changed with each new revision .
MisunderstandingSarah Wang
During a presentation in a high school class, one student mistakenly thought another had said something about him under her breath . He reacted angrily and threw an empty plastic bottle in her direction . In response, she threw a plastic bottle at him. I took the student who reacted first outside and he broke down crying right away . I asked why he threw the bottle and he explained that he had felt wronged by the other student’s comment . He also explained that he was having a bad morning and had gotten into an argument with his mom before he came to class . These two were friends and spent plenty of time teasing each other, so it was not like them to be angry with each other . Not long after, the other student came out voluntarily and I reiterated what the first student had told me before asking her to tell her side . She explained that he had misunderstood her and that her comment was not directed at him . They were great kids to begin with and it was really just a misunderstanding so they worked it out and hugged in the end .
RepairSher Wouters
Some 3rd graders had worked on a group project that was being stored in the hallway and had been destroyed by some “little creepy destroyer” hands . The students were devastated when they found their piece missing . In the following class, we discussed the experience and the students shared their reactions . Together they decided that the best protocol was to make a giant poster that communicated how they felt and asked the “destroyer hands” to be respectful of everyone’s artwork . The whole class got involved .

2 5
CURRICULUM RESOURCEART EDUCATION PROGRAM
Table of Concepts and MediumsWhat follows is a chart of foundational art concepts that are ideally addressed in a well-rounded, yearlong art curricula . Items are organized according to developmental stages: & . Some concepts may apply to all forms of art making while others may apply only to a specific medium. In addition to listing the concepts, the chart also relates them to Drawing, Collage & Printmaking, Painting, and Sculpture . You will notice that several concepts continue to be relevant beyond their developmental stage . These are repeated in each section . We have done our best to list concepts that apply to more than one medium in each category for which they are applicable . There are exceptions; some concepts that could be applied more broadly may only be listed with the mediums that posses the greatest physical or associative connections .
These tables are intended as a springboard for lesson planning as well as a toolkit from which you may use and combine items according to your own design .
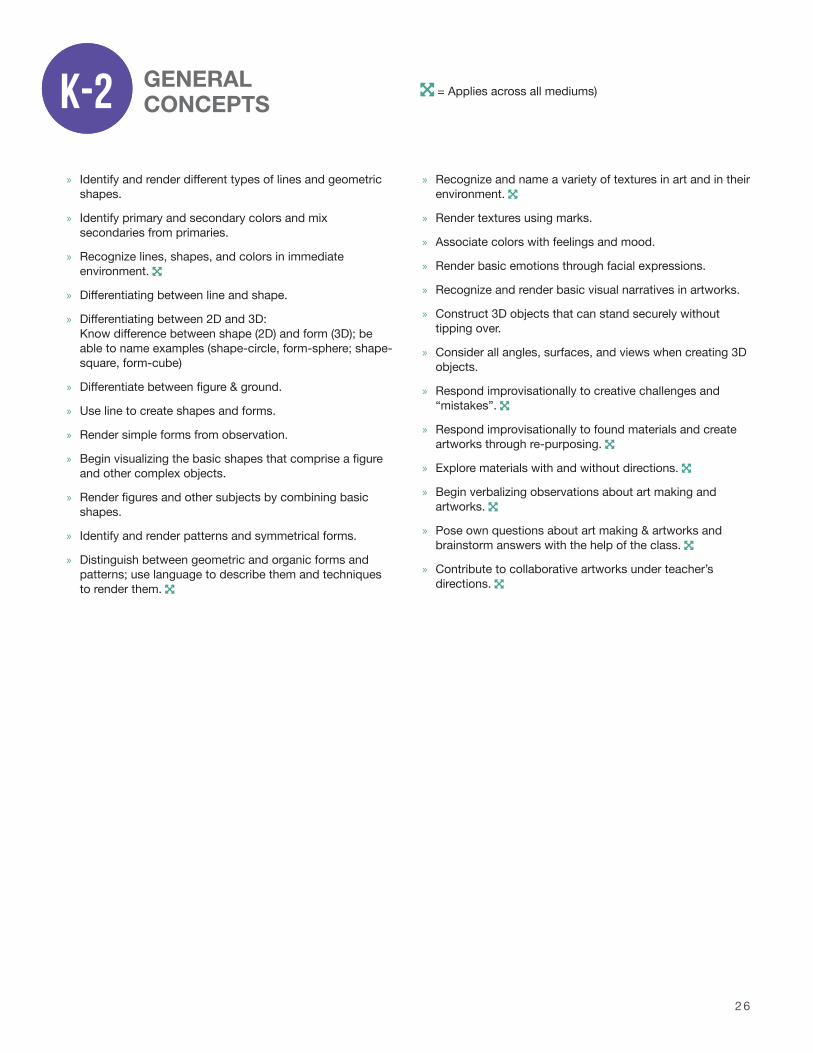
2 6
K-2 Concepts K-2 Concepts
» Identify and render different types of lines and geometric shapes .
» Identify primary and secondary colors and mix secondaries from primaries .
» Recognize lines, shapes, and colors in immediate environment .
» Differentiating between line and shape.
» Differentiating between 2D and 3D: Know difference between shape (2D) and form (3D); be able to name examples (shape-circle, form-sphere; shape-square, form-cube)
» Differentiate between figure & ground.
» Use line to create shapes and forms .
» Render simple forms from observation .
» Begin visualizing the basic shapes that comprise a figure and other complex objects .
» Render figures and other subjects by combining basic shapes .
» Identify and render patterns and symmetrical forms .
» Distinguish between geometric and organic forms and patterns; use language to describe them and techniques to render them .
» Recognize and name a variety of textures in art and in their environment .
» Render textures using marks .
» Associate colors with feelings and mood .
» Render basic emotions through facial expressions .
» Recognize and render basic visual narratives in artworks .
» Construct 3D objects that can stand securely without tipping over .
» Consider all angles, surfaces, and views when creating 3D objects .
» Respond improvisationally to creative challenges and “mistakes” .
» Respond improvisationally to found materials and create artworks through re-purposing .
» Explore materials with and without directions .
» Begin verbalizing observations about art making and artworks .
» Pose own questions about art making & artworks and brainstorm answers with the help of the class .
» Contribute to collaborative artworks under teacher’s directions .
= Applies across all mediums)K-2 GENERAL CONCEPTSK-2

2 7
Drawing Concepts
» Identify and render different types of lines and geometric shapes .
» Recognize lines, shapes, and colors in immediate environment .
» Differentiating between line and shape .
» Differentiate between figure & ground.
» Use line to create shapes and forms .
» Render simple forms from observation .
» Begin visualizing the basic shapes that comprise a figure and other complex objects .
» Render figures and other subjects by combining basic shapes .
» Identify and render patterns and symmetrical forms .
» Distinguish between geometric and organic forms and patterns; use language to describe them and techniques to render them .
» Recognize and name a variety of textures in art and environment .
» Render textures using marks .
» Render basic emotions through facial expressions .
» Recognize and render basic visual narratives in artworks .
Skills & Techniques
» Experience mark-making with a variety of materials (ex: use tape or string to make a drawing, trace objects and templates to make a drawing) .
» Holding pencil with tripod fingers.
» Vary line thickness
» Use side and tip of pastel, blending .
» Textural rubbings
» Layer and smudging pastels .
» Practice drawing simple forms from observation (ex: toy insect or piece of candy)
» Practice drawing from observation using pictures (ex: drawing or photographs of trees, animals, buildings, etc)
» Practice drawing subjects from imagination .
» Practice drawing self using a photograph or mirror
» Practice drawing a classmate
» List parts of body/face and make sure to draw each part
» Participate in collaborative drawing exercises such as the Surrealist drawing game Exquisite Corpse
Vocabulary
» Drawing
» Line & Mark
» Detail
» Words that describe qualities of line (ex: straight, curved, jagged, squiggly, thin, thick, dotted, broken, hard, soft, etc .)
» Composition (the way lines, shapes, colors and textures are arranged on a page)
» Vertical/Horizontal/Diagonal
» Geometric shapes (ex: circle, square, pentagon, etc .)
» Geometric & Organic
» Texture
» Words that describe qualities of texture (ex: rough, smooth, bumpy, grainy, squishy, etc .)
» Pattern (types of pattern; Radial, organic, grid, etc .)
» Outline/Contour
» Blend/Smear/Smudge
» Variation
» Observation
» Point of View
» Overlap/Layering
» Scale
Tools & Materials
» Variety of pencils
» Erasers
» Markers of varying thickness
» Oil & chalk pastels
» Color pencils/Watercolor pencils
» String/Tape
» Bamboo /Reed pens
» Twigs
» Graphite sticks
» Sumi ink & brushes
» Templates for tracing
K-2 MEDIUMS
K-2 DRAWING
K-2 Mediums: Drawing K-2 Mediums

2 8
K-2 Mediums: Collage & Printmaking
Collage & Printmaking Concepts
» Recognize lines, shapes, and colors in immediate environment .
» Differentiating between line and shape .
» Differentiate between figure & ground.
» Begin visualizing the basic shapes that comprise a figure and other complex objects .
» Render figures and other subjects by combining basic shapes .
» Identify and render patterns and symmetrical forms .
» Distinguish between geometric and organic forms and patterns; use language to describe them and techniques to render them .
» Recognize and name a variety of textures in art and in their environment .
» Render textures using marks .
» Associate colors with feelings and mood .
» Render basic emotions through facial expressions .
» Recognize and render basic visual narratives in artworks .
Skills & Techniques
» Learning to tear paper with intentionality .
» Learning to hold scissors properly and cut: • Curved and straight edges • “Draw shapes with scissor” • Cut folded paper to create symmetrical forms
» Learning how to apply appropriate amounts of adhesive: • Tape • Glue stick • Liquid Glue from bottle or with brush
» Learning to arrange and layer papers
» Learning to create simple pop-up structures, collage papers that stick up from the page, and simple bookbinding .
» Combining a variety of materials to create images: • Found objects • Textured and patterned papers and fabrics • String, wooden shapes, and other craft items
» Incorporating found imagery and text into collages .
» Textural rubbings
» Rubber stamps
» Simple printing of Styrofoam or collagraph plates (with assistance): • Applying ink with brayer • Applying appropriate pressure when hand rubbing prints
» Drawing, painting, or applying other mediums on top of prints .
» Learn how to sign and date prints
Vocabulary
» Words that describe qualities of edges (ex: straight, curved, jagged, hard, soft, etc .)
» Composition (the way lines, shapes, colors and textures are arranged on a page)
» Vertical/Horizontal/Diagonal
» Geometric shapes (ex: circle, square, pentagon, etc .)
» Geometric & Organic
» Texture
» Words that describe qualities of texture (ex: rough, smooth, bumpy, grainy, squishy, etc .)
» Pattern (types of pattern; Radial, organic, grid, etc .)
» Outline/Contour
» Variation
» Symmetry
» Overlap/Layering
» Detail
» Impression (another word for a print)
» Ghost Print
» Names of specialized tools and materials (brayers, plexiglass, etc .)
» Artist Proof/Proofing
Tools & Materials
» Colored Papers
» Textured, patterned, and metallic papers
» Translucent papers
» Clear and tinted mylar/cellophane
» Tape
» Glue
» Scissors
» Rulers
» Brayers
» Printing Inks
» Rubber Stamps and ink pads
» Plexiglass sheets
» Pre-cut shapes and materials
» String & rubber bands
» Fabrics
» Assorted craft items (beads, wood shapes, feathers, etc .)
» Found materials
» Soft foam sheets
» Styrofoam boards
» Wooden Stylus (skewers, craft sticks, etc)
K-2 COLLAGE & PRINTMAKING
K-2 MEDIUMS
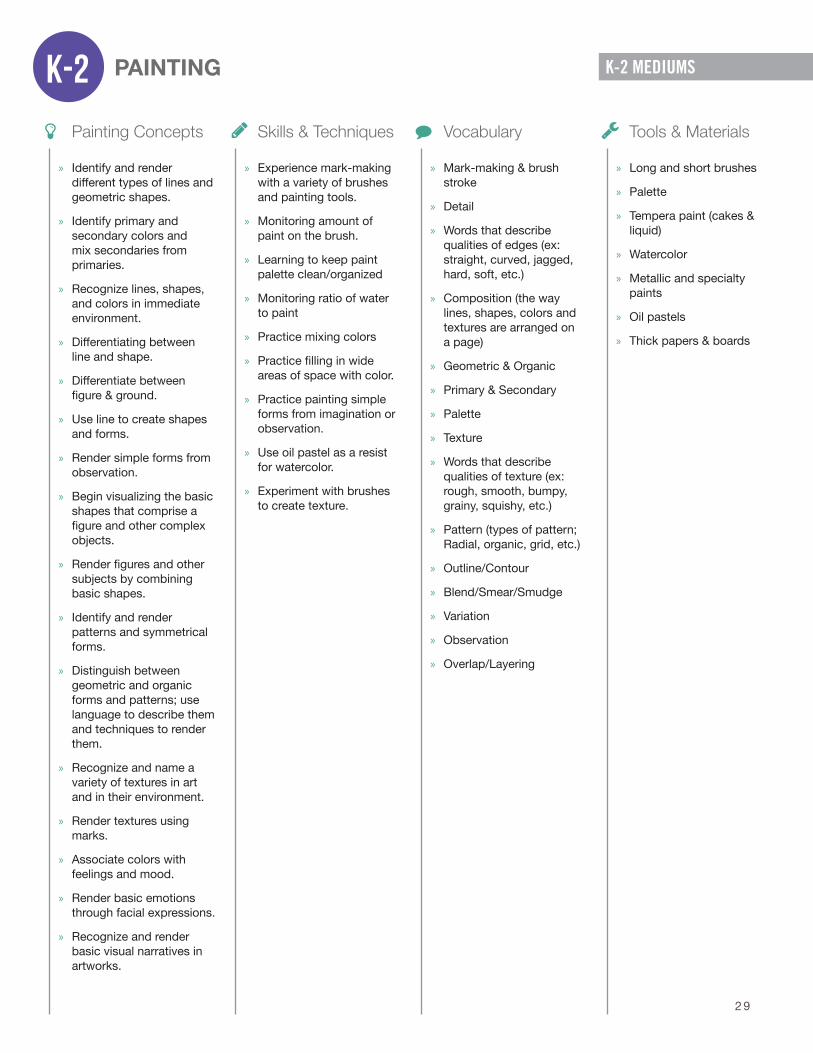
2 9
Painting Concepts
» Identify and render different types of lines and geometric shapes .
» Identify primary and secondary colors and mix secondaries from primaries .
» Recognize lines, shapes, and colors in immediate environment .
» Differentiating between line and shape .
» Differentiate between figure & ground.
» Use line to create shapes and forms .
» Render simple forms from observation .
» Begin visualizing the basic shapes that comprise a figure and other complex objects .
» Render figures and other subjects by combining basic shapes .
» Identify and render patterns and symmetrical forms .
» Distinguish between geometric and organic forms and patterns; use language to describe them and techniques to render them .
» Recognize and name a variety of textures in art and in their environment .
» Render textures using marks .
» Associate colors with feelings and mood .
» Render basic emotions through facial expressions .
» Recognize and render basic visual narratives in artworks .
Skills & Techniques
» Experience mark-making with a variety of brushes and painting tools .
» Monitoring amount of paint on the brush .
» Learning to keep paint palette clean/organized
» Monitoring ratio of water to paint
» Practice mixing colors
» Practice filling in wide areas of space with color .
» Practice painting simple forms from imagination or observation .
» Use oil pastel as a resist for watercolor .
» Experiment with brushes to create texture .
Vocabulary
» Mark-making & brush stroke
» Detail
» Words that describe qualities of edges (ex: straight, curved, jagged, hard, soft, etc .)
» Composition (the way lines, shapes, colors and textures are arranged on a page)
» Geometric & Organic
» Primary & Secondary
» Palette
» Texture
» Words that describe qualities of texture (ex: rough, smooth, bumpy, grainy, squishy, etc .)
» Pattern (types of pattern; Radial, organic, grid, etc .)
» Outline/Contour
» Blend/Smear/Smudge
» Variation
» Observation
» Overlap/Layering
Tools & Materials
» Long and short brushes
» Palette
» Tempera paint (cakes & liquid)
» Watercolor
» Metallic and specialty paints
» Oil pastels
» Thick papers & boards
K-2 PAINTING K-2 MEDIUMS
K-2 Mediums: Painting

3 0
K-2 Mediums: Sculpture
Sculpture Concepts
» Differentiating between 2D and 3D .
» Begin visualizing the basic forms that comprise a figure and other complex objects .
» Render figures and other subjects by combining basic forms .
» Know difference between shape (2D) and form (3D); be able to name examples (shape-circle, form-sphere; shape-square, form-cube)
» Construct 3D objects that can stand securely without tipping over .
» Consider all angles, surfaces, and views when creating 3D objects .
» Respond improvisationally to found materials and create artworks through re-purposing .
Skills & Techniques
» Manipulating clay with hands and tools
» Learning to pinch, pull, carve, roll, and smooth clay .
» Learning to draw in clay and use objects to create textural impressions .
» Learn to join clay pieces with scoring and smoothing techniques .
» Practice, stacking, balancing and gluing wooden shapes and small found objects (i .e . assemblage)
» Learn to fold, roll, and bend paper to make 3-D forms like masks and pop-ups .
» Constructing figures and animals with pipe cleaners, straws, and other found objects .
» Learn to build tin foil armatures .
» Learn to apply paper maché and/or plaster gauze to armatures or molds (i .e . balloons and plastic face masks) .
» Use a base to stabilize precarious objects .
Vocabulary
» 3D
» Vertical/Horizontal/Diagonal
» Assemblage
» Construction
» Balance/Stability
» Base
» Geometric volumes (ex: sphere, cube, pyramid, column, etc .)
» Paper Maché
» Armature
» Impression (shapes and textures pushed into clay)
» Score
» Join
» Mold (drape-mold)
» Positive & Negative Space
Tools & Materials
» Play Dough
» Clay
» Model Magic
» Wood scraps
» Found materials
» Paper Maché & plaster gauze
» Paper & cardboard
» Assorted craft items
» String
» Pipe cleaners
K-2 MEDIUMS
K-2 SCULPTURE

3 1
» Identify primary and secondary colors and mix secondaries from primaries .
» Apply 3-5 distinct gray values in an artwork .
» Understand and apply shades and tints to colors .
» Mix variations of a singular color .
» Recognize lines, shapes, and colors in immediate environment .
» Begin visualizing the basic shapes that comprise a figure and other complex objects .
» Render figures and other subjects by combining basic shapes .
» Identify and render patterns and symmetrical forms .
» Distinguish between geometric and organic forms and patterns; use language to describe them and techniques to render them .
» Recognize and name a variety of textures in art and in their environment .
» Render textures using marks .
» Use scale shifts to suggest the illusion of depth .
» Recognize and apply foreground/middleground/background .
» Render more detailed visual narratives and sequential narratives .
» Associate colors with feelings and mood .
» Recognizing the qualities of opacity and translucency of varied mediums and use them intentionally .
» Construct 3D objects that can stand securely without tipping over .
» Consider all angles, surfaces, and views when creating 3D objects .
» Respond improvisationally to creative challenges and “mistakes” .
» Explore materials with and without directions .
» Differentiate between a practice draft and a final version.
» Developing the ability to investigate; attempting to solve a creative challenge in more than one way .
» Developing awareness of personal interests in subject matter, and visual style .
» Developing ability to verbalize personal understanding of artworks using art terminology as opposed to “that thing .”
» Developing ability to recognize symbols and symbolic use of color and/or other visual elements in artwork .
» Collaborate with a small group to create an artwork; Negotiate roles and decisions by consensus .
» Articulate observations about art making and artworks through discussion and brief written statements .
» Developing awareness of professional and vocational applications for artistic skills, i .e . Careers in the Arts .
= Applies across all mediums)3-5
3-5 Concepts 3-5 Concepts
GENERAL CONCEPTS

3 2
3-5 Mediums: Drawings 3-5 Mediums
3-5 MEDIUMS
DRAWING3-5Drawing Concepts
» Identify and render different types of lines and geometric shapes .
» Recognize lines, shapes, and colors in immediate environment .
» Render simple forms from observation .
» Begin visualizing the basic shapes that comprise a figure and other complex objects .
» Render figures and other subjects by combining basic shapes .
» Identify and render patterns and symmetrical forms .
» Distinguish between geometric and organic forms and patterns; use language to describe them and techniques to render them .
» Recognize and name a variety of textures in art and environment .
» Render textures using marks .
» Render basic emotions through facial expressions .
» Differentiate between a practice draft and a final version .
» Apply 3-5 distinct gray values in an artwork
» Use scale shifts to suggest the illusion of depth .
» Recognize and apply foreground/middleground/background .
» Render more visual narratives and sequential narratives .
Skills & Techniques
» Experience mark-making with a variety of materials (ex: use tape or string to make a drawing, trace objects and templates to make a drawing) .
» Vary line thickness . » Use side and tip of pastel,
blending . » Vary pressure to create dark and
light lines . » Practice cross-hatching, stippling,
and other drawn gradients . » Make practice sketches . » Trace and transfer visual
information » Textural Rubbings » Layer and smudging pastels . » Draw still lives from observation
(ex: Common household objects, etc)
» Practice drawing from observation using pictures (ex: drawing or photographs of trees, animals, buildings, etc) .
» Practice drawing subjects from imagination .
» Observe and list details for a scene and then select a key number of details to incorporate .
» Draw imagery from different points of view (ex: Birdseye view)
» Draw overlapping items . » Experiment with foreshortening . » Practice drawing self using a
photograph or mirror . » Practice drawing a classmate » Observe and render more accurate
human/animal proportions . » Draw figures that can bend knees
and elbows . » Participate in collaborative drawing
exercises such as the Surrealist drawing game Exquisite Corpse .
» Draw a sequence of images (ex: Before and after scenes or how a place changes through the seasons)
» Practice drawing atmospheric perspective from imagination or observation .
» Design logos and other graphic elements
» Incorporate text into drawings .
Vocabulary
» Words that describe qualities of line (ex: straight, curved, jagged, squiggly, thin, thick, dotted, broken, hard, soft, etc .)
» Composition (the way lines, shapes, colors and textures are arranged on a page)
» Vertical/Horizontal/Diagonal
» Geometric & Organic
» Texture
» Words that describe qualities of texture (ex: rough, smooth, bumpy, grainy, squishy, etc .)
» Pattern (types of pattern; Radial, organic, grid, etc .)
» Outline/Contour
» Blend/Smear/Smudge
» Variation
» Observation
» Point of View
» Overlap/Layering
» Scale
» Proportion
» Foreground/Middleground/Background
» Foreshortening
» Frontal/Profile Views
» Sketch
» Cross Hatching/Stippling
» Gradient/Value/Tone
Tools & Materials
» Variety of pencils
» Erasers
» Markers of varying thickness
» Permanent Markers
» Oil & chalk pastels
» Color pencils/Watercolor pencils
» String/Tape
» Bamboo /Reed pens
» Twigs
» Graphite sticks
» Sumi ink & brushes
» Fine point pens
» Mechanical pencils
» Graphite sticks
» Calligraphy pens
» Various straight edges
» Compass, triangle, French Curves, and other templates for tracing
» Viewfinder

3 3
Collage & Printmaking Concepts
» Recognize lines, shapes, and colors in immediate environment .
» Begin visualizing the basic shapes that comprise a figure and other complex objects .
» Render figures and other subjects by combining basic shapes .
» Identify and render patterns and symmetrical forms .
» Distinguish between geometric and organic forms and patterns; use language to describe them and techniques to render them .
» Recognize and name a variety of textures in art and in their environment .
» Render textures using marks .
» Associate colors with feelings and mood .
» Render basic emotions through facial expressions .
» Recognize and render basic visual narratives in artworks .
» Differentiate between a practice draft and a final version . (Printmaking)
» Recognizing the qualities of opacity and translucency of varied mediums and use them intentionally .
» Use scale shifts to suggest the illusion of depth .
» Respond improvisationally to found materials and create artworks through re-purposing .
» Learn to make monotypes from one plate .
Skills & Techniques
» Learning to tear paper with intentionality .
» Learning to hold scissors properly and cut: • Curved and straight edges • “Draw shapes with scissor” • Cut folded paper to create symmetrical forms
» Learning how to apply appropriate amounts of adhesive: • Tape • Glue stick • Liquid Glue from bottle or with brush
» Learning to arrange and layer papers
» Learning to create simple pop-up structures, collage papers that stick up from the page, and simple bookbinding .
» Combining a variety of materials to create images: • Found objects • Textured and patterned papers and fabrics • String, wooden shapes, and other craft items
» Incorporating found imagery and text into collages .
» Textural Rubbings
» Rubber Stamps
» Simple printing of Styrofoam or collagraph plates (with assistance): • Applying ink with brayer • Applying appropriate pressure when hand rubbing prints
» Drawing, painting, or applying other mediums on top of prints .
» Learn how to sign and date prints
Vocabulary
» Words that describe qualities of edges (ex: straight, curved, jagged, hard, soft, etc .)
» Composition (the way lines, shapes, colors and textures are arranged on a page)
» Vertical/Horizontal/Diagonal
» Geometric & Organic
» Texture
» Words that describe qualities of texture (ex: rough, smooth, bumpy, grainy, squishy, etc .)
» Pattern (types of pattern; Radial, organic, grid, etc .)
» Outline/Contour
» Variation
» Symmetry
» Overlap/Layering
» Detail
» Impression (another word for a print)
» Ghost Print
» Names of specialized tools and materials (brayers, plexiglass, etc .)
» Artist Proof/Proofing
» Transparent/Opaque
Tools & Materials
» Colored Papers
» Textured, patterned, and metallic papers
» Translucent papers
» Clear and tinted mylar/cellophane
» Tape
» Glue
» Scissors
» Rulers
» Brayers
» Printing Inks
» Rubber Stamps and ink pads
» Plexiglass sheets
» Pre-cut shapes and materials
» String & rubber bands
» Fabrics
» Assorted craft items (beads, wood shapes, feathers, etc .)
» Found materials
» Soft foam sheets
» Styrofoam boards
» Wooden Stylus (skewers, craft sticks, etc)
3-5 MEDIUMSCOLLAGE & PRINTMAKING3-5
3-5 Mediums: Collage & Printmaking
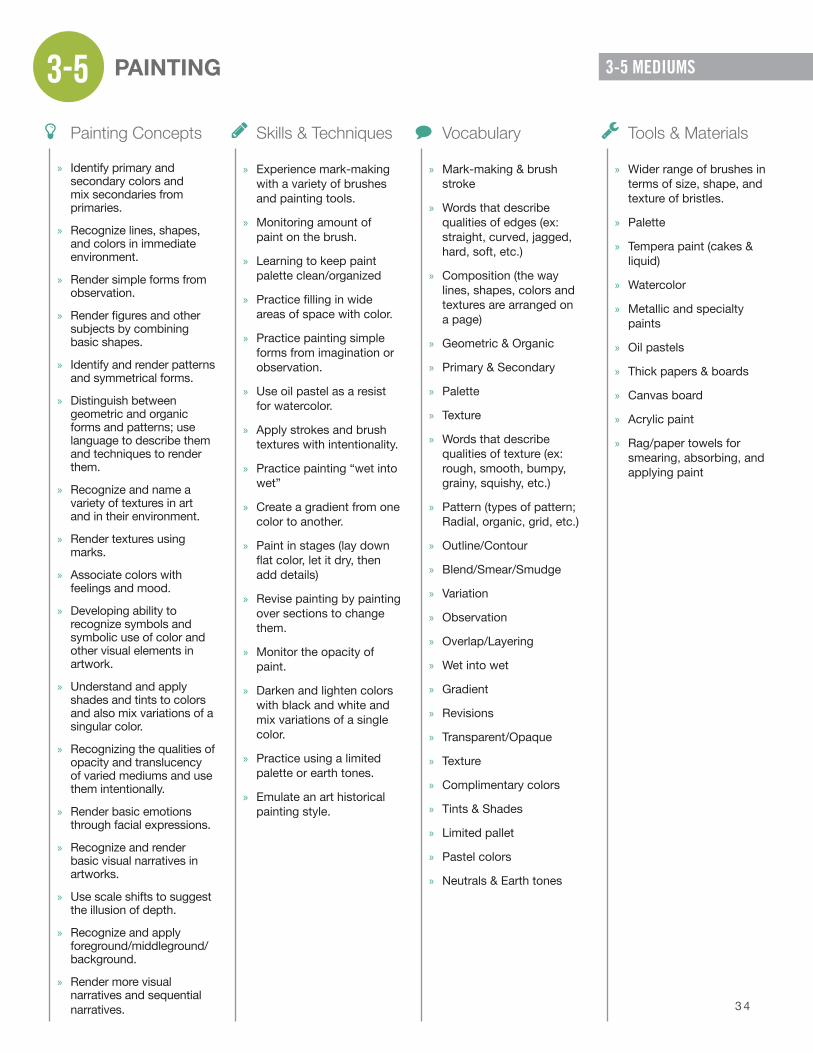
3 4
3-5 Mediums: Painting
Painting Concepts
» Identify primary and secondary colors and mix secondaries from primaries .
» Recognize lines, shapes, and colors in immediate environment .
» Render simple forms from observation .
» Render figures and other subjects by combining basic shapes .
» Identify and render patterns and symmetrical forms .
» Distinguish between geometric and organic forms and patterns; use language to describe them and techniques to render them .
» Recognize and name a variety of textures in art and in their environment .
» Render textures using marks .
» Associate colors with feelings and mood .
» Developing ability to recognize symbols and symbolic use of color and other visual elements in artwork .
» Understand and apply shades and tints to colors and also mix variations of a singular color .
» Recognizing the qualities of opacity and translucency of varied mediums and use them intentionally .
» Render basic emotions through facial expressions .
» Recognize and render basic visual narratives in artworks .
» Use scale shifts to suggest the illusion of depth .
» Recognize and apply foreground/middleground/background .
» Render more visual narratives and sequential narratives .
Skills & Techniques
» Experience mark-making with a variety of brushes and painting tools .
» Monitoring amount of paint on the brush .
» Learning to keep paint palette clean/organized
» Practice filling in wide areas of space with color .
» Practice painting simple forms from imagination or observation .
» Use oil pastel as a resist for watercolor .
» Apply strokes and brush textures with intentionality .
» Practice painting “wet into wet”
» Create a gradient from one color to another .
» Paint in stages (lay down flat color, let it dry, then add details)
» Revise painting by painting over sections to change them .
» Monitor the opacity of paint .
» Darken and lighten colors with black and white and mix variations of a single color .
» Practice using a limited palette or earth tones .
» Emulate an art historical painting style .
Vocabulary
» Mark-making & brush stroke
» Words that describe qualities of edges (ex: straight, curved, jagged, hard, soft, etc .)
» Composition (the way lines, shapes, colors and textures are arranged on a page)
» Geometric & Organic
» Primary & Secondary
» Palette
» Texture
» Words that describe qualities of texture (ex: rough, smooth, bumpy, grainy, squishy, etc .)
» Pattern (types of pattern; Radial, organic, grid, etc .)
» Outline/Contour
» Blend/Smear/Smudge
» Variation
» Observation
» Overlap/Layering
» Wet into wet
» Gradient
» Revisions
» Transparent/Opaque
» Texture
» Complimentary colors
» Tints & Shades
» Limited pallet
» Pastel colors
» Neutrals & Earth tones
Tools & Materials
» Wider range of brushes in terms of size, shape, and texture of bristles .
» Palette
» Tempera paint (cakes & liquid)
» Watercolor
» Metallic and specialty paints
» Oil pastels
» Thick papers & boards
» Canvas board
» Acrylic paint
» Rag/paper towels for smearing, absorbing, and applying paint
3-5 MEDIUMSPAINTING3-5
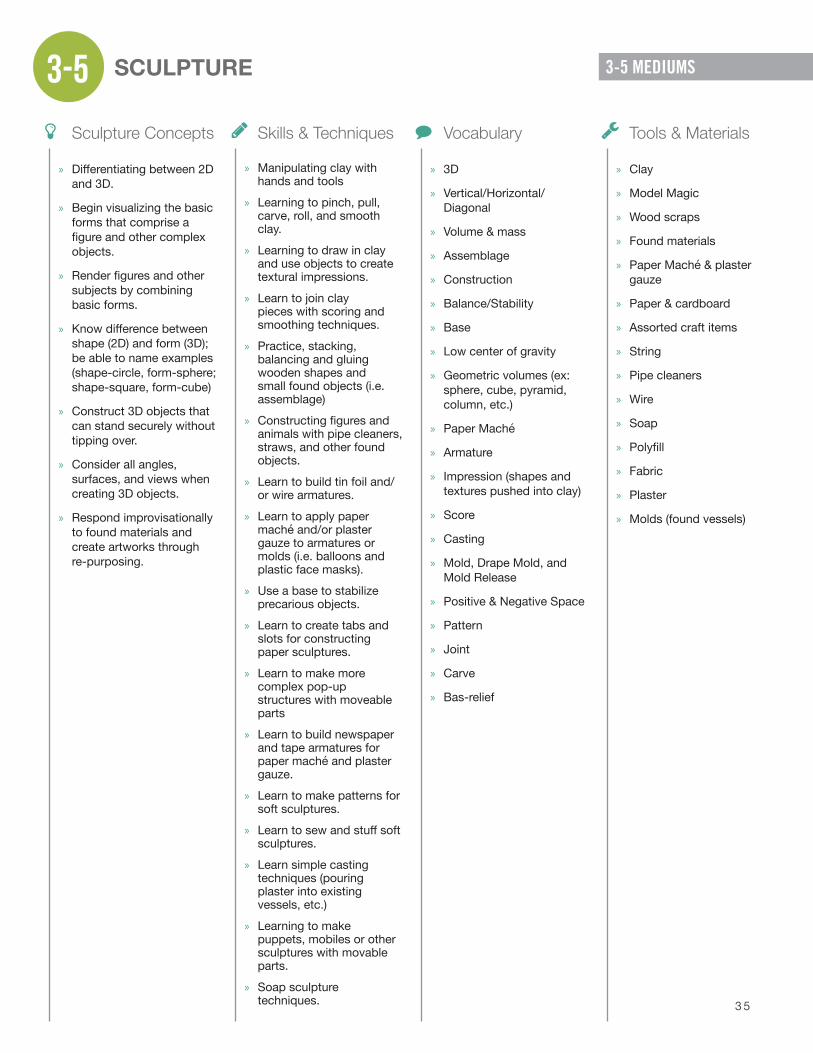
3 5
Sculpture Concepts
» Differentiating between 2D and 3D .
» Begin visualizing the basic forms that comprise a figure and other complex objects .
» Render figures and other subjects by combining basic forms .
» Know difference between shape (2D) and form (3D); be able to name examples (shape-circle, form-sphere; shape-square, form-cube)
» Construct 3D objects that can stand securely without tipping over .
» Consider all angles, surfaces, and views when creating 3D objects .
» Respond improvisationally to found materials and create artworks through re-purposing .
Skills & Techniques
» Manipulating clay with hands and tools
» Learning to pinch, pull, carve, roll, and smooth clay .
» Learning to draw in clay and use objects to create textural impressions .
» Learn to join clay pieces with scoring and smoothing techniques .
» Practice, stacking, balancing and gluing wooden shapes and small found objects (i .e . assemblage)
» Constructing figures and animals with pipe cleaners, straws, and other found objects .
» Learn to build tin foil and/or wire armatures .
» Learn to apply paper maché and/or plaster gauze to armatures or molds (i .e . balloons and plastic face masks) .
» Use a base to stabilize precarious objects .
» Learn to create tabs and slots for constructing paper sculptures .
» Learn to make more complex pop-up structures with moveable parts
» Learn to build newspaper and tape armatures for paper maché and plaster gauze .
» Learn to make patterns for soft sculptures .
» Learn to sew and stuff soft sculptures .
» Learn simple casting techniques (pouring plaster into existing vessels, etc .)
» Learning to make puppets, mobiles or other sculptures with movable parts .
» Soap sculpture techniques .
Vocabulary
» 3D
» Vertical/Horizontal/Diagonal
» Volume & mass
» Assemblage
» Construction
» Balance/Stability
» Base
» Low center of gravity
» Geometric volumes (ex: sphere, cube, pyramid, column, etc .)
» Paper Maché
» Armature
» Impression (shapes and textures pushed into clay)
» Score
» Casting
» Mold, Drape Mold, and Mold Release
» Positive & Negative Space
» Pattern
» Joint
» Carve
» Bas-relief
Tools & Materials
» Clay
» Model Magic
» Wood scraps
» Found materials
» Paper Maché & plaster gauze
» Paper & cardboard
» Assorted craft items
» String
» Pipe cleaners
» Wire
» Soap
» Polyfill
» Fabric
» Plaster
» Molds (found vessels)
3-5 MEDIUMSSCULPTURE3-5
3-5 Mediums: Sculpture

3 6
MS/HS Concepts MS/HS Concepts
» Review color wheel in detail; create own secondaries, tertiaries, neutrals, gradients & black; use a limited palette .
» Understand and apply shades and tints to colors .
» Mix variations of a singular color .
» Developing understanding of • Emotional resonance of color and symbolic use of color . • Symbolic color • Local color • Hue/Saturation
» Apply analogous, harmonizing and dissonant colors to an image or composition .
» Use scale shifts to suggest the illusion of depth .
» Recognize and apply foreground/middleground/background .
» Developing an understanding of light, shadow and value .
» Engage in experimental modes of drawing; using varied mark making .
» Develop visual narratives that reflect personal interests and experiences .
» Developing a basic understanding of perspective; particularly one point perspective and ability to render 2-3 sides of cubic forms in space .
» Developing ability to render figures from angles other than front or profile.
» Ability to interpret and render maps, blueprints, and other schematic visual representations .
» Perform more complex artistic processes such as tracing, transferring, reversing imagery; using grid method to scale up images, casting, etc .
» Developing ability to: • Monitor effects of opacity and transparency • Layer mediums and materials • Create multiples and variations on a theme
» Construct 3D objects that can stand securely without tipping over .
» Consider all angles, surfaces, and views when creating 3D objects .
» Respond improvisationally to creative challenges and “mistakes” .
» Respond improvisationally to found materials and create artworks through re-purposing .
» Explore materials with and without directions .
» Developing ability to self-select own materials and take material explorations in unconventional directions .
» Developing the ability to investigate; attempting to solve a creative challenge in more than one way .
» Developing ability to recognize symbols and symbolic use of color and/or other visual elements in artwork .
» Increased visual literacy; Developing greater abilities to decode symbolic meanings and speculate on artist’s intentions .
» Recognize and apply elements of composition including: Positive/negative space, focal points, contrast, visual balance, etc .
» Create drafts, mock-ups, and revisions in order to realize ambitious projects .
» Maintain self-directed/self-monitored sketchbook/journal .
» Engage in self-directed long-term projects .
» Write notes and ideas about artwork and art-making process .
» Developing ability to document, present and curate in a portfolio format .
» Developing ability to write artist and project statements .
» Developing awareness of own artistic style and aesthetic preferences .
» Connecting studio experience with art history and contemporary art world .
» Introduction to critical theory and ways to apply it to own artwork .
» Research, subjects to create art about them .
» Developing ability to question and deconstruct popular culture .
» Developing communication skills through reflection/critique.
» Explore own identity as a concept and subject .
» Posing and solving one’s own creative questions .
» Collaborate with a group or individual artist; divide labor based on skills and interest and determine own rules for negotiating decisions .
» Developing awareness of art audiences and catering to specific demographics .
» Explore careers in the arts by executing design-based projects .
= Applies across all mediums
= More relevant to younger or less experienced students
= More relevant to older or more experienced students
MS HS GENERAL CONCEPTS

3 7
Drawing Concepts
» Recognize and apply elements of composition including: Positive/negative space, focal points, contrast, visual balance, etc .
» Developing an understanding light, shadow and value .
» Engage in experimental modes of drawing; using varied mark making .
» Develop visual narratives that reflect personal interests and experiences .
» Developing a basic understanding of perspective; particularly one point perspective and ability to render 2-3 sides of cubic forms in space .
» Developing ability to render figures from angles other than front or profile.
» Ability to interpret and render maps, blueprints, and other schematic visual representations .
» Perform more complex artistic processes such as tracing, transferring, reversing imagery; using grid method to scale up images, etc .
» Maintain self-directed/self-monitored sketchbook/journal .
» Developing sensitivity to surface qualities of 2D and 3D artworks .
Skills & Techniques
» Experience mark-making with a variety of materials (ex: use tape or string to make a drawing, trace objects and templates to make a drawing) .
» Vary line thickness . » Vary pressure to create
dark and light lines . » Practice cross-hatching,
stippling, and other drawn gradients .
» Make practice sketches . » Trace and transfer visual
information » Textural Rubbings » Layer and smudging
pastels . » Learn reductive drawing
(i .e . drawing with an eraser) .
» Combine elements drawn from observation with elements from imagination .
» Draw imagery from different points of view (ex: Birdseye view)
» Draw images that require foreshortening .
» Participate in collaborative drawing exercises such as the Surrealist drawing game Exquisite Corpse .
» Practice drawing atmospheric perspective from imagination or observation .
» Design logos and other graphic elements
» Incorporate text into drawings .
» Draft layout for comic book page, map or poster .
» Render positive and negative space, focal points, and other compositional elements with intentionality .
» Draw in a variety of visual styles (ex: Observe and emulate styles of artistic movements, cultures, and individuals)
» Draw from observation: • Practice drawing light and shadow • Still, lives, self-portraits, fabrics, and other complex forms .
» Learn to use grid method of copying to scale change scale of images .
» Practice drawing linear perspective using graph paper and sight lines .
» Practice drawing linear perspective from observation .
» Practice drawing the model (ex: Gesture drawings, long poses etc .)
» Learn to use pencil or ruler to measure proportions, angles, and points of intersection
Vocabulary
» Proportion
» Foreshortening
» Cross Hatching/Stippling
» Gradient/Value/Tone
» Highlight/Shadow
» Volume
» Positive/Negative space
» Linear Perspective (types of perspective)
» Horizon Line/Vanishing Point
» Gesture
» Stylized, Abstract, Non-Objective
» Appropriation
» Typography/ Graphic Design
» Mass/Volume
Tools & Materials
» Variety of pencils
» Variety of hard, soft and kneaded erasers
» Markers of varying thickness
» Permanent Markers
» Oil & chalk pastels
» Color pencils/Watercolor pencils
» String/Tape
» Bamboo /Reed pens
» Twigs
» Graphite sticks
» Sumi ink & brushes
» Fine point pens
» Mechanical pencils
» Graphite sticks
» Charcoal/ Conté Crayons
» Chamois
» Oil stick
» Calligraphy pens
» Various straight edges
» Compass, triangle, French Curves, and other templates for tracing
» Viewfinder
MS/HS MEDIUMS
DRAWING
MS/HS Mediums: Drawing MS/HS Mediums

3 8
MS/HS Mediums: Collage & Printmaking
Collage & Printmaking Concepts
» Render textures using marks .
» Associate colors with feelings and mood .
» Develop visual narratives that reflect personal interests and experiences .
» Developing ability to: • Monitor effects of opacity and transparency • Layer mediums and materials • Create multiples and variations on a theme
» Use scale shifts to suggest the illusion of depth .
» Respond improvisationally to found materials and create artworks through re-purposing .
» Learn to make monotypes from one plate .
» Recognize and apply elements of composition including: Positive/negative space, focal points, contrast, visual balance, etc .
» Perform more complex artistic processes such as tracing, transferring, reversing imagery .
Skills & Techniques
» Drawing, painting, or applying other mediums on top of prints .
» Learn how to sign and date prints
» Learning to cut with a utility blade .
» Learning to sew and incorporate sewn elements .
» Learning a variety of bookbinding techniques .
» Learning to print editions
» Learning to print plates independently .
» Learning to print multiple layers .
» Learning to carve rubber, linoleum and wood blocks .
» Learn to make more complex pop-up book structures with moveable parts as well as various book bindings (accordion, pocket, flip, etc)
Vocabulary
» Ghost Print
» Names of specialized tools and materials (brayers, plexiglass, etc .)
» Transparent/Opaque
» Edition & Artist Proof
» BAT print; Bon à Tirer
» Bookmaking terms (grain of paper, signature, score, types of bindings, etc .)
» Registration
Tools & Materials
» Colored Papers
» Textured, patterned, and metallic papers
» Translucent papers
» Clear and tinted mylar/cellophane
» Tape
» Glue
» Scissors
» Rulers
» Brayers
» Printing Inks
» Rubber Stamps and ink pads
» Plexiglass sheets
» Pre-cut shapes and materials
» String & rubber bands
» Fabrics
» Found materials
» Soft foam sheets
» Styrofoam boards
» Rubber, linoleum and wood-blocks
» Wooden Stylus (skewers, craft sticks, etc)
» Utility blade
» Needle & thread
» Bookbinder’s folder
» Carving tools (woodcut)
» Screens and stencils for screenprinting
MS/HS MEDIUMS
COLLAGE & PRINTMAKING

3 9
Painting Concepts
» Create drafts, mock-ups, and revisions in order to realize ambitious projects .
» Recognize and apply elements of composition including: Positive/negative space, focal points, contrast, visual balance, etc .
» Review color wheel in detail; create own secondaries, tertiaries, neutrals, gradients & black; use a limited pallet .
» Developing understanding of: • Emotional resonance of color and symbolic use of color • Local color • Hue/Saturation
» Developing an understanding light, shadow and value .
» Develop visual narratives that reflect personal interests and experiences .
» Developing a basic understanding of perspective; particularly one point perspective and ability to render 2-3 sides of cubic forms in space .
» Developing ability to render figures from angles other than front or profile.
» Perform more complex artistic processes such as tracing, transferring, reversing imagery; using grid method to scale up images, etc .
» Developing ability to: • Monitor effects of opacity and transparency
Skills & Techniques
» Apply paint in different ways in order to describe a variety of surface textures .
» Practice painting “wet into wet”
» Create a painting from a preliminary sketch and/or underpainting .
» Learn to mix tertiary colors and subtle variations by creating color charts .
» Create images using complimentary and/or analogous colors, etc .
» Create a gradient from one color to another .
» Paint in stages and layers
» Revise painting by painting over sections to change them .
» Experiment with paints of varying consistencies (gel mediums, varnishes, etc .)
» Paint light and shadow from observation
» Paint in specific and intentional styles .
Vocabulary
» Wet into wet
» Gradient
» Tints & Shades
» Limited pallet
» Tertiary colors
» Warm & cool colors
» Hue/Saturation
» Monochrome/polychrome
» Analogous colors
» Underpainting
Tools & Materials
» Wider range of brushes in terms of size, shape, and texture of bristles .
» Palette
» Tempera paint (cakes & liquid)
» Watercolor
» Metallic and specialty paints
» Oil pastels
» Thick papers & boards
» Canvas board and/or stretcher
» Acrylic paint
» Rag/paper towels for smearing, absorbing, and applying paint
» Gel, varnishes and other mediums
MS/HS MEDIUMS
PAINTING
MS/HS Mediums: Painting

4 0
MS/HS Mediums: Sculpture
Sculpture Concepts
» Construct 3D objects that stand securely without tipping over .
» Consider all angles, surfaces, and views when creating 3D objects .
» Respond improvisationally to found materials and create artworks through re-purposing .
» Create drafts, mock-ups, and revisions in order to realize ambitious projects .
» Recognize and apply elements of composition including: Positive/negative space, focal points, contrast, visual balance, etc .
» Perform more complex artistic processes such as tracing, transferring, reversing imagery; using grid method to scale up images, casting, etc .
» Developing sensitivity to surface qualities of 2D and 3D artworks .
Skills & Techniques
» Manipulating clay with hands and tools
» Learn to build wire and wood armatures .
» Learn to apply paper maché and/or plaster gauze to armatures or molds .
» Learn to make patterns for soft sculptures .
» Learn to sew and stuff soft sculptures .
» Learning to make puppets, mobiles or other sculptures with movable parts .
» Carve Styrofoam blocks and light woods like balsa .
» Learn to make more complex pop-up structures with moveable parts .
» Use blades and adhesives to cut, score and construct 3D volumes from paper .
» Learn more complex casting techniques (making molds and casting in a variety of materials .)
» Learn to use hot glue, hammer and nails, and other techniques for constructing sculptures .
» Techniques for specialized mediums like ceramics, woodcraft, stained glass, and the like can be taught where there is access to appropriate equipment .
Vocabulary
» Assemblage
» Armature
» Score
» Casting
» Mold, Inner/outer mold & Mold release
» Bas-relief
» Score
Tools & Materials
» Clay
» Model Magic
» Wood scraps
» Found materials
» Paper maché & plaster gauze
» Paper & cardboard
» Assorted craft items
» String
» Wire
» Soap
» Polyfill
» Fabric
» Plaster
» Utility blades
» Hot glue gun
» Basic hardware tools (pliers, hammer, etc)
» Carving tools
» Soft carving blocks
» Molds (found vessels)
» Latex and plaster for molds
» Mold release agents
MS/HS MEDIUMS
SCULPTURE

4 1
CURRICULUM RESOURCEART EDUCATION PROGRAM
End NotesNow that you have reviewed the tables, you will notice that there are more items in each section than can be sufficiently addressed in a single year . The idea is that as a student progresses from one age group to the next they will be exposed to a majority of these concepts
We have done our best to list concepts that apply to more than one medium in each category for which they are relevant . For example, the concept “Using scale shifts to suggest the illusion of depth” appears with mediums like Drawing, Painting, and Collage but does not appear with Sculpture since this concept does not usually apply to 3D . There are some exceptions to this logic . For example, one can technically learn color mixing through a wide array of mediums however principles of color are traditionally associated most closely with painting . In order to keep the chart from becoming too confusing or unwieldy we have applied concepts relating to color in the Painting Table .
Concepts that apply more globally to higher order thinking skills such as the HS concept of “Posing and solving one’s own creative questions” are not listed in any of the medium charts because they can be taught through any medium yet do not directly relate to the physical characteristics of any of them . While the MS Concept of “Developing visual narratives that reflect personal interests and experiences” can theoretically apply to any medium, it bears a strong associative connection to Drawing and Painting .
What is presented here is akin to a drawing from observation that omits and exaggerates its subject in order to convey a certain point of view . Despite the subjective nature of this pursuit we believe this set of tables will be a valuable resource to those who wish to teach studio art .
End Notes

4 2
CURRICULUM RESOURCEART EDUCATION PROGRAM
SAMPLE LESSON PLAN FOR EARLY ELEMENTARY STUDENTS
Project Title:Transforming Mistakes
Duration: Formatted for a 1-hour After School Art class
Learner Objectives: This project is designed to ease frustration about imperfections . It encourages students to shift their thinking in relation to perceived “mistakes” and practice flexibility in moments of artistic distress . Each student will be given a paper with a pre-made “mistake” and will be invited to experiment with drawing various transformations, without the use of erasers . Students are encouraged to practice improvisation by envisioning multiple possibilities for the outcome of the “mistake” .
Through this exercise students will practice: » Creative problem solving, experimentation,
flexibility and persistence
» Envisioning new outcomes .
Student Outcomes:Students will work on a sheet of paper with a pre-made “mistake” in the form of scratches and squiggles made with a black permanent marker . These marks are made by the ATs prior to class. Each student will experiment with finding a creative solution to the “mistake” by transforming it into something new . The concept of transforming mistakes will be referenced throughout the term when students express frustration with content and technique .
Motivation/Introduction:The discussion may begin with a brief demonstration that
Exploration through creative play and a variety of materials is essential to the development of both mind and body . “Grades K-2” on page 5
Creatively, they are more self-critical and concerned with being right . “Grades 3-5” on page 5
Respond improvisationally to creative challenges and “mistakes” . “K-2 Concepts” on page 26
Holding pencil with tripod fingers. “K-2 Mediums: Drawing” on page 27
Practice drawing subjects from imagination . “K-2 Mediums: Drawing” on page 27
Use line to create shapes and forms . “K-2 Concepts” on page 26
Explore materials with and without directions . “K-2 Concepts” on page 26 “3-5 Concepts” on page 31
Begin visualizing the basic shapes that comprise a figure and other complex objects . “K-2 Concepts” on page 26 “3-5 Concepts” on page 31
Render figures and other subjects by combining basic shapes. “K-2 Concepts” on page 26 “3-5 Concepts” on page 31
Developing the ability to investigate; attempting to solve a creative challenge in more than one way . “K-2 Concepts” on page 26 “3-5 Concepts” on page 31
Sample Lesson Plans
In order to illustrate how the Curriculum Resource can inform the design of lessons we have included two sample lesson plans . These are two different approaches to lesson plan writing. Alongside the lesson plans are side notations marked with CR (for Curriculum Resource), showing how principles and ideas from this resource contributed to the lessons, and where you can find that information in this document .
CR
CR
4 3
CURRICULUM RESOURCEART EDUCATION PROGRAM
involves the AT making a drawing in front of the students and then expressing frustration about a “mistake” . The AT then puts a big X through the drawing, crumples the paper up and throws it on the floor. Students often respond with joy and empathy at witnessing this process . Students are invited to share their experience and feelings about ruined artworks . The AT then shows the students a paper with a pre-made “mistake” drawn on it . The AT asks the students “What should I transform this ‘mistake’ into?” Students are called on to make suggestions as the AT draws what they describe . The AT introduces the idea of transforming our “mistakes” and frustrations into something new . Some questions to motivate discussion can include:
» What is transformation?
» What is improvisation?
» What is a “happy accident?”
» What is the difference between on-purpose and accident? How can we use both?
» What is the difference between intent and chance? (Older elementary)
Vocabulary
(For all elementary)
» Experiment
» Frustration
» Imagine
» Transform
(For older elementary) » Chance
» Imagine/Envision
» Improvise
» Intent
» Problem solving
Materials: White paper, black sharpie marker, pens, color pencils, color markers
Resources: This lesson does not have external resources such as reproductions or videos .
With younger students it is important to set simple guidelines for discussion such as listening carefully to each others comments, raising hands and waiting for each other to finish speaking. “Classroom Discussion” on page 18
Students have a tendency to free associate and it can be easy to veer off topic. Bring younger children back into the discussion by calling attention to the pertinent information they are sharing, and moving away from the random comments . “Classroom Discussion” on page 18
Encourage young learners to share information and ideas as well as their personal perspective . This validates their experiences and allows them to speak to each other in their own words . This builds the confidence needed for self-directed research and problem solving . “Inquiry” on page 13
Pose own questions about art making & artworks and brainstorm answers with the help of the class . “K-2 Concepts” on page 26
Articulate observations about art making and artworks through discussion and brief written statements . “3-5 Concepts” on page 31
Refer to the K-2 (page 27) and 3-5 (page 32) Tables for Drawing for more vocabulary terms, which may be relevant to how you might teach this lesson . For example: Words that describe qualities of line ex: straight, curved, jagged, squiggly, thin, thick, dotted, broken, hard, soft, etc . “K-2 Mediums: Drawing” on page 27
Ideas for materials can be determined by referring to the K-2 (page 27) and 3-5 (page 32) Tables for Drawing . Some suggestions include:
Variety of pencils, Erasers, Markers of varying thickness, Color pencils “K-2 Mediums: Drawing” on page 27
Fine point pens, Sharpies “3-5 Mediums: Drawings” on page 32
CR
CR
CR
4 4
CURRICULUM RESOURCEART EDUCATION PROGRAM
Criteria: » Look at the “mistake” on your paper and think of three
things it reminds you of, write these on the back of your paper (Only for students old enough to write)
» Take your time to imagine/ envision how you will transform the “mistake”, do not rush your drawing .
» Make sure the original “mistake” is still a visible part of the finished drawing. In other words, coloring over it entirely is hiding it instead of transforming it .
Reflection:Perform a gallery walk so the students get to see each other’s artworks . After the gallery walk ask the following questions:
» What is frustration? Can anything good come out of it?
» What is transformation? How did you transform the “mistake”?
» When you are unhappy with your art, how can you calm yourself and transform your artwork?
Tasks for Assistant: » Help students brainstorm creative solutions
» Circulate to assist students in meeting the criteria
Tasks for Counselors: » Adjust seating arrangements to minimize distractions
» Remind students to write their names on their papers and check that they listed 3 things that the “mistakes” remind them of
» Monitor the images being passed around and make sure everyone gets a chance to see them
Articulate observations about art making and artworks through discussion and brief written statements . “3-5 Concepts” on page 31
Gallery Walk: When works are challenging to collect (such as sculptures or wet paintings), clean up all materials and arrange the artwork on the tabletops . As a starting point, you may want to ask students what the objectives of the project were . Invite students to gather around the table to view the work or travel around the tables in a single file line. “Reflection Tips” on page 16
Begin verbalizing observations about art making and artworks . “K-2 Concepts” on page 26
It is important to establish an understanding and agreement on each other’s areas of responsibility . It will help immeasurably to discuss in advance how to handle behavior issues, how to talk to students about their artwork, how to organize materials, and any other issues you feel are relevant to the class . “Working with our teaching partners and counselors” on page 8
Let the counselor know what role you would like them to hold in the classroom. Have specific tasks for them to do each class. Try to develop a consensus with them regarding student behavior guidelines . “Tips for working with counselors” on page 8
CR
CR
CR
CR

4 5
CURRICULUM RESOURCEART EDUCATION PROGRAM
In order to illustrate how the Curriculum Resource can inform the design of lessons we have included two sample lesson plans . These are two different approaches to lesson plan writing. Alongside the lesson plans are side notations marked with CR (for Curriculum Resource), showing how principles and ideas from this resource contributed to the lessons, and where you can find that information in this document .
SAMPLE LESSON PLAN FOR HIGH SCHOOL STUDENTS
Project Title: Developing a Self-Portrait in Charcoal
Duration: Formatted for a 3-hour Saturday Studios Art class
Learner Objectives:Students will practice making a self-portrait from observation in the mirror . Through this process students will:
» Learn how to measure facial proportions from observation
» Map the image with light contour lines before darkening lines and adding tone .
» Develop the habit of stepping back to observe work from a distance and make revisions based on their observations .
Student Outcomes:Students will make 2-3 preliminary self-portrait sketches in their sketchbooks and a tonal self-portrait in charcoal on 18” x 24” white drawing paper .
Motivation: » Observe and discuss self-portraits by Henri
Matisse and Käthe Kollwitz . Guiding questions:
» How did these artists approach making their self-portraits?
» What are the strongest/weakest passages in this artwork?
» What can you learn from this drawing to use in your own work?
» AT models the self-portrait process: mapping out a composition lightly with pencil, using contour lines to delineate head and shoulders, use charcoal to indicate tones (light and shade)
Recognize and apply elements of composition including: Positive/negative space, focal points, contrast, visual balance, etc . (MS-HS Table: Drawing) “MS/HS Mediums: Drawing” on page 37
Developing an understanding light, shadow and value . “MS/HS Mediums: Drawing” on page 37
Developing ability to render figures from angles other than front or profile. “MS/HS Mediums: Drawing” on page 37
Draw in a variety of visual styles (ex: Observe and emulate styles of artistic movements, cultures, and individuals) . “MS/HS Mediums: Drawing” on page 37
Vary pressure to create dark and light lines . “MS/HS Mediums: Drawing” on page 37
Practice cross-hatching, stippling, and other drawn gradients . “MS/HS Mediums: Drawing” on page 37
Make practice sketches . “MS/HS Mediums: Drawing” on page 37
We may find that high school students are interested in knowing how artists they admire have achieved their mastery . Their focus may be intensely geared towards accelerating their own skills to approximating those levels . “High School, grades 9-12” on page 6
This process of questioning and discovery is an ideal way for students to engage with new materials and techniques . Inquiry methods may be used in all aspects of teaching and learning about art from including:
» Cultivating multifaceted understandings of artworks » Developing new art making skills » Exploring concepts and themes for art making » Reflecting on the works created by self
and peers . “Inquiry” on page 13
Connecting studio experience with art history and contemporary art world . “MS/HS Concepts” on page 36
Increased visual literacy; Developing greater abilities to decode symbolic meaning and speculate on artist’s intentions . “MS/HS Mediums: Drawing” on page 37
CR
CR
CR

4 6
CURRICULUM RESOURCEART EDUCATION PROGRAM
Vocabulary: » Highlight/Shadow
» Mass
» Volume
» Gesture
» Tone/Value
» Cross-hatch
Materials: Sketchbooks,18” x 24” white drawing paper, soft vine charcoal, paper towels, 3b pencils, kneaded erasers, student portfolios
Reproductions: » Kathe Kollwitz, Self-portrait, Hand at the Forehead, 1910
» Henri Matisse, Autoportrait au chapeau de paille (Self-portrait in a country hat), 1941
Criteria: » Make at least two preliminary sketches in sketchbook .
» Make a composition that takes into account the size and scale of paper and image .
» Draw only what you see; persist in making contour drawings by looking at subject .
» Stand back from your drawing at least 3 times during the work period and make any revisions as you think are necessary .
Reflection: In their sketchbooks students will write down answers to these questions:
» What part of this drawing process did I struggle with? Why?
» What is the strongest part of my drawing? Why?
» What part of my drawing needs more work? Why?
In the group, students may share their answer to one of these questions .
Tasks for Assistant: » Arrange tables & chairs and lay out drawing
» Photograph the drawings at various stages of development
» Remind students to step back, evaluate and revise their drawings
» Ask 1-2 reflection questions, in this instance the Assistant could lead the reflection.
» Supervise clean up
Several vocabulary terms were taken from the table: MS/HS Mediums: Drawing, page 37
Many materials for this lesson were drawn from the table: MS/HS Mediums: Drawing, page 37
Connecting studio experience with art history and contemporary art world . “MS/HS Concepts” on page 36
Recognize and apply elements of composition including: Positive/negative space, focal points, contrast, visual balance, etc . “MS/HS Concepts” on page 36
Maintain self-directed/self-monitored sketchbook/journal . “MS/HS Concepts” on page 36
Practice drawing light and shadow from observation . “MS/HS Mediums: Drawing” on page 37
Developing communication skills through reflection/critique. “MS/HS Concepts” on page 36
Developing awareness of own artistic style and aesthetic preferences .
Write notes and ideas about artwork and art-making process .
It is important to establish an understanding and agreement on each other’s areas of responsibility . It will help immeasurably to discuss in advance how to handle behavior issues, how to talk to students about their artwork, how to organize materials, and any other issues you feel are relevant to the class . “Working with our teaching partners and counselors” on page 8
Photographing artwork connects to: Developing ability to document, present and curate in a portfolio format . “MS/HS Concepts” on page 36
CR
CR
CR
CR
CR
CR

4 7
CURRICULUM RESOURCEART EDUCATION PROGRAM
Notes
4 8
CURRICULUM RESOURCEART EDUCATION PROGRAM
Notes

4 9
CURRICULUM RESOURCEART EDUCATION PROGRAM
Credits
CONTENT CONTRIBUTORS
The following Artist-Teachers comprised the Curricular Planning Committee and co-created this resource . Through group dialogue they determined the content and structure of this resource:
Jenn Brehm
Alan Calpe
Cevan Castle
Dahlia Elsayed
Molly Herman
Lance Paladino
Antonia Perez
Denise Schatz
This resource was developed and written by Antonia Perez and Denise Schatz based on a series of discussions and editorial reviews with the Curriculum Committee over the course of a year and a half . Saul Chernick provided substantial revisions of the Table of Concepts and Mediums . Saul Chernick and Travis Laughlin provided editorial and JMF philosophical oversight . Melissa Dean developed the layout and graphic design .


