Cuisinart Stick Blender CSB77A Manual Recipe
32
INSTRUCTION/ RECIPE BOOKLET Smart Stick Hand Blender For your safety and continued enjoyment of this product, always read the instruction book carefully before using. CSB-77A
description
manual
Transcript of Cuisinart Stick Blender CSB77A Manual Recipe

INSTRUCTION/RECIPE BOOKLET
Smart Stick Hand Blender
For your safety and continued enjoyment of this product,always read the instruction book carefully before using.
CSB-77A

IMPORTANT SAFEGUARDSWhen using an electrical appliance, basic safety precautions shouldalways be followed including the following:
1. READ ALL INSTRUCTIONS.
2. To protect against electrical shock, do not put the motor body,cordor electrical plug of this hand blender in water or other liquid. Thedetachable blending shaft of this appliance has been designed forimmersion into water or other liquids. Never submerge any otherportion of this unit. If hand blender falls into liquid, remove immediately.Do not reach into the liquid without unplugging the unit first.
3. This appliance should not be used by children. To avoid possibleaccidental injury, close supervision is necessary when any applianceis used by or near children.
4. Unplug from outlet when not in use, before putting on or takingoff parts, and before cleaning. To unplug, grasp plug and pullfrom electrical outlet. Never pull cord.
5. Avoid contacting moving parts.
6. During operation keep hands, hair, clothing, as well as spatulas andother utensils away from attachments and any mixing container, toreduce risk of injury to persons, and/or damage to the appliance.A spatula may be used, but must be used only when the unit isnot operating.
7. Do not operate any appliance with a damaged cord or plug, or afterthe appliance has malfunctioned or has been dropped or damaged inany way or is not operating properly. Return the appliance to thenearest Cuisinart Repair Centre for examination, repair, ormechanical or electrical adjustment.
8. Remove detachable shaft from the blender before washing the bladesor shaft.
9. Blades are SHARP. Handle carefully when removing, insertingor cleaning.
10. When mixing liquids, especially hot liquids, use a tall container ormake small quantities at a time to reduce spillage, splattering andpossibility of injury from burning.
11. To reduce the risk of injury, never place chopper/grinder attachmentcutting blade on base without first putting prep bowl properly in place.
12. Be certain the chopper/grinder attachment cover is securely locked inplace before operating appliance. Do not attempt to remove coveruntil blade has stopped rotating.
13. Check prep bowl for presence of foreign objects before using.
2

14. The use of attachments or accessories not recommended byCuisinart may cause fire, electrical shock, or risk of injury.
15. Do not use outdoors, or use for other than intended use.
16. Do not let any cord hang over the edge of the table or counter.Do not let cord contact hot surfaces, including stovetop.
17. Make sure the appliance is off, the motor has stopped completely,and the appliance is unplugged from outlet before putting on or takingoff attachments, and before cleaning.
18. To reduce the risk of fire or electrical shock, do not operate anyheating appliance beneath the mounting unit.
19. Maximum rating of 200W is based on the chopper/grinderattachment that draws the greatest power.
This appliance is not intended for use by persons (including children) withreduced physical, sensory or mental capabilities, or lack of experienceand knowledge, unless they have been given supervision or instructionconcerning use of the appliance by a person responsible for their safety.
Children should be supervised to ensure that they do not play withthe appliance.
SAVE THESE INSTRUCTIONSFOR HOUSEHOLD USE ONLYTABLE OF CONTENTSImportant Safeguards . . . . . . . . . . . . . . . . . . . . . . . . . . . . . . . . . . . . . . . 2Introduction . . . . . . . . . . . . . . . . . . . . . . . . . . . . . . . . . . . . . . . . . . . . . . . 4Unpacking Instructions . . . . . . . . . . . . . . . . . . . . . . . . . . . . . . . . . . . . . . 4Features and Benefits. . . . . . . . . . . . . . . . . . . . . . . . . . . . . . . . . . . . . . . 4Tips and Hints . . . . . . . . . . . . . . . . . . . . . . . . . . . . . . . . . . . . . . . . . . . . . 5Whisk Tips. . . . . . . . . . . . . . . . . . . . . . . . . . . . . . . . . . . . . . . . . . . . . . . . 6Diagram. . . . . . . . . . . . . . . . . . . . . . . . . . . . . . . . . . . . . . . . . . . . . . . . . . 7Assembly. . . . . . . . . . . . . . . . . . . . . . . . . . . . . . . . . . . . . . . . . . . . . . . . . 8
Blending Attachment. . . . . . . . . . . . . . . . . . . . . . . . . . . . . . . . . . . 8Chopper/Grinder Attachment . . . . . . . . . . . . . . . . . . . . . . . . . . . . 8Reversible Blade. . . . . . . . . . . . . . . . . . . . . . . . . . . . . . . . . . . . . . 9Whisk Attachment . . . . . . . . . . . . . . . . . . . . . . . . . . . . . . . . . . . . 11
Operation . . . . . . . . . . . . . . . . . . . . . . . . . . . . . . . . . . . . . . . . . . . . . . . 12Blending . . . . . . . . . . . . . . . . . . . . . . . . . . . . . . . . . . . . . . . . . . . 12Whisking . . . . . . . . . . . . . . . . . . . . . . . . . . . . . . . . . . . . . . . . . . . 12Chopping/Grinding . . . . . . . . . . . . . . . . . . . . . . . . . . . . . . . . . . . 12
Cleaning . . . . . . . . . . . . . . . . . . . . . . . . . . . . . . . . . . . . . . . . . . . . . . . . 13Frequent Uses for Chopper/Grinder . . . . . . . . . . . . . . . . . . . . . . . . . . . 15Recipes . . . . . . . . . . . . . . . . . . . . . . . . . . . . . . . . . . . . . . . . . . . . . . . . . 16Warranty . . . . . . . . . . . . . . . . . . . . . . . . . . . . . . . . . . . . . . . . . . . . . . . . 29
3
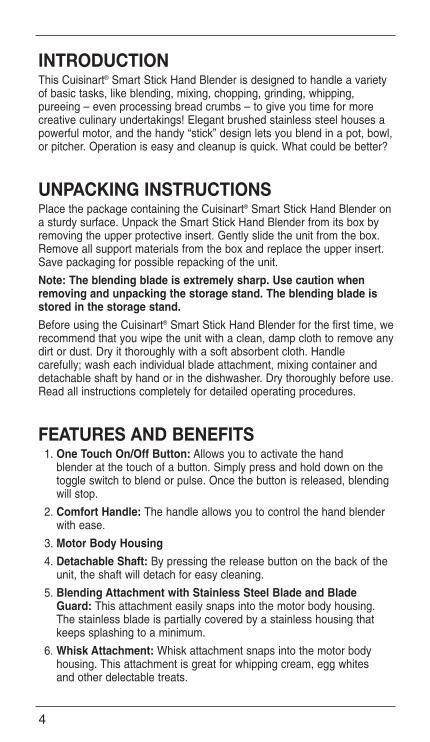
INTRODUCTIONThis Cuisinart® Smart Stick Hand Blender is designed to handle a varietyof basic tasks, like blending, mixing, chopping, grinding, whipping,pureeing – even processing bread crumbs – to give you time for morecreative culinary undertakings! Elegant brushed stainless steel houses apowerful motor, and the handy “stick” design lets you blend in a pot, bowl,or pitcher. Operation is easy and cleanup is quick. What could be better?
UNPACKING INSTRUCTIONSPlace the package containing the Cuisinart® Smart Stick Hand Blender ona sturdy surface. Unpack the Smart Stick Hand Blender from its box byremoving the upper protective insert. Gently slide the unit from the box.Remove all support materials from the box and replace the upper insert.Save packaging for possible repacking of the unit.
Note: The blending blade is extremely sharp. Use caution whenremoving and unpacking the storage stand. The blending blade isstored in the storage stand.
Before using the Cuisinart® Smart Stick Hand Blender for the first time, werecommend that you wipe the unit with a clean, damp cloth to remove anydirt or dust. Dry it thoroughly with a soft absorbent cloth. Handlecarefully; wash each individual blade attachment, mixing container anddetachable shaft by hand or in the dishwasher. Dry thoroughly before use.Read all instructions completely for detailed operating procedures.
FEATURES AND BENEFITS1. One Touch On/Off Button: Allows you to activate the hand
blender at the touch of a button. Simply press and hold down on thetoggle switch to blend or pulse. Once the button is released, blendingwill stop.
2. Comfort Handle: The handle allows you to control the hand blenderwith ease.
3. Motor Body Housing
4. Detachable Shaft: By pressing the release button on the back of theunit, the shaft will detach for easy cleaning.
5. Blending Attachment with Stainless Steel Blade and BladeGuard: This attachment easily snaps into the motor body housing.The stainless blade is partially covered by a stainless housing thatkeeps splashing to a minimum.
6. Whisk Attachment: Whisk attachment snaps into the motor bodyhousing. This attachment is great for whipping cream, egg whitesand other delectable treats.
4

7. Chopper/Grinder Attachment: Chop, mince and grind withthe Cuisinart® Chopper/Grinder attachment. Chopper/Grinderattaches to the blender motor body in place of the blender shaft orwhisk attachment.
8. Mixing Beaker: 2-cup mixing beaker is microwave- and dishwashersafe. Use this container to blend drinks, shakes, salad dressings andmore. Designed for easy gripping and drip-free pouring.
TIPS AND HINTS1. Liquid should come within an inch of where the shaft attaches to the
motor housing.
2. Some spices may scratch the chopper/grinder attachment.
3. When using with a nonstick cooking surface, be careful not to scratchthe coating with the hand blender.
4. Do not immerse motor body housing, chopper/grinder cover, or whiskgearbox in water or any other liquid.
5. Cut most solid foods into 13mm cubes for easy blending. Suggestion:use chopper/grinder for chopping and grinding solid foods.
6. Pour liquid ingredients into the mixing container first, unless recipeinstructs otherwise.
7. To avoid splashing, don’t turn the hand blender on until the blade isbeneath the surface of the mixture and do not pull the hand blenderout of the mixture while blender is running.
8. Do not let hand blender stand in a hot pot on stove while not in use.
9. Do not put fruit pits, bones, or other hard material into the blendingmixture, as these are liable to damage the blades.
10. Do not fill mixing containers too full. The level of mixture will rise whenblending, and can overflow.
11. Adding liquids that are warm, not cold, facilitates blending solidswith liquids.
12. For recipes calling for ice, use crushed ice (not whole cubes) forbest results.
13. Using a gentle up-and-down motion is the best way to blend andincorporate ingredients uniformly.
14. To avoid spatter, turn the hand blender off and let the blade stopcompletely before lifting the unit out of the mixture you are processing.
15. To whip air into a mixture, always hold the blade just underthe surface.
16. To make a soup creamy in texture, use the hand blender to puréethe soup solids to the desired consistency using a gentle up-and-down
5

motion right in the saucepan. You can quickly change your soup into athick and creamy blend.
17. If you are making a dip or spread, it is not necessary to processcompletely into a smooth purée; leave some texture for interest.
18. When making compound butters, remove the butter from therefrigerator and let it come to room temperature before blendingthe ingredients.
19. The hand blender is perfect for frothing milk for cappuccino or lattes.
20. Use the hand blender to make smooth gravies and pan sauces.
21. For best results when adding celery to a recipe, use a vegetablepeeler to remove tough outer strings from the celery before slicing.
WHISK TIPSUse the whisk attachment for beating heavy cream or egg whites. It mayalso be used for whisking eggs for scrambled eggs or fluffy omelettes.
BEATING EGG WHITESWhen beating egg whites use a very clean metal or glass bowl, neverplastic. Plastic can contain hidden oils and fats that can ruin the delicateegg white foam. To help stabilize the egg whites add 1/8 teaspoon ofcream of tartar per egg white prior to beating them. (If using a copperbowl omit the cream of tartar). Beat the egg whites until soft peaks formthat do not droop over. Beating the egg whites longer causes them to dryout and become even less stable. When adding sugar to beaten eggwhites add it slowly when soft peaks just begin to form and then continuebeating to form soft peaks that don’t droop over.
BEATING HEAVY CREAMWhen beating heavy cream, if possible and time allows, use a chilledbowl, and chill the whisk attachment. The best shaped bowl for whippingcream is one that is deep with a rounded bottom. The cream should comeout of the refrigerator just before whipping. Hold the Whip attachment sothat it is just skimming the surface, and whip until the cream beginsto thicken and develop some body; then immerse the whisk totally intothe cream. Whipped cream may be used at either soft or firm peaksdepending on preference. It may be flavoured as desired. For bestresults, whip cream just before using.
6

7
MotorBody Housing
DetachableBlending Shaft
BladeGuard
StainlessSteel
BlendingBlade
Chopper/GrinderAttachment
CordWrap
On/OffButton
ComfortHandle
Whisk Attachment
DetachableGearbox
Chopper/GrinderCover

ASSEMBLYBLENDING ATTACHMENT1. Align the motor body with the blending attachment and slide the
pieces together until you hear and feel the pieces click together.It may be helpful to press the release button when assembling.
CHOPPER/GRINDER ATTACHMENT
8
A. Chopper/GrinderPrep Bowl
B. Cover Slots (3)for AttachingCover
C. Metal BladeAssembly Shaft
D. Rubber Feet
E. Blade Assembly
F. Blade Ring
G. Plastic BladeSheath
H. Chopper/GrinderCover
I. Lift Tabs
J. Chopper/GrinderSpline
A
B
C
D
J
H
I E
F
G
9
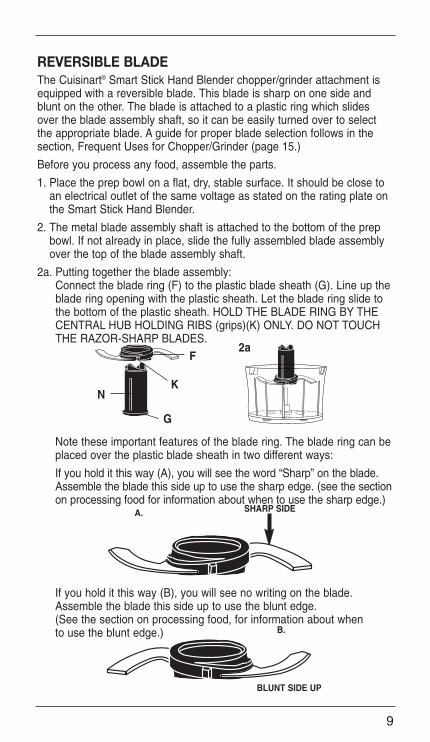
REVERSIBLE BLADEThe Cuisinart® Smart Stick Hand Blender chopper/grinder attachment isequipped with a reversible blade. This blade is sharp on one side andblunt on the other. The blade is attached to a plastic ring which slidesover the blade assembly shaft, so it can be easily turned over to selectthe appropriate blade. A guide for proper blade selection follows in thesection, Frequent Uses for Chopper/Grinder (page 15.)
Before you process any food, assemble the parts.
1. Place the prep bowl on a flat, dry, stable surface. It should be close toan electrical outlet of the same voltage as stated on the rating plate onthe Smart Stick Hand Blender.
2. The metal blade assembly shaft is attached to the bottom of the prepbowl. If not already in place, slide the fully assembled blade assemblyover the top of the blade assembly shaft.
2a. Putting together the blade assembly:Connect the blade ring (F) to the plastic blade sheath (G). Line up theblade ring opening with the plastic sheath. Let the blade ring slide tothe bottom of the plastic sheath. HOLD THE BLADE RING BY THECENTRAL HUB HOLDING RIBS (grips)(K) ONLY. DO NOT TOUCHTHE RAZOR-SHARP BLADES.
Note these important features of the blade ring. The blade ring can beplaced over the plastic blade sheath in two different ways:
If you hold it this way (A), you will see the word “Sharp” on the blade.Assemble the blade this side up to use the sharp edge. (see the sectionon processing food for information about when to use the sharp edge.)
If you hold it this way (B), you will see no writing on the blade.Assemble the blade this side up to use the blunt edge.(See the section on processing food, for information about whento use the blunt edge.)
N
F
G
K
2a
A. SHARP SIDE
B.
BLUNT SIDE UP

There are notches (C) on opposite sides of the interior of the hub.These fit over ridges on the sides of the plastic blade sheath.
Pick up the blade ring by its hub holding ribs (grips) and line up thenotches in the interior of the blade ring hub with the ridges on the sidesof the plastic blade sheath. Let the blade ring slide down to the bottomof the plastic blade sheath. The lower blade should almost touch thebottom of the prep bowl.
Lift the prep bowl, holding it firmly from the bottom. Pick up the bladering by its hub holding ribs (grips) and turn it very slightly clockwise.This locks it in place on the plastic blade sheath and prevents it fromsliding up during processing.
3. Connect the Smart Stick Hand Blendermotor body to the top of thechopper/grinder attachment cover.Align the spine in the chopper/grindercover’s drive shaft with the ribbedopening on the underside of the motorbody. When aligned properly, slide thetwo pieces together until they meet.You will feel and hear a slight click.It may be helpful to press the rubberrelease button when sliding thesepieces together.
4. With the hand blender in place,locate the chopper/grinder coverand place it on top of the prep bowl.
4a. Be sure that the 3 ridges at the top of the blade assemblyline up with the 3-arm propeller gear in the underside of thechopper/grinder cover, and that the cover is seated all around thetop of the prep bowl.
4b. To properly seat the cover, you must line up the three moldedpins from the cover with the 3 slots at the top of the prep bowl.Rotate cover counterclockwise to secure it to the prep bowl.Rotate the cover until the pins are in the far left position inthe slots.
10
3.
MotorBody Bottom andChopper/GrinderCover Top View
C.NOTCH

5. Plug the power cord of the Smart Stick Hand Blender into anelectrical outlet.
6. Place one hand on the cover of the chopper/grinder attachment,while gripping the Smart Stick Hand Blender motor body handlewith the other. Press the ON/OFF button with your fingers to startthe motor and run the chopper/grinder.
To turn the unit off, remove your fingers from the ON/OFF button.
7. WHEN THE BLADE STOPS MOVING, unplug the Smart Stick HandBlender, remove the motor body from the chopper/grinder cover, andremove the cover from the prep bowl.
WHISK ATTACHMENT1. Align the end of the whisk with the small opening of
the whisk gearbox.
2. Push end into opening until it locks into position.
3. Align the motor body with the assembled whiskattachment and slide the pieces together untilyou hear and feel the pieces click together.It may be helpful to press the release buttonwhen assembling.
11
4a.
4.
Inside View ofPrep Bowl
Inside View ofChopper/Grinder
Cover
4b.
OPERATIONBLENDINGBlending & Mixing
The specially designed blade is for mixing and stirring all kinds offoods, including salad dressings, powdered drink products, and sauces.It is ideal for combining dry ingredients, and can be used to emulsifymayonnaise, too.
This blade mixes and stirs while adding only a minimum of air toyour mixture. A gentle up-and-down motion is all you need to makethe most flavourful, full-bodied liquid recipes. Be careful never toremove the Cuisinart® Smart Stick Hand Blender from the liquidwhile in operation.
1. Insert the blending attachment into the motor body. (See Assemblyfor Blending Attachment, page 8.)
2. Plug electrical cord into an electrical wall socket.
3. Place blending shaft into mixture that will be blended.
4. Press and hold the ON/OFF button. The hand blender will continueto run as long as the switch is pressed in. To turn hand blender OFF,release the ON/OFF button and the motor will stop.
5. Do not hold the button ON for longer than 50 seconds at a time.
6. Unplug immediately after use.
WHISKING1. Insert the whisk attachment into the motor body. (See Assembly for
Whisk Attachment, page 11.)
2. Plug electrical cord into an electrical wall socket.
3. Place the whisk into mixture that will be blended.
4. Press and hold the ON/OFF button. The hand blender will continueto run as long as the switch is pressed in. To turn hand blender OFF,release the ON/OFF button and the motor will stop.
5. Do not hold the button ON for longer than 20 seconds at a time.See Recipes.
6. Unplug immediately after use.
CHOPPING AND GRINDINGProcessing Food
1. Place the prep bowl firmly on a flat sturdy surface like a countertop.Be sure the blade is assembled to use the blade edge that isappropriate for the food to be processed.
12

2. Place food in the prep bowl. Be sure the food is cut in small pieces,and the bowl is not overloaded.
3. Place the chopper/grinder cover on top of the prep bowl. Be surethe cover is properly seated.
4. Press the ON/OFF button on the Smart Stick Hand Blender.
5. Do not operate the chopper/grinder attachment for longer than15 seconds at a time.
Note: Due to the powerful motor provided with this unit, Cuisinartrecommends using one hand to support the chopper/grinderduring operation.
6. When you have finished processing the food, stop the machine bytaking your fingers off the ON/OFF button.
7. WHEN THE BLADE STOPS MOVING, remove the Smart Stick HandBlender motor body from the chopper/grinder cover, and remove thecover from the chopper/grinder.
8. Unplug the unit.
9. Carefully remove the blade assembly, holding it by the gripping ridgeson the plastic sheath. NEVER TOUCH THE BLADE ITSELF.
10. Remove food with the spatula.
Note: Do not operate the Smart Stick Chopper/Grinder attachmentwithout food contents in the prep bowl.
CLEANINGSMART STICK HAND BLENDERAlways clean the Smart Stick motor body and blending shaft thoroughlyafter using.
Remove the blending shaft from the motor body. Clean the motor bodyonly with a sponge or damp cloth. Do not use abrasive cleaners whichcould scratch the surface. To clean the blending shaft, wash by hand inhot water using mild detergent.
Never immerse the motor body in water.
When the appliance has malfunctioned or has been dropped or damagedin any way or it is not operating properly, return the appliance to thenearest Cuisinart Repair Centre for examination, repair or mechanicalor electrical adjustment.
CHOPPER/GRINDER ATTACHMENTTo simplify cleaning, rinse the prep bowl, cover and blade immediatelyafter use, so that food won’t dry onto them. Wash blade ring,plastic sheath, and prep bowl in warm soapy water. Rinse and dry.
13
Wipe the underside of the chopper/grinder cover with a spongeor damp cloth to remove any food. Do not submerge the cover inwater or place in the dishwasher. Wash the blade carefully.Avoid leaving it in soapy water where it may disappear from sight.
If you have a dishwasher, you can wash the prep bowl bladeassembly on the upper shelf. Insert the Prep Bowl upside down.Put the blade in the cutlery basket. Unload the dishwasher carefullyto avoid contact with the sharp blade. Wipe the motor body and topof the cover with a damp sponge or cloth. Dry it immediately.Never submerge the motor body or the cover in water or other liquid.
The Smart Stick chopper/grinder attachment is intended forHOUSEHOLD USE ONLY. Any service, other than cleaning and normaluser maintenance, should be performed by an authorised CuisinartService Representative.
WHISK ATTACHMENTTo clean your whisk attachment, simply release the attachmentfrom the motor body housing. Once the whisk is removed, detachthe metal whisk from the gearbox by pulling pieces apart. To cleanthe gearbox, simply wipe with a damp cloth. To clean the metalwhisk, wash with warm, soapy water or place in the dishwasher.Do not submerge the gearbox in water or any other liquid.
14

15
FREQUENT USES FOR CHOPPER GRINDER
Ingredient CommentsBaby foods (always consultpaediatrician or familyphysician for appropriatefood recommendations)
Bread crumbs – fresh or dry(day old)
Hard Cheese (Asiago, Locatelli,Parmesan, Romano, etc.)(Not recommended for softercheeses unless making dipor dressing.)
Chocolate
Creamy Dressings/Dips
Garlic
Ginger root (fresh)
Herbs, fresh
Nuts
Onion
Vegetables (cooked)
Vegetables (uncooked)
Meat (Beef, Pork)
Place small amounts of cooked foods intochopper/grinder bowl. Add small amount ofappropriate liquid. Use pulse action to chop,then continuous-hold action to blend.
Pulse to chop, then process until desiredconsistency is reached.
Cut into 5mm pieces. Pulse to chop, thenprocess until desired consistency isreached, no more than 30g at a time.
Cut into 10mm pieces; may chill in freezerfor 3 minutes before chopping. Pulse tochop, then process, no more than 30g ata time, until desired texture is reached.
Place ingredients in chopper grinder bowl;do not cover or spill on stem. Use pulseaction to chop, then continuous-hold actionto blend as needed to desired consistency.
Peel cloves, up to 6 cloves. Pulse to chop.
Peel, cut into 10mm pieces. Pulse to chop,15g at a time.1⁄2 cup; must be clean and dry. Pulse to chop.
Shelled, toast first for best flavour. Pulse tochop, then process up to 1⁄2 cup at a time,until desired chop is reached from coarse tofine. May be processed to nut-butter stage.
Peel, cut into 10mm pieces. Pulse to chop,up to 1⁄2 cup at a time, until desired chopis reached.
Cut into 10mm pieces and cook until forktender. Pulse to chop, up to 1⁄2 cup at a time.May need to add cooking liquid, stock ormilk to process to a vegetable purée.Not recommended for mashed potatoes.
Peel as needed, cut into 10mm pieces.Peel celery with vegetable peeler to removetough strings. Chop/process up to 1⁄2 cup ata time.
250g, cut into 10mm pieces.

SMOOTHIES AND DRINKSBLUEBERRY BANANA ANTI-OXIDANT SMOOTHIE
Makes 2 cups
1 cup frozen blueberries1 small (125g) banana, sliced3⁄4 cup soy milk or fat-free milk14 grams soy protein powder (or soy protein isolate)1 teaspoon flaxseed oil1–2 teaspoons honey (optional)
Place soy milk, protein powder, blueberries, banana, flaxseed oil andhoney if using in mixing container. Insert the Cuisinart® Hand Blender,making sure the protective guard is submerged. Blend, using a gentleup- and-down motion until ingredients are combined, about 35 seconds.
Nutritional information per cup (made without honey):Calories 159 (17% from fat) • carb. 26g • pro. 9g • fat 3g
• sat. fat 0g • chol. 0mg • sod. 12mg • calc. 89mg • fibre 4g
STRAWBERRY KIWI SMOOTHIE
Makes one 400ml smoothie
1 cup frozen strawberries, partly thawed1 kiwi, peeled, cut into eighths1⁄2 cup fat-free vanilla yogurt1⁄2 cup fat-free milk1 tablespoon honey
Place ingredients in the mixing container. Insert the blender, making surethe protective guard is submerged. Blend, using a gentle up-and-downmotion until ingredients are well combined, about 30–35 seconds.
Nutritional information per smoothie:Calories 286 (2% from fat) • carb. 63g • pro. 11g • fat 1g
• sat. fat 0g • chol. 4mg • sod. 133mg • calc. 371mg • fibre 6g
16

FROZEN COFFEE FRAPPÉ
Makes one 350ml beverage
13⁄4 cups coffee ice cream or ice milk1⁄2 cup strong brewed coffee (may use espresso)2 tablespoons fat-free milk
Place ingredients in mixing container. Insert blender, making sure theprotective guard is submerged. Blend, using an up-and-down motion untilingredients are well combined, about 20–30 seconds.
For a thicker style milkshake:Fill mixing container with coffee ice cream up to the 1-cup mark. Add 1⁄4cup brewed coffee and 1 tablespoon of fat-free milk. Blend using thesame technique as above.
For a Mudslide variation:Add 1 tablespoon each of Irish Cream Liqueur and Kahlua®.
Nutritional information per shake:Calories 215 (44% from fat) • carb. 26g • pro. 5g • fat 11g
• sat. fat 7g • chol. 45mg • sod. 105mg • calc. 172mg • fibre 0g
Kahlua® is a registered trademark owned by the Kahlua Company.
PEACH MARGARITA
Makes 2 cups
1 cup frozen peaches1 cup citrus juice (orange, lime, lemon in any combination)1⁄3 cup good quality tequila1⁄2 tablespoon Triple Sec or Grand Marnier®
1–2 teaspoons granulated sugar
Place ingredients into mixing container. Insert the blender, making surethe protective guard is submerged. Blend, using an up-and-down motionuntil ingredients are combined, about 30 seconds.
Nutritional information per cup:Calories 177 (0% from fat) • carb. 25g • pro. 1g • fat 0g
• sat. fat 0mg • chol. 0mg • sod. 2mg • calc. 9mg • fibre 2g
Grand Marnier® is a registered trademark owned by the Société des Produits Marnier-LaPostolle.
17

SOUPS, SAUCES, DIPS AND SPREADSASPARAGUS SOUP
Makes 21⁄2 cups
1 50g shallot, peeled1 tablespoon unsalted butter1 clove garlic, peeled and crushed1 600g fresh asparagus, tough ends removed1 90g red potato, peeled, cut in 1.5cm dice1⁄4 cup dry white wine11⁄2 cups fat-free low-sodium chicken broth3⁄4 teaspoon kosher salt1⁄4 teaspoon freshly ground pepper1⁄4 teaspoon dried basil1⁄4 cup heavy cream (optional)
Insert the blade assembly in the prep bowl. Place the shallot in the prepbowl, connect hand blender motor body to the top of the chopper/grinderattachment cover, cover prep bowl and pulse 10 times to finely chop.
Melt butter in a 3-litre saucepan over medium low heat. Add shallots andcrushed garlic and “sweat” over medium-low heat for about 5 minutes.Do not allow the shallots and garlic to brown.
While shallots are cooking, cut the asparagus into 15mm pieces andreserve the tips. When shallots are soft, add asparagus and potato tosaucepan and cook for about 6 minutes longer, until asparagus is bright incolor. Add wine and raise the heat to bring the wine to boil. Reduce thewine until a scant tablespoon remains. Add chicken stock. Bring to boiland then reduce heat to low. Simmer for about 20 minutes until thevegetables are soft. Insert the blender into the saucepan, making sure theprotective guard is submerged. Blend, using a gentle up-and-down motionuntil ingredients are well combined, about 40-50 seconds. Season withsalt, pepper and basil. Stir in cream if using.
While soup is cooking bring 2 cups of water to boil. Add the asparagustips and cook for 2 minutes until bright green. Drain and immediatelyplunge into an ice-water bath to stop cooking.
Serve soup hot, garnished with reserved asparagus tips.
Nutritional information per 1/2 cup serving:Calories 81 (28% from fat) • carb. 10g • pro. 4g • fat 3g
• sat. fat 1g • chol. 6mg • sod.525mg • calc. 36mg • fibre 2g
18

CURRIED CAULIFLOWER SOUP
Makes 5 cups
1 tablespoon olive oil1 120g leeks, washed and trimmed, dark green parts
removed, sliced1 teaspoon curry powder1⁄4 teaspoon turmeric1⁄2 teaspoon kosher salt1 head of cauliflower (about 750g) cut into small florets1 100g red potato peeled and cut into 15mm cubes1⁄2 cup white wine31⁄2 cups chicken stock or vegetable stock1 teaspoon lemon or lime juice
Place a 4-litre saucepan over medium heat and add olive oil. Add leeksand “sweat” for about 6–8 minutes until very soft. Add curry powder,turmeric, and salt to leek mixture and cook for about 1–2 minutes.Add cauliflower florets and potato. Stir to coat with spices and cook foranother 5 minutes to soften slightly. Add white wine and increase heat tobring to boil. Reduce the wine until there is a scant amount left. Add stockjust to cover. Bring to boil and then reduce heat to medium low. Simmerfor about 25 minutes or until the vegetables are very soft.
Insert the blender into the saucepan, making sure the protective guard issubmerged. Blend, using an up-and-down motion until ingredients are
well combined, about 45–50 seconds. Add lemon juice. Taste and adjustseasoning accordingly.
Nutritional information per 1/2 cup serving:Calories 71 (22% from fat) • carb. 10g • pro. 4g • fat 2g
• sat. fat 0g • chol. 0mg • sod. 350mg • calc. 39mg • fibre 3g
SWEET RED PEPPER COULIS
This multipurpose sauce is great for chicken,fish, crab cakes, and pastas
Makes 21⁄2 cups
1 tablespoon olive oil1 medium yellow onion, peeled, roughly chopped6 cloves of garlic, peeled and smashed3 medium red peppers (about 175g each), roughly chopped1⁄2 teaspoon kosher salt1⁄4 teaspoon freshly ground pepper1⁄4 cup dry white wine
19

1⁄4 cup chicken stock
Heat the olive oil in a 21⁄2-litre saucepan over medium-low heat. Add theonion, garlic, red pepper, salt, and pepper and stir to coat. Reduce heatto low, cover loosely and “sweat” slowly until softened for about 15–20minutes. Take care that the vegetables do not pick up any color.
When vegetables are soft, add wine and increase the temperature so thatthe wine comes to a boil. Reduce the wine until about 1 tablespoonremains. Add stock and bring to boil. Reduce heat to medium low andsimmer for about 10 minutes. Insert the blender into the saucepan,making sure the protective guard is submerged. Blend, using an up-and-down motion until ingredients are smooth and well combined, about 50-60seconds.
Nutritional information per 1/2 cup serving:Calories 41 (33% from fat) • carb. 5g • pro. 1g • fat 2g
• sat. fat 0g • chol. 0mg • sod. 148mg • calc.13mg• fibre 1g
GARDEN VEGETABLE TOMATO SAUCE
A fresh and healthy pasta sauce that is excellent served withwhole-wheat pasta and topped with crumbled feta cheese.
Makes 4 cups
1 tablespoon olive oil1 120g yellow onion cut into quarters2 garlic cloves, peeled and crushed1 100g red pepper, cut into 25mm pieces1 85g eggplant, peeled and cut into 25mm pieces1 85g zucchini, cut into 25mm pieces1 85g summer squash, cut into 25mm pieces1 small carrot, peeled and cut into 15mm pieces1⁄4 cup dry white wine1 sprig fresh thyme3⁄4 teaspoon salt1 750g can diced tomatoes
Insert the blade assembly in the prep bowl. Place the onion in the prepbowl and pulse approximately 8 times to a rough chop.
Heat the olive oil in a 3-litre saucepan over medium heat. Add thechopped onion and the crushed garlic cloves to the pan and reduce heatto low. One at a time, place the remaining vegetables in the prep bowland chop with 8 even pulses and then add to the pan, stirring betweeneach addition. After carrot is added, stir and allow vegetables to cook overlow heat for about 15 minutes. Add white wine and reduce wine to 1tablespoon. Add thyme, salt, and tomatoes. Simmer for 25 minutes longer.
20
Insert the blender into the saucepan, making sure the protective guard issubmerged. Blend, using an up-and-down motion until ingredients arewell combined, about 50–60 seconds.
Nutritional information per 1/4 cup serving:Calories 60 (25% from fat) • carb. 9g • pro. 2g • fat 2g
• sat. fat 0g • chol. 0mg • sod. 351mg • calc. 29mg• fibre 3g
BASIC VINAIGRETTE
Use this basic vinaigrette as a guide and change your vinegar/oilflavours to come up with appropriate combinations to create exciting
salads. You may add other flavours such as crushed or roasted garlic,chopped shallots, fresh or dried herbs, sun-dried tomatoes, honey,
lemon juice, or flavoured vinegars.
Makes 1 cup1⁄4 cup wine vinegar
1 tablespoon Dijon mustard3⁄4 cup salad or olive oil
kosher salt and freshly ground pepper to taste
Place all ingredients in the mixing container. Process until combined,about 10–15 seconds. Keep unused portions in an airtight container in therefrigerator up to 2 weeks.
Nutritional analysis per tablespoon:Calories 91(98% from fat) • carb. 0g • pro. 0g • fat 10g
• sat. fat 1g • chol. 0mg • sod. 23mg • calc. 0mg V fibre 0g
CREAMY PARMESAN & ROASTED GARLIC DRESSING
Similar to a Caesar dressing, but made with roasted garlic togive the dressing a more mellow flavour.
Makes about 11⁄3 cups
1 30g Parmigiano-Reggiano cheese, cut in 10mm cubes4 cloves roasted garlic*2 tablespoons fresh lemon juice2 tablespoons red or white wine vinegar2 tablespoons lowfat mayonnaise1 tablespoon Dijon mustard1 tablespoon anchovy paste1 teaspoon Worcestershire sauce1 teaspoon freshly ground pepper1 cup extra virgin olive oil
21

Tabasco® or other hot sauce (to taste)
Insert the blade assembly in the prep bowl. Place the cheese cubes in theprep bowl. Pulse to chop, 10 times, then process to chop finely, about15–20 seconds. Add remaining ingredients to prep bowl. Process forabout 30–40 seconds, until creamy and totally emulsified.
Nutritional analysis per tablespoon:Calories 53 (89% from fat) • carb. 1g • pro. 1g • fat 5g
• sat. fat 1g • chol. 4mg • sod. 82mg • calc. 18mg • fibre 0g
*To roast garlic: Place 12 or more peeled cloves in a double thickness ofaluminum foil, toss with a tablespoon of olive oil and fold the foil to seal.Place in 170˚C oven for 30–40 minutes, until tender and browned. If youdo not wish to roast the garlic, you may blanch it until tender.
MANGO SALSA
Mango Salsa is excellent served over grilled fish such as salmon, tuna,swordfish or scallops, and grilled chicken, duck or pork tenderloin.It can also be served like traditional tomato salsa with tortilla chips.
Makes 1 cup1⁄4 red bell pepper (about 30g), cut in 10mm pieces (1⁄4 cup)1 small clove garlic, peeled1⁄2 jalapeño pepper, stemmed and seeded, cut in 10mm pieces1⁄2 small red onion (about 45g), peeled,
cut in 10mm pieces1 mango (350g - 400g), peeled and pitted, cut in 10mm pieces11⁄2 tablespoons fresh cilantro leaves2 teaspoons fresh lime juice11⁄2 teaspoons rice vinegar (may use raspberry or
white balsamic vinegar)1⁄2 teaspoon honey
Insert the blade assembly in the prep bowl. Place the red bell pepperpieces in the prep bowl and use the pulse to coarsely chop, 6–8 pulses.Transfer to a 1-litre bowl and reserve. Add the garlic, jalapeño pepper andonion to the prep bowl, pulse 5 to 10 times to chop. Remove and add tochopped red pepper. Add mango and cilantro to prep bowl and pulse untilmango reaches desired chopped consistency, about 10 to 20 pulses.Transfer to the bowl with the chopped red pepper and reserve. Stir in thelime juice, vinegar, and honey. Cover and let sit for 30 minutes to allowthe flavours to blend. If not using immediately, cover and refrigerate.Mango Salsa is best when served the day it is prepared, but may beprepared up to one day ahead. Remove from the refrigerator 30 minutesbefore serving for best flavour.
22

Nutritional information per 1/4 cup serving:Calories 45 (3% from fat) • carb. 12g • pro. 1g • fat 0g
• sat. fat 0g • chol. 0mg • sod. 28mg • calc. 11mg • fibre 1g
GUACAMOLE
An all-time favourite, serve guacamole with tortilla chips and salsa.Makes 2⁄3 cups
1 clove garlic, peeled and smashed1 green onion, trimmed and cut in 10mm pieces1⁄2 jalapeño pepper, cored, seeded and cut in 10mm pieces1 ripe avocado (about 300g), peeled and pitted,
cut into 15 - 20mm chunks1 tablespoon fresh lime juice1⁄4 teaspoon cumin powder1⁄4 teaspoon powdered coriander1⁄4 teaspoon kosher salt
Insert the blade assembly in the prep bowl. Place the garlic, green onionand jalapeño pepper in the prep bowl. Pulse to chop, 10–12 times. Addavocado, lime juice, cumin, coriander and salt. Pulse to chop avocado,10 times, then process continuously until desired consistency is reached,stopping every 20 to 30 seconds to scrape the bowl.
Transfer to a serving bowl, cover with plastic wrap placed directly on theguacamole and refrigerate for 30 minutes before serving to allow theflavours to blend.
Nutritional analysis per tablespoon:Calories 25 (72% from fat) • carb. 2g • pro. 0g • fat 2g
• sat. fat 0g • chol. 0mg • sod. 65mg • calc 3mg • fibre 1g
23

TOMATO AND BASIL TOPPING FOR BRUSCHETTA
Makes 1 cup
1 small garlic clove, peeled11⁄2 tablespoon fresh basil leaves1 475g grape tomatoes3 teaspoons extra virgin olive oil1⁄2 teaspoon salt
Insert the blade assembly in the prep bowl. Place garlic in the prep bowland run for 30 seconds. Add basil and pulse 4 times.
Add remaining ingredients to prep bowl pulse about 10–15 times to reachdesired consistency. Season to taste. Serve as topping for bruschetta.
Nutritional information per serving:Calories 50 (61% from fat) • carb. 4g • pro. 1g • fat 4g
• sat. fat 1g • chol. 0mg • sod. 301mg • calc. 8mg • fibre 1g
24
DESSERTSCHOCOLATE PISTACHIO MACAROONS
A change from the traditional almond macaroon.
Makes about 30 cookies3⁄4 cup granulated sugar1⁄2 cup shelled pistachios, unsalted1⁄4 cup Dutch processed cocoa4 large egg whites1 cup mini chocolate morsels
Preheat oven to 145°C. Line two 38cm x 28cm baking sheets withbaking paper.
Insert the blade assembly in the prep bowl. Place 1⁄4 cup of the sugar andthe pistachios in the prep bowl and process for 30–40 seconds until finelyground. Add cocoa and pulse 6 times to incorporate.
Place egg whites in a glass or stainless mixing bowl. Insert the blenderfitted with the whisk attachment and beat whites. After 11⁄2 minutes add theremaining 1⁄2 cup of sugar. Whites should reach firm peaks after 3 minutes.
Fold the pistachio and cocoa mixture into the egg whites in threeincrements with a rubber spatula. Gently fold in the chocolate morsels,taking care not to deflate.
Drop the batter in spoonfuls (2 tablespoons) onto the prepared bakingsheets. Bake in preheated 145°C oven for 35–40 minutes, until thecookies lift easily from the baking sheet and cookie bottoms are smooth.
Transfer the baking paper with the cookies from the hot pan to a coolsurface. Peel off the paper and store in airtight container once cooled.
Nutritional information per macaroon:Calories 76 (38% from fat) • carb. 11g • pro. 1g • fat 3g
• sat. fat 1g • chol. 0mg • sod. 11mg • calc. 4mg • fibre 2g
SWEET WHIPPED CREAM
Sweetened whipped cream is the perfect finish for just about anydessert, or spoon a dollop over coffee or hot chocolate.
Makes 2 cups
11⁄4 cups heavy cream, chilled2 tablespoons granulated sugar11⁄2 teaspoons vanilla extract
Place the cream, sugar, and vanilla in a large stainless or glass mixingbowl. Insert the blender fitted with the whisk attachment. Start the blender
25

but be careful to have the whisk just skim the surface of the cream. Blenduntil the cream gains some body and then move the blender in an up-and-down motion throughout the bowl. Whipped cream will reach softpeaks between 50-60 seconds.
Nutritional information per serving (2 tablespoons):Calories70 (86% from fat) • carb. 2g • pro. 0g • fat 7g
• sat. fat 4g • chol. 25mg • sod. 7mg • calc 12mg • fibre 0g
Variation:
Cocoa Whipped Cream: Place 11⁄4 cups heavy cream, 3 tablespoonsgranulated sugar, 1 tablespoon unsweetened cocoa, and 1 teaspoonvanilla in mixing bowl. Whip as directed.
BERRY COULIS
This versatile dessert sauce could not be easier.
Makes 11⁄4 cup
1 350g bag of frozen mixed berries thawed1⁄4 cup granulated sugar1⁄2 teaspoon fresh lemon juice
Place all ingredients in a 21⁄2-litre saucepan. Over medium heat bringmixture to a simmer and cook for about 5 minutes to melt the sugar.Insert the blender into the saucepan, making sure the protective guard issubmerged. Blend, using an up-and-down motion until ingredients arewell combined, about 30–40 seconds. Strain the sauce through a finemesh strainer and serve.
Nutritional information per 1/4 cup serving:Calories 86 (4% from fat) • carb. 22g • pro. 0mg • fat 0g
• sat. fat 0g • chol. 0mg • sod. 25mg • calc. 14mg • fibre 4g
26

WARRANTYLimited Three-Year WarrantyThis warranty is available to consumers only. You are a consumerif you own a Cuisinart® Smart Stick Hand Blender that waspurchased at retail for personal, family or household use.Except as otherwise required under applicable law, this warranty isnot available to retailers or other commercial purchaser or owners.
We warrant that your Cuisinart® Smart Stick Hand Blender will befree of defects in materials and workmanship under normal homeuse for 3 years from the date of original purchase.
We suggest you complete and return the enclosed productregistration card promptly to facilitate verification of the date oforiginal purchase. However, return of the product registration carddoes not eliminate the need for the consumer to maintain theoriginal proof of purchase in order to obtain the warranty benefits.In the event that you do not have proof of purchase date, thepurchase date for purposes of this warranty will be the dateof manufacture.
If your Cuisinart® Smart Stick Hand Blender should prove to bedefective within the warranty period, we will repair it, or if we thinknecessary, replace it. To obtain warranty service, simply call ourtoll-free number at 1800 808 971 (AUST), 0800 435 000 (NZ) foradditional information from our Customer Service Representativesor send the defective product to:
Cuisinart Australia24 Salisbury RoadAsquith NSW 2077
or
Cuisinart New Zealand44 Apollo DriveMairangi BayAuckland New Zealand
NOTE: For added protection and secure handling of anyCuisinart® product that is being returned, we recommend you usea traceable, insured delivery service. Cuisinart cannot be heldresponsible for in-transit damage or for packages that are notdelivered to us. Lost and/or damaged products are not coveredunder warranty.
Please be sure to include your return address, daytime phonenumber, description of the product defect, product model #(located on bottom of product), original date of purchase,and any other information pertinent to the product’s return.
27

Your Cuisinart® Smart Stick Hand Blender has been manufacturedto the strictest specifications and has been designed for use withthe authorised accessories and replacement parts.
This warranty expressly excludes any defects or damages causedby accessories, replacement parts, or repair service other thanthose that have been authorised by Cuisinart.
This warranty does not cover any damage caused by accident,misuse, shipment or other ordinary household use.
This warranty excludes all incidental or consequential damages.
28

29
NOTES:

30
NOTES:

NOTES:
31

©2008 CuisinartCuisinart® is a registered
trademark of Cuisinart150 Milford Road
East Windsor, NJ 08520Printed in China
04CU13123IB-8/055
Cuisinart offers an extensive assortment of top quality products to make life in thekitchen easier than ever. Try some of our other countertop appliances and
cookware, and Savour the Good Life.
www.cuisinart.com.au
Coffeemakers FoodProcessors
Toaster Ovens Blenders Cookware Ice CreamMakers
32
S A V O U R T H E G O O D L I F E
S&H1618/08