Crochet Fan Shawl - Crystal Palace Yarns · Gauge is not important for this pattern Abbreviations:...
8
Crochet Fan Shawl © 2012 Valerie Martin
Transcript of Crochet Fan Shawl - Crystal Palace Yarns · Gauge is not important for this pattern Abbreviations:...

Crochet Fan Shawl
© 2012 Valerie Martin

Materials: 9 balls Crystal Palace Panda Silk (or approx. 1746 yds/428 grams of fingering weight/4ply)Size US F/3.75 mm crochet hookDarning needle
Skill Level: Gauge (Tension):Intermediate Gauge is not important for this pattern
Abbreviations:ldc - Linked Double Crochet (US)/Linked Treble Crochet (UK)ldcd - Linked Double Crochet Decrease (US)/Linked Treble Crochet Decrease (UK)ltc - Linked Treble Crochet (US)/Linked Double Treble Crochet (UK)xdc - Crossed Double Crochet (US)/Crossed Treble Crochet (UK)fsc - Foundation Single Crochet (US)/Foundation Double Crochet (UK)
Stitch Directions:ldc - insert hook into horizontal-ish bar at the bottom of stitch just made, yarn over and draw up a loop. Insert hook into next stitch, yarn over and draw up a loop. Yarn over pull through two loops, Yarn over pull through last two loops on hook. Begin row with regular double crochet.
ldc dec. - insert hook into horizontal-ish bar at the bottom of stitch just made, yarn over and draw up a loop. Insert hook into next stitch, yarn over and draw up a loop. Yarn over pull through two loops, insert hook into horizontal-ish bar just made, yarn over and draw up a loop. Insert hook into next stitch, yarn over and draw up loop. Yarn over and pull through two loops on hook, yarn over and pull through three remaining loops. When ldc dec. falls at the beginning of a row, start a regular double crochet. After the first yo pull through two loops, continue with the instructions for ldc dec.
ltc - Yo insert hook into horizontal-ish bar at the bottom of stitch just made, yarn over and draw up a loop. Insert hook into next stitch, yarn over and draw up a loop. Yarn over pull through two loops, yarn over pull through two loops, yarn over pull through last two loops on hook.
ldc double dec. - begin creating an ldc dec. After pulling through two loops the second time, insert hook into horizontal-ish bar just made, yarn over and draw up a loop. Insert hook into next stitch, yarn over and draw up loop. Yarn over and pull through two loops on hook, yarn over and pull through four remaining loops. xdc - skip one stitch. Double crochet into next stitch. Double crochet into skipped stitch coming in front of the stitch just made.
Notes:This pattern tries to minimize the amount of ends to weave in by creating one motif off of the first and continuing in rows of motifs. There is a chart for the basic motif and a diagram of the direction that you will be working. In creating this pattern in this manner foundation single crochet is necessary. If you do not know how to do fsc but would like to know, I recommend this video http://www.youtube.com/watch?v=-hzN2eSIzvc on You Tube. If you do not like using foundation single crochet you can make each motif separately and connect them at the end. If you choose to make them separately be aware that the top of the shawl is a row of incomplete motifs.
There are pictures at the end of the pattern to help you work the stitches defined above.
Chain two does not count as a stitch unless otherwise noted.
© 2012 Valerie Martin
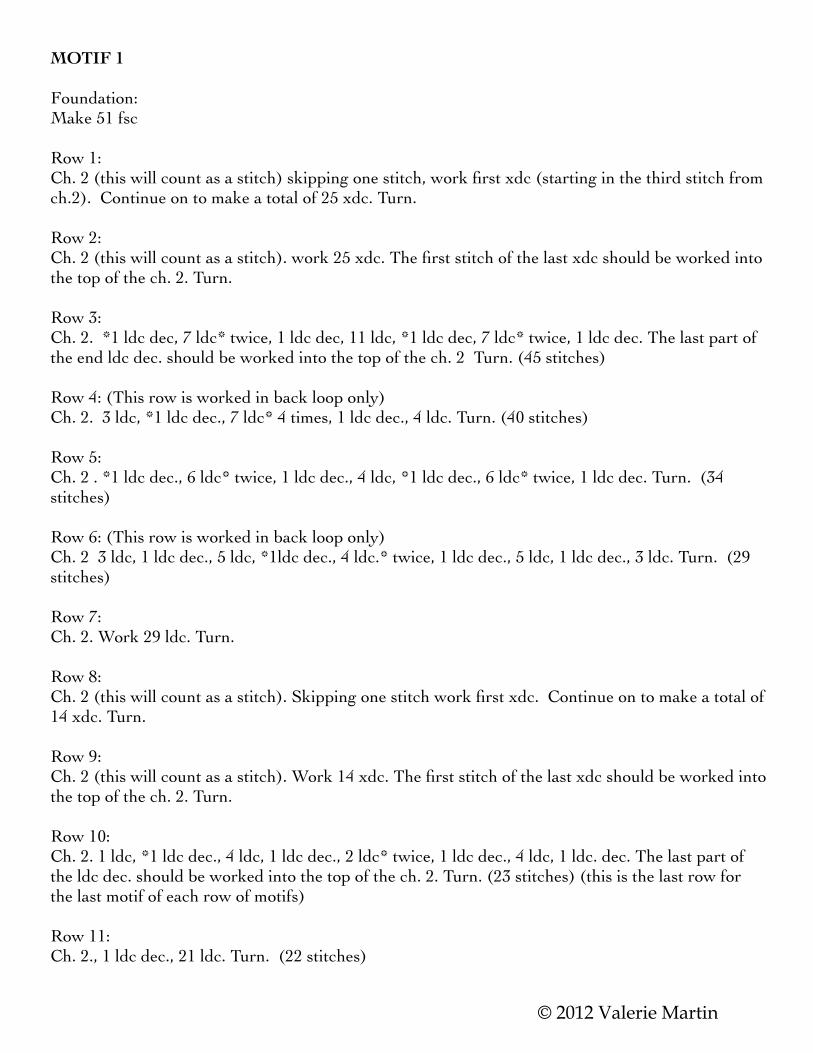
MOTIF 1
Foundation: Make 51 fsc
Row 1:Ch. 2 (this will count as a stitch) skipping one stitch, work first xdc (starting in the third stitch from ch.2). Continue on to make a total of 25 xdc. Turn.
Row 2:Ch. 2 (this will count as a stitch). work 25 xdc. The first stitch of the last xdc should be worked into the top of the ch. 2. Turn.
Row 3:Ch. 2. *1 ldc dec, 7 ldc* twice, 1 ldc dec, 11 ldc, *1 ldc dec, 7 ldc* twice, 1 ldc dec. The last part of the end ldc dec. should be worked into the top of the ch. 2 Turn. (45 stitches)
Row 4: (This row is worked in back loop only)Ch. 2. 3 ldc, *1 ldc dec., 7 ldc* 4 times, 1 ldc dec., 4 ldc. Turn. (40 stitches)
Row 5:Ch. 2 . *1 ldc dec., 6 ldc* twice, 1 ldc dec., 4 ldc, *1 ldc dec., 6 ldc* twice, 1 ldc dec. Turn. (34 stitches)
Row 6: (This row is worked in back loop only)Ch. 2 3 ldc, 1 ldc dec., 5 ldc, *1ldc dec., 4 ldc.* twice, 1 ldc dec., 5 ldc, 1 ldc dec., 3 ldc. Turn. (29 stitches)
Row 7:Ch. 2. Work 29 ldc. Turn.
Row 8:Ch. 2 (this will count as a stitch). Skipping one stitch work first xdc. Continue on to make a total of 14 xdc. Turn.
Row 9:Ch. 2 (this will count as a stitch). Work 14 xdc. The first stitch of the last xdc should be worked into the top of the ch. 2. Turn.
Row 10:Ch. 2. 1 ldc, *1 ldc dec., 4 ldc, 1 ldc dec., 2 ldc* twice, 1 ldc dec., 4 ldc, 1 ldc. dec. The last part of the ldc dec. should be worked into the top of the ch. 2. Turn. (23 stitches) (this is the last row for the last motif of each row of motifs)
Row 11:Ch. 2., 1 ldc dec., 21 ldc. Turn. (22 stitches)
© 2012 Valerie Martin

Row 12: (This row is worked in back loop only.)Ch. 2. 2 ldc, *1 ldc dec., 2 ldc* 5 times. Turn. (17 stitches)
Row 13:Ch. 2. *1 ldc dec., 1 ldc* 5 times. 1 ldc dec. Turn. (11 Stitches)
Row 14:Ch. 2. 3 ldc dec., 1 ldc, 2 ldc dec. Turn. (6 stitches)
Row 15:Ch. 2. 3 ldc dec. Turn. (3 stitches)
Row 16:Ch. 2. 1 ldc double dec. DO NOT fasten off. Ch. 1
MOTIFS 2-8
Make sure right side is facing you. (Side with the back loop only bumps)
Foundation:25 sc evenly spaced down the left side of Motif 1. 26 fsc.
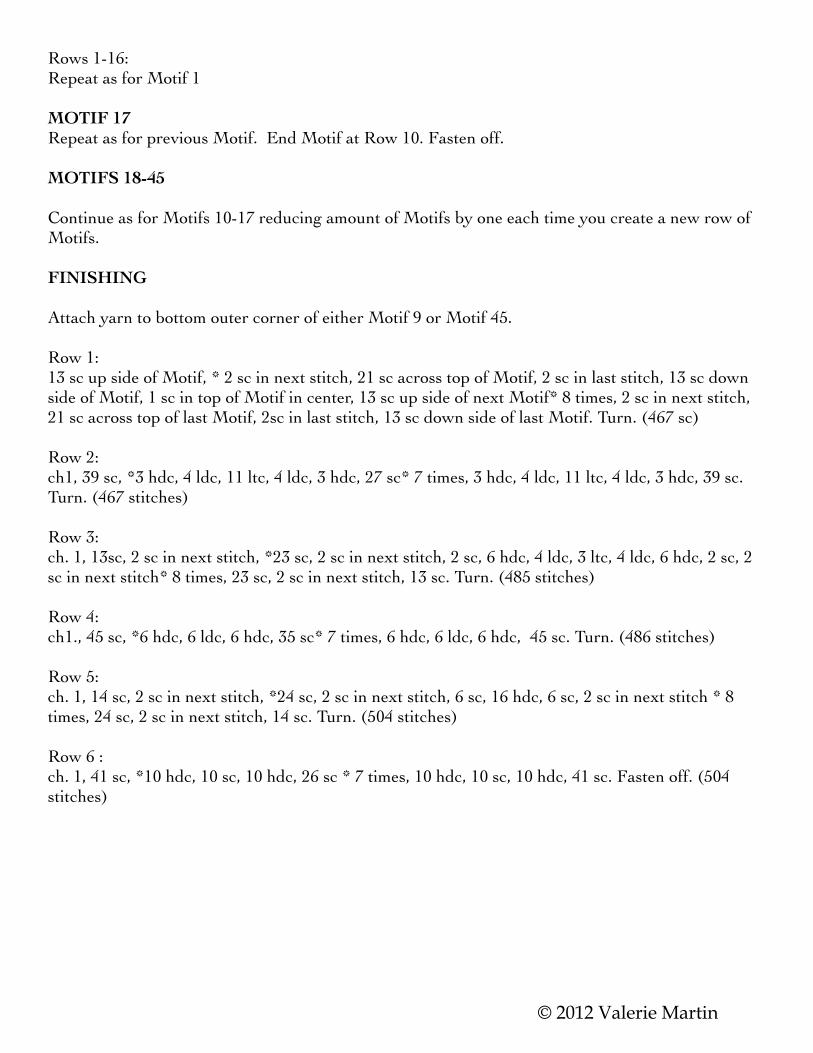
Rows 1-16:Repeat as for Motif 1
MOTIF 9
Repeat as for previous Motif. End Motif at Row 10. Fasten off
MOTIF 10
Foundation:26 fsc. Connect your work to the previous row by single crochet on the side of Motif 1 that has not been worked yet. 25 more sc spaced evenly up the side of Motif 1.
Rows 1-16:Repeat as for Motif 1.
MOTIFS 11-16
Make sure right side is facing you.
Foundation:25 sc evenly spaced down side of Motif that you just created, 1 sc right in the join of the previous Motifs, 25 sc evenly space up the side of the Motif to the left of the Motif that you just single crocheted down the side of.
© 2012 Valerie Martin
Rows 1-16:Repeat as for Motif 1
MOTIF 17Repeat as for previous Motif. End Motif at Row 10. Fasten off.
MOTIFS 18-45
Continue as for Motifs 10-17 reducing amount of Motifs by one each time you create a new row of Motifs.
FINISHING
Attach yarn to bottom outer corner of either Motif 9 or Motif 45.
Row 1:13 sc up side of Motif, * 2 sc in next stitch, 21 sc across top of Motif, 2 sc in last stitch, 13 sc down side of Motif, 1 sc in top of Motif in center, 13 sc up side of next Motif* 8 times, 2 sc in next stitch, 21 sc across top of last Motif, 2sc in last stitch, 13 sc down side of last Motif. Turn. (467 sc)
Row 2:ch1, 39 sc, *3 hdc, 4 ldc, 11 ltc, 4 ldc, 3 hdc, 27 sc* 7 times, 3 hdc, 4 ldc, 11 ltc, 4 ldc, 3 hdc, 39 sc. Turn. (467 stitches)
Row 3:ch. 1, 13sc, 2 sc in next stitch, *23 sc, 2 sc in next stitch, 2 sc, 6 hdc, 4 ldc, 3 ltc, 4 ldc, 6 hdc, 2 sc, 2 sc in next stitch* 8 times, 23 sc, 2 sc in next stitch, 13 sc. Turn. (485 stitches)
Row 4:ch1., 45 sc, *6 hdc, 6 ldc, 6 hdc, 35 sc* 7 times, 6 hdc, 6 ldc, 6 hdc, 45 sc. Turn. (486 stitches)
Row 5:ch. 1, 14 sc, 2 sc in next stitch, *24 sc, 2 sc in next stitch, 6 sc, 16 hdc, 6 sc, 2 sc in next stitch * 8 times, 24 sc, 2 sc in next stitch, 14 sc. Turn. (504 stitches)
Row 6 :ch. 1, 41 sc, *10 hdc, 10 sc, 10 hdc, 26 sc * 7 times, 10 hdc, 10 sc, 10 hdc, 41 sc. Fasten off. (504 stitches)
© 2012 Valerie Martin

Stitch Direction Images
ldc
Image A:Look just above my nail. See that horizontal-ish bar? That is where you insert the hook to begin the ldc. In this image I have started the row with my ch.2 and a regular dc so the hook is being inserted into the bar of the reg. dc
Image B:This is what your hook will look like after inserting into the horizontal-ish bar. After this you’ll yarn over and pull through, then insert hook into that next stitch, yo, pull through, yo pull through two loops, yo, pull through last two loops
Image C:Here we’ve already created an ldc. There just above and to the right of my nail is your horizontal-ish bar.
ldc dec.
Image D:What you’ll see after inserting into the horizontal-ish bar
Image E:After you’ve done the yo, pull through. Now see that bar just above and to the right of my nail. We’re gonna insert our hook there, then yo, pull through.
Image F:This is what you should see after you’ve inserted your hook into the horizontal bar. Then you’ll yo, pull through and complete the stitch.
Image G:This is what the decrease will look like once it’s complete.
© 2012 Valerie Martin

Motif Chart
© 2012 Valerie Martin

Row Direction Diagram
© 2012 Valerie Martin