Positive money creating and switching to a full sovereign monetary system

Page 1 of 53 01.2014
Creating switching commands in the visualisation New March 2011
HomeServer/FacilityServer
Creating switching functions in the ground plan visualisation
Introduction:
You are able to fulfill special customer requirements with the ground plan visualisation in the HomeServer. For example displaying the status of a light in a ground plan display.
Continue with any key.
In the following learning unit you
- create symbols for status display of various lights
- assign the symbols with a switching command.
Continue with any key.

01.2014 Page 2 of 53
Creating switching commands in the visualisation New March 2011

Page 3 of 53 01.2014
Creating switching commands in the visualisation New March 2011
1 HS Expert 2.5.100902 - [C:\Dokumente und Einstell ungen\ks\Eigene Dateien\HS+FS Experte 2.5\Projekte\Training\Training.hs3]
• Click the Interface ( ) tab.
1

01.2014 Page 4 of 53
Creating switching commands in the visualisation New March 2011
2 HS Expert 2.5.100902 - [C:\Dokumente und Einstell ungen\ks\Eigene Dateien\HS+FS Experte 2.5\Projekte\Training\Training.hs3]
• Click the Visualisation ( ) menu button. Open the visualisation editor with this.
1

Page 5 of 53 01.2014
Creating switching commands in the visualisation New March 2011
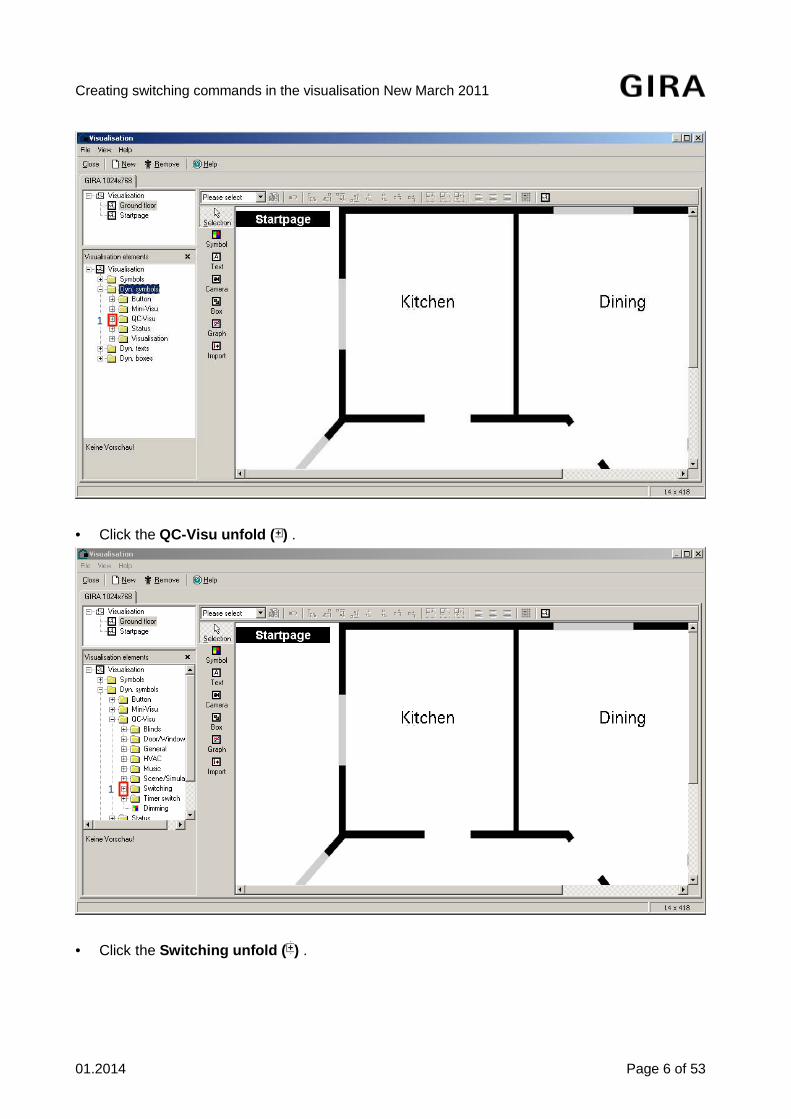
3 Visualisation
• Static symbols have only one display state.
• Dynamic symbols can be controlled via changing display and can display various switching conditions via a communication object. In this exercise the switching states On and Off should be displayed.
• Click the Dyn. symbols unfold ( ) .
1
01.2014 Page 6 of 53
Creating switching commands in the visualisation New March 2011
• Click the QC-Visu unfold ( ) .
• Click the Switching unfold ( ) .
1
1

Page 7 of 53 01.2014
Creating switching commands in the visualisation New March 2011
• Click the Light ( ) tree entry.
1

01.2014 Page 8 of 53
Creating switching commands in the visualisation New March 2011
• The preview window now displays the standard state (if no information about the status is available).
•
• Continue with any key.
1

Page 9 of 53 01.2014
Creating switching commands in the visualisation New March 2011
• While keeping the left mouse button pressed, drag the Light ( ) tree entry to the Kitchen . With this action you add the dynamic symbol in the kitchen.
1
2

01.2014 Page 10 of 53
Creating switching commands in the visualisation New March 2011
4 Visualisation element - Symbol
• Click the Symbol control ( ) button. After this click, select a communication object for symbol control.
1

Page 11 of 53 01.2014
Creating switching commands in the visualisation New March 2011
5 Communication objects
• Click the House 1 R012 LG1, 2/0/0 ( ) tree entry.
• Click the Apply ( ) menu item.
1
2
01.2014 Page 12 of 53
Creating switching commands in the visualisation New March 2011
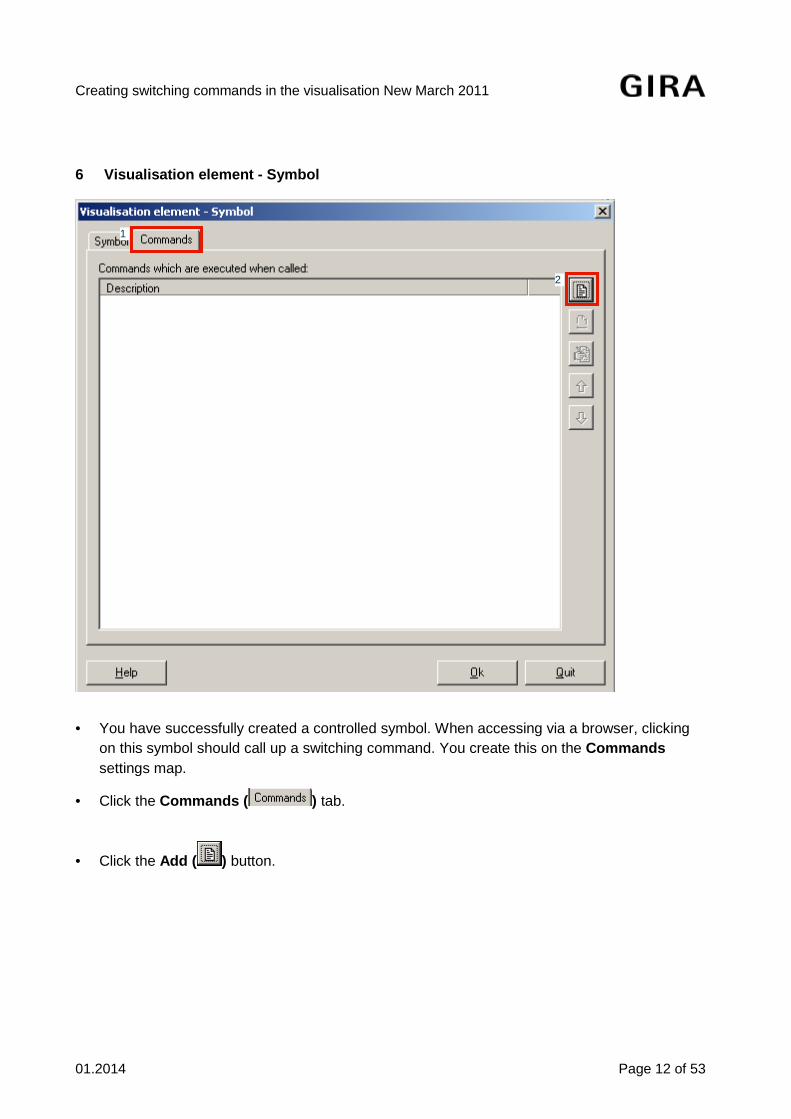
6 Visualisation element - Symbol
• You have successfully created a controlled symbol. When accessing via a browser, clicking on this symbol should call up a switching command. You create this on the Commands settings map.
• Click the Commands ( ) tab.
• Click the Add ( ) button.
1
2

Page 13 of 53 01.2014
Creating switching commands in the visualisation New March 2011
7 Edit/Add
• Click the Communication object ( ) button.
• With this you define the communication object with which the following command is transmitted.
•
1

01.2014 Page 14 of 53
Creating switching commands in the visualisation New March 2011
8 Communication objects
• Click the House 1 R012 LG1, 2/0/0 ( ) tree entry.
• Click the Apply ( ) menu item.
1
2

Page 15 of 53 01.2014
Creating switching commands in the visualisation New March 2011
9 Edit/Add
• Various command types are available. In this example you use the toggle command (switching over). Click the Model ( ) button.
1
1

01.2014 Page 16 of 53
Creating switching commands in the visualisation New March 2011
• Click the Toggle 0/Constant ( ) list item. This selects the switching behaviour.
• With this (default) presetting the switching command alternates between an OFF telegram (0) and an ON telegram (1). With non-1 bit objects other ON values are possible. With a dimmer for example 80%.
• Click the Ok ( ) button.
1

Page 17 of 53 01.2014
Creating switching commands in the visualisation New March 2011
10 Visualisation element - Symbol
• Click the Ok ( ) button.
1
01.2014 Page 18 of 53
Creating switching commands in the visualisation New March 2011
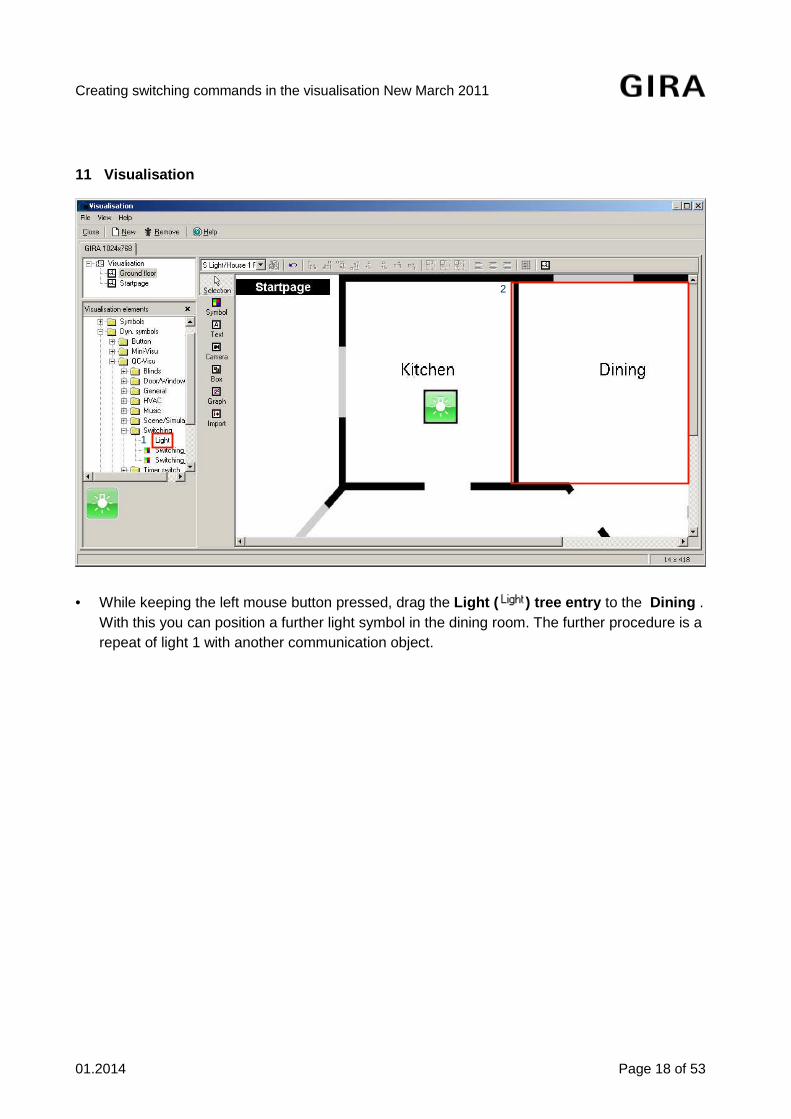
11 Visualisation
• While keeping the left mouse button pressed, drag the Light ( ) tree entry to the Dining . With this you can position a further light symbol in the dining room. The further procedure is a repeat of light 1 with another communication object.
1
2

Page 19 of 53 01.2014
Creating switching commands in the visualisation New March 2011
12 Visualisation element - Symbol
• Click the Symbol control ( ) button.
1
01.2014 Page 20 of 53
Creating switching commands in the visualisation New March 2011
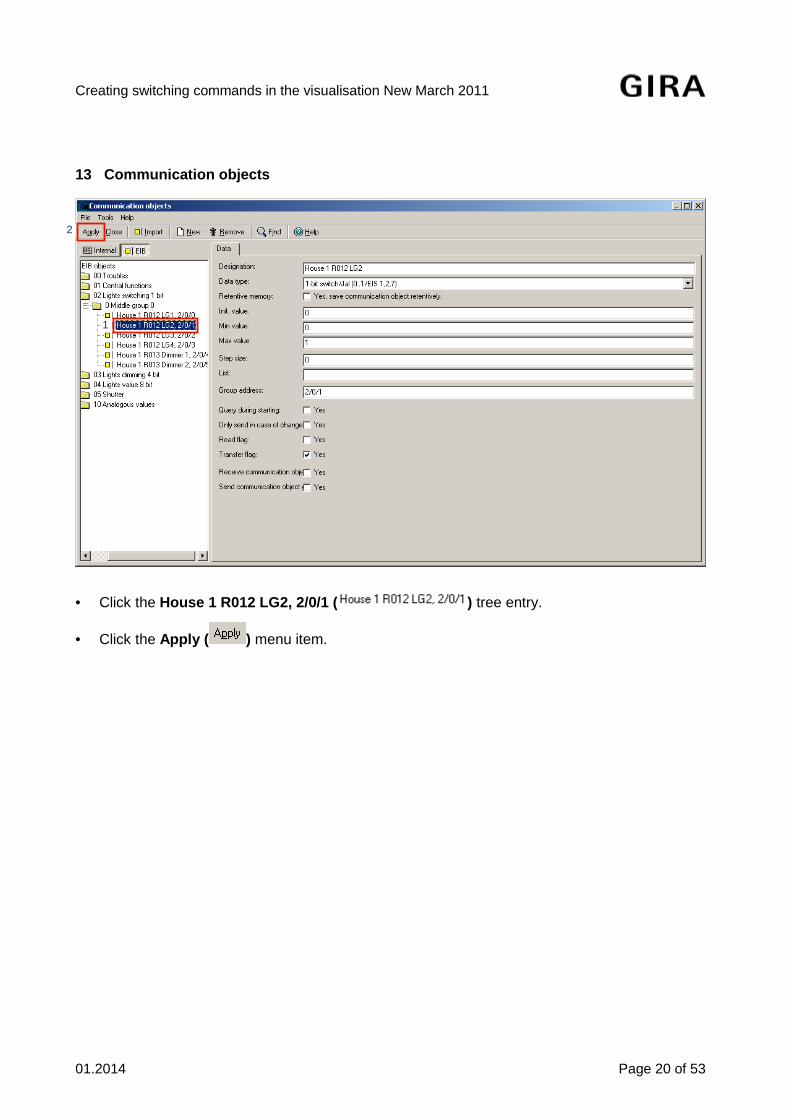
13 Communication objects
• Click the House 1 R012 LG2, 2/0/1 ( ) tree entry.
• Click the Apply ( ) menu item.
1
2

Page 21 of 53 01.2014
Creating switching commands in the visualisation New March 2011
14 Visualisation element - Symbol
• Click the Commands ( ) tab.
• Click the Add ( ) button.
1
2

01.2014 Page 22 of 53
Creating switching commands in the visualisation New March 2011
15 Edit/Add
• Click the Communication object ( ) button.
1

Page 23 of 53 01.2014
Creating switching commands in the visualisation New March 2011
16 Communication objects
• Click the House 1 R012 LG2, 2/0/1 ( ) tree entry.
• Click the Apply ( ) menu item.
1
2

01.2014 Page 24 of 53
Creating switching commands in the visualisation New March 2011
17 Edit/Add
• Click the Model ( ) button.
• Click the Toggle 0/Constant ( ) list item.
1
1

Page 25 of 53 01.2014
Creating switching commands in the visualisation New March 2011
• Click the Ok ( ) button.
1

01.2014 Page 26 of 53
Creating switching commands in the visualisation New March 2011
18 Visualisation element - Symbol
• Click the Ok ( ) button.
1

Page 27 of 53 01.2014
Creating switching commands in the visualisation New March 2011
19 Visualisation
• You have now twice created a new symbol, so implement a light symbol in the staircase via the time-saving function of copy and paste . After pasting, modify the communication objects in the pasted symbol.
• Right-click the LG Dining ( ) .
1

01.2014 Page 28 of 53
Creating switching commands in the visualisation New March 2011
20 Visualisation
• Click the ( ) menu item.
1
1
Page 29 of 53 01.2014
Creating switching commands in the visualisation New March 2011
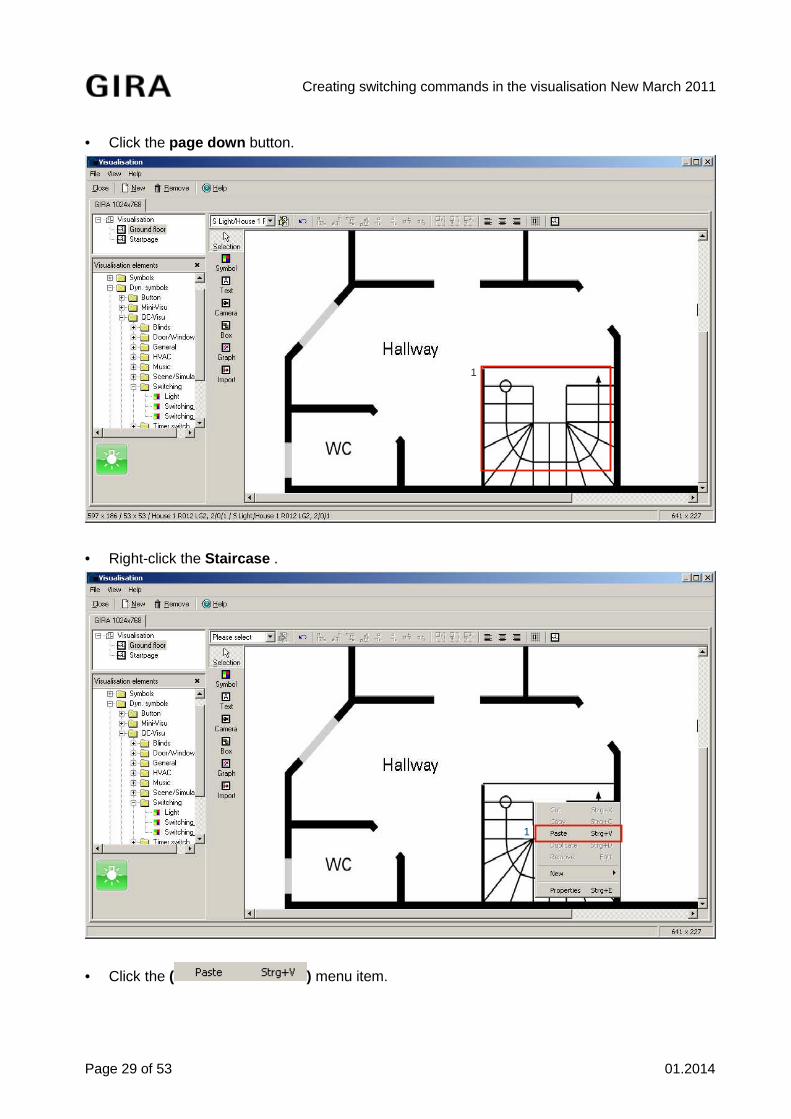
• Click the page down button.
• Right-click the Staircase .
• Click the ( ) menu item.
1
1

01.2014 Page 30 of 53
Creating switching commands in the visualisation New March 2011
• Right-click the Light staircase ( ) .
• Click the ( ) menu item.
1
1
Page 31 of 53 01.2014
Creating switching commands in the visualisation New March 2011
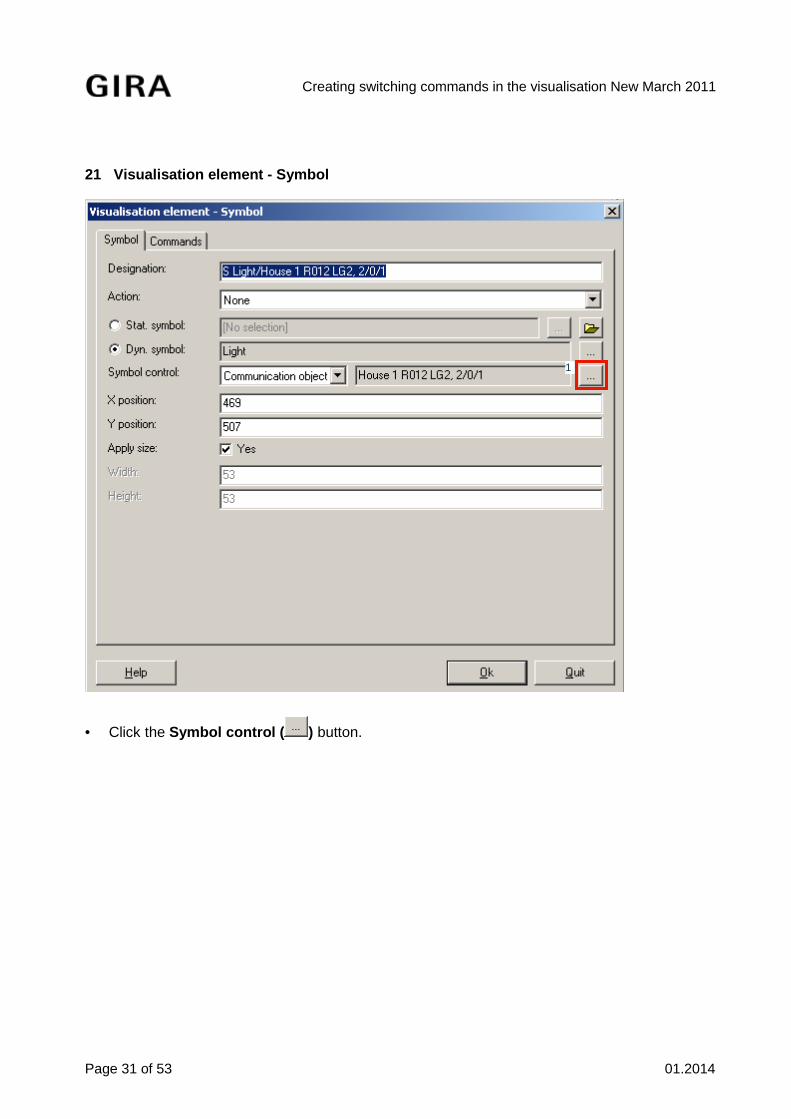
21 Visualisation element - Symbol
• Click the Symbol control ( ) button.
1

01.2014 Page 32 of 53
Creating switching commands in the visualisation New March 2011
22 Communication objects
• Click the House 1 R012 LG3, 2/0/2 ( ) tree entry.
• Click the Apply ( ) menu item.
1
2

Page 33 of 53 01.2014
Creating switching commands in the visualisation New March 2011
23 Visualisation element - Symbol
• Click the Commands ( ) tab.
• Double-click the Toggle 'House 1 R012 LG2, 2/0/1' 0/1 list item. With this you start the editing mode.
1
2

01.2014 Page 34 of 53
Creating switching commands in the visualisation New March 2011
24 Edit/Add
• Click the Communication object ( ) button.
1

Page 35 of 53 01.2014
Creating switching commands in the visualisation New March 2011
25 Communication objects
• Click the House 1 R012 LG3, 2/0/2 ( ) tree entry.
• Click the Apply ( ) menu item.
1
2
01.2014 Page 36 of 53
Creating switching commands in the visualisation New March 2011
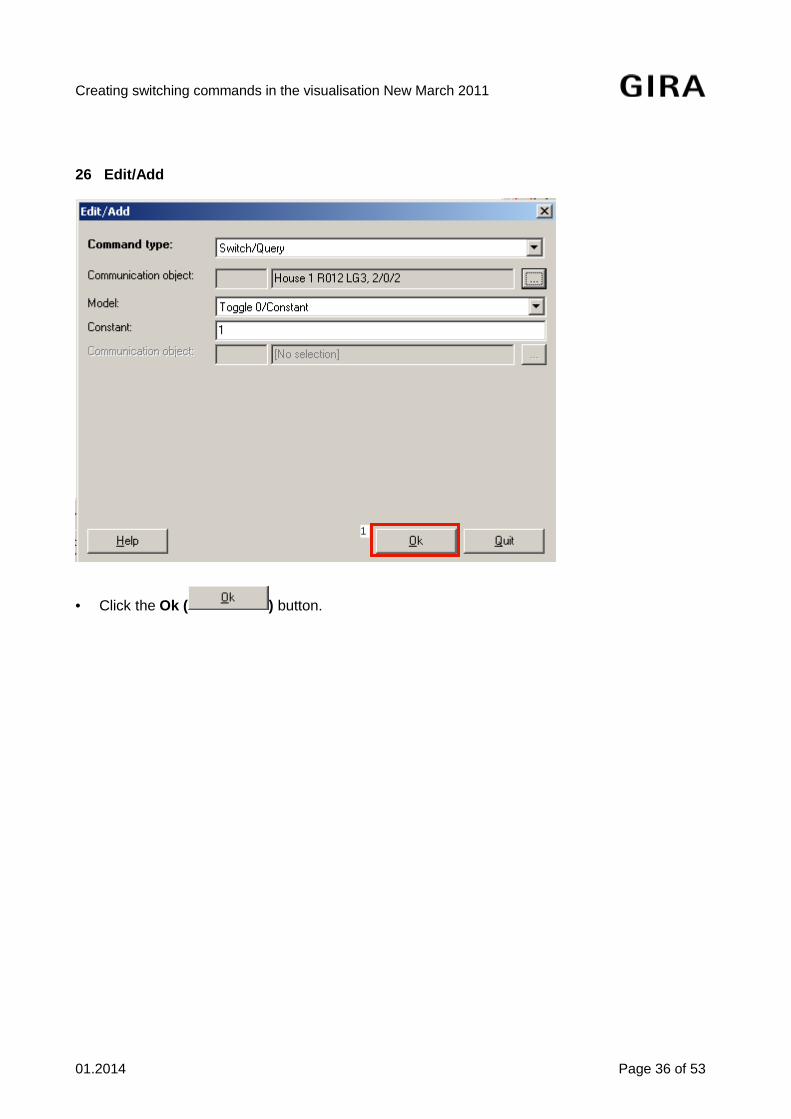
26 Edit/Add
• Click the Ok ( ) button.
1

Page 37 of 53 01.2014
Creating switching commands in the visualisation New March 2011
27 Visualisation element - Symbol
• Click the Ok ( ) button.
1

01.2014 Page 38 of 53
Creating switching commands in the visualisation New March 2011
• In the next step you select a symbol from Category Visualisation and duplicate the created symbol (copy and paste in one step) to save time. In addition, position the symbol via the grid and the keyboard arrow buttons. Click the fold Switching ( ) .
• Click on fold in QC-Visualisation ( ).
1
1

Page 39 of 53 01.2014
Creating switching commands in the visualisation New March 2011
• Click the unfold Visualisation ( ) .
• Click the Light ( ) tree entry. With this you call up the preview.
• Activate the grid via the View menu. Click the View ( ) menu item.
1
1
2

01.2014 Page 40 of 53
Creating switching commands in the visualisation New March 2011
• Click the Draw secondary lines Strg+R ( ) menu item.
• While keeping the left mouse button pressed, drag the Light ( ) tree entry to the Hallway .
1
1
2

Page 41 of 53 01.2014
Creating switching commands in the visualisation New March 2011
28 Visualisation element - Symbol
• Click the Symbol control ( ) button.
1

01.2014 Page 42 of 53
Creating switching commands in the visualisation New March 2011
29 Communication objects
• Click the House 1 R012 LG4, 2/0/3 ( ) tree entry.
• Click the Apply ( ) menu item.
1
2

Page 43 of 53 01.2014
Creating switching commands in the visualisation New March 2011
30 Visualisation element - Symbol
• Click the Commands ( ) tab.
• Click the Add ( ) button.
1
2

01.2014 Page 44 of 53
Creating switching commands in the visualisation New March 2011
31 Edit/Add
• Click the Communication object ( ) button.
1
Page 45 of 53 01.2014
Creating switching commands in the visualisation New March 2011
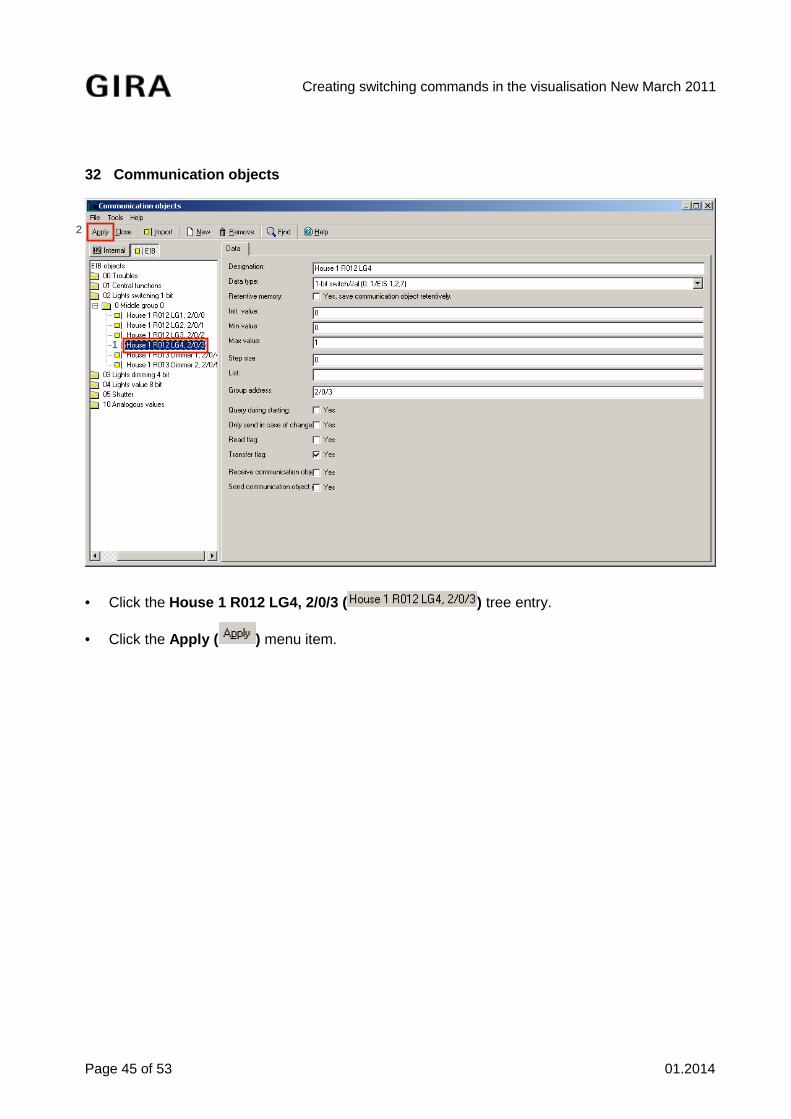
32 Communication objects
• Click the House 1 R012 LG4, 2/0/3 ( ) tree entry.
• Click the Apply ( ) menu item.
1
2
01.2014 Page 46 of 53
Creating switching commands in the visualisation New March 2011
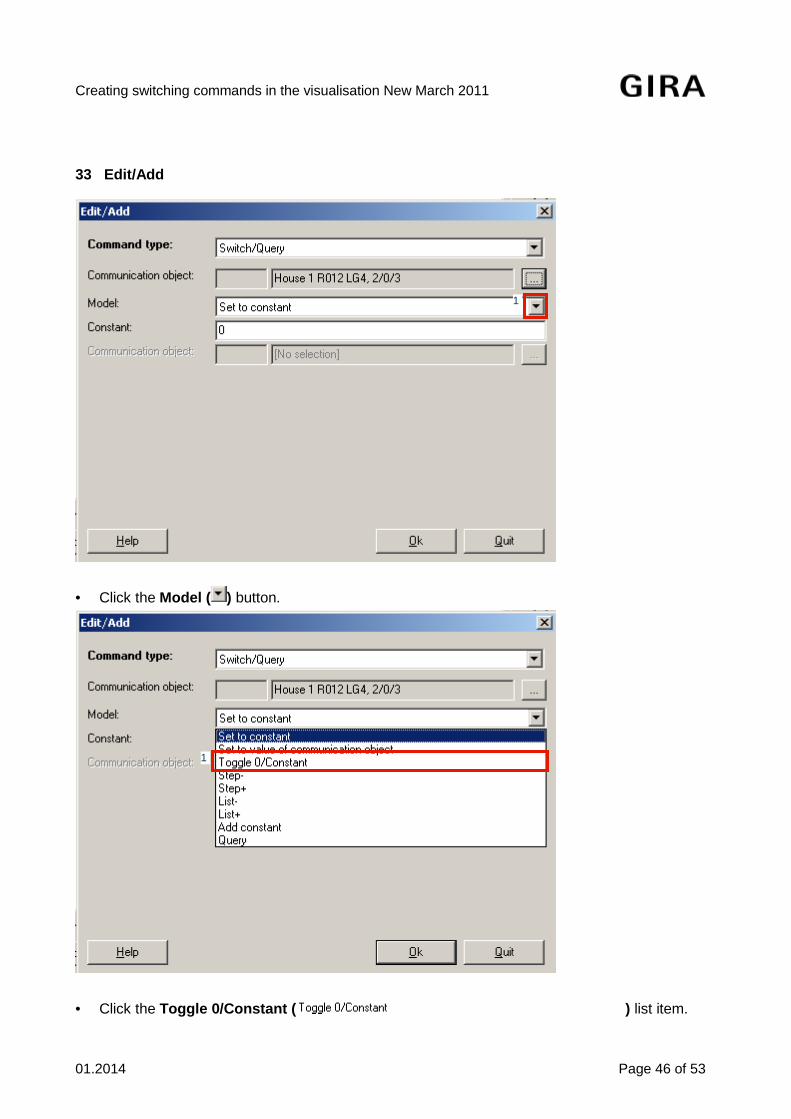
33 Edit/Add
• Click the Model ( ) button.
• Click the Toggle 0/Constant ( ) list item.
1
1

Page 47 of 53 01.2014
Creating switching commands in the visualisation New March 2011
• Click the Ok ( ) button.
1

01.2014 Page 48 of 53
Creating switching commands in the visualisation New March 2011
34 Visualisation element - Symbol
• Click the Ok ( ) button.
1

Page 49 of 53 01.2014
Creating switching commands in the visualisation New March 2011
35 Visualisation
• Right-click the Light symbol Hallway ( ) .
• Click the ( ) menu item.
1
1

01.2014 Page 50 of 53
Creating switching commands in the visualisation New March 2011
• Press the key.
• Press the key.
• Press the key.
• Press the key.
• Press the key.
• Press the key.
• Right-click the Light symbol hallway ( ) .
• Click the ( ) menu item.
1

Page 51 of 53 01.2014
Creating switching commands in the visualisation New March 2011
• Press the key.
• Press the key.
• Press the key.
• Press the key.
• Press the key.
• Press the key.
• Click the Close ( ) menu item.
1
01.2014 Page 52 of 53
Creating switching commands in the visualisation New March 2011
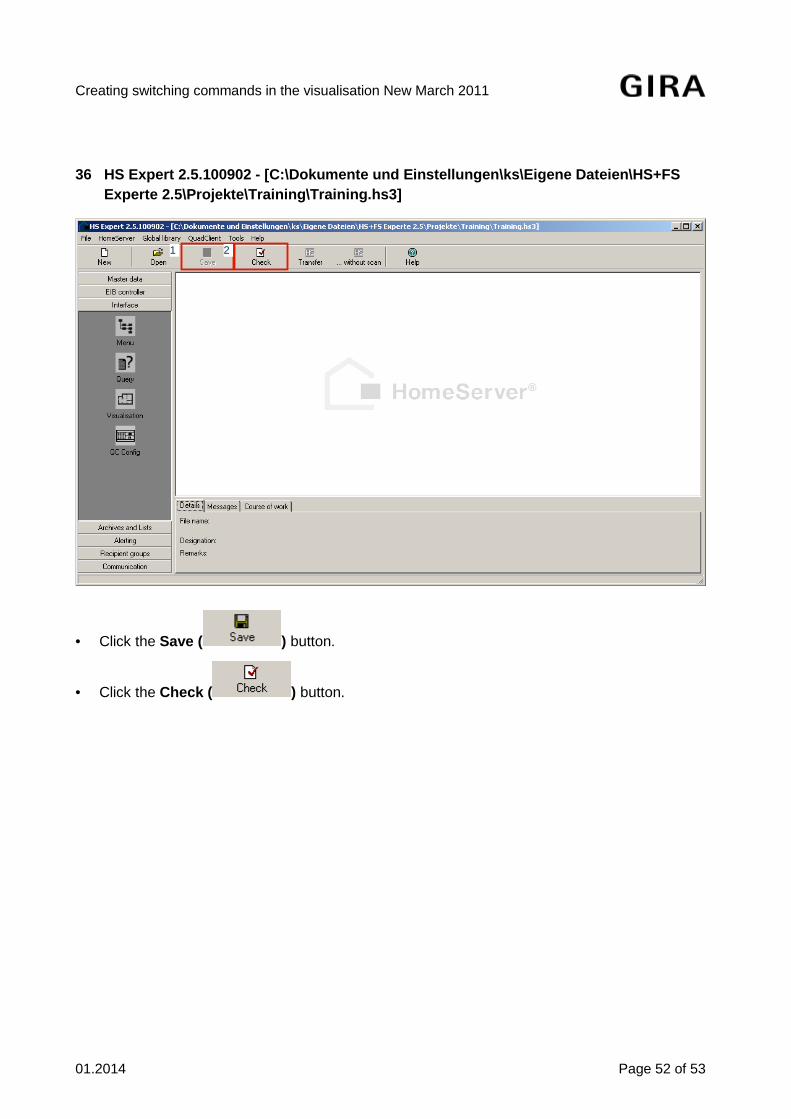
36 HS Expert 2.5.100902 - [C:\Dokumente und Einstel lungen\ks\Eigene Dateien\HS+FS Experte 2.5\Projekte\Training\Training.hs3]
• Click the Save ( ) button.
• Click the Check ( ) button.
1 2
Page 53 of 53 01.2014
Creating switching commands in the visualisation New March 2011
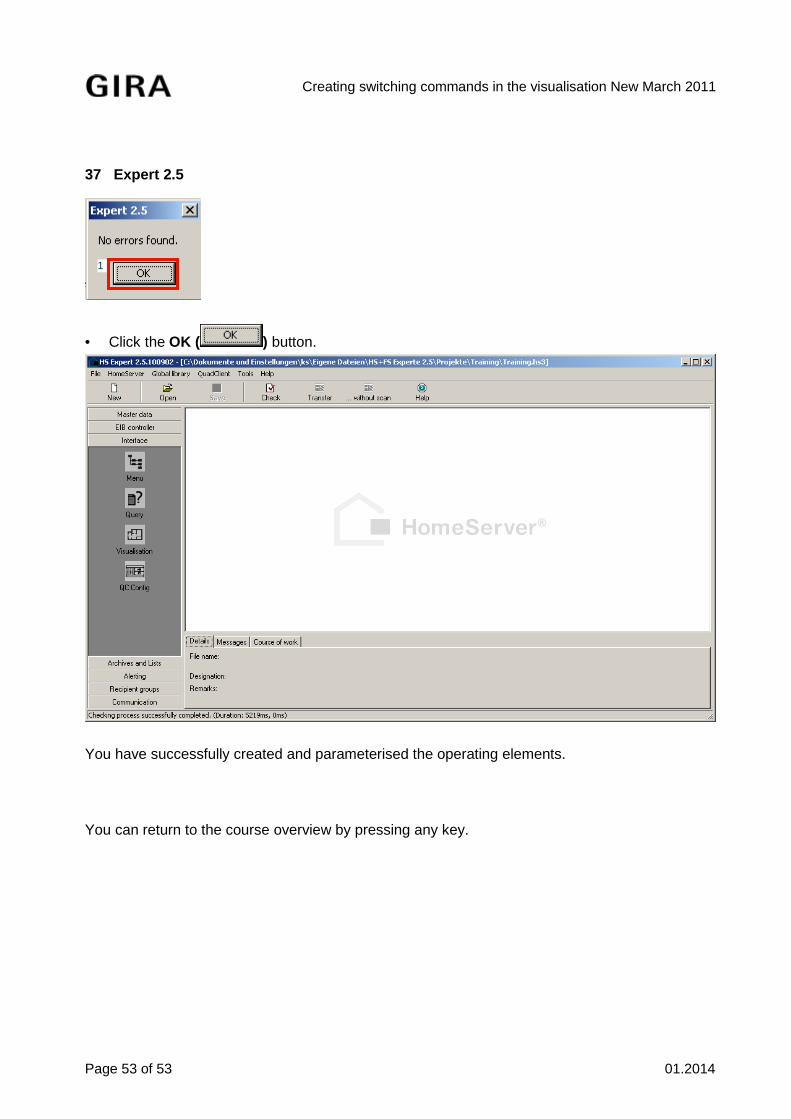
37 Expert 2.5
• Click the OK ( ) button.
You have successfully created and parameterised the operating elements.
You can return to the course overview by pressing any key.
1


![01.2014 LCV [RUS] - KSB · 2020. 12. 3. · 01.2014 lcv [rus] 1 Тип насоса: Серийный номер насоса: Дата: Покупатель: Номер заказа](https://static.fdocuments.net/doc/165x107/60baae9d40b9ba4f9a5f3d09/012014-lcv-rus-ksb-2020-12-3-012014-lcv-rus-1-.jpg)