Creating Documents with Full-text Searching
21
Creating Documents with Full Text Searching 1-Feb-12 © 2012 OCLC Page 1 of 21 Creating Documents with Full Text Searching This tutorial leads you through the process of creating a compound object with fully searchable page text and adding that document to your collection. You will also see how to search a compound object that has a transcript field with full text search enabled. Learn About Section I: Overview Section II: Issues to Consider Section III: The Scanning Process Section IV: Organizing Compound Objects Organizing Documents Organizing Monographs Section V: Establishing Collection Settings Section VI: Importing Images and Text Section VII: Searching the Compound Object Section VIII: Additional Resources Section I: Overview Assigning the data type of Full Text Search to a field provides additional functionality within your collection, especially when working with compound objects. If you assign full text search to a field you are able to: Use the transcript functionality within the Metadata Templates and Compound Object Wizards. Automatically extract text from PDFs and Encoded Archival Description (EAD) files. Search within all types of compound objects (documents and monographs). View the page and text of compound objects. Full text searching enables users to search the text within all types of compound objects. When the search results are returned, pages containing the specified term appear with red visual cues in the document navigation pane tabs. Enabling full text searching also allows the page image and the transcript, or OCR text of the page, to be displayed side-by-side in the Image & Text view.
Transcript of Creating Documents with Full-text Searching
Creating Documents with Full Text Searching 1-Feb-12
© 2012 OCLC Page 1 of 21
Creating Documents with Full Text Searching
This tutorial leads you through the process of creating a compound object with fully searchable page text and adding that document to your collection. You will also see how to search a compound object that has a transcript field with full text search enabled.
Learn About
Section I: Overview
Section II: Issues to Consider
Section III: The Scanning Process
Section IV: Organizing Compound Objects
Organizing Documents
Organizing Monographs
Section V: Establishing Collection Settings
Section VI: Importing Images and Text
Section VII: Searching the Compound Object
Section VIII: Additional Resources
Section I: Overview
Assigning the data type of Full Text Search to a field provides additional functionality within your collection, especially when working with compound objects. If you assign full text search
to a field you are able to:
Use the transcript functionality within the Metadata Templates and Compound Object Wizards.
Automatically extract text from PDFs and Encoded Archival Description (EAD) files. Search within all types of compound objects (documents and monographs).
View the page and text of compound objects.
Full text searching enables users to search the text within all types of compound objects.
When the search results are returned, pages containing the specified term appear with red visual cues in the document navigation pane tabs. Enabling full text searching also allows the page image and the transcript, or OCR text of the page, to be displayed side-by-side in the Image & Text view.

Creating Documents with Full Text Searching 1-Feb-12
© 2012 OCLC Page 2 of 21
Figure 1. Image and Text View of Document
The CONTENTdm administrator has configuration options for defining how full text fields are viewed within the metadata display. These options do not affect the Image and Text view. Administrators can choose to:
Hide the full text field in the metadata display.
Turn off automatic hyperlinks within the full text field without affecting other searchable fields.
For more information about configuration options, see the Full Text and Metadata website configuration options.
Use full text searching either by importing .txt transcript files or by using the CONTENTdm OCR Extension. Using the OCR Extension provides additional functionality — when you search for a term within a document, the search terms are highlighted within the document images,
and not just in the text transcripts, as shown in this tutorial. For information about using the OCR Extension, see the Help files.
This tutorial will cover the process of adding .txt files to a compound object to implement full text searching. The basic steps are:
1. Use OCR (Optical Character Recognition) software or transcribe the pages to create the text of each page. This is not covered in the tutorial.
2. Create a directory structure to hold your image files and your transcript files.
At a minimum, create two subdirectories within your root directory, one to hold your images and one to hold your transcript files.
3. If necessary, rename your image files and transcript files to be identical, except for the extension. For instance, the transcript for a file named
001Page1.gif would be 001Page1.txt.
4. From the Fields page within CONTENTdm Administration, create a field within the collection to hold the transcripts.

Creating Documents with Full Text Searching 1-Feb-12
© 2012 OCLC Page 3 of 21
5. Import the page images and page text into CONTENTdm.
6. Add the searchable compound object to the collection.
The final section demonstrates the user experience of searching an example compound object.
Section II: Issues to Consider
There are many issues to consider before creating a compound object with full text searching capability.
Before scanning your document, determine the appropriate scanning resolution for the document. Scanning resolution should be based on current best practices and considerations such as whether the goal is to show the condition of the document or to
make the document more legible. Information resources on scanning and metadata are provided at the end of this tutorial.
The order of import into the Project Client is ascending alphanumeric order. Determine your file names accordingly. Page titles are used as navigation for end users. If you make a mistake, pages can be renamed or reordered using the Web editor within CONTENTdm Administration, or by using the Find in Collection tab within the Project
Client to find your compound object and add it to a project to make any necessary changes.
Once you create an OCR text file of each scanned page, review and edit the OCR text to verify that characters have been rendered correctly. Do not add any text formatting other than <br> tags to the OCR text or transcript files. CONTENTdm recognizes the
HTML <br> tag only, but no other formatting (such as carriage returns or hypertext links) is retained by the database.
Corresponding images and text files must have the same root file names such as those shown in the table below.
Image file name Page text file name
000_cover.jpg 000_cover.txt
001_page 1.jpg 001_page 1.txt
002_page 2.jpg 002_page 2.txt
Table 1. Image and Transcript Names
You must decide your document structure before you begin and order your files accordingly. If your directory structure is established with a tab-delimited text file, you must create the tab-delimited text file before you begin importing your compound object.
Other questions that must be answered before importing a compound object are: How
will you name the pages? Will the first page be the cover of your document or the physical first page? Will you scan and number blank pages and insides of covers?
Section III: The Scanning Process
For this example, we scanned a simple 18-page document, an Annual Report of the Center for
Urban Horticulture at the University of Washington.
Many organizations include as much administrative metadata and scanning information as possible in their metadata as in the following example:

Creating Documents with Full Text Searching 1-Feb-12
© 2012 OCLC Page 4 of 21
Metadata Field Value
Source Physical Dimensions: 15 cm x 20 cm
Light Source: -
Resolution: Archival TIFF: 400 ppi; 2400 x 3200
Date-Created: 19 - 11 1909
Dimensions: JPEG: 72 ppi; 650 x 800
Bit Depth: 24-bit RGB Color
Scanning Device: Epson Expression
Scanning Technician: Mary Curling
Metadata Cataloger: Rob Weber and Clay Bourne
Table 2. Image Settings
For this example, the physical dimensions of the document pages measure 8 ½ inches x 11 inches. The document was scanned at 150 dpi using an HP ScanJet 4200C. At the time of scanning, the TIFFs were cropped and reduced to 650 pixels x 825 pixels in Photoshop then
saved to a local directory. Since we chose not to work with archival images for this example,
copies of the TIFF scans were saved in a local directory as GIFs (with the exception of the document's color cover and several pages containing black and white photographs which were saved as JPEGs) using the Photoshop settings shown in the image below.
Figure 2. Photoshop Settings
The GIFs were then imported with text files into the Project Client to create the searchable compound document.
Another option is to use the CONTENTdm Archival File Manager to temporarily hold the archival TIFFs and allow CONTENTdm to generate the display and thumbnail images automatically. (For more information, see Managing Archival Files & High-Resolution

Creating Documents with Full Text Searching 1-Feb-12
© 2012 OCLC Page 5 of 21
Images.) Settings and processes in your own environment will vary according to the practices adopted by your organization, document type, and desired outcome.
Section IV: Organizing Compound Objects
All compound objects must be stored in a root directory. Your root directory may have subdirectories for images, for your own custom display images, and/or for transcripts.
Monographs, a type of compound object that has multiple levels of structure or hierarchy, might have more complicated directory structures. An example of a monograph is a book with chapters, a bibliography, and an appendix.
One way to import monographs requires that the monograph’s directory structure mirrors the
structure of the monograph. After you have organized your directory structure, you import a monograph just like any compound object.
This section includes information on organizing monographs, but the rest of the examples in this tutorial focus on documents. See the Compound Object Tutorial for more information.
Organizing Documents
As with all compound objects, when creating a document, store scanned page images in a
single directory. The image directory name can be used as your document name. Store text transcripts (saved as .txt files) in another directory. Image and text directories must be accessible from the machine that has the Project Client installed on it.
If your scanned images are saved as TIFFs, read the tutorial on Archiving Full Resolution Files to understand all your options for working with full resolution and display images within CONTENTdm.
Organizing Monographs
There are two ways to import monographs:
Use a tab-delimited text file to structure your files. Use a directory structure to structure your files.
If you are using a tab-delimited text file, the monographs must be in a single directory. See Adding Compound Objects with Tab-Delimited Text in the Help files for more
information.
If you are using a directory structure to structure your files, create subdirectories for your image files within the root directory to establish the monograph structure. Keep in mind that subdirectories are imported in alphanumeric order. Be careful when planning and organizing your directories and subdirectories.
The image below shows one way you might organize your files when creating a monograph. The image shows that the monograph entitled History of Ohio Canals has six chapters, an
appendix, and a bibliography.

Creating Documents with Full Text Searching 1-Feb-12
© 2012 OCLC Page 6 of 21
Figure 3. Monograph Directory Structure
By naming the files and chapters with a numeric prefix, we ensure that they are imported in the appropriate order. Any text files you import with page images must be named in the same
manner in a separate directory. However, the text files do not need to be separated into subdirectories like the images.
Files within subdirectories, which are simply pages within chapters, are organized in the same manner as shown in the image below.
Figure 4. Monograph Subdirectory
During the import process, CONTENTdm provides the option to use the existing file names as titles and to ignore any portion of the title that appears before an underscore. Determining
your file names in advance and using this option can save time because the titles of directories, subdirectories and pages are also used as navigation for end users.
Note: If you use a tab-delimited text file to structure your files, the page name options in the
wizard effect only the page navigation label, not the contents of the Title field, which are created from the metadata field mapped to Title in your tab delimited text file.
Below is an example of a monograph as it displays after it has been added to the collection. Notice that the file structure is maintained with the use of expandable nodes.

Creating Documents with Full Text Searching 1-Feb-12
© 2012 OCLC Page 7 of 21
Figure 5. Viewing a Monograph
Section V: Establishing Collection Settings
To enable full text searching, one field within the collection must be designated as a full text search field. The steps below provide an example of how you might construct your fields.
Note: Only one full text search field is allowed per collection.
1. Open CONTENTdm Administration from the Project Client by clicking on the Administration menu and selecting CONTENTdm Administration or, open your Web browser and navigate to http://your.server.address/cgi-bin/admin/start.exe
2. Click the Collections tab and then click Fields.

Creating Documents with Full Text Searching 1-Feb-12
© 2012 OCLC Page 8 of 21
Figure 6. Metadata Fields
3. Click Add field to create a new field for the transcript text.
Figure 7. Add Field
4. Configure the new field as shown in the table below. Name the field Transcript. The OCR text or transcription of each page will eventually be displayed in this field. Once you’ve
finished, click Add field.
Field name Value
Field name Transcript
Dublin Core mapping Description
Creating Documents with Full Text Searching 1-Feb-12
© 2012 OCLC Page 9 of 21
Data type Full text search
Show large field Yes
Searchable Yes
Hidden No
Required No
Controlled vocabulary No
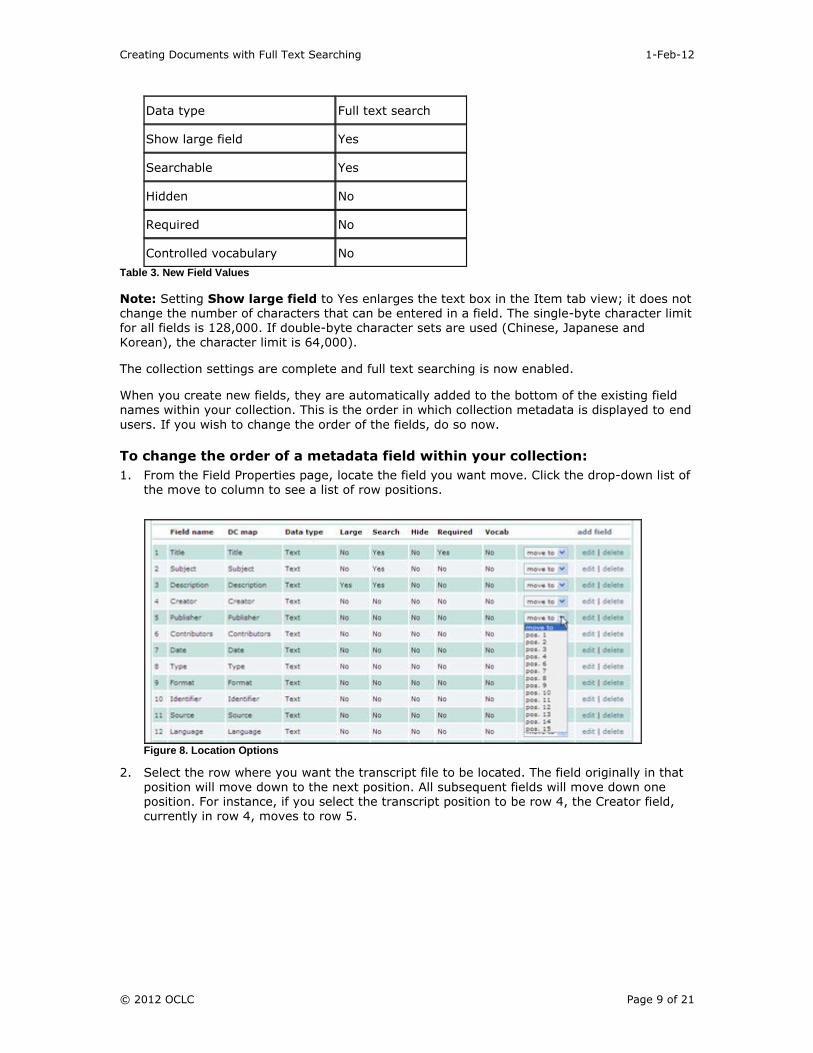
Table 3. New Field Values
Note: Setting Show large field to Yes enlarges the text box in the Item tab view; it does not change the number of characters that can be entered in a field. The single-byte character limit for all fields is 128,000. If double-byte character sets are used (Chinese, Japanese and Korean), the character limit is 64,000).
The collection settings are complete and full text searching is now enabled.
When you create new fields, they are automatically added to the bottom of the existing field names within your collection. This is the order in which collection metadata is displayed to end
users. If you wish to change the order of the fields, do so now.
To change the order of a metadata field within your collection:
1. From the Field Properties page, locate the field you want move. Click the drop-down list of the move to column to see a list of row positions.
Figure 8. Location Options
2. Select the row where you want the transcript file to be located. The field originally in that position will move down to the next position. All subsequent fields will move down one position. For instance, if you select the transcript position to be row 4, the Creator field, currently in row 4, moves to row 5.

Creating Documents with Full Text Searching 1-Feb-12
© 2012 OCLC Page 10 of 21
Figure 9. Changing Field Positions
After you have completed the changes to the field properties, close and reopen the Project Client so the changes can take effect.
You are now ready to add images and text into your project.
Section VI: Importing Images and Text
After you have a full text search field, you are ready to import your compound object. In this tutorial, we will import the images and text using the Compound Object Wizard.
Before you get started, you may want to review the Metadata Templates to specify the metadata properties or enter values for any field so that some metadata can be consistently and automatically imported for each page of the compound object. (For more information, see the Using Metadata Templates Help topic.)
Tip: Put terms that your end users are likely to search for in the compound object-level
metadata so that your end users will retrieve the compound object in their first search.
For this example, specify the following fields for the Compound Object Template:
Field Name Default Properties Default Value
Format Format If you specify Format, CONTENTdm
automatically populates this field with basic format information such as audio, video, or image.
Identifier File Name If you specify File Name, CONTENTdm
automatically populates this field with
the appropriate administrative metadata—file name.
Language Text English
Table 4. Metadata Template Values

Creating Documents with Full Text Searching 1-Feb-12
© 2012 OCLC Page 11 of 21
Figure 10. Metadata Template
Using the Metadata Template is an optional but recommended step. When you have saved the template, you can begin adding the object.
1. In the Project Client, click Add Compound Objects from the left task bar or from the Add menu. The Import Multiple Compound Objects screen displays.

Creating Documents with Full Text Searching 1-Feb-12
© 2012 OCLC Page 12 of 21
Figure 11. Import Multiple Compound Objects
2. From the Add Using drop-down list, select Compound Object Wizard and then click Add. The Choose Type screen displays.
Figure 12. Choose Type
3. From the Choose Type screen, select Document.
4. Select No in answer to the question, Are compound object structure and metadata defined by a tab-delimited text file? Click Next. The Select Directory screen displays.
Click Browse to locate the directory that contains your scanned image files.
Figure 13. Select Directory Screen
Note: The compound object level name is created from the name of the image directory. For example, if you name the directory “Center for Urban Horticulture Annual Report 2001”, the compound object will automatically be named "Center for Urban Horticulture Annual Report 2001".

Creating Documents with Full Text Searching 1-Feb-12
© 2012 OCLC Page 13 of 21
5. After you have specified the directory, click Next. The Display Image Settings screen displays.
Figure 14. Display Image Settings
6. Select Yes and then click Next. (For more information about display images and settings, see the Help topic Adding Full Resolution Images). The Page Information screen displays.

Creating Documents with Full Text Searching 1-Feb-12
© 2012 OCLC Page 14 of 21
Figure 15. Page Information
7. Specify how document page names should be applied within your document.
For this tutorial, select the following settings: Use file names as titles and Ignore information before underscore. In this example, a file named 000_cover will appear in the document as cover.
8. Next, select Import transcript files from a directory and click Browse to locate the directory containing the text transcript files. (If the Transcript option is unavailable, full text searching has not been enabled.)
9. Select Create Print PDF to automatically generate a PDF file of the entire object for
printing.

Creating Documents with Full Text Searching 1-Feb-12
© 2012 OCLC Page 15 of 21
Figure 16. Page Information
10. Click Next. The Confirm Settings screen displays.
Creating Documents with Full Text Searching 1-Feb-12
© 2012 OCLC Page 16 of 21
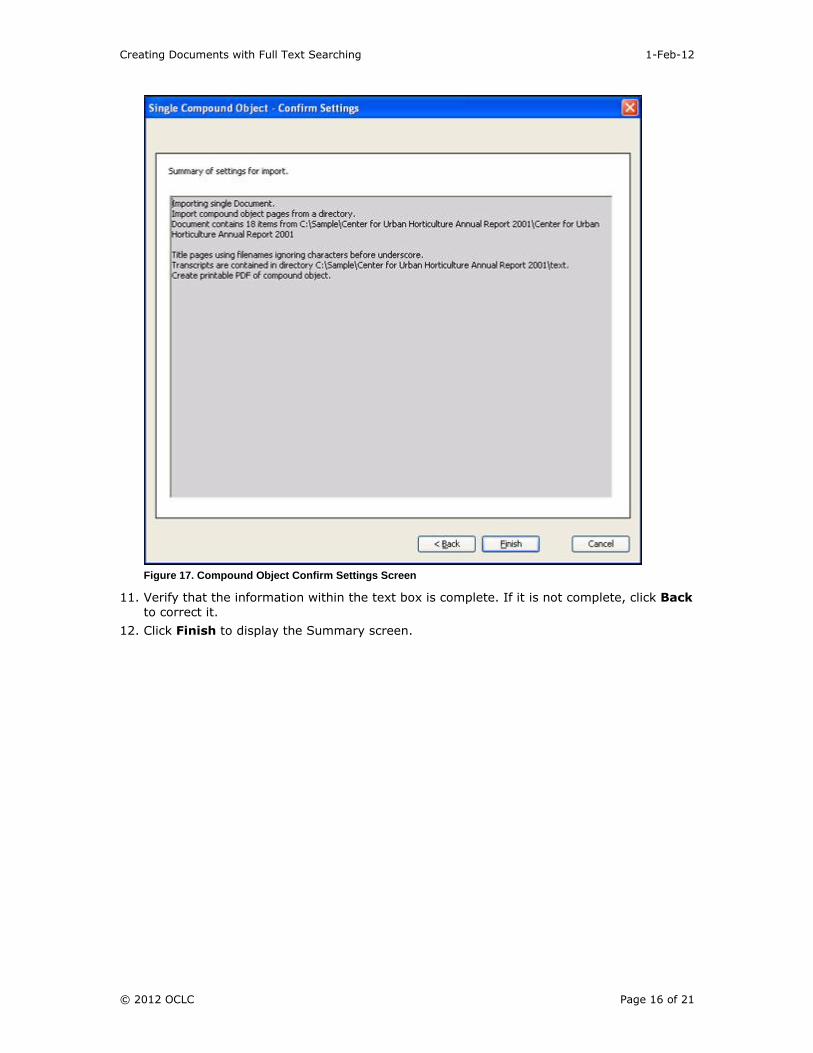
Figure 17. Compound Object Confirm Settings Screen
11. Verify that the information within the text box is complete. If it is not complete, click Back
to correct it.
12. Click Finish to display the Summary screen.

Creating Documents with Full Text Searching 1-Feb-12
© 2012 OCLC Page 17 of 21
Figure 18. Summary Screen
13. Click Close to return to the Import Multiple Compound Objects window. The compound object has been added to the list.

Creating Documents with Full Text Searching 1-Feb-12
© 2012 OCLC Page 18 of 21
Figure 19. Compound Object List
14. Click Finish to add the compound object to the project. A progress screen displays as the object is processed and the PDF version is created. The Summary screen displays when processing completes.
Figure 20. Summary Screen
15. Click Close to close the wizard and go to the Project Spreadsheet. The compound object is
added to the spreadsheet, and you can edit metadata or open the object in a new tab to edit or enter metadata. (For more information, see Editing Compound Objects in the
Project Client.)
Figure 21. Project Spreadsheet

Creating Documents with Full Text Searching 1-Feb-12
© 2012 OCLC Page 19 of 21
Note: Editing page navigation after the object has been added to the project does not change the metadata title of each page. If you want the page navigation to match the metadata title of each page, you need to edit both the navigation and the metadata, or make sure to name the files as you want them to display before adding the object to your
project.
Note: Any edits to the compound object after it has been added to the project will not be reflected in the PDF version, if you chose to create one automatically on import.
16. Upload the document to the pending queue by selecting it in the spreadsheet and then clicking Upload for Approval. View status of the upload by clicking View Upload Manager in the left task bar.
When the upload is complete, your compound object will be in the pending queue, waiting
for a CONTENTdm Administrator to review it, add it to the collection, and index the collection. This process makes the document accessible to users through the Web interface.
Tip: When collections are in the developmental stages, CONTENTdm Administrators can designate collections as "not published" so they are not available in the public Web interface but are still accessible to those who are working to build the collections. Learn more about
collection configuration in the Help files.
Section VII: Searching a Compound Object
Once the CONTENTdm Administrator has added the compound object to the collection and indexed the collection, the end user can view the object by searching or browsing for it.
To search a compound object:
1. Open your browser and navigate to the URL of your collection.
2. Search or browse for the document.
3. From the results page, click on the thumbnail image of the document or its hyperlinks. The document displays.
Figure 22. Compound Object Viewer
4. Click the Text Search tab to expand it. Then enter the word you wish to search for in the Search This Item text box and click Go.
Creating Documents with Full Text Searching 1-Feb-12
© 2012 OCLC Page 20 of 21
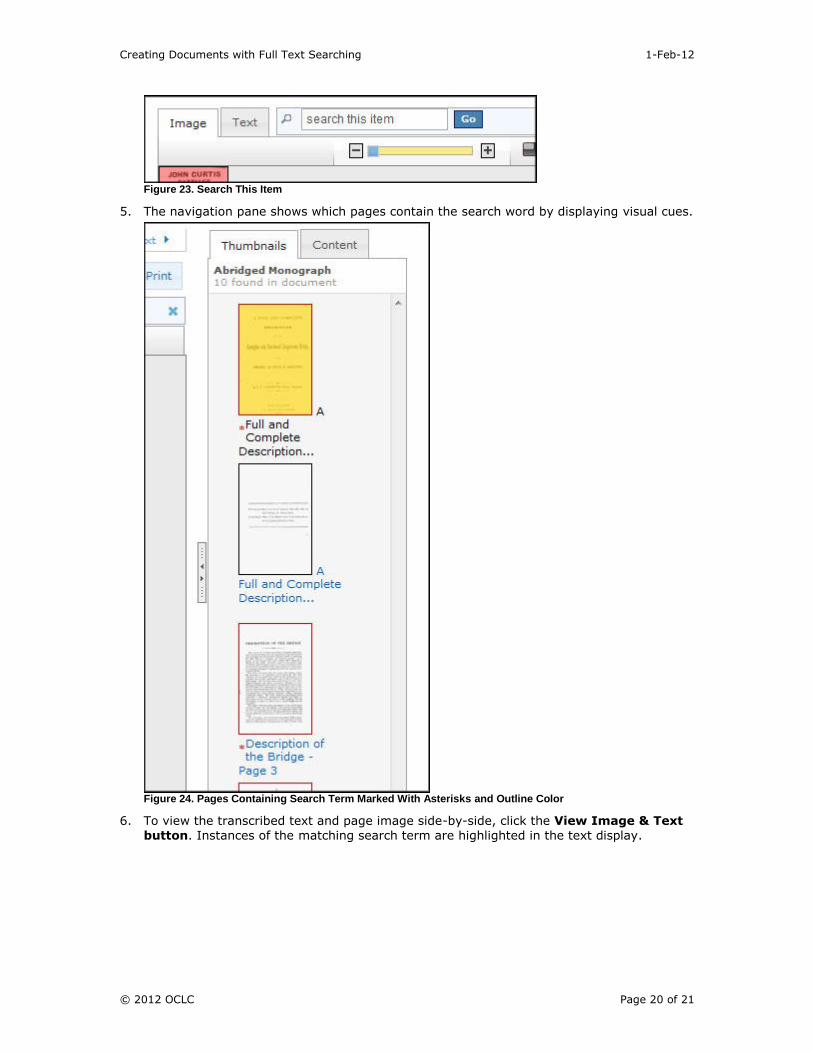
Figure 23. Search This Item
5. The navigation pane shows which pages contain the search word by displaying visual cues.
Figure 24. Pages Containing Search Term Marked With Asterisks and Outline Color
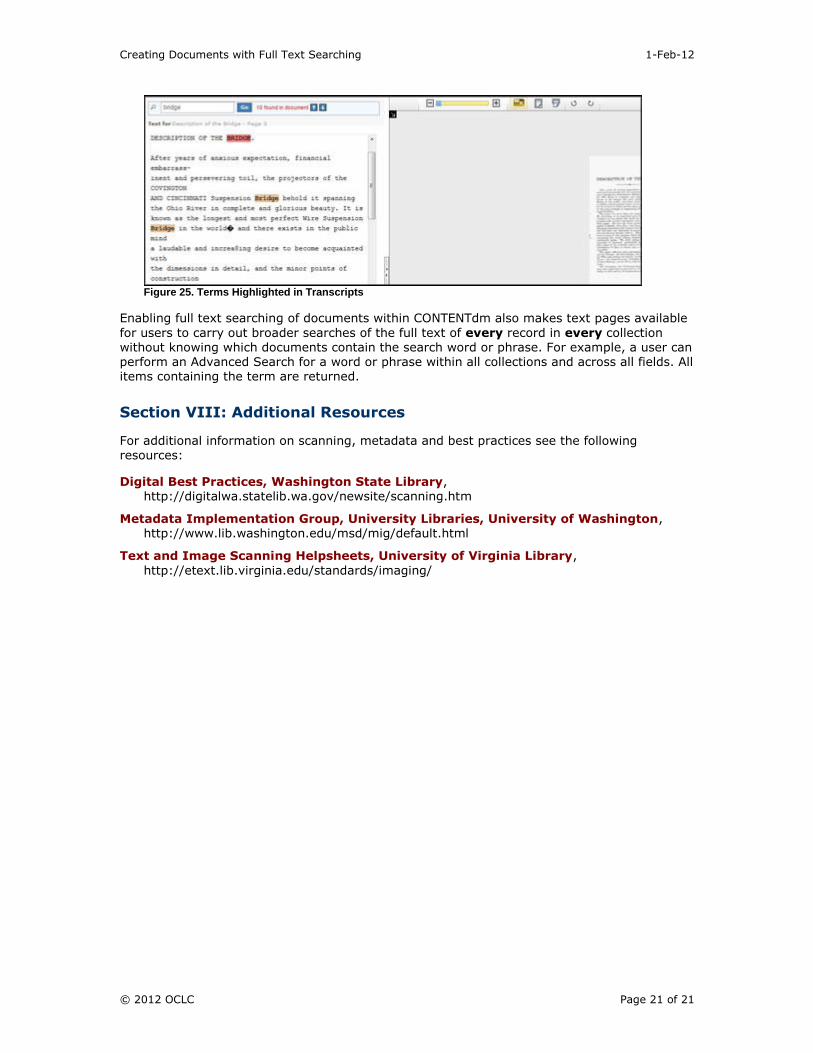
6. To view the transcribed text and page image side-by-side, click the View Image & Text
button. Instances of the matching search term are highlighted in the text display.
Creating Documents with Full Text Searching 1-Feb-12
© 2012 OCLC Page 21 of 21
Figure 25. Terms Highlighted in Transcripts
Enabling full text searching of documents within CONTENTdm also makes text pages available
for users to carry out broader searches of the full text of every record in every collection without knowing which documents contain the search word or phrase. For example, a user can perform an Advanced Search for a word or phrase within all collections and across all fields. All items containing the term are returned.
Section VIII: Additional Resources
For additional information on scanning, metadata and best practices see the following resources:
Digital Best Practices, Washington State Library, http://digitalwa.statelib.wa.gov/newsite/scanning.htm
Metadata Implementation Group, University Libraries, University of Washington, http://www.lib.washington.edu/msd/mig/default.html
Text and Image Scanning Helpsheets, University of Virginia Library,
http://etext.lib.virginia.edu/standards/imaging/