CREATING ALISIC GROUNDWORK -...
4
48 FineScale Modeler March 2010 A ny figure or model kit, no matter how well it is assembled and painted, is ultimately judged on the aesthetic impact of the overall figure/model kit including its base and groundwork. I’ve seen many instances where a nicely painted figure or model was undone by an uncom- plimentary base. To avoid this, we must pay the same attention and care to the base as we do to the project. The base and ground- work should always complement the piece and be used to frame the piece in its natural environment or historical time period. As I look back on the more than 80 figures I’ve painted over the years, the ones that have been the most recognized by my peers just so happen to have the best groundwork too! Preparing the base Before I begin to assemble or sculpt a fig- ure, I decide on the theme for the ground- work and the approximate size and shape of the base. I like to have the base in posses- sion before I start painting. The figure in this article is a French Marine from the time of the French and Indian War between the British and French, which lasted in North America between 1754 and 1763. The groundwork that I chose would place the French Marine in a typical wood- land area near a river. I chose this wooden base specifically because I thought the knot in its top would make an ideal gully, 1. Once you have decided on the base, it must be properly prepped. As a first step, I wrap low-tack masking tape around the base edges to pro- tect it. I then used the back of a hobby- knife blade to rough up the top to provide a good adhesive surface for the putty, 2. Once the surface is scribed, I position the figure on the base and drill two holes for the figure’s foot pins using a motor tool with appropriate bit size. Photo 3 shows the unfinished figure pinned to the prepped base. Pinning the figure is essential for sup- port. There is nothing more heartbreaking than arriving at a show with the figure bro- ken off the base. From hard lessons learned, I always pin and glue my figures to the base. This has worked so well that I have even mailed figures and had them arrive intact. One other advantage of pinning is that it allows you to mount the figure to a temporarily painting block while you paint. Creating natural rocks Since the figure will be standing in a wood- land area near a gully, I needed rocks of various shapes and sizes. There are two CREATING A woodland setting for a French Marine during the French and Indian War BY JOE HUDSON AND CARISSIMA M. HUDSON Photos by Joe Hudson REALISTIC GROUNDWORK
Transcript of CREATING ALISIC GROUNDWORK -...
48 FineScale Modeler March 2010
Any figure or model kit, no matter how well it is assembled and painted, is ultimately judged on the
aesthetic impact of the overall figure/model kit including its base and groundwork. I’ve seen many instances where a nicely painted figure or model was undone by an uncom-plimentary base. To avoid this, we must pay the same attention and care to the base as we do to the project. The base and ground-work should always complement the piece and be used to frame the piece in its natural environment or historical time period. As I look back on the more than 80 figures I’ve painted over the years, the ones that have been the most recognized by my peers just so happen to have the best groundwork too!
Preparing the baseBefore I begin to assemble or sculpt a fig-
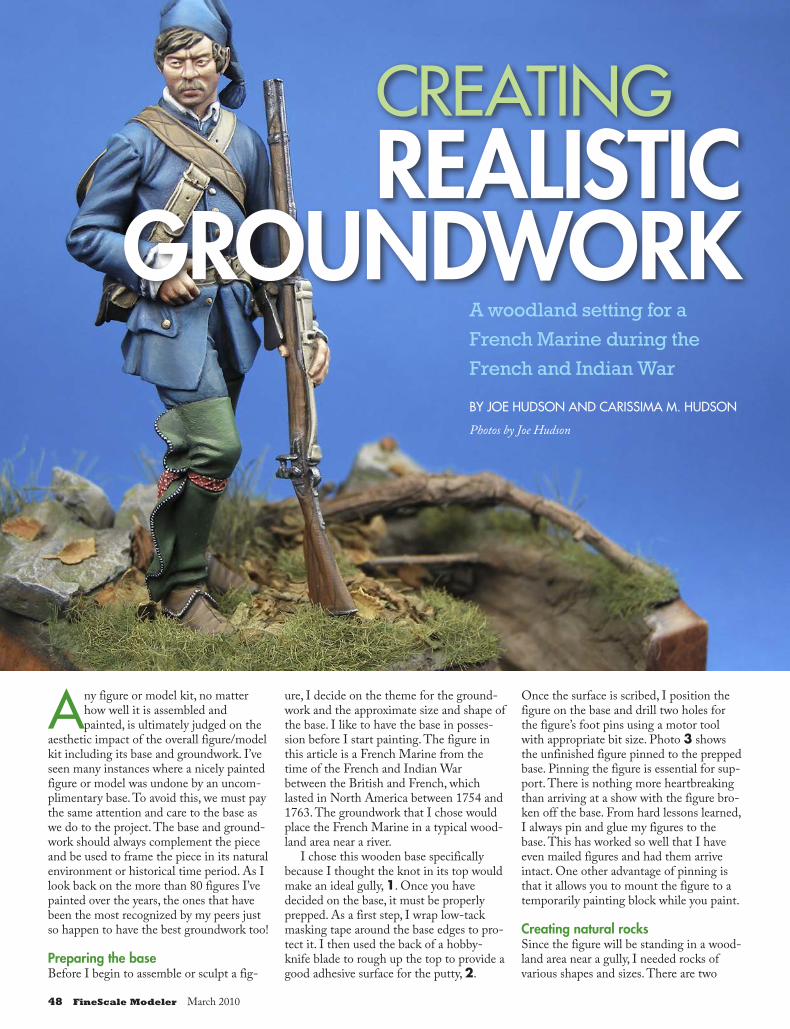
ure, I decide on the theme for the ground-work and the approximate size and shape of the base. I like to have the base in posses-sion before I start painting. The figure in this article is a French Marine from the time of the French and Indian War between the British and French, which lasted in North America between 1754 and 1763. The groundwork that I chose would place the French Marine in a typical wood-land area near a river.
I chose this wooden base specifically because I thought the knot in its top would make an ideal gully, 1. Once you have decided on the base, it must be properly prepped. As a first step, I wrap low-tack masking tape around the base edges to pro-tect it. I then used the back of a hobby-knife blade to rough up the top to provide a good adhesive surface for the putty, 2.
Once the surface is scribed, I position the figure on the base and drill two holes for the figure’s foot pins using a motor tool with appropriate bit size. Photo 3 shows the unfinished figure pinned to the prepped base. Pinning the figure is essential for sup-port. There is nothing more heartbreaking than arriving at a show with the figure bro-ken off the base. From hard lessons learned, I always pin and glue my figures to the base. This has worked so well that I have even mailed figures and had them arrive intact. One other advantage of pinning is that it allows you to mount the figure to a temporarily painting block while you paint.
Creating natural rocksSince the figure will be standing in a wood-land area near a gully, I needed rocks of various shapes and sizes. There are two
CREATING
A woodland setting for a
French Marine during the
French and Indian War
BY JOE HUDSON AND CARISSIMA M. HUDSON
Photos by Joe Hudson
REALISTIC GROUNDWORK
7
March 2010 www.FineScale.com 49
1
2
3
ways to do this: The most obvious way is to go outside and collect them. This can be time consuming, however. I chose to make them myself. I believe this method is actu-ally faster since I can create the perfect rock at any time. The rocks used in this scene were created using Sculpey, a sculpting putty that you can find at any craft store. I shaped the Sculpey into a ball and then flattened it into a rectangle, 4. I then placed the putty on a balsa block inside a Crock Pot and cooked it at 325 degrees for approximately one hour. I placed the putty on the block so it wouldn’t come into con-tact with (or stick to) the bottom of the pot.
After the putty cooled, I placed it in a plastic bag and smashed it with a hammer until the putty shattered into smaller pieces, 5. Instant rocks! Since this putty can be carved, you can tailor each rock easily.
Molding the terrainNow it’s time to build up the terrain. First, I inserted two toothpicks into the foot pin holes in the base so I won’t lose or fill them. I always use toothpicks because they’re the same diameter as the brass support pins I use. After adding the toothpicks, I covered the base with a uniform layer of Aves Apoxie Sculpt putty. Excess putty was sliced off the edges using a spatula. I smoothed the edges of the putty near the base rim using a moistened finger, 6.
After removing the toothpicks I began texturing the surface to simulate rough ground by pressing a rock into the wet putty, 7. At this point I check to see if the groundwork is appropriate for the figure stance and footing by gently reinserting the figure into the pin holes. I put baby powder on the base so I can position the figure on the groundwork without it sticking to the wet putty. If all looks well, I then push the figure into the putty slightly, leaving a natu-ral footprint for the figure.
Building up the groundworkNow that the terrain is completed, it’s time to start building up the groundwork. For this figure, the first step was to embed rocks into the terrain putty. After carefully choos-ing rocks and positioning them on the base, I pushed them into the putty. To complete the illusion that the rocks are deeply embedded into the ground, I gently pushed putty into the side of the rocks using an old paintbrush to close any unnatural looking gaps. This is done by dipping the brush in water and gently manipulating the putty around each rock, 8. If you don’t like the position or look of a particular rock, it can be removed (or carved) since the underlying putty is still wet.
Since the theme of the groundwork is a
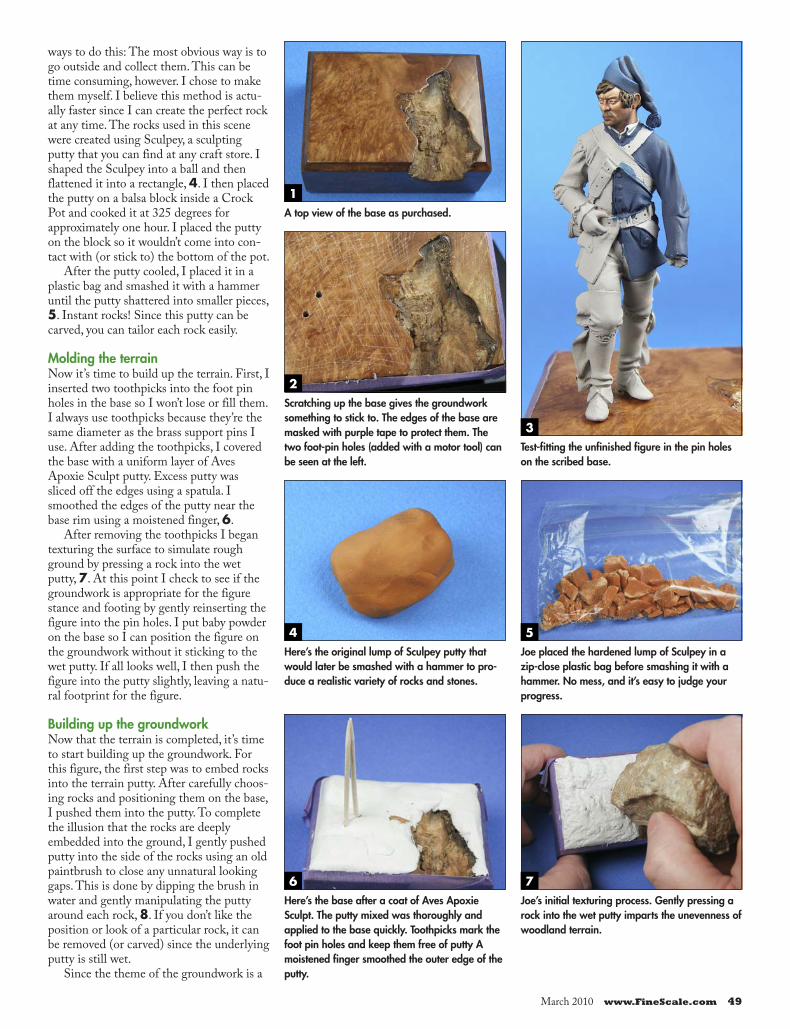
A top view of the base as purchased.
Scratching up the base gives the groundwork something to stick to. The edges of the base are masked with purple tape to protect them. The two foot-pin holes (added with a motor tool) can be seen at the left.
Test-fitting the unfinished figure in the pin holes on the scribed base.
Here’s the original lump of Sculpey putty that would later be smashed with a hammer to pro-duce a realistic variety of rocks and stones.
Joe placed the hardened lump of Sculpey in a zip-close plastic bag before smashing it with a hammer. No mess, and it’s easy to judge your progress.
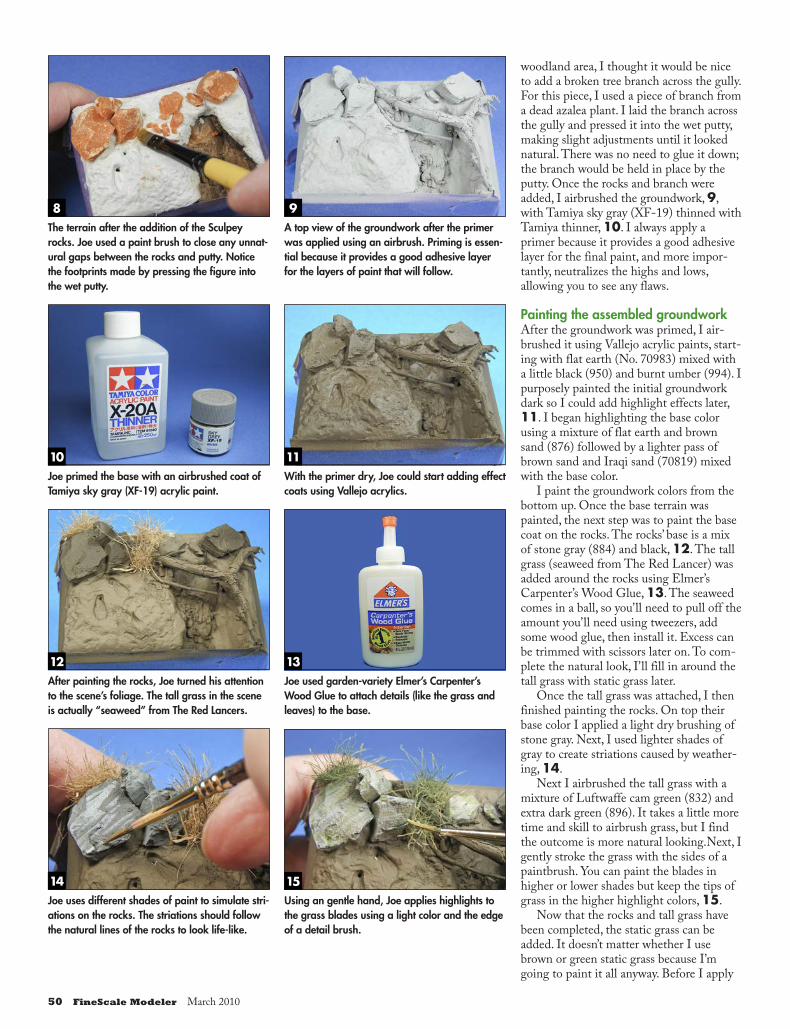
Here’s the base after a coat of Aves Apoxie Sculpt. The putty mixed was thoroughly and applied to the base quickly. Toothpicks mark the foot pin holes and keep them free of putty A moistened finger smoothed the outer edge of the putty.
4 5
6Joe’s initial texturing process. Gently pressing a rock into the wet putty imparts the unevenness of woodland terrain.
50 FineScale Modeler March 2010
woodland area, I thought it would be nice to add a broken tree branch across the gully. For this piece, I used a piece of branch from a dead azalea plant. I laid the branch across the gully and pressed it into the wet putty, making slight adjustments until it looked natural. There was no need to glue it down; the branch would be held in place by the putty. Once the rocks and branch were added, I airbrushed the groundwork, 9, with Tamiya sky gray (XF-19) thinned with Tamiya thinner, 10. I always apply a primer because it provides a good adhesive layer for the final paint, and more impor-tantly, neutralizes the highs and lows, allowing you to see any flaws.
Painting the assembled groundworkAfter the groundwork was primed, I air-brushed it using Vallejo acrylic paints, start-ing with flat earth (No. 70983) mixed with a little black (950) and burnt umber (994). I purposely painted the initial groundwork dark so I could add highlight effects later, 11. I began highlighting the base color using a mixture of flat earth and brown sand (876) followed by a lighter pass of brown sand and Iraqi sand (70819) mixed with the base color.
I paint the groundwork colors from the bottom up. Once the base terrain was painted, the next step was to paint the base coat on the rocks. The rocks’ base is a mix of stone gray (884) and black, 12. The tall grass (seaweed from The Red Lancer) was added around the rocks using Elmer’s Carpenter’s Wood Glue, 13. The seaweed comes in a ball, so you’ll need to pull off the amount you’ll need using tweezers, add some wood glue, then install it. Excess can be trimmed with scissors later on. To com-plete the natural look, I’ll fill in around the tall grass with static grass later.
Once the tall grass was attached, I then finished painting the rocks. On top their base color I applied a light dry brushing of stone gray. Next, I used lighter shades of gray to create striations caused by weather-ing, 14.
Next I airbrushed the tall grass with a mixture of Luftwaffe cam green (832) and extra dark green (896). It takes a little more time and skill to airbrush grass, but I find the outcome is more natural looking.Next, I gently stroke the grass with the sides of a paintbrush. You can paint the blades in higher or lower shades but keep the tips of grass in the higher highlight colors, 15.
Now that the rocks and tall grass have been completed, the static grass can be added. It doesn’t matter whether I use brown or green static grass because I’m going to paint it all anyway. Before I apply
Joe used garden-variety Elmer’s Carpenter’s Wood Glue to attach details (like the grass and leaves) to the base.
Joe uses different shades of paint to simulate stri-ations on the rocks. The striations should follow the natural lines of the rocks to look life-like.
13
14Using an gentle hand, Joe applies highlights to the grass blades using a light color and the edge of a detail brush.
15
10Joe primed the base with an airbrushed coat of Tamiya sky gray (XF-19) acrylic paint.
11With the primer dry, Joe could start adding effect coats using Vallejo acrylics.
12After painting the rocks, Joe turned his attention to the scene’s foliage. The tall grass in the scene is actually “seaweed” from The Red Lancers.
The terrain after the addition of the Sculpey rocks. Joe used a paint brush to close any unnat-ural gaps between the rocks and putty. Notice the footprints made by pressing the figure into the wet putty.
A top view of the groundwork after the primer was applied using an airbrush. Priming is essen-tial because it provides a good adhesive layer for the layers of paint that will follow.
98
March 2010 www.FineScale.com 51
the static grass I place a dollop of wood glue on the groundwork then I pick up a little static grass with tweezers and drop it into the glue. I repeated this process until I covered the grassy sections on the base. You can repeat the process once the initial “coat” of grass is dry. I airbrushed it using a very dark green mixture of Russian uniform (924) and flat green (968).
After the grass was completed, I added the next layer of groundwork, leaves. I learned a long time ago from Bill Horan to shun prepackaged leaves, since every leaf looks the same. The leaves on this project are bits of oregano from my wife’s kitchen rack. I poured some oregano onto a sheet of paper to find some that looked in scale. After applying wood glue to spots on the groundwork, I gently added the leaves and then pressed them into the glue, 16.
I used Humbrol, Winsor & Newton, and Liquitex paints to color the leaves, 17. I mixed leather and burnt umber with thin-ner to create a wash and painted all the leaves. Use a small amount of paint on the leaves – oregano absorbs a lot of paint and can become soggy. I made various mixtures of different colors to paint each leaf indi-vidually to create the look of fall foliage. This might sound like a lot of work, but it really is worth it.
I painted the tree branch using progres-sively lighter colors from the initial base coat. A very light dry brushing of the light-est color finished it off. When I completed the tree, I noticed it looked too bright. To correct this, I applied a wash of the leather/burnt umber mixture, 18, to dull the fin-ished branch, 19.
After completing the groundwork and painting of the figure, I glued the figure to the base using five-minute epoxy. Since the figure is in a woodland area surrounded by leaves, rocks, and grass, you can add some fallen leaves or trampled grass to the shoes to dirty them up – just don’t overdo it.
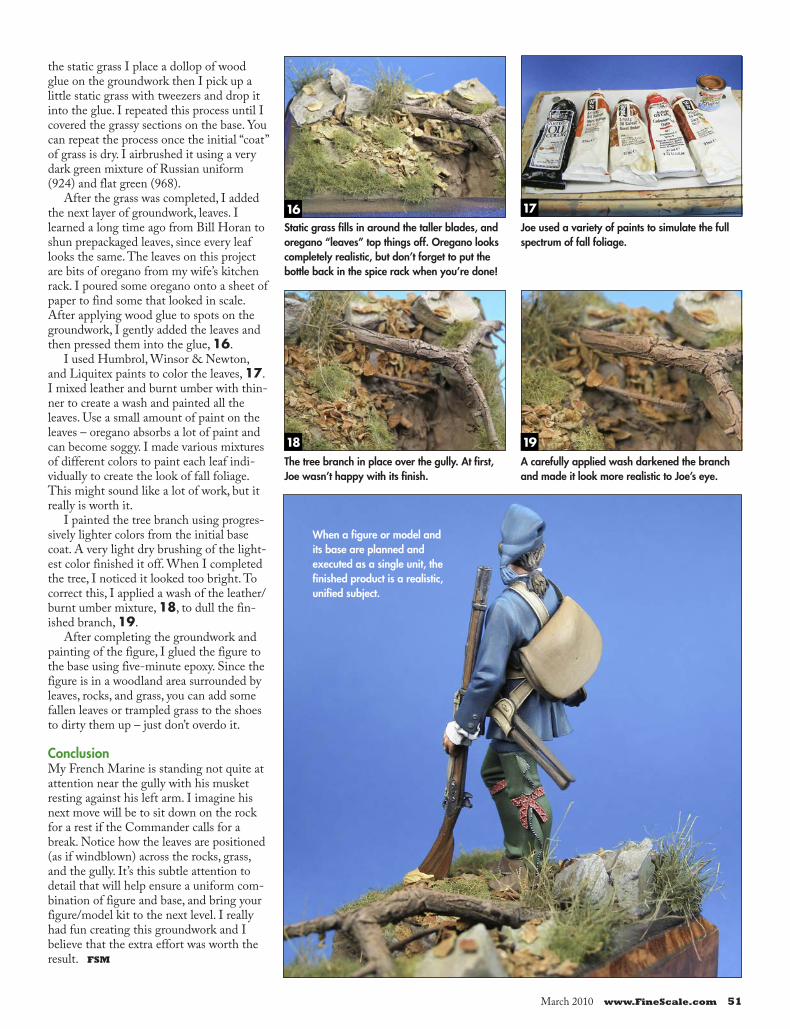
ConclusionMy French Marine is standing not quite at attention near the gully with his musket resting against his left arm. I imagine his next move will be to sit down on the rock for a rest if the Commander calls for a break. Notice how the leaves are positioned (as if windblown) across the rocks, grass, and the gully. It’s this subtle attention to detail that will help ensure a uniform com-bination of figure and base, and bring your figure/model kit to the next level. I really had fun creating this groundwork and I believe that the extra effort was worth the result. FSM
16 17Static grass fills in around the taller blades, and oregano “leaves” top things off. Oregano looks completely realistic, but don’t forget to put the bottle back in the spice rack when you’re done!
Joe used a variety of paints to simulate the full spectrum of fall foliage.
18The tree branch in place over the gully. At first, Joe wasn’t happy with its finish.
19A carefully applied wash darkened the branch and made it look more realistic to Joe’s eye.
When a figure or model and its base are planned and executed as a single unit, the finished product is a realistic, unified subject.