Create a Dreamweaver Site D · Create a Dreamweaver Site Create a Dreamweaver Site D reamweaver is...
22
Create a Dreamweaver Site Create a Dreamweaver Site D reamweaver is a full-featured Web application development tool. Dreamweaver’s features not only assist you with creating and editing Web pages, but also with managing and maintaining your entire Web site. To take advantage of all of Dreamweaver’s Web development features, you need to set up a Dreamweaver site that defines your development environment and tells Dreamweaver where files are located. A Dreamweaver site organizes your Web site to facilitate the development process. In most cases, you create and edit your Web pages in a folder on your local computer and then, when your Web site is completed to your satisfaction, you copy the Web page files to the folder where visitors access your Web site. That is, you copy the Web page files to the folder located at the URL that users type to view your Web site. To support the development process, you create a Dreamweaver site with two different parts: the Local site and the Remote site. The Local site is the folder where you store the files for your Web site while creating and editing them. People visiting your Web site cannot access the files in this site. The local site is usually located on your own computer, but can be anywhere. 1 3 4 2 1 Click Site. 2 Click Manage Sites. The Manage Sites dialog box appears. 3 Click New. 4 Click Site. 4 COPYRIGHTED MATERIAL
Transcript of Create a Dreamweaver Site D · Create a Dreamweaver Site Create a Dreamweaver Site D reamweaver is...

Create a Dreamweaver Site
Create a Dreamweaver SiteD reamweaver is a full-featured Web application
development tool. Dreamweaver’s featuresnot only assist you with creating and editing
Web pages, but also with managing and maintainingyour entire Web site. To take advantage of all ofDreamweaver’s Web development features, you needto set up a Dreamweaver site that defines yourdevelopment environment and tells Dreamweaverwhere files are located.
A Dreamweaver site organizes your Web site tofacilitate the development process. In most cases, youcreate and edit your Web pages in a folder on yourlocal computer and then, when your Web site is
completed to your satisfaction, you copy the Webpage files to the folder where visitors access your Website. That is, you copy the Web page files to the folderlocated at the URL that users type to view your Website. To support the development process, you create aDreamweaver site with two different parts: the Localsite and the Remote site.
The Local site is the folder where you store the files foryour Web site while creating and editing them. Peoplevisiting your Web site cannot access the files in thissite. The local site is usually located on your owncomputer, but can be anywhere.
1
3 4
21 Click Site.
2 Click Manage Sites.
The Manage Sites dialog box appears.
3 Click New.
4 Click Site.
4
05_177457 ch01.qxp 10/18/07 11:25 PM Page 4
COPYRIG
HTED M
ATERIAL

56
9
0
•
7
8
Can I set up aDreamweaver site for anexisting Web site?
Yes. The process isbasically the same for anew Web site or anexisting Web site. Duringthe setup, you enter apath to the Web site files.For a new Web site, thepath points to a newempty directory; for anexisting site, the pathpoints to a directory thatcontains the existing Website files.
How do I set up theDreamweaver site for anexisting site if the Web sitefiles are currently locatedonly at the remote site?
You can set up a local siteand then copy the filesinto the local site. Copythe entire folder structurefrom the remote site intothe local site, not just theindividual files, so thatDreamweaver does notupload files to the wronglocation.
What is the Basic optionfor setting up a newDreamweaver site?
The Basic option providesa wizard that promptsfor information one stepat a time. If you click theBasic tab at the top of theSite Definition window,Dreamweaver starts thewizard that guides youthrough the steps requiredto create a new site. Thisprocedure is slower, but canbe useful if you are new todeveloping Web sites.
The Site Definition dialog box appears, displayingthe Local Info section of the Advanced tab.
If the Basic tab is selected, click the Advanced tab.
• Click the Advanced tab if necessary.
5 Type a name for your new site.
6 Click the folder button ( ) to browse to the folderwhere you want to store the local site.
The Choose local root folder for site dialog box opens.
7 Navigate to the folder where you want to store theWeb site folders.
In this example, sites-local is selected. You can createthe new Web site folder in any folder you choose.
8 Click the Create New Folder button ( ).
9 Type a name for the new folder.
0 Click Open.
Dreamweaver opens the new folder.
PA
RT
ISetting Up Your Dreamweaver Site
5
chapter 1
05_177457 ch01.qxp 10/18/07 11:25 PM Page 5

Create a Dreamweaver Site (continued)
Create a DreamweaverSite (continued)
T he Remote site is the location where users canview your Web pages. After you have finishedcreating and editing your Web pages in your
Local site, you move the completed files to the Remotesite. Your Web site might be located in a specific folderon your company network, in a folder assigned to youby a Web hosting company, or in a folder on your owncomputer if you run your own Web server. You needto enter the host name, directory, login, and passwordwhen creating the Remote site. The information isprovided to you by the person who sets up your Website, such as your company IT department or yourWeb hosting company.
If the Remote site is on a different computer thanthe Local site, the files are moved via File Transfer
Protocol (FTP) or a local network that includes theRemote site.
The Dreamweaver site organizes all the documents inyour Web site. It tracks and maintains links, managesfiles, and handles the file transfers from your Local siteto your Remote site. Your Local site and your Remotesite need to contain the same hierarchical structure offolders to prevent Dreamweaver from copying filesfrom the Local site into the wrong folder in theRemote site, and vice versa.
You can manage your files better if you create a folderon your computer (that is, a local site) that containsall of your Dreamweaver sites. Each site is stored in afolder named with the Dreamweaver site name.
!
#
•
•
@
• You can create a folder to hold images,but Dreamweaver does not require one.
! Click Select.
The Site Definition dialog box displays thepath to the Local root folder.
@ If you created a folder for your images,add its path/filename to the Default imagesfolder field.
• You can click and navigate to thefolder.
# Type the URL that you will use to view yourWeb pages.
In this example, the Local site is on a localcomputer, so localhost is the URL that isused.
6
05_177457 ch01.qxp 10/18/07 11:25 PM Page 6

How does Dreamweaveruse a default imagesfolder?
If you specify a defaultimages folder during theDreamweaver site setup,Dreamweaver places newimages that you add toyour site into that folder,unless you explicitly putthe images elsewhere. Forexample, if you drag animage from the Desktopinto the Documentwindow, Dreamweaverplaces a copy of the imagein the default folder.
Will the name that I givemy site appear anywhereon my finished Web site?
No. The name is usedonly for keeping trackof different sites inDreamweaver. It appearsin the Site drop-downlist at the top of the Sitewindow. It also appears inthe Files panel, which isused to manage Web sitefiles. Using the Files panelis discussed in Chapter 2.
Are Remote and Local theonly possible sites in aDreamweaver site?
No. An additional site —the Testing Server site —can be defined. Youneed this site only fordynamic Web sites thatuse ColdFusion, PHP, oranother dynamic Webapplication language. Thischapter does not discusstest sites because it doesnot discuss dynamic Websites. Chapter 14, whichdiscusses dynamic sites,explains how to set up atest site.
$ Click Remote Info.
% Click here and select an access type.
^ Fill in host, directory, login, and apassword for the remote site.
& Click Test.
A response to the test appears.
* Click OK.
The test message closes.
( Click OK.
• Dreamweaver lists the new site inthe Manage Sites dialog box.
) Click Done.
The new site is now created and youcan add Web pages to it.
PA
RT
ISetting Up Your Dreamweaver Site
7
chapter 1
%^
&
*
•
$
(
)
05_177457 ch01.qxp 10/18/07 11:25 PM Page 7

Change Dreamweaver Site Information
Change DreamweaverSite InformationT he site information (also called site settings)
is the information you provided when youset up the site, such as the name of the
Dreamweaver site, the path to the directory wherethe Web site files are stored, the URL to your Web site,the path to an images folder, information about theremote site, and so on. Dreamweaver stores thisinformation in an internal file, with the informationassociated with the individual Dreamweaver site.
Sometimes you discover that you provided incorrectinformation to Dreamweaver when you set up your
Dreamweaver site; or, you provided the correctinformation, but the information changed at a latertime. You can change the information for yourDreamweaver site at any time.
Dreamweaver provides an option to edit the settingsfor a site. When you select the edit option, you canaccess the same dialog boxes that you used to enterthe information when you set up the site. You canchange any of the site settings and save the newsettings for the Dreamweaver site.
3
4
2
5
1 Open the Manage Sites dialog box.
Note: See the section “Create a Dreamweaver Site”to open the Manage Sites dialog box.
2 Click the site name.
This example uses a site namedDreamweaver9Book.
3 Click Edit.
The Local Info category appears active in theSite Definition dialog box.
4 Change any information you need to change.
Note: To change information for the remote site,click Remote Info and change the informationin the Remote Info category.
5 Click OK.
6 Click Done to close the Manage Sitesdialog box.
8
05_177457 ch01.qxp 10/18/07 11:25 PM Page 8

Remove a Dreamweaver Site
Remove a Dreamweaver SiteY ou can remove a Dreamweaver Site when
you no longer need it. The settings saved forthe site are deleted from Dreamweaver’s
internal files. When you remove a Dreamweaver site,Dreamweaver permanently deletes the siteinformation. You cannot undo the action andrecreate the site. The site is gone forever.
The Dreamweaver site refers only to the siteinformation. The site contains a path to the rootfolder where the Web site files are stored. When you
remove the site, the path to the Web site files isdeleted, along with all the site settings. However,the files themselves are not deleted; the folder withthe files is untouched. You could create a newDreamweaver site, with a new name, and give thenew site the same root directory path that wasset for the site you just removed. The new sitewould then display the same Web pages that weredisplayed by the site you removed.
3
2
4
5
1 Open the Manage Sites dialog box.
Note: See the section “Create a Dreamweaver Site”to open the Manage Sites dialog box
2 Click the name of the site you want removed.
This example refers to the siteDreamweaver9Book.
3 Click Remove.
PA
RT
ISetting Up Your Dreamweaver Site
9
chapter 1
A window opens to verify that you want todelete the site.
4 Click Yes.
Dreamweaver removes the site name fromthe list of sites.
5 Click Done.
Dreamweaver closes the Manage Sites dialogbox for you to continue working on yourpages.
05_177457 ch01.qxp 10/18/07 11:25 PM Page 9

Move a Dreamweaver Site
Move a Dreamweaver SiteD reamweaver stores information in internal
files for each Dreamweaver site, such as thesite name, the path to the root directory,
the URL to the Web site, information needed toconnect to the remote site, and so on. In some cases,you might need to set up the same Dreamweaver siteon a different computer. Perhaps you need to changeyour development environment to a differentcomputer; or, if you need to work on the Web site incooperation with other developers, your co-developerswill need to establish the same Dreamweaverenvironment to coordinate your work. Instead ofsetting up a new Dreamweaver site on a new
computer, with the extra work and potential errors,you can move the existing Dreamweaver site toanother computer.
Moving a Dreamweaver site requires three steps:Exporting the current site, moving the file containingthe site information to the new computer; andimporting the site file into Dreamweaver on the newcomputer. When you export the current site, the siteinformation is stored in a file called sitename.ste. Theexported file contains the information in XML formatin a text file that you can examine in a text editor.You move the exported file to the new computer andimport it into Dreamweaver.
3
5
7
2
6
4
Export the existing site
1 Open the Manage Sites dialog box.
Note: See the section “Create a Dreamweaver Site”to open the Manage Sites dialog box.
2 Click the site name.
3 Click Export.
The Exporting Site dialog box appears.
4 Check an option if the default is not correct( changes to ).
5 Click OK.
10
The Export Site dialog box opens.
6 Click here and navigate to the folder whereyou want to store the exported site.
7 Click Save.
Dreamweaver saves the file with a .steextension in the selected folder.
05_177457 ch01.qxp 10/18/07 11:25 PM Page 10

9
!
0
@
Import on the new computer
8 Open the Manage Sites dialog box.
Note: See the section “Create aDreamweaver Site” to openthe Manage Sites dialog box.
9 Click Import.
The Import Site dialog box appears.
0 Click here and navigate to thefolder where the exported file isstored.
! Click the filename.
@ Click Open.
Dreamweaver imports the siteand lists its name in the ManageSites box.
PA
RT
ISetting Up Your Dreamweaver Site
11
chapter 1
Are the Web site filesautomatically moved whenyou move the Dreamweaversite?
No. Only the site settings areincluded in the file thatcontains the exported site.One of the settings is the pathto the root directory wherethe Web site files are stored.You must move the actualWeb site files separately. Youcan copy the files on the newcomputer into a folder withthe same path, so that thecurrent path is correct; or,you can change the path tothe root directory after youimport the site, setting thepath so that the Dreamweaversite looks for the Web site filesin a different folder.
What does the file that contains the exported sitelook like?
The file contains the settings for the Dreamweaver sitein XML format. The file begins with an XML tag, suchas:<?xml version=”1.0” encoding=”utf-8” ?>
Next, it starts each line of site information with a sitetag, as follows:<site>
The file then includes various settings. It includesinformation on the local site, starting with a tagresembling the following:<localinfo sitename= “DreamweaverBook” ...
After the local site tag, the file contains a tag for theremote site, similar to the following:<remoteinfo accesstype=”ftp”host=”janet.valade.com” ...
The file contains other tags containing other sitesettings.
05_177457 ch01.qxp 10/18/07 11:25 PM Page 11

A new, blank Web page opens.
Note: If the page displays HTML code ratherthan a blank page, it may be in Code view.See Chapter 2 for instructions on changingto Design view.
6 Type a title for the page.
7 Type the contents of the Web page.
• The filename appears as Untitled-1because you have not yet saved thefile and given it a name.
Note: An asterisk appears if the file has beenchanged.
Create a Web Page
Create a Web PageA fter you have set up your Dreamweaver
site, you can create Web pages for the newWeb site and store them in the local site.
Dreamweaver provides a WYSIWYG (What You See IsWhat You Get) interface where you can add contentto your Web page. You can see the content you enterand move or edit the page as desired. Dreamweaveralso provides an interface where you can writeHTML code directly if you prefer. The Dreamweaverinterface is described in Chapter 2.
In this section, you create a simple Web page, usingthe WYSIWYG editor, to show the basic process. Thenext section shows how to save the Web page file inyour Dreamweaver site.
A new blank page in Dreamweaver is not completelyempty. It contains the required HTML tags, such as<head> and <body> tags, which do not display anycontent in the Web page. In addition, when you createa new HTML page, you can specify a page layout thatadds CSS layout code, with informational comments,and placeholder content to the file. You can thenreplace the placeholder content in the Web page.
Dreamweaver creates your Web page using codethat conforms to the document type definition (DTD)specified for your Web page. The new documentuses the DTD specified in your preference settings,but you can change it when creating a newdocument. Changing your preference settings isdiscussed in Chapter 2.
4
6
2
7
5
3
•
1 Click the File menu and then choose New.
The New Document dialog box appears.
2 Click Blank page.
3 Click HTML.
4 Click a page layout.
In this case, the page layout is <none>.
5 Click Create.
12
05_177457 ch01.qxp 10/18/07 11:25 PM Page 12

Save a New Web Page
Save a New Web PageA s with most other applications that create
files, you must save the Web page or it willbe lost when you exit Dreamweaver. Saving
your Web page frequently as you work on it is alwayswise — that way, problems such as computer crashescause as little content loss as possible. If you attemptto shut down Dreamweaver without saving a Webpage, Dreamweaver prompts you to save it.
When you save the file, you give it a name. It is bestto use only letters, numbers, hyphens, andunderscores in the filename. Using punctuation,
spaces, or special characters can sometimes causeproblems with a Web server, making a fileunviewable. Do not begin the filename with anumber, which can also sometimes cause problems.
Most non-dynamic Web page filenames require the.htm or .html filename extension. If you are creatingdynamic Web pages that interact with an applicationserver and a database, you need to use an extensionspecific to the application, such as .cfm (ColdFusion),.jsp (Java server page), or .php. Chapter 14 discussesdynamic Web pages.
5
2
•
43
1 Click the File menu and then chooseSave As.
The Save As dialog box appears.
2 Click here to navigate to the local site.
3 Type a filename.
4 Click here and select the correct filetype.
5 Click Save.
PA
RT
ISetting Up Your Dreamweaver Site
13
chapter 1
• The filename tab now shows thefilename.
05_177457 ch01.qxp 10/18/07 11:25 PM Page 13

Using Dreamweaver Page Designs
Using DreamweaverPage DesignsD reamweaver comes with numerous
predefined Web pages to help you createstarter pages for a number of different types
of sites. Using such ready-made designs can save youtime and keep the pages within your site consistent.
Dreamweaver page-design documents are formattedand have placeholder information. When you selecta page design, a Web page opens that is formattedand has placeholder content for the various partsof the Web page. You just need to replace theplaceholder content with the content you want onyour Web page. You can also change the Web pageformat until it suits you perfectly and save the filewith an appropriate filename.
Dreamweaver provides predefined Web pages withCSS code layouts or HTML table code layouts. CSSlayouts are available in the New Document dialogbox in the column labeled Layout. HTML table layoutsare available in sample pages available in the NewDocument dialog box. The sample pages are groupedinto categories, such as Commerce (display productsand shopping cars) and Image (formats for displayingimages).
Page-design documents are not templates. They arejust Web pages that have code already in them. Youcan edit the code as you need to and replaceplaceholder text and images. Templates are morecomplicated. Chapter 9 discusses the many uses andfeatures of templates.
•2
3
4
5
1 Display the New Document dialog box.
Note: See the section “Create a Web Page” todisplay the New Document dialog box.
2 Click Page from Sample.
3 Click Starter Page (Basic).
A list of available page designs appears.
4 Click Text: Article A.
• Dreamweaver displays a previewand description of the design.
5 Click Create.
A new page opens with placeholder content.
6 Replace the placeholder information withthe information you want on your Web page.
Note: Chapter 3 discusses editing Web pages.
Note: Chapter 4 discusses adding text andChapter 5 discusses images.
7 Save the file.
Note: See the section “Save a Web Page”to save a Web page.
14
05_177457 ch01.qxp 10/18/07 11:25 PM Page 14

Preview a Web Site
Preview a Web SiteY ou can view your local site in a browser to
see how it will look when published on yourremote Web site. You can preview your
Web pages at any time.
You can select a browser in which to preview theWeb pages. The Preview in Browser menu itemdisplays a list of browsers from which to choose. Youcan add or remove browsers from the list bychanging your preference settings. Chapter 2explains how to change preference settings. If youclick Edit Browser List in the Preview in Browsermenu, the browser list preference settings aredisplayed for you to change.
You can create a list of up to 20 browsers that youcan use to preview your Web pages. Unless youknow exactly what browsers the visitors to your Website will be using, you should test your Web pages inboth current and older versions of the most popularbrowsers, including Internet Explorer, Firefox, andNetscape. This helps ensure that your Web siteappears correctly for the widest possible range ofusers. You can set one of the browsers as the primarybrowser and one as the secondary browser.
2
1
3
1 Click File.
2 Click Preview in Browser.
3 Click the browser you want to use.
Be sure to save any changes beforepreviewing the Web page.
PA
RT
ISetting Up Your Dreamweaver Site
15
chapter 1
The Web page appears in the selectedbrowser.
05_177457 ch01.qxp 10/18/07 11:25 PM Page 15

Validate the Web Page
Validate the Web PageD reamweaver provides a validation feature
that checks the syntax of your code. TheHTML syntax is validated based on the DTD
you selected for your document. For example, if youchose XHTML 1.0 transitional for your DTD, the syntaxis checked using that standard.
If you create your Web pages using Dreamweaver’sWYSIWIG editor, Dreamweaver builds your sourcecode and seldom makes syntax errors. However, if youedit the code yourself, or if you copied some Webpage files into your Local site from a Web site thatalready exists, you need to validate the pages to besure the syntax is correct.
Dreamweaver displays the results of your validation inthe bottom pane of your window in the Results panel.(Chapter 2 provides more details on using panels.)Each error is listed in a separate row, showing the linenumber in your source code that produced the error.An icon at the beginning of the line indicates the typeof error.
The Web page created earlier in this chapter,displaying the text “This is my first Dreamweaverpage” and saved with the name FirstPage.html, iscreated by Dreamweaver and has no syntax errors. Toshow how the Validator works, the </head> tag andthe </html> tag were removed from the source code.
23
•
1 Open the file to be validated.
2 Click the Validate Markupbutton ( ).
3 Click Validate Current Document.
16
• Validation results appear atthe bottom in the Resultspanel.
05_177457 ch01.qxp 10/18/07 11:25 PM Page 16

•
4
5
6
7
What types of informationdoes the Validator display?
The Validator displaysthree types of messages,each marked with an icon( ): 1) Informationalmessages just conveyinformation and are noterror messages; 2) warningmessages ( ) point outincorrect syntax that isunlikely to affect theappearance of the Webpage; and 3) errormessages ( ) point outincorrect syntax that isvery likely to affect theappearance of the Webpage.
Does the Web page needto be open before I canvalidate it?
No. You can validate anyfile. Click the filename inthe Files panel, and thenclick Windows, Results,and the Validation tab. Ifyou have previously run avalidation, the ValidationResults panel will be open.To validate the selectedfile, you need to click theValidation button or theRun Validation button inthe panel.
Can I validate more thanone file at a time?
Yes, you can select morethan one file in the Filespanel, using Shift-click orCtrl-click. Click Windows,Results, and the Validationtab; or you can click thesite name in the Filespanel (See chapter 2 forinformation on using theFiles panel), then clickWindows, Results,Validation tab, and all thefiles in the site will bevalidated.
4 Click the Split button ( ) to seethe code with line numbers.
The code window opens, showingthe HTML source code.
5 Type </head> on line 6 in thecode window.
6 Type </html> on line 10.
7 Click the Run button ( ).
• New Validator results appear.
PA
RT
ISetting Up Your Dreamweaver Site
17
chapter 1
05_177457 ch01.qxp 10/18/07 11:25 PM Page 17

Check Browser Compatibility
Check Browser Compatibility
•
2
3
4
1 Open a Web page.
Note: When the page is opened,Dreamweaver automaticallychecks for browser compatibility.
• The green check mark meansno browser compatibilityproblems.
2 Click .
The Code Window opens.
3 Click the Check Page button ( ).
4 Click Settings.
18
H TML and CSS standards are set by theWorld Wide Web Consortium or W3C(www.w3c.org). However, not all browsers
and/or browser versions implement all parts of thestandard the same way. In addition, some browsershave added HTML tags and attributes that are not inthe standard and do not work in all browsers.Dreamweaver provides a feature that you can use tocheck which browsers support the HTML and CSScode in your Web page.
Dreamweaver stores a list of target browsers that ituses to check compatibility. You can add browsers toor remove browsers from the target browser list. If youknow what browsers your visitors are likely to use, youcan include only those browsers in the target browserlist. If you do not know, make your code compatible
with popular browsers. You can also select whichversion of the browser to include. For example, olderbrowsers do not support CSS.
The FirstPage Web page file created earlier in thischapter has no compatibility problems with thedefault set of target browsers. To create a sampleproblem, the text was put into a table cell and thestyle white-space was added to the cell. Recentbrowsers support this style, but Internet Explorer 5.0or earlier browsers do not.
For the browser check feature to work as described,the Auto-check on Open feature must be turned on.To check that the feature is turned on, click the CheckPage button ( ). The menu should show a check bythe feature. If not, click the feature to turn it on.
05_177457 ch01.qxp 10/18/07 11:25 PM Page 18
•
•
7
6
8
What types of messages does CheckTarget Browsers display?
Check Target Browsers displays three typesof messages: 1) Informational messagesflag code that is not supported in a specificbrowser, but does not change the way theWeb page appears; 2) warning messagespoint out code that will not appearcorrectly in a specific browser, but will notcause any serious display problems; and3) error messages flag code that mayseriously affect the Web page appearancein a specific browser, such as making partsof the page disappear.Each message is marked by an icon. Theinformational message icon looks like ,the warning message icon looks like
, and the error message icon lookslike .
Does Dreamweaver check for syntaxerrors when it checks browsercompatibility?
No. Dreamweaver checks only for HTMLor CSS elements that are incompatible toany of the browsers in the Target BrowserList. Elements that are not implementedin a specific browser are the only elementsreported. To check for syntax errors, youneed to use the Validator described in theprevious section.
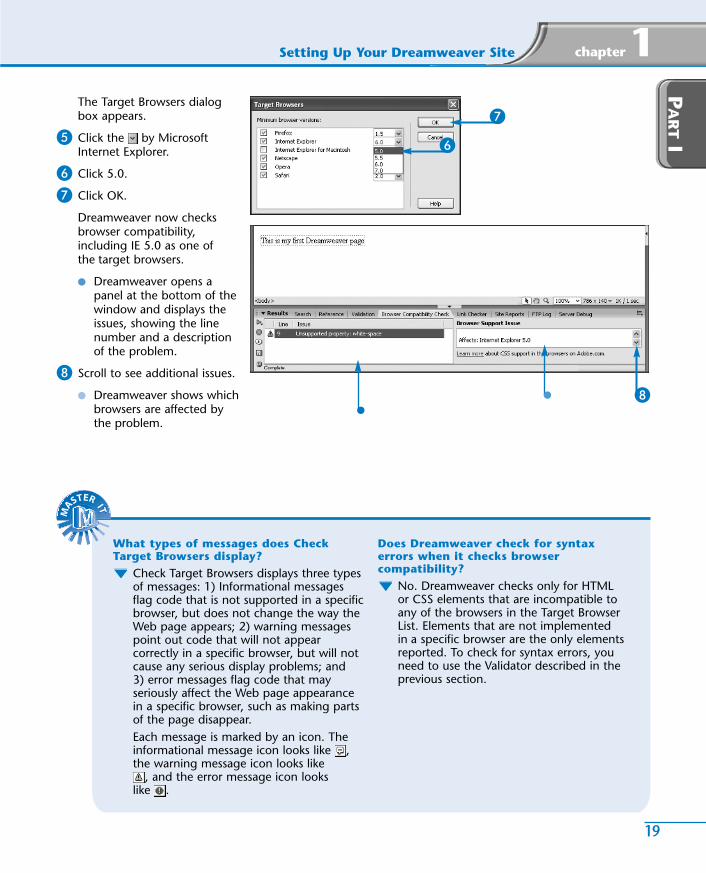
The Target Browsers dialogbox appears.
5 Click the by MicrosoftInternet Explorer.
6 Click 5.0.
7 Click OK.
Dreamweaver now checksbrowser compatibility,including IE 5.0 as one ofthe target browsers.
• Dreamweaver opens apanel at the bottom of thewindow and displays theissues, showing the linenumber and a descriptionof the problem.
8 Scroll to see additional issues.
• Dreamweaver shows whichbrowsers are affected bythe problem.
PA
RT
ISetting Up Your Dreamweaver Site
19
chapter 1
05_177457 ch01.qxp 10/18/07 11:25 PM Page 19

Publishing a Dreamweaver Site
Publishing a Dreamweaver SiteT he Web pages you create and edit in your
Local site are not available to visitors to yourWeb site. To make your finished Web pages
available on the World Wide Web (WWW), you needto publish your Dreamweaver site. Publishing your sitemeans copying the Web page files to your Remote site.
When you set up your Dreamweaver site, you set up aRemote site — the site where the public can view yourWeb pages. You provided Dreamweaver with theinformation it needs to transfer the files from yourLocal site to your Remote site. Uploading your files tothe Remote site is sometimes called “putting your
files,” based on the FTP command put, used toupload files. Dreamweaver handles the details of theconnection to the remote server and transferringthe files.
You can transfer your entire site or any single fileto the Remote site. Because this example showspublishing your first Web site, the entire site istransferred. The Web site in this example actuallyconsists of only one file and an empty Imagesdirectory. If more files exist in the Local site, all thefiles are transferred using the steps shown in thissection.
1
2
3
4
1 Click Window.
2 Click Files.
The Files panel opens in the right-hand pane.
3 Click here and select a site.
4 Click the Upload button ( ).
20
05_177457 ch01.qxp 10/18/07 11:25 PM Page 20

6
Do I need to save the Webpages before I publishthem?
Dreamweaver transfersthe saved versions of thefiles. However, if youcurrently have a file openwith changes that havenot been saved yet,Dreamweaver asks youwhether you want to savethe file before putting thefile on the remote site.If you click No, the Webpage uploads without thecurrent, unsaved changes.
Do I need to create thefolder structure on myremote server beforeuploading my local site?
No. Dreamweaverduplicates the local sitefolder structure on theremote site. WhenDreamweaver uploads afile from a local folder thatalready exists on theremote site, it puts theWeb page into the existingfolder. When Dreamweaveruploads a file from a localfolder that does not existon the remote site, itcreates the folder andthen puts the Web pageinto the new folder.
How can I check that allthe Web pages werecorrectly put on theremote site?
Dreamweaver displays theLocal site and the Remotesite side-by-side so youcan see the structure andfiles on both. You canopen this display from theFiles panel. Click besideLocal view, click Remoteview, and then click theExpand button ( ).Dreamweaver displays thefolder/file names, file size,date last modified, andother information aboutthe folders and files.
The Background File Activitywindow opens.
Note: When the uploadingwindow disappears, the sitehas finished uploading.
5 Open your browser.
6 Type the URL to yourWeb site and press Enter.
Your Web site appearsin your browser.
PA
RT
ISetting Up Your Dreamweaver Site
21
chapter 1
05_177457 ch01.qxp 10/18/07 11:25 PM Page 21

Copy a Dreamweaver Site
Copy a Dreamweaver SiteA Dreamweaver site consists of the settings
Dreamweaver needs to organize and managethe site Web pages. The settings include the
site name, the path to the root folder where the Website files are stored, the information needed to connectto the remote site, and other information. When youwant to set up a new Dreamweaver site that is verysimilar to an existing Dreamweaver site, you can oftensave time by copying the existing site and changing
only the information that is different, such as the sitename and the path to the root folder.
The duplicate site has all the same settings as theoriginal site. It is given the name Sitename Copy,such as DreamweaverBook Copy. You can thenchange the information for the duplicate site, such asthe site name, as described in the section “ChangeDreamweaver Site Information” earlier in this chapter.
1 Display the Manage Sites dialog box.
Note: See the section “Create a Dreamweaver Site”to display the Manage Sites dialog box.
2 Click the site name.
3 Click Duplicate.
22
• The duplicate site is added to the list ofsites.
• You can click Edit to change the propertiesof the duplicate site.
4 Click Done.
3
2
4
••
05_177457 ch01.qxp 10/18/07 11:25 PM Page 22
Set Up A Check-out System
Set Up a Check-out SystemL arge Web sites consist of many files with
more than one developer working on thefiles. In such a situation, a system to prevent
developers from simultaneously working on the samefiles and overwriting each other’s work is necessary.Dreamweaver provides a check-in/check-out systemthat prevents two developers from working on thesame file at the same time.
The check-out system requires a developer to checkout a file before changing it. While the developer hasthe file checked out, no one else can change the file.When the developer is through changing the file,he or she checks the file back in.
The Dreamweaver check-in/check-out system isimplemented on a per site basis. The check-out systemmust be turned on for each individual Dreamweaversite. You can enable the check-out system when youset up the Dreamweaver site. A check box labeled“Enable file check in and check out” appears in thedialog box when you are setting up the remote site.
If you did not enable the check-out system whenyou set up your Dreamweaver site, you can changethe site settings to enable file check out, asdescribed in the section “Change Dreamweaver SiteInformation” earlier in this chapter. You can thencheck in your site files.
4
2
5
3
4
•
32
1
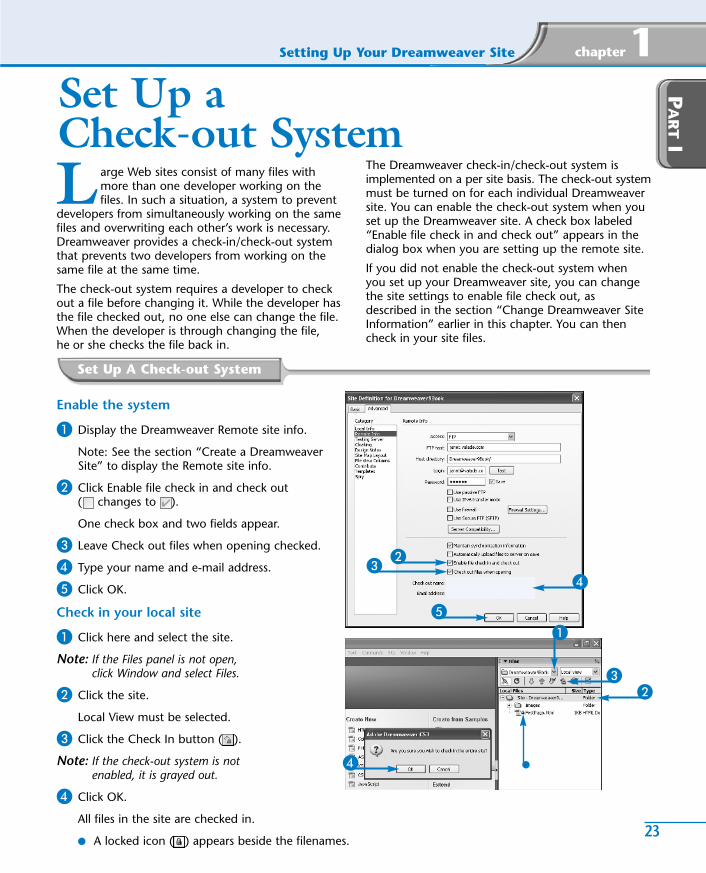
Enable the system
1 Display the Dreamweaver Remote site info.
Note: See the section “Create a DreamweaverSite” to display the Remote site info.
2 Click Enable file check in and check out ( changes to ).
One check box and two fields appear.
3 Leave Check out files when opening checked.
4 Type your name and e-mail address.
5 Click OK.
Check in your local site
1 Click here and select the site.
Note: If the Files panel is not open,click Window and select Files.
2 Click the site.
Local View must be selected.
3 Click the Check In button ( ).
Note: If the check-out system is notenabled, it is grayed out.
4 Click OK.
All files in the site are checked in.
• A locked icon ( ) appears beside the filenames.
PA
RT
ISetting Up Your Dreamweaver Site
23
chapter 1
05_177457 ch01.qxp 10/18/07 11:25 PM Page 23

Check Files In and Out
Check Files In and OutL arge Web sites, consisting of many files with
more than one developer working on thefiles, require a check-out system to prevent
developers from working on files simultaneouslyand overwriting each other’s changes. Dreamweaverprovides a check-out system that requires adeveloper to check out a file before changing it andprevents anyone else from changing the file whileit is checked out.
When several developers work on a Web site, theremote site is the most up-to-date version of the site.A developer’s local site might not contain the latest
version of a file that another developer worked on.Therefore, files are checked into and out of theremote site.
The file list in the Files panel shows the file status — ared check mark beside a file that is checked out, alongwith the name of the person who checked it out, anda lock beside files that are checked in. Files that youchecked out show a green check mark.
A file can be checked in or out with or without itsdependent files, such as images and style sheets.Unless you are going to change them, you do notneed to check out the dependent files.
1
2
3
4
5
1 Click Window.
2 Click Files.
The Files panel opens.
3 Click here and select the site.
4 Double-click a filename.
The Dependent Files dialog boxopens.
5 Click Yes or No.
24
05_177457 ch01.qxp 10/18/07 11:25 PM Page 24

6
7
••
How does Dreamweaverknow whether a file ischecked in or checked out?
Dreamweaver checkswhether a lock file exists.The lock file is namedfilename.ext.LCK (forexample, FirstPage.html.LCK). When the file ischecked out, Dreamweavercreates this file in the localand remote sites. The lockfile is not removed untilthe file is checked back in.Thus, if Dreamweaverfinds the lock file, the filestatus is checked out; if nolock file exists, the filestatus is checked in.
How does Dreamweaverprevent me from changinga file without checking itout?
When a file is checked in,the copy of the file in thelocal site becomes ReadOnly. You can open thefile and make changes,but you cannot save thefile. Of course, you canmanually change the filestatus so that you canwrite to it, using Windowscommands, but end runsaround the check-insystem usually result inconfusion, content loss,and possible disaster.
What do I do when I reallyneed to work on a filethat someone else haschecked out?
When you set up thecheck-out system for yourDreamweaver site,Dreamweaver requestsyour name and e-mailaddress. In the Files panel,the name of the personwho has checked out a fileis listed beside thefilename. The name is alink that, when clicked,allows you to e-mail theperson who has the file.You can send the person amessage letting him or herknow you need to workon the file.
The Web page opens.
• A green check mark appears bythe filename.
6 Make the changes to the Web page.
7 Click .
The file is uploaded to the remote site.
• The file status changes back tochecked in.
PA
RT
ISetting Up Your Dreamweaver Site
25
chapter 1
05_177457 ch01.qxp 10/18/07 11:25 PM Page 25