Crafty Cattery Anatomy Doll Pattern -...
21
Anatomy Doll Pattern by Cat Carlisle 1 This pattern can be found for free at www.craftycattery.com. Please do not reproduce or repost this pat- tern without permission. This pattern and items created from it should never be sold. © Cat Carlisle Printing Instructions: This file is formatted to print on 8.5”x11” Letter paper. If printed on other paper, the scale may be off. 1. Open the PDF file using Acrobat Reader. 2. Go to File, then Print to open the Print window. 3. In the Page Handling box, look for the setting for Page Scaling. In the drop down box next to it, select “None.” 4. Before you print the entire file, test that the settings are correct by printing this page by itself. You will be able to tell if the scale is not right by measuring the 1 inch bar to the right. If it is not an inch (or at least pretty dang close), then you know the scale is off and you can fix your settings. 5. Once your settings are correct, you can print this entire file. Pages 2-15 are the patterns. Pages 16-21 are the instructions.
Transcript of Crafty Cattery Anatomy Doll Pattern -...

Anatomy Doll Pattern by Cat Carlisle 1
This pattern can be found for free at www.craftycattery.com. Please do not reproduce or repost this pat-tern without permission. This pattern and items created from it should never be sold. © Cat Carlisle
Printing Instructions: This file is formatted to print on 8.5”x11” Letter paper. If printed on other paper, the scale may be off. 1. Open the PDF file using Acrobat Reader. 2. Go to File, then Print to open the Print window. 3. In the Page Handling box, look for the setting for Page
Scaling. In the drop down box next to it, select “None.” 4. Before you print the entire file, test that the settings are
correct by printing this page by itself. You will be able to tell if the scale is not right by measuring the 1 inch bar to the right. If it is not an inch (or at least pretty dang close), then you know the scale is off and you can fix your settings.
5. Once your settings are correct, you can print this entire file. Pages 2-15 are the patterns. Pages 16-21 are the instructions.

Anatomy Doll Pattern by Cat Carlisle 2
This pattern can be found for free at www.craftycattery.com. Please do not reproduce or repost this pat-tern without permission. This pattern and items created from it should never be sold. © Cat Carlisle

Anatomy Doll Pattern by Cat Carlisle 3
This pattern can be found for free at www.craftycattery.com. Please do not reproduce or repost this pat-tern without permission. This pattern and items created from it should never be sold. © Cat Carlisle

Anatomy Doll Pattern by Cat Carlisle 4
This pattern can be found for free at www.craftycattery.com. Please do not reproduce or repost this pat-tern without permission. This pattern and items created from it should never be sold. © Cat Carlisle
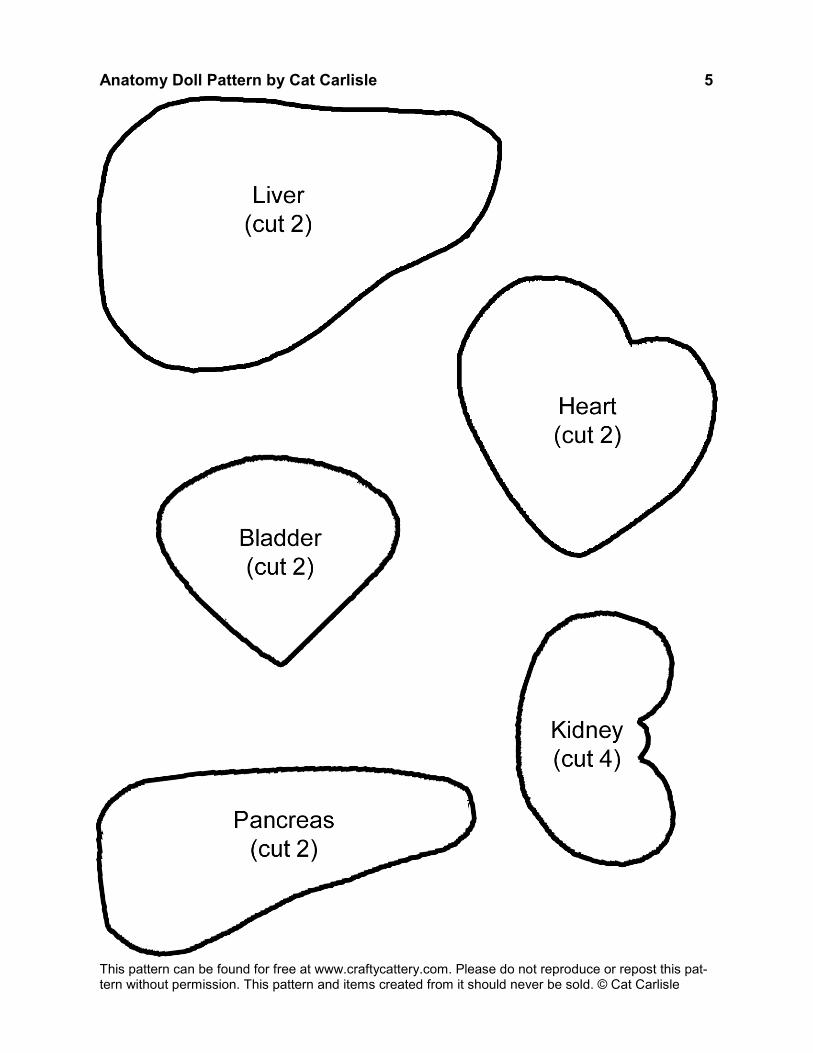
Anatomy Doll Pattern by Cat Carlisle 5
This pattern can be found for free at www.craftycattery.com. Please do not reproduce or repost this pat-tern without permission. This pattern and items created from it should never be sold. © Cat Carlisle

Anatomy Doll Pattern by Cat Carlisle 6
This pattern can be found for free at www.craftycattery.com. Please do not reproduce or repost this pat-tern without permission. This pattern and items created from it should never be sold. © Cat Carlisle
Small Intestine: Because the Small Intestine is so long, I could not fit the pattern here. However, the pattern is a simple rectangle so you can easily make it yourself. To make the pattern, find a large piece of paper like newspaper, wrapping paper or freezer paper. Draw a rectangle 27 1/2 inches long and 1 1/4 inches wide (27.5” x 1.25”). Cut out the rectan-gle. Write “Small Intestine” on it. There’s your pattern!
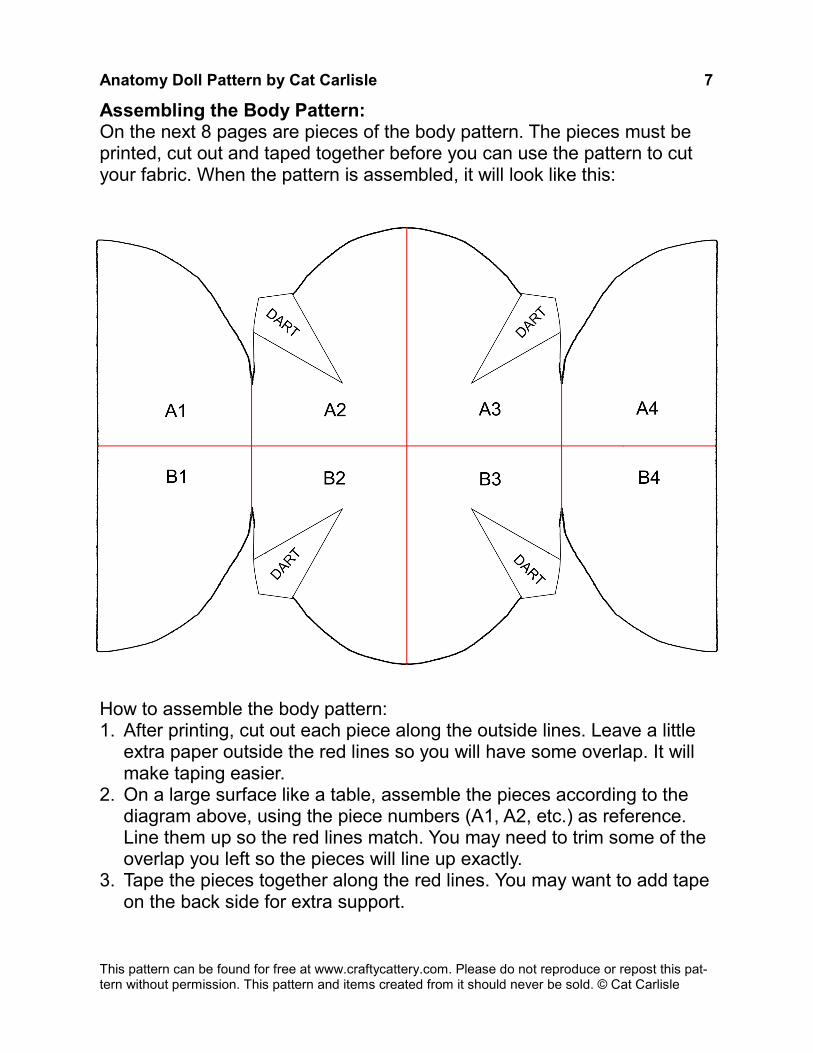
Anatomy Doll Pattern by Cat Carlisle 7
This pattern can be found for free at www.craftycattery.com. Please do not reproduce or repost this pat-tern without permission. This pattern and items created from it should never be sold. © Cat Carlisle
Assembling the Body Pattern: On the next 8 pages are pieces of the body pattern. The pieces must be printed, cut out and taped together before you can use the pattern to cut your fabric. When the pattern is assembled, it will look like this:
How to assemble the body pattern: 1. After printing, cut out each piece along the outside lines. Leave a little
extra paper outside the red lines so you will have some overlap. It will make taping easier.
2. On a large surface like a table, assemble the pieces according to the diagram above, using the piece numbers (A1, A2, etc.) as reference. Line them up so the red lines match. You may need to trim some of the overlap you left so the pieces will line up exactly.
3. Tape the pieces together along the red lines. You may want to add tape on the back side for extra support.

Anatomy Doll Pattern by Cat Carlisle 8
This pattern can be found for free at www.craftycattery.com. Please do not reproduce or repost this pat-tern without permission. This pattern and items created from it should never be sold. © Cat Carlisle

Anatomy Doll Pattern by Cat Carlisle 9
This pattern can be found for free at www.craftycattery.com. Please do not reproduce or repost this pat-tern without permission. This pattern and items created from it should never be sold. © Cat Carlisle
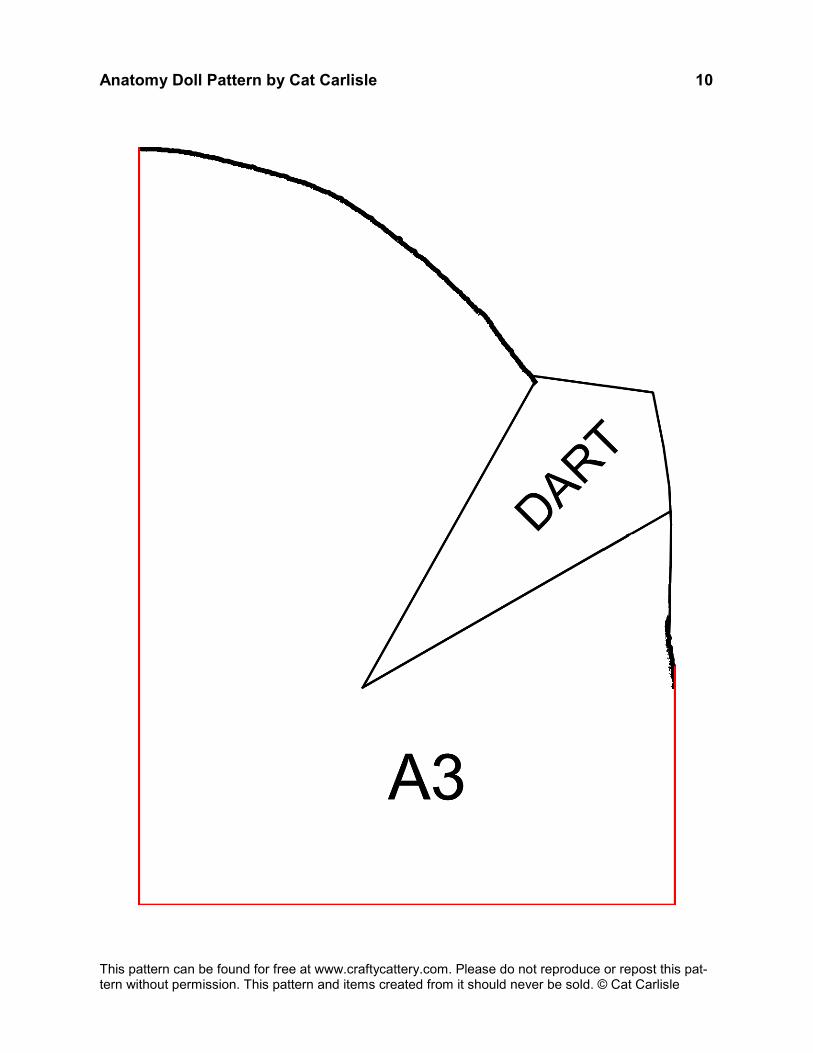
Anatomy Doll Pattern by Cat Carlisle 10
This pattern can be found for free at www.craftycattery.com. Please do not reproduce or repost this pat-tern without permission. This pattern and items created from it should never be sold. © Cat Carlisle

Anatomy Doll Pattern by Cat Carlisle 11
This pattern can be found for free at www.craftycattery.com. Please do not reproduce or repost this pat-tern without permission. This pattern and items created from it should never be sold. © Cat Carlisle
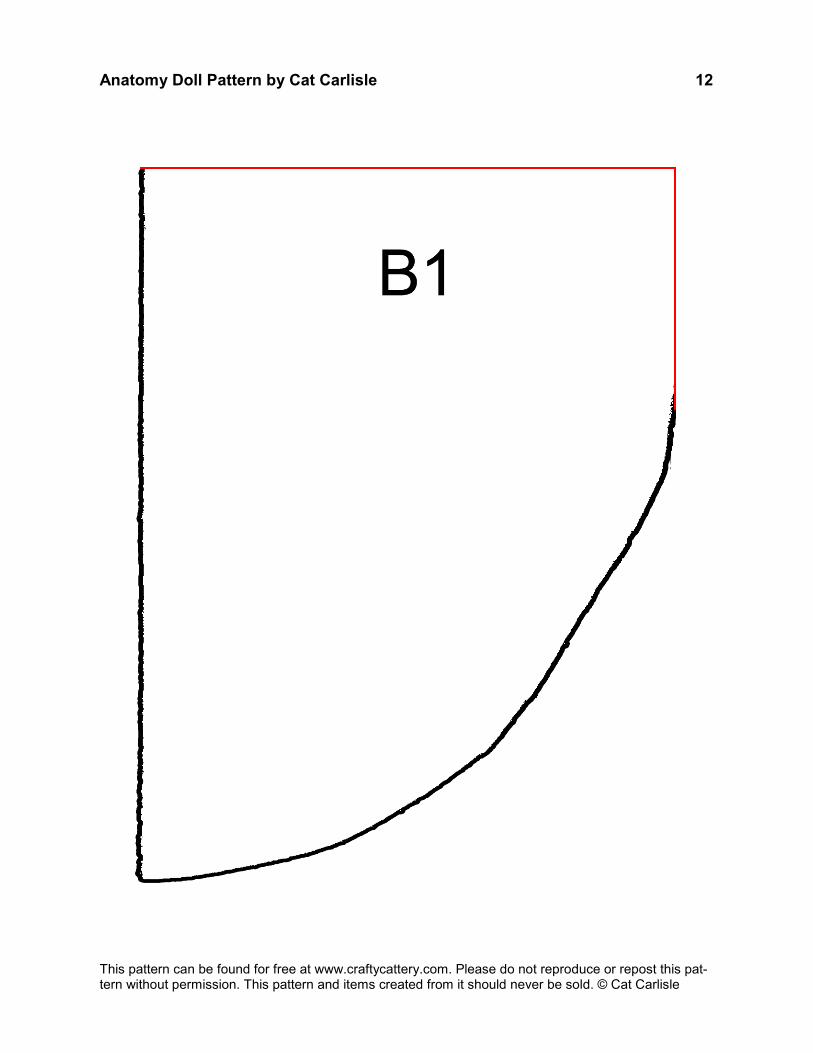
Anatomy Doll Pattern by Cat Carlisle 12
This pattern can be found for free at www.craftycattery.com. Please do not reproduce or repost this pat-tern without permission. This pattern and items created from it should never be sold. © Cat Carlisle
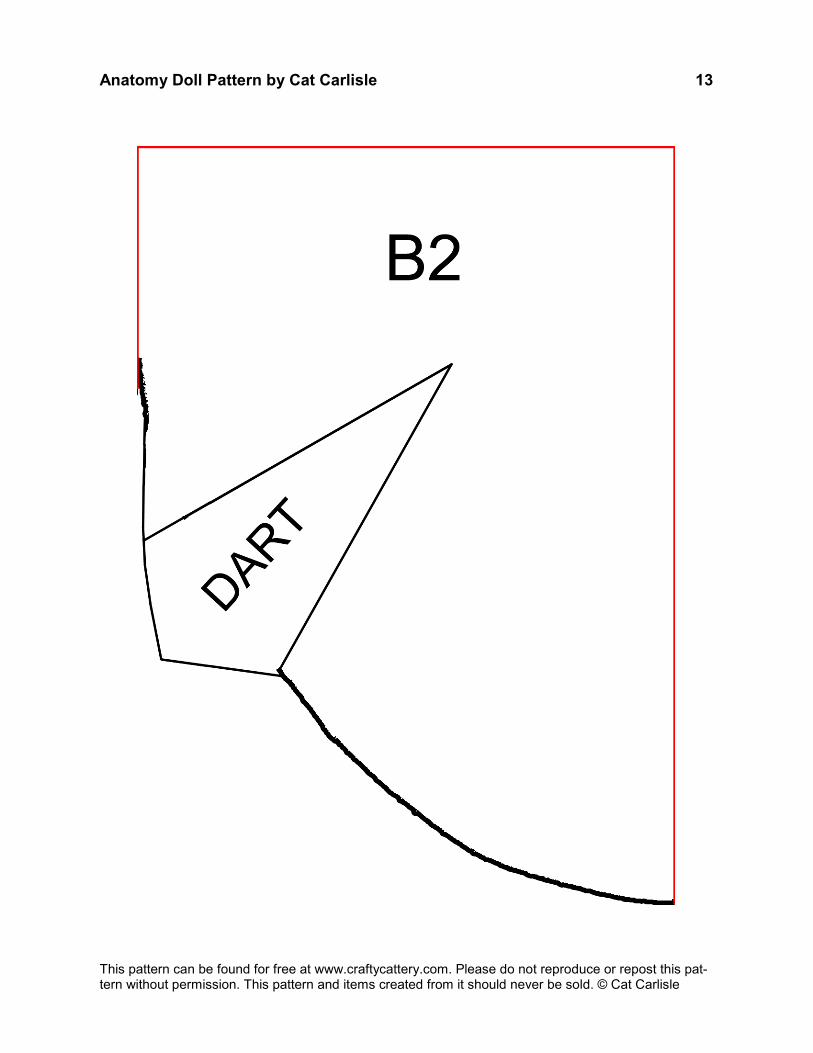
Anatomy Doll Pattern by Cat Carlisle 13
This pattern can be found for free at www.craftycattery.com. Please do not reproduce or repost this pat-tern without permission. This pattern and items created from it should never be sold. © Cat Carlisle

Anatomy Doll Pattern by Cat Carlisle 14
This pattern can be found for free at www.craftycattery.com. Please do not reproduce or repost this pat-tern without permission. This pattern and items created from it should never be sold. © Cat Carlisle

Anatomy Doll Pattern by Cat Carlisle 15
This pattern can be found for free at www.craftycattery.com. Please do not reproduce or repost this pat-tern without permission. This pattern and items created from it should never be sold. © Cat Carlisle
Anatomy Doll Pattern by Cat Carlisle 16
This pattern can be found for free at www.craftycattery.com. Please do not reproduce or repost this pat-tern without permission. This pattern and items created from it should never be sold. © Cat Carlisle
Recommended Fabrics: Outside Body, Head, Arms and Legs: skin-color fleece Lining Inside Body: shiny red fabric like satin or satinette Organs: 10 different colors of fleece (one color for each organ)
Notions Thread to match each color of fabric Fusible interfacing Batting (stuffing) Yarn for the hair Embroidery floss for the mouth/facial features Safety eyes if desired (not recommended for children under 3 years) Velcro or magnets if desired (magnets not recommended for children under
3 years) Hooks and eyes, snaps, buttons, or Velcro for closure of the body
Fabric Cutting Instructions Because fleece is not a sturdy fabric, I like to reinforce all parts of the doll with fusible interfacing. It also makes transferring the pattern easier. Here’s what I do: 1. After you’ve cut out all of the pattern pieces, transfer the pattern from all of the pieces to the non-fusible side of the fusible interfacing (the non-sticky / non-textured side). I recommend using a pencil because it will not smear. Here’s how many times you need to transfer each piece:
Body and Head: 2 times Small Intestine: 1 time Arms, Legs, Lung, Kidney: 4 times total, 2 times from the front side of the
pattern and 2 times from the back All Other Organs: 2 times total, 1 time from the front side of the pattern and 1
time from the back Note that you are using the back of the pattern sometimes so you will end up with both a front and back of the piece, instead of two fronts and no back. 2. Cut out each piece, leaving an inch or so of interfacing around the pattern (don’t cut right up to the line, leave some extra). 3. Follow the instructions from your interfacing to fuse it to the wrong side of the fol-lowing fabrics:
The Head, Arms, Legs and one of the Body pieces should be fused to the skin colored fabric.
The second Body piece should be fused to the shiny red lining fabric. The Organs should be fused to the colors of fleece fabric that you chose for
each. 4. Cut out each piece along the lines.

Anatomy Doll Pattern by Cat Carlisle 17
This pattern can be found for free at www.craftycattery.com. Please do not reproduce or repost this pat-tern without permission. This pattern and items created from it should never be sold. © Cat Carlisle
Organ Sewing Instructions Note: All patterns include a 1/4 inch seam allowance (0.25”). “Wrong Side” means the side with the interfacing. The Organs (except Small Intestine): 1. Match the two pieces of an organ together with the wrong sides facing out. 2. Sew them together along the edges, stopping at least one inch from where you be-
gan so you can turn it inside out. 3. Clip curves in the seam allowance if needed. 4. Turn the organ right side out through the hole you left. 5. Stuff the organ.
*If you would like the stomach, small intestine and large intestine to magnetically connect, you can place one magnet inside the lower end of the stomach and another in the beginning of the large intestine (remember magnets are not recommended for children under 3 years).
6. Close the hole using a blind hem stitch. 7. Add Velcro to the back of the organ if desired. The Small Intestine: 1. Fold the rectangle in half long ways (hot dog style) with
the wrong side facing out. 2. Sew along the long edge to form a tube. Do not sew
the short ends yet. Trim seam. 3. Turn the tube right side out. 4. Run some basting stitches around one end of the tube. Loosely run the needle
through the tube so it comes out the other end. Fold the ends of the tube where the stitches are to the inside of the tube then pull the needle tight. The end of the tube should close with the unfinished edges inside and you can run the needle back through the tube and tie off the thread discreetly at the closed end. *If you would like the stomach, small intestine and large intestine to magnetically connect, you can place one magnet inside the closed end of the small intestine. Be sure to hold the magnet against the magnet in the stomach to make sure they will attach before you proceed.
5. Stuff the small intestine. Make sure it is not stuffed too tightly—it should still be fairly flexible. *If you are using magnets, add a magnet to the other end of the small intestine now, being sure to check that it will attach to the magnet in the large intestine.
6. Run some basting stitches around the open end of the tube. Loosely run the needle through the tube so it comes out the side. Fold the ends of the tube where the stitches are to the inside of the tube then pull the needle tight. The end of the tube should close with the unfinished edges inside. Tie off the thread discreetly.

Anatomy Doll Pattern by Cat Carlisle 18
This pattern can be found for free at www.craftycattery.com. Please do not reproduce or repost this pat-tern without permission. This pattern and items created from it should never be sold. © Cat Carlisle
Head, Arms and Legs Sewing Instructions Note: All patterns include a 1/4 inch seam allowance (0.25”). “Wrong Side” means the side with the interfacing. Head: 1. Before sewing the pieces of the head together, decorate one piece as the face.
Embroider eyes, nose, mouth, etc. on it. 2. With the right sides together and wrong sides of the head facing out, sew the two
pieces of the head together. Do not sew across the neck. 3. Turn the head right side out through the neck hole. 4. Add hair if desired. 5. Stuff the head. 6. Use a loose basting stitch within the seam allowance to sew it closed at the neck so
the stuffing won’t come out.
Arms and Legs: 1. With the right sides together and the wrong sides facing out, sew the two pieces of
each appendage together. Do not sew across the shoulder/hip. 2. Turn the appendage right side out through the hole. 3. Stuff the appendage. 4. Use a loose basting stitch within the seam allowance to sew the appendage closed
at the shoulder/hip so the stuffing won’t come out.

Anatomy Doll Pattern by Cat Carlisle 19
This pattern can be found for free at www.craftycattery.com. Please do not reproduce or repost this pat-tern without permission. This pattern and items created from it should never be sold. © Cat Carlisle
Body Sewing Instructions Note: All patterns include a 1/4 inch seam allowance (0.25”). “Wrong Side” means the side with the interfacing. Outer Body (skin-colored piece): 1. Fold the dart so the two lines are together. The right side of the fabric should be in-
side the fold and the wrong side should be on the outside of the fold. Sew along the line. Cut off any excess fabric.
2. Repeat Step 1 for all other darts.
Body Lining (shiny red piece) 1. Fold the dart so the two lines are together. The right side of the fabric should be in-
side the fold and the wrong side should be on the outside of the fold. Sew along the line. Cut off any excess fabric.
2. Repeat Step 1 for all other darts.
Outer Body—Wrong Side Outer Body—Right Side
Body Lining—Wrong Side Body Lining—Right Side

Anatomy Doll Pattern by Cat Carlisle 20
This pattern can be found for free at www.craftycattery.com. Please do not reproduce or repost this pat-tern without permission. This pattern and items created from it should never be sold. © Cat Carlisle
Attaching the Head, Arms and Legs Note: All patterns include a 1/4 inch seam allowance (0.25”). “Wrong Side” means the side with the interfacing. 1. Pin the head, arms and legs in the appropriate places on the right side of the outer
body, matching raw edges. It won’t seem right until you flip everything out like in the photo below:
2. Make sure everything looks correct (thumbs and feet are pointing the right direction, face is facing forward), flip everything back and then sew all the pieces to the body within the seam allowance.
Now’s a good time to think about what sort of closure you want to use on the stomach flaps. If it’s Velcro or snaps and you don’t want your stitching to be visible on the outer body, you should attach them to the lining now. Also, if you want to use Velcro to at-tach the organs to the inside of the body cavity, now is the time to sew it to the lining as well. Attach the Lining to the Outer Body 1. Fold the limbs and head against the right side of the outer body. 2. Line up the lining and the outer body, right sides together and wrong sides facing
out. Pin the edges. 3. Sew along the edges, leaving a gap between the legs so the doll can be turned
right side out. Clip curves within seam allowance. 4. Turn the doll right side out and use a blind hem stitch to close the gap.
(face)

Anatomy Doll Pattern by Cat Carlisle 21
This pattern can be found for free at www.craftycattery.com. Please do not reproduce or repost this pat-tern without permission. This pattern and items created from it should never be sold. © Cat Carlisle
Finishing Touches If you haven’t already put closures on the stomach, you can do so now. Place the or-gans inside the body cavity and you’re done! You can make clothes or a hospital gown for the doll if you wish (I have a pattern for a gown somewhere, I will add it when I can find it).