CPR AED textbook compressed
100
given more safet y demonstrations than I can count, kept m y neighbor’s home from burning to the ground, and saved 26 lives. I HAVE: CPR/AED for the Professional Rescuer PARTICIPANT’S MANUAL
-
Upload
john-alexander-gallin -
Category
Documents
-
view
228 -
download
0
Transcript of CPR AED textbook compressed

7/24/2019 CPR AED textbook compressed
http://slidepdf.com/reader/full/cpr-aed-textbook-compressed 1/100
given more safet y demonstrations
than I can count, kept m y neighbor’s
home from burning to the ground,
and saved 26 lives.
I HAVE:
CPR/AED for the Professional Rescuer
PARTICIPANT’S MANUAL

7/24/2019 CPR AED textbook compressed
http://slidepdf.com/reader/full/cpr-aed-textbook-compressed 2/100

7/24/2019 CPR AED textbook compressed
http://slidepdf.com/reader/full/cpr-aed-textbook-compressed 3/100
CPR/AED for
the Professional
Rescuer
This participant’s manual was developed and produced through the combined
efforts of the American Red Cross, external reviewers and StayWell. Without thecommitment to excellence of both employees and volunteers, this manual could not
have been created.
D a n i e l C i m a

7/24/2019 CPR AED textbook compressed
http://slidepdf.com/reader/full/cpr-aed-textbook-compressed 4/100
Copyright © 2006 by The American National Red Cross
All rights reserved. No part of this publication may be reproduced,
stored in a retrieval system, or transmitted in any form or by any means,
electronic, mechanical, photocopying, recording, or otherwise,
without prior permission from American Red Cross National Headquarters,
Products and Health and Safety Services.
American Red Cross certificates may be issued upon successful completion of a
training program, which uses this textbook as an integral part of the course. By
itself, the text material does not constitute comprehensive Red Cross training. In
order to issue ARC certificates, your instructor must be authorized by the American
Red Cross and must follow prescribed policies and procedures. Make certain that
you have attended a course authorized by the Red Cross. Ask your instructor aboutreceiving American Red Cross certification, or contact your local chapter for more
information.
The content in this text reflects the 2005 Consensus on Science for CPR and
Emergency Cardiovascular Care (ECC) and the Guidelines 2005 for First Aid.
The emergency care procedures outlined in this book reflect the standard of
knowledge and accepted emergency practices in the United States at the time this
book was published. It is the reader’s responsibility to stay informed of changes in
the emergency care procedures.
Printed in the United States of America.
Composition by Graphic World, Inc.Printing/Binding by Banta Book Group.
StayWell
780 Township Line Rd.
Yardley, PA 19067
ISBN:1-58480-304-5
Library of Congress Cataloging-in-Publication Data
CPR/AED for the professional rescuer. -- 3rd ed.
p. ; cm.Includes bibliographical references.
ISBN 1-58480-304-5
1. CPR (First aid) 2. Automated external defibrillation.
I. American Red Cross.
[DNLM: 1. Cardiopulmonary Resuscitation--methods. 2. Defib-
rillators. WA 292 C8817 2006]
RC87.9.C743 2006
616.1’025--dc22
2006014677
0 6 0 7 0 8 0 9 1 0 / 9 8 7

7/24/2019 CPR AED textbook compressed
http://slidepdf.com/reader/full/cpr-aed-textbook-compressed 5/100
THE AMERICAN RED CROSS’ ADVISORYCOUNCIL ON FIRST AID AND SAFETY
In late 1998, the American Red Cross formed anindependent panel of nationally recognized health
and safety experts known as the Advisory Councilon First Aid and Safety (ACFAS). Drawing on abody of collective expertise from such diversefields as emergency medicine, occupational
health, sports medicine, school health, emergencymedical services response, disaster mobilizationand education, ACFAS was designed as a conduit to establish the standard in first aid care. ACFAS
was charged to advise the Red Cross in areasrelated to the development and dissemination ofaudience-appropriate information and skills training in first aid and safety.
According to the National First Aid ScienceAdvisory Board, of which the Red Cross is afounding member, first aid is defined as assess-ments and interventions that can be performed
by a bystander (or performed by the patient)with minimal or no medical equipment. A firstaid provider is a person with formal first aid,emergency care or medical training (or the
patient) who provides assessments and inter-ventions that can be performed by a bystander(or performed by the patient) with minimal or nomedical equipment.
TOGETHER WE PREPARE
The American Red Cross mission is to provide relief
to victims of disaster and help people prevent, pre-pare for and respond to emergencies. But we need
your help. There are five actions that every organi-zation, individual and family should take to better
prepare themselves for an emergency or disaster, these include—
Make a plan. Everyone should design a FamilyDisaster Plan. The Family Disaster Plan focuses onboth families and individuals.
Build a kit. For your home and workplace, assemble a
Disaster Supplies Kit, which contains items that youmay need if you are 1) confined to your home or place
of work for an extended period (e.g., after a disasteror winter storm) or 2) told to evacuate on short notice.
Get trained. Participate in first aid, CPR and AED
training and attend Red Cross Community DisasterEducation presentations.
Volunteer. Give your time through volunteering.
Give blood. Become a regular and frequent blooddonor to ensure a blood supply that meets all needs,all of the time.
For more information visit www.redcross.org

7/24/2019 CPR AED textbook compressed
http://slidepdf.com/reader/full/cpr-aed-textbook-compressed 6/100
iv | Acknowledgments
ACKNOWLEDGMENTS
The American Red Cross CPR/AED for the Professional Rescuer program and supporting materials were
developed through the dedication of both employees and volunteers. Their commitment to excellence made this program possible.
The American Red Cross team for this edition included:
Pat BoniferDirector
Research and Product Development
Jennifer DeibertProject Manager
Research and Product Development
Mike EspinoManager
Research and Product Development
Greta PetrillaManager
Communication and Marketing
John HendricksonSenior Associate
Chapter Business Development and
Sales Support
Tom HeneghanSenior Associate
Program Administration and Support
Steve Lynch
Senior AssociateBusiness Planning
Marc MaddenSenior Associate
Research and Product Development
Lindsay OaksmithSenior Associate
Research and Product Development
Kelly FischbeinAssociate
Evaluation
Rhadames AvilaAdministrative Assistant
Research and Product Development
Betty J. ButlerAdministrative Assistant
Research and Product Development
The StayWell team for this edition included:
Nancy MonahanSenior Vice President
Bill WinnebergerSenior Director of Manufacturing
Paula BattExecutive Director
Sales and Business Development
Reed KlanderudExecutive Director
Marketing and New Product
Development
Shannon BatesManaging Editor
Lorraine P. CoffeySenior Developmental Editor
Kate PlourdeMarketing Manager
Stephanie WeidelSenior Production Editor
The following members of the American Red Cross Advisory Council on First Aid and Safety (ACFAS) also provided guidance and review:
David Markenson, MD, FAAP, EMT-PChair, Advisory Council on First Aid
and Safety (ACFAS)
Chief Pediatric Emergency Medicine
Maria Fareri Children’s Hospital
Westchester Medical Center
Valhalla, New York
Kim Dickerson, EMT-P, RNCommittee Member, Advisory
Council on First Aid and Safety
(ACFAS)
Fort Myers, Florida
Paul M. Gannon, MS Ed, RNCommittee Member, Advisory
Council on First Aid and Safety
(ACFAS)
Ambulatory Surgery Staff Nurse, St.
Joseph Hospital
Cheektowaga, New York
Health and Safety Instructor
American Red Cross Greater Buffalo
Chapter
West Seneca, New York
Claudia Hines, RNCommittee Member, Advisory
Council on First Aid and Safety
(ACFAS)
Emergency Medical Services for
Children
Children’s Hospitals and Clinics of
Minnesota
Minneapolis, Minnesota
The following individuals provided external review:
Bryan A. Hoffmann, B.A., EMT-B (I)UMDNJ-EMSNewark, New Jersey
Jersey Coast Chapter of the
American Red Cross
Elaine D. Kyte, LPNHealth and Safety Director
American Red Cross Hazleton
Chapter
West Hazleton, Pennsylvania
Sean E. Page, MSN, CRNP, CSNPA EMS Instructor
PA State Fire Academy InstructorInstructor Trainer
American Red Cross York County
Chapter
York, Pennsylvania
Jude F. Younker, B.A., EMT-BNorth Flight EMS
Board of Directors Chairman
American Red Cross of
Northwestern Michigan Chapter
Traverse City, Michigan
The American Red Cross and
StayWell thank Casey Berg, Ted T.Crites, Terri Eudy, Terry Georgia,
Ellen Jones, Vincent Knaus,
Adreania McMillian, MaryKate
Martelon, Cheryl Murray, Craig
Reinertson, Jessica Silver, Greg
Stockton, Katherine Tunney, Lynn
Whittemore and Stephan Widell for
their contributions to the develop-
ment of this program.

7/24/2019 CPR AED textbook compressed
http://slidepdf.com/reader/full/cpr-aed-textbook-compressed 7/100
Preface |
PREFACE
Professional rescuers work as nurses, EMTs, life-
guards, firefighters, first responders, athletic
trainers, physicians, health care professionals andnumerous other occupations. Despite the wide range
of occupations, professional rescuers share a
unique responsibility; the responsibility to save lives.
This awesome responsibility of saving lives is con-
stantly being tested with new challenges and
changes. The skills, knowledge and tools that pro-
fessional rescuers use to save lives are constantly
changing as well.
This new American Red Cross CPR/AED forthe Professional Rescuer Participant’s Manual
and course reflect changes based on the2005 Consensus on Science for CPR and Emergency Cardiovascular Care (ECC) and the Guidelines 2005 for First Aid . Changes to this program and manual
include simplifications to many of the CPR skill
sequences, which helps improve retention. There
have also been changes to help improve the quality
of CPR. The integration of CPR skills into the opera-
tion of AEDs has changed to help improve survivalfrom sudden cardiac arrest. Professional rescuers
are now trained to use AEDs on adults and children.
Information has been updated and added to this pro-
gram to help professional rescuers administer epi-
nephrine, aspirin and fixed-flow-rate oxygen.
The skills learned in this course include adult, child
and infant rescue breathing, conscious and uncon-
scious choking, CPR, two-rescuer CPR and adult and
child AED. Additional training can be added to this
course including bloodborne pathogens training and
emergency oxygen administration. While the skillsand knowledge that professional rescuers use are
increasing, this training will help you meet your most
important responsibility as a professional rescuer—
the responsibility to save lives.

7/24/2019 CPR AED textbook compressed
http://slidepdf.com/reader/full/cpr-aed-textbook-compressed 8/100
Dedicated to
professional rescuers
who have lost their livessaving others
D a n i e l C i m a

7/24/2019 CPR AED textbook compressed
http://slidepdf.com/reader/full/cpr-aed-textbook-compressed 9/100
Chapter 1The Professional Rescuer . . . . . . . . . . . . . . . . .1
Responsibilities . . . . . . . . . . . . . . . . . . . . . . . . . . . . . .2
Personal Characteristics . . . . . . . . . . . . . . . . . . . . . .2
The Emergency Medical Services System . . . . . . .2
Legal Considerations . . . . . . . . . . . . . . . . . . . . . . . . .4
Putting it All Together . . . . . . . . . . . . . . . . . . . . . . . .5
Chapter 2Bloodborne Pathogens . . . . . . . . . . . . . . . . . . . .6
Bloodborne Pathogens . . . . . . . . . . . . . . . . . . . . . . .7
How Pathogens Spread . . . . . . . . . . . . . . . . . . . . . . .8
Preventing the Spread of Bloodborne
Pathogens . . . . . . . . . . . . . . . . . . . . . . . . . . . . . . .10
If You Are Exposed . . . . . . . . . . . . . . . . . . . . . . . . . .14
Putting it All Together . . . . . . . . . . . . . . . . . . . . . . .14
Skill Sheet—Removing Gloves . . . . . . . . . . . . . . . .15
Chapter 3Taking Action and Caring for BreathingEmergencies . . . . . . . . . . . . . . . . . . . . . . . . . . .16
Moving a Victim . . . . . . . . . . . . . . . . . . . . . . . . . . . .19
Breathing Emergencies . . . . . . . . . . . . . . . . . . . . . .22
Rescue Breathing . . . . . . . . . . . . . . . . . . . . . . . . . . .23
Airway Obstruction . . . . . . . . . . . . . . . . . . . . . . . . . .26
Putting it All Together . . . . . . . . . . . . . . . . . . . . . . .27
Skill Sheet—Initial Assessment . . . . . . . . . . . . . . .28
Skill Sheet—Rescue Breathing—Adult . . . . . . . . .31
Skill Sheet—Rescue Breathing—Child . . . . . . . . .32
Skill Sheet—Rescue Breathing—Infant . . . . . . . .33Skill Sheet—Using a Bag-Valve-Mask
Resuscitator—Two Rescuers . . . . . . . . . . . . . . .34
Skill Sheet—Conscious Choking—
Adult and Child . . . . . . . . . . . . . . . . . . . . . . . . . . .36
Skill Sheet—Conscious Choking—Infant . . . . . . .38
Skill Sheet—Unconscious Choking—
Adult and Child . . . . . . . . . . . . . . . . . . . . . . . . . . .40
Skill Sheet—Unconscious Choking—Infant . . . . .43
Table of Contents | v
TABLE OF CONTENTS

7/24/2019 CPR AED textbook compressed
http://slidepdf.com/reader/full/cpr-aed-textbook-compressed 10/100
Chapter 4Cardiac Emergencies . . . . . . . . . . . . . . . . . . . .45
Cardiac Chain of Survival . . . . . . . . . . . . . . . . . . . . .46
CPR . . . . . . . . . . . . . . . . . . . . . . . . . . . . . . . . . . . . . . .48
Automated External Defibrillation . . . . . . . . . . . . . .51Administering Emergency Oxygen . . . . . . . . . . . . .51
Putting it All Together . . . . . . . . . . . . . . . . . . . . . . .51
Skill Sheet—CPR—Adult and Child . . . . . . . . . . . .52
Skill Sheet—CPR—Infant . . . . . . . . . . . . . . . . . . . .54
Skill Sheet—Two-Rescuer CPR—
Adult and Child . . . . . . . . . . . . . . . . . . . . . . . . . . .56
Skill Sheet—Two-Rescuer CPR—Infant . . . . . . . .58
Chapter 5Automated External Defibrillation . . . . . . . . .61
The Heart’s Electrical System . . . . . . . . . . . . . . . . .62
When the Heart Stops . . . . . . . . . . . . . . . . . . . . . . .62
Defibrillation . . . . . . . . . . . . . . . . . . . . . . . . . . . . . . .62
AEDs and the Cardiac Chain of Survival . . . . . . . .63
Using an AED—Adult . . . . . . . . . . . . . . . . . . . . . . . .63
Using an AED—Child . . . . . . . . . . . . . . . . . . . . . . . .63
AED Precautions . . . . . . . . . . . . . . . . . . . . . . . . . . . .63
AEDs—Special Situations . . . . . . . . . . . . . . . . . . . .64
AED Maintenance . . . . . . . . . . . . . . . . . . . . . . . . . . .65
Putting it All Together . . . . . . . . . . . . . . . . . . . . . . .65AED Algorithm for the Professional Rescuer . . . . .66
Skill Sheet—Using an AED—Adult and Child . . . .67
Skill Sheet—Using an AED—Adult and Child,
CPR in Progress . . . . . . . . . . . . . . . . . . . . . . . . . .70
Chapter 6Administering Emergency Oxygen . . . . . . . . .73
Emergency Oxygen . . . . . . . . . . . . . . . . . . . . . . . . . .74
Oxygen Delivery Devices . . . . . . . . . . . . . . . . . . . . .76Putting it All Together . . . . . . . . . . . . . . . . . . . . . . .77
Skill Sheet—Using a Resuscitation Mask
for Rescue Breathing . . . . . . . . . . . . . . . . . . . . . . .78
Skill Sheet—Oxygen Delivery . . . . . . . . . . . . . . . . .81
Appendix A . . . . . . . . . . . . . . . . . . . . . . . . . . . .85References . . . . . . . . . . . . . . . . . . . . . . . . . . . . .86
viii | Table of Contents

7/24/2019 CPR AED textbook compressed
http://slidepdf.com/reader/full/cpr-aed-textbook-compressed 11/100

7/24/2019 CPR AED textbook compressed
http://slidepdf.com/reader/full/cpr-aed-textbook-compressed 12/100
RESPONSIBILITIES
Professional rescuers share important responsibilities
that include—
● Having a duty, when on the job, to respond to an emer-
gency.
● Using techniques learned in professional training.
● Ensuring their personal safety and the safety of fellow
team members and bystanders.
● Gaining safe access to the victim.
● Determining any threats to the victim’s life.
● Summoning more advanced medical personnel when
necessary.
● Providing needed care for the victim.
● Assisting more advanced medical personnel.
PERSONAL CHARACTERISTICS
As someone who deals with the public, your responsibili-
ties extend beyond providing care. These include—
● Maintaining a professional appearance and attitude .
Working with injured or ill victims is sometimes diffi-
cult. Be compassionate, knowing that anger often
results from fear. Lay responders who help during an
emergency may also be afraid. Try to be reassuring
and thank them for taking action.
● Keeping your skills and knowledge up to date . Join pro-
fessional organizations and take continuing education
and refresher trainings.
● Controlling your own fears . Try not to reveal your anxi-
eties to the victim or bystanders. The presence of
blood, vomit or unpleasant odors is often disturbing.
You may need to compose yourself before you act.
● Maintaining a healthy lifestyle . Job stress can
adversely affect your health. Exercise and diet help you
manage your physical, mental and emotional stress.
Maintain a healthy lifestyle both on and off the job.
THE EMERGENCY MEDICAL SERVICESSYSTEM
The emergency medical services (EMS) system is a net-
work of community resources and medical personnel
that provides emergency care to victims of injury or
sudden illness (Fig. 1-1). The first step in the EMS system
is activated when someone recognizes that an emer-
gency has occurred and takes action. Depending on the
situation, a professional rescuer might perform the first
2 | CPR/AED for the Professional Rescuer
1. Recognition and response by the lay responder
2.
Early activation of EMS system3. Professional rescuer care4. Prehospital care provided by
advanced medical personnel5. Hospital care6. Rehabilitation
1.
2.
3.
4.
5.6.
Fig. 1-1

7/24/2019 CPR AED textbook compressed
http://slidepdf.com/reader/full/cpr-aed-textbook-compressed 13/100
step in the EMS system. You and other highly trained
professionals then provide additional care to injured or
ill victims as needed. The basic purpose of the EMS
system is to bring rapid medical care to victims of life-
threatening injuries or illness. You, as a professional
rescuer, play a critical role in this system. The survival
and recovery of the critically injured or ill depends on—
1. Recognition and response by the lay responder.
2. Early activation of the EMS system.
3. Professional rescuer care.
4. Prehospital care provided by advanced medical
personnel.
5. Hospital care.
6. Rehabilitation.
Recognition and Response by the LayResponderThe first step in the EMS system is recognition and
response by a lay responder. This person recognizes the
emergency and responds by dialing 9-1-1 or a local emer-
gency number. Lay responders frequently provide first aid
and cardiopulmonary resuscitation (CPR) to injured or ill
victims while waiting for more highly trained medical per-
sonnel to arrive and take over. Often the care provided by
lay responders in these first few minutes is critical.
Early Activation of the EMS SystemThe next step involves the lay responder calling 9-1-1 or
the local emergency number to activate the EMS system.
A dispatcher quickly determines what help is needed and
dispatches the appropriate EMS personnel. The dis-
patcher may also provide instructions about what care to
give before advanced medical personnel arrive.
Professional Rescuer CareTypically, next to arrive on the scene are professional
rescuers trained to provide a higher level of care than lay
responders. These rescuers are trained to assess the
victim’s condition more effectively and to take appro-
priate actions, which include caring for life-threatening
conditions. Their care often provides a critical transition
between a lay responder’s initial actions and the care
provided by more advanced medical personnel.
Prehospital Care Provided by AdvancedMedical PersonnelEmergency medical technicians (EMTs) comprise the next
step in the EMS system. Depending on the level of training
and certification (basic, intermediate or paramedic), EMTs
provide more advanced care and life-support techniques.
Paramedics provide the highest level of prehospital care
and serve as the field extension of the emergency care
physician. Regardless of the level of training, the EMT’s
role is to reassess the victim’s condition and to provide
appropriate care until the victim reaches the hospital.
Hospital CareWhen the victim arrives at the emergency or trauma
department, physicians, nurses and other highly skilled pro-
fessionals take over care. Most hospital emergency depart-
ments are staffed by emergency department physicians
trained to care for the acutely injured or ill. In addition,
other specially trained personnel may also provide care to
further stabilize a critically injured or ill victim. These med-
ical specialists include cardiologists, orthopedic surgeons,
neurosurgeons, trauma surgeons and allied health-care
professionals, such as respiratory therapists, radiology
technicians and laboratory technicians. Once stabilized, the
victim may be transferred to another department within the
hospital to receive more specialized care.
RehabilitationRehabilitation is often the final step in the EMS system.
This phase begins after the acute medical problem has
been corrected. The goal of rehabilita-
tion is to return the victim to his or her
previous state of health. Additional
health-care professionals, including
family physicians, consulting
specialists, social workers
and therapists, may work
together to rehabilitate the
victim.
Supporting the EMSSystemThe EMS system depends on
all of these people per-
forming their roles promptly
and correctly. When each
part of the system is working
effectively, the victim’s
chances for a full recovery
The Professional Rescuer |
REMEMBER :
Survival is the result
of an EMS system in
which all participants
fulfill their roles.

7/24/2019 CPR AED textbook compressed
http://slidepdf.com/reader/full/cpr-aed-textbook-compressed 14/100
are improved. Lay responders must recognize emergen-
cies, quickly activate the EMS system and then take
action within the first critical minutes. Professional res-
cuers must respond quickly and effectively to emergen-
cies when they are summoned. In a serious injury or ill-
ness, survival and recovery are not a matter of chance.
Survival is the result of an EMS system in which all par-
ticipants fulfill their roles. For this reason, it is important
for professional rescuers to keep their training current
and stay abreast of new issues and developments in
emergency care.
LEGAL CONSIDERATIONS
Many people are concerned about lawsuits. However,
lawsuits against those who provide care at the scene of
an emergency are highly unusual and rarely successful.
Being aware of basic legal principles and proper emer-
gency medical care can help you avoid legal action.
Following are some important legal principles involved
in emergency care. Because laws vary from state to
state, you should inquire about your state’s specific laws.
● Duty to Act—Most professional rescuers, by case law,
statute or job description, have a duty to act at the
scene of an emergency. This duty applies to public
safety officers as well as licensed and certified profes-
sionals while on duty. Failure to adhere to this duty
could result in legal action.
● Scope of Practice—When called upon to act at the
scene of an emergency, you may only act within your
scope of practice. The scope of practice is the set of
skills and knowledge that you have acquired in training
and that you are authorized by your certification to
practice. The scope of practice establishes the limit of
care that you can legally provide. This limit may vary
from state to state. Therefore, you should learn about
the expectations for your area.
● Standard of Care—The public expects a certain level
of knowledge and skill from personnel summoned to
provide emergency care. This level is called the stan-
dard of care . For example, the standard of care for cer-
tified first responders and EMTs is based on the
training guidelines developed by the U.S. Department
of Transportation and by the states and municipalities
in which they serve. Other authorities, such as national
organizations, may also play a role in developing these
standards. The standard of care requires you to—
● Communicate proper information and warnings to
help prevent injuries.
● Recognize a victim in need of care.
● Attempt to rescue a victim needing assistance.
● Provide emergency care according to your level of
training.
● Negligence—If you do not follow the standard of care
or your failure to act results in someone being injured
or causes further harm to the victim, you may be con-
sidered negligent. Negligence includes—
● Failing to provide care.
● Providing care beyond your scope of practice or
level of training.
● Providing inappropriate care.
● Failing to control or stop any behaviors that could
result in further harm or injury.
● Good Samaritan Laws—The vast majority of states and
the District of Columbia have Good Samaritan laws that
protect people who willingly give emergency care
without accepting anything in return. These laws, which
differ from state to state, may protect people from legal
liability if they act in good faith, are not negligent and
act within their scope of training. However, because of
their “duty,” professional rescuers are not usually con-
sidered Good Samaritans. Check your local and state
laws to see if Good Samaritan laws protect you.
● Consent—Before providing care to a conscious victim,
you must first obtain his or her consent. For a minor,
you must obtain consent from a parent or guardian. To
obtain consent—
● State your name.
● Tell the victim you are trained to help and what level
of training you have.
● Ask the victim if you can help.
● Explain to the victim that you would like to assess
him or her to find out what is wrong.
● Explain what you plan to do.
Continue to get consent as you give care. If the victim
does not give consent or later withdraws it, summon
more advanced medical personnel. A victim who is
unconscious, confused or seriously ill may not be able to
give consent. In these situations, consent is implied,
meaning the law assumes this person would give consent
if able to do so. The same is true for minors when a
parent or guardian is not present.
● Refusal of Care—Some injured or ill victims, even
those who desperately need assistance, may refuse
4 | CPR/AED for the Professional Rescuer
The vast majority of states
and the District of Columbia
have Good Samaritan laws
that protect people who
willingly give emergency
care without accepting
anything in return.

7/24/2019 CPR AED textbook compressed
http://slidepdf.com/reader/full/cpr-aed-textbook-compressed 15/100
care. Even though the victim may be seriously injured
or ill, you must honor his or her wishes. However, you
should explain why he or she needs care and what
may happen if he or she does not seek medical atten-
tion. A parent, if present, can refuse care for a minor. If
a witness is available, have him or her listen to, and
document in writing, any refusal of care.
● Advanced Directives—These are written instructions
that describe the wishes of a person regarding medical
treatment or health-care decisions in the event the
person becomes incapacitated and can no longer
express his or her wishes. Advanced directives include
do-not-resuscitate (DNR) orders, living wills and durable
powers of attorney. Professional rescuers are required to
comply with state laws regarding advanced directives.
They should receive this specific training from their
employer, agency or medical director, as all types of
advanced directives are not recognized in every state.
Guidance for advanced directives, including any required
identification and verification process is documented in
state, regional or local laws, statutes and/or protocols.
● Battery—Battery is the unlawful, harmful or offensive
touching of a person without the person’s consent. You
must obtain consent before touching a victim.
● Abandonment—Once you begin providing care, you
must continue until someone with equal or more
advanced training arrives and takes over. You can be
held legally responsible for abandoning a victim who
requires ongoing care, if you leave the scene of an
emergency or stop providing care.
● Confidentiality—While providing care, you may learn
something about an injured or ill victim that is private
and confidential. Do not share this information with
anyone except EMS personnel directly associated with
the victim’s medical care. Become familiar with the
Health Insurance Portability and Accountability Act of
1996 that was created by the federal government.
Sharing personal information with individuals not
directly associated with a victim’s medical care may
constitute a breach in the victim’s privacy.
● Documentation—By documenting injuries and inci-
dents, you establish a written record of the events that
took place, care you gave and facts you discovered
after the incident occurred. This is important for sev-
eral reasons.
● It assists more advanced medical personnel when
they arrive on the scene and can help speed up their
care. It becomes part of the victim’s overall record of
care, along with the report completed by advanced
medical personnel.
● If a legal action occurs in the future, a written report
can provide legal documentation of what you saw,
heard and did at the scene.
● Documentation of injuries and incidents is also
useful when analyzing current response practices
and protocols and planning preventative action for
the future.
Many agencies have printed forms, while others use
electronic forms for documentation. Be familiar with your
agency’s forms and how to complete them.
● Complete the forms as soon as possible after the inci-
dent occurs. As time passes, you are likely to forget
critical details.
● Be neat and accurate, and record the facts of the inci-
dent, not opinion.
● Sign, date and keep a copy of your report, even if you
provide care when not on duty.
PUTTING IT ALL TOGETHER
In a serious injury or illness, the victim’s survival and
recovery are not a matter of chance. Survival depends on
a carefully orchestrated series of events in which all par-
ticipants fulfill their roles within the EMS system. Each
part of the EMS system needs to work effectively to
increase the victim’s chances for a full recovery. You, as
a professional rescuer, play a critical role in this system.
In your role as an emergency care provider, you are
guided by certain legal parameters, such as the duty to
act and professional standards of care. Be aware of the
legal considerations as you fulfill your duty as a profes-
sional rescuer.
The Professional Rescuer |

7/24/2019 CPR AED textbook compressed
http://slidepdf.com/reader/full/cpr-aed-textbook-compressed 16/100
Chapter 2
Bloodborne Pathogens
6
WOULD YOU KNOW WHAT TO DO?
A man has collapsed in the lobby of an
office building. He is bleeding from the
mouth and face. Vomit and blood are on
the floor around him. “His face hit the
floor when he fell,” a bystander says. He
does not appear to be breathing. Do you
know how to respond and what you can
do to protect yourself from possible dis-
ease transmission?
To help prevent disease transmission, you
need to understand how infections occur,
how diseases are spread from one person
to another and what you as a professional
rescuer can do to protect yourself and
others. Infectious diseases are spread
from infected people and from animals,
insects or objects that have been in con-
tact with them. Professional rescuers
must protect themselves and others from
infectious diseases.

7/24/2019 CPR AED textbook compressed
http://slidepdf.com/reader/full/cpr-aed-textbook-compressed 17/100
BLOODBORNE PATHOGENS
Bloodborne pathogens are bacteria and viruses present
in blood and body fluids, which can cause disease in
humans. Bacteria and viruses are the most common
forms of pathogens. They are found almost everywhere in
our environment. Bacteria can live outside the body and
commonly do not depend on other organisms for life. If a
person is infected by bacteria, antibiotics and other med-
ications often are used to treat the infection. Viruses
depend on other organisms to live. Once viruses are in
the body, they are difficult to kill. That is why prevention
is so critical. The bloodborne pathogens of primary con-
cern to professional rescuers are the hepatitis B virus,
hepatitis C virus and human immunodeficiency virus (HIV)
(Table 2-1).
Hepatitis BHepatitis B is a liver infection caused by the hepatitis B
virus. Hepatitis B may be severe or even fatal and it can
be in the body for up to 6 months before symptoms
appear. These may include flu-like symptoms such as
fatigue, abdominal pain, loss of appetite, nausea, vom-
iting and joint pain. Later-stage symptoms include jaun-
dice (a yellowing of the skin and eyes).
Medications are available to treat chronic hepatitis
B infection, but they do not work for everyone. The
most effective means of prevention is the hepatitis B
vaccine. This vaccine, which is given in a series of
three doses, provides immunity to the disease.
Scientific data show that hepatitis B vaccines are very
safe for adults, children and infants. There is no con-
firmed evidence indicating that hepatitis B vaccine
causes chronic illnesses.
The hepatitis B vaccination series must be made
available to all employees who have occupational expo-
sure. It must be made available within 10 working days
of initial assignment, after appropriate training has
been completed. However, employees may decide not
to have the vaccination. If an employee decides not to
be vaccinated, he or she must sign a form affirming this
decision.
Hepatitis CHepatitis C is a liver disease caused by the hepatitis C
virus. It is the most common chronic bloodborne infection
in the United States. Its symptoms are similar to hepatitis
B infection, including fatigue, abdominal pain, loss of
appetite, nausea, vomiting and jaundice. There is no vac-
cine against hepatitis C and no treatment available to
prevent infection after exposure. Hepatitis C is the
leading cause of liver transplants. For these reasons,
hepatitis C is more serious than hepatitis B.
HIVThe human immunodeficiency virus (HIV) is the virus that
causes acquired immunodeficiency syndrome (AIDS). HIV
attacks white blood cells and destroys the body’s ability
Bloodborne Pathogens |
TABLE 2-1 HOW BLOODBORNE PATHOGENS ARE TRANSMITTED
Disease Signs and Symptoms Mode of Transmission Infective Material
Hepatitis B Jaundice, fatigue, abdominal Direct and indirect Blood, semenpain, loss of appetite, nausea, contact
vomiting, joint pain.
Hepatitis C Jaundice, fatigue, dark urine, Direct and indirect Blood, semenabdominal pain, loss of contactappetite, nausea.
HIV May or may not be signs and Direct and possibly Blood, semen,symptoms in early stage. indirect vaginal fluid,
Late-contact stage symptoms breast milkmay include fever, fatigue,diarrhea, skin rashes, nightsweats, loss of appetite, swollen
lymph glands, significant weightloss, white spots in the mouth orvaginal discharge (signs of yeastinfection) and memory ormovement problems.

7/24/2019 CPR AED textbook compressed
http://slidepdf.com/reader/full/cpr-aed-textbook-compressed 18/100
8 | CPR/AED for the Professional Rescuer
to fight infection. This weakens the body’s immune
system. The infections that strike people whose immune
systems are weakened by HIV are called opportunistic
infections . Some opportunistic infections include severe
pneumonia, tuberculosis, Kaposi’s sarcoma and other
unusual cancers.
People infected with HIV may not feel or look sick. A
blood test, however, can detect the HIV antibody. When
an infected person has a significant drop in a certain type
of white blood cells or shows signs of having certain
infections or cancers, he or she may be diagnosed as
having AIDS. These infections can cause fever, fatigue,
diarrhea, skin rashes, night sweats, loss of appetite,
swollen lymph glands and significant weight loss. In the
advanced stages, AIDS is a very serious condition.
People with AIDS eventually develop life-threatening
infections and can die from these infections. Currently,
there is no vaccine against HIV.
There are many other illnesses, viruses and infections
that a responder may be exposed to. Keep immunizations
current, have regular physical checkups and be knowl-
edgable about other pathogens. For more information on
illnesses listed above and other diseases and illnesses of
concern, contact the Centers for Disease Control and
Prevention (CDC) at (800) 342-2437 or at www.cdc.gov
HOW PATHOGENS SPREAD
Exposures to blood and other body fluids occur across a
wide variety of occupations. Health-care workers, emer-
gency response personnel, public safety personnel and
other workers can be exposed to blood through injuries
from needles and other sharps devices, as well as by
direct and indirect contact with skin and mucous mem-
branes. For any disease to be spread, including blood-
borne diseases, all four of the following conditions must
be met:
● A pathogen is present.
● A sufficient quantity of the pathogen is present to
cause disease.
● A person is susceptible to the pathogen.
● The pathogen passes through the correct entry site
(e.g., eyes, mouth and other mucous membranes; non-
intact skin or skin pierced by needlesticks, human
bites, cuts, abrasions and other means).
To understand how infections occur, think of these four
conditions as pieces of a puzzle (Fig. 2-1). All of the
pieces must be in place for the picture to be complete. If
any one of these conditions is missing, an infection
cannot occur.
Disease-Causing Agents
Pathogen Diseases and Conditions They CauseViruses Hepatitis, measles, mumps, chicken pox, meningitis, rubella, influenza, warts, colds,
herpes, HIV (the virus that causes AIDS), genital warts, smallpox, Avian flu
Bacteria Tetanus, meningitis, scarlet fever, strep throat, tuberculosis, gonorrhea, syphilis,
chlamydia, toxic shock syndrome, Legionnaires’ disease, diphtheria, food poi-
soning, Lyme disease, anthrax
Fungi Athlete’s foot, ringworm, histoplasmosis
Protozoa Malaria, dysentery, cyclospora, giardiasis
Rickettsia Typhus, Rocky Mountain spotted fever
Parasitic Worms Abdominal pain, anemia, lymphatic vessel blockage, lowered antibody response,
respiratory and circulatory complications
Prions Creutzfeldt-Jakob disease (CJD) or bovine spongiform encephalopathy (mad cow
disease), kuru
Yeasts Candidiasis
For additional information on these or other diseases, visit the Centers for Disease Control and
Prevention (CDC) Web site at www.cdc.gov

7/24/2019 CPR AED textbook compressed
http://slidepdf.com/reader/full/cpr-aed-textbook-compressed 19/100

7/24/2019 CPR AED textbook compressed
http://slidepdf.com/reader/full/cpr-aed-textbook-compressed 20/100
10 | CPR/AED for the Professional Rescuer
mission. Workers who have received the hepatitis B
vaccine and have developed immunity to the virus are at
virtually no risk for infection by the hepatitis B virus. For
an unvaccinated person, the risk for infection from a
needlestick or cut exposure to hepatitis B-infected
blood can be as high as 30 percent, depending on sev-
eral factors. In contrast, the risk for infection after a
needlestick or cut exposure to hepatitis C-infected
blood is about 2 percent and the risk of infection after a
needlestick or cut exposure to HIV-infected blood is less
than 1 percent.
PREVENTING THE SPREAD OFBLOODBORNE PATHOGENS
OSHA RegulationsThe federal Occupational Safety and Health Administration
(OSHA) has issued regulations about on-the-job exposure
to bloodborne pathogens. OSHA determined that
employees are at risk when they are exposed to blood or
other body fluids. OSHA therefore requires employers to
reduce or remove hazards from the workplace that may
place employees in contact with infectious materials.
OSHA regulations and guidelines apply to employees
who may come into contact with blood or other body sub-
stances that could cause an infection. These regulations
apply to you as a professional rescuer because you are
expected to give emergency care as part of your job.
OSHA has revised its regulations to include the require-
ments of the federal Needlestick Safety and Prevention
Act. These guidelines may help you and your employer
meet the OSHA bloodborne pathogens standard to pre-
vent transmission of serious diseases. For more informa-
tion about the OSHA bloodborne pathogens Standard 29
CFR 1910.1030, visit OSHA’s Web site at www.osha.gov
Exposure Control PlanOSHA regulations require employers to have an exposure
control plan. This is a written program outlining the pro-
tective measures your employer will take to eliminate or
minimize employee exposure incidents. The exposure
control plan should include exposure determination,
methods for implementing other parts of the OSHA stan-
dard (e.g., ways of meeting the requirements and record-
keeping) and procedures for evaluating details of an
exposure incident. The exposure control plan guidelines
should be made available to you and should specifically
explain what you need to do to prevent the spread of
infectious diseases.
Universal, BSI and Standard PrecautionsUniversal precautions are OSHA-required practices of
control to protect employees from exposure to blood and
Employers’ Responsibilities
The OSHA regulations on bloodborne
pathogens have placed specific responsibili-
ties on employers for protection of employees that include—
● Identifying positions or tasks covered by the
standard.
● Creating an exposure control plan to
minimize the possibility of exposure and
making the plan easily accessible to
employees.
● Developing and putting into action a written
schedule for cleaning and decontaminating
at the workplace.● Creating a system for easy identification
of soiled material and its proper disposal.
● Developing a system of annual training for
all covered employees.
● Offering the opportunity for employees to get
the hepatitis B vaccination at no cost.
● Establishing clear procedures to follow for
reporting an exposure.
● Creating a system of recordkeeping.
● In workplaces where there is potentialexposure to injuries from contaminated
sharps, soliciting input from non-managerial
employees with potential exposure
regarding the identification, evaluation
and selection of effective engineering and
work practice controls.
● If a needlestick injury occurs, recording the
appropriate information in the sharps injury
log.
● Type and brand of device involved in theincident.
● Location of the incident.
● Description of the incident.
● Maintaining a sharps injury log in such
a way that protects the privacy of
employees.
● Ensuring confidentiality of employees’ med-
ical records and exposure incidents.

7/24/2019 CPR AED textbook compressed
http://slidepdf.com/reader/full/cpr-aed-textbook-compressed 21/100
Bloodborne Pathogens | 1
other potentially infectious materials. These precautions
require that all human blood and certain body substances
be treated as if known to be infectious for hepatitis B,
hepatitis C, HIV or other bloodborne pathogens. Other
approaches to infection control are called standard pre-
cautions and body substance isolation (BSI) precautions.
These precautions mean that you should consider all
body fluids and substances as infectious. These
approaches to infection control can be applied through
the use of personal protective equipment, good hand
hygiene, engineering controls, work practice controls,
proper equipment cleaning and spill cleanup procedures.
Personal Protective EquipmentPersonal protective equipment that is appropriate for
your job duties should be available in your workplace and
should be identified in the exposure control plan.
Personal protective equipment includes all specialized
clothing, equipment and supplies that keep you from
directly contacting infected materials. These include, but
are not limited to, breathing barriers (Fig. 2-6), disposable
(single-use) gloves, gowns, masks, shields and protective
eyewear (Table 2-2).
Use disposable gloves made of material such as
latex, nitrile or vinyl. Wear disposable gloves when
providing care to injured or ill people. For information
on glove removal, refer to the Removing Gloves Skill
Sheet, page 15. Breathing barriers include resuscitation
masks, face shields and bag-valve-mask resuscitators
(BVMs). Breathing barriers help protect you against dis-
ease transmission when giving rescue breaths to a
victim.
Department of Health and Human Services, Public Health Services: A curriculum guide for public safety and emergency response
workers prevention of transmission of immunodeficiency virus and hepatitis B virus , Atlanta, Georgia, February 1989, Dept. Health and
Human Services, Centers for Disease Control. With modifications from Nixon, Robert G., Communicable Diseases and Infection
Control for EMS, Prentice Hall, 2000.
TABLE 2-2 RECOMMENDED PROTECTIVE EQUIPMENT AGAINST HEPATITIS B, HEPATITIS CAND HIV TRANSMISSION IN PREHOSPITAL SETTINGS
Task or Activity Disposable Gloves Gown Mask Protective Eyewear
Bleeding control Yes Yes Yes Yeswith spurting blood
Bleeding control Yes No No Nowith minimalbleeding
Emergency Yes Yes Yes Yes
childbirth
Oral/nasal Yes No No, unless No, unlesssuctioning splashing splashing is
manually clearing is likely likelyairway
Handling and Yes No, unless No Nocleaning soiling is likelycontaminatedequipment andclothing
Fig. 2-6

7/24/2019 CPR AED textbook compressed
http://slidepdf.com/reader/full/cpr-aed-textbook-compressed 22/100
12 | CPR/AED for the Professional Rescuer
To prevent infection, follow these guidelines:
● Avoid contact with blood and other body fluids.
● Use breathing barriers, such as resuscitation masks,
face shields and BVMs, when giving rescue breaths to
a victim.
● Wear disposable gloves whenever providing care, par-
ticularly if you may come into contact with blood or
body fluids.
● Use gloves that are appropriate to the task and provide
an adequate barrier.
● Remove jewelry, including rings, before wearing dis-
posable gloves.
● Keep any cuts, scrapes or sores covered before putting
on protective clothing.
● Do not use disposable gloves that are discolored, torn
or punctured.
● Do not clean or reuse disposable gloves.
● Avoid handling items such as pens, combs or radios
when wearing soiled gloves.
● Change gloves before giving care to a different victim.
● In addition to gloves, wear protective coverings, such
as a mask, eyewear and gown, whenever you are likely
to come in contact with blood or other body fluids that
may splash.
● Do not wear gloves and other personal protective
equipment away from the workplace.
● Remove disposable gloves without contacting the
soiled part of the gloves and dispose of them in a
proper container.
Hand HygieneWash your hands before providing care, if possible, so
you do not pass pathogens to the victim. Wash your
hands frequently and every time after giving care (Fig.
2-7). Hand washing is an effective way to help prevent ill-
ness. By washing your hands often, you wash away
disease-causing germs that you have picked up from
other people, animals or contaminated surfaces. In addi-
tion, jewelry, including rings, should not be worn where
the potential for risk of exposure exists.
To ensure that you wash your hands correctly, follow
these steps:
1. Wet hands with warm water.
2. Apply liquid soap to hands.
3. Rub hands vigorously for at least 15 seconds, cov-
ering all surfaces of the hands and fingers. Use soap
and warm running water. Scrub nails by rubbing them
against the palms.
4. Rinse hands with water.
5. Dry hands thoroughly with a paper towel.
6. Turn off the faucet using the paper towel.
Alcohol-based hand sanitizers and lotions allow you to
cleanse your hands when soap and water are not readily
available. In addition to washing your hands frequently,
keep your fingernails less than one-quarter of an inch
long and avoid wearing artificial nails.
Engineering Controls and Work Practice ControlsEngineering controls are control measures that isolate or
remove a hazard from the workplace. In other words,
engineering controls are the things you use in the work-
place to help reduce the risk of an exposure incident.
Examples of engineering controls include—
● Sharps disposal containers (Fig. 2-8).
● Self-sheathing needles.
● Safer medical devices such as sharps with engineered
sharps injury protections or needleless systems.
● Biohazard bags and labels.
● Personal protective equipment.
Work practice controls reduce the likelihood of exposure
by changing the way a task is carried out. These are the
things you do to help reduce the risk of an exposure inci-
dent. Examples of work practice controls include—
● Placing sharp items (e.g., needles, scalpel blades)
in puncture-resistant, leakproof and labeled
containers and having the containers at the point of
use.
Fig. 2-7
Fig. 2-8

7/24/2019 CPR AED textbook compressed
http://slidepdf.com/reader/full/cpr-aed-textbook-compressed 23/100
Bloodborne Pathogens | 1
● Avoiding splashing, spraying and splattering droplets of
blood or other potentially infectious materials when
performing all procedures.
● Removing and disposing of soiled protective clothing
as soon as possible.
● Cleaning and disinfecting all equipment and work sur-faces possibly soiled by blood or other body fluids.
● Washing your hands thoroughly with soap and water
immediately after providing care, using a utility or rest-
room sink (not one in a food preparation area).
● Not eating, drinking, smoking, applying cosmetics or lip
balm, handling contact lenses or touching your eyes,
mouth or nose when you are in an area where you may
be exposed to infectious materials.
● Using alcohol-based sanitizers or lotions where hand-
washing facilities are not available.
You should also be aware of any areas, equipment orcontainers that may be contaminated. Biohazard warning
labels are required on any container holding contami-
nated materials, such as used gloves, bandages or
trauma dressings. Signs should be posted at entrances to
work areas where infectious materials may be present.
Equipment Cleaning and Spill CleanupAfter providing care, always clean and disinfect the
equipment and surfaces that you used (Fig. 2-9). Handle
all soiled equipment, supplies and other materials with
care until they are properly cleaned and disinfected.
Place all used disposable items in labeled containers.Place all soiled clothing in marked plastic bags for dis-
posal or washing (Fig. 2-10). Take the following steps to
clean up spills:
● Wear disposable gloves and other personal protective
equipment when cleaning spills.
The Needlestick Safety
and Prevention ActBlood and other potentially infectious mate-
rials have long been recognized as potential
threats to the health of employees who are
exposed to these materials through penetra-
tion of the skin. Injuries from contaminated
needles and other sharps have been associ-
ated with an increased risk of disease from
more than 20 infectious agents. The most
serious pathogens are hepatitis B, hepatitis C
and HIV. Needlesticks and other sharps
injuries resulting in exposure to blood or other
potentially infectious materials are a concern
because they happen frequently and can have
serious health effects.
In 2001, in response to the federal Needlestick
Safety and Prevention Act, OSHA revised the
Bloodborne Pathogens Standard 29 CFR
1910.1030. The revised standard clarifies the
need for employers to select safer needledevices and to involve employees in identi-
fying and choosing these devices. The
updated standard also requires employers to
maintain a log of injuries from contaminated
sharps.
For information on the Needlestick Safety and
Prevention Act, visit OSHA’s Web site at
www.osha.gov
Fig. 2-9
Fig. 2-10

7/24/2019 CPR AED textbook compressed
http://slidepdf.com/reader/full/cpr-aed-textbook-compressed 24/100
14 | CPR/AED for the Professional Rescuer
● Clean up spills immediately or as soon as possible after
the spill occurs.
● If the spill is mixed with sharp objects, such as broken
glass and needles, do not pick these up with your
hands. Use tongs, a broom and dustpan or two pieces
of cardboard.
● Dispose of the absorbent material used to collect the
spill in a labeled biohazard container.
● Flood the area with a fresh disinfectant solution of
approximately 11 ⁄ 2 cups of liquid chlorine bleach to
1 gallon of water (1 part bleach per 10 parts water),
and allow it to stand for at least 10 minutes.
● Use appropriate material to absorb the solution, and
dispose of it in a labeled biohazard container.
● Scrub soiled boots, leather shoes and other
leather goods, such as belts, with soap, a brush
and hot water. If you wear a uniform to work,
wash and dry it according to the manufacturer’s
instructions.
IF YOU ARE EXPOSED
Exposure incidents involve contact with blood or other
potentially infectious materials through a needlestick,
broken or scraped skin or the
mucous membranes of the
eyes, mouth or nose. Take
these steps immediately:
● Wash needlestick injuries,
cuts and exposed skin with
soap and water.
● Flush splashes of blood or
other potentially infectious
materials to the mouth and
nose with water.
● Irrigate eyes with clean
water, saline or sterile irri-
gants.
Following any exposure inci-
dent you should—
● Report the exposure incident to your supervisor immedi-
ately. Reporting an exposure incident immediately can
be critical to the success of post-exposure treatment.
● Write down what happened.
● Get immediate medical attention. Follow the steps in
the exposure control plan for confidential medical eval-
uation and follow up by a health-care professional.
PUTTING IT ALL TOGETHER
Bloodborne pathogens are bacteria and viruses present
in blood and body fluids, which can cause disease in
humans. The bloodborne pathogens of primary concern
are hepatitis B, hepatitis C and HIV. Bloodborne
pathogens such as hepatitis B, hepatitis C and HIV are
spread primarily through direct or indirect contact with
infected blood or other body fluids.
To prevent the spread of bloodborne pathogens and
other diseases, professional rescuers should follow stan-
dard precautions. These precautions require that all blood
and other potentially infectious materials be treated as if
known to be infectious for hepatitis B, hepatitis C, HIV or
other bloodborne pathogens. These precautions can be
applied by using personal protective equipment, washing
your hands frequently, using engineering controls, fol-
lowing work practice controls and following proper equip-
ment cleaning and spill cleanup procedures.
If you become exposed to blood or other potentially
infectious materials, you should immediately wash, flush
or irrigate the exposed area of your
body and report the incident to your
supervisor.
REMEMBER :
If you become exposed toblood or other potentially
infectious materials, you
should immediately wash,
flush or irrigate the exposed
area of your body and
report the incident to your
supervisor.

7/24/2019 CPR AED textbook compressed
http://slidepdf.com/reader/full/cpr-aed-textbook-compressed 25/100
Bloodborne Pathogens | 1
Skill Sheet | Removing Gloves
STEP 1Partially remove the first glove.
● Pinch the glove at the wrist, being careful to touch
only the glove’s outside surface (A).
● Pull the glove inside-out toward the fingertips
without completely removing it (B).
● The glove is now partly inside out.
STEP 2Remove the second glove.
● With your partially gloved hand, pinch the outside
surface of the second glove.
● Pull the second glove toward the fingertips until itis inside out, and then remove it completely.
STEP 3Finish removing both gloves.
● Grasp both gloves with your free hand.
● Touch only the clean interior surface of the glove.
STEP 4After removing both gloves—
● Discard gloves in an appropriate container.
● Wash your hands thoroughly with soap and warm
water.
Step 2
Step 3
Step 1 A
Step 1 B
7/24/2019 CPR AED textbook compressed
http://slidepdf.com/reader/full/cpr-aed-textbook-compressed 26/100
Chapter 3
Taking Action and Caringfor Breathing Emergencies
WOULD YOU KNOW WHAT TO DO?
While watching a local youth soccer
game, you see a young man slowly
walking off the field toward you and the
bench. It is obvious that he is having diffi-
culty breathing; as he passes you hear a
loud wheezing sound with each exhala-
tion, and you notice that with each breath
his chest is expanding in an abnormal
manner. When he sits down on the bench,
you notice that he leans forward and rests
his hand on the bench. He appears to be
experiencing severe respiratory distress.
His eyes are large and he has a frightened
look on his face. What would you do in this
situation?
16

7/24/2019 CPR AED textbook compressed
http://slidepdf.com/reader/full/cpr-aed-textbook-compressed 27/100
As a professional rescuer, you may encounter many
emergency situations that require you to act quickly and
decisively. In any emergency, first size up the scene, then
perform an initial assessment and summon advanced
medical personnel if needed.
1. Size up the scene.
● Determine if the scene is safe for you, other res-
cuers, the victim(s) and any bystanders.
● Look for dangers, such as traffic, unstable struc-
tures, downed power lines, swift-moving water,
violence, explosions or toxic gas exposure.
● Put on the appropriate personal protective equipment.
● Determine the mechanism of injury or nature of ill-
ness. Try to find out what happened and what
caused the injury or illness.
● Determine the number of victims.
● Determine what additional help may be needed.
2. Perform an initial assessment.
This is done to identify any life-threatening conditions.
● Check the victim for consciousness and obtain
consent if the victim is conscious.
● Check for signs of life (movement and breathing).
● Check for a pulse.
● Check for severe bleeding.
If during the initial assessment you are alone and must
leave the victim to summon advanced medical personnel or
you find that the victim is moving, breathing and has a
pulse but is unconscious, place the victim in a recovery
position. This position is used to maintain an open airway
for a breathing victim with a decreased level of conscious-
ness (Fig. 3-1). To place the victim in a recovery position,
first kneel at the victim’s side. Take the arm farthest from
you and move it up next to the head and take the other arm
and cross it over the chest. Grasp the leg closest to you
and bend it up. Then, with your hand on the shoulder and
hip, gently roll the body as a unit, keeping the head, neck
and back in a straight line. Carefully angle the head toward
the ground, allowing fluids to drain away from the throat.
Monitor the airway, breathing and circulation (ABCs).
Roll the victim to the opposite side every 30 minutes or if
you notice the skin of the lower arm is pale, ashen or
grayish or is cool to the touch. If you suspect a head,
neck or back injury and a clear, open airway can be
maintained, do not move the victim unnecessarily. If you
must leave the victim to get help, or if a clear airway
cannot be maintained, move the victim to his or her side
while keeping the head, neck and back in a straight line
by placing the victim in a modified-high-arm-in-endan-
gered-spine (H.A.IN.E.S.) position (Fig. 3-2).
To place a victim in the modified-H.A.IN.E.S. position,
kneel at the victim’s side. Reach across the body and lift
the far arm up next to the head with the victim’s palm
facing up. Then take the victim’s nearest arm and place it
next to his side. Grasp the leg farthest from you and bend
it up. Using your hand nearest the victim’s head, cup the
base of the victim’s skull in the palm of your hand and
carefully slide your forearm under the victim’s near
shoulder. Do not lift or push the victim’s head or neck.
Place your other hand under the arm and hip closest to
you. Then, with a smooth motion, roll the victim away from
you by lifting with your hand and forearm. The victim’s
head must remain in contact with his extended arm. Be
sure to support the head and neck with your hand. Stop
all movement when the victim is on his or her side. Bend
the knee closest to you and place it on top of the other
knee. Make sure the arm on top is in line with the upper
body. Monitor the ABCs and care for the conditions you
find.
3. Summon advanced medical personnel.Summon
more advanced medical personnel if you find any of
the following life-threatening conditions:
● Unconsciousness or disorientation
● Breathing problems (difficulty breathing or no
breathing)
● Chest discomfort, pain or pressure lasting more than
3 to 5 minutes or that goes away and comes back
● No pulse
● Severe bleeding
● Persistent abdominal pain or pressure
● Suspected head, neck or back injuries
● Severe allergic reactions
● Stroke (weakness on one side of the face, weak-
ness or numbness in one arm, slurred speech or
trouble getting words out)
Fig. 3-1
Fig. 3-2
Taking Action and Caring for Breathing Emergencies | 1
7/24/2019 CPR AED textbook compressed
http://slidepdf.com/reader/full/cpr-aed-textbook-compressed 28/100
18 | CPR/AED for the Professional Rescuer
● Seizures that occur in the water
● Seizures that last more than 5 minutes or cause injury
● Repeated seizures (one after another)
● Seizures involving a victim who is pregnant, dia-
betic or who does not regain consciousness
● Vomiting blood or passing blood
● Severe (critical) burns
● Suspected broken bones
● Suspected poisoning
● Sudden severe headache
If you are unsure of the victim’s condition or notice the con-
dition worsening, call 9-1-1 or the local emergency number.
Stroke
Stroke is the third leading cause of death in
the U.S. Successful treatment and recovery
depends upon recognizing the signs and symp- toms of stroke and summoning advanced med-
ical personnel right away. Look for these signs
and symptoms of stroke:
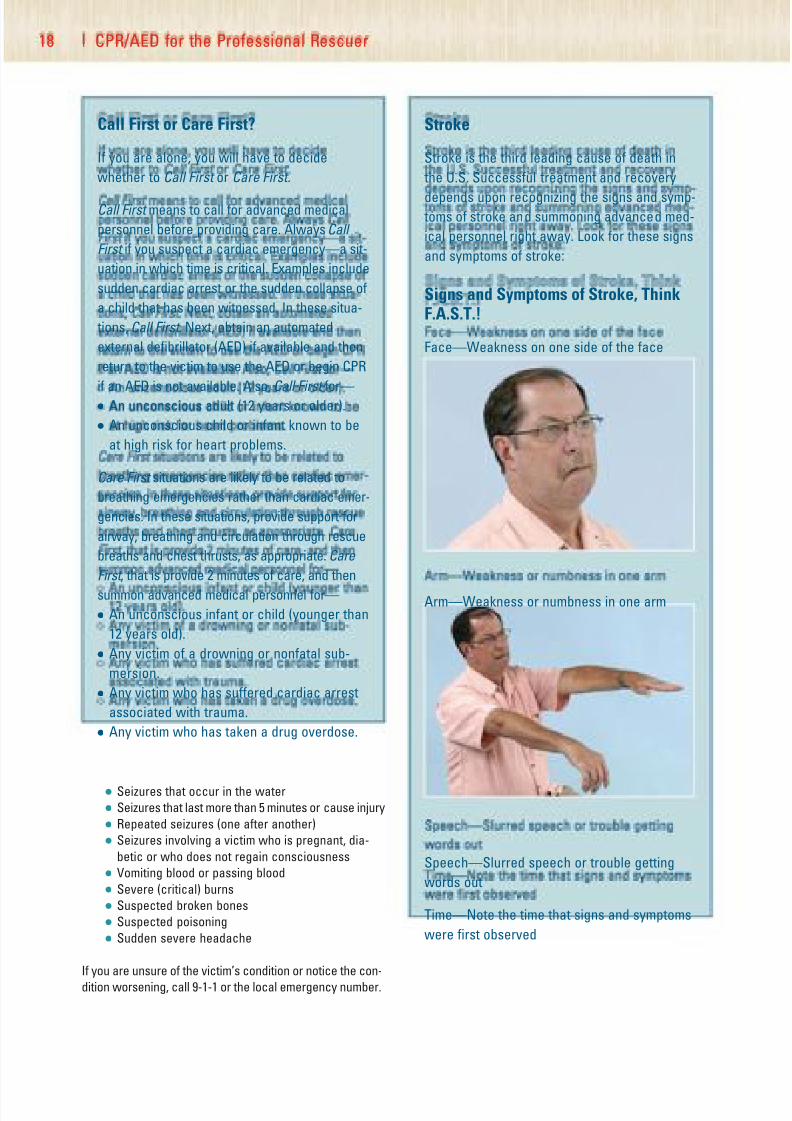
Signs and Symptoms of Stroke, ThinkF.A.S.T.!
Face—Weakness on one side of the face
Arm—Weakness or numbness in one arm
Speech—Slurred speech or trouble getting
words out
Time—Note the time that signs and symptoms
were first observed
Call First or Care First?
If you are alone, you will have to decide
whether to Call First or Care First.
Call First means to call for advanced medical
personnel before providing care. Always Call
First if you suspect a cardiac emergency—a sit-
uation in which time is critical. Examples include
sudden cardiac arrest or the sudden collapse of
a child that has been witnessed. In these situa-
tions, Call First . Next, obtain an automated
external defibrillator (AED) if available and then
return to the victim to use the AED or begin CPR
if an AED is not available. Also,Call First
for—● An unconscious adult (12 years or older).
● An unconscious child or infant known to be
at high risk for heart problems.
Care First situations are likely to be related to
breathing emergencies rather than cardiac emer-
gencies. In these situations, provide support for
airway, breathing and circulation through rescue
breaths and chest thrusts, as appropriate. Care
First , that is provide 2 minutes of care, and then
summon advanced medical personnel for—
● An unconscious infant or child (younger than
12 years old).
● Any victim of a drowning or nonfatal sub-
mersion.
● Any victim who has suffered cardiac arrest
associated with trauma.
● Any victim who has taken a drug overdose.
7/24/2019 CPR AED textbook compressed
http://slidepdf.com/reader/full/cpr-aed-textbook-compressed 29/100
MOVING A VICTIM
In many cases, you will care for the victim where you find
him or her. Do not move the victim unless it is necessary.
Moving a victim needlessly can lead to further pain and
injury. Move an injured victim only if—
● The scene is unsafe or becoming unsafe (e.g., fire, risk
of explosion, a hazardous chemical leak or collapsing
structure).
● You have to reach another victim who may have a
more serious injury or illness.
● You need to provide proper care (e.g., someone has
collapsed on a stairway and needs CPR, which must be
performed on a firm, flat surface).
If you must leave a scene to ensure your personal safety,
you must make all attempts to move the victim to safety as
well. Rescuer safety is of the utmost importance. When
moving a victim, a rescuer should consider the following:
● Victim’s height and weight
● Physical strength of rescuer
● Obstacles, such as stairs and narrow passages
● Distance to be moved
● Whether others are available to assist
● Victim’s condition
● Whether aids to transport are readily available
To improve your chances of successfully moving an
injured or ill victim without injuring yourself or the victim—
● Use your legs, not your back, when you bend.
● Bend at the knees and hips and avoid twisting your body.
● Walk forward when possible, taking small steps and
looking where you are going.
● Avoid twisting or bending anyone with a possible head,
neck or back injury.
● Do not move a victim who is too large to move com-
fortably.
There are several ways to move a victim from an unsafe
scene or to perform proper care. Use any of the following
techniques to move a victim if necessary:
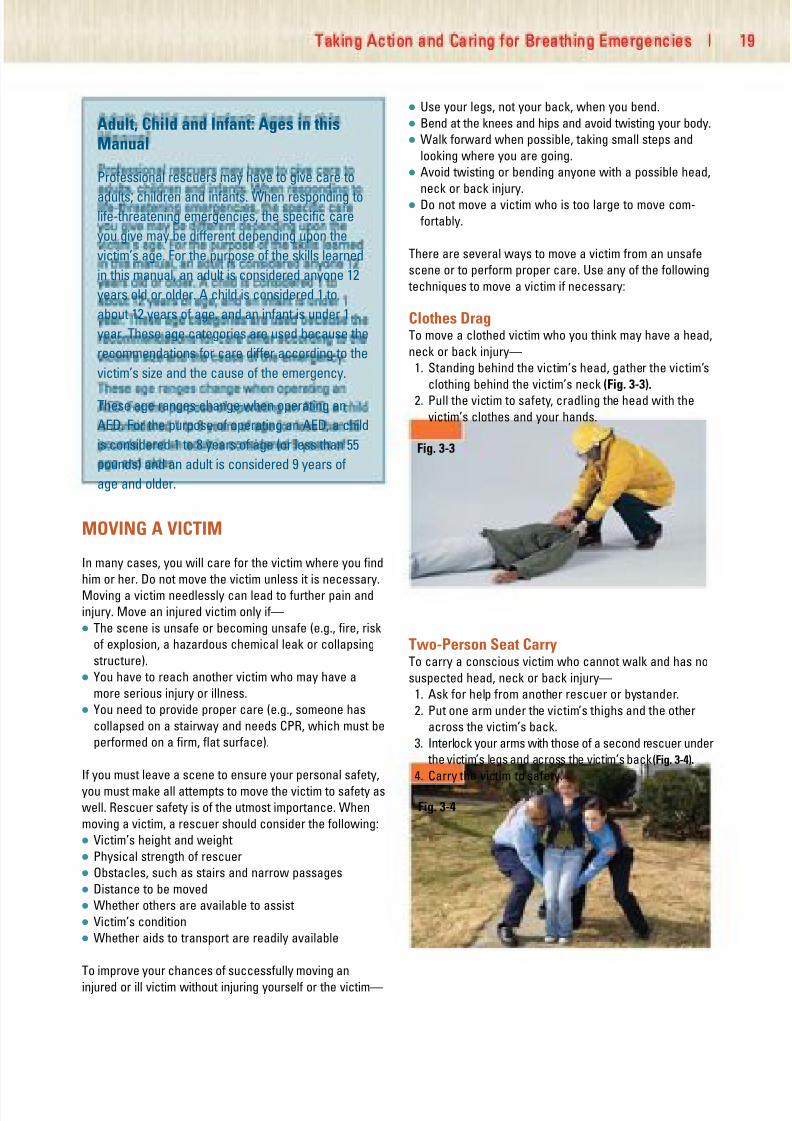
Clothes DragTo move a clothed victim who you think may have a head,
neck or back injury—
1. Standing behind the victim’s head, gather the victim’s
clothing behind the victim’s neck (Fig. 3-3).
2. Pull the victim to safety, cradling the head with the
victim’s clothes and your hands.
Two-Person Seat CarryTo carry a conscious victim who cannot walk and has no
suspected head, neck or back injury—
1. Ask for help from another rescuer or bystander.
2. Put one arm under the victim’s thighs and the other
across the victim’s back.
3. Interlock your arms with those of a second rescuer under
the victim’s legs and across the victim’s back (Fig. 3-4).
4. Carry the victim to safety.
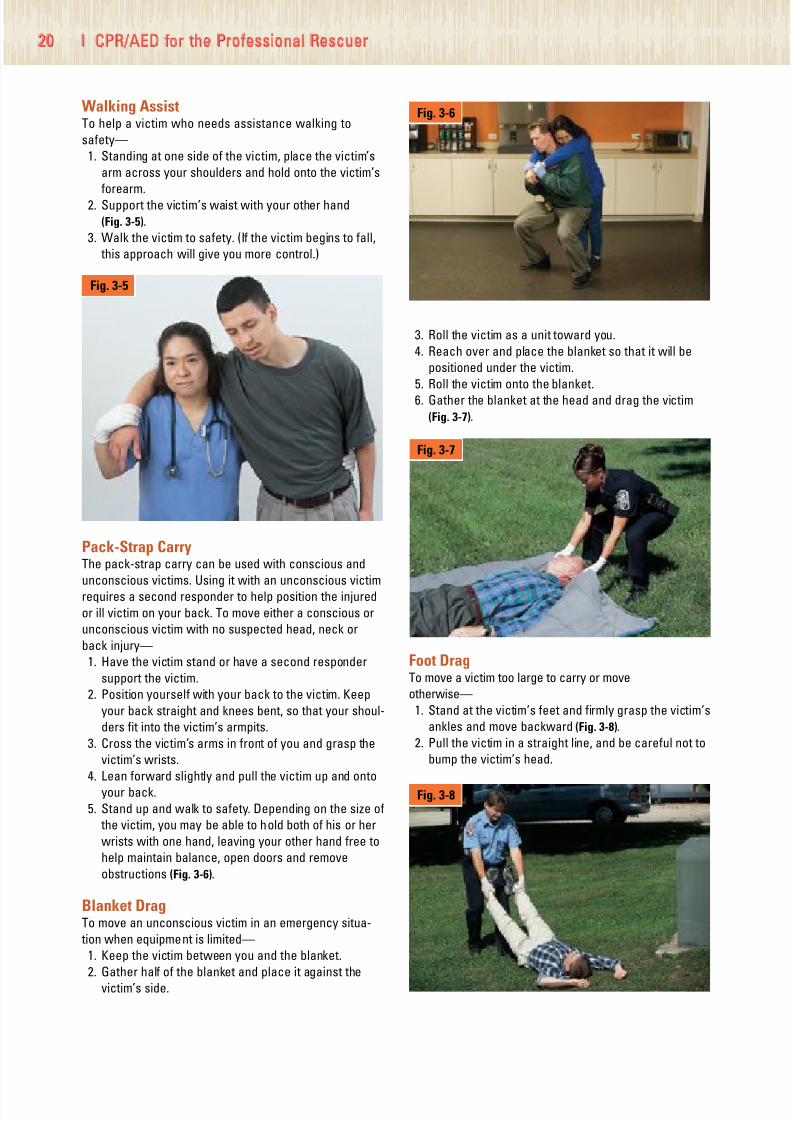
Adult, Child and Infant: Ages in thisManual
Professional rescuers may have to give care to
adults, children and infants. When responding tolife-threatening emergencies, the specific care
you give may be different depending upon the
victim’s age. For the purpose of the skills learned
in this manual, an adult is considered anyone 12
years old or older. A child is considered 1 to
about 12 years of age, and an infant is under 1
year. These age categories are used because the
recommendations for care differ according to the
victim’s size and the cause of the emergency.
These age ranges change when operating an
AED. For the purpose of operating an AED, a child
is considered 1 to 8 years of age (or less than 55
pounds) and an adult is considered 9 years of
age and older.
Fig. 3-3
Taking Action and Caring for Breathing Emergencies | 1
Fig. 3-4
7/24/2019 CPR AED textbook compressed
http://slidepdf.com/reader/full/cpr-aed-textbook-compressed 30/100

7/24/2019 CPR AED textbook compressed
http://slidepdf.com/reader/full/cpr-aed-textbook-compressed 31/100
Taking Action and Caring for Breathing Emergencies | 2
Epinephrine Administration
Approximately 2 million people in the United
States are at risk for anaphylaxis, and each year
400 to 800 people die from anaphylactic reac- tions. Insect stings; penicillin; aspirin; food addi-
tives, such as sulfites; and certain foods, such as
shellfish, fish and nuts, can trigger anaphylaxis in
susceptible people. These reactions may be life
threatening and require immediate care. An ID
bracelet should be worn by anyone at risk. Some
possible signs and symptoms in anaphylactic
victims include—
● Swelling of the face, neck, hands, throat,
tongue or other body part.● Itching of tongue, armpits, groin or any body
part.
● Dizziness.
● Redness or welts on the skin.
● Red watery eyes.
● Nausea, abdominal pain or vomiting.
● Rapid heart rate.
● Difficulty breathing or swallowing.
● Feeling of constriction in the throat or chest.
Epinephrine is a medication prescribed to treat
the signs and symptoms of these reactions. If
someone shows any of these signs or symptoms,
summon more advanced medical personnel
immediately.
Note: Rescuers should follow local protocols or
medical directives when applicable.
Use an epinephrine auto-injector when a victim—
●
Relates a history of allergies or allergicreactions.
● Is having an allergic reaction.
● Requests assistance to administer epinephrine.
● Provides the epinephrine or auto-injector.
● Has a family member who relates a victim’s his-
tory of allergies or allergic reactions and pro-
vides the victim’s auto-injector.
Continued
Before assisting or administering epinephrine to
the victim—
● Summon more advanced medical personnel.
● Check the label to ensure that the prescriptionis for the victim.
● Ensure that the person has not already taken
epinephrine or antihistamine. If so, do not
administer another dose unless directed by
emergency medical services (EMS) personnel.
● Ensure that the prescription has not
expired.
● Ensure that the medication is clear and not
cloudy or discolored.
● Read and follow instructions provided with theauto-injector.
An epinephrine auto-injector is simple and easy to
use. However, it needs to be accessed quickly.
Assisting the victim with the medication can
include getting the pen from a purse, car, home or
out of a specially designed carrier on a belt. It may
also include taking it out of the plastic tube or
assisting the victim with the injection into the thigh.
The standard epinephrine dose is 0.3 mg for anadult or 0.15 mg for a child weighing less than
45 pounds. To administer an intramuscular
injection—
1. Locate the middle of the outer thigh or the
upper arm to use as the injection site.
2. Grasp the auto-injector firmly and remove the
safety cap.
3. Hold the auto-injector at a 90-degree angle to
the victim’s outer thigh.
P h o t o
c o u r t e s y
o f D e y ,
L .
P .

7/24/2019 CPR AED textbook compressed
http://slidepdf.com/reader/full/cpr-aed-textbook-compressed 32/100
22 | CPR/AED for the Professional Rescuer
BREATHING EMERGENCIES
You may detect a breathing emergency during the initial
assessment. A breathing emergency occurs if a victim has
difficulty breathing (respiratory distress) or stops breathing
(respiratory failure/arrest). Without adequate oxygen,
hypoxiawill result. Hypoxia is a condition in which insuffi-
cient oxygen reaches the cells. Signs and symptoms of
hypoxia include increased breathing and heart rates,
cyanosis (a condition that develops when tissues do not get
enough oxygen and turn blue, particularly in the lips and nail
beds), changes in level of consciousness, restlessness and
chest pain. Breathing emergencies can be caused by—
● Obstructed airway (choking).
● Injury to the head, chest, lungs or abdomen.
● Illness, such as pneumonia.
● Respiratory conditions, such as emphysema or asthma.
● Heart attack.
● Coronary heart disease (such as angina).
● Allergic reactions (food or insect stings).
● Electrocution.
● Shock.
● Drowning.
● Nonfatal submersion injury.
● Poisoning.
● Drugs.
● Emotional distress.
4. Firmly jab the tip straight into the thigh. You
will hear a click. Hold the auto-injector firmly
in place for 10 seconds.
5. Remove it from the thigh and massage the
injection site for several seconds.
Respiratory DistressA victim who is having difficulty breathing is in respira-
tory distress. Signs and symptoms of respiratory distress
include—
● Slow or rapid breathing.
● Unusually deep or shallow breathing.
● Shortness of breath or noisy breathing.
● Dizziness, drowsiness or light-headedness.
● Changes in the level of consciousness.
● Increased heart rate.
● Chest pain or discomfort.
● Skin that is flushed, pale, ashen or bluish.
● Unusually moist or cool skin.
● Gasping for breath.
● Wheezing, gurgling or making high-pitched noises.
● Inability to speak in full sentences.
● Tingling in the hands or feet.
Injuries and other conditions such as asthma, emphy-
sema and anaphylactic shock can cause respiratory
distress.
Asthma is a condition that narrows the air passages
and makes breathing difficult. During an asthma attack,
the air passages become constricted by a spasm of the
muscles lining the bronchi or by swelling of the bronchi
themselves. Asthma may be triggered by an allergic reac-
tion, emotional stress or physical activity. A character-
Continue to check ABCs. Give used auto-injector
to EMS personnel.
In all cases of epinephrine administration, follow-
up care and transport to a medical facility isneeded. The beneficial effect of epinephrine is rel-
atively short in duration. Someone having a severe
allergic reaction may require additional medica-
tions that can be administered only in a hospital.

7/24/2019 CPR AED textbook compressed
http://slidepdf.com/reader/full/cpr-aed-textbook-compressed 33/100
istic sign of asthma is wheezing when exhaling.
Emphysema is a disease in which the lungs lose their
ability to exchange carbon dioxide and oxygen efficiently,
causing a shortness of breath.
Anaphylactic shock, also known as anaphylaxis , is a
severe allergic reaction. The air passages may swell and
restrict breathing. Anaphylaxis may be caused by insect
bites or stings, foods, chemicals, medications or latex aller-
gies. Anaphylactic shock is a life-threatening condition.
Caring for Respiratory DistressYou do not need to know the cause of respiratory distress
to provide care. Whenever you find a victim experiencing
difficulty breathing—
● Summon advanced medical personnel.
● Help the victim rest in a comfortable position that
makes breathing easier.
● Reassure and comfort the victim.
● Assist the victim with any of his or her prescribed med-
ication.
● Keep the victim from getting chilled or overheated.
● Give emergency oxygen, if it is available and you are
trained to do so.
Someone with asthma or emphysema who is in respira-
tory distress may try to do pursed-lip breathing. Have the
person assume a position of comfort. After he or she
inhales, have the person slowly exhale out through the
lips, pursed as though blowing out candles. This creates
back pressure, which can help open airways slightly until
advanced medical personnel arrive.
Respiratory ArrestA victim who has stopped breathing is in respiratory arrest
or failure. Respiratory arrest may develop from respiratory
distress or may occur suddenly as a result of an obstructed
airway, heart attack or other cause. If an unconscious
victim has a pulse, but is not moving or breathing normally,
he or she needs rescue breathing. When checking an
unconscious victim you may detect an irregular, gasping or
shallow breath. This is known as an agonal breath. Do not
confuse this with normal breathing. Look for movement and
check for breathing and a pulse during the initial assess-
ment. If the person has a pulse but is not moving or
breathing normally, begin rescue breathing.
RESCUE BREATHING
Rescue breathing is a technique for breathing air into a
victim to give him or her oxygen needed to survive. The
air you exhale contains enough oxygen to keep a person
alive. When giving rescue breaths, take a normal breath
and breathe into the mask. Each breath should last about
1 second and make the chest clearly rise. Give 1 breath
every 5 seconds for an adult. Give 1 breath every 3 sec-
onds for a child or infant.
Continue rescue breathing until—
● The victim begins to breathe on his or her own.
● Another trained rescuer takes over for you.
● You are too exhausted to continue.
● The victim has no pulse, in which case you should
begin CPR or use an AED if one becomes immediately
available.
● The scene becomes unsafe.
Breathing BarriersBreathing barriers include resuscitation masks, face
shields and bag-valve-mask resuscitators (BVMs).
Breathing barriers help protect you against disease
transmission when giving rescue breaths. As a profes-
sional rescuer, a resuscitation mask with a one-way
valve or BVM should be available in your response gear.
Resuscitation MasksResuscitation masks are flexible, dome-shaped devices
that cover a victim’s mouth and nose and allow you to
breathe air into a victim without making mouth-to-mouth
contact. Most employers provide resuscitation masks for
professional rescuers. Resuscitation masks have several
benefits. They—
● Supply air to the victim more quickly through both the
mouth and nose.
● Create a seal over the victim’s mouth and nose.
● Can be connected to emergency oxygen if they have
an oxygen inlet.
● Protect against disease transmission when giving
rescue breaths.
A resuscitation mask should have the following charac-
teristics (Fig. 3-9):
● Be easy to assemble and use
● Be made of transparent, pliable material that allows you
to make a tight seal over the victim’s mouth and nose
● Have a one-way valve for releasing exhaled air
Standardcouplingassembly
One-way valve
Oxygeninlet
Transparent pliablematerial Fig. 3-9
Taking Action and Caring for Breathing Emergencies | 2

7/24/2019 CPR AED textbook compressed
http://slidepdf.com/reader/full/cpr-aed-textbook-compressed 34/100
24 | CPR/AED for the Professional Rescuer
● Have a standard 15-mm or 22-mm coupling assembly
(the size of the opening for the one-way valve)
● Have an inlet for delivering emergency oxygen
● Work well under different environmental conditions,
such as extreme heat or cold
Child and infant resuscitation masks are available and
should be used to care for children and infants (Fig. 3-10). If
a pediatric resuscitation mask is not available, an adult
mask can be used instead by placing the narrow end of the
mask over the mouth. You do not need to rotate all resusci-
tation masks to create an adequate seal. For additional
information on how to use a resuscitation mask, refer to
Using a Resuscitation Mask for Rescue Breathing Skill
Sheet, pages 78-80.
Face ShieldsOne of the most compact and easy-to-use breathing
devices is a face shield (Fig. 3-11). A face shield is a small
sheet of plastic with a filter or one-way valve in the
middle. It is placed over a victim’s face with the one-way
valve covering the mouth. This allows you to give rescue
breaths to a victim while reducing the risk of disease
transmission during rescue breathing. A major limitation
of face shields for professional rescuers is that they
cannot be used with emergency oxygen like resuscitation
masks and BVMs.
BVMsA BVM is a hand-held device used primarily to ventilate a
victim in respiratory arrest (Fig. 3-12). It can also be used
for a victim in respiratory distress. Because it is neces-
sary to maintain a tight seal on the mask, two rescuers
should operate a BVM (one rescuer positions and seals
the mask, while the second rescuer squeezes the bag).
BVMs have several advantages. They—
● Increase oxygen levels in the blood by using the air in
the surrounding environment instead of the air exhaled
by the rescuer.
● Can be connected with emergency oxygen.
● Are more effective for delivering ventilations when
used correctly by two rescuers.
● Protect against disease transmission.
BVMs come in various sizes. Pediatric BVMs are available
for children and infants. Facilities must have BVMs for
adults, children and infants in order to be appropriately pre-
pared. If a pediatric BVM is not available, an adult mask
can be used by placing the narrow end of the mask over
the mouth and making sure not to use as much force when
squeezing the bag. Using an adult BVM on an infant has
the potential for harm and should only be used in an emer-
gency situation when pediatric BVMs are not available.
For additional information on how to use a BVM, refer
to Using a Bag-Valve-Mask Resuscitator—Two Rescuers
Skill Sheet, pages 34-35.
Rescue Breathing—Special SituationsSuspected Head, Neck or Back InjurySuspect a head or neck injury if the victim—
● Was involved in a motor vehicle, motorized cycle or
bicycle crash as an occupant, rider or pedestrian.
● Was injured as a result of a fall from greater than a
standing height.
● Complains of neck or back pain, tingling in the extremi-
ties or weakness.
● Is not fully alert.
● Appears to be intoxicated.
● Appears frail or over 65 years of age.
● Has a head or neck injury.
Check for the following signs and symptoms of a possible
head, neck or back injury before you attempt to provide care:
● Changes in the level of consciousness
● Severe pain or pressure in the head, neck or back
Fig. 3-11
Oxygen reservoir bag
BagOne-way
valveFig. 3-12
Fig. 3-10

7/24/2019 CPR AED textbook compressed
http://slidepdf.com/reader/full/cpr-aed-textbook-compressed 35/100
● Loss of balance
● Partial or complete loss of movement of any body part
● Tingling or loss of sensation in the hands, fingers, feet
or toes
● Persistent headache
● Unusual bumps, bruises or depressions on the head,
neck or back
● Seizures
● Blood or other fluids in the ears or nose
● Heavy external bleeding of the head, neck or back
● Impaired breathing or vision as a result of injury
● Nausea or vomiting
● Bruising of the head, especially around the eyes and
behind the ears
If you suspect an unconscious victim has a head, neck
or back injury, remember the priority of care. Airway
and breathing take precedence over spinal movement.
Try to open the airway by lifting the chin without
tilting the head, using the jaw-thrust maneuver
(Fig. 3-13):
1. Position the mask.
2. Place your thumbs along each side of the resuscita-
tion mask.
3. Brace your elbows for support.
4. Slide your fingers into position under the angles of the
victim’s jawbone.
5. Without moving the victim’s head, apply downward
pressure with your thumbs to seal the mask and lift
the jaw to open the airway.
6. Give rescue breaths.
If the jaw-thrust maneuver does not open the airway,
use the head-tilt/chin-lift technique to open the
airway.
Air in the StomachWhen giving rescue breaths, breathe slowly, just enough
to make the victim’s chest clearly rise. If you breathe too
much air into the victim, it will enter the stomach, causing
gastric distention. The victim will then likely vomit, which
can obstruct the airway and complicate resuscitation
efforts.
Vomiting and DrowningWhen you give rescue breaths to a victim of a nonfatal sub-
mersion injury, the victim will likely vomit. If this occurs,
quickly turn the victim onto his or her side. Support the
head and neck and turn the body as a unit (Fig. 3-14).
Turning the victim onto his or her side keeps vomit from
blocking the airway and entering the lungs. After vomiting
stops, quickly wipe the victim’s mouth clean. Then turn the
victim on his or her back, and continue with rescue
breathing.
People with DenturesIf the victim is wearing dentures, leave them in place
unless they become loose and block the airway. Dentures
help support the victim’s mouth and cheeks, making it
easier to seal the resuscitation mask during rescue
breathing.
Mask-to-Nose BreathingIf the victim’s mouth is injured, you may need to give
rescue breathing through the nose. To perform mask-to-
nose breathing—
● Use a resuscitation mask.
● Maintain the head-tilt position.
● Place the resuscitation mask over the victim’s mouth
and nose.
● Use both hands to close the victim’s mouth.
● Seal the resuscitation mask with both hands.
● Give breaths.
Fig. 3-13
Fig. 3-14
Taking Action and Caring for Breathing Emergencies | 2

7/24/2019 CPR AED textbook compressed
http://slidepdf.com/reader/full/cpr-aed-textbook-compressed 36/100
26 | CPR/AED for the Professional Rescuer
Mask-to-Stoma BreathingOn rare occasions, you may see an opening in a victim’s
neck as you tilt the head back to check for breathing.
This victim may have had an operation to remove part of
the windpipe. If so, the victim breathes through this
opening, which is called a stoma. If a victim with a stoma
needs rescue breathing, follow the same steps for mouth-
to-mask breathing, except—
● Look, listen and feel for breathing with your ear over
the stoma.
● Maintain the airway in a neutral position. (This
ensures the victim’s airway is neither flexed nor
extended, as the stoma provides access to the lower
airway.)
● Use a child or infant resuscitation mask over the
victim’s stoma.
● If possible, pinch the nose and close the mouth, as
some victims with a stoma may still have a passage for
air that reaches the mouth and nose in addition to the
stoma.
● Give rescue breaths.
AIRWAY OBSTRUCTION
An airway obstruction is the most common cause of res-
piratory emergencies. A victim whose airway is blocked
can quickly stop breathing, lose consciousness and die.
There are two types of airway obstructions: anatomical
and mechanical. An anatomical obstruction occurs when
the airway is blocked by an anatomical structure, such
as the tongue or swollen tissues of the mouth and throat.
In an unconscious victim, the tongue is a common cause
of airway obstruction. This occurs because the tongue
relaxes when the body is deprived of oxygen. As a result,
the tongue rests on the back of the throat, inhibiting the
flow of air to the lungs. A mechanical obstruction occurs
when foreign objects, such as a piece of food or a small
toy, or fluids, such as vomit, blood, mucus or saliva,
block the airway. A conscious victim who is clutching his
or her throat with one or both hands is usually choking.
This is considered the universal sign of choking.
Common causes of choking include—
● Poorly chewed food.
● Drinking alcohol before or during meals. (Alcohol dulls
the nerves that aid swallowing, making choking on food
more likely.)
● Eating too fast or talking or laughing while eating.
● Walking, playing or running with food or objects in the
mouth.
● Wearing dentures. (Dentures make it difficult to sense
whether food is fully chewed before it is swallowed.)
Caring for Airway ObstructionsProfessional rescuers must be able to recognize when
a victim is choking. The airway may be partially or com-
pletely obstructed. A victim who is clutching his or her
throat with one or both hands is usually choking.
Someone with a partial airway obstruction can still
move some air to and from the lungs and may make
wheezing sounds. Someone with a complete airway
obstruction cannot cough, speak or breathe. Get con-
sent before helping a conscious choking victim. If the
choking victim is unconscious, consent is implied.
Conscious Choking Adult and ChildWhen caring for a conscious choking adult or child, per-
form a combination of 5 back blows followed by 5 abdom-
inal thrusts. Each back blow and abdominal thrust should
be a distinct attempt to dislodge the object. Use less
force when giving back blows and abdominal thrusts to a
child. Using too much force may cause internal injuries.
Continue back blows and abdominal thrusts until the
object is dislodged and the victim can breathe or cough
forcefully, or becomes unconscious. For additional infor-
mation on how to care for a conscious choking adult or
child, refer to Conscious Choking—Adult and Child Skill
Sheet, pages 36-37.
Conscious Choking InfantWhen caring for a conscious choking infant, use a combi-
nation of 5 back blows and 5 chest thrusts. Continue back
blows and chest thrusts until the object is dislodged and
the infant can breathe or cough forcefully, or becomes
unconscious. For additional information on how to care
for a conscious choking infant, refer to Conscious
Choking—Infant Skill Sheet, pages 38-39.
Special Considerations for Choking VictimsIn some situations, abdominal thrusts may not be an
effective method of care for conscious choking victims. If
you cannot reach far enough around the victim to give
effective abdominal thrusts or if the victim is obviously
pregnant or known to be pregnant, you should give 5
back blows followed by 5 chest thrusts.
To perform chest thrusts—
● Stand behind the victim.
● Make a fist with one hand and place the thumb
side against the center of the victim’s chest. If the
victim is obviously pregnant or known to be
pregnant, position your hands slightly higher on the
victim’s chest.
An airway obstruction is
the most common cause of
respiratory emergencies.
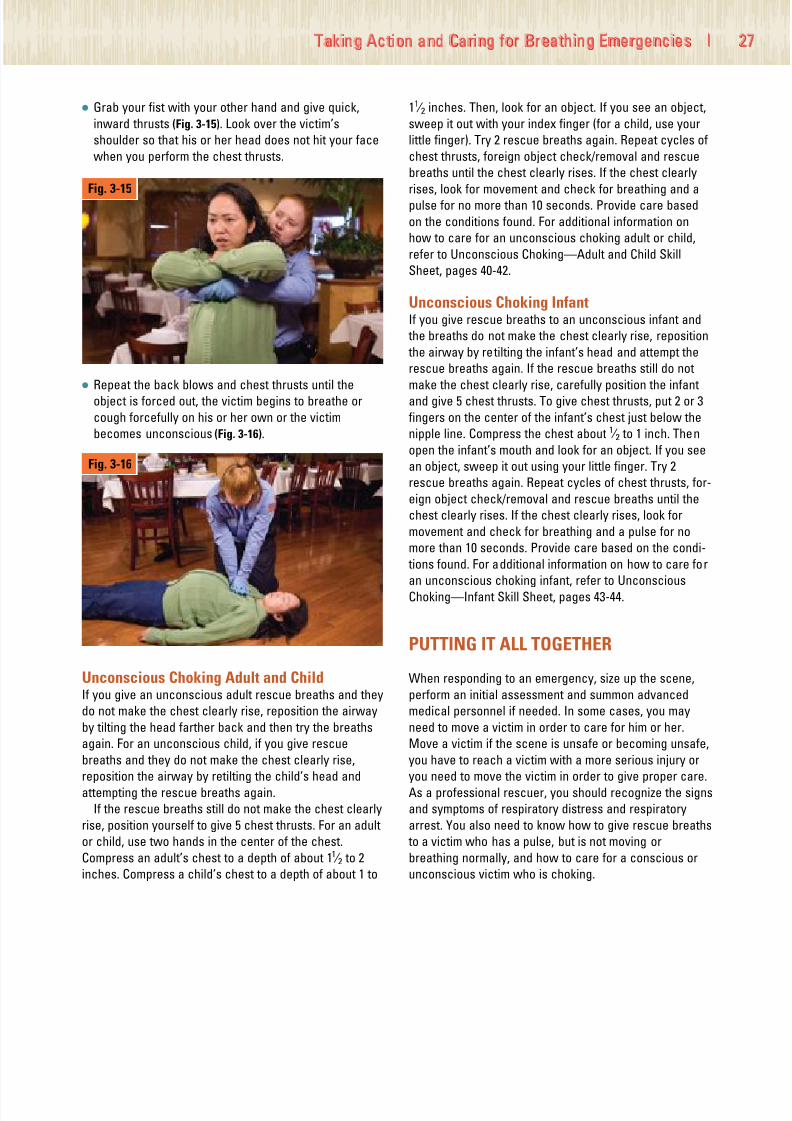
7/24/2019 CPR AED textbook compressed
http://slidepdf.com/reader/full/cpr-aed-textbook-compressed 37/100
Taking Action and Caring for Breathing Emergencies | 2
● Grab your fist with your other hand and give quick,
inward thrusts (Fig. 3-15). Look over the victim’s
shoulder so that his or her head does not hit your face
when you perform the chest thrusts.
● Repeat the back blows and chest thrusts until the
object is forced out, the victim begins to breathe or
cough forcefully on his or her own or the victim
becomes unconscious (Fig. 3-16).
Unconscious Choking Adult and ChildIf you give an unconscious adult rescue breaths and they
do not make the chest clearly rise, reposition the airway
by tilting the head farther back and then try the breaths
again. For an unconscious child, if you give rescue
breaths and they do not make the chest clearly rise,
reposition the airway by retilting the child’s head and
attempting the rescue breaths again.
If the rescue breaths still do not make the chest clearly
rise, position yourself to give 5 chest thrusts. For an adult
or child, use two hands in the center of the chest.
Compress an adult’s chest to a depth of about 11 ⁄ 2 to 2
inches. Compress a child’s chest to a depth of about 1 to
11 ⁄ 2 inches. Then, look for an object. If you see an object,
sweep it out with your index finger (for a child, use your
little finger). Try 2 rescue breaths again. Repeat cycles of
chest thrusts, foreign object check/removal and rescue
breaths until the chest clearly rises. If the chest clearly
rises, look for movement and check for breathing and a
pulse for no more than 10 seconds. Provide care based
on the conditions found. For additional information on
how to care for an unconscious choking adult or child,
refer to Unconscious Choking—Adult and Child Skill
Sheet, pages 40-42.
Unconscious Choking InfantIf you give rescue breaths to an unconscious infant and
the breaths do not make the chest clearly rise, reposition
the airway by retilting the infant’s head and attempt the
rescue breaths again. If the rescue breaths still do not
make the chest clearly rise, carefully position the infant
and give 5 chest thrusts. To give chest thrusts, put 2 or 3
fingers on the center of the infant’s chest just below the
nipple line. Compress the chest about 1 ⁄ 2 to 1 inch. Then
open the infant’s mouth and look for an object. If you see
an object, sweep it out using your little finger. Try 2
rescue breaths again. Repeat cycles of chest thrusts, for-
eign object check/removal and rescue breaths until the
chest clearly rises. If the chest clearly rises, look for
movement and check for breathing and a pulse for no
more than 10 seconds. Provide care based on the condi-
tions found. For additional information on how to care for
an unconscious choking infant, refer to Unconscious
Choking—Infant Skill Sheet, pages 43-44.
PUTTING IT ALL TOGETHER
When responding to an emergency, size up the scene,
perform an initial assessment and summon advanced
medical personnel if needed. In some cases, you may
need to move a victim in order to care for him or her.
Move a victim if the scene is unsafe or becoming unsafe,
you have to reach a victim with a more serious injury or
you need to move the victim in order to give proper care.
As a professional rescuer, you should recognize the signs
and symptoms of respiratory distress and respiratory
arrest. You also need to know how to give rescue breaths
to a victim who has a pulse, but is not moving or
breathing normally, and how to care for a conscious or
unconscious victim who is choking.
Fig. 3-16
Fig. 3-15

7/24/2019 CPR AED textbook compressed
http://slidepdf.com/reader/full/cpr-aed-textbook-compressed 38/100
28 | CPR/AED for the Professional Rescuer
Remember: Always size up the scene before the
initial assessment. Determine the scene safety,
mechanism of injury and number of victims. Put on
the appropriate personal protective equipment and
call for additional help if necessary.
STEP 1Tap the victim’s shoulder and shout, “Are you
okay?” (A)
● For an infant, gently tap the shoulder or flick the
foot (B).
STEP 2If no response, summon advanced medical per-
sonnel.
Note: If the victim is face-down, roll the victim onto
his or her back, while supporting the head and neck.
Skill Sheet | Initial Assessment
Step 1
Step 1 B
A

7/24/2019 CPR AED textbook compressed
http://slidepdf.com/reader/full/cpr-aed-textbook-compressed 39/100
Taking Action and Caring for Breathing Emergencies | 2
STEP 3Check for signs of life (movement and normal
breathing).
● Tilt the head back and lift the chin to open the
airway.
● Look for movement and look, listen and feel for
normal breathing for no more than 10 seconds.
Note:
● Irregular, gasping or shallow breathing is not
normal breathing.
● Do not tilt a child or infant’s head back as far as an
adult’s. Tilt an infant’s head to the neutral position
and a child’s head slightly past the neutral position.
● If you suspect a head, neck or back injury, try the
jaw-thrust maneuver to open the airway (see p. 25).
STEP 4If there is no movement or breathing, give 2 rescue
breaths.
● Assemble and position the resuscitation mask.
● Tilt the head back and lift the chin to open the
airway.
● Each breath should last about 1 second and make
the chest clearly rise.
Note: Use a pediatric resuscitation mask for a child
or infant, if available.
STEP 5If the chest clearly rises, check for a pulse for no
more than 10 seconds.
● For a hypothermia victim, check for a pulse for up
to 30 to 45 seconds
● Adult and Child: Feel for a pulse at the carotid
artery. With one hand on the victim’s forehead,
place 2 fingers on the front of the neck. Slide your
fingers toward you and down into the groove at
the side of the neck (A).
Step 4
Step 5
Step 3
Continued
A
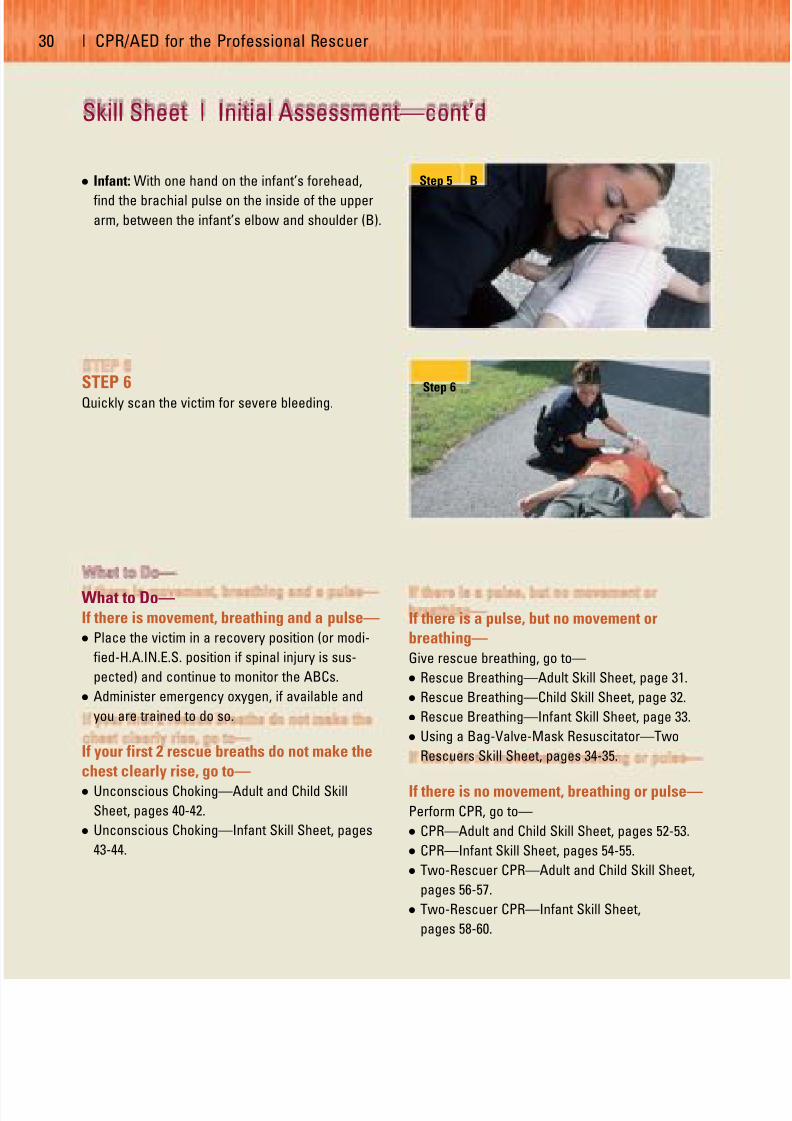
7/24/2019 CPR AED textbook compressed
http://slidepdf.com/reader/full/cpr-aed-textbook-compressed 40/100
30 | CPR/AED for the Professional Rescuer
● Infant: With one hand on the infant’s forehead,
find the brachial pulse on the inside of the upper
arm, between the infant’s elbow and shoulder (B).
STEP 6Quickly scan the victim for severe bleeding.
What to Do—If there is movement, breathing and a pulse—● Place the victim in a recovery position (or modi-
fied-H.A.IN.E.S. position if spinal injury is sus-
pected) and continue to monitor the ABCs.
● Administer emergency oxygen, if available and
you are trained to do so.
If your first 2 rescue breaths do not make the
chest clearly rise, go to—● Unconscious Choking—Adult and Child Skill
Sheet, pages 40-42.
● Unconscious Choking—Infant Skill Sheet, pages
43-44.
If there is a pulse, but no movement or
breathing—
Give rescue breathing, go to—
● Rescue Breathing—Adult Skill Sheet, page 31.
● Rescue Breathing—Child Skill Sheet, page 32.
● Rescue Breathing—Infant Skill Sheet, page 33.
● Using a Bag-Valve-Mask Resuscitator—Two
Rescuers Skill Sheet, pages 34-35.
If there is no movement, breathing or pulse—Perform CPR, go to—
● CPR—Adult and Child Skill Sheet, pages 52-53.
● CPR—Infant Skill Sheet, pages 54-55.
● Two-Rescuer CPR—Adult and Child Skill Sheet,
pages 56-57.
● Two-Rescuer CPR—Infant Skill Sheet,
pages 58-60.
Step 6
Step 5
Skill Sheet | Initial Assessment—cont’d
B

7/24/2019 CPR AED textbook compressed
http://slidepdf.com/reader/full/cpr-aed-textbook-compressed 41/100
Taking Action and Caring for Breathing Emergencies | 3
Skill Sheet | Rescue Breathing—Adult
Complete Steps 1-6, Initial Assessment Skill Sheet,
pages 28-30.
STEP 7If there is a pulse, but no movement or breathing,
give 1 rescue breath about every 5 seconds.
● Position the resuscitation mask.
● Tilt the head back and lift the chin to open the
airway.
● Breathe into the mask.
● Each rescue breath should last about 1 second
and make the chest clearly rise.
STEP 8Continue to give 1 rescue breath about every 5
seconds.
● Watch the chest clearly rise when giving each
rescue breath.
● Do this for about 2 minutes.
STEP 9Remove the resuscitation mask, look for movement
and recheck for breathing and a pulse for no more
than 10 seconds.
What to Do—If there is a pulse, but still no movement or
breathing—● Replace the mask and continue rescue breathing.
● Look for movement and recheck for breathing and
a pulse about every 2 minutes.
If there is movement, breathing and a pulse—● Place the victim in a recovery position (or modi-
fied-H.A.IN.E.S. position if spinal injury is sus-
pected) and continue to monitor the ABCs.
● Administer emergency oxygen, if available and
you are trained to do so.
Step 7
Step 9
If there is no movement, breathing or pulse—Perform CPR, go to—
● CPR—Adult and Child Skill Sheet, pages 52-53.
● Two-Rescuer CPR—Adult and Child Skill Sheet,
pages 56-57.

7/24/2019 CPR AED textbook compressed
http://slidepdf.com/reader/full/cpr-aed-textbook-compressed 42/100
32 | CPR/AED for the Professional Rescuer
Complete Steps 1-6, Initial Assessment Skill Sheet,
pages 28-30.
STEP 7If there is a pulse, but no movement or breathing,
give 1 rescue breath about every 3 seconds.
● Position the resuscitation mask.
● Tilt the head slightly past neutral and lift the chin
to open the airway.
● Breathe into the mask.
● Each rescue breath should last about 1 second
and make the chest clearly rise.
STEP 8Continue to give 1 rescue breath about every 3
seconds.
● Watch the chest clearly rise when giving each
rescue breath.
● Do this for about 2 minutes.
STEP 9Remove the resuscitation mask, look for movement
and recheck for breathing and a pulse for no more
than 10 seconds.
What to Do—If there is a pulse, but still no movement or
breathing—● Replace the mask and continue rescue breathing.
● Look for movement and recheck for breathing and
a pulse about every 2 minutes.
If there is movement, breathing and a pulse—
● Place the victim in a recovery position (or modi-
fied-H.A.IN.E.S. position if spinal injury is sus-
pected) and continue to monitor the ABCs.
● Administer emergency oxygen, if available and
you are trained to do so.
Skill Sheet | Rescue Breathing—Child
Step 7
Step 9
If there is no movement, breathing or pulse—Perform CPR, go to:
● CPR—Adult and Child Skill Sheet, pages 52-53.
● Two-Rescuer CPR—Adult and Child Skill Sheet,
pages 56-57.

7/24/2019 CPR AED textbook compressed
http://slidepdf.com/reader/full/cpr-aed-textbook-compressed 43/100
Taking Action and Caring for Breathing Emergencies | 3
Skill Sheet | Rescue Breathing—Infant
Complete Steps 1-6, Initial Assessment Skill Sheet,
pages 28-30.
STEP 7If there is a pulse, but no movement or breathing,
give 1 rescue breath about every 3 seconds.
● Position the resuscitation mask.
● Tilt the head to a neutral position and lift the chin
to open the airway.
● Breathe into the mask.
● Each rescue breath should last about 1 second
and make the chest clearly rise.
STEP 8Continue to give 1 rescue breath about every 3
seconds.
● Watch the chest clearly rise when giving each
rescue breath.
● Do this for about 2 minutes.
STEP 9Remove the resuscitation mask, look for movement
and recheck for breathing and a pulse for no more
than 10 seconds.
What to Do—If there is a pulse, but still no movement or
breathing—● Replace the mask and continue rescue breathing.
● Look for movement and recheck for breathing and
a pulse about every 2 minutes.
If there is movement, breathing and a pulse—
● Maintain an open airway and continue to monitor
the ABCs.
● Administer emergency oxygen, if available and
you are trained to do so.
If there is no movement, breathing or pulse—
Perform CPR, go to—
● CPR—Infant Skill Sheet, pages 54-55.
● Two-Rescuer CPR—Infant Skill Sheet,
pages 58-60.
Step 7
Step 9
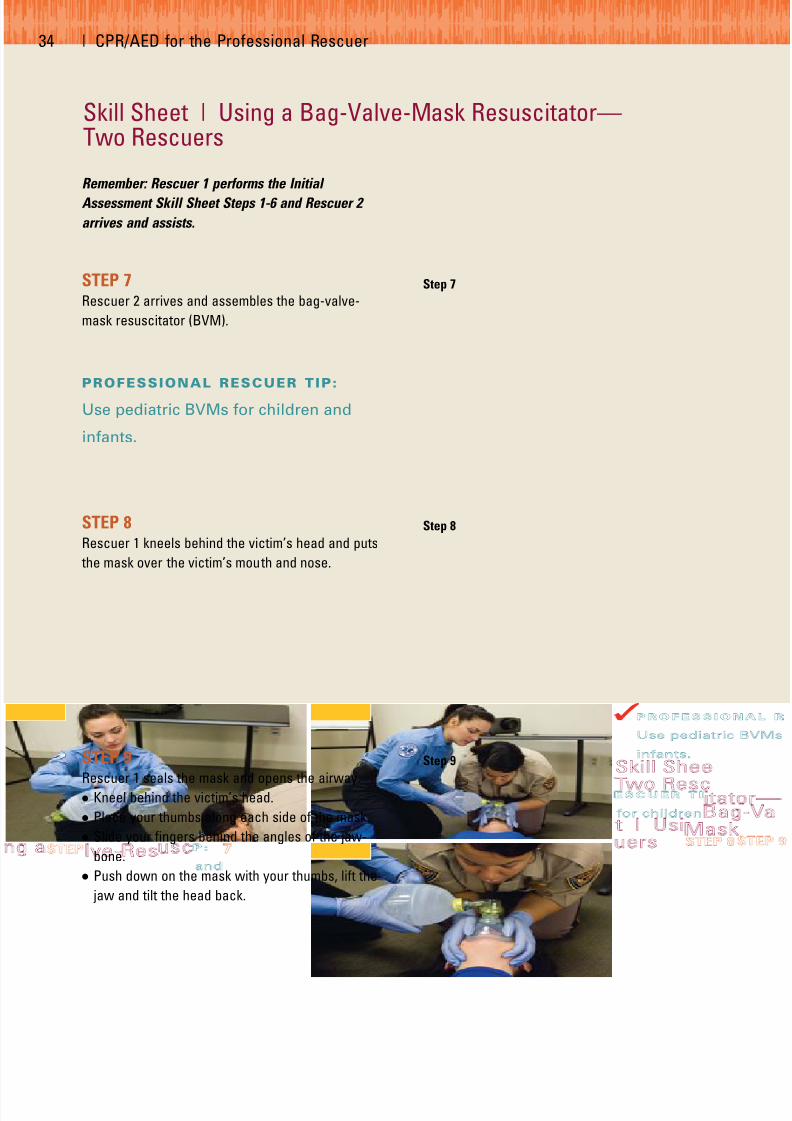
7/24/2019 CPR AED textbook compressed
http://slidepdf.com/reader/full/cpr-aed-textbook-compressed 44/100
34 | CPR/AED for the Professional Rescuer
Remember: Rescuer 1 performs the Initial
Assessment Skill Sheet Steps 1-6 and Rescuer 2
arrives and assists.
STEP 7Rescuer 2 arrives and assembles the bag-valve-
mask resuscitator (BVM).
PROFESSIONAL RESCUER TIP:
Use pediatric BVMs for children and
infants.
STEP 8Rescuer 1 kneels behind the victim’s head and puts
the mask over the victim’s mouth and nose.
STEP 9Rescuer 1 seals the mask and opens the airway.
● Kneel behind the victim’s head.
● Place your thumbs along each side of the mask.
● Slide your fingers behind the angles of the jaw-
bone.
● Push down on the mask with your thumbs, lift the
jaw and tilt the head back.
Skill Sheet | Using a Bag-Valve-Mask Resuscitator—Two Rescuers
Step 7
Step 8
Step 9

7/24/2019 CPR AED textbook compressed
http://slidepdf.com/reader/full/cpr-aed-textbook-compressed 45/100
Taking Action and Caring for Breathing Emergencies | 3
STEP 10Rescuer 2 begins ventilations.
● Squeeze the bag slowly for about 1 second using
just enough force to make the chest clearly rise
with each ventilation.
● Give 1 ventilation about every 5 seconds for an
adult and 1 ventilation about every 3 seconds for a
child or infant.
● Do this for about 2 minutes.
STEP 11Remove the BVM, look for movement and
recheck for breathing and a pulse for no more
than 10 seconds.
What to Do—If there is a pulse, but still no movement or
breathing—● Replace the BVM and continue ventilations.
● Continue to look for movement and recheck forbreathing and a pulse about every 2 minutes.
If there is movement, breathing and a pulse—
● Place the victim in a recovery position (or modi-
fied-H.A.IN.E.S. position if spinal injury is sus-
pected) and continue to monitor the ABCs.
● Administer emergency oxygen, if available and
you are trained to do so.
If there is no movement, breathing or pulse—Perform CPR, go to—
● CPR—Adult and Child Skill Sheet, pages 52-53.
● CPR—Infant Skill Sheet, pages 54-55.
● Two-Rescuer CPR—Adult and Child Skill Sheet,
pages 56-57.
● Two-Rescuer CPR—Infant Skill Sheet,
pages 58-60.
Step 10

7/24/2019 CPR AED textbook compressed
http://slidepdf.com/reader/full/cpr-aed-textbook-compressed 46/100
36 | CPR/AED for the Professional Rescuer
Remember: If a parent or guardian is present,
obtain consent before caring for a conscious
choking child. Tell the child’s parent or guardian
your level of training and the care you are going to
provide. If the parent or guardian is not available,
consent is implied.
STEP 1Ask the victim “Are you choking?”
● Identify yourself and ask if you can help.
● If the victim is coughing forcefully, encourage
continued coughing.
STEP 2If the victim cannot cough, speak or breathe, have
someone else summon advanced medical per-
sonnel.
STEP 3Lean the victim forward and give 5 back blows with
the heel of your hand.
● Position yourself slightly behind the victim.
● Provide support by placing one arm diagonally
across the chest and lean the victim forward.
● Firmly strike the victim between the shoulder
blades with the heel of your hand.
● Each blow is a distinct attempt to dislodge the
object.
Skill Sheet | Conscious Choking—Adult and Child
Step 1
Step 3

7/24/2019 CPR AED textbook compressed
http://slidepdf.com/reader/full/cpr-aed-textbook-compressed 47/100
Taking Action and Caring for Breathing Emergencies | 3
STEP 4Give 5 abdominal thrusts.
● Adult: Stand behind the victim.
● Child: Stand or kneel behind the child depending
on the child’s size. Use less force on a child than
you would on an adult (A).
● Use one hand to find the navel.
● Make a fist with your other hand and place the
thumb side of your fist against the middle of the
victim’s abdomen, just above the navel (B).
● Grab the fist with your other hand.
● Give quick, upward thrusts. Each thrust should be
a distinct attempt to dislodge the object (C).
Continue giving 5 back blows and 5
abdominal thrusts until—
● The object is forced out.
● The victim begins to breathe or cough forcefully
on his or her own.
● The victim becomes unconscious.
What to Do—If the victim becomes unconscious, go to—
● Unconscious Choking—Adult and Child Skill
Sheet, pages 40-42.
Note: Some conscious choking victims may need
chest thrusts instead of abdominal thrusts.
Use chest thrusts if—● You cannot reach far enough around the victim to
give abdominal thrusts.
● The victim is obviously pregnant or known to be
pregnant.
Step 4
Step 4
Step 4
A
B
C

7/24/2019 CPR AED textbook compressed
http://slidepdf.com/reader/full/cpr-aed-textbook-compressed 48/100
38 | CPR/AED for the Professional Rescuer
Remember: If a parent or guardian is present,
obtain consent before caring for a conscious
choking infant. Tell the infant’s parent or guardian
your level of training and the care you are going to
provide. If the parent or guardian is not available,
consent is implied.
STEP 1If the infant cannot cough, cry or breathe, carefully
position the infant face-down along your forearm.
● Support the infant’s head and neck with your
hand.
● Lower the infant onto your thigh, keeping the
infant’s head lower than his or her chest.
STEP 2Give 5 back blows.
● Use the heel of your hand.
● Give back blows between the infant’s shoulder
blades.
● Each back blow should be a distinct attempt to
dislodge the object.
STEP 3Position the infant face-up along your forearm.
● Position the infant between both of your forearms,
supporting the infant’s head and neck.
● Turn the infant face-up.
● Lower the infant onto your thigh with the infant’s
head lower than his or her chest.
Skill Sheet | Conscious Choking—Infant
Step 2

7/24/2019 CPR AED textbook compressed
http://slidepdf.com/reader/full/cpr-aed-textbook-compressed 49/100
Taking Action and Caring for Breathing Emergencies | 3
STEP 4Give 5 chest thrusts.
● Put 2 or 3 fingers on the center of the chest just
below the nipple line.
● Compress the chest 5 times about 1 ⁄ 2 - 1 inch.
● Each chest thrust should be a distinct attempt to
dislodge the object.
Continue giving 5 back blows and 5 chest
thrusts until—
● The object is forced out.
● The infant begins to cough or breathe on his orher own.
● The infant becomes unconscious.
What to Do—If the infant becomes unconscious, go to—
● Unconscious Choking—Infant Skill Sheet,
pages 43-44.
Step 4
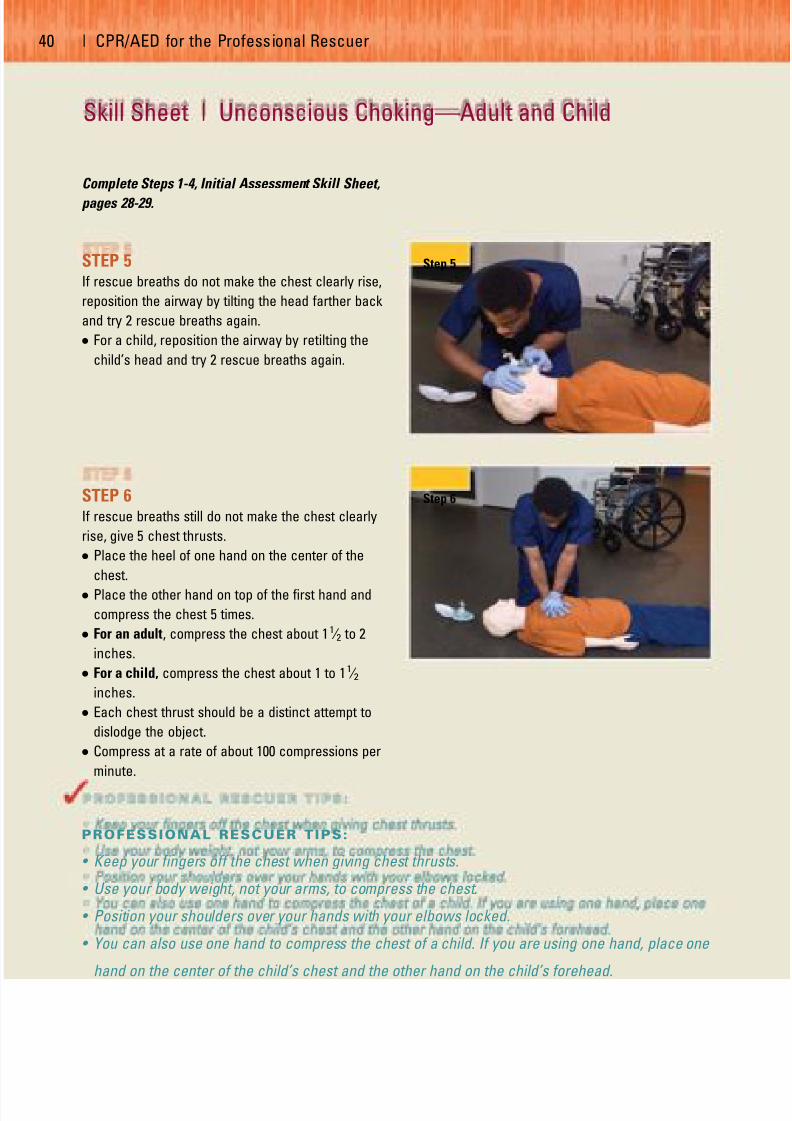
7/24/2019 CPR AED textbook compressed
http://slidepdf.com/reader/full/cpr-aed-textbook-compressed 50/100
40 | CPR/AED for the Professional Rescuer
Complete Steps 1-4, Initial Assessment Skill Sheet,
pages 28-29.
STEP 5If rescue breaths do not make the chest clearly rise,
reposition the airway by tilting the head farther back
and try 2 rescue breaths again.
● For a child, reposition the airway by retilting the
child’s head and try 2 rescue breaths again.
STEP 6If rescue breaths still do not make the chest clearly
rise, give 5 chest thrusts.
● Place the heel of one hand on the center of the
chest.
● Place the other hand on top of the first hand and
compress the chest 5 times.
● For an adult, compress the chest about 11 ⁄ 2 to 2
inches.
● For a child, compress the chest about 1 to 11 ⁄ 2
inches.
● Each chest thrust should be a distinct attempt to
dislodge the object.
● Compress at a rate of about 100 compressions per
minute.
Skill Sheet | Unconscious Choking—Adult and Child
Step 5
Step 6
PROFESSIONAL RESCUER TIPS:
• Keep your fingers off the chest when giving chest thrusts.
• Use your body weight, not your arms, to compress the chest.
• Position your shoulders over your hands with your elbows locked.
• You can also use one hand to compress the chest of a child. If you are using one hand, place one
hand on the center of the child’s chest and the other hand on the child’s forehead.

7/24/2019 CPR AED textbook compressed
http://slidepdf.com/reader/full/cpr-aed-textbook-compressed 51/100
Taking Action and Caring for Breathing Emergencies | 4
STEP 7Look inside the victim’s mouth.
● Grasp the tongue and lower jaw between your
thumb and fingers and lift the jaw.
STEP 8If you see the object, take it out.
● For an adult, remove the object with your index
finger by sliding the finger along the inside of the
cheek, using a hooking motion to sweep the
object out (A).
● For a child, remove the object with your little
finger by sliding it along the inside of the cheek,
using a hooking motion to sweep the object out
(B).
STEP 9Replace the resuscitation mask and give 2 rescue
breaths (A).
What to Do—If the rescue breaths still do not make the
chest clearly rise—● Repeat Steps 6-9.
Step 7
Step 8
Step 8
Step 9 A
Continued
B
A
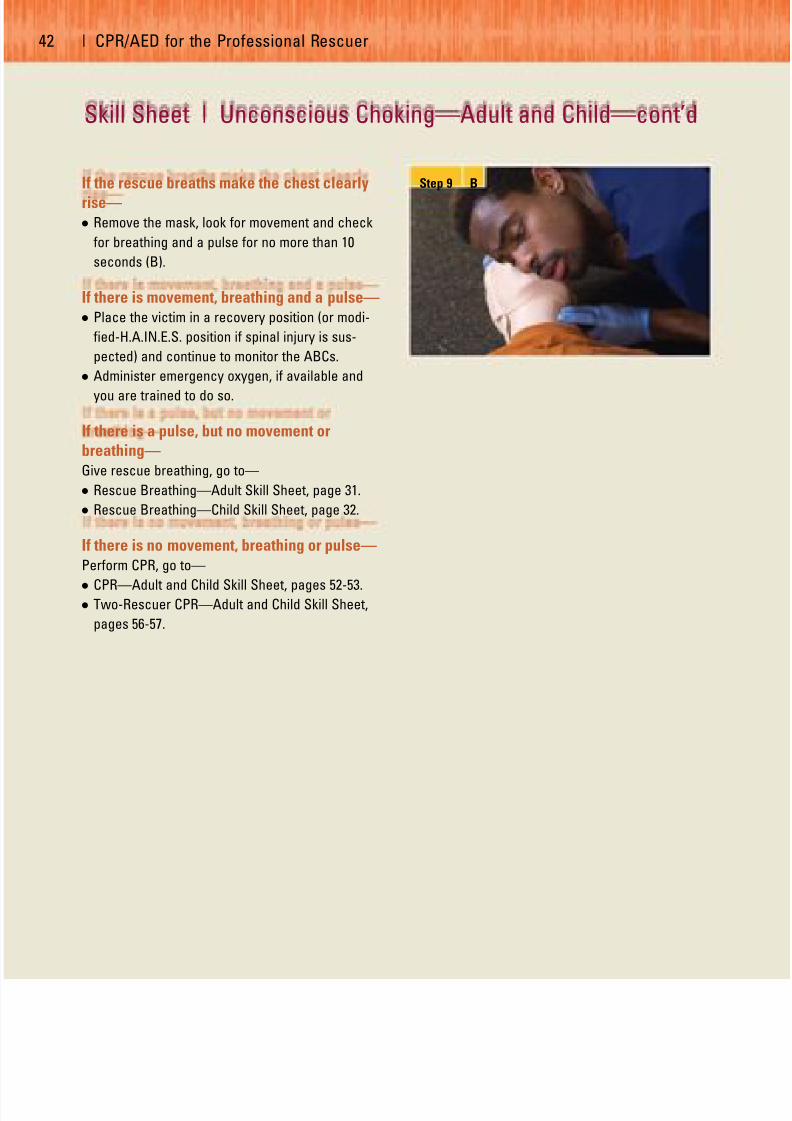
7/24/2019 CPR AED textbook compressed
http://slidepdf.com/reader/full/cpr-aed-textbook-compressed 52/100
42 | CPR/AED for the Professional Rescuer
If the rescue breaths make the chest clearly
rise—● Remove the mask, look for movement and check
for breathing and a pulse for no more than 10
seconds (B).
If there is movement, breathing and a pulse—● Place the victim in a recovery position (or modi-
fied-H.A.IN.E.S. position if spinal injury is sus-
pected) and continue to monitor the ABCs.
● Administer emergency oxygen, if available and
you are trained to do so.
If there is a pulse, but no movement or
breathing—Give rescue breathing, go to—
● Rescue Breathing—Adult Skill Sheet, page 31.
● Rescue Breathing—Child Skill Sheet, page 32.
If there is no movement, breathing or pulse—Perform CPR, go to—
●
CPR—Adult and Child Skill Sheet, pages 52-53.● Two-Rescuer CPR—Adult and Child Skill Sheet,
pages 56-57.
Step 9 B
Skill Sheet | Unconscious Choking—Adult and Child—cont’d
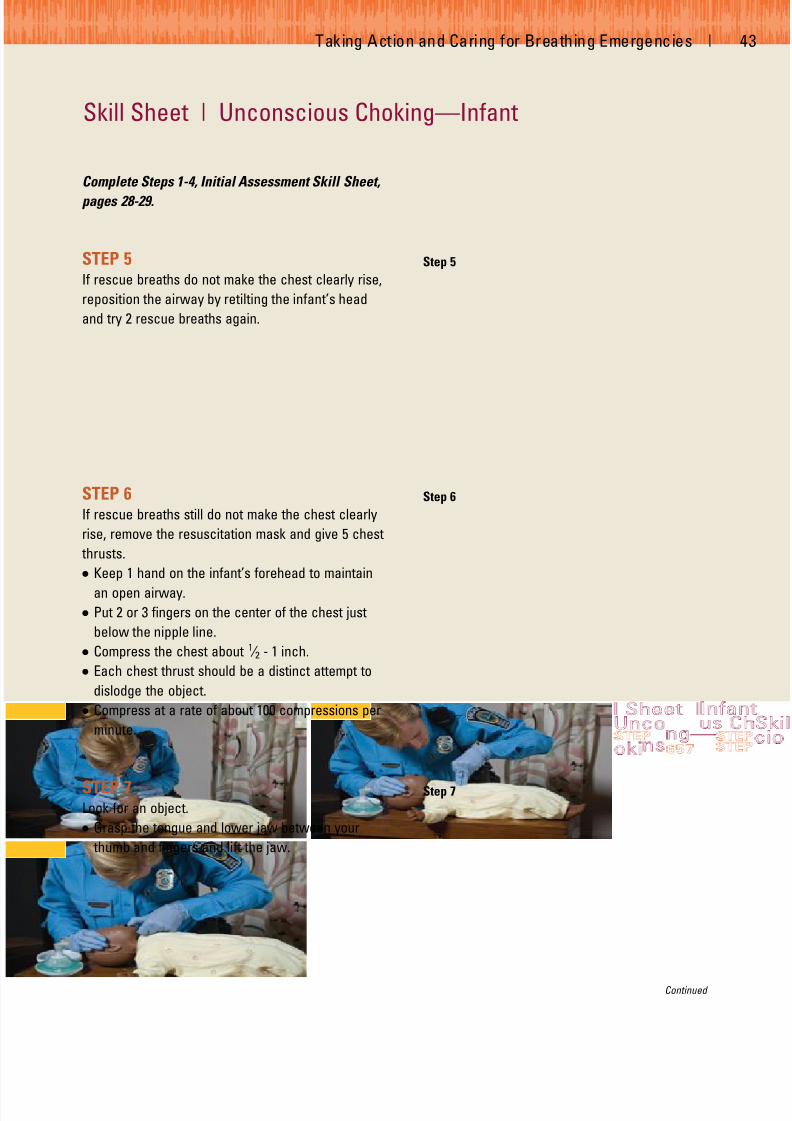
7/24/2019 CPR AED textbook compressed
http://slidepdf.com/reader/full/cpr-aed-textbook-compressed 53/100
Taking Action and Caring for Breathing Emergencies | 4
Skill Sheet | Unconscious Choking—Infant
Complete Steps 1-4, Initial Assessment Skill Sheet,
pages 28-29.
STEP 5If rescue breaths do not make the chest clearly rise,
reposition the airway by retilting the infant’s head
and try 2 rescue breaths again.
STEP 6If rescue breaths still do not make the chest clearly
rise, remove the resuscitation mask and give 5 chest
thrusts.
● Keep 1 hand on the infant’s forehead to maintain
an open airway.
● Put 2 or 3 fingers on the center of the chest just
below the nipple line.
● Compress the chest about 1 ⁄ 2 - 1 inch.
● Each chest thrust should be a distinct attempt to
dislodge the object.
● Compress at a rate of about 100 compressions per
minute.
STEP 7Look for an object.
● Grasp the tongue and lower jaw between your
thumb and fingers and lift the jaw.
Step 5
Step 6
Step 7
Continued

7/24/2019 CPR AED textbook compressed
http://slidepdf.com/reader/full/cpr-aed-textbook-compressed 54/100
44 | CPR/AED for the Professional Rescuer
STEP 8If you see the object, take it out.
● If you see an object, remove it with your little
finger by sliding it along the inside of the cheek,
using a hooking motion to sweep the object out.
STEP 9Replace the resuscitation mask and give 2 rescue
breaths (A).
What to Do—If the rescue breaths still do not make the
chest clearly rise—● Repeat Steps 6-9.
If the rescue breaths make the chest clearlyrise—
● Look for movement and check for breathing and a
pulse for no more than 10 seconds (B).
If there is movement, breathing and a pulse—
● Maintain an open airway and continue to monitor
the ABCs.
● Administer emergency oxygen, if available and
you are trained to do so.
If there is a pulse, but no movement or
breathing—Give rescue breathing, go to—
● Rescue Breathing—Infant Skill Sheet, page 33.
If there is no movement, breathing or pulse—Perform CPR, go to—
● CPR—Infant Skill Sheet, pages 54-55.
● Two-Rescuer CPR—Infant Skill Sheet, pages 58-60.
Step 8
Step 9 A
Step 9 B
Skill Sheet | Unconscious Choking—Infant—cont’d

7/24/2019 CPR AED textbook compressed
http://slidepdf.com/reader/full/cpr-aed-textbook-compressed 55/100
Chapter 4
Cardiac Emergencies
WOULD YOU KNOW WHAT TO DO?
While working at a high school football
game, you see a woman slowly walking
toward you on the sideline. It is obvious
that she is having difficulty breathing and
is sweating profusely. Her skin looks pale
and she appears to be in severe pain.
When she gets to you, you notice that she
is rubbing her arm. She appears to be
experiencing a heart attack. She has a
frightened look on her face. What would
you do in this situation?
45

7/24/2019 CPR AED textbook compressed
http://slidepdf.com/reader/full/cpr-aed-textbook-compressed 56/100
CARDIAC CHAIN OF SURVIVAL
During the initial assessment, you learned to identify and
care for life-threatening conditions. Your priorities focused
on the victim’s airway, breathing and circulation (ABCs). As
a professional rescuer, you must learn how to provide care
for cardiac emergencies, such as heart attack and cardiac
arrest. To effectively respond to cardiac emergencies, it
helps to understand the importance of the Cardiac Chain of
Survival. The four links in the cardiac chain of survival are—
1. Early recognition of the emergency and early access
to EMS. The sooner more advanced medical per-
sonnel or the local emergency number is called, the
sooner EMS personnel arrive and take over.
2. Early cardiopulmonary resuscitation (CPR).CPR
helps supply oxygen to the brain and other vital
organs to keep the victim alive until an automated
external defibrillator (AED) is used or advanced med-
ical care is given.
3. Early defibrillation. An electrical shock called defib-
rillation may restore a normal heart rhythm. Each
minute defibrillation is delayed reduces the victim’s
chance of survival by about 10 percent.
4. Early advanced medical care.EMS personnel provide
more advanced medical care and transport the victim
to the hospital.
Common Causes of a Heart AttackHeart attacks usually result from cardiovascular disease.
Cardiovascular disease is the leading cause of death for
adults in the United States. Cardiovascular disease
develops slowly. Deposits of cholesterol, a fatty sub-
stance made by the body, and other material may gradu-
ally build up on the inner walls of the arteries (Fig. 4-1).
This condition, called atherosclerosis , causes these ves-
sels to progressively narrow. When coronary arteries
narrow, a heart attack may occur. Other common causes
of heart attack include respiratory distress, electrocution
and traumatic injury.
Recognizing a Heart AttackWhen the muscle of the heart suffers a loss of oxy-
genated blood, the result is a myocardial infarction (MI),
or heart attack. The sooner you recognize the signs and
symptoms of a heart attack and act, the better chance
you have to save a life. Many people will deny they are
having a heart attack. Summon
advanced medical personnel if the victim
shows some or all of the following signs
and symptoms:
● Discomfort, pressure or pain.The
major signal is persistent discomfort,
pressure or pain in the chest that does
not go away. Unfortunately, it is not
always easy to distinguish heart
attack pain from the pain of indiges-
tion, muscle spasms or other condi-
tions. This often causes people to
delay getting medical care. Brief,
stabbing pain or pain that gets worse
when you bend or breathe deeply is
not usually caused by a heart problem.
The pain associated with a heart
attack can range from discomfort to an
unbearable crushing sensation in the
chest. The victim may describe it as
pressure, squeezing, tightness, aching or
heaviness in the chest. Many heart
attacks start slowly, as mild pain or dis-
comfort. Often the victim feels discom-
fort or pain in the center of the chest
(Fig. 4-2). It may spread to the shoulder,
arm, neck, jaw or back. The discomfort
or pain becomes constant. It is usually
not relieved by resting, changing posi-
46 | CPR/AED for the Professional Rescuer
Arteries of the heart
Unblocked Partially blocked
Completely blocked
Fig. 4-1

7/24/2019 CPR AED textbook compressed
http://slidepdf.com/reader/full/cpr-aed-textbook-compressed 57/100
tion or taking medicine. When interviewing the victim, a
rescuer should ask open-ended questions, such as “Can
you describe the pain for me?” and allow the victim to
respond in his or her own words.
Any chest pain that is severe, lasts longer than 3 to 5
minutes, goes away and comes back or persists even
during rest requires medical care at once. Even people
who have had a previous heart attack may not recognize
the signs and symptoms because each heart attack can
have entirely different signs and symptoms.
● Pain that comes and goes. Some people with coronary
heart disease may have chest pain or pressure that
comes and goes. This type of pain is called angina pec-
toris , a medical term for pain
in the chest. It develops
when the heart needs more
oxygen than it gets because
the arteries leading to it are
too narrow. When a person
with angina is exercising,
excited or emotionally upset,
the heart might not get
enough oxygen. This lack of
oxygen can cause chest dis-
comfort or pain.
A person who knows he or
she has angina may tell you
so. People with angina usually have medicine to take to
stop the pain. Stopping physical activity or easing the dis-
tress and taking the medicine usually ends the discomfort
or pain of angina.
● Trouble breathing. Another signal of a heart attack is
trouble breathing. The victim may be breathing faster
than normal because the body tries to get much-
needed oxygen to the heart.
● Other signs and symptoms. The victim’s skin may be
pale or ashen, especially around the face. The face
also may be damp with sweat. Some people suffering
from a heart attack sweat heavily or feel dizzy. These
signs and symptoms are caused by the stress put on
the body when the heart does not work as it should.
Both men and women experience the most common
signs and symptoms of a heart attack—chest pain or
discomfort. But women are somewhat more likely to
experience some of the other warning signals, particu-
larly shortness of breath, nausea or vomiting and back
or jaw pain. Women also tend to delay telling others
about their signs and symptoms to avoid bothering or
worrying them.
Care for a Heart AttackIf you think someone is having a heart attack—
● Take immediate action and summon advanced medical
personnel.
● Have the victim stop what he or she is doing and rest.
● Loosen any tight or uncomfortable clothing.
● Closely monitor the victim until advanced medical per-
sonnel arrive. Notice any changes in the victim’s
appearance or behavior.
● Comfort the victim.
● If medically appropriate and local protocols or medical
direction permit, give aspirin if the
victim can swallow and has no
known contraindications.
Cardiac Emergencies | 4
Fig. 4-2
REMEMBER :
Take immediate action
if you suspect someone
is having a heart attack.

7/24/2019 CPR AED textbook compressed
http://slidepdf.com/reader/full/cpr-aed-textbook-compressed 58/100
● Assist the victim with his or her prescribed medication
and give emergency oxygen, if it is available and you
are trained to do so.
● Be prepared to give CPR or use an AED.
Cardiac ArrestCardiac arrest is a life-threatening emergency. It may be
caused by a heart attack, electrocution, respiratory
arrest, drowning or other conditions. Cardiac arrest
occurs when the heart stops beating or is beating too
irregularly or weakly to circulate blood effectively. It can
occur suddenly and without warning. In many cases, the
victim may already be experiencing the signs and symp-
toms of a heart attack.
The signs of a cardiac arrest include—
● Unconsciousness.
● No movement or breathing.
● No pulse.
CPR
A victim who is unconscious, not moving or breathing and
has no pulse is in cardiac arrest and needs CPR. CPR is a
combination of rescue breaths and chest compressions.
Summoning advanced medical personnel immediately is
critical for the victim’s survival. If you are trained and an
AED is available, use it according to your local protocol
and in combination with CPR until more advanced med-
ical personnel arrive and take over.
Effective chest compressions are essential for quality
CPR. Effective chest compressions circulate blood to
the victim’s brain and other vital organs. Chest com-
pressions can also increase the likelihood that a suc-
cessful shock can be delivered to a victim suffering a
sudden cardiac arrest, especially if more than 4 min-
utes have elapsed since the victim’s collapse. To
ensure quality CPR (Table 4-1)—
● Chest compressions should be performed at a rate of
about 100 compressions per minute for any victim.
● Chest compressions should be deep. Compress the
chest of an adult about 11 ⁄ 2 to 2 inches, a child about
1-11 ⁄ 2 inches and an infant about 1 ⁄ 2 to 1 inch.
● Let the chest fully recoil to its normal position
after each compression before starting the next
compression.
Continue CPR until another trained rescuer arrives and
takes over, an AED is available and ready to use, you
are too exhausted to continue, the scene becomes
unsafe or you notice an obvious sign of life. When giving
CPR, it is not unusual for the victim’s ribs to break or
cartilage to separate. The victim may vomit and the
scene may be chaotic. As a professional rescuer with a
duty to respond, you need to understand that despite
your best efforts to give quality care, not all victims of
cardiac arrest survive.
48 | CPR/AED for the Professional Rescuer
Aspirin Administration
You may be able to help a conscious victim
who is showing early signs and symptoms of a
heart attack by offering him or her an appro-
priate dose of aspirin when the signs and
symptoms first begin. However, offer aspirin
only if medically appropriate and local
protocols allow and never delay calling
9-1-1 to do this. Always call 9-1-1 as soon as
you recognize the signs and symptoms, and then help the victim to be comfortable before
you give the aspirin.
Then, if the victim is able to take medicine by
mouth, ask the victim—
● Are you allergic to aspirin?
● Do you have a stomach ulcer or stomach
disease?
● Are you taking any blood thinners, such as
Coumadin™ or Warfarin™?
● Have you been told by a doctor not to take
aspirin?
If the victim answers no to all of these ques-
tions, you may offer him or her two chewable
(162-mg) baby aspirins, or up to one 5-grain
(325-mg) adult aspirin tablet with a small
amount of water. Be sure that you only use
aspirin and not Tylenol™, acetaminophen,
Motrin™, Advil™ or ibuprofen, which are
painkillers. Likewise, do not use coated aspirinproducts or products meant for multiple uses
such as cold, fever and headache.
You may also offer these doses of aspirin if
you have cared for the victim and he or she
has regained consciousness and is able to
take the aspirin by mouth.
Note: Rescuers should follow local protocols
or medical directives when applicable.

7/24/2019 CPR AED textbook compressed
http://slidepdf.com/reader/full/cpr-aed-textbook-compressed 59/100
Adult CPRIf an unconscious adult is not moving or breathing and
has no pulse, begin CPR. Give cycles of 30 chest com-
pressions and 2 rescue breaths. Give compressions at
the rate of about 100 compressions per minute. Use two
hands in the center of the chest for compressions.
Compress the chest about 11 ⁄ 2 to 2 inches. Let the chest
fully recoil to its normal position after each compression.
For additional information on Adult CPR, refer to CPR—
Adult and Child Skill Sheet, pages 52-53.
Child and Infant CPRCPR for children and infants is similar to the technique
used for adults but is modified because of their smaller
body sizes. Cardiac arrest in children and infants is usu-
ally caused by a respiratory emergency. If you recognize
that a child or infant is in respiratory distress or arrest,
provide care immediately. If cardiac arrest occurs, begin
CPR. Give cycles of 30 chest compressions and 2 rescue
breaths. Give compressions at the rate of about 100 com-
pressions per minute. For a child, use two hands on the
center of the chest for compressions. For an infant, use
2 or 3 fingers on the center of the chest, just below the
nipple line for compressions. Compress the chest about
1 to 11 ⁄ 2 inches for a child and about 1 ⁄ 2 to 1 inch for an
infant. Let the chest fully recoil to its normal position after
each compression.
For additional information on Child and Infant CPR,
refer to CPR—Adult and Child Skill Sheet, pages 52-53 or
CPR—Infant Skill Sheet, pages 54-55.
Two-Rescuer CPRWhen an additional rescuer is available, provide two-
rescuer CPR. One rescuer gives rescue breaths and the
other rescuer gives chest compressions. When providing
two-rescuer CPR to an adult, rescuers should perform 30
compressions and 2 rescue breaths during each cycle.
When performing two-rescuer CPR on a child or infant,
rescuers should change the compression to ventilation
ratio to 15:2. This provides more frequent respiration for
children and infants. Professional rescuers should
change positions (alternate turns giving compressions
Cardiac Emergencies | 4
TABLE 4-1 SUMMARY OF TECHNIQUES FOR ADULT, CHILD AND INFANT CPR
Adult Child Infant
Hand Position: Two hands on the center Two hands or one hand Two or three fingers onof the chest on the center of the the center of the chest
chest. (just below the nipple line)
Compress: About 11 ⁄ 2-2 inches About 1-11 ⁄ 2 inches About 1 ⁄ 2 -1 inch
Breathe: Until chest clearly rises Until chest clearly rises Until chest clearly rises(about 1 second per (about 1 second per (about 1 second per
breath) breath) breath)
Cycle: 30 compressions 30 compressions 30 compressions(1 rescuer) 2 breaths 2 breaths 2 breaths
Cycle: 30 compressions 15 compressions 15 compressions(2 rescuers) 2 breaths 2 breaths 2 breaths
Rate: About 100 compressions About 100 compressions About 100 compressions
per minute per minute per minute

7/24/2019 CPR AED textbook compressed
http://slidepdf.com/reader/full/cpr-aed-textbook-compressed 60/100
and breaths) every 2 minutes for an adult, child or infant.
Changing positions should take less than 5 seconds.
When providing two-rescuer CPR to an infant, rescuers
should perform the two-thumb-encircling-hands chest
compression technique with thoracic squeeze. Perform
two-rescuer CPR in the following situations:
● Two rescuers arrive on the scene at the same time and
begin CPR together
● One rescuer is giving CPR and a second rescuer
becomes available
When CPR is in progress by one rescuer and a second
rescuer arrives, the second rescuer should ask whether
advanced medical personnel have been summoned.
If advanced medical personnel have not been sum-
moned, the second rescuer should do so before getting
the AED or assisting with care. If advanced medical
personnel have been summoned, the second rescuer
should get the AED or if an AED is not available the
second rescuer should help perform two-rescuer CPR.
For additional information on two-rescuer CPR, refer
to Two-Rescuer CPR—Adult and Child Skill Sheet,
pages 56-57 and Two-Rescuer CPR—Infant Skill Sheet,
pages 58-60.
CPR—Special SituationsProfessional rescuers should continue CPR without inter-
ruptions for as long as possible. They should limit any
interruptions to only seconds, except for specific inter-
ventions, such as insertion of an advanced airway or use
of a defibrillator. You may have to move a victim to give
CPR:
● In a stairwell, move the victim to a flat area at the head
or foot of the stairs to perform CPR (do not interrupt
CPR for longer than about 30 seconds).
● Do not interrupt CPR while a victim is being transferred
to an ambulance or into the emergency department.
50 | CPR/AED for the Professional Rescuer
REMEMBER :
When CPR is in progress by onerescuer and a second rescuerarrives, the second rescuershould ask whether advancedmedical personnel have beensummoned. If advanced med-ical personnel have not beensummoned, the second rescuershould do so before getting theAED or assisting with care.

7/24/2019 CPR AED textbook compressed
http://slidepdf.com/reader/full/cpr-aed-textbook-compressed 61/100
AUTOMATED EXTERNALDEFIBRILLATION
Each year, approximately 500,000 Americans die of car-
diac arrest. CPR started promptly can help by keeping
blood containing oxygen flowing to the brain and other
vital organs. However, in many cases, CPR alone cannot
correct the underlying heart problem. An automated
external defibrillator (AED) is needed to correct the
problem. An AED is an automated device that recognizes
a heart rhythm that requires a shock. It can then charge
itself and prompt the operator to deliver a life-saving
shock to the victim by pressing a button. For additional
information on AEDs, refer to Chapter 5, AEDs, page 61.
ADMINISTERING EMERGENCY OXYGEN
The normal concentration of oxygen in the air is approxi-
mately 21 percent. Under normal conditions, this is more
than enough oxygen to sustain life. However, when
serious injury or sudden illness occurs, the body does not
function properly and can benefit from emergency
oxygen. Emergency oxygen provides a substantially
higher oxygen concentration, in some cases nearly 100
percent, to the victim. A higher concentration of oxygen
being delivered to a victim can help counter the effects of
a life-threatening injury or illness to the body. The
American Red Cross offers optional training in the use of
emergency oxygen. For additional information on admin-
istering emergency oxygen, refer to Chapter 6,
Emergency Oxygen, page 73.
PUTTING IT ALL TOGETHER
As a professional rescuer, you should be able to recog-
nize and respond to cardiac emergencies. You should
understand the importance of the four links of the Cardiac
Chain of Survival: early recognition of the emergency and
early access to EMS, early CPR, early defibrillation and
early advanced medical care. You should be able to rec-
ognize and care for the signs and symptoms of a heart
attack. You also should know how to recognize and care
for a victim of cardiac arrest.
Cardiac Emergencies | 5

7/24/2019 CPR AED textbook compressed
http://slidepdf.com/reader/full/cpr-aed-textbook-compressed 62/100
52 | CPR/AED for the Professional Rescuer
Complete Steps 1-6, Initial Assessment Skill Sheet,
pages 28-30.
STEP 7Find the correct hand position to give compressions.
● Place the heel of one hand on the center of the
chest.
● Place the other hand on top.
STEP 8Give 30 chest compressions.
● For an adult, compress the chest about 11 ⁄ 2 to
2 inches
● For a child, compress the chest about 1 to 11 ⁄ 2
inches.
● Let the chest fully recoil to its normal position
after each compression.
● Compress at a rate of about 100 compressions per
minute.
Skill Sheet | CPR—Adult and Child
Step 7
Step 8
PROFESSIONAL RESCUER TIPS:
• Keep your fingers off the chest when giving compressions.
• Use your body weight, not your arms, to compress the chest.
• Position your shoulders over your hands with your elbows locked.
• Counting out loud helps keep an even pace.
• You can also use one hand to compress the chest of a child. If you are using one hand, place one
hand on the center of the child’s chest and the other hand on the child’s forehead.
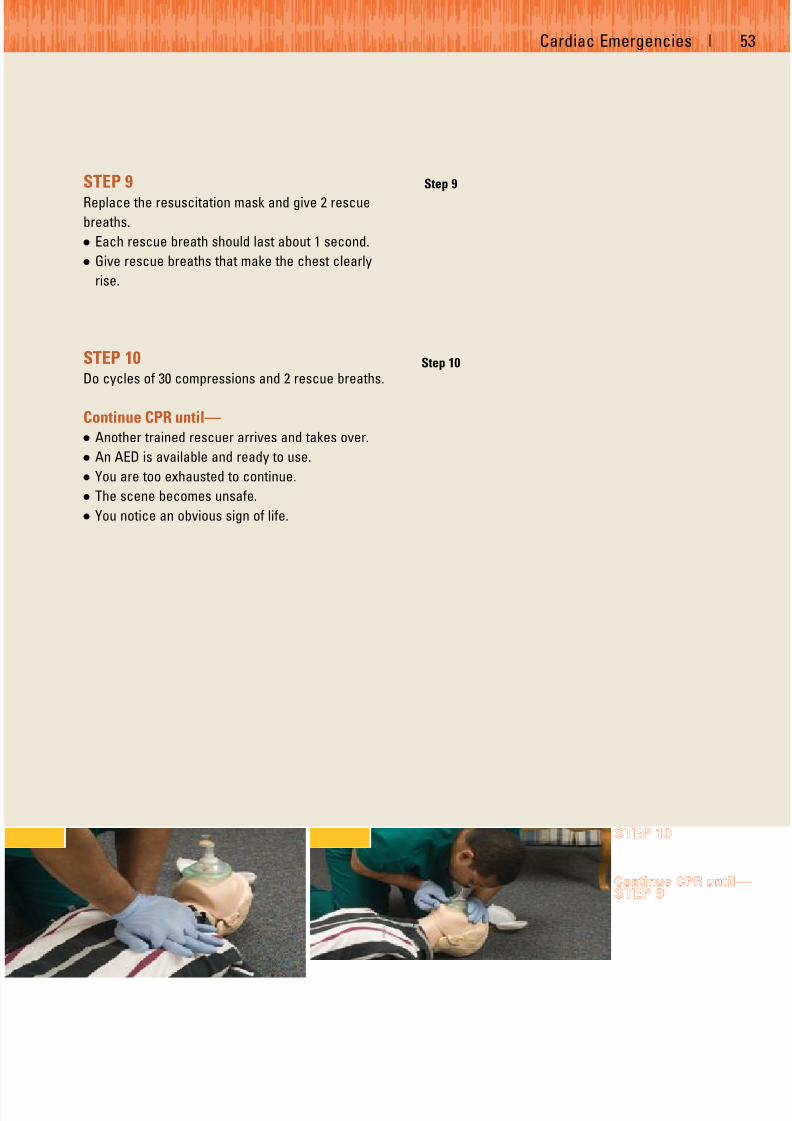
7/24/2019 CPR AED textbook compressed
http://slidepdf.com/reader/full/cpr-aed-textbook-compressed 63/100
STEP 9Replace the resuscitation mask and give 2 rescue
breaths.
● Each rescue breath should last about 1 second.
● Give rescue breaths that make the chest clearly
rise.
STEP 10Do cycles of 30 compressions and 2 rescue breaths.
Continue CPR until—● Another trained rescuer arrives and takes over.
● An AED is available and ready to use.
● You are too exhausted to continue.
● The scene becomes unsafe.
● You notice an obvious sign of life.
Step 9
Step 10
Cardiac Emergencies | 5

7/24/2019 CPR AED textbook compressed
http://slidepdf.com/reader/full/cpr-aed-textbook-compressed 64/100
54 | CPR/AED for the Professional Rescuer
Complete Steps 1-6, Initial Assessment Skill Sheet,
pages 28-30.
STEP 7
Find the correct hand position to give compressions.● Put 2 or 3 fingers on the center of the chest just
below the nipple line.
● Keep one hand on the infant’s forehead to main-
tain an open airway.
STEP 8Give 30 chest compressions.
● Compress the chest about 1 ⁄ 2 - 1 inch.
● Let the chest fully recoil to its normal position
after each compression.
● Compress at a rate of about 100 compressions per
minute.
Skill Sheet | CPR—Infant
Step 7
Step 8
PROFESSIONAL RESCUER TIP:
• Counting out loud helps keep an even pace.
PROFESSIONAL RESCUER TIP:
Place the infant on his or her back on a firm, flat surface, such as the floor or a table.
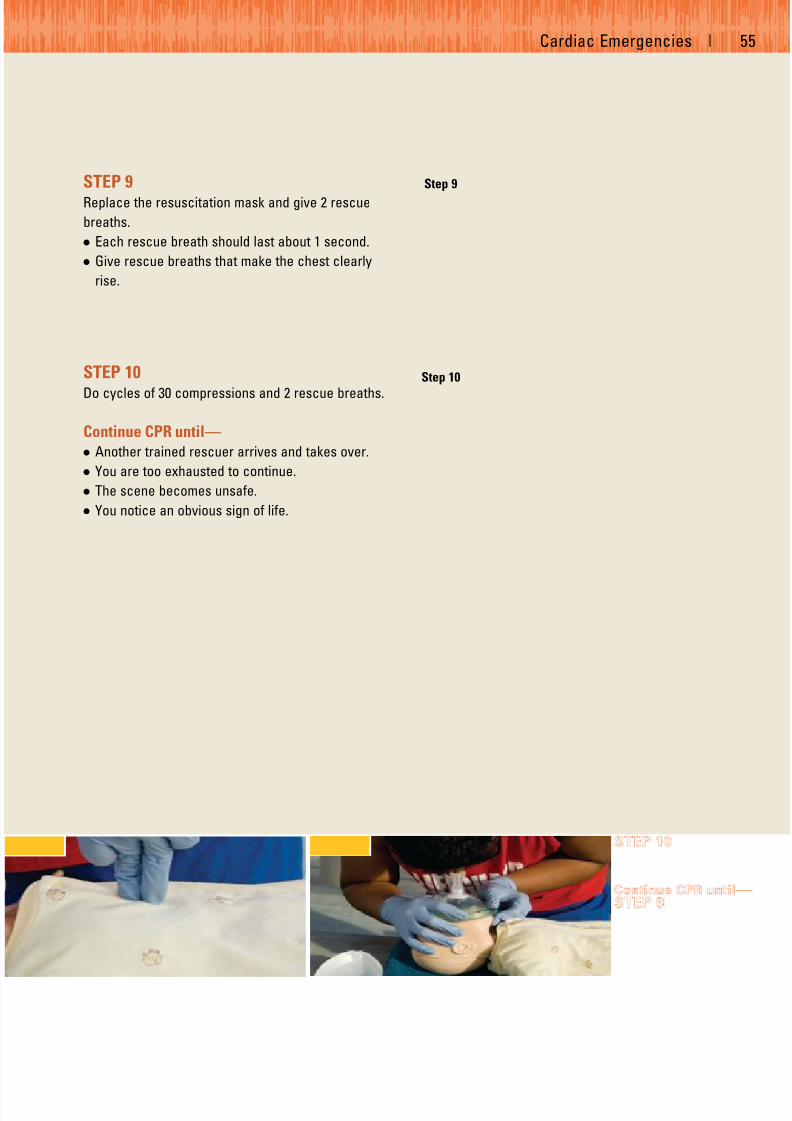
7/24/2019 CPR AED textbook compressed
http://slidepdf.com/reader/full/cpr-aed-textbook-compressed 65/100
STEP 9Replace the resuscitation mask and give 2 rescue
breaths.
● Each rescue breath should last about 1 second.
● Give rescue breaths that make the chest clearly
rise.
STEP 10
Do cycles of 30 compressions and 2 rescue breaths.
Continue CPR until—
● Another trained rescuer arrives and takes over.
● You are too exhausted to continue.
● The scene becomes unsafe.
● You notice an obvious sign of life.
Step 9
Step 10
Cardiac Emergencies | 5

7/24/2019 CPR AED textbook compressed
http://slidepdf.com/reader/full/cpr-aed-textbook-compressed 66/100
56 | CPR/AED for the Professional Rescuer
Rescuer 1 completes Steps 1-6, Initial Assessment
Skill Sheet, pages 28-30.
STEP 7Rescuer 2 finds the correct hand position to give
compressions.
● Places the heel of one hand on the center of the
chest.
● Places the other hand on top.
STEP 8Rescuer 2 gives chest compressions.
● Gives compressions when Rescuer 1 says “Victim
has no pulse. Begin CPR.”
● Adult: 30 compressions, compress the chest
about 11 ⁄ 2 to 2 inches
● Child: 15 compressions, compress the chest
about 1 to 11 ⁄ 2 inches
● Lets the chest fully recoil to its normal position
after each compression.
● Compresses at a rate of about 100 compressions
per minute.
Skill Sheet | Two-Rescuer CPR—Adult and Child
Step 8
PROFESSIONAL RESCUER TIPS:
• Keep your fingers off the chest when giving compressions.
• Use your body weight, not your arms, to compress the chest.
• Position your shoulders over your hands with your elbows locked.
• Counting out loud helps keep an even pace.
• You can also use one hand to compress the chest of a child. If you are using one hand, place one
hand on the center of the child’s chest and the other hand on the child’s forehead.

7/24/2019 CPR AED textbook compressed
http://slidepdf.com/reader/full/cpr-aed-textbook-compressed 67/100
STEP 9Rescuer 1 replaces the mask and gives 2 rescue
breaths.
● Each rescue breath should last about 1 second.
● Gives rescue breaths that make the chest clearly
rise.
STEP 10Do about 2 minutes of compressions and breaths.
● Adult: cycles of 30 compressions and 2 rescue
breaths
● Child: cycles of 15 compressions and 2 rescue
breaths
STEP 11Change positions.
● Rescuer 2 calls for a position change by using the
word “change” at the end of the last compression
cycle.
● Rescuer 1 gives 2 rescue breaths.
● Rescuer 2 moves to the victim’s head with his or
her own mask.
● Rescuer 1 moves into position at the victim’s
chest and locates correct hand position on the
victim’s chest.
● Changing positions should take less than 5 seconds.
STEP 12
Rescuer 1 gives chest compressions.
● Continue cycles of compressions and rescue
breaths.
Continue CPR until—
● Another trained rescuer arrives and takes over.
● An AED is available and ready to use.
● You are too exhausted to continue.
● The scene becomes unsafe.
● You notice an obvious sign of life.
Step 9
Step 12
Cardiac Emergencies | 5

7/24/2019 CPR AED textbook compressed
http://slidepdf.com/reader/full/cpr-aed-textbook-compressed 68/100
58 | CPR/AED for the Professional Rescuer
Skill Sheet | Two-Rescuer CPR—Infant
Rescuer 1 completes Steps 1-6, Initial Assessment
Skill Sheet, pages 28-30.
STEP 7Rescuer 2 finds the correct hand position to give
compressions.
● Place thumbs next to each other on the center of
the chest just below the nipple line.
● Place both hands underneath the infant’s back
and support the infant’s back with your fingers.
● Ensure that your hands do not compress or
squeeze the side of the ribs.
● If available, a towel or padding can be placed
underneath the infant’s shoulders to help maintain
the head in the neutral position.
STEP 8Rescuer 2 gives 15 chest compressions.
● Give compressions when Rescuer 1 says “Victim
has no pulse, begin CPR.”
● Use both thumbs to compress the chest about1 ⁄ 2 - 1 inch at a rate of about 100 compressions per
minute.
● Let the chest fully recoil to its normal position
after each compression.
Step 7
Step 8
PROFESSIONAL RESCUER TIP:
• Counting out loud helps keep an even pace.

7/24/2019 CPR AED textbook compressed
http://slidepdf.com/reader/full/cpr-aed-textbook-compressed 69/100
Cardiac Emergencies | 5
STEP 9Rescuer 1 replaces the mask and gives 2 rescue
breaths.
● Each rescue breath should last about 1 second.
● Gives rescue breaths that make the chest clearly
rise.
STEP 10Do cycles of 15 chest compressions and 2 rescue
breaths.
STEP 11Change positions.
● Rescuer 2 calls for a position change by using the
word “change” in place of the word “15” in the
last compression cycle.
● Rescuer 1 gives 2 rescue breaths.
● Rescuer 2 moves to the infant’s head with his or
her own mask.
● Rescuer 1 moves into position and locates correct
finger placement on the infant’s chest.
● Changing positions should take less than 5 seconds.
Step 9
Continued

7/24/2019 CPR AED textbook compressed
http://slidepdf.com/reader/full/cpr-aed-textbook-compressed 70/100
60 | CPR/AED for the Professional Rescuer
Skill Sheet | Two-Rescuer CPR—Infant—cont’d
STEP 12Rescuer 1 gives chest compressions.
● Continue cycles of 15 compressions and 2 rescue
breaths.
Continue CPR until—
● Another trained rescuer arrives and takes over.
● You are too exhausted to continue.
● The scene becomes unsafe.
● You notice an obvious sign of life.
Step 12

7/24/2019 CPR AED textbook compressed
http://slidepdf.com/reader/full/cpr-aed-textbook-compressed 71/100
Chapter 5
Automated External Defibrillation
WOULD YOU KNOW WHAT TO DO?
A woman suddenly collapses while run-
ning laps. She is lying on the track’s sur-
face and does not appear to be moving.
You recognize the emergency and perform
an initial assessment. You determine that
she is unconscious, not moving or
breathing and has no pulse. The facility
has an automated external defibrillator
(AED). How would you respond? Would
you know what to do?
61

7/24/2019 CPR AED textbook compressed
http://slidepdf.com/reader/full/cpr-aed-textbook-compressed 72/100
Each year, approximately 500,000 Americans die of car-
diac arrest. When started promptly cardiopulmonary
resuscitation (CPR) can help by supplying oxygen to the
brain and other vital organs. However, in many cases,
CPR by itself cannot correct the underlying heart
problem. An AED is needed to correct the problem and
return the heart to a normal rhythm (Fig. 5-1). AEDs pro-
vide an electrical shock to the heart, called defibrillation.
The sooner the shock is administered, the greater the
likelihood of the victim’s survival. Professional rescuers
must assess victims quickly and be prepared to use an
AED in cases of cardiac arrest. This chapter covers the
basic principles of how AEDs work and how to use them.
THE HEART’S ELECTRICAL SYSTEM
The heart’s electrical system controls the pumping action
of the heart. Under normal conditions, specialized cells of
the heart initiate and transmit electrical impulses. These
cells make up the conduction system . Electrical impulses
travel through the upper chambers of the heart, called
the atria, to the lower chambers of the heart, called the
ventricles (Fig. 5-2).
The normal point of origin of the electrical impulse is
the sinoatrial (SA) node above the atria. This impulse
travels to a point midway between the atria and ventri-
cles. This point is called the atrioventricular (AV) node .
The pathway divides after the AV node into two
branches, then into the right and left ventricles. These
right and left branches become a network of fibers,
called Purkinje fibers , which spread electrical impulses
across the heart. Under normal conditions, this impulse
reaches the muscular walls of the ventricles and causes
the ventricles to contract. This contraction forces blood
out of the heart to circulate through the body. The con-
traction of the left ventricle results in a pulse. The pauses
between the pulse beats are the periods between con-
tractions. When the heart muscles contract, blood is
forced out of the heart. When they relax, blood refills the
chambers.
Electrical activity of the heart can be evaluated with a
cardiac monitor or electrocardiograph. Electrodes attached
to an electrocardiograph pick up electrical impulses and
transmit them to a monitor. This graphic record is referred
to as an electrocardiogram (ECG) . Heart rhythms appear on
an ECG as a series of peaks and valleys.
WHEN THE HEART STOPS
Any damage to the heart from disease or injury can disrupt
the heart’s electrical system. This disruption can result in
an abnormal heart rhythm that can stop circulation. The
two most common treatable abnormal rhythms initially
present in sudden cardiac arrest victims are ventricular
fibrillation (V-fib) and ventricular tachycardia (V-tach) .
V-fib is a state of totally disorganized electrical activity in
the heart. It results in fibrillation, or quivering, of the ventri-
cles. In this state, the ventricles cannot pump blood and
there is no movement or breathing and no pulse. V-tach is
a very rapid contraction of the ventricles. Though there is
electrical activity resulting in a regular rhythm, the rate is
often so fast that the heart is unable to pump blood prop-
erly. As with V-fib, there is no movement or breathing and
no pulse.
DEFIBRILLATION
In many cases, V-fib and V-tach rhythms can be cor-
rected by early defibrillation. Delivering an electrical
shock with an AED disrupts the electrical activity of V-fib
and V-tach long enough to allow the heart to sponta-
neously develop an effective rhythm on its own. If V-fib
or V-tach is not interrupted, all electrical activity will
eventually cease, a condition called asystole . Asystole
cannot be corrected by defibrillation. Remember that you
cannot tell what, if any, rhythm the heart has by feeling
for a pulse. CPR, started immediately and continued until
defibrillation, helps maintain a low level of circulation in
the body until the abnormal rhythm can be corrected by
defibrillation.
62 | CPR/AED for the Professional Rescuer
Fig. 5-1
SA node
AV node
Atria
Ventricles
Fig. 5-2

7/24/2019 CPR AED textbook compressed
http://slidepdf.com/reader/full/cpr-aed-textbook-compressed 73/100
AEDS AND THE CARDIAC CHAIN OFSURVIVAL
To effectively respond to cardiac emergencies, it helps
to understand the importance of the Cardiac Chain
of Survival. The four links in the cardiac chain of
survival are—
1. Early recognition of the emergency and early access
to emergency medical services (EMS). The sooner
more advanced medical personnel or the local emer-
gency number is called, the sooner EMS personnel
arrive and take over.
2. Early CPR. CPR helps supply oxygen to the brain and
other vital organs to keep the victim alive until an AED
is used or advanced medical care is given.
3. Early defibrillation. An electrical shock called defib-
rillation may restore a normal heart rhythm. Each
minute defibrillation is delayed reduces the victim’s
chance of survival by about 10 percent.
4. Early advanced medical care. EMS personnel provide
more advanced medical care and transport the victim
to the hospital.
USING AN AED—ADULT
When a cardiac arrest occurs, an AED should be used as
soon as it is available and ready to use. If the AED
advises that a shock is needed, the responder should
follow protocols to provide 1 shock followed by 5 cycles
(about 2 minutes) of CPR.
After a shock is delivered or if no shock is indicated,
give 5 cycles (about 2 minutes) of CPR before analyzing
the heart rhythm again. If, at any time, you notice
an obvious sign of life, stop CPR and monitor airway,
breathing and circulation (ABCs). Administer
emergency oxygen, if it is available and you are
trained to do so.
For additional information on using an AED, refer to:
● Using an AED—Adult and Child Skill Sheet, pages
67-69.
● Using an AED—Adult and
Child, CPR in Progress Skill
Sheet, pages 70-72.
USING AN AED—CHILD
While the incidence of cardiac
arrest in children is relatively low
compared with adults, cardiac
arrest resulting from
V-fib does happen to young chil-
dren. Most cardiac arrests in
children are not sudden. Possible causes of cardiac arrest
in children are—
● Airway and breathing problems.
● Traumatic injuries or accidents (e.g., automobile,
drowning, electrocution or poisoning).
● A hard blow to the chest.
● Congenital heart disease.
AEDs equipped with pediatric AED pads are capable of
delivering levels of energy to children between 1 and 8
years old or weighing less than 55 pounds. Use pediatric
AED pads and/or equipment if available. If pediatric-spe-
cific equipment is not available, an AED designed for
adults may be used on a child. Always follow local proto-
cols and manufacturer’s instructions. For a child in cardiac
arrest, follow the same general steps and precautions that
you would follow when using an AED on an adult.
After a shock is delivered or if no shock is indicated,
give 5 cycles (about 2 minutes) of CPR before analyzing
the heart rhythm again. If, at any time, you notice an
obvious sign of life, stop CPR and monitor the ABCs.
Administer emergency oxygen, if it is available and you
are trained to do so.
For additional information on using an AED, refer to—
● Using an AED—Adult and Child Skill Sheet, pages
67-69.
● Using an AED—Adult and Child, CPR in Progress Skill
Sheet, pages 70-72.
AED PRECAUTIONS
● Do not touch the victim while defibrillating. You or
someone else could be shocked.
● Before shocking a victim with an AED, make sure that
no one is touching or is in contact with the victim or
the resuscitation equipment.
● Do not touch the victim while the
AED is analyzing. Touching or
moving the victim may affect the
analysis.
Automated External Defibrillation | 6
REMEMBER :
When a cardiac arrest
occurs, an AED should be
used as soon as it is
available and ready to use.

7/24/2019 CPR AED textbook compressed
http://slidepdf.com/reader/full/cpr-aed-textbook-compressed 74/100
● Do not use alcohol to wipe the victim’s chest dry.
Alcohol is flammable.
● Do not defibrillate someone when around flammable or
combustible materials such as gasoline or free-flowing
oxygen.
● Do not use an AED in a moving vehicle. Movement may
affect the analysis.
● Do not use an AED on a victim who is in contact with
water. Move the victim away from puddles of water or
swimming pools, or out of the rain before defibrillating.
● Do not use an AED and/or pads designed for adults on a
child under age 8 or less than 55 pounds, unless pedi-
atric pads specific to the device are not available. Local
protocols may differ on this and should be followed.
● Do not use pediatric AED pads on an adult, as they may
not deliver enough energy for defibrillation.
● Do not use an AED on a victim wearing a nitroglycerin
patch or other patch on the chest. With a gloved hand,
remove any patches from the chest before attaching
the device.
● Do not use a mobile phone or radio within 6 feet of the
AED. This may interrupt analysis.
AEDs—SPECIAL SITUATIONS
Some situations require professional rescuers to pay
special attention when using an AED. These include
using AEDs around water, AED use on victims with
implantable devices or nitroglycerin patches and using
an AED on victims of trauma or hypothermia. Be familiar
with these situations and know how to respond appropri-
ately. Always use common sense when using an AED and
follow manufacturer’s recommendations.
AEDs Around WaterIf the victim was removed from the water, be sure there
are no puddles of water around you, the victim or the
AED. Remove wet clothing for proper pad placement if
necessary. Dry the victim’s chest and attach the AED.
If it is raining, ensure that the victim is as dry as pos-
sible and sheltered from the rain. Wipe the victim’s chest
dry. Minimize delaying defibrillation, though, when taking
steps to provide for a dry environment. The electrical cur-
rent of an AED is very directional between the pads. AEDs
are very safe, even in rain and snow, when all precautions
and manufacturer’s operating instructions are followed.
AEDs and Implantable DevicesSometimes people may have had a pacemaker implanted
if they have a weak heart or a heart that skips beats, or
beats too slow or fast. These small implantable devices
are sometimes located in the area below the right collar-
bone. There may be a small lump that can be felt under
the skin. Sometimes the pacemaker is placed somewhere
else. Other people may have an implantable cardioverter-
defibrillator (ICD), a miniature version of an AED, which
acts to automatically recognize and restore abnormal
heart rhythms. Sometimes, a victim’s heart beats irregu-
larly, even if the victim has a pacemaker or ICD.
If the implanted device is visible or you know that the
victim has an implanted device, do not place the defibril-
lation pad directly over the device (Fig. 5-3). This may
interfere with the delivery of the shock. Adjust pad place-
ment if necessary and continue to follow the established
protocol. If you are not sure, use the AED if needed. It will
not harm the victim or rescuer.
Nitroglycerin PatchesPeople with a history of cardiac problems may have nitro-
glycerin patches on their chests. Since nitroglycerin can
be absorbed by a rescuer, you should remove the patch
with a gloved hand before defibrillation. Nicotine patches
used to stop smoking look similar to nitroglycerin
patches. In order not to waste time trying to identify
patches, remove any patch you see on the victim’s chest
with a gloved hand. (Fig. 5-4)
64 | CPR/AED for the Professional Rescuer
Fig. 5-3
Fig. 5-4
P h o t o
c o u r t e s y o f M e d t r o n i c

7/24/2019 CPR AED textbook compressed
http://slidepdf.com/reader/full/cpr-aed-textbook-compressed 75/100

7/24/2019 CPR AED textbook compressed
http://slidepdf.com/reader/full/cpr-aed-textbook-compressed 76/100
66 | CPR/AED for the Professional Rescuer
AED Algorithm for the Professional Rescuer
Note: As long as there is no obvious sign of life and the AED still indicates a need to shock, continue
repeating sets of 1 shock to the maximum your local protocols allow, with 5 cycles (about 2 minutes) of
CPR between each set. Also, as long as there is no obvious sign of life and the AED indicates that no shock is advised, you should still continue to give 5 cycles (about 2 minutes) of CPR before the AED
reanalyzes. Be thoroughly familiar with your local protocols, which may vary from this example.
AED Available
Analyze
Shockable
Give 1 shock
Resume 5 cyclesor about 2 minutes
of CPR
Resume 5 cycles or about 2 minutes of CPR
Non-shockable
Analyze
Resume 5 cyclesor about 2 minutes
of CPR
Shockable
Give 1 shock
Non-shockable
Resume 5 cycles or about 2 minutes of CPR

7/24/2019 CPR AED textbook compressed
http://slidepdf.com/reader/full/cpr-aed-textbook-compressed 77/100
Complete Steps 1-6, Initial Assessment Skill Sheet,
pages 28-30.
STEP 7Turn on the AED.
STEP 8Wipe the chest dry.
STEP 9Attach the pads.
● Place one pad on the victim’s upper right chest.
● Place the other pad on the victim’s lower left
side (A).
● For a child, use pediatric AED pads if available.
Make sure the pads are not touching.
Automated External Defibrillation | 6
Skill Sheet | Using an AED—Adult and Child
Continued
Step 7
Step 8
Step 9 A

7/24/2019 CPR AED textbook compressed
http://slidepdf.com/reader/full/cpr-aed-textbook-compressed 78/100
Skill Sheet | Using an AED—Adult and Child—cont’d
● If the pads risk touching each other on a child,
place one pad on the child’s chest and the other
pad on the child’s back (between the shoulder
blades) (B,C).
STEP 10Plug the connector into the AED, if necessary.
68 | CPR/AED for the Professional Rescuer
Step 10
Step 9 B
Step 9 C
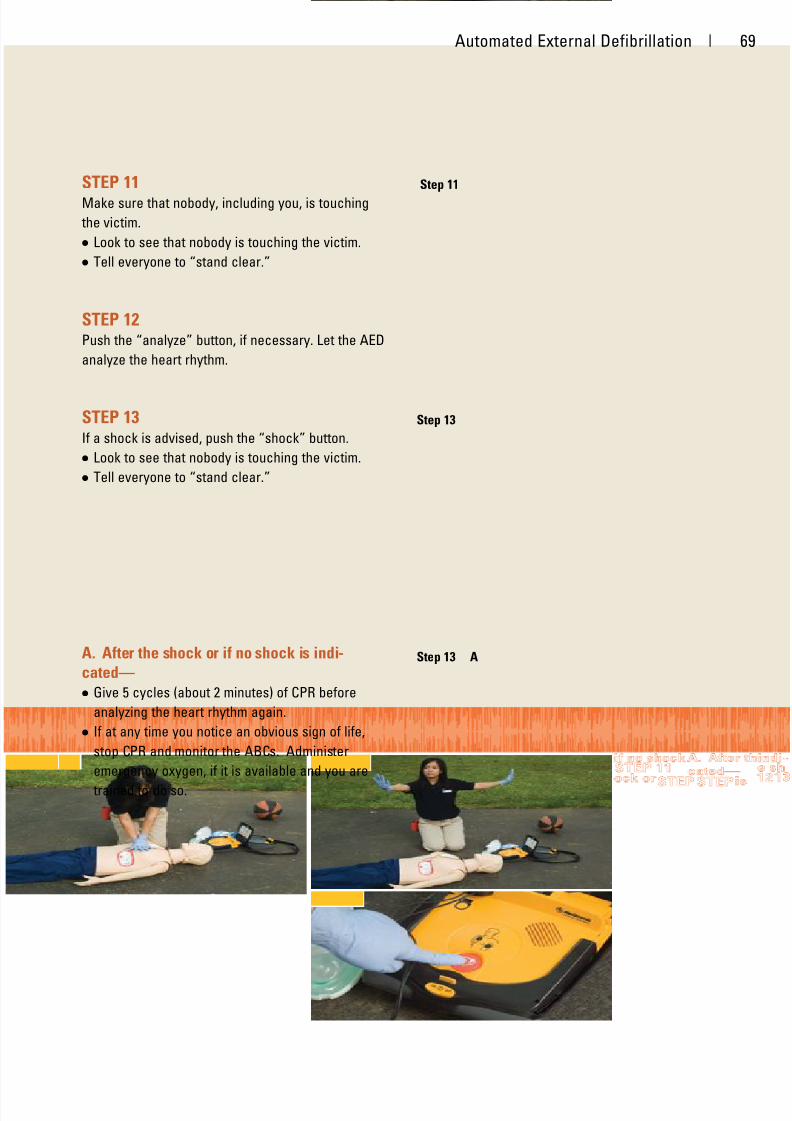
7/24/2019 CPR AED textbook compressed
http://slidepdf.com/reader/full/cpr-aed-textbook-compressed 79/100

7/24/2019 CPR AED textbook compressed
http://slidepdf.com/reader/full/cpr-aed-textbook-compressed 80/100
Skill Sheet | Using an AED—Adult and Child, CPR in Progress
Rescuer 1 completes Steps 1-6, Initial Assessment
Skill Sheet, pages 28-30, and begins CPR until
Rescuer 2 arrives with an AED and the AED is
ready to use.
Rescuer 2 completes steps 7-13 below.
STEP 7Turn on the AED.
STEP 8Wipe the chest dry.
STEP 9Attach the pads.
● Place one pad on the victim’s upper right
chest (A).
● Place the other pad on the victim’s lower left side.
● For a child, use pediatric AED pads if available.
Make sure the pads are not touching.
70 | CPR/AED for the Professional Rescuer
Step 7
Step 8
Step 9 A

7/24/2019 CPR AED textbook compressed
http://slidepdf.com/reader/full/cpr-aed-textbook-compressed 81/100
● If the pads risk touching each other on a child,
place one pad on the child’s chest and the other
pad on the child’s back (between the shoulder
blades) (B,C).
STEP 10Plug the connector into the AED, if necessary.
Automated External Defibrillation | 7
Step 10
Continued
Step 9 B
Step 9 C
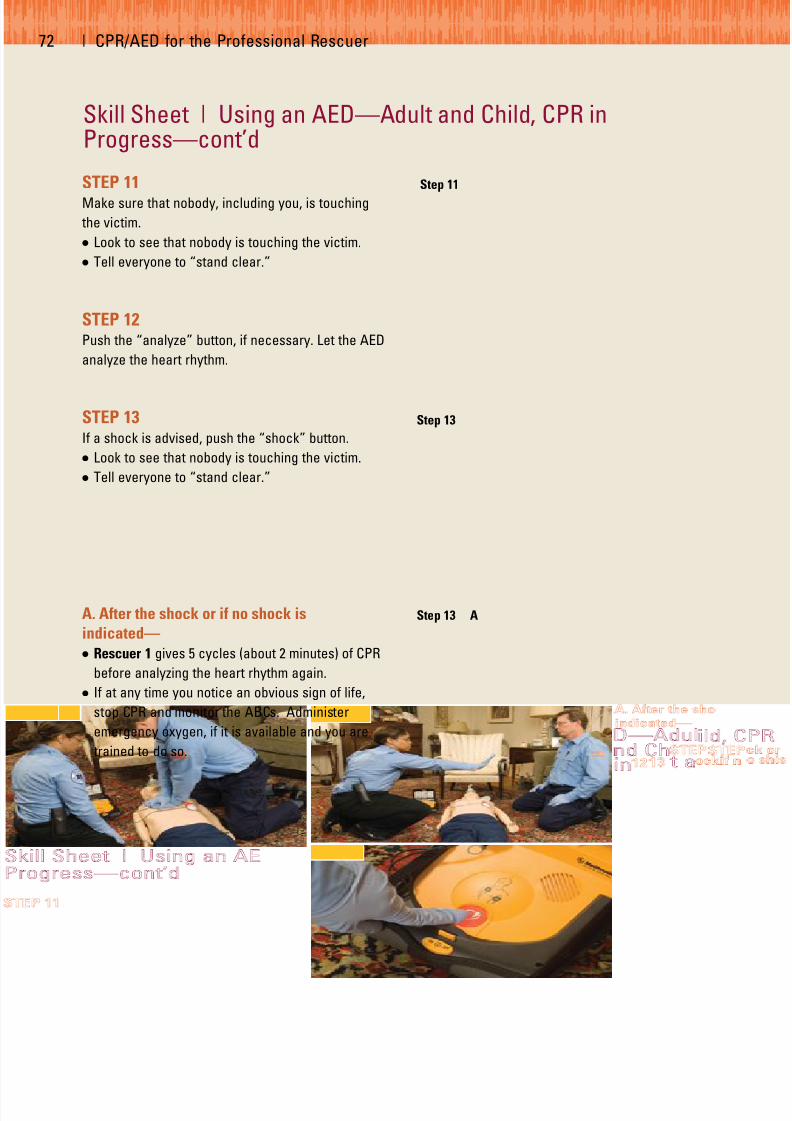
7/24/2019 CPR AED textbook compressed
http://slidepdf.com/reader/full/cpr-aed-textbook-compressed 82/100
Skill Sheet | Using an AED—Adult and Child, CPR inProgress—cont’d
STEP 11Make sure that nobody, including you, is touching
the victim.
● Look to see that nobody is touching the victim.
● Tell everyone to “stand clear.”
STEP 12Push the “analyze” button, if necessary. Let the AED
analyze the heart rhythm.
STEP 13If a shock is advised, push the “shock” button.
● Look to see that nobody is touching the victim.
● Tell everyone to “stand clear.”
A. After the shock or if no shock is
indicated—
● Rescuer 1 gives 5 cycles (about 2 minutes) of CPR
before analyzing the heart rhythm again.
● If at any time you notice an obvious sign of life,
stop CPR and monitor the ABCs. Administer
emergency oxygen, if it is available and you are
trained to do so.
72 | CPR/AED for the Professional Rescuer
Step 11
Step 13
Step 13 A

7/24/2019 CPR AED textbook compressed
http://slidepdf.com/reader/full/cpr-aed-textbook-compressed 83/100
Chapter 6
Administering Emergency Oxygen
WOULD YOU KNOW WHAT TO DO?
A 45-year-old man is having difficulty
breathing and complains of shortness of
breath. He says it started about 30 minutes
ago. His breathing has become labored,
and he is gasping for breath. You recog- nize he has a serious condition. How
would you respond? Would you know
what to do?
73

7/24/2019 CPR AED textbook compressed
http://slidepdf.com/reader/full/cpr-aed-textbook-compressed 84/100
In this situation, professional rescuers should use emer-
gency oxygen to help the victim. By using emergency
oxygen, you can give care to injured or ill victims until
more advanced medical personnel arrive and take over.
Oxygen helps victims of respiratory distress and should be
used when caring for victims of respiratory arrest as well.
EMERGENCY OXYGEN
When someone has a breathing emergency or cardiac
emergency, the supply of oxygen to his or her brain, heart
and blood cells is reduced, resulting in hypoxia. Hypoxia
is a condition in which insufficient oxygen reaches the
cells. Signs and symptoms of hypoxia include increased
breathing and heart rates, changes in consciousness,
restlessness, chest pain and cyanosis (bluish lips and nail
beds). If breathing stops (respiratory arrest), the brain
and heart will soon be starved of oxygen, resulting in car-
diac arrest and then death.
The air you normally breathe is about 21 percent oxygen.
When you give rescue breaths or provide CPR, the air you
exhale into the victim is about 16 percent oxygen. This may
not be enough oxygen to save the victim’s life. By adminis-
tering emergency oxygen (Fig. 6-1), you can deliver a
higher percentage of oxygen.
Emergency oxygen can be given for just about any
breathing or cardiac emergency. If a person is breathing
but has no obvious signs or symptoms of injury or illness,
emergency oxygen should be considered if—
● An adult is breathing fewer than 12 breaths per minute
or more than 20 breaths per minute.
● A child is breathing fewer than 15 breaths per minute
or more than 30 breaths per minute.
● An infant is breathing fewer than 25 breaths per minute
or more than 50 breaths per minute.
Oxygen should be delivered with properly sized equip-
ment for the respective victims and appropriate flow
rates for the delivery device.
Variable-Flow-Rate OxygenMany EMS systems use variable-flow-rate oxygen.
Variable-flow-rate oxygen systems allow the rescuer to
vary the flow of oxygen. Because of the large amount of
oxygen EMS systems deliver and the variety of equipment
and emergency situations they respond to, variable-flow-
rate oxygen is practical. To deliver variable-flow-rate
emergency oxygen, the following pieces of equipment
need to be assembled:
● An oxygen cylinder
● A regulator with pressure gauge and flowmeter
● A delivery device
Emergency oxygen units are available without pre-
scription for first aid use, provided they contain at
least a 15-minute supply of oxygen, and that they are
designed to deliver a preset flow rate of at least 6
LPM. Oxygen cylinders are labeled “U.S.P.” and
marked with a yellow diamond that says “Oxygen”
(Fig. 6-2, A). The U.S.P. stands for United States
Pharmacopeia and indicates the oxygen is medical
grade. Oxygen cylinders come in different sizes and
have various pressure capacities. In the United States,
oxygen cylinders typically have green markings.
However, the color scheme is not regulated, so dif-
ferent manufacturers and other countries may use dif-
ferent color markings. Oxygen cylinders are under
74 | CPR/AED for the Professional Rescuer
Fig. 6-1
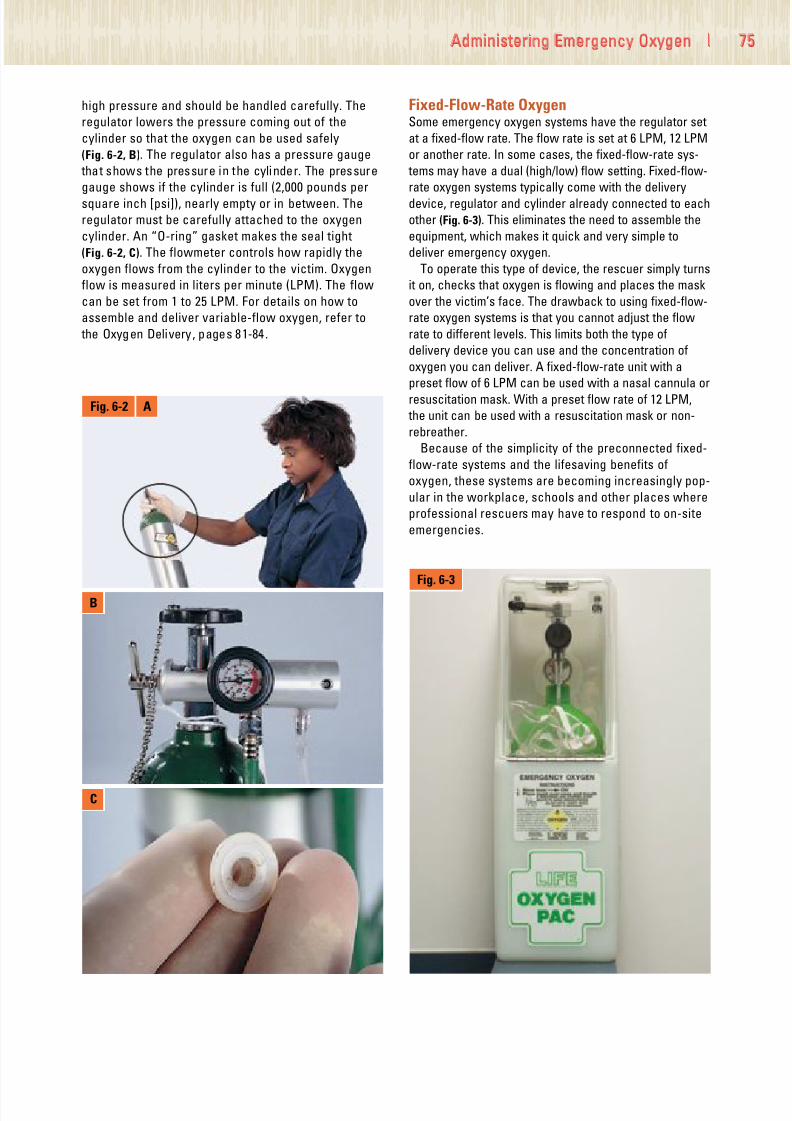
7/24/2019 CPR AED textbook compressed
http://slidepdf.com/reader/full/cpr-aed-textbook-compressed 85/100
high pressure and should be handled carefully. The
regulator lowers the pressure coming out of the
cylinder so that the oxygen can be used safely
(Fig. 6-2, B). The regulator also has a pressure gauge
that shows the pressure in the cylinder. The pressure
gauge shows if the cylinder is full (2,000 pounds per
square inch [psi]), nearly empty or in between. The
regulator must be carefully attached to the oxygen
cylinder. An “O-ring” gasket makes the seal tight
(Fig. 6-2, C). The flowmeter controls how rapidly the
oxygen flows from the cylinder to the victim. Oxygen
flow is measured in liters per minute (LPM). The flow
can be set from 1 to 25 LPM. For details on how to
assemble and deliver variable-flow oxygen, refer to
the Oxygen Delivery, pages 81-84.
Fixed-Flow-Rate OxygenSome emergency oxygen systems have the regulator set
at a fixed-flow rate. The flow rate is set at 6 LPM, 12 LPM
or another rate. In some cases, the fixed-flow-rate sys-
tems may have a dual (high/low) flow setting. Fixed-flow-
rate oxygen systems typically come with the delivery
device, regulator and cylinder already connected to each
other (Fig. 6-3). This eliminates the need to assemble the
equipment, which makes it quick and very simple to
deliver emergency oxygen.
To operate this type of device, the rescuer simply turns
it on, checks that oxygen is flowing and places the mask
over the victim’s face. The drawback to using fixed-flow-
rate oxygen systems is that you cannot adjust the flow
rate to different levels. This limits both the type of
delivery device you can use and the concentration of
oxygen you can deliver. A fixed-flow-rate unit with a
preset flow of 6 LPM can be used with a nasal cannula or
resuscitation mask. With a preset flow rate of 12 LPM,
the unit can be used with a resuscitation mask or non-
rebreather.
Because of the simplicity of the preconnected fixed-
flow-rate systems and the lifesaving benefits of
oxygen, these systems are becoming increasingly pop-
ular in the workplace, schools and other places where
professional rescuers may have to respond to on-site
emergencies.
Administering Emergency Oxygen | 7
Fig. 6-2 A
B
C
Fig. 6-3

7/24/2019 CPR AED textbook compressed
http://slidepdf.com/reader/full/cpr-aed-textbook-compressed 86/100
Oxygen Safety PrecautionsWhen preparing and administering oxygen, safety is a
concern. Use emergency oxygen equipment according to
the manufacturer’s instructions and in a manner consis-
tent with federal and local regulations. Also follow these
recommended guidelines:
● Be sure that oxygen is flowing before putting the
delivery device over the victim’s face.
● Do not use oxygen around flames or sparks. Oxygen
causes fire to burn more rapidly.
● Do not use grease, oil or petroleum products to lubricate
or clean the regulator. This could cause an explosion.
● Do not stand oxygen cylinders upright unless they are
well secured. If the cylinder falls, the regulator or valve
could become damaged or cause injury.
● Do not drag or roll cylinders.
● Do not carry a cylinder by the valve or regulator.
● Do not hold on to protective valve caps or guards when
moving or lifting cylinders.
● Do not deface, alter or remove any labeling or mark-
ings on the oxygen cylinder.
● Do not attempt to mix gases in an oxygen cylinder or
transfer oxygen from one cylinder to another.
If defibrillating, make sure that no one is touching or in
contact with the victim or the resuscitation equipment.
Do not defibrillate someone when around flammable
materials, such as gasoline or free-flowing oxygen.
OXYGEN DELIVERY DEVICES
An oxygen delivery device is the piece of equipment a
victim breathes through when receiving emergency
oxygen. Tubing carries the oxygen from the regulator to
the delivery device on the victim’s face (Table 6-1). These
devices include nasal cannulas, resuscitation masks,
non-rebreather masks and bag-valve-mask resuscitators
(BVMs). Various sizes of masks, BVMs and nasal can-
nulas are available for adults, children and infants.
Appropriate sizing is important to ensure adequate
airway management.
Nasal CannulasA nasal cannula delivers oxygen to someone who is
breathing (Fig. 6-4). It has two small prongs that are
inserted into the nose. Nasal cannulas are not used often
in an emergency because they do not give as much
oxygen as a resuscitation mask, non-rebreather mask or
a BVM. They are used mostly for victims with minor
breathing problems rather than for life-threatening condi-
tions. If a victim will not accept having a mask on his or
her face, a nasal cannula can be used. With a nasal can-
nula, set the flow rate at 1-6 LPM.
Resuscitation MasksA resuscitation mask with an oxygen inlet can be used
with emergency oxygen to give rescue breaths to a
nonbreathing victim. It also can be used for someone
who is breathing, but still needs emergency oxygen.
Some resuscitation masks come with elastic straps to
put over the victim’s head to keep the mask in place
(Fig. 6-5). If the mask does not have a strap, you or the
victim can hold it in place. With a resuscitation mask,
set the flow rate at 6-15 LPM. For additional information
76 | CPR/AED for the Professional Rescuer
TABLE 6-1 OXYGEN DELIVERY DEVICES
Delivery Common OxygenDevice Flow Rate Concentration Function
Nasal Cannula 1-6 LPM 24-44 percent Breathing victims only
Resuscitation Mask 6-15 LPM 35-55 percent Breathing and nonbreathing victims
Non-Rebreather Mask 10-15 LPM 90 percent Breathing victims only
BVM 15 LPM 90 percent Breathing and nonbreathing victims
Fig. 6-4

7/24/2019 CPR AED textbook compressed
http://slidepdf.com/reader/full/cpr-aed-textbook-compressed 87/100
on using a resuscitation mask, refer to the Using a
Resuscitation Mask for Rescue Breathing Skill Sheet,
pages 78-80.
Non-Rebreather MasksA non-rebreather mask (Fig. 6-6) is an effective method
for delivering high concentrations of oxygen to breathing
victims. The non-rebreather mask consists of a face
mask with an attached oxygen reservoir bag and a one-
way valve between the mask and bag to prevent the
victim’s exhaled air from mixing with the oxygen in the
reservoir bag. The victim inhales oxygen from the bag
and exhaled air escapes through flutter valves on the
side of the mask. The reservoir bag should be inflated by
covering the one-way valve with your thumb before
placing it on the victim’s face. The oxygen reservoir bag
should be sufficiently inflated (about 2 ⁄ 3 full) so as not to
deflate when the victim inhales. If it begins to deflate,
increase the flow rate of the oxygen to refill the reservoir
bag. With non-rebreather masks, the flow rate should be
set at 10-15 LPM. When using the non-rebreather mask
with a high flow rate of oxygen, up to 90 percent or more
oxygen can be delivered to the victim. Because young
children and infants may be frightened by a mask being
placed on their faces, consider a “blow-by” technique.
The rescuer, parent or guardian should hold a non-
rebreather mask approximately 2 inches from the child’s
or infant’s face. This will allow the oxygen to pass over
the face and be inhaled.
Bag-Valve-Mask ResuscitatorsA BVM can be used on a person who is breathing or not
breathing. By using a BVM with emergency oxygen
attached to an oxygen reservoir bag, you can deliver up
to 100 percent oxygen to the victim (Fig. 6-7). The BVM
can be held by a breathing victim to inhale the oxygen or
you can squeeze the bag as the victim inhales to help
deliver more oxygen. If you use a BVM without emer-
gency oxygen, the nonbreathing victim receives 21 per-
cent oxygen—the amount in the air. With a BVM, the
flow rate should be set at 15 LPM or more.
PUTTING IT ALL TOGETHER
Administering emergency oxygen to the victim of a cardiac
or breathing emergency can help improve the hypoxia. It
also helps reduce the pain and breathing discomfort
caused by hypoxia. Variable-flow-rate oxygen systems
allow the rescuer to vary the concentration of oxygen and
the type of delivery device used. Preconnected fixed-flow-
rate systems eliminate the need to assemble the equip-
ment, which makes it quick and very simple to deliver
emergency oxygen. When using emergency oxygen, follow
safety precautions and use the equipment according to the
manufacturer’s instructions. An oxygen delivery device is
the piece of equipment a victim breathes through when
receiving emergency oxygen. These delivery devices
include nasal cannulas, resuscitation masks, non-
rebreather masks and BVMs. Be familiar with the unique
features and benefits of these devices as well as their
appropriate flow rates and situations in which they should
be used.
Administering Emergency Oxygen | 7
Fig. 6-5
Fig. 6-6
Fig. 6-7

7/24/2019 CPR AED textbook compressed
http://slidepdf.com/reader/full/cpr-aed-textbook-compressed 88/100
Skill Sheet | Using A Resuscitation Mask for RescueBreathing
STEP 1Assemble the mask.
● Attach the one-way valve to the resuscitation
mask.
STEP 2Position the mask.
● Kneel behind or to the side of the victim’s head
and place the rim of the mask between the lower
lip and chin. Lower the resuscitation mask until it
covers the victim’s mouth and nose.
STEP 3Seal the mask and open the victim’s airway.
A. From the back of the victim’s head—
● Place your thumbs along each side of the resusci-
tation mask.
● Slide your fingers into position behind the angles
of the victim’s jawbone.
● Apply downward pressure with your thumbs.
● Lift the jaw and tilt the head back to open the
airway.
78 | CPR/AED for the Professional Rescuer
Step 1
Step 2
Step 3 A

7/24/2019 CPR AED textbook compressed
http://slidepdf.com/reader/full/cpr-aed-textbook-compressed 89/100
B. From the side of the victim’s head—
● With your top hand, place your thumb and fingers
around the top of the resuscitation mask.
● With your other hand, slide your first two fingers
into position on the bony part of the victim’s chin.
● Apply downward pressure with your top hand and
the thumb of your lower hand to seal the top and
bottom of the resuscitation mask.
● Lift the chin and tilt the head back to open the
airway.
STEP 4Check for a pulse. If there is a pulse, but no move-
ment or breathing, begin rescue breathing.
● Give 1 rescue breath about every 5 seconds for an
adult and 1 rescue breath about every 3 seconds
for a child or infant.
● Watch the victim’s chest clearly rise with each
rescue breath.
Administering Emergency Oxygen | 7
Step 3 B
Continued
Step 4
What to Do—If you suspect the victim may have a head, neck or back
injury—Try the jaw-thrust maneuver to open the airway.
● Position the mask.
● Place your thumbs along each side of the resuscitation mask.
● Slide your fingers into position behind the angles of the victim’s
jawbone.
● Without moving the victim’s head, apply downward pressure with
your thumbs and lift the jaw to open the airway.
● If the jaw-thrust maneuver does not open the airway, use the head-
tilt/chin-lift technique to open the airway.

7/24/2019 CPR AED textbook compressed
http://slidepdf.com/reader/full/cpr-aed-textbook-compressed 90/100
Skill Sheet | Using A Resuscitation Mask for RescueBreathing—cont’d
If using an adult resuscitation mask on an
infant:
● Kneel behind the infant’s head.
● Rotate the mask and position the nose of the mask
on the infant’s chin.
● Lower the wide end of the mask to cover the
infant’s mouth and nose.
● Place your thumbs along either side of the rim and
slide your fingers into position behind the angles
of the infant’s jawbone.
● Seal the mask by applying downward pressure
with your thumbs.
● Lift the jaw and tilt the head to a neutral position
to open the airway.
Note: Not all adult resuscitation masks require the
rescuer to rotate the mask to create an adequate
seal for an infant. If you are using a pediatric mask,
you do not need to rotate the mask. Pediatric masks
are specifically designed to fit a child or infant. Seal
the pediatric mask and give rescue breaths in the
same manner you learned for an adult.
80 | CPR/AED for the Professional Rescuer

7/24/2019 CPR AED textbook compressed
http://slidepdf.com/reader/full/cpr-aed-textbook-compressed 91/100
STEP 1Make sure the oxygen cylinder is labeled “U.S.P.”
and marked with a yellow diamond that says
“Oxygen.”
STEP 2Clear the valve.
● Remove the protective covering and save the
O-ring gasket.
● Turn the cylinder away from you and others
before opening.
● Open the cylinder valve for 1 second to clear the
valve.
STEP 3Attach the regulator.
● Put the O-ring gasket into the valve on top of the
cylinder, if necessary (A).
Administering Emergency Oxygen | 8
Skill Sheet | Oxygen Delivery
Continued
Step 1
Step 2
Step 3 A

7/24/2019 CPR AED textbook compressed
http://slidepdf.com/reader/full/cpr-aed-textbook-compressed 92/100
Skill Sheet | Oxygen Delivery—cont’d
● Make sure that it is marked “Oxygen
Regulator” (B).
● Secure the regulator on the cylinder by placing
the three metal prongs into the valve.
● Hand-tighten the screw until the regulator is
snug (C).
STEP 4Open the cylinder one full turn (A).
● Check the pressure gauge.
82 | CPR/AED for the Professional Rescuer
Step 3 B
Step 3 C
Step 4 A
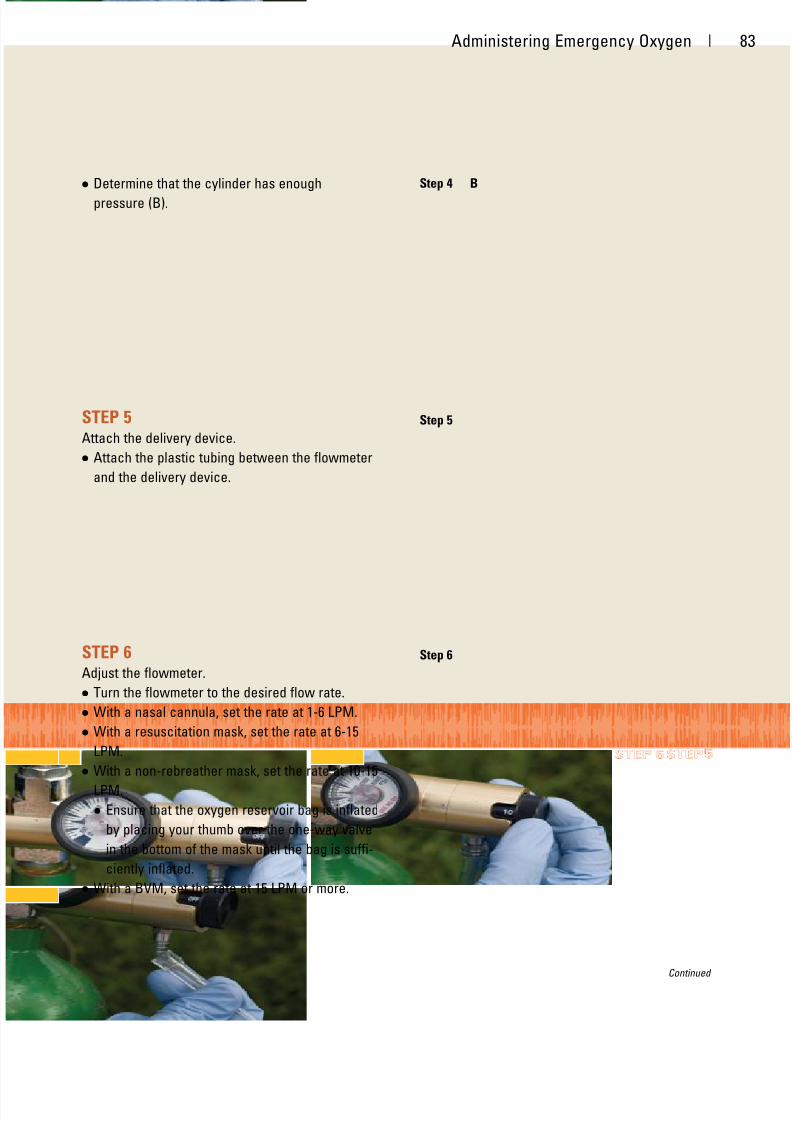
7/24/2019 CPR AED textbook compressed
http://slidepdf.com/reader/full/cpr-aed-textbook-compressed 93/100
● Determine that the cylinder has enough
pressure (B).
STEP 5Attach the delivery device.
● Attach the plastic tubing between the flowmeter
and the delivery device.
STEP 6Adjust the flowmeter.
● Turn the flowmeter to the desired flow rate.
● With a nasal cannula, set the rate at 1-6 LPM.
● With a resuscitation mask, set the rate at 6-15
LPM.
● With a non-rebreather mask, set the rate at 10-15
LPM.
● Ensure that the oxygen reservoir bag is inflated
by placing your thumb over the one-way valve
in the bottom of the mask until the bag is suffi-
ciently inflated.
● With a BVM, set the rate at 15 LPM or more.
Administering Emergency Oxygen | 8
Step 5
Step 6
Continued
Step 4 B

7/24/2019 CPR AED textbook compressed
http://slidepdf.com/reader/full/cpr-aed-textbook-compressed 94/100
Skill Sheet | Oxygen Delivery—cont’d
STEP 7Verify the oxygen flow.
● Listen and feel for oxygen flow through the
delivery device.
STEP 8Place the delivery device on the victim and continue
care until more advanced medical personnel arrive
and take over.
84 | CPR/AED for the Professional Rescuer
Step 7
Step 8

7/24/2019 CPR AED textbook compressed
http://slidepdf.com/reader/full/cpr-aed-textbook-compressed 95/100
Appendix A | 8
Appendix A
HEALTH PRECAUTIONS ANDGUIDELINES DURING TRAINING
The American Red Cross has trained millions of people in
first aid and cardiopulmonary resuscitation (CPR) using
manikins as training aids.
The Red Cross follows widely accepted guidelines for
cleaning and decontaminating training manikins. If these
guidelines are adhered to, the risk of any kind of disease
transmission during training is extremely low.
To help minimize the risk of disease transmission, you
should follow some basic health precautions and guide-
lines while participating in training. You should take pre-
cautions if you have a condition that would increase your
risk or other participants’ risk of exposure to infections.
Request a separate training manikin if you—
● Have an acute condition, such as a cold, a sore throat
or cuts or sores on the hands or around your mouth.
● Know you are seropositive (have had a positive blood
test) for hepatitis B surface antigen (HBsAg), indicating
that you are currently infected with the hepatitis B
virus.*
● Know you have a chronic infection indicated by long-
term seropositivity (long-term positive blood tests) for
the hepatitis B surface antigen (HBsAg)* or a positive
blood test for anti-human immunodeficiency virus (HIV)
(that is, a positive test for antibodies to HIV, the virus
that causes many severe infections including acquired
immunodeficiency syndrome [AIDS]).
● Have had a positive blood test for hepatitis C.
● Have a condition that makes you unusually likely to get
an infection.
To obtain information about testing for individual health
status, visit the CDC Web site at www.cdc.gov/ncidod/
diseases/hepatitis/c/faq.htm
If you decide you should have your own manikin, ask
your instructor if he or she can provide one for you to
use. You will not be asked to explain why in your request.
The manikin will not be used by anyone else until it has
been cleaned according to the recommended end-of-
class decontamination procedures. Because the number
of manikins available for class use is limited, the more
advance notice you give, the more likely it is that you can
be provided a separate manikin.
GuidelinesIn addition to taking the precautions regarding manikins,
you can further protect yourself and other participants
from infection by following these guidelines:
● Wash your hands thoroughly before participating in
class activities.
● Do not eat, drink, use tobacco products or chew gum
during class.
● Clean the manikin properly before use.
● For some manikins, this means vigorously wiping the
manikin’s face and the inside of its mouth with a
clean gauze pad soaked with either a fresh solution
of liquid chlorine bleach and water (1 ⁄ 4 cup sodium
hypochlorite per gallon of tap water) or rubbing
alcohol. The surfaces should remain wet for at least
1 minute before they are wiped dry with a second
piece of clean, absorbent material.
● For other manikins, it means changing the manikin’s
face. Your instructor will provide you with instructions
for cleaning the type of manikin used in your class.
● Follow the guidelines from your instructor when prac-
ticing skills such as clearing a blocked airway with
your finger.
Physical Stress and InjurySuccessful course completion requires full participation
in classroom and skill sessions, as well as successful
performance in skill and knowledge evaluations. You will
be participating in strenuous activities, such as per-
forming CPR on the floor. If you have a medical condition
or disability that will prevent you from taking part in the
skills practice sessions, please let your instructor know
so that accommodations can be made. If you are unable
to participate fully in the course, you may “audit” the
course and participate as much as you can or desire. To
audit a course, you must let the instructor know before
the training begins. You will not be eligible to receive a
course completion certificate.
* A person with a hepatitis B infection will test positivefor the HBsAg. Most people infected with hepatitis B willget better within a period of time. However, in some
people hepatitis B infections will become chronic andwill linger for much longer. These people will continue to test positive for HBsAg. Their decision to participate inCPR training should be guided by their physician. After aperson has had an acute hepatitis B infection, he or shewill no longer test positive for the surface antigen butwill test positive for the hepatitis B antibody (anti-HBs).People who have been vaccinated for hepatitis B willalso test positive for the hepatitis antibody. A positive
test for anti-HBs should not be confused with a positive test for HBsAg.

7/24/2019 CPR AED textbook compressed
http://slidepdf.com/reader/full/cpr-aed-textbook-compressed 96/100
86 | CPR/AED for the Professional Rescuer
References
2005 International Consensus on CPR and ECC Science
with Treatment Recommendations Guidelines 2005 for
First Aid, Circulation . Volume 112, Issue 22 Supplement;
November 29, 2005.
American Heart Association and the American National
Red Cross, 2005 Guidelines for First Aid, Supplement to
Circulation, www.circulationaha.org
The American National Red Cross, Bloodborne
Pathogens Training: Preventing Disease Transmission.
Yardley, PA: StayWell, 2003.
The American National Red Cross, CPR/AED for the
Professional Rescuer. Yardley, PA: StayWell, 2002.
The American National Red Cross, Emergency Response.
Yardley, PA: StayWell, 2001.
The American National Red Cross, First Aid/CPR/AED for
Schools and the Community. Yardley, PA: StayWell, 2006.
The American National Red Cross, First Aid/CPR/AED for
the Workplace Participant's Workbook. Yardley, PA:
StayWell, 2006.
The American National Red Cross. Lifeguard Training.Yardley, PA: StayWell, 2001.
The American National Red Cross, Oxygen
Administration. Yardley, PA: StayWell, 1993.
American Red Cross Advisory Council on First Aid and
Safety, (ACFAS). Advisory Statement on Aspirin
Administration, 2001.
American Red Cross Advisory Council on First Aid and
Safety, (ACFAS). Advisory Statement on Epinephrine
Administration, 2001.
American Red Cross Advisory Council on First Aid and
Safety, (ACFAS), Advisory Statement on Asthma
Assistance, 2003.

7/24/2019 CPR AED textbook compressed
http://slidepdf.com/reader/full/cpr-aed-textbook-compressed 97/100
7/24/2019 CPR AED textbook compressed
http://slidepdf.com/reader/full/cpr-aed-textbook-compressed 98/100

7/24/2019 CPR AED textbook compressed
http://slidepdf.com/reader/full/cpr-aed-textbook-compressed 99/100
Trained. Empowered. Prepared.
Become an American Red Cross Instructor…
And Help Save Lives!
It doesn’t take much. A little time. A little caring. A BIG reward.
Your time. Your knowledge. Your experience.
These gifts can help save thousands of l ives. How? Each year, the American Red Cross teaches lifesaving ski lls
to nearly 12 million people. But we can’t do it alone. Reaching this many people is only possible through the
help of people like you. People who care about the safety and lives of others, and are willing to devote a little
bit of their time to help us make the world a safer place.
Become certified to teach:
Do you have what it takes?
We’ll help you build and refine all the skills you need.The American Red Cross offers flexible scheduling and a
chance to make a real difference. Work with America’s most trusted health and safety training provider and
show your community that you care.
For more information, contact your local American Red Cross
chapter, visit www.redcross.org or call (800) 667-2968.
• First Aid/CPR/AED • CPR/AED for the Professional Rescuer • Administering Emergency Oxygen• Bloodborne Pathogens Training • Emergency Preparedness

7/24/2019 CPR AED textbook compressed
http://slidepdf.com/reader/full/cpr-aed-textbook-compressed 100/100
The training YOU need to save a life.
In every community, in every city, the AmericanRed Cross is there because you are.
The American Red Cross CPR/AED for the ProfessionalRescuer course gives first responders the skills andconfidence necessary to save a life. Red Cross training isbased on more than 90 years of experience in emergency preparedness and response. And, because the RedCross works side by side with professional rescuers in
emergency situations, we know what it takes to be thebest first responder you can be.
Learn the Skills You Need to Act Quickly and Save a Life
American Red Cross training combines discussions and video with hands-on skills training to promote effectivelearning and keep students motivated. The course isbased on real-life rescue scenarios, so you’ll be confident in any emergency. You will learn to:
• Respond to breathing and cardiac emergenciesin adults, children and infants
• Use an AED on an adult and child victim ofcardiac arrest
• Use personal protective equipment to stop bloodbornepathogens and other diseases from spreading
Plus, you can add on optional training in BloodborneP th Ad i i t i E O ti i
Resources for Instructors
A CD-ROM, included with the CPR/AED for theProfessional Rescuer Instructor’s Manual, helps instructorsquickly access customizable teaching tools such asMicrosoft PowerPoint™ presentations, review questionsand marketing templates including ads and fliers. TheCD-ROM also includes dozens of in-service trainingoutlines available to help refresh and expand skillsh h h
CERTIFICATION ALSO AVAILABLEIN FIRST AID.
I am trained, empowered and prepared.
I am the American Red Cross.
CPR/AED for the Professional Rescuer
has been updated with the latest
science on CPR and emergency
cardiovascular care (ECC).