COVaxON User Profile Set Up Job Aid
20
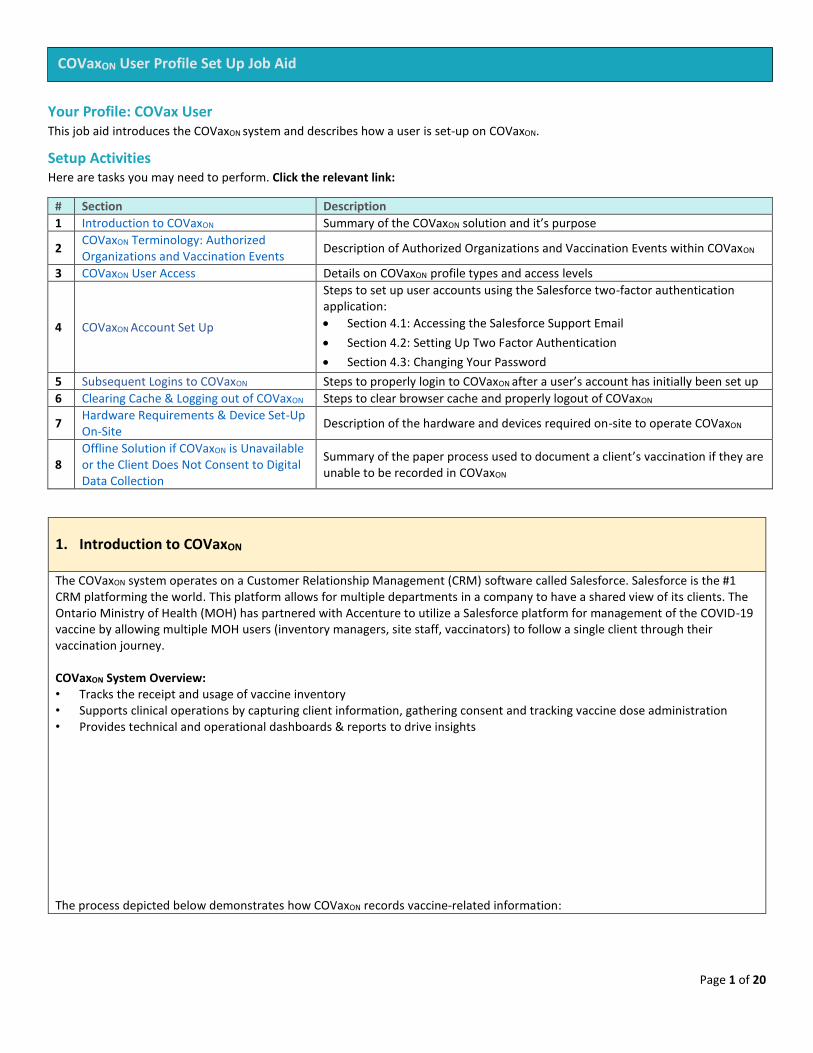
Page 1 of 20 COVaxON User Profile Set Up Job Aid Your Profile: COVax User This job aid introduces the COVaxON system and describes how a user is set-up on COVaxON. Setup Activities Here are tasks you may need to perform. Click the relevant link: # Section Description 1 Introduction to COVaxON Summary of the COVaxON solution and it’s purpose 2 COVaxON Terminology: Authorized Organizations and Vaccination Events Description of Authorized Organizations and Vaccination Events within COVaxON 3 COVaxON User Access Details on COVaxON profile types and access levels 4 COVaxON Account Set Up Steps to set up user accounts using the Salesforce two-factor authentication application: • Section 4.1: Accessing the Salesforce Support Email • Section 4.2: Setting Up Two Factor Authentication • Section 4.3: Changing Your Password 5 Subsequent Logins to COVaxON Steps to properly login to COVaxON after a user’s account has initially been set up 6 Clearing Cache & Logging out of COVaxON Steps to clear browser cache and properly logout of COVaxON 7 Hardware Requirements & Device Set-Up On-Site Description of the hardware and devices required on-site to operate COVaxON 8 Offline Solution if COVaxON is Unavailable or the Client Does Not Consent to Digital Data Collection Summary of the paper process used to document a client’s vaccination if they are unable to be recorded in COVaxON 1. Introduction to COVaxON The COVaxON system operates on a Customer Relationship Management (CRM) software called Salesforce. Salesforce is the #1 CRM platforming the world. This platform allows for multiple departments in a company to have a shared view of its clients. The Ontario Ministry of Health (MOH) has partnered with Accenture to utilize a Salesforce platform for management of the COVID-19 vaccine by allowing multiple MOH users (inventory managers, site staff, vaccinators) to follow a single client through their vaccination journey. COVaxON System Overview: • Tracks the receipt and usage of vaccine inventory • Supports clinical operations by capturing client information, gathering consent and tracking vaccine dose administration • Provides technical and operational dashboards & reports to drive insights The process depicted below demonstrates how COVaxON records vaccine-related information:
Transcript of COVaxON User Profile Set Up Job Aid
Page 1 of 20
COVaxON User Profile Set Up Job Aid
Your Profile: COVax User This job aid introduces the COVaxON system and describes how a user is set-up on COVaxON.
Setup Activities Here are tasks you may need to perform. Click the relevant link:
# Section Description
1 Introduction to COVaxON Summary of the COVaxON solution and it’s purpose
2 COVaxON Terminology: Authorized Organizations and Vaccination Events
Description of Authorized Organizations and Vaccination Events within COVaxON
3 COVaxON User Access Details on COVaxON profile types and access levels
4 COVaxON Account Set Up
Steps to set up user accounts using the Salesforce two-factor authentication application:
• Section 4.1: Accessing the Salesforce Support Email
• Section 4.2: Setting Up Two Factor Authentication
• Section 4.3: Changing Your Password
5 Subsequent Logins to COVaxON Steps to properly login to COVaxON after a user’s account has initially been set up
6 Clearing Cache & Logging out of COVaxON Steps to clear browser cache and properly logout of COVaxON
7 Hardware Requirements & Device Set-Up On-Site
Description of the hardware and devices required on-site to operate COVaxON
8 Offline Solution if COVaxON is Unavailable or the Client Does Not Consent to Digital Data Collection
Summary of the paper process used to document a client’s vaccination if they are unable to be recorded in COVaxON
1. Introduction to COVaxON The COVaxON system operates on a Customer Relationship Management (CRM) software called Salesforce. Salesforce is the #1 CRM platforming the world. This platform allows for multiple departments in a company to have a shared view of its clients. The Ontario Ministry of Health (MOH) has partnered with Accenture to utilize a Salesforce platform for management of the COVID-19 vaccine by allowing multiple MOH users (inventory managers, site staff, vaccinators) to follow a single client through their vaccination journey. COVaxON System Overview: • Tracks the receipt and usage of vaccine inventory • Supports clinical operations by capturing client information, gathering consent and tracking vaccine dose administration • Provides technical and operational dashboards & reports to drive insights The process depicted below demonstrates how COVaxON records vaccine-related information:

Page 2 of 20
COVaxON User Profile Set Up Job Aid
Monitoring a client’s “Service Status” in COVaxON: As the client progresses through their vaccination journey (shown in the process diagram above), the “Service Status” on their record will be updated (see image to the right). Service Status is used to describe the phase of the vaccination journey that the client is currently in. See below for a description of each Service Status option:
Service Status Description
New The client record has been created in COVaxON, but they have not been checked in for a vaccination dose yet
Scheduled The client has been scheduled to receive their vaccine. This is specific to sites that have clients booking through the provincial booking tool
Checked In The client has been successfully checked into COVaxON by passing the COVID-19 assessment and consenting to digital data collection
Administered The client has received a vaccination and the details have been recorded in COVaxON.
Checked Out The client has waited for the 15-minute AEFI waiting period and been successfully checked out of the COVaxON system. Their immunization receipt has been printed and the client exits the location.
Note: After a client receives their vaccine: The “Total Valid Dose” count on their record will increase to reflect the total number of doses of the COVID-19 vaccine they have received.
Additional Training Materials: To learn more about the various functions in COVaxON, please refer to the relevant job aid outlined below. All job aids are located on the Ministry of Health SharePoint site and are refreshed regularly based on the latest functionality release.
Number Job Aid Title Job Aid Description
1 Introduction to COVaxON and User Set-Up (this document)
Introduces the COVaxON system and describes how a user is set-up on COVaxON
2 Inventory Job Aid Overview of creating shipments, shipment line item(s), processing Inventory for SLI(s), allocating inventory to VEs to and reconciling inventory as part of an ongoing operations
3 Reporting and Dashboard Job Aid Overview of how users can leverage various reports and dashboards to aid in their understanding what each report/dashboard displays and how they can be used to gain useful insights for operational purposes. In addition, COVaxON navigation tips can be found in this job aid

Page 3 of 20
COVaxON User Profile Set Up Job Aid
4 Creating Vaccine Events Overview of how to create and manage a Vaccination Event (VE) record associated to an Authorized Organization (AO) to enable vaccinations at that location
5 Check-in Job Aid Overview of recording client information on the client record and checking clients into COVaxON
6 Vaccine Admin Job Aid Overview of how to document client consent for service and complete client dose administration
7 Edit Dose Admin Records & Merge Duplicate Clients Job Aid
Overview of how to document any changes to client dose administration (DA) records and how to manage duplicate clients in COVaxON
8 Check Out Job Aid Overview of monitoring clients after vaccination, performing client check out, and printing proof of vaccination receipts
9 Simplified Vaccination Flow Job Aid One user performing the full clinical flow including check-in, dose administration, and check out.
10 Bulk Client Upload Job Aid Overview on how to prepare and upload new client data into COVaxON using the Bulk Client Upload functionality.
11 PCP Vaccinators & Clinic Coordinators Job Aid
Overview on how to document client consent for service, complete client dose administration, and record any inventory adjustments at the VE level
12 Creating Tasks for Inter-AO Communications Job Aid
Overview on sending and receiving communications for users between different AOs within COVaxON
13 OOP & NOS Functionality Job Aid Overview on recording Out of Province or Non-Ontario Stock historical dose administration records
2. COVaxON Terminology: Authorized Organizations & Vaccination Events The Terms “Authorized Organization” and “Vaccination Event” describe two distinct entity types. These terms are relevant to all COVaxON users. 1. Authorized Organizations (AO) are the entities that are requested by the ministry (via signed agreements) to receive and
manage vaccine stock. This is the umbrella organization where vaccine stock is received directly from the federal government or from other Organizations. AO’s also have accountability for COVaxON users. • An “Authorized Organization” field is listed on each User profile. Users can perform functions within COVaxON for the AO
on their profile and users are unable to change this AO manually 2. Vaccination Events (VE) are the physical locations where Vaccine Administration takes place. These ‘Events’ are created by
an AO at a specific “venue” that uses the vaccine stock that the AO has received and is accountable for. AO’s are responsible for the creation of Vaccination Events (VEs) in COVaxON to capture stock for which they are accountable. • Creation of VEs by Authorized Organizations allows for the pre-population of inventory and clients in COVaxON ahead of
the Event to minimize manual data entry in COVaxON. It also improves location efficiency and data quality during the VE, and Reporting by the AO on specific VEs
• VEs are flexible and can be created to cover a time period for a client’s dose, and they can involve one or multiple lots of inventory.
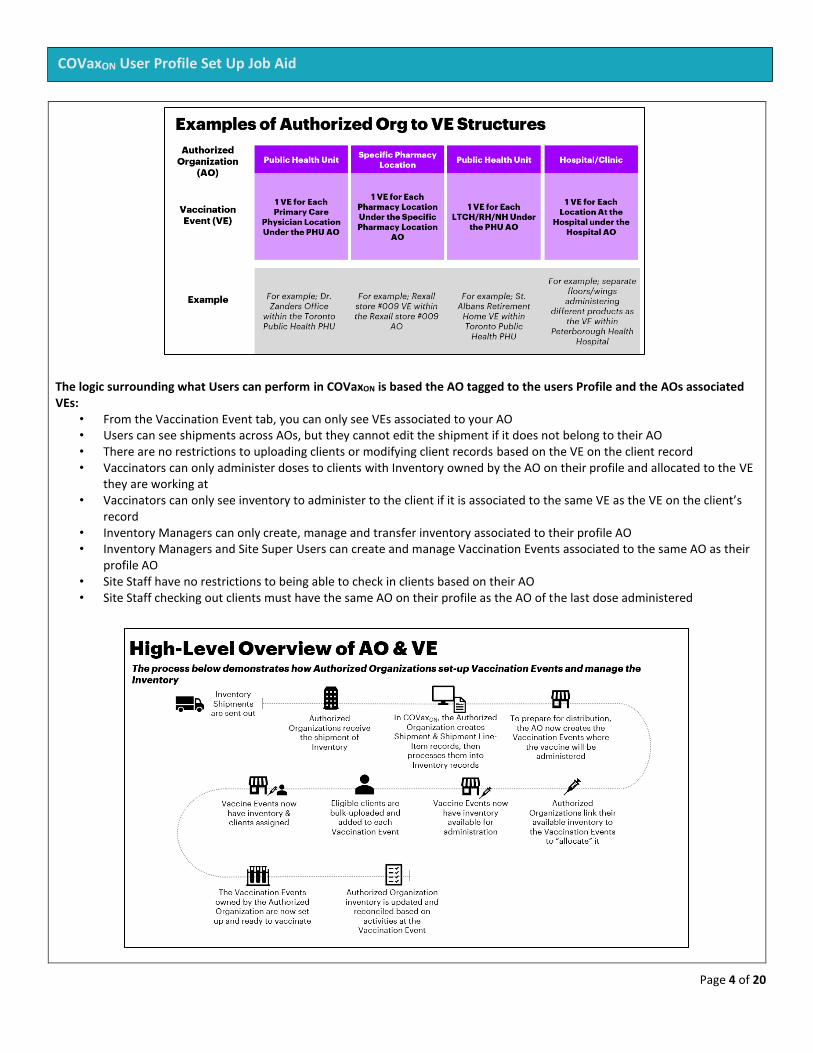
The relationship between AO and VE There is typically a one-to-many relationship between AOs and VEs. One Authorized Organization owns and allocates inventory to multiple Vaccination Events. This relationship is seen when the AO is a PHU, Hospital or Clinic. For pharmacies, there is a 1:1 relationship between the AO and VE. Each pharmacy acts as their own AO and VE.
Page 4 of 20
COVaxON User Profile Set Up Job Aid
The logic surrounding what Users can perform in COVaxON is based the AO tagged to the users Profile and the AOs associated VEs:
• From the Vaccination Event tab, you can only see VEs associated to your AO • Users can see shipments across AOs, but they cannot edit the shipment if it does not belong to their AO • There are no restrictions to uploading clients or modifying client records based on the VE on the client record • Vaccinators can only administer doses to clients with Inventory owned by the AO on their profile and allocated to the VE
they are working at • Vaccinators can only see inventory to administer to the client if it is associated to the same VE as the VE on the client’s
record • Inventory Managers can only create, manage and transfer inventory associated to their profile AO • Inventory Managers and Site Super Users can create and manage Vaccination Events associated to the same AO as their
profile AO • Site Staff have no restrictions to being able to check in clients based on their AO • Site Staff checking out clients must have the same AO on their profile as the AO of the last dose administered

Page 5 of 20
COVaxON User Profile Set Up Job Aid
3. COVaxON User Access
a. Creating User Accounts in COVaxON: COVaxON user accounts can be created using 2 different methods. For both methods, the account must be created by Information Technology Services (ITS)):
1) Bulk User Upload • Site Leads populate the User Template excel document (found on the MOH SharePoint site) and send it to the Ministry of
Health ITS team • The bulk upload tool is used to upload the list of Users provided by the Site Leads prior to the first date of vaccinations
2) Ad Hoc User Creation
• If a new user was not included in the user bulk upload (described above) and requires COVaxON access, the designated Site Lead has the authority to request access for a new user(s) to be added to COVaxON by submitting a ticket to the Ministry of Health ITS team.
b. User Account Permissions:
• All User accounts are associated with a “Profile” type and an associated “Authorized Organization” (AO). A user’s profile and AO assignment drives their ability to perform activities within COVaxON. The chart below outlines the core 6 profiles in COVaxON and the associated activities that can be performed at each level:
There are 6 core profile types with defined access to COVaxON: User Profile Functionality Profile Has Access To Reports/Dashboards Profile Has Access To
COVax Inventory Manager
• Create shipments, inventory line item and inventory records
• Link inventory to VEs, create and manage VE records
• Read and Export Vaccine Inventory Report Summary Client Dose Admin Reports

Page 6 of 20
COVaxON User Profile Set Up Job Aid
• Report inventory reconciliations at the AO and VE levels
• Manage transfers and recalls
COVax Site Staff
• Search clients and update client information
• Check in and check out clients
• Read and Export Vaccine Inventory Report, VE and AO Inventory Report, Summary Client Dose Admin Reports, and Client with Highest Risk (28 Days) Report
• View AO Site Dashboard, AO Scheduling Dashboards, and the associated Linked Reports
COVax Vaccinator
• Search clients and update client information
• Check in, vaccinate, and check out clients
• Perform simplified clinical flow
• Edit Dose Admin Records
• Merge duplicate clients
• Read-only access for VE records
• View AO Site Dashboard, AO Scheduling Dashboards, and the associated Linked Reports
COVax Site Super User
• Inventory Manager functionalities
• Vaccinator functionalities
• Mass data client upload
• Read and Export Vaccine Inventory Report, VE and AO
Inventory Report, Detailed Client Dose Admin
Reports, Summary Client Dose Admin Reports, and
Client with Highest Risk (28 Days) Report
• View AO Site Dashboard, AO Scheduling Dashboards,
and the associated Linked Reports
COVax Clinic Coordinator (will be used at Non-Primary Care Provider locations (PHUs, Hospitals, Pharmacies)
• All “Vaccinator” permissions
• Report inventory reconciliations at the VE level (Wastage, Extra Doses from Vial, No Consent)
• View AO Site Dashboard, AO Scheduling Dashboards, and the associated Linked Reports
COVax Primary Care Provider Vaccinator (used at Primary Care Provider locations)
• All “Vaccinator” permissions
• Report inventory reconciliations at the VE level (Wastage, Extra Doses from Vial, No Consent)
• View AO Site Dashboard, AO Scheduling Dashboards, and the associated Linked Reports
c. Viewing User AO Assignments: 1. Click on the Salesforce avatar on the top right-hand corner of the page.
2. Select “Settings” 3. Navigate to “Advanced User Details” 4. Scroll-down to check your “Authorized Organization”
d. Users Who Work Across Multiple AOs:
• Separate login credentials will be granted for users who work across multiple Authorized Organizations.
• Contact the Site Lead of the new AO you require access to, so they can submit a request to the ITS team to grant you additional login credentials.
• Users with multiple accounts will use the same email for all accounts, but with a slightly modified username. An example of this is:
o Account 1: [email protected] o Account 2: [email protected]
• The Site Leads are encouraged to regularly audit the list of Users and revoke access to any inactive users. In the case that a Site Lead is uploading a user for a secondary account, ensure to indicate that in the “USERS_LOAD_TEMPLATE” which is used to upload users to COVaxON. e. Users Who Work Across multiple VEs within the same AO:
• These users do not require multiple logins and will be able to successfully use the system for both VEs.
f. Users Who Require Changes to Their Profile:
6

Page 7 of 20
COVaxON User Profile Set Up Job Aid
There are certain cases where a User’s profile may need to be changed, (i.e. if they are improperly mapped to an Authorized Organization or if their profile type (i.e. Vaccinator, Site Staff, etc.), needs to be updated). The below process should be followed for profile changes:
• Users at Clinics/Hospitals/LTCH/RH: Users must reach out to their Site Lead and request a User Profile change. The Site Lead will confirm their reasoning and reach out the ITS team on the user’s behalf. The ITS team will grant the user refreshed login credentials based on the update they are requesting.
• Users at Pharmacies: Users may call the Service Desk to request a User profile change. The Service Desk will provide the user with an email template (see below) that the Pharmacy Manager must fill out on the user’s behalf and submit from their Employee One Mail account. (The One Mail account indicates that the request has been approved by a supervisor)
Once the Pharmacy Manager is set up on One Mail and has filled out the email template, they will send the User profile request to the COVaxON Support Mailbox from their One Mail account. Note: this process is only applicable to changing user profile; adding new users to an AO or moving a user from one AO to another will follow the process explained above.
4. COVaxON Account Setup When a new user is set up in COVaxON, they must follow the below two factor authentication steps when initially setting up their account. All COVaxON users require 2 devices each time a user logs into COVaxON: 1) a smartphone and 2) a tablet/computer for using COVaxON For existing users that are adding a secondary account to the Salesforce Authenticator app, skip to section 4.2 “Setting Up Two
Factor Authentication” step 11.
Attention new COVaxON Users:
• Please set up your account prior to the first day of vaccinations
• The step-by-step instructions for doing so are included in this job aid
• You will require your mobile device and a separate device (i.e., laptop or iPad)
Recommended browsers:
• For iPad: Safari
• For Desktop/Laptop: Safari, Google Chrome, Microsoft Edge or Mozilla Firefox
4.1 Accessing the Salesforce Support Email
Email Template for Pharmacy Manager: (Send this to from your One Mail with the Subject line
“AUTHORIZED USER CHANGE FOR XYZ” (XYZ is your AO name in COVaxON).
User 1:
• Full Name: XXX
• Email address: XXX
• Username: XXX
• AO: XXX
• Change required: XXX Request Submitted by:
• Name: XXX
• Role: XXX I hereby attest that I am the Pharmacy Manager, Designated Manager or have been given authority to
make the user profile changes outlined in this email.
Page 8 of 20
COVaxON User Profile Set Up Job Aid
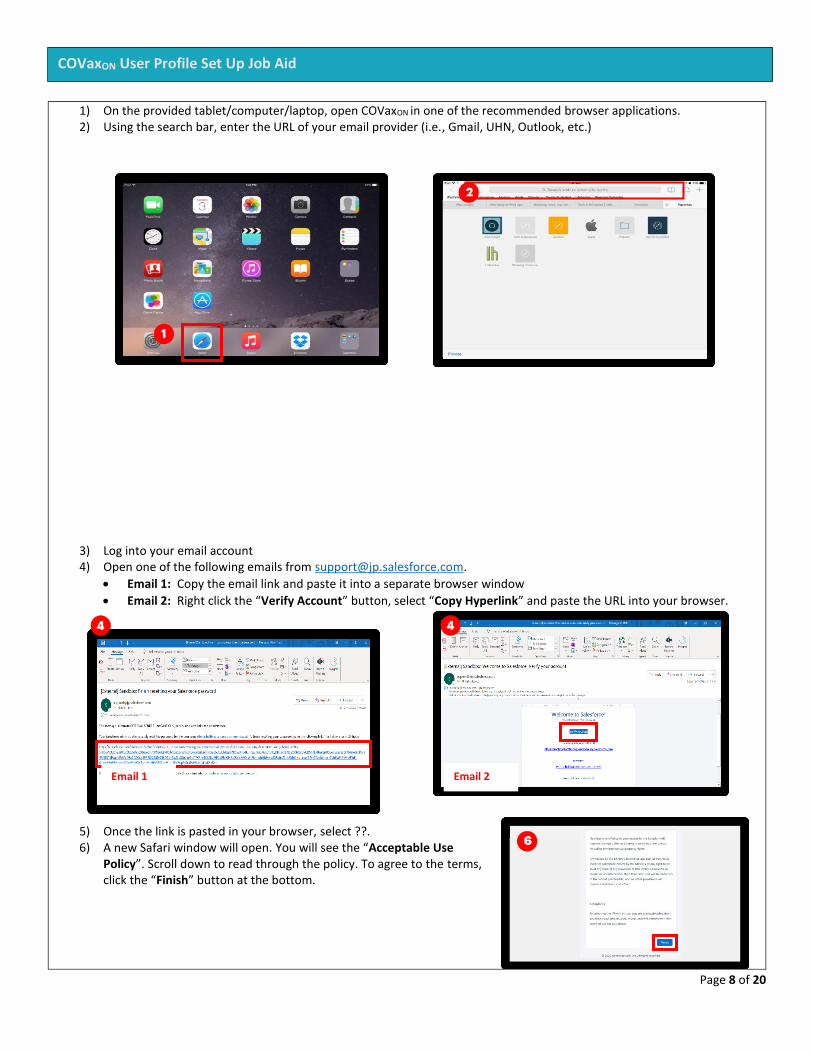
1) On the provided tablet/computer/laptop, open COVaxON in one of the recommended browser applications. 2) Using the search bar, enter the URL of your email provider (i.e., Gmail, UHN, Outlook, etc.)
3) Log into your email account 4) Open one of the following emails from [email protected].
• Email 1: Copy the email link and paste it into a separate browser window
• Email 2: Right click the “Verify Account” button, select “Copy Hyperlink” and paste the URL into your browser.
5) Once the link is pasted in your browser, select ??. 6) A new Safari window will open. You will see the “Acceptable Use
Policy”. Scroll down to read through the policy. To agree to the terms, click the “Finish” button at the bottom.
Email 1 Email 2
Page 9 of 20
COVaxON User Profile Set Up Job Aid
4.2 Setting Up Two Factor Authentication
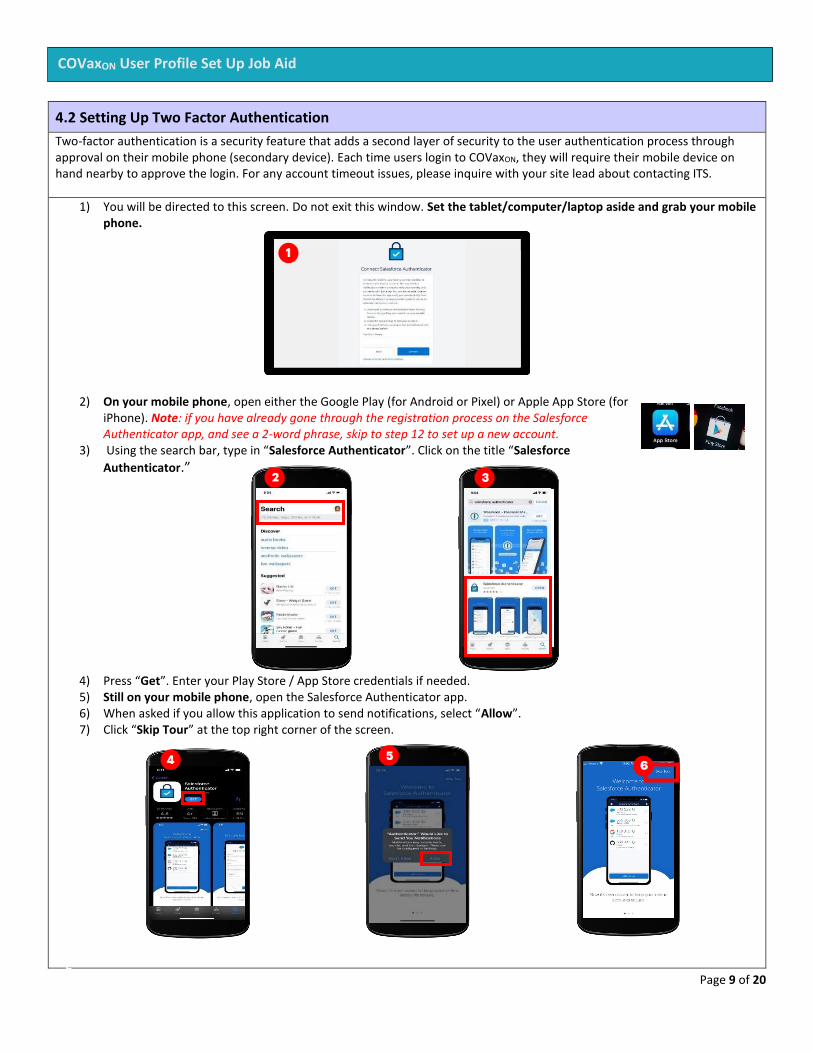
Two-factor authentication is a security feature that adds a second layer of security to the user authentication process through approval on their mobile phone (secondary device). Each time users login to COVaxON, they will require their mobile device on hand nearby to approve the login. For any account timeout issues, please inquire with your site lead about contacting ITS.
1) You will be directed to this screen. Do not exit this window. Set the tablet/computer/laptop aside and grab your mobile phone.
2) On your mobile phone, open either the Google Play (for Android or Pixel) or Apple App Store (for
iPhone). Note: if you have already gone through the registration process on the Salesforce Authenticator app, and see a 2-word phrase, skip to step 12 to set up a new account.
3) Using the search bar, type in “Salesforce Authenticator”. Click on the title “Salesforce
Authenticator.”
4) Press “Get”. Enter your Play Store / App Store credentials if needed. 5) Still on your mobile phone, open the Salesforce Authenticator app. 6) When asked if you allow this application to send notifications, select “Allow”. 7) Click “Skip Tour” at the top right corner of the screen.
6
v
6
v
Page 10 of 20
COVaxON User Profile Set Up Job Aid
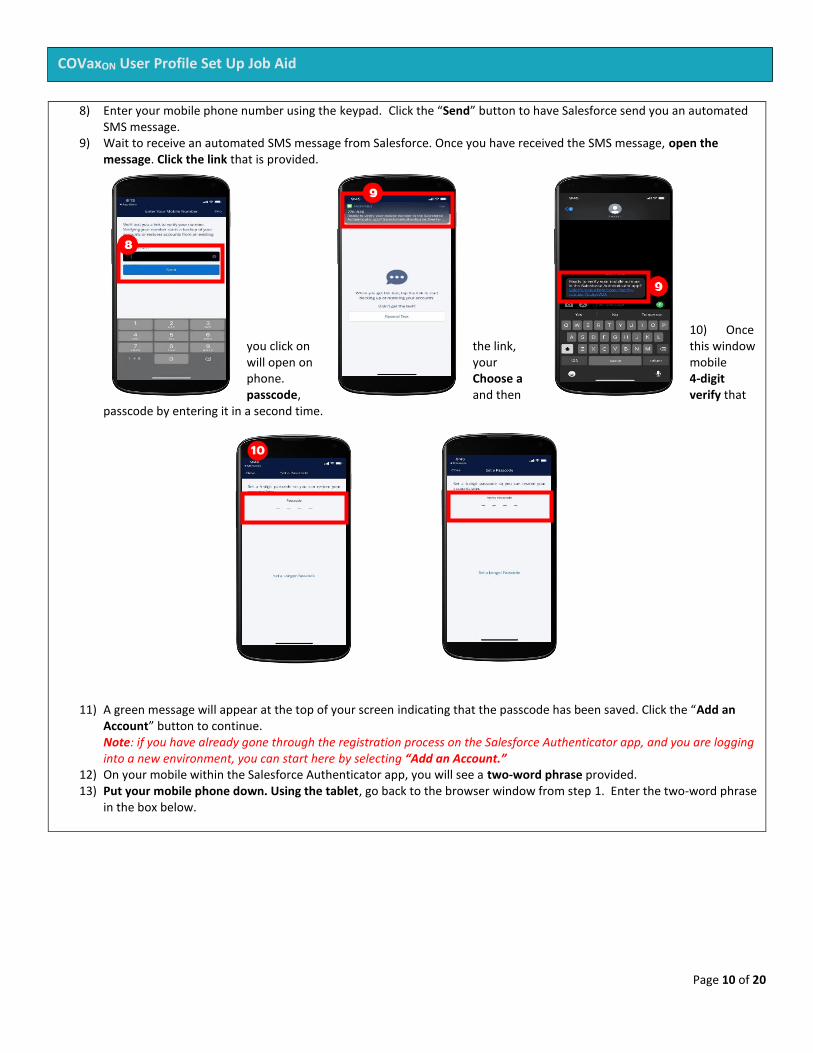
8) Enter your mobile phone number using the keypad. Click the “Send” button to have Salesforce send you an automated SMS message.
9) Wait to receive an automated SMS message from Salesforce. Once you have received the SMS message, open the message. Click the link that is provided.
10) Once you click on the link, this window will open on your mobile phone. Choose a 4-digit passcode, and then verify that
passcode by entering it in a second time.
11) A green message will appear at the top of your screen indicating that the passcode has been saved. Click the “Add an Account” button to continue. Note: if you have already gone through the registration process on the Salesforce Authenticator app, and you are logging into a new environment, you can start here by selecting “Add an Account.”
12) On your mobile within the Salesforce Authenticator app, you will see a two-word phrase provided. 13) Put your mobile phone down. Using the tablet, go back to the browser window from step 1. Enter the two-word phrase
in the box below.

Page 11 of 20
COVaxON User Profile Set Up Job Aid
14) The following message will appear. Follow the prompt and go back to your mobile device. 15) On your mobile device, open the Salesforce Authenticator app. 16) The following screen will appear. Click “Connect”.
17) The app will indicate that the connection is successful. Click “Got It” to confirm. 18) The Salesforce Authenticator app will ask you to approve the account. Click
“Approve”.
4.3 Changing your Password
Page 12 of 20
COVaxON User Profile Set Up Job Aid
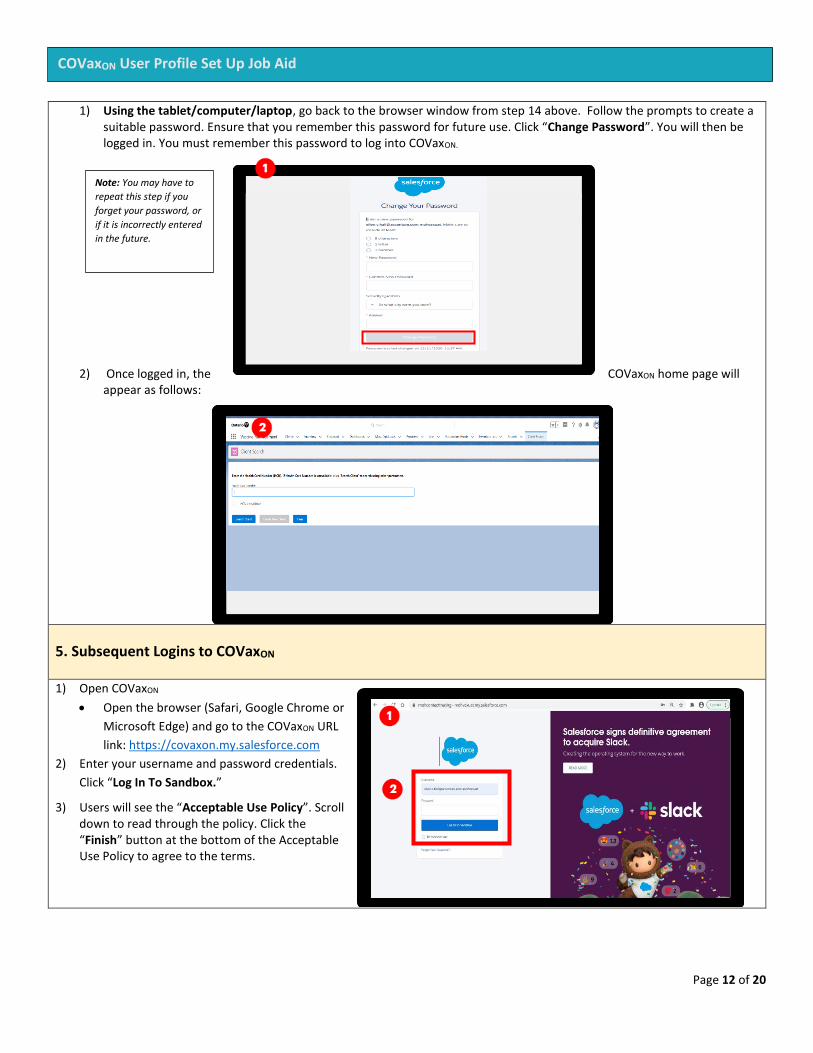
1) Using the tablet/computer/laptop, go back to the browser window from step 14 above. Follow the prompts to create a suitable password. Ensure that you remember this password for future use. Click “Change Password”. You will then be logged in. You must remember this password to log into COVaxON.
2) Once logged in, the COVaxON home page will appear as follows:
5. Subsequent Logins to COVaxON
1) Open COVaxON
• Open the browser (Safari, Google Chrome or
Microsoft Edge) and go to the COVaxON URL
link: https://covaxon.my.salesforce.com
2) Enter your username and password credentials.
Click “Log In To Sandbox.”
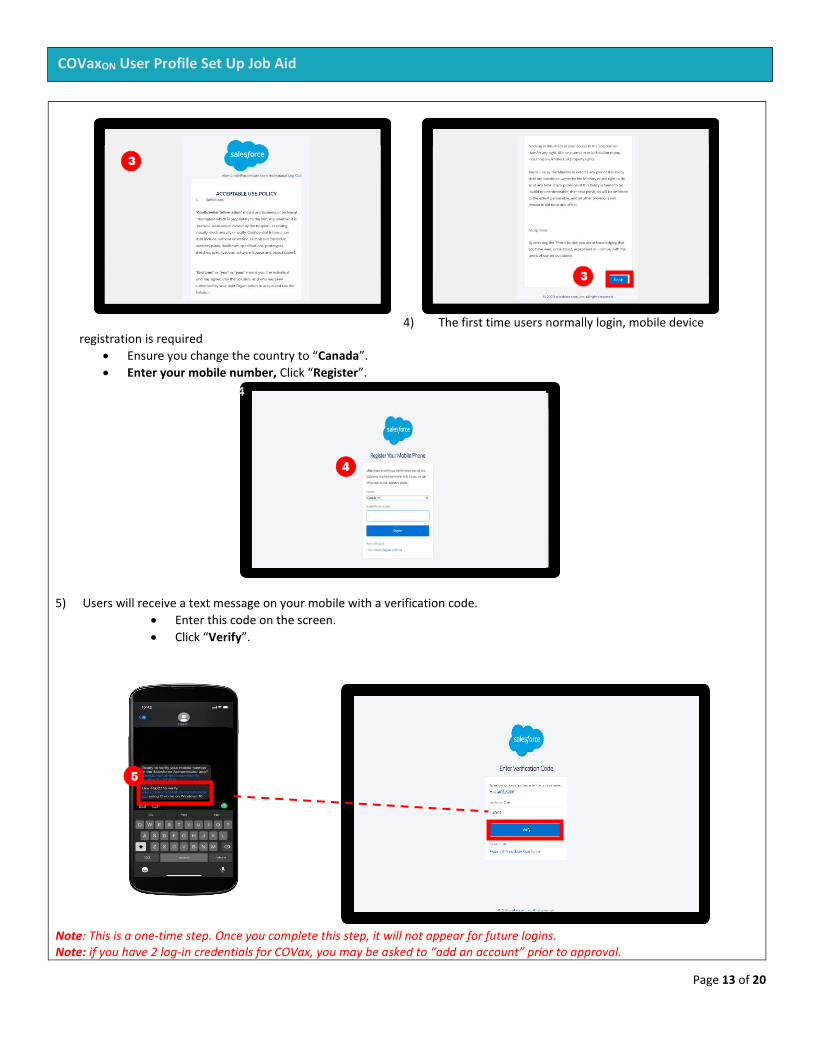
3) Users will see the “Acceptable Use Policy”. Scroll down to read through the policy. Click the “Finish” button at the bottom of the Acceptable Use Policy to agree to the terms.
1
2
Note: You may have to
repeat this step if you
forget your password, or
if it is incorrectly entered
in the future.
Page 13 of 20
COVaxON User Profile Set Up Job Aid
4) The first time users normally login, mobile device registration is required
• Ensure you change the country to “Canada”.
• Enter your mobile number, Click “Register”.
5) Users will receive a text message on your mobile with a verification code.
• Enter this code on the screen.
• Click “Verify”.
Note: This is a one-time step. Once you complete this step, it will not appear for future logins. Note: if you have 2 log-in credentials for COVax, you may be asked to “add an account” prior to approval.
5
4
Page 14 of 20
COVaxON User Profile Set Up Job Aid
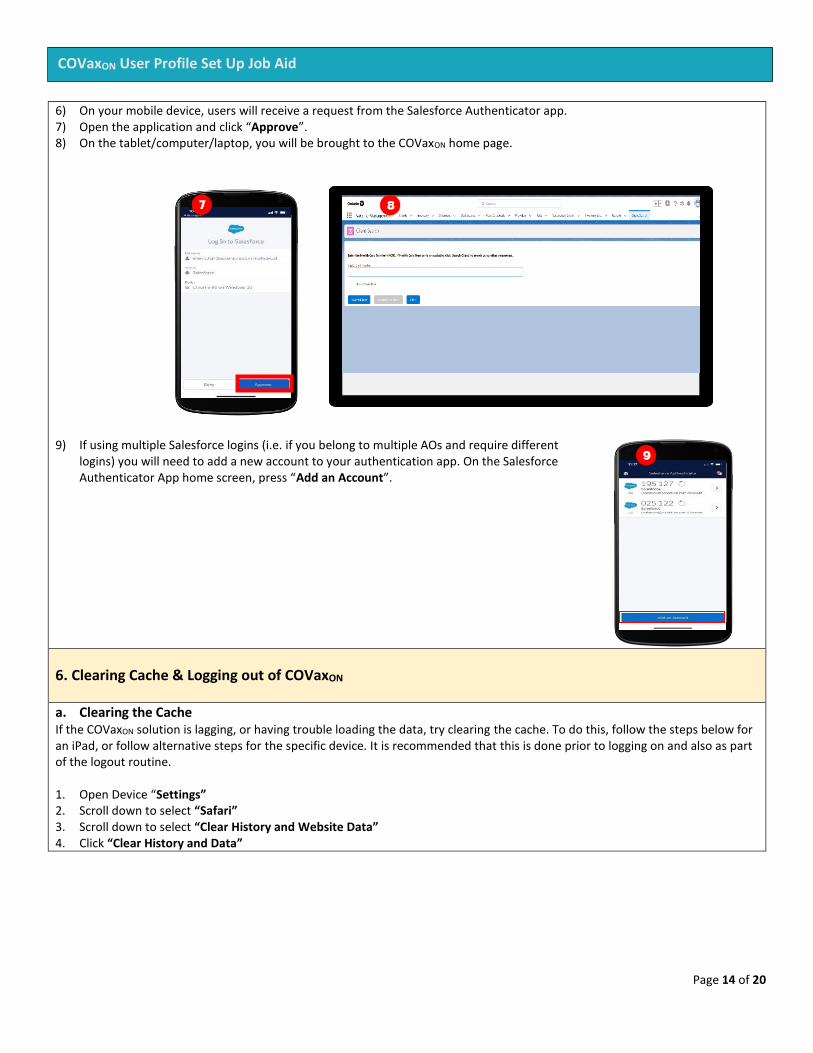
6) On your mobile device, users will receive a request from the Salesforce Authenticator app. 7) Open the application and click “Approve”. 8) On the tablet/computer/laptop, you will be brought to the COVaxON home page.
9) If using multiple Salesforce logins (i.e. if you belong to multiple AOs and require different
logins) you will need to add a new account to your authentication app. On the Salesforce Authenticator App home screen, press “Add an Account”.
6. Clearing Cache & Logging out of COVaxON
a. Clearing the Cache If the COVaxON solution is lagging, or having trouble loading the data, try clearing the cache. To do this, follow the steps below for an iPad, or follow alternative steps for the specific device. It is recommended that this is done prior to logging on and also as part of the logout routine.
1. Open Device “Settings” 2. Scroll down to select “Safari” 3. Scroll down to select “Clear History and Website Data” 4. Click “Clear History and Data”

Page 15 of 20
COVaxON User Profile Set Up Job Aid
5. Sanitize each iPad according to individual site protocols
b. Logging Out of COVaxON It is important that at the end of each use and before exchanging devices with another user that the user logs out of their COVaxON account. Some locations have been provided their own devices to access COVax. Therefore, the below instructions are recommended to properly log out of COVaxON.
1. On the tablet/computer/laptop, click on the icon on the top right corner on the COVaxON home screen. Select “Log Out”
2. Exit the browser window. 3. Go to Settings and clear the cache (website and browsing history) for the next user 4. Do not save the password in the salesforce login page. This will prevent other users from easily logging in 5. Sanitize shared devices according to individual site protocols and provide to on-site IT.
7. Hardware Requirements & Device Set-Up On-Site
Hardware Overview: There are 4 Types of Hardware Devices that are required on-site: 1. Mobile Device: You will require a smart phone on-site to access the Salesforce Authentication app

Page 16 of 20
COVaxON User Profile Set Up Job Aid
2. Second Device (Tablet/Desktop): This must have proper internet connection, to access COVaxON (Salesforce) Recommended Browsers: Safari, Google Chrome, Microsoft Edge or Mozilla Firefox 3. Printer: To print the client receipt, you must have a working printer on-site. Further instructions are provided below for more details. 4. Access Point Wi-Fi Routers: If LTE does not work (for Bell, Telus and Rogers Network Carriers). Further instructions are provided below for more details. Follow these steps to maintain hardware & software on-site:
• Access COVaxON using the one of the recommended browsers and use the URL: https://covaxon.my.salesforce.com • If COVaxON is lagging/having trouble loading, go to the “Settings” on the device and clear your cache (website and
browsing history). Then log back into COVaxON • Do not save your password in the salesforce login page. This will prevent other users from easily logging in. • Always logout from your COVaxON account at the end of your shift • Sanitize the device after each user based on location protocol
Hardware Set Up: There are 3 Types of Devices that may be available at site: 1. iPad: Air Model-8th Generation 2. Printers: Brother RuggedJet4 Mobile and Brother Thermal Printer (TD-4550DNWB) 3. Access Point Wi-Fi Routers: If LTE does not work (for Bell, Telus and Rogers Network Carriers) 1. iPad Set-up: Some locations have been provided their own iPads to access COVaxON
• The COVaxON location iPads will be preconfigured and hardened via the MDM ITS Intune policy. • The iPad’s password information will be communicated via email to the ITS and Hospital support staff. • The iPads will be pre-set and will be ready for use at site. • To change the font size on an iPad:
• On the Safari browser, select the “aA” icon in the URL ribbon to increase the font size displayed on the screen. Select the smaller A to make the font smaller and the larger A to make the font larger, or
• Select Ctrl + on the iPad keyboard while the browser is open to increase the font size 2. Printers:
a. Brother RuggedJet4 Mobile: From a network connectivity perspective, the printers can be set up using two options/scenarios: 1) Option 1 (PREFERED): iPad’s are not connected to an access point router (provided by Bell/Rogers/Telus).
Set-Up Printer Instructions for Option 1: 1) Click MENU → Select WLAN → Click OK, OK 2) Enable WLAN → Select On/Off → Click OK 3) Select ON → Click OK 4) On WLAN → Click OK 5) Scroll to MODE → Click OK 6) Select DIRECT → Click OK
3 6

Page 17 of 20
COVaxON User Profile Set Up Job Aid
2) Option 2 (Fallback): iPad’s are connected to an access point router (provided by Bell/Rogers/Telus) due to a poor signal (poor signal = iPads are connected to an access point)
Set-Up Printer Instructions for Option 2: 1) Click MENU → Select WLAN → Click OK 2) Enable WLAN → Select On/Off → Click OK 3) Select ON → Click OK 4) On WLAN → Click OK 5) Then select WPS → Click OK 6) Select Button Push → Click OK 7) When the screen shows WPS Settings → (8) Go to the router and press WPS button Note: The printer display will show “Finished” when the connection of the printer to the router is established.
b. Brother Thermal Printer (TD-4550DNWB): From a network connectivity perspective, the printers can be set up using two options/scenarios:
1) Option 1 (PREFERED): Connecting the printer to the router via WPS: 1) Place your printer within the range of your wireless access point/router. The range may differ depending on your environment. 2) Click MENU 3) Use the arrows to select the following: WLAN → OK → WBS Button Push → OK 4) You can also configure the setting using the PIN code by selecting the “WPS PIN Code”. 5) Use the arrows to select START → OK 6) Press the WPS button on your wireless access point/router. When the connection is established, the WLAN icon appears on the printer’s LCD Notes:
• Printers will try to connect using WPS for 2 minutes. If OK is pressed during that time, the printer continues trying to connect for an additional 2 minutes.
• Please repeat the steps again to add a second TD-4550DNWB printer to the same LTE hub if required. 2) Option 2 (FALLBACK): Connecting the printer using Wireless Direct (if LTE Hub fails)
1) Set the printer to Wireless Direct mode using the LCD menu

Page 18 of 20
COVaxON User Profile Set Up Job Aid
2) Press MENU → Use arrow keys to select WLAN → Press OK 3) Use arrow keys to select WLAN ON/OFF → Press OK 4) Use arrow keys to select ON → Press OK 5) Use arrow keys to select WLAN → Press OK 6) Use arrow keys to select NETWORK MODE → Press OK 7) Use arrow keys to select DIRECT MODE → Press OK. The Wireless Direct icon will appear on the LCD 8) On your mobile device’s Wi-Fi settings screen, select your printer’s SSID, and enter the password
• The default SSID is: SSID: “DIRECT-*****_td-4550DNWB” where ***** is the last 5 digits of the product serial number
• The default password is: “455*****” where ***** is the last 5 digits of the product serial number 9) It may take several minutes until the connection is complete.
c. Printing Receipts: Brother Thermal Printer (TD-4550DNWB): How to cut paper for the TD-4550DNWB printer: IMPORTANT NOTE: The automatic cutters have been backordered. You will either receive the printer with the cutter installed or with no cutter at all. Once the cutters are back in stock, they will be shipped to you. The printer can still be used without the cutter. With the cutter: The receipt will be cut to size automatically Without the cutter: Tear the receipt against the existing printer housing in a swift upward motion (45-degree angle). See picture for more details. Paper Size Set Up for TD-4550DNWB: The paper size can be configured using the Web Based Management by connecting the iPad to the printer via “wireless direct” option. Select Printer settings → Paper Size Setup → Select RD 102” → click Submit Brother Thermal Printer (TD-4550DNWB): Using Web Based Management to input the Location information: (users are able to add a distinguishing location name to identify the printer associated to themselves) 1) Connect the iPad’s WI-FI to the DIRECT MODE 2) Print the “Printer configuration” to find out the IP address associated to the
printer Select Menu (scroll down) → Select Information (scroll down) → Select Print Configuration (identify the printer’s IP address at the bottom of the printed receipt) 3) Type “http://printer_ip_address/” into your browser. (Where
“printer_ip_address” is the IP address or the print server name.) (For example (if the printer’s IP address is 192.168.118.1.))
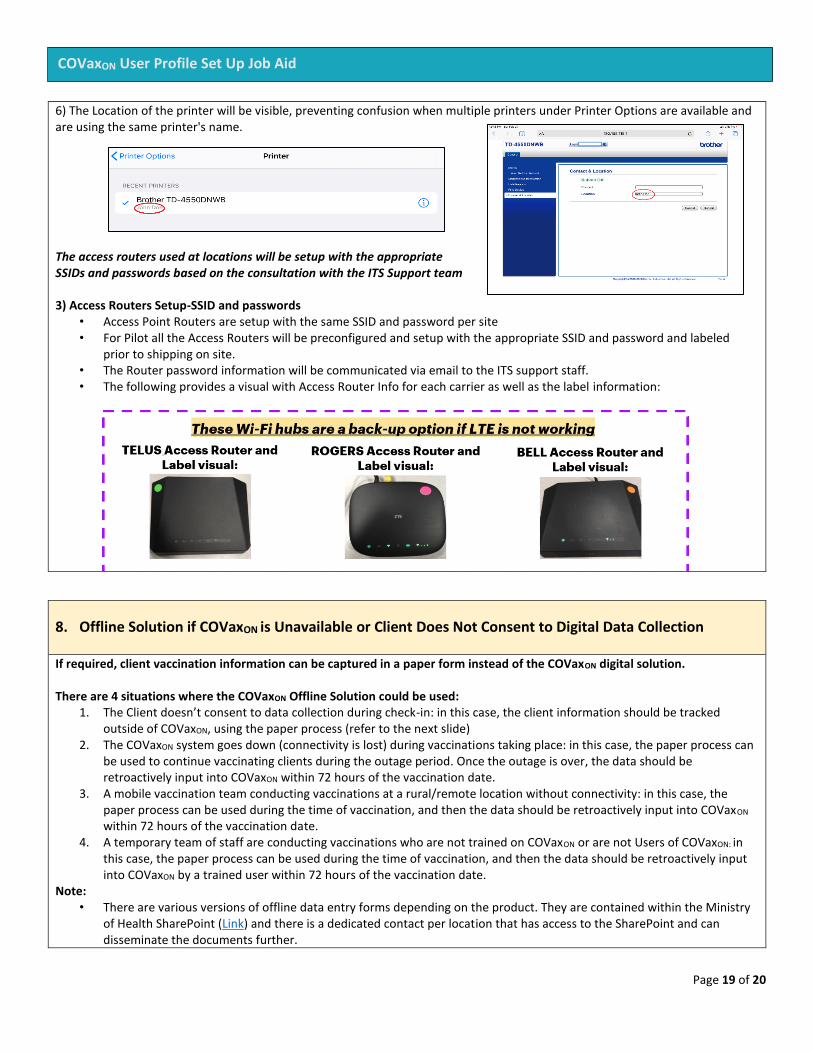
Using Web Based Management to input the Location information: (users are able to add a distinguishing location name to identify the printer associated to themselves) 4) Click on Contact & Location 5) In the Location field type a distinguish unique name and click Submit
Page 19 of 20
COVaxON User Profile Set Up Job Aid
6) The Location of the printer will be visible, preventing confusion when multiple printers under Printer Options are available and are using the same printer's name. The access routers used at locations will be setup with the appropriate SSIDs and passwords based on the consultation with the ITS Support team 3) Access Routers Setup-SSID and passwords
• Access Point Routers are setup with the same SSID and password per site • For Pilot all the Access Routers will be preconfigured and setup with the appropriate SSID and password and labeled
prior to shipping on site. • The Router password information will be communicated via email to the ITS support staff. • The following provides a visual with Access Router Info for each carrier as well as the label information:
8. Offline Solution if COVaxON is Unavailable or Client Does Not Consent to Digital Data Collection
If required, client vaccination information can be captured in a paper form instead of the COVaxON digital solution. There are 4 situations where the COVaxON Offline Solution could be used:
1. The Client doesn’t consent to data collection during check-in: in this case, the client information should be tracked outside of COVaxON, using the paper process (refer to the next slide)
2. The COVaxON system goes down (connectivity is lost) during vaccinations taking place: in this case, the paper process can be used to continue vaccinating clients during the outage period. Once the outage is over, the data should be retroactively input into COVaxON within 72 hours of the vaccination date.
3. A mobile vaccination team conducting vaccinations at a rural/remote location without connectivity: in this case, the paper process can be used during the time of vaccination, and then the data should be retroactively input into COVaxON within 72 hours of the vaccination date.
4. A temporary team of staff are conducting vaccinations who are not trained on COVaxON or are not Users of COVaxON: in this case, the paper process can be used during the time of vaccination, and then the data should be retroactively input into COVaxON by a trained user within 72 hours of the vaccination date.
Note: • There are various versions of offline data entry forms depending on the product. They are contained within the Ministry
of Health SharePoint (Link) and there is a dedicated contact per location that has access to the SharePoint and can disseminate the documents further.
Page 20 of 20
COVaxON User Profile Set Up Job Aid
• The completed paper forms should be filed for reference when the client returns next dose. The Inventory Manager should be made aware that there were doses administered outside of COVaxON so they can adjust the inventory availability as required (covered in the following slides)
1. Client brings completed consent form to the COVID-19 Vaccination Event 2. Check-in clinicians confirms that the form has been fully completed 3. Client presents completed form to the vaccinator 4. Vaccinator confirms the client has no contraindications and has consented to service. Note: If the client has
contraindications or has not consented to service, the Vaccinator indicates this in the “For Clinic Use Only” section on the consent form (page 2)
5. Vaccinator completes the “For Clinic Use Only” section on the consent form (page 2), excluding the appointment date for the second dose and returns the form to the client and directs them to the check-out area
6. Client presents the form to the check-out clinician who books the client for the second dose appointment, creates a manual paper receipt (using the data from the top of the consent form), including the date and time of the next appointment and gives it to the client.
Impact to Inventory: • When a client follows the offline paper process, their dose administration is not captured within COVaxON, therefore the
inventory will not be decremented in COVaxON and the doses available quantity will not be accurately reflected. • The number of clients that did not consent to digital data collection and used the paper process should be tracked and
an inventory adjustment must be made following the dose administration to ensure the doses available quantity is accurately reflected in COVaxON.
• Refer to the Inventory Management section of this User Guide and the Inventory Management job aid (within the training folder of the Ministry of Health SharePoint) for details on how to adjust the inventory quantity for clients who did not consent to digital data collection